Graphic Design and Illustration CC...
80
Dear Candidate, In preparation for the Graphic Design and Illustration certification exam, we’ve put together a set of practice materials and example exam items for you to review. What you’ll find in this packet are: Topic areas and objectives for the exam. Practice materials with image assets. Practice exam items. We’ve assembled excerpted material from the Adobe Digital Careers curriculum (http://edex.adobe.com/digitalcareers) to highlight a few of the more challenging techniques covered on the exam. You can work through these technical guides with the provided image and video files (provided separately). Additionally, we’ve included the certification objectives so that you are aware of the elements that are covered on the exam. Finally, we’ve included practice exam items to give you a feel for some of the items. These materials are meant to help you familiarize yourself with the areas of the exam so are not comprehensive across all the objectives. Thank you, Adobe Education
Transcript of Graphic Design and Illustration CC...

Dear Candidate,
In preparation for the Graphic Design and Illustration certification exam, we’ve put together a set of practice materials and example exam items for you to review. What you’ll find in this packet are:
§ Topic areas and objectives for the exam.
§ Practice materials with image assets.
§ Practice exam items.
We’ve assembled excerpted material from the Adobe Digital Careers curriculum (http://edex.adobe.com/digital-‐careers) to highlight a few of the more challenging techniques covered on the exam. You can work through these technical guides with the provided image and video files (provided separately). Additionally, we’ve included the certification objectives so that you are aware of the elements that are covered on the exam. Finally, we’ve included practice exam items to give you a feel for some of the items.
These materials are meant to help you familiarize yourself with the areas of the exam so are not comprehensive across all the objectives.
Thank you,
Adobe Education
Adobe Graphic Design & Illustration using Adobe Illustrator 2013 Adobe Systems Incorporated Page 1
Adobe Graphic Design & Illustration using Adobe Illustrator EXAM AND OBJECTIVES
After taking the exam, your score is electronically reported. Please allow 2-4 weeks from the date you pass the exam to receive your ACA Welcome Kit.
Exam Structure The following lists the topic areas for the exam:
• Setting project requirements
• Identifying design elements when preparing graphics
• Understanding Adobe Illustrator
• Create graphics using Adobe Illustrator
• Archive, export, and publish graphics using Adobe Illustrator Number of Questions and Time
• 39 questions
• 50 minutes
Exam Objectives Domain 1.0 Setting project requirements
1.1 Identify the purpose, audience, and audience needs for preparing graphics.
1.2 Demonstrate knowledge of standard copyright rules for artwork, graphics and graphic use.
1.3 Demonstrate knowledge of project management tasks and responsibilities.
1.4 Communicate with others (such as peers and clients) about design plans.
Domain 2.0 Identifying design elements used when preparing graphics
2.1 Demonstrate knowledge of design principles, elements, and graphic composition.
2.2 Demonstrate knowledge of graphic resolution, graphic size, and graphic file format for web, video, and print.
2.3 Demonstrate knowledge of typography.
2.4 Demonstrate knowledge of the use of symbols and representative graphics.
2.5 Understand key terminology of graphics.
Adobe Graphic Design & Illustration using Adobe Illustrator 2013 Adobe Systems Incorporated Page 2
Domain 3.0 Understanding Adobe Illustrator
3.1 Identify elements of the Illustrator user interface and demonstrate knowledge of their functions.
3.2 Use non-printing design tools in the interface.
3.3 Demonstrate an understanding of and select the appropriate features and options required to manage color, pattern, and gradient swatches.
3.4 Demonstrate an understanding of vector drawing concepts.
3.5 Demonstrate knowledge of how to work with brushes, symbols, graphic styles, and patterns.
3.6 Demonstrate knowledge of layers and masks.
3.7 Import, export, and save files.
Domain 4.0 Create graphics using Adobe Illustrator
4.1 Demonstrate knowledge of how to create documents
4.2 Demonstrate knowledge of how to use drawing and shape tools.
4.4 Demonstrate knowledge of how to use type tools.
4.5 Demonstrate knowledge of how to use scanned or photographic images.
4.6 Demonstrate the ability to create realistic graphics.
4.7 Demonstrate knowledge of how to modify and transform objects.
Domain 5.0 Archive, export, and publish graphics using Adobe Illustrator
5.1 Demonstrate knowledge of preparing graphics for web, print and video.
PRACTICE MATERIALS
Graphic Design and Illustration
by using Adobe Illustrator
• Overview of Adobe Illustrator • How to use layers in Illustrator • How to work with swatches • How to modify and transform graphics • How to draw in Illustrator • How to export and save files
Adobe Illustrator Guide
Overview of Adobe IllustratorIn this guide, you’ll learn how to do the following:
• Work with the Adobe Illustrator workspace, tools, document windows, and panels.
• Learn how to customize the workspace.
• Learn how to create a new document.
• Change the magnification of the document.
• Navigate through a document by using the artboard and navigator panels.
Exploring the workspace
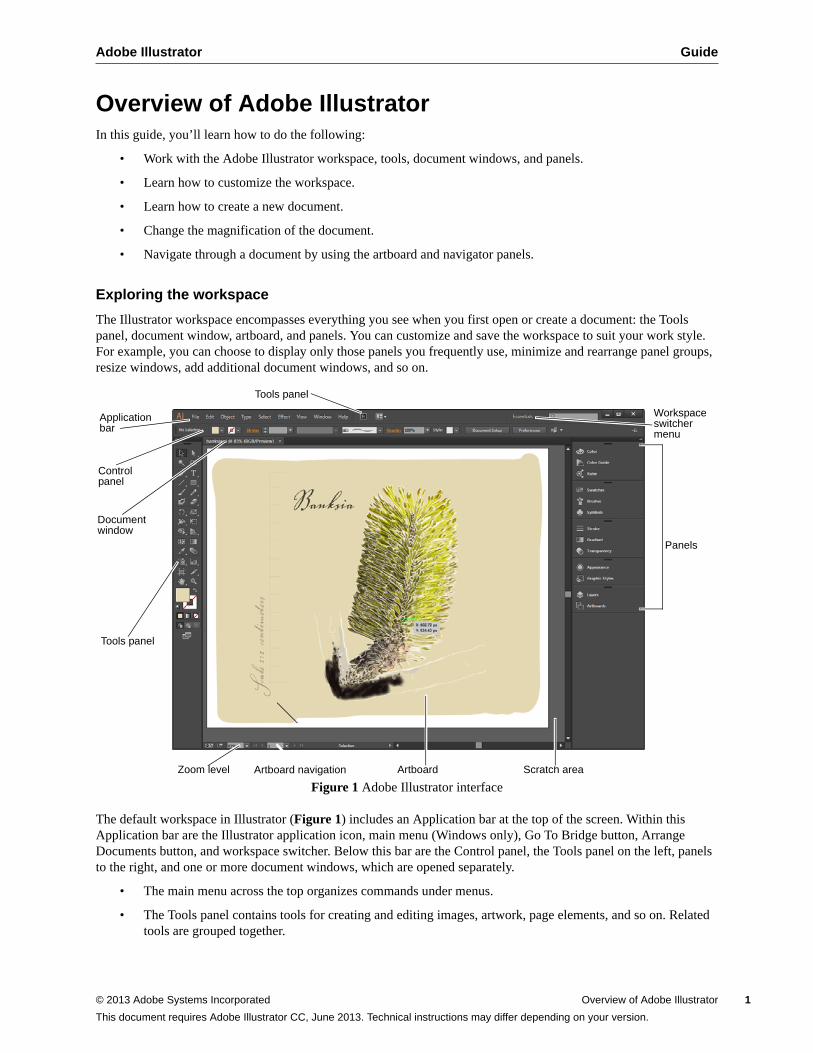
The Illustrator workspace encompasses everything you see when you first open or create a document: the Tools panel, document window, artboard, and panels. You can customize and save the workspace to suit your work style. For example, you can choose to display only those panels you frequently use, minimize and rearrange panel groups, resize windows, add additional document windows, and so on.
Figure 1 Adobe Illustrator interface
The default workspace in Illustrator (Figure 1) includes an Application bar at the top of the screen. Within this Application bar are the Illustrator application icon, main menu (Windows only), Go To Bridge button, Arrange Documents button, and workspace switcher. Below this bar are the Control panel, the Tools panel on the left, panels to the right, and one or more document windows, which are opened separately.
• The main menu across the top organizes commands under menus.
• The Tools panel contains tools for creating and editing images, artwork, page elements, and so on. Related tools are grouped together.
Application bar
Control panel
Document window
Tools panel
Workspace switcher menu
Panels
Zoom level Artboard navigation Artboard Scratch area
Tools panel
© 2013 Adobe Systems Incorporated Overview of Adobe Illustrator 1
This document requires Adobe Illustrator CC, June 2013. Technical instructions may differ depending on your version.
Guide Adobe Illustrator
2
• The Control panel displays control options for the currently selected tool.
• Document windows display document pages for files you’re currently working on. Each page in the document is surrounded by its own artboard, which represents the maximum printable area. Outside the artboard is the scratch area, on which you can create, edit, and store elements of artwork before moving them to the artboard. Objects on the scratch area are visible onscreen, but they do not print.
• Panels help you monitor and modify your work. You can reorganize, group, stack, or dock panels.
Customizing the workspace
By saving the current size and position of panels in the Illustrator interface as a named workspace, you can restore that arrangement even if you move or close a panel. The names of saved workspaces appear in the workspace switcher.
How to create a custom workspace:
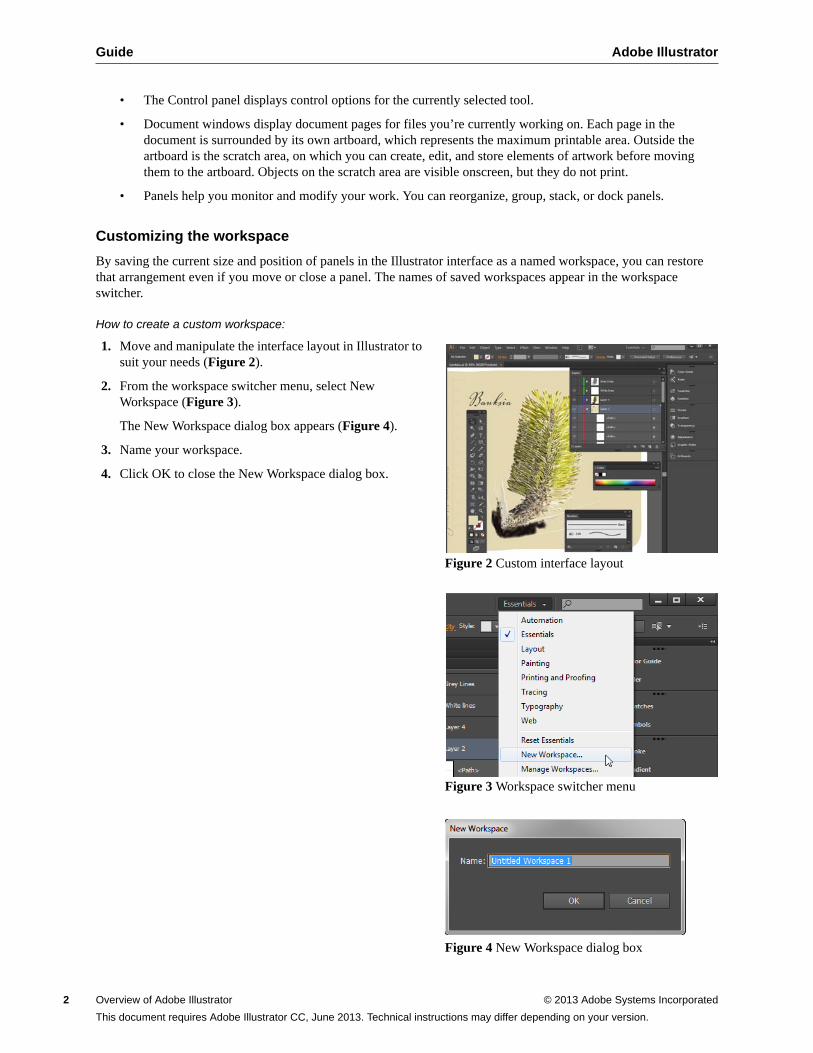
1. Move and manipulate the interface layout in Illustrator to suit your needs (Figure 2).
2. From the workspace switcher menu, select New Workspace (Figure 3).
The New Workspace dialog box appears (Figure 4).
3. Name your workspace.
4. Click OK to close the New Workspace dialog box.
Figure 2 Custom interface layout
Figure 3 Workspace switcher menu
Figure 4 New Workspace dialog box
Overview of Adobe Illustrator © 2013 Adobe Systems Incorporated
This document requires Adobe Illustrator CC, June 2013. Technical instructions may differ depending on your version.
Adobe Illustrator Guide
5. Choose Window > Workspace.
Notice that your new workspace now appears at the top of the Workspace menu.
Even if you make changes, you can return to the workspace you saved by selecting it from the menu or from the workspace switcher (Figure 5).
You can restore the saved workspace at any time by choosing Reset [your named] Workspace from the workspace switcher menu. Figure 5 Selecting a saved workspace from the
workspace switcher
Creating a new Illustrator document
You can create new Illustrator documents from a new document profile or from a template. Creating a document from a new document profile gives you a blank document with the selected profile’s default fill and stroke colors, graphic styles, brushes, symbols, actions, viewing preferences, and other settings.
How to create a new Illustrator document:
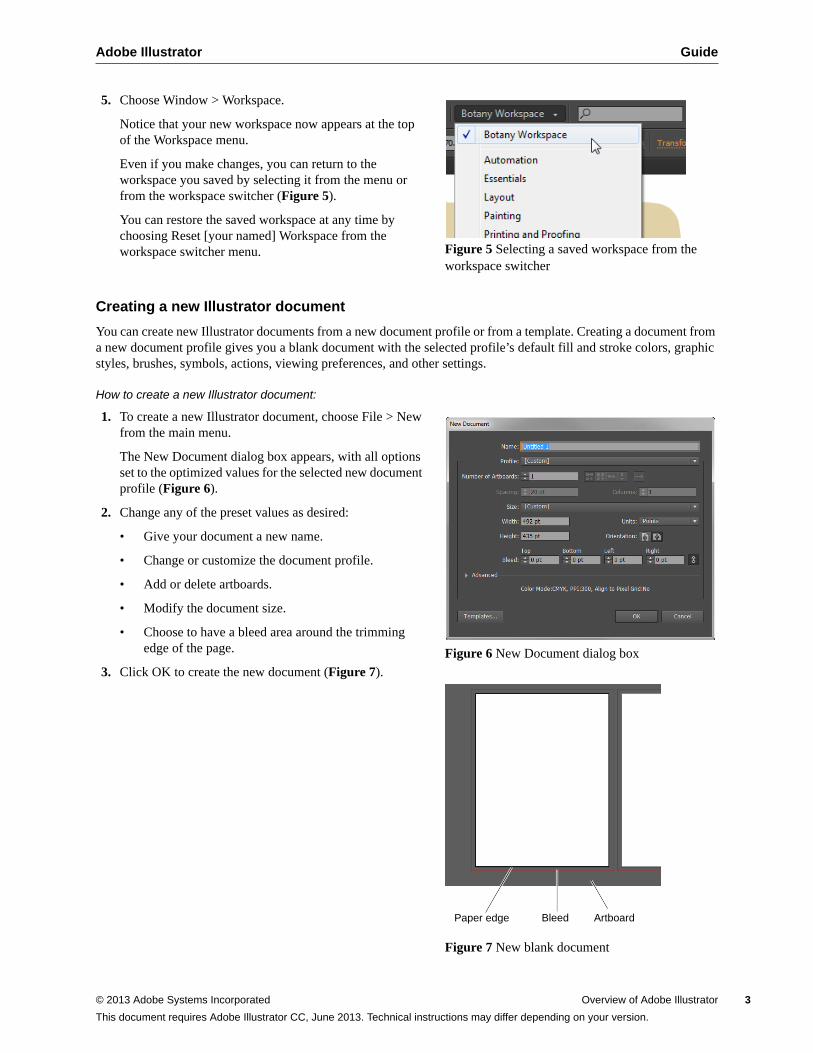
1. To create a new Illustrator document, choose File > New from the main menu.
The New Document dialog box appears, with all options set to the optimized values for the selected new document profile (Figure 6).
2. Change any of the preset values as desired:
• Give your document a new name.
• Change or customize the document profile.
• Add or delete artboards.
• Modify the document size.
• Choose to have a bleed area around the trimming edge of the page.
3. Click OK to create the new document (Figure 7).
Figure 6 New Document dialog box
Figure 7 New blank document
ArtboardBleedPaper edge
© 2013 Adobe Systems Incorporated Overview of Adobe Illustrator 3
This document requires Adobe Illustrator CC, June 2013. Technical instructions may differ depending on your version.
Guide Adobe Illustrator
4
Tools panel overview
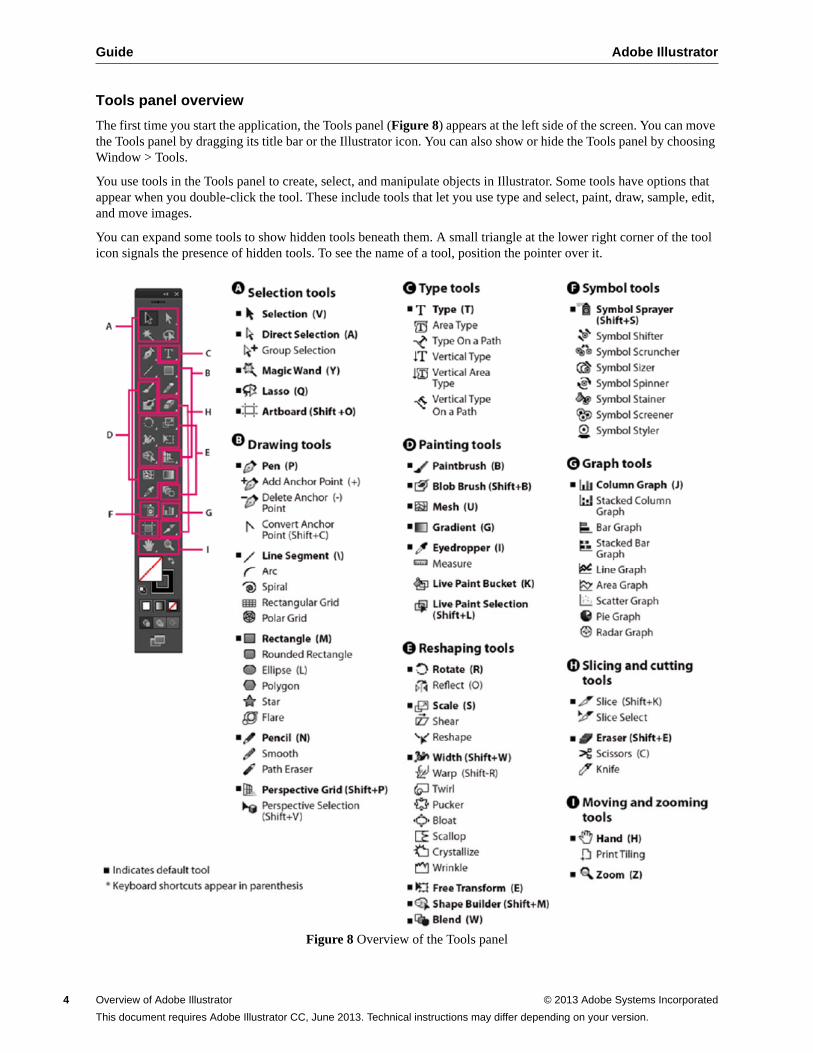
The first time you start the application, the Tools panel (Figure 8) appears at the left side of the screen. You can move the Tools panel by dragging its title bar or the Illustrator icon. You can also show or hide the Tools panel by choosing Window > Tools.
You use tools in the Tools panel to create, select, and manipulate objects in Illustrator. Some tools have options that appear when you double-click the tool. These include tools that let you use type and select, paint, draw, sample, edit, and move images.
You can expand some tools to show hidden tools beneath them. A small triangle at the lower right corner of the tool icon signals the presence of hidden tools. To see the name of a tool, position the pointer over it.
Figure 8 Overview of the Tools panel
Overview of Adobe Illustrator © 2013 Adobe Systems Incorporated
This document requires Adobe Illustrator CC, June 2013. Technical instructions may differ depending on your version.
Adobe Illustrator Guide
How to use the Zoom tool to navigate your document
You can zoom in or out of artwork to manipulate fine elements of a layout.
How to use the Zoom tool to change the magnification of your document:
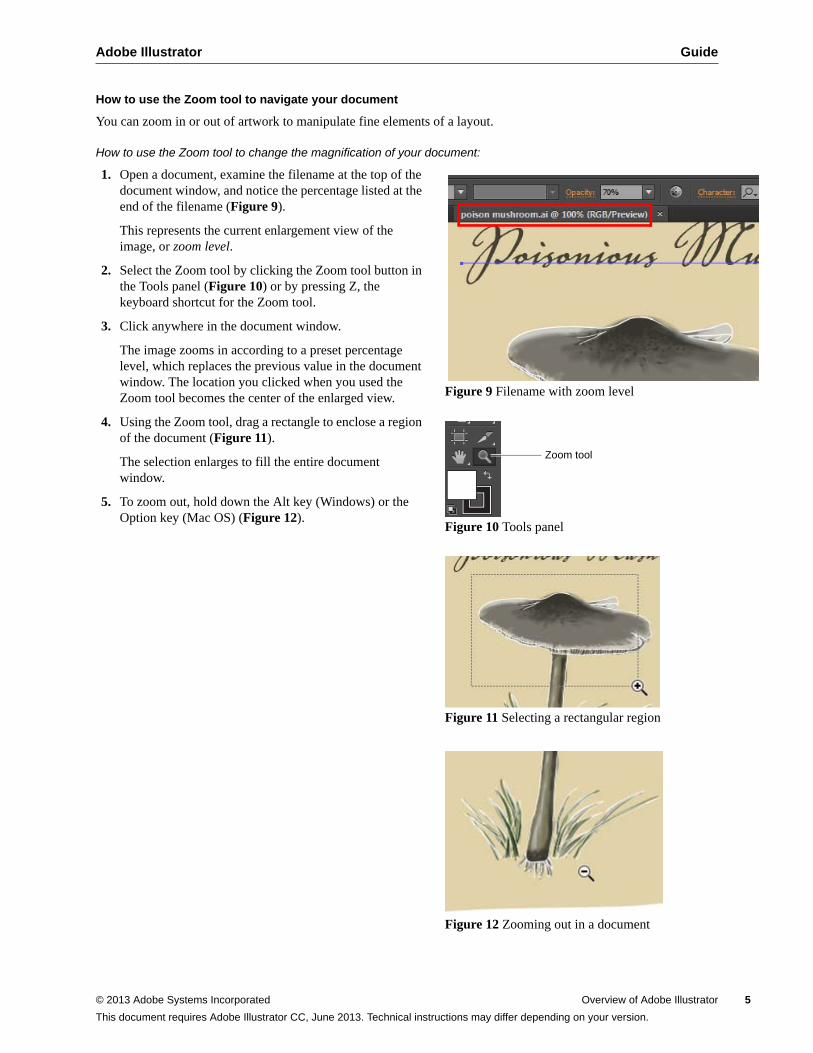
1. Open a document, examine the filename at the top of the document window, and notice the percentage listed at the end of the filename (Figure 9).
This represents the current enlargement view of the image, or zoom level.
2. Select the Zoom tool by clicking the Zoom tool button in the Tools panel (Figure 10) or by pressing Z, the keyboard shortcut for the Zoom tool.
3. Click anywhere in the document window.
The image zooms in according to a preset percentage level, which replaces the previous value in the document window. The location you clicked when you used the Zoom tool becomes the center of the enlarged view.
4. Using the Zoom tool, drag a rectangle to enclose a region of the document (Figure 11).
The selection enlarges to fill the entire document window.
5. To zoom out, hold down the Alt key (Windows) or the Option key (Mac OS) (Figure 12).
Figure 9 Filename with zoom level
Figure 10 Tools panel
Figure 11 Selecting a rectangular region
Figure 12 Zooming out in a document
Zoom tool
© 2013 Adobe Systems Incorporated Overview of Adobe Illustrator 5
This document requires Adobe Illustrator CC, June 2013. Technical instructions may differ depending on your version.
Guide Adobe Illustrator
6
How to scroll around a document with the Hand tool
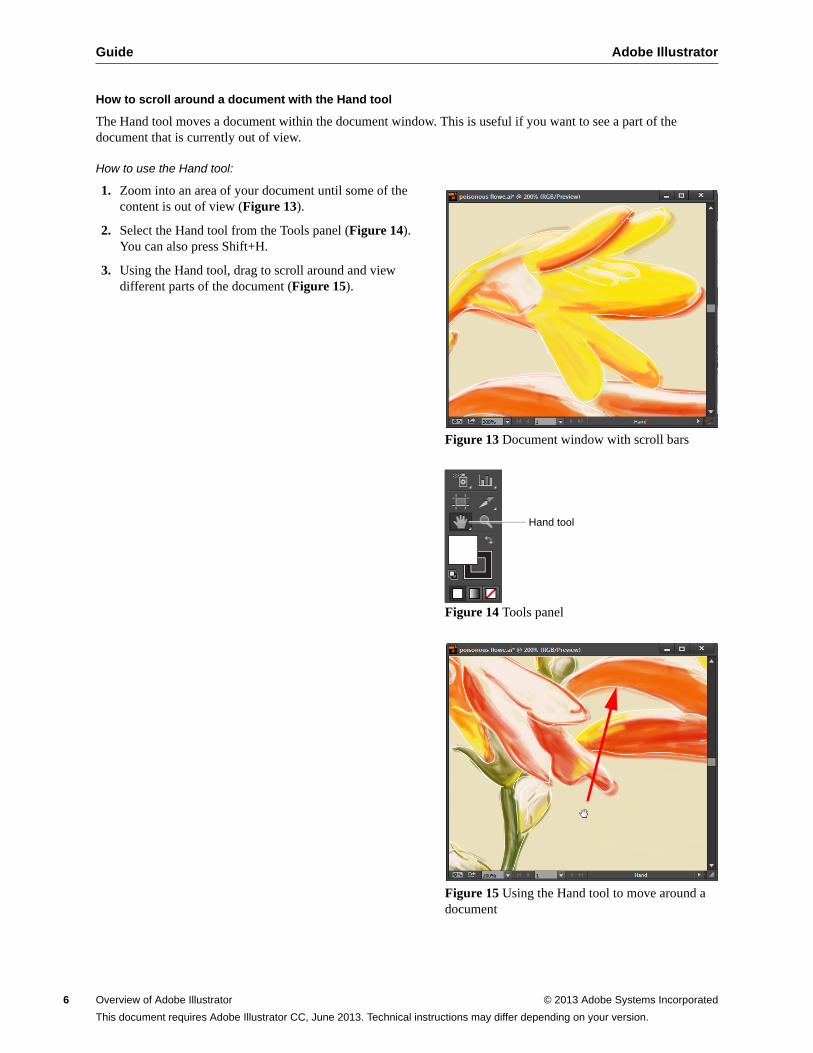
The Hand tool moves a document within the document window. This is useful if you want to see a part of the document that is currently out of view.
How to use the Hand tool:
1. Zoom into an area of your document until some of the content is out of view (Figure 13).
2. Select the Hand tool from the Tools panel (Figure 14). You can also press Shift+H.
3. Using the Hand tool, drag to scroll around and view different parts of the document (Figure 15).
Figure 13 Document window with scroll bars
Figure 14 Tools panel
Figure 15 Using the Hand tool to move around a document
Hand tool
Overview of Adobe Illustrator © 2013 Adobe Systems Incorporated
This document requires Adobe Illustrator CC, June 2013. Technical instructions may differ depending on your version.
Adobe Illustrator Guide
About artboards
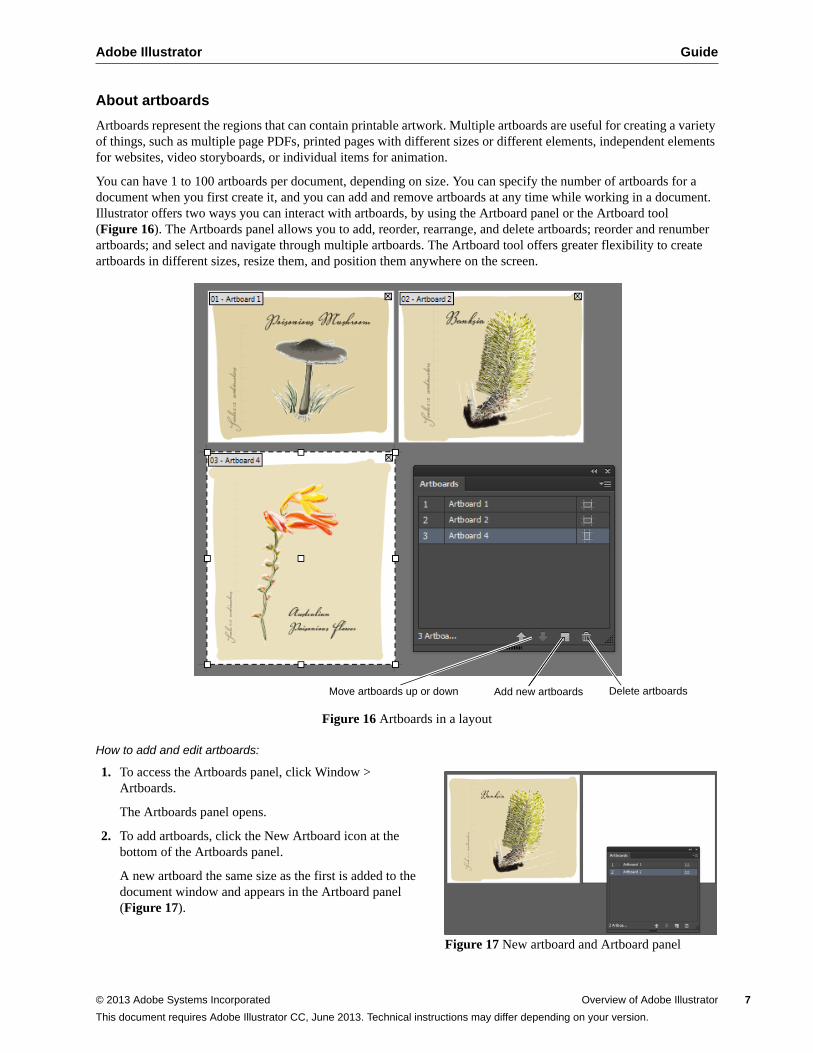
Artboards represent the regions that can contain printable artwork. Multiple artboards are useful for creating a variety of things, such as multiple page PDFs, printed pages with different sizes or different elements, independent elements for websites, video storyboards, or individual items for animation.
You can have 1 to 100 artboards per document, depending on size. You can specify the number of artboards for a document when you first create it, and you can add and remove artboards at any time while working in a document. Illustrator offers two ways you can interact with artboards, by using the Artboard panel or the Artboard tool (Figure 16). The Artboards panel allows you to add, reorder, rearrange, and delete artboards; reorder and renumber artboards; and select and navigate through multiple artboards. The Artboard tool offers greater flexibility to create artboards in different sizes, resize them, and position them anywhere on the screen.
Figure 16 Artboards in a layout
How to add and edit artboards:
1. To access the Artboards panel, click Window > Artboards.
The Artboards panel opens.
2. To add artboards, click the New Artboard icon at the bottom of the Artboards panel.
A new artboard the same size as the first is added to the document window and appears in the Artboard panel (Figure 17).
Figure 17 New artboard and Artboard panel
Delete artboardsAdd new artboardsMove artboards up or down
© 2013 Adobe Systems Incorporated Overview of Adobe Illustrator 7
This document requires Adobe Illustrator CC, June 2013. Technical instructions may differ depending on your version.
Guide Adobe Illustrator
8
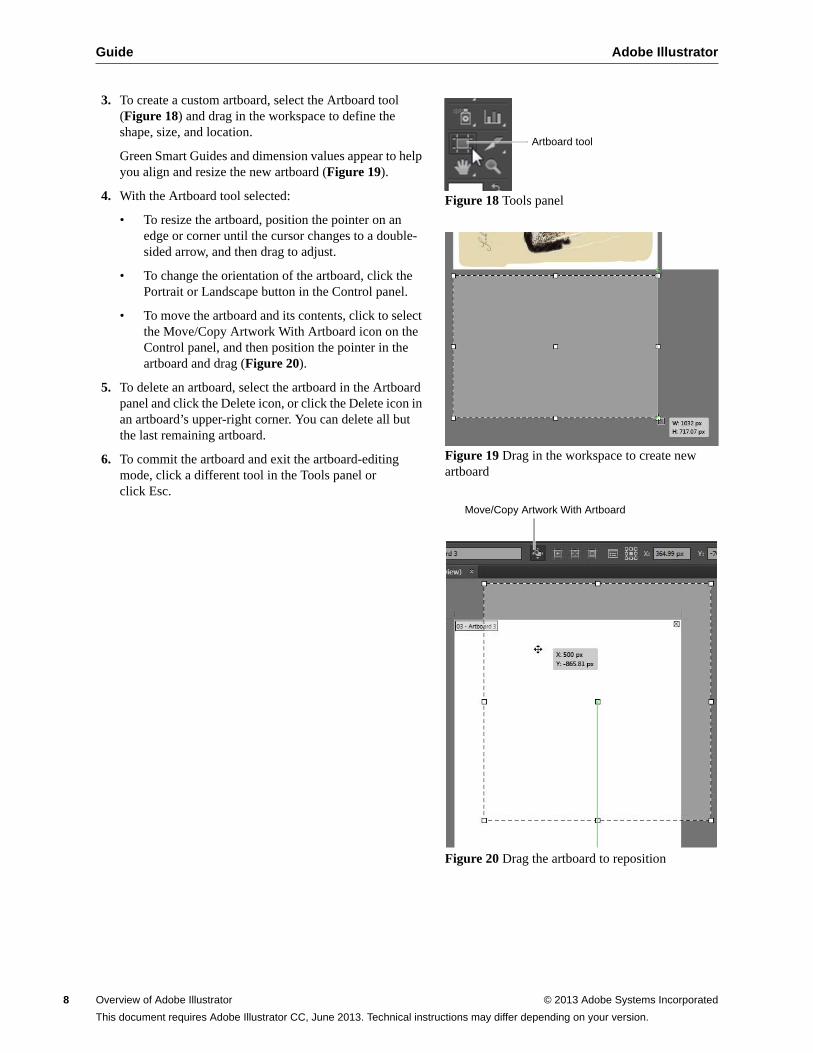
3. To create a custom artboard, select the Artboard tool (Figure 18) and drag in the workspace to define the shape, size, and location.
Green Smart Guides and dimension values appear to help you align and resize the new artboard (Figure 19).
4. With the Artboard tool selected:
• To resize the artboard, position the pointer on an edge or corner until the cursor changes to a double-sided arrow, and then drag to adjust.
• To change the orientation of the artboard, click the Portrait or Landscape button in the Control panel.
• To move the artboard and its contents, click to select the Move/Copy Artwork With Artboard icon on the Control panel, and then position the pointer in the artboard and drag (Figure 20).
5. To delete an artboard, select the artboard in the Artboard panel and click the Delete icon, or click the Delete icon in an artboard’s upper-right corner. You can delete all but the last remaining artboard.
6. To commit the artboard and exit the artboard-editing mode, click a different tool in the Tools panel or click Esc.
Figure 18 Tools panel
Figure 19 Drag in the workspace to create new artboard
Figure 20 Drag the artboard to reposition
Artboard tool
Move/Copy Artwork With Artboard
Overview of Adobe Illustrator © 2013 Adobe Systems Incorporated
This document requires Adobe Illustrator CC, June 2013. Technical instructions may differ depending on your version.
Adobe Illustrator Guide
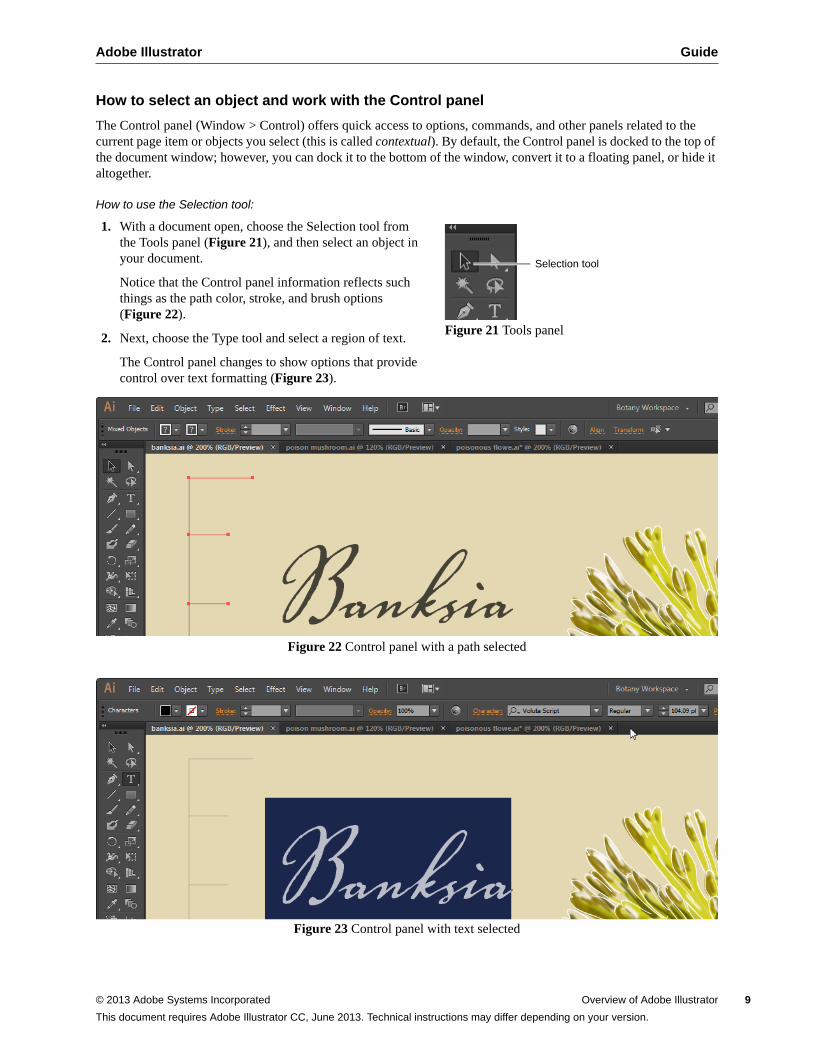
How to select an object and work with the Control panel
The Control panel (Window > Control) offers quick access to options, commands, and other panels related to the current page item or objects you select (this is called contextual). By default, the Control panel is docked to the top of the document window; however, you can dock it to the bottom of the window, convert it to a floating panel, or hide it altogether.
How to use the Selection tool:
1. With a document open, choose the Selection tool from the Tools panel (Figure 21), and then select an object in your document.
Notice that the Control panel information reflects such things as the path color, stroke, and brush options (Figure 22).
2. Next, choose the Type tool and select a region of text.
The Control panel changes to show options that provide control over text formatting (Figure 23).
Figure 21 Tools panel
Figure 22 Control panel with a path selected
Figure 23 Control panel with text selected
Selection tool
© 2013 Adobe Systems Incorporated Overview of Adobe Illustrator 9
This document requires Adobe Illustrator CC, June 2013. Technical instructions may differ depending on your version.
Guide Adobe Illustrator
10
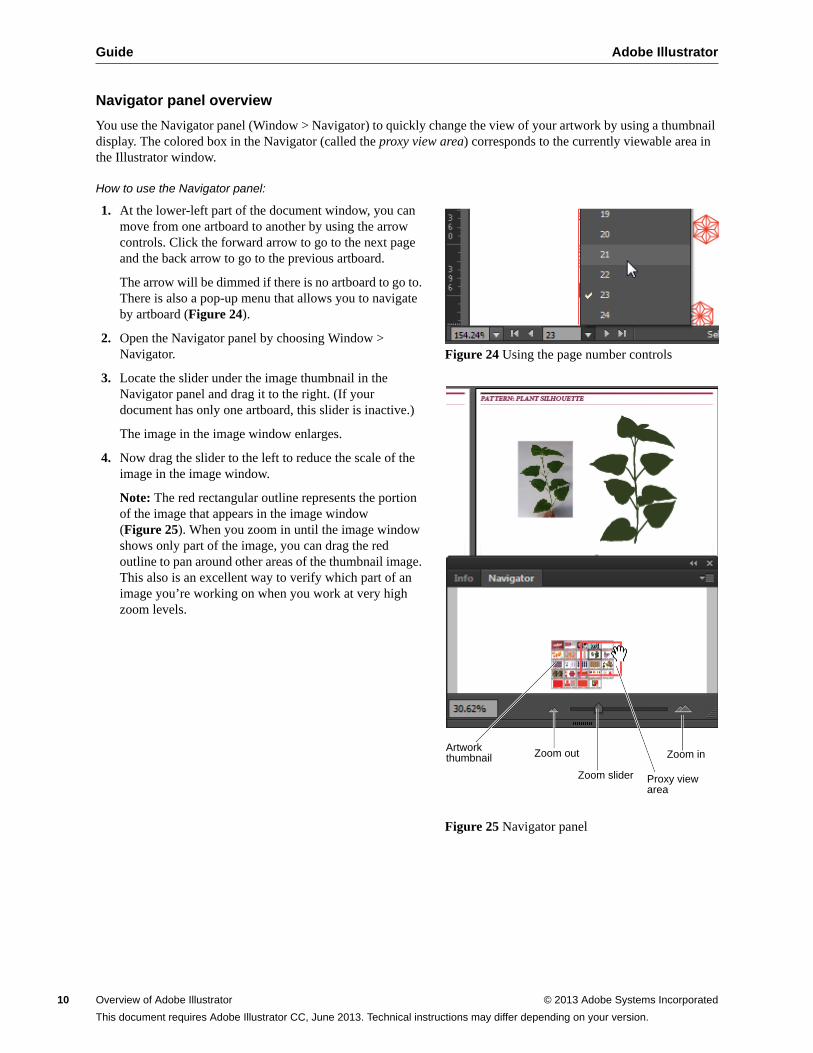
Navigator panel overview
You use the Navigator panel (Window > Navigator) to quickly change the view of your artwork by using a thumbnail display. The colored box in the Navigator (called the proxy view area) corresponds to the currently viewable area in the Illustrator window.
How to use the Navigator panel:
1. At the lower-left part of the document window, you can move from one artboard to another by using the arrow controls. Click the forward arrow to go to the next page and the back arrow to go to the previous artboard.
The arrow will be dimmed if there is no artboard to go to. There is also a pop-up menu that allows you to navigate by artboard (Figure 24).
2. Open the Navigator panel by choosing Window > Navigator.
3. Locate the slider under the image thumbnail in the Navigator panel and drag it to the right. (If your document has only one artboard, this slider is inactive.)
The image in the image window enlarges.
4. Now drag the slider to the left to reduce the scale of the image in the image window.
Note: The red rectangular outline represents the portion of the image that appears in the image window (Figure 25). When you zoom in until the image window shows only part of the image, you can drag the red outline to pan around other areas of the thumbnail image. This also is an excellent way to verify which part of an image you’re working on when you work at very high zoom levels.
Figure 24 Using the page number controls
Figure 25 Navigator panel
Zoom slider
Zoom inZoom outArtwork thumbnail
Proxy view area
Overview of Adobe Illustrator © 2013 Adobe Systems Incorporated
This document requires Adobe Illustrator CC, June 2013. Technical instructions may differ depending on your version.
Adobe Illustrator Guide
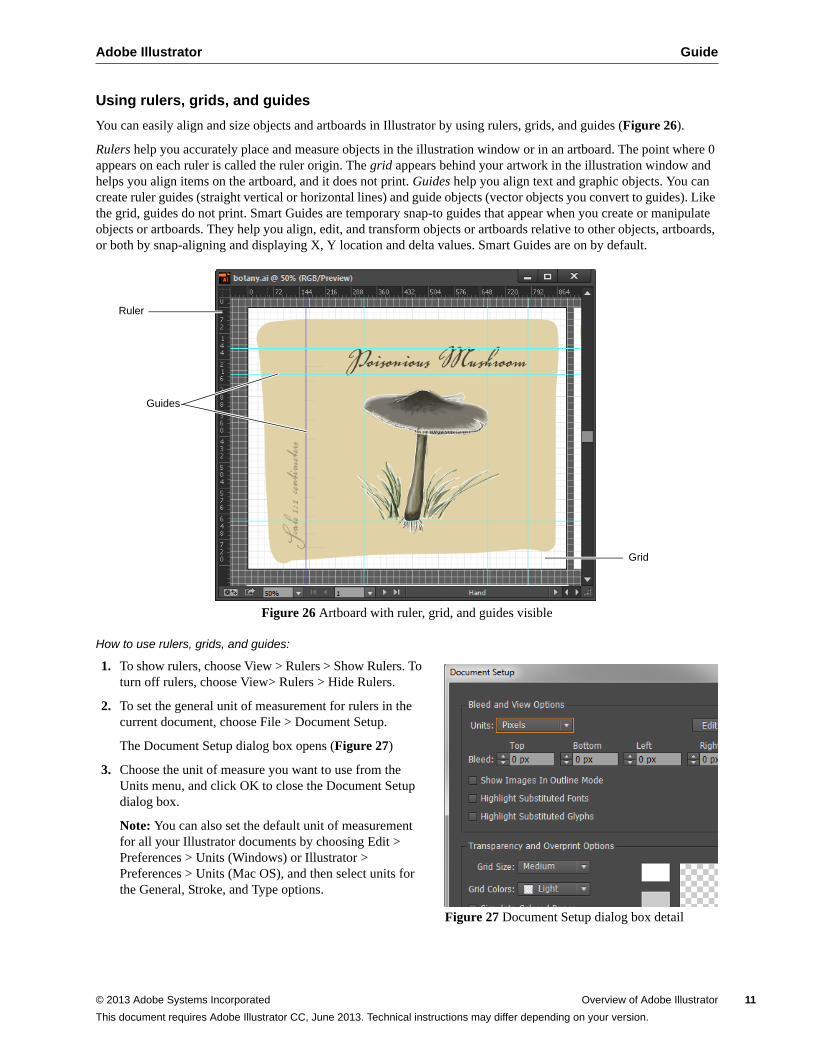
Using rulers, grids, and guides
You can easily align and size objects and artboards in Illustrator by using rulers, grids, and guides (Figure 26).
Rulers help you accurately place and measure objects in the illustration window or in an artboard. The point where 0 appears on each ruler is called the ruler origin. The grid appears behind your artwork in the illustration window and helps you align items on the artboard, and it does not print. Guides help you align text and graphic objects. You can create ruler guides (straight vertical or horizontal lines) and guide objects (vector objects you convert to guides). Like the grid, guides do not print. Smart Guides are temporary snap-to guides that appear when you create or manipulate objects or artboards. They help you align, edit, and transform objects or artboards relative to other objects, artboards, or both by snap-aligning and displaying X, Y location and delta values. Smart Guides are on by default.
Figure 26 Artboard with ruler, grid, and guides visible
How to use rulers, grids, and guides:
1. To show rulers, choose View > Rulers > Show Rulers. To turn off rulers, choose View> Rulers > Hide Rulers.
2. To set the general unit of measurement for rulers in the current document, choose File > Document Setup.
The Document Setup dialog box opens (Figure 27)
3. Choose the unit of measure you want to use from the Units menu, and click OK to close the Document Setup dialog box.
Note: You can also set the default unit of measurement for all your Illustrator documents by choosing Edit > Preferences > Units (Windows) or Illustrator > Preferences > Units (Mac OS), and then select units for the General, Stroke, and Type options.
Figure 27 Document Setup dialog box detail
Grid
Guides
Ruler
© 2013 Adobe Systems Incorporated Overview of Adobe Illustrator 11
This document requires Adobe Illustrator CC, June 2013. Technical instructions may differ depending on your version.
Guide Adobe Illustrator
12
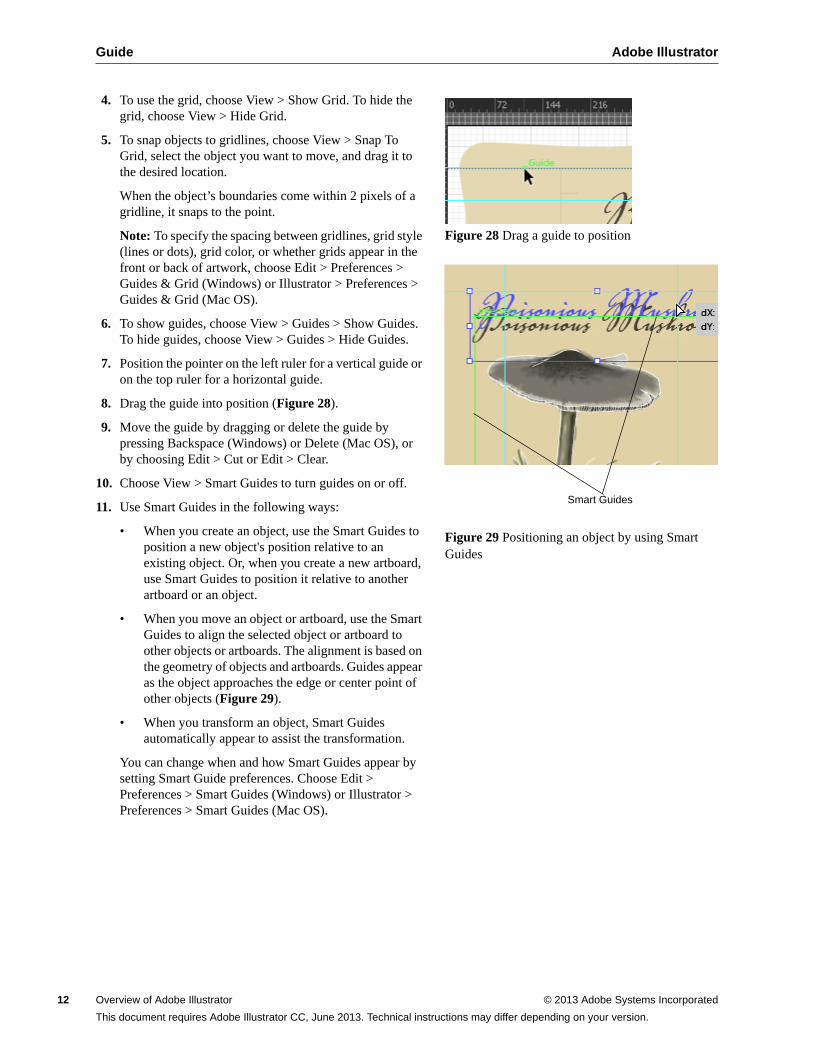
4. To use the grid, choose View > Show Grid. To hide the grid, choose View > Hide Grid.
5. To snap objects to gridlines, choose View > Snap To Grid, select the object you want to move, and drag it to the desired location.
When the object’s boundaries come within 2 pixels of a gridline, it snaps to the point.
Note: To specify the spacing between gridlines, grid style (lines or dots), grid color, or whether grids appear in the front or back of artwork, choose Edit > Preferences > Guides & Grid (Windows) or Illustrator > Preferences > Guides & Grid (Mac OS).
6. To show guides, choose View > Guides > Show Guides. To hide guides, choose View > Guides > Hide Guides.
7. Position the pointer on the left ruler for a vertical guide or on the top ruler for a horizontal guide.
8. Drag the guide into position (Figure 28).
9. Move the guide by dragging or delete the guide by pressing Backspace (Windows) or Delete (Mac OS), or by choosing Edit > Cut or Edit > Clear.
10. Choose View > Smart Guides to turn guides on or off.
11. Use Smart Guides in the following ways:
• When you create an object, use the Smart Guides to position a new object's position relative to an existing object. Or, when you create a new artboard, use Smart Guides to position it relative to another artboard or an object.
• When you move an object or artboard, use the Smart Guides to align the selected object or artboard to other objects or artboards. The alignment is based on the geometry of objects and artboards. Guides appear as the object approaches the edge or center point of other objects (Figure 29).
• When you transform an object, Smart Guides automatically appear to assist the transformation.
You can change when and how Smart Guides appear by setting Smart Guide preferences. Choose Edit > Preferences > Smart Guides (Windows) or Illustrator > Preferences > Smart Guides (Mac OS).
Figure 28 Drag a guide to position
Figure 29 Positioning an object by using Smart Guides
Smart Guides
Overview of Adobe Illustrator © 2013 Adobe Systems Incorporated
This document requires Adobe Illustrator CC, June 2013. Technical instructions may differ depending on your version.
Adobe Illustrator Guide
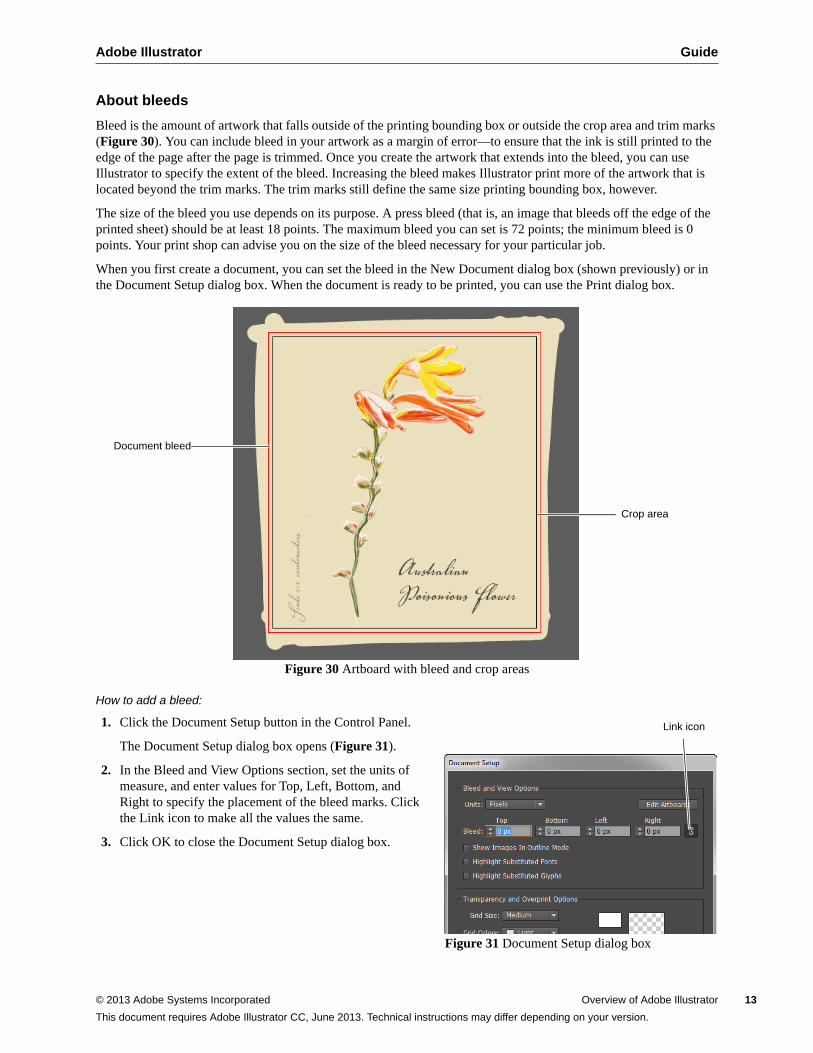
About bleeds
Bleed is the amount of artwork that falls outside of the printing bounding box or outside the crop area and trim marks (Figure 30). You can include bleed in your artwork as a margin of error—to ensure that the ink is still printed to the edge of the page after the page is trimmed. Once you create the artwork that extends into the bleed, you can use Illustrator to specify the extent of the bleed. Increasing the bleed makes Illustrator print more of the artwork that is located beyond the trim marks. The trim marks still define the same size printing bounding box, however.
The size of the bleed you use depends on its purpose. A press bleed (that is, an image that bleeds off the edge of the printed sheet) should be at least 18 points. The maximum bleed you can set is 72 points; the minimum bleed is 0 points. Your print shop can advise you on the size of the bleed necessary for your particular job.
When you first create a document, you can set the bleed in the New Document dialog box (shown previously) or in the Document Setup dialog box. When the document is ready to be printed, you can use the Print dialog box.
Figure 30 Artboard with bleed and crop areas
How to add a bleed:
1. Click the Document Setup button in the Control Panel.
The Document Setup dialog box opens (Figure 31).
2. In the Bleed and View Options section, set the units of measure, and enter values for Top, Left, Bottom, and Right to specify the placement of the bleed marks. Click the Link icon to make all the values the same.
3. Click OK to close the Document Setup dialog box.
Figure 31 Document Setup dialog box
Document bleed
Crop area
Link icon
© 2013 Adobe Systems Incorporated Overview of Adobe Illustrator 13
This document requires Adobe Illustrator CC, June 2013. Technical instructions may differ depending on your version.
Guide Adobe Illustrator
14
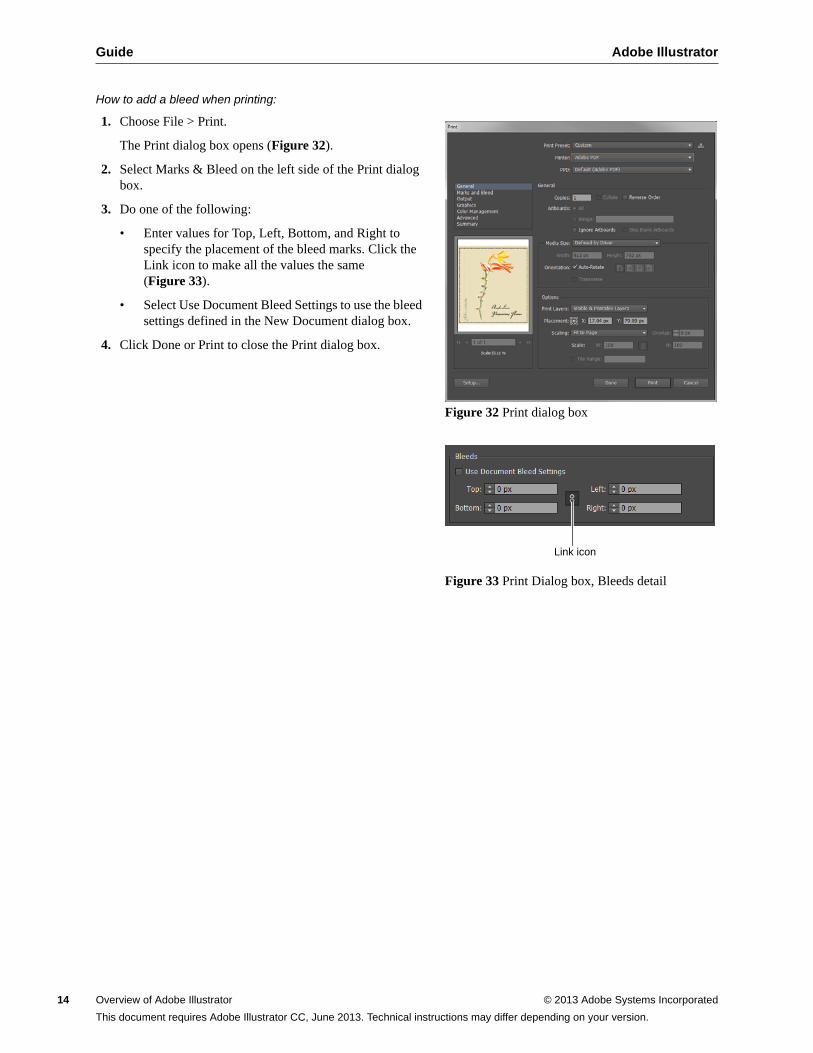
How to add a bleed when printing:
1. Choose File > Print.
The Print dialog box opens (Figure 32).
2. Select Marks & Bleed on the left side of the Print dialog box.
3. Do one of the following:
• Enter values for Top, Left, Bottom, and Right to specify the placement of the bleed marks. Click the Link icon to make all the values the same (Figure 33).
• Select Use Document Bleed Settings to use the bleed settings defined in the New Document dialog box.
4. Click Done or Print to close the Print dialog box.
Figure 32 Print dialog box
Figure 33 Print Dialog box, Bleeds detail
Link icon
Overview of Adobe Illustrator © 2013 Adobe Systems Incorporated
This document requires Adobe Illustrator CC, June 2013. Technical instructions may differ depending on your version.

Adobe Illustrator Guide
How to use layers in IllustratorWhen creating complex artwork, keeping track of all the items in your document window is a challenge. Small items get hidden under larger items, and selecting artwork becomes difficult. Layers provide a way to manage all the items that make up your artwork. Think of layers as clear folders that contain artwork. If you reshuffle the folders, you change the stacking order of the items in your artwork. You can move items between folders and create subfolders within folders.
The structure of layers in your document can be as simple or complex as you want it to be. By default, all items are organized in a single, parent layer. However, you can create new layers and move items into them, or move elements from one layer to another at any time. The Layers panel provides an easy way to select, hide, lock, rename, and change the appearance attributes of artwork.
Layers panel overview
You use the Layers panel to list, organize, and edit the objects in a document (Figure 1). By default, every new document contains one layer, and each object you create is listed under that layer. However, you can create new layers and rearrange items to best suit your needs.
By default, Illustrator assigns a unique color (up to nine colors) to each layer in the Layers panel. The color appears next to the layer name in the panel. The same color appears in the illustration window in the bounding box, path, anchor points, and center point of a selected object. You can use this color to locate an object's corresponding layer quickly Layers panel, and you can change the layer color to suit your needs.
When an item in the Layers panel contains other items, a triangle appears to the left of the item’s name. Click the triangle to show or hide the contents. If no triangle appears, the item contains no additional items.
Figure 1 Layers panel
The Layers panel provides columns to the left and right of the listings. Click in a column to control the following characteristics:
• Visibility column Indicates whether items in the layers are visible or hidden (blank space), or whether they are template layers or outline layers.
• Edit column Indicates whether items are locked or unlocked. The lock icon indicates that the item is locked and cannot be edited; a blank space indicates the item is unlocked and can be edited.
Visibility column
Edit column
Target column
Selection column
Layer name
© 2013 Adobe Systems Incorporated How to use layers in Illustrator 1
This document requires Adobe Illustrator CC, June 2013. Technical instructions may differ depending on your version.
Guide Adobe Illustrator
2
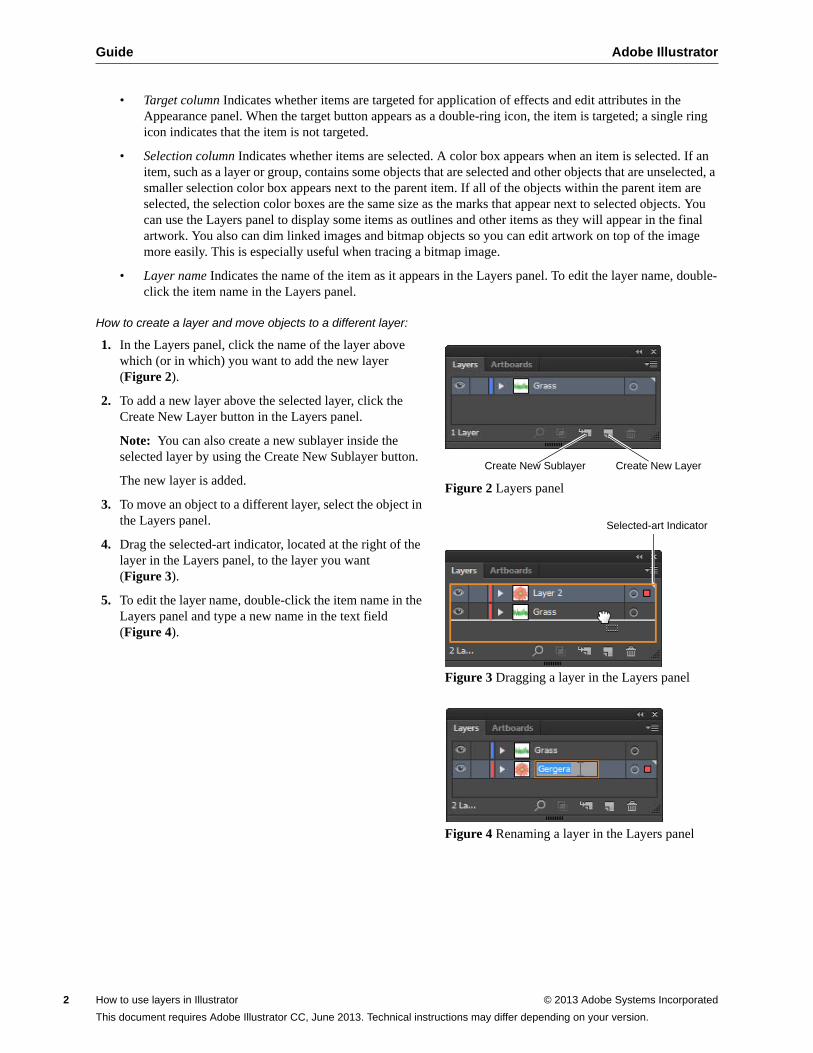
• Target column Indicates whether items are targeted for application of effects and edit attributes in the Appearance panel. When the target button appears as a double-ring icon, the item is targeted; a single ring icon indicates that the item is not targeted.
• Selection column Indicates whether items are selected. A color box appears when an item is selected. If an item, such as a layer or group, contains some objects that are selected and other objects that are unselected, a smaller selection color box appears next to the parent item. If all of the objects within the parent item are selected, the selection color boxes are the same size as the marks that appear next to selected objects. You can use the Layers panel to display some items as outlines and other items as they will appear in the final artwork. You also can dim linked images and bitmap objects so you can edit artwork on top of the image more easily. This is especially useful when tracing a bitmap image.
• Layer name Indicates the name of the item as it appears in the Layers panel. To edit the layer name, double-click the item name in the Layers panel.
How to create a layer and move objects to a different layer:
1. In the Layers panel, click the name of the layer above which (or in which) you want to add the new layer (Figure 2).
2. To add a new layer above the selected layer, click the Create New Layer button in the Layers panel.
Note: You can also create a new sublayer inside the selected layer by using the Create New Sublayer button.
The new layer is added.
3. To move an object to a different layer, select the object in the Layers panel.
4. Drag the selected-art indicator, located at the right of the layer in the Layers panel, to the layer you want (Figure 3).
5. To edit the layer name, double-click the item name in the Layers panel and type a new name in the text field (Figure 4).
Figure 2 Layers panel
Figure 3 Dragging a layer in the Layers panel
Figure 4 Renaming a layer in the Layers panel
Create New Sublayer Create New Layer
Selected-art Indicator
How to use layers in Illustrator © 2013 Adobe Systems Incorporated
This document requires Adobe Illustrator CC, June 2013. Technical instructions may differ depending on your version.
Adobe Illustrator Guide
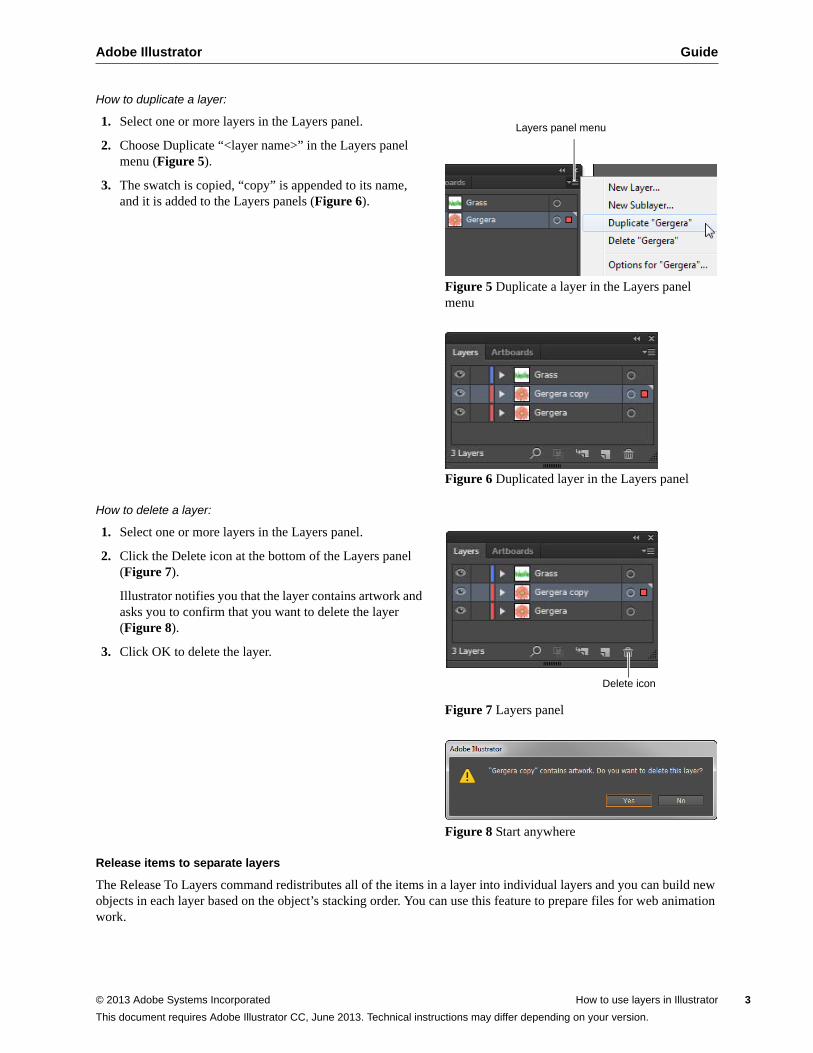
How to duplicate a layer:
1. Select one or more layers in the Layers panel.
2. Choose Duplicate “<layer name>” in the Layers panel menu (Figure 5).
3. The swatch is copied, “copy” is appended to its name, and it is added to the Layers panels (Figure 6).
Figure 5 Duplicate a layer in the Layers panel menu
Figure 6 Duplicated layer in the Layers panel
How to delete a layer:
1. Select one or more layers in the Layers panel.
2. Click the Delete icon at the bottom of the Layers panel (Figure 7).
Illustrator notifies you that the layer contains artwork and asks you to confirm that you want to delete the layer (Figure 8).
3. Click OK to delete the layer.
Figure 7 Layers panel
Figure 8 Start anywhere
Release items to separate layers
The Release To Layers command redistributes all of the items in a layer into individual layers and you can build new objects in each layer based on the object’s stacking order. You can use this feature to prepare files for web animation work.
Layers panel menu
Delete icon
© 2013 Adobe Systems Incorporated How to use layers in Illustrator 3
This document requires Adobe Illustrator CC, June 2013. Technical instructions may differ depending on your version.
Guide Adobe Illustrator
4
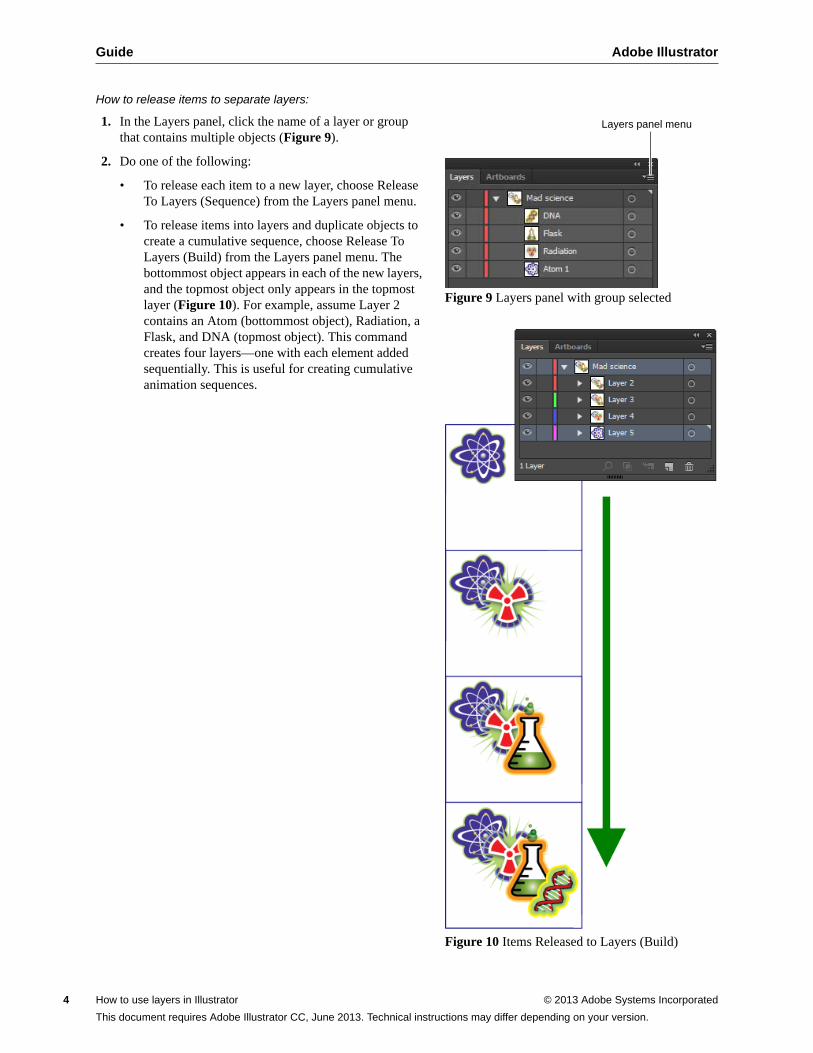
How to release items to separate layers:
1. In the Layers panel, click the name of a layer or group that contains multiple objects (Figure 9).
2. Do one of the following:
• To release each item to a new layer, choose Release To Layers (Sequence) from the Layers panel menu.
• To release items into layers and duplicate objects to create a cumulative sequence, choose Release To Layers (Build) from the Layers panel menu. The bottommost object appears in each of the new layers, and the topmost object only appears in the topmost layer (Figure 10). For example, assume Layer 2 contains an Atom (bottommost object), Radiation, a Flask, and DNA (topmost object). This command creates four layers—one with each element added sequentially. This is useful for creating cumulative animation sequences.
Figure 9 Layers panel with group selected
Figure 10 Items Released to Layers (Build)
Layers panel menu
How to use layers in Illustrator © 2013 Adobe Systems Incorporated
This document requires Adobe Illustrator CC, June 2013. Technical instructions may differ depending on your version.
Adobe Illustrator Guide
Consolidate layers and groups
Merging and flattening layers are similar in that they both let you consolidate objects, groups, and sublayers into a single layer or group. With merging, you can select which items you want to consolidate; with flattening, all visible items in the artwork are consolidated in a single layer. With either option, the stacking order of the artwork remains the same, but other layer-level attributes, such as clipping masks, aren’t preserved.
• To merge items into a single layer or group, hold down Ctrl (Windows) or Command (Mac OS) and click the names of the layers or groups you want to merge. Alternatively, hold down Shift to select all listings in between the layer or group names you click. Then, select Merge Selected from the Layers panel menu. Note that items will be merged into the layer or group you selected last. Layers can only merge with other layers on the same hierarchical level in the Layers panel. Likewise, sublayers can only merge with other sublayers that are within the same layer and at the same hierarchical level. Objects can’t be merged with other objects.
• To flatten layers, click the name of the layer into which you want to consolidate the artwork. Then select Flatten Artwork from the Layers panel menu.
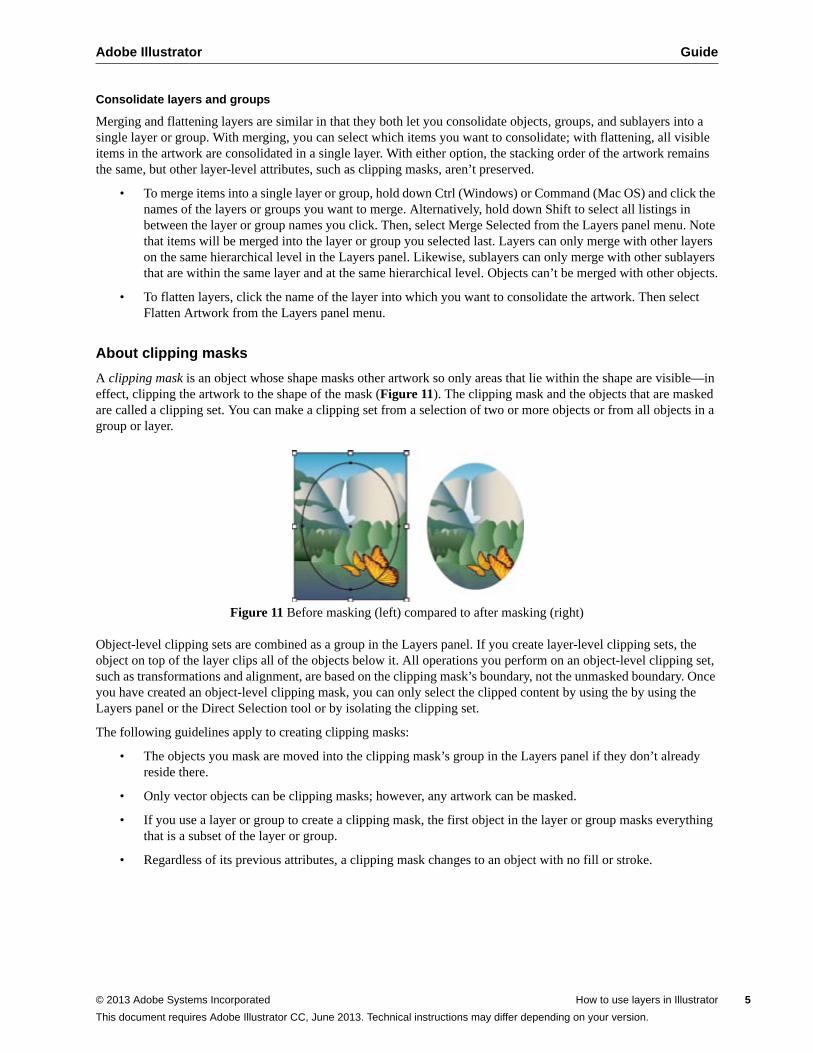
About clipping masks
A clipping mask is an object whose shape masks other artwork so only areas that lie within the shape are visible—in effect, clipping the artwork to the shape of the mask (Figure 11). The clipping mask and the objects that are masked are called a clipping set. You can make a clipping set from a selection of two or more objects or from all objects in a group or layer.
Figure 11 Before masking (left) compared to after masking (right)
Object-level clipping sets are combined as a group in the Layers panel. If you create layer-level clipping sets, the object on top of the layer clips all of the objects below it. All operations you perform on an object-level clipping set, such as transformations and alignment, are based on the clipping mask’s boundary, not the unmasked boundary. Once you have created an object-level clipping mask, you can only select the clipped content by using the by using the Layers panel or the Direct Selection tool or by isolating the clipping set.
The following guidelines apply to creating clipping masks:
• The objects you mask are moved into the clipping mask’s group in the Layers panel if they don’t already reside there.
• Only vector objects can be clipping masks; however, any artwork can be masked.
• If you use a layer or group to create a clipping mask, the first object in the layer or group masks everything that is a subset of the layer or group.
• Regardless of its previous attributes, a clipping mask changes to an object with no fill or stroke.
© 2013 Adobe Systems Incorporated How to use layers in Illustrator 5
This document requires Adobe Illustrator CC, June 2013. Technical instructions may differ depending on your version.
Guide Adobe Illustrator
6
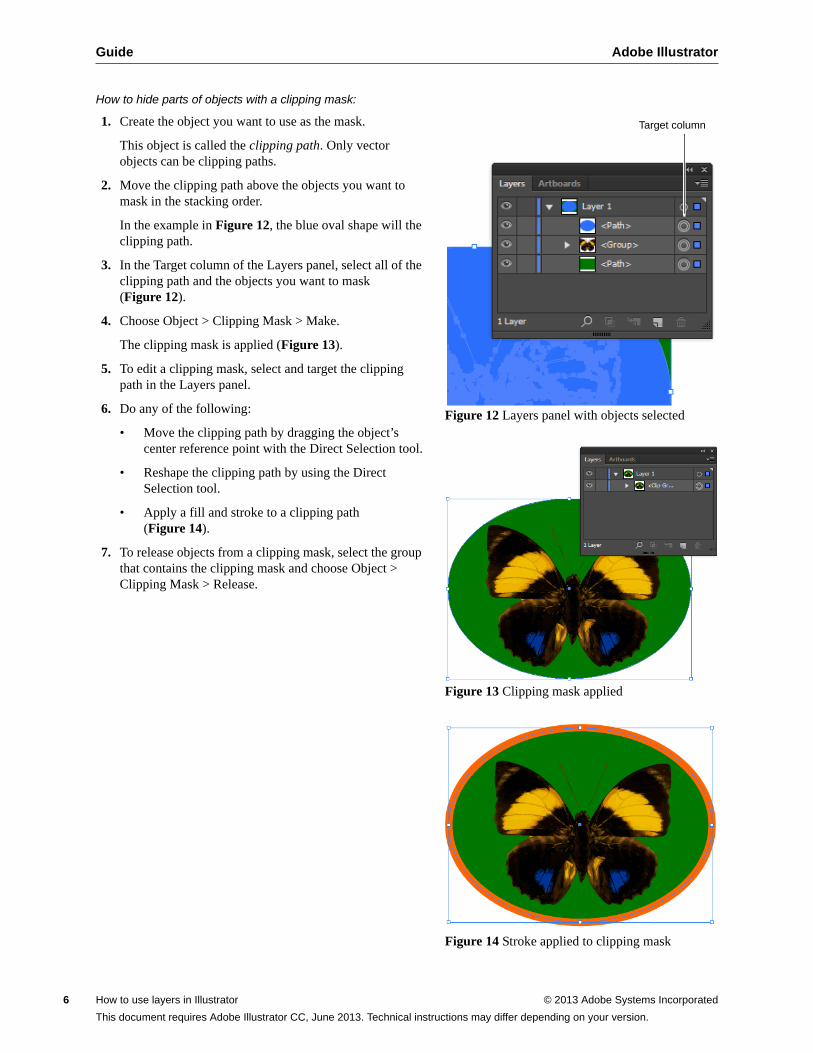
How to hide parts of objects with a clipping mask:
1. Create the object you want to use as the mask.
This object is called the clipping path. Only vector objects can be clipping paths.
2. Move the clipping path above the objects you want to mask in the stacking order.
In the example in Figure 12, the blue oval shape will the clipping path.
3. In the Target column of the Layers panel, select all of the clipping path and the objects you want to mask (Figure 12).
4. Choose Object > Clipping Mask > Make.
The clipping mask is applied (Figure 13).
5. To edit a clipping mask, select and target the clipping path in the Layers panel.
6. Do any of the following:
• Move the clipping path by dragging the object’s center reference point with the Direct Selection tool.
• Reshape the clipping path by using the Direct Selection tool.
• Apply a fill and stroke to a clipping path (Figure 14).
7. To release objects from a clipping mask, select the group that contains the clipping mask and choose Object > Clipping Mask > Release.
Figure 12 Layers panel with objects selected
Figure 13 Clipping mask applied
Figure 14 Stroke applied to clipping mask
Target column
How to use layers in Illustrator © 2013 Adobe Systems Incorporated
This document requires Adobe Illustrator CC, June 2013. Technical instructions may differ depending on your version.
Adobe Illustrator Guide
About opacity masks
You use an opacity mask and a masking object to alter the transparency of artwork. The opacity mask (also referred to as masked artwork) provides the shape through which other objects show (Figure 15). The masking object defines which areas are transparent and the degree of transparency. You can use any colored object or raster image as the masking object. Illustrator uses the grayscale equivalents of the colors in the masking object for the opacity levels in the mask. Where the opacity mask is white, the artwork is fully visible. Where the opacity mask is black, the artwork is hidden. Shades of gray in the mask result in varying degrees of transparency in the artwork.
Figure 15 A. Underlying objects; B. Opacity mask artwork; C. Masking object filled with black-to-white gradient; D. C moved over the area of B and masking B
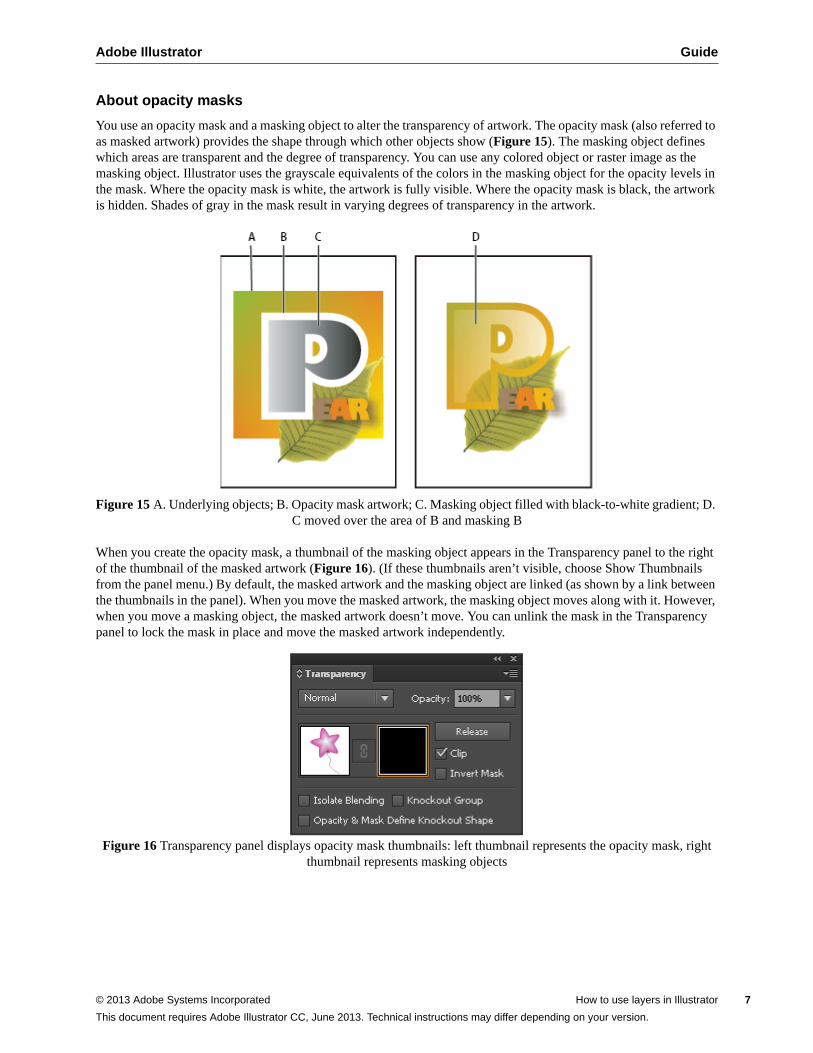
When you create the opacity mask, a thumbnail of the masking object appears in the Transparency panel to the right of the thumbnail of the masked artwork (Figure 16). (If these thumbnails aren’t visible, choose Show Thumbnails from the panel menu.) By default, the masked artwork and the masking object are linked (as shown by a link between the thumbnails in the panel). When you move the masked artwork, the masking object moves along with it. However, when you move a masking object, the masked artwork doesn’t move. You can unlink the mask in the Transparency panel to lock the mask in place and move the masked artwork independently.
Figure 16 Transparency panel displays opacity mask thumbnails: left thumbnail represents the opacity mask, right thumbnail represents masking objects
© 2013 Adobe Systems Incorporated How to use layers in Illustrator 7
This document requires Adobe Illustrator CC, June 2013. Technical instructions may differ depending on your version.
Guide Adobe Illustrator
8
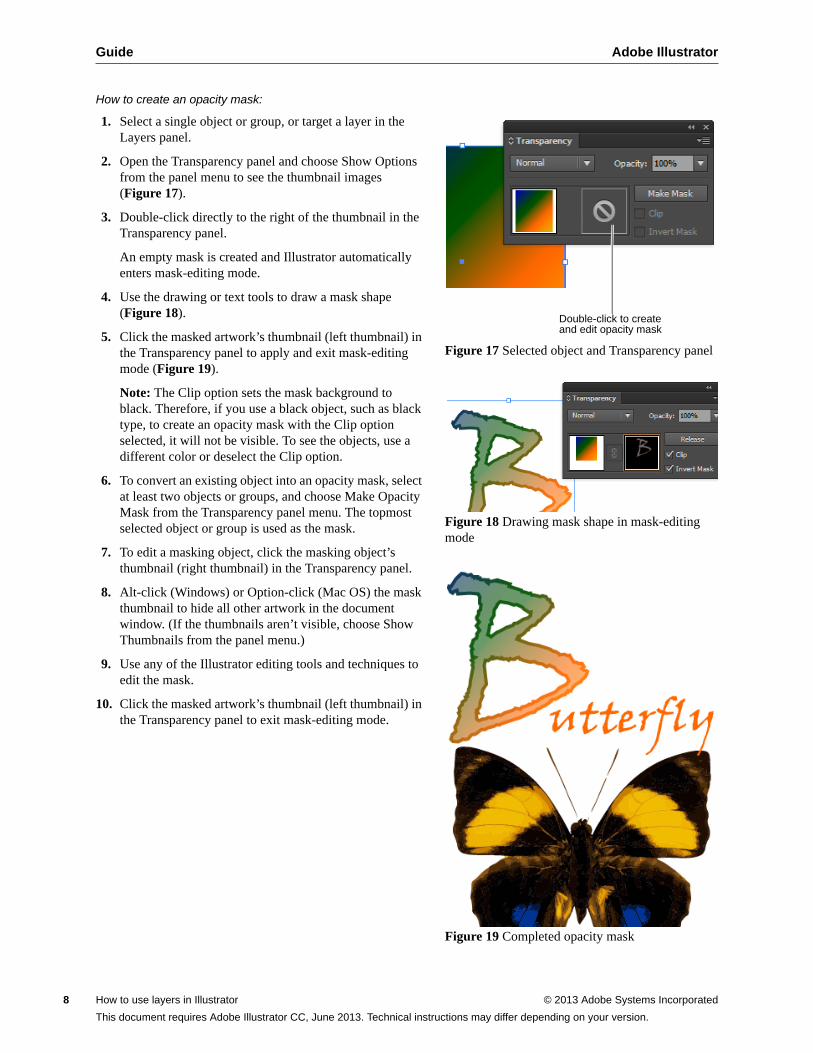
How to create an opacity mask:
1. Select a single object or group, or target a layer in the Layers panel.
2. Open the Transparency panel and choose Show Options from the panel menu to see the thumbnail images (Figure 17).
3. Double-click directly to the right of the thumbnail in the Transparency panel.
An empty mask is created and Illustrator automatically enters mask-editing mode.
4. Use the drawing or text tools to draw a mask shape (Figure 18).
5. Click the masked artwork’s thumbnail (left thumbnail) in the Transparency panel to apply and exit mask-editing mode (Figure 19).
Note: The Clip option sets the mask background to black. Therefore, if you use a black object, such as black type, to create an opacity mask with the Clip option selected, it will not be visible. To see the objects, use a different color or deselect the Clip option.
6. To convert an existing object into an opacity mask, select at least two objects or groups, and choose Make Opacity Mask from the Transparency panel menu. The topmost selected object or group is used as the mask.
7. To edit a masking object, click the masking object’s thumbnail (right thumbnail) in the Transparency panel.
8. Alt-click (Windows) or Option-click (Mac OS) the mask thumbnail to hide all other artwork in the document window. (If the thumbnails aren’t visible, choose Show Thumbnails from the panel menu.)
9. Use any of the Illustrator editing tools and techniques to edit the mask.
10. Click the masked artwork’s thumbnail (left thumbnail) in the Transparency panel to exit mask-editing mode.
Figure 17 Selected object and Transparency panel
Figure 18 Drawing mask shape in mask-editing mode
Figure 19 Completed opacity mask
Double-click to create and edit opacity mask
How to use layers in Illustrator © 2013 Adobe Systems Incorporated
This document requires Adobe Illustrator CC, June 2013. Technical instructions may differ depending on your version.
Adobe Illustrator Guide
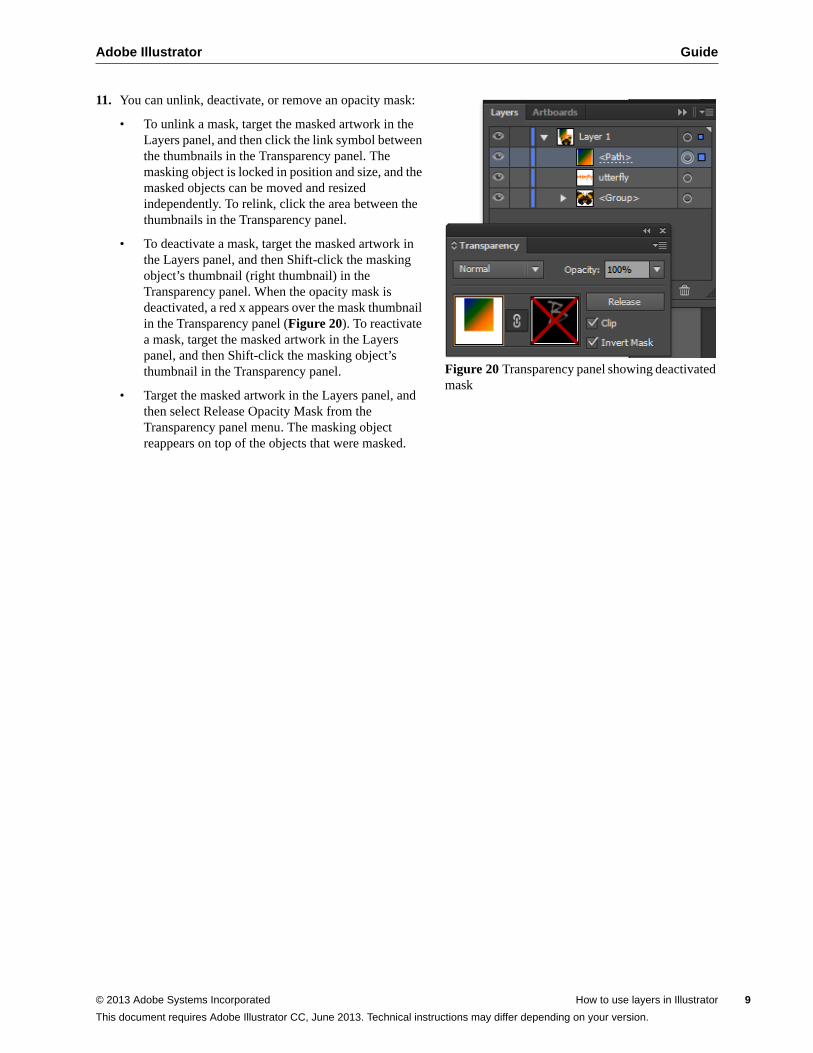
11. You can unlink, deactivate, or remove an opacity mask:
• To unlink a mask, target the masked artwork in the Layers panel, and then click the link symbol between the thumbnails in the Transparency panel. The masking object is locked in position and size, and the masked objects can be moved and resized independently. To relink, click the area between the thumbnails in the Transparency panel.
• To deactivate a mask, target the masked artwork in the Layers panel, and then Shift-click the masking object’s thumbnail (right thumbnail) in the Transparency panel. When the opacity mask is deactivated, a red x appears over the mask thumbnail in the Transparency panel (Figure 20). To reactivate a mask, target the masked artwork in the Layers panel, and then Shift-click the masking object’s thumbnail in the Transparency panel.
• Target the masked artwork in the Layers panel, and then select Release Opacity Mask from the Transparency panel menu. The masking object reappears on top of the objects that were masked.
Figure 20 Transparency panel showing deactivated mask
© 2013 Adobe Systems Incorporated How to use layers in Illustrator 9
This document requires Adobe Illustrator CC, June 2013. Technical instructions may differ depending on your version.
Adobe Illustrator Guide
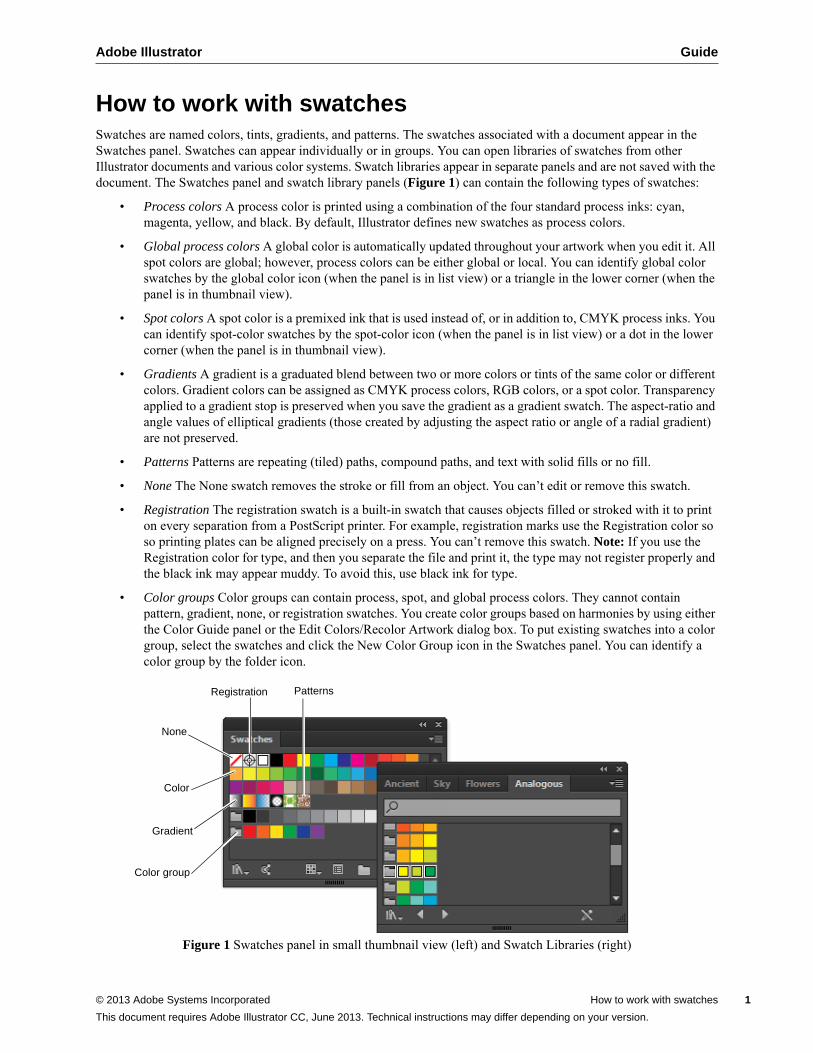
How to work with swatchesSwatches are named colors, tints, gradients, and patterns. The swatches associated with a document appear in the Swatches panel. Swatches can appear individually or in groups. You can open libraries of swatches from other Illustrator documents and various color systems. Swatch libraries appear in separate panels and are not saved with the document. The Swatches panel and swatch library panels (Figure 1) can contain the following types of swatches:
• Process colors A process color is printed using a combination of the four standard process inks: cyan, magenta, yellow, and black. By default, Illustrator defines new swatches as process colors.
• Global process colors A global color is automatically updated throughout your artwork when you edit it. All spot colors are global; however, process colors can be either global or local. You can identify global color swatches by the global color icon (when the panel is in list view) or a triangle in the lower corner (when the panel is in thumbnail view).
• Spot colors A spot color is a premixed ink that is used instead of, or in addition to, CMYK process inks. You can identify spot-color swatches by the spot-color icon (when the panel is in list view) or a dot in the lower corner (when the panel is in thumbnail view).
• Gradients A gradient is a graduated blend between two or more colors or tints of the same color or different colors. Gradient colors can be assigned as CMYK process colors, RGB colors, or a spot color. Transparency applied to a gradient stop is preserved when you save the gradient as a gradient swatch. The aspect-ratio and angle values of elliptical gradients (those created by adjusting the aspect ratio or angle of a radial gradient) are not preserved.
• Patterns Patterns are repeating (tiled) paths, compound paths, and text with solid fills or no fill.
• None The None swatch removes the stroke or fill from an object. You can’t edit or remove this swatch.
• Registration The registration swatch is a built-in swatch that causes objects filled or stroked with it to print on every separation from a PostScript printer. For example, registration marks use the Registration color so so printing plates can be aligned precisely on a press. You can’t remove this swatch. Note: If you use the Registration color for type, and then you separate the file and print it, the type may not register properly and the black ink may appear muddy. To avoid this, use black ink for type.
• Color groups Color groups can contain process, spot, and global process colors. They cannot contain pattern, gradient, none, or registration swatches. You create color groups based on harmonies by using either the Color Guide panel or the Edit Colors/Recolor Artwork dialog box. To put existing swatches into a color group, select the swatches and click the New Color Group icon in the Swatches panel. You can identify a color group by the folder icon.
Figure 1 Swatches panel in small thumbnail view (left) and Swatch Libraries (right)
PatternsRegistration
None
Color
Gradient
Color group
© 2013 Adobe Systems Incorporated How to work with swatches 1
This document requires Adobe Illustrator CC, June 2013. Technical instructions may differ depending on your version.
Guide Adobe Illustrator
2
You can also create tints in the Swatches panel. A tint is a global process color or spot color with a modified intensity. Tints of the same color are linked together, so if you edit the color of a tint swatch, all associated tint swatches (and the objects painted with those swatches) change color, though the tint values remain unchanged. Tints are identified by a percentage (when the Swatches panel is in list view).
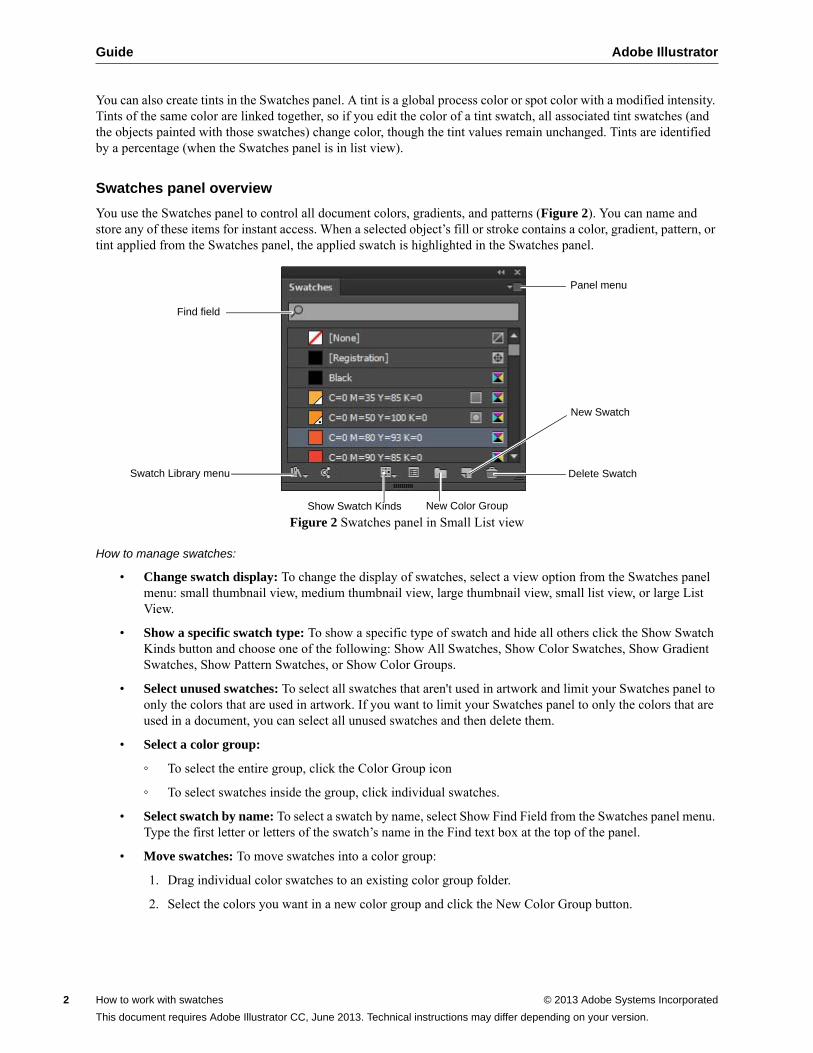
Swatches panel overview
You use the Swatches panel to control all document colors, gradients, and patterns (Figure 2). You can name and store any of these items for instant access. When a selected object’s fill or stroke contains a color, gradient, pattern, or tint applied from the Swatches panel, the applied swatch is highlighted in the Swatches panel.
Figure 2 Swatches panel in Small List view
How to manage swatches:
• Change swatch display: To change the display of swatches, select a view option from the Swatches panel menu: small thumbnail view, medium thumbnail view, large thumbnail view, small list view, or large List View.
• Show a specific swatch type: To show a specific type of swatch and hide all others click the Show Swatch Kinds button and choose one of the following: Show All Swatches, Show Color Swatches, Show Gradient Swatches, Show Pattern Swatches, or Show Color Groups.
• Select unused swatches: To select all swatches that aren't used in artwork and limit your Swatches panel to only the colors that are used in artwork. If you want to limit your Swatches panel to only the colors that are used in a document, you can select all unused swatches and then delete them.
• Select a color group:
◦ To select the entire group, click the Color Group icon
◦ To select swatches inside the group, click individual swatches.
• Select swatch by name: To select a swatch by name, select Show Find Field from the Swatches panel menu. Type the first letter or letters of the swatch’s name in the Find text box at the top of the panel.
• Move swatches: To move swatches into a color group:
1. Drag individual color swatches to an existing color group folder.
2. Select the colors you want in a new color group and click the New Color Group button.
Panel menu
Show Swatch Kinds
Find field
New Color Group
New Swatch
Delete SwatchSwatch Library menu
How to work with swatches © 2013 Adobe Systems Incorporated
This document requires Adobe Illustrator CC, June 2013. Technical instructions may differ depending on your version.
Adobe Illustrator Guide
• Reorder swatches: To reorder individual swatches or swatches inside a color group, select Sort By Name or Sort By Kind from the Swatches panel menu. These commands only work on individual swatches, not swatches in a color group. Drag a swatch to a new location.
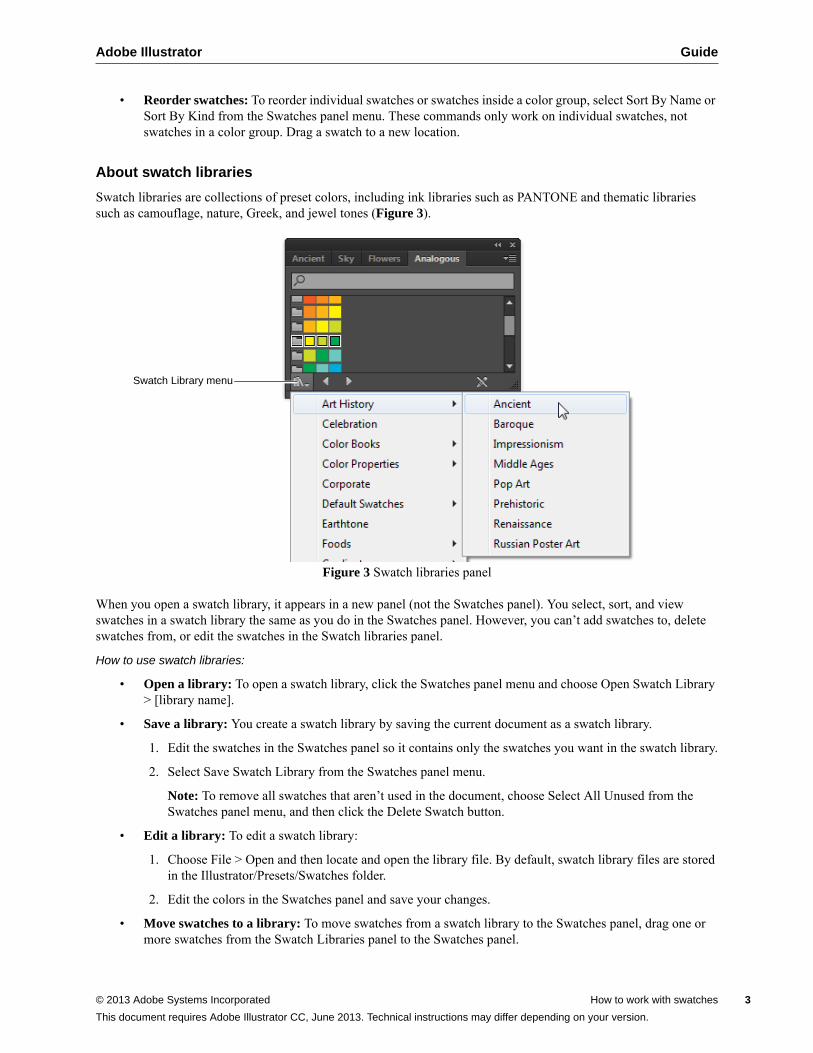
About swatch libraries
Swatch libraries are collections of preset colors, including ink libraries such as PANTONE and thematic libraries such as camouflage, nature, Greek, and jewel tones (Figure 3).
Figure 3 Swatch libraries panel
When you open a swatch library, it appears in a new panel (not the Swatches panel). You select, sort, and view swatches in a swatch library the same as you do in the Swatches panel. However, you can’t add swatches to, delete swatches from, or edit the swatches in the Swatch libraries panel.
How to use swatch libraries:
• Open a library: To open a swatch library, click the Swatches panel menu and choose Open Swatch Library > [library name].
• Save a library: You create a swatch library by saving the current document as a swatch library.
1. Edit the swatches in the Swatches panel so it contains only the swatches you want in the swatch library.
2. Select Save Swatch Library from the Swatches panel menu.
Note: To remove all swatches that aren’t used in the document, choose Select All Unused from the Swatches panel menu, and then click the Delete Swatch button.
• Edit a library: To edit a swatch library:
1. Choose File > Open and then locate and open the library file. By default, swatch library files are stored in the Illustrator/Presets/Swatches folder.
2. Edit the colors in the Swatches panel and save your changes.
• Move swatches to a library: To move swatches from a swatch library to the Swatches panel, drag one or more swatches from the Swatch Libraries panel to the Swatches panel.
Swatch Library menu
© 2013 Adobe Systems Incorporated How to work with swatches 3
This document requires Adobe Illustrator CC, June 2013. Technical instructions may differ depending on your version.
Guide Adobe Illustrator
4
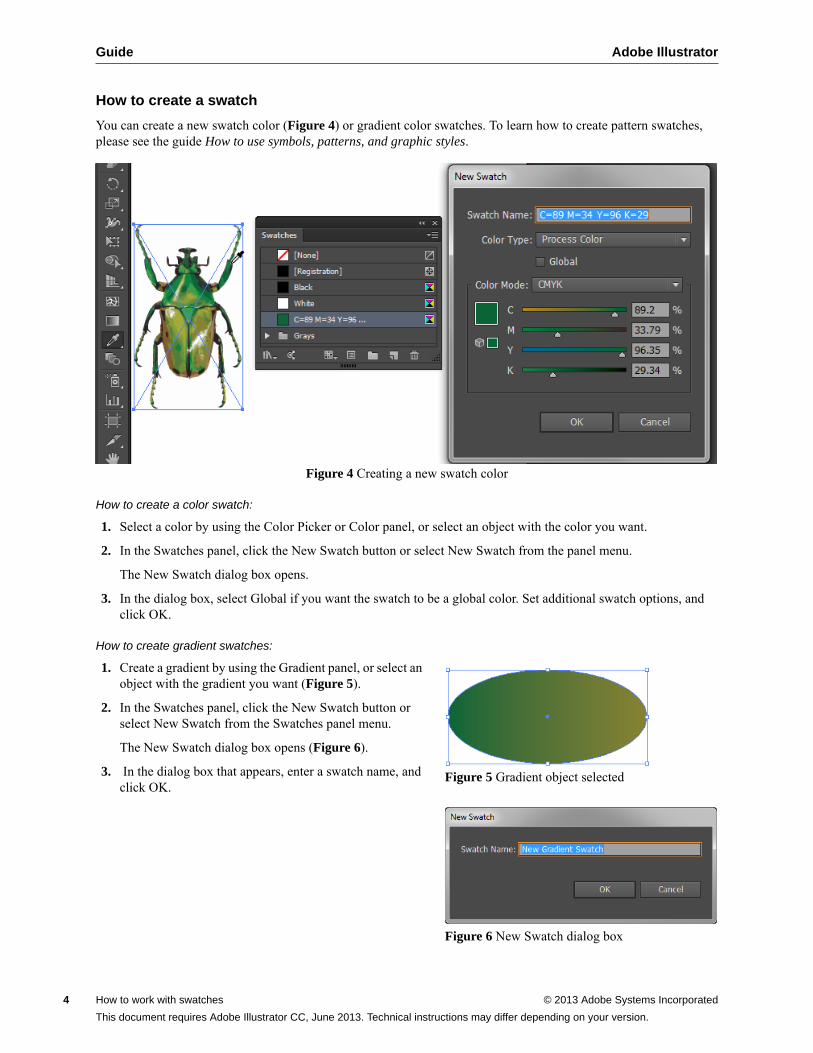
How to create a swatch
You can create a new swatch color (Figure 4) or gradient color swatches. To learn how to create pattern swatches, please see the guide How to use symbols, patterns, and graphic styles.
Figure 4 Creating a new swatch color
How to create a color swatch:
1. Select a color by using the Color Picker or Color panel, or select an object with the color you want.
2. In the Swatches panel, click the New Swatch button or select New Swatch from the panel menu.
The New Swatch dialog box opens.
3. In the dialog box, select Global if you want the swatch to be a global color. Set additional swatch options, and click OK.
How to create gradient swatches:
1. Create a gradient by using the Gradient panel, or select an object with the gradient you want (Figure 5).
2. In the Swatches panel, click the New Swatch button or select New Swatch from the Swatches panel menu.
The New Swatch dialog box opens (Figure 6).
3. In the dialog box that appears, enter a swatch name, and click OK.
Figure 5 Gradient object selected
Figure 6 New Swatch dialog box
How to work with swatches © 2013 Adobe Systems Incorporated
This document requires Adobe Illustrator CC, June 2013. Technical instructions may differ depending on your version.
Adobe Illustrator
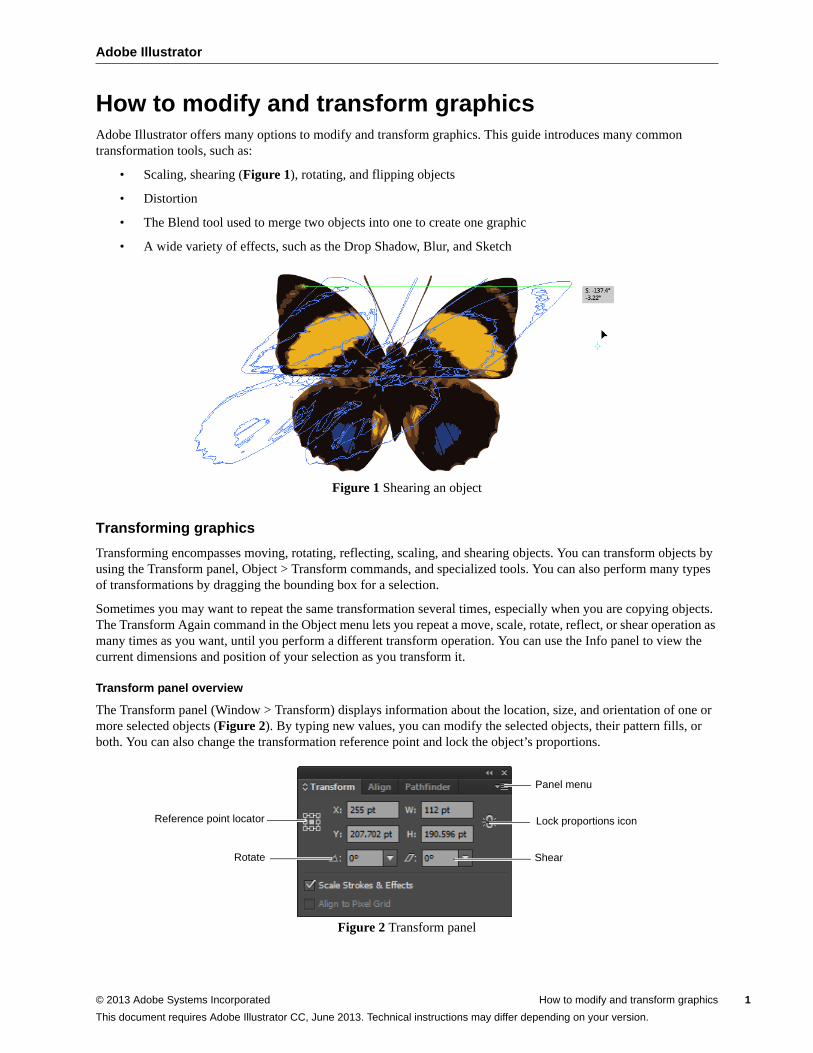
How to modify and transform graphicsAdobe Illustrator offers many options to modify and transform graphics. This guide introduces many common transformation tools, such as:
• Scaling, shearing (Figure 1), rotating, and flipping objects
• Distortion
• The Blend tool used to merge two objects into one to create one graphic
• A wide variety of effects, such as the Drop Shadow, Blur, and Sketch
Figure 1 Shearing an object
Transforming graphics
Transforming encompasses moving, rotating, reflecting, scaling, and shearing objects. You can transform objects by using the Transform panel, Object > Transform commands, and specialized tools. You can also perform many types of transformations by dragging the bounding box for a selection.
Sometimes you may want to repeat the same transformation several times, especially when you are copying objects. The Transform Again command in the Object menu lets you repeat a move, scale, rotate, reflect, or shear operation as many times as you want, until you perform a different transform operation. You can use the Info panel to view the current dimensions and position of your selection as you transform it.
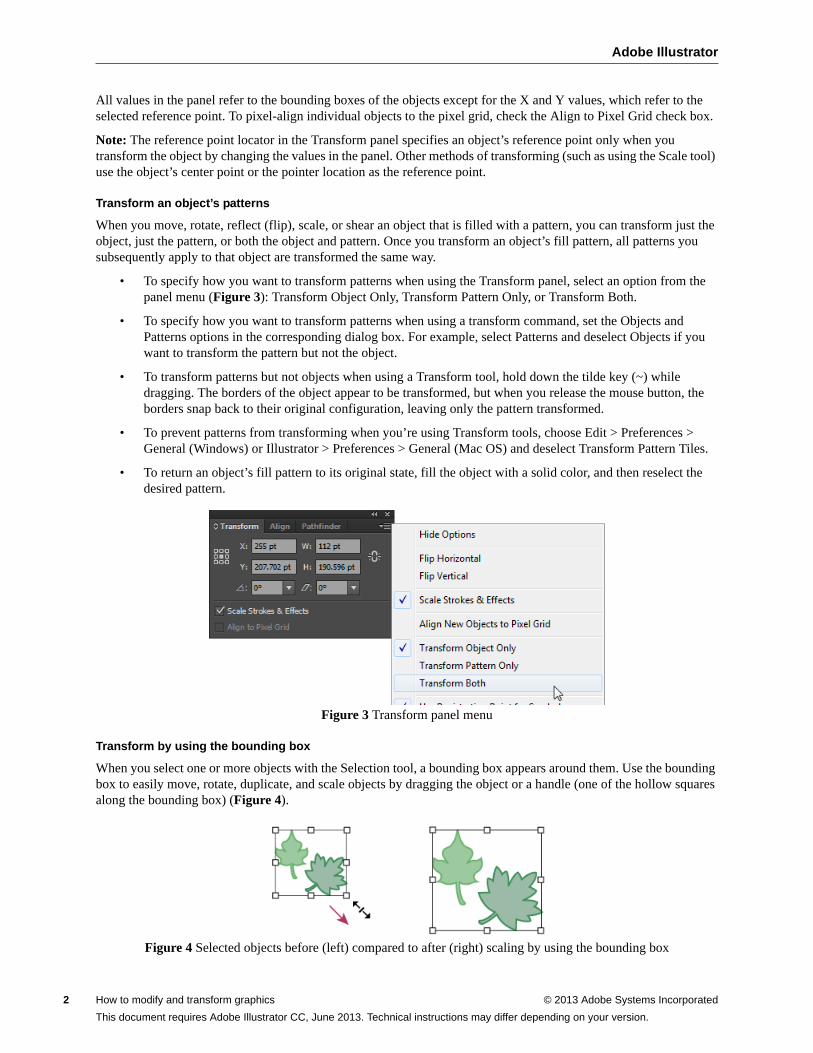
Transform panel overview
The Transform panel (Window > Transform) displays information about the location, size, and orientation of one or more selected objects (Figure 2). By typing new values, you can modify the selected objects, their pattern fills, or both. You can also change the transformation reference point and lock the object’s proportions.
Figure 2 Transform panel
Reference point locator
Panel menu
Lock proportions icon
ShearRotate
© 2013 Adobe Systems Incorporated How to modify and transform graphics 1
This document requires Adobe Illustrator CC, June 2013. Technical instructions may differ depending on your version.
Adobe Illustrator
2
All values in the panel refer to the bounding boxes of the objects except for the X and Y values, which refer to the selected reference point. To pixel-align individual objects to the pixel grid, check the Align to Pixel Grid check box.
Note: The reference point locator in the Transform panel specifies an object’s reference point only when you transform the object by changing the values in the panel. Other methods of transforming (such as using the Scale tool) use the object’s center point or the pointer location as the reference point.
Transform an object’s patterns
When you move, rotate, reflect (flip), scale, or shear an object that is filled with a pattern, you can transform just the object, just the pattern, or both the object and pattern. Once you transform an object’s fill pattern, all patterns you subsequently apply to that object are transformed the same way.
• To specify how you want to transform patterns when using the Transform panel, select an option from the panel menu (Figure 3): Transform Object Only, Transform Pattern Only, or Transform Both.
• To specify how you want to transform patterns when using a transform command, set the Objects and Patterns options in the corresponding dialog box. For example, select Patterns and deselect Objects if you want to transform the pattern but not the object.
• To transform patterns but not objects when using a Transform tool, hold down the tilde key (~) while dragging. The borders of the object appear to be transformed, but when you release the mouse button, the borders snap back to their original configuration, leaving only the pattern transformed.
• To prevent patterns from transforming when you’re using Transform tools, choose Edit > Preferences > General (Windows) or Illustrator > Preferences > General (Mac OS) and deselect Transform Pattern Tiles.
• To return an object’s fill pattern to its original state, fill the object with a solid color, and then reselect the desired pattern.
Figure 3 Transform panel menu
Transform by using the bounding box
When you select one or more objects with the Selection tool, a bounding box appears around them. Use the bounding box to easily move, rotate, duplicate, and scale objects by dragging the object or a handle (one of the hollow squares along the bounding box) (Figure 4).
Figure 4 Selected objects before (left) compared to after (right) scaling by using the bounding box
How to modify and transform graphics © 2013 Adobe Systems Incorporated
This document requires Adobe Illustrator CC, June 2013. Technical instructions may differ depending on your version.
Adobe Illustrator
• To show the bounding box, choose View > Show Bounding Box.
• To hide the bounding box, choose View > Hide Bounding Box.
• To reorient the bounding box after you rotate it, choose Object > Transform > Reset Bounding Box.
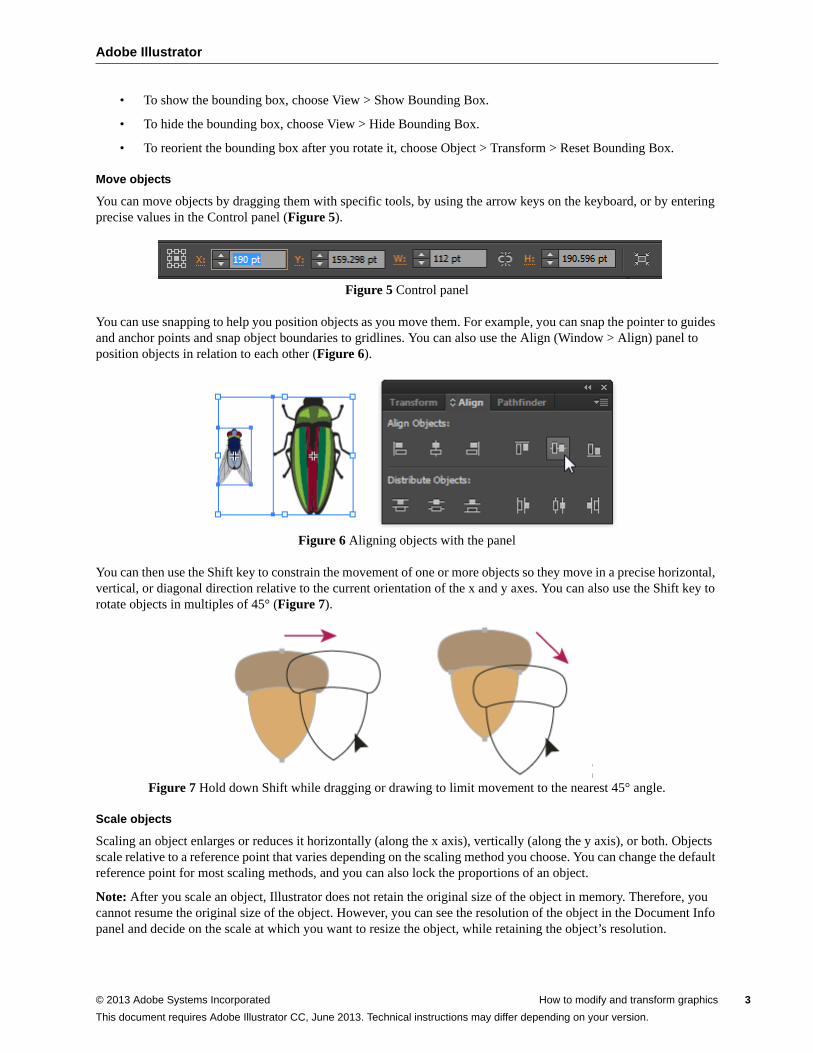
Move objects
You can move objects by dragging them with specific tools, by using the arrow keys on the keyboard, or by entering precise values in the Control panel (Figure 5).
Figure 5 Control panel
You can use snapping to help you position objects as you move them. For example, you can snap the pointer to guides and anchor points and snap object boundaries to gridlines. You can also use the Align (Window > Align) panel to position objects in relation to each other (Figure 6).
Figure 6 Aligning objects with the panel
You can then use the Shift key to constrain the movement of one or more objects so they move in a precise horizontal, vertical, or diagonal direction relative to the current orientation of the x and y axes. You can also use the Shift key to rotate objects in multiples of 45° (Figure 7).
Figure 7 Hold down Shift while dragging or drawing to limit movement to the nearest 45° angle.
Scale objects
Scaling an object enlarges or reduces it horizontally (along the x axis), vertically (along the y axis), or both. Objects scale relative to a reference point that varies depending on the scaling method you choose. You can change the default reference point for most scaling methods, and you can also lock the proportions of an object.
Note: After you scale an object, Illustrator does not retain the original size of the object in memory. Therefore, you cannot resume the original size of the object. However, you can see the resolution of the object in the Document Info panel and decide on the scale at which you want to resize the object, while retaining the object’s resolution.
© 2013 Adobe Systems Incorporated How to modify and transform graphics 3
This document requires Adobe Illustrator CC, June 2013. Technical instructions may differ depending on your version.
Adobe Illustrator
4
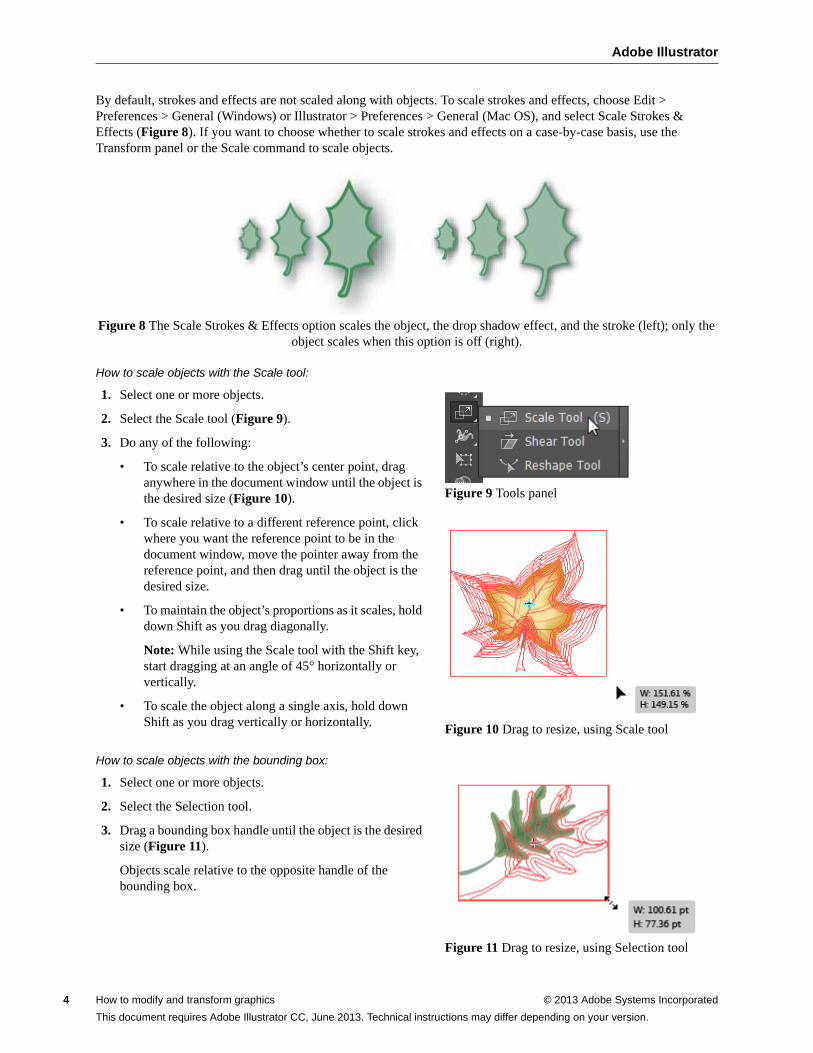
By default, strokes and effects are not scaled along with objects. To scale strokes and effects, choose Edit > Preferences > General (Windows) or Illustrator > Preferences > General (Mac OS), and select Scale Strokes & Effects (Figure 8). If you want to choose whether to scale strokes and effects on a case-by-case basis, use the Transform panel or the Scale command to scale objects.
Figure 8 The Scale Strokes & Effects option scales the object, the drop shadow effect, and the stroke (left); only the object scales when this option is off (right).
How to scale objects with the Scale tool:
1. Select one or more objects.
2. Select the Scale tool (Figure 9).
3. Do any of the following:
• To scale relative to the object’s center point, drag anywhere in the document window until the object is the desired size (Figure 10).
• To scale relative to a different reference point, click where you want the reference point to be in the document window, move the pointer away from the reference point, and then drag until the object is the desired size.
• To maintain the object’s proportions as it scales, hold down Shift as you drag diagonally.
Note: While using the Scale tool with the Shift key, start dragging at an angle of 45° horizontally or vertically.
• To scale the object along a single axis, hold down Shift as you drag vertically or horizontally.
Figure 9 Tools panel
Figure 10 Drag to resize, using Scale tool
How to scale objects with the bounding box:
1. Select one or more objects.
2. Select the Selection tool.
3. Drag a bounding box handle until the object is the desired size (Figure 11).
Objects scale relative to the opposite handle of the bounding box.
Figure 11 Drag to resize, using Selection tool
How to modify and transform graphics © 2013 Adobe Systems Incorporated
This document requires Adobe Illustrator CC, June 2013. Technical instructions may differ depending on your version.
Adobe Illustrator
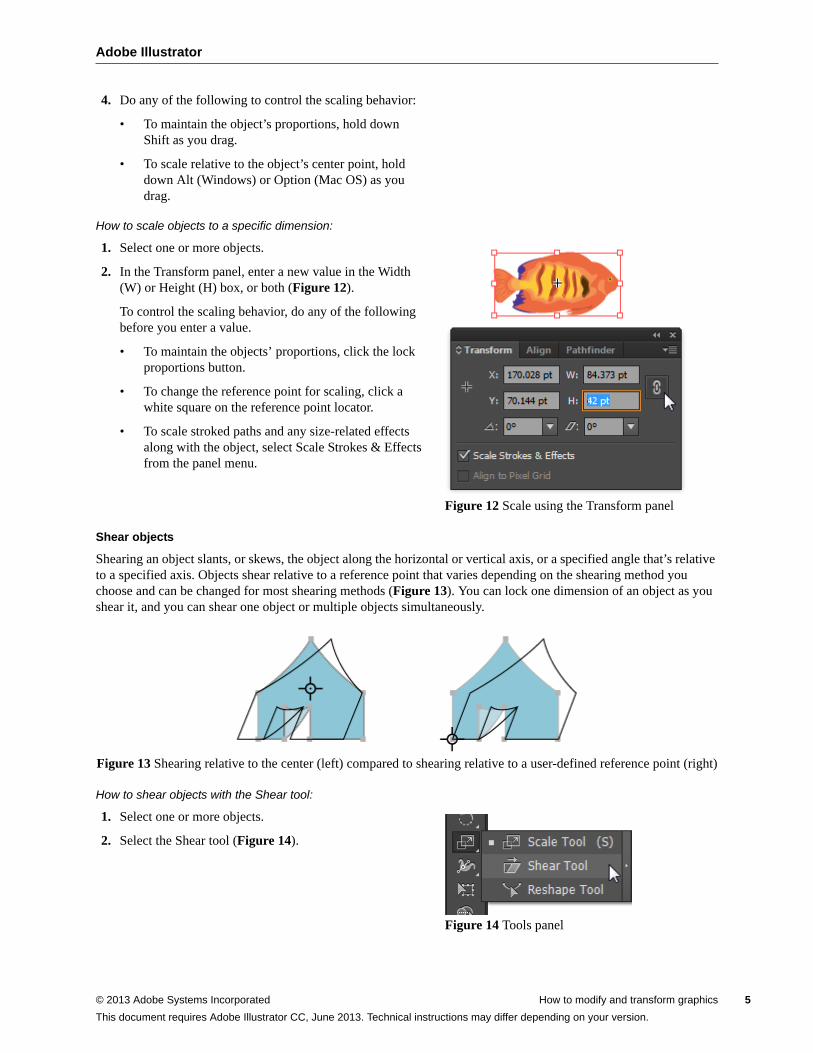
4. Do any of the following to control the scaling behavior:
• To maintain the object’s proportions, hold down Shift as you drag.
• To scale relative to the object’s center point, hold down Alt (Windows) or Option (Mac OS) as you drag.
How to scale objects to a specific dimension:
1. Select one or more objects.
2. In the Transform panel, enter a new value in the Width (W) or Height (H) box, or both (Figure 12).
To control the scaling behavior, do any of the following before you enter a value.
• To maintain the objects’ proportions, click the lock proportions button.
• To change the reference point for scaling, click a white square on the reference point locator.
• To scale stroked paths and any size-related effects along with the object, select Scale Strokes & Effects from the panel menu.
Figure 12 Scale using the Transform panel
Shear objects
Shearing an object slants, or skews, the object along the horizontal or vertical axis, or a specified angle that’s relative to a specified axis. Objects shear relative to a reference point that varies depending on the shearing method you choose and can be changed for most shearing methods (Figure 13). You can lock one dimension of an object as you shear it, and you can shear one object or multiple objects simultaneously.
Figure 13 Shearing relative to the center (left) compared to shearing relative to a user-defined reference point (right)
How to shear objects with the Shear tool:
1. Select one or more objects.
2. Select the Shear tool (Figure 14).
Figure 14 Tools panel
© 2013 Adobe Systems Incorporated How to modify and transform graphics 5
This document requires Adobe Illustrator CC, June 2013. Technical instructions may differ depending on your version.
Adobe Illustrator
6
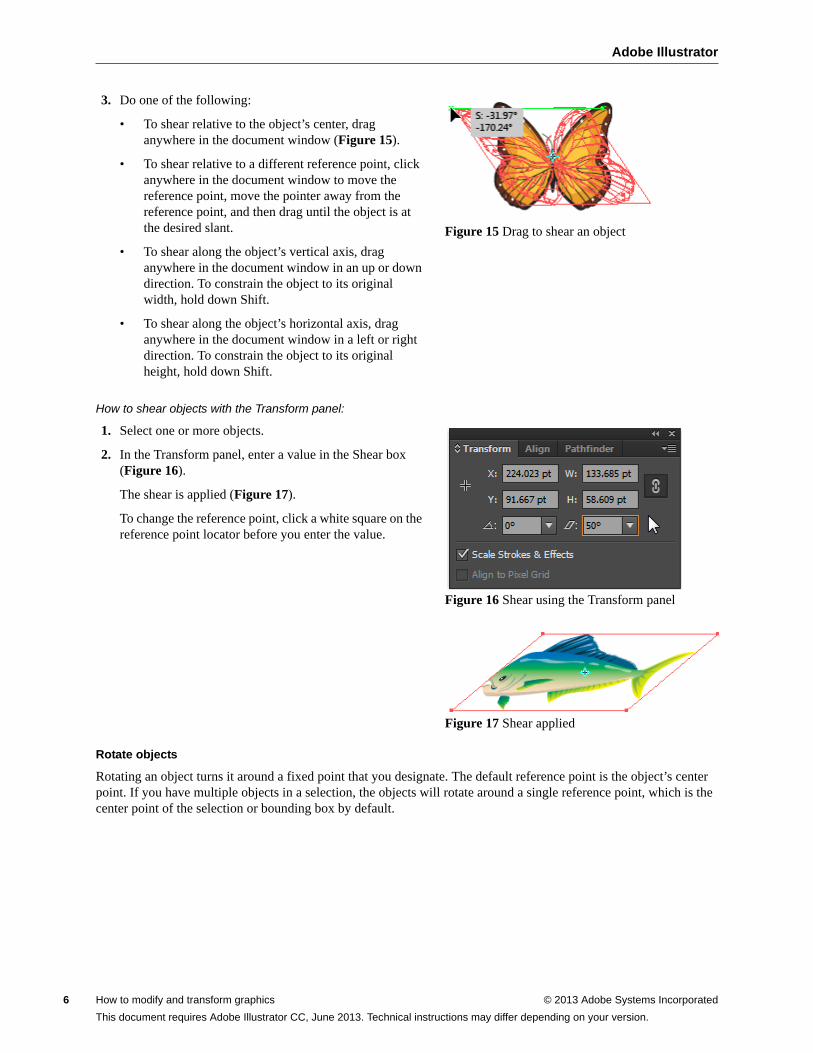
3. Do one of the following:
• To shear relative to the object’s center, drag anywhere in the document window (Figure 15).
• To shear relative to a different reference point, click anywhere in the document window to move the reference point, move the pointer away from the reference point, and then drag until the object is at the desired slant.
• To shear along the object’s vertical axis, drag anywhere in the document window in an up or down direction. To constrain the object to its original width, hold down Shift.
• To shear along the object’s horizontal axis, drag anywhere in the document window in a left or right direction. To constrain the object to its original height, hold down Shift.
Figure 15 Drag to shear an object
How to shear objects with the Transform panel:
1. Select one or more objects.
2. In the Transform panel, enter a value in the Shear box (Figure 16).
The shear is applied (Figure 17).
To change the reference point, click a white square on the reference point locator before you enter the value.
Figure 16 Shear using the Transform panel
Figure 17 Shear applied
Rotate objects
Rotating an object turns it around a fixed point that you designate. The default reference point is the object’s center point. If you have multiple objects in a selection, the objects will rotate around a single reference point, which is the center point of the selection or bounding box by default.
How to modify and transform graphics © 2013 Adobe Systems Incorporated
This document requires Adobe Illustrator CC, June 2013. Technical instructions may differ depending on your version.
Adobe Illustrator
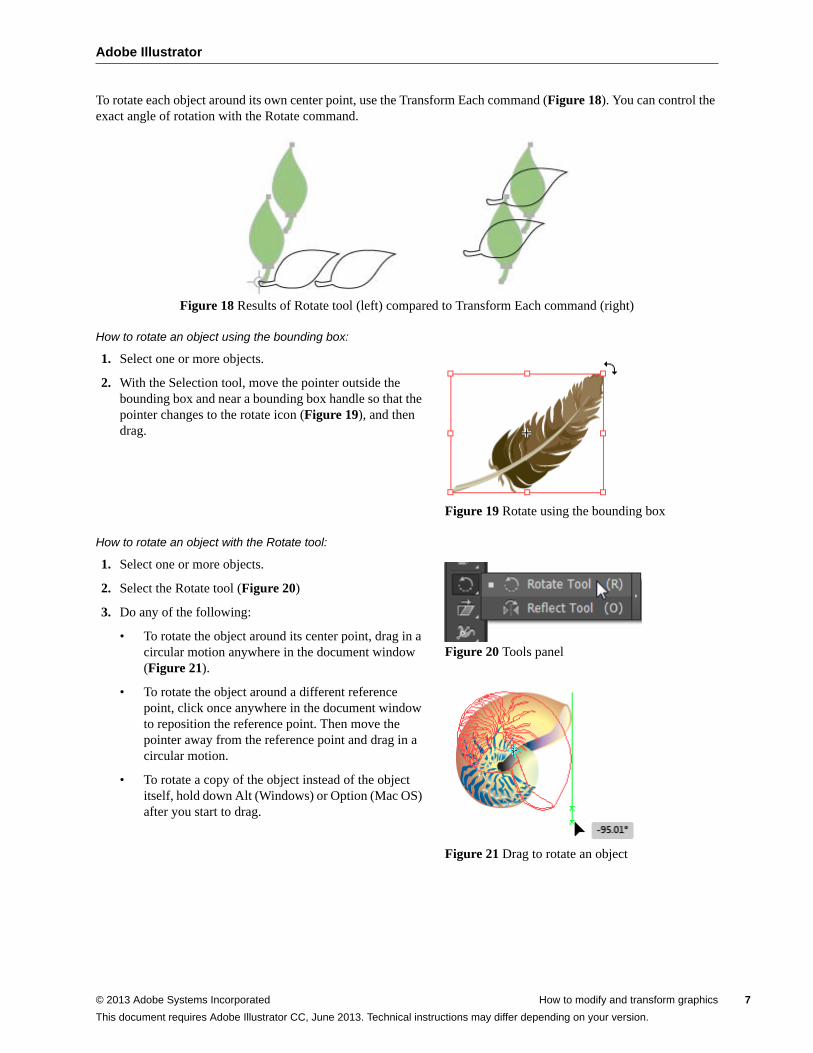
To rotate each object around its own center point, use the Transform Each command (Figure 18). You can control the exact angle of rotation with the Rotate command.
Figure 18 Results of Rotate tool (left) compared to Transform Each command (right)
How to rotate an object using the bounding box:
1. Select one or more objects.
2. With the Selection tool, move the pointer outside the bounding box and near a bounding box handle so that the pointer changes to the rotate icon (Figure 19), and then drag.
Figure 19 Rotate using the bounding box
How to rotate an object with the Rotate tool:
1. Select one or more objects.
2. Select the Rotate tool (Figure 20)
3. Do any of the following:
• To rotate the object around its center point, drag in a circular motion anywhere in the document window (Figure 21).
• To rotate the object around a different reference point, click once anywhere in the document window to reposition the reference point. Then move the pointer away from the reference point and drag in a circular motion.
• To rotate a copy of the object instead of the object itself, hold down Alt (Windows) or Option (Mac OS) after you start to drag.
Figure 20 Tools panel
Figure 21 Drag to rotate an object
© 2013 Adobe Systems Incorporated How to modify and transform graphics 7
This document requires Adobe Illustrator CC, June 2013. Technical instructions may differ depending on your version.
Adobe Illustrator
8
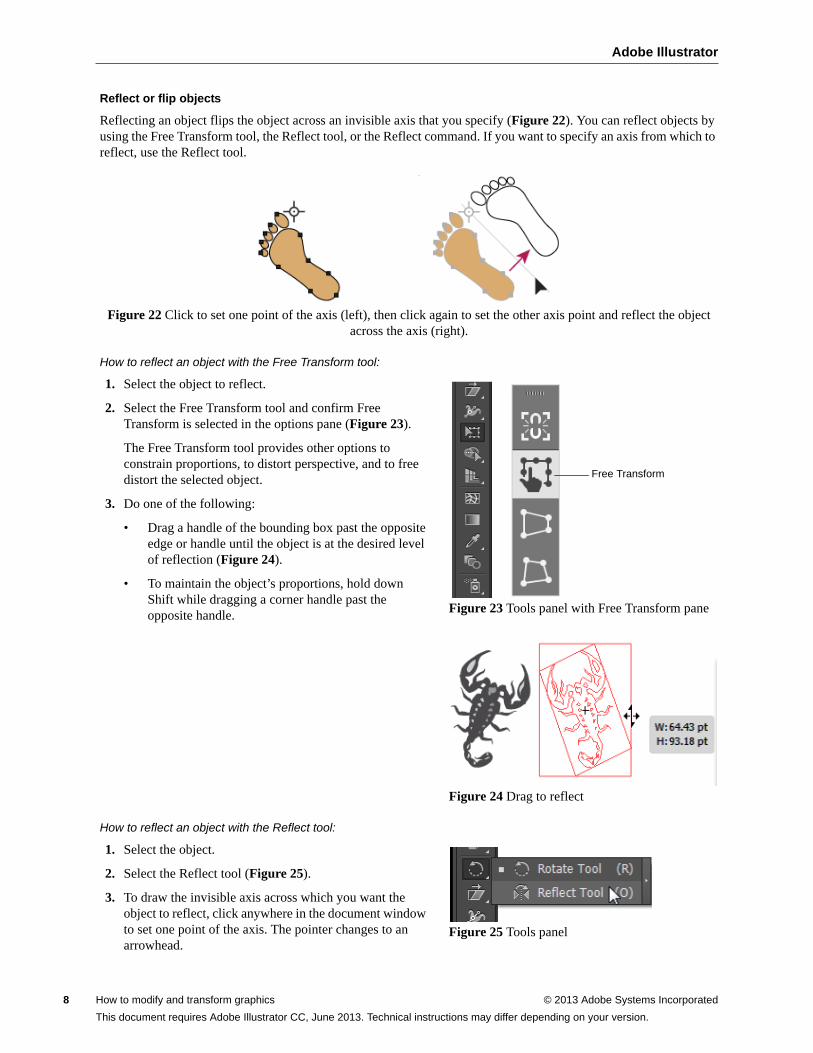
Reflect or flip objects
Reflecting an object flips the object across an invisible axis that you specify (Figure 22). You can reflect objects by using the Free Transform tool, the Reflect tool, or the Reflect command. If you want to specify an axis from which to reflect, use the Reflect tool.
Figure 22 Click to set one point of the axis (left), then click again to set the other axis point and reflect the object across the axis (right).
How to reflect an object with the Free Transform tool:
1. Select the object to reflect.
2. Select the Free Transform tool and confirm Free Transform is selected in the options pane (Figure 23).
The Free Transform tool provides other options to constrain proportions, to distort perspective, and to free distort the selected object.
3. Do one of the following:
• Drag a handle of the bounding box past the opposite edge or handle until the object is at the desired level of reflection (Figure 24).
• To maintain the object’s proportions, hold down Shift while dragging a corner handle past the opposite handle. Figure 23 Tools panel with Free Transform pane
Figure 24 Drag to reflect
How to reflect an object with the Reflect tool:
1. Select the object.
2. Select the Reflect tool (Figure 25).
3. To draw the invisible axis across which you want the object to reflect, click anywhere in the document window to set one point of the axis. The pointer changes to an arrowhead.
Figure 25 Tools panel
Free Transform
How to modify and transform graphics © 2013 Adobe Systems Incorporated
This document requires Adobe Illustrator CC, June 2013. Technical instructions may differ depending on your version.
Adobe Illustrator
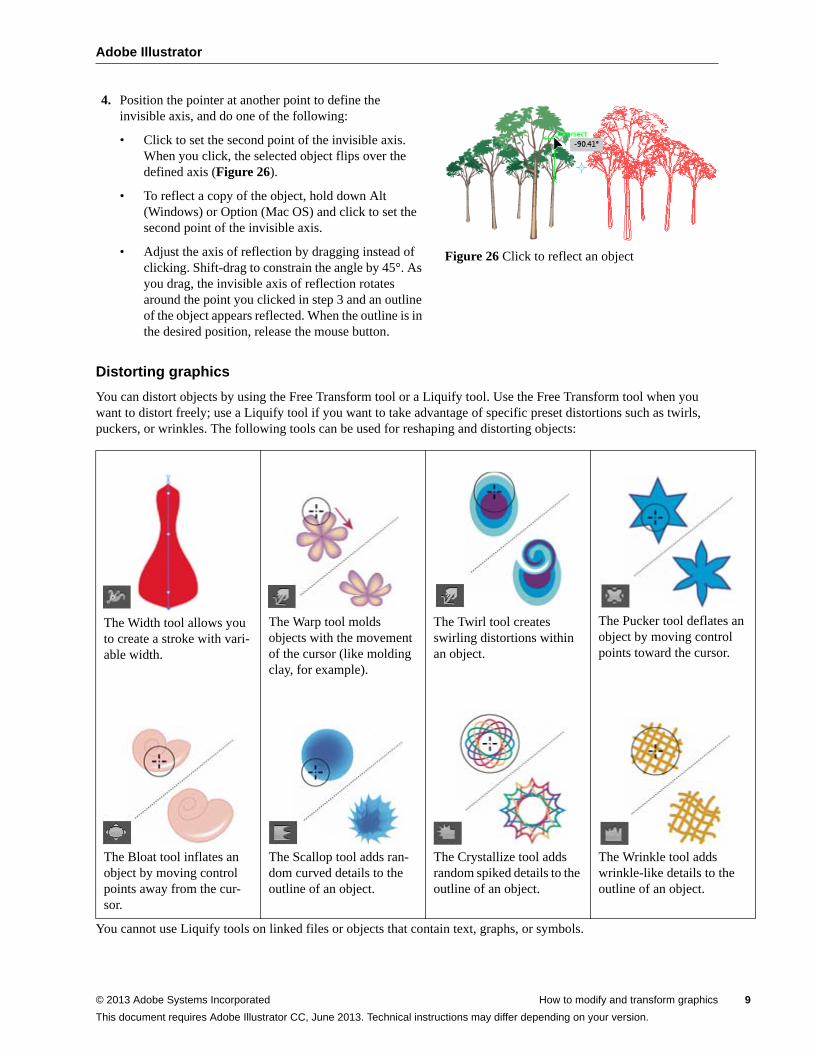
4. Position the pointer at another point to define the invisible axis, and do one of the following:
• Click to set the second point of the invisible axis. When you click, the selected object flips over the defined axis (Figure 26).
• To reflect a copy of the object, hold down Alt (Windows) or Option (Mac OS) and click to set the second point of the invisible axis.
• Adjust the axis of reflection by dragging instead of clicking. Shift-drag to constrain the angle by 45°. As you drag, the invisible axis of reflection rotates around the point you clicked in step 3 and an outline of the object appears reflected. When the outline is in the desired position, release the mouse button.
Figure 26 Click to reflect an object
Distorting graphics
You can distort objects by using the Free Transform tool or a Liquify tool. Use the Free Transform tool when you want to distort freely; use a Liquify tool if you want to take advantage of specific preset distortions such as twirls, puckers, or wrinkles. The following tools can be used for reshaping and distorting objects:
You cannot use Liquify tools on linked files or objects that contain text, graphs, or symbols.
The Width tool allows you to create a stroke with vari-able width.
The Warp tool molds objects with the movement of the cursor (like molding clay, for example).
The Twirl tool creates swirling distortions within an object.
The Pucker tool deflates an object by moving control points toward the cursor.
The Bloat tool inflates an object by moving control points away from the cur-sor.
The Scallop tool adds ran-dom curved details to the outline of an object.
The Crystallize tool adds random spiked details to the outline of an object.
The Wrinkle tool adds wrinkle-like details to the outline of an object.
© 2013 Adobe Systems Incorporated How to modify and transform graphics 9
This document requires Adobe Illustrator CC, June 2013. Technical instructions may differ depending on your version.
Adobe Illustrator
10
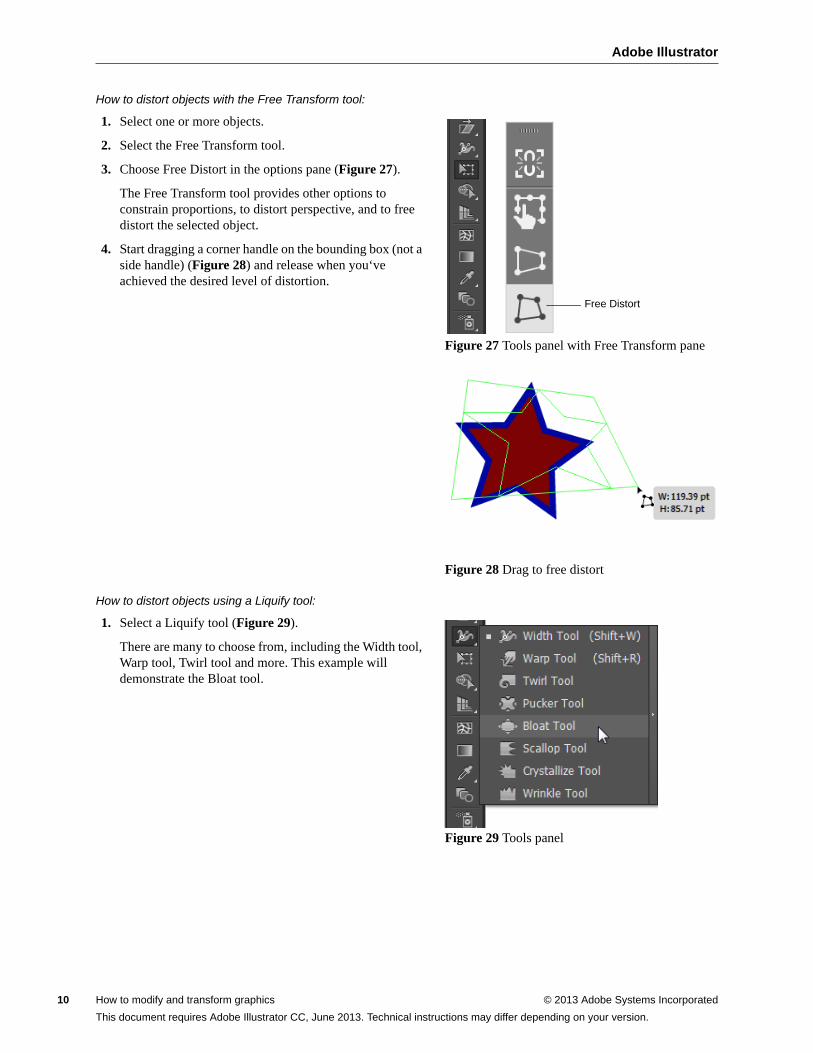
How to distort objects with the Free Transform tool:
1. Select one or more objects.
2. Select the Free Transform tool.
3. Choose Free Distort in the options pane (Figure 27).
The Free Transform tool provides other options to constrain proportions, to distort perspective, and to free distort the selected object.
4. Start dragging a corner handle on the bounding box (not a side handle) (Figure 28) and release when you‘ve achieved the desired level of distortion.
Figure 27 Tools panel with Free Transform pane
Figure 28 Drag to free distort
How to distort objects using a Liquify tool:
1. Select a Liquify tool (Figure 29).
There are many to choose from, including the Width tool, Warp tool, Twirl tool and more. This example will demonstrate the Bloat tool.
Figure 29 Tools panel
Free Distort
How to modify and transform graphics © 2013 Adobe Systems Incorporated
This document requires Adobe Illustrator CC, June 2013. Technical instructions may differ depending on your version.
Adobe Illustrator
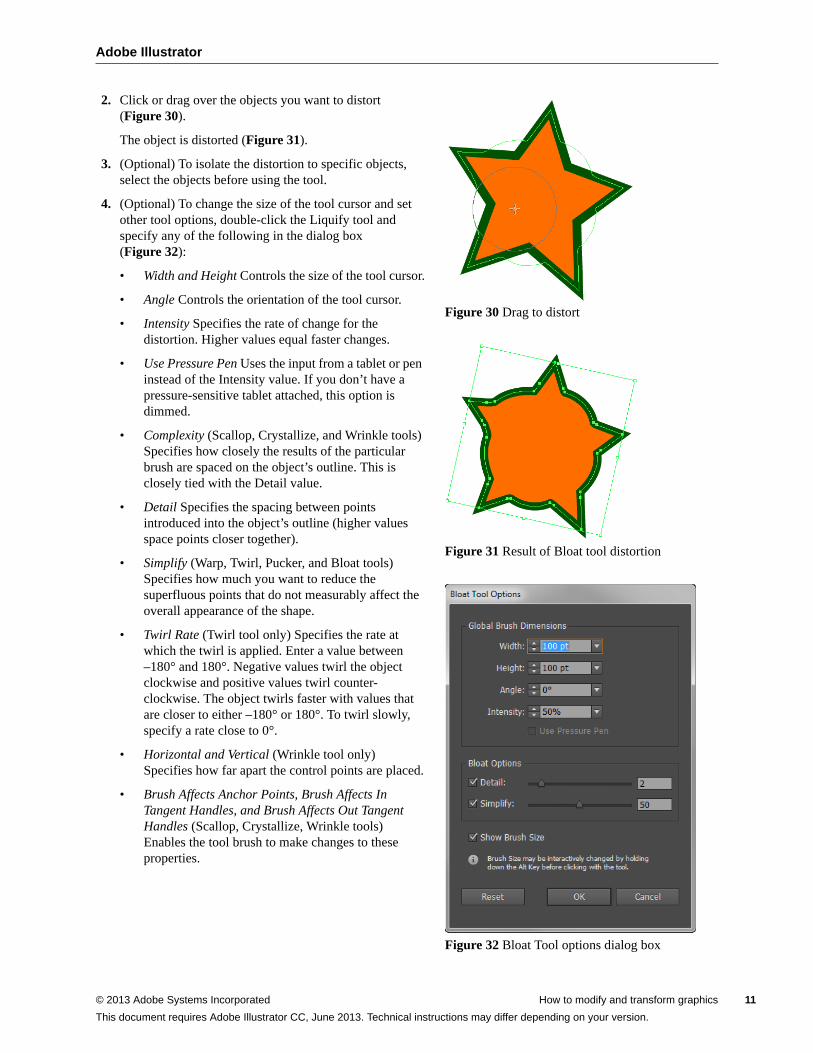
2. Click or drag over the objects you want to distort (Figure 30).
The object is distorted (Figure 31).
3. (Optional) To isolate the distortion to specific objects, select the objects before using the tool.
4. (Optional) To change the size of the tool cursor and set other tool options, double-click the Liquify tool and specify any of the following in the dialog box (Figure 32):
• Width and Height Controls the size of the tool cursor.
• Angle Controls the orientation of the tool cursor.
• Intensity Specifies the rate of change for the distortion. Higher values equal faster changes.
• Use Pressure Pen Uses the input from a tablet or pen instead of the Intensity value. If you don’t have a pressure-sensitive tablet attached, this option is dimmed.
• Complexity (Scallop, Crystallize, and Wrinkle tools) Specifies how closely the results of the particular brush are spaced on the object’s outline. This is closely tied with the Detail value.
• Detail Specifies the spacing between points introduced into the object’s outline (higher values space points closer together).
• Simplify (Warp, Twirl, Pucker, and Bloat tools) Specifies how much you want to reduce the superfluous points that do not measurably affect the overall appearance of the shape.
• Twirl Rate (Twirl tool only) Specifies the rate at which the twirl is applied. Enter a value between –180° and 180°. Negative values twirl the object clockwise and positive values twirl counter-clockwise. The object twirls faster with values that are closer to either –180° or 180°. To twirl slowly, specify a rate close to 0°.
• Horizontal and Vertical (Wrinkle tool only) Specifies how far apart the control points are placed.
• Brush Affects Anchor Points, Brush Affects In Tangent Handles, and Brush Affects Out Tangent Handles (Scallop, Crystallize, Wrinkle tools) Enables the tool brush to make changes to these properties.
Figure 30 Drag to distort
Figure 31 Result of Bloat tool distortion
Figure 32 Bloat Tool options dialog box
© 2013 Adobe Systems Incorporated How to modify and transform graphics 11
This document requires Adobe Illustrator CC, June 2013. Technical instructions may differ depending on your version.
Adobe Illustrator
12
About the Blend tool
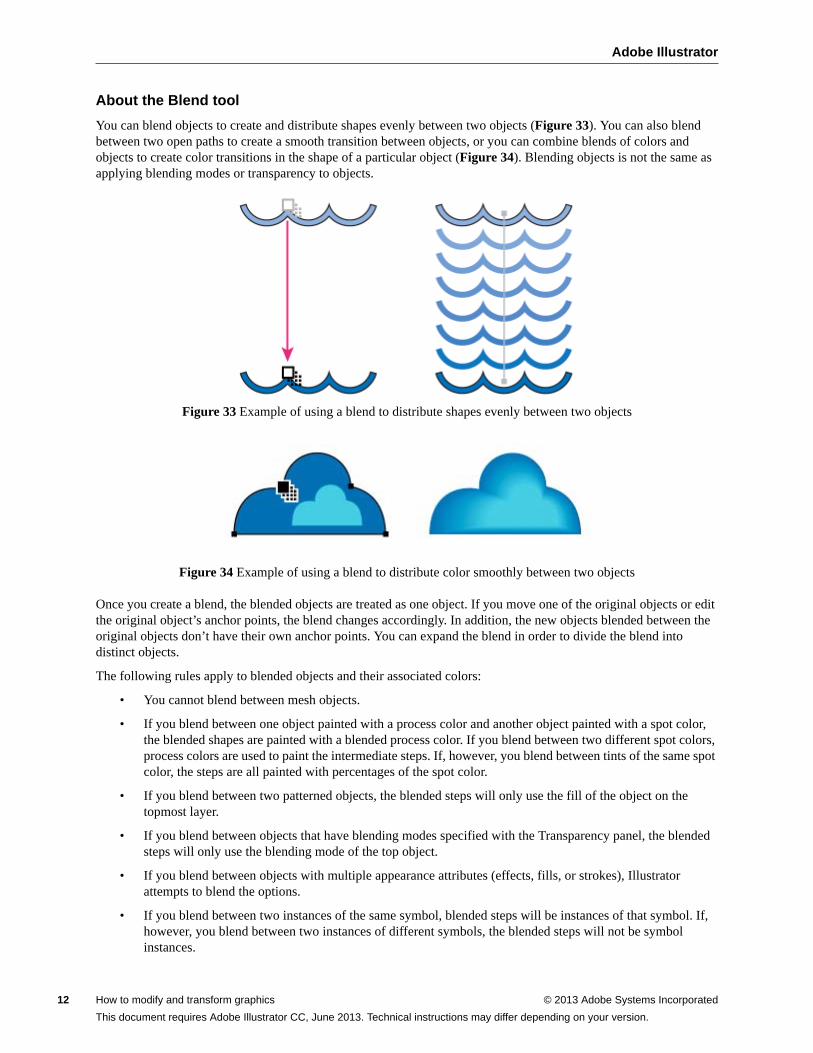
You can blend objects to create and distribute shapes evenly between two objects (Figure 33). You can also blend between two open paths to create a smooth transition between objects, or you can combine blends of colors and objects to create color transitions in the shape of a particular object (Figure 34). Blending objects is not the same as applying blending modes or transparency to objects.
Figure 33 Example of using a blend to distribute shapes evenly between two objects
Figure 34 Example of using a blend to distribute color smoothly between two objects
Once you create a blend, the blended objects are treated as one object. If you move one of the original objects or edit the original object’s anchor points, the blend changes accordingly. In addition, the new objects blended between the original objects don’t have their own anchor points. You can expand the blend in order to divide the blend into distinct objects.
The following rules apply to blended objects and their associated colors:
• You cannot blend between mesh objects.
• If you blend between one object painted with a process color and another object painted with a spot color, the blended shapes are painted with a blended process color. If you blend between two different spot colors, process colors are used to paint the intermediate steps. If, however, you blend between tints of the same spot color, the steps are all painted with percentages of the spot color.
• If you blend between two patterned objects, the blended steps will only use the fill of the object on the topmost layer.
• If you blend between objects that have blending modes specified with the Transparency panel, the blended steps will only use the blending mode of the top object.
• If you blend between objects with multiple appearance attributes (effects, fills, or strokes), Illustrator attempts to blend the options.
• If you blend between two instances of the same symbol, blended steps will be instances of that symbol. If, however, you blend between two instances of different symbols, the blended steps will not be symbol instances.
How to modify and transform graphics © 2013 Adobe Systems Incorporated
This document requires Adobe Illustrator CC, June 2013. Technical instructions may differ depending on your version.
Adobe Illustrator
• By default, blends are created as knockout transparency groups, so if any of the steps consist of overlapping transparent objects, these objects will not show through each other. You can change this setting by selecting the blend and deselecting Knockout Group in the Transparency panel.
The Blend tool and Make Blend command let you create blends, which are a series of intermediate objects and colors between two or more selected objects.
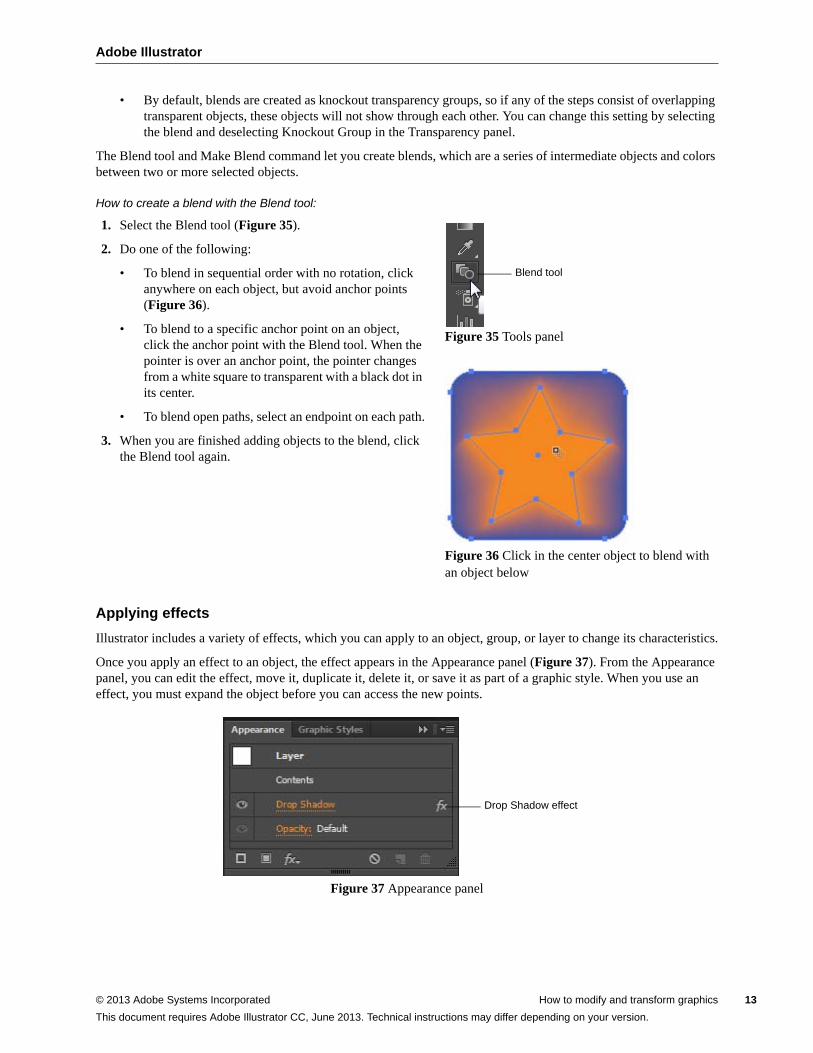
How to create a blend with the Blend tool:
1. Select the Blend tool (Figure 35).
2. Do one of the following:
• To blend in sequential order with no rotation, click anywhere on each object, but avoid anchor points (Figure 36).
• To blend to a specific anchor point on an object, click the anchor point with the Blend tool. When the pointer is over an anchor point, the pointer changes from a white square to transparent with a black dot in its center.
• To blend open paths, select an endpoint on each path.
3. When you are finished adding objects to the blend, click the Blend tool again.
Figure 35 Tools panel
Figure 36 Click in the center object to blend with an object below
Applying effects
Illustrator includes a variety of effects, which you can apply to an object, group, or layer to change its characteristics.
Once you apply an effect to an object, the effect appears in the Appearance panel (Figure 37). From the Appearance panel, you can edit the effect, move it, duplicate it, delete it, or save it as part of a graphic style. When you use an effect, you must expand the object before you can access the new points.
Figure 37 Appearance panel
Blend tool
Drop Shadow effect
© 2013 Adobe Systems Incorporated How to modify and transform graphics 13
This document requires Adobe Illustrator CC, June 2013. Technical instructions may differ depending on your version.

Adobe Illustrator
14
The effects in the top half of the Effects menu are vector effects (Figure 38). You can apply these effects only to vector objects or to the fill or stroke of a bitmap object in the Appearance panel. The following effects and effects categories from the top section are exceptions to this rule and can be applied to both vector and bitmap objects: 3D effects, SVG Filters, Warp effects, Transform effects, Drop Shadow, Feather, Inner Glow, and Outer Glow.
The effects in the bottom half of the Effects menu are raster effects. You can apply them to either vector or bitmap objects.
How to apply a drop shadow effect:
1. Select the object or group (or target a layer in the Layers panel).
If you want to apply an effect to a specific attribute of an object, such as its fill or stroke, select the object and then select the attribute in the Appearance panel.
2. Choose Effect > Stylize > Drop Shadow from the Effect menu (Figure 38).
The Drop Shadow dialog box opens (Figure 39)
3. Set drop shadow options, and then click OK.
The drop shadow effect is applied (Figure 40).
Figure 38 Effect menu
Figure 39 Drop Shadow dialog box
Figure 40 Drop shadow effect applied
How to modify and transform graphics © 2013 Adobe Systems Incorporated
This document requires Adobe Illustrator CC, June 2013. Technical instructions may differ depending on your version.

Adobe Illustrator Guide
How to draw in IllustratorYou can easily draw and modify vector paths and shapes by using a set of drawing tools and techniques in Adobe Illustrator. Vector graphics (sometimes called vector shapes or vector objects) are made up of lines and curves defined by mathematical objects called vectors, which describe an image according to its geometric characteristics. You can freely move or modify vector graphics without losing detail or clarity because they are resolution-independent—they maintain crisp edges when resized, printed to a PostScript printer, saved in a PDF file, or imported into a vector-based graphics application. As a result, vector graphics are the best choice for artwork, such as logos, that will be used at various sizes and in various output media (Figure 1).
Figure 1 An example of vector-based artwork produced in Adobe Illustrator
As you draw in Illustrator, the mathematical formulas create paths. Paths are lines that connect one point to another. Almost everything you draw in Illustrator is made up of paths. Because these paths are made up of connection points, you can adjust the connection points to change the shape of the path.
Adobe Illustrator is a powerful and professional-level vector graphics editor where the tasks and options for drawing are numerous. This guide serves as an introduction to Illustrator drawing tools and covers the following:
• Drawing with the Pencil tool
• How to work with brushes
• Drawing with the Pen tool
• Drawing with the Blob Brush tool
• Drawing shapes with the Shape tool and the Shape Builder tool
After you complete this guide, be sure to continue exploring the full breadth of drawing and shape tools available in Illustrator by checking out the Help section of the Adobe website.
© 2013 Adobe Systems Incorporated How to draw in Illustrator 1
This document requires Adobe Illustrator CC, June 2013. Technical instructions may differ depending on your version.
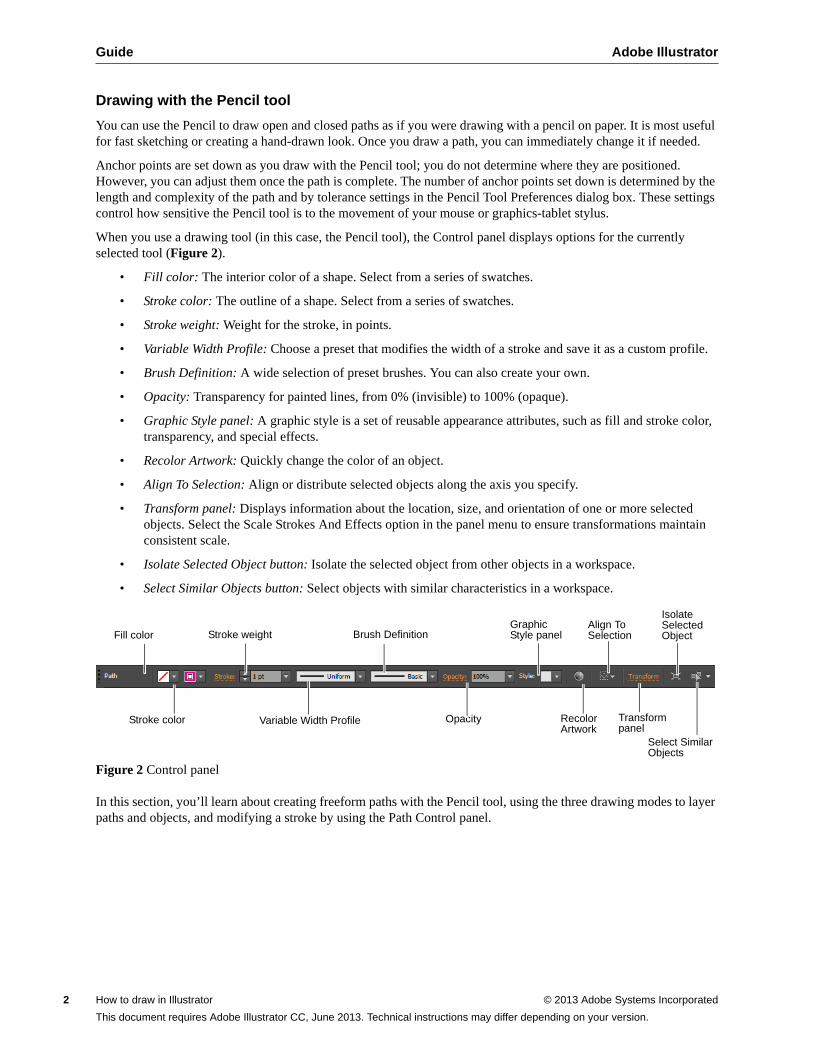
Guide Adobe Illustrator
2
Drawing with the Pencil tool
You can use the Pencil to draw open and closed paths as if you were drawing with a pencil on paper. It is most useful for fast sketching or creating a hand-drawn look. Once you draw a path, you can immediately change it if needed.
Anchor points are set down as you draw with the Pencil tool; you do not determine where they are positioned. However, you can adjust them once the path is complete. The number of anchor points set down is determined by the length and complexity of the path and by tolerance settings in the Pencil Tool Preferences dialog box. These settings control how sensitive the Pencil tool is to the movement of your mouse or graphics-tablet stylus.
When you use a drawing tool (in this case, the Pencil tool), the Control panel displays options for the currently selected tool (Figure 2).
• Fill color: The interior color of a shape. Select from a series of swatches.
• Stroke color: The outline of a shape. Select from a series of swatches.
• Stroke weight: Weight for the stroke, in points.
• Variable Width Profile: Choose a preset that modifies the width of a stroke and save it as a custom profile.
• Brush Definition: A wide selection of preset brushes. You can also create your own.
• Opacity: Transparency for painted lines, from 0% (invisible) to 100% (opaque).
• Graphic Style panel: A graphic style is a set of reusable appearance attributes, such as fill and stroke color, transparency, and special effects.
• Recolor Artwork: Quickly change the color of an object.
• Align To Selection: Align or distribute selected objects along the axis you specify.
• Transform panel: Displays information about the location, size, and orientation of one or more selected objects. Select the Scale Strokes And Effects option in the panel menu to ensure transformations maintain consistent scale.
• Isolate Selected Object button: Isolate the selected object from other objects in a workspace.
• Select Similar Objects button: Select objects with similar characteristics in a workspace.
Figure 2 Control panel
In this section, you’ll learn about creating freeform paths with the Pencil tool, using the three drawing modes to layer paths and objects, and modifying a stroke by using the Path Control panel.
Fill color Stroke weight Brush DefinitionGraphic Style panel
Align To Selection
Isolate Selected Object
Stroke color Variable Width Profile Opacity Recolor Artwork
Transform panel
Select Similar Objects
How to draw in Illustrator © 2013 Adobe Systems Incorporated
This document requires Adobe Illustrator CC, June 2013. Technical instructions may differ depending on your version.
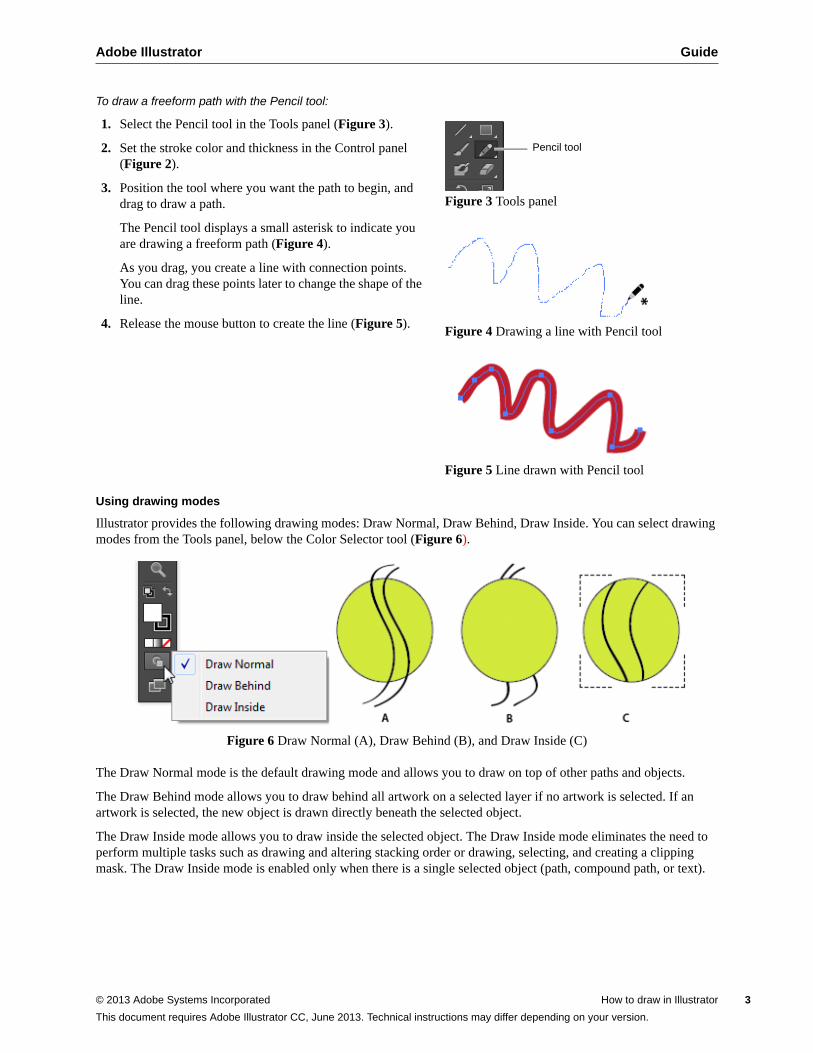
Adobe Illustrator Guide
To draw a freeform path with the Pencil tool:
1. Select the Pencil tool in the Tools panel (Figure 3).
2. Set the stroke color and thickness in the Control panel (Figure 2).
3. Position the tool where you want the path to begin, and drag to draw a path.
The Pencil tool displays a small asterisk to indicate you are drawing a freeform path (Figure 4).
As you drag, you create a line with connection points. You can drag these points later to change the shape of the line.
4. Release the mouse button to create the line (Figure 5).
Figure 3 Tools panel
Figure 4 Drawing a line with Pencil tool
Figure 5 Line drawn with Pencil tool
Using drawing modes
Illustrator provides the following drawing modes: Draw Normal, Draw Behind, Draw Inside. You can select drawing modes from the Tools panel, below the Color Selector tool (Figure 6).
Figure 6 Draw Normal (A), Draw Behind (B), and Draw Inside (C)
The Draw Normal mode is the default drawing mode and allows you to draw on top of other paths and objects.
The Draw Behind mode allows you to draw behind all artwork on a selected layer if no artwork is selected. If an artwork is selected, the new object is drawn directly beneath the selected object.
The Draw Inside mode allows you to draw inside the selected object. The Draw Inside mode eliminates the need to perform multiple tasks such as drawing and altering stacking order or drawing, selecting, and creating a clipping mask. The Draw Inside mode is enabled only when there is a single selected object (path, compound path, or text).
Pencil tool
© 2013 Adobe Systems Incorporated How to draw in Illustrator 3
This document requires Adobe Illustrator CC, June 2013. Technical instructions may differ depending on your version.
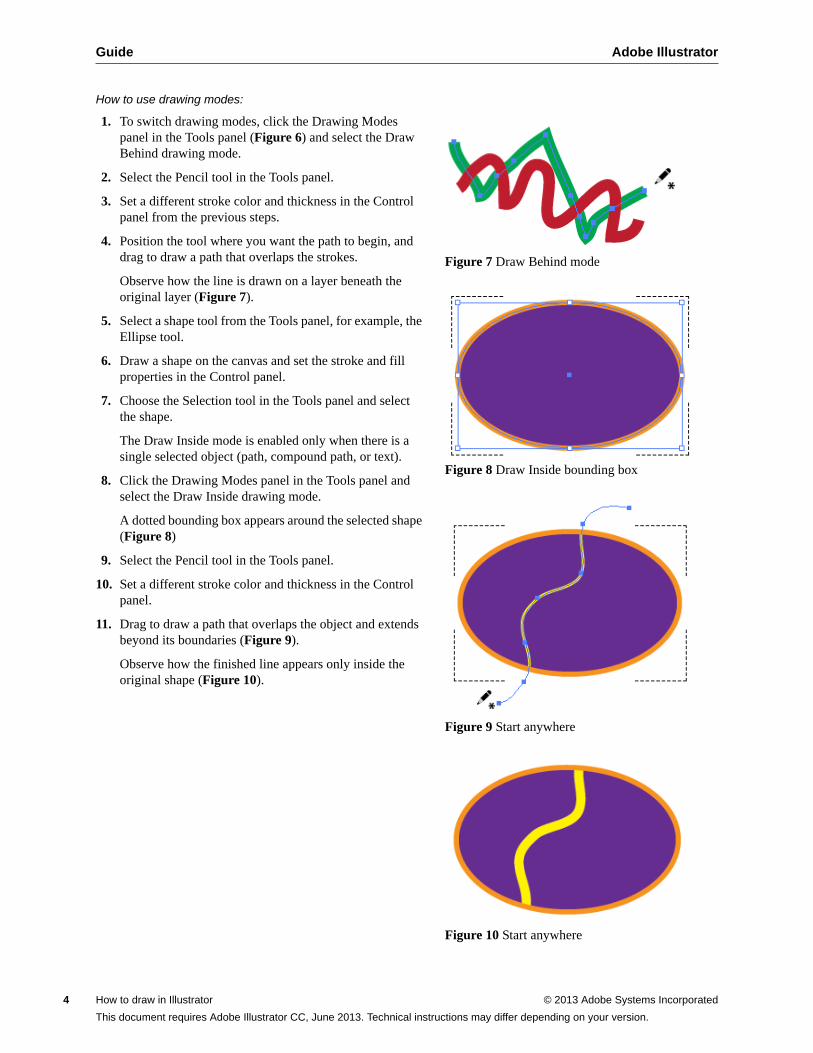
Guide Adobe Illustrator
4
How to use drawing modes:
1. To switch drawing modes, click the Drawing Modes panel in the Tools panel (Figure 6) and select the Draw Behind drawing mode.
2. Select the Pencil tool in the Tools panel.
3. Set a different stroke color and thickness in the Control panel from the previous steps.
4. Position the tool where you want the path to begin, and drag to draw a path that overlaps the strokes.
Observe how the line is drawn on a layer beneath the original layer (Figure 7).
5. Select a shape tool from the Tools panel, for example, the Ellipse tool.
6. Draw a shape on the canvas and set the stroke and fill properties in the Control panel.
7. Choose the Selection tool in the Tools panel and select the shape.
The Draw Inside mode is enabled only when there is a single selected object (path, compound path, or text).
8. Click the Drawing Modes panel in the Tools panel and select the Draw Inside drawing mode.
A dotted bounding box appears around the selected shape (Figure 8)
9. Select the Pencil tool in the Tools panel.
10. Set a different stroke color and thickness in the Control panel.
11. Drag to draw a path that overlaps the object and extends beyond its boundaries (Figure 9).
Observe how the finished line appears only inside the original shape (Figure 10).
Figure 7 Draw Behind mode
Figure 8 Draw Inside bounding box
Figure 9 Start anywhere
Figure 10 Start anywhere
How to draw in Illustrator © 2013 Adobe Systems Incorporated
This document requires Adobe Illustrator CC, June 2013. Technical instructions may differ depending on your version.
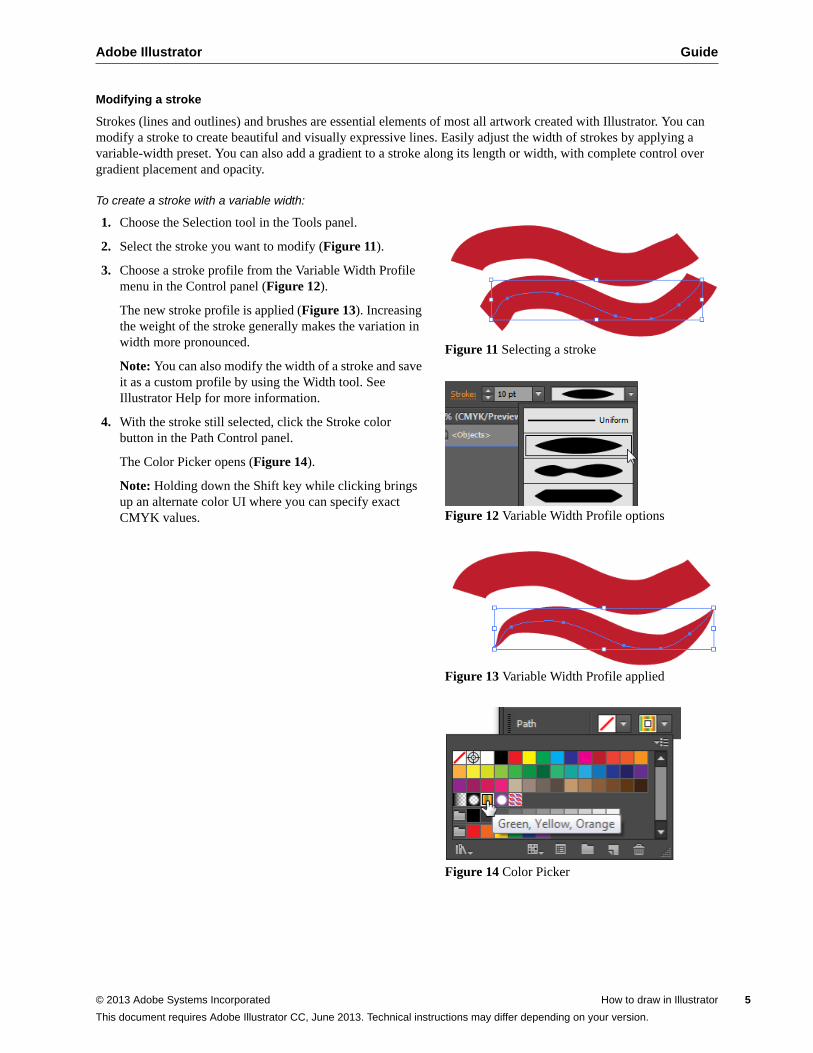
Adobe Illustrator Guide
Modifying a stroke
Strokes (lines and outlines) and brushes are essential elements of most all artwork created with Illustrator. You can modify a stroke to create beautiful and visually expressive lines. Easily adjust the width of strokes by applying a variable-width preset. You can also add a gradient to a stroke along its length or width, with complete control over gradient placement and opacity.
To create a stroke with a variable width:
1. Choose the Selection tool in the Tools panel.
2. Select the stroke you want to modify (Figure 11).
3. Choose a stroke profile from the Variable Width Profile menu in the Control panel (Figure 12).
The new stroke profile is applied (Figure 13). Increasing the weight of the stroke generally makes the variation in width more pronounced.
Note: You can also modify the width of a stroke and save it as a custom profile by using the Width tool. See Illustrator Help for more information.
4. With the stroke still selected, click the Stroke color button in the Path Control panel.
The Color Picker opens (Figure 14).
Note: Holding down the Shift key while clicking brings up an alternate color UI where you can specify exact CMYK values.
Figure 11 Selecting a stroke
Figure 12 Variable Width Profile options
Figure 13 Variable Width Profile applied
Figure 14 Color Picker
© 2013 Adobe Systems Incorporated How to draw in Illustrator 5
This document requires Adobe Illustrator CC, June 2013. Technical instructions may differ depending on your version.
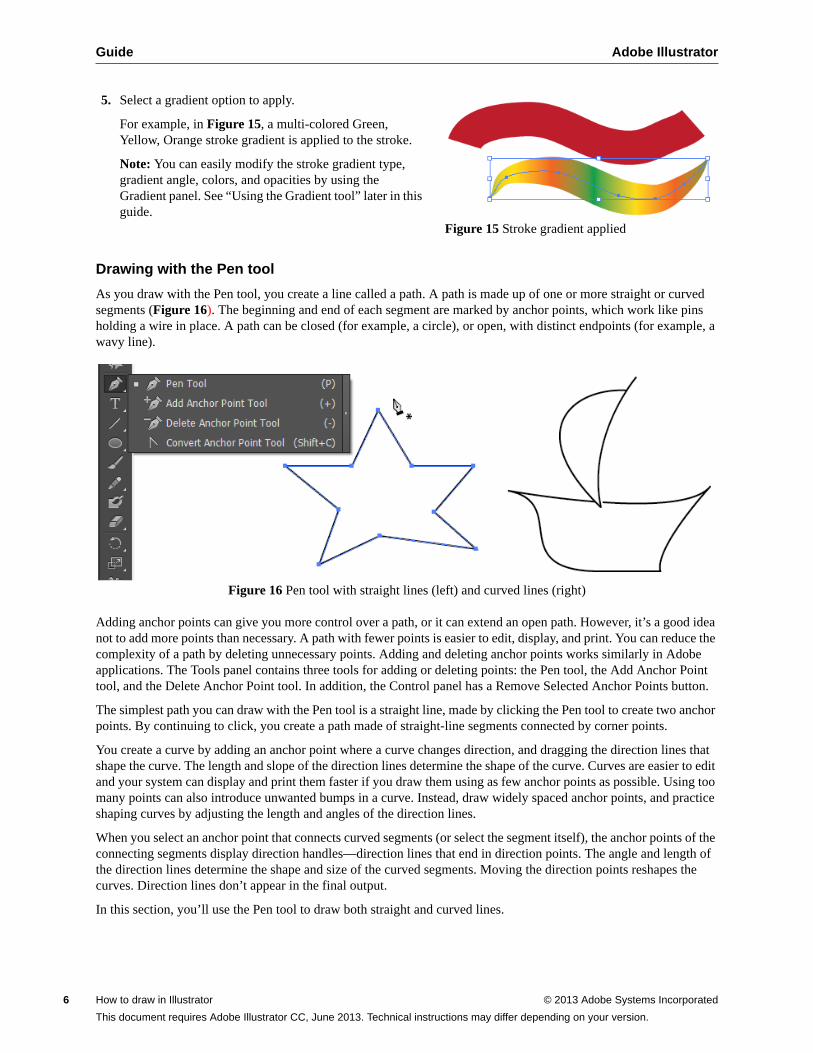
Guide Adobe Illustrator
6
5. Select a gradient option to apply.
For example, in Figure 15, a multi-colored Green, Yellow, Orange stroke gradient is applied to the stroke.
Note: You can easily modify the stroke gradient type, gradient angle, colors, and opacities by using the Gradient panel. See “Using the Gradient tool” later in this guide.
Figure 15 Stroke gradient applied
Drawing with the Pen tool
As you draw with the Pen tool, you create a line called a path. A path is made up of one or more straight or curved segments (Figure 16). The beginning and end of each segment are marked by anchor points, which work like pins holding a wire in place. A path can be closed (for example, a circle), or open, with distinct endpoints (for example, a wavy line).
Figure 16 Pen tool with straight lines (left) and curved lines (right)
Adding anchor points can give you more control over a path, or it can extend an open path. However, it’s a good idea not to add more points than necessary. A path with fewer points is easier to edit, display, and print. You can reduce the complexity of a path by deleting unnecessary points. Adding and deleting anchor points works similarly in Adobe applications. The Tools panel contains three tools for adding or deleting points: the Pen tool, the Add Anchor Point tool, and the Delete Anchor Point tool. In addition, the Control panel has a Remove Selected Anchor Points button.
The simplest path you can draw with the Pen tool is a straight line, made by clicking the Pen tool to create two anchor points. By continuing to click, you create a path made of straight-line segments connected by corner points.
You create a curve by adding an anchor point where a curve changes direction, and dragging the direction lines that shape the curve. The length and slope of the direction lines determine the shape of the curve. Curves are easier to edit and your system can display and print them faster if you draw them using as few anchor points as possible. Using too many points can also introduce unwanted bumps in a curve. Instead, draw widely spaced anchor points, and practice shaping curves by adjusting the length and angles of the direction lines.
When you select an anchor point that connects curved segments (or select the segment itself), the anchor points of the connecting segments display direction handles—direction lines that end in direction points. The angle and length of the direction lines determine the shape and size of the curved segments. Moving the direction points reshapes the curves. Direction lines don’t appear in the final output.
In this section, you’ll use the Pen tool to draw both straight and curved lines.
How to draw in Illustrator © 2013 Adobe Systems Incorporated
This document requires Adobe Illustrator CC, June 2013. Technical instructions may differ depending on your version.
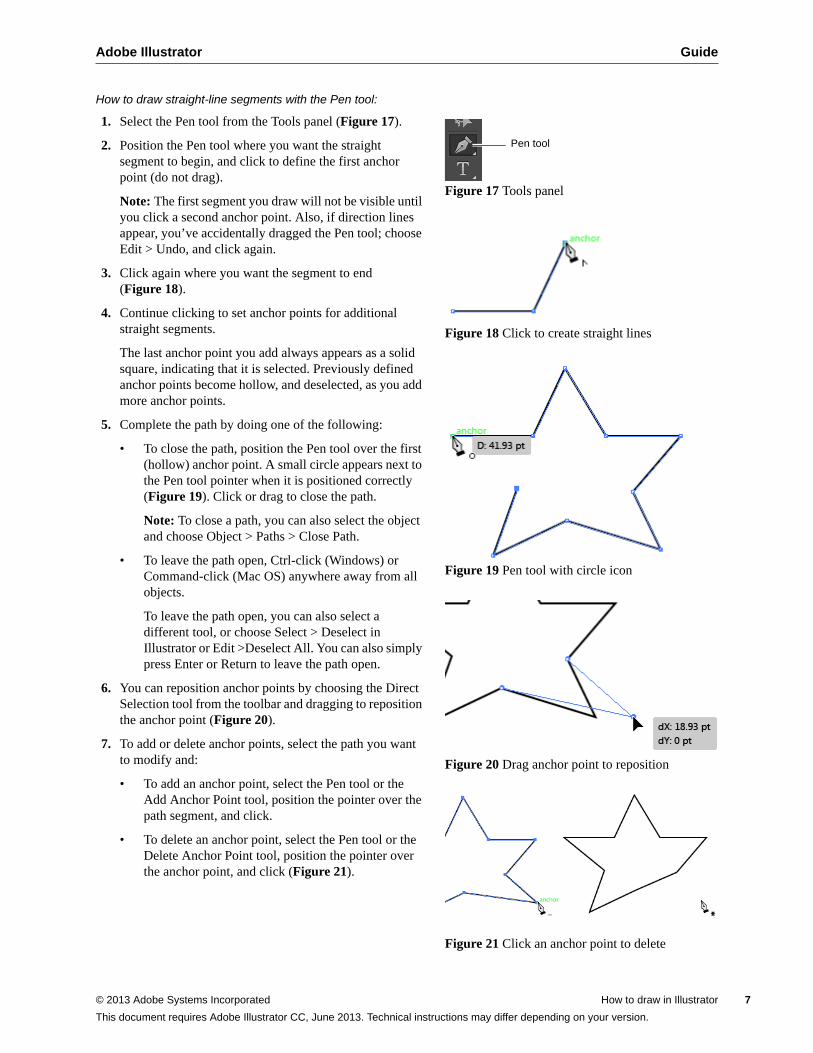
Adobe Illustrator Guide
How to draw straight-line segments with the Pen tool:
1. Select the Pen tool from the Tools panel (Figure 17).
2. Position the Pen tool where you want the straight segment to begin, and click to define the first anchor point (do not drag).
Note: The first segment you draw will not be visible until you click a second anchor point. Also, if direction lines appear, you’ve accidentally dragged the Pen tool; choose Edit > Undo, and click again.
3. Click again where you want the segment to end (Figure 18).
4. Continue clicking to set anchor points for additional straight segments.
The last anchor point you add always appears as a solid square, indicating that it is selected. Previously defined anchor points become hollow, and deselected, as you add more anchor points.
5. Complete the path by doing one of the following:
• To close the path, position the Pen tool over the first (hollow) anchor point. A small circle appears next to the Pen tool pointer when it is positioned correctly (Figure 19). Click or drag to close the path.
Note: To close a path, you can also select the object and choose Object > Paths > Close Path.
• To leave the path open, Ctrl-click (Windows) or Command-click (Mac OS) anywhere away from all objects.
To leave the path open, you can also select a different tool, or choose Select > Deselect in Illustrator or Edit >Deselect All. You can also simply press Enter or Return to leave the path open.
6. You can reposition anchor points by choosing the Direct Selection tool from the toolbar and dragging to reposition the anchor point (Figure 20).
7. To add or delete anchor points, select the path you want to modify and:
• To add an anchor point, select the Pen tool or the Add Anchor Point tool, position the pointer over the path segment, and click.
• To delete an anchor point, select the Pen tool or the Delete Anchor Point tool, position the pointer over the anchor point, and click (Figure 21).
Figure 17 Tools panel
Figure 18 Click to create straight lines
Figure 19 Pen tool with circle icon
Figure 20 Drag anchor point to reposition
Figure 21 Click an anchor point to delete
Pen tool
© 2013 Adobe Systems Incorporated How to draw in Illustrator 7
This document requires Adobe Illustrator CC, June 2013. Technical instructions may differ depending on your version.
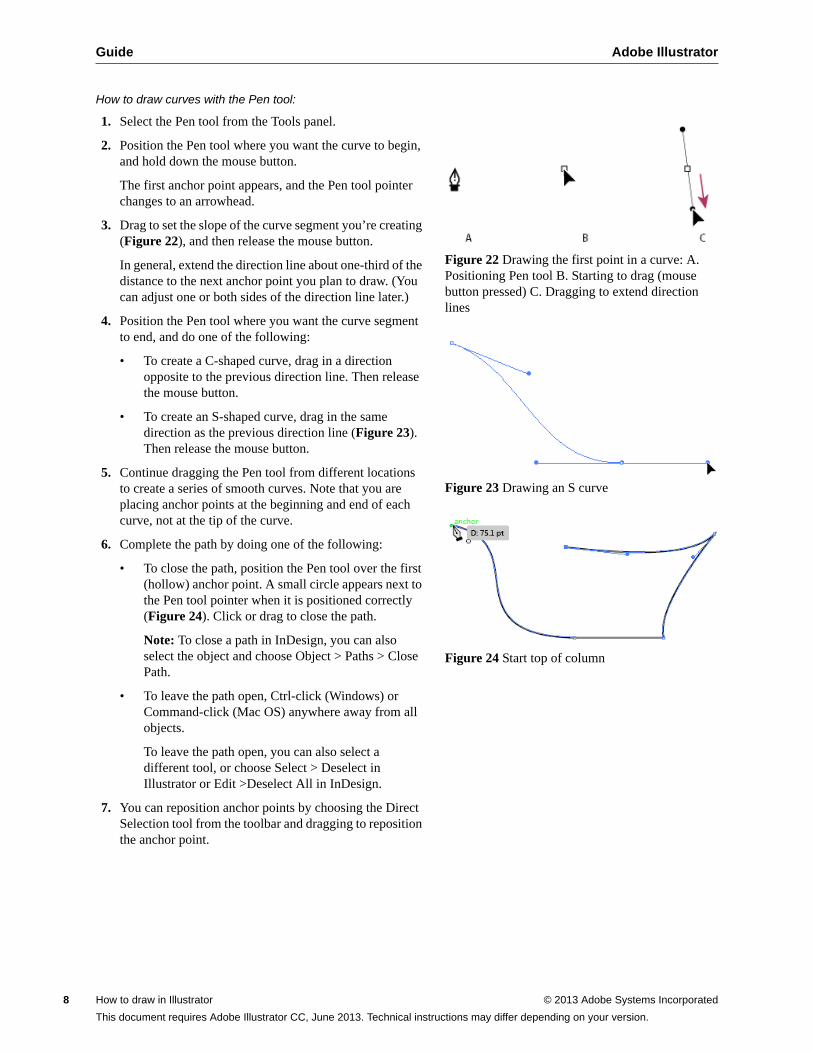
Guide Adobe Illustrator
8
How to draw curves with the Pen tool:
1. Select the Pen tool from the Tools panel.
2. Position the Pen tool where you want the curve to begin, and hold down the mouse button.
The first anchor point appears, and the Pen tool pointer changes to an arrowhead.
3. Drag to set the slope of the curve segment you’re creating (Figure 22), and then release the mouse button.
In general, extend the direction line about one-third of the distance to the next anchor point you plan to draw. (You can adjust one or both sides of the direction line later.)
4. Position the Pen tool where you want the curve segment to end, and do one of the following:
• To create a C-shaped curve, drag in a direction opposite to the previous direction line. Then release the mouse button.
• To create an S-shaped curve, drag in the same direction as the previous direction line (Figure 23). Then release the mouse button.
5. Continue dragging the Pen tool from different locations to create a series of smooth curves. Note that you are placing anchor points at the beginning and end of each curve, not at the tip of the curve.
6. Complete the path by doing one of the following:
• To close the path, position the Pen tool over the first (hollow) anchor point. A small circle appears next to the Pen tool pointer when it is positioned correctly (Figure 24). Click or drag to close the path.
Note: To close a path in InDesign, you can also select the object and choose Object > Paths > Close Path.
• To leave the path open, Ctrl-click (Windows) or Command-click (Mac OS) anywhere away from all objects.
To leave the path open, you can also select a different tool, or choose Select > Deselect in Illustrator or Edit >Deselect All in InDesign.
7. You can reposition anchor points by choosing the Direct Selection tool from the toolbar and dragging to reposition the anchor point.
Figure 22 Drawing the first point in a curve: A. Positioning Pen tool B. Starting to drag (mouse button pressed) C. Dragging to extend direction lines
Figure 23 Drawing an S curve
Figure 24 Start top of column
How to draw in Illustrator © 2013 Adobe Systems Incorporated
This document requires Adobe Illustrator CC, June 2013. Technical instructions may differ depending on your version.
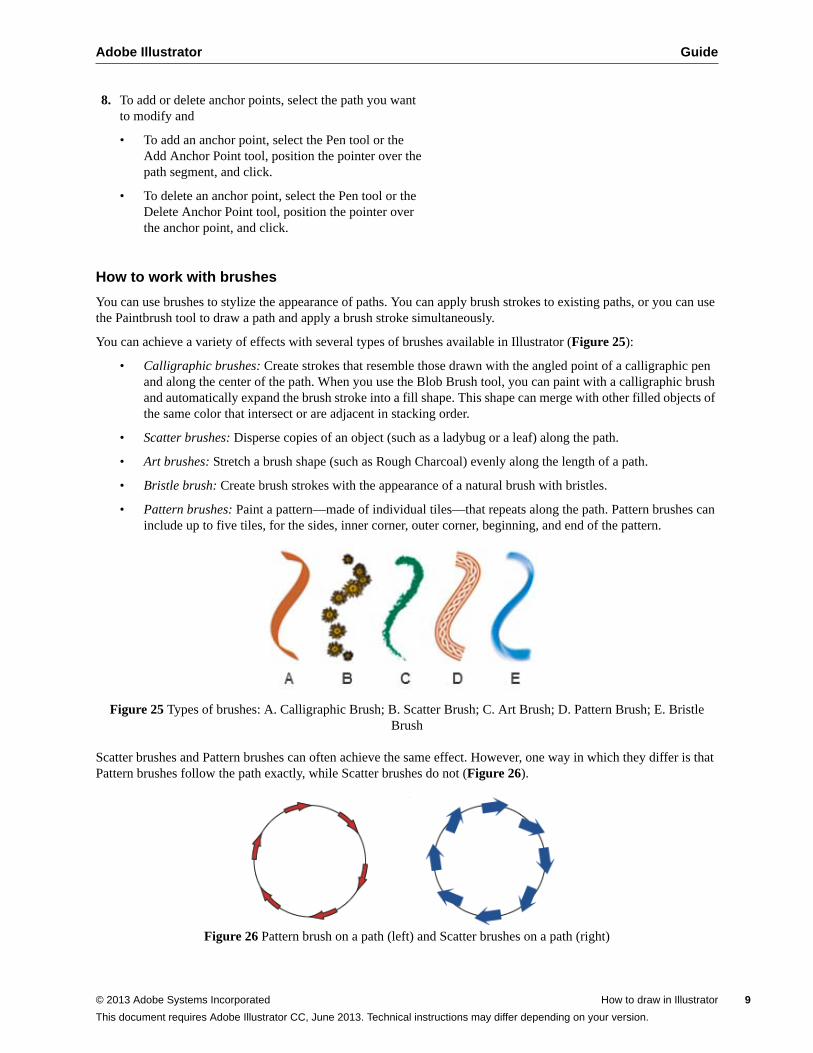
Adobe Illustrator Guide
8. To add or delete anchor points, select the path you want to modify and
• To add an anchor point, select the Pen tool or the Add Anchor Point tool, position the pointer over the path segment, and click.
• To delete an anchor point, select the Pen tool or the Delete Anchor Point tool, position the pointer over the anchor point, and click.
How to work with brushes
You can use brushes to stylize the appearance of paths. You can apply brush strokes to existing paths, or you can use the Paintbrush tool to draw a path and apply a brush stroke simultaneously.
You can achieve a variety of effects with several types of brushes available in Illustrator (Figure 25):
• Calligraphic brushes: Create strokes that resemble those drawn with the angled point of a calligraphic pen and along the center of the path. When you use the Blob Brush tool, you can paint with a calligraphic brush and automatically expand the brush stroke into a fill shape. This shape can merge with other filled objects of the same color that intersect or are adjacent in stacking order.
• Scatter brushes: Disperse copies of an object (such as a ladybug or a leaf) along the path.
• Art brushes: Stretch a brush shape (such as Rough Charcoal) evenly along the length of a path.
• Bristle brush: Create brush strokes with the appearance of a natural brush with bristles.
• Pattern brushes: Paint a pattern—made of individual tiles—that repeats along the path. Pattern brushes can include up to five tiles, for the sides, inner corner, outer corner, beginning, and end of the pattern.
Figure 25 Types of brushes: A. Calligraphic Brush; B. Scatter Brush; C. Art Brush; D. Pattern Brush; E. Bristle Brush
Scatter brushes and Pattern brushes can often achieve the same effect. However, one way in which they differ is that Pattern brushes follow the path exactly, while Scatter brushes do not (Figure 26).
Figure 26 Pattern brush on a path (left) and Scatter brushes on a path (right)
© 2013 Adobe Systems Incorporated How to draw in Illustrator 9
This document requires Adobe Illustrator CC, June 2013. Technical instructions may differ depending on your version.
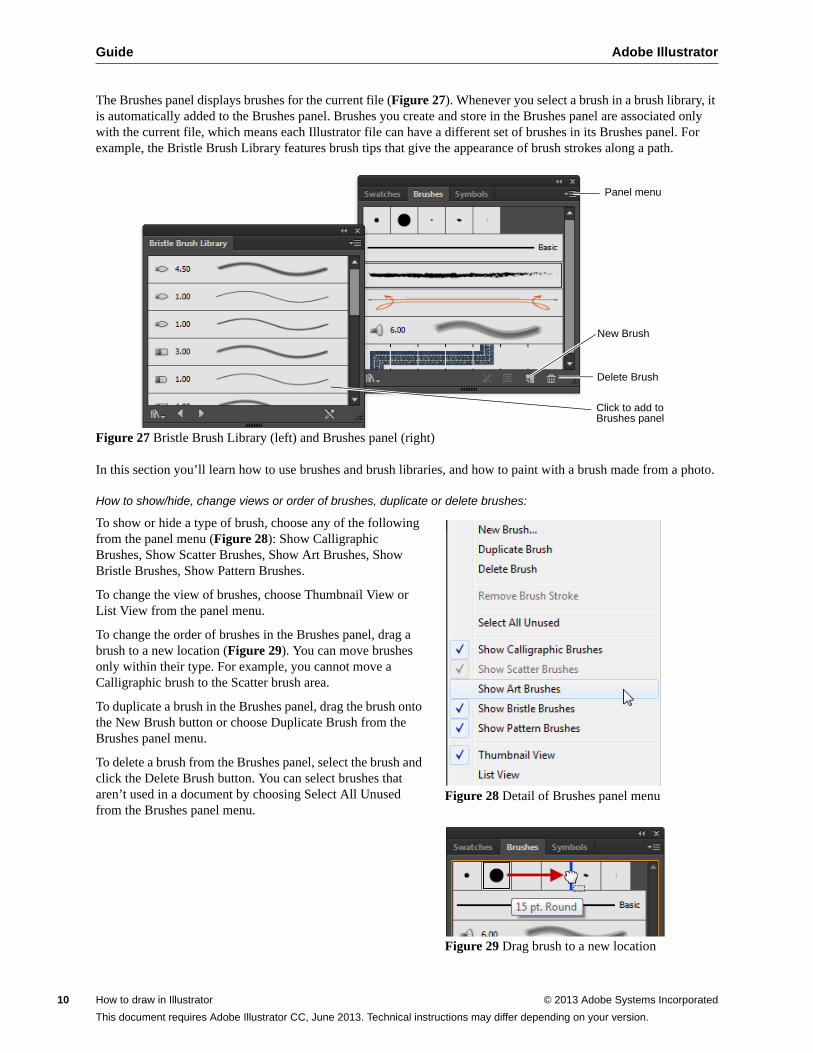
Guide Adobe Illustrator
10
The Brushes panel displays brushes for the current file (Figure 27). Whenever you select a brush in a brush library, it is automatically added to the Brushes panel. Brushes you create and store in the Brushes panel are associated only with the current file, which means each Illustrator file can have a different set of brushes in its Brushes panel. For example, the Bristle Brush Library features brush tips that give the appearance of brush strokes along a path.
Figure 27 Bristle Brush Library (left) and Brushes panel (right)
In this section you’ll learn how to use brushes and brush libraries, and how to paint with a brush made from a photo.
How to show/hide, change views or order of brushes, duplicate or delete brushes:
To show or hide a type of brush, choose any of the following from the panel menu (Figure 28): Show Calligraphic Brushes, Show Scatter Brushes, Show Art Brushes, Show Bristle Brushes, Show Pattern Brushes.
To change the view of brushes, choose Thumbnail View or List View from the panel menu.
To change the order of brushes in the Brushes panel, drag a brush to a new location (Figure 29). You can move brushes only within their type. For example, you cannot move a Calligraphic brush to the Scatter brush area.
To duplicate a brush in the Brushes panel, drag the brush onto the New Brush button or choose Duplicate Brush from the Brushes panel menu.
To delete a brush from the Brushes panel, select the brush and click the Delete Brush button. You can select brushes that aren’t used in a document by choosing Select All Unused from the Brushes panel menu.
Figure 28 Detail of Brushes panel menu
Figure 29 Drag brush to a new location
Panel menu
New Brush
Delete Brush
Click to add to Brushes panel
How to draw in Illustrator © 2013 Adobe Systems Incorporated
This document requires Adobe Illustrator CC, June 2013. Technical instructions may differ depending on your version.
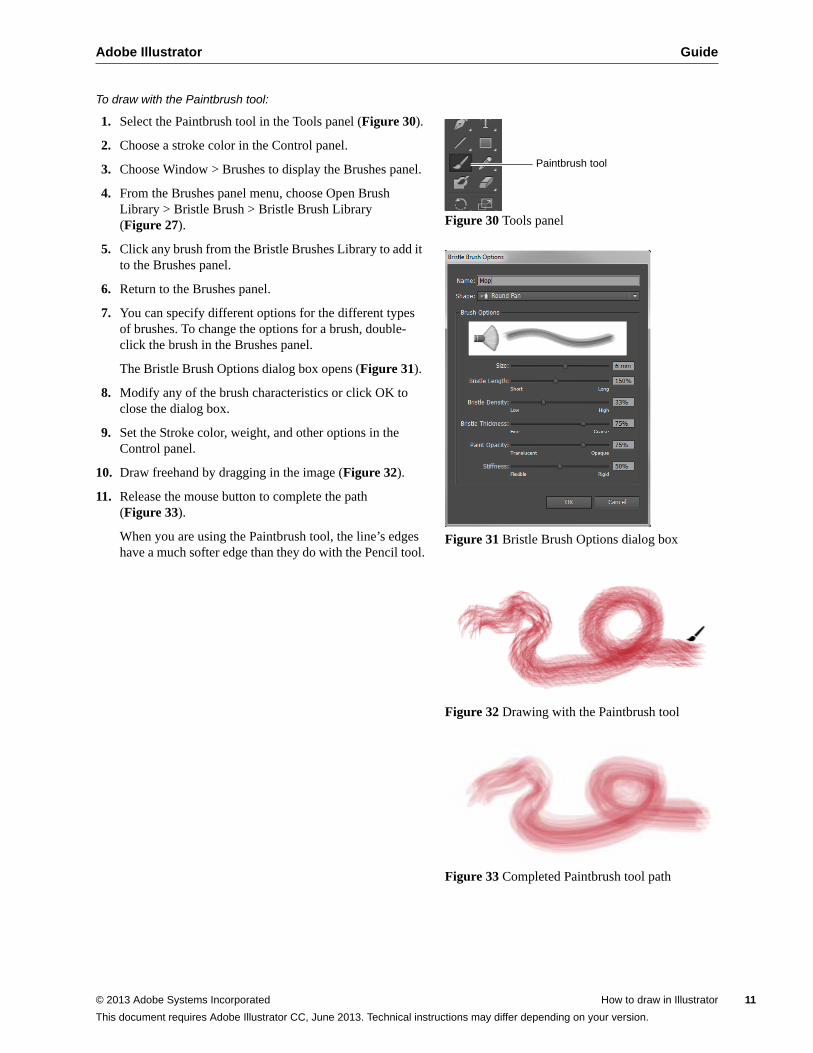
Adobe Illustrator Guide
To draw with the Paintbrush tool:
1. Select the Paintbrush tool in the Tools panel (Figure 30).
2. Choose a stroke color in the Control panel.
3. Choose Window > Brushes to display the Brushes panel.
4. From the Brushes panel menu, choose Open Brush Library > Bristle Brush > Bristle Brush Library (Figure 27).
5. Click any brush from the Bristle Brushes Library to add it to the Brushes panel.
6. Return to the Brushes panel.
7. You can specify different options for the different types of brushes. To change the options for a brush, double-click the brush in the Brushes panel.
The Bristle Brush Options dialog box opens (Figure 31).
8. Modify any of the brush characteristics or click OK to close the dialog box.
9. Set the Stroke color, weight, and other options in the Control panel.
10. Draw freehand by dragging in the image (Figure 32).
11. Release the mouse button to complete the path (Figure 33).
When you are using the Paintbrush tool, the line’s edges have a much softer edge than they do with the Pencil tool.
Figure 30 Tools panel
Figure 31 Bristle Brush Options dialog box
Figure 32 Drawing with the Paintbrush tool
Figure 33 Completed Paintbrush tool path
Paintbrush tool
© 2013 Adobe Systems Incorporated How to draw in Illustrator 11
This document requires Adobe Illustrator CC, June 2013. Technical instructions may differ depending on your version.
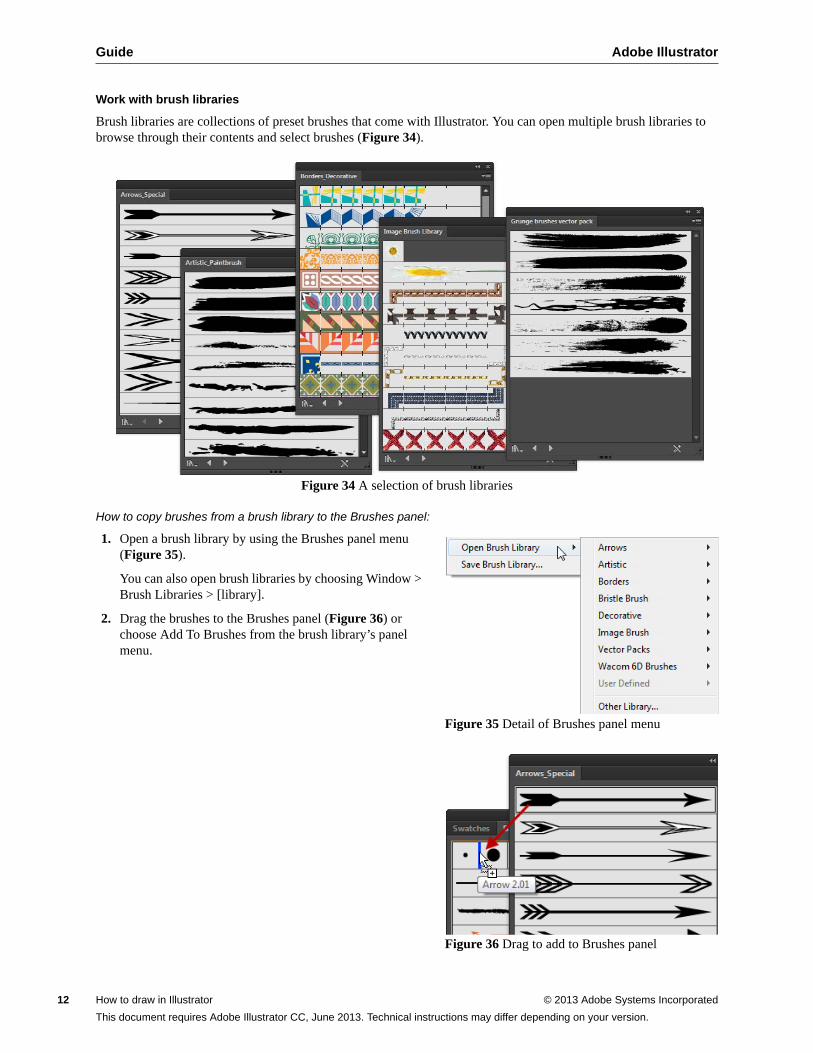
Guide Adobe Illustrator
12
Work with brush libraries
Brush libraries are collections of preset brushes that come with Illustrator. You can open multiple brush libraries to browse through their contents and select brushes (Figure 34).
Figure 34 A selection of brush libraries
How to copy brushes from a brush library to the Brushes panel:
1. Open a brush library by using the Brushes panel menu (Figure 35).
You can also open brush libraries by choosing Window > Brush Libraries > [library].
2. Drag the brushes to the Brushes panel (Figure 36) or choose Add To Brushes from the brush library’s panel menu.
Figure 35 Detail of Brushes panel menu
Figure 36 Drag to add to Brushes panel
How to draw in Illustrator © 2013 Adobe Systems Incorporated
This document requires Adobe Illustrator CC, June 2013. Technical instructions may differ depending on your version.
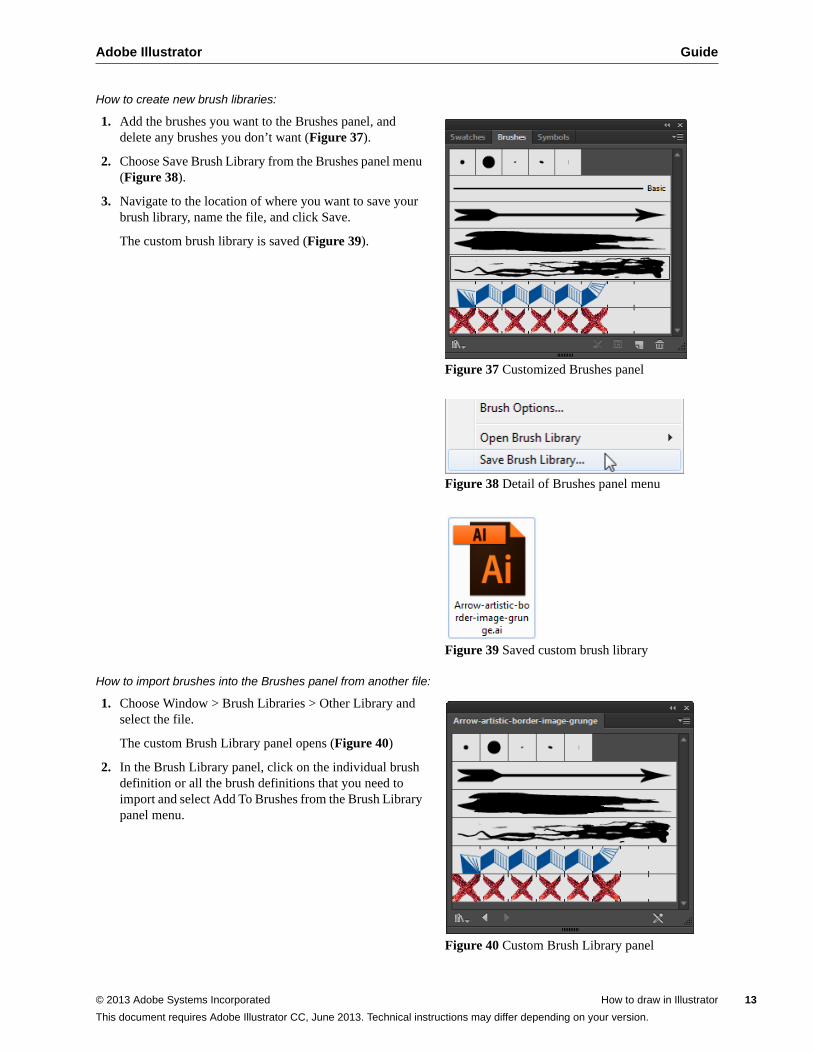
Adobe Illustrator Guide
How to create new brush libraries:
1. Add the brushes you want to the Brushes panel, and delete any brushes you don’t want (Figure 37).
2. Choose Save Brush Library from the Brushes panel menu (Figure 38).
3. Navigate to the location of where you want to save your brush library, name the file, and click Save.
The custom brush library is saved (Figure 39).
Figure 37 Customized Brushes panel
Figure 38 Detail of Brushes panel menu
Figure 39 Saved custom brush library
How to import brushes into the Brushes panel from another file:
1. Choose Window > Brush Libraries > Other Library and select the file.
The custom Brush Library panel opens (Figure 40)
2. In the Brush Library panel, click on the individual brush definition or all the brush definitions that you need to import and select Add To Brushes from the Brush Library panel menu.
Figure 40 Custom Brush Library panel
© 2013 Adobe Systems Incorporated How to draw in Illustrator 13
This document requires Adobe Illustrator CC, June 2013. Technical instructions may differ depending on your version.
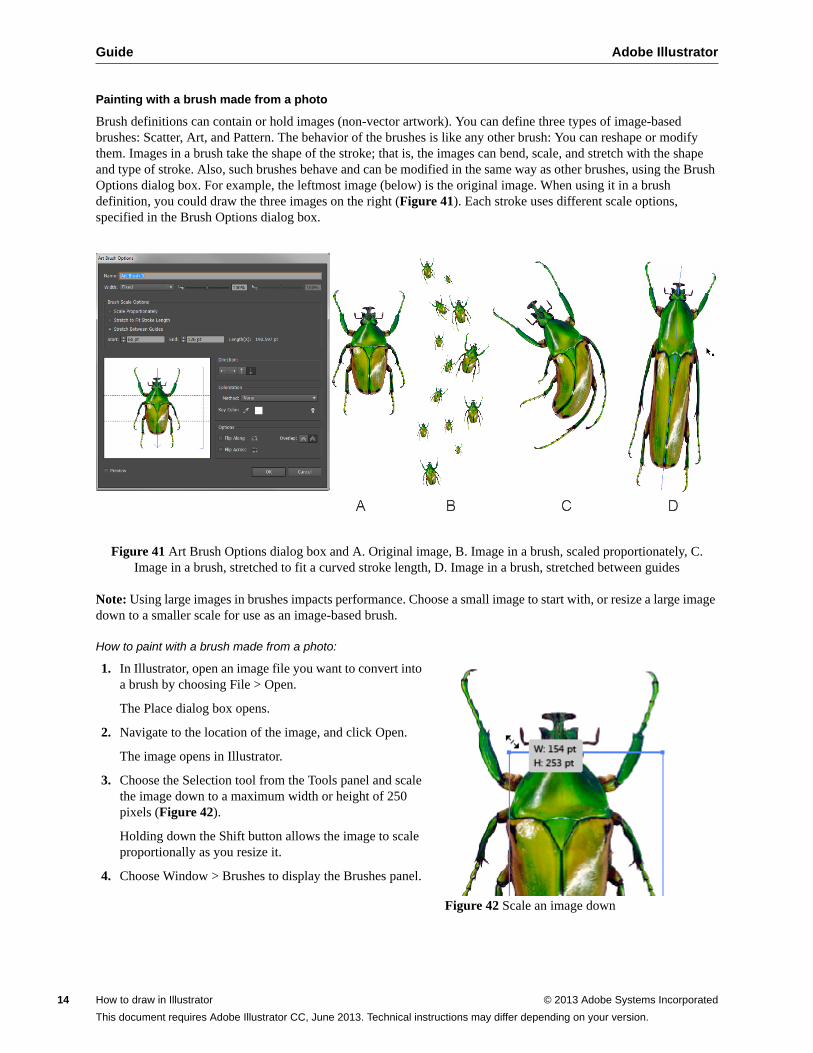
Guide Adobe Illustrator
14
Painting with a brush made from a photo
Brush definitions can contain or hold images (non-vector artwork). You can define three types of image-based brushes: Scatter, Art, and Pattern. The behavior of the brushes is like any other brush: You can reshape or modify them. Images in a brush take the shape of the stroke; that is, the images can bend, scale, and stretch with the shape and type of stroke. Also, such brushes behave and can be modified in the same way as other brushes, using the Brush Options dialog box. For example, the leftmost image (below) is the original image. When using it in a brush definition, you could draw the three images on the right (Figure 41). Each stroke uses different scale options, specified in the Brush Options dialog box.
Figure 41 Art Brush Options dialog box and A. Original image, B. Image in a brush, scaled proportionately, C. Image in a brush, stretched to fit a curved stroke length, D. Image in a brush, stretched between guides
Note: Using large images in brushes impacts performance. Choose a small image to start with, or resize a large image down to a smaller scale for use as an image-based brush.
How to paint with a brush made from a photo:
1. In Illustrator, open an image file you want to convert into a brush by choosing File > Open.
The Place dialog box opens.
2. Navigate to the location of the image, and click Open.
The image opens in Illustrator.
3. Choose the Selection tool from the Tools panel and scale the image down to a maximum width or height of 250 pixels (Figure 42).
Holding down the Shift button allows the image to scale proportionally as you resize it.
4. Choose Window > Brushes to display the Brushes panel.
Figure 42 Scale an image down
How to draw in Illustrator © 2013 Adobe Systems Incorporated
This document requires Adobe Illustrator CC, June 2013. Technical instructions may differ depending on your version.
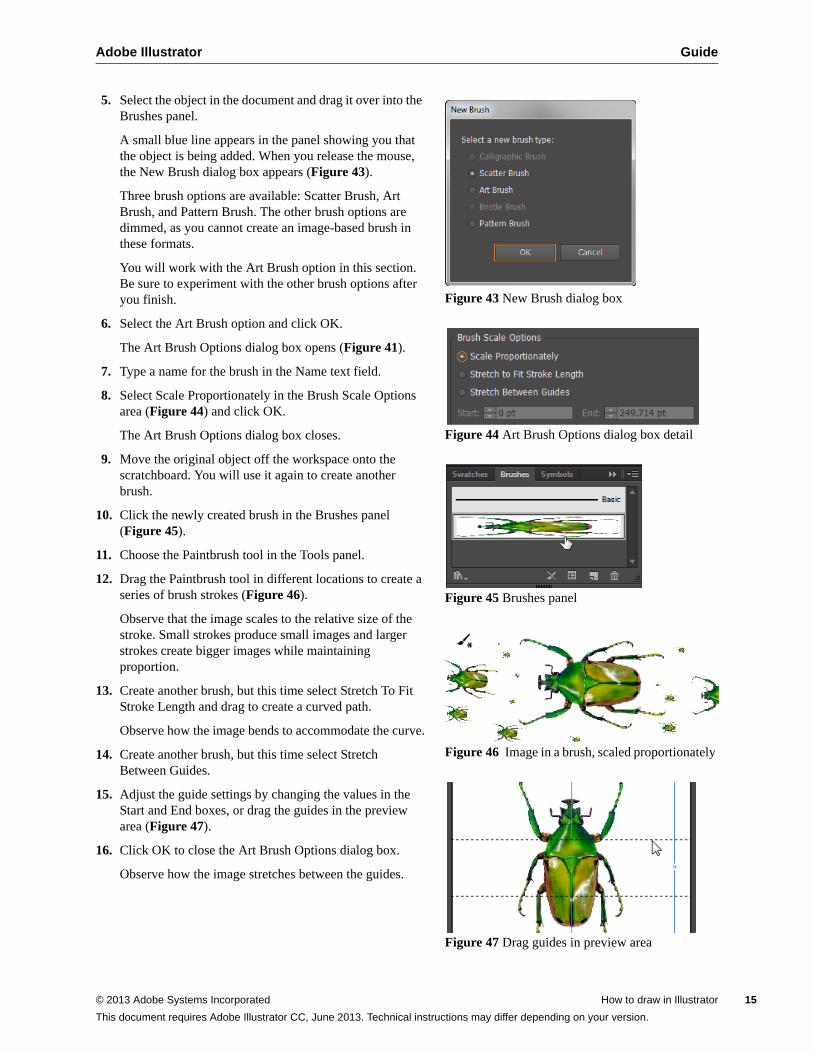
Adobe Illustrator Guide
5. Select the object in the document and drag it over into the Brushes panel.
A small blue line appears in the panel showing you that the object is being added. When you release the mouse, the New Brush dialog box appears (Figure 43).
Three brush options are available: Scatter Brush, Art Brush, and Pattern Brush. The other brush options are dimmed, as you cannot create an image-based brush in these formats.
You will work with the Art Brush option in this section. Be sure to experiment with the other brush options after you finish.
6. Select the Art Brush option and click OK.
The Art Brush Options dialog box opens (Figure 41).
7. Type a name for the brush in the Name text field.
8. Select Scale Proportionately in the Brush Scale Options area (Figure 44) and click OK.
The Art Brush Options dialog box closes.
9. Move the original object off the workspace onto the scratchboard. You will use it again to create another brush.
10. Click the newly created brush in the Brushes panel (Figure 45).
11. Choose the Paintbrush tool in the Tools panel.
12. Drag the Paintbrush tool in different locations to create a series of brush strokes (Figure 46).
Observe that the image scales to the relative size of the stroke. Small strokes produce small images and larger strokes create bigger images while maintaining proportion.
13. Create another brush, but this time select Stretch To Fit Stroke Length and drag to create a curved path.
Observe how the image bends to accommodate the curve.
14. Create another brush, but this time select Stretch Between Guides.
15. Adjust the guide settings by changing the values in the Start and End boxes, or drag the guides in the preview area (Figure 47).
16. Click OK to close the Art Brush Options dialog box.
Observe how the image stretches between the guides.
Figure 43 New Brush dialog box
Figure 44 Art Brush Options dialog box detail
Figure 45 Brushes panel
Figure 46 Image in a brush, scaled proportionately
Figure 47 Drag guides in preview area
© 2013 Adobe Systems Incorporated How to draw in Illustrator 15
This document requires Adobe Illustrator CC, June 2013. Technical instructions may differ depending on your version.
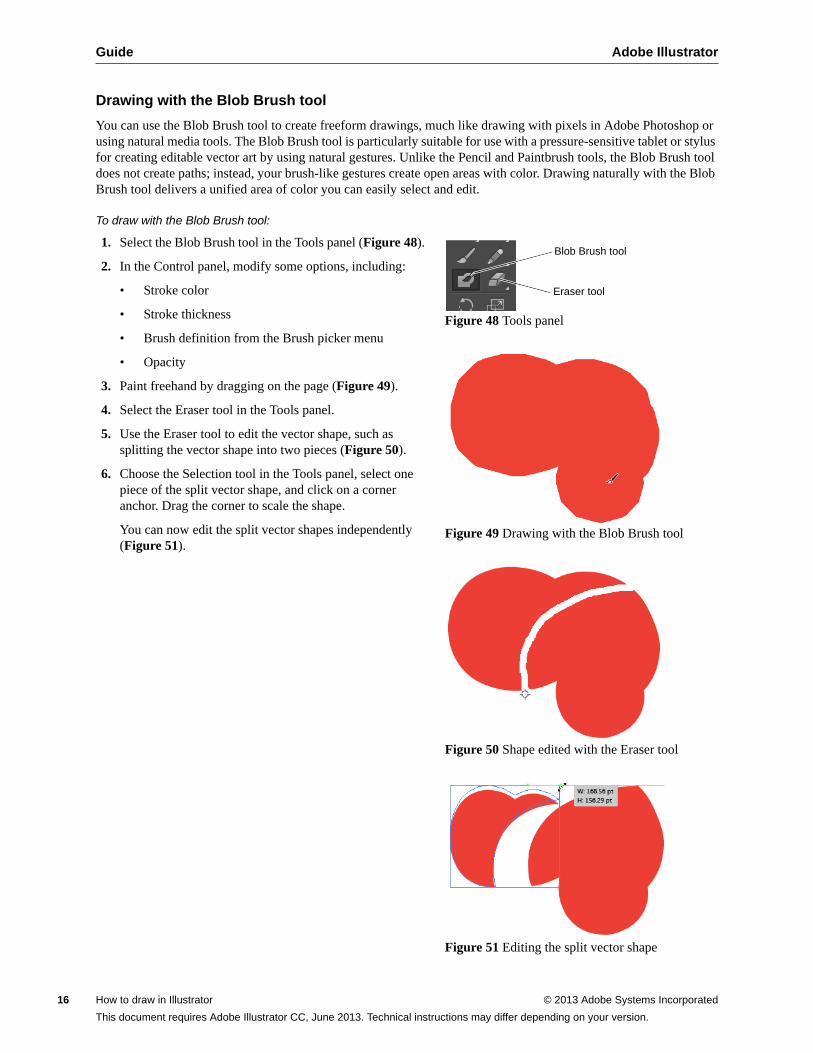
Guide Adobe Illustrator
16
Drawing with the Blob Brush tool
You can use the Blob Brush tool to create freeform drawings, much like drawing with pixels in Adobe Photoshop or using natural media tools. The Blob Brush tool is particularly suitable for use with a pressure-sensitive tablet or stylus for creating editable vector art by using natural gestures. Unlike the Pencil and Paintbrush tools, the Blob Brush tool does not create paths; instead, your brush-like gestures create open areas with color. Drawing naturally with the Blob Brush tool delivers a unified area of color you can easily select and edit.
To draw with the Blob Brush tool:
1. Select the Blob Brush tool in the Tools panel (Figure 48).
2. In the Control panel, modify some options, including:
• Stroke color
• Stroke thickness
• Brush definition from the Brush picker menu
• Opacity
3. Paint freehand by dragging on the page (Figure 49).
4. Select the Eraser tool in the Tools panel.
5. Use the Eraser tool to edit the vector shape, such as splitting the vector shape into two pieces (Figure 50).
6. Choose the Selection tool in the Tools panel, select one piece of the split vector shape, and click on a corner anchor. Drag the corner to scale the shape.
You can now edit the split vector shapes independently (Figure 51).
Figure 48 Tools panel
Figure 49 Drawing with the Blob Brush tool
Figure 50 Shape edited with the Eraser tool
Figure 51 Editing the split vector shape
Blob Brush tool
Eraser tool
How to draw in Illustrator © 2013 Adobe Systems Incorporated
This document requires Adobe Illustrator CC, June 2013. Technical instructions may differ depending on your version.
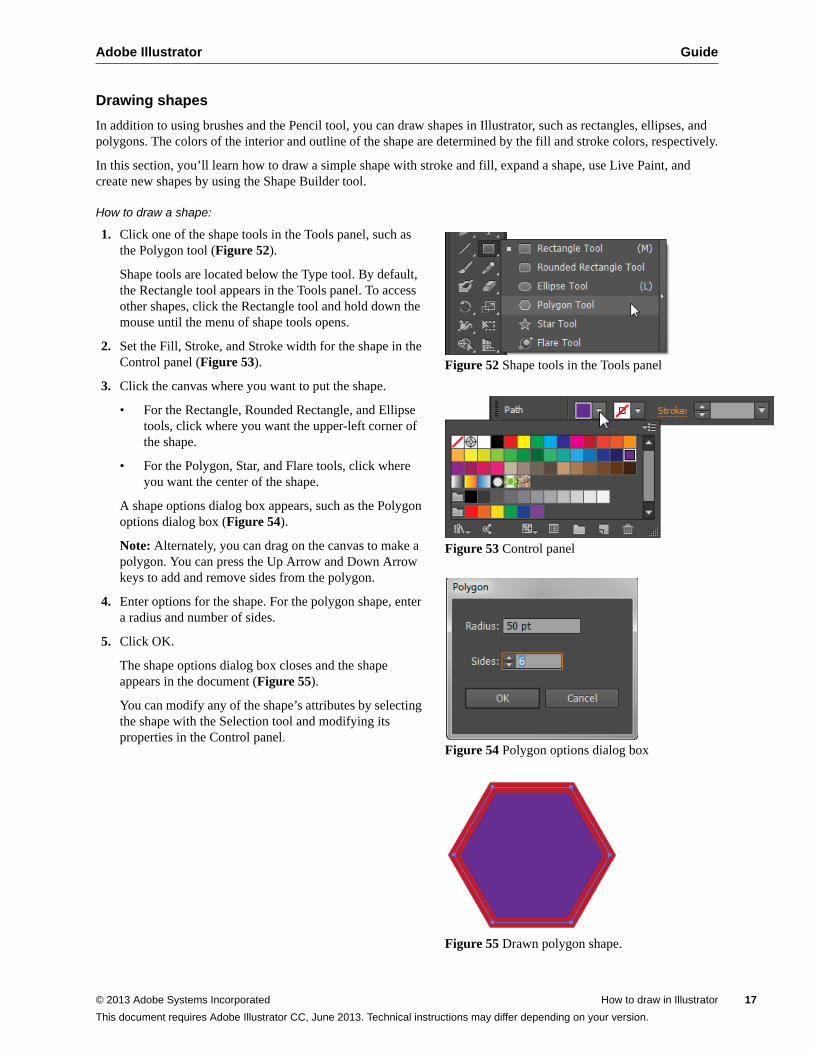
Adobe Illustrator Guide
Drawing shapes
In addition to using brushes and the Pencil tool, you can draw shapes in Illustrator, such as rectangles, ellipses, and polygons. The colors of the interior and outline of the shape are determined by the fill and stroke colors, respectively.
In this section, you’ll learn how to draw a simple shape with stroke and fill, expand a shape, use Live Paint, and create new shapes by using the Shape Builder tool.
How to draw a shape:
1. Click one of the shape tools in the Tools panel, such as the Polygon tool (Figure 52).
Shape tools are located below the Type tool. By default, the Rectangle tool appears in the Tools panel. To access other shapes, click the Rectangle tool and hold down the mouse until the menu of shape tools opens.
2. Set the Fill, Stroke, and Stroke width for the shape in the Control panel (Figure 53).
3. Click the canvas where you want to put the shape.
• For the Rectangle, Rounded Rectangle, and Ellipse tools, click where you want the upper-left corner of the shape.
• For the Polygon, Star, and Flare tools, click where you want the center of the shape.
A shape options dialog box appears, such as the Polygon options dialog box (Figure 54).
Note: Alternately, you can drag on the canvas to make a polygon. You can press the Up Arrow and Down Arrow keys to add and remove sides from the polygon.
4. Enter options for the shape. For the polygon shape, enter a radius and number of sides.
5. Click OK.
The shape options dialog box closes and the shape appears in the document (Figure 55).
You can modify any of the shape’s attributes by selecting the shape with the Selection tool and modifying its properties in the Control panel.
Figure 52 Shape tools in the Tools panel
Figure 53 Control panel
Figure 54 Polygon options dialog box
Figure 55 Drawn polygon shape.
© 2013 Adobe Systems Incorporated How to draw in Illustrator 17
This document requires Adobe Illustrator CC, June 2013. Technical instructions may differ depending on your version.
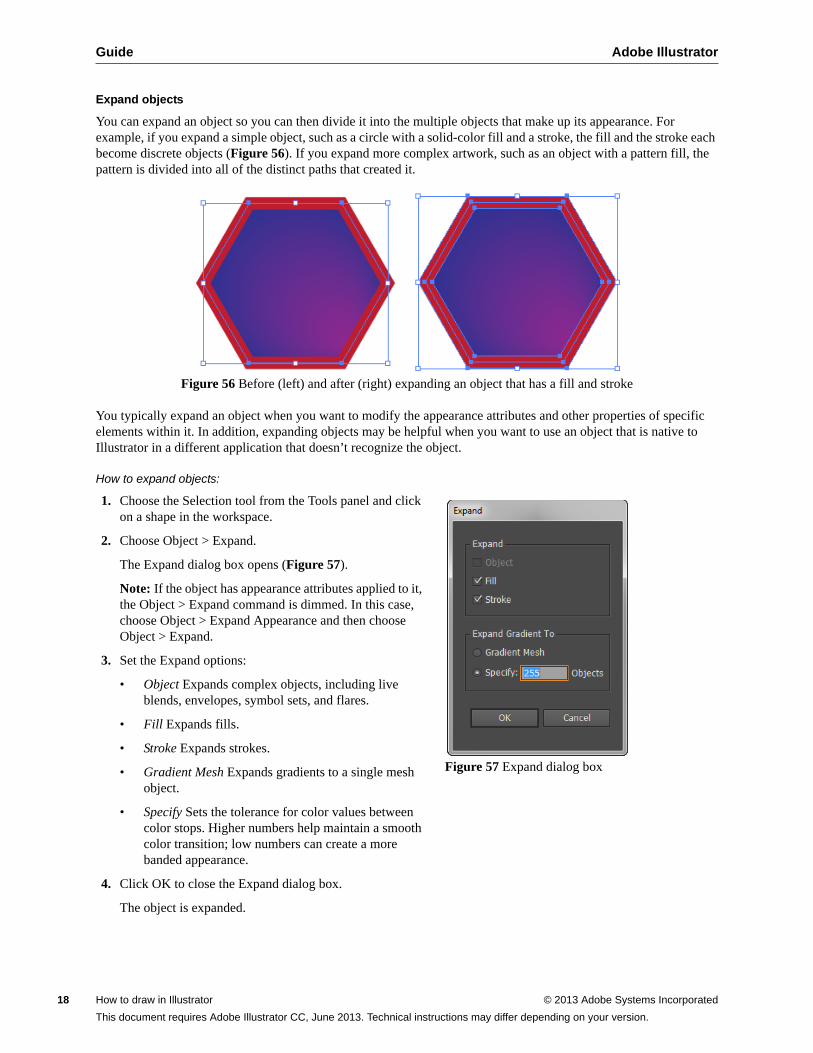
Guide Adobe Illustrator
18
Expand objects
You can expand an object so you can then divide it into the multiple objects that make up its appearance. For example, if you expand a simple object, such as a circle with a solid-color fill and a stroke, the fill and the stroke each become discrete objects (Figure 56). If you expand more complex artwork, such as an object with a pattern fill, the pattern is divided into all of the distinct paths that created it.
Figure 56 Before (left) and after (right) expanding an object that has a fill and stroke
You typically expand an object when you want to modify the appearance attributes and other properties of specific elements within it. In addition, expanding objects may be helpful when you want to use an object that is native to Illustrator in a different application that doesn’t recognize the object.
How to expand objects:
1. Choose the Selection tool from the Tools panel and click on a shape in the workspace.
2. Choose Object > Expand.
The Expand dialog box opens (Figure 57).
Note: If the object has appearance attributes applied to it, the Object > Expand command is dimmed. In this case, choose Object > Expand Appearance and then choose Object > Expand.
3. Set the Expand options:
• Object Expands complex objects, including live blends, envelopes, symbol sets, and flares.
• Fill Expands fills.
• Stroke Expands strokes.
• Gradient Mesh Expands gradients to a single mesh object.
• Specify Sets the tolerance for color values between color stops. Higher numbers help maintain a smooth color transition; low numbers can create a more banded appearance.
4. Click OK to close the Expand dialog box.
The object is expanded.
Figure 57 Expand dialog box
How to draw in Illustrator © 2013 Adobe Systems Incorporated
This document requires Adobe Illustrator CC, June 2013. Technical instructions may differ depending on your version.
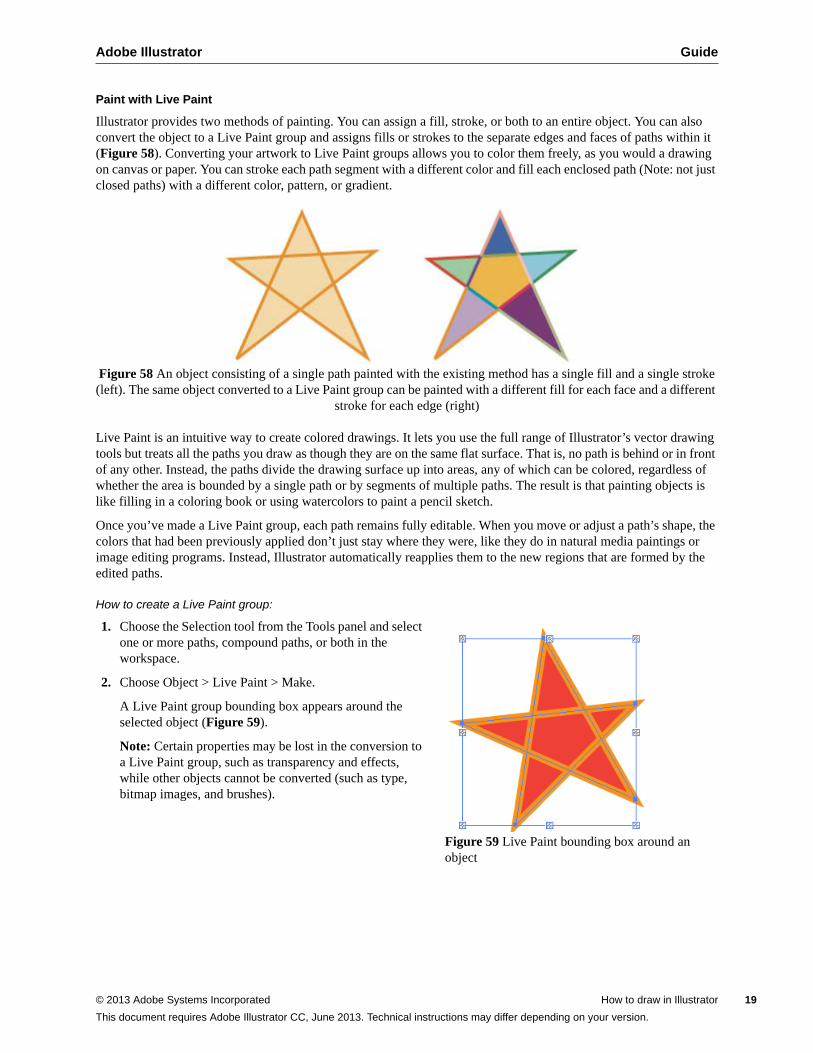
Adobe Illustrator Guide
Paint with Live Paint
Illustrator provides two methods of painting. You can assign a fill, stroke, or both to an entire object. You can also convert the object to a Live Paint group and assigns fills or strokes to the separate edges and faces of paths within it (Figure 58). Converting your artwork to Live Paint groups allows you to color them freely, as you would a drawing on canvas or paper. You can stroke each path segment with a different color and fill each enclosed path (Note: not just closed paths) with a different color, pattern, or gradient.
Figure 58 An object consisting of a single path painted with the existing method has a single fill and a single stroke (left). The same object converted to a Live Paint group can be painted with a different fill for each face and a different
stroke for each edge (right)
Live Paint is an intuitive way to create colored drawings. It lets you use the full range of Illustrator’s vector drawing tools but treats all the paths you draw as though they are on the same flat surface. That is, no path is behind or in front of any other. Instead, the paths divide the drawing surface up into areas, any of which can be colored, regardless of whether the area is bounded by a single path or by segments of multiple paths. The result is that painting objects is like filling in a coloring book or using watercolors to paint a pencil sketch.
Once you’ve made a Live Paint group, each path remains fully editable. When you move or adjust a path’s shape, the colors that had been previously applied don’t just stay where they were, like they do in natural media paintings or image editing programs. Instead, Illustrator automatically reapplies them to the new regions that are formed by the edited paths.
How to create a Live Paint group:
1. Choose the Selection tool from the Tools panel and select one or more paths, compound paths, or both in the workspace.
2. Choose Object > Live Paint > Make.
A Live Paint group bounding box appears around the selected object (Figure 59).
Note: Certain properties may be lost in the conversion to a Live Paint group, such as transparency and effects, while other objects cannot be converted (such as type, bitmap images, and brushes).
Figure 59 Live Paint bounding box around an object
© 2013 Adobe Systems Incorporated How to draw in Illustrator 19
This document requires Adobe Illustrator CC, June 2013. Technical instructions may differ depending on your version.
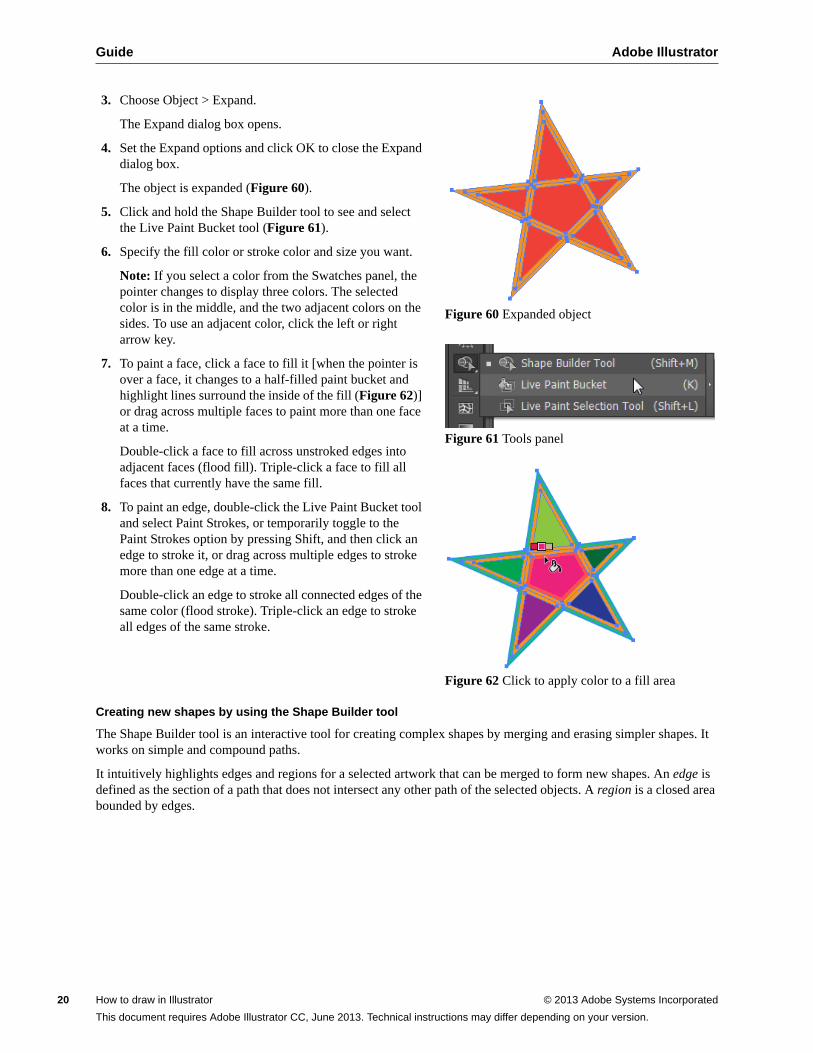
Guide Adobe Illustrator
20
3. Choose Object > Expand.
The Expand dialog box opens.
4. Set the Expand options and click OK to close the Expand dialog box.
The object is expanded (Figure 60).
5. Click and hold the Shape Builder tool to see and select the Live Paint Bucket tool (Figure 61).
6. Specify the fill color or stroke color and size you want.
Note: If you select a color from the Swatches panel, the pointer changes to display three colors. The selected color is in the middle, and the two adjacent colors on the sides. To use an adjacent color, click the left or right arrow key.
7. To paint a face, click a face to fill it [when the pointer is over a face, it changes to a half-filled paint bucket and highlight lines surround the inside of the fill (Figure 62)] or drag across multiple faces to paint more than one face at a time.
Double-click a face to fill across unstroked edges into adjacent faces (flood fill). Triple-click a face to fill all faces that currently have the same fill.
8. To paint an edge, double-click the Live Paint Bucket tool and select Paint Strokes, or temporarily toggle to the Paint Strokes option by pressing Shift, and then click an edge to stroke it, or drag across multiple edges to stroke more than one edge at a time.
Double-click an edge to stroke all connected edges of the same color (flood stroke). Triple-click an edge to stroke all edges of the same stroke.
Figure 60 Expanded object
Figure 61 Tools panel
Figure 62 Click to apply color to a fill area
Creating new shapes by using the Shape Builder tool
The Shape Builder tool is an interactive tool for creating complex shapes by merging and erasing simpler shapes. It works on simple and compound paths.
It intuitively highlights edges and regions for a selected artwork that can be merged to form new shapes. An edge is defined as the section of a path that does not intersect any other path of the selected objects. A region is a closed area bounded by edges.
How to draw in Illustrator © 2013 Adobe Systems Incorporated
This document requires Adobe Illustrator CC, June 2013. Technical instructions may differ depending on your version.

Adobe Illustrator Guide
To create a shape with the Shape Builder tool:
1. Create the shapes on which you want to apply the Shape Builder tool.
2. Using the Selection tool, select only the paths you need to merge to create the shape (Figure 63).
Note: Make sure that you select only those paths on which you need to apply the tool.
3. Select the Shape Builder tool from the Tools panel (Figure 64).
By default, the tool is in merge mode, ready to combine different paths.
4. To merge two or more paths, drag across the regions enclosed by the paths. Each region is highlighted as you drag across it (Figure 65). Release the mouse button when all the regions are highlighted.
The regions are merged to form a new shape (Figure 66). Notice the topmost circle has not been merged into the shape. In the next step, you will delete a portion of that shape.
The art style that the new shape inherits depends on the following rules:
• The art style of the object from where the mouse drag was initiated is applied to the merging shapes.
• If no art style is available on mouse down, the art style available on mouse release is applied to the merging shapes.
• If no art style is available on mouse down or mouse release, the art style of the topmost selected object in the Layers panel is applied.
For coloring, you can override these rules by selecting Color Swatches from the Pick Color From menu in the Shape Builder Tool Options dialog box. (Double-click the Shape Builder tool to open the Shape Builder Tool Options dialog box.)
Note: An alternative to dragging across the regions to be merged is to Shift-drag a rectangular marquee around the regions with the Shape Builder tool. When you release, the regions are merged.
Figure 63 Selecting paths
Figure 64 Tools panel
Figure 65 Selecting a region to merge
Figure 66 Merged shape
Shape Builder tool
© 2013 Adobe Systems Incorporated How to draw in Illustrator 21
This document requires Adobe Illustrator CC, June 2013. Technical instructions may differ depending on your version.
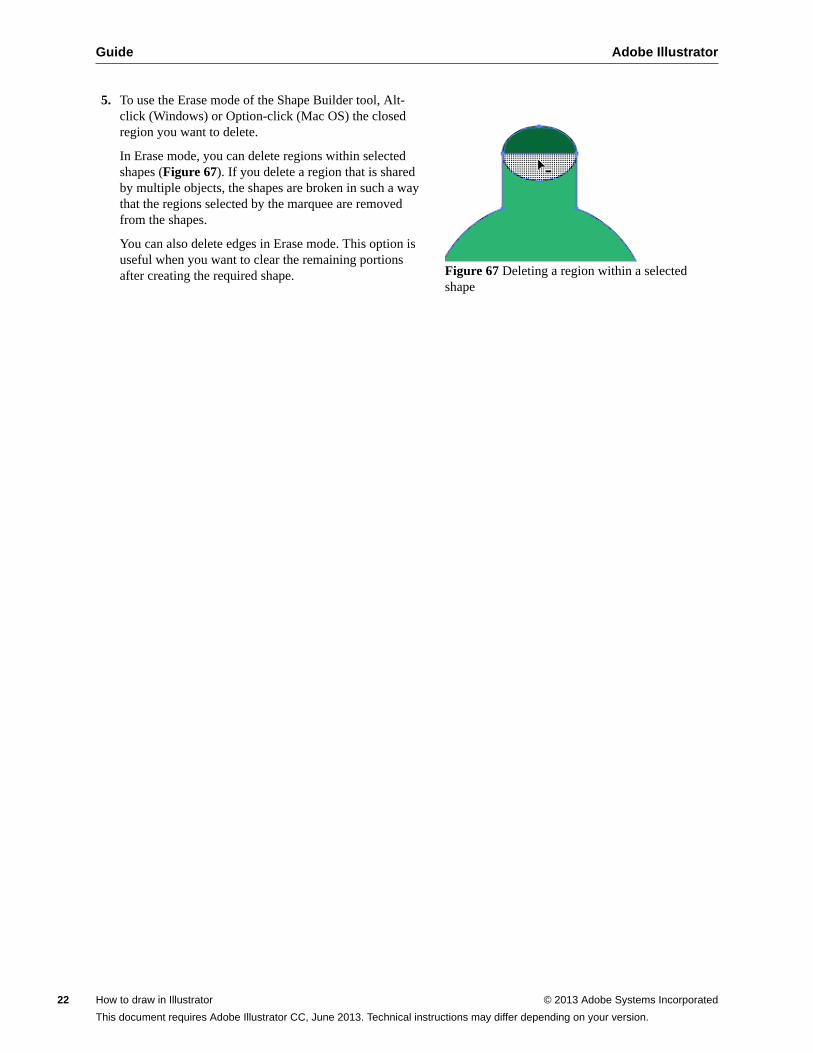
Guide Adobe Illustrator
22
5. To use the Erase mode of the Shape Builder tool, Alt-click (Windows) or Option-click (Mac OS) the closed region you want to delete.
In Erase mode, you can delete regions within selected shapes (Figure 67). If you delete a region that is shared by multiple objects, the shapes are broken in such a way that the regions selected by the marquee are removed from the shapes.
You can also delete edges in Erase mode. This option is useful when you want to clear the remaining portions after creating the required shape. Figure 67 Deleting a region within a selected
shape
How to draw in Illustrator © 2013 Adobe Systems Incorporated
This document requires Adobe Illustrator CC, June 2013. Technical instructions may differ depending on your version.
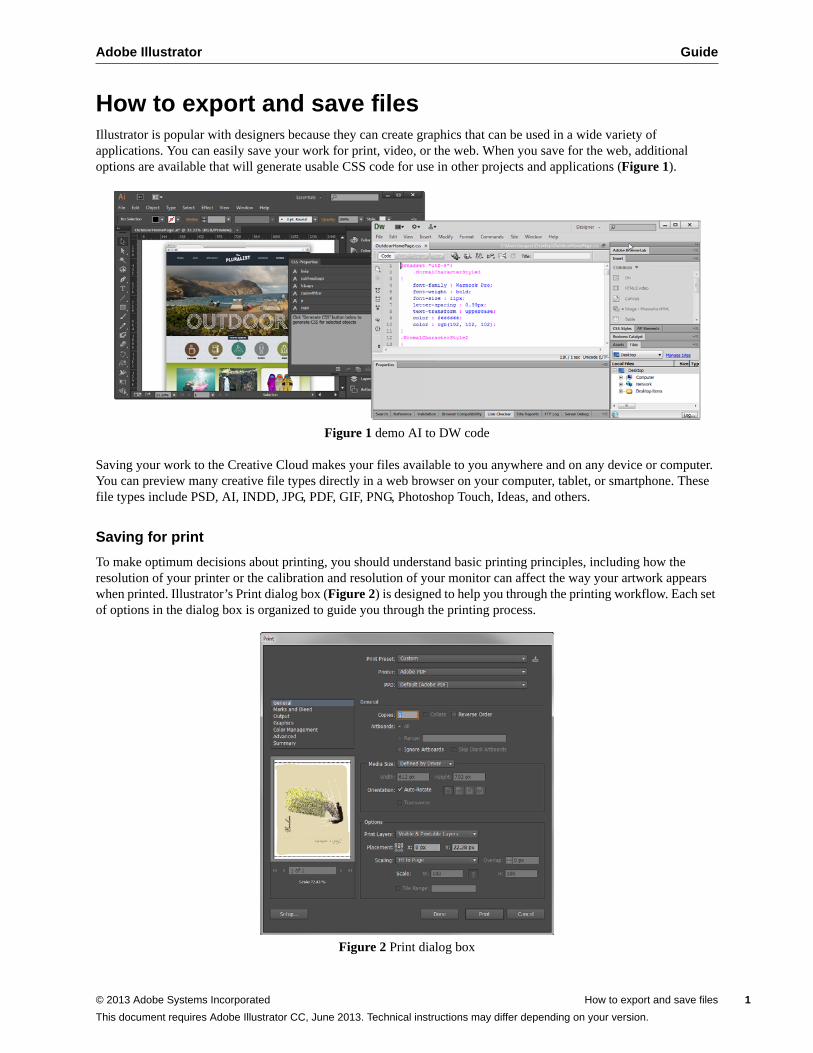
Adobe Illustrator Guide
How to export and save filesIllustrator is popular with designers because they can create graphics that can be used in a wide variety of applications. You can easily save your work for print, video, or the web. When you save for the web, additional options are available that will generate usable CSS code for use in other projects and applications (Figure 1).
Figure 1 demo AI to DW code
Saving your work to the Creative Cloud makes your files available to you anywhere and on any device or computer. You can preview many creative file types directly in a web browser on your computer, tablet, or smartphone. These file types include PSD, AI, INDD, JPG, PDF, GIF, PNG, Photoshop Touch, Ideas, and others.
Saving for print
To make optimum decisions about printing, you should understand basic printing principles, including how the resolution of your printer or the calibration and resolution of your monitor can affect the way your artwork appears when printed. Illustrator’s Print dialog box (Figure 2) is designed to help you through the printing workflow. Each set of options in the dialog box is organized to guide you through the printing process.
Figure 2 Print dialog box
© 2013 Adobe Systems Incorporated How to export and save files 1
This document requires Adobe Illustrator CC, June 2013. Technical instructions may differ depending on your version.
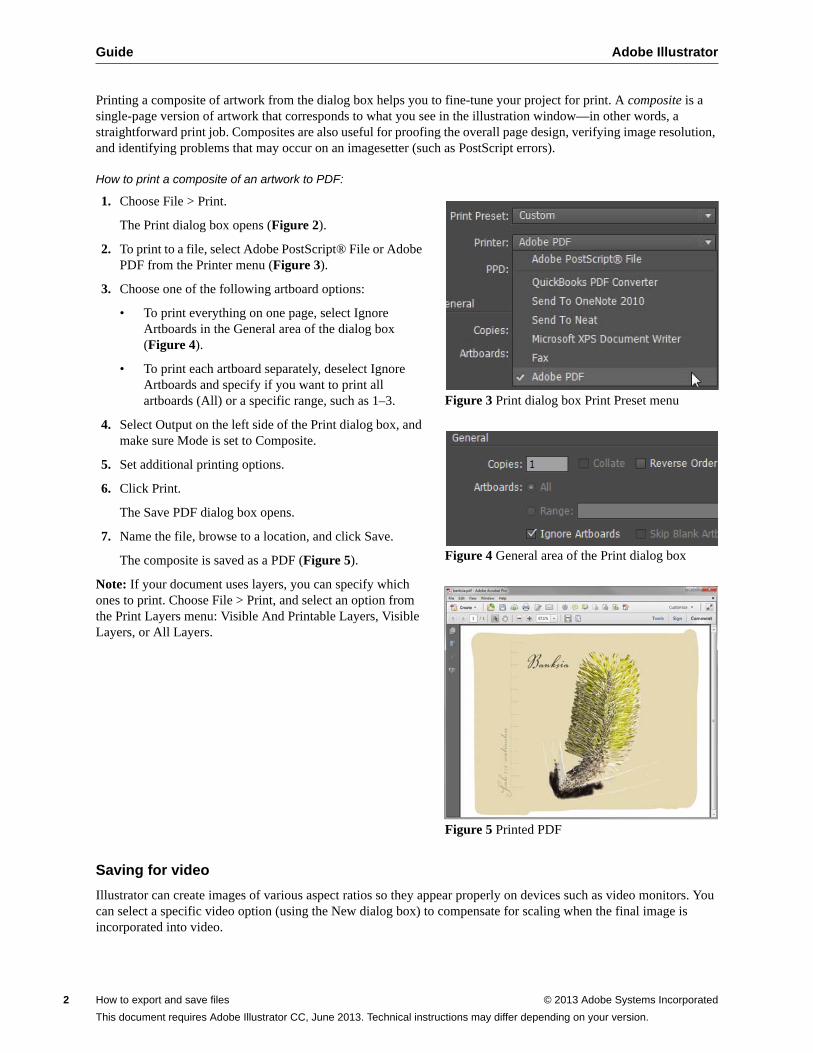
Guide Adobe Illustrator
2
Printing a composite of artwork from the dialog box helps you to fine-tune your project for print. A composite is a single-page version of artwork that corresponds to what you see in the illustration window—in other words, a straightforward print job. Composites are also useful for proofing the overall page design, verifying image resolution, and identifying problems that may occur on an imagesetter (such as PostScript errors).
How to print a composite of an artwork to PDF:
1. Choose File > Print.
The Print dialog box opens (Figure 2).
2. To print to a file, select Adobe PostScript® File or Adobe PDF from the Printer menu (Figure 3).
3. Choose one of the following artboard options:
• To print everything on one page, select Ignore Artboards in the General area of the dialog box (Figure 4).
• To print each artboard separately, deselect Ignore Artboards and specify if you want to print all artboards (All) or a specific range, such as 1–3.
4. Select Output on the left side of the Print dialog box, and make sure Mode is set to Composite.
5. Set additional printing options.
6. Click Print.
The Save PDF dialog box opens.
7. Name the file, browse to a location, and click Save.
The composite is saved as a PDF (Figure 5).
Note: If your document uses layers, you can specify which ones to print. Choose File > Print, and select an option from the Print Layers menu: Visible And Printable Layers, Visible Layers, or All Layers.
Figure 3 Print dialog box Print Preset menu
Figure 4 General area of the Print dialog box
Figure 5 Printed PDF
Saving for video
Illustrator can create images of various aspect ratios so they appear properly on devices such as video monitors. You can select a specific video option (using the New dialog box) to compensate for scaling when the final image is incorporated into video.
How to export and save files © 2013 Adobe Systems Incorporated
This document requires Adobe Illustrator CC, June 2013. Technical instructions may differ depending on your version.
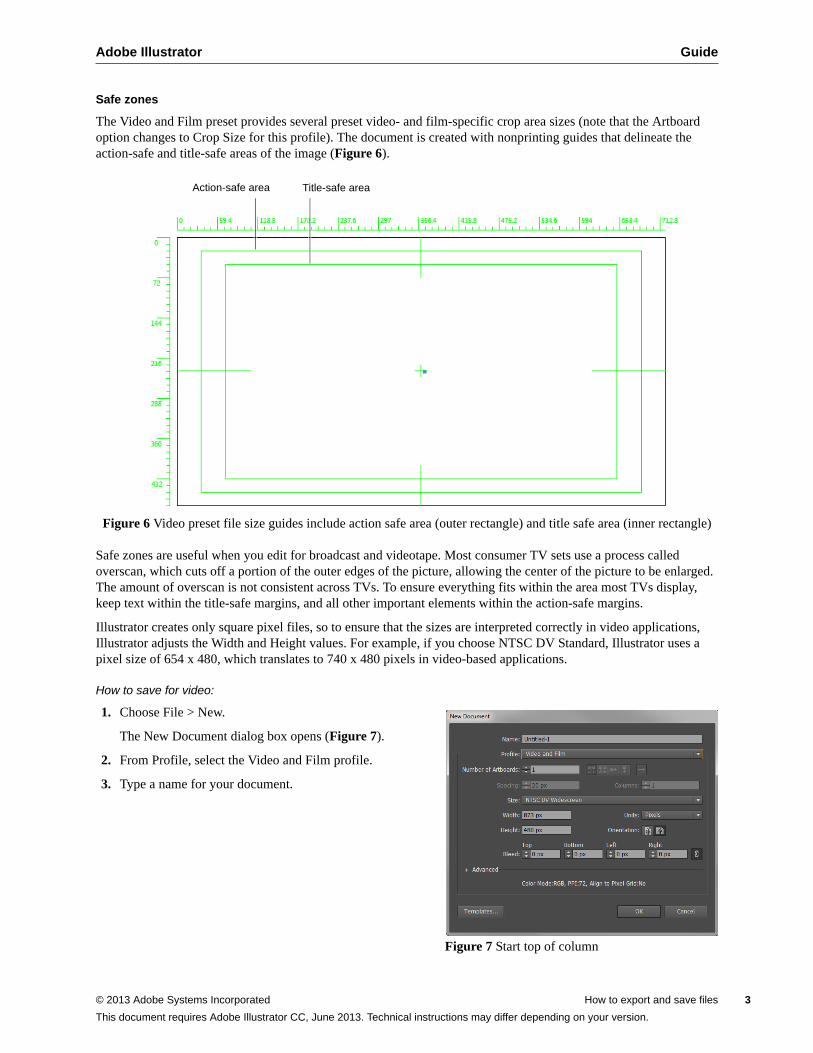
Adobe Illustrator Guide
Safe zones
The Video and Film preset provides several preset video- and film-specific crop area sizes (note that the Artboard option changes to Crop Size for this profile). The document is created with nonprinting guides that delineate the action-safe and title-safe areas of the image (Figure 6).
Figure 6 Video preset file size guides include action safe area (outer rectangle) and title safe area (inner rectangle)
Safe zones are useful when you edit for broadcast and videotape. Most consumer TV sets use a process called overscan, which cuts off a portion of the outer edges of the picture, allowing the center of the picture to be enlarged. The amount of overscan is not consistent across TVs. To ensure everything fits within the area most TVs display, keep text within the title-safe margins, and all other important elements within the action-safe margins.
Illustrator creates only square pixel files, so to ensure that the sizes are interpreted correctly in video applications, Illustrator adjusts the Width and Height values. For example, if you choose NTSC DV Standard, Illustrator uses a pixel size of 654 x 480, which translates to 740 x 480 pixels in video-based applications.
How to save for video:
1. Choose File > New.
The New Document dialog box opens (Figure 7).
2. From Profile, select the Video and Film profile.
3. Type a name for your document.
Figure 7 Start top of column
Title-safe areaAction-safe area
© 2013 Adobe Systems Incorporated How to export and save files 3
This document requires Adobe Illustrator CC, June 2013. Technical instructions may differ depending on your version.
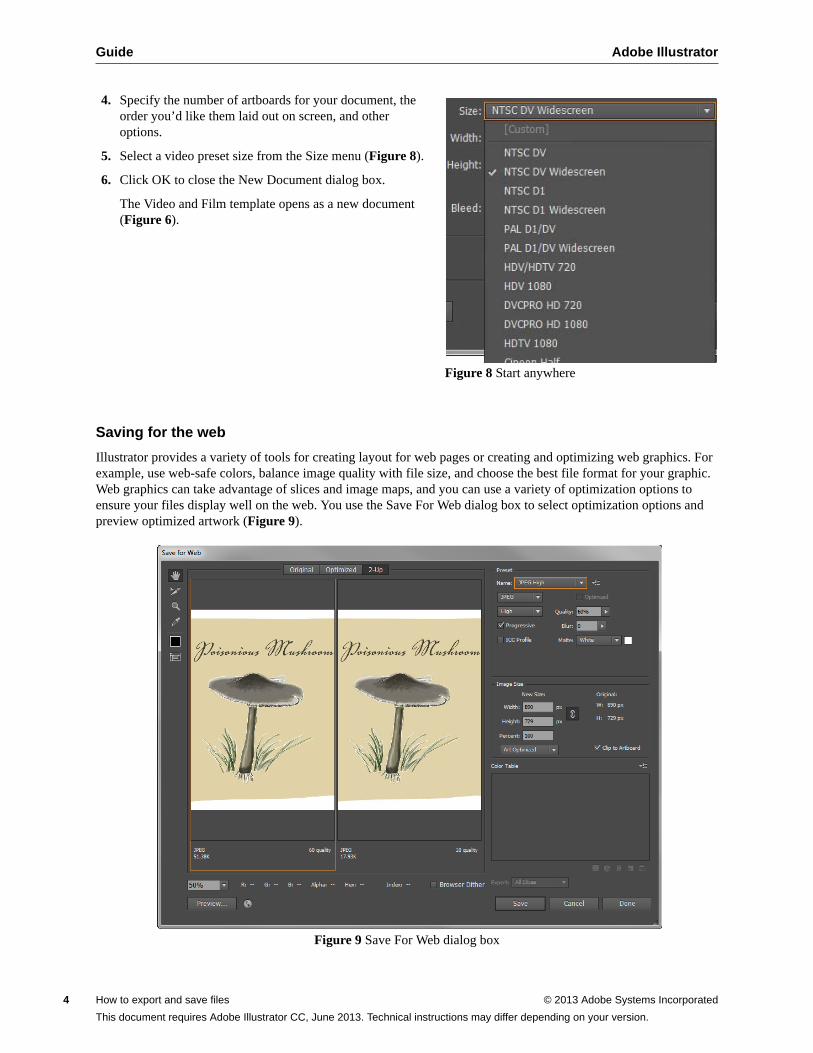
Guide Adobe Illustrator
4
4. Specify the number of artboards for your document, the order you’d like them laid out on screen, and other options.
5. Select a video preset size from the Size menu (Figure 8).
6. Click OK to close the New Document dialog box.
The Video and Film template opens as a new document (Figure 6).
Figure 8 Start anywhere
Saving for the web
Illustrator provides a variety of tools for creating layout for web pages or creating and optimizing web graphics. For example, use web-safe colors, balance image quality with file size, and choose the best file format for your graphic. Web graphics can take advantage of slices and image maps, and you can use a variety of optimization options to ensure your files display well on the web. You use the Save For Web dialog box to select optimization options and preview optimized artwork (Figure 9).
Figure 9 Save For Web dialog box
How to export and save files © 2013 Adobe Systems Incorporated
This document requires Adobe Illustrator CC, June 2013. Technical instructions may differ depending on your version.
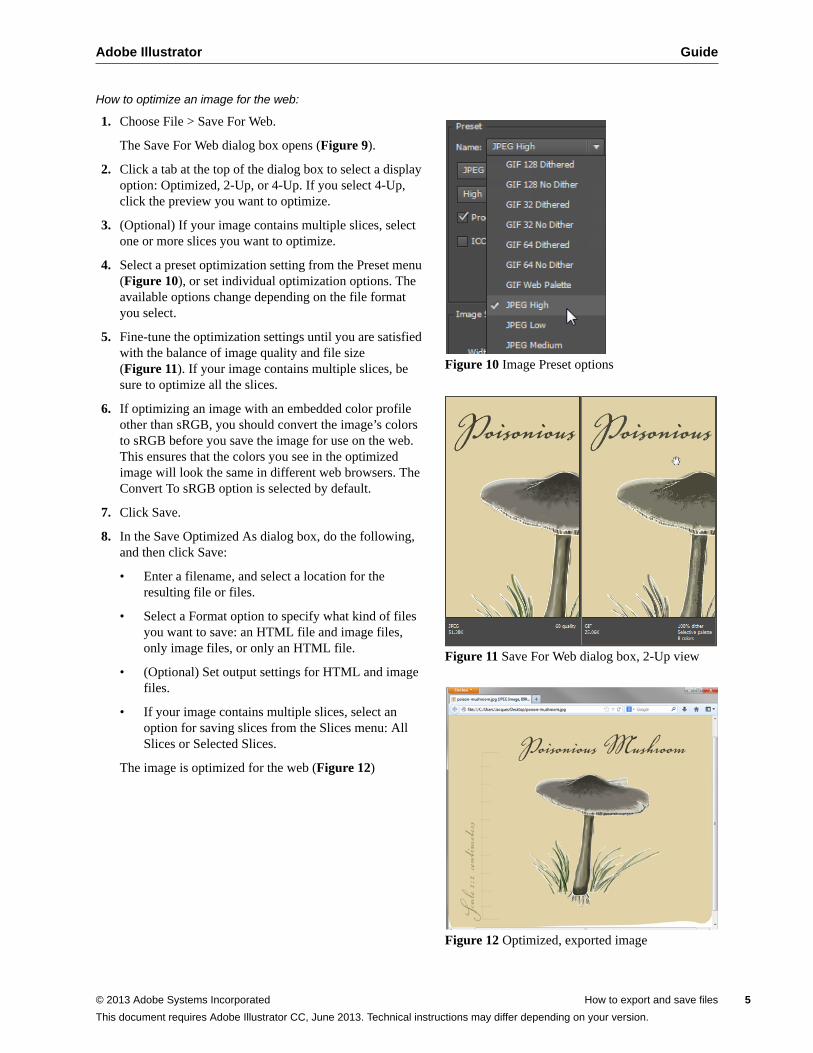
Adobe Illustrator Guide
How to optimize an image for the web:
1. Choose File > Save For Web.
The Save For Web dialog box opens (Figure 9).
2. Click a tab at the top of the dialog box to select a display option: Optimized, 2-Up, or 4-Up. If you select 4-Up, click the preview you want to optimize.
3. (Optional) If your image contains multiple slices, select one or more slices you want to optimize.
4. Select a preset optimization setting from the Preset menu (Figure 10), or set individual optimization options. The available options change depending on the file format you select.
5. Fine-tune the optimization settings until you are satisfied with the balance of image quality and file size (Figure 11). If your image contains multiple slices, be sure to optimize all the slices.
6. If optimizing an image with an embedded color profile other than sRGB, you should convert the image’s colors to sRGB before you save the image for use on the web. This ensures that the colors you see in the optimized image will look the same in different web browsers. The Convert To sRGB option is selected by default.
7. Click Save.
8. In the Save Optimized As dialog box, do the following, and then click Save:
• Enter a filename, and select a location for the resulting file or files.
• Select a Format option to specify what kind of files you want to save: an HTML file and image files, only image files, or only an HTML file.
• (Optional) Set output settings for HTML and image files.
• If your image contains multiple slices, select an option for saving slices from the Slices menu: All Slices or Selected Slices.
The image is optimized for the web (Figure 12)
Figure 10 Image Preset options
Figure 11 Save For Web dialog box, 2-Up view
Figure 12 Optimized, exported image
© 2013 Adobe Systems Incorporated How to export and save files 5
This document requires Adobe Illustrator CC, June 2013. Technical instructions may differ depending on your version.
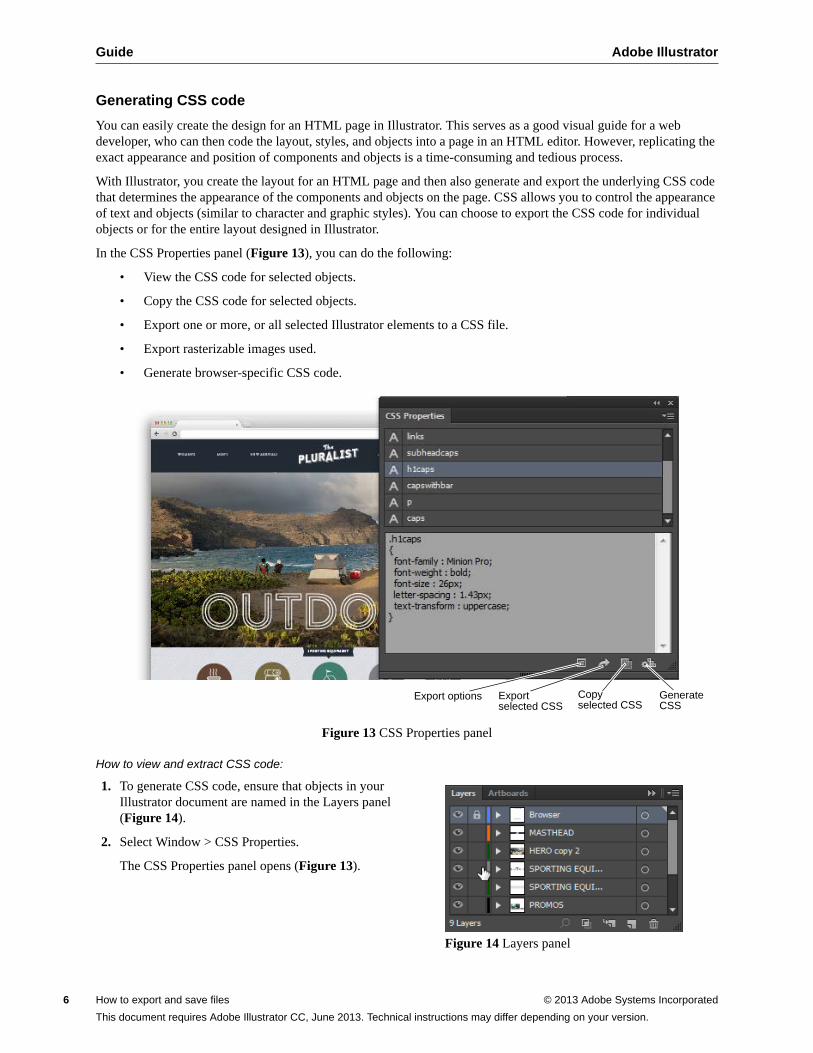
Guide Adobe Illustrator
6
Generating CSS code
You can easily create the design for an HTML page in Illustrator. This serves as a good visual guide for a web developer, who can then code the layout, styles, and objects into a page in an HTML editor. However, replicating the exact appearance and position of components and objects is a time-consuming and tedious process.
With Illustrator, you create the layout for an HTML page and then also generate and export the underlying CSS code that determines the appearance of the components and objects on the page. CSS allows you to control the appearance of text and objects (similar to character and graphic styles). You can choose to export the CSS code for individual objects or for the entire layout designed in Illustrator.
In the CSS Properties panel (Figure 13), you can do the following:
• View the CSS code for selected objects.
• Copy the CSS code for selected objects.
• Export one or more, or all selected Illustrator elements to a CSS file.
• Export rasterizable images used.
• Generate browser-specific CSS code.
Figure 13 CSS Properties panel
How to view and extract CSS code:
1. To generate CSS code, ensure that objects in your Illustrator document are named in the Layers panel (Figure 14).
2. Select Window > CSS Properties.
The CSS Properties panel opens (Figure 13).
Figure 14 Layers panel
Export options Export selected CSS
Copy selected CSS
Generate CSS
How to export and save files © 2013 Adobe Systems Incorporated
This document requires Adobe Illustrator CC, June 2013. Technical instructions may differ depending on your version.
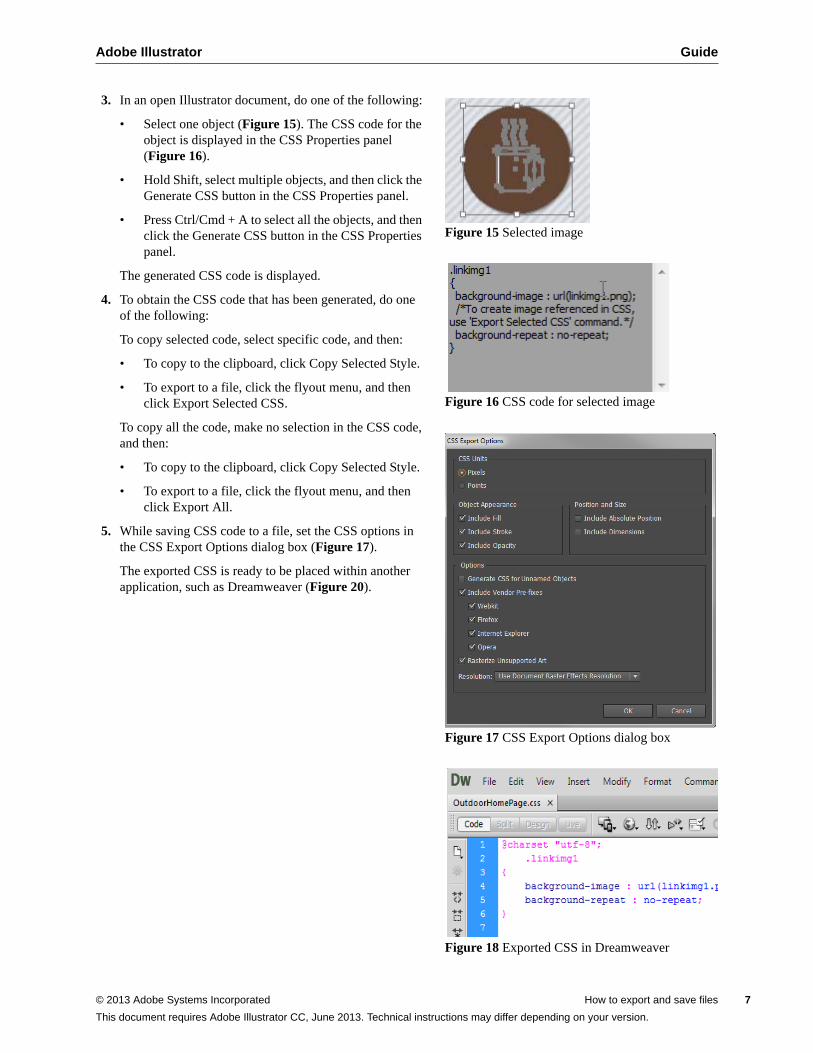
Adobe Illustrator Guide
3. In an open Illustrator document, do one of the following:
• Select one object (Figure 15). The CSS code for the object is displayed in the CSS Properties panel (Figure 16).
• Hold Shift, select multiple objects, and then click the Generate CSS button in the CSS Properties panel.
• Press Ctrl/Cmd + A to select all the objects, and then click the Generate CSS button in the CSS Properties panel.
The generated CSS code is displayed.
4. To obtain the CSS code that has been generated, do one of the following:
To copy selected code, select specific code, and then:
• To copy to the clipboard, click Copy Selected Style.
• To export to a file, click the flyout menu, and then click Export Selected CSS.
To copy all the code, make no selection in the CSS code, and then:
• To copy to the clipboard, click Copy Selected Style.
• To export to a file, click the flyout menu, and then click Export All.
5. While saving CSS code to a file, set the CSS options in the CSS Export Options dialog box (Figure 17).
The exported CSS is ready to be placed within another application, such as Dreamweaver (Figure 20).
Figure 15 Selected image
Figure 16 CSS code for selected image
Figure 17 CSS Export Options dialog box
Figure 18 Exported CSS in Dreamweaver
© 2013 Adobe Systems Incorporated How to export and save files 7
This document requires Adobe Illustrator CC, June 2013. Technical instructions may differ depending on your version.
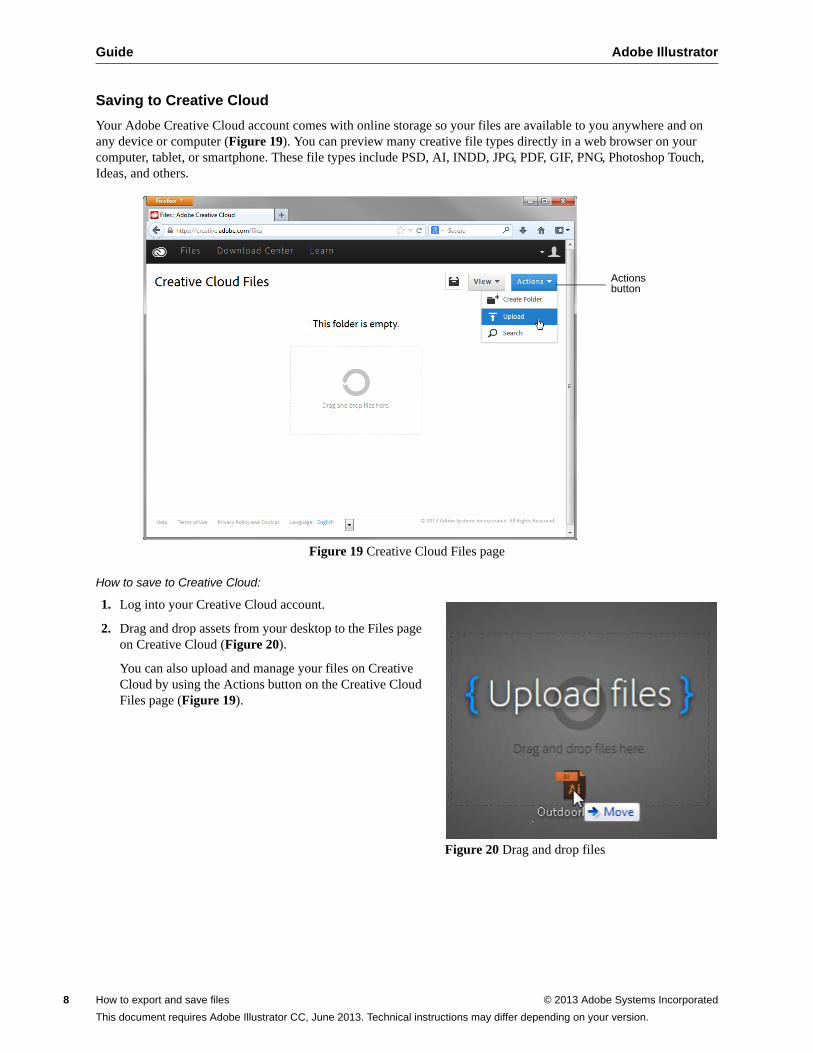
Guide Adobe Illustrator
8
Saving to Creative Cloud
Your Adobe Creative Cloud account comes with online storage so your files are available to you anywhere and on any device or computer (Figure 19). You can preview many creative file types directly in a web browser on your computer, tablet, or smartphone. These file types include PSD, AI, INDD, JPG, PDF, GIF, PNG, Photoshop Touch, Ideas, and others.
Figure 19 Creative Cloud Files page
How to save to Creative Cloud:
1. Log into your Creative Cloud account.
2. Drag and drop assets from your desktop to the Files page on Creative Cloud (Figure 20).
You can also upload and manage your files on Creative Cloud by using the Actions button on the Creative Cloud Files page (Figure 19).
Figure 20 Drag and drop files
Actions button
How to export and save files © 2013 Adobe Systems Incorporated
This document requires Adobe Illustrator CC, June 2013. Technical instructions may differ depending on your version.
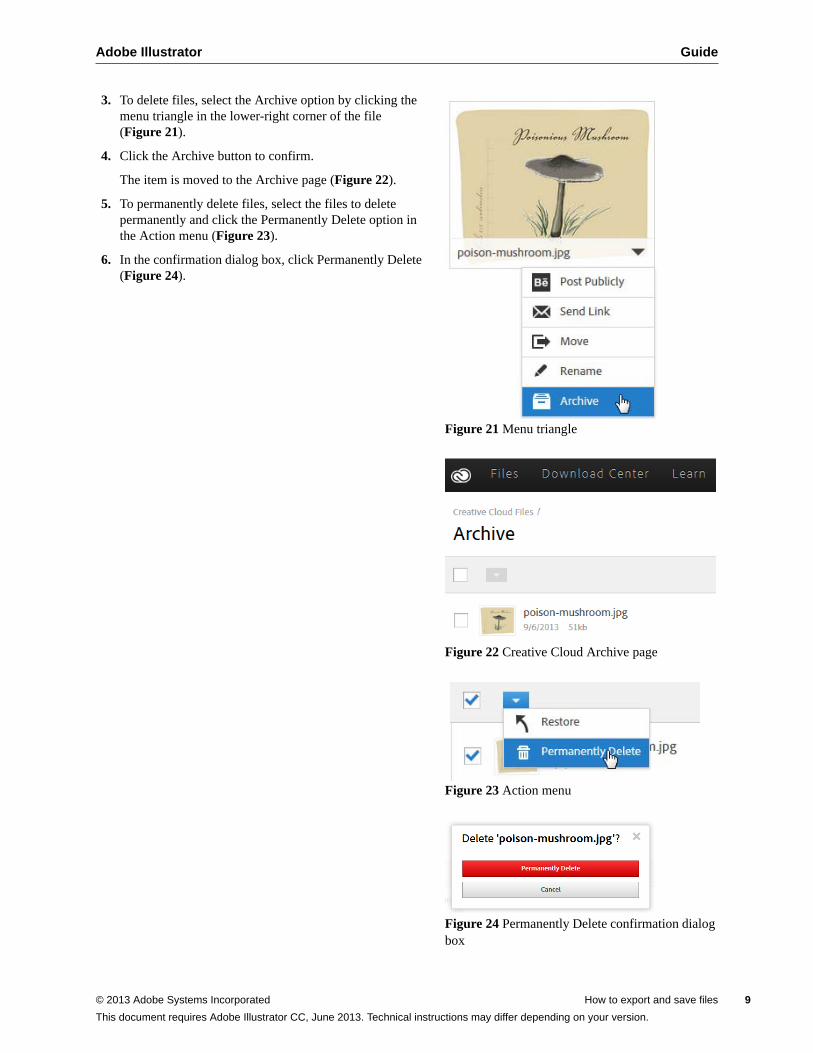
Adobe Illustrator Guide
3. To delete files, select the Archive option by clicking the menu triangle in the lower-right corner of the file (Figure 21).
4. Click the Archive button to confirm.
The item is moved to the Archive page (Figure 22).
5. To permanently delete files, select the files to delete permanently and click the Permanently Delete option in the Action menu (Figure 23).
6. In the confirmation dialog box, click Permanently Delete (Figure 24).
Figure 21 Menu triangle
Figure 22 Creative Cloud Archive page
Figure 23 Action menu
Figure 24 Permanently Delete confirmation dialog box
© 2013 Adobe Systems Incorporated How to export and save files 9
This document requires Adobe Illustrator CC, June 2013. Technical instructions may differ depending on your version.
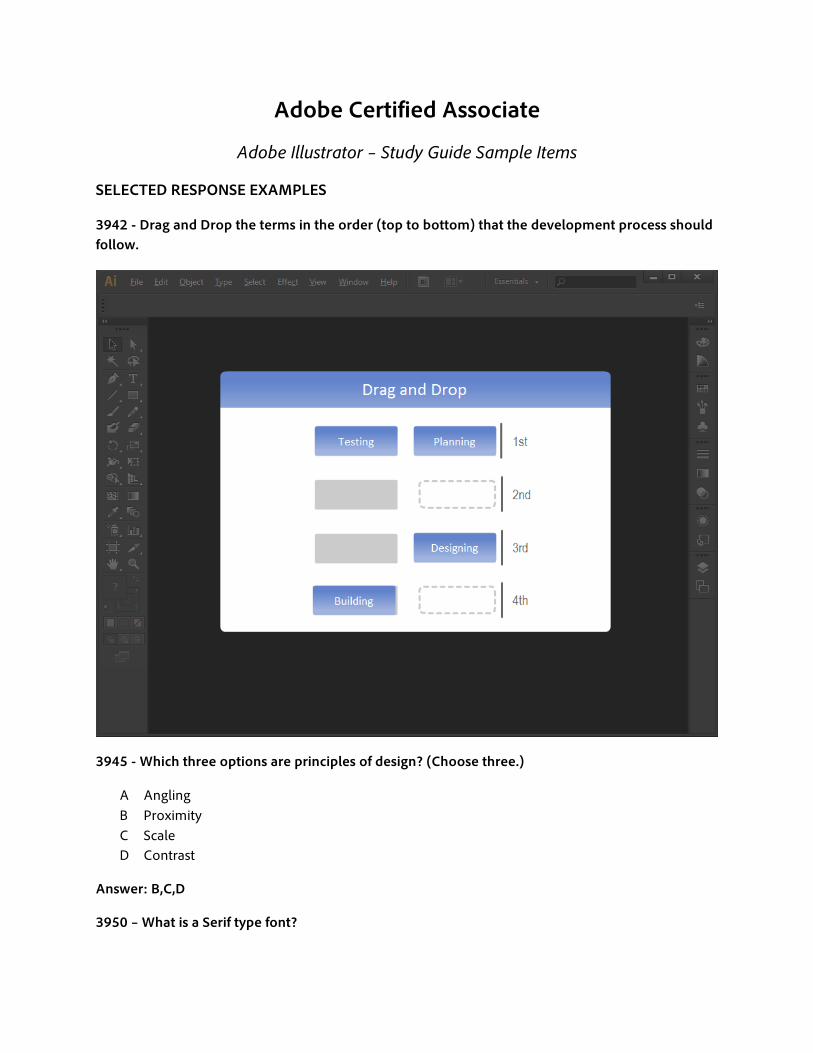
Adobe Certified Associate
Adobe Illustrator – Study Guide Sample Items
SELECTED RESPONSE EXAMPLES
3942 - Drag and Drop the terms in the order (top to bottom) that the development process should follow.
3945 - Which three options are principles of design? (Choose three.)
A Angling B Proximity C Scale D Contrast
Answer: B,C,D
3950 – What is a Serif type font?
A A font that meets the FFC standards B A font with semi-structural details on the ends of some of the strokes C A font that is compatible with any computer D A font that is uniform in its size and shape
Answer: B
3952 – What is a symbol in Illustrator?
A Any visual graphic created in your document B A special type of color swatch C An art object that you can reuse in a document D An interactive link found in a document
Answer: C
3953 – Which two options are vector drawing tools? (Choose two.)
A Pen tool B Lasso tool C Smooth tool D Slice tool
Answer: A and C
3960 - What is the difference between raster and vector graphics?
A Raster graphics use CMYK, while vector graphics use the RGB B Raster graphics are composed of pixels, while vector graphics are composed of path C Raster graphics are composed of swatches, while vector graphics are composed of arcs D Raster graphics can be exported, while vector graphics can only be saved
Answer: B
3964 - When exporting as BMP, which three color mode options do you have? (Choose three.)
A Bitmap B CMYK C Grayscale D RGB
Answer: A,C, D
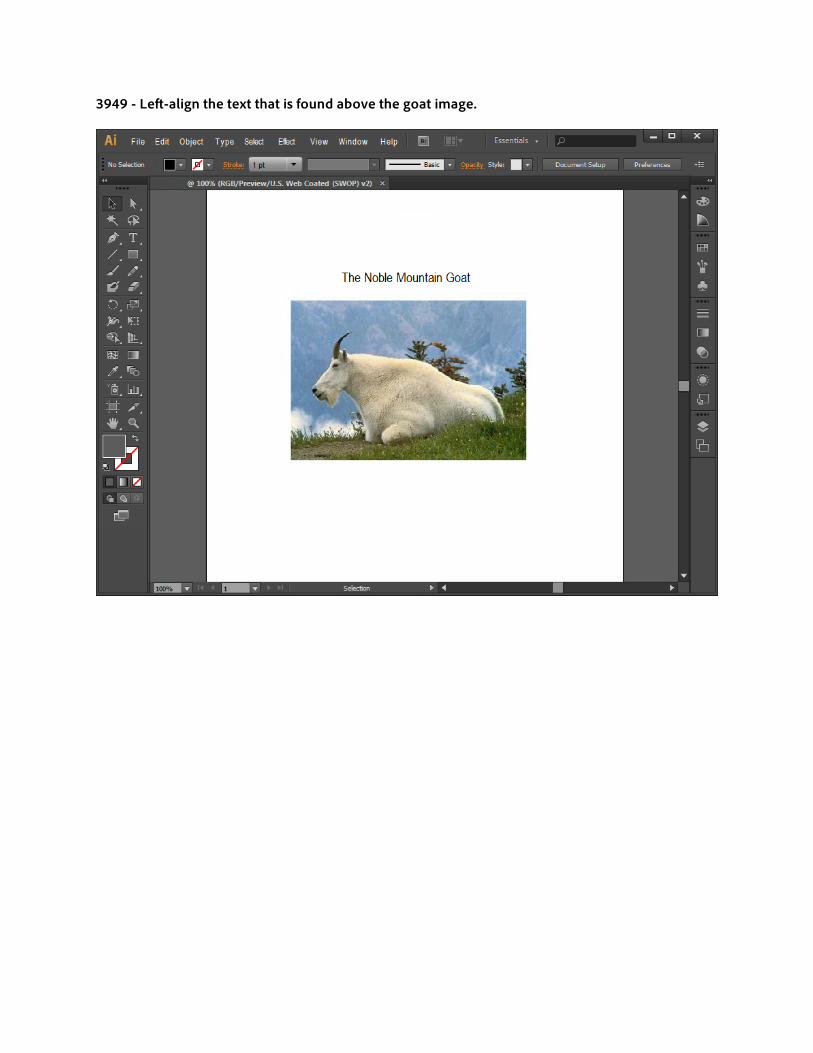
3949 - Left-align the text that is found above the goat image.
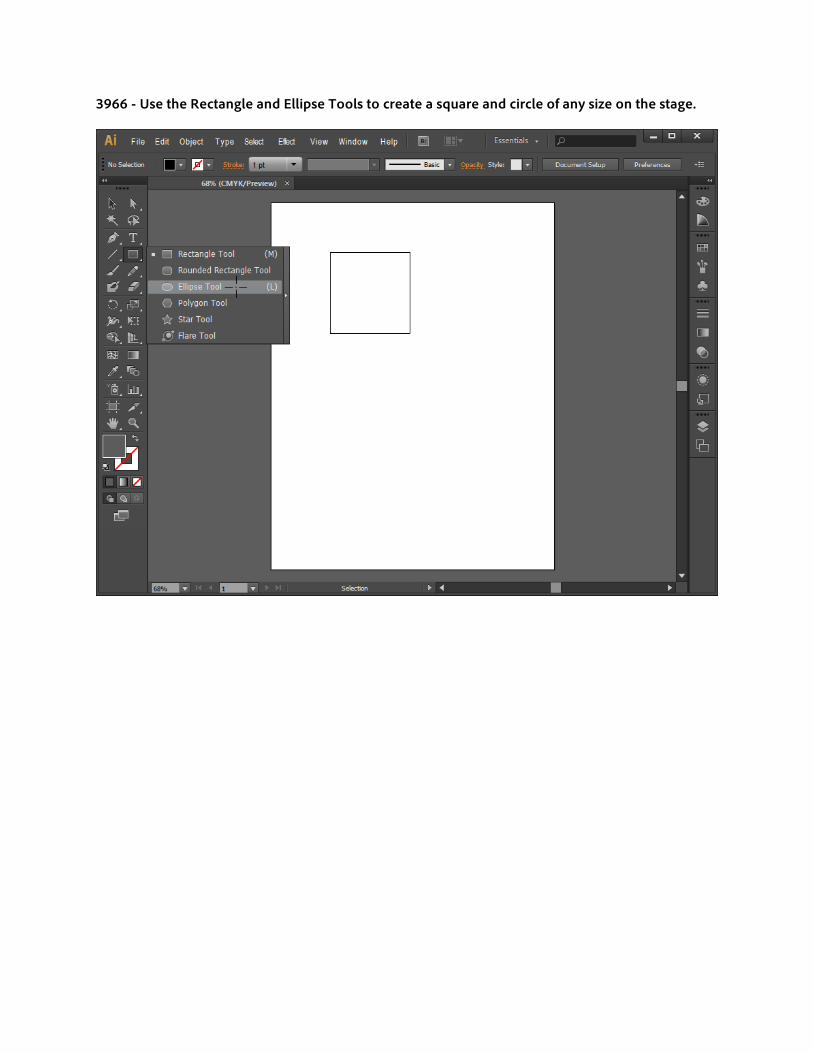
3966 - Use the Rectangle and Ellipse Tools to create a square and circle of any size on the stage.