Grand Canyon National Park Canyon National Park PO Box 129 Grand Canyon, Arizona 86023-0129 GEO- 1...
32
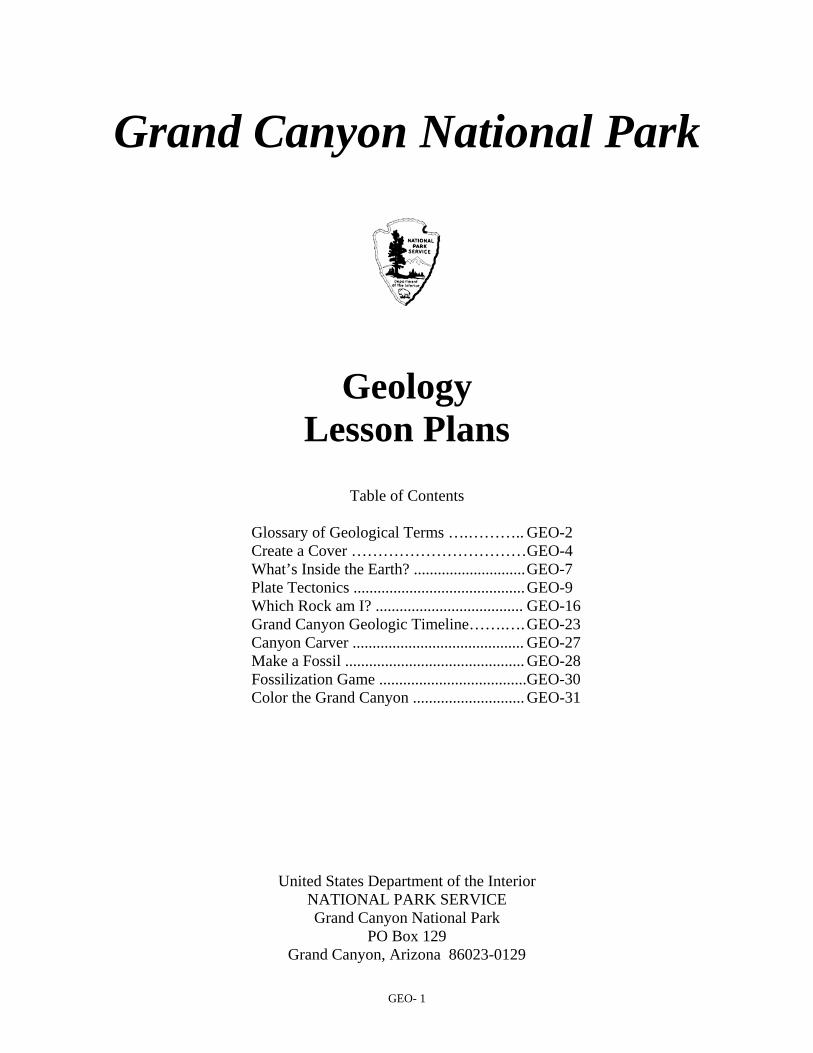
Grand Canyon National Park Geology Lesson Plans Table of Contents Glossary of Geological Terms ….……….. GEO-2 Create a Cover ……………………………GEO-4 What’s Inside the Earth? ............................ GEO-7 Plate Tectonics ........................................... GEO-9 Which Rock am I? ..................................... GEO-16 Grand Canyon Geologic Timeline…….…. GEO-23 Canyon Carver ........................................... GEO-27 Make a Fossil ............................................. GEO-28 Fossilization Game .....................................GEO-30 Color the Grand Canyon ............................ GEO-31 United States Department of the Interior NATIONAL PARK SERVICE Grand Canyon National Park PO Box 129 Grand Canyon, Arizona 86023-0129 GEO- 1
Transcript of Grand Canyon National Park Canyon National Park PO Box 129 Grand Canyon, Arizona 86023-0129 GEO- 1...
Grand Canyon National Park
Geology Lesson Plans
Table of Contents
Glossary of Geological Terms ….……….. GEO-2 Create a Cover …………………………… GEO-4 What’s Inside the Earth? ............................ GEO-7 Plate Tectonics ........................................... GEO-9 Which Rock am I? ..................................... GEO-16 Grand Canyon Geologic Timeline…….…. GEO-23 Canyon Carver ........................................... GEO-27 Make a Fossil ............................................. GEO-28 Fossilization Game .....................................GEO-30 Color the Grand Canyon ............................ GEO-31
United States Department of the Interior NATIONAL PARK SERVICE Grand Canyon National Park
PO Box 129 Grand Canyon, Arizona 86023-0129
GEO- 1
GEO- 2
Glossary of Geological Terms
Classification: the grouping or ordering of objects or organisms into categories based on shared or common characteristics. Colorado Plateau: a large geologic area uplifted thousands of feet in elevation covering parts of Arizona, Colorado, New Mexico and Utah. Colorado River: a major river of the southwestern United States, flowing 1450 miles from its headwaters in the Rocky Mountains of Colorado, through the Grand Canyon, and ending in the Gulf of California. Deposit: anything that is laid down, especially the settling of matter by a natural process. Dune: a mound, hill or ridge of windblown sand. Environment: the total of all of the surroundings – air, water, vegetation, human element, wildlife, climate, location – that has influence on something’s existence. Erosion: the slow wearing away of rocks or soil by natural processes, such as rain, wind, ice and snow. Fault: a fracture in bedrock along which movement has taken place. Fossil: the hardened remains or imprints of plants or animals preserved in stone or other material. Geography: the study of the earth’s surface features, and the distribution of life, including human life and the relationship of humans to their environment. Geology: the study of the origin, history and structure of the earth. Gneiss: a common metamorphic rock similar in composition to granite but in which the mineral grains are aligned in distinct bands. Granite: a common intrusive igneous rock that is hard, course grained, light colored, rock, and is composed primarily of quartz and feldspar or mica. Igneous Rock: rock formed from hot magma which then cools and hardens. Ex: granite Inner Gorge: the steep-walled gorge at the bottom of the Grand Canyon where the Colorado River flows. Lava: the general term for molten rock that erupts and cools at the Earth’s surface. Law of Superposition: states that in a sequence of rock layers, lying one on top of the other in the order they were originally deposited, the first layer deposited is the one on the bottom, thus the bottom layer is the oldest, and the top layer is the youngest. Limestone: a sedimentary rock consisting chiefly of the mineral calcite (calcium carbonate), often containing marine fossils. Magma: molten rock found beneath the surface of the earth.
GEO- 3
Metamorphic Rock: rock that has been subjected to high heat and pressure, causing it to change chemically or physically from its original form (unlike igneous rocks, metamorphic rocks never melted). Ex: Sedimentary limestone changes into metamorphic marble; Vishnu Schist is the dark-colored, metamorphic rock found at the bottom of the canyon. Mineral: a naturally occurring inorganic substance with a definite chemical and physical properties and a definite crystal structure. North Rim: the top of the north side of Grand Canyon, a less visited part of the park that is closed from mid-October through mid-May due to snow. The North Rim is approximately 8000 feet in elevation, which is 1000 feet higher than the South Rim. Paleontology: the study of fossils and ancient life forms. Plate Tectonics: the theory that the surface of the earth is made up of moving plates which are responsible for geologic activity, such as earthquakes, mountain ranges, and uplifts. Plateau: an elevated area of flat land. Radiometric Dating: a way to determine the age of various materials by watching the rate at which chemicals in the material break down. Sandstone: rock made mostly of sand-like quartz grains, often cemented in calcite or silica. Schist: a metamorphic rock with distinct parallel layering. Sedimentary Rock: rock that is formed when deposits of loose materials are cemented together, usually by lime or silica, to form layers. Ex: limestone, sandstone, and shale - the upper 4000 feet of visible rock at the Grand Canyon are sedimentary. Shale: a sedimentary rock composed primarily of fine-grained materials such as silt and clay; also called mudstone. Silica: quartz (silicon dioxide, SiO2), one of the most common rock-forming minerals. South Rim: the top of Grand Canyon on the south side where most people visit; open year-round. The elevation at the South Rim averages 7000 feet.
GEO- 4
Creating a Cover School Subjects Science; Art Grade Level 3rd – 5th AZ Standards Addressed
SC03-S1C4-01: Communicate investigations and explanations using evidence and appropriate terminology. SC03-S1C4-03: Communicate with other groups to describe the results of an investigation. SC04-S1C1-04: Locate information (e.g., book, article, website) related to an investigation. SC04-S1C4-01: Communicate verbally or in writing the results of an inquiry. SC04-S1C4-03: Communicate with other groups to describe the results of an investigation. SC05–S1C1-03: Locate information (e.g., book, article, website) related to an investigation. SC05-S1C4-01: Communicate verbally or in writing the results of an inquiry. SC05-S1C4-03: Communicate with other groups to describe the results of an investigation. VA-S1C2-202: Demonstrate purposeful use of materials, tools, and techniques in his or her own artwork VA-S1C4-302: Create artwork that communicate substantive meanings or achieve intended purposes
Lesson Overview Students create their own cover for the journal they will complete during a Dynamic Earth, Stories in Stone, or Grand Canyon Rocks program. The cover can include a collage of photos and/or drawings of rock formations found in Grand Canyon or representations of the 3 major rock types. Lesson Objectives Students will be able to identify the three main rock types, or families, and how they form. Additionally, they will be introduced to the idea of a journal as a tool for studying Grand Canyon and will understand how a creative and personal approach to their journal will increase their memory and understanding of Grand Canyon. Materials
• Construction paper (various colors may be used; size can be 8 ½ x 11 or 9 x 12) • Journal insert included in your confirmation packet for your in-park program with the Environmental
Education Office (make enough copies so each student will have one) • Magazines, brochures, or other media with photos of rocks near your hometown and/or from Grand
Canyon (for more introductory activities, see What Rock am I? on page 16 of this packet). • Scissors • Glue • Colored pencils, crayons, or markers • Staples and stapler • Optional: reference books on animals, encyclopedias, field guides, etc.
Background Information Rocks are continually changing. Wind and water wear them down and carry bits of rock away. Rock deep below the surface of the earth is being heated to the melting point. Movement of the plates exerts heat and pressure, metamorphosing existing rock. Modern geologists have classified rocks into three groups according to the major Earth processes that formed them: igneous, sedimentary, and metamorphic. You can see all three rock types at Grand Canyon National Park. Igneous rocks are formed from melted rock that has cooled and solidified. When rocks are buried deep within the Earth’s crust, they sometimes melt because of the high temperatures forming an underground mass of molten rock known as a magma chamber. This magma may rise to the surface and cause a volcanic eruption, or it may cool slowly underground. When magma cools slowly underground, large crystals grow from the molten liquid, and a course-grained rock, such as granite, forms. This is called an intrusive igneous rock. When magma erupts onto the earth’s surface the molten rock cools quickly. This rapid cooling does not allow time for
GEO- 5
large crystals to form, therefore the crystals are small and a fine-grained rock, such as basalt, is formed. This is called extrusive igneous rock, and is also known as volcanic rock. Sedimentary rocks are formed at the surface of the Earth, either in water or on land. They are layered accumulations of sediments – fragments of rocks, minerals, or animal or plant material. If a layer of sediment is buried beneath overlying rock, the layer becomes compacted and may form a layer of sedimentary rock. The sediment becomes cemented together by minerals and chemicals or is held together by electrical attraction. Sand and gravel deposits on beaches or in river bars look like the sandstone and conglomerate they may become. Compacted and dried mud flats harden into shale. Mud and shells settling on sea floors can cement into limestone. Metamorphic rocks are formed when sedimentary or igneous rocks are subjected to pressures so intense and/or heat so high that they are completely changed. The process of metamorphism does not melt the rocks, but instead transforms them by reorganizing and changing their crystalline structure. New minerals are created either by rearrangement of mineral components or by reactions with fluids that enter the rocks. Pressure or temperature can even change previously metamorphosed rocks into new types of metamorphic rock. Procedure 1. Prior to conducting the activity, begin collecting magazines, brochures and other printed media with canyon
images and photos of rocks found in Grand Canyon. You can also have students start bringing some of these items in from home, too. If you will be introducing rock types for the first time, consider asking students to bring a rock from home.
2. Tell the students that they will be making the front and back covers of a journal they will use during their field trip to Grand Canyon. Discuss the value of journals; in addition to recording observations, feelings and impressions, they are places to record important data to refer to later. Both words and artwork can be important ways to record all these things; and both recording methods will be used in the Dynamic Earth, Stories in Stone, or Grand Canyon Rocks journal. If you are not taking a fieldtrip to Grand Canyon, you can adapt this activity to meet your needs with another sort of journal.
3. If you had students bring rocks from home, have them study their rock, describe it and compare it with rocks other students brought into class. Use the student descriptions to suggest categories rocks are grouped into. Introduce or review the three rock types, or families, and how they form. Explain that Grand Canyon has examples of rocks in all three families. Though Grand Canyon has a lot of exposed rock in which to study the earth’s history, rocks are found in their backyard.
4. Hand out the construction paper – if you have a variety of colors, they can come up and choose which color they want. Have students fold the construction paper in half. Get out colored pencils, crayons, marking pens, or the like. Also get out the scissors, glue, tape and stapler.
5. If you have collected a lot of canyon and rock photos, have the students cut out at least one of each found in Grand Canyon*. Have them glue the photos to what will be their journal cover. Make sure they leave room to put their own name on the cover, too.
*if you don’t have enough photos, they can also draw the rocks or symbols to represent how they form. 6. Take the journal insert and have the students staple it into their journal cover such that their artwork forms
the outside front and back covers of their journal.
GEO- 6
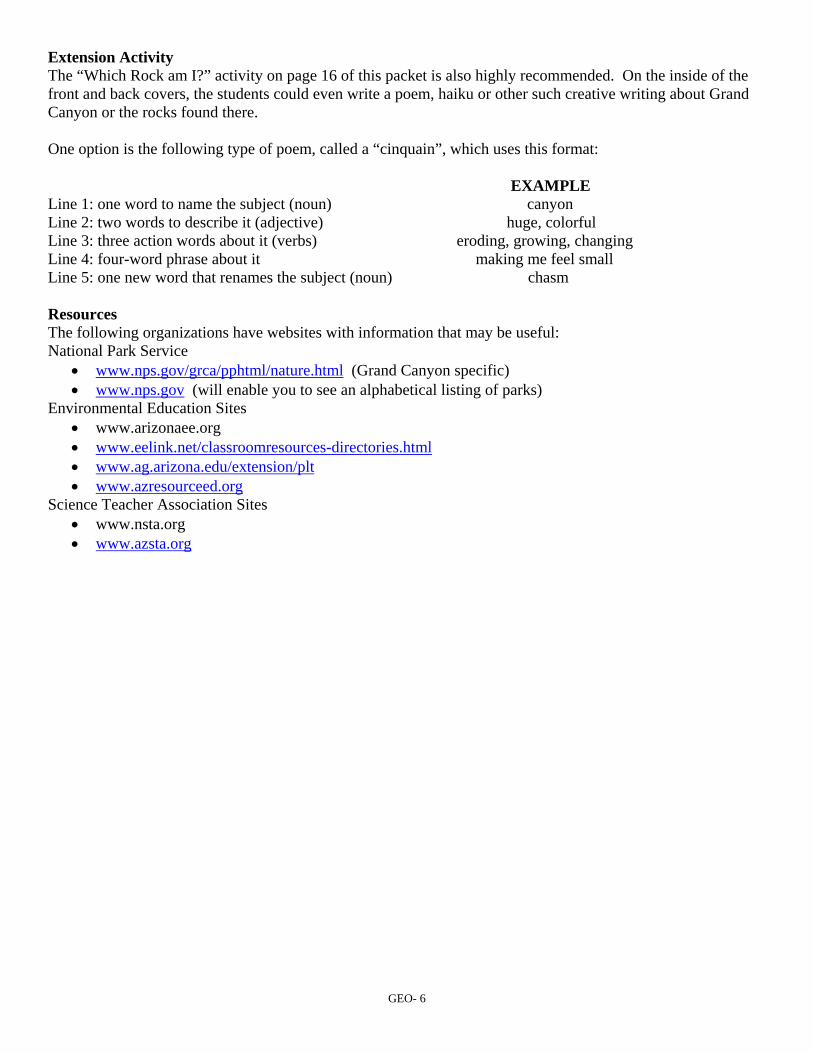
Extension Activity The “Which Rock am I?” activity on page 16 of this packet is also highly recommended. On the inside of the front and back covers, the students could even write a poem, haiku or other such creative writing about Grand Canyon or the rocks found there. One option is the following type of poem, called a “cinquain”, which uses this format: EXAMPLE Line 1: one word to name the subject (noun) canyon Line 2: two words to describe it (adjective) huge, colorful Line 3: three action words about it (verbs) eroding, growing, changing Line 4: four-word phrase about it making me feel small Line 5: one new word that renames the subject (noun) chasm Resources The following organizations have websites with information that may be useful: National Park Service
• www.nps.gov/grca/pphtml/nature.html (Grand Canyon specific) • www.nps.gov (will enable you to see an alphabetical listing of parks)
Environmental Education Sites • www.arizonaee.org • www.eelink.net/classroomresources-directories.html • www.ag.arizona.edu/extension/plt • www.azresourceed.org
Science Teacher Association Sites • www.nsta.org • www.azsta.org
GEO- 7
What’s Inside the Earth? School Subjects Science, Math Grade Level 3rd - 6th AZ Standards Addressed
SC03-S6C1-01: Identify the layers of the earth: crust, mantle, core SC03-S6C1-02: Describe the different types of rocks and how they are formed: metamorphic, igneous, sedimentary M03-S1C1-02: Compare and order whole numbers through six digits by applying the concept of place value.
Lesson Overview The students will practice using the concept of scale by constructing a scale model of the earth. Lesson Objectives This lesson will help the students to develop an understanding of the structure and materials of the earth’s interior. Materials
paper and crayons, markers, or colored pencils apple and knife construction paper (blue, orange, yellow, red, and white), scissors, and glue compass for drawing circles metric ruler food coloring (red and yellow) and baker’s clay mix: flour, salt, and water plastic wrap or bags, large knife, aluminum foil, oven, and poster paint/brush
Background Information In order to understand how the Grand Canyon came to be, it helps to have some basic knowledge of earth science including the theory of plate tectonics. To understand plate tectonics, it helps to know something about the earth’s interior. The planet earth is made up of three main parts: the crust, the mantle, and the core. The mantle and core are each divided into two parts. Although the core and mantle are about equal in thickness, the core actually forms only 15 percent of the Earth’s volume, whereas the mantle occupies 84%. The crust, which is very thin and brittle, makes up the remaining one percent. Our knowledge of the layering and chemical composition of the Earth is steadily being improved by earth scientists doing laboratory experiments on rocks at high pressure and analyzing earthquake waves traveling through the Earth. Because the crust is accessible to us, its geology has been extensively studied, and therefore much more information is known about its structure and composition than about the structure and composition of the mantle and core. By the large-scale process of plate tectonics, seven large plates and about a dozen smaller ones have moved about on the earth’s surface through much of geologic time. The edges of the plates are marked by concentrations of earthquakes and volcanoes. Collisions of plates can produce mountains like the Himalayas, the tallest range in the world. The plates include the crust and part of the upper mantle, and they move over a hot, yielding upper mantle zone at very slow rates of a few centimeters per year. The crust is much thinner under the oceans than under the continents. Between 100 and 200 kilometers below the Earth’s surface, the temperature of the rock is near the melting point; molten rock erupted by some volcanoes originates in this region of the mantle. This zone of extremely yielding rock is presumed to be the layer on which the tectonic plates ride. The lower mantle is made up of relatively simple iron and magnesium silicate minerals, which change gradually with depth to very dense forms.
GEO- 8
Based on how earthquake waves travel through the earth, the outer core is presumed to be liquid while the inner core is considered to be solid. The core is presumed to be composed principally of iron and nickel. Procedure 1. Have students draw a picture answering the questions below:
• Where do you live? • What is your house on top of? • What is the dirt on top of? • What are the rocks on top of?
2. Have a discussion on what the students believe the earth is made of and capture ideas on the board. 3. Present an apple as representing the earth. Cut the apple in half. Discuss the make up of the apple by talking
about it having skin, an inside, and a center. Discuss whether the earth would have similar characteristics. Point out that the skin could be the crust, the heart the mantle, the seed covering the outer core and the seed the inner core. On the back of their picture, have students draw the apple as a model of the earth with all parts named.
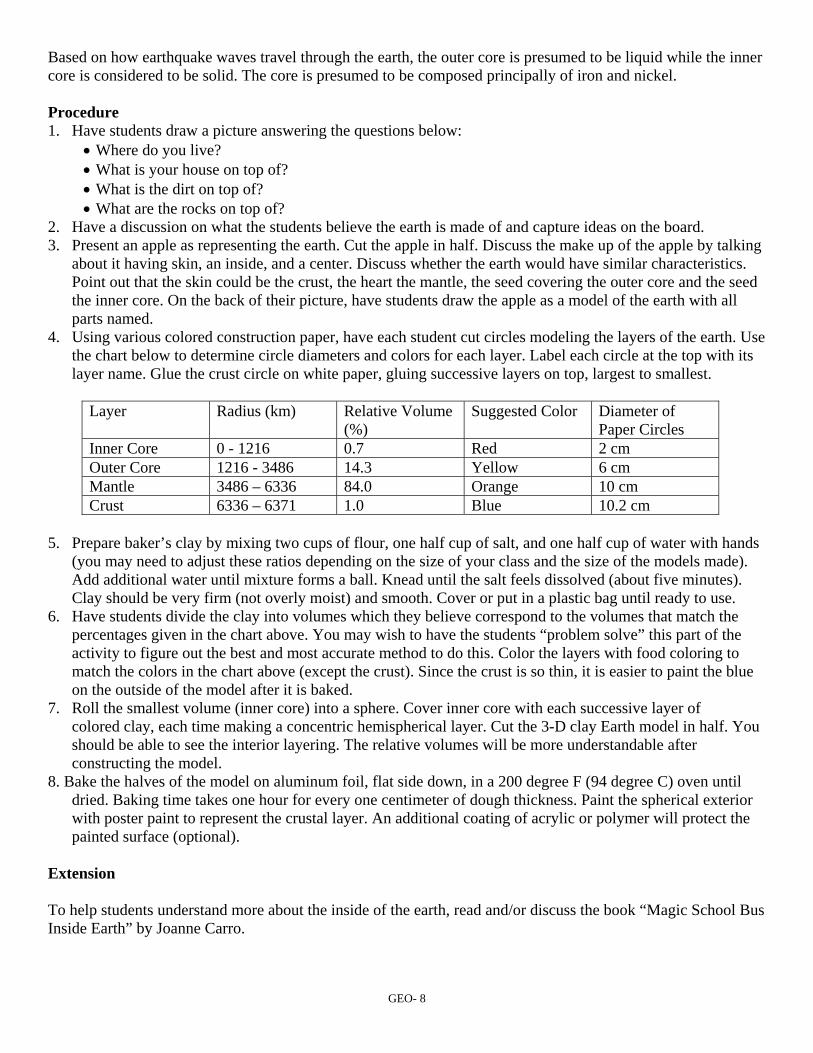
4. Using various colored construction paper, have each student cut circles modeling the layers of the earth. Use the chart below to determine circle diameters and colors for each layer. Label each circle at the top with its layer name. Glue the crust circle on white paper, gluing successive layers on top, largest to smallest.
Layer Radius (km) Relative Volume
(%) Suggested Color Diameter of
Paper Circles Inner Core 0 - 1216 0.7 Red 2 cm Outer Core 1216 - 3486 14.3 Yellow 6 cm Mantle 3486 – 6336 84.0 Orange 10 cm Crust 6336 – 6371 1.0 Blue 10.2 cm
5. Prepare baker’s clay by mixing two cups of flour, one half cup of salt, and one half cup of water with hands
(you may need to adjust these ratios depending on the size of your class and the size of the models made). Add additional water until mixture forms a ball. Knead until the salt feels dissolved (about five minutes). Clay should be very firm (not overly moist) and smooth. Cover or put in a plastic bag until ready to use.
6. Have students divide the clay into volumes which they believe correspond to the volumes that match the percentages given in the chart above. You may wish to have the students “problem solve” this part of the activity to figure out the best and most accurate method to do this. Color the layers with food coloring to match the colors in the chart above (except the crust). Since the crust is so thin, it is easier to paint the blue on the outside of the model after it is baked.
7. Roll the smallest volume (inner core) into a sphere. Cover inner core with each successive layer of colored clay, each time making a concentric hemispherical layer. Cut the 3-D clay Earth model in half. You should be able to see the interior layering. The relative volumes will be more understandable after constructing the model.
8. Bake the halves of the model on aluminum foil, flat side down, in a 200 degree F (94 degree C) oven until dried. Baking time takes one hour for every one centimeter of dough thickness. Paint the spherical exterior with poster paint to represent the crustal layer. An additional coating of acrylic or polymer will protect the painted surface (optional).
Extension To help students understand more about the inside of the earth, read and/or discuss the book “Magic School Bus Inside Earth” by Joanne Carro.
GEO- 9
Plate Tectonics School Subjects Science, Social Studies Grade Level 3rd - 8th AZ Standards Addressed
SS03-S4C1-01: Discuss that different types of maps serve various purposes. SS03-S4C1-06: Recognize characteristics of human and physical features. SS03-S4C1-07: Locate physical and human features using maps, illustrations, images, or globes. SC03-S6C1-01: Identify the layers of the earth: crust, mantle, core SC03-S6C1-02: Describe the different types of rocks and how they are formed: metamorphic, igneous, sedimentary SC03-S2C1-01: Identify how diverse people and/or cultures, past and present, have made important
contributions to scientific innovations. SC05-S2C2-01: Provide examples that support the premise that science is an ongoing process that changes in
response to new information and discoveries. SC05-S2C2-02: Explain the cycle by which new seientific knowledge generates new scientific inquiry. SC06-S2C2-01: Describe how science is an ongoing process that changes in response to new information and
discoveries. SC06-S2C1-02: Describe how a major milestone in science or technology has revolutionized the thinking of the
time. SC06-S2C2-02: Describe how scientific knowledge is subject to change as new information and/or technology
challenges prevailing theories. SC06-S2C2-03: Apply the following scientific processes to other problem solving or decision making
situations: observing, questioning, communicating, comparing, measuring, classifying, predicting, organizing data, inferring, generating hypotheses, identifying variables
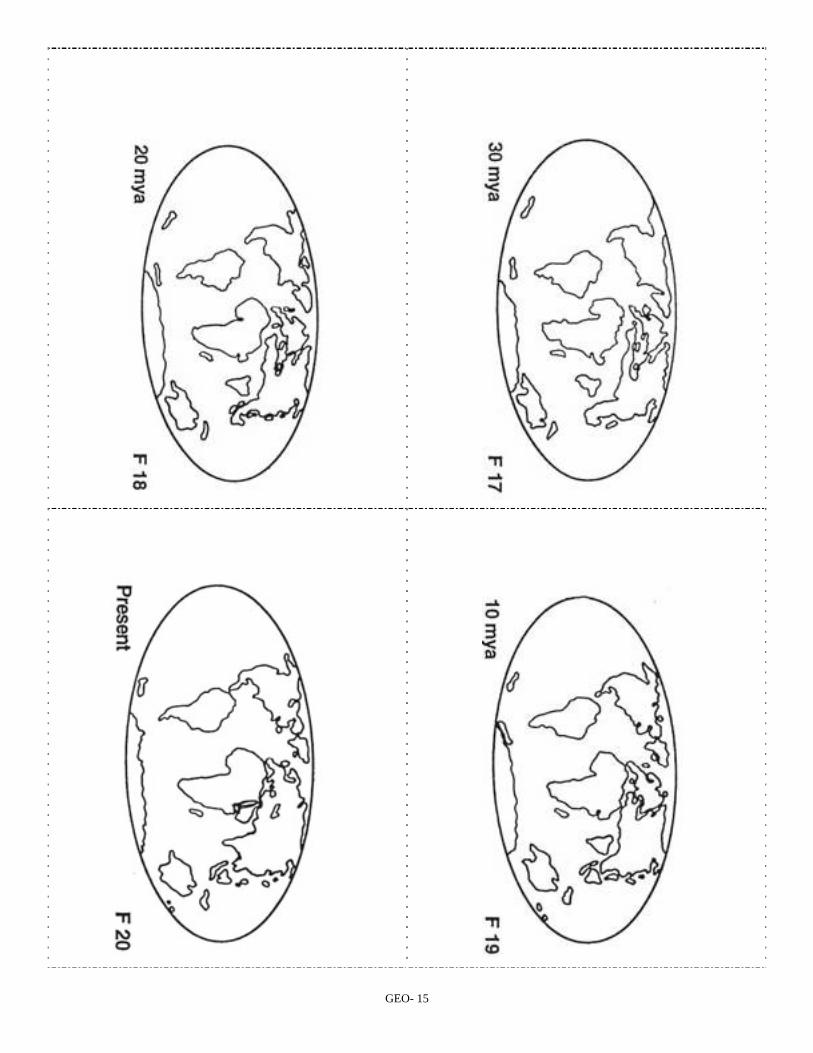
SC06-S5C3-04: Explain how thermal energy can be transferred by: conduction, convection, radiation Lesson Overview Students will label maps, and use them to demonstrate change over time due to plate tectonic movements. Lesson Objectives Students will become familiar with the theory of plate tectonics through an activity that helps them understand how continents move slowly over millions of years. This will help students on the field trip better understand the formation of Grand Canyon’s rock layers and the uplift of the Colorado Plateau. Materials
present day map of the world scissors, stapler (heavy duty best), and crayons, markers or colored pencils copies of figures 1-20 for each student (preferably on thick paper such as card stock), found on pages 6-10 calculator
Background Information The belief that continents have not always been fixed in their present positions was suspected long before the 20th century. However, it was not until 1912 that the idea of moving continents – called Continental Drift – was first proposed by a German meteorologist named Alfred Wegener. Wegener’s theory was based in part on what appeared to him to be the remarkable fit of the South American and African continents, by the occurrence of unusual geologic structures, and of plant and animal fossils found on matching coastlines. Drifting continents also helped explain the evidence of dramatic climate changes on some continents such as tropical plant fossils found in Antarctica. Wegener’s proposal was not well received at the time. However, after his death, new evidence from ocean-floor exploration and other studies rekindled interest in Wegener’s theory starting in the 1950s and the theory of plate tectonics was born. One of the exciting advances in geology has been the realization that the continents and substantial parts of the bordering ocean floor have slowly moved with respect to each other and that the outermost layer of the Earth’s crust is made up of lithospheric plates. As these thin plates of ocean and continental crust move, they change the

GEO- 10
positions of the continents; the theory that describes their formation, movement, and destruction is called plate tectonics. The North American plate is slowly moving at the rate of about an inch per year. About 200 million ears ago, a supercontinent (called Pangea) linked North and South America, Africa, and Europe. y
What drives plate tectonics? Most scientists believe the plates slowly move from the force of convection currents and from the creation of new crust. Below the rigid plates, hot, softened mantle, heated by radioactive decay and residual heat leftover from the formation of the earth, is slowly moving in a circular motion, somewhat like a pot of thick soup when heated to boiling. The heated soup rises to the surface, spreads and begins to cool, and then sinks back to the bottom of the pot where it is reheated and rises again. This cycle is repeated over and over to generate what scientists call a convection cell or convection flow. This circular
otion of the mantle carries the continents along in much the same way as a conveyor belt. m Look at an atlas, globe or map and identify the mid-ocean ridge, a series of huge mountain ranges that extend along the floors of the oceans. Along these ridges, the plates are moving away from each other. This is known as sea floor spreading. As they move apart, magma (molten rock) escapes from the mid-ocean ridge, cools and hardens, thereby adding to the crust at each side of the ridge. This theory is supported by dating the rocks on the ocean floor with radiometric dating. Rocks right at the mid-ocean ridge are the youngest; the further the rocks re from the mid-ocean ridge, the older they are. a
What happens to all the new sea floor that is created when magma escapes from the mid-ocean ridge? There are no rocks on the ocean floor older than 200 million years. In addition, our earth is not getting bigger, so for all the new crust that is created, some must be destroyed. This appears to happen where plates collide, and is called plate convergence. When two plates of different densities move toward one another, the denser plate slides under the other and it is forced back into the hot interior of the earth’s center. Places where one plate is forced under another are called subduction zones. Earthquakes and volcanoes are common along these convergent plate boundaries. Since oceanic crust is made of denser, heavier material than is continental crust, it (the oceanic plate) dives beneath the lighter continental crust when the two collide. Procedure 1. Discuss plate tectonics with the students. Look at a present day map of the world and use it as a key to name
each of the continents shown on Figure 20 (Present). MYA = Million Years Ago. 2. Have the students color the North American continent on each figure the same color, starting with Figure 20
and working back through time. (You can also have each student choose a different country or continent to color the same on each of their figures.)
3. Each student should then cut the rectangles apart, keeping each rectangle about the same size as the others. Assemble the rectangles by date with the present at the top or bottom of the stack. Align the right side of the rectangles and staple the books on the left side. Left-handed students may wish to reverse the alignment and staple area. A heavy duty stapler may be required.
4. Now each student can flip through their book to watch the continents move through time. If each student colored a different continent, students can trade books to see how other continents have moved. If the pages do not flip easily, students may need to slightly “stair-step” the pages from bottom to top. Heavier paper may also help.
5. North America has been moving northwestward at the rate of about an inch per year. Figure out how far it has come in the past 200 million years by using the following information; there are 5,280 feet per mile and 200 million is expressed mathematically as 200,000,000 (2 x 10⁸).
6. Now find where you live on a map and figure out approximately where it was 200 million years ago, using latitude and longitude. Look on the map and see what exists now at that longitude and latitude. What is the climate like at that spot? How does it compare to the climate where you live now?
*Adapted from Project Earth Science: Geology, by National Science Teachers Association, 1996.

GEO- 11
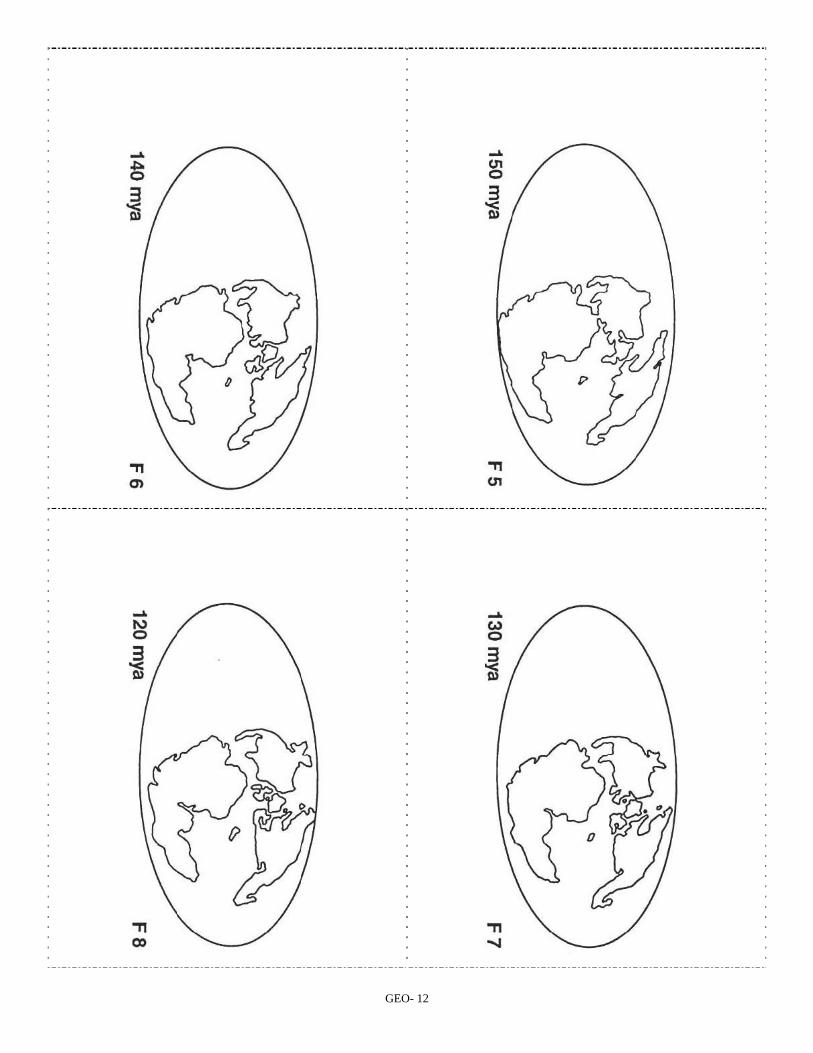
GEO- 12
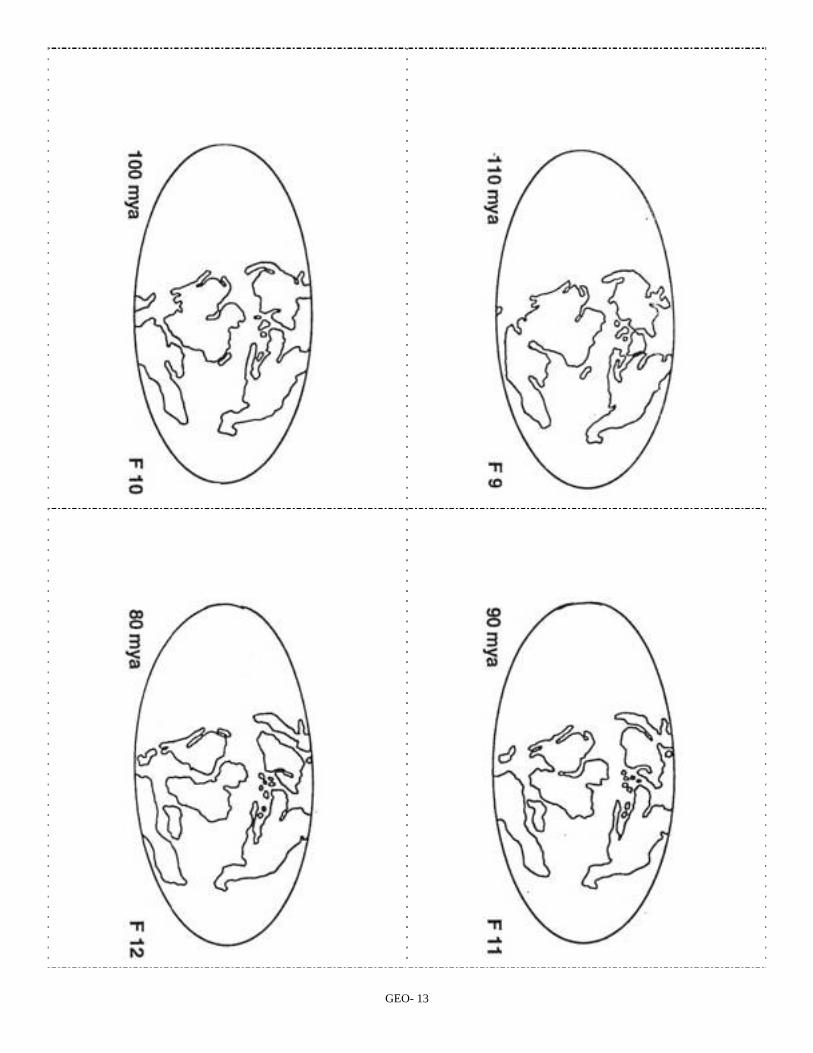
GEO- 13
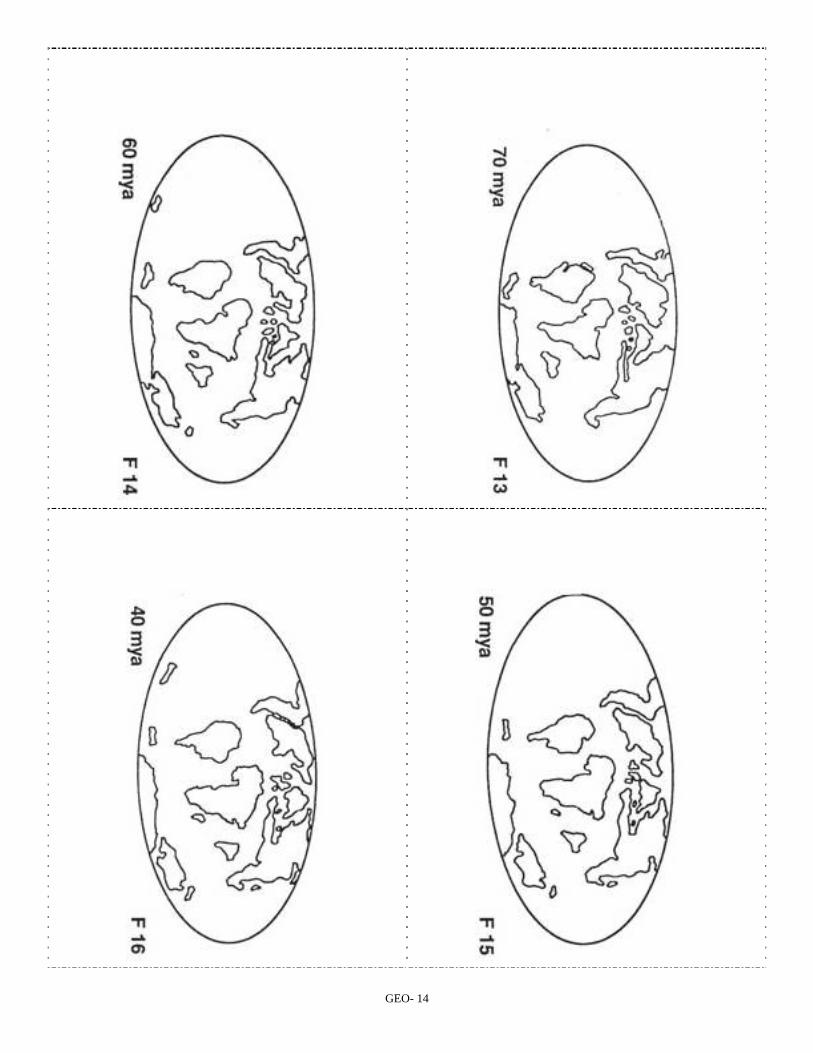
GEO- 14
GEO- 15

GEO- 16
Which Rock Am I?
School Subject Science Grade Level 3rd - 7th AZ Standards Addressed
SC03-S6C1-02: Describe the different types of rocks and how they are formed: metamorphic, igneous, sedimentary SC07-S6C1-07: Explain the following processes involved in the formation of the Earth’s structure: erosion, deposition, plate
tectonics, volcanism Lesson Overview After giving a brief explanation of the different types of rocks, students will listen to rock cycle process scenarios and go to the station that best describes the rock type. Lesson Objectives The student will learn about the three types of rocks (igneous, metamorphic and sedimentary), the rock cycle, the earth’s dynamic nature (rocks are ever-changing), and that the Grand Canyon has all three types of rocks (sedimentary being the most abundant). Materials
Signs for rock cycle game (pages 19-21) Examples of different rock types, or pictures if rocks are not available Optional, enough copies of the Rock Cycle Diagram for each student to label and color (page 22)
Background Information Rocks are continually changing. Wind and water wear them down and carry bits of rock away. Rock deep below the surface of the earth is being heated to the melting point. Movement of the plates exerts heat and pressure, metamorphosing existing rock. Modern geologists have classified rocks into three groups according to the major Earth processes that formed them: igneous, sedimentary, and metamorphic. You can see all three rock types at Grand Canyon National Park. Igneous rocks are formed from melted rock that has cooled and solidified. When rocks are buried deep within the Earth’s crust, they sometimes melt because of the high temperatures forming an underground mass of molten rock known as a magma chamber. This magma may rise to the surface and cause a volcanic eruption, or it may cool slowly underground. When magma cools slowly underground, large crystals grow from the molten liquid, and a course-grained rock, such as granite, forms. This is called an intrusive igneous rock. When magma erupts onto the earth’s surface the molten rock cools quickly. This rapid cooling does not allow time for large crystals to form, therefore the crystals are small and a fine-grained rock, such as basalt, is formed. This is called extrusive igneous rock, and is also known as volcanic rock. Sedimentary rocks are formed at the surface of the Earth, either in water or on land. They are layered accumulations of sediments – fragments of rocks, minerals, or animal or plant material. If a layer of sediment is buried beneath overlying rock, the layer becomes compacted and may form a layer of sedimentary rock. The sediment becomes cemented together by minerals and chemicals or is held together by electrical attraction. Sand and gravel deposits on beaches or in river bars look like the sandstone and conglomerate they may become. Compacted and dried mud flats harden into shale. Mud and shells settling on sea floors can cement into limestone. Metamorphic rocks are formed when sedimentary or igneous rocks are subjected to pressures so intense and/or heat so high that they are completely changed. The process of metamorphism does not melt the rocks, but instead transforms them by reorganizing and changing their crystalline structure. New minerals are created
GEO- 17
either by rearrangement of mineral components or by reactions with fluids that enter the rocks. Pressure or temperature can even change previously metamorphosed rocks into new types of metamorphic rock. Procedure 1. Explain there are many rocks that make up the earth’s crust, but science has categorized all the rocks into
three types: igneous, metamorphic and sedimentary. 2. Define an igneous rock and show an example. Igneous rock is molten material that has cooled and lithified
(hardened into rock). Igneous literally means ‘fire’ rock, so ask children words that have ‘ign” in them that mean fire (ignite, ignition).
3. Define metamorphic rock. Metamorphic rock is rock that has been changed through the process of extreme heat and pressure. ‘Morph’ means change. Caterpillars metamorphose into butterflies. Show an example of a metamorphic rock.
4. Define sedimentary rock. First define sediment, then explain sedimentary rocks are created from sediments that deposited and then cemented together, creating a rock. It is good to show sandstone for the example because it is easier to see the individual grains.
5. Ask students if an igneous rock today will always be an igneous rock. Ask if it can erode (break down) and become something else. Ask if it can become sedimentary rock (through weathering, erosion, deposition, cementation). Ask if it can change into a metamorphic rock (subject it to extreme heat and pressure-plate tectonics). Do this with each rock type until you have completed the entire “rock cycle.” Make sure that it is clear that these processes take millions of years.
6. Print out the six Rock Cycle Cards (cardstock is best). 7. Evenly space the rock cycle cards in a large, clockwise circle in the following order: S – Thermometer – M
– Volcano – I – Cloud. The circle size will vary depending on number of students and space available. The cards can be attached to sticks, posts, or taped on classroom walls. This activity is best done outdoors or in a gym, but can be done in the classroom, if space permits.
8. Break the students into three groups. Start one group at each rock type: I for igneous, S for sedimentary and M for metamorphic. There are two choices for each rock type which will direct the students to a different part of the rock cycle.
9. Hold up the number one or two (using fingers) and/or say the number to indicate which path the students should take (each rock type card has two choices listed for the students).
10. When the students get to the process cards (cloud for weathering/erosion, thermometer for heat/pressure, a volcano for volcanic activity) they will follow the instructions on the card (acting out the process), then proceed to the rock type indicated on the process card represented by a letter (I, S, or M).
11. Again, hold up one or two fingers and/or say the number. 12. Continue until each group has traveled each path represented on the rock cycle diagram. The following
sequence covers all the paths represented on the rock cycle diagram: 1, 2, 2, 1. 13. Optional: Hand out the Rock Cycle Diagram (page 22). Instruct the students to write-in the six parts
(Sedimentary, Heat and Pressure, Metamorphic, Melt, Igneous, Weathering and Erosion) in the rock cycle and then permit time for students to color the diagram.
Other thoughts:
Make sure students understand that this is the rock “cycle.” Any rock that is broken down through weathering and erosion, melted, or changed by heat and pressure, may become another rock type. Rocks can also undergo change and still remain part of the same rock type. For example: granite, an igneous rock, can be re-melted and released as lava from a volcano; forming a different igneous rock.
Activity follow-up questions: 1. What machine drives the rock cycle? (Plate tectonics) 2. Does the rock cycle ever stop? (no) 3. What are the 3 categories of rocks? (sedimentary, igneous, metamorphic)

GEO- 18
4. Could a rock go from a sedimentary rock to a metamorphic rock? Could a metamorphic rock become a sedimentary rock? Could a metamorphic rock become an igneous rock? (yes, to all)
5. Could a rock go through the entire cycle in our lifetime? (no) 6. Does geology move quickly or slowly compared to our lives? (slowly)
GEO- 19
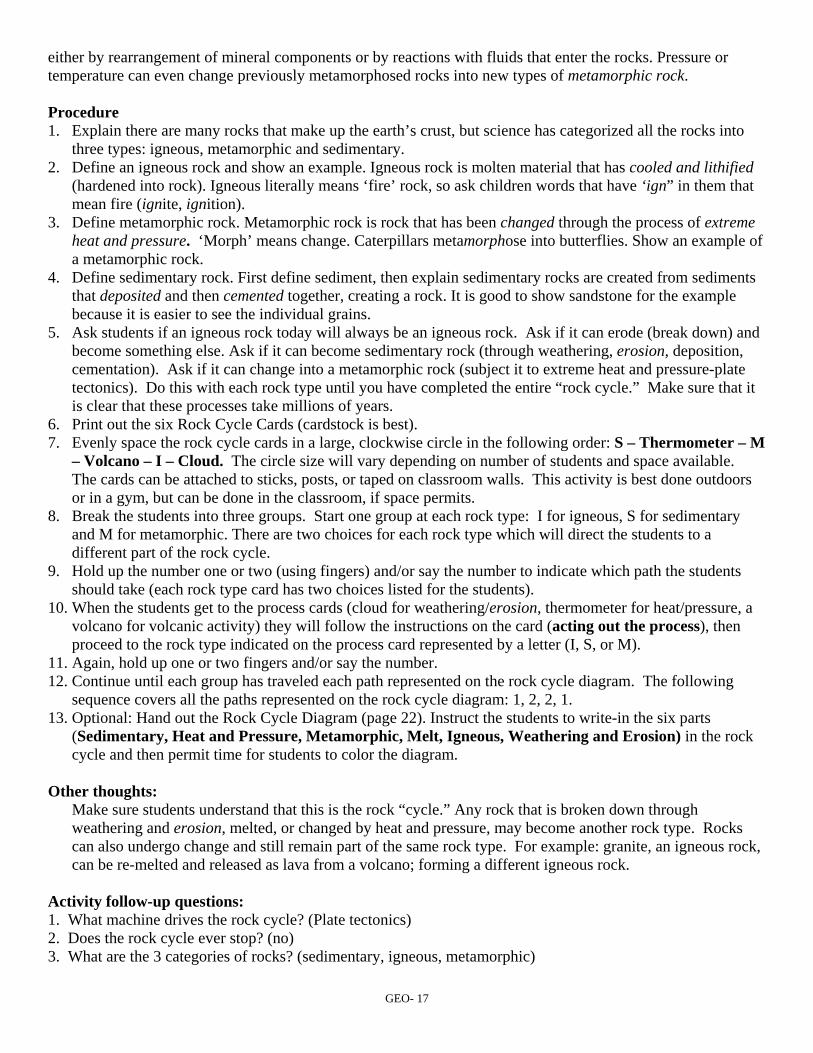
You started as magma and either cooled quickly above ground or cooled slowly underground. You are an igneous rock. Go to the number your teacher tells you. 1. Go to the Cloud. 2. Go to the Thermometer. - - - - - - - - - - - - - - - - - - - - - - - - - - - - - - - - - - - - - - - - - - - - - - - - - - - - - - - - - - - - - - - - - - - - - - - - - - - - -
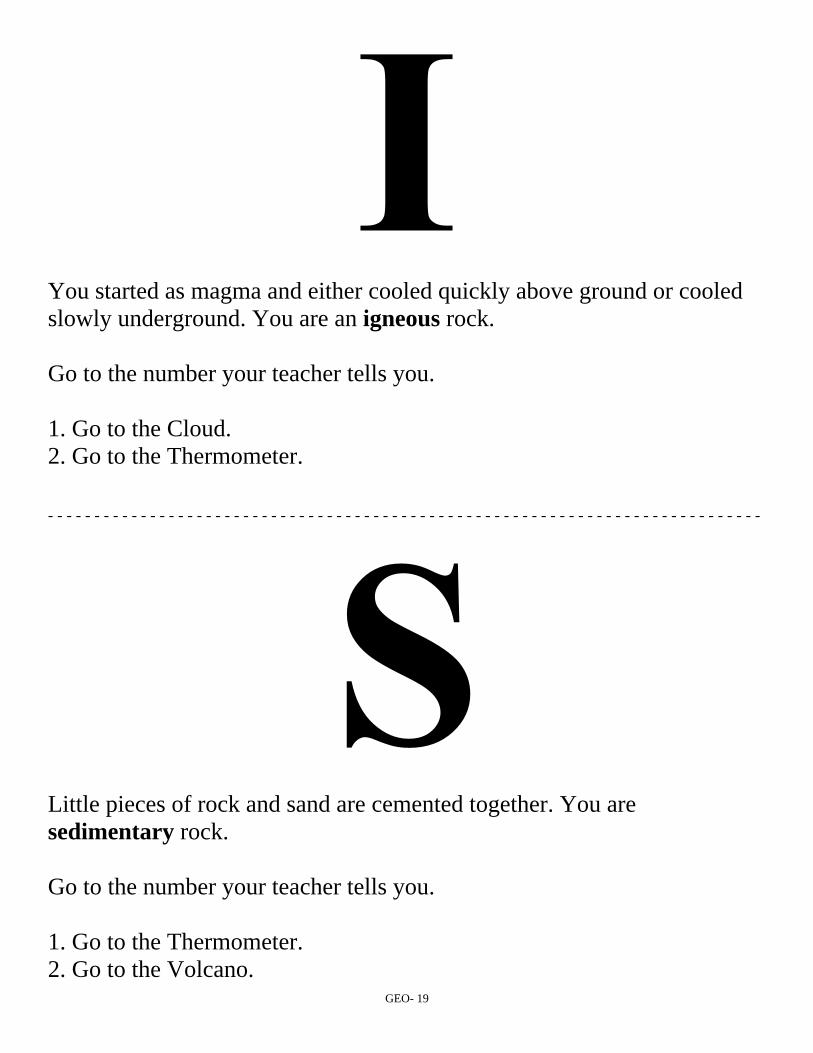
Little pieces of rock and sand are cemented together. You are sedimentary rock. Go to the number your teacher tells you. 1. Go to the Thermometer. 2. Go to the Volcano.

Rain, snow and ice are beating down on you. You break into little pieces. Act like you are getting wet from rain, snow and ice, then act like you are breaking into little pieces. Go to the S.
- - - - - - - - - - - - - - - - - - - - - - - - - - - - - - - - - - - - - - - - - - - - - - - - - - - - - - - - - - - - - - - - - - - - - - - - - - - - -
Two tectonic plates collide and you are feeling tremendous heat and pressure. Act like you are being squeezed and are getting really hot! Go to the M.
GEO- 20
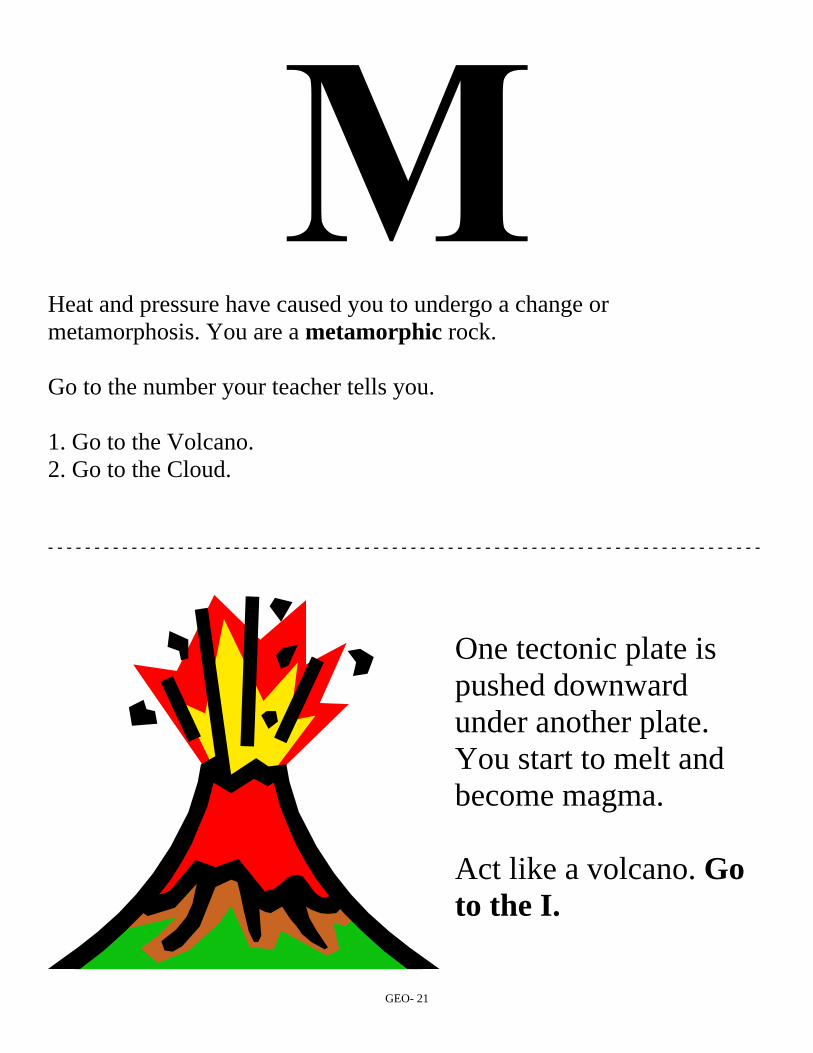
Heat and pressure have caused you to undergo a change or metamorphosis. You are a metamorphic rock. Go to the number your teacher tells you. 1. Go to the Volcano. 2. Go to the Cloud. - - - - - - - - - - - - - - - - - - - - - - - - - - - - - - - - - - - - - - - - - - - - - - - - - - - - - - - - - - - - - - - - - - - - - - - - - - - - -
One tectonic plate is pushed downward under another plate. You start to melt and become magma. Act like a volcano. Go to the I.
GEO- 21
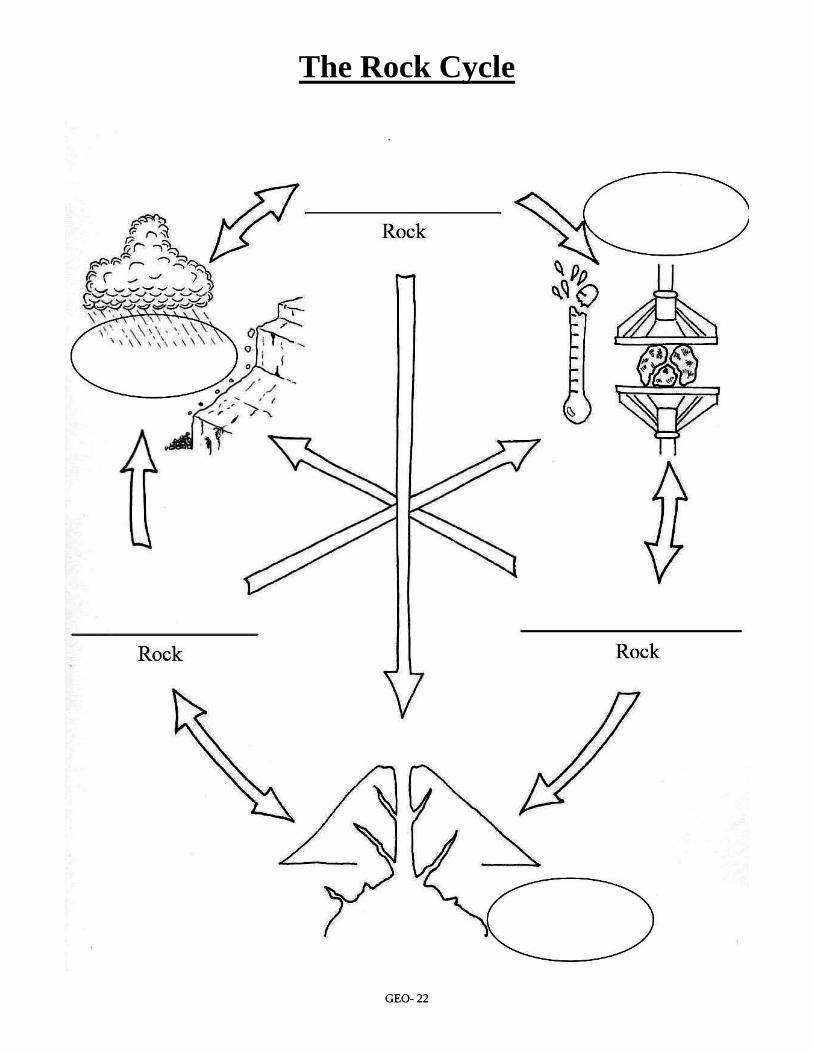
The Rock Cycle
GEO- 22 GEO- 22
GEO- 23
Grand Canyon Geologic Timeline School Subjects Science, Social Studies Grade Level 3rd - 7th AZ Standards Addressed
SS03-S1C1-01: Use timelines to identify the time sequence of historical data SC03-S6C1-02: Describe the different types of rocks and how they are formed: metamorphic, igneous, sedimentary SC03-S6C1-03: Classify rocks based on the following physical properties: color, texture SC03-S6C1-04: Describe fossils as a record of past life forms SS05-S1C1-02: Construct timelines of the historical era being studied SS06-S1C1-03: Construct timelines of the historical era being studied SS07-S1C1-03: Construct timelines of the historical era being studied SC07-S6C1-07: Explain the following processes involved in the formation of the Earth’s structure: erosion, deposition, plate
tectonics, volcanism Lesson Overview Students will construct a timeline of the Earth’s geologic history. Lesson Objectives Students will be able to describe the sequence of geologic events that occurred to form Grand Canyon. Through this exercise, students will begin to conceptualize a relationship between human historical events and geologic events. Materials
Download the GEOLOGIC TIMELINE CARDS available on the park’s website at <http://www.nps.gov/grca/forteachers/lessonplansandteacherguides.htm>
markers, crayons, and/or colored pencils large piece of butcher paper at least 46 feet long (optional) measuring tape
Background Information The earth is very old — about 4½ billion years — based on current scientific research. This vast span of time, called geologic time by earth scientists, is difficult to comprehend in the familiar time units of months and years, or even centuries. How then do scientists reckon geologic time, and why do they believe the Earth is so old? The evidence for an ancient Earth is concealed in the rocks that form the Earth’s crust and surface. The rocks are not all the same age—or even nearly so—but, like the pages in a long and complicated history, they record the Earth-shaping events and life of the past. The record, however, is incomplete. Many pages, especially in the early parts, are missing and many others are tattered, torn, and difficult to decipher. But enough of the pages are preserved to reward the reader with accounts of astounding episodes which certify that the Earth is billions of years old. The oldest known rocks on Earth are close to four billion years old. They are found on the shores of Great Slave Lake in Canada’s Northwest Territory and in remote areas of Greenland. The rock layers of Grand Canyon range in age from 1800 million years old at the bottom of the canyon to 270 million years old at the top. The canyon landscape we see today, however, is relatively young, having been sculpted in just the last 5-6 million years. The metamorphic rocks, found in the Inner Gorge at the bottom of the canyon formed when sedimentary rocks were subjected to igneous intrusions followed by deep burial. Subsequent flooding by inland seas and windy desert conditions deposited and then reworked the sedimentary rock layers above them. The canyon seen today is relatively young, having been sculpted in just the last 5-6 million years. The Colorado River carved through many rock layers to create Grand Canyon. Lateral erosion widened the canyon.
GEO- 24
Procedure 1. Create a timeline with the measuring tape or piece of butcher paper. Determine how long you want the
timeline to be. Remember we’re covering 4.6 billion years (4,600 million years) of geologic history. The longer the timeline, the better. We suggest a 46-foot timeline, which means: 1 foot = 100 million years
2. Make geologic time cards by cutting apart the following geologic events (see pages 24 – 26). If desired, you can cut and paste each geologic event description on 8 ½ x 11 paper or heavy stock. This allows room for the drawing described in step 3. As an alternative you can print out the GEOLOGIC TIMELINE CARDS available on the park’s website (see above web address). These cards already have artwork depicting the past environments/events.
3. Students can work individually or in groups. Give each group a Grand Canyon geologic time card. Have the students draw a picture on the card to represent the event listed on their card.
4. Ask the students to take five minutes to decide where they think their card should be placed on the Earth timeline. You may need to discuss scale on a timeline.
5. Each team makes a short presentation to the group explaining why and where they think their card should go and then placing it in the appropriate location on the timeline.
6. Walk through the timeline in chronological order, discussing the major geological events with respect to the depositional environment and the type of rock left behind. Explain that the rock had to be deposited before the canyon could ever exist.
7. Once the cards are in place ask questions such as: -What took longer, the building of layers or the carving of the canyon? -We usually think of dinosaurs as very old. But, looking at the timeline, can dinosaur fossils be found in the layers of Grand Canyon? (Answer: No, all the rocks are older than the dinosaurs). Are dinosaurs old compared to the oldest rocks at Grand Canyon? -How does a timeline help you see or learn more than just order of events through time? -Where do you fit on the timeline? (Answer: Human history is less than the width of a strand of hair on the 46 foot timeline).
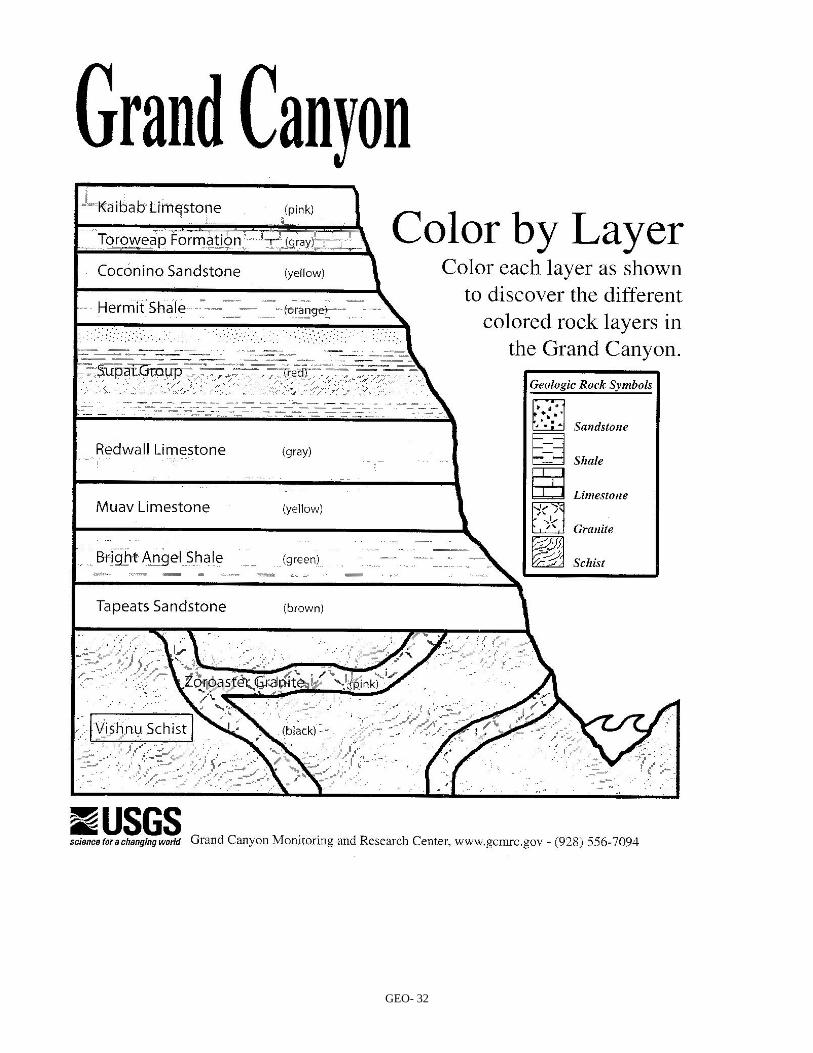
Extension: Have students do further research on their rock’s depositional environment before drawing the picture. (Ex: what is a brachiopod, cephalopod, cross-bedding, trilobite, why do some rocks form slopes and others cliffs, etc…) - - - - - - - - - - - - - - - - - - - - - - - - - - - - - - - - - - - - - - - - - - - - - - - - - - - - - - - - - - - - - - - - - - - - - - - - - - - - - 1.7 – 1.8 Billion Years Ago: The Vishnu Schist and other basement rocks formed Precambrian Era
Metamorphic rocks and intrusive igneous rocks formed deep within the earth’s crust when volcanic islands created by subduction collided with the ancestral North American Plate. Life did not yet exist on the earth. The Vishnu Schist is the dark colored metamorphic rock that forms the narrow gorge at river level in the bottom of the Grand Canyon. Other basement rocks, such as Zoroaster Granite, are intrusive igneous rocks that look like pink veins running through the darker-colored metamorphic gorge. These are the oldest exposed rocks at Grand Canyon National Park.
GEO- 25
515 Million Years Ago: The Bright Angel Shale formed Paleozoic Era (Cambrian Period) The Grand Canyon area was covered by a very muddy, warm, shallow sea. Trilobites, brachiopods, crinoids and worm-like creatures that burrowed in the sea-floor thrived in the nutrient-rich water. This greenish-colored shale forms the broad, flat area known as the Tonto Platform in the Grand Canyon. - - - - - - - - - - - - - - - - - - - - - - - - - - - - - - - - - - - - - - - - - - - - - - - - - - - - - - - - - - - - - - - - - - - - - - - - - - - - - 340 Million Years Ago: The Redwall Limestone formed Paleozoic Era (Mississippian Period) North America lay close to the equator. The Grand Canyon area was covered by a shallow, warm, clear and well-lit sea where crinoids lived in abundance. Other species included corals, bryozoans, brachiopods, and cephalopods. This limestone layer creates a 500 foot cliff in most areas of the Grand Canyon. While the limestone itself is gray in color, the surfaces of the exposed cliffs are stained red by iron that seeps down from the layers above with rain and snow melt. - - - - - - - - - - - - - - - - - - - - - - - - - - - - - - - - - - - - - - - - - - - - - - - - - - - - - - - - - - - - - - - - - - - - - - - - - - - - - 315- 285 Million Years Ago: The Supai Group formed Paleozoic Era (Pennsylvanian and early Permian Periods) The Grand Canyon area was covered by rapidly changing coastlines as sea levels rose and fell. Therefore, the Grand Canyon area was sometimes covered with beaches and dunes, and sometimes covered with sea water. The marine environments contained a rich population of brachiopods, while the terrestrial environments hosted a sparse distribution of plants. Both environments contained multiple types of burrowing creatures. This layer consists of a wide variety of rock types, including limestones, mudstones, and sandstones that form a series of cliffs and slopes, which look like stairs into the Grand Canyon. - - - - - - - - - - - - - - - - - - - - - - - - - - - - - - - - - - - - - - - - - - - - - - - - - - - - - - - - - - - - - - - - - - - - - - - - - - - - - 280 Million Years Ago: The Hermit Formation formed Paleozoic Era (Permian Period) The Grand Canyon area was covered by a broad coastal plain fed by multiple slowly meandering streams. The environment was prime habitat for an abundance of ferns and conifers, along with reptiles and insects, including dragonflies with three-foot wingspans. This layer consists of siltstones, mudstones, and fine grained sandstones rich in iron that create a gentle slope in most parts of Grand Canyon National Park. - - - - - - - - - - - - - - - - - - - - - - - - - - - - - - - - - - - - - - - - - - - - - - - - - - - - - - - - - - - - - - - - - - - - - - - - - - - - - 275 Million Years Ago: The Coconino Sandstone formed Paleozoic Era (Permian Period) North America lay near the equator. The Grand Canyon area was covered with coastal dune-fields that reached as far north as present day Monument Valley, and as far south as Sedona. The ocean lay to the west. Reptiles, spiders, scorpions, and other insects dwelled on the sand dunes of this extensive desert. This sandstone layer creates a broad, light-colored cliff a few hundred feet below the rim of Grand Canyon. Cross-bedding (lines that run at steep angles to one-another) can be seen in the rock, giving evidence to the sand dunes that once covered the area.
GEO- 26
270 Million Years Ago: The Kaibab Formation formed Paleozoic Era (Permian Period) North America was the western part of the super-continent Pangaea. The Grand Canyon region was once again covered by a shallow, warm, and well-lit clear sea with a sandy/muddy floor. The coast was nearby and to the northeast. Brachiopods and sponges dominated these waters. Other species included crinoids, corals, bryozoans, cephalopods, sharks and fish. This limestone is the top-most layer, and thus the youngest rock, found at Grand Canyon National Park. - - - - - - - - - - - - - - - - - - - - - - - - - - - - - - - - - - - - - - - - - - - - - - - - - - - - - - - - - - - - - - - - - - - - - - - - - - - - - 245 Million Years Ago: Dinosaurs First Appear Mesozoic Era (Triassic, Jurassic, and Cretaceous periods) The Paleozoic Era ended about 250 million years ago with the largest mass extinction known; 90% of all known living organisms died. Thus began the Mesozoic Era, known as the Age of the Reptiles. Reptiles during the Mesozoic dominated the land, skies and seas. Most well-known are the dinosaurs, which first appear 230 million years ago and evolved into the largest land animals ever known. They walked with their legs tucked under their bodies, unlike living reptiles, which have splayed legs. - - - - - - - - - - - - - - - - - - - - - - - - - - - - - - - - - - - - - - - - - - - - - - - - - - - - - - - - - - - - - - - - - - - - - - - - - - - - - 65 Million Years Ago: Dinosaurs Went Extinct End of Cretaceous Period (End of Mesozoic Era) Approximately 50% of all known living species, including the dinosaurs, died out at the end of the Cretaceous Period (this also marks the end of the Mesozoic Era). This extinction coincides with the impact of a large meteorite in the Caribbean Sea off the Yucatan Peninsula in Mexico. The resulting shock waves, tidal waves, and intense heat, followed by years of cold and darkness, are all thought to have contributed to the disappearance of so many life forms. - - - - - - - - - - - - - - - - - - - - - - - - - - - - - - - - - - - - - - - - - - - - - - - - - - - - - - - - - - - - - - - - - - - - - - - - - - - - - 60 Million Years Ago: Colorado Plateau Uplift Began The Colorado Plateau was lifted up high above sea-level during the Laramide Orogeny, a mountain-building event that culminated in the uplift of the Rocky Mountains. - - - - - - - - - - - - - - - - - - - - - - - - - - - - - - - - - - - - - - - - - - - - - - - - - - - - - - - - - - - - - - - - - - - - - - - - - - - - - 5-6 Million Years Ago: The Colorado River began to carve Grand Canyon There is much debate as to how the Colorado River started to carve the Grand Canyon, however geologic evidence indicates that the canyon is no more than 5 or 6 million years old. The Colorado River is 1,400 miles long and empties into the Gulf of California, which itself is no older than 5.5 million years old. - - - - - - - - - - - - - - - - - - - - - - - - - - - - - - - - - - - - - - - - - - - - - - - - - - - - - - - - - - - - - - - - - - - - - - - - - - - - - Present Day Dynamic geologic processes are at work today. Even Grand Canyon is not static and continues to slowly become wider and deeper as the processes of weathering and erosion endlessly grind away at the rock.

Canyon Carver School Subject Science Grade Level 4th AZ Standards Addressed
SC04-S6C2-01: Identify the earth processes that cause erosion. SC04-S6C2-03: Describe the role that water plays in the following processes that alter the Earth’s surface features: erosion, deposition, weathering SC04-S6C3-01: Identify the sources of water within an environment. SC04-S6C3-03: Differentiate between weather and climate as they relate to the southwestern United States.
Lesson Overview Students will demonstrate the process of erosion (transportation of sediment by water) using the milk carton technique. Lesson Objective Students will learn the basics of erosional processes and how they form the landscape of Grand Canyon. Materials (each group of two or more students will need)
1.9-L milk carton 2.0-L (water) bottle source of sediment (sand or potting soil) ruler
scissors source of water garden trowel
Background Students often know that rivers such as the Colorado River can be muddy. But they may not know that some of the sediment (sand, silt, and clay) that makes the river muddy comes from the riverbed itself and is a result of the river cutting down. The canyon, and all of the formations within it, resulted directly from weathering and erosion in various forms. The Grand Canyon is one of the world’s greatest examples of arid land erosion through layers of stratified rock. Procedure 1. Provide each team with an empty half-gallon milk carton. 2. Use scissors to cut out the side panel of the carton under the spout, leaving the spout intact. For younger
students, you may prefer to do this cutting ahead of time. 3. (You may wish to continue this activity outside; don’t forget all the necessary materials.) Lay the carton on
its side with the cut out panel facing up. Fill the container about half full with the sediment, of which you may wish to smooth the surface.
4. To simulate a flowing river, set one end of the carton approximately 1-cm higher than the other end, using something to prop it up such as a rock or piece of bark. Be sure the lower end of the carton is the one with the spout.
5. Place the mouth of the (water) bottle on the higher end and slowly pour the water out. The water should flow steadily down and out the spout end. Remember, the water flow will be directly affected by your sediment choice and degree of its saturation.
6. Continue repeating steps 3-5, but raise the elevated end a cm or two at a time. Then discuss the various depths and formations created.
GEO- 27
GEO- 28
Make a Fossil School Subject Science Grade Level 3rd - 4th AZ Standards Addressed
SC03-S6C1-04: Describe fossils as a record of past life forms. SC03-S6C1-05: Describe how fossils are formed. SC04-S6C2-06: Analyze evidence that indicates life and environmental conditions have changed.
Lesson Overview Students will simulate making a fossil. Lesson Objectives Students will learn what fossils are and how they are formed. Students will also understand how fossils and the rock layers they are found in can be used as clues to the past. Materials
clear plastic cups, petroleum jelly, and tubs of various colored mud something to scoop mud with (scoops, trowels, large spoons, etc.) shells, leaves, plastic animals and/or their tracks, plastic plants, bones (cleaned chicken bones work
well) small digging tools such as toothpicks, spoons, etc. paper, pencil or pen, and art supplies such as crayons, colored pencils, etc. optional: Plaster of Paris, disposable cups (7 oz.), plates and spoons, modeling clay, and water
Background A fossil is any evidence of ancient life. This evidence may be the actual remains, such as bone, teeth, shells or plant tissues; chemically altered remains; or traces of the activities of organisms, such as burrows and tracks. Paleontology is the study of fossils. Scientists who study fossils are paleontologists. Paleontologists use fossils to reconstruct ancient life, using what we know about the present to understand the past and drawing upon the sciences of geology and biology. Paleontology is often confused with archaeology, which is the study of ancient humans and their cultures. The focus of paleontology is the history of life on earth, from its beginnings approximately 3.6 billion years ago, up to the advent of human culture about 10,000 years ago. Except for rare occurrences, fossils are found only in sedimentary rocks. Upon death, most plant and animal remains are soon digested by bacteria and other living organisms. Thus some of the organic elements of life are recycled to build new organisms. Rare and special circumstances are necessary for any parts or traces of an organism to be preserved as a fossil. Preservation usually requires that an organism or its remains be buried rapidly, be insulated from oxygen and decay-producing organisms, and remain buried and undisturbed. Under even the best of conditions, the preservation of soft parts is exceptionally rare. Usually only hard skeletal elements are preserved as fossils. Fossils are not always the actual remains of living organisms. Many fossils are just copies called imprints, molds, or casts. Imprints are impressions made by organisms in soft sediment that were preserved when the sediment solidified. Imprints can be traces of an animal’s activity, rather than its actual remains. The hardened tracks of animals or the burrows of prehistoric worms in solidified mud are examples of fossil imprints. Molds are made when organisms are totally or partially buried in sediment that hardens into rock. Over time, ground water may dissolve the organisms, leaving cavities shaped like their bodies. Both imprints and molds are mirror images of the organisms. If a mold was later filled with mud or mineral material, the hardened filling is called a cast. It is a reproduction that has the same outer shape as the organism. A cast looks like the organism itself, not
GEO- 29
like its imprint. Paleontologists make casts of fossil molds by filling them with liquids, such as plaster, that harden. Procedure 1. Ask the class what they think a fossil is and how they think fossils are formed. Tell them that they are now
going to simulate the making of a fossil. 2. Distribute a clear, plastic cup to each student, or distribute one cup to each group if they will be working
cooperatively. Grease the inside of the cup with a thin layer of petroleum jelly. Have several tubs of mud available, preferably of different shades or colors. Explain that they are going to simulate a body of water (lake, ocean, etc.) in which sediment (mud, sand, etc.) is slowly being deposited. In this water body, plants and animals fall to the bottom when they die. Add liquid mud to the cup in increments, alternating colors and allowing the mud to settle between each addition. Have the students add small shells, leaves, plastic animals/plants, or bones on top of some of the layers of mud. Choose only one type of item for each layer. Ask the students which layer is the “oldest” (that is, which layer is laid down first) and which is the “youngest” (that is, which layer is laid down last). Tell them that this is known in geology as the law of superposition which states that, in any sequence of sedimentary strata (layers) that has not been overturned, the youngest stratum is at the top and the oldest is at the base.
3. Dry the sediment. The drying of the mud simulates turning the sediment into rock. Drying will take place much faster if the cups are placed in a warm, dry place for a few hours. Remind the students that real fossilization is a bit more complicated and does not happen this quickly but can take millions of years.
4. Have the students swap cups. If possible, carefully remove the hardened mud from the cup. Students can then excavate the “fossils” using simple tools such as toothpicks, spoons, etc.
5. Have each student write a story and draw a picture (or make a diorama) about each “environment” based on the “fossils” they find in each layer. For example, if they found a shell, they might draw a picture of an ocean, and write a description of what that ocean might have been like. Remind them to start with the oldest layer and work forwards in time, pretending that the layers were formed over millions of years. Discuss how our knowledge of today’s environments might help them decide what the past environments were like. Some things to consider are: What other animals and plants might have been living in that environment? What did those plants and animals need to survive? What did they eat and who ate them? What dangers might have threatened them? What was the climate like? What did the landscape look like?
Extension (making fossil casts) 1. Squeeze clay until it is pliable and place the clay on a paper plate. 2. Coat one side of a shell, thick green leaf, plastic animal footprint, flat plastic plant (such as a fake fern), or
bone with petroleum jelly. Press the lubricated side of the item into the clay. Carefully remove the item from the clay. Observe the imprint. Compare the imprint in the clay with the shape and texture of the item.
3. Place four spoonfuls of dry plaster of Paris and two spoonfuls of water in disposable cup and stir with a disposable spoon until smooth. Pour the plaster mixture into the shell imprint in the clay. Allow the plaster to harden. This will take about 20 minutes. (Note: Do not wash any plaster down the sink as it can clog the drain. Throw the cup and spoon away.)
4. Gently separate the clay from the plaster. Compare the shape and texture of the item with the shape and texture of the plaster cast.
GEO- 30
Fossilization Game School Subject Science Grade Level 3rd - 4th AZ Standards Addressed
SC03-S6C1-04: Describe fossils as a record of past life forms. SC03-S6C1-05: Describe how fossils are formed. SC04-S6C2-06: Analyze evidence that indicates life and environmental conditions have changed.
Lesson Overview Students will play a game to understand the fossilization process. Lesson Objective Students will understand the fossilization process and why some things get fossilized and some things don’t. Materials
Fossilization cards Background See previous activity titled Make a Fossil. Procedure 1. Have students choose an environment in which there is a depositional setting such as a lake, pond, stream,
swamp, desert, river, forest, or sea floor. The students can use their imaginations to describe this setting in as much detail as they desire.
2. Each student should then choose the role of an animal or plant that might inhabit the environment they have chosen (alternative suggestion: you can also put roles on cards and hand them out to the students). For example, in an aquatic setting, possible roles include not only snails, clams, fish, salamanders, turtles, alligators, and other aquatic animals, but also horses, deer, monkeys, rabbits, and birds that come to drink. Help students think of ways they could act out their animal or plant and how different roles might interact. For instance, a fish might wiggle and make gulping noises, a plant might grow or sway in the breeze or current, carnivores might chase predators, herbivores might nibble on plants, etc.
3. Have the students act out their roles. Each can be given a turn to make vocalizations or gestures. Students can also interact with each other as they might in their natural environment.
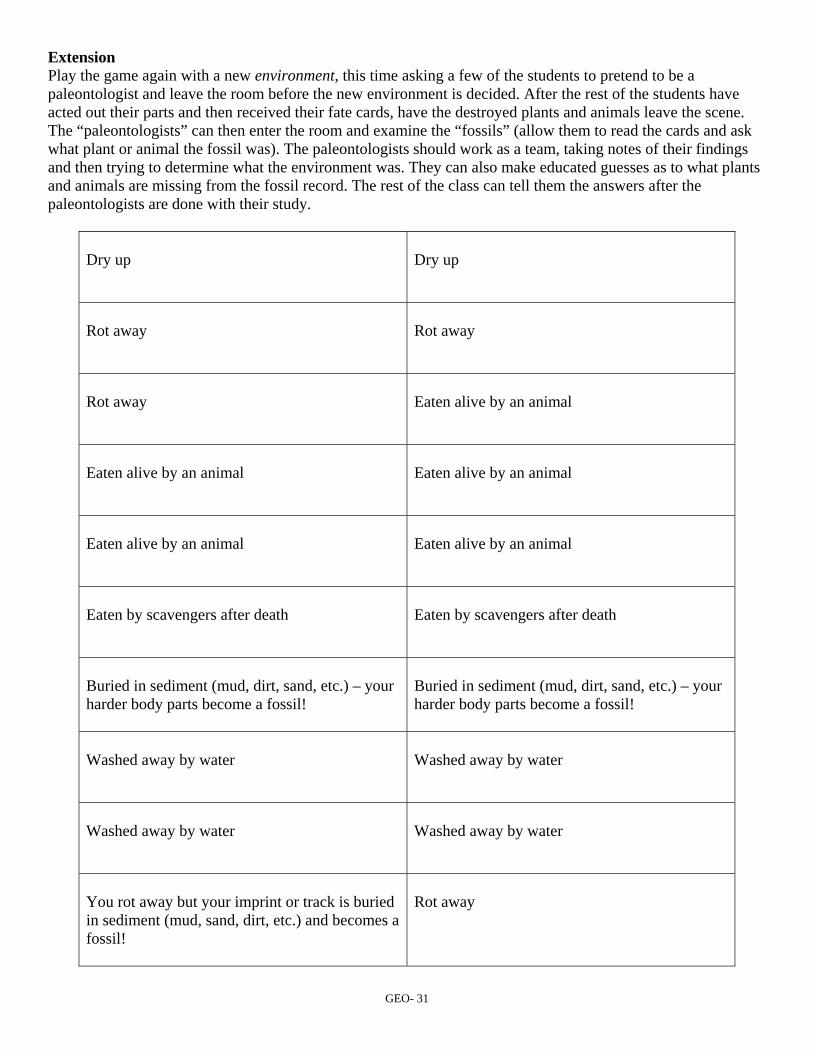
4. At a time determined by the teacher, the teacher yells “freeze” (or makes a noise with some kind of sound maker such as a whistle or duck call). “Freeze” means that the time for possible fossilization begins and all students must stop in their tracks. The teacher then has each student pick a card which will tell their fate. Use the cards below, or make up your own. If you need more cards, simply make a double set. Be sure that there are many more “destruction” cards than “fossilization” cards to represent the small chance of something being fossilized in the real world. Students can then act out the role of their demise or fossilization.
5. Discuss the meaning of this exercise. Have each student discuss his or her role as an organism and what happened to this organism after it died. On the blackboard, make one list of the organisms that were fossilized and another list of those that were destroyed. Remind the students that the only animals and plants future paleontologist will know anything about are the ones that become fossils. Discuss whether your list of fossils is a good representation of the living community they just acted out. Ask the students how this might affect the science of paleontology.
GEO- 31
Extension Play the game again with a new environment, this time asking a few of the students to pretend to be a paleontologist and leave the room before the new environment is decided. After the rest of the students have acted out their parts and then received their fate cards, have the destroyed plants and animals leave the scene. The “paleontologists” can then enter the room and examine the “fossils” (allow them to read the cards and ask what plant or animal the fossil was). The paleontologists should work as a team, taking notes of their findings and then trying to determine what the environment was. They can also make educated guesses as to what plants and animals are missing from the fossil record. The rest of the class can tell them the answers after the paleontologists are done with their study.
Dry up
Dry up
Rot away
Rot away
Rot away
Eaten alive by an animal
Eaten alive by an animal
Eaten alive by an animal
Eaten alive by an animal
Eaten alive by an animal
Eaten by scavengers after death
Eaten by scavengers after death
Buried in sediment (mud, dirt, sand, etc.) – your harder body parts become a fossil!
Buried in sediment (mud, dirt, sand, etc.) – your harder body parts become a fossil!
Washed away by water
Washed away by water
Washed away by water
Washed away by water
You rot away but your imprint or track is buried in sediment (mud, sand, dirt, etc.) and becomes a fossil!
Rot away
GEO- 32