Grails 1.1 Web Application Development - Packt Publishing · PDF fileFor More Information:...
38
Grails 1.1 Web Application Development Jon Dickinson Chapter No. 10 "Managing Content through Tagging"
Transcript of Grails 1.1 Web Application Development - Packt Publishing · PDF fileFor More Information:...

Grails 1.1 Web Application Development
Jon Dickinson
Chapter No. 10 "Managing Content through Tagging"

For More Information: www.packtpub.com/grails-1-0-web-application-development/book
In this package, you will find: A Biography of the author of the book
A preview chapter from the book, Chapter NO.10 "Managing Content through Tagging"
A synopsis of the book’s content
Information on where to buy this book
About the Author Jon Dickinson is an independent software development consultant based in the UK. He has been delivering web applications on the Java platform over a range of business domains covering finance, tourism, energy, education, and transport, for the last ten years. He uses a mix of agile methods, pragmatism, and software craftsmanship to deliver valuable software that helps achieve the goals of real users.
He is the principal consultant and founder of Accolade Consulting Ltd. (http://www.accolade-consulting.co.uk) and can be contacted at [email protected].

For More Information: www.packtpub.com/grails-1-0-web-application-development/book
Grails 1.1 Web Application Development The expectations of our users are increasing, and rightly so. The Internet is no longer the playground of geeks and nerds. Businesses use it to communicate with and support their customers; families use it to keep in touch while whole communities share their experiences with like-minded people. The democratization of the Internet has brought a new wave of software into the lives of people who would otherwise rarely use computers. The most successful of the new generation of web applications have not been written for the expert user, but for the casual user, focusing on ease of use. Web application development frameworks that focus on developer productivity have improved the ability of developers to respond to the demands of their users. Simpler and more intuitive frameworks have allowed the rapid development and refinement of new features.
Java web application development has something of a checkered history; simple isn't it. There may be more than one way to skin a cat, but there are almost infinite numbers of ways to build a Java web application. The options that are available are mind-boggling. Which database server to use? What about the application server? You also better choose an MVC framework while you're at it. Should you use a persistence framework, or hand code SQL statements? If you use an ORM framework, which one is best? Don't forget to choose a logging library. How should the project be laid out? Once you've finished making all these decisions, it's time to start on the configuration to get all of these disparate frameworks working together. Now, eventually you are ready to start coding! No wonder the latest and greatest web applications are built in PHP and Ruby on Rails.
Java still has a lot to offer. It is faster than most other languages that are used for web application development. It is an extremely mature platform, with lots of high quality libraries available. Moreover, its static, strong typing gives you less rope to hang yourself with. However, Java developers need to find technologies that deal with the common activities of web development. Sometimes we need a few choices taken away to help us focus on the problem at hand, creating great software that provides value to our users at less cost to the people paying the bills.
Grails does just this. It removes the need for reams of configuration through a convention-based approach that constrains developers in a healthy way. The decisions concerning project layout and which frameworks to use are removed. This leaves the developers free to use their creative talents for producing great software, rather than tweaking configuration files.
Throughout this book, you will learn how to build a web application using Grails and a number of key plug-ins. You will see that it is possible to achieve a great deal with very little code. Who knows, you may even rediscover your passion for web development on the Java platform!

For More Information: www.packtpub.com/grails-1-0-web-application-development/book
What This Book Covers Chapter 1 presents a short state of the nation of Java web development and makes the case for a framework like Grails. At the end of the chapter, we will install and create a Grails project.
Chapter 2 covers the use of Grails scaffolding to generate some simple pages to manage users and roles for our application.
Chapter 3 shows how to post messages, where we write the first basic functionality for the application by allowing users to post messages that can be shared with other users. This chapter introduces a number of basic concepts for Grails development including: controllers, validation, Groovy Server Pages (GSP), and Grails Object-Relational Mapping (GORM).
Chapter 4 covers an introduction to Groovy. Here we take a short break from the Grails framework to get a better understanding of the Groovy programming language. We will cover just enough of the language to be able to proceed through the rest of the book.
Chapter 5 shows how to use our first external plug-in to add authentication and authorization to the application.
Chapter 6 covers testing, where we introduce the different levels of automated testing that are available in the Grails framework. We see how to write, unit tests with new support for testing in Grails 1.1. We also cover integration tests, and install a functional testing plug-in.
Chapter 7 covers file sharing, where we allow users to share files through the application by introducing file uploads.
Chapter 8 covers some advanced querying techniques, using Hibernate criteria support in GORM, to implement file version history.
Chapter 9 introduces Grails services in more depth. We see how to extract logic from our controllers into services to keep the application maintainable.
Chapter 10 introduces more advanced GORM techniques, such as: persisting inheritance and performing polymorphic queries to enable tagging. We also delve into GSP a bit more by using templates to encapsulate view components.
For More Information: www.packtpub.com/grails-1-0-web-application-development/book
Chapter 11 covers AJAX and RIA Frameworks—Where we improve the user experience with AJAX to allow users to edit tags in-line and use the RichUI plug-in to create tag clouds and perform auto suggestion when editing tags.
Chapter 12 shows us how to use the Searchable plug-in to add a search feature to our site in a matter of minutes. We also provide an RSS feed and a REST based API for managing messages.
Chapter 13 show us how to build our own plug-in, where we follow the example of the Grails plug-in community and extract our tagging code into a plug-in that we can use on future projects.
Chapter 14 shows how to package and deploy the application to a production ready for use in a production environment. We then discuss some next steps that may be worth investigating to handle real world situations.

For More Information: www.packtpub.com/grails-1-0-web-application-development/book
Managing Content through Tagging
Over the last few chapters, we added the ability for our users to upload and share fi les with their teammates. As with messages, fi les are displayed on the home page in the order they are added to the system. Currently all messages and fi les are displayed on the home page. Over time, our home page is going to become rather large and unwieldy. We need a user's home page to show only the fi les and messages that they are interested in. To do this, users need to be able to tag their content.
We will implement a simple tagging solution, restructure the home page and then add some new pages to the application for viewing all of the messages and fi les.
The new Grails concepts that will be introduced in this chapter are:
Working with inheritance in the domain classes, and looking at which strategies GORM supports for persistenceUsing polymorphic queries over a domain inheritance hierarchyEncapsulating view-rendering logic in GSP templatesManipulating collections with the Groovy collect and sort methods
Add basic tagging Tagging is a loose, community-based way of categorizing content. It allows a group of people to categorize by consensus. Anyone is able to tag a piece of content. The more a tag is used, the more meaning it takes on and the more widely used it becomes. This categorization by consensus has been dubbed as folksonomy (http://en.wikipedia.org/wiki/Folksonomy) in recent times.
So let's get started by building our tagging support.
•
•
•
•

For More Information: www.packtpub.com/grails-1-0-web-application-development/book
Managing Content through Tagging
[ 174 ]
Tagging domain model When implementing tagging in our system, we need to consider the following:
We must be able to have many tags in our systemWe must be able to associate a single tag with many different fi les and messages We need to make sure that new domain objects can be easily tagged without having to change the tagging logicWe want to know when a domain object was tagged
To satisfy these requirements, we need to create the following new domain classes:
Tag—to store the name of the tag. There is one instance of this class per unique tag name in the application. Tagger—to store the relationship from domain objects to a tag. This allows us to store the date a tag was added to a domain object.
Let's create these domain classes and then write a test to prove that we can tag a message using this tagging structure.
The Tag class We are going to separate the tagging classes out from our application domain classes. Create a folder under grails-app/domain called tagging. This is where we will put the domain model to implement tagging.
Our Tag class is extremely simple and holds only a name property:
package tagging
class Tag {
String name
static constrains = { name( blank: false ) }}
The Tagger class The next class that we are going to create is the Tagger class. In relational terms, this object represents a link table between a Tag and any other domain class. It is important that the relationship between tagged domain classes and the Tagger relationship class is unidirectional. By this, we mean the domain classes are allowed to know that they can be tagged, but tags do not know which domain classes can be tagged, otherwise every tagged domain class would need a special relationship class.
••
•
•
•
•

For More Information: www.packtpub.com/grails-1-0-web-application-development/book
Chapter 10
[ 175 ]
Create the Tagger class as a domain class in the tagging package as follows:
package tagging
class Tagger {
Tag tag
static constraints = { tag( nullable: false ) }
}
The basics of our tagging model are complete! We now need some logic to allow tags to be created. Create a new service class called TagService under grails-app/services/tagging, as shown below:
package taggingclass TagService {
boolean transactional = true
def createTagRelationships(String spaceDelimitedTags) { return spaceDelimitedTags?.split(' ')?.collect { tagName -> createTagRelationship( tagName ) } }
def createTagRelationship(String tagName) { def tag = Tag.findByName(tagName)?: new Tag(name: tagName).save() return new Tagger( tag: tag ) }
This service provides two utility methods to create new relationships by tag name or by a space delimited string of tag names. The important behavior of these two methods is that they do not allow duplicate tags to be created in the application. If a tag name already exists, the tag will be retrieved from the database and used as the tag in the relationship.
Notice that the createTagRelationships method is using the collect method to simplify what would normally take a few more lines of code to achieve. We did briefl y cover the collect method back in our introduction to Groovy in Chapter 4, but to reiterate: the collect method is dynamically added to any object that can be iterated over. For example, collections, arrays, strings and so on. It takes a closure as its argument and executes this closure for each item in the collection. The return value from each execution of the closure is added to a new collection that the collect method builds up and then returns once it has fi nished iterating the original collection.

For More Information: www.packtpub.com/grails-1-0-web-application-development/book
Managing Content through Tagging
[ 176 ]
In createTagRelationship, we are using another neat language feature of Groovy called the "Elvis operator". It is named so, as it looks like Elvis' hair style. This is a shorter version of the normal Java ternary operator. If the operand being checked is true then the checked operand will be returned as the default, otherwise the alternative operand will be used. So in our example:
def tag = Tag.findByName(tagName) ?: new Tag(name: tagName).save()
If a tag can be found from the database then it is used, otherwise a new tag is created.
Tagging a message The next step is to allow a message to be tagged. Write some integration tests to make sure the relationships are working before using tagging in the application.
In the folder test/integration/app, create the fi le TaggableIntegrationTests.groovy and add the following code:
package app
import tagging.Tag
class TaggableIntegrationTest extends GroovyTestCase {
User flancelot
protected void setUp() {
flancelot = User.findByUsername('flancelot') Tag.list().each { it.delete() } Message.list().each { it.delete() } }}
The code above sets up the test data needed to create messages and associate tags to messages. Remember that the fl ancelot user already exists because it was created by the BootStrap class.
The fi rst test will determine that we can add tags to a message and then retrieve messages by tag. Add the following test method to your test class:
void testCanRetrieveMessagesByTags() { Message message = new Message(user: flancelot, title: 'tagged', detail: "I've been tagged.").save(flush: true) Message secondMessage = new Message(user: flancelot, title: 'other tagged', detail: "I've been tagged.").save(flush: true)
message.addTag('urgent') message.addTag('late') secondMessage.addTag('urgent')

For More Information: www.packtpub.com/grails-1-0-web-application-development/book
Chapter 10
[ 177 ]
def taggedMessages = Message.withTag( 'urgent' ) assertEquals(2, taggedMessages.size()) assertEquals(2, Tag.list().size())
def secondMessages = Message.withTag( 'late' ) assertEquals(1, secondMessages.size()) assertEquals(2, Tag.list().size())}
The test above does the following:
Creates two new messagesAdds the urgent tag to both messagesAdds the late tag to one messageChecks if we can retrieve both messages by using the urgent tagChecks if only one message is returned for the late tag
Notice that the highlighted lines of code have not been implemented yet. To allow this test to pass, we need to add the following methods to the Message domain class:
addTag—instance method to allow a message to be taggedwithTag— class method to retrieve all messages with a particular tag
Add the following method to the Message class (don't forget to import tagging.Tagger):
def addTag(String tagName) { tags = (tags)?:[]
tags << tagService.createTagRelationship( tagName ) }
This method simply delegates the creation of the tag relationship off to the TagService class, and then stores the relationship in the tags list.
Add the following method to the Message class that retrieves all messages with a given tag name:
def static withTag(String tagName) { return Message.withCriteria { tags { tag { eq('name', tagName ) } } }}
•••••
•
•

For More Information: www.packtpub.com/grails-1-0-web-application-development/book
Managing Content through Tagging
[ 178 ]
This method must be static on the Message class, as it is used to load message instances for a given tag. We do not want to have to instantiate a message before we can perform the search.
Before running the test, you will notice both of these new methods assume that there is a property on the Message class called tags. This has not yet been created. We need to create a one-to-many relationship from Message to Tagger that will allow messages to be tagged. We also need to inject the TagService into new instances of the Message class so the work for creating a new tag relationship can be delegated. Add the relationship to the Message class and inject TagService as shown below:
class Message {
def tagService static hasMany = [tags:Tagger] …}
Now we can run our tests by entering the following on the command line:
grails test-app
We should see some output in the command line similar to:
Running test app.TaggableTest...
testCanRetrieveMessagesByTags...SUCCESS
Tagging a file Now that we have implemented tagging for messages, we need to make tagging available for fi les.
Currently the logic for creating and fetching tags is in the Message domain class. We need to extract this logic so the File domain class can reuse it. It's time to look at how GORM supports inheritance.

For More Information: www.packtpub.com/grails-1-0-web-application-development/book
Chapter 10
[ 179 ]
GORM inheritance The GORM supports inheritance of domain classes by default through the underlying Hibernate framework. Hibernate has a number of strategies for handling inheritance and Grails supports the following two:
Table-per-hierarchy—this strategy creates one database table per inheritance hierarchy. This is the default strategy in Grails.Table-per-subclass—this strategy creates a database table for each subclass in an inheritance hierarchy and treats the inheritance (is a) relationship as a foreign key (has a) relationship.
Taking our domain as an example, we have two classes. They are Message and File. We are going to make them both extend a super class Taggable, which will handle all of our tagging logic and state.
Table-per-hierarchy If we were to choose the table-per-hierarchy strategy, we would end up with one table called Taggable that contained the data for both Message and File. The database structure would look something like:
Tag
ID
NAME
Tagger
IDTAG_IDTAGGABLE_IDDATE_CREATED
Taggable
ID
FILE_VERSION_CURRENT_ID (from File) NULLABLE
TITLE (from Message) NULLABLE
DETAIL (from Message) NULLABLE
The interesting side-effect of this approach is that all of the fi elds to be persisted must be nullable. If a File is created and persisted, it is obviously not possible for the fi elds from Message to be populated.
•
•

For More Information: www.packtpub.com/grails-1-0-web-application-development/book
Managing Content through Tagging
[ 180 ]
Table-per-subclass By using the table-per-subclass strategy, we would keep two separate tables called Message and File, and both would have the tags relationship inherited from Taggable. So the Message table will look like:
Tag
ID
NAME
Tagger
IDTAG_IDTAGGABLE_IDDATE_CREATED
Taggable
ID
File
IDFILE_VERSION_CURRENT_ID
Message
IDTITLEDETAIL
We can see in the diagram above that the Message and File tables have remained separate and a table representing the superclass Taggable has been created, which the subclass tables have foreign key relationships to. In the table-per-subclass strategy, a table must exist to represent the inheritance (is a) relationship.
We are going to follow the table-per-subclass strategy so that we can retain database level data integrity. The default behavior for GORM is to use the table-per-hierarchy strategy. To override this we must use the mapping property:
static mapping = { tablePerHierarchy false}

For More Information: www.packtpub.com/grails-1-0-web-application-development/book
Chapter 10
[ 181 ]
Taggable superclass Now that we have discussed how GORM handles domain class inheritance, it is time to implement our Taggable superclass that will allow Message and File to handle tagging. Create a domain class in the tagging package that:
Contains a set of Tagger instancesDefi nes the hibernate inheritance mapping strategy to useImplements the addTag method from Message Implements the withTag method from Message
The implementation for the base class looks like:
package tagging
class Taggable {
def tagService static hasMany = [tags: Tagger]
static mapping = { tablePerHierarchy false }
def addTag(String tagName) { tags = (tags)?:[]
tags << tagService.createTagRelationship( tagName ) }
def static withTag(String tagName) { return Taggable.withCriteria { tags { tag { eq('name', tagName ) } } } }}
Now that we have the tag-specifi c logic implemented in a base class, we need to remove the addTag and withTag methods from the Message class, as well as the tags relationship and the tagService property, and make the File and Message classes extend Taggable. Message, as shown below:
import tagging.Taggable
class Message extends Taggable { … }
•
•
•
•

For More Information: www.packtpub.com/grails-1-0-web-application-development/book
Managing Content through Tagging
[ 182 ]
Make the following changes to the File class:
import tagging.Taggable
class File extends Taggable {…}
Run the tests again and we can see that TaggableIntegrationTests still passes. Now add a test to verify that File objects can be tagged:
void testFileCanBeTagged() { def fileData = new FileData(data: [0]) def aVersion = new FileVersion(name: name, fileData: fileData, description: 'foo', extension: 'pdf', user: fred ) def firstFile = new File( currentVersion: aVersion ) .save(flush: true) def secondFile = new File( currentVersion: aVersion ) .save(flush: true)
firstFile.addTag('draft') secondFile.addTag('draft') secondFile.addTag('released')
def draftFiles = File.withTag('draft') assertEquals(2, draftFiles.size()) assertEquals(2, Tag.list().size())
def releasedFiles = File.withTag('released') assertEquals(1, releasedFiles.size()) assertEquals(2, Tag.list().size())}
This test verifi es that File instances can be tagged in exactly the same way as Message instances.
Polymorphic queries So far so good, however, there is an additional implication to inheritance with domain classes that we need to investigate, that is, the introduction of polymorphic queries. When we query a domain superclass, we are performing a polymorphic query, which means the query will actually run over the subclasses and return all matching instances from all of the subclasses.
In more practical terms, when we call the withTag method on File or Message, we are actually going to receive all File and Message instances with the specifi ed tag. This is because the withTag implementation exists on the Taggable class, so we are performing the query against the Taggable class:

For More Information: www.packtpub.com/grails-1-0-web-application-development/book
Chapter 10
[ 183 ]
def static withTag(String tagName) { return Taggable.withCriteria { tags { tag { eq('name', tagName ) } } }}
Let's write a test to prove this:
void testTaggedObjectsCanBeRetrievedByType() { def fileData = new FileData( data: [0] ) def aVersion = new FileVersion( name: 'v1', fileData: fileData, description: 'foo', size: 101, extension: 'pdf', user: fred ) def firstFile = new File( currentVersion: aVersion ) .save(flush: true) def message = new Message(user: fred, title: 'tagged', detail: "I've been tagged.").save(flush: true)
firstFile.addTag('draft') message.addTag('draft') assertEquals(1, Message.withTag('draft').size()) assertEquals(1, File.withTag('draft').size())}
Here we are creating a fi le and a message, and tagging each of them as draft. If we didn't know about polymorphic queries, we would expect to be able to retrieve one message with the 'draft' tag and one fi le with the 'draft' tag.
Running the tests now, we will see the following failed test in the output:
Running test app.TaggableTest...
testCanRetrieveMessagesByTags...SUCCESS
testFileCanBeTagged...SUCCESS
testTaggedObjectsCanBeRetrievedByType...FAILURE

For More Information: www.packtpub.com/grails-1-0-web-application-development/book
Managing Content through Tagging
[ 184 ]
Open the tests HTML report (test/reports/html/index.html) to get more detail on the reason for the failure as shown in the following screenshot:
Our expectation was that there should be one item in the returned results; instead two items were returned—the tagged message and the tagged fi le.
This functionality may be useful to us in the future, but for now, we need to be able to search by a specifi c type. To solve this problem, we can create another withTag method that also takes a type. We end up with the following methods in Taggable:
def static withTag(String tagName) { return withTag(tagName, Taggable)}
def static withTag(String tagName, Class type) { return type.withCriteria { tags { tag { eq('name', tagName ) } } }}

For More Information: www.packtpub.com/grails-1-0-web-application-development/book
Chapter 10
[ 185 ]
Now we can optionally specify a type that we wish to query. The default behavior, if no type is specifi ed, is to perform a polymorphic query against Taggable. We can now add a withTag method onto the Message and File classes that will override the default behavior of the Taggable class so that our test passes. Add the following method to Message:
def static withTag(String tagName) { return Taggable.withTag(tagName, Message)}
And add the following method to File:
def static withTag(String tagName) { return Taggable.withTag(tagName, File)}
Now run the tests again and all should pass.
Exposing tagging to the usersThe domain model is up and running so we can move on to allowing users to tag messages and fi les. In the fi rst instance, we will allow users to tag messages and fi les when they are created. To do this, we need to make the following changes:
The GSPs that render the forms to submit messages and fi les must allow users to enter tagsThe Taggable class needs to handle adding many tags in one go The controllers must handle tags entered by the userThe FileService class must populate user tags on the File The home page needs to render the tags that were added to each message and fi le
Add the Tags input field We are going to allow users to input tags in free text and make them delimited by spaces. So we simply need to add a new text input fi eld to each of the Post Message and Post File screens. The fieldset element in the message create.gsp becomes:
<fieldset> <dl> <dt>Title</dt> <dd><g:textField name="title" value="${message.title}" size="35"/> </dd>
•
•
•
•
•
For More Information: www.packtpub.com/grails-1-0-web-application-development/book
Managing Content through Tagging
[ 186 ]
<dt>Message detail</dt> <dd><g:textArea name="detail" value="${message.detail}"/></dd> <dt>Tags</dt> <dd><g:textField name="userTags" value="${userTags}" size="35"/></dd> </dl></fieldset>
While the fieldset for the fi le create.gsp becomes:
<fieldset> <dl> <dt>Title</dt> <dd><g:textField name="name" value="${file.name}" size="35"/></dd> <dt>File</dt> <dd><input type="file" name="data"/></dd> <dt>Message detail</dt> <dd><g:textArea name="description" value="${file.description}"/></dd> <dt>Tags</dt> <dd><g:textField name="userTags" value="${userTags}" size="35"/></dd> </dl></fieldset>
Add multiple tags to Taggable We can already store a list of tags against a Taggable class, but currently they must be added one at a time. For our users convenience, we really need to be able to handle adding multiple tags in one go. Let's create the addTags method on Taggable:
def addTags(String spaceDelimitedTags) { tags = (tags)?:[] tags.addAll(tagService.createTagRelationships(spaceDelimitedTags))}
Once again, here we just delegate the logic to the TagService class.
Saving the users tags The next step is to handle the new user input so that the tags will be persisted. The save action on MessageController is updated as shown below:
def save = { def message = new Message(params) message.addTags( params.userTags ) message.user = userService.getAuthenticatedUser()

For More Information: www.packtpub.com/grails-1-0-web-application-development/book
Chapter 10
[ 187 ]
if( !message.hasErrors() && message.save() ) { flash.toUser = "Message [${message.title}] has been added." redirect(action: 'create') } else { render(view: 'create', model: [message: message, userTags: params.userTags]) }}
We need to convert the user input, a space delimited list of tags, into our structured tagging model. This means we are not able to take advantage of the Grails data binding support and must add the tags manually through the addTags method that we created earlier. When there are validation errors, we must also make sure the tags entered by the user are made available on the page model so the tags are not lost when rendering the error messages.
In FileController, we must also make the users tags are available on the model when rendering validation errors. Change the current line in the save action from:
render(view: 'post', model: [file: file.currentVersion])
to:
render(view: 'post', model: [file: file.currentVersion,
userTags: params.userTags])
The call to addTags takes place in the saveNewVersion method in FileService:
def saveNewVersion( params, multipartFile ) { def version = createVersionFile( params, multipartFile ) def file = applyNewVersion( params.fileId, version ) file.addTags( params.userTags ) file.save() return file}
Displaying tags The last step for our basic tag handling is to display the tags to the users. To accomplish this we need to be able to get a list of tags as a string and then render the string representation on the home page. Add a read-only property implementation to Taggable:
def getTagsAsString() { return ((tags)?:[]).join(' ')}

For More Information: www.packtpub.com/grails-1-0-web-application-development/book
Managing Content through Tagging
[ 188 ]
We also need to override the toString implementation on Tagger:
public String toString() { return tag.name}
Open up the index.gsp fi le under views/home and add the following under the messagetitle div:
<div class="tagcontainer"> <g:message code="tags.display" args="${[message.tagsAsString]}" /></div>
Then add the following under the filename panel:
<div class="tagcontainer"> <g:message code="tags.display" args="${[file.tagsAsString]}" /></div>
Create the entry for tags.display in the message bundle fi le under i18n/messages.properties:
tags.display=tags: {0}
Now if we run the application, we should see that users are able to add tags to their messages and fi les:

For More Information: www.packtpub.com/grails-1-0-web-application-development/book
Chapter 10
[ 189 ]
These tags can be displayed on the home page as shown in the following screenshot:
Customize the home pageWith tagging in place, we can enhance the application to allow users to create their own home page. The aim is to allow users to specify the tags they are interested in, so any content with these tags will be displayed on their home page. This will allow us to break the home page up into two sections:
A Most Recent section, containing the last fi ve fi le uploads and messagesA Your Data section, containing all the fi les and messages that are tagged according to the user's preferences
Introducing templatesTaking this approach means that fi les and messages will be displayed in many different places on the site, instead of just the home page. By the end of this chapter, messages and fi les will be rendered in the context of:
A Most Recent sectionA Your Data section
•
•
•
•

For More Information: www.packtpub.com/grails-1-0-web-application-development/book
Managing Content through Tagging
[ 190 ]
In the future, we will probably render messages and fi les in the following contexts as well:
Show all fi les and messagesShow fi les and messages by tagsShow fi les and messages by search results
Ideally we want to encapsulate the rendering of a fi le and a message so they look the same all over the site, and we don't need to duplicate our presentation logic. Grails provides a mechanism to handle this, through GSP, called templates.
A template is a GSP fi le, just the same as our view GSP fi les, but is differentiated from a view by prefi xing the fi le name with an underscore. We are going to create two templates—one template for messages, which will be called _message.gsp and the other for fi les, which will be called _file.gsp.
The templates will be responsible for rendering a single message and a single fi le.
Templates can be created anywhere under the views folder. The location that they are created in affects the way they are executed. To execute a template we use the grails render tag. Assume that we create our message template under the views/message folder. To render this template from a view in the same folder, we would call the following:
<g:render template="message" />
However, if we need to render a message from another controller view, say the home page, which exists under views/home, we would need to call it like so:
<g:render template="/message/message" />
Passing data to a template The two examples of executing a template above would only be capable of rendering static information. We have not supplied any data to the template to render. There are three ways of passing data into a template:
Send a map of the data into the template to be renderedProvide an object for the template to renderProvide a collection of objects for the template to render
•
•
•
•
•
•

For More Information: www.packtpub.com/grails-1-0-web-application-development/book
Chapter 10
[ 191 ]
Render a map This mechanism is the same as when a controller provides a model for a view to render. The keys of the map will be the variable names that the values of the map are bound to within the template. Calling the render tag given below:
<g:render template="message" model="[message: myMessage]" />
would bind the myMessage object into a message variable in the template scope and the template could perform the following:
<div class="messagetitle"> <g:message code="${message.title}" encodeAs="HTML"/></div>
Render an object A single object can be rendered by using the bean attribute:
<g:render template="message" bean="${message}" />
The bean is bound into the template scope with the default variable named it:
<div class="messagetitle"> <g:message code="${it.title}" encodeAs="HTML"/></div>
Render a collection A collection of objects can be rendered by using the collection and var attributes:
<g:render template="message" var="message" collection="${messages}" />
When using a collection, the render tag will iterate over the items in the collection and execute the template for each item, binding the current item into the variable name supplied by the var attribute.
<div class="messagetitle"> <g:message code="${message.title}" encodeAs="HTML"/></div>
Be careful to pass in the actual collection by using ${}. If just the name of the variable is passed through, then the characters in the collection variable name provided will be iterated over, rather than the items in the collection. For example, if we use the following code, the messages collection will be iterated over:
<g:render template="message" var="message" collection="${messages}" />

For More Information: www.packtpub.com/grails-1-0-web-application-development/book
Managing Content through Tagging
[ 192 ]
However, if we forget to reference the messages object and just pass through the name of the object, we will end up iterating over the string "messages":
<g:render template="message" var="message" collection="messages" />
Template namespace Grails 1.1 has introduced a template namespace to make rendering of templates even easier. This option only works if the GSP fi le that renders the template is in the same folder as the template itself. Consider the fi rst example we saw when rendering a template and passing a Map of parameters to be rendered:
<g:render template="message" model="[message: myMessage]" />
Using the template namespace, this code would be simplifi ed as follows:
<tmpl:message message="${myMessage}"/>
As we can see, this is a much simpler syntax. Do remember though that this option is only available when the GSP is in the same folder as the template.
Create the message and file templates Now, we must extract the presentation logic on the home page, views/home/index.gsp, to a message and fi le template. This will make the home page much simpler and allow us to easily create other views that can render messages and fi les.
Create two new template fi les:
/views/message/_message.gsp
/views/file/_file.gsp
Taking the code from the index page, we can fi ll in _message.gsp as follows:
<div class="amessage"> <div class="messagetitle"> <g:message code="message.title" args="${[message.title]}" encodeAs="HTML"/> </div> <div class="tagcontainer"> <g:message code="tags.display" args="${[message.tagsAsString]}" /> </div> <div class="messagetitlesupplimentary"> <g:message code="message.user" args="${[message.user.firstName, message.user.
•
•

For More Information: www.packtpub.com/grails-1-0-web-application-development/book
Chapter 10
[ 193 ]
lastName]}"/> </div> <div class="messagebody"> <g:message code="message.detail" args="${[message.detail]}" encodeAs="HTML"/> </div></div>
Likewise, the <div> that contains a fi le panel should be moved over to the new _file.gsp. This means the main content of our home page (views/home/index.gsp) becomes much simpler:
<div class="panel"> <h2>Messages</h2> <g:render template="/message/message" collection="${messages}" var="message"/> </div>
<div class="panel"> <h2>Files</h2> <g:render template="/file/file" collection="${files}" var="file"/></div>
User tags The next step is to allow users to register their interest in tags. Once we have captured this information then we can start to personalize the home page. This is going to be surprisingly simple, although it sounds like a lot! We just need to:
Create a relationship between Users and TagsCreate a controller to handle user profi lesCreate a form that will allow users to specify the tags in which they are interested
User to tag relationship Creating a relationship between users and tags is very simple. Users will select a number of tags that they want to watch, but users themselves are not 'tagged', so the User class cannot extend the Taggable class. Otherwise users would be returned when performing a polymorphic query on Taggable for all objects with a certain tag.
Besides allowing a user to have a number of tags, it is also necessary to be able to add tags to a user by specifying a space delimited string. We must also be able to return the list of tags as a space delimited string.
•
•
•
For More Information: www.packtpub.com/grails-1-0-web-application-development/book
Managing Content through Tagging
[ 194 ]
The updates to the user class are:
package app
import tagging.Tagger
class User {
def tagService static hasMany = [watchedTags: Tagger]
…
def overrideTags( String tags ) { watchedTags?.each { tag -> tag.delete() } watchedTags = [] watchedTags.addAll( tagService.createTagRelationships( tags )) }
def getTagsAsString() { return ((watchedTags)?:[]).join(' ') }}
User ProfileController The ProfileController is responsible for loading the current user for the My Tags form, and then saving the tags that have been entered about the user. Create a new controller class called ProfileController.groovy under the grails-app/controller/app folder, and add the following code to it:
package app
class ProfileController {
def userService
def myTags = { return ['user': userService.getAuthenticatedUser() ] }
def saveTags = { User.get(params.id)?.overrideTags( params.tags ) redirect( controller:'home' ) } }
The myTags action uses userService to retrieve the details of the user making the request and returns this to the myTags view. Remember, if no view is specifi ed, Grails will default to the view with the same name of the action.
The saveTags action overrides the existing user tags with the newly submitted tags.

For More Information: www.packtpub.com/grails-1-0-web-application-development/book
Chapter 10
[ 195 ]
The myTags form The last step is to create the form view that will allow users to specify the tags they would like to watch. We will create a GSP view to match the myTags action in ProfileController. Create the folder grails-app/views/profile and then create a new fi le myTags.gsp and give it the following markup:
<%@ page contentType="text/html;charset=UTF-8" %><html><head> <meta http-equiv="Content-Type" content="text/html; charset=UTF-8"/> <meta name="layout" content="main"/> <title>My Tags</title></head><body>
<g:form action="saveTags"> <g:hiddenField name="id" value="${user.id}"/> <fieldset> <dl> <dt>My Tags</dt> <dd><g:textField name="tags" value="${user.tagsAsString}" size="35" class="bigfield"/></dd> </dl> </fieldset> <g:submitButton name="Save" value="Save"/> | <g:link controller="home">Cancel</g:link></g:form>
</body></html>
This view will be rendered by the myTags action on the ProfileController and is provided with a User instance. The form submits the tags to the saveTags action on the ProfileController. The user id is put in a hidden fi eld so we know which user to add the tags to when the form is submitted, and any existing tags for the user are rendered in the text fi eld via the tagsAsString property.
Add a link to the myTags action in the header navigation from our layout in main.gsp:
<div id="header"> <jsec:isLoggedIn> <div id="profileActions"> <span class="signout"> <g:link controller="profile" action="myTags">My Tags</g:link> |

For More Information: www.packtpub.com/grails-1-0-web-application-development/book
Managing Content through Tagging
[ 196 ]
<g:link controller="auth" action="signOut">Sign out</g:link> </span> </div> </jsec:isLoggedIn>
<h1><g:link controller="home">Teamwork</g:link></h1></div>
Now restart the application, log in as the default user and you will be able to specify which tags you are interested in.
Personalizing the home pageNow that we have a way of allowing users to register interest in specifi c tags, we can update the home page to have a more personal feel. We are going to modify the homepage to display only the fi ve most recent posts and fi les, as well as all of the tagged content that the user is interested in.
Content serviceTo help retrieve this information, we are going to introduce a ContentService class that can handle the necessary logic and call this from the HomeController. Under services/app, create a new class ContentService.groovy. First of all, we will implement the code to retrieve all the items tagged with one of the tags that the current user is interested in:
package app
import tagging.Taggableimport org.hibernate.FetchMode
class ContentService {
def userService

For More Information: www.packtpub.com/grails-1-0-web-application-development/book
Chapter 10
[ 197 ]
def allWatchedItems() { def watchedTags = userService.authenticatedUser.tags return watchedTags ? Taggable.withTags( watchedTags, lastUpdatedSort ) : [] }
private lastUpdatedSort = {one, other -> one.lastUpdated < other.lastUpdated? 1 : (one.lastUpdated == other.lastUpdated) ? 0 : -1 } }
The allWatchedItems method gets all of the instances of Tag that the user is interested in and then performs a polymorphic query on Taggable to get all of the items with one or more of these tags. When querying for the items, we also pass in a reference to a closure that can be used as a comparator on Groovy List objects for sorting. The return value from this closure is an integer that determines if the fi rst object is less than, equal to or greater than the second object.
To allow the lastUpdatedSort closure to work, we need to add the lastUpdated property to the File domain class.
So the code for the File domain class is as shown below:
package app
import tagging.Taggable
class File extends Taggable {
static hasMany = [versions: FileVersion] SortedSet versions FileVersion currentVersion Date lastUpdated
def newVersion(version) { versions = (versions) ?: new TreeSet() versions << currentVersion currentVersion = version }
def static withTag(String tagName) { return Taggable.withTag(tagName, File) }}

For More Information: www.packtpub.com/grails-1-0-web-application-development/book
Managing Content through Tagging
[ 198 ]
We need to add a method to the User class to retrieve a list of Tag instances that the user is watching. At the moment the User class can only return a list of Tagger instances. Add the following method to the User class:
def getTags() { return watchedTags.collect{ it.tag }}
We have also not implemented the withTags method on Taggable, so let's take a look at it now:
def static withTags( checkTags, sorter ) { return Taggable.withCriteria { tags { 'in'('tag', checkTags) } }.sort( sorter )}
This method performs a polymorphic query against Taggable to fi nd all subclass instances that have a relationship to a Tag instance that is in the supplied list of tags to check. The results are then sorted using the sorter closure, which in our case, happens to be the lastUpatedSort closure from ContentService.
The next responsibility of the ContentService is to return the fi ve most recent items posted to the application. It can be implemented by using the following code:
def fiveMostRecentItems() { def messages = Message.list(sort: 'lastUpdated', order: 'desc', fetch: [user: 'eager'], max: 5) def files = File.createCriteria().listDistinct { currentVersion { order('dateCreated', 'desc') fetchMode('user', FetchMode.EAGER) } fetchMode('tags', FetchMode.EAGER) maxResults(5) } return mergeAndSortListsToSize(messages, files, lastUpdatedSort, 5)}
private mergeAndSortListsToSize(list1, list2, sorter, size) { def merged = list1 merged.addAll( list2 ) merged = merged.sort( sorter )

For More Information: www.packtpub.com/grails-1-0-web-application-development/book
Chapter 10
[ 199 ]
if( merged.size() >= size ) { merged = merged[0..<size] } return merged}
First, the fi ve most recent messages are retrieved, followed by the fi ve fi les where the latest version was updated most recently. Both of these results are then merged together into one list, ordered and then limited to fi ve results by the mergeAndSortListsToSize method. Notice how we have been able to reuse the lastUpdatedSort closure here.
Update the HomeController Now that the ContentService is implemented, we can use this code from the HomeController to display the required information:
package app
class HomeController {
def contentService
def index = { return [ latestContent: contentService.fiveMostRecentItems(), myContent: contentService.allWatchedItems()] }}
We can see that the fi ve most recent items are made available to the home page via the latestContent variable, and the user's watched items are available in the myContent variable.
Update the home page We now have the situation where we are returning collections of mixed types; messages and fi les instances are stored side-by-side in the same collection. We will implement a template to handle this so we can continue to reuse the individual fi le and message templates and keep the implementation of the home page clean. Create the following folder: grails-app/views/shared. Now create a new template GSP called _item.gsp. This will determine which template to use, based on the type of a particular object:
<%@ page import="app.Message" contentType="text/html;charset=UTF-8" %><%@ page import="app.File" contentType="text/html;charset=UTF-8" %><g:each in="${data}" var="item"> <g:if test="${item.class == File}">

For More Information: www.packtpub.com/grails-1-0-web-application-development/book
Managing Content through Tagging
[ 200 ]
<g:render template="/file/file" bean="${item}" var="file"/> </g:if> <g:if test="${item.class == Message}"> <g:render template="/message/message" bean="${item}" var="message"/> </g:if></g:each>
We can use this template from our home page. Replace the main content div in views/home/index.gsp with the following:
<div id="mostrecent" class="panel"> <h2>Most Recent Updates</h2> <g:render template="/shared/item" bean="${latestContent}" var="data"/></div><div id="yourdata" class="panel"> <h2>Items of Interest</h2> <g:render template="/shared/item" bean="${myContent}" var="data"/></div>
Everything is in place for our personalized home page! Run the application and create some messages and fi les. Make sure to tag the fi les and then create some tags for our user as shown in the following screenshot.

For More Information: www.packtpub.com/grails-1-0-web-application-development/book
Chapter 10
[ 201 ]
All Messages and Files Our home page is starting to feel really useful now! It provides an initial overview for the users to quickly see what new information has been posted by their teammates and keep an eye on things that interest them. The only problem is that as more and more messages and fi les are posted, the old content can't be viewed any more. We need a couple of new pages to list all messages and fi les. Hopefully, by now, we are starting to see how trivial this is going to be. In fact, we can add the new pages without even restarting our application!
In MessageController, create a new action called list:
def list = { def messages = Message.list(sort: 'lastUpdated', order: 'desc', fetch: [user: 'eager']) return [messages: messages] }
In FileController create a new action called list:
def list = { def files = File.withCriteria { currentVersion { order('dateCreated', 'desc') fetchMode('user', FetchMode.EAGER) } } return [files: files]}
We will also need to import the Hibernate fetch mode for FileController:
import org.hibernate.FetchMode
Create a new view under views/message called list.gsp and give it the following markup:
<html><head> <meta http-equiv="Content-Type" content="text/html; charset=UTF-8"/> <meta name="layout" content="main"/> <title>Messages</title></head><body>
<div class="singlepanel">

For More Information: www.packtpub.com/grails-1-0-web-application-development/book
Managing Content through Tagging
[ 202 ]
<h2>View All Message</h2> <g:render template="message" collection="${messages}" var="message"/></div></body></html>
Then create a new view under views/file called list.gsp and give it the following markup:
<html><head> <meta http-equiv="Content-Type" content="text/html; charset=UTF-8"/> <meta name="layout" content="main"/> <title>Files</title></head><body>
<div class="singlepanel"> <h2>View All Files</h2> <g:render template="file" collection="${files}" var="file"/></div></body></html>
Update the layout (views/layouts/main.gsp) to link to the two new pages in the navigation:
<g:link controller="message" action="list" class="navigationitem">All Messages</g:link> |<g:link controller="file" action="list" class="navigationitem">All Files</g:link>
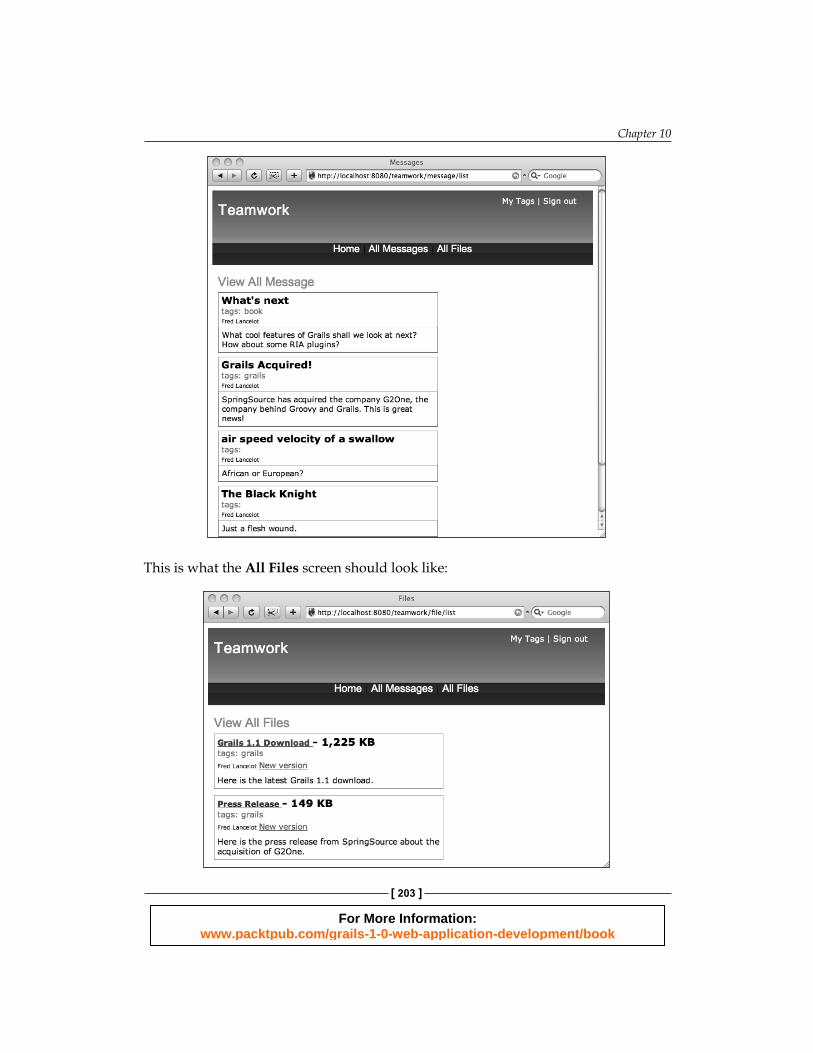
Without restarting the application, go back to your web browser and you should be able to see two new links on the primary navigation: All Messages and All Files. This is what you should see on the All Messages screen as shown in the following screenshot:
For More Information: www.packtpub.com/grails-1-0-web-application-development/book
Chapter 10
[ 203 ]
This is what the All Files screen should look like:

For More Information: www.packtpub.com/grails-1-0-web-application-development/book
Managing Content through Tagging
[ 204 ]
SummaryIn this chapter, we have seen how to construct a domain model to allow fi les and messages to be tagged. We used inheritance to enable tagging for the Message and File domain classes and saw how GORM supports persistence of inheritance structures to the database. Creating an inheritance structure in our domain classes allowed us to make use of polymorphic queries.
Our home page started to become a bit complicated, but Grails templates came to the rescue allowing us to extract repeatable and reusable presentation logic into templates for rendering messages and fi les.
Once the tagging structure was set up and the templates were in place, we moved on to allow users to customize their home page by specifying tags that they are interested in. Finally, while creating the pages to view All Messages and All Files, once again, we saw how trivial it is to create new pages and rework an applications structure in Grails.
In the next chapter, we will see how Grails supports AJAX and look at some of the Rich Internet Application (RIA) plug-ins that are available.

For More Information: www.packtpub.com/grails-1-0-web-application-development/book
Where to buy this book You can buy Grails 1.1 Web Application Development from the Packt Publishing website: http://www.packtpub.com/grails-1-0-web-application-development/book
Free shipping to the US, UK, Europe and selected Asian countries. For more information, please read our shipping policy.
Alternatively, you can buy the book from Amazon, BN.com, Computer Manuals and most internet book retailers.
www.PacktPub.com