GPRS GameCamera - Bresserarchive.bresser.de/download/3340000/ANL3340000_0913_english.pdf · GPRS...
32
GPRS GameCamera Wildlife and observation camera Instruction manual GB Art. No. 33-40000
Transcript of GPRS GameCamera - Bresserarchive.bresser.de/download/3340000/ANL3340000_0913_english.pdf · GPRS...

GPRS GameCameraWildlife and observation camera
Instruction manualGB
Art. No. 33-40000
GPRS GameCamera

2

3
General Information
About this Instruction ManualPlease read the safety instructions in this manual carefully. To avoid damage to the unit and the risk of injury, only use this product as described in the manual.Keep the instruction manual handy so that you can easily look up information on all the functions.
DANGER!You will find this symbol before every section of text that deals with the risk of minor to severe injuries resulting from improper use.
ATTENTION!You will find this symbol in front of every section of text which deals with the risk of damage to property or the environment.
General Warnings
DANGER!This device contains electronic components which operate via a power source (power supply and/or
batteries). Only use the device as described in the manual, or you run the risk of an electric shock.
Keep batteries out of the reach of children! Make sure you insert the batteries correctly. Empty or damaged batteries could cause burns if they come into contact with the skin. If necessary, wear adequate gloves for protection.
ATTENTION!Do not disassemble the device. In the event of a defect, please contact your dealer. The dealer will contact the Service Centre and can send the device in to be repaired, if necessary. Do not expose the device to temperatures above 60°C.
Do not expose the device to high temperatures. Use only the supplied power supply or the recommended batteries. Do not short-circuit the device or batteries or throw them into a fire! Excessive heat or improper handling could trigger a short-circuit, a fire or an explosion.
Use only the recommended batteries. Always replace weak or empty batteries with a new, complete set of
GB

4
batteries at full capacity. Do not use batteries from different brands or with different capacities. The batteries should be removed from the unit if it has not been used for a long time.
EC Declaration of Conformity
Meade Instruments Europe GmbH & Co. KG has issued a "Declaration of Conformity" in accordance with applicable guidelines and corresponding standards. This can be viewed any time upon request.
DISPOSAL
Dispose of the packaging materials properly, according to their type, such as paper or cardboard. Contact your local waste-disposal service or environmental authority for information on the proper disposal.
Do not dispose of electronic devices in the household garbage! As per Directive 2002/96/EC of the European Parliament on waste electrical and electronic equipment and its adaptation into
German law, used electronic devices must be collected separately and recycled in an environmentally friendly manner.
In accordance with the regulations concerning batteries and rechargeable batteries, disposing of them in the normal household waste is explicitly forbidden. Please make sure to dispose of your used batteries as required by law — at a local collection point or in the retail market. Disposal in domestic waste violates the Battery Directive.
Batteries that contain toxins are marked with a sign and a chemical symbol. "Cd" = cadmium, "Hg" = mercury, "Pb" = lead.
1 battery contains cadmium2 battery contains mercury3 battery contains lead

5
1 General Information 1.1 General DescriptionThis digital observation camera, with black IR illumination, works fully automatically. The specific region of interested (ROI) is monitored by a high sensitive Passive Infrared (PIR) motion sensor and can be triggered by the slightest movement of either human or animal thus leading to automatic exposure of high quality pictures (up to 8MP interpolated) or recording of video clips (VGA) according to default settings or preset customer settings. Images can then be directly forwarded to your mobile phone or by email via GSM/GPRS network. The automatic messaging function sends you information when photos or videos are triggered.
Colour photos and videos are possible when sufficient light is available. In darkness the integrated infrared LEDs illuminate the region of interest while the camera photographs (monochrome). It’s novel patented IR illumination is not visible to animals and has a range of up to 18 meters.
The camera is water and snow resistant thus being ideal for outdoor use. Furthermore, it can be used as a portable digital camera.
Manual pictures and videos can be taken by pressing “OK” on the remote control (please note that the “TEST” mode needs to be activated as well as an SD-card inserted.)
1.2 Included in delivery (Fig. 1)
B Digital camera, C Antenna, D Remote control, E USB cable, F Belt, G Assembly accessories, Instruction manual
BC
F
D
G
E
*not included with your purchase
GB

6
6. Camera lens7. PIR (Passive Infrared motion sensor)8. Antenna9. LCD Display10. LED Indicator11. IR Illumination12. SIM-card slot13. USB connector14. Lock15. Battery compartment
16. Battery depot handle
B
C
D
1. DC power connector2. Tilt adjustment 3. Theft-protection lock
1.3 Camera I/O InterfacesThe camera has the following I/O interfaces: Mini USB connector, SD-card1 slot, TV output, SIM card1 slot and external DC power connector.There is a small hole in the battery compartment where one can attach a lock1 for theft-protection.
BC
F
D
G
E
HI
J
1)
1!
1@
1#
1$1%1^
1. Bottom cover2. TV-Out Connector3. Power Switch4. SD-card slot5. Laser pointer
1not included with your purchase

7
B
C
F D
G
E
1.4 Remote ControlCamera and password settings can be adjusted using the remote control. The wireless infrared device has a reception range of up to 9 meters.
Please note:It can take up to 20 seconds, after the camera has been switched on, before it receives signals from the remote control.
The remote control has 15 function keys.
1. Select item (UP), Increase value2. Make selection (OK)
3. Select option (RIGHT)4. Select item (DOWN), Decrease value5. Select option (LEFT)6. Display menus, Exit (MENU)
1.4.1 Navigation
Please note:In order to navigate through the camera´s menu with the remote control, an SD-card must be inserted and „TEST“ mode must be activated (power switch in „Test“ position).
1. Press „Menu“ on remote control to start camera menu.2. Press or keys to switch between the different
menus.3. Press or kkeys to switch from a submenu to
another menu point.4. Press „OK“ key to make a selction.
1.4.2 Entering special characters Some helpful special characters may be entered using the following key combinations:
1 . / : @ _ 0 + -
*not included with your purchase
GB
8
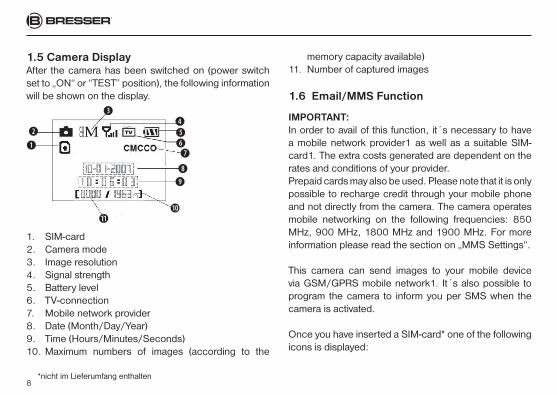
1.5 Camera DisplayAfter the camera has been switched on (power switch set to „ON“ or “TEST” position), the following information will be shown on the display.
B
C F
D
G
E
H
IJ
1)1!
1. SIM-card2. Camera mode3. Image resolution4. Signal strength5. Battery level6. TV-connection7. Mobile network provider8. Date (Month/Day/Year)9. Time (Hours/Minutes/Seconds)10. Maximum numbers of images (according to the
memory capacity available)11. Number of captured images
1.6 Email/MMS Function
IMPORTANT:In order to avail of this function, it´s necessary to have a mobile network provider1 as well as a suitable SIM-card1. The extra costs generated are dependent on the rates and conditions of your provider.Prepaid cards may also be used. Please note that it is only possible to recharge credit through your mobile phone and not directly from the camera. The camera operates mobile networking on the following frequencies: 850 MHz, 900 MHz, 1800 MHz and 1900 MHz. For more information please read the section on „MMS Settings“.
This camera can send images to your mobile device via GSM/GPRS mobile network1. It´s also possible to program the camera to inform you per SMS when the camera is activated.
Once you have inserted a SIM-card* one of the following icons is displayed:
*nicht im Lieferumfang enthalten

9
SIM-card* inserted and functional.
SIM-card inserted but not functional due to lack of signal or other error of communication. If no SIM-card* is inserted no icon appears.
Please note:Deactivate the PIN code query before inserting the SIM-card. This can be done via the settings menu of your mobile phone. It is not possible to deactivate the query directly via the camera.
There are 4 possible settings for the email and MMS function: „Send Mode“, „MMS Set“, „GPRS Set“ and „Send to“. Using the “Send Mode” you can determine when you get an automatic message by camera exposure (see table in section on “Settings”). The extent of the functionality of the “MMS Set” and “GPRS Set” is dependant on the services available through your mobile phone provider. When using the “Send to “ option, simply enter the correct mobile phone number or email address where the camera should forward the images to.
Please note:The SSL/TLS encryption for sending emails is not supported by this device. Some providers require this setting activated in order to send emails. Please ask your Internet provider whether this function is required.
1.7 Supported formatsThe SD-card* file system is normally irrelevant for use. However one can experience difficulties reading data from the card. In this situation please format the card again either in the camera or on your computer and it´s ready for use.
Item Format
Image JPG
Video AVI
File format FAT32
*not included with your purchase
GB

10
2. Important Safety Instructions!• The working voltage of the camera is 6V. The camera
is supplied with 2 x 4 AA type batteries.• Please install batteries according to polarity
displayed.• For camera operation an SD-card* (8 MB to 32 GB) is
necessary.• Please unlock the write-protection function before
inserting the SD-card.• Please insert the SD-card before testing the camera
and ensure the power switch is at the OFF position. The camera has no internal memory for saving images or videos.
• Do not insert or remove the SD-card* or SIM-card* when the power switch is at the ON position.
• When first in use it is recommended to format the SD-card via the camera.
• The camera automatically changes to USB mode when connected to the USB port of a computer. In this case, the SD-card* functions as an exchangeable memory device.
• In the TEST mode the camera shuts down automatically after 3 minutes if not in use. In this situation it´s necessary to switch the power back on in order to
*not included with your purchase
continue working with the remote control. • The red filter in front of the lens moves automatically
when needed. It might seem to have no real function the way it hangs halfway over the lens. However, this is not a camera defect as long as the image quality remains unaffected.
3. Basic Operations 3.1 Power supply2x4 AA type batteries* are necessary for power supply for the camera.Optionally, the device may be powered through an external power supply (extra accessory).
This manual only describes use with battery power supply.
ATTENTION!The manufacturer does not take liability for any damage caused by the wrong insertion of batteries or by the use of a non-compatible power supply!
Open the bottom cover.

11
ATTENTION!Make sure that the power switch is at the OFF position.
Using the handle open the battery compartment and pull it out.Insert fully charged batteries into the compartment according to the polarity shown in the battery slots. Always insert two batteries with the same polarity in each slot.The following batteries with 1.5V output can be used:
1. High-density alkaline batteries (recommended) or Lithium ion batteries
2. Rechargeable alkaline batteries3. Rechargeable NiMH batteries
There are 4 battery slots.
*not included with your purchase
Two slots are combined to one group. The slots of the two groups are marked with “1” and “2”. For normal power supply only one group is needed but however it is recommended to insert batteries in all the slots.
When the batteries are low the camera automatically shuts down after two indication sounds. Please change the batteries in time. Remove used batteries from the device immediately! If the MMS function is activated, you will be informed about low-battery-status.
3.2 Inserting the SD-card* and SIM-card*Open the bottom cover. Insert the SD-card* into the card slot with the unmarked side facing upwards. Please note that the card can only be inserted in one direction. Make sure that the write-protect switch of the SD-card is in the “write” position as otherwise the camera cannot be switched on.
GB

12
To use MMS/SMS or eMail functions, a suitable SIM-card* must be inserted into the available card slot.
IMPORTANT:This device operates only with Mini SIM-cards*. Micro SIM-cards and Nano SIM-cards* are not compatible. Please contact your mobile network provider for further information about suitable Mini SIM-cards.
3.3 Switching the camera onBefore switching on, please pay attention to the following:
1. Avoid temperature and motional disturbances in front of the camera; for example air-conditioner, chimney or other heat sources. This can have a negative effect on the camera´s trigger function.
2. Select the camera location according to the objects under observation. A height of 1-2 metres is generally recommended.
3. Switch on the camera by sliding the power switch to the ON position.
Hint:Before switching on the camera, you can use the integrated laser pointer to align the camera to the required monitoring area. Read more in section on “Laser pointer”.
After switching the camera on, the red LED indicator blinks for approximately 10 seconds. This buffer allows you to locate the camera according to wish. After the 10 seconds the camera automatically functions capturing images or videos according to the selected mode.
IMPORTANT:The remote control cannot be used when the camera is in the “ON” position. The camera automatically captures images or videos according to setting. The integrated audio recorder allows you to record videos with sound.
3.4 TEST functionIn order to capture user-defined imagery one can adjust the settings by using the “TEST” function of the camera. This is done by turning the power switch from the “OFF” or “ON” position to the “TEST” position. Various features such as user-defined settings, manual photography, preview or manual MMS messaging can be selected
*not included with your purchase

13
accordingly through the remote control.
Hint: The settings for automatic image capturing, MMS messages, etc., are deactivated when the camera is switched to “TEST” mode.
3.4.1 Manual useIn TEST mode it is possible to capture pictures or videos manually by pressing the Tbutton on the remote control. Use the Tbutton to stop the manual recording.
3.4.2 View images or videosPress OK to enter image storage. Press key to view the previous image or key for the next.
Please note: Videos cannot be played on the LCD screen and only thumbnails of the videos are shown. Detailed information of operations like deleting images or videos is described in the section “Advanced Operations”.
3.4.3 Sending messages via MMS or by e-MailIf the option “Manual” under menu point “Send mode” is
selected, images can be send to the set address. The settings for “Daily report” and “Instant” under menu point “Send mode” can only be used in the “ON” mode.
3.4.4 Switching offTurn the power switch to the OFF position to switch the camera off. Please note that even in the OFF mode, the camera still consumes certain power at μA level. Therefore, please remove the batteries if the camera will not be used for a while.
4. Erweiterte OptionenWe know from the basic operations of the camera in the previous chapter, that the camera has three basic operational modes:
1. OFF mode: Power switch is in OFF position2. ON mode: Power switch is in ON position3. TEST mode: Power switch is in ON position
and the remote control is connected to the camera.
The OFF mode is a specific safety mode for replacing the SD-card or batteries and transporting the camera.
GB

14
ATTENTION: Replace the SD-card* and SIM-card* only in the OFF mode!
4.1 SettingsIn order to avail of specific settings the remote control has to be connected and a SD-card inserted. Now you can change to the “TEST” mode explained before. Press MENU on the remote control to open the “Settings” menu on the camera´s display.
Setting items Description
Camera Mode Choice of function (Imagery or video)
Default Set Resets all customer settings to default values
Password Set password to protect the camera menu from unauthorized access
Send To Select a setting to send images to your mobile phone or by e-Mail:1. Mobile phone (MMS): Send an image
to a mobile phone via WAP2. Email (MMS): Send an image to an
E-Mail address via WAP
Send To 3. Email (GPRS): Send an image to an E-Mail address via SMTP. This method of messaging is much cheaper in some countries.
This method of messaging is much cheaper in some countries.
Send Mode 3 different dispatch modes:„Manual“ for the function in TEST mode, „Daily Report“ or „Instant“ for the function in ON mode.
IMPORTANT:Ensure that a fully functional SIM-card is inserted.
1. „ Manual“: Select „Manual“ when using the TEST mode. Only single images can be sent with this function. Videos cannot be sent.
2. “Daily Report”: This function is only available in the ON mode. The camera sends a text message at a specific time with information about captured images or videos up to that point. If image capturing is set, you will receive a MMS message with the last image as well as information about
*not included with your purchase

15*nicht im Lieferumfang enthalten
the complete number of images that had been captured during the last 24 hours. If video recording is set, you will get a SMS message with information about the complete number of videos that had been captured during the last 24 hours.
3. “Instant”: This function is only available in the ON mode. The camera sends a MMS message each time when a new image or video had been taken. It´s possible to select the number of images that should be sent each day. If you select a maximum number of “10”, the camera will send the first 10 images via MMS. All other images will be stored on the SD-card.
4. “OFF”: Disable MMS function.
GPRS Set Settings for sending e-Mails via GPRS mobile network.In order to send e-Mails, one has to have the correct GPRS settings (for example server port, APN, etc.,). If you are not familiar with these settings, please contact your mobile and e-Mail provider for further information and assistance.
MMS Set The camera sends MMS messages via the GPRS mobile network. However, your mobile phone provider must activate the GPRS service. The camera supports the following 4 transmission frequencies (Quad-Band): 850 MHz, 900 MHz, 1800 MHz and 1900 MHz. In order to send MMS messages the camera must have the correct settings activated (for example URL, APN, IP and Port). Please contact your mobile phone provider should you have difficulties activating these settings.
Timer Switch The camera can be activated for a certain period of a day. The camera is switched off the rest of the time.
Sense Level Choose sensitivity of PIR (Passive infrared motion sensor). The higher the setting, the easier the motion sensor activates triggering. It is recommended to use Normal mode. The sensitivity of the PIR is strongly related to temperature. High temperatures reduce sensitivity. Therefore, you may need to adjust the sensor level to an appropriate value.
GB

16*not included with your purchase
PIR Interval Choose how long the camera should stop functioning after each triggering. The camera’s PIR is disabled during this interval.
Video Length Choose duration of recording videos.
Photo Burst Choose the number of continuous shots after each triggering.
Set Clock Set camera date and time.
Video Size Choose the video resolution, e.g. 640×480 (VGA).
Photo Size Choose the image resolution, e.g. 8MP or 5MP.
Format Format the SD-card*. All images and videos on the SD-card are deleted.

17
4.1.1 Default SettingsDefault settings are listed below:
Setting Items Default Settings Options Submenu
Camera Mode Image Video
Default Set Enter
Password OFF ON Set Password
Send To Phone (MMS) Email (MMS), Email (GPRS)
GPRS Set Enter Server, APN, Port
MMS Set Enter URL, APN, IP, Port
Timer Switch OFF ON Start, Stop (00:00 – 23:59)
Sense Level Normal High, Low
PIR Interval 1 Minute 0–59 Seconds, 1-60 Minutes
Video Length Avi 10 Seconds Avi 1–60 Seconds
Photo Burst 1 Photo 2 Photos, 3 Photos
Set Clock Enter Adjust Clock
Video Size 640×480 320×240
Photo Size 8MP (Megapixel) 5MP (Megapixel)
Format Enter Yes, No
GB
18
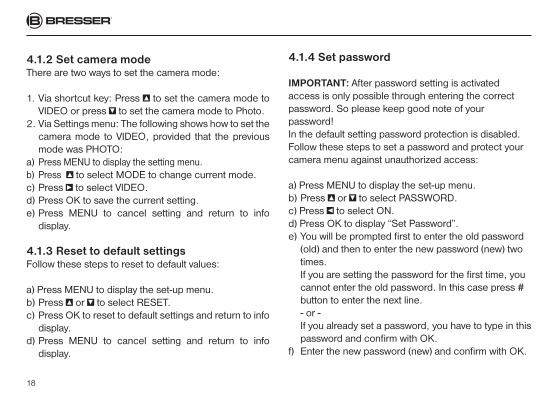
4.1.2 Set camera modeThere are two ways to set the camera mode:
1. Via shortcut key: Press to set the camera mode to VIDEO or press to set the camera mode to Photo.
2. Via Settings menu: The following shows how to set the camera mode to VIDEO, provided that the previous mode was PHOTO:
a) Press MENU to display the setting menu.b) Press to select MODE to change current mode.c) Press to select VIDEO.d) Press OK to save the current setting.e) Press MENU to cancel setting and return to info
display.
4.1.3 Reset to default settingsFollow these steps to reset to default values:
a) Press MENU to display the set-up menu.b) Press or to select RESET.c) Press OK to reset to default settings and return to info
display. d) Press MENU to cancel setting and return to info
display.
4.1.4 Set password
IMPORTANT: After password setting is activated access is only possible through entering the correct password. So please keep good note of your password!In the default setting password protection is disabled. Follow these steps to set a password and protect your camera menu against unauthorized access:
a) Press MENU to display the set-up menu.b) Press or to select PASSWORD.c) Press to select ON.d) Press OK to display “Set Password”.e) You will be prompted first to enter the old password
(old) and then to enter the new password (new) two times. If you are setting the password for the first time, you cannot enter the old password. In this case press # button to enter the next line. - or - If you already set a password, you have to type in this password and confirm with OK.
f) Enter the new password (new) and confirm with OK.

19
4.1.6 MMS-dispatch (Send Mode)You can choose between 3 different MMS dispatch options: Use the “Manual” option when using the camera in “TEST” mode. The 2 other options, „Daily Report“ and „Instant“, can only be used when the “ON” mode is set. For further information on these functions, please read the section on “Settings”.The following steps describe how to install the dispatch option “Instant”, provided the camera is set to “OFF”.
a) Press MENU to display the set-up menu.b) Press or to select SEND MODE.c) Press to select the option „Instant“.d) Press OK to enter the submenu.e) Press to determine the maximum amount of
images to be transmitted. You have a choice between the following predefined options: 00-99 or unlimited.
f) Press OK to save settings and exit the set-up menu.
Please note: For “Daily Report” dispatch, the camera requires information on the length of time, in hours and minutes, which it should transmit.
g) Enter the new password (new) again and confirm with OK.
h) Press MENU to cancel setting return to info display.
4.1.5 Set message recipient (Send To)Here you can type in the mobile phone number or email address of the MMS recipient. The following steps describe how to setup MMS messaging to a mobile phone (PHONE (MMS)), assuming that the previous option was EMAIL (MMS):a) Press MENU to display the set-up menu.b) Press or to select SEND TO.c) Press to select PHONE (MMS).d) Press OK to display the submenu.e) Four input fields are available for selection. You can
switch between the input fields by pressing the # button. Press any keys to enter the necessary numbers, letters or special characters. - or - Press to delete your input.
f) Press OK to save the settings and return to info display.
GB

20
4.1.7 GPRS/Email Set-up (GPRS Set)The following steps describe what parameters are necessary in order to set up email dispatch via GPRS connection:
a) Press MENU to display the set-up menu.b) Press oder to select MMS SET.c) Press ENTER to enter the submenu.d) The following entry fields must be completed: Server1): Name of email Server (for example
smtp.domainname.de) Port1): Port of email Server (for example 25) APN2): Your mobile provider´s Internet APN (for
example web.providername.de) Account and Password2): Most mobile providers
require extra user´s name and password in order to avail of their mobile Internet service.
Email User1): User name Email Password1): Email password. You can switch from one entry field to another using
the # key. Use the numeric keys to enter numbers, letters or special characters. - or - Press to delete the entry.
e) Press OK to save settings and exit the set-up menu.
Please note:Set-up can also be undertaken via computer. Further information can be found in the section on “Easy set-up for GPRS/Email and MMS functions”.
4.1.8 MMS Set-up (MMS Set)
IMPORTANT:It is not possible to automatically configure the device through transmission of data via SMS. The configuration has to be undertaken manually.
Follow these steps to enter the necessary set-up parameters2) for MMS dispatch:
a) Press MENU to display the set-up menu.b) Press or to select MMS SET.c) Press ENTER to enter the submenu.d) The following entry fields must be completed: URL: URL for the MMS service (max. 64
characters) APN2): Internet APN of your mobile provider
(max. 32 characters) IP: The IP-address of the MMS servers (max. 16
characters)
1) Please request information on set-up details from your email provider.2) Please request information on GPRS mobile networking from your mobile provider.

21
Port: MMS server port (max. 6 characters) Account and Password2): Some mobile providers
require extra user´s name and password in order to avail of their MMS service.
Use the numeric keys to enter numbers, letters or special characters. - or - Press to delete the entry.
e) Press OK to save settings and exit the set-up menu.
Please note:Set-up can also be undertaken via computer. Further information can be found in the section on “Easy set-up for GPRS/Email and MMS functions”.
4.1.9 “Easy set-up for GPRS/Email and MMS functions”. (Editing via Computer)
IMPORTANT:Please ensure that the batteries are fully charged and that SD card and SIM card are inserted in the camera. You can also complete the GPRS/Email and MMS set-up via computer. Simply follow these steps:
a) Change the camera to TEST mode by sliding the main switch into “TEST” position.
b) Select “SEND TO” in the menu and enter a valid mobile number or email address in the entry field. This automatically generates a “PROFILE.INI” document in the “GSM” file of your SD card.
c) Connect the camera to your computer using the USB cable included. The content of the memory card is then shown as external data media on your computer.
WARNING:Do not interrupt an on-going data connection to a computer before all data has been transferred. This could lead to data loss for which the manufacturer is not liable.
d) Select the document „PROFILE.INI“ from the “GSM” file of the memory card and save to your computer as backup.
e) Open the document „PROFILE.INI“ from the “GSM” file using the editor.
f) Enter the required parameters (see sections 4.1.7 and 4.1.8) for MMS set-up in the entry fields provided.
1) Please request information on set-up details from your email provider.2) Please request information on GPRS mobile networking from your mobile provider.
GB

22
g) After entering the required parameters save the document to the memory card under the same name and in the same file (overwritten with new parameter details).
h) Disconnect the memory card from your computer using the function “ eject memory device” and remove the USB cable.
4.1.10 Setting timerThe setting steps are similar to SET CLOCK.Please note that the start and stop time (24h clock) can only be effective when the timer is set to ON. Assuming that the camera should work from eight a.m. to five p.m., the steps are as following:
a) Press MENU to display the set-up menu.b) Press or to select TIMER SWITCH.c) Press to select ON.d) Press OK to enter into submenu.e) Press to select item, press or to change the
value.f) Press OK to save all current setting.g) Press MENU to return to previous menu.
4.1.11 Set PIR sensitivity
Note: It is recommended to use NORMAL mode.
The following steps show how to set PIR sensitivity to Low provided that the previous option is NORMAL.
a) Press MENU to display the set-up menu.b) Press or to select SENSOR LEVEL.c) Press to select LOW.d) Press OK to save the current setting.e) Press MENU to cancel setting and return to info
display.
4.1.12 Set triggering interval timePress to decrease or increase the value by 1 second or 1 minute.The following steps show how to set the triggering interval time to 5 MINUTES provided that the previous value was 1 MINUTE.
a) Press MENU to display the set-up menu.b) Press or to select INTERVAL.c) Press to decrease or increase to 5 MINUTES.d) Press OK to save the current setting.

23
e) Press MENU to cancel setting and return to info display.
4.1.13 Set video lengthPress to decrease or increase the value by 1 second.The following steps show how to set video length to 5 SECONDS provided that the previous value was 1 SECOND:
a) Press MENU to display the set-up menu.b) Press or to select VIDEO LENGTH.c) Press to increase to 5 SECONDS.d) Press OK to save the current setting.e) Press MENU to cancel setting and exit.
4.1.14 Set photo burstThe following steps show how to set continuous capture number to 3 IMAGES provided that the previous option was 1 IMAGE:
a) Press MENU to display the set-up menu.b) Press or to select PHOTO BURST.c) Press to select 3 IMAGES.d) Press OK to save the current setting.e) Press MENU to cancel setting and return to info display.
4.1.15 Set clockThe date format is month/day/year, the time format is hour/minute/second (24h clock). The valid settings lie between 2006 and 2031. Default setting may vary from the current date. Provided that date and time settings need to be changed, the steps are as follows:
a) Press MENU to display the set-up menu.b) Press or to select SET CLOCK.c) Press OK to enter into submenu.d) Press to select item, press or to change the
value.e) Press OK to save all current settings and return to
info display.f) Press MENU to cancel setting and return to info
display.
4.1.16 Set video sizeThe following steps show how to set video size as 320×240 provided that the option is set to 640×480:a) Press MENU to display the set-up menu.b) Press or to select VIDEO SIZE.c) Press to select 320×240.d) Press OK to save the current setting.
GB

24
e) Press MENU to cancel setting and return to info display.
4.1.17 Set photo sizeThe following steps show how to set photo size to 5MP provided that the option is set to 8MP:a) Press MENU to display the set-up menu.b) Press or to select PHOTO SIZE.c) Press to select 5MP.d) Press OK to save the current setting.e) Press MENU to cancel setting and return to info
display.
4.1.18 Format SD-Card
ATTENTION: Formatting deletes all images or videos stored on the SD-card. Please ensure that you have a back-up of all important data.
a) Press MENU to display the set-up menu.b) Press or to select FORMAT.c) Press OK to enter into the submenu.d) Press to select YES.e) Press OK to start formatting the SD-card. During
formatting, the display screen will show a message
“Formatting…” as below.f) Press MENU to cancel setting and return to info display.
Please Wait!
4.1.19 View image or videoa) Switch to TEST mode and enter into info display.b) Press OK to view previous image or video.
Please note: It is not possible to play the recorded videos on the camera´s display. Only a preview is possible.
c) Press , to view the next picture (or video) and for the previous.
d) Press OK to return to info display.The total number of all images on the SD-card, as well as the index number of the displayed image, are shown respectively when viewing the images.
4.1.20 Delete image or videoa) Switch to TEST mode to view the image (or video)
that is to be deleted.

25
b) Press MENU to display the DELETE SELECT menu.c) Press or depending on whether you want to
select DELETE ONE (delete selected image) or DELETE ALL (delete all). The option DELETE ONE is preprogramed..
d) Press OK. NO and YES are prompted. NO is highlighted.
e) Press to highlight YES.f) Press OK to delete the image or video.g) Press MENU to cancel and return to playback.
ATTENTION: After deleting a picture or a video file, the deleted files can’t be restored! Furthermore, in order to delete all images and video clips on the SD-card, it is recommended you format the SD-card.
4.1.21 Manual MMS and Email Dispatch
IMPORTANT:This function only operates when the camera is switched to TEST mode. Furthermore the option “Manual” must be selected in the “SEND MODE” menu.
a) Choose an image that you would like to send.b) Press MENU to display the option SEND MESSAGe.
c) Press or to select SEND MESSAGE.d) Press OK to send the image to the mobile number or
email address required.e) Press MENU to cancel and return to image/video
display. Please note:It is only possible to send photo images. An active SIM card* is required.
4.1.22 Laser pointerThe integrated laser pointer allows you to precisely align the camera to the specific object under observation.
a) Change to TEST mode.b) Press the * key to activate or deactivate the laser
pointer. c) Adjust the camera according to requirements using
the tilting option located at the back of the camera.
WARNING:Do not look directly at the laser beam. The high concentration of light can cause irreparable eye damage.
*not included with your purchase
GB

26
4.2 File numberingImages and videos are saved in the pre-named folder. File numbering continues by adding one to the last number for each new image or video. The files are saved using names like IMAG0001.JPG or IMAG0001.AVI. Through the suffix you can distinguish whether the file is an image (with suffix .jpg) or a video (with suffix .avi).
5. Erfassungsbereich des BewegungssensorsDas folgende Schaubild zeigt den Erfassungswinkel des Bewegungssensors bei verschiedenen Entfernungen. Auf eine Entfernung von 15 Metern beträgt der Erfassungswinkel etwa 35°. Bei einer Entfernung von 9 Metern beträgt der Erfassungswinkel schon etwa 52°.
6. Troubleshooting 6.1 The USB device is not recognized by the
computerThis circumstance occasionally occurs in some OEM versions of Windows. A defect device does not necessarily cause this. In most cases updating the USB drive on the notebook or PC can solve the problem.In case an update of the drive does not result in a satisfactorily solution it is recommended to proceed as described below (the manufacturer takes no liability for any loss or damage caused by running this process!1):
27
Delete the so-called ‘Ghost Devices’ (devices that are not currently connected to the computer). Background information: Windows generates an entry in its system preferences for each new USB device (e.g. USB stick) it is plugged into. Every time you start your computer Windows searches for these devices. This delays detection of USB devices as well as the launch of Windows itself and is responsible for the failure to recognize the USB port!Therefore, you should ‘clear up’ your system environment and remove unused devices. To do this, right-click on ‘My Computer’ or ‘Computer’ and open the ‘Properties’ item in the context menu. Then click in the window on the tab ‘ADVANCED /ADVANCED SYSTEM SETTINGS’ and click on ‘ENVIRONMENT VARIABLES’. Now select the lower part (NEW ENVIRONMENT VARIABLE). At ‘NAME OF VARIABLES’ enter the following text:
devmgr_show_nonpresent_devices
Enter the value ‘1’ in ‘Value of Variables’Confirm the entry with ‘OK’ and restart the computer. After rebooting open the Device Manager. Select the menu item VIEW and activate the option ‘Show Hidden Devices’. The ‘Ghost Devices’ previously hidden are
now displayed in grey. Check for entries in the different categories such as USB, storage volumes, etc. Only delete the entries of devices you no longer use from the ‘Device Manager'1
1Source: Microsoft Knowledge Base http://support.microsoft.com/kb/315539/en
GB

28
Service und Garantie
The period of warranty is 2 years, beginning on the day of purchase. Please keep the cash receipt as evidence of purchase. Devices which become defective during the warranty period can be returned to the dealer where the device was bought. The repaired device or a new one will then be returned to you. In the case of defects which occur after the end of the warranty period, the devices can also be returned. However, repairs which become necessary after the end of the warranty period will be subject to a service fee.
Important: Make sure to return the device carefully packed in the original packaging in order to prevent transport damage. Please also enclose the cash receipt (or a copy). This warranty does not imply any restriction of your statutory rights.
Your dealer:
Name: .................................................................
Postcode / City: ....................................................
Street: .................................................................
Telephone: ...........................................................
Date of purchase: ..................................................
Signature: ............................................................
Product description: ...............................................
Short description of defect: .....................................
...........................................................................
...........................................................................
...........................................................................

29
Photo Burst 1-3
Video Length 1-60 sec.
Power Supply 8×AA (recommended) or 4×AA batteries*
Stand-by Current < 0.25 mA (<6mAh/Day)
Power Consumption 400 Videos (interval = 5 min.,Video length = 10 sec.)> 500 MMS (use 8× AA batteries*)
Low Battery Alert LED indicator
Mounting with belt
Dimensions 140×87×55 mm
Operation Humidity 5% - 90%
Appendix: Specifications
Image Sensor 5MP CMOS Colour
Linse F/NO = 3.0 FOV (Field of View) = 52°
PIR detection range 18M/60F
Display 1.5” built-in LCD
Memory Card* SD-card* (from 8 MB to 32 GB)
Image Resolution 8MP = 3328×24965MP = 2560×1920
Video Resolution 640×480 (16fps)
PIR Sensor Multi Zone
PIR Sensivity Adjustable (High/Normal/Low)
Trigger Time 1.2 sec.
Weight 0.30 kg
Operation/Storage Temperature
-20° to +60° / -30° to +70°
Interval 1 second to 60 minutes
*not included with your purchase
GB

30

31
www.bresser.de/start/bresser

ANL3
3400
00GB
0913
BRES
SER
Erro
rs a
nd te
chni
cal c
hang
es re
serv
ed.
Meade Instruments Europe GmbH & Co. KGGutenbergstr. 2 · DE-46414 RhedeGermany
www.bresser.de · [email protected]