Attachment-retained Restorations ASTRA TECH Implant System EV
Upload
implant-directCategory
view
227download
5description

Date: 9-06-08 To: Implant Direct Customers
Subject:
Product Release: Gold Abutments - Non-Engaging - Implant Level
Gold/Plastic Abutments for multi-unit screw-retained restorations!!!!!!
Implant Direct introduces the Non-Engaging, Implant Level, Gold/Plastic Abutment line of prosthetics
for the RePlant, RePlus and ReActive product line. Available for the 3.5mmD, 4.3mmD and 5.0mmD
tri-lobe platforms, these abutments are 100% compatible with corresponding tri-lobe platform diameters
from competitor product lines.
Implant-Level Non-Engaging Gold/Plastic Abutments are used in the laboratory fabrication
of implant-level multi-unit splinted restorations: 1) A screw-retained partial denture. 2) An
implant level multi-unit bar (limited clearance).
The plastic sheath is modified and incorporated into the wax framework pattern. The
laboratory converts the plastic/wax design into a metal of choice utilizing the “Lost Wax”
technique. The gold base (referred to as gold due to its high noble metal content is NOT
gold in color) is incorporated into the final metal framework providing a machined interface
which contacts the top of the implant directly.
These abutments are supplied with the NEW Dual-Grip Abutment Screw, [1000-22]
with the 4.3mmD and 5.0mmD abutments and the [1000-23] with the 3.5mmD
abutments. The screw is designed to accommodate both the standard 1.25mmD Hex
Tool and the competitor’s Uni-Grip Driver. Please review Product Release on new
Dual-Grip Screws.
The USA list price for the Gold/Plastic Abutments is $100.00.
6035-41 6043-41 6050-413.5mmD
Platform
4.3mmD
Platform
5.0mmD
Platform
w w w . i m p l a n t d i r e c t . c o m
2 7 0 3 0 M a l i b u H i l l s R o a d , C a l a b a s a s H i l l s , C A 9 1 3 0 1
P h o n e : 8 1 8 . 4 4 4 . 3 3 3 3 o p t 2 : 8 8 8 - N I Z N I C K ( 6 4 9 - 6 4 2 5 ) F a x : 8 1 8 . 4 4 4 . 3 4 0 0

w w w . i m p l a n t d i r e c t . c o m
Abutment supplied with
new black colored
Dual-Grip fixation screw.
[1000-22] for 4.3mmD
and 5.0mmD platform
components and
[1000-23] for 3.5mmD
components.
Plastic Cylinder for ease
of preparation and clean
burn out during “Lost
Wax” technique.
0.6mmL
6.9mmL height of
plastic sheath
Implant
20° taper allows for a
40° relative divergence
between connected
abutments.
Plastic is injected molded
onto gold base to prevent
gaps being created in
final casting.
2.6mmL height to top of
gold base
Abutment Dimensions and Specifications:
During the waxing up process
in the laboratory, the technician
can substitute the fixation
screw for the long fixation
screw [1000-11] for 4.3mmD
and 5.0mmD and [1000-12]
for 3.5mmD abutments
respectively. This enables the
technician to increase the
vertical height of the prosthesis
while maintaining the screw
access channel.
STEP 1- FABRICATE A WORKING CAST:Fabricate a working cast containing an Implant Analog according to routine procedures.
STEP 2-ASSEMBLE AND PREPARE THE PATTERN:Use the abutment screw to attach the gold alloy base (60% Gold, 20% Palladium, 19% Platinum and 1% Iridium) and plastic
sheath assembly to the Implant Analog in the working cast. If adjustment for occlusal clearance or angulation is necessary,
reduce the plastic sheath in height. Do not reduce its thickness, however, in order to ensure complete casting. Create the
abutment pattern directly over the plastic sheath. Apply a thin flash of wax to seal the margin between the plastic sheath and
the base. Because porcelain will not bond to the gold alloy base, extend the flash of wax onto the base to wherever porcelain
will be applied. A system specific waxing screw is available as an option to using the plastic sheath.
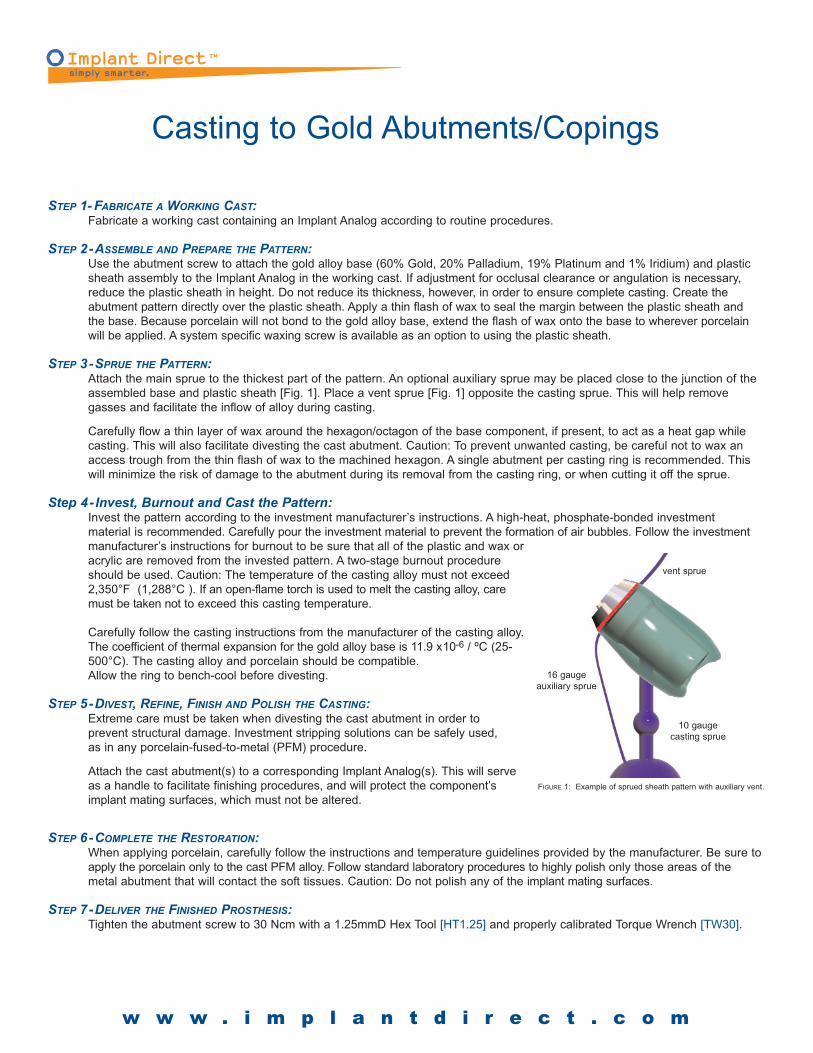
STEP 3-SPRUE THE PATTERN:Attach the main sprue to the thickest part of the pattern. An optional auxiliary sprue may be placed close to the junction of the
assembled base and plastic sheath [Fig. 1]. Place a vent sprue [Fig. 1] opposite the casting sprue. This will help remove
gasses and facilitate the inflow of alloy during casting.
Carefully flow a thin layer of wax around the hexagon/octagon of the base component, if present, to act as a heat gap while
casting. This will also facilitate divesting the cast abutment. Caution: To prevent unwanted casting, be careful not to wax an
access trough from the thin flash of wax to the machined hexagon. A single abutment per casting ring is recommended. This
will minimize the risk of damage to the abutment during its removal from the casting ring, or when cutting it off the sprue.
Step 4- Invest, Burnout and Cast the Pattern:Invest the pattern according to the investment manufacturer’s instructions. A high-heat, phosphate-bonded investment
material is recommended. Carefully pour the investment material to prevent the formation of air bubbles. Follow the investment
manufacturer’s instructions for burnout to be sure that all of the plastic and wax or
acrylic are removed from the invested pattern. A two-stage burnout procedure
should be used. Caution: The temperature of the casting alloy must not exceed
2,350°F (1,288°C ). If an open-flame torch is used to melt the casting alloy, care
must be taken not to exceed this casting temperature.
Carefully follow the casting instructions from the manufacturer of the casting alloy.
The coefficient of thermal expansion for the gold alloy base is 11.9 x10⁻⁶ / ºC (25-
500°C). The casting alloy and porcelain should be compatible.
Allow the ring to bench-cool before divesting.
STEP 5-DIVEST, REFINE, FINISH AND POLISH THE CASTING:Extreme care must be taken when divesting the cast abutment in order to
prevent structural damage. Investment stripping solutions can be safely used,
as in any porcelain-fused-to-metal (PFM) procedure.
Attach the cast abutment(s) to a corresponding Implant Analog(s). This will serve
as a handle to facilitate finishing procedures, and will protect the component’s
implant mating surfaces, which must not be altered.
STEP 6-COMPLETE THE RESTORATION:When applying porcelain, carefully follow the instructions and temperature guidelines provided by the manufacturer. Be sure to
apply the porcelain only to the cast PFM alloy. Follow standard laboratory procedures to highly polish only those areas of the
metal abutment that will contact the soft tissues. Caution: Do not polish any of the implant mating surfaces.
STEP 7-DELIVER THE FINISHED PROSTHESIS:Tighten the abutment screw to 30 Ncm with a 1.25mmD Hex Tool [HT1.25] and properly calibrated Torque Wrench [TW30].
FIGURE 1: Example of sprued sheath pattern with auxiliary vent.
vent sprue
16 gauge
auxiliary sprue
10 gauge
casting sprue
Casting to Gold Abutments/Copings
w w w . i m p l a n t d i r e c t . c o m

w w w . i m p l a n t d i r e c t . c o m
7. Divest the casting using a combination of
chemical investment removers and blasting
with glass bead. Care must be taken to
prevent damage to abutment interface.
1. Use the fixture mounts or implant level
transfers to make impression.
Follow standard laboratory procedures to
fabricate the soft tissue working cast.
10. Seat framework on implants. Thread a
fixation screw through the most distal
component. Inspect and confirm passive fit.
Return the framework to laboratory.
6. Sprue and connect framework to a runner
bar then assemble to rubber casting base.
Remove finger oils from metal base and do not
use a debubblizer when investing the
gold/plastic components. Invest, burnout and
cast framework (Noble or High Noble alloys)
following standard laboratory procedures.
3. Trim the plastic sheath to provide adequate
clearance with adjacent and opposing dentition.
If additional height is required use waxing
screw to maintain screw access channel.
12. Remove healing components. Sterilize
and seat prosthesis. Confirm fit, contour and
occlusion. Occlude screw access holes with
materials of choice.
Gold/Plastic Non-EngagingAbutment Technique Sheet
2. Remove soft tissue from working cast and
attach platform specific non-engaging
gold/plastic abutments to implant analog with
corresponding fixation screw.
11. Prepare the framework for application of
veneering material of choice, either porcelain
or composite. Polish and return to clinician
for final placement.
5. Place a narrow cut between the sections
and then lute together with burnout resin or
wax. This procedure is followed to relieve the
inherent contraction distortion between
adjacent components during the waxing
process. This contraction distortion can lead
to inaccuracies in the final restoration.
4. Use a combination of wax and burnout
resin to fabricate the framework pattern.
Carefully apply a thin layer of wax at the
junction of the plastic sheath and gold base to
ensure a smooth transition between cast alloy
and gold base.
8. Place framework back on working cast,
thread fixation screws through access holes
and finger tighten to confirm a passive fit.
Send back to clinician for framework try-in.
9. Remove framework from working cast.
Clean and sterilize according to standard
clinical procedures. Use corresponding tool
to remove healing components.