Give Thanks - media.rainpos.com · Give Thanks Finished Size: 21¼” x 21¼” Finished Size: 18...
8
Give Thanks Finished Size: 21¼” x 21¼” www.QuiltingTreasures.com Finished Size: 18 ¾” x 14” Table Topper B Table Topper A Pieced Style 1 Sashed Style 1 Pieced Style 2 Sashed Style 2 Revised June 06, 2012
Transcript of Give Thanks - media.rainpos.com · Give Thanks Finished Size: 21¼” x 21¼” Finished Size: 18...

Give Thanks
Finished Size: 21¼” x 21¼”
www.QuiltingTreasures.com
Finished Size: 18 ¾” x 14”
Table Topper B
Table Topper A
Pieced Style 1
Sashed Style 1
Pieced Style 2
Sashed Style 2
Revised June 06, 2012
www.QuiltingTreasures.com© Angela Anderson
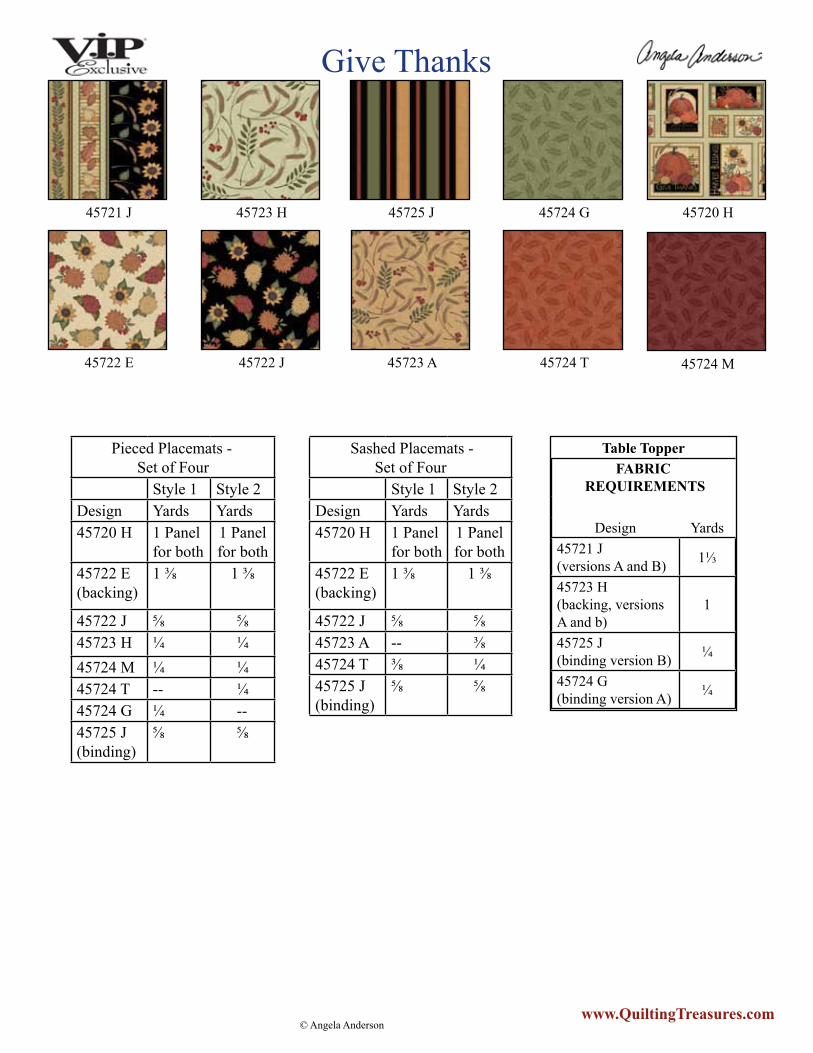
Table TopperFABRIC
REQUIREMENTS
Design Yards45721 J (versions A and B) 1⅓
45723 H (backing, versions A and b)
1
45725 J (binding version B) ¼
45724 G (binding version A) ¼
45721 J 45724 G 45723 H 45725 J 45720 H
45722 E 45724 T 45724 M 45722 J 45723 A
Give Thanks
Sashed Placemats - Set of Four
Style 1 Style 2Design Yards Yards45720 H 1 Panel
for both 1 Panel for both
45722 E (backing)
1 ⅜ 1 ⅜
45722 J ⅝ ⅝45723 A -- ⅜45724 T ⅜ ¼45725 J (binding)
⅝ ⅝
Pieced Placemats - Set of Four
Style 1 Style 2Design Yards Yards45720 H 1 Panel
for both 1 Panel for both
45722 E (backing)
1 ⅜ 1 ⅜
45722 J ⅝ ⅝45723 H ¼ ¼45724 M ¼ ¼45724 T -- ¼45724 G ¼ --45725 J (binding)
⅝ ⅝

Giving Thanks Table TopperTopper designed by Janice AverillFinished topper size: 21¼” x 21¼”Skill level: Intermediate
Cutting Directions: WOF = width of fabric
45721-J Border stripe• See instructions. Do not prewash.
45724-G Green texture• Cut (3) 2 ½” x 42” strips for binding.
45723-H Light green print• Cut (1) 30” x 30” square for backing.
Assembly:
1. Apply a light coat of spray starch to the border stripe and press dry.2. Prepare a clear plastic template for the large wedge A piece using the pattern provided.3. Choose a section of the border stripe. Place the template on the fabric. Trace several areas of the print onto the template with a fine-point permanent marker. Mark the wedge shape onto the fabric. Move the wedge shape to the same motif on another section of the fabric, aligning the print of the fabric with the traced print on the template. Mark the wedge. Repeat to mark 8 identical wedge pieces. Cut out the wedge pieces. Note: Use the fabric left between the wedge pieces to cut 8 more identical wedges for another table topper. The placement of the stripe sections will be opposite those of the first topper. See the alternate topper image.4. Make a mark at the seam allowance point on the wrong side of each of the wedge pieces.
5. Place 2 wedge pieces right sides together, aligning the seam allowance marks at the point. Begin stitching at the ¼” mark. Take 2 stitches and then backstitch to lock the seam end. Stitch the length of the side. Press the seam to the left. Repeat to make 4 pairs of wedges.
6. Place 2 pairs right sides together, aligning the ¼” marks at the points. Beginning at the outer edge, stitch along the side, moving the previously sewn seam allowance at the point out of the way. Stop and lock stitches at the ¼” seam mark. Press the seam to the left. Repeat with the 2 remaining pairs.
7. Place the 2 pieced units right sides together, aligning the ¼” marks. Beginning at the outer edge, stitch to the ¼” mark and lock stitches, again moving the previously sewn seam out of the way as you approach the point. Beginning at the opposite outer edge, stitch to the ¼” mark and lock stitches. Press the seam on each side of the center in the same direction as the other seams.
8. Layer, quilt, and bind, using your favorite methods and the green texture binding strips, to complete the table topper.
www.QuiltingTreasures.com
Give Thanks

www.QuiltingTreasures.com
Give Thanks

www.QuiltingTreasures.com
Give Thanks

Giving Thanks Place MatsPlace mats designed by Janice AverillFinished place mat size: 18 ¾” x 14”Skill level: Beginner
Note: Each Giving Thanks panel will yield 2 sets of 4 place mats—1 set of each pieced style, 1 set of each sashed style, 1 set of pieced style 1 and 1 set of sashed style 1, or 1 set of pieced style 2 and 1 set of sashed style 2.
Pieced Style 1 Placemmats - Set of 4
Cutting Directions: WOF = width of fabric
45720-H Giving Thanks panel• Cut (2) 9 ½” x 11 ½” rectangles with the “Autumn Greetings” motif centered in the rectangles.• Cut (2) 9 ½” x 11 ½” rectangles with the “Harvest Blessing” motif centered in the rectangles.
45723-H Light green print• Cut (1) 3 ⅛” x WOF strip; recut into (8) 3 ⅛” squares. Cut the 3 ⅛” squares in half diagonally to make 16 triangles.• Cut (1) 2 ¾” x WOF strip; recut into (16) 2 ¾” squares
45724-M Red texture• Cut (1) 3 ⅛” x WOF strip; recut into (8) 3 ⅛” squares and (4) 2 ¾” squares. • Cut the 3 ⅛” squares into 16 triangles.
45724-G Green texture• Cut (2) 2 ⅝” x WOF strips; recut into (8) 2 ⅝” x 7 ¼” rectangles.
45722-J Black floral• Cut (8) 2” x WOF strips; recut into (8) 2” x 16 ¼” strips and (8) 2” x 14 ½” strips.
45725-J Stripe• Cut (8) 2 ¼” x WOF strips for binding.
45722-E Cream floral• Cut (2) 22” x WOF strips; recut into (4) 17” x 22” rectangles for backing.
Blocks:
1. Sew a light green triangle to a red triangle on the long diagonal edges. Press seam toward the red triangle. Repeat to make 16 triangle units total.
2. Sew a 2 ¾” light green square between 2 triangle units. Press seams toward the square. Repeat to make a second strip.3. Sew a 2 ¾” red square between 2 light green squares. Press seams toward the light green squares.4. Sew the rows together to complete a 7 ¼” x 7 ¼” blocks. Press seams toward the center row. Repeat to make 4 blocks total.
Assembly:
1. Sew a 2 ⅝” x 7 ¼” green texture rectangle to the top and bottom of each block. Press seams toward the green texture strips. Sew the block sections to the right edge of each panel rectangle to complete 4 place mat centers.
www.QuiltingTreasures.com
Give Thanks

Press seams toward the panel rectangles. 2. Sew a 2” x 16 ¼” black floral strip to the top and bottom of each place mat center and a 2” x 14 ½” strip to the short ends to complete the place mat tops. Press seams toward the strips.3. Layer, quilt, and bind, using your favorite methods and the stripe binding strips, to complete the place mats.
Pieced Style 2 Place Mats, Set of 4
Cutting Directions:
45720-H Giving Thanks panel • Cut (2) 11 ½” x 11 ½” squares with the “Give Thanks” motif centered in the squares.• Cut (2) 11 ½” x 11 ½” squares with the 3 smaller motifs centered in the squares.
45723-H Light green print• Cut (1) 6” x WOF strip; recut into (2) 6” squares. • Cut each square twice diagonally to make 8 triangles.
45724-M Red texture• Cut (1) 6” x WOF strip; recut into (2) 6” squares. • Cut each square twice diagonally to make 8 triangles.
45724-T Orange texture• Cut (1) 5 ⅝” x WOF strip; recut into (4) 5 ⅝” squares. • Cut each square in half diagonally to make 8 triangles.
45722-J Black floral• Cut (8) 2” x WOF strips; recut into (8) 2” x 16 ¼” strips. and (8) 2” x 14 ½” strips.
45725-J Stripe• Cut (1) 2” x WOF strip; recut into (4) 2” x 5 ¼” strips. • Cut (8) 2 ¼” x 42” strips for binding.
45722-E Cream floral• Cut (2) 22” x 42” strips; recut into (4) 17” x 22” rectangles for backing.
Assembly:
1. Sew a light green triangle to a red triangle. Press seam toward the red triangle. Add an orange triangle to the long side. Press seam toward the orange triangle. Repeat to make 4 triangle units and 4 reversed triangle units total.
2. Sew a 2” x 5 ¼” stripe strip between 1 triangle unit and 1 reversed triangle unit to complete a 5 ¼” x 11 ½” pieced strip. Press seams toward the stripe strip. Repeat to make 4 pieced strips total.
3. Sew a pieced strip to the right edge of each panel square to complete 4 place mat centers. Press seams toward the squares.
4. Sew a 2” x 16 ¼” black floral strip to the top and bottom of each place mat center and a 2” x 14 ½” strip to the short ends to complete the place mat tops. Press seams toward the strips.5. Layer, quilt, and bind, using your favorite methods and the stripe binding strips, to complete the place mats.
www.QuiltingTreasures.com
Give Thanks

Sashed Style 1 Place Mats, Set of 4
Cutting Directions:
45720-H Giving Thanks panel• Cut (2) 11 ½” x 11 ½” squares with the “Give Thanks” motif centered in the squares.• Cut (2) 11 ½” x 11 ½” squares with the 3 smaller motifs centered in the squares.
45724-T Orange texture• Cut (3) 2 ⅞” x WOF strips; recut into (8) 2 ⅞” x 11 ½” rectangles.
45722-J Black floral• Cut (8) 2” x WOF strips; recut into (8) 2” x 16 ¼” strips and (8) 2” x 14 ½” strips.
45725-J Stripe• Cut (8) 2 ¼” x WOF strips for binding.
45722-E Cream floral• Cut (2) 22” x WOF strips; recut into (4) 17” x 22” rectangles for backing. Note: If using a longarm machine quilter, do not cut individual backing rectangles.
Assembly:1. Sew a 2 ⅞” x 11 ½” orange rectangle to opposite sides of each panel square to complete the place mat centers. Press seams toward the rectangles.
2. Sew a 2” x 16 ¼” black floral strip to the top and bottom of each place mat center and a 2” x 14 ½” strip to the short ends to complete the place mat tops. Press seams toward the strips.3. Layer, quilt, and bind, using your favorite methods and the stripe binding strips, to complete the place mats.
Sashed Style 2 Place Mats, Set of 4
Cutting Directions:
45720-H Giving Thanks panel• Cut (2) 9 ½” x 11 ½” rectangles with the “Autumn Greetings” motif centered in the rectangles.• Cut (2) 9 ½” x 11 ½” rectangles with the “Harvest Blessing” motif centered in the rectangles.
45724-T Orange texture• Cut (3) 1 ½” x WOF strips; recut into (8) 1 ½” x 11 ½” strips.
45723-A Tan print• Cut (3) 2 ⅞” x WOF strips; recut into (8) 2 ⅞” x 11 ½” rectangles.
45722-J Black floral• Cut (8) 2” x WOF strips; recut into (8) 2” x 16 ¼” strips and (8) 2” x 14 ½” strips.
45725-J Stripe• Cut (8) 2 ¼” x WOF strips for binding.
45722-E Cream floral• Cut (2) 22” x WOF strips; recut into (4) 17” x 22” rectangles for backing.
Assembly:1. Sew a 1 ½” x 11 ½” orange strip to each 2 ⅞” x 11 ½” tan strip. Press seams toward the orange strips. Sew a pieced strip to opposite sides of each panel square to complete the place mat centers. Press seams toward the pieced strips.
2. Sew a 2” x 16 ¼” black floral strip to the top and bottom of each place mat center and a 2” x 14 ½” strip to the short ends to complete the place mat tops. Press seams toward the strips.3. Layer, quilt, and bind, using your favorite methods and the stripe binding strips, to complete the place mats.
Not for Resale/Winter 2012
While all possible care has been taken to ensure the accuracy of this pattern, we are not responsible for printing errors or the way in which individual work varies.
www.QuiltingTreasures.com
Give Thanks