Give film/video a cartoon look. ToonIt! for Film/Video
46
Four great plugins for After Effects, Final Cut Pro, Motion, and Premiere Pro Give film/video a cartoon look. ToonIt! for Film/Video [from: Digital Anarchy] f/x tools for revolutionaries www.digitalanarchy.com [render code by]
Transcript of Give film/video a cartoon look. ToonIt! for Film/Video

Four great plugins for After Effects, Final Cut Pro, Motion, and Premiere Pro
Give film/video a cartoon look. ToonIt! for Film/Video
[ from: Digital Anarchy] f/x tools for revolutionaries
www.digitalanarchy.com
[render code by]

© 2007, Digital Anarchy : f/x tools for revolutionaries | ToonIt! : Give video a cartoon look.
ToonIt! Film/Video: Table of Contents
Introduction to ToonIt! 1Easy, believable cartooning 1Breakdown of ToonIt! filters 1Roto Toon filter 1Outlines Only filter 2Goth filter 2Blacklight Edges filter 2
Installation & Specs 2Support & Registration 3Where to find the tools 3
ToonIt! and Speed 4Multi-processing support 4Example of speed tests 4Final Cut Pro notes 4Note about FCP render times 5Note about interlaced footage 5
How to work with ToonIt! speed 5
Filter 1: Roto Toon 6About this manual 6About Roto Toon params 7
Blur Type section 7Blur Type 7Blur Radius 7Blur Thresh 7Blur Quality 8
Roto section 8Roto 8Flatness 9Simplicity 10Roto Quality 10Strength 10Level 11Temporal Fix 11

ToonIt! Film/Video: Table of Contents
© 2007, Digital Anarchy : f/x tools for revolutionaries | ToonIt! : Give video a cartoon look.
Halftone section 11Halftone 11Dot Size 11Dot Quality 12
Blur Outline section 13Use Main Blur 13Outline Color 13Blur Type 13Outline Blur Radius 13Outline Blur Thresh 14Blur Quality 14
Soft section 14Soft 14Soft Strength 14Soft Thickness 15Soft Outline Quality 15
Comic section 16Comic 16Comic Sensitivity 16Comic Strength 17Comic Thickness 17Comic Antialias 17Comic Outline Quality 17
Shadow section 18Shadow 18Shadow Threshold 18Shadow Antialias 18Tint Foreground 18
Stipple section 19Works with Blur params 19Stipple 19Stipple Density 20Stipple Threshold 20

© 2007, Digital Anarchy : f/x tools for revolutionaries | ToonIt! : Give video a cartoon look.
ToonIt! Film/Video: Table of Contents
Fine Tune params 21Lighter 21Blend with Original 21
Filter 2: Outlines Only 22About this manual 22About Outlines Only params 23
Fine Tune params 23Outline Color 23Blend with Original 23
Blur section 24Blur Type 24Blur Radius 24Blur Thresh 25Blur Quality 25
Soft section 26Soft 26Soft Strength 26Soft Thickness 26Soft Outline Quality 26
Comic section 27Comic 27Comic Sensitivity 27Comic Strength 27Comic Thickness 27Comic Antialias 29Comic Outline Quality 29
Shadow section 29Shadow 29Shadow Threshold 29Shadow Antialias 29
Stipple section 30Stipple 31Stipple Density 31Stipple Thresh 31

ToonIt! Film/Video: Table of Contents
© 2007, Digital Anarchy : f/x tools for revolutionaries | ToonIt! : Give video a cartoon look.
Filter 3: Goth 32About this manual 32About Goth params 33
Color section 33Type 33Color 33Level 33Color Width 34
Blur section 34Blur Type 34Blur Radius 35Blur Thresh 35Blur Quality 35
Fine Tune section 35Blend with Original 35
Filter 4: Blacklight Edges 36About this manual 36About Blacklight Edges params 37
Edge section 37Color 37Edge Width 37Invert 37
Blur section 38Blur Type 38Blur Radius 38Blur Thresh 38Blur Quality 38
Fine Tune section 39Blend with Original 39

ToonIt! Film/Video: Introduction
© 2007, Digital Anarchy : f/x tools for revolutionaries | ToonIt! : Give video a cartoon look.1
Introduction to ToonIt! Finally! An easy way to give video footage that sought-after cartoon look. ToonIt! uses advanced algorithms to process your image and create cartoon shading and lines. ToonIt! plugins free you from time consuming techniques like rotoscoping and hand painting.
ToonIt! analyses an image, then reduces its color palette and detects where the important edges are. The edges are used to shape and control areas of color. ToonIt!ʼs edges can be rendered to produce a pen & ink look. Use ʻedges onlyʼ options to create a realistic line drawing. Combine different styles and outlines to create even more variation. Voila: youʼve been toonʼed.
This plugin set is a collaboration between Digital Anarchy and the technology company Toonamation.
Easy, believable cartooningAchieving a cartoon look with other methods is time-consuming and limiting. ToonIt! gives you the power of new technology designed by Toonamation specifically for animators and video editors. An easy-to-use interface and custom controls give you unlimited flexibility. No other cartooning solution produces such good results with so little work.
Using the four filters in ToonIt!, you can effortlessly cartoon in several different styles, including: Flat Cartoon, Graphic Novel, Comic Noir (b&w), Half-Tone (dots), Stipple, High Contrast, Line Art and Neon Edge.
Breakdown of ToonIt! filters There are four plugins in this package. The primary tool is Roto Toon; you will probably use this filter the most, as it creates a full-fledged cartoon image. The Outlines Only filter is an edge detection version of Roto Toon. Goth creates a high contrast effect. Blacklight Edges is a stylized edge detection filter.
Roto Toon filterRoto Toon is the full ToonIt! package working together. This filter contains the internal rotoscoping and edge detection composited together to produce a fully-fledged cartoon effect. Three rotoscoping algorithms plus a half-tone effect, the entire Outlines set, individual blurring and detail parameters… The works!

© 2007, Digital Anarchy : f/x tools for revolutionaries | ToonIt! : Give video a cartoon look.2
ToonIt! Film/Video: Introduction
Outlines Only filterThis filter contains all of the edge detection algorithms included in ToonIt! This will disregard all the color in the footage and reduce it to edges on a white background, which can be kept as is or composited back onto the original footage. Soft Edges with mild shading, hard Comic edges, ink & paint Shadow fills, and noise Stippling are all included and are fully customizable.
Goth filterThis filter will run the internal rotoscoping algorithm to flatten the entire image into three colors, a dark, a light, and a midtone. You can change the algorithm used, the midtone color, and how much or little the image is affected. This produces a very high contrast effect for extreme stylization.
Blacklight Edges filterThis filter will run the ToonIt! edge detection algorithm on your footage and map a specialized color gradient to the resulting edges, making your image stand out as if the edges have been placed under a blacklight.
Installation & SpecsToonIt! is supported on Mac 10.3.9, 10.4, and 10.5 +higher, and runs natively on Intel Macs. The plugins are supported in Windows 2000, XP Pro, XP Home, Vista 32-bit, and Vista 64-bit.
On Mac systems, ToonIt! works in After Effects 5.5 +higher, including AE CS3. It is also compatible with FCP 4.0 +higher and Motion 2.1 +higher. On Windows and Vista systems, ToonIt! works in After Effects 5.5 +higher, including AE CS3. It is also compatible with Premiere Pro 2.0 +higher.
Installation is simple and directed towards your host applicationʼs Plugins folder. For help installing ToonIt!, please refer to our installation guide. You can download that document here: www.digitalanarchy.com/toon/ToonIt-Install.man.

ToonIt! Film/Video: Introduction
© 2007, Digital Anarchy : f/x tools for revolutionaries | ToonIt! : Give video a cartoon look.3
Support & RegistrationRegistration occurs when you purchase the filter. We register you in our database using the contact information you supplied upon purchase, and the serial number weʼve given you. If you need a serial number, installer, or any other material support, just contact [email protected].
We hope that you find ToonIt! to give you all the control you could want, while simple enough that you can set everything up in a few minutes. Itʼs our desire to make sure youʼre satisfied with your purchase. If you have any questions, comments, or whatever, weʼd love to hear them. Send an email to [email protected].
If youʼre having trouble with ToonIt!, please make sure to go through the intro video tutorials available at www.digitalanarchy.com/toon/toon_tutes.html.
Where to find the toolsToonIt! filter names are prefixed with ʻToonItʼ. In After Effects and Premiere Pro, the ToonIt! filters appear in a Digital Anarchy sub-menu in the Effects menu. In Final Cut Pro and Motion, the filters will appear under a ʻDigital Anarchyʼ folder in the Video Filters bin.

© 2007, Digital Anarchy : f/x tools for revolutionaries | ToonIt! : Give video a cartoon look.4
ToonIt! Film/Video: Render speed
About Render SpeedToonIt! is an very render intensive product. Using the default values, we have
averaged around 2-3 seconds per frame for SD footage, and about 12-13
seconds a frame for HD footage on both PCs and Macs.
Multi-processing supportWe are working towards faster speed upgrades and multiprocessing support, which will be available in ToonIt! 1.1, a free update for owners of the product. Version 1.1 will include speed upgrades and optimization along with multi-processing support.
However, ToonIt! will never be a real-time or even a semi-real time product, so please plan your render time accordingly. Check our website www.digitalanarchy.com for a timeline on the update.
We are aware of ToonItʼs speed and are committed to improving the render times. However, we are even more firmly committed to making sure that the quality of the results are rivaled only by manual rotoscoping. This is what makes ToonIt! stand out and makes the product worth using.
Quality vs SpeedToonIt! is a quality vs. speed effect. It requires a lot of processing to create the effect and keep all the frames consistant over time. Other cartooning effects, including the Cartoon filter in our PlasmaFX plugin set, use Posterization algorithms to create a quick and dirty cartoon effect. This is pretty fast but doesnʼt create as nice of a look and there tends to be a lot of jitter from frame to frame.
One of the main features of ToonIt! is its ability to create a smooth animation over time with very little jitter. The smoothness and consistancy of the results is really only matched by hand rotoscoping. If you compare ToonIt vs. doing this effect by hand, itʼs actually a very fast process, even if you have to render out a sequence over night.
Another wonderful aspect of ToonIt! is how it holds up when dealing with human faces. This is one of the most difficult kind of images to sell digitally and where most cartooning filters fall apart. ToonIt! provides pretty spectacular results and again, that is a reason that its render time is high.

ToonIt! Film/Video: Render speed
© 2007, Digital Anarchy : f/x tools for revolutionaries | ToonIt! : Give video a cartoon look.5
Example of speed testsIn our tests on a dual 1.8 ghz PPC Mac, we are averaging about 5-6 seconds a frame using SD footage. This was using default settings in Roto Toon. On the Mac Pro Dual 2.6 Intel Xeon processors, our tests were averaging around 4 seconds a frame. We experienced similar times under Windows XP Pro. Vista 32-bit was a little faster than XP because itʼs 64-bit. This refers to RAM previewing as well the final output render.
Speed releases will be addressed in a free version 1.1 update. However, ToonIt! will never be a real-time or even semi-real time product. Itʼs too render intensive.
Final Cut Pro notesDue to the way Apple handles FxPlug plug-ins and the way Final Cut Pro handles the Canvas video display, ToonIt! is extremely slow in FCP 5.1.4 and below. We were unable to build in the proper workarounds to make the rendering times faster in FCP 5.1.4 and below. That improvement is also coming in the free 1.1 update.
Apple seems to have fixed the video display issues in FCP 6.0 (part of Final Cut Studio 2). This means that ToonIt! is faster in FCP 6.0 and higher.
Note about FCP render timesFCP likes to give really rough render time estimates while rendering. The app usually starts at the worst-case time scenario and then gradually chips time away from the estimated finish.
As you work with ToonIt!, keep this factor in mind when you evaluate how long the render will actually take: Does the render dialog start at 25 hours and stay there? Or does the time estimate gradually start going down as the render progresses (such as saying 20 hours after a few frames have been rendered, then saying 13 hours after a few more frames have rendered a few minutes later).
Note about interlaced footageRight now, we recommend deinterlacing any interlaced footage and completing all ToonIt! work in a Progressive frame state.
For instance, in relation to our FCP render time note above, the speed issues are mainly generated by FCP forcing ToonIt! to render twice per frame, once for each field. By working with progressive footage, you can instantly cut the render times in half.

© 2007, Digital Anarchy : f/x tools for revolutionaries | ToonIt! : Give video a cartoon look.6
ToonIt! Film/Video: Render speed
Tips for ToonIt! speedSo you have ToonIt! set up for a 30 minute production. The visuals look great. You hit the ʻRenderʼ button and your host app calculates that a final render will take almost 3 days…! Yikes.
Render in SectionsFor something as long as 30 minutes, we recommend doing it in sections or splitting up the rendering between machines. ToonIt! is actually quite stable; weʼve worked out all of the crashing bugs and memory leaks, so you donʼt need to worry about the product crashing during render.
Render as image or Targa sequenceFor a long project that has huge render times, you could render the project out as an uncompressed image or Targa sequence. That way, if anything goes wrong during the render, you will have all of your frames up to the crash intact, and not be left with a corrupted QuickTime .mov file. You could then start rendering from the frame where everything went wrong and not have to re-render everything all over again.
After you get your full image sequences, just pop them back into After Effects or Premiere and render the sequence out with your final target codec of choice. Rendering out image sequences takes no time at all; the only drawback is that image sequences can take up more disk space than a compressed movie file while initially rendering everything.
Work at half-resolutionHere is another way to change your workflow to speed things up. The ToonIt! effect looks very similar at lower resolutions as it does at full resolution. You can set everything up at half (or even quarter) resolution and then wait until you go to lunch to render out the full sequence.
Composite using other layersIf youʼre trying to composite other effects on top of a ToonIt layer, render out the ToonIt effect and use the render in your timeline instead of the layer with ToonIt! applied to it. You can then turn off this rendered layer and use the original layer when you do the final render.

ToonIt! Film/Video: Render speed
© 2007, Digital Anarchy : f/x tools for revolutionaries | ToonIt! : Give video a cartoon look.7
Evaluate your footageToonIt! will do its darned best to ʻtoonifyʼ your footage with a minimum amount of tweaking when you first apply it. The results of this toonʼing, however, are largely based on the quality of your footage. As with most things graphic, the better your source material, the better your final results.
Visual information is brought out by good lighting, attention to composition, and the quality of the capture. For instance, capturing directly to a hard drive when shooting will produce much better results than capturing off a DV tape. You will get a cleaner image with less image grain. The better your results, the less initial tweaking youʼll have to do to get a good, solid toon.
ToonIt! tends to give a better image when working with progressive footage. When possible, try deinterlacing your footage first, render out a Toonʼed sequence, then import that into your final interlaced project.

© 2007, Digital Anarchy : f/x tools for revolutionaries | ToonIt! : Give video a cartoon look.8
ToonIt! Film/Video: Roto Toon plugin
Filter 1: Roto ToonRoto Toon contains the internal rotoscoping and edge detection composited together to produce a full-fl edged cartoon eff ect. Three rotoscoping algorithms plus a half-tone eff ect, the entire Outlines set, individual blurring and detail parameters…The works!
About this manualOur screenshots for Roto Toon will show an After Eff ects CS3 interface. However, the parameters look and work exactly the same in Final Cut Pro, Motion and Premiere Pro. This page shows the fi rst eight Roto Toon parameters in each host application. When there is a diff erence in host apps, we will highlight that information in this manual.
After Eff ects 5.5-6.5 screenshot
After Eff ects 7.0/CS3 screenshot
Premiere Pro screenshot
Final Cut Pro screenshot
Motion screenshot

ToonIt! Film/Video: Roto Toon plugin
© 2007, Digital Anarchy : f/x tools for revolutionaries | ToonIt! : Give video a cartoon look.9
Blur Type parameters
About Roto Toon paramsRoto Toon parameters fall into some basic categories: Blur, Roto, Halftone, Outline, Blur Quality, Soft, Comic, Shadow and Stipple. Each section is described below according to its group. A few uncategorized parameters are discussed in our final Fine Tune section.
Blur Type sectionThis group of parameters sets the Blur style and properties used by the rotoscoping algorithm.
Blur Type Select between a Box Blur or a Gaussian Blur for the rotoscoping algorithm to use. Box will generally give you better final results than Gaussian, which tends to soften the image. Both blur methods are present to give you a choice when creating your final effect.
Blur Radius Sets the radius of the selected blur type. The higher this is, the less color detail will be apparent in the footage, or the color areas will blur together better.
Blur Thresh Threshold of the blur effect. How much of the footage is actually affected by the blurring before being passed to the rotoscoping algorithm. The higher this value is, the more of the frame will be affected.
Blur Radius at 3 (the default). All other params at defaults.
Blur Radius at 15. There is less detail in the footage; especially in the background foliage, details are blurred together.
Original footage.

© 2007, Digital Anarchy : f/x tools for revolutionaries | ToonIt! : Give video a cartoon look.10
ToonIt! Film/Video: Roto Toon plugin
Roto parameters
Blur QualityMenu to switch between a Fast and High Quality blur. Leave this set to Fast so that any parameter tweaks or interaction is relatively quick, then set it to High prior to rendering.
Roto sectionThis group of parameters sets the type of rotoscoping algorithm used by the Roto Toon filter. There are options to controls the appearance and behavior of the Roto algorithm.
RotoThe meat of the Roto Toon plug-in! This menu allows you to select exactly which rotoscoping algorithm youʼd like to use with your footage. There are three settings to choose from.
Use Roto1 The smoothest of the group. Blends analogous colors into smooth fields and holds the color true over the course of your footage. Uses Flatness and Simplicity parameters.
Use Roto2 A little rougher than Roto1, but preserves more detail and highlight information in the final render. Deactivates the Flatness and Simplicity parameters and uses the Strength and Level parameters.
No Roto Bypasses the initial rotoscoping algorithm. Gives you a rougher set of color fields with higher detail, but no customization other than the Blurring controls.
Blur Thresh at 15 (default). Other params default.
Blur Thresh at 30. At a higher value, more blurring occurs. The shadows in the girlʼs scarf arenʼt as deep, and the background leaves appear softer.

ToonIt! Film/Video: Roto Toon plugin
© 2007, Digital Anarchy : f/x tools for revolutionaries | ToonIt! : Give video a cartoon look.11
Roto2. This rotoscoping style preserves more detail in your footage. Use Strength and Level to customize results.
Roto1. This setting gives the smoothest imagery. Other params default. Use Flatness and Simplicity to customize results.
No Roto. Higher level of detail, but no way to customize the results because all Roto options are grayed out.
Flatness This spreads the color field bands out across the footage. Flatness makes highlights and shadows stand out a lot more, but also reduces the depth of the frame. The higher this is, the more ʻflatʼ the footage appears. Activated with Roto1.
TECH NOTE: Though Flatness can go to 60, itʼs really recommended that you do NOT go above 20. This is for the sake of speed and overall quality of the effect. The amount of quality that you generate above 20 isnʼt worth the speed crippling.
Roto1, Flatness at 1. Other params default.Roto1, Flatness at 20. All other params default. The shadows and highlights are subtely more visible; look at her brighter forehead and darker hair.

© 2007, Digital Anarchy : f/x tools for revolutionaries | ToonIt! : Give video a cartoon look.12
ToonIt! Film/Video: Roto Toon plugin
Simplicity Controls the amount of color detail left in the frame. The higher this is, the less detail youʼll be able to make out in fields of color. Activated with Roto1.
Roto Quality Set this to Fast in order to speed up the interactivity of the plug-in and to speed up render times. The trade-off to the boost in speed is the reduction of the final render quality.
WORK TIP: One way of working with this option is to set Roto Quality to Fast while setting up the effect. Switch back to High just before the final render to use Roto Toonʼs full effect.
Strength Sets the visual strength of the effect, making the separation between the dark, midtone and highlight segments more defined. The lower this value is, the more blended together theyʼll appear. Activated with Roto2.
Simplicity at 2, Roto1. Other params default. Simplicity at 25 (the limit). Notice how detail in the foliage is lost, and the womanʼs face looks slightly blurred.
Strength at 100%, Roto2. Other params default.
Strength at 10%. There is less of a contrast between lights and darks, which makes the footage look lighter overall.
ToonIt! Film/Video: Roto Toon plugin
© 2007, Digital Anarchy : f/x tools for revolutionaries | ToonIt! : Give video a cartoon look.13
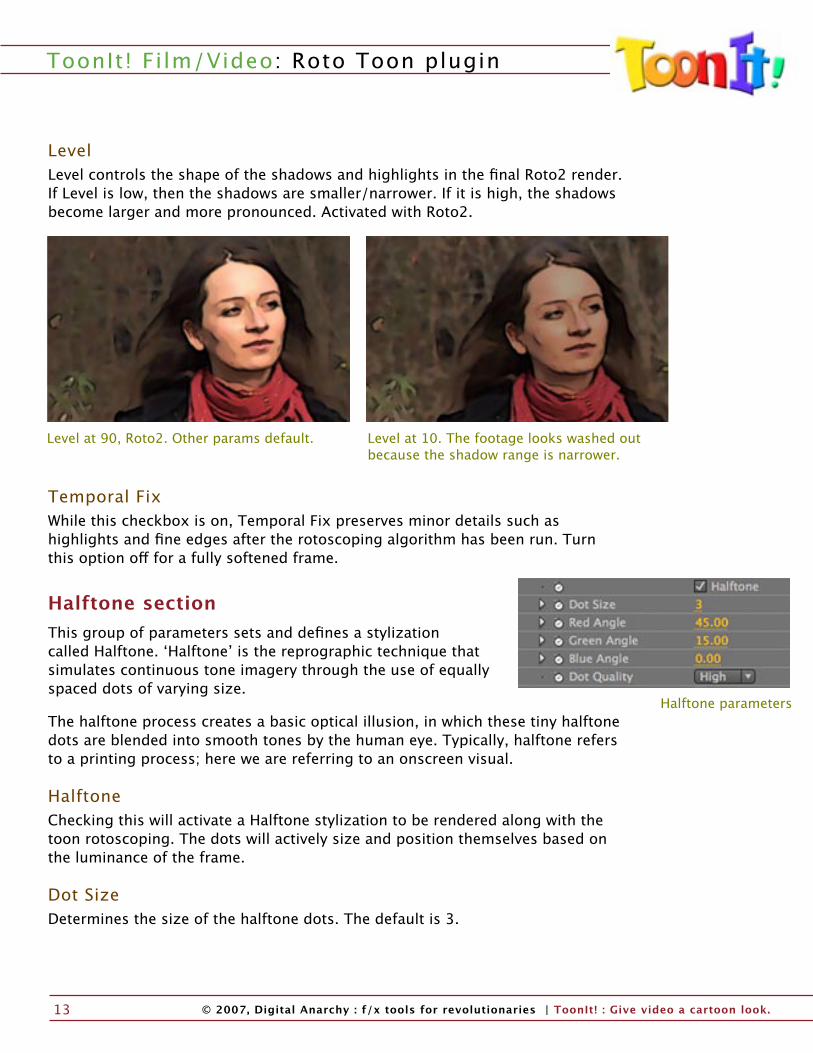
LevelLevel controls the shape of the shadows and highlights in the final Roto2 render. If Level is low, then the shadows are smaller/narrower. If it is high, the shadows become larger and more pronounced. Activated with Roto2.
Temporal Fix While this checkbox is on, Temporal Fix preserves minor details such as highlights and fine edges after the rotoscoping algorithm has been run. Turn this option off for a fully softened frame.
Halftone sectionThis group of parameters sets and defines a stylization called Halftone. ʻHalftoneʼ is the reprographic technique that simulates continuous tone imagery through the use of equally spaced dots of varying size.
The halftone process creates a basic optical illusion, in which these tiny halftone dots are blended into smooth tones by the human eye. Typically, halftone refers to a printing process; here we are referring to an onscreen visual.
HalftoneChecking this will activate a Halftone stylization to be rendered along with the toon rotoscoping. The dots will actively size and position themselves based on the luminance of the frame.
Dot SizeDetermines the size of the halftone dots. The default is 3.
Halftone parameters
Level at 90, Roto2. Other params default. Level at 10. The footage looks washed out because the shadow range is narrower.
© 2007, Digital Anarchy : f/x tools for revolutionaries | ToonIt! : Give video a cartoon look.14
ToonIt! Film/Video: Roto Toon plugin
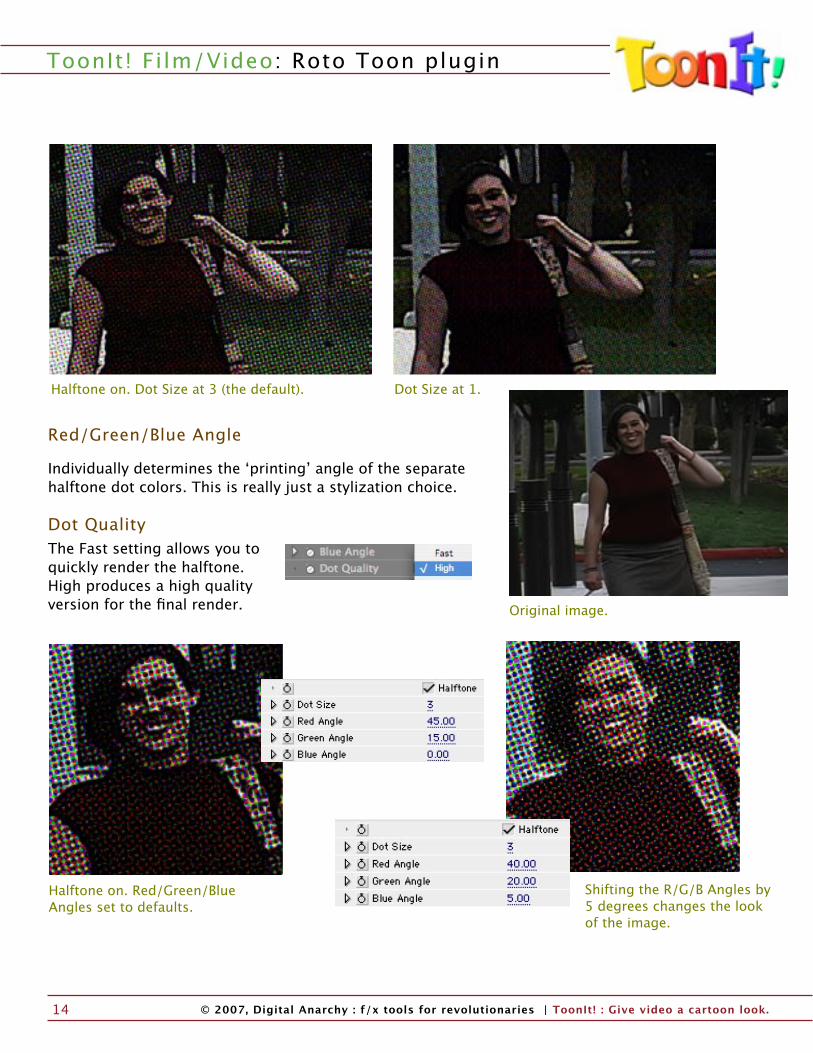
Red/Green/Blue Angle
Individually determines the ʻprintingʼ angle of the separate halftone dot colors. This is really just a stylization choice.
Dot Quality The Fast setting allows you to quickly render the halftone. High produces a high quality version for the final render.
Dot Size at 1.
Original image.
Halftone on. Dot Size at 3 (the default).
Halftone on. Red/Green/Blue Angles set to defaults.
Shifting the R/G/B Angles by 5 degrees changes the look of the image.

ToonIt! Film/Video: Roto Toon plugin
© 2007, Digital Anarchy : f/x tools for revolutionaries | ToonIt! : Give video a cartoon look.15
Blur Outline sectionThis group of parameters sets the Blur properties used by the Outlines created by our rotoscoping algorithm.
Use Main Blur Keep this option checked to pass the Blur settings from the Roto section down to the Outline section of the plugin. (Those parameters are Blur Type, Blur Radius, Blur Thresh, and Blur Quality.) The same parameters in the Outline section are grayed out if Use Main Blur is checked.
Uncheck this if you want to have separately styled Outlines and Rotoscoped color fields. This will activate Blur Type, Outline Blur Radius, Outline Blur Thresh, and Blur Quality in the Outlines section.
Outline Color This sets the final color of all the edge detection results. The default color is black.
Blur Type Select between a Box blur or a Gaussian blur for the edge detection algorithm.
Outline Blur Radius Sets the radius of the selected Blur Type. Raising this value will result in less defined edge areas, especially in shaded areas. Basically, the Outline is less present at higher values.
Blur Outline parameters
Outline color set to deep red.
Outline Blur Radius at 1. Other params default. OBR at 30. The absence of dark areas between the tree shapes makes them less defined.
Use Main Blur turned off.

© 2007, Digital Anarchy : f/x tools for revolutionaries | ToonIt! : Give video a cartoon look.16
ToonIt! Film/Video: Roto Toon plugin
Outline Blur Thresh Threshold of the blur effect. How much of the footage is actually affected by the blurring before being passed to the edge detection algorithm. The higher this value is, the more that the frame will be affected.
Blur QualityMenu to switch between a Fast and High Quality blur. Leave this set to Fast so that any parameter tweaks or interaction is relatively quick, then set it to High prior to rendering.
Soft sectionThese parameters determine the detail level of Roto Toonʼs edge detection, which Outlines the cartoon fields.
Soft Checking this enables the Soft outline edge detection method. This option generates fine edges with soft areas of shading. Turning on Soft activates Soft Strength, Soft Thickness and Soft Outline Quality.
Turning off Soft removes the shape outlines that are present by default. This parameterʼs activation causes a definite shift in visual stylization. TECH NOTE: With Soft unchecked, Outline Color has no effect.
Soft StrengthDetermines the amount of soft shading present in the frame. If Soft Outline Quality is set to High, the final effects are more detailed than with Fast Quality turned on. The lines might be a bit more aliased in the lower Quality setting.
Soft parameters
Outline Blur Thresh at 2. Other params default. The trees and grass have dark lines for definition.
OBT at 30. The trees and grass appear blurred together without lines providing definition between their shapes.

ToonIt! Film/Video: Roto Toon plugin
© 2007, Digital Anarchy : f/x tools for revolutionaries | ToonIt! : Give video a cartoon look.17
Soft ThicknessDetermines the thickness of the major Soft edges. This parameter has a very narrow range, from 1 to 3. If Soft Outline Quality is set to High, the final effects are more detailed than with Fast Quality turned on. The lines might be a bit more aliased in the lower Quality setting.
Soft Outline QualityDetermines the quality of the effect. Set it to fast for better interaction while tweaking, and set it to High for the final render.
Along with the varying render speeds, the Quality setting will determine how precise and defined the Soft effect looks. For instance, Soft Outlines at Fast Quality wonʼt look as defined as the ones at High Quality.
Soft turned off, which removes the dark lines that are typically present.
Soft turned on. Soft Strength at 0 (default). Soft Thickness at 2 (default). Other params default.
Soft Thickness at 3.Soft Strength at 100.

© 2007, Digital Anarchy : f/x tools for revolutionaries | ToonIt! : Give video a cartoon look.18
ToonIt! Film/Video: Roto Toon plugin
Comic sectionThis group of parameters sets and defines a stylization called Comic. You can think of ʻComicʼ as looking like the pencilled and inked edges of a graphic novel; black lines with no direct shading. In Roto Toon, this stylization varies depending upon how you set up the Comic parameters.
ComicProduces harsh comic-book style edges with a little rough shading.
Turning this option on will activate the Comic parameters: Comic Sensitivity, Comic Strength, Comic Thickness, Comic Antialias and Comic Outline Quality.
Comic Sensitivity Determines how much detail will be picked up by the edge algorithm. Raising this will increase the amount of edge detail, adding in the color of Outline Color.
By default, this parameter is set to 50%. Lowering the value considerably, like to 10 or 20%, may cause the parameter to have no effect. Raising the value to 100%, will saturate the image in the Outline Color because so much edge is added.
The higher the Sensitivity, the denser the comic outlines will appear in the dark areas. For instance, in our example below, notice how the color of the womanʼs shirt changes with Color Sensitivity. The lines start filling in around the darker parts of the image as the value goes higher.
Comic Outline parameters
Original Roto Toon image.
Comic Sensitivity at 90.Comic Sensitivity at 80. Other params default.

ToonIt! Film/Video: Roto Toon plugin
© 2007, Digital Anarchy : f/x tools for revolutionaries | ToonIt! : Give video a cartoon look.19
Comic Strength Determines how heavily the Comic lines are drawn. Increase this for a heavier woodblock/linotype effect. The default is 50%.
Comic Thickness Sets how thick the Comic lines are drawn. The value is limited to 1 (thinner) or 2 (thicker). The default is 2.
Comic Antialias A percentage slider for the final result antialiasing to help tone down any jagged edges.
Comic Outline Quality Determines the quality of the effect. Set it to fast for better interaction while tweaking, and set it to High for the final render. The default is 75%.
Comic Strength at 90. Linotype/woodblock stylization.Comic Strength at 70. Other params default.
Comic Thickness at 2. Lines are a little thicker.Comic Thickness at 1. Other params default.

© 2007, Digital Anarchy : f/x tools for revolutionaries | ToonIt! : Give video a cartoon look.20
ToonIt! Film/Video: Roto Toon plugin
Shadow sectionThese parameters add an effect that we call ʻShadowʼ. Roto Toon Shadows fill in the cartoon color fields with a dark value. This can quickly create a dramatic effect.
Shadow Check this to enable to Shadow edge detection effect. This will find the shadows of the image and fill them in with as much of the Outline Color as it can. Turning on Shadow activates three parameters: Shadow Threshold, Shadow Antialias and Tint Foreground.
Shadow Threshold Sets how much of the image is actually being filled in with the shadow. The lower the value, the less the shadow fill. The default is 50%.
Shadow AntialiasA percentage slider for the final result antialiasing to help tone down any jagged edges. The default is 75%.
Tint Foreground Tint Foreground is a more extreme Lighter parameter. Tint Foreground leaves the footage colors but wipes out darks. It was built to fill in the missing darks within Shadow outlines.
Shadow parameters
Original Roto Toon footage.
Shadow Threshold at 30.Shadow Threshold at 20. Other params default.

ToonIt! Film/Video: Roto Toon plugin
© 2007, Digital Anarchy : f/x tools for revolutionaries | ToonIt! : Give video a cartoon look.21
TECH NOTE: If Shadow and Tint Foreground are turned on and Shadow Threshold is set to 0, the Tint effect will be applied to the whole image. Tint Foreground overrides all other color effects, except the Halftone checkbox.
Stipple sectionThese parameters set and define a stylization called Stipple. ʻStipplingʼ is the technique of using small dots to simulate varying degrees of solidity or shading. This technique produces shaded line art illustrations in drawing or painting, in addition to being a printing and printmaking technique. In Roto Toon, our Stipple params create varying densities of noise to simulate that look.
Works with Blur paramsStipple params can work nicely with the Blur parameters. In general, keep this concept in mind: The higher the Blur, the more random the Stipple noise generation.
Lowering the Stipple Thresh gives the stippling a lot of definition; it makes the noise more refined and shaped towards the initial subject. If you raise the Blur a bit and boost the Stipple Thresh to above 30, the noise will appear to “flow” more over the image, not holding as true to the original shapes. This can be an interesting stylization for the right footage.
StippleCheck this to enable stippling. This option will use varying densities of noise to shade the image. Turning on Stipple activates two parameters, Stipple Density and Stipple Thresh.
Stipple parameters
Shadow and Tint Foreground turned on. Shadow Threshold at 20. Other params default.
Shadow and Tint Foreground turned on. Shadow Threshold at 0. This makes Tint apply itself to the whole image, not just the Shadow areas.

© 2007, Digital Anarchy : f/x tools for revolutionaries | ToonIt! : Give video a cartoon look.22
ToonIt! Film/Video: Roto Toon plugin
Stipple DensityDetermines the amount of shading will be used in the image. This visually defines the stylization. Increase for higher contrast and heavy noise. The default is 50%.
Stipple Threshold Sets how much of the image is affected by the stippling. The default is 50%.
Original Roto Toon footage.
Stipple Threshold at 30%. Other params default. Stipple Threshold at 50%.
Stipple Density at 60%. Other params default. Stipple Density at 80%.

ToonIt! Film/Video: Roto Toon plugin
© 2007, Digital Anarchy : f/x tools for revolutionaries | ToonIt! : Give video a cartoon look.23
Fine Tune paramsYouʼll find these two parameters mingled among the other sections in the Roto Toon palette. These effects are special in and of themselves, so they get their very own section!
Lighter Lighter is sort of its own beast. This parameter is a combination of effects intended to lighten flesh tones without making colors desaturated. Lighter still leaves in the darks of your footage. Using Lighter, a cartoon effect could look like the Sunday comics, especially after outlines are overlaid.
Lighter will raise the brightness of the frame via a percentage value to take care of any unwanted color blending in the tooning process. The more analogous two colors are, the more likely theyʼll get blended by the roto process. By raising the Lightness (or brightness), you reseparate out those colors a bit.
This parameter is also a good way to fix your footage if it looks too dark. Kind of a low-level Brightness filter without any mid-tone control.
Blend with Original Percentage slider that will fade the results back into the original image. This slider is located at the bottom of the parameter list.
Weʼve actually been using the Lighter parameter throughout this manual. Our original footage was a little too dark. Whenever we have indicated ʻOther params defaultʼ, that statement was true except for Lighter, which was set to 20%.
Lighter at 50. The footage is lighter/brighter.
Lighter at 0. The original Roto Toon.
Blend with Original at 30%. Blend with Original at 60%.

© 2007, Digital Anarchy : f/x tools for revolutionaries | ToonIt! : Give video a cartoon look.24
ToonIt! Film/Video: Outlines Only plugin
Filter 2: Outlines OnlyOutlines Only is all edge detection algorithms. This fi lter will disregard the color in your footage and reduce it to edges on a white background. The white can be kept as is, or composited back onto the original footage.
About this manualOur screenshots for Outlines Only will show an After Eff ects CS3 interface. However, the parameters look and work exactly the same in Final Cut Pro, Motion and Premiere Pro. This page shows the fi rst eight Outlines Only parameters in each host application. When there is a diff erence in host apps, we will highlight that information in this manual.
After Eff ects 5.5-6.5 screenshot
After Eff ects 7.0-CS3 screenshot
Premiere Pro screenshot
Final Cut Pro screenshot
Motion screenshot

ToonIt! Film/Video: Outlines Only plugin
© 2007, Digital Anarchy : f/x tools for revolutionaries | ToonIt! : Give video a cartoon look.25
Fine Tune parameters
About Outlines Only paramsOutlines Only parameters fall into some basic categories: Blur, Outline, Soft, Comic, Shadow and Stipple. Each section is described below according to its group. A few uncategorized parameters are discussed in the Fine Tune section.
Similar to Roto Toon, this filter can produce a variety of customizable effects: Soft Edges with mild shading, hard Comic edges, ink & paint Shadow fills, and noise Stippling. In fact, you will recognize most of the parameters from their appearance and behavior in the Roto Toon parameter list. In some ways, Outlines Only is Roto Toon with the color options stripped away.
Fine Tune paramsYouʼll find these two parameters mingled among the other sections in the Outlines Only palette.
Outline Color Sets the final color of all the edge detection results. The default color is black. This color well is located at the top of the parameter list.
Blend with Original Percentage slider that will fade the results back into the original image. This slider is located at the bottom of the parameter list.
Original footage.
Outlines Only applied. All params defaults. Outline Color set to a reddish-brown color that we eyedroppered from the source footage.
© 2007, Digital Anarchy : f/x tools for revolutionaries | ToonIt! : Give video a cartoon look.26
ToonIt! Film/Video: Outlines Only plugin
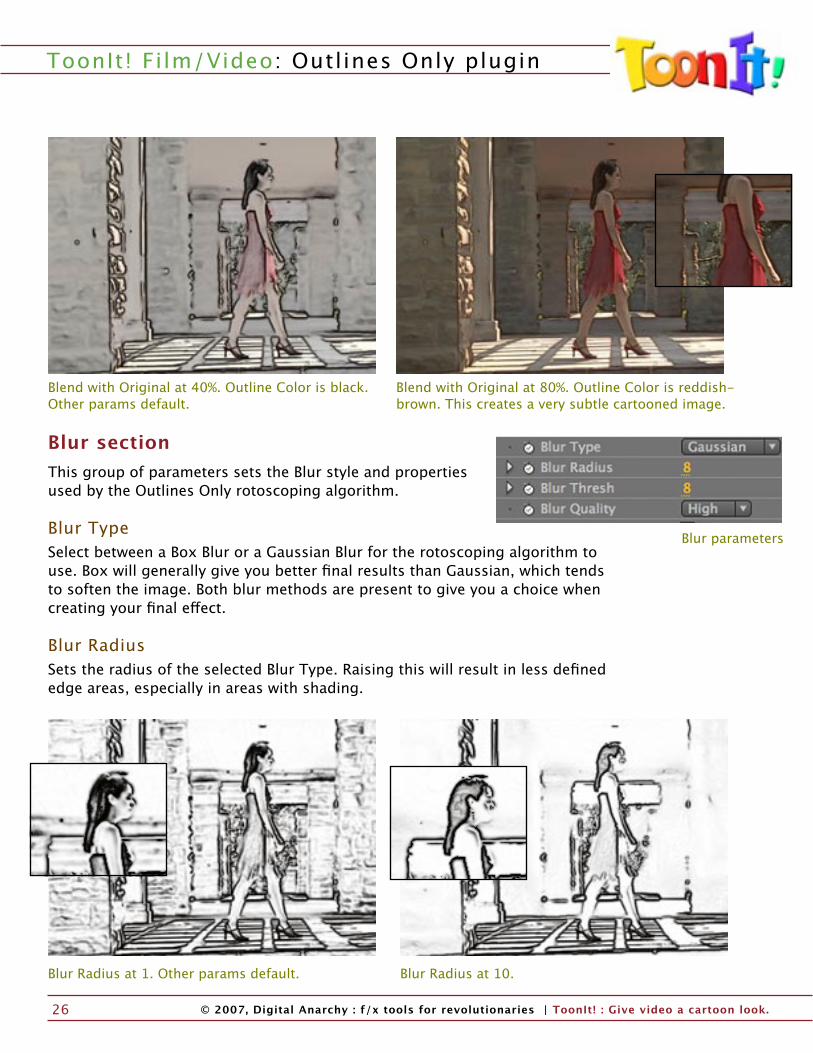
Blur sectionThis group of parameters sets the Blur style and properties used by the Outlines Only rotoscoping algorithm.
Blur Type Select between a Box Blur or a Gaussian Blur for the rotoscoping algorithm to use. Box will generally give you better final results than Gaussian, which tends to soften the image. Both blur methods are present to give you a choice when creating your final effect.
Blur Radius Sets the radius of the selected Blur Type. Raising this will result in less defined edge areas, especially in areas with shading.
Blend with Original at 40%. Outline Color is black. Other params default.
Blend with Original at 80%. Outline Color is reddish-brown. This creates a very subtle cartooned image.
Blur parameters
Blur Radius at 1. Other params default. Blur Radius at 10.

ToonIt! Film/Video: Outlines Only plugin
© 2007, Digital Anarchy : f/x tools for revolutionaries | ToonIt! : Give video a cartoon look.27
Blur ThreshThreshold of the blur effect. How much of the footage is actually affected by the blurring before being passed to the edge detection algorithm. The higher this value is, the more of the frame will be affected.
Blur Thresh at 3. Other params default. Blur Thresh at 30.
Blur Thresh at 5. Blur Thresh at 25.
Original footage.
Blur Quality Menu to switch between a Fast and High Quality blur. Leave this set to Fast so that any parameter tweaks or interaction is relatively quick, then set it to High prior to rendering.

© 2007, Digital Anarchy : f/x tools for revolutionaries | ToonIt! : Give video a cartoon look.28
ToonIt! Film/Video: Outlines Only plugin
Soft parameters
Soft sectionThis group of parameters determines the detail level of Outline Onlyʼs edge detection, which creates Outlines around the cartoon fields.
Soft Checking this enables the Soft outline edge detection method. This generates fine edges with soft areas of shading. This option is turned on by default. Deactivating Soft will turn off Soft Strength, Soft Thickness and Soft Outline Quality.
Soft Strength Determines the amount of soft shading present in the frame. The default is 50%.
Soft Thickness Determines the thickness of the major Soft edges. The default is 1.
Soft Outline Quality Determines the quality of the effect. Set it to fast for better interaction while tweaking, and set it to High for the final render.
Soft Strength at 10. Other params default. Soft Strength at 90.
Soft Thickness at 5. Other params default.

ToonIt! Film/Video: Outlines Only plugin
© 2007, Digital Anarchy : f/x tools for revolutionaries | ToonIt! : Give video a cartoon look.29
Comic parameters
Comic Sensitivity at 60%. Other params default.
Soft Thickness at 5. Other params default.
Comic sectionThis group of parameters sets and defines a stylization called Comic. You can think of ʻComicʼ as looking like the pencilled and inked edges of a graphic novel; black lines with no direct shading. In Outlines Only, that visualization depends on how you set up the Outline parameters.
Comic Produces harsh comic-book style edges with a little rough shading. Turning on this option will activate Comic Sensitivity, Comic Strength, Comic Thickness, Comic Antialias and Comic Outline Quality.
Comic Sensitivity Determines how much detail will be picked up by the edge algorithm. Raising this will increase the amount of edge detail. The default is 50%.
Comic Strength Determines how heavily the Comic lines are drawn. Increase this for a heavier woodblock/linotype style effect. The default is 50%.
Comic Thickness Sets how thick the lines are drawn. The default is 2.
Soft Thickness at 10.

© 2007, Digital Anarchy : f/x tools for revolutionaries | ToonIt! : Give video a cartoon look.30
ToonIt! Film/Video: Outlines Only plugin
Comic Sensitivity at 80%. Other params default. Comic Sensitivity at 90%.
Comic Strength at 100. Comic Strength at 10. Other params default.
Comic Thickness at 15. Comic Thickness at 7. Other params default.
ToonIt! Film/Video: Outlines Only plugin
© 2007, Digital Anarchy : f/x tools for revolutionaries | ToonIt! : Give video a cartoon look.31
Comic Strength at 80%. Other params default.
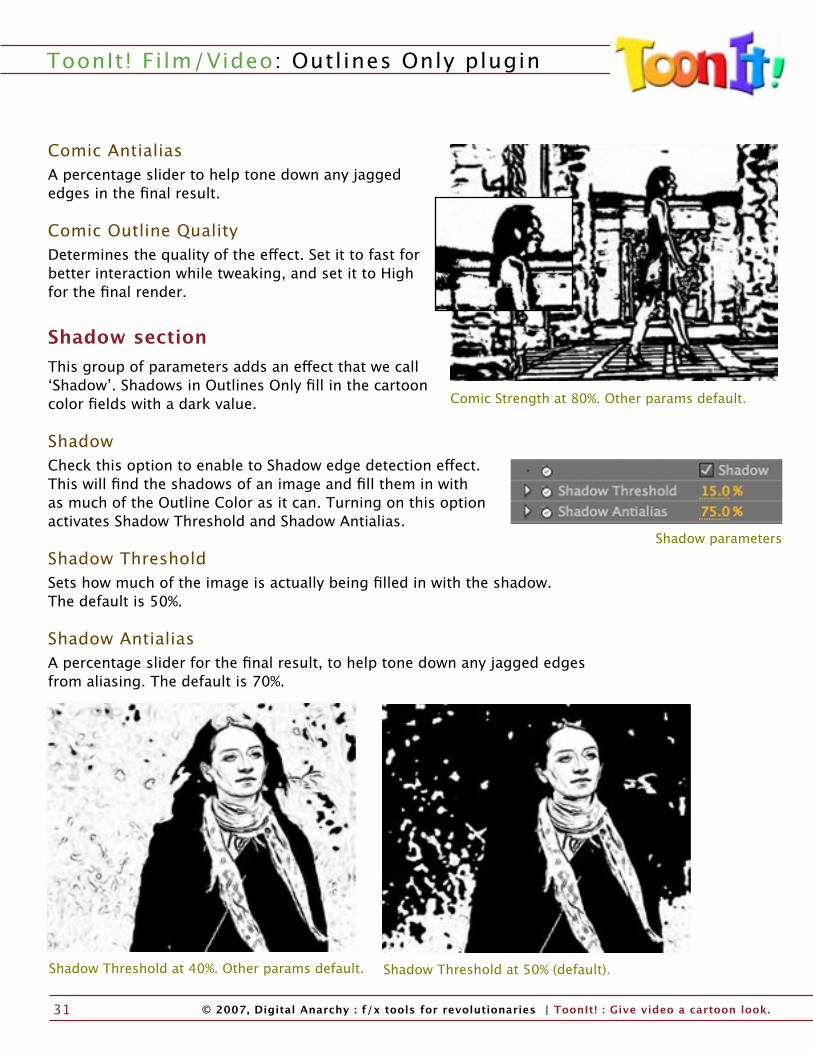
Comic Antialias A percentage slider to help tone down any jagged edges in the final result.
Comic Outline Quality Determines the quality of the effect. Set it to fast for better interaction while tweaking, and set it to High for the final render.
Shadow sectionThis group of parameters adds an effect that we call ʻShadowʼ. Shadows in Outlines Only fill in the cartoon color fields with a dark value.
Shadow Check this option to enable to Shadow edge detection effect. This will find the shadows of an image and fill them in with as much of the Outline Color as it can. Turning on this option activates Shadow Threshold and Shadow Antialias.
Shadow Threshold Sets how much of the image is actually being filled in with the shadow. The default is 50%.
Shadow AntialiasA percentage slider for the final result, to help tone down any jagged edges from aliasing. The default is 70%.
Shadow parameters
Shadow Threshold at 50% (default).Shadow Threshold at 40%. Other params default.

© 2007, Digital Anarchy : f/x tools for revolutionaries | ToonIt! : Give video a cartoon look.32
ToonIt! Film/Video: Outlines Only plugin
Stipple sectionThis group of parameters sets and defines a stylization called Stipple. ʻStipplingʼ is the technique of using small dots to simulate varying degrees of solidity or shading.
This technique is popular as a means of producing shaded line art illustrations in drawing or painting, in addition to being a printing and printmaking technique. In Outlines Only, our Stipple params create varying densities of noise to simulate that look.
Something to note about Stipple is that its difficult to preview at Half or Low resolution. To get an idea of how the effect will really look, you will need to look at a Full or High resolution preview, even just for a frame or two.
Stipple parameters
Shadow Threshold at 30%. Other params default. Shadow Threshold at 40%.
Stipple turned on. Other params default.
LEFT: Half resolution preview in After Effects.
RIGHT: Full resolution preview.

ToonIt! Film/Video: Outlines Only plugin
© 2007, Digital Anarchy : f/x tools for revolutionaries | ToonIt! : Give video a cartoon look.33
Stipple Density at 80%.Stipple Density at 60%. Other params default.
Stipple Thresh at 90%.Stipple Thresh at 60%. Other params default.
Stipple Check this to enable stippling. This will use varying densities of noise to shade the image. Turning on Stipple will activate Stipple Density and Stipple Thresh.
Stipple Density Determines the amount of shading will be used in the image. Increase this for higher contrast and heavy noise. The default is 50%.
Stipple Thresh Sets how much of the image is affected by the stippling. The default is 50%.

© 2007, Digital Anarchy : f/x tools for revolutionaries | ToonIt! : Give video a cartoon look.34
ToonIt! Film/Video: Goth plugin
Filter 3: GothGoth will run the internal rotoscoping algorithm to flatten the entire image into three colors, a dark, a light, and a midtone. You can change the algorithm used, the midtone color, and how much or little the image is affected. This produces a very high contrast effect for extreme stylization.
About this manualOur screenshots for Goth will show a Premiere Pro interface. However, the parameters look and work exactly the same in After Effects, Final Cut Pro, and Motion. This page shows the Goth parameters in each host application. When there is a difference in host apps, we will highlight that information in this manual.
After Effects 5.5-6.5 screenshot
After Effects 7.0-CS3 screenshot
Premiere Pro screenshot
Final Cut Pro screenshot
Motion screenshot

ToonIt! Film/Video: Goth plugin
© 2007, Digital Anarchy : f/x tools for revolutionaries | ToonIt! : Give video a cartoon look.35
Color parameters
About Goth paramsBecause the Goth filter creates a very stylized look, its parameters are more limited than Roto Toon and Outlines Only. There is a Blur section as with all of the ToonIt! filters. Most of the other options are color related.
Color sectionThe Goth effect is all about reducing an image into three color values - dark, light and midtone - then mixing them into a high contrast image. This group of parameters chooses color behavior.
Type Selects which Goth algorithm will be used. Goth 1 has a heavy low color, while Goth 2 allows for more of the midtone to leak through the final result.
Color Color well that sets the color of the midtone. The default is red.
LevelSets the threshold or ʻdepthʼ of the Goth effect. At a high value, the image will fill with white. At a lower value, the image will fill with black.
The Blur Quality setting determines the amount of detail that is affected. The subjectʼs edges wonʼt hold as true to the original image at a lower Fast Quality than at the High Quality setting.
Goth1 is Type. All other options at defaults. Goth2 is Type. All other options at defaults.
Original footage.

© 2007, Digital Anarchy : f/x tools for revolutionaries | ToonIt! : Give video a cartoon look.36
ToonIt! Film/Video: Goth plugin
Color Width Sets how wide the midtone color appears in the final render. A higher value will fill more of the frame with the midtone color.
Blur sectionThis group of parameters sets the Blur style and properties used by the Goth rotoscoping algorithm.
Blur Type Select between a Box Blur or a Gaussian Blur for the rotoscoping algorithm to use. Box will generally give you better final results than Gaussian, which tends to soften the image. Both Blur methods are present to give you a choice when creating your final effect.
Blur parameters
Level at 20. Goth1 is Type. Color Width at 50. Level at 70. Goth1 is Type. Color Width at 50.
Level at 20. Goth1 is Type. Color Width at 30. Level at 70. Goth1 is Type. Color Width at 100.

ToonIt! Film/Video: Goth plugin
© 2007, Digital Anarchy : f/x tools for revolutionaries | ToonIt! : Give video a cartoon look.37
Blur Radius Sets the radius of the selected Blur Type. A higher Blur Radius will make the effect more noticeable along the edges of the subject in your footage. It will also make the finer edge details disappear.
Blur Thresh Threshold of the blur effect. How much of the footage is actually affected by the blurring before being passed to the edge detection algorithm. The higher this value is, the more of the frame will be affected.
Blur QualityMenu to switch between a Fast and High Quality blur. Leave this set to Fast so that any parameter tweaks or interaction is relatively quick, then set it to High prior to rendering.
Fine Tune sectionThereʼs only one ʻleftoverʼ parameter in the short Goth list.
Blend with Original Percentage slider that will fade the results back into the original image. This slider is located at the bottom of the parameter list.
Blend with Original at 40%. Goth2 is Type. Level at 40, Color Width at 70.
Blend with Original at 70%.
Original footage.
Fine Tune parameter

© 2007, Digital Anarchy : f/x tools for revolutionaries | ToonIt! : Give video a cartoon look.38
ToonIt! Film/Video: Blacklight Edges plugin
Filter 4: Blacklight EdgesBlacklight Edges will run the ToonIt! edge detection algorithm on your footage, then map a specialized color gradient to the resulting edges. This makes your image stand out as if the edges have been placed under a blacklight.
About this manualOur screenshots for Blacklight Edges will show a Premiere Pro interface. However, the parameters look and work exactly the same in After Effects, Motion and Final Cut Pro. This page shows the Blacklight Edges parameters in each host application. When there is a difference in host apps, we will highlight that information in this manual.
After Effects 5.5-6.5 screenshot
After Effects 7.0-CS3 screenshot
Premiere Pro screenshot
Final Cut Pro screenshot
Motion screenshot

ToonIt! Film/Video: Blacklight Edges plugin
© 2007, Digital Anarchy : f/x tools for revolutionaries | ToonIt! : Give video a cartoon look.39
About Blacklight Edges paramsLike the Goth filter, Blacklight Edges creates a very stylized look. This means its parameters are limited compared to Roto Toon and Outlines Only. There are Blur options, Edge options, and the ever-present Blend with Original parameter.
Edge sectionBlacklight Edges maps a color gradient to the edges it detects in your footage. This group of parameters chooses the appearance of those edges.
Color Sets the color that is mapped to the edges. The color will be arranged in a varying gradient on the edges, mapped with its complementary color directly at the extreme outside parts of the edges.
Edge Width Sets the width of the rendered edges.
Invert Inverts the edge effect. Original footage.
Color is default red. Edge Width at 1.0.
Color is blue. Edge Width at 3.0. Color is still blue but Invert is turned on. Edge Width at 2.0.
Edge parameters

© 2007, Digital Anarchy : f/x tools for revolutionaries | ToonIt! : Give video a cartoon look.40
ToonIt! Film/Video: Blacklight Edges plugin
Blur sectionThis group of parameters sets the Blur style and properties used by the Blacklight Edges rotoscoping algorithm.
Blur Type Select between a Box Blur or a Gaussian Blur for the rotoscoping algorithm to use. Box will generally give you better final results than Gaussian, which tends to soften the image. Both blur methods are present to give you a choice when creating your final effect.
Blur Radius Sets the radius of the selected Blur Type. A higher Blur Radius will smooth out the segment edges between the low, mid and high colors. The edges will become more rounded, especially if you have Blur Thresh set higher than the default value.
Blur Thresh Threshold of the blur effect. How much of the footage is actually affected by the blurring before being passed to the edge detection algorithm. The higher this value is, the more of the frame will be affected.
Blur Quality Menu to switch between a Fast and High Quality blur. Leave this set to Fast so that any parameter tweaks or interaction is relatively quick. Set it to High prior to rendering.
Blur Thresh at default 20. Color is blue. Edge Width at 3.0.
Blur Thresh at 35, which is the value limit. This image is softer.
Blur Thresh at 5. This image has sharper, extra details.
Blur parameters
ToonIt! Film/Video: Blacklight Edges plugin
© 2007, Digital Anarchy : f/x tools for revolutionaries | ToonIt! : Give video a cartoon look.41
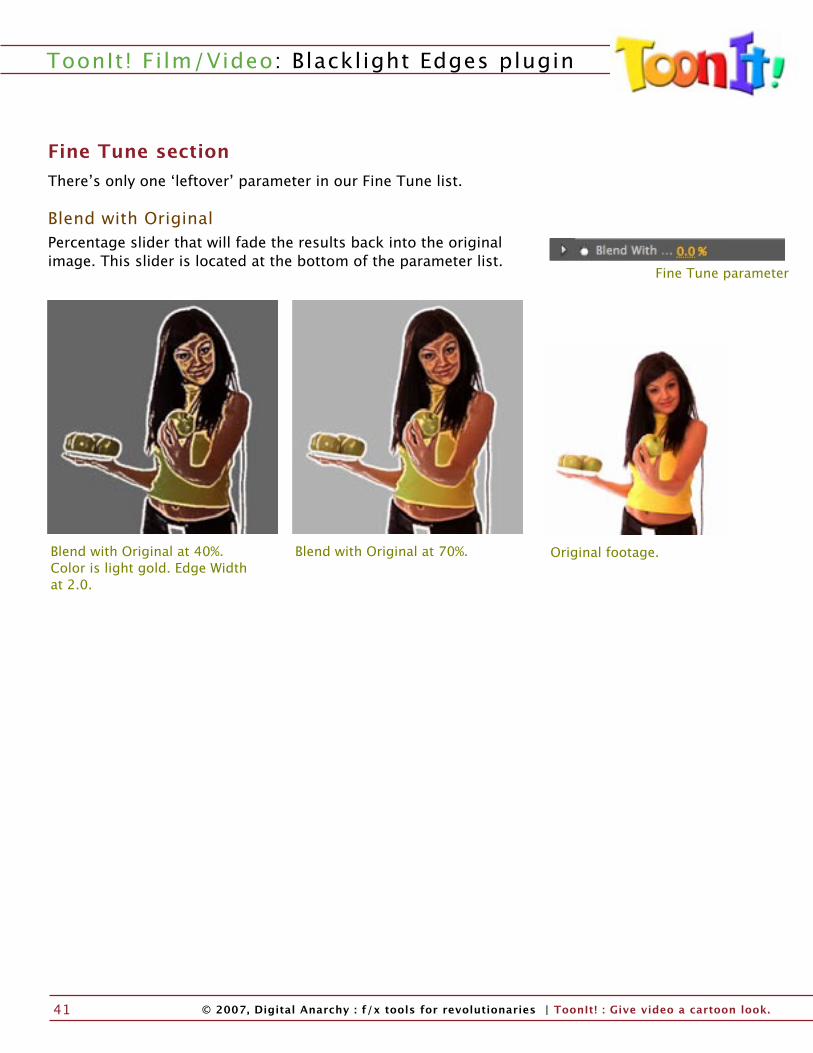
Fine Tune sectionThereʼs only one ʻleftoverʼ parameter in our Fine Tune list.
Blend with Original Percentage slider that will fade the results back into the original image. This slider is located at the bottom of the parameter list.
Blend with Original at 70%.Blend with Original at 40%. Color is light gold. Edge Width at 2.0.
Original footage.
Fine Tune parameter