Getting started: Hello Android - UniTrentolatemar.science.unitn.it/.../Android-MARCONI.pdf ·...
116
Getting started: Hello Android Marco Ronchetti Università degli Studi di Trento
Transcript of Getting started: Hello Android - UniTrentolatemar.science.unitn.it/.../Android-MARCONI.pdf ·...
Getting started: Hello Android
Marco Ronchetti Università degli Studi di Trento
2 2
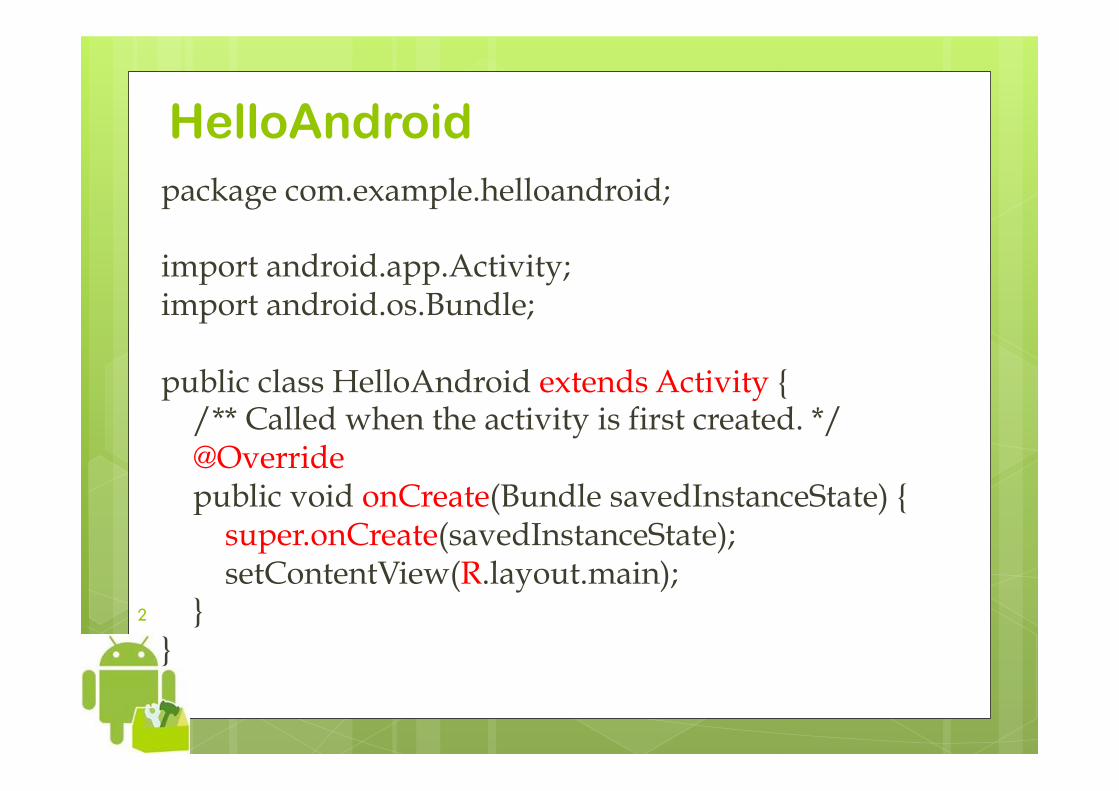
HelloAndroid package com.example.helloandroid; import android.app.Activity; import android.os.Bundle; public class HelloAndroid extends Activity { /** Called when the activity is first created. */ @Override public void onCreate(Bundle savedInstanceState) { super.onCreate(savedInstanceState); setContentView(R.layout.main); } }
3 3
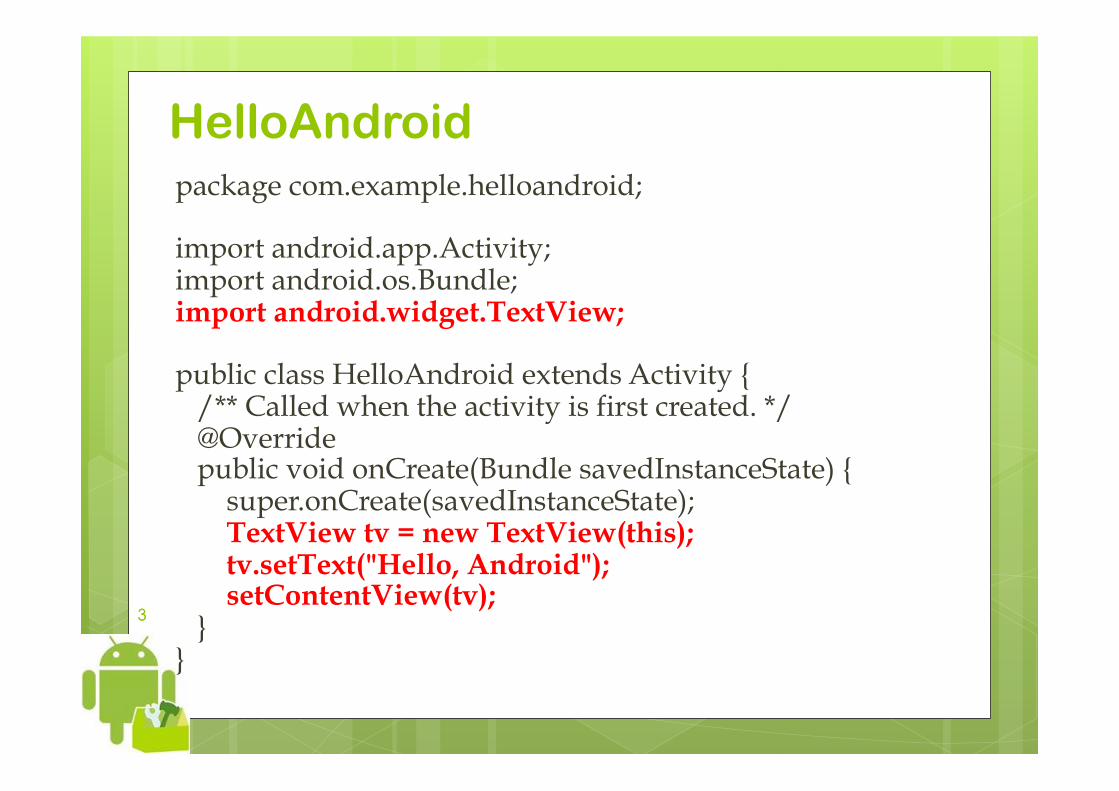
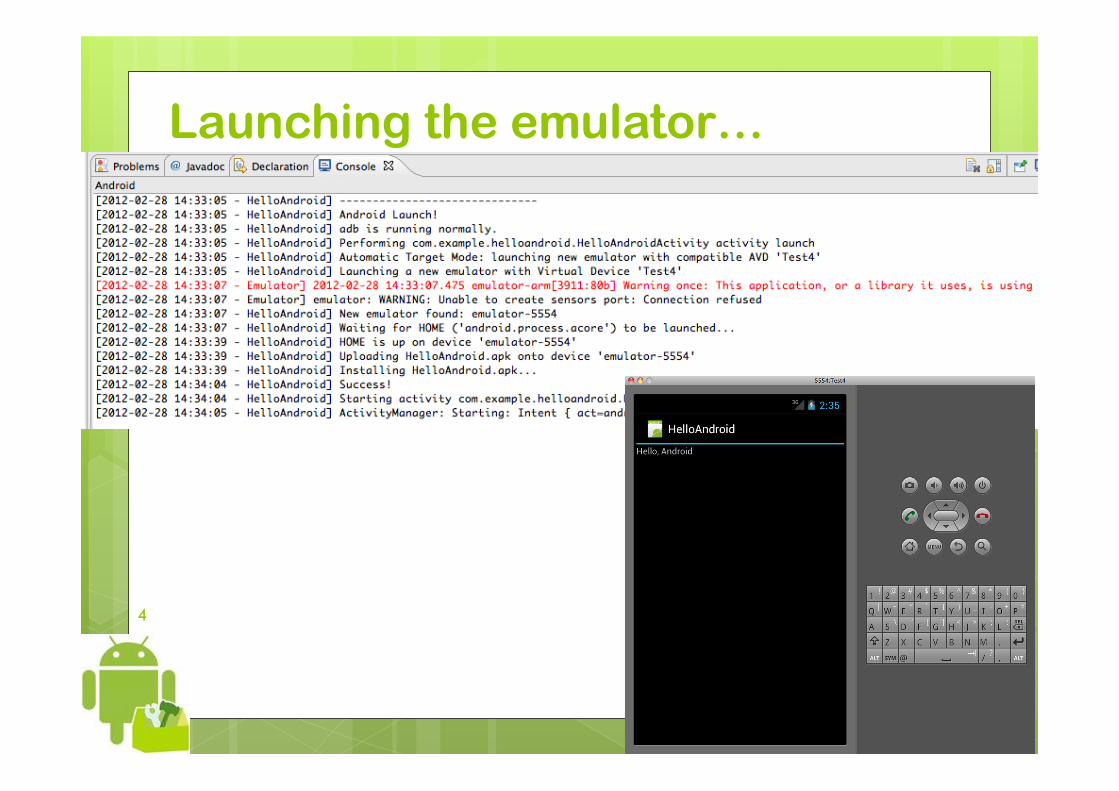
HelloAndroid package com.example.helloandroid; import android.app.Activity; import android.os.Bundle; import android.widget.TextView; public class HelloAndroid extends Activity { /** Called when the activity is first created. */ @Override public void onCreate(Bundle savedInstanceState) { super.onCreate(savedInstanceState); TextView tv = new TextView(this); tv.setText("Hello, Android"); setContentView(tv); } }
4 4
Launching the emulator…
5 5
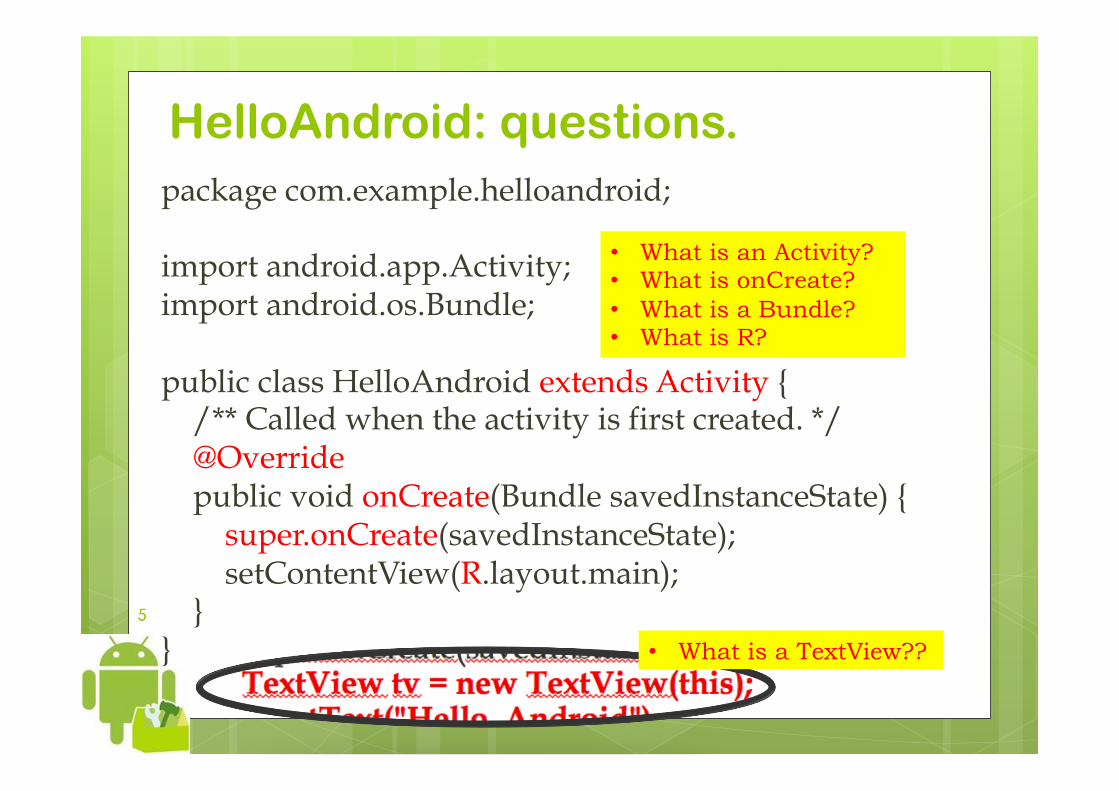
HelloAndroid: questions. package com.example.helloandroid; import android.app.Activity; import android.os.Bundle; public class HelloAndroid extends Activity { /** Called when the activity is first created. */ @Override public void onCreate(Bundle savedInstanceState) { super.onCreate(savedInstanceState); setContentView(R.layout.main); } }
• What is an Activity? • What is onCreate? • What is a Bundle? • What is R?
• What is a TextView??
Dissecting the HelloWorld Marco Ronchetti Università degli Studi di Trento

7 7
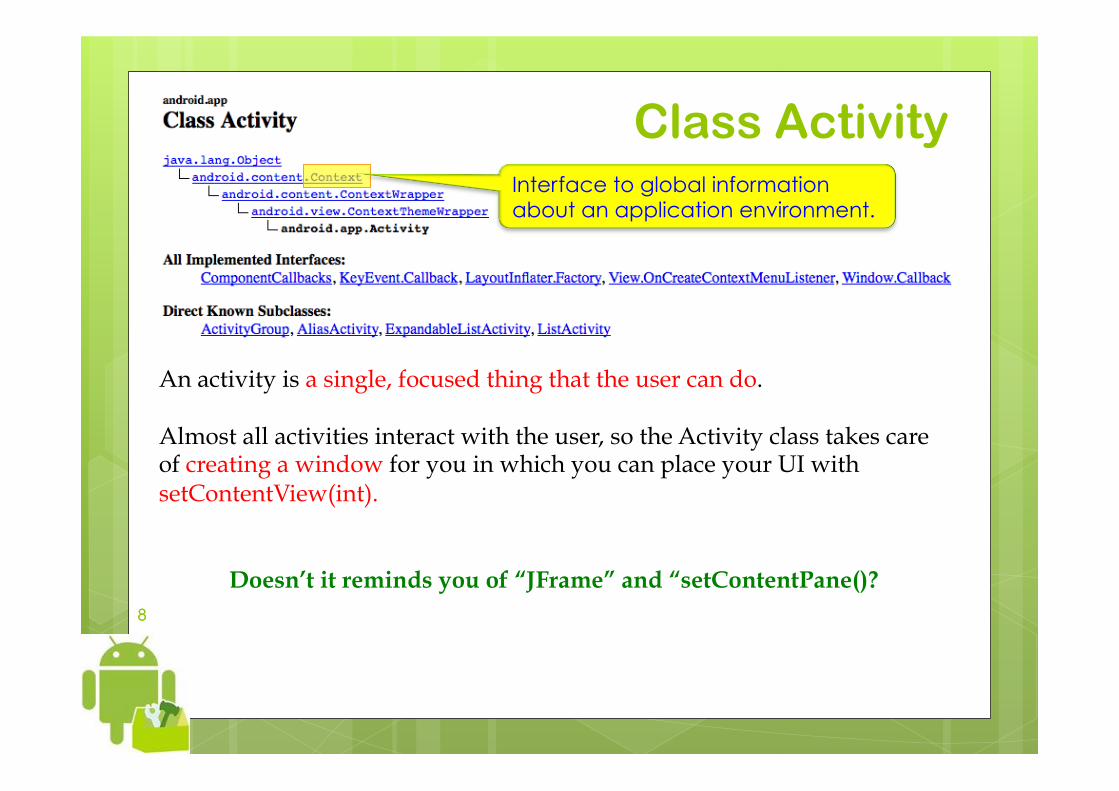
Class Activity
An activity is a single, focused thing that the user can do. Almost all activities interact with the user, so the Activity class takes care of creating a window for you in which you can place your UI with setContentView(int).
Doesn’t it reminds you of “JFrame” and “setContentPane()?
8 8
Class Activity
An activity is a single, focused thing that the user can do. Almost all activities interact with the user, so the Activity class takes care of creating a window for you in which you can place your UI with setContentView(int).
Doesn’t it reminds you of “JFrame” and “setContentPane()?
Interface to global information about an application environment.
9 9
While activities are often presented to the user as full-screen windows, they can also be used in other ways: as floating windows (via a theme with R.attr.windowIsFloating set) or embedded inside of another activity (using ActivityGroup).
Class Activity
10 10
Resources You should always externalize resources (e.g. images and strings)from your application code, so that you can: • maintain them independently. • provide alternative resources, e.g.:
• different languages • different screen sizes
Resources must be organized in your project's res/ directory, with various sub-directories that group resources by type and configuration.

11 11
The R class When your application is compiled, aapt generates the R class, which contains resource IDs for all the resources in your res/ directory. For each type of resource, there is an R subclass (for example, R.layout for all layout resources) and for each resource of that type, there is a static integer (for example, R.layout.main). This integer is the resource ID that you can use to retrieve your resource. More about resources in future lectures.
12 12
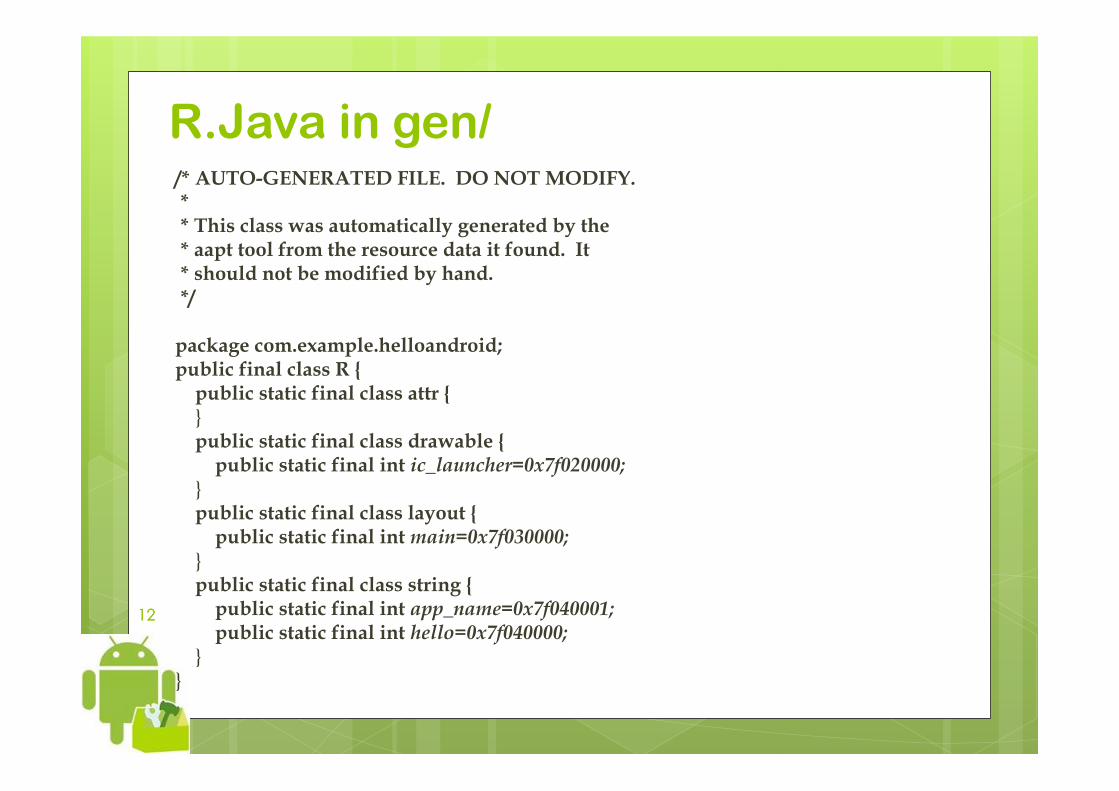
R.Java in gen/ /* AUTO-GENERATED FILE. DO NOT MODIFY. * * This class was automatically generated by the * aapt tool from the resource data it found. It * should not be modified by hand. */ package com.example.helloandroid; public final class R { public static final class attr { } public static final class drawable { public static final int ic_launcher=0x7f020000; } public static final class layout { public static final int main=0x7f030000; } public static final class string { public static final int app_name=0x7f040001; public static final int hello=0x7f040000; } }
13 13
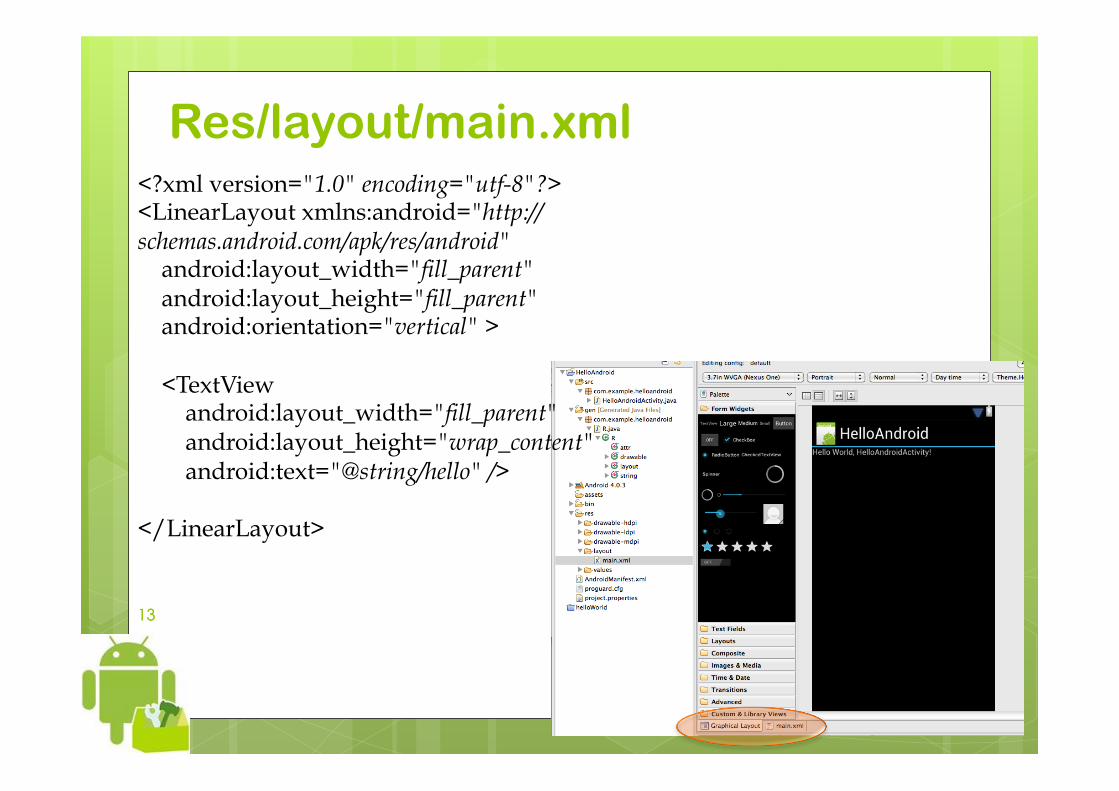
Res/layout/main.xml <?xml version="1.0" encoding="utf-8"?> <LinearLayout xmlns:android="http://schemas.android.com/apk/res/android" android:layout_width="fill_parent" android:layout_height="fill_parent" android:orientation="vertical" > <TextView android:layout_width="fill_parent" android:layout_height="wrap_content" android:text="@string/hello" /> </LinearLayout>
14 14
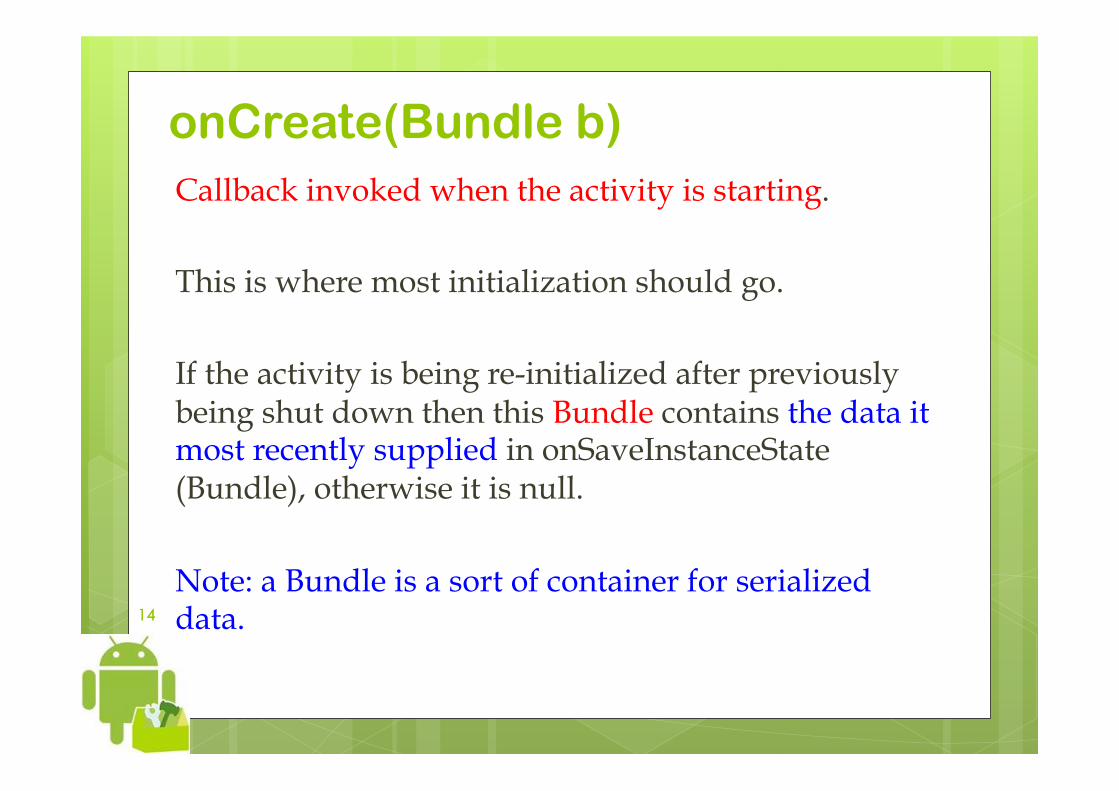
onCreate(Bundle b) Callback invoked when the activity is starting. This is where most initialization should go. If the activity is being re-initialized after previously being shut down then this Bundle contains the data it most recently supplied in onSaveInstanceState(Bundle), otherwise it is null. Note: a Bundle is a sort of container for serialized data.
15 15
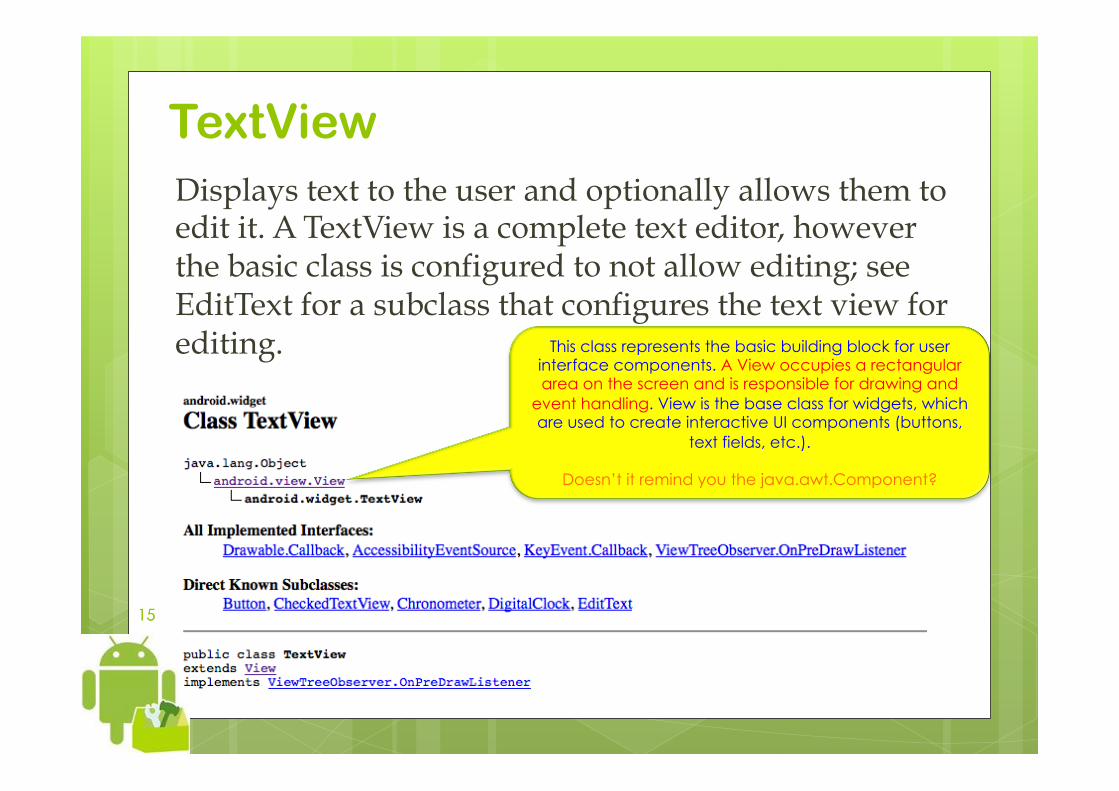
TextView Displays text to the user and optionally allows them to edit it. A TextView is a complete text editor, however the basic class is configured to not allow editing; see EditText for a subclass that configures the text view for editing. This class represents the basic building block for user
interface components. A View occupies a rectangular area on the screen and is responsible for drawing and
event handling. View is the base class for widgets, which are used to create interactive UI components (buttons,
text fields, etc.).
Doesn’t it remind you the java.awt.Component?
16 16
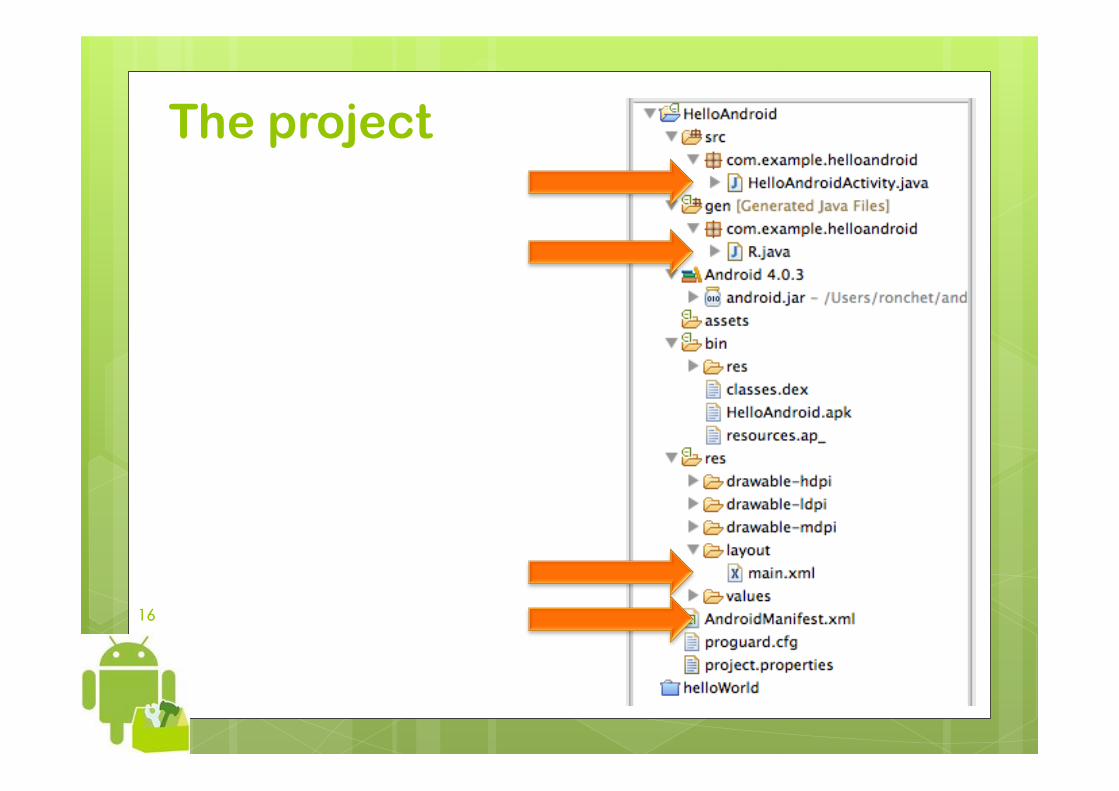
The project

17 17
AndroidManifest.xml <?xml version="1.0" encoding="utf-8"?> <manifest xmlns:android="http://schemas.android.com/apk/res/android" package="com.example.helloandroid" android:versionCode="1" android:versionName="1.0" > <uses-sdk android:minSdkVersion="15" /> <application android:icon="@drawable/ic_launcher" android:label="@string/app_name" > <activity android:name=".HelloAndroidActivity" android:label="@string/app_name" > <intent-filter> <action android:name="android.intent.action.MAIN" /> <category android:name="android.intent.category.LAUNCHER" /> </intent-filter> </activity> </application> </manifest>
18 18
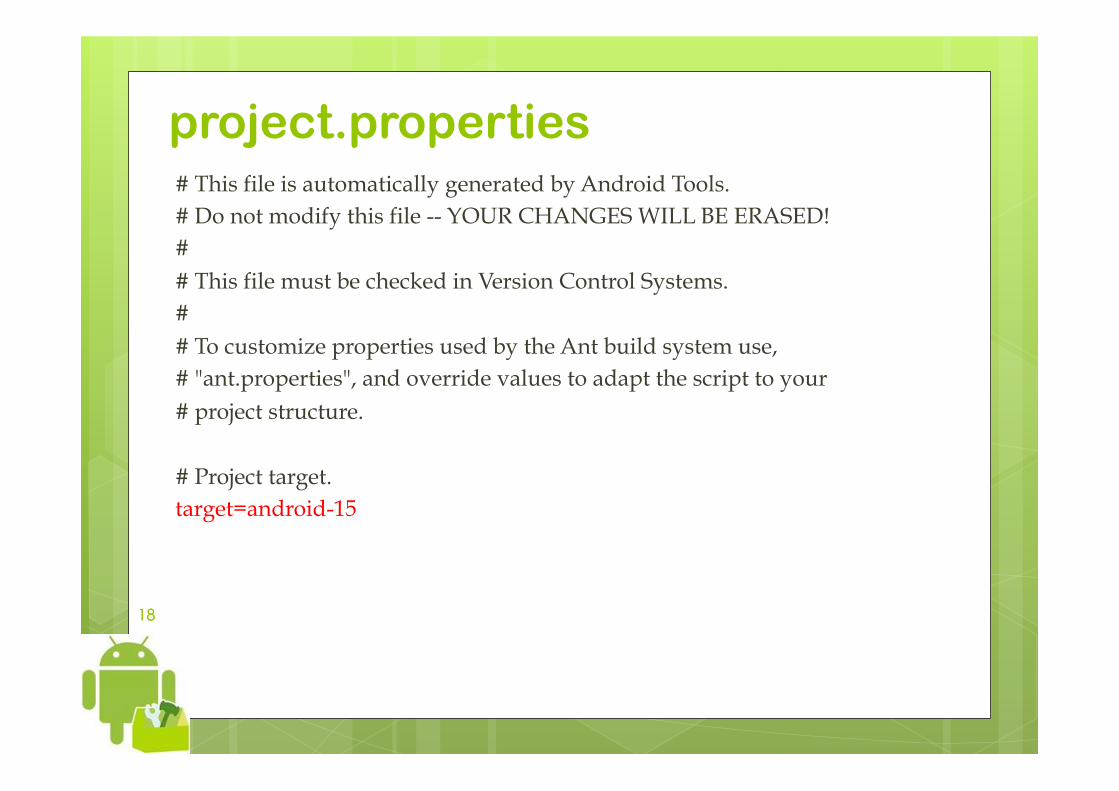
project.properties # This file is automatically generated by Android Tools. # Do not modify this file -- YOUR CHANGES WILL BE ERASED! # # This file must be checked in Version Control Systems. # # To customize properties used by the Ant build system use, # "ant.properties", and override values to adapt the script to your # project structure. # Project target. target=android-15

Basic tips: having troubles…
Marco Ronchetti Università degli Studi di Trento

20 20
A bugged program package com.example.helloandroid; import android.app.Activity; import android.os.Bundle; public class BugActivity extends Activity { /** Called when the activity is first created. */ @Override public void onCreate(Bundle savedInstanceState) { super.onCreate(savedInstanceState); Object o = null; o.toString(); setContentView(R.layout.main); } }
Basic tips: printing on the console
Marco Ronchetti Università degli Studi di Trento
22 22
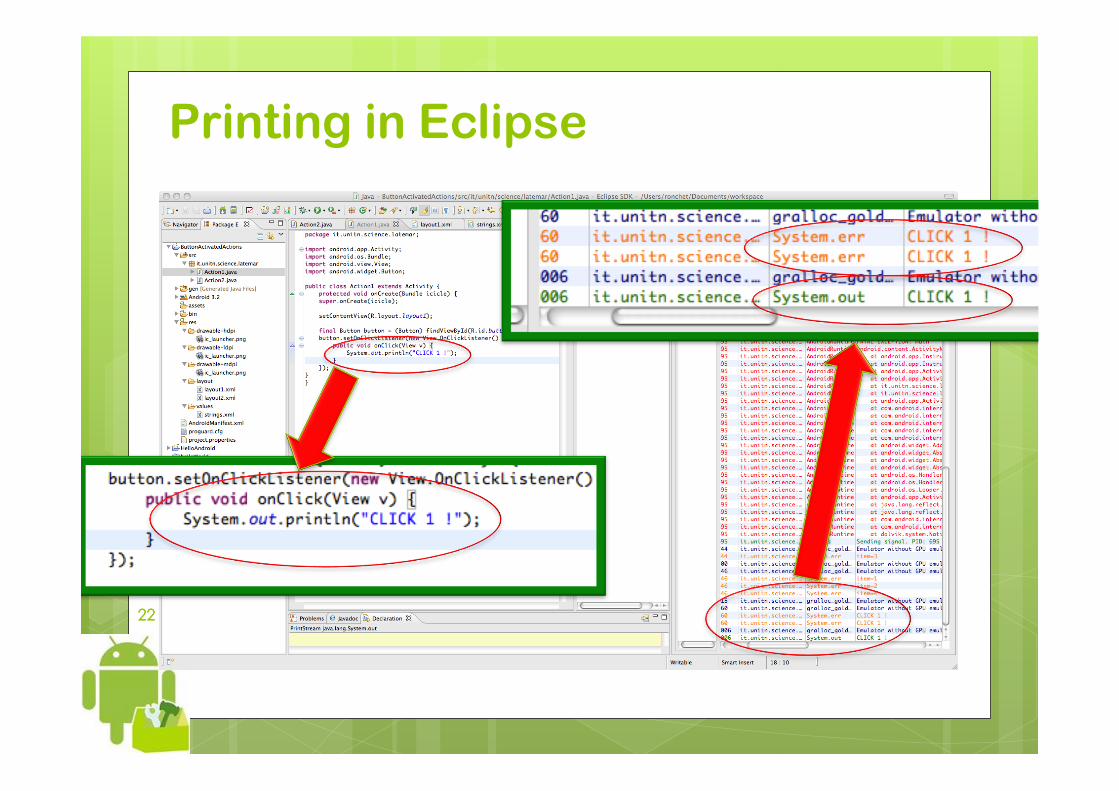
Printing in Eclipse
23 23
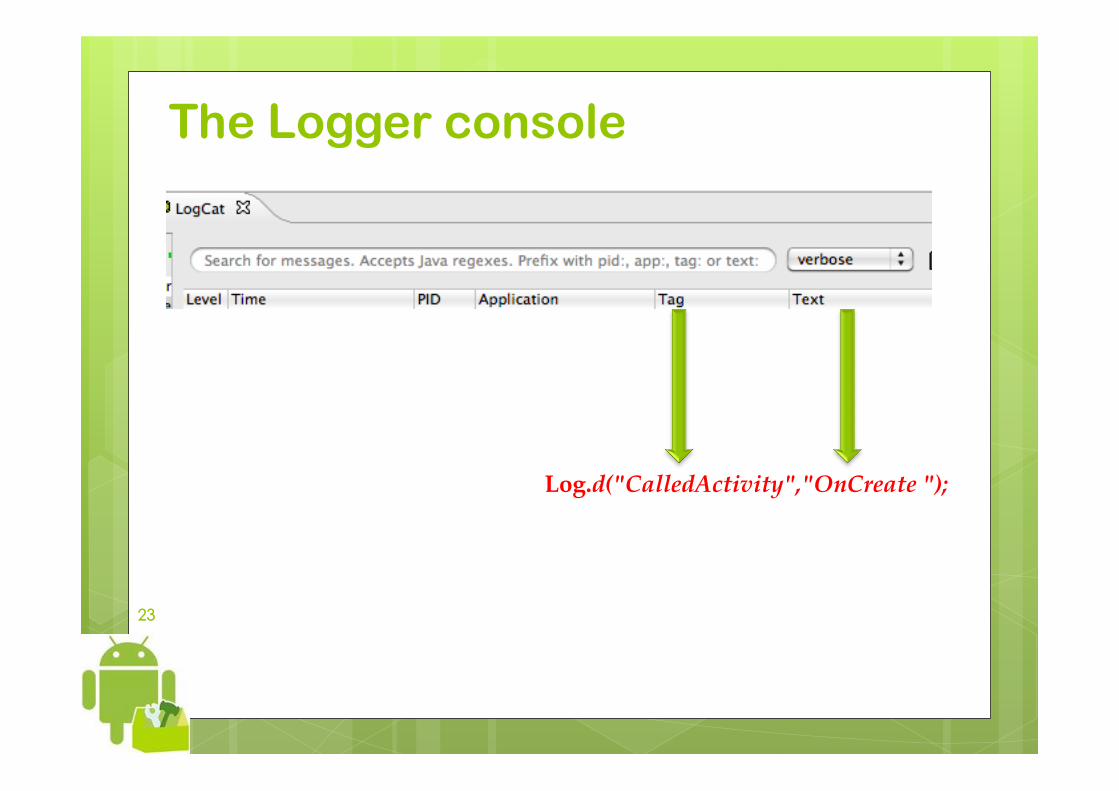
The Logger console
Log.d("CalledActivity","OnCreate ");
Testing and deploying on your device
Marco Ronchetti Università degli Studi di Trento
25 25
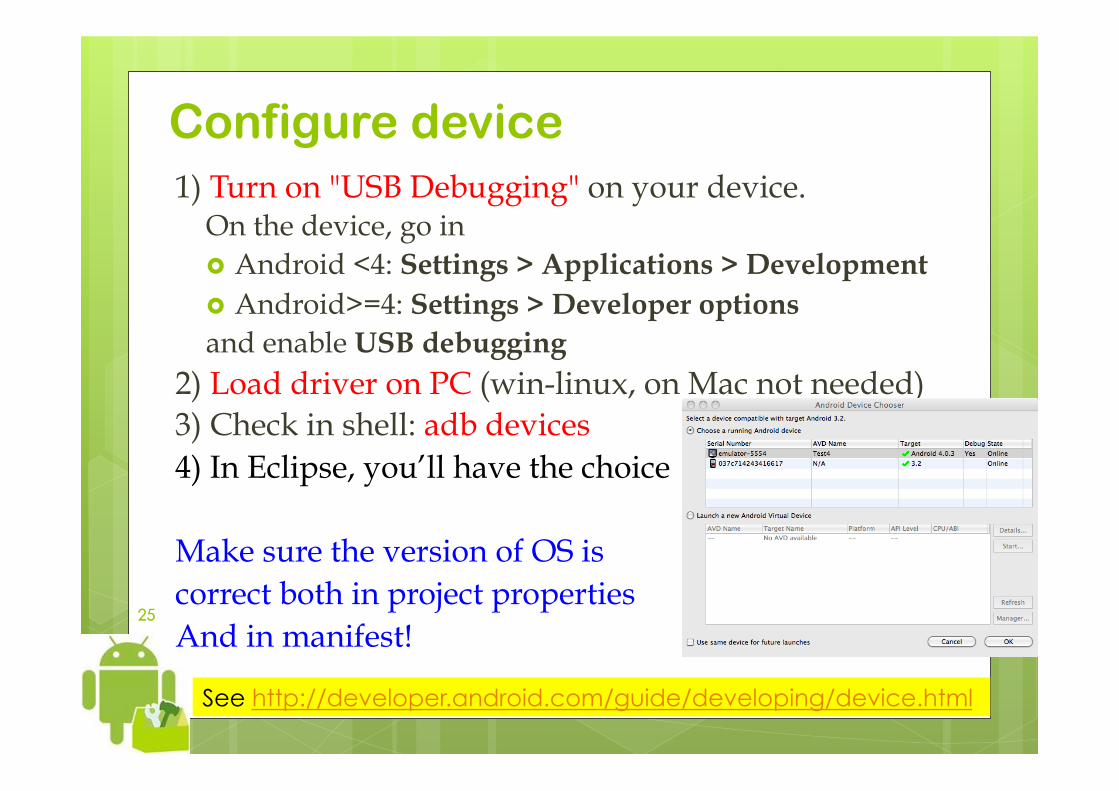
Configure device 1) Turn on "USB Debugging" on your device.
On the device, go in Android <4: Settings > Applications > Development Android>=4: Settings > Developer options and enable USB debugging
2) Load driver on PC (win-linux, on Mac not needed) 3) Check in shell: adb devices 4) In Eclipse, you’ll have the choice Make sure the version of OS is correct both in project properties And in manifest!
See http://developer.android.com/guide/developing/device.html
26 26
Alternative, simple way to deploy e.g. to give your app to your friends Get Dropbox both on PC and Android device Copy your apk from bin/res into dropbox (on PC) Open dropbox on Android device, and open your apk By sharing your dropbox with others you can easily pass your app.
www.dropbox.com

The fundamental components
Marco Ronchetti Università degli Studi di Trento
28 28
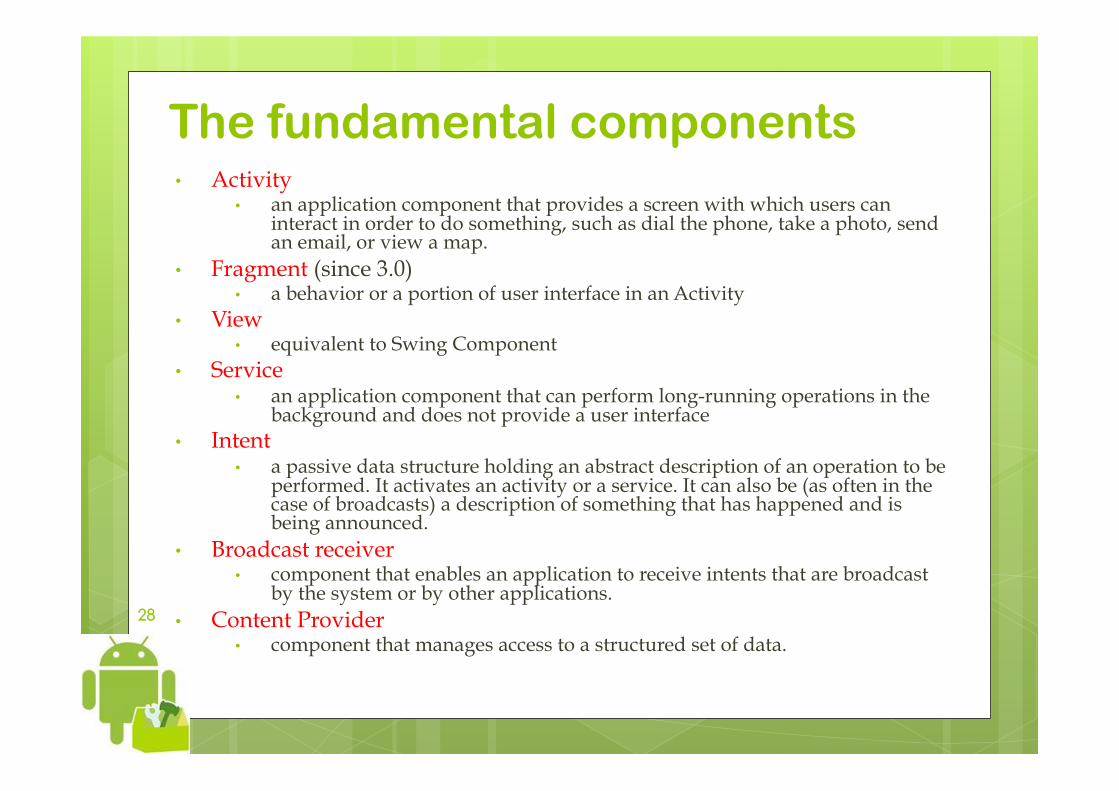
The fundamental components • Activity
• an application component that provides a screen with which users can interact in order to do something, such as dial the phone, take a photo, send an email, or view a map.
• Fragment (since 3.0) • a behavior or a portion of user interface in an Activity
• View • equivalent to Swing Component
• Service • an application component that can perform long-running operations in the
background and does not provide a user interface • Intent
• a passive data structure holding an abstract description of an operation to be performed. It activates an activity or a service. It can also be (as often in the case of broadcasts) a description of something that has happened and is being announced.
• Broadcast receiver • component that enables an application to receive intents that are broadcast
by the system or by other applications. • Content Provider
• component that manages access to a structured set of data.
29 29
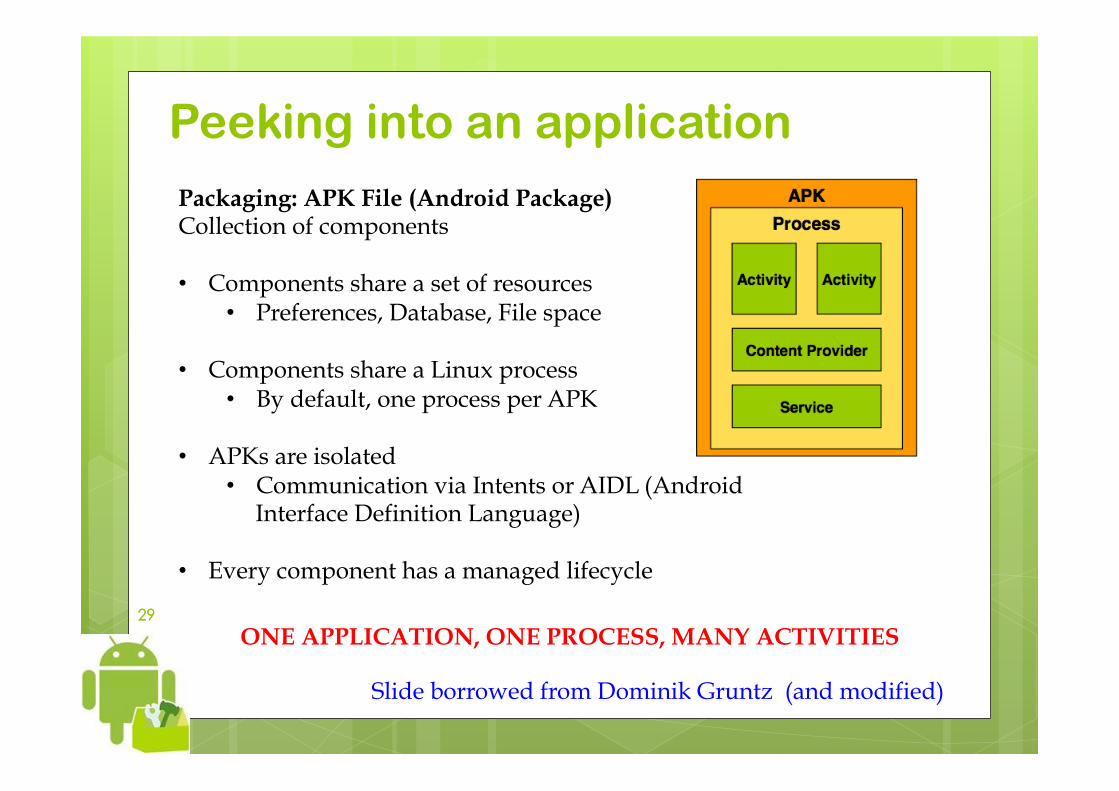
Peeking into an application Packaging: APK File (Android Package) Collection of components • Components share a set of resources
• Preferences, Database, File space
• Components share a Linux process • By default, one process per APK
• APKs are isolated • Communication via Intents or AIDL (Android
Interface Definition Language)
• Every component has a managed lifecycle
Slide borrowed from Dominik Gruntz (and modified)
ONE APPLICATION, ONE PROCESS, MANY ACTIVITIES
30 30
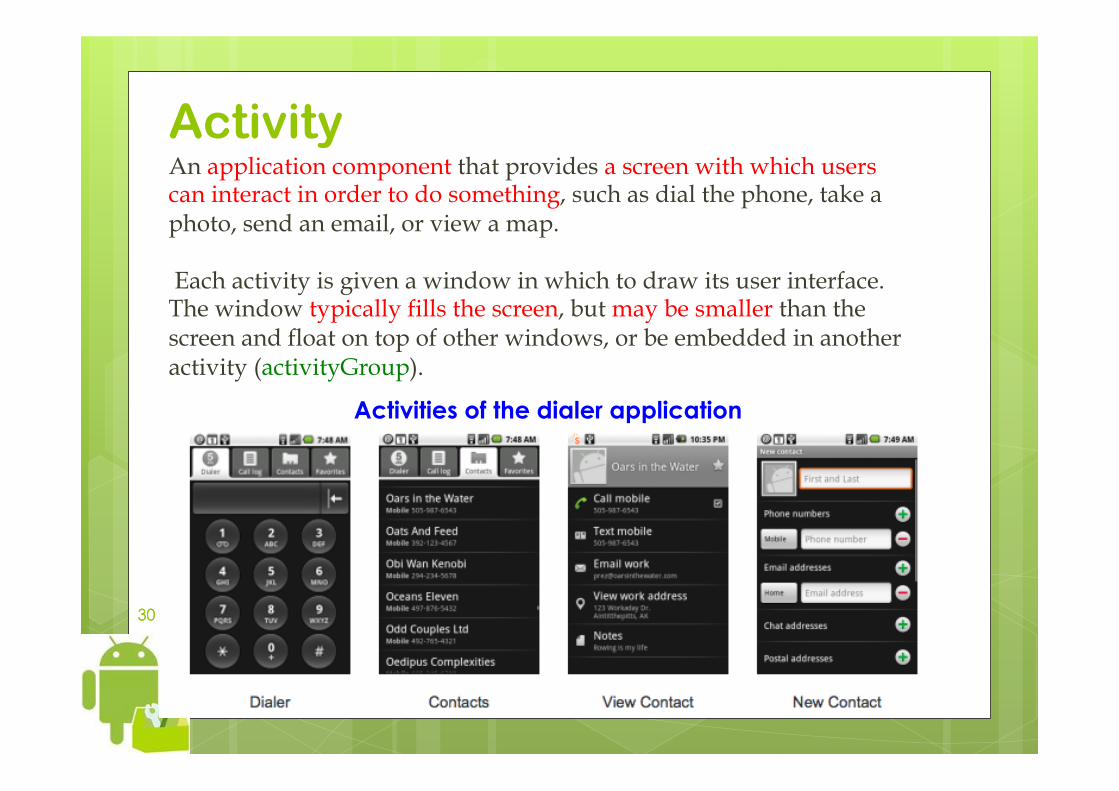
An application component that provides a screen with which users can interact in order to do something, such as dial the phone, take a photo, send an email, or view a map. Each activity is given a window in which to draw its user interface. The window typically fills the screen, but may be smaller than the screen and float on top of other windows, or be embedded in another activity (activityGroup).
Activity
Activities of the dialer application
31 31
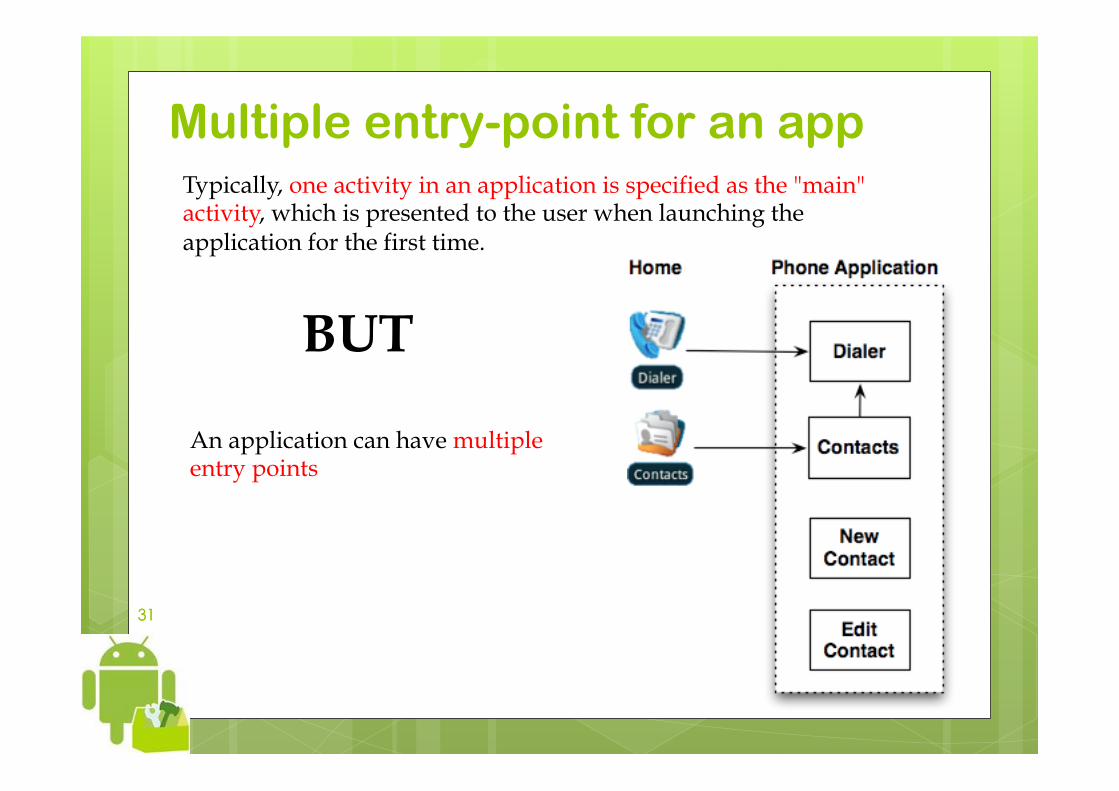
Multiple entry-point for an app
An application can have multiple entry points
Typically, one activity in an application is specified as the "main" activity, which is presented to the user when launching the application for the first time.
BUT

32 32
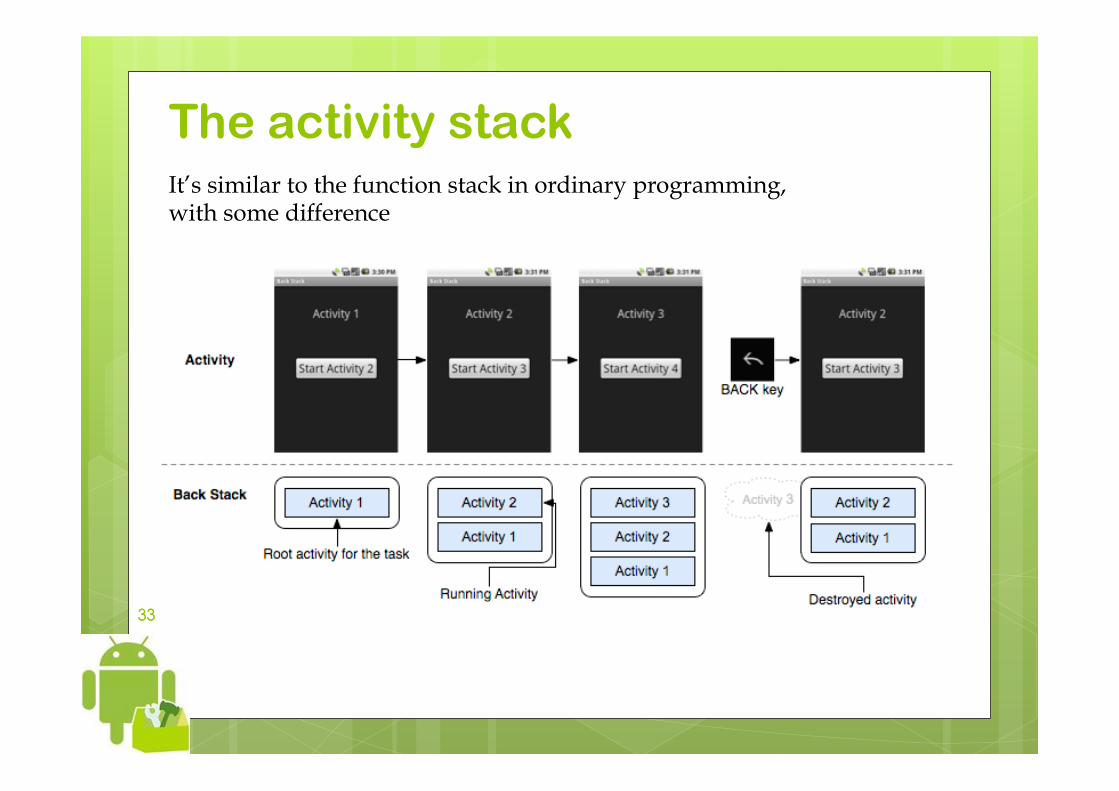
Activity Each activity can start another activity in order to perform different actions. Each time a new activity starts, the previous activity is stopped. The system preserves the activity in a LIFO stack (the "activity stack" or "back stack"). The new activity it is pushed on top of the back stack and takes user focus. When the user is done with the current activity and presses the BACK button, the current activity is popped from the stack (and destroyed) and the previous activity resumes.
33 33
The activity stack It’s similar to the function stack in ordinary programming, with some difference
34 34
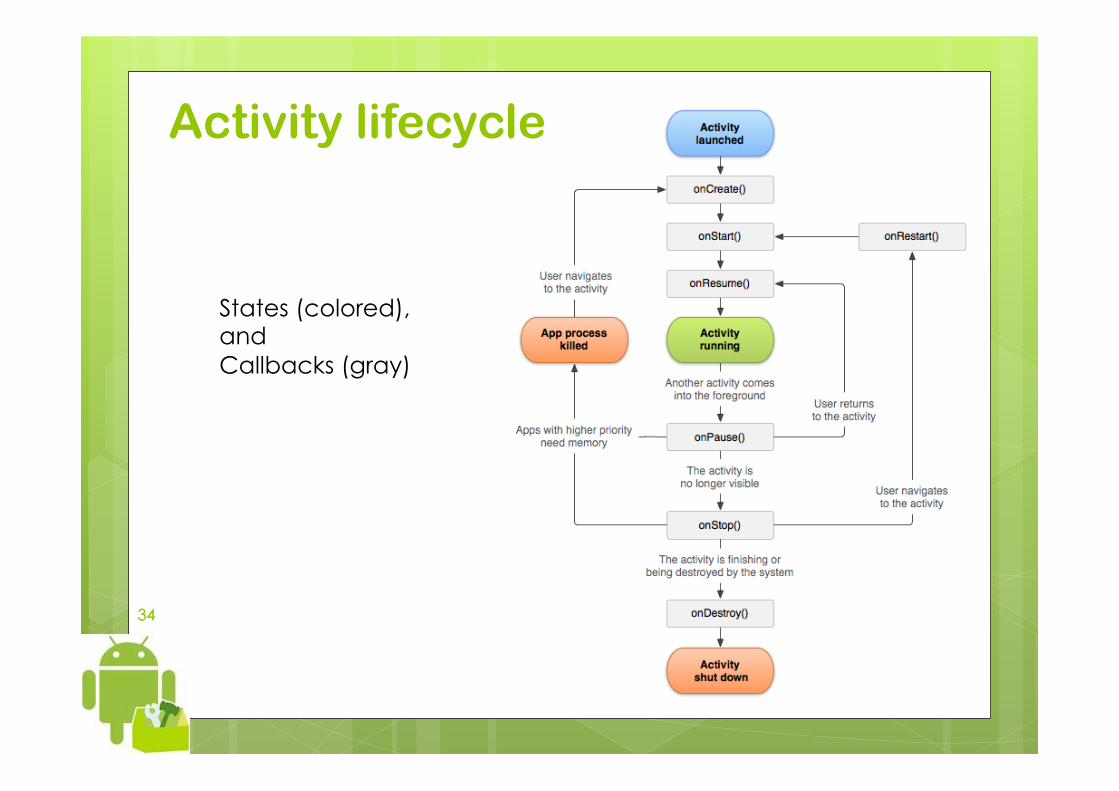
Activity lifecycle
States (colored), and Callbacks (gray)
35 35
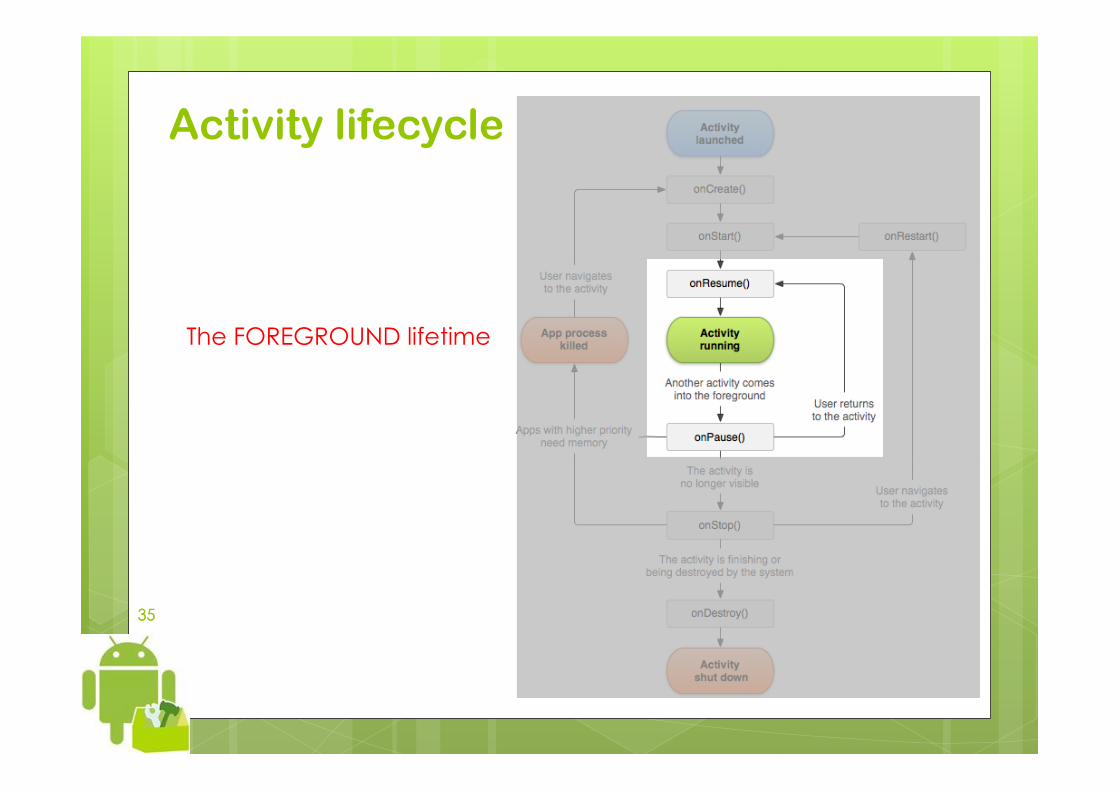
Activity lifecycle
The FOREGROUND lifetime
36 36
Activity lifecycle
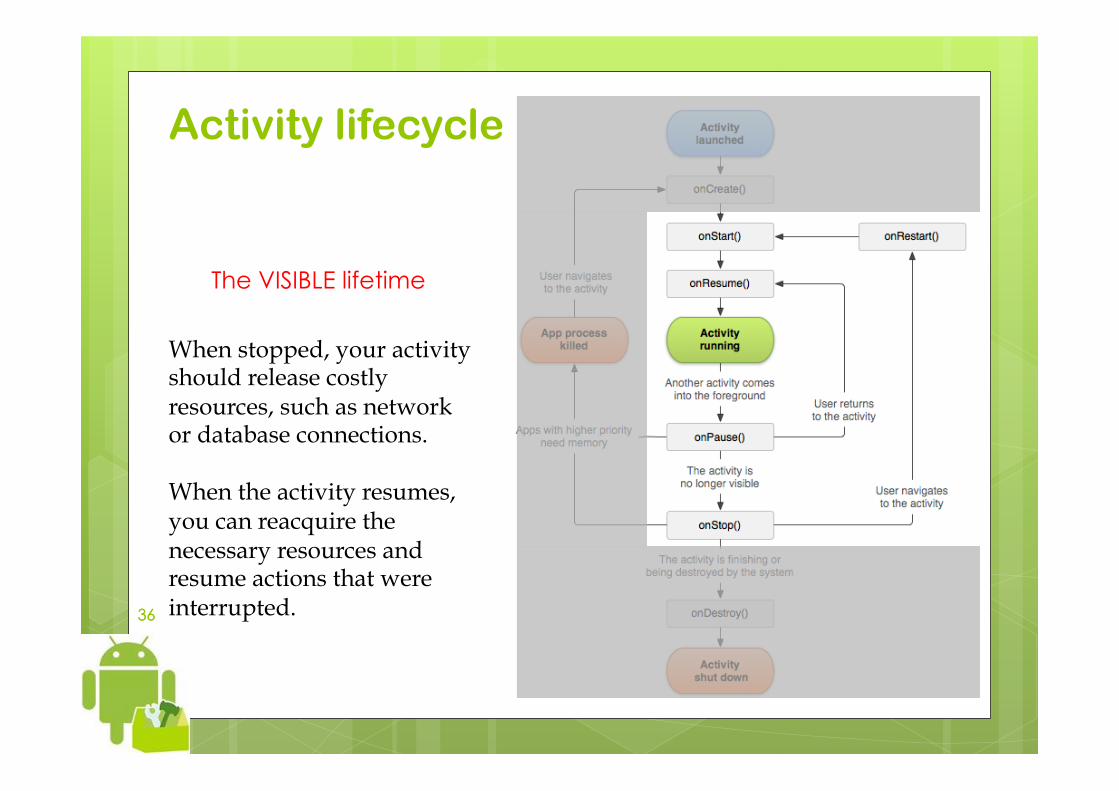
The VISIBLE lifetime
When stopped, your activity should release costly resources, such as network or database connections. When the activity resumes, you can reacquire the necessary resources and resume actions that were interrupted.

37 37
Activity lifecycle
The ENTIRE lifetime
38 38
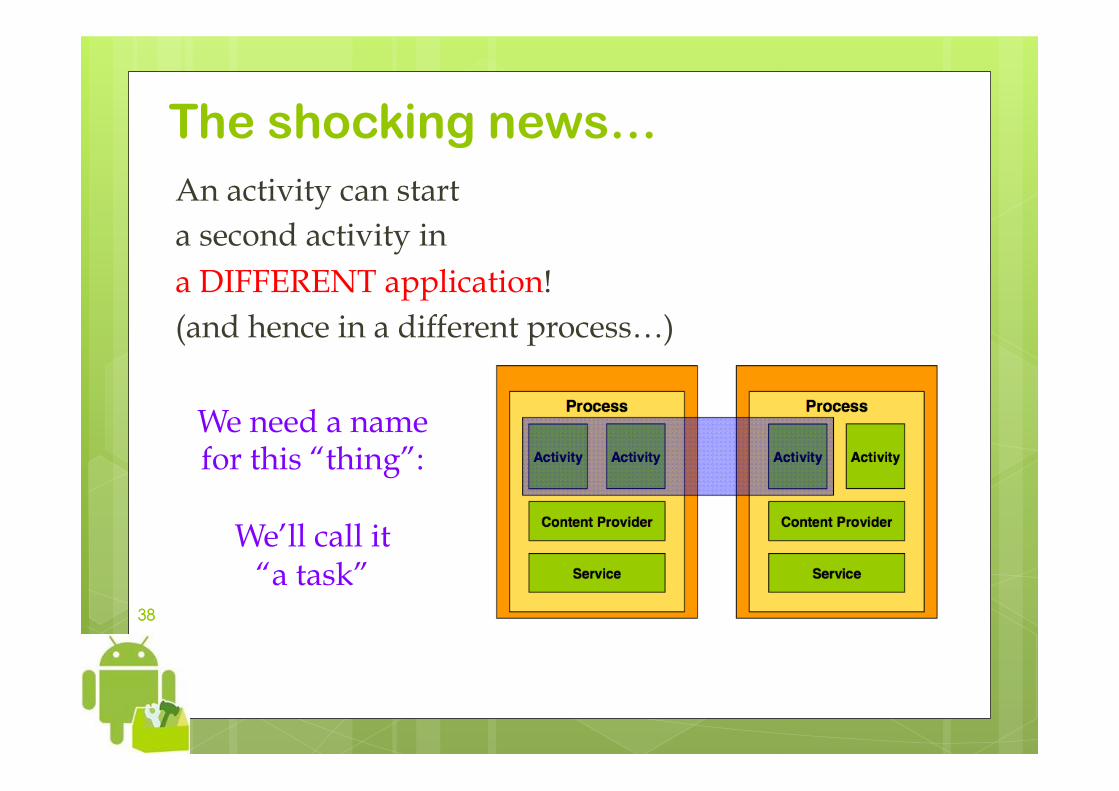
The shocking news… An activity can start a second activity in a DIFFERENT application! (and hence in a different process…)
We need a name for this “thing”:
We’ll call it
“a task”
39 39
Tasks
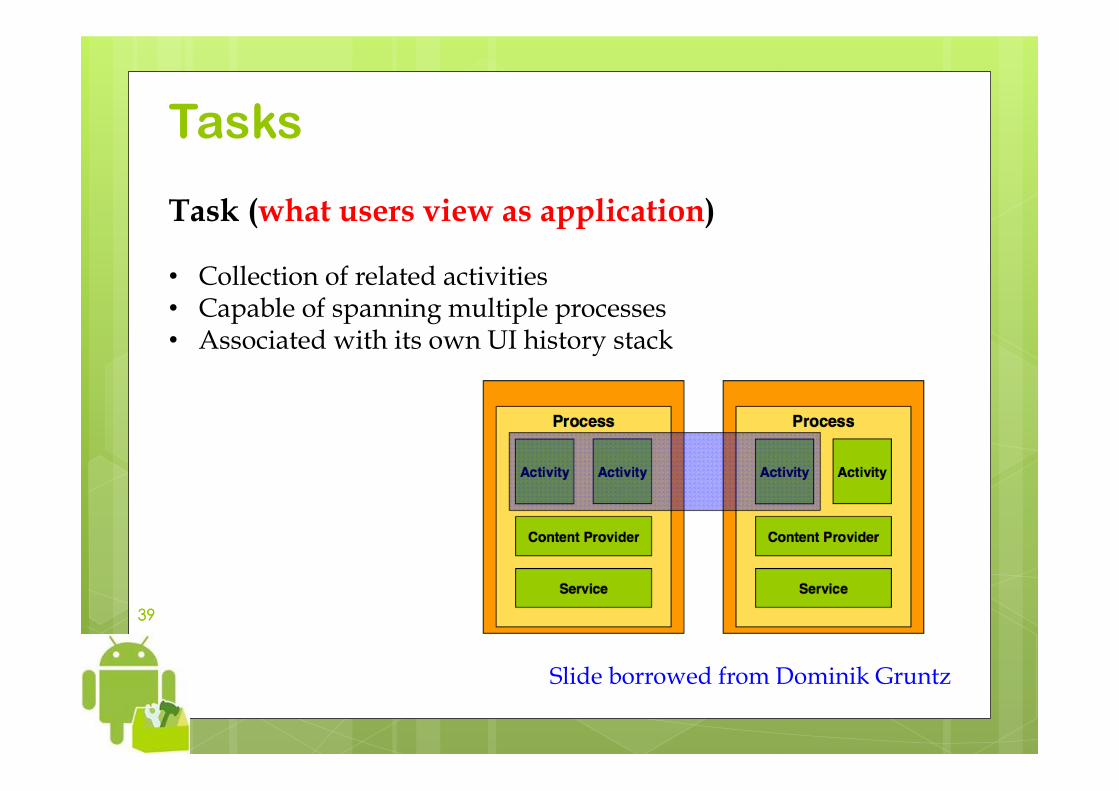
Task (what users view as application) • Collection of related activities • Capable of spanning multiple processes • Associated with its own UI history stack
Slide borrowed from Dominik Gruntz

40 40
Tasks An App defines at least one task, may define more. Activities may come from different applications (favoring reuse). Android maintains a seamless user experience by keeping the activities in the same task. Tasks may be moved in the background.
41 41
Tasks The Home screen is the starting place for most tasks. When the user touches an icon in the application launcher (or a shortcut on the Home screen), that application's task comes to the foreground. If no task exists for the application (the application has not been used recently), then a new task is created and the "main" activity for that application opens as the root activity in the stack. If the application has been used recently, its task is resumed (in general with its state preserved: more on this in the next lecture).
42 42
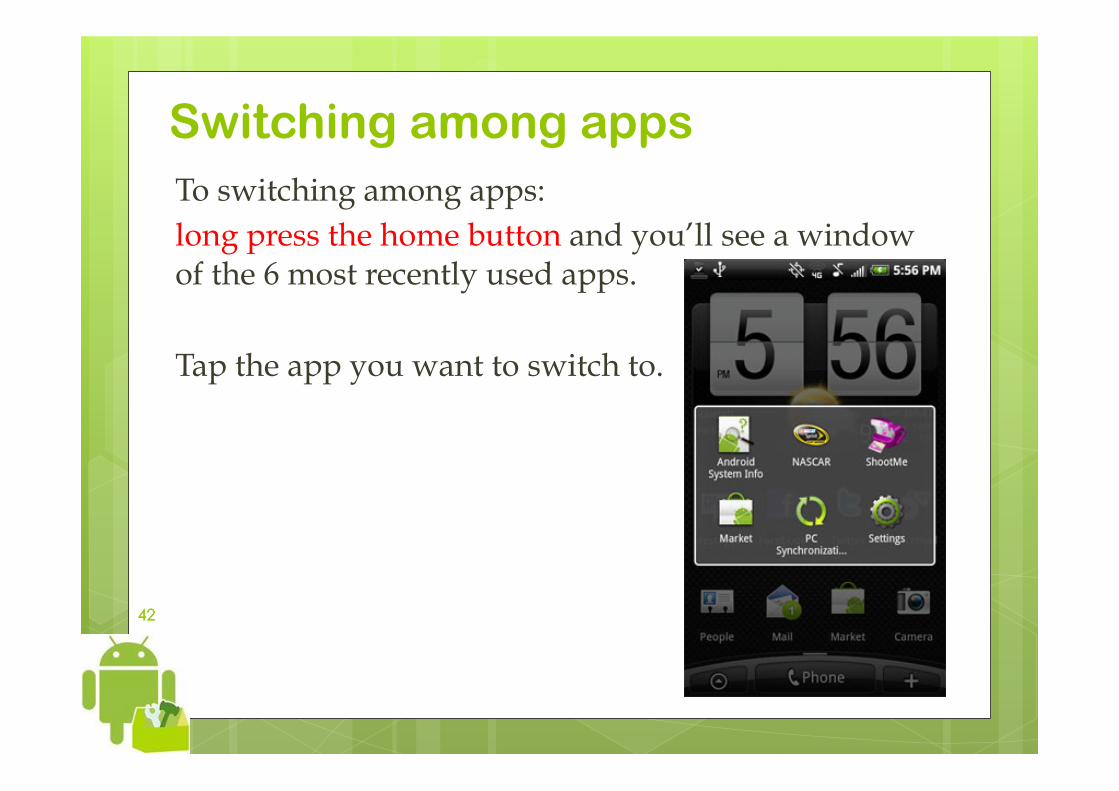
Switching among apps To switching among apps: long press the home button and you’ll see a window of the 6 most recently used apps. Tap the app you want to switch to.

Basic UI elements: Android Buttons (Basics)
Marco Ronchetti Università degli Studi di Trento
44 44
Let’s work with the listener
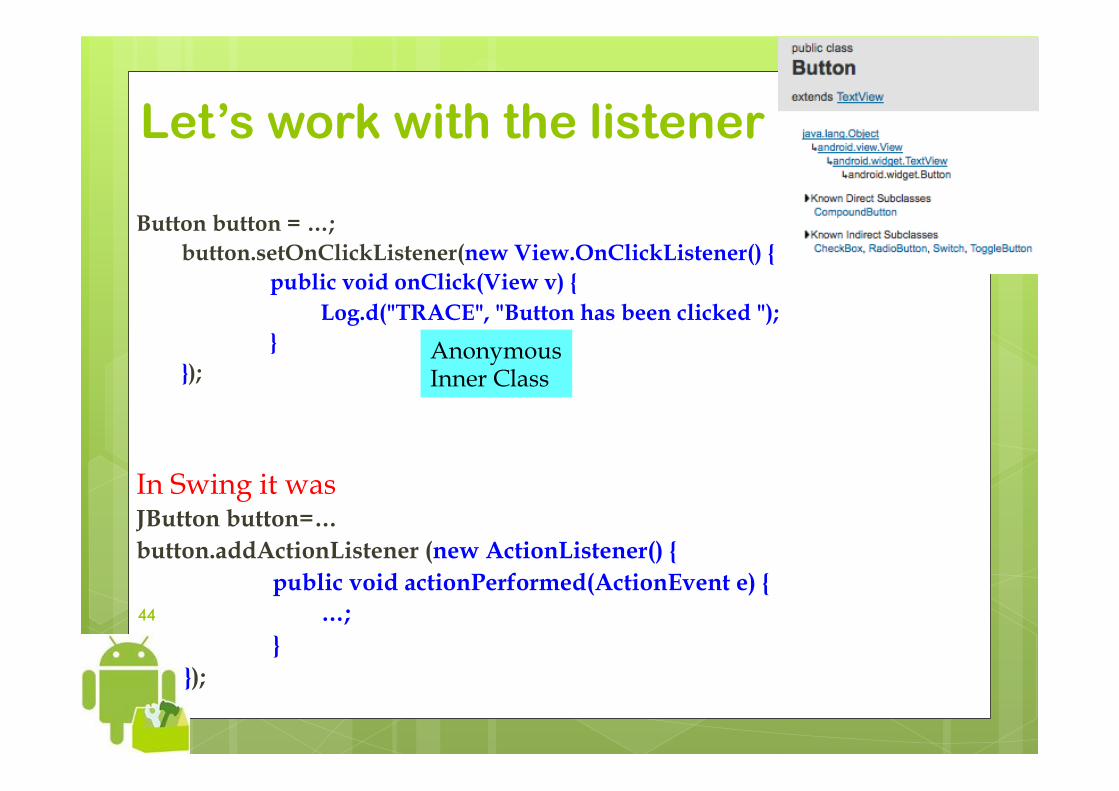
Button button = …; button.setOnClickListener(new View.OnClickListener() {
public void onClick(View v) { Log.d("TRACE", "Button has been clicked "); }
});
In Swing it was JButton button=… button.addActionListener (new ActionListener() {
public void actionPerformed(ActionEvent e) { …; }
});
Anonymous Inner Class
45 45
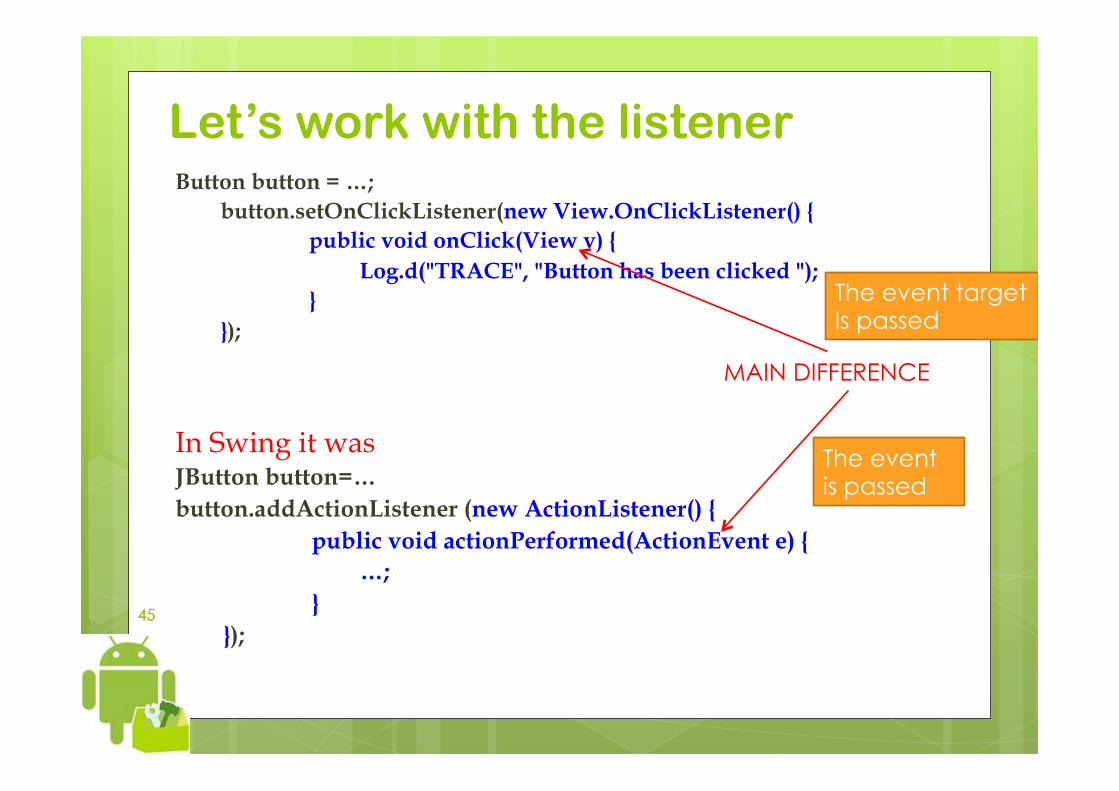
Let’s work with the listener Button button = …; button.setOnClickListener(new View.OnClickListener() {
public void onClick(View v) { Log.d("TRACE", "Button has been clicked "); }
});
In Swing it was JButton button=… button.addActionListener (new ActionListener() {
public void actionPerformed(ActionEvent e) { …; }
});
MAIN DIFFERENCE
The event is passed
The event target Is passed
46 46
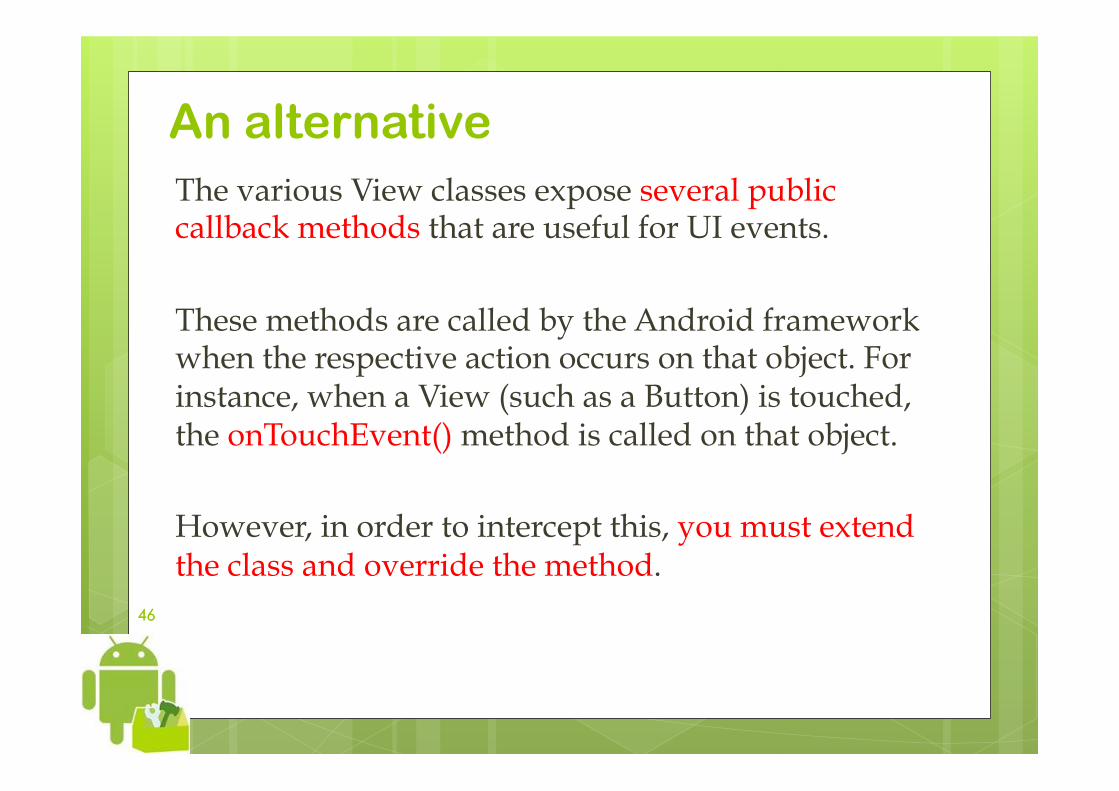
An alternative The various View classes expose several public callback methods that are useful for UI events. These methods are called by the Android framework when the respective action occurs on that object. For instance, when a View (such as a Button) is touched, the onTouchEvent() method is called on that object. However, in order to intercept this, you must extend the class and override the method.
47 47
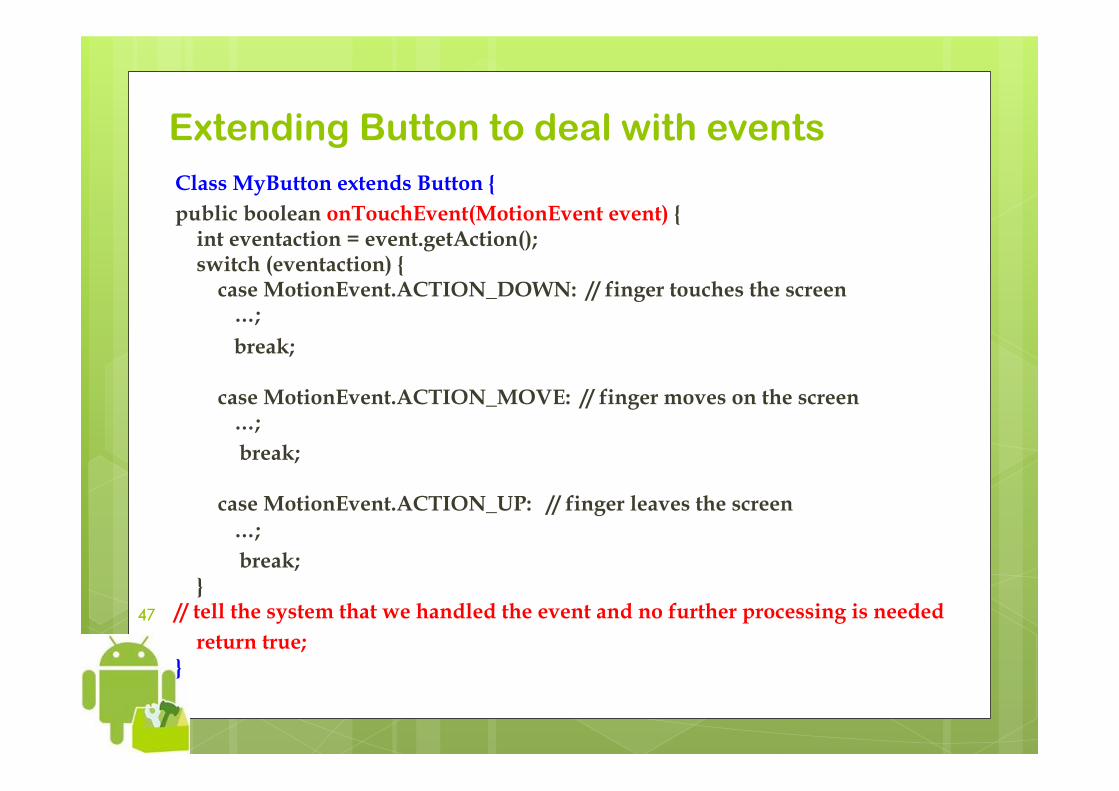
Extending Button to deal with events Class MyButton extends Button { public boolean onTouchEvent(MotionEvent event) { int eventaction = event.getAction(); switch (eventaction) { case MotionEvent.ACTION_DOWN: // finger touches the screen …;
break; case MotionEvent.ACTION_MOVE: // finger moves on the screen …; break; case MotionEvent.ACTION_UP: // finger leaves the screen …; break; } // tell the system that we handled the event and no further processing is needed return true; }

48 48
SimpleClick
49 49
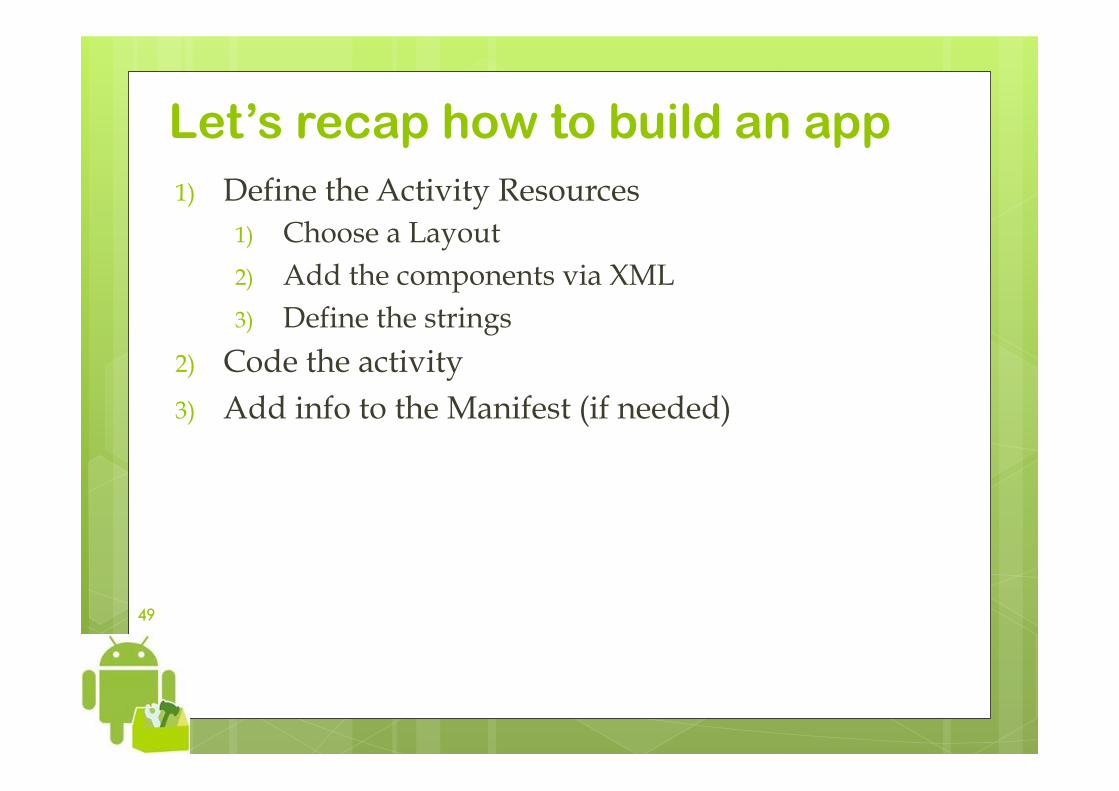
Let’s recap how to build an app 1) Define the Activity Resources
1) Choose a Layout 2) Add the components via XML 3) Define the strings
2) Code the activity 3) Add info to the Manifest (if needed)
50 50
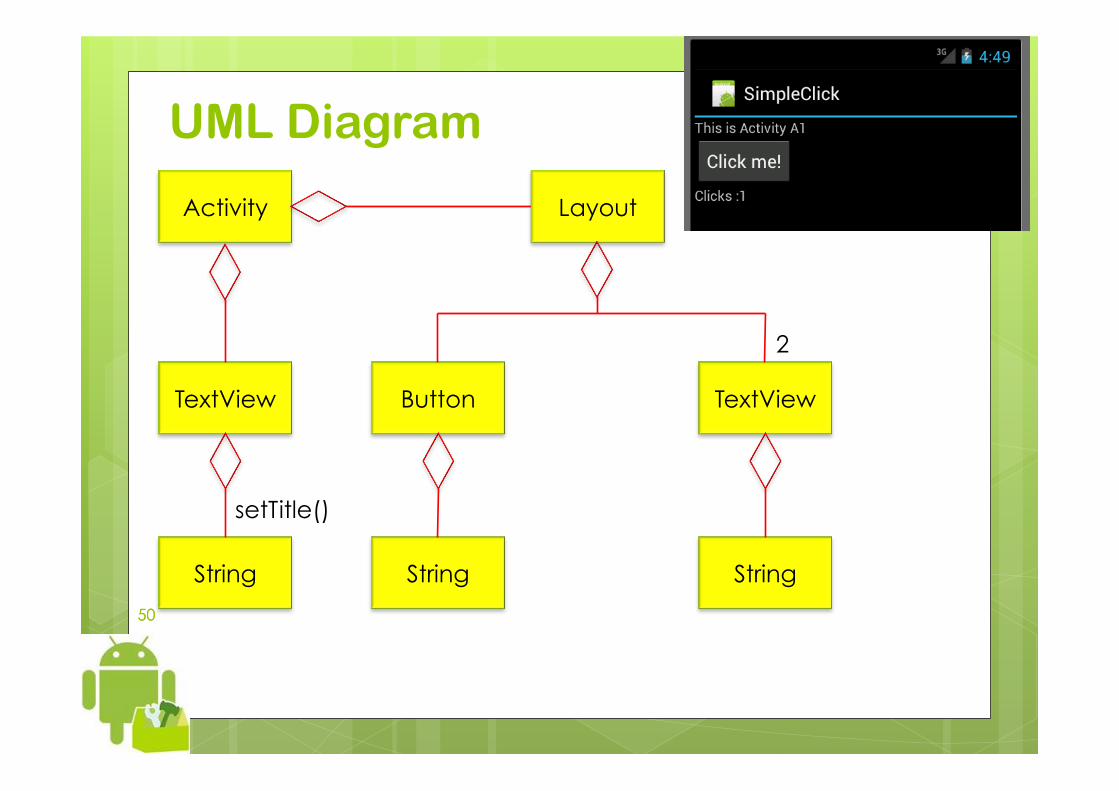
UML Diagram
Activity Layout
Button
String
TextView
String
2
TextView
String
setTitle()
51 51
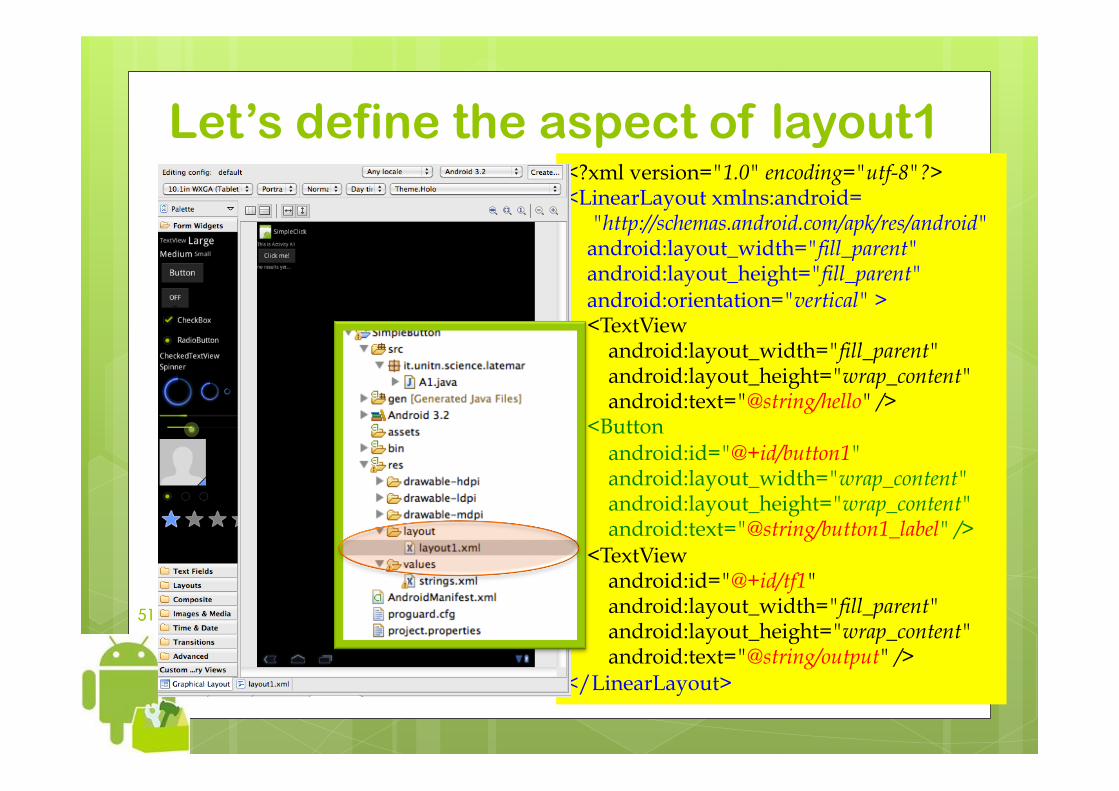
Let’s define the aspect of layout1 <?xml version="1.0" encoding="utf-8"?> <LinearLayout xmlns:android= "http://schemas.android.com/apk/res/android" android:layout_width="fill_parent" android:layout_height="fill_parent" android:orientation="vertical" > <TextView android:layout_width="fill_parent" android:layout_height="wrap_content" android:text="@string/hello" /> <Button android:id="@+id/button1" android:layout_width="wrap_content" android:layout_height="wrap_content" android:text="@string/button1_label" /> <TextView android:id="@+id/tf1" android:layout_width="fill_parent" android:layout_height="wrap_content" android:text="@string/output" /> </LinearLayout>

52 52
Let’s define the strings
<?xml version="1.0" encoding="utf-8"?> <resources> <string name="hello">This is Activity A1</string> <string name="app_name">SimpleClick</string> <string name="button1_label">Click me!</string> <string name="output">no results yet...</string> </resources>
53 53
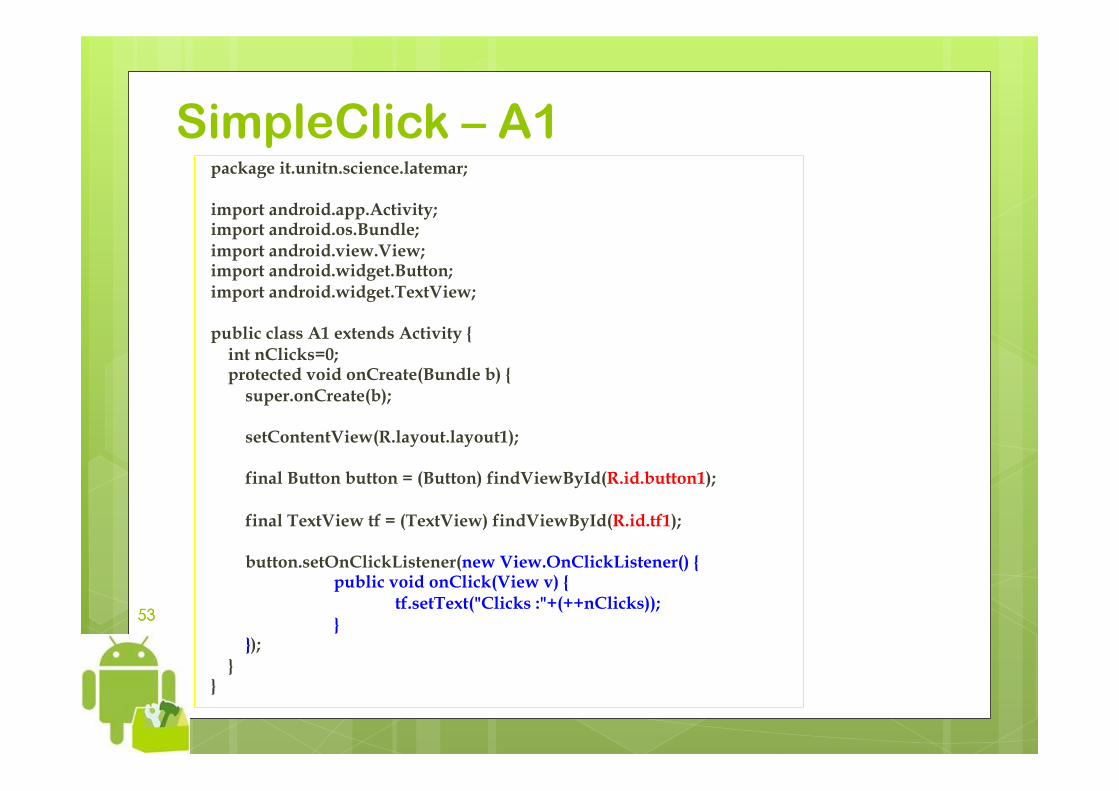
SimpleClick – A1 package it.unitn.science.latemar; import android.app.Activity; import android.os.Bundle; import android.view.View; import android.widget.Button; import android.widget.TextView; public class A1 extends Activity { int nClicks=0; protected void onCreate(Bundle b) { super.onCreate(b); setContentView(R.layout.layout1); final Button button = (Button) findViewById(R.id.button1); final TextView tf = (TextView) findViewById(R.id.tf1); button.setOnClickListener(new View.OnClickListener() {
public void onClick(View v) { tf.setText("Clicks :"+(++nClicks)); }
}); } }

Calling Activities: Explicit Intents
Marco Ronchetti Università degli Studi di Trento

55 55
startActivity(Intent x) startActivity(Intent x) • starts a new activity, which will be placed at the top
of the activity stack.
• takes a single argument which describes the activity to be executed.
• An intent is an abstract description of an operation to be performed.
56 56
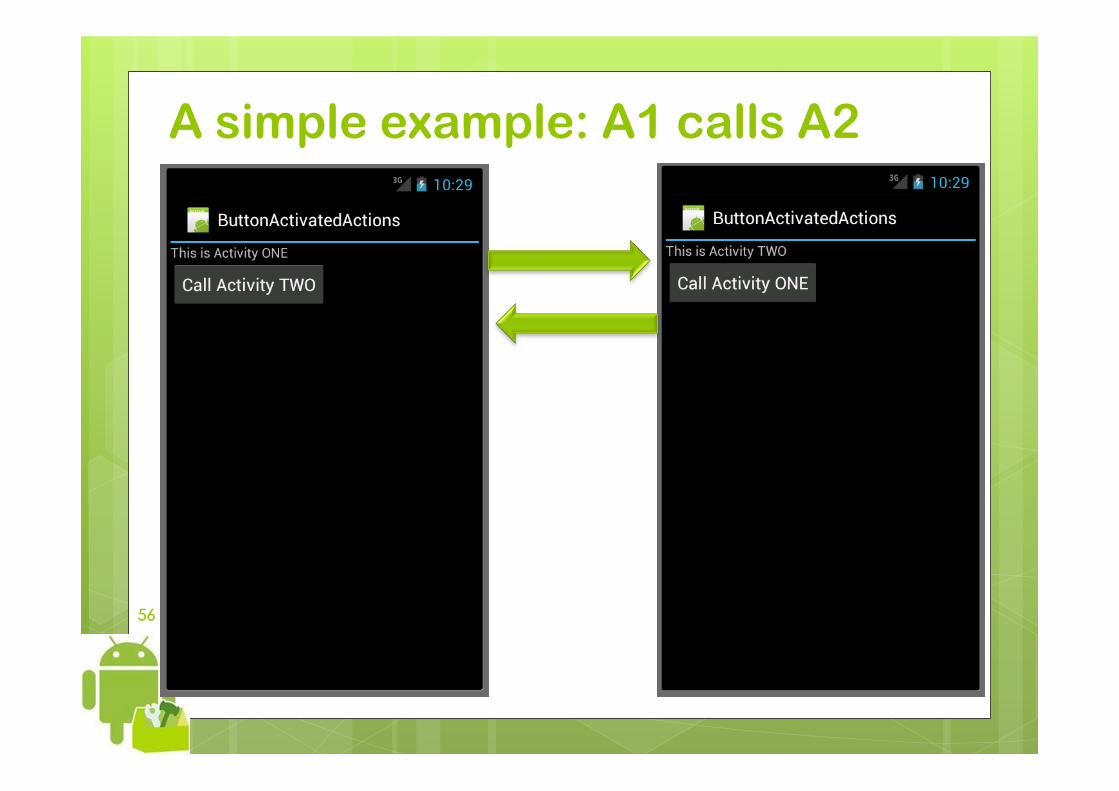
A simple example: A1 calls A2
57 57
Explicit Intents We will use the basic mode:
“Explicit starting an activity” Explicit Intents specify the exact class to be run. Often these will not include any other information, simply being a way for an application to launch various internal activities it has as the user interacts with the application.
58 58
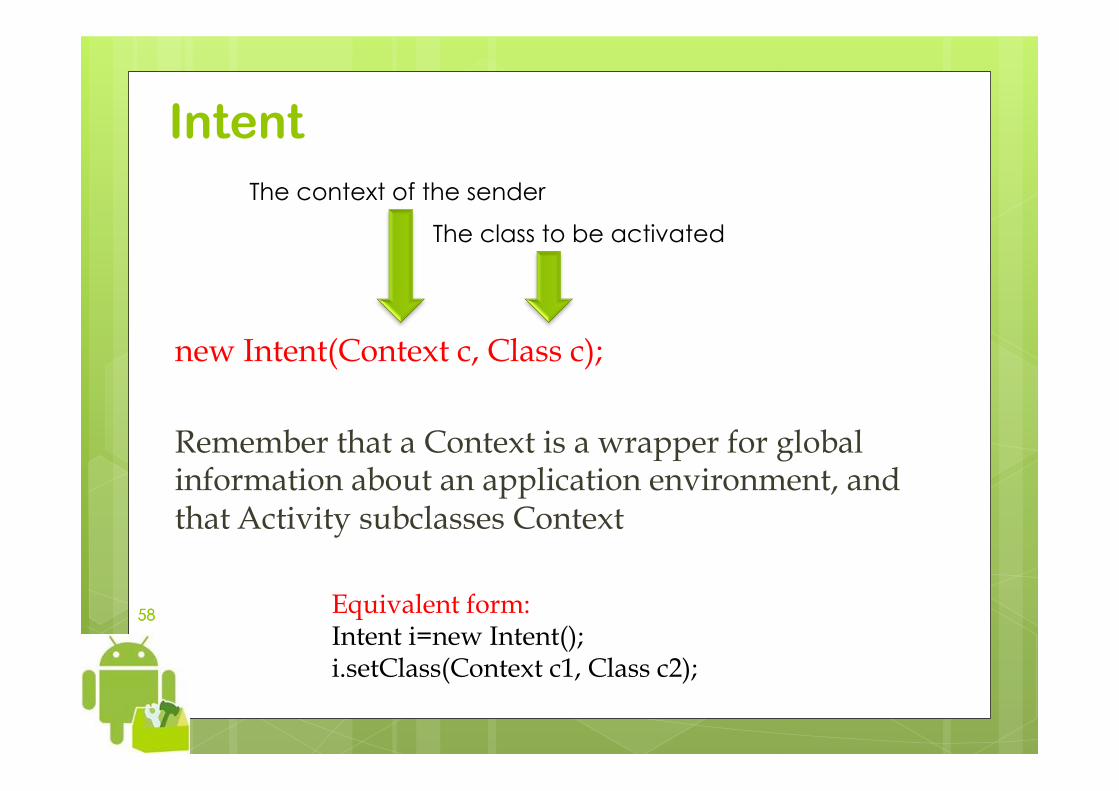
Intent
new Intent(Context c, Class c); Remember that a Context is a wrapper for global information about an application environment, and that Activity subclasses Context
The context of the sender
The class to be activated
Equivalent form: Intent i=new Intent(); i.setClass(Context c1, Class c2);
59 59
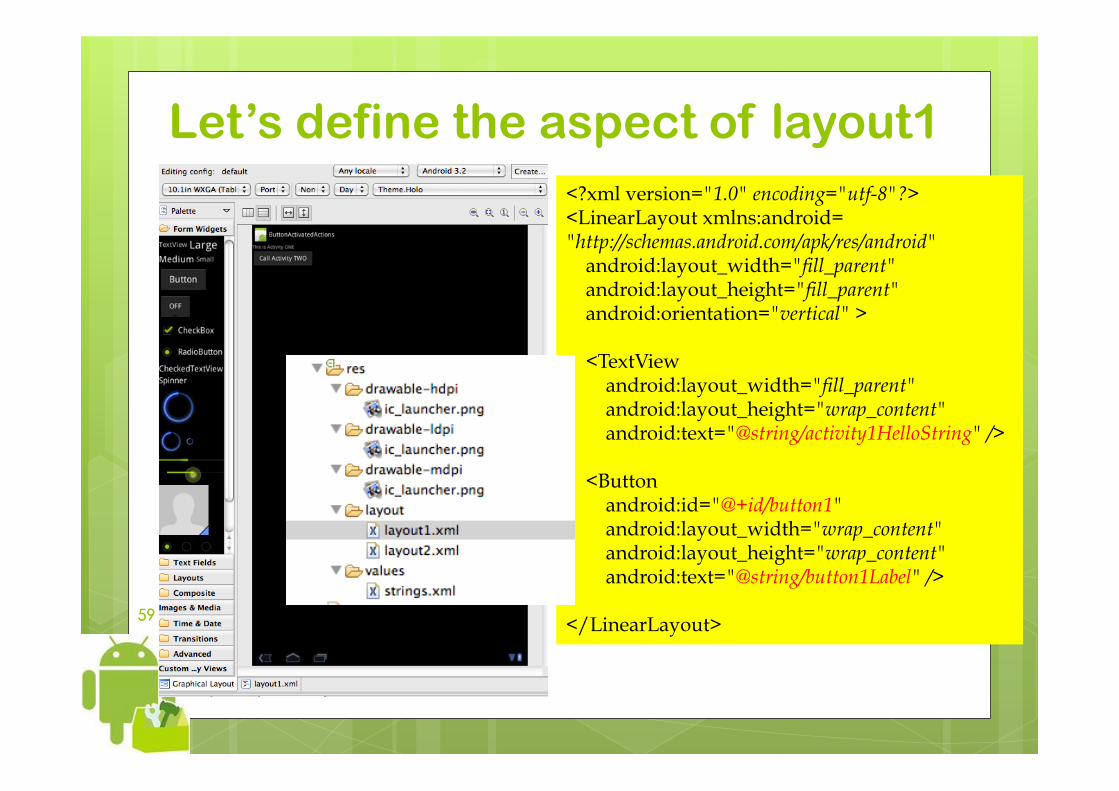
Let’s define the aspect of layout1 <?xml version="1.0" encoding="utf-8"?> <LinearLayout xmlns:android= "http://schemas.android.com/apk/res/android" android:layout_width="fill_parent" android:layout_height="fill_parent" android:orientation="vertical" > <TextView android:layout_width="fill_parent" android:layout_height="wrap_content" android:text="@string/activity1HelloString" /> <Button android:id="@+id/button1" android:layout_width="wrap_content" android:layout_height="wrap_content" android:text="@string/button1Label" /> </LinearLayout>
60 60
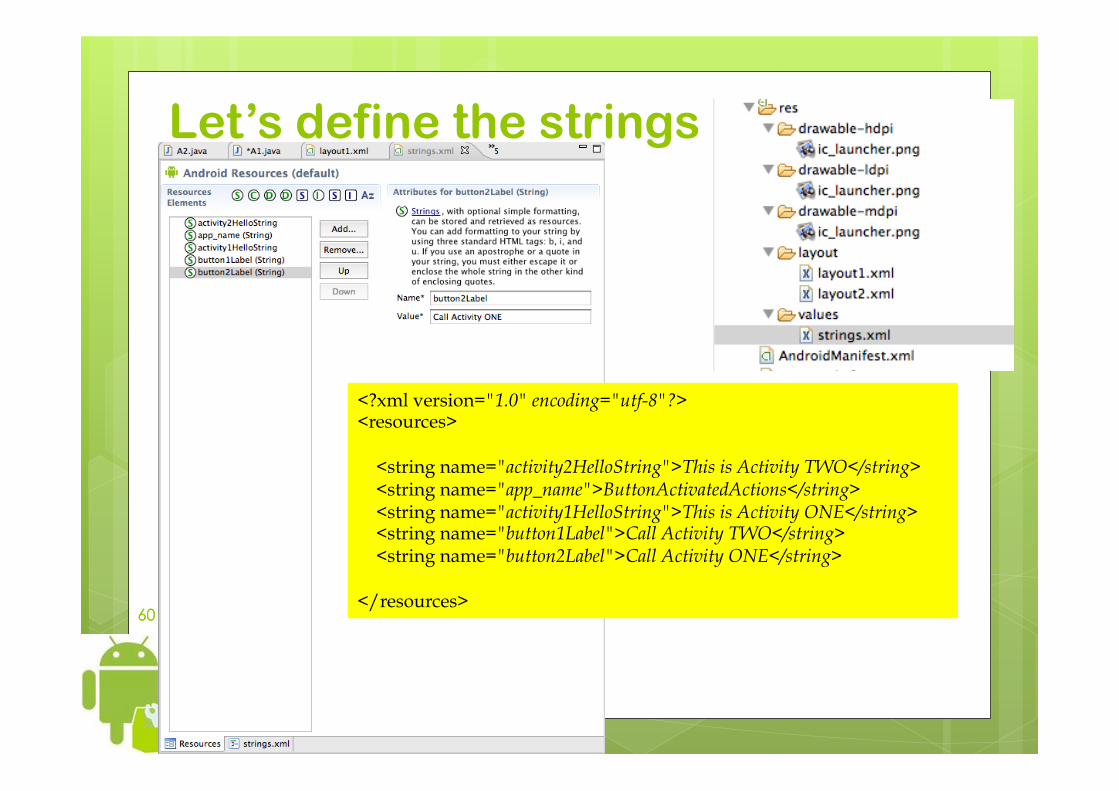
Let’s define the strings
<?xml version="1.0" encoding="utf-8"?> <resources> <string name="activity2HelloString">This is Activity TWO</string> <string name="app_name">ButtonActivatedActions</string> <string name="activity1HelloString">This is Activity ONE</string> <string name="button1Label">Call Activity TWO</string> <string name="button2Label">Call Activity ONE</string> </resources>
61 61
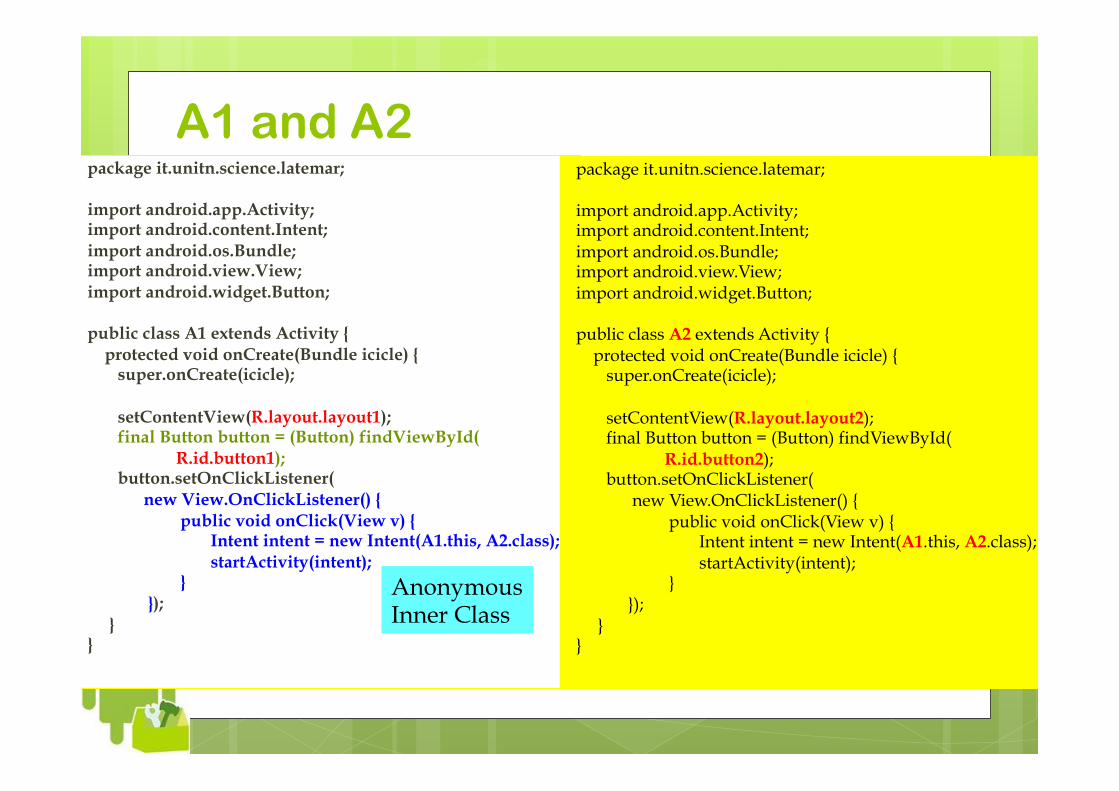
A1 and A2 package it.unitn.science.latemar; import android.app.Activity; import android.content.Intent; import android.os.Bundle; import android.view.View; import android.widget.Button; public class A1 extends Activity { protected void onCreate(Bundle icicle) { super.onCreate(icicle); setContentView(R.layout.layout1); final Button button = (Button) findViewById(
R.id.button1); button.setOnClickListener( new View.OnClickListener() {
public void onClick(View v) { Intent intent = new Intent(A1.this, A2.class); startActivity(intent); }
}); } }
Anonymous Inner Class
package it.unitn.science.latemar; import android.app.Activity; import android.content.Intent; import android.os.Bundle; import android.view.View; import android.widget.Button; public class A2 extends Activity { protected void onCreate(Bundle icicle) { super.onCreate(icicle); setContentView(R.layout.layout2); final Button button = (Button) findViewById(
R.id.button2); button.setOnClickListener( new View.OnClickListener() {
public void onClick(View v) { Intent intent = new Intent(A1.this, A2.class); startActivity(intent); }
}); } }
62 62
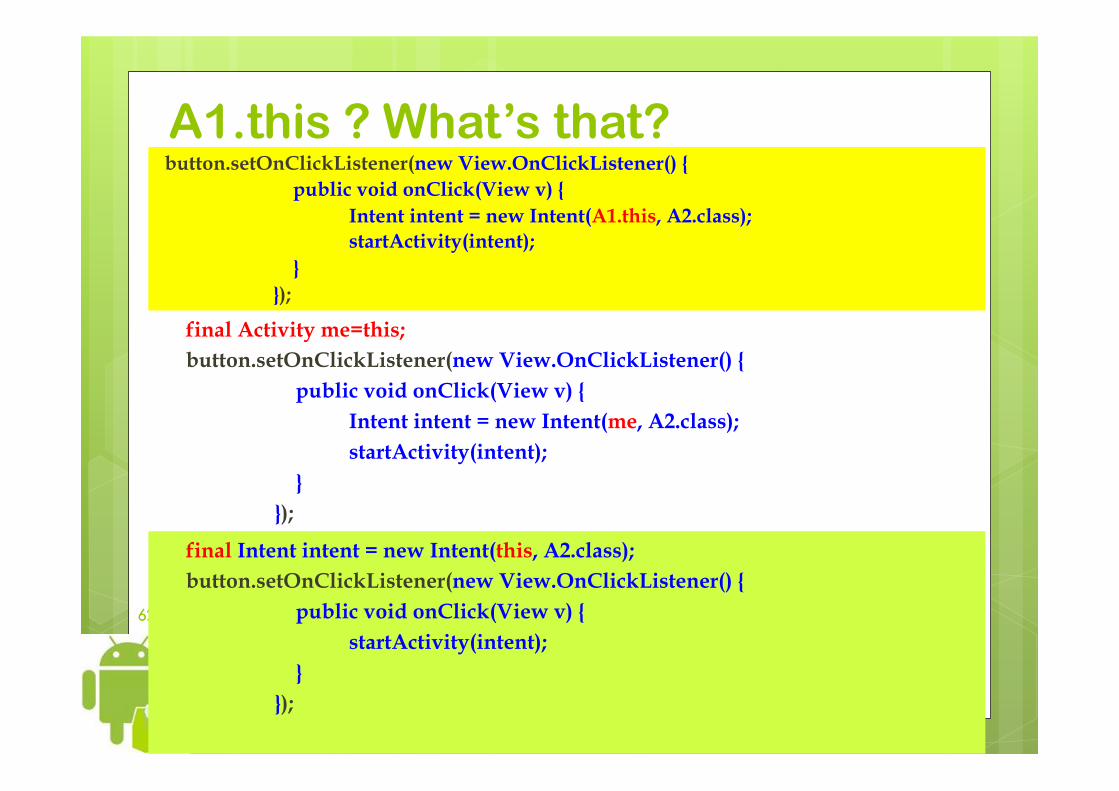
A1.this ? What’s that?
final Activity me=this; button.setOnClickListener(new View.OnClickListener() {
public void onClick(View v) { Intent intent = new Intent(me, A2.class); startActivity(intent); } });
button.setOnClickListener(new View.OnClickListener() { public void onClick(View v) { Intent intent = new Intent(A1.this, A2.class); startActivity(intent); } });
final Intent intent = new Intent(this, A2.class); button.setOnClickListener(new View.OnClickListener() {
public void onClick(View v) { startActivity(intent); } });
63 63
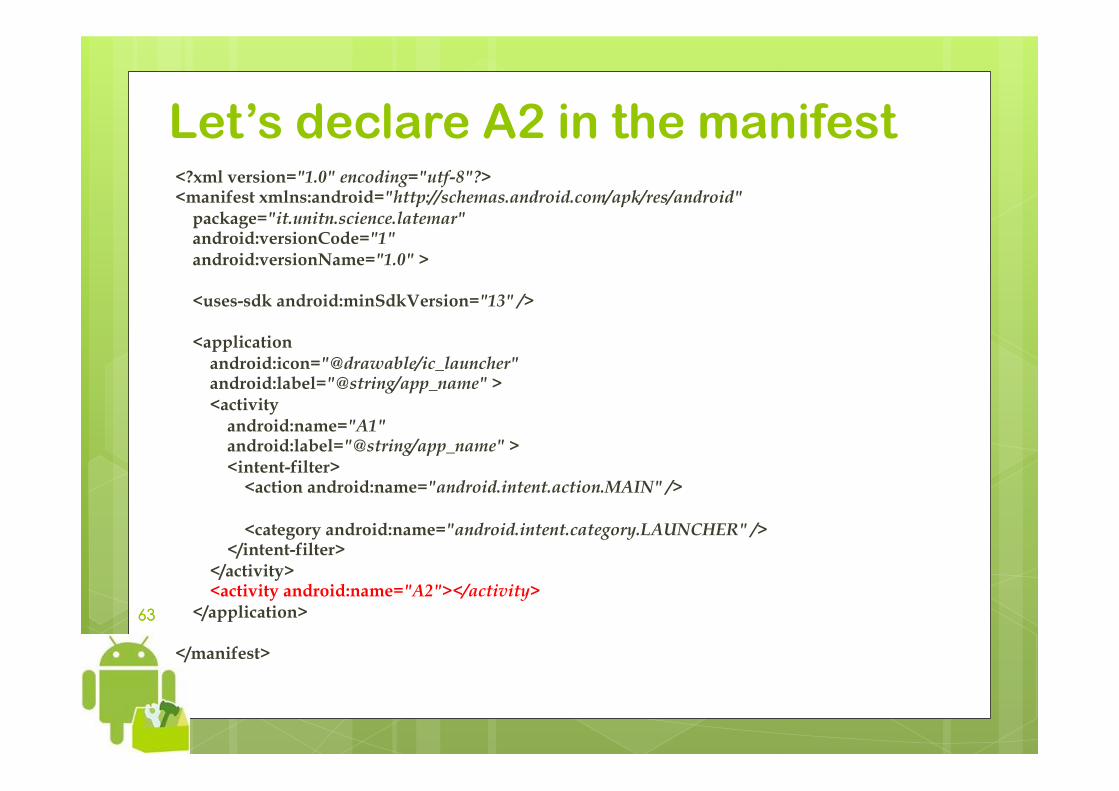
Let’s declare A2 in the manifest <?xml version="1.0" encoding="utf-8"?> <manifest xmlns:android="http://schemas.android.com/apk/res/android" package="it.unitn.science.latemar" android:versionCode="1" android:versionName="1.0" > <uses-sdk android:minSdkVersion="13" /> <application android:icon="@drawable/ic_launcher" android:label="@string/app_name" > <activity android:name="A1" android:label="@string/app_name" > <intent-filter> <action android:name="android.intent.action.MAIN" /> <category android:name="android.intent.category.LAUNCHER" /> </intent-filter> </activity> <activity android:name="A2"></activity> </application> </manifest>
How many instances? Marco Ronchetti Università degli Studi di Trento
65 65
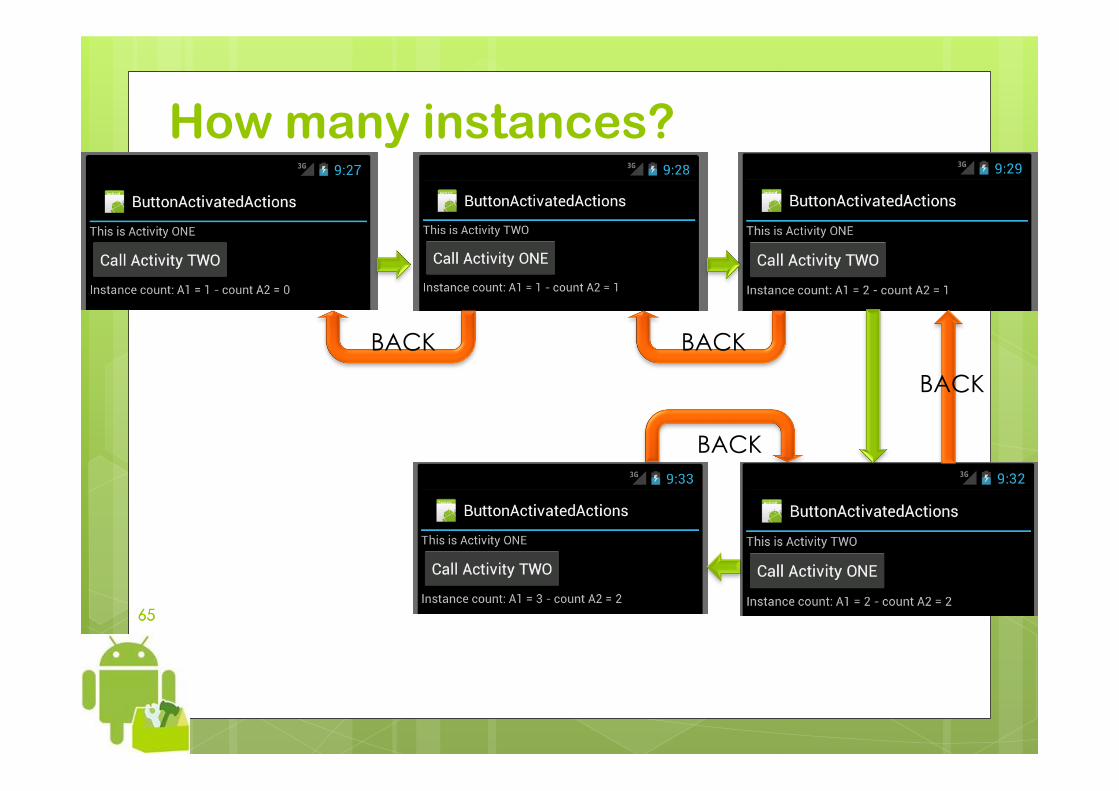
How many instances?
BACK BACK
BACK
BACK
66 66
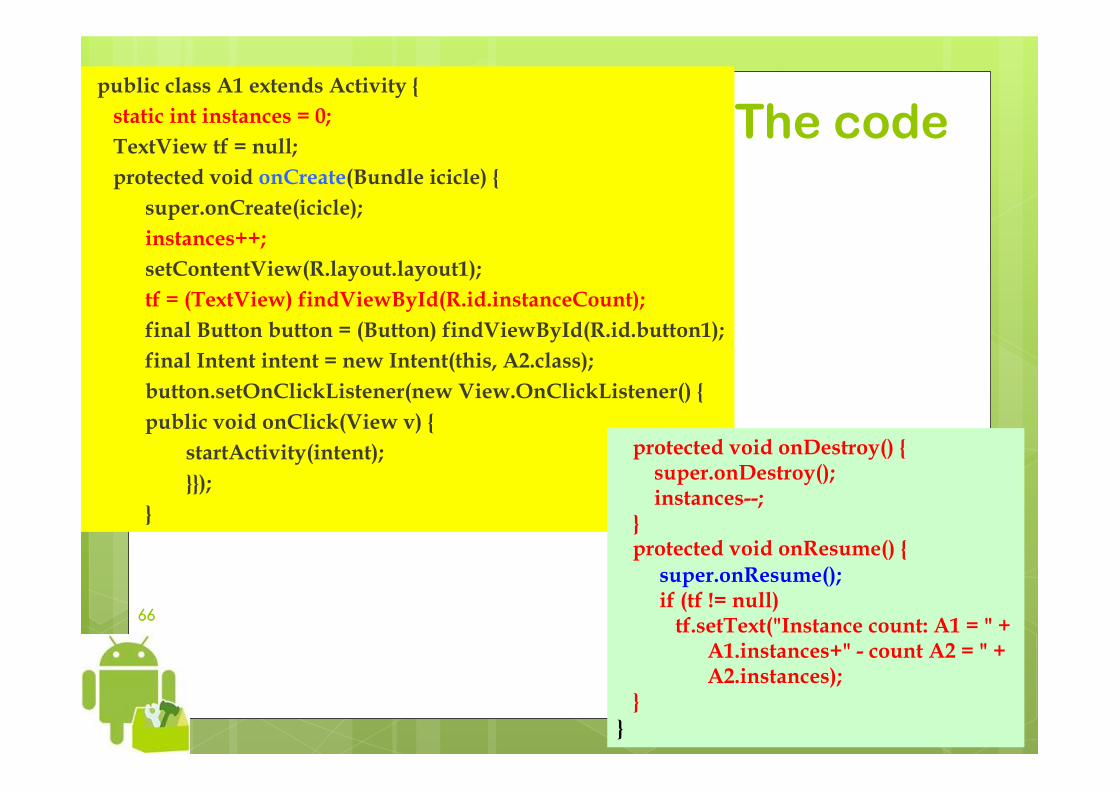
The code public class A1 extends Activity { static int instances = 0; TextView tf = null; protected void onCreate(Bundle icicle) { super.onCreate(icicle); instances++; setContentView(R.layout.layout1); tf = (TextView) findViewById(R.id.instanceCount); final Button button = (Button) findViewById(R.id.button1); final Intent intent = new Intent(this, A2.class); button.setOnClickListener(new View.OnClickListener() { public void onClick(View v) {
startActivity(intent); }});
}
protected void onDestroy() { super.onDestroy(); instances--; } protected void onResume() { super.onResume(); if (tf != null) tf.setText("Instance count: A1 = " + A1.instances+" - count A2 = " + A2.instances); } }
67 67
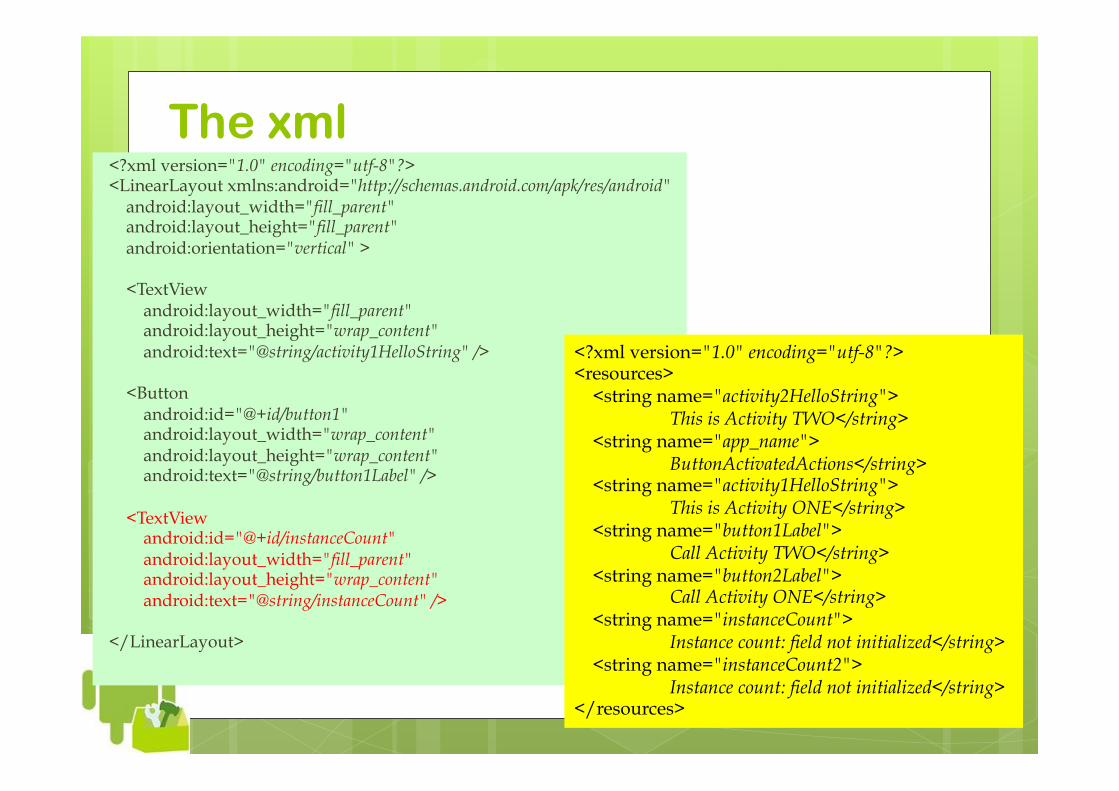
The xml <?xml version="1.0" encoding="utf-8"?> <LinearLayout xmlns:android="http://schemas.android.com/apk/res/android" android:layout_width="fill_parent" android:layout_height="fill_parent" android:orientation="vertical" > <TextView android:layout_width="fill_parent" android:layout_height="wrap_content" android:text="@string/activity1HelloString" /> <Button android:id="@+id/button1" android:layout_width="wrap_content" android:layout_height="wrap_content" android:text="@string/button1Label" /> <TextView android:id="@+id/instanceCount" android:layout_width="fill_parent" android:layout_height="wrap_content" android:text="@string/instanceCount" /> </LinearLayout>
<?xml version="1.0" encoding="utf-8"?> <resources> <string name="activity2HelloString">
This is Activity TWO</string> <string name="app_name">
ButtonActivatedActions</string> <string name="activity1HelloString">
This is Activity ONE</string> <string name="button1Label">
Call Activity TWO</string> <string name="button2Label">
Call Activity ONE</string> <string name="instanceCount">
Instance count: field not initialized</string> <string name="instanceCount2">
Instance count: field not initialized</string> </resources>
68 68
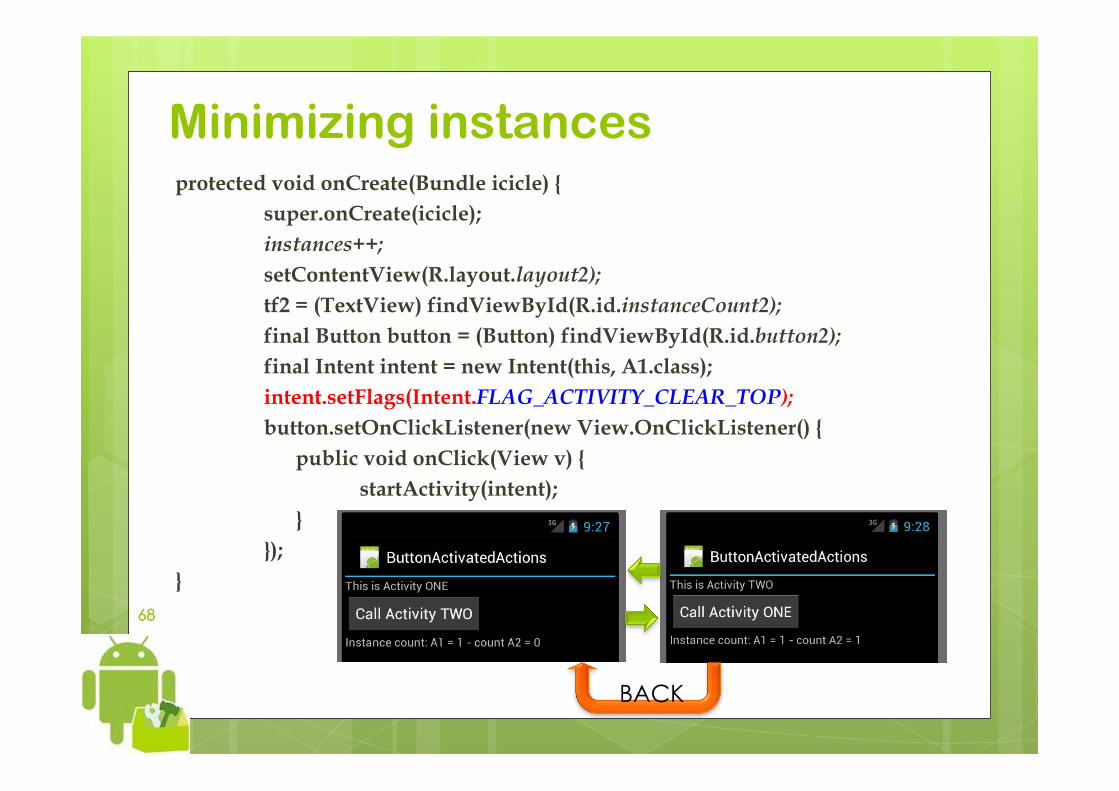
Minimizing instances protected void onCreate(Bundle icicle) {
super.onCreate(icicle); instances++; setContentView(R.layout.layout2); tf2 = (TextView) findViewById(R.id.instanceCount2); final Button button = (Button) findViewById(R.id.button2); final Intent intent = new Intent(this, A1.class); intent.setFlags(Intent.FLAG_ACTIVITY_CLEAR_TOP); button.setOnClickListener(new View.OnClickListener() { public void onClick(View v) { startActivity(intent); } });
}
BACK
69 69
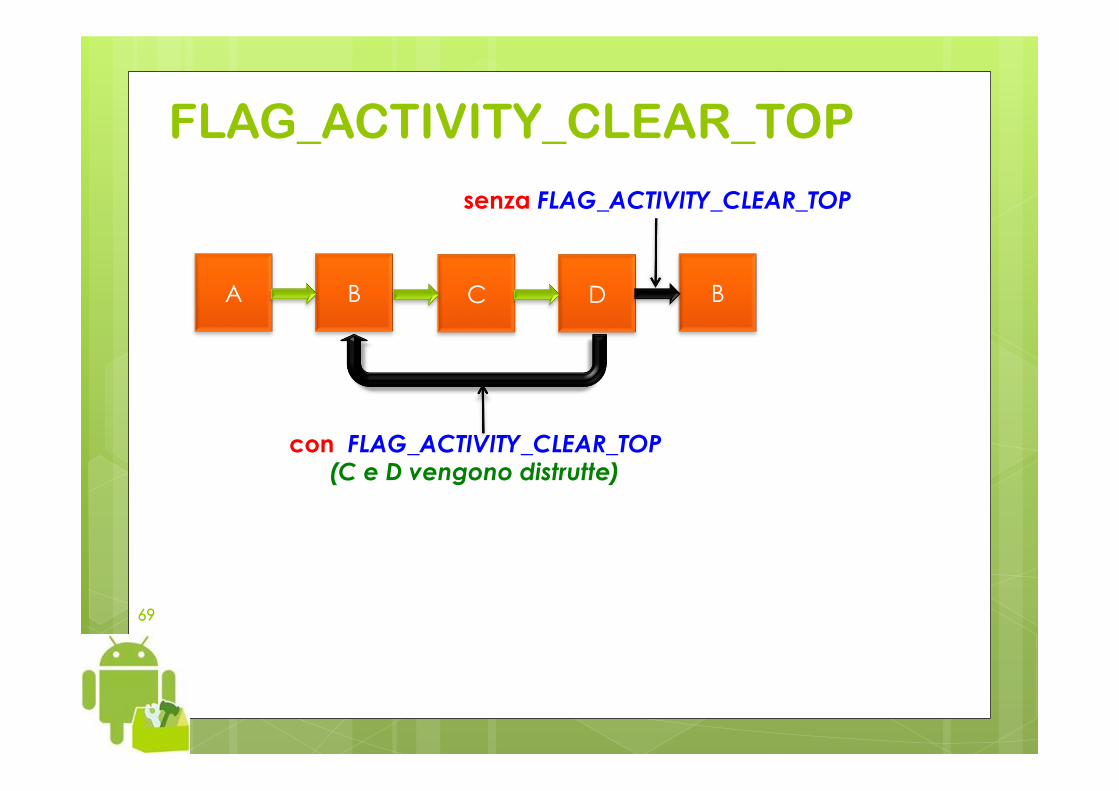
FLAG_ACTIVITY_CLEAR_TOP
A B C D B
con FLAG_ACTIVITY_CLEAR_TOP (C e D vengono distrutte)
senza FLAG_ACTIVITY_CLEAR_TOP
70 70
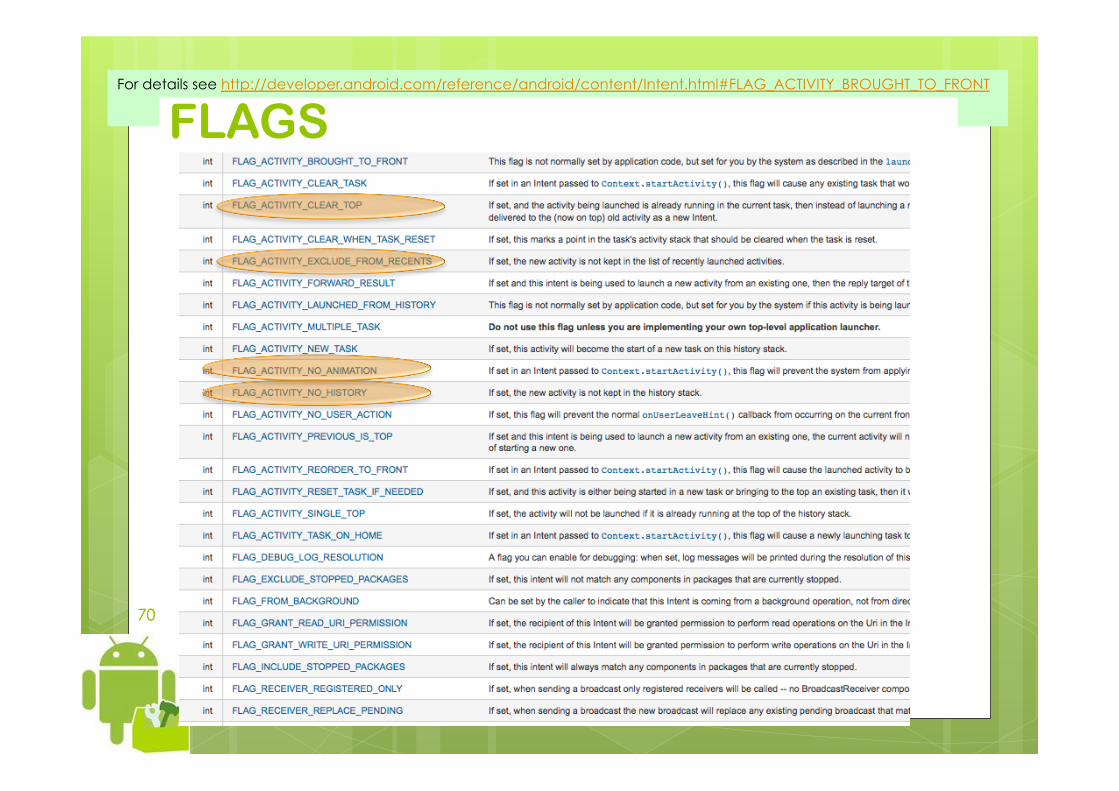
For details see http://developer.android.com/reference/android/content/Intent.html#FLAG_ACTIVITY_BROUGHT_TO_FRONT
FLAGS

Calling Activities with return values: startActivityForResults
Marco Ronchetti Università degli Studi di Trento
72 72
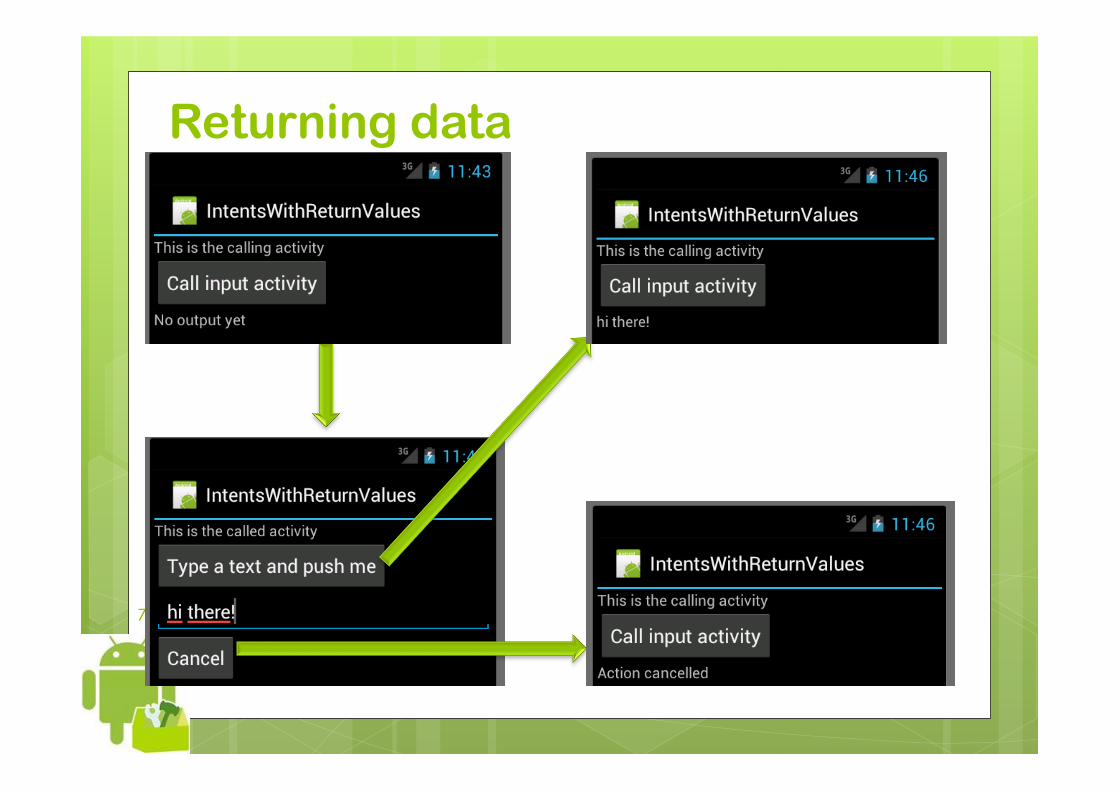
Returning data
73 73
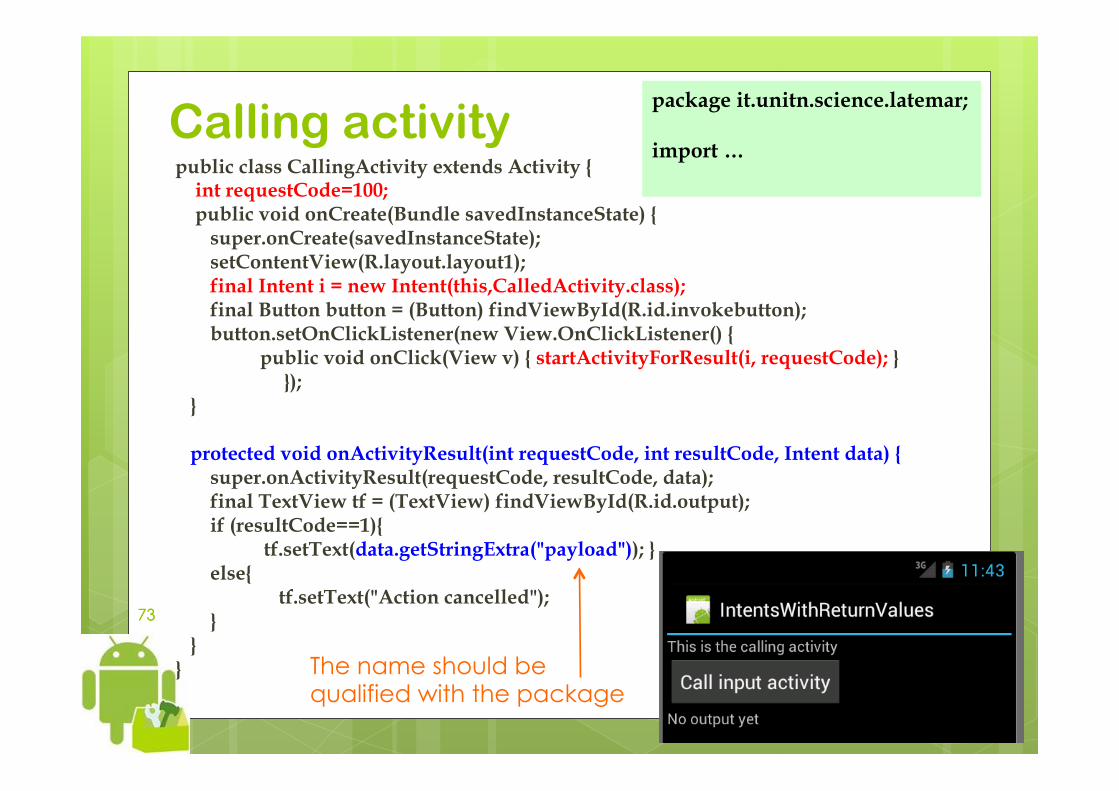
Calling activity public class CallingActivity extends Activity { int requestCode=100; public void onCreate(Bundle savedInstanceState) { super.onCreate(savedInstanceState); setContentView(R.layout.layout1); final Intent i = new Intent(this,CalledActivity.class); final Button button = (Button) findViewById(R.id.invokebutton); button.setOnClickListener(new View.OnClickListener() { public void onClick(View v) { startActivityForResult(i, requestCode); } }); } protected void onActivityResult(int requestCode, int resultCode, Intent data) { super.onActivityResult(requestCode, resultCode, data); final TextView tf = (TextView) findViewById(R.id.output); if (resultCode==1){
tf.setText(data.getStringExtra("payload")); } else{ tf.setText("Action cancelled"); } } }
package it.unitn.science.latemar; import …
The name should be qualified with the package
74 74
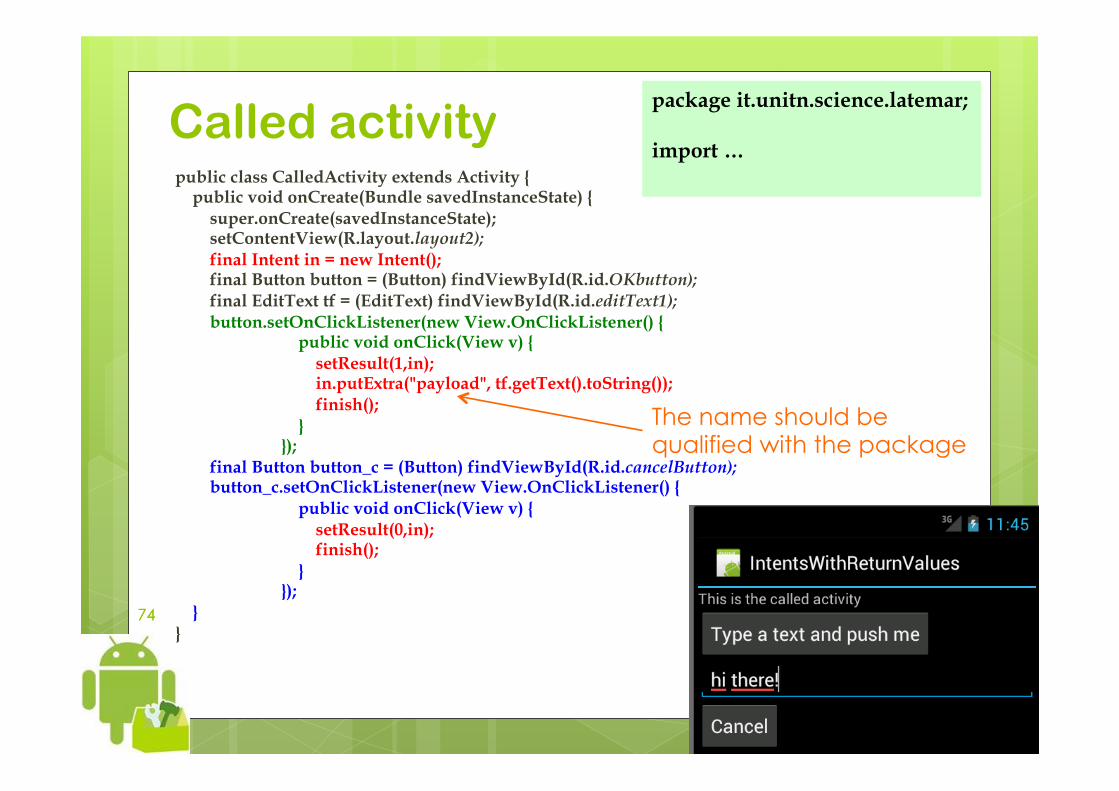
Called activity public class CalledActivity extends Activity { public void onCreate(Bundle savedInstanceState) { super.onCreate(savedInstanceState); setContentView(R.layout.layout2); final Intent in = new Intent(); final Button button = (Button) findViewById(R.id.OKbutton); final EditText tf = (EditText) findViewById(R.id.editText1); button.setOnClickListener(new View.OnClickListener() { public void onClick(View v) { setResult(1,in); in.putExtra("payload", tf.getText().toString()); finish(); } }); final Button button_c = (Button) findViewById(R.id.cancelButton); button_c.setOnClickListener(new View.OnClickListener() { public void onClick(View v) { setResult(0,in); finish(); } }); } }
package it.unitn.science.latemar; import …
The name should be qualified with the package
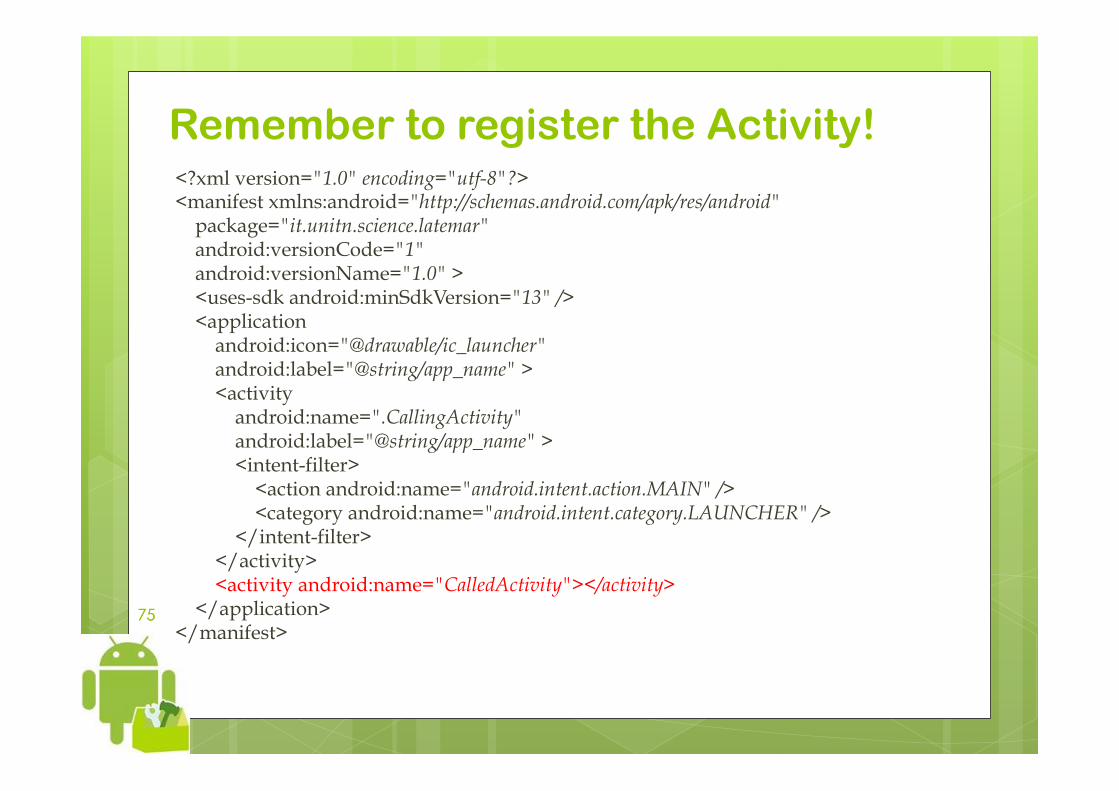
75 75
Remember to register the Activity! <?xml version="1.0" encoding="utf-8"?> <manifest xmlns:android="http://schemas.android.com/apk/res/android" package="it.unitn.science.latemar" android:versionCode="1" android:versionName="1.0" > <uses-sdk android:minSdkVersion="13" /> <application android:icon="@drawable/ic_launcher" android:label="@string/app_name" > <activity android:name=".CallingActivity" android:label="@string/app_name" > <intent-filter> <action android:name="android.intent.action.MAIN" /> <category android:name="android.intent.category.LAUNCHER" /> </intent-filter> </activity> <activity android:name="CalledActivity"></activity> </application> </manifest>
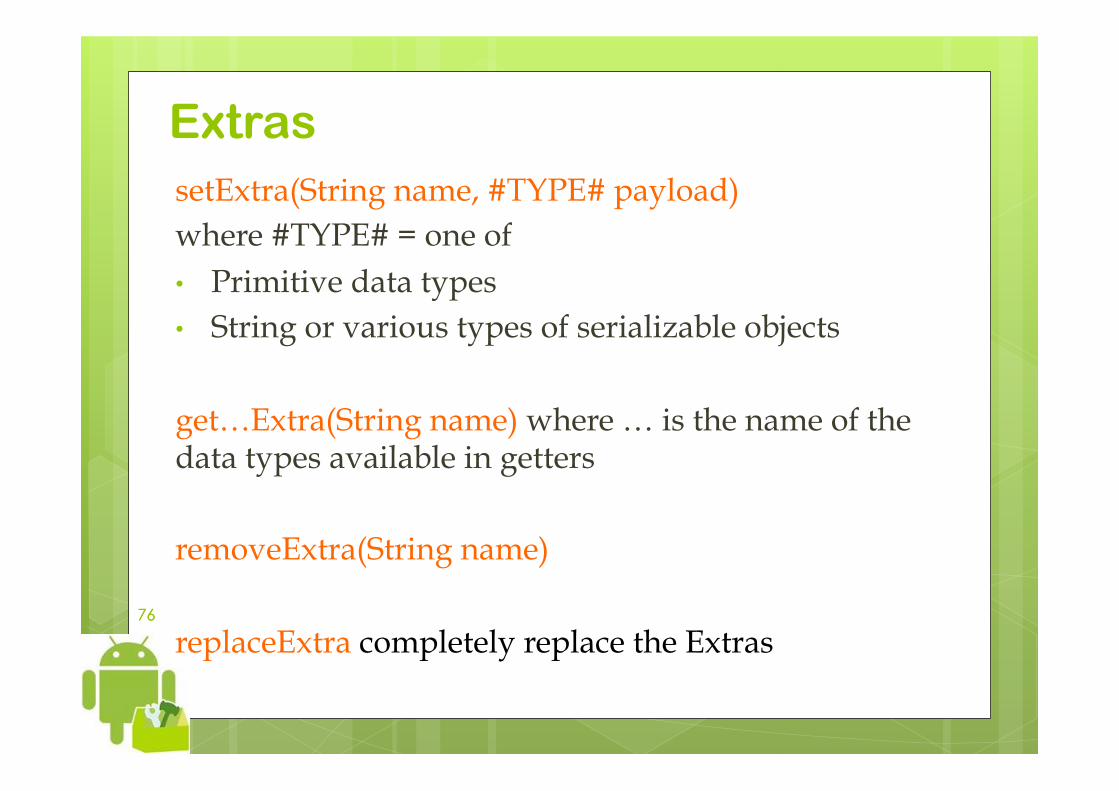
76 76
Extras setExtra(String name, #TYPE# payload) where #TYPE# = one of • Primitive data types • String or various types of serializable objects get…Extra(String name) where … is the name of the data types available in getters removeExtra(String name) replaceExtra completely replace the Extras
Basic UI elements: Views and Layouts, a deeper insight
Marco Ronchetti Università degli Studi di Trento
78 78
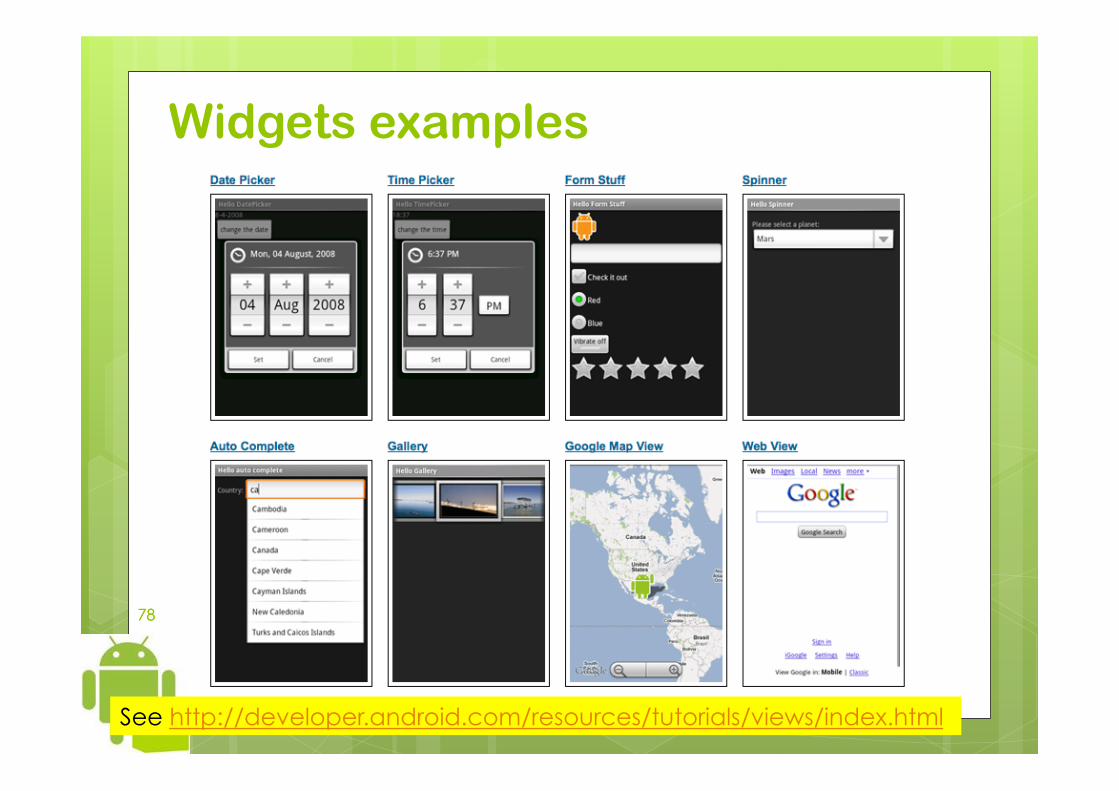
Widgets examples
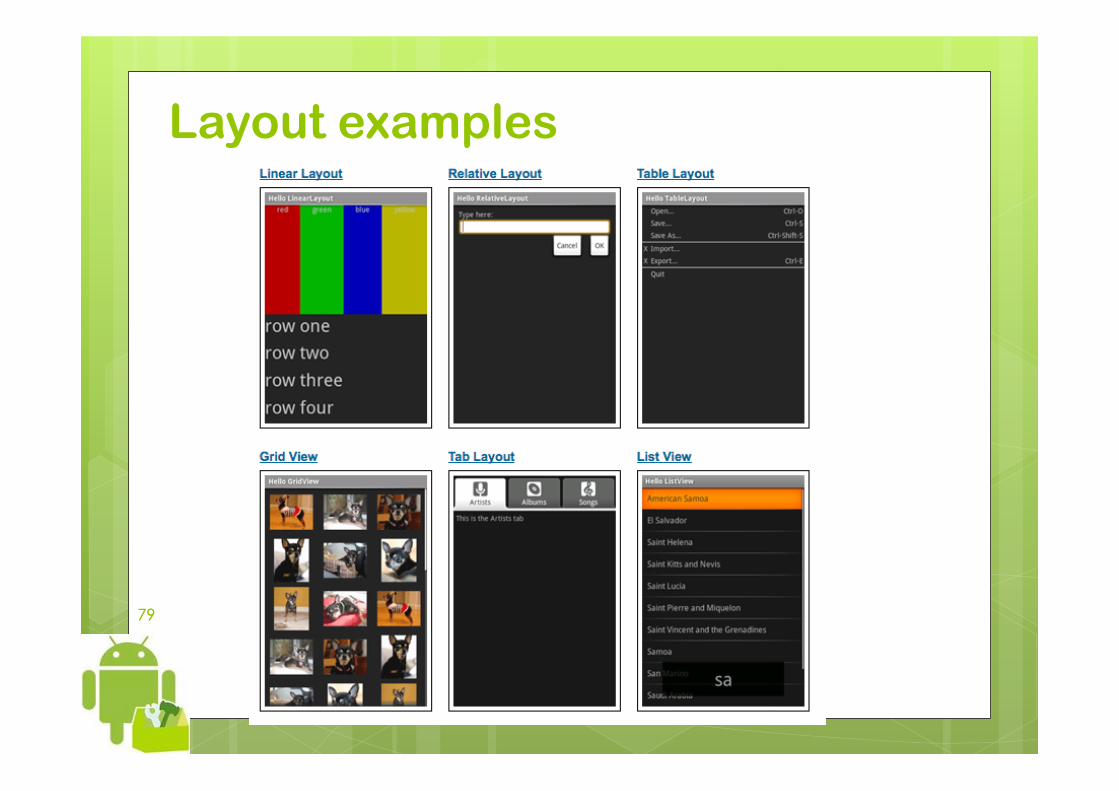
See http://developer.android.com/resources/tutorials/views/index.html
79 79
Layout examples
80 80
Defining layouts in XML Each layout file must contain exactly one root element, which must be a View or ViewGroup object. Once you've defined the root element, you can add additional layout objects or widgets as child elements to gradually build a View hierarchy that defines your layout.
81 81
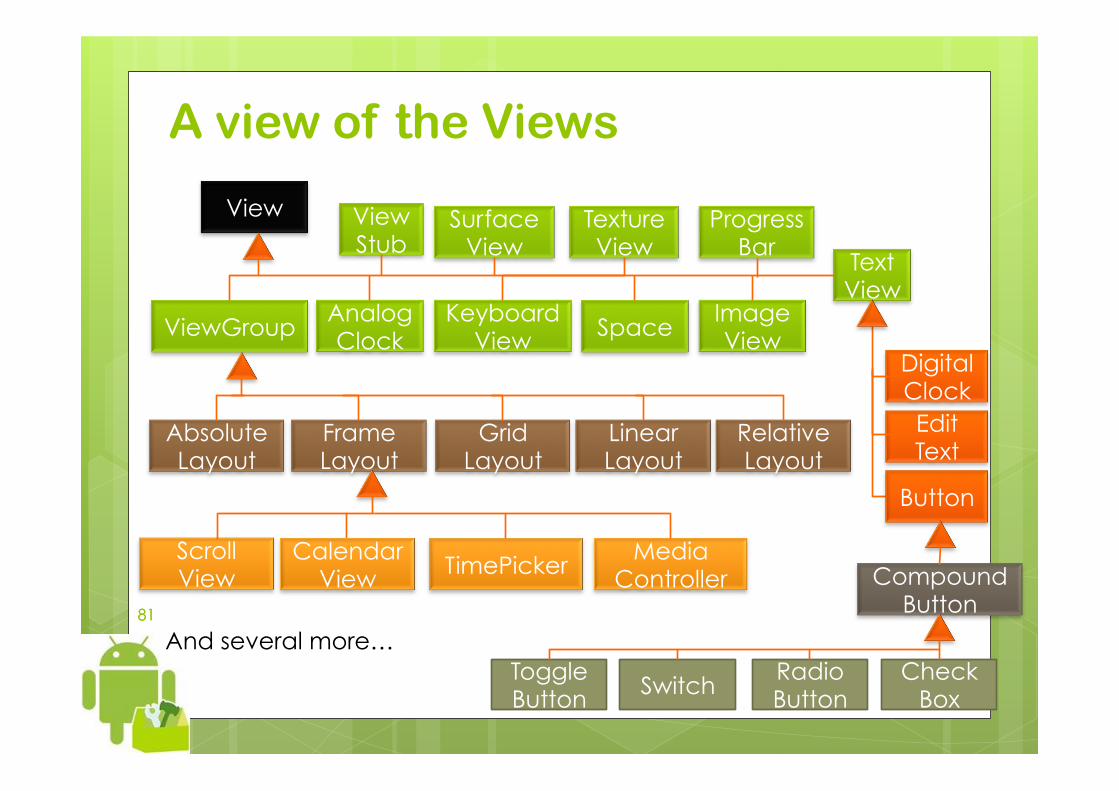
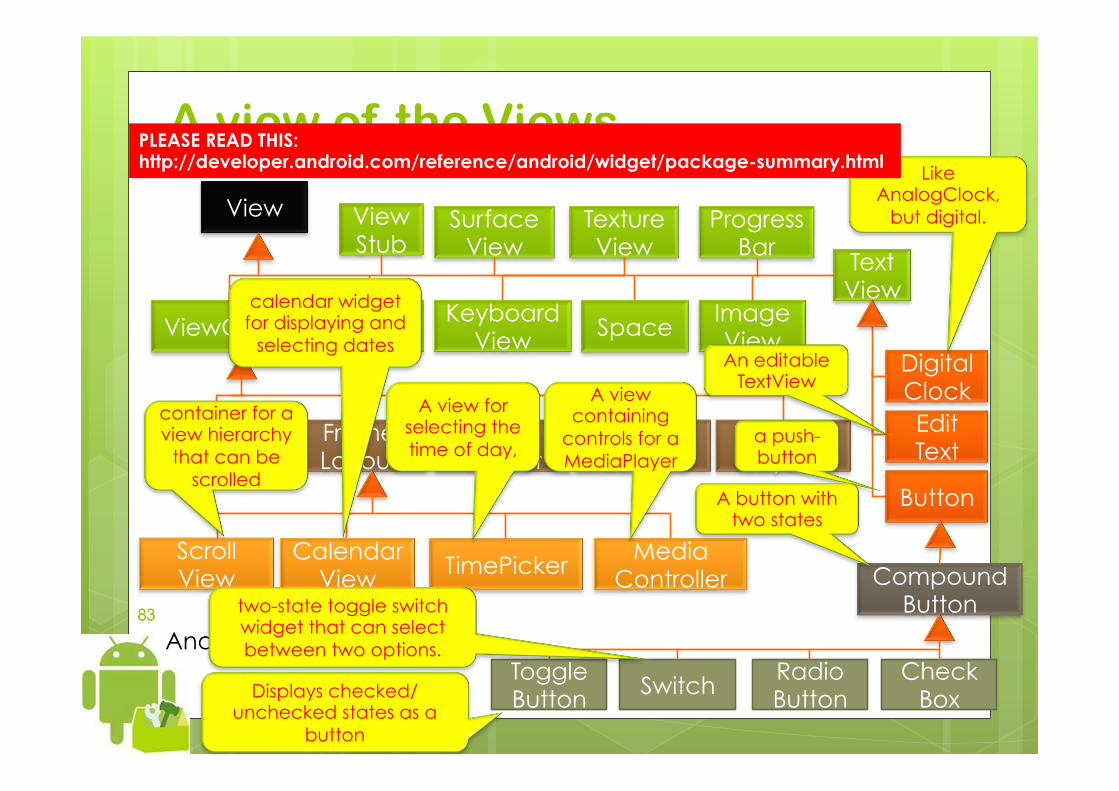
A view of the Views
View
AnalogClock
ImageView
KeyboardView
ProgressBar
Space
SurfaceView
TextView
TextureView
ViewGroup
ViewStub
Absolute Layout
Frame Layout
Grid Layout
Linear Layout
Relative Layout
Calendar View TimePicker
Media Controller
Scroll View
And several more…
Button
Edit Text
Digital Clock
Compound Button
Check Box
Radio Button Switch
Toggle Button
82 82
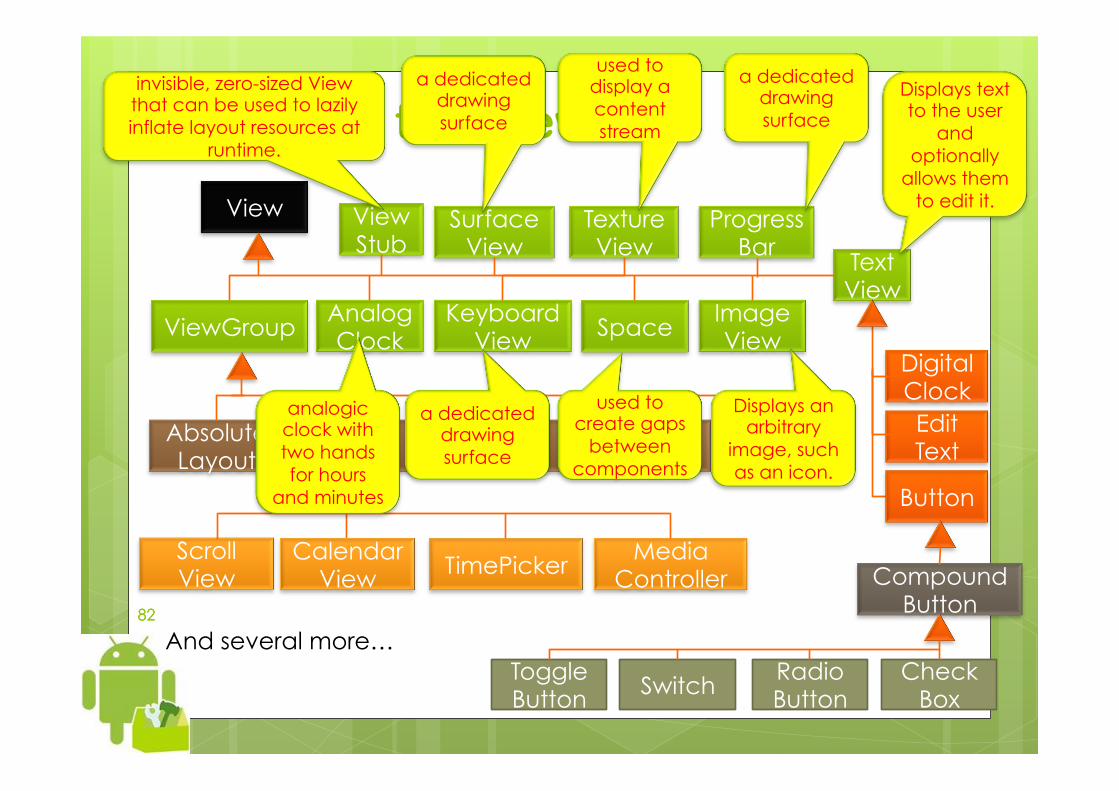
A view of the Views
View
AnalogClock
ImageView
KeyboardView
ProgressBar
Space
SurfaceView
TextView
TextureView
ViewGroup
ViewStub
Absolute Layout
Frame Layout
Grid Layout
Linear Layout
Relative Layout
Calendar View TimePicker
Media Controller
Scroll View
And several more…
Button
Edit Text
Digital Clock
Compound Button
Check Box
Radio Button Switch
Toggle Button
invisible, zero-sized View that can be used to lazily inflate layout resources at
runtime.
a dedicated drawing surface
a dedicated drawing surface
used to display a content stream
Displays text to the user
and optionally
allows them to edit it.
Displays an arbitrary
image, such as an icon.
used to create gaps
between components
a dedicated drawing surface
analogic clock with two hands for hours
and minutes
83 83
A view of the Views
View
AnalogClock
ImageView
KeyboardView
ProgressBar
Space
SurfaceView
TextView
TextureView
ViewGroup
ViewStub
Absolute Layout
Frame Layout
Grid Layout
Linear Layout
Relative Layout
Calendar View TimePicker
Media Controller
Scroll View
And several more…
Button
Edit Text
Digital Clock
Compound Button
Check Box
Radio Button Switch
Toggle Button
calendar widget for displaying and
selecting dates
A view containing
controls for a MediaPlayer
A view for selecting the time of day,
An editable TextView
Like AnalogClock,
but digital.
Displays checked/unchecked states as a
button
container for a view hierarchy
that can be scrolled
a push-button
A button with two states
two-state toggle switch widget that can select between two options.
PLEASE READ THIS: http://developer.android.com/reference/android/widget/package-summary.html
84 84
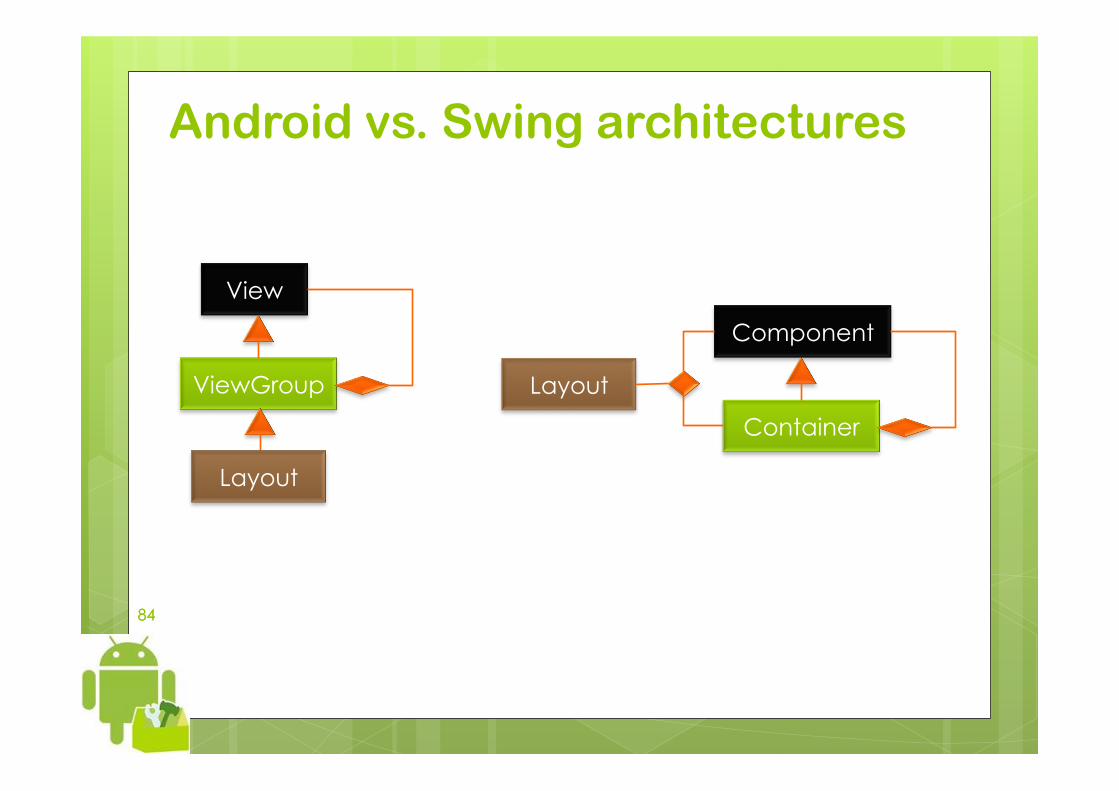
Android vs. Swing architectures
View
ViewGroup
Layout
Component
Container
Layout
85 85
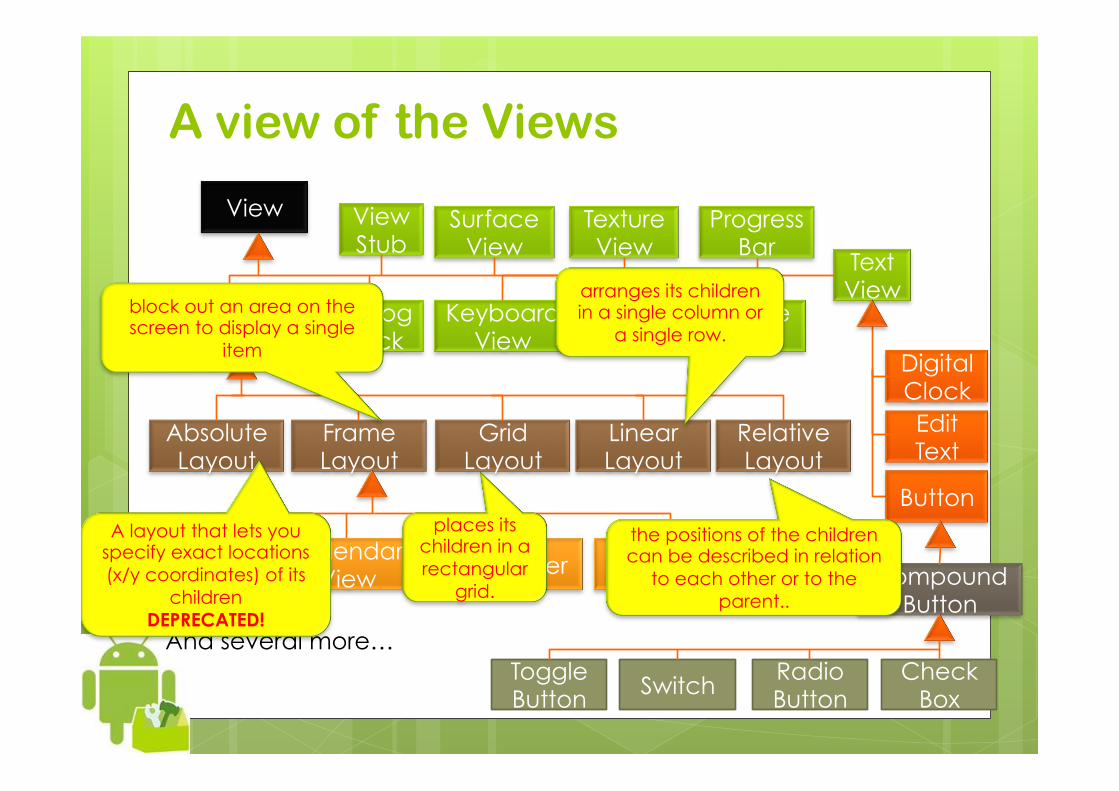
A view of the Views
View
AnalogClock
ImageView
KeyboardView
ProgressBar
Space
SurfaceView
TextView
TextureView
ViewGroup
ViewStub
Absolute Layout
Frame Layout
Grid Layout
Linear Layout
Relative Layout
Calendar View TimePicker
Media Controller
Scroll View
And several more…
Button
Edit Text
Digital Clock
Compound Button
Check Box
Radio Button Switch
Toggle Button
block out an area on the screen to display a single
item
arranges its children in a single column or
a single row.
the positions of the children can be described in relation
to each other or to the parent..
places its children in a rectangular
grid.
A layout that lets you specify exact locations (x/y coordinates) of its
children DEPRECATED!
86 86
Layout examples See several examples in http://luca-petrosino.blogspot.com/2011/03/android-view-e-layout.html
We quickly discuss some of them here.
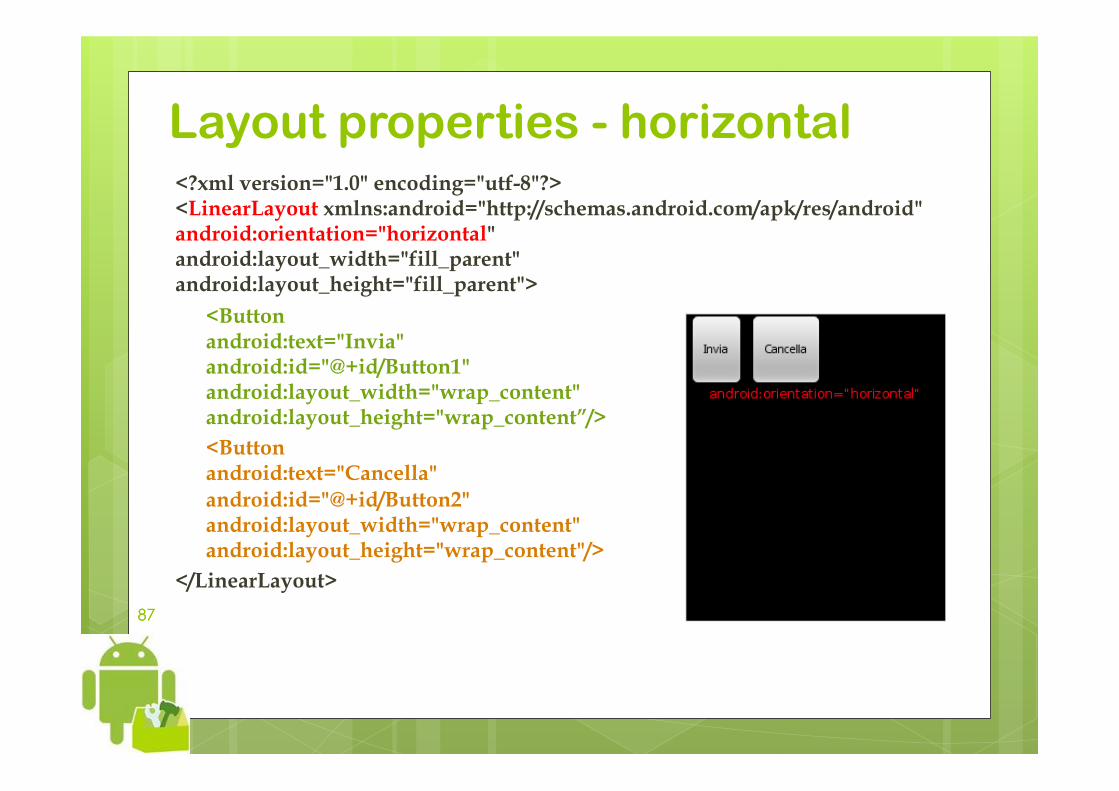
87 87
Layout properties - horizontal <?xml version="1.0" encoding="utf-8"?> <LinearLayout xmlns:android="http://schemas.android.com/apk/res/android" android:orientation="horizontal" android:layout_width="fill_parent" android:layout_height="fill_parent">
<Button android:text="Invia" android:id="@+id/Button1" android:layout_width="wrap_content" android:layout_height="wrap_content”/> <Button android:text="Cancella" android:id="@+id/Button2" android:layout_width="wrap_content" android:layout_height="wrap_content"/>
</LinearLayout>
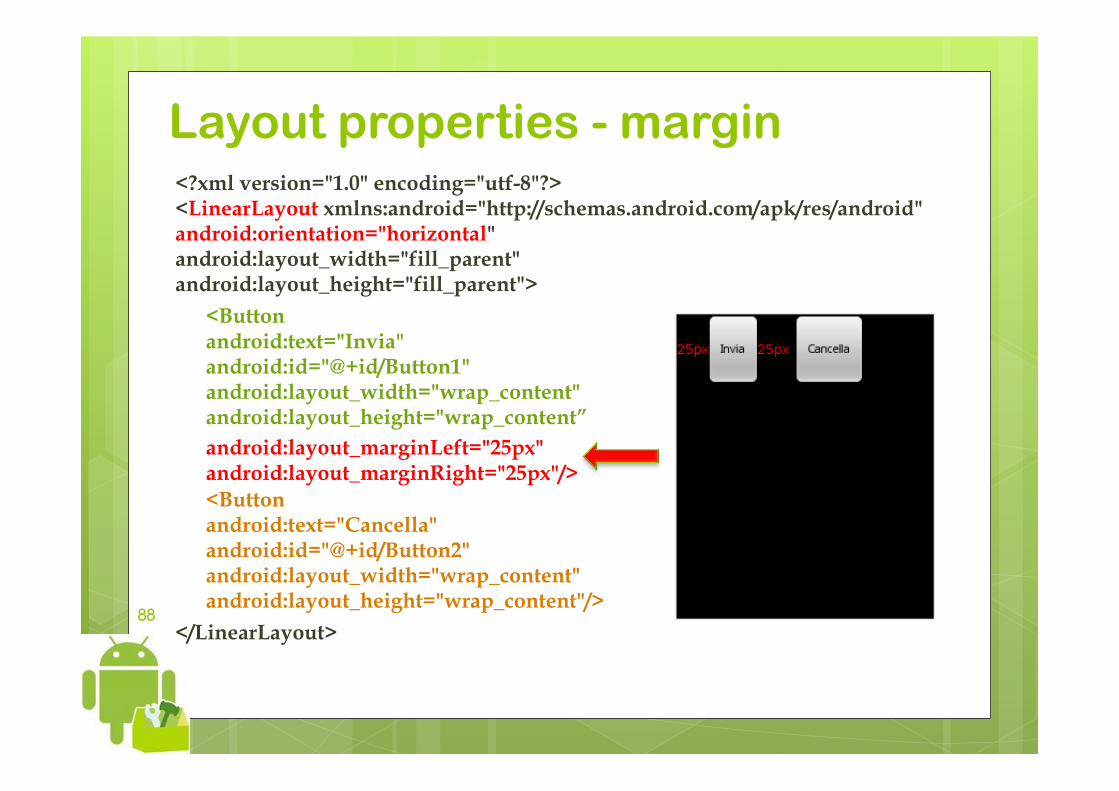
88 88
Layout properties - margin <?xml version="1.0" encoding="utf-8"?> <LinearLayout xmlns:android="http://schemas.android.com/apk/res/android" android:orientation="horizontal" android:layout_width="fill_parent" android:layout_height="fill_parent">
<Button android:text="Invia" android:id="@+id/Button1" android:layout_width="wrap_content" android:layout_height="wrap_content” android:layout_marginLeft="25px" android:layout_marginRight="25px"/> <Button android:text="Cancella" android:id="@+id/Button2" android:layout_width="wrap_content" android:layout_height="wrap_content"/>
</LinearLayout>
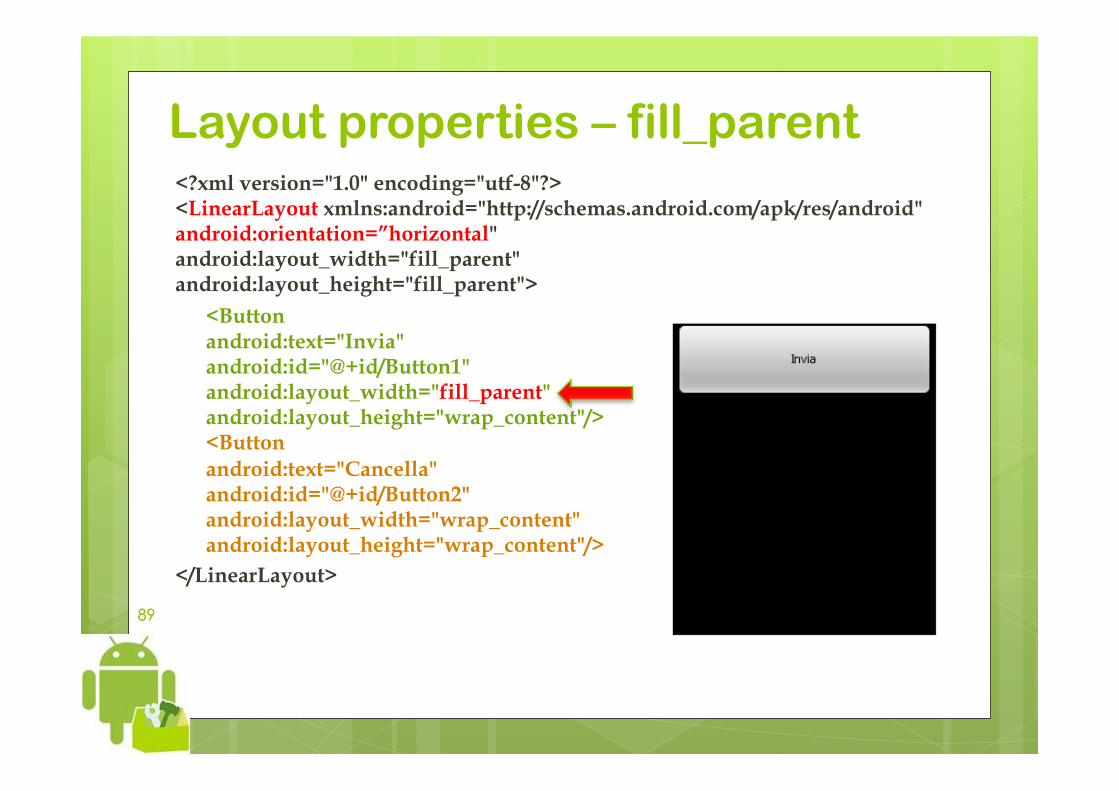
89 89
Layout properties – fill_parent <?xml version="1.0" encoding="utf-8"?> <LinearLayout xmlns:android="http://schemas.android.com/apk/res/android" android:orientation=”horizontal" android:layout_width="fill_parent" android:layout_height="fill_parent">
<Button android:text="Invia" android:id="@+id/Button1" android:layout_width="fill_parent" android:layout_height="wrap_content"/> <Button android:text="Cancella" android:id="@+id/Button2" android:layout_width="wrap_content" android:layout_height="wrap_content"/>
</LinearLayout>
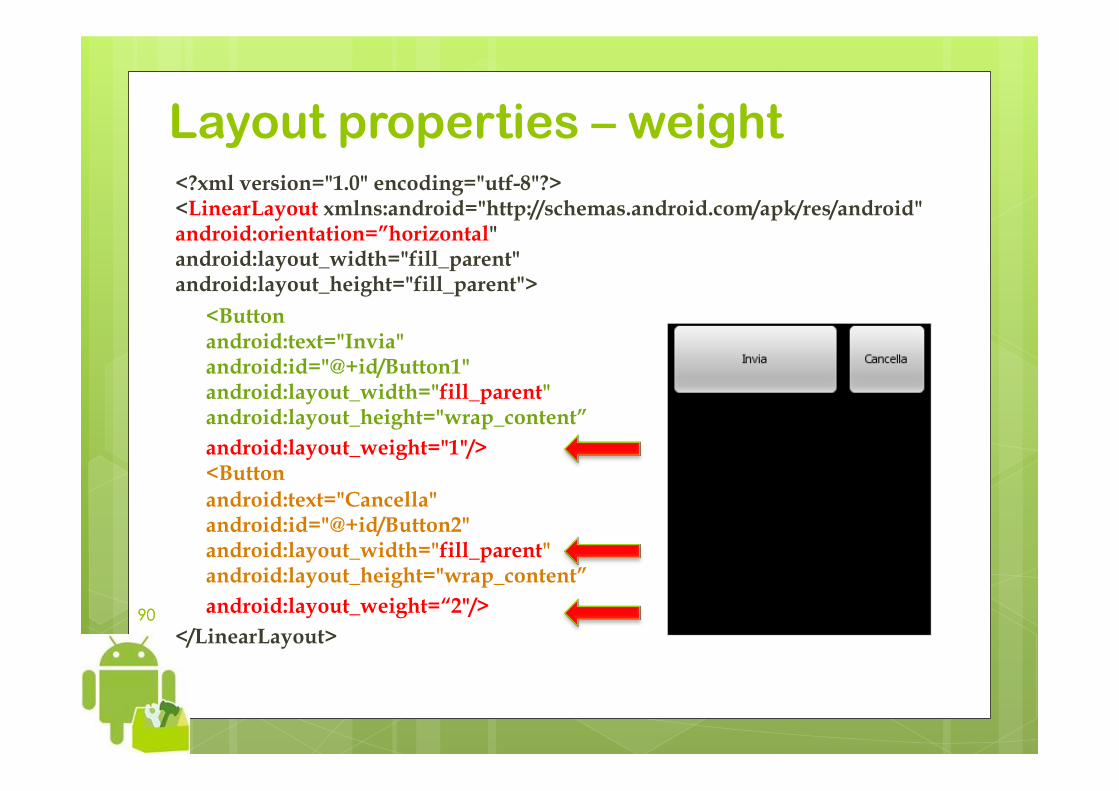
90 90
Layout properties – weight <?xml version="1.0" encoding="utf-8"?> <LinearLayout xmlns:android="http://schemas.android.com/apk/res/android" android:orientation=”horizontal" android:layout_width="fill_parent" android:layout_height="fill_parent">
<Button android:text="Invia" android:id="@+id/Button1" android:layout_width="fill_parent" android:layout_height="wrap_content” android:layout_weight="1"/> <Button android:text="Cancella" android:id="@+id/Button2" android:layout_width="fill_parent" android:layout_height="wrap_content” android:layout_weight=“2"/>
</LinearLayout>
91 91
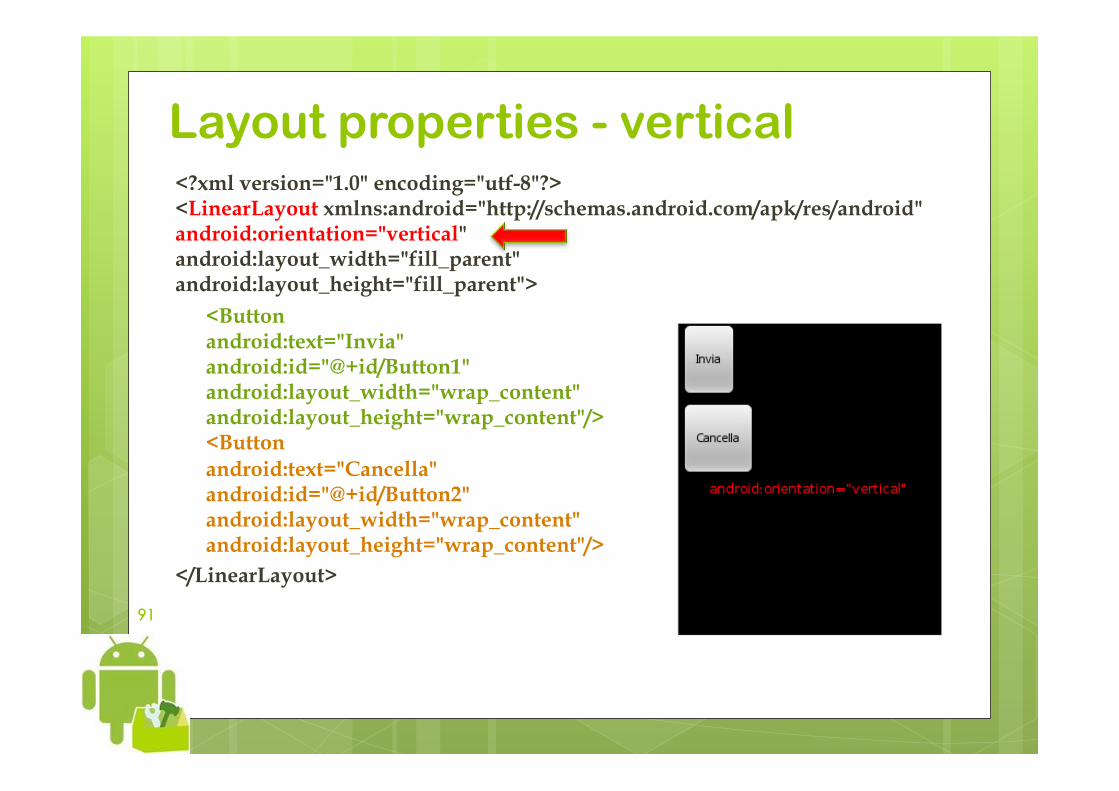
Layout properties - vertical <?xml version="1.0" encoding="utf-8"?> <LinearLayout xmlns:android="http://schemas.android.com/apk/res/android" android:orientation="vertical" android:layout_width="fill_parent" android:layout_height="fill_parent">
<Button android:text="Invia" android:id="@+id/Button1" android:layout_width="wrap_content" android:layout_height="wrap_content"/> <Button android:text="Cancella" android:id="@+id/Button2" android:layout_width="wrap_content" android:layout_height="wrap_content"/>
</LinearLayout>
92 92
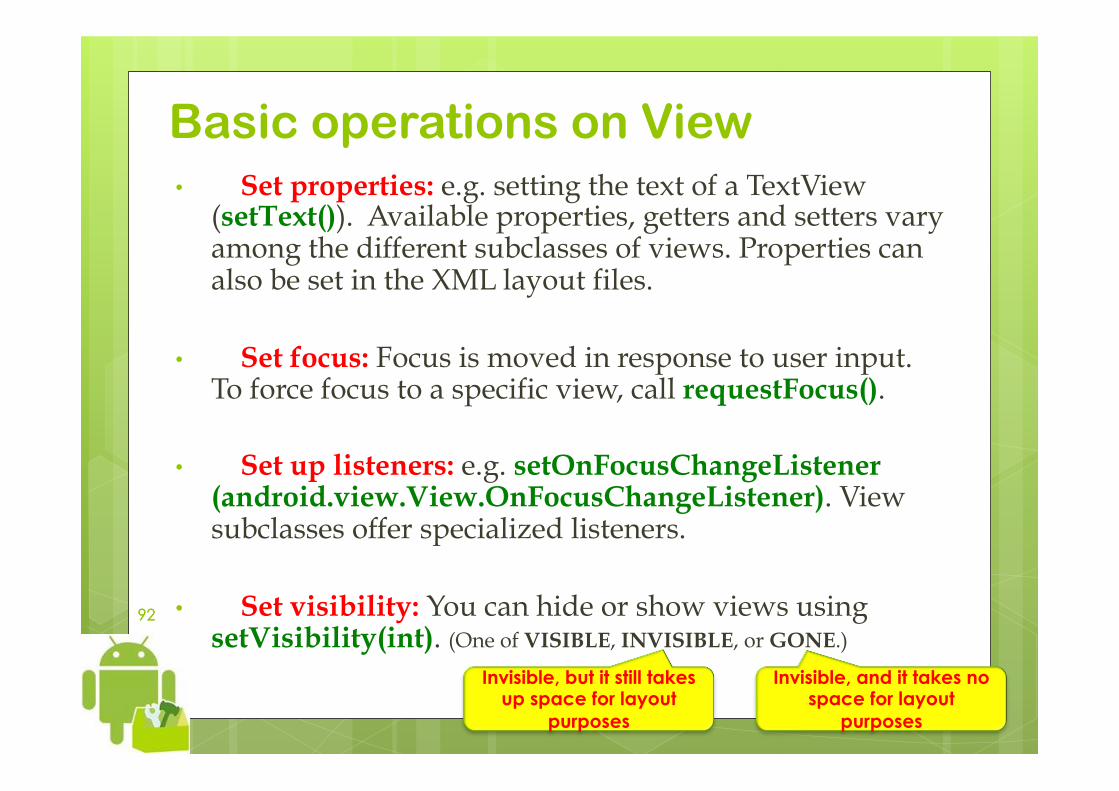
Basic operations on View • Set properties: e.g. setting the text of a TextView
(setText()). Available properties, getters and setters vary among the different subclasses of views. Properties can also be set in the XML layout files.
• Set focus: Focus is moved in response to user input. To force focus to a specific view, call requestFocus().
• Set up listeners: e.g. setOnFocusChangeListener (android.view.View.OnFocusChangeListener). View subclasses offer specialized listeners.
• Set visibility: You can hide or show views using setVisibility(int). (One of VISIBLE, INVISIBLE, or GONE.)
Invisible, but it still takes up space for layout
purposes
Invisible, and it takes no space for layout
purposes
93 93
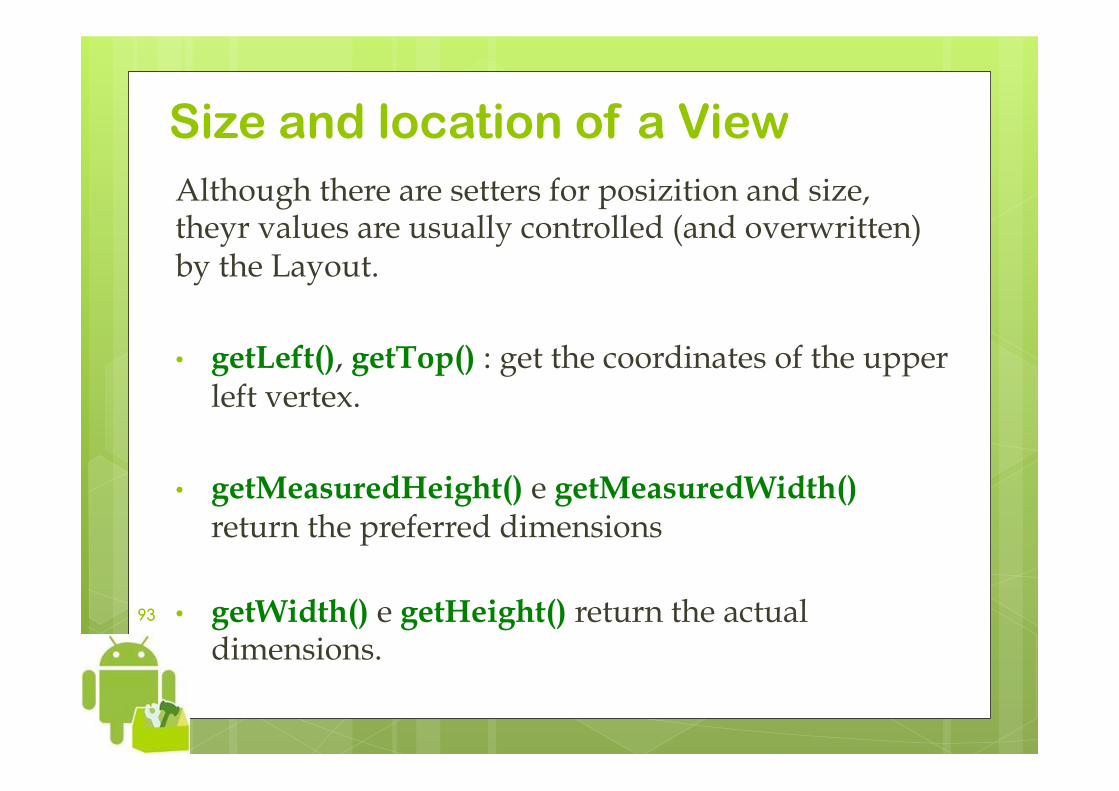
Size and location of a View Although there are setters for posizition and size, theyr values are usually controlled (and overwritten) by the Layout. • getLeft(), getTop() : get the coordinates of the upper
left vertex.
• getMeasuredHeight() e getMeasuredWidth() return the preferred dimensions
• getWidth() e getHeight() return the actual dimensions.
94 94
Custom views To implement a custom view, you will usually begin overriding for some of the standard methods that the framework calls on all views (at least onDraw()). For more details, see http://developer.android.com/reference/android/view/View.html

Basic UI elements: Android Menus (basics)
Marco Ronchetti Università degli Studi di Trento
96 96
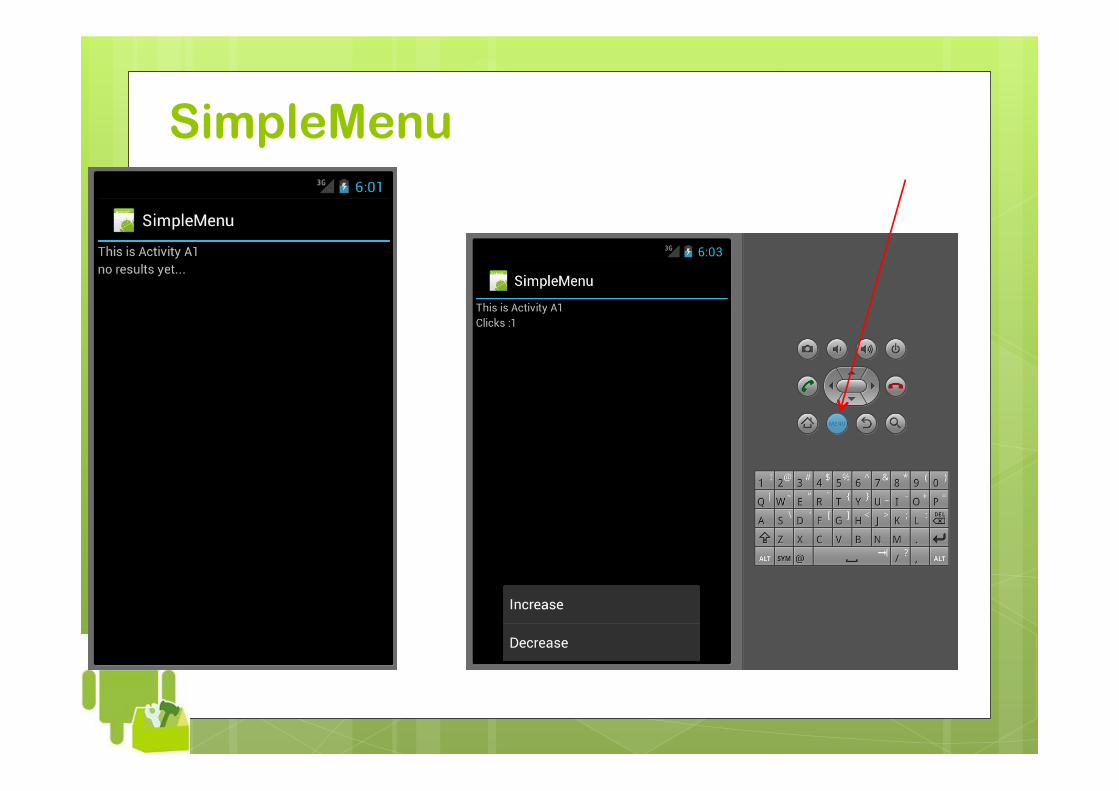
SimpleMenu
97 97
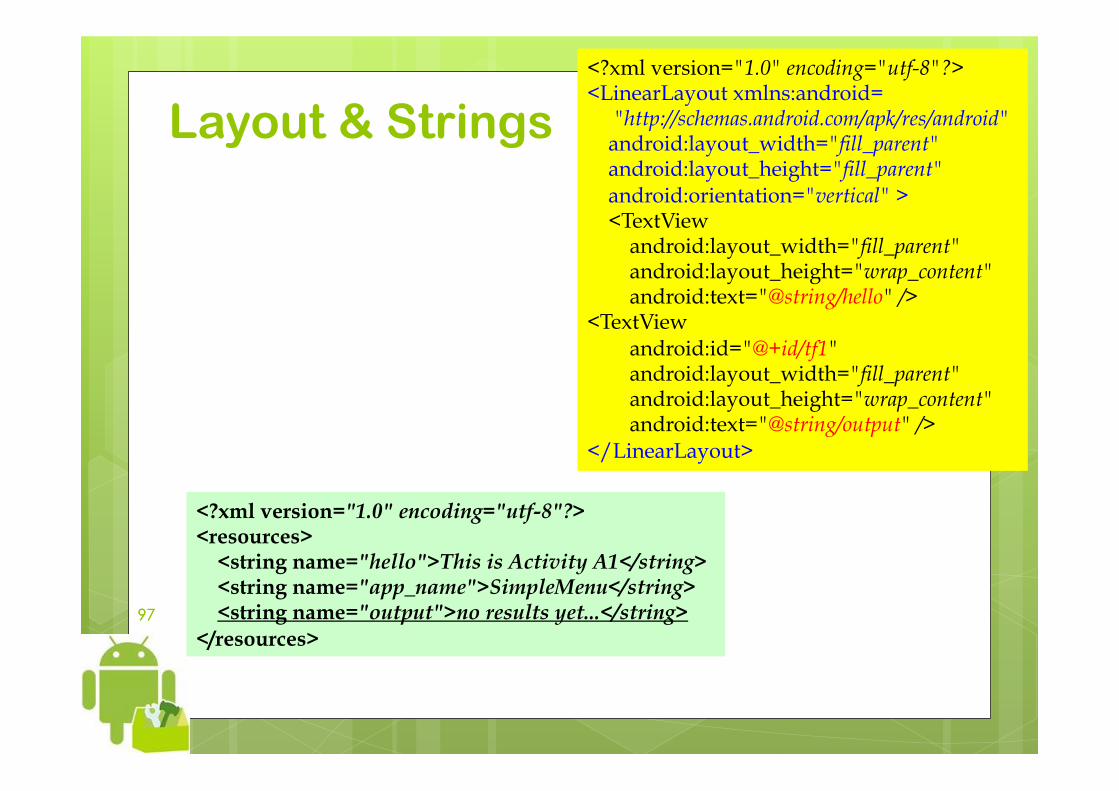
Layout & Strings <?xml version="1.0" encoding="utf-8"?> <LinearLayout xmlns:android= "http://schemas.android.com/apk/res/android" android:layout_width="fill_parent" android:layout_height="fill_parent" android:orientation="vertical" > <TextView android:layout_width="fill_parent" android:layout_height="wrap_content" android:text="@string/hello" /> <TextView android:id="@+id/tf1" android:layout_width="fill_parent" android:layout_height="wrap_content" android:text="@string/output" /> </LinearLayout>
<?xml version="1.0" encoding="utf-8"?> <resources> <string name="hello">This is Activity A1</string> <string name="app_name">SimpleMenu</string> <string name="output">no results yet...</string> </resources>
98 98
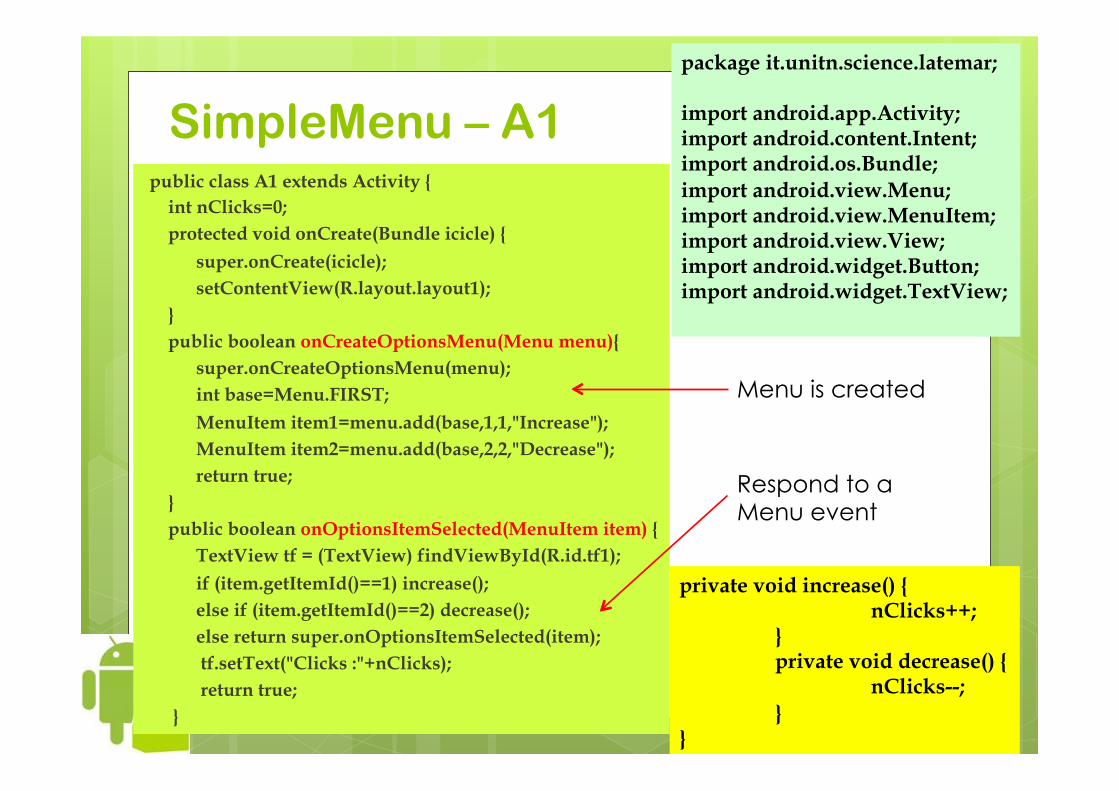
SimpleMenu – A1 public class A1 extends Activity { int nClicks=0; protected void onCreate(Bundle icicle) {
super.onCreate(icicle); setContentView(R.layout.layout1); } public boolean onCreateOptionsMenu(Menu menu){ super.onCreateOptionsMenu(menu); int base=Menu.FIRST;
MenuItem item1=menu.add(base,1,1,"Increase"); MenuItem item2=menu.add(base,2,2,"Decrease"); return true; } public boolean onOptionsItemSelected(MenuItem item) { TextView tf = (TextView) findViewById(R.id.tf1);
if (item.getItemId()==1) increase(); else if (item.getItemId()==2) decrease(); else return super.onOptionsItemSelected(item); tf.setText("Clicks :"+nClicks); return true; }
package it.unitn.science.latemar; import android.app.Activity; import android.content.Intent; import android.os.Bundle; import android.view.Menu; import android.view.MenuItem; import android.view.View; import android.widget.Button; import android.widget.TextView;
private void increase() { nClicks++; } private void decrease() { nClicks--; }
}
Menu is created
Respond to a Menu event

Calling Activities in other apps: Android Intents
Marco Ronchetti Università degli Studi di Trento
100 100
Re-using activities When you create an application, you can assemble it from • activities that you create • activities you re-use from other applications. An app can incorporate activities from other apps. Yes, but how? By means of Intents These activities are bound at runtime: newly installed applications can take advantage of already installed activities
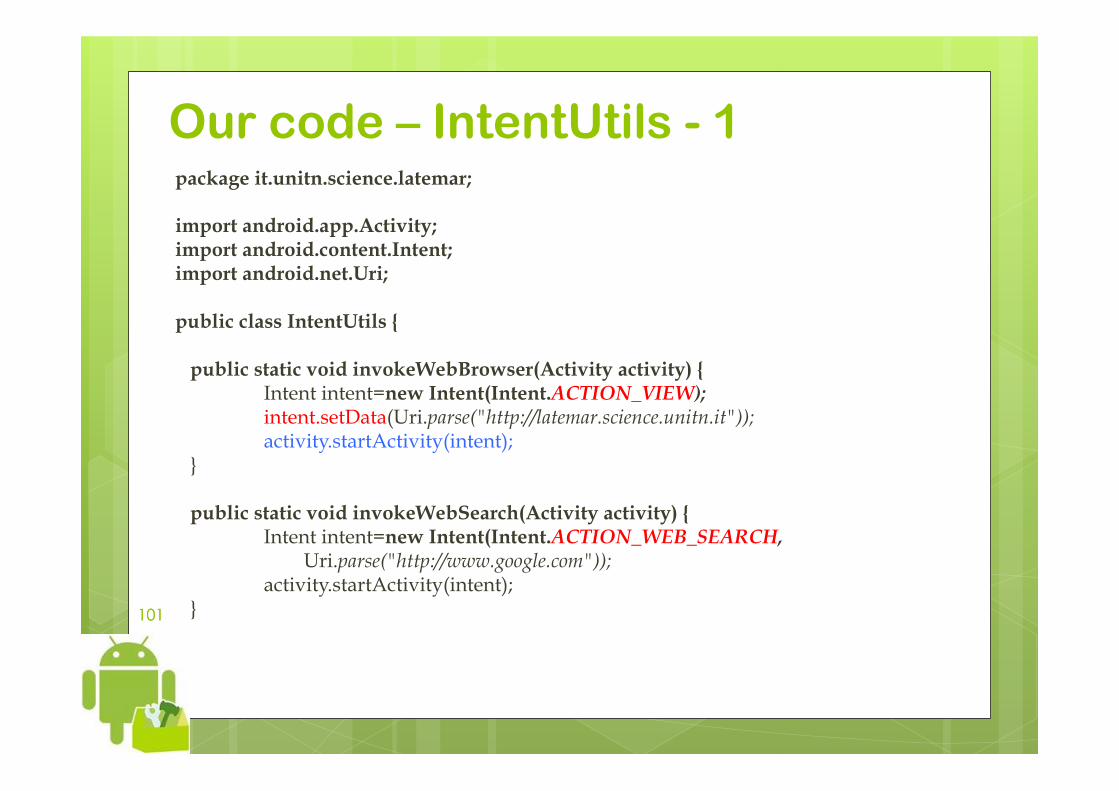
101 101
Our code – IntentUtils - 1 package it.unitn.science.latemar; import android.app.Activity; import android.content.Intent; import android.net.Uri; public class IntentUtils { public static void invokeWebBrowser(Activity activity) {
Intent intent=new Intent(Intent.ACTION_VIEW); intent.setData(Uri.parse("http://latemar.science.unitn.it")); activity.startActivity(intent);
} public static void invokeWebSearch(Activity activity) {
Intent intent=new Intent(Intent.ACTION_WEB_SEARCH, Uri.parse("http://www.google.com")); activity.startActivity(intent);
}
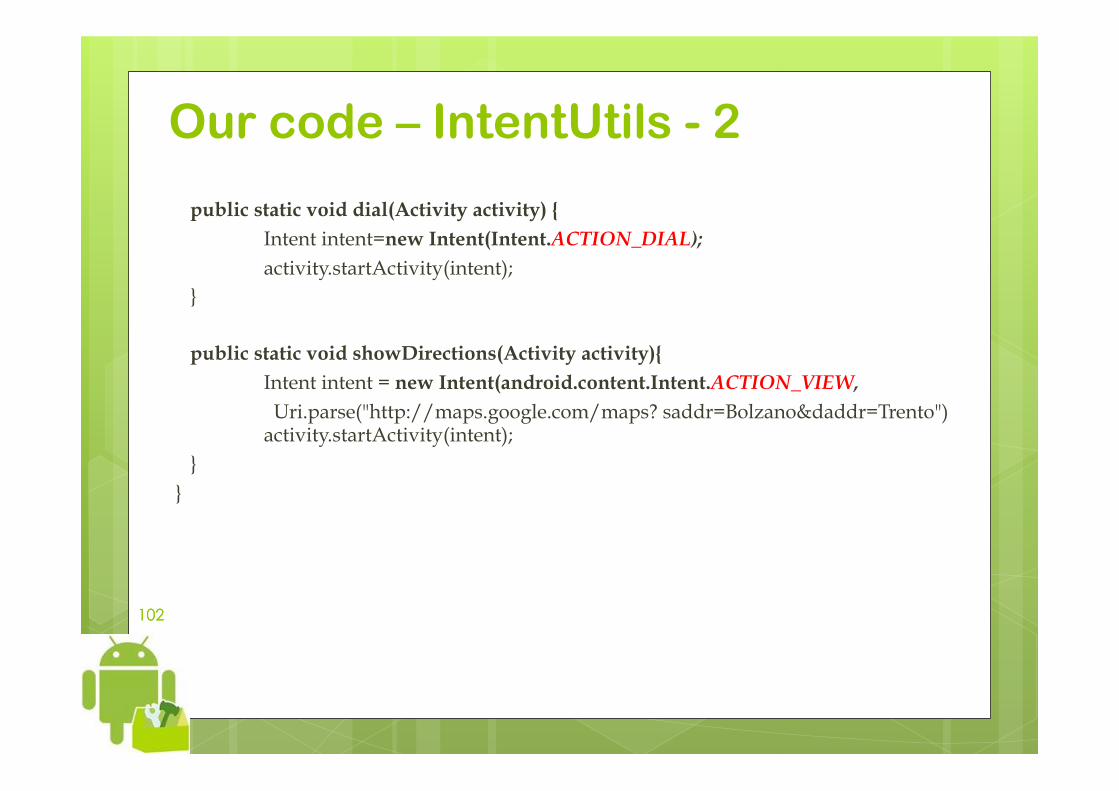
102 102
Our code – IntentUtils - 2 public static void dial(Activity activity) {
Intent intent=new Intent(Intent.ACTION_DIAL); activity.startActivity(intent);
}
public static void showDirections(Activity activity){ Intent intent = new Intent(android.content.Intent.ACTION_VIEW, Uri.parse("http://maps.google.com/maps? saddr=Bolzano&daddr=Trento") activity.startActivity(intent);
} }
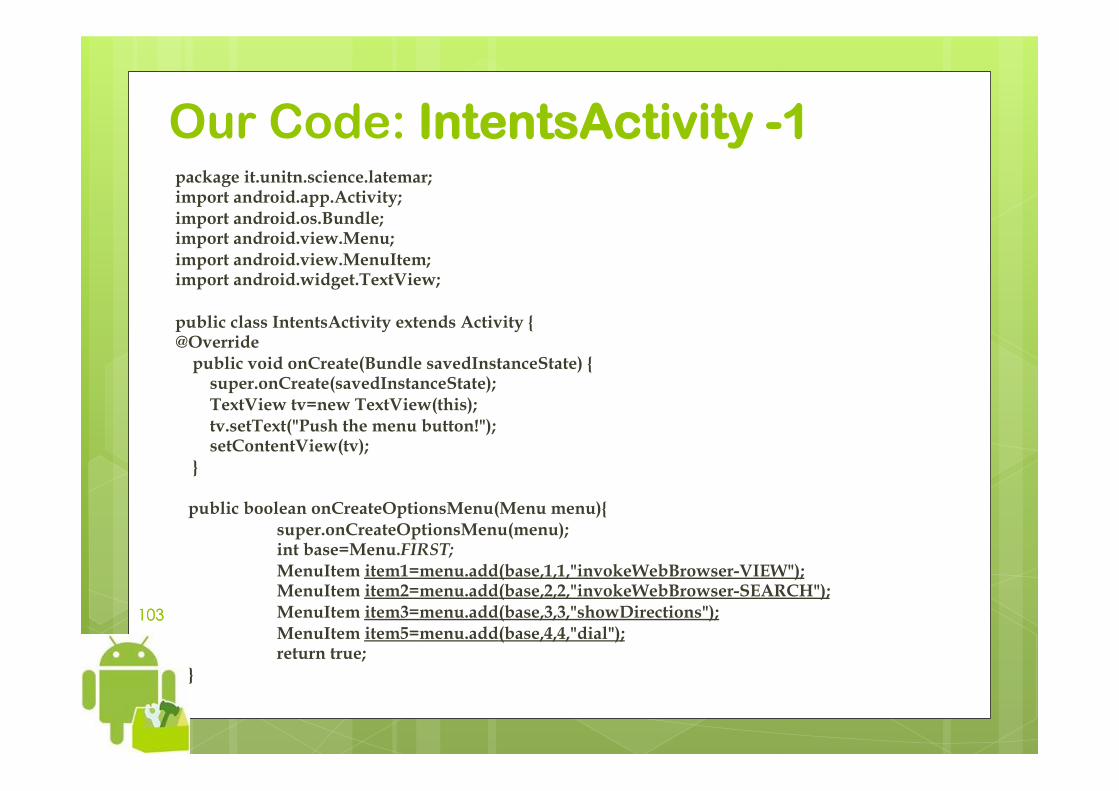
103 103
Our Code: IntentsActivity -1 package it.unitn.science.latemar; import android.app.Activity; import android.os.Bundle; import android.view.Menu; import android.view.MenuItem; import android.widget.TextView; public class IntentsActivity extends Activity { @Override public void onCreate(Bundle savedInstanceState) { super.onCreate(savedInstanceState); TextView tv=new TextView(this); tv.setText("Push the menu button!"); setContentView(tv); } public boolean onCreateOptionsMenu(Menu menu){
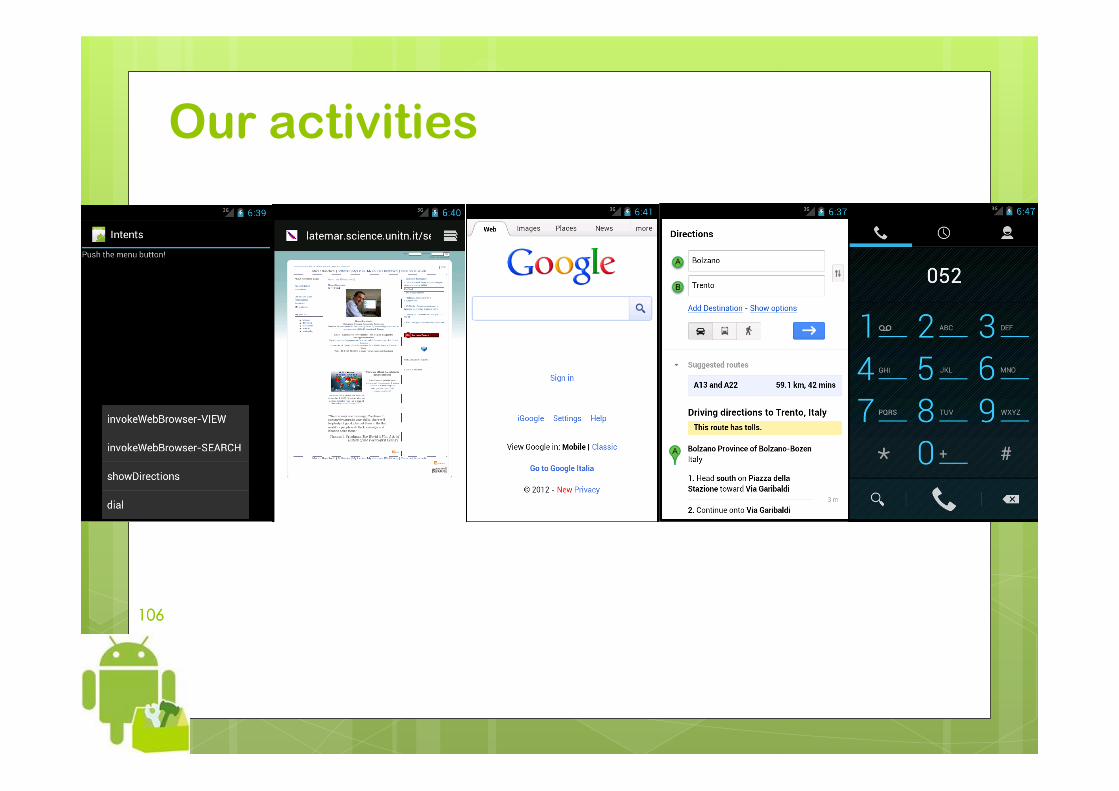
super.onCreateOptionsMenu(menu); int base=Menu.FIRST; MenuItem item1=menu.add(base,1,1,"invokeWebBrowser-VIEW"); MenuItem item2=menu.add(base,2,2,"invokeWebBrowser-SEARCH"); MenuItem item3=menu.add(base,3,3,"showDirections"); MenuItem item5=menu.add(base,4,4,"dial"); return true;
}
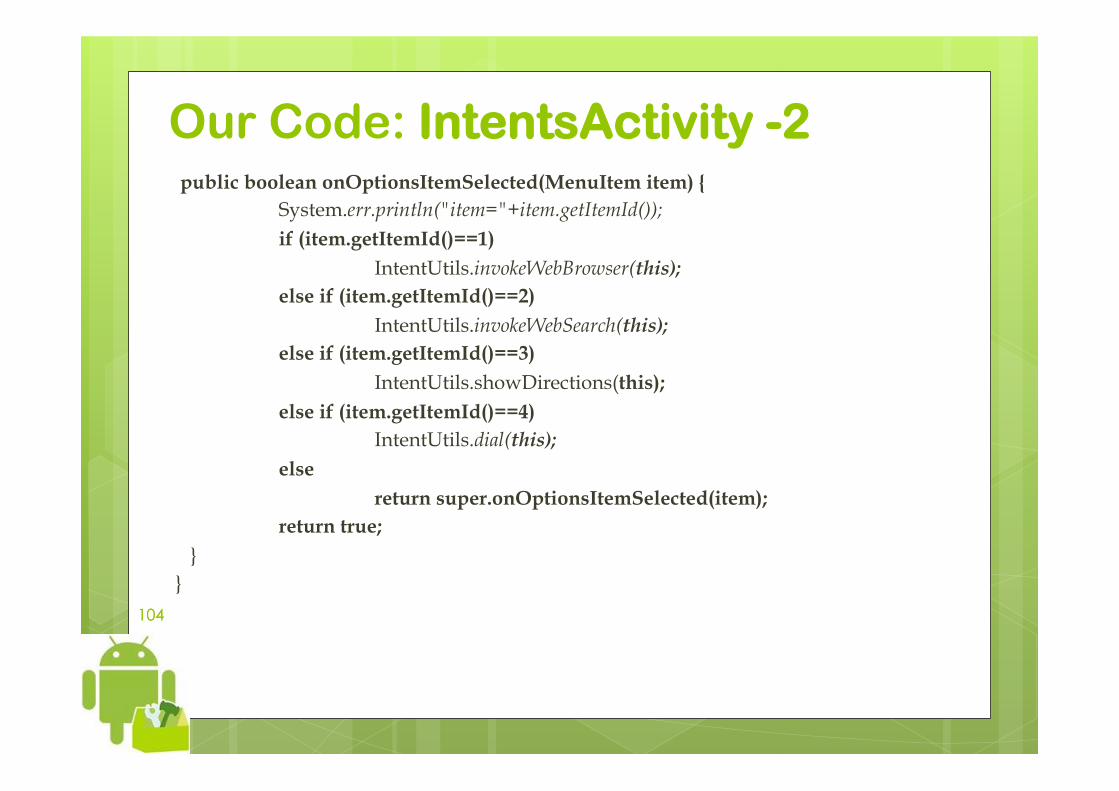
104 104
Our Code: IntentsActivity -2 public boolean onOptionsItemSelected(MenuItem item) {
System.err.println("item="+item.getItemId()); if (item.getItemId()==1) IntentUtils.invokeWebBrowser(this); else if (item.getItemId()==2) IntentUtils.invokeWebSearch(this); else if (item.getItemId()==3) IntentUtils.showDirections(this); else if (item.getItemId()==4) IntentUtils.dial(this); else return super.onOptionsItemSelected(item); return true;
} }
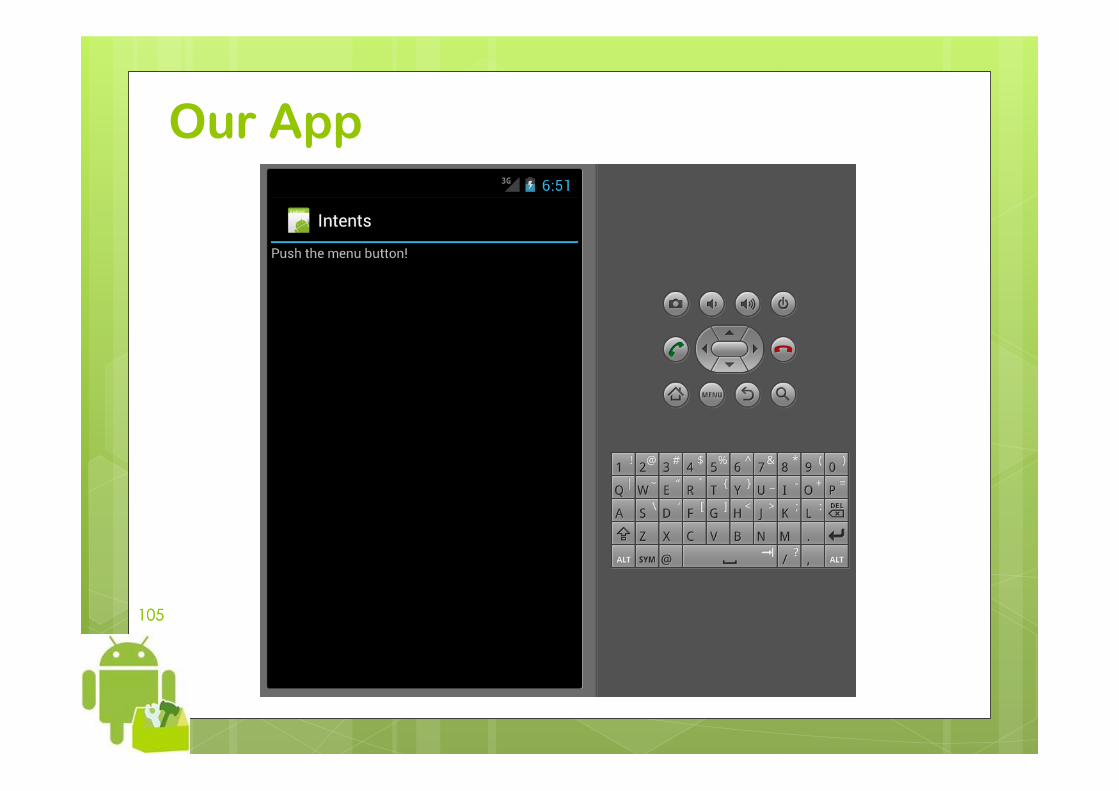
105 105
Our App
106 106
Our activities

Intent structure and resolution
Marco Ronchetti Università degli Studi di Trento
108 108
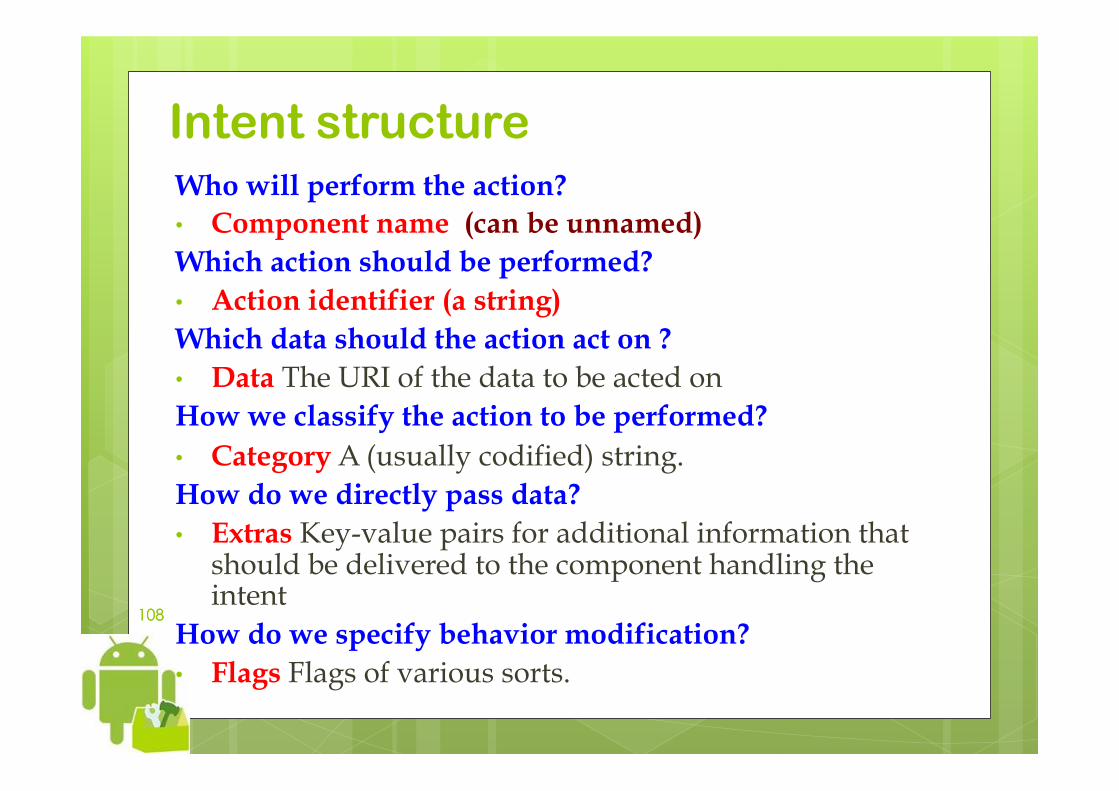
Intent structure Who will perform the action? • Component name (can be unnamed) Which action should be performed? • Action identifier (a string) Which data should the action act on ? • Data The URI of the data to be acted on How we classify the action to be performed? • Category A (usually codified) string. How do we directly pass data? • Extras Key-value pairs for additional information that
should be delivered to the component handling the intent
How do we specify behavior modification? • Flags Flags of various sorts.
109 109
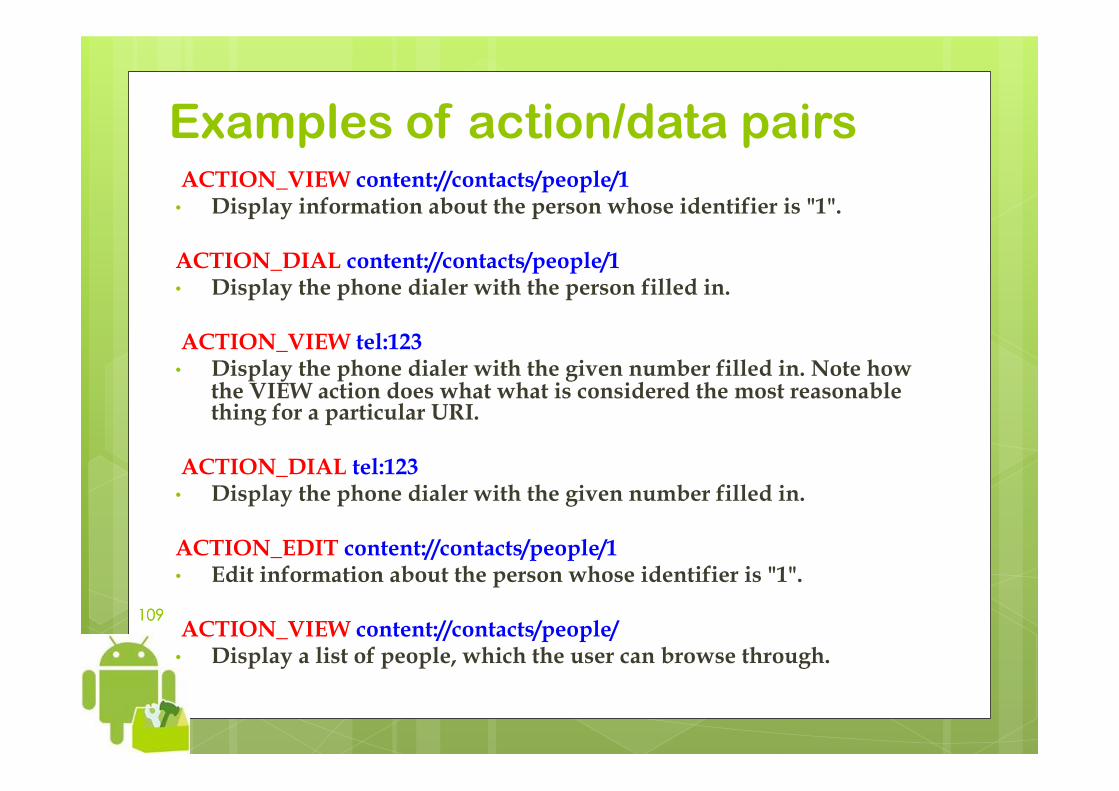
Examples of action/data pairs ACTION_VIEW content://contacts/people/1 • Display information about the person whose identifier is "1". ACTION_DIAL content://contacts/people/1 • Display the phone dialer with the person filled in. ACTION_VIEW tel:123 • Display the phone dialer with the given number filled in. Note how
the VIEW action does what what is considered the most reasonable thing for a particular URI.
ACTION_DIAL tel:123 • Display the phone dialer with the given number filled in. ACTION_EDIT content://contacts/people/1 • Edit information about the person whose identifier is "1". ACTION_VIEW content://contacts/people/ • Display a list of people, which the user can browse through.
110 110
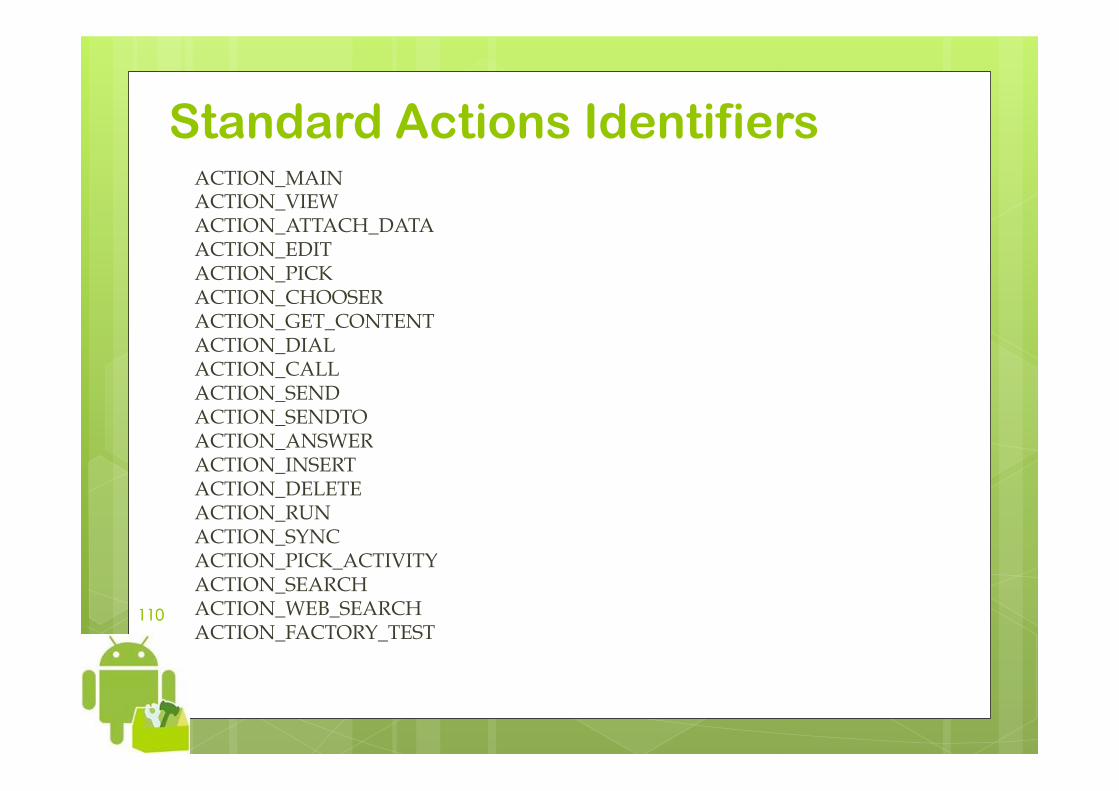
Standard Actions Identifiers ACTION_MAIN ACTION_VIEW ACTION_ATTACH_DATA ACTION_EDIT ACTION_PICK ACTION_CHOOSER ACTION_GET_CONTENT ACTION_DIAL ACTION_CALL ACTION_SEND ACTION_SENDTO ACTION_ANSWER ACTION_INSERT ACTION_DELETE ACTION_RUN ACTION_SYNC ACTION_PICK_ACTIVITY ACTION_SEARCH ACTION_WEB_SEARCH ACTION_FACTORY_TEST
111 111
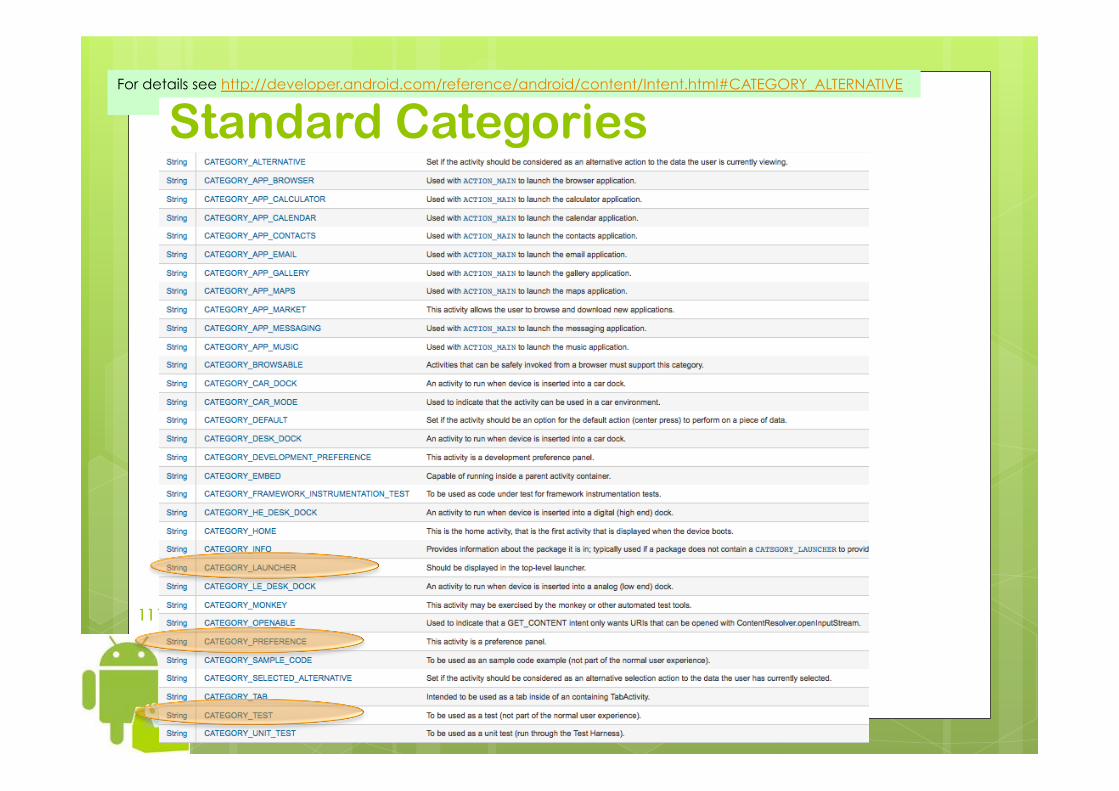
For details see http://developer.android.com/reference/android/content/Intent.html#CATEGORY_ALTERNATIVE
Standard Categories
112 112
Implicit intents and intent resolution Implicit intents do not name a target (the field for the component name is blank). In the absence of a designated target, the Android system must find the best component (or components) to handle the intent. It does so by comparing the contents of the Intent object to intent filters, structures associated with components that can potentially receive intents. Filters advertise the capabilities of a component and delimit the intents it can handle. They open the component to the possibility of receiving implicit intents of the advertised type. If a component does not have any intent filters, it can receive only explicit intents. A component with filters can receive both explicit and implicit intents.
113 113
Intent Filters Only three aspects of an Intent object are consulted when the object is tested against an intent filter: action data (both URI and data type) category The extras and flags play no part in resolving which component receives an intent.
114 114
Intents Intent messaging is a facility for late run-time binding between components in the same or different applications. The intent itself, an Intent object, is a passive data structure holding an abstract description of an operation to be performed — or, often in the case of broadcasts, a description of something that has happened and is being announced. There are separate mechanisms for delivering intents to each type of component.
115 115
Using intents with activities An Intent object is passed to Context.startActivity() or Activity.startActivityForResult() to launch an activity or get an existing activity to do something new. (It can also be passed to Activity.setResult() to return information to the activity that called startActivityForResult().)
116 116
Other uses of Intents An Intent object is passed to Context.startService() to initiate a service or deliver new instructions to an ongoing service. Similarly, an intent can be passed to Context.bindService() to establish a connection between the calling component and a target service. It can optionally initiate the service if it's not already running. Intent objects passed to any of the broadcast methods (such as Context.sendBroadcast(), Context.sendOrderedBroadcast(), or Context.sendStickyBroadcast()) are delivered to all interested broadcast receivers. Many kinds of broadcasts originate in system code. In each case, the Android system finds the appropriate activity, service, or set of broadcast receivers to respond to the intent, instantiating them if necessary. There is no overlap within these messaging systems: Broadcast intents are delivered only to broadcast receivers, never to activities or services. An intent passed to startActivity() is delivered only to an activity, never to a service or broadcast receiver, and so on.