
Getting Started -...
42
Transform TM Content Center Getting Started
Transcript of Getting Started -...

TM
Transform Content CenterGetting Started
Transform Content Center Getting Started
Version 2.0© Copyright 2008 Bottomline Technologies, Inc. All rights reserved.
Information in this document is subject to change without notice and does not represent a commitment on the part of Bottomline Technologies. Bottomline Technologies makes no warranties with respect to this documentation and disclaims any implied warranties of merchantability or fitness for a particular purpose.
No part of this publication may be reproduced, stored in a retrieval system or transmitted in any form or by any means, electronic, mechanical, photocopying, recording or otherwise without the prior written permission of the publisher.
No responsibility for loss occasioned to any person acting or refraining from acting as a result of any material in this publication can be accepted by the author or publisher.
Bottomline Technologies and the BT logo are trademarks of Bottomline Technologies, Inc. which may be registered in certain jurisdictions. All other brand and product names are trademarks or registered trademarks of their respective owners.
RSA Data Security, Inc. MD5 Message-Digest Algorithm copyright © 1991-1992, RSA Data Security, Inc.
This product contains software developed by the Apache Software Foundation (http:/www.apache.org). © Copyright The Apache Software Foundation 1999-2003. All rights reserved.
Bottomline TechnologiesEmail: [email protected]: www.bottomline.com
325 Corporate Drive 115 Chatham StreetPortsmouth, NH 03801 Reading, RG1 7JXTelephone: (603) 436-0700 +44 (0)118 9258250Fax: (603) 436-0300 +44 (0) 118 9569990

TABLE OF CONTENTS
Preface
Chapter 1: Installation Overview . . . . . . . . . . . . . . . . . . . . . . . . . . . . . . 1
Chapter 2: System Requirements . . . . . . . . . . . . . . . . . . . . . . . . . . . . . 3Hardware Requirements. . . . . . . . . . . . . . . . . . . . . . . . . . . . . . . . . . . . . . 3Software Requirements . . . . . . . . . . . . . . . . . . . . . . . . . . . . . . . . . . . . . . 3
Virtual servers . .. . . . . . . .. . . . . . . .. . . . . . . .. . . . . . . .. . . . . . . .. . . . 4
Chapter 3: Setting up a Database . . . . . . . . . . . . . . . . . . . . . . . . . . . . . . 5Database Options. . . . . . . . . . . . . . . . . . . . . . . . . . . . . . . . . . . . . . . . . . . 5Setting up an Oracle Database . . . . . . . . . . . . . . . . . . . . . . . . . . . . . . . . 5
Oracle installation prerequisites . . . .. . . . . . . .. . . . . . . .. . . . . . . .. . . . 5Changing Oracle HTTP server to manual . . . .. . . . . . . .. . . . . . . .. . . . 6Creating and configuring the Oracle database. . . . . . . .. . . . . . . .. . . . 6Creating a Net Service Name. . . . . .. . . . . . . .. . . . . . . .. . . . . . . .. . . . 6
Setting up an SQL Server Database . . . . . . . . . . . . . . . . . . . . . . . . . . . . 6Changing the webrepadmin Password. . . . . . . . . . . . . . . . . . . . . . . . . . . 7
Chapter 4: Installing and Removing Transform Content Center Soft-ware . . . . . . . . . . . . . . . . . . . . . . . . . . . . . . . . . . . . . . . . . . . . . . . . . . . . . . 9
Installing . . . . . . . . . . . . . . . . . . . . . . . . . . . . . . . . . . . . . . . . . . . . . . . . . . 9After the Installation . . . . . . . . . . . . . . . . . . . . . . . . . . . . . . . . . . . . . . . . 10Configuring . . . . . . . . . . . . . . . . . . . . . . . . . . . . . . . . . . . . . . . . . . . . . . . 11Removing Transform Content Center Software . . . . . . . . . . . . . . . . . . . 13
Uninstalling. . . . .. . . . . . . .. . . . . . . .. . . . . . . .. . . . . . . .. . . . . . . .. . . 14Rolling back . . . .. . . . . . . .. . . . . . . .. . . . . . . .. . . . . . . .. . . . . . . .. . . 15Removing rollback records. . . . . . . .. . . . . . . .. . . . . . . .. . . . . . . .. . . 15
Chapter 5: Licensing . . . . . . . . . . . . . . . . . . . . . . . . . . . . . . . . . . . . . . . 17About Licenses . . . . . . . . . . . . . . . . . . . . . . . . . . . . . . . . . . . . . . . . . . . . 17Uploading a License . . . . . . . . . . . . . . . . . . . . . . . . . . . . . . . . . . . . . . . . 17
Chapter 6: Installation on a Multiprocessor Machine . . . . . . . . . . . . . 19Limiting the Number of Processors . . . . . . . . . . . . . . . . . . . . . . . . . . . . 19
Getting Started iii
TABLE OF CONTENTS
Viewing Errors . . . . . . . . . . . . . . . . . . . . . . . . . . . . . . . . . . . . . . . . . . . . 20
Chapter 7: Configuring a Web Server . . . . . . . . . . . . . . . . . . . . . . . . . 21Configuring an IIS Web Server. . . . . . . . . . . . . . . . . . . . . . . . . . . . . . . . 21Configuring an Apache Web Server . . . . . . . . . . . . . . . . . . . . . . . . . . . . 22
Specification and configuration requirements .. . . . . . . .. . . . . . . .. . . 22Editing the Apache configuration file . . . . . . . .. . . . . . . .. . . . . . . .. . . 23
Configuring an IBM WebSphere Server . . . . . . . . . . . . . . . . . . . . . . . . . 24Enabling the Web Server in a DMZ . . . . . . . . . . . . . . . . . . . . . . . . . . . . 25
Installing configuration files . . . . . . .. . . . . . . .. . . . . . . .. . . . . . . .. . . 25Creating system environment variables . . . . .. . . . . . . .. . . . . . . .. . . 26Configuring an IIS Web server in the DMZ . . .. . . . . . . .. . . . . . . .. . . 26Configuring an Apache or IBM Web server in the DMZ .. . . . . . . .. . . 26Specifying the default URLs . . . . . . .. . . . . . . .. . . . . . . .. . . . . . . .. . . 27Configuring the Branch IPC Broker .. . . . . . . .. . . . . . . .. . . . . . . .. . . 28
Chapter 8: Setup and Maintenance . . . . . . . . . . . . . . . . . . . . . . . . . . . 29Accessing the Transform Content Center Application . . . . . . . . . . . . . . 29
Signing in to the Transform Content Center application.. . . . . . . .. . . 29Creating Users . . . . . . . . . . . . . . . . . . . . . . . . . . . . . . . . . . . . . . . . . . . . 30Specifying Browser Settings. . . . . . . . . . . . . . . . . . . . . . . . . . . . . . . . . . 30Checking the Date Setting . . . . . . . . . . . . . . . . . . . . . . . . . . . . . . . . . . . 30Configuring Transform Content Center Services . . . . . . . . . . . . . . . . . . 31Providing SSL Access . . . . . . . . . . . . . . . . . . . . . . . . . . . . . . . . . . . . . . 31
Chapter 9: Integrating with Other Bottomline Products . . . . . . . . . . 33Watched Folders . . . . . . . . . . . . . . . . . . . . . . . . . . . . . . . . . . . . . . . . . . 33Storage Time . . . . . . . . . . . . . . . . . . . . . . . . . . . . . . . . . . . . . . . . . . . . . 33Configuring Storage . . . . . . . . . . . . . . . . . . . . . . . . . . . . . . . . . . . . . . . . 34Storing Create!form Documents . . . . . . . . . . . . . . . . . . . . . . . . . . . . . . . 35
Creating a category . . . . . .. . . . . . . .. . . . . . . .. . . . . . . .. . . . . . . .. . . 35Defining archive variables .. . . . . . . .. . . . . . . .. . . . . . . .. . . . . . . .. . . 35
Storing PayBase Documents . . . . . . . . . . . . . . . . . . . . . . . . . . . . . . . . . 35Storing Transform Scan Center Documents. . . . . . . . . . . . . . . . . . . . . . 36Storing DCS, eCI, and DC&DS Documents . . . . . . . . . . . . . . . . . . . . . . 36
iv Getting Started
PREFACE
Preface
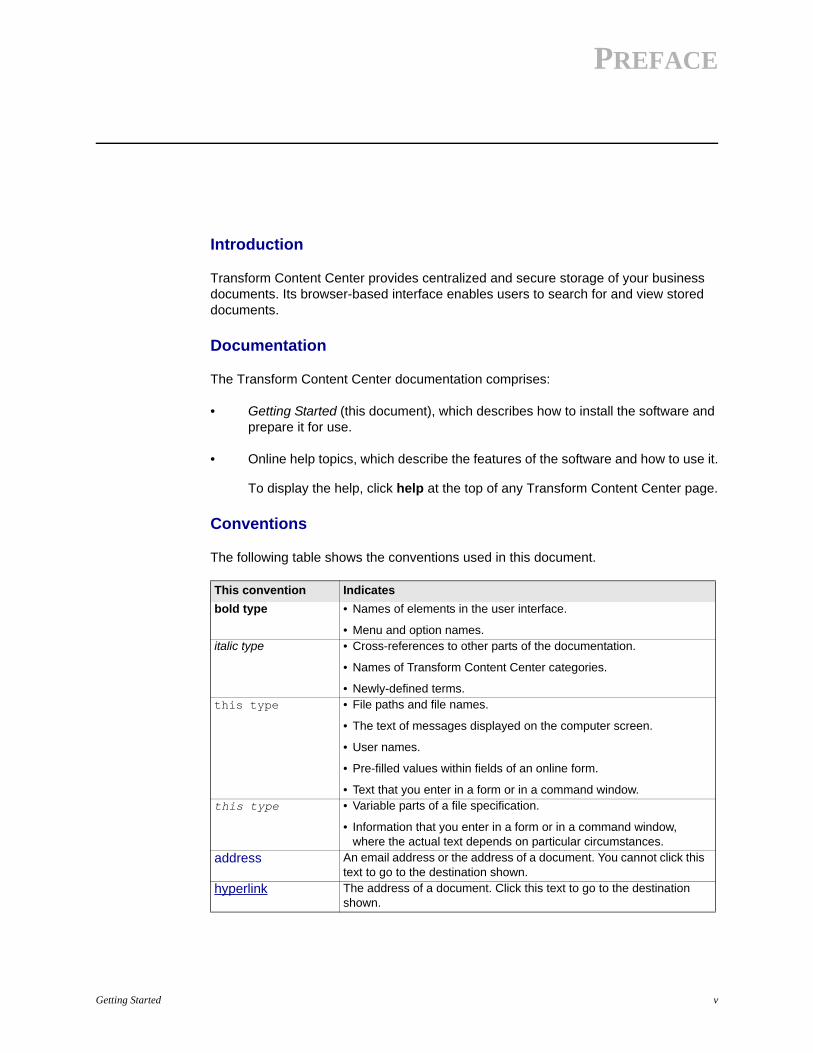
Introduction
Transform Content Center provides centralized and secure storage of your business documents. Its browser-based interface enables users to search for and view stored documents.
Documentation
The Transform Content Center documentation comprises:
• Getting Started (this document), which describes how to install the software and prepare it for use.
• Online help topics, which describe the features of the software and how to use it.
To display the help, click help at the top of any Transform Content Center page.
Conventions
The following table shows the conventions used in this document.
This convention Indicatesbold type • Names of elements in the user interface.
• Menu and option names.italic type • Cross-references to other parts of the documentation.
• Names of Transform Content Center categories.
• Newly-defined terms.this type • File paths and file names.
• The text of messages displayed on the computer screen.
• User names.
• Pre-filled values within fields of an online form.
• Text that you enter in a form or in a command window.this type • Variable parts of a file specification.
• Information that you enter in a form or in a command window, where the actual text depends on particular circumstances.
address An email address or the address of a document. You cannot click this text to go to the destination shown.
hyperlink The address of a document. Click this text to go to the destination shown.
Getting Started v
Comments
We welcome your suggestions and comments on the Transform Content Center docu-mentation. Please send them to [email protected].
vi Getting Started
CHAPTER
1
Installation OverviewTo install and implement a Transform Content Center system:
1. Install your database software. This can be on a separate machine from the Transform Content Center software.
• If you are using an Oracle database, you must create a new database.
• If you are using an SQL Server database, you do not need to create a new database because the Configuration wizard creates it for you.
For more information, see Setting up a Database on page 5.
2. Install your Transform Content Center software.
For more information, see Installing and Removing Transform Content Center Software on page 9.
3. Use the Configuration wizard to configure your Web server and database.
For more information, see Configuring on page 11.
4. If you intend to use an alternative Web server to the preconfigured Apache Web server, install and configure it.
For information about configuring an alternative Web server, see Configuring a Web Server on page 21.
5. Perform any necessary configuration tasks that are described in Setup and Maintenance on page 29.
6. If you plan to use your Transform Content Center software in conjunction with other Bottomline software, configure the systems to work together.
For more information, see Integrating with Other Bottomline Products on page 33.
Getting Started 1

INSTALLATION OVERVIEW
2 Getting Started
CHAPTER
2
System RequirementsThis chapter lists the hardware and software requirements for installation of the Trans-form Content Center software.
Hardware RequirementsThe following are the hardware requirements for installing Transform Content Center software:
• 2 GB memory
• 2 GB minimum free disk space
• 2.4 GHz or higher Pentium®-compatible CPU
• 1024 x 768 or higher graphics card
• CD-ROM drive
• Network adapter
• 200 MB free disk space for installation
We recommend that you use only hardware (workstations, printers and other peripher-als) that is listed in a Windows catalog as being compatible with your Windows operating system. See http://www.microsoft.com/whdc/hcl/default.mspx.
Do not install Transform Content Center software on a FAT32-formatted disk.
Software RequirementsAny machine on which you install Transform Content Center software must meet the fol-lowing requirements:
• Any of:
• Microsoft Windows XP Professional
• Microsoft Windows 2003 Standard
Getting Started 3
SYSTEM REQUIREMENTSSoftware Requirements
• Microsoft Windows 2003 Standard x64 edition
• Microsoft Windows Server 2003 Enterprise
• Microsoft Windows 2003 Enterprise x64 edition
Transform Content Center software uses the WOW64 emulator to run on Windows 64-bit operating systems. This is a standard component of these systems. When running on a 64-bit platform, ensure that any third-party software used in conjunction with your Transform Content Center software is compatible with such a platform.
• Microsoft Windows TCP/IP service installed and configured.
• A Web server. A preconfigured Apache Web server is supplied. For information about using an alternative Web server, see Configuring a Web Server on page 21.
• Microsoft Internet Explorer or Mozilla Firefox browser software.
Virtual servers
Transform Content Center software can run on the following virtual server platforms:
• Microsoft Virtual Server
• VMware Server
A separate license is required for each installation on a virtual server platform.
Virtualization software adds a layer of processing, and applications that run in a virtual server environment share the resources of the host machine. In order to maintain per-formance in such an environment, careful tuning and configuration of the virtual server environment is sometimes necessary. See the documentation for your virtual server software for information about how to do this.
4 Getting Started
CHAPTER
3
Setting up a DatabaseThis chapter describes how to set up your database for use with Transform Content Center software.
Database OptionsThe Transform Content Center software supports the following databases:
• Oracle 9i, 10g, or 11g
For information about setting up an Oracle database, see Setting up an Oracle Database on page 5.
• Microsoft SQL Server 2000 or 2005
For information about setting up an SQL Server database, see Setting up an SQL Server Database on page 6.
Setting up an Oracle DatabaseThe following sections describe how to prepare an Oracle database for use with Trans-form Content Center software.
Note: Use the appropriate version of Oracle for your Windows platform.
Oracle installation prerequisites
If the Oracle server is on a different machine from the Transform Content Center soft-ware, install the Oracle client on the Transform Content Center host machine, so that it can connect to the database. It is not necessary to install the client on the database server host. The Oracle client and server must both be the same version.
Microsoft Data Access Components (MDAC) must be installed on the Transform Con-tent Center host machine. MDAC is installed by default on Windows XP and later oper-ating systems.
Getting Started 5
SETTING UP A DATABASESetting up an SQL Server Database
Changing Oracle HTTP server to manual
If the Oracle database is on the same machine as the Transform Content Center soft-ware, change the Oracle HTTP Server to Manual.
To change the Oracle HTTP Server to Manual:
1. In the Windows Services window, double-click the Oracle HTTP Server service.
2. On the General tab, change Start-Up Type to Manual and then stop the service.
3. Either restart the machine to restart all the services, or within the Internet Information Services window, stop and restart the Default Web Site.
The Internet Information Services window is located from Administrative Tools on the Control Panel.
Creating and configuring the Oracle database
On the Oracle server, create a database. Do not configure this database because the Configuration wizard creates the required tables, procedures, triggers, indexes, and se-quences.
When you run the Configuration wizard, you can specify the initial size and the incre-mental growth size of the database. The size you specify must take into account factors such as the size and number of files you are likely to store.
Creating a Net Service Name
Create a Net Service Name on the Oracle client machine. This is used in the configu-ration process.
When specifying the details of the database machine, specify a Port Number of 1521.
The Service Name is usually the same as the Global Database Name.
Setting up an SQL Server DatabaseFor use with Transform Content Center software, SQL Server must be configured to be case insensitive.
If you are using an SQL Server 2000 database, it must be configured to allow full-text search.
If you are using an SQL Server 2005 database, you must install the full-text search com-ponents.
If you are using an SQL Server database, you do not need to create a database because the Configuration wizard does this for you.
6 Getting Started
SETTING UP A DATABASEChanging the webrepadmin Password
When you run the Configuration wizard, you can specify the initial size and the incre-mental growth size of the database. The size you specify must take into account factors such as the size and number of files you are likely to store.
You must also ensure that there is enough contiguous space in the transaction log to accommodate the largest files that you store.
Microsoft Data Access Components (MDAC) must be installed on the machine that hosts Transform Content Center software. MDAC is installed by default on Windows XP and later operating systems.
Changing the webrepadmin PasswordAccess to the database is achieved by means of the webrepadmin user. The default password for this user is webrepadmin. If you change this password in the database, you must configure all computers that connect to the database to use the new pass-word.
To update the webrepadmin password:
1. On each computer that connects to the database, start the Configuration wizard.
2. Accept the existing Web server configuration information.
3. On the Database configuration page, select Replace or upgrade the database.
4. Accept the details of your configured database until you reach the Configure user accounts page.
5. Update and confirm the new webrepadmin password, and then complete the wizard.
Getting Started 7

SETTING UP A DATABASEChanging the webrepadmin Password
8 Getting Started
CHAPTER
4
Installing and Removing Transform Content Center Software
This chapter describes how to install and remove Transform Content Center software.
If you intend to configure your Transform Content Center software with an existing Web server in place of the preconfigured Apache Web server supplied with the software, read Configuring a Web Server on page 21 before starting the installation.
Before installing Transform Content Center software, you must have appropriate data-base software installed. Read Setting up a Database on page 5 before starting the in-stallation.
InstallingYou must have administrator privileges on the machine on which you are installing Transform Content Center software.
To install Transform Content Center software:
1. Exit all applications.
2. Double-click the installation executable file, TransformContentCenter-nnnn.exe.
nnnn is the build number for this release.
The Setup screen appears.
3. To specify a different directory under which to install the Transform Content Center software, click Change and then browse to your chosen directory.
To change the name of the installation directory, type the name in the field at the bottom of the screen.
Do not choose a directory that already exists.
The documentation refers to the directory specified here as <root>.
4. Click Next.
Getting Started 9
INSTALLING AND REMOVING TRANSFORM CONTENT CENTER SOFTWAREAfter the Installation
5. Specify the directory under which to install the configuration data files and then click OK. By default, this directory is C:\Documents and Settings\All Users\Application Data\Bottomline Technologies\data.
The documentation refers to the directory you specify here as <data>.
6. In the Choose License window, click Browse to locate and select your Transform Content Center license, click Open to close the Select License File window, and then click OK to upload the license.
On completion of the installation, the Configuration wizard starts. See Configuring on page 11 for information about using the wizard.
After the InstallationUpon completion of the installation:
• The Transform Content Center option is available on the Windows Start menu, and offers the following options:
• Change License
This enables you to upload a new license for your Transform Content Center software.
• Configuration Wizard
This starts the Configuration wizard, which enables you to configure a Transform Content Center Web server and database, as described in Configuring on page 11.
• Transform Content Center
This opens the Sign In page for the Transform Content Center application.
• The following Windows services are running:
• Bottomline Document Storage Services, which runs the Transform Content Center application services. See Configuring Transform Content Center Services on page 31 for information about these services.
• Bottomline Document Web Server, which is the preconfigured Apache Web server. This serves the Transform Content Center pages if you configure the application to use this Web server.
You can configure a different Web server to run the Transform Content Center application. See Configuring a Web Server on page 21 for more information.
10 Getting Started
INSTALLING AND REMOVING TRANSFORM CONTENT CENTER SOFTWAREConfiguring
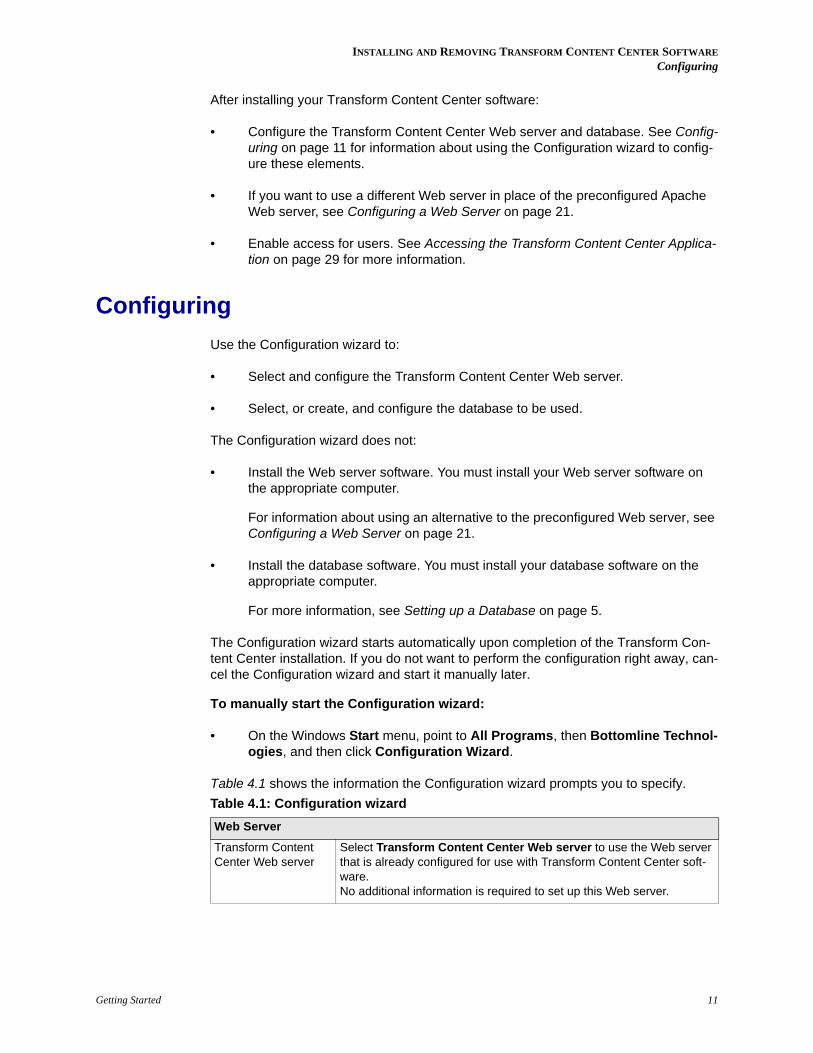
After installing your Transform Content Center software:
• Configure the Transform Content Center Web server and database. See Config-uring on page 11 for information about using the Configuration wizard to config-ure these elements.
• If you want to use a different Web server in place of the preconfigured Apache Web server, see Configuring a Web Server on page 21.
• Enable access for users. See Accessing the Transform Content Center Applica-tion on page 29 for more information.
ConfiguringUse the Configuration wizard to:
• Select and configure the Transform Content Center Web server.
• Select, or create, and configure the database to be used.
The Configuration wizard does not:
• Install the Web server software. You must install your Web server software on the appropriate computer.
For information about using an alternative to the preconfigured Web server, see Configuring a Web Server on page 21.
• Install the database software. You must install your database software on the appropriate computer.
For more information, see Setting up a Database on page 5.
The Configuration wizard starts automatically upon completion of the Transform Con-tent Center installation. If you do not want to perform the configuration right away, can-cel the Configuration wizard and start it manually later.
To manually start the Configuration wizard:
• On the Windows Start menu, point to All Programs, then Bottomline Technol-ogies, and then click Configuration Wizard.
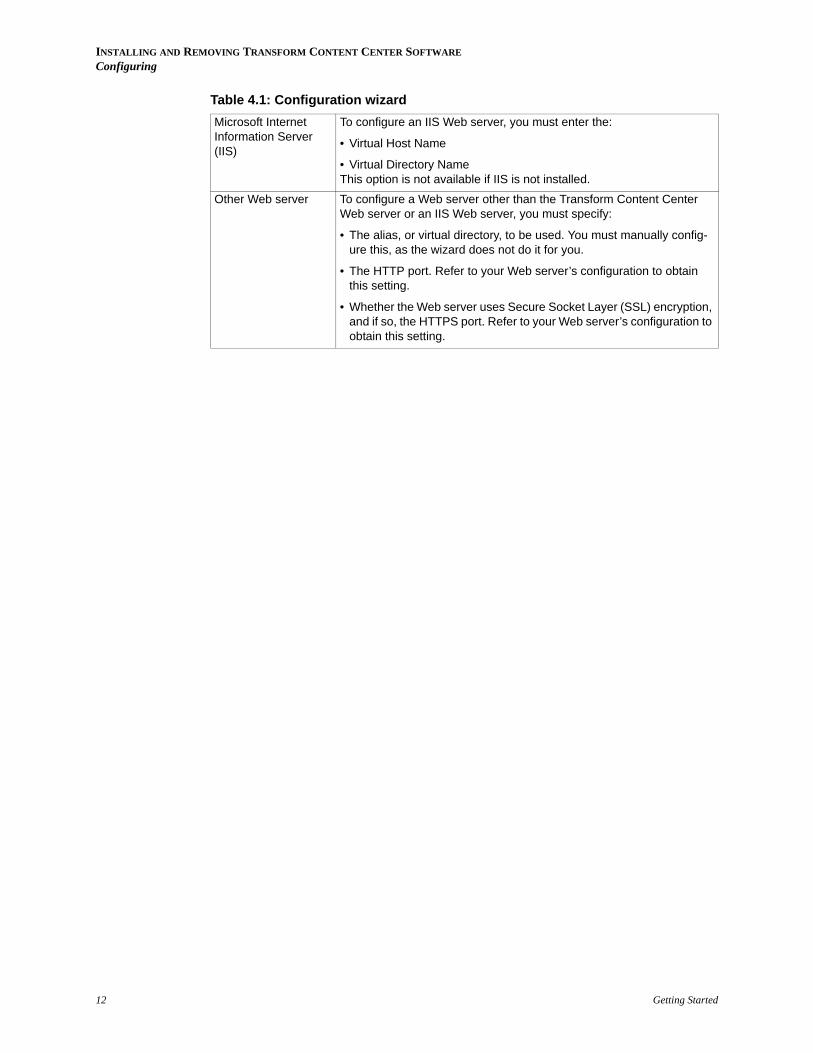
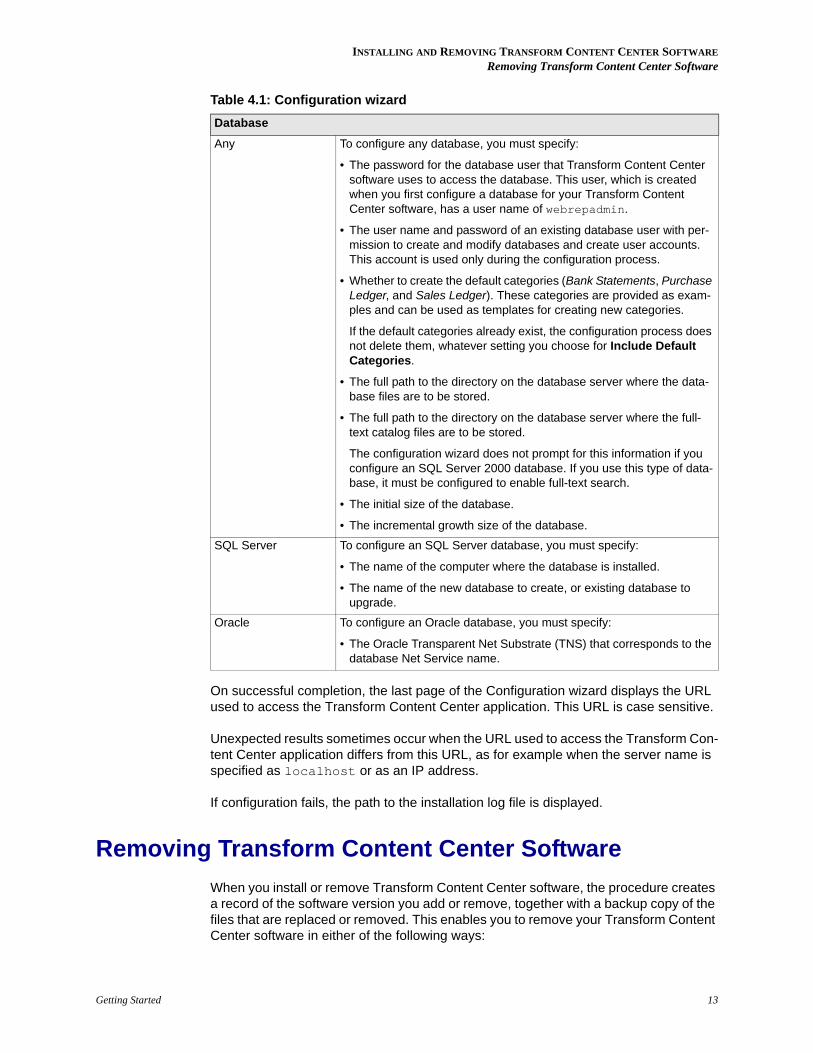
Table 4.1 shows the information the Configuration wizard prompts you to specify. Table 4.1: Configuration wizardWeb Server
Transform Content Center Web server
Select Transform Content Center Web server to use the Web server that is already configured for use with Transform Content Center soft-ware.No additional information is required to set up this Web server.
Getting Started 11
INSTALLING AND REMOVING TRANSFORM CONTENT CENTER SOFTWAREConfiguring
Microsoft Internet Information Server (IIS)
To configure an IIS Web server, you must enter the:
• Virtual Host Name
• Virtual Directory NameThis option is not available if IIS is not installed.
Other Web server To configure a Web server other than the Transform Content Center Web server or an IIS Web server, you must specify:
• The alias, or virtual directory, to be used. You must manually config-ure this, as the wizard does not do it for you.
• The HTTP port. Refer to your Web server’s configuration to obtain this setting.
• Whether the Web server uses Secure Socket Layer (SSL) encryption, and if so, the HTTPS port. Refer to your Web server’s configuration to obtain this setting.
Table 4.1: Configuration wizard
12 Getting Started
INSTALLING AND REMOVING TRANSFORM CONTENT CENTER SOFTWARERemoving Transform Content Center Software
On successful completion, the last page of the Configuration wizard displays the URL used to access the Transform Content Center application. This URL is case sensitive.
Unexpected results sometimes occur when the URL used to access the Transform Con-tent Center application differs from this URL, as for example when the server name is specified as localhost or as an IP address.
If configuration fails, the path to the installation log file is displayed.
Removing Transform Content Center SoftwareWhen you install or remove Transform Content Center software, the procedure creates a record of the software version you add or remove, together with a backup copy of the files that are replaced or removed. This enables you to remove your Transform Content Center software in either of the following ways:
Database
Any To configure any database, you must specify:
• The password for the database user that Transform Content Center software uses to access the database. This user, which is created when you first configure a database for your Transform Content Center software, has a user name of webrepadmin.
• The user name and password of an existing database user with per-mission to create and modify databases and create user accounts. This account is used only during the configuration process.
• Whether to create the default categories (Bank Statements, Purchase Ledger, and Sales Ledger). These categories are provided as exam-ples and can be used as templates for creating new categories.
If the default categories already exist, the configuration process does not delete them, whatever setting you choose for Include Default Categories.
• The full path to the directory on the database server where the data-base files are to be stored.
• The full path to the directory on the database server where the full-text catalog files are to be stored.
The configuration wizard does not prompt for this information if you configure an SQL Server 2000 database. If you use this type of data-base, it must be configured to enable full-text search.
• The initial size of the database.
• The incremental growth size of the database.
SQL Server To configure an SQL Server database, you must specify:
• The name of the computer where the database is installed.
• The name of the new database to create, or existing database to upgrade.
Oracle To configure an Oracle database, you must specify:
• The Oracle Transparent Net Substrate (TNS) that corresponds to the database Net Service name.
Table 4.1: Configuration wizard
Getting Started 13
INSTALLING AND REMOVING TRANSFORM CONTENT CENTER SOFTWARERemoving Transform Content Center Software
• Completely uninstall Transform Content Center software.
• Roll back to a previously installed version of the software. This can be an earlier version or a later version from which you have previously rolled back.
When you roll back to a previously installed version, your system reverts to using the appropriate version of installed files. It does not revert to versions of volatile files such as license files that were current at the time you replaced or removed the Transform Content Center software.
Uninstalling
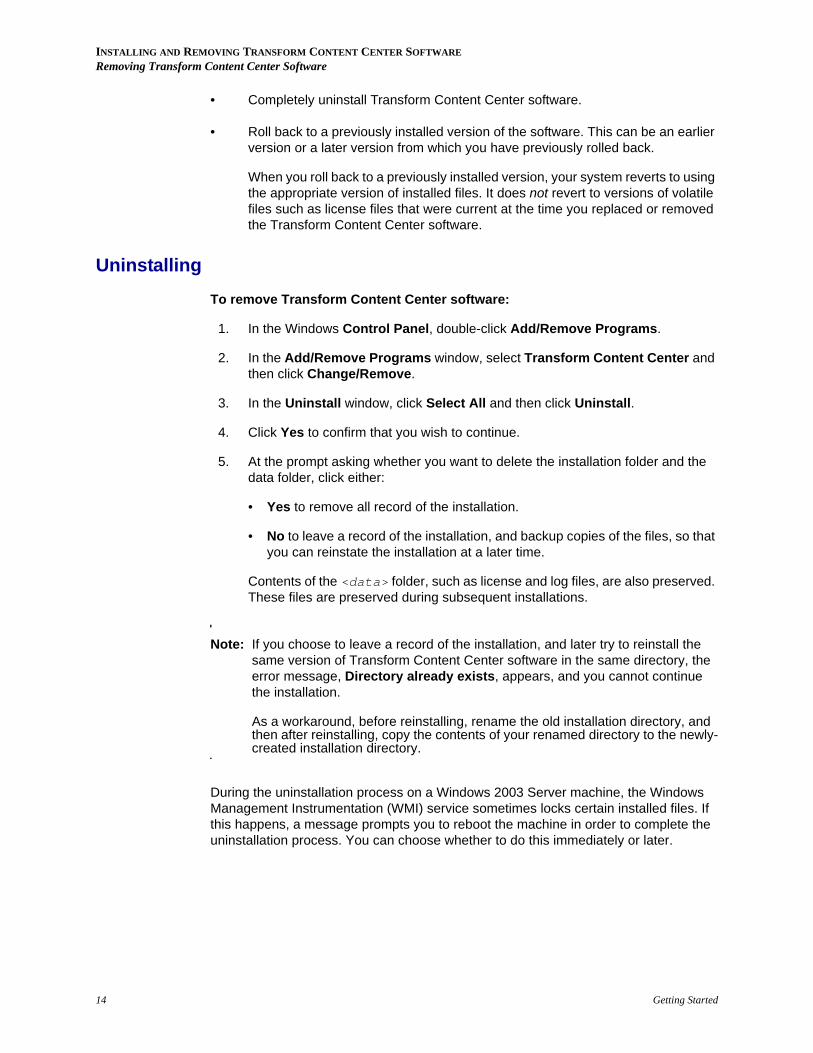
To remove Transform Content Center software:
1. In the Windows Control Panel, double-click Add/Remove Programs.
2. In the Add/Remove Programs window, select Transform Content Center and then click Change/Remove.
3. In the Uninstall window, click Select All and then click Uninstall.
4. Click Yes to confirm that you wish to continue.
5. At the prompt asking whether you want to delete the installation folder and the data folder, click either:
• Yes to remove all record of the installation.
• No to leave a record of the installation, and backup copies of the files, so that you can reinstate the installation at a later time.
Contents of the <data> folder, such as license and log files, are also preserved. These files are preserved during subsequent installations.
Note: If you choose to leave a record of the installation, and later try to reinstall the same version of Transform Content Center software in the same directory, the error message, Directory already exists, appears, and you cannot continue the installation.
As a workaround, before reinstalling, rename the old installation directory, and then after reinstalling, copy the contents of your renamed directory to the newly-created installation directory.
During the uninstallation process on a Windows 2003 Server machine, the Windows Management Instrumentation (WMI) service sometimes locks certain installed files. If this happens, a message prompts you to reboot the machine in order to complete the uninstallation process. You can choose whether to do this immediately or later.
14 Getting Started
INSTALLING AND REMOVING TRANSFORM CONTENT CENTER SOFTWARERemoving Transform Content Center Software
The uninstallation process does not remove the Transform Content Center database.
Rolling back
To roll back to a previously installed version of Transform Content Center software:
1. In the Windows Control Panel, double-click Add/Remove Programs.
2. In the Add/Remove Programs window, select Transform Content Center and then click Change/Remove.
3. In the Roll back changes section of the Uninstall window, select the version you wish to reinstate and then click Restore.
Removing rollback records
When you roll back to a previously installed version, or choose to save the installation folder during an uninstall process, backup copies are kept of files that are removed or replaced. To minimize the amount of disk space used for such backup files, you can de-lete the files associated with any installation. Do this only if you are sure you do not wish to roll back to that installation.
To delete the files associated with a previous installation:
1. In the Windows Control Panel, double-click Add/Remove Programs.
2. In the Add/Remove Programs window, select Transform Content Center and then click Change/Remove.
3. In the Roll back changes section of the Uninstall window, select the version you wish to delete, and then click Delete.
Getting Started 15

INSTALLING AND REMOVING TRANSFORM CONTENT CENTER SOFTWARERemoving Transform Content Center Software
16 Getting Started
CHAPTER
5
LicensingThe Transform Content Center installation process prompts you to upload a license, and so your system is ready to use upon completion of installation.
When this license expires, or if you upgrade your license, you can upload a new one.
If you install Transform Content Center software on a multiprocessor machine, you must ensure that you have sufficient license units for the number of processors you wish to use. See Installation on a Multiprocessor Machine on page 19 for more information.
About LicensesLicenses are distributed in the form of XML files. Save the license files on a machine that can be accessed from the Transform Content Center host machine.
You must upload your license within the activation period specified with the license. If you upload a license after this time, you can use your Transform Content Center soft-ware for a limited grace period before the license expires. To continue to use the soft-ware after this grace period, you must obtain a new license and upload it within the specified activation period.
Details of your currently installed license, including its expiry date, are shown in the Cur-rent License area of the Choose License window.
Uploading a LicenseTo upload a license:
1. On the Windows Start menu, point to All Programs, then Bottomline Technologies, and then click Change License.
2. In the Choose License window, click Browse and then browse to the folder containing the license file.
3. Select the license file and then click Open.
4. In the Choose License window, check the details of the license, and if they are correct, click OK.
Getting Started 17

LICENSINGUploading a License
18 Getting Started
CHAPTER
6
Installation on a Multiprocessor MachineTo take advantage of the parallel processing capacity of a multiprocessor machine, you can configure the Bottomline Document Storage Services service to run on the maxi-mum number of processors permitted by your license. No such configuration is neces-sary if you have sufficient license units to cover all available processors on your machine.
This chapter describes how to limit the number of processors on which the Bottomline Document Storage Services service runs.
Limiting the Number of ProcessorsTo limit the number of processors to that for which you have license units, set an affinity for the Bottomline Document Storage Services service with an appropriate number of CPUs.
To set an affinity for the Bottomline Document Storage Services service:
1. In the Windows Services application, stop the Bottomline Document Storage Services service.
2. Double-click the Bottomline Document Storage Services service to open its properties page.
3. On the General tab, in the Start parameters field, enter-a “<cpu_list>”
<cpu_list> is a space-separated list of CPU identifiers. Each identifier is an integer between 0 and 31.
The list must not contain more items than the number of processors permitted by your product license.
4. Restart the service.
If, after setting an affinity with a number of CPUs, you acquire additional product license units, edit the Bottomline Document Storage Services service again to add further CPUs to the CPU list. Alternatively, if you acquire sufficient license units for all the available processors on your host machine, in the Start parameters field, enter-a “”
Getting Started 19
INSTALLATION ON A MULTIPROCESSOR MACHINEViewing Errors
Viewing ErrorsAny errors made while configuring the service are added to the system event log when you restart the service.
To view configuration errors:
1. Open the Windows Event Viewer application.
2. In the left pane, click Application.
3. In the right pane, identify the events that have a value of Bottomline Document Storage Services in the Source column. Double-click an event to display its details.
20 Getting Started
CHAPTER
7
Configuring a Web ServerThe Transform Content Center installation includes a preconfigured Apache Web serv-er, listening on port 24500. To use the preconfigured Apache Web server, simply specify this in the Configuration wizard. No further configuration is necessary.
This chapter describes how to integrate your Transform Content Center installation with an alternative Web server to the preconfigured Apache Web server.
To use an alternative Web server:
1. In the Configuration wizard, specify details of the Web server, as described in Configuring on page 11.
2. Configure your Web server as described in this chapter.
For information about configuring an IIS Web server, see Configuring an IIS Web Server on page 21
For information about configuring an Apache Web server, see Configuring an Apache Web Server on page 22.
For information about configuring an IBM WebSphere server, see Configuring an IBM WebSphere Server on page 24.
Extra configuration is necessary if your Web server is installed on a different machine from your Transform Content Center machine, and the Web server host is located out-side your firewall in a demilitarized zone (DMZ). See Enabling the Web Server in a DMZ on page 25.
Configuring an IIS Web ServerTo enable users to manually upload large documents to the Transform Content Center repository on a system using IIS 6.0, you must increase the IIS upload limit.
To increase the IIS 6.0 upload limit:
1. In the Windows Services window, stop the IIS Admin Service and its dependant services (World Wide Web Publishing Service, FTP Publishing Service, and SMTP Service).
2. Make a backup copy of WINDOWS\system32\inetsrv\Metabase.XML.
Getting Started 21
CONFIGURING A WEB SERVERConfiguring an Apache Web Server
3. In a text editor, open WINDOWS\system32\inetsrv\Metabase.XML.
4. Increase the value of AspMaxRequestEntityAllowed.
5. The value must be higher than the largest document you intend to upload.
6. Save and close WINDOWS\system32\inetsrv\Metabase.XML.
7. In the Windows Services window, restart the IIS Admin Service, World Wide Web Publishing Service, FTP Publishing Service, and SMTP Service.
In addition to providing a Web server, IIS can also be used to provide support for Simple Mail Transfer Protocol (SMTP) functionality, which enables users to send email from the Transform Content Center client without the need of a mail client.
To verify that the SMTP Service is installed and running:
• At a command prompt use the telnet command to connect to the host machine on port 25:
telnet <host> 25
<host> is the name of the Transform Content Center host machine.
If the service is ready for use, a message is displayed, giving details of the service and stating that it is ready.
If the service is not ready, the following message is displayed.
Could not open a connection to host on port 25 : Connect failed
If this is the case, on the Transform Content Center host machine, open the Internet Services Manager, right-click SMTP Virtual Server, and then click Start.
Configuring an Apache Web ServerAfter using the Configuration wizard, selecting Other Web server to specify details of your Web server, configure an existing Apache Web server as described in this section.
For more information about Apache, see the Apache 2.0 documentation at http://www.apache.org.
Configuration involves editing the httpd.conf file within the Apache installation (nor-mally in the \conf directory).
Specification and configuration requirements
For use with Transform Content Center software, your Apache Web server must meet the following criteria:
• Apache 2.0.47 minimum. If possible, use a more recent version.
22 Getting Started
CONFIGURING A WEB SERVERConfiguring an Apache Web Server
• The httpd.conf configuration file must include the following directives to load Dynamically Shared Objects (DSOs):
LoadModule access_module modules/mod_access.soLoadModule alias_module modules/mod_alias.soLoadModule autoindex_module modules/mod_autoindex.soLoadModule cgi_module modules/mod_cgi.soLoadModule dir_module modules/mod_dir.soLoadModule mime_module modules/mod_mime.so
Any corresponding directives for these modules are assumed to be the default configuration shipped with Apache 2.0.
Editing the Apache configuration file
When editing the Apache configuration file:
• In file path specifications shown in the examples below, replace <root> with the Transform Content Center installation directory and <data> with the path to the directory containing the Transform Content Center configuration data files. Both these paths are specified during installation.
• Replace <alias> with the alias, or virtual directory, to be used by Transform Content Center software, as specified in the Configuration wizard.
To edit the Apache configuration file:
1. Open the httpd.conf file in a text editor. This is normally in the \conf subdirectory of your Apache installation directory.
2. Find the following section:
## Note that from this point forward you must specifically # allow particular features to be enabled - so if something's # not working as you might expect, make sure that you have # specifically enabled it below.#
3. Beneath the above text, add the following lines in order to specify the content directory of the Transform Content Center Web site as <root>\DOL.fsr\DOL
# Transform Content Center Configuration Settings
Alias /<alias> "<root>/dol.fsr/DOL"
<Directory "<root>/dol.fsr/DOL">
DirectoryIndex index.fsp
Options +ExecCGI
</Directory>
4. Save your changes and close the text editor.
Getting Started 23
CONFIGURING A WEB SERVERConfiguring an IBM WebSphere Server
Configuring an IBM WebSphere ServerWhen specifying details of your IBM WebSphere Web server in the Configuration wizard:
• Specify the port number for the IBM HTTP port as shown in the Core Settings subsection of the Basic Settings section of the IBM Administration Server.
• Ensure that Enable SSL is cleared, because by default, IBM HTTP Server does not include SSL support.
After using the Configuration wizard to specify details of your Web server, configure the server as described in this section.
Configuration involves editing the IBM WebSphere configuration file. When editing this file:
• In file path specifications shown in the examples below, replace <root> with the Transform Content Center installation directory and <data> with the path to the directory containing the Transform Content Center configuration data files. Both these paths are specified during installation.
• Replace <alias> with the alias, or virtual directory, to be used by Transform Content Center software, as specified in the Configuration wizard.
To configure an IBM WebSphere Web server:
1. Log in to the IBM Administration Server Web page on port 8008.
2. In the left pane of Administration Server, expand View Configuration and then click Edit Configuration.
3. In the configuration editor, find the following section:
## Note that from this point forward you must specifically allow# particular features to be enabled - so if something's not working # as you might expect, make sure that you have specifically enabled # it below.#
4. Beneath the above text, add the following lines in order to specify the content directory of the Transform Content Center Web site as <root>\DOL.fsr\DOL
# Transform Content Center Configuration Settings
Alias /<alias> "<root>/dol.fsr/DOL"
<Directory "<root>/dol.fsr/DOL">
DirectoryIndex index.fsp
Options +ExecCGI
</Directory>
5. Click Submit to save the configuration.
24 Getting Started
CONFIGURING A WEB SERVEREnabling the Web Server in a DMZ
6. In the Windows Services window, restart the IBM HTTP Server service.
Enabling the Web Server in a DMZThis section describes the tasks that are necessary to enable the Transform Content Center Web server to run in the demilitarized zone (DMZ), on a separate machine from the Transform Content Center host.
The tasks are:
• Installing configuration files. See Installing configuration files on page 25.
• Creating system environment variables on the Web server host to identify the Transform Content Center host machine and the location of Transform Content Center data on that machine. See Creating system environment variables on page 26.
• Configuring the Web server. See Configuring an IIS Web server in the DMZ on page 26 or Configuring an Apache or IBM Web server in the DMZ on page 26.
• Specifying the default URLs for the Transform Content Center application. See Specifying the default URLs on page 27
In addition, if the Transform Content Center and Web server host machines are in dif-ferent subnets, it is sometimes necessary to configure the Branch IPC Broker process to enable Transform Content Center processes on the two machines to communicate with each other. See Configuring the Branch IPC Broker on page 28.
Note: Traffic must be allowed across the firewall between the Transform Content Center and Web server host machines on port 24505.
Installing configuration files
To install the necessary configuration files:
1. On the Transform Content Center host, run the file <root>\CollateRemoteFiles.bat.
<root> is the Transform Content Center installation directory.
This creates a directory, <root>\RemoteFiles, which contains the necessary folders and files.
2. On the Web server host machine, create a directory path that exactly matches the Transform Content Center installation path (<root>).
3. Copy the contents of the <root>\RemoteFiles directory from the Transform Content Center host to the <root> directory on the Web server host machine created in Step 2.
Getting Started 25

CONFIGURING A WEB SERVEREnabling the Web Server in a DMZ
4. Copy the file <root>\bin\exe\vcredist_x86.exe from the Transform Content Center host to the Web server host machine, and then run the executable on the Web server host.
Creating system environment variables
On the Web server host machine, create system environment variables as follows:
1. In a Windows Explorer window, right-click My Computer, and then click Properties.
2. In the System Properties window, click the Advanced tab, and then click Environment Variables.
3. In the System variables area of the Environment Variables window, create the following system environment variables:
4. Click OK.
5. Reboot the Web server host machine.
Configuring an IIS Web server in the DMZ
To configure the IIS Web server:
1. Create a virtual directory for Transform Content Center with a content directory of <root>\DOL.fsr\DOL.
<root> is the copy of the Transform Content Center installation directory created on the Web server host machine.
2. On the Access Permissions page of the Virtual Directory Creation wizard, select Execute (such as ISAPI applications or CGI).
Configuring an Apache or IBM Web server in the DMZ
To configure an Apache or IBM Web server:
1. Configure the Web server as described in Configuring an Apache Web Server on page 22 or Configuring an IBM WebSphere Server on page 24.
2. Edit the Web server configuration file, httpd.conf, on the Transform Content Center host, and find the following section:
## Note that from this point forward you must specifically # allow particular features to be enabled - so if something's # not working as you might expect, make sure that you have
FSWEB_RT_SERVER The IP address or DNS name of the Transform Content Center host machine.
FSWEB_RT_DATAPATH The path to the <data> directory on the Transform Content Center host machine.
26 Getting Started
CONFIGURING A WEB SERVEREnabling the Web Server in a DMZ
# specifically enabled it below.#
3. Copy everything below this text, up to the following section:
## The following lines prevent .htaccess and .htpasswd files # from being viewed by Web clients#
4. Open the httpd.conf file on the Web server host machine and paste the copied text into the same part of the file.
5. Immediately above the pasted text, insert the following:
PassEnv FSWEB_RT_SERVERPassEnv FSWEB_RT_DATAPATH
6. Find the following directive sections:
• <Directory "<root>/bin/exe">
• <Directory "<root>/dol.fsr/DOL">
• <Directory "<data>/fsserver/server.fsr">
• <Directory "<root>/web">
<root> is the Transform Content Center installation directory, and <data> is the Transform Content Center data directory.
If they are not already present, add the following lines to each of the directives:
Order allow,denyAllow from all
Specifying the default URLs
Change the default URL and, if necessary, the Default SSL URL for Transform Content Center to identify the Web server host machine.
To change the default URLs:
1. Sign in to the Transform Content Center application as a user with Administrator access rights, as described in Accessing the Transform Content Center Application on page 29.
2. Click admin.
3. On the Admin Home page, click General Settings.
4. Enter the correct URL in the Default URL field and, if necessary, in the Default SSL URL field, and then click Save.
Getting Started 27
CONFIGURING A WEB SERVEREnabling the Web Server in a DMZ
Configuring the Branch IPC Broker
If the Web server and Transform Content Center host machines are in different subnets, to enable processes on the two machines to communicate with each other, configure the Branch IPC broker process as follows:
1. Use a text editor to edit the file <data>\fsserver\files\server-config\STALPR\server-config.xml .
2. In the following line, after the -f argument, the hash (#) characters specify that the numbers in the equivalent part of the IP address must match.
<cmdLine>"$(BINDIR)\fscupid.exe" -hn $(DEFAULTGROUP) -f #.#.#.* -dp "$(DATAPATH)"</cmdLine>
For any part of the IP addresses of the Web server and Transform Content Center host machines that do not match, change the hash character to an asterisk (*).
For example, if the IP address of one machine is 77.78.9.2 and the other is 77.78.8.4, the -f argument must have a value of #.#.*.* .
28 Getting Started
CHAPTER
8
Setup and MaintenanceThis chapter describes tasks involved in setting up and maintaining your Transform Content Center system to enable users to access its features.
Accessing the Transform Content Center ApplicationThe Transform Content Center application enables users to retrieve and view docu-ments stored in the database. Access to documents is controlled by permissions asso-ciated with the user or group of users. Permissions are set by means of administration options, which users with Administrator access rights can access.
Signing in to the Transform Content Center application
To sign in to the Transform Content Center application:
1. Do one of the following:
• On the Transform Content Center host, on the Windows Start menu, point to All Programs, then Bottomline Technologies, and then click Transform Content Center.
• In a Web browser, enter the Transform Content Center URL, http://<host>:24500/TransformContentCenter.
This URL is displayed upon successful completion of the Configuration wizard, and is case sensitive.
2. On the Sign In page:
• Select the type of user you are signing in as.
The first time you sign in after installing the Transform Content Center software, select Web.
• Enter your user name and password.
The first time you sign in after installing the Transform Content Center software, enter administrator as the user name, and leave the Password field blank.
3. Click Sign In.
Getting Started 29
SETUP AND MAINTENANCECreating Users
Note: When the Single Sign-in for Windows users setting is enabled on the General Settings page, Windows users and members of Windows groups can access the Transform Content Center application without first having to sign in.
Creating UsersYou can create either of the following types of user:
• Web users, who can access the Transform Content Center application from out-side your corporate Windows domain.
Upon installation, two Web user accounts, administrator and guest, are automatically created. These accounts have no associated password.
• Windows users, who have Windows user accounts within your Windows domain.
Individuals can also access the Transform Content Center application as members of a Web group or of a Windows group.
To enable people to access the Transform Content Center application, you must sign in initially as the administrator user and create user profiles for them.
When you have signed in to the Transform Content Center application, click the help link on any page to display the online help. Information about creating and managing users is in the Administration section of the help.
Specifying Browser SettingsTo ensure that the user interface is correctly displayed on any machine that is to access the Transform Content Center application by means of an Internet Explorer browser, set the browser settings to check for new versions of cached pages on each visit to a page.
To check for new versions of cached pages on each visit to a page:
1. On the Microsoft Internet Explorer Tools menu, click Internet Options.
2. In the Temporary Internet files section of the General tab, click Settings.
3. On the Settings page, under Check for newer versions of stored pages, select Every visit to the page.
Checking the Date SettingTo ensure the proper storage of date indexes, check the date setting in the Regional Options, located in the Control Panel on the Transform Content Center host machine. The year within the date must be displayed as a four-figure number; for example 2008 as opposed to 08.
30 Getting Started
SETUP AND MAINTENANCEConfiguring Transform Content Center Services
Configuring Transform Content Center ServicesThe Transform Content Center installation installs a number of services that run in the background. These services are:
• The Auto Delete Service, which deletes documents when they reach their speci-fied deletion date.
• The Email Service, which sends email.
• The Offline Service, which transfers documents to offline storage on their speci-fied offline date.
• The Subscriptions Service, which counts the number of documents posted to a subscription and, if necessary, creates emails with document attachments to be sent.
In the Windows Services window, these services appears as a single entry: Bottomline Document Storage Services. You cannot start or stop the individual services from the Window Services window.
Manage the individual document storage services on the Service Settings page in the admin section of the application. For more information about managing these services, see the online help.
Providing SSL AccessIf your Transform Content Center Web server uses Secure Socket Layers (SSL) encryp-tion, you must specify the default URL for access to the application.
To specify the default SSL URL:
1. Sign in as a user with Administrator access rights.
2. On the Home page, click admin.
3. On the Admin Home page, click General Settings.
4. On the General Settings page, in the Default SSL URL field, enter the default URL to use for SSL access, and then click Save.
Getting Started 31

SETUP AND MAINTENANCEProviding SSL Access
32 Getting Started

CHAPTER
9
Integrating with Other Bottomline Products
Transform Content Center software is able to store documents produced by the follow-ing products:
• Create!form
• PayBase
• Transform Scan Center (formerly known as Intelligent Document Capture (IDC))
• Optio Document Customization Server (DCS), eComIntegrate (eCI), and Design Center and Document Server (DC&DS)
This chapter describes how to configure your Transform Content Center to store the out-put of these products.
Watched FoldersThe Transform Content Center system monitors designated directories in a file system and automatically uploads files placed in these directories. These directories are known as watched folders.
Storage TimeIt is possible to specify the length of time that stored documents remain in storage before they are either deleted or moved to offline storage.
For documents to be automatically deleted, the Auto Delete service must be running, and for documents to be moved to offline storage, the Offline service must be running. See Configuring Transform Content Center Services on page 31 and the online help for information about these services.
It is possible for a user with Administrator access to change the date on which individual documents are automatically deleted or moved to offline storage, or to specify that they remain in storage and are not deleted or moved. See the online help for information about how to do this.
Getting Started 33
INTEGRATING WITH OTHER BOTTOMLINE PRODUCTSConfiguring Storage
Configuring StorageThe watched folder in which to place documents to be stored, and the amount of time documents are to remain in storage before being deleted or moved offline, are specified in the IntegrationImporter.dat file in the <data>\fsserver\serv-er.fsr\BTIntegration directory.
<data> is the path to the directory, specified during installation, that contains the Trans-form Content Center configuration data files.
This file contains a section for each Bottomline product whose documents can automat-ically be placed in the Transform Content Center store. Each section contains the fol-lowing lines:
• <prefix>WatchedFolder, which specifies the path to the folder in which the product places its output files so that they can automatically be loaded into the Transform Content Center store.
• <prefix>OfflineDays which specifies the number of days documents remain in storage before being moved to offline storage.
• <prefix>DeleteDays, which specifies the number of days documents remain in storage before being automatically deleted. The Transform Content Center application can automatically delete documents from offline storage as well as from its own store.
<prefix> identifies the product that generates the documents to be stored, and can be:
• CF for Create!form documents
• Paybase for PayBase documents
• IDC for Transform Scan Center documents
• ECI for DCS, eCI, or DC&DS documents
To specify the storage settings:
1. In a text editor, open the IntegrationImporter.dat file.
2. In the section for each product whose output you wish to store, at the end of the WatchedFolder line, specify the path to the folder in which the product places its output files.
In addition, optionally specify a value for OfflineDays, DeleteDays, or both. If you do not want to configure offline storage or automatic deletion, either leave the value unspecified or specify a value of 0. If you specify a value for both these settings, give a higher value to DeleteDays than to OfflineDays.
3. Save the file.
34 Getting Started

INTEGRATING WITH OTHER BOTTOMLINE PRODUCTSStoring Create!form Documents
Storing Create!form DocumentsEnabling the Transform Content Center system to store Create!form documents in-volves:
• Specifying the storage settings to identify the watched folder where the Create!form system places documents to be stored and, optionally, the length of time documents remain in storage before being automatically deleted or moved to offline storage.
See Configuring Storage on page 34.
• Creating a Transform Content Center category for the documents.
• Defining Create!form archive variables to identify the Transform Content Center category and to provide the index values for each document that is stored.
Creating a category
See the Transform Content Center help for information about how to create a category.
When you define a category for storing Create!form documents, indexes you create must have names that contain only uppercase letters and underscore characters.
Defining archive variables
See the Create!form Designer documentation for information about how to create ar-chive variables and define how to derive their values.
Use either the existing ARC_DOCTYPE1 variable or create a variable called ARC_CATEGORY to identify the name of the Transform Content Center category for storing Create!form documents. Do not give different values to these two variables — either give each the same value or give a value to just one of the variables.
For each index you create in the Transform Content Center category, create an archive variable with the same name, and define how to derive its value.
Storing PayBase DocumentsWhen a PayBase document and its associated metadata file are placed in the folder identified in the IntegrationImporter.dat file as the PaybaseWatchedFolder, the Transform Content Center system stores the document in a specially configured cat-egory, using the information in the metadata file to populate the indexes associated with that category.
To configure Transform Content Center to store PayBase documents:
1. Specify the storage settings to identify the watched folder where the PayBase system places documents to be stored and, optionally, the length of time documents remain in storage before being automatically deleted or moved to offline storage.
Getting Started 35
INTEGRATING WITH OTHER BOTTOMLINE PRODUCTSStoring Transform Scan Center Documents
See Configuring Storage on page 34.
2. Run the batch file, <root>\bin\exe\install-paybase-category.bat.
<root> is the Transform Content Center installation directory.
This creates a Transform Content Center category, PaybaseDocuments, for the storage of PayBase documents.
Storing Transform Scan Center DocumentsTo configure Transform Content Center to store Transform Scan Center documents:
1. Specify the storage settings to identify the watched folder where the Transform Scan Center system places documents to be stored and, optionally, the length of time documents remain in storage before being automatically deleted or moved to offline storage.
See Configuring Storage on page 34.
2. Create a Transform Content Center category for the documents.
See the Transform Content Center help for information about how to create a category.
3. In Transform Scan Center, configure the path to the watched folder identified in Step 1.
Storing DCS, eCI, and DC&DS DocumentsTo configure Transform Content Center to store DCS, eCI, or DC&DS documents:
1. Specify the storage settings to identify the watched folder where the originating system places documents to be stored and, optionally, the length of time documents remain in storage before being automatically deleted or moved to offline storage.
See Configuring Storage on page 34.
2. Create a Transform Content Center category for the documents.
See the Transform Content Center help for information about how to create a category.
The Transform Content Center system converts to underscores any spaces or hyphens in index names specified within the PDF documents to be stored.
36 Getting Started


