
Geospatial Analysis with PROC GMAPanalytics.ncsu.edu/sesug/2016/RV-278_Final_PDF.pdfGeospatial...
19
SESUG 2016 1 Paper RV-278 Geospatial Analysis with PROC GMAP Michael Jadoo, Washington, D.C. ABSTRACT Geospatial analysis is the finest example of data visualization products today. It produces the maximum amount of information of statistical accounts data. Join us on an adventure, whether you are the seasoned practitioner or the exploring novice, as we explore the world of heat maps. An in depth look will be conducted on how to make choropleth (heat) maps in SAS®. This review will cover different types of maps that can be made, importing data, and data structure needed to create the map. INTRODUCTION Geospatial analysis is the gathering, displaying, and manipulation of imagery, and historical data, using geographical coordinates to obtain some sort of information. Using this kind of map in the right situation can be a very valuable tool for your office. The presentation of data is an essential part of virtually every branch of science and being able to create a large variety of charts, reports, and data summaries can be useful. PROC GMAP creates heat maps by using a data set that is the combination of map data (FIPS codes, Latitude and longitude, X and Y coordinates) and a response data set (the variable being analyzed). The information on the map data set contains the information to create the locations by county, state, countries, and even zip codes. The purpose of this paper is to enable the reader to create maps at different geographical levels. What is PROC GMAP? The GMAP procedure produces several different kinds of maps that show variations of a variable value in a respective area at a point in time. The GMAP procedure can summarize data by area, show trends and variation of data, highlight differences or outliners, and produce maps. For the purposes of this paper the focus will be placed on heat maps. A heat map indicates levels of data values by filling the map areas with different colors. Getting started Whether it is used for inter-office task or presented to the customer maps should capture the viewers’ attention and facilitate communication. When approaching map making one should first identify uniform features that you want your map to have. Having uniform design for each map helps the viewer identify either you or your office that has made the map. This is done in case there are follow-on questions so that everyone knows who to contact about the illustration. TITLE AND FOOTNOTE STATEMENTS Using the TITLE and FOOTNOTE statements before the GMAP procedure adds additional information to the heat map output. Decide what information sets are relevant to the map and place them at locations that does not interrupt the viewer’s ability to collect information. Moreover, use statements to make the maps you have made uniform so that others knows it’s you who created it. Here an example of using the TITLE and FOOTNOTE to identify your map and the information it contains: title height=2 font="Times New Roman" "REGONAL MAP OF NEW ENGLAND"; title2 height=2 font="Times New Roman" "PERSONAL INCOME BY COUNTY"; footnote J=L font="Times New Roman" "DATA SOURCE: BEA"; footnote2 J=L font="Times New Roman" "TIME PERIOD: 2011"; FOOTNOTE3 J=L FONT="Times New Roman" "CYCLE: ANNUAL"; proc gmap map=divstate data=divstate anno=conanno GOUT=new ; id state COUNTY;
Transcript of Geospatial Analysis with PROC GMAPanalytics.ncsu.edu/sesug/2016/RV-278_Final_PDF.pdfGeospatial...

SESUG 2016
1
Paper RV-278
Geospatial Analysis with PROC GMAP
Michael Jadoo, Washington, D.C.
ABSTRACT
Geospatial analysis is the finest example of data visualization products today. It produces the maximum amount of information of statistical accounts data. Join us on an adventure, whether you are the seasoned practitioner or the exploring novice, as we explore the world of heat maps.
An in depth look will be conducted on how to make choropleth (heat) maps in SAS®. This review will cover different types of maps that can be made, importing data, and data structure needed to create the map.
INTRODUCTION
Geospatial analysis is the gathering, displaying, and manipulation of imagery, and historical data, using geographical
coordinates to obtain some sort of information. Using this kind of map in the right situation can be a very valuable
tool for your office. The presentation of data is an essential part of virtually every branch of science and being able to
create a large variety of charts, reports, and data summaries can be useful.
PROC GMAP creates heat maps by using a data set that is the combination of map data (FIPS codes, Latitude and
longitude, X and Y coordinates) and a response data set (the variable being analyzed). The information on the map
data set contains the information to create the locations by county, state, countries, and even zip codes. The
purpose of this paper is to enable the reader to create maps at different geographical levels.
What is PROC GMAP?
The GMAP procedure produces several different kinds of maps that show variations of a variable value in a
respective area at a point in time. The GMAP procedure can summarize data by area, show trends and variation of
data, highlight differences or outliners, and produce maps. For the purposes of this paper the focus will be placed on
heat maps. A heat map indicates levels of data values by filling the map areas with different colors.
Getting started
Whether it is used for inter-office task or presented to the customer maps should capture the viewers’ attention and
facilitate communication. When approaching map making one should first identify uniform features that you want
your map to have. Having uniform design for each map helps the viewer identify either you or your office that has
made the map. This is done in case there are follow-on questions so that everyone knows who to contact about the
illustration.
TITLE AND FOOTNOTE STATEMENTS
Using the TITLE and FOOTNOTE statements before the GMAP procedure adds additional information to the heat
map output. Decide what information sets are relevant to the map and place them at locations that does not interrupt
the viewer’s ability to collect information. Moreover, use statements to make the maps you have made uniform so
that others knows it’s you who created it.
Here an example of using the TITLE and FOOTNOTE to identify your map and the information it contains:
title height=2 font="Times New Roman" "REGONAL MAP OF NEW ENGLAND";
title2 height=2 font="Times New Roman" "PERSONAL INCOME BY COUNTY";
footnote J=L font="Times New Roman" "DATA SOURCE: BEA";
footnote2 J=L font="Times New Roman" "TIME PERIOD: 2011";
FOOTNOTE3 J=L FONT="Times New Roman" "CYCLE: ANNUAL";
proc gmap map=divstate
data=divstate anno=conanno GOUT=new ;
id state COUNTY;

Geospatial Analysis with PROC GMAP, continued SESUG 2016
2
choro Y2011 / statistic=sum ;
format y2011 comma20.;
label Y2011=WAGES;
run;
quit;
Figure 1
Output 1. Regional map of Northeast region.
COLORS
The use of colors is a critical part of creating heat maps which makes it imperative to know how to use them for each
situation. Pay attention to the background color of the map so that it won’t conflict with the viewer’s experience for
the areas on your map. Use background color that contrasts well with the object. Use color only when needed to
serve a specific goal. Use different colors for different meanings in the data. For example, whenever identifying
areas with large values a darker color should be used.
Fortunately, in BASE SAS there are a variety of different predefined colors or patterns available for the user. The
PATTERN statement is the method that uses the color or pattern code from SAS. An example of this code is below:
pattern1 v=s c= cxF3F7FE ; *bone white;
pattern2 v=s c= cxd9ef8b ; *light green;
pattern3 v=s c= CXffff00 ; *yellow;
pattern4 v=s c= cxff6060 ; *red;
Figure 2
The FORMAT procedure also supports the application of colors on areas with certain numerical values for your map.
Here is an example:
proc format;
value tghat low - -0.01 = 'Decrease'
0.0 - 5 = 'Up 0 to 5%'
5.01 - 10 = 'Up 5 to 10%'
10.01 - 20 = 'Up 10 to 20%'
20.01 - 30 = 'Up 20 to 30%'
30.01 - high= 'Up over 30%';
run;
Geospatial Analysis with PROC GMAP, continued SESUG 2016
3
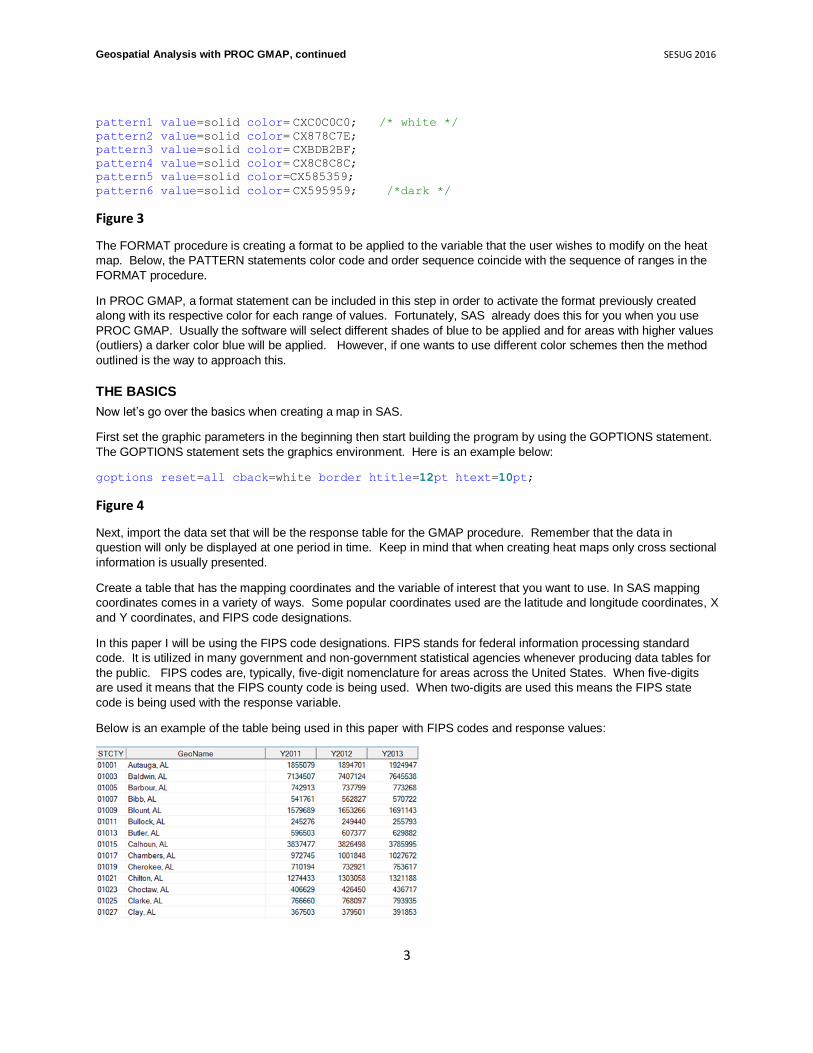
pattern1 value=solid color= CXC0C0C0; /* white */ pattern2 value=solid color= CX878C7E; pattern3 value=solid color= CXBDB2BF; pattern4 value=solid color= CX8C8C8C; pattern5 value=solid color=CX585359;
pattern6 value=solid color= CX595959; /*dark */
Figure 3
The FORMAT procedure is creating a format to be applied to the variable that the user wishes to modify on the heat
map. Below, the PATTERN statements color code and order sequence coincide with the sequence of ranges in the
FORMAT procedure.
In PROC GMAP, a format statement can be included in this step in order to activate the format previously created
along with its respective color for each range of values. Fortunately, SAS already does this for you when you use
PROC GMAP. Usually the software will select different shades of blue to be applied and for areas with higher values
(outliers) a darker color blue will be applied. However, if one wants to use different color schemes then the method
outlined is the way to approach this.
THE BASICS
Now let’s go over the basics when creating a map in SAS.
First set the graphic parameters in the beginning then start building the program by using the GOPTIONS statement.
The GOPTIONS statement sets the graphics environment. Here is an example below:
goptions reset=all cback=white border htitle=12pt htext=10pt;
Figure 4
Next, import the data set that will be the response table for the GMAP procedure. Remember that the data in
question will only be displayed at one period in time. Keep in mind that when creating heat maps only cross sectional
information is usually presented.
Create a table that has the mapping coordinates and the variable of interest that you want to use. In SAS mapping
coordinates comes in a variety of ways. Some popular coordinates used are the latitude and longitude coordinates, X
and Y coordinates, and FIPS code designations.
In this paper I will be using the FIPS code designations. FIPS stands for federal information processing standard
code. It is utilized in many government and non-government statistical agencies whenever producing data tables for
the public. FIPS codes are, typically, five-digit nomenclature for areas across the United States. When five-digits
are used it means that the FIPS county code is being used. When two-digits are used this means the FIPS state
code is being used with the response variable.
Below is an example of the table being used in this paper with FIPS codes and response values:

Geospatial Analysis with PROC GMAP, continued SESUG 2016
4
Display 1. Collect the map data set.
If you have BASE SAS the several map data set is available by SAS to use which is located in one of the libraries
specifically designed for map building. The maps data set used should have same type of location variable (FIPS
code) as the response data set as seen above.
Display 2. Create an annotate data table for addition features for your map.
The Annotate data set is created by an ordinary data step that contains additional information for the GMAP
procedure to use in which to put additional features on the map. The syntax in this data step follows a certain format
to get the results you want. For example:
data maplabel;
length function $ 8;
retain flag 0 xsys ysys '2' hsys '3' when 'a' style "'Albany AMT'";
set maps.uscenter(drop=long lat);
where fipstate(state) ne 'DC' and fipstate(state) ne 'PR';
function='label'; text=fipstate(state); size=2.5; position='5';
if ocean='Y' then
do;
position='6'; output;
function='move';
flag=1;
end;
else if flag=1 then
do;
function='draw'; size=.5;
flag=0;
end;
output;
run;
Figure 5
Use the tables created in PROC GMAP.
The map data set will be placed after the MAP= statement. The response data set will be placed after the DATA=
statement. The variable of interest is placed after the CHORO statement. The Annotate data set created earlier will
be placed at the ANNOTATE options statement. The ID statement uses the geographical variable to create the
image, in this example it is the STATE variable. The FORMAT statement below allows the user to change the
response variable value into the format that is being applied; in this case it is the percent change format. This is done
so that the numeric values in the legend are presented in a manner that is desired for the map’s purpose. Below is an
example of a PROC GMAP starter code that creates a map.
proc gmap data=pop map=maps.us;
format change tghat.;
id state;
Geospatial Analysis with PROC GMAP, continued SESUG 2016
5
choro change / discrete coutline=black annotate=maplabel;
run;
quit;
Figure 6
Regional, State, County U.S. maps
Having the ability to create different levels of maps can greater assist the analysis whenever researching or
investigating a hypothesis within the context of geography. Using a similar syntax from the previous code I will show
how to display data by state, county, and by regional area.
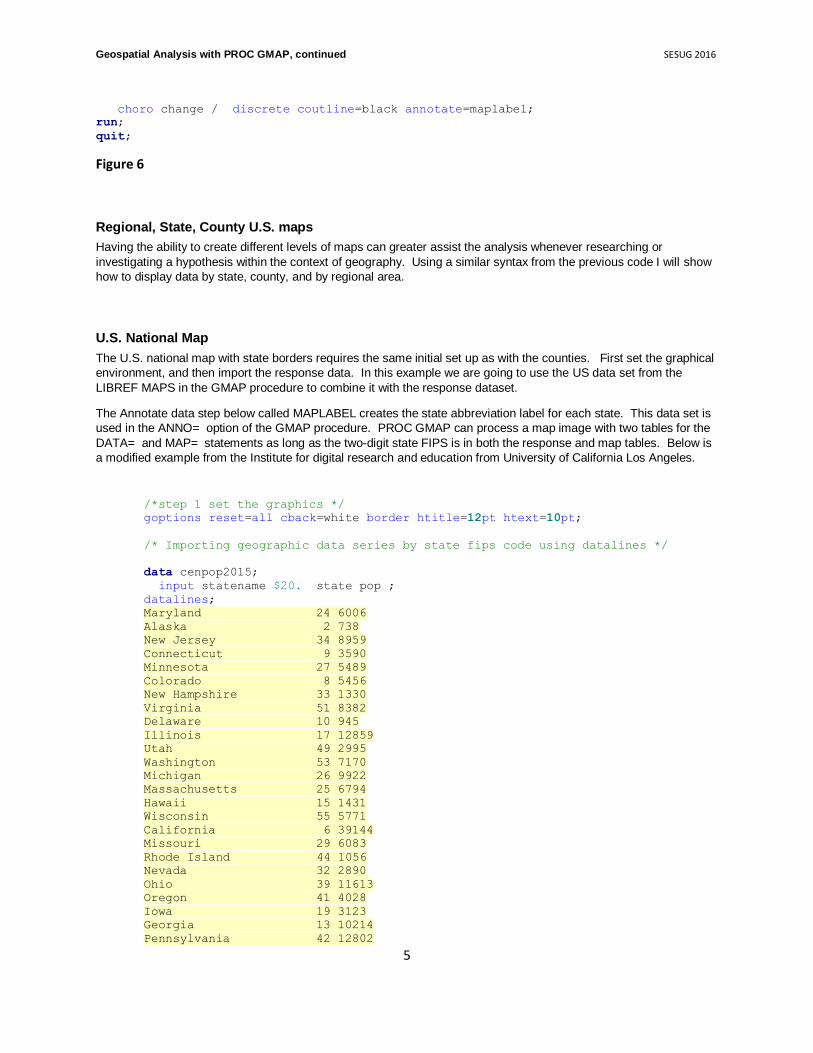
U.S. National Map
The U.S. national map with state borders requires the same initial set up as with the counties. First set the graphical
environment, and then import the response data. In this example we are going to use the US data set from the
LIBREF MAPS in the GMAP procedure to combine it with the response dataset.
The Annotate data step below called MAPLABEL creates the state abbreviation label for each state. This data set is
used in the ANNO= option of the GMAP procedure. PROC GMAP can process a map image with two tables for the
DATA= and MAP= statements as long as the two-digit state FIPS is in both the response and map tables. Below is
a modified example from the Institute for digital research and education from University of California Los Angeles.
/*step 1 set the graphics */
goptions reset=all cback=white border htitle=12pt htext=10pt;
/* Importing geographic data series by state fips code using datalines */
data cenpop2015;
input statename $20. state pop ;
datalines;
Maryland 24 6006
Alaska 2 738
New Jersey 34 8959
Connecticut 9 3590
Minnesota 27 5489
Colorado 8 5456
New Hampshire 33 1330
Virginia 51 8382
Delaware 10 945
Illinois 17 12859
Utah 49 2995
Washington 53 7170
Michigan 26 9922
Massachusetts 25 6794
Hawaii 15 1431
Wisconsin 55 5771
California 6 39144
Missouri 29 6083
Rhode Island 44 1056
Nevada 32 2890
Ohio 39 11613
Oregon 41 4028
Iowa 19 3123
Georgia 13 10214
Pennsylvania 42 12802

Geospatial Analysis with PROC GMAP, continued SESUG 2016
6
Indiana 18 6619
Vermont 50 626
New York 36 19795
Maine 23 1329
Arizona 4 6828
Texas 48 27469
Nebraska 31 1896
North Carolina 37 10042
Kansas 20 2911
Wyoming 56 586
District of Columbia 11 672
Idaho 16 1654
Florida 12 20271
Kentucky 21 4425
South Carolina 45 4896
Alabama 1 4858.9
South Dakota 46 858
Tennessee 47 6600
New Mexico 35 2085
Oklahoma 40 3911
North Dakota 38 756
Montana 30 1032
Louisiana 22 4670
Mississippi 28 2992
Arkansas 5 2978
West Virginia 54 1844
;
run;
data maplabel;
length function $ 8;
retain flag 0 xsys ysys '2' hsys '3' when 'a' style "'Albany AMT'";
set maps.uscenter(drop=long lat);
where fipstate(state) ne 'PR';
function='label'; text=fipstate(state); size=2.5; position='5';
if ocean='Y' then
do;
position='6'; output;
function='move';
flag=1;
end;
else if flag=1 then
do;
function='draw'; size=.5;
flag=0;
end;
output;
run;
/* this proc step creates the basic US maps with state lines
coming from the MAPS library in SAS. The ID statement includes the
state variable which identifies where the income values will go.
The choro statement puts the matching state to income values by color on the
map. */
title height=2 font="Times New Roman" "U.S. MAP OF STATES";

Geospatial Analysis with PROC GMAP, continued SESUG 2016
7
title2 height=2 font="Times New Roman" "STATE LEVEL POPULATION ESTIMATES (in
thousands)";
footnote J=L font="Times New Roman" "DATA SOURCE: U.S. CENSUS";
footnote2 J=L font="Times New Roman" "TIME PERIOD: 2015";
FOOTNOTE3 J=L FONT="Times New Roman" "CYCLE: ANNUAL";
proc gmap data = cenpop2015 map=maps.us;
id state;
choro pop/ annotate=maplabel;
label pop="Civilian Popluation";
run;
quit;
Figure 7
Output 2. U.S. National Map with state lines and abbreviations.
The MAPLABEL DATA step creates the state abbreviations as well as the thickness of the boarders. This data set is
placed in the ANNOTATE = statement to produce this visualization.
U.S. National Map with state and county boundaries
County boundaries are an important geographical identifier when analyzing smaller level estimates. Shown in the
larger context across the U.S. national map, estimates distribution can be more noticeable. In this example the
USCOUNTY map dataset from the MAPS libref is used. Moreover, at the ID statement instead of just the STATE
variable the STATE and COUNTY variable needs to be included in the PROC GMAP procedure step. The PROC
GREMOVE is used to break down the state and county borders
/*step 1 set the graphics */
goptions reset=all cback=white border htitle=12pt htext=10pt;
libname n 'C:\GMAP\DEMO_MAPS ';
/*step 2 import the file to be used */
data fmt;

Geospatial Analysis with PROC GMAP, continued SESUG 2016
8
set n.pi (rename = (STCTY = statecode ));
run;
/*step 3 reformat the variables to be used in later proc steps */
data sasdata2;
set fmt;
statear=substr(statecode,1,2);
ctyfips=substr(statecode,3,3);
run;
data sasdata3;
set sasdata2;
STATE=input(statear,comma5.);
COUNTY=input(ctyfips,comma5.);
if COUNTY=901 then COUNTY=009; *this if statement is to change the state of
Hawaii county code to be used by PROC GMAP due to the different naming convention of
the response and map data set;
run;
proc sort data=sasdata3;
by state county;
run;
/*combine datasets as needed */
data uscb;
merge sasdata3 (in=a) maps.uscounty (in=b);
by state county;
if a=1 and b=1;
run;
proc sort data=uscb out=divstate;
by state county;
run;
/*for US Map for County lines collect the county projected dataset */
data newmap;
set maps.uscounty;
by state;
run;
proc sort data=newmap out=newdivs;
by state;
run;
proc gremove data=newdivs out=remstate;
by state;
id county;
run;
/* creating state boundaries */
data annost;
set remstate;
by state segment;

Geospatial Analysis with PROC GMAP, continued SESUG 2016
9
length function color $8;
retain xsys ysys '2' when 'a' color 'black' size 1.95;
drop xsave ysave;
if first.segment then function='poly';
/* Draw to each successive coordinate */
else function='polycont';
output;
run;
/* creating state labels and take out Puerto Rico from the data set */
data maplabel;
length function $ 8;
retain flag 0 xsys ysys '2' hsys '3' when 'a' style 'swissb';
set maps.uscenter(where=(fipstate(state) ne 'DC') drop=long lat);
if fipstate(state)= 'PR' then delete;
function='label';
text=fipstate(state);
size=2.5; /*control the size of state letters */
position='5';
if ocean='Y' then
do;
position='6'; output;
function='move';
flag=1;
end;
else if flag=1 then
do;
function='draw'; size=.25;
flag=0;
end;
output;
run;
/*combine annotate datasets to be placed on the map */
data conanno;
set maplabel annost;
run;
/* create the map */
proc gmap map=divstate data=divstate anno=conanno all;
id state COUNTY;
choro Y2011 / statistic=sum ;
format Y2011 dollar12.0;
run;
quit;
Figure 8

Geospatial Analysis with PROC GMAP, continued SESUG 2016
10
Output 3. U.S. map with county borders.
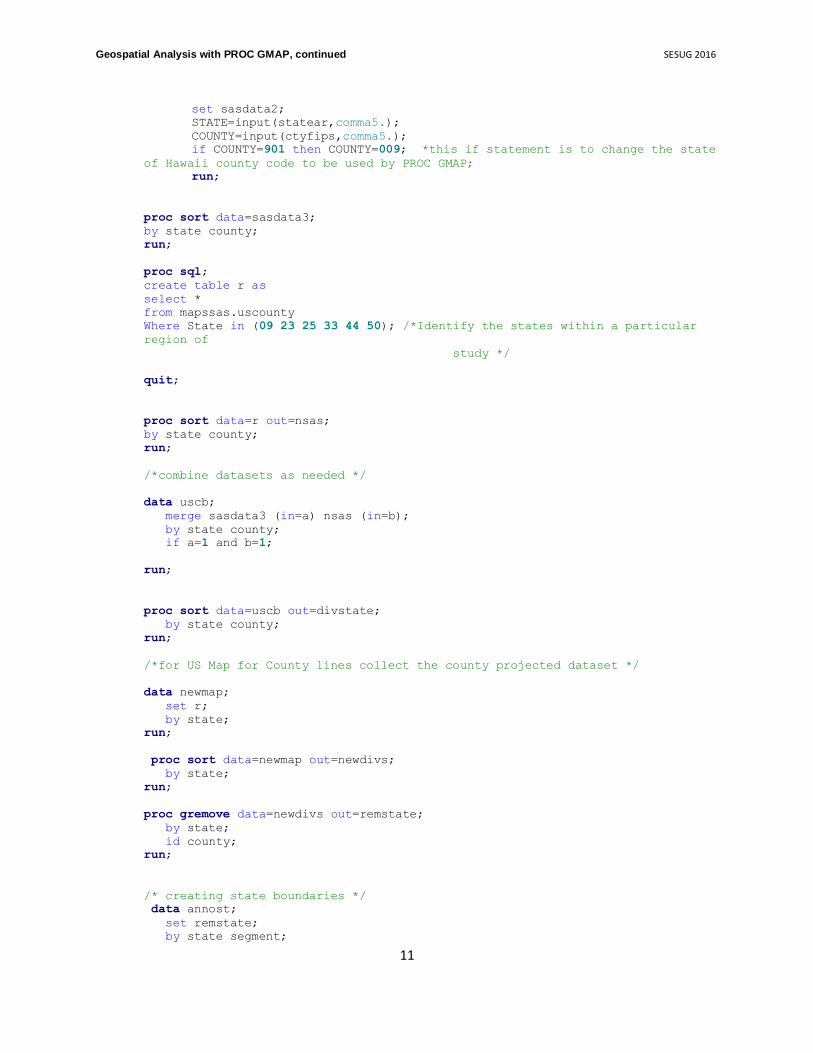
Regional map
In this demonstration I will cover creating a regional map of states while presenting county borders. This task is a
little bit more complicated; however, if you are in a situation where you’re dealing with multiple states this section will
help your efforts. Just as before, set the graphical environment in the beginning using GOPTIONS statement. Next,
import the data set used and insure that it has the proper location variables needed. Match tables as needed
throughout the program. The SQL procedure step the important part of this process which is collecting the states of
interest from the map data set.
In this demonstration I am looking at the New England states. These states are identified in the WHERE statement.
Next merge the response and map data set. After this is done the GREMOVE procedure step will be used to remove
borders of the state and county areas. The next step will be to create the new border areas using the annotate
facility for the state and county. Combine all the annotate data sets into one table and put it in the ANNO= statement
in the GMAP procedure. Finally, create the output format desired for your viewers as in the state and county map
demonstration.
/*step 1 set the graphics */
[Same as previous example]
/*step 2 import the file to be used */
[Same as previous example]
/*step 3 reformat the variables to be used in later proc steps */
data sasdata2;
set fmt;
statear=substr(statecode,1,2);
ctyfips=substr(statecode,3,3);
run;
data sasdata3;
Geospatial Analysis with PROC GMAP, continued SESUG 2016
11
set sasdata2;
STATE=input(statear,comma5.);
COUNTY=input(ctyfips,comma5.);
if COUNTY=901 then COUNTY=009; *this if statement is to change the state
of Hawaii county code to be used by PROC GMAP;
run;
proc sort data=sasdata3;
by state county;
run;
proc sql;
create table r as
select *
from mapssas.uscounty
Where State in (09 23 25 33 44 50); /*Identify the states within a particular
region of
study */
quit;
proc sort data=r out=nsas;
by state county;
run;
/*combine datasets as needed */
data uscb;
merge sasdata3 (in=a) nsas (in=b);
by state county;
if a=1 and b=1;
run;
proc sort data=uscb out=divstate;
by state county;
run;
/*for US Map for County lines collect the county projected dataset */
data newmap;
set r;
by state;
run;
proc sort data=newmap out=newdivs;
by state;
run;
proc gremove data=newdivs out=remstate;
by state;
id county;
run;
/* creating state boundaries */
data annost;
set remstate;
by state segment;

Geospatial Analysis with PROC GMAP, continued SESUG 2016
12
length function color $8;
retain xsys ysys '2' when 'a' color 'black' size 1;
drop xsave ysave;
if first.segment then function='poly';
/* Draw to each successive coordinate */
else function='polycont';
output;
run;
data rsasw;
set mapssas.uscenter;
if OCEAN='Y' then delete;
run;
/* This data set creates the state label for Rhode Island as it needs to be
placed in the ocean */
data ri;
set mapssas.uscenter;
where state= 44 and OCEAN='Y';
run;
data center;
length function $ 8;
retain flag 0 xsys ysys '2' hsys '3' when 'a';
set rsasw(where=(STATE in (09 23 25 33 50))) ri;
style = "'Albany AMT/bold'";
function='label';
text=fipstate(state);
size=2.5;
position='5';
if ocean='Y' then
do;
position='6';
output;
function='move';
flag=1;
end;
else if flag=1 then
do;
function='draw';
size=.25;
flag=0;
end;
output;
run;
/*combine annotate datasets to be placed on the map */
data conanno;
length x 8 y 8;
set center annost;
run;
/* create the map */

Geospatial Analysis with PROC GMAP, continued SESUG 2016
13
title height=2 font="Times New Roman" "REGONAL MAP OF NEW ENGLAND";
title2 height=2 font="Times New Roman" "PERSONAL INCOME BY COUNTY";
footnote J=L font="Times New Roman" "DATA SOURCE: BEA";
footnote2 J=L font="Times New Roman" "TIME PERIOD: 2011";
FOOTNOTE3 J=L FONT="Times New Roman" "CYCLE: ANNUAL";
proc gmap map=divstate
data=divstate anno=conanno GOUT=new ;
id state COUNTY;
choro Y2011 / statistic=sum ;
format y2011 comma20.;
label Y2011=WAGES;
run;
quit;
title;
Figure 9
Output 4. U.S. map of the Northeast region
State Map with county lines
Working at a smaller spatial area can be considered more valuable than national level estimates. Because at a
smaller area one can more easily associate the different terrain features that might have an effect on the variable
being measured. For example, the road that runs through different counties may contribute to the increase in wages
for that area. Each state in the U.S. is comprised of several counties which defines its physical position. Each state
has a different number of counties.
Below is an example of how to construct a state map with county lines which includes the names of each county
labeled on the map by using the %MAPLABEL macro.
data sasdata4;
set sasdata3;
keep y2011 STATE COUNTY;
run;
proc sort data= sasdata4;
by STATE COUNTY;

Geospatial Analysis with PROC GMAP, continued SESUG 2016
14
run;
/* Create a projected map of the state with county boundaries */
proc gproject data=maps.counties out=ctymap;
/* State FIPS for state */
where state=21;
id state county;
run;
quit;
data sasdata5;
set sasdata4 (in=a) ctymap (in=a);
by STATE COUNTY;
run;
proc sort data=sasdata5;
by state county;
run;
/* Create a data set containing the names of the counties */
/* in state. */
data ctynames;
set maps.cntyname;
/* State FIPS code for state */
where state=21;
run;
/* Make the annotate macros available */
%annomac;
%maplabel(ctymap,ctynames,anno,countynm,state county,font='Albany AMT/bold',
color=black,size=1.0); *change size to fit text inside the map outline,
also change first two data sets;
title1 "County Map of Kentucky Contract Labor County Wage Estimates";
footnote "Wages are in 1000's of U.S. dollars";
* fill patterns for the map/county areas for wage totals (gray-scale fills);
pattern1 v=s c=grayff;
pattern2 v=s c=grayda;
pattern3 v=s c=grayaa;
pattern4 v=s c=gray68;
/* Generate a county map with county labels */
ods html;
proc gmap data=sasdata5 map=ctymap;
id state county;
choro y2011 / anno=anno;
format y2011 dollar12.0;
run;
quit;
Figure 10
The %MAPLABEL macro should be a pre-constructed macro within your SAS system. It is used as a shortcut when
creating labels for counties.

Geospatial Analysis with PROC GMAP, continued SESUG 2016
15
%MAPLABEL (map-dataset, attr-dataset,output-dataset,label-var,id-
list,font=font_name,color=n,size=n,hsys=n);
The macro parameters for %MAPLABEL are:
The input map dataset
Data set that contains
Output data set for use in ANNO= in GMAP
Variable for the labeling
List of IDs that the map and attribute sorted under
FONT= Font for the label
COLOR= Color of the label
SIZE= Size of the label
HSYS= UNIT system for SIZE=
Output 5. State map with county boarders and names.
County Map
Whenever constructing a U.S. county map the five-digit FIPS code is the vital component to your data set. In this
example, I will demonstrate creating a map of just counties within the context of a specific state. However, do not let
this example limit your belief that only this type of scale map can be made.
After setting the graphical options and importing the response table, use the five-digit FIPS code (sometimes called
county FIPS) to create two variables which are STATE and COUNTY. The STATE variable will have the two-digit
state FIPS code and the COUNTY variable will have the three-digit FIPS code which is the last piece of the variable
that identifies each specific county within a state.
In the MAP data set this is already done for you. Put the MAP data set in a DATA step and filter out only the counties
you want investigate. Next, match and merge the response data set and the map data set (using the COUNTIES
data set from the LIBREF MAPSAS) using either the IN= option in the DATA step or JOIN in SQL procedure. When
using the COUNTIES table keep the longitude and latitude variables.

Geospatial Analysis with PROC GMAP, continued SESUG 2016
16
Afterwards, use the GPROJECT procedure to process the data set. The GPROJECT procedure converts longitude
and latitude variables so that the GMAP procedure can display the table.
Next, input the table that has the map data set and the response data into the PROC GMAP. The ID statement must
identify the county and state variables created earlier. Finally, create the text and formats that you want to have
display for your viewers.
data sasdata2;
set fmt;
statear=substr(statecode,1,2);
ctyfips=substr(statecode,3,3);
run;
data sasdata3;
set sasdata2;
STATE=input(statear,comma5.);
COUNTY=input(ctyfips,comma5.);
if COUNTY=901 then COUNTY=009;
run;
data mymap;
set mapssas.counties(where=(fipstate(state)='GA' and county in (001 003 005)));
run;
proc sort data=sasdata3;
by state county;
run;
proc sort data=mymap;
by state county;
run;
data combined;
merge sasdata3(in=a) mymap(in=b);
by state county;
if a=1 and b=1;
run;
proc gproject data=combined out=combined dupok;
id state county;
run;
title height=2 font="Times New Roman" "COUNTY MAP OF BALDWIN, BANKS, AND BARROW IN
THE STATE OF GEORGIA";
title2 height=2 font="Times New Roman" "PERSONAL INCOME BY COUNTY";
footnote J=L font="Times New Roman" "DATA SOURCE: BEA";
footnote2 J=L font="Times New Roman" "TIME PERIOD: 2011";
FOOTNOTE3 J=L FONT="Times New Roman" "CYCLE: ANNUAL";
proc gmap data=combined map=combined ;
id state county;
choro Y2011 / stat=sum coutline=black ;
format y2011 dollar20.;
label Y2011=WAGES;
run;
quit;

Geospatial Analysis with PROC GMAP, continued SESUG 2016
17
Figure 11
Output 6. County map within the state of Georgia.
Statistical measures and the histogram
At this point we have covered several different types of heat maps that can be made for analytical purposes.
Statistical measures can also be used as tools can also be used to gather information from a geographical area.
First step when analyzing your data decide the area that will be investigated. Sub-setting certain areas of interest,
like cluster of counties or regional sections of the national map, and applying statistical will allow the analyst to be
able to infer more information.
For example, taking all the states in the Northeast region to construct the kurtosis one can see if these areas have
states that are experiencing extreme observations, outliers, for a particular measure that is being studied.
proc univariate data=divstate ;
var Y2011;
histogram ;
run;
Figure 12
Output 7. Histogram of Northeast region
Geographical Statistics
In this section a review of measures of central tendency, measures of dispersion, and measures of shape will be
covered to show some examples of measures that can be used geographically.

Geospatial Analysis with PROC GMAP, continued SESUG 2016
18
Measures of central tendency
The typical value of a data series can be estimated by using the median, mean, or mode. The mode is simply the
value that occurs most frequently in a data set but it does not offer practical results. The mean (arithmetic mean) is
the most widely measure of central tendency. However, this measure can easily be affected by outliers with the data
set. The median can actually prove to be more robust compared to the mean in the case of outliers. These three
measures identify the center of a distribution.
Measures of Dispersion
Some typical measures of dispersion that can be used for measuring geographical areas are the average deviation,
or coefficient of variation. The average deviation is based on the mean of a set of scores of the area being studied. It
is the absolute value of the sum of scores different form the mean divide by the number of areas being studied. This
tells the analyst which section deviates from the overall area.
The coefficient of variation is the standard deviation divided by the mean. This measure reports how disperse the
sections (data points) are from the mean of the area. The higher the value the more dispersed the sections with the
area for the topic being analyzed. Conversely, the lower the value the less dispersed each section is from the area.
Measures of shape
Within the context of geographical statistics the traditional measures of shape, skewness and kurtosis, become more
valuable. The skewness still can determine whether an area has outliers. However, the kurtosis measure can report
if sections cluster around a central point. If the kurtosis is positive then observations have a stronger concentration of
a cluster. Conversely if this measure is negative or 0 then this means it is less or there is no cluster apparent.
When using these measures keep in mind that your observation count is still a solid determinate factor on the type of
analysis one should perform.
CONCLUSION
In summary, we covered in depth on how to make choropleth (heat) maps and some additional information to be
aware of when presenting your map to viewers. The first step in any project like this is to have an understanding
about what it is you are analyzing. Afterward, start building your map keeping in mind the color you’re using and
information presented either in text or geographical illustration. Don’t let this paper limit your capabilities as there are
still more ways to explore the use of GMAP procedure.
REFERENCES
Few, Stephen, “Practical Rules for Using Color in Charts”. http://www.perceptualedge.com/articles/visual_business_intelligence/rules_for_using_color.pdf
February 2008. Visual Business Intelligence Newsletter. July 4, 2016) Idre. “SAS Code Fragments Making maps with proc gmap”. University of California Los Angeles.
http://www.ats.ucla.edu/stat/sas/code/gmap.htm (August 26th, 2016) Zdeb, Mike. “The Basics of Map Creation with SAS/GRAPH® University of Albany School of Public Health. http://www.albany.edu/~msz03/251-29.pdf (July 3, 2016) Carpenter, Arthur L. “Data Driven Annotations: An Introduction to SAS/GRAPH’s® Annotate Facility”
California Occidental Consultants.

Geospatial Analysis with PROC GMAP, continued SESUG 2016
19
SAS. “Color-naming Schemes-Predefined SAS® Colors”.
https://v8doc.sas.com/sashtml/gref/zgscheme.htm#zxvalues (July 3, 2016)
SAS Institute Inc. , GPROJECT Procedure. Overview: GPROJECT Procedure Cary, NC: SAS Institute Inc.
http://support.sas.com/documentation/cdl/en/graphref/63022/HTML/default/viewer.htm#gprojectc
hap.htm (July 3, 2016)
SAS Institute Inc. , GMAP Procedure: Example 8: Using Traditional Map Data When Specifying the
Statistic for the Response Variable. Cary, NC: SAS Institute Inc.
http://support.sas.com/documentation/cdl/en/graphref/67881/HTML/default/viewer.htm#n10en3b
9tjnqb8n1otej9smhvsfk.htm (July 3, 2016)
SAS Institute Inc., %MAPLABEL macro. Cary, NC: SAS Institute Inc. http://support.sas.com/documentation/cdl/en/graphref/67881/HTML/default/viewer.htm#p09j2f8si6
a6uan1fuqp9ym8guxr.htm (August 20, 2016)
SAS Institute Inc. The GMAP procedure. SAS/GRAPH® Software: Reference, Version 8, Cary, NC: SAS
Institute Inc., 1999.
McGrew,Lembo, Monroe. An Introduction to Statistical Problem Solving in Geography, 3rd ed.
Descriptive Problem Solving in Geography page 44-47
CONTACT INFORMAITON
Your comments and questions are valued and encouraged.
Contact the author at:
Michael Jadoo [email protected]
SAS and all other SAS Institute Inc. product or service names are registered trademarks or trademarks of SAS Institute Inc. in the USA and other countries. ® indicates USA registration.
Other brand and product names are trademarks of their respective companies.


![Aadad Ka Jadoo [Kutubistan.blogspot.com]](https://static.fdocuments.net/doc/165x107/577c7f011a28abe054a2d256/aadad-ka-jadoo-kutubistanblogspotcom.jpg)


