Georeferencing Soil Maps in ArcMap 9.x - Ryerson University
17
1 Georeferencing Soil Maps in ArcMap 9.x: Basic procedures to download, open, manipulate and print spatial data These procedures outline: A. Obtaining soil maps. B. Downloading boundary files. C. Uncompressing the downloaded file. D. Opening the boundary file and soil map in ArcMap 9.x. E. Georeferencing the soil map. F. Saving. G. Preparing the layout for printing and exporting the map into various file formats. In order to use these instructions, you must have ArcMap 9.x. In this example, we are going to use a soil map of Peel County obtained from The National Land and Water Information Service via the library catalogue. In addition, a Toronto CMA boundary file will be downloaded from the Ryerson University Library website. A. Obtaining the Soil Map The soil map used in this procedure will be obtained from The National Land and Water Information Service. The Ryerson University Library has various soil survey maps in the Geospatial Map and Data Centre map cabinets as well as on reserve. The soil maps that are catalogued are searchable through the use of the Ryerson Library website. Some of the records within the catalogue have a direct link to The National Land and Water Information Service where users can view online versions of soil reports or download digital versions of soil maps. This procedure will outline the latter. 1. Browse to the Ryerson University Library website (www.ryerson.ca/library) and click Catalogue. This will take you to the catalogue search page. 2. In the search box type in soil survey of Peel County. Note: Soil maps in Ontario are published by county, if you would like to select another area type in soil survey of (desired region) County. Click Soil survey of Peel County / by D.W. Hoffman and N.R. Richards. 3. In the Connect to Internet Resources table click View map online. Scroll down below the map and click Download. 4. Save the file in an appropriate location on your hard drive that is easily accessible. B. Downloading Boundary Files
Transcript of Georeferencing Soil Maps in ArcMap 9.x - Ryerson University
1
Georeferencing Soil Maps in ArcMap 9.x: Basic procedures to download, open, manipulate and print spatial data These procedures outline:
A. Obtaining soil maps. B. Downloading boundary files. C. Uncompressing the downloaded file. D. Opening the boundary file and soil map in ArcMap 9.x. E. Georeferencing the soil map. F. Saving. G. Preparing the layout for printing and exporting the map into various file formats.
In order to use these instructions, you must have ArcMap 9.x. In this example, we are going to use a soil map of Peel County obtained from The National Land and Water Information Service via the library catalogue. In addition, a Toronto CMA boundary file will be downloaded from the Ryerson University Library website. A. Obtaining the Soil Map The soil map used in this procedure will be obtained from The National Land and Water Information Service. The Ryerson University Library has various soil survey maps in the Geospatial Map and Data Centre map cabinets as well as on reserve. The soil maps that are catalogued are searchable through the use of the Ryerson Library website. Some of the records within the catalogue have a direct link to The National Land and Water Information Service where users can view online versions of soil reports or download digital versions of soil maps. This procedure will outline the latter.
1. Browse to the Ryerson University Library website (www.ryerson.ca/library) and click Catalogue. This will take you to the catalogue search page.
2. In the search box type in soil survey of Peel County. Note: Soil maps in
Ontario are published by county, if you would like to select another area type in soil survey of (desired region) County. Click Soil survey of Peel County / by D.W. Hoffman and N.R. Richards.
3. In the Connect to Internet Resources table click View map online. Scroll down
below the map and click Download.
4. Save the file in an appropriate location on your hard drive that is easily accessible.
B. Downloading Boundary Files
2
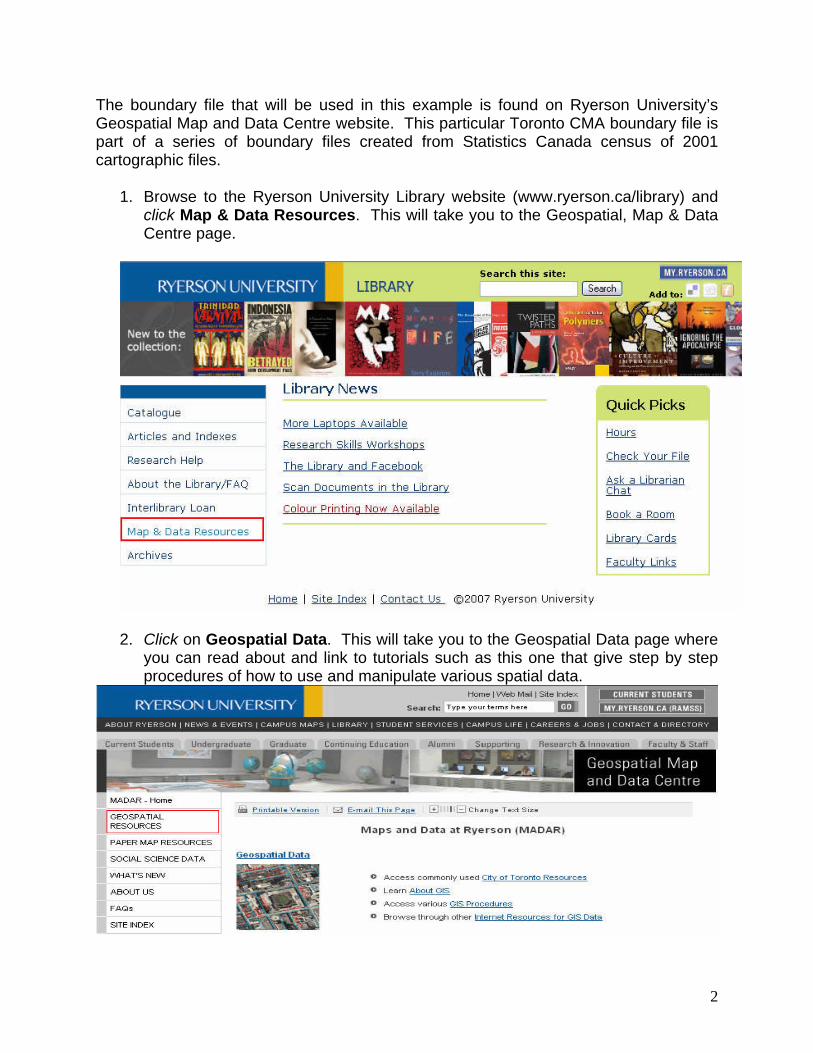
The boundary file that will be used in this example is found on Ryerson University’s Geospatial Map and Data Centre website. This particular Toronto CMA boundary file is part of a series of boundary files created from Statistics Canada census of 2001 cartographic files.
1. Browse to the Ryerson University Library website (www.ryerson.ca/library) and click Map & Data Resources. This will take you to the Geospatial, Map & Data Centre page.
2. Click on Geospatial Data. This will take you to the Geospatial Data page where
you can read about and link to tutorials such as this one that give step by step procedures of how to use and manipulate various spatial data.

3
3a. In the search textbox, type in Boundary. Click Search.
b. Scroll to and click the record titled Toronto CMA and GTA Boundary Files.
4. This is the record information page that gives detailed information about the data that you are about to download. Click Link to Index Map. Click CMA COUNTY.

4
5. You will then be asked for your Matrix user name and password (the same as
your Ryerson e-mail and password), fill this information out then click Login. a. Read the DMTI Data Release Agreement then click I Agree. b. In the view data page click CMA_county.zip.
6. Once the file is clicked, you will be prompted to Open or Save each file. Save the file to an appropriate location on your hard drive.
C. Uncompressing the Downloaded Files As you may have noticed while downloading the boundary file and the soil image, the extension for the file was .zip. This is a Zip file or compressed file. Files are stored in this format on the server to save space. The following section outlines the procedure for uncompressing these files. The extraction process varies depending on whether or not WinZip is loaded on your computer. Select one of the following options: With WinZip

5
1. Browse to the location of the downloaded file. 2. Right click the desired file. 3. Scroll down to WinZip then click Extract to folder…
Without WinZip
1. Browse to the location of the downloaded file. 2. Right click the desired file. 3. In the drop down menu, click Extract All and then follow the instructions in the
Extraction Wizard for each file downloaded.
D. Opening the Boundary file and Soil Map in ArcMap 9.x ArcMap 9.x is software that allows the user to view, manipulate or create spatial data. ArcMap is part of the ArcGIS software package created by ESRI. This section will demonstrate how to open files in ArcMap 9.x.
1. The first step is to open ArcMap. Double-Click on the ArcMap 9.x icon or Select Start > Programs > ArcGIS > ArcMap. ArcMap should automatically prompt
the option to Add Data. Otherwise, Click the Add Data button .

6
2. In the Add data window,
browse to the shape file that you wish to add (in this example it is CMA_county.shp). Note: If there were more than one file in this folder, you can hold down the CTRL or Shift key to select multiple files and open them at the same time.
3. Click Add.
Your data view (main viewing window) should show a file similar to the one below. Note: Your colours may be slightly different as ArcMap 9.x chooses the colours at random when the files are initially opened. Zoom in to Peel County.
4. Repeat steps 2 and 3 to open the soil image (on18_map.jpg). Note: Initially, the soil image will not appear in the data view. When adding the soil image, if asked to build pyramids, select Yes.
E. Georeferencing the Soil Map
7
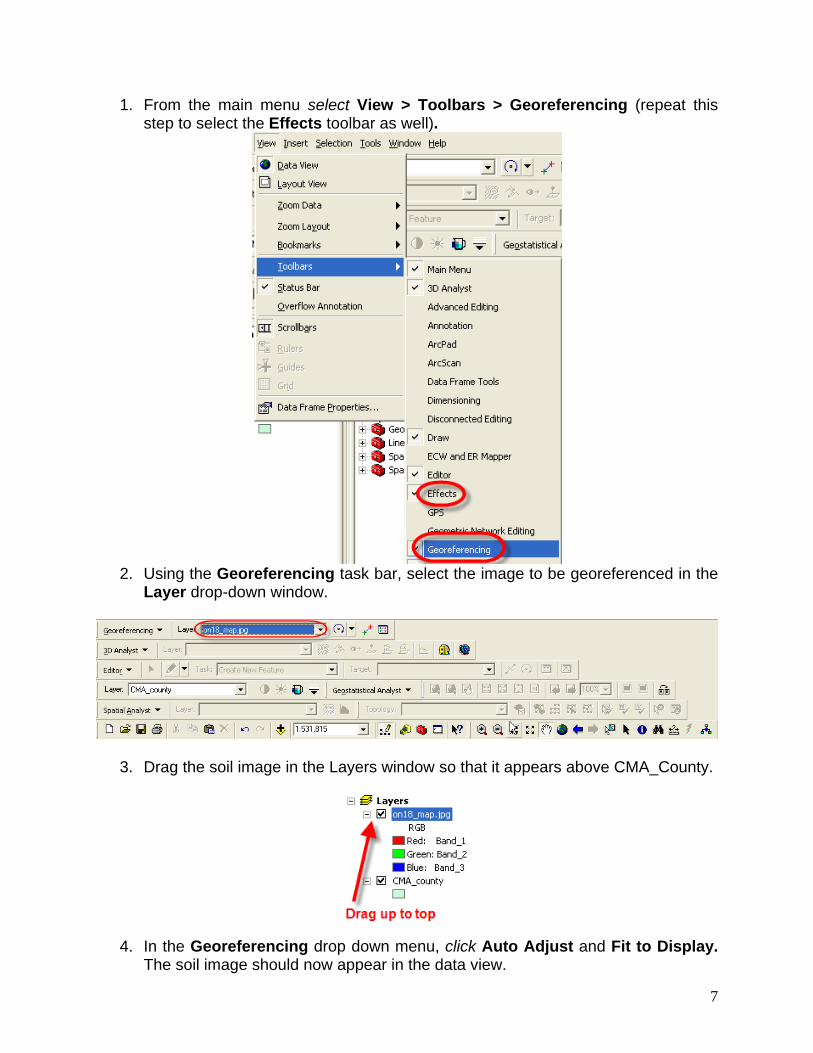
1. From the main menu select View > Toolbars > Georeferencing (repeat this step to select the Effects toolbar as well).
2. Using the Georeferencing task bar, select the image to be georeferenced in the
Layer drop-down window.
3. Drag the soil image in the Layers window so that it appears above CMA_County.
4. In the Georeferencing drop down menu, click Auto Adjust and Fit to Display.
The soil image should now appear in the data view.

8
5. In the Effects toolbar select the soil image (on18_map.jpg) in the drop down menu. Using the Adjust Transparency button located in the Effects toolbar, select a transparency percent that will allow you to adequately view the boundary file underneath your soil image (40% works well).
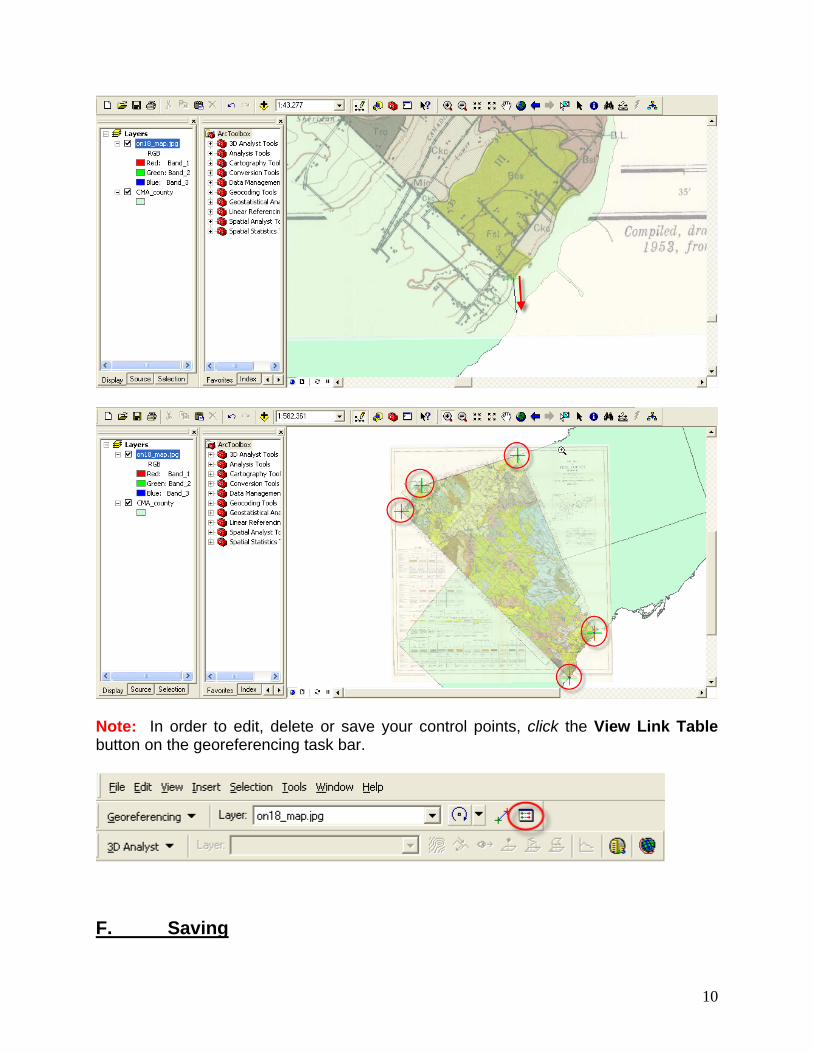
6. Click the Add Control Points button. Click a point on the soil map image (a green cross will appear) then click a known point on the Toronto CMA boundary file (a red cross will appear). Repeat this step four times using the corners of Peel Region as reference points. Note: ArcGIS needs at least 3 control points. Eventually, your image will warp into place.

9
You may want to zoom in order to align the corners more accurately.
10
Note: In order to edit, delete or save your control points, click the View Link Table button on the georeferencing task bar.
F. Saving

11
1. In the Georeferencing drop down menu, click Update Georeferencing to save the transformation information with the raster dataset. This creates a new file with the same name as the raster dataset, but with an .aux file extension. It also creates a world file for .tif and .img files.
G. Preparing the Layout for Printing and Exporting the Map into
Various File Formats Compared to other GIS software, creating a layout in ArcMap is a simple task. The following section describes how to create a basic layout including the fundamental map elements.
1. To change the View from Data View to Layout View. Click View from the main menu and Select Layout View from the drop down menu.
2. Note: If your layout view is already in portrait view then skip to step 3. The Peel County image is elongated vertically, thus it would be more appropriate to

12
display the map on a portrait image. From the main menu, click File then click Page and Print Setup.
a. In the Page and Print Setup window click on the Portrait radio button and check
on the Scale Map Elements … button. Then click OK.
You should notice that your layout view has changed to portrait.
3. Neatline – A neatline is automatically added to the
layout view, however, in the previous step we changed

13
the layout to portrait and now the neatline must be adjusted to fit the print layout. In order to do this, grab one of the corners of the neatline and drag it to the corresponding corner of the page layout (Do not pull the corner farther than the dotted lines because anything outside of that region will not be printed). Example below.
Note: if you would like to add a neatline to other objects in the layout, click the object, click Insert from the main menu, then click Neatline. The Neatline window will appear allowing you to change the properties of the neatline. Click OK, when you are satisfied with the neatline.
4. Click Insert from the main menu. In the
ensuing drop down menu, you can add a Title, Legend, North Arrow, and Scale Bar. Once inserted into the layout view, each item can be manipulated by Double-Clicking on it. Examples are listed below:
5. Title – Click Insert from the main menu. Select Title. In the Text textbox type in
the title Major Roads, Highways and Golf Courses in the City of Toronto (2005) then push Enter on your keyboard. Double-Click the Title to open the Properties window.
14
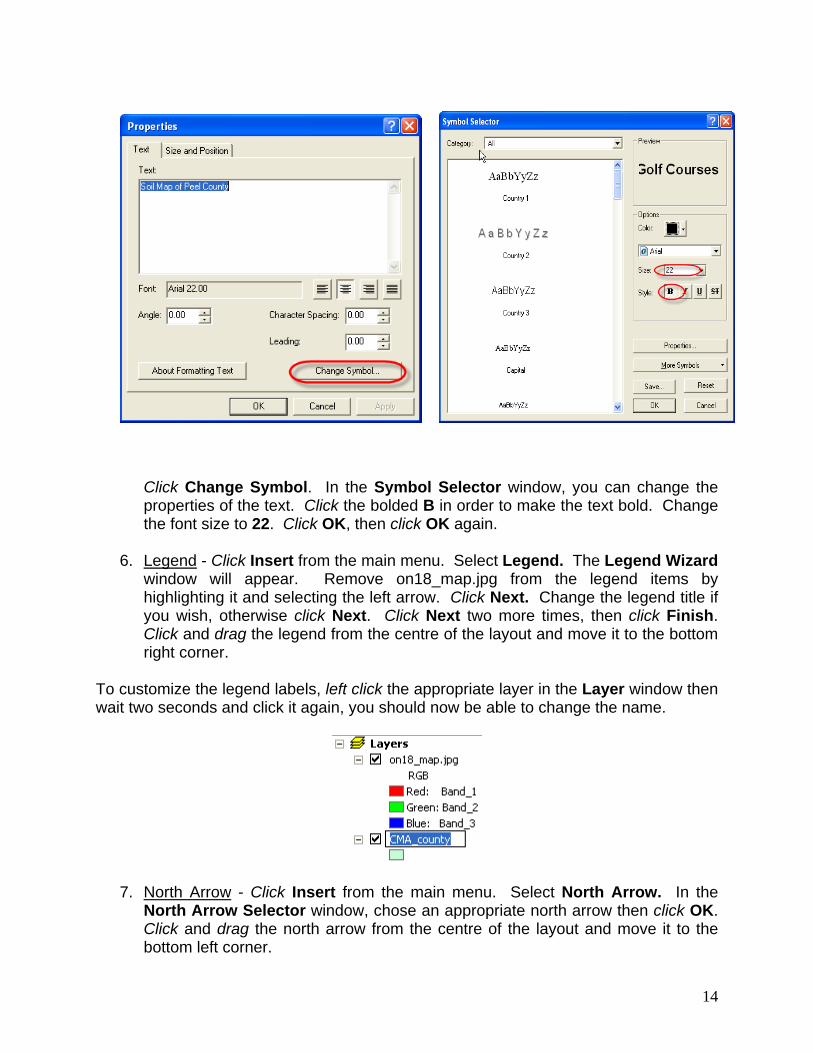
Click Change Symbol. In the Symbol Selector window, you can change the properties of the text. Click the bolded B in order to make the text bold. Change the font size to 22. Click OK, then click OK again.
6. Legend - Click Insert from the main menu. Select Legend. The Legend Wizard window will appear. Remove on18_map.jpg from the legend items by highlighting it and selecting the left arrow. Click Next. Change the legend title if you wish, otherwise click Next. Click Next two more times, then click Finish. Click and drag the legend from the centre of the layout and move it to the bottom right corner.
To customize the legend labels, left click the appropriate layer in the Layer window then wait two seconds and click it again, you should now be able to change the name.
7. North Arrow - Click Insert from the main menu. Select North Arrow. In the North Arrow Selector window, chose an appropriate north arrow then click OK. Click and drag the north arrow from the centre of the layout and move it to the bottom left corner.

15
8. Scale Bar - Click Insert from the main menu. Select Scale Bar. Click
Properties to open the Scale Bar window. In the Division Units textbox, select kilometers. Click OK. Click OK. Click and drag the scale bar from the centre of the layout and move it to an appropriate position below the map.
If done correctly, your map should look like the image below.

16
9. To print the map, Click File from the main menu and Select Print from the drop down menu. After selecting the appropriate printer and print specifications, Click OK.
Exporting to PDF or Other Formats
Alternatively, you may opt to export your map and save it for later use rather than printing your map. ArcMap offers a variety of file types that you can save your map as. The following procedure will show you how to export your map, using one of the various file types.
1. Once you have completed Steps 1 through 8 above or you are satisfied with your map, you may begin the export procedure. Click File from the main menu and Select Export Map.

17
2. The Export Map window will open. In the Save In window, browse to the location that you wish to save your map. In the File Name text box, chose an appropriate name for your map. In the Save as Type textbox select the format that you would like to save your map in.
3. Click Save.
Noel Damba November 28, 2006