Georeferencing - iDigBio Web viewWhen georeferencing MONTU and FLD specimens, I use Symbiota...
20
Georeferencing Procedure Outline Michael Yost | MaCC Project Assistant Denver Botanic Gardens Greetings, fellow georeferencers! My name is Mike Yost, Macrofungi Collection Consortium (MaCC) Project Assistant at the Denver Botanic Gardens. I am currently georeferencing specimens for the University of Montana Herbarium (MONTU) and the Fort Lewis College Herbarium (FLD). I would like to share what I have learned working through these two collections. In this blog, I will outline my georeferencing process, cultivated from the training I received here in Denver as well as the instructions provided in the MaCC manual. (Additional information regarding Georeferencing Best Practices can be found here on the Global Biodiversity Information Facility website: http://www.gbif.org/resource/80536 ) Although the MaCC manual provides basic georeferencing procedures, I began to have additional questions as I was working through the MONTU and FLD collections.
Transcript of Georeferencing - iDigBio Web viewWhen georeferencing MONTU and FLD specimens, I use Symbiota...

Georeferencing Procedure OutlineMichael Yost | MaCC Project AssistantDenver Botanic Gardens
Greetings, fellow georeferencers!
My name is Mike Yost, Macrofungi Collection Consortium (MaCC) Project Assistant at the Denver Botanic Gardens.
I am currently georeferencing specimens for the University of Montana Herbarium (MONTU) and the Fort Lewis College Herbarium (FLD). I would like to share what I have learned working through these two collections.
In this blog, I will outline my georeferencing process, cultivated from the training I received here in Denver as well as the instructions provided in the MaCC manual. (Additional information regarding Georeferencing Best Practices can be found here on the Global Biodiversity Information Facility website: http://www.gbif.org/resource/80536)
Although the MaCC manual provides basic georeferencing procedures, I began to have additional questions as I was working through the MONTU and FLD collections.
For example, what are the parameters when georeferencing specimens found along creeks, rivers, or trails? Where do I set the uncertainty radius for those specimens when using the point-radius method? What if I want to batch georeference numerous specimens collected in the same location? How do I consolidate specimens collected in identical locations, but with varying locality verbiage?
Georeferencing ProcedureMike Yost | Denver Botanic Gardens
My hope is that this blog will answer those questions and assist other project assistants as they work through their own collections. Keep in mind that I’m using a single location as example, and that this blog is not intended to be an all-encompassing outline for georeferencing protocols.
With that said, I also hope to build a platform for dialogue between other project assistants who would like to post their own georeferencing procedures and questions, sharing what they have learned through their own georeferencing process.
Let’s begin!
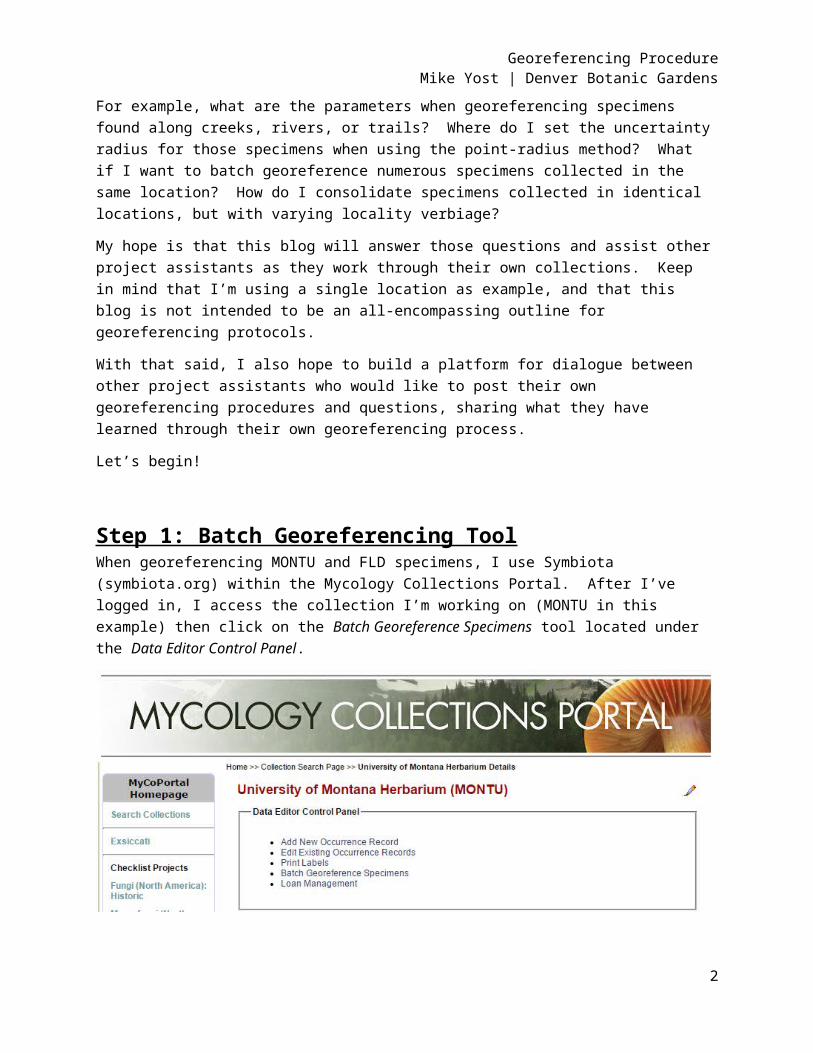
Step 1: Batch Georeferencing ToolWhen georeferencing MONTU and FLD specimens, I use Symbiota (symbiota.org) within the Mycology Collections Portal. After I’ve logged in, I access the collection I’m working on (MONTU in this example) then click on the Batch Georeference Specimens tool located under the Data Editor Control Panel.
The tool is helpful not only when I’m georeferencing multiple specimens collected in the same location, but also when georeferencing a single specimen at a time. For me, the main advantage to using this tool is that it generates a helpful list of similar locations within the same herbarium for which I can compare locality data.
Check out the image below, and I’ll show you what I mean. Once inside the Batch Georeference Tool, I access the Query Form to limit the number of specimens populated in the list. When working on specimens located within the USA, I prefer to georeference one county at a time. This limits the number of specimens generated, making the list easier to manage. In the example below, I limit my search to Erie County, Ohio.
2

Georeferencing ProcedureMike Yost | Denver Botanic Gardens
As you can see, only four specimens are listed in Erie County. I’ve seen counties with thousands of specimens and counties with just a single entry. Of course it all depends on the collection you’re working on. For the purposes of this blog, I’m keeping things simple with just four entries to a single county.
If you read through the locality data in the example above, you’ll quickly realize that each specimen, though separated as four different entries, designates the same area. So, I want to merge all of this locality data into a single entry before assigning coordinates to the specimens.
NOTE: If a specimen in the Portal contains no data in the locality field, that specimen will not appear in the batch tool list. For example, if a specimen was collected in Akron, Ohio in Summit County, but the city was not entered into the locality field (in addition to the municipality field), the specimen will not appear in a query search under the state of Ohio in Summit County. In addition, the GeoLocate tool will not be able to locate the city. I’ve made it a habit to add the municipality to the locality field (in addition to the municipality field) for this very reason.
Step 2: ConsolidationI’ve often found specimens that contain different verbiage to describe identical locations. Usually it’s because different collectors acquire specimens at similar locations and describe the area differently.
In this example, the locality information refers to the same area, but with slightly different verbiage for each entry. The Batch Georeference Tool will even separate entries if a single word isn’t capitalized (such as the word, river). And you’ll also notice the last entry contains a typo.
Before georeferencing, I edit the locality data so that all of these entries are uniform.
3

Georeferencing ProcedureMike Yost | Denver Botanic Gardens
NOTE: Be sure to check with your project manager regarding this step. Some institutions require that the locality information should be transcribed exactly as written with no changes, regardless of typos or slight differences in verbiage.
I use the editing tool (the pencil located across from the Return Count) to edit the locality verbiage for each specimen. I then add the following to the locality field: East branch of Vermilion River, southeast corner of Erie County.
NOTE: DO NOT INFER LOCATION! If you use this method, be very careful not to infer where the specimen was collected. For example, let’s say one of the entries included the following: “Southern bank of east branch of Vermillion River, southeast corner of Erie County.” In this case, you would not include this specimen in the consolidation process, since there is addition locality information regarding which side of the river bank the specimen was collected. In addition, you would not add southern bank to any of the other entries, even if it’s the same collector on the same day.
After I make the edits and save the changes to each specimen, I click on the Generate List button again. The following now appears in the field:
Happiness! I verify that the number located at the end of the entry now reads [4], representing the number of specimens which contain matching verbiage in the locality data field.
4

Georeferencing ProcedureMike Yost | Denver Botanic Gardens
NOTE: Before moving forward, I’ve made it a habit of checking for additional specimens with similar locality data that might be hidden from view.
For example, if there were hundreds of entries in Erie County, the following verbiage would be buried in the list: Southeastern corner of Erie County, east branch of Vermilion River [1]. It’s the same location as in my example, but because locality data is listed alphabetically, the entry would not have been visible in the generated field of specimens (unless I scrolled down).
I’ve found that taking the additional step of limiting my search to a single word in the Locality Term field can assist in finding these “rogue” specimens.
Now that all the specimens for the same location contain uniform verbiage, it’s time to assign coordinates!
Step 3: Establishing Latitude/Longitude CoordinatesIn my experience, I’ve found that the efficacy of the GeoLocate tool varies widely, depending on the content of the locality data. (This tool is located across from Return Count next to the magnifying glass).
For example, when using the tool with specimens that have a city listed in the locality field, GeoLocate does an excellent job finding that specific city and clearly displaying the city boundaries. However, in some cases I’ve found that the GeoLocate button won’t provide a place marker to work from, or it sometimes generates as many as 30 possible locations for a single entry.
NOTE: I’m working with a more challenging example in this blog to demonstrate how I georeference specimens when GeoLocate cannot find a location. Hopefully most of your specimens will not be as complicated.
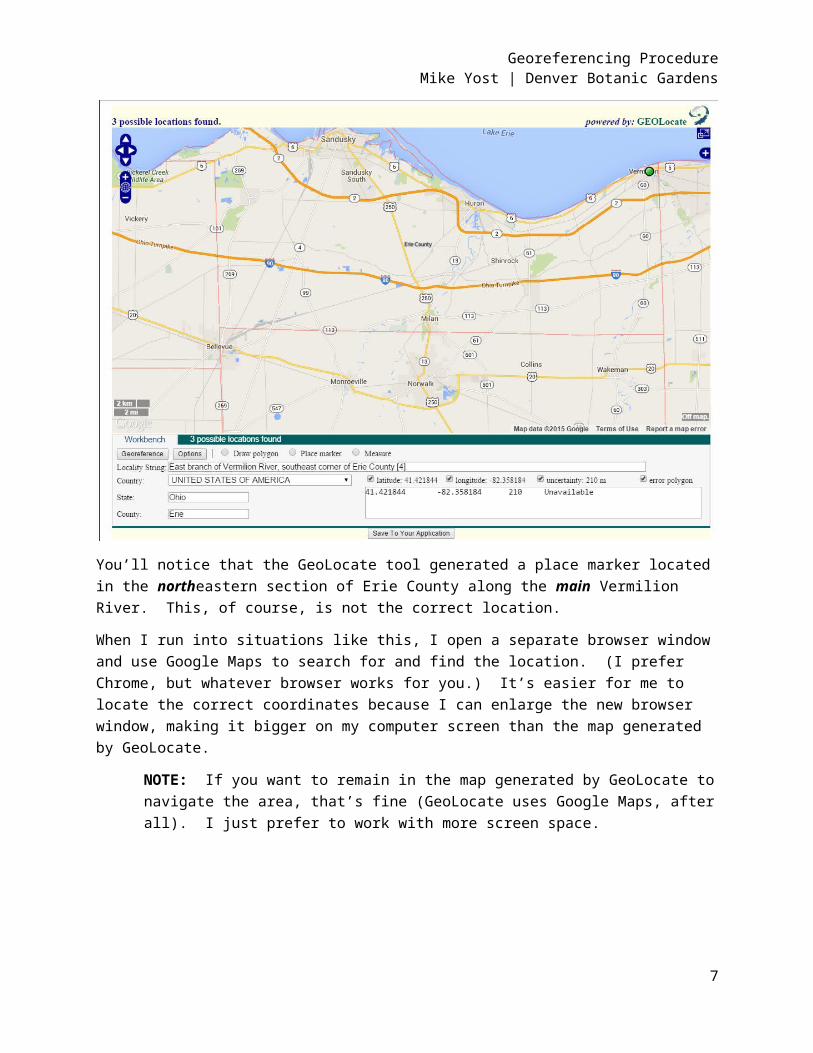
Let me show what happens with my example when I use the GeoLocate tool. Now that I have my four specimens from the previous step consolidated to a single line, I highlight East branch of Vermilion River, southeast corner of Erie County [4] and click on the GeoLocate button. The following appears:
[Image on following page]
5

Georeferencing ProcedureMike Yost | Denver Botanic Gardens
You’ll notice that the GeoLocate tool generated a place marker located in the northeastern section of Erie County along the main Vermilion River. This, of course, is not the correct location.
When I run into situations like this, I open a separate browser window and use Google Maps to search for and find the location. (I prefer Chrome, but whatever browser works for you.) It’s easier for me to locate the correct coordinates because I can enlarge the new browser window, making it bigger on my computer screen than the map generated by GeoLocate.
NOTE: If you want to remain in the map generated by GeoLocate to navigate the area, that’s fine (GeoLocate uses Google Maps, after all). I just prefer to work with more screen space.
6
Georeferencing ProcedureMike Yost | Denver Botanic Gardens
Using Google Maps in my separate browser window, I search along the Vermilion River until I find the east branch, listed as the East Fork Vermilion River in Google Maps.
The locality data states the specimen was located in the southeast corner of Erie County, giving me a second reference point to work with. So, now I search for the Erie County boundary in Google Maps. I note that the eastern boundary of Erie County runs along Highway 2.
NOTE: The GeoLocate tool also displays county boundaries for each US state. Just click on the plus sign in the upper right-hand corner and select US Counties under Overlays. Keep in mind that when you zoom in past the 2 mile legend on the map, the county lines disappear.
I have now located the east fork of the Vermilion River where it branches off the main river, and I have also located the eastern boundary of Erie County, which is Highway 2.
Using these two reference points, I switch back over to the GeoLocate map and move the place marker down to the East Fork of the Vermilion River. Since the locality data does not tell me where on the east
7

Georeferencing ProcedureMike Yost | Denver Botanic Gardens
fork the specimens were collected, I place my marker at the approximate midpoint between the mouth of the East Fork Vermilion River to the northwest and the Erie County boundary (or Highway 2) to the southeast.
NOTE: I’ve made it a habit to zoom in as close as possible when first setting the place marker. I’ve seen situations where the place marker looks as if it’s situated on a river or a creek when the map is zoomed out, only to zoom in closer and find the place marker is actually tens of meters away from the river or creek.
Happiness! I now have latitude and longitude coordinates along the east branch of the Vermilion River in the southeast corner of Erie County! But before I save the data, I need to establish the uncertainty radius.
Step 4: Uncertainty RadiusSince the locality data for my example does not provide any additional information as to where the specimens were collected, I want to include the entire length of the East Fork Vermilion River within Erie County.
8

Georeferencing ProcedureMike Yost | Denver Botanic Gardens
To do this, I expand the uncertainty radius so that it borders the mouth of the east fork at the main Vermilion River to the northwest and the boundary of Erie County (Highway 2) to the southeast. This ensures that the entire length of the river between these two points is included in the uncertainty radius.
NOTE: The point-radius method is a quick method of georeferencing specimens, but the uncertainty is greater than if you draw a polygon around the river. The polygon method may reduce your uncertainty, but takes more time and could potentially reduce the timeliness of georeferencing completion. Check with your project manager regarding which method to use.
I double-checking my work to verify the place marker is set at the approximate midpoint of the river, and that the uncertainty radius borders the mouth of the river to the northwest and the county boundary to the southeast. Sometimes during this step I have to go back and forth between moving the place marker and adjusting the uncertainty radius to make sure everything is accurate.
9

Georeferencing ProcedureMike Yost | Denver Botanic Gardens
Now that I have my latitude/longitude coordinates established and my uncertainty radius set, verifying its location, I click on the button, Save To Your Application, located at the bottom of the screen.
The map will disappear, and the coordinates, along with the error data in meters, will be automatically transferred to the original screen where I started. Happiness!
Because I am fairly new to georeferencing, I’ve made it a habit to verify my work by clicking on the globe next to the Latitude Decimal field. This will generate a map with a place marker.
10

Georeferencing ProcedureMike Yost | Denver Botanic Gardens
Sure enough, the place marker appears exactly where I want it, the midpoint between the mouth of the east fork to the northwest and the Erie County boundary (Highway 2) to the southeast. I close the map and move to the next step.
Step 5: Georeference RemarksThe Georeferencing guide for best practices cites that documentation is one of the most important steps in the georeferencing process. It is imperative that I clearly outline how I established my coordinates and uncertainty for these specimens.
So, I try to be as specific as possible when detailing how and why I placed the georeference marker where I did. At the same time, I want to be concise with my explanation, as there is a limit of about 255 characters in the field.
The following verbiage is what I used to explain how I established the latitude/longitude coordinates for my example, along with how I measured the uncertainty radius.
11

Georeferencing ProcedureMike Yost | Denver Botanic Gardens
Georeferenced to approximate midpoint of East Fork Vermilion River between mouth of river to the northwest and boundary of Erie County to the southeast, with the uncertainty radius encompassing entire length of river between those two points.
I’ve made it a habit to write out all of my georeferencing remarks in a Word document to establish an index I can access later if needed. This method also helps me with proofreading entries before I save them to the Portal since the remarks field does not display the entire entry.
Here are a few more examples of remarks I have used for other locations:
Road in National Forest: “Georeferenced to midpoint of Blue Mountain Road between northern and eastern borders of Lolo National Forest with uncertainty radius encompassing entire road within national forest.”
Hiking Trail: “Georeferenced to approximate midpoint of Kautz Creek Trail between trailhead and trail termination with uncertainty radius encompassing entire trail.”
Creek: “Georeferenced to approximate midpoint of East Fork Packer Creek between Packer Creek and termination of East Fork Packer Creek with uncertainty radius encompassing entire creek.”
City Block: “Georeferenced to intersection of Rattlesnake Drive and Chokecherry Lane with uncertainty radius extending out to Larch Avenue.”
After writing out my remarks and proofreading the entry, I copy and paste the text to the Remarks field. But before I can move forward, I need to input additional information.
Step 6: Inputting Additional DataAfter adding georeferencing remarks, I add information to the Datum field, which is always WGS84 since I use Google Maps to generate the georeferencing data.
The following fields should have content generated automatically by the Portal:
Sources: georef batch tool 2015-01-01; GeoLocate Verification Status: reviewed - high confidence Georeferenced By: Michael Yost
[Image on following page]
12

Georeferencing ProcedureMike Yost | Denver Botanic Gardens
NOTE: You’ll notice in the image above that there is no way to change the Processing Status of the specimens I’m georeferencing from Stage 2 to Stage 3, nor can I add any information to the Georeference Protocol field. I make these changes in the next step.
Now that I have double-checked my place marker and verified that all the information I have added to these four specimens is correct, I click on the Update Coordinates button. The highlighted entry disappears, and all the information is saved to the Portal. Happiness!
13

Georeferencing ProcedureMike Yost | Denver Botanic Gardens
Step 7: Auditing Georeferencing DataThis next step takes some extra time, but since I am fairly new to georeferencing, I’ve made it a habit to audit my work before changing the specimens I’ve georeferenced to Stage 3. This step also gives me a chance to add the necessary data to the Georeference Protocol field.
From the Data Editor Control Panel, I click on Edit Existing Occurrence Records which opens the Record Search Form. In Custom Field 1, I select the following: Decimal Latitude, Is Not Null. Finally, I select the following in Sort By: Date Last Modified, descending.
Then I click on Display Table. I find this is the best method for me, because it generates a table with all the specimens I’ve added latitude/longitude coordinates to, regardless of Processing Status, descending from the latest specimen I just georeferenced.
I click on the first specimen on the table which opens the display editor. I quickly verify all the necessary geolocation data is present (see image below), then add the following to Georeference Protocol: GBIF Best Practices (as required in the georeferencing section of the MaCC manual).
[Image on following page]
14

Georeferencing ProcedureMike Yost | Denver Botanic Gardens
I’ve also made it a habit to glance over the other information to make sure I don’t see anything out of place (incorrect formatting for date or collector, for example), but depending on your own benchmarks, you might not have time to do this.
Finally, I change the Processing Status to Stage 3, and then I click on Save Edits.
NOTE: Remember that some of the specimens might read Review Pending or Expert Required, so I do not set the Status Auto-set to Stage 3 when auditing and saving a batch of specimens I’ve georeferenced.
That’s it! I’ve just georeferenced four specimens and saved the information to the Portal. Happiness!
15

Georeferencing ProcedureMike Yost | Denver Botanic Gardens
Final ThoughtsThis was a basic walkthrough of my procedure, using just one example out of thousands of possible locations listed in the MONTU and FLD collections. Your own methods may vary, depending on location and protocols set up at your own institution. You may have even found a more efficient, accurate method of batch georeferencing specimens!
So, I encourage other project assistants to post their own questions, procedures, and lessons-learned. This is a learning process for most of us, and working together, I’m confident we can tackle and georeference any location a specimen might pop up out of.
Thank you for reading and have a spectacular day!
Mike YostMaCC Project AssistantDenver Botanic Gardens
16