Geneos Control-M Plug-in Technical Reference v1.0 ·...
40
Web Dashboard User Guide Functional Area: Web Dashboard Geneos Release: v4.6 Document Version: v1.0.0 Date Published: 16 March 2018
Transcript of Geneos Control-M Plug-in Technical Reference v1.0 ·...

Web Dashboard User Guide
Functional Area: Web Dashboard
Geneos Release: v4.6
Document Version: v1.0.0
Date Published: 16 March 2018

Copyright 2018. ITRSGroup Ltd. All rights reserved.
Information in this document is subject to change without notice. The software described in this document is furnished under a license agreement
or nondisclosure agreement. The softwaremaybe used or copied only in accordance with the termsof those agreements. No part of this
publicationmaybe reproduced, stored in a retrieval system, or transmitted in any form or anymeanselectronic or mechanical, including
photocopying and recording for anypurpose other than the purchaser's personal use without the written permission of ITRSGroup Ltd.
ITRSGroup Ltd
6th Floor, The Bonhill Building, 15 Bonhill Street,
London, EC2A4DN, UK
t: +44 (0)20 7638 6700
f: +44 (0)20 7256 5760
Web Dashboard
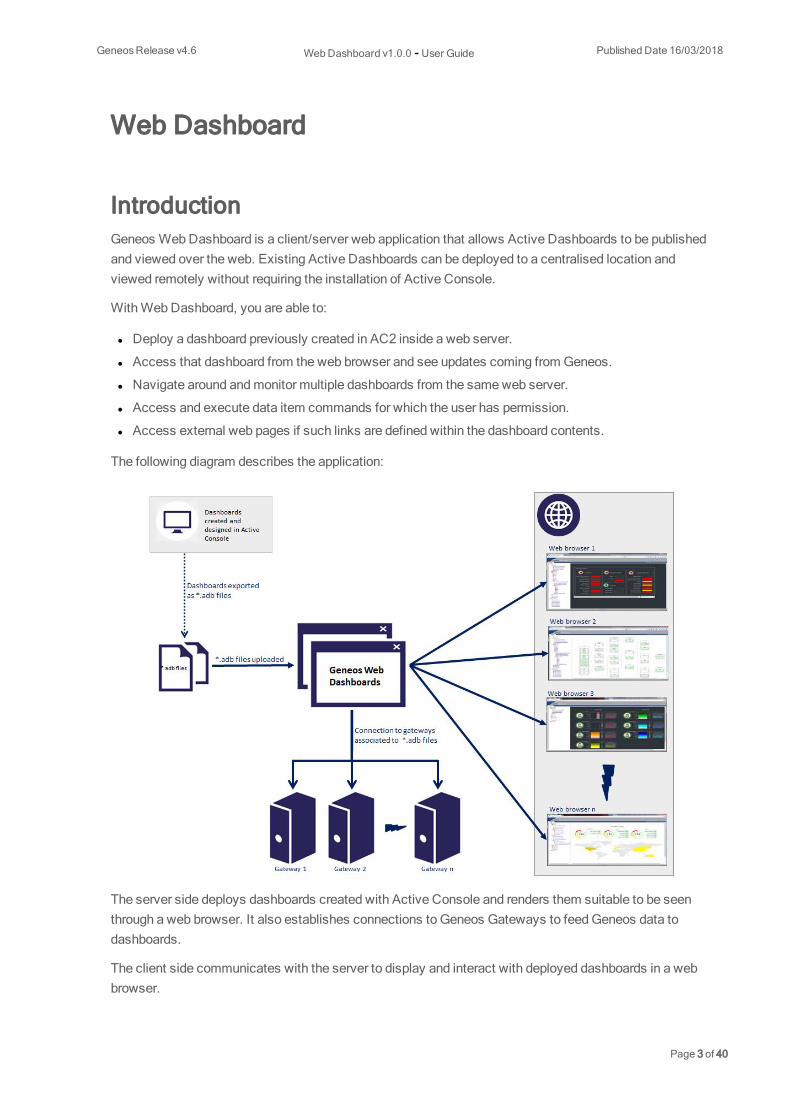
IntroductionGeneos WebDashboard is a client/server web application that allows Active Dashboards to be publishedand viewed over the web. Existing Active Dashboards can be deployed to a centralised location andviewed remotely without requiring the installation of Active Console.
WithWebDashboard, you are able to:
l Deploy a dashboard previously created in AC2 inside a web server.
l Access that dashboard from the web browser and see updates coming from Geneos.
l Navigate around andmonitor multiple dashboards from the sameweb server.
l Access and execute data item commands for which the user has permission.
l Access external web pages if such links are defined within the dashboard contents.
The following diagram describes the application:
The server side deploys dashboards created with Active Console and renders them suitable to be seenthrough a web browser. It also establishes connections to Geneos Gateways to feedGeneos data todashboards.
The client side communicates with the server to display and interact with deployed dashboards in a webbrowser.
GeneosRelease v4.6 WebDashboard v1.0.0 - User Guide Published Date 16/03/2018
Page 3 of 40

User InterfaceThe user interface is accessed using a web browser.
There are twomain sections that can be accessed via the following URLs:
l Display and navigation of dashboards and slideshows:
http://<web-dashboard-host>:<web-dashboard-port>/
l Configuration of connections, dashboards and slideshows:
http://<web-dashboard-host>:<web-dashboard-port>/#Config:
GeneosRelease v4.6 WebDashboard v1.0.0 - User Guide Published Date 16/03/2018
Page 4 of 40

Dashboard NavigationThis user interface allows the navigation through the dashboards that have been uploaded inWebDashboard and have been configured to appear in the navigation tree.
The navigation tree also allows viewing the slideshows if they have been configured.
The following picture shows the navigation page.
GeneosRelease v4.6 WebDashboard v1.0.0 - User Guide Published Date 16/03/2018
Page 5 of 40

Dashboard ConfigurationThis user interface is required to add/remove dashboards inWebDashboard, configure the navigation tree,and define slideshows and connections.
The following picture shows the configuration pages.
System RequirementsWebDashboard is a 64-bit application on Linux and a 32-bit application on Solaris, with the followingsystem requirements:
CPU: Multicore Intel / AMD / SPARCRAM: 4GBNetwork: 1 Network Interface CardDisk: 500MB available spacePlease refer to the Geneos Compatibility Matrix for the list of supported platforms and web browsers.
Note: Other OS distributions may work with the correct libraries installed but are not officiallysupported. For x86-64 distributions, the required 32-bit libraries must be available on the system. Also,other web browsers may work but are not officially supported.
GeneosRelease v4.6 WebDashboard v1.0.0 - User Guide Published Date 16/03/2018
Page 6 of 40
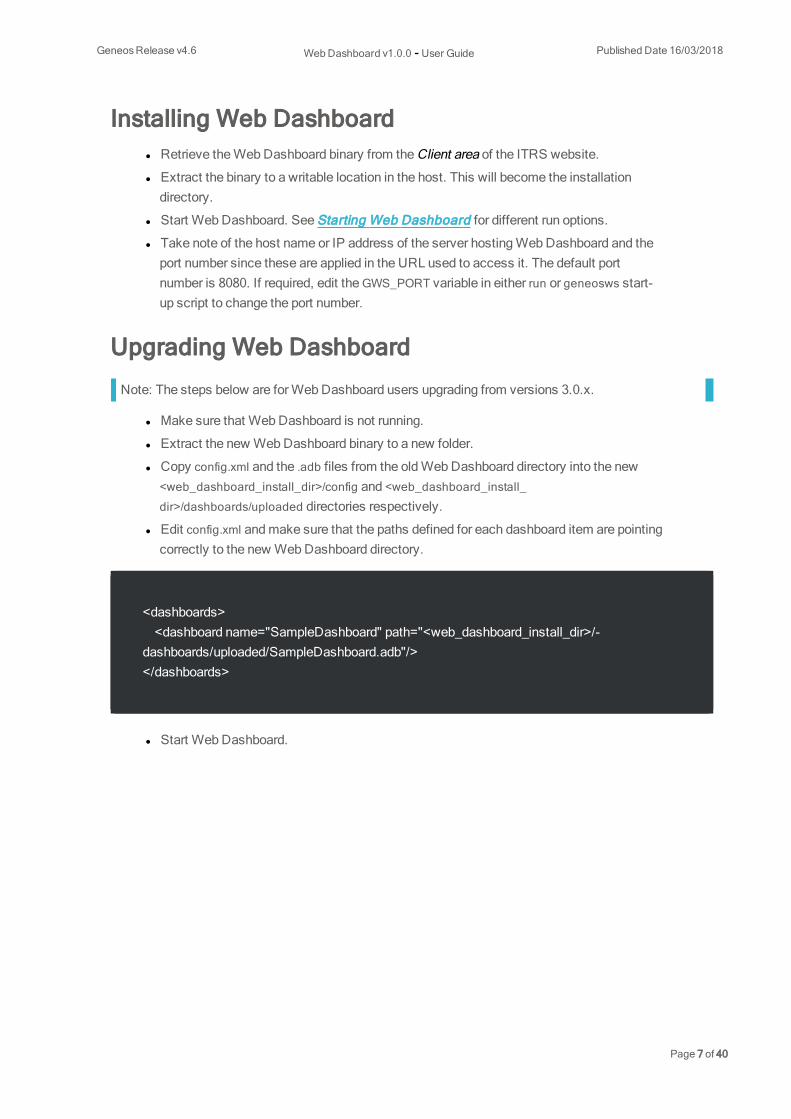
Installing Web Dashboardl Retrieve theWebDashboard binary from the Client area of the ITRS website.
l Extract the binary to a writable location in the host. This will become the installationdirectory.
l Start WebDashboard. See Starting Web Dashboard for different run options.
l Take note of the host name or IP address of the server hostingWebDashboard and theport number since these are applied in the URL used to access it. The default portnumber is 8080. If required, edit theGWS_PORT variable in either run or geneosws start-up script to change the port number.
Upgrading Web Dashboard
Note: The steps below are forWebDashboard users upgrading from versions 3.0.x.
l Make sure that WebDashboard is not running.
l Extract the new WebDashboard binary to a new folder.
l Copy config.xml and the .adb files from the oldWebDashboard directory into the new<web_dashboard_install_dir>/config and <web_dashboard_install_dir>/dashboards/uploaded directories respectively.
l Edit config.xml andmake sure that the paths defined for each dashboard item are pointingcorrectly to the new WebDashboard directory.
<dashboards><dashboard name="SampleDashboard" path="<web_dashboard_install_dir>/-
dashboards/uploaded/SampleDashboard.adb"/></dashboards>
l Start WebDashboard.
GeneosRelease v4.6 WebDashboard v1.0.0 - User Guide Published Date 16/03/2018
Page 7 of 40

Starting Web DashboardThe first timeWebDashboard is started:
l Theminimal template file config.xml.min.tmpl is automatically renamed to config.xml and used asminimal configuration by the server.
l A Logs folder is created in the installation directory with the fileWebDashboard.log.{date}.
Running Start Scripts
Note: JRE 1.8.0_xxx 64-bit is required, specifically 1.8.0_144 being the tested version. For binariespackaged without JRE, JAVA_HOME environment variable should be set on themachine.
There are two scripts in the installation directory to start WebDashboard:
l run - starts WebDashboard in the foreground and produces a standard output as well as a log file.This is the default mode, and the script can be run in all supported operating systems.
./run
l geneosws - starts WebDashboard in the background as a service with the output sent to a log file.This script can only be run in Linux Redhat or CentOS operating systems. The following additionalconfigurationmust be done in order for the script to work:
1. Copy the geneosws script into the system’s /etc/init.d directory.
2. Set the appropriate run level. For example, in CentOS, it is:
chkconfig --level 345 geneosws on
3. Specify the user that will start the service by editing the USERNAME variable. This usermust have administrative authorization to run the service.
4. Change the base directory by editing the SCRIPTPATH variable from “.” to the installationdirectory. By default, the geneosws script assumes that the base directory is the currentdirectory.
GeneosRelease v4.6 WebDashboard v1.0.0 - User Guide Published Date 16/03/2018
Page 8 of 40

The following commands are supported:
./geneosws {start|stop|status|try-restart|restart|force-reload|reload}
l start - launches web server in the background
l stop - kills web server process
l status - checks if web server is running
l reload/restart/force-reload/try-restart - restarts web server process
Enabling Authentication
Note: Always clear browser cache and cookies when switching between authenticated andunauthenticated versions of WebDashboard.
Note: Single Sign On (SSO)must be disabled when enabling Authentication
1. Go to <web_dashboard_install_dir>/config directory.
2. Edit security.xml. Comment out:
<intercept-url pattern="/**" access="permitAll" />
Note: In XML documents, follow this syntax to comment out: "<!--Comment String Here-->"
and uncomment the following:
<intercept-url pattern="/**" access="isAuthenticated()" />
<authentication-provider><password-encoder hash="bcrypt"/><user-service properties="file:./config/users.properties"/>
</authentication-provider>
3. Edit users.properties. Follow the syntax indicated in the file to add users. To generate anencrypted password, run the following command at the <web_dashboard_install_dir> directory:
GeneosRelease v4.6 WebDashboard v1.0.0 - User Guide Published Date 16/03/2018
Page 9 of 40

java -cp 'lib/*:lib/geneos-bcrypt-hasher.jar' com.itrsgroup.login.auth.BCryptPasswordHasher<password to encrypt>
Enabling SSO
Note: Authenticationmust be disabled when enabling SSO
If Single-Sign-On (SSO) is enabled, the SSOAgent verifies the user permission. After the verification ofuser credentials, theWebDashboard checks the user's group to grant the appropriate access.
When the user logs in for the first time, the browser will automatically save the user's credentials in thecache. Clear the browser cache to change the current user.
l Go to your <web_dashboard_install_dir>/config directory
l Edit sso.properties
Property Description
sso.agent.url SSO Agent URL and port
webdashboard.url Web Dashboard URL and port
dashboard.user.groups Comma-separated values that define the user groups that are allowed to access theDashboards and Slideshows sections of Web Dashboard
config.user.groups Comma-separated values that define the user groups that are allowed to access theConfig section of Web Dashboard
sso.enabled Determines whether SSO is enabled (true) or disabled (false)
sso.pubkey File where the public key for SSO Agent is located
The public key is generated by the SSOAgent andmust be in PEM format, with lines no longer thatn 76characters. For example:
-----BEGIN PUBLIC KEY----
MIIBIjANBgkqhkiG9w0BAQEFAAOCAQ8AMIIBCgKCAQEA9KTR6IFL44UTGCs5Hi2x
fISO7eMBaqf75BQym/E8woQE2NOocyAvshGLAaE9oHP4vqRnc+hHyDs7DDF2u0VF
cYp6r4uISe+HUka+wKjfSZZFOB5lFYzZfb7hRGvc5kMZEvg7QYBej/c37uSB9r1/
T4yao3SAdHGEwlthTKf0V+TtDGvlWPKGzVdCYowmNC0Z1RxsT/X3jhNvnkHRQYXW
hwGiEKU1+U7Bgtlpzd/3UFQnZsOIMFME9R53b+Wjron04B6OBB0jqmWFTYaoXWh2
oZBK5XZ1e165HaNXAYkeC4RcHdu8M0urk8JkkRby9M8UXxCATbVrtYGosoI9JH+t
1wIDAQAB
-----END PUBLIC KEY-----
GeneosRelease v4.6 WebDashboard v1.0.0 - User Guide Published Date 16/03/2018
Page 10 of 40

Enabling SSLHere are the steps to enable SSL inWebDashboard:
Configure SSL CertificatesA script called ssl_util.sh exists in the installation directory which is used to generate or import a certificate.The script needs to be updated first as per instruction written inside it before doing any of the configurationbelow and running it.
There are two ways to configure an SSL certificate on the server:
1. Generate a new self-signed certificate
Run ./ssl_util.sh from <web_dashboard_install_dir> directory and specify the host name or IP address of thebox. This will generate the certificate and add it to a keystore.
cd <web_dashboard_install_dir>./ssl_util.sh add <hostname_or_ip>
2. Import an existing certificate for your domain name
If the server runningWebDashboard has an existing SSL certificate issued by a Certificate Authority(CA), you will need to import that certificate and its private key into the server’s keystore.
Convert your existing certificate and private key into PKCS12 format. Your certificate file needs to becalled <hostname_or_ip>.cer.
cd <web_dashboard_install_dir>./ssl_util.sh convert <hostname_or_ip> <private_key_file>
3. If your CA provides multiple intermediary certificates, you will need to combine them intoa single file using the command:
cat my_cert.cer intermediate1.cer intermediate2.cer > hostname_or_ip.cer
4. Import the newly converted certificate using the command and specify the ExportPassword from step 1.
./ssl_util.sh import <hostname_or_ip> <export_password>
GeneosRelease v4.6 WebDashboard v1.0.0 - User Guide Published Date 16/03/2018
Page 11 of 40

Edit config files
Edit <web_dashboard_install_dir>/config/security.properties. If changes weremade to the value ofKEYSTORE and PASSWD in ssl_util.sh, update the values of the properties below as per changes made.
keyStore=config/keystore.dbtrustStore=config/keystore.dbkeyStorePassword=ab987ctrustStorePassword=ab987c
To change the port number to use for secure connection, update the property below.
port=7443
Edit scripts
Edit the run or geneosws script depending on the start-upmode to use. Uncomment this line:
#ENABLE_SSL="-ssl true"
Restart Web Dashboard
Restart yourWebDashboard server and verify that the certificate is being used by opening the followingpage: https://hostname_or_ip:port/.
If you generated a self-signed SSL certificate, the browser will warn you that the certificate is not trusted -this is expected behavior. Add an exclusion rule (or continue).
Configuring Web DashboardType the host and the port of WebDashboard in the web browser to access the configuration page in thefollowing format:
http://<web-dashboard-host>:<web-dashboard-port>/#Config:
Example:
GeneosRelease v4.6 WebDashboard v1.0.0 - User Guide Published Date 16/03/2018
Page 12 of 40

http://192.168.10.155:8080/#Config:
Adding Active DashboardsDashboards need to be created in Active Console and exported as .adb files before they can be added toWebDashboard.
The deployment of dashboards intoWebDashboard takes place in 3 steps:
Connecting to gateways
1. Click on the “Add Connection” button to add a new gateway connection.
2. Edit the gateway connection fields. If connecting to a secure gateway, tick the “Secure”checkbox.
3. Click on the “Save” button forWebDashboard to establish the new gateway connectionand add it to config.xml.
GeneosRelease v4.6 WebDashboard v1.0.0 - User Guide Published Date 16/03/2018
Page 13 of 40

Gateway connections in config.xmlEach connection is defined by a <gatewayConnection> element with a name attribute. The connection hasthe following properties:
Property Mandatory Description
<enabled> Yes Determines whether a connection isenabled (true) or disabled (false)
<primary> Yes Contains the primary gateway’s hostand port number defined in <host>and <port>
<secondary> No Contains the secondary gateway’shost and port number defined in<host> and <port>
<secure> No Determines whether a connection issecure (true) or insecure (false)
<description> No The gateway’s description
<sslEnabled> No Determines whether a connectionwill use SSL connection (true) ornormal authentication (false). Whenthis is + enabled, the user propertybecomes mandatory and thepassword is no longer used.
<user> No Username to access the gateway
<password> No Password to access the gateway.
The password has an attribute
called type which could have the
values “encrypted” or “plain”. This
attribute is used to determine if the
password is encrypted or not. By
default, the type is “encrypted” if the
gateway connection has been
entered through the configuration
interface.
Example:
<geneosWebServer><gatewayConnections>
<gatewayConnection name="Gateway1">
GeneosRelease v4.6 WebDashboard v1.0.0 - User Guide Published Date 16/03/2018
Page 14 of 40

<enabled>true</enabled><primary>
<host>gateway1A-host</host><port>30001</port>
</primary><secondary>
<host>gateway1B-host</host><port>30002</port>
</secondary><description>Gateway One</description><user>user1</user><password type="encrypted">AABBZZYYZZ</password>
</gatewayConnection><gatewayConnection name="Gateway3">
<enabled>true</enabled><secure>true</secure><primary>
<host>localhost</host><port>80003</port>
</primary><secondary>
<host/><port>0</port>
</secondary><description>Gateway Three</description><user>admin</user><password type="plain">MyPlainPassword</password>
</gatewayConnection><gatewayConnectionname="Gateway2"><enabled>true</enabled><secure>true</secure>
<primary><host>gateway2A-host</host>
<port>80004</port></primary><secondary>
<host/><port>0</port>
</secondary><description>Gateway Two</description><sslEnabled>admin</sslEnabled><user>admin</user><passwordtype="plain"></password>
GeneosRelease v4.6 WebDashboard v1.0.0 - User Guide Published Date 16/03/2018
Page 15 of 40

</gatewayConnection></gatewayConnections>
</geneosWebServer>
SSL Certificate AuthenticationIn addition to password authentication, a secure connection to a gateway can be established using an SSLCertificate. This authenticationmethod can be enabled by ticking the SSL column of a gateway in theconnections configuration page or by setting the gateway's sslEnabled property to true. An SSLcertificate/key pair needs to be added to the keystore and aliased 'geneosAuthentication' before theWebServer is started.
Generating an SSL Certificate and Private key pairTo generate a public certificate and private key forWebDashboard, see the examples in SecureCommunications. The process is the same as when generating a certificate and private key for theGateway or Netprobe. The certificate forWebDashboard should be named geneosAuthentication.cer andshould be generated by the sameCertificate Authority as the certificate issued for every Gateway WebDashboard will connect to.
GeneosRelease v4.6 WebDashboard v1.0.0 - User Guide Published Date 16/03/2018
Page 16 of 40

Adding a Certificate and Private Key to the keystore1. Edit <web_dashboard_install_dir>/ssl_utl.sh and change the value of KEYSTORE to point to the desiredkeystore file. The keystore password can be changed by modifying the value of PASSWD.
KEYSTORE=${WEB_DASHBOARD_CONFIG_DIR}/keystore.db
2. Convert your existing certificate and private key into PKCS12 format. The certificate needs to be calledgeneosAuthentication.cer.
cd <web_dashboard_install_dir>
/ssl_util.sh convert geneosAuthentication <private_key_file>
3. The converted certificate needs to be imported to the keystore using the password specified when thecertificate was converted.
./ssl_util.sh import geneosAuthentication <password>
4. if KEYSTORE or PASSWD have been changed in
<web_dashboard_install_dir>/ssl_utl.sh
then edit
<web_dashboard_install_dir>/config/security.properties
and update the values of the properties below accordingly:
GeneosRelease v4.6 WebDashboard v1.0.0 - User Guide Published Date 16/03/2018
Page 17 of 40

keyStore=config/keystore.db
trustStore=config/keystore.db
keyStorePassword=ab987c
trustStorePassword=ab987c
Uploading .adb files
1. Select Dashboards from the left-hand navigation list in order to deploy a dashboard.
2. Click on the “Add Dashboard” button. This shows the Dashboard dialog.
In the dialog, type a name for the dashboard.
Note: Do not add URL character codes (e.g., ‘%20’,’%5C’) in the dashboard name.
1. Click on the “Browse” button to locate the .adb file to upload.
2. Click on the “Upload” button tomake a copy of the .adb file in the dashboard folder.
3. Click on the “Save” button forWebDashboard to add the new dashboard to config.xml.
GeneosRelease v4.6 WebDashboard v1.0.0 - User Guide Published Date 16/03/2018
Page 18 of 40

Uploaded dashboards in config.xmlDashboard information is contained in the <dashboard> element in config.xml with the following attributes:
Attribute Description
name The name given to the dashboard
path The location where the .adb file used by the
dashboard is contained
By default, the path is installation_
directory/dashboards/uploaded folder if the
dashboard has been uploaded using the
configuration interface. Optionally, a user may
allocate another path that contains the .adb file.
Example:
<geneosWebServer><dashboards>
<dashboard name="dashboard1" path-h="/path/to/dashboards/uploaded/dashboard1.adb"/>
<dashboard name="dashboard2"path="/path/to/dashboards/uploaded/dashboard2.adb"/>
<dashboard name="dashboard3" path-h="/path/to/dashboards/uploaded/dashboard3.adb"/>
</dashboard></dashboards>
</geneosWebServer>
Changing the default dashboards upload folderTo change the default dashboard upload folder, edit the run script and a new parameter -Dcom.itrsgroup.dashboard.dir that has the value of the chosen folder the dashboard files will be uploaded.
-Dcom.itrsgroup.dashboard.dir=<PATH TO DASHBOARDS UPLOADS FOLDER>
For users who have as existing setup and would want to change their dashboard upload folder, thefollowing steps have to be done:
1. Manually update the dashboard paths in the config.xml file to point to the new dashboardupload folder.
GeneosRelease v4.6 WebDashboard v1.0.0 - User Guide Published Date 16/03/2018
Page 19 of 40

2. Copy all the dashboards (.adb) files from the old upload folder to the new one.
Remember to do the 2 steps when setting a new upload folder from an existing setup. Doing only step 2will cause the dashboards copied to the new upload folder to be deleted.
Configuring the navigation treeSelect Navigation from the left-hand navigation list in order to organize the tree of dashboards for viewing.
1. Select Dashboards which is the top of the tree.
2. Click on the “AddGroup” button to add a group. This shows a dialog with a single field totype the name of the new group.
3. Select a group and click on the “Add Dashboard” button to add a dashboard in the group.This shows a dialog with a dropdownmenu of dashboards that have been uploaded byWebDashboard.
GeneosRelease v4.6 WebDashboard v1.0.0 - User Guide Published Date 16/03/2018
Page 20 of 40

4. Typing in the first characters of a dashboard name filters the dropdownmenu to thedashboard names that start with those characters.
l Continue creating new groups which can be populated with selected dashboards. Ahierarchical order can be defined in the navigation tree by creating groups under groups.
GeneosRelease v4.6 WebDashboard v1.0.0 - User Guide Published Date 16/03/2018
Page 21 of 40

l Click on the “Save” button to save the configuration of the navigation tree in config.xml.
l Click on the Dashboard tab to check how the navigation will be seen by users.
GeneosRelease v4.6 WebDashboard v1.0.0 - User Guide Published Date 16/03/2018
Page 22 of 40

Navigation tree in config.xmlThe navigation tree is defined under the <tree> element with the following properties:
Property Mandatory? Attribute Description
<group> No name A group contains one ormore dashboards andcould also contain anothergroup.
<dashboard> No name A dashboard is part of agroup
Example:
<geneosWebServer><tree>
<group name="GROUP 1"><dashboard name="dashboard1A"/><dashboard name="Dashboard1B"/>
</group><group name="GROUP 2">
<dashboard name="dashboard2A"/><dashboard name="dashboard2B"/><dashboard name="dashboard2AC"/><group name="GROUP 2.1">
<dashboard name="dashboard2.1A"/><dashboard name="dashboard2.1B"/>
</group></group><group name="GROUP 3">
<dashboard name="dashboard3A"/><dashboard name="Dashboard3B"/>
</group></tree>
</geneosWebServer>
Defining slideshowsSlideshows can be defined to view a set of dashboards or all dashboards, one after another at specifiedtime intervals.
Select Slideshows from the left-hand navigation list in order to define a slideshow.
WebDashboard can be configured to set:
GeneosRelease v4.6 WebDashboard v1.0.0 - User Guide Published Date 16/03/2018
Page 23 of 40

l A single slideshow for all dashboards defined in the navigation tree
l Any number of user-defined slideshows to view selected dashboards in the navigation tree
Slideshow to display all dashboards in the navigation tree
l Tick the “Add a slideshow with all dashboards” checkbox. This shows the interval timefield.
l The default interval time is 5 seconds. If a longer interval is required, edit the intervaltime.
l Click on the “Save” button to save the slideshow in config.xml.
l Go to the Dashboard tab to check the “All Dashboards” slideshow.
GeneosRelease v4.6 WebDashboard v1.0.0 - User Guide Published Date 16/03/2018
Page 24 of 40

Slideshow to display selected dashboards
l Click on the “Add Slideshow” button to open a new slideshow row.
l Edit the name of the new slideshow. This shows the Dashboards dialog.
l The default interval time is 5 seconds. If a longer interval is required, edit the intervaltime.
l Click on the “Add” button in the Dashboards dialog. By default, the name of the firstdashboard in the list appears. Click on the name to show the dropdown list ofdashboards.
l Repeat step 4 to addmore dashboards to this slideshow.
l The “Up” and “Down” buttons in the Dashboards dialog can be used to define the sequence ofdashboards in the slideshow.
GeneosRelease v4.6 WebDashboard v1.0.0 - User Guide Published Date 16/03/2018
Page 25 of 40

l The “Remove” button can be used to delete a dashboard from the slideshow.
l Once the new slideshow configuration is completed, click on the “Save” button to savethe new slideshow details config.xml.
l Go to the Dashboard tab to check the new slideshow.
GeneosRelease v4.6 WebDashboard v1.0.0 - User Guide Published Date 16/03/2018
Page 26 of 40
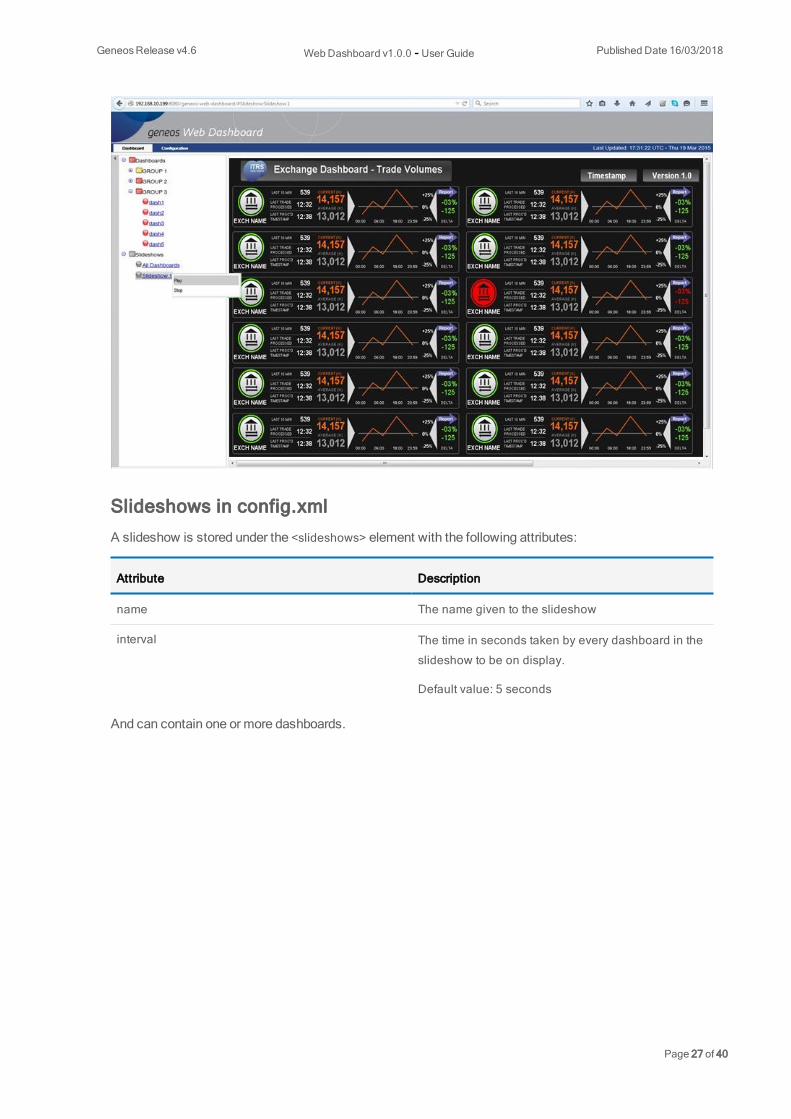
Slideshows in config.xmlA slideshow is stored under the <slideshows> element with the following attributes:
Attribute Description
name The name given to the slideshow
interval The time in seconds taken by every dashboard in the
slideshow to be on display.
Default value: 5 seconds
And can contain one or more dashboards.
GeneosRelease v4.6 WebDashboard v1.0.0 - User Guide Published Date 16/03/2018
Page 27 of 40

Example:
<geneosWebServer><slideshows>
<slideshow name="All Dashboards" interval="5"/><slideshow name="Slideshow 1" interval="5">
<dashboard name="dashboard1"/><dashboard name="dashboard2"/><dashboard name="dashboard3"/><dashboard name="dashbaord4"/></slideshows>
</geneosWebServer>
Settings for the visualization of dashboards in browsersconfig.xml contains the <dashboardDefaults> element with the settings applicable to all dashboardsconfigured inWebDashboard:
<geneosWebServer><dashboardDefaults>
<updateRate>5</updateRate><dashboardRefreshRate>3</dashboardRefreshRate><tileSize>
<width>200</width><height>200</height>
</tileSize></dashboardDefaults>
</geneosWebServer>
Property Attribute Description
<updateRate> Sets the interval time at which the
Web Dashboard client checks for
updates to a dashboard.
Default value: 5 seconds
<dashboardRefreshRate> Sets the frequency at which the Web
Dashboard server processes
dashboard updates.
Default value: 3 seconds
GeneosRelease v4.6 WebDashboard v1.0.0 - User Guide Published Date 16/03/2018
Page 28 of 40

Property Attribute Description
<tileSize> <width><height>
Sets the tile size to be used by Web
Dashboard when rendering the
dashboard image.
Default value for both attributes: 200
pixels
It is not recommended to change these settings but, if required, these changes need to be implementedwith care. The following points need to be taken in consideration:
l <updateRate> should be set equal or more than <dashboardRefreshRate> since clients areguaranteed not to receive an update until a dashboard refresh takes place.
l Faster <dashboardRefreshRate>makes dashboards appear more real-time but in turn increasesCPU usage on the server and potentially increases network traffic as updates are being sent morefrequently – this assumes <updateRate> is closely aligned to <dashboardRefreshRate>.
l Tiling size allows for more granular control of how updates are processed on the server and sentover the network. Smaller values makemore efficient use of network as clients download lessredundant data but in turnmakes many more requests. Also, CPU usage on the server mayincrease due to processingmore granular updates and handling the increased number of requests.
Note: The settings tileCacheSize and tileCacheTime have been removed from config.xml.
Deleting a dashboard in Web DashboardRemoving a dashboard from the configuration takes place in 4 steps in a precise sequence:
Removing the dashboard from a user-defined slideshow
l Go to the Slideshows configuration page.
l Click on the user-defined slideshow. This shows the Dashboards dialog.
l Select the dashboard in the Dashboards dialog list and click on the “Remove” button.
l Click on the “Save” button so that WebDashboardmodifies the <slideshows> element inconfig.xml.
GeneosRelease v4.6 WebDashboard v1.0.0 - User Guide Published Date 16/03/2018
Page 29 of 40

Removing the dashboard from the Navigation tree
l Go to the Navigation configuration page.
l Locate the dashboard in the navigation tree and right-click on it.
l Select the “Remove” option.
l Click on the “Save” button so that WebDashboardmodifies the <tree> element inconfig.xml and its internal dashboard handler program.
Deleting the dashboard from Web Dashboard
l Go to the Dashboards configuration page.
l Click on the dashboard so that the “Remove Dashboard” button is activated.
l Click on the “Remove Dashboard” button.
l Click on the “Save” button so that WebDashboardmodifies the <dashboards> elementconfig.xml and deletes the uploaded .adb file in the installation directory.
Deleting the gateway connection if it only served the deleted dash-board
l Go to the Connections configuration page.
l Locate the gateway and click on its “X” icon.
l Click on the “Save” button so that WebDashboardmodifies the <gatewayConnections>element in config.xml.
Deleting a slideshow in Web Dashboardl Go to the Slideshows configuration page.
l Locate the slideshow and click on its “X” icon.
l Click on the “Save” button so that WebDashboardmodifies the <slideshows> element inconfig.xml.
Working with the Web Dashboard Navigation interface
Opening the navigation interfaceType the host and the port of WebDashboard in the web browser to access the navigation interface in thefollowing format:
http://<web-dashboard-host>:<web-dashboard-port>/
Example:
GeneosRelease v4.6 WebDashboard v1.0.0 - User Guide Published Date 16/03/2018
Page 30 of 40

http://192.168.10.155:8080/
If authentication is enabled, the page displays a log-in screen. See Enabling Authentication in StartingWeb Dashboard section to set up users.
Note: Username is case-insensitive.
If authentication is disabled or after a successful log-in, the page displays the navigation tree with 2 rootentries: Dashboards and Slideshows. The Dashboards group expands to the first level if the navigationtree has been configured.
GeneosRelease v4.6 WebDashboard v1.0.0 - User Guide Published Date 16/03/2018
Page 31 of 40

Selecting a dashboard to viewThere are 2 ways to bring a dashboard to be displayed:
l Select the dashboard in the Dashboards navigation tree. This may require to expand a group in thetree by clicking on its plus icon.
l Access the dashboard directly by adding #WebDashboard:<dashboardname> to the basic URL,e.g.,
http://192.168.10.155:8080/#WebDashboard:Dashboard1
Maximizing the view of the dashboardBy default, the dashboard on display occupies a pane beside the navigation tree and under the top banner.
There are 2 ways tomaximize the display of a dashboard:
l Right-click anywhere in the dashboard and select “Toggle Full Screen”.
The same steps can be used to return to the normal view.
l Select the dashboard in the Dashboards navigation tree and add ?fullscreen to the basic URL, e.g.,
GeneosRelease v4.6 WebDashboard v1.0.0 - User Guide Published Date 16/03/2018
Page 32 of 40
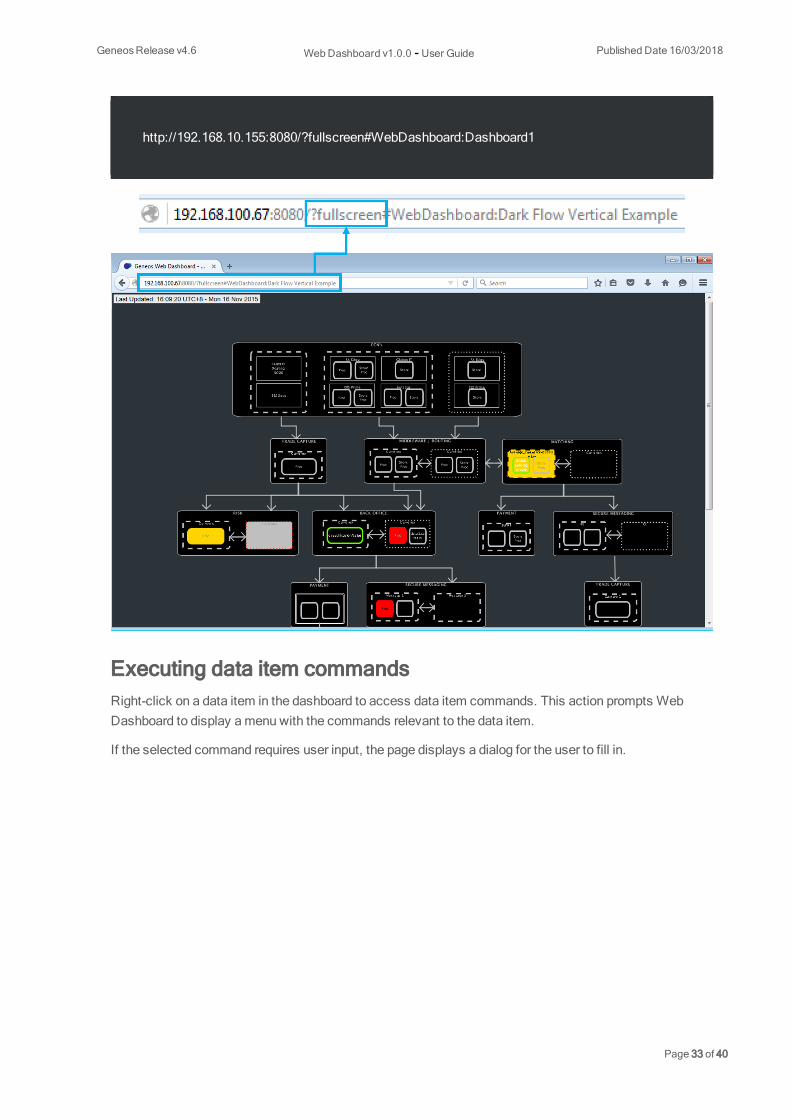
http://192.168.10.155:8080/?fullscreen#WebDashboard:Dashboard1
Executing data item commandsRight-click on a data item in the dashboard to access data item commands. This action prompts WebDashboard to display amenu with the commands relevant to the data item.
If the selected command requires user input, the page displays a dialog for the user to fill in.
GeneosRelease v4.6 WebDashboard v1.0.0 - User Guide Published Date 16/03/2018
Page 33 of 40

If the execution of the command results to an output, the page displays a command output dialog.
Executing hyperlinksIf hyperlinks have been defined in the dashboard, these can be accessed through the right-click menu ofthe data item. Select a link to open its page as a new tab in the browser.
GeneosRelease v4.6 WebDashboard v1.0.0 - User Guide Published Date 16/03/2018
Page 34 of 40

Selecting a slideshow to viewThere are 3 ways to bring a slideshow to be displayed:
l Click on the slideshow in the Slideshows navigation tree.
l Right-click on the slideshow in the Slideshows navigation tree and select the “Play” option.
l Access the slideshow directly by adding #Slideshow:<slideshowname> to the basic URL, e.g.,
http://192.168.10.155:8080/#Slideshow:User Slideshow 1
The slideshow displays the sequence of dashboards it was configured with. The time a dashboard remainsin view is the time interval defined in the configuration of the slideshow.
Every dashboard in the slideshow that is displayed is highlighted in the Dashboards navigation tree. Thisallows the user to follow the order of the sequence.
GeneosRelease v4.6 WebDashboard v1.0.0 - User Guide Published Date 16/03/2018
Page 35 of 40

Stopping a slideshowThere are 2 ways to stop a slideshow:
l Right-click on the slideshow in the navigation tree and select the “Stop” option.
l Select and click on any other dashboard in the navigation tree.
Troubleshooting
Defining update rates or tiling size settings for individual dash-boardsBy default, the settings in the <dashboardDefaults> element are applied to all dashboards configured inWebDashboard. However, if these settings are not adequate for an individual dashboard, specific settingsmay be set for that dashboard only.
Edit the dashboard entry in config.xml and add the new settings.
Example:
<dashboardDefaults><updateRate>5</updateRate><dashboardRefreshRate>3</dashboardRefreshRate><tileSize>
GeneosRelease v4.6 WebDashboard v1.0.0 - User Guide Published Date 16/03/2018
Page 36 of 40

<width>200</width><height>200</height>
</tileSize></dashboardDefaults><dashboards>
<dashboard name="Dashboard1" path="/root/dashboards/uploaded/db1.adb"/><dashboard name="Dashboard2" path="/root/dashboards/uploaded/db2.adb"/><dashboard name="Dashboard3" path="/root/dashboards/uploaded/db3.adb">
<!-- DASHBOARD SPECIFIC SETTINGS --><updateRate>10</updateRate><dashboardRefreshRate>5</dashboardRefreshRate><tileSize>
<width>400</width><height>400</height>
</tileSize></dashboard>
</dashboards>
In this example, “Dashboard1” and “Dashboard2” use the default settings, while “Dashboard3” has its ownsettings.
Redirecting the dashboard loading folderBy default, Web Dashboard uploads the .adb files into the <web_dashboard_install_dir>/dashboards/uploaded/ folder and then loads the dashboard from that location.
If a different location is required, edit config.xml to change the path attribute of the dashboard under the<dashboards> element.
Example:
<dashboards><dashboard name="Dashboard_A2" path="/home/gelo/etc/support_dashboard.adb"/><dashboard name="Dashboard_B1" path="/home/gelo/etc/test.adb"/></dashboard></dashboards>
Resolving high CPU/memory of Web DashboardCPU andmemory used by WebDashboard are largely determined by the contents and updates of thedashboards it has been configured with.
GeneosRelease v4.6 WebDashboard v1.0.0 - User Guide Published Date 16/03/2018
Page 37 of 40

Edit config.xml to slow down the update rate for:
l The <dashboardDefaults> element - this action implies that the new settings for <updateRate> and<dashboardRefreshRate> are applied to all dashboards.
l Individual dashboards if they have been identified as main contributors to the high CPU/memory -the settings for <updateRate> and <dashboardRefreshRate> need to be added to the specificdashboard under the <Dashboards> element.
In both cases, it is recommended that <dashboardRefreshRate> is equal or faster than <updateRate> toensure timely updates.
Resolving the constant flickering and blank areas of a dash-board on displayThis issuemay be the result of:
l Havingmore updates than those processed by WebDashboard in the time set by the<dashboardRefreshRate> parameter. If this is the case, increase the value of this parameter up tothe value of the <updateRate> parameter.
l Having increased the tile size, which implies that there is toomuch data through the network foreach tile. If this is the case, reduce the values of the <tileSize> element.
Preventing memory buildup due to gateway disconnectionBy default, Web Dashboard will try to reconnect to a disconnected gateway over and over again until theconnection is restored. This, in turn, causes rapidmemory buildup. To prevent this behavior:
l Edit the run script to add:
export ORBFASTER_FAST_CALLBACK=false
l Save the changes and restart WebDashboard.
Applying MySQL to Web DashboardWebDashboard supports database queries required for historical charts. Although no changes arerequired for Sybase, MSSQL, or Oracle, the connection toMySQL needs to bemanually incorporated tothe geneos-web-server.jar file.
l Create a temporary directory (e.g., gws) under theWebDashboard installation directory.
l Copy geneos-web-server.jar into the gws directory.
l Extract the jar file with the following command:
GeneosRelease v4.6 WebDashboard v1.0.0 - User Guide Published Date 16/03/2018
Page 38 of 40

jar xvf geneos-web-server.jar
The gws directory will contain the folders: com andMETA-INF.
l Delete geneos-web-server.jar from the gws directory.
l Navigate to theMETA-INF folder.
l OpenMANIFEST.MF in an editor.
l Add the path to theMySQL driver to the end of the Class-Path pair and save theMANIFEST.MF file.
l Go back to the gws directory and recreate geneos-web-server.jar with the followingcommand:
jar cmf META-INF/MANIFEST.MF geneos-web-server.jar *
l Replace geneos-web-server.jar in theWebDashboard installation directory with the newgeneos-web-server.jar file just created.
Note: The jar command is present in the Java JDK package, and the pathmust be indicated.
TheMANIFEST.MF file must end with a blank line, and themaximum width of the line is 70characters.
Enabling DEBUG in Web DashboardSometimes, theremay be issues withWebDashboard that need further investigation, and a detailed logfile may be useful.
l Edit log4j.properties andmodify the log4j.rootLogger parameter from:
log4j.rootLogger=off, CONSOLE, FILE
to:
log4j.rootLogger=DEBUG, CONSOLE, FILE
GeneosRelease v4.6 WebDashboard v1.0.0 - User Guide Published Date 16/03/2018
Page 39 of 40

l Save the changes and restart WebDashboard.
l Repeat the actions that led to the issue.
l Send the log file to Geneos Support for assistance.
Gateway connections are not displayed when opening the Con-figuration interfaceFrequent manipulation of config.xmlmay disrupt the presentation of the Connections page.
Press the “Reload” button to restore the gateway connections or press F5 to refresh the page.
Cannot remove a dashboard in the Dashboards configurationinterfaceThis action will not be allowed if the dashboard has been configured in the Navigation tree and has beenincluded in Slideshows.
l Remove the dashboard from Slideshows and then in the Navigation tree.
l Remove the dashboard from the Dashboards configuration interface.
Slideshow on display does not seem to update if a new dash-board has been addedPress F5 to refresh the slideshow on display.
GeneosRelease v4.6 WebDashboard v1.0.0 - User Guide Published Date 16/03/2018
Page 40 of 40