GCB192 Growing Flowers - NDSU · or shows, cut flowers for decorating your home or outdoor...
28
GCB192 December 2015 Esther McGinnis Extension Horticulturist Growing Flowers for Containers and Gardens
Transcript of GCB192 Growing Flowers - NDSU · or shows, cut flowers for decorating your home or outdoor...
GCB192
December 2015
Esther McGinnis Extension Horticulturist
Growing Flowers for Containers and Gardens

Gardening is growing plants from seeds or transplants. It is a great hobby and can help build a nutritious diet. Gardening also includes the production of ornamental plants.
This publication will focus on growing flowers. Flowers make our homes and communities bright and cheerful. Watching plants you care for burst forth with beautiful blooms is exciting.
Whether you plan to grow flowers for exhibition or shows, cut flowers for decorating your home or outdoor landscaping, this publication will help you get started. Use the ideas here for inspiration, then let your imagination and curiosity lead you to discovering the colorful world of floriculture.
Keeping Records
Your project will be more fun if you keep some simple
records of what you did throughout the summer.
Here’s what to include in your garden journal:
i Names, varieties and color of the flowers you
sowed, transplanted or used for cut flowers
i Sowing or transplanting dates (Sections 1 to 3)
i Number of plants sown or transplanted in the
garden or container (Sections 1 to 3)
i First flowering date
i Dates and descriptions of all fertilizing
and maintenance performed
i A copy of your garden or container design
(Sections 1 to 3)
i Photos of your project
i Date the plants were finished (or killed
by frost) for the year
i Description of the category and results if you
exhibited your flowers
i Whether you would recommend this kind
of flower
i Notes on what you can improve for next year
ContentsKeeping Records .................................................2
Section 1: Growing Annual Flowers From Seed ......................................3
Learning Objectives ..............................................3
Definitions ............................................................3
Introduction ...........................................................4
Seed Sources .......................................................4
Annual Flowers to Direct Seed Outdoors .............5
How to Start Annual Flowers Indoors ...................6
Planting Steps ......................................................9
Summer Care of the Flower Garden ..................11
Section 2: Growing Flowers in a Container ...............................................12
Learning Objectives ...........................................12
You Can Garden Anywhere ................................13
Container Selection ............................................13
Potting Soil .........................................................14
Consider the Light Level .....................................14
When to Plant .....................................................14
Recipe for Eye-catching Containers ...................15
Maintaining Your Container Garden ...................21
Section 3: Designing Your Flower Garden .............................................22
Learning Objectives ...........................................22
Introduction .........................................................23
Location ..............................................................23
Landscape Design ..............................................23
Color Combinations .....................................25
Texture .........................................................25
Maintenance ................................................26
Conclusion ...................................................26
Section 4: Preparing Cut Flowers for Show ..................................27
2 Growing Flowers for Containers and Gardens • www.ndsu.edu/4h
Learning Objectives
You will be able to:
m Select appropriate annual flower seeds to sow indoors or directly into the soil outdoors
m Transplant indoor-grown seedlings into the soil or containers
m Maintain your planting
Growing Annual Flowers From Seed
Section 1
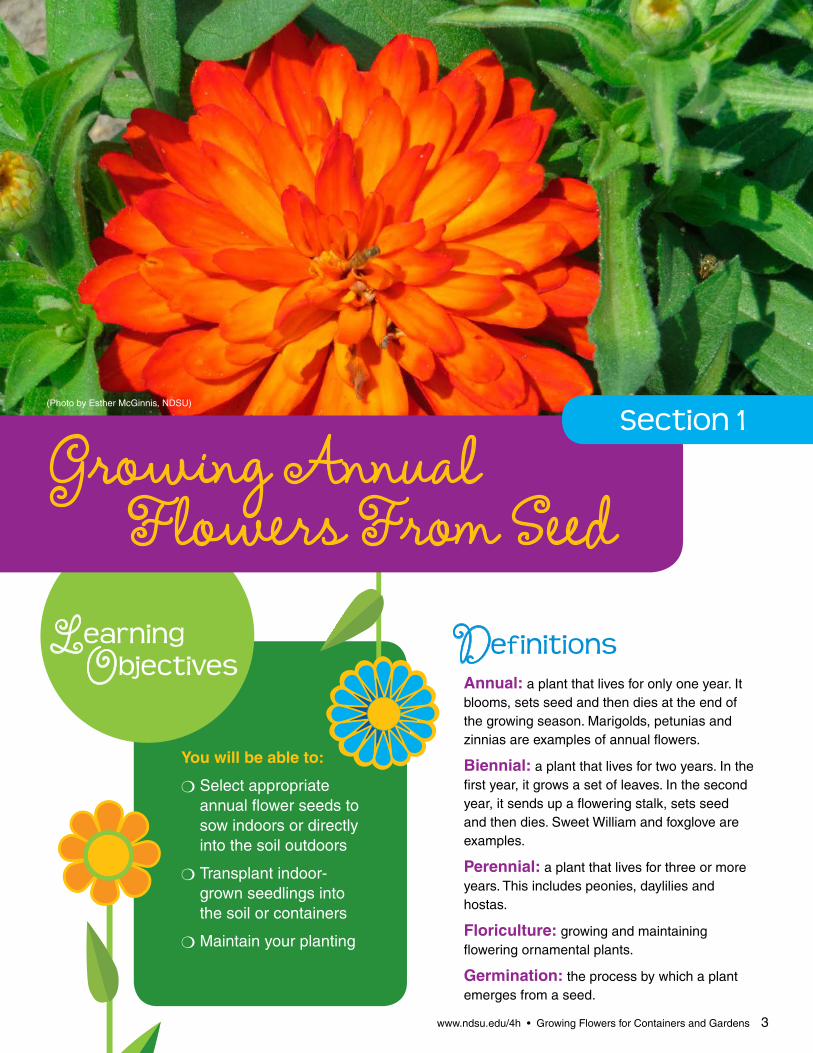
Definitions Annual: a plant that lives for only one year. It blooms, sets seed and then dies at the end of the growing season. Marigolds, petunias and zinnias are examples of annual flowers.
Biennial: a plant that lives for two years. In the first year, it grows a set of leaves. In the second year, it sends up a flowering stalk, sets seed and then dies. Sweet William and foxglove are examples.
Perennial: a plant that lives for three or more years. This includes peonies, daylilies and hostas.
Floriculture: growing and maintaining flowering ornamental plants.
Germination: the process by which a plant emerges from a seed.
(Photo by Esther McGinnis, NDSU)
www.ndsu.edu/4h • Growing Flowers for Containers and Gardens 3
IntroductionAnnual flowers are a cheerful addition to the garden and containers. Unlike perennials, annual flowers bloom for a long period and will provide color for most of the summer. Annual flowers live to bloom. You can say they have “flower power”!
While you can buy annual flowers from a garden center, growing plants from seed is extra special. If you look at a seed, it appears so small and lifeless. However, when you sow the seed and nurture it, something extraordinary happens. After several days, a tiny plant will emerge from the soil. As you care for it, that delicate seedling will transform into a vigorously growing plant with many leaves.
After several weeks, the plant that you sowed will produce flower buds that will open and greet the sun. Yes, purchasing a plant from the garden center is faster, but you would miss the great pride that you feel in watching your seeds germinate and grow. This publication will take you through the steps of growing annuals flowers from seed indoors or sowing directly outdoors.
Seed SourcesLocal garden centers and hardware stores begin selling annual flower seeds in late winter. If you are looking for a larger selection, online seed companies such as Burpee, Park Seed, Harris Seed and Johnny’s Selected Seed offer a wide assortment of interesting flowers.
Seed packed fresh for this year will germinate better than seed stored at room temperature from previous years. If you have leftover seed from these projects, you can save them for next year if you store them properly. The best way to store seeds is to seal the packets and put them in a jar in a refrigerator. Do not freeze the seeds. To keep the humidity down, place a drying agent (desiccant) such as silica gel in the jar. Frequently, boxes of new shoes will contain packets of silica gel. You can recycle these packets to protect your seeds.
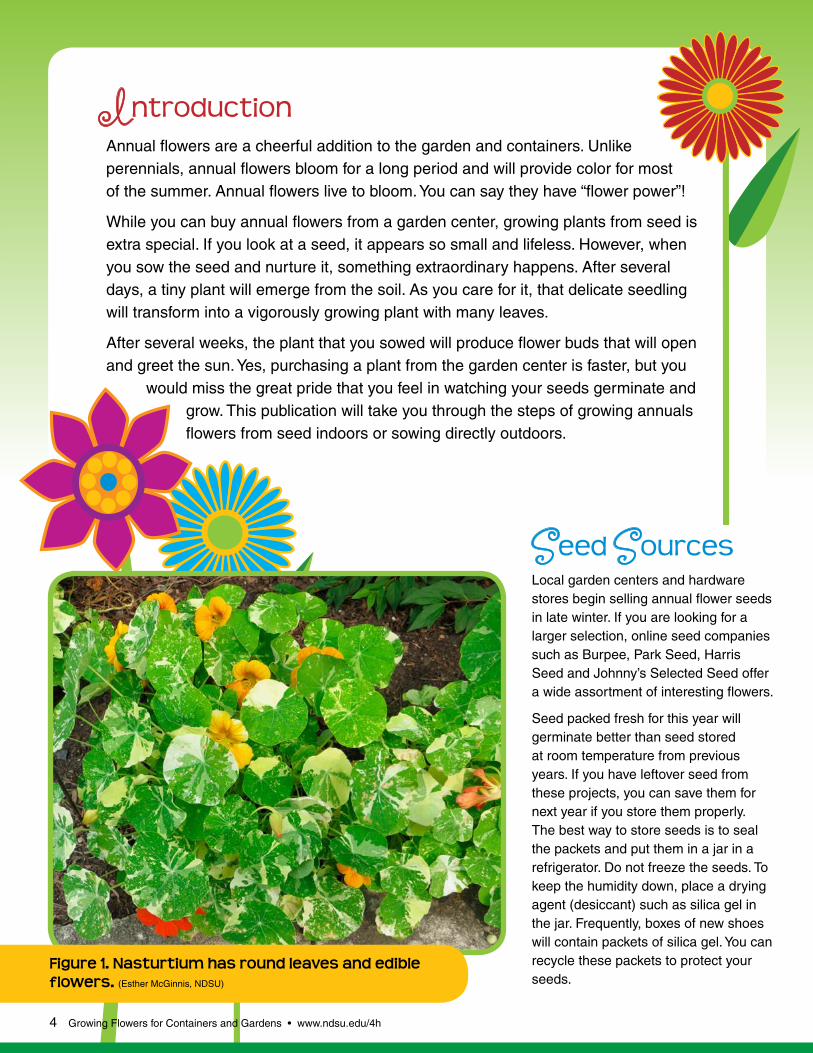
Figure 1. Nasturtium has round leaves and edible flowers. (Esther McGinnis, NDSU)
4 Growing Flowers for Containers and Gardens • www.ndsu.edu/4h
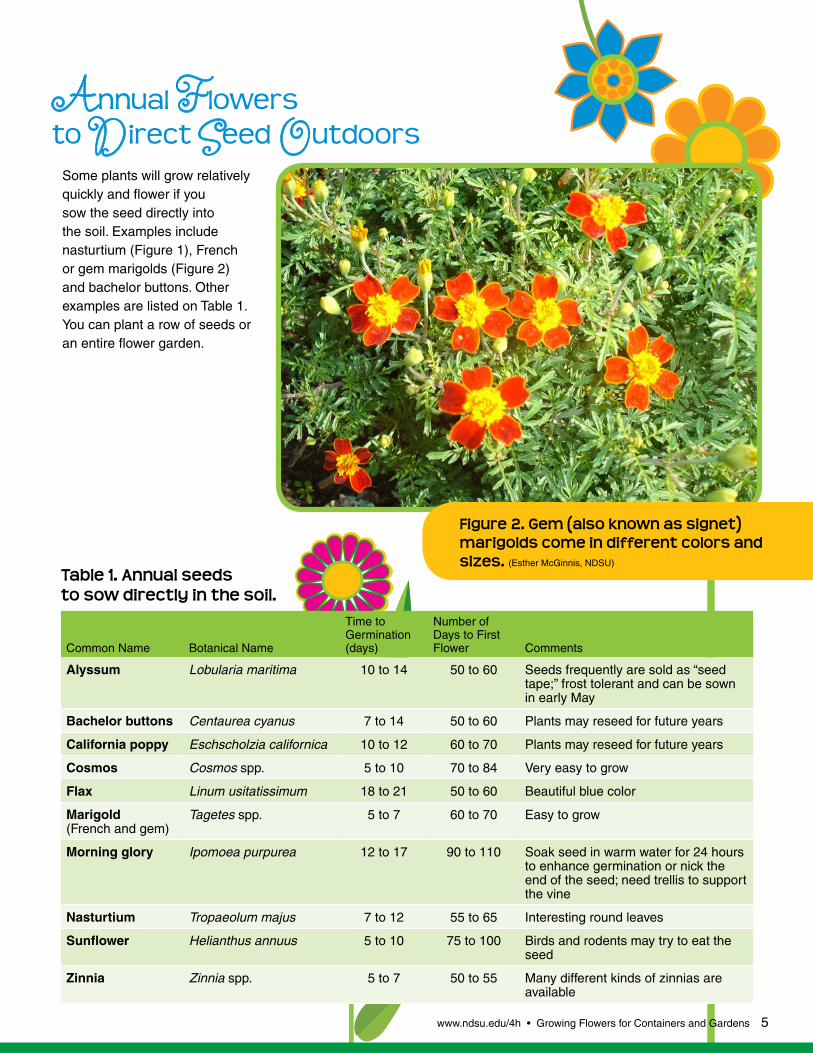
Figure 2. Gem (also known as signet) marigolds come in different colors and sizes. (Esther McGinnis, NDSU)
Table 1. Annual seeds to sow directly in the soil.
Common Name Botanical Name
Time to Germination (days)
Number of Days to First Flower Comments
Alyssum Lobularia maritima 10 to 14 50 to 60 Seeds frequently are sold as “seed tape;” frost tolerant and can be sown in early May
Bachelor buttons Centaurea cyanus 7 to 14 50 to 60 Plants may reseed for future years
California poppy Eschscholzia californica 10 to 12 60 to 70 Plants may reseed for future years
Cosmos Cosmos spp. 5 to 10 70 to 84 Very easy to grow
Flax Linum usitatissimum 18 to 21 50 to 60 Beautiful blue color
Marigold (French and gem)
Tagetes spp. 5 to 7 60 to 70 Easy to grow
Morning glory Ipomoea purpurea 12 to 17 90 to 110 Soak seed in warm water for 24 hours to enhance germination or nick the end of the seed; need trellis to support the vine
Nasturtium Tropaeolum majus 7 to 12 55 to 65 Interesting round leaves
Sunflower Helianthus annuus 5 to 10 75 to 100 Birds and rodents may try to eat the seed
Zinnia Zinnia spp. 5 to 7 50 to 55 Many different kinds of zinnias are available
Annual Flowers to D irect Seed Outdoors
Some plants will grow relatively quickly and flower if you sow the seed directly into the soil. Examples include nasturtium (Figure 1), French or gem marigolds (Figure 2) and bachelor buttons. Other examples are listed on Table 1. You can plant a row of seeds or an entire flower garden.
www.ndsu.edu/4h • Growing Flowers for Containers and Gardens 5
Wait to sow the seed until the danger of spring freezes are past. For most of the state, the average last freeze date is prior to May 15, but you may have to delay planting by a week to 10 days in northern areas of the state. In general, sowing from May 15 through June 1 is advised based on your location in the state. However, weather can vary from year to year, so your best option is to look at the long-range weather forecast before sowing seeds.
Preparing your garden area is a crucial step. First determine whether the soil is dry enough to be worked. You can do this by picking up a handful of soil and squeezing. If it stays in a mud ball, the soil is too wet to be worked. If the soil ball crumbles, the soil is dry enough.
Remove all weeds, including their roots. Then rake the soil to create a smooth surface and eliminate large clods of soil. Dig a shallow trench to the depth recommended on the seed packet.
Reading the information on the seed packet is very important because it contains instructions on how best to grow the plant. If the seed packet doesn’t suggest a seed depth, the rule of thumb is to sow the seed at a depth equal to four times the width of the seed. This is not very deep!
After you have sown the seeds in the trench, lightly cover them with soil. Sowing too deeply can delay germination or prevent emergence.
After planting, water the area and keep it moist. The seeds will germinate. Thinning the seedlings may be necessary. Consult the seed packet for the recommended spacing between plants.
How to Start Annual
F lowers IndoorsStarting annual flowers from seed indoors has a couple of big benefits. Most annuals will take several weeks or more to grow large enough to bloom. You can achieve earlier flowering in your garden by starting the seeds indoors in early spring instead of direct sowing in the garden. In addition, starting seeds indoors is a fun project when you are stuck in the house because snow still is on the ground.
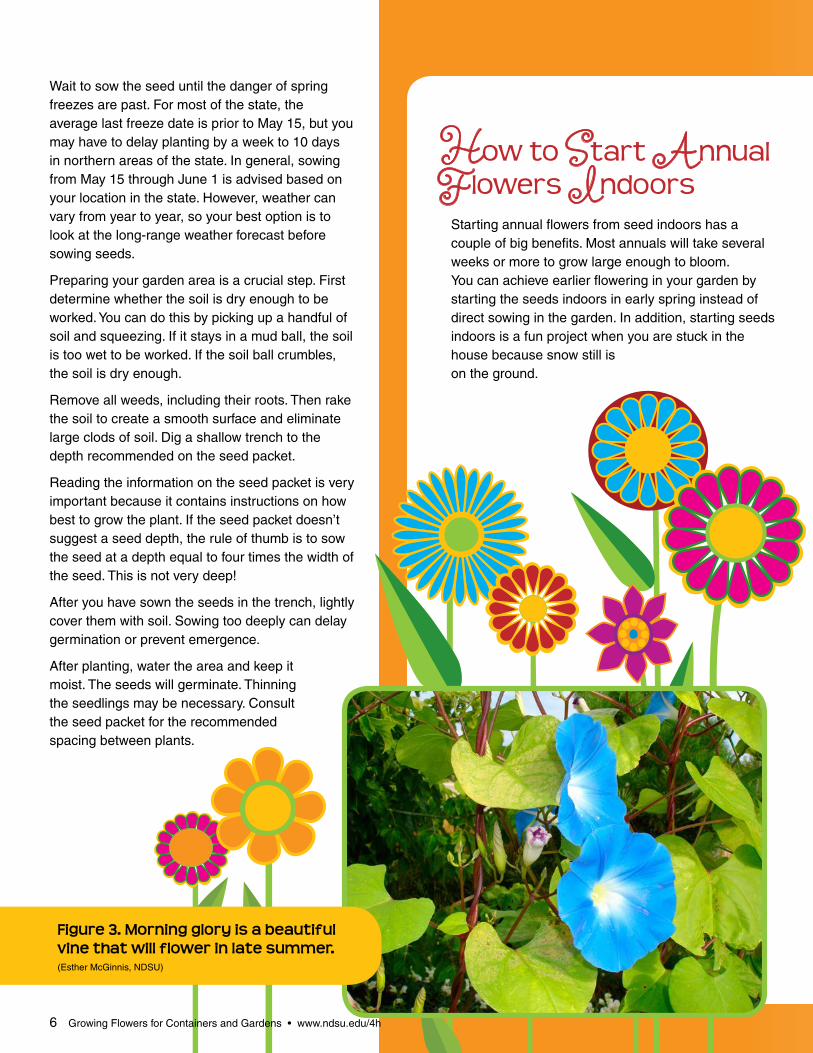
Figure 3. Morning glory is a beautiful vine that will flower in late summer. (Esther McGinnis, NDSU)
6 Growing Flowers for Containers and Gardens • www.ndsu.edu/4h
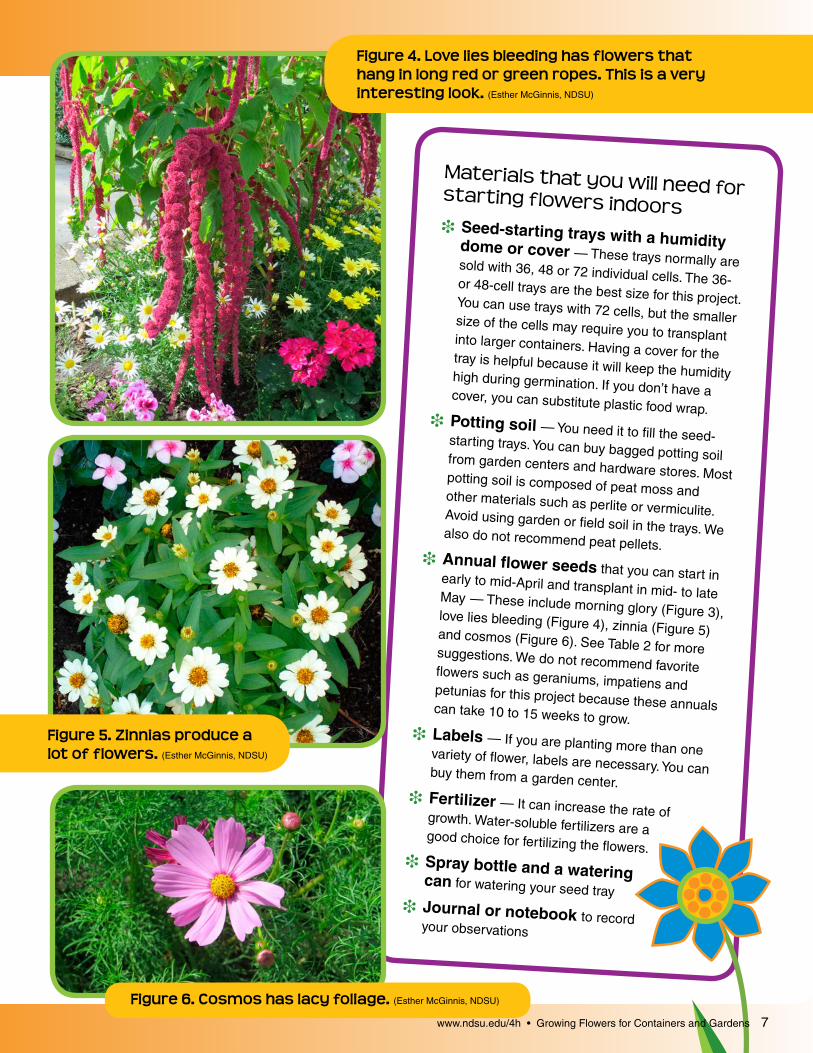
Materials that you will need for starting flowers indoorsi Seed-starting trays with a humidity dome or cover — These trays normally are sold with 36, 48 or 72 individual cells. The 36- or 48-cell trays are the best size for this project. You can use trays with 72 cells, but the smaller size of the cells may require you to transplant into larger containers. Having a cover for the tray is helpful because it will keep the humidity high during germination. If you don’t have a cover, you can substitute plastic food wrap.
i Potting soil — You need it to fill the seed-starting trays. You can buy bagged potting soil from garden centers and hardware stores. Most potting soil is composed of peat moss and other materials such as perlite or vermiculite. Avoid using garden or field soil in the trays. We also do not recommend peat pellets. i Annual flower seeds that you can start in early to mid-April and transplant in mid- to late May — These include morning glory (Figure 3), love lies bleeding (Figure 4), zinnia (Figure 5) and cosmos (Figure 6). See Table 2 for more suggestions. We do not recommend favorite flowers such as geraniums, impatiens and petunias for this project because these annuals can take 10 to 15 weeks to grow.
i Labels — If you are planting more than one variety of flower, labels are necessary. You can buy them from a garden center.i Fertilizer — It can increase the rate of growth. Water-soluble fertilizers are a good choice for fertilizing the flowers.i Spray bottle and a watering can for watering your seed trayi Journal or notebook to record your observations
Figure 4. Love lies bleeding has flowers that hang in long red or green ropes. This is a very interesting look. (Esther McGinnis, NDSU)
Figure 6. Cosmos has lacy foliage. (Esther McGinnis, NDSU)
Figure 5. Zinnias produce a lot of flowers. (Esther McGinnis, NDSU)
www.ndsu.edu/4h • Growing Flowers for Containers and Gardens 7
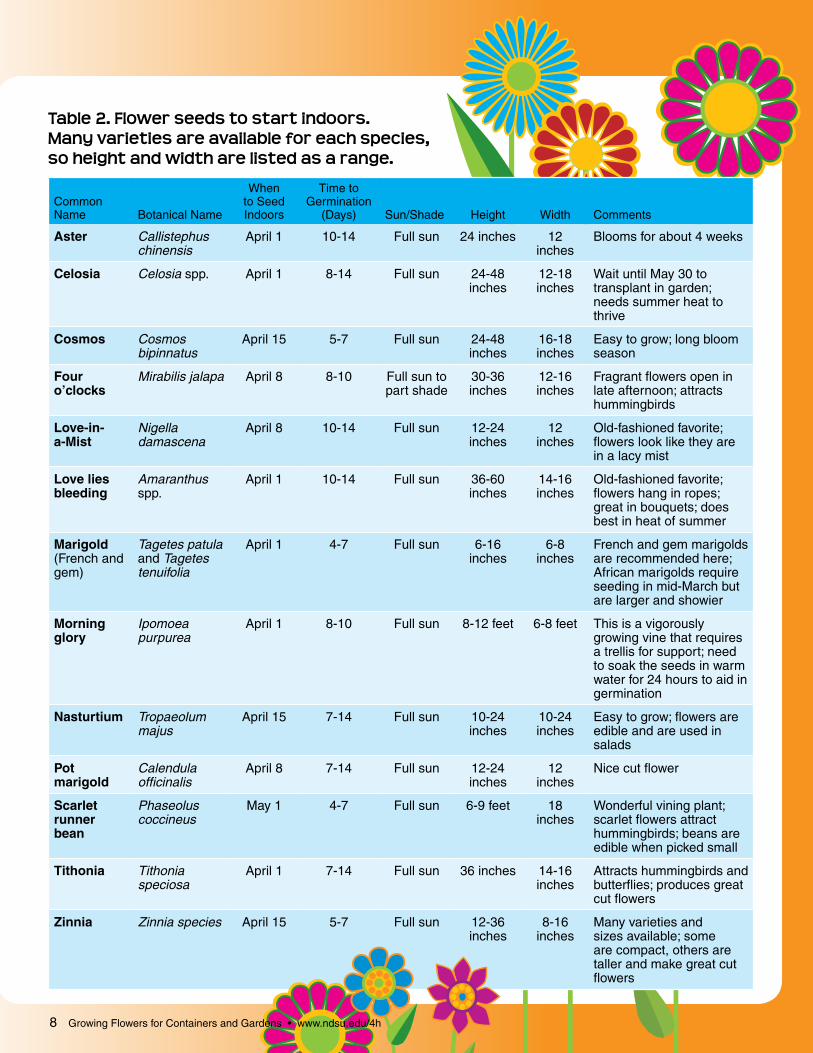
Table 2. Flower seeds to start indoors. Many varieties are available for each species, so height and width are listed as a range.
Common Name Botanical Name
When to Seed Indoors
Time to Germination
(Days) Sun/Shade Height Width Comments
Aster Callistephus chinensis
April 1 10-14 Full sun 24 inches 12 inches
Blooms for about 4 weeks
Celosia Celosia spp. April 1 8-14 Full sun 24-48 inches
12-18 inches
Wait until May 30 to transplant in garden; needs summer heat to thrive
Cosmos Cosmos bipinnatus
April 15 5-7 Full sun 24-48 inches
16-18 inches
Easy to grow; long bloom season
Four o’clocks
Mirabilis jalapa April 8 8-10 Full sun to part shade
30-36 inches
12-16 inches
Fragrant flowers open in late afternoon; attracts hummingbirds
Love-in- a-Mist
Nigella damascena
April 8 10-14 Full sun 12-24 inches
12 inches
Old-fashioned favorite; flowers look like they are in a lacy mist
Love lies bleeding
Amaranthus spp.
April 1 10-14 Full sun 36-60 inches
14-16 inches
Old-fashioned favorite; flowers hang in ropes; great in bouquets; does best in heat of summer
Marigold (French and gem)
Tagetes patula and Tagetes tenuifolia
April 1 4-7 Full sun 6-16 inches
6-8 inches
French and gem marigolds are recommended here; African marigolds require seeding in mid-March but are larger and showier
Morning glory
Ipomoea purpurea
April 1 8-10 Full sun 8-12 feet 6-8 feet This is a vigorously growing vine that requires a trellis for support; need to soak the seeds in warm water for 24 hours to aid in germination
Nasturtium Tropaeolum majus
April 15 7-14 Full sun 10-24 inches
10-24 inches
Easy to grow; flowers are edible and are used in salads
Pot marigold
Calendula officinalis
April 8 7-14 Full sun 12-24 inches
12 inches
Nice cut flower
Scarlet runner bean
Phaseolus coccineus
May 1 4-7 Full sun 6-9 feet 18 inches
Wonderful vining plant; scarlet flowers attract hummingbirds; beans are edible when picked small
Tithonia Tithonia speciosa
April 1 7-14 Full sun 36 inches 14-16 inches
Attracts hummingbirds and butterflies; produces great cut flowers
Zinnia Zinnia species April 15 5-7 Full sun 12-36 inches
8-16 inches
Many varieties and sizes available; some are compact, others are taller and make great cut flowers
8 Growing Flowers for Containers and Gardens • www.ndsu.edu/4h
Planting Steps
Step 2: GrowingContinue to grow the seedlings. The seedlings first will have a pair of leaves called seed leaves or cotyledons. The cotyledons contain food reserves to help the seedlings germinate and emerge from the potting soil. In some plants, the cotyledons will fall off once the true leaves develop. You may notice that the true leaves are a different shape than the cotyledons.
As soon as the seedlings germinate, move the tray near a bright, sunny window but not directly on the window sill. Temperatures on the window sill can be too cold at night and too hot during the day. Optimum temperatures for growing the seedlings range from 65 to 75 F during the day, with slightly cooler temperatures at night.
Alternatively, you can grow the plants under a shop light that contains two fluorescent tubes. Position the fluorescent lights so they are hanging 4 to 6 inches above the plants. You may need to adjust the height of the lights as the plants grow. Fluorescent lighting will produce plants that are bushy and less spindly than plants grown near a window. Incandescent lights will not work because they produce the wrong form of light and they are too hot. The plants will grow best under 12 to 16 hours of light per day.
If more than one seed germinated in each cell, carefully use a scissors to clip off the smaller plant. The remaining plant will have a better chance of growing if it doesn’t have to compete with another plant.
Pay careful attention to watering. Avoid wilted plants because they may not recover or they may be stunted. Too much water can be harmful, too. Plant roots will die if they sit in water. The best practice is to wait to water until the surface of the soil feels dry to the touch. If excess water remains in the bottom of the tray, you can empty it.
After the plants have developed four leaves, begin fertilizing them once a week. This can replace one of the waterings. Mix a garden fertilizer such as Miracle-Gro Water Soluble All Purpose Plant Food to one-quarter of the recommended strength. Full strength
Step 1: SowingOnce you have gathered your supplies, you can begin sowing. Potting soil tends to be a little dry, so moisten it by mixing it with a small amount of water in a bowl. Fill your seed trays with the pre-moistened potting soil so it is almost level with the top of the cell pack. Do not compress the potting soil because that will make growing difficult for the seed’s roots. Then, drop one or two seeds in each cell. Kids’ fingers are better than adults’ at hand seeding.
Cover the seeds with a small amount of potting soil as recommended on the seed packet. Don’t cover too deeply or the small seedlings won’t be able to poke through the soil. If the seeds are really tiny, do not to cover them at all.
Label the seed tray with the name or names of the flowers and the date you planted the seeds. This information is important for your records.
Water the seed tray gently with a fine mist until all the soil is moist. Note: Do not water with too much force or you will wash the seeds away.
Keep the tray covered with the plastic cover or dome. This will keep the soil moist and you might not have to water again for several days. If the soil does dry out, the seeds cannot grow. Keep the soil moist until you can see the seeds sprout.
Put the tray in a warm area. Keeping the potting soil warm so the seeds will germinate quicker is important. Seeds germinate best at temperatures of approximately 72 to 75 F. If you have a heat mat, you can use it to provide bottom heat to keep the soil warm.
Look closely at the seed tray morning and afternoon. As soon as you can see a majority of the tiny seedlings coming through the soil, remove the plastic cover. Otherwise, the seedlings may rot.
www.ndsu.edu/4h • Growing Flowers for Containers and Gardens 9
fertilizer may “burn” the plants and cause the leaves to turn brown.
The plants you started indoors might not always grow the way you would like. Plants might grow too tall, spindly and weak. Things that commonly go wrong include:
i Plants started too early in the spring
i Over- or underwatering
i Not enough light — giving seedlings as much sunlight as they need indoors is hard to do
Step 3: Hardening the PlantsThe plants soon will be ready to transplant outdoors into the flower bed. The next step is to get the plants adjusted to outdoor weather. This is called “hardening the plants.” Begin hardening about a week to 10 days before you plan to plant them into your flower bed or container.
Set the plants outdoors in the afternoon for a couple of hours in a shady, protected spot. The plants cannot handle full sun or wind at first. Each evening, bring the plants indoors. Gradually increase the amount of time outdoors and the amount of sunlight. Make sure the plants do not dry out. By the end of this time, the plants may remain outdoors until you are ready to plant, provided that frost is not in the forecast.
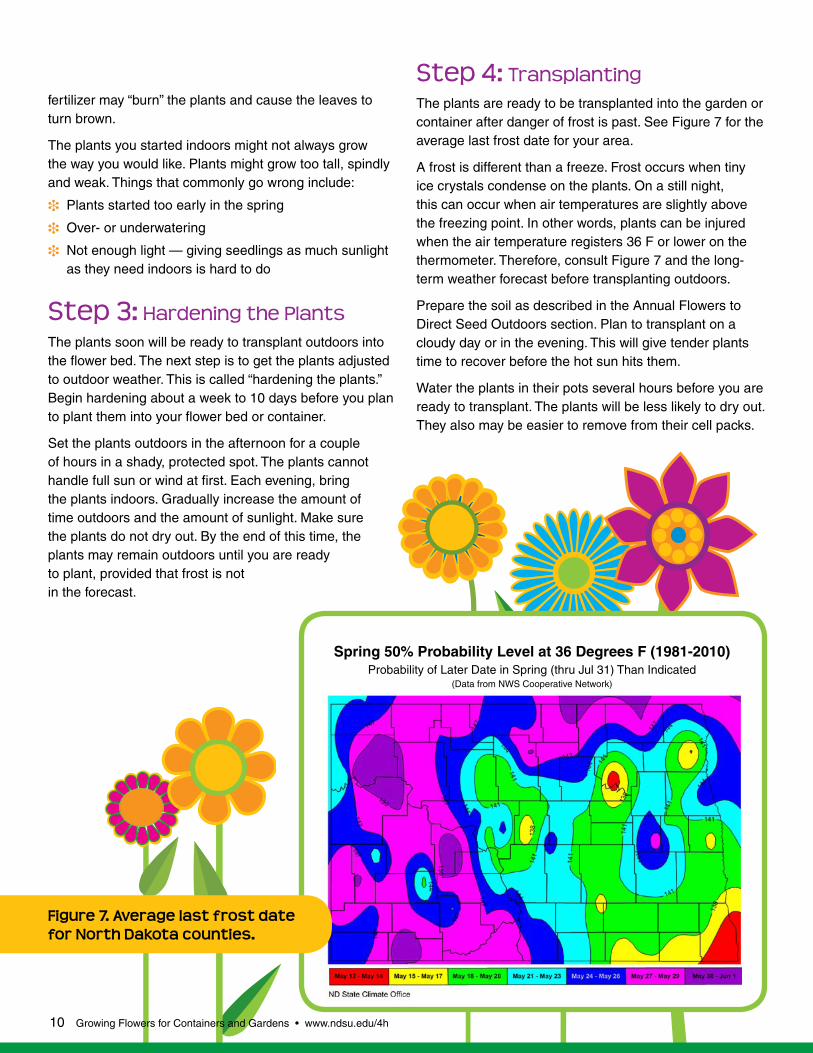
Step 4: TransplantingThe plants are ready to be transplanted into the garden or container after danger of frost is past. See Figure 7 for the average last frost date for your area.
A frost is different than a freeze. Frost occurs when tiny ice crystals condense on the plants. On a still night, this can occur when air temperatures are slightly above the freezing point. In other words, plants can be injured when the air temperature registers 36 F or lower on the thermometer. Therefore, consult Figure 7 and the long-term weather forecast before transplanting outdoors.
Prepare the soil as described in the Annual Flowers to Direct Seed Outdoors section. Plan to transplant on a cloudy day or in the evening. This will give tender plants time to recover before the hot sun hits them.
Water the plants in their pots several hours before you are ready to transplant. The plants will be less likely to dry out. They also may be easier to remove from their cell packs.
Spring 50% Probability Level at 36 Degrees F (1981-2010)Probability of Later Date in Spring (thru Jul 31) Than Indicated
(Data from NWS Cooperative Network)
Figure 7. Average last frost date for North Dakota counties.
10 Growing Flowers for Containers and Gardens • www.ndsu.edu/4h

To remove the plants, push up on the bottom of each cell and gently hold the plant by the base of the stem. If the plant is stuck, tearing the cell pack is OK. If the plants were growing in pots or cups, turn each pot upside down and gently tap the bottom while holding onto the plant.
Next, dig a hole with a small hand trowel. Make the hole about three times as large as the soil ball around the roots. Plant the transplants ½ inch deeper than what they were in the containers. Plants can wilt quickly if the tender roots are exposed to air. Finally, firm the soil around the root ball by pressing it gently with your hands.
Leave a shallow dip or depression around each plant to catch water. When all the flowers have been planted, water the entire flower bed. This will settle the soil and help the plants become adjusted and begin growing.
Flower plants sometimes grow too spindly and have only one flower on top of a stem that is too tall. To help the plant become bushier and produce more flowers, “pinch” it back when it has three or four sets of leaves. A good time to pinch is when you are transplanting the flowers. Take your thumb and forefinger and pinch out the first set of leaves from each of the stems. Flowers that respond especially well to pinching include marigolds, calendula and zinnia.
Summer Care of the F lower GardenAn important part of maintaining the flower garden is weeding on a regular basis. The key to good weed control is to tackle the job when the weeds are young. You can use a hoe to control the weeds. Don’t hoe too close to your annual flowers because you might injure the roots. If you let the weeds grow too large, you might have to pull each one by hand to save your flowers. Hoeing the flower bed once a week should prevent the weeds from taking over.
After your flowers have established, you can cut back on watering. However, the plants still will need water during the heat of summer if you do not get rain. Watering deeply two or three times a week is better than watering a little every day.
On average, the plants need approximately an inch of water per week. If you water with a sprinkler, put a can or bucket near the sprinkler so you can tell how much water you are applying. Water the flower bed until you collect 1 inch of water or a little more in the can or bucket. Special soaker hoses are available and allow the water to trickle slowly and soak in around the flowers. In hot, dry weather, the plants may need more frequent watering.
Fertilizing your plants will help them grow faster. Several fertilizers are on the market. The easiest to use is a slow-release fertilizer such as Osmocote Flower and Vegetable that comes in a pelleted form. Sprinkle the slow-release fertilizer on the surface of the soil in the amount indicated on the label. This type of fertilizer will release nutrients for several months. Alternatively, you can use half-strength, water-soluble fertilizer such as Miracle-Gro All Purpose Plant Food and apply it every two weeks.
As flower blooms fade and dry, you can pinch them off with your fingers or cut them off with a shears. This is called “deadheading.” If dead blooms remain on the plant, they will “set seed” and rob energy from the plant. The flower’s job is to produce seeds, so once the flower petal falls off, we need to cut off the seed head so the plant will keep on flowering. Annuals will produce more flowers if we deadhead the seeds.
www.ndsu.edu/4h • Growing Flowers for Containers and Gardens 11
Growing Flowers in a Container
Section 2
Learning Objectives You will be able to:
m Design a flowering container garden
m Plant the container garden
m Maintain the planting for the summer
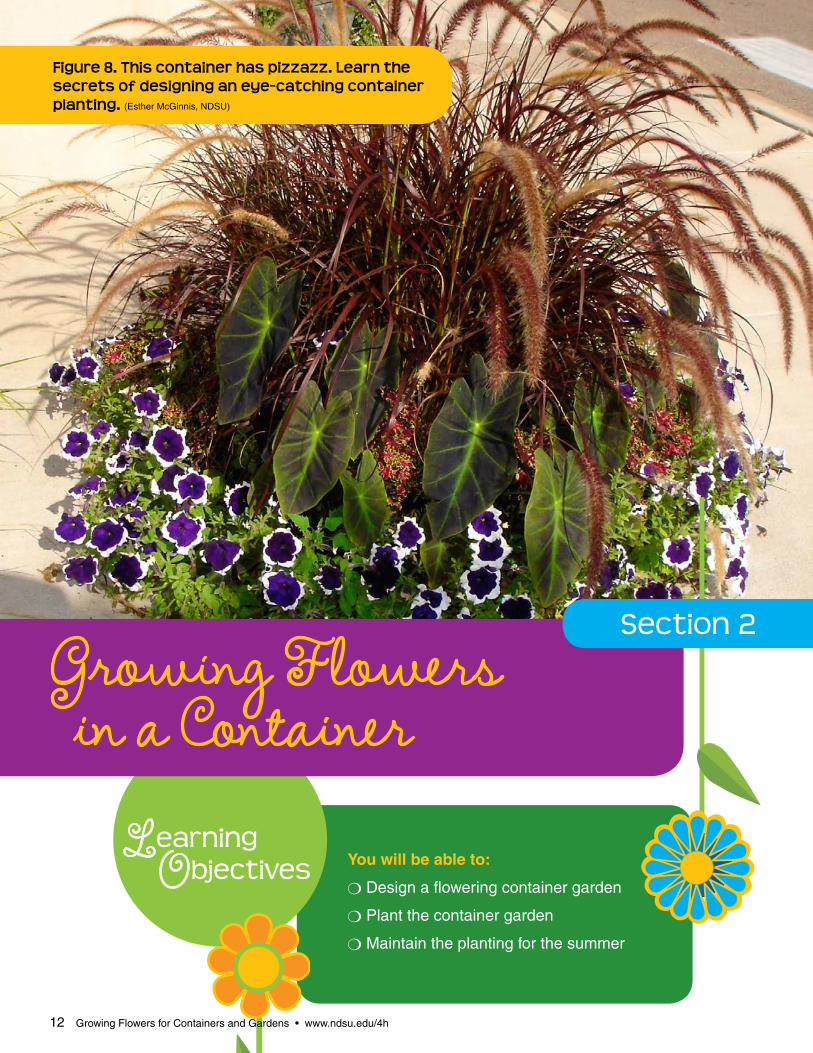
Figure 8. This container has pizzazz. Learn the secrets of designing an eye-catching container planting. (Esther McGinnis, NDSU)
12 Growing Flowers for Containers and Gardens • www.ndsu.edu/4h
Section 2
You Can Garden AnywhereThe beauty of container gardening is that you don’t have to live in a house or have a big yard to have a flower garden. You can garden on your balcony, patio or front step. With a little planning and care, you can have an attractive flower garden from late May until fall.
Container SelectionBe creative with the container you choose. You can use traditional clay, ceramic or plastic pots. Plastic pots are usually lighter and less expensive than ceramic or clay pots.
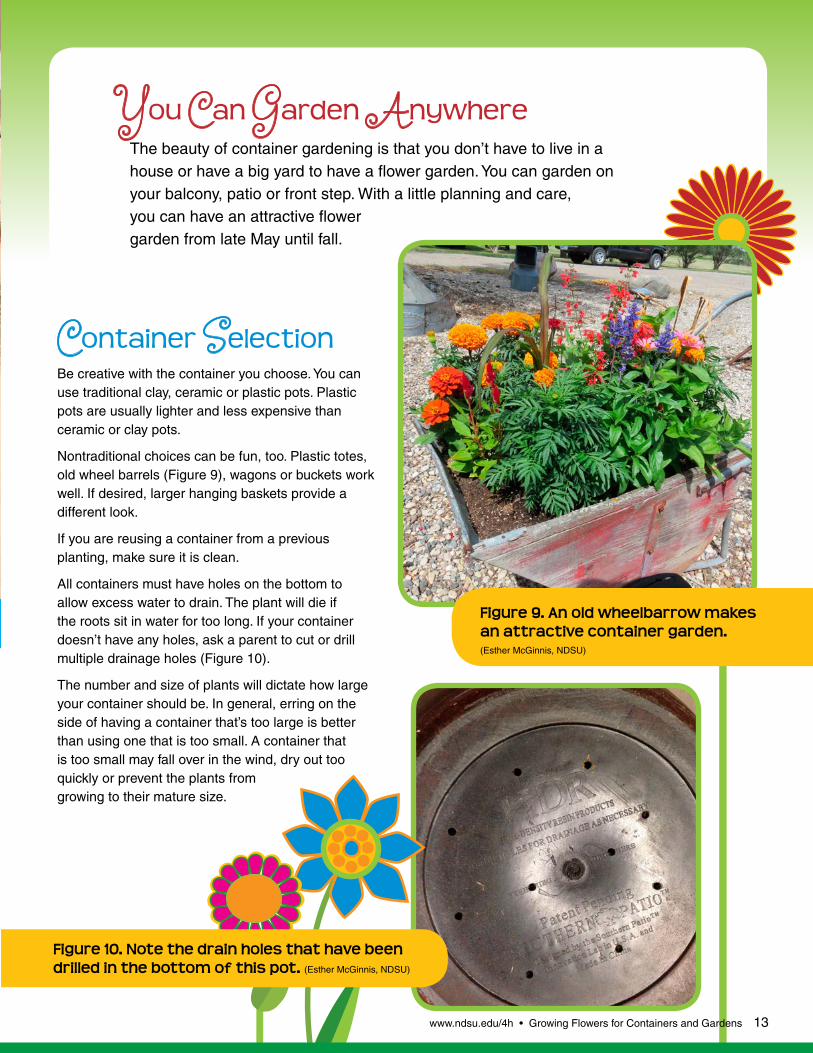
Nontraditional choices can be fun, too. Plastic totes, old wheel barrels (Figure 9), wagons or buckets work well. If desired, larger hanging baskets provide a different look.
If you are reusing a container from a previous planting, make sure it is clean.
All containers must have holes on the bottom to allow excess water to drain. The plant will die if the roots sit in water for too long. If your container doesn’t have any holes, ask a parent to cut or drill multiple drainage holes (Figure 10).
The number and size of plants will dictate how large your container should be. In general, erring on the side of having a container that’s too large is better than using one that is too small. A container that is too small may fall over in the wind, dry out too quickly or prevent the plants from growing to their mature size.
Figure 10. Note the drain holes that have been drilled in the bottom of this pot. (Esther McGinnis, NDSU)
Figure 9. An old wheelbarrow makes an attractive container garden. (Esther McGinnis, NDSU)
www.ndsu.edu/4h • Growing Flowers for Containers and Gardens 13

Potting SoilPotting soil works better in containers than regular soil from a field or yard. Regular soil drains poorly, can have weed seeds or insects, and may contain herbicide residues. Regular soil also compacts easily and may become very hard, which makes getting water difficult for the roots.
You can buy bags of potting soil from hardware stores or garden centers. Avoid reusing potting soil from previous years because the media may harbor plant diseases.
Generally, potting soils contain peat moss as the primary component, with perlite, vermiculite, and/or shredded bark as additional components. New formulations of potting soil have hydrogel beads for moisture retention. These hydrogel beads have not proven to aid in plant growth. Therefore, simpler and cheaper potting soils are fine.
Consider the Light LevelHow much light will your container garden receive at its chosen location? Will your plants receive a lot of sun or will they be in shade?
A good practice is to record the amount of light your container garden will receive. If the plants will receive six or more hours of direct sunlight a day, this is considered full sun. Partial shade is less than six hours of direct sun but more than four. Full shade is less than four hours of sunlight. See Tables 3, 4, and 5 to select plants by light level.
When to P lantNorth Dakota still can experience cool temperatures in May. The best time to plant a container in North Dakota is between May 15 and June 1. Plants are readily available in the garden centers and temperatures are usually warmer by this time. However, if the weather forecast predicts nighttime temperatures in the 30s or 40s, move the container into the garage until the cold weather is past.Annual PlantsMost people purchase annual plants for their containers. Annuals are those plants that will survive for only one growing season. They will not survive winter temperatures. We use annuals for containers because they have colorful flowers or foliage, bloom for most of the summer and are inexpensive, compared with perennials. You can use some of the annuals you have grown from seed if you desire.
14 Growing Flowers for Containers and Gardens • www.ndsu.edu/4h

Recipe for Eye-catching ContainersYou can design a stunning container garden by following a simple recipe for success. The recipe calls for thriller, spiller and filler plants.
What does this mean? It means choosing plants with different heights, shapes and forms to create a full and balanced planting. The thriller plant provides the height, the spiller trails over the pot and the filler takes up the rest of the space. (See Figure 11.)
thriller spiller filler
Figure 11. This newly planted container follows the thriller, spiller, filler recipe. Papyrus ‘King Tut’ is the thriller that provides the height. Purple and lime green sweet potato vines are planted on both sides of the papyrus and eventually will trail down the sides of the pot. Finally, the red and white petunia in the front is a filler that provides welcome color to the mix. (Esther McGinnis, NDSU)
www.ndsu.edu/4h • Growing Flowers for Containers and Gardens 15
thriller
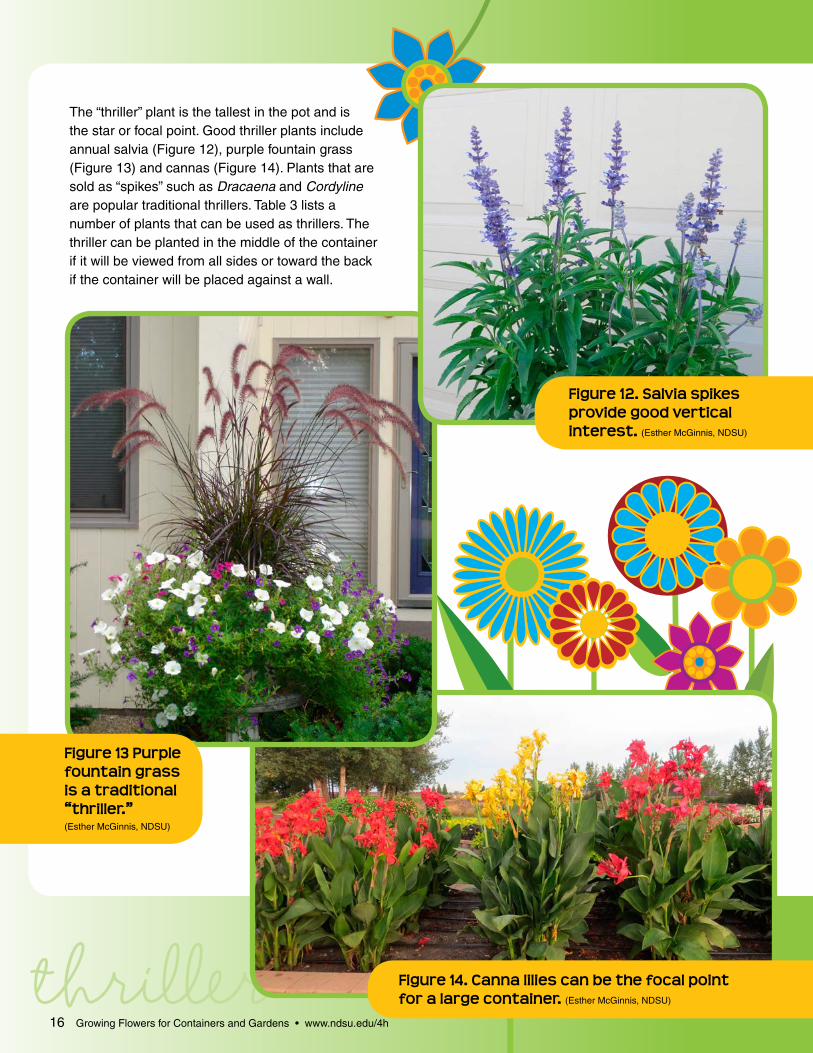
The “thriller” plant is the tallest in the pot and is the star or focal point. Good thriller plants include annual salvia (Figure 12), purple fountain grass (Figure 13) and cannas (Figure 14). Plants that are sold as “spikes” such as Dracaena and Cordyline are popular traditional thrillers. Table 3 lists a number of plants that can be used as thrillers. The thriller can be planted in the middle of the container if it will be viewed from all sides or toward the back if the container will be placed against a wall.
Figure 14. Canna lilies can be the focal point for a large container. (Esther McGinnis, NDSU)
Figure 13 Purple fountain grass is a traditional “thriller.” (Esther McGinnis, NDSU)
Figure 12. Salvia spikes provide good vertical interest. (Esther McGinnis, NDSU)
16 Growing Flowers for Containers and Gardens • www.ndsu.edu/4h
thriller thriller thriller
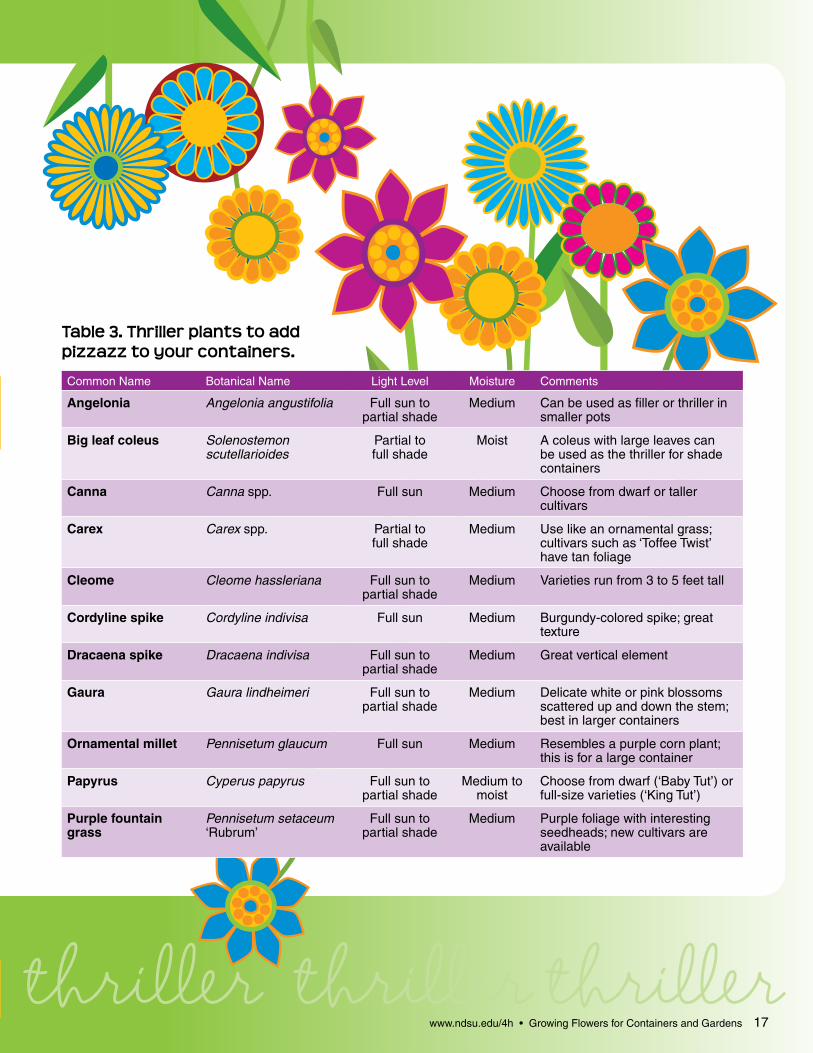
Table 3. Thriller plants to add pizzazz to your containers.
Common Name Botanical Name Light Level Moisture Comments
Angelonia Angelonia angustifolia Full sun to partial shade
Medium Can be used as filler or thriller in smaller pots
Big leaf coleus Solenostemon scutellarioides
Partial to full shade
Moist A coleus with large leaves can be used as the thriller for shade containers
Canna Canna spp. Full sun Medium Choose from dwarf or taller cultivars
Carex Carex spp. Partial to full shade
Medium Use like an ornamental grass; cultivars such as ‘Toffee Twist’ have tan foliage
Cleome Cleome hassleriana Full sun to partial shade
Medium Varieties run from 3 to 5 feet tall
Cordyline spike Cordyline indivisa Full sun Medium Burgundy-colored spike; great texture
Dracaena spike Dracaena indivisa Full sun to partial shade
Medium Great vertical element
Gaura Gaura lindheimeri Full sun to partial shade
Medium Delicate white or pink blossoms scattered up and down the stem; best in larger containers
Ornamental millet Pennisetum glaucum Full sun Medium Resembles a purple corn plant; this is for a large container
Papyrus Cyperus papyrus Full sun to partial shade
Medium to moist
Choose from dwarf (‘Baby Tut’) or full-size varieties (‘King Tut’)
Purple fountain grass
Pennisetum setaceum ‘Rubrum’
Full sun to partial shade
Medium Purple foliage with interesting seedheads; new cultivars are available
www.ndsu.edu/4h • Growing Flowers for Containers and Gardens 17
spiller spiller spiller
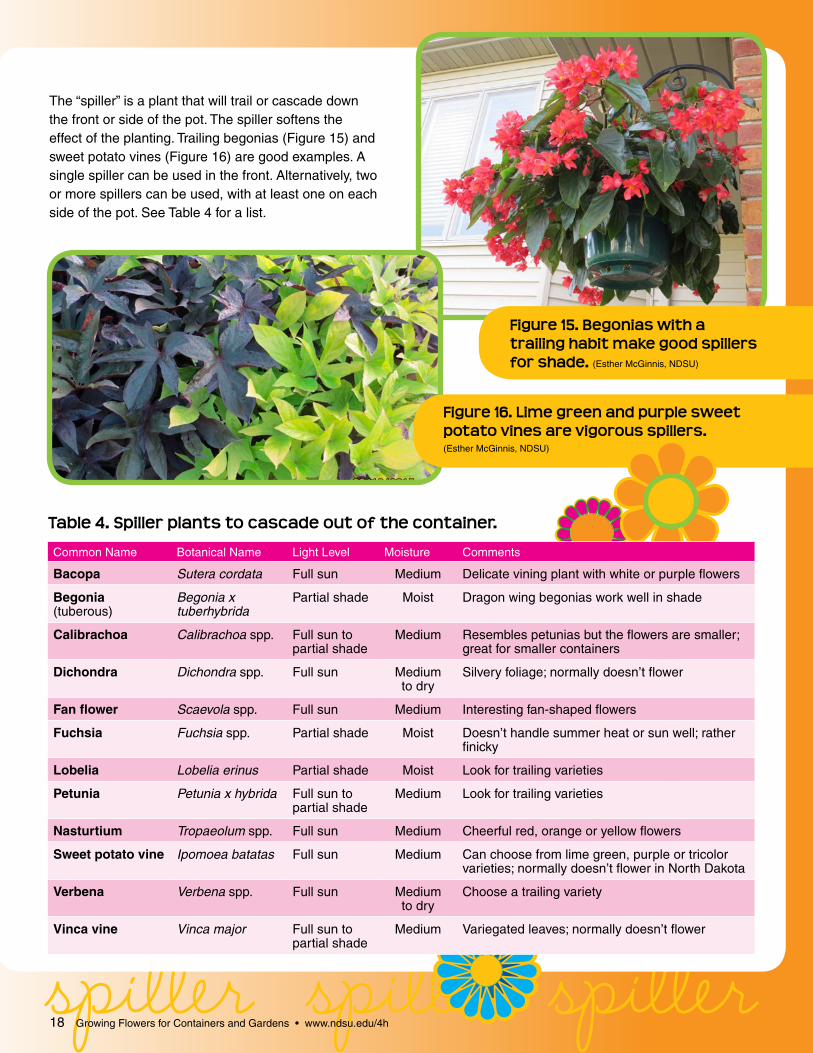
The “spiller” is a plant that will trail or cascade down the front or side of the pot. The spiller softens the effect of the planting. Trailing begonias (Figure 15) and sweet potato vines (Figure 16) are good examples. A single spiller can be used in the front. Alternatively, two or more spillers can be used, with at least one on each side of the pot. See Table 4 for a list.
Figure 15. Begonias with a trailing habit make good spillers for shade. (Esther McGinnis, NDSU)
Figure 16. Lime green and purple sweet potato vines are vigorous spillers. (Esther McGinnis, NDSU)
Table 4. Spiller plants to cascade out of the container.
Common Name Botanical Name Light Level Moisture Comments
Bacopa Sutera cordata Full sun Medium Delicate vining plant with white or purple flowers
Begonia (tuberous)
Begonia x tuberhybrida
Partial shade Moist Dragon wing begonias work well in shade
Calibrachoa Calibrachoa spp. Full sun to partial shade
Medium Resembles petunias but the flowers are smaller; great for smaller containers
Dichondra Dichondra spp. Full sun Medium to dry
Silvery foliage; normally doesn’t flower
Fan flower Scaevola spp. Full sun Medium Interesting fan-shaped flowers
Fuchsia Fuchsia spp. Partial shade Moist Doesn’t handle summer heat or sun well; rather finicky
Lobelia Lobelia erinus Partial shade Moist Look for trailing varieties
Petunia Petunia x hybrida Full sun to partial shade
Medium Look for trailing varieties
Nasturtium Tropaeolum spp. Full sun Medium Cheerful red, orange or yellow flowers
Sweet potato vine Ipomoea batatas Full sun Medium Can choose from lime green, purple or tricolor varieties; normally doesn’t flower in North Dakota
Verbena Verbena spp. Full sun Medium to dry
Choose a trailing variety
Vinca vine Vinca major Full sun to partial shade
Medium Variegated leaves; normally doesn’t flower
18 Growing Flowers for Containers and Gardens • www.ndsu.edu/4h
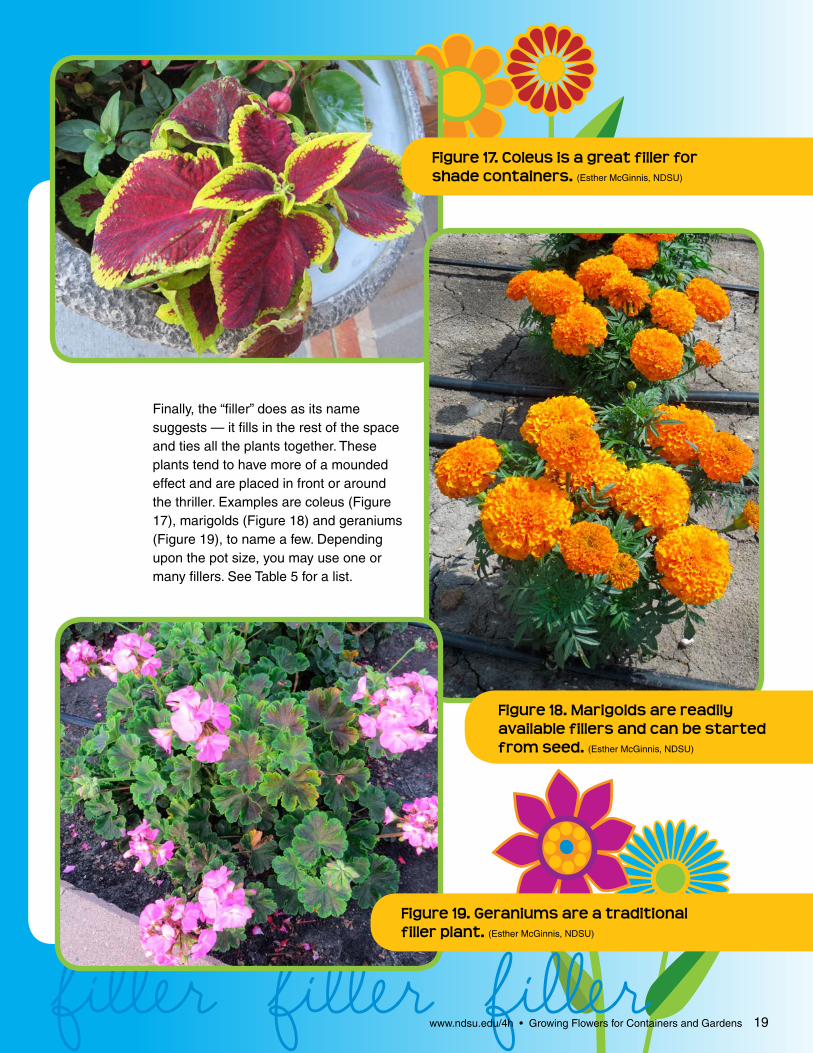
Finally, the “filler” does as its name suggests — it fills in the rest of the space and ties all the plants together. These plants tend to have more of a mounded effect and are placed in front or around the thriller. Examples are coleus (Figure 17), marigolds (Figure 18) and geraniums (Figure 19), to name a few. Depending upon the pot size, you may use one or many fillers. See Table 5 for a list.
Figure 18. Marigolds are readily available fillers and can be started from seed. (Esther McGinnis, NDSU)
filler filler fillerFigure 19. Geraniums are a traditional filler plant. (Esther McGinnis, NDSU)
Figure 17. Coleus is a great filler for shade containers. (Esther McGinnis, NDSU)
www.ndsu.edu/4h • Growing Flowers for Containers and Gardens 19
filler filler filler
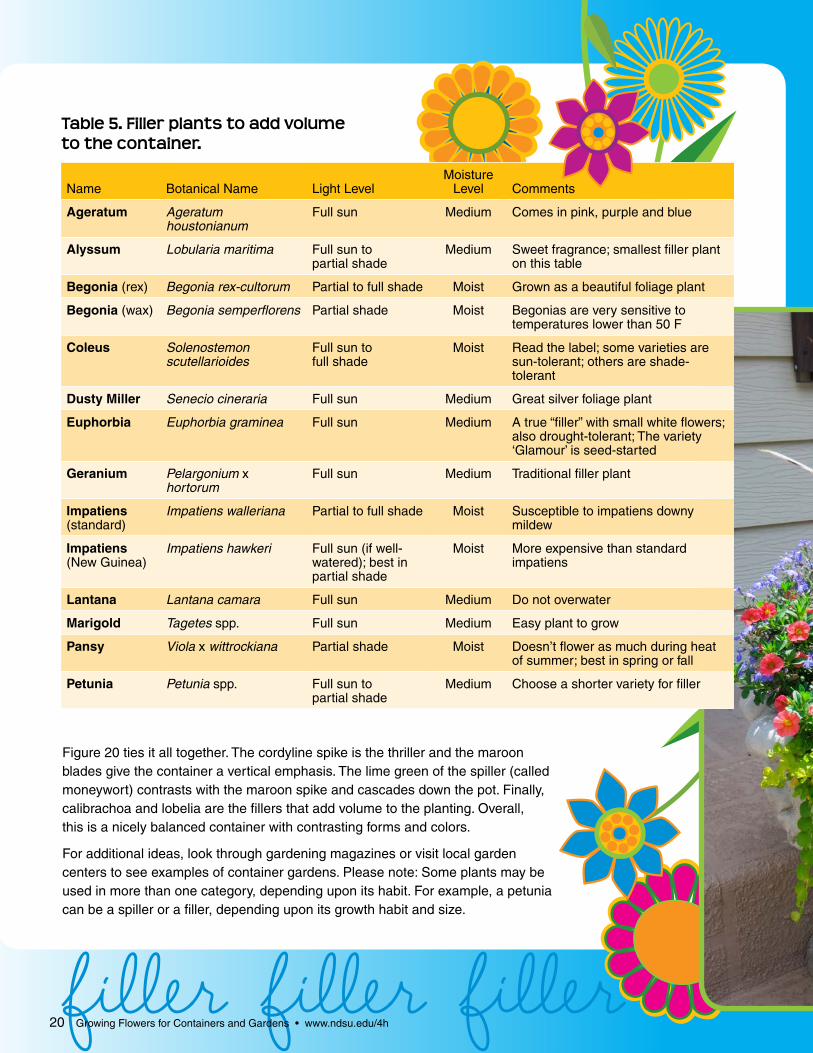
Figure 20 ties it all together. The cordyline spike is the thriller and the maroon blades give the container a vertical emphasis. The lime green of the spiller (called moneywort) contrasts with the maroon spike and cascades down the pot. Finally, calibrachoa and lobelia are the fillers that add volume to the planting. Overall, this is a nicely balanced container with contrasting forms and colors.
For additional ideas, look through gardening magazines or visit local garden centers to see examples of container gardens. Please note: Some plants may be used in more than one category, depending upon its habit. For example, a petunia can be a spiller or a filler, depending upon its growth habit and size.
Table 5. Filler plants to add volume to the container.
Name Botanical Name Light LevelMoisture
Level Comments
Ageratum Ageratum houstonianum
Full sun Medium Comes in pink, purple and blue
Alyssum Lobularia maritima Full sun to partial shade
Medium Sweet fragrance; smallest filler plant on this table
Begonia (rex) Begonia rex-cultorum Partial to full shade Moist Grown as a beautiful foliage plant
Begonia (wax) Begonia semperflorens Partial shade Moist Begonias are very sensitive to temperatures lower than 50 F
Coleus Solenostemon scutellarioides
Full sun to full shade
Moist Read the label; some varieties are sun-tolerant; others are shade-tolerant
Dusty Miller Senecio cineraria Full sun Medium Great silver foliage plant
Euphorbia Euphorbia graminea Full sun Medium A true “filler” with small white flowers; also drought-tolerant; The variety ‘Glamour’ is seed-started
Geranium Pelargonium x hortorum
Full sun Medium Traditional filler plant
Impatiens (standard)
Impatiens walleriana Partial to full shade Moist Susceptible to impatiens downy mildew
Impatiens (New Guinea)
Impatiens hawkeri Full sun (if well-watered); best in partial shade
Moist More expensive than standard impatiens
Lantana Lantana camara Full sun Medium Do not overwater
Marigold Tagetes spp. Full sun Medium Easy plant to grow
Pansy Viola x wittrockiana Partial shade Moist Doesn’t flower as much during heat of summer; best in spring or fall
Petunia Petunia spp. Full sun to partial shade
Medium Choose a shorter variety for filler
20 Growing Flowers for Containers and Gardens • www.ndsu.edu/4h
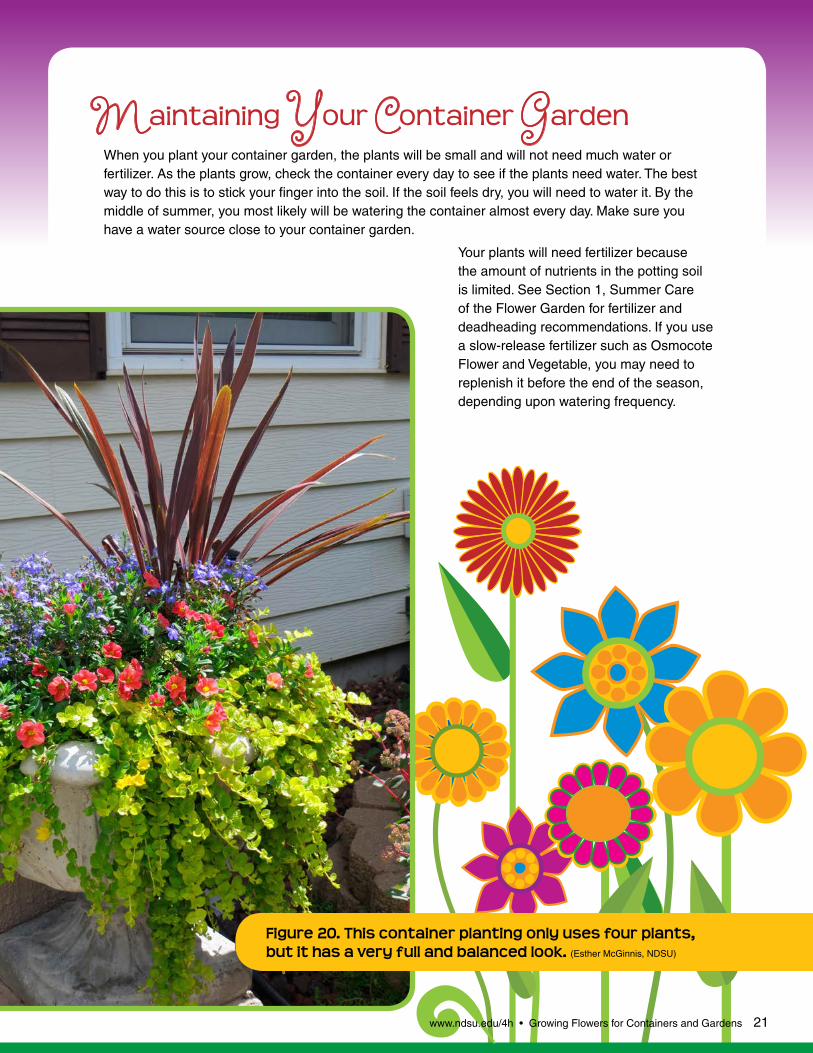
Maintaining Your Container GardenWhen you plant your container garden, the plants will be small and will not need much water or fertilizer. As the plants grow, check the container every day to see if the plants need water. The best way to do this is to stick your finger into the soil. If the soil feels dry, you will need to water it. By the middle of summer, you most likely will be watering the container almost every day. Make sure you have a water source close to your container garden.
Your plants will need fertilizer because the amount of nutrients in the potting soil is limited. See Section 1, Summer Care of the Flower Garden for fertilizer and deadheading recommendations. If you use a slow-release fertilizer such as Osmocote Flower and Vegetable, you may need to replenish it before the end of the season, depending upon watering frequency.
Figure 20. This container planting only uses four plants, but it has a very full and balanced look. (Esther McGinnis, NDSU)
www.ndsu.edu/4h • Growing Flowers for Containers and Gardens 21
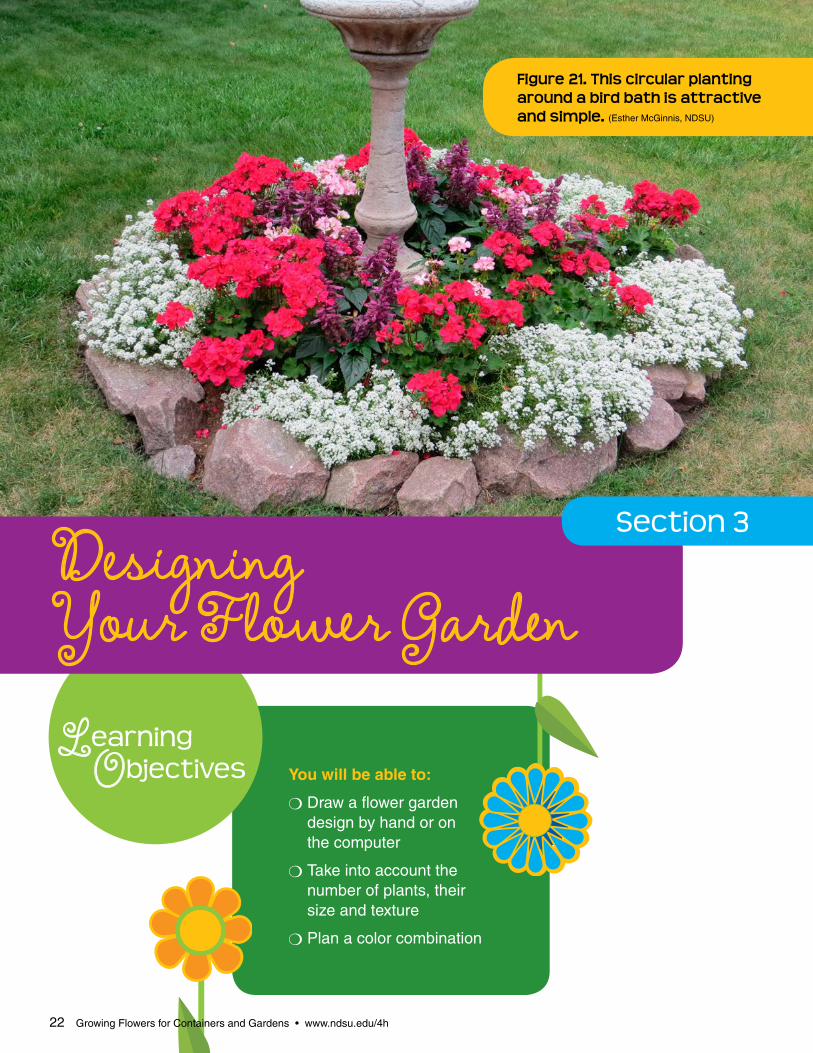
You will be able to:
m Draw a flower garden design by hand or on the computer
m Take into account the number of plants, their size and texture
m Plan a color combination
Section 3
Designing Your Flower Garden
Figure 21. This circular planting around a bird bath is attractive and simple. (Esther McGinnis, NDSU)
Learning Objectives
22 Growing Flowers for Containers and Gardens • www.ndsu.edu/4h
IntroductionThe plants that you have grown from seed will need a home in the great outdoors. If you have a small number of plants, you can add the plants to an existing flower bed that has room or you can plant them in containers.
You may be even more ambitious and may want to design an entire flower bed from scratch. In that case, you may need to purchase plants from a garden center or nursery to supplement the number of plants you grew from seed. Whether your garden is big or small, you have many factors to consider before you begin transplanting.
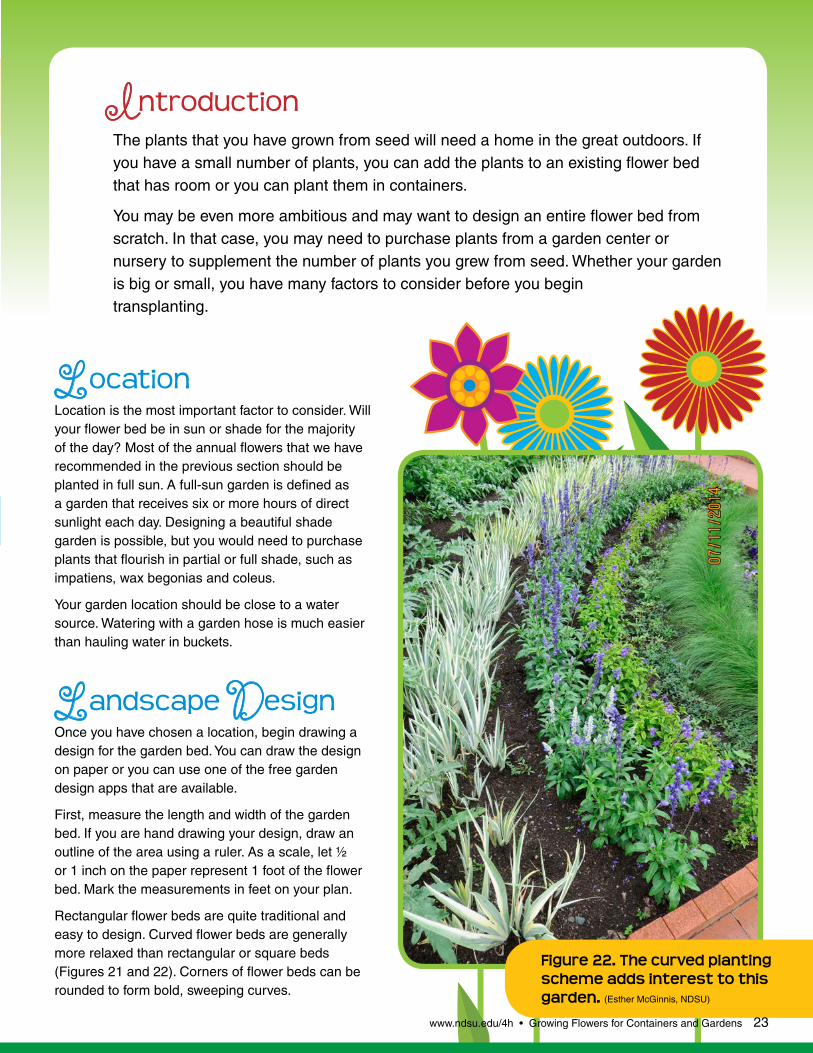
LocationLocation is the most important factor to consider. Will your flower bed be in sun or shade for the majority of the day? Most of the annual flowers that we have recommended in the previous section should be planted in full sun. A full-sun garden is defined as a garden that receives six or more hours of direct sunlight each day. Designing a beautiful shade garden is possible, but you would need to purchase plants that flourish in partial or full shade, such as impatiens, wax begonias and coleus.
Your garden location should be close to a water source. Watering with a garden hose is much easier than hauling water in buckets.
Landscape DesignOnce you have chosen a location, begin drawing a design for the garden bed. You can draw the design on paper or you can use one of the free garden design apps that are available.
First, measure the length and width of the garden bed. If you are hand drawing your design, draw an outline of the area using a ruler. As a scale, let ½ or 1 inch on the paper represent 1 foot of the flower bed. Mark the measurements in feet on your plan.
Rectangular flower beds are quite traditional and easy to design. Curved flower beds are generally more relaxed than rectangular or square beds (Figures 21 and 22). Corners of flower beds can be rounded to form bold, sweeping curves.
Figure 22. The curved planting scheme adds interest to this garden. (Esther McGinnis, NDSU)
www.ndsu.edu/4h • Growing Flowers for Containers and Gardens 23
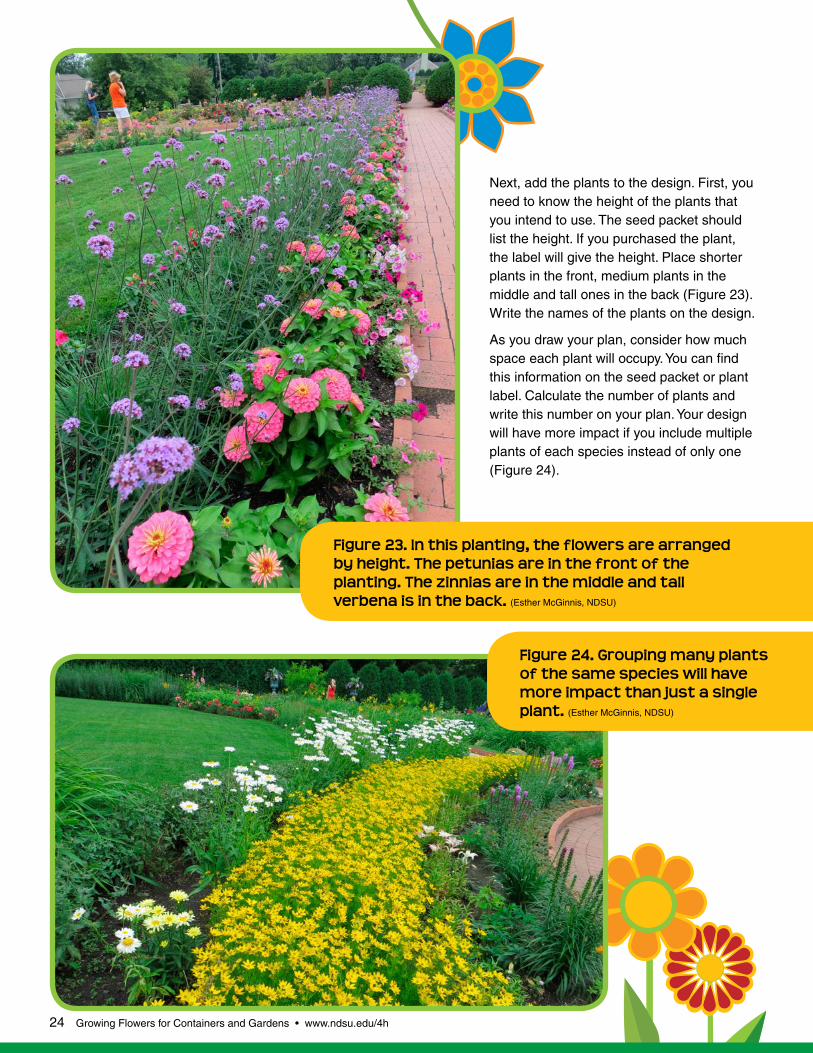
Next, add the plants to the design. First, you need to know the height of the plants that you intend to use. The seed packet should list the height. If you purchased the plant, the label will give the height. Place shorter plants in the front, medium plants in the middle and tall ones in the back (Figure 23). Write the names of the plants on the design.
As you draw your plan, consider how much space each plant will occupy. You can find this information on the seed packet or plant label. Calculate the number of plants and write this number on your plan. Your design will have more impact if you include multiple plants of each species instead of only one (Figure 24).
Figure 23. In this planting, the flowers are arranged by height. The petunias are in the front of the planting. The zinnias are in the middle and tall verbena is in the back. (Esther McGinnis, NDSU)
Figure 24. Grouping many plants of the same species will have more impact than just a single plant. (Esther McGinnis, NDSU)
24 Growing Flowers for Containers and Gardens • www.ndsu.edu/4h
Color Combinations
The flower colors you choose are very important
in making the flower bed attractive. Some
color combinations work because the colors
are harmonious. Other combinations create
excitement in the garden because they use
contrasting colors. Flower beds are usually more
interesting if the gardener uses combinations
of two or three colors. The following is a list of
colors that go well together, but don’t be afraid
to experiment with other combinations. There
is no wrong color combination. It is a matter of
personal taste.
Three-color combinations
Yellow, orange and red
Pink, violet and blue (or dark purple)
Lime green, yellow and orange
Yellow, purple and green
Two-color combinations
Fuchsia and lime green
Yellow and purple
Yellow and red
Pink and purple
Pink and yellow
Orange and blue
Red and silver
Red and green
White goes with all colors
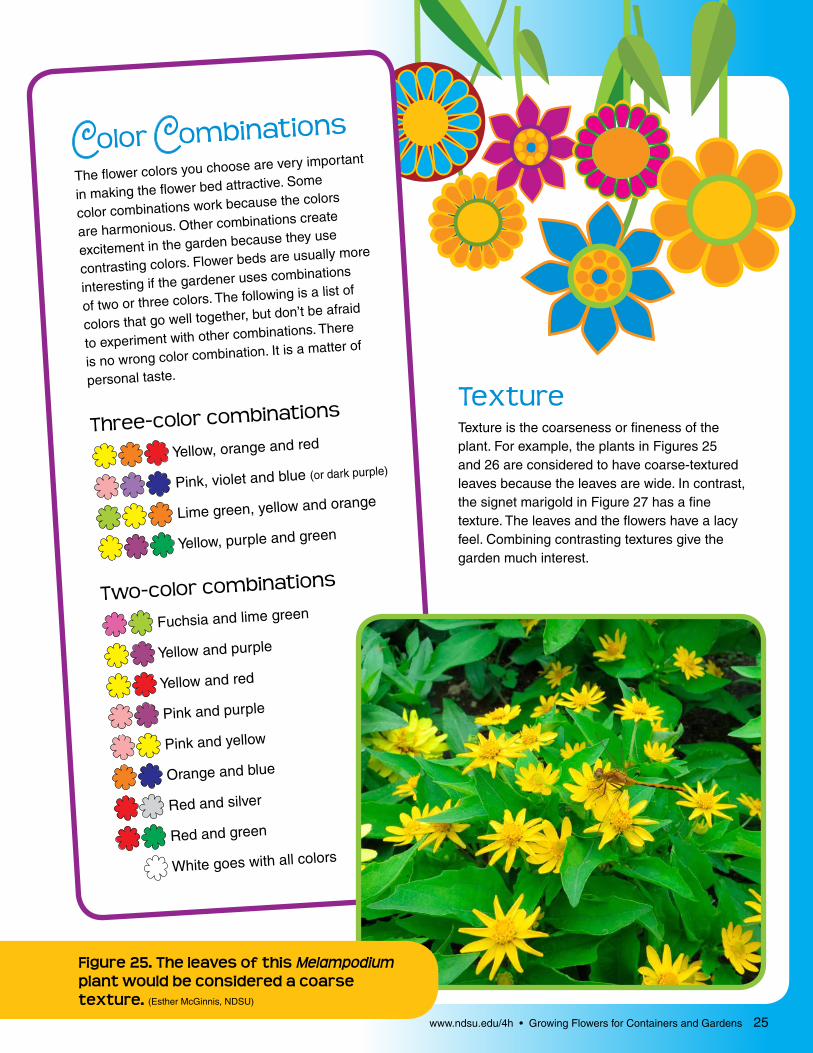
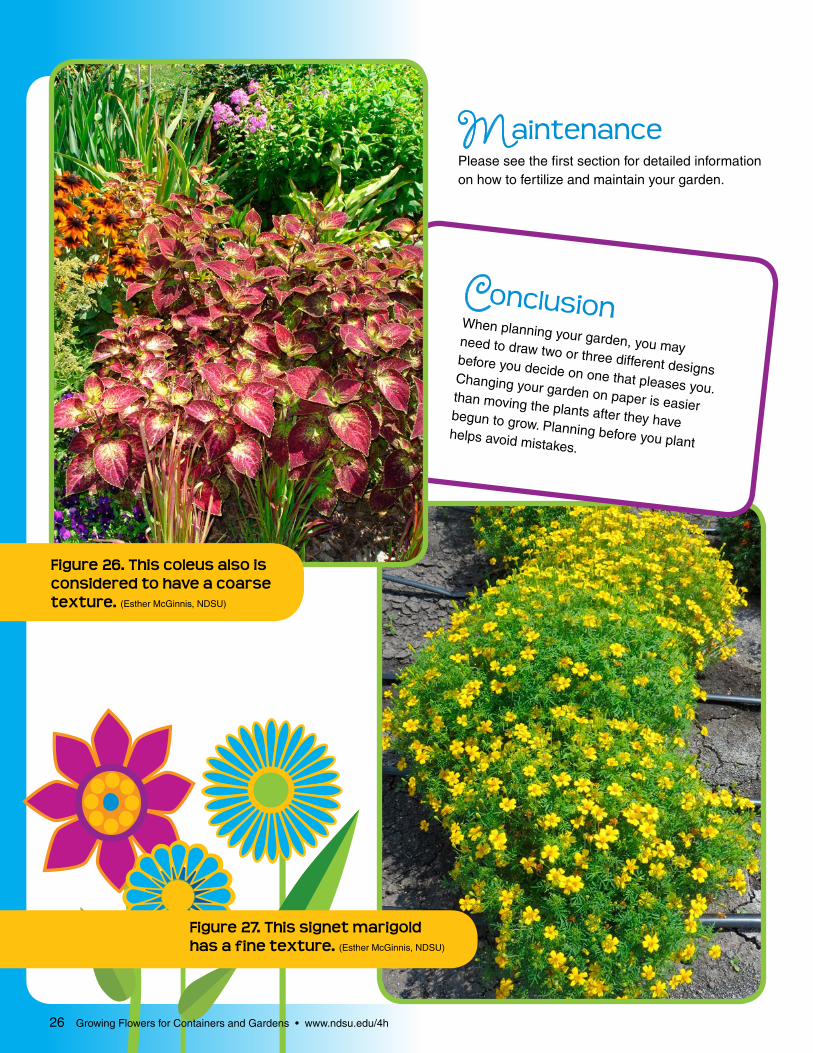
TextureTexture is the coarseness or fineness of the plant. For example, the plants in Figures 25 and 26 are considered to have coarse-textured leaves because the leaves are wide. In contrast, the signet marigold in Figure 27 has a fine texture. The leaves and the flowers have a lacy feel. Combining contrasting textures give the garden much interest.
Figure 25. The leaves of this Melampodium plant would be considered a coarse texture. (Esther McGinnis, NDSU)
www.ndsu.edu/4h • Growing Flowers for Containers and Gardens 25
MaintenancePlease see the first section for detailed information on how to fertilize and maintain your garden.
ConclusionWhen planning your garden, you may need to draw two or three different designs
before you decide on one that pleases you. Changing your garden on paper is easier than moving the plants after they have begun to grow. Planning before you plant
helps avoid mistakes.
Figure 26. This coleus also is considered to have a coarse texture. (Esther McGinnis, NDSU)
Figure 27. This signet marigold has a fine texture. (Esther McGinnis, NDSU)
26 Growing Flowers for Containers and Gardens • www.ndsu.edu/4h
Section 4
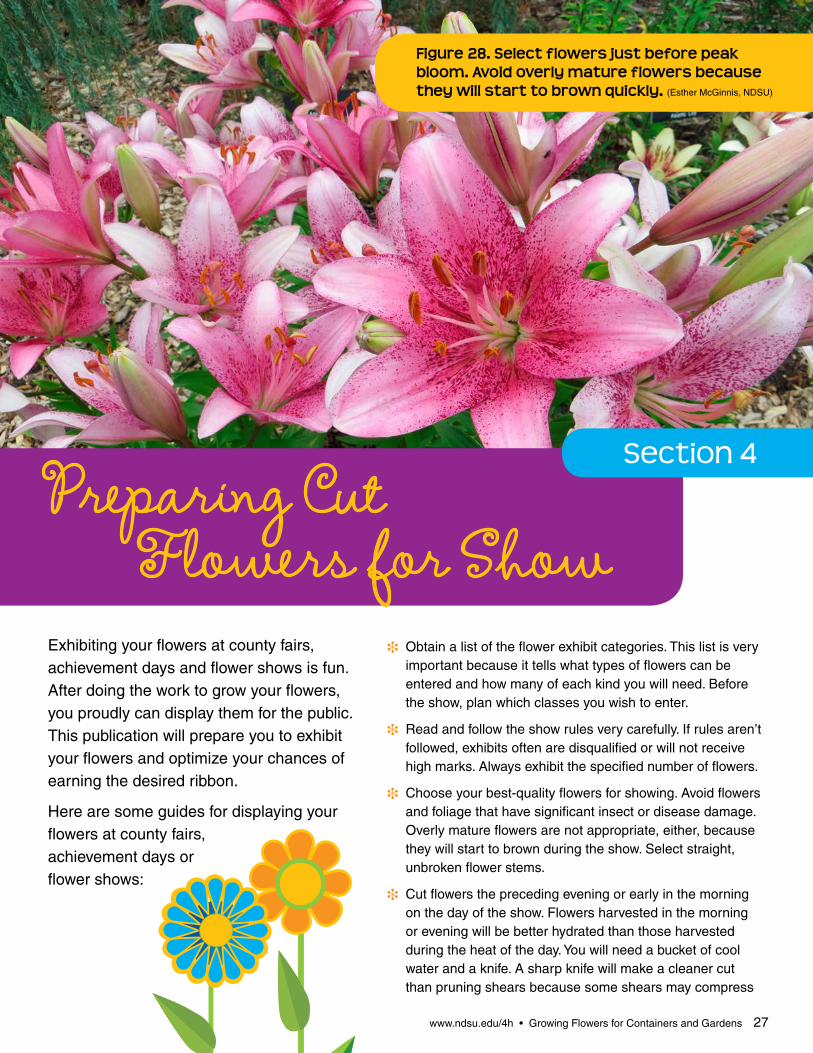
Preparing Cut Flowers for ShowExhibiting your flowers at county fairs, achievement days and flower shows is fun. After doing the work to grow your flowers, you proudly can display them for the public. This publication will prepare you to exhibit your flowers and optimize your chances of earning the desired ribbon.
Here are some guides for displaying your flowers at county fairs, achievement days or flower shows:
i Obtain a list of the flower exhibit categories. This list is very important because it tells what types of flowers can be entered and how many of each kind you will need. Before the show, plan which classes you wish to enter.
i Read and follow the show rules very carefully. If rules aren’t followed, exhibits often are disqualified or will not receive high marks. Always exhibit the specified number of flowers.
i Choose your best-quality flowers for showing. Avoid flowers and foliage that have significant insect or disease damage. Overly mature flowers are not appropriate, either, because they will start to brown during the show. Select straight, unbroken flower stems.
i Cut flowers the preceding evening or early in the morning on the day of the show. Flowers harvested in the morning or evening will be better hydrated than those harvested during the heat of the day. You will need a bucket of cool water and a knife. A sharp knife will make a cleaner cut than pruning shears because some shears may compress
Figure 28. Select flowers just before peak bloom. Avoid overly mature flowers because they will start to brown quickly. (Esther McGinnis, NDSU)
www.ndsu.edu/4h • Growing Flowers for Containers and Gardens 27
the stem’s water-conducting vessels. Cut the flower stem at its maximum length because you will trim the stems more later. The cut should be angled to prevent the stem from suctioning itself to the bottom of the bucket and limiting water uptake. As you harvest each flower, immediately place the cut stem into the bucket of cool water. Any delay will cause bubbles to form in the stem’s water-conducting vessels. The level of water in the bucket should be approximately half the length of the stems. Remove leaves that are below the water line because they may rot and increase bacteria levels in the water. Harvest extra flower stems in case a stem breaks or the flower wilts.
i After harvesting, leave the bucket of flowers in a cool, dark spot indoors for several (three to 12) hours. This cooling treatment is called conditioning. Conditioning is very important because it lets the flowers soak up water so they won’t wilt so quickly when you take them to the show.
i The rules usually will explain what type of container should be used for your display. Often, the containers can be clear glass pint or quart canning jars. Flowers usually are judged on their quality, not the fanciness of the container. Make sure to select a container that is proportionate in size to your flowers. Short-stemmed flowers will not make an attractive display in an overly large container and vice versa. Be sure the container holds enough water to keep the flowers well-supplied while on display.
i Add water to the container with the proper amount of flower food (floral preservative) to extend the life of the flowers. Flower food can be found in floral shops and garden centers.
i Recut the stems to the optimum length just prior to exhibiting and immediately place the stems in the water with the flower food. This fresh cut will help the flowers take up more water.
i When you are arranging the correct number of flowers in your container, remove any leaves that will be submerged below the water line. The leaves above the water line should be left unless damaged. Gently wash or brush off any dirt that may be sticking to the leaves.
i Uniformity is very important in a category that requires more than one flower. The stems should all be the same length. The flowers should be about the same size and at approximately the same maturity level. All the flowers in your entry should be the same color, rather than mixed.
i Protect your flowers on the way to the show so they don’t become bruised or broken. Take along a few extra flowers so that you will be able to replace any that are damaged on the way to the show.
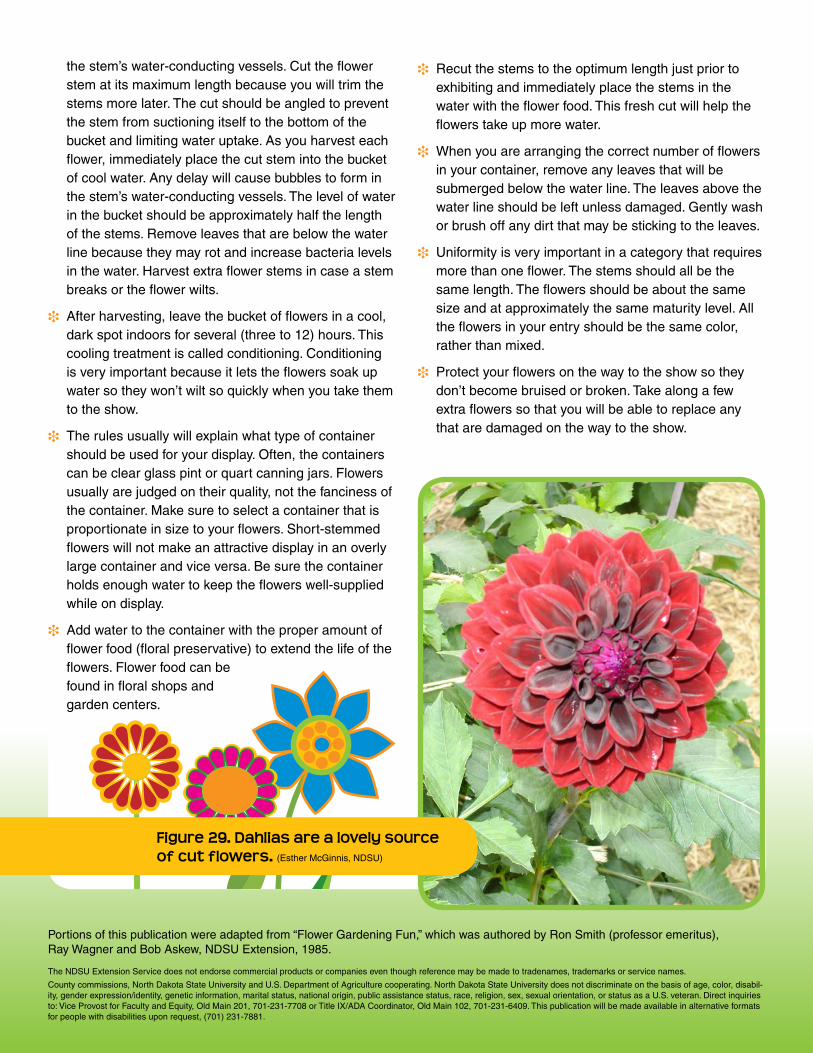
Figure 29. Dahlias are a lovely source of cut flowers. (Esther McGinnis, NDSU)
Portions of this publication were adapted from “Flower Gardening Fun,” which was authored by Ron Smith (professor emeritus), Ray Wagner and Bob Askew, NDSU Extension, 1985.
The NDSU Extension Service does not endorse commercial products or companies even though reference may be made to tradenames, trademarks or service names.
County commissions, North Dakota State University and U.S. Department of Agriculture cooperating. North Dakota State University does not discriminate on the basis of age, color, disabil-ity, gender expression/identity, genetic information, marital status, national origin, public assistance status, race, religion, sex, sexual orientation, or status as a U.S. veteran. Direct inquiries to: Vice Provost for Faculty and Equity, Old Main 201, 701-231-7708 or Title IX/ADA Coordinator, Old Main 102, 701-231-6409. This publication will be made available in alternative formats for people with disabilities upon request, (701) 231-7881.