Ganeti Web Manager Documentation - Read the Docs · Ganeti Web Manager Documentation, Release...
111
Ganeti Web Manager Documentation Release 0.11.2 Oregon State University Open Source Lab April 27, 2017
Transcript of Ganeti Web Manager Documentation - Read the Docs · Ganeti Web Manager Documentation, Release...
Ganeti Web Manager DocumentationRelease 0.11.2
Oregon State University Open Source Lab
April 27, 2017

Contents
1 Getting Started 31.1 Requirements . . . . . . . . . . . . . . . . . . . . . . . . . . . . . . . . . . . . . . . . . . . . . . . 31.2 Installation . . . . . . . . . . . . . . . . . . . . . . . . . . . . . . . . . . . . . . . . . . . . . . . . 41.3 Configuring . . . . . . . . . . . . . . . . . . . . . . . . . . . . . . . . . . . . . . . . . . . . . . . . 71.4 Importing a Cluster . . . . . . . . . . . . . . . . . . . . . . . . . . . . . . . . . . . . . . . . . . . . 14
2 Deployment 172.1 Deployment Intro . . . . . . . . . . . . . . . . . . . . . . . . . . . . . . . . . . . . . . . . . . . . . 172.2 Static Files . . . . . . . . . . . . . . . . . . . . . . . . . . . . . . . . . . . . . . . . . . . . . . . . 172.3 Apache + mod_wsgi . . . . . . . . . . . . . . . . . . . . . . . . . . . . . . . . . . . . . . . . . . . 182.4 Nginx + uWSGI . . . . . . . . . . . . . . . . . . . . . . . . . . . . . . . . . . . . . . . . . . . . . 19
3 Features 213.1 Permissions . . . . . . . . . . . . . . . . . . . . . . . . . . . . . . . . . . . . . . . . . . . . . . . . 213.2 Object Log . . . . . . . . . . . . . . . . . . . . . . . . . . . . . . . . . . . . . . . . . . . . . . . . 233.3 VNC . . . . . . . . . . . . . . . . . . . . . . . . . . . . . . . . . . . . . . . . . . . . . . . . . . . 233.4 SSH Keys . . . . . . . . . . . . . . . . . . . . . . . . . . . . . . . . . . . . . . . . . . . . . . . . . 253.5 LDAP . . . . . . . . . . . . . . . . . . . . . . . . . . . . . . . . . . . . . . . . . . . . . . . . . . . 263.6 Virtual Machine Templates . . . . . . . . . . . . . . . . . . . . . . . . . . . . . . . . . . . . . . . . 273.7 Managing Clusters . . . . . . . . . . . . . . . . . . . . . . . . . . . . . . . . . . . . . . . . . . . . 273.8 Cluster Read Only Mode . . . . . . . . . . . . . . . . . . . . . . . . . . . . . . . . . . . . . . . . . 283.9 Open Registration . . . . . . . . . . . . . . . . . . . . . . . . . . . . . . . . . . . . . . . . . . . . 283.10 Caching . . . . . . . . . . . . . . . . . . . . . . . . . . . . . . . . . . . . . . . . . . . . . . . . . . 303.11 Ganetiviz . . . . . . . . . . . . . . . . . . . . . . . . . . . . . . . . . . . . . . . . . . . . . . . . . 31
4 Usage 334.1 Upgrading . . . . . . . . . . . . . . . . . . . . . . . . . . . . . . . . . . . . . . . . . . . . . . . . 334.2 Clusters . . . . . . . . . . . . . . . . . . . . . . . . . . . . . . . . . . . . . . . . . . . . . . . . . . 344.3 Virtual Machines . . . . . . . . . . . . . . . . . . . . . . . . . . . . . . . . . . . . . . . . . . . . . 344.4 Nodes . . . . . . . . . . . . . . . . . . . . . . . . . . . . . . . . . . . . . . . . . . . . . . . . . . . 344.5 Templates . . . . . . . . . . . . . . . . . . . . . . . . . . . . . . . . . . . . . . . . . . . . . . . . . 34
5 Contributing 355.1 Issues . . . . . . . . . . . . . . . . . . . . . . . . . . . . . . . . . . . . . . . . . . . . . . . . . . . 355.2 OSL Development Process . . . . . . . . . . . . . . . . . . . . . . . . . . . . . . . . . . . . . . . . 375.3 GWM Release Process . . . . . . . . . . . . . . . . . . . . . . . . . . . . . . . . . . . . . . . . . . 405.4 GWM Developer Guide . . . . . . . . . . . . . . . . . . . . . . . . . . . . . . . . . . . . . . . . . 415.5 Developer Installation . . . . . . . . . . . . . . . . . . . . . . . . . . . . . . . . . . . . . . . . . . 46
i
5.6 Vagrant . . . . . . . . . . . . . . . . . . . . . . . . . . . . . . . . . . . . . . . . . . . . . . . . . . 48
6 Project Information 516.1 Compatibility . . . . . . . . . . . . . . . . . . . . . . . . . . . . . . . . . . . . . . . . . . . . . . . 516.2 Changelog . . . . . . . . . . . . . . . . . . . . . . . . . . . . . . . . . . . . . . . . . . . . . . . . 516.3 History . . . . . . . . . . . . . . . . . . . . . . . . . . . . . . . . . . . . . . . . . . . . . . . . . . 576.4 Design . . . . . . . . . . . . . . . . . . . . . . . . . . . . . . . . . . . . . . . . . . . . . . . . . . 576.5 Contact Information . . . . . . . . . . . . . . . . . . . . . . . . . . . . . . . . . . . . . . . . . . . 576.6 Screenshots . . . . . . . . . . . . . . . . . . . . . . . . . . . . . . . . . . . . . . . . . . . . . . . . 576.7 GPL License . . . . . . . . . . . . . . . . . . . . . . . . . . . . . . . . . . . . . . . . . . . . . . . 586.8 FAQ . . . . . . . . . . . . . . . . . . . . . . . . . . . . . . . . . . . . . . . . . . . . . . . . . . . . 676.9 Contributors . . . . . . . . . . . . . . . . . . . . . . . . . . . . . . . . . . . . . . . . . . . . . . . 686.10 Release Cycle . . . . . . . . . . . . . . . . . . . . . . . . . . . . . . . . . . . . . . . . . . . . . . 706.11 References . . . . . . . . . . . . . . . . . . . . . . . . . . . . . . . . . . . . . . . . . . . . . . . . 70
7 Deprecated 957.1 Deprecated: Dependencies . . . . . . . . . . . . . . . . . . . . . . . . . . . . . . . . . . . . . . . . 957.2 Deprecated: Compatibility . . . . . . . . . . . . . . . . . . . . . . . . . . . . . . . . . . . . . . . . 957.3 Deprecated: Installation . . . . . . . . . . . . . . . . . . . . . . . . . . . . . . . . . . . . . . . . . 967.4 Deprecated: Upgrading . . . . . . . . . . . . . . . . . . . . . . . . . . . . . . . . . . . . . . . . . 987.5 Deprecated: Caching . . . . . . . . . . . . . . . . . . . . . . . . . . . . . . . . . . . . . . . . . . . 101
8 Indices and tables 105
ii
Ganeti Web Manager Documentation, Release 0.11.2
Ganeti Web Manager is a Django based web frontend for managing Ganeti virtualization clusters. Since Ganeti onlyprovides a command-line interface, Ganeti Web Manager‘s goal is to provide a user friendly web interface to Ganetivia Ganeti’s Remote API. On top of Ganeti it provides a permission system for managing access to clusters and virtualmachines, an in browser VNC console, and vm state and resource visualizations. You can see a few screenshots here.
If you don’t already have a Ganeti cluster setup, these directions can help you get started.
If you are looking for support, please contact us.
If you are looking to deploy Ganeti Web Manager for the first time, check out our Installation guide.
If you already have a Ganeti Web Manager instance running it might be time to upgrade.
Finally, if you would like to report a bug or request a feature, please file an issue.
Ganeti Web Manager is licensed under the GPLv2. It is currently developed and maintained by the Oregon StateUniversity Open Source Lab and a handful of volunteers. If you would like to get involved in development see ourdevelopment guide.
Contents 1
Ganeti Web Manager Documentation, Release 0.11.2
2 Contents
CHAPTER 1
Getting Started
Requirements
Operating system
We officially support Ubuntu 11.10, Ubuntu 12.04 and CentOS 6. Ganeti Web Manager is also known to work onDebian 7 and CentOS 5.
More on compatibility page.
Base
• sudo
• git
These dependencies are required to install Ganeti Web Manager via setup.sh installation script. Follow up toinstallation instructions.
During installation, if python and python-virtualenv are not installed, they will be installed.
Other Platforms
For operating systems other than CentOS and Debian, it will be necessary to install several required packages that thescript handles, specifically:
• Python
• python-virtualenv
Virtualenv is used to manage Ganeti Web Manager‘s dependencies without touching other software on the system.
When running the setup.sh script, pass the -N flag to disable installation of these packages.
Databases
All database dependencies are installed automatically during setup.sh run. All you need is sudo priviledge. Ifyou have any issues, please refer to Django database documentation.
If you, for any reason, want to install these database dependencies on your own, here’s the list:
3
Ganeti Web Manager Documentation, Release 0.11.2
MySQL requires MySQL-python package installed within virtual environment, which in turn requireslibmysqlclient18 on Ubuntu/Debian and mysql-libs on CentOS.
PostgreSQL requires psycopg2 package installed within virtual environment, which in turn requires libpq5 onUbuntu/Debian and postgresql-libs on CentOS.
If you’re using the setup.sh script these database dependencies should be installed for you. But if it runs into errors,these are the dependencies needed.
LDAP
LDAP dependencies can be found on the LDAP dependencies page.
VNCAuthProxy
VNCAuthProxy, is used to connect the VNC web frontend to a Ganeti VM’s VNC Console. This project is built ontwisted and for encryption requires openssl and FFI development headers.
On CentOS, the OpenSSL package is openssl-devel and on Ubuntu/Debian its libssl-dev. The LibFFIpackage is libffi-devel on CentOS and libffi-dev on Ubuntu/Debian.
These packages are necessary to install VNCAuthProxy and should be installed before the setup script is run.
Installation
Warning: Prior to version 0.11, the preferred way of installing Ganeti Web Manager was by using fabric. It isno longer a default way of installing Ganeti Web Manager. If you have older Ganeti Web Manager, look at theseinstructions.
This instruction covers installation steps for end users. It is not intended for Ganeti Web Manager developers orpeople installing unstable version. If you want to play with unstable Ganeti Web Manager, please follow instructionsfor developers.
Installing
Installation is now automatic. There is now a shell script detects your operating system, installs required dependencies(even for your database of choice!), creates Python virtual environment and finally installs Ganeti Web Manager withits own dependencies.
1. Make sure that all Ganeti Web Manager‘s Requirements are met. For non-CentOS and non-Debian machines,make sure to see Other Platforms.
2. Next you need the latest release of Ganeti Web Manager which is 0.11.2. You can download that here:https://github.com/osuosl/ganeti_webmgr/archive/0.11.2.tar.gz. You can also clone the repo and checkout thelatest tag as well:
$ git clone https://github.com/osuosl/ganeti_webmgr.git$ git checkout $VERSION
Note: Replace $VERSION with the version you want to deploy, such as 0.11.2
4 Chapter 1. Getting Started
Ganeti Web Manager Documentation, Release 0.11.2
It doesn’t actually matter where you put these, it will only be used for installation, which will eventuallyinstall the project to another location, which by default is /opt/ganeti_webmgr.
1. Once you’ve got the project, you will use our shell script to install things. First, cd to the Ganeti Web Managerproject folder:
$ cd ./ganeti_webmgr
Next run ./scripts/setup.sh -h to get help and see all possible usages of our shell script. There aredifferent options for installing to different locations, as well as installing different database dependencies.
2. Now that you’ve looked at the options, you’ll want to actuall install Ganeti Web Manager. By default, it willinstall to /opt/ganeti_webmgr and will not install any database dependencies. To do this install run thefollowing:
$ ./scripts/setup.sh
If you want to install Ganeti Web Manager with mysql support, which means installing your systems mysql-client libraries, development headers, and the python mysql package run:
$ ./scripts/setup.sh -D mysql
Note: You will likely need to run this as root as it requires permissions to install packages and createdirectories in /opt.
Warning: For CentOS 6, the EPEL repository must be installed to use python-virtualenv. Ifyou do not want to install EPEL, manually install python-virtualenv and pass the -N flag tosetup.sh.
VNC AuthProxy startup script
Ganeti Web Manager provides an in-browser VNC console. For more information, see VNC. In order to use the VNCconsole, you must run VNC AuthProxy, which comes with Ganeti Web Manager.
VNC AuthProxy can be set up to start on boot if wanted. To do so, it is necessary to set up an init script to managethe daemon. These vary by platform, so depending on what kind of system you are running Ganeti Web Manager on,there are a few choices.
CentOS and Ubuntu
Important: These scripts were written for CentOS 6.5 and Ubuntu 12.04.
If you are running CentOS, copy the file scripts/vncauthproxy/init-centos to/etc/init.d/vncauthproxy and install the service:
$ sudo cp /path/to/gwm/source/scripts/vncauthproxy/init-centos /etc/init.d/vncauthproxy$ sudo chkconfig --add vncauthproxy
Otherwise, if you are running Ubuntu, copy the file scripts/vncauthproxy/init-ubuntu to/etc/init.d/vncauthproxy and install the service:
$ sudo cp /path/to/gwm/scripts/vncauthproxy/init-ubuntu /etc/init.d/vncauthproxy$ sudo update-rc.d vncauthproxy defaults
The vncauthproxy service is installed and can be started:
1.2. Installation 5
Ganeti Web Manager Documentation, Release 0.11.2
$ sudo service vncauthproxy start
systemd
For systems running systemd, a basic systemd script is provided. It has been tested on Debian 8.
Copy the file scripts/vncauthproxy/init-systemd to /lib/systemd/system/vncauthproxy.serviceand enable the service:
$ sudo cp /path/to/gwm/scripts/vncauthproxy/init-systemd /lib/systemd/system/vncauthproxy.service$ sudo systemctl enable vncauthproxy
The script supports variables for PIDFILE, LOGFILE, PORT, and INTERFACE, which can be set in‘/etc/defaults/vncauthproxy’.
To set the location of the twistd daemon to somewhere other than /opt/ganeti_webmgr/bin/twistd, it isat this time necessary to modify the service file directly.
Minimum Configuration
There are defaults for most settings, however, there are no defaults set for database settings. Make sure to set theseor you will run into problems with the rest of the installation.
See configuration page for documentation on configuring Ganeti Web Manager.
Initializing
Because your Ganeti Web Manager instance lives within virtual environment, you must activate the virtual environmentin order to access GWM:
$ source /opt/ganeti_webmgr/bin/activate
Now all the programs installed to that virtual environment are available for you (until you issue deactivate orclose your terminal session).
We’ll be using the django-admin.py tool to run commands to administer our app from this point forward. Youmight be familiar with manage.py, which is essentially what django-admin.py is. However, we need to telldjango-admin.py what settings to use, in order for it to work. To do this run the following command:
$ export DJANGO_SETTINGS_MODULE="ganeti_webmgr.ganeti_web.settings"
You only need to run this once each time you activate the virtual environment, or if you prefer, each time you rundjango-admin.py you can provided the --settings argument:
$ django-admin.py $CMD --settings "ganeti_webmgr.ganeti_web.settings"
Note: Replace $CMD with the command you actually need to run. Also note that the --settings flag must comeafter the $CMD being run.
Install Javascript dependencies
Ganeti Web Manager uses bower to manage its dependencies. This allows them to be easily ugpraded, as well as notrequiring keeping them inside the repository. To install the dependencies, use django-admin‘s bower command:
6 Chapter 1. Getting Started
Ganeti Web Manager Documentation, Release 0.11.2
$ django-admin.py bower install
The dependencies might take a minute to download and install.
Initialize database
• MySQL or SQLite: create new tables and migrate all applications using South:
$ django-admin.py syncdb --migrate
• PostgreSQL: only fresh installation supports PostgreSQL, because there are no migrations for this databasewithin Ganeti Web Manager prior to version 0.11:
$ django-admin.py syncdb --all$ django-admin.py migrate --fake
Update Cache
Prior to version 0.11 when migrations were run, we would automatically update the cache of RAPI data in theDatabase, however running this during migrations was prone to a lot of errors, so it is now its own command. Run thefollowing to update the cache:
$ django-admin.py refreshcache
New in version 0.11.
Search indexes
Build them with:
$ django-admin.py rebuild_index
Note: Running django-admin.py update_index on a regular basis ensures that the search indexes stayup-to-date when models change in Ganeti Web Manager.
Next Steps
Congratulations! Ganeti Web Manager is now installed and initialized. Next, you’ll want to look into Configuring andDeployment Intro, if you are going to be setting up a production instance.
Otherwise, if you just want to play around with Ganeti Web Manager, or are developing, take a look at the DevelopmentServer.
Configuring
After you installed your Ganeti Web Manager instance with setup script it’s time for some configuration.
Configuration of Ganeti Web Manager can be defined with YAML, a human-readable markup language. Ganeti WebManager also supports configuration through settings.py.
1.3. Configuring 7
Ganeti Web Manager Documentation, Release 0.11.2
Ganeti Web Manager supports settings.py for those that do not wish to use YAML; however, YAML configurationis preferred. The YAML configuration method makes it much easier to store settings outside of the project’s repository,which makes managing settings with a configuration management tool easier and safer.
The YAML configuration file is always named config.yml. You can customize the location Ganeti WebManager looks for this file by setting the GWM_CONFIG_DIR environmental variable. The current default is/opt/ganeti_webmgr/config.
By default you will need to put your yaml config in /opt/ganeti_webmgr/config/config.yml. If youwant to customize the location you can set GWM_CONFIG_DIR like so:
$ export GWM_CONFIG_DIR='/etc/ganeti_webmgr'
This will cause Ganeti Web Manager to look for your config file at /etc/ganeti_webmgr/config.yml.
When both config.yml and settings.py are present, any settings stored in settings.py take precedence.
Note: A quick note about settings. Any setting value which contains an - or :, or any other character used by yaml,must be wrapped in quotes.
Example: localhost:8000 becomes "localhost:8000".
Creating configuration files
To get started configuring Ganeti Web Manager with YAML, copy the config.yml.dist to config.yml in thedirectory where you want your settings:
$ cp /path/to/gwm/ganeti_webmgr/ganeti_web/settings/config.yml.dist /opt/ganeti_webmgr/config/config.yml
Alternatively, to configure Ganeti Web Manager with the standard Django settings.py, copysettings.py.dist to settings.py in the same directory it is in:
$ cp /path/to/gwm/ganeti_webmgr/ganeti_web/settings/settings.py.dist \/path/to/gwm/ganeti_webmgr/ganeti_web/settings/settings.py
LDAP configuration
To configure Ganeti Web Manager to use LDAP, see the LDAP documentation.
Databases
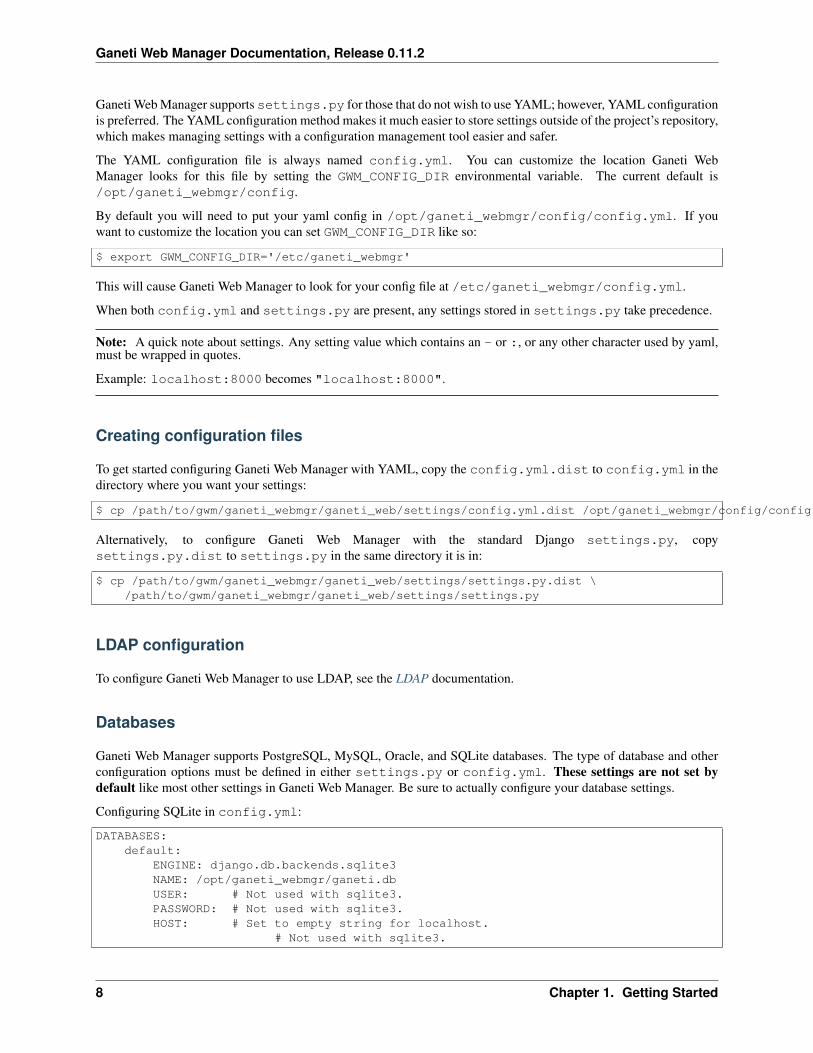
Ganeti Web Manager supports PostgreSQL, MySQL, Oracle, and SQLite databases. The type of database and otherconfiguration options must be defined in either settings.py or config.yml. These settings are not set bydefault like most other settings in Ganeti Web Manager. Be sure to actually configure your database settings.
Configuring SQLite in config.yml:
DATABASES:default:
ENGINE: django.db.backends.sqlite3NAME: /opt/ganeti_webmgr/ganeti.dbUSER: # Not used with sqlite3.PASSWORD: # Not used with sqlite3.HOST: # Set to empty string for localhost.
# Not used with sqlite3.
8 Chapter 1. Getting Started
Ganeti Web Manager Documentation, Release 0.11.2
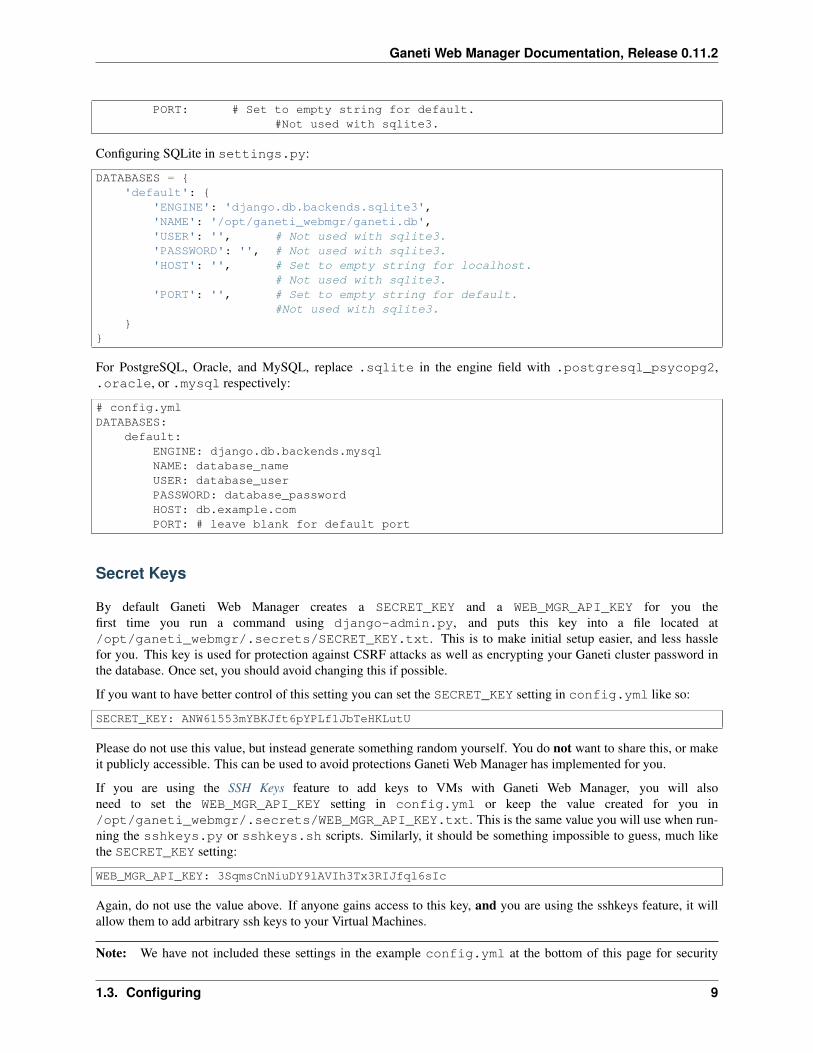
PORT: # Set to empty string for default.#Not used with sqlite3.
Configuring SQLite in settings.py:
DATABASES = {'default': {
'ENGINE': 'django.db.backends.sqlite3','NAME': '/opt/ganeti_webmgr/ganeti.db','USER': '', # Not used with sqlite3.'PASSWORD': '', # Not used with sqlite3.'HOST': '', # Set to empty string for localhost.
# Not used with sqlite3.'PORT': '', # Set to empty string for default.
#Not used with sqlite3.}
}
For PostgreSQL, Oracle, and MySQL, replace .sqlite in the engine field with .postgresql_psycopg2,.oracle, or .mysql respectively:
# config.ymlDATABASES:
default:ENGINE: django.db.backends.mysqlNAME: database_nameUSER: database_userPASSWORD: database_passwordHOST: db.example.comPORT: # leave blank for default port
Secret Keys
By default Ganeti Web Manager creates a SECRET_KEY and a WEB_MGR_API_KEY for you thefirst time you run a command using django-admin.py, and puts this key into a file located at/opt/ganeti_webmgr/.secrets/SECRET_KEY.txt. This is to make initial setup easier, and less hasslefor you. This key is used for protection against CSRF attacks as well as encrypting your Ganeti cluster password inthe database. Once set, you should avoid changing this if possible.
If you want to have better control of this setting you can set the SECRET_KEY setting in config.yml like so:
SECRET_KEY: ANW61553mYBKJft6pYPLf1JbTeHKLutU
Please do not use this value, but instead generate something random yourself. You do not want to share this, or makeit publicly accessible. This can be used to avoid protections Ganeti Web Manager has implemented for you.
If you are using the SSH Keys feature to add keys to VMs with Ganeti Web Manager, you will alsoneed to set the WEB_MGR_API_KEY setting in config.yml or keep the value created for you in/opt/ganeti_webmgr/.secrets/WEB_MGR_API_KEY.txt. This is the same value you will use when run-ning the sshkeys.py or sshkeys.sh scripts. Similarly, it should be something impossible to guess, much likethe SECRET_KEY setting:
WEB_MGR_API_KEY: 3SqmsCnNiuDY9lAVIh3Tx3RIJfql6sIc
Again, do not use the value above. If anyone gains access to this key, and you are using the sshkeys feature, it willallow them to add arbitrary ssh keys to your Virtual Machines.
Note: We have not included these settings in the example config.yml at the bottom of this page for security
1.3. Configuring 9
Ganeti Web Manager Documentation, Release 0.11.2
reasons. We do not want anyone copying the values we’ve used in our examples for security prone settings such asthis. If you wish to set these yourself, you will need to manually add them to config.yml.
Time zone and locale
Ganeti Web Manager supports time zones, translations and localizations for currency, time, etc. To find the correcttime zone for your locale, visit the List of time zones. For language codes, see List of language codes. Not everylanguage is supported by Ganeti Web Manager.
Date and datetime format follows the Django date format. For instance, d/m/Y will result in dates formatted withtwo-digit days, months, and four- digit years.
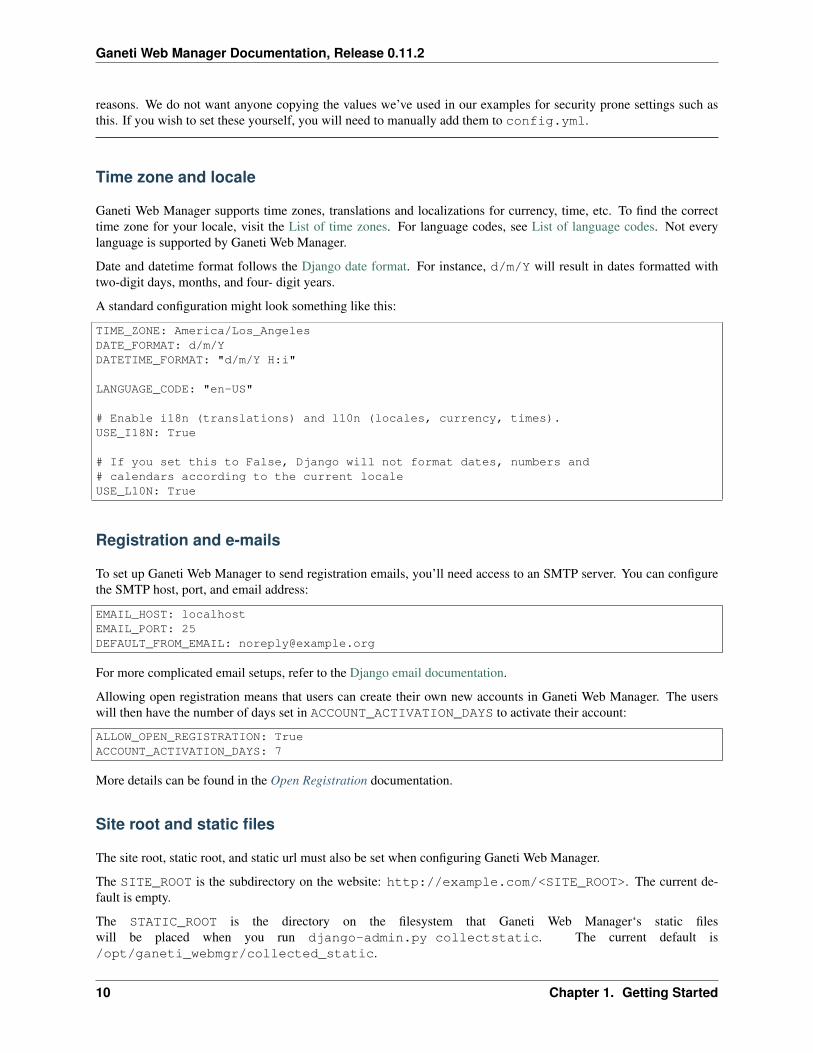
A standard configuration might look something like this:
TIME_ZONE: America/Los_AngelesDATE_FORMAT: d/m/YDATETIME_FORMAT: "d/m/Y H:i"
LANGUAGE_CODE: "en-US"
# Enable i18n (translations) and l10n (locales, currency, times).USE_I18N: True
# If you set this to False, Django will not format dates, numbers and# calendars according to the current localeUSE_L10N: True
Registration and e-mails
To set up Ganeti Web Manager to send registration emails, you’ll need access to an SMTP server. You can configurethe SMTP host, port, and email address:
EMAIL_HOST: localhostEMAIL_PORT: 25DEFAULT_FROM_EMAIL: [email protected]
For more complicated email setups, refer to the Django email documentation.
Allowing open registration means that users can create their own new accounts in Ganeti Web Manager. The userswill then have the number of days set in ACCOUNT_ACTIVATION_DAYS to activate their account:
ALLOW_OPEN_REGISTRATION: TrueACCOUNT_ACTIVATION_DAYS: 7
More details can be found in the Open Registration documentation.
Site root and static files
The site root, static root, and static url must also be set when configuring Ganeti Web Manager.
The SITE_ROOT is the subdirectory on the website: http://example.com/<SITE_ROOT>. The current de-fault is empty.
The STATIC_ROOT is the directory on the filesystem that Ganeti Web Manager‘s static fileswill be placed when you run django-admin.py collectstatic. The current default is/opt/ganeti_webmgr/collected_static.
10 Chapter 1. Getting Started
Ganeti Web Manager Documentation, Release 0.11.2
STATIC_URL is the full url where Ganeti Web Manager will look when trying to obtain static files. The default forthis is currently /static which means it will try looking at the same domain it is hosted on. For example if yourhostname is www.yourwebsite.com it will look for them at www.yourwebsite.com/static.
A standard configuration, putting Ganeti Web Manager at the root of the domain, might look like this:
SITE_ROOT: /web_adminSTATIC_ROOT: /opt/ganeti_webmgr/collected_staticSTATIC_URL: www.yourwebsite.com/static
Haystack Search Settings
Haystack is Ganeti Web Manager‘s way of performing search indexing. It currently has one setting which you need toworry about.
HAYSTACK_WHOOSH_PATH is the path to a location on the filesystem which Ganeti Web Manager will store thesearch index files. This location needs to be readable and writable by whatever user is running Ganeti Web Manager.Example users might be the apache or nginx user, or whatever user you’ve set the Ganeti Web Manager process to runas.
The default path for this setting is /opt/ganeti_webmgr/whoosh_index.
An example of this setting might be:
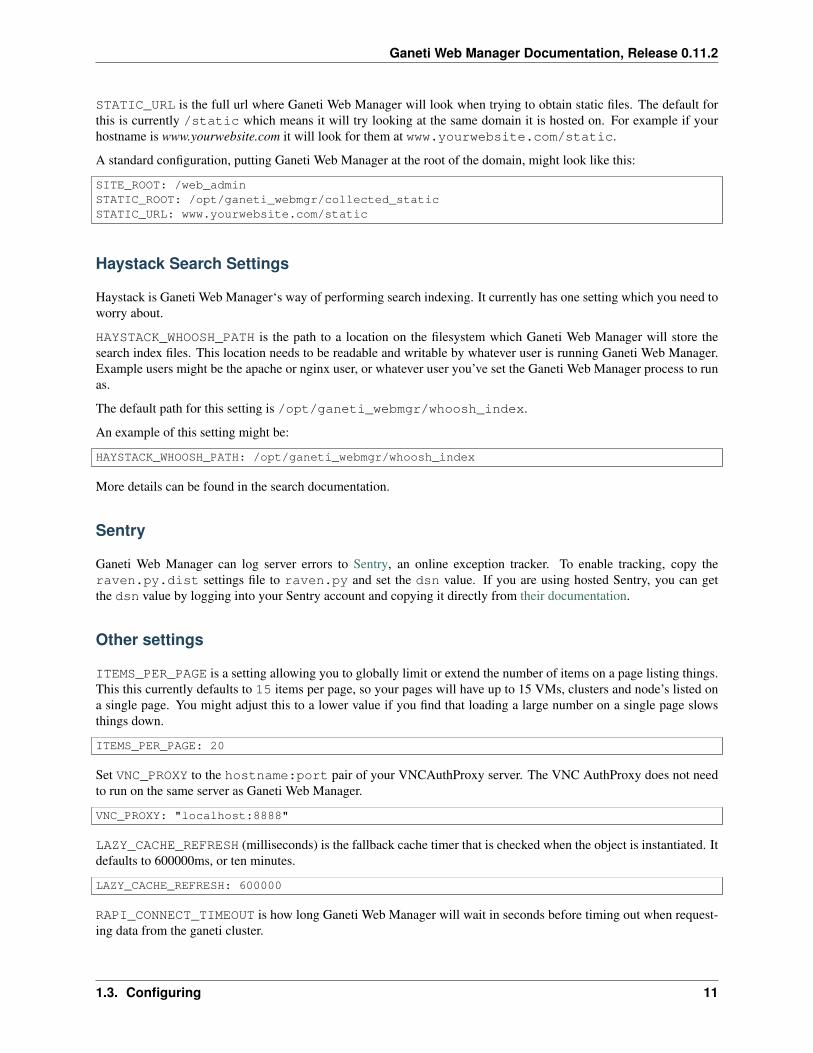
HAYSTACK_WHOOSH_PATH: /opt/ganeti_webmgr/whoosh_index
More details can be found in the search documentation.
Sentry
Ganeti Web Manager can log server errors to Sentry, an online exception tracker. To enable tracking, copy theraven.py.dist settings file to raven.py and set the dsn value. If you are using hosted Sentry, you can getthe dsn value by logging into your Sentry account and copying it directly from their documentation.
Other settings
ITEMS_PER_PAGE is a setting allowing you to globally limit or extend the number of items on a page listing things.This this currently defaults to 15 items per page, so your pages will have up to 15 VMs, clusters and node’s listed ona single page. You might adjust this to a lower value if you find that loading a large number on a single page slowsthings down.
ITEMS_PER_PAGE: 20
Set VNC_PROXY to the hostname:port pair of your VNCAuthProxy server. The VNC AuthProxy does not needto run on the same server as Ganeti Web Manager.
VNC_PROXY: "localhost:8888"
LAZY_CACHE_REFRESH (milliseconds) is the fallback cache timer that is checked when the object is instantiated. Itdefaults to 600000ms, or ten minutes.
LAZY_CACHE_REFRESH: 600000
RAPI_CONNECT_TIMEOUT is how long Ganeti Web Manager will wait in seconds before timing out when request-ing data from the ganeti cluster.
1.3. Configuring 11
Ganeti Web Manager Documentation, Release 0.11.2
RAPI_CONNECT_TIMEOUT: 10
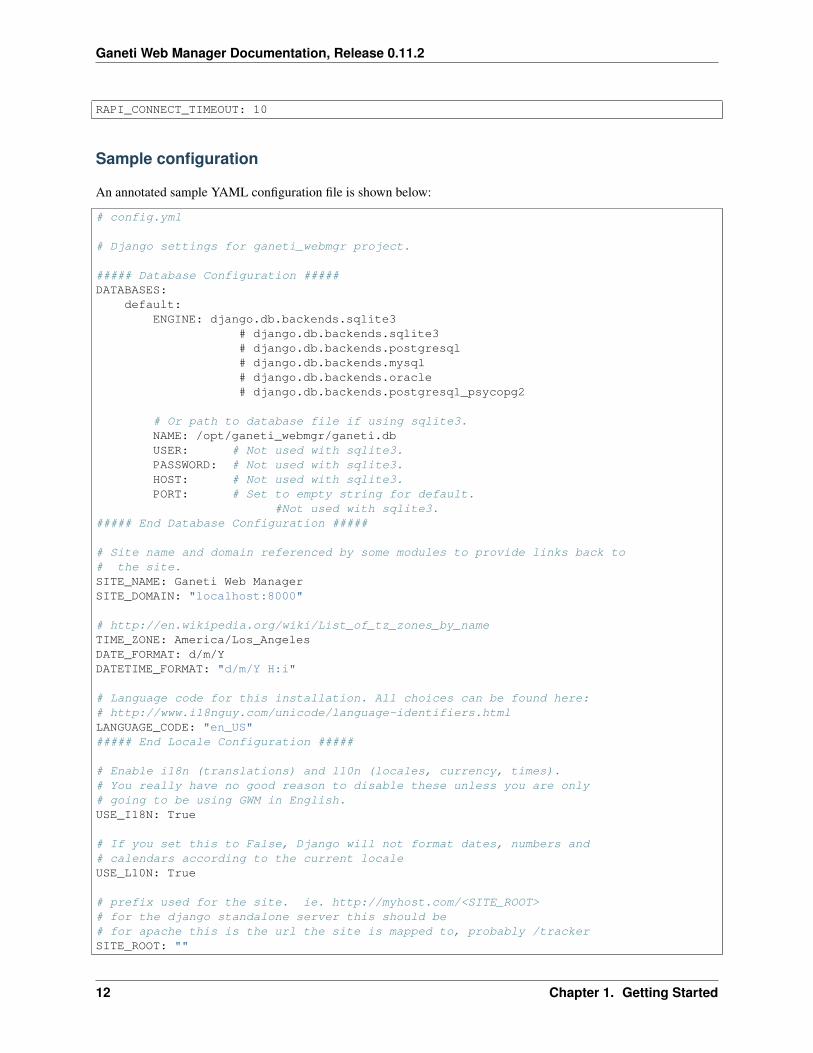
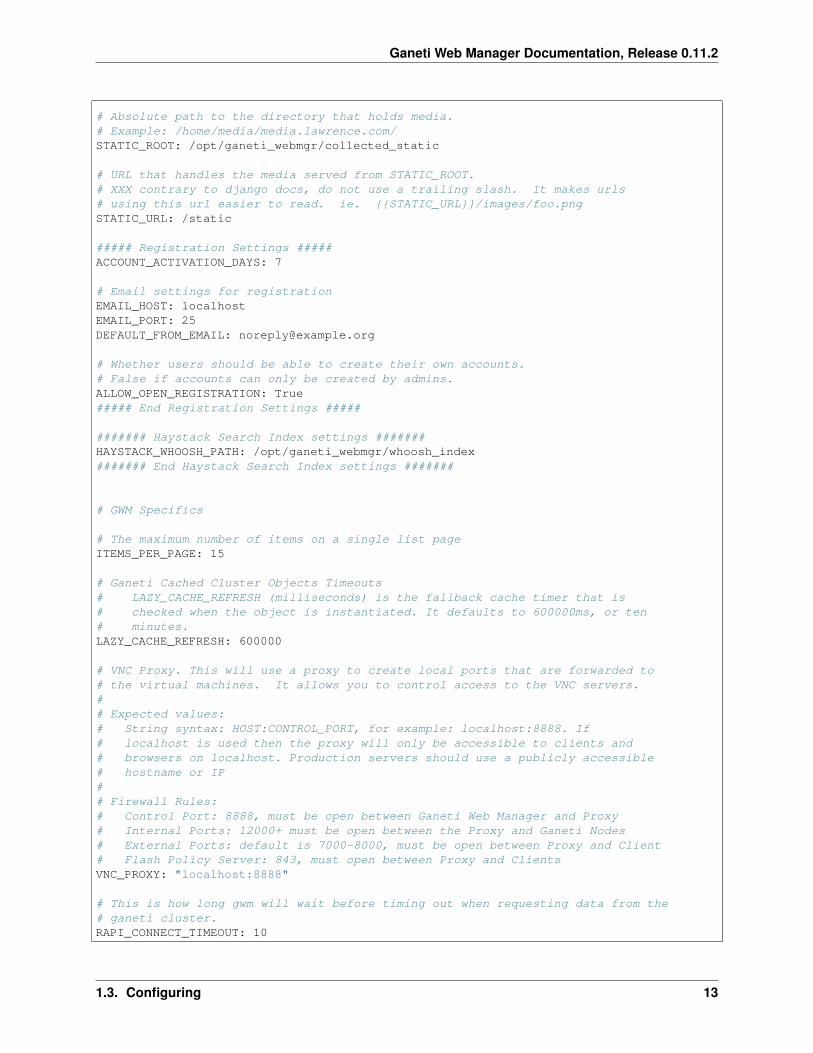
Sample configuration
An annotated sample YAML configuration file is shown below:
# config.yml
# Django settings for ganeti_webmgr project.
##### Database Configuration #####DATABASES:
default:ENGINE: django.db.backends.sqlite3
# django.db.backends.sqlite3# django.db.backends.postgresql# django.db.backends.mysql# django.db.backends.oracle# django.db.backends.postgresql_psycopg2
# Or path to database file if using sqlite3.NAME: /opt/ganeti_webmgr/ganeti.dbUSER: # Not used with sqlite3.PASSWORD: # Not used with sqlite3.HOST: # Not used with sqlite3.PORT: # Set to empty string for default.
#Not used with sqlite3.##### End Database Configuration #####
# Site name and domain referenced by some modules to provide links back to# the site.SITE_NAME: Ganeti Web ManagerSITE_DOMAIN: "localhost:8000"
# http://en.wikipedia.org/wiki/List_of_tz_zones_by_nameTIME_ZONE: America/Los_AngelesDATE_FORMAT: d/m/YDATETIME_FORMAT: "d/m/Y H:i"
# Language code for this installation. All choices can be found here:# http://www.i18nguy.com/unicode/language-identifiers.htmlLANGUAGE_CODE: "en_US"##### End Locale Configuration #####
# Enable i18n (translations) and l10n (locales, currency, times).# You really have no good reason to disable these unless you are only# going to be using GWM in English.USE_I18N: True
# If you set this to False, Django will not format dates, numbers and# calendars according to the current localeUSE_L10N: True
# prefix used for the site. ie. http://myhost.com/<SITE_ROOT># for the django standalone server this should be# for apache this is the url the site is mapped to, probably /trackerSITE_ROOT: ""
12 Chapter 1. Getting Started
Ganeti Web Manager Documentation, Release 0.11.2
# Absolute path to the directory that holds media.# Example: /home/media/media.lawrence.com/STATIC_ROOT: /opt/ganeti_webmgr/collected_static
# URL that handles the media served from STATIC_ROOT.# XXX contrary to django docs, do not use a trailing slash. It makes urls# using this url easier to read. ie. {{STATIC_URL}}/images/foo.pngSTATIC_URL: /static
##### Registration Settings #####ACCOUNT_ACTIVATION_DAYS: 7
# Email settings for registrationEMAIL_HOST: localhostEMAIL_PORT: 25DEFAULT_FROM_EMAIL: [email protected]
# Whether users should be able to create their own accounts.# False if accounts can only be created by admins.ALLOW_OPEN_REGISTRATION: True##### End Registration Settings #####
####### Haystack Search Index settings #######HAYSTACK_WHOOSH_PATH: /opt/ganeti_webmgr/whoosh_index####### End Haystack Search Index settings #######
# GWM Specifics
# The maximum number of items on a single list pageITEMS_PER_PAGE: 15
# Ganeti Cached Cluster Objects Timeouts# LAZY_CACHE_REFRESH (milliseconds) is the fallback cache timer that is# checked when the object is instantiated. It defaults to 600000ms, or ten# minutes.LAZY_CACHE_REFRESH: 600000
# VNC Proxy. This will use a proxy to create local ports that are forwarded to# the virtual machines. It allows you to control access to the VNC servers.## Expected values:# String syntax: HOST:CONTROL_PORT, for example: localhost:8888. If# localhost is used then the proxy will only be accessible to clients and# browsers on localhost. Production servers should use a publicly accessible# hostname or IP## Firewall Rules:# Control Port: 8888, must be open between Ganeti Web Manager and Proxy# Internal Ports: 12000+ must be open between the Proxy and Ganeti Nodes# External Ports: default is 7000-8000, must be open between Proxy and Client# Flash Policy Server: 843, must open between Proxy and ClientsVNC_PROXY: "localhost:8888"
# This is how long gwm will wait before timing out when requesting data from the# ganeti cluster.RAPI_CONNECT_TIMEOUT: 10
1.3. Configuring 13
Ganeti Web Manager Documentation, Release 0.11.2
Importing a Cluster
1. Log in as an admin user.
2. Navigate Clusters -> Add Cluster
3. Fill out properties and click save
When the Cluster is imported into Ganeti Web Manager it will automatically synchronize. Virtual Machine objectswill be created to match what is found on the Ganeti Cluster. Permission Tags will also be parsed to automatically addpermissions for virtual machines.
A cluster can be added with only its hostname and port, but a username and password for the cluster are required ifyou want to make changes to it. Clusters added without a valid username and password appear in Cluster Read OnlyMode where you can only change aspects of the cluster that are local to Ganeti Web Manager’s database.
If you’re logged in as a cluster admin or superuser you can edit properties of a cluster by using the “edit” button onthe cluster detail page.
Warning: If a cluster is in Cluster Read Only Mode, there will be errors if you try to modify virtual machines orcreate new ones.
Synchronizing Clusters
Ganeti Web Manager stores some information about clusters in its database. Cluster and virtual machine informationwill refresh automatically, but the list of virtual machines must be synchronized manually. This can be done by viathe orphans view
1. Main Menu -> Orphans
Clusters are synchronized when the orphans view is visited.
Adding Virtual Machines
To add a virtual machine, select “Create VM” in the toolbar. Only fields with multiple options will be selectable. Forexample, if you are unable to change the cluster to which a VM gets added, it means that there is only one valid optionand cluster is a mandatory field.
• If the user creating the VM has permissions to do so, the owner will be that user. If the user does not have createpermissions but is a member of a group that can create VMs, ownership defaults to that group.
• Cluster can be chosen from those that the the user creating the VM has access to.
• The Hypervisor will generally be dictated by the cluster that you choose.
• The instance name must be a fully qualified domain name (FQDN). (e.g. hostname.example.org)
• If you uncheck “Start up after creation”, you can start the VM manually on its virtual machine detail page. (clickVirtual Machines in the sidebar, then the VM’s name)
• DNS name check: if checked, sends the name you selected for the VM to the resolver (e.g. in DNS or /etc/hosts,depending on your setup). Since the name check is used to compute the IP address this also enables/disables IPchecks (e.g. if the IP is pingable). Uncheck if using dynamic DNS.
• Disk Template chooses a layout template from these options:
– plain - Disk devices will be logical volumes (e.g. LVM)
– drbd - Disk devices will be DRBD (version8.x) on top of LVM volumes
14 Chapter 1. Getting Started
Ganeti Web Manager Documentation, Release 0.11.2
* If drbd is selected, a primary and secondary node will need to be chosen unless automatic allocationhas been selection. DRBD will allow the virtual machine to use live migration and failover in caseone of the nodes goes offline.
– file - Disk devices will be regular files (e.g. qcow2)
– diskless - This creates a virtual machine with no disks. Its useful for testing only (or other special cases).
• Operating system to install on the virtual machine. Your choices are limited to the images configured on thecluster.
General Parameters:
• Virtual CPUs will be deducted from owner’s quota. If the owner field appears blank and is not selectable, thedefault owner has been chosen.
• Memory is the amount of RAM to give this VM. If no units are given, megabytes is assumed.
• Disk size is the amount of owner’s disk quota to allot this VM. If no units are given, megabytes is assumed.
• Disk type determines the way the disks are presented to the virtual machine. Options may vary based on cluster’shypervisor settings.
• More information about NIC Mode, NIC Link, and NIC Type can be found here
Hypervisor parameters:
TODO finish this part
Orphaned Virtual Machines
Permission Tags are parsed by virtual machine objects, but sometimes virtual machines will have no tags. To quicklyidentify virtual machines with no admin users, use the orphans view
1. Main Menu -> Orphans
Visiting the orphans view will force a synchronization of all clusters and display VirtualMachines that do not have anypermissions assigned. You only need to grant permissions directly on virtual machines if you are granting access tonon-admin users.
1.4. Importing a Cluster 15
Ganeti Web Manager Documentation, Release 0.11.2
16 Chapter 1. Getting Started
CHAPTER 2
Deployment
Deployment Intro
Ganeti Web Manager supports various methods of deployment. By default Django ships with a simple python webserver for development purposes. If you’re just trying to get Ganeti Web Manager up and running, or you simply wantto contribute to the project then using the Development Server is probably your best bet. Otherwise check out StaticFiles. Once you’ve gotten your static files figured out, move into either deployment with Apache + mod_wsgi or Nginx+ uWSGI.
Development Server
Make sure you’ve already checked out Initializing.
If you are just testing Ganeti Web Manager out, run:
$ django-admin.py runserver --insecure
Then open a web browser, and navigate to http://localhost:8000.
If you want this to be accessable from a machine other than where you ran that command, then run the following:
$ django-admin.py runserver 0.0.0.0:8000 --insecure
Note: This should only be used to test. This should never be used in a production environment.
Static Files
Django is not very good at serving static files like CSS and Javascript. This is why we use web servers like Apache orNginx. So we need to collect all of our static files into a single directory.
To adjust where these static assets get copied to, you can adjust the STATIC_ROOT setting in config.yml. Bydefault it copies files to /opt/ganeti_webmgr/collected_static. To actual do the copy, run the following:
$ source /opt/ganeti_webgr/bin/activate$ django-admin.py collectstatic
Once you’ve done that, you can move on to deploying using your preferred web server.
• Apache
17
Ganeti Web Manager Documentation, Release 0.11.2
• Nginx
Apache + mod_wsgi
Overview
Before beginning deploying Ganeti Web Manager using Apache, read the following Django article on deployingDjango with apache and mod_wsgi.
If you haven’t already, make sure you’ve set up Static Files.
To get Ganeti Web Manager installed there are a few steps.
• Install Apache
• Configure/install mod_wsgi and other Apache modules
• Create the Ganeti Web Manager VirtualHost
Configuration
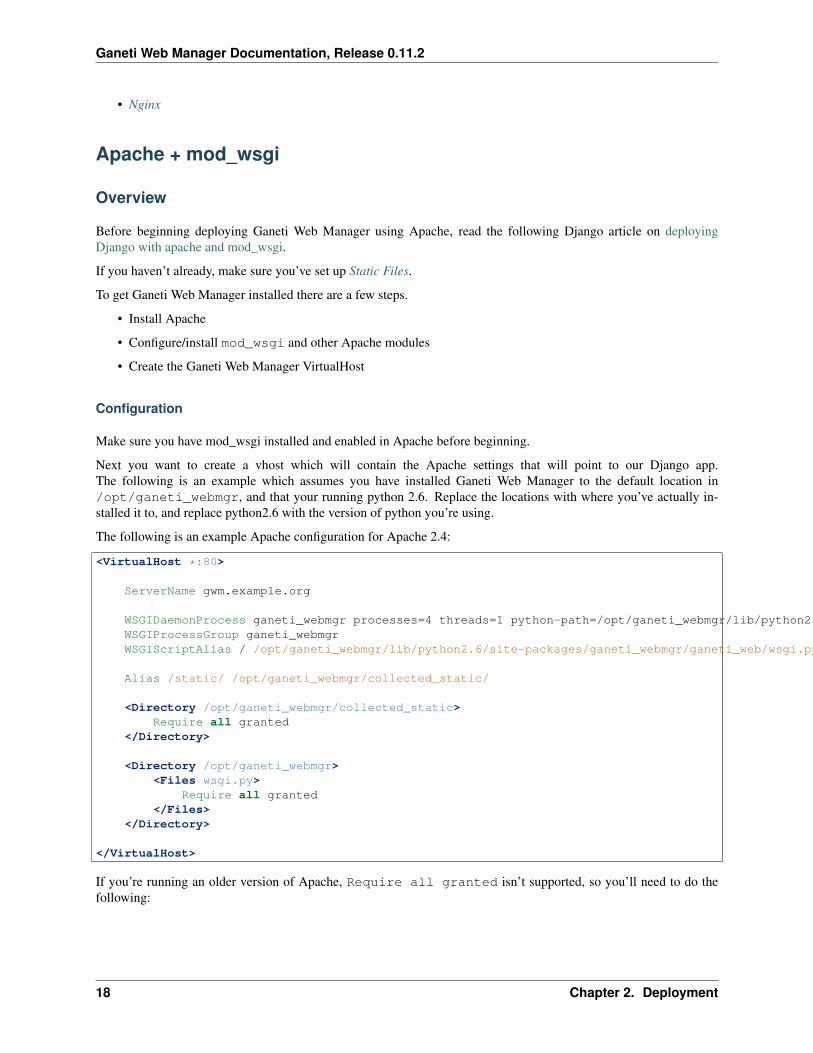
Make sure you have mod_wsgi installed and enabled in Apache before beginning.
Next you want to create a vhost which will contain the Apache settings that will point to our Django app.The following is an example which assumes you have installed Ganeti Web Manager to the default location in/opt/ganeti_webmgr, and that your running python 2.6. Replace the locations with where you’ve actually in-stalled it to, and replace python2.6 with the version of python you’re using.
The following is an example Apache configuration for Apache 2.4:
<VirtualHost *:80>
ServerName gwm.example.org
WSGIDaemonProcess ganeti_webmgr processes=4 threads=1 python-path=/opt/ganeti_webmgr/lib/python2.6/site-packagesWSGIProcessGroup ganeti_webmgrWSGIScriptAlias / /opt/ganeti_webmgr/lib/python2.6/site-packages/ganeti_webmgr/ganeti_web/wsgi.py
Alias /static/ /opt/ganeti_webmgr/collected_static/
<Directory /opt/ganeti_webmgr/collected_static>Require all granted
</Directory>
<Directory /opt/ganeti_webmgr><Files wsgi.py>
Require all granted</Files>
</Directory>
</VirtualHost>
If you’re running an older version of Apache, Require all granted isn’t supported, so you’ll need to do thefollowing:
18 Chapter 2. Deployment
Ganeti Web Manager Documentation, Release 0.11.2
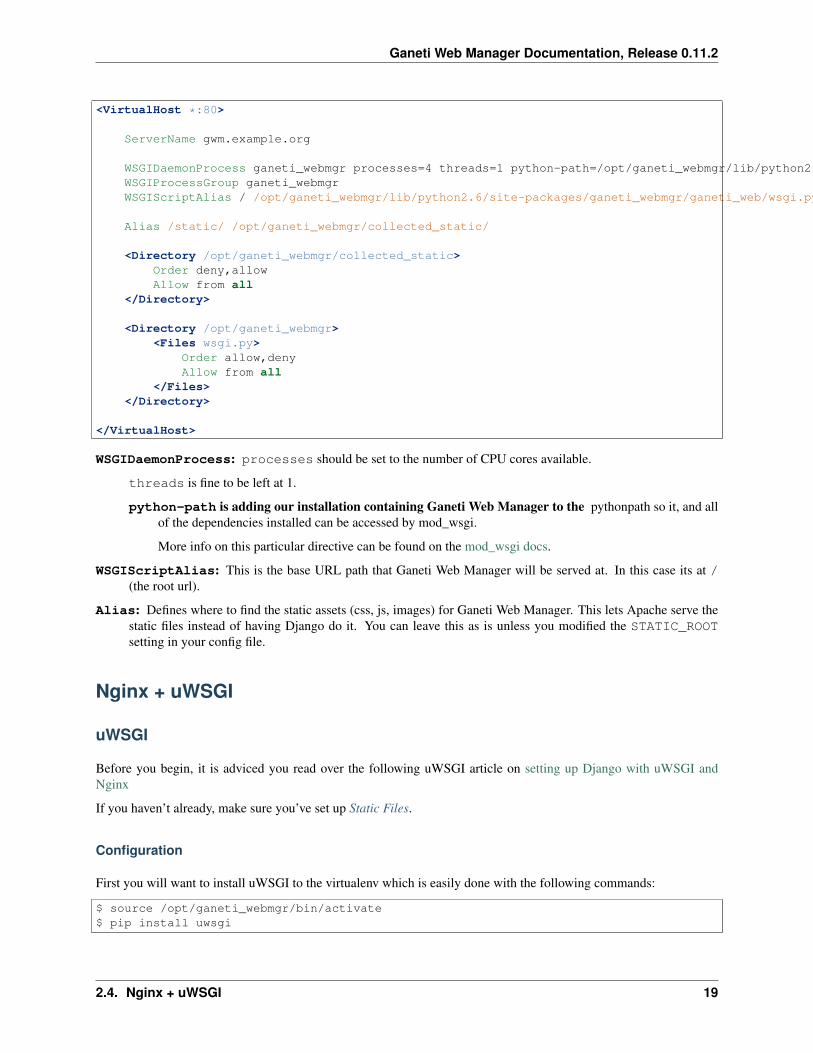
<VirtualHost *:80>
ServerName gwm.example.org
WSGIDaemonProcess ganeti_webmgr processes=4 threads=1 python-path=/opt/ganeti_webmgr/lib/python2.6/site-packagesWSGIProcessGroup ganeti_webmgrWSGIScriptAlias / /opt/ganeti_webmgr/lib/python2.6/site-packages/ganeti_webmgr/ganeti_web/wsgi.py
Alias /static/ /opt/ganeti_webmgr/collected_static/
<Directory /opt/ganeti_webmgr/collected_static>Order deny,allowAllow from all
</Directory>
<Directory /opt/ganeti_webmgr><Files wsgi.py>
Order allow,denyAllow from all
</Files></Directory>
</VirtualHost>
WSGIDaemonProcess: processes should be set to the number of CPU cores available.
threads is fine to be left at 1.
python-path is adding our installation containing Ganeti Web Manager to the pythonpath so it, and allof the dependencies installed can be accessed by mod_wsgi.
More info on this particular directive can be found on the mod_wsgi docs.
WSGIScriptAlias: This is the base URL path that Ganeti Web Manager will be served at. In this case its at /(the root url).
Alias: Defines where to find the static assets (css, js, images) for Ganeti Web Manager. This lets Apache serve thestatic files instead of having Django do it. You can leave this as is unless you modified the STATIC_ROOTsetting in your config file.
Nginx + uWSGI
uWSGI
Before you begin, it is adviced you read over the following uWSGI article on setting up Django with uWSGI andNginx
If you haven’t already, make sure you’ve set up Static Files.
Configuration
First you will want to install uWSGI to the virtualenv which is easily done with the following commands:
$ source /opt/ganeti_webmgr/bin/activate$ pip install uwsgi
2.4. Nginx + uWSGI 19
Ganeti Web Manager Documentation, Release 0.11.2
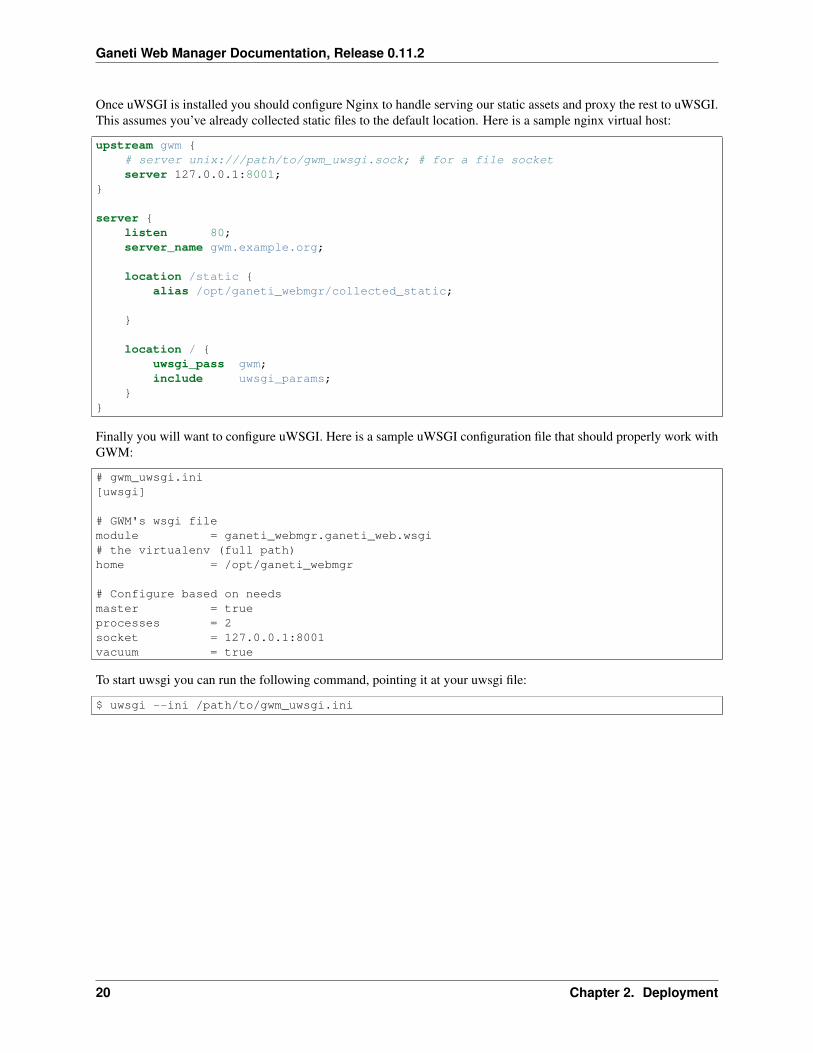
Once uWSGI is installed you should configure Nginx to handle serving our static assets and proxy the rest to uWSGI.This assumes you’ve already collected static files to the default location. Here is a sample nginx virtual host:
upstream gwm {# server unix:///path/to/gwm_uwsgi.sock; # for a file socketserver 127.0.0.1:8001;
}
server {listen 80;server_name gwm.example.org;
location /static {alias /opt/ganeti_webmgr/collected_static;
}
location / {uwsgi_pass gwm;include uwsgi_params;
}}
Finally you will want to configure uWSGI. Here is a sample uWSGI configuration file that should properly work withGWM:
# gwm_uwsgi.ini[uwsgi]
# GWM's wsgi filemodule = ganeti_webmgr.ganeti_web.wsgi# the virtualenv (full path)home = /opt/ganeti_webmgr
# Configure based on needsmaster = trueprocesses = 2socket = 127.0.0.1:8001vacuum = true
To start uwsgi you can run the following command, pointing it at your uwsgi file:
$ uwsgi --ini /path/to/gwm_uwsgi.ini
20 Chapter 2. Deployment
CHAPTER 3
Features
Permissions
Permissions may be granted to both clusters and virtual machines. The permissions system is intended to allow usersto manage themselves. Any object that can have its permissions edited will have a Users tab.
For a high level description of how permissions can be used in various scenarios, read this blog post.
Adding users to objects.
1. navigate to Group, Cluster, or VirtualMachine detail page
2. click Add New User
3. select user or group
4. select permissions
5. save
Updating permissions
1. navigate to Group, Cluster, or VirtualMachine detail page
2. click Users tab
3. click permissions column
4. select permissions and save
Deleting permissions
1. navigate to Group, Cluster, or VirtualMachine detail page
2. click Users tab
3. click the delete icon
Deleting a user will remove all permissions, and other properties associated with the user such as cluster quotas.
21
Ganeti Web Manager Documentation, Release 0.11.2
Groups
Groups may be created so that permissions can be given out to multiple users at once. This allows permissionsstructures where you are granting permissions to different organizations. Users may belong to unlimited number ofgroups. They will inherit the permissions of any group they belong to.
Groups are a persona that user’s may act on behalf of. When creating virtual machines, the user must choose whetherthey are acting on behalf of themselves or a group they are a member of. When acting on behalf of a group, the group’spermissions and quota used.
Group Permissions
• admin - Grants the ability to see the member list, and edit permissions
Cluster
These permissions can be granted to either a user or a group. A user who is part of a group with a permission doesnot automatically have that permission individually. For instance, a user who is part of a group that has VM createpermission can create a VM, but can only assign ownership to the group, not to themself. To grant permissions on acluster, click add user on the Users tab of the cluster detail page. Cluster permissions can also be added by clickingAdd Cluster in the Permissions tab of the user detail page.
• admin - Grants full access to the cluster. Includes ability to set permissions and quotas, and full access to allvirtual machines.
• create_vm - Grants ability to create virtual machines on the cluster.
• tags - Grants ability to set tags on the cluster.
• replace disks - Ability to replace disks of VMs on the cluster.
• migrate - Can migrate a VM to another node
• export - Can export a virtual machine
Quotas
Quotas restrict the usage of cluster resources by users and groups. Default quotas can be set by editing clusters, if noquota is set unlimited access is allowed. This will affect all users and groups.
The default quota can be overridden on the cluster users page:
1. Clusters -> Cluster -> Users
2. click quota value.
3. edit values, and click save
Leaving a value empty specifies unlimited access for that resource.
Virtual Machines
To grant a user permissions on a VM, click Add VirtualMachine in the Permissions tab of the User detail page. Togrant permissions to a user or group, use the Add User button on the Users tab of the VM detail page.
• admin - Grants full access to the virtual machine, including granting permissions.
• Modify - Allows user to modify VM’s settings, including reinstallation of OS
22 Chapter 3. Features
Ganeti Web Manager Documentation, Release 0.11.2
• Remove - Permission to delete this VM
• Power - Permission to start, stop, reboot, and access console
• Tags - Can set tags for this VM
Permission Tags
Permissions for virtual machines are also registered as tags on the virtual machine object. This allows the permissionsto be viewed and set via the command line tool. Tags will be parsed when creating virtual machines, and will beupdated when the object is refreshed (#387). When permissions are granted tags will be set on the virtual machine(#393).
Tags use the pattern: GANETI_WEB_MANAGER:<permission>:[G|U]:<user_id>
• GANETI_WEB_MANAGER:admin:U:2 - admin permission for User with id 2
• GANETI_WEB_MANAGER:admin:G:4 - admin permission for Group with id 4
• GANETI_WEB_MANAGER:start:U:2 - start permission for User with id 2
Object Log
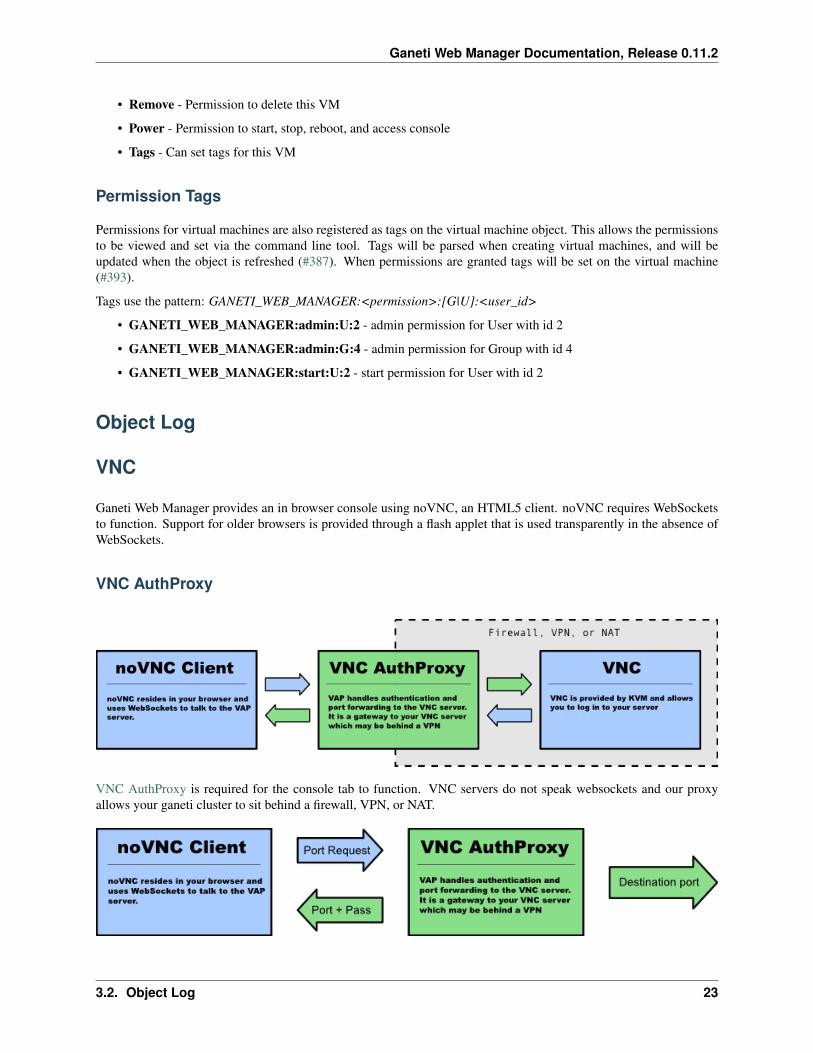
VNC
Ganeti Web Manager provides an in browser console using noVNC, an HTML5 client. noVNC requires WebSocketsto function. Support for older browsers is provided through a flash applet that is used transparently in the absence ofWebSockets.
VNC AuthProxy
VNC AuthProxy is required for the console tab to function. VNC servers do not speak websockets and our proxyallows your ganeti cluster to sit behind a firewall, VPN, or NAT.
3.2. Object Log 23
Ganeti Web Manager Documentation, Release 0.11.2
VNC AuthProxy has a control channel that is used to request port forwarding to a specific VNC machine. It willrespond with a local port and temporary password that must be used within a short period. This allows a secureconnection with the VNC AuthProxy, without compromising the vnc password, and without leaving the port open toanyone with a port scanner.
Configuring VNC AuthProxy
Set the host and port that the proxy uses in config.yml with the VNC_PROXY setting.
Syntax is HOST:CONTROL_PORT, for example: "localhost:8888".
If the host is localhost then the proxy will only be accessible to clients and browsers on the same machine as the proxy.Production servers should use a public hostname or IP.
Note: If using Vagrant, you will need to add the VM’s FQDN and IP address to your /etc/hosts file.
# located in your settings fileVNC_PROXY = 'localhost:8888'
To set up encryption, find where VNC AuthProxy‘s working directory. This may depend on how you haveset it set up to automatically start; for instance, with runit, it automatically sets the working directory to/etc/sv/vncauthproxy.
You then should put your HTTPS certificate file in /path/to/working/dir/keys/vncap.crt and yourHTTPS private key in /path/to/working/dir/keys/vncap.key. VNC AuthProxy should then automat-ically accept encrypted connections.
Starting the Daemon
VNC AuthProxy is now controlled with an init.d script. To install the script, see VNC AuthProxy startup script.
Once installed, VNC AuthProxy can be controlled with standard service commands. You can start, stop, andrestart the service, and get check if the service is running with status:
$ sudo service vncauthproxy status
If you do not wish to install VNC AuthProxy as a service, it can be manually started when inside the Ganeti WebManager virtual environment.
$ twistd --pidfile=/tmp/proxy.pid -n vncap
Starting Flash Policy Server
Browsers that do not support WebSockets natively are supported through the use of a flash applet. Flash applets thatmake use of sockets must retrieve a policy file from the server they are connecting to. VNC AuthProxy includes apolicy server. It must be run separately since it requires a root port. You may want to open port 843 in your firewallfor production systems.
Start the policy server with twistd
sudo twistd --pidfile=/tmp/policy.pid -n flashpolicy
24 Chapter 3. Features

Ganeti Web Manager Documentation, Release 0.11.2
Firewall Rules
The following ports are used by default
• 8888: Control port used to request vnc forwarding. Should be open between Ganeti Web Manager and Proxy
• 12000+: Internal VNC Ports assigned by Ganeti. Should be open between Proxy and Ganeti Nodes.
• 7000-8000: External VNC Ports assigned by Proxy. Should be open between Proxy and Clients/WebBrowsers.
• 843: Flash policy server. Required to support browsers without native websocket support. Should be openbetween Proxy and Clients/Web Browsers.
Debugging Help
Python Path for flash policy server
The following error indicates that your python path is not set or the proxy is not installed:
/usr/bin/twistd: Unknown command: flashpolicy
Ensure that your virtualenv is active:
source venv/bin/activate
If not using a virtualenv, then you must manually set the PYTHONPATH environment variable as root:
export set PYTHONPATH=.
SSH Keys
Ganeti Web Manager allows users to store SSH Keys. Each virtual machine has a view that will return SSH keys forusers with access.
Configuring User SSH Keys
As an User
1. click your username in the menu sidebar
2. use the Add, Edit, and Delete buttons to manage your keys
As an Admin
1. click Users in the menu sidebar
2. click the edit button for the user you want to edit
3. use the Add, Edit, and Delete buttons to manage your keys
3.4. SSH Keys 25
Ganeti Web Manager Documentation, Release 0.11.2
SSH Keys script
Ganeti Web Manager provides a script that will automatically generate an authorized_keys files
$ python util/sshkeys.py [-c CLUSTER [-i INSTANCE]] WEB_MGR_API_KEY URL
• WEB_MGR_API_KEY is the value set in config.yml settings file
• URL is a URL pointing to the GWM server
• CLUSTER is the identifier of a cluster
• INSTANCE is the hostname of an instance
The GWM server URL has some flexibility in how it may be specified; HTTP and HTTPS are supported, as well ascustom port numbers. The following are all valid URLs:
• http://example.com/
• https://example.com/
• http://example.com:8080/
CLUSTER and INSTANCE are optional. Including them will narrow the list of users to either a Cluster or aVirtualMachine.
SSH Keys Ganeti hook
If you want your VMs to automatically copy the ssh keys from GWM, then you can use the included sshkeys ganeti hook found in util/hooks/sshkeys.sh. Copy that file onto every node in your cluster in thehooks directory for the instance definition you’re using (i.e. ganeti-debootstrap). Copy and set the variables inutil/hooks/sshkeys.conf into the variant config and/or the instance definition config file. Make sure thatthe hook is executable and all the variables are set include changing the API Key.
LDAP
New in version 0.10.
Ganeti Web Manager supports LDAP authentication through the use of django-auth-ldap and python-ldap. A fabriccommand has been written to easily handle enabling and disabling LDAP support.
Dependencies
In order to use python-ldap a couple of system level packages need to be installed first.
For a Debian based systems:
• libldap2-dev
• libsasl2-dev
For a Red Hat based systems:
• openldap-devel
26 Chapter 3. Features
Ganeti Web Manager Documentation, Release 0.11.2
Deploying
To deploy Ganeti Web Manager with LDAP
1. Copy ldap_settings.py.dist to ldap_settings.py.
$ cd ganeti_webmgr/ganeti_web/settings$ cp ldap_settings.py.dist ldap_settings.py
2. Change ldap_settings.py to fit your LDAP configuration.
$ vi ldap_settings.py
Note: ldap_settings.py.dist has been thoroughly commented so that external documentationshouldn’t be needed. If you have specific questions about options or want an overview of the package, pleaseconsult the django-auth-ldap documentation.
3. Install the LDAP-specific requirements.
$ pip install -r requirements/ldap.txt # in root of repository
Disabling
If you would like to later disable LDAP support, all that is required is to remove your ldap_settings file:
$ cd ganeti_webmgr/ganeti_web/settings$ rm ldap_settings.py
Note: This will not remove django-auth-ldap and python-ldap, nor the the system specific dependencies. If you wantto remove these, use pip and your system’s package manager.
Virtual Machine Templates
A new feature of Ganeti Web Manager 0.8 is the ability to create Templates.
Managing Clusters
Ganeti RAPI users and passwords
Before you can start using Ganeti Web Manager you will need to create a user and password on the Ganeti cluster.
Create MD5 hash
Here is an example with a user jack and password abc123
echo -n 'jack:Ganeti Remote API:abc123' | openssl md5
3.6. Virtual Machine Templates 27
Ganeti Web Manager Documentation, Release 0.11.2
Add user to Ganeti cluster
Add the hash to /var/lib/ganeti/rapi_users on all the nodes in the cluster and restart ganeti-rapi. Here’san example using above: For ganeti 2.4 and above you need use file /var/lib/ganeti/rapi/users
# Hashed password for jackjack {HA1}54c12257ee9be413f2f3182435514aae write
For more information on adding users, please check the Ganeti RAPI documentation
Cluster Read Only Mode
It is possible to add a cluster with only its hostname and port number, and no username and password credentials. Thiscreates a copy of the cluster and its VMs in your local Ganeti Web Manager database without giving you the ability tochange the cluster itself.
In Read-Only mode, you CAN:
• Assign ownership of VMs to GWM users from the Orphans page
• Delete VMs from your Ganeti Webmanager database from the Missing VMs page
• Import nodes to your database or delete nodes from it
• Assign permissions to users on the cluster or VM (note that although you can assign VM create permission to auser or group, they cannot actually create a VM in read-only mode)
• Edit the cluster, so that you can go back and add username/password credentials and gain full privileges on itlater.
• Delete the record of the cluster from your database (Note: This does not affect the actual cluster)
• Record a default quotas for Virtual CPUs, Disk Space, and Memory
• Change the cluster’s slug (the name of the cluster as it appears in the url: <hostname>/cluster/<slug>/<vm>)
In Read-Only mode, you can NOT:
• Redistribute the cluster’s configuration
• Start, stop, or reinstall a VM
• Migrate or change disks
• Access a VM’s console
• Create a new VM on the cluster
Open Registration
Ganeti Web Manager versions 0.8 and above allow you to choose whether users can create their own accounts, or needto be added by an administrator.
The default setting for registration is open, which means that visitors to your site’s login page can follow a link fromthe login page to create their own accounts.
28 Chapter 3. Features
Ganeti Web Manager Documentation, Release 0.11.2
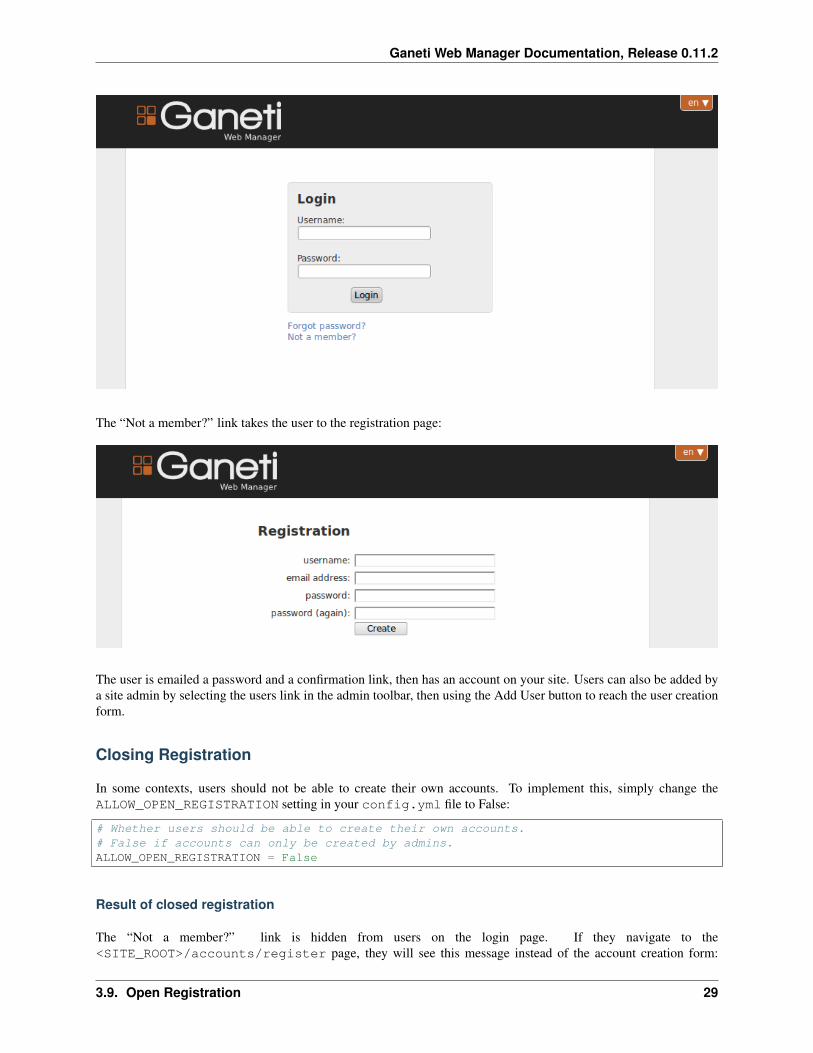
The “Not a member?” link takes the user to the registration page:
The user is emailed a password and a confirmation link, then has an account on your site. Users can also be added bya site admin by selecting the users link in the admin toolbar, then using the Add User button to reach the user creationform.
Closing Registration
In some contexts, users should not be able to create their own accounts. To implement this, simply change theALLOW_OPEN_REGISTRATION setting in your config.yml file to False:
# Whether users should be able to create their own accounts.# False if accounts can only be created by admins.ALLOW_OPEN_REGISTRATION = False
Result of closed registration
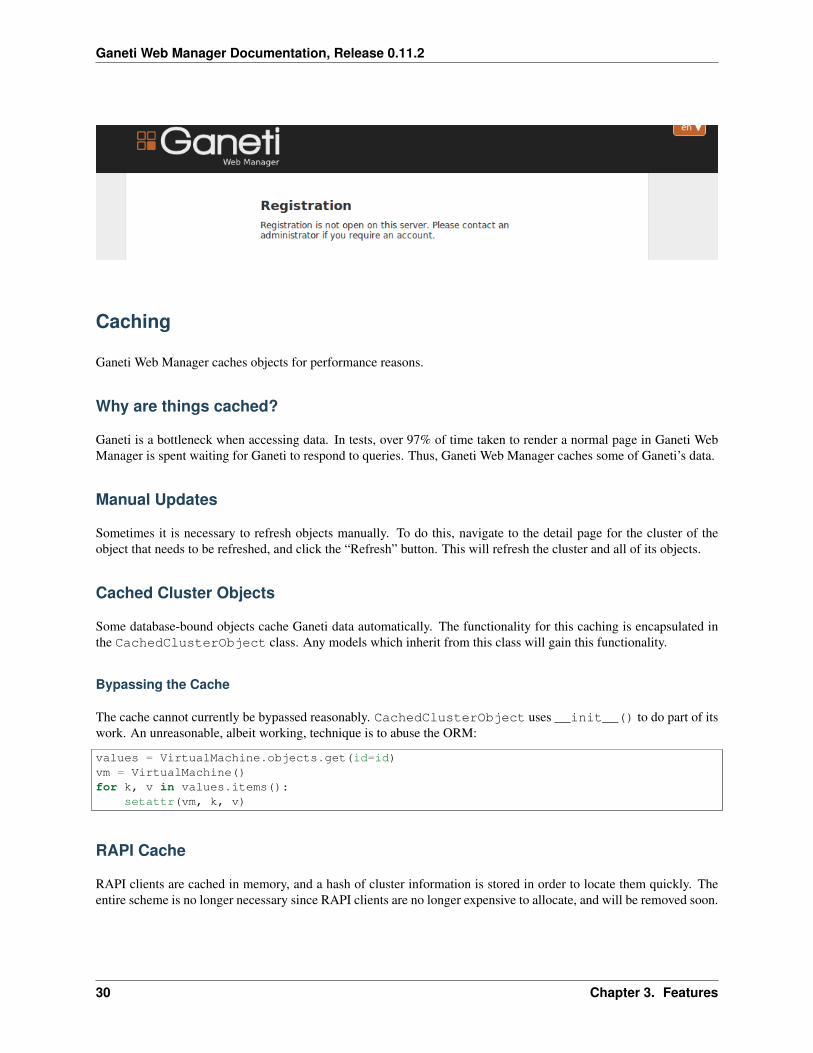
The “Not a member?” link is hidden from users on the login page. If they navigate to the<SITE_ROOT>/accounts/register page, they will see this message instead of the account creation form:
3.9. Open Registration 29
Ganeti Web Manager Documentation, Release 0.11.2
Caching
Ganeti Web Manager caches objects for performance reasons.
Why are things cached?
Ganeti is a bottleneck when accessing data. In tests, over 97% of time taken to render a normal page in Ganeti WebManager is spent waiting for Ganeti to respond to queries. Thus, Ganeti Web Manager caches some of Ganeti’s data.
Manual Updates
Sometimes it is necessary to refresh objects manually. To do this, navigate to the detail page for the cluster of theobject that needs to be refreshed, and click the “Refresh” button. This will refresh the cluster and all of its objects.
Cached Cluster Objects
Some database-bound objects cache Ganeti data automatically. The functionality for this caching is encapsulated inthe CachedClusterObject class. Any models which inherit from this class will gain this functionality.
Bypassing the Cache
The cache cannot currently be bypassed reasonably. CachedClusterObject uses __init__() to do part of itswork. An unreasonable, albeit working, technique is to abuse the ORM:
values = VirtualMachine.objects.get(id=id)vm = VirtualMachine()for k, v in values.items():
setattr(vm, k, v)
RAPI Cache
RAPI clients are cached in memory, and a hash of cluster information is stored in order to locate them quickly. Theentire scheme is no longer necessary since RAPI clients are no longer expensive to allocate, and will be removed soon.
30 Chapter 3. Features
Ganeti Web Manager Documentation, Release 0.11.2
Ganetiviz
Graphical Visualization of a ganeti cluster is now possible with the help of ganetiviz app in GWM (should be packagedin the next GWM release, version 0.11). Ganetiviz uses the Cytoscape JS library to render network graphs, whereganeti nodes are represented as vertices and failover directions are shown as edges.
The graph is interactive and has the following features:
Features
1. Nodes are represented as circles, which can host a number of primary instances, and mirror data for instanceshosted on other secondary nodes.
2. Any node can play the role of both a primary node or a secondary node.
3. When you click on a node, all the instances running on that node are shown.
4. Further, when you click on an instance an edge in the graph connecting 2 nodes is highlighted.
5. The edge points to the secondary node for that particular instance originating at the primary node.
6. Edge thickness between the nodes gives and idea of the total number of failover possibilities existing betweentwo nodes.
7. All the ‘running’ instances are shown in green and all the *_DOWN instances are shown in red. Instances “red”in color are not “running” and might require a failover.
8. Additional instance information is shown in the bottom right corner and is fetched on demand on clicking on aninstance.
9. Zoom In - Zoom Out using mouse scroll in any region by placing mouse-pointer there first.
10. Long-click & hold the graph at any point and pan it in any direction to shift the whole graph object or Pan byusing arrow keys, or use the previous mouse method: longclick-hold-move
11. Select any node ans press the character “s” to see all the secondary instances for a given node.
12. Press the character “c” at any time to clear (actually hide) all the visible instances.
13. Press the character ‘r’ to reset the whole graph orientation as in the beginning.
14. Most of this important information is available easily pressing character the ‘h’ ie. help.
Visualizing a cluster via GWM
1. Navigate to Cluster detail page
2. Click the Visualize button with an ‘eye’ on it.
3. ganetiviz - opens up and renders the appropriate cluster.
History
In the initial stages of development I wrote a blog post on Ganetiviz. It might be a little outdated now, but will helpunderstand the ganetiviz evolution.
The ganetiviz-cytoscape project was initially created as a front end component for ganetiviz which was then portedto devganetiviz - a django application that can be run outside GWM and ships with some mock data to get startedcontributing to GWM in seconds.
3.11. Ganetiviz 31
Ganeti Web Manager Documentation, Release 0.11.2
Improving ganetiviz
Since ganetiviz is a part of GWM; improving ganetiviz actually means improving GWM. Developing for GWM cansometimes be tedious for front-end contributors who do not want to concern themselves with running a live or virtualganeti cluster with GWM every time for development purposes.
Ganetiviz has a sister project that makes it possible for anyone to start contributing easily.
1. Front-End code contribution: For any front end contribution you must refer to devganetiviz, a separate djangoproject that comes with batteries included (fixture data, etc), so you do not need to run any physical or virtualserver to add front-end features to ganetiviz.
2. For any contribution that changes JSON data avaiable to the front end component. For changing the data returnedby GWM to ganetiviz, it is important to run GWM the standard way along with a Virtual or real cluster.
32 Chapter 3. Features
CHAPTER 4
Usage
Upgrading
Note: Please read the instructions fully before starting. The order of operations is important. The upgrade may fail ifdone out of order.
Warning: This guide is intended for Ganeti Web Manager in versions 0.11 and higher. If you have older installa-tion that you want to upgrade, please read carefully Deprecated: Upgrading page.
This guide will walk you through upgrading Ganeti Web Manager. Our upgrade process uses South, a databasemigration tool that will update your database.
1. Back up the database
2. Make sure newest Ganeti Web Manager is available in OSUOSL repository athttp://ftp.osuosl.org/pub/osl/ganeti-webmgr/
3. Run your setup script with -u ./gwm_venv argument.
Follow the guide for your version.
0.11 and later
Since 0.11, Ganeti Web Manager uses special setup script for installing and upgrading.
By using this script (and due to other major changes in Ganeti Web Manager architecture), you now have to use dif-ferent management script. It gets installed into Ganeti Web Manager‘s virtual environment as django-admin.py.Once you’ve activated your virtual environment, it will be in your path.
In order to upgrade your database run:
$ django-admin.py migrate --delete-ghost-migrations --settings "ganeti_webmgr.ganeti_web.settings"
Updated settings
0.11
Settings now have a few ways of configuring, designed to make life easier for those deploying Ganeti Web Manager,especially if your unfamilar with python.
33
Ganeti Web Manager Documentation, Release 0.11.2
Settings now live in /opt/ganeti_webmgr/config/config.yml. You can now use yaml to configure yoursettings. By default this config file does not exist, so be sure to add your config file there.
An example yaml config file can be found in the configuration documentation, and can also be found inganeti_webmgr/ganeti_web/settings/ in a file named config.yml.dist.
If you prefer configuration using the typical django settings.py file, fear not, that will still work, however it haschanged a bit.
You will need to remove any imports of other settings files from it, and you will need to add it to theganeti_webmgr/ganeti_web/settings/ folder as settings.py. Take a look at settings.py.distin that same folder for an example.
Clusters
Virtual Machines
Nodes
Templates
34 Chapter 4. Usage
CHAPTER 5
Contributing
Issues
The issue tracker for Ganeti Web Manager is on Github. All bugs and feature requests for Ganeti Web Manager shouldbe tracked there. Please create an issue for any bug, feature, or translation you wish to contribute or report.
Please follow this guide when filing new issues for Ganeti Web Manager.
Description
When submitting an issue, the description should generally include the following:
• Exactly what the submitter did to encounter the situation
• What the submitter expected to happen
• What actually happened
Depending on the issue, knowing details about the operating system or web browser being used may be helpful.
In addition to these points, bug reports should also include any relevant information with regard to attempted fixesor workarounds as well as any other effects the bug may have on the software. Any patches which resolve or workaround bugs are also appreciated, if only to help developers understand the scope of the bug.
Trackers
There are several “trackers” or categories of issues that can be filed.
Bugs
Bugs are well...bugs. Things that are broken. Pieces of the project that don’t work as expected.
Features
Features are enhancements to the project that implement a new functionality. They are generally referenced with aphrase like “The ability to...”.
35
Ganeti Web Manager Documentation, Release 0.11.2
Enhancements
Enhancements are updates to existing features. They are not errors encountered in features, but improve the function-ality or usability of a feature.
Status
Status reflects where a ticket stands in the filing process.
New This issue is new and we haven’t begun work on it, possibly haven’t even decided whether we will work on it.
In Progress We are working on this issue.
Won’t Fix This is a legitimate issue, but we’ve decided that it is not something we can or will work on
Duplicate This issue is actually a duplicate of an exisiting issue
Blocked We can’t work on this issue until another issue is resolved
Feedback We’ve worked on this issue, or made some comments on it, and assigned it to someone for their feedback.
Resolved We’ve completed work on this issue.
Upstream This is actually an issue with some package or library we depend on.
Closed We are done with this issue.
Rejected We don’t think this is a legitimate issue, and reject it entirely
Can’t Reproduce We believe you, but we can’t reproduce the behavior this issue refers to, so we can’t do anythingwith it
Priorities
How important it is for us to get this issue fixed.
• Low
• Normal
• High
• Urgent
• Blocker
Categories
Categories simply describe the general area or topic of an issue, categories may change with time depending on theproject’s needs.
Difficulty
An estimation of how hard a bug, feature, or enhancement will be and how long it may take.
• Easy
• Medium
• Hard
36 Chapter 5. Contributing
Ganeti Web Manager Documentation, Release 0.11.2
OSL Development Process
This document describes the general process the OSL uses for developing and maintaining projects.
Issue Triage
When an issue is reported on Github, the core team will triage the issue, assigning it to a release version, rejecting it,or sending it back for more information. This process may take place as part of planning for a new version release, orad hoc in order to address an important bug in the current release.
Features
Features will be considered only for the next minor or major version release. If the current release cycle has not yetreached the ‘feature freeze’ deadline, the feature may be considered for the current release; otherwise it should beassigned to a future release.
Enhancements
Enhancements will not be considered for the current version after that version’s feature freeze date. Enhancementissues must apply to a current existing feature, if they introduce new basic functionality, they should be reclassified asFeatures. If they address malfunctioning code or incorrect functionality, they should be reclassified as Bugs.
Bugs
Bugs may be assigned to a release at any time. If they apply to an existing released version, either a new point releasemust be created, or the bug must be incorporated into the next major or minor release. For example, an urgent fix tothe 0.10.1 release should generate a 0.10.2 release to contain the changes. A less urgent fix for 0.10.1 might simply beincorporated into 0.11. In general, we try to collect multiple fixes into any point or minor release.
Workflow
The following workflow should be followed when contributing code.
Assignment
Issues are assigned to developers in several ways:
• direct assignment by the project lead
• volunteer self-assignment
The project lead and core developers may re-assign issues based on time or other considerations.
Branching
The git branching model essentially follows the git-flow model.
When work begins on an issue, a new branch should be created containing the issue type and number.
5.2. OSL Development Process 37
Ganeti Web Manager Documentation, Release 0.11.2
git checkout -b feature/12345
This branch should be based on the main branch to which it will apply. For features and enhancements, this shouldalways be develop. For bugs that apply to a specific release, the branch may be taken from that release’s branch.
Commit Messages
Commit messages should be informative, they should contain everything another developer might need to know inorder to understand your commit. It should contain the problem addressed by the commit and a quick description ofthe solution.
Commit messages have a header line and a body, the header line should contain a very brief description of the commit,and should be limited to 50 characters. The body should contain a bit more detail on what was changed.
In order to track the commit within our bug tracker, the commit message should also contain a reference to the issuenumber:
refs: #12345
An example commit:
Short (50 chars or less) summary of changes
refs: #12345
More detailed explanatory text, if necessary. Wrap it to about 72characters or so. In some contexts, the first line is treated as thesubject of an email and the rest of the text as the body. The blankline separating the summary from the body is critical (unless you omitthe body entirely); some git tools can get confused if you run thetwo together.
Further paragraphs come after blank lines.
- Bullet points are okay, too
- Typically a hyphen or asterisk is used for the bullet, preceded by asingle space, with blank lines in between, but conventions varyhere
# Please enter the commit message for your changes. Lines starting# with '#' will be ignored, and an empty message aborts the commit.# On branch master# Changes to be committed:# (use "git reset HEAD <file>..." to unstage)## modified: hello.py#
Review
Before being merged into develop or a release branch, all work must be reviewed. Our process is informal. A developermay ask another developer to review their work, or a project lead may assign issues for review. To assign someone toreview an issue, the issue should be assigned to the reviewer with the status “needs review”.
Code, documentation and internationalization should all be reviewed before being merged.
Code review criteria
38 Chapter 5. Contributing
Ganeti Web Manager Documentation, Release 0.11.2
• code should be examined for logical or typographical errors
• code should be examined in the context of the larger application
– does the code fit the structure of the application?
– does the code follow the application’s conventions, such as method names, variable namespaces, etc?
– does the code leverage existing methods, or re-implement things that exist elsewhere?
• code should be audited for standards compliance (i.e. PEP8)
• unit tests should be run in a local dev environment to verify there are no failures
• the features the code effects should be tested by running the application and using those features
• all new code should be accompanied by documentation. Travis CI will check that the PR contains changes tothe docs. If you do not believe that new docs are necessary you may argue so in the PR and we may decide toignore Travis.
Internationalization should be reviewed as code. If the accuracy of translations cannot be confirmed, the code shouldbe reviewed to ensure the correct strings are translated and no errors have been introduced by adding translations tostrings.
Documentation review criteria
• documentation should be examined for misspellings, typographical errors and grammar
• documentation should be examined for formatting consistency
– are headers, paragraphs and other elements used consistently with other docs?
– is the narrative style and organization consistent with other docs?
• documentation should be complete, and where it is not, ‘todo’ blocks should be included with descriptions ofwhat is still pending
• documentation should be accurate - docs containing instructions should be tested by following those instructionsand verifying that the produce the correct result
If the work passes review, the reviewer should add a note to the issue in the tracker, describing what was tested andverifying that the work passed.
If the work does not pass review, the reviewer should add a note in the tracker describing the problem and describingthe necessary fixes if known. The reviewer will then re-assign the issue back to the original developer with the status“needs work”.
In some cases, work might pass the review, but contain small things that could be cleaned up or done more efficiently.If time constraints or other factors make reassigning for more work undesirable, a detailed note should be added to theissue describing things that could be done to improve the code.
Merging
When work has passed review, the project lead, or a developer assigned by the lead, may merge the work into theappropriate branch.
If the branch has diverged significantly from its parent, the parent should be merged with the branch prior to submittingfor review. If this has not been done, the developer responsible for merging into the parent branch may do this, or mayassign it back to the original developer. If significant conflicts arise during merging, the issue should be reassigned tothe original developer to resolve the conflicts.
Merging should be done with the –no-ff flag to preserve commit history.
5.2. OSL Development Process 39
Ganeti Web Manager Documentation, Release 0.11.2
After merging the parent branch into the submitted issue, the merging developer will run all tests for the project toensure no bugs have been introduced by the merge.
When all tests pass, the work will be merged with the parent branch. After merging, the developer doing the mergewill run the test suit again.
If all tests pass, the developer will update the issue in the tracker, adding a note that the code was merged and anycomments on conflicts resolved. The developer will then change the status of the issue to “resolved”.
Github and Pull Requests
If work is done on GitHub or on an external repository rather than the OSL Gitolite instance, the work will be submittedto the core via a Github pull request.
Pull requests will be subject to the same review process outlined above, and should correspond to an issue in the OSLissue tracker. If no such issue exists, it must be created before accepting the pull request. When the pull requestis approved, a new branch will be created following the normal naming conventions, and the work pulled into thisbranch. From this point, the work follows the same workflow as above.
If the original developer does not have or is not willing to create an account on the OSL tracker, and the issue needs tobe assigned back for additional work, such assignment may be communicated via email, an issue on the Github issuetracker for the developers’ clone. If the developer is not willing to participate in this process, a core developer may beassigned to adopt the work, and the issue will be assigned to that developer for further work.
GWM Release Process
The Ganeti Web Manager release process involves several stages of testing and preparation.
Feature Freeze All of the features to be included in this release are complete - no new feature issues can be createdfor this release, and all remaining issues should be resolved.
Release Branch When all issues are resolved, a new release branch is created to contain the new release, it will benamed for the version, i.e. release/0.10.2. The version number strings in this branch will be updated to thecorrect version number.
First Test Phase The release branch version of GWM will be tested on the OSL GWM staging server. The deploymentand all new features for this version should be tested, and the unit test suite will be run.
Documentation Audit While testing on the staging server, the documentation will be audited to make sure it is up todate and correct for this version. Any issues will be filed as bugs against this version.
First Bug Fix Phase Any code or documentation bugs discovered through testing on the staging server will be ad-dressed during this time, and fixes applied to the release branch. If no bugs are found, we move on to the nextphase.
First Release Candidate (two weeks) A release canidate tag is created from the release branch, and announced onthe mailing list and in IRC. The release candidate is deployed on staging for continued testing. The releasecandidate will be tested at OSL and by end users for two weeks. Any bugs discovered will be filed against thisversion.
Second Bug Fix Phase If bugs were found in the release candidate during the two week testing period, fixes shouldbe applied to the release branch as soon as possible. If no bugs were found, the release moves on to the FinalRelease step.
Second Release Candidate If bugs were fixed in the first release candidate, a new candidate tag is created and is testedfor one week. Further release candidates may be created as needed to fix bugs, each release candidate shouldhave a lifetime of one week.
40 Chapter 5. Contributing
Ganeti Web Manager Documentation, Release 0.11.2
Final Release If no issues were found in the last release candidate after the one or two week testing phase, the releaseis considered final, a release tag is created. See below for full list of Final Release tasks.
Final Release Tasks
Creating a final release consists of the following tasks.
1. All issues for the release version should be resolved and closed
2. Build and upload Python wheels for all requirements (see building wheels). Don’t forget to build thepsycopg2 and MySQL-python wheels!
3. Bump version in docs/source/conf.py, scripts/setup.sh, and inganeti_webmgr/constants.py
4. Create a release tag for this version, e.g. 0.11.2
5. Create a tar file for this release and upload it to Github’s Releases.
6. Create a Python package from the tag
7. Announce the new release to the mailing list and IRC channels
GWM Developer Guide
This guide is intended to help you begin writing code and documentation for the Ganeti Web Manager project. Pleaseread the OSL Development Process for information on how this project is managed and what we do to review andintegrate code into the master repository. Please read the entire guide before beginning work, we will not be able toaccept contributions that don’t follow these guidelines and standards.
For information on our release cycle and versions, please see Release Cycle .
Issue Tracking
The bug tracker for Ganeti Web Manager is on Github, and all bugs and feature requests for Ganeti Web Managershould be tracked there. Please create an issue for any code, documentation or translation you wish to contribute.
Please see Issues for details on how to create informative issues.
Dev Environment
Writing and testing code is made much easier by the right tools and a development environment that mirrors a pro-duction environment. To begin working with Ganeti Web Manager code, you will need Git, Python 2.6+, and PythonVirtualEnv. We also recommend VirtualBox and Vagrant, a scripting front-end to VirtualBox to set up a virtual clusterto test your code with.
Git
If you are unfamiliar with Git, please read the official Git tutorial or this excellent tutorial.
There are many Git GUIs, if you are not comfortable working with Git on the command line. See this list of Git GUIclients for more information.
5.4. GWM Developer Guide 41

Ganeti Web Manager Documentation, Release 0.11.2
Virtualenv and Pip
Ganeti Web Manager‘s install script uses the Python VirtualEnv utility to create a local environment in which toinstall all of GWM’s Python dependencies, and GWM itself runs from within this environment. To run tasks withmanage.py, or to work with the python console on GWM code, you will need to activate the environment in yourshell:
source /path/to/gwm/venv/bin/activate
Note that the environment will only be active for the terminal in which this command is run.
Pip is used to install packages to the currently active Python environment. If you would like to install python packagesfor debugging or to add functionality to Ganeti Web Manager, be sure the Ganeti Web Manager virtual environment isactive and install packages:
pip install packagename
If you are adding python packages to add functionality or to support Ganeti Web Manager features you are adding,be sure to add the package to requirements.txt. You can get a list of all python packages installed in your currentenvironment with
pip freeze
Add your package name to requirements.txt and commit this with the rest of your code. For more information on Pipand package name/version specifications, see (a link to pip docs)
VirtualBox and Vagrant
Virtual machines provide an easy way to deploy a Ganeti cluster to test Ganeti Web Manager with, or for use as aself-contained dev environment that can be shared with other developers. VirtualBox is a free virtualization platformavailable on Windows, Linux, and MacOS. Vagrant is a scripting front end for VirtualBox that allows easy creation,provisioning, and management of VirtualBox VMs, allowing developers to write and test their code in a uniformenvironment.
Installation
To install the GWM application for development work, please see Developer Installation.
Ganeti Web Manager ships with support for Vagrant. This allows developers to modify and test their code in thesame environment and reduce the amount of configuration necessary. See Vagrant for details on setting up the virtualmachine.
In addition, use of Ganeti Web Manager requires a Ganeti Cluster. For instructions on setting up a test cluster withVagrant, see test_cluster.
Alternatively, Ganeti Web Manager now comes with a Dockerfile. This allows developers to use Docker to quicklyrun their code without needing to deal with setup and virtual machines. For now, the included Docker setup does notset up a Ganeti Cluster, for this, Vagrant is still needed.
To use Docker, simply build the included Dockerfile:
$ docker build -t="osuosl/ganeti_webmgr:dev" .
Then, just create a Docker container from the image:
$ docker run -it -p 8000:8000 osuosl/ganeti_webmgr:dev
42 Chapter 5. Contributing
Ganeti Web Manager Documentation, Release 0.11.2
Ganeti Web Manager can now be accessed on http://localhost:8000. To change the port that it runs on, thefirst number in the above command can be changed to the port of choice.
Some developers may prefer to mount their copy of the application as a volume when they run the app. This removesthe need to rebuild the Docker image each time the code is changed, and can be done as follows:
$ docker run -v /path/to/code/:/opt/ganeti_webmgr -it -p 8000:8000 osuosl/whats_fresh:dev
Repository Layout
We loosely follow Git-flow for managing repository. Read about the branching model and why you may wish to use ittoo.
master Releases only, this is the main public branch.
release/<version> A release branch, the current release branch is tagged and merged into master.
develop Mostly stable development branch. Small changes only. It is acceptable that this branch have bugs, butshould remain mostly stable.
feature/<issue number> New features, these will be merged into develop when complete.
bug/<issue number> Bug fixes.
enhancement/<issue number> Enhancements to existing features.
See Issues for more information on issue types.
When working on new code, be sure to create a new branch from the appropriate place:
• develop - if this is a new feature
• release/<version> - if this is a bug fix on an existing release
Code Standards
PEP8
We follow PEP 8, “the guide for python style”.
In addition to PEP 8:
• Do not use backslash continuations. If a line must be broken up, use parenthetical continuations instead.
Units
Write modular code. Focus on isolating units of code that can be easily analyzed and tested. For sanity purposes,please avoid mutually recursive objects.
JSON
If you need a JSON library, the import for this code base is “from django.utils import simplejson as json”. See #6579for more information.
5.4. GWM Developer Guide 43

Ganeti Web Manager Documentation, Release 0.11.2
Testing
Ideally, tests should be written for all code that is submitted to the project. We recommend writing a test for any newfeature before writing the code.
For bugs in features that have existing tests, be sure to run the existing tests on your code before submitting. In somecases a test will need to be updated or modified to test a bug fix, this should be done before writing code to fix the bug.
Tests can be submitted for features separate from the feature code itself, and feature requests that are submitted alongwith tests will be much more likely to be implemented.
See testing for more information on writing unit tests for Ganeti Web Manager.
See selenium for some ideas on using the Selenium web testing framework to test GWM.
Adding features
When adding a feature to GWM, please remember to include:
Help tips
The gray box with a green title bar that appears on the right side of the page when you focus on a form fieldis a help tip. To add one for a new field, add it to the file which corresponds to your field’s form in theganeti_web/templates/ganeti/helptips/ directory.
Internationalization
Ganeti Web Manager is designed to support translation to other languages using Django’s i18n machinery. If you addtext that will be displayed to the user, please remember to format it for translation:
{% trans "this text will be displayed in the correct language" %}
{% blocktrans %}Here is a some text that will be displayedin the correct language but would notfit well in a single line
{% endblocktrans %}
Django’s i18n page has more information about this.
Fixing Bugs
When bugs are fixed, the issue should be updated with a clear description of the nature of the bug, the nature of thefix, and any additional notes that will help future developers understand the fix.
Before working on a bug fix, determine if the faulty code is covered by a unit test. If so, and the test did not reveal theflaw, update the test appropriately. If no test exists, it should be written if possible. The test should be submitted alongwith the fixed code.
Writing Documentation
Documentation exists as RestructuredText files within the GWM repository, and as in-line comments in the sourcecode itself.
44 Chapter 5. Contributing
Ganeti Web Manager Documentation, Release 0.11.2
Sphinx
The docs/ directory contains the full tree of documentation in RestructuredText format. To generate the docs locally,make sure you have activated the Ganeti Web Manager virtual environment, and that Sphinx is installed.
pip install -r requirements/docs.txtcd docsmake html
HTML documentation will be generated in the build/html directory. For information on generating other formats, seethe Sphinx documentation.
The documentation for Ganeti Web Manager is divided into several sections:
• Features: Descriptions of features and their implementation
• User Guide: How to use GWM and its various features
• Development Guide: How to work on the GWM code (this document)
• Info: Various information on the project itself
• Reference: General information referred to in other docs
Usage of features should be documented in the usage/ directory. Each distinct unit of functionality should have aseparate file, for instance “create a new virtual machine” should have a single file documenting how to create a newvirtual machine. Overview documents, for example “managing virtual machines” will reference or include these subfiles.
Implementation and structural details of features should be documented in the features/ directory, one file per distinctfeature. This documentation should give an overview of the functionality, rational and implementation of the feature -for example, documenting how the “add virtual machine” view generates a request to the RAPI.
Any changes or enhancements to an existing feature should be documented in the feature’s documentation files.
Development documentation should be updated when any changes are made to the development process, standards, orimplementation strategies.
In-line Docs
All methods in the source code should be commented with doc strings, including parameters, return values, and generalfunctionality.
Submitting Code
Please read OSL Development Process for details on how we triage, review and merge contributed code.
Bower is used to manage javascript dependencies that have previously been stored within GWM as minimized files.For more information on django-bower, check out their docs.
To update or add Javascript dependencies, add them to base.py and run manage.py bower install. Thiswill install the new or updated dependencies to ganeti_webmgr/bower_components. Include the added de-pendencies with the pull request.
Patches
Patches should either be attached to issues, or emailed to the mailing list. If a patch is relevant to an issue, then pleaseattach the patch to the issue to prevent it from getting lost.
5.4. GWM Developer Guide 45
Ganeti Web Manager Documentation, Release 0.11.2
Patches must be in git patch format, as generated by git format-patch.
git commitgit format-patch HEAD^
To create patches for all changes made from the origin’s master branch, try:
git format-patch origin/master
For more information, see the man page for git-format-patch.
Sending emails to the list can be made easier with git send-mail; see the man page for git-send-email for instructionson getting your email system to work with git.
Pull Requests
If there are multiple patches comprising a series which should be applied all at once, git pull requests are fine. Send arationale for the pull request, along with a git pull URL and branch name, to the mailing list.
Git Write Access
Contributors in good standing who have contributed significant patches and who have shown a long-term commitmentto the project may be given write access to our repository. Such contributors must follow our OSL DevelopmentProcess, including participating in code review and planning.
Submitting Documentation
Documentation is just as much a part of the project as code, and as such you can contribute documentation just asoutlined above for code. See Writing Documentation for details on the documentation tree.
If you are not comfortable with git, patches or pull requests, you may submit documentation via a text file sent to themailing list or attached to an issue. We recommend creating an issue, as this helps us keep track of contributions, butthe mailing list is an excellent place to solicit feedback on your work.
Submitting Translations
Translations should be submitted via patches, a pull request, or by attaching a .po file to an issue. We recommendcloning the git repository and using django-admin.py makemessages to find all the available strings for translation. Ifyou find strings in the UI that are not available for translation, patches to fix this condition are much appreciated. Aswith all contributions, we recommend creating a new issue on our issue tracker for your work.
For details on how to write translation strings and how to make use of them, please see Django’s i18n page
Developer Installation
Make sure you have virtualenv installed, you will want it to keep all of your dependencies isolated, in addition, we usevirtualenv for our end user installation as well.
46 Chapter 5. Contributing
Ganeti Web Manager Documentation, Release 0.11.2
Requirements
• Python >= 2.6
• your compiler of choice
• python-dev for compilation of some of Ganeti Web Manager dependencies
• virtualenvwrapper (really recommended)
• or python-environment if you can’t (or don’t want to) install above wrapper
• libpq-dev (Ubuntu/Debian) or postgresql-devel (CentOS) if you want to use PostgreSQL
• libmysqlclient-dev (Ubuntu/Debian) or mysql-devel (CentOS) if you want to use MySQL
Guide
Virtual environment
Start with creating appropriate virtual environment:
$ mkvirtualenv gwm
This command will work only if you installed virtualenvwrapper. We recommend to use it, because it createsvirtual environments in $HOME/.virtualenvs, which makes your project directory free of any bin, include,lib, local or share directories.
Alternatively, if you do not have mkvirtualenv you can manually create a virtual environment in$HOME/.virtualenvs:
$ virtualenv ~/.virtualenvs/gwm$ source ~/.virtualenvs/gwm/bin/activate
Take a look at Virtual environment page to get better understanding of how virtual enviroments andvirtualenvwrapper work.
Development package
Clone Ganeti Web Manager repository:
(gwm)$ git clone https://github.com/osuosl/ganeti_webmgr
You can also fork on GitHub.
Make sure to switch to develop branch, as it’s the main branch where development happens:
(gwm)$ cd ganeti_webmgr(gwm)$ git checkout develop
Now it’s time to install Ganeti Web Manager as a development package. This means even though Ganeti Web Man-ager gets installed as a Python package (and appears on pip list, and is importable from everywhere in vir-tual environment), you can still work on it from the directory you cloned it to. No need to go into virtualenv’slib/python2.x/site-packages/ganeti-webmgr directory.
(gwm)$ python setup.py develop
This installs Ganeti Web Manager dependencies as well, and in some cases requires compilation.
5.5. Developer Installation 47
Ganeti Web Manager Documentation, Release 0.11.2
Databases
Database drivers / interfaces aren’t listed explicitly in Ganeti Web Manager requirements file, so you have to installthem manually.
Make sure you have your dependencies for DBs met.
To install support for MySQL:
(gwm)$ pip install mysql-python
To install support for PostgreSQL:
(gwm)$ pip install psycopg2
To install support for SQLite: you don’t have to do anything. It’s included in Python.
Configuration
Copy settings.py.dist to settings.pywithin ganeti_webmgr/ganeti_webmgr/ganeti_web/settingsdirectory.
Edit configuration files in ganeti_webmgr/ganeti_webmgr/ganeti_web/settings directory:
base.py Base settings, might not need to be changed.
settings.py Look there for options you might want to change. This file exists there especially for you. Whendeveloping, it is necessary to set testing=TRUE in order to run the testing suite.
Warning: Remember to configure settings.py, not settings.py.dist!
Management
It’s still done via manage.py script, though the script is now hidden deeper in directories structure:
/path/to/ganeti_webmgr/ganeti_webmgr/manage.py
Vagrant
Vagrant is a tool to help automate the creation and deployment of virtual machines for development purposes. Itreduces the amount of effort to make sure multiple developers are using the same set of tools to reduce complaints of“but it worked on my machine”.
Vagrant home page
Ganeti Web Manager comes with a Vagrantfile and uses Chef to automate the deployment process within Vagrant.
What you get
• In /home/vagrant/ganeti_webmgr you will have your project mounted. All changes made to files inyour project folder either in Vagrant, or on the host will be seen on both systems.
• You will have a Django Superuser created with the following credentials (these can be changed in theVagrantfile):
48 Chapter 5. Contributing
Ganeti Web Manager Documentation, Release 0.11.2
username: admin
password: password
• A MySQL Database and User pre-configured for Ganeti Web Manager
All of these values can be changed by overriding the Chef attributes in the Vagrantfile.
Use
Using Vagrant to deploy Ganeti Web Manager is simple. You will need Vagrant version 1.5.4 or greater and twovagrant plugins, vagrant-berkshelf and vagrant-omnibus. For compatability versions, we require vagrant-berkshelfwith a version greater than or equal to 2.0.
Installing Vagrant is easy, you can install it to your system by downloading the appropriate package, and running it.
To install the vagrant-berkshelf and vagrant-omnibus plugins run the following command in your terminal:
vagrant plugin install vagrant-omnibusvagrant plugin install vagrant-berkshelf --plugin-version '>= 2.0.1'
Once you have the plugins installed you can use the following commands to start the Virtual Machine (this may takea while):
vagrant up
After it finishes and your back to your prompt, if you do not see any output after:
[default] Installing Chef 11.x.x Omnibus Package...
Then you need to run the following command to have it reprovision the VM:
vagrant provision
After provisioning, your Virtual Machine will have Ganeti Web Manager installed and running with the Apache webserver. However, so that you can modify the source code, you’ll need to run the Development Server.
You can get to the VM by using the vagrant ssh command. To run Ganeti Web Manager you need to source yourvirtualenv and start the development server:
source /opt/ganeti_webmgr/bin/activatecd ~/ganeti_webmgrpython ganeti_webmgr/manage.py runserver 0.0.0.0:8000
From there you can visit Ganeti Web Manager at (by default) 33.33.33.100:8000 in your web browser.
Note: The reason we runserver on 0.0.0.0 is because by default it runs on 127.0.0.1 which is only accessible from theVM.
More details on vagrant can be found at http://docs.vagrantup.com/v2/
Configuration
Configuration of the deployment with Vagrant is done using Chef. For documentation on the available attributes forconfiguring the deployment visit the cookbook’s github here: https://github.com/osuosl-cookbooks/ganeti_webmgr
5.6. Vagrant 49

Ganeti Web Manager Documentation, Release 0.11.2
50 Chapter 5. Contributing
CHAPTER 6
Project Information
Compatibility
Ganeti Web Manager is compatible with the following:
Ganeti Supported versions: 2.4.x–2.6.0.
Any newer software should work, but its features may not be implemented in Ganeti Web Manager.
Warning: Earlier versions are unsupported; they may occasionally work, but should not be relied upon.
Browsers Mozilla Firefox >= 3.x, current Google Chrome/Google Chromium.
Other contemporary browsers may also work, but are not supported.
The web-based VNC console requires browser support of WebSockets and HTML5.
Databases SQLite, MySQL.
New in version 0.10: PostgreSQL has limited support
Operating Systems Ubuntu 11.10, Ubuntu 12.04, CentOS 6.
Known to work on Debian 7 and CentOS 5.
Debian 6 should work, provided that pip and virtualenv are the latest version.
Changelog
v0.11.0
Notable Changes:
• Ganeti Web Manager is now a Python package
• New installation script!
• Refactoring and new internal application structure
• Reworked configuration, with config.yml
Other:
• Added notes field to virtual machines
51
Ganeti Web Manager Documentation, Release 0.11.2
• The VM Wizard now has a summary page
• Updated VNCAuthProxy
• Updated documentation
v0.10.2
Notable Changes:
• Assigning owners to a VM has been changed slightly.
– Must have admin/create_vm permissions to be an owner
– Groups can be owners
– Superusers can assign owner to anyone
– Owner assignment dropdown is now sorted by name (finally)
• Users without perms on any clusters now get a 403 error if they try to go to the VM Creation page. Before theywould get to the page but have no clusters to choose from.
• The 5th step of the VM Wizard composing of HVParams is now properly submitting the data to the RAPI
• Refresh button now refreshes data for nodes and vms instead of just the cluster from the RAPI.
• Hostnames are now stored in the database using all lowercase
• More validation on data retrieved from the RAPI
• Updated sshkeys scripts to be more redundant
• Fixed missing CSRF token on password reset page
• VM List pages should be consistent between the global VM list and the cluster VM lists
v0.10.1
Notable Changes:
• Cluster defaults are now used for all steps in VM Wizard. Previously NIC settings and Disk size had no defaults.
• Pinned Versions of dependencies
Other:
• Fixed bug for KVM where kernel path was required, now optional. (KVM only)
• Fixed exception when owner of a VM was a group
• During VM Creation the form now properly raises a validation error if primary node is the same as the secondarynode
v0.10
Notable Changes:
• Ganeti 2.6 Support
• VM Wizard
• Job List - Cluster
52 Chapter 6. Project Information
Ganeti Web Manager Documentation, Release 0.11.2
• LDAP Support
• Manual Refresh Button
• Notice on Read-Only Clusters
• Sharedfile Disk Template Added
Other:
• Docs now ship with product
• Fabfile cleaned up and simplified
v0.9.2
• Pinned requirements at Django 1.4. Project not reviewed for Django 1.5 compatibility.
v0.9.1
• New Error list page
• Pagination links now correctly show up on the Virtual Machines page
• Migrate button disabled for non-drbd VMs on VM detail page
• VM template fields correctly set NIC and DNS defaults for new VM
• Fix network devices not copied back to new VM page, when deployment fails
• Account password reset form fixed
• Error messages on VMs clearable again
v0.9
Notable changes:
• Django 1.4
• Ganeti 2.5 support
• Pip 1.0+ support
• Remove PyCurl dependency
• Immediate Shutdown button
• Improved installation process and documentation
• Improved RAPI functionality
Other:
• Simplified layout infrastructure
• Fix CSRF Token errors
• Transaction middleware
• Check VM hostnames for illegal characters
• New Help Tips
6.2. Changelog 53
Ganeti Web Manager Documentation, Release 0.11.2
• Many back-end fixes to improve standards compliance and Django best practices
• Many user interface fixes and improvements
v0.8.1
Bugfix release.
Bugs fixed:
• CsrfResponseMiddleware removed from settings.py.dist
v0.8
Notable Changes:
• VM Templates
• Multiple Disks and Nics for VM Creation
• ‘No Install’ option for VM Creation
• CDROM2 Image Path for KVM
• User auto-complete for all username fields
• Rework and stabilisation of Jobs
• User registration is now optional
• CPU info added to node list and detail pages
• Ability to replace disks for a VM on DRBD clusters
Other:
• Cached AJAX calls
• Unified json package use (django.utils.simplejson)
• Reduced name collisions with directory reorganizing
• Cache refresh migration moved to post_migrate hook
• Unified use of CSRF tokens
v0.7.2
• Fixed HAYSTACK_SITECONF default setting
• Updated README to include virtualenv for mod_wsgi script
v0.7.1
• Updated Fabric dependency: Django Object Permissions 1.4.1
• Overview: Used resources was not displaying clusters when used did not permissions
54 Chapter 6. Project Information
Ganeti Web Manager Documentation, Release 0.11.2
v0.7
Notable Changes:
• Xen Support
• Internationalization Support (only greek translations.)
• Fabric & Virtual Environment deployment.
• Improved Navigation:
– Search
– Contextual links added to more pages
– Breadcrumbs available on most pages
• Object log upgraded to 0.6 includes scalability improvements
• Object permissions upgraded to 1.4
– speed improvements
– contextual links added to generic views
– user/group selection widget added for permission editor.
• noVNC updated to latest head, includes better support for future revisions
• Node Evacuation now works properly
• VirtualMachine owner can now be edited
• Periodic Cache updater
– now syncronizes Nodes
– now runs using twistd
• Nodes can now be imported through the user interface
• Various UI fixes
• Various optimizations to views to improve load times.
v0.6.2
• fixing packaging issue with object log
v0.6.1
• updating object log to 0.5.1
v0.6
Notable Changes:
• Nodes are now cached in the database:
• Node detail views are now available, including some admin methods
• VirtualMachines may now be edited, renamed, and migrated.
6.2. Changelog 55
Ganeti Web Manager Documentation, Release 0.11.2
• Errors while creating virtual machines are now handled better, and can be recovered from
• Django Object Log is now providing logs for all objects tracked by GWM
• Admins can now add ssh keys for other users
• Virtual machine detail page has had its layout updated to be more readable and add more
• fixed bugs preventing syncdb working with postgresql
v0.5
Notable Changes:
• Status Dashboard is now the front page for GWM
– lists cluster status for admins.
– lists summary of virtual machines status for users.
– lists resource usage for the user and groups.
– error list including job failures and ganeti errors.
• Integrated NoVNC, an HTML5 + WebSockets VNC viewer
• Super users can now view resource usage and permissions for users and groups.
• Virtual machine lists are now paginated for quicker loading
• Ram and CPU quota is now based off running virtual machines
• Improved layout
• Virtual Machines list now properly works for cluster admins
v0.4
Initial Release
• Caching system
• Permissions system:
– user & group management
– per cluster/vm permissions
• basic VM management: Create, Delete, Start, Stop, Reboot
• ssh key feed
• basic quota system
• Import tools
56 Chapter 6. Project Information
Ganeti Web Manager Documentation, Release 0.11.2
History
Design
Next
1.0
Celery
Contact Information
Here are a couple of ways to get in touch with us.
Note: Before asking a support related question, please make sure it has not already been answered by searching themailing list archive and current issues.
• IRC - Join our IRC channel #ganeti-webmgr on Freenode
• Mailing List - Send an email to the mailing list
• Twitter - Tweet us!
Screenshots
Here’s a few screenshots of Ganeti Web Manager:
Status Dashboard
Viewing virtual machines in a cluster
Creating a new Virtual Machine
Virtual Machine Console
Virtual Machine Detail Page
Ganeti Web Manager is licensed under the GPLv2 or later. Ganeti Web Manager releases also include other librarieswith separate licenses:
• Django Object Permissions - MIT
• NoVNC - LPGL
6.3. History 57
Ganeti Web Manager Documentation, Release 0.11.2
GPL License
GNU GENERAL PUBLIC LICENSEVersion 2, June 1991
Copyright (C) 1989, 1991 Free Software Foundation, Inc.,51 Franklin Street, Fifth Floor, Boston, MA 02110-1301 USAEveryone is permitted to copy and distribute verbatim copiesof this license document, but changing it is not allowed.
Preamble
The licenses for most software are designed to take away yourfreedom to share and change it. By contrast, the GNU General PublicLicense is intended to guarantee your freedom to share and change freesoftware--to make sure the software is free for all its users. ThisGeneral Public License applies to most of the Free SoftwareFoundation's software and to any other program whose authors commit tousing it. (Some other Free Software Foundation software is covered bythe GNU Lesser General Public License instead.) You can apply it toyour programs, too.
When we speak of free software, we are referring to freedom, notprice. Our General Public Licenses are designed to make sure that youhave the freedom to distribute copies of free software (and charge forthis service if you wish), that you receive source code or can get itif you want it, that you can change the software or use pieces of it
58 Chapter 6. Project Information
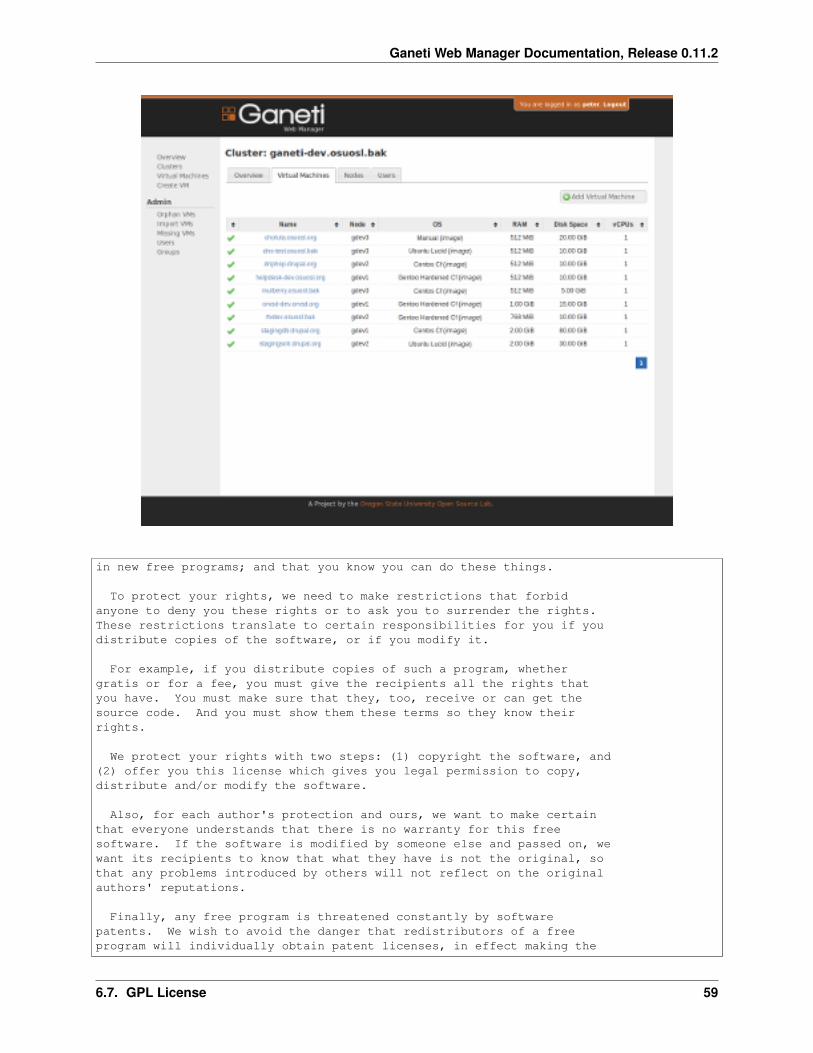
Ganeti Web Manager Documentation, Release 0.11.2
in new free programs; and that you know you can do these things.
To protect your rights, we need to make restrictions that forbidanyone to deny you these rights or to ask you to surrender the rights.These restrictions translate to certain responsibilities for you if youdistribute copies of the software, or if you modify it.
For example, if you distribute copies of such a program, whethergratis or for a fee, you must give the recipients all the rights thatyou have. You must make sure that they, too, receive or can get thesource code. And you must show them these terms so they know theirrights.
We protect your rights with two steps: (1) copyright the software, and(2) offer you this license which gives you legal permission to copy,distribute and/or modify the software.
Also, for each author's protection and ours, we want to make certainthat everyone understands that there is no warranty for this freesoftware. If the software is modified by someone else and passed on, wewant its recipients to know that what they have is not the original, sothat any problems introduced by others will not reflect on the originalauthors' reputations.
Finally, any free program is threatened constantly by softwarepatents. We wish to avoid the danger that redistributors of a freeprogram will individually obtain patent licenses, in effect making the
6.7. GPL License 59
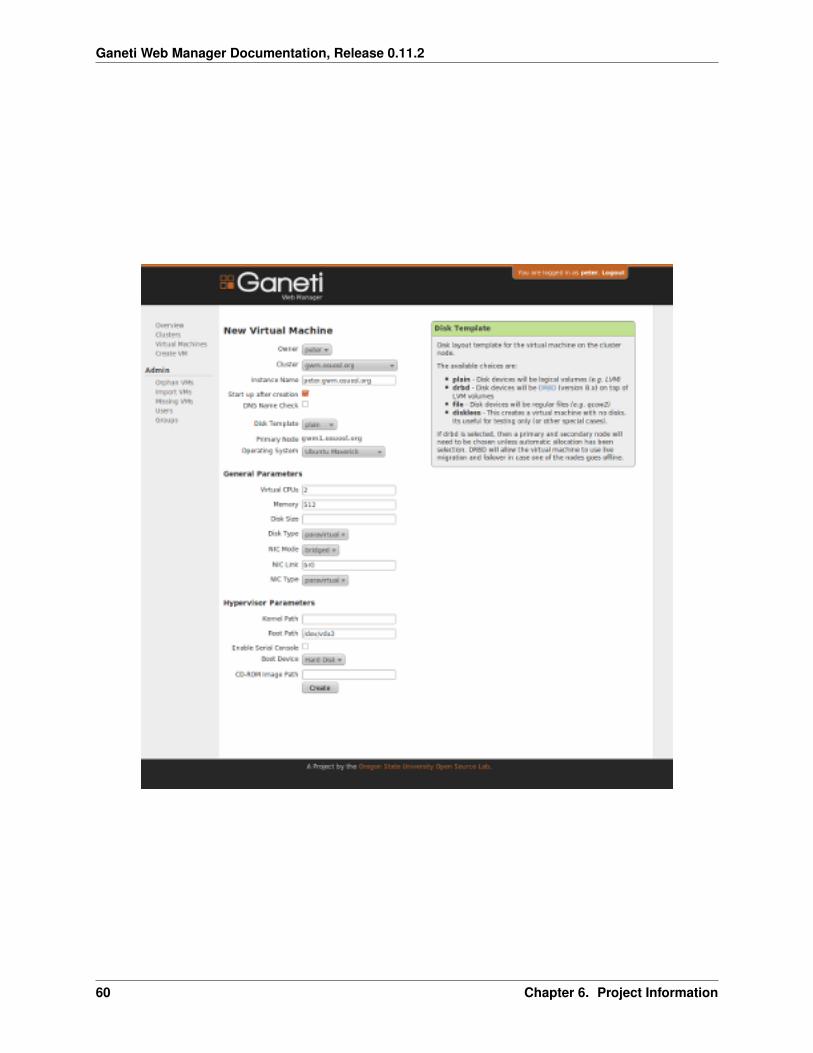
Ganeti Web Manager Documentation, Release 0.11.2
60 Chapter 6. Project Information
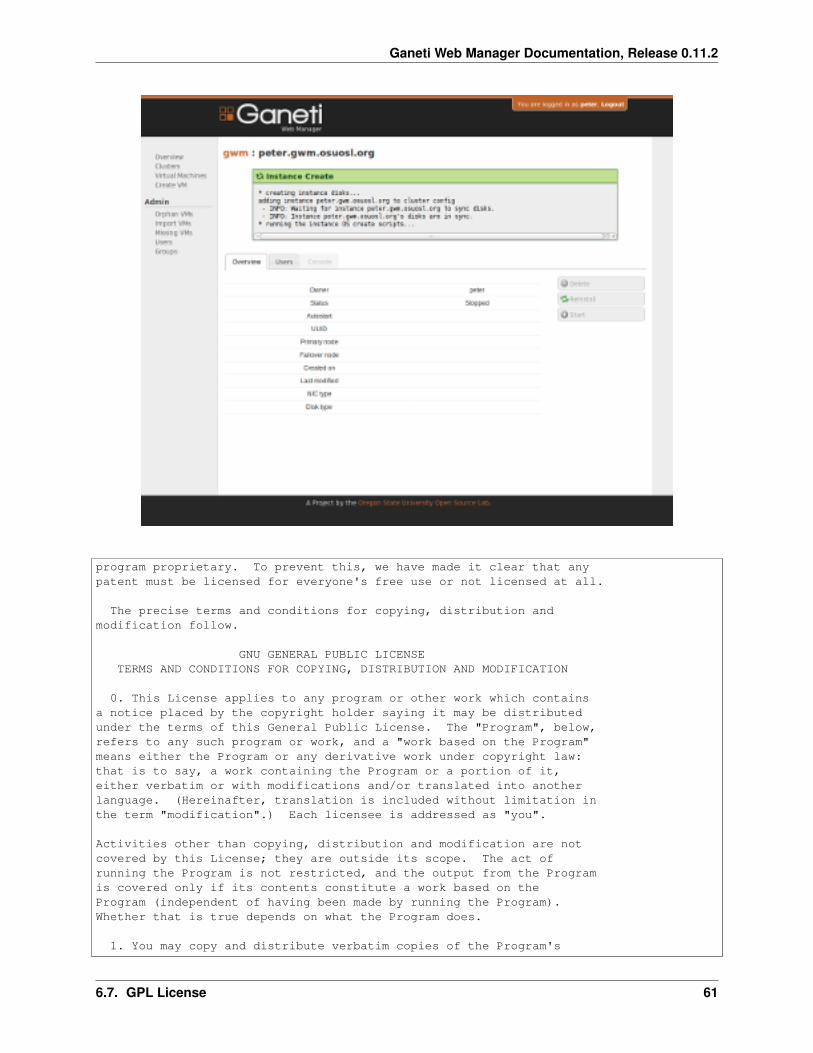
Ganeti Web Manager Documentation, Release 0.11.2
program proprietary. To prevent this, we have made it clear that anypatent must be licensed for everyone's free use or not licensed at all.
The precise terms and conditions for copying, distribution andmodification follow.
GNU GENERAL PUBLIC LICENSETERMS AND CONDITIONS FOR COPYING, DISTRIBUTION AND MODIFICATION
0. This License applies to any program or other work which containsa notice placed by the copyright holder saying it may be distributedunder the terms of this General Public License. The "Program", below,refers to any such program or work, and a "work based on the Program"means either the Program or any derivative work under copyright law:that is to say, a work containing the Program or a portion of it,either verbatim or with modifications and/or translated into anotherlanguage. (Hereinafter, translation is included without limitation inthe term "modification".) Each licensee is addressed as "you".
Activities other than copying, distribution and modification are notcovered by this License; they are outside its scope. The act ofrunning the Program is not restricted, and the output from the Programis covered only if its contents constitute a work based on theProgram (independent of having been made by running the Program).Whether that is true depends on what the Program does.
1. You may copy and distribute verbatim copies of the Program's
6.7. GPL License 61

Ganeti Web Manager Documentation, Release 0.11.2
62 Chapter 6. Project Information
Ganeti Web Manager Documentation, Release 0.11.2
source code as you receive it, in any medium, provided that youconspicuously and appropriately publish on each copy an appropriatecopyright notice and disclaimer of warranty; keep intact all thenotices that refer to this License and to the absence of any warranty;and give any other recipients of the Program a copy of this Licensealong with the Program.
You may charge a fee for the physical act of transferring a copy, andyou may at your option offer warranty protection in exchange for a fee.
2. You may modify your copy or copies of the Program or any portionof it, thus forming a work based on the Program, and copy anddistribute such modifications or work under the terms of Section 1above, provided that you also meet all of these conditions:
a) You must cause the modified files to carry prominent noticesstating that you changed the files and the date of any change.
b) You must cause any work that you distribute or publish, that inwhole or in part contains or is derived from the Program or anypart thereof, to be licensed as a whole at no charge to all thirdparties under the terms of this License.
c) If the modified program normally reads commands interactivelywhen run, you must cause it, when started running for suchinteractive use in the most ordinary way, to print or display anannouncement including an appropriate copyright notice and anotice that there is no warranty (or else, saying that you providea warranty) and that users may redistribute the program underthese conditions, and telling the user how to view a copy of thisLicense. (Exception: if the Program itself is interactive butdoes not normally print such an announcement, your work based onthe Program is not required to print an announcement.)
These requirements apply to the modified work as a whole. Ifidentifiable sections of that work are not derived from the Program,and can be reasonably considered independent and separate works inthemselves, then this License, and its terms, do not apply to thosesections when you distribute them as separate works. But when youdistribute the same sections as part of a whole which is a work basedon the Program, the distribution of the whole must be on the terms ofthis License, whose permissions for other licensees extend to theentire whole, and thus to each and every part regardless of who wrote it.
Thus, it is not the intent of this section to claim rights or contestyour rights to work written entirely by you; rather, the intent is toexercise the right to control the distribution of derivative orcollective works based on the Program.
In addition, mere aggregation of another work not based on the Programwith the Program (or with a work based on the Program) on a volume ofa storage or distribution medium does not bring the other work underthe scope of this License.
3. You may copy and distribute the Program (or a work based on it,under Section 2) in object code or executable form under the terms ofSections 1 and 2 above provided that you also do one of the following:
6.7. GPL License 63
Ganeti Web Manager Documentation, Release 0.11.2
a) Accompany it with the complete corresponding machine-readablesource code, which must be distributed under the terms of Sections1 and 2 above on a medium customarily used for software interchange; or,
b) Accompany it with a written offer, valid for at least threeyears, to give any third party, for a charge no more than yourcost of physically performing source distribution, a completemachine-readable copy of the corresponding source code, to bedistributed under the terms of Sections 1 and 2 above on a mediumcustomarily used for software interchange; or,
c) Accompany it with the information you received as to the offerto distribute corresponding source code. (This alternative isallowed only for noncommercial distribution and only if youreceived the program in object code or executable form with suchan offer, in accord with Subsection b above.)
The source code for a work means the preferred form of the work formaking modifications to it. For an executable work, complete sourcecode means all the source code for all modules it contains, plus anyassociated interface definition files, plus the scripts used tocontrol compilation and installation of the executable. However, as aspecial exception, the source code distributed need not includeanything that is normally distributed (in either source or binaryform) with the major components (compiler, kernel, and so on) of theoperating system on which the executable runs, unless that componentitself accompanies the executable.
If distribution of executable or object code is made by offeringaccess to copy from a designated place, then offering equivalentaccess to copy the source code from the same place counts asdistribution of the source code, even though third parties are notcompelled to copy the source along with the object code.
4. You may not copy, modify, sublicense, or distribute the Programexcept as expressly provided under this License. Any attemptotherwise to copy, modify, sublicense or distribute the Program isvoid, and will automatically terminate your rights under this License.However, parties who have received copies, or rights, from you underthis License will not have their licenses terminated so long as suchparties remain in full compliance.
5. You are not required to accept this License, since you have notsigned it. However, nothing else grants you permission to modify ordistribute the Program or its derivative works. These actions areprohibited by law if you do not accept this License. Therefore, bymodifying or distributing the Program (or any work based on theProgram), you indicate your acceptance of this License to do so, andall its terms and conditions for copying, distributing or modifyingthe Program or works based on it.
6. Each time you redistribute the Program (or any work based on theProgram), the recipient automatically receives a license from theoriginal licensor to copy, distribute or modify the Program subject tothese terms and conditions. You may not impose any furtherrestrictions on the recipients' exercise of the rights granted herein.You are not responsible for enforcing compliance by third parties tothis License.
64 Chapter 6. Project Information
Ganeti Web Manager Documentation, Release 0.11.2
7. If, as a consequence of a court judgment or allegation of patentinfringement or for any other reason (not limited to patent issues),conditions are imposed on you (whether by court order, agreement orotherwise) that contradict the conditions of this License, they do notexcuse you from the conditions of this License. If you cannotdistribute so as to satisfy simultaneously your obligations under thisLicense and any other pertinent obligations, then as a consequence youmay not distribute the Program at all. For example, if a patentlicense would not permit royalty-free redistribution of the Program byall those who receive copies directly or indirectly through you, thenthe only way you could satisfy both it and this License would be torefrain entirely from distribution of the Program.
If any portion of this section is held invalid or unenforceable underany particular circumstance, the balance of the section is intended toapply and the section as a whole is intended to apply in othercircumstances.
It is not the purpose of this section to induce you to infringe anypatents or other property right claims or to contest validity of anysuch claims; this section has the sole purpose of protecting theintegrity of the free software distribution system, which isimplemented by public license practices. Many people have madegenerous contributions to the wide range of software distributedthrough that system in reliance on consistent application of thatsystem; it is up to the author/donor to decide if he or she is willingto distribute software through any other system and a licensee cannotimpose that choice.
This section is intended to make thoroughly clear what is believed tobe a consequence of the rest of this License.
8. If the distribution and/or use of the Program is restricted incertain countries either by patents or by copyrighted interfaces, theoriginal copyright holder who places the Program under this Licensemay add an explicit geographical distribution limitation excludingthose countries, so that distribution is permitted only in or amongcountries not thus excluded. In such case, this License incorporatesthe limitation as if written in the body of this License.
9. The Free Software Foundation may publish revised and/or new versionsof the General Public License from time to time. Such new versions willbe similar in spirit to the present version, but may differ in detail toaddress new problems or concerns.
Each version is given a distinguishing version number. If the Programspecifies a version number of this License which applies to it and "anylater version", you have the option of following the terms and conditionseither of that version or of any later version published by the FreeSoftware Foundation. If the Program does not specify a version number ofthis License, you may choose any version ever published by the Free SoftwareFoundation.
10. If you wish to incorporate parts of the Program into other freeprograms whose distribution conditions are different, write to the authorto ask for permission. For software which is copyrighted by the FreeSoftware Foundation, write to the Free Software Foundation; we sometimesmake exceptions for this. Our decision will be guided by the two goals
6.7. GPL License 65
Ganeti Web Manager Documentation, Release 0.11.2
of preserving the free status of all derivatives of our free software andof promoting the sharing and reuse of software generally.
NO WARRANTY
11. BECAUSE THE PROGRAM IS LICENSED FREE OF CHARGE, THERE IS NO WARRANTYFOR THE PROGRAM, TO THE EXTENT PERMITTED BY APPLICABLE LAW. EXCEPT WHENOTHERWISE STATED IN WRITING THE COPYRIGHT HOLDERS AND/OR OTHER PARTIESPROVIDE THE PROGRAM "AS IS" WITHOUT WARRANTY OF ANY KIND, EITHER EXPRESSEDOR IMPLIED, INCLUDING, BUT NOT LIMITED TO, THE IMPLIED WARRANTIES OFMERCHANTABILITY AND FITNESS FOR A PARTICULAR PURPOSE. THE ENTIRE RISK ASTO THE QUALITY AND PERFORMANCE OF THE PROGRAM IS WITH YOU. SHOULD THEPROGRAM PROVE DEFECTIVE, YOU ASSUME THE COST OF ALL NECESSARY SERVICING,REPAIR OR CORRECTION.
12. IN NO EVENT UNLESS REQUIRED BY APPLICABLE LAW OR AGREED TO IN WRITINGWILL ANY COPYRIGHT HOLDER, OR ANY OTHER PARTY WHO MAY MODIFY AND/ORREDISTRIBUTE THE PROGRAM AS PERMITTED ABOVE, BE LIABLE TO YOU FOR DAMAGES,INCLUDING ANY GENERAL, SPECIAL, INCIDENTAL OR CONSEQUENTIAL DAMAGES ARISINGOUT OF THE USE OR INABILITY TO USE THE PROGRAM (INCLUDING BUT NOT LIMITEDTO LOSS OF DATA OR DATA BEING RENDERED INACCURATE OR LOSSES SUSTAINED BYYOU OR THIRD PARTIES OR A FAILURE OF THE PROGRAM TO OPERATE WITH ANY OTHERPROGRAMS), EVEN IF SUCH HOLDER OR OTHER PARTY HAS BEEN ADVISED OF THEPOSSIBILITY OF SUCH DAMAGES.
END OF TERMS AND CONDITIONS
How to Apply These Terms to Your New Programs
If you develop a new program, and you want it to be of the greatestpossible use to the public, the best way to achieve this is to make itfree software which everyone can redistribute and change under these terms.
To do so, attach the following notices to the program. It is safestto attach them to the start of each source file to most effectivelyconvey the exclusion of warranty; and each file should have at leastthe "copyright" line and a pointer to where the full notice is found.
<one line to give the program's name and a brief idea of what it does.>Copyright (C) <year> <name of author>
This program is free software; you can redistribute it and/or modifyit under the terms of the GNU General Public License as published bythe Free Software Foundation; either version 2 of the License, or(at your option) any later version.
This program is distributed in the hope that it will be useful,but WITHOUT ANY WARRANTY; without even the implied warranty ofMERCHANTABILITY or FITNESS FOR A PARTICULAR PURPOSE. See theGNU General Public License for more details.
You should have received a copy of the GNU General Public License alongwith this program; if not, write to the Free Software Foundation, Inc.,51 Franklin Street, Fifth Floor, Boston, MA 02110-1301 USA.
Also add information on how to contact you by electronic and paper mail.
If the program is interactive, make it output a short notice like this
66 Chapter 6. Project Information
Ganeti Web Manager Documentation, Release 0.11.2
when it starts in an interactive mode:
Gnomovision version 69, Copyright (C) year name of authorGnomovision comes with ABSOLUTELY NO WARRANTY; for details type `show w'.This is free software, and you are welcome to redistribute itunder certain conditions; type `show c' for details.
The hypothetical commands `show w' and `show c' should show the appropriateparts of the General Public License. Of course, the commands you use maybe called something other than `show w' and `show c'; they could even bemouse-clicks or menu items--whatever suits your program.
You should also get your employer (if you work as a programmer) or yourschool, if any, to sign a "copyright disclaimer" for the program, ifnecessary. Here is a sample; alter the names:
Yoyodyne, Inc., hereby disclaims all copyright interest in the program`Gnomovision' (which makes passes at compilers) written by James Hacker.
<signature of Ty Coon>, 1 April 1989Ty Coon, President of Vice
This General Public License does not permit incorporating your program intoproprietary programs. If your program is a subroutine library, you mayconsider it more useful to permit linking proprietary applications with thelibrary. If this is what you want to do, use the GNU Lesser GeneralPublic License instead of this License.
FAQ
Here are some frequently asked questions, and their answers. If your question isn’t answered here, ask on the FreenodeIRC network in channel #ganeti-webmgr or on the GWM Google Group.
List of questions
• I added a virtual machine using the gnt-instance command-line tool, and I don’t see it in GWM!• How do I limit the resources available to a user?• What does “Autostart” do?• I get the error “Whoosh_index not writable for current user/group”
I added a virtual machine using the gnt-instance command-line tool, and I don’tsee it in GWM!
Use the “Import VM” page (linked from the admin sidebar) to add those virtual machines to GWM.
How do I limit the resources available to a user?
Change the user’s quota on the cluster. Default quotas for virtual CPUs, disk space, and memory can beset when adding the cluster. After adding a user to the cluster, their quota will be listed in the “Users” tabof the cluster detail page. Their quota will be listed if it was set from default, or shown as an infinity sign
6.8. FAQ 67
Ganeti Web Manager Documentation, Release 0.11.2
if there is no existing quota. Click on the user’s quota to add or edit the amounts of disk space, memory,and CPUs available to that user.
What does “Autostart” do?
When the “Autostart” mark on a virtual machine’s detail page is a green check mark, it means that thevirtual machine will be automatically started if the node reboots. Otherwise, if the mark is a red cross, thevirtual machine will only start when a user manually starts it.
I get the error “Whoosh_index not writable for current user/group”
When running GWM through Apache, it is required that the apache user (or www-data) and group canwrite to the whoosh_index directory.
chown apache:apache whoosh_index/
Contributors
Core Contributors
• Ken Lett (kennric) - [email protected]
• Peter Krenesky (kreneskyp) - [email protected]
• Corbin Simpson (MostAwesomeDude) - [email protected]
• Trevor Bramwell (bramwelt) - [email protected]
• Scott White (whiteau) - [email protected]
• Piotr Banaszkiewicz (pbanaszkiewicz) - [email protected]
• Lance Albertson (ramereth) - [email protected]
• Rob McGuire-Dale (robatron) - [email protected]
• Emily Dunham (edunham) - [email protected]
• Jonah Brooks (brookjon) - [email protected]
• Chance Zibolski (ecnahc515) - [email protected]
• Evan Tschuy (tschuy) - [email protected]
• Ian Kronquist (radens) - [email protected]
Google Summer of Code 2013
• Pranjal Mittal (pmittal) - [email protected]
• Piotr Banaszkiewicz (pbanaszkiewicz) - [email protected]
68 Chapter 6. Project Information
Ganeti Web Manager Documentation, Release 0.11.2
Google Code In 2010
• Jonathan Smith (jaydez) - [email protected]
• Kyle Cesare (kylc) - [email protected]
• Kapeel Sable (kapeel) - [email protected]
• Samuel Dolean (samm) - [email protected]
• David Zderic - [email protected]
• Crypt Wizard - [email protected]
• Piotr Banaszkiewicz (pbanaszkiewicz) - [email protected]
Other Contributors
• Apollon (apoikos) - [email protected]
• Faidon Liambotis (paravoid) - [email protected]
• Leonidas Poulopoulos - [email protected]
Included Projects
Release Tarballs include noVNC by Joel Martin.
Search function uses Haystack by Daniel Lindsley.
Haystack search uses Whoosh by Matt Chaput.
Icons are from Silk set by Mark James.
MonkeyPatcher is used from testtools, written by Jonathan M. Lange and the testtool authors. It is seperatelylicensed under the MIT License.
The testtools authors are:
• Canonical Ltd
• Twisted Matrix Labs
• Jonathan Lange
• Robert Collins
• Andrew Bennetts
• Benjamin Peterson
• Jamu Kakar
• James Westby
• Martin [gz]
• Michael Hudson-Doyle
• Aaron Bentley
• Christian Kampka
• Gavin Panella
• Martin Pool
6.9. Contributors 69
Ganeti Web Manager Documentation, Release 0.11.2
and are collectively referred to as “testtools developers”.
Internally Created Add-Ons
Django Object Permissions
Django Object Log
Twisted VNCAuthProxy
Release Cycle
Ganeti Web Manager has a feature-based, calendar-influenced release cycle. We aim to release a new minor versionroughly twice a year, when new features and bug fixes justify it.
Versions
Ganeti Web Manager uses Major.Minor.Point release numbering. Major versions will incorporate major changes tothe application and do not gaurantee backwards compatibility with previous major version databases. Minor versionsmay incorporate significant changes, but must maintain a consistent upgrade path from previous minor versions. OurMajor version is currently 0, as we have not yet released version 1.0.0, the current 0.x series will become 1.0.
Our feature target for 1.0 is near complete feature parity with the ganeti RAPI, after which the 1.x series will beconsidered stable and no further major structural changes will be integrated. We will then begin work on the 2.0.0development version, which will incorporate major refactoring of the codebase to separate the UI from the core andcommunications with the RAPI.
References
Working With The RAPI
There are several places to view documentation detailing how to interface with the python RAPI, though none of themare comprehensive.
The following is a list of five different sources where information relating to the RAPI can be found.
1. The Ganeti RAPI PyDocs
2. The Ganeti RAPI HTML Docs
3. The gnt-instance man-page
4. The rapi client code contained in the upstream ganeti project
5. The rapi-tests which are also contained in the upstream ganeti project
RAPI in a Python Shell
Start up a python shell using the manage.py django script.
$ ./ganeti_webmgr/manage.py shell
In the python shell import client.py from util.
70 Chapter 6. Project Information
Ganeti Web Manager Documentation, Release 0.11.2
>>> from util import client
Assign a variable to the rapi client and pass in the name of the cluster as a string to the GanetiRapiClient object.
>>> rapi = client.GanetiRapiClient('my.test.cluster')
• Note - For R/W access to the cluster you need to pass in ‘username’ and ‘password’ as kwargs to the Ganeti-RapiClient object. Replace USERNAME and PASSWORD with the correct cluster R/W credentials
>>> rapi = client.GanetiRapiClient('my.test.cluster', username='USERNAME', password='PASSWORD')
• Optional - Setup PrettyPrinter to prettify the output of RAPI functions that return dictionaries.
>>> import pprint>>> pp = pprint.PrettyPrinter(indent=4).pprint
Now you are able to prettify output like this:
>>> pp(rapi.GetInfo())
• RAPI commands can now be accessed as functions of the rapi variable.
>>> rapi.GetInstance('my.test.instance')
REST API
Development of the RESTful API for GWM started as a Google Summer of Code 2011 project. The developer, BojanSuzic, can be reached at [email protected]. The mentor for this project is Peter Krenesky.
The current version of the page describes its status as of ~end August 2011. Currently it supports a fair amount of theunderlying functionality.
Additionally, this page is intented as a development resource and documentation source for the project.
The project code can be reached at https://github.com/bsu/GWM2. The additional code (changes in other relatedmodules) can be found at the following locations:
• https://github.com/bsu/django_obj_perm
• https://github.com/bsu/django_obj_log.
Users and developers are encouraged to try this addon and send their suggestions/bug reports/improvements eitherdirectly to the author, using the GWM mailing list or issue tracker. Please put the line **[REST-API]** in the subjectif you are sending email message.
REST API for GWM can now be considered as a beta software. For the further development the following is proposed:
Roadmap:
• completion of unit tests
• relocate parts of endpoints which may contain long answers - that variables should be accessed separately (suchas object logs)
• further refinement of the code and documentation
• work on further integration (like cloud driver)
The users/developers/visitors are advised to test the code and submit the comments/notices/wishes. Commentscan be submitted either directly to the author, here on this wiki or using the Redmine ticket
The version containing significant changes to this version may be expected in November 2011.
6.11. References 71
Ganeti Web Manager Documentation, Release 0.11.2
About this documentation
This documentation covers basic functionality of the REST API. It consists of the subsections, referring to particularendpoints forming the API. As an endpoints referred are application resources exposed as URIs through appropriatehierarchy. Currently, the system exposes the following resources as REST API endpoints: User, Group, VirtualMachine, Cluster, Node, Job. These are accessible in the form of CRUD operations using HTTP protocol.
By default, each API endpoint returns a list of resources.
For example:
/api/vm/
would return a list of Virtual Machines in the system, while the particular VM resource is accessed through:
/api/vm/1/
where 1 represents identifier of particular Virtual Machine. This way only that particular resource is returned. Eachresource contains fields related to particular instance in the system. The field types and their properties are describedfurther in the documentation, as a part of related subsections.
For each endpoint described is basic scheme of its resource representation. The scheme includes name, type anddescription of the particular fields, Additional properties described are possibility for the field to be modified andwhether the field returned may be excluded from the representation e.g. nullable. The later one might be useful forclients to prevent unexpected behavior.
While type field represents basic data types, it should be noted that related type points to other resource in the system.For example:...<cluster>...<virtualmachine>/api/vm/5</virtualmachine></cluster>...
says that particular cluster resource includes virtualmachine resource, described by related URI. Therefore, if neces-sary, the complete resource referred at that point may be obtained through provided URI.
This documentation trends to provide as much as complete list of resources and their schematic description. However,due to the level of deepness and limitations of the current wiki system, in some cases this representation is simplifiedand explained in words rather than in tabular form. It should be noted that all these descriptions are already includedin the system.
Using:
http://somesite.com/api/?format=xml
user is able to get the list of resources exposed, while with the help of:
http://somesite.com/api/resource/schema/?format=xml
the system returns detailed schema of resource representation and field properties in XML format. Therefore, the useris always able to take a look and check detailed description about a resource, if the one provided here in documentationis not detailed and clear enough.
72 Chapter 6. Project Information

Ganeti Web Manager Documentation, Release 0.11.2
Design principles
This API aims to expose the resources of Ganeti Web Manager, making suitable for integration into other systems orjust performing of simple operations on resources. It does not aim to expose all resources and functions contained inthe software, but only the set deemed necessary in order to support its business functions. Currently, it means that themost of the functionality present in the web interface is available for usage and manipulation also using this RESTAPI.
Installation
The most of the code of this addon comes under /api directory of GWM distribution. Other code changes are donein some of views and dependent modules (like django_object_log and django_object_permissions). Its inclusion inthe GWM is done in /urls.py via:
urlpatterns = patterns('',...
(r'^', include('api.urls')),...
The prerequisite for running RESTful API over Ganeti Web Manager is to have django-tastypie installed. The latestactive version/commit of tastypie should be used in order to support ApiKeys based authentication. That means, asof time of writing this documentation, that tastypie should be installed manually. Additionally, the following line intastypie/authentication.py:
username = request.GET.get('username') or request.POST.get('username')
should be changed to:
username = request.GET.get('username') or request.POST.get('username')or request.GET.get('user') or request.POST.get('user')
This is the known issue with tastypie already reported in its bug system. If not changed, the part username in/api/user/?api_key=xxx&username=xxx will produce error message during browsing the main user endpoint. Thischange makes tastypie to accept user for authentication instead of username. Later produces collision with the fieldof the same name under User model class.
The next change related to the installation of the module is inclusion of ‘tastypie’ in INSTALLED_APPS of set-tings.py. This will produce necessary tables during installation/migration.
Development
The code is prepared as a part of GSoC activities, and therefore by person not being a part of narrowed GWM devel-opment team before. As a such, the main principle to be followed is to try not to interfere too much with existing code.It implies further that the resulting code should be considered as an simple to install add-on. The core business logicof the GWM have not been changed or altered. The most changes done on GWM code are of technical nature, tryingto make functions/views accessible to REST backend interface additionally. The code has been committed to separaterepository. I tried mostly to perform smaller commits in size, in order to make the code and changes easily readableand trackable.
The framework used to introduce RESTful interface is django-tastypie. It has been selected after initial researchand testing of several popular Python/Django/REST frameworks. The system supports both XML and JSON as in-put/output serializations.
6.11. References 73
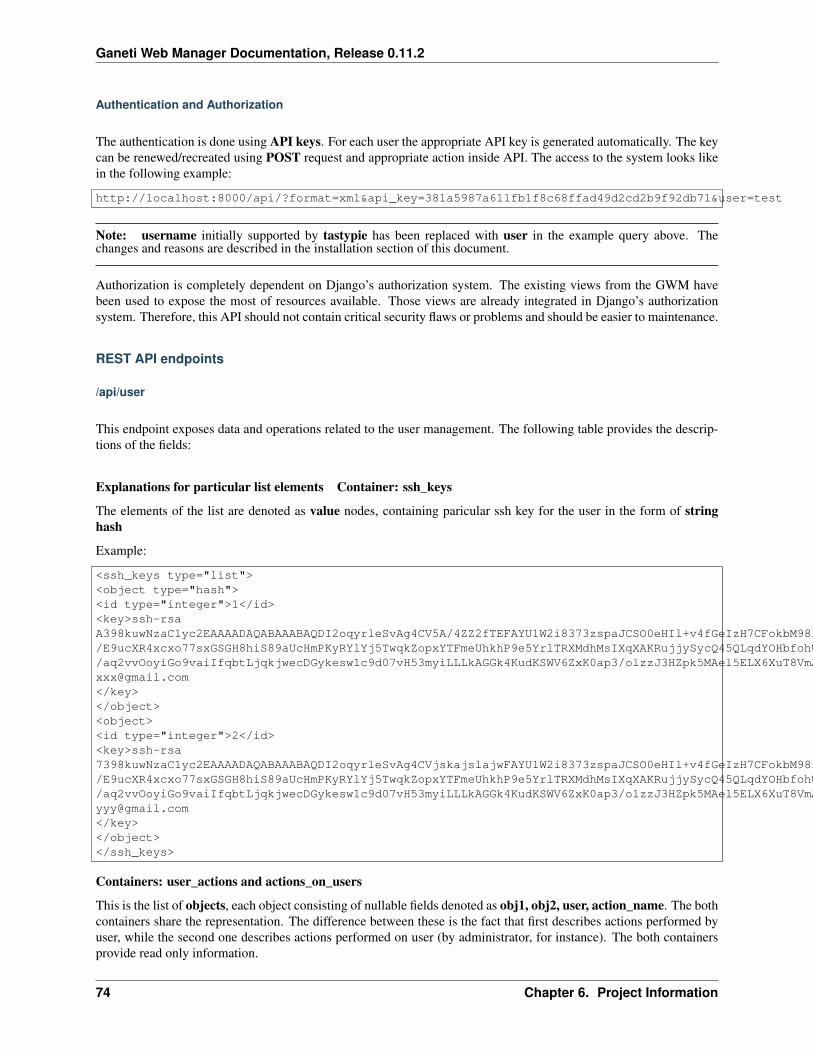
Ganeti Web Manager Documentation, Release 0.11.2
Authentication and Authorization
The authentication is done using API keys. For each user the appropriate API key is generated automatically. The keycan be renewed/recreated using POST request and appropriate action inside API. The access to the system looks likein the following example:
http://localhost:8000/api/?format=xml&api_key=381a5987a611fb1f8c68ffad49d2cd2b9f92db71&user=test
Note: username initially supported by tastypie has been replaced with user in the example query above. Thechanges and reasons are described in the installation section of this document.
Authorization is completely dependent on Django’s authorization system. The existing views from the GWM havebeen used to expose the most of resources available. Those views are already integrated in Django’s authorizationsystem. Therefore, this API should not contain critical security flaws or problems and should be easier to maintenance.
REST API endpoints
/api/user
This endpoint exposes data and operations related to the user management. The following table provides the descrip-tions of the fields:
Explanations for particular list elements Container: ssh_keys
The elements of the list are denoted as value nodes, containing paricular ssh key for the user in the form of stringhash
Example:
<ssh_keys type="list"><object type="hash"><id type="integer">1</id><key>ssh-rsaA398kuwNzaC1yc2EAAAADAQABAAABAQDI2oqyrleSvAg4CV5A/4ZZ2fTEFAYU1W2i8373zspaJCSO0eHIl+v4fGeIzH7CFokbM98ip2mwe7KtFk2VoO1/E9ucXR4xcxo77sxGSGH8hiS89aUcHmPKyRYlYj5TwqkZopxYTFmeUhkhP9e5YrlTRXMdhMsIXqXAKRujjySycQ45QLqdYOHbfohU0aKtDN01bYFOQ7/y/9wepXczlXD7rTIhT6/aq2vvOoyiGo9vaiIfqbtLjqkjwecDGykesw1c9d07vH53myiLLLkAGGk4KudKSWV6ZxK0ap3/olzzJ3HZpk5MAel5ELX6XuT8VmA3H3Yl5N//[email protected]</key></object><object><id type="integer">2</id><key>ssh-rsa7398kuwNzaC1yc2EAAAADAQABAAABAQDI2oqyrleSvAg4CVjskajslajwFAYU1W2i8373zspaJCSO0eHIl+v4fGeIzH7CFokbM98ip2mwe7KtFk2VoO1/E9ucXR4xcxo77sxGSGH8hiS89aUcHmPKyRYlYj5TwqkZopxYTFmeUhkhP9e5YrlTRXMdhMsIXqXAKRujjySycQ45QLqdYOHbfohU0aKtDN01bYFOQ7/y/9wepXczlXD7rTIhT6/aq2vvOoyiGo9vaiIfqbtLjqkjwecDGykesw1c9d07vH53myiLLLkAGGk4KudKSWV6ZxK0ap3/olzzJ3HZpk5MAel5ELX6XuT8VmA3H3Yl5N//[email protected]</key></object></ssh_keys>
Containers: user_actions and actions_on_users
This is the list of objects, each object consisting of nullable fields denoted as obj1, obj2, user, action_name. The bothcontainers share the representation. The difference between these is the fact that first describes actions performed byuser, while the second one describes actions performed on user (by administrator, for instance). The both containersprovide read only information.
74 Chapter 6. Project Information
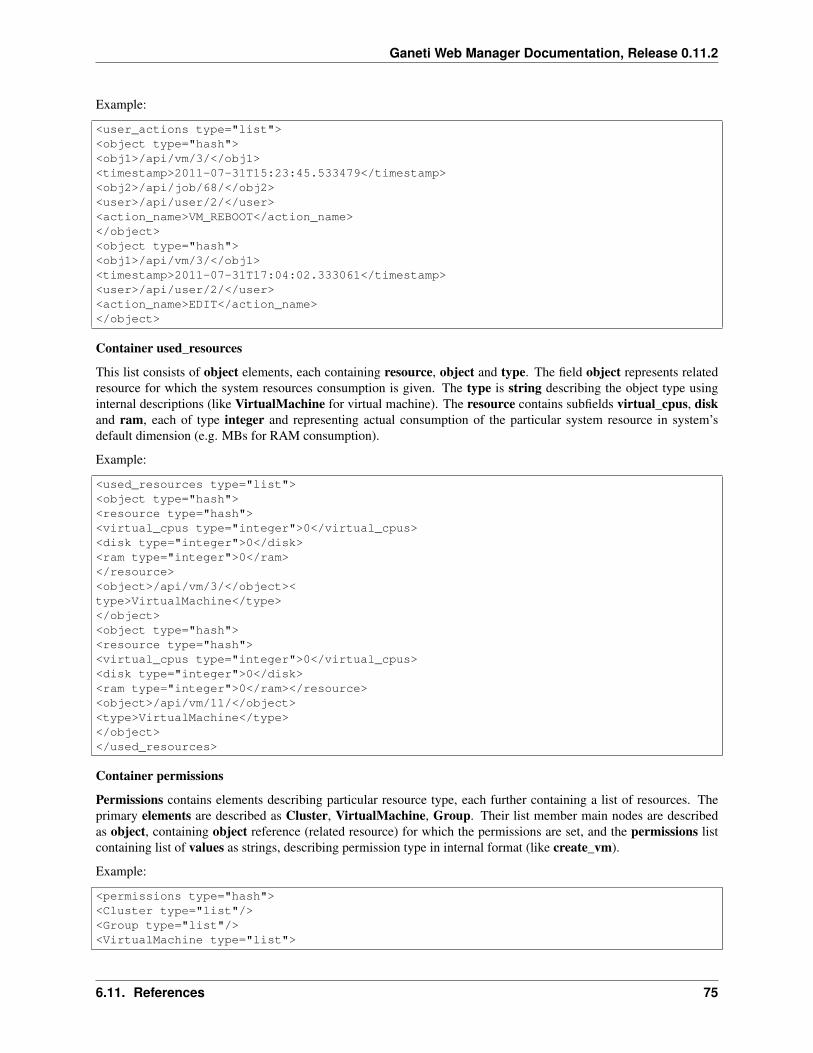
Ganeti Web Manager Documentation, Release 0.11.2
Example:
<user_actions type="list"><object type="hash"><obj1>/api/vm/3/</obj1><timestamp>2011-07-31T15:23:45.533479</timestamp><obj2>/api/job/68/</obj2><user>/api/user/2/</user><action_name>VM_REBOOT</action_name></object><object type="hash"><obj1>/api/vm/3/</obj1><timestamp>2011-07-31T17:04:02.333061</timestamp><user>/api/user/2/</user><action_name>EDIT</action_name></object>
Container used_resources
This list consists of object elements, each containing resource, object and type. The field object represents relatedresource for which the system resources consumption is given. The type is string describing the object type usinginternal descriptions (like VirtualMachine for virtual machine). The resource contains subfields virtual_cpus, diskand ram, each of type integer and representing actual consumption of the particular system resource in system’sdefault dimension (e.g. MBs for RAM consumption).
Example:
<used_resources type="list"><object type="hash"><resource type="hash"><virtual_cpus type="integer">0</virtual_cpus><disk type="integer">0</disk><ram type="integer">0</ram></resource><object>/api/vm/3/</object><type>VirtualMachine</type></object><object type="hash"><resource type="hash"><virtual_cpus type="integer">0</virtual_cpus><disk type="integer">0</disk><ram type="integer">0</ram></resource><object>/api/vm/11/</object><type>VirtualMachine</type></object></used_resources>
Container permissions
Permissions contains elements describing particular resource type, each further containing a list of resources. Theprimary elements are described as Cluster, VirtualMachine, Group. Their list member main nodes are describedas object, containing object reference (related resource) for which the permissions are set, and the permissions listcontaining list of values as strings, describing permission type in internal format (like create_vm).
Example:
<permissions type="hash"><Cluster type="list"/><Group type="list"/><VirtualMachine type="list">
6.11. References 75
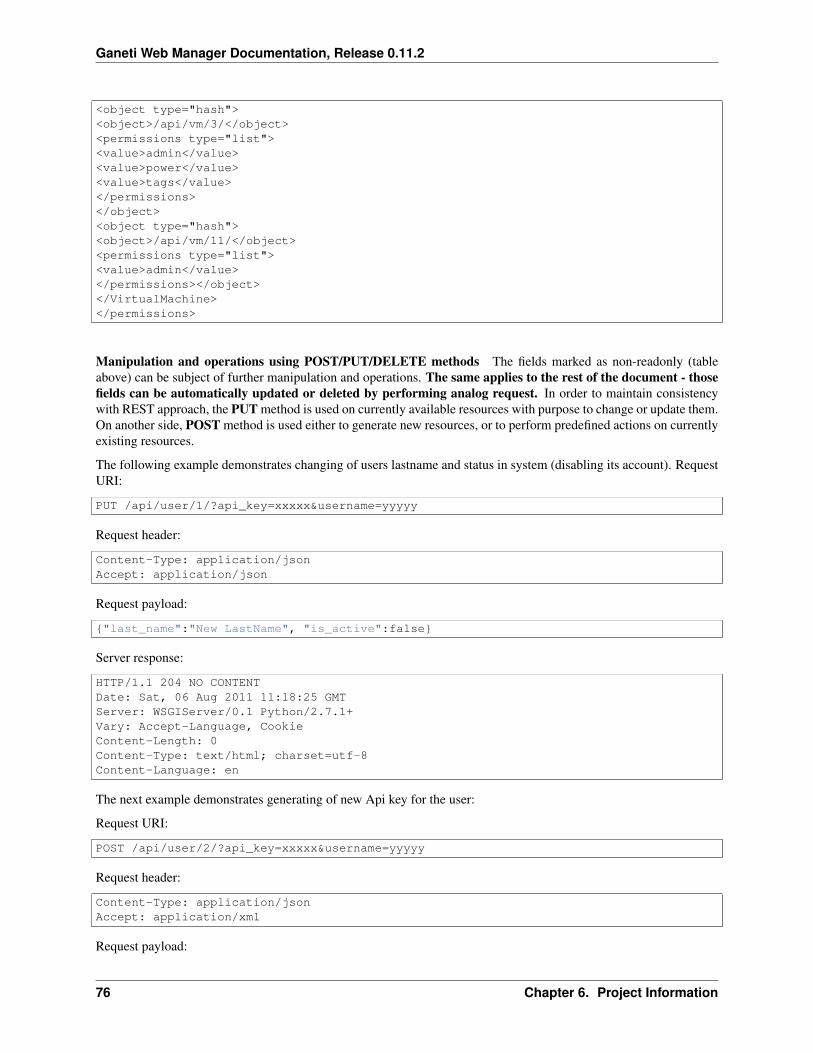
Ganeti Web Manager Documentation, Release 0.11.2
<object type="hash"><object>/api/vm/3/</object><permissions type="list"><value>admin</value><value>power</value><value>tags</value></permissions></object><object type="hash"><object>/api/vm/11/</object><permissions type="list"><value>admin</value></permissions></object></VirtualMachine></permissions>
Manipulation and operations using POST/PUT/DELETE methods The fields marked as non-readonly (tableabove) can be subject of further manipulation and operations. The same applies to the rest of the document - thosefields can be automatically updated or deleted by performing analog request. In order to maintain consistencywith REST approach, the PUT method is used on currently available resources with purpose to change or update them.On another side, POST method is used either to generate new resources, or to perform predefined actions on currentlyexisting resources.
The following example demonstrates changing of users lastname and status in system (disabling its account). RequestURI:
PUT /api/user/1/?api_key=xxxxx&username=yyyyy
Request header:
Content-Type: application/jsonAccept: application/json
Request payload:
{"last_name":"New LastName", "is_active":false}
Server response:
HTTP/1.1 204 NO CONTENTDate: Sat, 06 Aug 2011 11:18:25 GMTServer: WSGIServer/0.1 Python/2.7.1+Vary: Accept-Language, CookieContent-Length: 0Content-Type: text/html; charset=utf-8Content-Language: en
The next example demonstrates generating of new Api key for the user:
Request URI:
POST /api/user/2/?api_key=xxxxx&username=yyyyy
Request header:
Content-Type: application/jsonAccept: application/xml
Request payload:
76 Chapter 6. Project Information

Ganeti Web Manager Documentation, Release 0.11.2
{"action":"generate_api_key"}
Server response:
HTTP/1.1 201 CREATEDDate: Sat, 06 Aug 2011 11:21:56 GMTServer: WSGIServer/0.1 Python/2.7.1+Vary: Accept-Language, CookieContent-Type: text/html; charset=utf-8Content-Language: en
Response body:
<?xml version='1.0' encoding='utf-8'?><object><api_key>de0a57db0ce43d0f3c52f83eaf33387750ac9953</api_key><userid>2</userid></object>
For the API Key manipulation under /api/user/ endpoint implemented are two POST actions: generate_api_key, asdemonstrated in the example above, and clean_api_key. The former generates a new API key for the user and returnsit in the response, while the later one cleans user’s API key. This way its access to the system using REST API isdisabled, but the standard access using web interface is untouch.
Additionally, two POST actions are implemented for user-group membership manipulation.
/api/group
This endpoint exposes data and operations related to the group management. The following table summarizes sup-ported fields.
Container: actions_on_group
This is the list of objects, each object consisting of nullable fields denoted as obj1, obj2, user, action_name. This con-tainer describes actions performed on the group (by administrator, for instance) in the form of read-only information.Please note that inclusion od obj1 and obj2 depends on the action type, e.g. one of these may be omitted.
Example:
<actions_on_group type="list"><object type="hash"><obj1>/api/group/1/</obj1><timestamp>2011-07-29T08:28:24.566903</timestamp><user>/api/user/1/</user><action_name>CREATE</action_name></object><object type="hash"><obj1>/api/cluster/1/</obj1><timestamp>2011-07-29T08:28:59.854791</timestamp><obj2>/api/group/1/</obj2><user>/api/user/1/</user><action_name>ADD_USER</action_name></object></actions_on_group>
Field: users
This simple field contains a list of users belonging to the group. The type of the resource is related, which means thatit points to the URI representing the resource. Example:
6.11. References 77
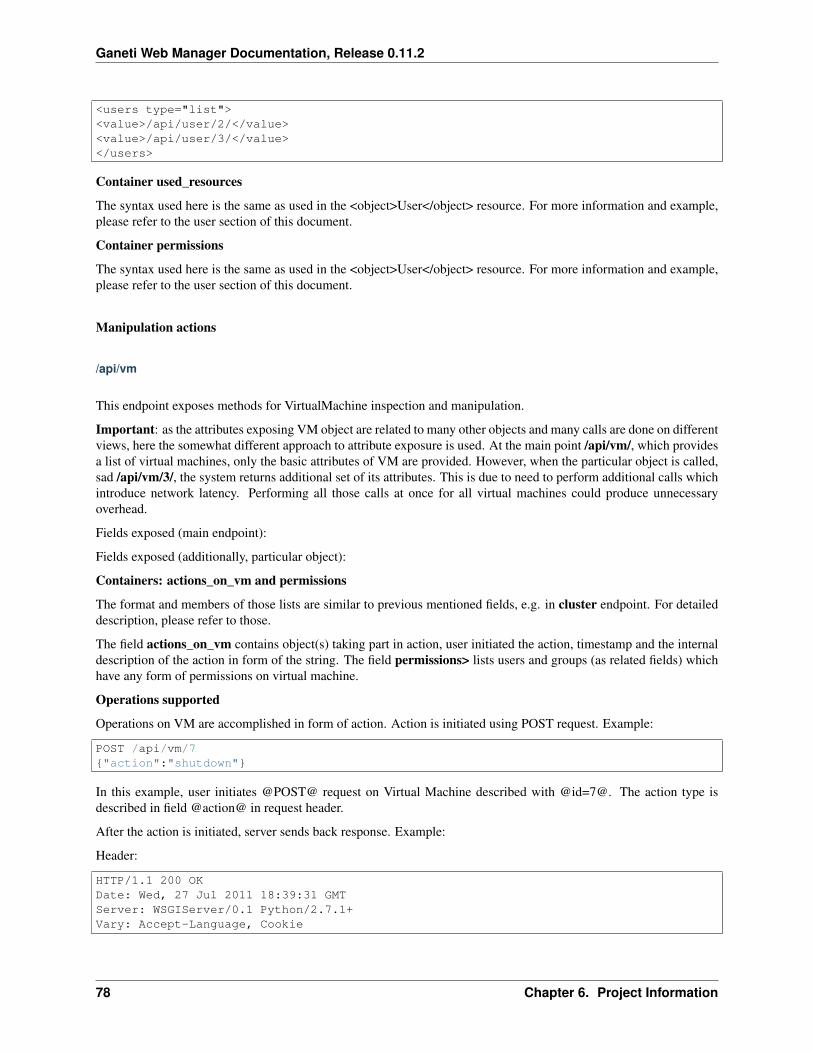
Ganeti Web Manager Documentation, Release 0.11.2
<users type="list"><value>/api/user/2/</value><value>/api/user/3/</value></users>
Container used_resources
The syntax used here is the same as used in the <object>User</object> resource. For more information and example,please refer to the user section of this document.
Container permissions
The syntax used here is the same as used in the <object>User</object> resource. For more information and example,please refer to the user section of this document.
Manipulation actions
/api/vm
This endpoint exposes methods for VirtualMachine inspection and manipulation.
Important: as the attributes exposing VM object are related to many other objects and many calls are done on differentviews, here the somewhat different approach to attribute exposure is used. At the main point /api/vm/, which providesa list of virtual machines, only the basic attributes of VM are provided. However, when the particular object is called,sad /api/vm/3/, the system returns additional set of its attributes. This is due to need to perform additional calls whichintroduce network latency. Performing all those calls at once for all virtual machines could produce unnecessaryoverhead.
Fields exposed (main endpoint):
Fields exposed (additionally, particular object):
Containers: actions_on_vm and permissions
The format and members of those lists are similar to previous mentioned fields, e.g. in cluster endpoint. For detaileddescription, please refer to those.
The field actions_on_vm contains object(s) taking part in action, user initiated the action, timestamp and the internaldescription of the action in form of the string. The field permissions> lists users and groups (as related fields) whichhave any form of permissions on virtual machine.
Operations supported
Operations on VM are accomplished in form of action. Action is initiated using POST request. Example:
POST /api/vm/7{"action":"shutdown"}
In this example, user initiates @POST@ request on Virtual Machine described with @id=7@. The action type isdescribed in field @action@ in request header.
After the action is initiated, server sends back response. Example:
Header:
HTTP/1.1 200 OKDate: Wed, 27 Jul 2011 18:39:31 GMTServer: WSGIServer/0.1 Python/2.7.1+Vary: Accept-Language, Cookie
78 Chapter 6. Project Information
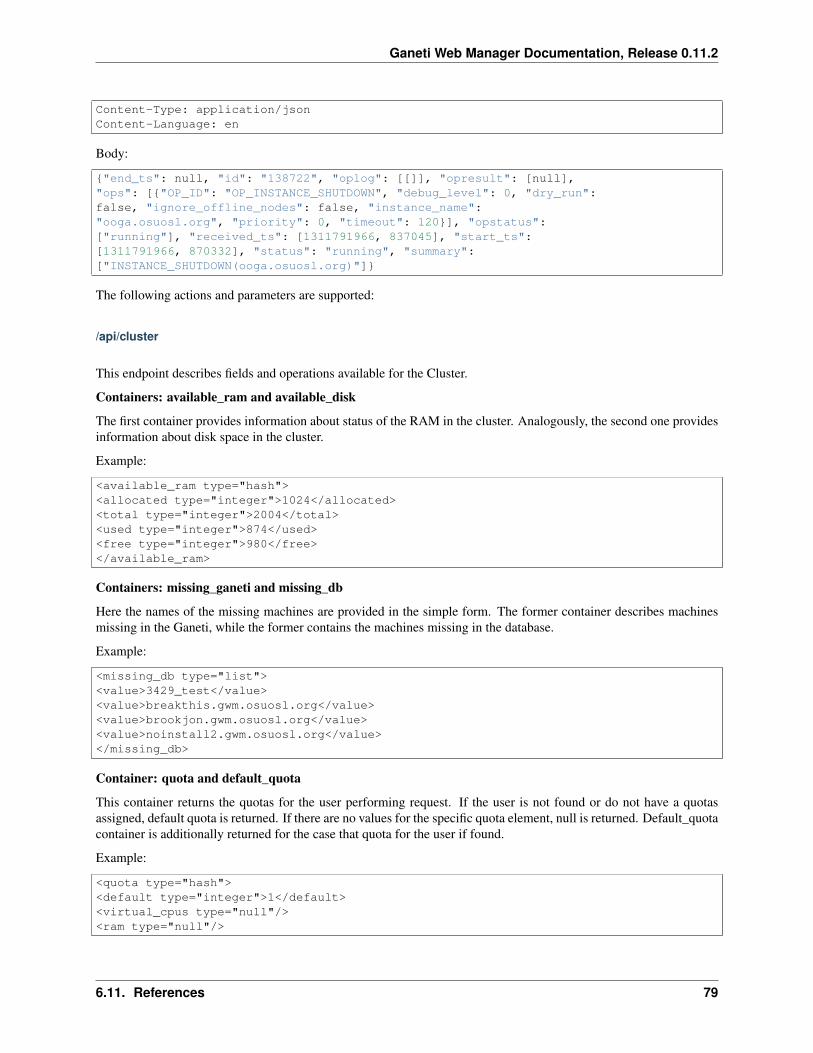
Ganeti Web Manager Documentation, Release 0.11.2
Content-Type: application/jsonContent-Language: en
Body:
{"end_ts": null, "id": "138722", "oplog": [[]], "opresult": [null],"ops": [{"OP_ID": "OP_INSTANCE_SHUTDOWN", "debug_level": 0, "dry_run":false, "ignore_offline_nodes": false, "instance_name":"ooga.osuosl.org", "priority": 0, "timeout": 120}], "opstatus":["running"], "received_ts": [1311791966, 837045], "start_ts":[1311791966, 870332], "status": "running", "summary":["INSTANCE_SHUTDOWN(ooga.osuosl.org)"]}
The following actions and parameters are supported:
/api/cluster
This endpoint describes fields and operations available for the Cluster.
Containers: available_ram and available_disk
The first container provides information about status of the RAM in the cluster. Analogously, the second one providesinformation about disk space in the cluster.
Example:
<available_ram type="hash"><allocated type="integer">1024</allocated><total type="integer">2004</total><used type="integer">874</used><free type="integer">980</free></available_ram>
Containers: missing_ganeti and missing_db
Here the names of the missing machines are provided in the simple form. The former container describes machinesmissing in the Ganeti, while the former contains the machines missing in the database.
Example:
<missing_db type="list"><value>3429_test</value><value>breakthis.gwm.osuosl.org</value><value>brookjon.gwm.osuosl.org</value><value>noinstall2.gwm.osuosl.org</value></missing_db>
Container: quota and default_quota
This container returns the quotas for the user performing request. If the user is not found or do not have a quotasassigned, default quota is returned. If there are no values for the specific quota element, null is returned. Default_quotacontainer is additionally returned for the case that quota for the user if found.
Example:
<quota type="hash"><default type="integer">1</default><virtual_cpus type="null"/><ram type="null"/>
6.11. References 79
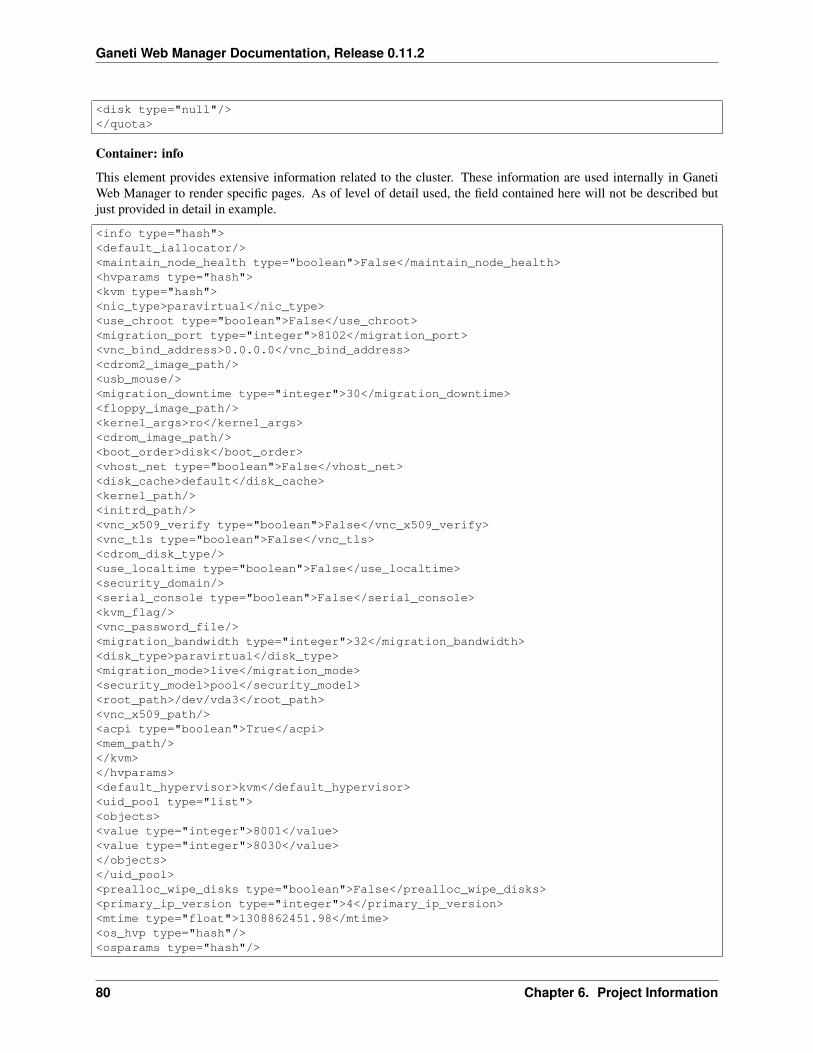
Ganeti Web Manager Documentation, Release 0.11.2
<disk type="null"/></quota>
Container: info
This element provides extensive information related to the cluster. These information are used internally in GanetiWeb Manager to render specific pages. As of level of detail used, the field contained here will not be described butjust provided in detail in example.
<info type="hash"><default_iallocator/><maintain_node_health type="boolean">False</maintain_node_health><hvparams type="hash"><kvm type="hash"><nic_type>paravirtual</nic_type><use_chroot type="boolean">False</use_chroot><migration_port type="integer">8102</migration_port><vnc_bind_address>0.0.0.0</vnc_bind_address><cdrom2_image_path/><usb_mouse/><migration_downtime type="integer">30</migration_downtime><floppy_image_path/><kernel_args>ro</kernel_args><cdrom_image_path/><boot_order>disk</boot_order><vhost_net type="boolean">False</vhost_net><disk_cache>default</disk_cache><kernel_path/><initrd_path/><vnc_x509_verify type="boolean">False</vnc_x509_verify><vnc_tls type="boolean">False</vnc_tls><cdrom_disk_type/><use_localtime type="boolean">False</use_localtime><security_domain/><serial_console type="boolean">False</serial_console><kvm_flag/><vnc_password_file/><migration_bandwidth type="integer">32</migration_bandwidth><disk_type>paravirtual</disk_type><migration_mode>live</migration_mode><security_model>pool</security_model><root_path>/dev/vda3</root_path><vnc_x509_path/><acpi type="boolean">True</acpi><mem_path/></kvm></hvparams><default_hypervisor>kvm</default_hypervisor><uid_pool type="list"><objects><value type="integer">8001</value><value type="integer">8030</value></objects></uid_pool><prealloc_wipe_disks type="boolean">False</prealloc_wipe_disks><primary_ip_version type="integer">4</primary_ip_version><mtime type="float">1308862451.98</mtime><os_hvp type="hash"/><osparams type="hash"/>
80 Chapter 6. Project Information
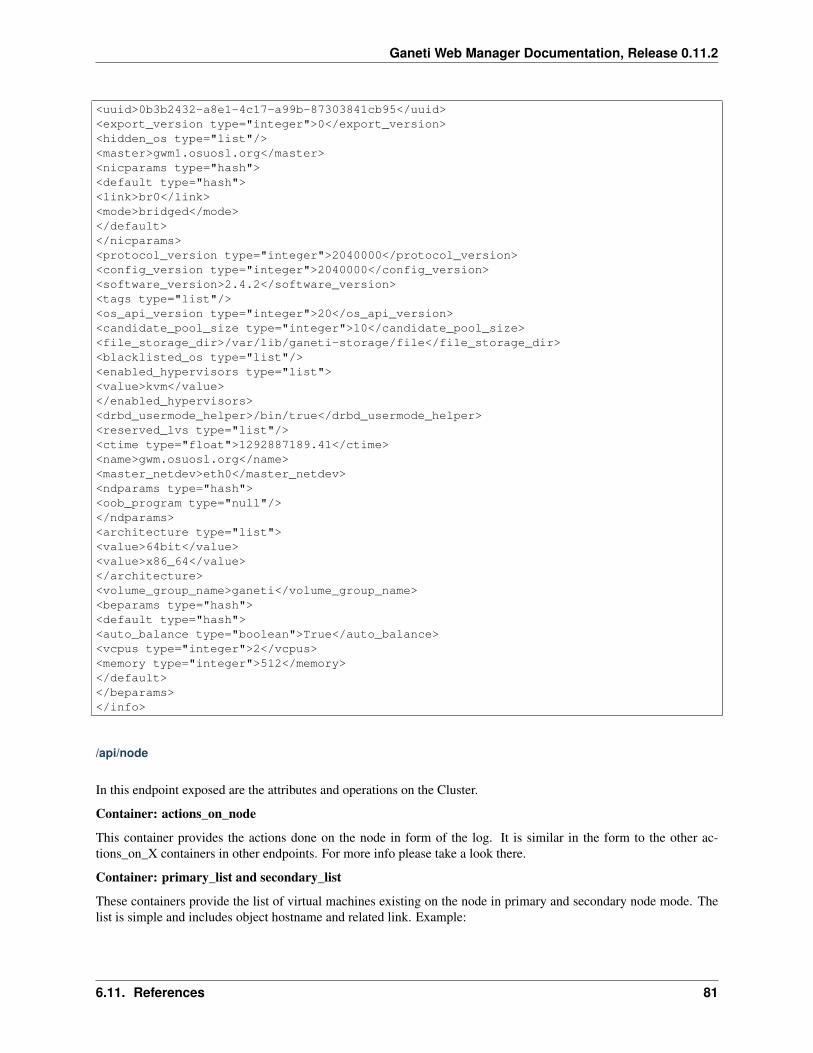
Ganeti Web Manager Documentation, Release 0.11.2
<uuid>0b3b2432-a8e1-4c17-a99b-87303841cb95</uuid><export_version type="integer">0</export_version><hidden_os type="list"/><master>gwm1.osuosl.org</master><nicparams type="hash"><default type="hash"><link>br0</link><mode>bridged</mode></default></nicparams><protocol_version type="integer">2040000</protocol_version><config_version type="integer">2040000</config_version><software_version>2.4.2</software_version><tags type="list"/><os_api_version type="integer">20</os_api_version><candidate_pool_size type="integer">10</candidate_pool_size><file_storage_dir>/var/lib/ganeti-storage/file</file_storage_dir><blacklisted_os type="list"/><enabled_hypervisors type="list"><value>kvm</value></enabled_hypervisors><drbd_usermode_helper>/bin/true</drbd_usermode_helper><reserved_lvs type="list"/><ctime type="float">1292887189.41</ctime><name>gwm.osuosl.org</name><master_netdev>eth0</master_netdev><ndparams type="hash"><oob_program type="null"/></ndparams><architecture type="list"><value>64bit</value><value>x86_64</value></architecture><volume_group_name>ganeti</volume_group_name><beparams type="hash"><default type="hash"><auto_balance type="boolean">True</auto_balance><vcpus type="integer">2</vcpus><memory type="integer">512</memory></default></beparams></info>
/api/node
In this endpoint exposed are the attributes and operations on the Cluster.
Container: actions_on_node
This container provides the actions done on the node in form of the log. It is similar in the form to the other ac-tions_on_X containers in other endpoints. For more info please take a look there.
Container: primary_list and secondary_list
These containers provide the list of virtual machines existing on the node in primary and secondary node mode. Thelist is simple and includes object hostname and related link. Example:
6.11. References 81
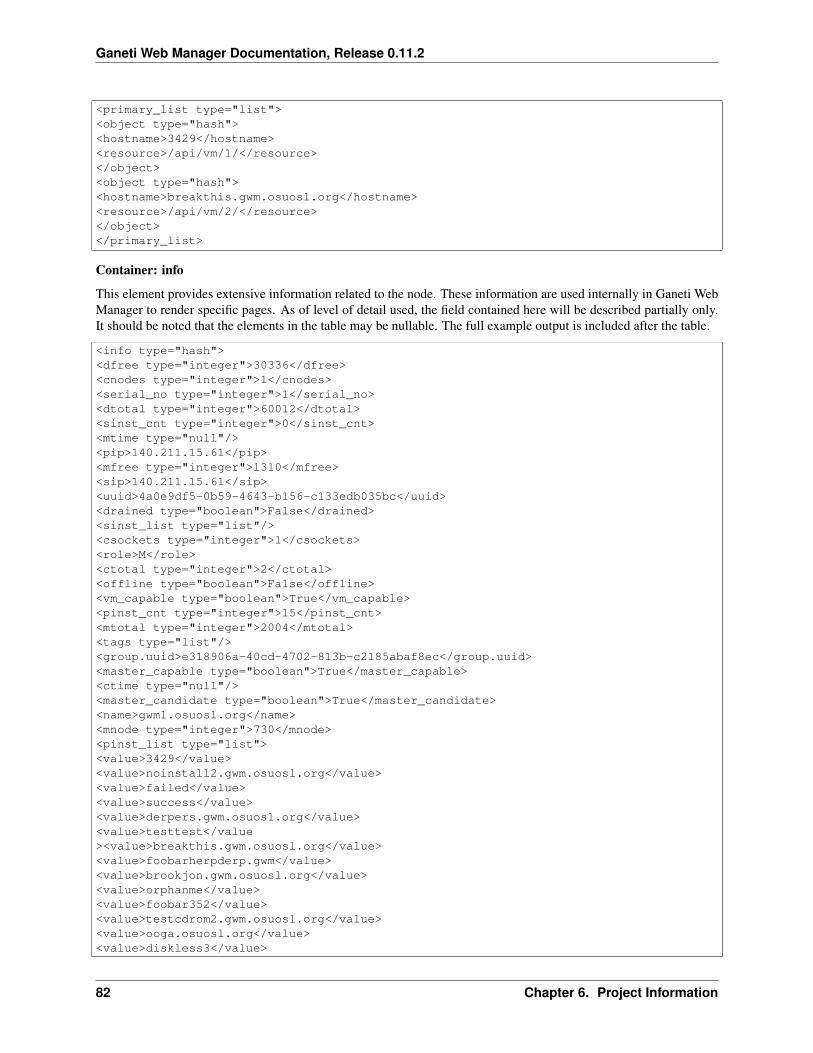
Ganeti Web Manager Documentation, Release 0.11.2
<primary_list type="list"><object type="hash"><hostname>3429</hostname><resource>/api/vm/1/</resource></object><object type="hash"><hostname>breakthis.gwm.osuosl.org</hostname><resource>/api/vm/2/</resource></object></primary_list>
Container: info
This element provides extensive information related to the node. These information are used internally in Ganeti WebManager to render specific pages. As of level of detail used, the field contained here will be described partially only.It should be noted that the elements in the table may be nullable. The full example output is included after the table.
<info type="hash"><dfree type="integer">30336</dfree><cnodes type="integer">1</cnodes><serial_no type="integer">1</serial_no><dtotal type="integer">60012</dtotal><sinst_cnt type="integer">0</sinst_cnt><mtime type="null"/><pip>140.211.15.61</pip><mfree type="integer">1310</mfree><sip>140.211.15.61</sip><uuid>4a0e9df5-0b59-4643-b156-c133edb035bc</uuid><drained type="boolean">False</drained><sinst_list type="list"/><csockets type="integer">1</csockets><role>M</role><ctotal type="integer">2</ctotal><offline type="boolean">False</offline><vm_capable type="boolean">True</vm_capable><pinst_cnt type="integer">15</pinst_cnt><mtotal type="integer">2004</mtotal><tags type="list"/><group.uuid>e318906a-40cd-4702-813b-c2185abaf8ec</group.uuid><master_capable type="boolean">True</master_capable><ctime type="null"/><master_candidate type="boolean">True</master_candidate><name>gwm1.osuosl.org</name><mnode type="integer">730</mnode><pinst_list type="list"><value>3429</value><value>noinstall2.gwm.osuosl.org</value><value>failed</value><value>success</value><value>derpers.gwm.osuosl.org</value><value>testtest</value><value>breakthis.gwm.osuosl.org</value><value>foobarherpderp.gwm</value><value>brookjon.gwm.osuosl.org</value><value>orphanme</value><value>foobar352</value><value>testcdrom2.gwm.osuosl.org</value><value>ooga.osuosl.org</value><value>diskless3</value>
82 Chapter 6. Project Information
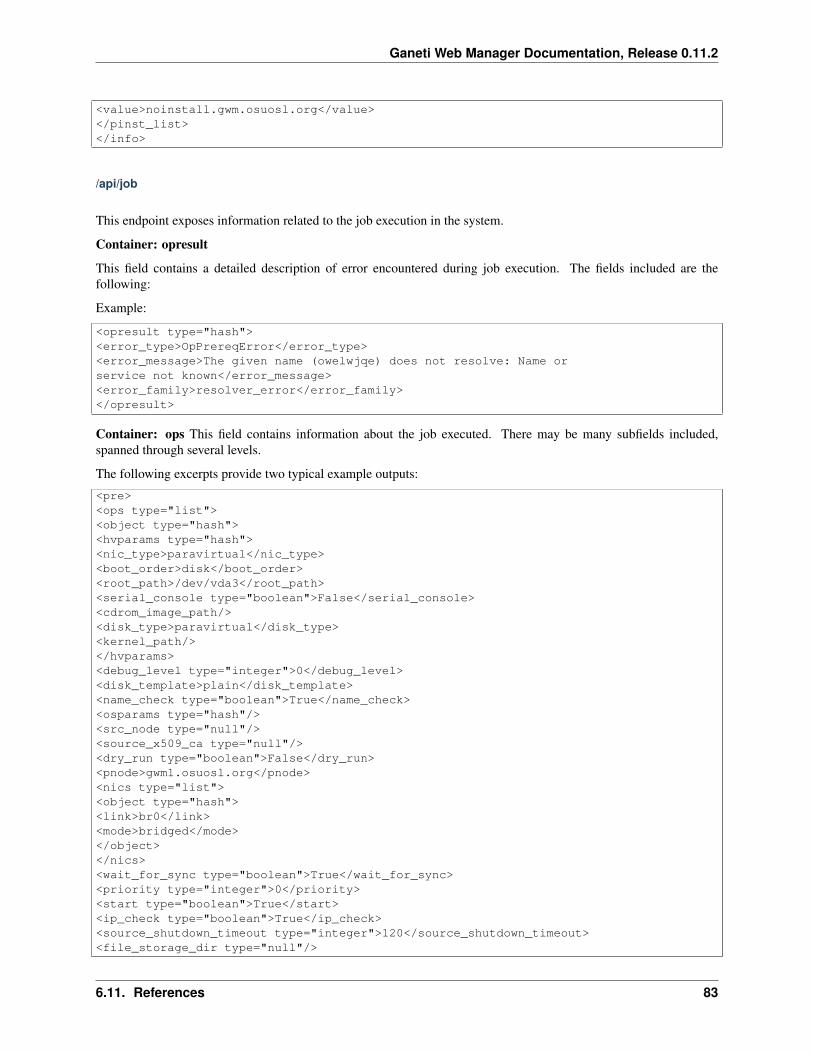
Ganeti Web Manager Documentation, Release 0.11.2
<value>noinstall.gwm.osuosl.org</value></pinst_list></info>
/api/job
This endpoint exposes information related to the job execution in the system.
Container: opresult
This field contains a detailed description of error encountered during job execution. The fields included are thefollowing:
Example:
<opresult type="hash"><error_type>OpPrereqError</error_type><error_message>The given name (owelwjqe) does not resolve: Name orservice not known</error_message><error_family>resolver_error</error_family></opresult>
Container: ops This field contains information about the job executed. There may be many subfields included,spanned through several levels.
The following excerpts provide two typical example outputs:
<pre><ops type="list"><object type="hash"><hvparams type="hash"><nic_type>paravirtual</nic_type><boot_order>disk</boot_order><root_path>/dev/vda3</root_path><serial_console type="boolean">False</serial_console><cdrom_image_path/><disk_type>paravirtual</disk_type><kernel_path/></hvparams><debug_level type="integer">0</debug_level><disk_template>plain</disk_template><name_check type="boolean">True</name_check><osparams type="hash"/><src_node type="null"/><source_x509_ca type="null"/><dry_run type="boolean">False</dry_run><pnode>gwm1.osuosl.org</pnode><nics type="list"><object type="hash"><link>br0</link><mode>bridged</mode></object></nics><wait_for_sync type="boolean">True</wait_for_sync><priority type="integer">0</priority><start type="boolean">True</start><ip_check type="boolean">True</ip_check><source_shutdown_timeout type="integer">120</source_shutdown_timeout><file_storage_dir type="null"/>
6.11. References 83
Ganeti Web Manager Documentation, Release 0.11.2
<no_install type="boolean">False</no_install><src_path type="null"/><snode type="null"/><identify_defaults type="boolean">False</identify_defaults><OP_ID>OP_INSTANCE_CREATE</OP_ID><source_instance_name type="null"/><source_handshake type="null"/><hypervisor>kvm</hypervisor><force_variant type="boolean">False</force_variant><disks type="list"><object type="hash"><size type="integer">408</size></object></disks><instance_name>owelwjqe</instance_name><mode>create</mode><iallocator type="null"/><file_driver>loop</file_driver><os_type>image+debian-squeeze</os_type><beparams type="hash"><vcpus type="integer">2</vcpus><memory type="integer">512</memory></beparams></object></ops></pre>
<pre><ops type="list"><object type="hash"><instance_name>brookjon.gwm.osuosl.org</instance_name><ignore_secondaries type="boolean">False</ignore_secondaries><dry_run type="boolean">False</dry_run><priority type="integer">0</priority><debug_level type="integer">0</debug_level><OP_ID>OP_INSTANCE_REBOOT</OP_ID><reboot_type>hard</reboot_type><shutdown_timeout type="integer">120</shutdown_timeout></object></ops></pre>
Working With Git
This page holds a list of some helpful git commands. Several of them were borrowed from Mislav’s Blog
git remote show origin
Find out what branches are tracked, configured for pull, configured for push, and are ‘up to date’.
git fetch
Update local references to remote branches.
git log -p
View each commits changes.
git log -m -S”search text”
84 Chapter 6. Project Information
Ganeti Web Manager Documentation, Release 0.11.2
Search through commits for commit messages containing the text = “search text”.
git reset –soft HEAD
Accidentally added the wrong file to the index? This command will reset the current head to HEAD andkeep your changes.
git reset –hard HEAD
Remove all your changes and reset the current head to HEAD.
git commit –amend
Change the commit message of the most recent commit.
git add (FILENAME or DIRECTORY)
Add a single file or directory to the index. If a directory is specified all files that are new or have beenchanged under that directory are added.
git commit
Open up the editor specified by git.editor to review changes and add a message. If no message is given,then the commit is aborted. Commit takes effect once the file is written.
git commit -m “COMMIT MESSAGE”
Commit changes with the message “COMMIT MESSAGE”.
git cherry -v BRANCH
Will list the commits that are part of the current branch, and not part of BRANCH
Logos
The Ganeti Web Manager logo by Oregon State University’s Open Source Lab are licensed under a Creative CommonsAttribution-NoDerivs 3.0 Unported License.
Versions
Date GWM Object Log Object Permissions Sep 16th, 2010 INIT – – Oct 8th, 2010 – – INIT Nov 16th, 2010 – – 0.9Nov 23rd, 2010 – – 1.0 Dec 10th, 2010 – – 1.1 Dec 20th, 2010 – – 1.2 Jan 26th, 2011 0.4 – 1.2 Feb 3rd, 2011 0.5 –1.3 Feb 25th, 2011 0.5 INIT 1.3 Mar 4th, 2011 0.6 0.5 1.3.1 Mar 6th, 2011 0.6 0.5.1 1.3.1 Mar 10th, 2011 0.6.2 0.5.11.3.1 Jun 17th, 2011 0.7 0.6 1.4.1 Jun 17th, 2011 0.7.1 0.6 1.4.1 Jun 19th, 2011 0.7.2 0.6
6.11. References 85
Ganeti Web Manager Documentation, Release 0.11.2
Setup script
As part of Google Summer of Code 2013 work, Ganeti Web Manager gained better internal structure and importantfeature, which is being a Python package.
This will ensure that future users of Ganeti Web Manager can install it easily with Python tools like pip.
What’s even more important is that we created an installation script for your convenience.
Note: Take a look at installation instructions to see how you should install Ganeti Web Manager.
setup.sh
The setup.sh script can be located in the scripts/ folder at the root of the Ganeti Web Manager project folder.
Workflow
What this script does:
1. Detects operating system (only Ubuntu, Debian and CentOS are supported) and it’s architecture.
2. Installs system dependencies (Python, python-virtualenv) via user’s OS default package manager (aptor yum) [requires sudo priviledge].
3. Creates virtual environment in local directory (or in directory specified by user).
4. Installs newest pip, setuptools and wheel Python packages into that virtual environment.
5. Installs Ganeti Web Manager and it’s dependencies from OSUOSL servers (http://ftp.osuosl.org/pub/osl/ganeti-webmgr/) into that virtual environment. These packages are provided as .whl packages, ie. binary compiledpackages. That helps speeding up installation time and requires no compilation on end user’s side.
Warning: If you happen to have different operating system from these supported by OSUOSL, you should notinstall .whl packages from OSUOSL servers. They’re compiled against these specific operating systems and theirbehavior on other systems / architectures might by unpredictable.
Warning: This script does not auto-configure your installation. You have to manually do this.
Database requirements
Depending on your operating system, different packages are needed for different database servers.
• MySQL: libmysqlclient18 on Ubuntu/Debian, or mysql-libs on CentOS
• PostgreSQL: libpq5 on Ubuntu/Debian, or postgresql-libs on CentOS
These dependencies are required for MySQL-python and psycopg2 Python packages to work.
The script will get appropriate packages for you, unless you use -N flag. For more information, take a look atCommand line arguments.
86 Chapter 6. Project Information
Ganeti Web Manager Documentation, Release 0.11.2
Usage
Command line arguments
-d <install directory>
Default /opt/ganeti_webmgr
Directory for the virtual environment.
-w <wheels (local/remote) directory location>
Default http://ftp.osuosl.org/pub/osl/ganeti-webmgr
Wheel packages are read from that path. The path can be either local (eg. ./gwm/wheels) or remote (eg.http://ftp.osuosl.org/pub/osuosl/wheels).
This also assumes the directory structure for the wheels package is structured according to how the Dependenciesbuilding script structures files.
Warning: Don’t change it unless you know what you’re doing!
-D <database server>
Default SQLite
If you provide postgresql or mysql, the script will try to install system and Python dependencies forselected database, unless -N flag is set.
-NSkip installing system dependencies. You want to use this flag if you either don’t trust this script or if you haveunsupported operating system.
Warning: When -N flag isn’t provided, the script will run sudo to get user’s permission to install somesystem dependencies.
-p <http proxy url>
Default none
If you provide an HTTP proxy URL, pip will use this proxy to install all of the required packages.
-u <install directory>
Default ./ganeti_webmgr
Upgrade existing installation. Point the script to directory being a virtual environment, ie. containing bin/pip(which is required in order to upgrade).
-hDisplay help.
Examples
Run with default settings:
$ ./scripts/setup.sh
Install PostgreSQL:
6.11. References 87
Ganeti Web Manager Documentation, Release 0.11.2
$ ./scripts/setup.sh -d ./gwm -D postgresql
Skip installing system dependencies:
$ ./scripts/setup.sh -N
Upgrade existing installation:
$ ./scripts/setup.sh -u ./existing_gwm
Generate wheels on your own with building script:
$ ./scripts/build_wheels.sh -e ./venv_whl -w ./wheels$ ./scripts/setup.sh -d ./ganeti_webmgr -w ./wheels
or send wheels to remote location and install from it:
$ ./scripts/build_wheels.sh -e ./venv_whl -w ./wheels$ rsync ./wheels [email protected]:/srv/www/wheels$ ./scripts/setup.sh -d ./ganeti_webmgr -w http://foo.example.org/wheels
Directory structure
After installing Ganeti Web Manager via setup.sh this is what you get:
./ganeti_webmgr-- bin-- config-- include| -- ...-- lib| -- ...-- local
-- ...
Directories bin, include, lib or local are Virtual environment specific - don’t bother about them. The directoryconfig on the other hand is important to you: this is where your Ganeti Web Manager configuration resides.
Troubleshooting
Can’t run setup.sh: permission denied
This script needs to be executable, you can make it by issuing this command:
$ chmod +x ./scripts/setup.sh
Dependencies building script
Along with the setup script, build_wheels.sh was created as a script that builds Ganeti Web Manager dependen-cies, both compiled and not, and packages them as .whl archives.
You can find the build script in Ganeti Web Manager‘s script directory at ./scripts/build_script.sh
88 Chapter 6. Project Information

Ganeti Web Manager Documentation, Release 0.11.2
Folder Structure
Wheels are put in subfolders in this pattern:
$wheels_dir/{distribution}/{version}/{architecture}/
The Setup script‘s -w flag expects the wheels to be in this folder structure. So using build_wheels.sh to createthese is required, unless you create the directory structure yourself.
Workflow
What this script does:
1. Detects operating system (only Ubuntu, Debian and CentOS are supported) and it’s architecture.
2. Tries to install necessary dependencies [requires sudo priviledge]:
• python
• python-dev
• python-virtualenv
• libpq-dev, libmysqlclient-dev on Ubuntu and Debian
• postgresql-devel, mysql-devel on CentOS
• git
3. Removes existing virtual environment installation.
4. Creates new virtual environment in the same destination.
5. Upgrades pip, setuptools and wheel (Python packages) in that virtual environment.
6. Installs Ganeti Web Manager into that virtual environment, while creating proper wheel packages.
7. Removes virtual environment.
Warning: Remember to keep wheels output directory and virtual environment apart.
Usage
The only existing dependency you need is bash. This script takes care of installing anything additional. However, ifyou have some troubles with dependencies, take a look at Can’t install or run dependencies.
To use the script, you simply run it. If you want to build wheels packages for a different version of Ganeti WebManager, you simply need to git checkout the branch or tag that you want to build the wheels packages for.
Directory structure
Directories you’ll need:
• venv for virtual environment installation,
• gwm for Ganeti Web Manager source code,
• wheels for wheel packages.
6.11. References 89
Ganeti Web Manager Documentation, Release 0.11.2
Hint: You can totally customize paths to these directories.
These directories will be created after you run build_wheels.sh.
Command line arguments
By specifying additional arguments you can change this script’s behavior and some paths it’s using.
Note: build_wheels.sh will work graciously without any additional arguments!
-e <virtual environment directory>
Default ./venv
Path where the script should create a temporary Python virtual environment.
-w <wheels output directory>
Default ./wheels
Path where output wheel packages are stored.
-NSkip installing system dependencies.
Examples
Default options:: $ ./scripts/build_wheels.sh
Here’s another way to do the above, specifiying the locations:
$ ./scripts/build_wheels.sh -e ./venv -w ./wheels
Build wheels without dependencies (an unsupported OS), and upload the wheels:
$ ./scripts/build_wheels.sh -N$ rsync ./wheels rsync@server:/srv/www/wheels
Troubleshooting
Can’t install or run dependencies
If you’re using operating system different from Ubuntu, Debian or CentOS, you might have troubles installing neces-sary dependencies.
What this script is looking for:
• /usr/bin/sudo
• /bin/rm
• /usr/bin/virtualenv (usually python-virtualen package provides it)
• /usr/bin/git (usually git package provides it)
Make sure you have these files present in your system and then run the script with -N command line argument.
90 Chapter 6. Project Information
Ganeti Web Manager Documentation, Release 0.11.2
Can’t run build_wheels.sh: permission denied
This script needs to be executable, you can make it by issuing this command:
$ chmod +x build_wheels.sh
Virtual environment
A virtual environment is a “space” separated from operating system, where Python packages get installed. This “space”is local, thus prevents Python packages from overwriting your system Python packages.
Imagine having package xyz in version 1.2.4 installed system-wide. Now you want to install Ganeti Web Manager,that requires this package in version 1.1.
You can’t keep both packages installed system-wide. Therefore you need to somehow separate packages required byGaneti Web Manager and your system packages. Virtual environment does exactly this.
Virtual environment structure
Virtual environment (shortly virtualenv or venv) consists of these directories:
• bin - contains executable files and activation scripts
• include - contains symlink to lib/python2.x directory
• lib - Python packages get installed to this directory
• local - contains symlinks to bin, include and lib directories
• share - contains documents and man pages installed along with Python packages
Helpers and tools
Main tool used for creating virtual environments is python-virtualenv and it’s executable: virtualenv.
When you issue virtualenv name in your shell, this tool creates structure described above in the name directory.
Usually next thing to do when developing (or deploying) a project in Python is to clone a repository within thatvirtual environment. It creates your project files next to virtual environment‘s directories. And everything becomesa mess.
To help overcome this mess, someone clever wrote virtualenvwrapper. This is a set of shell scripts, that:
• create virtual environment in your $HOME/.virtualenvs directory
• list virtual environments existing there
• remove specified virtual environment
• quickly switch between existing virtual environments
...and we highly recommend using it.
virtualenvwrapper commands
mkvirtualenv name Creates virtual environment with given name.
lsvirtualenv List all existing virtual environments.
6.11. References 91
Ganeti Web Manager Documentation, Release 0.11.2
rmvirtualenv name Remove existing virtual environment with given name.
workon name Switch to virtual environment with given name.
deactivate When you’re within virtual environment, you can leave it by issuing this command.
Command line prompt
By default, after activating specific virtual environment, it’s name appears at the beginning of your shell prompt. Forexample:
$ cd ganeti_webmgr$ workon gwm(gwm)$ django-admin.py --help...(gwm)$ deactivate$ lsvirtualenv
Note: In some guides in this documentation these brackets indicate commands issued from within virtual environ-ment.
About the search system
The search system in Ganeti Web Manager utilizes three main technologies:
• Haystack - A model-based search system for Django
• Whoosh - A pure-Python indexing and searching library
• jQuery UI Autocomplete widget - Displays suggestions to input boxes as the user types
Below, I will discuss the different components of the search system.
Haystack
Haystack is the meat ‘n’ potatoes of the search system, involved in every aspect. Mainly it does the following:
• Defines the search set in terms of GWM models in /ganeti_web/search_indexes.py
• Manages making queries and indexing the search back-end (currently Whoosh).
• Provides search-specific forms and templates (GWM only uses one search result template: /tem-plates/search/search.html)
Find out more about defining search indexes with the Haystack SearchIndex API. To find out more about Haystack ingeneral, see its documentation.
Whoosh
Whoosh is a pure-Python indexing and searching library that Haystack uses as a search back-end. The developeractually doesn’t need to interact with Whoosh directly.
92 Chapter 6. Project Information
Ganeti Web Manager Documentation, Release 0.11.2
Of indexing and DB performance
Haystack is currently set to do live indexing. This means that the search index gets updated every time an includedmodel is updated in the database. This means the index will always be up-to-date, but has the potential to severelyhamper performance when dealing with a lot of database changes.
Indexing behavior is set when the search set is defined in ganeti_webmgr/ganeti_web/search_indexes.py
If database performance starts to become an issue, try using SearchIndex instead of RealTimeSearchIndex, and run:
$ django-admin.py update_index
from time-to-time. For more information, please see the Haystack documentation on the subject.
jQuery UI Autocomplete widget
The Autocomplete widget suggests search results in real-time as the user types a query. This is facilitated through twomain components:
• jQuery UI Autocomplete widget itself
• An autocomplete Django view ganeti_web/views/search.py that supplies Autocomplete with suggestion datato display
Basically, the Autocomplete widget calls the autocomplete view as the user types, and fills a pop-up box underneaththe input box with search suggestions. The JavaScript logic can be found in /static/js/autocomplete_search.js, and thesearch view can be found in ganeti_web/views/search.py. Both of these files contain details about how the suggestiondata is structured, sent, and processed.
6.11. References 93
Ganeti Web Manager Documentation, Release 0.11.2
94 Chapter 6. Project Information
CHAPTER 7
Deprecated
Deprecated: Dependencies
Warning: This document is deprecated as of Ganeti Web Manager version 0.11.
Base
Python >= 2.5
Python-dev
sudo apt-get install python-dev
Note: Python-dev is required because some pip packages need it to build dependencies
Databases
All databases need their required python binding installed in order for Django to connect. Please refer to Djangodatabase documentation if you have any issues.
MySQL python-mysql
pip install MySQL-python
PostgreSQL postgresql_psycopg2
pip install psycopg2
LDAP
LDAP dependencies can be found on the Dependencies page.
Deprecated: Compatibility
Ganeti Web Manager is compatible with the following:
95
Ganeti Web Manager Documentation, Release 0.11.2
Ganeti 2.4.x–2.6.0.
Earlier versions are unsupported; they may occasionally work, but should not be relied upon.
Browsers Mozilla Firefox >= 3.x, current Google Chrome/Google Chromium.
Other contemporary browsers may also work, but are not supported.
The web-based VNC console requires browser support of WebSockets and HTML5.
Databases SQLite, MySQL.
New in version 0.10: PostgreSQL has limited support
Operating Systems Ubuntu 11.10, Ubuntu 12.04, CentOS 6.
Known to work on Debian 7 and CentOS 5.
Debian 6 should work, provided that pip, virtualenv and fabric are the latest version managed through pip.
Deprecated: Installation
Warning: This document is deprecated as of Ganeti Web Manager version 0.11.
We use Fabric, a tool for streamlining administration tasks, to deploy Ganeti Web Manager.
Before installing Ganeti Web Manager, make sure you have all the required Deprecated: Dependencies installed.
Installing
1. Download and unpack the latest release, currently this is 0.11.2.
2. Change to the project directory.
cd ganeti_webmgr
3. Run Fabric to automatically create a python virtual environment and install required dependencies. This maytake a few minutes.
# Deploy a production environmentfab deploy
Changed in version 0.10: fab prod deploy is now fab deploy. fab dev deploy is still the same.
Note: If you would like a more noisy output, adding v, as in fab v deploy, will provide more verbosity.
4. While in the project root, copy the default settings file settings.py.dist to settings.py:
cp settings.py.dist settings.py
Minimum Configuration
Getting Ganeti Web Manager up and running requires a minimum configuration of a database server. If you don’t havea database server available, and are fine using SQLite, you can skip this step.
96 Chapter 7. Deprecated
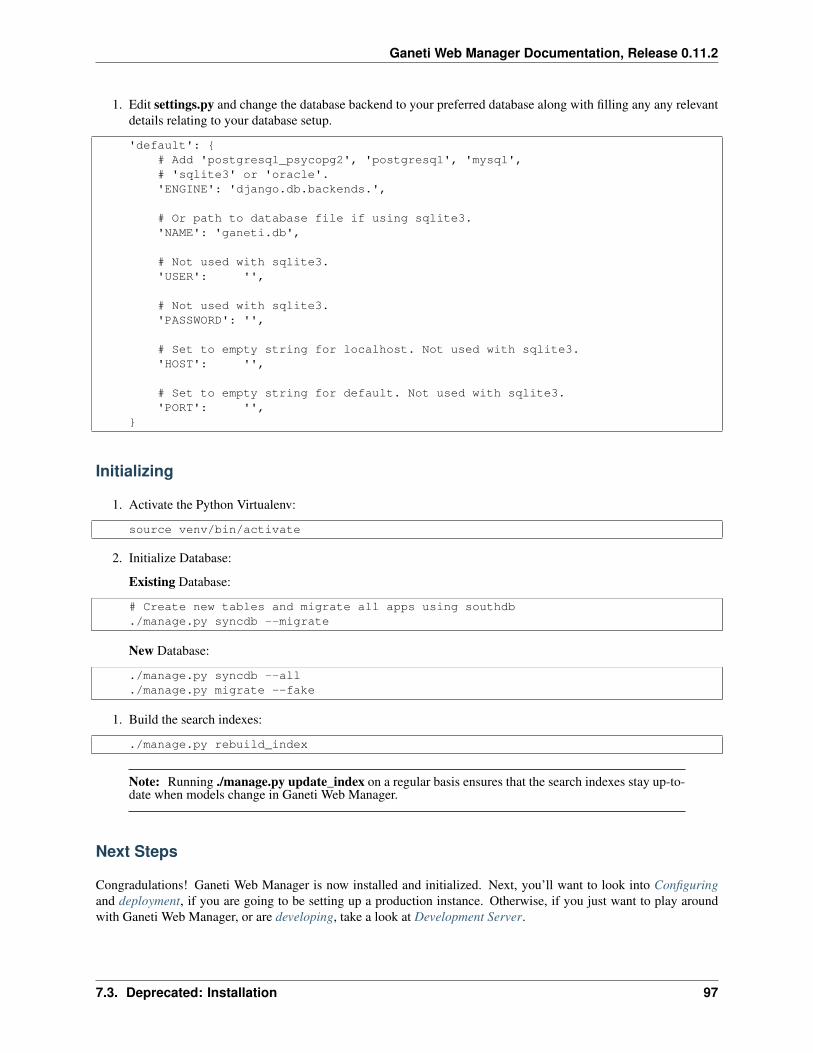
Ganeti Web Manager Documentation, Release 0.11.2
1. Edit settings.py and change the database backend to your preferred database along with filling any any relevantdetails relating to your database setup.
'default': {# Add 'postgresql_psycopg2', 'postgresql', 'mysql',# 'sqlite3' or 'oracle'.'ENGINE': 'django.db.backends.',
# Or path to database file if using sqlite3.'NAME': 'ganeti.db',
# Not used with sqlite3.'USER': '',
# Not used with sqlite3.'PASSWORD': '',
# Set to empty string for localhost. Not used with sqlite3.'HOST': '',
# Set to empty string for default. Not used with sqlite3.'PORT': '',
}
Initializing
1. Activate the Python Virtualenv:
source venv/bin/activate
2. Initialize Database:
Existing Database:
# Create new tables and migrate all apps using southdb./manage.py syncdb --migrate
New Database:
./manage.py syncdb --all
./manage.py migrate --fake
1. Build the search indexes:
./manage.py rebuild_index
Note: Running ./manage.py update_index on a regular basis ensures that the search indexes stay up-to-date when models change in Ganeti Web Manager.
Next Steps
Congradulations! Ganeti Web Manager is now installed and initialized. Next, you’ll want to look into Configuringand deployment, if you are going to be setting up a production instance. Otherwise, if you just want to play aroundwith Ganeti Web Manager, or are developing, take a look at Development Server.
7.3. Deprecated: Installation 97
Ganeti Web Manager Documentation, Release 0.11.2
Deprecated: Upgrading
Warning: This document is deprecated as of Ganeti Web Manager version 0.11.
Note: Please read the instructions fully before starting. The order of operations is important. The upgrade may fail ifdone out of order.
This guide will walk you through upgrading Ganeti Web Manager. Our upgrade process uses South, a databasemigration tool that will update your database.
1. Backup the database
2. Download the latest code
3. Save a copy of settings.py
4. Deploy code to your existing directory
5. Copy settings.py back into the directory
Follow the guide for your version.
Upgrading From Version 0.4
If you are upgrading from version 0.4 you will be required to convert your installation to use South. Version 0.4 didnot track the database with South, so South must be informed that your installation is already partially migrated. Readthe South documentation for more information about converting apps.
1. Backup your database
2. install python-django-south.
3. Add “south” to the list of INSTALLED_APPS inside settings.py
4. Make sure you add any new settings to settings.py that are listed in Settings Changes
5. Synchronize the database with ./manage.py syncdb
$ ./manage.py syncdb
/usr/lib/pymodules/python2.6/registration/models.py:4: DeprecationWarning: the sha module is deprecated; use the hashlib module insteadimport sha
Syncing...Creating table south_migrationhistoryNo fixtures found.
Synced:> django.contrib.auth> django.contrib.admin> django.contrib.contenttypes> django.contrib.sessions> django.contrib.sites> registration> logs> object_permissions> south
Not synced (use migrations):
98 Chapter 7. Deprecated
Ganeti Web Manager Documentation, Release 0.11.2
- ganeti- logs(use ./manage.py migrate to migrate these)
6. Convert the ganeti app to use South for future migrations.
$ ./manage.py migrate ganeti 0001 --fake
/usr/lib/pymodules/python2.6/registration/models.py:4: DeprecationWarning: the sha module is deprecated; use the hashlib module insteadimport sha
- Soft matched migration 0001 to 0001_version_0_4.Running migrations for ganeti:- Migrating forwards to 0001_version_0_4.> ganeti:0001_version_0_4
(faked)
7. Convert the logs app to use South for future migrations.
$ ./manage.py migrate logs 0001 --fake
/usr/lib/pymodules/python2.6/registration/models.py:4: DeprecationWarning: the sha module is deprecated; use the hashlib module insteadimport sha
- Soft matched migration 0001 to 0001_version_0_4.Running migrations for logs:- Migrating forwards to 0001_version_0_4.> logs:0001_version_0_4
(faked)
8. Run South migration
$ ./manage.py migrate
/usr/lib/pymodules/python2.6/registration/models.py:4: DeprecationWarning: the sha module is deprecated; use the hashlib module insteadimport sha
Running migrations for ganeti:- Migrating forwards to 0002_version_0_5.> ganeti:0002_version_0_5- Loading initial data for ganeti.No fixtures found.Running migrations for logs:- Nothing to migrate.
Upgrading from >=0.5
1. Backup your database
Pre-0.8
1. Run South migration.
$ ./manage.py migrate
0.8 till 0.11
1. Delete ghost migrations while running migrations.
7.4. Deprecated: Upgrading 99
Ganeti Web Manager Documentation, Release 0.11.2
$ ./manage.py migrate --delete-ghost-migrations
2. Update settings.py following the guide below
Settings Changes
The following settings have been added or changed. Please modify settings.py with these new values.
Version 0.5
TESTING
# XXX - Django sets DEBUG to False when running unittests. They want to ensure# that you test as if it were a production environment. Unfortunately we have# some models and other settings used only for testing. We use the TESTING flag# to enable or disable these items.## If you run the unittests without this set to TRUE, you will get many errors!TESTING = False
ITEMS_PER_PAGE
# default items per pageITEMS_PER_PAGE = 20
VNC_PROXY
# Enable the VNC proxy. When enabled this will use the proxy to create local# ports that are forwarded to the virtual machines. It allows you to control# access to the VNC servers. When disabled, the console tab will connect# directly to the VNC server running on the virtual machine.## Expected values: False if no proxy, string with proxy host and port otherwise# String syntax: "HOST:PORT", for example: "localhost:8888"## Note: you will probably have to open more ports in firewall. For proxy's default# settings, it uses port 8888 for listening for requests and ports 7000..8000# for serving proxy.## To run proxy (in 'util' directory):# $ python vncauthproxy.py --websockets# If you want to use encryption, then:# $ python vncauthproxy.py --websockets --cert=FILE.pemVNC_PROXY=False
Messages Framework
• Add django.contrib.messages.middleware.MessageMiddleware to MIDDLEWARE_CLASSES
• Add django.contrib.messages to INSTALLED_APPS after django.contrib.contenttypes
100 Chapter 7. Deprecated
Ganeti Web Manager Documentation, Release 0.11.2
Version 0.6
Rename Logs App
The logs app has been renamed object_log. Update INSTALLED_APPS to reflect this change.
Version 0.7
South
# Disable South during unittests. This is optional, but will likely cause unittests# to fail if these are not set properly.SOUTH_TESTS_MIGRATE = FalseSKIP_SOUTH_TESTS = True
Haystack
# haystack search engine configHAYSTACK_SITECONF = 'search_sites'HAYSTACK_SEARCH_ENGINE = 'whoosh'HAYSTACK_WHOOSH_PATH = os.path.join(DOC_ROOT, 'whoosh_index')
Version 0.8
Remember that it is absolutely critical to back up your database before making any changes.
User Registration
# Whether users should be able to create their own accounts.# False if accounts can only be created by admins.ALLOW_OPEN_REGISTRATION = True
More documentation for registration can be found at Open Registration.
Ganeti Version
Ganeti Web Manager version 0.8
Users have experienced problems with Ganeti version 2.1, because it does not support some of the new RAPI featuresavailable in version 0.8 of Ganeti Web Manager. (see Issue #8973). To avoid these problems, use GWM 0.8 withGaneti version 2.4 or better.
Deprecated: Caching
Warning: This document is deprecated as of Ganeti Web Manager version 0.11.
7.5. Deprecated: Caching 101
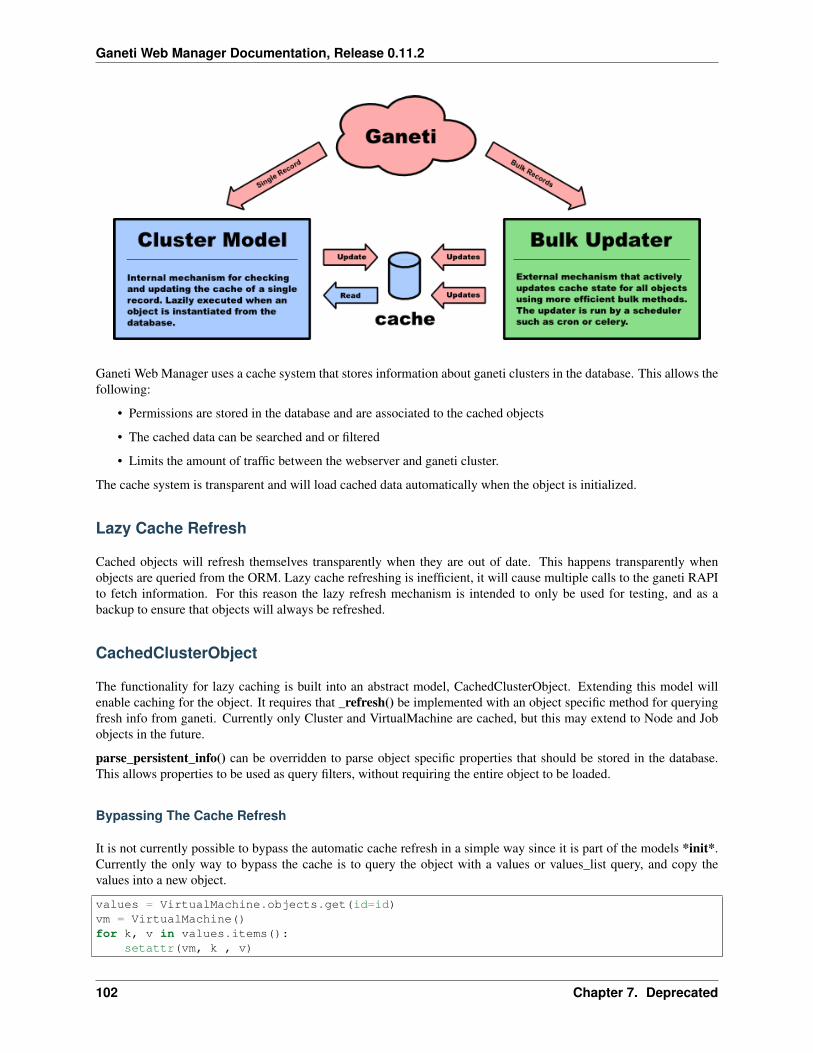
Ganeti Web Manager Documentation, Release 0.11.2
Ganeti Web Manager uses a cache system that stores information about ganeti clusters in the database. This allows thefollowing:
• Permissions are stored in the database and are associated to the cached objects
• The cached data can be searched and or filtered
• Limits the amount of traffic between the webserver and ganeti cluster.
The cache system is transparent and will load cached data automatically when the object is initialized.
Lazy Cache Refresh
Cached objects will refresh themselves transparently when they are out of date. This happens transparently whenobjects are queried from the ORM. Lazy cache refreshing is inefficient, it will cause multiple calls to the ganeti RAPIto fetch information. For this reason the lazy refresh mechanism is intended to only be used for testing, and as abackup to ensure that objects will always be refreshed.
CachedClusterObject
The functionality for lazy caching is built into an abstract model, CachedClusterObject. Extending this model willenable caching for the object. It requires that _refresh() be implemented with an object specific method for queryingfresh info from ganeti. Currently only Cluster and VirtualMachine are cached, but this may extend to Node and Jobobjects in the future.
parse_persistent_info() can be overridden to parse object specific properties that should be stored in the database.This allows properties to be used as query filters, without requiring the entire object to be loaded.
Bypassing The Cache Refresh
It is not currently possible to bypass the automatic cache refresh in a simple way since it is part of the models *init*.Currently the only way to bypass the cache is to query the object with a values or values_list query, and copy thevalues into a new object.
values = VirtualMachine.objects.get(id=id)vm = VirtualMachine()for k, v in values.items():
setattr(vm, k , v)
102 Chapter 7. Deprecated
Ganeti Web Manager Documentation, Release 0.11.2
RAPI Client Cache
Ganeti remote API clients are also cached. This reduces the number of database calls to retrieve a client capableof connecting to a cluster. This is a deterministic cache based off connection credentials. The keys are a hash ofhostname, port, user, and password. This allows changes in settings to be easily detected. Cached objects shouldstore the hash as part of its model and use it to look up existing clients without querying the cluster for the full set ofconnection credentials.
7.5. Deprecated: Caching 103

Ganeti Web Manager Documentation, Release 0.11.2
104 Chapter 7. Deprecated
CHAPTER 8
Indices and tables
• genindex
• modindex
• search
105

Ganeti Web Manager Documentation, Release 0.11.2
106 Chapter 8. Indices and tables
Index
Symbols-D <database server>
setup.sh command line option, 87-N
build_wheels.sh command line option, 90setup.sh command line option, 87
-d <install directory>setup.sh command line option, 87
-e <virtual environment directory>build_wheels.sh command line option, 90
-hsetup.sh command line option, 87
-p <http proxy url>setup.sh command line option, 87
-u <install directory>setup.sh command line option, 87
-w <wheels (local/remote) directory location>setup.sh command line option, 87
-w <wheels output directory>build_wheels.sh command line option, 90
Bbuild_wheels.sh command line option
-N, 90-e <virtual environment directory>, 90-w <wheels output directory>, 90
Ssetup.sh command line option
-D <database server>, 87-N, 87-d <install directory>, 87-h, 87-p <http proxy url>, 87-u <install directory>, 87-w <wheels (local/remote) directory location>, 87
107