Future Fuels from Forests: An Investigation into...
38
1 Future Fuels from Forests: An Investigation into Sustainability of Biofuels Production Teaching Unit Measuring Forest Productivity: Boards to Biofuels-A Cookie Cutter Approach for Teaching Sustainable Forest Management Chuck Schepke, Roscommon Middle School For: 8 th Grade Science Tech (Exploratory Shop Class) Submitted: 8/14/2009 Unit Overview The purpose of this 2/1/2 unit is designed to expose 8 th grade Science Tech (woodshop) Roscommon Middle School students to the issue of forest sustainability in terms of managing it as a natural resource for wood products as a commodity for dimensional lumber (in terms of boardfeet) or a feedstock for biofuels (carbon content in biomass). Forest industries are a large part of our local economy and the dilemma of using forests for lumber or feedstock is already an issue in our area at the present time. This unit will have the students simulating and modeling foresters managing a tract forested land as a resource that could be allotted for dimensional lumber or feed stock for biofuels on a wooded parcel of land (~ 4 acres) on school property, about 100 yards away from the shop. The students will be first be introduced the biology of tree growth and will practice tree identification by looking a tree cookies and trees growing in our local area. The students will make and/or use foresters tools such as Biltmore sticks, diameter measuring tapes, increment borers, clinometers, to make measurements and take samples to analyze trees in a quadrant of the study area in terms of their species, dbh, and height. This data will be mathematically analyzed and compared to determine the number of boardfeet and the carbon content from biomass that this tract of forest could provide. The students will make their own tree cookie and will be required to present it in terms of mirroring what they did in the field study and applying the material they went over in class in terms of forest productivity and sustainability. Source Consulted The resources consulted in developing this unit will be generally discussed initially and specifically cited concerning how each source is relevant to that lesson. Lesson 1: Forest Productivity: Background on Tree Growth During lesson 1, the students will be outlining a PowerPoint presentation by Dr. Chris Webster on “Future Fuels from Forests” in their student journal so they will have the biological background on trees and how it relates to photosynthesis. References - The Anatomy of Wood: Microscopic Structure and Gain of Wood. http://waynesword.palomar.edu/trjuly99.htm Accessed 8/10/2009. *Idea and pictures for Ray demo and lesson 1 worksheets. - Enchanted Learning.com Enchanted Learning.com Accessed 8/8/2009. *Pictures for lesson Tree Anatomy worksheet. - Webster, Chris. “Future Fuels from Forests ” Lecture and PowerPoint Future Fuels of the Forest Teacher Institute, July 7, 2009.
-
Upload
nguyenngoc -
Category
Documents
-
view
214 -
download
1
Transcript of Future Fuels from Forests: An Investigation into...

1
Future Fuels from Forests: An Investigation into Sustainability of Biofuels Production Teaching Unit Measuring Forest Productivity: Boards to Biofuels-A Cookie Cutter Approach for Teaching Sustainable Forest Management Chuck Schepke, Roscommon Middle School For: 8th Grade Science Tech (Exploratory Shop Class) Submitted: 8/14/2009 Unit Overview The purpose of this 2/1/2 unit is designed to expose 8th grade Science Tech (woodshop) Roscommon Middle School students to the issue of forest sustainability in terms of managing it as a natural resource for wood products as a commodity for dimensional lumber (in terms of boardfeet) or a feedstock for biofuels (carbon content in biomass). Forest industries are a large part of our local economy and the dilemma of using forests for lumber or feedstock is already an issue in our area at the present time. This unit will have the students simulating and modeling foresters managing a tract forested land as a resource that could be allotted for dimensional lumber or feed stock for biofuels on a wooded parcel of land (~ 4 acres) on school property, about 100 yards away from the shop. The students will be first be introduced the biology of tree growth and will practice tree identification by looking a tree cookies and trees growing in our local area. The students will make and/or use foresters tools such as Biltmore sticks, diameter measuring tapes, increment borers, clinometers, to make measurements and take samples to analyze trees in a quadrant of the study area in terms of their species, dbh, and height. This data will be mathematically analyzed and compared to determine the number of boardfeet and the carbon content from biomass that this tract of forest could provide. The students will make their own tree cookie and will be required to present it in terms of mirroring what they did in the field study and applying the material they went over in class in terms of forest productivity and sustainability. Source Consulted The resources consulted in developing this unit will be generally discussed initially and specifically cited concerning how each source is relevant to that lesson.
Lesson 1: Forest Productivity: Background on Tree Growth During lesson 1, the students will be outlining a PowerPoint presentation by Dr. Chris Webster on “Future Fuels from Forests” in their student journal so they will have the biological background on trees and how it relates to photosynthesis. References - The Anatomy of Wood: Microscopic Structure and Gain of Wood. http://waynesword.palomar.edu/trjuly99.htm Accessed 8/10/2009. *Idea and pictures for Ray demo and lesson 1 worksheets. - Enchanted Learning.com Enchanted Learning.com Accessed 8/8/2009. *Pictures for lesson Tree Anatomy worksheet. - Webster, Chris. “Future Fuels from Forests ” Lecture and PowerPoint Future Fuels of the Forest Teacher Institute, July 7, 2009.

2
Lesson 2: Tree Identification During Lesson 2, the students will going how to read a dichotomous key that was used in the field activity done with Dr. Chris Webster on “Forest Productivity Measurements” near the Mount Bohemia area. We will also take a class trip to our study area and practice identifying trees. Tree cookies given out to institute participants will be used too for honing identification skills based off bark characteristics. References - Chadde, Joan “Tree Cookie Distribution” Future Fuels of the Forest Teacher Institute, July 10, 2009. - Leaf Tree Key (For Print). http://www.uwsp.edu/cnr/leaf/Adobe/Key.pdf Accessed 8/4/2009. *Printable key for coniferous and deciduous trees, same one used in institute. - Identifying MI Trees. http://www.for.msu.edu/extension/ExtDocs/idents.htm Accessed 8/4/2009. Leaf, bud, and twig diagram to use with tree identification key. - Webster, Chris “Forest Productivity Measurements” Lab Future Fuels of the Forest Teacher Institute, July 7, 2009.
Lesson 3: Making Sense of Forestry Tools by Making Them Students will be introduced how to use the Biltmore stick, diameter tape, and clinometer in respect to tree measurement (growth) and will within their research groups construct simple homemade versions. Afterwards the students will practice using them on a large tree outside the classroom. The clinometer and diameter tape were used in the institute field study lab we did in the Mt. Bohemia area and an increment borer will be demonstrated. References - Home Made Clinometer. http://www.rondexter.com/professional/sun/home-made_clinometer.htm Accessed 8/2/2009. *Using a string, washer, and polysquare. - Homemade Gadgets and Equipment. dnr.state.oh.us/Portals/.../fieldsupport/enviroedu/pp tips tricks.doc Accessed 8/3/2009. *How to make a diameter tape. - Tangent Table. http://www.geocities.com/senecatech/tangent.html Accessed 8/4/2009. - Wood Owner Notes: Estimating the Volume of a Standing Tree Using a Scale (Biltmore) Stick. North Carolina State University & A & T State University Cooperative Extension. http://www.ces.ncsu.edu/forestry/pdf/WON/won05.pdf Accessed 8/2/2009. *Biltmore stick pattern includes Merritt hypsometer and diameter/bdf based on international log scale. Lesson 4 Measuring Forest Productivity: Sticking with the Basics This lesson will be done in two parts. The first part will be a field activity done outside in some wooded acreage walking distance from the school, which will deal with tree measurement, and expressing it in terms of wood volume as board feet. The second part will be done in class using the data from the field study, but expressing it in carbon content. Part I: Field Measurements of Study Area-the Lumber Aspect of Forest Resources The lesson will replicate in some extent what we did with Dr. Chris Webster out in the field in terms of making tree measurements in a determined study circular plot. However, the ultimate goal was to calculate the volume of wood or board feet that stand could produce. References - Webster, Chris. “Forest Productivity Measurements” Field Lab in Mount Bohemia Area Future Fuels of the Forest Teacher Institute, July 7, 2009.
3
Part II: Field Measurements of Study Area-the Biofuels Aspect of Forest Resources This lesson will use the data from the previous field study and reconfigure the calculations to determine the productivity of the stand in terms of carbon content (lbs). The allometric equations that will be used are based on the filed activity done with Maria Janowiak because the equations are more student friendly than those used in the Dr. Webster activity. References -Janowwiak, Maria. “Role of Biofuels in Carbon Sequestration in Northern Forests” Future Fuels of the Forest Teacher Institute, July 10, 2009. Lesson 5 Tree Cookie : A Recipe for Assessment This overall idea came from the idea of using tree cookies that I saw at the institute. I also found a past lesson from a past institute participant Melissa Jaeger, using tree cookies that incorporates mathematical analysis on that item to determine the tree it came from carbons content. The second part of this lesson will have students make their own tree cookie and subsequently have them make a presentation board with it. The students will mount the tree cookie on a section of luan or hardboard and will label/describe the wood structures exemplified in the cookie cross-section. They will furthermore utilize the tree rings in their tree cookie to display a chronology of “family tree” of events. References - Jaeger, Melissa. Fueling Our Future: Transportation Needs Investigating Ethanol from Forest Products http://wupcenter.mtu.edu/education/energy_education/2008/Jaeger_future_fuels_unit.pdf Accessed 8/6/2009. *Modified the Lesson 4 Lab “Putting on Pounds” -Sustainable Forestry, Teacher Resource Center. http://sftrc.cas.psu.edu/LessonPlans/Forestry/Forestry9to12.html Accessed 8/6/2009. *Used ideas from the lesson plans: Its in the Rings & Our Family Tree Learning Objectives The students will be able to:
1. Conduct scientific field investigation in a temperate forest system, employing (and constructing) equipment and techniques/methodology just like actual scientists, collect data, and then make conclusions on the data.
2. Describe tree growth in terms of tree growth as mass gain through photosynthesis. 3. Relate tree structures in terms of form and function in regards to tree growth. 4. Use and apply empirical and non-empirical formulas and allometric equations used in forestry. 5. Perform unit conversions if given conversion units. 6. Develop a sustainability approach for managing forests as a natural resource from boards or
biofuels prospective. Michigan Content Standards Biology HCSE Standards Standard B1: Inquiry, Reflection, and Social Implications B1.1C Conduct scientific investigations using appropriate tools and techniques (e.g., selecting an instrument that measures the desired quantity—length, volume, weight, time interval, temperature—with the appropriate level of precision). B1.1g Use empirical evidence to explain and critique the reasoning used to draw a scientific conclusion or explanation.

4
Standard B2: Organization & Development of Living Systems B2.p3B Explain the origins of plant mass. (prerequisite) B2.p3D Explain how the roots of specific plants grow. (prerequisite) B2.5f Relate plant structures and functions to the process of photosynthesis and respiration. Standard B3: Interdependence of Living Systems and the Environment B3.1D Explain how living organisms gain and use mass through the processes of photosynthesis and respiration. Math: Algebra Standards A2.4.2 Adapt the general symbolic form of a function to one that fits the specifications of a given situation by using the information to replace arbitrary constants with numbers. A2.4.3 Using the adapted general symbolic formula form and draws reasonable conclusions about the situation being modeled. A2.3.1 Convert units of measurement within and between systems; explain how arithmetic operations on measurements affect units, and carry units through calculations correctly. Unit Lesson Plans: Teacher Section is found on pages 7- 16 and the student section worksheets are on pages 17 -41. Unit will cover about 2 ½ weeks (13 class periods).
Lesson 1: Measuring Forest Productivity: Background Tree Growth
Time allotment: 1-1 ½ 50-minute class period(s).
Materials needed: - Tree Cross-section Warm-up Activity Sheet
- Tree Anatomy HW Worksheet
- CD: Future Fuels from Forests PowerPoint by Dr. Chris Webster
-A computer with Internet access, digital projector, & screen.
- Overhead projector (to present student outline)
- Student’s individual research journals
- Ray Demo: > Ray demo apparatus *see Ray Demo sheet
(OPTIONAL) > pike pump & large beaker/jar with water
- * If desired. Dry Erase board 1’ x 1’, paper towel, & dry erase markers * A 4’x8’
sheet of tile board ($10) can be cut up on a table saw to make 32 student dry erase boards.
- Large tree cookie * I plan to use a 24” diameter red oak
- Pine board (1” X 6”) demonstrating “stacking cone” growth in tree via grain
pattern
1. Warm-up: Ask students what is a renewable resource? Is a forest a renewable resource? Have the
students name some uses/products that come from trees in the forests (boards, wood to heat, maple
syrup, etc.). If one was trying to manage a forest to get these products; ask the students, one must know
how trees ________ (Ans: grow), so there are managed correctly. Share with the students that this unit
is going to allow them to experience how foresters measure forest productivity so they can make sound
5
decisions on how they are to be managed properly as a resource. Distribute the Tree Cross-section
Warm-up Activity sheet and have them label the diagram to the best of their ability.
2. Inform the students today they are going to have slide presentations on tree growth in respect to forest
management by a forestry science professor at MTU, named Dr. Webster. They will outline what is
shown on the overhead projector in their research journal and their journal will be spot-checked at the
end of class to make sure they copied the information. Regarding to their warm-up activity, they will be
to make corrections on it from information observed in the presentation.
3. The students will be also issued a 1’ X 1’ dry erase board and a dry erase marker. So the teacher may
spot check their understanding anytime during the presentation by having them writing down an answer,
holding it up; thus formally assessing quickly individually and as a class throughout the entire
presentation.
4. Play the following presentation on the digital projector “Future Fuels from Forests”
Go over the following outline using the overhead projector as students view it. Make sure students have
their warm-up worksheet, research journal, and dry erase board arranged in front of them neatly so
transition between using them goes smoothly.
OUTLINE
Photosynthesis ---- Wood cellulose ------------------ ethanol “mix gasoline, use less”
CO2 + H2O Sunlight ^sugar + O2 ^fermentation
How trees grow? - Crown: photosynthesis
- Trunk: support, travel nutrients/H2O up & down
- Root system: anchor, collects H2O & nutrients
Photosynthesis (Energy) Priority List: 1. Maintenance
*reproduction & defense anytime 2. Foliage/root production
3. Growth – Primary: height/root extension
- Secondary: cambium (tree width)
meristem: plant cells that can divide & make new cells.
Primary growth “stacked cones” Teacher note: Show 1” X 6” board cone grain pattern.
Tree Cookie Anatomy: Teacher note: Show students large red oak cookie and point out regions shown
on any of the slides on the tree cookie. Have them check their warm-up activity concurrently too.
A) Outer bark: protection
B) Phloem (inner bark): transport down
C) Cambium: radial (width) growth
6
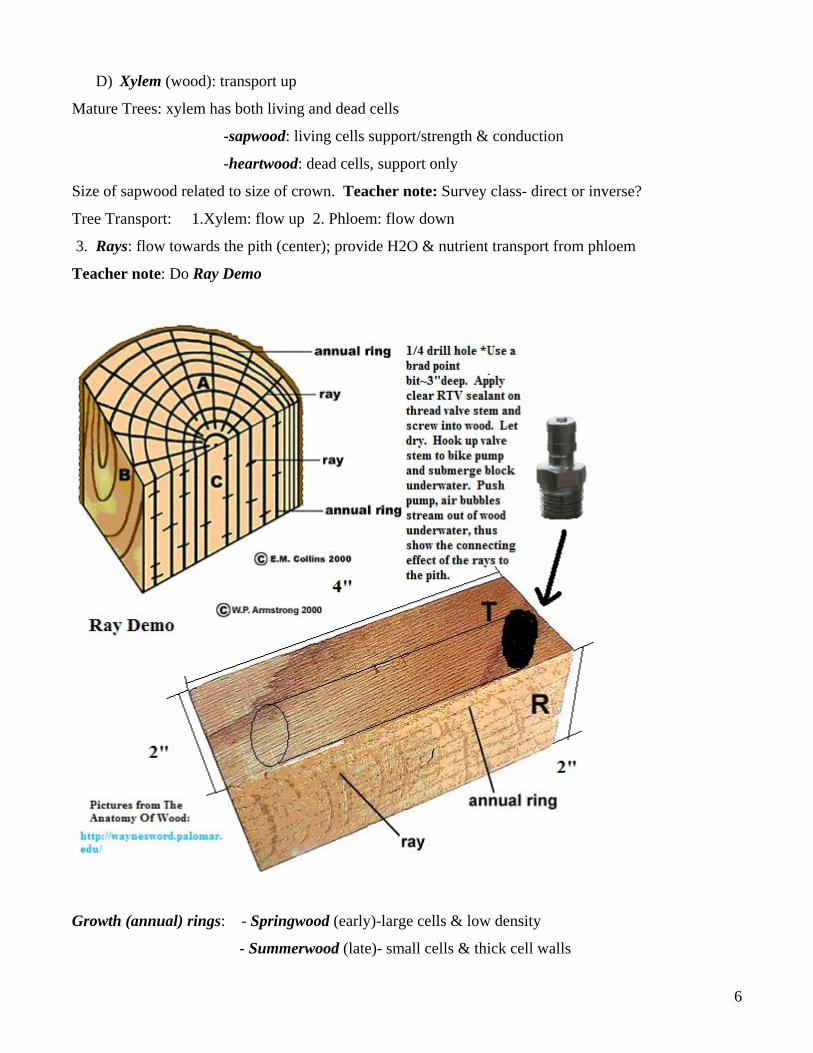
D) Xylem (wood): transport up
Mature Trees: xylem has both living and dead cells
-sapwood: living cells support/strength & conduction
-heartwood: dead cells, support only
Size of sapwood related to size of crown. Teacher note: Survey class- direct or inverse?
Tree Transport: 1.Xylem: flow up 2. Phloem: flow down
3. Rays: flow towards the pith (center); provide H2O & nutrient transport from phloem
Teacher note: Do Ray Demo
Growth (annual) rings: - Springwood (early)-large cells & low density
- Summerwood (late)- small cells & thick cell walls

7
*ring thickness related _________ (inverse or direct) growth rate Teacher note: Survey
Dendrochronology: science of tree rings Teacher note: Age red oak tree cookie & some other issues.
i.e. disease, false rings, etc.
Maintaining Forest Productivity
-leaves/twigs *nutrient recycling-fast release
-large wood *pools nutrient, slow release
Teacher note: Analyze soil graph -increase organic matter, increase water holding
Sustainability: providing for the best for people and the environment both now and in the
indefinite future; maintenance need for soil/nutrients Biodiversity -measure
^ erosion i.e. tree species, birds, etc.
5. Have students exchange Tree Cross-section warm-up sheet, go over, check, and record number
wrong. Collect them (plus dry erase boards if used) and check student research journals.
6. Handout homework assignment “Tree Anatomy HW Worksheet”, due next class.
Lesson 2: Tree Identification
Time allotment: 50-minute class period.
Materials needed: - “Tree Identification Key” student handout
- Assorted Tree Cookies (obtained at institute)
- Large tree cookie * I plan to use a 24” diameter red oak
1. Warm-up: Collect HW: “Tree Anatomy HW Worksheet”. Review the anatomy of a tree cookie by
pointing to different regions on the large red oak tree cookie. Ask the students; do they think all trees
grow at the same rate? (Ans: No, different species grow at different rates, old trees grow slower than
young trees, etc.) If you wanted to grow a tree for a biofuel, what would be the characters you would
look for? (Ans: fast growing, etc.).
2. Inform the students will be going out tot the field today to practice identifying different species of
trees today. When foresters make measurements on trees, they need to identify the species of tree they
are measuring.
3. Distribute out to the students the “Tree Identification Key” student handout. Go over the key and
how to use it. The two back pages contain pictures of leaves and twigs, so students can visualize shapes
of leaves, leaf margins, types of bud, position of leaves, etc.
4. Go over the two main types of trees, which are the coniferous trees (known as softwoods) and the
deciduous trees (known as hardwoods). Ask the students what features of trees could be used to identify
them? (Ans: leaves, flower/seeds, bark, etc). Show the students the assorted tree cookies. Questioned
8
them why would it be important to identify a tree from its bark characteristics? (Ans: It is the only
diagnostic feature in the wintertime for deciduous trees).
5. Have the students break into forester groups of 3-4 students per group. Take them outside to a
wooded area and demonstrate to them how to identify a couple trees using the key. *Make sure they
bring their research journals and tell them to date a page to write down the names of trees they find.
Then let them work in their forester groups and identify 5-8 different types of trees. Have them collect a
leaf, seed, or bark rubbing to the trees they identified and have them record the names in their research
journals. State to the class we will go over their data in the warm-up tomorrow and head back to class
so they can store their collected data and evidence.
Lesson 3: Making Sense of Forestry Tools by Making Them
Time allotment: 2 50-minute class periods.
Materials needed: - Clinometer project: -polysquare or protractor, ¼” dowel rod, string.
scissors, tape, & ½” washer.
- Diameter tape project: -¾” wide cotton woven tape, black fine-tip
permanent marker, and ruler with centimeters on it.
- Biltmore stick project: -copy the Biltmore stick template from
http://www.ces.ncsu.edu/forestry/pdf/WON/won05.pdf ,
cheap wooden yardsticks, glue, polyurethane (optional)
- 2’length, >10” diameter log
- Board 1” X 12” X 12”
- Forestry Tools-Tree Measurement Practice student worksheet
- Increment borer
- 100’ measuring tape
- “Tree Identification Key” student handout
Part I: Introduction and Construction of Forestry Tools
1. Warm-up: Go over the different types of trees identified from the field activity from the day before.
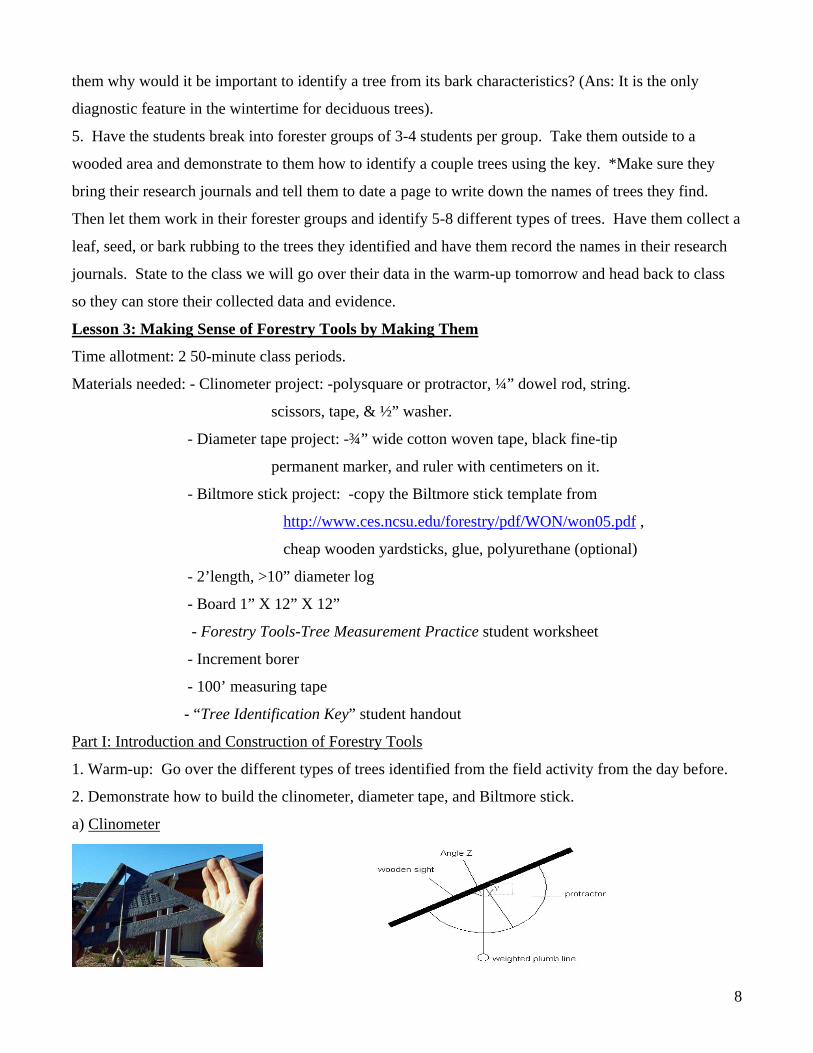
2. Demonstrate how to build the clinometer, diameter tape, and Biltmore stick.
a) Clinometer

9
-This is a simple project. I have polysquares at my disposal, but a protractor can be adapted into
clinometer (See the clinometer photos). Demonstrate how to make and operate this instrument to read
an angle when sighting a height of an object.
b) Diameter tape
Go over how this measuring tape measures diameter by using this relationship:
Circumference = pi X diameter or C = pi X D, solve for “D”
Therefore, D = C/pi, so if we divide up the tape (which represents the circumference because we are
going to wrap it around a tree) into units of pi or 3.14” (3 1/7”), every one of these “pi” units will equal
1”. *Diameter tapes are sometimes called pi-tapes.
A 3.14” or 3 1/7” unit is a difficult measurement to repeatedly mark off on our home made diameter
tape, so we are going to convert it to a friendlier unit to do this task.
Since 1” = 2.54 cm, do this conversion; 3.14” X 2.54cm/” = 7.98 cm ~ 8 cm. So mark off your tape in 8
cm increments and each increment will equal to 1”. The students can graduate or schedule their
diameter tape more in depth, I am going to have groups go down to at least ¼” increments or 2 cm
intervals. *See the diagram below. Demonstrate how to use the pi tape on a small log and check it with
a ruler to check its accuracy.
c) Biltmore stick
- Inform the students that Biltmore sticks can be used to measure (estimate) the diameter of a tree, how
many 16’ log lengths can be taken out of a tree (this part of the stick is called the Merritt hypsometer
scale), and predict the volume of wood or board feet you would get from the number of 16’ logs you
measured could come out of the tree.. Show and let the students handle a board (1” X 12” X 12”) has
the dimensions of a board foot. The word foot suggests length, it but represents a 1’ length of a board
that is 1”” thico and 12”’ wide, hence a volume. Distribute to each group a Biltmore template pattern,

10
cut it out, and glue it on the back of a wooden yardstick. They will polyurethane it near the end of class
to protect the paper from ripping.
3. Have the students in their forestry groups and construct these items. Inform the students in the next
class they will be going outside next class to measure trees with the homemade forestry measuring tools
they constructed.
Part II: Forestry Tools-Tree Measurement Practice
1. Warm-up: Inform the students to collect their constructed forestry tools. Ask them what type of
measurements each tool performs.
2. Distribute the “Forestry Tools-Tree Measurement Practice” student worksheet. Take the students to
a tree nearby the school. The teacher will also bring out an increment borer, tree id key, and 100’ tape
measure. Go up to the tree, identify the species, and measure at DBH the tree’s diameter with the
diameter tape and the Biltmore stick. Demonstrate how to use the increment borer, why foresters use it,
and take a core on the tree, then count the rings and determine the age of the tree. Measure out 66’ from
the tree and show the students how to use the Biltmore stick. Measure out next a 100’ and demonstrate
how to use the clinometer to determine tree height.
3. Pick out another tree and have the individual student forestry groups measure that tree by themselves
and record their answers on the “Forestry Tools-Tree Measurement Practice” student worksheet.
4. After the students have collected their data, take them back to the classroom, and have them start the
homework problem on the last page of the “Forestry Tools-Tree Measurement Practice” student
worksheet. This assignment will be collected next class.
Lesson 4 Measuring Forest Productivity: Sticking with the Basics
Time allotment: 3 -50-minute class periods.
Materials needed: - “Tree Identification Key” student handout
- Constructed Biltmore stick, clinometer, & diameter tape.
- 100’ measuring tape
- 8 wooden stakes *that can be pushed into the ground
- Measuring Forest Productivity: Student Field Data Worksheet
Part I: Tree Measurement Field Study: Intro/Start
1. Warm-up: Check the homework for completion and go over the answers with class.
2. Inform the students to collect their constructed forestry tools. Each group this time will be issued a
100’ tape measure too. Hand out the Measuring Forest Productivity: Student Field Data Worksheet to
each student. Tell the students you are going out to a study site and make measurements on trees within
11
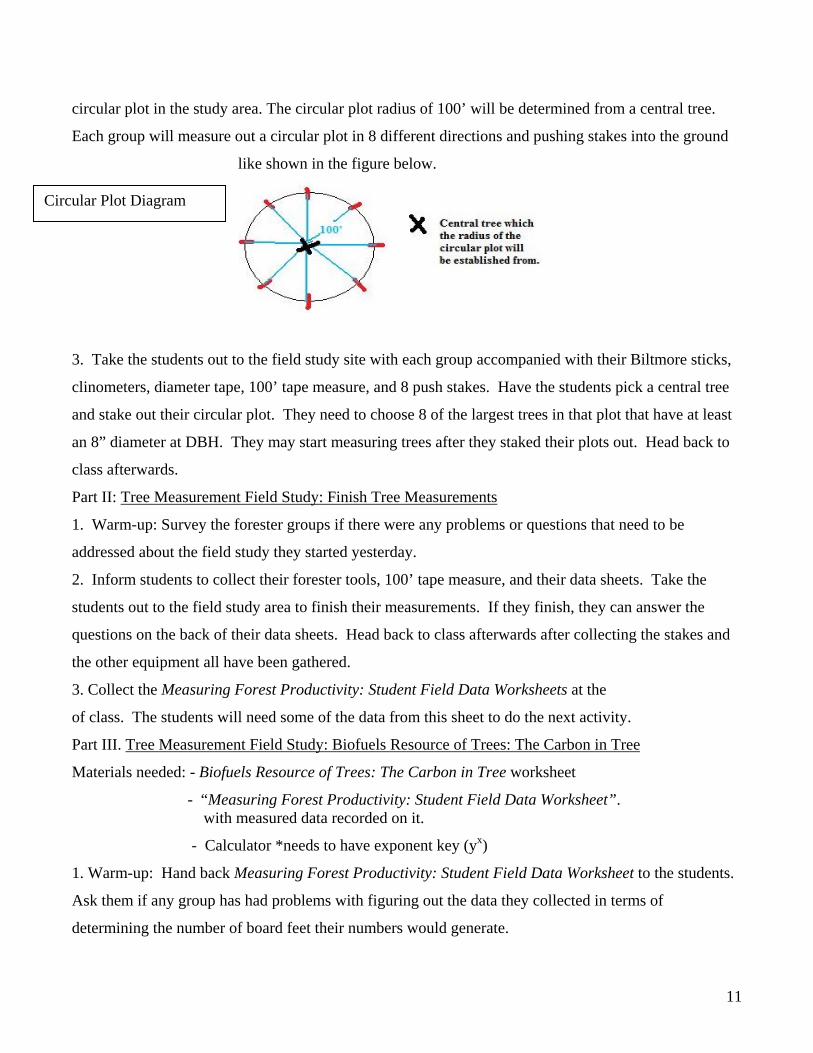
circular plot in the study area. The circular plot radius of 100’ will be determined from a central tree.
Each group will measure out a circular plot in 8 different directions and pushing stakes into the ground
like shown in the figure below.
3. Take the students out to the field study site with each group accompanied with their Biltmore sticks,
clinometers, diameter tape, 100’ tape measure, and 8 push stakes. Have the students pick a central tree
and stake out their circular plot. They need to choose 8 of the largest trees in that plot that have at least
an 8” diameter at DBH. They may start measuring trees after they staked their plots out. Head back to
class afterwards.
Part II: Tree Measurement Field Study: Finish Tree Measurements
1. Warm-up: Survey the forester groups if there were any problems or questions that need to be
addressed about the field study they started yesterday.
2. Inform students to collect their forester tools, 100’ tape measure, and their data sheets. Take the
students out to the field study area to finish their measurements. If they finish, they can answer the
questions on the back of their data sheets. Head back to class afterwards after collecting the stakes and
the other equipment all have been gathered.
3. Collect the Measuring Forest Productivity: Student Field Data Worksheets at the
of class. The students will need some of the data from this sheet to do the next activity.
Part III. Tree Measurement Field Study: Biofuels Resource of Trees: The Carbon in Tree
Materials needed: - Biofuels Resource of Trees: The Carbon in Tree worksheet
- “Measuring Forest Productivity: Student Field Data Worksheet”. with measured data recorded on it.
- Calculator *needs to have exponent key (yx)
1. Warm-up: Hand back Measuring Forest Productivity: Student Field Data Worksheet to the students.
Ask them if any group has had problems with figuring out the data they collected in terms of
determining the number of board feet their numbers would generate.
Circular Plot Diagram
12
2. Distribute the worksheet Biofuels Resource of Trees: The Carbon in Tree worksheet to the students.
Go over the introduction on that worksheet as a class so students understand the terms empirical vs. non-
empirical formulas, allometry, and how to do the math. *Especially in how to use the calculator’s
exponent key (yx).
3. Let the students work on the assignment and circulate around the room to monitor student
understanding and progress. At the end of class, collect both assignments Biofuels Resource of Trees:
The Carbon in Tree worksheet and Measuring Forest Productivity: Student Field Data Worksheet.
Lesson 5: Tree Cookie - A Recipe for Assessment
Part I: Tree Cookie Activity - Carbon Content
Time allotment: 1- 50-minute class period.
Materials needed: -“Tree Cookie Activity Part I: Carbon Content” student handout
- Class set of aspen cookies
- Ruler with centimeters
- Calculator *needs to have exponent key (yx)
1. Warm-up: Ask the students about terms that were on yesterday’s Biofuels Resource of Trees: The
Carbon in Tree worksheet like carbon sequestration, biofuels, allometry, empirical and non-empirical
formulas. Inform the students that they will be doing a similar assignment today on an aspen tree cookie.
Distribute “Tree Cookie Activity Part I: Carbon Content” student handouts to the class.
2. Pass out an aspen cookie to each student. Let the students work on the assignment and circulate
around to monitor student understanding and progress. Model the measuring procedure if the class or
individuals have problems.
3. When the students finish and have them turn in their worksheet and supplies they may start on the
next part of the lesson, which involves them making their own cookies. They can choose a hardwood
tree cookie and start hand sanding it.
Part II: Tree Cookie Activity - Assessment Cookie Time allotment: ~5- 50-minute class periods.
Materials needed: - Various hardwood cookies previously cut with a chain saw,
1’ X 2’ piece of 1/8” hardboard *Take two sheets of 4’ X 8’ sheets (about $16-$20) and rip them into
the desired dimensions. - Tree Cookie Activity Part II: Assessment Cookie student information
sheet. - 1” finish nails or brads - polyurethane - tree cookie - various grits of sandpaper - electric
sanders -hammer/brad driver - string - glue - 2-1” hardboard screws - drill and 1/8” bit -wood or
small bar clamps - colored construction paper -Phillips screwdriver -poster board
-safety glasses - scissors -masking tape - fine tip permanent markers

13
1. Distribute the Tree Cookie Activity Part II: Assessment Cookie student information sheet to the
students. Go over the procedural steps for the Tree Cookie assessment and let students know they can
start anywhere especially if they find during the projects there is not any tool availability. There is no
excuse for having any type of down time. If students desire, they can bring in their own tree cookie from
home, but it must be no larger than 8” – 10” in diameter.
2. Finally go over the Tree Cookie Rubric with the students, which is on the last page of the student
handout.
3. Assign students with different jobs so clean up, equipment, and supply management is efficient. Let
the students start the project. Walk around the room to monitor safety and check on individual student
progress. Repeat this format till project completion.

14
Name____________________________ Tree Cross-section Warm-up Activity To the best of your ability, try labeling this tree cross-section with the terms below. You will be watching a Future Fuels from Forests PowerPoint, which put a large emphasis on tree growth. As you view this, feel free to make changes to your labels to make them correct. We will check your diagram at the end of the class-anybody who gets it all correct, will get 3 bonus points to be added to your overall point score.
-Outer bark -Pith -Annual ring -Sapwood (Xylem) -Summer wood -Rays -Phloem (inner bark) -Cambium -Spring wood -Heartwood

15
Tree Anatomy HW Worksheet Name: __________________________ - Label the diagram with the correct terms.
cambium - a single layer of living cells in the trunk that is located between the sapwood and the inner bark. The cambium produces the sapwood (on the inside of the cambium) and the inner bark (on the outside of the cambium). canopy of leaves - upper parts of the tree, where the branches and leaves are located. heartwood -core of the trunk, which contains very strong, dead tissue that supports the tree. outer bark - the protective outer layer of the trunk. roots - structures that obtain food and water from the soil, store energy, and provide support for the plant. Most roots grow underground. sapwood - the layers of wood just outside the heartwood. Each year a new layer of wood is formed (by cambium tissue), forming an annual ring. Sap (containing water and some nutrients) is transported in this layer in vessels called xylem. Older, inner rings of sapwood eventually become heartwood. The age of a tree is found by counting its annual rings. branches - woody parts of the tree that grow from the trunk. trunk - the main support of the tree. outer bark - the protective outer layer of the trunk. inner bark (phloem) - layer of the trunk through which the tree's food flows - it is located between the outer bark and the cambium. When this short-lived layer dies, it is called cork.
.

16
Interpretation of a Cross-sectional Tree Diagram
- Using the diagram to the right and the one you labeled on the front of this worksheet, label the following regions in this cross-section. i.e.: cambium, phloem, xylem, summerwood, springwood, pith, heartwood, sapwood, outer bark, rays, and annual rings. - Determine the age of the cross-section below and record your answer here: _____________.

17
TREE IDENTIFICATION KEY LEAF Guide • 7-8 UNIT Wisconsin’s K-12 Forestry Education Program www.uwsp.edu/cnr/leaf BEGIN HERE: Tree has needles use..................................................................use CONIFEROUS TREE KEY Tree has broad leaves ...................................................................use DECIDUOUS TREE KEY
CONIFEROUS TREE KEY 1. Needles in bundles or groups (2) 1. Needles single or flattened and scaly (3) 2. Needles in clusters of more than 5 needles..............................Tamarack* (Larix laricina) 2. Needles 2 to 5 per bundle: Pine species (see a-c below) a. Five needles per bundle ........................................White Pine (Pinus strobus) b. Needles in pairs, 3 to 4 inches long........................Red Pine (Pinus resinosa) c. Needles in pairs, under 2 inches long, bark dark gray .....................................................Jack Pine (Pinus banksiana) 3. Needles scaly and flattened (4) 3. Needles single (5) 4. Has cones, scales flat, branches fan-like ........................................Northern White Cedar .........................................................................................................(Thuja occidentalis) 4. Has berries, may have scaly and prickly needles on same tree, scales rounded.......................................Eastern Red Cedar (Juniperus virginiana) 5. Needles flat (6) 5. Needles square, 4-sided, stiff, sharp: Spruce species (see a-b below) a. Needles 1/3 to 3/4 inch long, twigs hairless........White Spruce (Picea glauca) b. Needles 1/3 to 3/4 inch long, twigs have hair, grows in wet areas ....................................Black Spruce (Picea mariana) 6. Needles 1/2 inch long with short petiole .....................Eastern Hemlock (Tsuga canadensis) 6. Needles 3/4 inch to 1 1/4 inches long, no petiole, bubbles in bark.........................................................................Balsam Fir (Abies balsamea) *Note: A tamarack is a deciduous conifer.

18
TREE IDENTIFICATION KEY DECIDUOUS TREE KEY 1. Opposite branching (2) 1. Alternate branching (4) 2. Compound leaves (3) 2. Simple leaves: Maple species (see a-c below) a. Leaf margins smooth, 5 lobes ........................Sugar Maple (Acer saccharum) b. Leaf margins double-toothed, 3 to 5 lobes...............Red Maple (Acer rubrum) c. Leaf margins single-toothed, 3 to 5 lobes, lobes separated by deep, angular openings ...............................Silver Maple (Acer saccharinum) 3. 3 (rarely 5) leaflets........................................................................Box Elder (Acer negundo) 3. 5 to 11 leaflets: Ash species (see a-c below) a. 9 to 11 leaflets, leaflets do not have petiole...........Black Ash (Fraxinus nigra) b. 5 to 9 leaflets, leaflets have petiole, smile-shaped leaf scar extending up sides of new bud ......White Ash (Fraxinus americana) c. 7 to 9 leaflets, leaflets have petiole, leaf scar ends at base of new bud.............................................Green Ash (Fraxinus pennsylvanica) 4. Compound leaves (5) 4. Simple leaves (8) 5. 7 or fewer (usually 5) leaflets, egg-shaped nut ......................Shagbark Hickory (Carya ovata) 5. 7 or more leaflets (6) 6. Leaflets rounded .................................................Black Locust (Robinia pseudonacacia) 6. Leaflets pointed (7) 7. Leaf 6 to 8 inches long ...................................................Mountain Ash (Sorbus americana) 7. Leaf 8 to 24 inches long ..........................................................Black Walnut (Juglans nigra) 8. Leaves not lobed (9) 8. Leaves lobed: Oak species (see a-f below) a. Rounded lobes, 5 to 9 deep even lobes and sinuses, leaves hairless .........................................................White Oak (Quercus alba) b. Rounded lobes, pair of deep sinuses near middle of leaf, hairy underside of leaves ...............................Bur Oak (Quercus macrocarpa) c. Rounded lobes, leaf narrow at base and broad near middle, hairy underside of leaves ......................Swamp White Oak (Quercus bicolor) d. Pointed lobes, sinues extend halfway to mid-vein, leaves hairless, dull green ..................................................................Red Oak (Quercus rubra) e. Pointed lobes, deep sinues extend 3/4 of the way to mid-vein, leaves hairless, bright green and shiny .....Northern Pin Oak (Quercus ellipsoidalis) f. Pointed lobes, deep sinues, young leaves hairy underneath, dark green and shiny, leathery ..........................Black Oak (Quercus velutina) LEAF Guide • 7-8 UNIT Wisconsin’s K-12 Forestry Education Program www.uwsp.edu/cnr/leaf
19
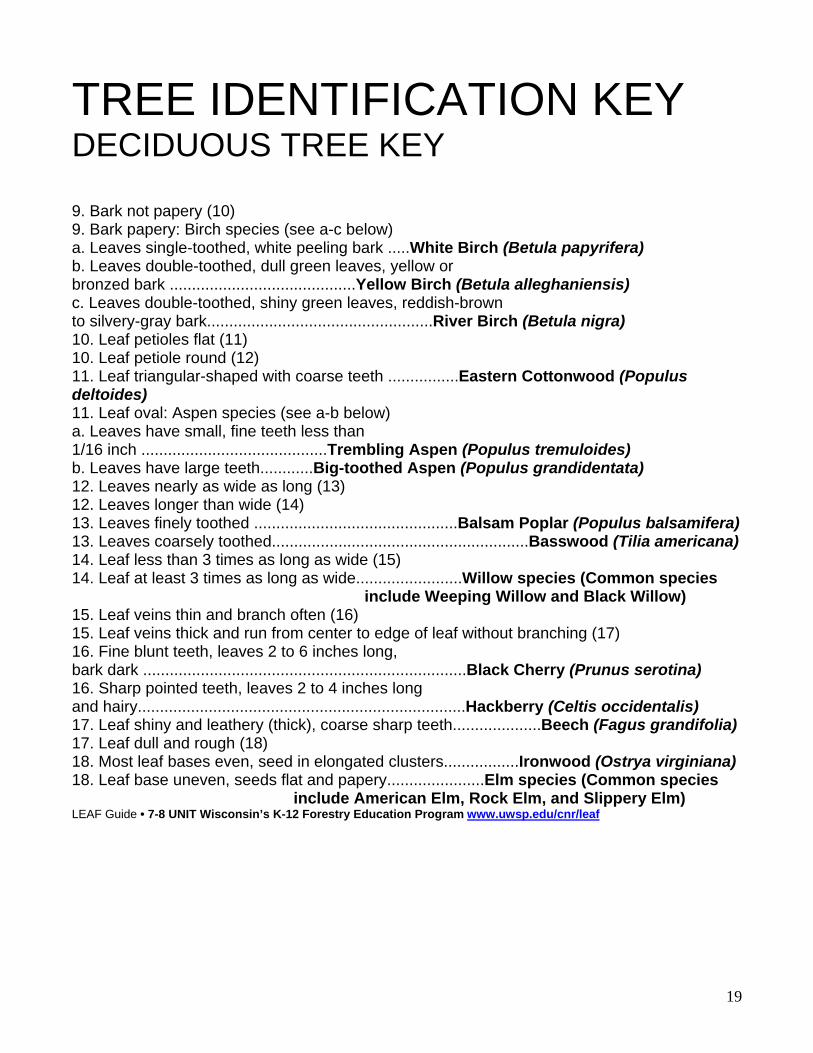
TREE IDENTIFICATION KEY DECIDUOUS TREE KEY 9. Bark not papery (10) 9. Bark papery: Birch species (see a-c below) a. Leaves single-toothed, white peeling bark .....White Birch (Betula papyrifera) b. Leaves double-toothed, dull green leaves, yellow or bronzed bark ..........................................Yellow Birch (Betula alleghaniensis) c. Leaves double-toothed, shiny green leaves, reddish-brown to silvery-gray bark...................................................River Birch (Betula nigra) 10. Leaf petioles flat (11) 10. Leaf petiole round (12) 11. Leaf triangular-shaped with coarse teeth ................Eastern Cottonwood (Populus deltoides) 11. Leaf oval: Aspen species (see a-b below) a. Leaves have small, fine teeth less than 1/16 inch ..........................................Trembling Aspen (Populus tremuloides) b. Leaves have large teeth............Big-toothed Aspen (Populus grandidentata) 12. Leaves nearly as wide as long (13) 12. Leaves longer than wide (14) 13. Leaves finely toothed ..............................................Balsam Poplar (Populus balsamifera) 13. Leaves coarsely toothed..........................................................Basswood (Tilia americana) 14. Leaf less than 3 times as long as wide (15) 14. Leaf at least 3 times as long as wide........................Willow species (Common species ..................................................................include Weeping Willow and Black Willow) 15. Leaf veins thin and branch often (16) 15. Leaf veins thick and run from center to edge of leaf without branching (17) 16. Fine blunt teeth, leaves 2 to 6 inches long, bark dark .........................................................................Black Cherry (Prunus serotina) 16. Sharp pointed teeth, leaves 2 to 4 inches long and hairy..........................................................................Hackberry (Celtis occidentalis) 17. Leaf shiny and leathery (thick), coarse sharp teeth....................Beech (Fagus grandifolia) 17. Leaf dull and rough (18) 18. Most leaf bases even, seed in elongated clusters.................Ironwood (Ostrya virginiana) 18. Leaf base uneven, seeds flat and papery......................Elm species (Common species ..................................................include American Elm, Rock Elm, and Slippery Elm) LEAF Guide • 7-8 UNIT Wisconsin’s K-12 Forestry Education Program www.uwsp.edu/cnr/leaf

20

21
Student Leaf Branch Diagram

22
23
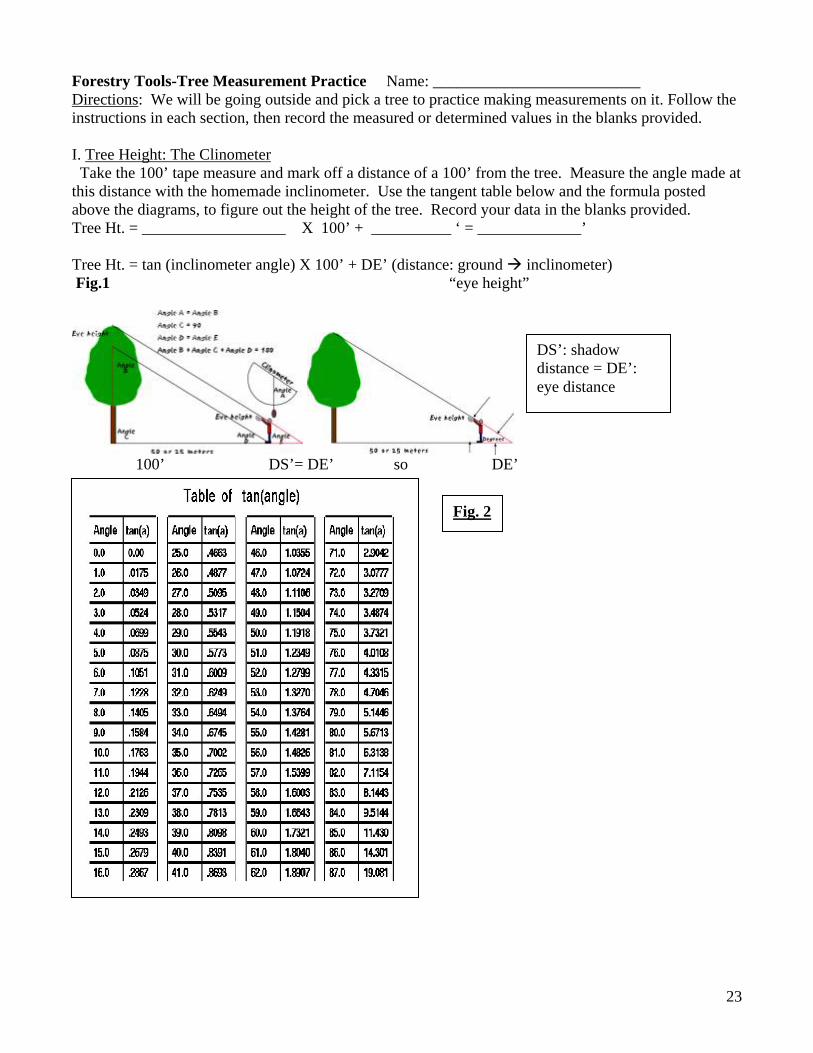
Forestry Tools-Tree Measurement Practice Name: __________________________ Directions: We will be going outside and pick a tree to practice making measurements on it. Follow the instructions in each section, then record the measured or determined values in the blanks provided. I. Tree Height: The Clinometer Take the 100’ tape measure and mark off a distance of a 100’ from the tree. Measure the angle made at this distance with the homemade inclinometer. Use the tangent table below and the formula posted above the diagrams, to figure out the height of the tree. Record your data in the blanks provided. Tree Ht. = __________________ X 100’ + __________ ‘ = _____________’ Tree Ht. = tan (inclinometer angle) X 100’ + DE’ (distance: ground inclinometer) Fig.1 “eye height”
100’ DS’= DE’ so DE’
DS’: shadow distance = DE’: eye distance
Fig. 2

24
II. The Tree Diameter: Biltmore Stick & Diameter Tape a) Determining Tree Diameter with a Biltmore Stick. The diameter measurement of a tree occurs at a height known as distance at breast height or DBH. The DBH is at a height of 4 ½’. The zero end of the Biltmore stick is matched with the edge of the tree at DBH when it is placed at a centered distance of 25” from your eye. Then you read the mark from the other side of the stick that matches up with the other edge of the tree (see top view diagram). Using a tape measure, gage the 25” distance with each person holding the Biltmore stick in your group so you have an idea of the correct distance. DBH Biltmore stick diameter of tree = ______” Fig. 3 TOP VIEW SIDE VIEW
DBH b) Determining Tree Diameter with a Diameter Tape Take you homemade diameter tape and measure around the tree’s trunk at DBH. Make sure your tape is level and not angled when you are done wrapping it around the tree. DBH Diameter tape diameter of tree = ________” Fig.4
25
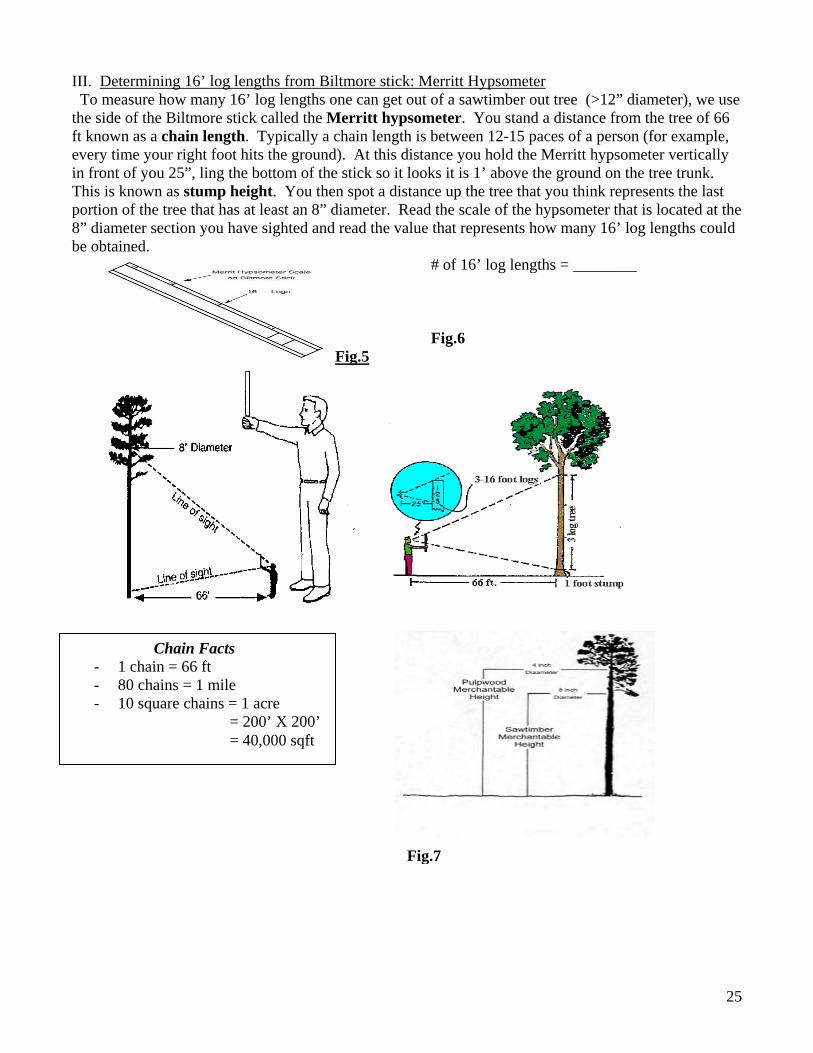
III. Determining 16’ log lengths from Biltmore stick: Merritt Hypsometer To measure how many 16’ log lengths one can get out of a sawtimber out tree (>12” diameter), we use the side of the Biltmore stick called the Merritt hypsometer. You stand a distance from the tree of 66 ft known as a chain length. Typically a chain length is between 12-15 paces of a person (for example, every time your right foot hits the ground). At this distance you hold the Merritt hypsometer vertically in front of you 25”, ling the bottom of the stick so it looks it is 1’ above the ground on the tree trunk. This is known as stump height. You then spot a distance up the tree that you think represents the last portion of the tree that has at least an 8” diameter. Read the scale of the hypsometer that is located at the 8” diameter section you have sighted and read the value that represents how many 16’ log lengths could be obtained.
# of 16’ log lengths = ________ Fig.6 Fig.5
Fig.7
Chain Facts - 1 chain = 66 ft - 80 chains = 1 mile - 10 square chains = 1 acre = 200’ X 200’ = 40,000 sqft

26
IV. Calculating Boardfeet of Lumber from Log Lengths When you hear the word board foot or the plural form of boardfeet you probably are thinking about a length due to the words “foot” or “feet”. A board foot represents a volume of wood with the dimensions of 1” X 12” X 12” or 144 cubic inches or 1 sqft (See Fig.8). Fig.8 To determine boardfeet, take the tree diameter you took at DBH and find it in the International ¼’ rule log scale table. Then take the number of 16’ log lengths and determine where both values intersect on the table to get the number of board feet. For example, if you measure a tree with a DBH diameter of 15” and determined that you could get 4-16’ log lengths using the Merritt hypsometer on the Biltmore stick, you board feet value would be 242 board feet. List your previous values below and figure out the number of board feet they would generate. DBH diameter = _____ # of 16’ lengths = _____ _______ board feet Fig.9
Log Scales like the International, Scribner, and Doyle are board feet estimation tables based log dimensions, where measurements take place, and what width of the saw cut is made due to the thickness of the saw blade or kerf is made. The International and Scribner scale use a ¼ kerf, but the Doyle scale uses a 5/16” kerf.
Fig. 10

27
References - Forest Products. http://www.timberpa.com/s2/pdfs/Forest%20Products%20-%20What%20are%20they%20and%20how%20do%20we%20get%20them.pdf Accessed 8/5/2009. *For Fig.11. - Georgia County Blog. http://www.georgiacountry.com/blogspot/ Georgia county blog Accessed 8/5/2009. *Figure 4. - Maryland Environthon Forestry Resource Guide. http://www.mascd.net/envirothon/Forestry/Forestry%20Study%20Guide.pdf Accessed 8/5/2009. *For Figures 7, 8. 9, 12, and 13. - Measuring Height of Trees, buildings, and poles. http://www.huntel.net/rsweetland/science/actPlans/outdoorEd/measureTree.htm Accessed 8/5/2009. *For Figure1. - Mississippi State University Extension Service: Measuring Standing Sawtimber. http://msucares.com/pubs/publications/p1473.htm Accessed 8/5/2009. *For Figures 3 & 5. - Michigan State University Extension Marketing Trees. http://www.kbs.msu.edu/extension/marketing/Tree_volume.html Accessed 8/5/2009. For Figure 6. - Tangent Table. http://www.geocities.com/senecatech/tangent.html Accessed 8/4/2009. *For Figure 2. - Wikipedia, File/Saw Blade. http://en.wikipedia.org/wiki/File:Saw_blade.png Accessed 8/5/2009. *For Figure 10. Fig.11.

28
Homework: Determining Amount of Firewood from a Standing Tree Background A tree can be a resource for other items like biofuels (for heat, electricity, ethanol for car gas mixtures, etc.) rather than just being the only resource for building materials (see Fig.11). The local Grayling Generation Station burns wood chips to produce steam, to generate electricity. Some of you may use wood to heat your home. Living here in Roscommon, most of you are very familiar with firewood. Firewood is also measured by volume, but it is known as a cord. A cord is a volume of cut stacked wood that has the dimensions of 4’ X 4’ X 8’ (see Fig 12.). Pretend you used a Biltmore stick or a clinometer to measure a DBH diameter of 18” of an oak tree and also measured the distance from the stump height to a location on the tree where the diameter is about 4”. The measured value from one chain length away was determined to be 70’ in height. Answer the following questions below the figures. Fig.12
Fig. 13
1. Using the table above, how many cords of wood could this tree produce? ______ 2. How many cubic feet are in: *show your math work a). 1 cord of wood. b). In your tree’s cord amount of wood. 3. How many board feet would your cord of wood be in cubic feet? 4. What is kerf? 5. One chain equals how many miles?

29
Measuring Forest Productivity: Student Field Data Worksheet Name: _________________________ Directions: *Review how to board feet scale on Biltmore stick. Pick a tree and measuring out from it 100 feet with the 100’ measuring tape in 8 directions and mark it by stakes, to you form a rough circle pattern. Take data only trees at least 8 inches in diameter with your homemade diameter tapes, Biltmore sticks, and clinometers. Fill out this data sheet with your measured/estimated values. Choose the 8 largest trees in your circular plot. *Use the Biltmore sticks International ¼ Scale that is printed on the stick. Tree Samples Using Diameter Tapes Using Biltmore Sticks Sample# Species of Tree
*Tree Ht. Determine @ 100’
Species DBH from diameter tape
# of 16’ logs from Biltmorestick *
# of bdft from diametertape *int.scale
DBH from Biltmorestick
# of 16’ logs from Biltmore stick *
# of bdft from Biltmorestick
Clino angle
Ht. (ft)
* Tree Height = tan (measured clinometer angle) X 100’. Use the tangent table on the back of this sheet.
30
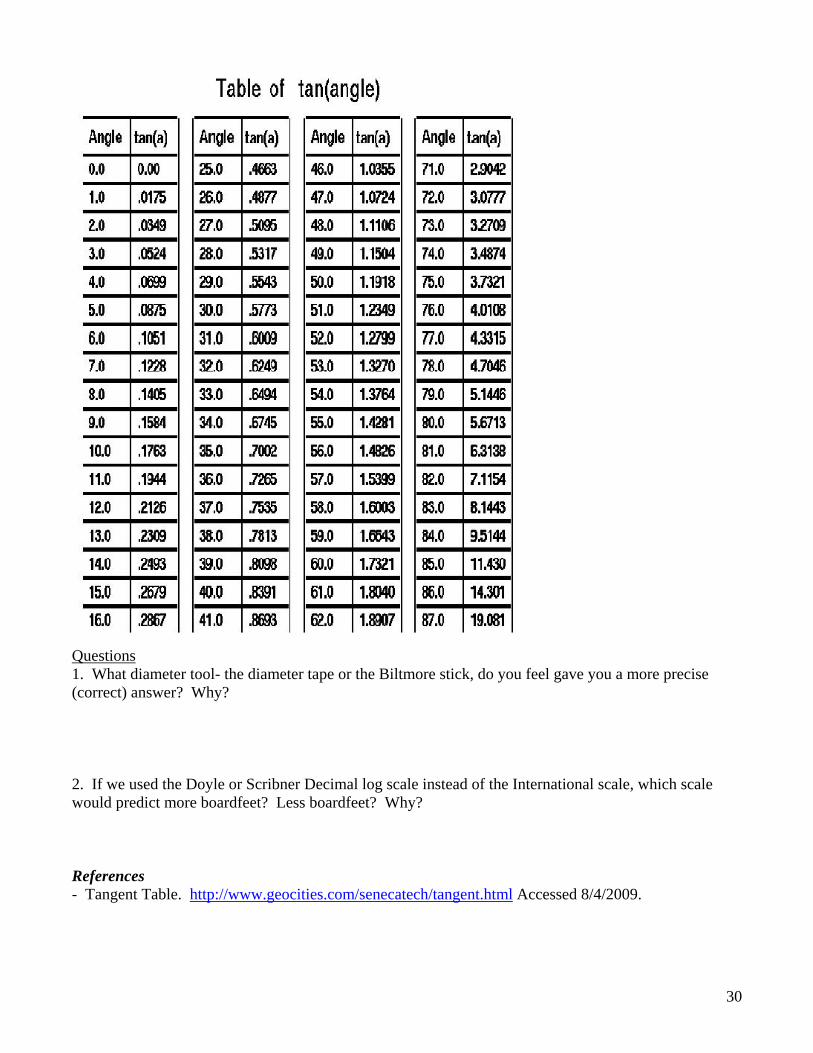
Questions 1. What diameter tool- the diameter tape or the Biltmore stick, do you feel gave you a more precise (correct) answer? Why? 2. If we used the Doyle or Scribner Decimal log scale instead of the International scale, which scale would predict more boardfeet? Less boardfeet? Why? References - Tangent Table. http://www.geocities.com/senecatech/tangent.html Accessed 8/4/2009.

31
Biofuels Resource of Trees: The Carbon in Tree Name: _____________________ Description: At the present there is an interest at using forests for bioenergy (renewable) and carbon sequestration (CO2 C-sugar or carbon storage) requires knowledge how carbon is stored within trees inside forests. In this activity, we are going to take the data from the field measurements you made on trees in our study area to predict the number of board feet to predict their carbon content (lb C). Follow the directions below and fill out the result table below. We are going to be using empirical formulas known as allometric equations. Empirical equations are based on observations and experiments rather than theories. When you do the empirical math, many times the units will not cancel out reflecting the fact that these equations were found by experimentally and not mathematically (non-empirical). Allometry is defined as the study of the relationships between the growth and size of one body part to the growth and size of the whole organism; however, allometric relationships also exist between body size and other biological parameters (e.g., metabolic rate). Since different species of trees grow (metabolic rate) differently so different allometric values must be used for each type of tree. *You will need a calculator and the previous “Measuring Forest Productivity: Student Field Data Worksheet” worksheet. Directions 1. Record the sample number and species of tree you sampled in the previous activity “Measuring Forest Productivity”. In the wood type column write “H” if the tree is a hardwood (deciduous) or “S” if it is a softwood (conifer) tree. 2. Take your DBH in inches, multiply it by 2.54 cm/in to convert to DBH in cm. 3. Calculate the biomass of each sampled tree species. Use the following allometric equation. M = a Db M = biomass (kg) dry weight (above ground) D = DBH diameter a & b are allometric species specific coefficient. (Table1) *Remember your order of operations (PEMDAS) - Please Excuse My Dear Aunt Sally - Parentheses, Exponents, Multiplication, Division, Addition, & Subtraction 1st 2nd Ex. Ash DBH = 15” X 2.54cm/in 38.1cm M = 0.16 X 38.12.35 Enter 38.1, hit yx key, and enter 2.35, then multiply by 0.16 M = 0.16 X 5,190 = 830.41 kg Enter your calculated values into the biomass (kg) column.
Species a b Ash 0.16 2.35 Aspen 0.05 2.51 Balsam fir 0.07 2.50 Basswood 0.09 2.35 Beech 0.20 2.39 Eastern hemlock 0.10 2.36 Northern white cedar 0.09 2.23 Red maple 0.16 2.31 Red oak 0.13 2.42 Red pine 0.78 2.42 Sugar maple 0.17 2.36 White birch 0.12 2.43 White oak 0.20 2.16 White pine 0.75 2.38 Yellow birch 0.09 2.59
Table 1. Allometric Coefficients

32
4. Determining Carbon Content *Since carbon is the major building block of life, a tree contains a large portion of carbon (about half of its biomass). To determine how much carbon is in a tree:
-Multiply the biomass (M) by 0.521 for hardwood trees. -Multiply the biomass (M) by 0.498 for softwood trees.
Enter your calculated values into the carbon content (kg) column. 5. To convert carbon content (kg) carbon content (lb), take your carbon content (kg) value and multiply it by 2.2 lb/kg. Record your value into the carbon content (lb) column.
Sample #
Tree Species
Wood Type Hardwood:H Softwood:S
DBH (cm)
Biomass (kg) Carbon Content (kg)
Carbon Content (lb)
Questions 1. The mathematical process you did in step 2 was non-empirical and in step 3 was empirical. Explain. 2. If you compared a 40 cm DBH red pine to a 40cm DBH aspen, without doing the actual math, predict which tree would have more carbon content? Modified lesson originally developed by Maria Janowiak < [email protected]> Northern Institute of Applied Carbon Science, Michigan Tech School of Forest Resources & Environmental Sciences
Result Data Table

33
Tree Cookie Activity Part I: Carbon Content Name: ___________________ Modified lesson originally developed by Amber Roth <[email protected]>, Michigan Tech School of Forest Resources & Environmental Science, which was further, modified by Melissa Jaeger jaeger@ghaps Description: As forest resources are increasingly being used for bioenergy and biofuel industries; foresters must be able to calculate the amount of mass, or biomass, for standing trees in a forest. This is evident in our area with the dependency of the Grayling Generation Station on 4 mile, just north of our county line in terms of trees for biofuels. This facility relies on industrial wood waste from our lumber industry, but might have to rely on forests due to the declining wood economy. In Michigan, there are proposed ethanol plants planned in the future that will use wood chips to ferment to ethanol, which means more reliance on forests for fuel stock. To calculate the carbon content of a forested stand, foresters calculate the biomass of individual trees and project these estimates across a forest stand. For this activity you will estimate the tree biomass accumulated during the last ten years based off an aspen (poplar) cookie. Objectives: Estimate tree biomass and average annual growth rate. Materials Needed: Aspen Tree cookie Metric ruler and/or tape measure Calculator Pencil Allometric equation for tree species of cookie used Instructions: Part 1: Calculate biomass for whole tree Step 1: With pencil, draw two perpendicular lines that pass through the cookie’s pith as indicated in the diagram. Make all measurements in this activity along those lines (guides). Measure the two diameters in cm and calculate an average. This is the average diameter at breast height, D. Diameter 1: _______ cm Diameter 2: _______ cm Average Diameter: _______ cm Step 2: Calculate biomass for whole tree. To calculate tree biomass, we use a standard allometric equation of the form M=aDb where M is aboveground tree biomass (dry weight; kg), D is the diameter at breast height (cm), and “a” and “b” are species-specific coefficients.

34
For aspen cookies, use the equation M=0.08 D2.35 Insert your total tree biomass (M) estimate in Part 3. Part 2: Calculate biomass accumulated in the last ten years. Step 1: From the bark inward, count 10 summer wood (dark) rings. Mark this ring with a pencil mark at the four places where it intersects your guides. Step 2: Measure inner diameter of the wood between your pencil marks. Take a second measurement at a right angle to the first. Inner diameter 1: _______ cm Inner diameter 2: _______ cm Step 3: Measure width of bark. Take a second measurement 90 degrees from the first. Bark Width 1: _______ cm Bark Width 2: _______ cm Step 4: Add together all measurements from Steps 2 and 3 and divide by two. This is the average diameter at breast height estimate for this tree 10 years ago. Average diameter: ________ cm Step 5: Calculate biomass of the tree 10 years Use the same allometric equation as in Part 1. Use the diameter as your answer to step 4. For aspen cookies, use the equation M=0.08 D2.35 Insert your 10 years ago tree biomass estimate (M) in Part 3. Part 3: Calculate biomass accumulated during the last 10 years and the average annual growth rate during that time. Step 1: To calculate the total biomass accumulated during the last 10 years, subtract the 10 years ago tree biomass from the total tree biomass. Total tree biomass from Part 1: ________ kg x 2.2 lbs/kg = _______ lbs

35
10 years ago tree biomass from Part 2: ________ kg x 2.2 lbs/kg = _______ lbs Tree biomass accumulated during 10 year’s: _______ kg x 2.2 lbs/kg = _______ lbs Step 2: To calculate the average annual growth rate during 10 years, divide the tree biomass (lbs) accumulated during the 10 years by 10 (used in Part 2). Average annual growth rate during the last ten year’s: _____ lbs/yr Tree cookie graphic credits: www.nj.gov and www.state.sc.us. Allometric equations from Ter-Mikaelian, M.T. and M.D. Korzukhin. 1997. Biomass equations for sixty-five North American tree species. Forest Ecology and Management 97:1-24.

36
Tree Cookie Activity Part II: Assessment Cookie Background
To wrap up this unit, you are going to make a hardwood cookie and make a presentation board with it
mounted on it. This means you will be sanding it, to bring out the wood features and polyurethane it, to
prevent from cracking. Look at the Tree Cookie Presentation Board as a reference as you read the
requirements for this project.
Materials
- 1’ X 2’ piece of 1/8” hardboard - 1” finish nails or brads - polyurethane
- tree cookie - various grits of sandpaper - electric sanders -hammer/brad driver
- string - glue - 2-1” hardboard screws - drill and 1/8” bit -wood or small bar clamps
- colored construction paper -Phillips screwdriver -poster board -safety glasses
- scissors - masking tape - fine tip permanent markers
Requirements *Look at the Tree Cookie Rubric on the back of this sheet.
*Anytime tools are being used, safety glasses must be worn.
Overall Presentation
- You need to write neatly or type out all your printed information and labels. You need to position all
your presentation so it is not cluttered so an observer can read the information easily. You want to glue
items down without excess glue oozing out around them. *Use the Tree Cookie Presentation Board as
a visual guide.
Tree Cookie Anatomy
- Select a hardwood tree cookie about 8” diameter (no larger). *You may bring one from home, if you
desired. We are sticking with hardwoods and not softwoods, which have the tendency to gum up the
sandpaper too much. Once you have sanded it thoroughly from high grit (#60 #80 #100 #120)
to low grit, the entire tree cookie needs to be sealed with polyurethane.

37
- Obtain a 1’ X 2’ of 1/8” hardboard and clamp your tree cookie in the position where you desire it to be.
Drill two 1/8” holes into the hardboard on the backside of your clamped tree cookie and do not go past
the 1” length mark on the drill, so you don’t drill through entire cookie. Attach the cookie with two 1”
hardboard screws with a Phillips screwdriver.
- Make labels for the following tree anatomy terms: Outer bark -Pith -Annual ring -Sapwood (Xylem) -Summer wood -Rays -Phloem (inner bark) -Cambium -Spring wood -Heartwood On these labels, state one fact or function of that tree part, use your notes in your research journal. Glue
the labels down on the hardboard around your attached tree cookie. Drive nails into your tree cookie in
areas where that spot coordinates to one of your labels. Tie a string to a nail and stretch it to its correct
label, cut it, and then glue the end of the string to the edge of that label. Make a label entitled Tree
Anatomy and post it in the tree cookie section of your presentation board.
Family Tree
- Count the number of annual tree rings in your tree cookie. After you determine the number of years
recorded in your tree cookie, make a list of your personal family in terms of events that have occurred in
that time frame. It could be births, deaths, vacations, what grade you were in at school that year, the
year you caught a large fish or shot a deer, etc. You need to list 7 or 8 of them on a sheet of paper
entitled Family Events and number them 1., 2., 3., etc. Wrap small piece of masking tape on a finish
nail, and take a fine tip permanent marker to number it with one of your family event numbers. Finally,
take your number taped finish nails and hammer it into an annual ring that matches the year that family
event occurred. Glue your Family Events list down on your presentation board along with the Family
Tree heading. *See the Tree Cookie Presentation Board.

38
Forest Productivity & Sustainability
This is going to be a 1-2 page essay that needs to address the question, “What is Sustainable Forest
Management? The following guidelines and elements must be followed and contained in your essay.
Essay Format for “What is Sustainable Forest Management”
Introduction: -Define sustainability.
Body: -Forest as a resource, mention uses and forest products.
- How do you measure forest productivity; think back to field activities and math.
- How do you maintain forest productivity, use words like nutrient recycling, organic matter, soil,
erosion, photosynthesis, carbon sequestration etc.
Conclusion: Justify why sustainability is a good or not good way to manage forests.
*If you use another reference besides your research journal, list that reference at the bottom of your
paper. Attach your essay and its heading label on your presentation board. *See the Tree Cookie
Presentation Board.
Tree Cookie Rubric 15pts 10pts 5pts 0pts
Overall
Presentation
Neatness
Information clearly presented, Typed or neatly printed, word spelled correctly, uncluttered
Not all information not clearly presented, some clutter, some messy print and words not spelled correctly
Information not clearly, a large amount of clutter, messy print, and many words not spelled correctly
Missing entire project
Tree Cookie
Anatomy
The anatomy of the tree cookie correctly identified and the labeled part has a fact or stated function
A few tree cookie parts are mislabeled or are missing their stated function or fact
Tree cookie is missing many labeled parts or stated function/facts
Tree cookie section missing entirely or present with no labeling of anatomical parts
Family Tree Family tree clearly presented and 7-8 events showcased
Family tree clearly presented and 5-6 events showcased
Family tree clearly presented and 3-4 events showcased
Family tree missing or only has 1-2 events showcased
Forest
Productivity &
Sustainability
The essay has all the required guidelines and elements
The essay has 1 of the guidelines or elements missing
The essay has 2-3 of the guidelines or elements missing
Essay missing or has only one guideline or element stated