Full text - Universiteit van Amsterdam
221
Thesis Submitted for the MSC in Mathematics and Science Education Traditional teaching about Angles compared to an Active Learning Approach that focuses on students’ skills in seeing, measuring and reasoning, including the use of Dynamic Geometry Software: Differences in achievement Budi Mulyono Supervised by Dr. Wolter Kaper AMSTEL Institute Universiteit van Amsterdam Science Park 904 1098 XH Amsterdam The Netherlands August 19, 2010
Transcript of Full text - Universiteit van Amsterdam
Thesis Submitted for the MSC in Mathematics and Science Education
Traditional teaching about Angles compared to an Active
Learning Approach that focuses on students’ skills in seeing,
measuring and reasoning, including the use of Dynamic
Geometry Software: Differences in achievement
Budi Mulyono
Supervised by
Dr. Wolter Kaper
AMSTEL Institute Universiteit van Amsterdam
Science Park 904 1098 XH Amsterdam
The Netherlands
August 19, 2010


iii
Acknowledgements
This research is one of the most important parts of my study here. There were many people
directly or not directly involved at any stages of my research. Therefore I would like to express
my appreciation for all kindness, patience, help, and collaboration from all of you.
First of all, I would like to thank the supervisor of my research, Wolter Kaper who helped and
supported me to finish the report of my research. I learned a lot from him about how to make a
research report.
Secondly, I am grateful to Mary Beth Key, the MMSE program coordinator who always
encouraged and helped me to be strong in facing many kinds of problems since I started my
study here.
Thirdly, I would like to thank to André Heck, the third member of the reading committee.
Fourthly, I want to say thank you to the collaborative teacher, Ari Akhirni, and all her students
who were involved in my research
I also would like to thank all teachers and staff of the AMSTEL Institute, who gave me an
opportunity to learn a lot about education, especially mathematics education. After I studied
here, I think I have been a bit changed from “nothing” to be “something” about mathematics
education.
Finally, thank you very much to all my family members who never stopped supporting me to
study abroad.

iv
v
Abstract
An active learning approach is a teaching method that aims to trigger students active
involvement in their learning activities, and Dynamic Geometry Software (DGS) is a kind of
software program which allows a user to create and manipulate any geometrical figure. This
research is about combining those things in a designed teaching method. An active learning
approach using DGS was implemented at a junior high school in Indonesia. There were two
classes involved in this experiment, one as the experimental class and the other one as the
control class. To compare students’ achievements in learning one topic of geometry, the angle
concept, the researcher taught his design lesson sequence to the experimental class.
Meanwhile the collaborative teacher taught using the traditional teaching method (without
using DGS) to the control class.
The pretest results show that both classes were not significantly different in their ability to
know the concept of angle before the intervention began. But after the intervention was done,
the posttest results show that they were significantly different in their achievement of
understanding the concept of angle. By using ANCOVA, the data analysis shows that the
intervention significantly affected students of the experimental class in understanding the
concept of angle.

vi
vii
Table of contents
Page Acknowledgements iii Abstract v Table of contents vii 1 Introduction 1 2 Theoretical Framework 5 2.1 Skills in learning geometry 5 2.2 How children think and learn about concepts of angle 7 2.3 Dynamic Geometry Software (DGS) 8 2.4 Active Learning 9 3 Research Questions 11 4 Method 13 4.1 Research design 13 4.2 Data collection methods 13 4.3 Data analysis method 17 5 Research Setting and Teaching Design 19 5.1 The school, students, and classes 19 5.2 The researcher’s role and the collaborative teacher’s role 20 5.3 A Teaching Design for the Subject of Angles 21 6 Findings and Data Analysis 35 6.1 The pretest findings 35 6.2 The posttest findings 36 6.3 Analysis of the pretest, the posttest, and the treatment 37 6.4 Findings of each of the posttest questions 38 6.5 Questionnaire findings 39 6.5.1 Findings of question 1 39 6.5.2 Findings of questions 2-11 41 6.6 Interview findings 42 6.6.1 Findings of the collaborative teacher's interview 42 6.6.2 Findings of the experimental students’ interview 43 6.7 Intervention findings 43 6.7.1 The first meeting 43 6.7.1.1 Section without computer use 44 6.7.1.2 Section with computer use 49 6.7.1.3 Conclusions of the first meeting 57 6.7.2 The second meeting 58 6.7.2.1 Section without computer use 58 6.7.2.2 Section with computer use 63 6.7.2.3 Conclusions of the second meeting 67
viii
6.7.3 The third meeting 68 6.7.3.1 Section without computer use 68 6.7.3.2 Section with computer use 73 6.7.3.3 Conclusions of the third meeting 76 6.7.4 The fourth meeting 77 6.7.4.1 Section without computer use 77 6.7.4.2 Section with computer use 82 6.7.4.3 Conclusions of the fourth meeting 87 6.7.5 The fifth meeting 88 6.7.5.1 Section without computer use 88 6.7.5.2 Section with computer use 95 6.7.5.3 Conclusions of the fifth meeting 99 6.7.6 Summary of the intervention findings 99 7 Conclusions and Discussions 105 7.1 Conclusions 105 7.2 Discussion 107 8 References 111 9 Bibliography 113 10 Link references 113 116 Appendices A1 Pretest scores 113 A2 Posttest scores 114 B1 Independent samples t-test of the pretest results 115 B2 Independent samples t-test of the posttest results 116 B3 ANCOVA test of pretest, posttest and treatment 117 B4 ANCOVA test of each posttest question 120 C1 Questionnaire results: question 1 123 C2 Questionnaire results: questions 2-11 129 D1 Teacher interview 131 D2 Student interviews 134 E1 Teacher's manual, meeting 1, pen and paper 138 E2 Teacher's manual, meeting 1, Geogebra 143 E3 Teacher's manual, meeting 2, pen and paper 147 E4 Teacher's manual, meeting 2, Geogebra 152 E5 Teacher's manual, meeting 3, pen and paper 154 E6 Teacher's manual, meeting 3, Geogebra 160 E7 Teacher's manual, meeting 4, pen and paper 162 E8 Teacher's manual, meeting 4, Geogebra 167 E9 Teacher's manual, meeting 5, pen and paper 170 E10 Teacher's manual, meeting 5, Geogebra 178 F1 Pretest questions 181 F2 Posttest questions 185 G1 Photographs: the pretest meeting 192
ix
G2 Photographs: introduction of Geogebra 194 G3 Photographs: first meeting 196 G4 Photographs: second meeting 199 G5 Photographs: third meeting 201 G6 Photographs: fourth meeting 204 G7 Photographs: fifth meeting 207 G8 Photographs: posttest meeting 210

x
1
1. Introduction
In the researcher’s opinion, teaching mathematics is a very challenging thing to do because
mathematics teachers, students, and mathematics subjects should be running together in
harmony, which means mathematics teachers teach using an appropriate teaching method for
students, students are able to engage in their learning activities, and the mathematics subjects
taught are suitable to students’ level of thinking. One of possible problems in teaching and
learning mathematics is that mathematics teachers, in their opinion, think that their regular
teaching method is appropriate to students without trying to evaluate whether students are
really satisfied with their teaching method. On the other hand, students do not think that their
mathematics teachers use an appropriate teaching method for teaching them. Meanwhile
mathematics is still considered as a difficult subject to learn by some students, However they
must take it, because mathematics is one of the compulsory subjects that students must
accomplish in their study, at least from elementary school to senior high school levels. That is
why some students feel tortured every time they meet a mathematics class in their study.
Actually there are some reasons for this condition, such as students do not see the relevance of
mathematics to their life, which makes it hard for them to understand it; mathematics teachers
do not provide suitable and appropriate teaching methods so that students are not engaging in
learning mathematics; there is not enough teaching-learning media to help students become
more enthusiastic and motivated to learn mathematics.
I think that to overcome this condition, mathematics teachers should be more innovative in
their teaching methods. Mathematics teachers also should consider the use of ICT in their
teaching, because use of ICT in education can help students understand and help teachers
explain mathematics subjects more effectively. There exists a lot of research investigating the
use of ICT in education, and it shows that students become more independent in doing their
learning activities when they engage in learning through ICT tools. An example of the use of ICT
in education is the use of mathematics software to teach students. Mathematics software is a
2
kind of application program that has the special function to help its user understand about the
mathematics topics they learn. There are many kinds of mathematics software, such as
Cinderela, Geogebra, Mathematica, etc. Mathematics software nowadays is easy enough to use
and to understand, most are really user friendly, so that users do not need special computer
skills to use them. Some mathematics software is free which means that users can use the
software without needing a license.
One of the free mathematics software programs is Geogebra, a kind of software called dynamic
geometry software (DGS). The definition of dynamic geometry is: "the theory of construction-
like descriptions of function-like objects under parameter changes" (Kortenkamp, 1999).
Meanwhile dynamic geometry software is a computer program by which a user can construct
or create any plane geometrical shape, then can manipulate it as well. Therefore dynamic
geometry software is really helpful for teaching and learning geometry, because in it there are a
lot of tools that can be used to visualize and to construct geometrical shapes in simple ways. By
learning geometry through dynamic geometry software, the researcher hopes that students will
be more excited about learning geometry, and it will make them engage more in their learning
activities.
Teaching and learning geometry traditionally only uses common tools, such as a blackboard, a
protractor, a ruler, and a compass. I do not mean to imply that a traditional way of teaching
geometry is not appropriate to students. However, to use those tools is sometimes difficult for
students and it takes time to create or construct geometrical shapes. Therefore some students
will lose the time needed to understand geometry, because the drawing of geometrical figures
is so time consuming, and this condition makes students think that learning geometry is not fun
and it is difficult as well. It shows that students’ achievement and opinion are affected by the
tools used for teaching.
This condition triggered me to do a research study in which I conducted an intervention of
teaching geometry through dynamic geometry software, Geogebra. I wanted to compare

3
students’ achievement in learning geometry in a class taught in the traditional way and a class
taught according to the designed intervention.

4
5
2. Theoretical Framework
Geometry is a branch of mathematics studying shapes and configurations. In learning
geometry there are some skills that students should acquire such as intuition, measuring,
and reasoning skills. Students should have all these abilities after they learned geometry
well. One of the geometry topics is the angle concept, which is foundational for learning
geometry. There are some stages in which children understand the concepts of angle which
are from concrete to abstract (Mitchelmore and White, 2004). Geometry topics are
sometimes related to visualization of concepts and definitions of geometry objects. For
example, a line can be created by connecting two points. To visualize this concept, a picture
of a line should be drawn to make the concepts more real to students.
Many kinds of tools can be used to visualize geometry concepts. One of the tools is dynamic
geometry software. By using such software, students will easily be able to draw and
manipulate a geometrical picture. In teaching and learning activities, especially in teaching
mathematics, mathematics teachers should not be the center of the class, and students
should be more active and independent in their learning activities. In the researcher’s
opinion, an active learning approach which combines with the use of DGS will help students
learn mathematics much better and also will make them active and critical in learning
activities. This is the reason why I was interested in doing a research study about it.
2.1 Skills in learning geometry
Many educators and researchers in mathematics argue that intuition plays a crucial role in
geometry, and that an intuition process in geometry comes into one’s mind after seeing
shapes of geometrical things. Actually, it is difficult to define what exactly the definition of
intuition in geometry is, but generally it is a skill to ‘see’ geometrical figures even if they are
not drawn on paper. Creating and manipulating such figures in the mind to solve problems
in geometry can be regarded as an intuition skill (Fujita, Jones, and Yamamoto, 2004 b). This
means that intuition relates to what students see and then think about. Treutlein (1911; in
6
Fujita, Jones, and Yamamoto, 2004b) considered intuition as an essential skill in geometry
as well as in everyday life, and argued that training students’ ‘imagination’ through
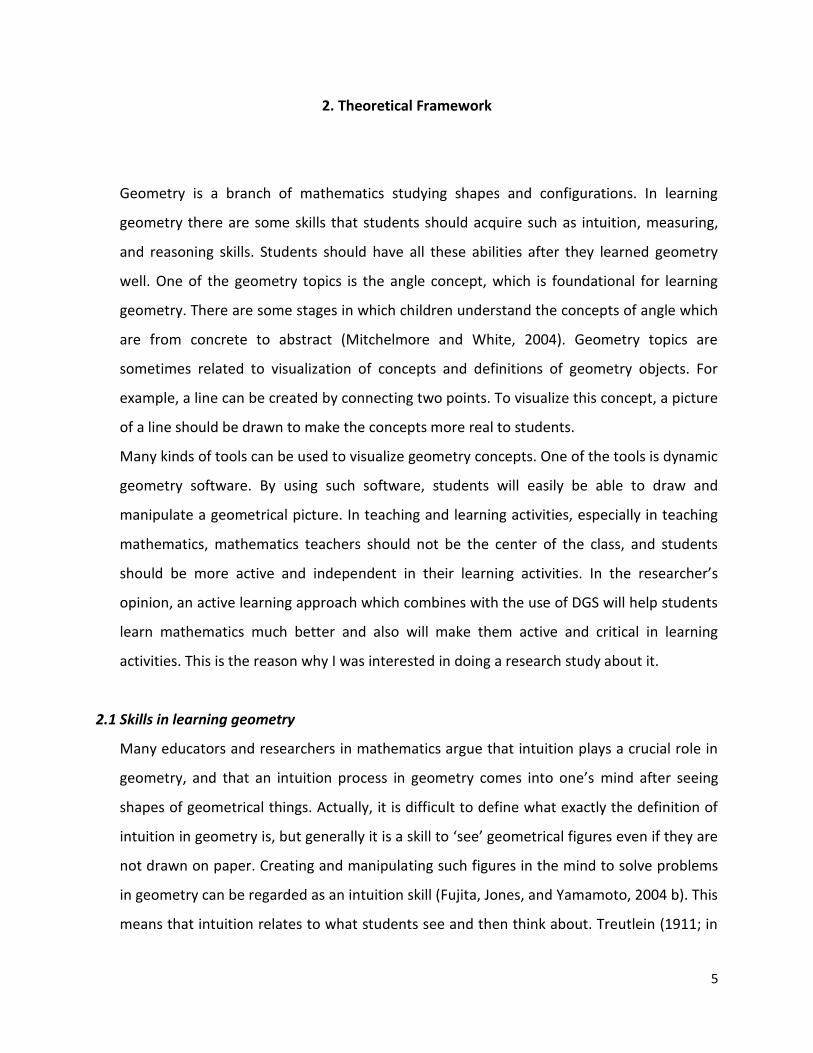
geometry was very important. An interesting example of Treutlein’s tasks for students is
when he asked students to make new figures in their mind by manipulating two (given)
triangles. (see figure 2.1)
Figure 2.1 Formation of new figures
Students were asked to make as many combination figures as they could by mentally
manipulating the first two triangles. The more often students use their ‘imagination’ in
geometry, the higher the possibility that they improve their intuition skill in it. To be a
successful problem solver in geometry, a student must practice and exercise a skill, which is
called ‘geometrical intuition’, in creating and manipulating geometrical figures in the mind,
perceiving geometrical properties, relating images to concepts and theorems in geometry,
and deciding where and how to start showing a given problem in geometry (Fujita, Jones,
and Yamamoto, 2004 a).
Measuring in geometry is one of the important skills in order to determine the size of an
angle, length, area, or volume of geometrical things. Measuring in geometry is mostly
related to using tools such as a ruler, a compass, a protractor, etc. By using such tools
students can measure real geometrical things, and they can investigate whether their
intuition about geometrical objects is accurate or not. For example, when students are
asked to investigate whether two given triangles are congruent or not, students can use
their intuition to answer the question. However, to make sure whether the students’

7
intuitive answer is correct or not, they need to use a ruler and a protractor to measure all
properties of each triangle.
Reasoning in geometry relates to abilities to give logical explanations, argumentations,
verifications, or proofs to arrive at convincing solutions to geometrical problems. Intuition
and measuring skills need to be supported by reasoning skills. This means that reasoning
plays a justification role for what intuition and measurement give as solutions to geometry
problems. Actually, good reasoning will make a solution of a geometry problem more
mathematical and more elegant. Through reasoning skills students can enhance their
understanding about geometry and find it possible to make other theories from what they
have learned and understood.
Geometry deals with mental entities (geometrical figures) which possess conceptual and
figural characters (Fischbein, 1993). Concepts and images are considered two basically
distinct categories of mental entities. Pieron (1957; in Fischbein, 1993) defines a concept as
a symbolic representation (almost always verbal) used in the process of abstract thinking
and possessing a general significance corresponding to an ensemble of concrete
representations with regard to what they have in common. Meanwhile, an image is a
sensory representation of an object or phenomenon. For example, an angle is an abstract
ideal concept, but it also possesses figural properties. Actually, the absolute perfection of a
geometrical angle cannot be found in reality, even though we can find many different
contexts of angle.
2.2 How children think and learn about concepts of angle
Mathematical objects may best be described as abstract-apart, since mathematics is
essentially a self-contained system, but on the other hand, fundamental mathematical ideas
are closely related to the real world and their learning involves empirical concepts
(Mitchelmore and White, 2004). In everyday life we can see situations around us as many
kinds of angle contexts, such as the intersection between two streets, inclination or slope,
8
corners of a table, an end point of a pen, etc. That is why the angle concept is special
because it can appear in so many different contexts. Henderson (in Lehrer, 2003) suggests
three conceptions of angle, which are (1) angle as movement, (2) angle as a geometric
shape, and (3) angle as a measure. The angle concept as movement can be contextual in
rotation or sweep, the angle concept as a geometric shape can be contextual in a
delineation of space by two intersecting lines, and the angle concept as a measure can be
contextual in a perspective that coordinates the first two.
Children find it difficult to learn the angle concept because of the multifaceted nature of
angle (Mitchelmore & White, 2000), and to acquire a general concept of angle, students
need to see the similarities between the various angle contexts and identify their essential
common features (Mitchelmore & White, 2004). In understanding about concepts of angle,
children pass through some developmental stages, during which “children progressively
recognize deeper and deeper similarities between their physical angle experiences and
classify them firstly into specific situations, then into more general contexts, and finally into
abstract domains”, and during which, from the classification at each stage of development,
an angle concept is abstracted (Mitchlemore & White, 2000).
2.3 Dynamic Geometry Software (DGS)
Teaching mathematics in a regular or traditional way without using ICT does not mean that
the method is not appropriate for students. However, teaching mathematics through using
ICT nowadays has become a familiar trend in many countries. Using ICT in education is a
method to help teachers and students to interact in a better way in teaching-learning
activities (Jhurree, 2005). One example of the use of ICT in education is using dynamic
geometry software to teach mathematics to students, especially geometry. Dynamic
geometry software is a certain type of software which is predominantly used for the
construction and analysis of tasks and problems in elementary geometry (Straber, Bielefeld,
and Lulea, 2002). With this software a user can construct, create, and manipulate all kinds
of geometrical shapes. Using DGS in learning activities will be helpful to students, because it
9
provides them with access to the world of geometrical theorems, which is mediated by
features of the software environment, certainly in the vital early and intermediate stages of
using the software (Jones, 2000).
There are many kinds of DGS such as Cabri, Cinderela, Geogebra, etc. Some are free
software, which means users do not need a license to use the software; one of these is
Geogebra. This software can be downloaded free of charge on the official site of Geogebra
which is http://www.geogebra.org/cms/. Geogebra provides many tools in which users can
interactively create and manipulate geometrical shapes to find geometrical theories. This
software does not require special skills in computer programming to use it. To learn about
angle concepts, Geogebra also provides many tools to students to enable them to
understand angle concepts. Students can do many experiments by creating, drawing,
constructing, and manipulating any angles they desire. Since geometry always relates to
shapes and configurations, visualization is very important in helping students to learn
geometry. By providing visualizations of geometrical shapes children will easily learn to
recognize them, and after this they can use their intuition, measuring, and reasoning skills
to respond to questions related to the shapes. Since Geogebra provides such good tools for
visualization of geometrical objects, I chose Geogebra as the DGS to use in teaching
geometry in my intervention.
2.4 Active Learning
In the traditional teaching method, teachers are always being the center of teaching and
learning activities, which means that teachers are active, and students are passive in the
class. In this method teachers give lectures to students and after that teachers give some
examples of what they just taught. Meanwhile, students are only listening to what their
teachers explain, and doing some exercises after they get some examples of the exercises.
In my opinion, such a teaching method makes students become dependent on their
teachers, so that they will not be able to learn how to be critical, innovative, and creative in
their learning activities. Students will only get superficial understanding of what they
10
learned by such a rote method. In my opinion, to overcome this problem, mathematics
teachers should modify or even change their traditional teaching method to an active
learning approach.
“Active learning differs from “learning from examples” in that the learning algorithm
assumes at least some control over what part of the input domain it receives information
about” (Atlas, L, Chon, D., & Ladner, R. 1990). This means that a teaching method which
consists of only giving students some examples and then asking them to learn from those
and after that asking students to solve some similar questions by themselves is not an active
learning technique. In an active learning approach, teachers should be more aware of their
students’ actions in learning activities, and teachers should make their students more
active, more engaged, and more critical in class activities. To prepare for active learning
activities, teachers should design a lesson plan in which students must read, write, discuss,
or be engaged in solving problems (Bonwell, C. Charles, 1991). Therefore, in such teaching
methods, teachers are not the center of the class, but students are the centre of the
learning activities. “Most important, to be actively involved, students must engage in such
higher-order thinking tasks as analysis, synthesis, and evaluation. Within this context, it is
proposed that strategies promoting active learning be defined as instructional activities
involving students in doing and thinking about what they are doing” (Bonwell, C. Charles,
1991). Bonwell suggests some major characteristics associated with active learning
strategies: “students are involved in more than passive learning; students are engaged in
activities; there is less emphasis placed on information transmission and greater emphasis
placed on developing student skills; there is greater emphasis placed on the exploration of
attitudes and values; students' motivation is increased; students can receive immediate
feedback from their instructor; and students are involved in higher order thinking (analysis,
synthesis, evaluation).” Therefore I propose that an active learning approach should be
considered as one possible innovation of teaching methods to be applied in teaching and
learning activities.
11
3. Research Questions
The main research question:
Is there any difference in students’ achievement between those who have been taught
about angles according to an active learning approach using DGS and those who have been
taught in the traditional way, both in a first level of junior high school in Indonesia?
Sub-research questions:
1. Does the active learning approach using DGS help motivate students to learn geometry?
2. Do students feel that the active learning approach using DGS helps them to understand
geometry?
3. Does the active learning approach using DGS help students to improve their abilities of
seeing, measuring, and reasoning in learning geometry?
Expectation of the research
In this research, the researcher expected that the researcher’s intervention would make a
significant difference in students’ achievement between those two classes.
The researcher also expected that the researcher’s intervention would help motivate
students to learn geometry.
The researcher expected that the intervention would help students to understand geometry
and that students would notice this.
Because the intervention assignments, both the paper and DGS assignments, were aimed at
improving students’ abilities in seeing, measuring and reasoning, the researcher expected to

12
see improvements in students’ ability to recognize angles and angle patterns, to measure
angles, and to reason about angles.
13
4. Method
4.1 Research design
There were two classes involved in this research, which were the experimental class and the
control class. Both classes were at the same level of junior high school, which was the first level.
However in this research, the experimental class and the control class got different treatments.
The control class was taught by the researcher using the set of activities which were developed
by the researcher. Meanwhile the control class was taught by the collaborative teacher using
her own regular teaching method.
The researcher developed a set of activities in which students of the experimental class could
learn a geometry topic about angles, doing this in a double section for each meeting. During the
first section students did activities without using dynamic geometry software, and during the
second section they learned geometry using dynamic geometry software. In this research the
researcher used Geogebra software.
The collaborative teacher developed her own lesson activities with her own choice of
mathematics books. Dynamic geometry software was not involved in these activities.
4.2 Data collection methods
To answer the main research question and the sub-research questions, the researcher used a
pretest, a posttest, questionnaires, interviews, and research field notes as data sources.
Pretest and Posttest
Before the experimental teaching of the angle concept starts, both classes did a pretest;
after the teaching of angles ended, both classes did a posttest. The pretest and the posttest
were not exactly the same, but they were about the same topic which was geometry of
angles to the extent that it was taught during the intervention.
14
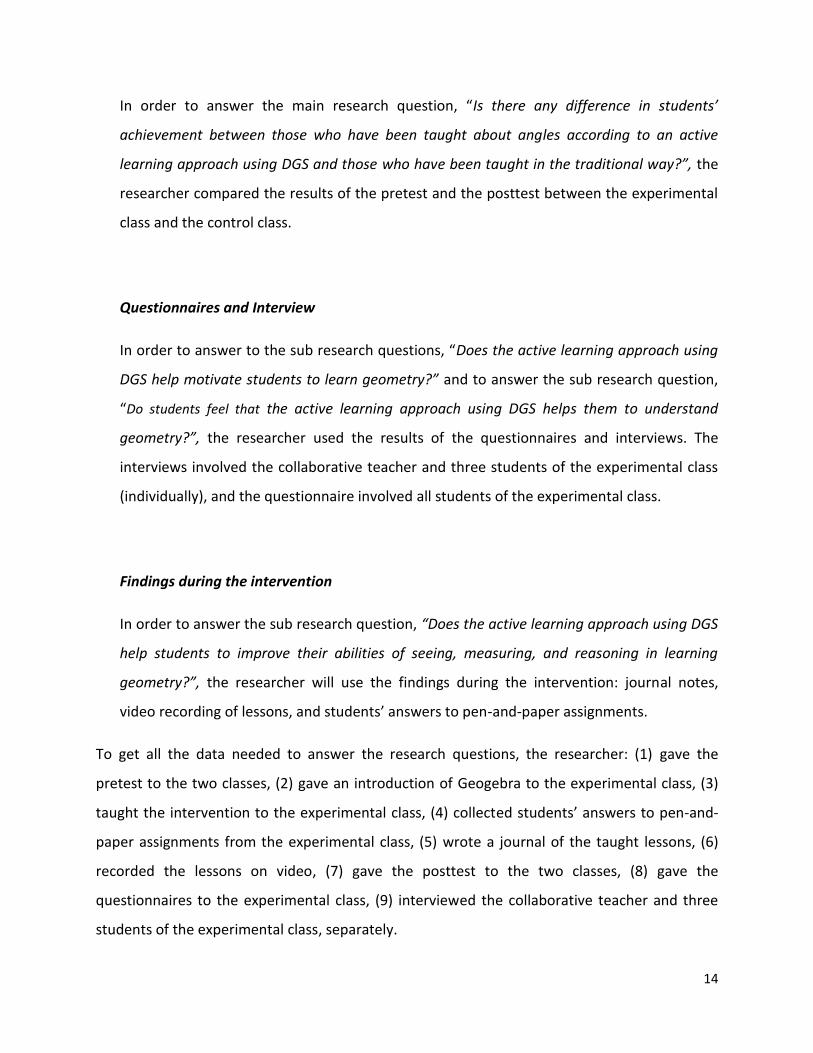
In order to answer the main research question, “Is there any difference in students’
achievement between those who have been taught about angles according to an active
learning approach using DGS and those who have been taught in the traditional way?”, the
researcher compared the results of the pretest and the posttest between the experimental
class and the control class.
Questionnaires and Interview
In order to answer to the sub research questions, “Does the active learning approach using
DGS help motivate students to learn geometry?” and to answer the sub research question,
“Do students feel that the active learning approach using DGS helps them to understand
geometry?”, the researcher used the results of the questionnaires and interviews. The
interviews involved the collaborative teacher and three students of the experimental class
(individually), and the questionnaire involved all students of the experimental class.
Findings during the intervention
In order to answer the sub research question, “Does the active learning approach using DGS
help students to improve their abilities of seeing, measuring, and reasoning in learning
geometry?”, the researcher will use the findings during the intervention: journal notes,
video recording of lessons, and students’ answers to pen-and-paper assignments.
To get all the data needed to answer the research questions, the researcher: (1) gave the
pretest to the two classes, (2) gave an introduction of Geogebra to the experimental class, (3)
taught the intervention to the experimental class, (4) collected students’ answers to pen-and-
paper assignments from the experimental class, (5) wrote a journal of the taught lessons, (6)
recorded the lessons on video, (7) gave the posttest to the two classes, (8) gave the
questionnaires to the experimental class, (9) interviewed the collaborative teacher and three
students of the experimental class, separately.
15
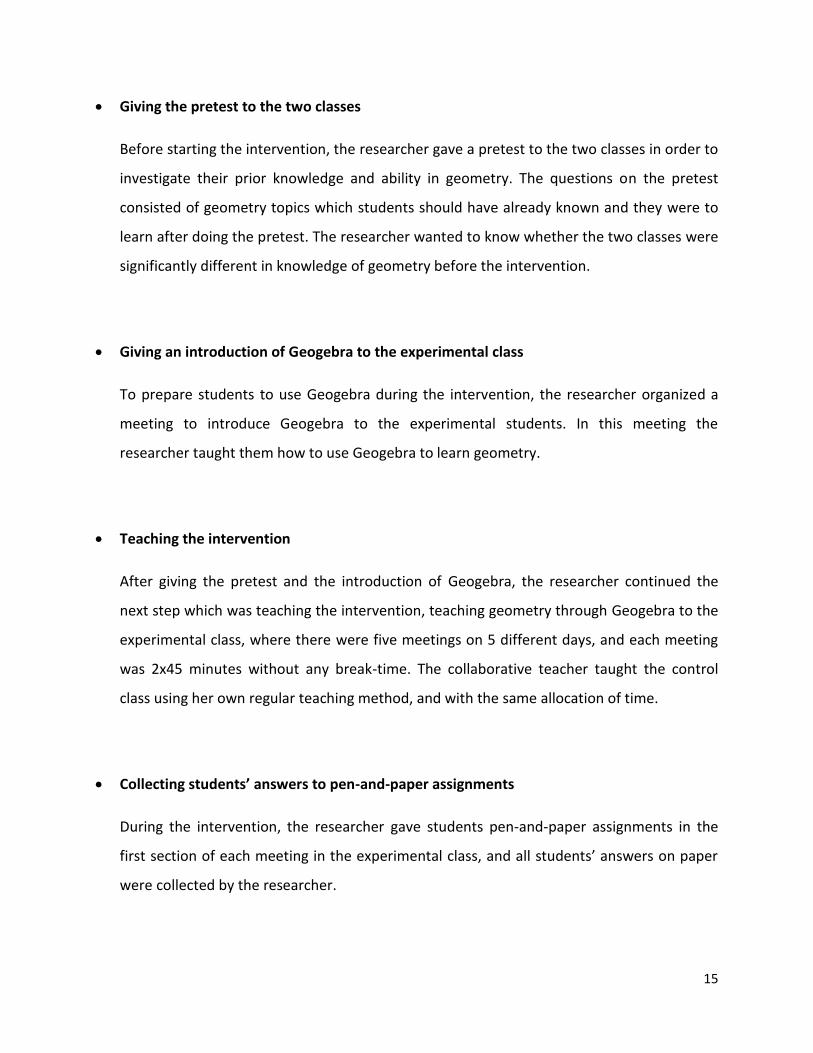
Giving the pretest to the two classes
Before starting the intervention, the researcher gave a pretest to the two classes in order to
investigate their prior knowledge and ability in geometry. The questions on the pretest
consisted of geometry topics which students should have already known and they were to
learn after doing the pretest. The researcher wanted to know whether the two classes were
significantly different in knowledge of geometry before the intervention.
Giving an introduction of Geogebra to the experimental class
To prepare students to use Geogebra during the intervention, the researcher organized a
meeting to introduce Geogebra to the experimental students. In this meeting the
researcher taught them how to use Geogebra to learn geometry.
Teaching the intervention
After giving the pretest and the introduction of Geogebra, the researcher continued the
next step which was teaching the intervention, teaching geometry through Geogebra to the
experimental class, where there were five meetings on 5 different days, and each meeting
was 2x45 minutes without any break-time. The collaborative teacher taught the control
class using her own regular teaching method, and with the same allocation of time.
Collecting students’ answers to pen-and-paper assignments
During the intervention, the researcher gave students pen-and-paper assignments in the
first section of each meeting in the experimental class, and all students’ answers on paper
were collected by the researcher.
16
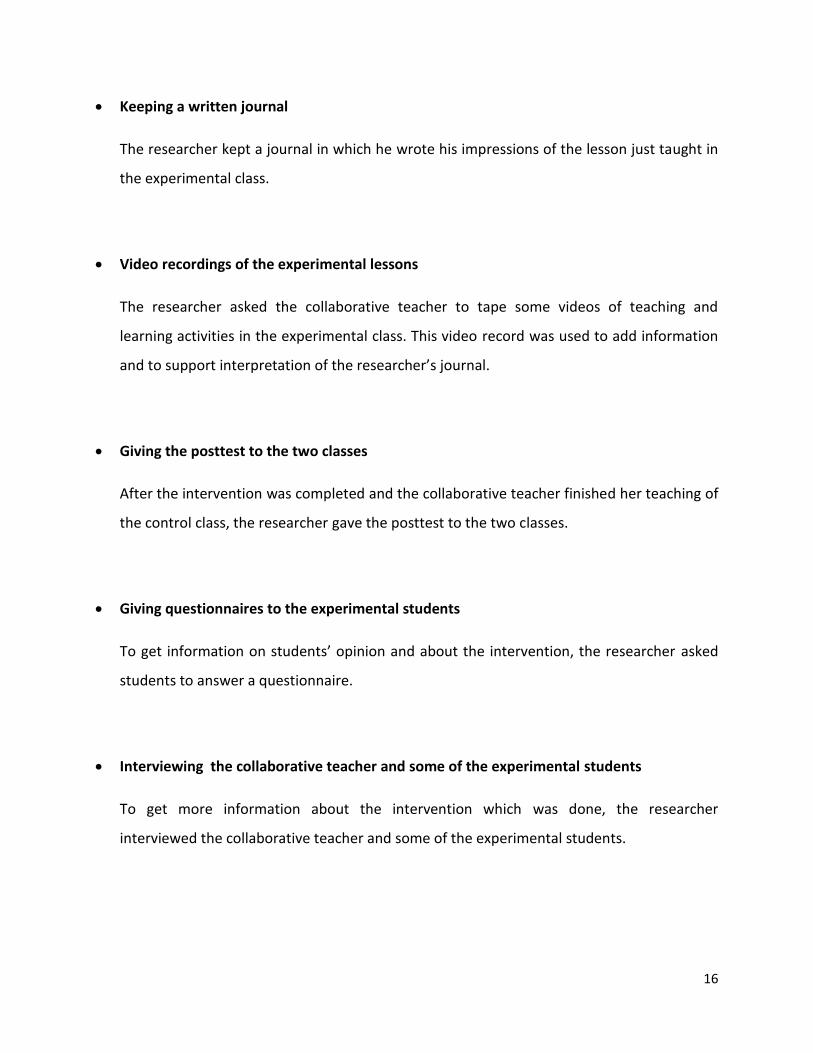
Keeping a written journal
The researcher kept a journal in which he wrote his impressions of the lesson just taught in
the experimental class.
Video recordings of the experimental lessons
The researcher asked the collaborative teacher to tape some videos of teaching and
learning activities in the experimental class. This video record was used to add information
and to support interpretation of the researcher’s journal.
Giving the posttest to the two classes
After the intervention was completed and the collaborative teacher finished her teaching of
the control class, the researcher gave the posttest to the two classes.
Giving questionnaires to the experimental students
To get information on students’ opinion and about the intervention, the researcher asked
students to answer a questionnaire.
Interviewing the collaborative teacher and some of the experimental students
To get more information about the intervention which was done, the researcher
interviewed the collaborative teacher and some of the experimental students.

17
4.3 Data analysis method
Pretest and posttest were compared using t-test and ANCOVA.
Questionnaire results were elaborated by devising categories for the one open question
(see pages 39-40). For the closed (Likert scale) questions, for each question the
students’ answers were classified as positive, negative, or neutral with respect to the
intervention.
Findings during the intervention were analyzed by comparing students’ answers to
expected answers and in case of big differences: trying to understand the reasoning
behind students’ answers. Difficulties that appeared more than once were noted and for
each of these difficulties it was attempted to determine if students did overcome the
difficulty and if so, how.

18
19
5. Research Setting and Teaching Design
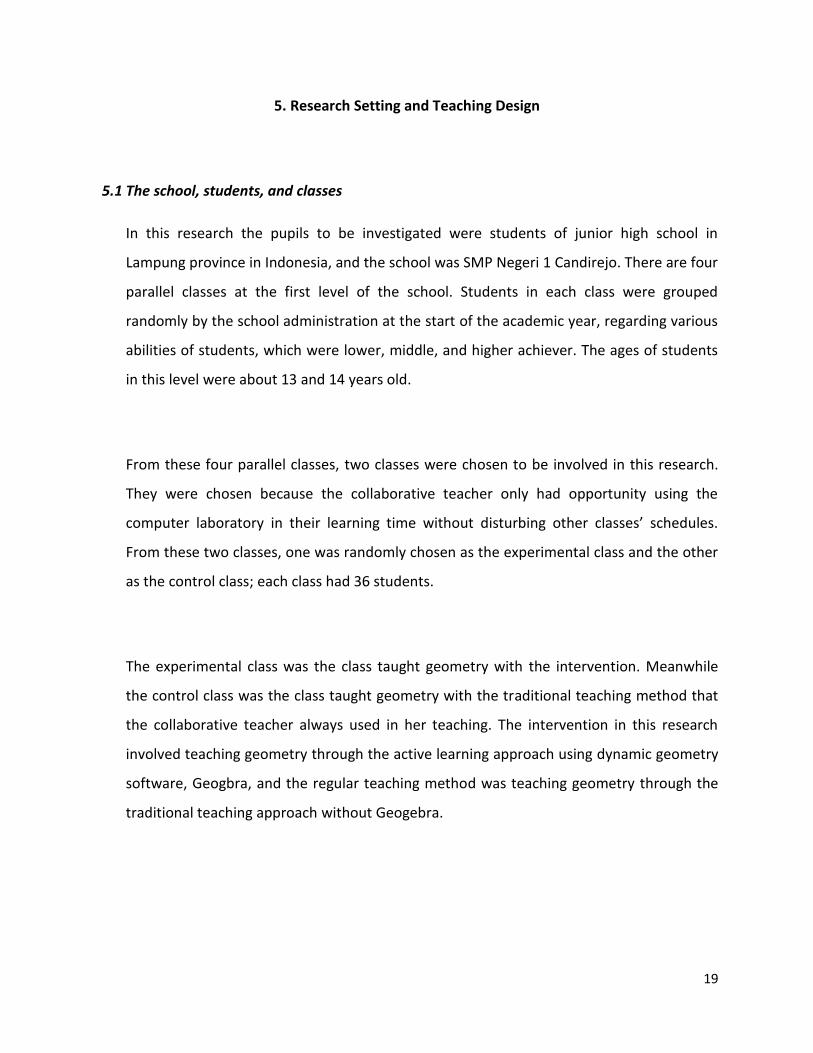
5.1 The school, students, and classes
In this research the pupils to be investigated were students of junior high school in
Lampung province in Indonesia, and the school was SMP Negeri 1 Candirejo. There are four
parallel classes at the first level of the school. Students in each class were grouped
randomly by the school administration at the start of the academic year, regarding various
abilities of students, which were lower, middle, and higher achiever. The ages of students
in this level were about 13 and 14 years old.
From these four parallel classes, two classes were chosen to be involved in this research.
They were chosen because the collaborative teacher only had opportunity using the
computer laboratory in their learning time without disturbing other classes’ schedules.
From these two classes, one was randomly chosen as the experimental class and the other
as the control class; each class had 36 students.
The experimental class was the class taught geometry with the intervention. Meanwhile
the control class was the class taught geometry with the traditional teaching method that
the collaborative teacher always used in her teaching. The intervention in this research
involved teaching geometry through the active learning approach using dynamic geometry
software, Geogbra, and the regular teaching method was teaching geometry through the
traditional teaching approach without Geogebra.
20
5.2 The researcher’s role and the collaborative teacher’s role
There were five meetings of teaching geometry through Geogebra to the experimental
class. In the intervention there were always two consecutive sections in every meeting,
which were the first section without Geogebra, and the second section with Geogebra. In
each section, all activities were student centered, which means the researcher just gave
the tasks without giving a lecture about the topic that students would learn, but the
researcher gave some help and hints to students who had a problem when doing the tasks.
At the end of each meeting the researcher always gave an explanation and emphasized
what students just learned and did in each section to make students better understand
what they could take home from the learning activities.
For instance, the researcher gave a task for students to recognize and to measure a
straight angle. Instead of using direct teaching and telling students that a straight angle is
1800, the researcher preferred to give students guiding questions which were displayed
one by one on the wall through a projector. The first question was “do you remember how
many degrees is in one full rotation of a circle?” Actually, this question was planned to be
done privately by each group, but because many students did not remember, the
researcher asked this question openly of the whole class. And the researcher just
confirmed the correct answer received from one of students. The researcher then
displayed a picture of a diameter AOB and asked students the next question, “how many
degrees is angle AOB?” In this strategy, the researcher always tried to make students more
active in exploring their own thinking.
The collaborative teacher in each of the researcher’s intervention meetings just assisted
the researcher in taking some pictures, taping some videos, and giving some feedback to
the researcher after each meeting. Meanwhile the researcher did not have any
contribution to the collaborative teacher’s class, which was the control class, because the
collaborative teacher objected when the researcher asked to observe her class during her
teaching. However the researcher already knew her teaching method from a telephonic
interview conducted before the start of the research as well as from various talks during
21
the intervention period. Her teaching method was not different from most mathematics
teachers’ teaching method in my region. In her teaching, at the beginning of the class she
gave a lecture of the topics she wanted to teach, and after that she gave students some
examples of questions with the answers, and then she continued asking students to
answer some questions similar to the examples. She also used some discussion during her
teaching, but mostly all activities were teacher centered.
5.3 A Teaching Design for the Subject of Angles
For the experimental class, a series of assignments was developed, aiming at the concept
of angle. The design of these assignments (see appendix xxx) as well as their intended use
will be described below. In the first meeting the researcher taught students how to
recognize an angle shape and what the definition of an angle is. Mathematically, a
common definition of an angle is a shape, formed by two lines or rays diverging from a
common point (the vertex of an angle). To teach this definition to students, in the first
section of a meeting the researcher asked students to recognize an angle shape by putting
together two end points of two small sticks which they brought into the class. In this task
the researcher hoped that students learned that from real things they could create an
angle shape. Meanwhile in the second section with Geogebra, students were asked to
draw two segment lines and to put the end points of two segment lines together, so as to
create an angle. In this activity the researcher hoped that students could see the
visualization of attributes of an angle. These are the attributes of an angle that students
were supposed to learn: a vertex, legs, interior, and exterior of the angle. The definitions of
each attribute are described below:
The vertex of an angle is the common point at which the two lines or rays are
joined.
The legs (sides) of an angle are the two lines that make it up.
22
The interior of an angle is the space or the area between the rays that make up
an angle, and extending away from the vertex to infinity.
The exterior of an angle is all space on the plane that is not the interior.
In the researcher’s opinion, by using Geogebra tools students should be able to recognize
all the attributes of an angle in an easy way, because Geogebra provides tools to help
students to construct and to recognize all those attributes, which could not be recognized
easily by shaping an angle from two small sticks in the section without Geogebra, especially
since students do not see any visualization of points of an angle formed by two small sticks
(see picture 5.1 and picture 5.2).
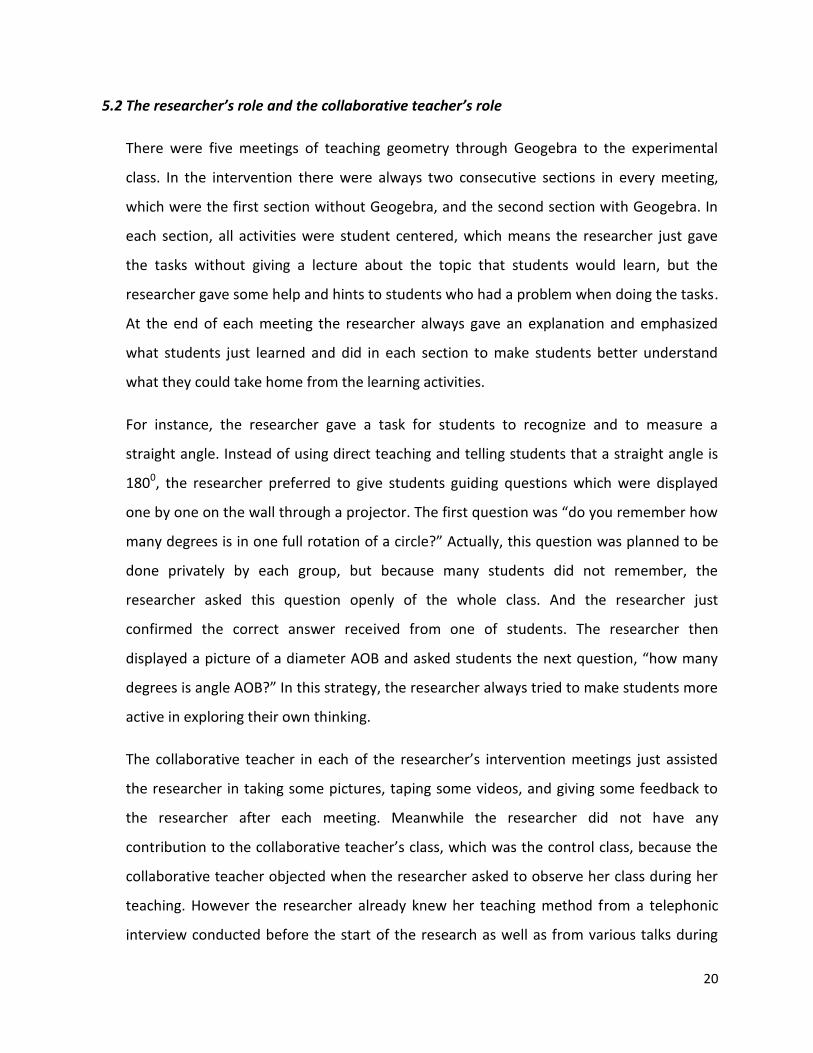
Picture 5.1 An angle BAC constructed by Geogebra
An angle BAC in the picture above is really clearly showing a corner point A, two segment
lines of AB and AC, and an area of angle BAC (colored area).
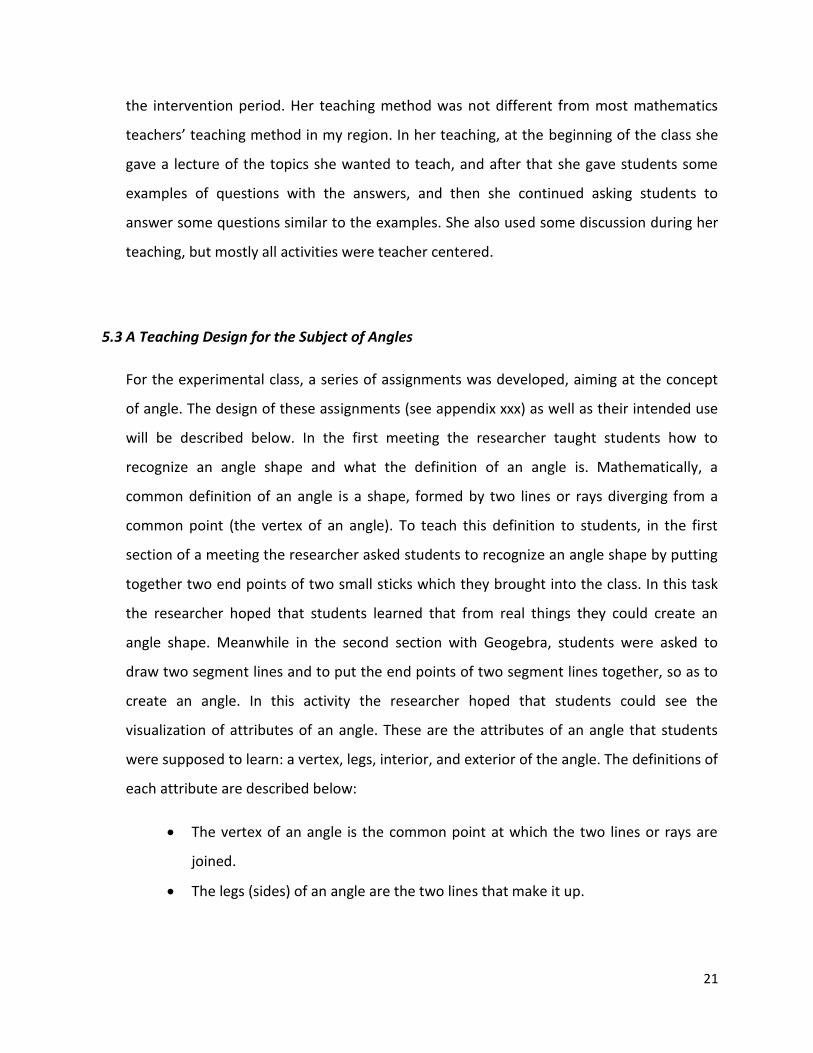
Picture 5.2 An angle constructed by two small sticks
23
In picture 5.2, the researcher thinks that students only can recognize an angle shape, but
they do not see a concrete image of end points, vertex and area of an angle.
Even though drawing an angle can be done in the traditional way using a ruler, in the
researcher’s opinion, drawing an angle using Geogebra tools gives students another
experience which is different from what they are used to. After the students were able to
shape an angle, then they would learn how to identify an angle by its own name based on
the names of points of the angle. There are two ways to identify an angle which are like
this: (1) ABC (the angle symbol, followed by three points that define the angle, with the
middle letter identifying the vertex, and the other two indentifying points on both the
legs), or (2) B (just by the vertex, as long as it is not ambiguous). Based on the researcher’s
experience in teaching mathematics, a lot of students make mistakes in naming an angle,
for example, when they are asked to draw angle ABC, they draw an angle BAC, and when
they are asked to name an angle from a pictured angle BAC, they name it as angle ABC. By
using Geogebra tools, students will easily to recognize these mistakes, because Geogebra
tools automatically measures an angle after the student identifies it by clicking three points
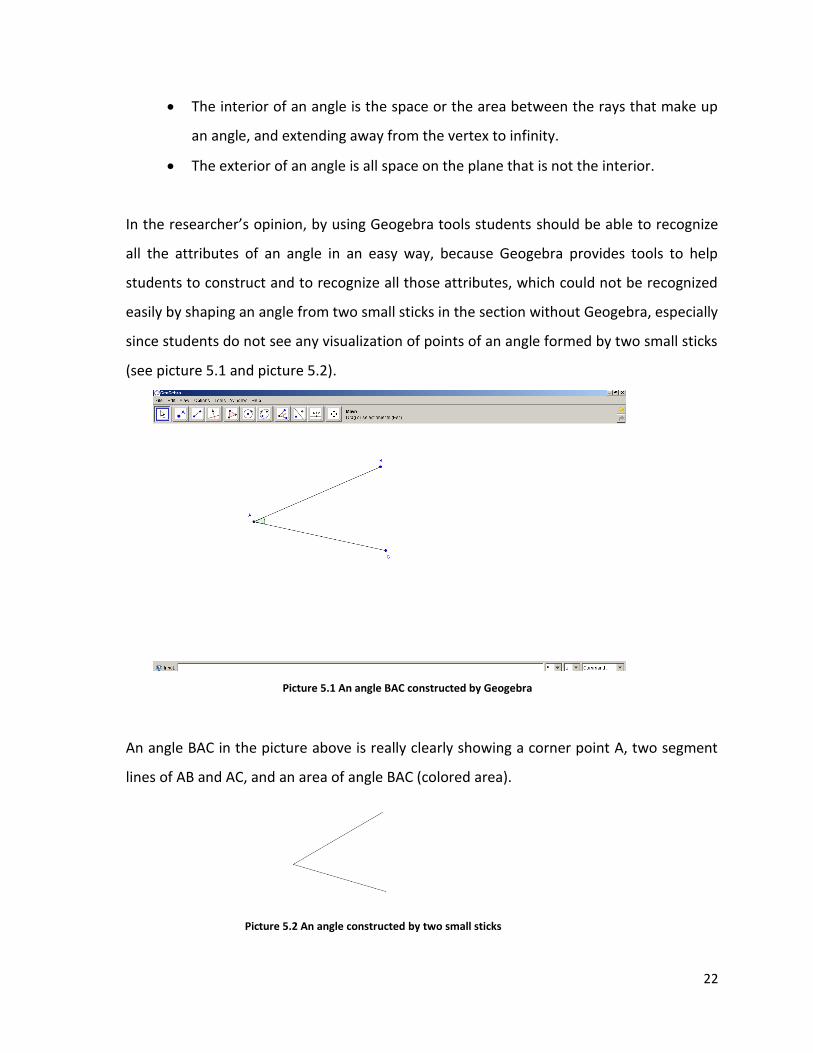
in the right order. (See picture 5.3 and picture 5.4)
Picture 5.3 An angle constructed by clicking points A, B, and C in sequent order
24
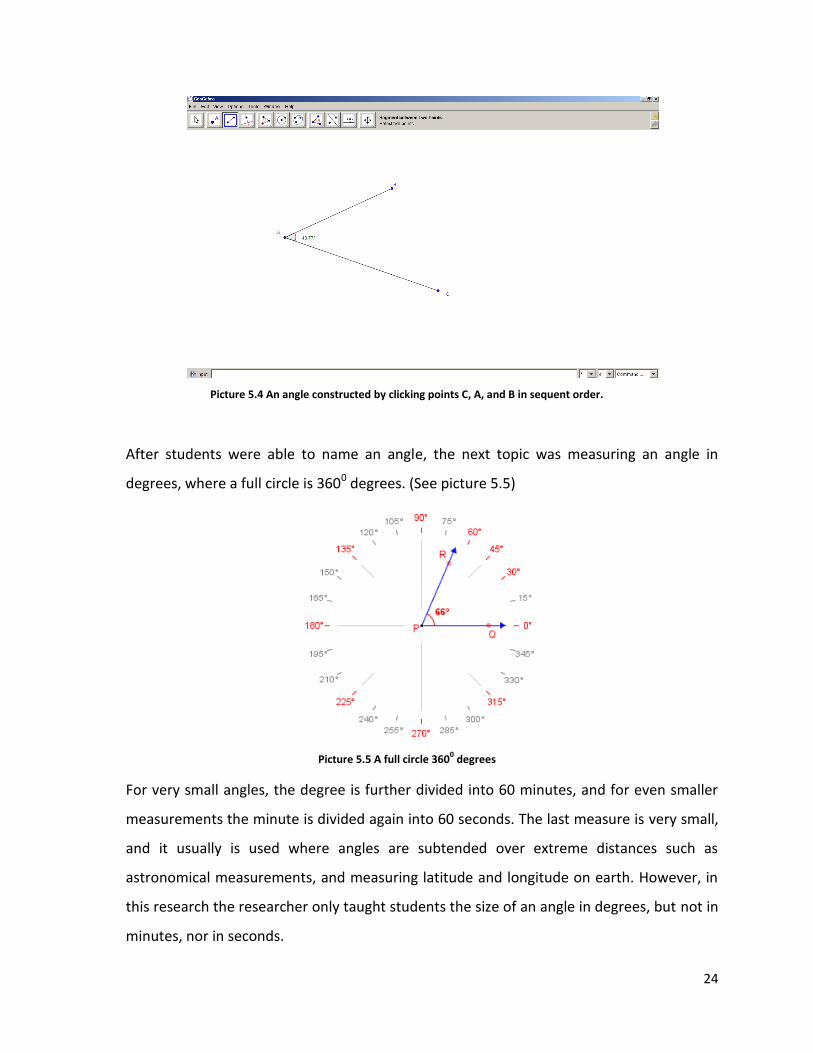
Picture 5.4 An angle constructed by clicking points C, A, and B in sequent order.
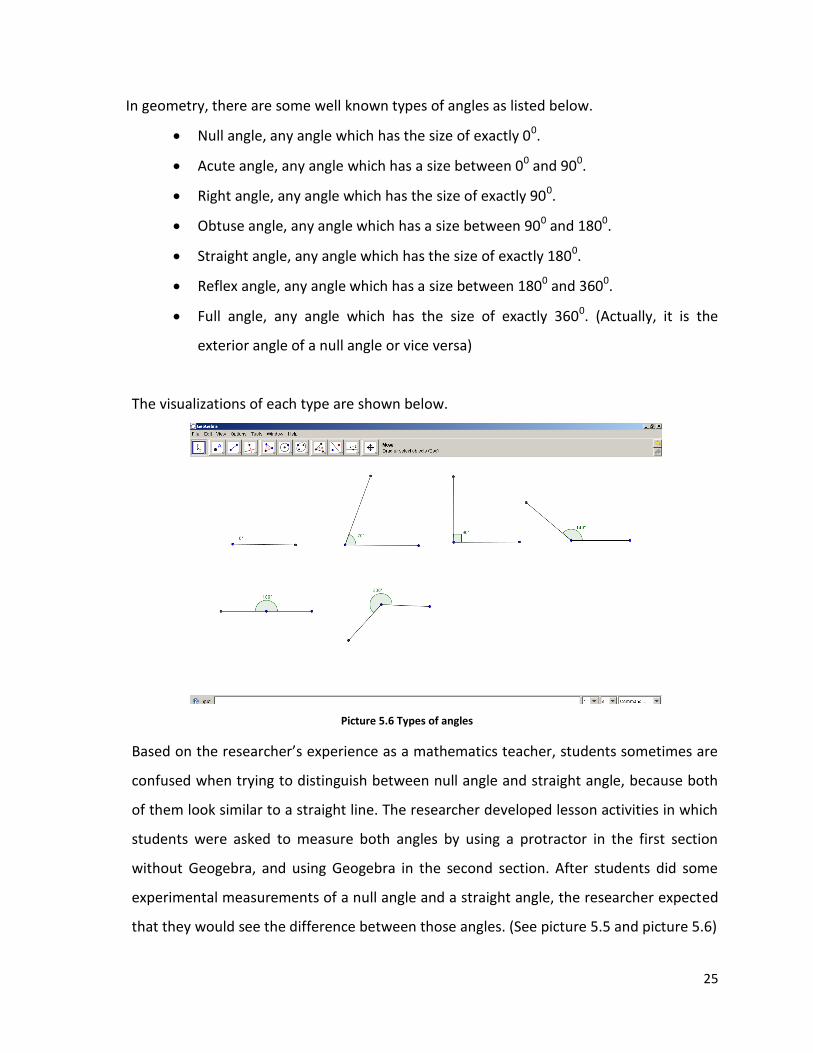
After students were able to name an angle, the next topic was measuring an angle in
degrees, where a full circle is 3600 degrees. (See picture 5.5)
Picture 5.5 A full circle 3600 degrees
For very small angles, the degree is further divided into 60 minutes, and for even smaller
measurements the minute is divided again into 60 seconds. The last measure is very small,
and it usually is used where angles are subtended over extreme distances such as
astronomical measurements, and measuring latitude and longitude on earth. However, in
this research the researcher only taught students the size of an angle in degrees, but not in
minutes, nor in seconds.
25
In geometry, there are some well known types of angles as listed below.
Null angle, any angle which has the size of exactly 00.
Acute angle, any angle which has a size between 00 and 900.
Right angle, any angle which has the size of exactly 900.
Obtuse angle, any angle which has a size between 900 and 1800.
Straight angle, any angle which has the size of exactly 1800.
Reflex angle, any angle which has a size between 1800 and 3600.
Full angle, any angle which has the size of exactly 3600. (Actually, it is the
exterior angle of a null angle or vice versa)
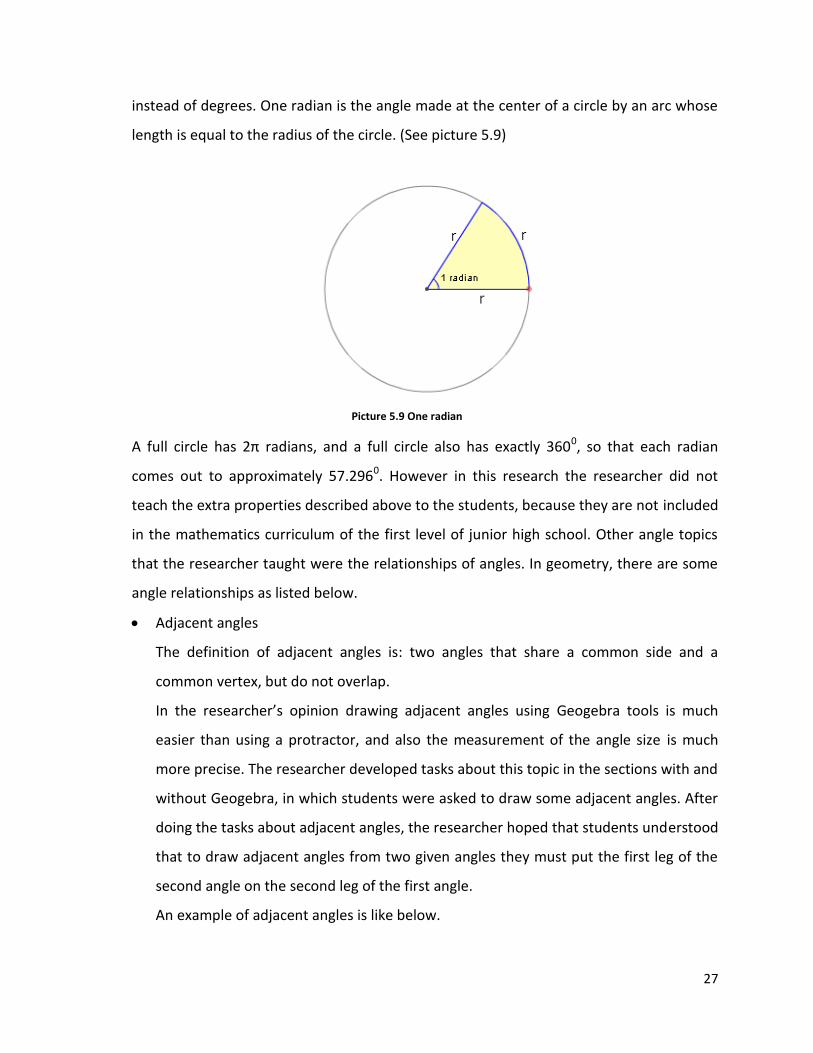
The visualizations of each type are shown below.
Picture 5.6 Types of angles
Based on the researcher’s experience as a mathematics teacher, students sometimes are
confused when trying to distinguish between null angle and straight angle, because both
of them look similar to a straight line. The researcher developed lesson activities in which
students were asked to measure both angles by using a protractor in the first section
without Geogebra, and using Geogebra in the second section. After students did some
experimental measurements of a null angle and a straight angle, the researcher expected
that they would see the difference between those angles. (See picture 5.5 and picture 5.6)

26
Picture 5.7 A straight angle constructed by clicking points A, B, and C consecutively
Picture 5.8 A null angle constructed by clicking points B, A, and C consecutively
A null angle has a corner point which is not lying in between the other points of the null
angle (picture 5.8). Meanwhile a straight angle has a corner point which is lying in
between the other points of the straight angle (picture 5.7).
Actually when used in geometry, angles have some extra properties, in which they can
have a size larger than 3600, can be positive and negative, and are positioned on a
coordinate grid with x and y axes. In that situation they are usually measured in radians
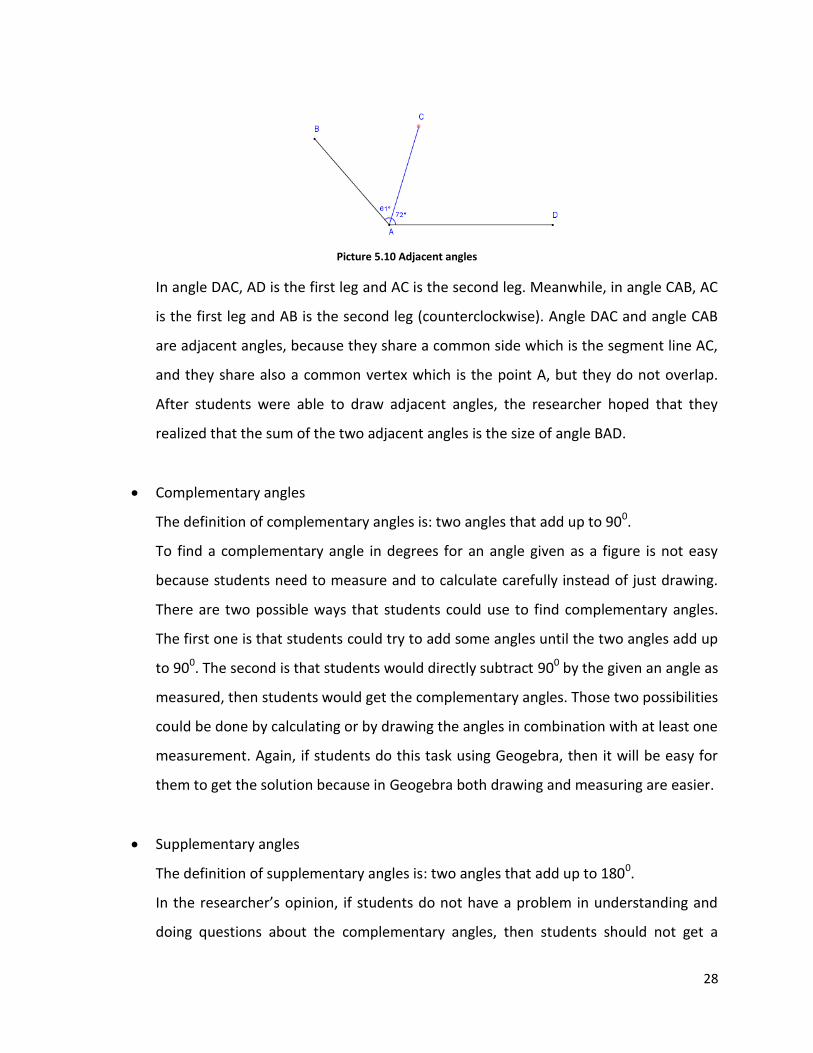
27
instead of degrees. One radian is the angle made at the center of a circle by an arc whose
length is equal to the radius of the circle. (See picture 5.9)
Picture 5.9 One radian
A full circle has 2π radians, and a full circle also has exactly 3600, so that each radian
comes out to approximately 57.2960. However in this research the researcher did not
teach the extra properties described above to the students, because they are not included
in the mathematics curriculum of the first level of junior high school. Other angle topics
that the researcher taught were the relationships of angles. In geometry, there are some
angle relationships as listed below.
Adjacent angles
The definition of adjacent angles is: two angles that share a common side and a
common vertex, but do not overlap.
In the researcher’s opinion drawing adjacent angles using Geogebra tools is much
easier than using a protractor, and also the measurement of the angle size is much
more precise. The researcher developed tasks about this topic in the sections with and
without Geogebra, in which students were asked to draw some adjacent angles. After
doing the tasks about adjacent angles, the researcher hoped that students understood
that to draw adjacent angles from two given angles they must put the first leg of the
second angle on the second leg of the first angle.
An example of adjacent angles is like below.
28
Picture 5.10 Adjacent angles
In angle DAC, AD is the first leg and AC is the second leg. Meanwhile, in angle CAB, AC
is the first leg and AB is the second leg (counterclockwise). Angle DAC and angle CAB
are adjacent angles, because they share a common side which is the segment line AC,
and they share also a common vertex which is the point A, but they do not overlap.
After students were able to draw adjacent angles, the researcher hoped that they
realized that the sum of the two adjacent angles is the size of angle BAD.
Complementary angles
The definition of complementary angles is: two angles that add up to 900.
To find a complementary angle in degrees for an angle given as a figure is not easy
because students need to measure and to calculate carefully instead of just drawing.
There are two possible ways that students could use to find complementary angles.
The first one is that students could try to add some angles until the two angles add up
to 900. The second is that students would directly subtract 900 by the given an angle as
measured, then students would get the complementary angles. Those two possibilities
could be done by calculating or by drawing the angles in combination with at least one
measurement. Again, if students do this task using Geogebra, then it will be easy for
them to get the solution because in Geogebra both drawing and measuring are easier.
Supplementary angles
The definition of supplementary angles is: two angles that add up to 1800.
In the researcher’s opinion, if students do not have a problem in understanding and
doing questions about the complementary angles, then students should not get a
29
problem in understanding supplementary angles either. However, based on the
researcher’s experience, students sometimes made mistakes by mixing up the two
words, “complementary” and “supplementary”. For example, when students were
asked to find complementary angles, they gave an answer which was supplementary
angles.
Opposite angles
The definition of opposite angles is: a pair of non-adjacent angles formed by the
intersection of two straight lines.
The researcher argues that besides remembering the definition of opposite angles,
students should also be able to recognize opposite angles by the picture of opposite
angles to help students better understand them. In the researcher’s opinion,
visualization of some definitions in mathematics can help students to understand
these definitions.
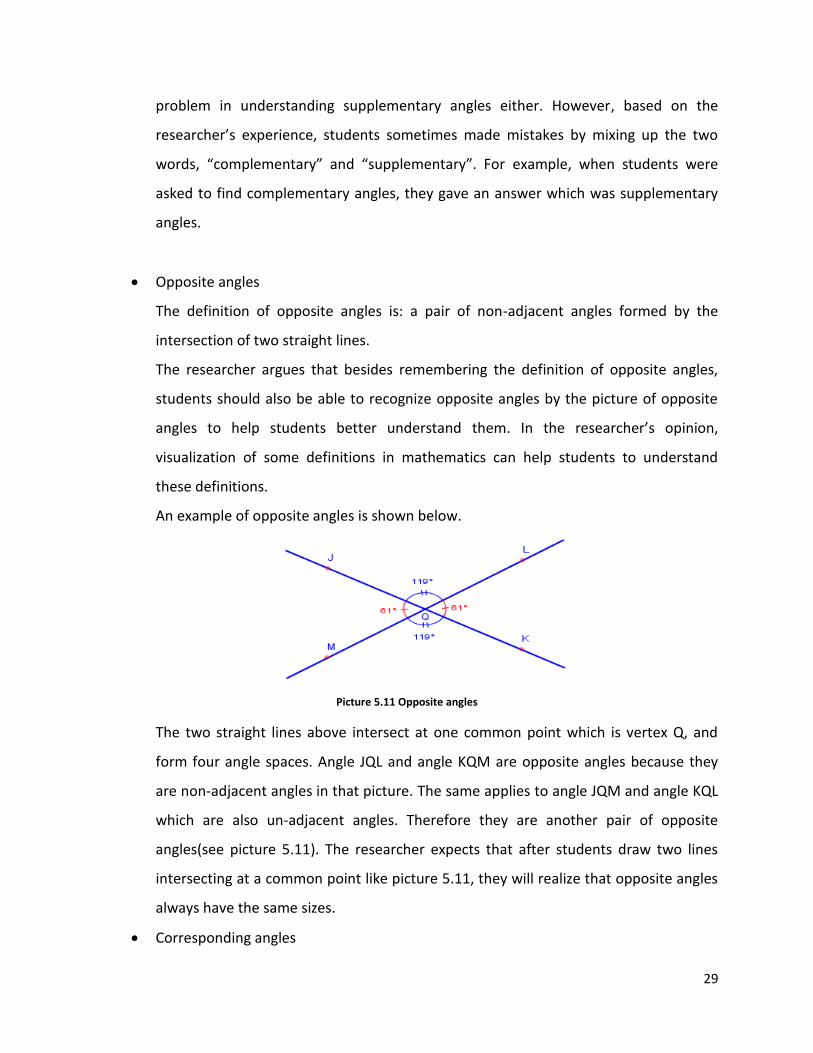
An example of opposite angles is shown below.
Picture 5.11 Opposite angles
The two straight lines above intersect at one common point which is vertex Q, and
form four angle spaces. Angle JQL and angle KQM are opposite angles because they
are non-adjacent angles in that picture. The same applies to angle JQM and angle KQL
which are also un-adjacent angles. Therefore they are another pair of opposite
angles(see picture 5.11). The researcher expects that after students draw two lines
intersecting at a common point like picture 5.11, they will realize that opposite angles
always have the same sizes.
Corresponding angles
30
Corresponding angles are formed where a transversal crosses other lines. A
transversal is a line that cuts across two or more lines. The corresponding angles are
the ones at corresponding locations at each intersection.
In the researcher’s opinion, this relationship of angles is much more difficult than the
previous relationships, because the definition and the visualization of the definition
are a bit complicated to understand. Visualization and examples of the definition are
really important to help students understand, especially to students of junior high
school level.
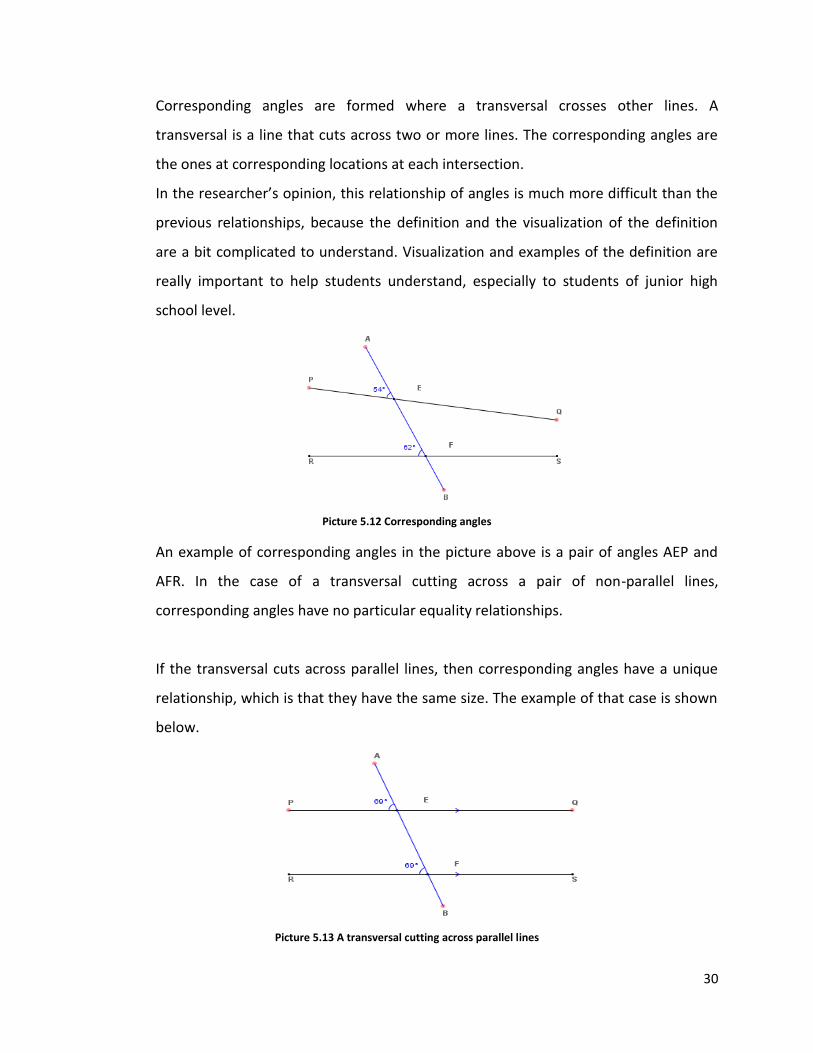
Picture 5.12 Corresponding angles
An example of corresponding angles in the picture above is a pair of angles AEP and
AFR. In the case of a transversal cutting across a pair of non-parallel lines,
corresponding angles have no particular equality relationships.
If the transversal cuts across parallel lines, then corresponding angles have a unique
relationship, which is that they have the same size. The example of that case is shown
below.
Picture 5.13 A transversal cutting across parallel lines
31
In the above case, PQ and RS are parallel lines that are cut by the transversal AB.
Therefore angle AEP and angle AFR have the same size, because they are
corresponding angles in the picture above. Analogous remarks can be made about
other pairs of corresponding angles.
There are other particular angle relationships that occur in the case when the
transversal cuts across two parallel lines, which are alternate interior angles, alternate
exterior angles, interior angles of a transversal, and exterior angles of a transversal.
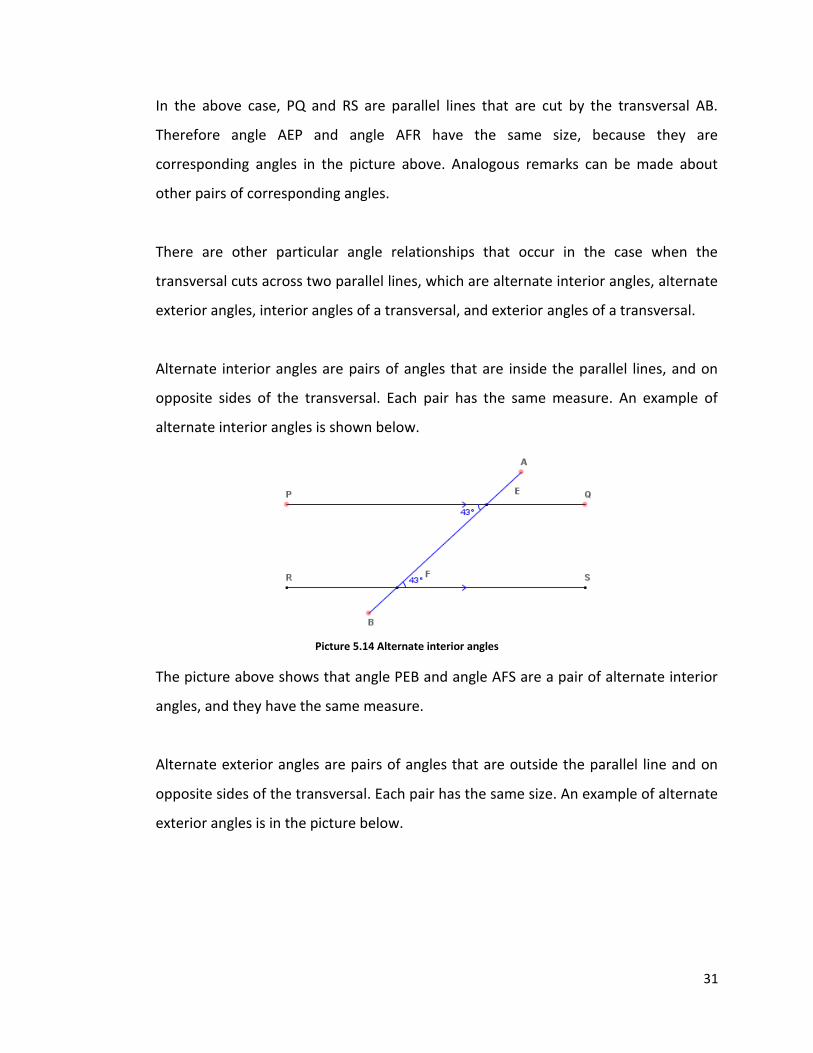
Alternate interior angles are pairs of angles that are inside the parallel lines, and on
opposite sides of the transversal. Each pair has the same measure. An example of
alternate interior angles is shown below.
Picture 5.14 Alternate interior angles
The picture above shows that angle PEB and angle AFS are a pair of alternate interior
angles, and they have the same measure.
Alternate exterior angles are pairs of angles that are outside the parallel line and on
opposite sides of the transversal. Each pair has the same size. An example of alternate
exterior angles is in the picture below.
32
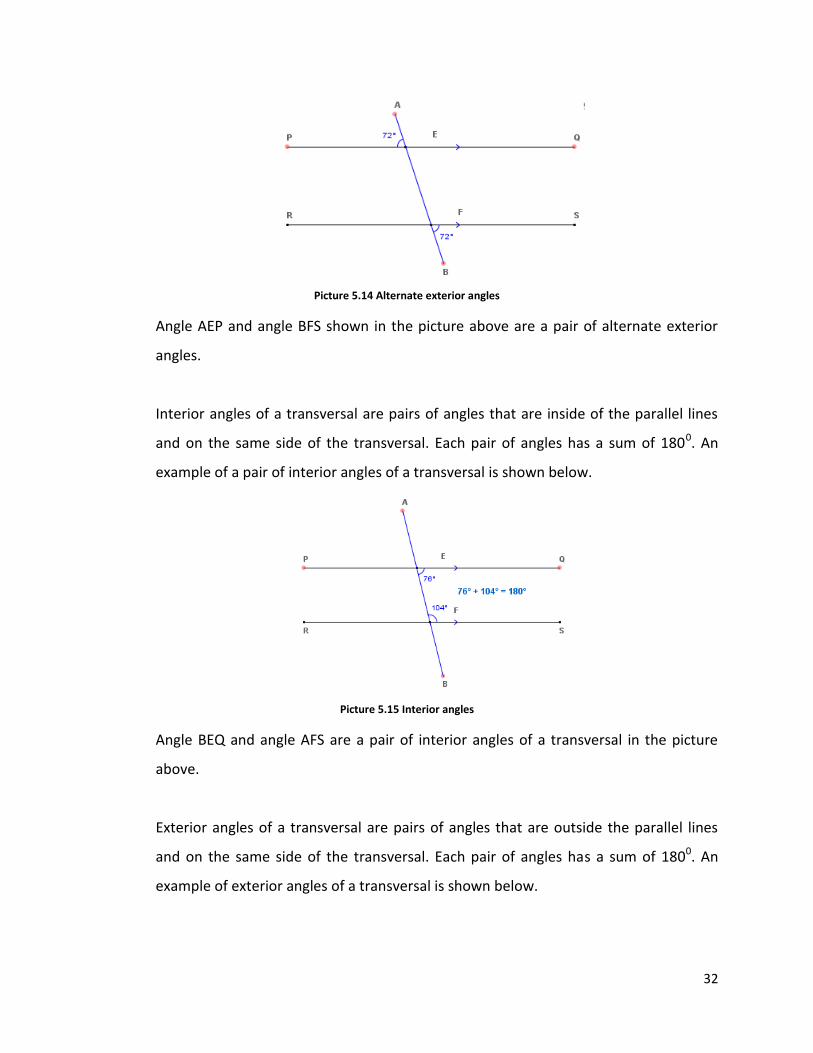
Picture 5.14 Alternate exterior angles
Angle AEP and angle BFS shown in the picture above are a pair of alternate exterior
angles.
Interior angles of a transversal are pairs of angles that are inside of the parallel lines
and on the same side of the transversal. Each pair of angles has a sum of 1800. An
example of a pair of interior angles of a transversal is shown below.
Picture 5.15 Interior angles
Angle BEQ and angle AFS are a pair of interior angles of a transversal in the picture
above.
Exterior angles of a transversal are pairs of angles that are outside the parallel lines
and on the same side of the transversal. Each pair of angles has a sum of 1800. An
example of exterior angles of a transversal is shown below.
33
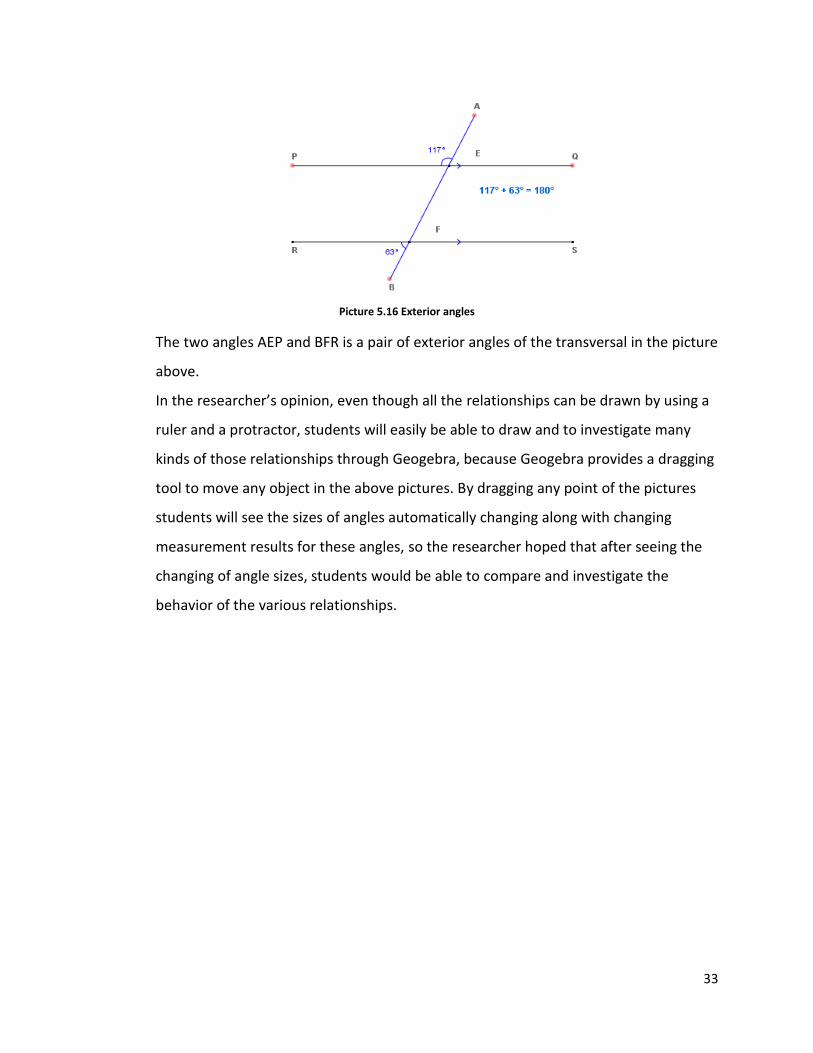
Picture 5.16 Exterior angles
The two angles AEP and BFR is a pair of exterior angles of the transversal in the picture
above.
In the researcher’s opinion, even though all the relationships can be drawn by using a
ruler and a protractor, students will easily be able to draw and to investigate many
kinds of those relationships through Geogebra, because Geogebra provides a dragging
tool to move any object in the above pictures. By dragging any point of the pictures
students will see the sizes of angles automatically changing along with changing
measurement results for these angles, so the researcher hoped that after seeing the
changing of angle sizes, students would be able to compare and investigate the
behavior of the various relationships.

34
35
6. Findings and Data Analysis
In this chapter, the researcher will analyze data and findings during the intervention. First of all,
the researcher will analyze the pretest results of the control class and the experimental class to
see whether both classes are different or not in their pretest results. After that, the researcher
will analyze their posttest results to see whether there is a difference between both classes in
their posttest results. The next step is that the researcher analyzes whether the pretest results
and the treatment significantly predict the posttest results. After that, the researcher is going to
analyze findings of posttest questions to know whether there is a significant effect from the
pretest results and the treatment on students’ answers to each posttest question.
After finishing with the pretest and the posttest data, the researcher will continue to analyze
questionnaire findings to see whether students of the experimental class give positive or
negative opinions about the intervention. After that, the researcher will analyze interview
findings to see whether the collaborative teacher and three students of the experimental class
say positive or negative statements about the intervention.
Finally, the researcher is going to analyze findings of meetings during the intervention in the
experimental class to see how students of the experimental class were affected by the various
activities. All the steps of analyzing data and findings are described below.
6.1 Pre-test
On the pre-test, the control class and the experimental class took the same test questions
which were asking about their previous knowledge and the topic of geometry that they
would learn after the test. Before the pretest, the researcher did not know whether both
classes had the same level of ability in geometry.
The pretest results give information that the control class reached the score-mean 64.69,
meanwhile the experimental class got score-mean 67.58 out of the maximum score (140).
36
The score-means show that the experimental class did better than the control class did in
the pretest. It shows that difference between the means of pretest results is 2.89.
To know whether they were really similar or not, the independent-samples t-test is used to
investigate it.
The outcome gives information that the Levene’s test for equality of variances shows that
the value F (1.461) is not significant (0.237) which means that there is no significant
different in the variances of the two classes, therefore in this case we may assume equal
variances.
Under this assumption the t-test gives a significance value (2-tailed) of 0.474 which is more
than 0.05, therefore there is no significant difference between the means of the two
classes.
The outcome says that even though the experimental class got the score which was better
than the control class, they were not significantly different.
6.2 Post-test
The post-test was held after both the researcher and the collaborative teacher finished
teaching their lesson material to the classes. Although both the pretest and the posttest
were about the subject of angles, the questions were different. We had no intention to
compare the pretest and the posttest directly.
The posttest was given to investigate whether there is any significant difference between
the experimental class and the control class after the intervention. And to investigate the
question the independent-samples t-test is used in this case as well.
In the posttest results the experimental class reached the score-mean 64.49, meanwhile the
control class got a score-mean 49.49 out of the maximum score (150). It shows that the
37
experimental class did better than the control class did, with a difference of 15.00 between
the means.
The outcome of the independent-samples t-test shows that under the Levene’s test for
equality of variances the value F (0.413) is not significant (0.522), which means that there is
no significant difference between the variances of the two classes. Therefore we may
assume equal variance.
Using that assumption, the t-test for equality of means shows a significance (2-tailed) of
0.004 which is less than 0.05, therefore there is a significant difference between the means
of the two classes. It is a lot more significant than the researcher hoped for.
The outcome of the independent-samples t-test of the posttest results tell us that the
experimental class did better than the control class in the posttest.
6.3 Analysis of the pretest, the posttest, and the treatments.
The pretest and posttest design in this research is used for comparing the two classes (the
experimental class and the control class) in their achievement in learning geometry after
they got different treatments (different teaching methods).
In the previous data analysis the control class and the experimental class are not
significantly different in their pretest score-means, but after each class got different
treatments (teaching methods in learning geometry), they become significantly different in
their posttest score-means.
To investigate whether the posttest score is predicted by the pretest score and the
treatment, an ANCOVA test is used to analyze it.
38
In this test the posttest score is the dependent variable, meanwhile the treatment is taken
as the fixed factor, and the pretest score is used as the covariate.
The outcome of ANCOVA test gives information that the pretest score (covariate)
significantly predicts the dependent variable (the posttest score), because the significance
value (0.000) is less than 0.001.
The ANCOVA also shows that the effect of the treatments on the posttest is significant,
because the p value is 0.004 which is less than 0.01.
The outcome of pairwise comparisons shows that the mean difference of posttest scores is
significant at the 0.01 level. It means that the treatment significantly affects the posttest,
after correcting for the (small) initial difference between both groups.
From the ANCOVA outcome we can say that the posttest result was influenced significantly
by the pretest score and the treatments, and that the intervention has a positive effect on
the achievement of the experimental students.
6.4 Findings of each of the posttest questions
The ANCOVA for each of the separate questions is shown below, with the required p-value =
0.05/15≈0.0033 to all questions, and with the p-value = 0.05/6 ≈ 0.0083 to questions 1, 2, 3,
6a, 6b, and 9, because the researcher expects that the experimental class will do better
than the control class does for each question, and the experimental class is expected to be
much better than the control class especially in answering questions 1, 2, 3, 6a, 6b, and 9. A
Bonferroni correction was used to lower the p-value criterion appropriately, such that in
total, the chance of incorrectly finding a significant difference would not rise above 0.05 for
each of these two classes of questions.
39
From the table in the appendix B4, no one of questions 1, 2, 3, 6a, 6b, and 9 shows that the
intervention has significantly affected the experimental class, by the p-value = 0.0033 or
even by the p-value = 0.0083. However, on question 9, the result shows that the pretest
result significantly predicts the posttest result. Question 9 asks students to recognize some
angles and to find out their size, where some concepts are necessary to answer this posttest
question and some of these concepts were questioned in the pretest. It means that the
better the pretest results the better the posttest result for question 9.
Only questions 4b and 5a show that the intervention has significantly affected the
experimental class by the p-value = 0.0033, where the experimental class did better than
the control class did. The question 4b asks students to investigate which lines are unparallel
lines from the picture given, and the question 5a asks students to investigate how many
angles can be recognized from the picture given (see appendix K). In the intervention, the
experimental class actually had opportunities and experiences to deal with kinds of
questions like 4b and 5a. Therefore when they faced questions 4b and 5a, they did not
really find it difficult to answer the questions.
There are two questions (1 and 6a) in which the control class did better than the
experimental class did, but it is not significantly different. Even though this case is not
significant, it shows that the experimental class has a weakness in some parts comparing to
the control class. Overall the experimental class did better than the control class in all other
questions.
6.5 Questionnaire findings
6.5.1 Findings of question 1: What do you think about Geogebra?
To analyze the question 1, the researcher used three categories of students’ opinions about
Geogebra , which are:
1. Easy
1. “Easy”: Geogebra is easy to use to learn geometry
40
2. Helpful
1. “Helping to understand”: Geogebra helps students to understand geometry
2. Others: Helpful in various ways.
3. Motivating
1. “Enjoyable”: Geogebra makes learning geometry more enjoyable
2. “Fun”: Geogebra is fun to use to learn geometry
3. “Helping to motivate”: Geogebra helps students to motivate themselves to learn
geometry
4. “Interesting”: Geogebra is interesting to use to learn geometry
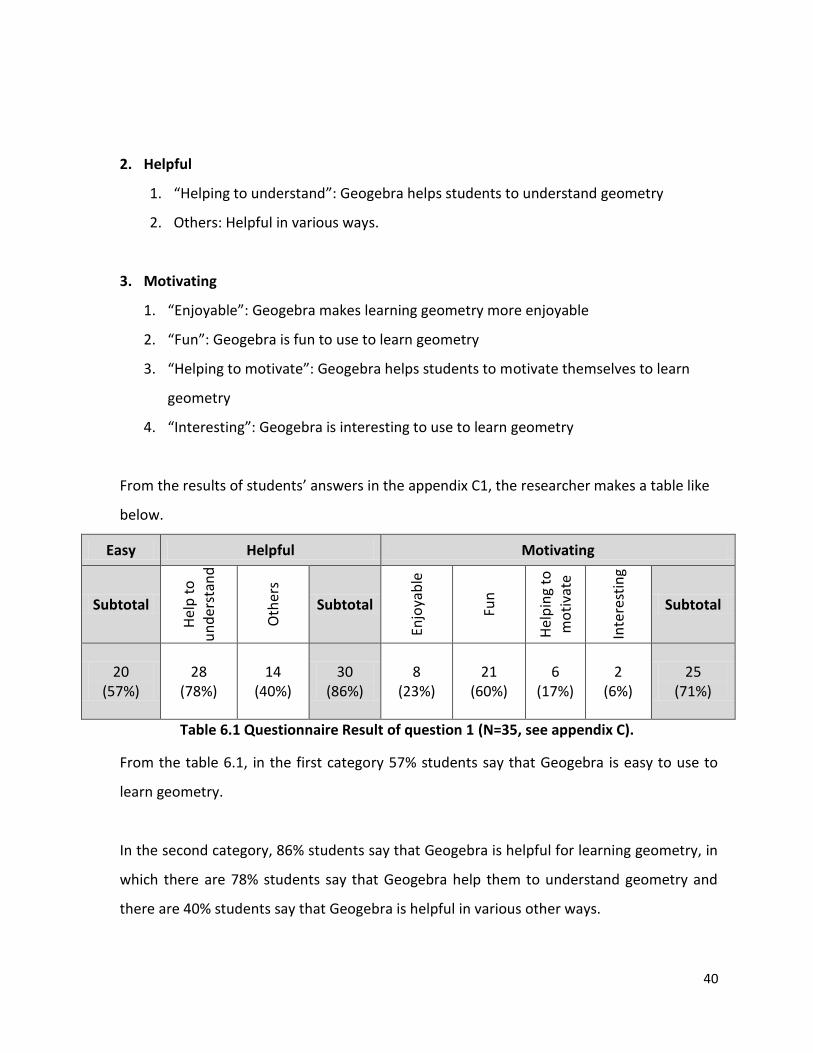
From the results of students’ answers in the appendix C1, the researcher makes a table like
below.
Easy Helpful Motivating
Subtotal
Hel
p t
o
un
der
stan
d
Oth
ers
Subtotal
Enjo
yab
le
Fun
Hel
pin
g to
mo
tiva
te
Inte
rest
ing
Subtotal
20 (57%)
28 (78%)
14 (40%)
30 (86%)
8 (23%)
21 (60%)
6 (17%)
2 (6%)
25 (71%)
Table 6.1 Questionnaire Result of question 1 (N=35, see appendix C).
From the table 6.1, in the first category 57% students say that Geogebra is easy to use to
learn geometry.
In the second category, 86% students say that Geogebra is helpful for learning geometry, in
which there are 78% students say that Geogebra help them to understand geometry and
there are 40% students say that Geogebra is helpful in various other ways.
41
In the third category, 71% students say that Geogebra is motivating; in which 23% students
say that Geogebra makes learning geometry more enjoyable; 60% students say that
Geogebra is fun to use; 17% students say that Geogebra helps to motivate them to learn
geometry; and 6% students say that Geogebra is interesting to use.
From these findings, the researcher concludes that each of the three positive points (easy,
helpful, motivating) is expressed by more than 50% of the students.
6.5.2 Findings of questions 2-11
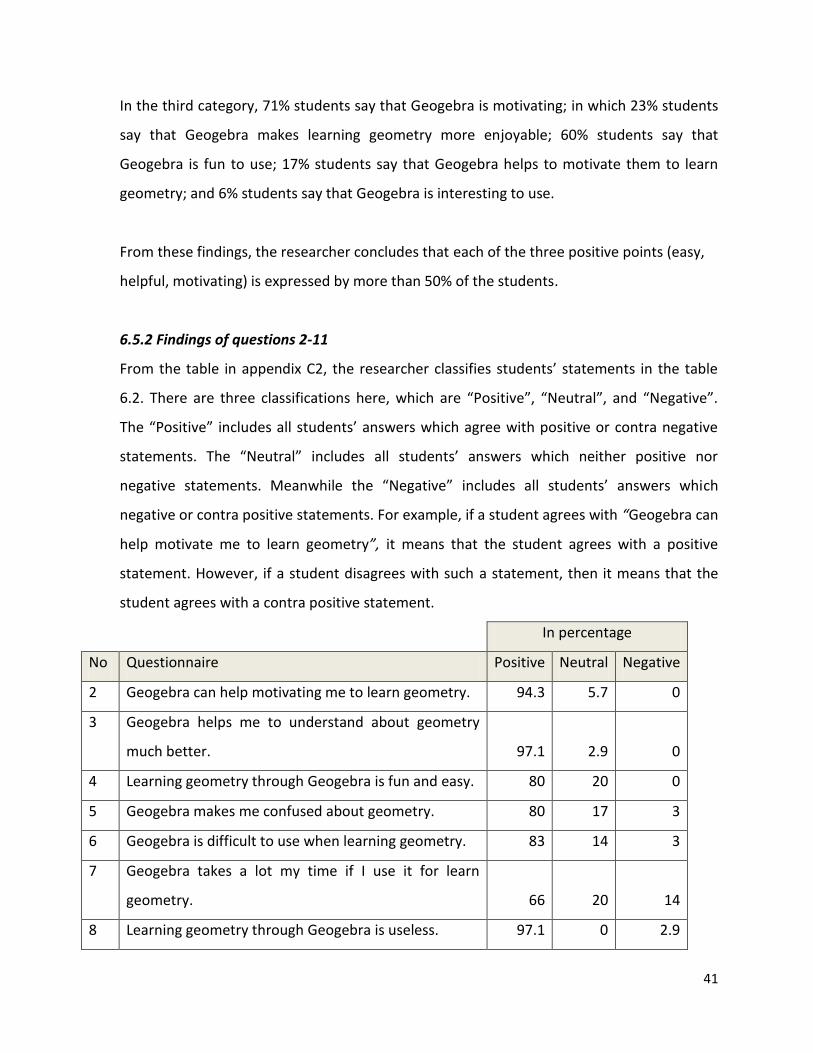
From the table in appendix C2, the researcher classifies students’ statements in the table
6.2. There are three classifications here, which are “Positive”, “Neutral”, and “Negative”.
The “Positive” includes all students’ answers which agree with positive or contra negative
statements. The “Neutral” includes all students’ answers which neither positive nor
negative statements. Meanwhile the “Negative” includes all students’ answers which
negative or contra positive statements. For example, if a student agrees with “Geogebra can
help motivate me to learn geometry”, it means that the student agrees with a positive
statement. However, if a student disagrees with such a statement, then it means that the
student agrees with a contra positive statement.
In percentage
No Questionnaire Positive Neutral Negative
2 Geogebra can help motivating me to learn geometry. 94.3 5.7 0
3 Geogebra helps me to understand about geometry
much better. 97.1 2.9 0
4 Learning geometry through Geogebra is fun and easy. 80 20 0
5 Geogebra makes me confused about geometry. 80 17 3
6 Geogebra is difficult to use when learning geometry. 83 14 3
7 Geogebra takes a lot my time if I use it for learn
geometry. 66 20 14
8 Learning geometry through Geogebra is useless. 97.1 0 2.9
42
In percentage
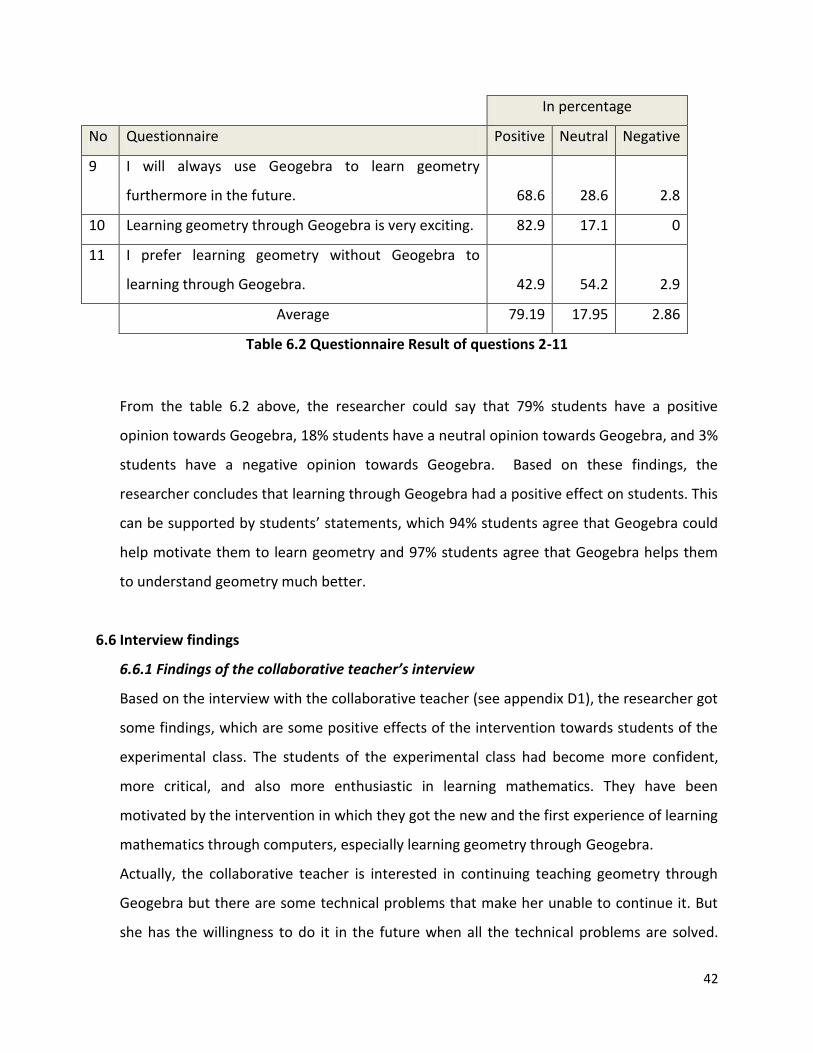
No Questionnaire Positive Neutral Negative
9 I will always use Geogebra to learn geometry
furthermore in the future. 68.6 28.6 2.8
10 Learning geometry through Geogebra is very exciting. 82.9 17.1 0
11 I prefer learning geometry without Geogebra to
learning through Geogebra. 42.9 54.2 2.9
Average 79.19 17.95 2.86
Table 6.2 Questionnaire Result of questions 2-11
From the table 6.2 above, the researcher could say that 79% students have a positive
opinion towards Geogebra, 18% students have a neutral opinion towards Geogebra, and 3%
students have a negative opinion towards Geogebra. Based on these findings, the
researcher concludes that learning through Geogebra had a positive effect on students. This
can be supported by students’ statements, which 94% students agree that Geogebra could
help motivate them to learn geometry and 97% students agree that Geogebra helps them
to understand geometry much better.
6.6 Interview findings
6.6.1 Findings of the collaborative teacher’s interview
Based on the interview with the collaborative teacher (see appendix D1), the researcher got
some findings, which are some positive effects of the intervention towards students of the
experimental class. The students of the experimental class had become more confident,
more critical, and also more enthusiastic in learning mathematics. They have been
motivated by the intervention in which they got the new and the first experience of learning
mathematics through computers, especially learning geometry through Geogebra.
Actually, the collaborative teacher is interested in continuing teaching geometry through
Geogebra but there are some technical problems that make her unable to continue it. But
she has the willingness to do it in the future when all the technical problems are solved.
43
There are some reasons why she wants to do it. One of the reasons is that she agrees with
Geogebra being easy to use and to understand geometry, and the other reason is that she
realized that there have been some positive effects her students got after the intervention.
She also considered the special case that the collaborative teacher mentioned in the
interview, which is the case of Sindi, showing that the intervention had changed Sindi’s
behavior towards mathematics from a common student to a talent student in mathematics.
6.6.2 Findings of the experimental students’ interview
Based on the interview of the three experimental students (see appendix D2), the
researcher concludes that Geogebra is a good software to help students in learning
geometry, because it helps students to understand geometry, motivates them in learning
geometry, helps them training their skills in reasoning, intuition, and measuring, and also
makes learning geometry fun and enjoyable. Actually students did not have any problem to
learn Geogebra and used it to learn geometry, but the problem was only the total of
computers in laboratory which were not sufficient to support each student to explore and
to experience more, because students should take turns to use a computer.
6.7 Intervention Findings
There were five meetings in the intervention. During each meeting sometimes the
researcher helped some students or some groups to guide them and to give some hints to
overcome problems in doing the tasks without giving them a direct correct answer, in other
words the researcher just tried to make students more confident and more engaged in
learning activities without disturbing their own attempts to explore and to learn using their
own thinking. However, at the end of each meeting the researcher always gave some
explanation about the correct answer and also discussed the problems that students were
facing during doing the tasks to make students better understand what they just did and
what they learned.

44
6.7.1 The First Meeting
In the first meeting the students were grouped in 6 groups of 6 students in each group,
because there were only 6 computers available to use in the lab. There were two sections in
the first meeting, which were a section without computer use, and a section with computer
use.
6.7.1.1 Section without computer use
In this section the researcher was starting by giving a little introduction about what students
would do in the first section and the second section, which they would do some paper
works without using computers in the first section, and do some tasks with using computers
in the second section. After that the researcher was showing a transparent block. The
researcher asked students a question: do you know what it is? Even though not all students
answer the question, the researcher hoped that all students knew what it is, because some
students could answer the question, which they answered: it is a block. After that, the
researcher distributed the lesson materials to each group. Each group was asked to discuss
and answer some questions, and the results are shown below.
Question 1
1. Please look at the picture below:
a. How many corner points (meeting points of edges) are there in the block above?
45
The aim of this question is: students will be able to identify the corner points of the
block, and the expected answer is: there are 8 corner points.
In this question only one group could not answer well, while 5 groups gave the correct
answer, which is 8 corner points. It shows that there is a group that did not understand
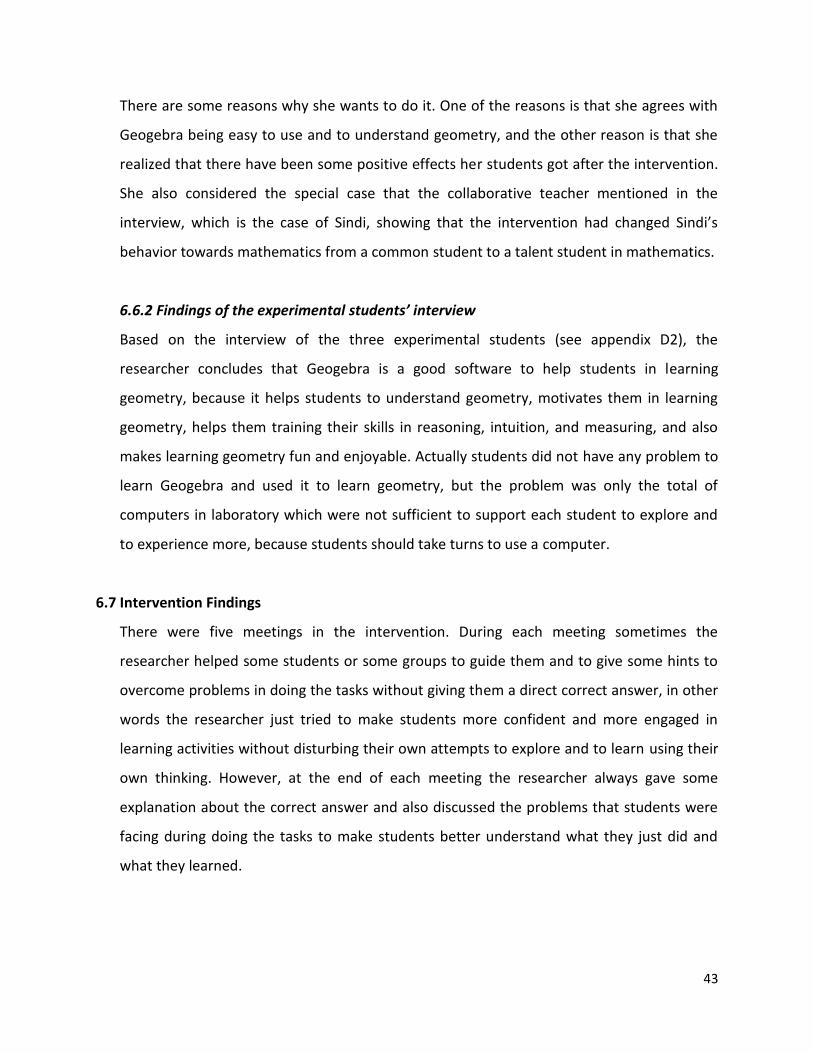
what the corner point means. However, it is still interesting to try interpreting what the
students meant by the incorrect answer they gave, which is there are 24 corner points.
The students might consider that because each point has 3 edges shaping a corner point
and there are 8 points at the block they see, then they just multiply 3 by 8 that equals to
24. For example, when the students see that the point A has 3 edges.
And then they see there are 8 points in total, then they just simply multiply 3 by 8 which
equals to 24.
It means that some students misunderstood in interpreting the question. However, the
researcher still concludes that students did not find difficult it to answer this question,
because almost all groups could answer the question correctly.
b. How many edges are there meeting at every one corner point?
The aim of this question is: students will able to understand that the corner point is the
meeting point of some edges of the block, and the expected answer: there are 3 edges
that meet at every one corner point.
In this question almost all groups answered 3 edges, because there is only one group
answering 2 edges. Actually, 2 edges is not the best answer, but it could be the group
just considering that 2 edges are enough to make or to create an intersection point or a
corner point, so it is still acceptable in the researcher point of view. The researcher
concludes that students did not find difficult to answer this question.
c. Write down a group of edges that meet each other at a corner point.
46
The aim of this question is: students can identify the name of every edge that meets at
one common corner point, and some possible answers are: the first group is AB, AD, and
AE; the second group is BA, BC, and BF.
In this question there is only one group giving a correct answer, which is BA, DA, and CA.
One group answered not really complete as the researcher expected, this group just
wrote edge AB meets with BF, but it is still acceptable, because those edges create a
common corner point. Meanwhile the rest of the groups gave incorrect answers.
Actually this question was not expected to be difficult by the researcher, but
unfortunately most students found difficult to answer well this question. The researcher
supposes that students did not yet know how to write a name of an edge. This is shown
by two categories of their answers, the first one is that they wrote edge E meets with H,
F, A. In this case the researcher tried to catch what they meant by considering this
answer as meaning: edge EH, edge EF, and edge EA (two groups gave such an answer).
And the other incorrect answer is a corner point A meets with BDE, which the
researcher try to interpret the meaning as a group of edges AB, AD, and AE. Besides the
correct answer and the two categories of answers that the researcher could interpret as
notational difficulty, there is a group which just wrote BF, which the researcher is not
able to analyze, in other words one group did not understand the question.
d. Write down three pairs of edges that do not meet each other.
The aim: students will be able to investigate the edges that are not meeting at one
common corner point, and an example of an expected answer: 1st pair is AB and CD; 2nd
pair is BC and EH; and 3rd pair is AB and EH.
In this question there are three groups giving correct answers, and three groups gave
incorrect answers. Some students did not yet know how to write an edge. The
researcher found some answers which show that students did not really understand
which one is an edge of the block and which one is not. One of the incorrect answers is
AC, BF, and CG, which shows that students considered AC as an edge of the block. The
researcher found that they did not yet know how to distinguish between an edge and a
47
diagonal, because they mixed edges BF and CG with a diagonal AC. And it shows as well
that students did not pay attention that actually between AC and CG there is a common
point C. The other interesting incorrect answer is CE, GA, and HB, which looks like a
correct answer if we just see the letter of each point, then there is not a common point
between them, but when we pay attention more, there is a mistake. The mistake is that
they are not edges of the block, and actually they meet in the middle of the block (two
groups had such mistakes).
e. Please give a reason why some edges can meet at a common corner point.
The aim of this question is: students will be able to give their reasons and show their
understanding about the relationships of edges that meets at one common corner
point, and the expected answer is: there are some edges meeting at corner points
because they are not parallel to each other and they are on the same plane.
In this question no one of groups gave the correct answer the researcher expected,
which is that the edges must be unparallel and must be on the same plane. It shows that
students still did not really understand what characteristics of edges determine if they
can meet at a common point. This shows that students did not yet know how to give a
reason in mathematics and also they did not yet know how to give a general answer,
without reference to any specific situation. Some students wrote answers that had
nothing to do with the question, for instance, they wrote: because HDC meets an angle.
Other students just answered by repeating similar words as used in the question, such
as because the edges meet at a common point.
f. Look carefully at edges that do not meet at corner points. For example, the relationship
between AB and EF, and also between AE and CD. What is your conclusion on the
relationship of those example pairs of edges?
The aim of this question is: students will be able to formulate in their own words the
two relationships between edges that do not meet at one common corner point, and
the expected answer is: AB and EF are parallel and they do not meet at any point at all.
48
AE and CD are not parallel, they are not at the same face, and they do not meet at any
point as well. The conclusion is that two edges will not meet each other not only for one
possible reason which is that they are parallel, but also there is another possible reason,
which is that they are not parallel and not at the same face as well. The edges like AE
and CD are called crossing-lines or crossing-edges. (But this name was not yet
mentioned to the students)
In this question four groups gave the correct answer, writing similar words like AB and
EF are parallel edges, meanwhile AE and CD do not intersect and are not parallel, which
is called crossing edges. One group did not give any answer at all, and one group gave an
answer which needs the researcher to interpret the answer, because the group just
wrote, those lines do not connect with each other and are crossing. The researcher tries
to understand the meaning of the answer as those lines do not connect = AB and EF do
not meet at a common point that means they are parallel lines, meanwhile and crossing
= AE and CD are crossing each other. In this case the researcher considers that students
understand the question and know the answer, but they could not write it in the
appropriate ways.
g. How many possibilities of relationship between two edges of the block are there?
The aim of this question is: students will be able to know all the possibilities of
relationships between edges of the block, and the expected answer: there are 3
possibilities of a relationship between 2 edges of the block, which are 1st parallel edges,
2nd intersecting edges, and 3rd crossing edges.
In this question there are only two groups giving the correct answer. The researcher is a
bit surprised, because this question should be easy if the question f could be answered
well. In fact there is a contrast because only 2 groups did well at the question g, whereas
there are 4 groups who did well at the question f. One example of incorrect answers
students gave is that students just wrote: there are many possibilities AB, BF, AD, EH,
FG, HG, and DC. This answer shows that students did not understand the question.
49
h. Write down your conclusion of your observation at the picture above, when do two
edges meet at one point, and when do two edges not meet at one point?
The aim of this question is: students will able to make their final conclusion on what
they have just learned during class activities, and the expected answer: two edges will
meet at one common point if they are not parallel and they are on the same face. Two
edges will not meet at one common point if they are parallel, or they are not parallel but
not on the same face.
In this question no one of the groups gave the correct conclusions. All students’ answers
had nothing to do with the question. One example of students’ answer is: A. because
having two points which meet and having some edges, B. because having no unparallel
edges and crossing. This answer is far from what the researcher expected, and it shows
that students did not know how to make a general conclusion from what they just
learned. The researcher concludes that question f, which asked about relationships
between specific lines, was much easier than questions g and h, which asked for
generalizations.
6.7.1.2 Section with computer use
In this section the researcher allowed students to use a computer to play with
Geogebra. Because there were only six computers in the computer lab that could be
used, students were grouped in groups of 6. Even though this condition was not really
good enough for students, they were still engaged and enjoyed learning geometry
through Geogebra. After grouping the students, the researcher started to give them
some tasks which were related to the previous section. In the second section of every
meeting, the researcher did not ask students to work on paper, so all descriptions below
are based on the researcher’s observation notes and some video tape that the
collaborative teacher took during the class. What they did in this meeting is described
below.
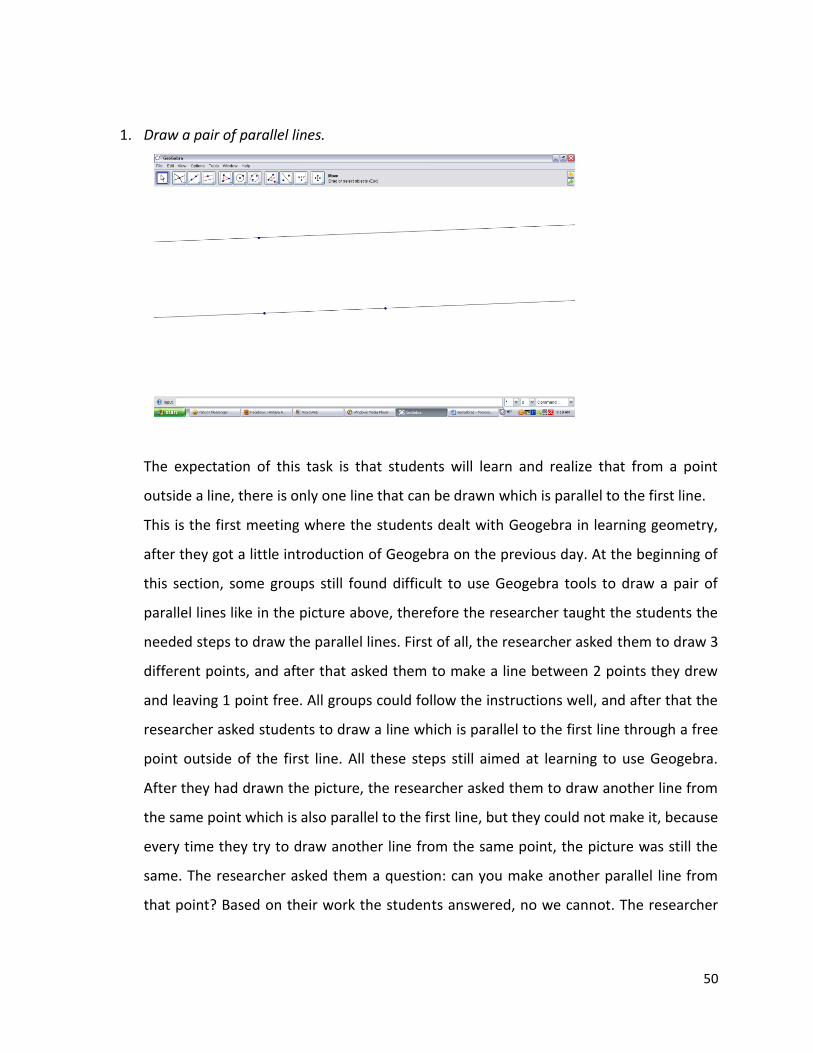
50
1. Draw a pair of parallel lines.
The expectation of this task is that students will learn and realize that from a point
outside a line, there is only one line that can be drawn which is parallel to the first line.
This is the first meeting where the students dealt with Geogebra in learning geometry,
after they got a little introduction of Geogebra on the previous day. At the beginning of
this section, some groups still found difficult to use Geogebra tools to draw a pair of
parallel lines like in the picture above, therefore the researcher taught the students the
needed steps to draw the parallel lines. First of all, the researcher asked them to draw 3
different points, and after that asked them to make a line between 2 points they drew
and leaving 1 point free. All groups could follow the instructions well, and after that the
researcher asked students to draw a line which is parallel to the first line through a free
point outside of the first line. All these steps still aimed at learning to use Geogebra.
After they had drawn the picture, the researcher asked them to draw another line from
the same point which is also parallel to the first line, but they could not make it, because
every time they try to draw another line from the same point, the picture was still the
same. The researcher asked them a question: can you make another parallel line from
that point? Based on their work the students answered, no we cannot. The researcher
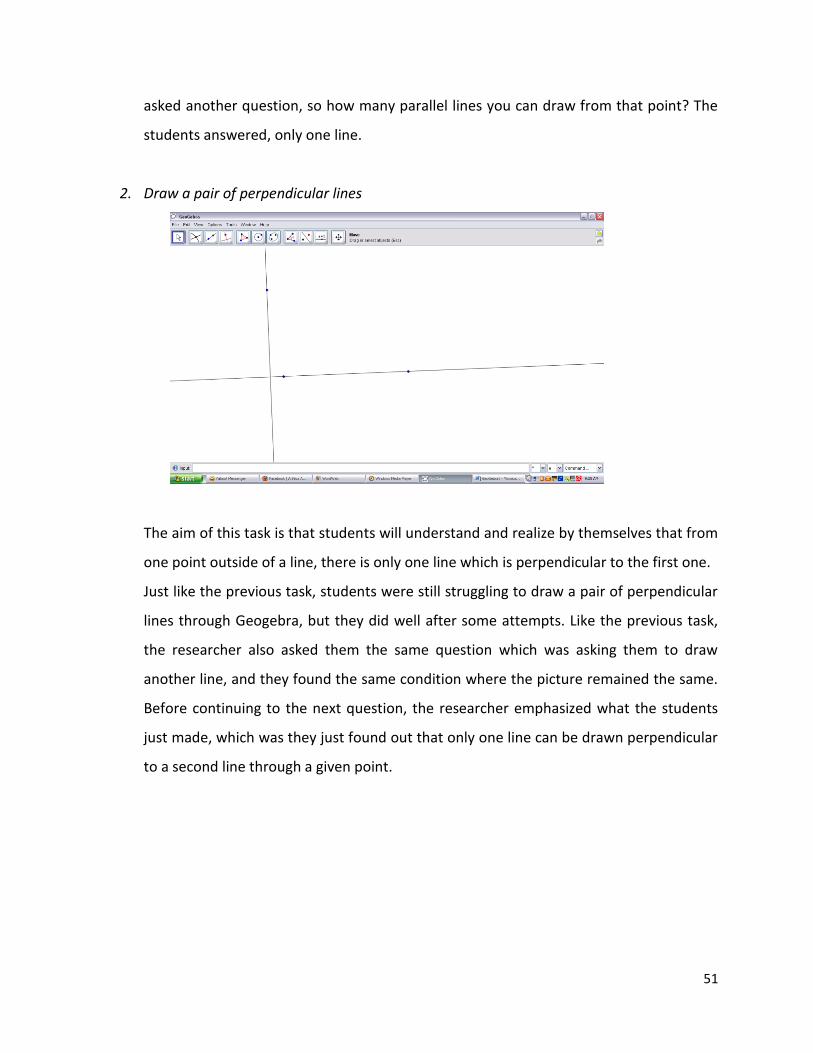
51
asked another question, so how many parallel lines you can draw from that point? The
students answered, only one line.
2. Draw a pair of perpendicular lines
The aim of this task is that students will understand and realize by themselves that from
one point outside of a line, there is only one line which is perpendicular to the first one.
Just like the previous task, students were still struggling to draw a pair of perpendicular
lines through Geogebra, but they did well after some attempts. Like the previous task,
the researcher also asked them the same question which was asking them to draw
another line, and they found the same condition where the picture remained the same.
Before continuing to the next question, the researcher emphasized what the students
just made, which was they just found out that only one line can be drawn perpendicular
to a second line through a given point.
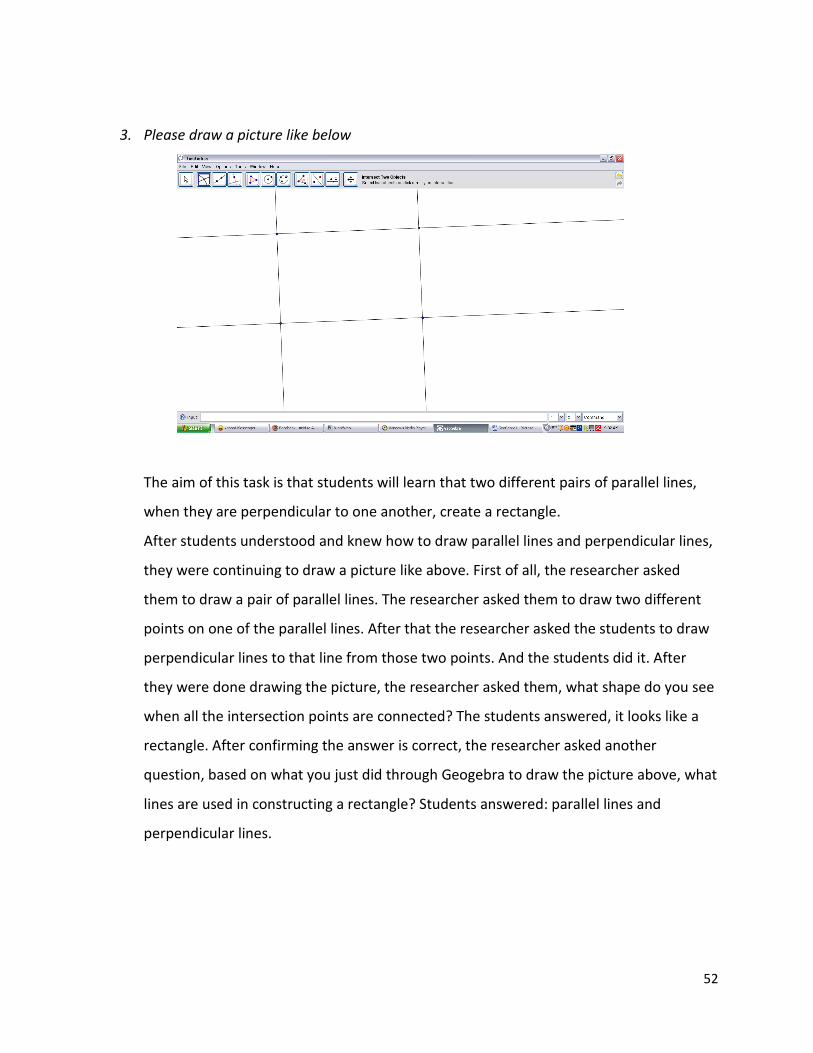
52
3. Please draw a picture like below
The aim of this task is that students will learn that two different pairs of parallel lines,
when they are perpendicular to one another, create a rectangle.
After students understood and knew how to draw parallel lines and perpendicular lines,
they were continuing to draw a picture like above. First of all, the researcher asked
them to draw a pair of parallel lines. The researcher asked them to draw two different
points on one of the parallel lines. After that the researcher asked the students to draw
perpendicular lines to that line from those two points. And the students did it. After
they were done drawing the picture, the researcher asked them, what shape do you see
when all the intersection points are connected? The students answered, it looks like a
rectangle. After confirming the answer is correct, the researcher asked another
question, based on what you just did through Geogebra to draw the picture above, what
lines are used in constructing a rectangle? Students answered: parallel lines and
perpendicular lines.

53
4. Please draw a picture like below
The aim of this task is that students learn and realize that from a point more than one
line can be drawn.
After finishing the task 3, students were asked to continue to draw a picture like above.
The researcher asked students to draw a pair of parallel lines through two different
intersection points. After students drew the picture, the researcher asked this question
to students: Look at your own picture. How many lines have you drawn from each
intersection point? The students answered, some points have 2 lines, and some points
have 3 lines. And the researcher emphasized to the students that the students just
learned that from a point they can draw more than one line.
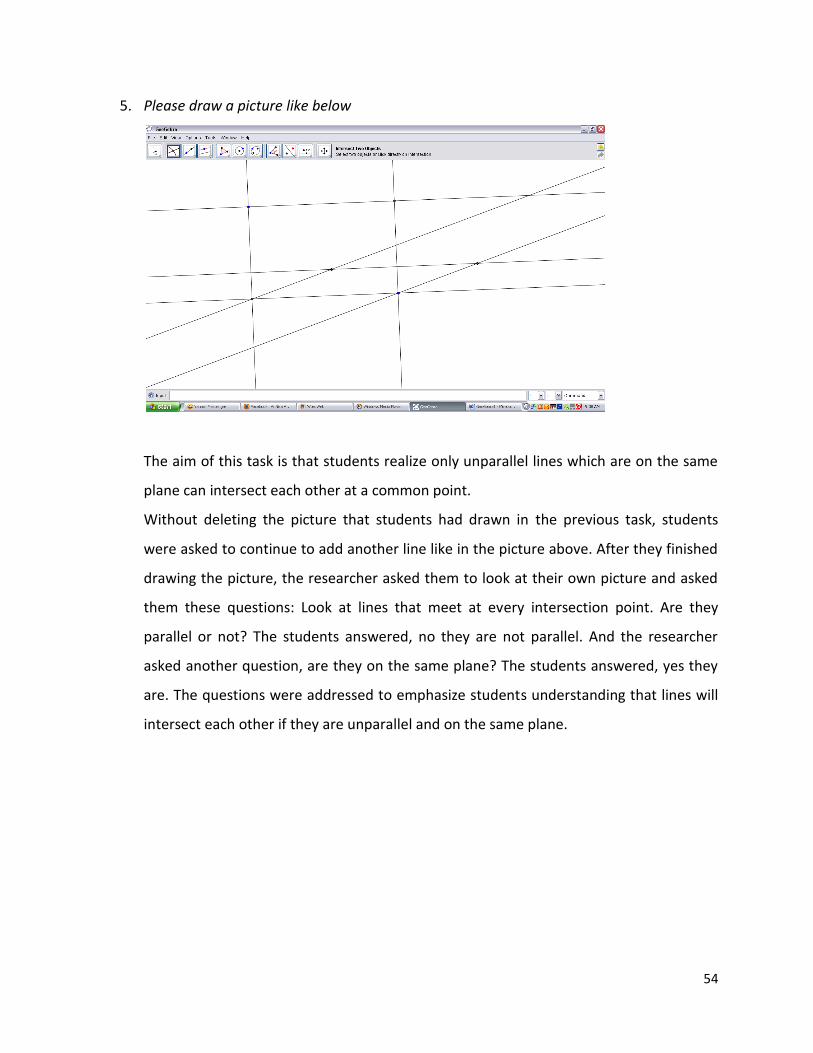
54
5. Please draw a picture like below
The aim of this task is that students realize only unparallel lines which are on the same
plane can intersect each other at a common point.
Without deleting the picture that students had drawn in the previous task, students
were asked to continue to add another line like in the picture above. After they finished
drawing the picture, the researcher asked them to look at their own picture and asked
them these questions: Look at lines that meet at every intersection point. Are they
parallel or not? The students answered, no they are not parallel. And the researcher
asked another question, are they on the same plane? The students answered, yes they
are. The questions were addressed to emphasize students understanding that lines will
intersect each other if they are unparallel and on the same plane.
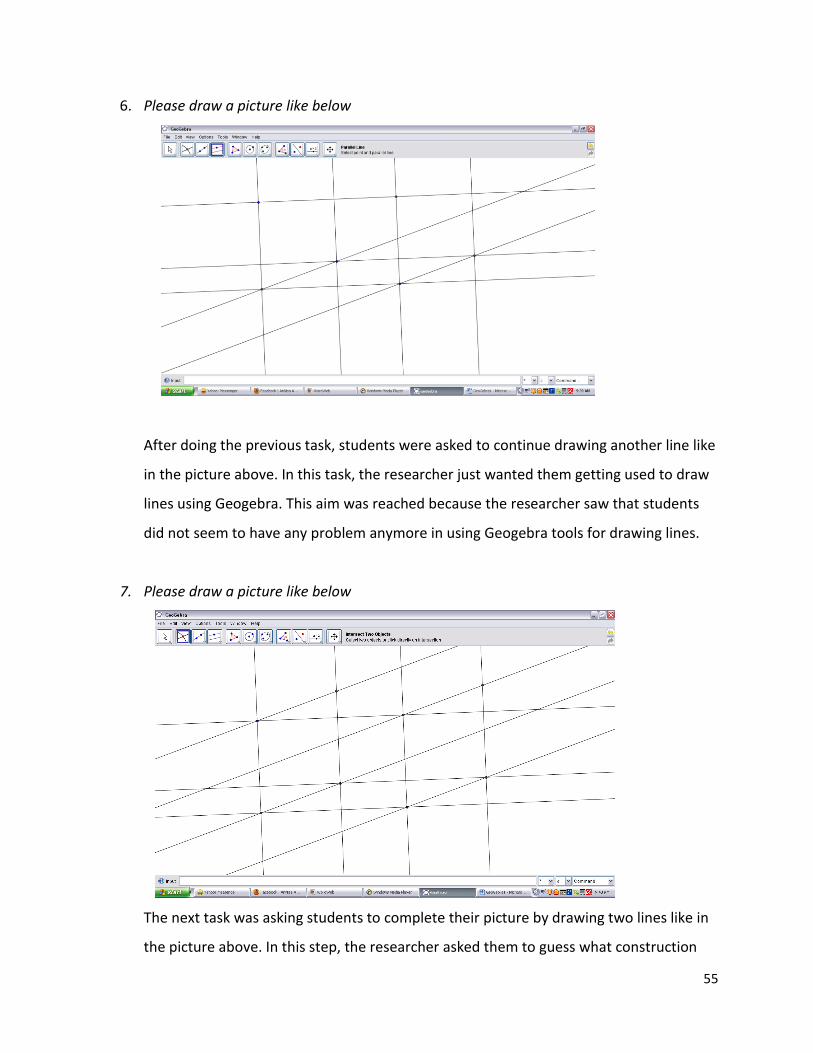
55
6. Please draw a picture like below
After doing the previous task, students were asked to continue drawing another line like
in the picture above. In this task, the researcher just wanted them getting used to draw
lines using Geogebra. This aim was reached because the researcher saw that students
did not seem to have any problem anymore in using Geogebra tools for drawing lines.
7. Please draw a picture like below
The next task was asking students to complete their picture by drawing two lines like in
the picture above. In this step, the researcher asked them to guess what construction
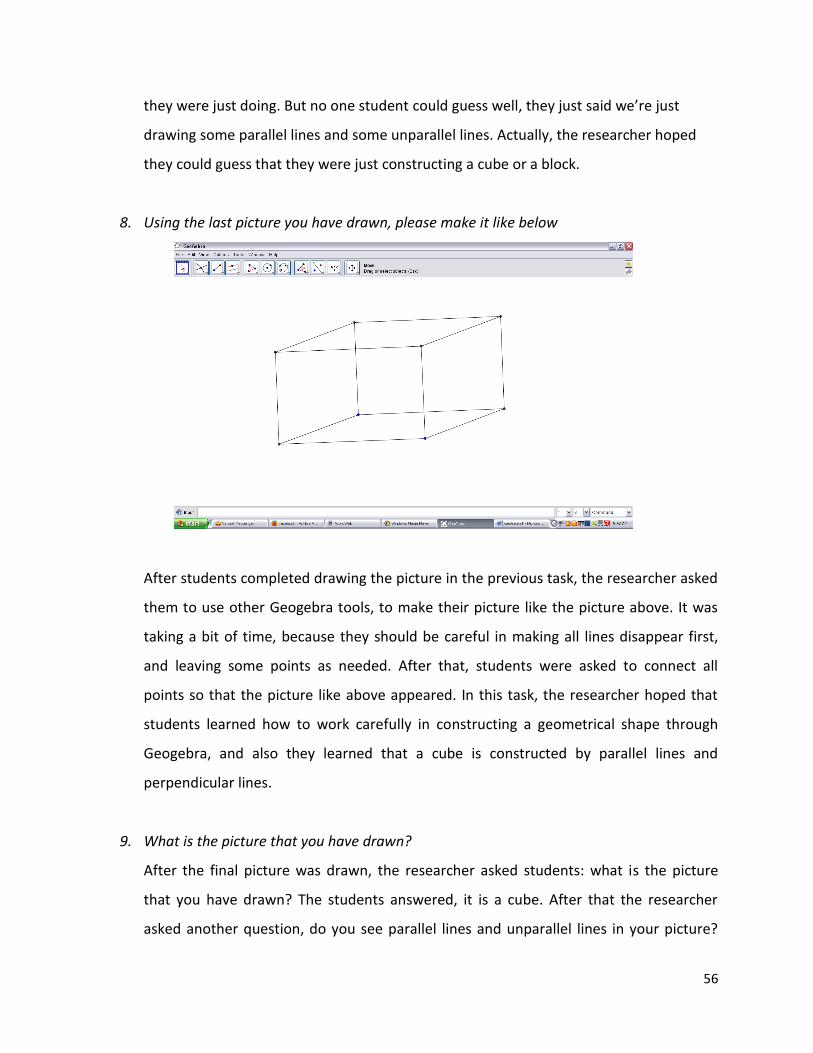
56
they were just doing. But no one student could guess well, they just said we’re just
drawing some parallel lines and some unparallel lines. Actually, the researcher hoped
they could guess that they were just constructing a cube or a block.
8. Using the last picture you have drawn, please make it like below
After students completed drawing the picture in the previous task, the researcher asked
them to use other Geogebra tools, to make their picture like the picture above. It was
taking a bit of time, because they should be careful in making all lines disappear first,
and leaving some points as needed. After that, students were asked to connect all
points so that the picture like above appeared. In this task, the researcher hoped that
students learned how to work carefully in constructing a geometrical shape through
Geogebra, and also they learned that a cube is constructed by parallel lines and
perpendicular lines.
9. What is the picture that you have drawn?
After the final picture was drawn, the researcher asked students: what is the picture
that you have drawn? The students answered, it is a cube. After that the researcher
asked another question, do you see parallel lines and unparallel lines in your picture?
57
The students answered, yes we do. The researcher asked the questions to emphasize
that in a cube there are parallel lines and perpendicular lines, as they learned from the
first section of the first meeting.
6.7.1.3 Conclusions of the first meeting
In the pen-and-paper section, most students did not find it difficult to recognize corner
points of a block, and they also did not have problem to recognize how many edges
meet at a corner point. However, at the question 1c, most students had difficulty to
name edges which meet at a corner point. They, possibly, did not yet know how to
name an edge correctly. To overcome this problem, before displaying question 1d, the
researcher gave some examples of how to name an edge, without directly giving the
answer to question 1c. And then, the researcher saw that most students showed an
improvement in naming edges of a block at the question 1d, but a new problem came
up, which was that some students could not distinguish between an edge and a diagonal
of a block. To overcome this problem, the researcher gave an explanation how to
distinguish an edge and a diagonal of a block at the end of the first meeting. The
researcher hoped that students would understand more about that by learning from
their own mistakes and getting a correct explanation from the researcher. At the
question 1e, the researcher found that all students did not yet know how to give a
reason in mathematics. At this stage, the researcher just encouraged students to give
their own reasons and arguments, no matter if it was wrong or not, because the
researcher hoped students became more confident in their own thinking in learning
mathematics. And it worked, because after that, the researcher saw that students were
more confident and brave to propose their own thinking. At the question 1f, the
researcher found that some students (four groups) had improved in giving correct
reasons to a specific situation. But in contrast, at the question 1g, the researcher found
that students had a problem when they were asked to reason abstractly, because there
were only two groups which gave correct reasons. And this happened again on question
1h, where no group gave correct answers. This evidence tells that most students did not
58
yet know how to give a general answer, without reference to any specific situation.
However, the researcher was satisfied with students at the first section, because the
researcher observed that students became more confident, enthusiastic and engaged in
their learning activities.
In the DGS section, the researcher tried to emphasize what students learned from the
first section. The researcher observed that students were excited playing and learning
through Geogebra, even though they experienced some difficulties to use Geogebra
tools in the beginning. The researcher saw that students did not really have a problem
to do tasks 1 till 6, because the researcher guided them by showing and telling them
what tools they needed in order to construct the pictures. Also the researcher was
asking questions which directed students to correct conclusions. However, at the
question 7, students did not recognize that what they just constructed was a block,
probably, because the picture was still not clear as a block. This evidence shows that
students did not succeed using their intuition skill at this question. After they did the
task 8, they did recognize what they just constructed: a block. The researcher expected
that after doing the tasks in the first section and the second section, students will better
understand about corner points, edges, parallel lines, intersecting lines, crossing lines,
which will be used to learn about the concept of angle in the second meeting.
6.7.2 The Second meeting
In the second meeting the students were still grouped in 6 groups of 6 students in each
group, but the researcher changed members of each group because the researcher
wanted every student to have an opportunity to collaborate with many students in
varying groups. There were also two sections in the second meeting, which were a
section without computer use, and a section with computer use.
6.7.2.1 Section without computer use
In this section the researcher was starting the class by giving some questions about
what they had learned in the first meeting to make students aware of what they already
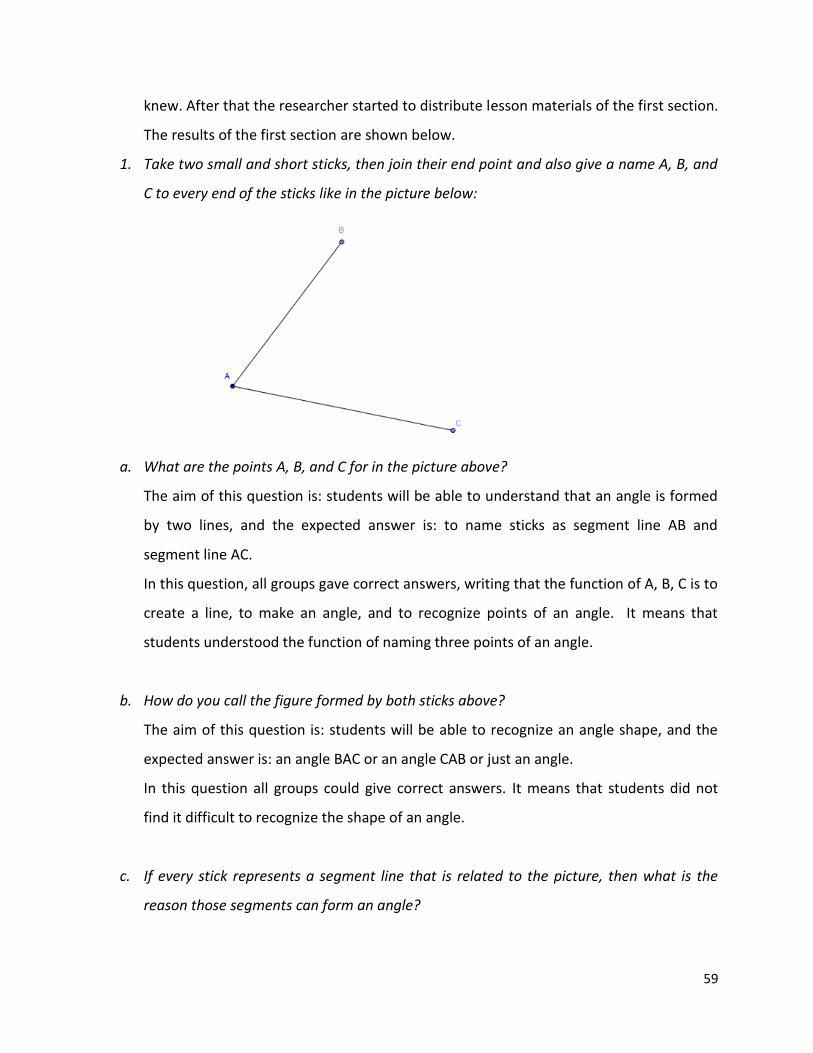
59
knew. After that the researcher started to distribute lesson materials of the first section.
The results of the first section are shown below.
1. Take two small and short sticks, then join their end point and also give a name A, B, and
C to every end of the sticks like in the picture below:
a. What are the points A, B, and C for in the picture above?
The aim of this question is: students will be able to understand that an angle is formed
by two lines, and the expected answer is: to name sticks as segment line AB and
segment line AC.
In this question, all groups gave correct answers, writing that the function of A, B, C is to
create a line, to make an angle, and to recognize points of an angle. It means that
students understood the function of naming three points of an angle.
b. How do you call the figure formed by both sticks above?
The aim of this question is: students will be able to recognize an angle shape, and the
expected answer is: an angle BAC or an angle CAB or just an angle.
In this question all groups could give correct answers. It means that students did not
find it difficult to recognize the shape of an angle.
c. If every stick represents a segment line that is related to the picture, then what is the
reason those segments can form an angle?
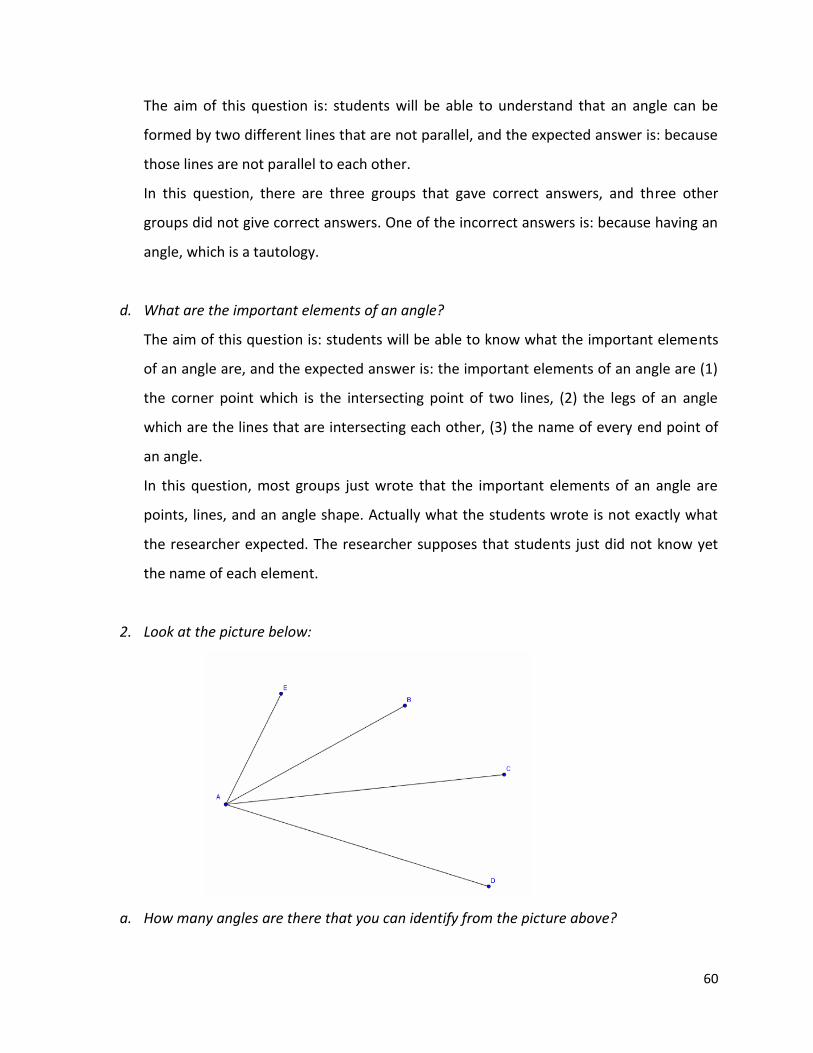
60
The aim of this question is: students will be able to understand that an angle can be
formed by two different lines that are not parallel, and the expected answer is: because
those lines are not parallel to each other.
In this question, there are three groups that gave correct answers, and three other
groups did not give correct answers. One of the incorrect answers is: because having an
angle, which is a tautology.
d. What are the important elements of an angle?
The aim of this question is: students will be able to know what the important elements
of an angle are, and the expected answer is: the important elements of an angle are (1)
the corner point which is the intersecting point of two lines, (2) the legs of an angle
which are the lines that are intersecting each other, (3) the name of every end point of
an angle.
In this question, most groups just wrote that the important elements of an angle are
points, lines, and an angle shape. Actually what the students wrote is not exactly what
the researcher expected. The researcher supposes that students just did not know yet
the name of each element.
2. Look at the picture below:
a. How many angles are there that you can identify from the picture above?
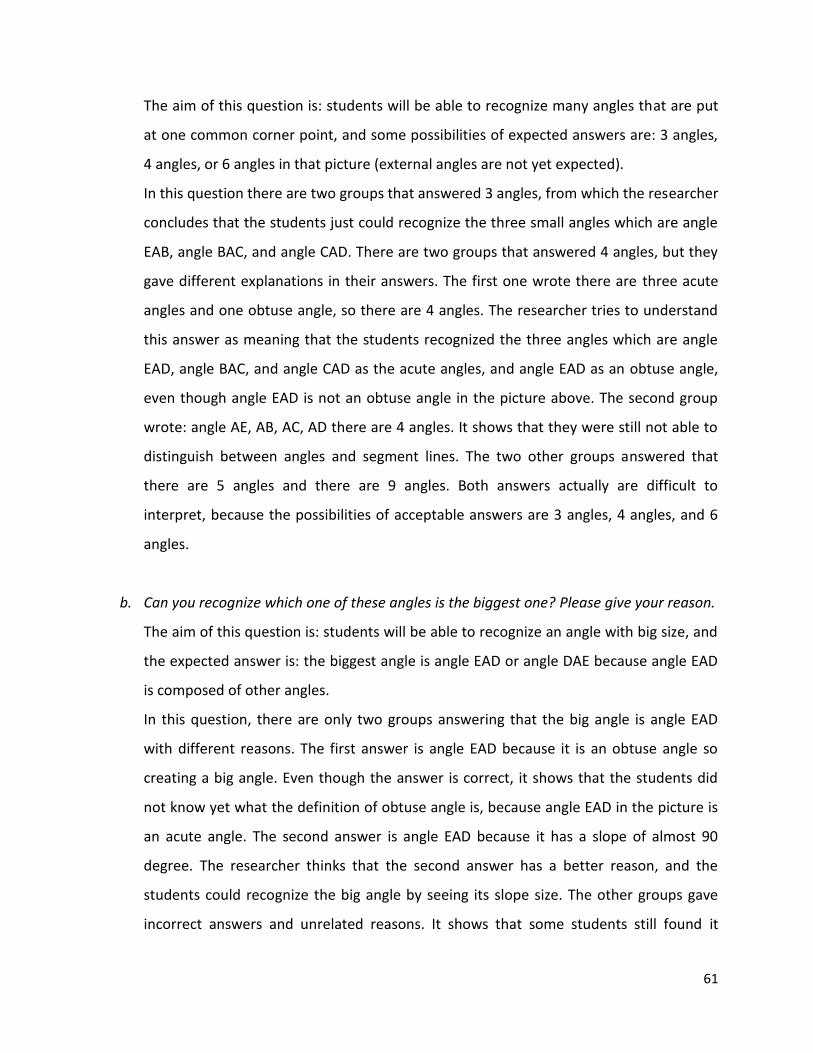
61
The aim of this question is: students will be able to recognize many angles that are put
at one common corner point, and some possibilities of expected answers are: 3 angles,
4 angles, or 6 angles in that picture (external angles are not yet expected).
In this question there are two groups that answered 3 angles, from which the researcher
concludes that the students just could recognize the three small angles which are angle
EAB, angle BAC, and angle CAD. There are two groups that answered 4 angles, but they
gave different explanations in their answers. The first one wrote there are three acute
angles and one obtuse angle, so there are 4 angles. The researcher tries to understand
this answer as meaning that the students recognized the three angles which are angle
EAD, angle BAC, and angle CAD as the acute angles, and angle EAD as an obtuse angle,
even though angle EAD is not an obtuse angle in the picture above. The second group
wrote: angle AE, AB, AC, AD there are 4 angles. It shows that they were still not able to
distinguish between angles and segment lines. The two other groups answered that
there are 5 angles and there are 9 angles. Both answers actually are difficult to
interpret, because the possibilities of acceptable answers are 3 angles, 4 angles, and 6
angles.
b. Can you recognize which one of these angles is the biggest one? Please give your reason.
The aim of this question is: students will be able to recognize an angle with big size, and
the expected answer is: the biggest angle is angle EAD or angle DAE because angle EAD
is composed of other angles.
In this question, there are only two groups answering that the big angle is angle EAD
with different reasons. The first answer is angle EAD because it is an obtuse angle so
creating a big angle. Even though the answer is correct, it shows that the students did
not know yet what the definition of obtuse angle is, because angle EAD in the picture is
an acute angle. The second answer is angle EAD because it has a slope of almost 90
degree. The researcher thinks that the second answer has a better reason, and the
students could recognize the big angle by seeing its slope size. The other groups gave
incorrect answers and unrelated reasons. It shows that some students still found it
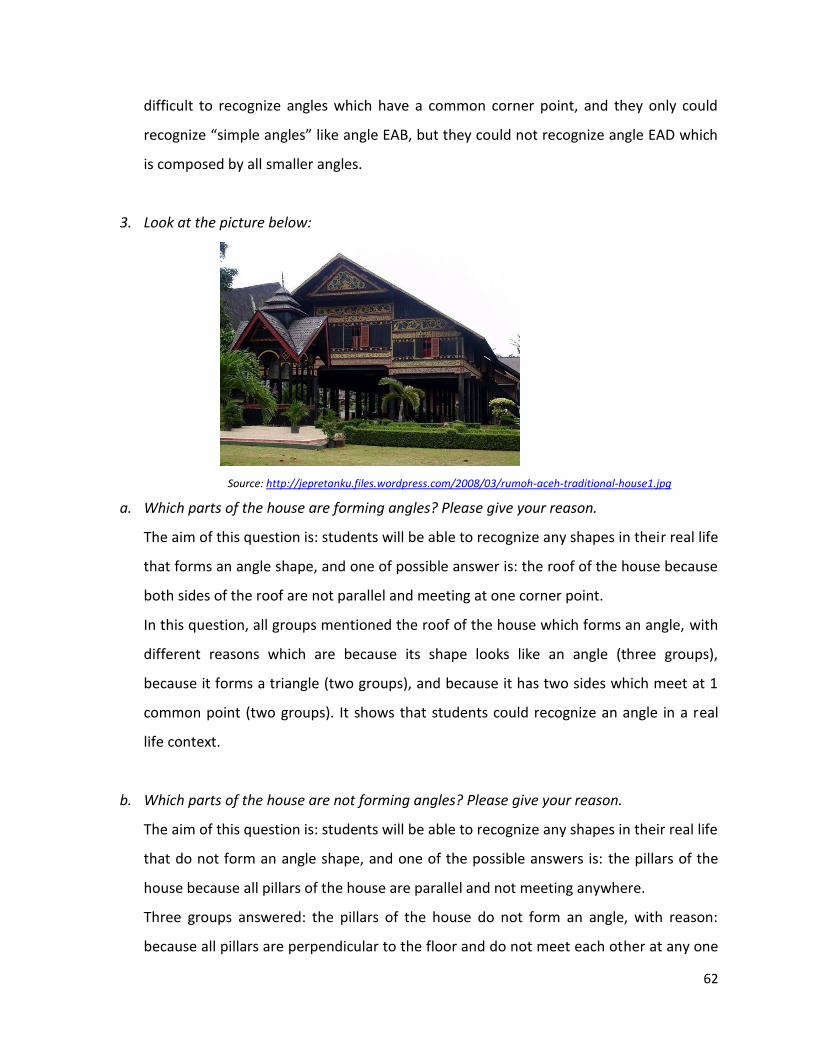
62
difficult to recognize angles which have a common corner point, and they only could
recognize “simple angles” like angle EAB, but they could not recognize angle EAD which
is composed by all smaller angles.
3. Look at the picture below:
Source: http://jepretanku.files.wordpress.com/2008/03/rumoh-aceh-traditional-house1.jpg
a. Which parts of the house are forming angles? Please give your reason.
The aim of this question is: students will be able to recognize any shapes in their real life
that forms an angle shape, and one of possible answer is: the roof of the house because
both sides of the roof are not parallel and meeting at one corner point.
In this question, all groups mentioned the roof of the house which forms an angle, with
different reasons which are because its shape looks like an angle (three groups),
because it forms a triangle (two groups), and because it has two sides which meet at 1
common point (two groups). It shows that students could recognize an angle in a real
life context.
b. Which parts of the house are not forming angles? Please give your reason.
The aim of this question is: students will be able to recognize any shapes in their real life
that do not form an angle shape, and one of the possible answers is: the pillars of the
house because all pillars of the house are parallel and not meeting anywhere.
Three groups answered: the pillars of the house do not form an angle, with reason:
because all pillars are perpendicular to the floor and do not meet each other at any one

63
common point. Two groups wrote the garden is not forming an angle with the reason it
does not show an angle. And one group did not give any answer. It shows that students
found it much easier to recognize a shape of an angle than elements that do not form an
angle.
6.7.2.2 Section with computer use
In this section, the groups were changing again and there were six students in each
group. What students did in this section is shown below.
1. Draw a picture like below
The aim of this task is that students can recognize a picture of unparallel segment lines.
Using Geogebra, students did not find it difficult to draw a picture like above. After that
the researcher asked a question to students, are they parallel or not? The students
answered, they obviously do not look parallel.
2. Construct the angle between those two segment lines above.
In this task the researcher hoped that students learn how to make an angle from two
unparallel-segment lines which were not intersecting yet, by translating one segment to
another without changing their slopes. Even though by extending both lines, an angle
64
can also be created, the researcher only wants students to do a similar action like they
did with the two sticks in the first section.
In this question, students were asked to use the Geogebra move tool to connect an end
point of a segment line to an end point of another segment line. To do that, the
researcher asked them to choose which one of segment lines will move and which one
will stay motionless. After that, by using the move tool, students could put an end point
of the moving segment line to one end point of the other segment line.
3. How many possibilities of an angle picture can you construct between them?
After students could create an angle by translating the segment lines one to another,
the researcher asked students a question, can we create an angle between the two
segment lines without translating them like we did before? Students got confused by
this question, because they already stuck on their mind that the segment lines could
only be moved to create an angle. The researcher asked another question, can we
extend a segment line to be a line? Students answered yes we can. After students
realized that a segment line could extend to be a line, the researcher asked students to
extend each of the segment lines (The researcher taught students about a line, a
segment line, a ray in the introduction of Geogebra, in which they learned about all
those things through using tools). After that, the researcher asked students a question:
look at the picture you just drew. Do the extended lines create an angle? Students
answered: yes, but not only one angle is created here, there are four angles we see. The
researcher responded by saying: yes, you’re right. The researcher hoped students
learned and realized that there were two ways to construct angle shapes from two given
segment lines, which were by translating them and by extending them.
4. Do they have the same size?
The students were asked to investigate whether the two ways of creating angles from
two segment lines gives the same size of angle. The researcher asked them to use a tool
that can measure a size of angle to their own angle pictures. This question took a lot of
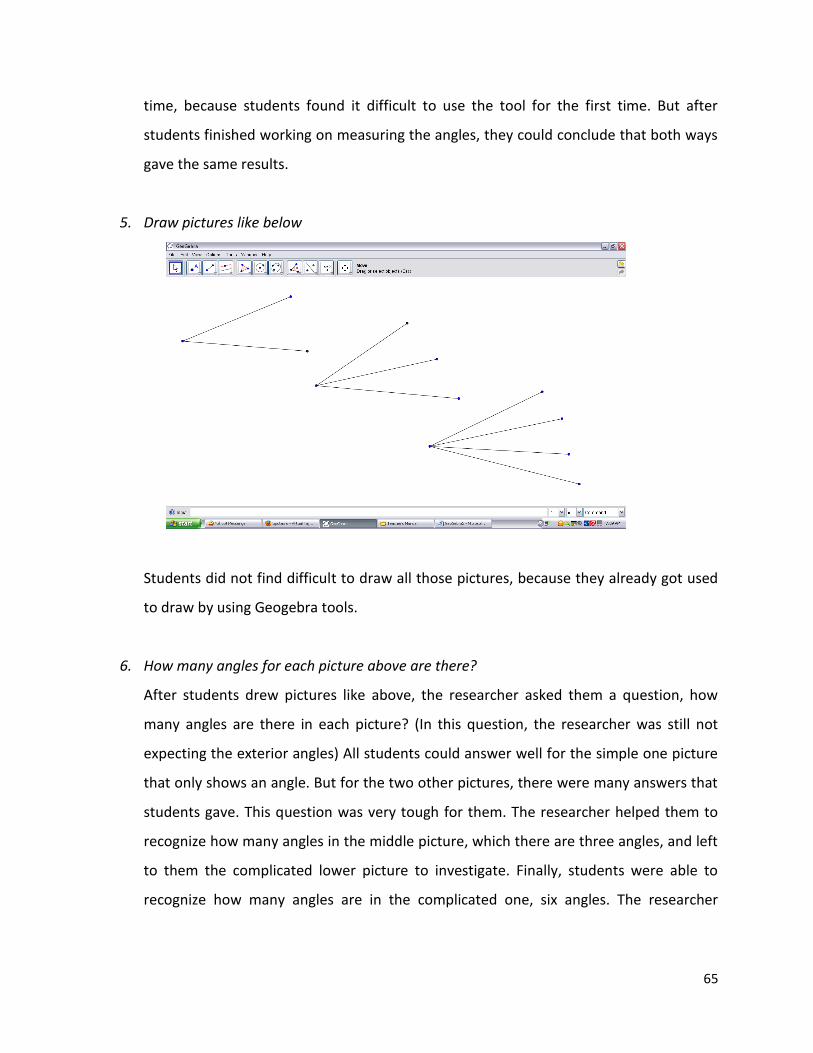
65
time, because students found it difficult to use the tool for the first time. But after
students finished working on measuring the angles, they could conclude that both ways
gave the same results.
5. Draw pictures like below
Students did not find difficult to draw all those pictures, because they already got used
to draw by using Geogebra tools.
6. How many angles for each picture above are there?
After students drew pictures like above, the researcher asked them a question, how
many angles are there in each picture? (In this question, the researcher was still not
expecting the exterior angles) All students could answer well for the simple one picture
that only shows an angle. But for the two other pictures, there were many answers that
students gave. This question was very tough for them. The researcher helped them to
recognize how many angles in the middle picture, which there are three angles, and left
to them the complicated lower picture to investigate. Finally, students were able to
recognize how many angles are in the complicated one, six angles. The researcher
66
hoped that students learned from this question how to recognize angles that are
formed by many segment lines that meet at a common point.
7. Can you see a pattern of those numbers of angles?
In this question, students were asked to see whether there is a pattern or not from the
picture above. Students found it really hard to see the pattern by themselves. Therefore
the researcher gave questions one by one to help students seeing the pattern. Firstly,
the researcher asked a question, look at the first picture. How many segment lines meet
at a common point? Students answered, there are two segment lines. Then the next
question, how many angles do you recognize? They answered, only one angle. The
researcher asked them to write down what they just answered to each question, which
is if two segment lines meet at a common point, then there is only one angle
recognized. The researcher went on to the next pictures. Even though they already
wrote what they answered to each question, which were 2 segment lines --> 1 angle, 3
segment lines --> 3 angles, 4 segment lines --> 6 angles, they still could not see the
pattern. Actually, the pattern can be seen like this: 1 angle--->3 angles (+2); 3 angles---
>6 angles (+3); 6 angles---> 10 angles (+4); etc. The researcher understood that students
at this level could not see a pattern like that. The researcher finally gave them the
formula, which is total angles =(n-1).n/2, where n is the total number of segment lines.
The researcher hoped that students trained their intuition skill in trying to recognize the
pattern of angles which were formed by many segment lines meeting at a common
point.
8. Can you guess how many angles exist if there are 5 segment lines meeting at one
common point?
After they got the formula, they were able to answer this question, which is 10 angles.
The researcher asked them to draw a picture of five segment lines meeting at a
common point, and asked them to see whether there are really 10 angles or not. After
they were doing what the researcher asked, they said that yes, it’s true. What the
67
researcher hoped is that students learned from this question how they could combine
their skills in thinking by seeing and by using a formula. However, the researcher could
not check from student’s answers if this question had this effect.
6.7.2.3 Conclusions of the second meeting
In the pen-and-paper section, the researcher found that students understood the
function of naming points of an angle, and they also could recognize a shape of an angle.
However, at the question 1c, some students (three groups) could not give correct
answers why two segment lines (representing of two sticks) can form an angle shape.
This evidence tells that probably the students could not use what they learned in the first
meeting to answer this question. The researcher also found that most students could
recognize an angle, but they did not know the name of its elements. To overcome this
problem, the researcher gave an explanation about the name of elements of an angle, at
the end of the first section. At the question 2a, the researcher found that some students
found it difficult to determine the number of angles from a picture that has many
segment lines with a common corner point. They only recognized an angle which was
composed of two segments lines which close to each other, but they did not recognize
an angle which had some segment lines between its legs. Comparing students’ answers
to questions 3a and 3b, the researcher concludes that most of the students found it
much easier to recognize examples of angles rather than non-examples.
In the DGS section, the researcher tried to emphasize what students learned from the
first section. Before the researcher gave some hints, students did not realize that an
angle can be created by extending two segment lines which are not parallel on the same
plane. At the question 6, students still found it difficult determine the number of angles
from a picture which has more than two segment lines with a common corner point, but
after the researcher gave them some help, then they could recognize the angles.
Actually, at the question 7, the researcher expected that students would be able to see
the pattern in the numbers of angles, but they could not. The researcher concludes that
question 7 was really tough for them, especially at their ages.
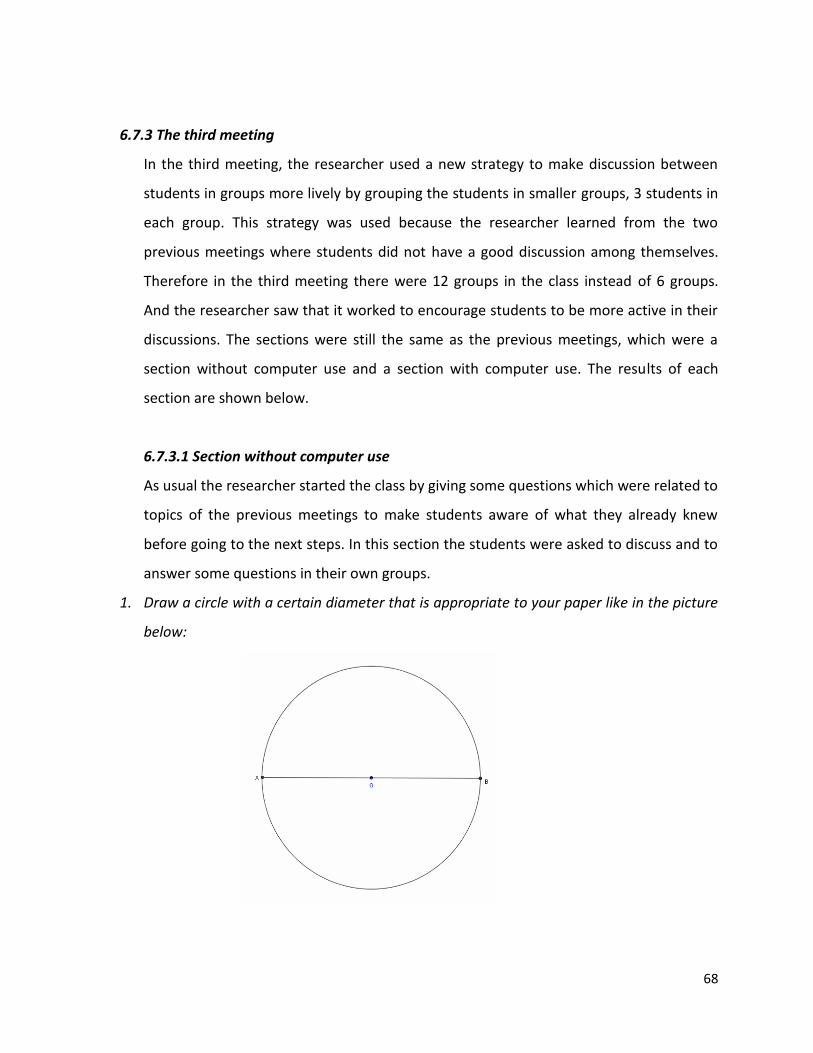
68
6.7.3 The third meeting
In the third meeting, the researcher used a new strategy to make discussion between
students in groups more lively by grouping the students in smaller groups, 3 students in
each group. This strategy was used because the researcher learned from the two
previous meetings where students did not have a good discussion among themselves.
Therefore in the third meeting there were 12 groups in the class instead of 6 groups.
And the researcher saw that it worked to encourage students to be more active in their
discussions. The sections were still the same as the previous meetings, which were a
section without computer use and a section with computer use. The results of each
section are shown below.
6.7.3.1 Section without computer use
As usual the researcher started the class by giving some questions which were related to
topics of the previous meetings to make students aware of what they already knew
before going to the next steps. In this section the students were asked to discuss and to
answer some questions in their own groups.
1. Draw a circle with a certain diameter that is appropriate to your paper like in the picture
below:
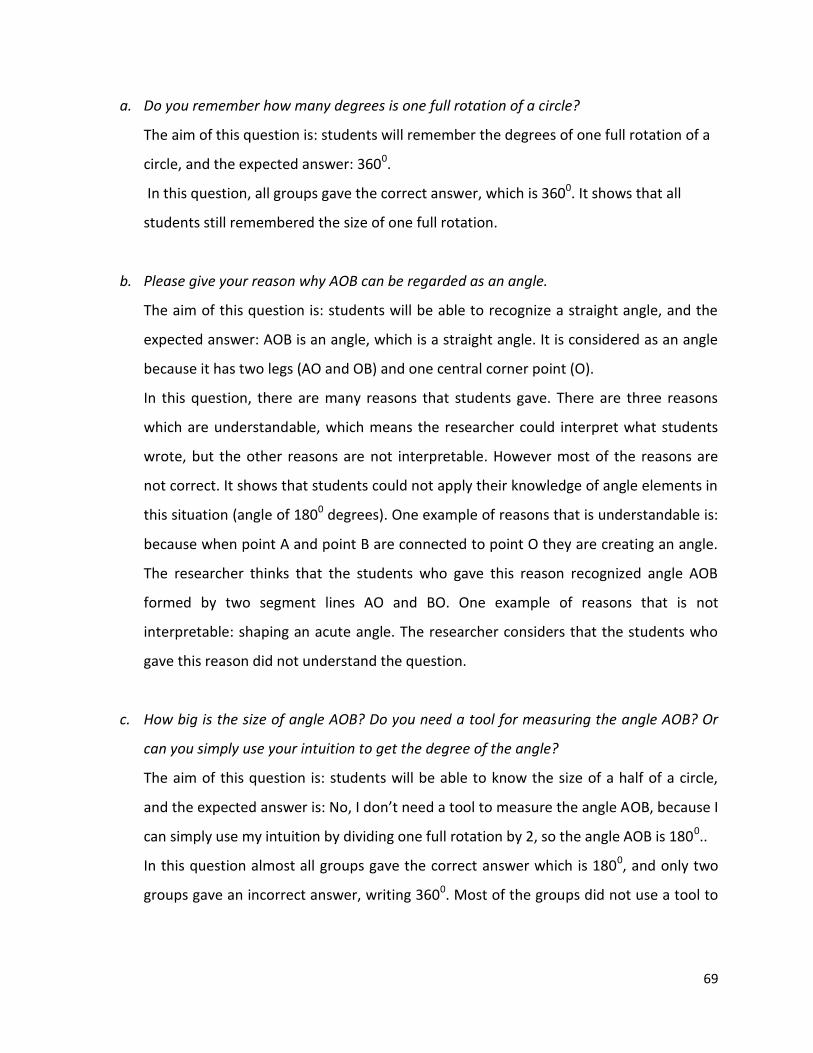
69
a. Do you remember how many degrees is one full rotation of a circle?
The aim of this question is: students will remember the degrees of one full rotation of a
circle, and the expected answer: 3600.
In this question, all groups gave the correct answer, which is 3600. It shows that all
students still remembered the size of one full rotation.
b. Please give your reason why AOB can be regarded as an angle.
The aim of this question is: students will be able to recognize a straight angle, and the
expected answer: AOB is an angle, which is a straight angle. It is considered as an angle
because it has two legs (AO and OB) and one central corner point (O).
In this question, there are many reasons that students gave. There are three reasons
which are understandable, which means the researcher could interpret what students
wrote, but the other reasons are not interpretable. However most of the reasons are
not correct. It shows that students could not apply their knowledge of angle elements in
this situation (angle of 1800 degrees). One example of reasons that is understandable is:
because when point A and point B are connected to point O they are creating an angle.
The researcher thinks that the students who gave this reason recognized angle AOB
formed by two segment lines AO and BO. One example of reasons that is not
interpretable: shaping an acute angle. The researcher considers that the students who
gave this reason did not understand the question.
c. How big is the size of angle AOB? Do you need a tool for measuring the angle AOB? Or
can you simply use your intuition to get the degree of the angle?
The aim of this question is: students will be able to know the size of a half of a circle,
and the expected answer is: No, I don’t need a tool to measure the angle AOB, because I
can simply use my intuition by dividing one full rotation by 2, so the angle AOB is 1800..
In this question almost all groups gave the correct answer which is 1800, and only two
groups gave an incorrect answer, writing 3600. Most of the groups did not use a tool to
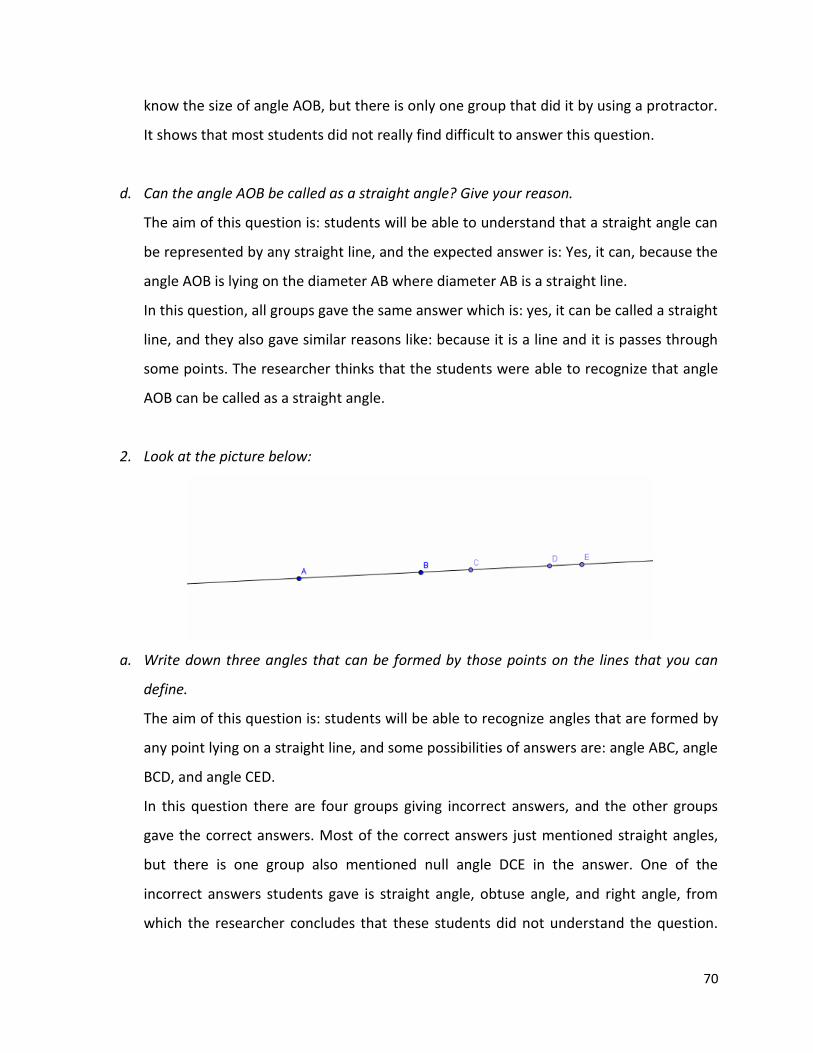
70
know the size of angle AOB, but there is only one group that did it by using a protractor.
It shows that most students did not really find difficult to answer this question.
d. Can the angle AOB be called as a straight angle? Give your reason.
The aim of this question is: students will be able to understand that a straight angle can
be represented by any straight line, and the expected answer is: Yes, it can, because the
angle AOB is lying on the diameter AB where diameter AB is a straight line.
In this question, all groups gave the same answer which is: yes, it can be called a straight
line, and they also gave similar reasons like: because it is a line and it is passes through
some points. The researcher thinks that the students were able to recognize that angle
AOB can be called as a straight angle.
2. Look at the picture below:
a. Write down three angles that can be formed by those points on the lines that you can
define.
The aim of this question is: students will be able to recognize angles that are formed by
any point lying on a straight line, and some possibilities of answers are: angle ABC, angle
BCD, and angle CED.
In this question there are four groups giving incorrect answers, and the other groups
gave the correct answers. Most of the correct answers just mentioned straight angles,
but there is one group also mentioned null angle DCE in the answer. One of the
incorrect answers students gave is straight angle, obtuse angle, and right angle, from
which the researcher concludes that these students did not understand the question.
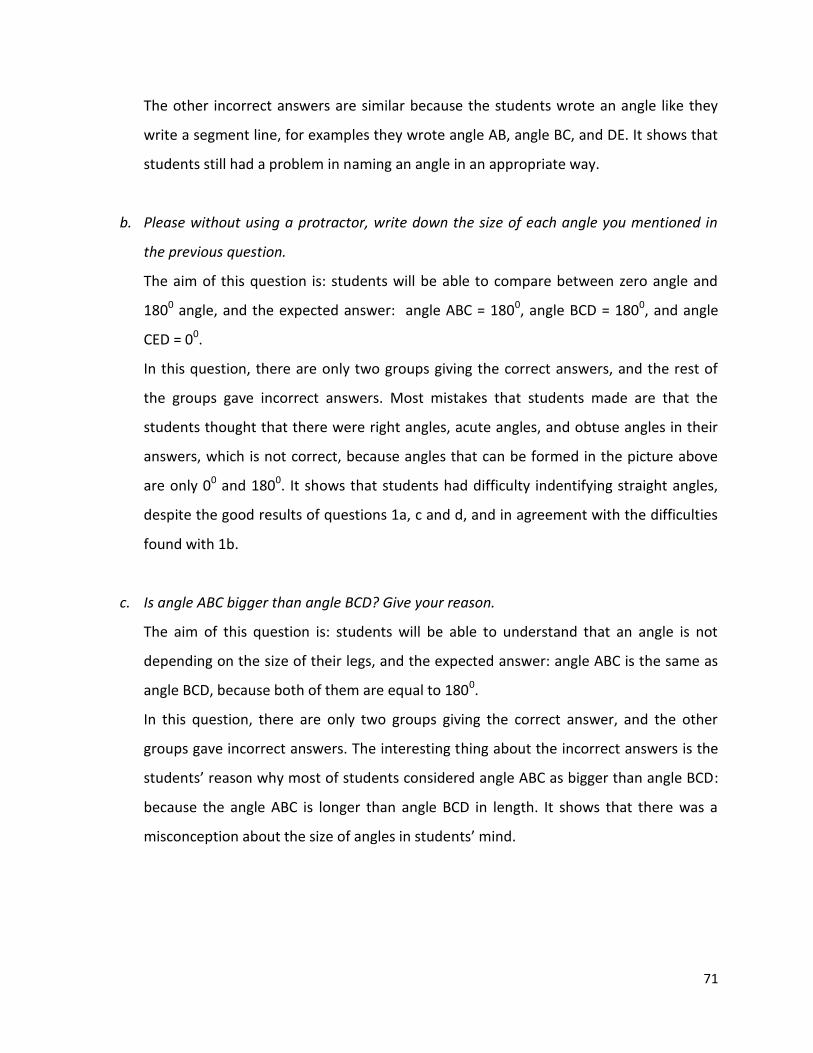
71
The other incorrect answers are similar because the students wrote an angle like they
write a segment line, for examples they wrote angle AB, angle BC, and DE. It shows that
students still had a problem in naming an angle in an appropriate way.
b. Please without using a protractor, write down the size of each angle you mentioned in
the previous question.
The aim of this question is: students will be able to compare between zero angle and
1800 angle, and the expected answer: angle ABC = 1800, angle BCD = 1800, and angle
CED = 00.
In this question, there are only two groups giving the correct answers, and the rest of
the groups gave incorrect answers. Most mistakes that students made are that the
students thought that there were right angles, acute angles, and obtuse angles in their
answers, which is not correct, because angles that can be formed in the picture above
are only 00 and 1800. It shows that students had difficulty indentifying straight angles,
despite the good results of questions 1a, c and d, and in agreement with the difficulties
found with 1b.
c. Is angle ABC bigger than angle BCD? Give your reason.
The aim of this question is: students will be able to understand that an angle is not
depending on the size of their legs, and the expected answer: angle ABC is the same as
angle BCD, because both of them are equal to 1800.
In this question, there are only two groups giving the correct answer, and the other
groups gave incorrect answers. The interesting thing about the incorrect answers is the
students’ reason why most of students considered angle ABC as bigger than angle BCD:
because the angle ABC is longer than angle BCD in length. It shows that there was a
misconception about the size of angles in students’ mind.
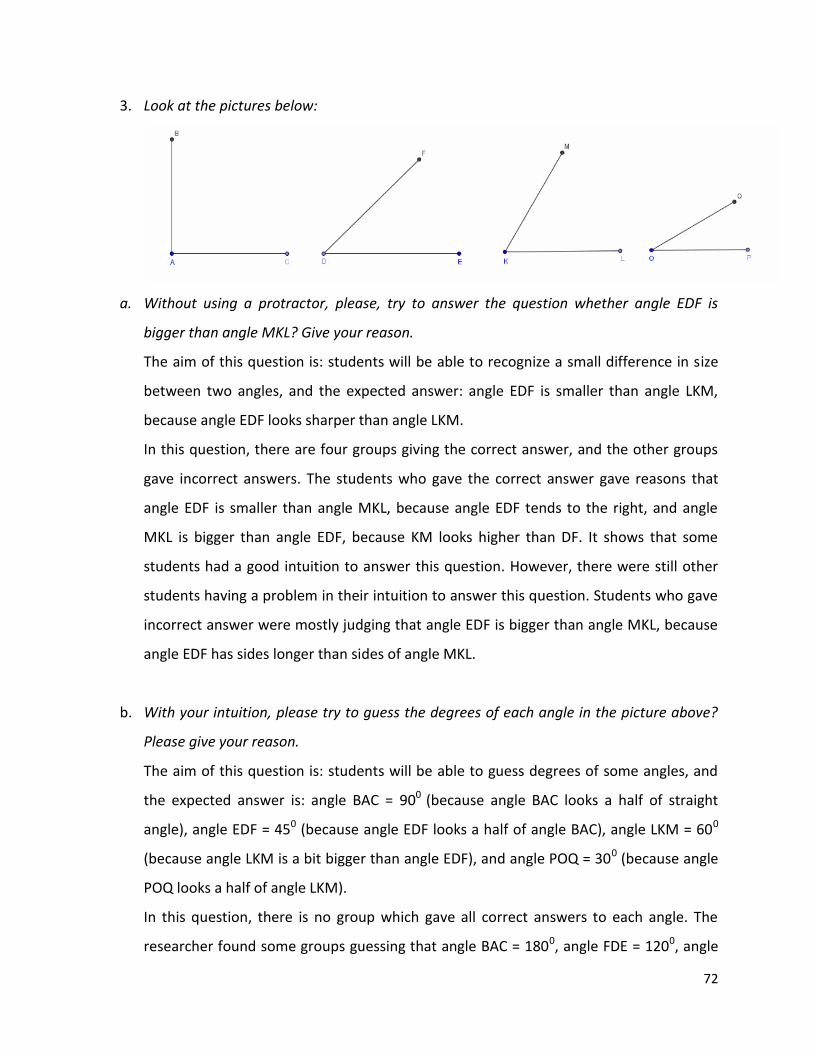
72
3. Look at the pictures below:
a. Without using a protractor, please, try to answer the question whether angle EDF is
bigger than angle MKL? Give your reason.
The aim of this question is: students will be able to recognize a small difference in size
between two angles, and the expected answer: angle EDF is smaller than angle LKM,
because angle EDF looks sharper than angle LKM.
In this question, there are four groups giving the correct answer, and the other groups
gave incorrect answers. The students who gave the correct answer gave reasons that
angle EDF is smaller than angle MKL, because angle EDF tends to the right, and angle
MKL is bigger than angle EDF, because KM looks higher than DF. It shows that some
students had a good intuition to answer this question. However, there were still other
students having a problem in their intuition to answer this question. Students who gave
incorrect answer were mostly judging that angle EDF is bigger than angle MKL, because
angle EDF has sides longer than sides of angle MKL.
b. With your intuition, please try to guess the degrees of each angle in the picture above?
Please give your reason.
The aim of this question is: students will be able to guess degrees of some angles, and
the expected answer is: angle BAC = 900 (because angle BAC looks a half of straight
angle), angle EDF = 450 (because angle EDF looks a half of angle BAC), angle LKM = 600
(because angle LKM is a bit bigger than angle EDF), and angle POQ = 300 (because angle
POQ looks a half of angle LKM).
In this question, there is no group which gave all correct answers to each angle. The
researcher found some groups guessing that angle BAC = 1800, angle FDE = 1200, angle
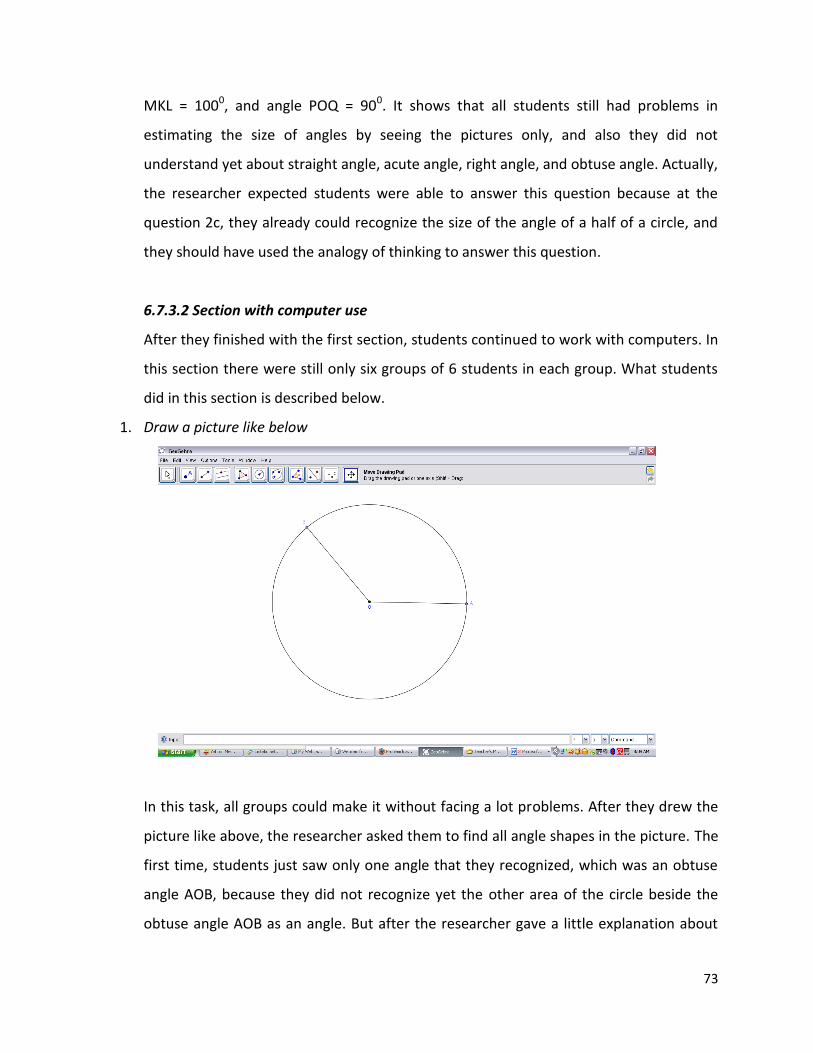
73
MKL = 1000, and angle POQ = 900. It shows that all students still had problems in
estimating the size of angles by seeing the pictures only, and also they did not
understand yet about straight angle, acute angle, right angle, and obtuse angle. Actually,
the researcher expected students were able to answer this question because at the
question 2c, they already could recognize the size of the angle of a half of a circle, and
they should have used the analogy of thinking to answer this question.
6.7.3.2 Section with computer use
After they finished with the first section, students continued to work with computers. In
this section there were still only six groups of 6 students in each group. What students
did in this section is described below.
1. Draw a picture like below
In this task, all groups could make it without facing a lot problems. After they drew the
picture like above, the researcher asked them to find all angle shapes in the picture. The
first time, students just saw only one angle that they recognized, which was an obtuse
angle AOB, because they did not recognize yet the other area of the circle beside the
obtuse angle AOB as an angle. But after the researcher gave a little explanation about
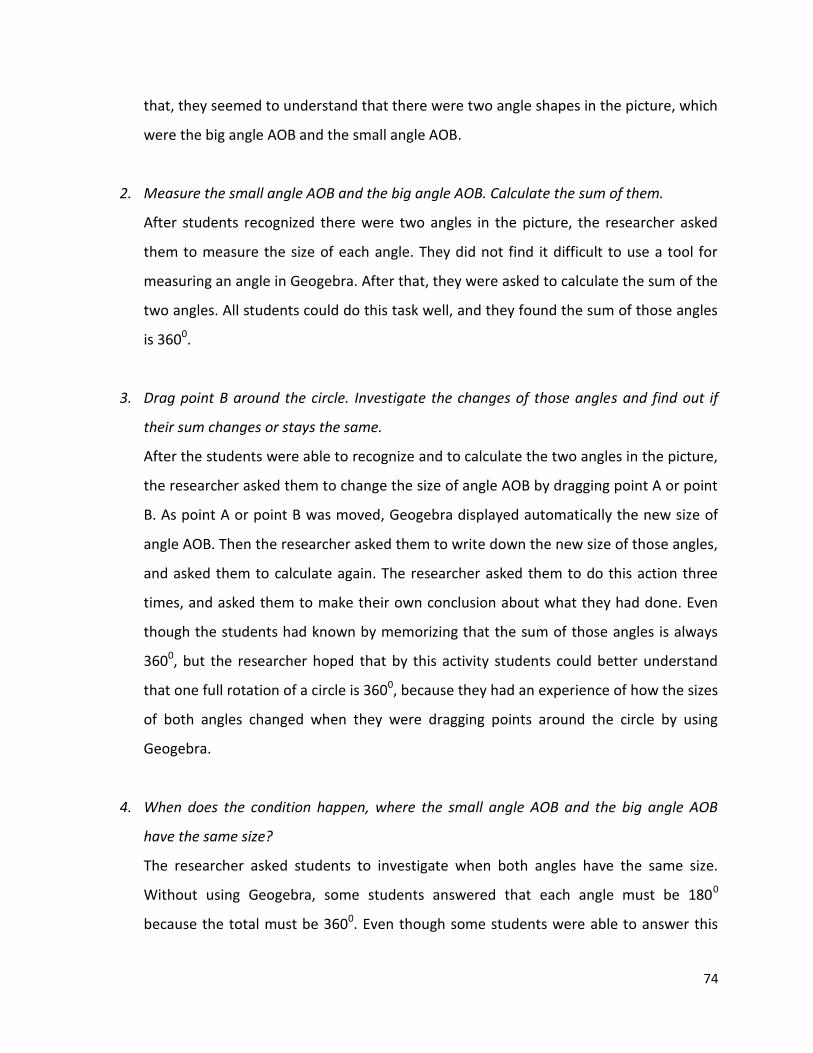
74
that, they seemed to understand that there were two angle shapes in the picture, which
were the big angle AOB and the small angle AOB.
2. Measure the small angle AOB and the big angle AOB. Calculate the sum of them.
After students recognized there were two angles in the picture, the researcher asked
them to measure the size of each angle. They did not find it difficult to use a tool for
measuring an angle in Geogebra. After that, they were asked to calculate the sum of the
two angles. All students could do this task well, and they found the sum of those angles
is 3600.
3. Drag point B around the circle. Investigate the changes of those angles and find out if
their sum changes or stays the same.
After the students were able to recognize and to calculate the two angles in the picture,
the researcher asked them to change the size of angle AOB by dragging point A or point
B. As point A or point B was moved, Geogebra displayed automatically the new size of
angle AOB. Then the researcher asked them to write down the new size of those angles,
and asked them to calculate again. The researcher asked them to do this action three
times, and asked them to make their own conclusion about what they had done. Even
though the students had known by memorizing that the sum of those angles is always
3600, but the researcher hoped that by this activity students could better understand
that one full rotation of a circle is 3600, because they had an experience of how the sizes
of both angles changed when they were dragging points around the circle by using
Geogebra.
4. When does the condition happen, where the small angle AOB and the big angle AOB
have the same size?
The researcher asked students to investigate when both angles have the same size.
Without using Geogebra, some students answered that each angle must be 1800
because the total must be 3600. Even though some students were able to answer this
75
question intuitively, the researcher still asked them to play with Geogebra to find a
picture where both angles are the same in size. After trying out moving point A or point
B, students found the condition, where point A, point O, and point B were on a diameter
of the circle.
5. When does the small angle AOB reach the smallest size?
In this question, the students did not find it difficult to find out the solution, because by
Geogebra they could easily drag point A or point B to get the condition where the small
angle AOB reached size 00. By only dragging one of those points, the researcher hoped
that students could realize that 00 degree appeared when point A and point B are
together at the same place.
6. Draw a picture like below.
In this task, all groups could do it well without having problems. After they drew the
picture, the researcher asked them to recognize angles in it.
76
7. Measure angle ABC, angle ABD, and angle BCD. Are they the same in size? Why?
Even though by using Geogebra students could easily measure all angle sizes, they found
it a bit difficult to give the reason why all the angles had the same size. The researcher
guided them to see carefully the similarity of those angles, which they are all on the
same lines and they are straight angles, and the corner point is in between the other
angle points. After this task was done, the researcher hoped that students were able to
understand the reason for the equality of these angles.
8. Measure angle ACB, angle BCA, and angle DBC. Are they the same in size? Why?
In this question, by using Geogebra, students could easily find out that the size of these
angles is 00. Like with question 7 the students could not give their own reasons, so the
researcher guided students to understand why all those angles are the same size, which
is because they all are on the same lines, and the corner point is not in between the
other angle points. The researcher expected that students were able to understand the
reasons why those angles had the same size after they did this task.
6.7.3.3 Conclusions of the third meeting
In the pen-and-paper section, the researcher found that most students could not
explain why AOB (the diameter of a circle with centre O) can be regard as an angle AOB.
The researcher concludes that students did not yet recognize AO and BO as legs of the
angle, and O as the corner point of the angle, which means that students found it
difficult to recognize a straight angle as an angle. However, they did not have any
problem to determine the size of angle AOB, and most of the students did not use a
protractor, because they simply divided 3600 by 2. Students also could recognize angle
AOB as a straight angle, because they see AOB obviously as a diameter of a circle, which
could also be representing a line. However, most students found it difficult to recognize
a straight angle at question 2, probably, because they did not see it as a half of circle.
Most of students considered angle ABC as bigger than angle BCD by comparing the
length of ABC and the length of BCD, while both angles should be the same size (1800).
77
At the question 3a, some students used their intuition skill well and gave a good reason
in their answers. However, other students still judged the size of an angle by the length
of its legs. At the question 3b, the researcher found that students had difficulty
estimating the size of an angle just by seeing.
In the DGS section, overall students did not really have problems to do the tasks. The
researcher observed that students could find the difference between a straight angle
and a null angle, which they did not get it yet in the pen-and-paper section, because
using Geogebra students could easily experiment with creation of null angles.
6.7.4 The fourth meeting
In the fourth meeting, the researcher still grouped students within 12 groups like in the
third meeting, and members of each group had been changed like the researcher did in
the second meeting and third meeting. In this meeting also there were still two sections
like in the previous meetings, which were a section without computer use and a section
with computer use.
6.7.4.1 Section without computer use
Like the previous meetings, at the beginning of the class the researcher was asking the
students some questions about what they just learned in the previous meetings. The
students seemed like they got used to the researcher’s teaching style, so they were
ready when the researcher asked them questions at the beginning of the class. This was
shown by their enthusiasm to answer the questions, and a lot of them could answer
those questions well. After that the students were starting again to work in their own
groups. The results of their work without computer use are shown below.
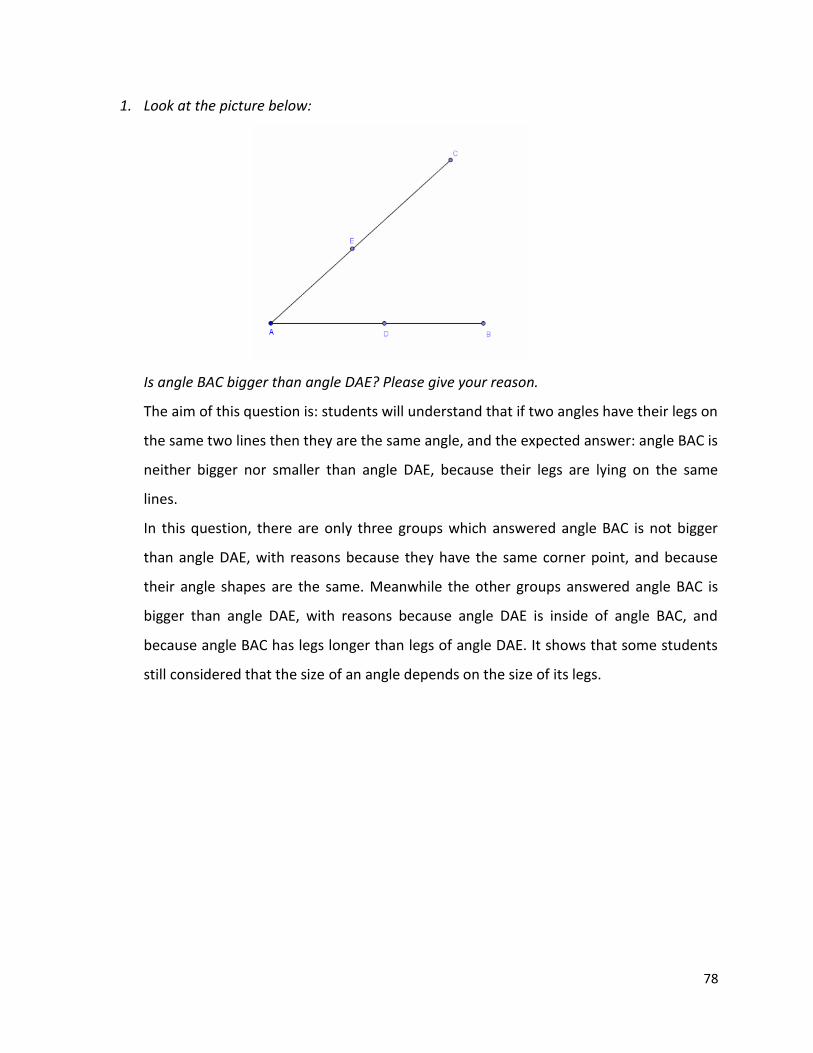
78
1. Look at the picture below:
Is angle BAC bigger than angle DAE? Please give your reason.
The aim of this question is: students will understand that if two angles have their legs on
the same two lines then they are the same angle, and the expected answer: angle BAC is
neither bigger nor smaller than angle DAE, because their legs are lying on the same
lines.
In this question, there are only three groups which answered angle BAC is not bigger
than angle DAE, with reasons because they have the same corner point, and because
their angle shapes are the same. Meanwhile the other groups answered angle BAC is
bigger than angle DAE, with reasons because angle DAE is inside of angle BAC, and
because angle BAC has legs longer than legs of angle DAE. It shows that some students
still considered that the size of an angle depends on the size of its legs.
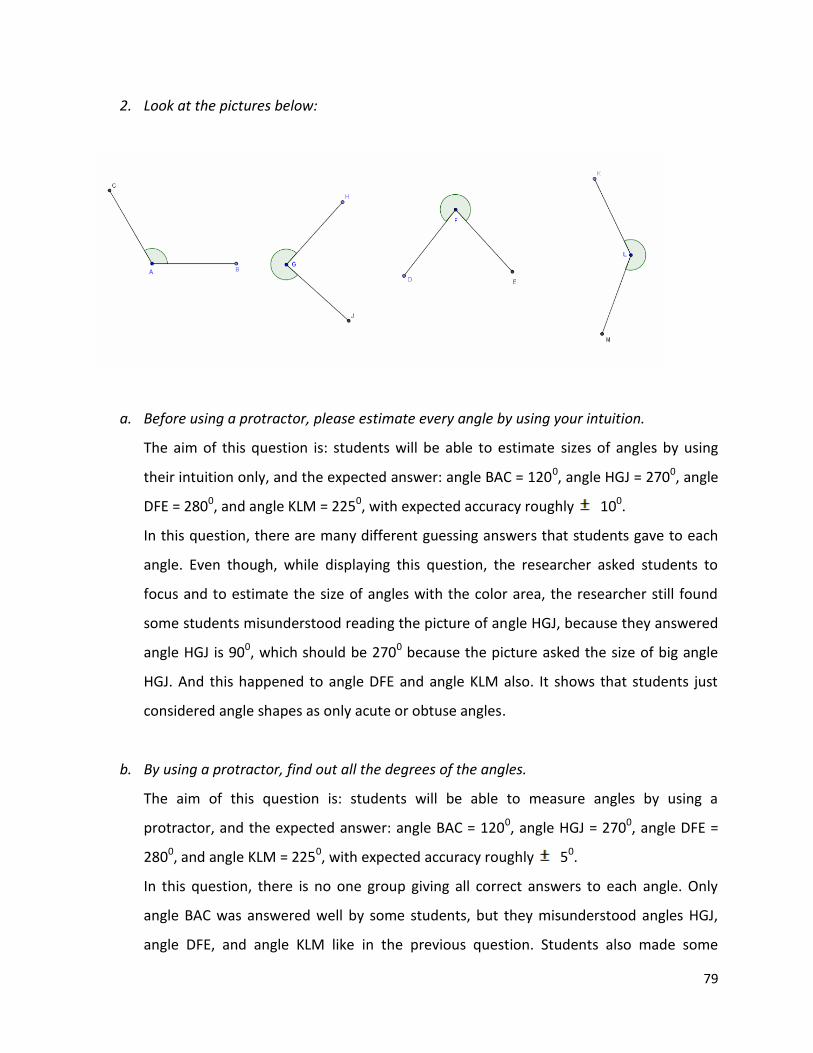
79
2. Look at the pictures below:
a. Before using a protractor, please estimate every angle by using your intuition.
The aim of this question is: students will be able to estimate sizes of angles by using
their intuition only, and the expected answer: angle BAC = 1200, angle HGJ = 2700, angle
DFE = 2800, and angle KLM = 2250, with expected accuracy roughly 100.
In this question, there are many different guessing answers that students gave to each
angle. Even though, while displaying this question, the researcher asked students to
focus and to estimate the size of angles with the color area, the researcher still found
some students misunderstood reading the picture of angle HGJ, because they answered
angle HGJ is 900, which should be 2700 because the picture asked the size of big angle
HGJ. And this happened to angle DFE and angle KLM also. It shows that students just
considered angle shapes as only acute or obtuse angles.
b. By using a protractor, find out all the degrees of the angles.
The aim of this question is: students will be able to measure angles by using a
protractor, and the expected answer: angle BAC = 1200, angle HGJ = 2700, angle DFE =
2800, and angle KLM = 2250, with expected accuracy roughly 50.
In this question, there is no one group giving all correct answers to each angle. Only
angle BAC was answered well by some students, but they misunderstood angles HGJ,
angle DFE, and angle KLM like in the previous question. Students also made some
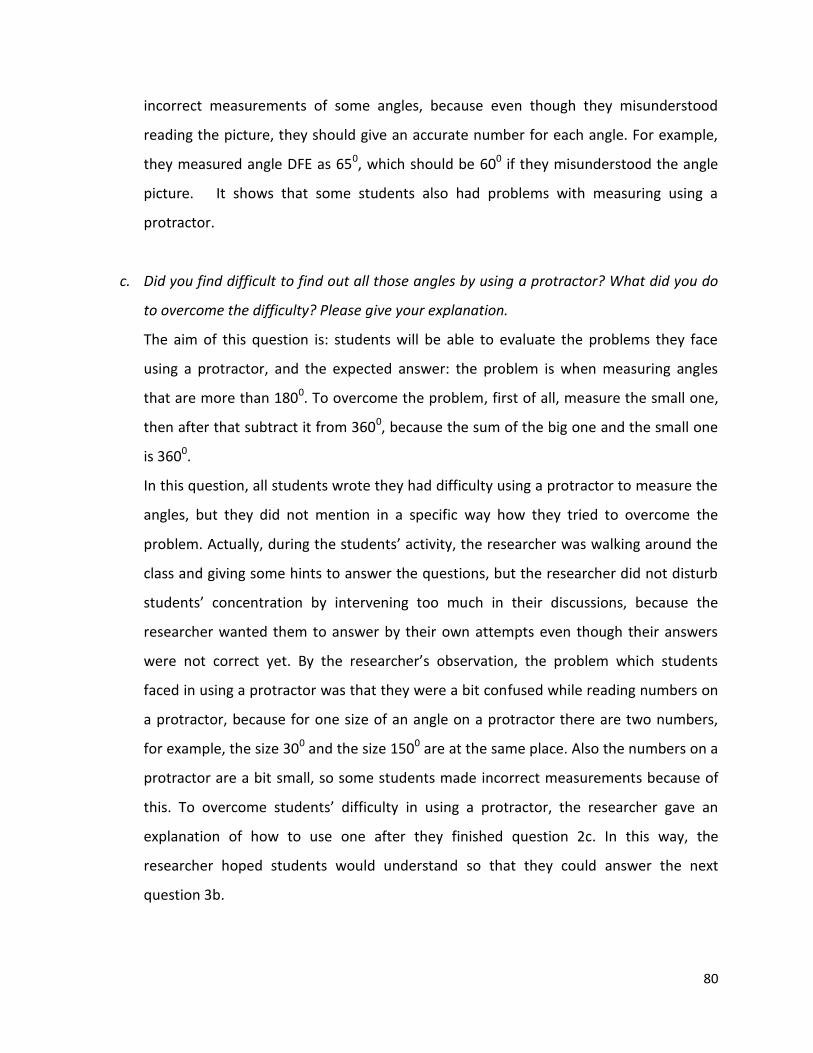
80
incorrect measurements of some angles, because even though they misunderstood
reading the picture, they should give an accurate number for each angle. For example,
they measured angle DFE as 650, which should be 600 if they misunderstood the angle
picture. It shows that some students also had problems with measuring using a
protractor.
c. Did you find difficult to find out all those angles by using a protractor? What did you do
to overcome the difficulty? Please give your explanation.
The aim of this question is: students will be able to evaluate the problems they face
using a protractor, and the expected answer: the problem is when measuring angles
that are more than 1800. To overcome the problem, first of all, measure the small one,
then after that subtract it from 3600, because the sum of the big one and the small one
is 3600.
In this question, all students wrote they had difficulty using a protractor to measure the
angles, but they did not mention in a specific way how they tried to overcome the
problem. Actually, during the students’ activity, the researcher was walking around the
class and giving some hints to answer the questions, but the researcher did not disturb
students’ concentration by intervening too much in their discussions, because the
researcher wanted them to answer by their own attempts even though their answers
were not correct yet. By the researcher’s observation, the problem which students
faced in using a protractor was that they were a bit confused while reading numbers on
a protractor, because for one size of an angle on a protractor there are two numbers,
for example, the size 300 and the size 1500 are at the same place. Also the numbers on a
protractor are a bit small, so some students made incorrect measurements because of
this. To overcome students’ difficulty in using a protractor, the researcher gave an
explanation of how to use one after they finished question 2c. In this way, the
researcher hoped students would understand so that they could answer the next
question 3b.
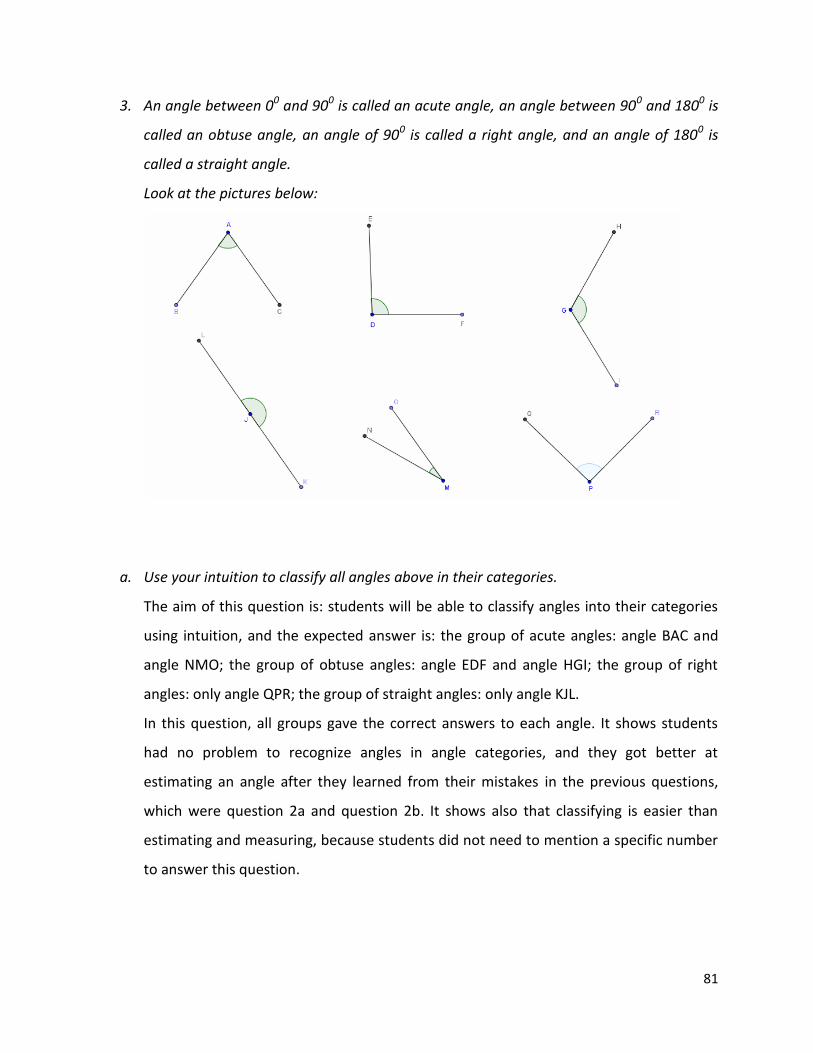
81
3. An angle between 00 and 900 is called an acute angle, an angle between 900 and 1800 is
called an obtuse angle, an angle of 900 is called a right angle, and an angle of 1800 is
called a straight angle.
Look at the pictures below:
a. Use your intuition to classify all angles above in their categories.
The aim of this question is: students will be able to classify angles into their categories
using intuition, and the expected answer is: the group of acute angles: angle BAC and
angle NMO; the group of obtuse angles: angle EDF and angle HGI; the group of right
angles: only angle QPR; the group of straight angles: only angle KJL.
In this question, all groups gave the correct answers to each angle. It shows students
had no problem to recognize angles in angle categories, and they got better at
estimating an angle after they learned from their mistakes in the previous questions,
which were question 2a and question 2b. It shows also that classifying is easier than
estimating and measuring, because students did not need to mention a specific number
to answer this question.
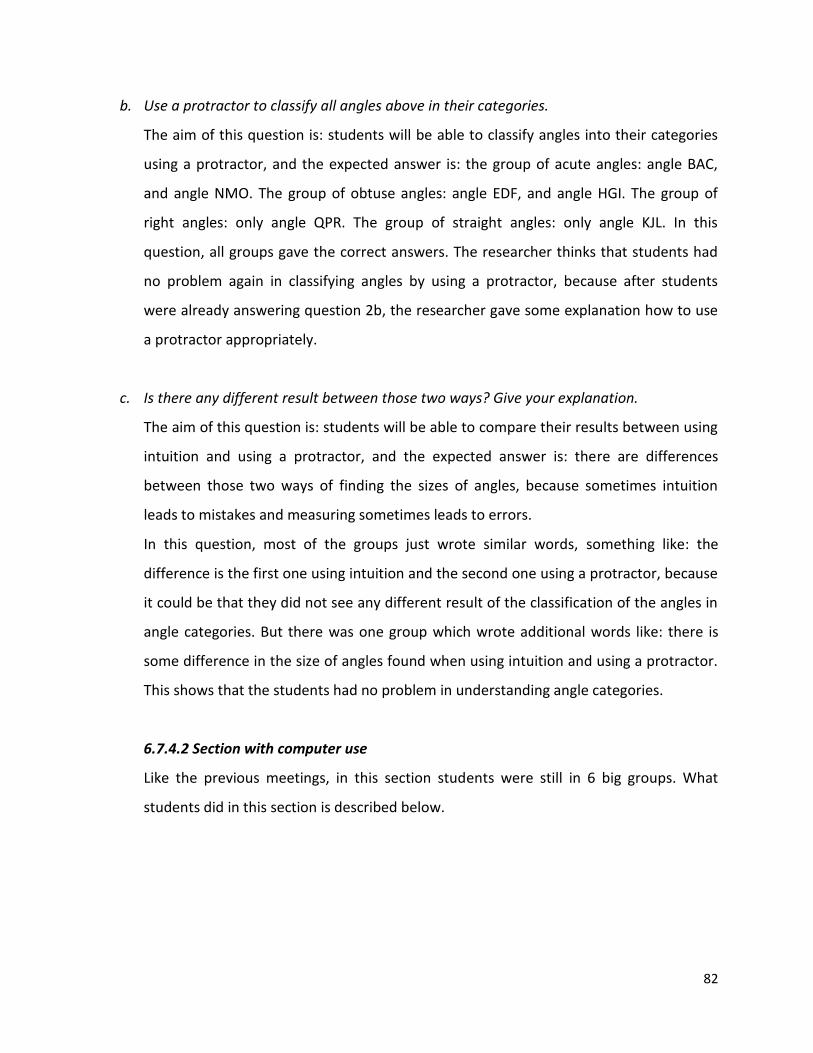
82
b. Use a protractor to classify all angles above in their categories.
The aim of this question is: students will be able to classify angles into their categories
using a protractor, and the expected answer is: the group of acute angles: angle BAC,
and angle NMO. The group of obtuse angles: angle EDF, and angle HGI. The group of
right angles: only angle QPR. The group of straight angles: only angle KJL. In this
question, all groups gave the correct answers. The researcher thinks that students had
no problem again in classifying angles by using a protractor, because after students
were already answering question 2b, the researcher gave some explanation how to use
a protractor appropriately.
c. Is there any different result between those two ways? Give your explanation.
The aim of this question is: students will be able to compare their results between using
intuition and using a protractor, and the expected answer is: there are differences
between those two ways of finding the sizes of angles, because sometimes intuition
leads to mistakes and measuring sometimes leads to errors.
In this question, most of the groups just wrote similar words, something like: the
difference is the first one using intuition and the second one using a protractor, because
it could be that they did not see any different result of the classification of the angles in
angle categories. But there was one group which wrote additional words like: there is
some difference in the size of angles found when using intuition and using a protractor.
This shows that the students had no problem in understanding angle categories.
6.7.4.2 Section with computer use
Like the previous meetings, in this section students were still in 6 big groups. What
students did in this section is described below.
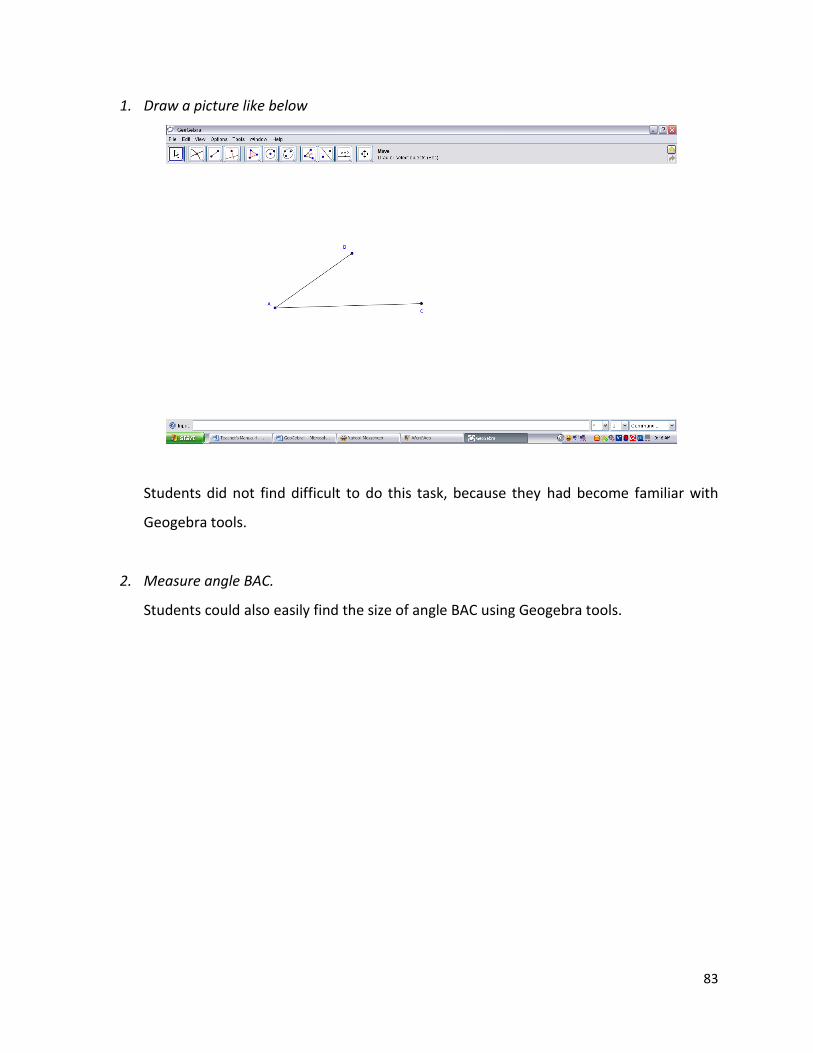
83
1. Draw a picture like below
Students did not find difficult to do this task, because they had become familiar with
Geogebra tools.
2. Measure angle BAC.
Students could also easily find the size of angle BAC using Geogebra tools.
84
3. Extend segment line AB, and AC like in the picture below
In this task also students did well drawing the picture.
4. Measure angle DAE. Compare with angle BAC. Do they have different size? Why?
Students found that angle DAE and angle ABC had the same size, but the reason was not
easy for them. To help students to find the reason, the researcher asked them to
recognize the similarity of each leg of those angles and the corner of each angle by
asking some questions. First of all, the researcher asked a question: are leg AC and leg
AE on the same line? Students said: yes, they are. After that the researcher asked the
next question: what about leg AB and leg AD? Students said: they are also. And after
that the researcher asked another question: do angle DAE and angle BAC have the same
corner point? Students said: yes, they do. The researcher said that all those facts are the
reasons why angle DAE and angle BAC are the same. The researcher hoped that finally
they understood the reason why both angles are the same size.
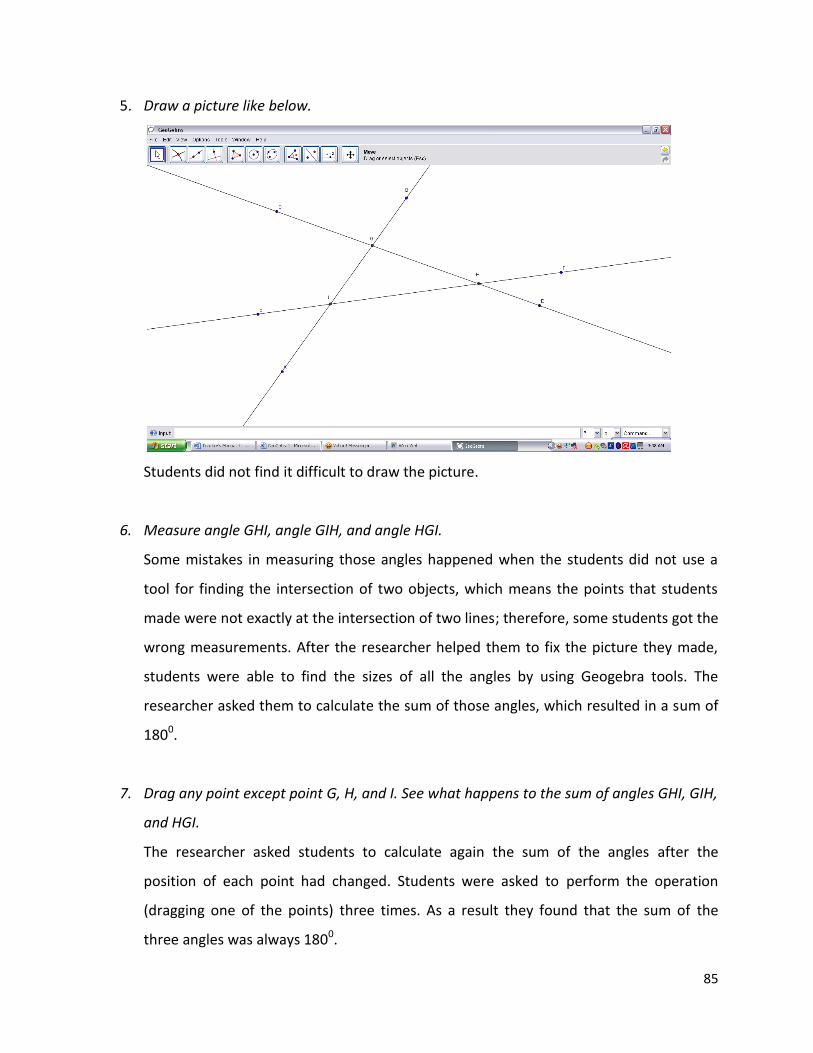
85
5. Draw a picture like below.
Students did not find it difficult to draw the picture.
6. Measure angle GHI, angle GIH, and angle HGI.
Some mistakes in measuring those angles happened when the students did not use a
tool for finding the intersection of two objects, which means the points that students
made were not exactly at the intersection of two lines; therefore, some students got the
wrong measurements. After the researcher helped them to fix the picture they made,
students were able to find the sizes of all the angles by using Geogebra tools. The
researcher asked them to calculate the sum of those angles, which resulted in a sum of
1800.
7. Drag any point except point G, H, and I. See what happens to the sum of angles GHI, GIH,
and HGI.
The researcher asked students to calculate again the sum of the angles after the
position of each point had changed. Students were asked to perform the operation
(dragging one of the points) three times. As a result they found that the sum of the
three angles was always 1800.
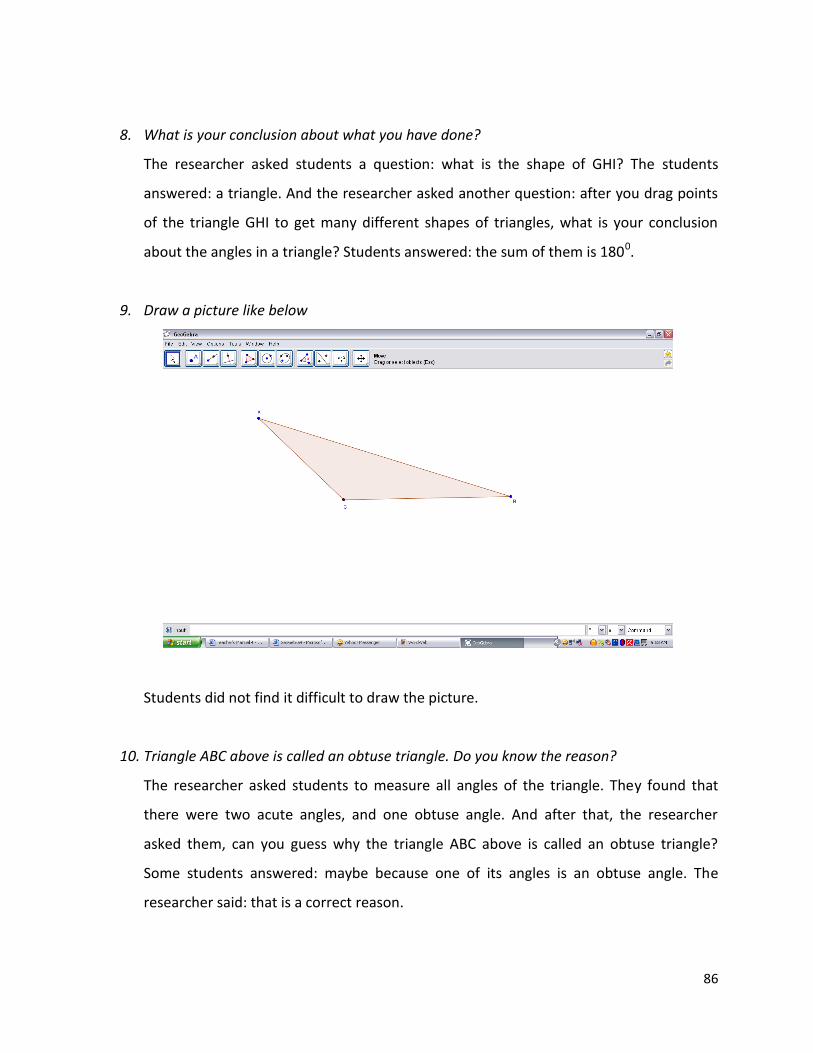
86
8. What is your conclusion about what you have done?
The researcher asked students a question: what is the shape of GHI? The students
answered: a triangle. And the researcher asked another question: after you drag points
of the triangle GHI to get many different shapes of triangles, what is your conclusion
about the angles in a triangle? Students answered: the sum of them is 1800.
9. Draw a picture like below
Students did not find it difficult to draw the picture.
10. Triangle ABC above is called an obtuse triangle. Do you know the reason?
The researcher asked students to measure all angles of the triangle. They found that
there were two acute angles, and one obtuse angle. And after that, the researcher
asked them, can you guess why the triangle ABC above is called an obtuse triangle?
Some students answered: maybe because one of its angles is an obtuse angle. The
researcher said: that is a correct reason.
87
11. Please draw a right triangle and an acute triangle.
In this task, students did not find it difficult to draw the two triangles with Geogebra.
What they learned was in a right triangle there is one right angle in it, and in an acute
triangle all angles are acute angles.
6.7.4.3 Conclusions of the fourth meeting
In the pen-and-paper section, for question 1, the researcher still found that some
students considered that the size of an angle is dependent on the length of its legs, even
though from the previous meeting they had already answered similar problems. The
researcher concludes that students could not use their experience to answer similar
problems. The researcher also found that students had a problem in using a protractor
to answer question 1b. To overcome this problem, the researcher explained how to use
a protractor properly. On question 2a, the researcher found that students only
considered the size of an angle which was less than 1800, even though in the third
meeting they had learned that the size of an angle could be more than 1800. However,
for question 3, the researcher found that students did not have a problem in using a
protractor to answer this question, and they could classify angles into categories without
any mistakes. The researcher concludes that classifying was easier for students than
estimating and measuring.
In the DGS section, students did a small investigation on a problem similar to question 1
in the first section. After the researcher helped and guided students to investigate why
angle DAE and angle BAC have the same size, students found that the size of an angle
does not depend on the length of its legs. Students also found that the total of the three
angles of a triangle is always 1800, and they found a reason why some triangles can be
called obtuse triangles.
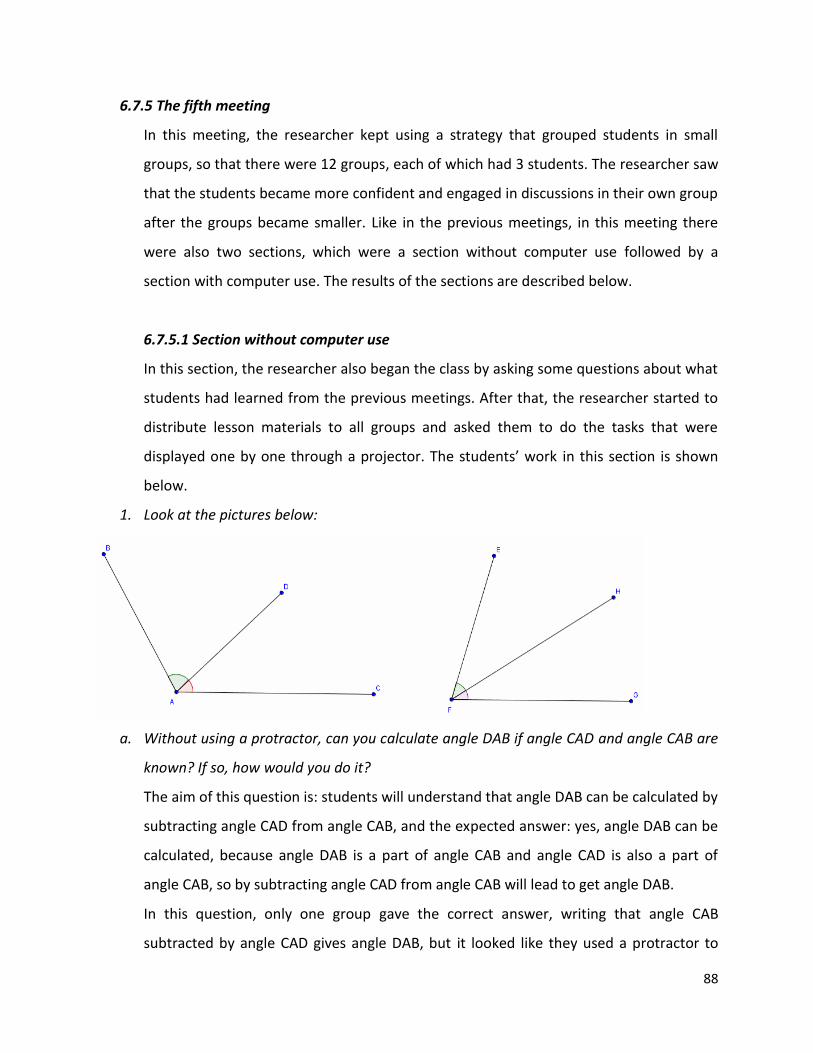
88
6.7.5 The fifth meeting
In this meeting, the researcher kept using a strategy that grouped students in small
groups, so that there were 12 groups, each of which had 3 students. The researcher saw
that the students became more confident and engaged in discussions in their own group
after the groups became smaller. Like in the previous meetings, in this meeting there
were also two sections, which were a section without computer use followed by a
section with computer use. The results of the sections are described below.
6.7.5.1 Section without computer use
In this section, the researcher also began the class by asking some questions about what
students had learned from the previous meetings. After that, the researcher started to
distribute lesson materials to all groups and asked them to do the tasks that were
displayed one by one through a projector. The students’ work in this section is shown
below.
1. Look at the pictures below:
a. Without using a protractor, can you calculate angle DAB if angle CAD and angle CAB are
known? If so, how would you do it?
The aim of this question is: students will understand that angle DAB can be calculated by
subtracting angle CAD from angle CAB, and the expected answer: yes, angle DAB can be
calculated, because angle DAB is a part of angle CAB and angle CAD is also a part of
angle CAB, so by subtracting angle CAD from angle CAB will lead to get angle DAB.
In this question, only one group gave the correct answer, writing that angle CAB
subtracted by angle CAD gives angle DAB, but it looked like they used a protractor to
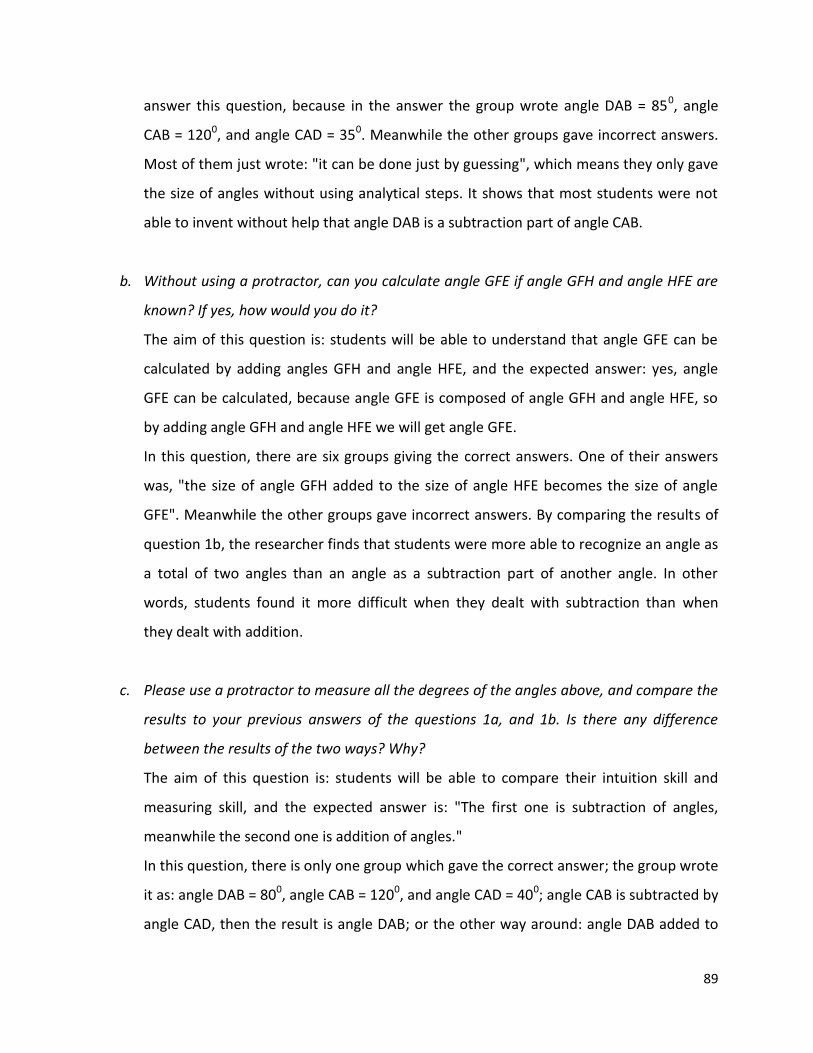
89
answer this question, because in the answer the group wrote angle DAB = 850, angle
CAB = 1200, and angle CAD = 350. Meanwhile the other groups gave incorrect answers.
Most of them just wrote: "it can be done just by guessing", which means they only gave
the size of angles without using analytical steps. It shows that most students were not
able to invent without help that angle DAB is a subtraction part of angle CAB.
b. Without using a protractor, can you calculate angle GFE if angle GFH and angle HFE are
known? If yes, how would you do it?
The aim of this question is: students will be able to understand that angle GFE can be
calculated by adding angles GFH and angle HFE, and the expected answer: yes, angle
GFE can be calculated, because angle GFE is composed of angle GFH and angle HFE, so
by adding angle GFH and angle HFE we will get angle GFE.
In this question, there are six groups giving the correct answers. One of their answers
was, "the size of angle GFH added to the size of angle HFE becomes the size of angle
GFE". Meanwhile the other groups gave incorrect answers. By comparing the results of
question 1b, the researcher finds that students were more able to recognize an angle as
a total of two angles than an angle as a subtraction part of another angle. In other
words, students found it more difficult when they dealt with subtraction than when
they dealt with addition.
c. Please use a protractor to measure all the degrees of the angles above, and compare the
results to your previous answers of the questions 1a, and 1b. Is there any difference
between the results of the two ways? Why?
The aim of this question is: students will be able to compare their intuition skill and
measuring skill, and the expected answer is: "The first one is subtraction of angles,
meanwhile the second one is addition of angles."
In this question, there is only one group which gave the correct answer; the group wrote
it as: angle DAB = 800, angle CAB = 1200, and angle CAD = 400; angle CAB is subtracted by
angle CAD, then the result is angle DAB; or the other way around: angle DAB added to
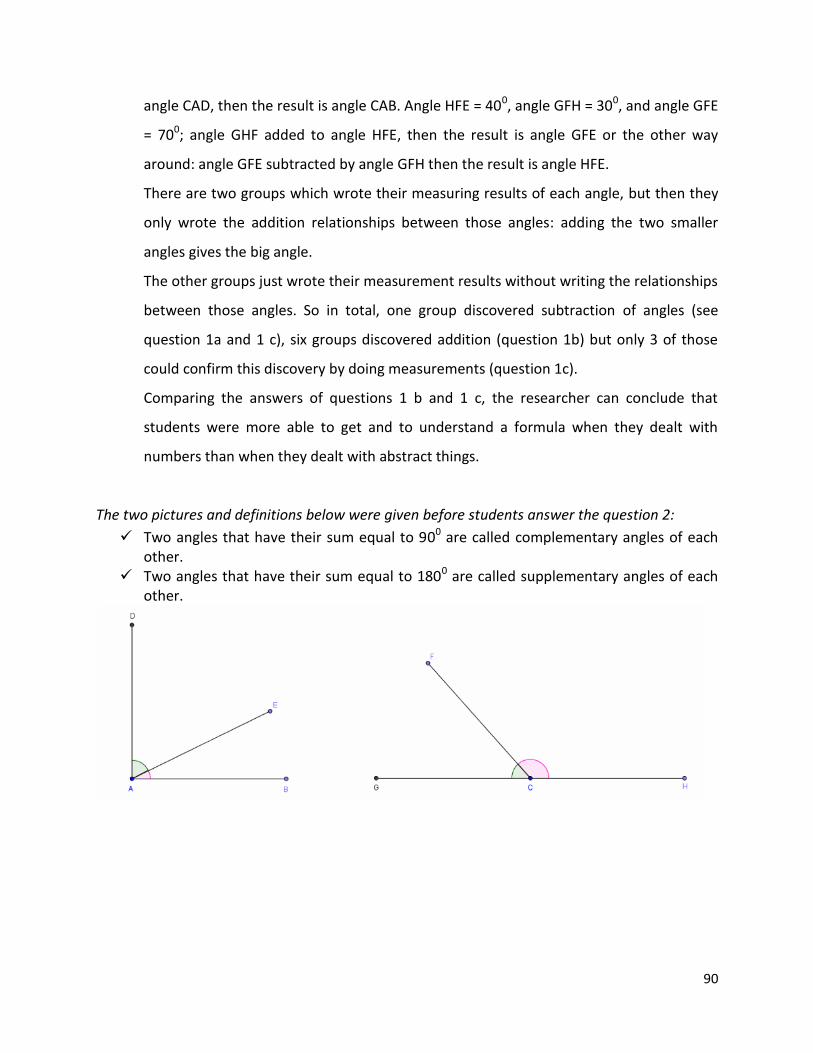
90
angle CAD, then the result is angle CAB. Angle HFE = 400, angle GFH = 300, and angle GFE
= 700; angle GHF added to angle HFE, then the result is angle GFE or the other way
around: angle GFE subtracted by angle GFH then the result is angle HFE.
There are two groups which wrote their measuring results of each angle, but then they
only wrote the addition relationships between those angles: adding the two smaller
angles gives the big angle.
The other groups just wrote their measurement results without writing the relationships
between those angles. So in total, one group discovered subtraction of angles (see
question 1a and 1 c), six groups discovered addition (question 1b) but only 3 of those
could confirm this discovery by doing measurements (question 1c).
Comparing the answers of questions 1 b and 1 c, the researcher can conclude that
students were more able to get and to understand a formula when they dealt with
numbers than when they dealt with abstract things.
The two pictures and definitions below were given before students answer the question 2:
Two angles that have their sum equal to 900 are called complementary angles of each other.
Two angles that have their sum equal to 1800 are called supplementary angles of each other.
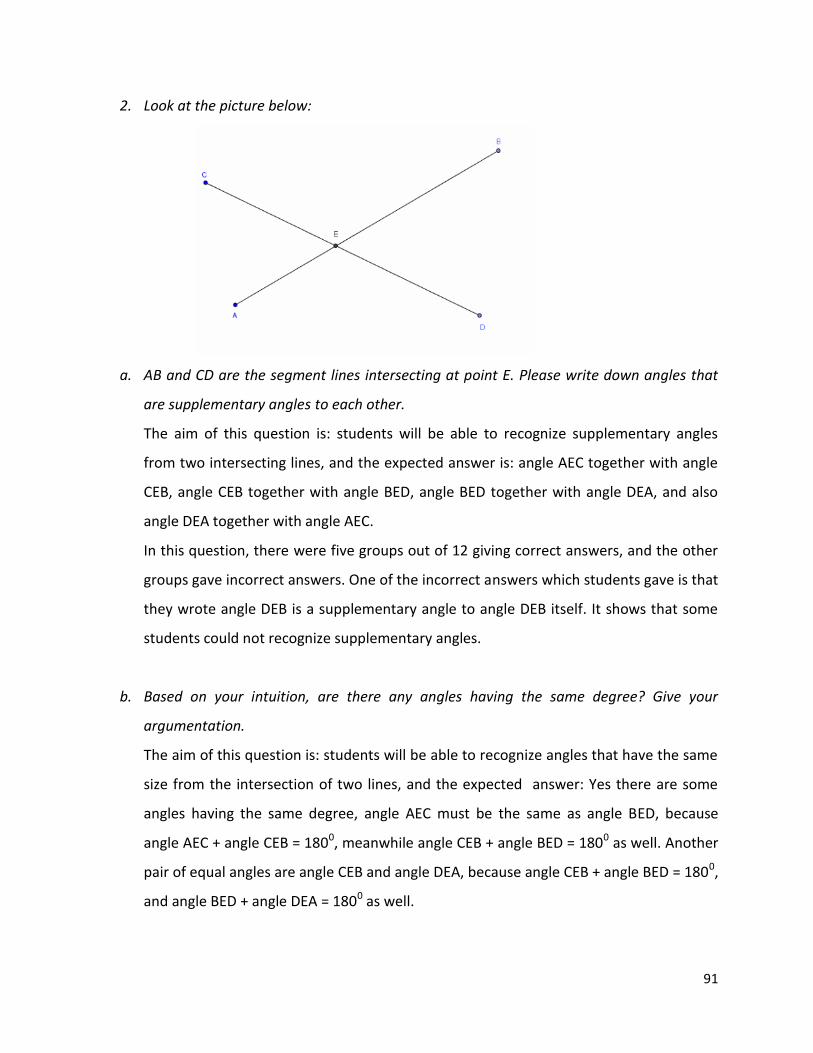
91
2. Look at the picture below:
a. AB and CD are the segment lines intersecting at point E. Please write down angles that
are supplementary angles to each other.
The aim of this question is: students will be able to recognize supplementary angles
from two intersecting lines, and the expected answer is: angle AEC together with angle
CEB, angle CEB together with angle BED, angle BED together with angle DEA, and also
angle DEA together with angle AEC.
In this question, there were five groups out of 12 giving correct answers, and the other
groups gave incorrect answers. One of the incorrect answers which students gave is that
they wrote angle DEB is a supplementary angle to angle DEB itself. It shows that some
students could not recognize supplementary angles.
b. Based on your intuition, are there any angles having the same degree? Give your
argumentation.
The aim of this question is: students will be able to recognize angles that have the same
size from the intersection of two lines, and the expected answer: Yes there are some
angles having the same degree, angle AEC must be the same as angle BED, because
angle AEC + angle CEB = 1800, meanwhile angle CEB + angle BED = 1800 as well. Another
pair of equal angles are angle CEB and angle DEA, because angle CEB + angle BED = 1800,
and angle BED + angle DEA = 1800 as well.
92
In this question, there were four groups giving correct answers, but they gave different
reasons that are acceptable in the researcher’s opinion. Their reasons were: "because
the angles have the same shape" (1 group), "because the angles have the same size" (3
groups). Meanwhile the other groups gave incorrect answers. One of the incorrect
answers is that the students wrote angle ABC has equal size to angle ABD, because they
have size 1800. A common mistake that students made is that they tried using the rule
of question 2a to answer question 2b. It means that a lot of students found it difficult to
understand and to recognize angles which have the same size formed by two
intersecting lines.
3. Look at the picture below:
AB and CD are parallel segment lines, and EF is the segment line intersecting them at
points G and H.
a. Based on your intuition, identify three pairs of angles that have the same degrees. Give
your argumentation.
The aim of this question is: students will be able to recognize angles that have the same
size from a pair of two parallel lines intersected by another unparallel line, and one of
the possible answers is: angle AHE is the same as angle CGH, because line CD is a
translated line of line AB so all angles shaped by intersecting line AB to EF will have the
same size as all angles shaped by intersecting line CD to EF. Therefore, two other
93
examples of angles which have the same size are angle AHG = angle CGF, and angle EHB
= angle HGD.
In this question, there were five groups out of 12 giving correct answers with common
reasons given: because the angles have the same size, or because the angles are
parallel. The other groups gave incorrect answers, most of them making wrong pairs of
the angles. For example, they wrote angle FGC has the same size as angle GHB. It could
happen because the students were not really careful in recognizing the angles which
have the same size. It shows that some students found it difficult to recognize angles
which have the same size as in the picture above.
b. If you are asked to find out all degrees of angles in the picture above, how many angles
do you need minimally to find the other angles? Give your reason.
The aim of this question is: students will be able to understand that to find all unknown
angles in the pictures they only need one angle known, and the expected answer: only
one known angle is needed to find all unknown angles in the pictures, because by using
the result of the previous question it shows that if one angle is known then other angles
can be determined as well.
In this question, there are two groups that wrote they only needed 1 angle known to
know all other angles. Three groups answered that they needed 2 angles known, four
groups needed 3 angles known, and one group needed 4 angles to know all other
angles. One group gave an unreadable answer, because the answer does not show the
number of angles needed. One interesting answer is that one group wrote that they
needed 8 angles, because there are 8 angles in the picture. It shows that a lot of
students were not able to invent independently how to find out all sizes of angles in the
picture above using only one known angle.
Before asking the question 3c, the researcher displayed the categories below.
Note: In the picture of question 31:
1 The Indonesian terms for pairs of related angles (in case of parallel lines intersected by a third line) are difficult, if
not impossible, to translate. The English and Dutch terms do not convey the full range of meanings carried by the 6 different terms in Indonesian.
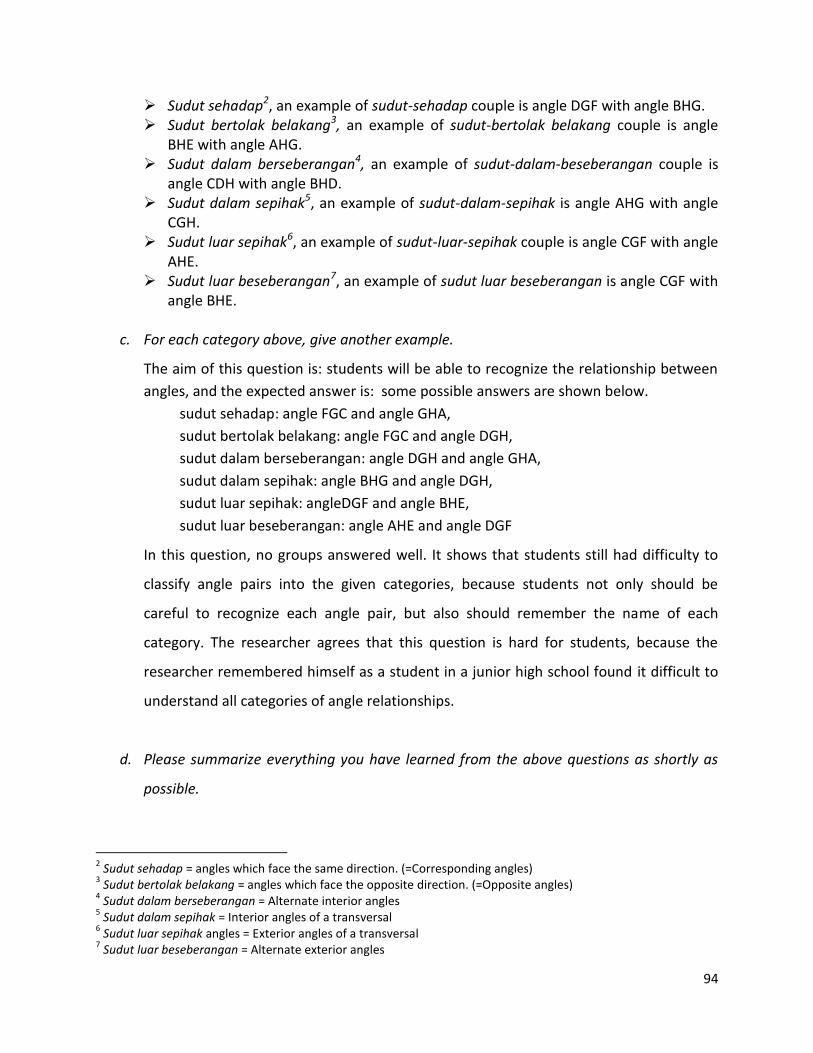
94
Sudut sehadap2, an example of sudut-sehadap couple is angle DGF with angle BHG. Sudut bertolak belakang3, an example of sudut-bertolak belakang couple is angle
BHE with angle AHG. Sudut dalam berseberangan4, an example of sudut-dalam-beseberangan couple is
angle CDH with angle BHD. Sudut dalam sepihak5, an example of sudut-dalam-sepihak is angle AHG with angle
CGH. Sudut luar sepihak6, an example of sudut-luar-sepihak couple is angle CGF with angle
AHE. Sudut luar beseberangan7, an example of sudut luar beseberangan is angle CGF with
angle BHE.
c. For each category above, give another example.
The aim of this question is: students will be able to recognize the relationship between
angles, and the expected answer is: some possible answers are shown below.
sudut sehadap: angle FGC and angle GHA,
sudut bertolak belakang: angle FGC and angle DGH,
sudut dalam berseberangan: angle DGH and angle GHA,
sudut dalam sepihak: angle BHG and angle DGH,
sudut luar sepihak: angleDGF and angle BHE,
sudut luar beseberangan: angle AHE and angle DGF
In this question, no groups answered well. It shows that students still had difficulty to
classify angle pairs into the given categories, because students not only should be
careful to recognize each angle pair, but also should remember the name of each
category. The researcher agrees that this question is hard for students, because the
researcher remembered himself as a student in a junior high school found it difficult to
understand all categories of angle relationships.
d. Please summarize everything you have learned from the above questions as shortly as
possible.
2 Sudut sehadap = angles which face the same direction. (=Corresponding angles)
3 Sudut bertolak belakang = angles which face the opposite direction. (=Opposite angles)
4 Sudut dalam berseberangan = Alternate interior angles
5 Sudut dalam sepihak = Interior angles of a transversal
6 Sudut luar sepihak angles = Exterior angles of a transversal
7 Sudut luar beseberangan = Alternate exterior angles
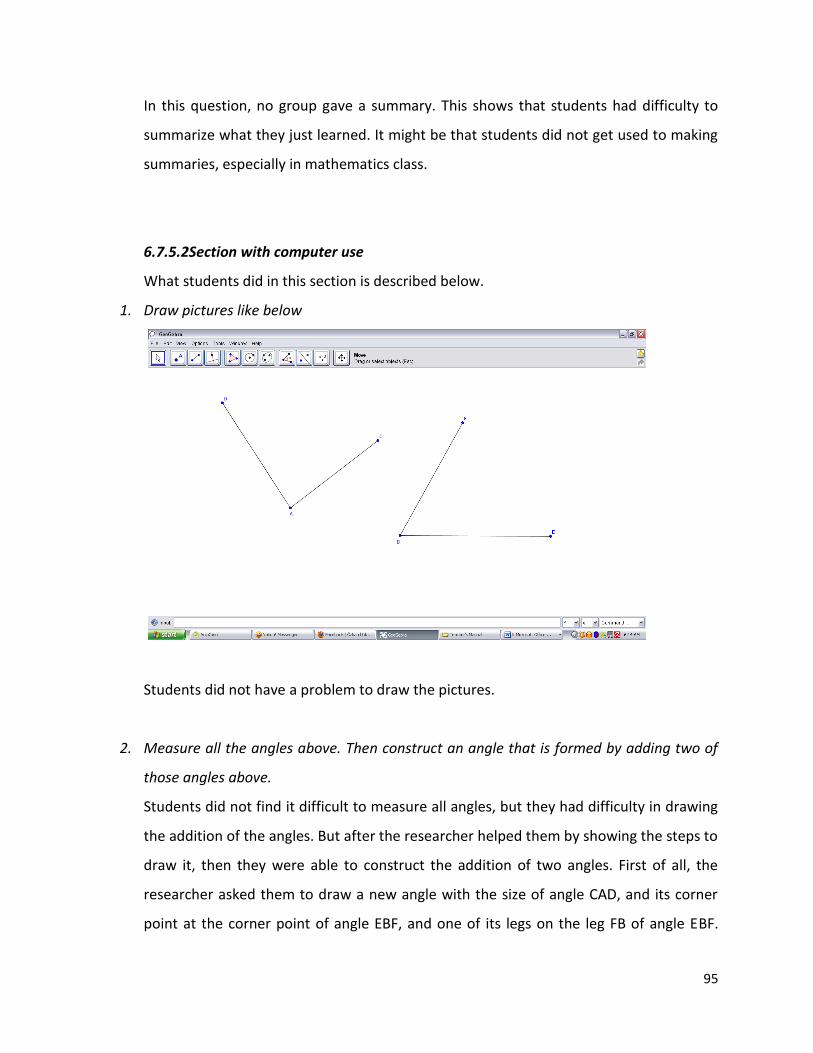
95
In this question, no group gave a summary. This shows that students had difficulty to
summarize what they just learned. It might be that students did not get used to making
summaries, especially in mathematics class.
6.7.5.2Section with computer use
What students did in this section is described below.
1. Draw pictures like below
Students did not have a problem to draw the pictures.
2. Measure all the angles above. Then construct an angle that is formed by adding two of
those angles above.
Students did not find it difficult to measure all angles, but they had difficulty in drawing
the addition of the angles. But after the researcher helped them by showing the steps to
draw it, then they were able to construct the addition of two angles. First of all, the
researcher asked them to draw a new angle with the size of angle CAD, and its corner
point at the corner point of angle EBF, and one of its legs on the leg FB of angle EBF.
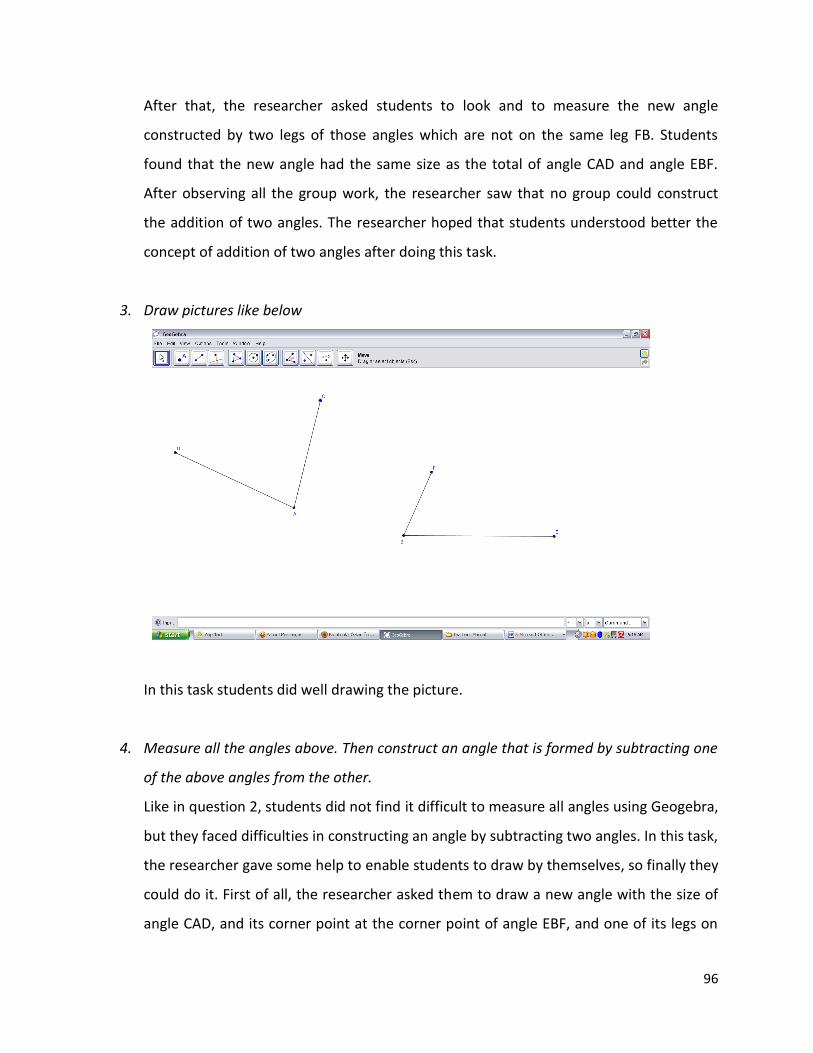
96
After that, the researcher asked students to look and to measure the new angle
constructed by two legs of those angles which are not on the same leg FB. Students
found that the new angle had the same size as the total of angle CAD and angle EBF.
After observing all the group work, the researcher saw that no group could construct
the addition of two angles. The researcher hoped that students understood better the
concept of addition of two angles after doing this task.
3. Draw pictures like below
In this task students did well drawing the picture.
4. Measure all the angles above. Then construct an angle that is formed by subtracting one
of the above angles from the other.
Like in question 2, students did not find it difficult to measure all angles using Geogebra,
but they faced difficulties in constructing an angle by subtracting two angles. In this task,
the researcher gave some help to enable students to draw by themselves, so finally they
could do it. First of all, the researcher asked them to draw a new angle with the size of
angle CAD, and its corner point at the corner point of angle EBF, and one of its legs on
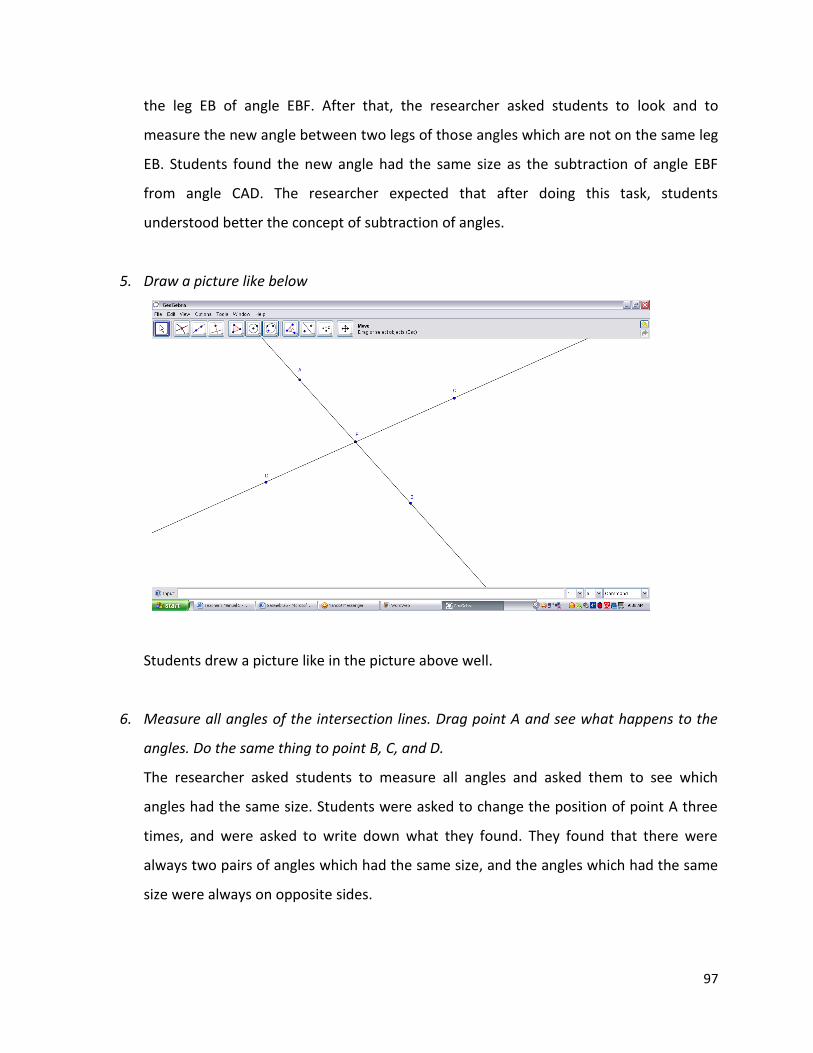
97
the leg EB of angle EBF. After that, the researcher asked students to look and to
measure the new angle between two legs of those angles which are not on the same leg
EB. Students found the new angle had the same size as the subtraction of angle EBF
from angle CAD. The researcher expected that after doing this task, students
understood better the concept of subtraction of angles.
5. Draw a picture like below
Students drew a picture like in the picture above well.
6. Measure all angles of the intersection lines. Drag point A and see what happens to the
angles. Do the same thing to point B, C, and D.
The researcher asked students to measure all angles and asked them to see which
angles had the same size. Students were asked to change the position of point A three
times, and were asked to write down what they found. They found that there were
always two pairs of angles which had the same size, and the angles which had the same
size were always on opposite sides.
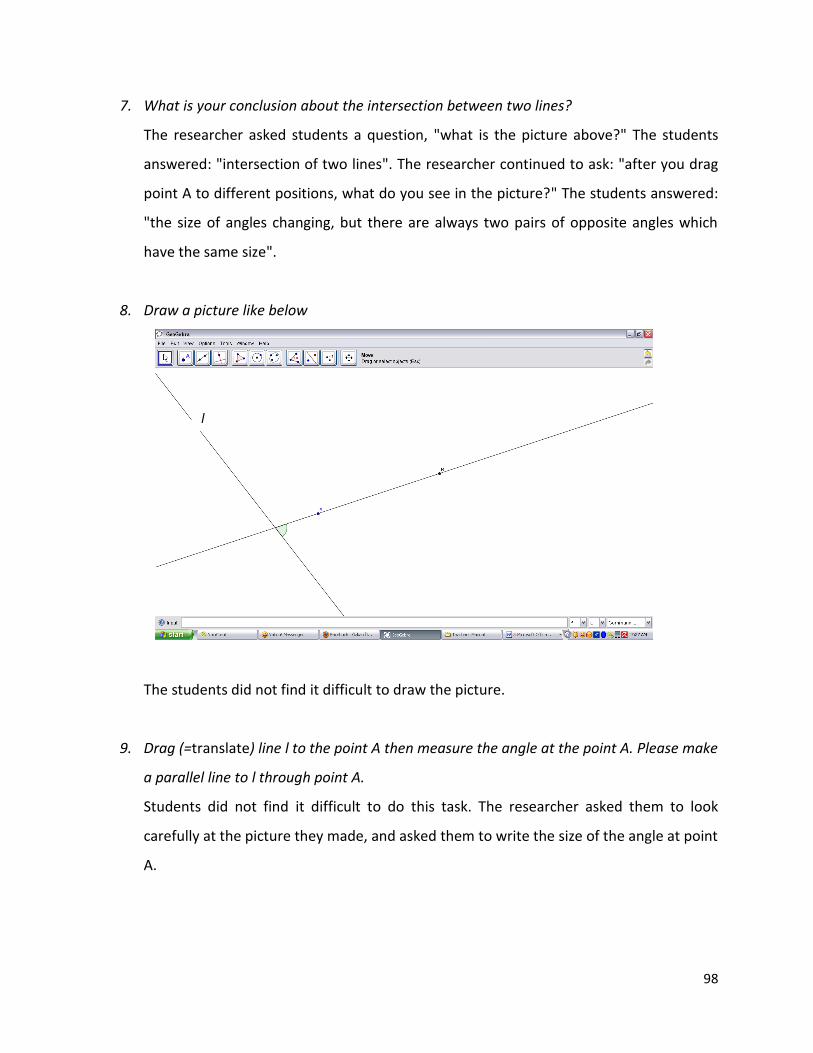
98
7. What is your conclusion about the intersection between two lines?
The researcher asked students a question, "what is the picture above?" The students
answered: "intersection of two lines". The researcher continued to ask: "after you drag
point A to different positions, what do you see in the picture?" The students answered:
"the size of angles changing, but there are always two pairs of opposite angles which
have the same size".
8. Draw a picture like below
The students did not find it difficult to draw the picture.
9. Drag (=translate) line l to the point A then measure the angle at the point A. Please make
a parallel line to l through point A.
Students did not find it difficult to do this task. The researcher asked them to look
carefully at the picture they made, and asked them to write the size of the angle at point
A.
l
99
10. Do the same things to point B. What is your conclusion on what you have drawn?
Students also did well drawing a line parallel to line l at point B. After that, the
researcher asked them to measure the angle at point B, and to compare the angle at
point A. They found that both angles had the same size. The researcher hoped that
students learned in this task that if two parallel lines are intersected by another line,
then the angles at the points of intersection have the same size.
6.7.5.3 Conclusions of the fifth meeting
In the pen-and-paper section, by seeing students’ answers to question 1, the researcher
concludes that students found it more difficult when they dealt with subtraction than
when they dealt with addition of angles, and students were more able to obtain a
formula when they dealt with numbers than when they dealt with abstract things. At
the question 2a, the researcher found that most students did not really understand the
definition of supplementary angles. Students also found difficult to understand some
categories of relationships of angles which are formed by a pair of parallel lines
intersected by another line. The researcher also found that students could not write a
summary of what they just learned. The researcher concludes that making a summary
and understanding a definition are difficult things for students in learning mathematics.
In the DGS section, the researcher helped and guided students to do the tasks. The
researcher observed that students found and learned more about the concepts of
subtraction and addition of angles at the task 1-4, which they found difficult to
understand during the pen-and-paper section; students could see how opposite angles
at the intersection of two lines have the same size; and also students could realize that a
pair of parallel lines intersecting another line creates some relationships between angles
which they learned in the pen-and-paper section.
100
6.7.6 Summary of the intervention findings8
In the intervention findings, the following themes are recurring:
1. When do segment lines intersect?
2. Recognizing an angle, using angle attributes to reason that a figure is an angle,
recognizing an angle even in difficult cases like: straight angles, composite angles,
exterior angles.
3. Angle estimation / measuring / categorizing (acute / right / obtuse / straight)
sub-theme: angle size is independent of leg size
4. Angle relationship. (Addition, subtraction, complementary, supplementary,
opposing, angle pairs in case of parallel lines).
Below the developments in each of the themes are summarized.
1. When do lines intersect?
The theme question is first asked in meeting 1 (question 1d-h). Four out of six groups
could recognize two different cases of non-intersecting lines (parallel and crossing) in a
3-dimensional picture (question 1f), but most of the groups could not generalize these
observations into a rule (question 1g-h). An activity with Geogebra seemed to help
(meeting 1, Geogebra task 5). In the next meeting, on paper, half of the groups were
able to reason about why lines intersect (meeting 2, question 1c and question 3a-b).
2. Recognizing an angle.
The theme of recognising an angle shape starts at meeting 2 (question 1). Students
understand the need for labeling the three angle points (question 1a), they recognize an
angle shape (question 1b) but they are not accurate about the important elements of an
angle (question 1d). When they are asked to reason about whether something is an
angle (meeting 3, question 1-2, the special case of a straight angle), they do not initially
8 This section is contributed by Wolter Kaper, the supervisor of this research

101
use the angle elements, (like: one vertex and two legs) in their reasoning. The
recognition of angles in a daily life context goes well (meeting 2, question 3). The
recognition of composite angles is initially a problem (question 2), in the same meeting
this same subject is tried again with use of Geogebra plus more explanation and a
formula given by the teacher (meeting 2, Geogebra tasks 5-8), and, though finding the
formula themselves was perhaps too much to ask, students made progress in counting -
and therefore also recognizing - composite angles. Finally a problem about recognizing
angles appeared in meeting 3 (Geogebra tasks 1-5) where angles of sizes larger than 180
degrees were introduced. At first everything went as expected, especially as long as the
circle-picture was still there (Geogebra tasks 1-5). However at the next meeting, angles
larger than 180 degrees were not recognized by students (meeting 4, question 2),
possibly because the circle-pictures as used in meeting 3 were changed into other types
of pictures. This problem did not get repaired, because no more activities were devoted
to angles larger than 180 degrees. So we have evidence that most groups of students
could recognize angles, even if they were straight angles or composed angles, but most
students did not recognize angles larger than 180 degrees.
3. Angle estimation, angle measuring, & angle categorizing (acute/ right/ obtuse/
straight)
Finding the size of an angle is first done in meeting 2 with Geogebra (Geogebra task 4)
and this results in ability to find an angle equality by measuring (Geogebra task 4). This
measuring ability does not mean that students understand what we mean by the size of
an angle. During the third meeting, various answers indicate that students consider the
length of the angle's legs as important for the size of the angle (question 2c, q3a). This
problem was expected from the literature (Clements and Battista, 1992) and during the
fourth meeting two activities were planned to address this issue, one with pen and
paper (meeting 4, question 1) and the other with Geogebra (Geogebra task 3). In the
paper activity 9 out of 12 groups held on to their idea that leg-size is important. During
the Geogebra activity, the teacher started a question-answer session that seemed to
102
convince the students (Geogebra task 4). It would be nice to measure some time later
whether this result lasted!
Estimating an angle is first asked in meeting 3 (question 3) and goes on in meeting 4
(questions 2-3). In meeting three, 4 out of 12 groups were able to compare angles that
differed by a small amount. In meeting 4, estimating angles initially did not go well, nor
could students measure the given angles. The majority of the angles asked were bigger
than 180 degrees and students did not recognize them, therefore could not measure
nor estimate them (meeting 4, question 2). Categorizing angles into categories (acute /
right/ obtuse/ straight) went well (question 3). We might conclude that categorizing is
easier than estimating or measuring. However the reason might also be that all angles in
this last exercise were smaller than 180 degrees (question 3). We conclude that
students could categorize and measure angles smaller than 180 degrees by the end of
meeting 4. Possibly they could also estimate such angles, but we are not sure, because
the estimation activity was done with angles larger than 180 degrees mostly (question
2).
4. Angle relations
Angle relations were confined to meeting five, the last one. It was found that addition
was handled more easily by the students than subtraction (meeting 5, question 1).
Recognizing equality of two angles initially turned out problematic for 5 groups out of 12
in case of intersecting lines (opposing angles, question 2). The rule found
about supplementary angles (question 2a) interfered and disturbed the recognition of
equal opposing angles (question 2b). In the case of two parallel lines intersected by one
non-parallel line, again 5 out of 12 groups could recognize equalities. In the session with
Geogebra the same issues were addressed again, this time with more step-by-step
instruction by the teacher and more experimentation by the students. It seemed to
work, but as we have only the teacher/researcher's notes, we lack an independent
confirmation.
103
In general the data about the pen and paper sessions must be regarded as more reliable
than the data about the Geogebra sessions, because in case of the pen and paper
sessions written answers from all the groups were available, while for the Geogebra
sessions (because students did mostly not write) no answers were collected and the
researchers journal is the only source.
We conclude that for most of the themes (themes 1-3) we have evidence of progress.
For some of the sub-themes (angles larger than 180 degrees) there was no progress.
More lessons would be needed to have progress on all sub-themes. In as far as progress
was seen, experimentation with Geogebra has played a role in solving problems in
understanding that occurred (see themes 1-3 and possibly also 4). On some sub-themes
(e.g. categorisation of angles, theme 3) progress happened in the paper and pencil part
of the meeting. Often the paper and pencil part served well in finding out about
students ideas, because they were obliged not only to discuss but also to agree and
write down their answers. In all cases progress was connected to students being active:
either in experimenting with the help of Geogebra, or in estimating, classifiying and
formulating answers on paper. These intervention findings do not show that the
described teaching method gives better progress than other methods. But if by
comparing test results this teaching method turns out to give more progress (which it
did), than the above analysis shows that experimenting with Geogebra as well as
student centered lessons are two likely causes of the difference9.
9 This ends the summary as contributed by Wolter Kaper

104
105
7. Conclusions and Discussion
7.1 Conclusions
In this section, I will try to conclude and to answer the main research question and the
three sub research questions based on data analysis and findings.
7.1.2 The main research question: Is there any difference in students’ achievement between
those who have been taught about angles according to an active learning approach using
DGS and those who have been taught in the traditional way?
The analysis of the pretests shows that even though the experimental class got a higher
score than the control class, they were not significantly different. It means that before the
intervention to the experimental class, the two classes had the same level of knowledge in
geometry. After I finished doing the intervention and the collaborative teacher had done
her teaching of the control class, the posttest results show that the experimental class did
better than the control class because there is a significant difference between their score-
means. By all those findings I can say that the experimental class reached a better
achievement than the control class did after the intervention, and that there is a significant
difference between those classes’ achievement.
7.1.2 The first sub-research question: Does the active learning approach using DGS help
motivate students to learn geometry?
According to the questionnaire results (multiple choice question), 94.3% of students
answered that they were motivated by learning geometry through Geogebra, which shows
that almost all students were motivated by the intervention. From the findings of the
collaborative teacher’s interview, students were motivated by the intervention in which
they got their first experience of learning mathematics through computers, especially
106
learning geometry through Geogebra. From all those findings I conclude that the active
learning approach using DGS helps motivate students to learn geometry.
7.1.3 The second sub-research question: Do students feel that the active learning approach
using DGS helps them to understand geometry?
Based on the findings of the questionnaire question 1, which was an open question, 80% of
students said that learning through Geogebra helped them to understand geometry.
Meanwhile based on the findings of the questionnaire question 3, which was a closed
statement, 97.1% of students agreed that learning through Geogebra helped them to
understand geometry. The findings of the three student interviews give information that
learning through Geogebra helped them to understand geometry. By all those findings, I
conclude that students think that the active learning approach using DGS helps them to
understand geometry
7.1.4 The third sub-research question: Does the active learning approach using DGS help
students to improve their abilities of seeing, measuring, and reasoning in learning
geometry?
Based on the findings of all meetings, I conclude that students gradually improved their
abilities of seeing, measuring, and reasoning in learning geometry, even though students
sometimes still made some mistakes in doing the tasks of each meeting. For example, for
question 1e, I found that all students did not yet know how to give a reason in mathematics.
At this stage, I just encouraged students to give their own reasons and arguments, no
matter if it was wrong or not, because I hoped students would become more confident in
their own thinking in learning mathematics. And it worked, because after that, I saw that
students were more confident and brave to propose their own thinking. For question 1f, I
found that some students (four groups) showed improvement in giving correct reasons to a
specific situation. They also had been triggered to explore their intuition skill during the

107
intervention. In the first meeting, for question 7, students did not recognize what they just
constructed was a block, probably, because the picture was still not clear as a block. This
evidence shows that students did not succeed using their intuition skill at this question.
However, since then students were triggered to use their intuition skill in learning
geometry, and some students did well on this. For instance, in the third meeting, for
question 3a, some students used their intuition skill well and gave a good reason in their
answers. And they came to more understanding on how to measure an angle by using a
protractor and by using Geogebra. For example, in the fourth meeting, I found that
students had a problem in using a protractor to answer question 1b. To overcome this
problem, I gave an explanation on how to use a protractor properly, and students showed
improvement, which was on question 3, I found that students did not have a problem in
using a protractor to answer the question, and they could classify angles into categories
without any mistakes. Of course, there were many mistakes, that students made during
learning activities. This could be because they had difficulty to maintain what they had just
learned. However, overall I conclude that students showed gradual improvement in their
abilities of seeing, measuring, and reasoning in learning mathematics, especially in learning
the concept of angle in geometry.
7.2 Discussion
Motivation is one of the important things which a student should have in learning
mathematics. However, to trigger and to maintain students’ motivation in learning
mathematics is challenging for mathematics teachers, because most students, everywhere,
consider mathematics a boring and difficult subject. An interesting case which I found in my
research based on the collaborative teacher interview is: there is a student of the
experimental class, Sindi, showing a significant change in her behavior in learning
mathematics after my intervention was done. The collaborative teacher said that before my
intervention, Sindi did not show her talent and ability in mathematics so much, but now she
has become one of the active and diligent students in learning mathematics. From this
finding, I can say that my intervention triggered Sindi’s motivation to learn mathematics.
Even though to trigger students’ motivation is not easy, but to maintain students’
108
motivation is much harder. The collaborative teacher said that she was a bit afraid that she
could not maintain her students’ motivation after my intervention, because she could not
apply my kind of intervention to all her classes. Actually, she wanted to apply it, but she
could not teach only one or two classes in this waywhile the other parallel classes get the
traditional way.
This study has shown that the active learning approach using DGS is helpful for teacher and
students. However, this research actually had some limitations, which were: (1.) the
intervention was only conducted within a short period of time (5 meetings within 5 days,
each meeting 2x45 minutes); (2.) The computers used in this researcher were very limited
(only 6 computers for 36 students); (3.) The participants were junior high school students
and they did not yet have any experience learning mathematics through computers (it was
really exciting for them); (4.) the experimental class was quite big (36 students), which
made class management a bit difficult.
All the limitations in my research resulted in a struggle to reach a better teaching situation.
Therefore the results of this study can not be generalized to other situations. However, the
result of this research can be used as a reference for mathematics teachers who want to try
the active learning approach through DGS in their teaching. Therefore, for future research
on active learning approaches using DGS, I suggest to investigate it for a longer series of
lessons and with sufficient computers for the students. This kind of research could be useful
to apply also at a senior high school level, where making mathematics more interesting to
students might result in more students pursuing a career in mathematics, and also the
geometry topics that students learn are more advanced.
As we know, nowadays teaching and learning through DGS is known among mathematics
teachers, and also there has been a lot of research which was conducted to investigate
about learning geometry through DGS. One of them is the research conducted by Sang Sook
Choi-Koh (a professor of mathematics education from Korea), who investigated the
geometric learning of a secondary school student during instruction, on the basis of the van
109
Hiele model, with dynamic geometry software as a tool (Choi-Koh, 1999). In his research, he
examined the changes in the students’ learning according to the van Hiele levels of
geometric thought for the geometric topics of right triangles, isosceles triangles, and
equilateral triangles. The participant of his research was a student called Fred. However,
this student had not taken geometry but had taken a computer course or had had
experience with a computer at home, which means that he did not yet have experience in
learning geometry, but had computer skills. In his research, he investigated Fred through
four learning stages, which were: 1. Intuitive learning stage, 2. Analytical learning stage, 3.
Inductive learning stage, and 4. Deductive learning stage. During his investigation, he saw
that Fred was really enthusiastic doing the given task, and he also found that Fred properly
performed the task, and also Fred did the task in a much simpler way than he expected. He
also found that the visualization by dynamic computer software helped Fred make some
conjectures about relationships between triangles. Even though the background of the
participant was different from my participants’ background, the results of his research
about using dynamic geometry software shows also that learning through the intervention
in which DGS is embedded helps motivate students to learn with more enthusiasm, which
could lead students reaching better achievements in their study.
Finally, I want to say that in learning mathematics, motivation is like a spirit of life, which
means that learning activities become lively when students have good motivation.
Therefore mathematics teachers should be innovative and creative in their teaching
method, not only to trigger students’ motivation, but also to maintain students’ motivation.
110
8. References
Atlas, L., Chon, D., & Ladner, R. (1994). Improving generalization with active learning.
Machine Learning, 15: 201-221.
Bielefeld, Lulea, & Straber, R. (2002). Research on dynamic geometry software (DGS) – an
introduction. ZDM,Vol. 34 (3).
Bonwell, Charles C., & Eison, James A. (1991). Active learning: creating excitement in the
classroom. ERIC Digest. ED340272 1991-09-00.
Choi-Koh, S.S. (1999). A student's learning of geometry using a computer. The Journal of
Educational Research, Vol. 92 (No.5)
Clements, D.H., & Battista, M.T. (1992), "Geometry and spatial reasoning", in: Grouws, D.A.
(ed.), Handbook of research on mathematics teaching and learning. National Council of
Teachers of Mathematics, Reston, Virginia, USA.
Fischbein, E. (1993). The theory of figural concepts. Educational Studies in Mathematics,
Vol. 24, No. 2, 139-162.
Fujita, T., Jones, K., & Yamamoto, S. (2004 a). Geometrical intuition and the learning and the
teaching of geometry. Paper Presented to Topic Study Group 29 at the 10th International
Congress on Mathematical Education. Copenhagen, Denmark.
Fujita, T., Jones, K., & Yamamoto, S. (2004 b). The role of intuition in geometry education:
learning from the teaching practice in the early 20th century. Paper Presented to Topic Study
Group 29 at the 10th International Congress on Mathematical Education. Copenhagen,
Denmark.
111
Jones, K. (2000). Providing a foundation for deductive reasoning: students’ interpretations
when using dynamic geometry software and their evolving mathematical explanations.
Educational Studies in Mathematics, 44, 55-85.
Juhrree, V. (2005). Technology integration in education in developing countries: Guidelines
to policy makers. International Education Journal, 6(4), 467-483.
Kortenkamp, U. (1999). Foundation of Dynamic Geometry. A Dissertation Submitted to the
Swiss Federal Institute of Technology Zurich for the Degree of Doctor of Technical Sciences.
Diss. ETH N0 13403.
Lehrer, R. (2003). Developing understanding of measurement. A Research Companion to
Principles and Standard for School Mathematics, 179-192.
Mitchelmore, M.C., & White, P. (2000). Development of angle concepts by progressive
abstraction and generalization. Educational Studies in Mathematics, 41, 209-238.
Mitchelmore, M.C., Prescott, A. & White, P. (2002). Student difficulties in abstracting angle
concepts from physical activities with concrete materials. Proceedings of the 25th Annual
Conference of Mathematics Education Research Group of Australia, Auckland, 583-591.
Mitchelmore, M.C., & White, P. (2004). Abstraction in mathematics and mathematics
learning. Proceedings of the 28th Conference of the International Group for the Psychology of
Mathematics Education, Vol. 3, 329-339.
112
9. Bibliography
Hennessy, S. & Ruthven, K. (2002). A practitioner model of the use of computer-based tools
and resources to support mathematics teaching and learning. Educational Studies in
Mathematics, 49, 47-88.
Straesser, R. (2001). Cabri-Geometre: Does dynamic geometric software (DGS) change
geometry and its teaching and learning? International Journal of Computers for
Mathematical Learning, 6, 319-333.
Tinio, L.V. ICT in education. E-Primers on the Application of ICT. Http://www.eprimers.org
10. Link references:
http://www.mathopenref.com/angle.html
http://www.geogebra.org/cms/
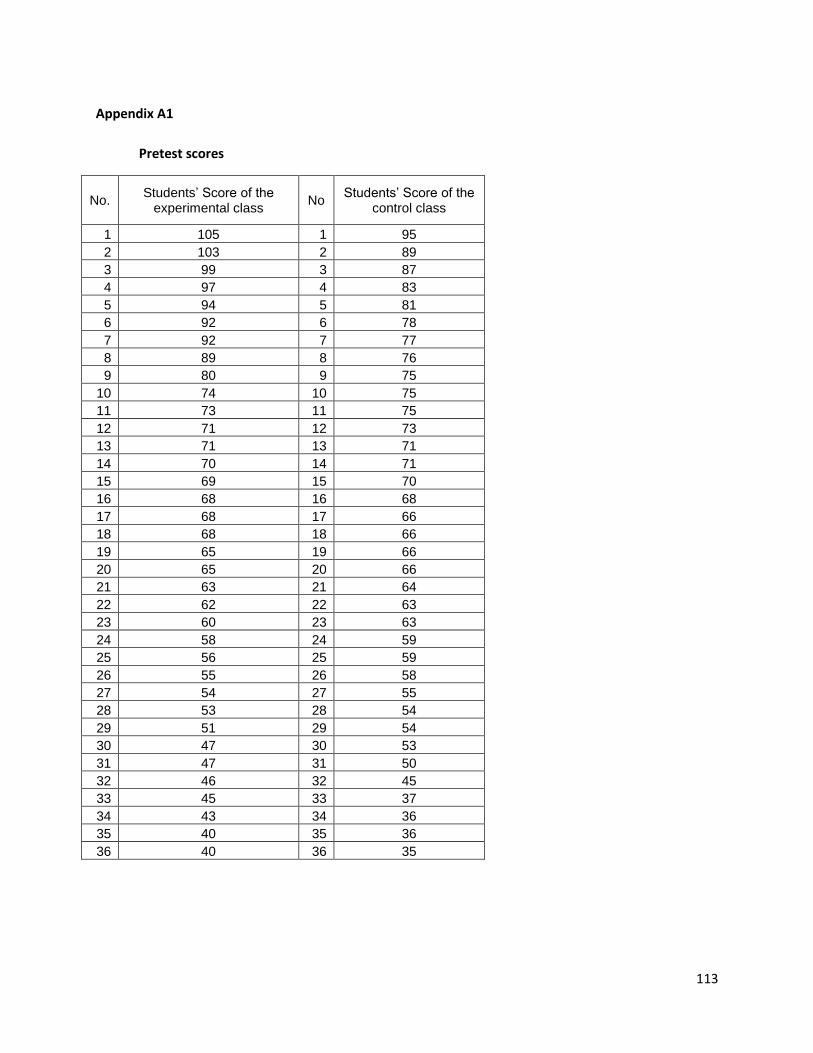
113
Appendix A1
Pretest scores
No. Students’ Score of the
experimental class No
Students’ Score of the control class
1 105 1 95
2 103 2 89
3 99 3 87
4 97 4 83
5 94 5 81
6 92 6 78
7 92 7 77
8 89 8 76
9 80 9 75
10 74 10 75
11 73 11 75
12 71 12 73
13 71 13 71
14 70 14 71
15 69 15 70
16 68 16 68
17 68 17 66
18 68 18 66
19 65 19 66
20 65 20 66
21 63 21 64
22 62 22 63
23 60 23 63
24 58 24 59
25 56 25 59
26 55 26 58
27 54 27 55
28 53 28 54
29 51 29 54
30 47 30 53
31 47 31 50
32 46 32 45
33 45 33 37
34 43 34 36
35 40 35 36
36 40 36 35
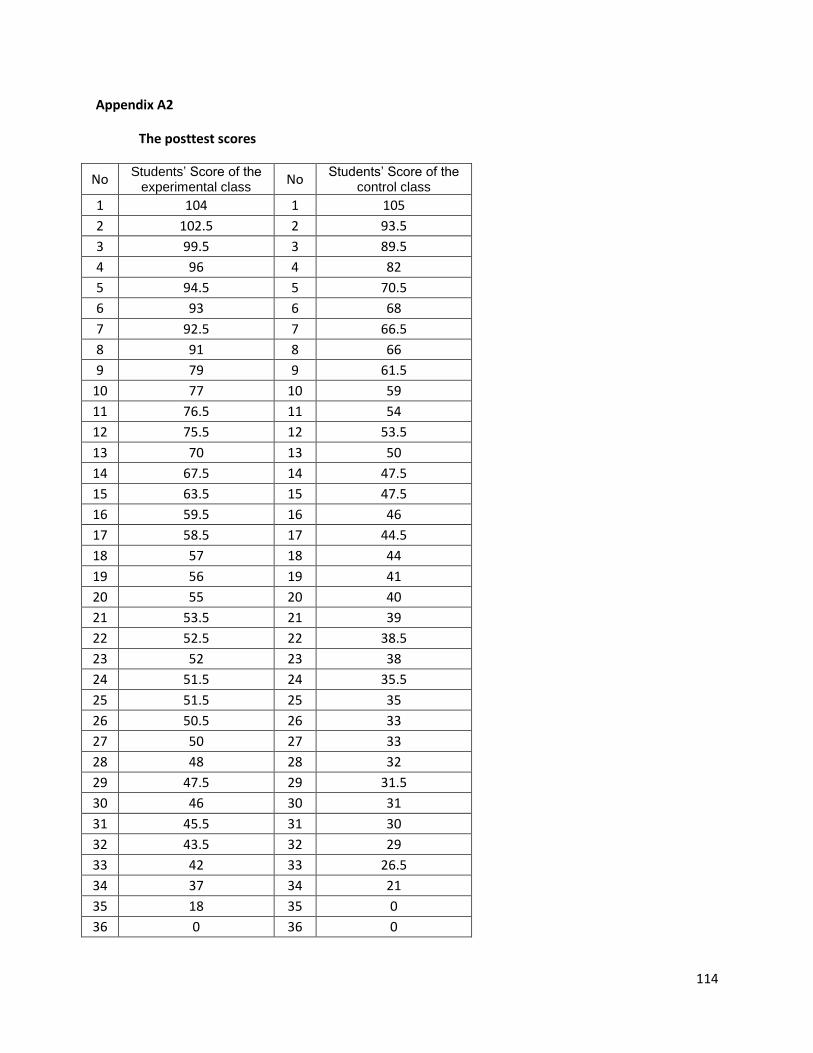
114
Appendix A2
The posttest scores
No Students’ Score of the
experimental class No
Students’ Score of the control class
1 104 1 105
2 102.5 2 93.5
3 99.5 3 89.5
4 96 4 82
5 94.5 5 70.5
6 93 6 68
7 92.5 7 66.5
8 91 8 66
9 79 9 61.5
10 77 10 59
11 76.5 11 54
12 75.5 12 53.5
13 70 13 50
14 67.5 14 47.5
15 63.5 15 47.5
16 59.5 16 46
17 58.5 17 44.5
18 57 18 44
19 56 19 41
20 55 20 40
21 53.5 21 39
22 52.5 22 38.5
23 52 23 38
24 51.5 24 35.5
25 51.5 25 35
26 50.5 26 33
27 50 27 33
28 48 28 32
29 47.5 29 31.5
30 46 30 31
31 45.5 31 30
32 43.5 32 29
33 42 33 26.5
34 37 34 21
35 18 35 0
36 0 36 0
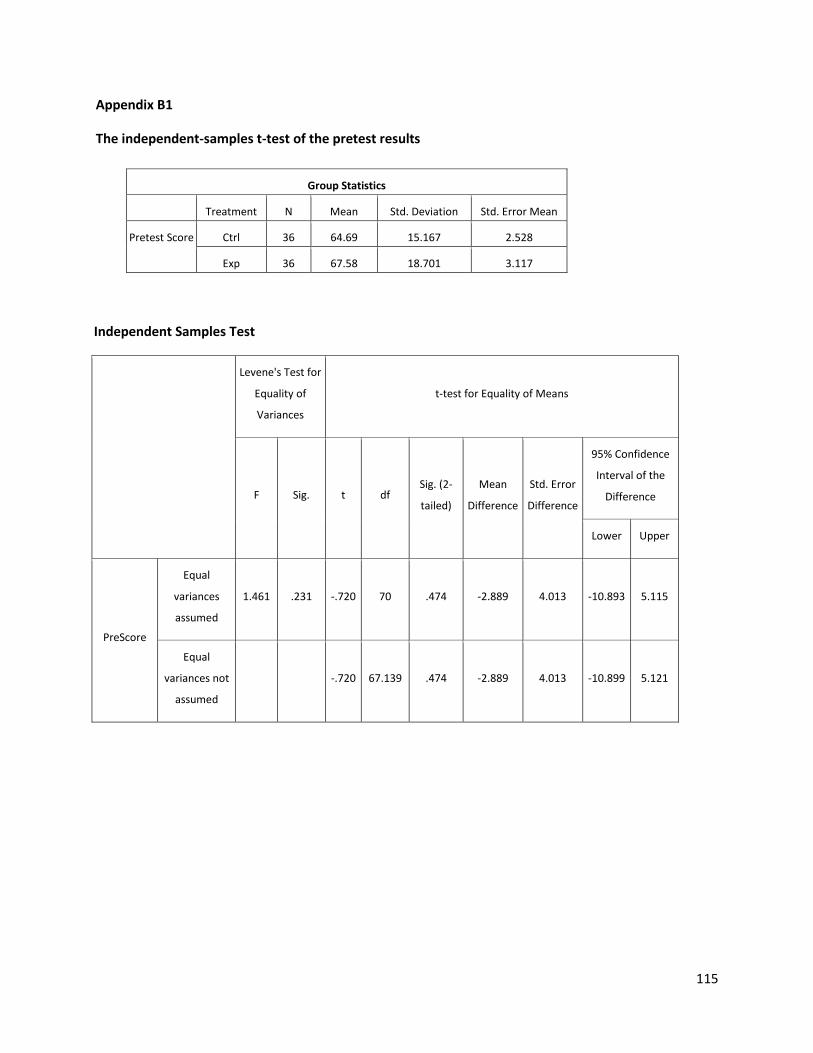
115
Appendix B1
The independent-samples t-test of the pretest results
Independent Samples Test
Levene's Test for
Equality of
Variances
t-test for Equality of Means
F Sig. t df Sig. (2-
tailed)
Mean
Difference
Std. Error
Difference
95% Confidence
Interval of the
Difference
Lower Upper
PreScore
Equal
variances
assumed
1.461 .231 -.720 70 .474 -2.889 4.013 -10.893 5.115
Equal
variances not
assumed
-.720 67.139 .474 -2.889 4.013 -10.899 5.121
Group Statistics
Treatment N Mean Std. Deviation Std. Error Mean
Pretest Score Ctrl 36 64.69 15.167 2.528
Exp 36 67.58 18.701 3.117
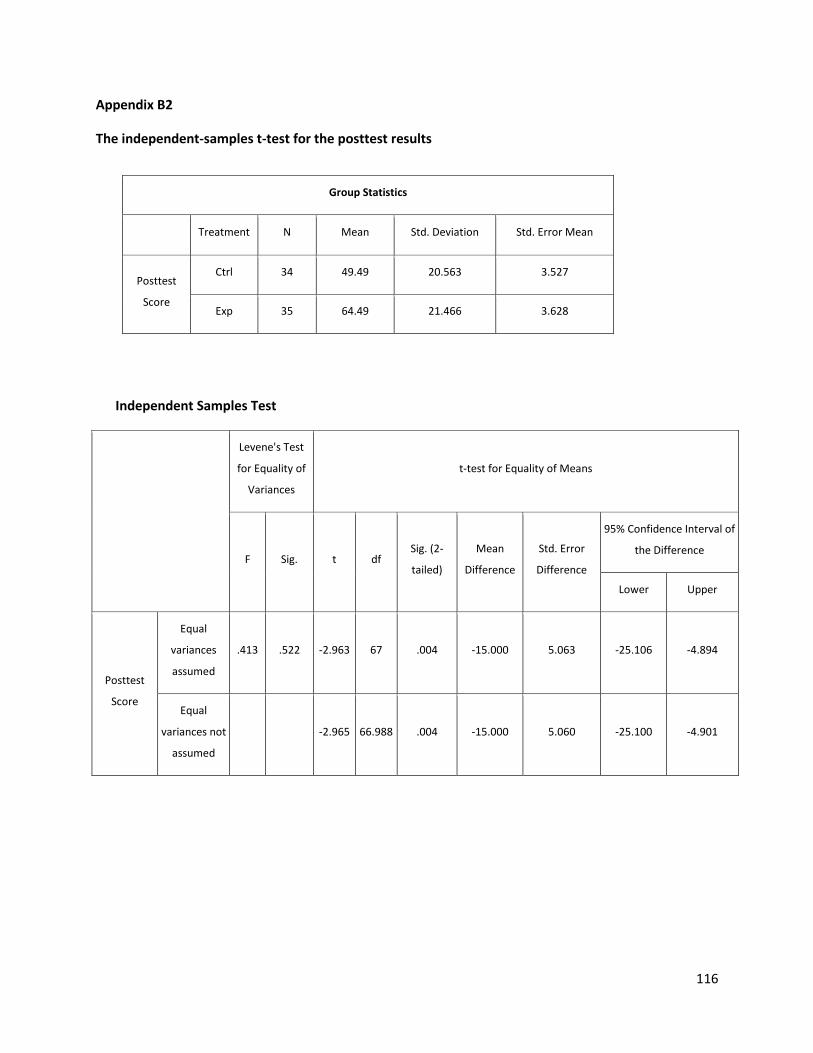
116
Appendix B2
The independent-samples t-test for the posttest results
Independent Samples Test
Levene's Test
for Equality of
Variances
t-test for Equality of Means
F Sig. t df Sig. (2-
tailed)
Mean
Difference
Std. Error
Difference
95% Confidence Interval of
the Difference
Lower Upper
Posttest
Score
Equal
variances
assumed
.413 .522 -2.963 67 .004 -15.000 5.063 -25.106 -4.894
Equal
variances not
assumed
-2.965 66.988 .004 -15.000 5.060 -25.100 -4.901
Group Statistics
Treatment N Mean Std. Deviation Std. Error Mean
Posttest
Score
Ctrl 34 49.49 20.563 3.527
Exp 35 64.49 21.466 3.628
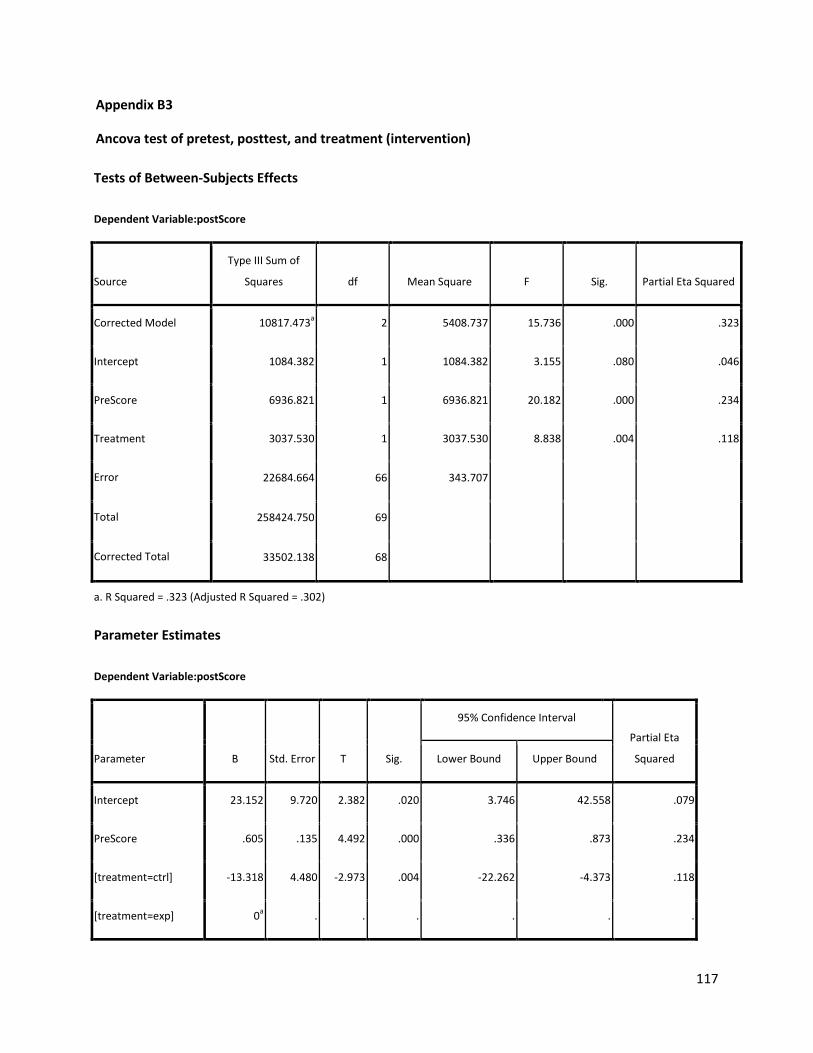
117
Appendix B3
Ancova test of pretest, posttest, and treatment (intervention)
Tests of Between-Subjects Effects
Dependent Variable:postScore
Source
Type III Sum of
Squares df Mean Square F Sig. Partial Eta Squared
Corrected Model 10817.473a 2 5408.737 15.736 .000 .323
Intercept 1084.382 1 1084.382 3.155 .080 .046
PreScore 6936.821 1 6936.821 20.182 .000 .234
Treatment 3037.530 1 3037.530 8.838 .004 .118
Error 22684.664 66 343.707
Total 258424.750 69
Corrected Total 33502.138 68
a. R Squared = .323 (Adjusted R Squared = .302)
Parameter Estimates
Dependent Variable:postScore
Parameter B Std. Error T Sig.
95% Confidence Interval
Partial Eta
Squared Lower Bound Upper Bound
Intercept 23.152 9.720 2.382 .020 3.746 42.558 .079
PreScore .605 .135 4.492 .000 .336 .873 .234
[treatment=ctrl] -13.318 4.480 -2.973 .004 -22.262 -4.373 .118
[treatment=exp] 0a . . . . . .
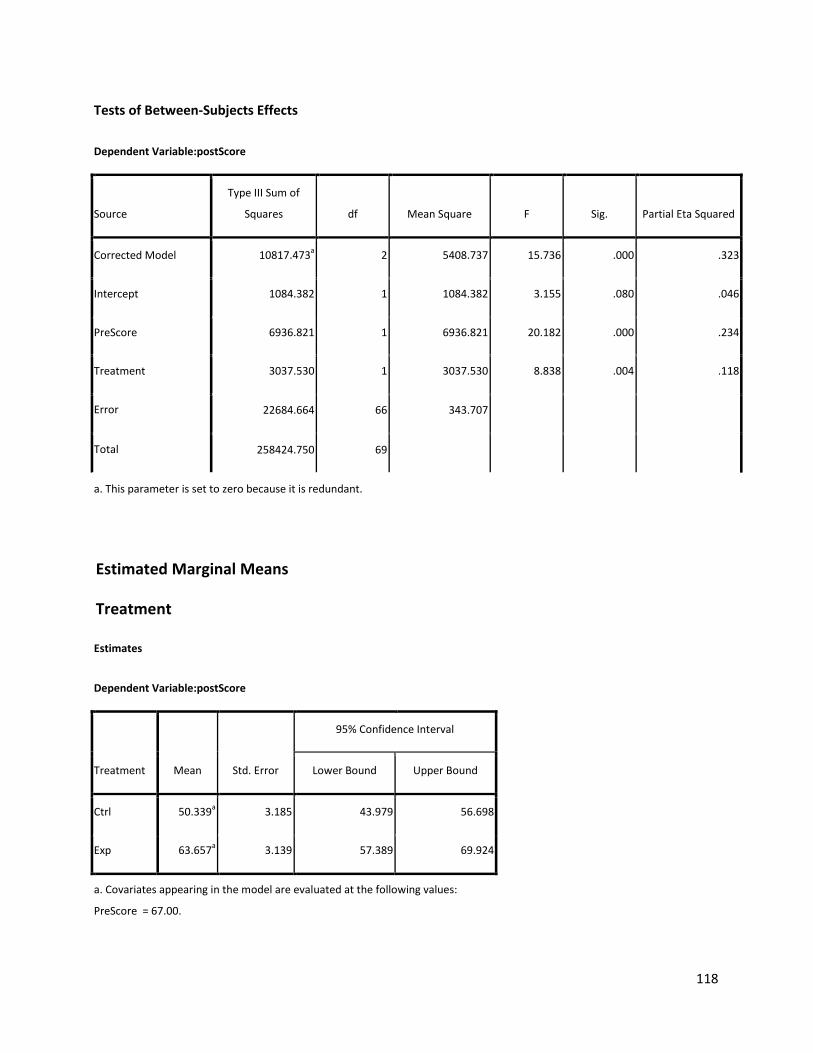
118
Tests of Between-Subjects Effects
Dependent Variable:postScore
Source
Type III Sum of
Squares df Mean Square F Sig. Partial Eta Squared
Corrected Model 10817.473a 2 5408.737 15.736 .000 .323
Intercept 1084.382 1 1084.382 3.155 .080 .046
PreScore 6936.821 1 6936.821 20.182 .000 .234
Treatment 3037.530 1 3037.530 8.838 .004 .118
Error 22684.664 66 343.707
Total 258424.750 69
a. This parameter is set to zero because it is redundant.
Estimated Marginal Means
Treatment
Estimates
Dependent Variable:postScore
Treatment Mean Std. Error
95% Confidence Interval
Lower Bound Upper Bound
Ctrl 50.339a 3.185 43.979 56.698
Exp 63.657a 3.139 57.389 69.924
a. Covariates appearing in the model are evaluated at the following values:
PreScore = 67.00.
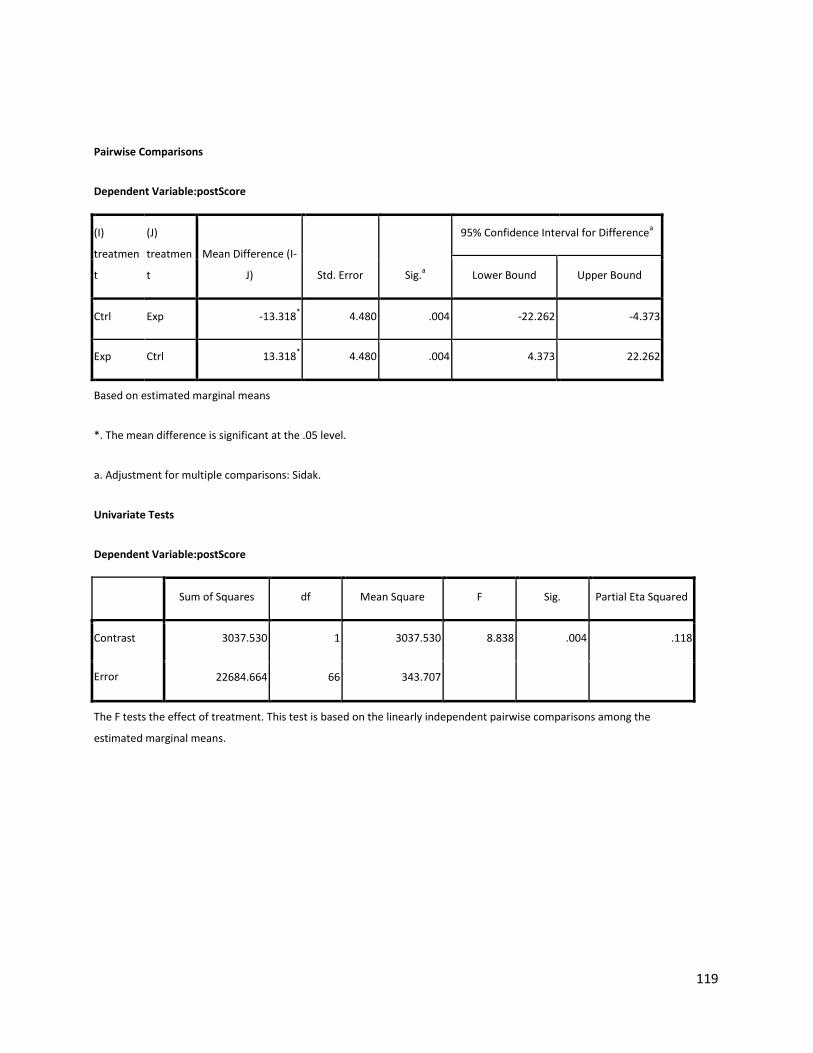
119
Pairwise Comparisons
Dependent Variable:postScore
(I)
treatmen
t
(J)
treatmen
t
Mean Difference (I-
J) Std. Error Sig.a
95% Confidence Interval for Differencea
Lower Bound Upper Bound
Ctrl Exp -13.318* 4.480 .004 -22.262 -4.373
Exp Ctrl 13.318* 4.480 .004 4.373 22.262
Based on estimated marginal means
*. The mean difference is significant at the .05 level.
a. Adjustment for multiple comparisons: Sidak.
Univariate Tests
Dependent Variable:postScore
Sum of Squares df Mean Square F Sig. Partial Eta Squared
Contrast 3037.530 1 3037.530 8.838 .004 .118
Error 22684.664 66 343.707
The F tests the effect of treatment. This test is based on the linearly independent pairwise comparisons among the
estimated marginal means.
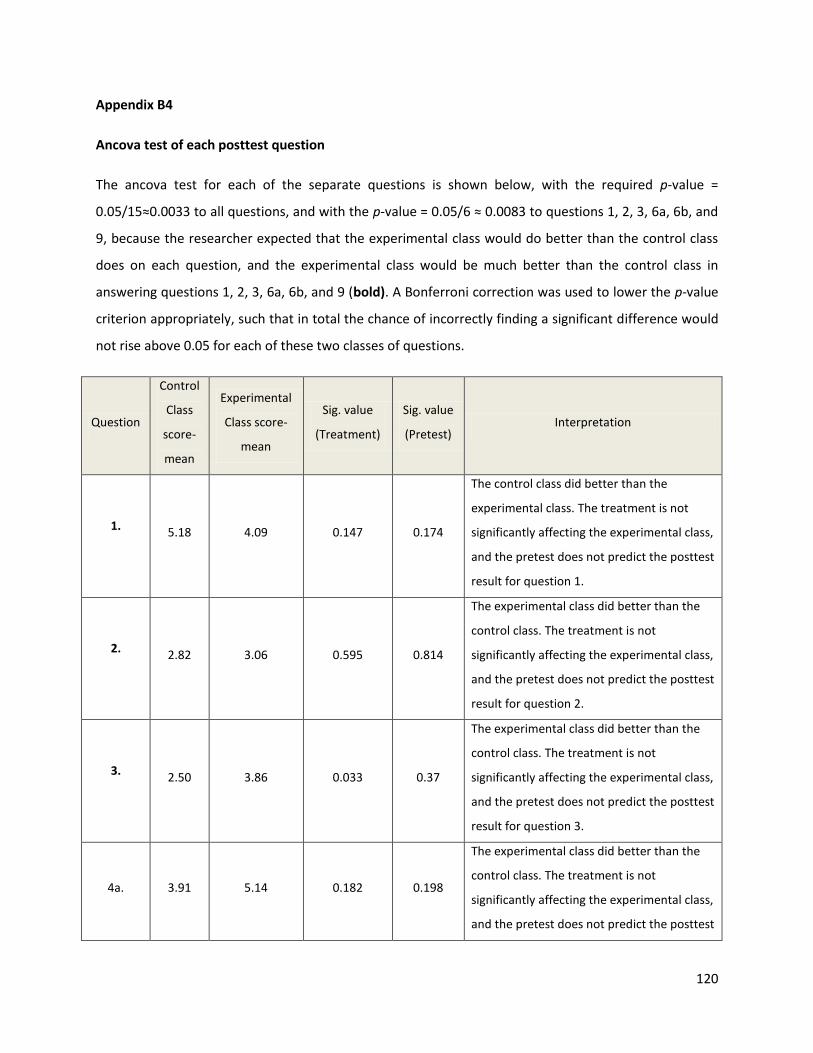
120
Appendix B4
Ancova test of each posttest question
The ancova test for each of the separate questions is shown below, with the required p-value =
0.05/15≈0.0033 to all questions, and with the p-value = 0.05/6 ≈ 0.0083 to questions 1, 2, 3, 6a, 6b, and
9, because the researcher expected that the experimental class would do better than the control class
does on each question, and the experimental class would be much better than the control class in
answering questions 1, 2, 3, 6a, 6b, and 9 (bold). A Bonferroni correction was used to lower the p-value
criterion appropriately, such that in total the chance of incorrectly finding a significant difference would
not rise above 0.05 for each of these two classes of questions.
Question
Control
Class
score-
mean
Experimental
Class score-
mean
Sig. value
(Treatment)
Sig. value
(Pretest) Interpretation
1. 5.18 4.09 0.147 0.174
The control class did better than the
experimental class. The treatment is not
significantly affecting the experimental class,
and the pretest does not predict the posttest
result for question 1.
2. 2.82 3.06 0.595 0.814
The experimental class did better than the
control class. The treatment is not
significantly affecting the experimental class,
and the pretest does not predict the posttest
result for question 2.
3. 2.50 3.86 0.033 0.37
The experimental class did better than the
control class. The treatment is not
significantly affecting the experimental class,
and the pretest does not predict the posttest
result for question 3.
4a. 3.91 5.14 0.182 0.198
The experimental class did better than the
control class. The treatment is not
significantly affecting the experimental class,
and the pretest does not predict the posttest
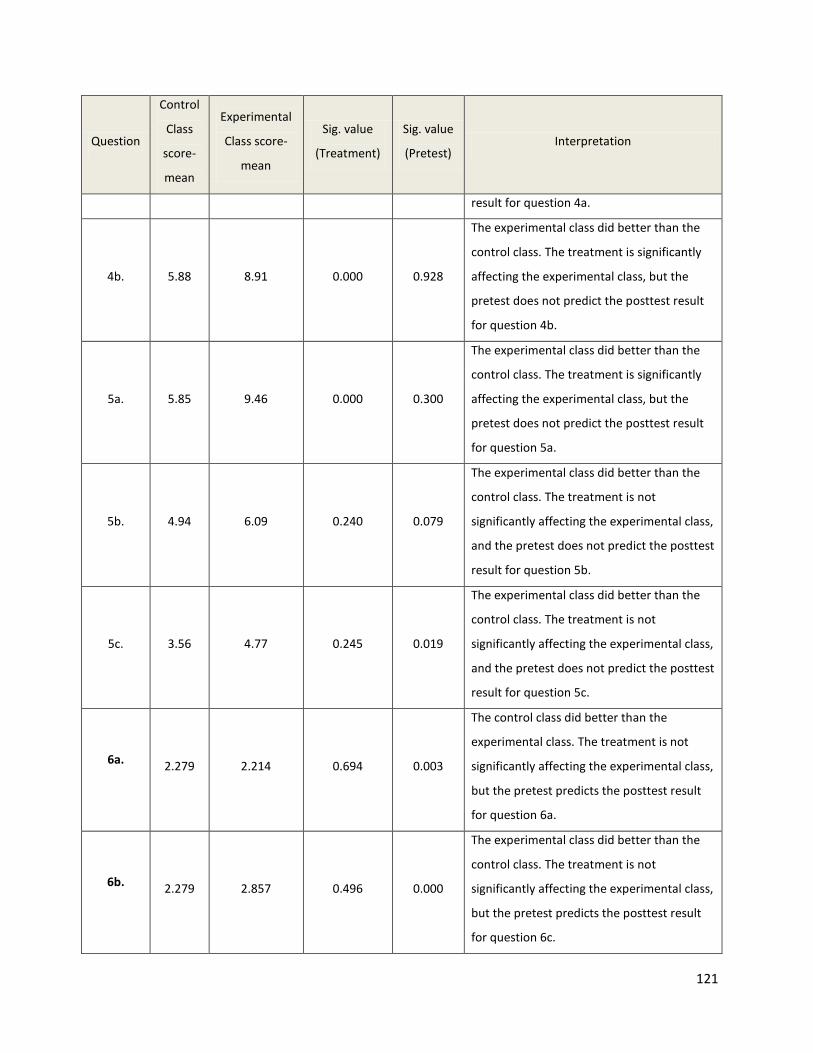
121
Question
Control
Class
score-
mean
Experimental
Class score-
mean
Sig. value
(Treatment)
Sig. value
(Pretest) Interpretation
result for question 4a.
4b. 5.88 8.91 0.000 0.928
The experimental class did better than the
control class. The treatment is significantly
affecting the experimental class, but the
pretest does not predict the posttest result
for question 4b.
5a. 5.85 9.46 0.000 0.300
The experimental class did better than the
control class. The treatment is significantly
affecting the experimental class, but the
pretest does not predict the posttest result
for question 5a.
5b. 4.94 6.09 0.240 0.079
The experimental class did better than the
control class. The treatment is not
significantly affecting the experimental class,
and the pretest does not predict the posttest
result for question 5b.
5c. 3.56 4.77 0.245 0.019
The experimental class did better than the
control class. The treatment is not
significantly affecting the experimental class,
and the pretest does not predict the posttest
result for question 5c.
6a. 2.279 2.214 0.694 0.003
The control class did better than the
experimental class. The treatment is not
significantly affecting the experimental class,
but the pretest predicts the posttest result
for question 6a.
6b. 2.279 2.857 0.496 0.000
The experimental class did better than the
control class. The treatment is not
significantly affecting the experimental class,
but the pretest predicts the posttest result
for question 6c.
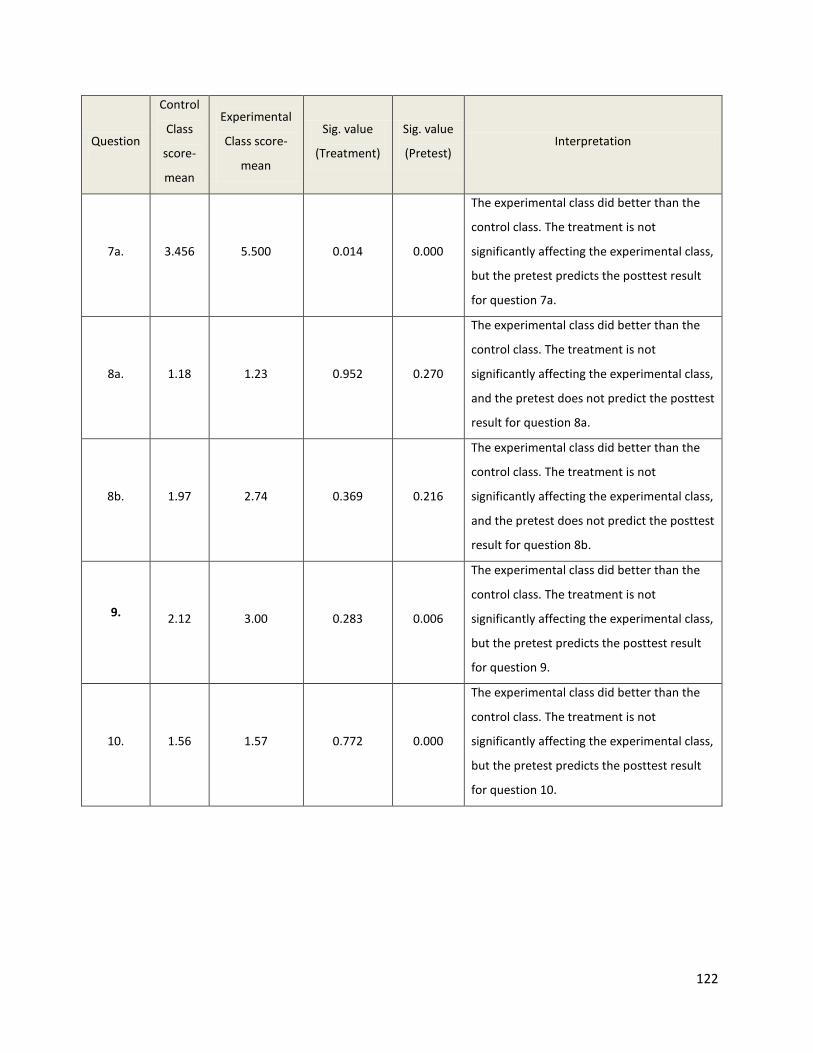
122
Question
Control
Class
score-
mean
Experimental
Class score-
mean
Sig. value
(Treatment)
Sig. value
(Pretest) Interpretation
7a. 3.456 5.500 0.014 0.000
The experimental class did better than the
control class. The treatment is not
significantly affecting the experimental class,
but the pretest predicts the posttest result
for question 7a.
8a. 1.18 1.23 0.952 0.270
The experimental class did better than the
control class. The treatment is not
significantly affecting the experimental class,
and the pretest does not predict the posttest
result for question 8a.
8b. 1.97 2.74 0.369 0.216
The experimental class did better than the
control class. The treatment is not
significantly affecting the experimental class,
and the pretest does not predict the posttest
result for question 8b.
9. 2.12 3.00 0.283 0.006
The experimental class did better than the
control class. The treatment is not
significantly affecting the experimental class,
but the pretest predicts the posttest result
for question 9.
10. 1.56 1.57 0.772 0.000
The experimental class did better than the
control class. The treatment is not
significantly affecting the experimental class,
but the pretest predicts the posttest result
for question 10.
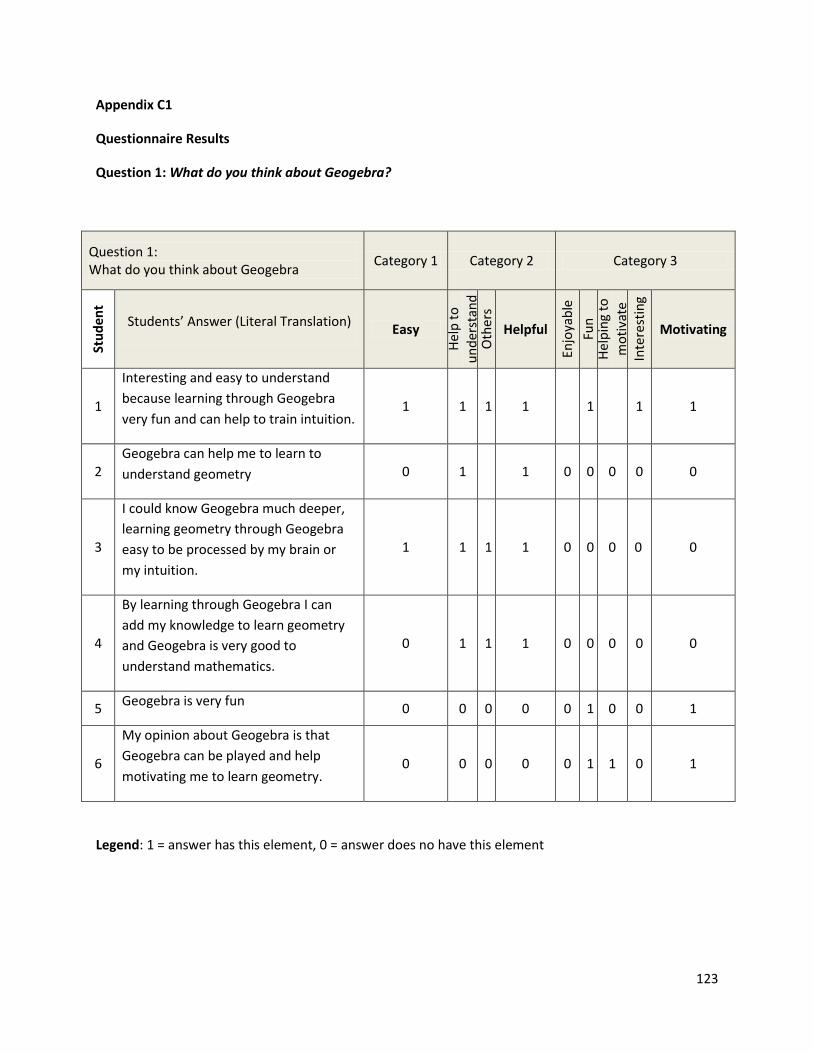
123
Appendix C1
Questionnaire Results
Question 1: What do you think about Geogebra?
Question 1: What do you think about Geogebra
Category 1 Category 2 Category 3
Stu
den
t
Students’ Answer (Literal Translation) Easy
Hel
p t
o
un
der
stan
d
Oth
ers
Helpful
Enjo
yab
le
Fun
H
elp
ing
to
mo
tiva
te
Inte
rest
ing
Motivating
1
Interesting and easy to understand
because learning through Geogebra
very fun and can help to train intuition. 1 1 1 1 1 1 1
2 Geogebra can help me to learn to
understand geometry 0 1 1 0 0 0 0 0
3
I could know Geogebra much deeper,
learning geometry through Geogebra
easy to be processed by my brain or
my intuition.
1 1 1 1 0 0 0 0 0
4
By learning through Geogebra I can
add my knowledge to learn geometry
and Geogebra is very good to
understand mathematics.
0 1 1 1 0 0 0 0 0
5 Geogebra is very fun
0 0 0 0 0 1 0 0 1
6
My opinion about Geogebra is that
Geogebra can be played and help
motivating me to learn geometry. 0 0 0 0 0 1 1 0 1
Legend: 1 = answer has this element, 0 = answer does no have this element
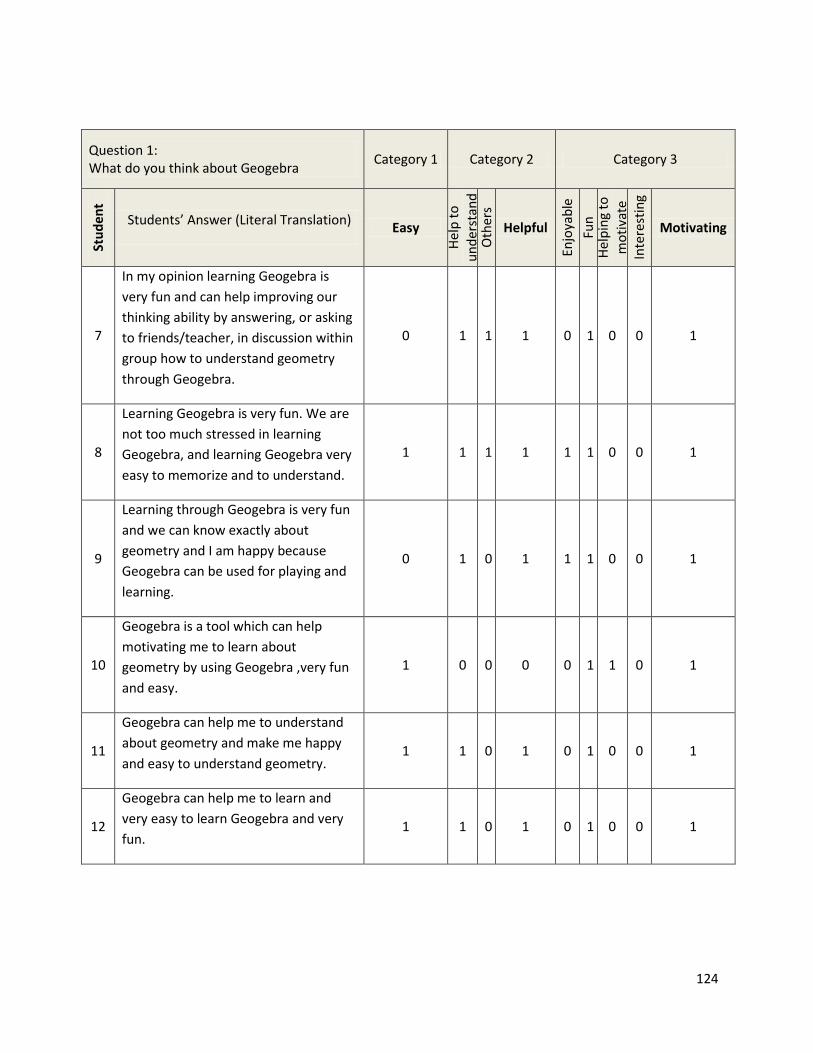
124
Question 1: What do you think about Geogebra
Category 1 Category 2 Category 3
Stu
den
t
Students’ Answer (Literal Translation) Easy
Hel
p t
o
un
der
stan
d
Oth
ers
Helpful
Enjo
yab
le
Fun
H
elp
ing
to
mo
tiva
te
Inte
rest
ing
Motivating
7
In my opinion learning Geogebra is
very fun and can help improving our
thinking ability by answering, or asking
to friends/teacher, in discussion within
group how to understand geometry
through Geogebra.
0 1 1 1 0 1 0 0 1
8
Learning Geogebra is very fun. We are
not too much stressed in learning
Geogebra, and learning Geogebra very
easy to memorize and to understand.
1 1 1 1 1 1 0 0 1
9
Learning through Geogebra is very fun
and we can know exactly about
geometry and I am happy because
Geogebra can be used for playing and
learning.
0 1 0 1 1 1 0 0 1
10
Geogebra is a tool which can help
motivating me to learn about
geometry by using Geogebra ,very fun
and easy.
1 0 0 0 0 1 1 0 1
11
Geogebra can help me to understand
about geometry and make me happy
and easy to understand geometry. 1 1 0 1 0 1 0 0 1
12
Geogebra can help me to learn and
very easy to learn Geogebra and very
fun. 1 1 0 1 0 1 0 0 1
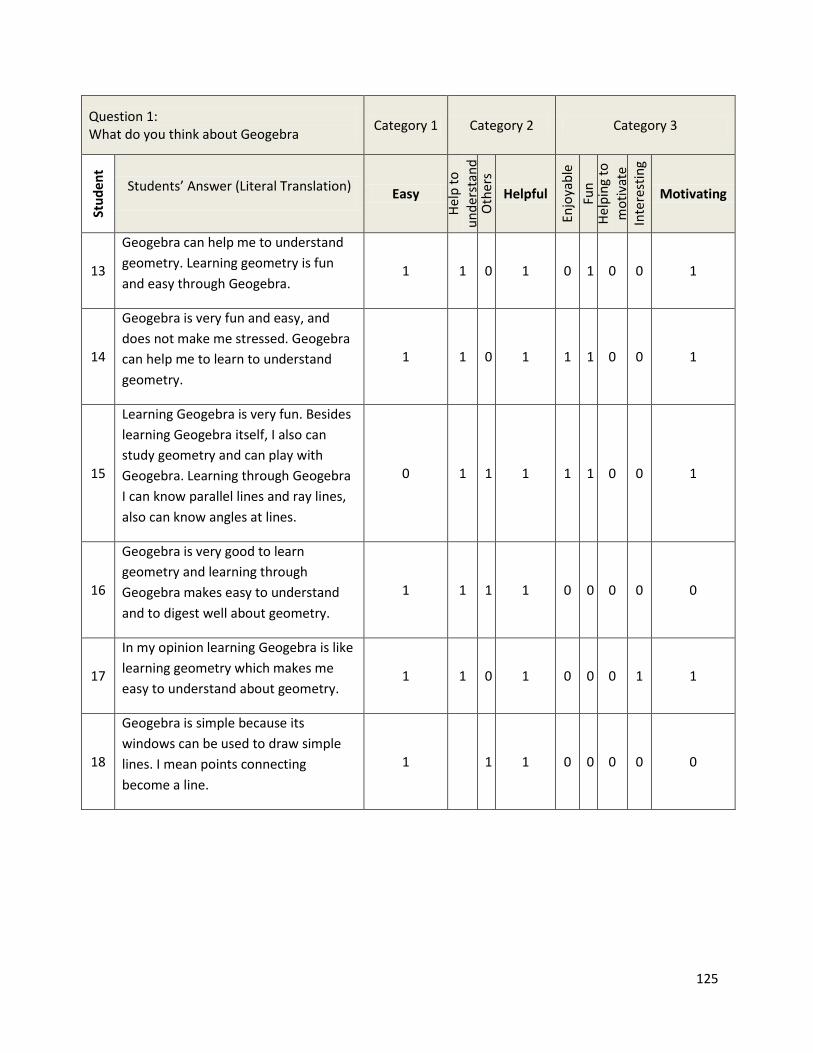
125
Question 1: What do you think about Geogebra
Category 1 Category 2 Category 3
Stu
den
t
Students’ Answer (Literal Translation) Easy
Hel
p t
o
un
der
stan
d
Oth
ers
Helpful
Enjo
yab
le
Fun
H
elp
ing
to
mo
tiva
te
Inte
rest
ing
Motivating
13
Geogebra can help me to understand
geometry. Learning geometry is fun
and easy through Geogebra. 1 1 0 1 0 1 0 0 1
14
Geogebra is very fun and easy, and
does not make me stressed. Geogebra
can help me to learn to understand
geometry.
1 1 0 1 1 1 0 0 1
15
Learning Geogebra is very fun. Besides
learning Geogebra itself, I also can
study geometry and can play with
Geogebra. Learning through Geogebra
I can know parallel lines and ray lines,
also can know angles at lines.
0 1 1 1 1 1 0 0 1
16
Geogebra is very good to learn
geometry and learning through
Geogebra makes easy to understand
and to digest well about geometry.
1 1 1 1 0 0 0 0 0
17
In my opinion learning Geogebra is like
learning geometry which makes me
easy to understand about geometry. 1 1 0 1 0 0 0 1 1
18
Geogebra is simple because its
windows can be used to draw simple
lines. I mean points connecting
become a line.
1 1 1 0 0 0 0 0
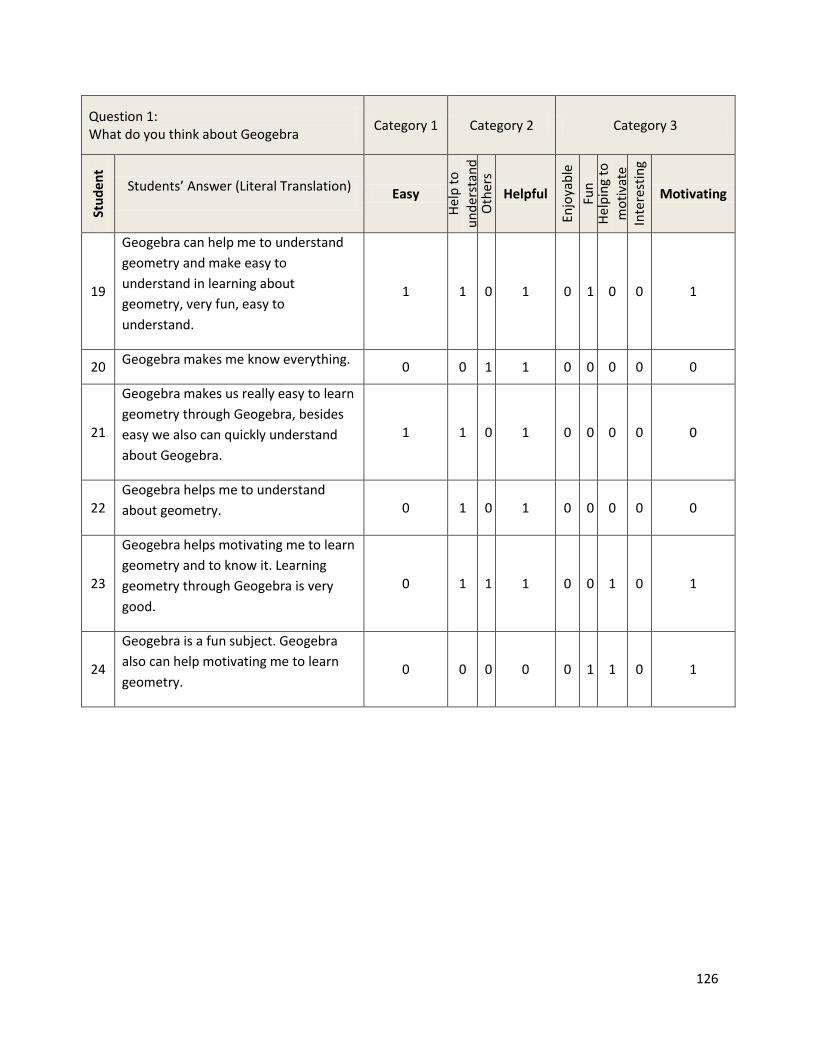
126
Question 1: What do you think about Geogebra
Category 1 Category 2 Category 3
Stu
den
t
Students’ Answer (Literal Translation) Easy
Hel
p t
o
un
der
stan
d
Oth
ers
Helpful
Enjo
yab
le
Fun
H
elp
ing
to
mo
tiva
te
Inte
rest
ing
Motivating
19
Geogebra can help me to understand
geometry and make easy to
understand in learning about
geometry, very fun, easy to
understand.
1 1 0 1 0 1 0 0 1
20 Geogebra makes me know everything.
0 0 1 1 0 0 0 0 0
21
Geogebra makes us really easy to learn
geometry through Geogebra, besides
easy we also can quickly understand
about Geogebra.
1 1 0 1 0 0 0 0 0
22 Geogebra helps me to understand
about geometry. 0 1 0 1 0 0 0 0 0
23
Geogebra helps motivating me to learn
geometry and to know it. Learning
geometry through Geogebra is very
good.
0 1 1 1 0 0 1 0 1
24
Geogebra is a fun subject. Geogebra
also can help motivating me to learn
geometry. 0 0 0 0 0 1 1 0 1
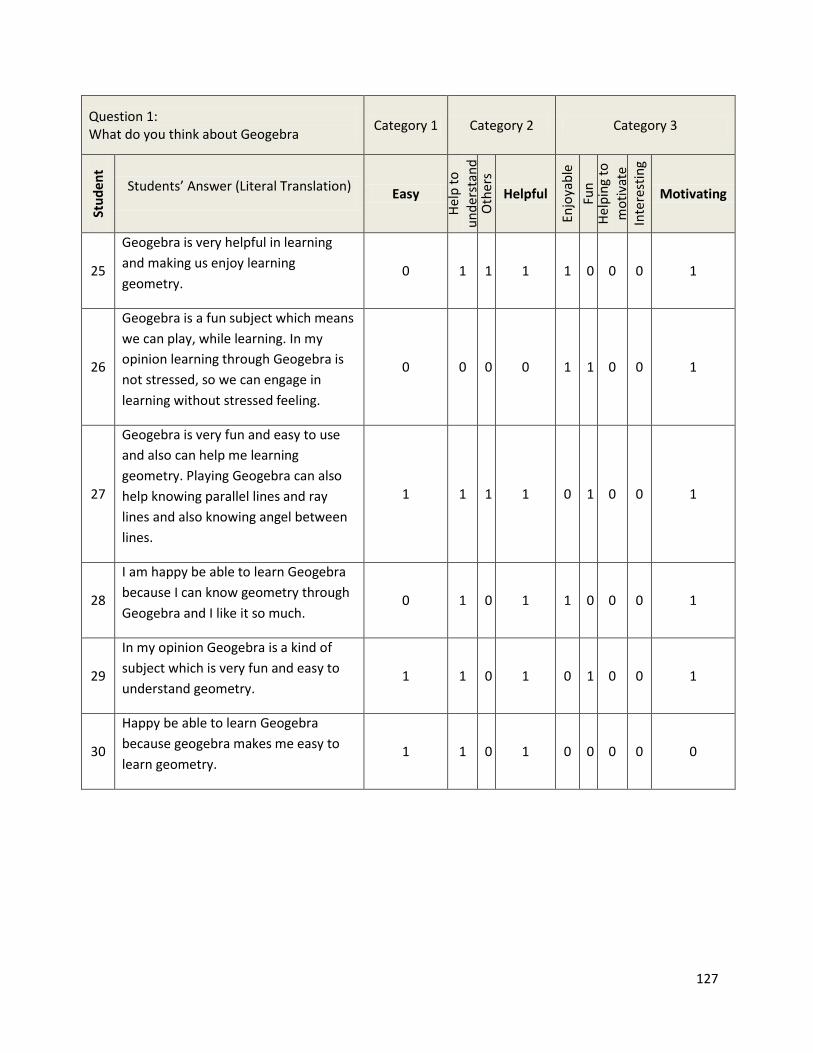
127
Question 1: What do you think about Geogebra
Category 1 Category 2 Category 3
Stu
den
t
Students’ Answer (Literal Translation) Easy
Hel
p t
o
un
der
stan
d
Oth
ers
Helpful
Enjo
yab
le
Fun
H
elp
ing
to
mo
tiva
te
Inte
rest
ing
Motivating
25
Geogebra is very helpful in learning
and making us enjoy learning
geometry. 0 1 1 1 1 0 0 0 1
26
Geogebra is a fun subject which means
we can play, while learning. In my
opinion learning through Geogebra is
not stressed, so we can engage in
learning without stressed feeling.
0 0 0 0 1 1 0 0 1
27
Geogebra is very fun and easy to use
and also can help me learning
geometry. Playing Geogebra can also
help knowing parallel lines and ray
lines and also knowing angel between
lines.
1 1 1 1 0 1 0 0 1
28
I am happy be able to learn Geogebra
because I can know geometry through
Geogebra and I like it so much. 0 1 0 1 1 0 0 0 1
29
In my opinion Geogebra is a kind of
subject which is very fun and easy to
understand geometry. 1 1 0 1 0 1 0 0 1
30
Happy be able to learn Geogebra
because geogebra makes me easy to
learn geometry. 1 1 0 1 0 0 0 0 0
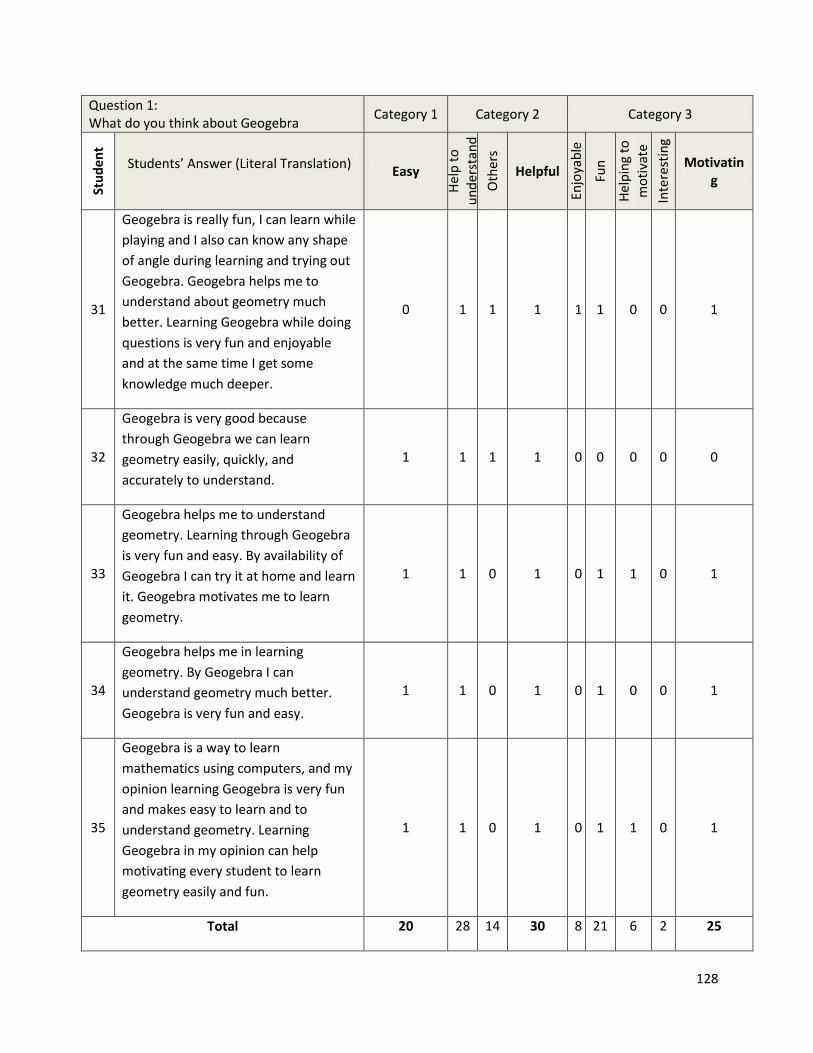
128
Question 1: What do you think about Geogebra
Category 1 Category 2 Category 3 St
ud
ent
Students’ Answer (Literal Translation) Easy
Hel
p t
o
un
der
stan
d
Oth
ers
Helpful
Enjo
yab
le
Fun
Hel
pin
g to
m
oti
vate
Inte
rest
ing
Motivating
31
Geogebra is really fun, I can learn while
playing and I also can know any shape
of angle during learning and trying out
Geogebra. Geogebra helps me to
understand about geometry much
better. Learning Geogebra while doing
questions is very fun and enjoyable
and at the same time I get some
knowledge much deeper.
0 1 1 1 1 1 0 0 1
32
Geogebra is very good because
through Geogebra we can learn
geometry easily, quickly, and
accurately to understand.
1 1 1 1 0 0 0 0 0
33
Geogebra helps me to understand
geometry. Learning through Geogebra
is very fun and easy. By availability of
Geogebra I can try it at home and learn
it. Geogebra motivates me to learn
geometry.
1 1 0 1 0 1 1 0 1
34
Geogebra helps me in learning
geometry. By Geogebra I can
understand geometry much better.
Geogebra is very fun and easy.
1 1 0 1 0 1 0 0 1
35
Geogebra is a way to learn
mathematics using computers, and my
opinion learning Geogebra is very fun
and makes easy to learn and to
understand geometry. Learning
Geogebra in my opinion can help
motivating every student to learn
geometry easily and fun.
1 1 0 1 0 1 1 0 1
Total 20 28 14 30 8 21 6 2 25
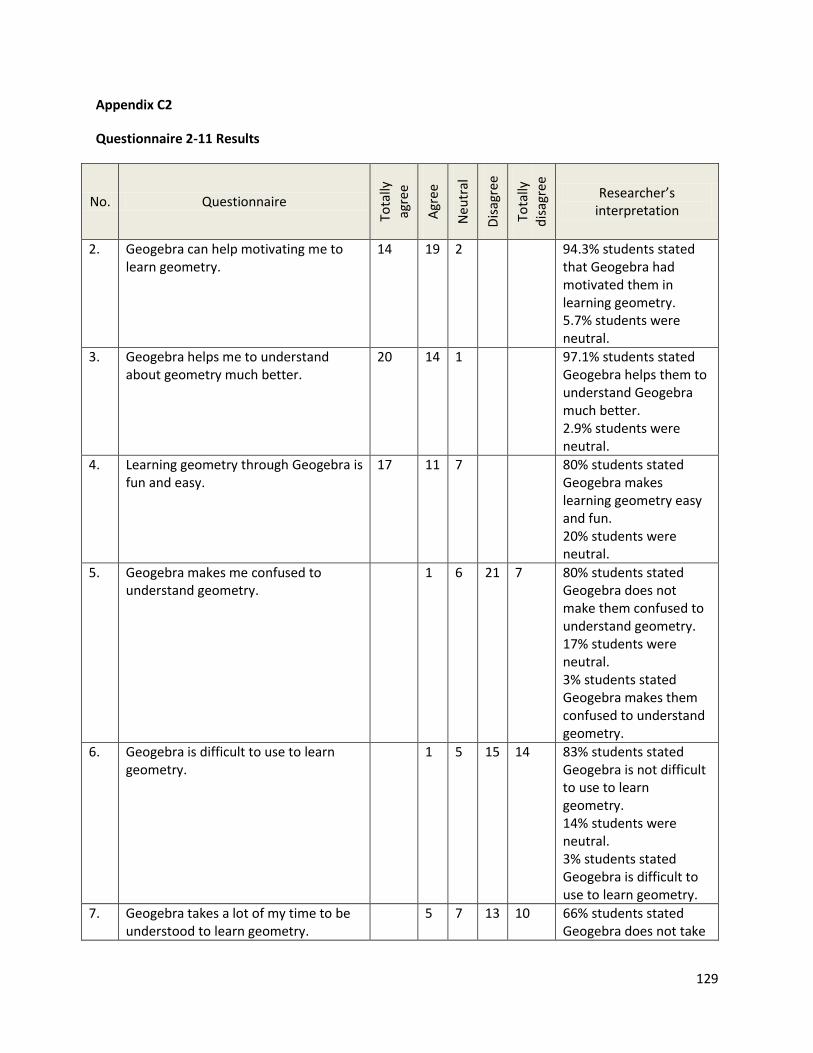
129
Appendix C2
Questionnaire 2-11 Results
No. Questionnaire
Tota
lly
agre
e
Agr
ee
Neu
tral
Dis
agre
e
Tota
lly
dis
agre
e
Researcher’s interpretation
2. Geogebra can help motivating me to learn geometry.
14 19 2 94.3% students stated that Geogebra had motivated them in learning geometry. 5.7% students were neutral.
3. Geogebra helps me to understand about geometry much better.
20 14 1 97.1% students stated Geogebra helps them to understand Geogebra much better. 2.9% students were neutral.
4. Learning geometry through Geogebra is fun and easy.
17 11 7 80% students stated Geogebra makes learning geometry easy and fun. 20% students were neutral.
5. Geogebra makes me confused to understand geometry.
1 6 21 7 80% students stated Geogebra does not make them confused to understand geometry. 17% students were neutral. 3% students stated Geogebra makes them confused to understand geometry.
6. Geogebra is difficult to use to learn geometry.
1 5 15 14 83% students stated Geogebra is not difficult to use to learn geometry. 14% students were neutral. 3% students stated Geogebra is difficult to use to learn geometry.
7. Geogebra takes a lot of my time to be understood to learn geometry.
5 7 13 10 66% students stated Geogebra does not take
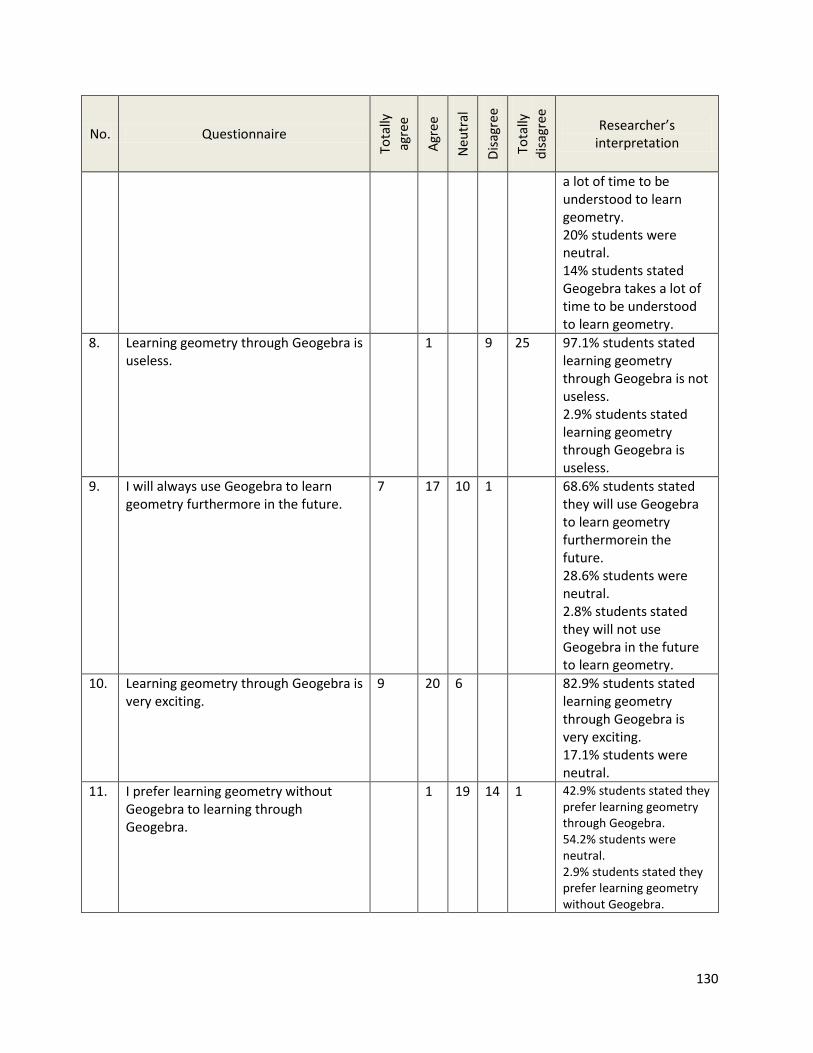
130
No. Questionnaire
Tota
lly
agre
e
Agr
ee
Neu
tral
Dis
agre
e
Tota
lly
dis
agre
e
Researcher’s interpretation
a lot of time to be understood to learn geometry. 20% students were neutral. 14% students stated Geogebra takes a lot of time to be understood to learn geometry.
8. Learning geometry through Geogebra is useless.
1 9 25 97.1% students stated learning geometry through Geogebra is not useless. 2.9% students stated learning geometry through Geogebra is useless.
9. I will always use Geogebra to learn geometry furthermore in the future.
7 17 10 1 68.6% students stated they will use Geogebra to learn geometry furthermorein the future. 28.6% students were neutral. 2.8% students stated they will not use Geogebra in the future to learn geometry.
10. Learning geometry through Geogebra is very exciting.
9 20 6 82.9% students stated learning geometry through Geogebra is very exciting. 17.1% students were neutral.
11. I prefer learning geometry without Geogebra to learning through Geogebra.
1 19 14 1 42.9% students stated they prefer learning geometry through Geogebra. 54.2% students were neutral. 2.9% students stated they prefer learning geometry without Geogebra.
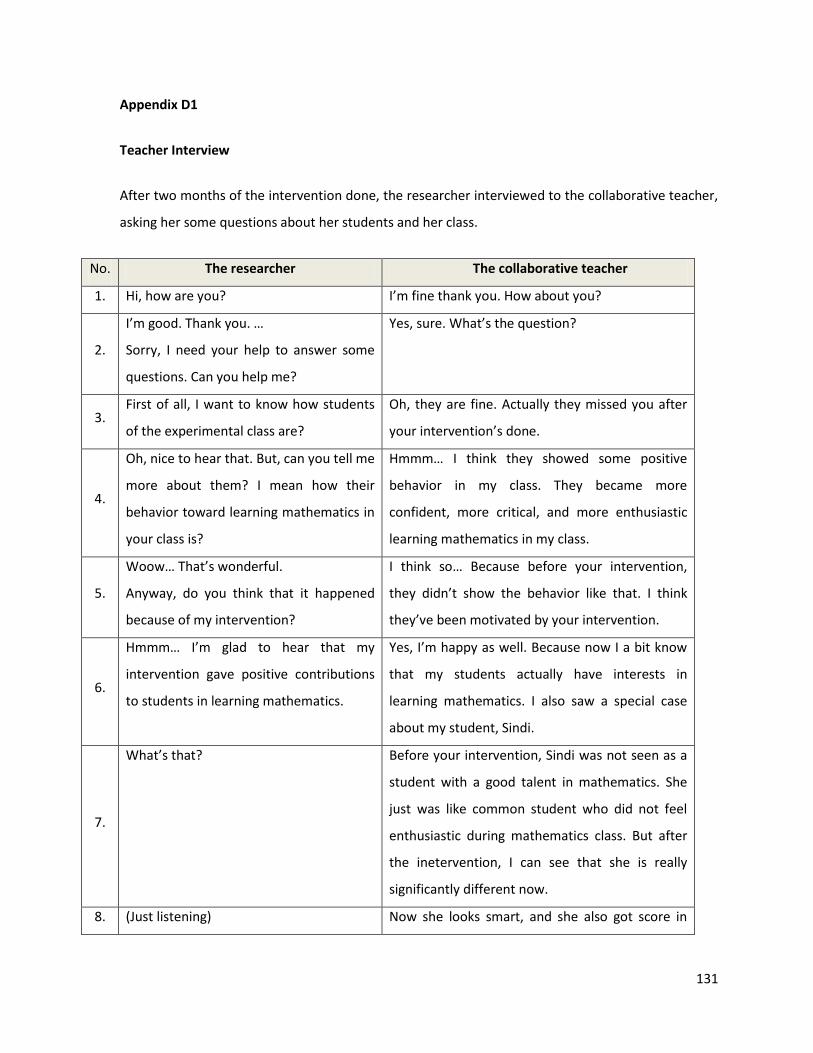
131
Appendix D1
Teacher Interview
After two months of the intervention done, the researcher interviewed to the collaborative teacher,
asking her some questions about her students and her class.
No. The researcher The collaborative teacher
1. Hi, how are you? I’m fine thank you. How about you?
2.
I’m good. Thank you. …
Sorry, I need your help to answer some
questions. Can you help me?
Yes, sure. What’s the question?
3. First of all, I want to know how students
of the experimental class are?
Oh, they are fine. Actually they missed you after
your intervention’s done.
4.
Oh, nice to hear that. But, can you tell me
more about them? I mean how their
behavior toward learning mathematics in
your class is?
Hmmm… I think they showed some positive
behavior in my class. They became more
confident, more critical, and more enthusiastic
learning mathematics in my class.
5.
Woow… That’s wonderful.
Anyway, do you think that it happened
because of my intervention?
I think so… Because before your intervention,
they didn’t show the behavior like that. I think
they’ve been motivated by your intervention.
6.
Hmmm… I’m glad to hear that my
intervention gave positive contributions
to students in learning mathematics.
Yes, I’m happy as well. Because now I a bit know
that my students actually have interests in
learning mathematics. I also saw a special case
about my student, Sindi.
7.
What’s that? Before your intervention, Sindi was not seen as a
student with a good talent in mathematics. She
just was like common student who did not feel
enthusiastic during mathematics class. But after
the inetervention, I can see that she is really
significantly different now.
8. (Just listening) Now she looks smart, and she also got score in
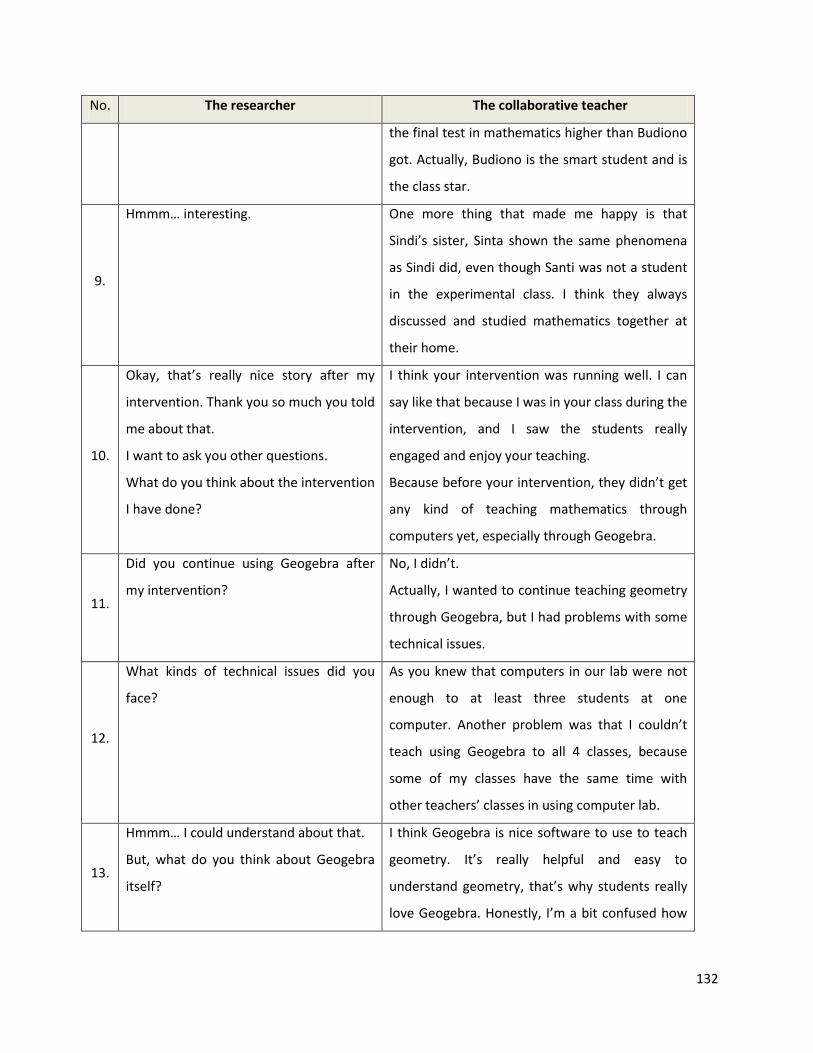
132
No. The researcher The collaborative teacher
the final test in mathematics higher than Budiono
got. Actually, Budiono is the smart student and is
the class star.
9.
Hmmm… interesting.
One more thing that made me happy is that
Sindi’s sister, Sinta shown the same phenomena
as Sindi did, even though Santi was not a student
in the experimental class. I think they always
discussed and studied mathematics together at
their home.
10.
Okay, that’s really nice story after my
intervention. Thank you so much you told
me about that.
I want to ask you other questions.
What do you think about the intervention
I have done?
I think your intervention was running well. I can
say like that because I was in your class during the
intervention, and I saw the students really
engaged and enjoy your teaching.
Because before your intervention, they didn’t get
any kind of teaching mathematics through
computers yet, especially through Geogebra.
11.
Did you continue using Geogebra after
my intervention?
No, I didn’t.
Actually, I wanted to continue teaching geometry
through Geogebra, but I had problems with some
technical issues.
12.
What kinds of technical issues did you
face?
As you knew that computers in our lab were not
enough to at least three students at one
computer. Another problem was that I couldn’t
teach using Geogebra to all 4 classes, because
some of my classes have the same time with
other teachers’ classes in using computer lab.
13.
Hmmm… I could understand about that.
But, what do you think about Geogebra
itself?
I think Geogebra is nice software to use to teach
geometry. It’s really helpful and easy to
understand geometry, that’s why students really
love Geogebra. Honestly, I’m a bit confused how
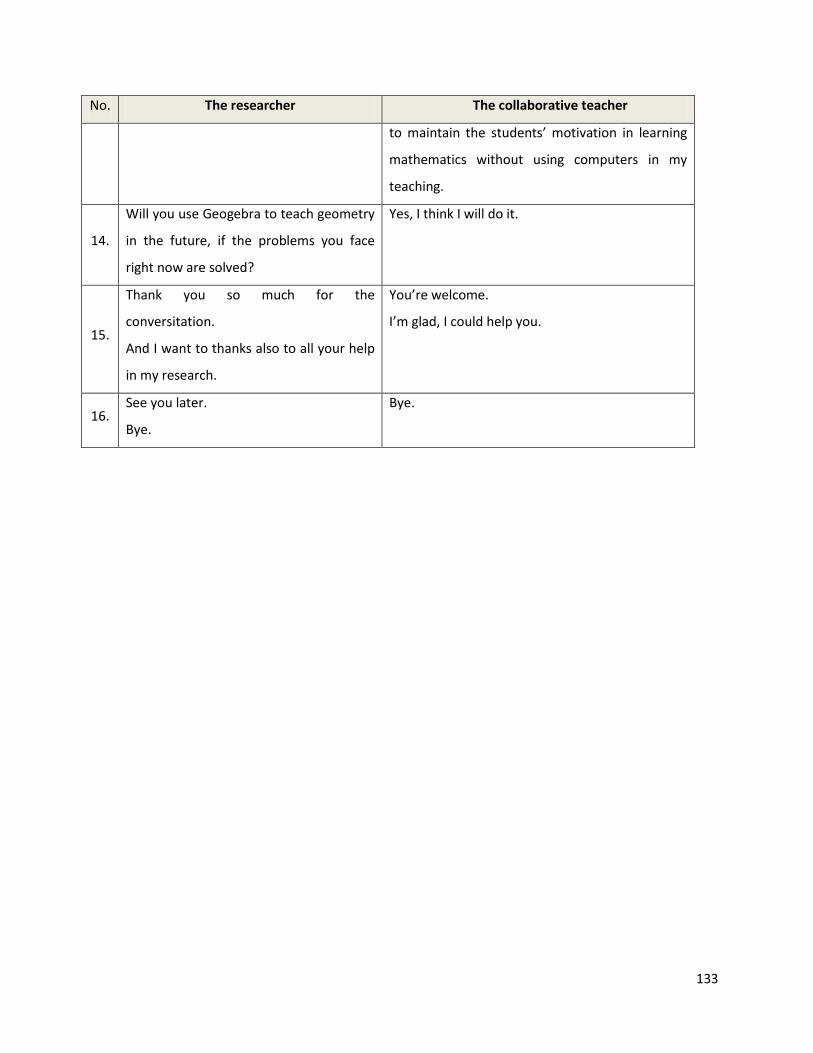
133
No. The researcher The collaborative teacher
to maintain the students’ motivation in learning
mathematics without using computers in my
teaching.
14.
Will you use Geogebra to teach geometry
in the future, if the problems you face
right now are solved?
Yes, I think I will do it.
15.
Thank you so much for the
conversitation.
And I want to thanks also to all your help
in my research.
You’re welcome.
I’m glad, I could help you.
16. See you later.
Bye.
Bye.
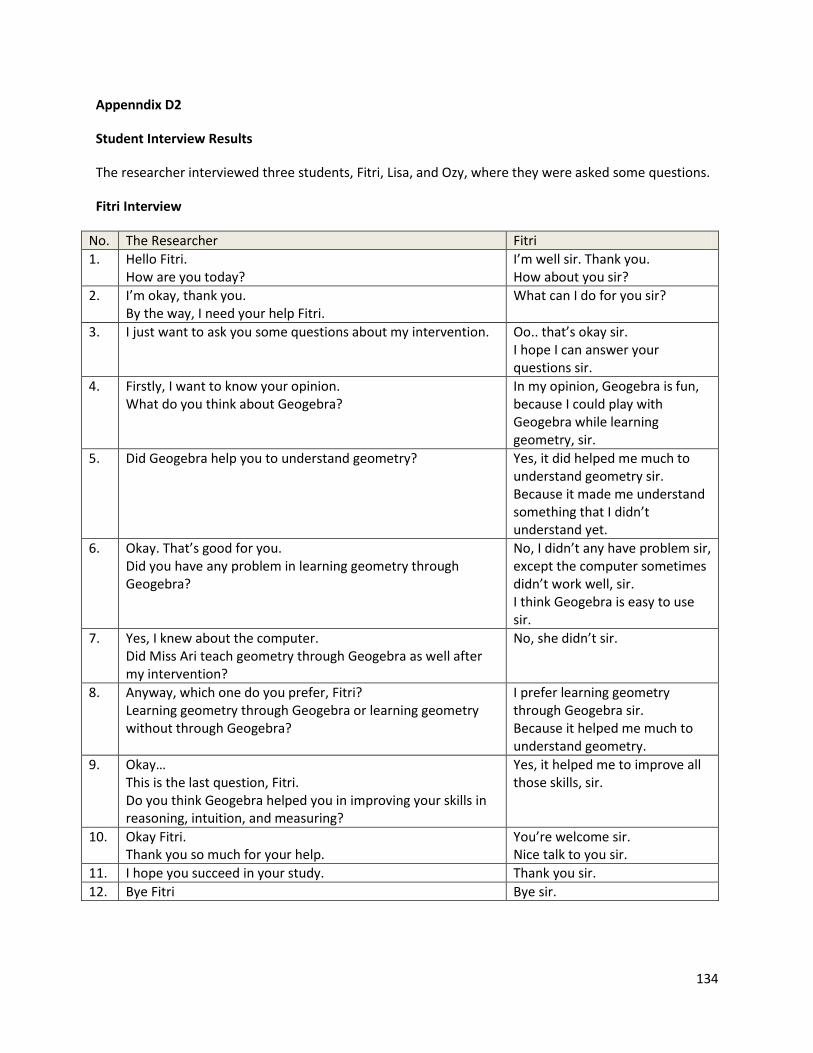
134
Appenndix D2
Student Interview Results
The researcher interviewed three students, Fitri, Lisa, and Ozy, where they were asked some questions.
Fitri Interview
No. The Researcher Fitri
1. Hello Fitri. How are you today?
I’m well sir. Thank you. How about you sir?
2. I’m okay, thank you. By the way, I need your help Fitri.
What can I do for you sir?
3. I just want to ask you some questions about my intervention. Oo.. that’s okay sir. I hope I can answer your questions sir.
4. Firstly, I want to know your opinion. What do you think about Geogebra?
In my opinion, Geogebra is fun, because I could play with Geogebra while learning geometry, sir.
5. Did Geogebra help you to understand geometry? Yes, it did helped me much to understand geometry sir. Because it made me understand something that I didn’t understand yet.
6. Okay. That’s good for you. Did you have any problem in learning geometry through Geogebra?
No, I didn’t any have problem sir, except the computer sometimes didn’t work well, sir. I think Geogebra is easy to use sir.
7. Yes, I knew about the computer. Did Miss Ari teach geometry through Geogebra as well after my intervention?
No, she didn’t sir.
8. Anyway, which one do you prefer, Fitri? Learning geometry through Geogebra or learning geometry without through Geogebra?
I prefer learning geometry through Geogebra sir. Because it helped me much to understand geometry.
9. Okay… This is the last question, Fitri. Do you think Geogebra helped you in improving your skills in reasoning, intuition, and measuring?
Yes, it helped me to improve all those skills, sir.
10. Okay Fitri. Thank you so much for your help.
You’re welcome sir. Nice talk to you sir.
11. I hope you succeed in your study. Thank you sir.
12. Bye Fitri Bye sir.
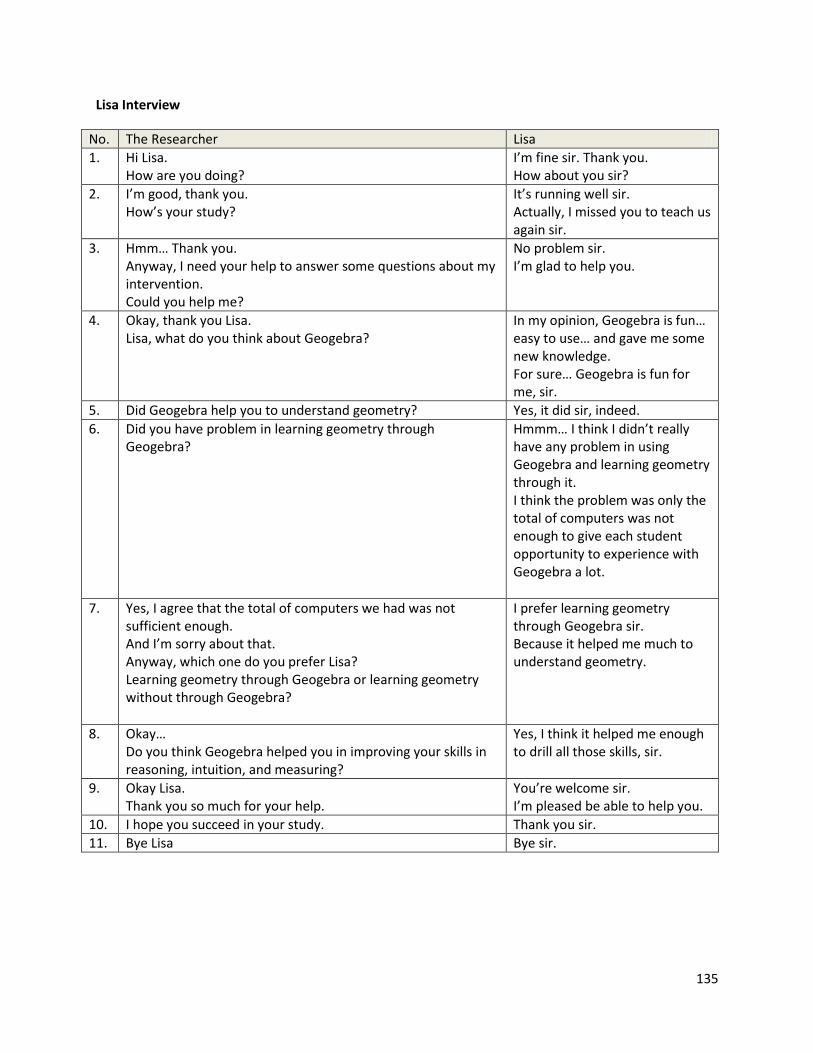
135
Lisa Interview
No. The Researcher Lisa
1. Hi Lisa. How are you doing?
I’m fine sir. Thank you. How about you sir?
2. I’m good, thank you. How’s your study?
It’s running well sir. Actually, I missed you to teach us again sir.
3. Hmm… Thank you. Anyway, I need your help to answer some questions about my intervention. Could you help me?
No problem sir. I’m glad to help you.
4. Okay, thank you Lisa. Lisa, what do you think about Geogebra?
In my opinion, Geogebra is fun… easy to use… and gave me some new knowledge. For sure… Geogebra is fun for me, sir.
5. Did Geogebra help you to understand geometry? Yes, it did sir, indeed.
6. Did you have problem in learning geometry through Geogebra?
Hmmm… I think I didn’t really have any problem in using Geogebra and learning geometry through it. I think the problem was only the total of computers was not enough to give each student opportunity to experience with Geogebra a lot.
7. Yes, I agree that the total of computers we had was not sufficient enough. And I’m sorry about that. Anyway, which one do you prefer Lisa? Learning geometry through Geogebra or learning geometry without through Geogebra?
I prefer learning geometry through Geogebra sir. Because it helped me much to understand geometry.
8. Okay… Do you think Geogebra helped you in improving your skills in reasoning, intuition, and measuring?
Yes, I think it helped me enough to drill all those skills, sir.
9. Okay Lisa. Thank you so much for your help.
You’re welcome sir. I’m pleased be able to help you.
10. I hope you succeed in your study. Thank you sir.
11. Bye Lisa Bye sir.
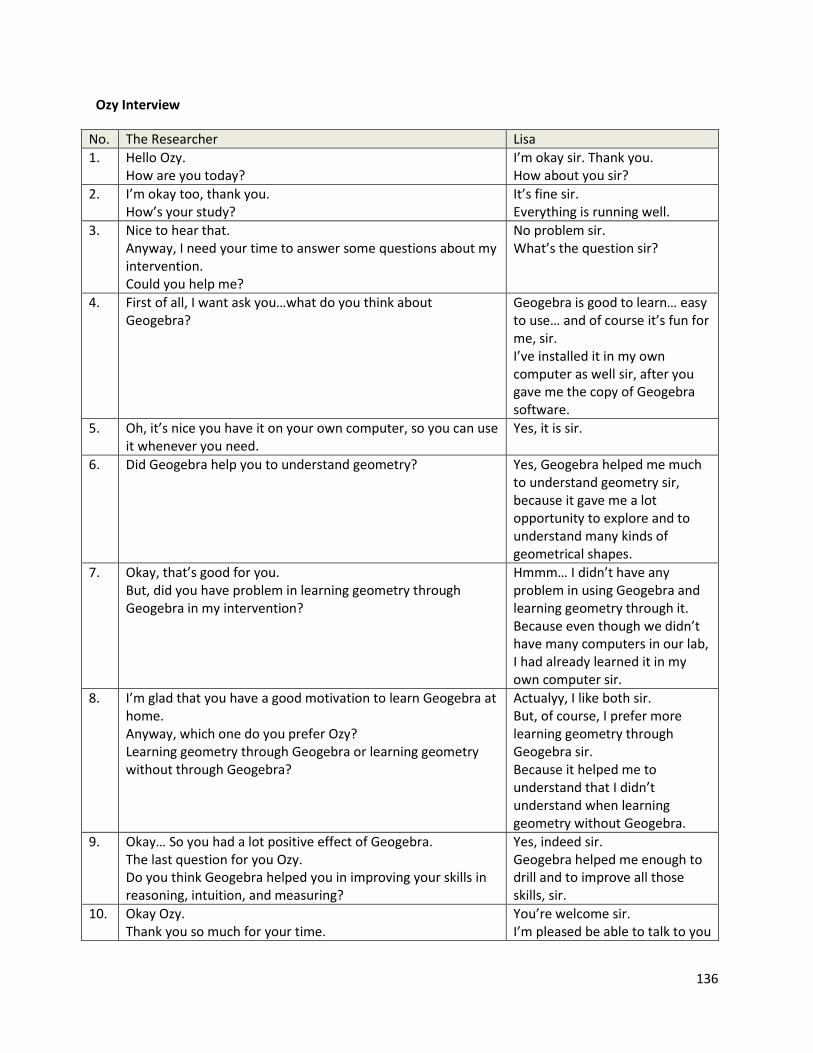
136
Ozy Interview
No. The Researcher Lisa
1. Hello Ozy. How are you today?
I’m okay sir. Thank you. How about you sir?
2. I’m okay too, thank you. How’s your study?
It’s fine sir. Everything is running well.
3. Nice to hear that. Anyway, I need your time to answer some questions about my intervention. Could you help me?
No problem sir. What’s the question sir?
4. First of all, I want ask you…what do you think about Geogebra?
Geogebra is good to learn… easy to use… and of course it’s fun for me, sir. I’ve installed it in my own computer as well sir, after you gave me the copy of Geogebra software.
5. Oh, it’s nice you have it on your own computer, so you can use it whenever you need.
Yes, it is sir.
6. Did Geogebra help you to understand geometry? Yes, Geogebra helped me much to understand geometry sir, because it gave me a lot opportunity to explore and to understand many kinds of geometrical shapes.
7. Okay, that’s good for you. But, did you have problem in learning geometry through Geogebra in my intervention?
Hmmm… I didn’t have any problem in using Geogebra and learning geometry through it. Because even though we didn’t have many computers in our lab, I had already learned it in my own computer sir.
8. I’m glad that you have a good motivation to learn Geogebra at home. Anyway, which one do you prefer Ozy? Learning geometry through Geogebra or learning geometry without through Geogebra?
Actualyy, I like both sir. But, of course, I prefer more learning geometry through Geogebra sir. Because it helped me to understand that I didn’t understand when learning geometry without Geogebra.
9. Okay… So you had a lot positive effect of Geogebra. The last question for you Ozy. Do you think Geogebra helped you in improving your skills in reasoning, intuition, and measuring?
Yes, indeed sir. Geogebra helped me enough to drill and to improve all those skills, sir.
10. Okay Ozy. Thank you so much for your time.
You’re welcome sir. I’m pleased be able to talk to you
137
sir.
11. Me too Ozy. I hope you succeed in your study.
Thank you sir.
12. See later Ozy See later sir.
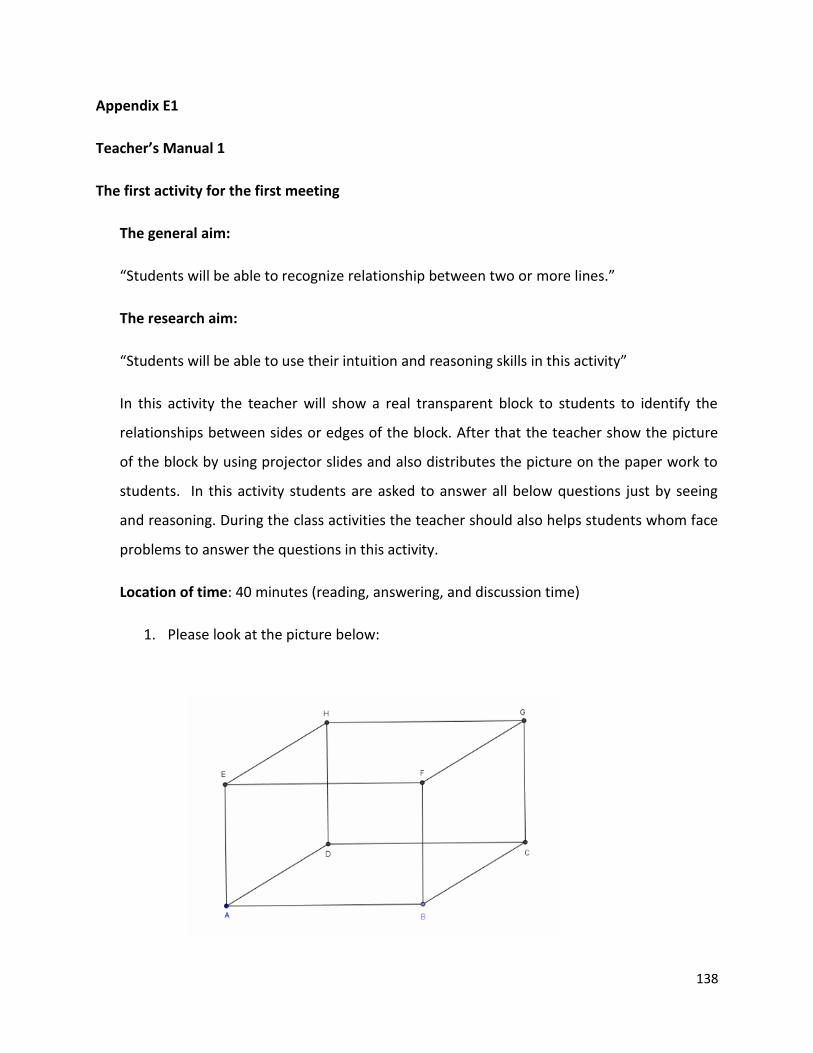
138
Appendix E1
Teacher’s Manual 1
The first activity for the first meeting
The general aim:
“Students will be able to recognize relationship between two or more lines.”
The research aim:
“Students will be able to use their intuition and reasoning skills in this activity”
In this activity the teacher will show a real transparent block to students to identify the
relationships between sides or edges of the block. After that the teacher show the picture
of the block by using projector slides and also distributes the picture on the paper work to
students. In this activity students are asked to answer all below questions just by seeing
and reasoning. During the class activities the teacher should also helps students whom face
problems to answer the questions in this activity.
Location of time: 40 minutes (reading, answering, and discussion time)
1. Please look at the picture below:
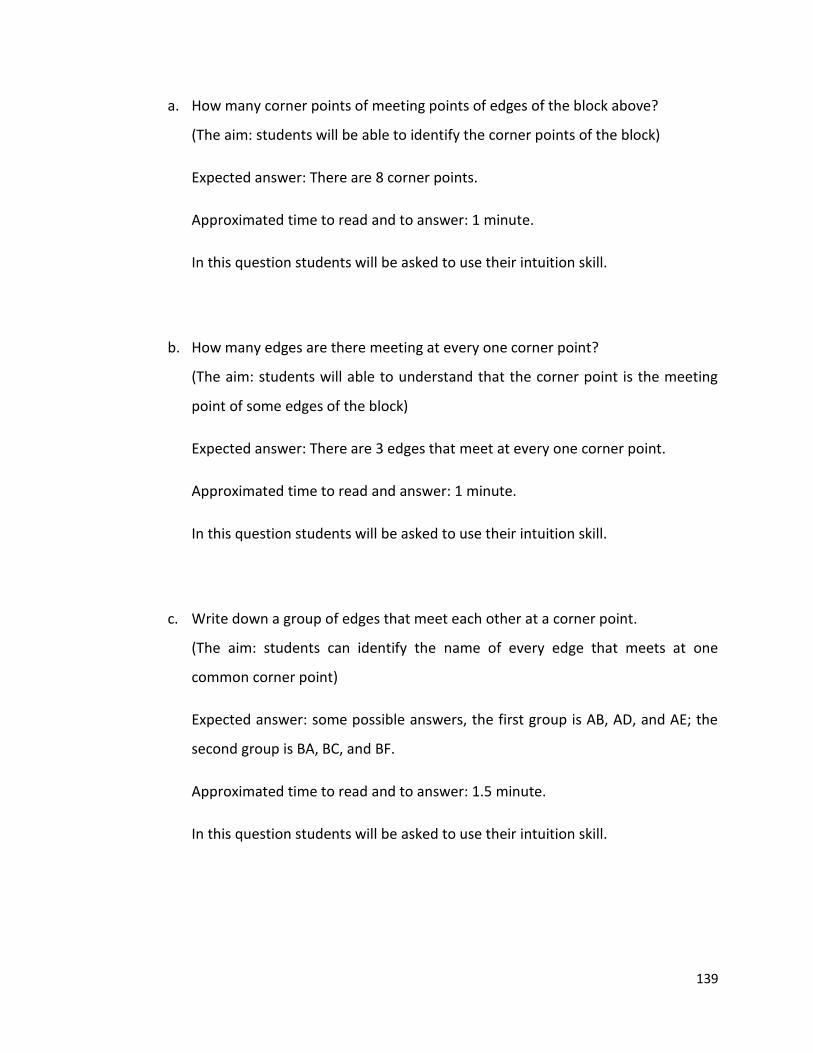
139
a. How many corner points of meeting points of edges of the block above?
(The aim: students will be able to identify the corner points of the block)
Expected answer: There are 8 corner points.
Approximated time to read and to answer: 1 minute.
In this question students will be asked to use their intuition skill.
b. How many edges are there meeting at every one corner point?
(The aim: students will able to understand that the corner point is the meeting
point of some edges of the block)
Expected answer: There are 3 edges that meet at every one corner point.
Approximated time to read and answer: 1 minute.
In this question students will be asked to use their intuition skill.
c. Write down a group of edges that meet each other at a corner point.
(The aim: students can identify the name of every edge that meets at one
common corner point)
Expected answer: some possible answers, the first group is AB, AD, and AE; the
second group is BA, BC, and BF.
Approximated time to read and to answer: 1.5 minute.
In this question students will be asked to use their intuition skill.

140
d. Write down three edges that do not meet each other.
(The aim: students will be able to investigate the edges that are not meeting at
one common corner point)
Expected answer: 1st pair is AB and CD, 2nd pair is BC and EH, and 3rd pair is AB
and EH.
Approximated time to read and to answer: 1.5 minutes.
In this question students will be asked to use their intuition skill.
e. Please give a reason why some edges can meet at a common corner point.
(The aim: students will be able to give their own reasons on their answers and
understanding about the relationships of edges that meets at one common
corner point)
Expected answer: there some edges meeting at corner points because they are
not parallel each other and must be on the same plane.
Approximated time to read and to answer: 2 minutes.
In this question students will be asked to use their reasoning skill.
f. Look carefully at edges that do not meet at corner points. For example, the
relationship between AB and EF, and also between AE and CD. What is your
conclusion on the relationship of those example pairs of edges?
(The aim: students will be able to make their own words to describe the other
relationships between edges that do not meet at one common corner point)
Expected answer: AB and EF are parallel and they do not meet at any point at all.
AE and CD are not parallel, they are not at the same face, and they do not meet
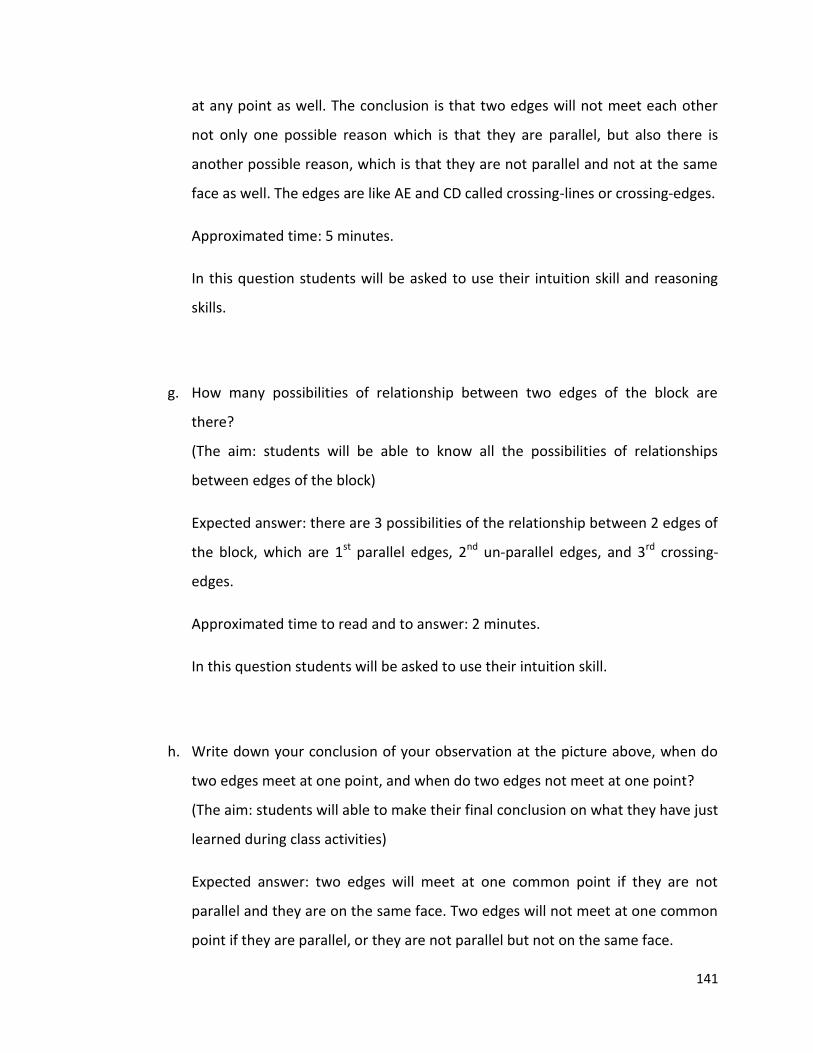
141
at any point as well. The conclusion is that two edges will not meet each other
not only one possible reason which is that they are parallel, but also there is
another possible reason, which is that they are not parallel and not at the same
face as well. The edges are like AE and CD called crossing-lines or crossing-edges.
Approximated time: 5 minutes.
In this question students will be asked to use their intuition skill and reasoning
skills.
g. How many possibilities of relationship between two edges of the block are
there?
(The aim: students will be able to know all the possibilities of relationships
between edges of the block)
Expected answer: there are 3 possibilities of the relationship between 2 edges of
the block, which are 1st parallel edges, 2nd un-parallel edges, and 3rd crossing-
edges.
Approximated time to read and to answer: 2 minutes.
In this question students will be asked to use their intuition skill.
h. Write down your conclusion of your observation at the picture above, when do
two edges meet at one point, and when do two edges not meet at one point?
(The aim: students will able to make their final conclusion on what they have just
learned during class activities)
Expected answer: two edges will meet at one common point if they are not
parallel and they are on the same face. Two edges will not meet at one common
point if they are parallel, or they are not parallel but not on the same face.
142
Approximated time to read and to answer: 3 minutes.
In this question students will be asked to use their reasoning skill.
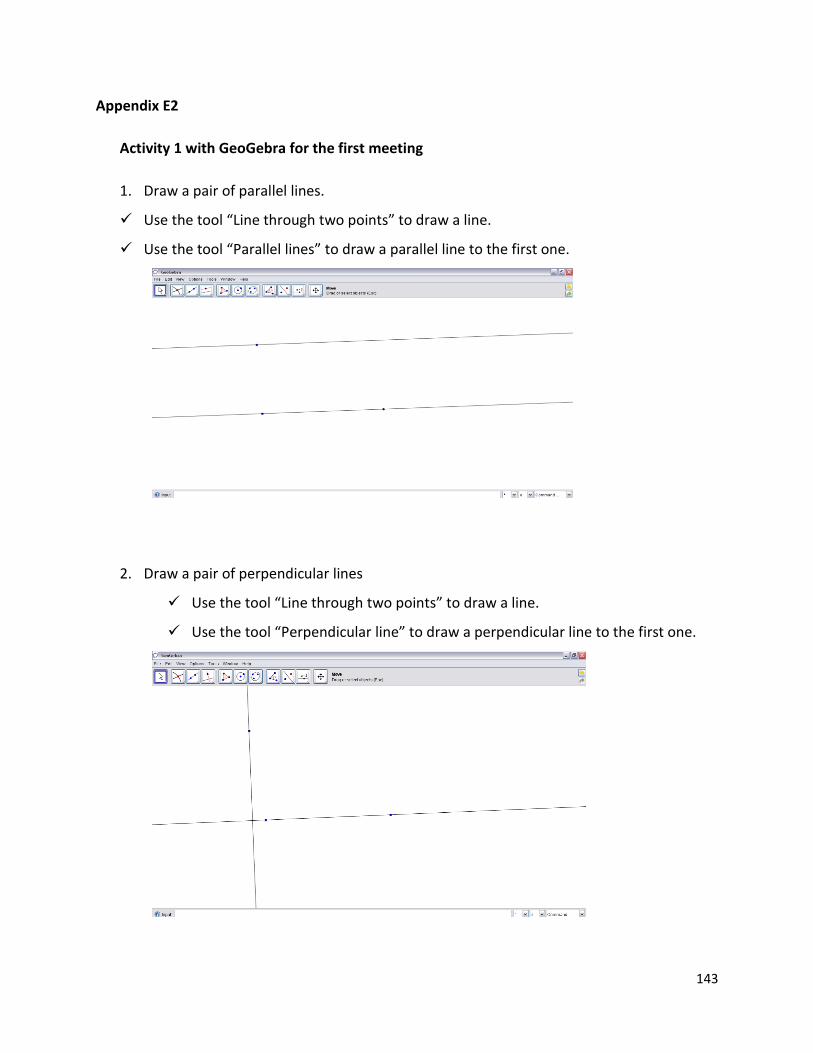
143
Appendix E2
Activity 1 with GeoGebra for the first meeting
1. Draw a pair of parallel lines.
Use the tool “Line through two points” to draw a line.
Use the tool “Parallel lines” to draw a parallel line to the first one.
2. Draw a pair of perpendicular lines
Use the tool “Line through two points” to draw a line.
Use the tool “Perpendicular line” to draw a perpendicular line to the first one.
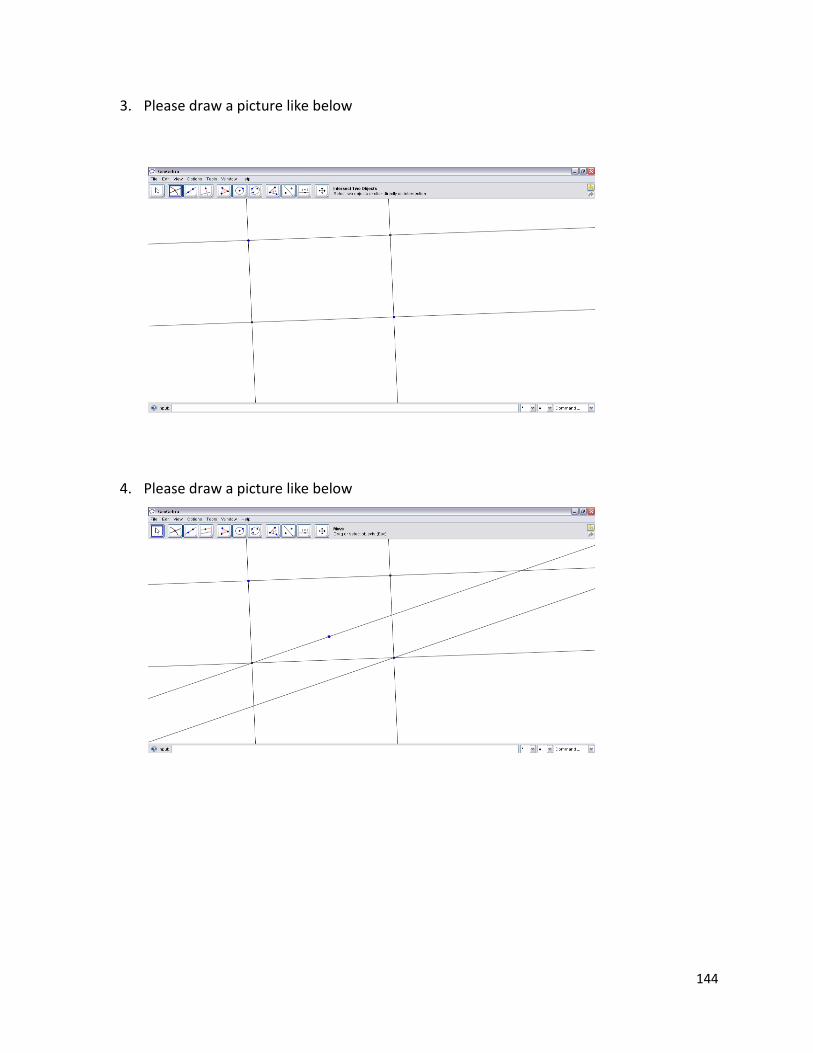
144
3. Please draw a picture like below
4. Please draw a picture like below
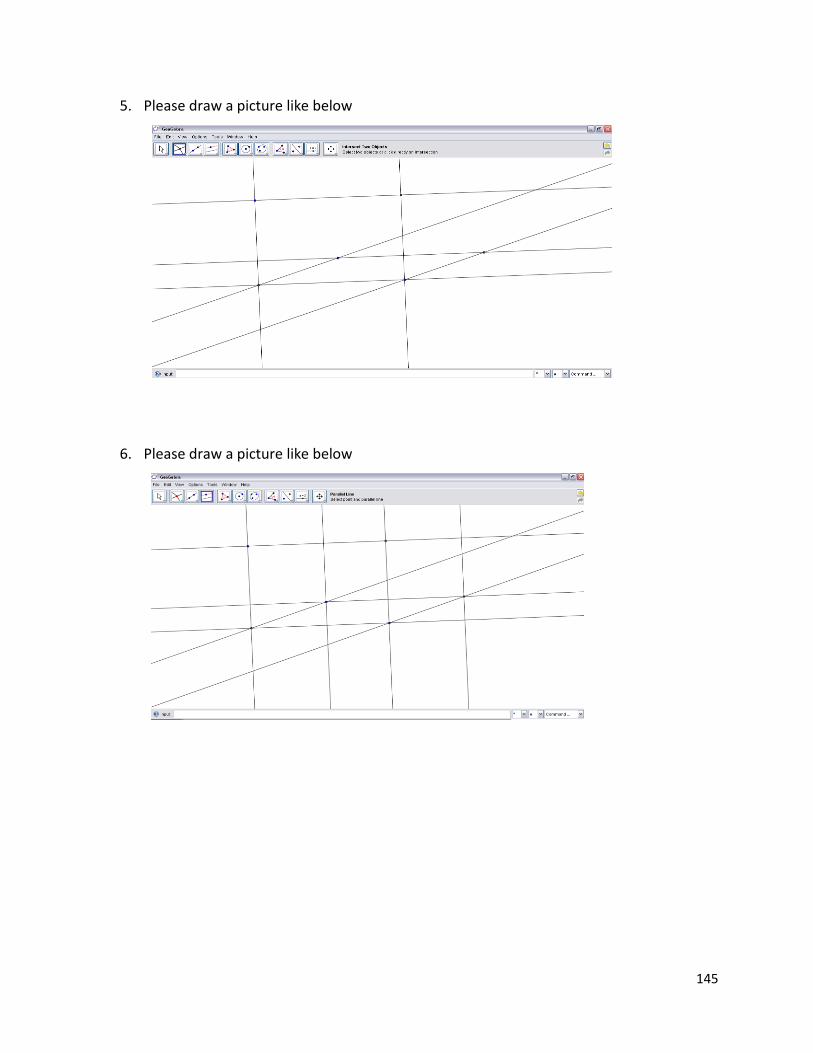
145
5. Please draw a picture like below
6. Please draw a picture like below
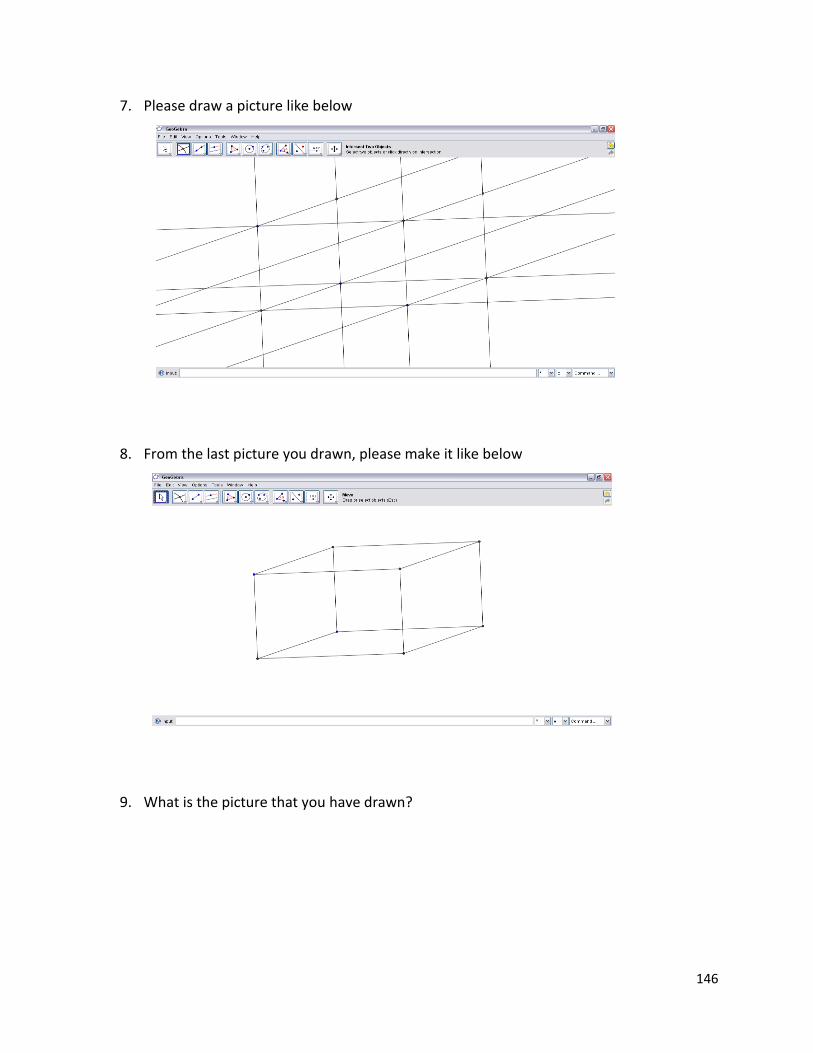
146
7. Please draw a picture like below
8. From the last picture you drawn, please make it like below
9. What is the picture that you have drawn?

147
Appendix E3
Teacher’s Manual 2
The second activity for the second meeting
The general aim: students will be able to recognize how an angle can be form and also to
know what the important elements of an angle to have.
The research aim:
“Students will be able to use their intuition and reasoning skills in this activity”
In this activity the teacher asks students to take two small sticks, and then asks them to join
the end of each stick so that forms an angle shape. After that the teacher asks students to
make their own words about what the important elements of an angle. The teacher also
asks students to distinguish between a small angle and a big angle.
Location of time: 40 minutes (reading, answering, and discussion time)
1. Take two small and short sticks, then join their end point and also give a name to
every end of the sticks by A, B, and C like picture below:
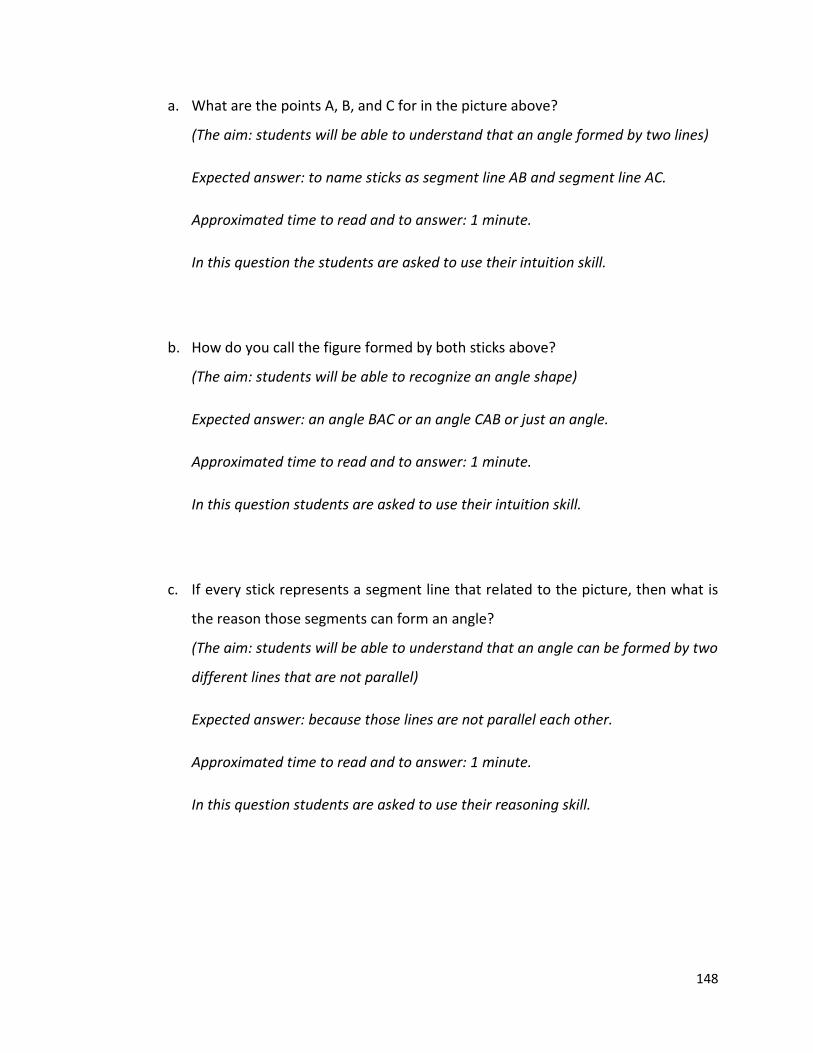
148
a. What are the points A, B, and C for in the picture above?
(The aim: students will be able to understand that an angle formed by two lines)
Expected answer: to name sticks as segment line AB and segment line AC.
Approximated time to read and to answer: 1 minute.
In this question the students are asked to use their intuition skill.
b. How do you call the figure formed by both sticks above?
(The aim: students will be able to recognize an angle shape)
Expected answer: an angle BAC or an angle CAB or just an angle.
Approximated time to read and to answer: 1 minute.
In this question students are asked to use their intuition skill.
c. If every stick represents a segment line that related to the picture, then what is
the reason those segments can form an angle?
(The aim: students will be able to understand that an angle can be formed by two
different lines that are not parallel)
Expected answer: because those lines are not parallel each other.
Approximated time to read and to answer: 1 minute.
In this question students are asked to use their reasoning skill.
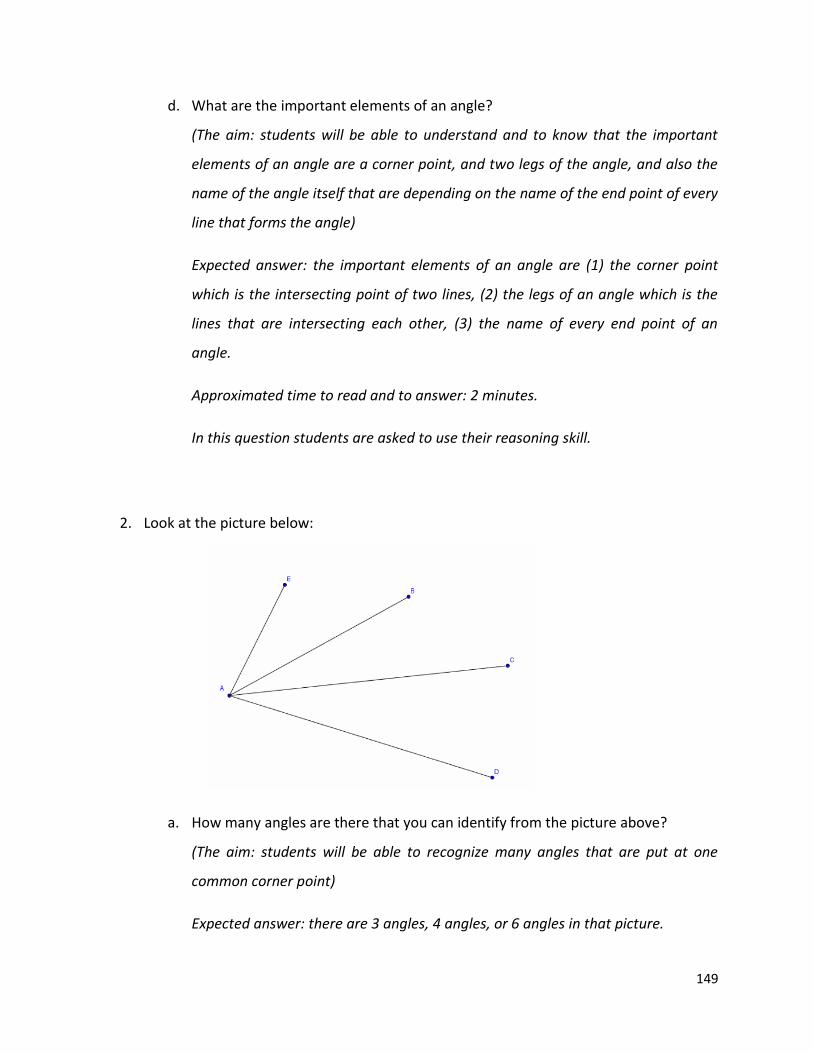
149
d. What are the important elements of an angle?
(The aim: students will be able to understand and to know that the important
elements of an angle are a corner point, and two legs of the angle, and also the
name of the angle itself that are depending on the name of the end point of every
line that forms the angle)
Expected answer: the important elements of an angle are (1) the corner point
which is the intersecting point of two lines, (2) the legs of an angle which is the
lines that are intersecting each other, (3) the name of every end point of an
angle.
Approximated time to read and to answer: 2 minutes.
In this question students are asked to use their reasoning skill.
2. Look at the picture below:
a. How many angles are there that you can identify from the picture above?
(The aim: students will be able to recognize many angles that are put at one
common corner point)
Expected answer: there are 3 angles, 4 angles, or 6 angles in that picture.
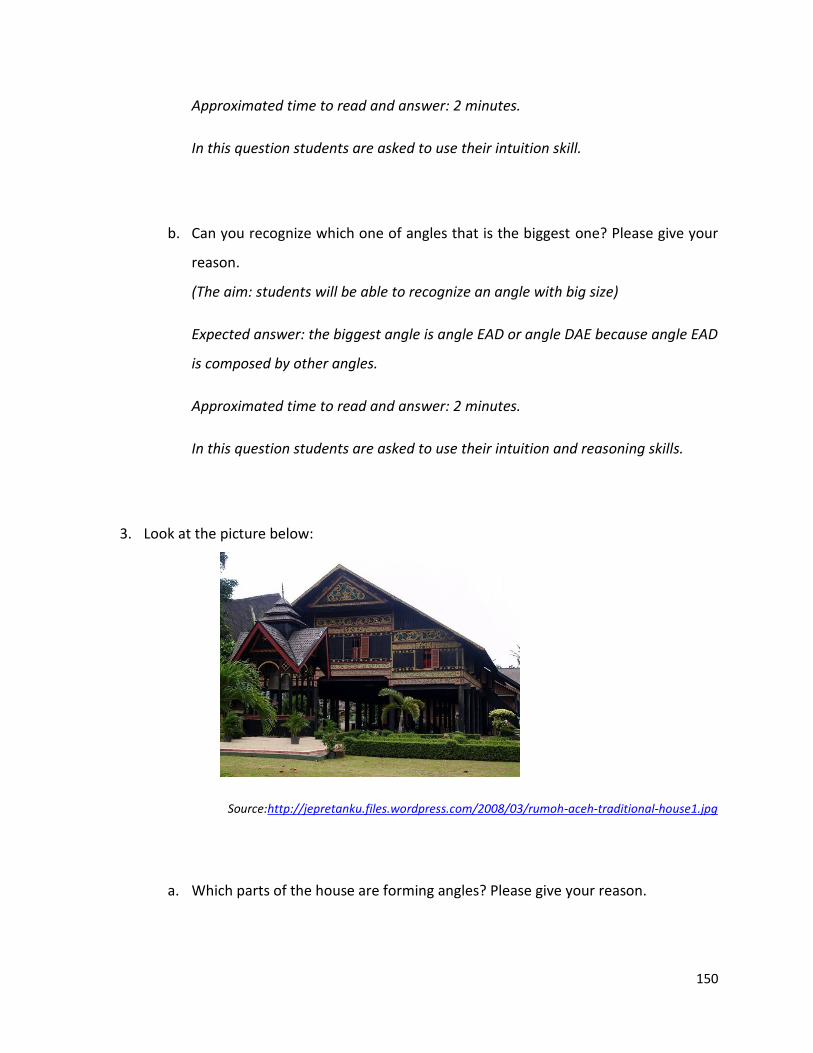
150
Approximated time to read and answer: 2 minutes.
In this question students are asked to use their intuition skill.
b. Can you recognize which one of angles that is the biggest one? Please give your
reason.
(The aim: students will be able to recognize an angle with big size)
Expected answer: the biggest angle is angle EAD or angle DAE because angle EAD
is composed by other angles.
Approximated time to read and answer: 2 minutes.
In this question students are asked to use their intuition and reasoning skills.
3. Look at the picture below:
Source:http://jepretanku.files.wordpress.com/2008/03/rumoh-aceh-traditional-house1.jpg
a. Which parts of the house are forming angles? Please give your reason.

151
(The aim: students will be able to recognize every shape in their real life that
forms an angle shape)
Expected answer: one possible answer is that the roof of the house because both
sides of the roof are not parallel and meeting at one corner point.
Approximated time to read and to answer: 1 minute.
In this question students are asked to use their intuition and reasoning skills.
b. Which parts of the house are not forming angles? Please give your reason.
(The aim: students will be able to recognize every shape in their real life that does
not form an angle shape)
Expected answer: one possible answer is that the pillars of the house because
both every pillar of the house are parallel and not meeting at one corner point.
Approximated time to read and to answer: 1 minute.
In this question students are asked to use their intuition and reasoning skills.
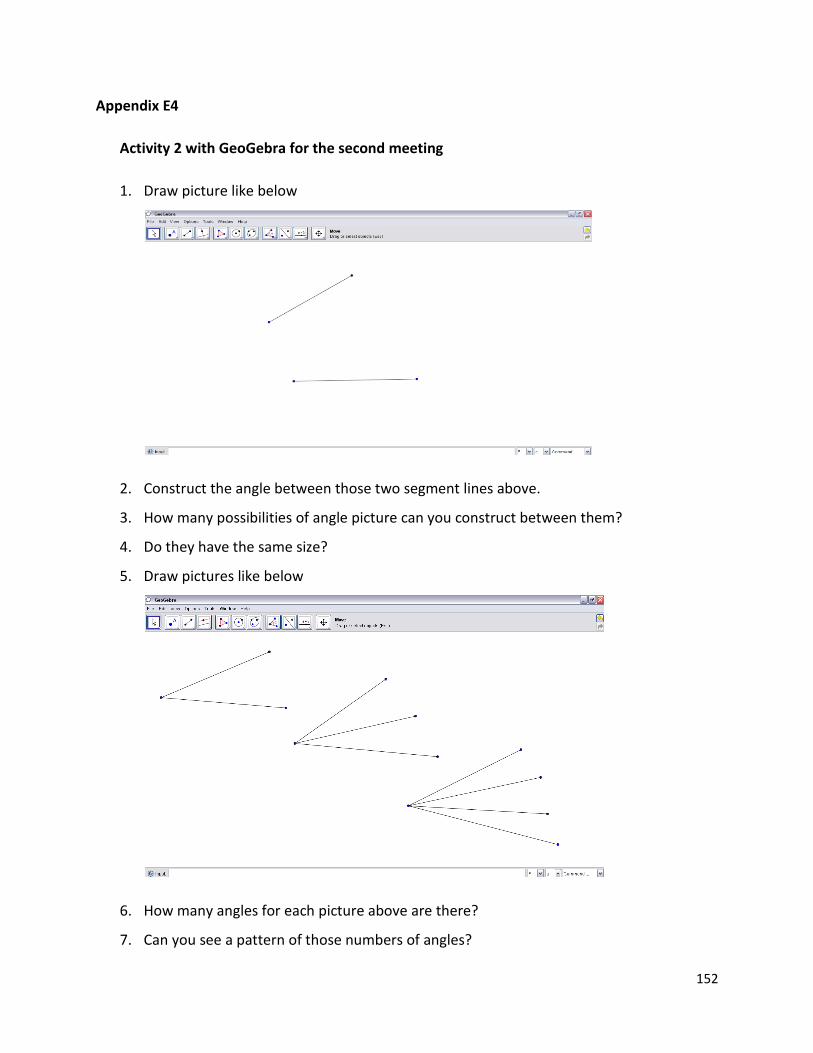
152
Appendix E4
Activity 2 with GeoGebra for the second meeting
1. Draw picture like below
2. Construct the angle between those two segment lines above.
3. How many possibilities of angle picture can you construct between them?
4. Do they have the same size?
5. Draw pictures like below
6. How many angles for each picture above are there?
7. Can you see a pattern of those numbers of angles?
153
8. Can you guess how many angles if there are 5 segment lines meeting at one common
point?
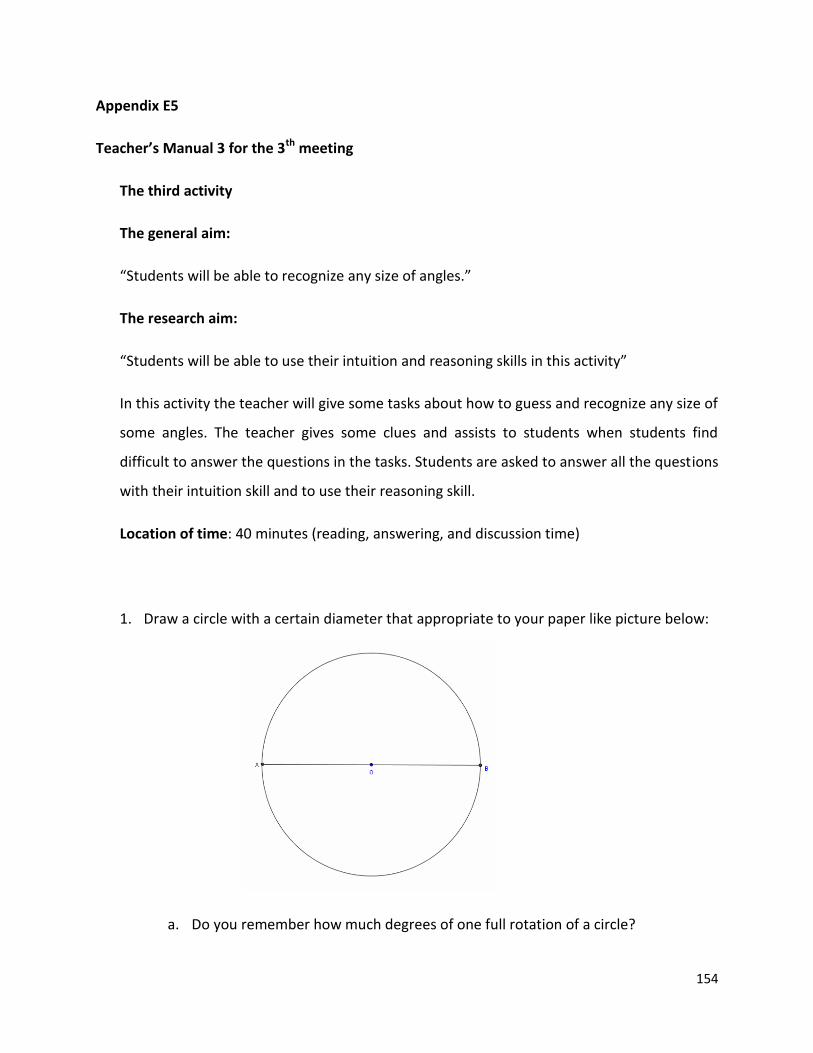
154
Appendix E5
Teacher’s Manual 3 for the 3th meeting
The third activity
The general aim:
“Students will be able to recognize any size of angles.”
The research aim:
“Students will be able to use their intuition and reasoning skills in this activity”
In this activity the teacher will give some tasks about how to guess and recognize any size of
some angles. The teacher gives some clues and assists to students when students find
difficult to answer the questions in the tasks. Students are asked to answer all the questions
with their intuition skill and to use their reasoning skill.
Location of time: 40 minutes (reading, answering, and discussion time)
1. Draw a circle with a certain diameter that appropriate to your paper like picture below:
a. Do you remember how much degrees of one full rotation of a circle?
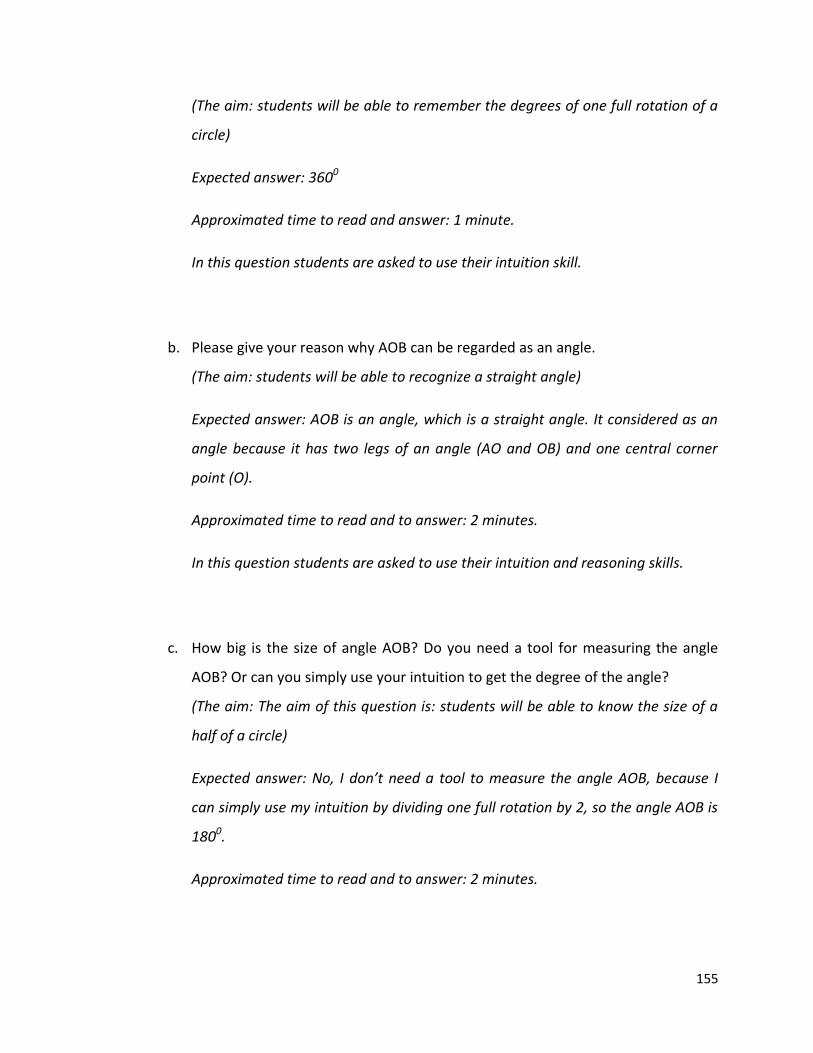
155
(The aim: students will be able to remember the degrees of one full rotation of a
circle)
Expected answer: 3600
Approximated time to read and answer: 1 minute.
In this question students are asked to use their intuition skill.
b. Please give your reason why AOB can be regarded as an angle.
(The aim: students will be able to recognize a straight angle)
Expected answer: AOB is an angle, which is a straight angle. It considered as an
angle because it has two legs of an angle (AO and OB) and one central corner
point (O).
Approximated time to read and to answer: 2 minutes.
In this question students are asked to use their intuition and reasoning skills.
c. How big is the size of angle AOB? Do you need a tool for measuring the angle
AOB? Or can you simply use your intuition to get the degree of the angle?
(The aim: The aim of this question is: students will be able to know the size of a
half of a circle)
Expected answer: No, I don’t need a tool to measure the angle AOB, because I
can simply use my intuition by dividing one full rotation by 2, so the angle AOB is
1800.
Approximated time to read and to answer: 2 minutes.
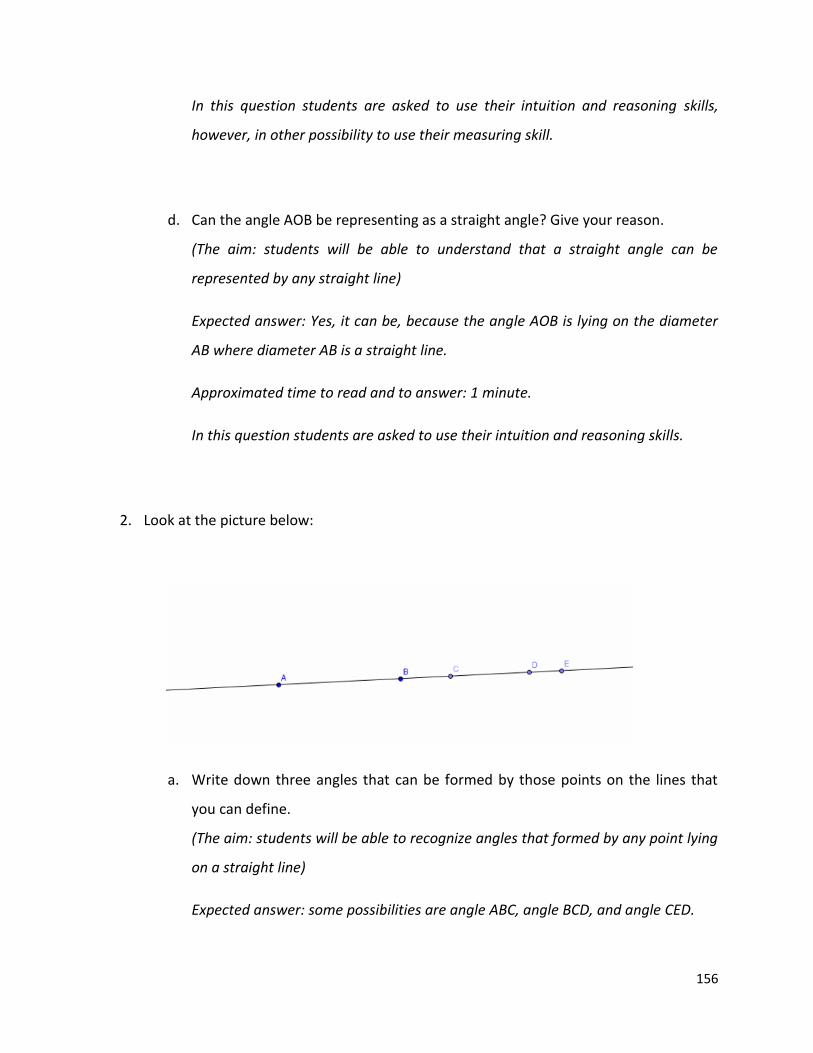
156
In this question students are asked to use their intuition and reasoning skills,
however, in other possibility to use their measuring skill.
d. Can the angle AOB be representing as a straight angle? Give your reason.
(The aim: students will be able to understand that a straight angle can be
represented by any straight line)
Expected answer: Yes, it can be, because the angle AOB is lying on the diameter
AB where diameter AB is a straight line.
Approximated time to read and to answer: 1 minute.
In this question students are asked to use their intuition and reasoning skills.
2. Look at the picture below:
a. Write down three angles that can be formed by those points on the lines that
you can define.
(The aim: students will be able to recognize angles that formed by any point lying
on a straight line)
Expected answer: some possibilities are angle ABC, angle BCD, and angle CED.
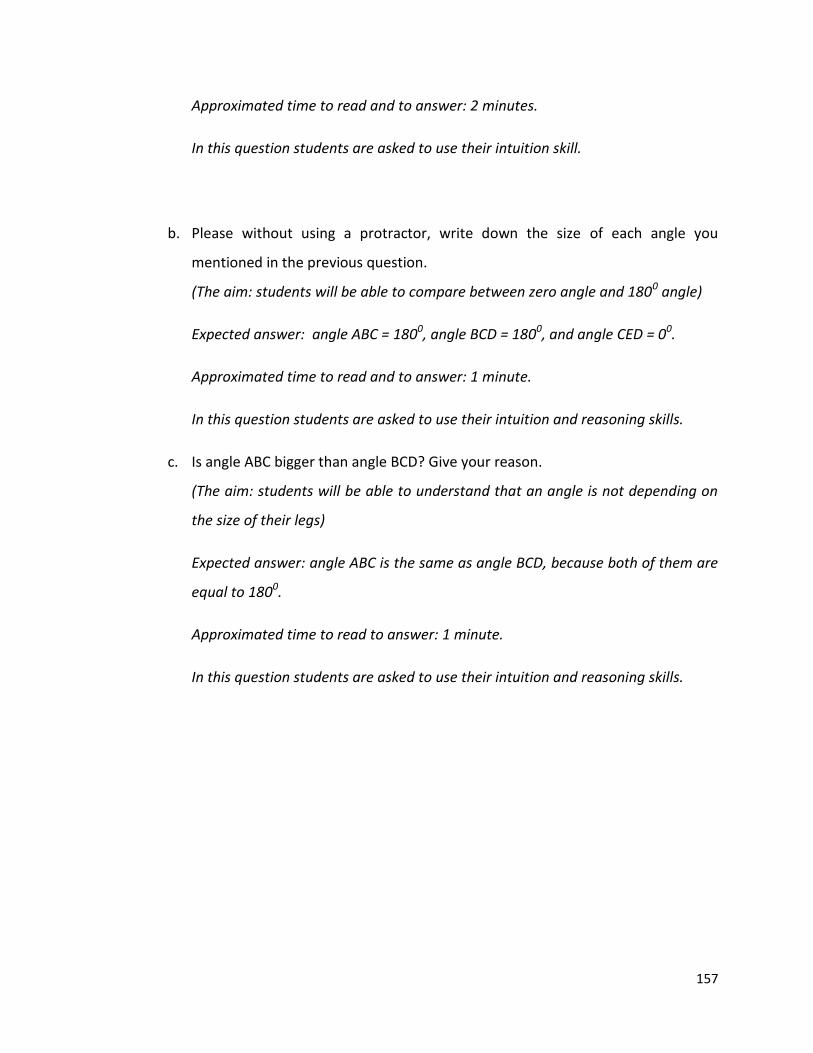
157
Approximated time to read and to answer: 2 minutes.
In this question students are asked to use their intuition skill.
b. Please without using a protractor, write down the size of each angle you
mentioned in the previous question.
(The aim: students will be able to compare between zero angle and 1800 angle)
Expected answer: angle ABC = 1800, angle BCD = 1800, and angle CED = 00.
Approximated time to read and to answer: 1 minute.
In this question students are asked to use their intuition and reasoning skills.
c. Is angle ABC bigger than angle BCD? Give your reason.
(The aim: students will be able to understand that an angle is not depending on
the size of their legs)
Expected answer: angle ABC is the same as angle BCD, because both of them are
equal to 1800.
Approximated time to read to answer: 1 minute.
In this question students are asked to use their intuition and reasoning skills.
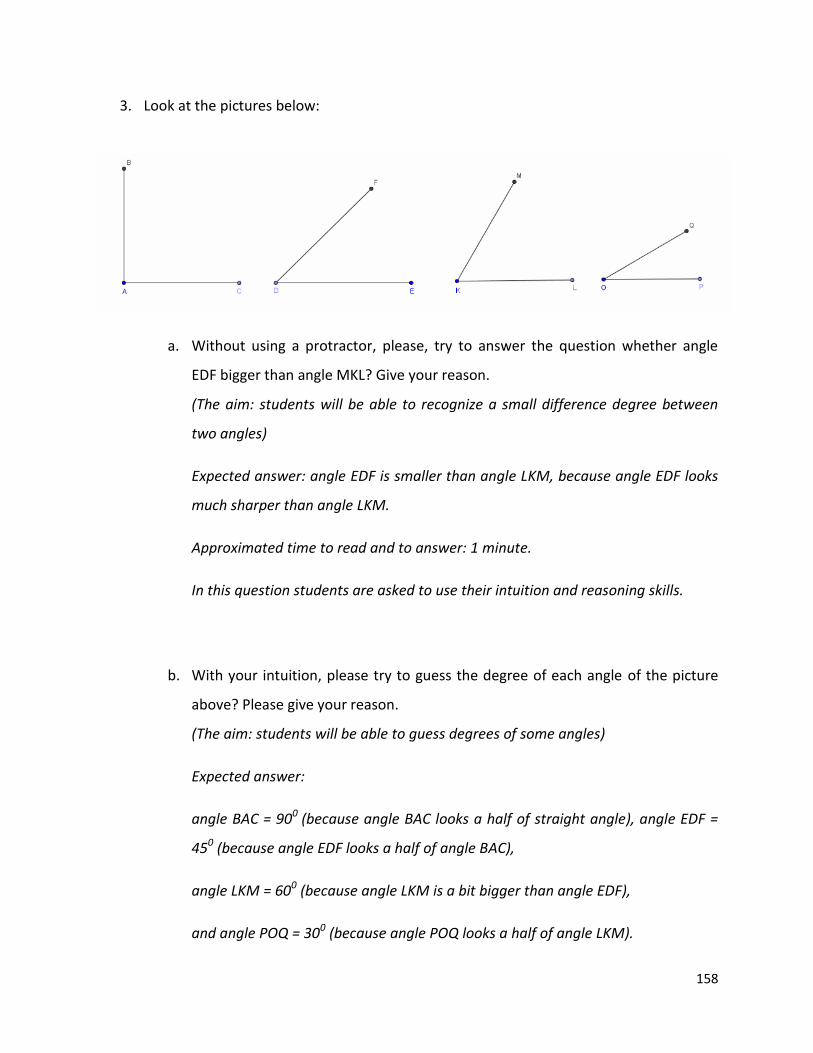
158
3. Look at the pictures below:
a. Without using a protractor, please, try to answer the question whether angle
EDF bigger than angle MKL? Give your reason.
(The aim: students will be able to recognize a small difference degree between
two angles)
Expected answer: angle EDF is smaller than angle LKM, because angle EDF looks
much sharper than angle LKM.
Approximated time to read and to answer: 1 minute.
In this question students are asked to use their intuition and reasoning skills.
b. With your intuition, please try to guess the degree of each angle of the picture
above? Please give your reason.
(The aim: students will be able to guess degrees of some angles)
Expected answer:
angle BAC = 900 (because angle BAC looks a half of straight angle), angle EDF =
450 (because angle EDF looks a half of angle BAC),
angle LKM = 600 (because angle LKM is a bit bigger than angle EDF),
and angle POQ = 300 (because angle POQ looks a half of angle LKM).

159
Approximated time to read and to answer: 2 minutes.
In this question students are asked to use their intuition and reasoning skills.

160
Appendix E6
Activity 3 with GeoGebra for the 3th meeting
1. Draw picture like below
2. Measure the small angle AOB and the big angle AOB. Calculate the sum of them.
3. Drag point B around the circle. Investigate the changes of those angles whether they
have the same sum with the sum of the previous one.
4. When does the condition happen, where the small angle AOB and the big angle AOB
having the same size?
5. When does the small angle AOB reach the smallest size?
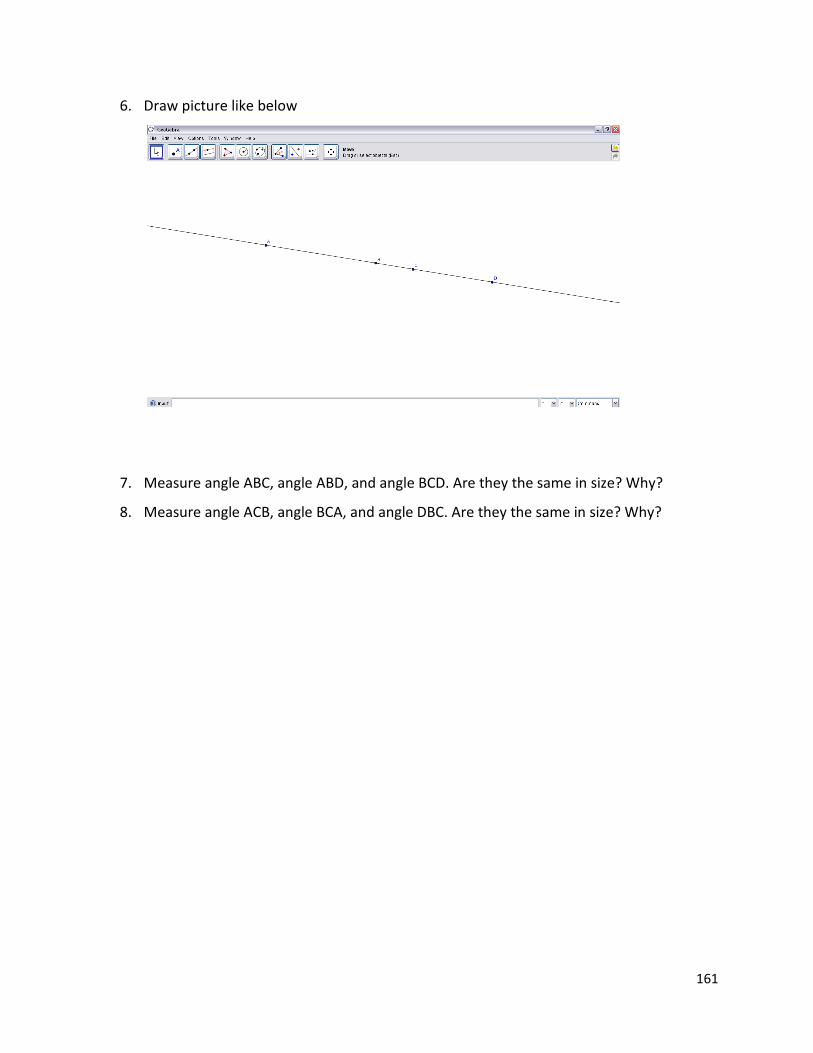
161
6. Draw picture like below
7. Measure angle ABC, angle ABD, and angle BCD. Are they the same in size? Why?
8. Measure angle ACB, angle BCA, and angle DBC. Are they the same in size? Why?
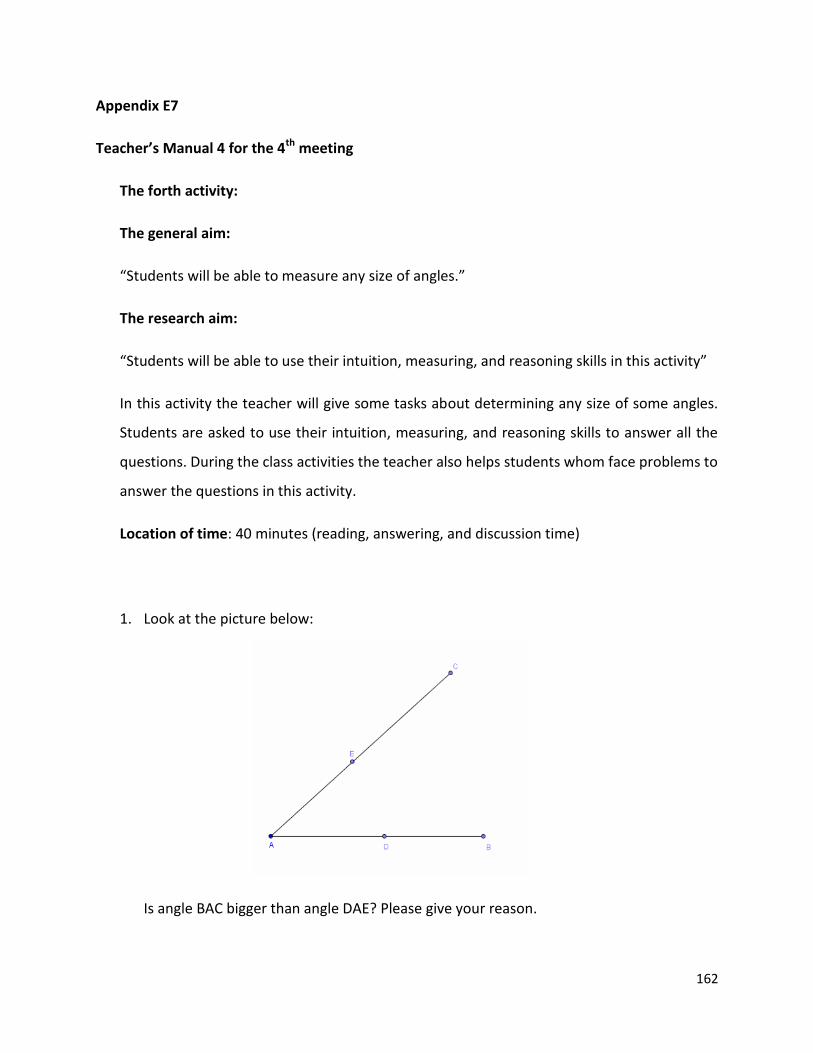
162
Appendix E7
Teacher’s Manual 4 for the 4th meeting
The forth activity:
The general aim:
“Students will be able to measure any size of angles.”
The research aim:
“Students will be able to use their intuition, measuring, and reasoning skills in this activity”
In this activity the teacher will give some tasks about determining any size of some angles.
Students are asked to use their intuition, measuring, and reasoning skills to answer all the
questions. During the class activities the teacher also helps students whom face problems to
answer the questions in this activity.
Location of time: 40 minutes (reading, answering, and discussion time)
1. Look at the picture below:
Is angle BAC bigger than angle DAE? Please give your reason.
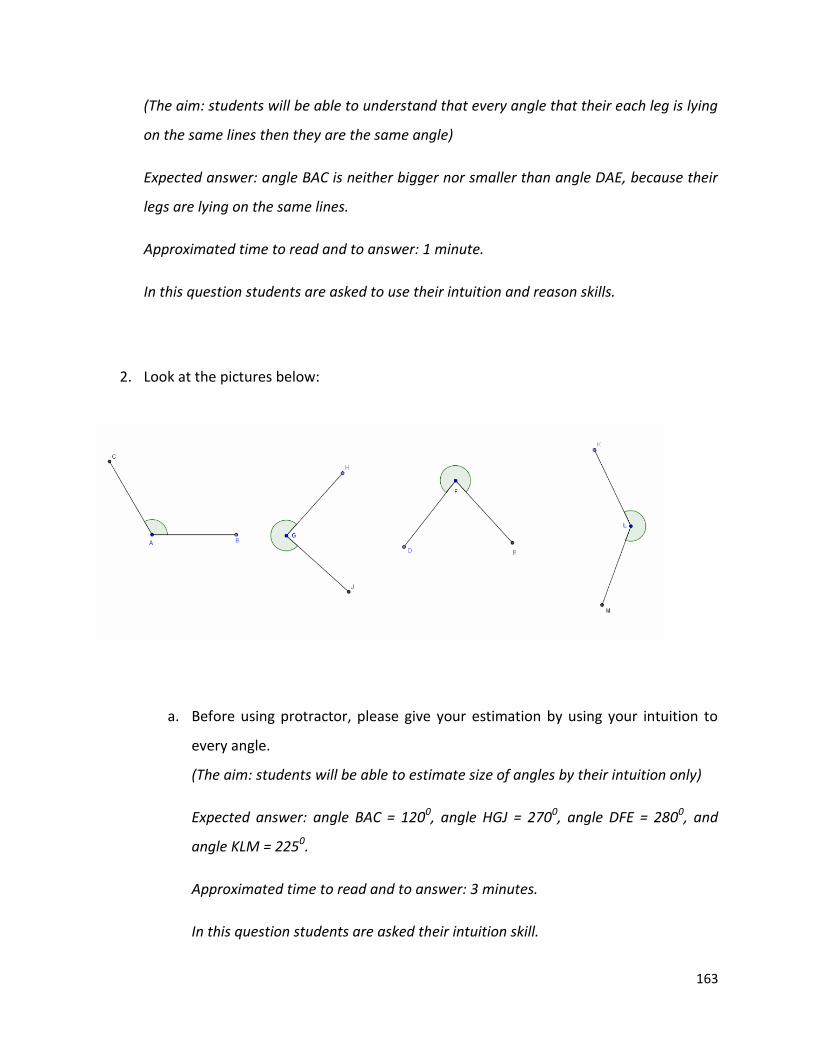
163
(The aim: students will be able to understand that every angle that their each leg is lying
on the same lines then they are the same angle)
Expected answer: angle BAC is neither bigger nor smaller than angle DAE, because their
legs are lying on the same lines.
Approximated time to read and to answer: 1 minute.
In this question students are asked to use their intuition and reason skills.
2. Look at the pictures below:
a. Before using protractor, please give your estimation by using your intuition to
every angle.
(The aim: students will be able to estimate size of angles by their intuition only)
Expected answer: angle BAC = 1200, angle HGJ = 2700, angle DFE = 2800, and
angle KLM = 2250.
Approximated time to read and to answer: 3 minutes.
In this question students are asked their intuition skill.

164
b. By using protractor, find out all the degrees of the angles.
(The aim: students will be able to measure angles by using protractor)
Expected answer: angle BAC = 1200, angle HGJ = 2700, angle DFE = 2800, and
angle KLM = 2250.
Approximated time to read and to answer: 4 minutes.
In this question students are asked to use their measuring skill.
c. Did you find difficult in finding out all those angles by using protractor? How did
you do to overcome the difficulty? Please give your explanation.
(The aim: students will be able to evaluate the problems they face using
protractor)
Expected answer: the problem is when measuring angles that are more than
1800. To overcome the problem first of all, measuring the small one then after
that subtracting it by 3600, because the sum of big one and small one angles is
3600.
In this question students are asked to use their reasoning skill.
3. Angle between 00 and 900 called acute angle, angle between 900 and 1800 called obtuse
angle, angle with degree 900 called right angle, and angle with degree 1800 called
straight angle.
Look at the pictures below:
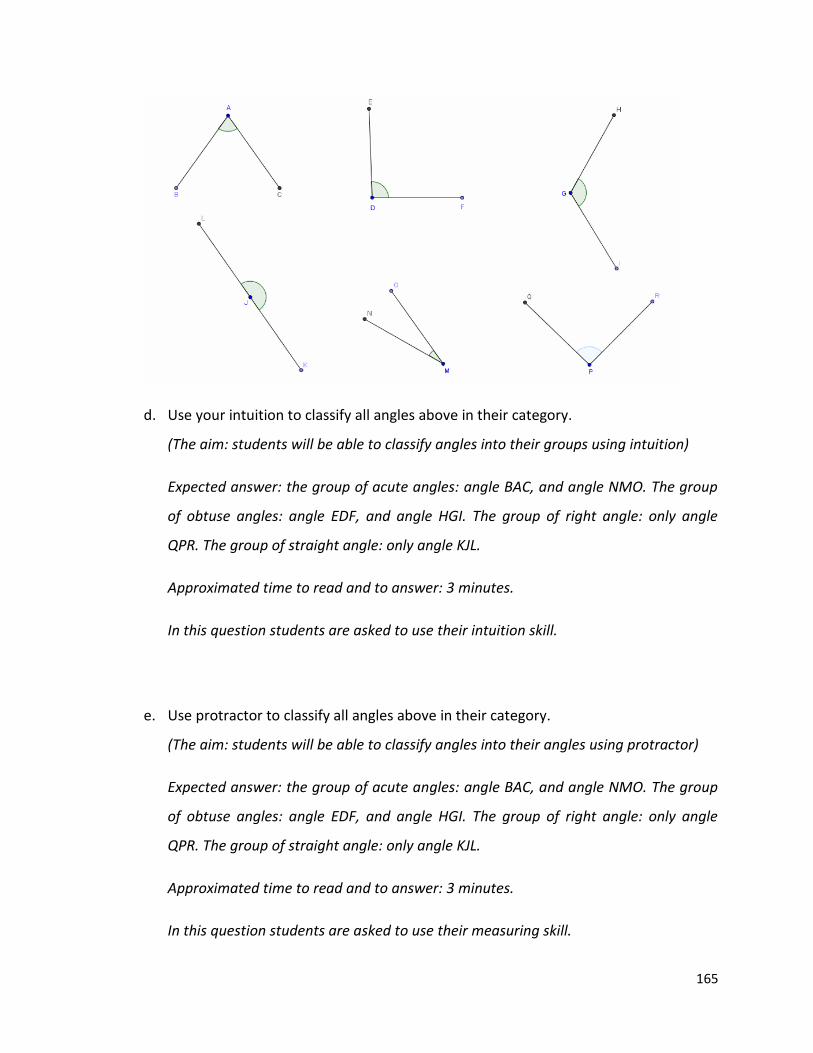
165
d. Use your intuition to classify all angles above in their category.
(The aim: students will be able to classify angles into their groups using intuition)
Expected answer: the group of acute angles: angle BAC, and angle NMO. The group
of obtuse angles: angle EDF, and angle HGI. The group of right angle: only angle
QPR. The group of straight angle: only angle KJL.
Approximated time to read and to answer: 3 minutes.
In this question students are asked to use their intuition skill.
e. Use protractor to classify all angles above in their category.
(The aim: students will be able to classify angles into their angles using protractor)
Expected answer: the group of acute angles: angle BAC, and angle NMO. The group
of obtuse angles: angle EDF, and angle HGI. The group of right angle: only angle
QPR. The group of straight angle: only angle KJL.
Approximated time to read and to answer: 3 minutes.
In this question students are asked to use their measuring skill.
166
f. Is there any different result between those two ways? Give your explanation.
(The aim: students will be able to compare their result between using intuition and
using protractor)
Expected answer: there is different result between those two ways of finding the size
of angles, because sometimes intuition leads mistakes and measuring sometimes
gives some error calculation.
Approximated time to read and to answer: 3 minutes.
In this question students are asked to use their reasoning skill.
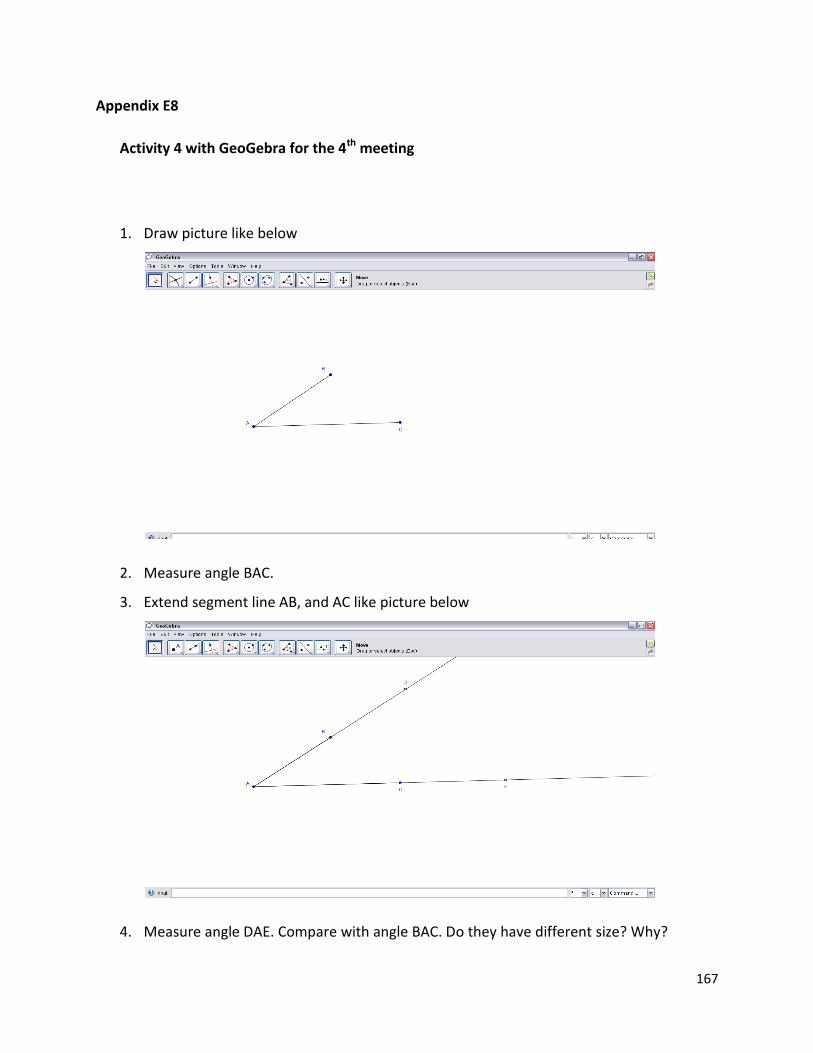
167
Appendix E8
Activity 4 with GeoGebra for the 4th meeting
1. Draw picture like below
2. Measure angle BAC.
3. Extend segment line AB, and AC like picture below
4. Measure angle DAE. Compare with angle BAC. Do they have different size? Why?
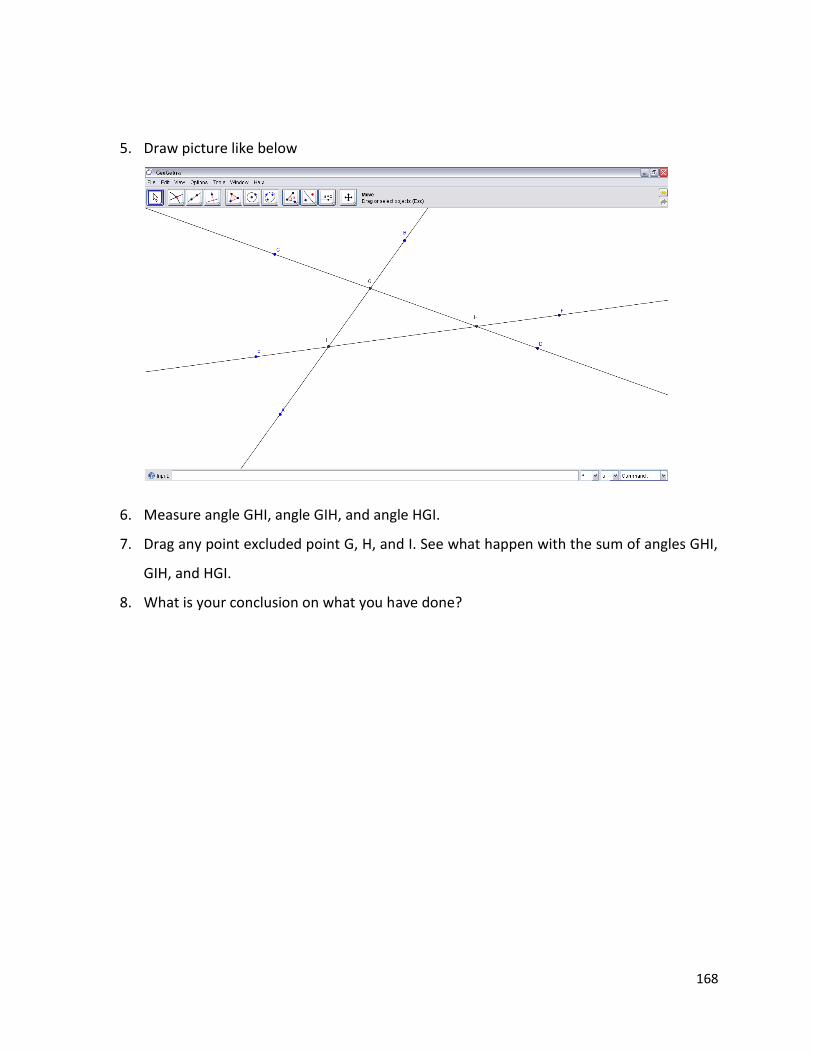
168
5. Draw picture like below
6. Measure angle GHI, angle GIH, and angle HGI.
7. Drag any point excluded point G, H, and I. See what happen with the sum of angles GHI,
GIH, and HGI.
8. What is your conclusion on what you have done?
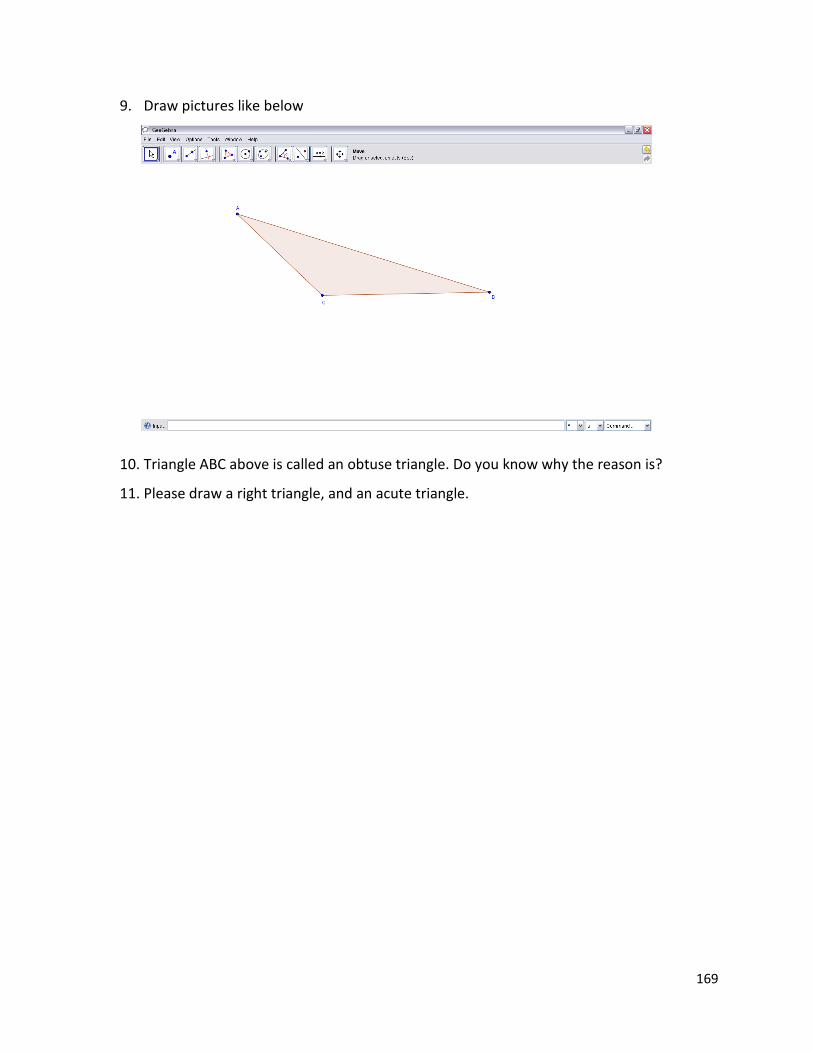
169
9. Draw pictures like below
10. Triangle ABC above is called an obtuse triangle. Do you know why the reason is?
11. Please draw a right triangle, and an acute triangle.
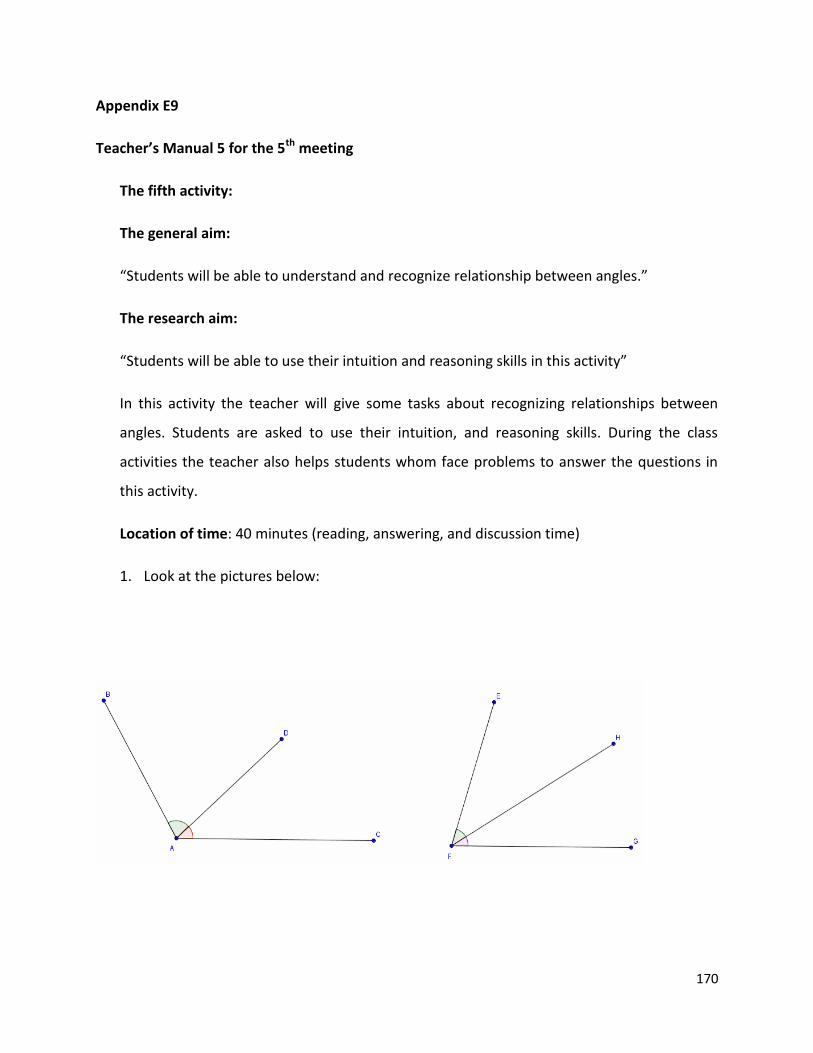
170
Appendix E9
Teacher’s Manual 5 for the 5th meeting
The fifth activity:
The general aim:
“Students will be able to understand and recognize relationship between angles.”
The research aim:
“Students will be able to use their intuition and reasoning skills in this activity”
In this activity the teacher will give some tasks about recognizing relationships between
angles. Students are asked to use their intuition, and reasoning skills. During the class
activities the teacher also helps students whom face problems to answer the questions in
this activity.
Location of time: 40 minutes (reading, answering, and discussion time)
1. Look at the pictures below:
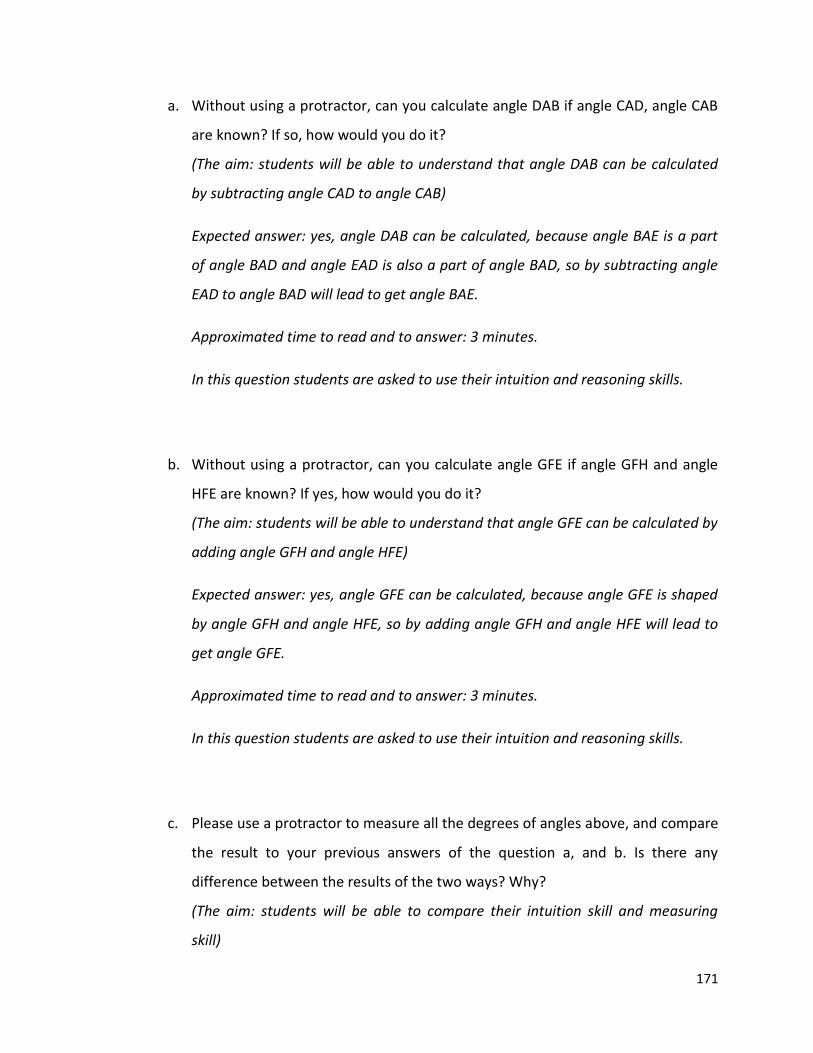
171
a. Without using a protractor, can you calculate angle DAB if angle CAD, angle CAB
are known? If so, how would you do it?
(The aim: students will be able to understand that angle DAB can be calculated
by subtracting angle CAD to angle CAB)
Expected answer: yes, angle DAB can be calculated, because angle BAE is a part
of angle BAD and angle EAD is also a part of angle BAD, so by subtracting angle
EAD to angle BAD will lead to get angle BAE.
Approximated time to read and to answer: 3 minutes.
In this question students are asked to use their intuition and reasoning skills.
b. Without using a protractor, can you calculate angle GFE if angle GFH and angle
HFE are known? If yes, how would you do it?
(The aim: students will be able to understand that angle GFE can be calculated by
adding angle GFH and angle HFE)
Expected answer: yes, angle GFE can be calculated, because angle GFE is shaped
by angle GFH and angle HFE, so by adding angle GFH and angle HFE will lead to
get angle GFE.
Approximated time to read and to answer: 3 minutes.
In this question students are asked to use their intuition and reasoning skills.
c. Please use a protractor to measure all the degrees of angles above, and compare
the result to your previous answers of the question a, and b. Is there any
difference between the results of the two ways? Why?
(The aim: students will be able to compare their intuition skill and measuring
skill)
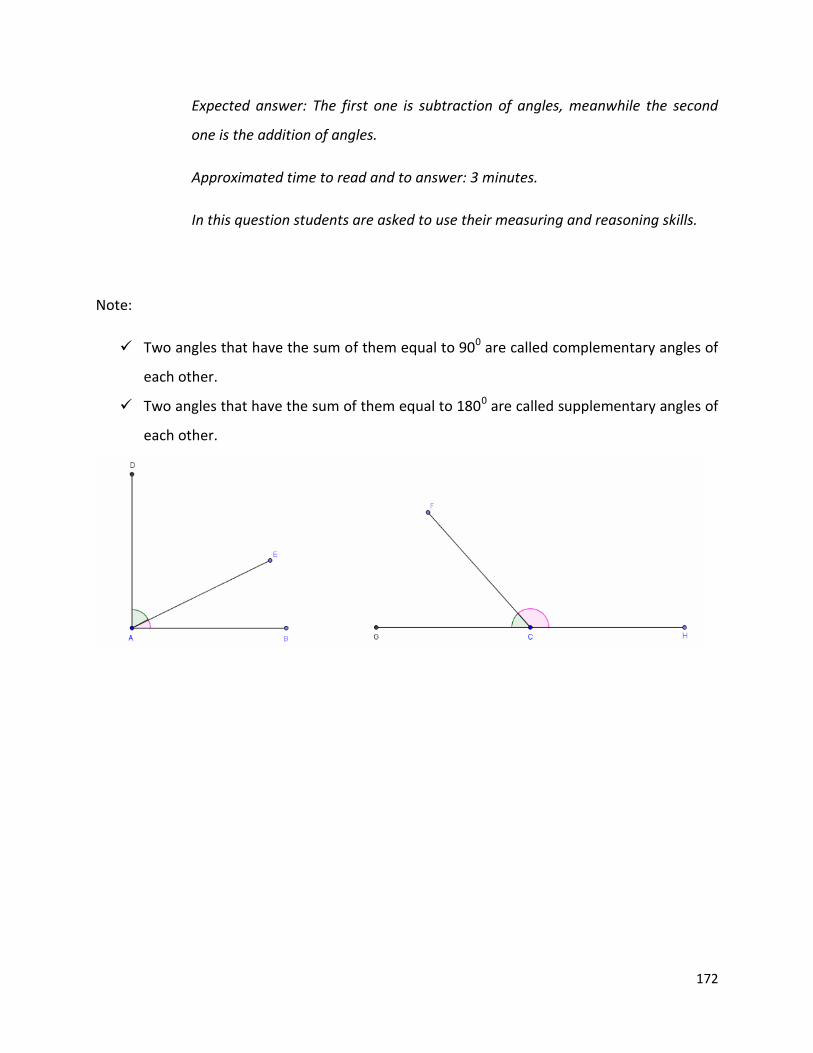
172
Expected answer: The first one is subtraction of angles, meanwhile the second
one is the addition of angles.
Approximated time to read and to answer: 3 minutes.
In this question students are asked to use their measuring and reasoning skills.
Note:
Two angles that have the sum of them equal to 900 are called complementary angles of
each other.
Two angles that have the sum of them equal to 1800 are called supplementary angles of
each other.
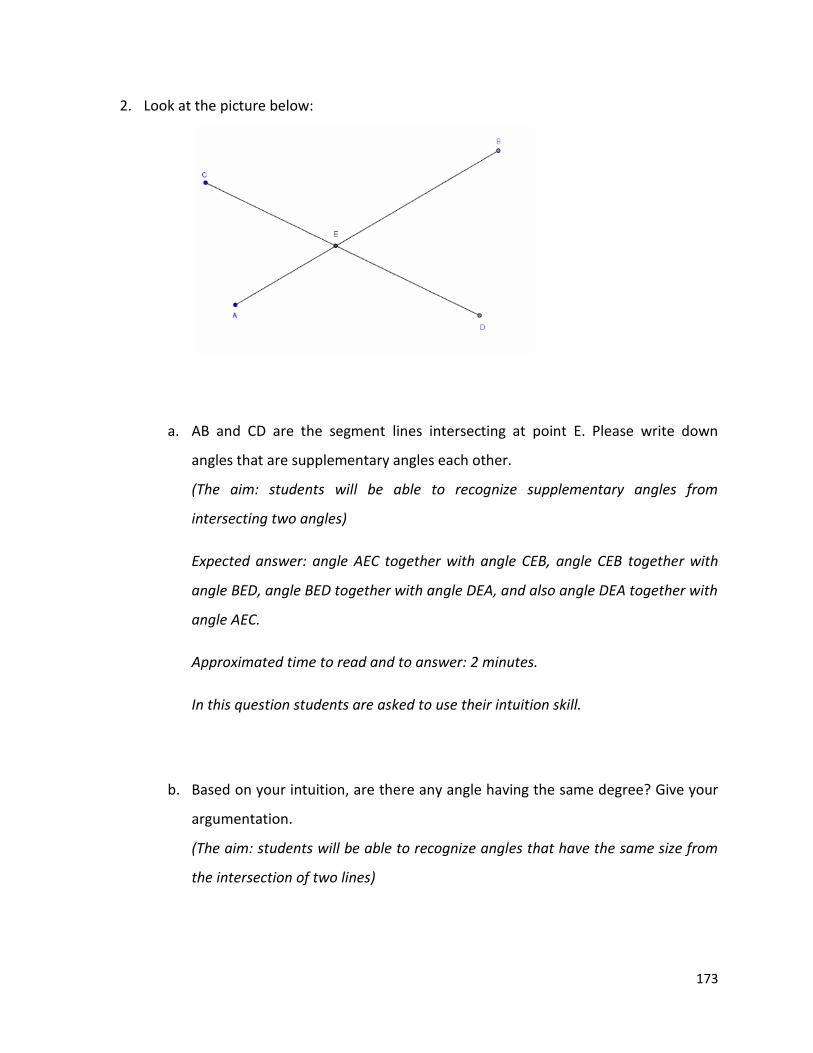
173
2. Look at the picture below:
a. AB and CD are the segment lines intersecting at point E. Please write down
angles that are supplementary angles each other.
(The aim: students will be able to recognize supplementary angles from
intersecting two angles)
Expected answer: angle AEC together with angle CEB, angle CEB together with
angle BED, angle BED together with angle DEA, and also angle DEA together with
angle AEC.
Approximated time to read and to answer: 2 minutes.
In this question students are asked to use their intuition skill.
b. Based on your intuition, are there any angle having the same degree? Give your
argumentation.
(The aim: students will be able to recognize angles that have the same size from
the intersection of two lines)
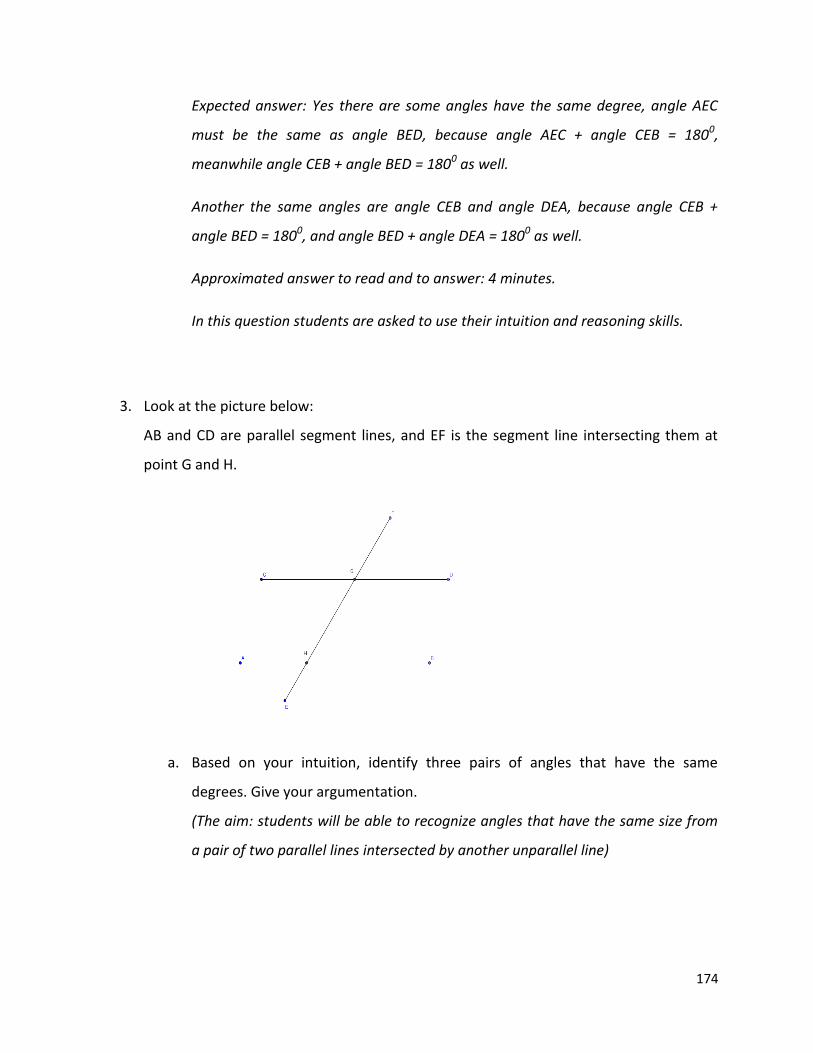
174
Expected answer: Yes there are some angles have the same degree, angle AEC
must be the same as angle BED, because angle AEC + angle CEB = 1800,
meanwhile angle CEB + angle BED = 1800 as well.
Another the same angles are angle CEB and angle DEA, because angle CEB +
angle BED = 1800, and angle BED + angle DEA = 1800 as well.
Approximated answer to read and to answer: 4 minutes.
In this question students are asked to use their intuition and reasoning skills.
3. Look at the picture below:
AB and CD are parallel segment lines, and EF is the segment line intersecting them at
point G and H.
a. Based on your intuition, identify three pairs of angles that have the same
degrees. Give your argumentation.
(The aim: students will be able to recognize angles that have the same size from
a pair of two parallel lines intersected by another unparallel line)
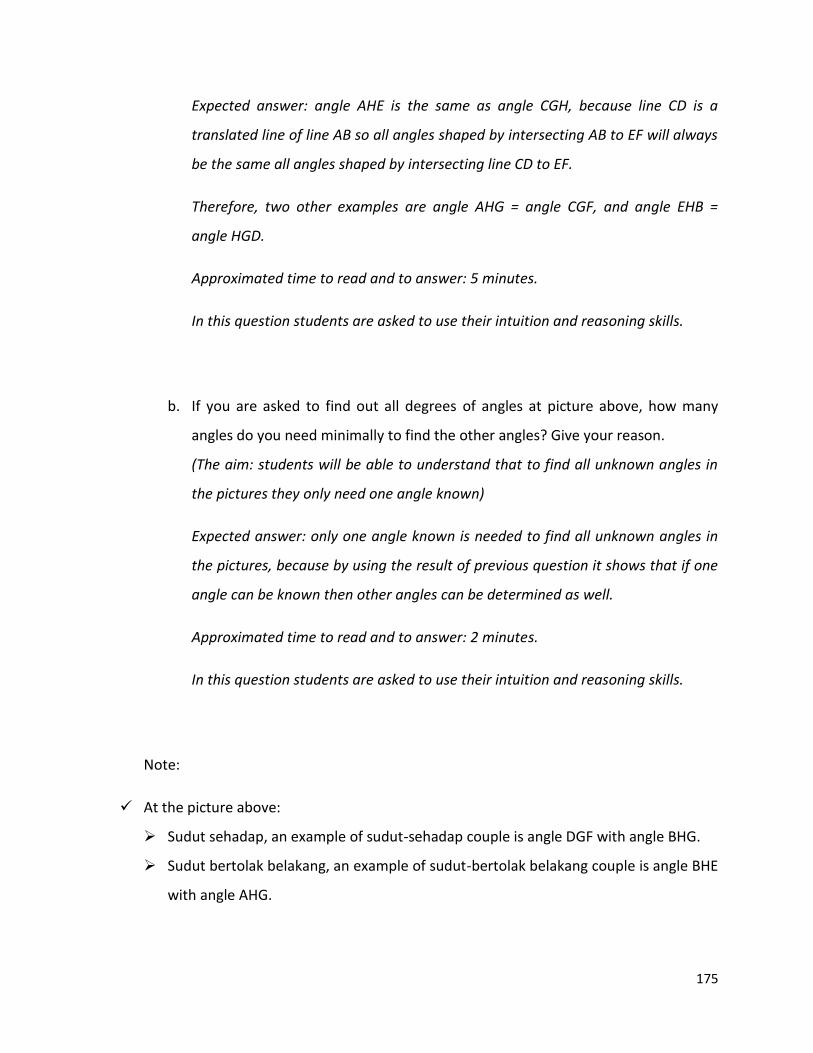
175
Expected answer: angle AHE is the same as angle CGH, because line CD is a
translated line of line AB so all angles shaped by intersecting AB to EF will always
be the same all angles shaped by intersecting line CD to EF.
Therefore, two other examples are angle AHG = angle CGF, and angle EHB =
angle HGD.
Approximated time to read and to answer: 5 minutes.
In this question students are asked to use their intuition and reasoning skills.
b. If you are asked to find out all degrees of angles at picture above, how many
angles do you need minimally to find the other angles? Give your reason.
(The aim: students will be able to understand that to find all unknown angles in
the pictures they only need one angle known)
Expected answer: only one angle known is needed to find all unknown angles in
the pictures, because by using the result of previous question it shows that if one
angle can be known then other angles can be determined as well.
Approximated time to read and to answer: 2 minutes.
In this question students are asked to use their intuition and reasoning skills.
Note:
At the picture above:
Sudut sehadap, an example of sudut-sehadap couple is angle DGF with angle BHG.
Sudut bertolak belakang, an example of sudut-bertolak belakang couple is angle BHE
with angle AHG.
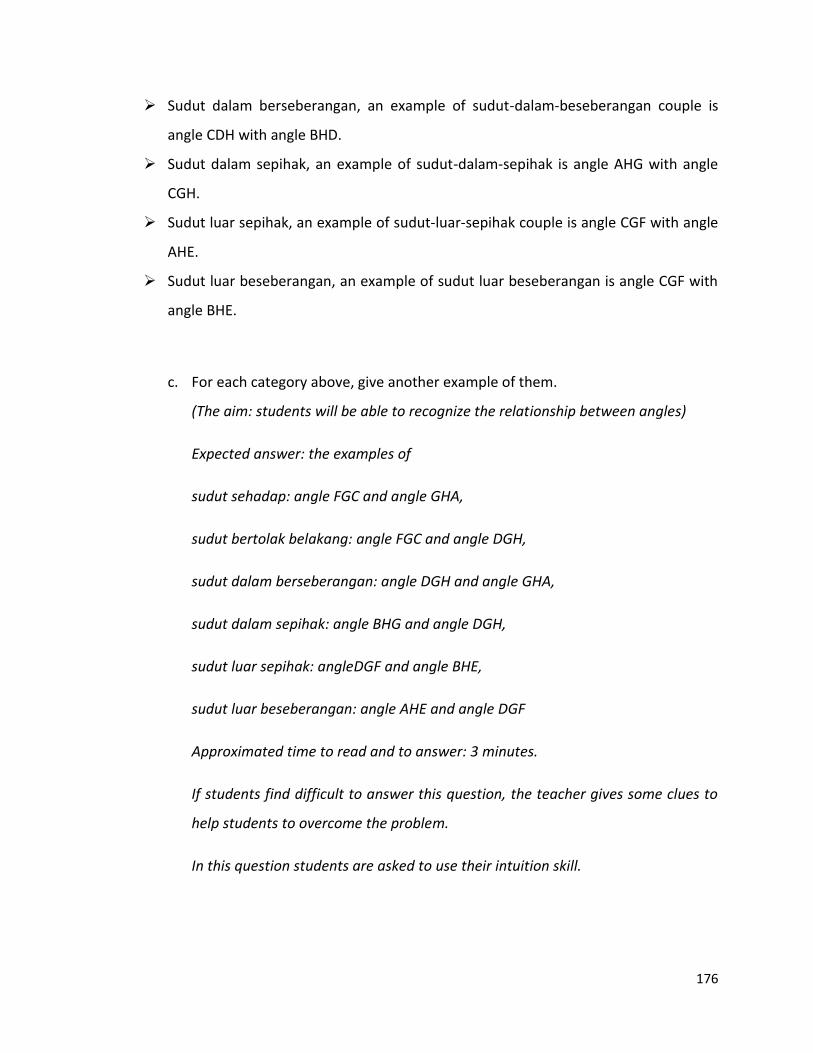
176
Sudut dalam berseberangan, an example of sudut-dalam-beseberangan couple is
angle CDH with angle BHD.
Sudut dalam sepihak, an example of sudut-dalam-sepihak is angle AHG with angle
CGH.
Sudut luar sepihak, an example of sudut-luar-sepihak couple is angle CGF with angle
AHE.
Sudut luar beseberangan, an example of sudut luar beseberangan is angle CGF with
angle BHE.
c. For each category above, give another example of them.
(The aim: students will be able to recognize the relationship between angles)
Expected answer: the examples of
sudut sehadap: angle FGC and angle GHA,
sudut bertolak belakang: angle FGC and angle DGH,
sudut dalam berseberangan: angle DGH and angle GHA,
sudut dalam sepihak: angle BHG and angle DGH,
sudut luar sepihak: angleDGF and angle BHE,
sudut luar beseberangan: angle AHE and angle DGF
Approximated time to read and to answer: 3 minutes.
If students find difficult to answer this question, the teacher gives some clues to
help students to overcome the problem.
In this question students are asked to use their intuition skill.

177
d. Please summarize everything you have learned from above questions as shortly
as possible.
(The aim: students will be able to summarize what they have learned about
relationships between angles)
Expected answer: if there are two unparallel lines intersecting, then there are two
pairs of angles that have the same size. If there is a pair of parallel lines
intersected by unparallel line, then only one angle should be known to determine
other unknown angles.
Approximated time to read and to answer: 2 minutes.
In this question students are asked to use their reasoning skill.
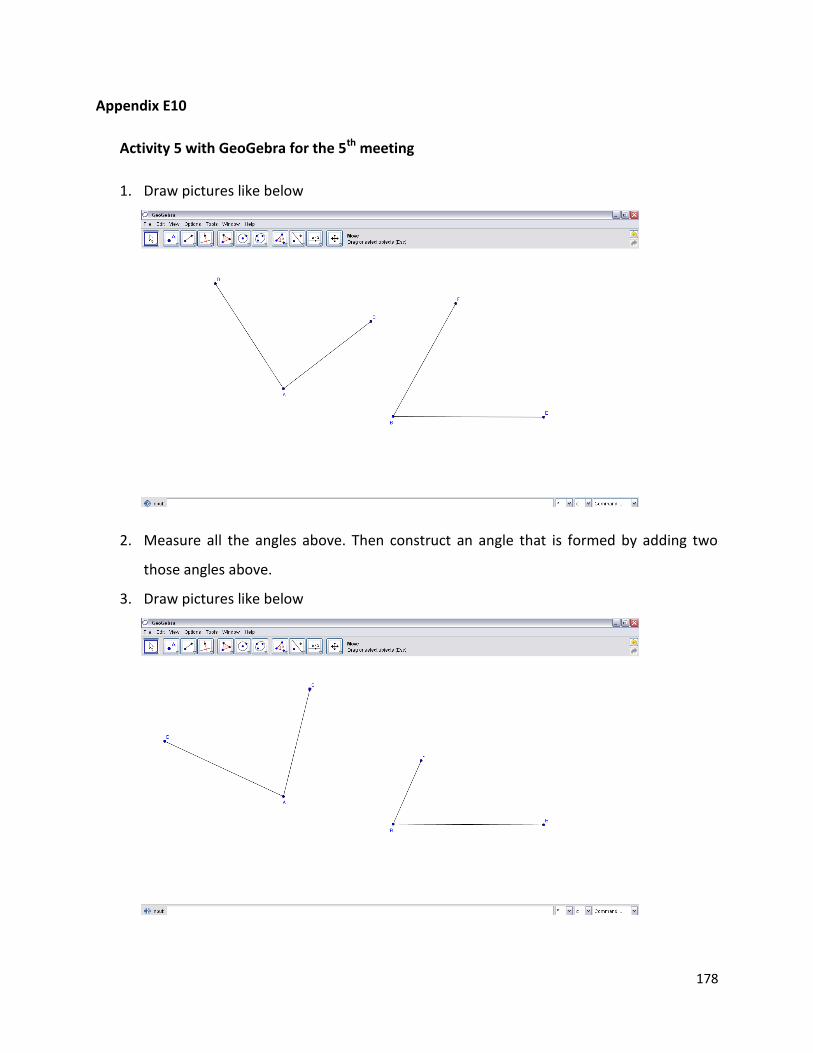
178
Appendix E10
Activity 5 with GeoGebra for the 5th meeting
1. Draw pictures like below
2. Measure all the angles above. Then construct an angle that is formed by adding two
those angles above.
3. Draw pictures like below
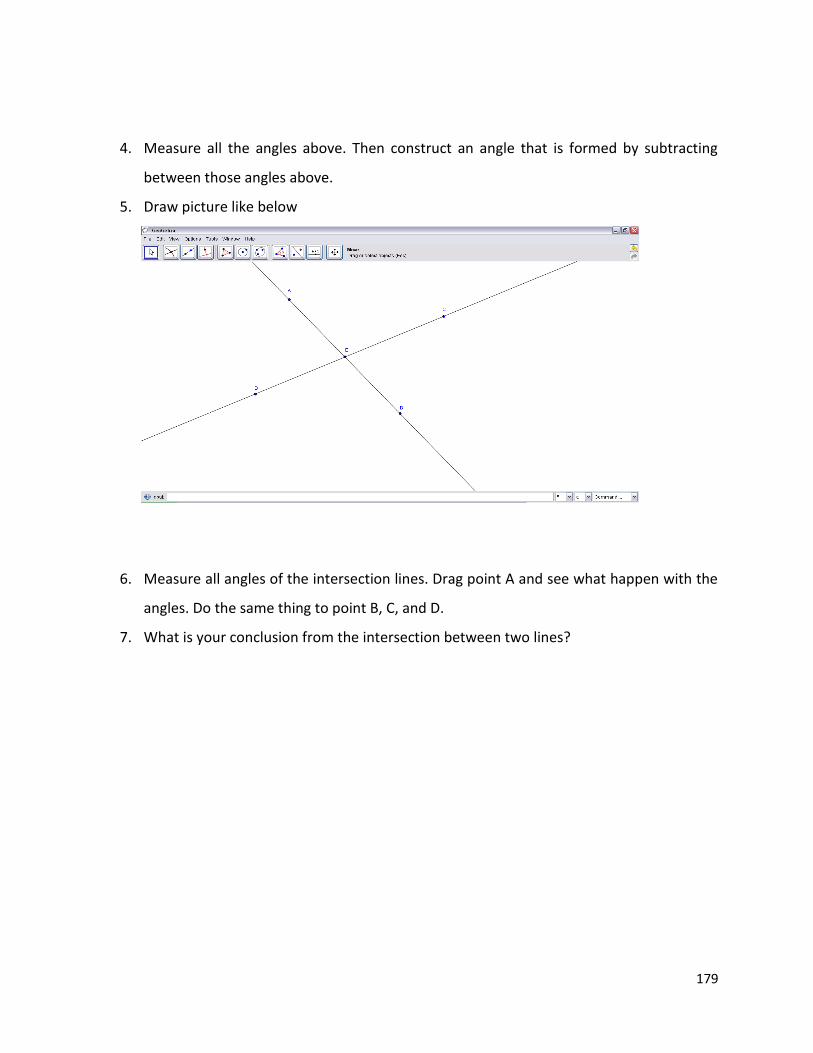
179
4. Measure all the angles above. Then construct an angle that is formed by subtracting
between those angles above.
5. Draw picture like below
6. Measure all angles of the intersection lines. Drag point A and see what happen with the
angles. Do the same thing to point B, C, and D.
7. What is your conclusion from the intersection between two lines?
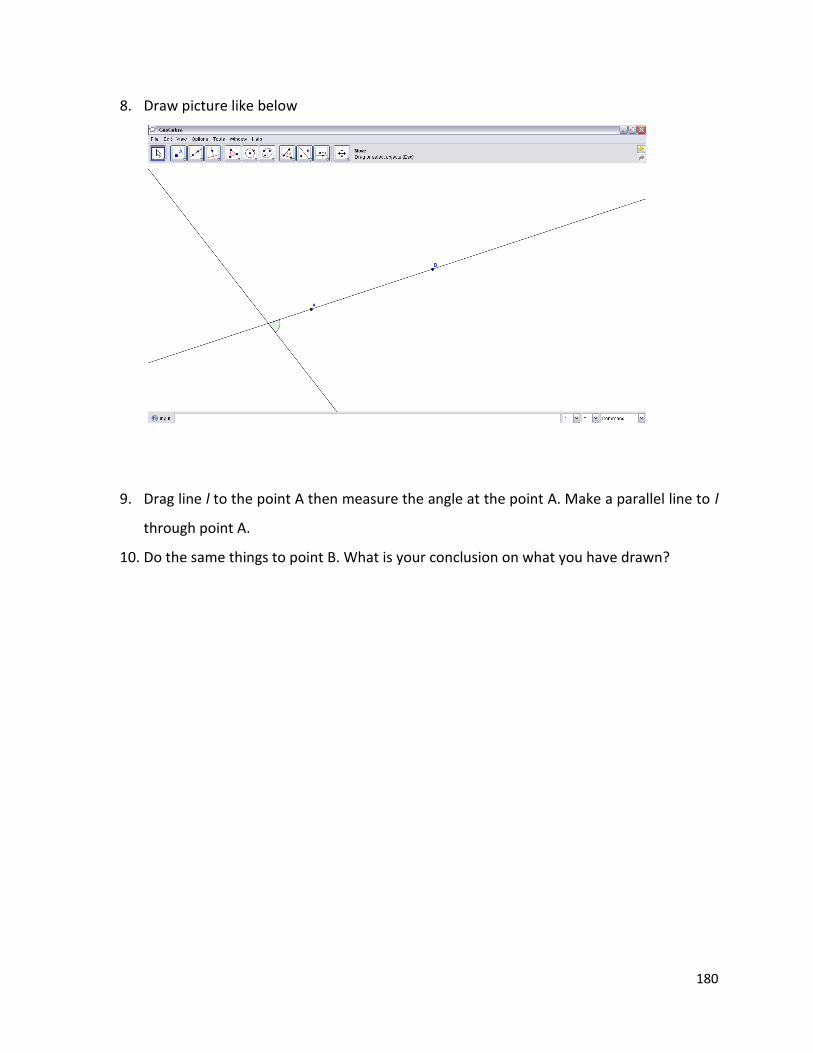
180
8. Draw picture like below
9. Drag line l to the point A then measure the angle at the point A. Make a parallel line to l
through point A.
10. Do the same things to point B. What is your conclusion on what you have drawn?
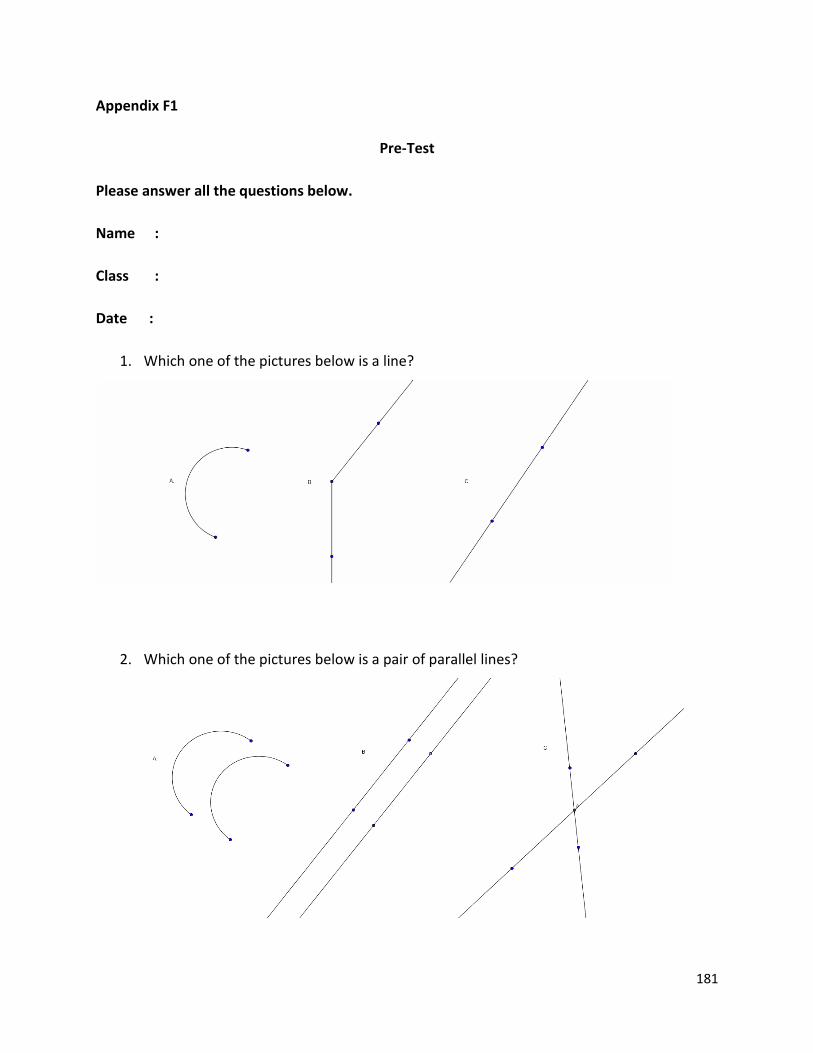
181
Appendix F1
Pre-Test
Please answer all the questions below.
Name :
Class :
Date :
1. Which one of the pictures below is a line?
2. Which one of the pictures below is a pair of parallel lines?
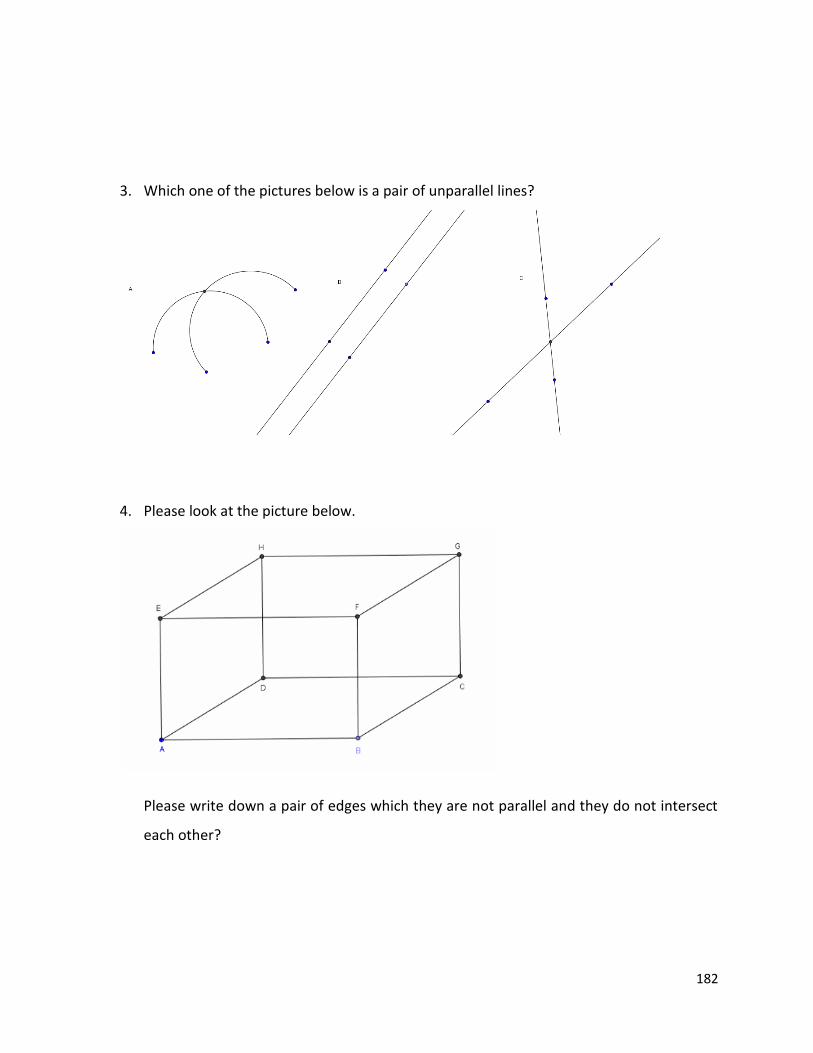
182
3. Which one of the pictures below is a pair of unparallel lines?
4. Please look at the picture below.
Please write down a pair of edges which they are not parallel and they do not intersect
each other?
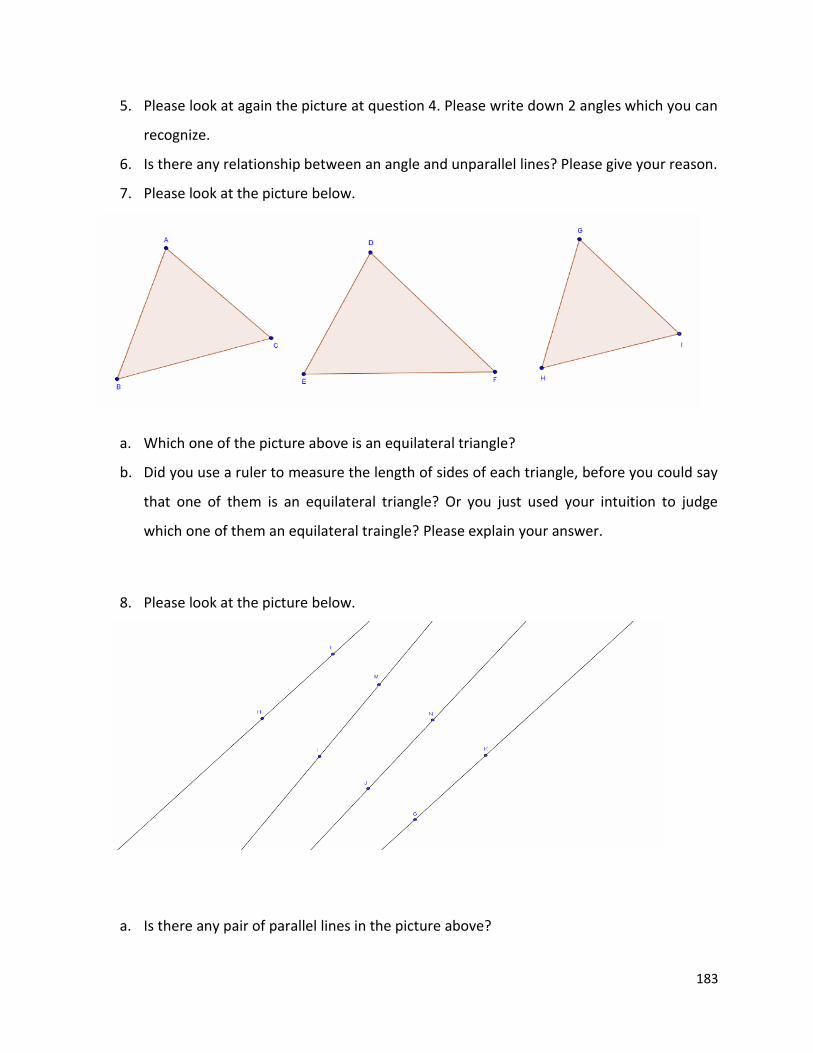
183
5. Please look at again the picture at question 4. Please write down 2 angles which you can
recognize.
6. Is there any relationship between an angle and unparallel lines? Please give your reason.
7. Please look at the picture below.
a. Which one of the picture above is an equilateral triangle?
b. Did you use a ruler to measure the length of sides of each triangle, before you could say
that one of them is an equilateral triangle? Or you just used your intuition to judge
which one of them an equilateral traingle? Please explain your answer.
8. Please look at the picture below.
a. Is there any pair of parallel lines in the picture above?
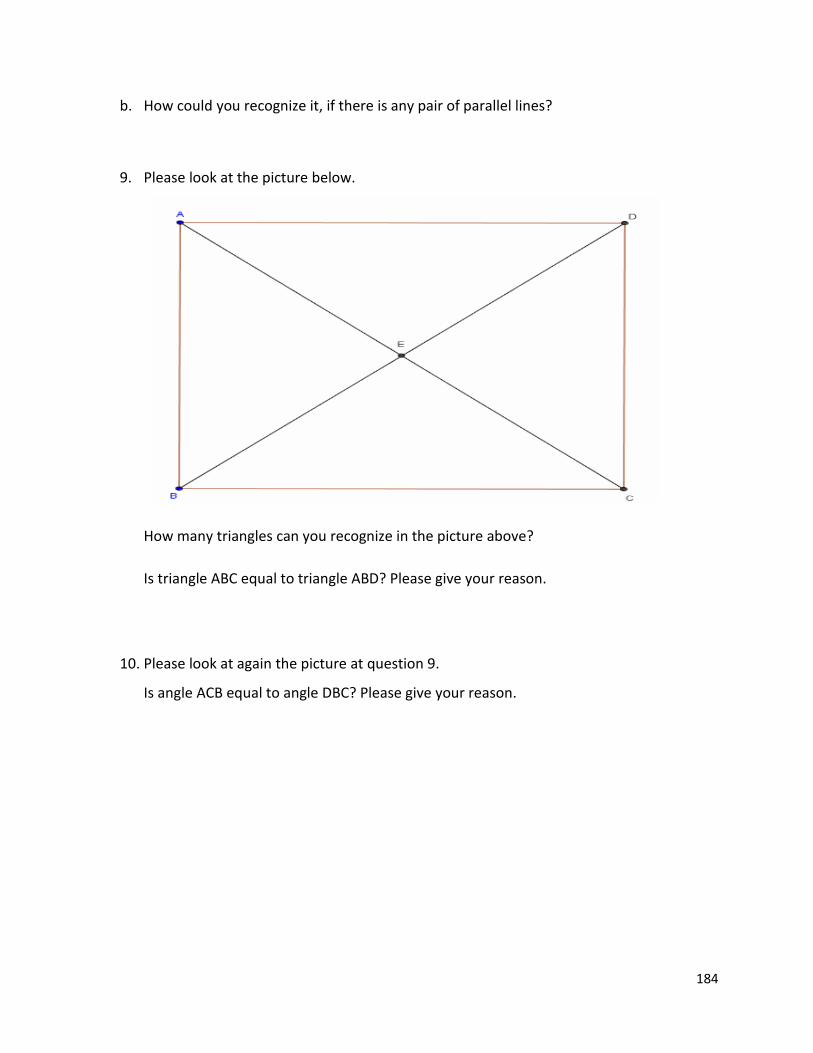
184
b. How could you recognize it, if there is any pair of parallel lines?
9. Please look at the picture below.
How many triangles can you recognize in the picture above?
Is triangle ABC equal to triangle ABD? Please give your reason.
10. Please look at again the picture at question 9.
Is angle ACB equal to angle DBC? Please give your reason.
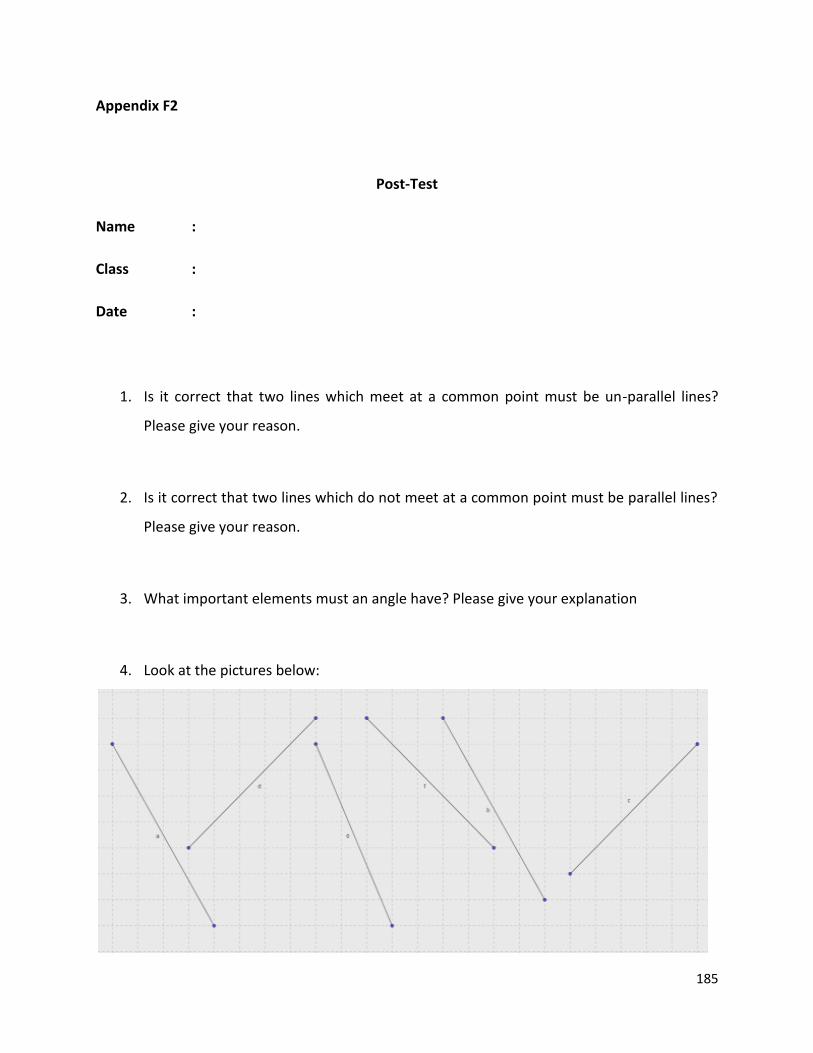
185
Appendix F2
Post-Test
Name :
Class :
Date :
1. Is it correct that two lines which meet at a common point must be un-parallel lines?
Please give your reason.
2. Is it correct that two lines which do not meet at a common point must be parallel lines?
Please give your reason.
3. What important elements must an angle have? Please give your explanation
4. Look at the pictures below:
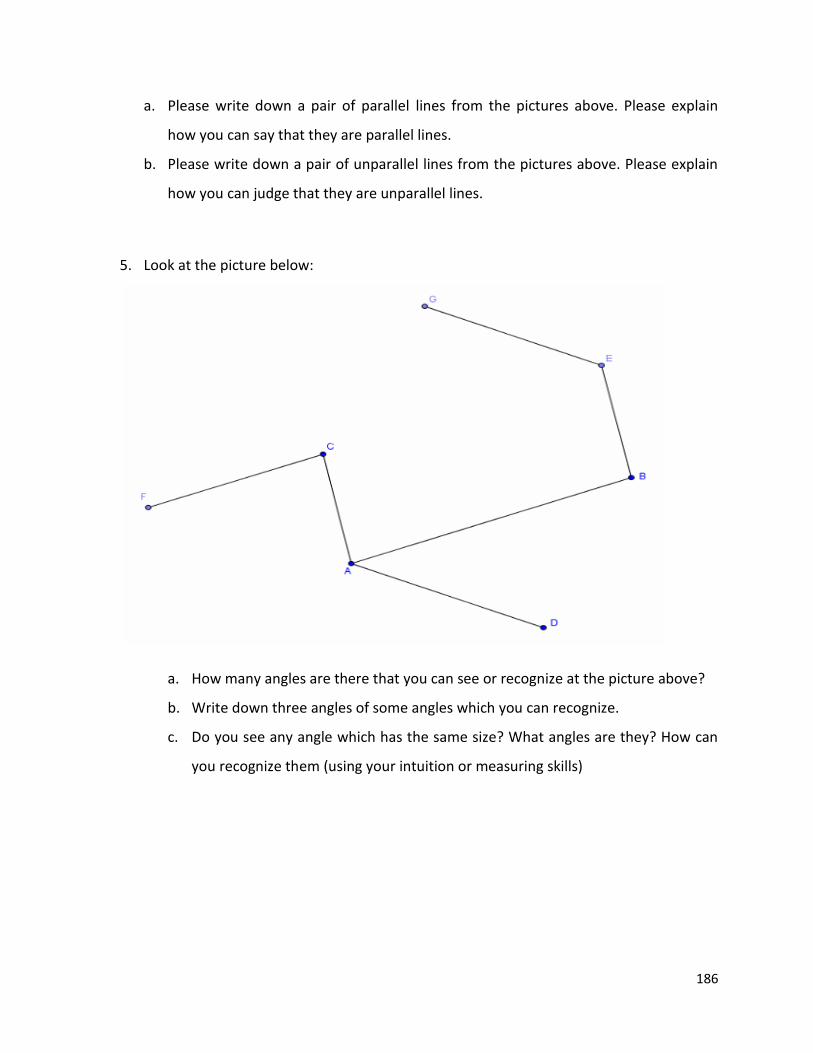
186
a. Please write down a pair of parallel lines from the pictures above. Please explain
how you can say that they are parallel lines.
b. Please write down a pair of unparallel lines from the pictures above. Please explain
how you can judge that they are unparallel lines.
5. Look at the picture below:
a. How many angles are there that you can see or recognize at the picture above?
b. Write down three angles of some angles which you can recognize.
c. Do you see any angle which has the same size? What angles are they? How can
you recognize them (using your intuition or measuring skills)
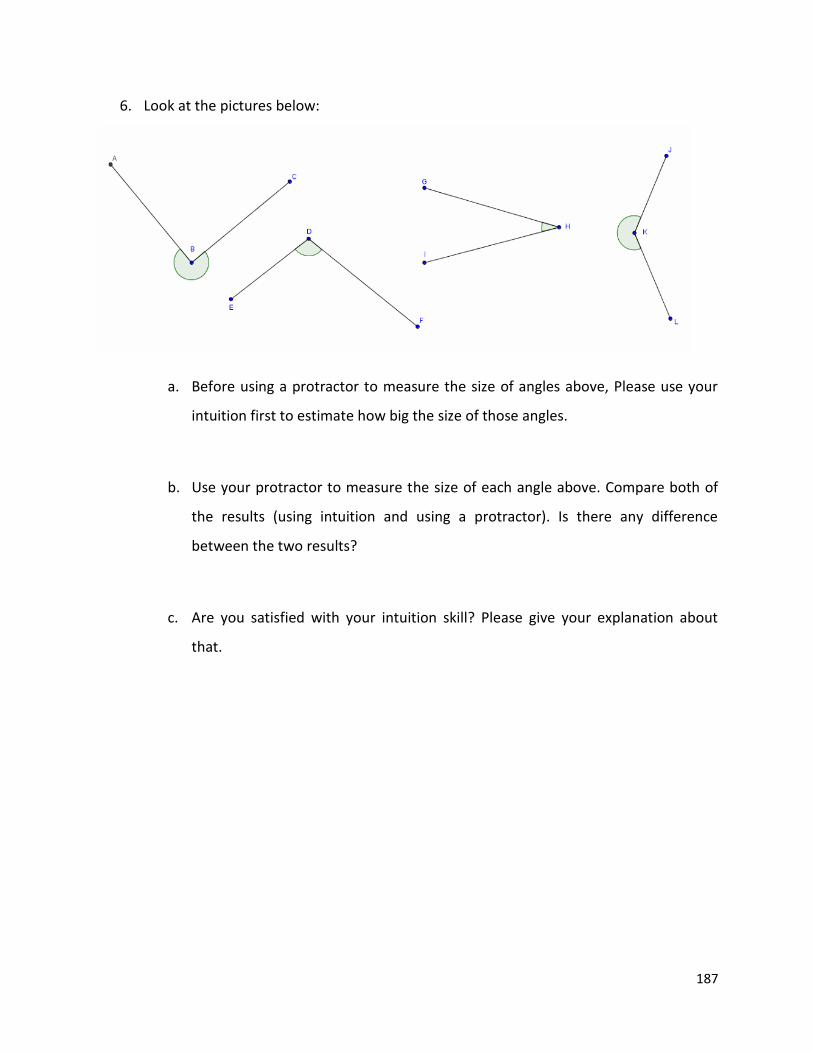
187
6. Look at the pictures below:
a. Before using a protractor to measure the size of angles above, Please use your
intuition first to estimate how big the size of those angles.
b. Use your protractor to measure the size of each angle above. Compare both of
the results (using intuition and using a protractor). Is there any difference
between the two results?
c. Are you satisfied with your intuition skill? Please give your explanation about
that.
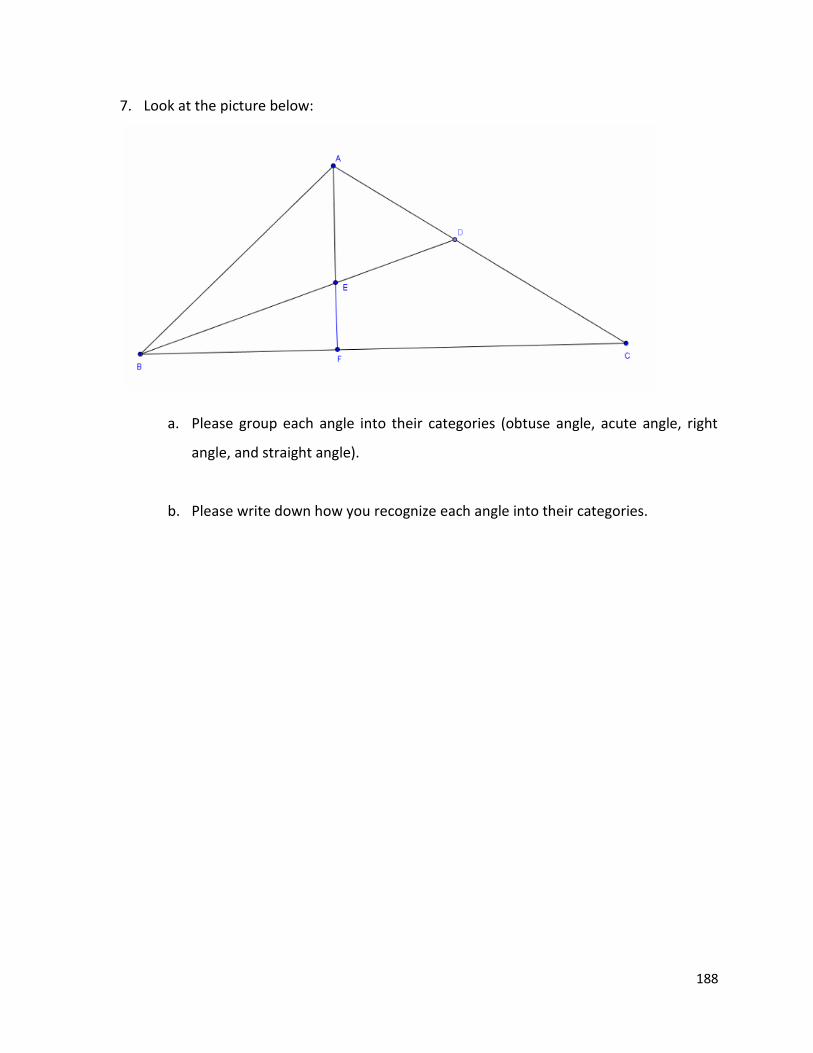
188
7. Look at the picture below:
a. Please group each angle into their categories (obtuse angle, acute angle, right
angle, and straight angle).
b. Please write down how you recognize each angle into their categories.
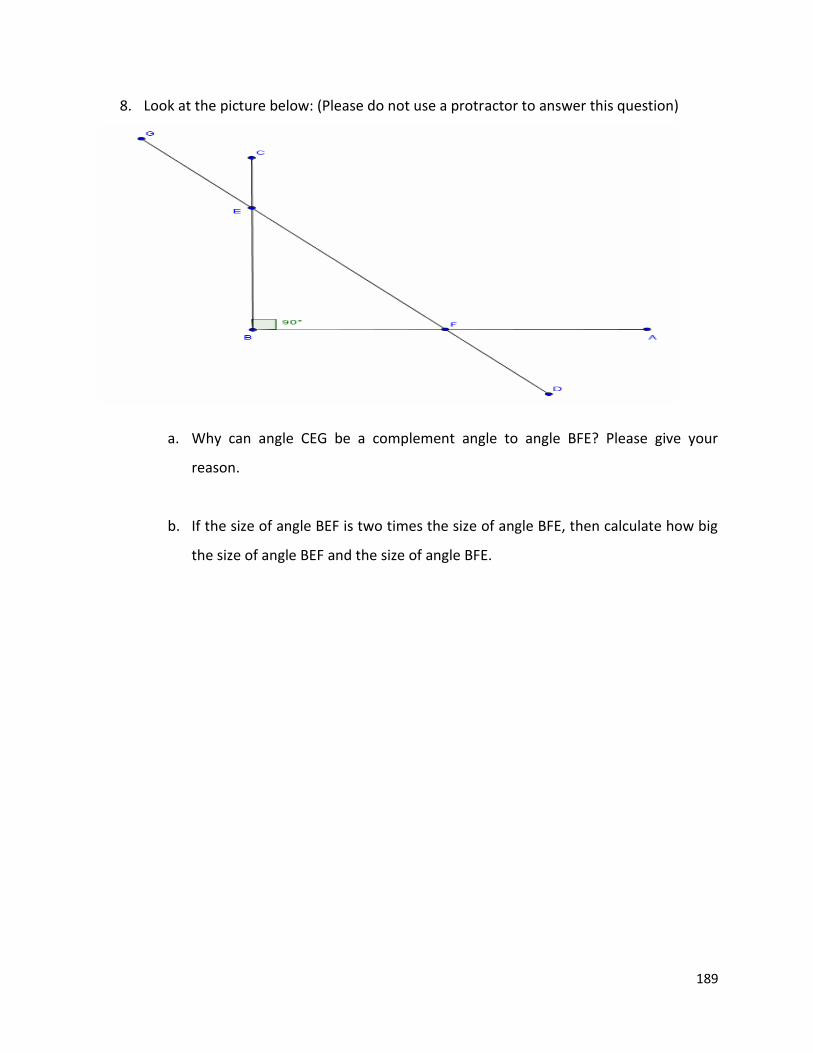
189
8. Look at the picture below: (Please do not use a protractor to answer this question)
a. Why can angle CEG be a complement angle to angle BFE? Please give your
reason.
b. If the size of angle BEF is two times the size of angle BFE, then calculate how big
the size of angle BEF and the size of angle BFE.

190
9. Look at the picture below (Please do not use a protractor to answer this question)
Find each size of all angles above that you can recognize and please give your
argumentation how you find the solution to this question.
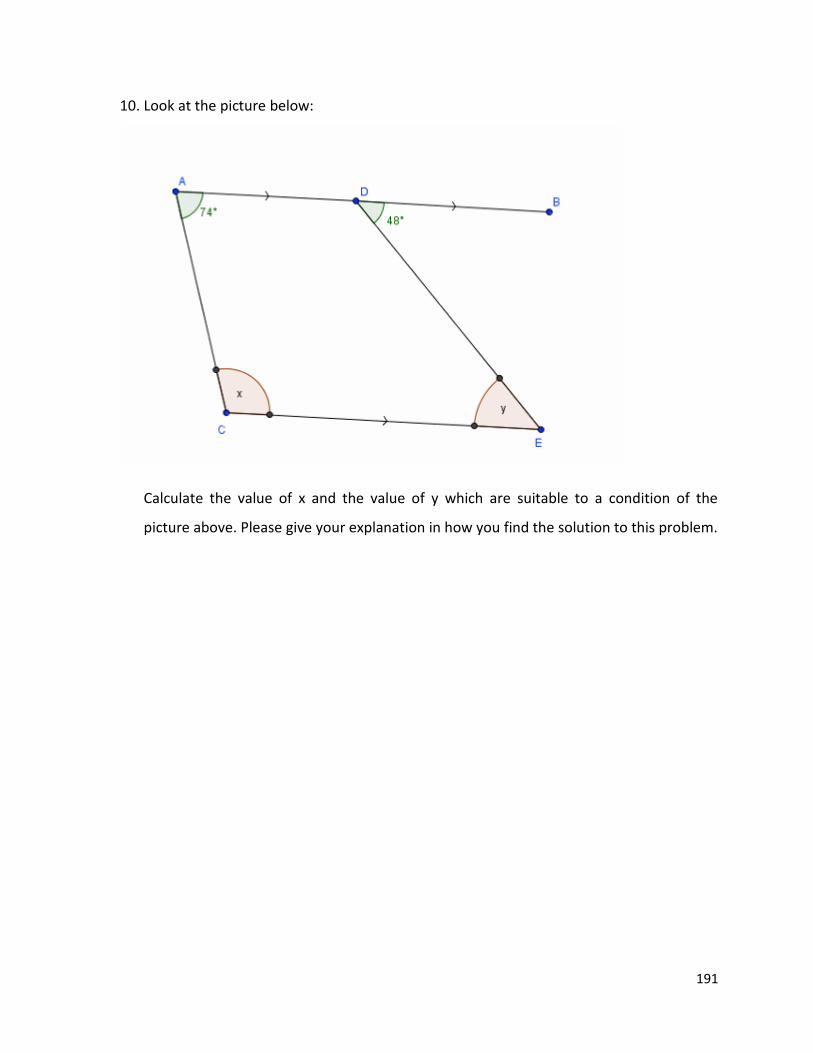
191
10. Look at the picture below:
Calculate the value of x and the value of y which are suitable to a condition of the
picture above. Please give your explanation in how you find the solution to this problem.
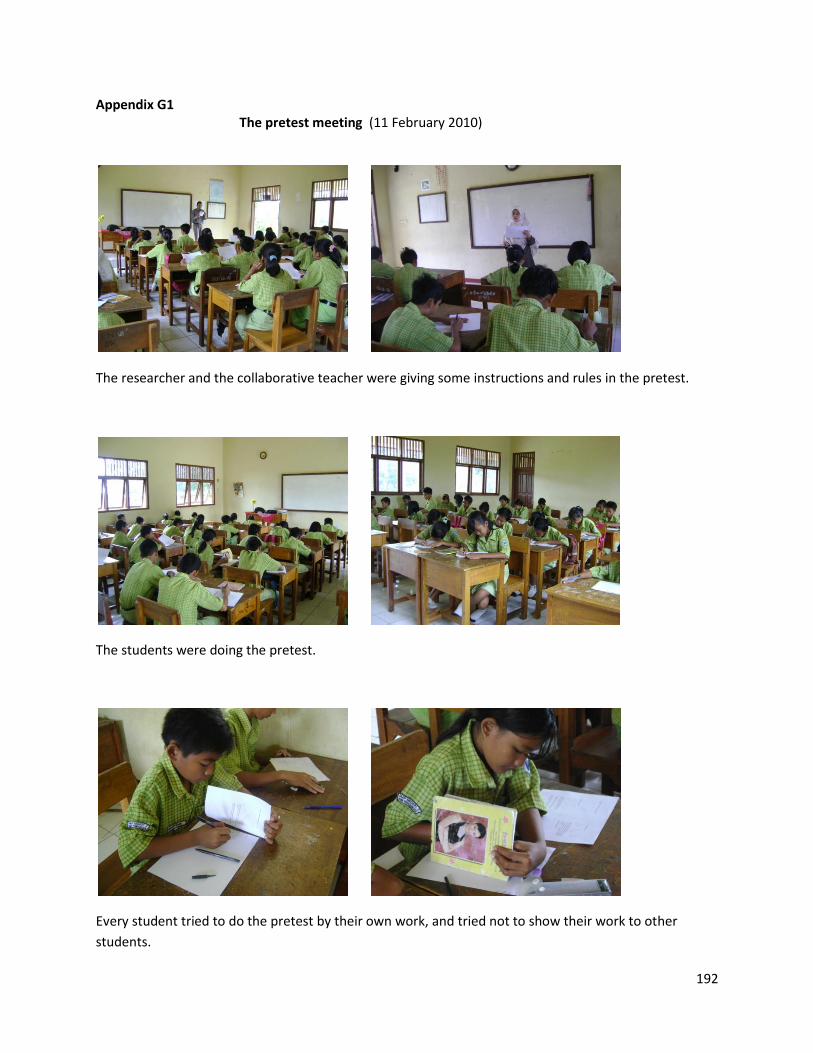
192
Appendix G1 The pretest meeting (11 February 2010)
The researcher and the collaborative teacher were giving some instructions and rules in the pretest.
The students were doing the pretest.
Every student tried to do the pretest by their own work, and tried not to show their work to other
students.
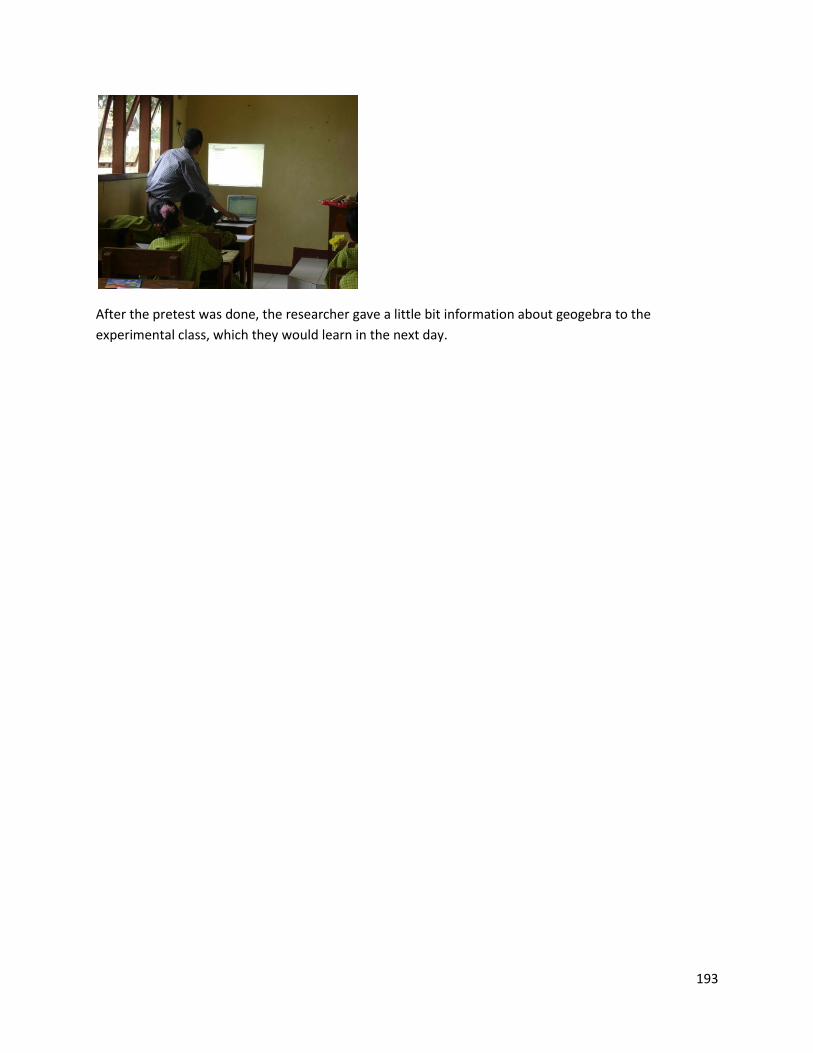
193
After the pretest was done, the researcher gave a little bit information about geogebra to the
experimental class, which they would learn in the next day.
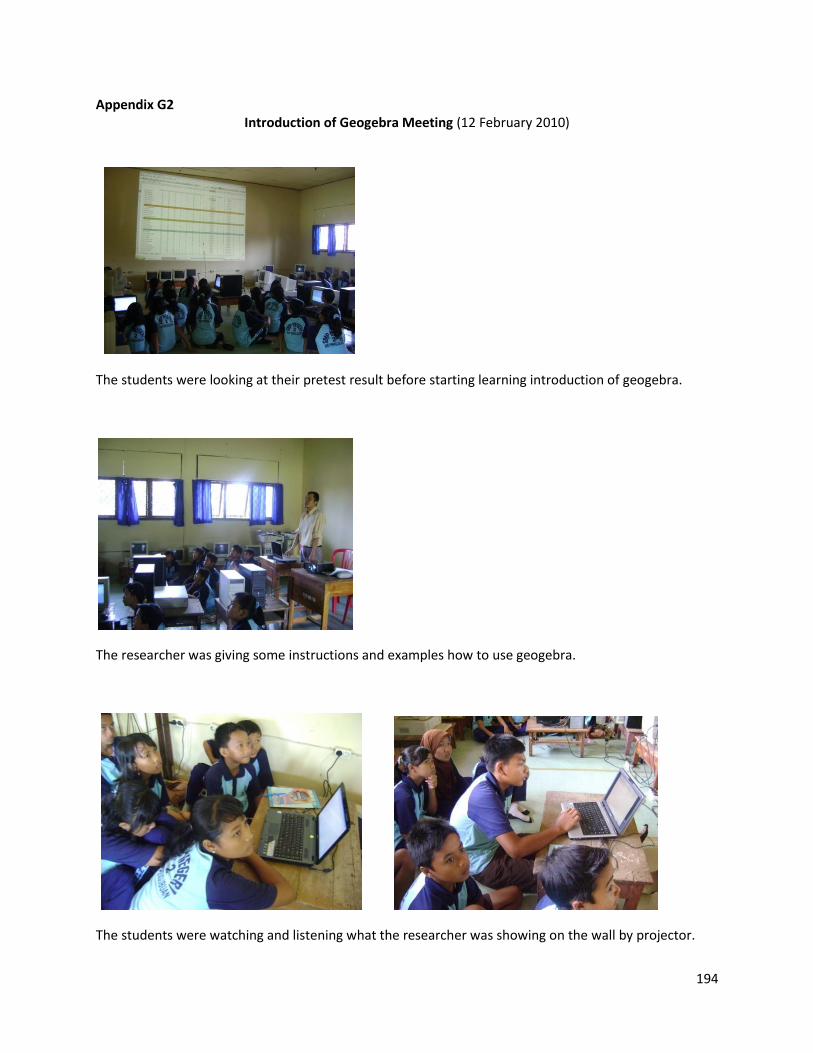
194
Appendix G2 Introduction of Geogebra Meeting (12 February 2010)
The students were looking at their pretest result before starting learning introduction of geogebra.
The researcher was giving some instructions and examples how to use geogebra.
The students were watching and listening what the researcher was showing on the wall by projector.
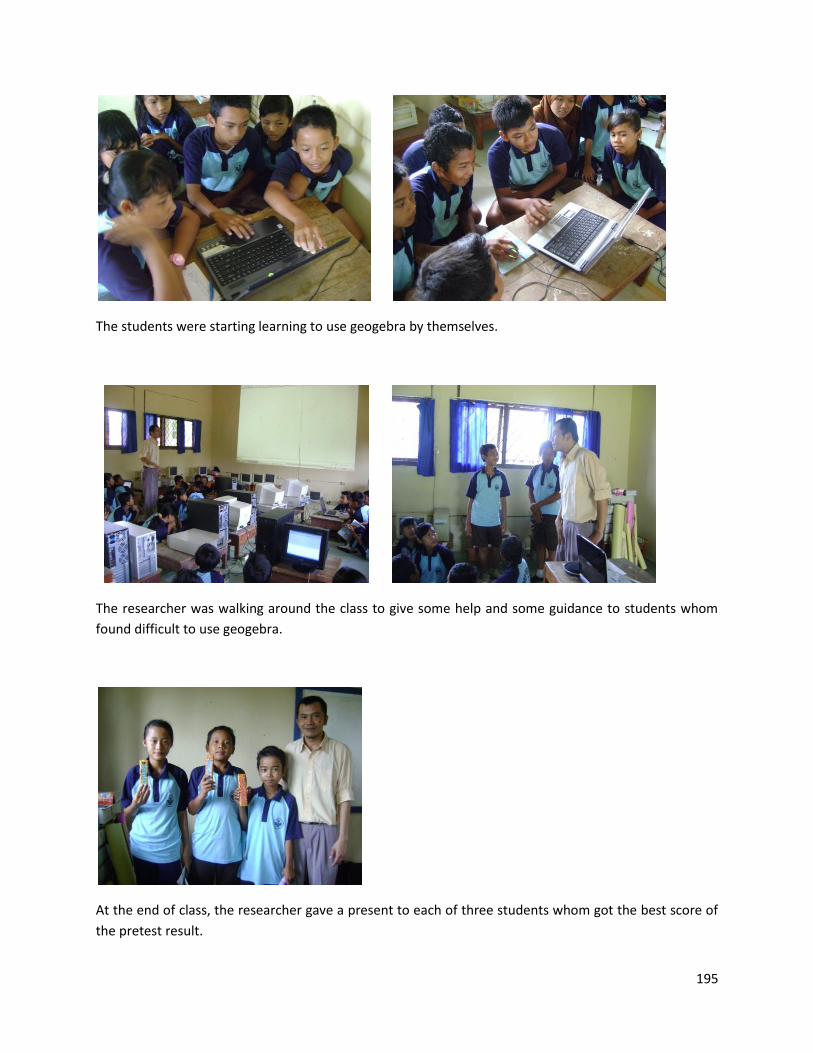
195
The students were starting learning to use geogebra by themselves.
The researcher was walking around the class to give some help and some guidance to students whom
found difficult to use geogebra.
At the end of class, the researcher gave a present to each of three students whom got the best score of
the pretest result.
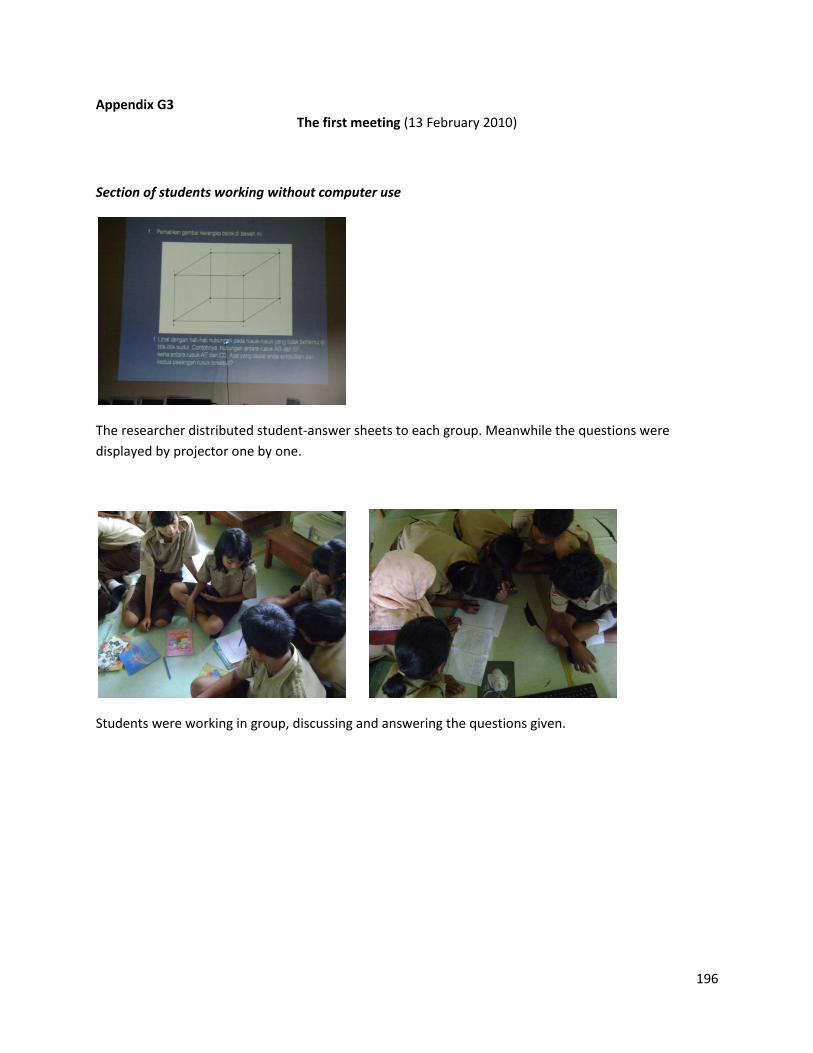
196
Appendix G3 The first meeting (13 February 2010)
Section of students working without computer use
The researcher distributed student-answer sheets to each group. Meanwhile the questions were
displayed by projector one by one.
Students were working in group, discussing and answering the questions given.
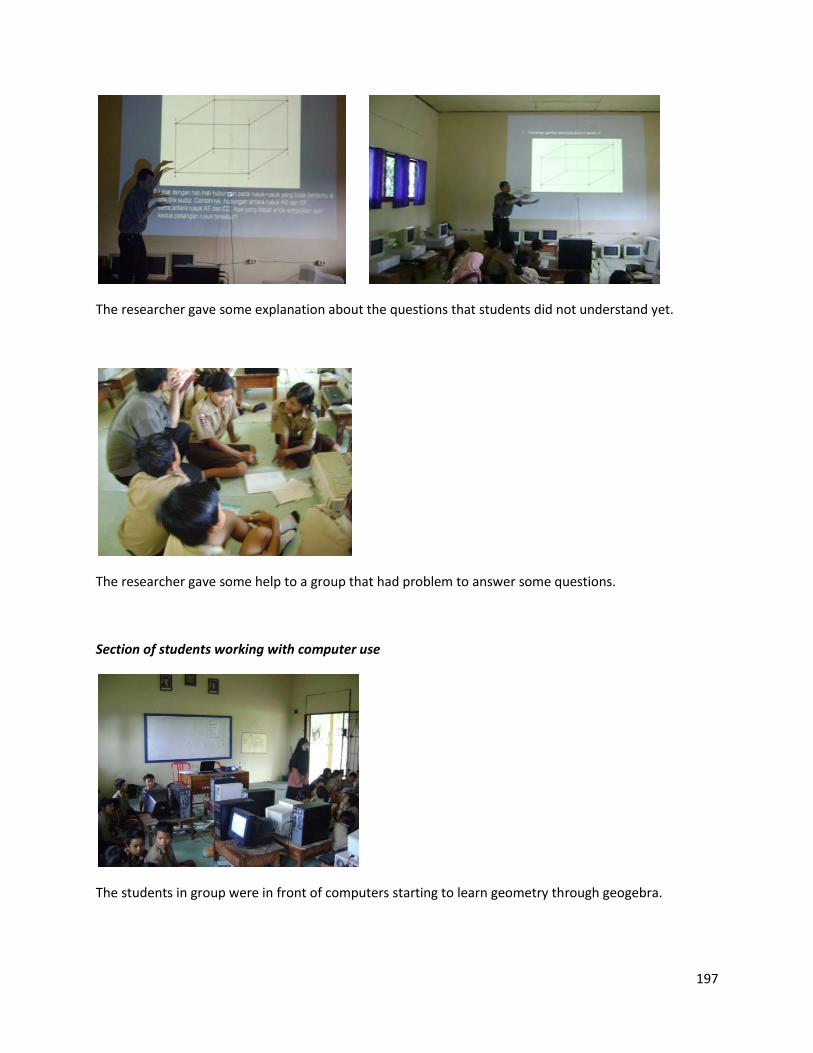
197
The researcher gave some explanation about the questions that students did not understand yet.
The researcher gave some help to a group that had problem to answer some questions.
Section of students working with computer use
The students in group were in front of computers starting to learn geometry through geogebra.
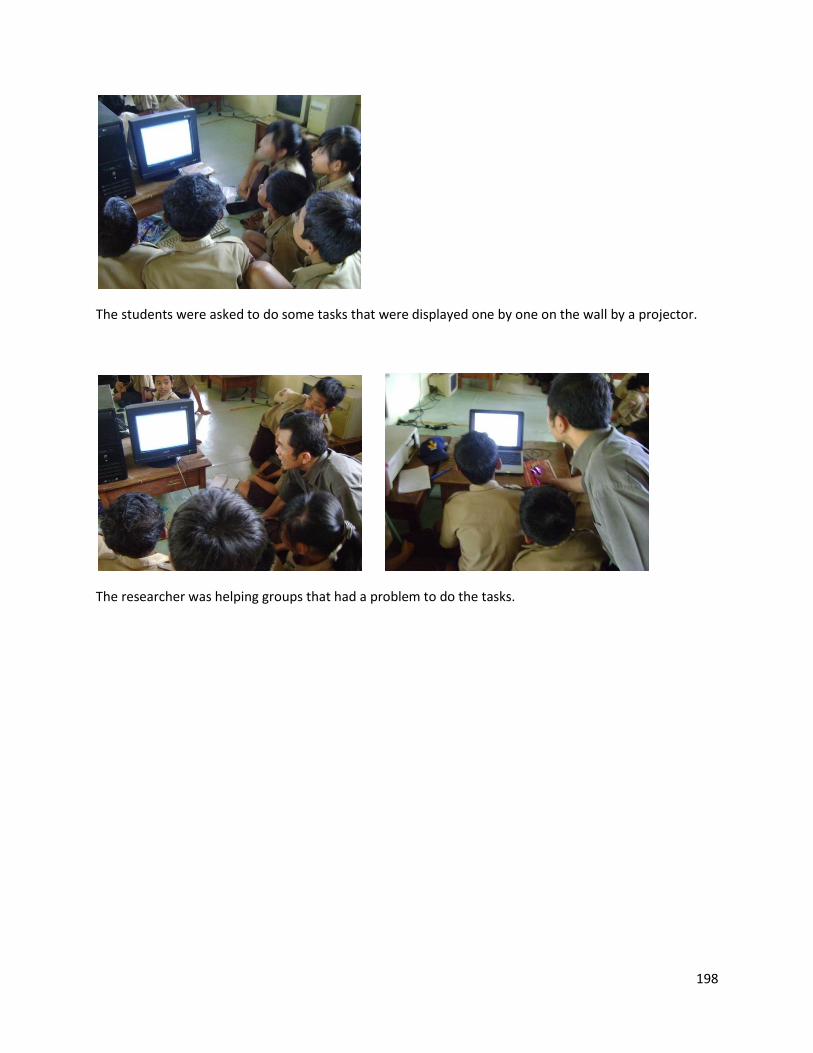
198
The students were asked to do some tasks that were displayed one by one on the wall by a projector.
The researcher was helping groups that had a problem to do the tasks.
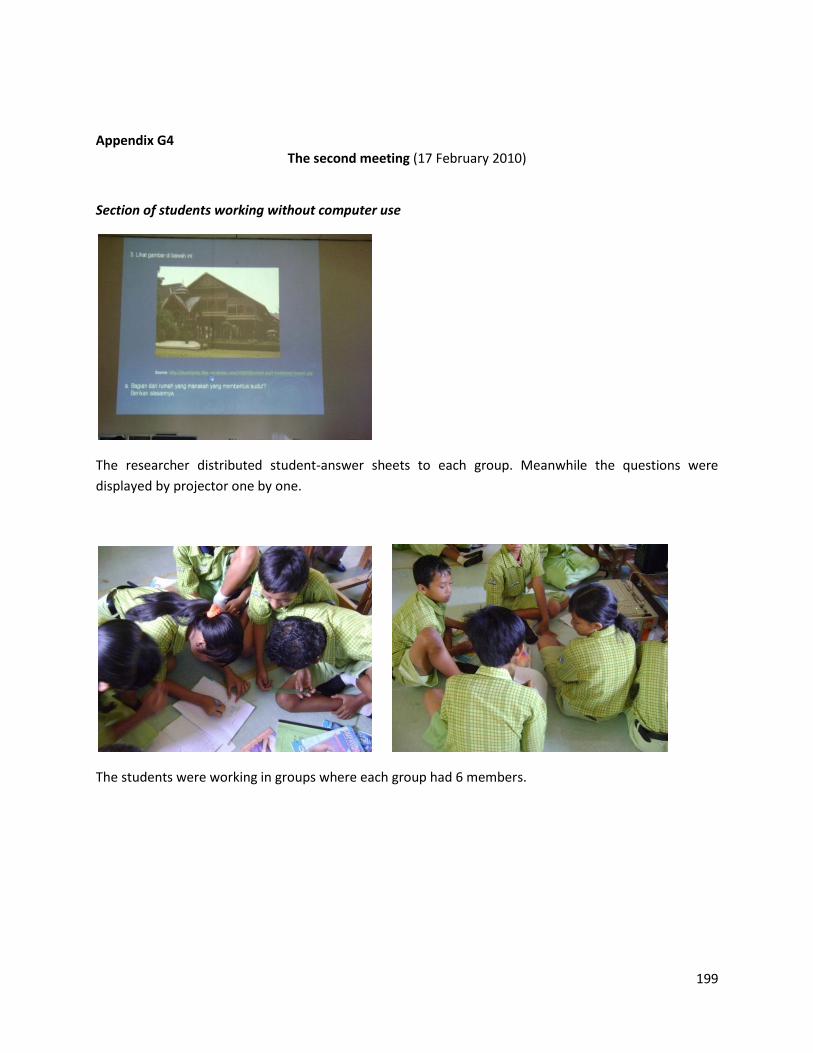
199
Appendix G4 The second meeting (17 February 2010)
Section of students working without computer use
The researcher distributed student-answer sheets to each group. Meanwhile the questions were
displayed by projector one by one.
The students were working in groups where each group had 6 members.
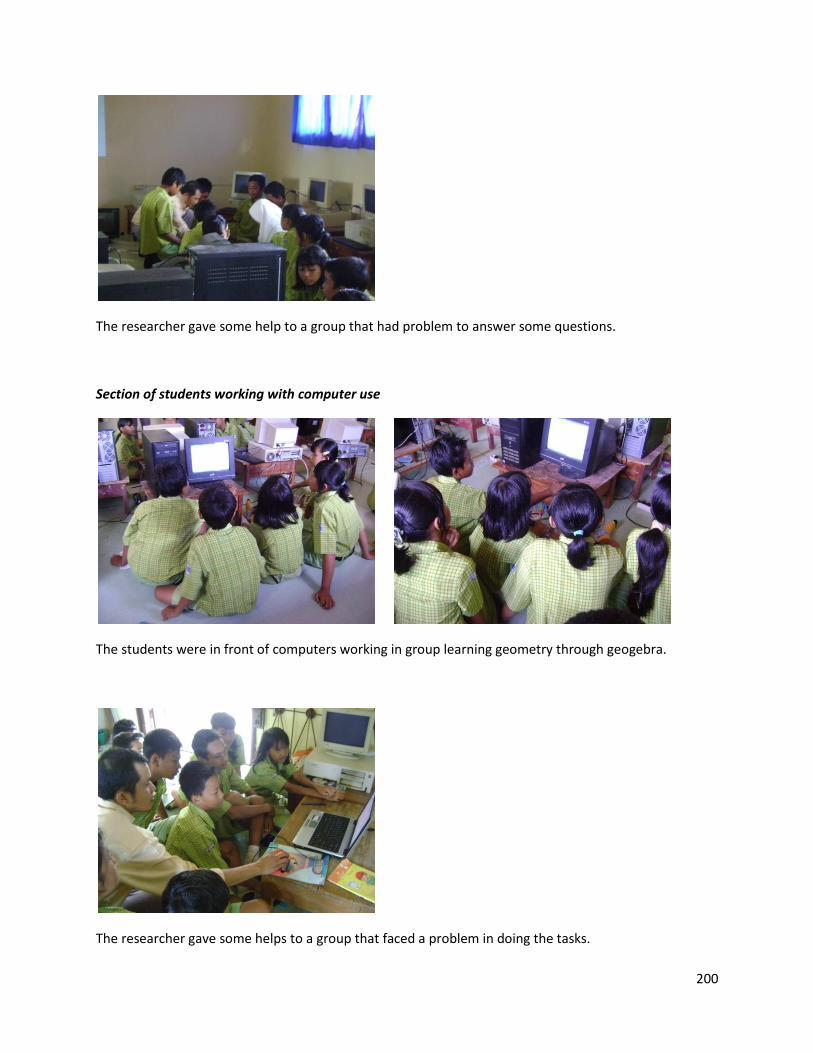
200
The researcher gave some help to a group that had problem to answer some questions.
Section of students working with computer use
The students were in front of computers working in group learning geometry through geogebra.
The researcher gave some helps to a group that faced a problem in doing the tasks.
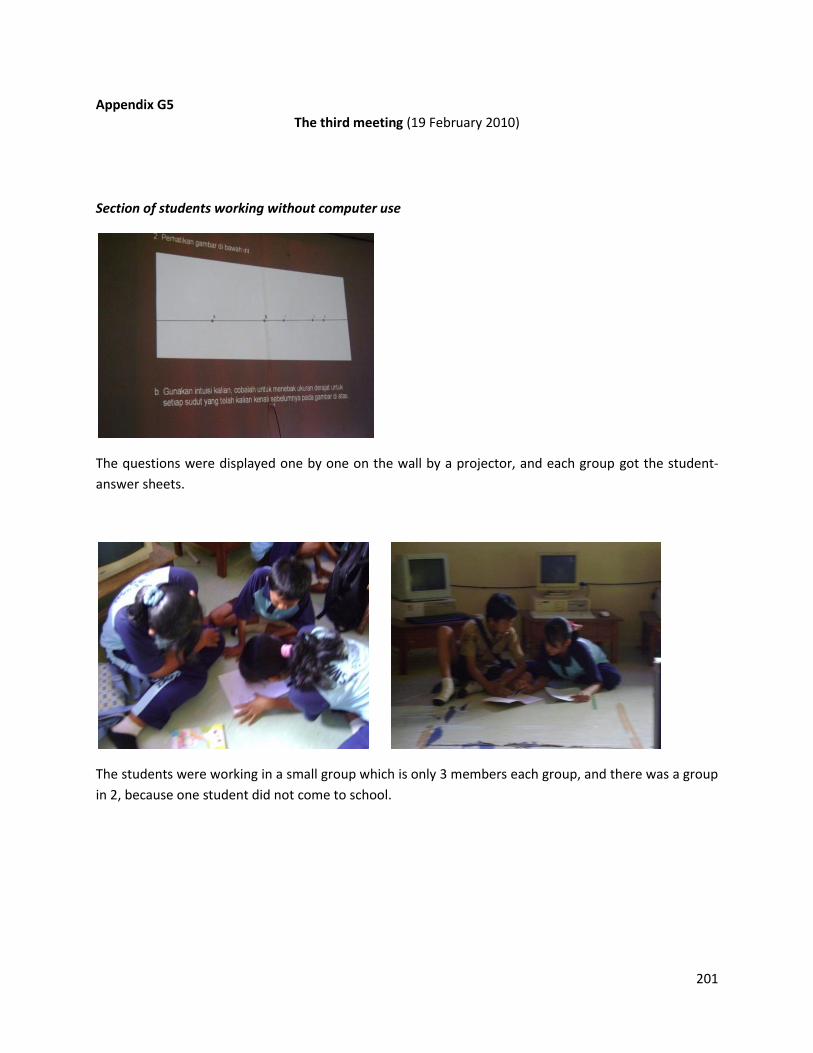
201
Appendix G5 The third meeting (19 February 2010)
Section of students working without computer use
The questions were displayed one by one on the wall by a projector, and each group got the student-
answer sheets.
The students were working in a small group which is only 3 members each group, and there was a group
in 2, because one student did not come to school.

202
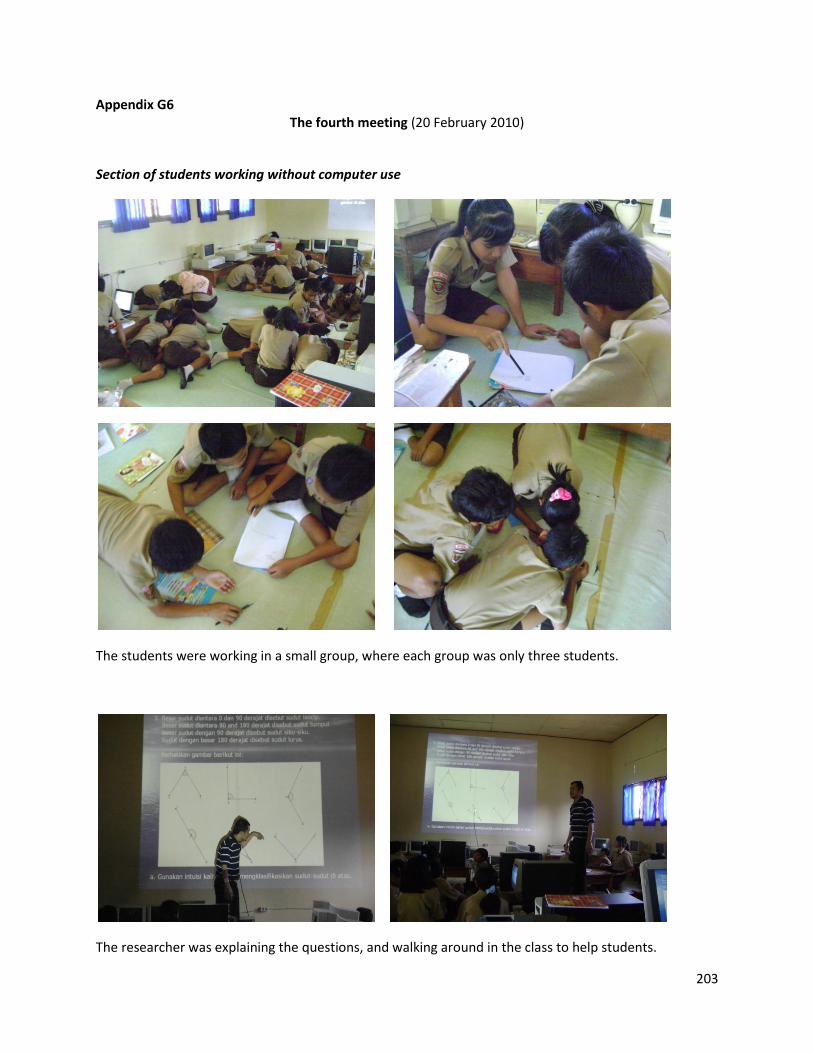
203
Appendix G6 The fourth meeting (20 February 2010)
Section of students working without computer use
The students were working in a small group, where each group was only three students.
The researcher was explaining the questions, and walking around in the class to help students.

204
The students were using a protractor to solve some questions.
Section of students working with computer use
The students were in front of computers doing their tasks through geogebra.
205
The researcher was giving some explanations, and helping students in doing their tasks.
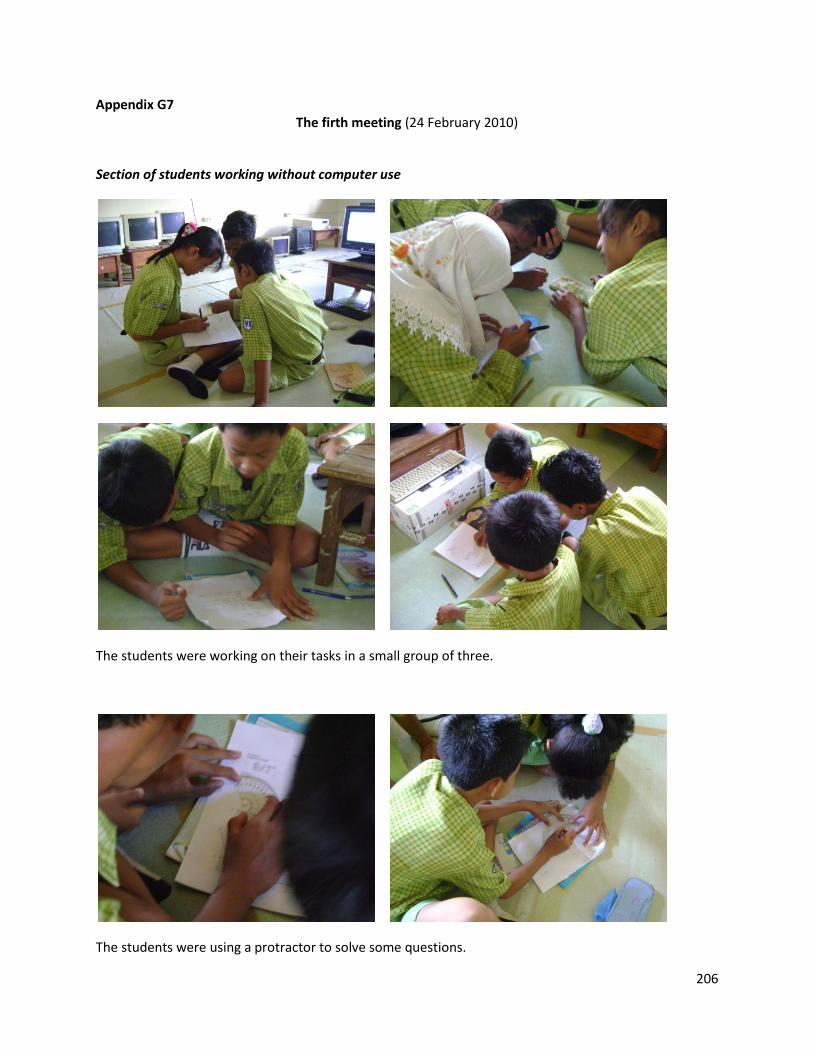
206
Appendix G7 The firth meeting (24 February 2010)
Section of students working without computer use
The students were working on their tasks in a small group of three.
The students were using a protractor to solve some questions.
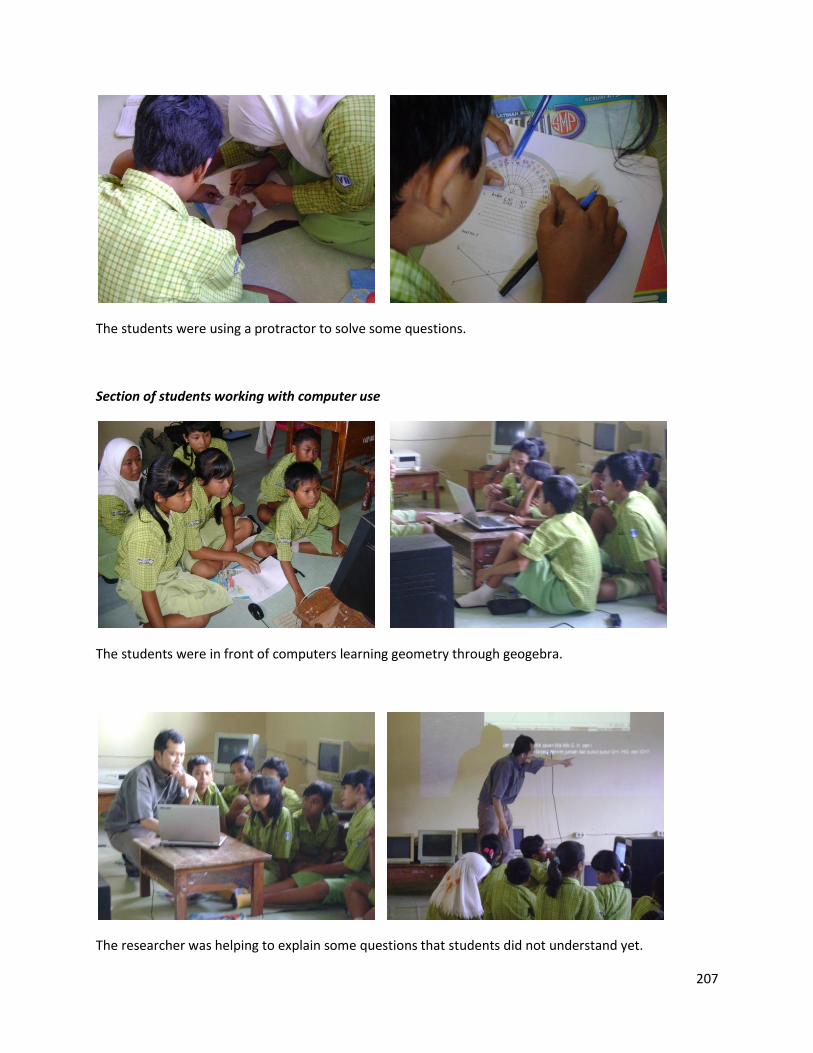
207
The students were using a protractor to solve some questions.
Section of students working with computer use
The students were in front of computers learning geometry through geogebra.
The researcher was helping to explain some questions that students did not understand yet.
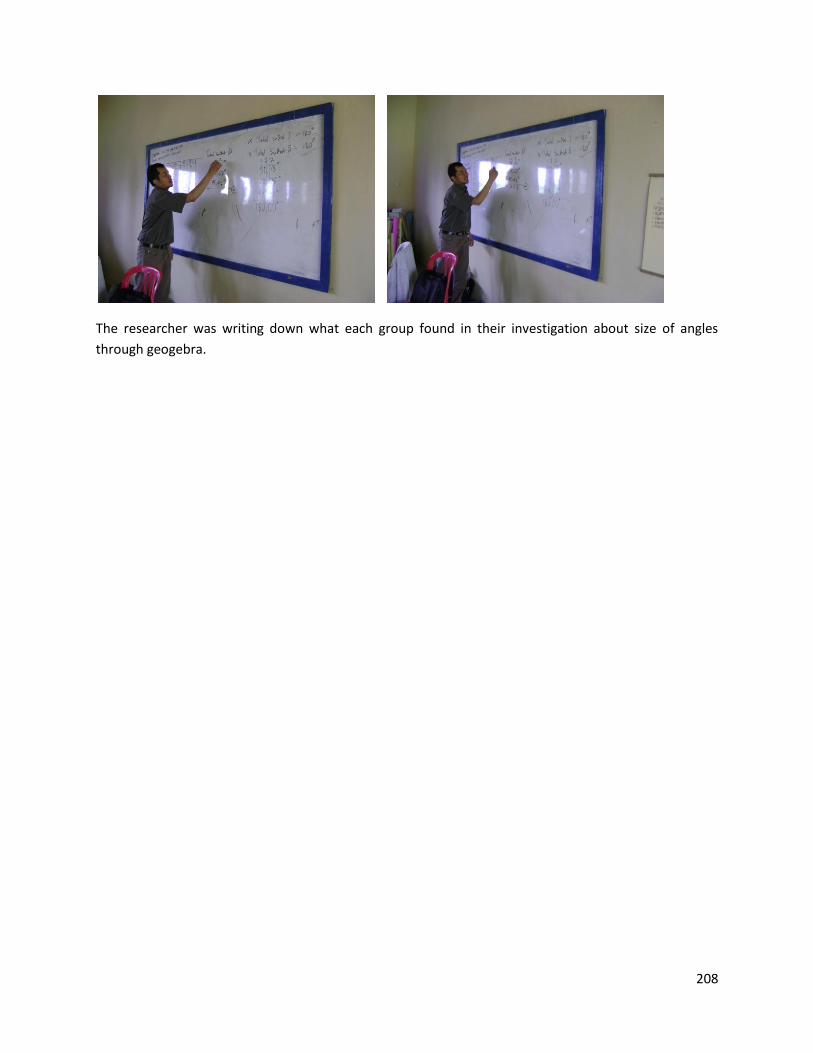
208
The researcher was writing down what each group found in their investigation about size of angles
through geogebra.
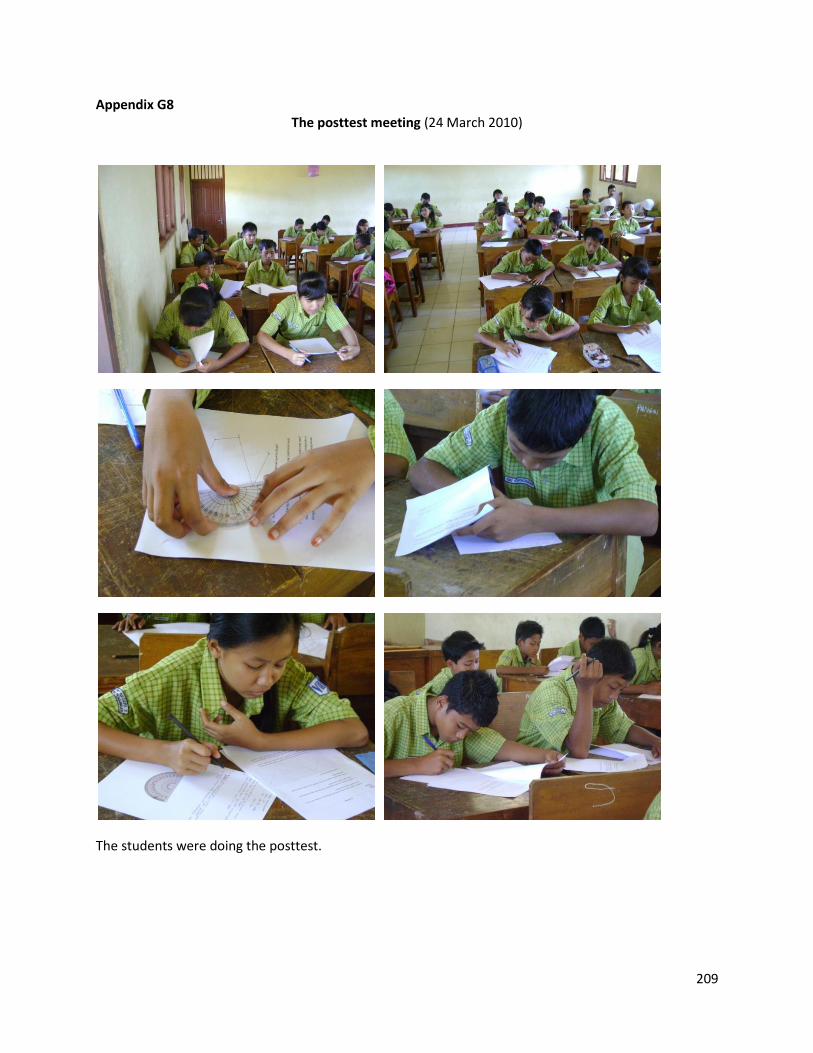
209
Appendix G8 The posttest meeting (24 March 2010)
The students were doing the posttest.

210