FS - Skylights · PDF filePlanning for your VELUX skylight ... FS is designed for roof pitch...
8
FS 15°-90° VAS 451811 - 0806
Transcript of FS - Skylights · PDF filePlanning for your VELUX skylight ... FS is designed for roof pitch...

FS
15°-90°VAS 451811 - 0806

� VELUX
Planning for your VELUX skylight - Light shaft application
Determine the position of the light shaft in relation to the skylight already installed (1). Install trimmers in the ceiling (2), following the procedure used when installing trimmers in the roof.Frame the light shaft if necessary. Insulate carefully around the light shaft and finish the inside, including vapour barrier etc. (3).
A skylight shaft is a light well from which the incoming light from the skylight installed in the roof is distributed throughout the room. In simple terms, the construction of a shaft involves cutting the roof opening for the skylight installation, cutting a larger opening in the ceiling below and then framing, insulating and finishing the shaft between the two openings with sheeting. By making the ceiling opening larger than the roof opening and flaring the shaft, you will not only make the skylight and room appear larger, you will also distribute light more evenly throughout the room. A shaft also allows you to direct light to specific areas that need accentuatingsuch as a bath vanity or work area. Painting the interior of the shaft with a light colour will also reflect more light into the room for maximum benefit.
1 2
3
15°-90°FS is designed for roof pitch 15-90 deg.
NOTICE All GLASS MAY BE SUBJECT TO UNEXPECTED BREAKAGE in rare circumstances due to imperfections in the glass that are undetectable during the manufacturing and inspection process by the manufacturer of the glass and VELUX.CONSULT LOCAL REGULATIONS AND/OR BUILDING MATERIAL CONSULTANTS TO DETERMINE WHICH TYPE OF GLASS IS RIGHT FOR YOU IN YOUR APPLICATION.

VELUX �
max 16 mm
1
2
Remove skylight from packaging and place the skylight making sure not to scratch or damage the metal covering. Remove only metal coverings as indicated.
Fix the brackets to the frame with two screws.Some skylight sizes are supplied with 6 fix-ing brackets: In these cases position brack-ets on each side frame.Position brackets according to type of roof-ing material - situation a, b or c and ensure that they are positioned to rest on the raft-ers. The bottom of the skylight frame must be level with the top of the batten - see also step �a, �b or �c.
1
2
2
a
b
c
4 VELUX
30-60 mm
min. 270 mm
60-1
50 m
m
100
mm
FRAME OUTLINE
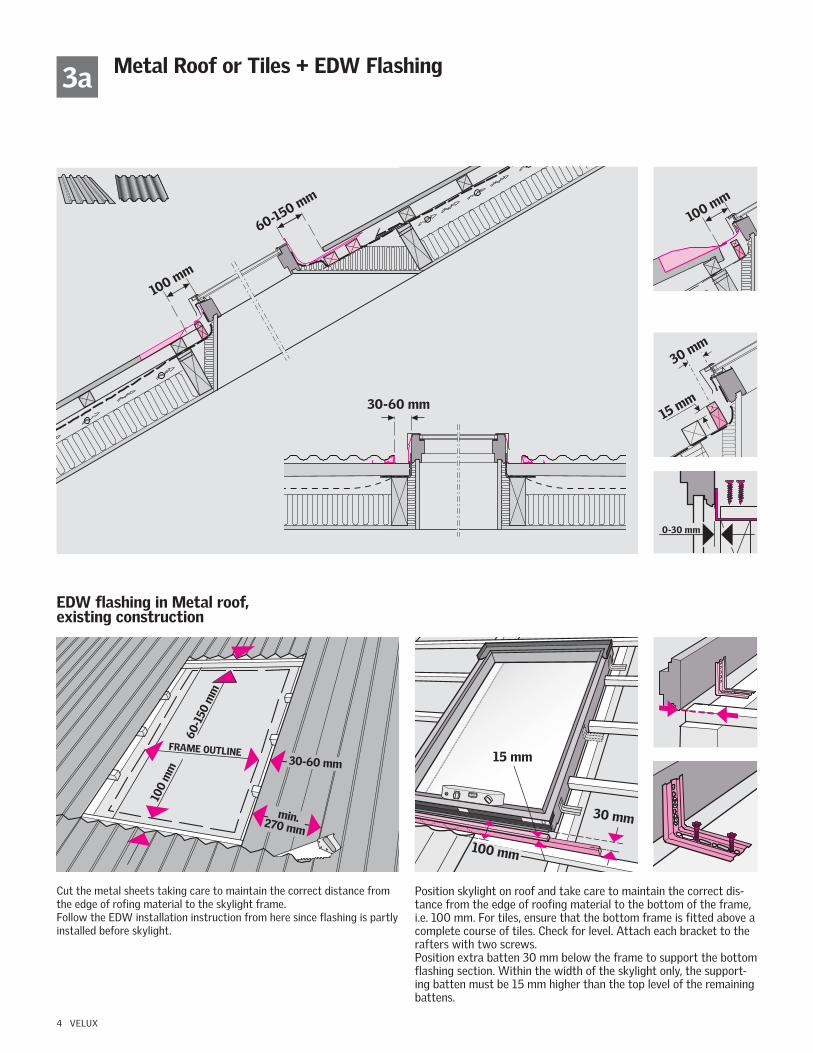
Metal Roof or Tiles + EDW Flashing
EDW flashing in Metal roof, existing construction
Cut the metal sheets taking care to maintain the correct distance from the edge of rofing material to the skylight frame.Follow the EDW installation instruction from here since flashing is partly installed before skylight.
3a
Position skylight on roof and take care to maintain the correct dis-tance from the edge of roofing material to the bottom of the frame, i.e. 100 mm. For tiles, ensure that the bottom frame is fitted above a complete course of tiles. Check for level. Attach each bracket to the rafters with two screws. Position extra batten �0 mm below the frame to support the bottom flashing section. Within the width of the skylight only, the support-ing batten must be 15 mm higher than the top level of the remaining battens.
100 mm
60-150 mm
30-60 mm
0-30 mm
100 mm
100 mm
30 mm
15 mm
30 mm
15 mm

VELUX 5
DECRA®, HARVEY™ or CORONA® roofing material + EDW Flashing3b
Cut a groove (�5 mm deep and 140 mm wide) in the battens at both sides and above the frame. An extra trimmer may be necessary to support the weakened battens.
Position skylight on roof and take care to maintain the correct dis-tance from the edge of the roofing material to the bottom frame, i.e. 100 mm. Check for level. Attach each bracket to the rafters with two screws. Position extra batten �0 mm below the frame to support the bot-tom flashing. The supporting batten to be positioned at a level 10 mm lower than that of remaining battens.
100 mm
60-150 mm
60 mm
0-30 mm
140 mm
100 mm
30 mm
140 mm
25 m
m
10 mm
30 mm

6 VELUX
Shingles and Slates + EDL flashings.3c
Position skylight on roof and take care to maintain the correct distance from the bot-tom edge of the roofing material to the bot-tom frame i.e. 100-110 mm. Check for level. Attach each bracket to the rafters with two screws.
60-100 mm
0-20 mm
100-110 mm
0-20 mm

VELUX �
2
3
2
1
If roofing underlay is used: Dress roofing underlay up around all four sides of the frame. Roof with counter battens shown for illustration purpose.
4
5
1 2
21
2
2
3
2
3
2
1
If flashing is not to be installed immedi-ately, replace the cladding parts starting at the bottom. Interlock side frame claddings with bottom frame cladding as shown. Insure top casing/ top frame cladding is placed in position 3 . Secure the claddings with the original screws.

EDL EDW
For flashing information see instructions supplied in each flashing carton. Contact VELUX for grouping / combi installation of skylights.
Vapor escape and vapor barrier: Insure tight joints where the finish material connects to the finish groove and to the ceiling - detail 1. Install vapor barrier to the finish groove - details �.
Underlayment: Install underlayment up against the frame on all four sides and establish over-flashing drainage at the top - details �.
Insulation: Insulate carefully around skylight always maintaining min. 1/�" (15 mm) distance to flashing - detail �.
In cold areas a combination of flared and 4" (100 mm) perpendicular lining at top and bottom allows for better insulation - detail 4.
2 2 2 31 4
AUS: VELUX (AUSTRALIA) PTY LTD. (0�) 9550-��88 1800 68� 589 (Toll Free)
NZ: VELUX-NEW ZEALAND LTD.‘
09 6�4-41�6 (0800) 650 445 (Toll Free)
© �001, �006 VELUX GroupVAS 451811-0806 ® VELUX and VELUX logo are registered trademarks
If you need further informations please contact VELUX
VELUX Blinds and AccessoriesVenetian Blinds Roller Blinds Awning Blinds Black-out Blinds
EKL EKW
min 15 mm
min
100 m
m