
from General Hydroponics utilizes modern simple but ... · he Euro Grower™ from General...
14
from General Hydroponics utilizes modern European technology in an easy to use home system. The Euro simple but elegant approach makes it ideal for a novice gardener- yet the results will excite even experienced growers. Plants rest two feet above the ground facilitating ease of use for seniors T
Transcript of from General Hydroponics utilizes modern simple but ... · he Euro Grower™ from General...

he Euro Grower™ from General Hydroponics utilizes modern
European technology in an easy to use home system. The Euro
Grower’s™ simple but elegant approach makes it ideal for a
novice gardener- yet the results will excite even experienced growers.
Plants rest two feet above the ground facilitating ease of use for seniors
and those with disabilities.
T

40 GallonReservoir & Lid
HydrotonGrowing
Media
BatoBuckets& DrainElbows
GeneralHydroponics™
FloraKit Nutrientswith ph Test Kit
Page 1
Box #1 Contains:(EuroGrower™ Complete & EuroGrower™
Module)
8 Bato Buckets & Drain Elbows1 40 Gallon Reservoir1 Reservoir Lid1 Reservoir Lid Support1 Mag Drive #2 Pump1 Drain Valve3 1 Pint Bottles of GH Flora
Series Nutrients1 pH Test Kit1 Grasslin Timer1 Drip Feed Line2 Drain Rails8 Drip Stakes1 Pumpline6 Drain Rail Clips
Box #2 Contains:(EuroGrower™ Complete only)
4 Blocks CocoTek™ Growing Medium1 50lb Bag of Hydroton
Drip Feed Line
DrainRails
GrasslinTimer
Mag Drive #2Pump
CoconutCoir
CocoTek™
GrowingMedia
DripStakes
Box #1 Box #2

Step 1
Place the reservoiron a level surfacewhere it will be used.
Step 2
Line the inside of theLower ReservoirGrommet with a thincoating of silicongrease (optional).Insert Drain Valveinto Grommet usinga twisting motion.
DrainValve
Page 2
Reservoir
Step 3
Attach the Drain RailClips by insertingthem into the holeson the reservoir lid.

Step 4
Place Reservoir Lid on top ofReservoir.
Lid Support should be positioned oncenter rib, approximately 6-8 inchesfrom edge of reservoir openingbehind pumpline.
Proper positioning of Lid Supportwill prevent the Reservoir Lid fromsagging.
Page 3
Step 3b
Place 3” Lid Support incenter of reservoir.
Lid Support should bepositioned on centerrib, approximately 6-8inches from edge ofreservoir openingbehind pumpline.
3”Lid Support

Step 5
Position both Drain Rails ontop of the Reservoir Lid.
Page 4
Step 5b
Make sure the Drain Rails restin holes in Reservoir Lid.
Step 6
Place Filter onto Mag Drive #2 Pump.

Page 5
Step 8
Place Mag Drive #2 Pump intothe Reservoir through theReservoir Access Hole locatedon top of the Reservoir Lid.
Step 9
Feed Pump Line and Pump PowerCable through small hole located nextto the Reservoir Access Hole.
Step 7
Screw Pump Line onto Mag Drive#2 Pump.

Step 10
Place the Drip Feed Line on top of theReservoir Lid between the two DrainRails. Screw the Drip Feed Line ontothe Mag Drive #2 Pump Line.
Page 6
Step 11
Place Access Lid over theAccess Hole on Reservoir Lid.
Step 12
Connect two Bato Elbows tocreate Drain Fittings.

Page 7
Step 13
Place the Bato Bucket on topof the Reservoir Lid so theBucket Drain rests in one ofthe holes of the Drain Rails.
Bucket Drain
Drain Rail Hole
Step 12b
Insert wide end of DrainFittings onto plastic exten-sions located on the bottomof the Bato Buckets.
The smaller end of the DrainFitting fits into hole on upperedge of Bato Bucket.

Step 14
Make sure that Feed Linesreach into the Bato Buckets.
Page 8
Step 15
Attach Drip Stakes to Feed Lines.
Feed Lines fit into second smallestopening on Drip Stakes.

Page 9
Step 16
Open bag of Hydroton andrinse it throughly with plainwater.
Step 17
Fill each Bato Bucket up tothe Drain Fittings with therinsed Hydroton.
Set aside a similar amount ofHydroton for top mulch.
The remaining Hydroton willbe mixed with CocoTek™
Growing Medium.
Step 18
Fill a 5 gallon bucket with 3gallons of water and place 3bricks of CocoTek™ GrowingMedium into the water. SoakGrowing Medium until itbreaks down into a soil likesubstance.
Step 19
Fill the Bato Buckets with thesoaked CocoTek™ mixture.
Steps 16-24 describeHydroton & CocoTek™ Growing Medium
which is only included in Box #2 if you have chosen the EuroGrower™ Complete.
(Any Hydroponic medium may be used in the Euro Grower™)

Page 10
Step 20
Throughly mix Hydroton withthe soaked CocoTek™ mixture.
Remember to leave someHydroton for topping off thebuckets.
Step 21
Top dress the Bato Bucketwith approximately 1 inch ofHydroton.
Step 22
Prepare your seedlings orplants for transplanting byremoving and rinsing any soiland / or organic material fromaround the roots.
It is best to choose seedlingsas it is more difficult to suc-cessfully transplant olderplants.
Page 11
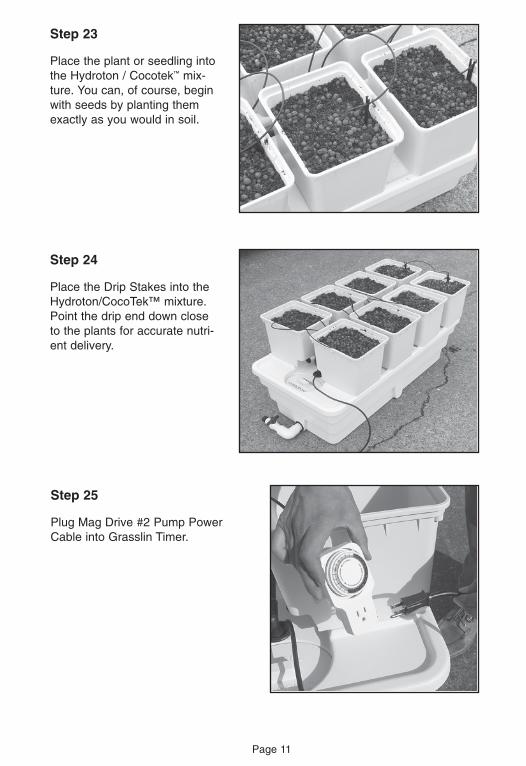
Step 23
Place the plant or seedling intothe Hydroton / Cocotek™ mix-ture. You can, of course, beginwith seeds by planting themexactly as you would in soil.
Step 24
Place the Drip Stakes into theHydroton/CocoTek™ mixture.Point the drip end down closeto the plants for accurate nutri-ent delivery.
Step 25
Plug Mag Drive #2 Pump PowerCable into Grasslin Timer.

Page 12
Cleaning between crops
Drain the whole system, brush outthe bato Buckets and, if necessary,unclog the Drip Feed Lines. Spongeoff all parts using a mild disinfectant.Rinse everything thoroughly. Cleanfilters frequently. Simply unplugpump and remove reusable filter.Rinse filter under hot water to clean.
Hydroton
We have had many years of excel-lent results working with Hydrotonclay pellets for plant support. We rec-ommend that you rinse newHydroton thoroughly to remove thefine sand which builds up from abra-sion during shipping. Between cropsit is good to wash the Hydroton well,removing all organic debris. An effec-tive method is to boil or steam usedHydroton in a large pot. This steriliz-es and dissolves any accumulatedsalts. Caution: Do Not rinse Hydrotonwith bleach (chlorine).
Nutrients
Nutrients are the lifeline to yourplants. Since you are providing theplants with all their nutritional needswe recommend you feed them thebest. General Hydroponics™ offers awide variety of plant foods. We havehad great success using our Floraseries 3 part system (FloraGro™,FloraBloom™ and FloraMicro™).
1 Fill the reservoir with fresh water.If you have hard water (over 200ppm Total Dissolved Solids or over70 ppm calcium), we recommendthat you use purified water(Reverse Osmosis and/or rainwater). General Hydroponics™ hasa new Hardwater FloraMicro™
nutrient formula available for grow-
ers with hard water. 2 Add nutrients as per instructions on
label. Stir in FloraMicro™ first thenadd FloraBloom, and FloraGro.Never pre-mix nutrient concentrates.This may cause nutrient “lock-out”.
3 Adjust the nutrient solution pHbetween 5.5 and 6.5 (see instruc-tions with the General HydroponicspH Control Kit).
Notes
Nutrient mixes can be adjusted in bothstrength (conductivity) and “flavor” (ie:the ratios of Nitrogen, Phosphorus,Potassium, Calcium, Magnesium,Sulfur & Microelements). To adjustthese factors mix different combina-tions of FloraGro™,FloraBloom™ andFloraMicro™ with water.• To enhance vegetative growth, use
more FloraGro™ and lessFloraBloom™.
• To enhance flower growth use lessFloraGro and more FloraBloom™.
• To enhance fruit production useequal amounts of FloraGro™,FloraBloom™ and FloraMicro™.
• To provide more Calcium or Iron (forgreen, leafy vegetables), use slightlymore FloraMicro™.
• Many growers follow the 3-2-1 mix:For vegetative growth: 3 partsFloraGro (ie, teaspoons per gallon),2 parts FloraMicro™ plus 1 partFloraBloom™. For flowering: 1 partFloraGro™ plus 2 parts FloraMicro™
plus 3 parts FloraBloom™. For fruit-ing: 2 parts FloraGro™ plus 2 partsFloraMicro™ plus 2 partsFloraBloom™. These units are ratios,not absolute quantities, and are onlya suggested starting point. Use aconductivity meter to determine totalnutrient strength.

P.O. Box 1576 • Sebastopol, CA 95473Phone (707) 824-9376 • Fax (707) 824-9377
www.generalhydroponics.com
Frequently Asked Questions.
1. How often do I add nutrient? What is “topping-off”?Add nutrient every time you drain your system. “Topping-off” is a term thatdescribes adding water to the system. Remember, during hot spells plants tran-spire large amounts of water leaving behind nutrient salts. These salts cancause ppm levels to sky-rocket creating a toxic environment for your plants.Keep your ppm at a lower level during these times of extreme transpiration.
2. How often should the water be changed?That depends upon the growth (stage and rate) of your plants. When plants areseedlings every three weeks should suffice. Once the plants start to approachmaturity it is best to change the nutrient mixture completely every two weeks, oreven more often for better results. Between nutrient changes it is important to“top-off” the reservoir with fresh water. Add more nutrient only if the conductivityor ppm drops. Generally the conductivity (nutrient strength) should be main-tained between 800 to 1,200 ppm (parts per million).
3. Should I invest in a ppm or conductivity meter?Yes, a conductivity meter is an essential tool for measuring nutrient strength. Byknowing the ideal conductivity level for a specific variety of plant, the grower canadjust nutrient strength to meet specific crop needs.
4. How often should I run my Euro Grower™ pump?This depends on the plant stage, the mixture of medium and your environment.An average situation calls for 3-5 15 minute intervals per day.
5. What is the optimal temperature range for the nutrient solution?Optimal temperature is generally between 65º and 75º F.
6. At what pH level should my system be maintained and why?pH levels should be between 5.5 and 6.5 because at this pH level, nutrients aremore readily available for the plant.
Ordering parts and suppliesTo order Bato Buckets, nutrients, Hydroton, or any other parts for yourEuroGrower™ system, see your General Hydroponics retailer, or call GeneralHydroponics, Inc. for listings.
707-824-9376 Monday thru Friday, 9 am to 4:30 pm, PST.
© GENERAL HYDROPONICS 2003062403mn
![Hydroponics introduction to hydroponics [website capture] ww](https://static.fdocuments.net/doc/165x107/559418031a28ab98468b4827/hydroponics-introduction-to-hydroponics-website-capture-ww.jpg)