Freelander Owner's Handbook - Eng · Handbrake & brake system ... flash if the brakes become in...
30
Instruments 57 INSTRUMENTS 1. Temperature gauge This gauge indicates the temperature of the engine coolant. As the engine warms up, the pointer will rise to the mid-point of the gauge, where it should remain while the engine is operating at its normal temperature. If the pointer reaches the RED mark, the coolant is too hot and severe engine damage could result; stop the vehicle as soon as safety permits and seek qualified assistance. 2. Tachometer (petrol model illustrated) Indicates engine speed in revolutions per minute (x 1000). To protect the engine from damage, NEVER allow the tachometer pointer to enter the RED sector. NOTE: On diesel models, the tachometer is only calibrated up to 6,000 rev/min. 3. Speedometer Indicates road speed in miles per hour and/or kilometres per hour. 4. Total distance and trip recorder (odometer) The digital display indicates the total distance travelled by the vehicle or, when the reset/mode button is pressed, indicates the trip recorder distance. 5. Trip recorder reset/mode button Press to alternate between total distance and trip recorders. Press and hold when in trip recorder mode to return the trip recorder to zero. 6. Fuel gauge The pointer indicates the fuel level, even when the starter switch is turned off. After refuelling, the pointer slowly rises to the new level after the starter switch is turned on. Operating Tip .......... Driving on twisting or hilly roads may disturb the accuracy of the fuel gauge. It is advisable to check the fuel level when the vehicle is travelling on a straight, level road. WARNING! Never allow the vehicle to run out of fuel - the resultant misfire could damage the catalytic converter. H2365A 1 2 3 4 5 6
Transcript of Freelander Owner's Handbook - Eng · Handbrake & brake system ... flash if the brakes become in...

Instruments
57
INSTRUMENTS1. Temperature gaugeThis gauge indicates the temperature of the engine coolant. As theengine warms up, the pointer will rise to the mid-point of the gauge,where it should remain while the engine is operating at its normaltemperature.
If the pointer reaches the RED mark, the coolant is too hot andsevere engine damage could result; stop the vehicle as soon assafety permits and seek qualified assistance.
2. Tachometer (petrol model illustrated)Indicates engine speed in revolutions per minute (x 1000). Toprotect the engine from damage, NEVER allow the tachometerpointer to enter the RED sector.
NOTE: On diesel models, the tachometer is only calibrated up to6,000 rev/min.
3. SpeedometerIndicates road speed in miles per hour and/or kilometres per hour.
4. Total distance and trip recorder (odometer)The digital display indicates the total distance travelled by thevehicle or, when the reset/mode button is pressed, indicates the triprecorder distance.
5. Trip recorder reset/mode buttonPress to alternate between total distance and trip recorders. Pressand hold when in trip recorder mode to return the trip recorder tozero.
6. Fuel gaugeThe pointer indicates the fuel level, even when the starter switch isturned off. After refuelling, the pointer slowly rises to the new levelafter the starter switch is turned on.
Operating Tip ..........Driving on twisting or hillyroads may disturb the accuracyof the fuel gauge. It is advisableto check the fuel level when thevehicle is travelling on astraight, level road.
WARNING!
Never allow the vehicle torun out of fuel - theresultant misfire coulddamage the catalyticconverter.
H2365A 1 2 3 4 5 6

Warning Lights
58
Direction indicators - GREEN
The left or right warning light flashes in time with theleft or right direction indicator lights whenever they
are operated. If either warning light fails to flash, or flashes veryrapidly, this means that one of the indicator lights is not operating.
Mainbeam - BLUE
Illuminates when the headlights are switched to mainbeam.
Battery charging - RED
The light illuminates as a bulb check when the starterswitch is turned to position ’II’ and extinguishes as
soon as the engine is running. If it remains on, or illuminates whendriving, a fault with the battery charging system is indicated. Seekqualified assistance urgently.
Handbrake & brake system - RED
The light illuminates when the handbrake is appliedand extinguishes when it is fully released. If the light
illuminates while the handbrake is released, a fault with the brakingsystem is indicated, check the brake fluid level (see ’Maintenance’ ).If the light continues to illuminate, seek qualified assistanceurgently.
Operating Tip ..........If the hazard warning lights areoperated, both directionindicator warning lights willflash together.
H2366

Warning Lights
59
Low oil pressure - RED
Illuminates as a bulb check when the starter switch isturned to position ’II’ and extinguishes when the
engine is started. If the light remains on, flashes on and off orilluminates continuously when driving, serious engine damagecould occur; stop the vehicle as soon as safety permits andSWITCH OFF THE ENGINE IMMEDIATELY. Seek qualified assistancebefore driving.
Trailer direction indicators - GREEN
Illuminates in conjunction with the vehicle directionindicator lights to show that all trailer indicator lights
are functioning correctly. In the event of a bulb failure on the trailer,the warning light flashes once and then remains off.
Airbag supplementary restraint system - RED
The light illuminates when the starter switch is turnedto position ’II’ and extinguishes after about five
seconds. If the light illuminates at any other time, seek qualifiedassistance urgently.
Rear fog guard light - AMBER
Illuminates when the rear fog guard lights areswitched on.
Hill descent control (HDC) ’information’ - GREEN
Illuminates briefly as a bulb check when the starterswitch is turned to position ’II’ and will illuminate
when HDC is selected.
If HDC is selected when either of the operating gears is engaged(1st or reverse), the light will illuminate continuously.
When HDC is selected and a non-operating gear is engaged, thelight will flash to inform the driver that HDC is selected, but notoperating (see also ’HDC fade-out’).
NOTE: When a trailer is notfitted, the warning light willflash once each time thedirection indicator switch isoperated.
Operating Tip ..........The trailer direction indicatorlight will also flash when thehazard warning lights areactivated, whether a trailer isattached or not.

Warning Lights
60
Hill descent control (HDC) ’failure’ - AMBER
The light illuminates briefly as a bulb check when thestarter switch is turned to position ’II’. The light will
flash if the brakes become in danger of overheating and continueflashing until the brakes have cooled sufficiently to enable HDC tooperate again (see also ’HDC fade-out’).If the light illuminates at any other time, a fault in the system isindicated. If this occurs, deselect HDC and consult your Land Roverdealer.
Door open - RED
Illuminates when any of the doors (including thetaildoor and bonnet) are not fully closed. DO NOT
drive the vehicle with the light illuminated.
Traction control - AMBER
Illuminates as a bulb and system check when thestarter switch is turned to position ’II’ and
extinguishes after approximately 4 seconds. The light illuminatesfor a minimum of 2 seconds, whenever traction control isoperating.
If the light illuminates continuously, a fault with the system isindicated; seek qualified assistance.
ABS - AMBER
Illuminates for approximately 1 second as a bulb andsystem check when the starter switch is turned to
position ’II’, and briefly extinguishes before coming on again. If thelight does not extinguish and then come on again, then a fault hasoccurred with the ABS system and you should consult your LandRover dealer at the earliest opportunity. The warning light willremain on until the vehicle is driven above approximately 5 mph(7 km/h).
If the light remains on or subsequently illuminates while driving, afault has been detected by the self-monitoring system. This meansthat full ABS control may not be available and you should consultyour dealer at the earliest opportunity.

Warning Lights
61
Check engine - AMBER(diesel models only)
The light illuminates briefly as a bulb check when thestarter switch is turned to position ’II’. If the light remains on orilluminates when driving, the emission control system requiresattention. Stop the vehicle and switch off the engine for 30 seconds;if the light illuminates again after the engine is restarted, it ispermissible to continue driving, but qualified assistance must besought as soon as possible to prevent potential engine damage.
Glow plugs - AMBER(diesel models only)
Illuminates when the starter switch is turned toposition ’II’. When the engine is cold, wait for the light to extinguishbefore starting.
Hazard warning lights - RED
Illuminates in conjunction with the direction indicatorwarning lights, when the hazard warning lights are
operated.

Starting & Driving
62
STARTER SWITCH & STEERING LOCKThe starter switch uses the following sequence of key positions tooperate the steering lock, electrical circuits and starter motor.
’0’ - Steering lockedWith the key removed, the steering column can be locked and mostelectrical circuits are non-operational.
’I’ - Steering unlockedTurn the switch to position ’I’ to unlock the steering. Theradio/cassette player can now be operated.
’II’ - Electrical circuits onWith the switch in position ’II’, all instruments, lights and electricalcircuits are operational.
’III’ - Starter motor operatesTurn the switch to position ’III’ to operate the starter motor; releasethe key as soon as the engine starts (the key will automaticallyreturn to position ’II’).
NOTE: On ABS models, immediately after the engine is started, ashort, low pitched ’buzz’ may be heard; this is the ABS systempriming and is no cause for concern.
WARNING!
DO NOT remove the key, orturn the starter switch toposition ’0’, while thevehicle is in motion - oncethe steering lock isengaged, it is impossible tosteer the vehicle.
Operating Tip ..........Unlocking the steeringAfter inserting the key, a smallmovement of the steeringwheel will help to disengage thelock before turning the switchto position ’I’.
Locking the steeringAfter removing the key, turn thesteering wheel towards thekerb until the lock engages.
H2324A

Starting & Driving
63
PETROL MODELS
Starting the engine1. Check that the handbrake is on and that the gear lever is in
neutral.2. Switch off all unnecessary electrical equipment (including the
air conditioning).3. Turn the starter key to position ’III’ and release the key as soon
as the engine has started.
DO NOT press the accelerator pedal while starting and DO NOToperate the starter for more than 15 seconds at a time. If the enginefails to start, switch off and wait for at least 10 seconds beforetrying again.
What to do if the engine fails to start, or starts but will notcontinue running:
• Ensure that the engine is remobilised (ie. the alarm indicatorlight is extinguished).
• Press the accelerator pedal half way down while operating thestarter. DO NOT operate the starter for more than 15 secondsand release the accelerator as soon as the engine fires.
• If the engine still fails to start, operate the starter again, this timefully depressing the accelerator pedal to clear the engine ofexcess fuel. Ensure the starter motor is not operated for morethan 15 seconds and release the accelerator as soon as theengine has started.
• DO NOT pump the accelerator pedal during starting.
Cold climatesIn freezing conditions, fully depress the clutch pedal while startingand hold it down until the engine is running. Note that enginecranking times will increase and that the battery charging and oilpressure lights may take several seconds to extinguish.
Warming upIn the interest of fuel economy, it is advisable to drive the vehiclesoon after starting, remembering that harsh acceleration, orlabouring the engine before normal operating temperature has beenreached, can damage the engine.
WARNING!
Never start, or leave theengine running, in anunventilated building -exhaust gases arepoisonous and containcarbon monoxide, whichcan cause unconsciousnessand may even be fatal.
Care Points .........Catalytic converters can bedamaged if the wrong fuel isused, or if an engine misfireoccurs. Before starting theengine, you should be aware ofthe precautions detailed under’Catalytic converter’.
Continued use of the starter willnot only discharge the battery,but may damage the startermotor and the catalyticconverter.
Operating Tip ..........In freezing conditions, or whenthe battery is in a low state ofcharge, depress the clutchbefore starting and hold itdown until the engine isrunning.

Starting & Driving
64
DIESEL MODELS
Starting the engine1. Check that the handbrake is applied and that the gear lever is in
neutral.2. Switch off all unnecessary electrical equipment (including the
air conditioning).3. Insert the key and turn the starter switch to position ’II’. Wait
until the glow plug warning light extinguishes.4. Turn the key to position ’III’ to operate the starter motor; DO
NOT press the accelerator pedal during starting and RELEASETHE KEY as soon as the engine is running. If the engine stalls,you MUST return the starter switch to position ’0’, then turn thestarter switch to position ’II’ and wait until the glow plugwarning light goes out before attempting to restart; the enginewill not start by turning the starter switch from position ’II’.
In temperate climates, DO NOT operate the starter for longer than10 seconds; if the engine fails to start, switch off and wait for 10seconds before re-using the starter.
Cold climatesIn temperatures of -10° C (14° F) and below, partially depress theaccelerator pedal and fully depress the clutch pedal while starting.Keep the pedals in this position until the engine is running. Notethat engine cranking times will increase - but must not exceed 15seconds - and that the battery charging and oil pressure warninglights may take several seconds to extinguish.
Warming upIn the interests of fuel economy, it is advisable to drive soon afterstarting, remembering that harsh acceleration, or labouring theengine before normal operating temperature has been reached, candamage the engine.
Switching offTo avoid the possibility of damaging the turbocharger bearingsthrough inadequate lubrication, ALWAYS allow the engine to idle for10 seconds before switching off.
WARNING!
Never start, or leave theengine running, in anunventilated building -exhaust gases arepoisonous and containcarbon monoxide, whichcan cause unconsciousnessand may even be fatal.
Care Points .........The engine must not be runabove fast idle speed, until theoil pressure warning lightextinguishes. This will ensurethat the engine andturbocharger bearings areproperly lubricated beforebeing run at normal drivingspeeds.
Catalytic converters can bedamaged if the wrong fuel isused, or if an engine misfireoccurs. Before starting theengine, you should be aware ofthe precautions detailed under’Catalytic converter’.
Continued use of the starter willnot only discharge the battery,but may damage the startermotor and the catalyticconverter.
Operating Tip ..........In freezing conditions, or whenthe battery is in a low state ofcharge, depress the clutchwhile operating the starter; thiswill reduce the load on thebattery.

Starting & Driving
65
ALL MODELS
ParkingAfter bringing the vehicle to a stop, ALWAYS apply the handbrakeand select neutral, before releasing the foot brake and switching offthe engine.
RUNNING-INThe engine, gearbox, brakes and tyres need time to ’bed-in’ andadjust to the demands of everyday motoring. During the first 600miles (1,000 km), it is essential that you drive with considerationfor the running-in process and heed the following advice:
• Do not allow the engine to exceed 3,000 rev/min in any gear.
• Do not operate at full throttle in any gear.
• Do not allow the engine to labour in any gear.
• Avoid heavy braking, where possible.
After the running-in distance has been completed, engine speedsmay be gradually increased.
FUEL ECONOMYFuel consumption is influenced by two major factors:1. How your vehicle is maintained.2. How you drive.
To obtain optimum fuel economy, it is essential that your vehicle ismaintained in accordance with the manufacturer’srecommendations, but above all, the way in which you drive is mostimportant. Note the operating tips alongside.
WARNING!
After switching off, coolingfans may continue rotatingfor several minutes, toprevent the engine fromoverheating. In somecircumstances the coolingfans may commenceoperating up to 4 minutesafter the engine is switchedoff. If the bonnet is opened,keep clear of fans.
Operating Tip ..........The following hints may helpyou to obtain optimum fuelconsumption:
• Avoid unnecessary short,start-stop journeys.
• Avoid fast starts. Alwaysaccelerate smoothly andgently from rest.
• Do not drive in low gearsfor longer than necessary.
• Decelerate gently and avoidsudden and heavy braking.
• Anticipate obstructions wellin advance and adjust yourspeed accordingly.
• Check tyre pressuresregularly.

Catalytic Converter
66
Catalytic converters are easily damaged through improper use,particularly if the wrong fuel is used, so be sure to take notice of thefollowing precautions to minimise the chance of accidental damage.
Fuel
• Use ONLY fuel recommended for your vehicle.
• Never allow the vehicle to run out of fuel - this could cause amisfire which could damage the catalyst.
Starting
• Do not continue to operate the starter after a few failed attempts,seek qualified assistance.
• Do not operate the starter if an engine misfire is suspected anddo not attempt to clear a misfire by pressing the acceleratorpedal.
• Do not attempt to push or tow start the vehicle.
WARNING!
Exhaust temperatures canbe extremely high, do notpark on ground wherecombustible materials suchas dry grass or leaves couldcome into contact with theexhaust system - in dryweather a fire could result.
H2333A

Catalytic Converter
67
Driving
• Do not overload or excessively ’rev’ the engine.
• Do not switch off the engine when the vehicle is in motion with adrive gear selected.
• Consult your dealer if you think your vehicle is burning toomuch oil, as this will progressively reduce catalyst efficiency.
• If a misfire is suspected, or the vehicle lacks power whiledriving, provided the engine has reached its normal operatingtemperature, it may be driven SLOWLY (at risk of catalystdamage) to a Land Rover dealer for assistance.
• Do not run the engine with a spark plug or lead removed or useany device that requires an insert into a spark plug.
• Do not drive the vehicle on extreme terrain likely to subject theunderside of the vehicle to heavy impacts.
IMPORTANT
Any engine misfire, loss ofengine performance or enginerun-on, could seriouslydamage the catalyticconverter. For this reason, itis vital that unqualifiedpersons do not tamper withthe engine and that regularmaintenance is carried out bya Land Rover dealer inaccordance with the serviceinterval plan in the ServicePortfolio book.

Gearbox
68
The gear positions are indicated on the gear lever knob.Synchromesh engagement is provided on all forward gears.
Selecting reverseBefore selecting reverse gear, ensure the vehicle is stationary; then,fully depress the clutch pedal and pause briefly before moving thegear lever into position.
Hill descent control(if fitted)Hill descent control can only be activated when the vehicle is in 1stor reverse gear.
For further information, see ’Hill Descent Control’.
Care Points .........Do not rest your hand on thegear lever when driving -pressure from your hand maycause premature wear to thegear selector mechanism.
Do not rest your foot on theclutch pedal when driving -excessive wear to the clutchwill result.
Do not hold the vehiclestationary on a hill by slippingthe clutch. This will wear outthe clutch. Always use thehandbrake.
Operating Tip ..........In the neutral position, the gearlever is spring loaded to restnaturally between 3rd and 4thgears.
H2327A

Fuel System
69
FUEL FILLERThe fuel filler is located in the rear right-hand wing. Insert the key inthe lock, turn it anti-clockwise and allow any pressure inside thetank to escape, before removing the cap.
TYPE OF FUEL
Petrol engines:The RON value (octane rating) and type of petroleum (unleaded orleaded), available at garage forecourts will vary in different parts ofthe world.
For example, in most European countries 95 RON unleaded fuel isreadily available, but in some parts of the world fuel supplies maybe limited to leaded or lower octane fuels only.
During manufacture, engines are tuned to suit the fuel suppliescommonly available in the market for which the vehicle is destined.However, if a vehicle is later exported to a different country, or isused to travel between different territories, the owner should beaware that the available fuel supplies may not be compatible withthe engine specification. If in doubt, consult a dealer for advice.
IN AN EMERGENCY (and only if the correct fuel is unavailable),lower octane rated fuel can be used for very limited periods ofmoderate, or low speed motoring, provided engine ’knocking’ doesnot occur.
Diesel engines:The quality of diesel fuel can vary in different countries and onlyclean, good quality fuel should be used. It is important that thesulphur content of diesel fuel does not exceed 0.3%. In Europe, allsupplies should be within this limit, but in other parts of the world,you should check with your supplier.
Ensure that the fuel filter element is changed at the recommendedservice intervals.
WARNING!
Use only the recommendedfuel! Serious damage to thecatalytic converter willoccur if the wrong fuel isused.
Petrol fuel specification:95 RON unleaded petrol toEN 228 specification.
Diesel fuel specification:Good quality diesel fuel toEN 590 specification.
Operating Tip ..........Diesel engines: If loss of engineperformance due to the use oflow quality fuel is experienced,drain the fuel filter (see later inthis section).
H2313A

Fuel System
70
FUEL FILLINGAlways fill the tank SLOWLY, until the filler nozzle automaticallycuts-off the fuel supply. DO NOT attempt to fill the tank beyond thispoint, or spillage could result due to expansion of the fuel.
Petrol engines:The filler tube is designed to accept a narrow filler nozzle, of thetype found on pumps that deliver ONLY unleaded fuel. A flap liesacross the filler neck; insert the nozzle sufficiently to fully open theflap before filling.
Diesel engines:The diesel fuel filling system on garage forecourts, is designed to fillat a maximum of 45 litres (10 gallons) per minute. Use ofcommercial vehicle diesel pumps with a higher fill rate, may resultin premature pump cut-off and fuel spillage.
Filling difficultiesThe fuel delivery rate of filling station pumps can vary significantlyfrom one garage forecourt to another. This, coupled with the factthat modern pumps are equipped with a sensor which automaticallycuts off the supply as soon as turbulence is detected in the upperpart of the vehicle’s filler neck, could result in isolated fuel fillingproblems.
If individual owners experience difficulty, the operating tipsalongside may be useful:
For Your Safety .........Petroleum gases are highlyinflammable and, in confinedspaces, are also extremelyexplosive. Always take carewhen refuelling:
• Switch off the engine.
• Do not smoke or use anaked flame.
• Avoid spilling fuel.
• Do not overfill the tank.
Care Points .........DO NOT fully fill the tank if thevehicle is to be parked in directsunlight, or high ambienttemperature - expansion of thefuel could cause spillage.
Operating Tip ..........• Fully insert the filler gun,
then withdraw the gun upto the first ridge on theunderside of the nozzle.
• Hold the filler gun with thetrigger directly below thenozzle. Twisting the gun toeither side is unlikely toease the filling process.
• Fill the tank slowly - DONOT fully squeeze thetrigger.
H2397A

Fuel System
71
Empty fuel tankNEVER allow the vehicle to run out of fuel - the resultant misfiremay destroy the catalytic converter.
Petrol engines:In the event of a fuel tank running dry, contact your Land Roverdealer before attempting to start the engine.
Diesel engines:In the event of the fuel tank running dry, it will be necessary tohand-prime the fuel system (after filling up) by squeezing thepriming bulb in the engine compartment (where shown inillustration), until the bulb feels solid.
Take care to ensure that the primer bulb is not trapped when thebonnet is closed. DO NOT attempt to start the engine until thesystem is properly primed.
H2413

Fuel System
72
FUEL CUT-OFF SWITCH(petrol models only)
The fuel cut-off switch is a safety device which, in the event of acollision or sudden impact, automatically cuts off the fuel supply.
The switch is located on the left hand side of the enginecompartment, mounted on the bulkhead. After the switch has beenactivated, it must be reset by pressing the rubber top (arrowed inillustration) before the engine can be restarted.
See also ’Door locking cut-off switch’ under ’Locks & Alarm’.
WARNING!
ALWAYS check for fuelleaks before resetting thefuel cut-off switch.
H2322

Fuel System
73
DIESEL FUEL FILTER - DRAININGIf running problems or loss of performance are experienced, thefuel filter should be drained, as a precaution against watercontamination of the fuel system.
The filter is located under the tool kit cradle at the rear of the enginecompartment.
To drain:Slacken off the drain cap (turn in the direction arrowed) to allow anywater to drain off. Retighten the cap as soon as pure diesel isemitted.
Operating Tip ..........Attach a length of flexible tubeto the nozzle on the drain cap,to enable fuel to be drained intoa container.
H2414

Lights & Indicators
74
DIRECTION INDICATORSMove the lever down to indicate a LEFT turn, or up to indicate aRIGHT turn. The indicators will cancel automatically, once a turnhas been completed.
The corresponding GREEN warning light on the instrument panelwill flash in time with the direction indicators.
SIDE AND HEADLIGHTSTurn the control to the first position to illuminate the side, tail andinstrument panel lights.
HeadlightsTurn the control to the second position to illuminate the headlights.
Headlight main and dipped beamsPull the lever fully towards the steering wheel to change headlightbeams (the BLUE warning light on the instrument panel illuminateswhen the headlights are on main beam).
To briefly flash the main beams on and off, pull the lever part waytowards the steering wheel and then release.
Operating Tip ..........Hold the direction indicatorlever half way up or down toindicate a lane change.
The side, tail and headlightsoperate with the starter switchin any position.
’Lights on’ warning buzzerIf the exterior lights are left onafter the starter switch isturned off, a warning buzzerwill sound as soon as thedriver’s door is opened. Thebuzzer will cease as soon asthe lights are switched off, orthe door is closed.
H2379A

Lights & Indicators
75
Headlight adjusterThe angle of the dipped beams is affected by the distribution ofpassenger and luggage weight within the vehicle. It is importantthat the headlights are adjusted to ensure that the point at whichthey meet the road surface provides adequate illumination ahead ofthe vehicle without dazzling other road users.
Using the load condition guide alongside, adjust the height of theheadlight beams by moving the control.
Position 0:One person in the driver seat,or driver plus one passenger inthe front seats.
Position 1:All the seats occupied.
Position 2:All seats occupied plus anevenly distributed load in theboot within the limits of themaximum permissible axleweight and maximumpermissible vehicle weight.
Position 3:Driver plus an evenlydistributed load in the bootwithin the limits of themaximum permissible axleweight and maximumpermissible vehicle weight.
These loading definitionsassume that all loads will bewithin the limits of themaximum permissible axle andvehicle weights.
H2310

Wipers & Washers
76
WIPER CONTROLSThe wipers and washers will only operate when the starter switch isturned to position ’II’.
Single wipePull the lever down and release immediately.
NOTE: With the lever held down, the wipers will operate at highspeed until the lever is released.
Intermittent wipeTurn the switch to the first position.
Normal speed wipeTurn switch to second position
Fast speed wipeTurn the switch to the third position.
Variable delay (A) - intermittent wipeRotate the switch to vary the delay between wipes.
Windscreen washerPull the lever towards the steering wheel. The windscreen wiperswill work in conjunction with the washers for as long as the lever isheld in this position, the wipers continuing for a further 3 to 4 wipesafter the lever is released.
Care Points .........DO NOT operate the front orrear wipers on a dry screen.
In freezing or very hotconditions, ensure that theblades are not frozen or stuckto the glass before beingoperated.
In winter, remove snow or icefrom around the arms andblades, including the wipedarea of the screen.
Operating Tip ..........If reverse gear is selected whilethe front wipers are operating(at any speed setting), the rearscreen wiper (if fitted) willoperate automatically until aneutral or a forward drive gearis selected.
H2381A
A

Wipers & Washers
77
Rear screen wash/wipe - if fittedPress and hold the upper switch for the required duration ofwindow washing. The wiper operates automatically during washingand continues for a further 4 wipes (approx.) after the switch isreleased.
Rear screen wiper - if fittedPress the lower switch to operate; after continuously wiping 3 or 4times, the wiper operates intermittently (approx once every 6seconds) until switched off.
Operating Tip ..........If reverse gear is selected whilethe front wipers are operating(at any speed setting), the rearscreen wiper (if fitted) willoperate automatically until aneutral or a forward drive gearis selected.Opening the taildoor, or thetaildoor glass, will switch therear screen wiper off.
H2380
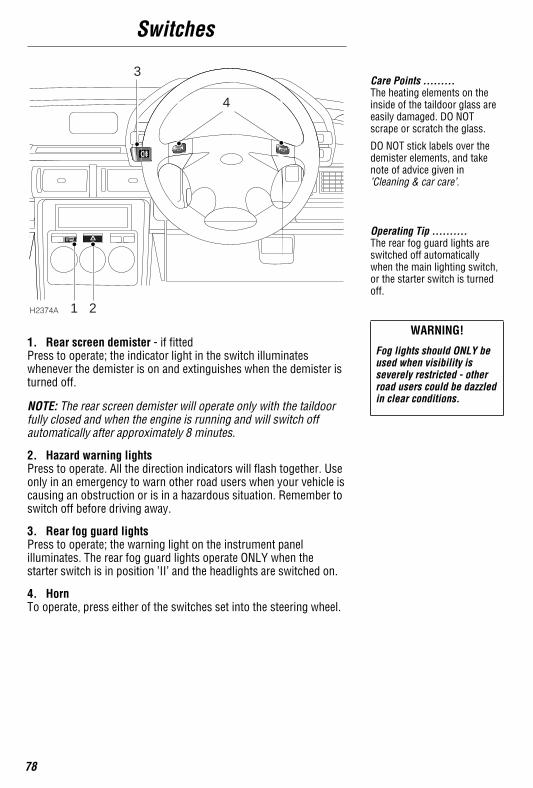
Switches
78
1. Rear screen demister - if fittedPress to operate; the indicator light in the switch illuminateswhenever the demister is on and extinguishes when the demister isturned off.
NOTE: The rear screen demister will operate only with the taildoorfully closed and when the engine is running and will switch offautomatically after approximately 8 minutes.
2. Hazard warning lightsPress to operate. All the direction indicators will flash together. Useonly in an emergency to warn other road users when your vehicle iscausing an obstruction or is in a hazardous situation. Remember toswitch off before driving away.
3. Rear fog guard lightsPress to operate; the warning light on the instrument panelilluminates. The rear fog guard lights operate ONLY when thestarter switch is in position ’II’ and the headlights are switched on.
4. HornTo operate, press either of the switches set into the steering wheel.
Care Points .........The heating elements on theinside of the taildoor glass areeasily damaged. DO NOTscrape or scratch the glass.
DO NOT stick labels over thedemister elements, and takenote of advice given in’Cleaning & car care’.
Operating Tip ..........The rear fog guard lights areswitched off automaticallywhen the main lighting switch,or the starter switch is turnedoff.
WARNING!
Fog lights should ONLY beused when visibility isseverely restricted - otherroad users could be dazzledin clear conditions.
H2374A 1 2
3
4

Brakes
79
BRAKING SYSTEMThe hydraulic braking system operates through dual circuits; if onecircuit should fail, the other will continue to function. However, inthe event of a brake failure where only one circuit is operational, thevehicle should only be driven at slow speed to the nearest LandRover dealer. In these circumstances, exercise EXTREME CAUTIONand be aware that much greater pedal effort and longer stoppingdistances will be required.
The braking system is servo assisted. This means that if the enginestops running, all servo assistance will be lost, requiring greaterpedal effort and resulting in longer stopping distances.
Brake padsBrake pads and linings require a period of bedding in. For the first200 miles (300 km), avoid situations where heavy braking isrequired.
Remember that regular servicing is vital to ensure that the brakecomponents are examined for wear at the correct intervals andchanged whenever necessary to ensure optimum safety andperformance.
Brake warning lightIf the warning light on the instrument panel illuminates whiledriving, and the handbrake is fully released, a fault with the brakingsystem is indicated. Check the brake fluid level; if the lightcontinues to illuminate, seek qualified assistance before continuing.
Operating Tip ..........DO NOT rest your foot on thebrake pedal while driving; thismay overheat the brakes,reducing their efficiency andcausing excessive wear.
WARNING!
If the brake warning lightilluminates while driving,stop the vehicle as soon assafety permits and seekqualified assistance beforecontinuing.
For Your Safety .........NEVER move the vehiclewithout the engine running,servo assistance may not beavailable. The brakes will stillfunction, but greater pedalpressure will be required.

Brakes
80
HANDBRAKEThe handbrake operates on the rear wheels only and should notrequire adjustment. To apply the handbrake, pull the lever up.Always apply the handbrake fully whenever you park the vehicle.
To release, pull the lever up slightly, depress the button (arrowed inillustration) and fully lower the lever (the warning light on theinstrument panel will extinguish when the handbrake is fullyreleased).
WARNING!
DO NOT drive with thehandbrake applied; thiscould damage the rearbrakes and will also preventthe anti-lock braking system(where fitted) fromfunctioning correctly.
H2308

Brakes
81
ANTI-LOCK BRAKING SYSTEM(if fitted)
The anti-lock braking system (ABS) prevents the wheels fromlocking, thereby helping to maintain steering control. No specialdriving techniques or effort is required from the driver.
Under normal braking (where sufficient road surface friction existsto reliably bring the vehicle to a halt, without the wheels locking),the anti-lock braking system will not be activated. However, if theforce of your braking should exceed the available adhesion betweenthe tyres and the road, causing one or more wheels to lock, then theanti-lock braking system will automatically come into operation.This will be recognised by a rapid pulsation felt through the brakepedal.
Anti-lock braking in actionIn an emergency situation, full braking effort should ALWAYS beapplied, even when the road surface is slippery. The anti-lockbraking system constantly monitors the speed of each wheel andvaries braking pressure to each, according to the amount of tractionavailable, thereby ensuring that the wheels do not lock.
Always remember, ABS is designed to maintain steering controlunder heavy braking conditions.
On soft surfaces such as powdery snow, sand or gravel, brakingdistances may be greater than those achievable on a vehicle withoutanti-lock braking. This is because the action of locked wheels onloose surfaces, is to build up a wedge of material in front of thewheels, which assists in bringing the vehicle to a halt. However,even in these circumstances, the anti-lock braking system willprovide better stability and steering control.
WARNING!
The anti-lock brakingsystem cannot overcomethe physical limitations ofstopping the vehicle in tooshort a distance, corneringat high speed, oraquaplaning, i.e. where alayer of water preventsadequate contact betweenthe tyres and road surface.
The fact that the vehicle isfitted with anti-lock braking,must never tempt the driverinto taking risks that couldaffect his/her safety, or thatof other road users. Driversstill have a duty to drivewithin normal safetymargins, having dueconsideration for theprevailing road surface,weather and trafficconditions.

Brakes
82
Warning lightThe anti-lock braking system incorporates a monitoring system,which checks that all the electrical components are in workingorder, as soon as the starter switch is turned to position ’II’ andalso at frequent intervals during your journey.
The warning light on the instrument panel is an important part ofthis system. The warning light should illuminate for approximatelyone second when the starter switch is turned to position ’II’ andthen briefly extinguishes before coming on again. If the light doesnot extinguish and then illuminate again, then a fault has occurredwith the ABS system and you should consult your Land Roverdealer at the earliest opportunity. The warning light will remainilluminated until the vehicle is driven above approximately 5 mph(7 km/h).
If the light remains on or subsequently illuminates while driving, afault has been detected by the self monitoring system and full ABScontrol may not be available - consult your dealer at the earliestopportunity.
NOTE: Immediately after the engine is started, a short, low pitched’buzz’ may be heard; this is the ABS system priming and is nocause for concern.

Hill Descent Control
83
HILL DESCENT CONTROL(if fitted)
Hill Descent Control (HDC) is of particular value when driving offroad, and operates in conjunction with the anti-lock braking systemto provide greater control in off-road situations, when descendingsevere gradients.
To select HDCHDC can be selected with the vehicle in any gear, but will onlyoperate once 1st or reverse gears are engaged.
Squeeze the yellow trigger mounted in the gear lever and slide thecollar section down until the yellow band is visible above the collar,and then release.
If 1st or reverse gear have been engaged, the HDC information light(GREEN) will illuminate (if 1st or reverse gear have not beenselected, the information light will flash).
To deselect HDC, squeeze the trigger - the collar will liftautomatically.
Operating Tip ..........Reverse gear can only beselected when the vehicle isstationary.
H2301A
Hill Descent Control
84
Hill descent control in actionDuring a descent, if engine braking is insufficient to control thevehicle speed, HDC (if selected) automatically operates the brakesto slow the vehicle and maintain a speed relative to the acceleratorpedal position.
When driving off-road, HDC can be permanently selected, to ensurethat control is maintained whenever 1st or reverse gears areengaged. ABS and traction control are still fully operational and willassist if the need arises.
NOTE: With HDC selected, gear changes can be carried out in thenormal way.If the brake pedal is depressed when HDC is active, HDC isoverridden and the brakes will perform as normal (a pulsation mightbe felt through the brake pedal). If the brake pedal is then released,HDC, if necessary, will recommence operating.
If the clutch is depressed for longer than 3 seconds while HDC isoperating, the HDC information light will flash. If, after 60 secondsthe clutch is still depressed, the information light extinguishes andthe HDC ’failure’ warning light flashes as the system gradually fadesout (see ’HDC fade-out’).In extreme circumstances, the HDC system may cause braketemperatures to exceed their pre-set limits. If this occurs, theinformation warning light will extinguish and the HDC ’failure’warning light (AMBER) will start to flash. You should stop thevehicle and disengage HDC. If HDC remains operating and the braketemperature continues to rise the HDC system will gradually fadeout (see ’HDC fade-out’) and the ’failure’ warning light will continueto flash until the brakes have cooled.
Operating Tip ..........Keep HDC selected whileoff-road driving, the system willonly operate when needed.
For Your Safety .........Do not depress the clutch pedalwhen descending a steep slope- control of the vehicle will becompromised and HDC will nolonger function.

Hill Descent Control
85
HDC fade-outHDC fade-out gradually decreases the HDC brake intervention withthe effect that the rate of hill descent will increase. If this occurseither one of the two HDC warning lights will flash for the periodthat HDC takes to fade. HDC will be disabled completely once thedescent is complete.
If required (eg. the angle of the descent levels out significantly),fade-out may be achieved deliberately by deselecting HDC while thesystem is operating or by changing out of the appropriate operatinggear, in which case the green information light will flash. Fade-outwill also occur if the clutch is depressed for longer than 60seconds, in which case the amber failure light will flash.
If a fault with the HDC system is detected, or if the braking systemreaches a pre-set temperature due to extreme conditions, HDC willautomatically fade out (amber failure light flashes).
HDC warning lightsThe HDC system incorporates two warning lights:
HDC information light - GREEN:The light illuminates briefly as a bulb check when thestarter switch is turned to position ’II’. If HDC is
selected when either of the operating gears is engaged (1st orreverse), the light will illuminate continuously. When HDC isselected and a non-operating gear is engaged, the light will flash toinform the driver that HDC is selected, but not operating. The lightwill also flash to indicate that HDC is fading out (see above).
HDC ’failure’ light - AMBER:The light illuminates briefly as a bulb check when thestarter switch is turned to position ’II’. The light will
start flashing if the brakes become in danger of overheating andcontinue flashing until the brakes have cooled sufficiently for HDCto operate again.
If the light illuminates at any other time, a fault in the system isindicated. If this occurs, deselect HDC and consult your Land Roverdealer.

Traction Control
86
ELECTRONIC TRACTION CONTROL(if fitted)
The purpose of electronic traction control is to aid traction whenone wheel spins while the other still has good grip, eg. if one side ofthe vehicle is on ice and the 9other is on tarmac. The system worksby applying the brake to a spinning wheel in order to transfer torqueto the other side of the axle.
NOTE: Traction control only operates below approximately 30 mph(50 km/h).The instrument panel has a traction control warning light (TC)which illuminates whenever the system is active (for a minimum of2 seconds) and also illuminates as a bulb check (for approximately4 seconds) when the starter switch is turned to position ’II’.
If there is a fault with the system, then the warning light willilluminate continuously - contact your dealer at the earliestopportunity.