FreeFlow Scanner 665E System Administration -...
84
FreeFlow Scanner 665E System Administration Guide 701P44149 Version 1.0/September 2005
Transcript of FreeFlow Scanner 665E System Administration -...
FreeFlow Scanner 665ESystem
AdministrationGuide
701P44149Version 1.0/September 2005
Xerox CorporationGlobal Knowledge & Language Services800 Phillips RoadBuilding 845Webster, New York 14580
©Copyright 2005 by Xerox Corporation. All Rights Reserved.
Printed in the U.S.A.
Copyright protection claimed includes all forms and matters of copyrighted material and information now allowed by statutory or judicial law or hereinafter granted, including without limitation, material generated from the software programs that are displayed on the screen such as styles, templates, icons, screen displays, looks, etc.
Xerox®, Xerox Canada Ltd®, Xerox Limited®, FreeFlow™, and all Xerox product names and product numbers mentioned in this publication are trademarks of XEROX CORPORATION. Copyright protection claimed includes all forms and matters of copyrightable material and information now allowed by statutory or judicial law or hereinafter granted, including without limitations, material generated from the software programs which are displayed on the screen such as styles, templates, icons, screen displays looks, etc. Other company brands and product names may be trademarks or registered trademarks of the respective companies and are also acknowledged.
While every care has been taken in the preparation of this material, no liability will be accepted by Xerox Corporation arising out of any inaccuracies or omissions.
Other company trademarks are acknowledged as follows:Adaptec®, the Adaptec logo, SCSlSelect®, and EZ-SCSI® are trademarks of Adaptec, Inc. Adobe PDFL - Adobe PDF Library Copyright© 1987-2002 Adobe Systems Incorporated.Adobe®, the Adobe logo, Acrobat®, the Acrobat logo, Acrobat Reader®, Distiller®, Adobe PDF JobReady™, and PostScript®, and the PostScript logo are either registered trademarks or trademarks of Adobe Systems Incorporated in the United States and/or other countries.Copyright 1987 - 2001 Adobe Systems Incorporated and its licensors. All rights reserved.Autologic® is a registered trademark of Autologic Information International, Inc.Compaq® and QVision® are registered United States Patent and Trademark Office, for Compaq Computer Corporation.DEC, DEC RAID, and Redundant Array of Independent Disks are registered trademarks of Digital Equipment Corporation.Dundas - This software contains material that is (c) 1997-2000 DUNDAS SOFTWARE LTD., all rights reserved.Hummingbird NFS Maestro® is a registered trademark of Hummingbird Communications, Ltd. Imaging Technology provided under license by Accusoft Corporation.ImageGear© 1996-20031 by AccuSoft Corporation. All Rights Reserved.Intel® and Pentium® are registered trademarks of Intel Corporation.Novell® and NetWare® are registered trademarks of Novell, Inc. in the United States and other countries.Oracle® is a registered trademark of Oracle Corporation Redwood City, CaliforniaTMSSequoia - ScanFix® Image Optimizer Copyright© TMSSEQUOIA, Inc. 1991-2000. All rights reserved.SonyTM and Storage by SonyTM are trademarks of Sony.StorageViewTM is a trademark of CMD Technology, Inc.TextBridge® is a registered Trademark of ScanSoft, Inc.TIIFF® is a registered trademark of Aldus Corporation.Windows®, Windows XP®, and Internet Explorer are trademarks of Microsoft Corporation; Microsoft® and MS-DOS® are registered trademarks of Microsoft Corporation.Portions Copyright© 2001 artofcode LLC.This software is based in part on the work of the Independent JPEG Group.This software is based in part on the work of the Freetype Team.Portions Copyright© 2001 URW++. All Rights Reserved.This product includes software developed by the Apache Software Foundation.This software is based in part on the work of Graeme W. Gill.Includes Adobe® PDF Libraries and Adobe Normalizer technologyThe Graphics Interchange Format© is the Copyright property of CompuServe Incorporated. GIFSM is a Service Mark property of CompuServe Incorporated.Portions contain an implementation of the LZW algorithm licensed under U.S. Patent 4,558,302All non-Xerox brands and product names are trademarks or registered trademarks of their respective companies.
FreeFlow Scanner 665E System Administrat ion Guide i
Table of contents
Conventions v
Symbols . . . . . . . . . . . . . . . . . . . . . . . . . . . . . . . . . . . . . . . . . . . . vWriting style conventions . . . . . . . . . . . . . . . . . . . . . . . . . . . . . . .vi
Safety notices vii
Electrical safety. . . . . . . . . . . . . . . . . . . . . . . . . . . . . . . . . . . . . . viiDisconnect device. . . . . . . . . . . . . . . . . . . . . . . . . . . . . . . . . viii
Laser safety . . . . . . . . . . . . . . . . . . . . . . . . . . . . . . . . . . . . . . . . .ixNorth America. . . . . . . . . . . . . . . . . . . . . . . . . . . . . . . . . . . . .ixEurope (EU) and other markets . . . . . . . . . . . . . . . . . . . . . . . x
Safety standards. . . . . . . . . . . . . . . . . . . . . . . . . . . . . . . . . . . . . . xNorth America. . . . . . . . . . . . . . . . . . . . . . . . . . . . . . . . . . . . . xEurope (EU) and other markets . . . . . . . . . . . . . . . . . . . . . . . x
Maintenance safety. . . . . . . . . . . . . . . . . . . . . . . . . . . . . . . . . . . .xiOperational safety. . . . . . . . . . . . . . . . . . . . . . . . . . . . . . . . . . . . .xiOzone safety. . . . . . . . . . . . . . . . . . . . . . . . . . . . . . . . . . . . . . . . xii
Notices xiii
Radio frequency emissions. . . . . . . . . . . . . . . . . . . . . . . . . . . . .xiiiFCC in the USA . . . . . . . . . . . . . . . . . . . . . . . . . . . . . . . . . .xiiiIn Canada (ICES-003) . . . . . . . . . . . . . . . . . . . . . . . . . . . . . xiiiRegulatory information for RFID . . . . . . . . . . . . . . . . . . . . . .xiv
Safety extra low voltage approval. . . . . . . . . . . . . . . . . . . . . . . .xivCertifications in Europe. . . . . . . . . . . . . . . . . . . . . . . . . . . . . . . . xvIt’s illegal in the USA. . . . . . . . . . . . . . . . . . . . . . . . . . . . . . . . . .xviIt’s illegal in Canada . . . . . . . . . . . . . . . . . . . . . . . . . . . . . . . . . .xixEnvironmental notices for the USA. . . . . . . . . . . . . . . . . . . . . . . xxEnvironmental notices for Canada . . . . . . . . . . . . . . . . . . . . . . .xxi
FreeFlow Scanner 665E System Administ rat ion Guidei i
Table of contents
Product recycling and disposal . . . . . . . . . . . . . . . . . . . . . . . . . xxiiNorth America. . . . . . . . . . . . . . . . . . . . . . . . . . . . . . . . . . . xxiiEuropean union . . . . . . . . . . . . . . . . . . . . . . . . . . . . . . . . . xxiiOther countries . . . . . . . . . . . . . . . . . . . . . . . . . . . . . . . . . . xxii
1. About this guide 1-1
Audience. . . . . . . . . . . . . . . . . . . . . . . . . . . . . . . . . . . . . . . . . . 1-2Related information. . . . . . . . . . . . . . . . . . . . . . . . . . . . . . . . . . 1-2
FreeFlow applications documentation . . . . . . . . . . . . . . . . 1-2Scanner documentation . . . . . . . . . . . . . . . . . . . . . . . . . . . 1-3
Xerox FreeFlow Scanner 665E. . . . . . . . . . . . . . . . . . . 1-3Xerox Production Printing Services . . . . . . . . . . . . . . . . . . 1-3Third party software . . . . . . . . . . . . . . . . . . . . . . . . . . . . . . 1-3Windows related information. . . . . . . . . . . . . . . . . . . . . . . . 1-4
Windows online Help . . . . . . . . . . . . . . . . . . . . . . . . . . 1-4Windows web site . . . . . . . . . . . . . . . . . . . . . . . . . . . . . 1-4
Getting Help online . . . . . . . . . . . . . . . . . . . . . . . . . . . . . . . . . . 1-5Using a Help menu . . . . . . . . . . . . . . . . . . . . . . . . . . . . . . . 1-5Using Help in a dialog box . . . . . . . . . . . . . . . . . . . . . . . . . 1-5
Ordering additional materials and supplies. . . . . . . . . . . . . . . . 1-6Obtaining additional support . . . . . . . . . . . . . . . . . . . . . . . . . . . 1-6
X-PRESS FAX . . . . . . . . . . . . . . . . . . . . . . . . . . . . . . . . . . 1-6Xerox FAQ web site . . . . . . . . . . . . . . . . . . . . . . . . . . . . . . 1-6Xerox Welcome Center. . . . . . . . . . . . . . . . . . . . . . . . . . . . 1-7
2. Virus protection 2-1
Protecting the system from virus contamination . . . . . . . . . . . . 2-1Microsoft updates . . . . . . . . . . . . . . . . . . . . . . . . . . . . . . . . 2-2
3. Windows and network configurations 3-1
Understanding and using Windows . . . . . . . . . . . . . . . . . . . . . 3-2Performing basic Windows administrative functions. . . . . . 3-2
Creating shortcuts. . . . . . . . . . . . . . . . . . . . . . . . . . . . . 3-2Adding Windows printers . . . . . . . . . . . . . . . . . . . . . . . 3-2Adding and configuring users and groups . . . . . . . . . . 3-2Setting up shared folders, files, and printers. . . . . . . . . 3-3Adding or removing network connections . . . . . . . . . . . 3-3
Preparing to shut down the system . . . . . . . . . . . . . . . . . . . . . 3-3Checking for connected users . . . . . . . . . . . . . . . . . . . . . . 3-4Notifying users connected to the system . . . . . . . . . . . . . . 3-5
FreeFlow Scanner 665E System Administrat ion Guide iii
Table of contents
Disconnecting users connected to the remote workstation. 3-5Using Windows Automatic Update . . . . . . . . . . . . . . . . . . . . . . 3-6
Running Automatic Update. . . . . . . . . . . . . . . . . . . . . . . . . 3-7Using the Event Viewer . . . . . . . . . . . . . . . . . . . . . . . . . . . . . . 3-9
4. Hardware maintenance 4-1
Scanner Support. . . . . . . . . . . . . . . . . . . . . . . . . . . . . . . . . . . . 4-1Configuration tab. . . . . . . . . . . . . . . . . . . . . . . . . . . . . . . . . 4-2Customer Replaceable Units (CRUs) . . . . . . . . . . . . . . . . . 4-3
Replacing Parts. . . . . . . . . . . . . . . . . . . . . . . . . . . . . . . 4-4Feed and Retard Rollers . . . . . . . . . . . . . . . . . . . . . 4-4Air Filter. . . . . . . . . . . . . . . . . . . . . . . . . . . . . . . . . . 4-6
Fault Log. . . . . . . . . . . . . . . . . . . . . . . . . . . . . . . . . . . . . . . 4-8Tools . . . . . . . . . . . . . . . . . . . . . . . . . . . . . . . . . . . . . . . . . . 4-9
Setup Registration . . . . . . . . . . . . . . . . . . . . . . . . . . . . 4-9Calibrate Scanner . . . . . . . . . . . . . . . . . . . . . . . . . . . . 4-12Test Buttons and LEDs . . . . . . . . . . . . . . . . . . . . . . . . 4-13Test Carriage and Lamp . . . . . . . . . . . . . . . . . . . . . . . 4-14Test Electronics. . . . . . . . . . . . . . . . . . . . . . . . . . . . . . 4-15Image Scan Test . . . . . . . . . . . . . . . . . . . . . . . . . . . . . 4-16
5. System administration 5-1
Security recommendations . . . . . . . . . . . . . . . . . . . . . . . . . . . . 5-1
6. Production printing administration 6-1
Understanding production printing . . . . . . . . . . . . . . . . . . . . . . 6-2Production printing via TCP/IP (UNIX) . . . . . . . . . . . . . . . . 6-2
Setting up production printers. . . . . . . . . . . . . . . . . . . . . . . . . . 6-3Adding a production printer. . . . . . . . . . . . . . . . . . . . . . . . . 6-4Modifying a production printer. . . . . . . . . . . . . . . . . . . . . . . 6-6Setting the default production printer . . . . . . . . . . . . . . . . . 6-6Removing a production printer . . . . . . . . . . . . . . . . . . . . . . 6-7Creating a Job Ticket . . . . . . . . . . . . . . . . . . . . . . . . . . . . . 6-8
Using High Security with DocuSP 4.x./5.x and TCP/IP . . . . . . 6-9Adding a High Security printer . . . . . . . . . . . . . . . . . . . . . . 6-9
Installing a security certificate. . . . . . . . . . . . . . . . . . . . . . . . . 6-11Resolving production printing problems . . . . . . . . . . . . . . . . . 6-13
Resolving TCP/IP problems . . . . . . . . . . . . . . . . . . . . . . . 6-13Viewing the Event Viewer . . . . . . . . . . . . . . . . . . . . . . . . . 6-13Cleaning up print file problems . . . . . . . . . . . . . . . . . . . . . 6-14
FreeFlow Scanner 665E System Administ rat ion Guideiv
Table of contents
7. Quick Print administration 7-1
System requirements . . . . . . . . . . . . . . . . . . . . . . . . . . . . . . . . 7-2Using DOS command lines. . . . . . . . . . . . . . . . . . . . . . . . . . . . 7-2Printing a document using Quick print . . . . . . . . . . . . . . . . . . . 7-3
FreeFlow Scanner 665E System Administrat ion Guide v
Conventions
Standardized conventions have been used in this manual to assist you in visually locating and identifying information quickly.
Symbols
CAUTION: This symbol alerts you to an action that may cause damage to hardware, software, or result in the loss of data.
WARNING: Warnings mark alert users to areas of the machine where there is a possibility of personal injury.
WARNING: This symbol identifies an area on the machine that is HOT and should not be touched.
WARNING: This symbol indicates a laser is being used in the machine and alerts you to refer to the appropriate safety information.
KEY POINT: This symbol identifies information that is being emphasized and is important for you to remember.
FreeFlow Scanner 665E System Administ rat ion Guidevi
Convent ions
The 1 2 3... symbol indicates the beginning of a task or work process you should use to complete a procedure and is followed by the first step of a numbered procedure, task, or work process.
NOTE: This symbol calls your attention to information that is helpful, but not essential to complete a procedure or task.
This symbol indicates that there is additional information from another source, such as a web site or manual.
Writing style conventions
• Bold type indicates the name of a button to press or touch.• Underlining is used to emphasize a word or term.• Italic type is used for the text associated with symbols such as
Notes to visually bring the information to your attention.• Italic type is also used to indicate names, such as the name of
a chapter, or the name of a screen.• Procedures direct you to press buttons located on the Control
Panel, and touch buttons located on the Touch Screen.• Text referring to illustrations or screen samples precedes the
image.
FreeFlow Scanner 665E System Administrat ion Guide vi i
Safety notices
This Xerox product and the recommended supplies are designed and tested to meet strict safety requirements. These include safety agency approval and compliance to established environmental standards. Please read the following instructions carefully before operating the product, and refer to them as needed to ensure the continued safe operation of your product.KEY POINT: The safety testing and performance of this product have been verified using Xerox materials only.WARNING: Any unauthorized alteration, which may include the addition of new functions or connection of external devices, may impact the product certification. Please contact your authorized local dealer for more information.
Electrical safety
• Use only the power cord supplied with this equipment.• Plug the power cord directly into a correctly grounded
electrical outlet. Do not use an extension cord. If you do not know whether or not an outlet is grounded, consult a qualified electrician.
• Do not use a ground adapter plug to connect this equipment to an electrical outlet that lacks a ground connection terminal.
WARNING: You may incur a severe electrical shock if the outlet is not grounded correctly.• Do not place the press where people may step or trip on the
power cord. Do not place objects on the power cord.• Do not override or disable electrical or mechanical interlocks.• Do not obstruct the ventilation openings. These openings
prevent overheating of the machine.
FreeFlow Scanner 665E System Administ rat ion Guidevi i i
Safety not ices
WARNING: Never push objects of any kind into slots or openings on this equipment. Making a contact with a voltage point or shorting out a part may result in fire or electrical shock.If any of the following conditions occur, immediately switch off the power to the machine and disconnect the power cord from the electrical outlet. Call an authorized Xerox service representative to correct the problem.• The machine emits unusual noises or odors.• The power cord is damaged or frayed.• A wall panel circuit breaker, fuse, or other safety device is
tripped.• Liquid is spilled into the press.• The machine is exposed to water.• Any part of the machine is damaged.
Disconnect device
The power cable is the disconnect device for this equipment and is attached to the back of the machine as a plug-in device. To remove all electrical power from the machine, disconnect the power cable from the electrical outlet.WARNING: This product must be connected to a protective earth current.
FreeFlow Scanner 665E System Administrat ion Guide ix
Safety not ices
Laser safety
North America
This product complies with safety standards and is certified as a Class 1 Laser product under the Center for Devices and Radiological Health (CDRH) of the United States Food and Drug Administration (FDA) implemented regulations for laser products. This product complies with FDA 21 CFR 1940.10 and 1040.11 except for deviations pursuant to Laser Notice No. 50, dated July 26, 2001. These regulations apply to laser products marketed in the United States. The label on the machine indicates compliance with CDRH regulations and must be attached to laser products marketed in the United States. This product does not emit hazardous laser radiation.CAUTION: Use of controls or adjustments or performance of procedures other than those specified herein may result in hazardous exposure of laser light.Since radiation emitted inside this product is completely confined within the protective housing and external covers, the laser beam cannot escape from the machine during any phase of the user operation.This product contains laser warning labels. These labels are intended for use by the Xerox Service Representative and are placed on or near panels or shields that require special tools for removal. Do not remove any of the panels. There are no operator serviceable areas in these covers.
FreeFlow Scanner 665E System Administ rat ion Guidex
Safety not ices
Europe (EU) and other markets
This product complies with IEC’s safety standard 60825-1 (Edition 1.2) issued August 2001.The equipment complies with laser product performance standards set by governmental, national, and international agencies as a Class 1 Laser Product. It does not emit hazardous radiation as the beam is totally enclosed during all phases of customer operation and maintenance.CAUTION: Use of controls or adjustments or performance of procedures other than those specified herein may result in hazardous radiation exposure.This product contains laser warning labels. These labels are intended for use by the Xerox Service Representative and are placed on or near panels or shields that require special tools for removal. Do not remove any of the panels. There are no operator serviceable areas inside these covers.If you need additional safety information concerning the product or Xerox supplied materials, you may call the following number:
+44 (0) 1707 353434
Safety standards
North America
This Xerox product is safety certified by Underwriters Laboratories Incorporated to Standards UL60950-1 (first edition), and CSA International CAN/CSA C22.2 No. 60950-1-03 (First Edition).
Europe (EU) and other markets
This Xerox product is safety certified by Underwriters Laboratories Incorporated to publication IEC60950-1 (2001) First Edition.
FreeFlow Scanner 665E System Administrat ion Guide xi
Safety not ices
Maintenance safety
• Do not attempt any maintenance procedure that is not specifically described in the documentation supplied with your product.
• Do not use aerosol cleaners. The use of supplies that are not approved may cause poor performance of the press and could create a dangerous condition.
• Use the supplies and cleaning materials only as directed in this manual. Keep all materials out of the reach of children.
• Do not remove the covers or guards that are fastened with screws. There are no parts behind these covers that you can maintain or service.
Do not perform any maintenance procedures unless you have been trained to do them by a Xerox representative, or unless a procedure is specifically described in one of the manuals included with your press.
Operational safety
Your Xerox equipment and supplies were designed and tested to meet strict safety requirements. These include safety agency examination, approval, and compliance with established environmental standards.Your attention to the following safety guidelines will help ensure the continued safe operation of your product:• Use the materials and supplies specifically designed for your
product. The use of unsuitable materials may result in poor performance of the machine and possibly a hazardous situation.
• Follow all warnings and instructions that are marked on or supplied with the machine.
• Place the machine in a room that provides adequate space for ventilation and servicing.
• Place the machine on a level, solid surface (not on a thick pile carpet) that has adequate strength to support the weight of the machine.
• Do not attempt to move the machine. A leveling device that was lowered when your machine was installed may damage the carpet or floor.
• Do not set up the machine near a heat source.• Do not set up the machine in direct sunlight.
FreeFlow Scanner 665E System Administ rat ion Guidexi i
Safety not ices
• Do not set up the machine in line with the cold air flow from an air conditioning system.
• Do not place containers of coffee or other liquid on the machine.
• Do not block or cover the slots and openings on the machine.• Do not attempt to override any electrical or mechanical
interlock devices.
WARNING: Be careful when working in areas identified with this warning symbol. These areas may be very hot and should not be touched.If you need any additional safety information concerning the machine or materials, contact your Xerox representative.
Ozone safety
This product produces ozone during normal operation. The ozone is heavier than air, and the quantity is dependent on print volume. Providing the correct environmental parameters, as specified in the Xerox installation procedures, ensures that concentration levels meet safe limits.If you need additional information about ozone, request the Xerox publication, OZONE by calling 1-800-828-6571 in the USA. For a French language version, call 1-800-828-6571 in the USA, then press 2.

FreeFlow Scanner 665E System Administrat ion Guide xii i
Notices
Radio frequency emissions
FCC in the USA
This equipment has been tested and found to comply with the limits for a Class A digital device, pursuant to Part 15 of the Federal Communications Commission (FCC) Rules. These limits are designed to provide reasonable protection against harmful interference when the equipment is operated in a commercial environment. This equipment generates, uses, and can radiate radio frequency energy and, if not installed and used in accordance with the instruction manual, may cause harmful interference to radio communications. Operation of this equipment in a residential area is likely to cause harmful interference in which case the user will be required to correct the interference at his/her own expense.Changes or modifications to this equipment not specifically approved by the Xerox Corporation may void the user’s authority to operate this equipment.WARNING: Shielded cables must be used with this equipment to maintain compliance with FCC regulations.
In Canada (ICES-003)
This Class “A” digital apparatus complies with Canadian ICES-003.Cet appareil numérique de la classe “A” est conforme á la norme NMB-003 du Canada.
FreeFlow Scanner 665E System Administ rat ion Guidexiv
Notices
Regulatory information for RFID
This product generates 13.56 MHz using an Inductive Loop System as a Radio Frequency IDentification system device (RFID). This system is certified in compliance with European Council Directive 99/5/EC and applicable local laws or regulations as applicable.
Safety extra low voltage approval
This Xerox product is in compliance with various governmental agencies and national safety regulations. All system ports meet the Safety Extra Low Voltage (SELV) circuits for connection to customer-owned devices and networks. Additions of customer-owned or third-party accessories that are attached to the press must meet or exceed the requirements previously listed. All modules that require external connection must be installed per the installation procedure.
FreeFlow Scanner 665E System Administrat ion Guide xv
Certifications in Europe
The CE marking that is applied to this product symbolizes Xerox Declaration of Conformity with the following applicable Directives of the European Union as of the dates indicated:
January 1, 1995: Council Directive 73/23/EEC amended by Council Directive 93/68/EEC, approximation of the laws of the member states related to low voltage equipment.
January 1, 1996: Council Directive 89/336/EEC, approximation of the laws of the member states related to electromagnetic compatibility.
March 9, 1999 Council Directive 99/5/EC on radio equipment and telecommunications terminal equipment and the mutual recognition of their conformity.A full declaration, defining the relevant directives and referenced standards, can be obtained from your Xerox Limited representative or by contacting:
Environment, Health and SafetyThe Document Company XeroxBessemer RoadWelwyn Garden CityHertsAL7 1HEEnglandTel Number +44 (0) 1707 353434
WARNING: This system is certified manufactured and tested in compliance with strict safety and radio frequency interference regulations. Any unauthorized alteration which includes the addition of new functions or the connection of external devices may impact this certification. Please contact your local Xerox Limited representative for a list of approved accessories.
FreeFlow Scanner 665E System Administ rat ion Guidexvi
Not ices
WARNING: In order to allow this equipment to operate in proximity to Industrial, Scientific, and Medical (ISM) equipment, the external radiation from the ISM equipment may have limited or special mitigation measures taken.WARNING: This is a Class A product in a domestic environment. This product may cause radio frequency interference in which case the user may be required to take adequate measures.WARNING: Shielded cables must be used with this equipment to maintain compliance with Council Directive 89/336/EEC.
It’s illegal in the USA
Congress, by statute, has forbidden the reproduction of the following subjects under certain circumstances. Penalties of fine or imprisonment may be imposed on those guilty of making such reproductions.
1. Obligations or Securities of the United States Government, such as:Certificates of Indebtedness National Bank CurrencyCoupons from Bonds Federal Reserve Bank NotesSilver Certificates Gold CertificatesUnited States Bonds Treasury NotesFederal Reserve Notes Fractional NotesCertificates of Deposit Paper MoneyBonds and Obligations of certain agencies of the government, such as FHA, etc.

FreeFlow Scanner 665E System Administrat ion Guide xvi i
Notices
Bonds. (U.S. Savings Bonds may be photographed only for publicity purposes in connection with the campaign for the sale of such bonds.)Internal Revenue Stamps. (If it is necessary to reproduce a legal document on which there is a canceled revenue stamp, this may be done provided the reproduction of the document is performed for lawful purposes.)Postage Stamps, canceled or uncanceled. (For philatelic purposes, Postage Stamps may be photographed, provided the reproduction is in black and white and is less than 75% or more than 150% of the linear dimensions of the original.)Postal Money Orders.Bills, Checks, or Drafts of money drawn by or upon authorized officers of the United States.Stamps and other representatives of value, of whatever denomination, which have been or may be issued under any Act of Congress.
2. Adjusted Compensation Certificates for Veterans of the World Wars.
3. Obligations or Securities of any Foreign Government, Bank, or Corporation.
4. Copyrighted material, unless permission of the copyright owner has been obtained or the reproduction falls within the “fair use” or library reproduction rights provisions of the copyright law. Further information of these provisions may be obtained from the Copyright Office, Library of Congress, Washington, D.C. 20559. Ask for Circular R21.
5. Certificates of Citizenship or Naturalization. (Foreign Naturalization Certificates may be photographed.)
FreeFlow Scanner 665E System Administ rat ion Guidexvi i i
Not ices
6. Passports. (Foreign Passports may be photographed.)
7. Immigration Papers.
8. Draft Registration Cards.
9. Selective Service Induction Papers that bear any of the following Registrant’s information:Earnings or Income Dependency StatusCourt Record Previous military servicePhysical or mental conditionException: United States military discharge certificates may be photographed.
10.Badges, Identification Cards, Passes, or Insignia carried by military personnel, or by members of the various Federal Departments, such as FBI, Treasury, etc. (unless photograph is ordered by the head of such department or bureau.)Reproducing the following is also prohibited in certain states: Automobile Licenses - Drivers’ Licenses - Automobile Certificates of Title.
The above list is not all inclusive, and no liability is assumed for its completeness or accuracy. In case of doubt, consult your attorney.
FreeFlow Scanner 665E System Administrat ion Guide xix
Notices
It’s illegal in Canada
Parliament, by statute, has forbidden the reproduction of the following subjects under certain circumstances. Penalties of fines or imprisonment may be imposed on those guilty of making such copies.
1. Current bank notes or current paper money.
2. Obligations or securities of a government or bank.
3. Exchequer bill paper or revenue paper.
4. The public seal of Canada or of a province, or the seal of a public body or authority in Canada, or of a court of law.
5. Proclamations, orders, regulations or appointments, or notices thereof (with intent to falsely cause same to purport to have been printed by the Queen’s Printer for Canada, or the equivalent printer for a province).
6. Marks, brands, seals, wrappers or designs used by or on behalf of the Government of Canada or of a province, the government of a state other than Canada or a department, board, Commission or agency established by the Government of Canada or of a province or of a government of a state other than Canada.
7. Impressed or adhesive stamps used for the purpose of revenue by the Government of Canada or of a province or by the government of a state other than Canada.
8. Documents, registers or records kept by public officials charged with the duty of making or issuing certified copies thereof, where the reproduction falsely purports to be a certified copy thereof.
9. Copyrighted material or trademarks of any manner or kind without the consent of the copyright or trademark owner.
The above list is provided for your convenience and assistance, but it is not all inclusive, and no liability is assumed for its completeness or accuracy. In case of doubt, consult your solicitor.
FreeFlow Scanner 665E System Administ rat ion Guidexx
Notices
Environmental notices for the USA
As an ENERGY STAR® partner, Xerox Corporation has determined that this product meets the ENERGY STAR guidelines for energy efficiency.The ENERGY STAR and ENERGY STAR MARK are registered United Stated trademarks.The ENERGY STAR Office Equipment Program is a team effort between U.S., European Union and Japanese governments, and the office equipment industry to promote energy-efficient copiers, printers, fax, multifunction machines, personal computers, and monitors. Reducing product energy consumption helps combat smog, acid rain, and long-term changes to the climate by decreasing the emissions that result from generating electricity.Xerox ENERGY STAR equipment is preset at the factory. Your machine will be delivered with the timer for switching to Low Power Mode from the last copy/print output, set at 15 minutes. The time to switch to power save (auto off/sleep) mode is set at 60 minutes from the last copy/print output. A more detailed description of the Power Saver Mode, together with instructions on changing the default time to suit your work pattern, can be found in the System Administration Guide, System Timers, Power Saver section.

FreeFlow Scanner 665E System Administrat ion Guide xxi
Notices
Environmental notices for Canada
Terra Choice Environmental Services, Inc. of Canada has verified that this Xerox product conforms to all applicable Environmental Choice EcoLogo requirements for minimized impact to the environment.
As a participant in the Environmental Choice program, Xerox Corporation has determined that this product model meets the Environmental Choice guidelines for energy efficiency.Environment Canada established the Environmental Choice program in 1988 to help consumers identify environmentally responsible products and services. Copier, printer, digital press, scanners, and fax products must meet energy efficiency and emissions criteria, and exhibit compatibility with recycled supplies. Currently, Environmental Choice has more than 1600 approved products and 140 licensees. Xerox has been a leader in offering EcoLogo approved products. In 1996, Xerox became the first company licensed to use the Environmental Choice EcoLogo for its copiers, printers, and fax machines.
FreeFlow Scanner 665E System Administ rat ion Guidexxi i
Not ices
Product recycling and disposal
If you are managing the disposal of your Xerox product, please note that the product contains lead and other materials whose disposal may be regulated due to environmental considerations. The presence of lead is fully consistent with global regulations applicable at the time that the product was placed on the market.
North America
Xerox operates a worldwide equipment take-back and reuse/recycle program. Contact your Xerox sales representative (1-800-ASK-XEROX) to determine whether this Xerox product is part of the program. For more information about Xerox environmental programs, visit www.xerox.com/environment.For recycling and disposal information, contact your local authorities. In the United States, you may also refer to the Electronic Industries Alliance web site: www.eiae.org.If your product is not part of the Xerox program and you are managing its disposal, please follow the instructions provided in the above paragraph.
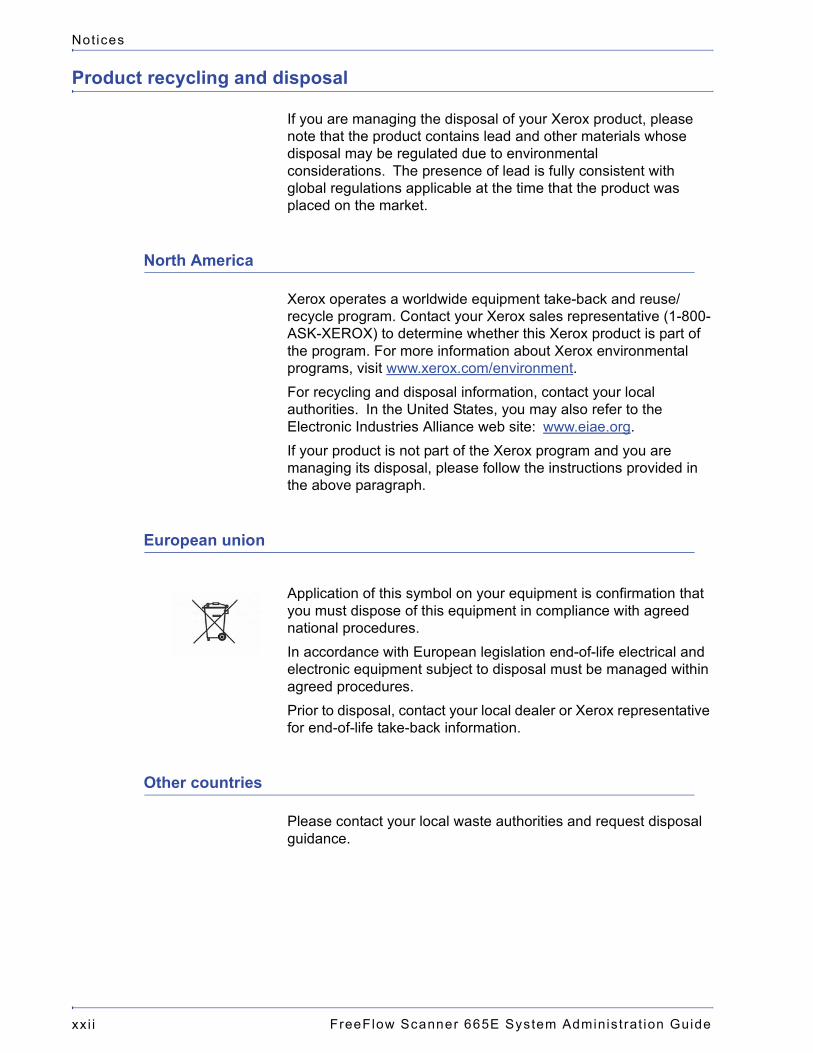
European union
Application of this symbol on your equipment is confirmation that you must dispose of this equipment in compliance with agreed national procedures.In accordance with European legislation end-of-life electrical and electronic equipment subject to disposal must be managed within agreed procedures.Prior to disposal, contact your local dealer or Xerox representative for end-of-life take-back information.
Other countries
Please contact your local waste authorities and request disposal guidance.
FreeFlow Scanner 665E System Administrat ion Guide 1-1
1. About this guide
The guide provides information on configuring, customizing, and maintaining your entire system. This guide also provides information for Quick Print, and it also provides instructions for using all the administrative functions in configuring the FreeFlow applications.This chapter explains the information found in this guide, how the information is organized, and helps you to get the most out of this guide by:• identifying the audience and the basic skills required to use
this guide effectively• explaining the standard conventions and cues that highlight
important information• listing related documentation you may find helpful• listing available online Help systems• providing information on ordering additional materials and
supplies• providing information on obtaining additional information
FreeFlow Scanner 665E System Administ rat ion Guide1-2
1. About this guide
Audience
This guide is a comprehensive reference manual intended for site administrators and advanced operators. Many of the procedures described in this guide require you to log on to a computer or network as an administrator with administrative privileges. Also, many of the maintenance tasks described in this guide require a solid understanding of hardware components, networks, and operating systems associated with FreeFlow applications.This guide assumes you are familiar with the Windows XP Professional operating system, standard communication protocols, basic networking terms, and production printer connections. You should also have a working knowledge of the following:• IBM-compatible personal computers • Local area networks (LANs)• Novell operating system• Xerox Publishing Printers
Related information
This section lists additional materials you may need, or will find helpful, when using your system.To order the Xerox documentation listed below, or for additional information on Xerox solutions, contact your Xerox Representative.
FreeFlow applications documentation
For more information on FreeFlow applications, refer to the following publications:• Online Help system in each application• Xerox FreeFlow Customer Software Release Document• Xerox FreeFlow Operator Manual• Xerox FreeFlow Scanner 665E Customer Training Programs
For more information on the training program, contact your Customer Training Specialist (CTS).

FreeFlow Scanner 665E System Administrat ion Guide 1-3
1. About th is guide
Scanner documentation
Xerox FreeFlow Scanner 665E
For more information on the FreeFlow Scanner 665E, refer to the FreeFlow Scanner 665E Online Help system.
Xerox Production Printing Services
For more information on the Xerox Production Printing Services and Network Server products, refer to the following publications:• Site Configuration Guide• Using Xerox Production Printing Services• Problem Solving Guide
Third party software
For additional information about third party software and hardware, refer to the following materials: • FreeFlow Scanner 665E Online Help
• DELL™ Optiplex and Monitor User’s Guides
FreeFlow Scanner 665E System Administ rat ion Guide1-4
1. About this guide
Windows related information
Microsoft provides users and administrators with several different resources to support the Windows environment. Some of these resources include web sites and online Help. The following sections describe these sources and tell you how to find and use them.
Windows online Help
Windows Server and Professional includes extensive online Help for all aspects of the operating systems. Most likely, the online Help will be your primary source for information. Administrative procedures, from adding users and managing groups to installing Windows printers, can be found in the online Help files. Furthermore, most Windows applications also contain their own online Help system, containing information that is specific to the application.To access online Help, select Start: Help from the Windows task bar. If you are looking for help within a specific application, use the options available from the Help menu within that application.
Windows web site
Microsoft has a Windows World Wide Web site that contains the latest Windows news and information about upgrades. The URL for this site is:http://www.microsoft.com/
FreeFlow Scanner 665E System Administrat ion Guide 1-5
1. About th is guide
Getting Help online
This section describes the type of online help available online for the FreeFlow applications.
Using a Help menu
All FreeFlow applications provide a Help menu.Select the Contents tab to browse for the desired topic in the Help system.Select the Index tab to scroll an alphabetical index of Help topics.Select the Search tab to search for all topics for information on a specific feature or function.
Using Help in a dialog box
Most dialog boxes in the FreeFlow system provide the standard Windows Help button [?] in dialog and message boxes. This button is displayed in the title bar of the dialog, next to the close button, [X].This button provides context-sensitive Help, so you can select it, then click in the dialog on the field or option for which you need Help. A Help window opens, displaying information for the selected field or option.
FreeFlow Scanner 665E System Administ rat ion Guide1-6
1. About this guide
Ordering additional materials and supplies
You are provided with all the resources you need to operate and maintain your FreeFlow system; however, you may order additional materials or supplies.To reorder the scanner registration documents or the training disks, or to order screen finder tools, refer to the Xerox Supplies Resource Catalog (610P18158) or contact your Xerox representative.To order cleaning supplies for the scanner, refer to the scanner Operator Manual.
Obtaining additional support
This section describes where you can obtain additional support for a FreeFlow application.
X-PRESS FAX
You can obtain additional support documentation for a specific FreeFlow system, including solutions to common work process problems and hints and tips for enabling optimal use of the equipment from Xerox C&TS Electronic Services.Call X-PRESS at 1-800-979-9709 and request document number 12300 to receive a complete index of the documented solutions for a FreeFlow system, along with complete instructions for using the X-PRESS fax system.
Xerox FAQ web site
Xerox provides a FAQ (Frequently Asked Questions) web site for customers who have a FreeFlow system. To access the Xerox FAQ web site:• Go to http://www.xerox.com from your web browser.• Search on the word “freeflow.”• Find the appropriate FreeFlow link.• Select the Support link under the appropriate FreeFlow link.• Under the FAQ heading, select the desired topic link to display
the FAQ page for that topic.
FreeFlow Scanner 665E System Administrat ion Guide 1-7
1. About th is guide
Xerox Welcome Center
If your system is down, you can’t solve a problem, or you have questions about your FreeFlow system, use the following phone numbers to contact the Xerox Welcome Center:• In North America, call 1-800-821-2797• In Canada, call 1-800-939-3769NOTE: When placing a call to the Xerox Welcome Center, have your serial number available for your FreeFlow system.

FreeFlow Scanner 665E System Administ rat ion Guide1-8
1. About this guide
FreeFlow Scanner 665E System Administrat ion Guide 2-1
2. Virus protection
This chapter describes the recommended procedures for protecting your system from virus contamination.
Protecting the system from virus contamination
Xerox takes special precautions to ensure the software is shipped free from computer virus contamination. It is strongly recommended that you invest in a virus detection software application to protect your system from viruses.Computer viruses are best detected by virus detection and control application software that is accepted by the PC industry.Some of the virus detection and control applications available to and widely-used by the PC industry include:• Norton Anti-Virus by Symantec• McAfee VirusScan by Network Associates, Inc.NOTE: To ensure maximum protection from new viruses, update or upgrade your virus detection software frequently.
It is strongly recommended that you follow these guidelines to keep your system decontaminated:• On a regular basis (at least weekly), run virus detection
software on all systems.You can remove a virus by using the procedures supplied with your virus protection software.
FreeFlow Scanner 665E System Administ rat ion Guide2-2
2. Virus protect ion
NOTE: This is is to protect your data in the event of corruption during the course of the virus removal.
You can then remove the virus using the procedures supplied with your virus protection software.
Microsoft updates
It is recommended that you perform periodic Windows update. This is discussed in more detail in “Using Windows Automatic Update” on page 3-6.
FreeFlow Scanner 665E System Administrat ion Guide 3-1
3. Windows and network configurations
This chapter describes some of the Windows functions and network configurations used with Xerox FreeFlow applications.Topics covered in this chapter include:• a brief description of some of the basic Windows procedures
you may need to perform• instructions for preparing to shut down the system• using Windows Update• instructions on using the Event ViewerKEY POINT: You are strongly advised to obtain a dedicated Windows operating system administration guide.

FreeFlow Scanner 665E System Administ rat ion Guide3-2
3. Windows and network conf igurat ions
Understanding and using Windows
This guide assumes you have a working knowledge of the Windows XP Professional operating systems and does not contain basic Windows procedures, unless they are part of a procedure that is specific to a FreeFlow software.
Performing basic Windows administrative functions
NOTE: This section does not provide the instructions for performing the basic Windows administrative functions. Refer to your Windows documentation for more information.
In addition to the FreeFlow software-specific administrative functions you will perform, you may also need to know how to perform the common Windows administrative functions listed below.
Creating shortcuts
You can create a shortcut to an application or file; allowing you to open the application or file directly from the Windows desktop.
Adding Windows printers
To add a local Windows printer, refer to the printer kit instructions packaged with your printer.
Adding and configuring users and groups
Ues the Windows User Manager to create Windows local user accounts and groups. The User Manager is accessed by selecting Start: Settings: Control Panel: Administrative Tools: Computer Management from the Windows desktop, expanding the System Tools, and expanding Local Users and Groups.
FreeFlow Scanner 665E System Administrat ion Guide 3-3
3. Windows and network conf igurat ions
Setting up shared folders, files, and printers
Windows allows you to set up shared folders, files, and printers that can be accessed from other Windows workstations.NOTE: The File Manager application can also be used to set up shared folders and files.
Adding or removing network connections
From the Network Connections dialog, you can add, remove, or change the properties for network services on the workstation. The Network Connections dialog is accessed by selecting Start: Settings: Network Connections from the Windows desktop.
Preparing to shut down the system
For the most part, shutting down the system is the same as shutting down any other Windows system. However, there are some precautions you must take before shutting down a system.The most important thing to do before shutting down a system is make sure no one else is connected to the system. If you shut down the system while someone is remotely accessing local cabinets, the remote user could lose data and experience problems with their system.CAUTION: Select No if you shut down the system and receive a message such as “still connected to a user; do you want to disconnect?” To properly shut down the local system and avoid problems with the remote workstation, you must have the connected user exit the application and then you must disconnect the remote workstation from the local system.The following sections describe how to check for connected users, notify them that the system is going to be shut down, and then disconnect them from the remote workstation.
FreeFlow Scanner 665E System Administ rat ion Guide3-4
3. Windows and network conf igurat ions
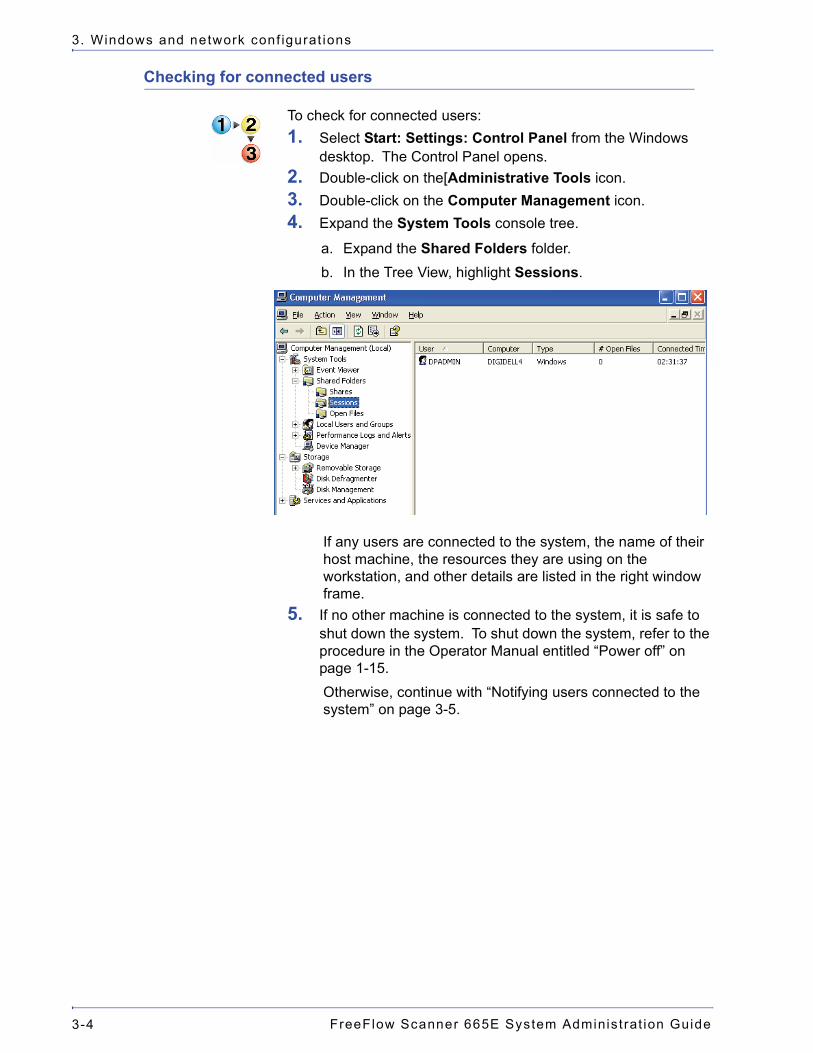
Checking for connected users
To check for connected users:1. Select Start: Settings: Control Panel from the Windows
desktop. The Control Panel opens.2. Double-click on the[Administrative Tools icon.3. Double-click on the Computer Management icon.4. Expand the System Tools console tree.
a. Expand the Shared Folders folder.b. In the Tree View, highlight Sessions.
If any users are connected to the system, the name of their host machine, the resources they are using on the workstation, and other details are listed in the right window frame.
5. If no other machine is connected to the system, it is safe to shut down the system. To shut down the system, refer to the procedure in the Operator Manual entitled “Power off” on page 1-15.Otherwise, continue with “Notifying users connected to the system” on page 3-5.
FreeFlow Scanner 665E System Administrat ion Guide 3-5
3. Windows and network conf igurat ions
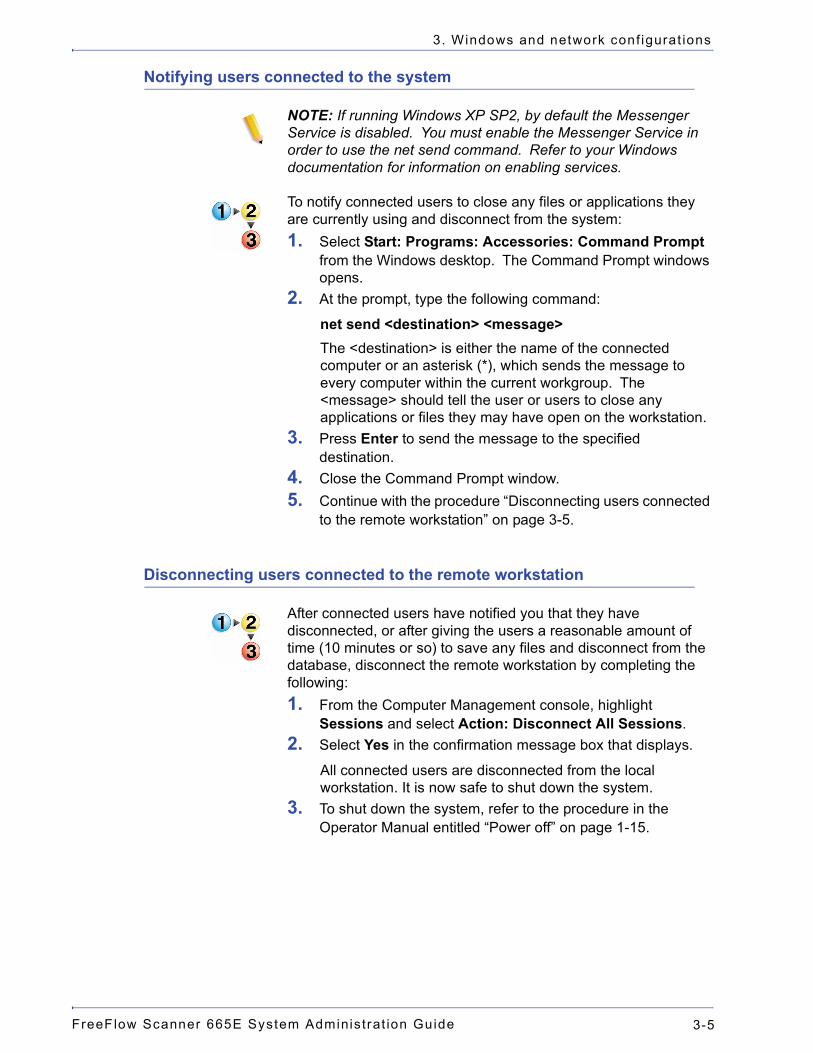
Notifying users connected to the system
NOTE: If running Windows XP SP2, by default the Messenger Service is disabled. You must enable the Messenger Service in order to use the net send command. Refer to your Windows documentation for information on enabling services.
To notify connected users to close any files or applications they are currently using and disconnect from the system:1. Select Start: Programs: Accessories: Command Prompt
from the Windows desktop. The Command Prompt windows opens.
2. At the prompt, type the following command:
net send <destination> <message>The <destination> is either the name of the connected computer or an asterisk (*), which sends the message to every computer within the current workgroup. The <message> should tell the user or users to close any applications or files they may have open on the workstation.
3. Press Enter to send the message to the specified destination.
4. Close the Command Prompt window.5. Continue with the procedure “Disconnecting users connected
to the remote workstation” on page 3-5.
Disconnecting users connected to the remote workstation
After connected users have notified you that they have disconnected, or after giving the users a reasonable amount of time (10 minutes or so) to save any files and disconnect from the database, disconnect the remote workstation by completing the following:1. From the Computer Management console, highlight
Sessions and select Action: Disconnect All Sessions.2. Select Yes in the confirmation message box that displays.
All connected users are disconnected from the local workstation. It is now safe to shut down the system.
3. To shut down the system, refer to the procedure in the Operator Manual entitled “Power off” on page 1-15.
FreeFlow Scanner 665E System Administ rat ion Guide3-6
3. Windows and network conf igurat ions
Using Windows Automatic Update
It is recommended that you use Microsoft’s Windows Automatic Update capability to install critical Microsoft Windows updates on your system.The details surrounding this process are as follows:• Only critical individual and cumulative updates are approved
for download via Windows Update. This includes updates for the operating system, supported release versions of Internet Explorer, IIS, and VM.
• New Service Packs and applicable non-critical patches will still require formal approval by FreeFlow and should only be installed by a Xerox Representative.
• When appropriate, special announcement bulletins will be distributed for security issues requiring immediate communication. Critical security information will also be captured on the www.xerox.com/security web site per the Carnegie Mellon University CERT/CC advisories.
• On a monthly basis, a summary of FreeFlow applicable critical Microsoft security patches that should have been installed on your system will be communicated on the www.xerox.com/security web site under “Other Security News and Advisories.”
• Each site should determine who is responsible for routinely running Windows Update. Due to the time criticality of installing many of the Microsoft patches, it is recommended that the customer perform this task. Customers requiring Xerox assistance to install updates per Windows Update should contact the hotline or make arrangements with their Xerox Representative.
• Microsoft Update may need to be run multiple times to install all eligible updates.
FreeFlow Scanner 665E System Administrat ion Guide 3-7
3. Windows and network conf igurat ions
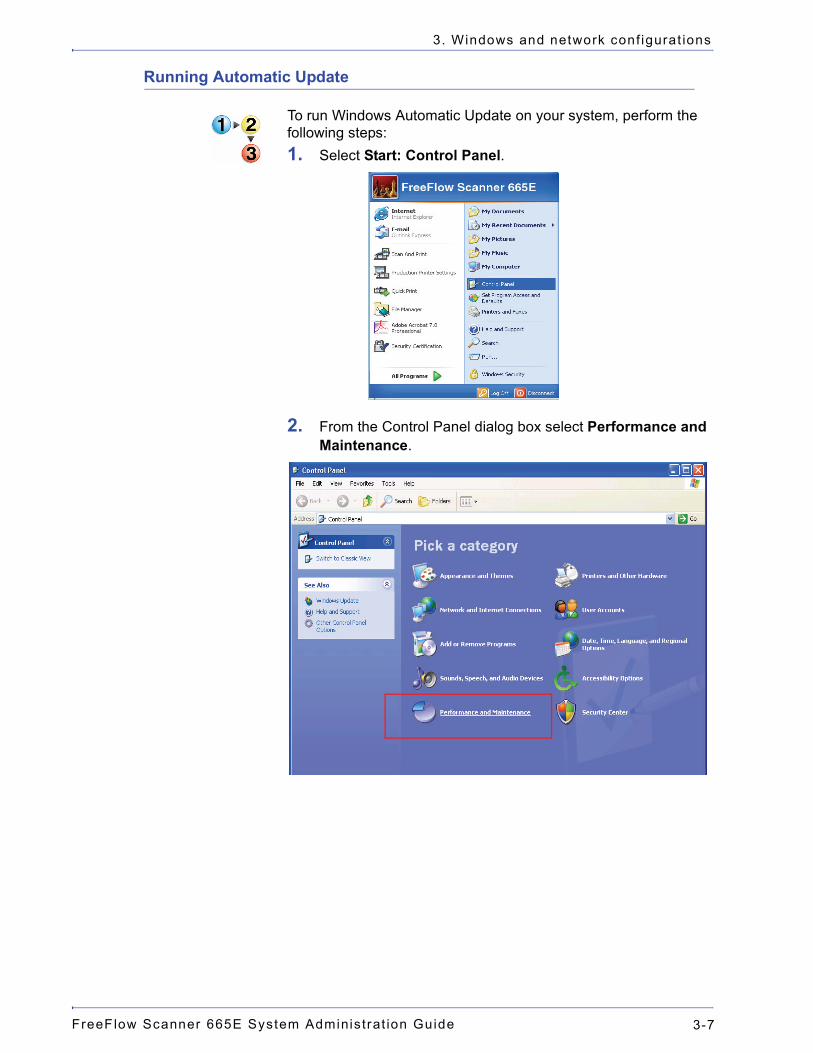
Running Automatic Update
To run Windows Automatic Update on your system, perform the following steps:1. Select Start: Control Panel.
2. From the Control Panel dialog box select Performance and Maintenance.
FreeFlow Scanner 665E System Administ rat ion Guide3-8
3. Windows and network conf igurat ions
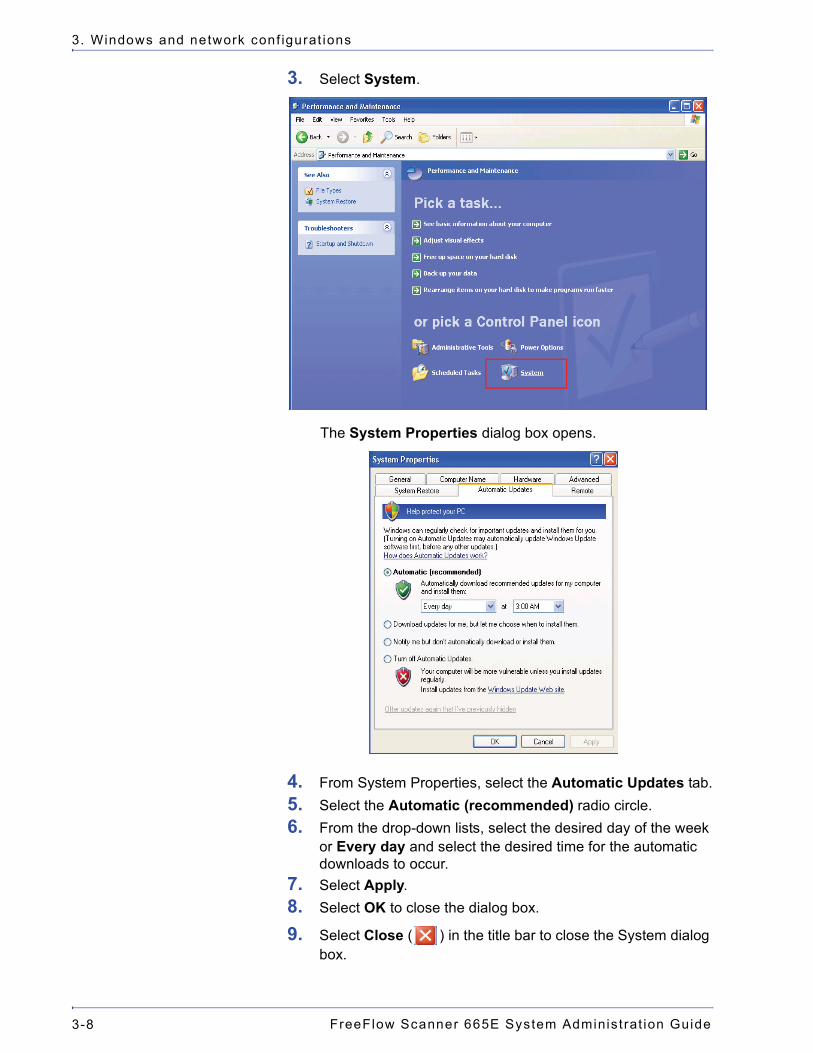
3. Select System.
The System Properties dialog box opens.
4. From System Properties, select the Automatic Updates tab.5. Select the Automatic (recommended) radio circle.6. From the drop-down lists, select the desired day of the week
or Every day and select the desired time for the automatic downloads to occur.
7. Select Apply.8. Select OK to close the dialog box.
9. Select Close ( ) in the title bar to close the System dialog box.
FreeFlow Scanner 665E System Administrat ion Guide 3-9
3. Windows and network conf igurat ions
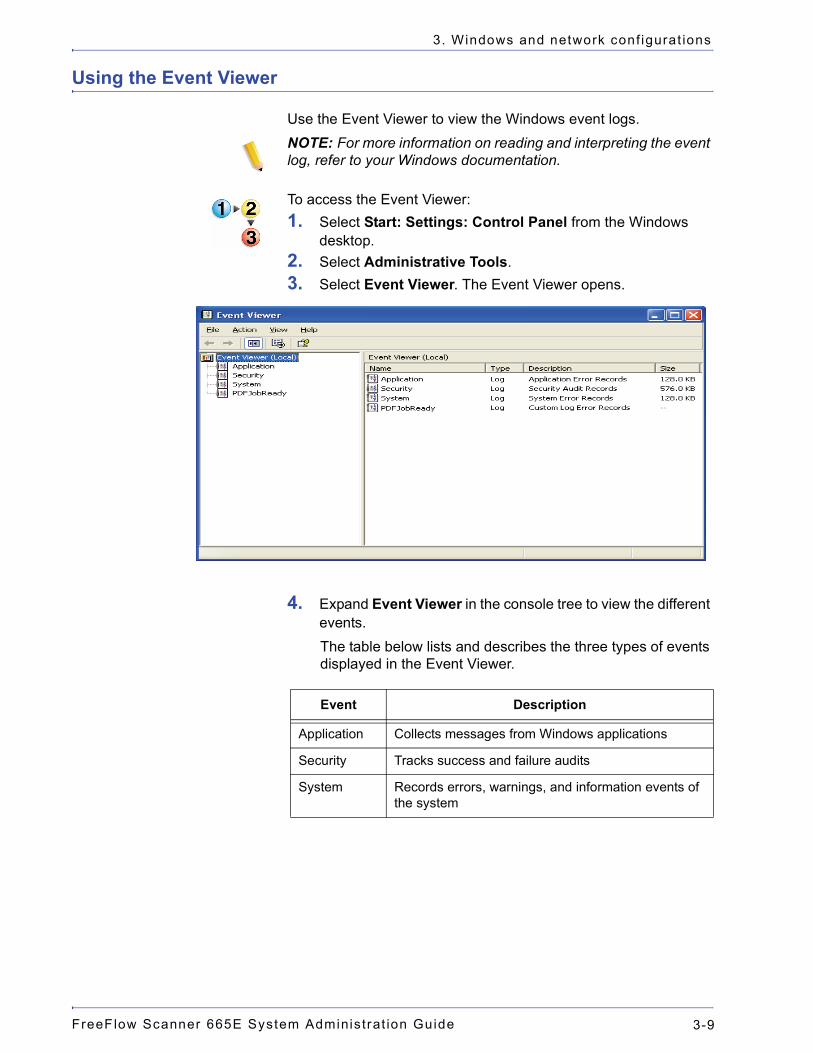
Using the Event Viewer
Use the Event Viewer to view the Windows event logs. NOTE: For more information on reading and interpreting the event log, refer to your Windows documentation.
To access the Event Viewer:1. Select Start: Settings: Control Panel from the Windows
desktop.2. Select Administrative Tools.3. Select Event Viewer. The Event Viewer opens.
4. Expand Event Viewer in the console tree to view the different events.The table below lists and describes the three types of events displayed in the Event Viewer.
Event Description
Application Collects messages from Windows applications
Security Tracks success and failure audits
System Records errors, warnings, and information events of the system
FreeFlow Scanner 665E System Administ rat ion Guide3-10
3. Windows and network conf igurat ions
5. To view an event log, select the appropriate event. The event log displays in the right frame.NOTE: You should save the Windows event logs to file once every two months and keep these log files for approximately one year. After saving the logs to file, you can then clear them from the Event Viewer. It is important to save event logs as they may be needed in the future for diagnosing problems.
The table below provides the Windows log files to which the Xerox FreeFlow Software writes event data.
6. Select File: Exit to close the Event Viewer.
Log file Log file path
Application log C:\WINDOWS\system32\config\AppEvent.Evt
Security log C:\WINDOWS\system32\config\SecEvent.Evt
System log C:\WINDOWS\system32\config\SysEvent.Evt
FreeFlow Scanner 665E System Administrat ion Guide 4-1
4. Hardware maintenance
This chapter provides procedures necessary for maintaining the hardware of your FreeFlow system.
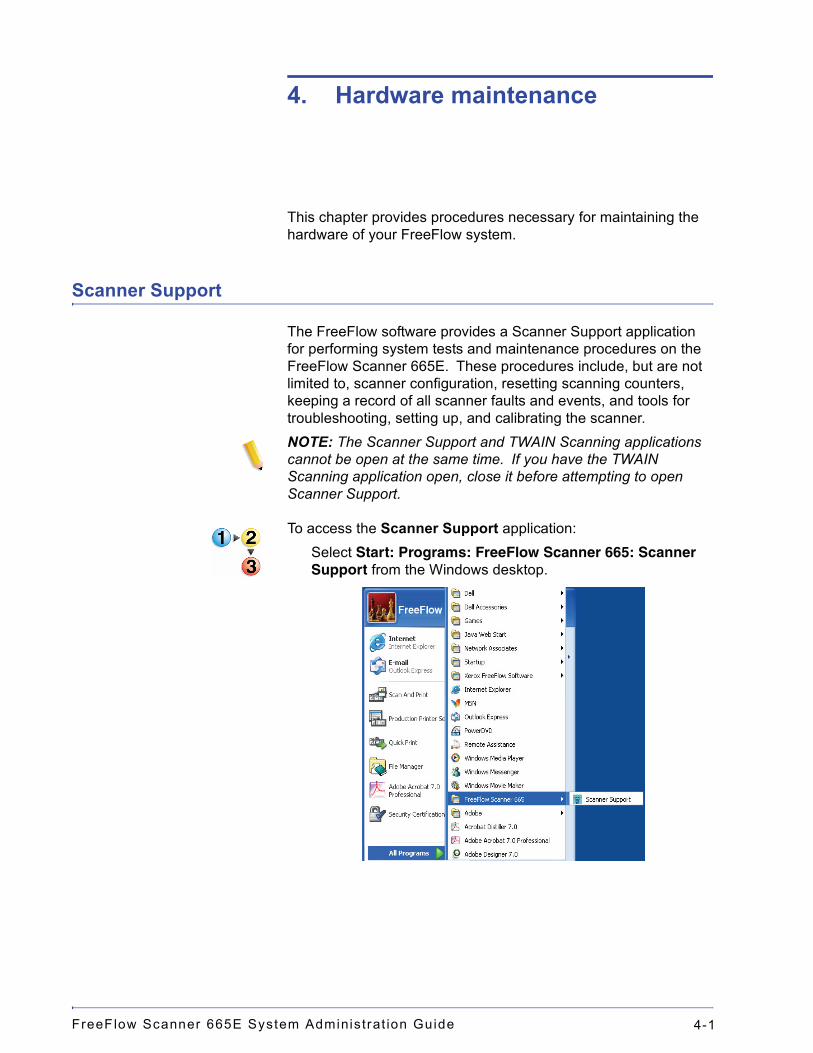
Scanner Support
The FreeFlow software provides a Scanner Support application for performing system tests and maintenance procedures on the FreeFlow Scanner 665E. These procedures include, but are not limited to, scanner configuration, resetting scanning counters, keeping a record of all scanner faults and events, and tools for troubleshooting, setting up, and calibrating the scanner.NOTE: The Scanner Support and TWAIN Scanning applications cannot be open at the same time. If you have the TWAIN Scanning application open, close it before attempting to open Scanner Support.
To access the Scanner Support application:Select Start: Programs: FreeFlow Scanner 665: Scanner Support from the Windows desktop.
FreeFlow Scanner 665E System Administ rat ion Guide4-2
4. Hardware maintenance
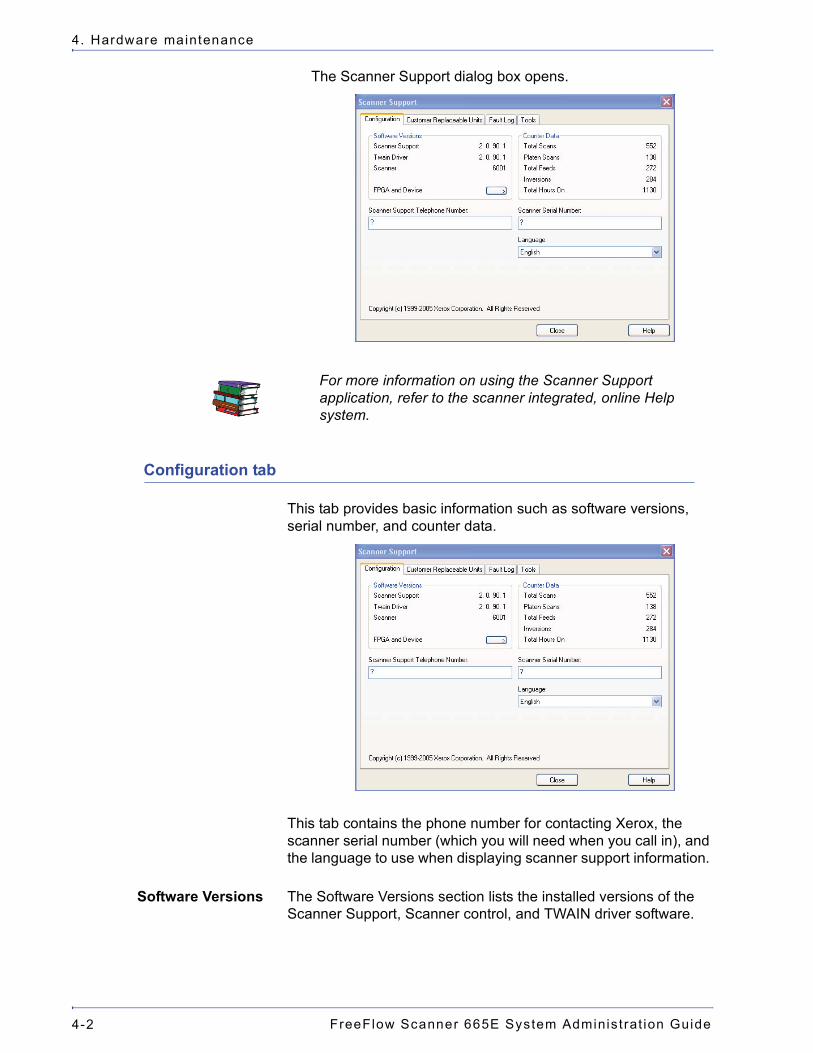
The Scanner Support dialog box opens.
For more information on using the Scanner Support application, refer to the scanner integrated, online Help system.
Configuration tab
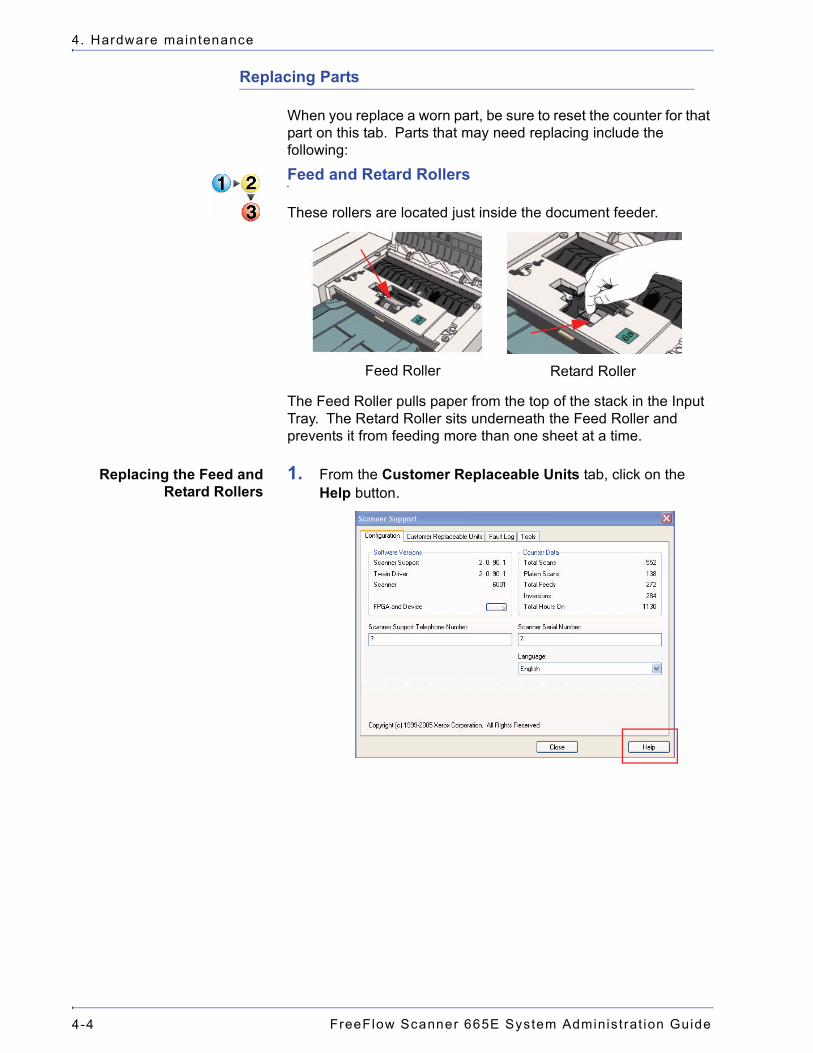
This tab provides basic information such as software versions, serial number, and counter data.
This tab contains the phone number for contacting Xerox, the scanner serial number (which you will need when you call in), and the language to use when displaying scanner support information.
Software Versions The Software Versions section lists the installed versions of the Scanner Support, Scanner control, and TWAIN driver software.
FreeFlow Scanner 665E System Administrat ion Guide 4-3
4. Hardware maintenance
Counter Data The Counter Data section lists the following information to assist in troubleshooting and support:Total Scans: This area shows the total number of scans performed since the system was first initialized.Platen Scans: This area shows the number of scans performed from the Document Glass.Total Feeds: This area shows the number of documents fed through the Document Feeder.Inversions: This area shows the number of 2-sided scans performed by the Document Feeder.Total Hours On: This area shows the number of hours the scanner has been powered on.
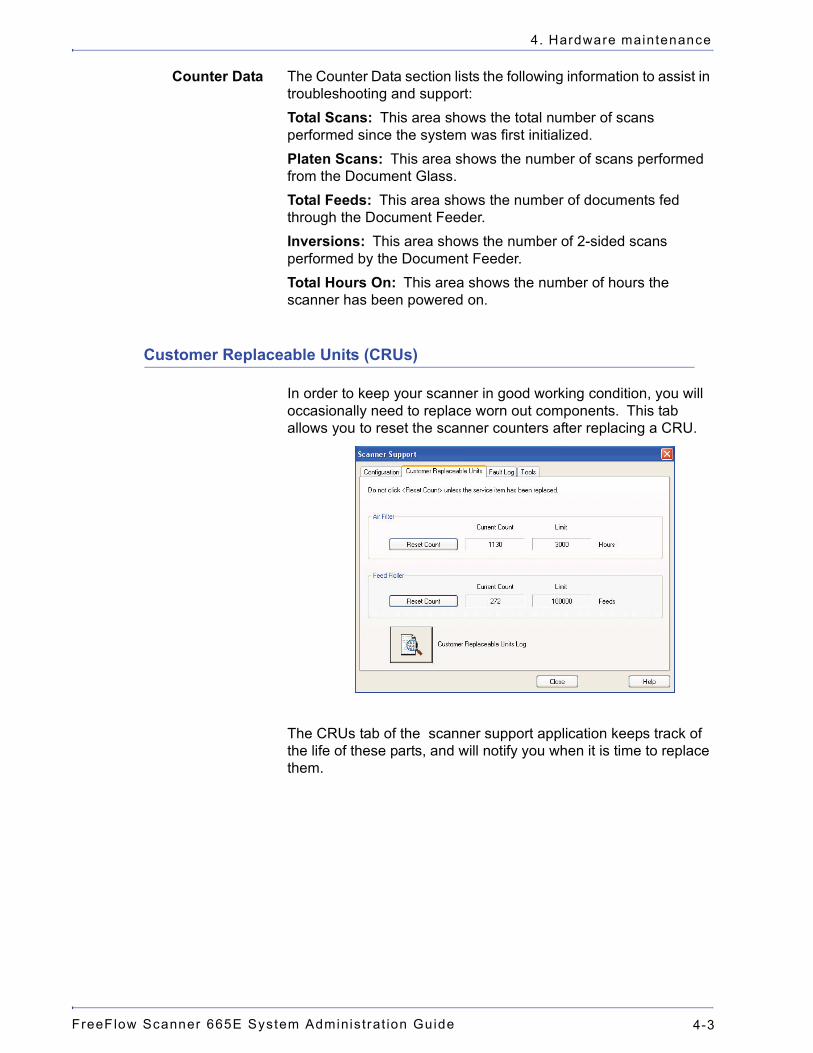
Customer Replaceable Units (CRUs)
In order to keep your scanner in good working condition, you will occasionally need to replace worn out components. This tab allows you to reset the scanner counters after replacing a CRU.
The CRUs tab of the scanner support application keeps track of the life of these parts, and will notify you when it is time to replace them.
FreeFlow Scanner 665E System Administ rat ion Guide4-4
4. Hardware maintenance
Replacing Parts
When you replace a worn part, be sure to reset the counter for that part on this tab. Parts that may need replacing include the following:
Feed and Retard Rollers
These rollers are located just inside the document feeder.
The Feed Roller pulls paper from the top of the stack in the Input Tray. The Retard Roller sits underneath the Feed Roller and prevents it from feeding more than one sheet at a time.
Replacing the Feed andRetard Rollers
1. From the Customer Replaceable Units tab, click on the Help button.
Feed Roller Retard Roller
FreeFlow Scanner 665E System Administrat ion Guide 4-5
4. Hardware maintenance
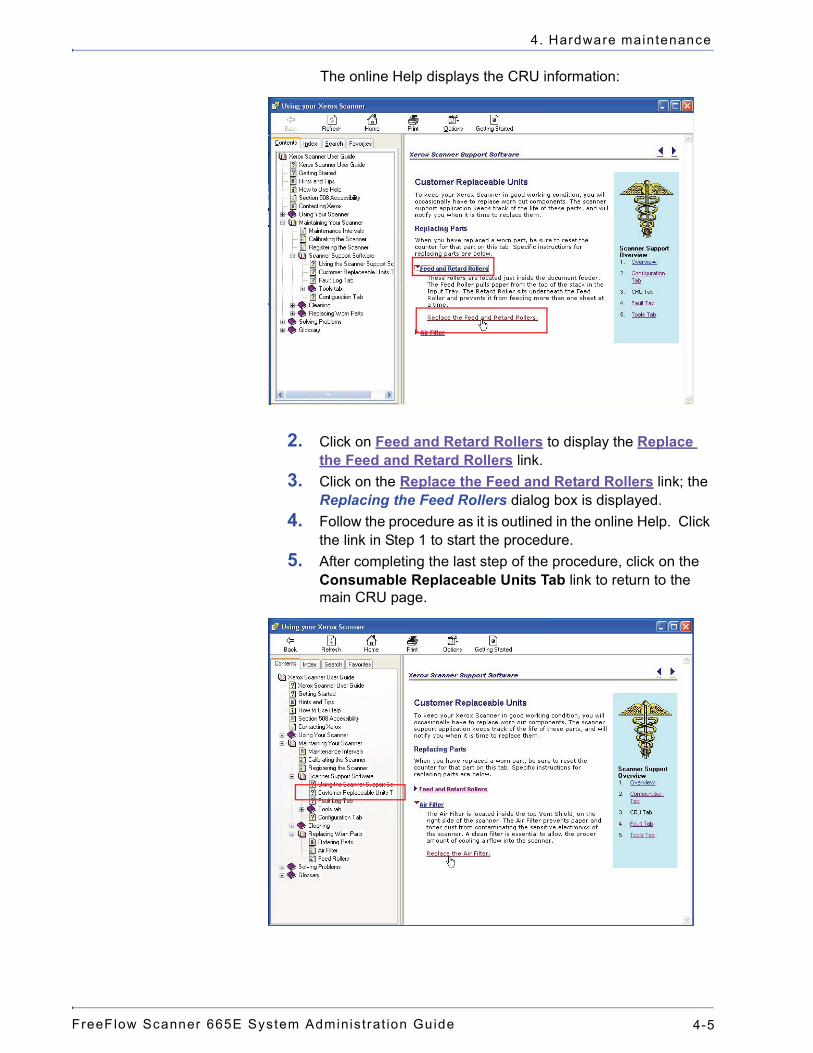
The online Help displays the CRU information:
2. Click on Feed and Retard Rollers to display the Replace the Feed and Retard Rollers link.
3. Click on the Replace the Feed and Retard Rollers link; the Replacing the Feed Rollers dialog box is displayed.
4. Follow the procedure as it is outlined in the online Help. Click the link in Step 1 to start the procedure.
5. After completing the last step of the procedure, click on the Consumable Replaceable Units Tab link to return to the main CRU page.
FreeFlow Scanner 665E System Administ rat ion Guide4-6
4. Hardware maintenance
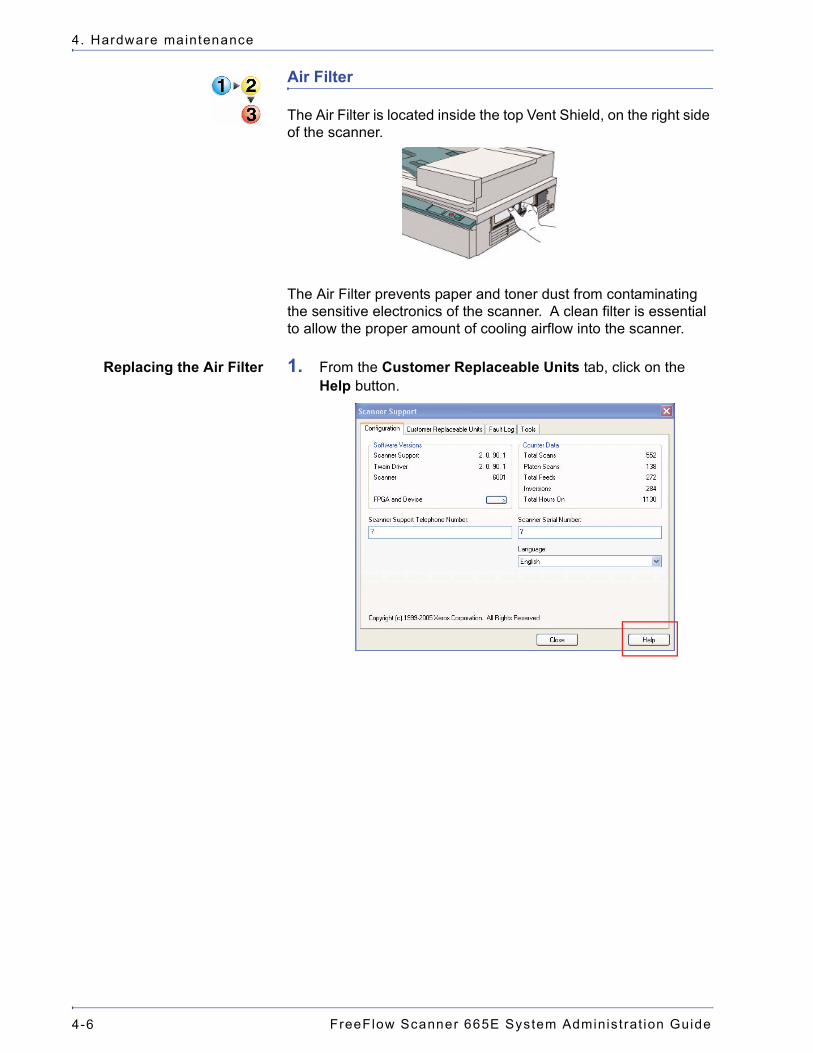
Air Filter
The Air Filter is located inside the top Vent Shield, on the right side of the scanner.
The Air Filter prevents paper and toner dust from contaminating the sensitive electronics of the scanner. A clean filter is essential to allow the proper amount of cooling airflow into the scanner.
Replacing the Air Filter 1. From the Customer Replaceable Units tab, click on the Help button.
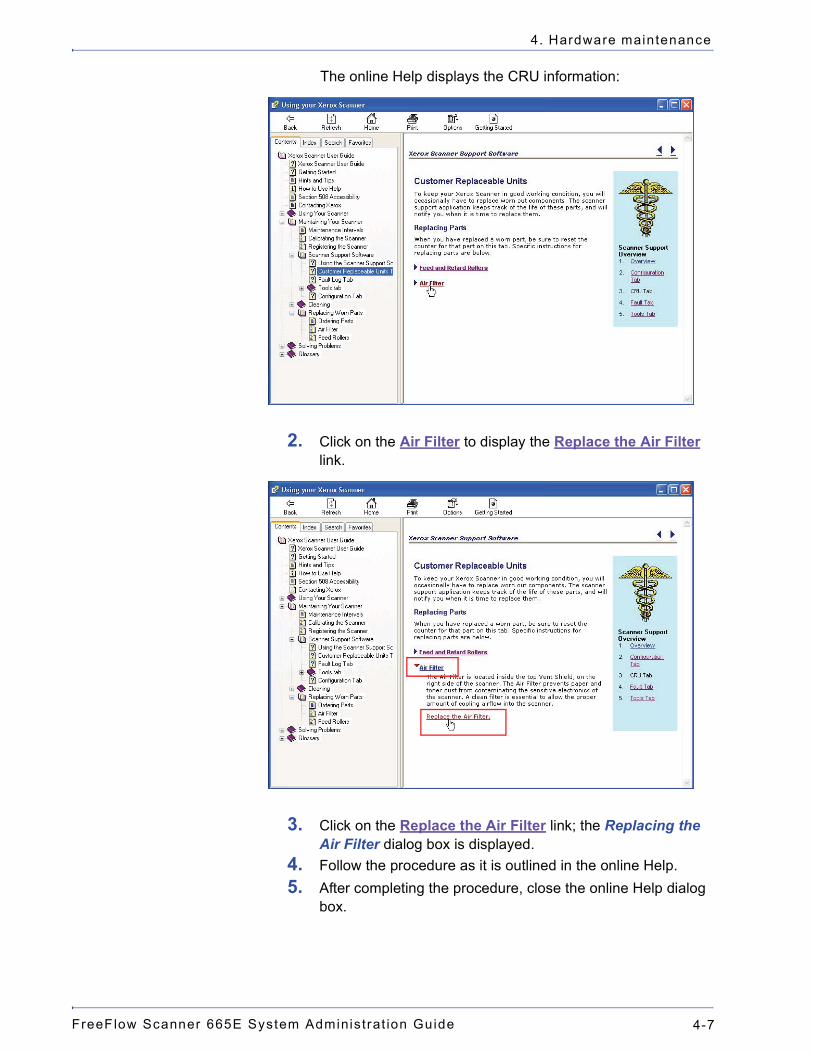
FreeFlow Scanner 665E System Administrat ion Guide 4-7
4. Hardware maintenance
The online Help displays the CRU information:
2. Click on the Air Filter to display the Replace the Air Filter link.
3. Click on the Replace the Air Filter link; the Replacing the Air Filter dialog box is displayed.
4. Follow the procedure as it is outlined in the online Help.5. After completing the procedure, close the online Help dialog
box.
FreeFlow Scanner 665E System Administ rat ion Guide4-8
4. Hardware maintenance
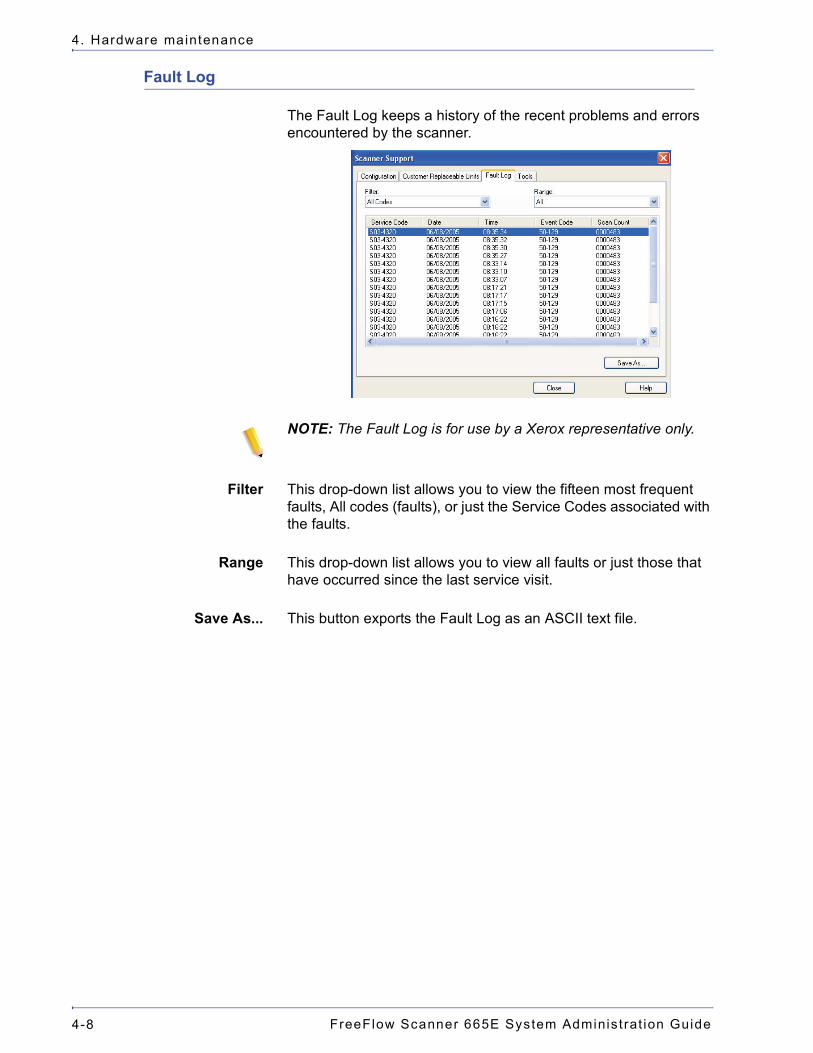
Fault Log
The Fault Log keeps a history of the recent problems and errors encountered by the scanner.
NOTE: The Fault Log is for use by a Xerox representative only.
Filter This drop-down list allows you to view the fifteen most frequent faults, All codes (faults), or just the Service Codes associated with the faults.
Range This drop-down list allows you to view all faults or just those that have occurred since the last service visit.
Save As... This button exports the Fault Log as an ASCII text file.
FreeFlow Scanner 665E System Administrat ion Guide 4-9
4. Hardware maintenance
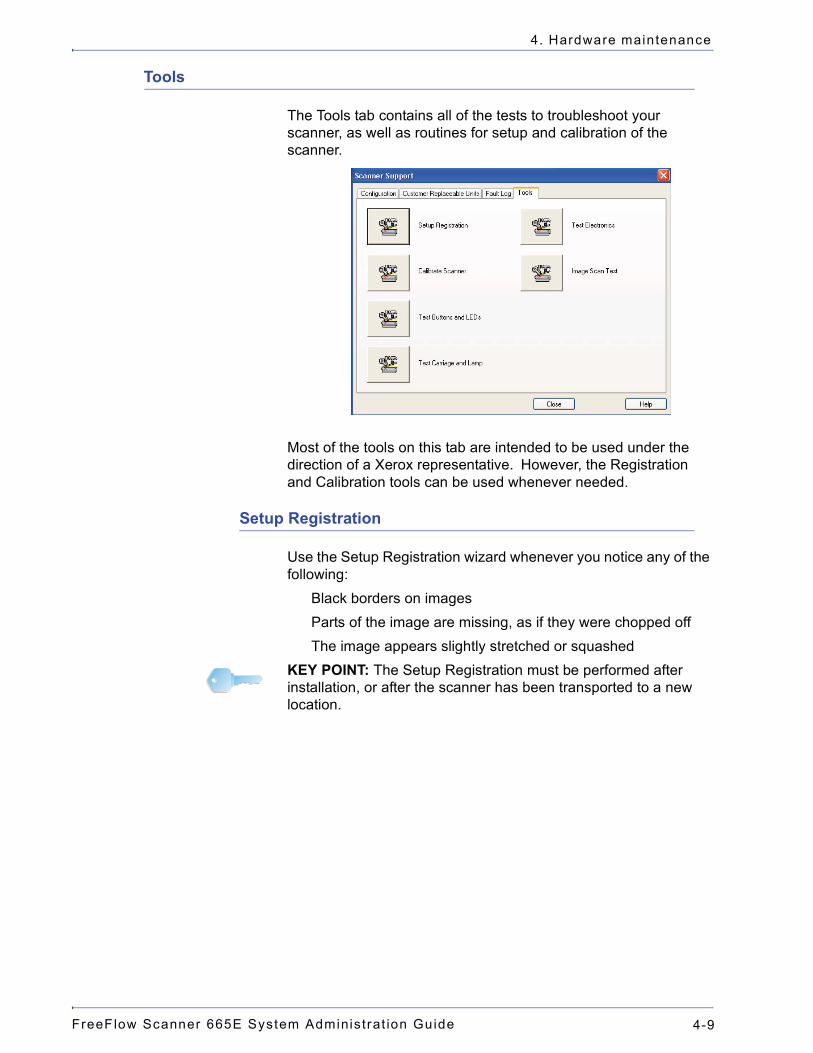
Tools
The Tools tab contains all of the tests to troubleshoot your scanner, as well as routines for setup and calibration of the scanner.
Most of the tools on this tab are intended to be used under the direction of a Xerox representative. However, the Registration and Calibration tools can be used whenever needed.
Setup Registration
Use the Setup Registration wizard whenever you notice any of the following:
Black borders on images Parts of the image are missing, as if they were chopped off The image appears slightly stretched or squashed
KEY POINT: The Setup Registration must be performed after installation, or after the scanner has been transported to a new location.
FreeFlow Scanner 665E System Administ rat ion Guide4-10
4. Hardware maintenance
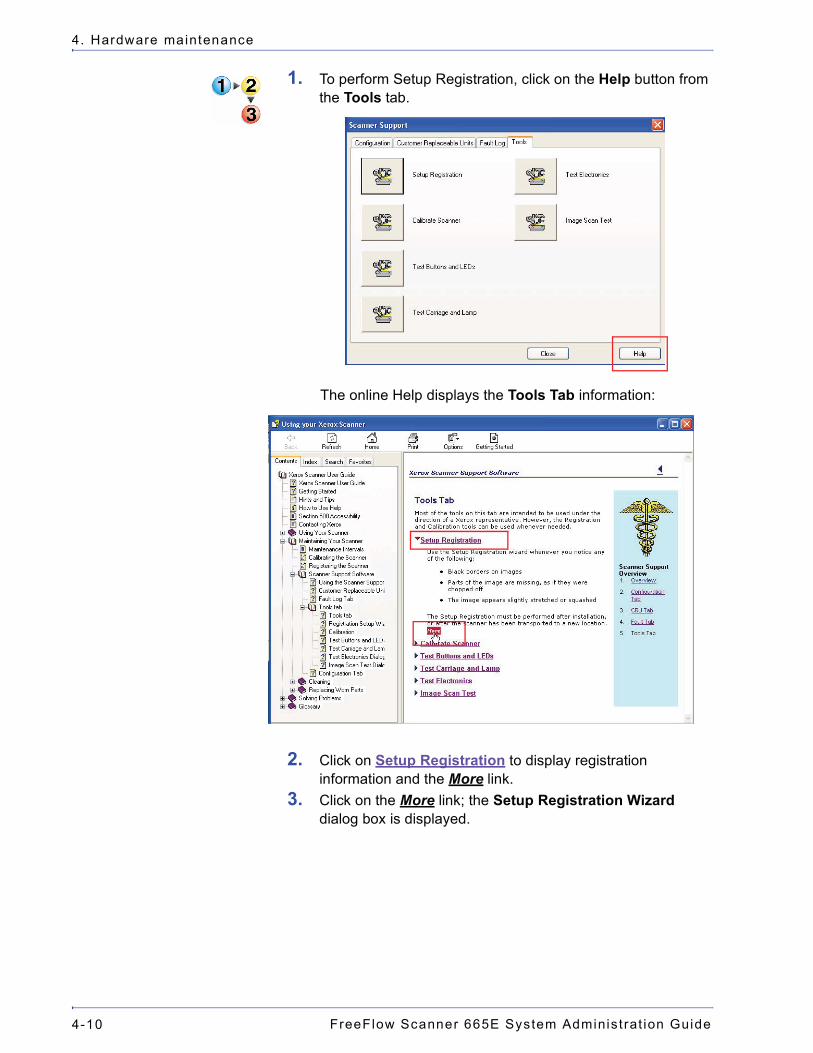
1. To perform Setup Registration, click on the Help button from the Tools tab.
The online Help displays the Tools Tab information:
2. Click on Setup Registration to display registration information and the More link.
3. Click on the More link; the Setup Registration Wizard dialog box is displayed.
FreeFlow Scanner 665E System Administrat ion Guide 4-11
4. Hardware maintenance
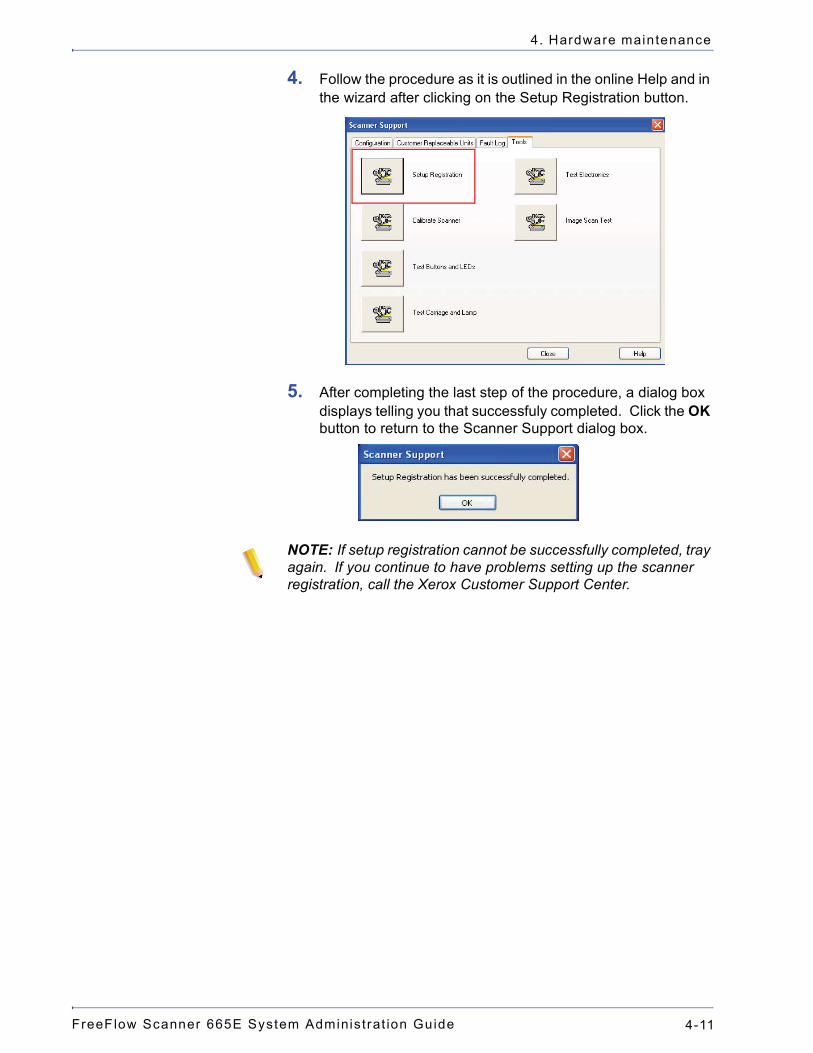
4. Follow the procedure as it is outlined in the online Help and in the wizard after clicking on the Setup Registration button.
5. After completing the last step of the procedure, a dialog box displays telling you that successfuly completed. Click the OK button to return to the Scanner Support dialog box.
NOTE: If setup registration cannot be successfully completed, tray again. If you continue to have problems setting up the scanner registration, call the Xerox Customer Support Center.
FreeFlow Scanner 665E System Administ rat ion Guide4-12
4. Hardware maintenance
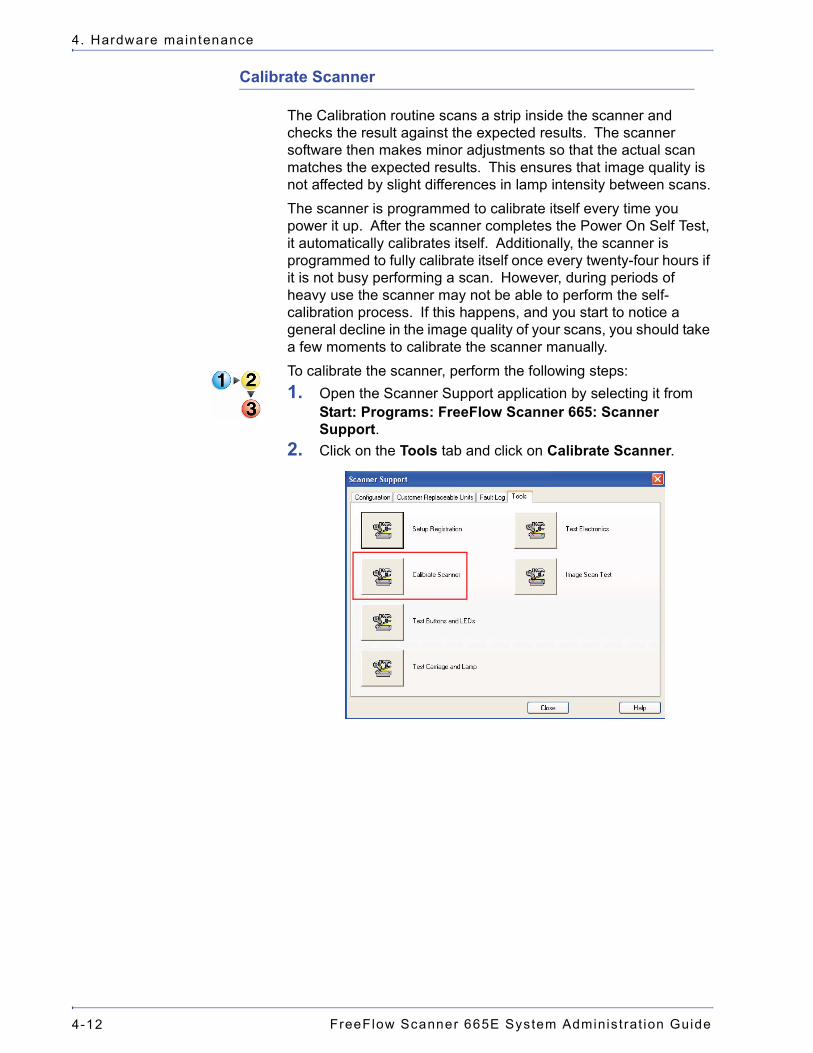
Calibrate Scanner
The Calibration routine scans a strip inside the scanner and checks the result against the expected results. The scanner software then makes minor adjustments so that the actual scan matches the expected results. This ensures that image quality is not affected by slight differences in lamp intensity between scans.The scanner is programmed to calibrate itself every time you power it up. After the scanner completes the Power On Self Test, it automatically calibrates itself. Additionally, the scanner is programmed to fully calibrate itself once every twenty-four hours if it is not busy performing a scan. However, during periods of heavy use the scanner may not be able to perform the self-calibration process. If this happens, and you start to notice a general decline in the image quality of your scans, you should take a few moments to calibrate the scanner manually.To calibrate the scanner, perform the following steps:1. Open the Scanner Support application by selecting it from
Start: Programs: FreeFlow Scanner 665: Scanner Support.
2. Click on the Tools tab and click on Calibrate Scanner.
FreeFlow Scanner 665E System Administrat ion Guide 4-13
4. Hardware maintenance
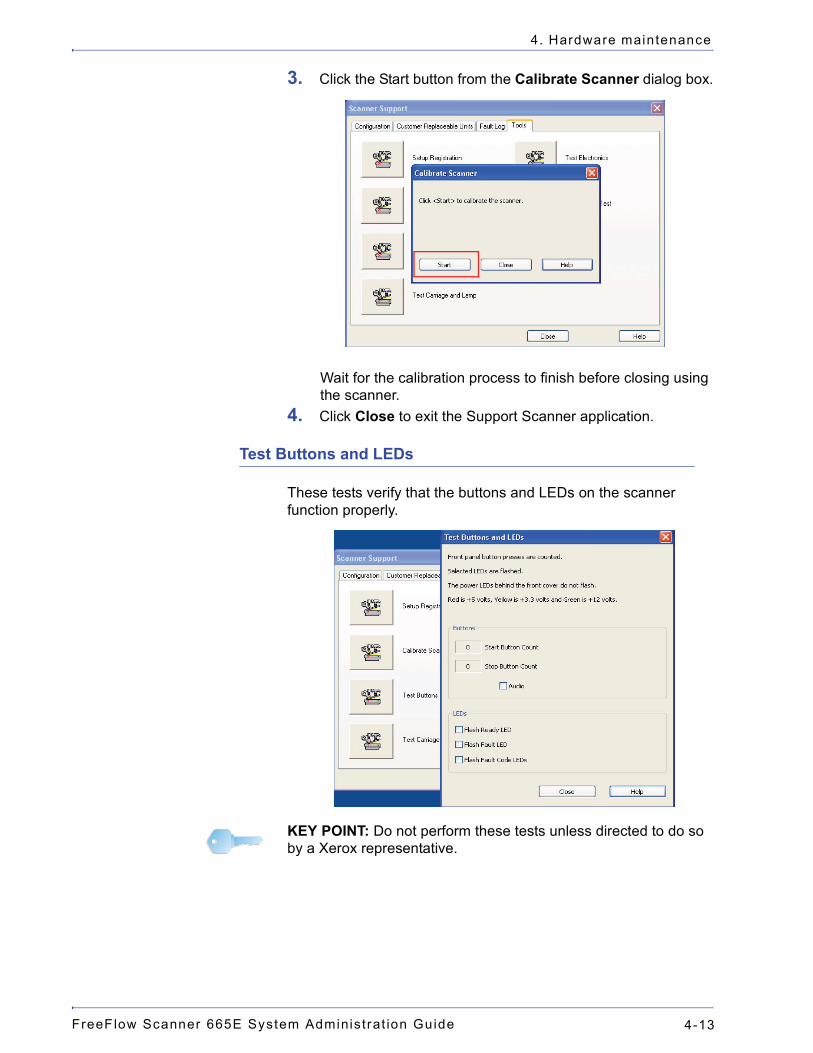
3. Click the Start button from the Calibrate Scanner dialog box.
Wait for the calibration process to finish before closing using the scanner.
4. Click Close to exit the Support Scanner application.
Test Buttons and LEDs
These tests verify that the buttons and LEDs on the scanner function properly.
KEY POINT: Do not perform these tests unless directed to do so by a Xerox representative.
FreeFlow Scanner 665E System Administ rat ion Guide4-14
4. Hardware maintenance
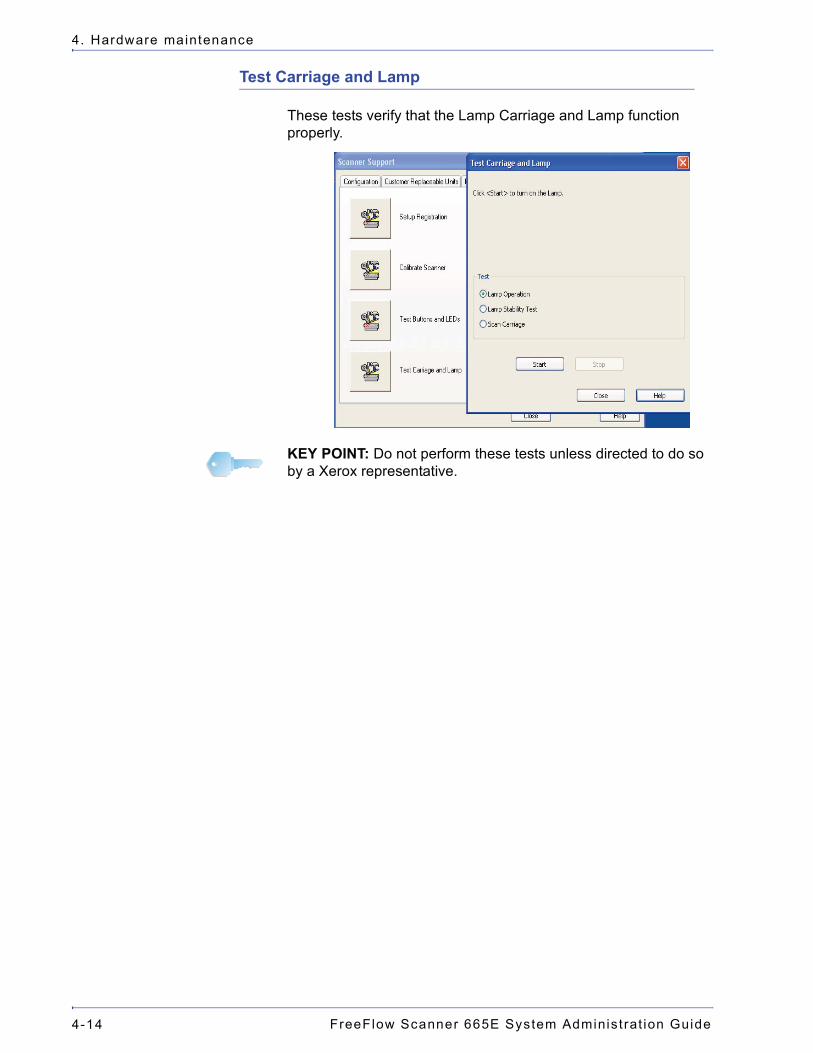
Test Carriage and Lamp
These tests verify that the Lamp Carriage and Lamp function properly.
KEY POINT: Do not perform these tests unless directed to do so by a Xerox representative.
FreeFlow Scanner 665E System Administrat ion Guide 4-15
4. Hardware maintenance
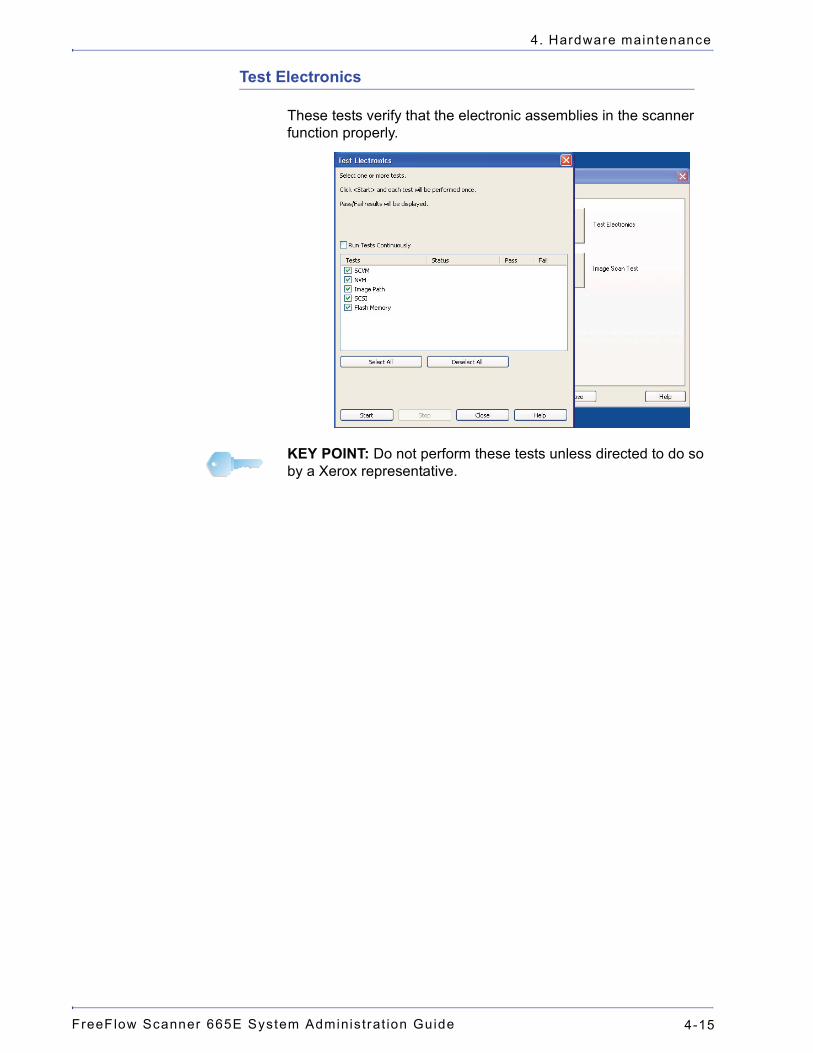
Test Electronics
These tests verify that the electronic assemblies in the scanner function properly.
KEY POINT: Do not perform these tests unless directed to do so by a Xerox representative.
FreeFlow Scanner 665E System Administ rat ion Guide4-16
4. Hardware maintenance
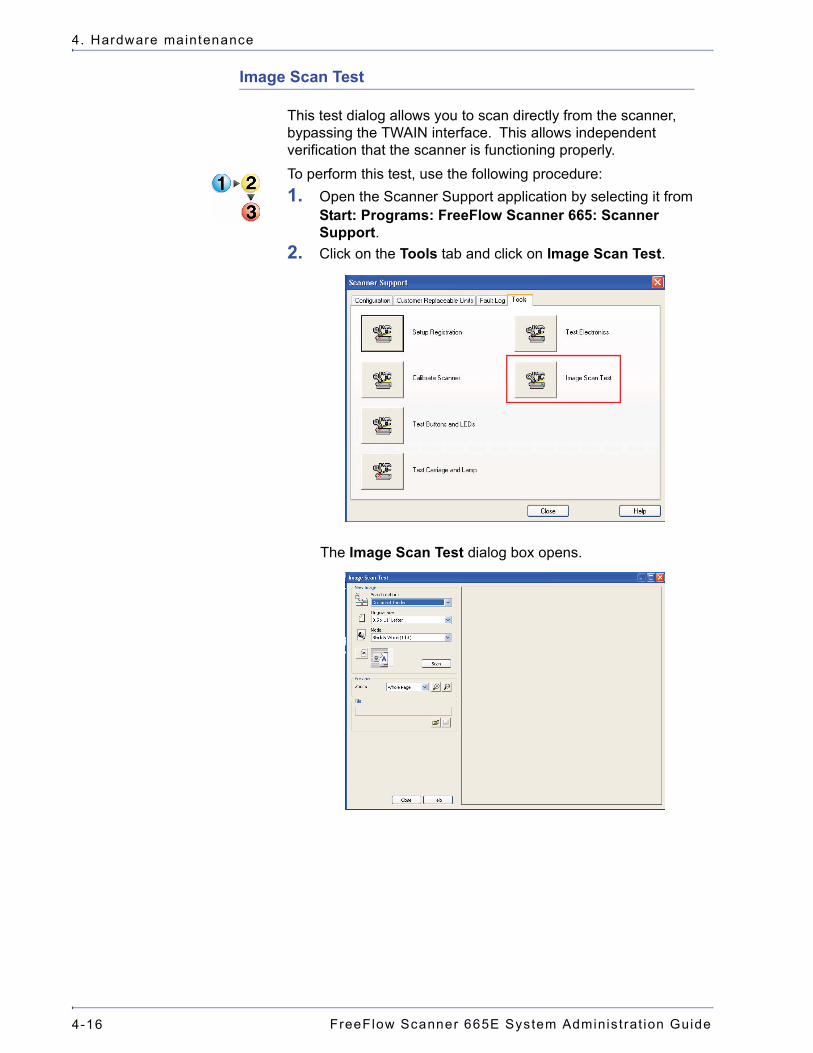
Image Scan Test
This test dialog allows you to scan directly from the scanner, bypassing the TWAIN interface. This allows independent verification that the scanner is functioning properly.To perform this test, use the following procedure:1. Open the Scanner Support application by selecting it from
Start: Programs: FreeFlow Scanner 665: Scanner Support.
2. Click on the Tools tab and click on Image Scan Test.
The Image Scan Test dialog box opens.
FreeFlow Scanner 665E System Administrat ion Guide 4-17
4. Hardware maintenance
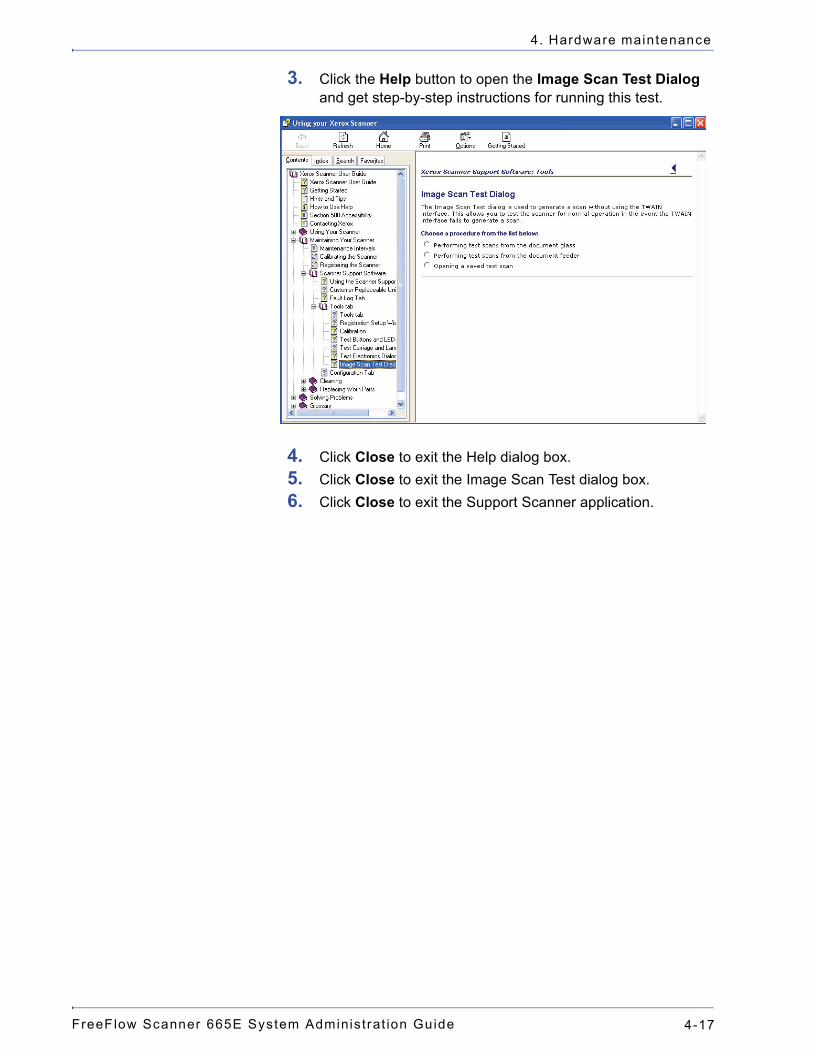
3. Click the Help button to open the Image Scan Test Dialog and get step-by-step instructions for running this test.
4. Click Close to exit the Help dialog box.5. Click Close to exit the Image Scan Test dialog box.6. Click Close to exit the Support Scanner application.

FreeFlow Scanner 665E System Administ rat ion Guide4-18
4. Hardware maintenance
FreeFlow Scanner 665E System Administrat ion Guide 5-1
5. System administration
This chapter identifies and describes the procedures needed to administer and support the system, specifically user and group administration.
Security recommendations
The following are security recommendations for keeping the system secure:• Disable the following services by selecting Start: Settings:
Control Panel: Administrative Tools: Services from the Windows task bar and changing the start up type to Disabled:– Computer Browser– Distributed Link Tracking Client– Remote Registry
• Microsoft XP SP2 Pop-Up BlockerIf your client has Windows XP with SP2 operating system, you may turn off the Pop-up Blocker. The default setting for the Windows XP SP2 Pop-up Blocker is on which prevents most pop-up windows from appearing over the web page you are currently viewing.
To turn off the Pop-up Blocker:1. Open the Internet Explorer browser.2. Select Tools: Pop-up Blocker: Turn Off Pop-up Blocker
from the browser menu bar.3. Select File: Close to close the browser.
The Pop-up Blocker does not block pop-ups from web sites that are on your local intranet or listed as a Trusted Site. If browsing a web site that is outside your intranet, you must change the Pop-up Blocker settings to allow the address of the web site you wish to browse.
FreeFlow Scanner 665E System Administ rat ion Guide5-2
5. System administrat ion
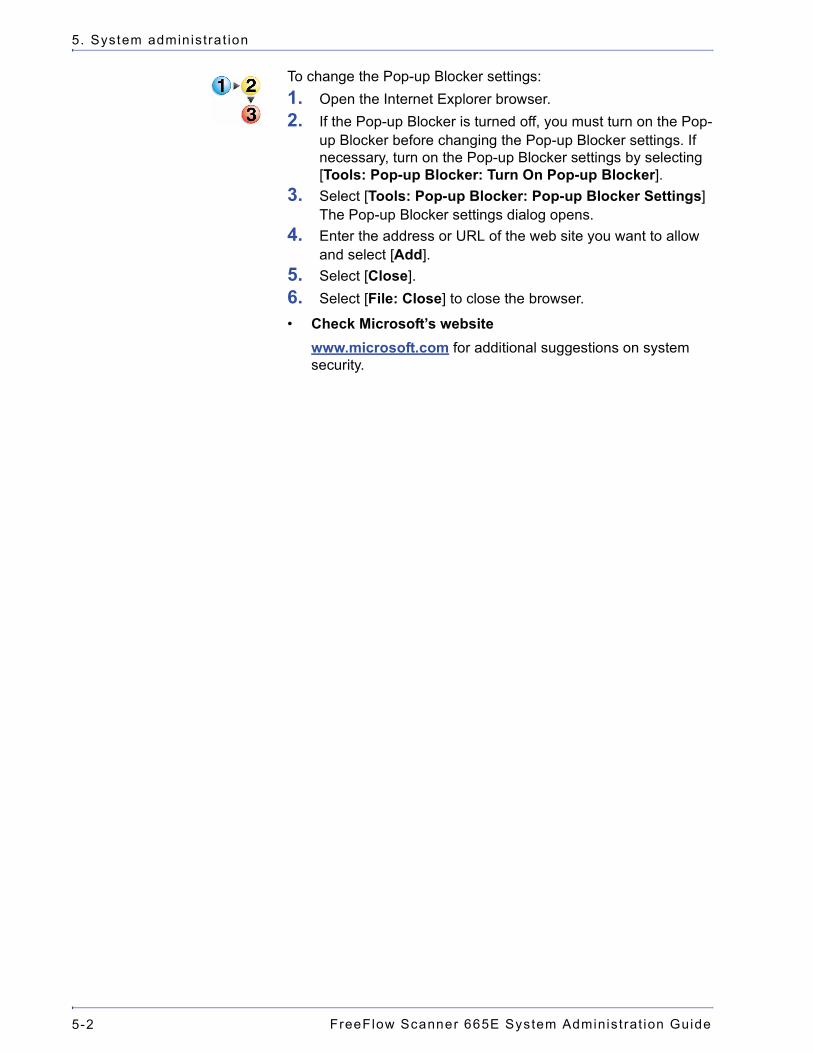
To change the Pop-up Blocker settings:1. Open the Internet Explorer browser.2. If the Pop-up Blocker is turned off, you must turn on the Pop-
up Blocker before changing the Pop-up Blocker settings. If necessary, turn on the Pop-up Blocker settings by selecting [Tools: Pop-up Blocker: Turn On Pop-up Blocker].
3. Select [Tools: Pop-up Blocker: Pop-up Blocker Settings] The Pop-up Blocker settings dialog opens.
4. Enter the address or URL of the web site you want to allow and select [Add].
5. Select [Close].6. Select [File: Close] to close the browser.
• Check Microsoft’s website www.microsoft.com for additional suggestions on system security.
FreeFlow Scanner 665E System Administrat ion Guide 6-1
6. Production printing administration
This chapter provides information and procedures for setting up and maintaining production printing with FreeFlow applications. Topics covered in this chapter include:• understanding production printing• setting up the DocuColor 8000 and/or DocuColor 7000 digital
presses• configuring Network Agent• using high security with DocuSP 4.x/5.x and TCP/IP• installing a security certificate• setting up the Remote Print Service (RPS)• using Print Manager options• resolving production printing problemsNOTE: This chapter covers only topics specific to production printing with the applications in FreeFlow. Refer to your color server and production printer documentation for detailed information regarding those Xerox products.
FreeFlow Scanner 665E System Administ rat ion Guide6-2
6. Product ion pr int ing administrat ion
Understanding production printing
The following sections provide a basic overview of how production printing works within FreeFlow applications and some of the things that need to be considered when setting up production printers for use with the FreeFlow applications. FreeFlow applications support production printing using two network types: TCP/IP and IPX/SPX.
TCP/IP: The most commonly used network protocol is TCP/IP. This protocol is used for communication between the system and production print servers.
IPX/SPX: The IPX/SPX network protocol is used for communication between the system and production print servers that use Novell NetWare as their network operating system.Two basic types of production printing are supported:• Printing locally from the system• Printing remotely on another system using the Remote
Printing Service (RPS)NOTE: To set up and configure network printers and local printers, refer to your printer documentation.
Production printing via TCP/IP (UNIX)
To print to a TCP/IP production printer, a valid user account must be available on the print server. Two kinds of accounts are available on a TCP/IP print server. One account does not require the user to log in to the server and the other requires the user to log in when submitting a print job.To allow a user to print an RDO to a DocuSP/DocuColor production printer without logging in to the color server, you must create an account with the user name xrxusr and a password of your choice (such as xrx123). Once this account is created, the color server is available to any user that knows the name of the server and print queue. No security check is provided by the server.To provide some degree of security, a login can be required from the user before a job is submitted to a color server. You can either create a local account for the user on the color server with the same account information as the system, or the user can use a network information service (NIS) account. Either way, the user will be prompted for an account name and password when submitting a print job to a particular color server.
FreeFlow Scanner 665E System Administrat ion Guide 6-3
6. Product ion pr int ing administrat ion
Setting up production printers
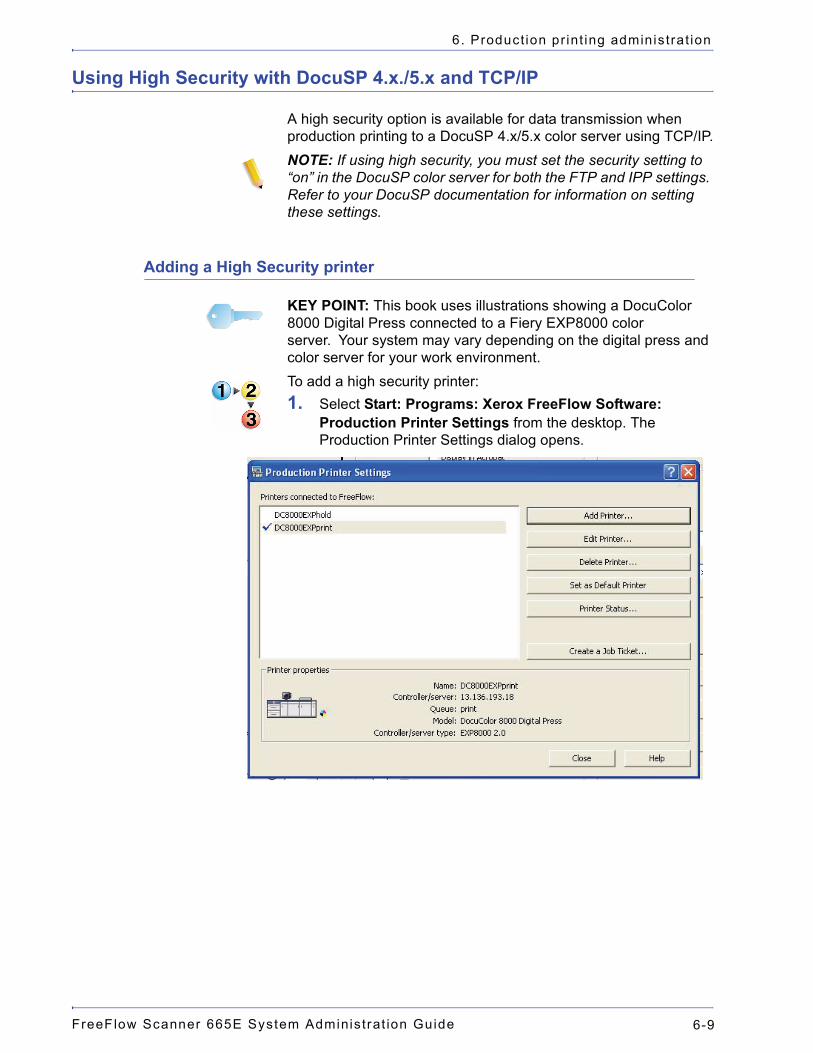
The Production Printer Settings application allows you to:• configure and manage production printers• install and/or update a security certificate• add, modify, and, remove production printers• set a production printer as the default printer• specify print and finishing options using the Create a Job
Ticket/Job Setup dialogNOTE: The following production printers supported in the Xerox FreeFlow applications: DocuColor 8000 Digital Press and DocuColor 7000 Digital Press.
The following sections provide detailed instructions for setting up production printers.
FreeFlow Scanner 665E System Administ rat ion Guide6-4
6. Product ion pr int ing administrat ion
Adding a production printer
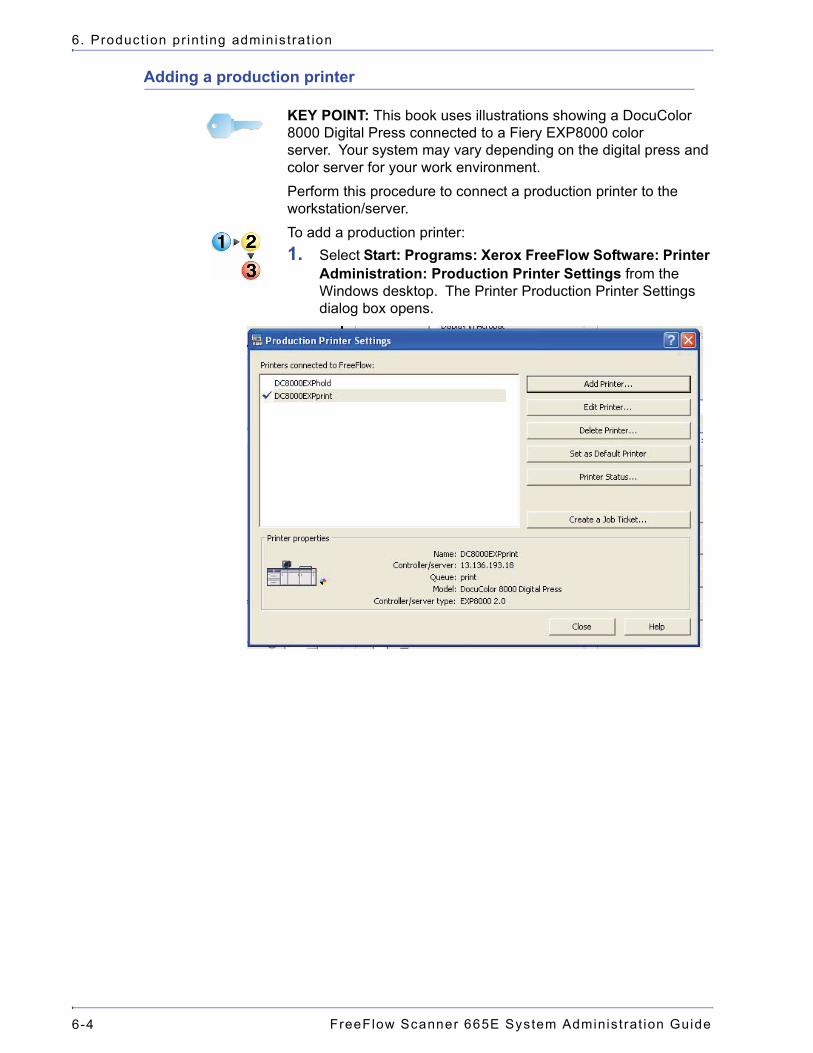
KEY POINT: This book uses illustrations showing a DocuColor 8000 Digital Press connected to a Fiery EXP8000 color server. Your system may vary depending on the digital press and color server for your work environment.Perform this procedure to connect a production printer to the workstation/server.To add a production printer:1. Select Start: Programs: Xerox FreeFlow Software: Printer
Administration: Production Printer Settings from the Windows desktop. The Printer Production Printer Settings dialog box opens.
FreeFlow Scanner 665E System Administrat ion Guide 6-5
6. Product ion pr int ing administrat ion
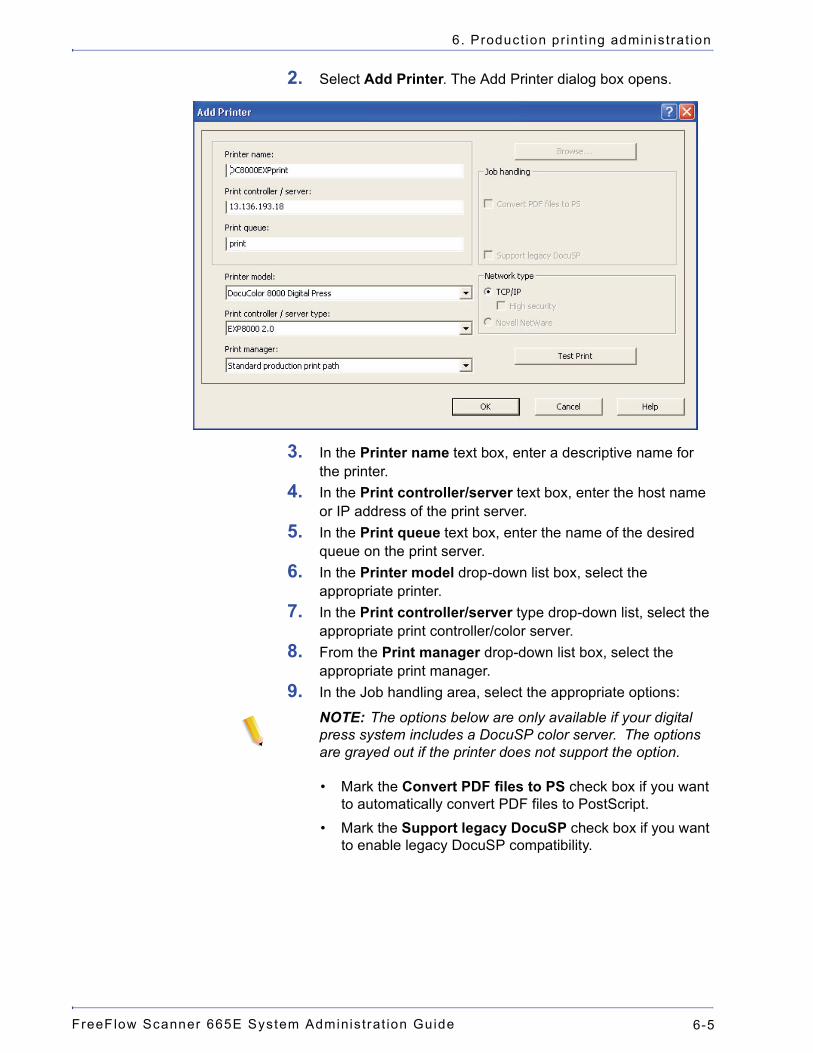
2. Select Add Printer. The Add Printer dialog box opens.
3. In the Printer name text box, enter a descriptive name for the printer.
4. In the Print controller/server text box, enter the host name or IP address of the print server.
5. In the Print queue text box, enter the name of the desired queue on the print server.
6. In the Printer model drop-down list box, select the appropriate printer.
7. In the Print controller/server type drop-down list, select the appropriate print controller/color server.
8. From the Print manager drop-down list box, select the appropriate print manager.
9. In the Job handling area, select the appropriate options:
NOTE: The options below are only available if your digital press system includes a DocuSP color server. The options are grayed out if the printer does not support the option.
• Mark the Convert PDF files to PS check box if you want to automatically convert PDF files to PostScript.
• Mark the Support legacy DocuSP check box if you want to enable legacy DocuSP compatibility.
FreeFlow Scanner 665E System Administ rat ion Guide6-6
6. Product ion pr int ing administrat ion
10. In the Network type area, select the appropriate options:
• TCP/IPNOTE: Mark the High security check box if you want to enable high security for the specified printer.• Novell Netware
11. Select Test Print if you want to validate the connection with the printer.
12. Select OK to save and close the Production Printer Settings dialog box.
Modifying a production printer
To modify the settings of a production printer:
1. Select Start: Programs: Xerox FreeFlow Software: Production Printer Settings from the Windows desktop. The Production Printer Settings dialog box opens.
2. Select the printer you wish to edit from the printers list.3. Select Edit Printer. The Edit Printer dialog box opens.4. Edit the printer settings as desired.5. Select OK to save and close the Production Printer Settings
dialog box.
Setting the default production printer
To set the default production printer: 1. Select Start: Programs: Xerox FreeFlow Software:
Production Printer Settings from the Windows desktop. The Production Printer Settings dialog box opens.
2. Select the production printer you wish to set as the default printer from the printers list.
3. Select Set as Default Printer.
NOTE: A blue check mark to the left of the printer name in the printer list indicates that the printer is set as the default printer.
4. Select Close to exit the Production Printer Settings dialog box.
FreeFlow Scanner 665E System Administrat ion Guide 6-7
6. Product ion pr int ing administrat ion
Removing a production printer
The following procedure describes how to remove production printers.NOTE: This procedure is valid for both Novell NetWare (IPX/SPX) and UNIX (TCP/IP) production printers.
To remove an existing production printer:1. Select Start: Programs: Xerox FreeFlow Software:
Production Printer Settings from the Windows desktop. The Production Printer Settings dialog box opens.
2. Select the production printer you wish to remove from the printers list.
3. Select Delete Printer. A confirmation message box appears.4. Select OK to delete the selected printer.5. Select Close to exit the Production Printer Settings dialog
box.CAUTION: To remove the access to the print/color server for a particular Windows user, you must do either of the following:• For a Novell NetWare server, delete the matching user
account from the NetWare server account database.• For a UNIX server, delete the user account from the UNIX
server account database. In addition, or as an alternative, delete the default xrxusr account.
FreeFlow Scanner 665E System Administ rat ion Guide6-8
6. Product ion pr int ing administrat ion
Creating a Job Ticket
The Job Setup dialog box is used for specifying print and finishing options for production printers and is used to:• reset to the default job ticket value• save the job ticket (.xpf file extension)• open an existing job ticket fileNOTE: Only features supported by the selected printer are available in the Job Setup dialog box.
To display the Job Setup:1. Select Start: Programs: Xerox FreeFlow Software:
Production Printer Settings from the Windows desktop. The Production Printer Settings dialog box opens.
2. From the printer list, select the production printer for which you wish to display the job setup features.
3. Select Create a Job Ticket. The Job Setup dialog box for the specified printer opens.
4. Make the desired changes and save the job ticket.5. For more information on Job Setup, refer to the Printer
Administration section of the online Help system.6. Select OK to close the Job Setup dialog box.7. Select Close to exit the Production Printer Settings dialog
box.
FreeFlow Scanner 665E System Administrat ion Guide 6-9
6. Product ion pr int ing administrat ion
Using High Security with DocuSP 4.x./5.x and TCP/IP
A high security option is available for data transmission when production printing to a DocuSP 4.x/5.x color server using TCP/IP.NOTE: If using high security, you must set the security setting to “on” in the DocuSP color server for both the FTP and IPP settings. Refer to your DocuSP documentation for information on setting these settings.
Adding a High Security printer
KEY POINT: This book uses illustrations showing a DocuColor 8000 Digital Press connected to a Fiery EXP8000 color server. Your system may vary depending on the digital press and color server for your work environment.To add a high security printer:1. Select Start: Programs: Xerox FreeFlow Software:
Production Printer Settings from the desktop. The Production Printer Settings dialog opens.
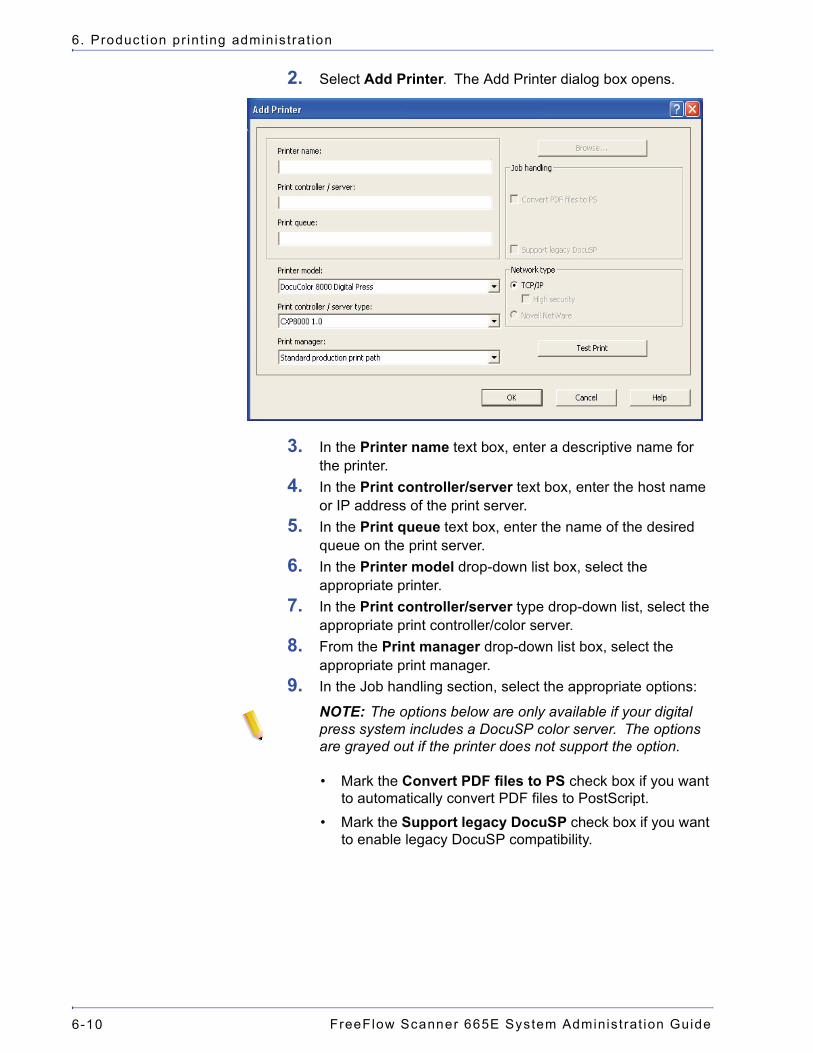
FreeFlow Scanner 665E System Administ rat ion Guide6-10
6. Product ion pr int ing administrat ion
2. Select Add Printer. The Add Printer dialog box opens.
3. In the Printer name text box, enter a descriptive name for the printer.
4. In the Print controller/server text box, enter the host name or IP address of the print server.
5. In the Print queue text box, enter the name of the desired queue on the print server.
6. In the Printer model drop-down list box, select the appropriate printer.
7. In the Print controller/server type drop-down list, select the appropriate print controller/color server.
8. From the Print manager drop-down list box, select the appropriate print manager.
9. In the Job handling section, select the appropriate options:
NOTE: The options below are only available if your digital press system includes a DocuSP color server. The options are grayed out if the printer does not support the option.
• Mark the Convert PDF files to PS check box if you want to automatically convert PDF files to PostScript.
• Mark the Support legacy DocuSP check box if you want to enable legacy DocuSP compatibility.
FreeFlow Scanner 665E System Administrat ion Guide 6-11
6. Product ion pr int ing administrat ion
10. In the Network type area: select the following:
• TCP/IPNOTE: Mark the High security check box if you want to enable high security for the specified printer.• Novell Netware
11. Select OK to save and close the Production Printer Settings dialog box.
Installing a security certificate
KEY POINT: The following information is applicable for systems connected to a DocuSP color server/controller.If your site requires a high security communication and you are connected to a DocuSP color server, you will need to implement the client-side secured FTP and/or Secure IPP security certificate in order to communicate with the DocuSP 4.x/5.x color server. The Security Certification application is used for installing the certificate and checking the status of an existing certificate on the DocuSP 4.x/5.x color server.NOTE 1: The security certificate must be enabled on the DocuSP color server. Refer to your DocuSP documentation for more information.NOTE 2: The security certificate is not the security certificate for use by FreeFlow applications to communicate to browsers connected to the site.
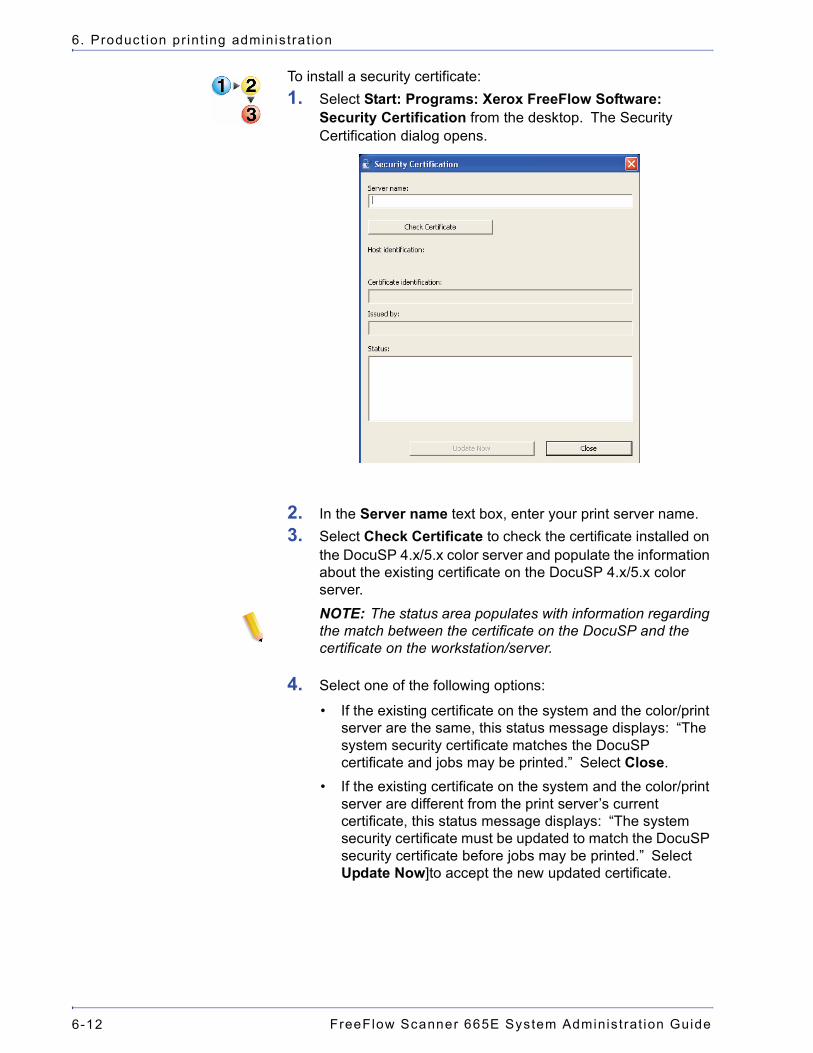
FreeFlow Scanner 665E System Administ rat ion Guide6-12
6. Product ion pr int ing administrat ion
To install a security certificate:1. Select Start: Programs: Xerox FreeFlow Software:
Security Certification from the desktop. The Security Certification dialog opens.
2. In the Server name text box, enter your print server name.3. Select Check Certificate to check the certificate installed on
the DocuSP 4.x/5.x color server and populate the information about the existing certificate on the DocuSP 4.x/5.x color server.NOTE: The status area populates with information regarding the match between the certificate on the DocuSP and the certificate on the workstation/server.
4. Select one of the following options:
• If the existing certificate on the system and the color/print server are the same, this status message displays: “The system security certificate matches the DocuSP certificate and jobs may be printed.” Select Close.
• If the existing certificate on the system and the color/print server are different from the print server’s current certificate, this status message displays: “The system security certificate must be updated to match the DocuSP security certificate before jobs may be printed.” Select Update Now]to accept the new updated certificate.
FreeFlow Scanner 665E System Administrat ion Guide 6-13
6. Product ion pr int ing administrat ion
Resolving production printing problems
This section describes resolving TCP/IP and Novell Netware printing problems, viewing the event viewer to troubleshoot printing problems, and cleaning up print file problems.
Resolving TCP/IP problems
If you or a user encounter problems when printing from a system to a TCP/IP server, some things to check include the following:• Make sure the user is using a valid login for the print server.
For example, xrxusr/<site specific password>• Make sure the printer added in the Production Printer Settings
dialog box has a selected printer type and server type that matches the TCP/IP print server.
• Make sure the print queue exists on the TCP/IP server and is enabled.
• If you or a user are having problems printing remotely, make sure you have properly set up the Remote Print Service and that it is using a valid user account for the print server.
• Make sure the server name and IP address are entered correctly in the host and lmhost files on the Windows file system.
• Make sure the system host name and IP address have been added to the host file of the print server.
Viewing the Event Viewer
The Event Viewer log captures all printing type faults. Refer to this log when experiencing problems printing.To view the event log, select Start: Settings: Control Panel: Administrative Tools: Event Viewer from the Windows desktop. For more information on using the Event Viewer, refer to Chapter 3, Windows and network configurations.NOTE: Refer to your Windows documentation for additional information on reading and interpreting the event log.
FreeFlow Scanner 665E System Administ rat ion Guide6-14
6. Product ion pr int ing administrat ion
Cleaning up print file problems
Occasionally, production print job files submitted to the DocuSP server may not be deleted from the server queue directory after they are finished printing. If such files are not removed, the queue directory could reach maximum capacity and no longer accept incoming print jobs. Documentation for this server contains procedures for manually cleaning up the server queues if this situation occurs. Refer to the following documentation:• Refer to the section regarding undeclared faults in the Xerox
Document Services Platform Series Problem Solving Guide.
FreeFlow Scanner 665E System Administrat ion Guide 7-1
7. Quick Print administration
This chapter provides information for using DOS command lines to automate job submission with Quick Print.The Quick Print application is a full-featured print utility that allows comprehensive programming of printing attributes for a broad array of Xerox Production Printing and Publishing devices.The Quick Print utility can be executed only on Windows XP Professional PC platforms other than those supplied with the Xerox FreeFlow applicationsThis capability provides the flexibility to access print-ready jobs that are support by FreeFlow, such as PostScript, PDF, TIFF, HP/PCL, ASCII, JPEG, and RDO document formats.
FreeFlow Scanner 665E System Administ rat ion Guide7-2
7. Quick Pr int administ rat ion
System requirements
The minimum system requirements for Quick Print are as follows:• Windows XP Professional operating system• 733 MHZ CPU• Minimum of 256 MB RAM• 200 MB free hard drive space for application installation• Free hard drive space for application useNOTE: The space required for application use is dependent on the size of the jobs.
Using DOS command lines
This section provides information for using DOS command lines to automate job submission with Quick Print.You can write and run a batch (a list of DOS commands) to print multiple jobs in Quick Print without the user interface display or user interaction. Quick Print prints the specified file(s) with the specified copy count to the specified printer and exits. All other job ticket attributes are default values (default values can be whatever job ticket values are in the RDO document).This is how the initiating program accesses Quick Print via the command line:domgr “<path name/file>” /b “<printer queue>”<copy count>If an invalid file name is entered, an error displays. You can re-enter the command line with a valid file name. If an invalid printer name is entered, no error messages display, but the Printer Settings window displays for you to select an existing printer or to add the desired printer. In these cases, user interaction is required.If an invalid copy count is specified, Quick Print prints the specified file with copy count of 1 (default value) to the specified printer and exits.
FreeFlow Scanner 665E System Administrat ion Guide 7-3
7. Quick Pr int administrat ion
Printing a document using Quick print
You can print RDO, TIFF, JPEG, PostScript, ASCII (TXT), HP/PCL, and PDF files using Standalone Quick Print. You can print one document at a time or print multiple documents as a single print job.NOTE: You cannot print page ranges for a multiple print job.
To print a document using Quick Print:1. Select Start: Programs: Xerox FreeFlow Software: Quick
Print from the Windows desktop. The Quick Print application opens.
2. Select Windows File System from the Select from drop-down list box.
3. From the Show file type drop-down list box, select the file type you want to print.
4. Use the directory window to navigate to the desired document and select the document.
5. In the Copies text box, enter the number of copies you want to print.
6. Mark the All check box to print all pages of the selected document. Or clear the All check box to print a range of pages in the document.NOTE: The All check box is checked or grayed out for multiple file jobs; all pages of the documents in multiple file jobs must be printed.
7. From the Printer drop-down list, select the desired production printer.NOTE: You can select Printer Settings to add another printer to the Printer drop-down list.
8. Select Job Setup to open the job ticket for the specified printer if you want to change the document printing options.NOTE: The Job Setup option is available when Print as Separate Job is selected.
9. When you have specified all the printing options, select Print to submit the document to the specified production printer.
10. When the print job submission is complete, a message box displays. Select OK to acknowledge the message and return to the Quick Print application.
11. Select Close to close Quick Print when you have finished submitting print jobs.
FreeFlow Scanner 665E System Administ rat ion Guide7-4
7. Quick Pr int administ rat ion


701P44149