Free Pattern Instructions Fit To Be Tied Apron...Free Pattern Instructions Fit To Be Tied Apron...
3
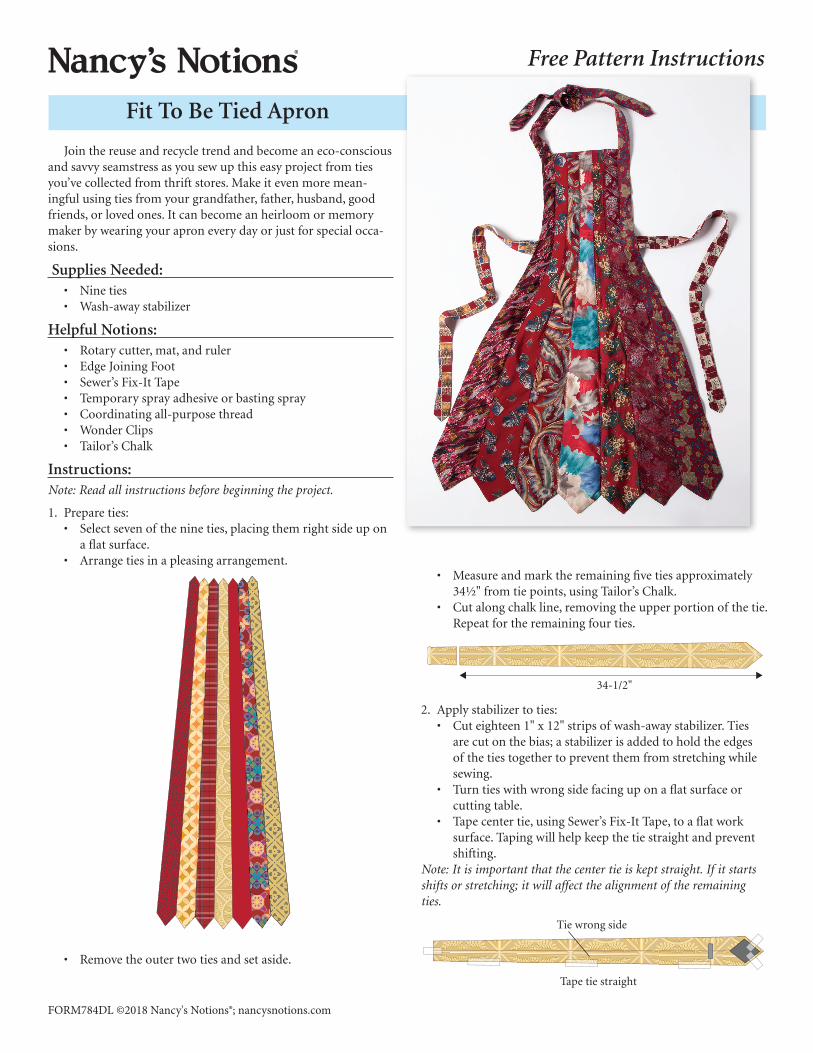
Free Pattern Instructions Fit To Be Tied Apron FORM784DL ©2018 Nancy's Notions®; nancysnotions.com Join the reuse and recycle trend and become an eco-conscious and savvy seamstress as you sew up this easy project from ties you’ve collected from thrift stores. Make it even more mean- ingful using ties from your grandfather, father, husband, good friends, or loved ones. It can become an heirloom or memory maker by wearing your apron every day or just for special occa- sions. Supplies Needed: • Nine ties • Wash-away stabilizer Helpful Notions: • Rotary cutter, mat, and ruler • Edge Joining Foot • Sewer’s Fix-It Tape • Temporary spray adhesive or basting spray • Coordinating all-purpose thread • Wonder Clips • Tailor’s Chalk Instructions: Note: Read all instructions before beginning the project. 1. Prepare ties: • Select seven of the nine ties, placing them right side up on a flat surface. • Arrange ties in a pleasing arrangement. • Remove the outer two ties and set aside. • Measure and mark the remaining five ties approximately 34½" from tie points, using Tailor’s Chalk. • Cut along chalk line, removing the upper portion of the tie. Repeat for the remaining four ties. 2. Apply stabilizer to ties: • Cut eighteen 1" x 12" strips of wash-away stabilizer. Ties are cut on the bias; a stabilizer is added to hold the edges of the ties together to prevent them from stretching while sewing. • Turn ties with wrong side facing up on a flat surface or cutting table. • Tape center tie, using Sewer’s Fix-It Tape, to a flat work surface. Taping will help keep the tie straight and prevent shifting. Note: It is important that the center tie is kept straight. If it starts shifts or stretching; it will affect the alignment of the remaining ties. 34-1/2" Tape tie straight Tie wrong side
Transcript of Free Pattern Instructions Fit To Be Tied Apron...Free Pattern Instructions Fit To Be Tied Apron...
Free Pattern Instructions
Fit To Be Tied Apron
FORM784DL ©2018 Nancy's Notions®; nancysnotions.com
Join the reuse and recycle trend and become an eco-conscious and savvy seamstress as you sew up this easy project from ties you’ve collected from thrift stores. Make it even more mean-ingful using ties from your grandfather, father, husband, good friends, or loved ones. It can become an heirloom or memory maker by wearing your apron every day or just for special occa-sions.
Supplies Needed:• Nine ties• Wash-away stabilizer
Helpful Notions:• Rotary cutter, mat, and ruler• Edge Joining Foot• Sewer’s Fix-It Tape• Temporary spray adhesive or basting spray• Coordinating all-purpose thread• Wonder Clips• Tailor’s Chalk
Instructions:Note: Read all instructions before beginning the project.
1. Prepare ties:• Select seven of the nine ties, placing them right side up on
a flat surface.• Arrange ties in a pleasing arrangement.
• Remove the outer two ties and set aside.
• Measure and mark the remaining five ties approximately 34½" from tie points, using Tailor’s Chalk.
• Cut along chalk line, removing the upper portion of the tie. Repeat for the remaining four ties.
2. Apply stabilizer to ties:• Cut eighteen 1" x 12" strips of wash-away stabilizer. Ties
are cut on the bias; a stabilizer is added to hold the edges of the ties together to prevent them from stretching while sewing.
• Turn ties with wrong side facing up on a flat surface or cutting table.
• Tape center tie, using Sewer’s Fix-It Tape, to a flat work surface. Taping will help keep the tie straight and prevent shifting.
Note: It is important that the center tie is kept straight. If it starts shifts or stretching; it will affect the alignment of the remaining ties.
34-1/2"
Tape tie straight
Tie wrong side

2FORM784DL ©2018 Nancy's Notions®; nancysnotions.com
• Position the next tie on right side of center tie making sure edges are aligned and bottom edge points match. Tape in place, if needed.
• Spray the adhesive on to the wash-away stabilizer. Careful not to shift or move the ties, center stabilizer over the two edges of both ties. Gently press stabilizer in place.
• Remove tape from ties before stitching.
3. Stitch ties together:• Using a zigzag stitch, stitch on right side of ties, center-
ing stitches over tie edges. Begin at tie points and sew up toward the cut edge. Stitch slowly to ensure you are catch-ing both edges of each tie.
Note: Guide the blade of the Edge Joining Foot between the two tie edges and stitching the edges together.
• Repeat steps adding next tie to left side of the center, add-ing stabilizer and stitching.
• Complete the body of apron by adding the remaining two cut ties, continuing to work from the right, then left.
Note: With each additional tie, you may need to slightly curve the stabilizer to ensure that the stabilizer holds both of tie edges.
4. Complete apron body:• After ties are stitched together, finish upper cut edge:
- Straighten cut edge, if needed.
- Fold upper edge ¾" to wrong side, then refold again. Pin or Wonder Clip in place. Topstitch ½" from the folded edge and top folded edge.
• Add the two remaining ties that were set aside in step 1, following steps 2 and 3.
3/4"
Fold over upper edge 3/4" twice

FORM784DL ©2018 Nancy's Notions®; nancysnotions.com 3
• Remove stabilizer:- Gently tear-away or trim as much excess stabilizer as
possible.- Soak apron in cold water for approximately two hours
to dissolve remaining wash-away stabilizer and hang to dry overnight.
Note: Be carefully how long the apron is left in water. If left too long, colors may bleed.
- Trim loose threads and press/steam the apron body flat.
5. Finish apron:• From the two remaining ties, cut from the narrow end of
tie, 25" in length.
• Attach the waist strap to apron body:- Mark apron on right side with fabric marking pen, 22"
up from bottom edge. Pin waist strap on wrong side of the apron body. Repeat with remaining strap.
- At the mark point, sew apron waist strap, on right, to secure waist strap. Repeat for remaining strap.
• Give apron final pressing with steam, if needed.
25"
Stitch strapStitch strap
22"
22"