FPS01 - silverstonetek.com · interferenza Si vous souhaitez utiliser un SSD SATA M.2, veuillez...
2
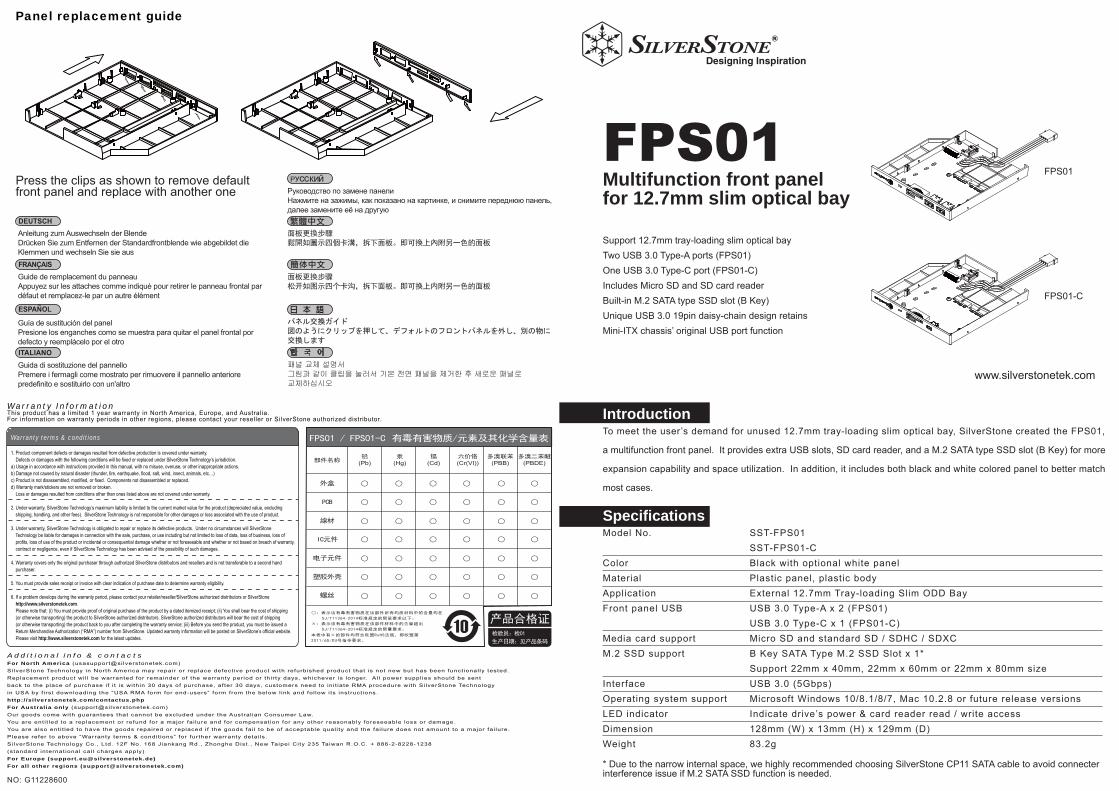
NO: G11228600 Руководство по замене панели Нажмите на зажимы, как показано на картинке, и снимите переднюю панель, далее замените её на другую 패널 교체 설명서 그림과 같이 클립을 눌러서 기본 전면 패널을 제거한 후 새로운 패널로 교체하십시오 面板更換步驟 鬆開如圖示四個卡溝,拆下面板。即可換上內附另一色的面板 面板更换步骤 松开如图示四个卡沟,拆下面板。即可换上内附另一色的面板 パネル交換ガイド 図のようにクリップを押して、デフォルトのフロントパネルを外し、別の物に 交換します Press the clips as shown to remove default front panel and replace with another one Anleitung zum Auswechseln der Blende Drücken Sie zum Entfernen der Standardfrontblende wie abgebildet die Klemmen und wechseln Sie sie aus Guía de sustitución del panel Presione los enganches como se muestra para quitar el panel frontal por defecto y reemplácelo por el otro Guida di sostituzione del pannello Premere i fermagli come mostrato per rimuovere il pannello anteriore predefinito e sostituirlo con un'altro Guide de remplacement du panneau Appuyez sur les attaches comme indiqué pour retirer le panneau frontal par défaut et remplacez-le par un autre élément Panel replacement guide Multifunction front panel for 12.7mm slim optical bay Support 12.7mm tray-loading slim optical bay Two USB 3.0 Type-A ports (FPS01) One USB 3.0 Type-C port (FPS01-C) Includes Micro SD and SD card reader Built-in M.2 SATA type SSD slot (B Key) Unique USB 3.0 19pin daisy-chain design retains Mini-ITX chassis’ original USB port function Model No. Color Material Application Front panel USB Media card support M.2 SSD support Interface Operating system support LED indicator Dimension Weight * Due to the narrow internal space, we highly recommended choosing SilverStone CP11 SATA cable to avoid connecter interference issue if M.2 SATA SSD function is needed. To meet the user’s demand for unused 12.7mm tray-loading slim optical bay, SilverStone created the FPS01, a multifunction front panel. It provides extra USB slots, SD card reader, and a M.2 SATA type SSD slot (B Key) for more expansion capability and space utilization. In addition, it includes both black and white colored panel to better match most cases. SST-FPS01 SST-FPS01-C Black with optional white panel Plastic panel, plastic body External 12.7mm Tray-loading Slim ODD Bay USB 3.0 Type-A x 2 (FPS01) USB 3.0 Type-C x 1 (FPS01-C) Micro SD and standard SD / SDHC / SDXC B Key SATA Type M.2 SSD Slot x 1* Support 22mm x 40mm, 22mm x 60mm or 22mm x 80mm size USB 3.0 (5Gbps) Microsoft Windows 10/8.1/8/7, Mac 10.2.8 or future release versions Indicate drive’s power & card reader read / write access 128mm (W) x 13mm (H) x 129mm (D) 83.2g www.silverstonetek.com FPS01 Specifications Introduction FPS01 FPS01-C Additional info & contacts For North America ([email protected]) SilverStone Technology in North America may repair or replace defective product with refurbished product that is not new but has been functionally tested. Replacement product will be warranted for remainder of the warranty period or thirty days, whichever is longer. All power supplies should be sent back to the place of purchase if it is within 30 days of purchase, after 30 days, customers need to initiate RMA procedure with SilverStone Technology in USA by first downloading the “USA RMA form for end-users” form from the below link and follow its instructions. http://silverstonetek.com/contactus.php For Australia only ([email protected]) Our goods come with guarantees that cannot be excluded under the Australian Consumer Law. You are entitled to a replacement or refund for a major failure and for compensation for any other reasonably foreseeable loss or damage. You are also entitled to have the goods repaired or replaced if the goods fail to be of acceptable quality and the failure does not amount to a major failure. Please refer to above “Warranty terms & conditions” for further warranty details. SilverStone Technology Co., Ltd. 12F No. 168 Jiankang Rd., Zhonghe Dist., New Taipei City 235 Taiwan R.O.C. + 886-2-8228-1238 (standard international call charges apply) For Europe ([email protected]) For all other regions ([email protected]) Warranty Information This product has a limited 1 year warranty in North America, Europe, and Australia. For information on warranty periods in other regions, please contact your reseller or SilverStone authorized distributor. 1. Product component defects or damages resulted from defective production is covered under warranty. Defects or damages with the following conditions will be fixed or replaced under SilverStone Technology’s jurisdiction. a) Usage in accordance with instructions provided in this manual, with no misuse, overuse, or other inappropriate actions. b) Damage not caused by natural disaster (thunder, fire, earthquake, flood, salt, wind, insect, animals, etc…) c) Product is not disassembled, modified, or fixed. Components not disassembled or replaced. d) Warranty mark/stickers are not removed or broken. Loss or damages resulted from conditions other than ones listed above are not covered under warranty. 2. Under warranty, SilverStone Technology’s maximum liability is limited to the current market value for the product (depreciated value, excluding shipping, handling, and other fees). SilverStone Technology is not responsible for other damages or loss associated with the use of product. 3. Under warranty, SilverStone Technology is obligated to repair or replace its defective products. Under no circumstances will SilverStone Technology be liable for damages in connection with the sale, purchase, or use including but not limited to loss of data, loss of business, loss of profits, loss of use of the product or incidental or consequential damage whether or not foreseeable and whether or not based on breach of warranty, contract or negligence, even if SilverStone Technology has been advised of the possibility of such damages. 4. Warranty covers only the original purchaser through authorized SilverStone distributors and resellers and is not transferable to a second hand purchaser. 5. You must provide sales receipt or invoice with clear indication of purchase date to determine warranty eligibility. 6. If a problem develops during the warranty period, please contact your retailer/reseller/SilverStone authorized distributors or SilverStone http://www.silverstonetek.com. Please note that: (i) You must provide proof of original purchase of the product by a dated itemized receipt; (ii) You shall bear the cost of shipping (or otherwise transporting) the product to SilverStone authorized distributors. SilverStone authorized distributors will bear the cost of shipping (or otherwise transporting) the product back to you after completing the warranty service; (iii) Before you send the product, you must be issued a Return Merchandise Authorization (“RMA”) number from SilverStone. Updated warranty information will be posted on SilverStone’s official website. Please visit http://www.silverstonetek.comfor the latest updates. Warranty terms & conditions FPS01 / FPS01-C 有毒有害物质/元素及其化学含量表 ○:表示该有毒有害物质在该部件所有均质材料中的含量均在 SJ/T11364-2014标准规定的限量要求以下。 ×:表示该有毒有害物质在该部件材料中的含量超出 SJ/T11364-2014标准规定的限量要求。 部件名称 PCB 線材 IC元件 电子元件 塑胶外壳 螺丝 外盒 多溴二苯醚 (PBDE) 多溴联苯 (PBB) 六价铬 (Cr(VI)) 镉 (Cd) 汞 (Hg) 铅 (Pb) ○ ○ ○ ○ ○ ○ ○ ○ ○ ○ ○ ○ ○ ○ ○ ○ ○ ○ ○ ○ ○ ○ ○ ○ ○ ○ ○ ○ ○ ○ ○ ○ ○ ○ ○ ○ ○ ○ ○ ○ ○ ○ 产品合格证 检验员:检01 生产日期:见产品条码 本表中有×的部件均符合欧盟RoHS法规,即欧盟第 2011/65/EU号指令要求。
Transcript of FPS01 - silverstonetek.com · interferenza Si vous souhaitez utiliser un SSD SATA M.2, veuillez...
NO: G11228600
Руководство по замене панелиНажмите на зажимы, как показано на картинке, и снимите переднюю панель, далее замените её на другую
패널 교체 설명서그림과 같이 클립을 눌러서 기본 전면 패널을 제거한 후 새로운 패널로 교체하십시오
面板更換步驟鬆開如圖示四個卡溝,拆下面板。即可換上內附另一色的面板
面板更换步骤松开如图示四个卡沟,拆下面板。即可换上内附另一色的面板
パネル交換ガイド図のようにクリップを押して、デフォルトのフロントパネルを外し、別の物に交換します
Press the clips as shown to remove default front panel and replace with another one
Anleitung zum Auswechseln der BlendeDrücken Sie zum Entfernen der Standardfrontblende wie abgebildet die Klemmen und wechseln Sie sie aus
Guía de sustitución del panelPresione los enganches como se muestra para quitar el panel frontal por defecto y reemplácelo por el otro
Guida di sostituzione del pannelloPremere i fermagli come mostrato per rimuovere il pannello anteriore predefinito e sostituirlo con un'altro
Guide de remplacement du panneauAppuyez sur les attaches comme indiqué pour retirer le panneau frontal par défaut et remplacez-le par un autre élément
Panel replacement guide
Multifunction front panel for 12.7mm slim optical bay
Support 12.7mm tray-loading slim optical bayTwo USB 3.0 Type-A ports (FPS01)One USB 3.0 Type-C port (FPS01-C)Includes Micro SD and SD card readerBuilt-in M.2 SATA type SSD slot (B Key)Unique USB 3.0 19pin daisy-chain design retains Mini-ITX chassis’ original USB port function
Model No.
ColorMaterialApplicationFront panel USB
Media card supportM.2 SSD support
InterfaceOperating system supportLED indicatorDimensionWeight
* Due to the narrow internal space, we highly recommended choosing SilverStone CP11 SATA cable to avoid connecter interference issue if M.2 SATA SSD function is needed.
To meet the user’s demand for unused 12.7mm tray-loading slim optical bay, SilverStone created the FPS01,
a multifunction front panel. It provides extra USB slots, SD card reader, and a M.2 SATA type SSD slot (B Key) for more
expansion capability and space utilization. In addition, it includes both black and white colored panel to better match
most cases.
SST-FPS01SST-FPS01-CBlack with optional white panelPlastic panel, plastic bodyExternal 12.7mm Tray-loading Slim ODD BayUSB 3.0 Type-A x 2 (FPS01)USB 3.0 Type-C x 1 (FPS01-C)Micro SD and standard SD / SDHC / SDXCB Key SATA Type M.2 SSD Slot x 1*Support 22mm x 40mm, 22mm x 60mm or 22mm x 80mm size USB 3.0 (5Gbps) Microsoft Windows 10/8.1/8/7, Mac 10.2.8 or future release versionsIndicate drive’s power & card reader read / write access128mm (W) x 13mm (H) x 129mm (D) 83.2g
www.silverstonetek.com
FPS01
Specifications
Introduction
FPS01
FPS01-C
Additional info & contactsFor North America (usasupport@si lverstonetek.com)Si lverStone Technology in North America may repair or replace defect ive product wi th refurbished product that is not new but has been funct ional ly tested. Replacement product wi l l be warranted for remainder of the warranty per iod or th i r ty days, whichever is longer. Al l power suppl ies should be sent back to the place of purchase i f i t is wi th in 30 days of purchase, af ter 30 days, customers need to in i t iate RMA procedure wi th Si lverStone Technology in USA by f i rst downloading the “USA RMA form for end-users” form from the below l ink and fol low i ts instruct ions.http:/ /si lverstonetek.com/contactus.phpFor Austral ia only (support@si lverstonetek.com)Our goods come with guarantees that cannot be excluded under the Austral ian Consumer Law. You are ent i t led to a replacement or refund for a major fa i lure and for compensat ion for any other reasonably foreseeable loss or damage. You are also ent i t led to have the goods repaired or replaced i f the goods fai l to be of acceptable qual i ty and the fai lure does not amount to a major fa i lure. Please refer to above “Warranty terms & condi t ions” for fur ther warranty detai ls. Si lverStone Technology Co., Ltd. 12F No. 168 Jiankang Rd., Zhonghe Dist . , New Taipei Ci ty 235 Taiwan R.O.C. + 886-2-8228-1238 (standard internat ional cal l charges apply)For Europe ([email protected])For al l other regions ([email protected])
Warranty InformationThis product has a limited 1 year warranty in North America, Europe, and Australia. For information on warranty periods in other regions, please contact your reseller or SilverStone authorized distributor.
1. Product component defects or damages resulted from defective production is covered under warranty. Defects or damages with the following conditions will be fixed or replaced under SilverStone Technology’s jurisdiction.a) Usage in accordance with instructions provided in this manual, with no misuse, overuse, or other inappropriate actions.b) Damage not caused by natural disaster (thunder, fire, earthquake, flood, salt, wind, insect, animals, etc…)c) Product is not disassembled, modified, or fixed. Components not disassembled or replaced.d) Warranty mark/stickers are not removed or broken. Loss or damages resulted from conditions other than ones listed above are not covered under warranty.
2. Under warranty, SilverStone Technology’s maximum liability is limited to the current market value for the product (depreciated value, excluding shipping, handling, and other fees). SilverStone Technology is not responsible for other damages or loss associated with the use of product.
3. Under warranty, SilverStone Technology is obligated to repair or replace its defective products. Under no circumstances will SilverStone Technology be liable for damages in connection with the sale, purchase, or use including but not limited to loss of data, loss of business, loss of profits, loss of use of the product or incidental or consequential damage whether or not foreseeable and whether or not based on breach of warranty, contract or negligence, even if SilverStone Technology has been advised of the possibility of such damages.
4. Warranty covers only the original purchaser through authorized SilverStone distributors and resellers and is not transferable to a second hand purchaser.
5. You must provide sales receipt or invoice with clear indication of purchase date to determine warranty eligibility.
6. If a problem develops during the warranty period, please contact your retailer/reseller/SilverStone authorized distributors or SilverStone http://www.silverstonetek.com. Please note that: (i) You must provide proof of original purchase of the product by a dated itemized receipt; (ii) You shall bear the cost of shipping (or otherwise transporting) the product to SilverStone authorized distributors. SilverStone authorized distributors will bear the cost of shipping (or otherwise transporting) the product back to you after completing the warranty service; (iii) Before you send the product, you must be issued a Return Merchandise Authorization (“RMA”) number from SilverStone. Updated warranty information will be posted on SilverStone’s official website. Please visit http://www.silverstonetek.com for the latest updates.
Warranty terms & conditions FPS01 / FPS01-C 有毒有害物质/元素及其化学含量表
○:表示该有毒有害物质在该部件所有均质材料中的含量均在
SJ/T11364-2014标准规定的限量要求以下。
×:表示该有毒有害物质在该部件材料中的含量超出
SJ/T11364-2014标准规定的限量要求。
部件名称
PCB
線材
IC元件
电子元件
塑胶外壳
螺丝
外盒
多溴二苯醚(PBDE)
多溴联苯(PBB)
六价铬(Cr(VI))
镉(Cd)
汞(Hg)
铅(Pb)
○
○
○
○
○
○
○
○
○
○
○
○
○
○
○
○
○
○
○
○
○
○
○
○
○
○
○
○
○
○
○
○
○
○
○
○
○
○
○
○
○
○
产品合格证检验员:检01
生产日期:见产品条码本表中有×的部件均符合欧盟RoHS法规,即欧盟第
2011/65/EU号指令要求。
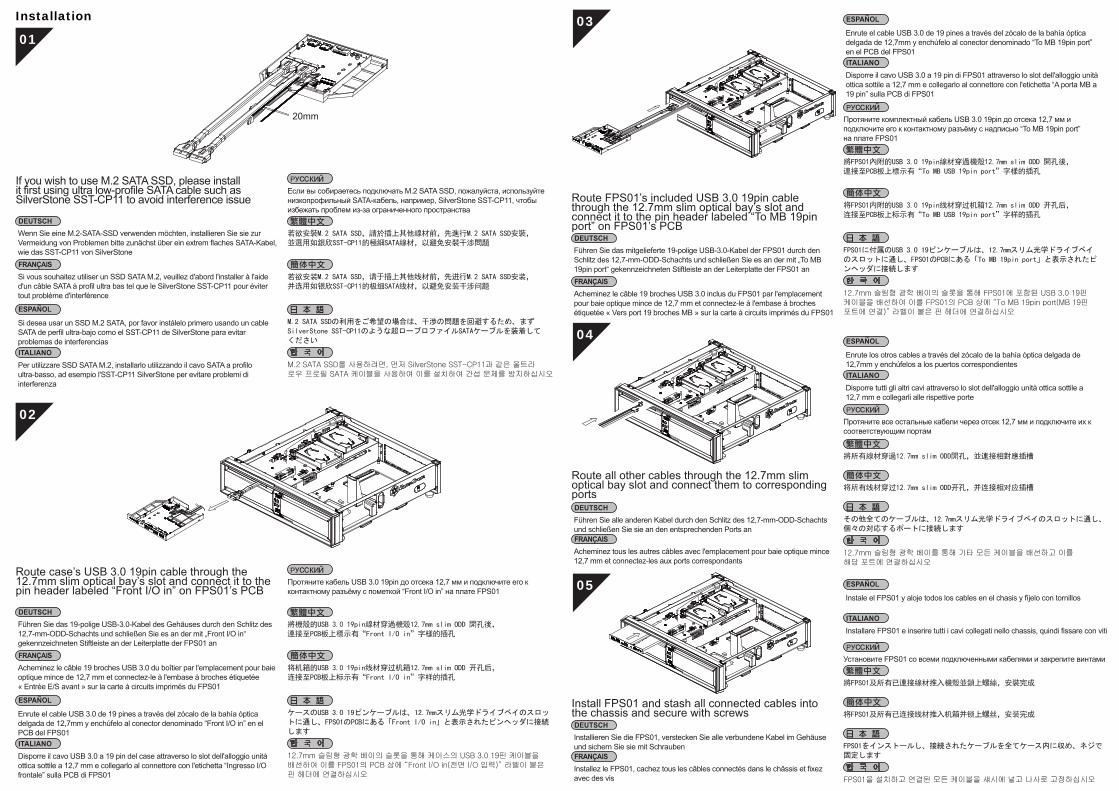
Если вы собираетесь подключать M.2 SATA SSD, пожалуйста, используйте низкопрофильный SATA-кабель, например, SilverStone SST-CP11, чтобы избежать проблем из-за ограниченного пространства
20mm
M.2 SATA SSD를 사용하려면, 먼저 SilverStone SST-CP11과 같은 울트라 로우 프로필 SATA 케이블을 사용하여 이를 설치하여 간섭 문제를 방지하십시오
若欲安裝M.2 SATA SSD,請於插上其他線材前,先進行M.2 SATA SSD安裝,並選用如銀欣SST-CP11的極細SATA線材,以避免安裝干涉問題
若欲安装M.2 SATA SSD,请于插上其他线材前,先进行M.2 SATA SSD安装,并选用如银欣SST-CP11的极细SATA线材,以避免安装干涉问题
M.2 SATA SSDの利用をご希望の場合は、干渉の問題を回避するため、まずSilverStone SST-CP11のような超ロープロファイルSATAケーブルを装着してください
If you wish to use M.2 SATA SSD, please install it first using ultra low-profile SATA cable such as SilverStone SST-CP11 to avoid interference issue
Wenn Sie eine M.2-SATA-SSD verwenden möchten, installieren Sie sie zur Vermeidung von Problemen bitte zunächst über ein extrem flaches SATA-Kabel, wie das SST-CP11 von SilverStone
Si desea usar un SSD M.2 SATA, por favor instálelo primero usando un cable SATA de perfil ultra-bajo como el SST-CP11 de SilverStone para evitar problemas de interferencias
Per utilizzare SSD SATA M.2, installarlo utilizzando il cavo SATA a profilo ultra-basso, ad esempio l'SST-CP11 SilverStone per evitare problemi di interferenza
Si vous souhaitez utiliser un SSD SATA M.2, veuillez d'abord l'installer à l'aide d'un câble SATA à profil ultra bas tel que le SilverStone SST-CP11 pour éviter tout problème d'interférence
Installation
Протяните комплектный кабель USB 3.0 19pin до отсека 12,7 мм и подключите его к контактному разъёму с надписью “To MB 19pin port” на плате FPS01
12.7mm 슬림형 광학 베이의 슬롯을 통해 FPS01에 포함된 USB 3.0 19핀 케이블을 배선하여 이를 FPS01의 PCB 상에 “To MB 19pin port(MB 19핀 포트에 연결)” 라벨이 붙은 핀 헤더에 연결하십시오
將FPS01內附的USB 3.0 19pin線材穿過機殼12.7mm slim ODD 開孔後,連接至PCB板上標示有“To MB USB 19pin port”字樣的插孔
将FPS01内附的USB 3.0 19pin线材穿过机箱12.7mm slim ODD 开孔后,连接至PCB板上标示有“To MB USB 19pin port”字样的插孔
FPS01に付属のUSB 3.0 19ピンケーブルは、12.7mmスリム光学ドライブベイのスロットに通し、FPS01のPCBにある「To MB 19pin port」と表示されたピンヘッダに接続します
Enrute el cable USB 3.0 de 19 pines a través del zócalo de la bahía óptica delgada de 12,7mm y enchúfelo al conector denominado “To MB 19pin port” en el PCB del FPS01
Disporre il cavo USB 3.0 a 19 pin di FPS01 attraverso lo slot dell'alloggio unità ottica sottile a 12,7 mm e collegarlo al connettore con l'etichetta “A porta MB a 19 pin” sulla PCB di FPS01
Route FPS01’s included USB 3.0 19pin cable through the 12.7mm slim optical bay’s slot and connect it to the pin header labeled “To MB 19pin port” on FPS01’s PCB
Führen Sie das mitgelieferte 19-polige USB-3.0-Kabel der FPS01 durch den Schlitz des 12,7-mm-ODD-Schachts und schließen Sie es an der mit „To MB 19pin port“ gekennzeichneten Stiftleiste an der Leiterplatte der FPS01 an
Acheminez le câble 19 broches USB 3.0 inclus du FPS01 par l'emplacement pour baie optique mince de 12,7 mm et connectez-le à l'embase à broches étiquetée « Vers port 19 broches MB » sur la carte à circuits imprimés du FPS01
Протяните все остальные кабели через отсек 12,7 мм и подключите их к соответствующим портам
12.7mm 슬림형 광학 베이를 통해 기타 모든 케이블을 배선하고 이를 해당 포트에 연결하십시오
將所有線材穿過12.7mm slim ODD開孔,並連接相對應插槽
将所有线材穿过12.7mm slim ODD开孔,并连接相对应插槽
その他全てのケーブルは、12.7mmスリム光学ドライブベイのスロットに通し、個々の対応するポートに接続します
Enrute los otros cables a través del zócalo de la bahía óptica delgada de 12,7mm y enchúfelos a los puertos correspondientes
Disporre tutti gli altri cavi attraverso lo slot dell'alloggio unità ottica sottile a 12,7 mm e collegarli alle rispettive porte
Route all other cables through the 12.7mm slim optical bay slot and connect them to corresponding ports
Führen Sie alle anderen Kabel durch den Schlitz des 12,7-mm-ODD-Schachts und schließen Sie sie an den entsprechenden Ports an
Acheminez tous les autres câbles avec l'emplacement pour baie optique mince 12,7 mm et connectez-les aux ports correspondants
Установите FPS01 со всеми подключенными кабелями и закрепите винтами
FPS01을 설치하고 연결된 모든 케이블을 섀시에 넣고 나사로 고정하십시오
將FPS01及所有已連接線材推入機殼並鎖上螺絲,安裝完成
将FPS01及所有已连接线材推入机箱并锁上螺丝,安装完成
FPS01をインストールし、接続されたケーブルを全てケース内に収め、ネジで固定します
Instale el FPS01 y aloje todos los cables en el chasis y fíjelo con tornillos
Installare FPS01 e inserire tutti i cavi collegati nello chassis, quindi fissare con viti
Install FPS01 and stash all connected cables into the chassis and secure with screws
Installieren Sie die FPS01, verstecken Sie alle verbundene Kabel im Gehäuse und sichern Sie sie mit Schrauben
Installez le FPS01, cachez tous les câbles connectés dans le châssis et fixez avec des vis
Протяните кабель USB 3.0 19pin до отсека 12,7 мм и подключите его к контактному разъёму с пометкой “Front I/O in” на плате FPS01
12.7mm 슬림형 광학 베이의 슬롯을 통해 케이스의 USB 3.0 19핀 케이블을 배선하여 이를 FPS01의 PCB 상에 “Front I/O in(전면 I/O 입력)” 라벨이 붙은 핀 헤더에 연결하십시오
將機殼的USB 3.0 19pin線材穿過機殼12.7mm slim ODD 開孔後,連接至PCB板上標示有“Front I/O in”字樣的插孔
将机箱的USB 3.0 19pin线材穿过机箱12.7mm slim ODD 开孔后,连接至PCB板上标示有“Front I/O in”字样的插孔
ケースのUSB 3.0 19ピンケーブルは、12.7mmスリム光学ドライブベイのスロットに通し、FPS01のPCBにある「Front I/O in」と表示されたピンヘッダに接続します
Route case’s USB 3.0 19pin cable through the 12.7mm slim optical bay’s slot and connect it to the pin header labeled “Front I/O in” on FPS01’s PCB
Führen Sie das 19-polige USB-3.0-Kabel des Gehäuses durch den Schlitz des 12,7-mm-ODD-Schachts und schließen Sie es an der mit „Front I/O in“ gekennzeichneten Stiftleiste an der Leiterplatte der FPS01 an
Enrute el cable USB 3.0 de 19 pines a través del zócalo de la bahía óptica delgada de 12,7mm y enchúfelo al conector denominado “Front I/O in” en el PCB del FPS01
Disporre il cavo USB 3.0 a 19 pin del case attraverso lo slot dell'alloggio unità ottica sottile a 12,7 mm e collegarlo al connettore con l'etichetta “Ingresso I/O frontale” sulla PCB di FPS01
Acheminez le câble 19 broches USB 3.0 du boîtier par l'emplacement pour baie optique mince de 12,7 mm et connectez-le à l'embase à broches étiquetée « Entrée E/S avant » sur la carte à circuits imprimés du FPS01
0103
04
05
02