FortéBio Bio-layer Interferometry Quantitation Tutorial · 1 day ago · 9 CONFIDENTIAL Octet...
68
Jennifer A. Codding-Bui, PhD M.L. Richard Yip, PhD Field Applications Scientists FortéBio Bio-layer Interferometry Quantitation Tutorial
Transcript of FortéBio Bio-layer Interferometry Quantitation Tutorial · 1 day ago · 9 CONFIDENTIAL Octet...

Jennifer A. Codding-Bui, PhD
M.L. Richard Yip, PhD
Field Applications Scientists
FortéBio Bio-layer
Interferometry
Quantitation Tutorial

CONFIDENTIAL2
• Introduction to Biolayer Interferometry (s. 3-9)
• Quantitation Basics (s. 10-17)
• Basic Quantitation Acquisition (s. 18-29)
• Advanced Quantitation (s. 30-50)
• Data Analysis HT (s. 51-66)
• Conclusions (s. 67-68)
Outline

CONFIDENTIAL3
Full life-cycle offering of instruments
• Label-free assays based on Bio-Layer Interferometry (BLI) and
Surface Plasmon Resonance (SPR) platforms
Octet & BLItz Pioneer
BLI SPR
ForteBio – A Leader in Biomolecular Analysis

CONFIDENTIAL4
Use of biosensors is core to BLI technology
Biosensor-based Technology

CONFIDENTIAL5
The Octet Dip and Read™ Biosensor consists of a fiber optic embedded into a polypropylene hub with a sensor-specific chemistry at the tip
|---- 600 mm ------|
Two-dimensional binding surface
Biocompatible Matrix
(minimizes non-specific binding)
Uniform
Non-denaturing
Dip and Read Biosensors

CONFIDENTIAL6
• In BLI, light is directed down an optical fiber (the sensor) toward two interfaces separated by a thin layer at the end of the fiber
• The two reflected beams interfere constructively or destructively at the spectrometer CCD detector array
1 2Ref Test
Reflections R & T are in phase
Constructive interference
Strong signal at the spectrometer
Reflections R & T are out of phase
Destructive interference
Weak signal at the spectrometer
R TR T
Bio-Layer Interferometry

CONFIDENTIAL7
Rela
tive
In
ten
sit
y
Wavelength (nm)
100%
0
nm
sh
ift
Time (sec)
Analyte binding changes bio-layer thickness;
thus, the increased distance that the light travels
is detected
Monitoring nm-shift Against Time

CONFIDENTIAL8
Cells
Bacteria
Virus
IgM
IgA
IgG, IgD, IgE
Antibody Fragments
Proteins
Peptides
Nucleotides (DNA)
Small Molecules
Atoms
200 nm
1000 nm
0.1 nm 1
1,000
100,000
1,000,00075 nm
150
MWSize
7 nm
1 nm
Bacteria
Virus
Antibody - Antigen
Receptor - Ligand
DNA - DNA
DNA - Protein
Antibody Fragment - Antigen
Antigen – Fusion Protein
Antibody - Peptide
Multiple Antibody Pairings
Antibody - Small Molecule
Protein - Small Molecule
Current Octet assays within blue area
Octet Versatility in Interaction Analysis

CONFIDENTIAL9
Octet RED96e Octet K2 Octet QKe Octet RED384 Octet HTX
Molecular Weight Range
> 150 Da > 150 Da > 5000 Da > 150 Da > 150 Da
# Spectrometers 8 2 1 16 16
# Channels per Read 8 2 8 16 1 - 96
Microplate Positions 1 1 1 2 2
Biosensor Reracking Yes Yes Yes Yes Yes
Robot Compatible No No No Yes Yes
Sample Vessel Formats 96 96 96, 96 HA96 / 96HA
384 / 384TW
96 / 96HA
384 / 384TWMinimum Sample Volume
180 µL per well 180 µL per well180 µL per
well40 µL per well 40 µL per well
Affinity range (approximate)
1 mM to10 pM
1 mM to10 pM
0.1 mM to10 pM
1 mM to10 pM
1 mM to10 pM
Sample Usage Non-destructive and recoverable
Temperature Control 15 – 40 °C 4°C above ambient to 40°C
Analysis time per sample
Up to 12 hrswith
evaporation cover
Up to 4 hrs
21 CFR Part 11 Compliance
Available as option for all systems
Octet Models

CONFIDENTIAL10
Quantitation Basics

CONFIDENTIAL11
Biosensor Application
Antibody-Specific Capture
• Anti-Human IgG Fc Capture (AHC) Human IgG Fc region, kinetic analysis
• Anti-Human IgG Fc Capture (AHQ) Human IgG Fc region, quantitation
• Anti-Mouse Fc Capture (AMC) Mouse IgG1, 2a & 2b Fc regions, kinetic analysis
• Anti-Mouse Fc Capture (AMQ) Mouse IgG1, 2a & 2b Fc regions, quantitation
• Anti-Human Fab-CHI (FAB2) Fab-CH1 domains of human IgG
• Protein A (ProA) Quantitation of various species IgG
• Protein G (ProG) Quantitation of various species IgG
• Protein L (ProL) Quantitation of IgG via kappa light chain
Affinity Tag Capture
• Streptavidin (SA) Biotinylated ligands
• High Precision Streptavidin (SAX) Biotinylated ligands (4% CV loaded SA)
• Super Streptavidin (SSA) Biotinylated ligands (high-density surface)
• Anti-GST (GST) GST-tagged recombinant proteins
• Anti-Penta HIS (HIS1K) HIS-tagged recombinant proteins
• Anti-Penta HIS 2nd Gen (HIS2) HIS-tagged recombinant proteins
• Ni-NTA (NTA) HIS-tagged recombinant proteins
Immobilization
• Amine Reactive 2nd Gen (AR2G) Covalent coupling to reactive amine groups
• Aminopropylsilane (APS) Adsorption to hydrophobic moieties
Quantitation Biosensors
• Quantitation biosensors listed in black

CONFIDENTIAL12
Kinetics Biosensors• Minimal Baseline Drift
• Higher Coefficient of Variation (CV)
Quant Biosensors• Precise – CV must be within a certain range
• Not checked for baseline drift – Short assays, high signal
Different Manufacturing and QC Criteria
Differences Between Kinetic vs
Quant Biosensors

CONFIDENTIAL13
A new standard curve is created for each target molecule and may be
utilized to analyze the same target over time under identical conditions
Quant Experimental Setup –
Start with a Standard Curve

CONFIDENTIAL14
• For each new condition, i.e. temp, buffers, pH, shake speed, etc.
• For each new target molecule
• With a new lot of biosensors
When do I need a new standard curve?

CONFIDENTIAL15
Bin
din
g (n
m)
Time (sec)
Bin
din
g R
ate
Concentration
120
• Quantitation in as little as 2 mins
• 1 step, no washing
Standards
Octet Biosensors
Test Samples
Octet Workflow for Quantitation

CONFIDENTIAL16
Bin
din
g (n
m)
Time (sec)
Bin
din
g R
ate
Concentration
120
Buffer/Neut.
Regen
• Binding rates of test samples are measured and interpolated from the standard curve to determine concentration
• Ability to reuse standard curve when sample is run under comparable conditions
Test Samples
Standards
Octet Biosensors
Octet Workflow for Quant with Regeneration

CONFIDENTIAL17
Considerations for Biosensor Regeneration

CONFIDENTIAL18
Basic Quantitation Workflow with Data Acquisition V11
Double click the Data Acquisition 11.0 software icon to start the program

CONFIDENTIAL19
Select Assay Type
For 384 and HTX models, click on the Present Button to
open the door and the stage will come out.
Select Basic Quantitation
or Basic Quantitation with
Regeneration
Click to Start
Select Blank Experiment

CONFIDENTIAL20
Acquisition Steps for Basic Quantitation
Work from left to right, from Tab 1 to Tab 4.
1. Plate Definition – In this tab, all the information about the sample plate and its wells
will be entered
2. Sensor Assignment – In this tab, sensors are assigned to samples
3. Review Experiment – In this tab, you can review the steps that make up the
experiment
4. Run Experiment – In this tab, you can select where you would like your data saved
and name the data file. Run settings may also be changed
CONFIDENTIAL21
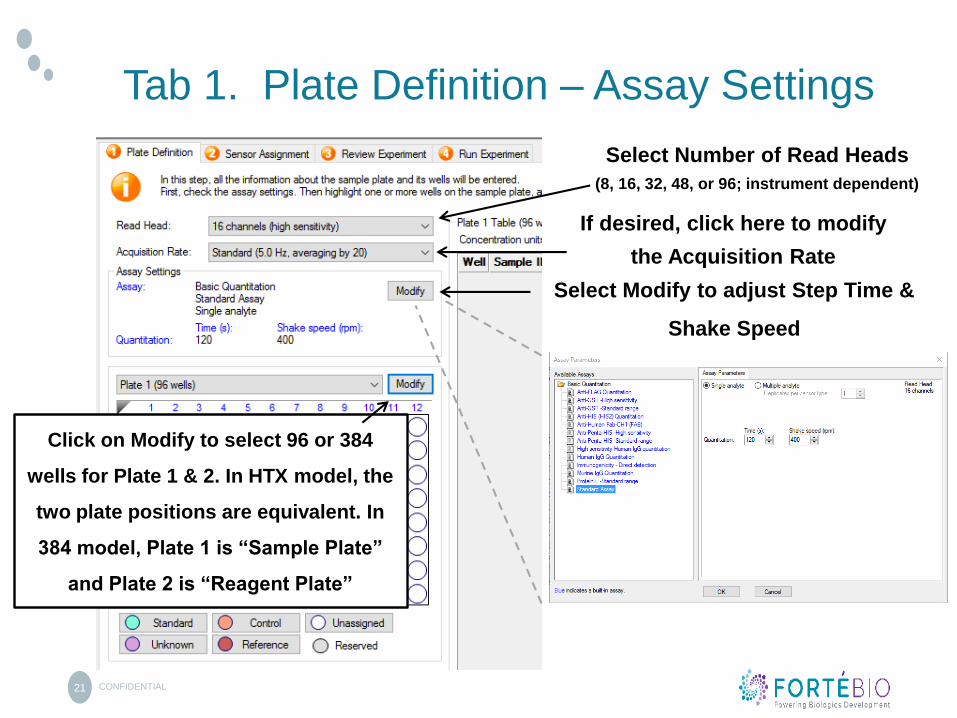
Tab 1. Plate Definition – Assay Settings
Select Number of Read Heads
(8, 16, 32, 48, or 96; instrument dependent)
Select Modify to adjust Step Time &
Shake Speed
Click on Modify to select 96 or 384
wells for Plate 1 & 2. In HTX model, the
two plate positions are equivalent. In
384 model, Plate 1 is “Sample Plate”
and Plate 2 is “Reagent Plate”
If desired, click here to modify
the Acquisition Rate

CONFIDENTIAL22
Tab 1. Plate Definition (96-well Plate)
1. Click on column number or specific wells to highlight wells of interest
2. Right click on highlighted wells or select from options below plate to select well type
1
2

CONFIDENTIAL23
Tab 1. Plate Definition (384-well Plate)
1. Hold down the Shift key on the keyboard and click to the upper left most well of choice to highlight the number of “associated” wells
2. Right click on highlighted wells or select from options below plate to select well type
2
1

CONFIDENTIAL24
Tab 1. Plate Definition (96 well Plate)
1. Label Sample ID
5. Notes in this
column will be
carried over to data
analysis
4. By using a
unique identifier,
replicate groups
can be assigned for
each sample where
mean, standard
deviation, and %
CV (coefficient of
variation) data is
required
3. Make sure that units are correct for the assay
2. Add concentration

CONFIDENTIAL25
Tab 1. Plate Definition
1. To set up a dilution series, highlight the concentrations of interest, right click, and select Set Well Data
3. Select a starting value, series operator, series operand, and the dilution orientation, and click OK
2. Check the box
by dilution series
*The concentration range
displayed here was not set up
using a dilution series
*

CONFIDENTIAL26
Tab 2. Sensor Assignment
1. Check box to have biosensors replaced back in the tray instead of being ejected to the waste container
2. Initially, one column of biosensors is assigned to each column on the plate. This is color coded, as displayed in the figure
3. To regenerate/
reuse biosensors,
increase regeneration
number and hit apply*
*ForteBio’s recommendation
is to utilize fresh biosensors
during initial assay
development; only optimize
regeneration conditions after
you have successfully run
your assay multiple times
4. Select the
sensor type and
enter the lot
number for your
biosensor. The
lot number will
auto populate

CONFIDENTIAL27
Tab 3. Review ExperimentStep Time & Total Run Time
2. The dry run demonstrates the specific column of biosensors going into each sample well. Here, the biosensors in column 1 are going into column 1 of the sample plate
1. Click on arrows
to review the
steps of the
experiment

CONFIDENTIAL28
Tab 4. Run Experiment
a
2. Change settings of interest, including plate temperature. The Red96e has a
temperature range between 15 to 40 °C. Other instruments have heating up to
40 °C but do not have cooling. For these instruments, the recommendation is to
set the temperature from 2 °C above ambient temperature up to 40 °C. This will
allow the instrument to consistently heat to the recommended temperature.
1. Saving an experiment is a two-step process. A. First, click on the box by the
three dots and select the folder where you would like to save the experiment. B.
Name the experiment in the Experiment run name (sub directory).
b

CONFIDENTIAL29
Tab 4. Run Experiment
1. After confirming the assay setup, place the
biosensors in assay buffer in the pre-hyrdation
plate, pipette the sample plate as defined in the
plate definition, and hit “GO”
2. Upon hitting Go, a box will appear as a reminder to
pre-hydrate your biosensors. You may hit OK
3. If the Delayed experiment start box is checked, a
timer will appear. If your biosensors have already been
incubating in assay buffer for 10 mins, you are welcome
to override the timer and begin the assay*. If using the
timer, the assay will begin automatically after the timer is
up
*Even if the biosensors have already been properly hydrated at the start of the experiment, ForteBio
recommends keeping this box checked and running the timer for 1-2 mins to allow your sample plate to
obtain the desired temperature. Shaking the sample plate for a short period of time may also remove air
bubbles from solution.

CONFIDENTIAL30
Advanced Quantitation Workflow with Data Acquisition V11
• In basic quantitation, binding of the analyte of interest to the ligand on the
biosensor generate robust signal.
• In advanced quantitation, the initial binding of the analyte of interest to the ligand
on the biosensor generate very small signal. In order to amplify the signal,
additional “detection” step(s) are needed.
• We will show two examples of the advanced quantitation.- 2-Steps Sandwich-style Quantitation Assay
- Multi-Steps Enzyme-linked Quantitation Assay

CONFIDENTIAL31
31
Standards
SamplesB
ind
ing (
nm
)
Time (sec)
Bin
din
g R
ate
Concentration
• Reuse detection reagent, which bind and
amplify the initial analyte binding signal
• No plate washing needed
Octet Biosensors
300
Detection
Octet Automated Workflow for
2-Steps Sandwich-style Quantitation

CONFIDENTIAL32
Select Assay Type
Click the “Experiment Wizard” button at the upper left hand corner to bring out
the dialog box
Select Advanced
QuantClick to Start
Select Blank Experiment

CONFIDENTIAL33
Acquisition Steps for Advanced Quantitation
384 ModelWork from left to right, from Tab 1 to Tab 4.
1. Plate Definition – In this tab, all the information about the two sample plates and their
wells will be entered.
2. Sensor Assignment – In this tab, sensors are assigned to samples.
3. Review Experiment – In this tab, you can review the steps that make up the
experiment.
4. Run Experiment – In this tab, you can select where you would like your data saved
and name the data file. Run settings may also be changed.

CONFIDENTIAL34
Tab 1. Plate Definition
Select Number of Read Head
(8 or 16 for the 384 model)
Select Modify to define and
adjust assay parameters
Click on Modify to
select 96 or 384
wells for Plate 1 & 2.

CONFIDENTIAL35
Tab 1. Plate Definition
Use dropdown manual to
complete programing
individual steps of the assay.
Adjust step time & shake
speed of each step
accordingly.

CONFIDENTIAL36
Tab 1. Plate Definition
Right click on
highlighted wells
to define the well
type. Select well
type from the
dropdown dialog
box.

CONFIDENTIAL37
Tab 2. Sensor Assignment
1. Check box to have biosensors replaced back in the tray instead of being ejected to the waste container
2. Initially, one column of biosensors is assigned to each column of samples on the plate. They are color coded, as displayed in the figure. For 384 model, the 2 columns of biosensor pickers are tied together and moved in unison. In order to pick 1 column of 8 biosensors at a time, an empty column is needed in between each column of the biosensors. Follow the figure to prepare the biosensor tray.
3 Right click to bring
out the dialog box to
select the sensor type.
4. Enter the lot number
for your biosensor once.
The software will
populate the rest.

CONFIDENTIAL38
Tab 3. Review Experiment &
Tab 4. Run Experiment
are the same as example shown for basic
quantitation.
Setting Up

CONFIDENTIAL39
Streptavidin
BiosensorsB
Multi-Step, Enzyme-linked Quantitation Assay
• Detect and quantify the presence of anti-drug Ab
• Additional sensitivity over direct binding format
• Better performance than other bridging assays such as ELISA
• Higher drug tolerance
• Fewer assay steps and faster time to result
• Allows use of up to 50% serum
Metal DAB
ADA (anti-drug Ab)
HRP
HRP-drug
Bio-drug

CONFIDENTIAL40
Select Assay Type
Click the “Experiment Wizard” button at the upper left hand corner to bring out the dialog box
Select Advanced
Quant
Click to Start
Select Blank Experiment

CONFIDENTIAL41
Acquisition Steps for Advanced Quantitation
HTX ModelWork from left to right, from Tab 1 to Tab 5.
1. Sensor Loading – In this unique tab for the HTX model, custom biosensors can be prepared. The number of read heads can be defined separately from the next tab. You may skip this tab if no custom biosensor is needed.
2. Plate Definition – In this tab, all the information about the sample plates and their wells will be entered.
3. Sensor Assignment – In this tab, sensors are assigned to samples.
4. Review Experiment – In this tab, you can review the steps that make up the experiment.
5. Run Experiment – In this tab, you can select where you would like your data saved and name the data file. Run settings may also be changed.

CONFIDENTIAL42
Streptavidin
BiosensorsB
Creating Custom Biosensors
• Steps to Prepare Custom Biosensors
Bio-drug
1. Dip bare biosensor into wells containing buffer
• The number of biosensors can be defined as needed. In the upcoming example, 2 rounds of 32 streptavidin biosensors were loaded with the desirable biotinylated-ligands
2. Dip into wells containing biotinylated ligands

CONFIDENTIAL43
Tab 1. Sensor Loading
Select “Modify” to
bring out dialog
box and then
specify the “Sensor
Loading” tab to
modify assay
parameters for
custom biosensor
creation
Click on Modify to
select 96 or 384 wells
for Plate 1 & 2.
Use dropdown manual to
complete programing individual
steps. Adjust time & shake
speed of each step accordingly.
Select Number of Read Heads
(8, 16, 32, 48, or 96 for HTX)

CONFIDENTIAL44
Tab 1. Sensor Loading
Hold down the Shift key on the
keyboard and click the upper left
most well of choice to highlight the
number of “associated” wells.
Hold down the Shift key on the
keyboard and click the upper left
most well of choice to highlight the
number of “associated” wells.
Define the well types by right
clicking on the highlighted wells
and bringing out the dropdown
dialog box.
CONFIDENTIAL45
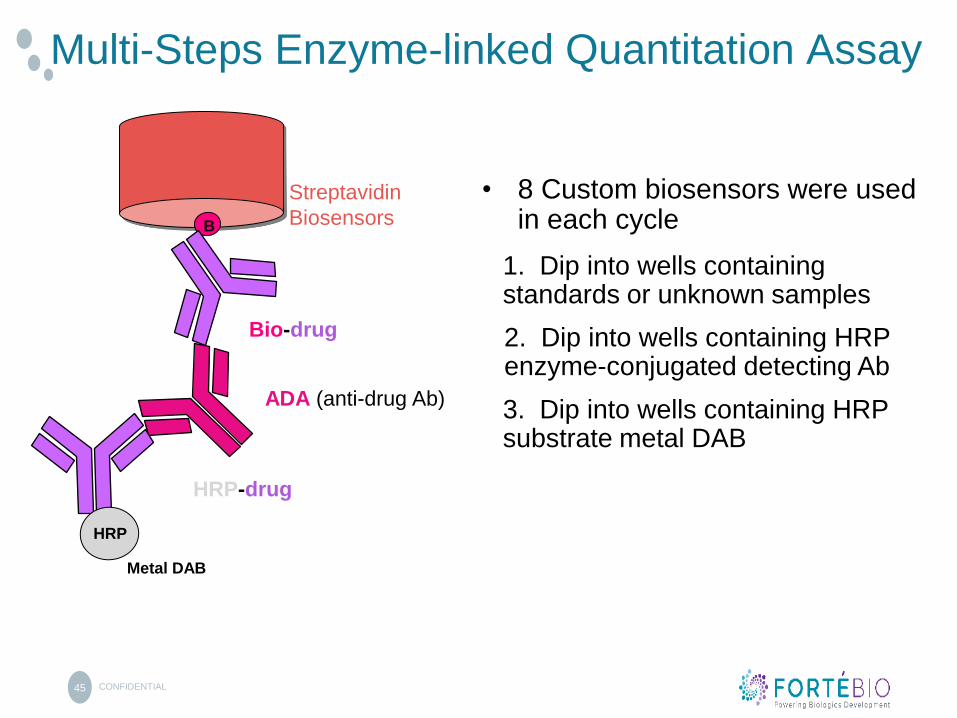
Multi-Steps Enzyme-linked Quantitation Assay
• 8 Custom biosensors were used in each cycle
Metal DAB
ADA (anti-drug Ab)
HRP
HRP-drug
Streptavidin
BiosensorsB
Bio-drug
1. Dip into wells containing standards or unknown samples
2. Dip into wells containing HRP enzyme-conjugated detecting Ab
3. Dip into wells containing HRP substrate metal DAB

CONFIDENTIAL46
Samples
Bin
din
g (
nm
)
Time (sec)
Bin
din
g R
ate
Concentration
• Low detection reagent consumption
• No wash format allows fewer steps and faster time to result
Octet Biosensors
300
Detection
Enzyme
Standards/Positive
Controls
Octet Automated Workflow for
Multi-Steps Enzyme-linked Quantitation Assay

CONFIDENTIAL47
Tab 2. Plate Definition
Select “Modify” to
bring out dialog
box and then
specify the “Assay
Parameters” tab to
modify assay
parameters for the
enzyme-linked
quant assay
Use dropdown manual to
complete programing
individual steps. Adjust time
& shake speed of each step
accordingly.
Select Number of Read Heads
(The choice could be different from
Sensor Loading if desired)

CONFIDENTIAL48
Tab 2. Plate Definition
Click to highlight the number of
“associated” wells.
Define the well types by right
clicking on the highlighted wells
and bringing out the dropdown
dialog box.

CONFIDENTIAL49
Tab 3. Sensor Assignment
1. Check box to have biosensors replaced back in the tray instead of being ejected to the waste container
2. Based on the assay design, 64 biosensors are needed for this experiment. Unlike in the 384 models, individual columns of biosensor pickers in HTX can moved independently. No empty column is needed. Follow the figure to prepare the biosensor tray.
3 Right click to bring
out the dialog box to
select the sensor type.
4. Enter the lot number
for your biosensor once
and the software will
populate the rest.

CONFIDENTIAL50
Tab 4. Review Experiment &
Tab 5. Run Experiment
are the same as example shown for basic
quantitation.
Setting Up

CONFIDENTIAL51
Advanced Quantitation Workflow with Data Analysis HT V11
Double click the Data Analysis HT 11.0 software icon to start the program

CONFIDENTIAL52
Data Analysis HT V11
Locate the
experimental folder
of interest among all
the files stored on
the computer
Highlight the specific
experimental folder to preview
its content in the lower left hand
corner

CONFIDENTIAL53
Loading Data into the Analysis Software
1. Double click the specific experimental folder to
load the data into the analysis software
2. Additional tabs appear after
data is loaded into the program
3. User Guide and Quick Start
Guide are available by clicking
one of these two Help Buttons

CONFIDENTIAL54
Processing Experimental Data
3. Sample types:
reference, standards,
and unknowns are
labelled correctly
while setting up data
acquisition
1. Select the “Preprocessed
Data” tab to carry out
appropriate data processing
steps.
2. Carry out data
editing & reference
subtraction in this tab

CONFIDENTIAL55
Processing Experimental Data
Right click on the
selected well to bring
out the dropdown
dialog box to edit
well information.

CONFIDENTIAL56
Processing Experimental Data
If reference subtraction is
desired, select all the wells
and then right click to bring
out dropdown dialog box.

CONFIDENTIAL57
Processing Experimental Data
Reference
subtraction is done
and the formula
can be found here.

CONFIDENTIAL58
Processing Experimental Data
Additional data
correction steps can
be found in this tab

CONFIDENTIAL59
Quantitation Analysis1. Select the “Quantitation
Analysis” tab once all the
desired data processing steps
are completed.
2. Standard curve was constructed
using default setting on the far left.
3. Concentration of each of the
unknown samples were determined
using the standard curve..

CONFIDENTIAL60
Quantitation Analysis
Standard curve can
be recalculated
using different fitting
models.

CONFIDENTIAL61
Quantitation Analysis
“Initial Slope” is the correct choice for all
direct quantitation experiments. For 2-steps
and multi-steps quantitation experiments
involving an amplification step, “R
equilibrium” is the appropriate choice.

CONFIDENTIAL62
Quantitation Analysis2. Clicking “Excel Report” button
brings out dialog box with multiple
choices for user to select desirable
info to be exported into an excel file.
1. Clicking any one of these three
“Standard Curves” buttons allow
user to either load a standard that
was generated from previous
experiment, or save a standard from
current experiment for future use, or
select specific standard from
multiple available standards.

CONFIDENTIAL63
Generating Custom Report
2. Use the “+” or
“-” button to
increase or
decrease the
number of
pages of the
report.
1. Selecting the “Report”
tab allows user to create a
custom report in pdf format.

CONFIDENTIAL64
Generating Custom Report
3. Each
individual
section can be
re-scaled and
positioned on
the page
freely.1. Select the “Data” to be
included in the report.
2. “Data” can be
dragged and
dropped onto
the report page.

CONFIDENTIAL65
Generating Custom Report
1. “Column Properties” of data
table can be edited by selecting
the table and right clicking to
bring out the dropdown dialog
box.

CONFIDENTIAL66
Generating Custom Report
1. Once the current
report layout is
formatted, it can be
saved as a template
for future use.
2. Load a
previously
saved template
to reduce time &
effort required to
create new
report with
current data.

CONFIDENTIAL67
• Fully equilibrate all reagents to room temperature
• Hydrate biosensors in sample matrix for 10min
• Match specific calibration standards with samples, e.g. Ab isotype and subtype
• Match neutralization solution to sample matrix
• Reference subtract using blank medium matrix
• Optimize shake speed and step time
• Use corresponding biosensors when making comparisons to other technologies
• Use black, polypropylene, flat bottom plates [absolutely no exception]
• Black 96 well plates: Greiner catalogue # 655209; 200mL sample volume
• Black 384 well plates: Greiner catalogue # 781209; 100mL sample volume
• Black 384 tilted-well plates: ForteBio 18-5080 or 18-5076; 50mL sample volume
• Keep Octet on at All Times. Turning the system on / off will shorten the lifespan
of the Lamp
• Knowledge Base link: www.fortebio.com/kb
Tips for Quantitation Assays

CONFIDENTIAL68For research use only. Not for use in diagnostic procedures.
© 2012-2018. Trademarks are the property of Molecular Devices, LLC or their respective owners.