Ford Motor Zetec
45
2C•1 2C Easy, suitable for novice with little experience Fairly easy, suitable for beginner with some experience Fairly difficult, suitable for competent DIY mechanic Difficult, suitable for experienced DIY mechanic Very difficult, suitable for exp Chapter 2 Part C: Zetec engine - in-car engine repair procedures Contents Auxiliary drivebelt check and renewal . . . . . . . . . . . . See Chapter 1 Camshaft oil seals - renewal .................... 12 Camshafts and hydraulic tappets - removal, inspection and refitting...................................13 Compression test - description and interpretation. .3 Crankshaft oil seals - renewal....................17 Crankshaft pulley - removal and refitting..........8 Cylinder head - removal and refitting.............14 Cylinder head and valve components - cleaning and inspection . . . . . . . . . . . . . . . . . . . . . . . . . . . . . . . . See Chapter 2D Cylinder head cover - removal and refitting .................... 5 Engine oil and filter change . . . . . . . . . . . . . . . . . . . . . See Chapter 1 Engine oil level check . . . . . . . . . . . . . . . . . . . . . . . . . See Chapter 1 Engine overhaul - general information . . . . . . . . . . . . . See Chapter 2D Engine/transmission - removal and refitting . . . . . . . . See Chapter 2D Degrees of difficulty Engine/transmission mountings - inspection and renewal 19 Exhaust manifold - removal, inspection and refitting7 Flywheel/driveplate - removal, inspection and refitting 18 General information................................1 Inlet manifold - removal and refitting.............6 Oil pump - removal, inspection and refitting......16 Repair operations possible with the engine in the vehicle 2 Spark plug renewal . . . . . . . . . . . . . . . . . . . . . . . . . . . See Chapter 1 Sump - removal and refitting......................15 Timing belt - removal, refitting and adjustment. . .10 Timing belt covers - removal and refitting.........9 Timing belt tensioner and toothed pulleys - removal, inspection and refitting...................................11 Top Dead Centre (TDC) for No 1 piston - locating. . .4 Water pump - removal and refitting . . . . . . . . . . . . . . See Chapter 3 Specifications General Engine type . . . . . . . . . . . . . . . . . . . . . . . . . . . . . . . . . . . . . . . . . . . . . . . Four-cylinder, in-line, double overhead camshafts Engine code: 1.6 litre models . . . . . . . . . . . . . . . . . . . . . . . . . . . . . . . . . . . . . . . . . . LIE 1.8 litre models . . . . . . . . . . . . . . . . . . . . . . . . . . . . . . . . . . . . . . . . . . RDA, RQB Capacity: 1.6 litre models . . . . . . . . . . . . . . . . . . . . . . . . . . . . . . . . . . . . . . . . . . 1597 cc 1.8 litre models . . . . . . . . . . . . . . . . . . . . . . . . . . . . . . . . . . . . . . . . . . 1796 cc Bore: 1.6 litre models . . . . . . . . . . . . . . . . . . . . . . . . . . . . . . . . . . . . . . . . . . 76.0 mm 1.8 litre models . . . . . . . . . . . . . . . . . . . . . . . . . . . . . . . . . . . . . . . . . . 80.6 mm Stroke - all models . . . . . . . . . . . . . . . . . . . . . . . . . . . . . . . . . . . . . . . . . 88.0 mm Compression ratio: 1.6 litre models.....................................10.3:1
-
Upload
jack-weisheimer -
Category
Documents
-
view
156 -
download
5
description
ford
Transcript of Ford Motor Zetec

2C•1
2C
Easy, suitable fornovice with little experience
Fairly easy, suitablefor beginner with some experience
Fairly difficult,suitable for competent DIY mechanic
Difficult, suitable forexperienced DIY mechanic
Very difficult,suitable for expert DIY or professional
Chapter 2 Part C:Zetec engine - in-car engine repair proceduresContentsAuxiliary drivebelt check and renewal . . . . . . . . . . . . See Chapter 1 Camshaft oil seals - renewal ............................................................. 12Camshafts and hydraulic tappets - removal, inspection
and refitting.....................................................................................13Compression test - description and interpretation................................3Crankshaft oil seals - renewal.............................................................17Crankshaft pulley - removal and refitting...............................................8Cylinder head - removal and refitting..................................................14Cylinder head and valve components - cleaning and
inspection . . . . . . . . . . . . . . . . . . . . . . . . . . . . . . . . See Chapter 2D Cylinder head cover - removal and refitting ........................................ 5Engine oil and filter change . . . . . . . . . . . . . . . . . . . . . See Chapter 1Engine oil level check . . . . . . . . . . . . . . . . . . . . . . . . . See Chapter 1 Engine overhaul - general information . . . . . . . . . . . . . See Chapter 2D Engine/transmission - removal and refitting . . . . . . . . See Chapter 2D
Degrees of difficulty
Engine/transmission mountings - inspection and renewal..................19Exhaust manifold - removal, inspection and refitting.............................7Flywheel/driveplate - removal, inspection and refitting........................18General information...............................................................................1Inlet manifold - removal and refitting.....................................................6Oil pump - removal, inspection and refitting........................................16Repair operations possible with the engine in the vehicle.....................2Spark plug renewal . . . . . . . . . . . . . . . . . . . . . . . . . . . See Chapter 1Sump - removal and refitting...............................................................15Timing belt - removal, refitting and adjustment...................................10Timing belt covers - removal and refitting.............................................9Timing belt tensioner and toothed pulleys - removal, inspection
and refitting.....................................................................................11Top Dead Centre (TDC) for No 1 piston - locating................................4Water pump - removal and refitting . . . . . . . . . . . . . . See Chapter 3
SpecificationsGeneralEngine type . . . . . . . . . . . . . . . . . . . . . . . . . . . . . . . . . . . . . . . . . . . . . . . Four-cylinder, in-line, double overhead camshafts Engine code:
1.6 litre models . . . . . . . . . . . . . . . . . . . . . . . . . . . . . . . . . . . . . . . . . . LIE1.8 litre models . . . . . . . . . . . . . . . . . . . . . . . . . . . . . . . . . . . . . . . . . . RDA, RQB
Capacity:1.6 litre models . . . . . . . . . . . . . . . . . . . . . . . . . . . . . . . . . . . . . . . . . . 1597 cc1.8 litre models . . . . . . . . . . . . . . . . . . . . . . . . . . . . . . . . . . . . . . . . . . 1796 cc
Bore:1.6 litre models . . . . . . . . . . . . . . . . . . . . . . . . . . . . . . . . . . . . . . . . . . 76.0 mm1.8 litre models . . . . . . . . . . . . . . . . . . . . . . . . . . . . . . . . . . . . . . . . . . 80.6 mm
Stroke - all models . . . . . . . . . . . . . . . . . . . . . . . . . . . . . . . . . . . . . . . . . 88.0 mmCompression ratio:
1.6 litre models.........................................................................................10.3:11.8 litre models.........................................................................................10.0:1
Firing order . . . . . . . . . . . . . . . . . . . . . . . . . . . . . . . . . . . . . . . . . . . . . . . 1-3-4-2 (No 1 cylinder at timing belt end) Direction of crankshaft rotation . . . . . . . . . . . . . . . . . . . . . . . . . . . . . . . Clockwise (seen from right-hand side of vehicle)
Cylinder headHydraulic tappet bore inside diameter . . . . . . . . . . . . . . . . . . . . . . . . . . 28.395 to 28.425 mm
Camshafts and hydraulic tappetsCamshaft bearing journal diameter . . . . . . . . . . . . . . . . . . . . . . . . . . . . 25.960 to 25.980 mm Camshaft bearing journal-to-cylinder head running clearance . . . . . . . 0.020 to 0.070 mm Camshaft endfloat . . . . . . . . . . . . . . . . . . . . . . . . . . . . . . . . . . . . . . . . . 0.080 to 0.220 mm
LubricationEngine oil type/specification . . . . . . . . . . . . . . . . . . . . . . . . . . . . . . . . . . See Chapter 1Engine oil capacity . . . . . . . . . . . . . . . . . . . . . . . . . . . . . . . . . . . . . . . . . See Chapter 1Oil pressure . . . . . . . . . . . . . . . . . . . . . . . . . . . . . . . . . . . . . . . . . . . . . . . No information available at time of writingOil pump clearances . . . . . . . . . . . . . . . . . . . . . . . . . . . . . . . . . . . . . . . . No information available at time of writing

2C•2 Zetec engine – in-car engine repair
Torque wrench settingsCylinder head cover bolts:
Nm lbf ft
Stage 1 . . . . . . . . . . . . . . . . . . . . . . . . . . . . . . . . . . . . . . . . . . . . . . . . 2 1.5Stage 2 . . . . . . . . . . . . . . . . . . . . . . . . . . . . . . . . . . . . . . . . . . . . . . . . 7 5
Camshaft toothed pulley bolts . . . . . . . . . . . . . . . . . . . . . . . . . . . . . . . . 68 50Camshaft bearing cap bolts:
Stage 1 . . . . . . . . . . . . . . . . . . . . . . . . . . . . . . . . . . . . . . . . . . . . . . . . 10 7Stage 2 . . . . . . . . . . . . . . . . . . . . . . . . . . . . . . . . . . . . . . . . . . . . . . . . 19 14
Cylinder head bolts:Stage 1 . . . . . . . . . . . . . . . . . . . . . . . . . . . . . . . . . . . . . . . . . . . . . . . . 25 18Stage 2 . . . . . . . . . . . . . . . . . . . . . . . . . . . . . . . . . . . . . . . . . . . . . . . . 45 33Stage 3 . . . . . . . . . . . . . . . . . . . . . . . . . . . . . . . . . . . . . . . . . . . . . . . . Angle-tighten a further 105º
Timing belt cover fasteners:Upper-to-middle (outer) cover bolts . . . . . . . . . . . . . . . . . . . . . . . . . . 4 3Cover-to-cylinder head or block bolts . . . . . . . . . . . . . . . . . . . . . . . . 7 5Cover studs-to-cylinder head or block . . . . . . . . . . . . . . . . . . . . . . . . 9 to 11 6.5 to 8
Timing belt tensioner bolt . . . . . . . . . . . . . . . . . . . . . . . . . . . . . . . . . . . . 38 28Timing belt tensioner backplate locating peg . . . . . . . . . . . . . . . . . . . . . 8 to 11 6 to 8Timing belt tensioner spring retaining pin . . . . . . . . . . . . . . . . . . . . . . . 10 7Timing belt guide pulley bolts . . . . . . . . . . . . . . . . . . . . . . . . . . . . . . . . . 35 to 40 26 to 30Water pump pulley bolts . . . . . . . . . . . . . . . . . . . . . . . . . . . . . . . . . . . . . 10 7Auxiliary drivebelt idler pulley . . . . . . . . . . . . . . . . . . . . . . . . . . . . . . . . . 48 35Inlet manifold nuts and bolts . . . . . . . . . . . . . . . . . . . . . . . . . . . . . . . . . 18 13Alternator mounting bracket-to-c ylinder block bolts . . . . . . . . . . . . . . . 47 35Cylinder head support plates:
Front plate Torx screws - to power steering pump/air conditioningcompressor mounting bracket and cylinder head . . . . . . . . . . . . . . . 47 35Rear plate/engine lifting eye to alternator mountingbracket and cylinder head bolts . . . . . . . . . . . . . . . . . . . . . . . . . . . . . 47 35
Front engine lifting eye bolt . . . . . . . . . . . . . . . . . . . . . . . . . . . . . . . . . . 16 12Inlet and exhaust manifold studs-to-cylinder head . . . . . . . . . . . . . . . . 10 maximum 7 maximumExhaust manifold heat shield bolts:
Shield-to-c ylinder head . . . . . . . . . . . . . . . . . . . . . . . . . . . . . . . . . . . 7 5Shield/dipstick tube . . . . . . . . . . . . . . . . . . . . . . . . . . . . . . . . . . . . . . 10 7Shield/coolant pipe-to-manifold . . . . . . . . . . . . . . . . . . . . . . . . . . . . . 23 17
Exhaust manifold nuts . . . . . . . . . . . . . . . . . . . . . . . . . . . . . . . . . . . . . . 16 12Air conditioning refrigerant pipe-to-exhaust manifold bolts . . . . . . . . . . 10 7Crankshaft pulley bolt . . . . . . . . . . . . . . . . . . . . . . . . . . . . . . . . . . . . . . . 108 to 115 80 to 85Oil pump-to-cylinder block bolts . . . . . . . . . . . . . . . . . . . . . . . . . . . . . . 10 7Oil pick-up pipe-to-pump screws . . . . . . . . . . . . . . . . . . . . . . . . . . . . . . 10 7Oil baffle/pump pick-up pipe nuts . . . . . . . . . . . . . . . . . . . . . . . . . . . . . 19 14Oil filter adapter-to-pump . . . . . . . . . . . . . . . . . . . . . . . . . . . . . . . . . . . . 18 to 25 13 to 18Oil pressure warning light switch . . . . . . . . . . . . . . . . . . . . . . . . . . . . . . 27 20Sump bolts . . . . . . . . . . . . . . . . . . . . . . . . . . . . . . . . . . . . . . . . . . . . . . . 21 to 22 15 to 16Coolant pipe-to-sump bolt . . . . . . . . . . . . . . . . . . . . . . . . . . . . . . . . . . . 10 7Flywheel/driveplate bolts . . . . . . . . . . . . . . . . . . . . . . . . . . . . . . . . . . . . 110 to 112 81 to 83Crankshaft left-hand oil seal carrier bolts . . . . . . . . . . . . . . . . . . . . . . . . 22 16Note: Refer to Part D of this Chapter for remaining torque wrench settings.
How to use this ChapterThis Part of Chapter 2 is devoted to repair
procedures possible while the engine is still installed in the vehicle, and includes only the Specifications relevant to those procedures. Similar information concerning the 1.3 litre HCS engine, and the 1.4 and 1.6 litre CVH engines, will be found in Parts A and B of this Chapter respectively. Since these procedures are based on the assumption that the engine is installed in the vehicle, if the engine has been removed from the vehicle and
mounted on a stand, some of the preliminary dismantling steps outlined will not apply.
Information concerning engine/transmission removal and refitting, and engine overhaul, can be found in Part D of this Chapter, which also includes the Specifications relevant to those procedures.
General description - Zetec engine
The Zetec engine, (formerly Zeta), is of sixteen-valve, double overhead camshaft (DOHC), four-cylinder, in-line type, mounted transversely at the front of the vehicle, with the (clutch and) transmission on its left-hand end (see illustrations).
Apart from the plastic timing belt covers and the cast-iron cylinder block/crankcase, all
major engine castings are of aluminium alloy. The crankshaft runs in five main bearings,
the centre main bearing’s upper half incorporating thrustwashers to control crankshaft endfloat. The connecting rods rotate on horizontally-split bearing shells at their big-ends. The pistons are attached to the connecting rods by gudgeon pins which are an interference fit in the connecting rod small- end eyes. The aluminium alloy pistons are fitted with three piston rings: two compression rings and an oil control ring. After manufacture, the cylinder bores and piston skirts are measured and classified into three grades, which must be carefully matched together, to ensure the correct piston/cylinder clearance; no oversizes are available to permit reboring.
1 General information

Zetec engine – in-car engine repair procedures 2C•3
A Longitudinal cross-section through engine - inset showing timing belt details
Inlet camshaftExhaust camshaft
Oil galleriesExhaust port
Oil strainer and pick-up pipeOil baffle
CrankshaftPiston-cooling oil jet (where fitted)
Inlet valveInlet port
Fuel injectorInlet camshaft toothed pulley
Timing beltExhaust camshaft toothed pulleyTiming belt (front) guide pulleyCrankshaft toothed pulley - behindCrankshaft pulleyOil cooler (where fitted)
Timing belt (rear) guide pulleyTiming belt tensioner
2C
The inlet and exhaust valves are each closed by coil springs; they operate in guides which are shrink-fitted into the cylinder head, as are the valve seat inserts.
Both camshafts are driven by the same toothed timing belt, each operating eight valves via self-adjusting hydraulic tappets, thus eliminating the need for routine checking and adjustment of the valve clearances. Each camshaft rotates in five bearings that are line- bored directly in the cylinder head and the (bolted-on) bearing caps; this means that the bearing caps are not available separately from the cylinder head, and must not be interchanged with caps from another engine.
The water pump is bolted to the right-hand end of the cylinder block, inboard of the timing belt, and is driven with the power steering pump and alternator by a flat “ polyvee”-type auxiliary drivebelt from the crankshaft pulley.
When working on this engine, note that Torx-type (both male and female heads) and hexagon socket (Allen head) fasteners are widely used; a good selection of bits, with the necessary adapters, will be required, so that these can be unscrewed without damage and, on reassembly, tightened to the torque wrench settings specified.
Lubrication is by means of an eccentric- rotor trochoidal pump, which is mounted on the crankshaft right-hand end, and draws oil 1.3B Lateral cross-section through enginethrough a strainer located in the sump. The pump forces oil through an externally- mounted full-flow cartridge-type filter - on
1 Exhaust valve2 Piston3 Oil baffle
4 Oil strainer and pick-up pipe
5 Spark plug
6 Fuel injector7 Piston-cooling oil jets
(where fitted)

Engine lubrication system - inset showing longitudinal cross-section
Main oil galleryFrom oil filter
Oil pumpCylinder head
oil-retaining valveCylinder head oil galleryCylinder head oil supply
Oil returnPiston-cooling oil spray (where fitted)Oil filter - oil cooler not shown here
2C•4 Zetec engine – in-car engine repair
some versions of the engine, an oil cooler is fitted to the oil filter mounting, so that clean oil entering the engine’s galleries is cooled by the main engine cooling system (see illustration).
Valve clearances - generalIt is necessary for a clearance to exist
between the tip of each valve stem and the valve operating mechanism, to allow for the expansion of the various components as the engine reaches normal operating temperature.
On most older engine designs, this meant that the valve clearances (also known as “tappet” clearances) had to be checked and adjusted regularly. If the clearances were allowed to be too slack, the engine would be very noisy, its power output would suffer, and its fuel consumption would increase. If the clearances were allowed to be too tight, the engine’s power output would be reduced, and the valves and their seats could be severely damaged.
The Zetec engine employs hydraulic tappets which use the lubricating system’s oil pressure to automatically take up the clearance between each camshaft lobe and its respective valve stem. Therefore, there is no need for regular checking and adjustment of the valve clearances, but it is essential that only good-quality oil of the recommended viscosity and specification is used in the engine, and that this oil is always changed at the recommended intervals. If this advice is not followed, the oilways and tappets may become clogged with particles of dirt, or deposits of burnt (inferior) engine oil, so that the system cannot work properly; ultimately, one or more of the tappets may fail, and expensive repairs may be required.
On starting the engine from cold, there will be a slight delay while full oil pressure builds up in all parts of the engine, especially in the tappets; the valve components, therefore, may well “rattle” for about 10 seconds or so, and then quieten. This is a normal state of affairs, and is nothing to worry about, provided that all tappets quieten quickly and stay quiet.
After the vehicle has been standing for several days, the valve components may “rattle” for longer than usual, as nearly all the oil will have drained away from the engine’s top- end components and bearing surfaces. While this is only to be expected, care must be taken not to damage the engine under these circumstances - avoid high speed running until all the tappets are refilled with oil and operating normally. With the vehicle stationary, hold the engine at no more than a fast idle speed (maximum 2000 to 2500 rpm) for 10 to 15 seconds, or until the noise ceases. Do not run the engine at more than 3000 rpm until the tappets are fully recharged with oil and the noise has ceased.
If the valve components are thought to be noisy, or if a light rattle persists from the top end after the engine has warmed up to normal operating temperature, take the vehicle to a Ford dealer for expert advice. Depending on the mileage covered and the usage to which each vehicle has been put, some vehicles may be noisier than others; only a good mechanic experienced in these engines can tell if the noise level is typical for the vehicle’s mileage, or if a genuine fault exists. If any tappet’s operation is faulty, it must be renewed (Section 13).
The following major repair operations can be accomplished without removing the engine from the vehicle. However, owners should note that any operation involving the removal of the sump requires careful forethought, depending on the level of skill and the tools and facilities available; refer to the relevant text for details:a) Compression pressure - testing.b) Cylinder head cover - removal and
refitting.c) Timing belt covers - removal and refitting.d) Timing belt - renewal.e) Timing belt tensioner and toothed pulleys
- removal and refitting.f) Camshaft oil seals - renewal.g) Camshafts and hydraulic tappets -
removal and refitting.h) Cylinder head - removal, overhaul and
refitting.i) Cylinder head and pistons -
decarbonising.j) Sump - removal and refitting.k) Crankshaft oil seals - renewal.l) Oil pump - removal and refitting.m) Piston/connecting rod assemblies -
removal and refitting (but see note below).n) Flywheel/driveplate - removal and
refitting.o) Engine/transmission mountings - removal
and refitting.Clean the engine compartment and the
exterior of the engine with some type of degreasant before any work is done. It will
2 Repair operations
possible with the engine in the vehicle

3 Compression test - description and interpretation
2
4 Top Dead Centre (TDC) for No 1 piston - locating
2
2C
Zetec engine – in-car engine repair procedures 2C•5
make the job easier, and will help to keep dirt out of the internal areas of the engine.
Depending on the components involved, it may be helpful to remove the bonnet, to improve access to the engine as repairs are performed (refer to Chapter 11 if necessary). Cover the front wings to prevent damage to the paint; special covers are available, but an old bedspread or blanket will also work.
If vacuum, exhaust, oil or coolant leaks develop, indicating a need for component/gasket or seal replacement, the repairs can generally be made with the engine in the vehicle. The inlet and exhaust manifold gaskets, sump gasket, crankshaft oil seals and cylinder head gasket are all accessible with the engine in place.
Exterior components such as the inlet and exhaust manifolds, the sump, the oil pump, the water pump, the starter motor, the alternator and the fuel system components can be removed for repair with the engine in place.
Since the cylinder head can be removed without lifting out the engine, camshaft and valve component servicing can also be accomplished with the engine in the vehicle, as can renewal of the timing belt and toothed pulleys.
In extreme cases caused by a lack of necessary equipment, repair or renewal of piston rings, pistons, connecting rods and big-end bearings is possible with the engine in the vehicle. However, this practice is not recommended, because of the cleaning and preparation work that must be done to the components involved, and because of the amount of preliminary dismantling work required - these operations are therefore covered in Part D of this Chapter.
1 When engine performance is down, or if misfiring occurs which cannot be attributed to the ignition or fuel systems, a compression test can provide diagnostic clues as to the engine’s condition. If the test is performed regularly, it can give warning of trouble before any other symptoms become apparent.2 The engine must be fully warmed-up to normal operating temperature, the oil level must be correct, the battery must be fully charged, and the spark plugs must be removed. The aid of an assistant will be required also.3 Disable the ignition system by unplugging the ignition coil’s electrical connector, and remove fuse 14 to disconnect the fuel pump. 4 Fit a compression tester to the No 1 cylinder spark plug hole - the type of tester which screws into the plug thread is to be preferred.5 Have the assistant hold the throttle wide open and crank the engine on the starter
motor; after one or two revolutions, the compression pressure should build up to a maximum figure, and then stabilise. Record the highest reading obtained.6 Repeat the test on the remaining cylinders, recording the pressure developed in each.7 Due to the variety of testers available, and the fluctuation in starter motor speed when cranking the engine, different readings are often obtained when carrying out the compression test. For this reason, actual compression pressure figures are not given by the manufacturer’s, but a typical reading would be in excess of 12 bars. All cylinders should produce very similar pressures; any difference greater than 10% indicates the existence of a fault. Note that the compression should build up quickly in a healthy engine; low compression on the first stroke, followed by gradually-increasing pressure on successive strokes, indicates worn piston rings. A low compression reading on the first stroke, which does not build up during successive strokes, indicates leaking valves or a blown head gasket (a cracked head could also be the cause). Deposits on the undersides of the valve heads can also cause low compression.8 If the pressure in any cylinder is considerably lower than the others, introduce a teaspoonful of clean oil into that cylinder through its spark plug hole, and repeat the test.9 If the addition of oil temporarily improves the compression pressure, this indicates that bore or piston ring wear is responsible for the pressure loss. No improvement suggests that leaking or burnt valves, or a blown head gasket, may be to blame.10 A low reading from two adjacent cylinders is almost certainly due to the head gasket having blown between them; the presence of coolant in the engine oil will confirm this.11 If one cylinder is about 20 percent lower than the others and the engine has a slightly rough idle, a worn camshaft lobe or faulty hydraulic tappet could be the cause.12 If the compression is unusually high, the combustion chambers are probably coated with carbon deposits. If this is the case, the cylinder head should be removed and decarbonised.13 On completion of the test, refit the spark plugs, reconnect the ignition system, and refit the fuel pump fuse.
General1 Top Dead Centre (TDC) is the highest point in its travel up and down its cylinder bore that each piston reaches as the crankshaft rotates. While each piston reaches TDC both at the top of the compression stroke and again at
the top of the exhaust stroke, for the purpose of timing the engine, TDC refers to the piston position (usually No 1 piston) at the top of its compression stroke.2 It is useful for several servicing procedures to be able to position the engine at TDC.3 No 1 piston and cylinder are at the right- hand (timing belt) end of the engine (right- and left-hand are always quoted as seen from the driver’s seat). Note that the crankshaft rotates clockwise when viewed from the right-hand side of the vehicle.
Locating TDC4 Remove all the spark plugs (Chapter 1).5 Disconnect the battery negative (earth) lead (refer to Chapter 5, Section 1) - unless the starter motor is to be used to turn the engine.6 Apply the handbrake and ensure that the transmission is in neutral, then jack up the front right-hand side of the vehicle and support on an axle stand. Remove the roadwheel.7 Remove the auxiliary drivebelt cover (see Chapter 1) to expose the crankshaft pulley and timing marks.8 It is best to rotate the crankshaft using a spanner applied to the crankshaft pulley bolt; however, it is possible also to use the starter motor (switched on either by an assistant using the ignition key, or by using a remote starter switch) to bring the engine close to TDC, then finish with a spanner. If the starter is used, be sure to disconnect the battery lead immediately it is no longer required.9 Note the two pairs of notches in the inner and outer rims of the crankshaft pulley. In the normal direction of crankshaft rotation (clockwise, seen from the right-hand side of the vehicle) the first pair of notches are irrelevant to the vehicles covered in this manual, while the second pair indicate TDC when aligned with the rear edge of the raised mark on the sump. Rotate the crankshaft clockwise until the second pair of notches align with the edge of the sump mark; use a straight edge extended out from the sump if greater accuracy is required (see illustrations).10 Nos 1 and 4 cylinders are now at TDC, one of them on the compression stroke.
4.9A Do not use crankshaft pulley’s first pair of notches “A” - align second pair of
notches “B” with raised rib on sump “C” . . .

2C•6 Zetec engine – in-car engine repair
5 Cylinder head cover - removal and refitting
1
4.9B . . . use a straight edge extended out from the sump (arrowed) if greater
accuracy is required
Remove the oil filler cap; if No 4 cylinder exhaust cam lobe is pointing to the rear of the vehicle and slightly downwards, it is No 1 cylinder that is correctly positioned. If the lobe is pointing horizontally forwards, rotate the crankshaft one full turn (360) clockwise until the pulley notches align again, and the lobe is pointing to the rear and slightly down. No 1 cylinder will then be at TDC on the compression stroke.11 Once No 1 cylinder has been positioned at TDC on the compression stroke, TDC for any of the other cylinders can then be located by rotating the crankshaft clockwise 180at a time and following the firing order (see Speci- fications).12 An alternative method of locating TDC is to remove the cylinder head cover (see Section 5) and to rotate the crankshaft (clockwise, as described in paragraph 8 above) until the inlet valves for the cylinder concerned have opened and just closed again. Insert a length of wooden dowel (approximately 150 mm/6 in long) or similar into the spark plug hole until it rests on the piston crown, and slowly further rotate the crankshaft (taking care not to allow the dowel to be trapped in the cylinder) until the dowel stops rising - the piston is now at the top of its
compression stroke, and the dowel can be removed.13 There is a “dead” area around TDC (as the piston stops rising, pauses and then begins to descend) which makes difficult the exact
5.8 Ensure gasket is located correctly in cover groove
5.4 Disconnecting crankcase breather hose from cylinder head cover union
location of TDC by this method; if accuracy is required, either establish carefully the exact mid-point of the dead area, or refer to the timing marks (paragraph 9 above).
1 Remove the air inlet hose and inlet duct as described in Chapter 4B.2 Disconnect the accelerator cable from the throttle linkage as described in Chapter 4B.3 Remove the timing belt upper cover (see Section 9).4 Disconnect the crankcase breather hose from the cylinder head cover union (see illustration).5 Unplug the HT leads from the spark plugs and withdraw them, unclipping the leads from the cover.6 Working progressively, unscrew the cylinder head cover retaining bolts, noting the spacer sleeve and rubber seal at each, then withdraw the cover (see illustration).7 Discard the cover gasket; this must be renewed whenever it is disturbed. Check that

Zetec engine – in-car engine repair procedures 2C•7
6 Inlet manifold - removal and refitting
2
the sealing faces are undamaged, and that the rubber seal at each retaining bolt is serviceable; renew any worn or damaged seals.8 On refitting, clean the cover and cylinder
5.9 Ensure rubber seal is fitted to each cover bolt spacer, as shown
5.6 Removing cylinder head cover
head gasket faces carefully, then fit a new gasket to the cover, ensuring that it locates correctly in the cover grooves (see illustration).9 Refit the cover to the cylinder head, then insert the rubber seal and spacer sleeve at each bolt location (see illustration). Start all bolts finger-tight, ensuring that the gasket remains seated in its groove.10 Working in a diagonal sequence from the centre outwards, and in two stages (see Specifications), tighten the cover bolts to the specified torque wrench setting.11 Refit the HT leads, clipping them into place so that they are correctly routed; each is numbered, and can also be identified by the numbering on its respective coil terminal.12 Reconnect the crankcase breather hose, and refit the timing belt upper cover. Reconnect and adjust the accelerator cable, then refit the air inlet hose and duct (see Chapter 4B).
Warning: Petrol is extremely flammable, so take extra precautions when disconnecting any part of the fuel system. Don’t
smoke, or allow naked flames or bare light bulbs, in or near the work area. Don’t work in a garage where a natural gas appliance (such as a clothes dryer or water heater) is installed. If you spill petrol on your skin, rinse it off immediately. Have a fire extinguisher rated for petrol fires handy, and know how to use it.
Removal1 Park the vehicle on firm, level ground and apply the handbrake firmly.2 Depressurise the fuel system (see Chap- ter 4B).3 Disconnect the battery negative (earth) lead- see Chapter 5, Section 1.4 Remove the air inlet hose and duct as described in Chapter 4B.5 Referring to Chapter 4B if necessary,

2C•8 Zetec engine – in-car engine repair
6.5A Disconnect the end of the accelerator cable from the throttle
linkage . . .
6.5B . . . then release the cable adjusting clip and withdraw the cable from the
support bracket
6.10 Disconnecting the vacuum hoses from the inlet manifold
disconnect the accelerator cable from the throttle linkage (see illustrations).6 Disconnect the crankcase breather hose from the cylinder head cover union.7 Unbolt the upper part of the exhaust manifold heat shield.8 Remove the two screws securing the wiring “rail” to the top of the manifold - this is simply so that it can be moved as required to reach the manifold bolts. Unplug their electrical connectors to disconnect the camshaft position sensor and the coolant temperature sensor, then unclip the wiring from the ignition coil bracket, and secure it to the manifold.9 Remove the three screws securing the wiring “rail” to the rear of the manifold. Releasing its wire clip, unplug the large electrical connector (next to the fuel pressure regulator) to disconnect the wiring of the manifold components from the engine wiring loom.10 Marking or labelling them as they are unplugged, disconnect the vacuum hoses as follows:a) One from the rear of the throttle housing
(only the one hose - there is no need to disconnect the second hose running to the fuel pressure regulator).
b) One from the union on the manifold’s left- hand end (see illustration).
c) The braking system vacuum servo unit hose (see Chapter 9 for details).
11 Equalise the pressure in the fuel tank by removing the filler cap, then undo the fuel
6.14 Always renew inlet manifold gasket - do not rely on sealants
feed and return lines connecting the engine to the chassis (see Chapter 4B). Plug or cap all open fittings.12 Unbolt the earth lead from the cylinder head rear support plate/engine lifting eye, then unscrew the bolt securing the support plate/lifting eye.13 Unscrew the nuts and bolts securing the manifold to the cylinder head, and withdraw it. Take care not to damage vulnerable components as the manifold assembly is manoeuvred out of the engine compartment.
Refitting14 Refitting is the reverse of the removal procedure, noting the following points:a) When using a scraper and solvent to remove all
traces of old gasket material and sealant from the manifold and cylinder head, be careful to ensure that you do not scratch or damage the mating faces of either components. If the gasket was leaking, have the mating surfaces checked for warpage at an automotive machine shop.
b) Provided the relevant mating surfaces are clean and flat, a new gasket will be sufficient to ensure the joint is gastight. Do not use any kind of silicone-based sealant on any part of the fuel system or inlet manifold.
c) Fit a new gasket, then locate the manifold on the head and install the nuts and bolts (see illustration).

Zetec engine – in-car engine repair procedures 2C•9
2C
7 Exhaust manifold - removal, inspection and refitting
1
7.5 Exhaust manifold heat shield upper part securing bolts (arrowed)
d) Tighten the nuts/bolts in three or four equal steps to the torque listed in this Chapter’s Specifications. Work from the centre outwards, to avoid warping the manifold.
e) Refit the remaining parts in the reverse order of removal - tighten all fasteners to the torque wrench settings specified.
f) Before starting the engine, check the accelerator cable for correct adjustment and the throttle linkage for smooth operation.
h) When the engine is fully warmed-up, check for signs of fuel, inlet and/or vacuum leaks.
i) Road-test the vehicle, and check for proper operation of all disturbed components.
Warning: The engine must be completely cool before beginning this procedure.
Note: In addition to the new gasket and any other parts, tools or facilities needed to carry out this operation, a new plastic guide sleeve will be required on reassembly.
Removal1 Disconnect the battery negative (earth) lead- see Chapter 5, Section 1.2 Remove the air inlet hose and duct as described in Chapter 4B.3 Drain the cooling system (see
Chapter 1).4 Disconnect the coolant hose and the coolant pipe/hose from the thermostat housing; secure them clear of the working area.5 Unbolt the exhaust manifold heat shield, and withdraw both parts of the shield (see illustration).6 While the manifold can be removed with the pulse-air system components attached - unbolt the filter housing and disconnect its vacuum hose if this is to be done - it is easier

2C•10 Zetec engine – in-car engine repair
8 Crankshaft pulley - removal and refitting
1
7.6 Pulse-air system (sleeve nuts arrowed) need not be removed unless required -
assembly can be withdrawn with exhaust manifold
7.8A Unscrew nuts (arrowed) to remove exhaust manifold . . .
to remove the pulse-air assembly first, as described in Chapter 6 (see illustration).7 Unplug the oxygen sensor electrical connector, to avoid straining its wiring. Unscrew the nuts to disconnect the exhaust system front downpipe from the manifold (see Chapter 4B).8 Remove the nuts and detach the manifold and gasket (see illustration). When removing the manifold with the engine in the vehicle, additional clearance can be obtained by unscrewing the studs from the cylinder head; a female Torx-type socket will be required (see illustration).9 Always fit a new gasket on reassembly, to carefully-cleaned components (see below). Do not attempt to re-use the original gasket.
Inspection10 Use a scraper to remove all traces of old gasket material and carbon deposits from the manifold and cylinder head mating surfaces. If the gasket was leaking, have the manifold checked for warpage at an automotive machine shop, and have it resurfaced if necessary.
Caution: When scraping, be very careful not to gouge or scratch the delicate aluminium alloy cylinder head.
11 Provided both mating surfaces are clean and flat, a new gasket will be sufficient to ensure the joint is gastight. Do not use any
kind of exhaust sealant upstream of the catalytic converter.12 Note that the downpipe is secured to the manifold by two bolts, with a coil spring, spring seat and self-locking nut on each. On refitting, tighten the nuts until they stop on the bolt shoulders; the pressure of the springs will then suffice to make a gastight joint (see illustrations).13 Do not overtighten the nuts to cure a leak- the bolts will shear; renew the gasket and the springs if a leak is found. The bolts themselves are secured by spring clips to the manifold, and can be renewed easily if damaged (see illustration).
Refitting14 Refitting is the reverse of the removal procedure, noting the following points:a) Position a new gasket over the cylinder
head studs, and fit a new plastic guide sleeve to the stud nearest to the thermostat housing, so that the manifold will be correctly located (see illustration). Do not refit the manifold without this sleeve.
b) Refit the manifold, and finger-tighten the mounting nuts.
c) Working from the centre out, and in three or four equal steps, tighten the nuts to the torque wrench setting given in the Speci- fications Section of this Chapter.
d) Refit the remaining parts in the reverse order of removal. Tighten all fasteners to the specified torque wrench settings.
e) Refill the cooling system (see Chapter 1).f) Run the engine, and check for exhaust
leaks. Check the coolant level when fully warmed-up to normal operating temperature.
7.8B . . . studs can be unscrewed also, if required, to provide additional working
space
7.12A Showing exhaust downpipe-to- manifold securing bolts - note coil
spring, and shoulder on bolt
1 Remove the auxiliary drivebelt - either remove the drivebelt completely, or just secure it clear of the crankshaft pulley, depending on the work to be carried out (see Chapter 1).

Zetec engine – in-car engine repair procedures
7.12B Renew exhaust system downpipe- to-manifold gasket to prevent leaks
7.13 Release spring clip to extract securing bolt from manifold, when
required
7.14 Fit plastic guide sleeve to stud (arrowed) when refitting exhaust manifold

9 Timing belt covers - removal and refitting
4
2C
2C•12 Zetec engine – in-car engine repair
Timing belt upper coverInlet camshaft toothed pulleyExhaust camshaft toothed pulleyTiming beltTiming belt tensionerCrankshaft toothed pulleyTiming belt middle coverTiming belt lower coverCrankshaft pulleyWater pump pulley
2 If necessary, rotate the crankshaft until the timing marks align (see Section 4).3 The crankshaft must now be locked to prevent its rotation while the pulley bolt is unscrewed. To do this, remove the starter motor (Chapter 5) and lock the starter ring gear teeth using a suitable screwdriver.4 Unscrew the pulley bolt and remove the pulley (see illustrations).5 Refitting is the reverse of the removal procedure; ensure that the pulley’s keyway is aligned with the crankshaft’s locating key, and tighten the pulley bolt to the specified torque wrench setting.
8.4A Unscrew pulley bolt to release crankshaft pulley
8.4B Ensure pulley is located on crankshaft Woodruff key on reassembly
Upper cover1 Unscrew the cover’s two mounting bolts and withdraw it.2 Refitting is the reverse of the removal procedure; ensure that the cover edges engage correctly with each other, and note the torque wrench setting specified for the bolts.
Middle cover3 Unscrew the nut securing the power steering pipe support clip to the stud at the rear of the middle cover. Lift the power steering fluid reservoir upwards out of its mounting bracket and move it clear, as far as the hoses will allow, for access. If insufficient clearance is obtained, disconnect the fluid unions as necessary, and collect the fluid in a suitable container. Plug or cover any disconnected unions.4 Slacken the water pump pulley bolts.5 Remove the timing belt upper cover (see paragraph 1 above).6 Remove the auxiliary drivebelt (see Chapter
1).7 Unbolt and remove the water pump pulley.8 Unscrew the middle cover fasteners (one bolt at the front, one at the lower rear, one stud at the top rear) and withdraw the cover (see illustration).9 Refitting is the reverse of the removal procedure. Ensure that the cover edges engage correctly with each other, and note the torque wrench settings specified for the various fasteners.10 If the power steering hoses where disconnected, bleed the system as described in Chapter 10 after reconnection.
Lower cover11 Remove the crankshaft pulley (see Section 8).12 Unscrew the cover’s three securing bolts, and withdraw it (see illustration).13 Refitting is the reverse of the removal procedure; ensure the cover edges engage correctly with each other, and note the torque
9.8 Timing belt and cover details
wrench settings specified for the various fasteners.
9.12 Removing timing belt lower cover -bolt locations arrowed
9.15 Timing belt inner shield fasteners(arrowed)

10 Timing belt - removal, refitting and adjustment
4
Zetec engine – in-car engine repair procedures
Inner shield14 Remove the timing belt, its tensioner components and the camshaft toothed pulleys (see Sections 10 and 11).15 The shield is secured to the cylinder head by two bolts at the top, and by two studs lower down; unscrew these and withdraw the shield (see illustration).16 Refitting is the reverse of the removal procedure; note the torque wrench settings specified for the various fasteners.
Note: To carry out this operation, a new timing belt (where applicable), a new cylinder head cover gasket, and some special tools (see text) will be required. If the timing belt is being removed for the first time since the vehicle left the factory, a tensioner spring and retaining pin must be obtained for fitting on reassembly.1 With the vehicle parked on firm level ground, open the bonnet and disconnect the battery negative (earth) lead - see Chapter 5, Section 1.2 Slacken the water pump pulley bolts.3 Remove the cylinder head cover (see Section 5).4 Remove the spark plugs, covering their holes with clean rag, to prevent dirt or other foreign bodies from dropping in (see Chap- ter 1).5 Remove the auxiliary drivebelt (see Chap- ter 1).6 Rotate the crankshaft clockwise until the second pair of notches in the pulley rim align with the edge of the sump mark, so that Nos 1 and 4 cylinders are at TDC (see Section 4).7 Unbolt and remove the water pump pulley and the auxiliary drivebelt idler pulley.8 Obtain Ford service tool 21-162, or fabricate a substitute from a strip of metal5 mm thick (while the strip’s thickness is critical, its length and width are not, but should be approximately 180 to 230 mm by20 to 30 mm). Check that Nos 1 and 4 cylinders are at Top Dead Centre (TDC) - No 1
on the compression stroke - by resting this tool on the cylinder head mating surface, and sliding it into the slot in the left-hand end of both camshafts (see illustration). The tool should slip snugly into both slots while resting on the cylinder head mating surface; if one camshaft is only slightly out of alignment, it is permissible to use an open-ended spanner to rotate the camshaft gently and carefully until the tool will fit.9 If both camshaft slots (they are machined significantly off-centre) are below the level of the cylinder head mating surface, rotate the crankshaft through one full turn clockwise and fit the tool again; it should now fit as described in the previous paragraph.10 With the camshaft aligning tool remaining in place, remove the crankshaft pulley. Do not use the locked camshafts to prevent the crankshaft from rotating - use only the locking method described in Section 8.11 Remove the timing belt lower and middle covers (see Section 9).12 With the camshaft-aligning tool still in place, slacken the tensioner bolt, and use an Allen key inserted into its centre to rotate the tensioner clockwise as far as possible away from the belt; retighten the bolt to secure the tensioner clear of the timing belt (see illustration).13 If the timing belt is to be re-used, use white paint or similar to mark its direction of rotation, and note from the manufacturer’s markings which way round it is fitted. Withdraw the belt. Do not rotate the crankshaft until the timing belt is refitted.14 If the belt is being removed for reasons other than routine renewal, check it carefully for any signs of uneven wear, splitting, cracks (especially at the roots of the belt teeth) or contamination with oil or coolant. Renew the belt if there is the slightest doubt about its condition. As a safety measure, the belt must be renewed as a matter of course at the intervals given in Chapter 1; if its history is unknown, the belt should be renewed irrespective of its apparent condition whenever the engine is overhauled. Similarly, check the tensioner spring (where fitted), renewing it if there is any doubt about its
condition. Check also the toothed pulleys for signs of wear or damage, and ensure that the tensioner and guide pulleys rotate smoothly on their bearings; renew any worn or damaged components. If signs of oil or coolant contamination are found, trace the source of the leak and rectify it, then wash down the engine timing belt area and related components, to remove all traces of oil or coolant.15 On reassembly, temporarily refit the crankshaft pulley, to check that the pulley notches and sump rib are aligned as described in paragraph 6 above, then ensure that both camshafts are aligned at TDC by the special tool (paragraph 8). If the engine is being reassembled after major dismantling, both camshaft toothed pulleys should be free to rotate on their respective camshafts; if the timing belt alone is being renewed, both pulleys should still be securely fastened.16 A holding tool will be required to prevent the camshaft toothed pulleys from rotating while their bolts are slackened and retightened; either obtain Ford service tool 15-030A, or fabricate a substitute as follows. Find two lengths of steel strip, one approximately 600 mm long and the other about 200 mm, and three bolts with nuts and washers; one nut and bolt forming the pivot of a forked tool, with the remaining nuts and bolts at the tips of the “forks”, to engage with the pulley spokes as shown in the accompanying illustrations. Note: Do not use the camshaft-aligning tool (whether genuine Ford or not) to prevent rotation while the camshaft toothed pulley bolts are slackened or tightened; the risk of damage to the camshaft concerned and to the cylinder head is far too great. Use only a forked holding tool applied directly to the pulleys, as described.17 If it is being fitted for the first time, screw the timing belt tensioner spring retaining pin into the cylinder head, tightening it to the specified torque wrench setting. Unbolt the tensioner, hook the spring on to the pin and the tensioner backplate, then refit the tensioner, engaging its backplate on the locating peg (see illustrations).18 In all cases, slacken the tensioner bolt (if

2C•14 Zetec engine – in-car engine repair
10.8 Fit camshaft-aligning tool to ensure engine is locked with Nos 1 and 4 cylinders
at TDC
10.12 Slacken tensioner bolt, and use Allen key to rotate tensioner away from
timing belt
10.17A Fitting tensioner spring retaining pin

Zetec engine – in-car engine repair procedures
2C
11 Timing belt tensioner and toothed pulleys - removal, inspection and refitting
4
10.17B Hook spring onto tensioner and refit as shown - engage tensioner
backplate on locating peg (arrowed) . . .
necessary), and use an Allen key inserted into its centre to rotate the tensioner clockwise as far as possible against spring tension, then retighten the bolt to secure the tensioner (see illustration).19 Fit the timing belt; if the original is being refitted, ensure that the marks and notes made on removal are followed, so that the belt is refitted the same way round, and to run in the same direction. Starting at the crankshaft toothed pulley, work anti-clockwise around the camshaft toothed pulleys and tensioner, finishing off at the rear guide pulley. The front run, between the crankshaft and the exhaust camshaft toothed pulleys, must be kept taut, without altering the position either of the crankshaft or of the camshaft(s) - if necessary, the position of the camshaft toothed pulleys can be altered by rotating each on its camshaft (which remains fixed by the aligning tool). Where the pulley is still fastened, use the holding tool described in paragraph 16 above to prevent the pulley from rotating while its retaining bolt is slackened - the pulley can then be rotated on the camshaft until the belt will slip into place; retighten the pulley bolt.20 When the belt is in place, slacken the tensioner bolt gently until the spring pulls the tensioner against the belt; the tensioner should be retained correctly against the timing belt inner shield and cylinder head, but must be just free to respond to changes in belt tension (see illustration).21 Tighten both camshaft toothed pulley bolts (or check that they are tight, as applicable) and remove the camshaft-aligning tool. Temporarily refit the crankshaft pulley,
10.18 . . . then use Allen key to position tensioner so that timing belt can be
refitted
and rotate the crankshaft through two full turns clockwise to settle and tension the timing belt, returning the crankshaft (pulley notches) to the position described in paragraph 6 above. Refit the camshaft- aligning tool; it should slip into place as described in paragraph 8. If all is well, proceed to paragraph 24 below.22 If one camshaft is only just out of line, fit the forked holding tool to its toothed pulley, adjust its position as required, and check that any slack created has been taken up by the tensioner; rotate the crankshaft through two further turns clockwise, and refit the camshaft-aligning tool to check that it now fits as it should. If all is well, proceed to paragraph 24 below.23 If either camshaft is significantly out of line, use the holding tool described in paragraph 16 above to prevent its pulley from rotating while its retaining bolt is slackened - the camshaft can then be rotated (gently and carefully, using an open-ended spanner) until the camshaft-aligning tool will slip into place; take care not to disturb the relationship of the pulley to the timing belt. Without disturbing the pulley’s new position on the camshaft, tighten the pulley bolt to its specified torque wrench setting (see illustration). Remove the camshaft-aligning tool, rotate the crankshaft through two further turns clockwise, and refit the tool to check that it now fits as it should.24 When the timing belt has been settled at its correct tension, and the camshaft-aligning tool fits correctly when the crankshaft pulley notches are exactly aligned, tighten the tensioner bolt to its specified torque wrench
10.20 Slacken tensioner bolt to give initial belt tension
setting (see illustration). Fitting the forked holding tool to the spokes of each pulley in turn, check that the pulley bolts are tightened to their specified torque wrench setting. Remove the camshaft-aligning tool, rotate the crankshaft through two further turns clockwise, and refit the tool to make a final check that it fits as it should.25 The remainder of the reassembly procedure is the reverse of removal, ensuring that all fasteners are tightened to the specified torque.
TensionerNote: If the tensioner is being removed for the first time since the vehicle left the factory, a tensioner spring and retaining pin must be obtained for fitting on reassembly.1 While it is possible to reach the tensioner once the timing belt upper and middle covers only have been removed (see Section 9), the whole procedure outlined below must be followed, to ensure that the valve timing is correctly reset once the belt’s tension has been disturbed.2 Release the tension from the timing belt as described in Section 10, paragraphs 1 to 12.3 Unscrew the tensioner bolt and withdraw the tensioner, unhooking the spring, if fitted (see illustration). Check the tensioner and spring as described in paragraph 14 of Section 10.

2C•16 Zetec engine – in-car engine repair
10.23 Using forked holding tool while camshaft toothed pulley bolt is tightened
10.24 When setting is correct, tighten tensioner bolt to specified torque wrench
setting11.3 Removing timing belt tensioner

12 Camshaft oil seals - renewal
4
13 Camshafts and hydraulic tappets - removal, inspection and refitting
4
Zetec engine – in-car engine repair procedures
11.8 Note “FRONT” marking on outside face of crankshaft toothed pulley - note which way round thrustwasher behind is
fitted
4 On reassembly, if it is being fitted for the first time, screw the timing belt tensioner spring retaining pin into the cylinder head, tightening it to the specified torque wrench setting. Hook the spring onto the pin and the tensioner backplate, then refit the tensioner, engaging its backplate on the locating peg.5 Use an Allen key inserted into its centre to rotate the tensioner clockwise as far as possible against spring tension, then tighten the bolt to secure the tensioner.6 Reassemble, checking the camshaft alignment (valve timing) and setting the timing belt tension, as described in paragraphs 20 to 25 of Section 10.
Camshaft and crankshaft toothed pulleys7 While it may be possible to remove any of these pulleys once the relevant belt covers have been removed, the complete timing belt removal/refitting procedure (see Section 10) must be followed, to ensure that the valve timing is correctly reset once the belt’s tension has been disturbed.8 With the timing belt removed, the camshaft toothed pulleys can be detached once their retaining bolts have been unscrewed as described in paragraphs 16 and 19 of Section10. The crankshaft toothed pulley can be pulled off the end of the crankshaft, once the crankshaft (grooved) pulley and the timing belt have been removed. Note the “FRONT” marking identifying the pulley’s outboard face, and the thrustwasher behind it; note which way round the thrustwasher is fitted (see illustration). Note the pulley-locating Woodruff key; if this is loose, it should be removed for safe storage with the pulley.9 Check the pulleys as described in paragraph 14 of Section 10.10 Refitting is the reverse of the removal procedure.
Timing belt guide pulleys11 Remove the timing belt covers (see Section 9).12 Unbolt and withdraw the pulley(s); check their condition as described in paragraph 14 of Section 10.13 Refitting is the reverse of the removal
11.13 Tighten timing belt guide pulley bolts to specified torque settings on
refitting
procedure; tighten the pulley bolts to the specified torque wrench setting (see illustration).
Note: While it is possible to reach either oil seal, once the respective toothed pulley has been removed (see Section 11) to allow the seal to be prised out, this procedure is not recommended. Not only are the seals very soft, making this difficult to do without risk of damage to the seal housing, but it would be very difficult to ensure that the valve timing and the timing belt’s tension, once disturbed, are correctly reset. Owners are advised to follow the whole procedure outlined below.1 Release the tension from the timing belt as described in Section 10, paragraphs 1 to 12. Note: If the timing belt is found to be contaminated by oil, remove it completely as described, then renew the oil seal (see below). Wash down the engine timing belt area and all related components, to remove all traces of oil. Fit a new belt on reassembly.2 If the timing belt is still clean, slip it off the toothed pulley, taking care not to twist it too sharply; use the fingers only to handle the belt. Do not rotate the crankshaft until the timing belt is refitted. Cover the belt, and secure it so that it is clear of the working area
12.5 Using socket and toothed pulley bolt to install camshaft oil seal
and cannot slip off the remaining toothed pulley.3 Unfasten the pulley bolt and withdraw the pulley (see Section 11).4 Unbolt the camshaft right-hand bearing cap, and withdraw the defective oil seal. Clean the seal housing, and polish off any burrs or raised edges, which may have caused the seal to fail in the first place.5 To fit a new seal, Ford recommend the use of their service tool 21-009B, with a bolt (10 mm thread size, 70 mm long) and a washer, to draw the seal into place when the camshaft bearing cap is bolted down; a substitute can be made using a suitable socket (see illustration). Grease the seal lips and periphery to ease installation, and draw the seal into place until it is flush with the housing/bearing cap outer edge. Refit the bearing cap, using sealant and tightening the cap bolts as described in Section 13.6 For most owners, the simplest answer will be to grease the seal lips, and to slide it onto the camshaft (until it is flush with the housing’s outer edge). Refit the bearing cap, using sealant and tightening the cap bolts as described in Section 13 (see illustration). Take care to ensure that the seal remains absolutely square in its housing, and is not distorted as the cap is tightened down.7 Refit the pulley to the camshaft, tightening the retaining bolt loosely, then slip the timing belt back onto the pulley (refer to para- graphs 16 and 19 of Section 10) and tighten the bolt securely.8 The remainder of the reassembly procedure, including checking the camshaft alignment (valve timing) and setting the timing belt tension, is as described in paragraphs 20 to 25 of Section 10.
Removal1 Release the tension from the timing belt as described in Section 10, paragraphs 1 to 12. 2 Either remove the timing belt completely (Section 10, paragraphs 13 and 14) or slip it
12.6 Alternatively, seal can be inserted when camshaft bearing cap is unbolted

2C•18 Zetec engine – in-car engine repair
2C
13.3 Using forked holding tool while camshaft toothed pulley bolt is slackened
off the camshaft toothed pulleys, taking care not to twist it too sharply; use the fingers only to handle the belt. Cover the belt, and secure it so that it is clear of the working area. Do not rotate the crankshaft until the timing belt is refitted.3 Unfasten the pulley bolts as described in Section 10, paragraphs 16 and 19, and withdraw the pulleys; while both are the same and could be interchanged, it is good working practice to mark them so that each is refitted only to its original location (see illustration).4 Working in the sequence shown, slacken progressively, by half a turn at a time, the camshaft bearing cap bolts (see illustration). Work only as described, to release gradually and evenly the pressure of the valve springs on the caps.5 Withdraw the caps, noting their markings and the presence of the locating dowels, then remove the camshafts and withdraw their oil seals. The inlet camshaft can be identified by the reference lobe for the camshaft position sensor; therefore, there is no need to mark the camshafts (see illustrations).6 Obtain sixteen small, clean containers, and number them 1 to 16. Using a rubber sucker, withdraw each hydraulic tappet in turn, invert it to prevent oil loss, and place it in its respective container, which should then be filled with clean engine oil (see illustrations). Do not interchange the hydraulic tappets, or the rate of wear will be much increased. Do not allow them to lose oil, or they will take a
13.4 Camshaft bearing cap slackening sequence
Note: Viewed from front of vehicle, showing bearing cap numbers
long time to refill on restarting the engine, resulting in incorrect valve clearances.
Inspection7 With the camshafts and hydraulic tappets removed, check each for signs of obvious wear (scoring, pitting etc) and for ovality, and renew if necessary.8 Measure the outside diameter of each tappet (see illustration) - take measurements at the top and bottom of each tappet, then a second set at right-angles to the first; if any measurement is significantly different from the others, the tappet is tapered or oval (as applicable) and must be renewed. If the necessary equipment is available, measure the inside diameter of the corresponding cylinder head bore. Compare the measurements obtained to those given in the Specifications Section of this Chapter; if the tappets or the cylinder head bores are excessively worn, new tappets and/or a new cylinder head will be required.9 If the engine’s valve components have sounded noisy, particularly if the noise persists after initial start-up from cold, there is reason to suspect a faulty hydraulic tappet. Only a good mechanic experienced in these engines can tell whether the noise level is typical, or if renewal of one or more of the tappets is warranted. If faulty tappets are diagnosed, and the engine’s service history is unknown, it is always worth trying the effect of
13.5A Note locating dowels when removing camshaft bearing caps
13.5 B Inlet camshaft has lobe for camshaft position
sensor
renewing the engine oil and filter (see Chapter 1), using only good-quality engine oil of the recommended viscosity and specification, before going to the expense of renewing any of the tappets - refer also to the advice in Section 1 of this Chapter.10 Visually examine the camshaft lobes for score marks, pitting, galling (wear due to rubbing) and evidence of overheating (blue, discoloured areas). Look for flaking away of the hardened surface layer of each lobe. If any such signs are evident, renew the component concerned.11 Examine the camshaft bearing journals and the cylinder head bearing surfaces for signs of obvious wear or pitting. If any such signs are evident, renew the component concerned.

Zetec engine – in-car engine repair procedures
13.6 A Removing hydraulic tappets
13.6B Hydraulic tappets must be stored as described in text
13.8 Use a micrometer to measure diameter of hydraulic tappets

2C•20 Zetec engine – in-car engine repair
13.17 Oil liberally when refitting hydraulic tappets
12 Using a micrometer, measure the diameter of each journal at several points. If the diameter of any one journal is less than the specified value, renew the cam- shaft.13 To check the bearing journal running clearance, remove the hydraulic tappets, use a suitable solvent and a clean lint-free rag to clean carefully all bearing surfaces, then refit the camshafts and bearing caps with a strand of Plastigage across each journal. Tighten the bearing cap bolts to the specified torque wrench setting (do not rotate the camshafts), then remove the bearing caps and use the scale provided to measure the width of the compressed strands. Scrape off the Plastigage with your fingernail or the edge of a credit card - don’t scratch or nick the journals or bearing caps.14 If the running clearance of any bearing is found to be worn to beyond the specified service limits, fit a new camshaft and repeat the check; if the clearance is still excessive, the cylinder head must be renewed.15 To check camshaft endfloat, remove the hydraulic tappets, clean the bearing surfaces carefully, and refit the camshafts and bearing caps. Tighten the bearing cap bolts to the specified torque wrench setting, then
measure the endfloat using a DTI (Dial Test Indicator, or dial gauge) mounted on the
13.21A Camshaft bearing cap tightening sequence
Note: View from front of vehicle - locate bearing caps according to etched numbers,
aligned as described in text
13.19 Apply sealant to mating surface of camshaft right-hand bearing caps
cylinder head so that its tip bears on the camshaft right-hand end.16 Tap the camshaft fully towards the gauge, zero the gauge, then tap the camshaft fully away from the gauge, and note the gauge reading. If the endfloat measured is found to be at or beyond the specified service limit, fit a new camshaft and repeat the check; if the clearance is still excessive, the cylinder head must be renewed.
Refitting17 On reassembly, liberally oil the cylinder head hydraulic tappet bores and the tappets (see illustration). Note that if new tappets are being fitted, they must be charged with clean engine oil before installation. Carefully refit the tappets to the cylinder head, ensuring that each tappet is refitted to its original bore, and is the correct way up. Some care will be required to enter the tappets squarely into their bores.18 Liberally oil the camshaft bearings and lobes. Ensuring that each camshaft is in its original location, refit the camshafts, locating each so that the slot in its left-hand end is approximately parallel to, and just above, the cylinder head mating surface.19 Ensure that the locating dowels are

Zetec engine – in-car engine repair procedures
pressed firmly into their recesses, and check that all mating surfaces are completely clean, unmarked and free from oil. Apply a thin film of suitable sealant (Ford recommend Loctite 518) to the mating surfaces of each
13.21B Fit camshaft-aligning tool to set TDC position while camshaft toothed
pulleys are refitted
13.20 Etched marks on camshaft bearing caps must be arranged as shown, and face
outwards
camshaft’s right-hand bearing cap (see illustration). Referring to paragraph 6 of Section 12, some owners may wish to fit the new camshaft oil seals at this stage.20 All camshaft bearing caps have a single- digit identifying number etched on them (see illustration). The exhaust camshaft’s bearing caps are numbered in sequence 0 (right-hand cap) to 4 (left-hand cap), the inlet’s 5 (right- hand cap) to 9 (left-hand cap); see illus- tration 13.21 for details. Each cap is to be fitted so that its numbered side faces outwards, to the front (exhaust) or to the rear (inlet).21 Ensuring that each cap is kept square to the cylinder head as it is tightened down, and working in the sequence shown, tighten the camshaft bearing cap bolts slowly and by one turn at a time, until each cap touches the cylinder head (see illustration). Next, go round again in the same sequence, tightening the bolts to the first stage torque wrench setting specified, then once more, tightening them to the second stage setting. Work only as described, to impose gradually and evenly the pressure of the valve springs on the caps. Fit the camshaft-aligning tool; it should slip into place as described in paragraph 8 of Section 10 (see illustration).22 Wipe off all surplus sealant, so that none is left to find its way into any oilways. Follow the sealant manufacturer’s instructions as to the time needed for curing; usually, at least an hour must be allowed between application of the sealant and starting the engine.23 If using Ford’s recommended procedure, fit new oil seals to the camshafts as described in paragraph 5 of Section 12.24 Using the marks and notes made on dismantling to ensure that each is refitted to its original camshaft, refit the toothed pulleys to the camshafts, tightening the retaining bolts loosely. Slip the timing belt back onto the pulleys (refer to paragraph 19 of Sec- tion 10) and tighten the bolts securely - use the forked holding tool described in paragraph 16 of Section 10.25 The remainder of the reassembly procedure, including checking the camshaft alignment (valve timing) and setting the timing belt tension, is as described in paragraphs 15 to 25 of Section 10.

14 Cylinder head - removal and refitting
4
2C
To prevent carbon entering the gap between the pistons and bores, smear a little grease in the gap. Aftercleaning each piston, use a small brush to remove all traces of grease and carbon from the gap, then wipe away the remainder with a clean rag.
2C•22 Zetec engine – in-car engine repair
RemovalNote: The following text assumes that the cylinder head will be removed with both inlet and exhaust manifolds attached. This simplifies the procedure, but makes it a bulky and heavy assembly to handle - an engine hoist will be required, to prevent the risk of injury, and to prevent damage to any delicate components as the assembly is removed and refitted. If it is wished first to remove the manifolds, proceed as described in Sections 6 and 7 of this Chapter; amend the following procedure accordingly.1 Depressurise the fuel system (see Chap- ter 4B).2 With the vehicle parked on firm level ground, open the bonnet and disconnect the battery negative (earth) lead - see Chapter 5, Section 1.3 Whenever you disconnect any vacuum lines, coolant and emissions hoses, wiring loom connectors, earth straps and fuel lines as part of the following procedure, always label them clearly, so that they can be correctly reassembled. Masking tape and/or a touch-up paint applicator work well for marking items. Take instant photos, or sketch the locations of components and brackets.4 Refer to Chapter 4B and remove the air inlet hose and inlet duct.5 Equalise the pressure in the fuel tank by removing the filler cap, then undo the fuel feed and return lines connecting the engine to the chassis (see Chapter 4B). Plug or cap all open fittings.6 Disconnect the accelerator cable from the throttle linkage as described in Chapter 4B. Secure the cable clear of the engine/ transmission.7 Remove the auxiliary drivebelt (see Chapter 1). 8 Refer to Chapter 10 and remove the power steering pump. Releasing its wire clip, unplug the power steering pressure switch electrical connector, then unbolt the earth lead from the
cylinder head rear support plate/engine lifting eye.9 Remove the three screws securing the wiring “rail” to the rear of the manifold. Releasing its wire clip, unplug the large electrical connector (next to the fuel pressure regulator) to disconnect the engine wiring from the main loom (see illustration). Unplug the electrical connectors on each side of the ignition coil, and the single connector from beneath the front of the thermostat housing, to disconnect the coil and coolant temperature gauge sender wiring (see illustration).10 Marking or labelling them as they are unplugged, disconnect the vacuum hoses as follows:a) One from the rear of the throttle housing
(only the one hose - there is no need to disconnect the second hose running to the fuel pressure regulator).
b) One from the union on the inlet manifold’s left-hand end.
c) The braking system vacuum servo unit hose (see Chapter 9 for details).
11 Unbolt both parts of the exhaust manifold heat shield. Either remove the dipstick and tube, or swing them out of the way.12 Unscrew the single bolt securing the pulse-air filter housing to the engine/ transmission front mounting bracket, then disconnect its vacuum hose.13 Drain the cooling system (see Chapter 1).14 Disconnect all coolant hoses from the thermostat housing (see illustration).15 Unscrew the two nuts to disconnect the exhaust system front downpipe from the manifold (Chapter 4B); disconnect the oxygen sensor wiring, so that it is not strained by the weight of the exhaust system.16 Support the weight of the engine/ transmission using a trolley jack, with a wooden spacer to prevent damage to the sump.17 Remove the timing belt and both camshafts (see Sections 10 and 13); if the cylinder head is to be dismantled, withdraw the hydraulic tappets.18 Remove the timing belt inner shield (see Section 9).
19 Working in the reverse of the sequence shown in illustration 14.30A, slacken the ten cylinder head bolts progressively and by one turn at a time; a Torx key (TX 55 size) will be required. Remove each bolt in turn, and ensure that new replacements are obtained for reassembly; these bolts are subjected to severe stresses and so must be renewed, regardless of their apparent condition, whenever they are disturbed.20 Lift the cylinder head away; use assistance if possible, as it is a heavy assembly. Remove the gasket, noting the two dowels, and discard it.
Refitting21 The mating faces of the cylinder head and cylinder block must be perfectly clean before refitting the head. Use a hard plastic or wood scraper to remove all traces of gasket and carbon; also clean the piston crowns. Take particular care, as the soft aluminium alloy is easily damaged. Also, make sure that the carbon is not allowed to enter the oil and water passages - this is particularly important for the lubrication system, as carbon could block the oil supply to any of the engine’s components. Using adhesive tape and paper, seal the water, oil and bolt holes in the cylinder block. Clean all the pistons in the same way.
22 Check the mating surfaces of the cylinder block and the cylinder head for nicks, deep scratches and other damage. If slight, they may be removed carefully with a file, but if excessive, machining may be the only alternative to renewal.23 If warpage of the cylinder head gasket surface is suspected, use a straight edge to

Zetec engine – in-car engine repair procedures
14.9A Unplug engine wiring loom connector alongside the inlet manifold
14.9B Unplug connectors (arrowed) to disconnect ignition coil wiring
14.14 Disconnect all coolant hoses from thermostat housing

2C•24 Zetec engine – in-car engine repair
14.25 Ensuring protruding tooth (or teeth) “A” are at front and marking “B” is
upwards, locate new cylinder head gasket on dowels “C”
check it for distortion. Refer to Part D of this Chapter, if necessary.24 Wipe clean the mating surfaces of the cylinder head and cylinder block. Check that the two locating dowels are in position in the cylinder block, and that all cylinder head bolt holes are free from oil.25 Position a new gasket over the dowels on the cylinder block surface, so that the “TOP/OBEN” mark is uppermost, and with the tooth (or teeth, according to engine size) protruding from the front edge (see illustration).26 Temporarily refit the crankshaft pulley, and rotate the crankshaft anti-clockwise so
14.30A Cylinder head bolt tightening sequence
Note: View from rear of vehicle
14.30B Tightening cylinder head bolts (Stages 1 and 2) using torque wrench . . .
that No 1 cylinder’s piston is lowered to approximately 20 mm before TDC, thus avoiding any risk of valve/piston contact and damage during reassembly.27 As the cylinder head is such a heavy and awkward assembly to refit with manifolds, it is helpful to make up a pair of guide studs from two 10 mm (thread size) studs approximately 90 mm long, with a screwdriver slot cut in one end - two old cylinder head bolts with their heads cut off would make a good starting point. Screw these guide studs, screwdriver slot upwards to permit removal, into the bolt holes at diagonally-opposite corners of the cylinder block surface (or into those where the locating dowels are fitted, as shown); ensure that approximately 70 mm of stud protrudes above the gasket.28 Refit the cylinder head, sliding it down the guide studs (if used) and locating it on the dowels. Unscrew the guide studs (if used) when the head is in place.29 Fit the new cylinder head bolts dry (do not oil their threads); carefully enter each into its hole and screw it in, by hand only, until finger- tight.30 Working progressively and in the sequence shown, use first a torque wrench, then an ordinary socket extension bar and an angle gauge, to tighten the cylinder head bolts in the stages given in the Specifications Section of this Chapter (see illustrations). Note: Once tightened correctly, following this procedure, the cylinder head bolts do not require check-tightening, and must not be re- torqued.31 Refit the hydraulic tappets (if removed), the camshafts, their oil seals and pulleys (see Sections 10, 11, 12 and 13, as appropriate). Temporarily refit the crankshaft pulley, and rotate the crankshaft clockwise to return the pulley notches to the position described in paragraph 6 of Section 10.32 Refit the timing belt and covers, checking the camshaft alignment (valve timing) and setting the timing belt tension, as described in Section 10.33 The remainder of reassembly is the reverse of the removal procedure, noting the following points:a) Tighten all fasteners to the torque wrench
settings specified.
14.30C . . . and to Stage 3 using angle gauge
b) Refill the cooling system, and top-up the engine oil.
c) Check all disturbed joints for signs of oil or coolant leakage, once the engine has been restarted and warmed-up to normal operating temperature.
d) If the power steering hoses where disconnected, bleed the system as described in Chapter 10 after reconnection.
15 Sump - removal and refitting
2RemovalNote: The full procedure outlined below must be followed, so that the mating surfaces can be cleaned and prepared to achieve an oil- tight joint on reassembly, and so that the sump can be aligned correctly; depending on your skill and experience, and the tools and facilities available, it may be that this task can be carried out only with the engine removed from the vehicle. Note that the sump gasket must be renewed whenever it is disturbed.1 With the vehicle parked on firm level ground, open the bonnet and disconnect the battery negative (earth) lead - see Chapter 5, Section 1.2 Drain the engine oil, then clean and refit the engine oil drain plug, tightening it to the specified torque wrench setting. Although not strictly necessary as part of the dismantling procedure, owners are advised to remove and discard the oil filter, so that it can be renewed with the oil (see Chapter 1).3 Refer to Chapter 5 and remove the starter motor.4 Remove the auxiliary drivebelt cover (see Chapter 1).5 Unplug the electrical connector(s) to disconnect the oxygen sensor.6 Unscrew the nuts to disconnect the exhaust system front downpipe from the manifold, then either unhook all the system’s rubber mountings and withdraw the complete exhaust system from under the vehicle, or remove only the downpipe/catalytic converter (see Chapter 4B for details).7 Unscrew the sump-to-transmission bolts, also any securing the engine/transmission lower adapter plate.8 Progressively unscrew the sump retaining bolts. Break the joint by striking the sump with the palm of the hand, then lower the sump and withdraw it with the engine/transmission lower adapter plate (where fitted); note the presence of any shims between the sump and transmission.9 Remove and discard the sump gasket; this must be renewed as a matter of course whenever it is disturbed.10 While the sump is removed, take the opportunity to remove the oil pump pick- up/strainer pipe and to clean it (see Sec- tion 16).

Zetec engine – in-car engine repair procedures
15.11 Ensure gasket is located correctly in sump groove
Refitting11 On reassembly, thoroughly clean and degrease the mating surfaces of the cylinder block/crankcase and sump, then use a clean rag to wipe out the sump and the engine’s interior. If the oil pump pick-up/strainer pipe was removed, fit a new gasket and refit the pipe, tightening its screws to the specified torque wrench setting. Fit the new gasket to the sump mating surface so that the gasket fits into the sump groove (see illustration).12 If the sump is being refitted with the engine/transmission still connected and in the vehicle, proceed as follows:a) Check that the mating surfaces of the
sump, the cylinder block/crankcase and the transmission are absolutely clean and flat. Any shims found on removal of the sump must be refitted in their original locations.
b) Apply a thin film of suitable sealant (Ford recommend Hylosil 102) to the junctions of the cylinder block/crankcase with the oil pump and the crankshaft left-hand oil seal carrier. Without delay - the sump bolts must be fully tightened within 10 to 20 minutes of applying the sealant - offer up the sump and engine/transmission lower adapter plate, and refit the bolts, tightening them lightly at first.
c) Ensuring that the engine/transmission lower adapter plate is correctly located, firmly press the sump against the transmission, and tighten the
15.13C Sump-to-cylinder block/crankcase alignment shims
1 Fitting points on sump 2 Shim
15.13A Apply sealant (arrowed) as directed when refitting sump
transmission-to-sump (ie, engine) bolts to the specified torque wrench setting.
d) Without disturbing the position of the sump, and working in a diagonal sequence from the centre outwards, tighten the sump bolts to the specified torque wrench setting.
e) Proceed to paragraph 14.
13 If the sump is being refitted with the engine and transmission separated (in or out of the vehicle), proceed as follows:
a) Apply a thin film of suitable sealant (Ford recommend Hylosil 102) to the junctions of the cylinder block/crankcase with the oil pump and the crankshaft left-hand oil seal carrier (see illustration). Without delay - the sump bolts must be fully tightened within 10 to 20 minutes of applying the sealant - offer up the sump to the cylinder block/crankcase, and insert the sump bolts, tightening them lightly at first.
b) Using a suitable straight edge to check alignment across the flat-machined faces of each, move the sump as necessary so that its left-hand face - including any shims found on removal - is flush with that of the cylinder block/crankcase (see illustration). Without disturbing the position of the sump, and working in a diagonal sequence from the centre outwards, tighten the sump bolts to the specified torque wrench setting.
c) Check again that both faces are flush before proceeding; if necessary, unbolt the sump again, clean the mating
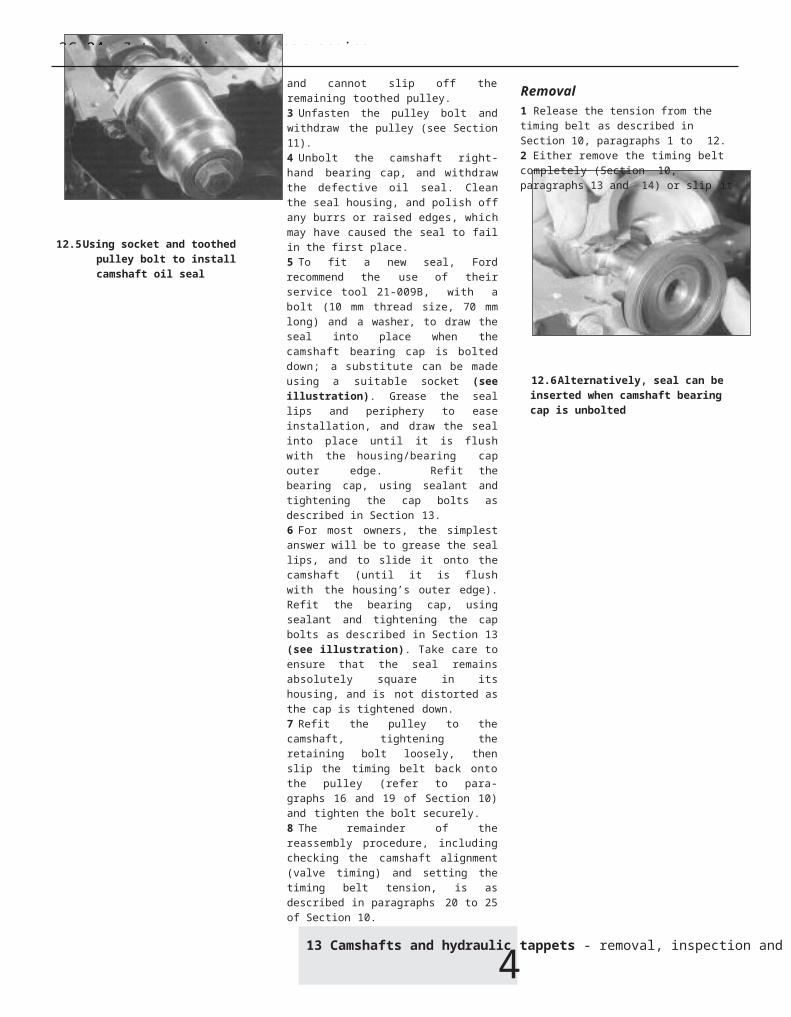
2C•26 Zetec engine – in-car engine repair
2C
16 Oil pump - removal, inspection and refitting
4
16.5 Unscrew bolts (arrowed) to remove oil pump
15.13B Checking alignment of sump with cylinder block/crankcase
surfaces, and repeat the full procedure to ensure that the sump is correctly aligned.
d) If it is not possible to achieve exact alignment by moving the sump, shims are available in thicknesses of 0.25 mm (colour-coded yellow) or 0.50 mm (colour- coded black) to eliminate the discrepancy (see illustration).
14 The remainder of reassembly is the reverse of the removal procedure, noting the following points.a) Tighten all fasteners to the
torque wrench settings specified.
b) Always renew any self-locking nuts disturbed on removal.
c) Refill the cooling system (see Chapter 1).
d) Refill the engine with oil, remembering that you are advised to fit a new filter (see Chapter 1).
e) Check for signs of oil or coolant leaks once the engine has been restarted and warmed-up to normal operating temperature.
RemovalNote: While this task is theoretically possible when the engine is in place in the vehicle, in practice, it requires so much preliminary dismantling, and is so difficult to carry out due to the restricted access, that owners are advised to remove the engine from the vehicle first. Note, however, that the oil pump pressure relief valve can be removed with the engine in situ - see paragraph 8.1 Remove the timing belt (see Section 10).2 Withdraw the crankshaft toothed pulley and the thrustwasher behind it, noting which way round the thrustwasher is fitted (see Sec- tion 11).3 Remove the sump (see Section 15).4 Undo the screws securing the oil pump pick-up/strainer pipe to the pump, then unscrew the nut and withdraw the oil pump pick-up/strainer pipe. Discard the gasket.5 Unbolt the pump from the
cylinder block/crankcase (see illustration). Withdraw

Zetec engine – in-car engine repair procedures
16.6 Withdrawing oil pump inner rotor 16.9A Unscrew threaded plug - seen through right-hand wheel arch . . .
16.9B . . . to withdraw oil pressure relief valve spring and plunger
and discard the gasket, and remove the crankshaft right-hand oil seal. Thoroughly clean and degrease all components, particularly the mating surfaces of the pump, the sump, and the cylinder block/crankcase.
Inspection6 Unscrew the Torx screws, and remove the pump cover plate; noting any identification marks on the rotors, withdraw the rotors (see illustration).7 Inspect the rotors for obvious signs of wear or damage, and renew if necessary; if either rotor, the pump body, or its cover plate are scored or damaged, the complete oil pump assembly must be renewed.
16.12 Use new gasket when refitting oil pump 8 The oil pressure relief valve can be
dismantled, if required, without disturbing the pump. With the vehicle parked on firm level ground, apply the handbrake securely and raise its front end, supporting it securely on axle stands. Remove the front right-hand roadwheel and auxiliary drivebelt cover (see Chapter 1) to provide access to the valve.9 Unscrew the threaded plug, and recover the valve spring and plunger (see illustrations). If the plug’s sealing O-ring is worn or damaged, a new one must be obtained, to be fitted on reassembly.10 Reassembly is the reverse of the dismantling procedure; ensure the spring and valve are refitted the correct way round, and tighten the threaded plug securely.
Refitting11 The oil pump must be primed on installation, by pouring clean engine oil into it, and rotating its inner rotor a few turns.12 Using grease to stick the new gasket in place on the cylinder block/crankcase, and rotating the pump’s inner rotor to align with the flats on the crankshaft, refit the pump and insert the bolts, tightening them lightly at first (see illustration).13 Using a suitable straight edge and feeler gauges, check that the pump is both centred

2C•28 Zetec engine – in-car engine repair
17 Crankshaft oil seals - renewal
4exactly around the crankshaft, and aligned squarely so that its (sump) mating surface is exactly the same amount - between 0.3 and0.8 mm - below that of the cylinder block/crankcase on each side of the
crankshaft (see illustration). Being careful not to disturb the gasket, move the pump into the correct position, and tighten its bolts to the specified torque wrench setting.14 Check that the pump is correctly located; if necessary, unbolt it again, and repeat the full procedure to ensure that the pump is correctly aligned.15 Fit a new crankshaft right-hand oil seal (see Section 17).16 Using grease to stick the gasket in place on the pump, refit the pick-up/strainer pipe, tightening its screws and nut to their specified torque wrench settings (see illustration).17 The remainder of reassembly is the reverse of the removal procedure, referring
to the relevant text for details where required.
Note: Don’t try to prise these seals out without removing the oil pump or seal carrier - the seals are too soft, and the amount of space available is too small, for this to be possible without considerable risk of damage to the seal housing and/or the crankshaft journal. Follow exactly the procedure given below.
Right-hand seal1 Remove the oil pump (see Section 16).2 Drive the oil seal out of the pump from behind (see illustration).
16.13 Oil pump must be centred on crankshaft, and square to cylinder block/ crankcase-to-sump mating surface - use straight edge and feeler gauges to check
that pump surface is an equal amount (within permissible limits) below
crankcase surface on both sides of crankshaft
16.16 Use new gasket when refitting oil pick-up pipe to pump
17.2 Driving out crankshaft right-hand oil seal

Zetec engine – in-car engine repair procedures
2C
17.5 Socket of correct size can be used to replace Ford service tool, drawing new
seal into place as described
17.6 If seal is tapped into place as shown, exercise great care to prevent seal from
being damaged or distorted
17.12 Unscrew bolts (arrowed) to remove crankshaft left-hand oil seal carrier . . .
3 Clean the seal housing and crankshaft, polishing off any burrs or raised edges, which may have caused the seal to fail in the first place.4 Refit the oil pump (see Section 16). Grease the lips and periphery of the new seal, to ease installation.5 To fit a new seal, Ford recommend the use of their service tool 21-093A, with the crankshaft pulley bolt, to draw the seal into place; an alternative can be arranged using a socket of suitable size, with a washer to match the crankshaft pulley bolt (see illustration).6 If such tools are not available, press the
17.13 . . . and ensure that carrier is properly supported when driving out used oil seal - note notches provided in carrier
for drift
seal squarely into place by hand; tap it in until it is flush with the pump housing, using a soft- faced mallet and a socket with an outside diameter only slightly smaller than the seal’s (see illustration). This approach requires great care, to ensure that the seal is fitted squarely, without distortion or damage.7 Wash off any traces of oil. The remainder of reassembly is the reverse of the removal procedure, referring to the relevant text for details where required. Check for signs of oil leakage when the engine is restarted.
Left- hand seal8 Remove the transmission (see the relevant Part of Chapter 7).9 Where appropriate, remove the clutch (Chapter 8).10 Unbolt the flywheel/driveplate (see Section 18).11 Remove the sump (see Section 15).12 Unbolt the oil seal carrier (see illustration). Remove and discard its gasket.13 Supporting the carrier evenly on wooden blocks, drive the oil seal out of the carrier from behind (see illustration).14 Clean the seal housing and crankshaft, polishing off any burrs or raised edges, which may have caused the seal to fail in the first
place. Clean also the mating surfaces of the cylinder block/crankcase and carrier, using a scraper to remove all traces of the old gasket- be careful not to scratch or damage the material of either - then use a suitable solvent to degrease them.15 Use grease to stick the new gasket in place on the cylinder block/crankcase, then offer up the carrier (see illustration).16 Using a suitable straight edge and feeler gauges, check that the carrier is both centred exactly around the crankshaft, and aligned squarely so that its (sump) mating surface is exactly the same amount - between 0.3 and0.8 mm - below that of the cylinder block/crankcase on each side of the crankshaft. Being careful not to disturb the gasket, move the carrier into the correct position, and tighten its bolts to the specified torque wrench setting (see illustration).17 Check that the carrier is correctly located; if necessary, unbolt it again, and repeat the full procedure to ensure that the carrier is correctly aligned.18 Ford’s recommended method of seal fitting is to use service tool 21-141, with two flywheel bolts to draw the seal into place. If this is not available, make up a guide from a thin sheet of plastic or similar, lubricate the lips of the new seal and the crankshaft shoulder with grease, then offer up the seal, with the guide feeding the seal’s lips over the crankshaft shoulder (see illustration). Press

2C•30 Zetec engine – in-car engine repair
17.15 Use new gasket when refitting left- hand oil seal carrier
17.16 Oil seal carrier must be centred on crankshaft, and square to cylinder block/ crankcase-to-sump mating surface - use straight edge and feeler gauges to check that carrier surface is an equal amount (within permissible limits) below crankcase
surface on both sides of crankshaft
17.18 Using guide made from thin sheet of plastic to slide oil seal lips over crankshaft
shoulder

Zetec engine – in-car engine repair procedures
18 Flywheel/driveplate - removal, inspection and refitting
3
18.11 Note “peg” tool used to lock flywheel/driveplate while (new) bolts are
tightened
the seal evenly into its housing by hand only, and use a soft-faced mallet gently to tap it into place until it is flush with the surrounding housing.19 Wipe off any surplus oil or grease; the remainder of the reassembly procedure is the reverse of dismantling, referring to the relevant text for details where required. Check for signs of oil leakage when the engine is restarted.
Removal1 Remove the transmission (see the relevant Part of Chapter 7). Now is a good time to check components such as oil seals, and renew them if necessary.2 Where appropriate, remove the clutch (Chapter 8). Now is a good time to check or renew the clutch components and pilot bearing.3 Use a centre-punch or paint to make alignment marks on the flywheel/driveplate and crankshaft, to ensure correct alignment
during refitting.4 Prevent the flywheel/driveplate from turning by locking the ring gear teeth, or by bolting a strap between the flywheel/driveplate and the cylinder block/crankcase. Slacken the bolts evenly until all are free.5 Remove each bolt in turn, and ensure that new replacements are obtained for reassembly; these bolts are subjected to severe stresses, and so must be renewed, regardless of their apparent condition, whenever they are disturbed.6 Noting the reinforcing plate (automatic transmission models only), withdraw the flywheel/driveplate; do not drop it - it is very heavy.
Inspection7 Clean the flywheel/driveplate to remove grease and oil. Inspect the surface for cracks, rivet grooves, burned areas and score marks. Light scoring can be removed with emery
19.8 Engine/transmission left-hand front mounting attachments
cloth. Check for cracked and broken ring gear teeth. Lay the flywheel/driveplate on a flat surface, and use a straight edge to check for warpage.8 Clean and inspect the mating surfaces of the flywheel/driveplate and the crankshaft. If the crankshaft left-hand seal is leaking, renew it (see Section 17) before refitting the flywheel/driveplate.9 While the flywheel/driveplate is removed, clean carefully its inboard (right-hand) face, particularly the recesses which serve as the reference points for the crankshaft speed/position sensor. Clean the sensor’s tip, and check that the sensor is securely fastened.
Refitting10 On refitting, ensure that the engine/transmission adapter plate is in place (where necessary), then fit the flywheel/driveplate to the crankshaft so that all bolt holes align - it will fit only one way - check this using the marks made on removal. Do not forget the reinforcing plate (automatic transmission models).11 Lock the flywheel/driveplate by the method used on dismantling. Working in a diagonal sequence to tighten them evenly,
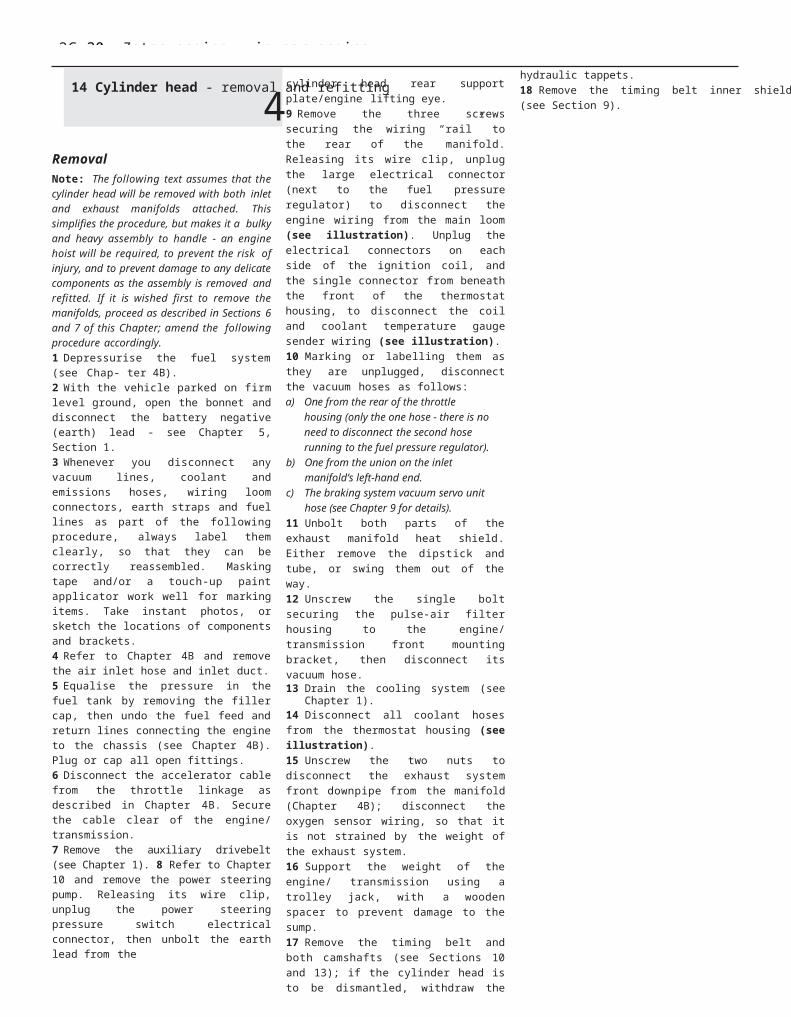
2C•32 Zetec engine – in-car engine repair
19 Engine/transmission mountings - inspection and renewal
1
and increasing to the final amount in two or three stages, tighten the new bolts to the specified torque wrench setting (see illustration).12 The remainder of reassembly is the reverse of the removal procedure, referring to the relevant text for details where required.
General1 The engine/transmission mountings seldom require attention, but broken or deteriorated mountings should be renewed immediately, or the added strain placed on the driveline components may cause damage or wear.2 The mounting arrangement varies considerably depending on whether manual
19.12 Engine/transmission left-hand rear mounting and mounting bracket
attachments
or automatic transmission is fitted, and if manual transmission is fitted, whether it is the BC type or MTX-75 type. This also has a significant bearing on the amount of peripheral dismantling necessary for access to the mountings, which will have to be assessed according to model.
Inspection3 During the check, the engine/transmission must be raised slightly, to remove its weight from the mountings.4 Raise the front of the vehicle, and support it securely on axle stands. Position a jack under the sump, with a large block of wood between the jack head and the sump, then carefully raise the engine/transmission just enough to take the weight off the mountings.
Warning: DO NOT place any part of your body under the engine when it is supported only by a jack!
5 Check the mountings to see if the rubber is cracked, hardened or separated from the metal components. Sometimes, the rubber will split right down the centre.6 Check for relative movement between each mounting’s brackets and the engine/ transmission or body (use a large screwdriver or lever to attempt to move the mountings). If movement is noted, lower the engine and check-tighten the mounting fasteners.
RenewalLeft-hand front mounting7 Position a jack under the transmission, with a block of wood between the jack head and the sump. Raise the jack to just take the weight off the mounting.8 Undo the two bolts securing the mounting to the body side member, and the two bolts securing the mounting to the transmission bracket (see illustration). Withdraw the mounting from its location.9 Refitting is the reversal of removal, tightening the retaining bolts to the specified torque.
Left-hand rear mounting10 Remove the air cleaner unit as described in Chapter 4B.

2C
Zetec engine – in-car engine repair procedures
11 Position a jack under the transmission, with a block of wood between the jack head and the transmission. Raise the jack to just take the weight off the mounting.12 Undo the nuts and bolts securing the mounting brackets to the top of the transmission and to the mounting itself (see illustration). Remove the mounting brackets from the transmission.13 Undo the two bolts, one from above and one from below, securing the mounting to the body. Remove the mounting from under the brake servo unit.14 Refitting is the reversal of removal, tightening the retaining bolts to the specified torque.
Right-hand mounting15 Raise the front of the vehicle, and securely support it on axle stands. For preference, raise the car on ramps.16 Drain the engine oil, and remove the oil filter (see Chapter 1).
19.18 Engine right-hand mounting-to-body retaining nuts
17 Undo the two upper bolts and one lower bolt and remove the mounting support brace.18 Undo the two upper nuts securing the mounting to the body (see illustration).19 Undo the two lower nuts securing the mounting to the engine bracket (see
19.19 Engine right-hand mounting-to- engine bracket retaining bolts (arrowed)
illustration). Manipulate the mounting, complete with damper weight, out from under the car.20 Refitting is the reversal of removal, tightening the retaining nuts and bolts to the specified torque.