FO-2600 Operation-Manual GB
105
OPERATION MANUAL FACSIMILE MODEL FO-2600 QUICK REFERENCE GUIDE 1. INSTALLATION 2. INITIAL SETTINGS 3. BASIC OPERATIONS 4. ANSWERING MACHINE CONNECTION 5. SPECIAL FUNCTIONS 6. OPTIONAL SETTINGS 7. PRINTING OUT REPORTS AND LISTS 8. MAINTENANCE 9. TROUBLESHOOTING SPECIFICATIONS
Transcript of FO-2600 Operation-Manual GB

OPERATION MANUAL
FACSIMILE
MODEL
FO-2600
QUICK REFERENCE GUIDE
1. INSTALLATION
2. INITIAL SETTINGS
3. BASIC OPERATIONS
4. ANSWERING MACHINE CONNECTION
5. SPECIAL FUNCTIONS
6. OPTIONAL SETTINGS
7. PRINTING OUT REPORTS AND LISTS
8. MAINTENANCE
9. TROUBLESHOOTING
SPECIFICATIONS

MAINS PLUG WIRING INSTRUCTIONS This equipment is fitted with a moulded type mains plug which incorporates a detachable fuse cover,under no circumstances should the plug be used without the fuse cover fitted. In the unlikely event of the socket outlet in your home not being compatible with the plug supplied, cutoff the mains plug and fit an appropriate type observing the wiring code below. DANGER: The fuse from the cut-off plug should be removed and the plug should be disposed of in asafe manner. Under no circumstances should the cut-off plug be inserted into a socket outlet as aserious electric shock may occur. If you are not sure how to do this, get help from a qualified electrician.
IMPORTANT
The wires in this mains lead are coloured in accordance with the following code:GREEN-AND-YELLOW: Earth BLUE: Neutral BROWN: Live
As the colours of the wires in the mains lead of this apparatus may not correspond with the colouredmarkings identifying the terminals in your plug, proceed as follows:The wire which is coloured GREEN-AND-YELLOW must be connected to the terminal in the plug whichis marked by the letter E, or by the safety earth symbol , or coloured green or green-and-yellow.The wire which is coloured BLUE must be connected to the terminal which is marked with the letter Nor coloured black.The wire which is coloured BROWN must be connected to the terminal which is marked with the letterL or coloured red.This apparatus must be protected by a 13A fuse in the mains plug or distribution board.
"WARNING: THIS APPARATUS MUST BE EARTHED"
This equipment complies with the requirements of Directives 89/336/EEC and 73/23/EEC as amended by 93/68/EEC.Dieses Gerät entspricht den Anforderungen der EG-Richtlinien 89/336/EWG und 73/23/EWG mit Änderung 93/68/EWG.Ce matériel répond aux exigences contenues dans les directives 89/336/CEE et 73/23/CEE modifiées par la directive93/68/CEE.Dit apparaat voldoet aan de eisen van de richtlijnen 89/336/EEG en 73/23/EEG, gewijzigd door 93/68/EEG.Dette udstyr overholder kravene i direktiv nr. 89/336/EEC og 73/23/EEC med tillæg nr. 93/68/EEC.Quest’ apparecchio è conforme ai requisiti delle direttive 89/336/EEC e 73/23/EEC, come emendata dalla direttiva93/68/EEC.
Este equipamento obedece às exigências das directivas 89/336/CEE e 73/23/CEE, na sua versão corrigida pela directiva93/68/CEE. Este aparato satisface las exigencias de las Directivas 89/336/CEE y 73/23/CEE, modificadas por medio de la 93/68/CEE.Denna utrustning uppfyller kraven enligt riktlinjerna 89/336/EEC och 73/23/EEC så som kompletteras av 93/68/EEC.Dette produktet oppfyller betingelsene i direktivene 89/336/EEC og 73/23/EEC i endringen 93/68/EEC.Tämä laite täyttää direktiivien 89/336/EEC ja 73/23/EEC vaatimukset, joita on muutettu direktiivillä 93/68/EEC.89/336/EEC : EMC directive 73/23/EEC : Low voltade directive 93/68/EEC : CE Mark regulation

QUICK REFERENCE GUIDE
Note: Steps which are optional are enclosed in a dotted frame:
Transmitting documents
Normal Dialling
Direct KeypadDialling
Rapid Key Dialling
Speed Dialling
Redialling
RESOLUTION
S P E E DRESOLUTION
RESOLUTION
RESOLUTION
R E D I A L
S T A R T
S T A R T
S T A R T
S T A R T
→ →→
→→→
→→
→→→
→
→→
→→→
→
→
Loaddocument
Lift handsetor
press SPEAKER
Dial (pressnumeric keys)
Wait forreception tone Hang up
Loaddocument
Dial (pressnumeric keys)
Loaddocument
Press RapidKey
Loaddocument
Enter Speed Dialnumber (press 2numeric keys)
Loaddocument
Wait forreception tone
RESOLUTION
Making voice calls
Normal Dialling
Rapid Key Dialling
Speed Dialling
Redialling
S P E E D
R E D I A L
→ →
→
→ →
→ →
→
Lift handsetor
press SPEAKERDial (pressnumeric keys)
Lift handset if youpressed SPEAKER
Press SPEAKER Press RapidKey
Lift handset if youpressed SPEAKER
Lift handsetor
press SPEAKER
Enter Speed Dial number(press 2 numeric keys)
Lift handset if youpressed SPEAKER
Lift handset
Function Guidance List
To print out a guide to all of the functions which are accessed by pressing theFUNCTION key, press the FUNCTION key and then the START key.
QUICK REFERENCE GUIDE Quick-i

ABOUT THE MERCURY RESIDENTIAL SERVICE
132 or Residential PIN Service
Residential 132 Service
Access code 132 is pre-programmed in theMercury key (Rapid key 01) at the factory
Simply prefix all numbers manually or auto-matically dialled with this key. The key canalso be used to assign the Mercury accesscode as a prefix to other autodial numbersduring programming (page 29).
Residential PIN Code Service
Clear access code 132 from the Mercurykey (Rapid key 01) (page 23).
Program the Mercury key (Rapid key 01)with access code 131, a pause, and MercuryPIN (page 27).
Simply prefix all numbers manually or auto-matically dialled with this key. The key canalso be used to assign the Mercury PIN as aprefix to other autodial numbers during pro-gramming (page 29).
To change from the Residential PIN Code Service to the Residential 132 Service, clear theMercury key (Rapid key 01) and reprogram it with the access code 132. The machine willautomatically recognise the digits 132 and accept them without requiring a further pauseor Mercury PIN.
QUICK REFERENCE GUIDE
Quick-ii QUICK REFERENCE GUIDE

INTRODUCTION
Thank you for purchasing the FO-2600! In addition to providing you with the ease andconvenience of plain-paper printing, the FO-2600 features a variety of specialfunctions designed to increase the range and power of your communications.
This manual gives you easy-to-follow instructions for installing and using your new fax.The Table of Contents will show you where instructions for using each feature arelocated. Whilst you may not need to read every section in detail at first, werecommend that you at least look over them briefly.
If you have any questions or problems which cannot be solved by reading this manual,please contact your Sharp dealer.
♦ Keys, switches, and labels on the machine are indicated in BOLD print.
♦ Messages appearing in the display are indicated in CAPITAL LETTERS.
♦ Your fax machine and the telephone system
Your Sharp FO-2600 Facsimile Transceiver is approved for connection to the PublicSwitched Telephone Network (PSTN), it is also approved for connection via a PrivateBranch Exchange (PBX), and can be used with either Loop Disconnect (LD) or DualTone Multi-Frequency (DTMF) signalling.
Your facsimile machine is not suitable as an extension to some payphones or for useon shared service lines.
REN
The Ringer Equivalence Number (REN) of your fax machine is 1.
The total number of instruments that can be connected to an exclusive line isdetermined by adding the REN values of each instrument. The total should not exceed4.0. A telephone provided by BT is assumed to have a REN of 1 unless otherwisemarked.
Satisfactory ringer operation can not be guaranteed in installations consisting of mixedapparatus types, even if the REN value does not exceed 4.
i

Emergency services
Emergency services (999) can be called from this apparatus. Please display on thetelephone the number required to access that service, together with the number of thetelephone, using the label provided.
♦ Private branch exchange (PBX) connection
Your facsimile machine is approved for connection to the Public Telephone Network(PSTN) via compatible PBX systems. Consult your supplier for a list of suitable PBXsystems. It cannot be guaranteed that this facsimile machine will operate correctlyunder all possible conditions of connection to compatible PBX systems.
This facsimile machine has been approved for use of the following facilities:
Simple telephone
Tone dialling (DTMF)
Loop disconnect (Pulse dialling)
Memory dialling
Loudspeaking (Call Progress Monitor)
On-hook dialling
Automatic answering
Automatic dialling
Automatic clearing
Last number redial
Time break or Earth recall
Series connection of extension telephone(s)
Any other usage will invalidate the approval of the facsimile if as a result it then ceasesto comply with the standards against which approval was granted.
Series connection
When connected via series apparatus, difficulties may occasionally be experiencedwhen making calls to the PSTN and by both parties during telephone conversations. Ifdifficulties are experienced, contact the supplier or maintainer of the series apparatusin the first instance.
While operation may be possible initially, changes to or modernisation of the networktaking place in the normal course of events may result in the facsimile equipment beingconnected to a network service with which it was not designed to be compatible.Failure of the facsimile / series apparatus to work under these circumstances may notbe the fault of the network operator.
The voltage drop introduced by your facsimile between the PSTN and the associatedapparatus at a current of 40mA d.c. is 2 volts, therefore no additional series equipmentmay be connected.
INTRODUCTION
ii

TABLE OF CONTENTS
QUICK REFERENCE GUIDE
1 INSTALLATION
UNPACKING . . . . . . . . . . . . . . . . . . . . . . . . . . . . . . . . . . . . . 1-1 INSTALLING THE PRINTER CARTRIDGES . . . . . . . . . . . . . . . . . . . . 1-2 ASSEMBLY AND CONNECTIONS . . . . . . . . . . . . . . . . . . . . . . . . . 1-6 LOADING PRINTING PAPER . . . . . . . . . . . . . . . . . . . . . . . . . . . . 1-10
2 INITIAL SETTINGS
A LOOK AT THE OPERATION PANEL . . . . . . . . . . . . . . . . . . . . . . . 2-1 ENTERING YOUR NAME AND FAX NUMBER . . . . . . . . . . . . . . . . . . . 2-2 ENTERING LETTERS FOR NAMES . . . . . . . . . . . . . . . . . . . . . . . . . 2-3 SETTING THE DATE AND TIME . . . . . . . . . . . . . . . . . . . . . . . . . . 2-5 SELECTING THE RECEPTION MODE . . . . . . . . . . . . . . . . . . . . . . . 2-6 STORING NUMBERS FOR AUTOMATIC DIALLING . . . . . . . . . . . . . . . . 2-7 USING THE MERCURY FUNCTION . . . . . . . . . . . . . . . . . . . . . . . . 2-11
3 BASIC OPERATIONS
SENDING DOCUMENTS . . . . . . . . . . . . . . . . . . . . . . . . . . . . . . 3-1 RECEIVING DOCUMENTS . . . . . . . . . . . . . . . . . . . . . . . . . . . . . 3-11 MAKING COPIES . . . . . . . . . . . . . . . . . . . . . . . . . . . . . . . . . . 3-14 MAKING TELEPHONE CALLS . . . . . . . . . . . . . . . . . . . . . . . . . . . 3-16
4 ANSWERING MACHINE CONNECTION
USING THE CONNECTION . . . . . . . . . . . . . . . . . . . . . . . . . . . . . 4-1 OPTIONAL A.M. MODE SETTINGS . . . . . . . . . . . . . . . . . . . . . . . . . 4-5
5 SPECIAL FUNCTIONS
MEMORY . . . . . . . . . . . . . . . . . . . . . . . . . . . . . . . . . . . . . . . 5-1 TRANSMISSION RESERVATION . . . . . . . . . . . . . . . . . . . . . . . . . . 5-3 BROADCASTING . . . . . . . . . . . . . . . . . . . . . . . . . . . . . . . . . . 5-4 CONFIDENTIAL TRANSMISSION . . . . . . . . . . . . . . . . . . . . . . . . . . 5-6 POLLING . . . . . . . . . . . . . . . . . . . . . . . . . . . . . . . . . . . . . . . 5-7 RELAY REQUEST . . . . . . . . . . . . . . . . . . . . . . . . . . . . . . . . . . 5-10 TIMER OPERATIONS . . . . . . . . . . . . . . . . . . . . . . . . . . . . . . . . 5-13 ENTERING AND USING PROGRAMS . . . . . . . . . . . . . . . . . . . . . . . 5-16 ANTI JUNK FAX . . . . . . . . . . . . . . . . . . . . . . . . . . . . . . . . . . . 5-22
6 OPTIONAL SETTINGS
7 PRINTING OUT REPORTS AND LISTS
8 MAINTENANCE
9 TROUBLESHOOTING
PROBLEMS AND SOLUTIONS . . . . . . . . . . . . . . . . . . . . . . . . . . . 9-1 MESSAGES AND SIGNALS . . . . . . . . . . . . . . . . . . . . . . . . . . . . . 9-3 CLEARING PAPER JAMS . . . . . . . . . . . . . . . . . . . . . . . . . . . . . . 9-5
SPECIFICATIONS
iii

Notes
TABLE OF CONTENTS
iv

1 INSTALLATIONUNPACKING
Take the fax machine out of the box carefully, and remove all packing material. Makesure you have all the items listed below. If any are missing, contact your dealer.
Handset
Handset lead
Telephone line cord
Paper tray cover
Rapid key labels
Operation manual
Paper tray
Original documentsupport
Received documentsupport
Imaging cartridge
Drum cartridge
Mercuryapplication set
British Telecom faxbook card
Precautions before setting up
♦ The fax must be installed on a level surface.
♦ Keep the fax away from air conditioners, heaters, direct sunlight, and dust.
♦ Provide easy access to the front, back, and sides of the fax. In particular, keep thearea in front of the fax clear, or the original document may jam as it comes out afterscanning.
♦ Keep liquids away from the fax. Liquids spilled on the fax can damage the internalcircuitry.
♦ If the fax is moved from a cold to a warm place, it is possible that condensation mayform on the reading glass, preventing proper scanning of documents fortransmission. To remove the condensation, turn on the power and waitapproximately 2 hours before using the fax.
INSTALLATION 1-1

INSTALLING THE PRINTER CARTRIDGES
The laser printer in your fax creates printed text and images by applying toner to thepage with a photoconductive drum. Follow the steps below to install or replace theimaging cartridge (which contains the toner) and the drum cartridge.
1 Pull the release on the right side ofthe operation panel forward, and openthe operation panel.
2 Grasp the top of the receiveddocument guide and pull it so that itrotates toward you. Lift the guidestraight up and out of the printingcompartment.
•• If you are installing the cartridges forthe first time, go to Step 5.
3 If you are replacing the cartridges,grasp the finger hold on the imagingcartridge handle (marked "PUSH")and pull the handle out. Rehold thehandle, and pull the imaging cartridgeout of the compartment.
•• Caution! The fusing unit (the blackunit with ribs extending across thebottom of the compartment) becomesvery hot during printing. Be careful notto touch it.
•• If you are only replacing the drumcartridge, place the imaging cartridgeon a piece of paper on a horizontalsurface. Make sure that the cartridgelies flat.
•• If you are only replacing the imagingcartridge, go to Step 8.
1-2 INSTALLATION

4 Grasp the two finger holds on the bluesection of the drum cartridge, and pullit out of the compartment.
5 Unfold the end of the drum cartridgebag, and remove the new drumcartridge.
•• Do not use a sharp object to cut thebag.
•• Do not remove the sheet of blackprotective paper yet.
6 Grasp the two finger holds on theblue section of the drum cartridge,and insert it into the compartment.Make sure it fits into place on top ofthe roller in the bottom of thecompartment.
•• If you have removed a used drumcartridge, place it in the empty drumcartridge bag, seal the bag, anddispose of it in a way that conforms toany local regulations that may exist inyour area.
7 Grasp the protruding end of theprotective paper, and pull the paperout of the cartridge.
•• Be sure not to leave any pieces of tornpaper in the printing compartment.
•• If you are not replacing the imagingcartridge, go to Step 10.
INSTALLING THE PRINTER CARTRIDGES
INSTALLATION 1-3
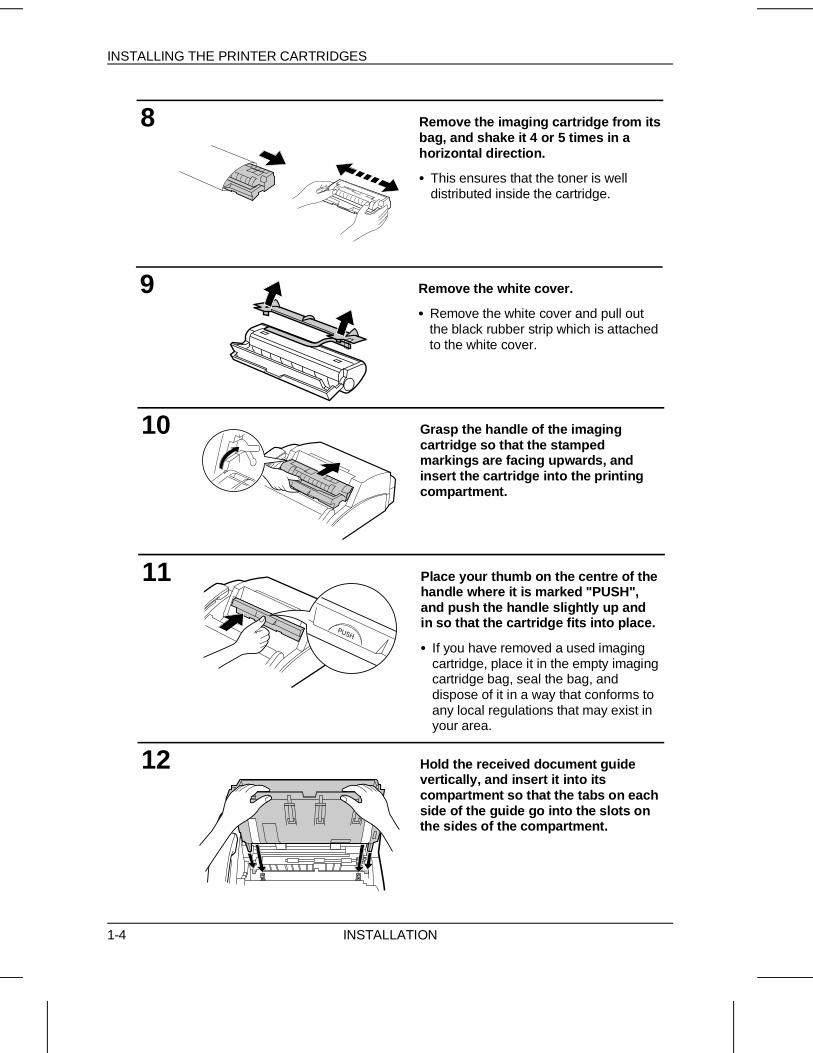
8 Remove the imaging cartridge from itsbag, and shake it 4 or 5 times in ahorizontal direction.
•• This ensures that the toner is welldistributed inside the cartridge.
9 Remove the white cover.
•• Remove the white cover and pull outthe black rubber strip which is attachedto the white cover.
10 Grasp the handle of the imagingcartridge so that the stampedmarkings are facing upwards, andinsert the cartridge into the printingcompartment.
11 Place your thumb on the centre of thehandle where it is marked "PUSH",and push the handle slightly up andin so that the cartridge fits into place.
•• If you have removed a used imagingcartridge, place it in the empty imagingcartridge bag, seal the bag, anddispose of it in a way that conforms toany local regulations that may exist inyour area.
12 Hold the received document guidevertically, and insert it into itscompartment so that the tabs on eachside of the guide go into the slots onthe sides of the compartment.
PUSH
INSTALLING THE PRINTER CARTRIDGES
1-4 INSTALLATION

13 Make sure that the receiveddocument guide is positioned so thatthe arm on the left side of the guidewill go into the hole. Place yourthumbs on both sides of the guidewhere it is marked "PUSH", and pushthe guide forward until it fits intoplace.
14Close the operation panel.
Replacing the cartridges
Your fax uses the following imaging cartridge and drum cartridge. These can beobtained from your dealer or retailer.
FO-26DC IMAGING CARTRIDGE
FO-26DR DRUM CARTRIDGE
The imaging cartridge is capable of printing approximately 2000 pages if A4 sizepaper is used and 4% of each page is covered with toner. When the cartridge nearsempty (about 250 pages can still be printed), the & indicator on the operation panelwill begin to blink. When the cartridge is empty, the indicator will light steadily andTONER EMPTY will appear in the display. Replace the cartridge as described above.
To assure printing quality, we recommend that you replace the drum cartridge after20,000 pages have been printed. You can check the total number of pages printed inthe display by pressing the FUNCTION key and then the "#" key.
PUSH
PUSH
INSTALLING THE PRINTER CARTRIDGES
INSTALLATION 1-5

ASSEMBLY AND CONNECTIONS
Handset
Connect the handset lead to thehandset and the fax as shown.
•• The ends of the handset lead areidentical, so they will go into eithersocket.
Place the handset on the handset rest.
Use the handset to make ordinaryphone calls, or to transmit andreceive documents manually.
Power lead
Plug the power lead into a 230 V,50 Hz, grounded (3-prong) AC outlet.
•• Important: Whenever you unplug thepower lead, disconnect the faxmachine from the telephone networkfirst.
•• Caution: The mains outlet(socket-outlet) shall be installed nearthe equipment and shall be easilyaccessible.
Press the power switch to turn on thepower.
Telephone line cord
Plug one end of the telephone linecord into the socket on the fax marked"TEL. LINE". Plug the other end into astandard telephone wall socket.
•• Be sure to plug the line cord into theTEL. LINE socket on the fax. Do notplug it into the TEL. SET socket.
•• Note : Connection to the telephonenetwork must not be hard wired.
TEL.
SET
TEL.
LINE
1-6 INSTALLATION

Comments:
•• Your fax is set for tone dialling. If you are on a pulse only dial line, you must reset it forpulse dialling by changing Option Setting 19. This procedure is described in Chapter 6,"Optional Settings".
•• A new plan telephone socket must be located near the machine. If you don’t have one,contact your local telephone supplier.
•• Your fax cannot be used on a key system without the necessary adaptation of the system.Please consult the installers of the system if this is required.
•• If you intend to use a computer fax modem on the same phone line, you must reset OptionSetting 12 to NO in order to prevent transmission and reception errors. This procedure isdescribed in Chapter 6, "Optional Settings".
•• If you are connectiong the fax to a PBX, you may need to reset the fax to the appropriaterecall mode for the PBX. This is done by Option Setting 21 as described in Chapter 6.
•• If your area experiences a high incidence of lightning or power surges, we recommend thatyou install surge protectors for the power and telephone lines. Surge protectors can bepurchased from your dealer or at most telephone specialty stores.
•• The facsimile will not ring in response to incoming calls in the absence of mains power tothe machine. For this reason it is recommended that the fax is not left as the only telephoneinstrument connected to the line when in this state to avoid the loss of voice calls.
•• Your fax is still capable of making outgoing telephone calls when the power is switchedOFF, however, the dialling method will default to pulse in this condition. The * key may beused to switch to tone dial mode.
S T A R T
Volume settings
Adjust the volume of the speaker for on-hook dialling as follows:
1 Press the FUNCTION key and thenthe SPEAKER key.
2 Press the "#" key to turn the volumeup, or the " *" key to turn it down.
3 Press the START key.
or
To adjust the volume of the ringer, reset Option Setting 22 as described in Chapter 6,"Optional Settings".
SPEAKERFUNCTION
ASSEMBLY AND CONNECTIONS
INSTALLATION 1-7

Trays
Attach the paper tray by inserting thetabs into the holes at the rear of thefax.
Place the paper cover on the paper trayso that the notches on each side of thecover fit onto thecatches on each sideof the tray.
Attach the original document supportand the received document support tothe top of the fax as shown.Original document
support
Received documentsupport
ASSEMBLY AND CONNECTIONS
1-8 INSTALLATION

Other devices
If desired, you can connect either an answering machine or an extension telephone toyour fax.
♦ Connecting an answering machine to the fax will allow you to receive both voice andfax messages on the same line while you are out. For details on using this feature,see Chapter 4.
♦ You can connect an extension phone to the fax to make and receive calls like anyother extension phone on your line. For details on receiving faxes from an extensionphone, see "Receiving Documents" in Chapter 3.
Remove the seal covering the socketmarked "EXT. TEL." on the fax.
Insert the modular plug of theextension phone or answeringmachine line into the U.K. style socketmarked "EXT. TEL." as shown.
•• Important: If the extension telephoneor answering machine is not connectedto the extension telephone socket onthe fax as shown, the set-up will notoperate properly.
•• Eire : Remove the seal covering thesocket marked "TEL. SET" on the fax.Insert the plug of the extensiontelephone or the answering machineline directly into the "TEL.SET" socket.
telline telphone
Comments:
•• The safety status of this socket is TNV, and is provided for the connection of approvedtelephone equipment only. To ensure continued safety compliance, do not connect anyother equipment to this socket.
•• More than one extension telephone may be connected to the same line as the fax, providedthey are connected as shown above and the total REN value does not exceed 4. If you areconnecting the fax into an existing multi-telephone installation, the wiring may need somealteration. Contact your telephone supplier for assistance.
Important: If you are connecting an answeringmachine, make sure the other end of the line isinserted into the answering machine’stelephone line socket, not its telephone socket.
ASSEMBLY AND CONNECTIONS
INSTALLATION 1-9

LOADING PRINTING PAPER
The paper tray holds the paper on which received documents and copies are printed.Up to 100 sheets of A4 size paper from 60 to 90 g/m2 can be loaded in the tray.
Caution!
•• Do not use paper which has already been printed on one side by a laser printer or copier.This may damage the roller in the fusing unit, causing poor printing quality and frequentpaper jams.
Note: Plain paper has a "print" side which should be used to obtain the best print quality. Theprint side is not visible to the naked eye, so check the label on the end of the packagebefore removing the paper. The print side will be indicated by an arrow, symbol, orwording. Load the paper in the tray print side up as described below.
1 Remove the paper tray cover.
2 Fan the paper, and then tap the edgeagainst a flat surface to even thestack.
3 Pull the lever on the right side of thepaper tray (marked "PULL") towardyou.
4 Insert the paper into the tray, printside up.
1-10 INSTALLATION

5 Make sure that the right edge of thepaper is aligned against the rightpaper guide, and then move the leftpaper guide until it fits into theposition marked "A4".
•• To move the guide, pinch the leveragainst the guide.
6 Push the lever on the right side of thepaper tray down to set the paper.
7 Replace the paper tray cover.
•• When adding paper to the paper tray, you must first take out any remaining paper, combine itinto one stack with the new paper, and then put the stack in the tray. If you do not remove theremaining paper and simply place new paper on top of it, double feeding may result.
LOADING PRINTING PAPER
INSTALLATION 1-11

Notes
LOADING PRINTING PAPER
1-12 INSTALLATION

2 INITIAL SETTINGSA LOOK AT THE OPERATION PANEL
Before you can begin using your fax, there are some settings which must be madeusing the keys on the operation panel. First take a moment to familiarize yourself withthe operation panel, and then make the settings as described on the following pages.
Liquid crystal displayThis displays variousmessages duringoperation andprogramming.
SPEED keyPress this key to diala 2-digit Speed Dialnumber.
REDIAL keyPress this key toautomatically redial thelast number dialled.
1 2ABC
3DEF
4GHI
5JKL
6MNO
7PQRS
8TUV
9WXYZ
0
S P E E D
R E D I A L
R
S P E A K E R
PAPERCHECK AUTO
COPY STOP
MANUAL ANS.SEARCH
DIALRECEPTION
MODEFUNCTIONBROADCASTMEMORYRESOLUTION
S T A R T
01 02 03 04 05
06 07 08 09 10
11 12 13 14 15
16/POLL 19/G1 20/G217/P1 18/P2
RESOLUTION keyPress this key to adjust theresolution and contrastbefore sending or copyinga document.
FUNCTION keyPress this key toselect variousspecial functions.
RECEPTION MODE keyPress this key to selectthe mode of reception.
Number keysUse these keys to dialnumbers, and enternumbers and lettersduring number/namestoring procedures.
SPEAKER keyPress this key to dial anumber without pickingup the handset.
R keyIf you are on a P.B.X. extension,press this key to transfer or putthe other party on hold. It canalso be used to move the cursorto the left when storing a numberor name.
Rapid KeysUse these keys to dial faxand voice numbersautomatically. Rapid Key 01(indicated by the blue logo)also serves as an accesskey when using the MercuryService.(Note that you must attachthe Rapid Key labels.)
STOP keyPress this key to stopoperations before theyare completed.
START keyPress this key tosend or receive adocument.
MEMORY keyPress this key to scan adocument into memorybefore transmitting it.
COPY keyPress thiskey tomake acopy of adocument.
Service indicatorThis lights when aproblem occurs whichmust be fixed by aservice engineer.
Toner empty indicatorThis blinks when theimaging cartridge is nearthe end of its life, andlights steadily when itmust be replaced.
PAPER CHECK lightThis light comes onwhen you are out ofpaper.
Reception mode lightsOne of these lights willcome on to indicatewhich reception modehas been selected.
SEARCH DIAL keyPress this key to searchfor an automatic diallingnumber.
BROADCAST keyPress this key to send adocument to a group ofreceiving fax machines.
INITIAL SETTINGS 2-1

ENTERING YOUR NAME AND FAX NUMBER
To have your name and fax/telephone number (called the "Sender’s name" and"Sender’s number") printed at the top of every page you transmit, program them bypressing the panel keys as shown below.
♦ If you enter an incorrect number or letter, press the R key to move the cursor backto the mistake, then enter the correct number or letter. (To move the cursor forward,press the SPEAKER key.)
Step Press these keys: Comments
1 "ENTRY MODE" will appear in the display.
2 "OWN NUMBER SET" will appear in the display.
3
4(Example)
Enter your fax number (max. of 20 digits) bypressing the numeric keys. (To insert a spacebetween digits, press the "#" key. To insert a "+",press the " " key.)
5
6
(Example: "SHARP")
Enter your name by pressing the appropriatenumeric keys as shown on the following page.Press each key repeatedly until the desired letterappears in the display.(Max. of 24 characters.)
7
8 Exit.
Note: To confirm that you have correctly entered your name and number, print out thePasscode List (see Chapter 7). This list also shows a sample of what will be printed atthe top of every page you transmit ("HEADER PRINT").
FUNCTION
S T A R T
5 5 5 4321
STOP
3
S T A R T
S T A R T
7PQRS
7PQRS
7PQRS
7PQRS
7PQRS
4GHI
4GHI
4GHI
2ABC
2ABC
7PQRS
7PQRS
7PQRS
7PQRS
SPEAKER
7PQRS
7PQRS
2-2 INITIAL SETTINGS

ABC DEF
GHI JKL MNO
PQRS TUV WXYZ
S P E E D
R E D I A L
R
S P E A K E R
1 2 3
4 5 6
7 8 9
0
ENTERING LETTERS FOR NAMES
Names are programmed by pressing the number keys. You will notice that letters aremarked above each of the number keys "2" through "9". To enter a letter (or number),press the appropriate key one or more times until the letter appears in the display (thenumber will appear first, followed by the letters in the order marked above the key).The keys used for entering letters and editing are shown below.
SpacePress this key twice toenter a space.
Letters and numbersTo enter a letter or number, pressthe appropriate key repeatedly untilthe desired number/letter appearsin the display (the number appearsfirst, then the letters in the ordershown above the key).
DeletePress this key to delete theletter highlighted by the cursor(if the cursor is to the right ofthe last letter entered, it willbackspace and delete the lastletter).
Cursor leftPress this key to move thecursor to the left.
ShiftPress this key once to changecase (press it again to changeback).
Cursor rightPress this key to move thecursor to the right.
SymbolsPress either key repeatedly untilthe desired symbol appears (seethe symbol list below).
Comments:
•• To enter two letters in succession which require using the same key, press the SPEAKERkey once after entering the first letter, then enter the second letter.
•• To change one individual letter to another, move the cursor to that letter and enter thedesired letter. The new letter will simply replace the old one.
Symbol listTo enter a symbol from the list below, press the "#" key or the "*" key repeatedlyuntil the desired symbol appears.
# → ← *
. / ! " # $ % & ’ ( ) + + , - : ; < = > ? @ [ ¥ ] ^ _ p { | } → ←
INITIAL SETTINGS 2-3

Example
The following is an example of entering the name "ABC Co. #1".
♦ The cursor in the display is indicated below by a rectangle:
A
A
A
A
A
B
B
B
CA B
C
A B C C
A B C C o
A B C C o .
A B C C o .
A B C C o . #
A B C C o . # 1
Step Press these keys: Display
1
2
3
4
5
6
7
8
9
10
11
12
13
2ABC
2ABC
2ABC
2ABC
2ABC
SPEAKER
SPEAKER
2ABC
2ABC
2ABC
2ABC
2ABC
2ABC
2ABC
2ABC
6MNO
6MNO
6MNO
6MNOR E D I A L
1
1S T A R T
1
11
ENTERING LETTERS FOR NAMES
2-4 INITIAL SETTINGS

SETTING THE DATE AND TIME
The date and time appear in the display, in reports, are printed at the top of each pageyou transmit, and are used for timer operations. Set the date and time by pressing thekeys on the operation panel as shown below.
♦ To correct a mistake, press the SPEED key to move the cursor back to the mistake,and then enter the correct number.
♦ The day of the week is set by entering a code number. Code numbers are as follows:
Day SUN MON TUE WED THU FRI SAT
Code 0 1 2 3 4 5 6
Step Press these keys: Comments
1 ENTRY MODE will appear in the display.
2 DATE & TIME SET will appear in the display.
3
4 (Example) Enter the day of the month (2 digits: "01" to "31").
5 (Example: January)Enter the month (2 digits: "01" for January, "02"for February, "12" for December, etc.).
6 (Example: 1995) Enter the last two digits of the year.
7 (Example: Thursday)Enter the day of the week by entering theappropriate code number (see above table).
8 (Example) Enter the hour (2 digits: "00" to "23").
9 (Example) Enter the minute (2 digits: "00" to "59").
10 The clock will now start.
11 Exit.
FUNCTION
S T A R T
STOP
3
S T A R T
0 1
1 2
1 0
2 5
9 5
4
INITIAL SETTINGS 2-5

SELECTING THE RECEPTION MODE
Your fax has three modes for receiving incoming calls and faxes:
MANUAL mode: This is the most convenient mode for receiving phone calls. You canalso receive faxes; however, all calls must first be answered by picking up the fax’shandset or an extension phone connected to the same line.
AUTO mode: Select this mode when you only want to receive faxes on your line. Thefax machine will automatically answer all calls and receive incoming faxes. AutomaticFax/Phone Changeover, a special function for receiving both faxes and voice calls,also operates in this mode.
ANS. mode: Select this mode when an answering machine is connected to the faxand you want the answering machine to answer all calls. This allows you to receiveboth voice messages and faxes while you are out.
Setting the reception mode
Press the RECEPTION MODE key untilthe light under the desired modecomes on.
For more information on receiving faxes in AUTO mode and MANUAL mode, see"Receiving Documents" in Chapter 3. For more information on using ANS. mode, seeChapter 4.
AUTO MANUAL ANS.RECEPTION
MODE
2-6 INITIAL SETTINGS

STORING NUMBERS FOR AUTOMATIC DIALLING
Automatic dialling is a quick and convenient way of dialling which is performed byeither pressing a Rapid Key (Rapid Key Dialling), or pressing the SPEED key andentering a 2-digit number (Speed Dialling). It can be used for both fax transmissionsand voice calls.
To use Automatic Dialling, you must first store the full number in your fax. The wayyou store it depends on whether you want to use it for Rapid Key Dialling or SpeedDialling:
♦ Rapid Key Dialling: You assign a full fax number to a Rapid Key. You can alsostore a name, a voice number (dialled as described in "Making telephone calls" inChapter 3), and a back-up fax number which is automatically dialled if the first faxnumber is busy. 20 Rapid Keys are available.
♦ Speed Dialling: You assign a full fax or voice number to a 2-digit Speed Dialnumber. You can also store a name. 30 Speed Dial numbers are available. (SpeedDial numbers are independent of Rapid Keys.)
Chain Dialling for long numbers or indirect access to alternative network opera-tors
The maximum number of digits which may be entered when storing a telephone or faxnumber is 20. If you need to store a number which is longer than 20 digits or wish toprogram an access number or PIN of an alternative network operator, use ChainDialling.
Chain Dialling allows you to combine two or more automatic dialling numbers, or usean automatic dialling number followed by additional digits entered manually with thenumeric keys, to dial a single number. In addition to being convenient for storing longnumbers, it allows you to store a network operator’s access code or PIN as anautomatic dialling number.
For example, to store a 36-digit number for automatic dialling, you would need tobreak it into two parts:
1. Store the first 20 digits into one Speed Dial number ("01", for example) using thestoring procedure on the following page, and press "1" in Step 11 of that procedureto specify it as a Chain Dialling number (when dialling, this tells the machine to waitfor the remainder of the telephone number when you use the Speed Dial number"01").
2. Store the remaining 16 digits into a separate Speed Dial number ("02", for example),and this time press "2" in Step 11 of the storing procedure to specify that it is not aChain Dial number (this tells the machine that the final part of the number has beendialled).
In this way, you specify all parts of the number except the last as Chain Dial numbers.
♦ The maximum number of digits which can be dialled at one time by Chain Dialling is50.
INITIAL SETTINGS 2-7

Storing numbers
Comments:
•• To enter letters for names or correct a mistake, see "Entering letters for names" in thischapter.
•• You may need to add a pause between certain digits to allow time for connection. Forexample, if you are on a PBX telephone system that requires an access number to bedialled (such as "9") to access an outside line, you may need to enter a pause between theaccess number and the number of the receiving fax machine.
•• Pauses are entered by pressing the REDIAL key, and several can be entered in a row ifnecessary. The first pause entered gives a time delay of about 4 seconds, and subsequentpauses give delays of 0.9 seconds each. The total duration of pauses entered for any onefax or voice number cannot exceed 11 seconds.
•• Rapid key 01 has been set at the factory for use as the Mercury key. If you are not using theMercury Service and want to use Rapid Key 01 for Rapid Key dialling, clear Rapid key 01 asdescribed in "Clearing numbers" which follows in this section, and reset Option Setting 23 asdescribed in Chapter 6.
•• To confirm that Automatic Dialling numbers have been stored correctly, print out theTelephone List. The procedure for doing this is described in Chapter 7, "Printing out Reportsand Lists".
Step Press these keys: Comments
1 ENTRY MODE will appear in the display.
2 FAX/TEL # MODE will appear in the display.
3 Select SET.
4(Example)
To store a Rapid Key number, press a RapidKey.To store a Speed Dial number, press twonumeric keys ("01" to "30").
5 (Example)Enter the fax number (max. of 20 digits includingpauses) using the numeric keys.
6 If you are storing a Speed Dial number, go toStep 9 after pressing START.
7(Example)
Enter a full voice number (max. of 20 digits).If you don’t want to enter a voice number, skipthis step.
8S T A R T
FUNCTION
S T A R T
5 5 5 1 432
3
5 5 5 5 537
01
1
STORING NUMBERS FOR AUTOMATIC DIALLING
2-8 INITIAL SETTINGS

9
(Example)
Enter the name of the location or party bypressing numeric keys as described in "EnteringLetters for Names" in this chapter (max. of 20characters). If you don’t want to enter a name,skip this step.
10
11 or
Press "1" if you want to specify the number as aChain Dialling number (see the beginning of thissection). Otherwise, press "2" or "START".If you pressed "1" or are storing a Speed Dialnumber, go to Step 14.
12(Example)
Enter a full back-up fax number.If you don’t want to enter a back-up number, goto Step 14.
13
14 Step 4 or
Return to Step 4 to store another number, orpress STOP to exit. If the number is a Rapid Keynumber, you can write the name on the labelabove the appropriate Rapid Key.
STOP
S T A R T
S T A R T
5 5 5 0 452
1 2
Clearing numbers
Step Press these keys: Comments
1 ENTRY MODE will appear in the display.
2 FAX/TEL. # MODE will appear in the display.
3 Select CLEAR.
4(Example)
To clear a Rapid Key number, press theappropriate Rapid Key.To clear a Speed Dial number, enter the 2-digitnumber with the numeric keys.
5
6 Step 4 orReturn to Step 4 to clear another number, orpress STOP to exit.
STOP
FUNCTION
S T A R T
3
2
01
2ABC
3DEF
4GHI
…… 9WXYZ
STORING NUMBERS FOR AUTOMATIC DIALLING
INITIAL SETTINGS 2-9

Making changes
To make changes in a number previously stored, repeat the storing procedure.Select the code number for which you want to make changes in Step 4, and thenchange the number and/or name when they appear in the display (Steps 5 and 7,respectively).
Numbers and letters are changed as described in "Entering letters for names" in thischapter.
♦ A lithium battery keeps automatic dialling numbers in memory
Your fax uses a lithium battery to keep automatic dialling numbers and otherprogrammed data in memory when the power is turned off.
Battery power is consumed primarily when the power is turned off. With the powerkept continuously off, the life of the battery is about 5 years.
If the battery fails, have your dealer or service agent replace it. Do not try to replace ityourself.
STORING NUMBERS FOR AUTOMATIC DIALLING
2-10 INITIAL SETTINGS

Storing Numbers in Group Keys
Group Keys allow you to dial a group of fax numbers by simply pressing theappropriate Group Key once. They are convenient for the Broadcasting function,which is used to transmit a document to a group of fax machines.
Rapid Keys 19/G1 and 20/G2 can be programmed as Group Keys. To program orclear a Group Key, follow the steps below. Note that one key cannot besimultaneously programmed as both a Rapid Key and a Group Key.
♦ Up to 49 fax numbers can be stored in one Group Key.
♦ Only Rapid Keys and Speed Dial numbers can be stored in a Group Key. No fullnumbers can be stored.
♦ A Group Key cannot be cleared if it is being used in a programmed Broadcastingoperation. First clear the programmed operation as described in "Entering andUsing Programs" in Chapter 5, then clear the key. If you need to check whichprogram the key is used in, print out the Program and Group List as described inChapter 7.
Step Press these keys: Comments
1 PROGRAM/GROUP will appear in the display.
2 GROUP ENTRY MODE will appear in thedisplay.
3 or Press "1" (SET) to program a Group Key, or "2"(CLEAR) to clear a Group Key.
4 or Press a Group Key ("19/G1" or "20/G2") toselect it. If you are clearing the key, go to Step 6.
5
(Example)
Enter fax numbers using one or both of thefollowing methods:• Press one or more Rapid Keys.• Enter one or more Speed Dial numbers with the numeric keys.
6
7 Step 4 orReturn to Step 4 to program/clear another GroupKey, or press STOP to exit.
1 2
S T A R T
19/G1 20/G2
01 02
……09
FUNCTION 7
0 1 0 2 2 2……
STOP
STORING NUMBERS FOR AUTOMATIC DIALLING
INITIAL SETTINGS 2-11
USING THE MERCURY FUNCTION
The Mercury Residential Service
Note: The Mercury Service is only available in the U.K.
Mercury’s Residential Service is a highly competitive telephone service for theresidential and small business user.
Most UK long distance and international calls are cheaper over Mercury, especially inthe Economy period. For customers who make a large number of long distance andinternational calls during the daytime, extra savings are available by joining theMercury Frequent Caller Programme.
Mercury calls are rounded to the second, and charged to the nearest tenth of a penny.You will also receive fully itemised bills. Mercury Customer Services are available 24hours a day to provide the highest level of customer service.
There are two ways to access Mercury, the Residential 132 Service and theResidential PIN Code Service. You can find out the best method for you by callingMercury Customer Services on FreeCall 0500-500 194 (24 hours). Most homes andbusinesses are now able to access the Mercury network via their existing BT line.Mercury Customer Services will be able to check whether Mercury is available in yourarea.
All Mercury’s charges and tariffs are the same for both methods of accessingMercury—the only difference is how you connect to the Mercury network.
For Residential 132 Service customers
Once you have become a Mercury Residential 132 customer, you simply dial 132before a long distance or international call to send it over the Mercury network.
The Mercury Key on your fax machine (Rapid Key 01) comes with the digits "132"pre-stored in it and therefore no further programming is necessary.
To check that you have access to the Mercury Residential Service pick up thehandset, wait for the dial tone, press the Mercury Key, and dial 132. This call is free ofcharge. You should be connected to a recorded message welcoming you to theMercury network. If you have any difficulties, please contact Mercury CustomerServices (Fault Reporting) on FreeCall 0500-500 193 (24 hours).
To send your long distance and international calls and faxes over Mercury, press theMercury Key before the STD code and telephone number of the party you are calling.
If the Residential 132 Service is not yet available in your area, you may apply to usethe Mercury Residential PIN Code Service.
2-12 INITIAL SETTINGS

For Residential PIN Code Service customers
After you apply for Mercury’s Residential PIN Code Service you will receive a MercuryPIN Code in two separate parts.
The PIN Code, which is similar to a bank PIN number, identifies you as a Mercurycustomer. For consistency with messages shown on the machine display, this manualwill refer to the Mercury PIN Code as the "I.D. Code".
To access Mercury’s Residential PIN Code Service, you must first dial the accesscode "131", wait until you hear the high-pitched Mercury tone, and then enter your I.D.Code. After this, dial the number of the party you want to call.
Cost Centre Codes
Cost centre codes are selectable on your Mercury order form. By keying in a codenumber (either 2 or 3 digits) before each Mercury call, businesses can allocate calls todifferent jobs, or residential users can see who is responsible for each call. If you haverequested this option then to make a call via Mercury you must press the MercuryKey, enter your chosen cost centre code, and then dial the telephone or fax number ofthe party you want to call.
Please note that Cost Centre Codes are not currently available with the Residential132 Service.
Programming the Mercury Key for the Residential PIN Code Service
The access code, a pause, and your I.D. code can all be programmed into theMercury Key (Rapid Key 01). This will allow you to access the Mercury network bysimply pressing the Mercury Key.
To program the Mercury Key, Option Setting 23 must be set to "1" (YES). It has beenset to "1" at the factory, but if you need to check the setting or reset it, see Chapter 6,"Optional Settings".
A pause must be entered between the access code and your I.D. code to allow timefor connection to the Mercury network. This is done by entering a code numbercorresponding to the length of the pause as shown in the table below. If you areconnected to a Tone exchange a pause of 4 seconds should be sufficient. However, ifprogramming the Mercury Key proves unsuccessful or if you are connected to a Pulseexchange, try longer pauses until programming proves successful.
Code 01 02 03 04 05 06 07 08 09 10
Pause (sec-onds) 4.0 4.9 5.8 6.7 7.6 8.5 9.4 10.3 11.2 12.1
USING THE MERCURY FUNCTION
INITIAL SETTINGS 2-13

Reprogram the Mercury Key by pressing the panel keys as shown below.
Important:
•• It is only necessary to follow the programming procedure below for access via the ResidentialPIN Code Service. For the Residential 132 Service no programming is required as the accessdigits are stored in the Mercury Key from the factory.
•• To reprogram the Mercury key, you must first clear it following the procedure described forclearing numbers in "Storing Numbers for Automatic Dialling" in this chapter.
Step Press these keys: Comments
1 ENTRY MODE will appear in the display.
2 FAX/TEL.# MODE will appear in the display.
3 Select SET.
4 Press Rapid Key 01 (the Mercury Key).
5 Enter the access code.
6 (Example)Enter a code number for a pause (see the tableon the previous page).
7(Example)
Enter your I.D. code (max. of 10 digits).
8
9 Exit. For easy identification, the blue Mercurylogo is located above the Mercury Key.
To check that the Mercury I.D. code has been reprogrammed correctly, pick up thehandset or press the SPEAKER key, wait for the dialling tone, and press the MercuryKey (followed by a 2 or 3 digit cost centre code if applicable), and dial 1500. This callis free of charge. During connection you will hear a high pitched tone. This is theMercury dial tone. You should then be connected to a recorded message welcomingyou to the Mercury network.
If you have any difficulties, please contact Mercury Customer Services on FreeCall0500 500 193 (24 hours).
Note: For security reasons, your I.D. code cannot be listed or displayed once it has beenentered. However, it can be cleared and re-programmed if desired.
FUNCTION
5 5 5 5 452
S T A R T
3
3
1
STOP
1 1
0 1
01
USING THE MERCURY FUNCTION
2-14 INITIAL SETTINGS

Clearing or changing the Mercury Key
To clear the Mercury Key or change the code programmed into it, follow the procedurefor clearing numbers described in "Storing Numbers for Automatic Dialling" in thischapter, and then repeat the programming procedure on the preceding page ifnecessary.
If for any reason you have to return your fax machine for repair, for security reasons,you should clear the PIN Code, if programmed, from the Mercury Key.
Rapid Key and Speed Dial numbers for Mercury use
Once the Mercury key has been programmed appropriately for either the 132 orResidential PIN Service, you can use it to include the Mercury access code whenstoring fax and voice numbers for Rapid Key and Speed Dialling. This will save youthe trouble of pressing the Mercury Key each time you dial numbers by Rapid Key orSpeed Dialling.
Simply press the Mercury Key before entering the desired fax or voice number whenperforming the procedure for storing numbers described in "Storing Numbers forAutomatic Dialling" in this chapter. (Press the Mercury Key before Step 5 in theprocedure.)
Dialling numbers on the Mercury network
To dial numbers on the Mercury network, you can use any of the methods of diallingdescribed in "Sending Documents" in Chapter 3 for fax transmissions, and any of themethods described in "Making Telephone Calls" in Chapter 3 for voice calls.
Simply press the Mercury Key before entering the number:
♦ Normal Dialling: Press the Mercury Key, enter a cost centre code (if applicable),and then dial the number of the other party.
♦ Direct Keypad Dialling: Press the Mercury Key, enter a cost centre code (ifapplicable), and then dial the number of the other party.
♦ Rapid Key Dialling: Press the Mercury Key and then the appropriate Rapid Key.
♦ Speed Dialling: Press the Mercury Key, then press the SPEED key and enter theSpeed Dial number.
Note: For Rapid Key and Speed Dialling, do not press the Mercury Key if it has already beenprogrammed into the automatic dialling number as described in the above section.
USING THE MERCURY FUNCTION
INITIAL SETTINGS 2-15

Notes
USING THE MERCURY FUNCTION
2-16 INITIAL SETTINGS

148 mm
216 mm
3 BASIC OPERATIONSSENDING DOCUMENTS
Transmittable documents
Your fax can transmit most standard office documents. Specific guidelines are asfollows:
Size and weight
The size and weight of documents which you can load in the document feeder dependon whether you load one sheet at a time or several sheets at once.
One sheet at a time:
Several sheets at once:
Note: The area of the document which is scanned by the fax is slightly smaller than the actualdocument size. Any letters or graphics outside this area cannot be transmitted.
Scanning width: 210 mm
Scanning length: The length of the sheet minus 4mm from both the top andbottom edges.
Other restrictions
♦ Documents written in yellow, greenish yellow, or light blue ink cannot be transmitted,as the scanner does not recognise these colours.
♦ Ink, glue, and correcting fluid on documents must be dry before they are transmitted.
♦ All clips, staples, and pins must be removed from documents before transmission. Ifthese are not removed, they may damage the fax.
♦ Documents which are patched, taped, torn, smaller than the minimum size, carbonbacked, or easily smudged should be photocopied, and the copy used fortransmission.
128 mm 1.0 m52 g/m 2 157 g/m2
148 mm216 mm
128 mm 356 mm80 g/m 252 g/m2
BASIC OPERATIONS 3-1

Loading the document
Up to 20 pages can be placed in the feeder at one time. The pages will beautomatically fed into the fax starting from the page on the bottom.
♦ It may be necessary, depending on the type of original, to feed the first sheet intothe feeder intially and then to place the remaining pages into the feeder.
♦ If you need to send or copy more than 20 pages, place the additional pages gentlyand carefully in the feeder just before the last page is scanned. Do not try to forcethem in, as this may cause double-feeding or jamming.
♦ If your document consists of several large or thick pages which must be loaded oneat a time, insert each page into the feeder as the previous page is being scanned.Insert gently to prevent double-feeding.
1 Adjust the document guides to thewidth of your document.
2 Place the document face down andpush it gently into the documentfeeder. The top edge of the documentshould enter the fax first.
•• The feeder will draw the leading edgeof the document into the fax.SEND/COPY READY will appear in thedisplay.
3 You can now either make resolutionand/or contrast settings as describedin the following section, or dial theother party as described in thesection, "Dialling and transmission".
Important:
•• If you need to remove the document from the feeder before transmission or copying, firstopen the operation panel by pulling the panel release on the right side of the fax forward, andthen remove the document. If you try to pull the document out without opening the operationpanel, you may damage the feeder mechanism.
SENDING DOCUMENTS
3-2 BASIC OPERATIONS

Optional transmission settings
If desired, there are several transmission settings which you can make before diallingand transmitting the document.
Note: To make the settings, the document must first be loaded in the feeder.
Resolution
Your fax has 4 resolution settings:
STANDARD: Use STANDARD for ordinary documents. This settinggives you the fastest and most economical transmission.
FINE: Use FINE for improved reproduction, especially with docu-ments containing small letters or fine drawings.
SUPER FINE: Use SUPER FINE when you need the highest quality ofreproduction.
HALF TONE: Use HALF TONE for photographs and illustrations. Theoriginal will be reproduced in 32 shades of grey.
If you do not make a setting, the fax will automatically send the document inSTANDARD.
♦ In order to transmit with FINE or SUPER FINE resolution, the receiving fax machinemust also have that resolution. If it doesn’t, the next best available setting will beused.
♦ The default resolution (the resolution the fax uses if you do not make a resolutionsetting) can be changed to FINE by changing Option Setting 1. See Chapter 6,"Optional Settings".
Contrast
The contrast is normally set to AUTO, which means that the fax automatically controlsthe contrast, but for faint documents you can change the setting to DARK.
Setting the resolution and contrast
Press the RESOLUTION key one ormore times until the desiredresolution and contrast settingsappear in the display.
•• The first time you move through the listof resolution settings, the contrastsetting AUTO will appear next to eachresolution setting. The second time youmove through the list, the contrastsetting DARK will appear.
PAPERCHECK
BROADCASTMEMORYRESOLUTION
SENDING DOCUMENTS
BASIC OPERATIONS 3-3

Cover Sheet
You can have your fax generate a cover sheet and send it as the last page of thetransmission. The cover sheet includes the date and time, the sender’s name andnumber, and the receiver’s name and number if an automatic dialling number is used.The total number of pages sent is indicated on the bottom.
♦ Your name and number must be programmed in order for them to appear on thecover sheet. (See "Entering Your Name and Fax Number" in Chapter 2.)
♦ Cover Sheet cannot be selected when you use the Relay Request Function.
To include a cover sheet with only a single transmission, press the panel keys asshown below. In this case, you can also select a message which will appear at the topof the cover sheet. If you want the fax to automatically send a cover sheet with everytransmission, set Option Setting 13 to YES as described in Chapter 6, "OptionalSettings" (no message can be selected in this case).
Step Press these keys: Comments
1 COVER SHEET MODE will appear in thedisplay.
2 or Press "1" to turn the cover sheet function on, or"2" to turn it off.
3 (Example)
If you pressed "1" in the previous step, select amessage by entering a number from "2" to "5" asshown below, or enter "1" if you don’t want toinclude a message."1": NO MESSAGE"2": URGENT"3": IMPORTANT"4": CONFIDENTIAL"5": PLS. DISTRIBUTE
Example
FUNCTION
1 2
9
2
SENDING DOCUMENTS
3-4 BASIC OPERATIONS

Batch Page Numbering (Page Counter)
This setting is used to change the page numbering of the transmitted document fromsimple numbering ("P.1", "P.2", etc.) to batch numbering, which means that a slashand the total number of pages being sent is added after each page number (forexample, "P. 1/5", "P.2/5", etc.). This allows the receiver to check for any missingpages.
♦ If you are sending a cover sheet, do not include the cover sheet in the total numberof pages. Your fax will adjust the number to include the cover sheet automatically.
♦ If you need to cancel a batch number entry, remove the document from the feederor press the STOP key.
♦ If the number of pages actually transmitted does not coincide with the batch numberentered, the alarm will sound and PAGE COUNT ERROR will appear in the display."PAGE E" will also appear in the "NOTE" column of the Transaction Report if it hasbeen set to print out.
Step Press these keys: Comments
1 PAGE COUNTER SET will appear in the display.
2 (Example)Enter the total number of pages (2 digits - "01" to"99") by pressing the numeric keys.
Note: Batch page numbering is automatically evoked whenever documents are sent frommemory, i.e., Memory transmission or Broadcasting.
FUNCTION
1 0
SENDING DOCUMENTS
BASIC OPERATIONS 3-5

Dialling and transmission
Once you have loaded the document and made any desired transmission settings, youare ready to dial the number of the receiving fax machine and transmit the document.There are several ways of dialling, and you can select the one which best suits yourneeds.
Normal Dialling
With Normal Dialling, you pick up the handset (or press the SPEAKER key) and dialas you would to make a telephone call. If the receiving machine is set to receive faxesmanually (this means that the receiving party first answers your call vocally, and thenpresses their Start key to begin fax reception), you can talk with them before sendingthe fax.
1 Pick up the handset or press theSPEAKER key. Listen for the dial tone.
2 Dial the number of the receivingmachine by pressing the number keys.
1 2ABC
3DEF
4GHI
5JKL
6MNO
7PQRS
8TUV
9WXYZ
0
SPEAKER
or
3 Wait for the connection. Dependingon the setting of the receivingmachine, you will either hear afacsimile reception tone or the otherperson will answer.
•• If the other party answers, ask them topress their Start key (if you pressed theSPEAKER key, pick up the handset tospeak with them). This causes thereceiving machine to issue a receptiontone.
Beep
4 When you hear the reception tone,press the START key. Replace thehandset if you used it.
•• When transmission is completed, thefax will beep.
S T A R T
SENDING DOCUMENTS
3-6 BASIC OPERATIONS

1 2ABC
3DEF
4GHI
5JKL
6MNO
7PQRS
8TUV
9WXYZ
0
Direct Keypad Dialling
If you do not need to talk with the other party before sending the fax, you can just dial;it isn’t necessary to pick up the handset or press the SPEAKER key.
♦ Direct Keypad Dialling is a form of automatic dialling, so if you need to insert apause between any digits of the number, press the REDIAL key. (For moreinformation on pauses, see "Storing Numbers for Automatic Dialling" in Chapter 2.)
1 Enter the number of the receivingmachine by pressing the number keys.
2 Check the display. If the number ofthe receiving machine shown iscorrect, press the START key.
•• If it is not correct, press the STOP keyto backspace and clear one digit at atime, and then re-enter the correctdigit(s).
Rapid Key Dialling
If the number you want to dial has been stored as a Rapid Key number (see "StoringNumbers for Automatic Dialling" in Chapter 2), you can dial it by pressing theappropriate Rapid Key.
Press the appropriate Rapid Key.
•• The name of the receiving party willappear in the display. If no name wasstored, the fax number will appear. (Ifthe name or number is incorrect, pressthe STOP key.)
•• The document will be automaticallytransmitted once the connection ismade.
S T A R T
01 02 03 04 05
06 07 08 09 10
11 12 13 14 15
SENDING DOCUMENTS
BASIC OPERATIONS 3-7

Speed Dialling
If the number you want to dial has been stored as a Speed Dial number, you can dialit by pressing the SPEED key and then entering the 2-digit number (see "StoringNumbers for Automatic Dialling" in Chapter 2).
1 Press the SPEED key and then enterthe two digits of the Speed Dialnumber by pressing the number keys.
•• To enter numbers 1 through 9, firstenter 0 and then the number.
2 Check the display. If the name ornumber shown is correct, press theSTART key. (If not, press the STOPkey and then repeat Step 1.)
S T A R T
S P E E D 1 2ABC
3DEF
4GHI
5JKL
6MNO
7PQRS
8TUV
9WXYZ
0
Chain Dialling
An automatic dialling number set for Chain Dialling (see "Storing Numbers forAutomatic Dialling" in Chapter 2) can be combined with another automatic diallingnumber or digits entered manually with the numeric keys to dial one phone number upto 50 digits long. The following are some examples of how this can be done:
♦ Press appropriate Rapid Keys in the proper order. For example, press Rapid Key01, then Rapid Key 02.
♦ Enter Speed Dial numbers in the proper order. For example, press the SPEED keyand "22", then the SPEED key and "23". Press the START key after the finalnumber to begin transmission.
♦ Press a Rapid Key and then manually enter a number by pressing appropriatenumeric keys. Press the START key after the final numeric key to begintransmission. (Use this method, for example, when you have stored a long distanceaccess code into a Rapid Key, and want to dial this in combination with a numberwhich hasn’t been stored as an automatic dialling number.)
SENDING DOCUMENTS
3-8 BASIC OPERATIONS

Using the SEARCH DIAL key
If you don’t remember the Rapid Key or Speed Dial number in which you have storeda particular fax number, you can search for the number by following the steps below.Once you have found the number, you can dial it and transmit the loaded documentby simply pressing the START key.
1 Press the SEARCH DIAL key.
2 Enter the first letter of the storedname by pressing the appropriatenumber key (the key whichcorresponds to the required letter)one or more times until the letterappears in the display. If the namebegins with a special character ornumber, press "1".
•• If you don’t remember the first letter,go to Step 3 (you will scroll through thelist from the beginning).
•• If a name wasn’t stored for the number,press "0". This will cause numbers, notnames, to appear when you scroll.
•• To access voice numbers stored inRapid Keys which have no name,press "0" twice (note that Speed Dialnumbers will also appear).
3 Press the "#" key or the " *" key toscroll through the names (numbers ifyou pressed "0"). Stop when thedesired name appears in the display.
•• If no names have been stored thatbegin with the entered letter, you willscroll from the next name, inalphabetical order, in the list. If nonames/numbers have been stored atall, NO DATA will appear.
SEARCHDIAL
2ABC
2ABC
or
(Example: "B")
SENDING DOCUMENTS
BASIC OPERATIONS 3-9

4 Press the START key. The documentwill be automatically transmitted oncethe connection is made.
Note: The SEARCH DIAL key can be used to access the first number in a Chain Diallingsequence, but not subsequent numbers.
Redialling
Automatic redialling
If you use automatic dialling (including Direct Keypad Dialling) and the line is busy,your fax will automatically redial the number. Up to 2 redialling attempts will be madeat intervals of 5 minutes.
♦ To stop automatic redialling, press the STOP key.
♦ If desired, you can change the number of times the fax redials to any number from 1to 4 with Option Setting 6, and the interval at which redialling is done to any numberof minutes from 1 to 5 with Option Setting 7.
Using the REDIAL key
You can press the REDIAL key to redial the last number dialled. To send a document,proceed from Step 3 of Normal Dialling. Note that the speaker will be automaticallyactivated, so you do not need to pick up the handset immediately.
S T A R T
SENDING DOCUMENTS
3-10 BASIC OPERATIONS

RECEIVING DOCUMENTS
Using AUTO mode
When the reception mode is set to AUTO (press the RECEPTION MODE key until theAUTO light comes on), your fax automatically answers all calls on 1 ring and receivesincoming documents.
♦ You can change the number of rings after which the fax answers incoming calls bychanging Option Setting 2 (see "Optional settings" in Chapter 6). Any number from"1" to "5" can be selected ("1" to "3" rings in Eire).
♦ If you pick up the handset before your fax answers, you can talk to the other partyand/or receive a document as described below in "Using MANUAL mode".
Note: Documents sent to your fax in Superfine resolution are printed in Fine resolution.
Using MANUAL mode
When the reception mode is set to MANUAL (press the RECEPTION MODE key untilthe MANUAL light comes on), you must answer all calls (including fax transmissions)using the fax’s handset or an extension phone connected to the same line.
Receiving faxes on the FO-2600
When your fax rings, pick up thehandset.
•• If you hear a fax tone, wait untilRECEIVING appears in the display,and then replace the handset.
•• If the other party first talks to you andthen wants to send a fax, press theSTART key after speaking. Replacethe handset.
Note: If you have set Option Setting 12 to "OFF" and you hear a fax tone when you pick upthe handset, you must press the START key to begin reception.
Note: As a back-up feature of manual reception mode, you can set the fax to automaticallyreceive documents on any number of rings from "1" to "5" ("1" to 3" in Eire). This isuseful if you are occasionally unable to respond to an incoming call personally. Thesetting is made with Option Setting 3. See "Optional Settings" in Chapter 6.
BASIC OPERATIONS 3-11

Received document outlet
Note: The Received Document Outlet has a maximum capacity of 100 sheets. To prevent theoutlet from becoming obstructed, which will in turn cause paper jams, be sure tofrequently remove received documents and copies. Do not allow a large number ofdocuments to accumulate in the outlet.
Receiving faxes on an extension phone
If you hear a fax tone when you answer an extension phone, wait until your faxanswers (the extension phone will go dead), and then hang up. Your fax willautomatically receive the document.
Note: If your fax does not respond within 5 seconds, noise on the line may be preventing itfrom detecting the fax tone. In this case, manually activate fax reception as described inthe following paragraph.
If the other party first talks to you and then wants to send a document, press "5", "*"and "*" if you are on a tone dial phone or a pulse dial phone capable of sending tonesignals. If your phone cannot send tone signals, hang up the extension handset (thetelephone line will remain open whilst the caller is offhook), walk over to the fax, pickup the handset, and press the START key.
Note: Your fax will not accept the signal to begin reception ("5", "*", and "*") if a document isloaded in its feeder.
Comments:
•• If you have set Option Setting 12 to "OFF" and hear a fax tone when you answer theextension phone, you must press "5", "*", and "*" if you are on a tone dial phone, or walkover to the fax, pick up the handset, and press the START key if you are on a pulse dialphone.
•• The code used to activate fax reception from a tone dial extension phone ("5", "*", and "*")can be changed if desired. See Option Setting 10 ("Tel/Fax Remote Number") in Chapter 6,"Optional Settings".
•• If you do not intend to use the code for activating fax reception, you can turn detection of thecode off by resetting Option Setting 11. This will ensure that the fax never mistakenlyattempts to begin reception if it detects a signal similar to "5", "*", and "*" while you aretalking on an extension phone.
RECEIVING DOCUMENTS
3-12 BASIC OPERATIONS

Automatic Fax/Phone Changeover
This is a special function in AUTO reception mode which is convenient for receivingboth faxes and voice calls. When it is turned on, your fax will detect whether anincoming call is a voice call (including manually dialled fax transmissions), or anautomatically dialled fax. If it is a voice call, the fax will make a special ringing soundto alert you to answer. If it is an automatically dialled fax transmission, reception willbegin automatically.
Comments:
•• Automatic Fax/Phone Changeover is normally used in AUTO reception mode. However, itcan also be used in MANUAL (telephone) reception mode if Option Setting 3 is set to YES.
•• When this function is enabled, the machine may not be connected to lines listed in telephonedirectories issued by public network operators. Publication of the number of this machineshould be accompanied with advice of the function.
Turning Automatic Fax/Phone Changeover on
Automatic Fax/Phone Changeover is turned on by setting Option Setting 8 to "YES".The procedure for doing this is described in Chapter 6, "Option Settings".
♦ Make sure the reception mode is set to AUTO.
How the function operates
When a call comes in, your fax will answer it after the number of rings set with OptionSetting 2. After answering, the fax monitors the line for about 5 seconds to see if a faxtone is being sent.
♦ If your fax detects a fax tone (this means that the call is an automatically dialledfax), it will automatically begin reception of the incoming document.
♦ If your fax doesn’t detect a fax tone (this means that the call is a voice call ormanually dialled fax), it will make a special ringing sound (called pseudo ringing) for15 seconds to alert you to answer. If you don’t answer within this time, your fax willsend a fax tone to the other machine to allow the calling party to send a faxmanually if they desire.
Comments:
•• Only the fax will alert you to voice calls or manually dialled faxes by pseudo ringing. Anextension phone connected to the same line will not ring after the connection has been made.
•• The duration of pseudo ringing can be adjusted with Option Setting 9. See Chapter 6,"Optional Settings".
•• The volume of the pseudo ringer is controlled by pressing the FUNCTION key and then theSPEAKER key, followed by the "#" or "*" keys. Make sure the speaker volume is turned upsufficiently to hear the pseudo ringer.
RECEIVING DOCUMENTS
BASIC OPERATIONS 3-13

MAKING COPIES
Your fax can also be used to make copies. Single and multiple copies (up to 99 peroriginal) can be made, enabling your fax to double as an office copier.
♦ The default resolution for copying is FINE.
Single copies
Follow these steps when you only want to make one copy of each original in thefeeder. Single copying is particularly convenient for making sample copies ofdocuments to be transmitted to see if the resolution or contrast needs adjustment.
1 Load the document(s) face down.
•• If desired, adjust the resolution and/orcontrast with the RESOLUTION key.
2 Press the COPY key, and then theSTART key. COPY
A B CA B C
A B C
A B CC C C
B B BA A A
Multiple copies
Follow these steps when you want to make multiple copies of one or more originals.Up to 99 copies per original can be made.
♦ If you are making multiple copies of more than one original, you can choosewhether to have the copies sorted (SORT COPY) or not sorted (MULTI COPY). Thefollowing example shows how each mode works when 3 copies each of 3 originalsare made.
Originals
SORT COPY MULTI COPY
S T A R T
3-14 BASIC OPERATIONS

1 Load the document(s) face down.
•• If desired, adjust the resolution and/orcontrast with the RESOLUTION key.
2 Press the COPY key.
3 Press "1" to select MULTI COPY, or"2" to select SORT COPY.
1 or 2
4 Enter the desired number of copieswith the numeric keys.
•• If the desired number of copies is from1 to 9, enter "0" first.
COPY
(Example)
5 Press the START key.
21
Note: If you place a large number of originals in the feeder, the memory may become fullbefore all of them can be scanned (MEMORY FULL will appear in the display). If thishappens, press the START key to copy the originals which have been scanned, andthen repeat the multiple copy procedure for the remaining originals, including theoriginal which was being scanned when the memory became full.
S T A R T
MAKING COPIES
BASIC OPERATIONS 3-15

MAKING TELEPHONE CALLS
Your fax can be used like a regular telephone to make and receive voice calls.
♦ To receive a phone call, the power must be on.
1 Pick up the handset or press theSPEAKER key. Listen for the dial tone.
•• To use Rapid Key Dialling, you mustpress the SPEAKER key.
2 Dial the number using one of thefollowing methods:
•• Normal Dialling: Enter the fulltelephone number with the numerickeys.
•• Rapid Key Dialling: Press theappropriate Rapid Key. (The voicenumber will be dialled.)
•• Speed Dialling : Press the SPEEDkey, and enter the 2-digit Speed Dialnumber with the numeric keys.
3 Speak with the other party when theyanswer.
•• If you pressed the SPEAKER key, pickup the handset.
Using the SEARCH key
You can use the SEARCH key to search for a Rapid Key or Speed Dial number. Firstsearch for the number as described in "Using the SEARCH key" in "SendingDocuments" in this chapter, and then pick up the handset or press the SPEAKER key.The number will be dialled automatically after you do so (do not press the START key).
Redial
The last number called can be redialled by pressing the REDIAL key (it is notnecessary to pick up the handset or press the SPEAKER key). When the other partyanswers, pick up the handset.
SPEAKER
1 2ABC
3DEF
4GHI
5JKL
6MNO
7PQRS
8TUV
9WXYZ
0
or
3-16 BASIC OPERATIONS

Issuing tone signals
If you are on a pulse dial line, you can use the "*" key to temporarily issue tonesignals when you press the numeric keys. This allows you to use certain telephoneservices which require entering tone signals.
When you need to enter one or more tone signals, press the "*" key and then pressthe appropriate numeric keys.
To change back to pulse mode, simply hang up (the dialling mode automaticallychanges back to the setting of Option Setting 19 when you hang up).
PBX operations and Network Services
If your fax is connected to a PBX, you can use it to perform the following operations:
♦ Making enquiry calls : During a call, you can put the other party on hold, make afurther call to a third party, and then go back to your original caller.
♦ Transferring calls : You can transfer a call to another number on the same PBXwithout operator assistance.
Note: The machine is also fully compatible with British Telecom Network Services and can beused in conjunction with any facility that requires a recall command.
Note: To perform the above PBX operations, Option Setting 21 must be set to the appropriaterecall mode for your PBX (see Chapter 6, "Optional Settings"). Check your PBX manualor consult your supplier for the correct recall mode. If you are using British TelecomNetwork Services, Option Setting 21 must be set to time-break recall. (This is the initialfactory setting).
Making enquiry calls
1During the telephone conversation,press the R key. This puts the otherparty on hold.
R
MAKING TELEPHONE CALLS
BASIC OPERATIONS 3-17

2When you hear the dial tone, dial thenumber of the third party for theenquiry call.
3 When you have finished the enquirycall, you will be automaticallyreturned to the original caller as soonas the third party hangs up.
Transferring calls
1 During the telephone conversation,press the R key. This puts the otherparty on hold.
1 2ABC
3DEF
4GHI
5JKL
6MNO
7PQRS
8TUV
9WXYZ
0
R
1 2ABC
3DEF
4GHI
5JKL
6MNO
7PQRS
8TUV
9WXYZ
0
2 When you hear the dial tone, dial thenumber to which you want to transferthe call. When the other partyanswers, hang up, and the call will betransferred.
•• If the other party does not answer,press the R key again to return to theoriginal caller.
MAKING TELEPHONE CALLS
3-18 BASIC OPERATIONS

AUTO MANUAL ANS.RECEPTION
MODE
4 ANSWERING MACHINE CONNECTIONUSING THE CONNECTION
If you have connected an answering machine to your fax as described in "Assemblyand Connections" in Chapter 1, you can receive both voice messages and faxtransmissions on the same line while you are out. To use the connection, first changethe outgoing message of your answering machine, and then set the reception mode ofyour fax to ANS. when you go out.
Changing the outgoing message
The outgoing message (OGM) of your answering machine should be changed toinform callers who want to send a fax to press their Start key. For example, yourmessage might go as follows:
"Hello. You’ve reached the ABC company. No one is available to take your call rightnow. Please leave a message after the beep or press your facsimile Start key to senda fax. Thank you for calling."
Comments:
•• It is advisable to keep the length of the message under 10 seconds. If it is too long, you mayhave difficulty receiving faxes sent by automatic dialling.
•• Your callers can even leave a voice message and send a fax message on the same call.Modify your outgoing message to explain that they can first leave a voice message, and thenpress their Start key to send a fax.
When you go out
1 Set the reception mode of your fax toANS. by pressing the RECEPTIONMODE key.
ANSWERING MACHINE CONNECTION 4-1

2 Set your answering machine to autoanswer.
•• Ideally it should be set to answer on nomore than two rings.
Note: If your answering machine has a remote retrieval function, make sure the code used toactivate remote retrieval is different from the code used to activate fax reception with anextension telephone (see "Receiving Documents" in Chapter 3). If they are the same,entering the code from an outside telephone to retrieve messages will cause the faxmachine to be activated.
How the answering machine mode operates
While you are out, all of your incoming calls will be answered by your answeringmachine and its outgoing message will play. During this time, your fax will quietlymonitor the line. If your fax detects a fax transmission, it will take over the line andbegin reception.
♦ If the connection is not good or there is noise on the line, the answering machineand/or fax machine may not respond properly.
♦ The call counter on your answering machine may indicate that voice messageswere received, when only fax messages were received.
Note: To prevent the fax from taking over the line and beginning reception if you call in froman external phone or answer on an extension phone, press any three keys (other thanthe code to activate fax reception, "5", "*", and "*") on the dial pad of the phone.This can only be performed from a phone capable of tone dialling.
USING THE CONNECTION
4-2 ANSWERING MACHINE CONNECTION

If it doesn’t work
If the connection doesn’t operate properly, first check the following:
♦ Is the answering machine connected properly to the fax? One end of the answeringmachine line should be inserted in the "EXT. TEL." socket on the fax ("TEL. SET" inIreland), and the other end in the answering machine’s telephone line socket.
♦ Is the reception mode set to ANS.?
If the above settings and connections are correct and the connection still doesn’toperate properly, the timing with which the answering machine and the fax operateare probably not well synchronized. Some common synchronization problems andtheir solutions are described below.
In addition, read the following section, "How fax transmissions are detected", to gain abetter understanding of how the fax operates when an answering machine isconnected. This will help you determine what course of action to take.
♦ Are callers who want to leave a voice message being interrupted by the fax beforethey can do so?
The fax is set to take over the line and begin reception if it detects a specified durationof silence (called "Quiet Detect Time"). If your outgoing message contains a pauseor the caller pauses while leaving a message, and the pause is longer than thespecified duration, the fax will interrupt.It is best to shorten or eliminate such pauses, but if necessary you can also trylengthening the Quiet Detect Time setting. This procedure is described in "OptionalA.M. Mode Settings" at the end of this chapter.
♦ Are callers who want to send a fax manually having trouble doing so after youranswering machine’s outgoing message plays?
If so, the answering machine may be disconnecting the line (hanging up) before yourfax has a chance to take over the line and begin reception. You can make your faxactivate sooner by shortening the Quiet Detect Time setting. This procedure isdescribed in "Optional A.M. Mode Settings" at the end of this chapter.
♦ Are you having trouble receiving documents sent by automatic dialling?
Make sure that your answering machine’s outgoing message is less than 10 secondslong, and that your answering machine is set to answer on between 2 and 4 rings.Inserting a short pause at the beginning of your answering machine’s outgoingmessage might also help, as this gives your fax a chance to clearly hear and detectthe fax "calling" tone which the transmitting fax sends in the case of automatic dialling.
USING THE CONNECTION
ANSWERING MACHINE CONNECTION 4-3

How fax transmissions are detected:
Your fax detects fax transmissions in two ways when an answering machine isconnected, depending on whether the document is being sent automatically ormanually:
Automatic dialling:
If the document is sent using a form of automatic dialling, such as Rapid Key or SpeedDialling, the transmitting fax machine will send a "calling tone" at 3-second intervalsfor a period of about 30 to 40 seconds after dialling. When your fax detects this tone, itwill disconnect the answering machine, send a "reception tone" in response, andbegin receiving the transmission.
If the transmitting fax does not receive a reception tone from your fax within 30 to 40seconds after dialling, it will usually hang up and automatically redial several minuteslater.
Since your fax may not be able to detect the transmitting fax’s calling tone until afterthe outgoing message ends, it is important that the answering machine answers thecall within 4 rings and the outgoing message does not last too long. Otherwise, yourfax may not be able to establish communication with the transmitting fax before thelatter hangs up.
Manual dialling:
If the document is being sent by normal (manual) dialling, the transmitting fax machinedoes not send a calling tone. Instead, the person faxing normally waits until they heara reception tone and then presses their Start key. In the case of an answeringmachine connection, they will hear your outgoing message instead of a receptiontone, and then press their Start key.
However, this does not signal a fax transmission to your fax. Instead, it must use afunction called "Quiet Detect Time" to detect the transmission. This function causesyour fax to disconnect the answering machine and begin reception if it detects acertain duration of silence.
Your fax is set to automatically begin fax reception if it detects a duration of silence of4 seconds. When the person faxing presses their Start key, the line will go quiet, andthe transmitting fax machine will wait for a reception tone from your fax. Your fax willtherefore disconnect the answering machine 4 seconds after the key is pressed, andsend a reception tone to tell the other fax machine to begin transmission.
If your answering machine has a fast disconnect time and disconnects the line before4 seconds elapses, fax reception will not be possible. In this case, you must shortenthe Quiet Detect Time setting as described on the following page. On the other hand,if the Quiet Detect Time setting is too short, your fax may interrupt voice callers if theypause during their message or if there is a period of silence in your outgoing message.
USING THE CONNECTION
4-4 ANSWERING MACHINE CONNECTION

5 SPECIAL FUNCTIONSMEMORY
Your fax has a memory which can be used to store both incoming and outgoingdocuments.
♦ Approximately 28 pages of average content (based on ITU-T Test Chart #1 atstandard resolution) can be held in memory if they are all to be transmitted, or 32pages if they are all received (39 received pages if Option Setting 20, ErrorCorrection Mode, is set to NO). Less can be held if any were scanned using fine orhalftone resolution.
♦ If you need more memory, a 1 MB add-on option is available from your dealer orretailer which will increase the capacity to 92 transmission pages or 92 receivedpages (99 received pages if Error Correction Mode is set to NO).
Sending documents from memory
With this function, the original document is scanned immediately, stored in memory,and then transmitted once the connection to the receiving machine is made. This isconvenient when transmitting to places where the line is often busy, as it saves youfrom waiting to collect the original document and frees the feeder for other operations.
♦ Only one memory transmission can be set at a time.
♦ The amount of memory currently occupied appears as a percentage in the displaywhile the document is being scanned.
1 Load the document(s).
•• Set the resolution and/or contrast ifdesired.
2 Press the MEMORY key.
3 Enter the number of the receivingmachine using one of the followingmethods:
•• Press a Rapid Key.
•• Press the SPEED key and enter aSpeed Dial number.
•• Enter a full telephone number bypressing the number keys.
MEMORY
10
(Example)
S P E E D
SPECIAL FUNCTIONS 5-1

4 Press the START key if you entered aSpeed Dial number or a full number.
•• The document is first scanned andstored in memory. The other machineis then dialled (redialling will beperformed automatically if necessary).When the connection is made,transmission begins. Afterwards, thedocument is cleared from memory andyour fax returns to standby mode.
If the memory becomes full...
If the memory becomes full while the document is being scanned, MEMORY FULL willappear in the display.
♦ Press the START key if you want to transmit the pages which have been stored upto that point in memory. The remaining pages will be ejected from the feeder. Aftertransmission, the memory will be cleared and you can transmit the remainingpages. You will also need to transmit the page which was being scanned when thememory filled up.
♦ Press the STOP key if you want to cancel the entire transmission.
Substitute reception into memory
This is a back-up function which is automatically activated if your fax runs out ofpaper, the imaging cartridge needs replacement, or the paper jams.
When you have received a document in memory, FAX RX IN MEMORY will appear inthe display, alternating with CHECK PAPER, REPLACE TONER, or PAPER JAM.When you add paper, replace the imaging cartridge, or clear the jam, the storeddocuments will automatically be printed out.
Caution!
•• When documents are stored in memory, do not turn the power off. This will erase all of thecontents.
•• If documents received in memory are lost due to a power failure or other interruption of thepower supply, a "CLEAR REPORT" will be printed out when the power is restored. This givesinformation about the receptions lost, including the fax numbers of the transmitting machinesif they are available.
S T A R T
MEMORY
5-2 SPECIAL FUNCTIONS

TRANSMISSION RESERVATION
When your fax is busy receiving a document or transmitting a document from memory,you can "reserve" a transmission by loading the document and entering the faxnumber. Once the current operation is completed, your fax will automatically dial thenumber and transmit the document, saving you from having to wait.
1 Load the document(s).
•• RESERVE READY will appear in thedisplay.
•• Set the resolution and/or contrast ifdesired.
2 Enter the number of the receivingmachine using one of the followingmethods:
•• Press a Rapid Key.
•• Press the SPEED key and enter aSpeed Dial number.
•• Enter a full number with the numerickeys.
3 Press the START key if you entered aSpeed Dial number or a full number.
•• The number will be dialled once thecurrent operation is completed, andtransmission will begin once theconnection is made.
Note: If the document is removed from the feeder after a transmission reservation is set, thereservation will be cancelled.
S T A R T
(Example)
10S P E E D
SPECIAL FUNCTIONS 5-3

BROADCASTING
This function allows you to send the same document to as many as 50 differentlocations with just one operation. You feed the document through the machine onceand it is stored in memory. After this, the numbers you have entered are automaticallydialled in succession, and the document transmitted to each location.
♦ To enter the fax numbers of the receiving machines, you must use Rapid Keys,Speed Dial numbers, or Group Keys; no full numbers can be entered.
1 Load the document(s).
2 Press the BROADCAST key.
3 Dial the receiving units using one ormore of the following methods:
•• Press one or more Rapid Keys.
•• Enter Speed Dial numbers with thenumeric keys.
•• Press one or more Group Keys.
4 Press the START key.
•• Set the resolution and/or contrast ifdesired.
BROADCAST
(Example)
S T A R T
01 02 09……
5 Press the START key. Transmissionwill begin.
•• A Transaction Report is automaticallyprinted out after Broadcasting iscompleted. Check the "Note" column ofthe report to see if any of the locationsare marked "Busy" or have acommunication error code. If so, sendthe document to those locations again.
S T A R T
5-4 SPECIAL FUNCTIONS

Broadcasting using a Group Key
If the fax machines to which you want to broadcast have all been programmed intoone Group Key, you can perform the broadcasting operation using the followingsimplified procedure:
1 Load the document(s).
•• Make any desired transmissionsettings (resolution, contrast, etc.).
2 Press the appropriate Group Key.Transmission will begin.19/G1
(Example)
BROADCASTING
SPECIAL FUNCTIONS 5-5

CONFIDENTIAL TRANSMISSION
The Confidential function is used to send documents confidentially. When thereceiving machine receives the document, it stores it in memory instead ofimmediately printing it out. Print-out will not be performed until the receiving partyenters the correct passcode.
♦ Confidential transmission is only possible when the receiving machine is a Sharpmodel with confidential reception capability.
♦ Confidential reception is not possible with the FO-2600.
1 Load the document(s).
•• Make any desired transmissionsettings (resolution, contrast, etc.).
2 Press the FUNCTION key, "6", and the"START" key.
•• CONF. TX MODE will appear in thedisplay.
3 If the receiving machine has multiplemailboxes, enter the appropriate2-digit mailbox number with thenumeric keys (if not, skip this step).
FUNCTION
(Example)
6
4 Press the START key.
5 Dial the receiving unit using one ofthe following methods:
•• Press a Rapid Key.
•• Press the SPEED key and enter aSpeed Dial number. Press the STARTkey.
•• Enter a full telephone number with thenumeric keys, and press the STARTkey.
Transmission will take place once theconnection is made.
S T A R T
(Example)
0 1
01
S T A R T
5-6 SPECIAL FUNCTIONS

POLLING
Polling allows you to request another fax machine to send a document to your faxmachine. In other words, the receiving fax machine, not the transmitting fax machine,activates the transmission. You can use your fax to both poll and be polled by others.
Setting the polling key
To use the polling function, you must first set Rapid Key 16/POLL for use as a pollingkey. This is done by pressing the panel keys as shown below.
♦ The polling key cannot be used for both Rapid Key Dialling and Polling. If it hasalready been programmed for Rapid Key Dialling, you must clear it first asdescribed in "Storing Numbers for Automatic Dialling" in Chapter 2.
Step Press these keys: Comments
1 ENTRY MODE will appear in the display.
2 POLLING FUNCTION will appear in the display.
3 or Press "1" to turn the polling function on, or "2" toturn it off.
4
5 Exit.
Polling others
1 Dial the fax machine you want to pollusing one of the following methods:
•• Pick up the handset (or press theSPEAKER key) and dial the fullnumber. Wait for the fax answerbacktone.
•• Press the SPEED key and enter a2-digit Speed Dial number.
•• Enter the full number using thenumeric keys.
SPEED
0 1
(Example)
FUNCTION
1
3
2S T A R T
STOP
SPECIAL FUNCTIONS 5-7

2 Press Rapid Key 16/POLL.
•• If you used the handset, replace itwhen POLLING appears in the display.Reception will begin.
Being polled (Polling Standby)
To let another fax machine poll your fax, simply set the reception mode to AUTO, andload the document(s) to be sent.
Transmission will take place when the other fax machine calls your fax and activatespolling. Automatic reception is possible whilst your fax is on polling standby.
Polling Security
Polling Security allows you to prevent unauthorized polling of your fax. When thisfunction is turned on, polling will only take place when the fax number of the pollingfax machine has been entered in your fax’s list of permitted fax numbers (called"passcode numbers"). The number of the polling fax must also be correctlyprogrammed into itself.
Turning Polling Security on and off
Step Press these keys: Comments
1 ENTRY MODE will appear in the display.
2 SECURITY SELECT will appear in the display.
FUNCTION 3
16/POLL
POLLING
5-8 SPECIAL FUNCTIONS

3 or Press "1" to turn polling security on, or "2" to turnit off.
4
5 Exit.
S T A R T
STOP
1 2
Storing and clearing fax numbers for polling permission
You can store up to 10 fax numbers in your fax’s list of permitted numbers.
Step Press these keys: Comments
1 ENTRY MODE will appear in the display.
2 PASSCODE # MODE will appear in the display.
3 or Press "1" to set a number, or "2" to clear anumber.
4
(Example)
Storing : Enter a 2-digit number (from 01 to 10).This number identifies the fax number you willenter in the next step.Clearing : Enter the 2-digit number whichidentifies the fax number you want to clear, andgo to Step 6.
5(Example)
Enter the fax number (max. 20 digits).
6
7 Step 4 orReturn to Step 4 to enter another number, orpress STOP to exit.
FUNCTION
1
3 4
10
S T A R T
3
5 5 5 1 2
STOP
2
POLLING
SPECIAL FUNCTIONS 5-9

RELAY REQUEST
Relay Request allows you to send a document to another fax machine and have thatfax broadcast the document to a number of other fax machines. This function is usefulwhen the relay fax machine is closer to the end fax machines than your fax, as itreduces telephone line costs.
Important:
•• Relay Request can only be used if the intermediate relay machine is a Sharp machine havingthe Relay Broadcast function (note that your fax cannot act as a relay machine).
Storing a relay group
To make a relay request, you must first enter the relay group. This consists of the faxnumber of the intermediate relay machine and the fax numbers of the end receivingmachines. Only one group can be entered, and this group will remain in memory untilcleared.
♦ Only a Rapid Key number or a Speed Dial number can be entered to specify therelay machine; a full number cannot be entered.
♦ Fax numbers of the end receiving machines can be entered as Rapid Key numbers,Speed Dial numbers, and/or Group Key numbers if they have been stored as suchin the relay machine (not in your fax machine). Check with the operator of the relaymachine for these numbers.
♦ The total number of end receiving machines which can be entered varies with themodel used as the intermediate relay machine. Check with the operator of the relaymachine to find out how many receiving machines can be entered.
♦ A maximum of 400 spaces are available in memory for storing the numbers of endreceiving machines. The number of spaces occupied by each number depends onwhat kind of number it is:
Rapid Key number: 4 spaces
Speed Dial number: 2 spaces
Group Key number: 4 spaces (for one group)
Full number: Number of digits in number (eg. a maximum of 13 fullnumbers can be entered, with a maximum of 30 digits pernumber).
5-10 SPECIAL FUNCTIONS

Step Press these keys: Comments
1 RELAY FUNCTION will appear in the display.
2 SET RELAY GROUP will appear in the display.
3
4(Example)
Enter the fax number of the relay machine bypressing a Rapid Key or entering a 2-digit SpeedDial number with the numeric keys.
5
6(Example)
Enter the relay machine’s Rapid Key numbers ofthe end receiving machines by pressing numerickeys (not Rapid Keys). (Skip this step if youdon’t want to enter Rapid Key numbers.)
7
8(Example)
Enter the relay machine’s Speed Dial numbersof the end receiving machines by pressingnumeric keys. (Skip this step if you don’t want toenter Speed Dial numbers.)
9
10(Example)
Enter numbers of Group Keys for end machinesby pressing numeric keys. (Skip this step if youdon’t want to enter Group Key numbers.)
11
12(Example)
Enter a full fax number (skip this step if you don’twant to enter full numbers). Include the areacode (e.g. "201") if the number is outside of thecalling area of the relay unit.
13 Press START and go back to Step 12 if youwant to enter another full number.
14
0 1
0 1
0
S T A R T
S T A R T
S T A R T
S T A R T
S T A R T
S T A R T
2
FUNCTION
S T A R T
5
3 45 5 5 1 2
0 1
RELAY REQUEST
SPECIAL FUNCTIONS 5-11

To clear the relay group
Step Press these keys: Comments
1 RELAY FUNCTION will appear in the display.
2 CLEAR RELAY GRP will appear in the display.
3
4 Exit.
Making a relay request
Important:
•• To make a relay request, your fax number must be entered into the Relay Passcode List ofthe relay fax machine by the operator of that fax. (Your number must also be correctlyentered in your fax as described in "Entering Your Name and Fax Number" in Chapter 2.)
1 Load the document.
•• Set the resolution and/or contrast ifdesired.
FUNCTION
S T A R T
5
2 Press the FUNCTION key, the "5" key,and the "#" key.
3Press the START key.
FUNCTION 5
S T A R T
STOP
RELAY REQUEST
5-12 SPECIAL FUNCTIONS

TIMER OPERATIONS
The timer function allows you to set a transmission or polling operation to beperformed automatically at a time you specify. Up to two transmission operations (onefrom the feeder and one from memory) and one polling operation can be set at anyone time, and the times they will be performed can be specified up to a week inadvance.
You can use this function, for example, to take advantage of off-peak telephone rateswithout having to be there when the operation is performed.
♦ For a timer transmission, you can either scan the document into memory when youset the transmission, or leave the document in the feeder before the transmissiontime. Scanning the document into memory is convenient because you don’t have toworry about document mix-ups or forgetting to load the document. If a transmissionfrom the feeder is set, a highlighted "T" will appear at the right of the display.
♦ Code numbers are used to specify days of the week. Refer to the table below whenmaking time settings which include a specified day:
Day SUN MON TUE WED THU FRI SAT
Code 0 1 2 3 4 5 6
Note: Only regular transmissions and polling operations can be set using the proceduredescribed below. If you want to set a broadcast, confidential, or relay request operationto be performed at a specified time, program the operation into a Program Key andinclude a timer setting. This is described in "Entering and Using Programs" in thischapter.
•• Only a rapid/speed number can be entered for a timer transmission, a direct dialled numbercannot be entered.
•• A timer operation is automatically cleared from memory after it is completed.
•• To include a cover sheet with a timer transmission, follow the procedure in Chapter 3 beforemaking the setting as below.
Setting a timer operation
Step Press these keys: Comments
1 TIMER MODE will appear in the display.
2 Select SET.
3 orPress "#" to set a transmission operation (SENDMODE), or "*" to set a polling operation(POLLING MODE).
4
1
1
FUNCTION
S T A R T
SPECIAL FUNCTIONS 5-13

5(Example)
Enter the time of the operation (2 digits for thehour and 2 digits for the minute).
6(Example)
Enter the code for the day of the operation (skipthis step if the operation will be performed withinthe next 24 hours).
7
8
(Example)
Enter the fax number of the other machine usingone of the following methods:• Press a Rapid Key.• Enter a Speed Dial number with the numeric keys.
9
10If this is a transmission operation, adjust theresolution and/or contrast if desired. (Otherwise,skip this step.)
11
12 or
Transmission operation : If you want to sendthe document from memory, load it now andpress MEMORY. Otherwise, press START andload the document any time before the settransmission time. If a non-memory timertransmission has already been set (START:END OF SET will appear), you must load thedocument now and press START to send it frommemory.Polling operation : Press START.
S T A R T
S T A R T
RESOLUTION
0 5
MEMORY
S T A R T
S T A R T
2
1 0 3 0
TIMER OPERATIONS
5-14 SPECIAL FUNCTIONS

To cancel an operation
If you need to cancel an operation after it has been set, follow the steps below.
If the operation is a transmission operation, you will need to know the numberassigned to it. If you don’t remember the number (it appears in the display when youset the operation), print out the Timer List. See Chapter 7, "Printing Out Reports andLists".
Step Press these keys: Comments
1 TIMER MODE will appear in the display.
2 Select CLEAR.
3 (Example)Enter the 1-digit timer number assigned to theoperation.
4
5 Exit.
1
2
FUNCTION
STOP
S T A R T
1
STOP
TIMER OPERATIONS
SPECIAL FUNCTIONS 5-15

ENTERING AND USING PROGRAMS
If you frequently perform the same operation involving the same party, you canprogram all the steps of the operation into one Program Key. This allows you toperform the operation by simply pressing that key.
♦ Rapid Keys 17/P1 and 18/P2 can be used as Program Keys. However, a keycannot be used if it is already being used for Rapid Key Dialling.
♦ Only Rapid Keys, Speed Dial numbers, and Group Keys can be used to enter faxnumbers of receiving machines in Program Keys. Full numbers cannot be entered.
♦ You can also include a timer setting in the program to have the operation performedautomatically at a selected time.
♦ To clear a mistake, press the STOP key.
Initial procedure
To program an operation, first perform the following basic procedure. After you havecompleted it, refer to the procedure for the specific operation you want to program.
♦ Code numbers are used to set days of the week. Refer to the table below whenmaking time settings which include a specified day:
Day SUN MON TUE WED THU FRI SAT
Code 0 1 2 3 4 5 6
Step Press these keys: Comments
1 PROGRAM/GROUP will appear in the display.
2 PRG. ENTRY MODE will appear in the display.
3 Select SET.
4 (Example)Select a Program Key by pressing theappropriate Rapid Key.
5(Example)
Enter a name for the program (max. of 20letters). (See "Entering Letters for Names" inChapter 2.)Skip this step if you don’t want to enter a name.
FUNCTION
1
7
17/P1
2ABC
3DEF
4GHI
…… 9WXYZ
5-16 SPECIAL FUNCTIONS

6
7 (Example)Enter the hour (2 digits: "00" to "23"). If you don’twant to make a timer setting, go to Step 10.
8 (Example) Enter the minute (2 digits - "00" to "59").
9(Example)
Enter the day of the week by entering theappropriate code number (see previous table).(Skip this step if the operation will be done within24 hours of pressing the Program Key.)
10
11
Press the "#" key or "*" key until the desiredoperation appears in the display.The operations will appear in the following order:• Transmission• Polling• Confidential transmission• Broadcasting• Relay Request
12 Continue with the specific procedure for youroperation (see the following pages).
S T A R T
1 0
1 5
4
Transmission
(Continued from "Initial procedure".)
13
(Example)
Enter the fax number of the other machine usingone of the following methods:• Press a Rapid Key.• Enter a Speed Dial number with the numeric keys.
14
15 Adjust the resolution and contrast if desired(otherwise skip this step).
S T A R T
S T A R T
RESOLUTION
10
S T A R T
ENTERING AND USING PROGRAMS
SPECIAL FUNCTIONS 5-17

16
17 or
If you want the document to be sent frommemory, press MEMORY.If you want the document to be sent from thefeeder, press START.
18 Exit.
Polling
(Continued from "Initial procedure".)
13
(Example)
Enter the fax number of the other machine usingone of the following methods:• Press a Rapid Key.• Enter a Speed Dial number with the numeric keys.
14
15 Exit.
MEMORYS T A R T
STOP
S T A R T
S T A R T
10
STOP
ENTERING AND USING PROGRAMS
5-18 SPECIAL FUNCTIONS

Confidential transmission(Continued from "Initial procedure".)
13(Example)
Enter the mailbox number (2 digits). (Skip thisstep if the receiving machine does not havemailboxes.)
14
15
(Example)
Enter the fax number of the other machine usingone of the following methods:• Press a Rapid Key.• Enter a Speed Dial number with the numeric keys.
16
17 Adjust the resolution and contrast if desired(otherwise skip this step).
18
19 or
If you want the document to be sent frommemory, press MEMORY.If you want the document to be sent from thefeeder, press START.
20 Exit.
Broadcasting
(Continued from "Initial procedure".)
13
(Example)
Enter the numbers of the receiving fax machinesusing one or more of the following methods:• Press one or more Rapid Keys.• Enter one or more Speed Dial numbers.• Press one or more Group Keys.
14
15 Adjust the resolution and contrast if desired(otherwise skip this step).
16
17 Exit.
S T A R T
S T A R T
RESOLUTION
MEMORYS T A R T
0 5
S T A R T
STOP
10
S T A R T
STOP
S T A R T S T A R T
RESOLUTION
1 200 ……
ENTERING AND USING PROGRAMS
SPECIAL FUNCTIONS 5-19

Relay Request
(Continued from "Initial procedure".)
13 Adjust the resolution and contrast if desired(otherwise skip this step).
14
15 or
If you want the document to be sent frommemory, press MEMORY.If you want the document to be sent from thefeeder, press START.
16 Exit.
Note: A relay group must first be entered see "Relay Request" in previous section.
Clearing a Program Key
To clear a Program key, follow these steps:
Step Press these keys: Comments
1 PROGRAM/GROUP will appear in the display.
2 PRG. ENTRY MODE will appear in the display.
3 Select CLEAR.
4 (Example) Press the Program Key you want to clear.
5
6 Exit.
S T A R T
RESOLUTION
MEMORYS T A R T
STOP
FUNCTION
S T A R T
7
2
17/P1
STOP
ENTERING AND USING PROGRAMS
5-20 SPECIAL FUNCTIONS

Using a Program Key
A programmed operation is performed as follows:
1 Load the document.
2 Press the appropriate Program Key.
Note: A maximum of 2 timer operations can be set at any one time, including both timeroperations set by pressing a Program Key and operations set as described in "TimerOperations" in this chapter.
To cancel a program operation
If a Program Key has been pressed for a timer operation and you need to cancel theoperation before it is performed, follow these steps:
1 Press the Program Key.17/P1
17/P1
2 Press the START key.
(Example)
(Example)
S T A R T
ENTERING AND USING PROGRAMS
SPECIAL FUNCTIONS 5-21

ANTI JUNK FAX
The Anti Junk Fax function lets you avoid wasting fax paper by preventing reception offaxes from specified parties.
To use this function, first turn it on as shown below, and then enter the fax numbersfrom which you do not want to receive faxes as shown on the following page.
Turning Anti Junk Fax on and off
Step Press these keys: Comments
1 ANTI JUNK FAX will appear in the display.
2 ANTI JUNK SELECT will appear in the display.
3 or Press "1" to turn Anti Junk Fax on, or "2" to turnit off.
4 Exit.
FUNCTION
STOP
8
1 2
5-22 SPECIAL FUNCTIONS

Storing and clearing junk fax numbers
Comments:
•• Up to 10 fax numbers can be entered in the Anti Junk Fax List.
•• To clear a fax number from the Anti Junk Fax List, you need to know the 2-digit numberwhich identifies it. If you have forgotten this number, print out the Anti Junk Fax Number Listas described in Chapter 7.
Step Press these keys: Comments
1 ANTI JUNK FAX will appear in the display.
2 JUNK FAX # MODE will appear in the display.
3 or Press "1" to store a fax number in the Anti JunkFax List, or "2" to clear a fax number from the list.
4
(Example)
Storing: Enter a number from "01" to "10". Thisnumber identifies the fax number you will storein the next step.Clearing: Enter the number which identifies thefax number you want to clear, and go to Step 6.
5 (Example) Enter the fax number (max. of 20 digits).
6
7 Step 4 orReturn to Step 4 to enter (or clear) anothernumber, or press STOP to exit.
5 5 5 4321
STOP
S T A R T
FUNCTION 8
1 2
10
ANTI JUNK FAX
SPECIAL FUNCTIONS 5-23

Notes
ANTI JUNK FAX
5-24 SPECIAL FUNCTIONS

6 OPTIONAL SETTINGS
A variety of optional settings are available which you can use to fine-tune your fax tobetter suit your needs. The settings are made by pressing the panel keys, and eachsetting is described in the list below.
Accessing the settings
Step Press these keys: Comments
1 OPTION SETTING will appear in the display.
2 orMove through the list of settings by pressing "#"to move forward, or "*" to move backward. Thesettings will appear in the order listed below.
3 (Example)When the desired setting appears in the display,change it appropriately as described below.
4 Exit.
FUNCTION
2
4
STOP
Settings
Setting 1 : FINE RESOLUTION PRIORITYThis sets the default resolution (the resolution used if a setting is not made with theRESOLUTION key) for transmitting documents. Press "1" (YES) to set it to FINE, or "2" (NO) toset it to STANDARD.
• Factory setting: "2"
Setting 2: NUMBER OF RINGS AUTO RECEPTIONThis sets the number of rings your fax allows before answering an incoming call in AUTOreception mode. Enter any number from "1" to "5" ("1" to "3" in Eire).
• Factory setting: "1"
Setting 3: NUMBER OF RINGS MANUAL RECEPTIONThis sets your fax to automatically answer a call after a certain number of rings when it is inmanual reception mode. Any number from "0" to "5" can be entered. (In Eire, enter any numberfrom "0" to "3"). (enter "0" if you don’t want your fax to answer automatically).
• Factory setting: "0"
OPTIONAL SETTINGS 6-1

Setting 4: ACTIVITY REPORT AUTO LISTINGPress ""1" (YES)" to have your fax automatically print out an Activity Report once every 30operations. (The list can still be printed out manually when desired.) Press ""2" (NO)" to turnautomatic print-out off.
• Factory setting: "2"
Setting 5 : TRANSACTION REPORT PRINT SELECTThis sets the condition for printing out Transaction Reports. Enter a number from "1" to "5" asfollows:
"1" (ALWAYS PRINTS): Print out after each transmission, reception, or error.
"2" (ERR/TIMER/MEM.): Print out only after an error, a timer operation, or a memoryoperation.
"3" (SEND ONLY): Print out only after a transmission.
"4" (NEVER PRINT): Never print out.
"5" (ERROR ONLY): Print out only after an error occurs.
• Factory setting: "3"
Setting 6: RECALL TIMESThis sets the maximum number of times your fax will automatically redial if the line is busy.Enter any number from "1" to "4". (In Eire, enter any number from "1" to "3").
• Factory setting: "2"
Setting 7: RECALL INTERVALThis sets the amount of time your fax will wait between automatic redials when the line is busy.Press "1" for 1 minute, "2" for 2 minutes, etc., up to a maximum of 15 minutes.
• Factory setting: "5"
Setting 8 : AUTO FAX/PHONE CHANGEOVERPress "1" (YES) to have your fax detect whether incoming calls are voice calls or faxtransmissions in automatic reception mode. Press "2" (NO) to turn the function off.
• Factory setting: "2"
Setting 9 : PSEUDO RINGING DURATIONThis sets the duration of pseudo ringing when Automatic Fax/Phone Changeover is turned on.Enter a number from "1" to "4" as shown below (in Eire, only 15 or 30 seconds can be selected).
"1" (15 SEC.): 15 seconds
"2" (30 SEC.): 30 seconds
"3" (60 SEC.): 60 seconds
"4" (120 SEC.): 120 seconds
• Factory setting: "1"
OPTIONAL SETTINGS
6-2 OPTIONAL SETTINGS

Setting 10 : TEL/FAX REMOTE NUMBER (TRANSFER CODE)This sets the 1-digit number for activating fax reception from an extension phone. Enter anynumber from "0" to "9".
• Factory setting: "5" (ie fax is activated by "5 *").
Setting 11: REMOTE RECEPTION SELECTThis turns detection of the code for activating fax reception from an extension phone on or off.Press "1" to turn detection on, or "2" to turn detection off.
• Factory setting: "1"
Setting 12: FAX SIGNAL RECEIVEYour fax is set to automatically begin reception if you hear a high-pitched fax tone afteranswering a call. If you use a computer fax modem on the same line, you must turn this settingoff in order to prevent your fax from mistakenly attempting to receive documents sent from thecomputer fax modem. Press "2" to turn the setting off, or "1" to turn it on.
• Factory setting: "1"
Setting 13: AUTO COVER SHEETPress "1" (YES) to have the fax automatically generate a cover sheet and send it as the lastpage of each transmission. Press "2" (NO) to turn the function off.
• Factory setting: "2"
Setting 14: COPY REDUCEThis sets the amount by which copies are reduced before printing to ensure that data on theedges is not cut off. Enter a number from "1" to "3" as follows:
"1 (AUTO)": Automatic reduction depending on the size of the originaland the printing paper.
"2 (100 %)": No reduction.
"3 (95 %)": Reduction of A4 size originals to the printing paper size.
• Factory setting: "2"
Setting 15: RECEIVE REDUCEThis sets the amount by which received documents are reduced before printing to ensure thatdata on the edges is not cut off. Enter a number from "1" to "3" as follows:
"1 (AUTO)": Automatic reduction depending on the size of the originaland the printing paper.
"2 (100 %)": No reduction.
"3 (92 %)": Reduction of A4 size originals to the printing paper size.
• Factory setting: "1"
OPTIONAL SETTINGS
OPTIONAL SETTINGS 6-3

Setting 16: COPY CUT-OFFPress "1" (CONTINUE) to have documents longer than the printing paper be continued on asecond page when copied. Press "2" (CUT-OFF) to have the part outside that length not printed.
• Factory setting: "2"
Setting 17: BEEP LENGTHThis sets the duration of the beep which signals the end of transmission, reception, or copying.Press "1" for 3 seconds, "2" for 1 second, or "3" for no beep.
• Factory setting: "1"
Setting 18: FOOTER PRINTPress "1" (YES) to have the transmitting machine’s fax number (if provided) together with thedate and time of reception printed at the bottom of each page you receive (this is in addition tosimilar information printed at the top of each page). Press "2" (NO) for no footer printing.
• Factory setting: "1"
Setting 19: DIAL MODEThis sets the mode of dialling. Press "1" if you are on a tone dial line, or "2" if you are on a pulsedial line.
• Factory setting: "1"
Setting 20: ERROR CORRECTION MODE (ECM)Press "1" (YES) to have any distortions in a transmission due to noise on the telephone line becorrected before print-out at the receiving end. This is only effective when the other machinehas ECM as well. Press "2" (NO) to turn the function off.
• Factory setting: "1"
Setting 21 : PBX RECALLThis sets the recall mode used for transferring calls on a PBX or utilising BT Network services.Refer to your PBX manual or consult your supplier for the correct setting if the factory setting isinappropriate. Enter "1" for earth recall, "2" for time break recall, or "3" for no operation.
• Factory setting: "2"
Setting 22: RINGING VOLUMEThis sets the volume of the ringer. Press "1" for low, "2" for middle, or "3" for high.
• Factory setting: "2"
Setting 23 : MERCURY FUNCTIONThis is used to select the Mercury Residential Service (U.K only). Press "1" (YES) to enable thefunction, or "2" (NO) to disable it.
• Factory setting: "1"
OPTIONAL SETTINGS
6-4 OPTIONAL SETTINGS
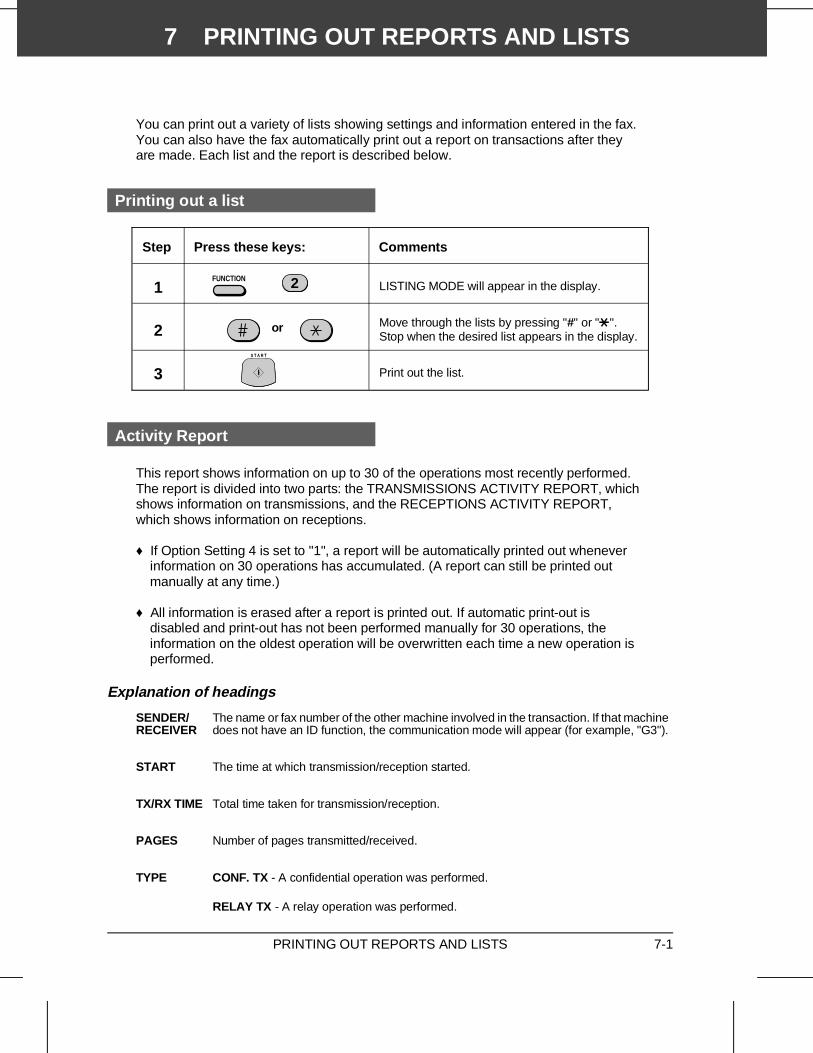
7 PRINTING OUT REPORTS AND LISTS
You can print out a variety of lists showing settings and information entered in the fax.You can also have the fax automatically print out a report on transactions after theyare made. Each list and the report is described below.
Printing out a list
Step Press these keys: Comments
1 LISTING MODE will appear in the display.
2 or Move through the lists by pressing "#" or "*".Stop when the desired list appears in the display.
3 Print out the list.
Activity Report
This report shows information on up to 30 of the operations most recently performed.The report is divided into two parts: the TRANSMISSIONS ACTIVITY REPORT, whichshows information on transmissions, and the RECEPTIONS ACTIVITY REPORT,which shows information on receptions.
♦ If Option Setting 4 is set to "1", a report will be automatically printed out wheneverinformation on 30 operations has accumulated. (A report can still be printed outmanually at any time.)
♦ All information is erased after a report is printed out. If automatic print-out isdisabled and print-out has not been performed manually for 30 operations, theinformation on the oldest operation will be overwritten each time a new operation isperformed.
Explanation of headings
SENDER/RECEIVER
The name or fax number of the other machine involved in the transaction. If that machinedoes not have an ID function, the communication mode will appear (for example, "G3").
START The time at which transmission/reception started.
TX/RX TIME Total time taken for transmission/reception.
PAGES Number of pages transmitted/received.
TYPE CONF. TX - A confidential operation was performed.
RELAY TX - A relay operation was performed.
FUNCTION 2
S T A R T
PRINTING OUT REPORTS AND LISTS 7-1
(T) - A timer operation was performed.(M) - The memory was used.
NOTE OK - Transmission/reception was normal.
P.FAIL - A power failure occurred.JAM - A problem with the printing paper or document occurred.BUSY - The line was busy.COM.E-0 to COM.E-7 - A telephone line error prevented the transaction. Explanationsof the error numbers are given in the following tables, however, these are primarily foruse by service engineers. In general, you will want to simply try the transaction again. Ifnecessary, check with the other party to make sure their machine is functioning properly.CANCEL - Transmission was cancelled because the STOP key was pressed, nodocument was in the feeder, or the other machine requested transmission using afunction which your fax does not have.CANCEL 3 - Confidential transmission was cancelled because the receiving machinedoes not have a confidential function, a confidential passcode is not programmed in it,its memory is full, or it is not a Sharp model.CANCEL 4 - Confidential transmission was cancelled because an incorrect mailboxnumber was entered for a fax machine with confidential mailboxes.CANCEL 5 - A relay request was not successful because the machine to which therequest was made has no relay function, it is not a Sharp model, or its memory was full.CANCEL 6 - A relay request was not successful because your machine’s fax numberhas not been entered into the relay machine’s list of permitted numbers, an automaticdialling number not stored in the relay machine was specified, or your fax number hasnot been entered in your machine as described in Chapter 2.
Transmission errors
E-0 Able to recognise handshake signal, but it haserrors.
E-1 Cannot recognise the handshake signal fromthe receiver side.
E-2 Line disconnected during transmission.
E-3 Line disconnected after modem speed fall-back.
E-4 Line disconnected during multi-pagetransmission.
E-6 Cannot recognize the handshake signal fornext page at receiver side.
E-7 No response from receiver side or "disconnectsignal" is received at transmitter side.
E-8Error was not corrected after thepredetermined number of retries because ofan error in a part of a page.
E-11Error occurred after or whilst reception by theremote (receiving) machine was revealed to beimpossible.
E-12 Error occurred just after fall-back.
E-13 Error occurred after a response to aretransmission end command was received.
Reception errors
E-0 Able to recognise handshake signal, but it haserrors.
E-1 Line disconnected during reception.
E-2 Cannot recognise the handshake signal fromthe transmitter side.
E-3 Cannot recognise the last handshake signalfrom the transmitter side.
E-4Cannot recognise the handshake signal fornext page from the transmitter side in thecase of mode change.
E-5 Cannot recognise the handshake signal fornext page from transmitter side.
E-7 No response from transmitter or "disconnectsignal" is received at receiver side.
E-8 Error occurred upon completion of receptionof all pages.
E-9Error occurred when mode was changed ortransmission/reception switching wasperformed.
E-10 Error occurred during partial page or physicalpage reception.
E-11Error occurred after or during inquiry from theremote (transmitting) machine as to whetherreception was possible or not.
E-12 Error occurred during or just after fallback.
E-13 Error occurred after retransmission endcommand was received.
E-14 Error occurred after voice communicationcommand was received.
PRINTING OUT REPORTS AND LISTS
7-2 PRINTING OUT REPORTS AND LISTS

Timer List
This list shows the timer operationswhich are currently set.
Telephone and Relay Group List
This list shows the fax and voicenumbers which have been storedfor Automatic Dialling, and thenumbers in the relay group.
Passcode List
This list shows the fax numberswhich have permission to poll you,as well as the polling and securitystatus, your name and number asentered into your fax, and a sampleof the header print which appearsat the top of every page youtransmit. The current setting of thetwo answering machine modeselections also appear.
Optional Setting List
This list shows the current status ofthe optional settings.
PRINTING OUT REPORTS AND LISTS
PRINTING OUT REPORTS AND LISTS 7-3

Program and Group List
The top part of this list shows theprograms which have been entered.The bottom part shows the faxnumbers which have been stored ineach Group Key.
Anti Junk Fax Number List
This list shows the fax numbersfrom which reception is not allowed.
Transaction Report
This report is printed out automatically after an operation is completed to allow you tocheck the result. The fax is set at the factory to print out the report after everytransmission, but you can change the setting to have it printed out under a variety ofother conditions. This is done by changing Option Setting 5 as described in Chapter 6.
♦ The Transaction Report shows the same information as the Activity Report. See"Activity Report" in this chapter for an explanation of the headings.
♦ The report cannot be printed out manually.
PRINTING OUT REPORTS AND LISTS
7-4 PRINTING OUT REPORTS AND LISTS

8 MAINTENANCE
Reading glass and rollers
Clean the reading glass and rollers frequently to ensure the quality of transmittedimages and copies. Open the operation panel (pull the panel release on the right sideof the fax forward), and clean the parts as shown below.
Wipe the reading glass, whitebackplate, and rollers with a soft cloth.
•• Make sure that all dirt and stains (suchas those of correcting fluid) areremoved, as these will cause verticallines on transmitted images and copies.
•• Adhesive cellophane tape is useful forremoval of debris from the feed rollers.
White backplate
Documentrollers
Reading glass
The housing
Wipe the external parts and surface of the machine with a dry cloth.
Caution!
•• Do not use benzene or thinner. These solvents may damage or discolour the machine.
MAINTENANCE 8-1

Cleaning the drum cartridge
If some of the characters are missing from the printed page, the surface of the drum inthe drum cartridge may need cleaning. Follow the steps below to clean the drum.
1 Remove any documents from thereceived document outlet. Open theoperation panel, and remove thereceived document guide, the imagingcartridge, and the drum cartridge. (Fordetailed instructions, see Steps 1 to 4in "Installing the Printer Cartridges" inChapter 1.)
•• Caution! The fusing unit (the black unitwith ribs extending across the bottomof the compartment) becomes very hotduring printing. Be careful not to touchit.
2 Place the drum gently on a clean,uncluttered, and level surface.
•• Do not touch the green drum in thedrum cartridge, and do not expose thedrum to direct light. Doing so willdamage the surface of the drum.
3 Take a sheet of clean paper and roll ittightly into a tube. Gently tap thesurface of the drum with the tube topick up any particles of toner whichmay be sticking to the drum.
•• Caution! Do not touch the drumsurface with the edges of the rolled uppaper or wipe the drum with the paper.This will damage the drum.
4 Replace the drum cartridge, imagingcartridge, and received documentguide. Close the operation panel. (Fordetailed instructions, see Step 6 andSteps 10 to 14 in "Installing thePrinter Cartridges" in Chapter 1.)
PUSH
MAINTENANCE
8-2 MAINTENANCE

9 TROUBLESHOOTINGPROBLEMS AND SOLUTIONS
Problem Check and remedy
Nothing appears in the display. •• Make sure the power cord is properly plugged into a poweroutlet.
•• Make sure the power switch has been switched to thecorrect position.
•• Connect another electrical appliance to the outlet to confirmthat it is live.
The fax does not respond when youpress any of its keys.
•• If a beep sound is not made when you press the keys, turnoff the power and then turn it back on several seconds later.
Automatic document feeding doesnot work for transmission or copying.
•• Check the size and weight of the document (see"Transmittable documents" in Chapter 3).
Dialling cannot be performed. •• Make sure that the telephone line is properly connected toboth the wall socket and the "TEL. LINE " socket.
•• Make sure that the fax is set to the correct dialling mode foryour telephone line. See Option Setting 19 in Chapter 6.
Nothing is printed at the receivingend.
•• Make sure that the document for transmission is placed facedown in the feeder.
•• Make sure that the printing paper is properly loaded in thereceiving machine.
The power is on, but notransmission takes place.
•• Make sure that the receiving machine has printing paper.
•• If the receiving machine is in manual mode with noattendant, reception will not be possible.
•• If the receiving machine is not a Sharp model, make sure it isG3 compatible.
•• Check the display for error messages.
•• Pick up the handset and check for a dial tone. Call thereceiving machine by nomal (manual) dialling, and confirmits response.
A distorted image is received at theother end.
•• Noise on the telephone line may cause distortion. Trysending the document again. (Only when error correction(Option Setting 20) is turned off.)
•• Make a copy of the document on your fax. If the copy is alsodistorted, your fax may have a problem. If the problempersists, call for service.
TROUBLESHOOTING 9-1

The printing paper does not comeout.
•• The printing paper may be jammed. See "Clearing JammedPrinting Paper" in this chapter.
•• Make sure that the printing paper is properly loaded in yourmachine.
The printing paper comes out blankwhen you try to receive a document.
•• Make sure that the document is loaded properly in the feederof the transmitting machine. Make a copy to confirm theprinting ability of your machine.
The received document is faint.•• Ask the other party to send higher contrast documents. If the
contrast is still too low, your fax may have a problem. Make acopy to check it.
•• The imaging cartridge may need replacement.
Received images are distorted.•• Noise on the telephone line may cause distortion. Have the
other party try sending the document again. (only when errorcorrection (Option Setting 20) is turned off.)
•• Make a copy of another document on your fax. If the copy isalso distorted, your fax may have a problem. If the problempersists, call for service.
•• The photoconductor drum may be damaged. Try a new drumcartridge.
No confidential transmission orrelay broadcast occurs.
•• Check the message in the display. See the next section,"Display Messages".
PROBLEMS AND SOLUTIONS
9-2 TROUBLESHOOTING

MESSAGES AND SIGNALS
Display messages
CONF REFUSEDA confidential transmission has been denied because youentered an incorrect mailbox number for a machine withmailboxes.
DOC. COVER OPEN The operation panel is open. Close it.
COVER OPEN The printer cover (or received document guide) has beenremoved or is open. Replace or close it.
DOCUMENT JAMThe original document is jammed. See the following section,"Clearing Paper Jams".
FAX RX IN MEMORY
A fax has been received in memory because the imagingcartridge needs replacement, the fax machine has run out ofprinting paper, or the paper is jammed. The fax will be printedout automatically once the problem is fixed.
FUNCTION MODE The FUNCTION key has been pressed.
LINE ERRORTransmission or reception was not successful. Press STOP toclear the message, and then try again.
MEMORY FULL The memory is full. See "Memory" in Chapter 5.
MEMORY PRINTING The fax is preparing or printing out a document from memory.
NO CONF. FUNC
Confidential transmission was cancelled because the receivingmachine does not have a confidential function, a confidentialpasscode is not programmed in it, its memory is full, or it is nota Sharp model.
CHECK PAPER You are out of printing paper.
NO RELAY FUNCA relay request has been denied because the other machinedoes not have a relay broadcast function, its memory is full, orit is not a Sharp machine.
PAPER JAMThe printing paper is jammed. See the following section,"Clearing Paper Jams".
ONHOOK DIAL MODEThe SPEAKER key has been pressed and the fax is waitingfor you to dial.
TROUBLESHOOTING 9-3

RELAY REFUSED
A relay request has been denied because your fax numberhas not been entered in the relay machine’s list of permittednumbers, an automatic dialling number not stored in the relaymachine was specified, or your fax number has not beenentered in your machine.
RESERVE READY The machine is ready to reserve a transmission (see"Transmission reservation" in Chapter 5).
REPLACE TONERThe imaging cartridge needs replacement, or has not beeninstalled.
SIZE ERROR The size of the paper loaded in the paper tray is not A4.Replace the paper with A4-size paper.
Audible signals
Continuous tone 3 seconds Indicates the end of transmission, reception, orcopying.
Intermittent tone(3 bleeps)
5 seconds(1 second on, 1 second off)
Indicates incomplete transmission, reception, orcopying.
Rapid intermittent tone0.5 seconds on, 0.5 seconds off
Indicates that the printer cover is open.
Rapid intermittent tone35 seconds(0.7 seconds on, 0.3 seconds off)
Indicates that the handset is off hook.
MESSAGES AND SIGNALS
9-4 TROUBLESHOOTING

CLEARING PAPER JAMS
Clearing a jammed document
If a document doesn’t feed properly during transmission or copying, or DOCUMENTJAM appears in the display, first try pressing the START key. If the document doesn’tfeed out, open the operation panel (pull the release on the right side of the faxforward) and pull it out gently.
Clearing jammed printing paper
1 If most of the jammed page isprotruding from the back of the fax,try pulling it out.
•• If the jammed page comes out, clearthe "PAPER JAM" message in thedisplay by resetting the stack ofprinting paper (pull the lever marked"PULL" on the paper tray toward you,take out the stack of paper, put it backin, and push the lever back down).
•• If you are unable to clear the paper jamin this way, continue with the followingsteps.
2 Remove any documents from thereceived document outlet. Open theoperation panel, and remove thereceived document guide, the imagingcartridge, and the drum cartridge. (Fordetailed instructions, see Steps 1 to 4in "Installing the Printer Cartridges" inChapter 1.)
•• Caution! The fusing unit (the black unitwith ribs extending across the bottom ofthe compartment) becomes very hotduring printing. Be careful not to touchit.
TROUBLESHOOTING 9-5
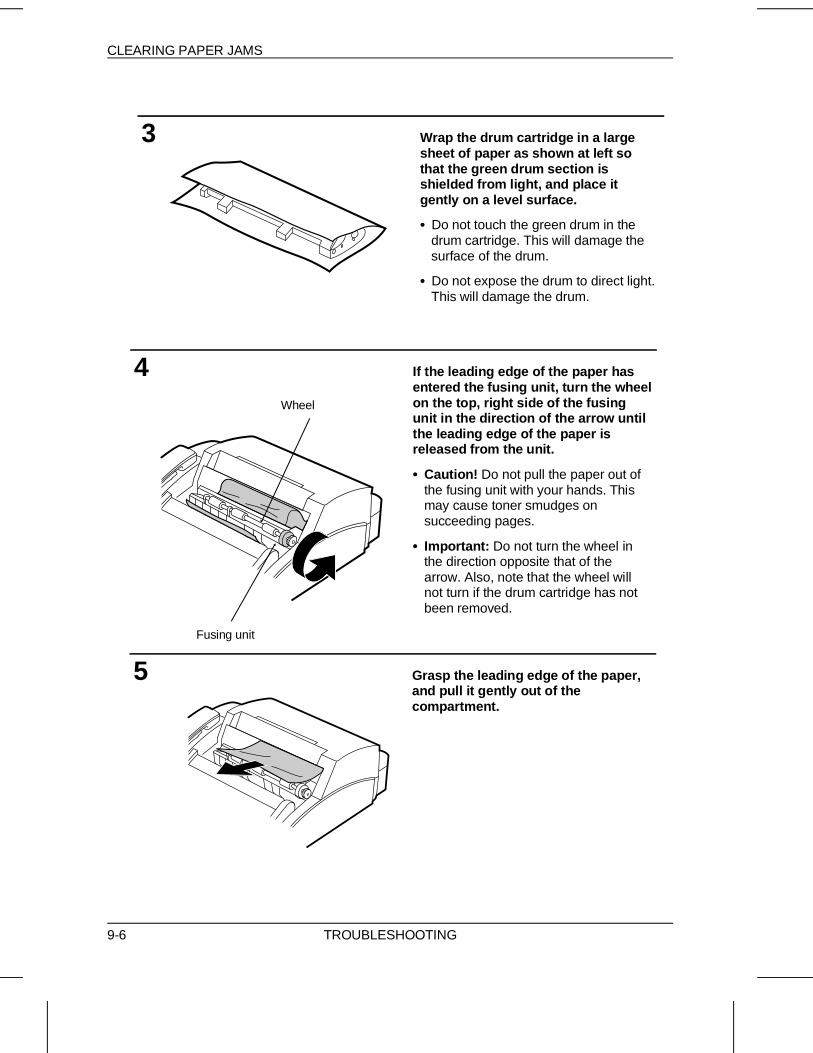
3 Wrap the drum cartridge in a largesheet of paper as shown at left sothat the green drum section isshielded from light, and place itgently on a level surface.
•• Do not touch the green drum in thedrum cartridge. This will damage thesurface of the drum.
•• Do not expose the drum to direct light.This will damage the drum.
4 If the leading edge of the paper hasentered the fusing unit, turn the wheelon the top, right side of the fusingunit in the direction of the arrow untilthe leading edge of the paper isreleased from the unit.
•• Caution! Do not pull the paper out ofthe fusing unit with your hands. Thismay cause toner smudges onsucceeding pages.
•• Important: Do not turn the wheel inthe direction opposite that of thearrow. Also, note that the wheel willnot turn if the drum cartridge has notbeen removed.
5 Grasp the leading edge of the paper,and pull it gently out of thecompartment.
Wheel
Fusing unit
CLEARING PAPER JAMS
9-6 TROUBLESHOOTING

6 Replace the drum cartridge, imagingcartridge, and received document guide.Close the operation panel. (For detailedinstructions, see Step 6 and Steps 10 to14 in "Installing the Printer Cartridges" inChapter 1.)
PUSH
CLEARING PAPER JAMS
TROUBLESHOOTING 9-7

Notes
CLEARING PAPER JAMS
9-8 TROUBLESHOOTING

SPECIFICATIONS
Applicable telephone line: Public switched telephone network / PBX
Compatibility: ITU-T (CCITT) G3 mode
Configuration: Half-duplex, desktop transceiver
Memory size*: 512 KB (approx. 39 average pages with ECM function off)1 MB add-on available as option
Compression scheme: Modified Huffman and Sharp special mode
Scanning method: Flat-bed, solid-state CCD
Resolution: Horizontal:8 lines/mmVertical:Standard 3.85 lines/mmFine /Halftone 7.7 lines/mmSuper fine 15.4 lines/mm
Display: 7 x 5 dots, 1 line by 16-digit display
Reception modes: Auto/Manual/Answering machine
Modem speed: 9600 bps with automatic fallback to 7200, 4800, or 2400 bps
Transmission time*: Approx. 13 seconds (Sharp special mode)
Effective recording width: 202 mm (average)
Paper capacity: 100 sheets
Input document size: Automatic feeding:Width 148 to 216 mmLength 128 to 356 mmManual feeding:Width 148 to 216 mmLength 128 to 1000 mm
Effective scanning width: 210 mm max.
Automatic document feeder: 20 sheets max.
Halftone (grey scale): 32 levels
Contrast control: Automatic/Dark selectable
Copy function: Single/Multi-copy/Sort-copy (99 copies/page)
Timer communication: Max. 3 communications
Power requirements: 230 V AC, 50 Hz
Operating temperature: 10 - 30°CPower consumption: Stand-by: 7 W
Maximum: 680 W
Dimensions: Width: 360 mmDepth: 412 mmHeight: 169 mm(Without attachments)
Weight: Approx. 7.2 kg
* Based on ITU-T Test Chart #1 at standard resolution in Sharp special mode, excluding time for protocolsignals (i.e., ITU-T phase C time only).
As a part of our policy of continuous improvement, SHARP reserves the right to make design andspecification changes for product improvement without prior notice. The performance specificationfigures indicated are nominal values of production units. There may be some deviations from thesevalues in individual units.
SPECIFICATIONS SPEC.-1

INDEX
A Activity Report . . . . . . . . . . . . . . 6-2,7-1Answering machine connection
Fax Reception When A.M. Fails . . . . 4-6Connecting . . . . . . . . . . . . . . . 1-9Problems . . . . . . . . . . . . . . . . 4-3Quiet Detect Time . . . . . . . . . . . 4-5
Remote Fax disable . . . . . . . . . . 4-2Remote-tone fax activation . . . . . . 4-6
Anti Junk Fax . . . . . . . . . . . . . 5-22 - 5-23Audible signals . . . . . . . . . . . . . . . . 9-4AUTO reception mode . . . . . . . . . 2-6, 3-11Automatic Dialling, storing numbers . . . . . 2-8Automatic Fax/Phone Changeover . . . 3-13, 6-2
BBatch page numbering . . . . . . . . . . . . 3-5Beep length . . . . . . . . . . . . . . . . . . 6-4Broadcasting . . . . . . . . . . . . . . . 5-4 - 5-5Broadcast Key . . . . . . . . . . . . . . 2-1, 5-4
C Chain Dialling . . . . . . . . . . . . . . . 2-7, 3-8Cleaning . . . . . . . . . . . . . . . . . . . 8-1Confidential transmission . . . . . . . . . . . 5-6Connections . . . . . . . . . . . . . . . 1-6 - 1-7Contrast . . . . . . . . . . . . . . . . . . . . 3-3Copies . . . . . . . . . . . . . . . . 3-14 - 3-15Copy key . . . . . . . . . . . . . . . . 2-1, 3-14Copy Reduce . . . . . . . . . . . . . . . . . 6-3Copy Cut-off . . . . . . . . . . . . . . . . . 6-4Cover sheet . . . . . . . . . . . . . . . . 3-4,6-3
D Date, setting . . . . . . . . . . . . . . . . . 2-5Dialling
Chain . . . . . . . . . . . . . . . 2-7, 3-8Direct Keypad . . . . . . . . . . . . . 3-7Normal . . . . . . . . . . . . . . . . . 3-6Rapid Key . . . . . . . . . . . . . . . 3-7Search . . . . . . . . . . . . . . . 3-9,3-16Speed . . . . . . . . . . . . . . . . . 3-8
Dialling mode . . . . . . . . . . . . . . . . . 6-4Direct Keypad Dialling . . . . . . . . . . . . 3-7Display messages . . . . . . . . . . . . 9-3 - 9-4Document feeder . . . . . . . . . . . . . . . 3-2Document guides . . . . . . . . . . . . . . . 3-2Document restrictions . . . . . . . . . . . . 3-1Document rollers . . . . . . . . . . . . . . . 8-1Document sizes . . . . . . . . . . . . . . . 3-1Document, readable length and width . . . . 3-1Drum cartridge . . . . . . . . . . . . . . . . 1-5
E Electrical outlet . . . . . . . . . . . . . . . . . 1-6Errer codes . . . . . . . . . . . . . . . . . . . 7-2Error correct ion Mode . . . . . . . . . . . . . 6-4Extension telephone, connecting . . . . . . . . 1-9Extension telephone, using . . . . . . . . . 3-12
F Fax signal receive . . . . . . . . . . . . 3-11,6-3Fine Resolution Priority . . . . . . . . . . . . . 6-1Function Guidance List . . . . . . . . . . . Quick-iFunction key . . . . . . . . . . . . . . . . . . 2-1Footer Print . . . . . . . . . . . . . . . . . . . 6-4
GGroup Keys . . . . . . . . . . . . . . . 2-11, 5-5
H Halftone . . . . . . . . . . . . . . . . . . . . . 3-3Handset . . . . . . . . . . . . . . . . . . . . . 1-6Housing, cleaning . . . . . . . . . . . . . . . 8-1
IImaging cartridge . . . . . . . . . . . . . 1-4,1-5
JJams, clearing . . . . . . . . . . . . . . . . . 9-5
L Letters, entering . . . . . . . . . . . . . 2-3 - 2-4Liquid crystal display . . . . . . . . . . . . . . 2-1Loading the document . . . . . . . . . . . . . 3-2
MMANUAL reception mode . . . . . . . 2-6, 3-11Memory
Transmission . . . . . . . . . . . 5-1 - 5-2Reception . . . . . . . . . . . . . . . . 5-2
Memory Key . . . . . . . . . . . . . . . 2-1, 5-1Mercury function . . . . . . . . . . . . 2-12, 6-4
N Normal Dialling . . . . . . . . . . . . . . . . . 3-6Number of Rings in Auto Answer Mode . . . . 6-1Numeric keys . . . . . . . . . . . . . . . . . . 2-1Network services . . . . . . . . . . . . . . . 3-14
Index-i

OOptional Setting List . . . . . . . . . . . . . . 7-3
P Paper, loading . . . . . . . . . . . . . 1-10 - 1-11Paper, setting the size . . . . . . . . . . . . 1-11PAPER CHECK light . . . . . . . . . . . . . . 2-1Paper jams, clearing . . . . . . . . . . . . . . 9-5Paper tray . . . . . . . . . . . . 1-8, 1-10 - 1-11Passcode List . . . . . . . . . . . . . . . . . 7-3Pauses in automatic Dialling numbers . . . . . 2-8PBX operations . . . . . . . . . . . . . 3-17,6-4Polling . . . . . . . . . . . . . . . . . . 5-7 - 5-9Polling key, setting . . . . . . . . . . . . . . 5-7Power cord . . . . . . . . . . . . . . . . . . . 1-6Program and Group List . . . . . . . . . . . . 7-4Programs . . . . . . . . . . . . . . . . 5-16 - 5-21Pseudo ring duration . . . . . . . . . . . 3-13,6-2
Q Quiet detect time . . . . . . . . . . . . . . . . 4-5
R Rapid Key Dialling . . . . . . . . . . . . . . . 3-7Rapid Keys . . . . . . . . . . . . . . . . . . . 2-1Reading glass, cleaning . . . . . . . . . . . . 8-1Recall Interval . . . . . . . . . . . . . . . . . 6-2Recall Times . . . . . . . . . . . . . . . . . . 6-2Reception mode . . . . . . . . . . . . . . 2-1,2-6
Setting . . . . . . . . . . . . . . . . . . 2-6 ANS mode . . . . . . . . . . . . . . 2-6,4-1
AUTO mode . . . . . . . . . . . . 2-6, 3-11MANUAL mode . . . . . . . . . . 2-6, 3-11
Reception mode key . . . . . . . . . . . 2-1, 2-6Receve reduce . . . . . . . . . . . . . . . . . 6-3Redial key . . . . . . . . . . . . . 2-1, 3-10, 3-16Redialling . . . . . . . . . . . . . . . . 3-10, 3-16Relay Request . . . . . . . . . . . . . 5-10 - 5-12Remote Fax machine disable . . . . . . . . . 4-2Remote Reception Number . . . . . . . 3-12, 6-3Resolution . . . . . . . . . . . . . . . . . . . 3-3Resolution key . . . . . . . . . . . . . . 2-1, 3-3Ringing volume . . . . . . . . . . . . . . . . . 1-7Rollers, cleaning . . . . . . . . . . . . . . . . 8-1
S Search Dial key . . . . . . . . . . 2-1, 3-9, 3-16Search Dialling . . . . . . . . . . . . . . . . . 3-9Sender’s name and number, entering . . . . . 2-2Service indicator . . . . . . . . . . . . . . . . 2-1Speaker key . . . . . . . . . . 1-7,2-1, 3-6, 3-16
Speaker volume . . . . . . . . . . . . . . . . 1-7Speed Dial key . . . . . . . . . . . 2-1, 3-6, 3-16Speed Dialling . . . . . . . . . . . . . . . . . 3-6Start key . . . . . . . . . . . . . . . . . . . . 2-1Stop key . . . . . . . . . . . . . . . . . . . . 2-1Storing numbers for automatic Dialling . . . . . 2-8
T Telephone, using as . . . . . . . . . . . . . 3-16Telephone line cord . . . . . . . . . . . . . . 1-6TEL/FAX Remote number . . . . . . . . . . . 6-3TEL. LINE jack . . . . . . . . . . . . . . 1-6,1-9TEL. SET jack . . . . . . . . . . . . . . 1-6,1-9Telephone and Relay Group List . . . . . . . . 7-3Time, setting . . . . . . . . . . . . . . . . . . 2-5Timer operations . . . . . . . . . . . 5-13 - 5-15Timer List . . . . . . . . . . . . . . . . . . . 7-3Toner empty indicator . . . . . . . . . . . . . 2-1Transaction Report . . . . . . . . . . . . . . . 7-4Transaction Report Print Select . . . . . . . . 6-2Transmission reservation . . . . . . . . . . . . 5-3Troubleshooting . . . . . . . . . . . . . 9-1-9-7
INDEX
Index-ii

Notes
INDEX
Index-iii

SHARP ELECTRONICS (U.K.) LTD.Sharp House, Thorp Road, Newton Heath, Manchester, M40 5BE
SHARP CORPORATION
PRINTED IN JAPAN(TINSE3545SCZZ)