FLYING SKILLS 2nd edition 2005 © J. Oberson www ...
42
Answers & commentary for SHV/FSVL theory exam for paragliders Part 1: Flying Skills. (2nd ed.) 2005 © J. Oberson, English Translation 2010 © A. Piers Page 1 of 42 FLYING SKILLS 2nd edition 2005 © J. Oberson www.soaringmeteo.ch English translation 2010 © Dr. A. Piers www.paraworld.ch
Transcript of FLYING SKILLS 2nd edition 2005 © J. Oberson www ...

Answers & commentary for SHV/FSVL theory exam for paragliders Part 1: Flying Skills. (2nd ed.) 2005 © J. Oberson, English Translation 2010 © A. Piers
Page 1 of 42
FLYING SKILLS
2nd edition 2005 © J. Oberson
www.soaringmeteo.ch
English translation 2010 © Dr. A. Piers
www.paraworld.ch

Answers & commentary for SHV/FSVL theory exam for paragliders Part 1: Flying Skills (2nd ed.) 2005 © J. Oberson, English Translation 2010 © A. Piers
Page 2 of 42
Table of Contents Physiology, Pathology, Trauma and First Aid ...................................................................... 3 Flight Preparation................................................................................................................. 6 Take-Off ............................................................................................................................... 9 Range and Optimization of Flight, Lateral Drift, Flight in Lift.............................................. 23 Flight Patterns, Exit from the Flight Area, Flight Incidents ................................................. 30 Landing .............................................................................................................................. 36

Answers & commentary for SHV/FSVL theory exam for paragliders Part 1: Flying Skills (2nd ed.) 2005 © J. Oberson, English Translation 2010 © A. Piers
Page 3 of 42
Physiology, Pathology, Trauma and First Aid The lack of oxygen at altitude is one of the most important and typical effects of paragliding that can affect the functioning of our bodies. In the meteorology section, we have seen that atmospheric pressure decreases with altitude and the air is composed of 20% oxygen and 80% nitrogen. These ratios do not change with altitude, but if the air (atmospheric) pressure decreases, both gases are less abundant. For example, he atmospheric pressure is twice as dense as 5500m relative to sea level; hence the concentration of oxygen per unit volume is also half that at 5500m. This means that in each breath there half the oxygen available to the body at 5500m vs. sea level. The cells in our body will suffer from lack of oxygen, particularly those of the nervous system. This oxygen deprivation is known as "hypoxia". Mild hypoxia causes reversible functional impairment but longer and more severe hypoxia is accompanied by severe risk of irreversible cell damage. Depending on the duration of oxygen deprivation, there are three types of hypoxia:
1. Instantaneous hypoxia, which produces immediate physiological effects of oxygen starvation. This can begin from approx. 4000m. The first symptom is a state of euphoria with progressive decline of the sensory and motor skills. Questions 003 and 004. If the altitude gradually increases to 7000m, the following quickly ensue; fatigue, convulsions, paralysis, coma and eventually death. The duration of exposure to high altitude is also very important. It is therefore less dangerous to linger for 3-4 minutes at 6000m than 3-4 hours at 5000m.
2. "Acute mountain sickness" produces effects which are more subtle and delayed (after 5-10 hours exposure). Question 005. The condition can begin from 2800-3500m. It consists of a complex pathophysiological response, caused by lack of oxygen, leading to edema (intratissular water retention) in particular in the brain and/or lung. The symptoms are a severe headache, difficulty breathing, a wheezing sensation and respiratory secretions. Due to the short exposure to altitude in flight, the probability of mountain sickness for a pilot is very low. Periodic (for several hours) when above 3000m will reduce the risk of acute mountain sicness. In fact this is primarily a condition typical and well known in the Himalayas amongst poorly acclimatized mountaneers.
3. Chronic hypoxia is a condition appearing after several weeks or months of life at high altitudes, and not discussed in this guide.
In the theory exam of SHV/FSVL, there is some confusion between the first two types of hypoxia. The most simple and effective way to treat hypoxia is by rapidly losing altitude. This is not too difficult for a pilot, but often impossible for a mountaineer. Thus, a pilot should react quickly if he suspects any symptoms of hypoxia. The adverse effects of hypoxia on the body can be reduced by regular physical exercise (especially endurance) and a gradual acclimatization to altitude. Question 006. Lack of training, medications, excessive consumption of drugs, alcohol and (particularly) tobacco, fatigue or lack of sleep can all lead to increased sensitivity to hypoxia and significantly reduce the functional capacity of the body. Question 001. In the skull, near the face and ear, there are small air-filled cavities (sinuses) equilibrated with air in the nasal cavity and the two tympanic (one in each ear through fine conduits.

Answers & commentary for SHV/FSVL theory exam for paragliders Part 1: Flying Skills (2nd ed.) 2005 © J. Oberson, English Translation 2010 © A. Piers
Page 4 of 42
See figure P1. The tympanic cavities are connected to the bottom of the throat (equilibrated with outside air) by the Eustachian tubes. If the altitude increases, atmospheric pressure (external) decreases, causing a passive evacuation of internal air from the sinuses to equalize internal and external pressures. If the ducts are clongested, for example due to an infection causing inflammation of the sinuses (sinusitis), nose (cold) or ears (ear infection), this compensation is restricted. During the altitude transition there likely to be pressure on these internal cavities that are unable to equilibrate, resulting in a sudden and throbbing pain in the head, especially around the face and ears. Question 002.
Figure P1: Sinus cavities of the skull.
(a) = nasal cavity. (b) = sinus. (c) = ducts. (d) = ear cavity. (e) = Eustachian tubes. Another important factor that can affect the body are the low temperatures encountered at high altitude. The human body is actually more sensitive to heat loss than temperature itself. Indeed, a water bath at 20°C seems colder than a room (air) at the same temperature because water is a better conductor of heat than air and heat loss in water is larger. Because evaporation (which takes energy, see part two, meteorology) from our body is increased in moving air currents (wind), the heat losses are greater than in still air. The temperature in a windy atmosphere seems so much colder (wind chill). For example, a glider flying at 32km/h in an air mass at 2°C, gives the pilot the impression of being in the air of -11°C. Question 007. Heat loss causes the significant loss of energy from the body, in turn increasing oxygen consumption and reducing physical performance. Question 008.

Answers & commentary for SHV/FSVL theory exam for paragliders Part 1: Flying Skills (2nd ed.) 2005 © J. Oberson, English Translation 2010 © A. Piers
Page 5 of 42
The increased evaporation caused by air flow also leads to a greater loss of fluid from the body. Fluid needs therefore increase during a long flight. Question 009. In the event of a paraglider accident the victim should be carefully assessed: (1) Is he conscious and does he respond? (2) Is he breathing? (respiratory function OK?) (3) Is there any bleeding? (risk of shock?) (4) Is there a pulse? Is it normal? (circulatory function OK?) Question 155. The emergency services summarize accident response into 3 questions with the sequence “ABC”: (A) Airway; (B) Breathing; (C) Circulation. When a casualty is breathing but unconscious with a pulse (vital functions, breathing and circulation are OK), contents of the stomach might be disturbed and induce vomit. The casualty should therefore be placed on his side, in the “recovery position”, and protected from weather and sun. Question 156. If the casualty complains of severe back pain and/or lack of sensation in the lower and/or upper limbs, the casualty potentially has suffered a spinal injury. Question 158. The spinal cord that transmits nerve impulses from the brain to the periphery of the body and passes through the spinal column. See figure P2.
Figure P2: 1 = spine, 2 = brain, 3 = spinal cord, 4 = nerves of the upper limbs, 5 = nerves of the lower limbs. A complete lesion of the spinal cord causes paralysis for motor systems below the lesion: Injury at point (i) affected lower limbs (paraplegia). Injury to the spinal cord at point (s) affects both the upper and lower limbs (quadriplegia).
Answers & commentary for SHV/FSVL theory exam for paragliders Part 1: Flying Skills (2nd ed.) 2005 © J. Oberson, English Translation 2010 © A. Piers
Page 6 of 42
A spinal injury can result in a substantial narrowing of the spinal canal by a displacement of the structure or fractured bone fragments, either of which can harm the fragile spinal cord. This can result in further spinal trauma and lead to paralysis below the area of nerve injury. It is essential to immobilize the casualty to prevent further (potentially irreversible) damage to the spinal cord. Question 157. See figure P2. If a helicopter rescue has been requested to transport the casualty to the hospital, you should make space for its landing. Firstly, all flight activity should be suspended in the flight area and secondly, it is important to remove any fabric (paragliding, clothing) around the area that could fly interfere with the approach of the helicopter. Question 159.
Flight Preparation Before flying, (the day before or the morning before) pilots should visit the site to familiarize themselves with the terrain, especially if it is an unknown site. The 4 factors to consider are:
1. Weather: The general, and local conditions expected during the flight. 2. Legal requirements: Air space rules, temporary or permanent, relevant to the site or
flight area. 3. Obstacles: Dangers and difficulties specific to the flying site. 4. Wildlife: The rules protecting wildlife in the area of flight.
Knowing the weather conditions pertinent to the proposed flight essential for safety and performance of a flight. Weather patterns, their analysis and evaluation, is covered in part two (meteorology) of this series. The greatest and most prevalent danger and for paraglider pilots is strong wind. This generates strong turbulence, especially in the Alps. Anticyclonic situations generally offer the calmest conditions with uniform distribution of atmospheric pressure on the ground (the pressure varies only slightly from one place to another) and weak winds at altitude. Experience has shown that for the Alpine region, the pressure difference on the ground between the north and south of the Alps is a simple and effective way estimating the barometric distribution. Before making this comparison it is obviously necessary to normalize the pressure to the same altitude, usually the sea level pressure (called QNH). If Zurich is described as QNH 1015, this means that the pressure, corrected to sea level according to the ICAO standard, is 1015 hPa, whereas the actual pressure measured in Zurich (approximately 500m altitude) is on average about 950hPa. Question 010. Usually the cities of Zurich (500m) and Lugano (about 270m) are used as reference points to measure the pressure difference between the north and south of the Alps. Atmospheric pressure recorded at the same time in both places is reduced to QNH. See figure P3. If Zurich reports QNH 1015 and Lugano QNH of 1007, this means that the pressure difference between the northern and the southern Alps is 8hPa, with the overpressure to the north. This will generate a strong northern wind through the Alps with the formation of clouds (and possibly precipitation) on the north side of the Alps and the turbulent windy conditions to the south (north foehn). Question 011. The valley winds north of the Alps (e.g. Wallis) will also be stronger. Conversely, if for a pressure difference between Lugano (e.g. QNH 1015) and Zurich (e.g. QNH 1007), the overpressure again be 8hPa but in the south. This will generate strong winds south through the Alps with the formation of clouds (and possibly precipitation) on the southern Alps and a dry, windy and turbulent conditions in the northern valleys of the Alps (south foehn). See part 2, meteorology. Question 012. In Valais, the valley wind will be stronger in some areas and
Answers & commentary for SHV/FSVL theory exam for paragliders Part 1: Flying Skills (2nd ed.) 2005 © J. Oberson, English Translation 2010 © A. Piers
Page 7 of 42
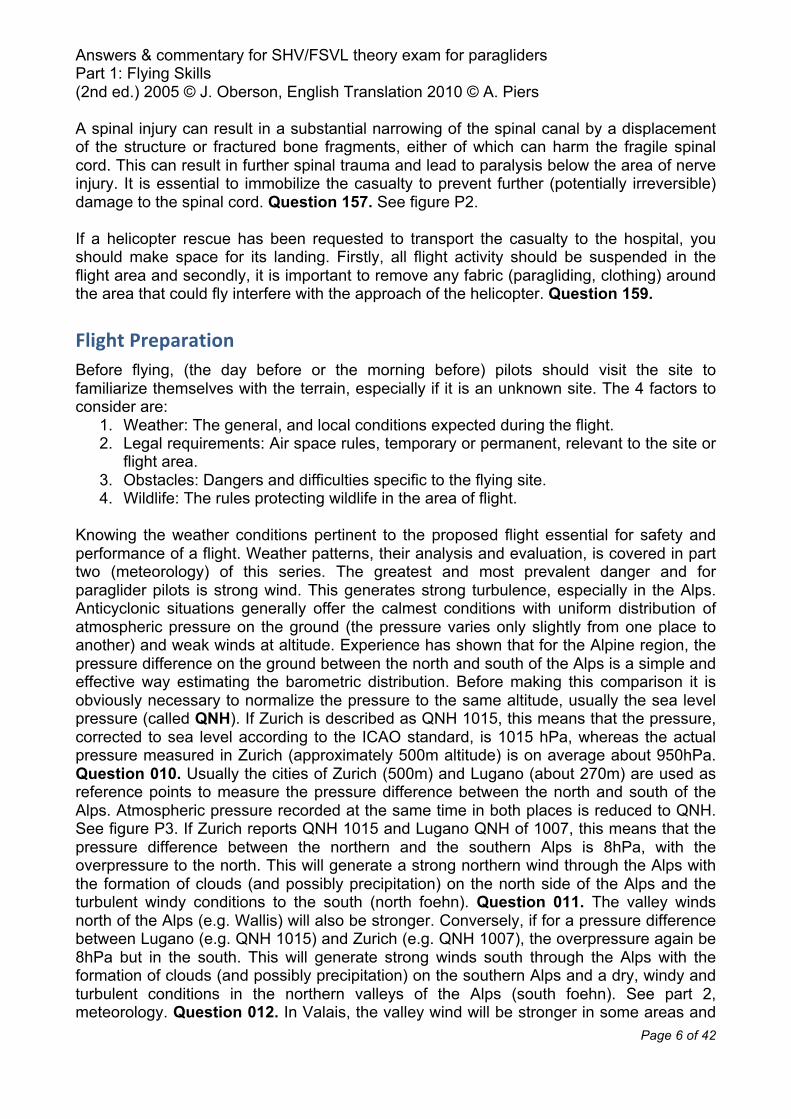
weak in others. Experience shos that a foehn effect is likely soon as the north-south pressure difference exceeds 4hPa. Question 013. This pressure difference can be predicted but also calculated with some precision by computer simulation models, including the Swiss model. See figure P3.
Figure P3: Left, schematic of a pressure difference across the Alps. Z = Zurich, L = Lugano.
Right, example of a barograph showing changes in the pressure difference between the north and south of the Alps, accessible via the Internet via MeteoSwiss. The red curve - predicted (by weather models), black
curve - actual. S = South overpressure. N = North overpressure. Weather reports abound. The are available in newspapers, telephone services (MeteoSwiss, including general weather, gliding and aviation etc...), television, radio, Teletext (forecast gliding and aviation, KOSIF). Question 019. Currently the internet provided the greatest abundance of searchable weather. In fact the problem may be too much information. A free service at www.soaringmeteo.com hosts the most useful information to Swiss paragliders. After the weather, the next consideration is limitations of air space and any obstacles in the flight area. Among the documents available, air maps at 1:300.000 scale, containing details of VFR AIP are probably the most useful. See figure L7, 2nd part, legislation. For example, the gliding map offers guidance regarding the classifications of airspace in the region (question 014), hours of military flight rules (question 017), radio frequencies, especially for contact with other gliders (question 018) and the locations of major fixed cables in the mountains that could be dangerous (question 022). This information is also available in the 1:100,000 scale map of “obstacles to air navigation”. The radio frequencies used are also in the noted on the VFR AIP. Temporary TMA and CTR zones, such as that of Lodrino, just north of Bellinzona, which are active only a few weeks per year, are also noted. These regions can be traversed only when they are inactive (which means most of the time). VFR-Notam publications provides the active dates of temporary CTR and TMA zones. Question 015. The dates and times of activity of dangerous areas, such as LS-D10 in the Goms are listed in the noted in VFR AIP. Question 016. When flying in a new site, it is important to prepare for the flight, inspect the landing zone and learn about air obstacles. Question 020. It is of course not necessary to register the flight with anyone. During the review of the landing zone, you should determine the wind

Answers & commentary for SHV/FSVL theory exam for paragliders Part 1: Flying Skills (2nd ed.) 2005 © J. Oberson, English Translation 2010 © A. Piers
Page 8 of 42
directions in which the landing is feasible and note the various obstacles which are in the path of flight on landing. Question 021. Pilots contribute to wildlife conservation by acting in accordance with agreements reached between the paragliding clubs and game wardens. Question 171. A basic knowledge of the habits of wildlife can also be useful. The SHV/FSVL exam refers to 3 animal species: the eagle, ibex and chamois. See figures P4 and P5.
Figure P4: Golden Eagle.
The golden eagle nests in the spring from March to May In the Alps. The mating couple builds its nest in the cliffs below the upper limit of forest. Therefore, the eagles are most disturbed when pilots fly near the nest in spring, which may scare the eagles and cause them to leave their eggs. The eagles mature at 5 years. They are monogamous for life. The mating couple lives in an area of approximately 100km2. Adolescent eagles roam vast distances in search of unoccupied territories. The undulating flight of the eagle is how it marks its territory. Questions 160 to 164.

Answers & commentary for SHV/FSVL theory exam for paragliders Part 1: Flying Skills (2nd ed.) 2005 © J. Oberson, English Translation 2010 © A. Piers
Page 9 of 42
Figure P5: Chamois and ibex left to right.
Chamois and ibex live on south facing slopes of valleys during winter and spring. Female chamois give birth in May and ibex in June. In summer, after feeding on the slopes, these animals move to the shaded cliffs or breezy ridges to rest. These animals are most disturbed by the glider pilots when they fly near the slopes in the uninhabited regions above the upper limit of forest. Questions 165 to 170.
Take-‐Off When flying from an unfamiliar site, the first thing to do is to inspect and evaluate the take off. It must be open, regular and moderately inclined. Later we will discuss the 3-satge take-off, the first 2 stages ensuring the wing is symmetrical and properly elevated above the pilot and the 3rd stage being the actual take with acceleration along the path that allows the pilot to leave the ground. One of the most important considerations is that a take-off can be aborted safely (if necessary) within the first two phases. Question 023. To help assess a take-off site, a pilot should consider 2 defined limits: the decision line and the the point of no return (translation from French = life line: i.e. the line that keeps you alive). See figure P6. The decision line (point where take-off is rejected) is the limit that should not be exceeded if the first 2 phases of takeoff were not successful (wing badly inflated, possibly even backwards or sideways, knots or tangled lines). Pilots learn to define this with experience. It is generally less than ten meters in front of where the pilot begins to inflate the wing. It depends mostly on wind and wing loading, that is to say the ground speed of the paraglider. The weaker the head wind and the higher the wing loading, the greater the speed of the glider will need to be on take off, hence the further the decision line will need to be from the start point. The point of no return defines the limit before which it is essential to have left the ground before the risk of falling or hitting an obstacle before the takeoff becomes unacceptable. It depends on the terrain, and the position and size obstacles. The larger any obstacles are, the closer the point of no return will be to the decision line. See figure P6. The ideal launch site would have a modest incline before the the decision line decision to facilitate an abort (if needed) and a progressively steeper slope between the decision line and the point of no return. If in

Answers & commentary for SHV/FSVL theory exam for paragliders Part 1: Flying Skills (2nd ed.) 2005 © J. Oberson, English Translation 2010 © A. Piers
Page 10 of 42
doubt, do not hesitate to explore the take off point thoroughly (hidden obstacles, uneven surfaces, terrain beyond the line of sight) before unpacking your equipment. You can never be too well prepared for a take off!
Figure P6: take off site. D = decision line. V = point of no return. 1, 2 and 3 = stages of take off.
Once the choice of launch site is made, we can deploy the wind and carefully untangle the lines. It is best to position the wing in an arc (rather than extended straight). See figure P7. This way, during the inflation of the canopy, the central lines will be tensioned at the same time or slightly earlier than the side lines. This facilitates a symmetrical and homogeneous inflation of the wing.

Answers & commentary for SHV/FSVL theory exam for paragliders Part 1: Flying Skills (2nd ed.) 2005 © J. Oberson, English Translation 2010 © A. Piers
Page 11 of 42
Figure P7: Positioning of the wing on take off. Left - wing is laid out sailing straight (unfavorable). Right -
wing is laid out in an arc (favorable). To untangle the lines, it is best to hold the end of one of the elevators with one hand and, with the other, separate groups of (A) – (D) lines from each other, starting with the brakes. Move laterally (perpendicular to the direction of takeoff) to gently pull at the brake lines and position them properly. See figure P8.
Figure P8: disentangling the brake lines (f).

Answers & commentary for SHV/FSVL theory exam for paragliders Part 1: Flying Skills (2nd ed.) 2005 © J. Oberson, English Translation 2010 © A. Piers
Page 12 of 42
Once the lines are clear, position and attach the risers to the harness, and stand symmetrically in front of the wing, so that the riser are slack. Grasp the brake handles in each hand, and reach down and grasp the (A) risers, so that the remaining risers rest gently on your forearms. This is the point to perform the pre-flight check (as with all aircraft pilots). The order of the check points is not important but it should be consistent and routine. The SHV/FSVL required 5-point check covers; (1) Equipment (harness, incl. leg straps, helmet, risers clipped to karabiners, radio, speed bar); (2) Risers & Lines; (3) Wing; (4) Wind (speed and direction) and (5) Airspace (free of other air users before takeoff). Question 033. It may be helpful to consider the checks as radiating out from you, with the first point relating to the equipment to close contact to you (harness, helmet, etc…) and ultimately radiating out to the flight area in general (airspace). Checking the airspace and the runway is the last point before takeoff. Question 035. At this moment you should check the wind for the last time. For point (2), it is good practice to look to your rear and sides to check the risers are lying correctly on top and behind the arms. This ensures that when the (A) lines are pulled up above the risers, the brake lines will be well below and out the way of other lines. See figure P9. Inspection of the lines to the stabilizer is also important. It must be clearly separated from other outside lines and proceed directly to the riser without making a loop (risk of snagging on inflation). The thigh straps always merit an extra check. The harness might feel attached without these, but there is a risk that you can slip through the harness on take off with fatal consequences. Question 036.

Answers & commentary for SHV/FSVL theory exam for paragliders Part 1: Flying Skills (2nd ed.) 2005 © J. Oberson, English Translation 2010 © A. Piers
Page 13 of 42
Figure P9: Pilot checks control lines to back and sides, clear of the arm and inspects the other lines and
risers. a = A lines, passing over other lines, s = lines to stabilizer well outside and separated from the other lines, f = control line passing through the pulley, below the other lines.
If the leg straps are too loose, the pilot can partially slide out of the harness just after takeoff, making it difficult to move into the seat. If necessary, and once clear of the slope the pilot can take the two brake handles in one hand and use the other push himself into a seated position. Questions 037 and 046. If you have any doubts about the take-off conditions (weather, terrain) it is better not to fly. Question 040. The launch itself should be performed in 3 main phases: (1) Inflation; (2) Checking/correction of the wing; (3) Acceleration. Question 041. The first 2 stages are a preparing the glider for flight, the take off is only the 3rd phase. See figure P10. The first phase itself is in 2 parts: (1a) is inflating the wing from lying on the ground to inflation just above the ground. This requires force and some running speed. (1b) is lifting inflated wing. Since the wing is located a few meters behind the pilot, he must allow time for it to rise above him. During this time he should reduce the force and speed a little. This decrease in energy allows the pilot to feel the tension in the risers and to better correct his wing and

Answers & commentary for SHV/FSVL theory exam for paragliders Part 1: Flying Skills (2nd ed.) 2005 © J. Oberson, English Translation 2010 © A. Piers
Page 14 of 42
his take off trajectory. In phase (2) the brakes are applied about 50% to prevent the wing overshooting and allows the pilot to check that the wing if flying correctly. If the sail is completely wrong or if there is a snag (part of a loop of the lines around the wing) or a knot between lines, it should be possible to abort the takeoff safely. The decision line should, in principle, not be passed at this stage. Question 042. If the wing is only slightly askew it may be possible to correct the problem (see later). Phase (3) is divided into 3 parts assuming phases 2 was uneventful): (3a) consists of a gradual acceleration down the runway with increased force, body leaning forward and head looking towards the flight path. (3b) The pilot's body leaves the ground. Figure P11. The pilot remains standing with his legs ready to cushion a possible return to the ground. He can finally sit in the harness in Phase (3c), when he is few meters from the ground. Each phase lasts about 1-3 seconds during which various faults and problems can occur: The wing turns because the tension of the lines is asymmetrical. The wing remains behind the pilot because the tension on the lines is poorly judged and
the pilot does not have enough time to raise the wing above his head. The wing rises too quickly, passes the pilot suffers a frontal collapse in Phase 2. This
happens when the lifting of the wing has been made with too much force and the pilot did not compensate by braking in phase 2.
With a headwind argued, if the lifting of the wing (phase 1b) is too quick and if the pilot over compensates by braking hard in phase 2, it can be partly in phase 2, preventing an effective acceleration in phase 3.
If the pilot was hesitant and did not accelerate well in phase 3a and begins to sit down too early in the harness, he will invariably retouch the ground, especially if the ground has a shallow inclined.
If the pilot, pulls down on the risers during inflation, the wing can suffer a frontal closure, and it becomes hard to inflate and raise.

Answers & commentary for SHV/FSVL theory exam for paragliders Part 1: Flying Skills (2nd ed.) 2005 © J. Oberson, English Translation 2010 © A. Piers
Page 15 of 42
Figure P10: 3 phased take off. 1a = inflation, 1b = lifting the wing, 2 = control, 3a = acceleration, 3c = sitting
in the harness. The arrow shows the direction of sight.

Answers & commentary for SHV/FSVL theory exam for paragliders Part 1: Flying Skills (2nd ed.) 2005 © J. Oberson, English Translation 2010 © A. Piers
Page 16 of 42
Figure P11: Phases of takeoff. 1a = inflation, 1b = lifting of the wing, 2 = control, 3a = acceleration, 3b =
actual take off, 3c = sitting in the harness, e = speed of running and force provided by the pilot (% of speed and maximum force), f = amplitude of braking (% of maximum braking), p = body position, d = standing, a = sitting, i = bent forward, r = direction of sight, h = looking to the horizon, v = looking to the wing, c = contact
with the ground, s = ground contact, q = pilot leaves the ground. In principle, once the Phase 3a has passed, there should be no problems because the decision line has been crossed, the pilot has decided that take off could occur safely. A problem in phase 3 is potentially very dangerous, so before a decision to abort take-off should be made before this if it is to happen safely. Therefore, phases 1 to 2 should be carried out calmly and carefully. Pilots should never launch too early and too quickly. The decision to take off in is always made before phase 3.

Answers & commentary for SHV/FSVL theory exam for paragliders Part 1: Flying Skills (2nd ed.) 2005 © J. Oberson, English Translation 2010 © A. Piers
Page 17 of 42
Landing and takeoff are both tricky maneuvers that can be dangerous if improperly performed. It is therefore useful to dissect and analyze each individual movement during the 3 phases. See figure P11. Speed & force (e): This has 2 peaks. The smaller first peak is during inflation of the wing
(1a). The second is greatest at the end of the acceleration (3b). During the lifting of the wing (1b), the pace is slowed. The running speed is roughly proportional to the force and energy that the pilot transmits down the lines. If the wind is low, zero or slightly behind, the pace and the force of the first phase are increased and can reach 100%.
Braking (f): this occurs at the beginning of phase (2) (wing above the pilot) firmly, evenly sharply and symmetrically. The brakes are then released gradually and cautiously until the end of the takeoff. If the slope is very steep and the wind is low, the intensity of braking may slightly exceed 50%. If the slope is quite flat, or the headwind is strong, the braking is less than 50%. If brakes are applied too early, the raising of the wing is slowed, and it can remain too far behind for effecive take-off.
The position of the pilot's body (p): He stands up for Phase (3b), that is to say of course during the launch but also for a short time after leaving the ground, in order to cushion the impact if he returns to the ground and resume the launch. Only in phase (3c), when the pilot is well off the ground he can sit (a) in the harness safely. While standing, the pilot's body leans forward (i) during phase (1b), to maintain tension in the lines and in phase (3a), to assist in acceleration on launch.
Direction of sight (r): It is generally directed towards the front (h) and never on the ground at the feet. The only exception is in phase (2) when the driver lifts his head fmomentarily (v) to check and control the wing.
Contact with the ground (c). During the launch, and until the final acceleration phase (3a), the pilot's legs keep contact with the ground (s). Only in phase (3b) does the pilot leave the ground (q), and actually takes off.
If the wing rises a little sideways (e.g. through a small component of the wind blowing slightly asymmetrically), a correction may be needed in phase (2) or at the end of Phase (1b). See figure P12.

Answers & commentary for SHV/FSVL theory exam for paragliders Part 1: Flying Skills (2nd ed.) 2005 © J. Oberson, English Translation 2010 © A. Piers
Page 18 of 42
Figure P12: Correction to take off. f = action on the brake on one side, d = lateral displacement of the trajectory on the other side. 2 and 3 = take off phases, p = planned trajectory of the race before the
correction. For example, if the wing rises tilted to the left, the pilot must proportionately apply the right brake (to correct the lateral inclination of the wing) and also reposition himself under the wing, by moving to the left has he runs. The two actions are reversed if the wing is angled to the right. A moderate headwind (e.g. 15 km/h) is ideal for takeoff. This reduces the ground speed of the glider. The distance and running speed are hence reduced. Question 024. If the wind is zero or very slightly from the read, the distance and running speed are increased, especially if the ground is only gently inclined. Question 025. In this case, the take-off runway for the pilot must be long, regular, without obstacles or uneven ground. Question 026. If the tailwind is more sustained (>5km/h) the take off should be abandoned because the risk of an accident is too great. The likely running speed may be insufficient to achieve an adequate air speed for the paraglider and the glide ratio of the glider is also reduced in these conditions. Question 044. If the wind is off to the side (e.g., a wind of 120°, i.e. SE,

Answers & commentary for SHV/FSVL theory exam for paragliders Part 1: Flying Skills (2nd ed.) 2005 © J. Oberson, English Translation 2010 © A. Piers
Page 19 of 42
on a south-facing slope) the pilot should deploy and inflate the wing into the wind (SE direction) and then gradually turn the paraglider during the control phase in the direction of the slope (S direction) and finally accelerate. Question 043. At high altitude (e.g. 3600m), the air is less dense (see the second part, meteorology) and oxygen is scarce. The necessary airspeed of a glider is increased (see part one, aerodynamics) and the performance of the human body is reduced. Therefore, compared to low altitude (e.g. 1400m), under calm conditions, the take off distance, will be more exhausting and longer. Question 045. A wet wing is heavier (several kg) than a dry wing. This contributes to an increase in the take-off weight, resulting in significant reduction of flight performance or significant increase in the required airspeed of the glider. The wing will be harder to inflate and raise off the ground due to the significant increase in the moment of force (weight of the water – acting along the length of lines). Questions 038 and 039. The flight stability is not affected but the risk of stalling is increased. If the take off is in a clearing, pilots should expect a wind gradient with accompanying turbulence (see part two, weather), with a weaker wind at ground level and a more sustained wind over the treetops. Question 029. Pilots should be very cautious with a highly variable wind on take off (potentially abrupt change in direction and strength). This may also mean that downwind of the slope and we can expect very strong and dangerous turbulence shortly after takeoff. Question 030. If the headwind is 20 to 25km/h, there is a risk that the glider may move backwards on take off. Hence the area behind the launch site should be considered. This location should be open, wide, safe and without steep drops (cliffs) downwind. Consider the potential disaster if the pilot inflated the wing in a strong headwind, with a precipice just behind him. Similarly, a gust could lead to unintended inflation and uncontrolled takeoff, particularly id there is a significant slope. Questions 027 and 028. Under these wind conditions, the best take off technique is to face the wing (i.e. back to the slope) in phases 1 and 2, with only a modest slope. This avoids taking off too soon, inaccurately or uncontrolled. Question 031. The preflight 5-point check during take-off in rear-facing launch must again be in the same order, but as the pilot is turned, he cannot not see the runway during the first 2 phases of take off. He should also pay close attention to the direction he must turn before the final acceleration, once turned, pause to cast a last glance over the airspace and runway before finally accelerating into flight. Questions 032 and 034. See figure P13.

Answers & commentary for SHV/FSVL theory exam for paragliders Part 1: Flying Skills (2nd ed.) 2005 © J. Oberson, English Translation 2010 © A. Piers
Page 20 of 42
Figure P13: Reverse take off. The pilot inflates (a), raises (b) and (c) controls the wing before (d) turning and
checking the glider and airspace and then (e) leaning forward and running. Once away from the slope, he finally settles into the harness (f).
There are several methods of handling a glider for reverse take off. Here is one example of a method, which is safe and easy. See figure P14. Avoid methods involving dropping the brake handles during the test phase in order to grasp the correct sides. This distracts the attention of the pilot, and the control of the wing is a bit jerky at discontinuous on take-off.

Answers & commentary for SHV/FSVL theory exam for paragliders Part 1: Flying Skills (2nd ed.) 2005 © J. Oberson, English Translation 2010 © A. Piers
Page 21 of 42
Figure P14: Handling of brakes rear-facing inflation. D = right, L = left.

Answers & commentary for SHV/FSVL theory exam for paragliders Part 1: Flying Skills (2nd ed.) 2005 © J. Oberson, English Translation 2010 © A. Piers
Page 22 of 42
1. The pilot attaches to the harness risers as usual with the wing to the rear. 2. If the pilot wants to turn to the right during takeoff (clockwise), he must now turn
(rotating on the spot) 180° to the left (anti-clockwise), while leaning back and lifting the right risers and lines over head.
3. He is now facing the wing. The right risers and lines remain in the right hand and pass over the left risers and lines. For each group of left and right risers, the (a) lines and risers are above the other risers of groups (B) – (D).
4. The right hand takes the right brake handle. The left hand takes the left brake handle.
5. Make sure that the intersection of left and right groups of lines takes place at the riser level and not at the lines. Keeping the right brake handle in the right hand, grasp the ends of both risers between thumb and forefinger in the right hand.
6. The pilot can now perform his 5-point check and should remains sensitive to the wind on his back and neck.
7. He then pulls the (A) lines while leaning slightly backwards, so that all lines are tensioned symmetrically. The force required will depend on the wind strength.
8. The wing gently rises, and when the wing is fully overhead head, the pilot drops the risers, and uses the brakes to control the wing. The right risers are now between the pilot and left risers. Throughout the inflation & elevation, the pilot can view and manage the wing, which is a big advantage compared to front facing inflation (back to wing).
9. The pilot turns to the right 180° (clockwise) aplying a little brake. The elevators and brakes are now uncrossed and in their normal position relative to the pilot.
10. The pilot is facing slope as in the conventional takeoff. He can tilt forward and accelerate for takeoff.
This rear-facing take off should be taught from the start of training. Once airborne, the pilot should clear the hill, before eventually releasing the brakes briefly, to help him sit back in the harness. It is important to be a safe distance from the hill before doing this, since if there are problems (for example a front collapse due to turbulence), the pilot will not have time to search for the brake handles and direct the glider on a safe trajectory avoiding the ground. Question 047. Consider now, the situation if the pilot finds a small knot between the lines, which should have been spotted at check beforehand. A knot shortens the lines affected and the profile is deformed on the side of the knot. This profile is weaker than the undeformed profile. The glider will tend to turn towards the knotted side. The pilot must then compensate by slowing down the opposite side to fly straight. For example if the pilot has to brake to the right to fly straight, there is probably a knot in the left lines. Question 048. If the knot is on the rear lines, the wing has an increased angle of incidence on the on the side of the knot. For example, if there is a knot between a (D) line and the left brake, the pilot must compensate by braking right. The higher angle of attack of the wing increases the risk of either a full stall and or a parachutal stall to the same extent. Additionally on turning right with the brakes, there is a risk of asymmetric stall (spin). Question 049. If the knot is on the forward lines (e.g. between lines (A) and (B)), there is a reduction the angle of attack (hence also lift) of the wing on the side of the knot. Therefore, the wing will be more sensitive to turbulence and deflate more easily on this side. Question 050.

Answers & commentary for SHV/FSVL theory exam for paragliders Part 1: Flying Skills (2nd ed.) 2005 © J. Oberson, English Translation 2010 © A. Piers
Page 23 of 42
To undo a knot between lines, A pilot should move from the hill and shake the knotted lines or possibly create a controlled colapse of the half-wing in question (see below). If the knot is located near the pilot (for example between a brake and riser), the pilot may try to untangle the knot with one hand. Question 051. A small snag of the wing might also occur (e.g. the stabilizer is twisted with a line). Once clear of the hill, you can try to shake the snagged lines or cause a controlled lateral closure of the half-wing in question (see below).
Range and Optimization of Flight, Lateral Drift, Flight in Lift The normal flight envelope is the set of all speeds and angles of flight than presents no danger to the pilot and results in stable and harmonious, linear or circular (turning) flight. When winds blow sideways in relation to the glide path of a paraglider, it drifts sideways in the direction of the crosswind. Optimizing the flight requires a pilot to make use of the best options available in the normal flight envelope in order to achieve a specific flight goal while losing the least (or gain the most) elevation and possible flight time during or between the thermals. This optimization task can seem daunting for a beginner but with practice it becomes intuitive, accurate and natural, without taking away the pleasure of flying. The range of possibilities for straight flight can be summarized by the polar curves, and has been extensively discussed in the first part, aerodynamics. See figure P15.
Figure P15: Polar curve of a paragliding wing. A = range requiring use of the accelerators system.α = glide angle for maximum glide ratio. Fmax = maximum glide ratio, Tmin = minimum sink rate. H = distance, V =
loss of altitude, Vh = horizontal velocity, Tc = rate of fall. % = Percentage of braking. F = range requiring use of brakes. B = range of “arms up” flight.
To fly as far as possible, without wind, the pilot must fly the glider at its maximum glide ratio. Question 052. For this we usually fly without brakes (arms up), however, depending on the model of glider, the maximum glide ratio may be achieved with either a little brake (10%) or with a little acceleration. To fly as long (duration) as possible, without wind, we must fly at minimum sink rate. This is usually with 20-30% with brakes. Question 054. See figure P15. When you know the characteristics of your paraglider, you can calculate the

Answers & commentary for SHV/FSVL theory exam for paragliders Part 1: Flying Skills (2nd ed.) 2005 © J. Oberson, English Translation 2010 © A. Piers
Page 24 of 42
maximum distance you can travel without wind (calm). For example with a glide ratio of 6 and an altitude drop of 1200m. The greatest distance you can travel is 1200m x 6 (glide ratio x altitude difference) = 7200m. Question 053. See also part I, aerodynamics. An interesting question which seems simple at first is impact of the position of the pilot in his harness to the speed of flight. Question 055. The full answer is more complex, and will requires explanation and some detailed calculations which are well beyond the scope of the SHV/FSVL exam. Nevertheless it is intuitively obvious, that if the pilot adopts an aerodynamic position, the glider will travel faster. In fact, a team of aerodynamic engineers (Toulouse, 1999) demonstrated that the speed gain in an aerodynamic position (drag reducing) was two times smaller than the gain in glide ratio, which can increase by 5% from its value on launch. For example, if the glide ratio of a glider with the pilot in a sitting position, arms outstretched, is 8, the glide ratio can be increased to 8.4 in aero position, while the gain in speed is only 1-2 Kmh. The same team has also shown, by measurements in a wind tunnel, that the optimum aerodynamic position was: (1) body leaning backward (recumbent position), (2) arms down and behind the risers, elbows pressed against body and (3) symmetrical legs, tucked and together, in front of the before the opening of the airbag in the harness. Straightening, or crossing of the legs increases drag. Having an aerodynamic helmet does virtually nothing. The optimum position is effectively an tight and compact "object". In this position, there is little difference in drag between a racing type harness and a normal standard harness. See figure P16.
Figure P16: Sitting standard left. On the right side and profile of the position of least aerodynamic drag parasite. A stand arms crossed in front of the chest provide even a little less drag but obviously limit the
possibilities of flight. To answer questions from 056 to 058, we must consider the polar curves for the paraglider relative to the ground and in a mass of moving air (i.e. wind). Figure P17. In this figure we have used the polar curves for a glider with a glide ratio = 8.2 at 35km/h in various wind conditions. To understand what is happening, it is easier to move the polar curve in relation to the strength and direction of the wind. For example, if the wind is a 20km/h headwind, we must move the polar curve to the left 20km/h. If it is a tail wind 2m/s, it must move the pole right by 2m/s etc..

Answers & commentary for SHV/FSVL theory exam for paragliders Part 1: Flying Skills (2nd ed.) 2005 © J. Oberson, English Translation 2010 © A. Piers
Page 25 of 42
Figure P17: Polar curve for a paraglider, relative to he ground in 5 different situations before launch. The
curve does not change shape but moves along the vertical (wind, m/s) and horizontal (km/h axes). Situations: a = no wind, b = headwind 25km/h, c = tailwind 20 km/h, d = ascending thermal 3m/s and down
draft 2m/s. Bottom right, the values of the polar without wind. Each curve represents the speed without wind, the middle number of independent speed and the lower the fineness ground paragliding.
To fly as far as possible, i.e. at maximum glide ratio, against a head wind of 25km/h (example (b) of figure P17) you must fly with moderate use of the accelerator. Question 056. The maximum glide ratio is found by drawing a tangent to the polar curve, which also passes through the origin of the axes. This gives an air speed of 41km/h or ground speed of 16km/h (41-25). The rate of fall is equal to just over 1.5m/s. The glide ratio is then 16 km/h/1.5m/s or 16km/h/5.4km/h = 2.9. A similar logic applies for the example (c), the glider needs to be flown with 15 to 20% brake in a tailwind of 20km/h to go as far as possible (maximum glide ratio). Question 057. In this case, the maximum glide ratio is equal to 13; with a ground speed of 54 km/h and airspeed to 34 km/h. By calculating and plotting the polar curve for an actual wing, we notice that the advice, on the speed, provided by the answers to questions 56 and 57 are somewhat exaggerated (too fast for the first and too slow for the second). For the situations (d), the calculation of the maximum glide ratio is not useful: in practice the desired objective is to climb as high as possible and not usually to fly as far as possible. Therefore normally we fly with minimum sink rate using 20-30% with brakes. Question 058. In this case, the rate of climb is equal to slightly less than 2m/s and the air and ground speeds are equal to 30km/h. When you fly in a mass of descending air (case (e) of Figure P17) we note that to achieve maximum glide ratio, we must fly moderately fast (moderate use of speed bar). For example, with a down draft of 2m/s, we must fly 40km/h (ground speed = airspeed) to obtain a glide ratio of 3.2.
Answers & commentary for SHV/FSVL theory exam for paragliders Part 1: Flying Skills (2nd ed.) 2005 © J. Oberson, English Translation 2010 © A. Piers
Page 26 of 42
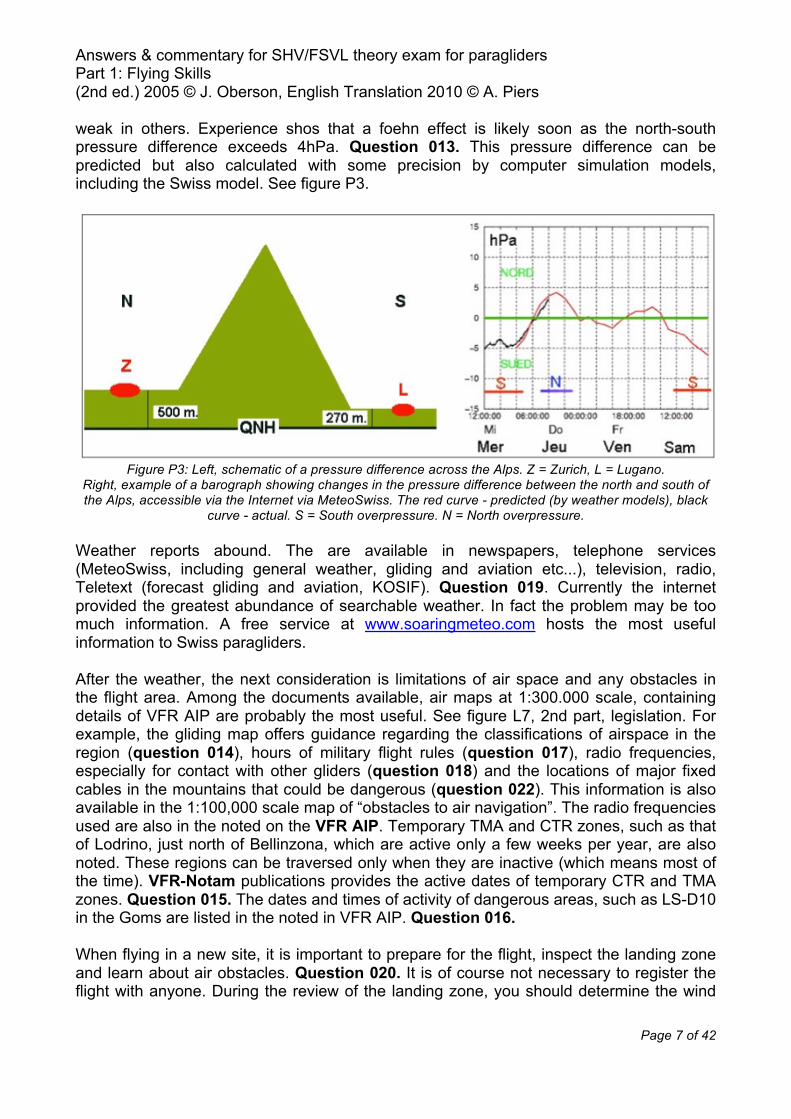
When the wind blows perpendicular to the desired trajectory we must fly like a "crab" that is to say turn, partly into the wind to compensate for wind and maximize the best possible flight trajectory (i.e. get the least altitude loss). Figure P18. The angle δ between the trajectory (along the ground) of paragliding and the longitudinal axis (roll, or axis of the trajectory over the air) is called the drift-correction angle. Question 064. As the crosswind increases, this angle increases. Question 065. Conversely, as the glider's airspeed increases, the smaller this angle becomes. Questions 066 and 67. In summary, this angle depends on the airspeed of the glider and the strength and direction of wind. Question 068.
Figure P18: Left, V = direction and strength of the crosswind, P = direction and speed of glider and flight
path, S = direction (trajectory) and the resulting ground speed = sum of vectors V and P, δ = angle of drift-correction. A right, polar curve for a paraglider with different speeds of crosswind.
The figure above shows that as the crosswind increases so does the need to fly faster (for example with using trim-tabs pulling the lines A and B or the accelerator) for a maximum glide ratio. With a 25km/h cross wind, for example, you must fly at 38km/h (airspeed) and to obtain a (maximum) glide ratio of 6 resulting in a ground speed of 29km/h. Question 059. For example if the desired trajectory (ground) is pointing south and the wind from the west, we must fly fast enough, in a south-west direction, for the best glide (i.e. to arrive with the least altitude loss). Question 060. The polar curve above shows that for up to 15km/h crosswinds, the glide ratio and speed are only slightly altered and it is only at 20km/h especially for low air speeds (brakes) that these values change significantly. Figure P19 shows what happens if a pilot is flying or not flying in "Crab". Case (1) shows the effect of an unchecked southern heading. With a westerly wind, the glider will be deflected from its trajectory and arrive too far east of the desired goal (to the left along a path south-east). Question 062. Case (2) shows the effect of flying in a "crab" position in the same westerly wind (i.e. the wing is pointing southwest). This pattern produce a flight path straight to the objective (i.e. a ground trajectory directed towards the south). Question 063. Case (3) shows the effect of frequent course correction course to adjust the longitudinal axis of the wing toward the objective. Its trajectory will be follow a curve. The pilot will arrive at the goal but not with the most efficient glide path. Question 061.

Answers & commentary for SHV/FSVL theory exam for paragliders Part 1: Flying Skills (2nd ed.) 2005 © J. Oberson, English Translation 2010 © A. Piers
Page 27 of 42
Figure P19: O = start point, B = objective (south), W = west crosswind, 20km/h, Vp = air speed of the glider,
Vs = ground speed of the glider. δ = angle of drift correction. Question 069 is not helpful. It is trick question that uses unclear phrases. To fly toward a goal, the pilot must simply steer toward that goal even if it this means flying “crab”. The utilization (banding) of thermals requires some experience, often quickly acquired by most pilots. Every pilot experiments according to his own theory. However, a simple and frequently used principle is as follows: when the rate of climb increases you should reduce the tightness of the turn, and when it reduces (or better, in anticipation) you should tighten the turn. Figure P20 gives a specific example. In phase (1), the pilot flies into the thermals (which is cylindrical). Since the rate of climb increases, the pilot initiates a turn toward the presumed center of the thermal (phase 2). When he feels that the rate of ascent decreases he increases the turn (phase 3) to return to greater uplift. Once that rate is rising again, he again reduces the turn (phase 4) and so on. If, at stage 4, the pilot continues too far or turns too liottle, he leaves the thermal. The best and fastest way to re-find the thermal it is to make a sharp 180° turn in the direction of the previous spiral. Question 075. Another example: after a 90° turn, the pilot misjudged the center of the thermal, losing significant altitude. He therefore finds himself in the peripheral zone, and descending. See figure P21. The best way to find the up draft is to continue the turn around 180 degrees. Question 072.

Answers & commentary for SHV/FSVL theory exam for paragliders Part 1: Flying Skills (2nd ed.) 2005 © J. Oberson, English Translation 2010 © A. Piers
Page 28 of 42
Figure P20: Phases 1 to 4 of centering on a thermal.
Figure P21: Re-finding a (lost) thermal. Phase 1 entry into the thermal, Phase 2 ejection from the thermal
after 90° turn, Phase 3, back in the thermal after the continuation of the turn 180 degrees. Thermals have associated turbulence and down drafts at their periphery. If the pilot circles the thermals too widely, or far from the center, he will fly inside the down draft and can lose significant altitude. Question 074.
Answers & commentary for SHV/FSVL theory exam for paragliders Part 1: Flying Skills (2nd ed.) 2005 © J. Oberson, English Translation 2010 © A. Piers
Page 29 of 42
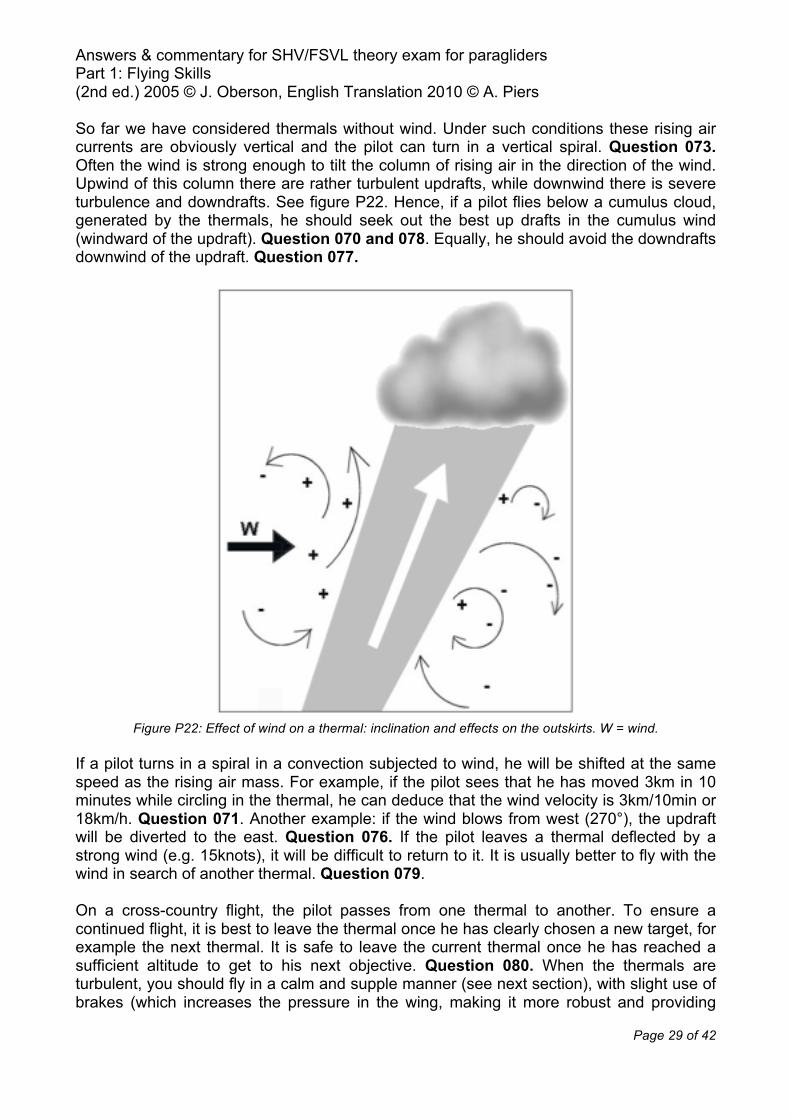
So far we have considered thermals without wind. Under such conditions these rising air currents are obviously vertical and the pilot can turn in a vertical spiral. Question 073. Often the wind is strong enough to tilt the column of rising air in the direction of the wind. Upwind of this column there are rather turbulent updrafts, while downwind there is severe turbulence and downdrafts. See figure P22. Hence, if a pilot flies below a cumulus cloud, generated by the thermals, he should seek out the best up drafts in the cumulus wind (windward of the updraft). Question 070 and 078. Equally, he should avoid the downdrafts downwind of the updraft. Question 077.
Figure P22: Effect of wind on a thermal: inclination and effects on the outskirts. W = wind.
If a pilot turns in a spiral in a convection subjected to wind, he will be shifted at the same speed as the rising air mass. For example, if the pilot sees that he has moved 3km in 10 minutes while circling in the thermal, he can deduce that the wind velocity is 3km/10min or 18km/h. Question 071. Another example: if the wind blows from west (270°), the updraft will be diverted to the east. Question 076. If the pilot leaves a thermal deflected by a strong wind (e.g. 15knots), it will be difficult to return to it. It is usually better to fly with the wind in search of another thermal. Question 079. On a cross-country flight, the pilot passes from one thermal to another. To ensure a continued flight, it is best to leave the thermal once he has clearly chosen a new target, for example the next thermal. It is safe to leave the current thermal once he has reached a sufficient altitude to get to his next objective. Question 080. When the thermals are turbulent, you should fly in a calm and supple manner (see next section), with slight use of brakes (which increases the pressure in the wing, making it more robust and providing

Answers & commentary for SHV/FSVL theory exam for paragliders Part 1: Flying Skills (2nd ed.) 2005 © J. Oberson, English Translation 2010 © A. Piers
Page 30 of 42
better sensitivity to steering). You should move away from the hill, thereby increasing the time available to recover from a flight incident, and also to get away from the most significant turbulence, which is usually near the ground. Question 081. Besides the thermals, the pilot of glider can remain aloft through dynamic updrafts. This is the updraft caused by a wind meeting a vertical geographical feature (e.g. ridge). Thie wind is forced to ascend the ridge and it is generates updrafts. This is often reffered to as ridge "soaring". In this mode of flight, when we want to make a turn, it is important to always turn to face the wind, and away from the ridge. Question 082. As long as the wind is string and consistent enough, the pilot can remain in the air, flying back and forth along the ridge indefinitely. Remember that the glider causes vortices (induced drag at the wing tips) in the wake of its flight (see part one, aerodynamics). This area of disturbed air can be felt by other pilots, and following behind another glider can result in significant difficulties, particularly when flying near the ground (landing and takeoff). Questions 083 and 084.
Flight Patterns, Exit from the Flight Area, Flight Incidents In severe turbulence and during or after extreme maneuvers, the wing often experiences strong movements around all three axes of flight, but mostly by rolling and pitching. In a zone of turbulence, pilots should remain supple and calm and to compensate for the movements of the wing, in a measured and controlled fashion. If in doubt, it is better to gently apply the brakes to maintain the wing pressure and feel the wing movements in order to anticipate its behavior, and not to over compensate for the rolling movements. Question 098. The pitching motions (forward surge) can be countered by a brief application of the brakes, whereas the reverse (the wind moves behind the pilot) should be countered by releasing brake tension completely (hands up). The pitching motions are also experienced after some extreme maneuvers, such as after the sudden exit of a tight spiral (see below). The effect is an initial pendular slowing (the wing moves back while the pilot continues forward as if pushed in a swing), this is followed by a surge when the wing dives forward. You should release the tension on the controls during the pendular slowing to enable the wing to catch the pilot (otherwise you may stall), then brake firmly but briefly during the swing (to avoid a frontal collapse). It is very important to master these simple reactions. See figure P23.

Answers & commentary for SHV/FSVL theory exam for paragliders Part 1: Flying Skills (2nd ed.) 2005 © J. Oberson, English Translation 2010 © A. Piers
Page 31 of 42
Figure P23: Pendular swing R, with pilot P rising faster than the wing (to counter this it is necessary to fly
“hands up” = i.e. no brake tension) followed by a swing A with the wing surging faster than the pilot (to counter this the pilot applies short symmetrical braking).
A spiral is a close series of tight 360° turns. The G-forces (increased apparent weight) are greatly increased due to centrifugal force. Question 102. The value of this maneuver is to rapidly lose altitude without deformation of the wing. Question 104. For this maneuver to be practically useful, we must fully master the technique, especially in turbulent air, and including the ability to leave on time and safely. One risk of this figure is the effect of the G-forces on the pilot physiology, and can lead to a “blackout” due to a decrease in cerebral circulation. Question 109. The other major risk from this maneuver is failure to make a successful exit. To stop a spiral maneuver, you should brake and initially slightly lean your body slightly exterior of the turn, and gradually increase the lean of your body. The severe the last maneuver is, the more the pendular swing will be and the more violent the exit from the spiral will be. See figure P23. The "wingover" maneuver is a series of quick-change curves (between 90° and 180°), the wing that may be at times banking at an angle of more than 90°. Question 101. See figure P24. The "big ears" maneuver symmetrically folds both ends of the wing at its extremities. See figure P24. To perform the “big ears”, the pilot grasps the outermost (A) lines and pulls symmetrically, and forcefully downwards. The advantage of “big ears” is that the paraglider continues horizontally on its defined course, without increasing the load factor, despite an increased rate of fall (3-4m/s). Question 103. The symmetrical deformation of the wing is not a real problem. The wing is stable but the angle of attack increases significantly resulting in a slightly higher risk of parachutal stall (see below), especially when exiting the maneuver. It is also possible to combine the use of big ears with the

Answers & commentary for SHV/FSVL theory exam for paragliders Part 1: Flying Skills (2nd ed.) 2005 © J. Oberson, English Translation 2010 © A. Piers
Page 32 of 42
accelerator (speed bar). This has the additive effect of further increasing the sink rate and speed and reducing the glide ratio. It therefore also increases the risk of a parachutal stall. Questions 106 to 108.
Figure P24: Wingover (a) and big ears (b)
Figure P25: B line stall (a) and asymmetrical collapse (b). Arrow = single fold on the underside at the points
of attachment of the B lines. Double arrow = closure (collapse) of left side of the wing. Arrow = compensation to maintain direction by the applying right brake.
A B-stall is achieved by pulling firmly but carefully and symmetrically on the B risers, causing a distortion of the profile of the wing (especially on the underside) in the form of a fold along the attachment points of the B lines. See figure P25. The fall rate is high, exceeding 5m/s, but the glider descends vertically (no wind on your face). It is easy to

Answers & commentary for SHV/FSVL theory exam for paragliders Part 1: Flying Skills (2nd ed.) 2005 © J. Oberson, English Translation 2010 © A. Piers
Page 33 of 42
trigger this maneuver, and there is no increase in the load factor. Question 105. On the other hand, the wing is less firm than with big ears and the risk of a parachutal stall on exit of the maneuver output is not negligible. Question 110. The best way to counteract this unfortunate tendancy is to release the B risers quickly and decisively when exiting the B stall. Question 111. This causes a small, harmless surge, which is a good sign of recovery of speed without a parachutal stall. These maneuvers (spiral, big ears and B stall) allow significant rates of descent and are used, for example when the pilot is caught in a powerful thermal just beneath a cumulus cloud. Question 112. This should happen rarely because we must always try to anticipate the flight conditions to achieve the best possible and safest flight. If the lift is powerful and wide, it is better to leave the area in a straight and normal flight for 200 to 300m. under the cloud base so that the legal distance from cloud is respected. In practice, B stall is rarely (if ever) used. In some severe turbulence, the wing may collapse (close) laterally or (rarely) frontally. A large collapse closure (50% or more) may be impressive but ultimately is not dangerous if you respond correctly. See figures P25 and P26. For closures front, it is usually sufficient to pull and release the brakes. For a side collapse, the priority is to maintain the direction of flight so as not accidently be re-directed into an obstacle or the hill. Indeed, a wing suffering a laterally collapse, tends to turn towards the side of the collapse, especially for high performance wings. If nothing is done, the wing accelerates into this autorotation resulting in increasingly tight turns, which can be dangerous. Question 096. The reaction immediately after the collapse is measured compensation (application of brake control and inclination of the body) on the open side, to maintain the flight direction. Question 097. If the compensation is too much, there is risk of spin (see below) on the side not collapsed. Figure P25.
Figure P26: Frontal collapse. The leading edge is folded down.
Front and side closures can also be caused intentionally. A frontal closure is achieved by pulling front symmetrically, with some force, on the 2 (A) risers. Figure P26. As to reduce

Answers & commentary for SHV/FSVL theory exam for paragliders Part 1: Flying Skills (2nd ed.) 2005 © J. Oberson, English Translation 2010 © A. Piers
Page 34 of 42
the angle of attack (and also increase speed) we must pull gently, and evenly, on the A, B and optionally C. This is the principle used by the speed bar. Question 095. Lateral collapses are induced by either pulling down the A lines or the on one side. Figure P25. A stall (with brakes) or full-stall, is caused by pulling too hard or too far on the brakes. Figure P27. This is referred to as dropping out, and the wing is partially deflates and loses its arched shape. This differs from a parachutal stall, where the wing more or less keeps its shape. Question 085. This is a flight configuration which is easy to achieve but can be very dangerous. It should not inadvertently happen to a trained pilot (having learned and explored of the full speed range). It can be done voluntarily as part of an ongoing SIV (simulated incidents of flight) above a lake with good instruction (specialized instructor and rescue team). The danger of continued stalling remains until well after the exit of the maneuver. Figure P27.
Figure P27: Stalls. (a) the wing is brought to minimum speed by pulling symmetrically and excessively on the brakes, it becomes very curved, then deflates and stops its horizontal movement. Inertia of the pilot then
propels him into a rocking motion forward and upward. Immediately after (in b) an pendulum motion is established; the wing re-inflates and plunges forward rapidly (a severe swing) while the pilot is propelled
backwards and upwards. The risk is (c) that the pilot may fall into the wing, become tangled in her wing an the lines, where it will be difficult for the pilot then throw the rescue ... !
The parachutal stall motion is softer. It is noticeable when there is no sensation of wind on your face or tension on the brake controls. The underside is more in tension, but has a concave surface. Question 086. To break this pattern of flight, if you have a safe altitude, you simply pull on the risers to cause a surge and propelling the wing into the normal flight envelope. Question 087. Near the ground, it is more prudent to let the glider continue its parachutal stall and prepare for a parachute landing (roll-over) on abrupt contact with the ground. Question 088. A deep stall can also occur if the exit from a B stall is poorly managed and if the wing loading is low (<2.5 kg/m2). Question 089. A spin is when the wing does flat turns quickly around the yaw axis, one half of the wing is moving forward, the other backward. Figure P28. Question 100. This should not be confused with a twist, where the pilot is rotated (e.g. through inertial mass movments) in relation to the wing. Question 099. More usually we refer to an asymmetric stall when the

Answers & commentary for SHV/FSVL theory exam for paragliders Part 1: Flying Skills (2nd ed.) 2005 © J. Oberson, English Translation 2010 © A. Piers
Page 35 of 42
spin is short and that the wing deflates and becomes deformed. These two configurations occur when braking is excessive and asymmetric (turning with the brakes) or a turn is initiated too quickly. A stall with rearward rotation of half of the wing occurs. Questions 090 and 091. A primary indication of a spin is the sudden decrease in tension (lower resistance) on the brake control on the inside side during a turn. Question 092. To exit from a potential spin, you just completely release the tension on the brake control (arms up) to allow the wing to resume symmetrically speed after a swing which may be more or less asymmetric. Question 093. To stop a spin that is already well underway, things are more complex but will not be addressed in this manual. To prevent a spin, we must constantly fly with a sufficient reserve of speed and fly the glider delicately . Question 094.
Figure P28: Spin and asymmetric stall. Rotation of the wing around the vertical axis (v).
The last serious incident of flight to be discussed is the collision between two gliders. It can be avoided by respecting the rules of priority and flying carefully in the airspace when there are many paragliders in the air. In particular we must absolutely avoid using a different direction of rotation in a thermal occupied by other gliders. Question 150. A collision can occur between a delta and a glider when the delta approaches the glider from the bottom and back. In this situation, both pilots have a poor field of view vis-à-vis the other. Question 149. Indeed, the paragliding pilot, in a sitting position, has poor visibility to his back and below, while the pilot delta, which is faster and with better glide angle, has his upward field of view obscured by the wing. The reserve parachute must be used whenever the flying of the wing becomes uncontrollable or when collision occurred. Questions 151 and 152. The steering becomes uncontrollable for example when there is failure of the equipment or an incident of flight causes an autorotation which is increasingly tight and fast. Question 153. When the

Answers & commentary for SHV/FSVL theory exam for paragliders Part 1: Flying Skills (2nd ed.) 2005 © J. Oberson, English Translation 2010 © A. Piers
Page 36 of 42
parachute is opened, the pilot should pull the lines B or C to prevent the wing flying and possibly interfering with the parachute. Then he must sit up in his seat, knees slightly bent and together to prepare for a smooth roll-over on contact with the ground (sink rate between 5-6m/s). This corresponds to a free fall of about 1.5m high. Question 154.
Landing Before landing, during flight, we must choose the landing site (if an emergency landing), observe it (e.g. for obstacles near or on the ground), and determine the direction of the wind. Therefore, before making the final approach (volte) it is recommended to fly over the landing strip. Question 113. The windsock gives a good sense of direction, strength and evenness of the wind. If there is no windsock, you can observe the drift of your flight from the ground, smoke plumes, flags, the waves on water surfaces, GPS (ground speed), the flight of other gliders. Question 114. Manoevers in preparation for landing called the volte or "u" landing pattern. Figure P29. This approach allows for a precision landing, but moreover, it allows pilots to anticipate the approach of other gliders as all pilots are expected to do the same thing. Question 116. The volte is performed in order to finally arrive in a straight path, facing the wind, at the exact spot where the pilot decided to land. The volte is divided into 4 parts: (1) The descending area to perform gentle 360° turns in order to lose height and reach about 50-70m above ground. These curves are made windward of the landing area, slightly to one side, never above the landing zone. (2) The downwind phase is a straight flight, parallel and adjacent to the ground, upwind. (3) The crosswind is a straight flight at 90° from the previous track, towards the landing zone. (4) The final approach is the final straight flight, against the wind, resulting in contact with the ground the at the pilot's target. Questions 117 to 120. Throughout the volte the pilot's eyes must be fixed on the target except for occasionally glancing for any obstacles around the landing zone. This is the only way to estimate the glide angle relative to the target, and determine the time and place to execute the various turns and phases of the landing. Riveted attention on a single obstacle has the effect of paralyzing the pilot and can be very dangerous. The landing pattern is one of the toughest maneuvers to execute properly, calmly and safely, and therefore requires considerable time to master. At the end of each flight the student should review his actions learn and better judge his glide angle and the landing pattern. You can make slalom turns of 180° at the crosswind phase (phase 3) to loose altitude if you find yourself too high. However focused and practiced pilot should use this move very rarely. The volte is generally (aviation convention) made to the left, i.e., all turns, phase 1 and phase between 2-3 and 3-4, are left turns. If the volte is made to the right, all turns are made to the right. In phase 1, we always descend in a spiral in the direction of the volte. Question 121.
Answers & commentary for SHV/FSVL theory exam for paragliders Part 1: Flying Skills (2nd ed.) 2005 © J. Oberson, English Translation 2010 © A. Piers
Page 37 of 42
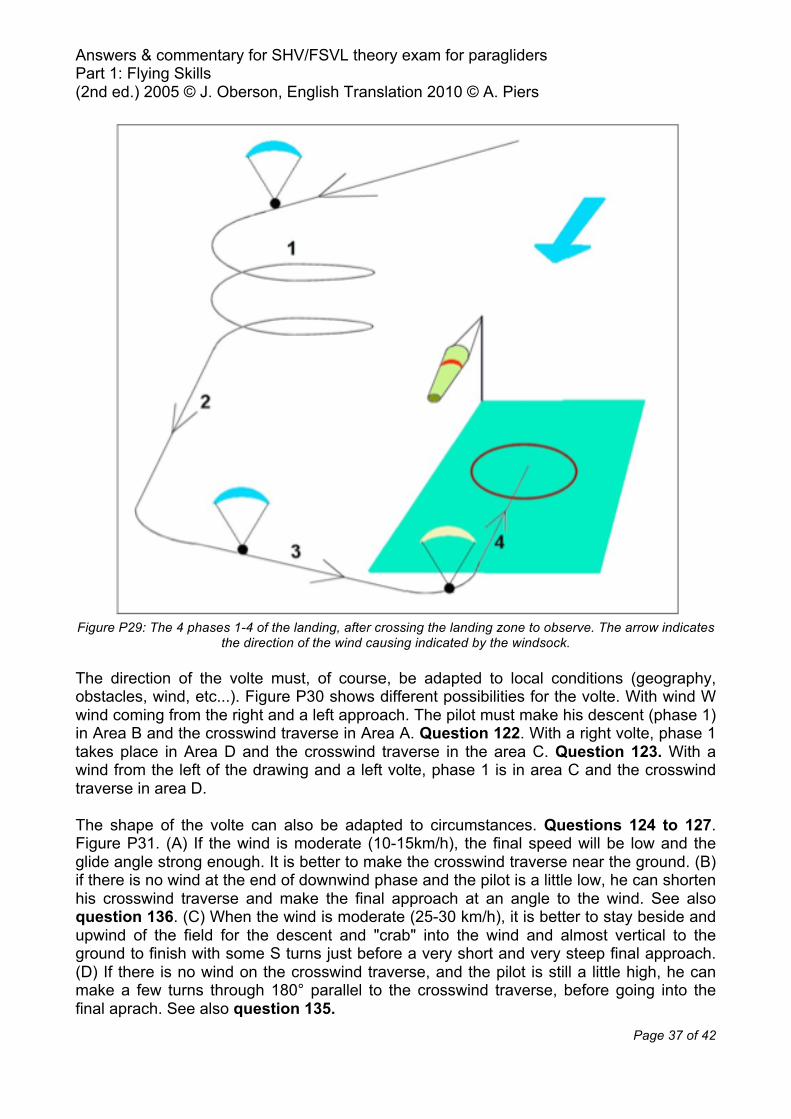
Figure P29: The 4 phases 1-4 of the landing, after crossing the landing zone to observe. The arrow indicates
the direction of the wind causing indicated by the windsock. The direction of the volte must, of course, be adapted to local conditions (geography, obstacles, wind, etc...). Figure P30 shows different possibilities for the volte. With wind W wind coming from the right and a left approach. The pilot must make his descent (phase 1) in Area B and the crosswind traverse in Area A. Question 122. With a right volte, phase 1 takes place in Area D and the crosswind traverse in the area C. Question 123. With a wind from the left of the drawing and a left volte, phase 1 is in area C and the crosswind traverse in area D. The shape of the volte can also be adapted to circumstances. Questions 124 to 127. Figure P31. (A) If the wind is moderate (10-15km/h), the final speed will be low and the glide angle strong enough. It is better to make the crosswind traverse near the ground. (B) if there is no wind at the end of downwind phase and the pilot is a little low, he can shorten his crosswind traverse and make the final approach at an angle to the wind. See also question 136. (C) When the wind is moderate (25-30 km/h), it is better to stay beside and upwind of the field for the descent and "crab" into the wind and almost vertical to the ground to finish with some S turns just before a very short and very steep final approach. (D) If there is no wind on the crosswind traverse, and the pilot is still a little high, he can make a few turns through 180° parallel to the crosswind traverse, before going into the final aprach. See also question 135.

Answers & commentary for SHV/FSVL theory exam for paragliders Part 1: Flying Skills (2nd ed.) 2005 © J. Oberson, English Translation 2010 © A. Piers
Page 38 of 42
Figure P30: Sectors A-B of different phases of the landing, according to the wind direction and the direction
of the volte.
Figure P31: Feint - The path of the standard turnaround. Dark - the different variations (a-d) of the path of the
volte, depending on circumstances.

Answers & commentary for SHV/FSVL theory exam for paragliders Part 1: Flying Skills (2nd ed.) 2005 © J. Oberson, English Translation 2010 © A. Piers
Page 39 of 42
If, in the downwind phase, the pilot is far too high, the best method to correct this is to enlarge the crosswind traverse, providing more space for the remaining phases of the landing. Question 133. If instead, the pilot is too low at the downwind phase, the remaining phases should be shortened. Question 134. In the final apprach, if the pilot realizes he is a little too high, the best method for a successful safe precision landing is to brake and stand upright in his harness (increase the drag of the pilot) to reduce the glide ratio, being careful that they do not stall. Question 137. Indeed, if a pilot takes 80% or greater brakes long enough, there is a risk a stall, which is especially dangerous near the ground. Question 139. If instead the pilot is a bit too low on final approach, he must maximize the glide ratio of his paraglider (= no brakes + arms up) and brake gently near to the ground to make the most of its potential glide. If the wind is high, e.g. 25km/h, the pilot on landing, should immediately turn 180° to face the wing, and control its flight by running in the direction of the wind and pulling the lines C and B. This leads to a collapse of the wing without increasing the lift and the pilot is not dragged dangerously on the ground by the wing. If you pull the brakes in these circumstances, the lift increases and the pilot can be dangerously lift off. Question 141. Immediately after landing, the pilot must leave the landing area as soon as possible to make room for other gliders to land. Question 140. We have seen that, downwind, the speed and glide ratio of a wing are larger than in no wind, and that these two quantities are smaller with a headwind. It is the same landing. A final downwind approach leads to a flatter angle (greater glide ratio) and speed. Question 131. Conversely with a headwind, the approach angle is steeper (less glide ratio) and the speed is slower than with no wind, making the landing easier. Question 132. Paragliders can easily land on sloping ground. In general there is not enough flexibility to land facing the slope. This type of landing is often too brutal. Therefore, it is preferable to land following the contour of the slope, i.e. it is the final approach is perpendicular to the slope or parallel to the slope. Question 142. Figure P32.
Figure P32: Paraglider landing on a slope.
Answers & commentary for SHV/FSVL theory exam for paragliders Part 1: Flying Skills (2nd ed.) 2005 © J. Oberson, English Translation 2010 © A. Piers
Page 40 of 42
If you must land against or in the direction of the slope, must it be slightly inclined. Figure P33 shows that against the direction of the slope, it is easy to be accurate, but contact with the ground is rough, while following the direction of the slope, it can be very difficult to be precise (the wing continues to fly in the final approach) but contact with the ground will be soft. Question 115.
Figure P33: Landing against the slope (top) and in the direction of the slope (bottom). S = available, S '=
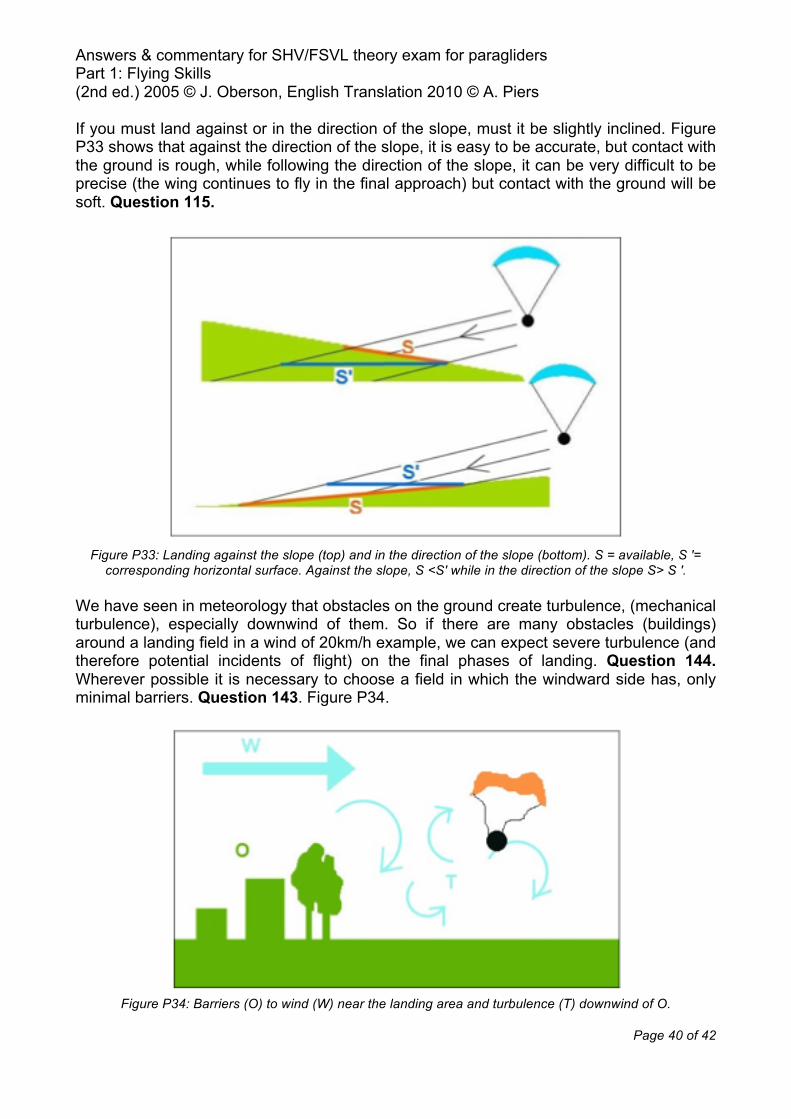
corresponding horizontal surface. Against the slope, S <S' while in the direction of the slope S> S '. We have seen in meteorology that obstacles on the ground create turbulence, (mechanical turbulence), especially downwind of them. So if there are many obstacles (buildings) around a landing field in a wind of 20km/h example, we can expect severe turbulence (and therefore potential incidents of flight) on the final phases of landing. Question 144. Wherever possible it is necessary to choose a field in which the windward side has, only minimal barriers. Question 143. Figure P34.
Figure P34: Barriers (O) to wind (W) near the landing area and turbulence (T) downwind of O.

Answers & commentary for SHV/FSVL theory exam for paragliders Part 1: Flying Skills (2nd ed.) 2005 © J. Oberson, English Translation 2010 © A. Piers
Page 41 of 42
If there are 3 gliders that follow at 50m when approaching the landing zone with no wind, the first pilot (the lowest) should decide the direction of the final approach, but by convention it should be a turn to his left. The following 2 other gliders must copy the decision of the first pilot. This approach allows everyone to anticipate and predict the path of other gliders and avoid collisions. Question 128. If the first pilot, in crosswind traverse, realizes that the wind will be given a light tail wind, it is too late to change the landing and it is much safer to continue it as planned. He must obviously expect a very flat glide angle in the final approach (increased glide ratio). Question 129. If the first pilot decided to turn to the right with a tailwind in the final approach (which is doubly wrong) the second pilot following closely (50m) should still carry out the same approach for the same reasons cited above. Question 130. With or without wind, and faced with a choice between landing in a tree, a stream, the middle of a lake or the sloped roof of a house, the first choice should be the least harmful if no alternative landing is possible. Question 145. On a stretch of water, the risk of drowning is important and the sloping roof of a house the impact can be very brutal. Statistics have shown that the greatest danger on landing in a tree happens, when the pilot leaves the spot without being adequately secured by a rope. The branches may yield under the weight of the pilot who then falls and gets injured. Question 147. To release the glider hanging from a tree, it may be necessary remove the top of the tree to avoid tearing the wing and to release the lines of at the quick links and brake handles. Question 148. If landing in water is unavoidable, it is recommended to open the straps of the harness before contact with water. This can prevent drowning if the glider is dragged under water. Question 146.

Answers & commentary for SHV/FSVL theory exam for paragliders Part 1: Flying Skills (2nd ed.) 2005 © J. Oberson, English Translation 2010 © A. Piers
Page 42 of 42
Dear current and future pilots, This document (2nd edition) is subject to copyright protection. Upon reflection and for many reasons not discussed, we have decided to freely distribute it for personal and private use, via the www.soaringmeteo.com website as a PDF file. You can download this file and print it (at your own cost). However, we do not authorize the commercial use of this form (e.g. publication of an extract or the sale of copies in a paragliding school) or modification (including headers) or the intellectual appropriation by a third party of any part of the document. In total there are 5 units each covering the 5 branches of theoretical exam of SHV/FSVL: Aerodynamics and Flight Mechanics Meteorology Equipment Legislation Practicalities of Flight
Download address: www.paraworld.ch or www.soaringmeteo.ch In exchange for free use of this document, please do not hesitate to let me know by email (see my website) errors in the language, absent questions or an unclear meaning which has been overlooked, so that other future pilots receive the best possible support in exam preparation. Good luck in your exams. Thank you for your understanding and your cooperation. Good flights and stay safe. Jean Oberson, March 2005 & Andy Piers, April 2010