FLOE quick attach & standard sEctiOnaL dOck and LEg kits...Page 2 FLOE quick attach & standard...
8
Page 1 ©FLOE International, Inc. 48473 State Hwy. 65 McGregor, MN 55760 www.floeintl.com All rights reserved. INSTRUCTION P/N 610-02500-01 ISSUED: 1/14/15 REV: 10/17 TOOLS REQUIRED • 7-32” ALLEN HEAD SOCKET • (2) 9/16” SCOKETS OR WRNCHES • 1-1/8” SOCKET AND SOCKET ADAPTOR OR FLOE SPEED WRENCH (TO ADJUST THE LEGS) • TORQUE WRENCH • CORDLESS DRILL • 13/32” DRILL BIT • TAPE MEASURE • LEVEL Never adjust your dock legs with an impact wrench or hammer drill. Never adjust your dock legs with more than 15 ft/lbs of force. Applying too much force to your dock legs will damage the mechanism. WARNING We recommend that the deck surface of the dock is a minimum of 16” above the water when properly adjusted. However if you have high wave conditions that commonly exceed 15” we recommend that your raise your dock accordingly. Waves should pass under the dock and not hit siderail or decking. FLOE QUICK ATTACH & STANDARD SECTIONAL DOCK AND LEG KITS ASSEMBLy INSTRUCTIONS KIT P/N 510-02550-00 X-SHALLOW KIT P/N 510-02551-00 SHALLOW KIT P/N 510-02552-00 MEDIUM KIT P/N 510-02553-00 DEEP
Transcript of FLOE quick attach & standard sEctiOnaL dOck and LEg kits...Page 2 FLOE quick attach & standard...

Page 1
©FLOE International, Inc.48473 State Hwy. 65McGregor, MN 55760www.floeintl.comAll rights reserved.
INSTRUCTION P/N 610-02500-01ISSUED: 1/14/15REV: 10/17
TOOLS REQUIRED• 7-32” ALLEN HEAD SOCKET• (2) 9/16” SCOKETS OR WRNCHES• 1-1/8” SOCKET AND SOCKET ADAPTOR OR FLOE SPEED WRENCH (TO ADJUST THE LEGS)• TORQUE WRENCH• CORDLESS DRILL• 13/32” DRILL BIT• TAPE MEASURE• LEVEL
Never adjust your dock legs with an impact wrench or hammer
drill. Never adjust your dock legs with more than 15 ft/lbs of force.
Applying too much force to your dock legs will damage the mechanism.
WARNING We recommend that the deck surface of the dock is a minimum of 16” above the water when properly
adjusted. However if you have high wave conditions that commonly exceed 15” we recommend that your raise your dock accordingly. Waves should pass under the
dock and not hit siderail or decking.
FLOE quick attach & standard sEctiOnaL dOck and LEg kitsASSEMBLy INSTRUCTIONSKIT P/N 510-02550-00 X-SHALLOWKIT P/N 510-02551-00 SHALLOWKIT P/N 510-02552-00 MEDIUMKIT P/N 510-02553-00 DEEP

Page 2
FLOE quick attach & standard sEctiOnaL dOck and LEg kitsEXPLODED VIEW AND PARTS LISTKIT P/N 510-02550-00 X-SHALLOWKIT P/N 510-02551-00 SHALLOWKIT P/N 510-02552-00 MEDIUMKIT P/N 510-02553-00 DEEP
Note: Leg Brace Tube and associated hardware is not included with X-Shallow #510-02552-00
Item Part No. Qty Description 1 001-26725-00 2 Pin, Safety Snap - 3/8 X 1.75 SS 2 001-70000-00 2 Soft Grip Knob, 1/2-13 X 1-1/4” 3 001-70110-00 2 HHCS 3/8-16 x 1 3/4” SS 4 001-70118-00 2 HHCS 3/8-16 x 3 3/4” SS 5 001-70119-00 2 HHCS 3/8-16 x 4” SS 6 001-71017-00 12 Flat Washer, 18-8 SS 7 001-73819-00 2 BHCS, 3/8-16 X 2” SS 7 001-73815-00 2 BHCS, 3/8-16 x 1” SS 8 001-76071-00 6 Nut, Nylock 3/8-16 Aluminum 9 001-76349-00 2 Nut, 3/8-16 Aluminum 10 001-76350-00 2 Nut, 1/2-13 Aluminum 11 002-00064-00 2 Bracket, W/K Brace 12 002-03305-00 2 Tube, Leg Brace - 22.5” 13 002-00143-00 2 BRKT., Quick Att. Sctnl. Connection-2” 13 002-07002-00 2 Quick Connect, SCTNL. Dock 14 110-00230-00 2 ASS’y, Shallow Leg Sectional Dock 15 110-00108-00 2 Weld’t, Sand Pad Sectional 16 110-00233-00 2 ASS’y, Medium Leg Sectional Dock 17 110-00242-00 2 ASS’y, Deep Leg Sectional Dock 18 110-00240-00 2 ASS’y X-Shallow Sectional Dock
Page 3
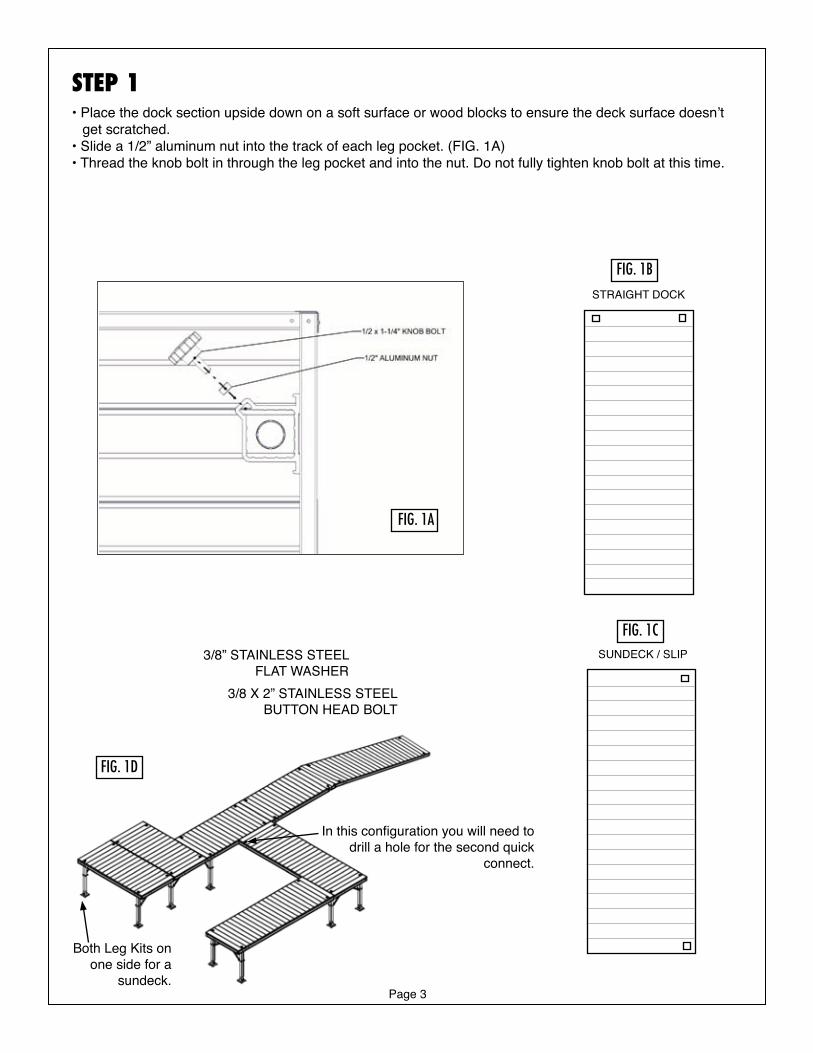
Step 1• Place the dock section upside down on a soft surface or wood blocks to ensure the deck surface doesn’t get scratched.• Slide a 1/2” aluminum nut into the track of each leg pocket. (FIG. 1A)• Thread the knob bolt in through the leg pocket and into the nut. Do not fully tighten knob bolt at this time.
FIG. 1D
3/8 X 2” STAINLESS STEEL BUTTON HEAD BOLT
3/8” STAINLESS STEEL FLAT WASHER
FIG. 1B
FIG. 1CSUNDECK / SLIP
STRAIGHT DOCK
In this configuration you will need to drill a hole for the second quick
connect.
Both Leg Kits on one side for a
sundeck.
FIG. 1A

Page 4
Step 3• Attach the (2) V-Braces to the Center V-Brace Mount using the (2) Safety Snap Pins.
• Adjust the V-brace Bracket Leg up or down the leg to allow the installation of the (2) 3/8 x 1-3/4” hex head bolt, (4) 3/8” stainless steel flat washers and (2) 3/8” nylock nuts as shown in FIG. 4. Do not over tighten and crush the V-Brace.
FIG. 3
• At this time, tighten the 3/8 x 4” bolt and nut on the V-brace Bracket Clamp installed in Step 3. TORQUE TO 20 FT/LBS.
V-BRACE
SAFETy SNAP PIN
3/8 X 1-3/4” STAINLESSSTEEL HEX HEAD BOLT
3/8” ALUMINUMNyLOCK NUT
3/8” STAINLESS STEEL WASHER
Step 2• Insert a leg into each Leg Pocket as shown in FIG. 2A (note the orientation of the stop blocks welded to the front and rear of the leg in FIG. 2A). Rocking the leg assembly while hand tightening the knob bolt will help to ensure that the leg is seated and the knob bolt is adequately tightened. Note – if the leg moves in the pocket, the knob bolt needs to be tightened further. Do not use any tools on the knob bolt.
FIG. 2A
FIG. 2B
3/8 X 4” STAINLESS STEEL HEX HEAD BOLT
3/8” STAINLESS STEEL WASHER
BRACE CLAMP
3/8” ALUMINUMNyLOCK NUT
STOP BLOCK
• Slide a Brace Clamp over the leg with the tab toward the center of the dock as shown in 2B and insert (2) 3/8 x 4” hex head bolts, (4) 3/8” stainless steel flat washers and (2) 3/8” nylock nuts. Do not tighten at this time.

Page 5
- - - - - - - - - - - - - - - - - - - - - - - - - - - - - - - - - - - - - - - - Note - - - - - - - - - - - - - - - - - - - - - - - - - - - - - - - - - - - - - - -
AS of Sept. 2017, V-BRAceS ARe Welded to dock SectIoNS ANd do Not Need to Be mouNted.
pRIoR to Sept. 2017, V-BRAceS WeRe Not Welded IN ANd Need to Be mouNted. foR INStAllING NeW Wheel kItS oN pRe-Sept. 2017 dockS, kIt #510-02515-00 IS NeceSSARY.
INStRuctIoNS foR theSe oldeR dockS IS BeloW.
3/8” ALUMINUMNyLOCK NUT
V-BRAce INStAllAtIoN foR dockS pRIoR to SeptemBeR 2017 • Attach the two Center V-Brace Mounts to each side of the center frame between the two leg pockets using
(2) 3/8 x 2” hex head bolts and (2) 3/8” nylock nuts as shown in Fig. B & C
• For a sundeck, attach each V-Brace Mount to opposite ends of the same frame beam as shown in Fig. C
• Torque to 20ft lbs.
Fig. A
3/8” ALUMINUM NyLOCK NUT3/8 X 2” STAINLESS STEEL
HEX HEAD BOLT
CENTER V-BRACE MOUNT
Fig. B
SUNDECK / SLIP
Fig. C
STRAIGHT DOCK
V-BRACE MOUNTLOCATION

Page 6
Step 5• Turn the dock section right side up and attach the Quick Connects to the dock using (2) 3/8 x 2” button head bolts and (2) aluminum nuts as shown in Fig 6A. TORQUE TO 20 FT/LBS.
• Note the orientation shown in FIG 6A is for straight docks or shore end ramps. For sundeck and slip applications, refer to the next pages.
3/8” ALUMINUM NUT
3/8 X 2” STAINLESSSTEEL BUTTON HEAD BOLT
ORIENTATION OF QUICK CONNECT FOR STRAIGHT DOCKS (INCLUDING SHORE END RAMP)
FIG. 5A
FIG. 4
Step 4• Attach the Sand pads to the Dock Legs using (2) 3/8 x 3 ¾” hex head bolts, (4) 3/8” stainless steel flat washers and (2) nylock nuts as shown in FIG. 5
3/8” ALUMINUMNyLOCK NUT
3/8” STAINLESS STEEL WASHER
3/8 X 3-3/4” STAINLESSSTEEL HEX HEAD BOLT
SANDPAD

Page 7
FIG. 5D
3 LEGS
Step 5 (continued)• Quick Connects have two different sides to accommodate straight lined docks and sundecks/slips. (FIG. 6B) For sundeck and slip applications, the Quick Connect must be positioned as shown in FIG. 6C. TORQUE TO 20 FT.LBS. WARNING: Incorrect orientation of the Quick Connects will produce a large gap between the two docksections and create a possible pinch hazard if the dock sections become out of level
• Sundecks are generally mounted off the side of a straight dock. If the sundeck is attached to the end (FIG. 6D), the first sundeck section will require 3 legs.
FIG. 5C
SUNDECK AND SLIP ORIENTATION OF QUICK CONNECT
SUNDECK
FIG. 5B

Page 8
Step 5 (continued)• For some standard sectional dock configurations, it may be necessary to drill additional holes for the Quick Connects. In such cases, the holes are positioned 43-1/16” apart and 1-3/4” up from the bottom of the frame. The Quick Connect can be used as a drill guide to achieve the proper hole height.
leVelING the dockRemove the plastic caps from the adjustment holes. Using FLOE SPEED WRENCH, a 1-1/8” socket and wrench, or a cordless drill with a socket and socket adaptor, adjust the height of the dock so the deck surface is approximately 16” above the water. SEE WARNINGS BELOW! Turn the adjuster nut on the top of the dock clockwise to lower and counter clockwise to raise. Use a level to make sure all dock surfaces are level. Once the dock is set in place and leveled, insert the plastic caps into the adjustment holes.
TORQUE TO 20 FT/LBS.
FIG. 5E
FIG. 5F
• For Quick Attach Sectional docks, hook Quick Connect onto dock and insert set bolt. TORQUE TO 5 FT/LBS MAXIMUM.