Flintlastic SA - Commercial Manual - CertainTeed adhesion of self-adhesive roofing membranes....
16
CertainTeed Self-Adhering SBS Modified Bitumen Roof Systems
-
Upload
vuongnguyet -
Category
Documents
-
view
219 -
download
3
Transcript of Flintlastic SA - Commercial Manual - CertainTeed adhesion of self-adhesive roofing membranes....

CertainTeed
Self-Adhering SBS Modified Bitumen Roof Systems
46624.indd 1 3/2/16 2:55 PM

After more than a century of making reliable,
durable roofing materials, CertainTeed remains a
leading trusted brand for roofing distributors and
contractors. We’re rated #1 with America’s building
and remodeling professionals.
So whether you have a residential or commercial
project, you can turn to CertainTeed with confidence.
We’ve been around a long time, and our expertise
goes into giving you better products.
We manufacture complete systems and protect
you with strong warranties. We use the highest
quality materials, and that makes for better roofs —
not to mention lower life-cycle costs.
It’s all a part of our promise to you.
Quality made certain. Satisfaction guaranteed.™
46624.indd 2 3/2/16 2:55 PM

1
Goes down fast. Stays on strong.Flintlastic® SA performs in all the right ways.
What’s more important to you? Speed of installation,
durability or appearance? The Flintlastic SA
(self-adhering) SBS modified bitumen low slope roofing
system is a premium performer in all these areas.
What is the SA system?
With high quality materials bottom to top, components
of the Flintlastic SA system include:
Flintlastic® SA NailBase (mechanically attached)
Flintlastic® SA PlyBase (self-adhering)
Flintlastic® SA MidPly (self-adhering)
Flintlastic® SA Cap (self-adhering)
Flintlastic® SA Cap FR (fire-rated, self-adhering)
Flintlastic® SA Cap CoolStar (self-adhering)
Flintlastic® SA Cap FR CoolStar (fire-rated, self-adhering)
FlintPrime® SA (quick-dry primer)
Please see page 12 for product detalis.
What are the advantages?
No torches, no hot asphalt, no fumes and no mess —
all of which means application is much cleaner and
faster. Plus, equipment needs are minimal. These
advantages are even more amazing considering the
long system life you can expect.
Where can I use it?
The value associated with labor savings and safety can
be applied to any roof project. In addition, Flintlastic SA
roof systems are ideal when access to the roof is limited,
such as high-rise buildings. And no asphalt kettle means
no odor, which makes SA systems an ideal solution on
healthcare, education, hospitality and residences/condos
where occupant comfort is tremendously desirable.
Energy Savings
Flintlastic SA Cap and SA Cap FR are available with
highly reflective granules, meeting ENERGY STAR®
requirements for cool roofs. Specific product details can
be found on product technical data sheets or by viewing
www.energystar.gov.
The Flintlastic SA Family of Products
CertainTeed offers two types of primers for use with
Flintlastic SA systems. FlintPrime® asphalt primer and
FlintPrime® SA quick-dry primer are designed to enhance
the adhesion of self-adhesive roofing membranes.
Available in 14 oz spray cans, 1-gallon cans, 3.5-gallon
buckets, and 5-gallon pails.
FlintBond® SBS Modified Bitumen Adhesive is a premium
grade adhesive. With Flintlastic SA membranes, the
trowel and caulk grade are used for endlap, sidelap bead
and vertical flashing details. Available in caulk, 3 gallon,
5 gallon and 55 gallon drums.
Considerations for Intended Use
If multiple SA products are listed, products are listed in order of warranty duration from shortest to longest, with the
exception of SA Cap and SA Cap-FR; SA Cap FR is intended for use where Class A fire rating is required (see UL Directory
for Class A system specification).
NOTE: Removal of the roof system (at end of life) may be difficult when adhering PlyBase or MidPly direct to a roof deck
(i.e. wood, concrete).
*FlintPrime or FlintPrime SA may be recommended, contact CertainTeed Technical Services for more information.
Deck Insulation/Coverboard* SA Anchor/Base SA Interply SA Cap
Steel Required NailBase (MF) Optional SA CapPlyBase (SA) PlyBase (SA)MidPly (SA) (SA) SA Cap FR
MidPly (SA) (SA)
Wood/LWIC/ Other, i.e. Optional Yes PlyBase, MidPlyGypsum, Cementitious No NailBase (MF)Wood Fiber, Wood Planks
Structural Wood Fiber, etc
Concrete Optional Yes PlyBase, MidPly No – Requires FlintPrime SA
46624.indd 3 3/2/16 2:55 PM

Important Application Considerations
Every professional roofer is familiar with the tools needed
to complete a roof installation, but just as a recap,
specific tools you’ll need to install Flintlastic® SA include:
• A weighted roller for pressing the membrane into place,
2" to 4" in diameter (40-75 lbs.).
• Suitable trowel for applying adhesive to flashing details.
• Roofer’s knife with hooked blade.
• Long-handled (standing) roller with 1/8"-1/4" nap for
applying primer (1/8" nap for smooth surfaces, 1/4" nap
for more porous surfaces).
• Caulk gun for applying beads of FlintBond adhesive.
• Seam probing tool to check for small voids.
Please Keep in Mind:
• Do not attempt application if ice, snow, moisture or
dew are present. Ambient temperature must be 50ºF
or above.
• Substrates must be free of dust, dirt, oil, debris
and moisture.
• Store Flintlastic SA rolls indoors on pallets, protected
from the elements. Rolls that are improperly stored or
have been warehoused for prolonged periods of time
may lose their tack and should not be used.
• If the material isn’t bonding, STOP the application!
• Always remember to put safety first and follow all OSHA
safety guidelines with any roofing installation.
• Primer, if used, must be applied at the specified rate
and must be allowed to thoroughly dry.
• Work with manageable lengths of MidPly and Cap for
the particular job. Where appropriate, cut rolls into
1/3- or 1/2-roll lengths and allow material to relax prior
to installation.
• In cooler weather, a hand-held hot air welding gun
such as the Leister Triac™ (110 volt power required)
or Primus Sievert PNS-4 Hot Air Kit, can be used to
warm the sidelap areas and improve adhesion (prior
to application of the FlintBond SBS Modified Bitumen
Adhesive).
• Target 1/4" FlintBond bleed out at endlap areas. Use
caution not to roll weighted roller into bleed out.”
• All plies of the assembly should be installed inone day. If blue film must be exposed for longerperiods of time, cover with tarp or suitable
alternate protection.
• When applying MidPly (or PlyBase) directly to substrate,
design adequate roof ventilation into the system
through the use of roof relief vents.
2
System Warranties at a Glance
SA System with Adhered Base Ply
SA System with Mechanically Attached Anchor Sheet
NOTE: Gold Star contractors have the option to offer their customers a 25% warranty duration extension with the CertainTeedIntegrity Maintenance Coverage program. *Refer to CertainTeed Commercial Systems Specifications.
Warranty Warranty Fee Insulation/ Base Interply Cap Re-Cover Spec*Duration (100 SQ Min.) Coverboard
15 years $7.50/SQ Optional SA PlyBase Prior SA-C-2-S15 years $7.50/SQ Optional SA MidPly SA Cap FR approval SA-I-2-S20 years $12.50/SQ Optional SA PlyBase SA PlyBase SA Cap required by SA-C-3-S
SA Cap FR CertainTeed SA-I-3-S20 years $12.50/SQ Optional SA MidPly SA Cap Technical SA-C-2-S
SA Cap FR Department SA-I-2-S25 years $15.00/SQ Double layer, SA MidPly SA Cap SA-C-3-S
2nd layer SA Cap FR SA-I-3-Sadhered
Warranty Warranty Fee Insulation/ Base Interply Cap Re-Cover Spec*Duration (100 SQ Min.) Coverboard
12 years $4.00/SQ Optional SA NailBase SA Cap Approved SA-C-2-SSA Cap FR SA-IN-2-S
SA-N-2-S15 years $7.50/SQ Optional SA NailBase SA PlyBase Prior SA-C-3-S20 years $12.50/SQ Optional SA NailBase SA MidPly approval SA-IN-3-S
required by SA-N-3-S20 years $12.50/SQ Optional SA NailBase 2-SA CertainTeed SA-IN-4-S
PlyBase Technical SA-N-4-SDepartment
46624.indd 4 3/2/16 2:55 PM

3
• Do not mix Flintlastic® SA membranes with other
types of roof membranes. Flintlastic SA membranes
are specifically designed to be applied together. The
permanent top film of the MidPly, PlyBase and NailBase
cannot receive torching, hot asphalt or other non
self-adhering application methods. The Flintlastic SA
Cap (or SA Cap FR), PlyBase and MidPly cannot be
applied to any surfaces other than as described herein.
• Do not use cold adhesives with Flintlastic SA
membranes other than for flashing details and cap
sheet overlaps as described herein.
• Refer to the CertainTeed Commercial Roof Systems
Manual for complete requirements.
• When applying Flintlastic SA on slopes exceeding 1"
in 12", membranes shall be back nailed. When applied
parallel to the slope, Flintlastic SA shall be blind-nailed
at end laps 2" in from top edge, 6" o.c. through tin
discs and to wood nailers. See General Requirements
Section of the CertainTeed Commercial Roof Systems
Specifications for details.
Application of Base Sheet
Flintlastic SA NailBase may be used as an anchor sheet
(mechanically fastened); PlyBase or MidPly may be
used as a base ply (fully adhered). Beginning at the
low point of the roof, mechanically fasten Flintlastic SA
NailBase to nailable deck using appropriate fasteners
(see fasteners chart). Start with an appropriate roll
width (1/3 or 1/2 roll) to accommodate offsetting of
sidelaps of subsequent layers of MidPly and/or Cap
sheet. Install so that no sidelaps are against the flow
of water. A minimum fastening pattern is every 9" on
center on sidelaps and every 18" on center in two
staggered rows in the field of the sheet.
Overlap base sheet sidelaps 2" and endlaps 4".
Offset endlaps a minimum of 3'. Turn base sheet over
facia by 2" and fasten. Do Not
Leave Base Sheet Exposed To
The Weather. Cover in the same
day with optional SA interply and SA
Cap/SA Cap FR.
SA PlyBase/MidPly may be adhered
to mechanically fastened or adhered
FlintBoard® ISO/FlintBoard ISO
Cold, or direct to primed substrates
(i.e. concrete roof decks, gypsum
coverboards, etc).
When using FlintPrime® SA, allow to dry thoroughly, but no
more than four hours to retain tack-enhancing properties.
It is recommended to prime fasteners with FlintPrime
Aerosol before installing the base ply. Before adhering
a base ply, sweep the surface of the deck or insulation
to remove any debris that could interfere with adhesion.
Start application at the low point of the roof. Install flush
to roof edge. Design layout so that no sidelaps are
against the flow of water.
Cut rolls into manageable lengths. Fold the membrane
back halfway lengthwise to remove the split release film.
Standard (Round Head) Roofing Nails and Cap
(Note: CertainTeed does not permit the use
of plastic caps) For use with Base Sheet, Flash/
Termination Bar on Plywood Decks, Non Veneer
Decks, Wood Plank Decks
Large Head Roofing Nails For use with Base
Sheet, Flash/Termination Bar on Plywood Decks,
Non Veneer Decks, Wood Plank Decks
Base Sheet Fasteners for some Cementitious
Roof Decks For use with Base Sheet on Light
Weight Insulation Concrete, Poured Gypsum
Self-Locking Fasteners For use with Base Sheet
on Cement/Wood Fiber
Insulation Fasteners
111The NRCA Roofing Manual: Membrane Roof Systems—2011Chapter 5—Fasteners
Figure 5-2: Fastener layout for 36-inch-wide base sheet
Figure 5-3: Insulation fasteners and plates used with rigid board insulation
111The NRCA Roofing Manual: Membrane Roof Systems—2011Chapter 5—Fasteners
Figure 5-2: Fastener layout for 36-inch-wide base sheet
Figure 5-3: Insulation fasteners and plates used with rigid board insulation
111The NRCA Roofing Manual: Membrane Roof Systems—2011Chapter 5—Fasteners
Figure 5-2: Fastener layout for 36-inch-wide base sheet
Figure 5-3: Insulation fasteners and plates used with rigid board insulation
111The NRCA Roofing Manual: Membrane Roof Systems—2011Chapter 5—Fasteners
Figure 5-2: Fastener layout for 36-inch-wide base sheet
Figure 5-3: Insulation fasteners and plates used with rigid board insulation
46624.indd 5 3/2/16 2:55 PM

Press membrane securely into place and repeat with the
opposite half of the membrane. Use a heavy, weighted
roller over the entire surface of the PlyBase or MidPly to
secure the membrane. Work outwards to eliminate voids.
Overlap sidelaps of subsequent PlyBase or MidPly
membrane lengths 2" and endlaps 4". Offset (stagger)
endlaps minimum 3'. Cut endlaps at opposing diagonal
corners at an angle approximately 5-1/2" long by
the selvage dimension from the corners to minimize
“T”-seams. Apply a bead or small trowel dab (quarter
size) of FlintBond® SBS Modified Bitumen Adhesive,
trowel or caulk grade, at the edge of the angled cut to
avoid a capillary. Use of a hand-held hot air gun at the
joint area prior to rolling the membrane will maximize
adhesion. In areas prone to cold temperatures, snow and
freeze-thaw cycles, it may be more effective to use the
hot air gun to form joints, and to completely fill all mole
holes with asphalt that has been slightly melted using
the gun. It is recommended to apply a bead of FlintBond
SBS Modified Bitumen Adhesive, caulk grade, at all
MidPly (or PlyBase) side and endlaps to eliminate
a capillary.
Do Not Leave Base Sheet Exposed To The Weather.
Cover in the same day with optional SA Interply and SA
Cap/SA Cap FR.
Refer to CertainTeed Commercial Systems Specifications
for comprehensive construction details.
Application of Interply (optional)
Note: Proceed to “Before Installing Flintlastic® SA Cap
(or SA Cap FR)” if installing a 2-ply system.
Before installing Flintlastic SA PlyBase or MidPly sweep
the underlying anchor sheet or base ply to remove
any debris that could interfere with adhesion. Start
with PlyBase or MidPly at the low point of the roof with
appropriate roll width to offset sidelaps 18" from sidelaps
of anchor sheet or base ply. all flush to roof edge. Design
layout so that no sidelaps are against the flow of water.
Cut rolls into manageable lengths. Fold the membrane
back halfway lengthwise to remove the split release film.
Press membrane securely into place and repeat with the
opposite half of the membrane. Use a heavy, weighted
roller over the entire surface of the PlyBase or MidPly to
secure the membrane. Work outwards to eliminate voids.
Overlap sidelaps of subsequent PlyBase or MidPly
membrane lengths 2" and endlaps 4". Offset (stagger)
endlaps minimum 3'.
Cut endlaps at opposing diagonal corners at an angle
approximately 5-1/2" long by the selvage dimension
from the corners to minimize “T”-seams. Apply a bead
or small trowel dab (quarter size) of FlintBond SBS
Modified Bitumen Adhesive, trowel or caulk grade, at
the edge of the angled cut to avoid a capillary. Use of a
hand-held hot air gun at the joint area prior to rolling the
membrane will maximize adhesion. In areas prone to
cold temperatures, snow and freeze-thaw cycles, it may
be more effective to use the hot air gun to form joints,
and to completely fill all mole holes with asphalt that has
been slightly melted using the gun. It is recommended
to apply a bead of FlintBond SBS Modified Bitumen
Adhesive, caulk grade, at all MidPly (or PlyBase) side
and endlaps to eliminate a capillary.
Do Not Leave Base Sheet Exposed To The Weather.
Cover in the same day with optional SA Interply and
SA Cap/SA Cap FR.
Refer to CertainTeed Commercial Systems Specifications
for comprehensive construction details.
Before Installing Flintlastic SA Cap or SA Cap FR
If roof edge detail utilizes edge metal, proceed as follows.
If MidPly or (PlyBase) has been applied, install minimum
26 gauge edge metal using appropriate fasteners,
and set entirely in a uniform 1/8"-1/4" thick troweling of
FlintBond SBS Modified Bitumen Adhesive, trowel grade.
Remove any oil from the metal surface using a vinegar
and water solution. Prime the horizontal surface of the
metal with FlintPrime SA and allow primer to dry. Apply
a bead of caulk grade FlintBond adhesive to the edge of
the metal where it meets the MidPly (or PlyBase). Proceed
with Flintlastic SA Cap (or SA Cap FR) installation.
If an interply is not specified, install a 9" wide flashing strip
of PlyBase or MidPly (material assumed to match base
ply) “onto the field of the roof and flush to the roof edge,
self-adhered. Install minimum 26 gauge edge metal
using appropriate fasteners, set entirely in a uniform
1/8"-1/4" thick troweling of FlintBond SBS Modified Bitumen
Adhesive, trowel grade.
Remove any oil from the metal surface using a vinegar
and water solution. Prime the horizontal surface of the
metal with FlintPrime® SA and allow primer to dry.
Apply a bead of caulk grade FlintBond at the roof side
edge of the metal where it meets the flashing strip.
Similarly, complete your sheet metal flashing installation
using cut PlyBase or MidPly flashing collars at all
flashing details prior to flashing application. Seal edges
of PlyBase or MidPly flashing collars with a bead of
FlintBond. See “Typical Construction Details” pages
for examples.
If an interply is specified, set flanges in trowel grade
FlintBond and properly fasten. If an interply is not
4
46624.indd 6 3/2/16 2:55 PM

5
specified, complete sheet metal flashing installation
using cut PlyBase or MidPly flashing collars at all flashing
details. All cap sheet flashings installed to transitions that
overlap onto mineral surface must be set in a uniform
troweling of FlintBond® trowel grade adhesive.
Application of Flintlastic SA Cap(or SA Cap FR)
Before installing Flintlastic® SA Cap or SA Cap FR, sweep
the underlying anchor sheet or base ply to remove
any debris that could interfere with adhesion. To install
Flintlastic SA Cap (or SA Cap FR), start at the low point of
the roof with an appropriate roll width to offset sidelaps
from the underlying membrane a minimum of 18".
Work with manageable lengths for proper handling.
Position SA Cap (or SA Cap FR) with selvage edge
release strip at high side of roof. Install in weather-lapped
fashion, with no laps against the flow of water.
Once positioned, lift and fold back (lengthwise) the lower
half of the membrane. Remove the split release film
and press firmly into place. Then repeat with the other
(high side of the roof) half of the membrane.
Follow the same layout and split release film procedures
as for MidPly (or PlyBase), but overlap sidelaps 3" and
endlaps 6". Use a weighted roller over the entire surface
of Flintlastic SA Cap (or SA Cap FR) to secure it in place
and prevent voids, working outward from the center
of the sheet.
As subsequent membrane lengths are installed, remove
the selvage edge release strip just prior to overlapping
to keep the adhesive area protected and clean.
Cut endlaps at opposing diagonal corners at an angle
approx. 3" by 5-1/2" from the corners to minimize
T-seams.
FlintBond trowel grade is required on the entire6" width of each endlap prior to overlapping.
Apply a uniform 1/8"-1/4" troweling of the FlintBond on the
entire width of the endlaps to the underlying membrane.
Install the overlapping sheet. Always apply FlintBond
(extend beyond underlying lap minimum 1/4") on the
entire width of any overlap when applying SA Cap
(or SA Cap FR) over another mineral surface such as
the SA Cap (or SA Cap FR) endlap.
At all vertical and other flashing points, apply FlintBond
trowel grade wherever there is an overlap onto mineral
surfacing.
Once the membrane has had a chance to bond, check
all laps and joints for full adhesion. If the membrane
can be lifted at any area it is not properly adhered.
A seam probing tool can be helpful to check for small
voids at laps. If necessary, use appropriate hand-held
hot air welding tool and seam roller or an application of
FlintBond to seal small unbonded areas if they exist.
46624.indd 7 3/2/16 2:55 PM

6
Construction Details
Included in this manual are a few common construction
details. Please refer to CertainTeed’s standard details
or the NRCA for details not found within this manual.
Important to note with all details, all metal must be
primed and set in FlintBond® trowel grade adhesive and
all overlaps over mineral surfacing must utilize FlintBond
trowel grade adhesive.
The Proper T-Seam Detail
• Before adhering Flintlastic® SA PlyBase or MidPly,
Cap (or SA Cap FR) endlaps, trim the underlying sheet’s
lower corner at the end of the roll.
• Follow with the overlapping sheet, trimming the upper
outside corner.
• Corners should be trimmed on a diagonal angle 5-1/2"
long from end of roll to outside edge.
• Width of trim should be equal in width to the sidelap
specified (3" for Flintlastic SA Cap [or SA Cap FR]
and 2" for Flintlastic SA MidPly [or PlyBase]).
• Trimmed corners should be completely covered by
application of succeeding courses.
• Note: If using Flintlastic SA PlyBase or MidPly, apply
quarter-size dab of FlintBond at T-seam area. If using
Flintlastic SA Cap (or SA Cap FR), the endlap should
be completely set in trowel grade FlintBond along the
entire 6" lap width.
Rake Edge Detail
• Cut selvage area at an angle at all rake edges.
• Apply a bead of FlintBond caulk along cut edge
to eliminate mole holes.
46624.indd 8 3/2/16 2:55 PM

Vent Pipe Collar Detail Drain Detail
Typical Construction Details – Flintlastic® SA 2-Ply System
Inside Corner Outside Corner
7
46624.indd 9 3/2/16 2:55 PM
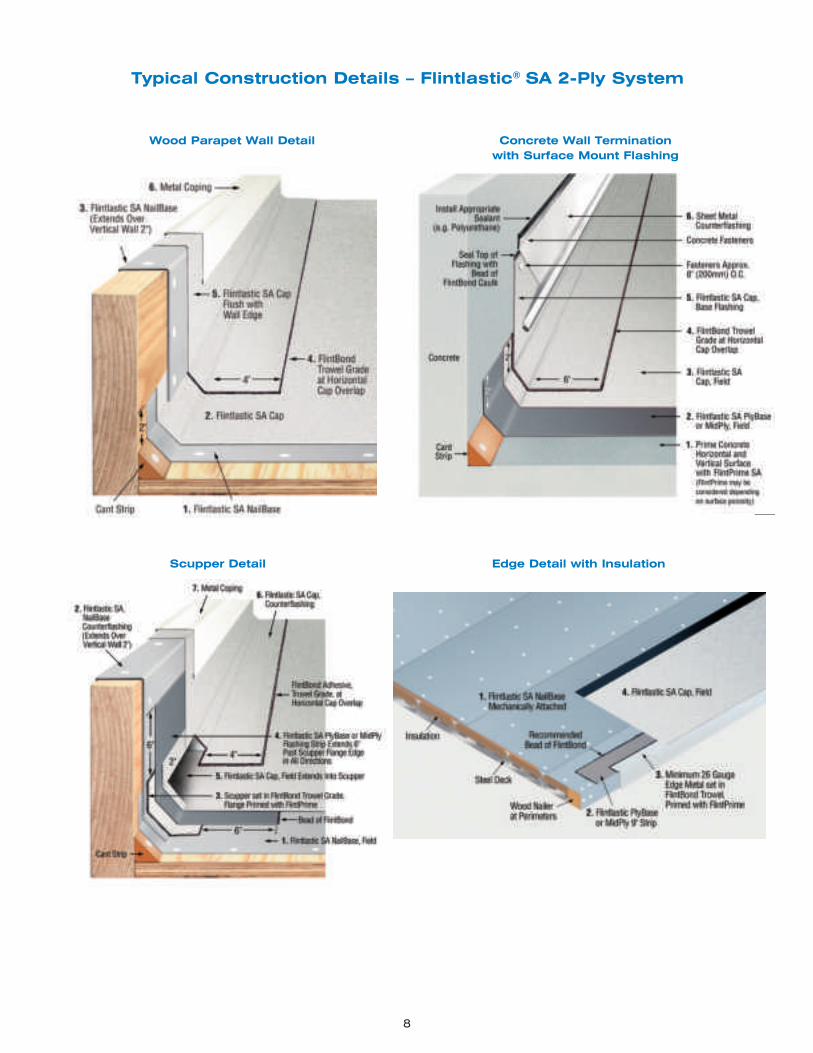
Wood Parapet Wall Detail Concrete Wall Terminationwith Surface Mount Flashing
Scupper Detail Edge Detail with Insulation
Typical Construction Details – Flintlastic® SA 2-Ply System
8
46624.indd 10 3/2/16 2:56 PM

2-Ply System Specifications
SPECIFICATION: SA-N-2-S
Flintlastic® SA NailBase, nailed.
Flintlastic SA Cap (FR), self-adhered.
For use over nailable decks
Note: Flintlastic SA MidPly, FlintBond Trowel Grade and
FlintBond Caulk Grade are needed for flashing details
and mineral surface membrane overlaps. FlintPrime (SA)
is needed for surfaces that require priming.
Cants
In angles of roof deck and vertical surfaces, the
roofing contractor shall furnish and install an approved
cant strip with a minimum 3" face.
SPECIFICATION: SA-C-2-S
Flintlastic SA NailBase, applied using hot asphalt, or
Flintlastic SA PlyBase or MidPly, self-adhered as base ply.
Flintlastic SA Cap (FR), self-adhered.
For use over non-nailable decks or
approved insulation
(Flintlastic SA Base required over insulation)
Note: Flintlastic SA MidPly, FlintBond Trowel Grade and
FlintBond Caulk Grade are needed for flashing details
and mineral surface membrane overlaps. FlintPrime (SA)
is needed for surfaces that require priming.
Cants
In angles of roof deck and vertical surfaces, the roofing
contractor shall furnish and install an approved cant strip
with a minimum 3" face.
Roof System Ventilation
Roof system as shown requires ventilation as per NRCA
recommendations.
9
46624.indd 11 3/2/16 2:56 PM

Typical Construction Details – Flintlastic® SA 3-Ply System
Vent Pipe Collar Detail Drain Detail
Edge Detail
10
46624.indd 12 3/2/16 2:56 PM

3-Ply System Specifications
SPECIFICATION: SA-N-3-S
Flintlastic® SA NailBase, nailed.
Flintlastic SA PlyBase or MidPly, self-adhered.
Flintlastic SA Cap (FR), self-adhered.
For use over nailable decks
Note: Flintlastic SA MidPly, FlintBond Trowel Grade and
FlintBond Caulk Grade are needed for flashing details
and mineral surface membrane overlaps. FlintPrime (SA)
is needed for surfaces that require priming.
Cants
In angles of roof deck and vertical surfaces, the roofing
contractor shall furnish and install an approved cant strip
with a minimum 3" face.
SPECIFICATION: SA-C-3-S
Flintlastic SA NailBase, applied using hot asphalt, or
Flintlastic SA PlyBase or MidPly, self-adhered as base ply.
Flintlastic SA PlyBase or MidPly, self-adhered.
Flintlastic SA Cap (FR), self-adhered.
For use over non-nailable decks or
approved insulation
Note: Flintlastic SA MidPly, FlintBond Trowel Grade and
FlintBond Caulk Grade are needed for flashing details
and mineral surface membrane overlaps. FlintPrime (SA)
is needed for surfaces that require priming.
Cants
In angles of roof deck and vertical surfaces, the roofing
contractor shall furnish and install an approved cant strip
with a minimum 3" face.
11
46624.indd 13 3/2/16 2:56 PM

Flintlastic® SA NailBase Flintlastic® SA PlyBase Flintlastic® SA MidPly Flintlastic® SA Cap Flintlastic® SA Cap FR
Roll Dimensions 64'6" x 39-3/8" 64'6" x 39-3/8" 32'1" x 39-3/8" 32'11" x 39-3/8" 32'11" x 39-3/8"
Thickness 1.5 mm 1.5 mm 2.8 mm 4.0 mm 3.2 mm
Weight 82 lbs 86 lbs 63 lbs 95 lbs 88 lbs.
Coverage 2 Squares 2 Squares 1 Square 1 Square 1 Square
Top Surface Permanent Film Permanent Film Permanent Film Mineral Mineral
Bottom Surface Sand Removable Release Film Removable Release Film Removable Release Film Removable Release Film
Reinforcement Fiberglass Mat Fiberglass Mat Fiberglass Mat Non-Woven Polyester Mat Heavy Duty Fiberglass Mat
Tensile (lb/in) 65/40 (MD/CD) 65/40 (MD/CD) 75/50 (MD/CD) 85/67 (MD/CD) 64/58 (MD/CD)
Elongation (%) 6/5 (MD/CD) 6/5 (MD/CD) 5/5 (MD/CD) 61/66 (MD/CD) 4/4 (MD/CD)(at peak load)
Packaging Palletized, Bands Individual Cartons Individual Cartons Individual Cartons Individual Cartons,20 Rolls Per Pallet 20 Rolls Per Pallet 20 Rolls Per Pallet 20 Rolls Per Pallet 20 Rolls Per Pallet
Burnt Sienna Colonial Slate Heather Blend Moiré Black
Resawn Shake Weathered Wood White CoolStar®
12
46624.indd 14 3/2/16 2:56 PM

46624.indd 15 3/2/16 2:56 PM

UL 2218 Class 4 Impact Resistance – Certain systems areUL classified as to impact resistance as described in theUL Roofing Materials and Systems Directory.
Caution: CertainTeed Flintlastic roofing products are intended for use by professional roofing contractors only. It is the responsibility of theinstaller to follow all appropriate and required safety precautions in conjunction with the installation of any CertainTeed roofing product.
Meets or exceeds ASTM D6164 (SA Mid Ply and SA Cap), ASTM D6163 (SA Cap FR) and ASTM D4601 (SA NailBase and PlyBase).
ICC-ES ESR-1388
BUR (Built-Up Roofing) APP Modified Bitumen
SBS Modified Bitumen Self-Adhering SBS Modified Bitumen
Primer
FlintEDGE™ Insulation
Adhesive Coating Repair
CertainTeed Full Systems
For more information on CertainTeed Commercial Roofing Products, go to www.certainteed.com.
CertainTeed Corporation20 Moores Road
Malvern, PA 19355
Professional: 800-233-8990Consumer: 800-782-8777
© 2016 CertainTeed Corporation, Printed in U.S.A.
Code No. COMM-123
ASK ABOUT ALL OF OUR OTHER CERTAINTEED® PRODUCTS AND SYSTEMS:
www.certainteed.com http://blog.certainteed.com
ROOFING • SIDING • TRIM • DECKING • RAILING • FENCEGYPSUM • CEILINGS • INSULATION
Fasteners
46624.indd 16 3/2/16 2:56 PM