Naval Air Training Command - Flight Training Instruction for Tactical Formation

NAVAL AIR TRAINING COMMAND
NAS CORPUS CHRISTI, TEXAS CNATRA P-870 (Rev. 08-13)
FLIGHT TRAINING
INSTRUCTION
FORMATION SNFO
TRAINING T-6A
2013


iii
FLIGHT TRAINING INSTRUCTION
FOR
SNFO FORMATION T-6A
Q-2A-0010

iv
LIST OF EFFECTIVE PAGES
Dates of issue for original and changed pages are: Original...0...May 05 Revision…1…30 Jun 07 Change Transmittal…1…21 Dec 07 Revision…2…29 Aug 12 Revision…3…28 Aug 13 TOTAL NUMBER OF PAGES IN THIS PUBLICATION IS 120 CONSISTING OF THE
FOLLOWING:
Page No. Change No. Page No. Change No.
COVER 0 8-1 – 8-6 0 LETTER 0 9-1 – 9-2 0 iii - x 0 10-1 – 10-14 0 1-1 – 1-9 0 A-1 – A-3 0 1-10 (blank) 0 A-4 (blank) 0 2-1 – 2-3 0 B-1 – B-2 0 2-4 (blank) 0 C-1 – C-4 0 3-1 – 3-10 0 4-1 – 4-20 0 5-1 - 5-15 0 5-16 (blank) 0 6-1 - 6-8 0 7-1 – 7-10 0

v
INTERIM CHANGE SUMMARY
The following Changes have been previously incorporated in this manual: CHANGE
NUMBER REMARKS/PURPOSE
The following Interim Changes have been incorporated in this Change/Revision: INTERIM
CHANGE
NUMBER
REMARKS/PURPOSE
ENTERED BY
DATE

vi
SAFETY/HAZARD AWARENESS NOTICE
This course does not require any special safety precautions other than those normally practiced on the flight line. TERMINAL OBJECTIVE
Upon completion of this course, the Student Naval Flight Officer (SNFO) shall be able to direct, with instructor assistance, specified two-plane formation maneuvers in the T-6A aircraft. ENABLING OBJECTIVE
Coordinate section formation maneuvers, with instructor assistance, recognize relative motion, and make recommendations to correct for deviations within the parameters of this Flight Training Instruction (FTI). Given an oral examination and aircraft models/training aids, the Student NFO shall be able to describe standard formation maneuvers without error. INSTRUCTIONAL OBJECTIVES
1. This is a flight training course and will be conducted in the simulator and aircraft. 2. The student will demonstrate a functional knowledge of the material presented through successful completion of the flight maneuvers. INSTRUCTIONAL REFERENCES
1. T-6A NATOPS Flight Manual 2. Local Standard Operating Procedures (SOP) Instruction

vii
TABLE OF CONTENTS
LIST OF EFFECTIVE PAGES .................................................................................................. iv
INTERIM CHANGE SUMMARY ...............................................................................................v
SAFETY/HAZARD AWARENESS NOTICE .......................................................................... vi
TABLE OF CONTENTS ........................................................................................................... vii
TABLE OF FIGURES ...................................................................................................................x
CHAPTER ONE - INTRODUCTION TO FORMATION .................................................... 1-1
100. INTRODUCTION ..................................................................................................... 1-1
101. FORMATION DEFINED .......................................................................................... 1-1
102. RELATIVE MOTION ............................................................................................... 1-1
103. RADIUS OF TURN ................................................................................................... 1-3
104. FLIGHT DISCIPLINE............................................................................................... 1-3
105. FORMATION COMMUNICATIONS/RADIO FREQUENCY CHANGES ........... 1-6 CHAPTER TWO - GROUND PROCEDURES...................................................................... 2-1
200. INTRODUCTION ..................................................................................................... 2-1 CHAPTER THREE - SECTION DEPARTURES.................................................................. 3-1
300. INTRODUCTION ..................................................................................................... 3-1
301. SECTION TAKEOFF ................................................................................................ 3-1
302. INTERVAL TAKEOFF............................................................................................. 3-4
303. RENDEZVOUS ......................................................................................................... 3-5
304. CLIMB AND LEVEL-OFF ....................................................................................... 3-6
305. SNFO RESPONSIBILITES ...................................................................................... 3-7
306. OPERATIONS CHECK ............................................................................................ 3-8
307. INDIVIDUAL CLEARANCES................................................................................. 3-8 CHAPTER FOUR - SECTION PARADE ............................................................................... 4-1
400. INTRODUCTION ..................................................................................................... 4-1
401. PARADE POSITION ................................................................................................ 4-1
402. PARADE TURNS ..................................................................................................... 4-3
403. CROSSUNDER ......................................................................................................... 4-4
404. LOST SIGHT EXERCISE ......................................................................................... 4-5
405. FENCE CHECKS/G-WARM .................................................................................... 4-6
406. 180° BREAKUP AND RENDEZVOUS ................................................................... 4-8
407. CRUISE POSITION ................................................................................................ 4-13
408. TAIL-CHASE EXERCISE ...................................................................................... 4-14

viii
409. LEAD CHANGE ..................................................................................................... 4-15
410. FUEL AWARENESS .............................................................................................. 4-17
411. F5001 PARADE SEQUENCE ................................................................................ 4-19 CHAPTER FIVE - SECTION TACTICAL FORMATION .................................................. 5-1
500. INTRODUCTION ..................................................................................................... 5-1
501. TAC TURNS ............................................................................................................. 5-5
502. 45° TURNS ................................................................................................................ 5-7
503. CHECK TURNS ...................................................................................................... 5-10
504. SHACKLE ............................................................................................................... 5-10
505. IN-PLACE TURNS ................................................................................................. 5-11
506. CROSS TURNS ....................................................................................................... 5-13
507. F5002 TACFORM SEQUENCE ............................................................................. 5-14
508. F6101 CONDUCT ................................................................................................... 5-15 CHAPTER SIX - SECTION RECOVERY ............................................................................. 6-1
600. INTRODUCTION ..................................................................................................... 6-1
601. RECOVERY OVERVIEW ........................................................................................ 6-1
602. MOA CHECK-OUT PROCEDURES ....................................................................... 6-2
603. THE BREAK ............................................................................................................. 6-4
604. SECTION APPROACHES ........................................................................................ 6-4
605. LANDING ................................................................................................................. 6-7
CHAPTER SEVEN - FORMATION EMERGENCIES ........................................................ 7-1
700. INTRODUCTION ..................................................................................................... 7-1
701. ABORTS .................................................................................................................... 7-1
702. MID-AIR/DAMAGED AIRCRAFT ......................................................................... 7-2
703. RADIO FAILURE ..................................................................................................... 7-2
704. DOWN AIRCRAFT PROCEDURES ....................................................................... 7-3
705. LOST SIGHT ............................................................................................................. 7-3
706. BLIND ....................................................................................................................... 7-8
707. TERMINATE AND KNOCK-IT-OFF PROCEDURES ........................................... 7-9
708. EJECTION ............................................................................................................... 7-10
CHAPTER EIGHT - FORMATION VISUAL SIGNALS..................................................... 8-1
800. INTRODUCTION ..................................................................................................... 8-1
801. AIRCREW VISUAL SIGNALS................................................................................ 8-2
802. AIRCRAFT VISUAL SIGNALS .............................................................................. 8-6

ix
CHAPTER NINE - SECTION INSTRUMENT NAVIGATION ........................................ 9-1
900. INTRODUCTION ..................................................................................................... 9-1
901. LEAD/WING RESPONSIBILITIES ......................................................................... 9-1
CHAPTER TEN - SECTION VISUAL NAVIGATION PROCEDURES ......................... 10-1
1000. INTRODUCTION ................................................................................................... 10-1
1001. FLIGHT PREPARATION ....................................................................................... 10-1
1002. CREW COORDINATION ...................................................................................... 10-3
1003. ENGINE START TO ROUTE ENTRY PROCEDURES ....................................... 10-4
1004. LOW LEVEL FLIGHT OPERATIONS .................................................................. 10-5
1005. TARGET ATTACKS .............................................................................................. 10-6
1006. ROUTE EXIT TO RETURN TO BASE (RTB) .................................................... 10-13
1007. ROUTE ABORT .................................................................................................... 10-14
APPENDIX A - GLOSSARY ................................................................................................... A-1
APPENDIX B - THE BRIEF ....................................................................................................B-1
EXPECTATIONS ........................................................................................................................B-1
THE BRIEFING BOARD ...........................................................................................................B-2
APPENDIX C - ACRONYMS ................................................................................................. C-1

x
TABLE OF FIGURES
Figure 1-1 Lateral Movement .............................................................................................. 1-2
Figure 1-2 Vertical Movement............................................................................................. 1-2
Figure 1-3 Radius of Turn ................................................................................................... 1-3
Figure 3-1 Runway Positioning for Takeoff ....................................................................... 3-2
Figure 3-2 NAV Rendezvous ............................................................................................. 3-10
Figure 4-1 Parade Checkpoints ........................................................................................... 4-1
Figure 4-2 Excessive Stepdown ........................................................................................... 4-2
Figure 4-3 Insufficient Stepdown ........................................................................................ 4-2
Figure 4-4 Crossunder Signal .............................................................................................. 4-4
Figure 4-5 Breakup and Rendezvous .................................................................................. 4-9
Figure 4-6 Kiss Off Signal .................................................................................................... 4-9
Figure 4-7 On Bearing Line ............................................................................................... 4-10
Figure 4-8 Sucked ............................................................................................................... 4-11
Figure 4-9 Acute.................................................................................................................. 4-11
Figure 4-10 Cruise Position ................................................................................................. 4-13
Figure 4-11 Fuel Check Signal ............................................................................................ 4-17
Figure 5-1 Primary Lookout Responsibilities .................................................................... 5-2
Figure 5-2 Tactical Turns Into the Wingman .................................................................... 5-6
Figure 5-3 Tac Turns Away from the Wingman ............................................................... 5-7
Figure 5-4 45° Turn Into the Wingman .............................................................................. 5-8
Figure 5-5 45° Turn Away from the Wingman .................................................................. 5-9
Figure 5-6 Shackle .............................................................................................................. 5-11
Figure 5-7 In-Place Turn ................................................................................................... 5-12
Figure 5-8 Cross Turns ...................................................................................................... 5-13
Figure 10-1 Shift Attack ....................................................................................................... 10-8
Figure 10-2 Crossing Attack (Same Target) .................................................................... 10-10
Figure 10-3 T-6A Pop Diagram ......................................................................................... 10-12
Figure 10-4 Example T-6A 10° Pop Diagram (w/target elevation of 200 ft) ................. 10-13

INTRODUCTION TO FORMATION 1-1
CHAPTER ONE
INTRODUCTION TO FORMATION
100. INTRODUCTION
For centuries, military strategists have been aware of the tactical value achieved via the concentration of forces. By flying in formation, aviation squadrons not only achieve concentration of force, but also gain the advantage of mutual support and improved command and control. Military aviators of all types are routinely called upon to demonstrate basic formation flying skills. 101. FORMATION DEFINED
A formation consists of two or more aircraft flying in close proximity whose movements are both
coordinated and conducted in unison. The smallest formation unit is a section. It consists of two aircraft: a Lead and a Wingman. Increasing in size, the next unit is a division. It consists of two sections. From this point a formation becomes larger by simply adding a section and/or division(s); however, it is important to remember that the basic unit of a formation no matter how
large, remains the section. For the purpose of this FTI, all further discussions will deal with sections unless otherwise noted. 102. RELATIVE MOTION
Formation flying is simply a function of controlling relative motion. To maneuver safely in relation to another aircraft, both the direction and rate of motion must be controlled; likewise, to maintain a proper fixed position in relation to another aircraft, the relative motion between the two must be stopped. In a section, the Lead is considered to be fixed and any movement between aircraft is considered as movement of and controlled by the Wingman. In the Contact stage, the horizon was used as the aircraft’s attitude reference, while in the Instrument stage, an artificial horizon (attitude gyro) was used; however, when flying formation, Lead’s aircraft becomes the primary reference. Relative motion can occur about any one or a combination of all three axes. Figure 1-1 depicts lateral movement relative to the Lead. Lateral movement can be controlled using power to
move fore/aft or by using aileron to move left/right relative to the Lead. Figure 1-2 depicts
vertical movement relative to the Lead. Vertical movement is primarily controlled by elevator inputs to climb/descend relative to the Lead.

CHAPTER ONE T-6A FORMATION
1-2 INTRODUCTION TO FORMATION
Figure 1-1 Lateral Movement
Figure 1-2 Vertical Movement

T-6A FORMATION CHAPTER ONE
INTRODUCTION TO FORMATION 1-3
103. RADIUS OF TURN
It is also necessary to understand the concept of radius of turn and how it relates to controlling relative position during formation flight. As mentioned earlier, the lead aircraft is the positional reference point of the flight; therefore, the Wing needs to anticipate any positional corrections in relation to the Lead’s radius of turn. For example, if the Wing is in the parade position and the Lead turns into the Wing, the wing aircraft will require less power to complete the turn because they will have to fly a smaller radius of turn. Vice versa, when Lead turns away from Wing’s position, the wing aircraft will require more power because they will be flying a larger turn radius.
If both aircraft were to turn a full 360°, the aircraft on the inside will always scribe a smaller circle in the sky. Radius of turn becomes a major consideration when executing cruise turns, during the breakup and rendezvous exercises, and during the tail-chase exercise. Figure 1-3 shows the relationship between radius of turn and Angle of Bank (AOB) for a constant airspeed, level turn.
Figure 1-3 Radius of Turn
104. FLIGHT DISCIPLINE
Flight discipline, as applied to formation flying, refers to the conduct of all flight members both as
individuals and as part of a team. As a member of a team where individual errors will negatively
affect the overall performance of the flight, each member of the flight must do their utmost to
ensure the flight functions properly.

CHAPTER ONE T-6A FORMATION
1-4 INTRODUCTION TO FORMATION
1. The Lead. The lead aircraft is primarily responsible for communications and conducting
the prescribed sequence of maneuvers in a safe and orderly manner. It is incumbent upon the
Lead to:
a. Keep the flight clear of other aircraft. b. Keep the flight clear of clouds unless under an Instrument Flight Rules (IFR)
clearance. c. Keep the flight within the proper operating areas while complying with local course
rules and Air Traffic Control (ATC) instructions. d. Be predictable. Maintain smooth, precise airwork. e. Always be aware of your Wingman's position.
Conducting the flight within the confines of the designated formation area presents problems which must be considered both before and during the flight. Maintaining the flight within a given area requires an understanding of the area boundaries combined with an awareness of how specific maneuvers cause the flight to track over the ground. SNFOs should be able to visualize how different combinations of turns can be used to maintain the flight within the area. During flight, the Lead SNFO must not only be aware of the flight’s position within the operating area, but also the sequence of maneuvers in order to determine a correct rollout heading to properly set up for the next maneuver. Additional factors to take into account are wind direction, which will affect the track of the flight, and the position of the sun, which can preclude the Wingman from seeing the lead aircraft.
NOTE
The Lead should conduct all maneuvers that minimize the Wingman’s need to look into the sun.
2. The Wingman. The wing aircraft is primarily responsible for maintaining flight integrity. It is incumbent upon the Wing to:
a. Keep the Lead in sight and maintain proper position with respect to the Lead at all times.
b. Comply with all instructions given by the Lead and, when required, be prepared to give a timely response.

T-6A FORMATION CHAPTER ONE
INTRODUCTION TO FORMATION 1-5
c. Back up the Lead (e.g., navigation, transponder, Situational Awareness (SA), etc.). d. Be prepared to assume the lead at all times.
3. Crew Coordination. In any discussion dealing with flight discipline, it is essential to address
Lead/Wing student responsibilities during the various phases of flight. To avoid unnecessary
duplication of effort and optimize crew efficiency while accomplishing the tasks listed in Sections
104(1) and 104(2) above, follow a few general guidelines. The lead instructor’s primary focus is
cockpit scan and visual lookout; thus, the lead student’s greatest contribution to good Crew
Resource Management (CRM) may be monitoring the Wing’s status/position. The Wing’s pilot will have an excellent awareness of Lead’s relative position. This awareness will likely occur at the expense of cockpit scan; therefore, the Wing’s student might assist with the scan. Just as in
instrument flying, one’s scan should never fixate on any single item. Keep your scan moving, but use CRM to prioritize your areas of focus. To further illustrate this point, let’s examine what might occur during a section takeoff. During takeoff roll the lead instructor will be
concentrating on providing a smooth predictable platform for the Wingman to reference; meanwhile, lead’s student will have the best perspective with respect to the Wingman’s
position/status. The wing instructor will be concentrating their efforts on the Lead in order to
achieve and maintain the proper takeoff position. The Wing’s student should back up the
instructor by monitoring engine instruments and calling out the appropriate airspeeds. The SNFO shall monitor formation keeping by the pilot to include all parade and tactical formations. SNFOs shall utilize the ICS to report deviations to the pilot that are not being corrected. Voice inflection shall be used in accordance with the amount of deviation noted. During IMC conditions, SNFOs shall call out altitude (in a descent), angle of bank and degrees to go (if in a turn), to help the pilot maintain situational awareness to formation maneuvering and terrain. For all tactical maneuvering, the SNFO shall back up the pilot with general situational awareness (i.e. direction of turn if pilot goes the wrong way, degrees to go for any turns, or position of lead aircraft with a clock code if pilot is blind out of the turn). 4. The Flight Leader. Sections/divisions shall be under the charge of a command designated flight Lead; typically, noted on the flight schedule. Although the flight Lead may not be in the actual formation Lead position, the flight Lead is the final authority in the formation and has total responsibility for all matters pertaining to the safe and orderly conduct of their flight.

CHAPTER ONE T-6A FORMATION
1-6 INTRODUCTION TO FORMATION
105. FORMATION COMMUNICATIONS/RADIO FREQUENCY CHANGES
The flight will use two call signs. One is the official callsign listed on the flight schedule (i.e., KATT 621) and is used to communicate with outside agencies (i.e., ATC, Base, etc.). The other is a tactical callsign, which is selected by the flight and is used solely for intra-flight communications. Students are encouraged to have a two-number tactical callsign selected for the flight prior to the brief (e.g., Lead = RAIDER 11, Wing = RAIDER 12). Standard terminology will include referring to the Ultra High Frequency (UHF) radio as “PRI” (primary) and the Very High Frequency (VHF) radio as “AUX” (auxiliary). Students will select a
PRI tactical frequency and an AUX tactical frequency along with suitable back-ups for each.
They will also deconflict these frequencies with any other formation flights scheduled to fly at the
same time. Flight flexibility and integrity dictate that flight members accomplish necessary frequency changes, simultaneously. The flight will always switch frequencies when directed by either ATC or the formation Lead (called a positive push). When pre-briefed, frequency changes as specific points in the flight plan can be accomplished automatically. The method used for check-in on the new frequency is determined by the type of frequency to which the flight is switching: 1. Switching to an ATC frequency: The flight will receive clearance to switch frequencies from ATC. The Lead SNFO will respond normally, reading back the new frequency to ATC. Both aircraft in the flight will then switch to the new frequency. After a brief pause to allow the Wingman to make the switch, the Lead SNFO will check-in normally with ATC as “KATT 6XX, flight of two,” while simultaneously looking back at the Wing SNFO. When the Wing SNFO sees the Lead SNFO look back, the Wing SNFO will pass a thumbs-up signifying that Wing heard the Lead SNFO’s transmission and both aircraft are on the same frequency. Upon initial checking-in with a new controlling agency, Lead will always use the flight’s official callsign followed by “flight of two.” This phrase enhances the
new controller’s SA. Subsequent calls made by Lead to the same controller do not need to
include the phrase “flight of two” unless Lead suspects that the controller has forgotten that the
flight is a formation.
The following example involves a standard frequency change: Pensacola Approach: “KATT 621, switch Tower, button 4.” Lead SNFO: “KATT 621, switch Tower, button 4.”

T-6A FORMATION CHAPTER ONE
INTRODUCTION TO FORMATION 1-7
Once established on button 4: Lead SNFO (while looking back at the Wing): “Sherman Tower, KATT 621, flight of two, approaching Pickens Gate for the break.”
Wing SNFO: (Signal thumbs-up when Lead’s transmission is heard on button 4) Sherman Tower: “KATT 621, Sherman Tower, roger. Report the numbers Runway 25L.” Ultimately it is the Wing’s responsibility to follow along with the Lead; therefore, in the case that a thumbs-up signal is either not seen or not given, Lead will continue on normally and Wing will administratively verify the current ATC frequency over tactical frequency only as necessary. 2. Switching to a tactical or safety-of-flight frequency: In the case where the flight is switching to a tactical or safety-of-flight frequency on which there will be no controller response (i.e. button 16 for the GATOR Military Operating Area (MOA) frequency or a CTAF frequency), a positive check-in is required by Wing on the new frequency. Lead will either read back the new frequency to ATC (if applicable) or execute a positive push from the current tactical frequency (if necessary), followed by a positive check-in on the
safety-of-flight frequency. The following three examples highlight these scenarios: Example 1: Switching to a non-ATC frequency: On PRI button 6: Pensacola Departure: “KATT 621, maintain 11,000. Cleared for 1A Hi/Lo, 2A Hi/Lo, frequency change approved.” Lead: “KATT 621, maintain 11,000, cleared for 1A Hi/Lo, 2A Hi/Lo, switching.” Lead gives enough time for both aircraft to switch to PRI button 16. On AUX tac: Lead: “RAIDER check PRI.”

CHAPTER ONE T-6A FORMATION
1-8 INTRODUCTION TO FORMATION
On PRI button 16: Lead: “RAIDER 11.” Wing: “RAIDER 12.” Example 2: Positive push from current tactical frequency: Lead desires to switch the flight to Monroe County CTAF in AUX. On PRI tac: Lead: “RAIDER switch AUX 123.0.”
Wing: “RAIDER 12.”
Lead gives enough time for both aircraft to switch to AUX 123.0. Lead: “RAIDER check AUX.”
On AUX 123.0: Lead: “RAIDER 11.”
Wing: “RAIDER 12.” Lead (at the appropriate time/distance): “Monroe County traffic, KATT 621, flight of two, 15 miles
southwest of Monroe County, setting up for a left over-head RWY 3, Monroe County traffic.”
Example 3: Switching both radios at the same time: Normally, the flight will only change one frequency at a time, but the need may arise to switch both radios concurrently. When this occurs, input the new ATC frequency first, then the new tactical frequency. In this example, the flight is using PRI for ATC and AUX for tac. ATC then
switches the flight to 121.0.

T-6A FORMATION CHAPTER ONE
INTRODUCTION TO FORMATION 1-9
On PRI: Lead: “KATT 621, switching 121.0.” At this point, Wing must recognize the need for a new tactical frequency on PRI. Lead should
give adequate time for both aircraft to switch to AUX 121.0 and PRI tac. When able, Lead will check in Wing on PRI tac. On AUX: Lead (while looking back at Wing): “Mobile Approach, KATT 621, flight of two, 5,000.”
Wing SNFO: Gives a thumbs-up signifying he heard the transmission and has made both frequency changes. On PRI (when able): Lead: “RAIDER, check PRI, RAIDER 11.” Wing: “RAIDER 12.”
The goal of the above procedures is communication brevity while maintaining control of frequency switches. This will alleviate congestion on busy/populated ATC or safety-of-flight frequencies for other users. Significant emphasis will be placed on communication procedures during your formation fllights in the T-6A. Examples of proper communications for specific procedures and maneuvers are included throughout this FTI. Good frequency switches should occur effortlessly. Plan and practice communications thoroughly while studying for your formation event.

CHAPTER ONE T-6A FORMATION
1-10 INTRODUCTION TO FORMATION
THIS PAGE INTENTIONALLY LEFT BLANK

GROUND PROCEDURES 2-1
CHAPTER TWO
GROUND PROCEDURES
200. INTRODUCTION
The following ground procedures will be common to all formation flights: 1. Aircraft issue and preflight will be conducted in the same manner as previous syllabus flights; however, students should note the position of their Wingman’s aircraft on the flight line. To the maximum extent possible, the aircraft will be spotted next to each other, enabling the aircrew to observe if an aircraft in the flight is having difficulties prior to check-in. Regardless of where the flight is parked, always remain apprised of your playmate’s progress. 2. Once the formation aircraft have been located in relation to each other, all checklists will be
completed through the Taxi Checklist (holding on Turn and Slip Indicators) along with the plane
captain final checks; additionally, both aircraft will copy Automatic Terminal Information Service (ATIS). Only the Lead will contact Clearance Delivery and request/copy the clearance. The flight will then accomplish a check-in on PRI tac and AUX tac as follows. The instructors will check-in on PRI tac, followed by the students on AUX tac, to ensure all radios are loud and clear. At this point, the Lead SNFO will initiate a “Nav Check” to a pre-briefed waypoint off of the Global Positioning System (GPS), pass the clearance to Wing, and switch the flight to Ground
frequency. If Wing is ready to proceed, the Wing SNFO will respond with their tactical callsign
and switch immediately to Ground. Lead will switch to Base for the “taxi outbound” call with both side numbers before requesting taxi clearance from Ground for the flight. Wing switches directly to Ground and plans his taxi to follow Lead. Should the Wing require more time before proceeding, he/she will inform the Lead after receiving the clearance (i.e. “RAIDER 12 needs two
minutes”). Lead will wait until both aircraft are ready to proceed before initiating taxi. The
following example demonstrates the communications check-in procedures: On PRI tac (instructors): Lead: “RAIDER check PRI…RAIDER 11.”
Wing: “RAIDER 12.” On AUX tac (students): Lead: “RAIDER check AUX…RAIDER 11.”

CHAPTER TWO T-6A FORMATION
2-2 GROUND PROCEDURES
Wing: “RAIDER 12.” Lead: “RAIDER, Nav Check TRADR 266 at 36.9.”
Wing: “RAIDER 12, same.” Or if there is a disagreement of more than 3 radials and 0.5 Nautical Miles (NM) “RAIDER 12 shows XXX at XXX.” Lead: “RAIDER, cleared to Bay Minette via the NPA-647, 1 DME past the TACAN turn left heading 220, climb and maintain 3,000. Expect 10,000, 10 minutes after departure, departure
frequency 270.8, squawk 4252…no questions button 3.” Wing: “RAIDER 12.” (If Wing is not ready to proceed inform Lead here.) 3. The request for clearance to taxi will be made to Ground control per standard local area operations. All aircraft in the flight will copy clearances and dial in the appropriate transponder code and altimeter setting. 4. While taxiing to the hold-short area, Lead will choose the downwind side of the longest taxiway in use and comply with the taxi instructions. Each subsequent member of the flight will taxi an equal distance but on the opposite side of the centerline from the aircraft directly in front of them for FOD considerations. The visual cue for proper taxi position is having the tip of the near elevator aligned over the yellow Canopy Fracturing System (CFS) door; however, under no circumstance should the aircraft be closer than 1 plane length (33 feet). When in the line or on narrow taxiways where Lead chooses to taxi on centerline, Wing will match Lead’s example and follow no closer than 100 feet in trail for FOD avoidance. Approaching the hold short, both aircraft will automatically switch to Tower frequency. A postive check-in on Tower frequency is not required. The Lead aircraft will position themselves in the run-up area leaving sufficient room for the Wingman. The Wingman will taxi into position next to Lead, matching his position. At this point, each SNFO will direct their Over-Speed Governor and Before Takeoff Checklists plus give their Departure Brief. When ready for takeoff, Wing will conduct an integrity check on Lead, then pass a “thumbs-up” signal. This signifies that the Wingman is on Tower frequency, has completed all checklists satisfactorily, and that the Lead aircraft appears ready for takeoff through the following integrity checks (EPPPFANN):
a. Engine cowlings secure b. All Panels secure

T-6A FORMATION CHAPTER TWO
GROUND PROCEDURES 2-3
c. Proper extension of struts d. Proper tire inflation e. Flaps at TO f. All Antennas secure g. No visible leaks h. Navigation and anti-collision lights on
5. Lead will conduct the same integrity check on Wing and return a thumbs up. Lead will switch Base for the “going flying” call prior to contacting Tower for takeoff for the flight of two. 6. If, while issuing the takeoff clearance, Tower clears the flight to “Change to Departure frequency,” the flight will switch as directed. Neither a positive switch from Lead nor check-in on Departure is required. 7. The entire flight will comply with Tower's instructions. All aircraft will complete the Lineup Checklist prior to taxiing into position on the runway. Lead will squawk “altitude” and all other aircraft will squawk “standby.”

CHAPTER TWO T-6A FORMATION
2-4 GROUND PROCEDURES
THIS PAGE INTENTIONALLY LEFT BLANK

SECTION DEPARTURES 3-1
CHAPTER THREE
SECTION DEPARTURES
300. INTRODUCTION
The departure phase of flight consists of the following: 1. Takeoff (Section/ Interval/ Individual) 2. Rendezvous/ Join-up 3. Climb and Level-off 4. Operations Checklist 5. Transit to working area In order to execute a takeoff involving more than one aircraft operating under the same clearance (i.e. a formation takeoff), the flight must have circling minimums for the runway in use or 1000 foot ceilings and 3 miles visibility in the event circling is not authorized (OPNAV 3710.7U). 301. SECTION TAKEOFF
The section takeoff has many practical advantages in tactical aviation. The section takeoff is frequently employed by sections of aircraft in order to expedite departures; additionally, it eliminates the need for a rendezvous, which can be particularly advantageous in marginal weather conditions. The following conditions must be met in order to perform a Section Takeoff:
a. The maximum crosswind is 10 knots for a dry runway and 5 knots for a wet runway. b. No standing water on the runway. c. Minimum runway width is 150 ft.
1. The Lead will call for and receive clearance for takeoff for the entire flight using the procedures outlined in Chapter 2 and local SOP. Lead should check the wind sock for prevailing winds, or make a mental note of the winds provided by Tower in the takeoff clearance.

CHAPTER THREE T-6A FORMATION
3-2 SECTION DEPARTURES
When cleared, Lead should taxi onto the active runway and center themselves on one half of the runway according to the following criteria (Figure 3-1):
a. If there is a crosswind, the Lead will position on the downwind side of the active runway. This will allow the wind to blow his prop wash off the runway, avoiding adverse effects on Wing’s takeoff roll.
Figure 3-1 Runway Positioning for Takeoff
b. If the winds are calm or straight down the runway, the Lead will position on the far side
of the runway.
2. The Wing will follow the Lead, center their aircraft in the other half of the runway, and move forward until the leading edge of their wing is in line with the trailing edge of the Lead’s horizontal stabilizer. This is the position Wing will maintain during the takeoff roll. Both aircraft should work expeditiously to complete the lineup checklist, switch to appropriate Departure frequency, and get into position. Once Wing has completed these tasks, Wing will pass a thumbs-up signal to the Lead signifying they are ready for run-up. 3. Upon receipt of Wing’s thumbs-up signal, Lead will give the run-up signal (2 fingers extended and rotate wrist forward and aft). Both aircraft will set 30% torque, check their aircraft gauges for normal indications, and visually inspect the other aircraft. When ready for takeoff, Wing will again pass a thumbs-up to Lead.

T-6A FORMATION CHAPTER THREE
SECTION DEPARTURES 3-3
4. Lead: When the run-up checks are complete and a thumbs-up is received from the Wingman (signifying Wing is ready for takeoff), the Lead pilot will raise his/her arm vertically above the canopy rail. After a slight pause, the Lead pilot will drop their arm smoothly in a karate chop motion. When the pilot’s arm reaches horizontal or drops below the canopy rail, Lead will release the brakes and set 90% torque. 5. Wing: At the completion of the Lead pilot’s karate chop motion, the Wing pilot will release his/her brakes and set max power. During the takeoff roll, the Wing pilot will remain centered on his half of the runway and stay in proper position utilizing Power Control Lever (PCL) adjustments (minimal differential braking may be used until the rudder becomes effective). In situations where the Wing pilot cannot maintain position with available PCL settings, they can transmit “power” on the tactical frequency to tell the Lead to add power and “gimme a couple” to tell the Lead to reduce power. 6. During the takeoff roll, the Lead SNFO has the responsibilty of monitoring the Wingman’s position and progress while the Lead pilot calls the standard takeoff dialogue on the Internal Communication System (ICS). In the Wing aircraft, the SNFO is responsible for the standard takeoff dialogue on ICS while the pilot maintains proper position. Obviously, both SNFOs should monitor the overall progress of the takeoff for safety as well. As per the Takeoff Checklist, the “MIN POWER at 60 KIAS” will not be 100% when power is set at 90%; instead, call the percentage displayed. 7. Approaching 85 KIAS, the Lead pilot will smoothly rotate to the takeoff attitude. The Wingman will match the Lead's attitude. As both aircraft reach flying speed, they should
become airborne at the same time, both having approximately the same attitude, weight, and
airspeed. 8. Once airborne, the Wingman will continue to maintain the same position on Lead. Reaching a safe altitude, the Lead SNFO will survey the Wingman ensuring they are safely climbing away from the ground and are in position to see the gear retraction signal. Passing 110 KIAS, the Lead SNFO will report “Above 110 knots, Wingman in position” over the ICS. The Lead pilot will then give the “head nod” signal to raise the landing gear and flaps. Upon sight of this signal, the Wing SNFO should call out the current airspeed on the ICS. Both pilots will raise their gear and flaps simultaneously. The Wing SNFO will pass a “thumbs-up” signal to inform Lead that Wing’s landing gear and flaps indicate up and locked and that Lead’s gear and flaps appear to be up and locked. The Lead SNFO will then notify the Lead pilot on ICS the flight is clean by saying “Flight’s clean at ____ knots.” The Wingman will then transition to the parade position. Throughout this phase both students will continue to monitor position and instruments, paying particular attention to airspeed.

CHAPTER THREE T-6A FORMATION
3-4 SECTION DEPARTURES
Steps for the Section Takeoff are:
a. Lead receives clearance for takeoff and the flight switches to Departure. b. While taxiing onto the runway both aircraft run through their Line-up checklists. c. Wingman lines up utilizing visual cues off Lead and gives a thumbs-up when on
Departure frequency, in position and ready for run-up. d. Lead gives the run-up signal, sets 30% torque, checks engine instruments and then
monitors the Wingman for a thumbs-up. e. Wing sets 30% torque, checks engine instruments and gives Lead a thumbs-up when
ready for takeoff. f. The Lead pilot will give the section takeoff “karate chop” signal and set power to 90%. g. Once airborne, the Lead SNFO will report “Above 110 knots, Wingman in position”
over ICS to alert the Lead pilot to give the raise gear and flaps “head nod” signal. Upon seeing this, the Wing SNFO will report their airspeed over the ICS. Both aircraft will raise the gear and flaps simultaneously.
h. When Wing’s gear and flaps indicate up the SNFO will give a “thumbs-up” to Lead and
the Lead SNFO will announce “Flight’s clean at __ knots” over the ICS. Wingman moves to parade position.
i. The Lead SNFO contacts Departure.
302. INTERVAL TAKEOFF
The other type of formation takeoff is the Interval Takeoff, which is commonly known as the “10-second go.” It accomplishes a formation takeoff without the risk of both aircraft in close proximity on the takeoff roll. The Interval Takeoff is a rendezvous where all aircraft in a flight takeoff in order and accomplish their join-up while the Lead is departing. Each aircraft must comply with prescribed course rules and/or departure procedures. If done properly, it is accomplished safely, expeditiously, and with maximum fuel economy. 1. When cleared on to the runway, the flight will position as discussed in Section 301, taking wind into account. In position, with takeoff clearance and a thumbs-up from the Wingman, Lead

T-6A FORMATION CHAPTER THREE
SECTION DEPARTURES 3-5
will give the run-up signal. Both aircraft will set 30% torque, check their aircraft gauges for normal indications, and visually inspect the other aircraft. When ready for takeoff, Wing will again pass a thumbs-up to Lead. 2. Lead: Upon receipt of Wing’s thumbs-up, Lead will give the kiss off signal (see section 801) to Wing and then execute a normal takeoff maintaining the proper half of the runway. When safely airborne, Lead will clean up, reduce power to 90%, and maintain 160 KIAS to facilitate the initial join-up. The Lead will also comply with appropriate departure procedures, making any required turns utilizing 30º AOB or less. If level-off should be necessary prior to rejoin, Lead will maintain 160 KIAS. Lead will contact Departure once Wing has called “RAIDER 12 airborne” on the tactical frequency. If a cloud layer is encountered during the climb that might cause Wing to lose sight, Lead will level off below the cloud layer. Once Wing is aboard and stable in the parade position or the flight path above is clear of clouds, Lead will continue the climb to the assigned altitude. 3. Wing: As Lead kisses off Wing and starts his takeoff roll, Wing will check the clock. After ten seconds have passed, Wing will release brakes and conduct a normal takeoff on the appropriate half of the runway. Wing should monitor the progress of Lead’s takeoff for signs of abort or directional control issues. The 10 second delay results in approximately 1000 ft of separation, thus mitigating the risk of a dual high-speed abort.
WARNING
Wake turbulence or lead aircraft propeller wash may result in severe degradation of trailing aircraft controllability during takeoff.
Once the Wing aircraft indicates gear and flaps retracted, the Wing SNFO will advise Lead on tactical frequency by stating “RAIDER 12 airborne.” Wing will now use AOB and power to complete the joinup or rendezvous. 303. RENDEZVOUS
A rendezvous is a means by which to join a flight together. The briefed departure rendezvous can be a CV (circling) rendezvous, a running rendezvous, or based off of a navigational fix, commonly referred to as a TACAN rendezvous. This will be covered in Section 307. 1. CV Rendezvous. The CV Rendezvous is used to join a flight in a turn. After takeoff, Lead begins a 30º AOB climbing turn at a briefed airspeed. When safely airborne and cleaned up, the Wingman executes a turn inside the Lead’s radius of turn to intercept the 45º bearing line.

CHAPTER THREE T-6A FORMATION
3-6 SECTION DEPARTURES
Wing must maneuver to place Lead slightly above the horizon, while maintaining rendezvous bearing and control of proper closure rate (Section 406). The Wingman should monitor airspeed until close enough to visually discern relative motion. When the Wing is on the bearing line and within three wingspans, he will begin the join-up by increasing step down and maintaining nose-to-tail separation. While controlling the relative motion, Wing flies outside of Lead’s turn and up into the VMC parade turn away position (Section 402). If performing a level rendezvous, Lead will maintain constant airspeed, altitude, and AOB until the Wingman is in the parade turn away position. 2. Running Rendezvous. The running rendezvous is used to join a flight while proceeding on course. It is normally the initial procedure following an interval takeoff. Lead will climb at a reduced power setting (maximum 90%) in order to allow the Wingman to close sufficiently. Once sufficient closing airspeed has been attained, Wing should place Lead on the horizon for the duration of the running rendezvous. The most important aspect in a running rendezvous for the Wingman will be setting the distance abeam the Lead. This distance is critical because visual closure cueing is derived from the Lead’s aircraft tracking aft on the Wingman’s canopy. If too wide, the Wingman will arrive on bearing line with a large distance to traverse in order to join. If too narrow, the Wingman may not recognize closure early enough when approaching the bearing line; also, closure on any aircraft is most difficult to perceive when approaching from directly behind and could result in a flight hazard due to an excessive closure rate. Approaching 500 ft from Lead, Wing will offset laterally approximately 200 ft (six wingspans). Once attained, the Wingman should concentrate on flying the aircraft on a straight line that parallels Lead’s flight path until arriving on the parade bearing line. Airspeed must be monitored to control closure until relative motion can be visually discerned Wing should remain on bearing line with no more than 10 knots of closure. Once stabilized on bearing line with closure under control, the Wingman will complete the join by moving up the bearing line into the parade position. Should Lead enter a turn during a running rendezvous, Wing will move to the inside of the turn and transition to a CV rendezvous. Likewise, should lead roll out of a turn during a CV rendezvous, Wing should transition to a running rendezvous until joined. 304. CLIMB AND LEVEL-OFF
1. If Instrument Meteorological Conditions (IMC) will not be encountered after the flight is joined up, the Wingman can be given the signal to take the cruise position (hitchhiking motion
over each shoulder) while transiting to the working area. If IFR, comply with all ATC departure
instructions. If VFR, then things such as remaining in Visual Meteorological Conditions (VMC),

T-6A FORMATION CHAPTER THREE
SECTION DEPARTURES 3-7
airspace restrictions, and traffic avoidance must all be considered when selecting the flight’s base
heading and altitude. In either case, Lead will establish a base airspeed of 200 KIAS upon
leveling off. This will remain the base airspeed for the flight unless otherwise briefed. 2. If IMC is anticipated, Wing should close to and maintain the parade position in order to keep
sight of the Lead. Lead should pat Wing aboard prior to entering any clouds. In IMC, the Wing
SNFO will continue to clear the airspace and backup the pilot on the instruments, as the pilot’s
main focus will be on the Lead aircraft. 305. SNFO RESPONSIBILITES
1. Lead SNFO responsibilities:
a. Monitor Wingman’s position. b. Monitor the gear retraction signal (below 150 KIAS). c. Confirm the Wingman’s landing gear and flaps appear up and locked. d. Call Departure when both aircraft are safely airborne and in the clean configuration. e. Direct and monitor the departure procedures. f. Keep Wingman in sight and Lead pilot apprised of Wingman’s progress during the
rendezvous. g. Continue clearing the area for the flight. h. Call for and accomplish the Climb Checklist when appropriate.
2. Wing SNFO responsibilities:
a. Monitor aircraft operation and make standard ICS calls on takeoff roll. b. Keep Lead in sight. c. Monitor internal instruments, as pilot will keep scan primarily on Lead, and anticipate
the gear retraction signal. Call out airspeed to the Wing pilot when this signal is given by Lead.

CHAPTER THREE T-6A FORMATION
3-8 SECTION DEPARTURES
d. Direct the passing of “thumbs-up” to Lead when landing gear and flaps are up. e. Back up Lead and monitor departure procedures. f. Continue clearing the area for the flight. g. Call for and accomplish the Climb Checklist.
306. OPERATIONS CHECK
After contacting Departure on the climb out each aircraft will individually accomplish their first operations check. Subsequent operations checks should be individually accomplished at least every 20 minutes, and after each fuel check following a lead change. 307. INDIVIDUAL CLEARANCES
When weather conditions at the field prohibit a formation takeoff, the flight may brief and coordinate separate takeoff clearances to execute a join-up clear of the weather. Lead will takeoff first, check in to the area, and set up a 200 KIAS orbit over either a geographic reference point (GEO REF) or a navigation fix and wait for Wingman to join up. When able, Lead should pass his working area to Wingman over TAC. Once airborne, Wingman will need to communicate to ATC his intent to join on Lead. Wingman must also use TAC to contact Lead prior to entering the working area to determine the rendezvous parameters (i.e. location, altitude, airspeed, and turn direction). It is imperative that Wing ensures at least 500’ of altitude separation until visual with Lead and stable on the rendezvous bearing line. A GEO REF/NAV rendezvous is a visual, turning rendezvous employed to join a flight above the weather or during the mission if the flight is separated. The GEO REF rendezvous uses a physical feature, while the NAV point utilizes a VOR/DME fix or GPS waypoint. The rendezvous is normally executed in a turn tangent to the briefed fix (radial/DME) at a specific airspeed, altitude, and direction (inbound or outbound to/from the fix). The default rendezvous for VT-10 is left turns, inbound on the radial, at 30° AOB and 200 KIAS unless briefed otherwise. Points around the rendezvous circle are numbered one to four for reference, with point one located at the fix and remaining points located at 90° intervals around the circle (Figure 3-2). Upon reaching the rendezvous fix, the Lead SNFO calls “point one” on TAC and directs a 30° AOB turn in the briefed direction. Continue transmitting each 90° position number until the

T-6A FORMATION CHAPTER THREE
SECTION DEPARTURES 3-9
Wingman calls “Visual” over TAC. Lead must compensate for wind by adjusting his rendezvous turn so that point one is always at the briefed fix. The Wingman should cross point one tangent to the rendezvous circle and 500’ below Lead’s altitude. Accomplish this by tracking the radial prior to the fix. The Wing SNFO will call “point one” upon crossing and direct a 30° AOB turn in the proper direction. Use Lead’s position reports to narrow the visual search area now that both aircraft are in the same “piece of sky.” Talk the pilot’s eyes onto Lead, and report “visual” over TAC once both crewmembers have gained sight. Now visual, the Wing SNFO must direct the aircraft to intercept Lead’s rendezvous bearing line. The Wing should maneuver to put his nose just in front of Lead’s aircraft (lead pursuit) and then roll wings level in order to close distance. This relative motion will cause Lead’s aircraft to track across Wing’s canopy. When Lead’s aircraft has moved approximately 30° across Wing’s nose, Wing should make another level turn to put his nose back in front of Lead to continue closing. Continue these turns until close enough to visually breakout Lead’s vertical stabilizer and opposite wingtip in order to maintain the bearing line. With closure under control (200 +/- 10 KIAS) and fuselage alignment between the two aircraft, Wing can climb to Lead’s altitude and complete the remainder of the turning rendezvous. A caveat is necessary when Wingman sights Lead aft of his wingline. In this instance, Wing must first fly toward the center of the circle and maneuver around the center point, or “post” of the circle, before starting the level turns to close distance. Without this step, the intercept angles generated become excessive for a normal, safe rendezvous. Figure 3-2 portrays a briefed rendezvous point of the Brookley 131 at 13, left turns inbound, with Lead at 14,000’. This could be represented as BFM 131/13 LTIB 14,000’ on a briefing board. Since the BFM 131/13 happens to be Sonny Callahan Airfield, the GPS could be set to either BFM with the 131 radial in OBS or KCQF with the 131 radial in OBS mode. For the former, you would fly to 13.0 DME and the latter, overfly the waypoint. In clear weather, Sonny Callahan would also be a good choice for a GEO REF point.

CHAPTER THREE T-6A FORMATION
3-10 SECTION DEPARTURES
Figure 3-2 NAV Rendezvous

SECTION PARADE 4-1
CHAPTER FOUR
SECTION PARADE
400. INTRODUCTION
Parade formation is used in various flight regimes to include instrument meteorological conditions (IMC), demonstrations, exhibition flights, and the break to name a few. Advantages
are: it offers the Wingman the best opportunity to maintain visual contact on Lead in poor weather conditions; facilitates good visual communications between aircraft in the flight; is easily and
positively controlled by the Lead; and presents a neat military appearance. The disadvantages of parade are a lack of maneuverability and hindrance of proper lookout doctrine by the Wingman. 401. PARADE POSITION
Figure 4-1 Parade Checkpoints
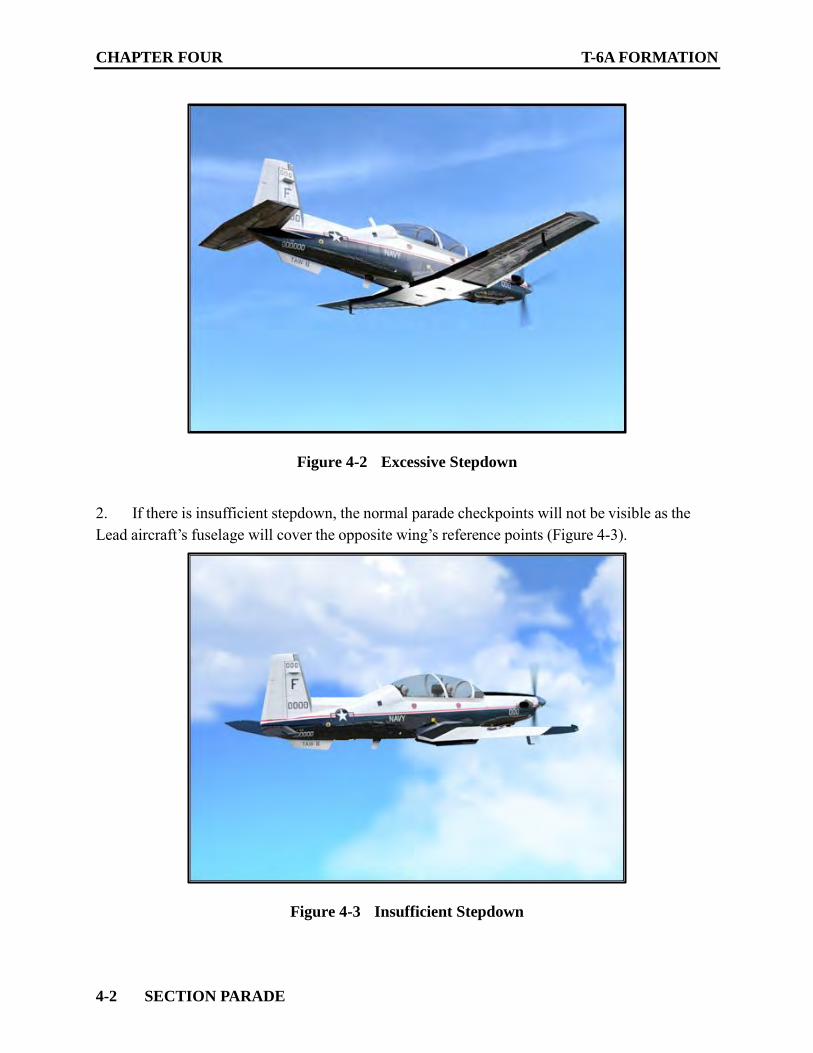
The parade position is a fixed position on Lead’s 45o bearing line that results in 3 feet of wingtip clearance and 5 feet of stepdown. 1. Visual Reference Points. Parade is maintained through the use of two visual reference points: aligning Lead’s prop arc with its inboard pitot tube and placing Lead’s UHF antenna over their opposite wing’s inboard aileron cutout. Proper stepdown is visually confirmed when a triangle
of air forms between the UHF antenna, fuselage, and wing. If too much stepdown exists, there
will be a large gap between the fuselage and opposite wing; additionally, the Wing will likely see
the bottom portion of the lead aircraft’s opposite wing (Figure 4-2).
CHAPTER FOUR T-6A FORMATION
4-2 SECTION PARADE
Figure 4-2 Excessive Stepdown
2. If there is insufficient stepdown, the normal parade checkpoints will not be visible as the Lead aircraft’s fuselage will cover the opposite wing’s reference points (Figure 4-3).
Figure 4-3 Insufficient Stepdown

T-6A FORMATION CHAPTER FOUR
SECTION PARADE 4-3
3. Maintaining Position. While in the Parade position, it is Wing’s responsibility to maintain proper stepdown and bearing line and to keep any relative motion smooth and slow. Wing accomplishes this through use of AOB and/or power while cross-checking the two visual cues in order to achieve and maintain the precise parade position relative to Lead’s aircraft. Wing should ensure that all relative motion between the two aircraft occurs along the 45º bearing line and not purely forward or horizontal. Due to the close proximity of the two aircraft, the vast majority of the Wing pilot’s scan is devoted to maintaining position. Lead should avoid setting less than 20% torque in T-6A formation to allow Wing to maintain position. 4. Safety. While in the Parade position it is Wing’s responsibility to:
a. Maintain the proper stepdown and bearing line. b. Keep any relative motion smooth and slow.
402. PARADE TURNS
Parade turns are usually performed using 30º AOB or less, but in no circumstance will the flight exceed 45º AOB. The formation leader must use slower than normal rates of roll when entering and exiting the turns to allow the Wingman to maintain position. Turns are always referenced as into or away from the Wingman. Turns away from the Wingman are conducted in two different ways depending on whether or not the flight is IMC or VMC. In the case of the VMC turn away, Wingman will roll about their own longitudinal axis and visually place Lead’s fuselage on the horizon, thereby remaining co-altitude with the Lead. In this position, the parade visual reference points line up vertically, as if connected on a plumb line. For VMC turns into the Wingman and all IMC turns, the Wingman rolls about Lead's longitudinal axis in order to maintain the proper parade visual cues. This means that Wing’s aircraft will always be lower than Lead’s on a turn into the Wingman, and higher than Lead’s on an IMC turn away. Lead will take the Wingman through a series of parade turns that will result in a heading change between 90 - 180 degrees. The amount of heading change may be adjusted due to area constraints or environmental factors (e.g., sun angle, clouds, etc.).

CHAPTER FOUR T-6A FORMATION
4-4 SECTION PARADE
Student Duties: 1. Lead. Prior to commencing a parade turn, the Lead SNFO will clear the area and ensure the Wingman is in position. The Lead SNFO will be expected to direct parade turns as well as subsequent rollouts and/or reversals. Remember, flight leadership involves planning ahead with consideration given to any subsequent maneuvers and area boundaries. 2. Wing. The Wingman will maintain flight integrity throughout the parade sequence; additionally, the Wing SNFO will continue to clear the area for the flight, maintain SA on area orientation, and monitor internal cockpit instruments. 403. CROSSUNDER
A formation must be flexible to achieve maximum maneuverability; therefore, the Lead must be able to change the position of the Wingman within the formation. The crossunder is the maneuver by which the Wingman moves from parade position on one side of the Lead to parade position on the opposite side of the Lead. 1. Lead. The Lead SNFO will clear the area and ensure the Wingman is in position. Once again consideration shall be given to keeping the formation clear of obstructions and within the area limits. The Lead will then give the crossunder signal (Figure 4-4), maintaining a steady platform while the Wingman is crossing under.
Figure 4-4 Crossunder Signal

T-6A FORMATION CHAPTER FOUR
SECTION PARADE 4-5
2. Wingman. The Wingman will reduce power to slide down and aft to achieve 20 feet of nose-to-tail separation AND enough step down to see the Lead's exhaust stacks. At this point, the Wing will use angle of bank to cross Lead's 6 o'clock position, and increase power to maintain nose-to-tail separation. Once the Wing is safely established on the proper side with the correct wing tip separation, he/she will move up and forward into parade position.
3. Safety.
a. The Lead will maintain a stable platform. b. Wing will avoid any rapid lateral motion. c. Wing will maintain the proper stepdown and keep Lead’s exhaust stacks in sight. This
position will keep Wing clear of any prop wash that may be encountered while executing the crossunder.
404. LOST SIGHT EXERCISE
The Lost Sight Exercise is used to simulate a Wingman losing sight of Lead in instrument meteorological conditions and may be accomplished any time during the parade turn sequence. The formation Lead SNFO will initiate the exercise from a turn into or away from the Wingman as follows: Lead: “RAIDER 12, standby lost sight exercise.”
Wing: “RAIDER 12.”
When ready to initiate the exercise: Lead: “RAIDER 12, go simulated lost sight.”
The wing SNFO will first direct his pilot to roll out or continue turn via ICS and then make the appropriate lost sight call over the tactical frequency (reference section 705 for procedures). Both SNFOs will direct their instructor through the appropriate procedure for the current flight regime (i.e. climb, descent, turn into or away). The following example is for a level turn away from Wingman: Wing (over ICS): “Roll out.”
CHAPTER FOUR T-6A FORMATION
4-6 SECTION PARADE
Wing: “RAIDER 12 lost sight, rolling out heading 120.”
Lead: “RAIDER 11.”
After continuing the turn for 30 past Wing’s called heading: Lead: “RAIDER 11 rolling out heading 090.” Wing: “RAIDER 12.” Lead: “Simulated climbs and descents, simulated 30 seconds, RAIDER 12 cleared to heading 090.”
The exercise should only take 10-15 seconds from initiation. This is used instead of the normal 30 seconds because the separation generated in 15 seconds places the Wingman in the proper position for the upcoming G-Warm.
NOTE
This exercise shall only be accomplished in VMC conditions. The Instructor pilots will remain vigilant during the separation maneuver while the SNFOs direct the appropriate aircraft maneuvers. The SNFOs are expected to know and be able to brief all the procedures outlined in Chapter 7.
405. FENCE CHECKS/G-WARM
Two ways aircrew prepare their body and aircraft for flight involving dynamic maneuvering and/or combat are through Fence Checks and the G-warm exercise. Fence is a mnemonic for: Fire-control system, Electronic counter measures, Navigation, Communication, and Emitters (which includes transponder). In the T-6A, the SNFOs will fence-in by completing the Pre-Stalling, Spinning, Aerobatic Checklist and confirming the proper transponder setting over ICS. The G-Warm will be paired with the fence-in and both are required prior to dynamic conduct such as aerobatics, tail chase, low altitude flying, and/or any other time aircrew plan to pull over 3Gs. Except for the F4001, this maneuver will be accomplished from combat spread (section 500) before entering the working area or low-level route. It will consist of a minimum of 180º of heading change. The first 90° of turn will be at 3 Gs followed by the last 90° at 4 Gs.

T-6A FORMATION CHAPTER FOUR
SECTION PARADE 4-7
The example below illustrates how the fence-in and G-warm should be conducted. Lead: “RAIDER fence-in.” Wing: “RAIDER 12.”
Both aircraft will complete the Pre-Stalling, Spinning, Aerobatic Checklist and check transponder code and mode. Lead should push the Wing to combat spread as necessary. With the flight established in combat spread at 200 KIAS, the following calls will be made on tactical frequency: Lead: “RAIDER, accel G-warm, reference 270.” (270 being an example heading.) Wing: “RAIDER 12.” Both aircraft will then apply power and accelerate to 220 KIAS. Once stable at 220 KIAS, the Lead pilot will call the turns: Lead pilot: “RAIDER, 90 Left (or Right), Go.” Both aircraft simultaneously execute a 3 G turn at max power in the called direction for 90º of heading change. Lead pilot: “RAIDER, 90 Left (or Right), Go.” Both aircraft simultaneously execute a 4 G turn at max power in the called direction for 90º of heading change and visually reacquire all members of the flight. After the final G-Warm turn, the Lead SNFO will direct the reporting of the fence checks on tactical frequency. Lead will normally take advantage of this report to get a fuel check simultaneously. “Good G” means that the aircraft has not been overstressed and both aircrew are able to proceed with the dynamic maneuvering. Lead: “RAIDER 11, fenced-in, 860 lbs, good G.” Wing: “RAIDER 12, fenced-in, 840 lbs, good G.”
After the fence-in, Lead will clear the Wingman back into parade position via the tactical frequency as necessary.

CHAPTER FOUR T-6A FORMATION
4-8 SECTION PARADE
At the completion of all dynamic maneuvering for the event, the Lead SNFO will direct the flight to fence-out. Lead: “RAIDER, fence-out.” Wing: “RAIDER 12.” Each SNFO will comply by individually completing an Operations Check and reporting the proper transponder setting. After giving both aircraft enough time to complete the checks, Lead will initiate reporting the fence-out as follows: Lead: “RAIDER 11 fenced-out, 620 lbs.” Wing: “RAIDER 12 fenced-out, 600 lbs.” 406. 180° BREAKUP AND RENDEZVOUS
The breakup and rendezvous, or B&R, is used to practice a co-altitude, co-airspeed rejoin. From the parade position, the breakup establishes the required interval for the rendezvous. Lead then initiates a turn and maintains a constant angle of bank and airspeed. The Wingman uses angle of bank to fly along the 45° bearing as the distance between the two aircraft is closed. Using a shallower angle of bank than Lead creates a larger radius of turn, which moves the Wingman closer to Lead. Conversely, a steeper angle of bank moves Wingman away from Lead. Through the continual manipulation of this principle, the joining aircraft is able to maintain a steady bearing line as it approaches the Lead aircraft. 1. Lead. Prior to initiating the maneuver, the Lead must ensure that the 180º breakup and rendezvous can be accomplished from the present heading. It is important to understand the ground track that this maneuver will take the formation through. For instance, if the breakup turn is commenced from a northerly heading, the track of the formation will be in either an easterly or westerly direction, depending on the direction of the rendezvous turn. The 180º breakup and rendezvous may be executed from either the right or left parade position. The Lead SNFO will:
a. Check to ensure the Wingman is in position. b. Check the area is clear. c. Give the breakup and rendezvous signal (Figure 4-5).

T-6A FORMATION CHAPTER FOUR
SECTION PARADE 4-9
d. Ensure the Wingman acknowledges the signal. e. Once again check the area is clear. f. Kiss off the Wingman and break away (Figure 4-6).
Figure 4-5 Breakup and Rendezvous
Figure 4-6 Kiss Off Signal
After giving the kiss off signal, Lead will break away from the Wingman and execute a level 180º turn utilizing maximum power and available Gs to maintain airspeed (i.e. energy sustaining) to roll out at the base airspeed (200 KIAS). Once Wing is in trail, they will transmit “in trail” on TAC frequency. The Lead will then roll to 45º AOB in the desired direction of the rendezvous to give the Wingman an initial “wing flash” before establishing a 30º AOB turn, on altitude and airspeed. Throughout the maneuver, the Lead SNFO will continue to monitor Lead pilot's airwork, while

CHAPTER FOUR T-6A FORMATION
4-10 SECTION PARADE
observing the Wingman for a safe rendezvous, informing the Lead pilot of relevant deviations in any condition. 2. Wingman. After a 3-second interval, the Wingman will break, matching Lead’s AOB and pull. When established straight and level and directly in trail of the Lead, the Wing SNFO will transmit “in trail” over TAC frequency. When the Lead “flashes” and moves left or right of centerline, Wing will roll in the designated direction and proceed until they are established on Lead’s 45º bearing line. The Wingman is on the bearing line when Lead’s vertical stabilizer aligns with Lead’s outboard wingtip (Figure 4-7). If Wing observes Lead’s vertical stabilizer moving forward and inboard along the wing, then Wing is behind the 45º bearing line and said to be sucked (Figure 4-8). When sucked, the Wingman must increase AOB to fly toward the center of the rendezvous circle to get back onto bearing line. On the other hand, should Wing observe Lead’s vertical stabilizer moving aft and eventually sky appearing between the vertical stabilizer and the wing, then Wing is ahead of the 45º bearing line and is said to be acute (Figure 4-9). To correct for an acute position, Wing must decrease AOB to increase his radius of turn, move away from the center of the rendezvous circle, and back onto the 45º bearing line. Wing will use multiple, small adjustments to his/her AOB to maintain this bearing line and close to one plane width. Once there, Wing will cross underneath and behind Lead and join in the VMC Turn Away position.
Figure 4-7 On Bearing Line

T-6A FORMATION CHAPTER FOUR
SECTION PARADE 4-11
Figure 4-8 Sucked
Figure 4-9 Acute
Wing should use the “ABCs” to continously correct for position during rendezvous. “A” stands for Altitude. The Lead should remain slightly above the horizon; about the height of a soda can. “B” stands for Bearing. The Wingman should evaluate the visual cues discussed above and strive to be on the bearing line at all times. “C” stands for Closure. A safe closure rate is that of a fast walk. From a long distance it is difficult to visually judge closure, so Wingman should maintain 200 KIAS +/- 10 until closure is visually discernable. The Wing SNFO is responsible for regularly calling out airspeed to the pilot during the join up, and also responsible for monitoring the progress of the rendezvous by reporting deviations of altitude and bearing line over ICS. Voice

CHAPTER FOUR T-6A FORMATION
4-12 SECTION PARADE
inflection should be proportional to the amount of deviation. Aircrew coordination and safety are paramount throughout the maneuver. 3. Underrun Procedure. In the event Wing’s aircraft becomes excessively acute, acute in close, or has an excessive closure rate resulting in an inability to execute a safe join-up, Wing shall discontinue the rendezvous and use the underrun procedure. Any crewmember in the flight recognizing the need for an underrun can direct it by announcing, “Tactical Callsign, underrun” over the radio. The Wing SNFO in the underrunning aircraft shall direct his/her pilot through the underrun maneuver by stating, “LOWER, LEVEL, IDLE, BOARDS” over the ICS and then inform Lead by stating “Tactical Callsign, underrun” over the tactical frequency. The Wing pilot will fly the underrun by:
a. Lowering the aircraft’s nose to achieve 20 ft. of stepdown. b. Leveling their wings. c. Reducing their power to idle in order to pass behind Lead. Speedbrakes may be used as
required. Wing will pass below and behind Lead and then fly up to the “perch” position, located on the extended 3-9 line, four plane widths abeam Lead and stepped up. Do not get too wide. Lead will visually acquire Wing and reply with: “RAIDER 12 cleared back inside when stable.” Wingman will reply: “RAIDER 12.” Once cleared by the Lead, Wing should slide aft to proceed below and behind Lead to the inside of the formation and reestablish the proper altitude, bearing line, and closure to complete the rendezvous. A common error is to “rush” to the inside of the turn thereby putting yourself in a bad position to rejoin because it is not controlled. 4. Wing Safety Considerations.
a. Never lose sight of the Lead. b. Recognize the need and call for the underrun procedure when applicable.
T-6A FORMATION CHAPTER FOUR
SECTION PARADE 4-13
5. Planned Underrun. After completing at least one successful rendezvous on F4001, the flight will execute a planned underrun to demonstrate excessive closure to the SNFO. With the Wing in trail, the Lead will execute a normal “wing flash” and then immediately slow to 180 KIAS to begin the rendezvous. The Wing will maintain 200 KIAS. The resulting airspeed differential will force excessive closure during the join-up. The Wing SNFO should announce the underrun over TAC upon recognizing the excessive closure rate. When clearing Wing back inside the turn, Lead should also announce “resetting 200 KIAS.” 407. CRUISE POSITION
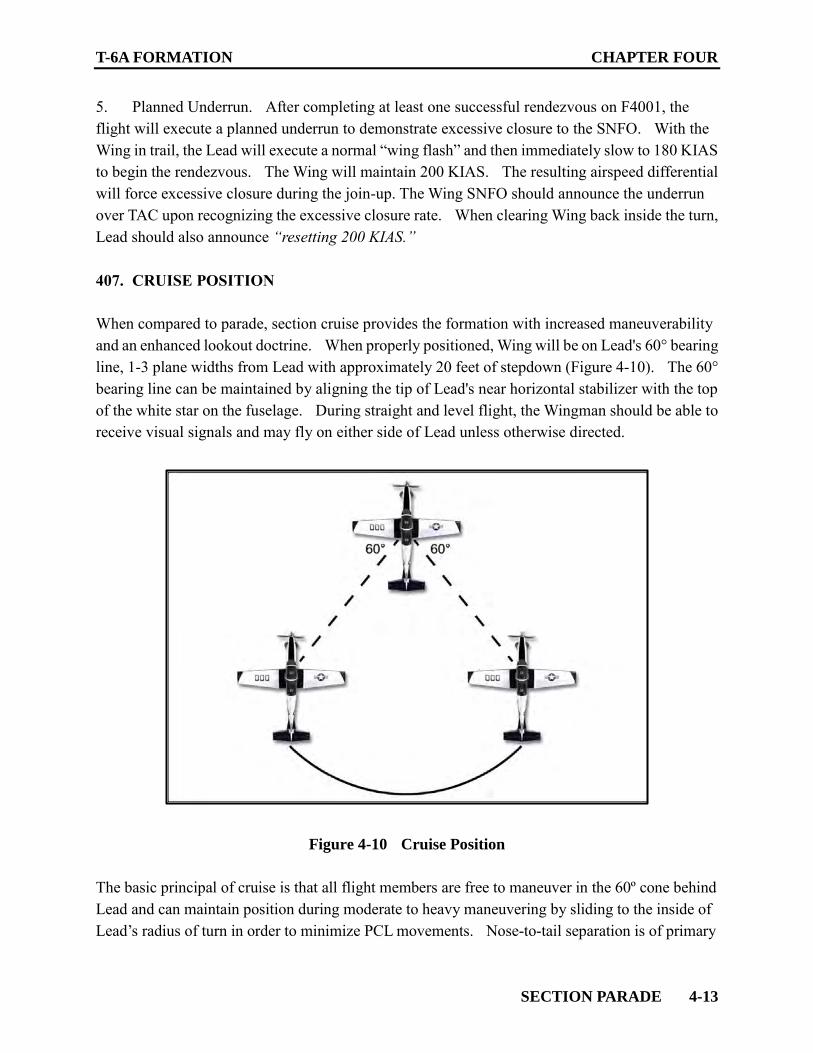
When compared to parade, section cruise provides the formation with increased maneuverability and an enhanced lookout doctrine. When properly positioned, Wing will be on Lead's 60° bearing line, 1-3 plane widths from Lead with approximately 20 feet of stepdown (Figure 4-10). The 60° bearing line can be maintained by aligning the tip of Lead's near horizontal stabilizer with the top of the white star on the fuselage. During straight and level flight, the Wingman should be able to receive visual signals and may fly on either side of Lead unless otherwise directed.
Figure 4-10 Cruise Position
The basic principal of cruise is that all flight members are free to maneuver in the 60º cone behind Lead and can maintain position during moderate to heavy maneuvering by sliding to the inside of Lead’s radius of turn in order to minimize PCL movements. Nose-to-tail separation is of primary

CHAPTER FOUR T-6A FORMATION
4-14 SECTION PARADE
concern and can be maintained by utilizing radius of turn. At no time should the Wingman be stepped up on the Lead. In addition to using cruise formation during transits to/from the area, the section may perform aerobatics in cruise. The Lead shall maintain between 1 and 4 G’s and airspeeds between 120-250 KIAS. Outside of aerobatic cruise maneuvering, Lead should restrict his angle of bank to 90°. The signals to move from cruise back into parade formation are the Lead aircraft porpoising his nose or aircrew tapping their shoulder. 408. TAIL-CHASE EXERCISE
1. Tail-Chase Exercise. From parade position, the Lead will pass the tail-chase signal which is similar to the crossunder signal except that the forefinger and thumb are extended into a “cocked pistol.” After receiving Wingman's thumbs up or head nod, Lead will kiss off the Wingman and break away for 180º. Both aircraft will set max power, and the Wingman will follow 3 seconds in trail. Once established in this position the Wingman will call “in trail” on the tactical frequency. The students will learn through the instructors' demonstration of lead, lag, and pure pursuit the basics of how flight paths relate to each other during high G, dynamic maneuvering; additionally, the students will also gain an appreciation for how proper body positioning will aid them in keeping the other aircraft in sight. Review and practice the Anti-G straining maneuver before these events. These techniques will have a direct application in the more advanced stages of training. 2. Tail-Chase Maneuvers. In the tail-chase portion of the F4001, the Lead will start the maneuvering with a series of steep turns and reversals. The series will include at least one fairly level turn to allow the Wingman to demonstrate lead, lag, and pure pursuit in a relatively benign flight regime. This will be followed by wingovers and barrel rolls designed to increase Situational Awareness (SA) in a dynamic flight regime; eventually, the flight will progress through the over-the-top maneuvers introduced in the Contact syllabus (e.g. loop, 1/2 Cuban eight). Lead should maintain airspeeds in excess of 120 KIAS and between plus 1 and 4 Gs, thereby allowing Wing an extra G with which to affect closure if necessary. The following are some specific responsibilities for the SNFOs during tail chase: 3. The lead SNFO will:
a. Keep their pilot informed of any significant changes in the Wingman’s position, calling out Wingman’s clock position as necessary. While keeping the Wingman in sight, the SNFO will learn how to effectively position their body for “high G” flight.

T-6A FORMATION CHAPTER FOUR
SECTION PARADE 4-15
b. Continue to maintain a proper lookout doctrine. c. Make altitude calls at 500-foot intervals anytime the lead aircraft is within 1500 feet of
a vertical boundary. d. Report approaching minimum or maximum Gs and/or 120 KIAS.
4. The wing SNFO will:
a. Continue to maintain a proper lookout doctrine while keeping the Lead in sight. b. Make altitude calls at 500-foot intervals anytime the Wing aircraft is within 1500 feet
of a vertical boundary. c. Report approaching minimum or maximum Gs and/or 120 KIAS.
The tail-chase exercise shall end using the appropriate “terminate” calls on the radio (covered later in this instruction). Lead will then maintain 200 KIAS and will clear the Wingman to parade position to facilitate a subsequent lead change. 409. LEAD CHANGE
The lead change is a maneuver designed to affect a change of the formation lead while minimizing the effect on flight integrity. Prior to signaling for a lead change, the Lead aircrew will ensure that the formation is in stable flight (altitude, airspeed, and heading) and will remain clear of other aircraft and weather while remaining in the working area. Lead changes may be done visually or over the radio and from any position with the correct coordination. The SNFO to lead the flight during the departure phase should also lead the flight during the arrival phase. Conduct a lead change as necessary prior to exiting the working area to ensure that this SNFO retains the admin lead for the extent of the flight. Lead changes are executed visually from the parade or cruise formation by the pilots only. To signal a lead change, the Lead pilot shall look at the Wingman, then pat the top of his helmet three times and point at the Wingman. If Wing is not ready to accept the lead, he shakes it off. If Wing is ready to accept the lead, he takes a small cut away from Lead for extra wingtip clearance and then adds power to assertively move in front of Lead. As the old Wingman moves forward of an abeam position, the pilot shall pat his head three times, then look and point forward. The exact moment of the lead change is when the pilot turns his head and points forward. The new

CHAPTER FOUR T-6A FORMATION
4-16 SECTION PARADE
Wingman shall move aft to the parade bearing line, ensuring wingtip separation, and then move close to parade position. For a lead change over the radio, the lead aircraft will simply make the following radio call on tactical frequency: Old Lead: “RAIDER 12, you have the lead on the left/right.”
New Lead: “RAIDER 12 has the lead on the left/right.”
The new Lead assumes the responsibility for communications and compliance with ATC clearance and as such, will place their aircraft’s transponder to “Altitude” and Traffic Avoidance System (TAS) to “Norm.” The new Wingman will place their transponder to “Standby,” as well as TAS to “Standby” if desired (as a technique, wait to hear a TAS alert from Lead prior to squawking “Standby.” The new Lead should begin a good VFR scan pattern, set 200 KIAS, maintain a solid platform, and orient themselves in the area. The new Lead should not attempt to make any corrections for altitude or heading until the new Wing has arrived in the parade position.
NOTE
In the event of a lead change, each aircraft keeps it’s original tactical callsign number. For example, after the parade sequence, there is a lead change and RAIDER 12 is now Lead while RAIDER 11 is now Wing. Any subsequent communications should reflect this change. It is recommended that another lead change takes place after the 2nd parade sequence (event F4001) and the 2nd uncalled TacForm sequence (event F4002) and before checking out of the area. This ensures the same SNFO leads the departure and the recovery phases of flight, taking ownership of the admin portions of the flight.
NOTE
For obvious safety reasons, there can be no confusion who owns the Lead and when, exactly, that Lead is assumed. Anytime there is
doubt as to who has the lead, quickly and accurately use the radio
to resolve the solution.

T-6A FORMATION CHAPTER FOUR
SECTION PARADE 4-17
410. FUEL AWARENESS
A fuel check shall be conducted after the conclusion of each lead change and at a minimum of every 20 minutes. The proper hand signal required to initiate a fuel check (drinking motion with fist and thumb) is illustrated in Figure 4-11. The Wing aircraft will give the hundreds digit followed by the tens digit via hand signals. Lead will reply to Wing with their state as well.
Figure 4-11 Fuel Check Signal
Knowing the fuel state of both aircraft at all times is paramount; as such, a few terms concerning fuel state need to be discussed. SNFOs will need to calculate MCF, Joker, Bingo, and divert fuel prior to each event, as they apply. Joker and Bingo do not apply to section instrument sorties. Unless otherwise noted, plan fuels to transit at 240 KTAS. 1. Mission Completion Fuel is the fuel required to complete planned mission conduct (route of flight, low-level, or tactical maneuvering) and return to planned destination via standard routing (including approaches for training or weather) to arrive with:
a. VMC: SOP minimum fuel on deck (200 lbs) or fuel to proceed to an alternate and arrive above SOP emergency fuel (120 lbs), whichever is higher.
b. IMC: Divert Fuel
2. Joker fuel is a pre-briefed fuel state that allows for one more tactical run/set, or 1 minute at max power (whichever is higher), prior to reaching Bingo fuel. In the T-6A, Joker will be set at 10 lbs above Bingo fuel.

CHAPTER FOUR T-6A FORMATION
4-18 SECTION PARADE
3. Bingo fuel is the fuel required to fly from the farthest point of a working area or route point to your planned destination via standard routing to arrive with:
a. VMC: SOP minimum fuel on deck (200 lbs) or fuel to proceed to an alternate and arrive above SOP emergency fuel (120 lbs), whichever is higher.
b. IMC: Divert Fuel
4. Divert fuel is the fuel required to fly direct to the planned alternate and fly an approach (if required, based on weather) to land above SOP emergency fuel on deck. 5. Emergency Divert fuel is the fuel required to fly an emergency profile from present position and make it to the nearest suitable divert with the published NATOPS reserve fuel. EXAMPLE (all numbers are approximate): Given a scenario that the form conduct will take place in the R-2908, the destination is Bay Minette, and the alternate is Mobile Downtown, calculate the different fuel numbers. Assume the weather allows VFR. Let’s start with Bingo. The southwest corner of the R-2908 is 43 NM from Bay Minette. This requires approximately 11 minutes of transit, 80 lbs of fuel at 240 KTAS, and 420 pounds per hour fuel flow. Mobile Downtown is 20 NM from Bay Minette, which requires 5 minutes of travel and 35 lbs of fuel. The choice for a VMC day is then either 280 lbs (200 + 80) or 235 lbs (120 + 35 + 80). Since 280 lbs is higher, it becomes the Bingo fuel. This means that if a flight member reaches 280 lb fuel state in the R-2908, then the flight has to immediately stop conduct and head direct to the destination to land with SOP minimum fuel. Joker then becomes 290 lbs (280 + 10), providing a small buffer above landing with SOP minimum fuel. If today’s mission requires two practice approaches, then MCF becomes 380 lbs (280 + 50 + 50). The farthest point of the working area was again chosen for the transit distance to be conservative. A VMC divert requires 160 lbs (125 + 35) between Bay Minette and Mobile Downtown, but this is lower than the SOP minimum fuel on deck, so the Divert fuel is 200 lbs.

T-6A FORMATION CHAPTER FOUR
SECTION PARADE 4-19
The emergency divert fuel would be determined in the aircraft by using the emergency divert table in the In Flight Guide and the distance to the nearest divert. Jack Edwards would the nearest divert in this case. EXAMPLE: Assuming the same working area and airfields from the last example, calculate the different fuel numbers if the destination and alternate are IMC. Since the IMC Bingo and MCF are both based on divert fuel, we’ll need to calculate it first. With a 35 lb fuel requirement between destination and alternate, the divert fuel becomes 205 lbs (120 + 35 + 50) after accounting for an approach. Bingo from the R-2908 then becomes 290 lbs (80 + 210) and Joker 300 lbs (290 + 10). Still intending to accomplish 2 instrument approaches at Bay Minute, the MCF becomes 390 lbs (210 + 80 + 50 + 50). 411. F4001 PARADE SEQUENCE
Formation Sequence: Once established in the working area, the formation conduct may be commenced. Both SNFOs must complete the following sequence of maneuvers from the Lead and Wing positions during the event (unless otherwise noted). 1. Parade turns into and away – VMC 2. Crossunder 3. Parade turns into and away - IMC 4. Lost Sight Exercise 5. Fence-In / G-Warm 6. Two - Breakup and rendezvous (B&Rs) 7. B&R to a planned underrun 8. Cruise maneuvering

CHAPTER FOUR T-6A FORMATION
4-20 SECTION PARADE
9. Tail chase 10. Lead change 11. Repeat sequence (minus G-warm & lost sight exercise) 12. Lead change 13. Fence-out/Recovery

SECTION TACTICAL FORMATION 5-1
CHAPTER FIVE
SECTION TACTICAL FORMATION
500. INTRODUCTION
In this chapter, we will teach the basics of maneuvering tactical formations through the use of engaging turns. SNFOs will learn how to establish and maintain combat spread (the basic formation positioning of tactical formation), remain within the working area, tactically turn a section up to 180°, and develop and practice positive lookout doctrine. 1. Combat Spread Position. The traditional Wingman combat spread position is 1-2 nautical miles abeam the lead with 1000 to 3000 feet of altitude difference. Due to the T-6A’s smaller size and turn radius, its combat spread position is reduced to an abeam distance of 1/2 NM with 200 feet of stepup. Wing is in proper position when he is directly abeam Lead, with the aircraft just outside the edge of the wing, visible to both crewmembers, and roughly the same length as the flash guard (the vertical card that sticks up from the wingtip and blocks the strobe light). Aircrew should be able to discern that there is a white spot on the side of the aircraft (but not a star) and there are two people in the cockpit. If there is more detail than this, Wing is too tight; not enough detail and Wing is too wide. 2. Lookout Doctrine. Success in air-to-air combat begins with early detection of the enemy. Each crewmember must develop an effective scan pattern in coordination with the other aircraft. Figure 5-1 delineates pilot and student lookout areas of responsibility for each aircraft. Notice the lack of a section blind area. Primary attention must be in the direction of the suspected threat (threat axis) and the Wingman's six o'clock position.

CHAPTER FIVE T-6A FORMATION
5-2 SECTION TATICAL FORMATION
Figure 5-1 Primary Lookout Responsibilities
3. Combat Spread Procedures.
a. Priorities. The first priority when flying combat spread is for the Wingman to maintain proper bearing (abeam or 0o bearing line). If the Wingman becomes sucked or acute, the lookout doctrine suffers; additionally, a sucked aircraft becomes more vulnerable to the enemy. The second priority is maintaining the 1/2 NM abeam distance. Should the Wingman become too wide, an enemy aircraft may be able to engage a Wingman undetected. If too close, the scanned area is reduced, it’s easier for the enemy to gain sight of both aircraft and he may be able to engage both simultaneously. The third priority is altitude. Altitude can easily be traded for airspeed and thus used to maintain bearing.
b. Taking Combat Spread From the Parade or Cruise position. When the flight is cleared
to maneuver, the flight Lead will pass the take combat spread signal (palm out, push away). Wing should reference base heading, altitude, and airspeed prior to repositioning to combat spread. The Wingman then selects maximum allowable power and aggressively drives the aircraft to the proper tactical combat spread position.
c. Once in combat spread the Wingman will return to the referenced base heading. In
order to correctly determine the abeam position, the Wingman should look straight out over his/her shoulder directly at the Lead. The tendency is to become sucked since it is easier to look forward at the Lead. To maintain a good combat spread requires a good scan both inside and outside the cockpit. The outside scan must encompass the

T-6A FORMATION CHAPTER FIVE
SECTION TACTICAL FORMATION 5-3
Lead’s relative position as well as the Wingman’s lookout area of responsibility. The inside scan compares reference airspeed, heading, and altitude in order to recognize early deviations and make the necessary adjustments.
d. If the Wingman becomes sucked, they will immediately correct by lowering their nose
and adding power to accelerate to the abeam bearing. The Wingman may dissipate as much altitude as required to regain the proper bearing line expeditiously. Approaching the bearing line, the Wing aircraft will raise their nose to arrive on bearing at 200 KIAS. When stable, reset power to referenced settings.
e. If the Wingman becomes acute, the aircraft will execute an aggressive nose-up pull to
dissipate forward velocity and regain the bearing line. Approaching the abeam position, the Wing’s nose should be lowered to arrive on bearing with 200 KIAS. If the Wingman is acute and close or very acute, the Wing should either execute an S-turn or extend their speedbrake to regain position. The S-turn is accomplished by using power as required while smartly turning at least 30º away from Lead followed by an immediate return to base heading. The Wingman should use caution since a sucked position may develop if the correction is too aggressive.
f. If bearing line and abeam distances are correct but the altitude is off, power is adjusted
in order to climb or descend. Remember, maintaining proper altitude is the last priority.
g. The amount of any correction is directly proportional to the amount of positional error.
Small errors require minor corrections to finesse the aircraft into proper combat spread while gross errors will require more aggressive maneuvering.
4. Combat Spread Voice Calls. All called turns (except the Cross Turn) will be completed as follows: Lead: “RAIDER, TAC left.” (Turn type and direction) Wing Pilot: “RAIDER 12.” The preparatory command occurs when Lead calls for the type of turn. The response, “RAIDER 12,” is the command of execution and indicates the Wingman understands and will comply. The response is given by the Wing pilot. This ensures the pilot flying is ready to execute the maneuver. If there is no response to the preparatory command, the Lead will repeat the call. The first aircraft to turn will check old six and the last aircraft to turn will check new six. In the case of 180° turns,

CHAPTER FIVE T-6A FORMATION
5-4 SECTION TATICAL FORMATION
each aircraft will check old six and new six. NOTE
If RAIDER 11 is in the Wing position, “RAIDER 11” is used as the command of execution.
5. TacForm Assumptions. Various turns can be utilized from combat spread that will maintain tactical integrity while changing course. For proper turn geometry, safety of flight, and coordination reasons, each aircraft must comply with a few basic assumptions while maneuvering in tactical formation:
a. All turns are max power, energy-sustaining turns that vary AOB and Gs to maintain airspeed
b. All uncalled turns are initially assumed to be tac turns. c. All wing flashes are assumed to be away from the wingman. d. Lead will make all turns level. e. Wingman is responsible for deconfliction.
6. SNFO Responsibilities: Lead SNFO:
a. Initiating each turn b. Area management c. Monitoring aircraft parameters (altitude, airspeed, heading, fuel, etc.) d. Visual lookout-traffic and weather avoidance e. Directing the pilot to turn or roll out as appropriate during TacForm.

T-6A FORMATION CHAPTER FIVE
SECTION TACTICAL FORMATION 5-5
Wing SNFO: a. Directing the pilot to turn or roll out as appropriate during TacForm b. Monitoring aircraft parameters, proper position, and ensuring deconfliction c. Visual lookout d. Maintaining situational awareness in order to take the lead at any time
501. TAC TURNS
Tac turns are the most basic turns and are used to turn the formation 60°-120°, with 90° as the typical initial assumption. These turns may be either into or away from the Wingman and may be called or uncalled. 1. Tac Turns Into the Wingman
a. Called Turns Into the Wingman (Figure 5-2). The maneuver will begin with the Lead calling “RAIDER, Tac (Left/Right).” When the Wing responds with their tactical callsign, the Lead will turn into the Wingman with a standard tactical turn. The wing aircraft will delay until Lead is on the 45º bearing line (visual cue is looking down the lead aircraft’s intake) before starting their tactical turn.

CHAPTER FIVE T-6A FORMATION
5-6 SECTION TATICAL FORMATION
Figure 5-2 Tactical Turns Into the Wingman
b. Uncalled turns into the Wingman are performed exactly the same as called turns except
there are no radio calls. Lead will simply turn into the Wingman when desired. The Wingman delays until the Lead approaches the 45º bearing line (visual cue as previously described) before commencing their tac turn.
2. Tac Turns Away From the Wingman
a. Called Turns Away From the Wingman (Figure 5-3). This maneuver begins with the Lead calling, “RAIDER, Tac (Left/Right).” Upon responding with their tactical callsign, the Wingman will immediately execute a standard tac turn into the Lead. The Lead will delay their tac turn until the wing aircraft reaches the 45º bearing line (visual cue is looking down the wing aircraft’s intake) at which point Lead will execute a standard tac turn.

T-6A FORMATION CHAPTER FIVE
SECTION TACTICAL FORMATION 5-7
Figure 5-3 Tac Turns Away from the Wingman
b. Uncalled turns away from the Wingman are performed exactly the same as called turns
except there are no radio calls. The Lead aircraft will initiate a wing flash away from the Wingman. Wingman will then commence a standard tactical turn into the Lead. Lead delays until the Wing approaches the 45° bearing line (visual cue as previously described) before commencing their tac turn.
502. 45° TURNS
Forty-five degree (45°) turns are used anytime the formation requires a turn between 31-60° of heading change. These turns may be either into or away from the Wingman and may be called or uncalled. 1. 45° Turns Into the Wingman.
a. Called Turns Into the Wingman (Figure 5-4). This maneuver begins with the Lead calling, “RAIDER, 45 (Left/Right).” When the Wingman responds with his/her tactical callsign, Lead will turn into the Wingman with a standard tactical turn rolling out on the desired new heading. Wing will drive forward until crossing Lead’s flight path, and then execute their 45° turn. Wing will then adjust for proper combat spread.

CHAPTER FIVE T-6A FORMATION
5-8 SECTION TATICAL FORMATION
Figure 5-4 45° Turn Into the Wingman
b. Uncalled turns into the Wingman are performed exactly the same way as called turns
except there are no radio calls. The Lead aircraft simply turns into the Wing and rolls out on the desired heading for the formation. The Wingman, initially assuming it is a tac turn, knows this is a 45° turn when Lead rolls out prior to seeing “intakes on.” Lead may momentarily roll out of the turn after 20-30 degrees before continuing.
The intent of this momentary roll out is to inform the Wingman that the maneuver is an uncalled 45° turn and not a 90º tac turn. The Wing will drive forward until crossing Lead’s flight path and then executes their 45° turn. Wing will then adjust for combat spread.

T-6A FORMATION CHAPTER FIVE
SECTION TACTICAL FORMATION 5-9
2. 45° Turns Away From the Wingman.
a. Called Turns Away From the Wingman (Figure 5-5). The maneuver begins with the Lead calling, “RAIDER, 45 (Left/Right).” Upon responding with their tactical callsign, the Wing will immediately execute a standard tactical turn into the Lead for 45º. Lead will fly below and across Wingman’s flight path and turn to the desired new heading. Wingman will adjust to the combat spread position on the opposite side.
Figure 5-5 45° Turn Away from the Wingman
b. Uncalled turns away from the Wingman are performed similar to called turns except
that the Lead uses wing flashes to signal Wing. The Lead aircraft initiates the turn with a wing flash away from the Wingman. The Wing will immediately commence his energy-sustaining turn into Lead, initially assuming it is a tac turn. When the Wing

CHAPTER FIVE T-6A FORMATION
5-10 SECTION TATICAL FORMATION
aircraft reaches the desired heading for the formation, Lead will give a wing flash into Wing. At this point, Wing immediately rolls wings level. Lead’s aircraft should track below and in front of Wing’s aircraft. Upon crossing Wing’s flight path, Lead conducts his turn to the desired heading. Wing will adjust for proper combat spread.
503. CHECK TURNS
Check turns are used to alter the formation heading 30º or less. The Lead initiates a called check turn by calling “RAIDER, Check 30 (Left/Right).” The Wingman will respond with his/her tactical callsign. At this point, Lead will change course to the new heading. Wing remains on the same side of the Lead and will adjust as required to maintain the proper bearing line. Uncalled check turns are accomplished by the lead aircraft simply turning to the desired heading (no wing flash). Check turns, if conducted with Wingman in position, will drive the Wingman acute (check turn into) or sucked (away). The Lead may use check turns to dress the formation by checking away from an acute Wingman or into a sucked Wingman. Nevertheless, it is the Wing’s responsibility to make adjustments as required to maintain the proper formation position. 504. SHACKLE
The Shackle is a maneuver used to cross the Wingman from one side of the tactical formation to the other. A Shackle can also be used to “dress” the formation should Wingman’s position be deemed unsatisfactory. 1. Called shackles are initiated by Lead calling, “RAIDER, Shackle.” Once Wingman responds with their tactical callsign, both aircraft immediately execute a 45° turn into each other. When their flight paths cross, both aircraft reverse their turns back to the original heading (Figure 5-6).

T-6A FORMATION CHAPTER FIVE
SECTION TACTICAL FORMATION 5-11
Figure 5-6 Shackle
2. When a shackle is called with Wingman out of the proper abeam position, the aircraft that is farthest downrange must turn greater than 45°, while the trailing aircraft turns less than 45°. It is a cooperative effort between aircraft to cross flight paths with roughly a 90° angle between the tracks. Upon crossing, the aircraft that turned greater than 45° must turn first to the original heading, followed shortly thereafter by the second aircraft’s turn. As always, Wing will adjust to a proper position off of Lead. When performed successfully, Wing will immediately roll out in combat spread.
3. Uncalled shackles have exactly the same geometry as the called shackle. Uncalled shackles are initiated by Lead giving a wing flash away from the Wingman. As the Wing starts his turn, Lead will start a turn into the Wingman, thus signaling a shackle.
505. IN-PLACE TURNS
In-place turns (Figure 5-7) are used for 120°-240° of heading change where both aircraft turn in the same direction; Typically, 180° is the initial assumption unless pre-briefed or until Wing recognizes otherwise. The in-place turns result in some lateral movement over the gound in the

CHAPTER FIVE T-6A FORMATION
5-12 SECTION TATICAL FORMATION
direction of turn. These turns may be called into or away from the Wingman and only away from the Wingman when uncalled.
Figure 5-7 In-Place Turn
1. Called in-place turns are initiated by the Lead calling “RAIDER, In-place (Left/Right).” When the Wingman responds with his/her tactical callsign, both aircraft will immediately execute a standard tactical turn in the called direction for 180o of heading change. It should be noted that during turns into the Wingman, the Wing will momentarily lose sight of Lead. At that point Lead assumes separation responsibility until visual contact is regained by the Wingman. Since this loss of visual contact is expected and briefed, a “blind call” is not required unless the Wing does not reacquire Lead when expected (i.e., rolling out of the turn).
2. Uncalled in-place turns can only be performed away from the Wingman. Uncalled in-place turns are initiated by the Lead giving a wing flash away from the Wingman. As Wing starts his turn into Lead, the Lead will immediately turn away from the Wingman, thus signaling the in-place turn. Both aircraft will continue their energy-sustaining turn for 180°. Wingman will reacquire sight of Lead and adjust for combat spread.

T-6A FORMATION CHAPTER FIVE
SECTION TACTICAL FORMATION 5-13
506. CROSS TURNS
Cross turns (Figure 5-8) are used to turn the section 180º while maintaining combat spread and clearing each others “six.” Unlike in-place turns, there is no lateral movement of the formation over the ground. These turns are always called.
Figure 5-8 Cross Turns
Cross turns are initiated by the Lead calling “RAIDER, cross turn, Lead LOW.” When the Wing IP responds “RAIDER 12, Wing HIGH,” Lead will initiate a level, 180° energy sustaining turn into the Wingman; simultaneously, the Wingman will match Lead’s turn while ensuring at least 200 feet of vertical separation IAW the CTW-6 T-6 Tail Chase Training Rules. Wing must be cognizant to not fly inside of Lead’s turn as the aircraft cross, for this would cause “blind” situation. As a reminder, each aircraft in the flight will always use their original tactical call sign, regardless of their respective flight position (Lead or Wing).

CHAPTER FIVE T-6A FORMATION
5-14 SECTION TATICAL FORMATION
507. F4002 TACFORM SEQUENCE
The Lead SNFO is responsible for directing the order of the turns for the F4002. Use the turn geometry to keep the section clear of the clouds and inside the working area. Each Lead SNFO must ensure they perform each turn type both into and away from Wingman, as applicable.
NOTE
The Lead SNFO will announce whether the following set of turns will be called or uncalled over tactical frequency prior to starting the sequence. Uncalled turns will be directed to the Lead pilot over the ICS.
NOTE
All called and uncalled turn sequences shall be ended with a “terminate” call.
1. Fence-in / G-Warm
2. Called tactical turns
a. Tac turns b. 45 turns c. In-place turns d. Cross turn e. Shackle
3. Uncalled tactical turns
a. Tac turns b. 45° turns c. In-place turns

T-6A FORMATION CHAPTER FIVE
SECTION TACTICAL FORMATION 5-15
d. Cross turn e. Shackle
4. Lead change 5. Repeat called and uncalled turns. 6. Lead change 7. Tail chase (fuel and time permitting) 8. Fence-out / Recovery 508. F4201 CONDUCT
The F4201 conduct is similar to the F4002, but shall include taking off with individual clearances, at least one lost sight exercise and each SNFO shall lead a NAV/GEO REF rendezvous.

CHAPTER FIVE T-6A FORMATION
5-16 SECTION TATICAL FORMATION
THIS PAGE INTENTIONALLY LEFT BLANK

SECTION RECOVERY 6-1
CHAPTER SIX
SECTION RECOVERY
600. INTRODUCTION
The recovery phase will commence once all work in the area is complete. Although instructor pilots may tailor the flow of training as desired, it is recommended that SNFOs plan for and brief at least one section approach on each flight. This may be followed by a departure and re-entry for the break if desired (no lead change required). Since the formation flight will normally be flown as “out-and-ins,” SNFOs must be prepared to lead the flight to the airfield noted on the flight schedule. In order to be familiar with airfield operations, SNFOs should review applicable publications (VFR/IFR Supplement, General Planning (GP), Read and Initial (R&I), Fixed Wing Operating Procedures (FWOP), etc.). If entering any of these fields for the break/overhead, there are a number of ways to proceed from the area to the airfield (depending on traffic, weather, etc.). These include: own VFR navigation, VFR flight following, and vectors to the break. Regardless of the VFR recovery technique used, the SNFO will want to keep the formation in the cruise position (to maximize lookout and maneuverability) until approximately 3 NM from the initial. At 3 NM, the Wing will still have enough time to get into the parade position on the proper side of the Lead, receive the appropriate visual break signal (3-second or fan), and stabilize their aircraft prior to executing the break. Each aircraft will get an opportunity to lead an approach on the F4001 and F4002. SNFOs should plan and brief their flights so that they execute one section approach on each flight, to include at least one to a section drag/full stop. SNFOs should also plan and brief so that they see at least one 3-second break and one fan break during the T-6A formation syllabus. 601. RECOVERY OVERVIEW
Upon completion of the conduct in the working area, the flight will be ready to initiate the recovery phase. This phase will consist of the following: 1. MOA check-out procedures (if applicable) 2. Radio channel changes to include ATIS 3. Descent 4. Request to ATC for appropriate entry

CHAPTER SIX T-6A FORMATION
6-2 SECTION RECOVERY
5. Required checklist(s) and briefs (e.g. descent checks, field brief, approach brief) 6. The Break/Instrument approaches 602. MOA CHECK-OUT PROCEDURES
It is imperative that SNFOs develop a suitable gameplan for the radios in order to smoothly exit the MOA and execute the recovery. Things to consider when the flight is preparing to leave the MOA for the destination airfield are the need to get ATIS and check-out/cancel IFR with Approach Control, while continually monitoring the MOA frequency and maintaining the ability to communicate with each other. If the Lead SNFO does not have a good plan for the radios it will quickly become apparent. Realize that the formation has the effective use of three radios between the two aircraft. This is because one radio in each aircraft should be dedicated to the tactical frequency at all times for safety of flight communications. For example: the formation is on PRI button 16 (GATOR MOA frequency) and AUX tac. The Lead (RAIDER 11) may send Wing (RAIDER 12) to get ATIS on PRI. After Wing returns with the ATIS information, Lead switches the flight to PRI tac. Lead then switches on his own to AUX button 5 (Pensacola Approach) to check-out of the MOA and cancel IFR. Lead then switches back to AUX tac.. At this point, Lead exits the MOA and switches the flight to AUX 118.5 (Mobile Approach), ensuring that the flight has a tactical frequency in use at all times. For example: On AUX tactical: Lead: “RAIDER 12, cleared off PRI for ATIS.” Wing: “RAIDER 12.” Once ATIS is obtained, RAIDER 12 switches back to PRI button 16 and passes ATIS to Lead when Lead is ready to copy: Wing: “RAIDER 12 up with information Foxtrot.” Lead: “RAIDER 11 ready to copy.”
Wing: “Winds 120 at 10, 29.92, RWY 14, better than 5000 and 5.” Lead: “RAIDER 11 copies. RAIDER switch PRI tac.” Wing: “RAIDER 12.”
T-6A FORMATION CHAPTER SIX
SECTION RECOVERY 6-3
Lead gives adequate time for both aircraft to switch to PRI tac. Lead: “RAIDER check PRI (on AUX), RAIDER 11 (on PRI).” Wing: “RAIDER 12.” Lead switches AUX button 5, while leaving Wingman on AUX tac: Lead: “Pensacola Approach, KATT 621, flight of two, complete in the GATOR MOA, cancel IFR.” Pensacola Approach: “KATT 621 cancellation received, squawk 1200, frequency change approved.” Lead: “KATT 621, squawking 1200, switching.”
Lead switches back to AUX tac. On AUX tac: Lead: “Squawking 1200 now. RAIDER switch AUX 118.5.” Wing: “RAIDER 12.” Lead gives adequate time for both aircraft to switch to AUX 118.5 (Mobile Approach frequency). On AUX 118.5: Lead: “Mobile Approach, KATT 612, Flight of two, VFR, 6,500, 10 NM east of Mobile Downtown.”
(Looking back at Wing for thumbs-up)
NOTE
It is acceptable and recommended for Lead to tell the Wingman to obtain the ATIS if it suits the flow of the flight and then report the information back to Lead. In any case, the specific details will be covered in the pre-flight briefing.
CHAPTER SIX T-6A FORMATION
6-4 SECTION RECOVERY
NOTE
The above example was executed very methodically. It would be equally acceptable for Lead to tell Wingman to get ATIS and report back up on PRI tac. Lead could have also switched Wingman to AUX 118.5 and checked out with Pensacola Approach on button 5 AUX before checking the Wingman in on AUX.
603. THE BREAK
There are two methods of executing the break. Either method is authorized, but the specific break must be briefed. 1. 3-second break. Prior to the break, the Lead will pass the visual 3-second break signal (extend arm vertically with 2 fingers vertical and rotate the wrist). The Wing will respond with either a head nod or thumbs-up. At the appropriate point, Lead will kiss off the Wingman and execute a normal break just like in Contact stage. When 3 seconds have elapsed, the Wingman will then execute a normal break. Lead will call, “KATT 621, 180, 3 down and locked, full stop.” Tower will clear both aircraft to land by replying, “KATT 621, cleared to land RWY 25L.” After Lead has read back the landing clearance, the Wing SNFO will call their gear by stating, “Dash-2, 3 down and locked;” however, Wing will not receive a separate landing clearance. Tower will likely reply, “dash-2, roger gear.” The flight will rejoin on deck after crossing the hold-short and then taxi as a flight. 2. Fan break. Prior to the break, Lead will pass the fan break signal (arm and hand extended vertically with palm facing inboard while motioning “come with me”). When ready, Lead will execute a parade rate of roll towards 90° AOB and Wing will match Lead’s roll rate. The Lead will leave their power set through 90° of turn before reducing it to IDLE, extending the speed brake, and increasing the pull to 3-4 Gs. The Wingman will match Lead’s roll rate but will reduce their power to IDLE and extend their speed brake at the beginning of the maneuver. This energy difference will create the separation needed for landing rollout. . The Wingman will pull to roll out in trail of Lead. From this point, the procedures and radio calls are the same as the 3-second break. 604. SECTION APPROACHES
There are two types of recoveries to get a section through IMC to a landing environment. One is the section drag, in which both aircraft plan to full stop, and the other is the lead low approach, wing touch and go, which is the procedure to bring a NORDO (no radio) Wingman back through IMC to the field. In order to commence a section approach, OPNAV 3710 requires circling approach

T-6A FORMATION CHAPTER SIX
SECTION RECOVERY 6-5
minimums or 1000-3 if no circling approach minimums are available. If the weather is below these minimums, the formation cannot perform a section approach and would have to split up for individual approaches or choose a different airfield. Since we are training for IMC during section approaches, all turns are made using IMC parade position (i.e., keep the same checkpoints as straight-and-level parade). In IMC, it is imperative the Wingman safely stay in visual contact in order to maintain section integrity. Prior to conducting an actual section approach, consideration should be given to the approach, missed approach, and the procedures for separating the flight on final. 1. It is important to remember that tasks take longer to accomplish in a formation than in a single aircraft intrument flight. Since Lead cannot set below 20% torque and intentions must be communicated to Wing before being executed, the SNFO should strive to get well ahead of the aircraft. The following items should be completed no later than 8-10 NM from the runway:
a. Bring the Wingman into the proper parade position. b. Slow the flight down. c. Configure the flight.
Although these tasks may appear simple at first glance, they can quickly become task saturating when the appropriate visual signals (Section 801) are combined with the required Instrument Navigation (INAV) briefings and checklists and/or talking with a PAR controller. Get ATIS, formulate the recovery gameplan, and complete required briefs earlier rather than later. Studying, planning, and practicing (chair-flying) will greatly help the SNFO during this phase of a formation flight. 2. The flight will comply with all approach control instructions; generally, the flight will receive radar vectors to the final approach course. On base leg or 10 – 12 miles on final, transition the flight to Basic Approach Configuration (BAC). When below 150, the Lead SNFO will initiate the “prepare to lower gear signal” for his aircraft. (As a technique, Leads will typically give at least an extra 5 knots of margin because of Wingman’s maneuvering). Wing SNFO will quickly cross-check the airspeed, call “below 150” over the ICS, and return a thumbs-up to Lead. The Lead pilot will then give the head nod signal to simultaneously lower the gear and place flaps to takeoff. Each SNFO should check both aircraft for good gear and flap indications. Lead will look to Wing for a thumbs-up, signifying that Wing’s aircraft indicates properly and Lead’s gear and flaps appear to be down-and-locked. Lead will return a similar thumbs-up and report “6 down and locked” to ATC when queried. The Lead SNFO should transition the flight to BAC in

CHAPTER SIX T-6A FORMATION
6-6 SECTION RECOVERY
VMC to the max extent practicable, but no later than 30º prior to the final approach course or 5 miles from the FAF. The section approach will culminate with Lead either dropping off the Wingman on final or directing a speed split on final for separation if both aircraft intend to touch down.
3. Lead Low Approach, Wing Touch and Go. This maneuver simulates recovering a No Radio (NORDO) Wingman on an approach. The landing environment must be considered when choosing which side to place the Wingman. For example, on an approach to runway 7L at KNPA, the Lead would want to be on the left side to not overfly the right runway. Lead SNFO will direct a normal instrument approach and direct the pilot to detach the Wingman approximately 1-2 NM from the runway threshold, with clearance to land and the runway in sight. To initiate this, the Lead pilot will point an index finger toward the runway in a stabbing motion then pat the dash twice while looking at Wingman for acknowledgement, to be followed by a “kiss off” signal and turning away smartly. This signifies the landing environment is in sight and wingman is cleared to land. The Lead shall leave the gear extended, flaps at takeoff, remain VMC, climb to 600 feet AGL or just below overcast, parallel runway/final bearing at 120 KIAS and after Wing initiates his flare to land, take position at the Wingman’s 10 or 2 o’clock. Wing will visually acquire the runway and execute a touch and go (or full stop if the situation dictates). At the completion of the touch and go, the Wingman will raise their gear and flaps. The Lead SNFO will inform the IP that Wing is airborne, upon which the Lead pilot will raise the gear and flaps. Lead will accelerate to 160 KIAS and maintain that airspeed until the Wingman has rejoined into parade. Wingman will use running rendezvous or CV rendezvous procedures as necessary. Should Lead need to begin a climb for airspace considerations, maintain 160 KIAS and not more than 90% power until the formation is rejoined. 4. Section Drag. The section drag is used to land both aircraft at the completion of a single section approach. The Lead SNFO will direct a normal instrument approach, but place Wingman on the upwind side of the landing runway. After the flight has received clearance to land and with the runway in sight, the Lead SNFO will direct the pilot to detach the Wingman, who will point an index finger toward the runway in a stabbing motion, pat the dash twice, and follow it with a “kiss off” signal. This signifies the landing environment is in sight and the flight is cleared to land. At this point the Wing SNFO will immediately direct the pilot to lower the flaps to LDG and slow to 100 KIAS (but no slower than on-speed). Initiating the separation 2.5-3 NM from the landing threshold should provide the Wingman with ample time to establish the required 1500 feet of landing separation. If Lead is unable to coordinate clearance to land and/or establish the section drag in time to ensure 1500 feet of runway separation, Lead will coordinate a section missed approach and re-attempt. If the Wingman realizes they will not have sufficient separation, they will execute a waveoff.

T-6A FORMATION CHAPTER SIX
SECTION RECOVERY 6-7
NOTE
OPNAVINST 3710.7 specifically prohibits the Wingman from trying to obtain proper interval (separation on final) by slowing to less than normal approach speed by “S” turning; additionally, the Section Drag may not be accomplished to a touch and go followed by a rejoin.
5. Section Missed Approach. In the event of a missed approach, the Wingman shall rejoin the lead aircraft in the configuration they were dropped off. Once joined, the Lead shall smoothly increase power to arrest the sink rate and gradually rotate the nose to commence a climb. Lead should signal Wingman to stay aboard by patting his shoulder (same as parade signal). Once a rate of climb is established, the Lead SNFO will report “aircraft’s climbing” to the pilot. The Lead SNFO will then direct the “prepare to raise gear signal” to be followed by the pilot’s head nod to signal both aircraft to simultaneously raise their gear and flaps. Wing will give Lead a thumbs up to signal that his gear and flaps are up and they are ready to proceed past 150 KIAS. Guidelines for the planning and execution of section instrument approaches are thoroughly covered in OPNAVINST 3710.7 Section 5.1.12 and the Training Wing SIX SOP. 6. Recovery as individual aircraft. Should the flight Lead determine that a section recovery is not desirable, for weather or any other reason, they have the option to split the formation for individual recoveries. Prior to detaching the Wingman under IFR control, Lead should coordinate his intentions with ATC to facilitate positive radar separation of the aircraft. This call should include Wingman’s new callsign, recovery intentions, which aircraft is to recover first (typically the aircraft with the lowest fuel state), and which side of the formation the Wingman is on. If recovering VFR, it is a good idea to coordinate recovery intentions (routing and airspeeds) in order to avoid overtaking one another during the recovery. 605. LANDING
Runway Ops. The lead aircraft will land on the center of the downwind half of the runway and the Wingman will land on the center of the upwind half of the runway. During the landing phase, the runway centerline is once again treated like a brick wall until both aircraft are safe on deck and have slowed to a safe taxi speed. With strong crosswinds or narrow runways, Lead has the option of directing both aircraft to land on centerline. In this event, Wing must ensure at least 3000 ft of separation before touching down (for T-6 aircraft IAW FAA Handbook 7110.65).

CHAPTER SIX T-6A FORMATION
6-8 SECTION RECOVERY
If Lead is required to cross the runway centerline (in front of the Wingman) in order to exit the active runway, they will delay accomplishing this until the Wing IP calls “Raider 12 slow” on flight tactical. This call signifies the Wingman has adequate spacing and speed control to ensure it is safe for Lead to cross. For Wing consideration, Lead should not rapidly apply brakes on rollout unless necessary. There is no rush to make an early turnoff from the runway, potentially compromising formation safety. If, at any time, things do not go as planned maintain aircraft control and use the radios. Also, Wing should waveoff if wake turbulence is encountered on short final Post Landing Ground Operations. Once clear of the runway, Lead will automatically switch to Ground without waiting for Wing and obtain the flight’s taxi clearance. Once Wing is clear of the runway, he/she will automatically switch to Ground frequency to join Lead. Once clear of the duty, it is Wing’s responsibility to establish and maintain the proper visual cues previously discussed for formation taxi. Each aircraft will individually complete their own After Landing and Engine Shutdown Checklists; additionally, Wing will report either “up aircraft” or their specific downing malfunction over TAC. When returning to Sherman Field, the formation will taxi back to the chocks on PRI button 3 and Lead will call Base with the flight's ATC callsign to inform Base of the flight’s return and the status of all aircraft (i.e., “in and up” or “990 down for cockpit overpressurization”). This call will be made as the Lead aircraft enters the T-6 ramp area and without notifying the Wingman.

FORMATION EMERGENCIES 7-1
CHAPTER SEVEN
FORMATION EMERGENCIES
700. INTRODUCTION
Two general points can be made pertaining to formation emergencies. First, the aircraft with the emergency informs the other aircraft (requests the Lead if necessary) and handles the emergency in accordance with (IAW) NATOPS. Secondly, each aircraft within the formation stands ready to lend assistance in an emergency situation. This assistance may be in the form of checklist backup, location of nearest airfields, communication coordination, exterior aircraft inspection, and/or a stable platform for Wingman to reference. The type of assistance varies with the type of emergency; however, quick and accurate communications (using Hydraulic, Electrical, Fuel, Oxygen, Engine [HEFOE] if NORDO) will greatly aid in coordination of a safe recovery.
NOTE
Avoid the tendency to assist to the point of jumping in the emergency aircraft’s cockpit. A good technique is to be prepared to offer any assistance only when requested.
As in previous training, the T-6A NATOPS Manual and NATOPS Pocket Checklist shall be used to address any emergency; however, there are a few unique considerations pertaining to formation flying which will be covered in the following paragraphs. 701. ABORTS
Serious thought must be given by the aircrew beforehand to the proper course of action that will be taken in the event of an abort. There are two prime considerations. The first is the safe abort of the aircraft experiencing difficulty. The second is the safety of the remaining aircraft in the flight. For these reasons, the runway centerline is treated as a brick wall not to be crossed while another aircraft is in the vicinity. It is better to go off the runway than hit a playmate. It is impossible to list all of the possible situations that might cause the flight to abort. The following are procedural guidelines that should be followed in the event of an abort. These guidelines should be tempered with sound judgment combined with decisive action by the emergency aircraft’s aircrew. For the T-6A aircraft, the following principles should be applied along with any applicable NATOPS procedures:

CHAPTER SEVEN T-6A FORMATION
7-2 FORMATION EMERGENCIES
1. Section Takeoff. If one aircraft aborts after brakes are released, the other aircraft should continue their takeoff. Do not transmit over the radio announcing the abort until after your wingman is airborne (e.g. “RAIDER 11 aborting”). This will avoid confusion between the need for a single aircraft abort and a dual abort. Should a situation arise that requires both aircraft to abort simultaneously (e.g. another aircraft errantly taxis onto the runway), the person identifying that need shall call on the radio, “RAIDER FLIGHT, ABORT, ABORT, ABORT.” Flight is the key word to execute a two-plane abort. It is imperative that each aircraft maintain their own side of the runway and execute the abort procedures IAW the T-6A NATOPS. Maintaining directional control during the abort is crucial to its safety and success. 2. Interval Takeoff. If Lead aborts, Wing will abort. Lead must call, “RAIDER 11 aborting,” in order to alert Wing to abort his takeoff as well. This is known as a “sympathetic abort.” Wingman should scan Lead’s takeoff roll for signs of abort or directional control issues. If Wing aborts alone, announce it over the radio only after the aircraft is under control and Lead is safely airborne. 702. MID-AIR/DAMAGED AIRCRAFT
The first consideration after a mid-air collision is to regain control of the aircraft and determine whether or not it can be flown. If control CANNOT be maintained, EJECT. Immediately separate the flight while keeping the other aircraft in sight if possible. Do not rejoin if the mid-air collision was with the Wingman. The aircraft with the most severe damage should be given priority to the closest landing site. Damage can occur from a number of sources: mid-air collision, bird strike, stuck control surfaces, etc. If the damage was not due to a mid-air collision between the formation members, then the section may continue to fly formation and the ‘good’ aircraft can perform a visual inspection as necessary. The good aircraft should not attempt to fly parade, and configuration changes should be announced over the radio. Aircrew will follow the procedures established in Section III of the T-6A NATOPS. In the final analysis, the pilot of the damaged aircraft must determine whether or not he/she can land safely and proceed to the nearest suitable field. 703. RADIO FAILURE
Before assuming a radio failure, both aircraft should check all radios, switches, circuit breakers, and connections. The NORDO (no radio) aircraft must communicate to the other aircraft, through hand signals, the exact nature of their problem. The aircraft with the operating radio will assume the Lead (if required) and lead the NORDO aircraft back to home field while advising the

T-6A FORMATION CHAPTER SEVEN
FORMATION EMERGENCIES 7-3
appropriate ATC agencies of the situation. A desire by the NORDO aircraft to land immediately will be indicated to the Wingman by making a landing motion with an open hand during the day. In day VMC conditions, with no HEFOE signals passed, the flight Lead may take the NORDO wingman into the break. If the Lead does a touch and go or full stop, then the Wingman is cleared to land. If Lead does a low approach, the Wingman will waveoff and follow Lead. Lead is expected to attempt another pattern after executing a waveoff. In IMC conditions or when HEFOE signals are passed, the NORDO aircraft should expect an instrument approach at 120 KIAS and flaps takeoff. Lead will execute the Lead Low Approach, Wing Touch and Go procedure from Section 604 to deliver Wing to a suitable landing position. Lead will remain alert to the possibility that the NORDO Wingman may need to rejoin in the event they execute a missed approach or waveoff. 704. DOWN AIRCRAFT PROCEDURES
In the event one aircraft in the formation develops difficulties to the extent that the crew is forced to eject, the responsibility of coordinating a Search and Rescue (SAR) is left with the remaining aircraft. Should the entire formation be involved in a SAR effort, the flight Lead will coordinate a flight split up or establish high/low orbits. Although it is important to get aid to the downed aircrew, the safe conduct of the remaining members of the flight is equally important. The aircrew who has assumed the On-Scene Commander (OSC) responsibilities, typically the senior member of the flight, will make the necessary voice reports, keep the downed aircrew and aircraft in sight, control the airspace, set a bingo fuel and formulate a recovery plan. The OSC will also follow procedures outlined in the In-Flight Guide. 705. LOST SIGHT
Lost sight is not to be confused with Blind. Lost sight is the term used when Wing loses sight of Lead after encountering IMC, typically from the parade or cruise positions. Blind is the term used when the aircrew in one aircraft of a flight does not have visual contact with the other aircraft during dynamic maneuvering (i.e. tail-chase, TacForm, etc.). Lost sight when flying formation in IMC can be very disorienting and potentially dangerous. The two main objectives after losing sight are Separation and Communication. Procedures and associated communications are listed below for various situations (use your tactical callsign when making these calls). Both aircraft shall conform to the procedures below to ensure separation.

CHAPTER SEVEN T-6A FORMATION
7-4 FORMATION EMERGENCIES
The general theme for all instances is that Wing should immediately call lost sight and “break the trend” of the maneuver to achieve separation. Once separation is achieved, Lead will coordinate with ATC for either a VFR join-up or separate IFR clearances. Should Wingman regain sight of Lead, call “visual.”
NOTE
If the below procedures are accomplished at a point when RAIDER 12 has the administrative flight Lead, each aircraft will use their pre-assigned flight tactical callsign number, regardless of position in the flight.
1. Inadvertent IMC (flight on a VFR clearance) – Straight and level Wing - Immediately transition to an instrument scan, call lost sight, and execute a ½ Standard Rate Turn (SRT) away from the Lead for 30° of heading change. Maintain the new heading for 30 seconds. When directed by Lead, turn another 150° away from the Lead using a ½ SRT. Lead - Maintain straight and level flight for 30 seconds after the Wingman separates. Utilizing a ½ SRT, turn away from Wingman to the reciprocal heading and communicate with Wingman. After becoming established on the reciprocal heading, the formation should visually reacquire each other as they return to VMC conditions. Example of communications: Wing: “RAIDER 12, lost sight.” (Wing commences a ½ SRT away from Lead.) Lead: “RAIDER 11, heading XXX.” Wing: “RAIDER 12.” (Wing rolls out after 30° of heading change from Lead.) After 30 seconds: Lead: “RAIDER 12, you are cleared right/left to heading ZZZ.” (ZZZ is the reciprocal heading of XXX.) Wing: “RAIDER 12.” 2. IFR Clearance – Straight and level

T-6A FORMATION CHAPTER SEVEN
FORMATION EMERGENCIES 7-5
Wing - Transition to instrument scan, call lost sight, and execute a ½ SRT away from Lead for 30° of heading change. Maintain new heading for 30 seconds, then turn to Lead’s heading. Lead - Maintain heading and altitude and reply to Wingman using directive communications when applicable. Advise ATC of the situation and either conduct a join-up if visual contact is re-established or arrange for a separate clearance for the Wingman. Example of communications: Wing: “RAIDER 12, lost sight.” (Wing executes a ½ SRT away from Lead) Lead: “RAIDER 11, heading XXX.” Wing: “RAIDER 12.” After 30 seconds, Lead clears Wing to turn back to heading XXX: Lead: “RAIDER 12, you are cleared to heading XXX.” 3. Lead making a level turn INTO the Wingman Wing – Transition to an instrument scan, call lost sight, and slightly increase angle of bank. Wing will continue the turn to 30° past Lead’s rollout heading. After 30 seconds turn to Lead’s called heading. Lead – Immediately roll wings level and notify Wingman of your heading. Advise ATC of the situation as necessary to facilitate a VFR join-up or separate RTBs. Example of communications: Wing: “RAIDER 12 lost sight.” Lead: “RAIDER 11, rolling out heading XXX.” Wing: “RAIDER 12.” (Wing continues turn to heading YYY, 30° beyond Lead’s heading) After 30 seconds, Lead clears Wing to turn back to heading XXX: Lead: “RAIDER 12, you are cleared to heading XXX.”

CHAPTER SEVEN T-6A FORMATION
7-6 FORMATION EMERGENCIES
Wing: “RAIDER 12.” 4. Lead making a level turn AWAY from Wingman Wing - Transition to an instrument scan, call lost sight, and roll wings level. Turn to parallel Lead 30 seconds after Lead calls their roll-out heading. Lead - Continue turn to new heading (30° from Wingman’s called heading). Make applicable directive communications with Wingman and ATC as necessary. Example of communications: Wing: “RAIDER 12, lost sight, rolling out heading YYY.” Lead: “RAIDER 11.” Upon reaching heading XXX (30° from Wing): Lead: “RAIDER 11 rolling out heading XXX.” Wing: “RAIDER 12.” After 30 seconds, Lead clears Wing to turn back to heading XXX: Lead: “RAIDER 12, you are cleared to heading XXX.” Wing: “RAIDER 12.” 5. Climbs and Descents Wing - Call lost sight with altitude and level off. The previously discussed procedures for turns still apply. Lead - Continue to climb or descend to the cleared altitude or to an intermediate altitude providing at least 500 ft of separation from Wing. The previously discussed procedures for turns into and away from Wing still apply.

T-6A FORMATION CHAPTER SEVEN
FORMATION EMERGENCIES 7-7
Example of communications: Lead turning away from Wing and passing 6500 for 9000: Wing: “RAIDER 12, lost sight, 6500, rolling out heading YYY.” Lead: “RAIDER 11 passing 6600 for 9000.”
Upon reaching heading XXX: Lead: “RAIDER 11 passing 7000, headed XXX.” Wing: “RAIDER 12.” After 30 seconds, Wing turns to parallel Lead’s heading XXX. Lead: “RAIDER 11 is level at 9000. RAIDER 12 you are cleared to climg to 8500.” Wing: “RAIDER 12.”
Lead turning into Wing and passing 7500 for 5000: Wing: “RAIDER 12, lost sight 7500.” (Wing slightly increases AOB and levels off) Lead: “RAIDER 11, rolling out XXX, passing 7400 for 5000.” Upon reaching heading YYY (30° past Lead’s XXX): Wing: “RAIDER 12, rolled out heading YYY.” Lead: “RAIDER 11.” After 30 seconds, Wing turns to heading XXX: Lead: “RAIDER 12 cleared to 5500.” (Assumes Lead is level at 5000) Wing: “RAIDER 12.”

CHAPTER SEVEN T-6A FORMATION
7-8 FORMATION EMERGENCIES
NOTE
Lead has a few options in the above scenario. They could have opted to level off at 7000 ft (providing 500 ft of altitude separation from Wingman) instead of going all the way to 9000 ft. In either case, it is important for Lead to first take control of the situation for safe separation and then advise ATC of the situation and the flight’s intentions. Good headwork and procedural knowledge from all formation members are important in lost sight situations.
6. Descending on Approach Wing – Transition to an instrument scan, call lost sight with altitude, and turn away to ensure clearance. Then commence the published or directed missed approach procedures while climbing to 500 feet above missed approach altitude. Lead – Continue to descend on the approach. Inform ATC of the situation to either coordinate separate clearances for RTBs or facilitate a VFR join-up. Example of communications: Wing: “RAIDER 12, lost sight, 900.” Lead: “RAIDER 11, descending through 880, headed 070.”
Wing: “RAIDER 12, headed 085, climbing to 1300.” Lead: “RAIDER 11, 070, passing 600.” Wing: “RAIDER 12, level 1300, headed 070.” 706. BLIND
An aircraft is blind if, during dynamic maneuvering (tail-chase, TacForm, etc.), both crewmembers expect to see the other aircraft but do not. If this happens to the Wingman, the Wingman should call “blind.” It is then Lead’s responsibility to direct the Wingman's eyes back onto the Lead aircraft. If the Lead is also blind, Lead should immediately be directive ensuring altitude separation, followed by coordination to get the flight back together. In the case where Lead cannot see the Wingman, but Wingman has Lead in sight, it is Wingman’s responsibility to

T-6A FORMATION CHAPTER SEVEN
FORMATION EMERGENCIES 7-9
call their position off Lead using the clock-code to help Lead reestablish visual contact. The following is an example of this flight coordination: Wing: “RAIDER 12, blind.” If Lead is Blind: Lead: “RAIDER 11 is blind at 9000 ft, heading 360.” Wing: “RAIDER 12 leveling at 9500 ft.” (Wingman will deconflict by a minimum of 500 ft, without going through Lead’s altitude) If Lead has visual contact: Lead: “RAIDER 11 is at your 2 o’clock slightly high, 1 mile.” Wing: (Once Lead is in sight) “RAIDER 12, visual.” 707. TERMINATE AND KNOCK-IT-OFF PROCEDURES
There may be times during formation flight when a member of the flight deems it necessary to stop maneuvering. Depending on the scale of the situation, the individual may utilize either the phrase “terminate” or “knock-it-off.” “Terminate” is used to cease a local engagement without affecting the overall exercise. Example situations that warrant a terminate call are: training objective complete, a crewmember getting sick, minor caution lights (i.e. generator light VMC), or other non-safety of flight scenarios. “Knock-it-off” is used to cease all air combat maneuvers/attacks/activities/exercises and generally applies to all members involved in the overall exercise. It is used when safety of flight issues arise such as an outside aircraft entering your working area, or when calling an end to an exercise. Refer to the Training Wing Six Training Rules for further examples. When either of these calls is made, Lead will maneuver in a predictable manner to a safe flying attitude. Utilizing directive comms, Lead will then make their intentions known to the flight. As with all communications in aviation, it is critical to use the proper format when making these calls. To initiate a “terminate” call, any member of the formation will state “RAIDER, terminate.” To initiate a “knock-it-off” call, any member of the formation will state “RAIDER, knock-it-off.” Regardless of who initiated the terminate or knock-it-off, each aircraft in the flight will respond in tactical callsign number order with a “roll call” acknowledging the initial call.

CHAPTER SEVEN T-6A FORMATION
7-10 FORMATION EMERGENCIES
Example of a “knock-it-off” call that was initiated by the flight Lead: Lead: “RAIDER, knock-it-off…RAIDER 11 knock-it-off.” Wing: “RAIDER 12 knock-it-off.” Example of a “terminate” call initiated by the Wingman: Wing: “RAIDER terminate.” Lead: “RAIDER 11 terminate.” Wing: “RAIDER 12 terminate.” 708. EJECTION
The most important consideration when ejecting is to get your ejection vector clear of the other aircraft’s flight path before pulling the handle. Aircrew should avoid telling the other aircraft to “eject” over the radio to avoid the potential confusion in other cockpits. If time permits, the Lead should be notified, and if NORDO, the “face curtain” signal can be used to pass your intention to the other aircraft.
FORMATION VISUAL SIGNALS 8-1
CHAPTER EIGHT
FORMATION VISUAL SIGNALS
800. INTRODUCTION
Good formation discipline depends on the proper use and execution of visual signals. A well briefed and disciplined formation can conduct an entire flight with a surprisingly small amount of talking between the two aircraft. In general, there are two types of formation visual signals; those given using aircrew (e.g. a shoulder pat), and those given using the aircraft (e.g. a porpoise). These signals cover most maneuvers encountered and preclude the need for in-flight radio transmissions. Aircrew signals are generally used anytime the Wingman is close enough to see them, such as in the parade or cruise positions. Signals must be clearly visible to the other aircraft, so hand signals need to be exaggerated and given well above the canopy rail. As Lead, when initiating any signal, pass the signal first, then pull the signal down and look at the Wingman for a response (i.e. Wing returns a thumbs-up or executes the desired maneuver). This will reduce the time Lead spends looking aft and thus enhances both outside scan and basic airwork. Coordinated signal passing from the same cockpit presents a disciplined military appearance and avoids confusion. The Lead SNFO should direct the execution of the signal over the ICS. An example cadence is “Crossunder signal, ready, ready, now.” Upon “now,” both aircrew raise their signal. After one second both aircrew drop their signals, and the SNFO immediately follows with “ready, ready, look.” Give signals with the hand nearest your playmate; typically, aircraft signals are reserved for when the Wingman is not close enough to see aircrew signals, such as when the Wingman is in combat spread. In the event that Wingman is outside the aircrew signal range and no aircraft signal exists for the desired maneuver, use the tactical frequency.
NOTE
Any signal that is timed upon actuation of controls (brake release, gear movement) will be accomplished by the pilot only. Also, due to the unique characteristics of the Lead change, the Lead pilot will look at Wing as he/she passes the signal to ensure a safe, positive change of the Lead. The Lead change will involve only the pilots; students shall keep their hands below the canopy.

CHAPTER EIGHT T-6A FORMATION
8-2 FORMATION VISUAL SIGNALS
801. AIRCREW VISUAL SIGNALS
General Signals: MEANING SIGNAL 1. Affirmative (I understand, ready to go) Thumbs-up, or head nod. 2. Negative (I do not know, not ready to go) Thumbs-down, or head shake. 3. Wait Fist held up with palm outward. 4. Ignore last signal Hand waved in an erasing motion in front of face, with palm turned forward. 5. Numerals, as indicated With forearm vertical, extend fingers to indicate desired number from one to five. With forearm horizontal, indicate number which added to five, gives desired number from six to nine. A clenched fist indicates zero. 6. I am in trouble Arm bent across forehead, weeping (used only when NORDO). 7. Ejecting Both clenched fists pulled downward across the face to simulate pulling the face curtain. Takeoff Signals: MEANING SIGNAL 1. Run-up signal Extend arm vertically with two fingers extended. Rotate wrist forward and aft. 2. Interval Takeoff Kiss off performed on runway.

T-6A FORMATION CHAPTER EIGHT
FORMATION VISUAL SIGNALS 8-3
3. Section Takeoff (Lead pilot only) Extend arm vertically. Lower in the smooth chopping motion until horizontal. Once arm motion stops, both pilots release brakes. 4. Gear retraction signal (Lead pilot only) Nods head forward, then sharply raises head and moves gear handle. In-Flight Signals: MEANING SIGNAL 1. Fuel check/Cruise check Raise fist with thumb extended in a drinking motion on Wingman side. 2. Cruise position Hitchhiking motion of thumb alternating over each shoulder. 3. Crossunder Extend forearm vertically with fist clenched. 4. Breakup and Rendezvous Initiated with run-up signal. Followed by kiss off. 5. Kiss off/Detach Fingers joined together on side of helmet (back of hand facing canopy), then make a splat motion toward Wingman, extending all fingers and back of hand against canopy. 6. Rejoin to parade Pat shoulder (or aircraft porpoise). 7. Push it up Fingers held together straight, open palm toward direction of flight. Hand moved in a forward motion repeatedly.

CHAPTER EIGHT T-6A FORMATION
8-4 FORMATION VISUAL SIGNALS
8. Offer Lead change Lead pilot taps the front of his helmet three times and then points to the Wingman. 9. Lead change Wingman pilot taps the front of his helmet three times and then points forward. 10. Prepare extend/retract SPDBK Open and close 4 fingers against thumb with fingertips pointing forward. Wing will extend/retract the speedbrake upon seeing Lead’s extend/retract. 11. Take Combat Spread Hand vertical, palm facing outboard. Hand moved in a push away motion repeatedly. Landing Signals: MEANING SIGNAL 1. Fan break Prior to the break, raise hand vertically (palm inboard), motion arm toward inside of cockpit simulating “come with me.” 2. 3-second break Same as run-up signal. 3. Prepare to lower/raise gear Rotary movement of hand in cockpit (palm forward) as if cranking the wheels down. 4. Lower/raise gear (Lead pilot only) Nods head forward, then sharply raises head and moves gear handle.

T-6A FORMATION CHAPTER EIGHT
FORMATION VISUAL SIGNALS 8-5
NOTE
In the T-6, the landing gear and flaps are lowered/raised together (to/from the “TO” position) using the “Prepare to lower/raise gear”
and head nod as command of execution. A separate raise/lower flap command is neither required nor expected.
5. Prepare to lower/raise flaps Open and close four fingers against thumb with fingertips pointing aft simulating flaps. 6. Lower/raise flaps Lead pilot only nods head forward then raises head sharply while moving the flaps. 7. Cleared to land, detach Lead points to the runway, pats the glare shield twice, and then kisses off the wingman. Electronic Communications: MEANING SIGNAL 1. Change PRI radio to preset frequency Tap ear, extend forearm vertically, and indicate by fingers the number of the preset frequency. 2. Change radio to manual frequency Tap ear, extend forearm vertically, followed by the numbers of the manual frequency. Equipment Malfunction (HEFOE signals, used in the event of communications failure): MEANING SIGNAL 1. I am having difficulty Arm bent across forehead, weeping 2. Hydraulic trouble One (1) finger extended upward

CHAPTER EIGHT T-6A FORMATION
8-6 FORMATION VISUAL SIGNALS
3. Electrical trouble Two (2) fingers extended upward 4. Fuel trouble Three (3) fingers extended upward 5. Oxygen trouble Four (4) fingers extended upward 6. Engine trouble Five (5) fingers extended upward 7. Radio receiver/ transmitter inoperative Tap ear or microphone, give thumbs- up or down, as appropriate. 802. AIRCRAFT VISUAL SIGNALS
MEANING SIGNAL 1. Go to the parade position Aircraft porpoise 2. NORDO or Knock-It-Off Aircraft wing rock

SECTION INSTRUMENT NAVIGATION 9-1
CHAPTER NINE
SECTION INSTRUMENT NAVIGATION
900. INTRODUCTION
In this block, we combine our instrument training with our formation training to administratively move a section from point A to point B. All procedures from both the Instrument and Formation FTIs still apply, but with a few additional details and considerations. Prior to the event, coordinate with your instructors for the destination or cross-country plan. The MCG requires each SNFO to perform four approaches as Lead and four as Wing, so unless told otherwise, plan for two approaches on each event in this block. It is expected that the SNFOs will plan the conduct of the flight and brief the specific details that change due to operating away from home field. Example items are comm plan frequencies or the point chosen for the Nav check. In accordance with the General Planning pub, the number of aircraft must be included on the DD-175 along with the type of aircraft. For a T-6A section, “2 x TEX2/G” should be filed. ATC may ask if you are a standard or non-standard formation. The FAA Pilot/Controller Glossary defines a standard formation to be one in which each wingman is within 1 mile laterally or longitudinally and 100 feet vertically of the flight leader. Because of this, any enroute section instrument travel in combat spread will be flown co-altitude (i.e., standard formation). Nonstandard formations may be approved by ATC if the flight leader requests it. SNFOs should complete the tasks of getting ATIS, giving the field and approach briefs, and the descent checks as early as reasonably possible. The Lead SNFO should keep in mind that the Wing is often waiting on Lead’s decisions to properly set up their cockpit, and an informative call over tactical frequency while not required, is often helpful. Wing should try to glean SA from Lead’s actions when possible (e.g. radio communications, flight path). 901. LEAD/WING RESPONSIBILITIES
Lead is responsible for the communication and navigation, overall conduct, and safety of the flight. As Lead, it is imperative that your instrument navigation is solid, especially in the terminal area. Focus the bulk of your time on flying instruments and thinking ahead of the flight conduct. As Lead, these events are your chance to practice directing section Admin. To be smooth, it requires you to think ahead of the aircraft. If you are only planning for the next task, you are too far behind. As an example, if we briefed a 3-second break at KMEI following the VR-1024 and off the route ATIS reports winds at 040/10 and landing runway 1: instead of going directly into the field brief,

CHAPTER NINE T-6A FORMATION
9-2 SECTION INSTRUMENT NAVIGATION
you should first think through what ATIS just determined for you: it will be a left break (found in the IFR Supp), which requires Wing on the right side. The right to left crosswind means Lead will land on the left side, which will require a “slow” call by Wing prior to exiting the runway. All of this can be determined 100 NM out! That is an idea of what it means to be thinking ahead of the aircraft. Obviously, if the conditions change or Key Tower requests that you make a right break, you must update your plan accordingly. It is Wing’s utmost responsibility to maintain position and follow directions from Lead. Wing should then build SA by anticipating upcoming events. While a Wingman could simply stay in position and follow Lead through the sky, he brings nothing to the formation when operating in this manner. Because of this, the Wing SNFO is still required to give his instrument turnpoint calls and update the navigation while maintaining position off Lead. In the clouds, the pilot’s task loading is extremely high and normally simple tasks like setting up approaches or studying approach plates can become difficult or even impossible. This is where a good SNFO can make a huge positive impact to SA, or where a bad one can really detract from it. During these times you come to learn that being a copilot is as much an art as it is a science. In this instance the delivery of the approach brief is critical. Instead of zipping straight through the format as you may have done in your initial Instrument training, instead brief the pilot in bite-size chunks to actually facilitate comprehension. You still cover all requirements of the approach brief, but now you must learn to deliver the information in a way to ensure understanding. The Wing SNFO’s CRM duties should emphasize augmenting the areas of the pilot’s scan that are affected most by flying formation. Unless briefed otherwise, a good Wingman will move into a parade position upon seeing approaching cloud layers and prior to entering the clouds. If the clouds are unavoidable, Lead must either confirm that this is happening or direct Wing to take parade.

SECTION VISUAL NAVIGATION PROCEDURES 10-1
CHAPTER TEN
SECTION VISUAL NAVIGATION PROCEDURES
1000. INTRODUCTION
The purpose of the formation visual navigation flight is to introduce SNFOs to the basic considerations and procedures required for maneuvering a formation in the low altitude environment in order to strike a target at a specific time. The section VNAV flights are very involved and require significant preparation, as well as a detailed brief and debrief. You will be introduced for the first time to the true low altitude environment by flying VFR Military Training Routes (VRs). The formation procedures previously discussed in this FTI will be applicable to the section visual navigation flights. The goal of these flights is to put the SNFO in the position of a Mission Commander using all of the knowledge accumulated during the previous flights. To that end, the Lead SNFO will be expected to take charge and direct the entire flight, with the Wing SNFO maintaining high situational awareness in order to be able to take the lead if necessary. The instructor will, to the maximum extent possible, act as a safety observer and intervene only as necessary. 1001. FLIGHT PREPARATION
In the brief, it is no longer necessary to describe how to perform each formation maneuver. Instead, brief the conduct as the sequence of events that will occur for the day based on the prevailing conditions. It should go without saying that the SNFO must still know all the details of each maneuver. This expected baseline of professionalism allows us to focus on more of the advanced topics in the TACAIR community. SNFOs are still expected to check and produce weather, NOTAMS, TFRs, and BASH. Ensure the weather is appropriate for the planned low level. Per the AP-1/B, the required weather to fly a Visual MTR is a minimum of 3000 ft ceiling and 5 miles of visibility. Bird hazard information for specific MTRs is available at www.usahas.com. Other products required are formation briefing cards and jet logs for all crewmembers and a DD-175. A standardized briefing card format is made available by the squadron. ADMIN information should be typed and entered according to the flight schedule and conduct for the day’s event. Should it be necessary to make minor, last minute changes to the briefing cards, the briefer should direct the crew to make ‘pen and ink’ changes at the beginning of the brief. The flights will typically be flown as out-and-ins utilizing two halves of the same MTR. One SNFO will lead the entire first flight and then fly as Wing on the second flight. Prior coordination

CHAPTER TEN T-6A FORMATION
10-2 SECTION VISUAL NAVIGATION PROCEDURES
with your instructor on the selection of your out-and-in destination is required. As the mission commander, you develop a conduct plan to meet your requirements for the mission and training block. Of note, each SNFO is required to lead one section approach and conduct at least 5 VFR touch and go’s in this block. Review the procedures for the landing pattern if necessary. The MTRs that will be used are the VR-1020, VR-1021, and the VR-1024. The AP-1/B defines each Military Training Route and lists specific procedures required to use it. Chapter 1 lays out the general requirements for aircraft using the MTR system. SNFOs will need to use the AP-1/B and the VT-10 VNAV Planning Guide to develop their charts. Your low-level chart will be constructed similar to the ones in VNAVs, but with a few differences: 1. Plan for 210 KTS ground speed instead of 180 KTS. 2. The route dimensions are now fully defined by the AP-1/B. Place a copy of the AP-1/B information on the back of your chart. 3. The AP-1/B defines the center of the route corridor by establishing turnpoints, charted by latitude and longitude. We then choose a significant visual feature near the published turnpoint to use as our visual turnpoint. The turn circle is centered on this feature, not the published turnpoint. The route centerline that you will fly is drawn from the centers of the turn circles, not the published turnpoints in the AP-1/B. For standardization purposes, the VT-10 VNAV Planning Guide details the significant features to be used as visual turnpoints. MTRs are official routes that any military aircraft can fly. In order to ensure aircraft de-confliction, route entry times must be scheduled and strictly adhered to. You do not want to accidentally get on the route a couple of minutes in front of an F/A-18 doing 480 KTS. Since CTW-6 controls the VRs listed above, contact the Squadron Duty Officer (SDO) to ensure that your route entry times are properly entered online in the Low Level Route Manager. For other routes, contact the scheduling activity listed in the AP-1/B. Review your SOPs and the CTW-6 Low Altitude Training Rules for de-confliction procedures related to formation and low-level flight. This will be the first time in your flight career that you will need to meet a specific time while airborne. Accurate flight planning is required to determine the time it will take to fly the flight planned route from takeoff to the route entry point. The flight schedule may not always have an accurate takeoff time to allow for your route entry. Determine an appropriate takeoff time to reach the entry point at the time noted on the flight schedule. It is better to take off a little early and hold near the route entry point than to be late. You must cross your entry point +/- 4 minutes

T-6A FORMATION CHAPTER TEN
SECTION VISUAL NAVIGATION PROCEDURES 10-3
from the scheduled time. Also, compute the actual clock time we should reach our target based on our entry time and flight time on the route. Brief this as the Time-on-Target (TOT) for the mission. As the Mission Commander, you are expected to drive all aspects of the conduct of the flight, from brief time to weapons release time, in order to strike the target at the TOT, and then direct the safe recovery of your aircraft. It should be obvious that your chances of success are much greater if you adhere to a solid preflight plan. 1002. CREW COORDINATION
Crew coordination is an essential skill for any mission, but communication in the fast-paced, task-saturated, low-level environment needs to be clear and concise. For this reason, you are expected to start minimizing your communications as you work through your procedures. Attempt to have your answers formulated BEFORE you start talking. Do not express units such as knots, feet, or psi unless there might be confusion. Standardizing terminology and the order of the calls will help in this manner. HEADINGS are to be spoken as three single digits. For example, a heading of 295 is spoken as “two-nine-five.” Do not preface a heading with the word “to.” “Turn to two-five-five” could make the pilot ask if the heading you want is 225 instead of 255. Directive calls of 10° or less of heading change should be prefaced with the term “new heading.” Calls of 11° or more should be prefaced with “Left (or Right) two-four-two.”
NOTE
You need to clear the turn PRIOR to getting there. AIRSPEEDS are given as a “one” number. For example, a speed of 225 is said “two-twenty-five.” Preface all airspeed calls with the word “set.” “Set two-twenty-five.” ETA’s will be spoken as four digits in “minutes plus seconds.” Ex: “ETA to Bravo is one four plus two zero.” An ideal wings-level call will now sound like: “Three-five-five” “Two-hundred” “One thousand, two hundred”
CHAPTER TEN T-6A FORMATION
10-4 SECTION VISUAL NAVIGATION PROCEDURES
“We are 120 above MCF, continue” “We are a half mile left of course, new heading zero-zero-five for two minutes. Time out one-three plus three-zero.” “We are 10 seconds early. New ETA one-eight plus one-zero.” “We were left of course and fast. Winds are two-two-five at 10. New heading zero-zero-three. Set one-ninety-five.”
Do not sacrifice accuracy for brevity, but you are expected to start working toward this standard. Also, avoid pointing to features or using the phrase “over there.” Instead, use descriptive words and clock codes. Simple additions such as near, far, low, mid, or high can expedite a crewmember's visual search greatly. An example of a good descriptive call is, “The intersection is at 2 o’clock low, just right of the tower.”
1003. ENGINE START TO ROUTE ENTRY PROCEDURES
Now that there is a tactical portion of the flight, we differentiate between basic tasks related to the administrative conduct (Admin) and tactical conduct (TAC Admin) of the flight. Admin tasks are basic aviation tasks required to get us to and from the tactical portion of the flight. These include: clearances, navigation, radio management, etc. TACADMIN tasks revolve around those tasks that facilitate the tactical portion of the hop: G-warm, fencing in/out, area/route management, etc. As the mission commander, it is up to you to determine when and how to best use the resources within your formation in order to accomplish these tasks prior to starting the tactical conduct of the event. ADMIN tasks 1. Ground procedures will be the same as previous formation flights. Choose a formation takeoff appropriate for the weather conditions and runway requirements. 2. Adjust enroute airspeed as necessary to meet your route entry time +/- 4 minutes. If it will not be possible to make your route entry time, either coordinate with the SDO to get a new entry time or abort the mission. 3. Cancel IFR when appropriate prior to entering the route. Give a HATT brief. 4. Update the weather and winds with the local FSS for your route.

T-6A FORMATION CHAPTER TEN
SECTION VISUAL NAVIGATION PROCEDURES 10-5
TACADMIN tasks 1. Fence-in and accomplish a G-warm (from combat spread) prior to route entry. 2. A radio call is required five minutes prior to entering any MTR on FSS 255.4. The call should sound like: “Any radio, any radio, KATT 6XX, flight of two Navy T-6’s, entering the VR-1024 Point A at 1215, exiting point G at 1245, 1000 feet, 210 knots.” Note that the times are in Zulu and the altitude is AGL. 3. Either perform a tactical turn from combat spread or keep the Wingman in cruise position until aligned with the course of the first route leg. Once lined up, push the Wingman out to combat spread. Set your airspeed for 210 KTS ground speed. (MACH) 4. Aircraft flying a VR route are required to squawk 4000. The flight Lead must ensure this occurs no later than the entry point. (SQUAWK) 5. Both aircraft must hack the clock at route entry. Lead SNFO will call the mark-on-top at the entry point in the form of a time hack over AUX Tac. (CLOCK) 1004. LOW LEVEL FLIGHT OPERATIONS
1. Normal VNAV turnpoint procedures will be used by both aircraft on the low level with a few exceptions:
a. The route will be flown at 210 KTS ground speed. At the two minute prior call to the
route entry point, determine the base airspeed to set for 210 KTAS. For IOATs of 34°C and above set 200 KIAS, below 34°C set 205 KIAS. Adjust the base airspeed to compensate for the expected winds.
b. The two standard course corrections that will be used will be 10° of heading change for
1 minute to correct for 0.5 NM off course and 20° of heading change for 1 minute to correct for 1 NM off. Apply the smallest heading change necessary. Even though the base airspeed is different, it remains a close enough approximation. There will be no BDHIs in formation.
c. The priority for the formation low level is to overfly the turnpoints. Therefore, if the
Lead aircraft has the turnpoint in sight, they may turn the formation to overfly the turnpoint.

CHAPTER TEN T-6A FORMATION
10-6 SECTION VISUAL NAVIGATION PROCEDURES
d. Speed adjustments for timing corrections will be in 20 knot increments (10%). The formation will not fly slower than 180 KIAS.
e. Turns, other than check turns, will be called over AUX Tac. When the Lead SNFO
calls for each turn, the flight has marked on top of the corresponding turnpoint. f. Both aircraft will monitor 255.4 for the entire low level route in order to deconflict with
other aircraft using the same or crossing routes. g. Z diagrams (to be addressed later in this chapter) will be adjusted for terrain elevation,
depicted in the chart margin near the target, and annotated in MSL altitudes.
2. The route will be flown at or above 1000 ft Above Ground Level (AGL) unless route restrictions dictate otherwise. During the preflight route study, SNFOs will determine the highest terrain on a route leg (+/- 5 NM from route centerline) and add 1000 ft to it to determine a Mean Sea Level (MSL) altitude to fly for each leg. The Wingman will fly the route with 200 ft of step-up from Lead. 3. The goal of the low level flight is to “hit” the target at your briefed TOT. The flight will execute one of two basic target attacks introduced in this chapter. 1005. TARGET ATTACKS
In this block, you will be introduced to some of the basic considerations in attacking a target. Typically, the strikers will be concerned with air-to-air threats until near enough to the target to commit to and focus on the ground attack. While many factors are used to derive this point, in the T-6A, the ATTACK COMMIT POINT will be planned 10 NM from the target. Upon reaching this point, the Lead SNFO will direct the section to commit to Air-to-Ground (A/G) mode through a directive “ATTACK” call on the Tac Freq that will be acknowledged by the Wing SNFO with tactical callsign. SNFOs will then ensure the A/G combat checks are then completed, switching the section from a simulated A/A sanitization game plan to an air-to-ground mindset. Air-to-Ground Checks
1. Set EHSI NAV mode to GPS with the #2 needle selected to GPS. 2. Review the Z Diagram info for the pilot. Number of degrees nose up, apex altitude, dive angle, and planned release altitude. “20 up to 1700, 10 down to 1200.”

T-6A FORMATION CHAPTER TEN
SECTION VISUAL NAVIGATION PROCEDURES 10-7
Pop Attacks
Pop attacks enable an attacker to ingress at low altitude and then rapidly climb to a higher altitude in order to achieve weapons release parameters. In VT-10, we will introduce two basic pop attacks - the Shift Pop Attack and the Crossing Pop Attack. Shift Pop Attack
A shift pop attack is a tactic that enables a section to create separation by time between the two attacking aircraft in order to prosecute the same target. This has certain advantages and safety considerations that make it a viable and practiced tactic in the fleet. One of the main reasons is that the separation between aircraft allows for fragmentation avoidance from the explosion of the first aircraft’s attack. Lead’s attack gives the added benefit of identifying the target area for the Wing aircraft, which allows the Wing to adjust his aim off of Lead’s hits. We will target 30 seconds of separation between aircraft. In T-6s, this separation will be created at 5 NM from the pre-planned target by an “ACTION” call made by the Lead SNFO on the Tac Freq. The Wing IP will acknowledge and maneuver the aircraft to turn 90° toward the lead’s flight path; in other words, Wing will cross behind Lead’s tail. After rolling out, the Wing SNFO will time 15 seconds before directing the turn to put the target back on the nose. Meanwhile, the Lead will continue toward the target point and execute the pop attack at 2 NM from the target by sharply turning 30° away from the target and then executing the “pop” in accordance with the Z diagram. The Wingman will execute the same attack approximately 30 seconds (or 1.5 NM) after the lead. The IPs will call “popping” and “rolling in, heading XXX” as the aircraft starts the pop and pulls down from the apex altitude, respectively. As indicated in Figure 10-1, both students in the section have required ICS calls to make during the attack and dive recovery. At the planned release altitude, each student will “MARK” over the ICS. The IPs will then smoothly apply G to get the aircraft nose above the horizon and then turn on course for the off target recovery. Lead should set 200 KIAS until the flight is rejoined. After passing the target, SNFOs will set the EHSI back to VOR mode and deselect the #2 needle to simulate placing the weapon system on safe. Then call, “Tactical callsign, off safe” on TAC. The Lead should attain a visual on Wingman as soon as possible after coming off target. The Wingman shall keep Lead in sight throughout the attack.

CHAPTER TEN T-6A FORMATION
10-8 SECTION VISUAL NAVIGATION PROCEDURES
Once off target, the Lead may delay his turn on course until the wingman calls “Off Safe” in order to facilitate the Wingman’s rejoin in combat spread to maintain mutual support. The off-target rendezvous plan should be covered in the brief.
Figure 10-1 Shift Attack
Crossing Pop Attack
A crossing pop attack is a tactic that enables a section to conduct simultaneous attacks on the same target (Figure 10-2). Unlike a shift attack, a crossing pop attack masses firepower on the target while minimizing exposure to target area defenses. The section shall ingress at the planned low-level altitude in combat spread. The crossing attack does not have a delay or separation maneuver; instead, the Lead SNFO will lead the section straight towards the target (bisecting the section to enable proper attack geometry). At the appropriate distance (2.5 NM from the target), the Lead SNFO will initiate the maneuver with the “ACTION” call on Tac Freq. Both aircraft

T-6A FORMATION CHAPTER TEN
SECTION VISUAL NAVIGATION PROCEDURES 10-9
will make a level turn away from each for 30 degrees. Lead IP will call, “Tactical callsign, popping” and immediately applying 2-3 G’s in a wings level climb. The apex of the pop will be the pattern altitude as depicted on the top of the Z diagram. Prior to reaching pattern altitude, the Lead will over-bank the aircraft and call, “Tactical callsign, rolling in, heading XXX” and intercept the Z diagram dive angle and attack parameters. Upon hearing the “ACTION” command, the Wing IP will acknowledge with tactical sign, mirror the Lead’s maneuvers in the opposite direction, and pop after a 2-second delay. Wing IP will call, “Tactical callsign, popping” and “Tactical callsign, rolling in, heading XXX, visual” as well. This delay is designed to keep the Lead forward of the Wingman’s wing-line and ensure altitude de-confliction. The Wingman will not roll-in on the target (from the APEX altitude) without a visual and until he can see Lead descending through the horizon. It is easy for a scan breakdown to occur by becoming fixated on the target. In the event that the IP is not maneuvering the aircraft to arrest the rate of descent, the SNFO will give “PULL” calls with rising voice inflection to get the IP’s attention. Again, after passing the target, SNFOs will set the EHSI back to VOR mode and deselect the #2 needle to simulate placing the weapon system on safe. Then call, “Tactical callsign, off safe” on TAC. The Lead should attain a visual on Wingman as soon as possible after coming off target. The Wingman shall keep Lead in sight throughout the attack. The Z diagram dive parameters and student’s attack comm procedures are identical to the shift pop attack, with the exception that both aircraft perform a multi-axis, near-simultaneous attack on the same target. Off of the target, the section will cross flight paths and continue on course. Aircraft de-confliction will be the responsibility of the Wingman.

CHAPTER TEN T-6A FORMATION
10-10 SECTION VISUAL NAVIGATION PROCEDURES
Figure 10-2 Crossing Attack (Same Target)
1. Lead SNFO: “ATTACK” call at 10 NM. Both aircraft complete A/G checks. 2. Lead SNFO: “ACTION” call at 2.5 NM. Both aircraft set max power. Wing SNFO: “Raider 12.” Wing SNFO should direct IP through the maneuver.
3. “Pop” at 2 NM from target:
Lead IP: “Raider 11, Popping.” Wing IP: “Raider 12, Popping.”

T-6A FORMATION CHAPTER TEN
SECTION VISUAL NAVIGATION PROCEDURES 10-11
4. Lead IP: “Raider 11, rolling in, heading 030.” Wing IP: “Raider 12, rolling in, heading 330, visual.” 5. At planned release altitude, SNFO (ICS): “MARK, (PULL call if necessary).” Note the time. 6. The IPs will smoothly apply G for the off target recovery and bring the aircraft nose above the horizon. 7. Switch back to A/A mode by changing the EHSI Nav mode back to VOR, deselect the GPS needle. SNFOs will then call: “Tactical callsign, Off Safe, visual.” If Lead is not in sight, call “blind.” 8. The Lead IP maintains 200 KIAS until the flight is rejoined. Each route will have its specific set of considerations that will be managed and mitigated through careful and thorough preflight planning. Pay special attention to any hazards in the target area. Each SNFO is responsible for their familiarity with the route to be flown and shall have an appropriate game plan to ingress and execute one of the pre-planned attacks. Pop Z Diagrams
1. In the fleet, preflight planning will involve determining the proper flight parameters (airspeed, altitude, dive angle, mil setting, etc.) needed at the instant of weapons release to successfully deliver your ordnance to the target. Z diagrams are useful presentations of this information and are to be included on briefing boards and kneeboard cards (Figure 10-3). To make an analogy, if releasing the ordnance is akin to pulling the trigger on a rifle, then the Z diagram details how to position and aim that rifle. 2. Since the T-6A does not have a heads-up display (HUD), radar altimeter (RADALT), or ordnance, this pop diagram is simplified from what you will see in future aircraft, but the concepts are the same. Our standard Z diagram is designed for a 20° climb and 10° dive angle. First, determine the elevation of the target and then use the basic T-6A pop diagram to plan the target attack while staying inside the confines of the route structure. The diagrams will be labeled with MSL altitudes to be denoted by an ‘M’ after the number.

CHAPTER TEN T-6A FORMATION
10-12 SECTION VISUAL NAVIGATION PROCEDURES
a. INGRESS ALT (MSL) / AIRSPEED (KGS) – Plan for 1000 feet AGL and 210 KTS
ground speed. b. POP POINT DISTANCE (NM) – Distance from waypoint c. POP ANGLE – Dive Angle plus 10 degrees d. APEX Altitude (MSL) – Max altitude of the pop. Start the roll-in to attack angle prior
to this. Plan to either to climb 1000 ft or to the top of the route structure, whichever is lower.
e. DIVE ANGLE – 10 degrees if pop to Apex is less than 1000 feet, otherwise 20 degrees. f. PLANNED RELEASE/NO LATER THAN RELEASE ALT (MSL) – “MARK” call on
ICS to simulate weapon release. Plan for 200 ft above Ingress altitude. Give a “PULL” call if pilot does not initiate pull to level the aircraft above MIN ALT.
g. MINIMUM ALTITUDE (MINALT MSL) – Must stay above this altitude. Use 1000
ft AGL.
Figure 10-3 T-6A Pop Diagram
B
A
D
E
F G C

T-6A FORMATION CHAPTER TEN
SECTION VISUAL NAVIGATION PROCEDURES 10-13
1006. ROUTE EXIT TO RETURN TO BASE (RTB)
Following the target attack, the formation must complete an off-target rendezvous to rejoin for one of our administrative travel positions. It does not make sense tactically to attempt a rendezvous overhead the target that was just bombed. To facilitate a safe join up, SNFOs will choose an easily identifiable terrain feature, at least 5 NM away from the target, in the general direction of our RTB course. This is known as an egress control point (ECP). Once Wing has called “off safe,” Lead will initiate a VFR climb clear of the route structure and toward the ECP. If Wing has called “visual” then Lead can continue on course to RTB as Wing completes a running rendezvous. If Wing is still “blind,” Lead will set up an orbit at the ECP for a turning rendezvous. De-confliction parameters will either be pre-briefed or done over the radio. Off target is not the time to let your guard down. Give the rendezvous its due diligence and execute safely. During the off-target rendezvous, the Lead and Wing will prioritize their respective TACADMIN tasks as conditions warrant. Lead: 1. Initiate and maintain a VMC climb. (Aviate, Navigate) 2. Ensure Wing calls “Tactical callsign, off safe, visual.” (Communicate) 3. Monitor Wing’s rendezvous. 4. Check off of the route with FSS. 5. Change squawk from 4000 to 1200.
Figure 10-4 Example T-6A 10° Pop
Diagram (w/target elevation of 200 ft)
1400’M 10
2.0
1200’M/210
1700’M
1200’M 20
CHAPTER TEN T-6A FORMATION
10-14 SECTION VISUAL NAVIGATION PROCEDURES
6. Switch flight to appropriate ATC frequency. 7. Fence out the section.
Wing: 1. Conduct rendezvous. 2. Monitor rendezvous closure rates. 3. Follow lead’s frequency changes. 4. Fence out on lead’s direction. Once the flight is rejoined and the TACADMIN tasks are complete, we need to shift our focus to the ADMIN recovery to the field. Plan to navigate visually to your field if the weather and fuel permit. Each SNFO must lead at least one section instrument approach and complete 5 VFR touch and go’s in this block. All requirements from previous blocks of training still apply: check ATIS, give a field brief, and give an approach brief if necessary. Strive to accomplish these tasks early to get ahead of the aircraft. 1007. ROUTE ABORT
Should the need arise to abort the route for weather, the flight shall: initially turn 180° to avoid the weather and then climb off the route. If weather cannot be avoided, both aircraft will begin a max power climb to route abort altitude and lead will squawk emergency (7700). Both aircraft should check away from each other. Minimum Safe Altitude (MSA) within 350 miles of Navy Pensacola is 3200 ft MSL. Lead will climb to 3200 ft MSL and Wing will climb to 3,700’ MSL. Lead will switch the flight to an appropriate ATC frequency on PRI, and begin coordinating IFR clearances for both aircraft.

GLOSSARY A-1
APPENDIX A
GLOSSARY
ABEAM: A position, either on the left or right side, which is 90º off the longitudinal axis of the aircraft. ACUTE: A condition in which the Wingman is positioned forward of a designated bearing line. BANDIT: Term used for a hostile aircraft. BEARING LINE: An imaginary line drawn aft from the Lead's 3/9 line. The bearing line is the angular difference between the Wingman's aircraft and Lead's 3/9 line (i.e., being established on the 60º bearing line means the Wingman is offset 30º from Lead's six o'clock position). BINGO: The fuel required to fly from the farthest point of a working area or route point to your planned destination via standard routing to arrive with:
(1) VMC: SOP minimum fuel on deck (200 lbs) or fuel to proceed to an alternate and arrive above SOP emergency fuel (120 lbs), whichever is higher.
(2) IMC: Divert Fuel
BLIND: A term used by Wing to communicate that he has lost visual contact with the lead aircraft when VMC. BREAKUP: A maneuver utilized to separate the formation aircraft and establish them in trail or column. CHECK SIX: A visual lookout to check the aircraft or formation’s six o’clock position for a potential adversary. CHECKPOINT: A selected point or set of points, on the lead aircraft, which are utilized by the Wingman to determine relative position. CLOSURE RATE: The relative rate at which the wing aircraft is approaching (or “closing on”) the lead aircraft. CROSSUNDER: A maneuver utilized to change the position of the wing aircraft from one side of the Lead to the other.
APPENDIX A T-6A FORMATION
A-2 GLOSSARY
CUTOUT: A visual checkpoint on the T-6A referring to the outermost or innermost corner of that portion of the wing that has been cut out to allow installation of the aileron. DASH TWO: A radio communication term used to refer to the Wingman in a formation. FLIGHT INTEGRITY: The ability of the Wingman to maintain the proper relative position while the formation is performing maneuvers. JOKER: Joker fuel is a pre-briefed fuel state that allows for one more tactical run/set, or 1 minute at max power (whichever is higher), prior to reaching Bingo fuel. In the T-6A, Joker will be set at 10 lbs above Bingo fuel. KNOCK-IT-OFF: A radio call used by a flight member to alert the formation to cease maneuvering. This radio call should be used when safety of flight is in question and may be initiated by any flight member. LOST SIGHT: A term used by the Wingman to communicate that he has lost visual contact with
the lead aircraft when IMC. NEW SIX: This is the formation’s new six o’clock position at the conclusion of a tactical turn or maneuver. Checking this position will normally be assigned to a specific crewmember during a
tactical turn, to maximize visual lookout opportunities and enhance visual lookout doctrine. NOSE-TO-TAIL: The distance from the nose of the wing aircraft to the tail of the lead aircraft. OLD SIX: This is the formation’s current or old six o’clock at the conclusion of a tactical maneuver or turn. Checking this position will normally be assigned to a specific crewmember during a tactical turn, to maximize visual lookout opportunities and enhance visual lookout doctrine. PARADE POSITION: A fixed position on the 45º bearing line on either the left or right side of the lead aircraft with 5 ft of stepdown and 3 ft of wingtip separation. PLAYMATE: A term used when referencing aircraft participating in your formation. PROP ARC: A visual checkpoint on the T-6A, referring to the outermost portion of the circle created by the tips of the propeller blades in motion.

T-6A FORMATION APPENDIX A
GLOSSARY A-3
RATE OF ROLL: A roll rate in which AOB is achieved. RENDEZVOUS: A maneuver where the formation aircraft are maneuvered into a position where
a join-up may be performed. SHAKE OFF: A visual signal (negative head shake) given by the Wingman to indicate he is not prepared to execute the next maneuver or required action. STACK: A visual checkpoint on the T-6A, referring to the trailing edge of the exhaust stacks. STAGNATED ON THE BEARING: A condition during the rendezvous where the wing aircraft ceases to continue closing on the lead aircraft. STEPDOWN: The vertical distance between the lead and wing aircraft. SUCKED: A condition in which the Wingman is positioned aft of a designated bearing line. TAIL CHASE: An exercise designed to demonstrate the concepts of lead, lag, and pure pursuit while dynamically maneuvering the section. TERMINATE: A radio call (normally initiated by the flight Lead) to terminate an exercise or maneuvering. This differs from the knock-it-off call in that it is anticipated/expected (i.e., after tail chase). TRAIL: A formation pattern where Wing is directly behind the lead aircraft. UNDERRUN: A maneuver utilized to allow the wing aircraft to pass below, behind, and outside
the lead aircraft's radius of turn in the event that the rendezvous becomes unsafe.

APPENDIX A T-6A FORMATION
A-4 GLOSSARY
THIS PAGE INTENTIONALLY LEFT BLANK

THE BRIEF B-1
APPENDIX B
THE BRIEF
EXPECTATIONS
As you can tell, there are numerous procedures associated with formation flying. Believe it or not, these procedures are only for the most basic maneuvers. However, these are the building blocks that provide the safety of flight and common ground upon which tactical aviators rely to perform more dynamic events. Because of this, the F5001 and F5002 briefs will be the largest undertakings of flight school thus far. SNFOs are expected to be able to talk through the entire conduct of the flight, from startup to shutdown, step by step, with accompanying hand signals and radio communications, without error! For example, it is not enough to brief, “We will taxi to the hold short and do our Overspeed Governor and Before Takeoff checklists. Then we’ll do the EPPPFANN checks. Lead will return Wing’s thumbs up and then call Base for the ‘going flying’ call and then call Tower for takeoff.” Instead, the level of detail should be more like this: “Lead will taxi on the downwind side of the longest taxiway, centered on his half. Wing will match Lead’s offset on the opposite side of the taxiway and keep the tip of the horizontal stab over the inboard CFS door. Upon passing the last taxiway before the hold short, both aircraft will auto-switch to Tower frequency. Lead will pull into the hold short as normal and Wing will taxi into position to match his example. Each aircraft will independently perform their Overspeed Governor and Before Takeoff checklists. Wing will then perform the EPPPFANN checks on Lead’s aircraft. EPPPFANN stands for: engine cowling secure, all panels secure, proper strut extension, proper tire inflation, flaps at takeoff, all antennas secure, no visible leaks, and navigation and anti-collision lights on. Wing will then pass a thumbs-up signal to Lead. Our crew coordination to pass the signal will be ‘ready, ready, now.’ Lead will perform the EPPPFANN checks simultaneously and after receiving Wing’s thumb-up, will return a thumbs-up. Lead will then switch to Base and call ‘KATT 621, flight of two, going flying.’ Then Lead will switch back to Tower frequency and call, ‘Tower, KATT 621, flight of two, takeoff IFR.’ Lead will look back to ensure that Wing passes a thumbs-up to signal they heard the radio transmission.” This example is not a script for you to memorize, but instead shows the level of detail that needs to be explained for every maneuver and sequence of events within the entire flight. Make no assumptions and take no detail for granted. The expectation, from this point on, is that if you cannot perform in the brief, then you almost certainly will not be able to perform in the air. Practice and observation of other student form briefs are essential prior to your event. Both

APPENDIX B T-6A FORMATION
B-2 THE BRIEF
students must know the roles of both Lead and Wing. A well-practiced and polished brief tends to lead to a smooth event. Other differences with a formation brief are that when briefing the section, only brief those items that pertain to the section. For example, when briefing aborted takeoff emergencies, cover Lead’s and Wing’s responsibilities during a section and interval takeoff, but do not go into the boldface of “PCL-IDLE, Brakes-As required” because that procedure applies to the individual aircraft, not the section. Also ensure you brief any applicable training rules such as the Tail Chase or Low Altitude Training Rules. Following the formation brief, each crew needs to conduct a “singles brief” to cover the remaining items such as: CRM, comm/nav set up, and the NATOPS emergency brief. THE BRIEFING BOARD
The briefing board is used to convey important mission information to the members of the crew. As such, it should be professional in appearance, neat, and legible. Its format always comes from the briefing guide. Use the briefing guide as a shell and fill in the details. Colors are used to easily differentiate portions of the brief. Black is used for Admin info, green for communications, blue for conduct, and red for emergencies. Included on the board will be the flight’s callsign as per the flight schedule as well as the tactical callsign chosen by the students. The tactical callsign is used to differentiate various formation flights from the same squadron that may be airborne concurrently. The students will also ensure that the scheduled MTR entry and exit times are included in the event timeline (in Admin portion of the board). Students will also prepare briefing cards to be taken to the plane for all crewmembers. The standard briefing card format will be provided by the Squadron. All three items, board, card, and guide, should match in format and information.

ACRONYMS C-1
APPENDIX C
ACRONYMS
AGL - Above Ground Level AGSM - Anti-G Straining Maneuver AOB - Angle of Bank AP - Area Planning ATC - Air Traffic Control ATIS - Automated Terminal Information Service AUX - Auxiliary Radio (VHF Radio) BAC - Basic Approach Configuration CFS - Canopy Fracturing System CRM - Crew Resource Management CTAF - Common Traffic Advisory Frequency DME - Distance Measuring Equipment E.O.D. - Emergency of the Day ETA - Estimated Time of Arrival FAF - Final Approach Fix FOD - Foreign Object Damage FSS - Flight Service Station FTI - Flight Training Instruction

APPENDIX C T-6A FORMATION
C-2 ACRONYMS
GP - General Planning GPS - Global Positioning System HEFOE - Hydraulic, Electrical, Fuel, Oxygen, and/or Engine IAW - In Accordance With ICS - Internal Communication System IFR - Instrument Flight Rules IMC - Instrument Meteorological Conditions INAV - Instrument Navigation KIAS - Knots Indicated Airspeed KTAS - Knots True Airspeed KTS - Knots L - Lead MNTS - Multi-Service Student NFO Training System MOA - Military Operations Area MSA - Minimum Safe Altitude MSL - Mean Sea Level NATOPS - Naval Air Training and Operating Procedures Standardization NFO - Naval Flight Officer NM - Nautical Miles NORDO - No Radio

T-6A FORMATION APPENDIX C
ACRONYMS C-3
NOTAM - Notice to Airmen NPA - Navy Pensacola OPNAV - Office of the Chief of Naval Operations OSC - On Scene Commander PCL - Power Control Lever PRI - Primary Radio (UHF Radio) Q.O.D. - Question of the Day RTB - Return to Base SA - Situational Awareness SAR - Search And Rescue SDO - Squadron Duty Officer SNFO - Student Naval Flight Officer SOP - Standard Operating Procedures SRT - Standard Rate Turn TAC - Tactical TAS - Traffic Avoidance System UHF - Ultra High Frequency VFR - Visual Flight Rules VHF - Very High Frequency VMC - Visual Meteorological Conditions
APPENDIX C T-6A FORMATION
C-4 ACRONYMS
VNAV - Visual Navigation VOR - VHF Omni-directional Range VR - VFR Military Training Route W - Wing/Wingman