Flex 3 with Java - Packt
27
Flex 3 with Java Satish Kore Chapter No. 5 "Working with XML"
Transcript of Flex 3 with Java - Packt
Flex 3 with Java
Satish Kore
Chapter No. 5 "Working with XML"
For More Information: www.packtpub.com/flex-3-with-java/book
In this package, you will find: A Biography of the author of the book
A preview chapter from the book, Chapter NO.5 "Working with XML"
A synopsis of the book’s content
Information on where to buy this book
About the Author Satish Kore is a software engineer, an amateur blogger, and a dreamer based in a beautiful city Bangalore in India. He has worked on a variety of technologies including Adobe Flex, Java, and J2ME over the past eight years. He has always been passionate about Rich Internet application (RIA) technologies and loves working on Adobe Flex. He always enjoyed writing software applications and solving common problems using technology. You can keep up with his work by visiting his blog at http://blog.satishkore.com, or by following him on Twitter http://twitter.com/satishkore.
I thank my family for being encouraging and supportive and special thanks to my friends for always inviting me on parties even though I constantly refused to join them by giving them the same boring reason that I am busy with writing.
This book means a lot to me since I have spent all my weekends and free time writing this book for the past 6-7 months. However, this book would not have been possible without some individuals who have worked alongside me during the writing, reviewing, and publishing phases.
I would thank James Lumsden for giving me the opportunity to write this book. I would also like to thank Neelkanth Mehta, Swapna Verlekar, Dhiraj Bellani, and all my technical reviewers for proofreading, reviewing, and refining the content of this book; without their efforts, this book wouldn’t have been completed.

For More Information: www.packtpub.com/flex-3-with-java/book
Flex 3 with Java Rich Internet applications (RIAs) are a new breed of web applications that are capable of doing things such as loading and handling heavy data ten times faster than HTTP, designing great-looking and sophisticated user interfaces that resemble desktop-based applications, and having the possibility of utilizing existing server technology such as Java, that would have never been possible with typical web technologies, such as HTML. Flex 3 is a leading technology for developing RIAs for the Web, as well as for the desktop. This book gives you an insight into, and provides a hands-on experience in, programming in Flex 3 by utilizing your existing knowledge of Java programming.
This book includes comprehensive information on various concepts of Flex 3 and ActionScript 3.0, such as developing simple applications and handling events to creating custom components and events, using RPC services, integration with Java and BlazeDS, styling and formatting, and how to package and deploy Flex applications. Finally, this book provides a step-by-step tutorial for developing e-commerce applications using Flex 3, ActionScript 3.0, BlazeDS, and Java.
You will start with downloading, installing, and configuring Flex 3 SDK and Flex Builder 3 and learn basic concepts, such as what is Macromedia Flex Markup Language (MXML) and ActionScript, understanding UI components, controls and compilers, and so on. Furthermore, you will start developing simple applications and slowly go into more depth where you will learn advanced concepts, such as creating custom components, debugging, integrating with Java, using RPC services, styling, internationalizing, and deploying Flex applications, and much more.
For More Information: www.packtpub.com/flex-3-with-java/book
What This Book Covers Chapter 1: Installing and Configuring Adobe Flex—In this chapter, you will learn the basics of Flex programming, that is, downloading, installing, and configuring Flex SDK and Flex Builder 3.
Chapter 2: Introduction to Flex 3 Framework—This chapter will introduce you to the MXML scripting for laying out User Interfaces (UI) in the Flex world. This chapter also provides hands-on examples required to get you started with MXML programming.
Chapter 3: Introduction to ActionScript 3.0—This chapter will introduce you to the ActionScript 3.0 programming language along with detailed code samples.
Chapter 4: Using External API and LocalConnection - In this chapter, you will learn how to communicate with JavaScript from a Flex application and vice versa.
Chapter 5: Working with XML—In this chapter, you will learn how to work with XML data using Flex's E4X approach.
Chapter 6: Overview of LiveCycle Data Services and BlazeDS—This chapter will provide an overview of BlazeDS and LiveCycle Data Services.
Chapter 7: Flex Data Access Methods—This chapter provides you with in-depth information about various data access methods available in Flex with detailed and step-by-step code samples along with Flash Player security model. It also gives you a detailed insight into how to use RemoteObject to communicate with Java code.
Chapter 8: Communicating with Server-side Java—This chapter provides step-by-step code examples to get started with Flex and Java communication along with clear and simple code examples..
Chapter 9: Debugging Techniques—In this chapter, you will learn how to debug your Flex application using Flex Builder 3 and some third-party tools.
Chapter 10: Packaging and Deployment—You will learn how to build and package a Flex application using available tools, such as Apache Ant, and learn about various deployment options that you can use.
Chapter 11: Styling Your Application—This chapter will give an overview of using Cascading Style Sheet (CSS) for changing the look and feel of your Flex application and components with brief code examples and tools for designing CSS files.
Chapter 12: Internationalization and Localization—This chapter will give you an overview of internationalizing your application.
Chapter 13: Creating an E-commerce Application—This chapter will provide a step-by-step guide for creating an end-to-end e-commerce application using Flex 3, ActionScript 3.0, BlazeDS, and Java.
For More Information: www.packtpub.com/flex-3-with-java/book
Working with XMLIn today's world, many server-side applications make use of XML to structure data because XML is a standard way of representing structured information. It is easy to work with, and people can easily read, write, and understand XML without the need of any specialized skills. The XML standard is widely accepted and used in server communications such as Simple Object Access Protocol (SOAP) based web services. XML stands for eXtensible Markup Language. The XML standard specifi cation is available at http://www.w3.org/XML/.
Adobe Flex provides a standardized ECMAScript-based set of API classes and functionality for working with XML data. This collection of classes and functionality provided by Flex are known as E4X. You can use these classes provided by Flex to build sophisticated Rich Internet applications using XML data.
This chapter covers the E4X approach to process XML data with a comprehensive example application using these techniques to process XML data.
XML basics XML is a standard way to represent categorized data into a tree structure similar to HTML documents. XML is written in plain-text format, and hence it is very easy to read, write, and manipulate its data.
A typical XML document looks like this:
<book> <title>Flex 3 with Java</title> <author>Satish Kore</author> <publisher>Packt Publishing</publisher> <pages>300</pages></book>
For More Information: www.packtpub.com/flex-3-with-java/book
Working with XML
[ 120 ]
Generally, XML data is known as XML documents and it is represented by tags wrapped in angle brackets (<>). These tags are also known as XML elements. Every XML document starts with a single top-level element known as the root element. Each element is distinguished by a set of tags known as the opening tag and the closing tag. In the previous XML document, <book> is the opening tag and </book> is the closing tag. If an element contains no content, it can be written as an empty statement (also called self-closing statement). For example, <book/> is as good as writing <book></book>.
XML documents can also be more complex with nested tags and attributes, as shown in the following example:
<book ISBN="978-1-847195-34-0"> <title>Flex 3 with Java</title> <author country="India" numberOfBooks="1"> <firstName>Satish</firstName> <lastName>Kore</lastName></author> <publisher country="United Kingdom">Packt Publishing</publisher> <pages>300</pages></book>
Notice that the above XML document contains nested tags such as <firstName> and <lastName> under the <author> tag. ISBN, country, and numberOfBooks, which you can see inside the tags, are called XML attributes.
To learn more about XML, visit the W3Schools' XML Tutorial at http://w3schools.com/xml/.
Understanding E4X Flex provides a set of API classes and functionality based on the ECMAScript for XML (E4X) standards in order to work with XML data. The E4X approach provides a simple and straightforward way to work with XML structured data, and it also reduces the complexity of parsing XML documents.
Earlier versions of Flex did not have a direct way of working with XML data. The E4X provides an alternative to DOM (Document Object Model) interface that uses a simpler syntax for reading and querying XML documents. More information about other E4X implementations can be found at http://en.wikipedia.org/wiki/E4X.
The key features of E4X include:
It is based on standard scripting language specifi cations known as ECMAScript for XML. Flex implements these specifi cations in the form of API classes and functionality for simplifying the XML data processing.
•
For More Information: www.packtpub.com/flex-3-with-java/book
Chapter 5
[ 121 ]
It provides easy and well-known operators, such as the dot (.) and @, to work with XML objects.The @ and dot (.) operators can be used not only to read data, but also to assign data to XML nodes, attributes, and so on.The E4X functionality is much easier and more intuitive than working with the DOM documents to access XML data.
ActionScript 3.0 includes the following E4X classes: XML, XMLList, QName, and Namespace. These classes are designed to simplify XML data processing into Flex applications.
Let's see one quick example:
Defi ne a variable of type XML and create a sample XML document. In this example, we will assign it as a literal. However, in the real world, your application might load XML data from external sources, such as a web service or an RSS feed.
private var myBooks:XML = <books publisher="Packt Pub"> <book title="Book1" price="99.99"> <author>Author1</author> </book> <book title="Book2" price="59.99"> <author>Author2</author> </book> <book title="Book3" price="49.99"> <author>Author3</author> </book> </books>;
Now, we will see some of the E4X approaches to read and parse the above XML in our application. The E4X uses many operators to simplify accessing XML nodes and attributes, such as dot (.) and attribute identifi er (@), for accessing properties and attributes.
private function traceXML():void { trace(myBooks.book.(@price < 50.99).@title); //Output: Book3 trace(myBooks.book[1].author); //Output: Author2 trace(myBooks.@publisher); //Output: Packt Pub //Following for loop outputs prices of all books for each(var price in myBooks..@price) { trace(price); }}
•
•
•
For More Information: www.packtpub.com/flex-3-with-java/book
Working with XML
[ 122 ]
In the code above, we are using a conditional expression to extract the title of the book(s) whose price is set below 50.99$ in the fi rst trace statement. If we have to do this manually, imagine how much code would have been needed to parse the XML. In the second trace, we are accessing a book node using index and printing its author node's value. And in the third trace, we are simply printing the root node's publisher attribute value and fi nally, we are using a for loop to traverse through prices of all the books and printing each price.
The following is a list of XML operators:
Operator Name Description@ attribute
identifi erIdentifi es attributes of an XML or XMLList objec t.
{ } braces (XML) Evaluates an expression that is used in an XML or XMLList initializer.
[ ] brackets (XML)
Accesses a property or attribute of an XML or XMLList object, for example myBooks.book["@title"].
+ concatenation (XMLList)
Concatenates (combines) XML or XMLList values into an XMLList object.
+= concatenation assignment (XMLList)
Assigns expression1, which is an XMLList object, the value of expression1 + expression2.
There is no operator
delete (XML) Deletes the XML elements or attributes specifi ed by reference. For example:delete myBooks.book[0].author;.(The above code line deletes the author element from the book node.)OR delete myBooks.book[0].@title; (The above code line deletes the title attribute from the book node.)
.. descendant accessor
Navigates to descendant elements of an XML or XMLList object, or (combined with the @ operator) fi nds matching attributes of descendants.
. dot (XML) Navigates to child elements of an XML or XMLList object, or (combined with the @ operator) returns attributes of an XML or XMLList object.
( ) parentheses (XML)
Evaluates an expression in an E4X XML construct.
< > XML literal tag delimiter
Defi nes an XML tag in an XML literal.
For More Information: www.packtpub.com/flex-3-with-java/book
Chapter 5
[ 123 ]
The @ and dot (.) operators can be used to read as well as assign data, as shown in following example:
myBooks.book[1].author = "Satish Kore";myBooks.book.(@price < 50.99).@title = "Low Price Edition Book";
Now, let's look at the important classes used for working with XML data in Flex in the next section.
The XML object An XML class represents an XML element, attribute, comment, processing instruction, or a text element.
We have used the XML class in our example above to initialize the myBooks variable with an XML literal. The XML class is included into an ActionScript 3.0 core class, so you don't need to import a package to use it.
The XML class provides many properties and methods to simplify XML processing, such as ignoreWhitespace and ignoreComments properties, used for ignoring whitespaces and comments in XML documents respectively. You can use the prependChild() and appendChild() methods to prepend and append XML nodes to existing XML documents. Methods such as toString() and toXMLString() allow you to convert XML to a string.
An example of an XML object:
private var myBooks:XML = <books publisher="Packt Pub"> <book title="Book1" price="99.99"> <author>Author1</author> </book> <book title="Book2" price="120.00"> <author>Author2</author> </book></books>;
In the above example, we have created an XML object by assigning an XML literal to it. You can also create an XML object from a string that contains XML data, as shown in the following example:
private var str:String = "<books publisher=\"Packt Pub\"> <book title=\"Book1\" price=\"99.99\"> <author>Author1</author> </book> <book title=\"Book2\" price=\"59.99\"> <author>Author2</author> </book> </books>";private var myBooks:XML = new XML(str);trace(myBooks.toXMLString()); //outputs formatted xml as string
For More Information: www.packtpub.com/flex-3-with-java/book
Working with XML
[ 124 ]
If the XML data in string is not well-formed (for example, a closing tag is missing), then you will see a runtime error.
You can also use binding expressions in the XML text to extract contents from a variable data. For example, you could bind a node's name attribute to a variable value, as in the following line:
private var title:String = "Book1"var aBook:XML = <book title="{title}">;
To read more about XML class methods and properties, go through Flex 3 LiveDocs at http://livedocs.adobe.com/flex/3/langref/XML.html.
The XMLList object As the class name indicates, XMLList contains one or more XML objects. It can contain full XML documents, XML fragments, or the results of an XML query.
You can typically use all of the XML class's methods and properties on the objects from XMLList. To access these objects from the XMLList collection, iterate over it using a for each… statement.
The XMLList provides you with the following methods to work with its objects:
child(): Returns a specifi ed child of every XML object children(): Returns specifi ed children of every XML object descendants(): Returns all descendants of an XML objectelements() : Calls the elements() method of each XML object in the XMLList. Returns all elements of the XML objectparent() : Returns the parent of the XMLList object if all items in the XMLList object have the same parentattribute(attributeName): Calls the attribute() method of each XML object and returns an XMLList object of the results. The results match the given attributeName parameterattributes(): Calls the attributes() method of each XML object and returns an XMLList object of attributes for each XML objectcontains(): Checks if the specifi ed XML object is present in the XMLListcopy(): Returns a copy of the given XMLList objectlength(): Returns the number of properties in the XMLList objectvalueOf(): Returns the XMLList object
•
•
•
•
•
•
•
•
•
•
•
For More Information: www.packtpub.com/flex-3-with-java/book
Chapter 5
[ 125 ]
For details on these methods, see the ActionScript 3.0 Language Reference.
Let's return to the example of the XMLList:
var xmlList:XMLList = myBooks.book.(@price == 99.99);var item:XML;for each(item in xmlList) { trace("item:"+item.toXMLString());}
Output:
item:<book title="Book1" price="99.99"> <author>Author1</author></book>
In the example above, we have used XMLList to store the result of the myBooks.book.(@price == 99.99); statement. This statement returns an XMLList containing XML node(s) whose price is 99.99$.
Working with XML objects The XML class provides many useful methods to work with XML objects, such as the appendChild() and prependChild() methods to add an XML element to the beginning or end of an XML object, as shown in the following example:
var node1:XML = <middleInitial>B</middleInitial>var node2:XML = <lastName>Kore</lastName>var root:XML = <personalInfo></personalInfo>root = root.appendChild(node1);root = root.appendChild(node2);root = root.prependChild(<firstName>Satish</firstName>);
The output is as follows:
<personalInfo> <fi rstName>Satish</fi rstName> <middleInitial>B</middleInitial> <lastName>Kore</lastName></personalInfo>

For More Information: www.packtpub.com/flex-3-with-java/book
Working with XML
[ 126 ]
You can use the insertChildBefore() or insertChildAfter() method to add a property before or after a specifi ed property, as shown in the following example:
var x:XML = <count> <one>1</one> <three>3</three> <four>4</four> </count>;x = x.insertChildBefore(x.three, "<two>2</two>");x = x.insertChildAfter(x.four, "<five>5</five>");trace(x.toXMLString());
The output of the above code is as follows:
<count> <one>1</one> <two>2</two> <three>3</three> <four>4</four> <fi ve>5</fi ve></count>
Using XML as dataProvider One of the powerful features of the XML object is to use it as a dataProvider for your component that allows you to tie XML directly with your component's data model. Let's see how we can use XML as the dataProvider of a DataGrid component to display complex data.
private var xmlData:XML = <books> <book ISBN="184719530X"> <title>Building Websites with Joomla! 1.5</title> <author> <lastName>Hagen</lastName> <firstName>Graf</firstName> </author> <image>../assets/images/184719530X.png</image> <pageCount>363</pageCount> <price>Rs.1,247.40</price> <description>The best-selling Joomla! tutorial</description>
For More Information: www.packtpub.com/flex-3-with-java/book
Chapter 5
[ 127 ]
</book></books>;private function getAuthorName(item:Object, column:DataGridColumn):String { var xml:XML = XML(item); return item.author.firstName +" "+ item.author.lastName;}
We have created an XML object with a complex XML structure. Now, we will tie this with the DataGrid component using data binding, as shown in the following example:
<mx:Panel title="XML dataProvider example" width="666" height="149"> <mx:DataGrid id="dgGrid" dataProvider="{xmlData.book}" height="100%" width="100%"> <mx:columns> <mx:DataGridColumn headerText="ISBN" dataField="@ISBN"/> <mx:DataGridColumn headerText="Title" dataField="title"/> <mx:DataGridColumn headerText="Author" labelFunction="getAuthorName"/> <mx:DataGridColumn headerText="Price" dataField="price"/> <mx:DataGridColumn headerText="Description" dataField="description"/> </mx:columns> </mx:DataGrid></mx:Panel>
In the code above, we have created a DataGrid component with a set of columns to display data from the XML object. Notice that we have used {} (curly braces) to bind the XML object's specifi c nodes with the DataGrid. This means {xmlData.book} specifi es that the DataGrid will use the book node(s) and its children nodes as source of its data.
We have used the DataGridColumn's dataField property. The dataField property is the name of the element or attribute in the XML data provider item associated with the column. For example, to display the book's title, the dataField property is set to title.
The labelFunction function is used to specify the name of a function. The function will be called and the return value is used to display in this column. For example, sometimes you might need to customize how your data gets displayed. In this case, labelFunction is used to concatenate the firstName and lastName element's values and return them as a single string.

For More Information: www.packtpub.com/flex-3-with-java/book
Working with XML
[ 128 ]
The labelFunction function takes two parameters: the DataGrid item as an object and the DataGrid column.
The output looks as follows:
You can also use the XMLListCollection object as the dataProvider of your component. The XMLListCollection object can hold the XMLList objects and provides a set of methods that lets you access, sort, fi lter, and modify the data items in that data object. This is very helpful if you are working with dynamic XML data. It can be used to dynamically add and remove items from the data provider and its representation in the UI control.
The following example shows how to work with XMLListCollection and dynamically add new elements in it:
private var xmlData:XML = <books> <book ISBN="184719530X"> <title>Building Websites with Joomla! 1.5</title> <author> <lastName>Hagen</lastName> <firstName>Graf</firstName> </author> <image>../assets/images/184719530X.png</image> <pageCount>363</pageCount> <price>Rs.1,247.40</price> <description>The best-selling Joomla! tutorial</description> </book> </books>;
private var newBookElement:XML = <book ISBN="1847196160"> <title>Drupal 6 JavaScript and jQuery</title> <author> <lastName>Matt</lastName> <firstName>Butcher</firstName> </author>
For More Information: www.packtpub.com/flex-3-with-java/book
Chapter 5
[ 129 ]
<image>../assets/images/1847196160.png</image> <pageCount>250</pageCount> <price>Rs.1,108.80</price> <description>Drupal 6 modules and themes</description> </book>;
private var xmlListCollection:XMLListCollection = new XMLListCollection(xmlData.book);
N ote that xmlData.book returns an XMLList object with all book elements.
Y ou can use the addItem() method of the X MLListCollection class to add newBookElement to it, as shown here:
xmlListCollection.addItem(newBookElement);
And you can set the xmlListCollection object as the dataProvider of your DataGrid using {} (curly braces) data-binding expression.
Loading external XML documentsY ou can use the URLLoader class to load external data from a URL. The URLLoader class downloads data from a URL as text or binary data. In this section, we will see how to use the URLLoader class for loading external XML data into your application. You can create a URLLoader class instance and call the load() method by passing URLRequest as a parameter and register for its complete event to handle loaded data. The following code snippet shows how exactly this works:
private var xmlUrl:String = "http://www.foo.com/rssdata.xml";private var request:URLRequest = new URLRequest(xmlUrl);private var loader:URLLoader = new URLLoader(;private var rssData:XML;
loader.addEventListener(Event.COMPLETE, completeHandler);
loader.load(request);
private function completeHandler(event:Event):void { rssData = XML(loader.data); trace(rssData);}

For More Information: www.packtpub.com/flex-3-with-java/book
Working with XML
[ 130 ]
Let's see one quick complete sample of loading RSS data from the Internet:
<?xml version="1.0" encoding="utf-8"?><mx:Application xmlns:mx="http://www.adobe.com/2006/mxml" creationComplete="loadData();">
<mx:Script> <![CDATA[ import mx.collections.XMLListCollection;
private var xmlUrl:String = "http://sessions.adobe.com/ 360FlexSJ2008/feed.xml"; private var request:URLRequest = new URLRequest(xmlUrl); private var loader:URLLoader = new URLLoader(request); [Bindable] private var rssData:XML;
private function loadData():void { loader.addEventListener(Event.COMPLETE, completeHandler); loader.load(request); } private function completeHandler(event:Event):void { rssData = new XML(loader.data); }
]]> </mx:Script> <mx:Panel title="RSS Feed Reader" width="100%" height="100%"> <mx:DataGrid id="dgGrid" dataProvider="{rssData.channel.item}" height="100%" width="100%"> <mx:columns> <mx:DataGridColumn headerText="Title" dataField="title"/> <mx:DataGridColumn headerText="Link" dataField="link"/> <mx:DataGridColumn headerText="pubDate" dataField="pubDate"/> <mx:DataGridColumn headerText="Description" dataField="description"/> </mx:columns> </mx:DataGrid> <mx:TextArea width="100%" height="80" text="{dgGrid.selectedItem.description}"/> </mx:Panel> </mx:Application>
In the code above, we are loading RSS feed from an external URL and displaying it in DataGrid by using data binding.

For More Information: www.packtpub.com/flex-3-with-java/book
Chapter 5
[ 131 ]
Output:
An example: Building a book explorerBy this time, you would be comfortable in writing Flex applications by using many features of Flex and ActionScript, which you have learned in the previous chapters. In this section, we will build something more complicated and interesting by using many features, including custom components, events, data binding, E4X, loading external XML data, and so on.
We will build a sample books explorer, which will load a books catalog from an external XML fi le and allow the users to explore and view details of books. We will also build a simple shopping cart component, which will list books that a user would add to cart by clicking on the add to cart button.
Create a new Flex project using Flex Builder. Once the project is created, create an \assets\images\ folder under its src folder. This folder will be used to store images used in this application. Now start creating the following source fi les into its source folder.
For More Information: www.packtpub.com/flex-3-with-java/book
Working with XML
[ 132 ]
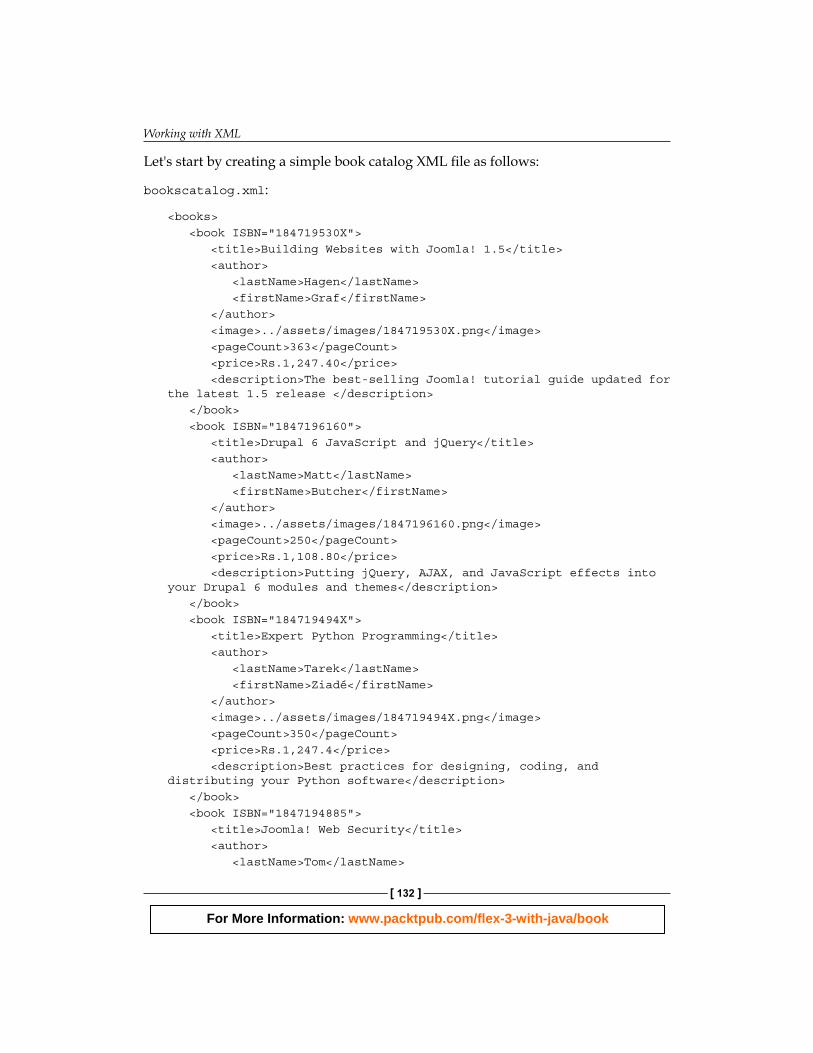
Let's start by creating a simple book catalog XML fi le as follows:
b ookscatalog.xml:
<books> <book ISBN="184719530X"> <title>Building Websites with Joomla! 1.5</title> <author> <lastName>Hagen</lastName> <firstName>Graf</firstName> </author> <image>../assets/images/184719530X.png</image> <pageCount>363</pageCount> <price>Rs.1,247.40</price> <description>The best-selling Joomla! tutorial guide updated for the latest 1.5 release </description> </book> <book ISBN="1847196160"> <title>Drupal 6 JavaScript and jQuery</title> <author> <lastName>Matt</lastName> <firstName>Butcher</firstName> </author> <image>../assets/images/1847196160.png</image> <pageCount>250</pageCount> <price>Rs.1,108.80</price> <description>Putting jQuery, AJAX, and JavaScript effects into your Drupal 6 modules and themes</description> </book> <book ISBN="184719494X"> <title>Expert Python Programming</title> <author> <lastName>Tarek</lastName> <firstName>Ziadé</firstName> </author> <image>../assets/images/184719494X.png</image> <pageCount>350</pageCount> <price>Rs.1,247.4</price> <description>Best practices for designing, coding, and distributing your Python software</description> </book> <book ISBN="1847194885"> <title>Joomla! Web Security</title> <author> <lastName>Tom</lastName>

For More Information: www.packtpub.com/flex-3-with-java/book
Chapter 5
[ 133 ]
<firstName>Canavan</firstName> </author> <image>../assets/images/1847194885.png</image> <pageCount>248</pageCount> <price>Rs.1,108.80</price> <description>Secure your Joomla! website from common security threats with this easy-to-use guide</description> </book></books>
The above XML fi le contains details of individual books in an XML form. You can also deploy this fi le on your web server and specify its URL into URLRequest while loading it.
Ne xt, we will create a custom event which we will be dispatching from our custom component. Make sure you create an events package under your src folder in Flex Builder called events, and place this fi le in it.
AddToCartEvent.as
package events{ import flash.events.Event;
public class AddToCartEvent extends Event { public static const ADD_TO_CART:String = "addToCart"; public var book:Object;
public function AddToCartEvent(type:String, bubbles:Boolean=false, cancelable:Boolean=false) { super(type, bubbles, cancelable); }
}}
Th is is a simple custom event created by inheriting the flash.events.Event class. This class defi nes the ADD_TO_CART string constant, which will be used as the name of the event in the addEventListener() method. You will see this in the BooksExplorer.mxml code. We have also defi ned an object to hold the reference of the book which the user can add into the shopping cart. In short, this object will hold the XML node of a selected book.
For More Information: www.packtpub.com/flex-3-with-java/book
Working with XML
[ 134 ]
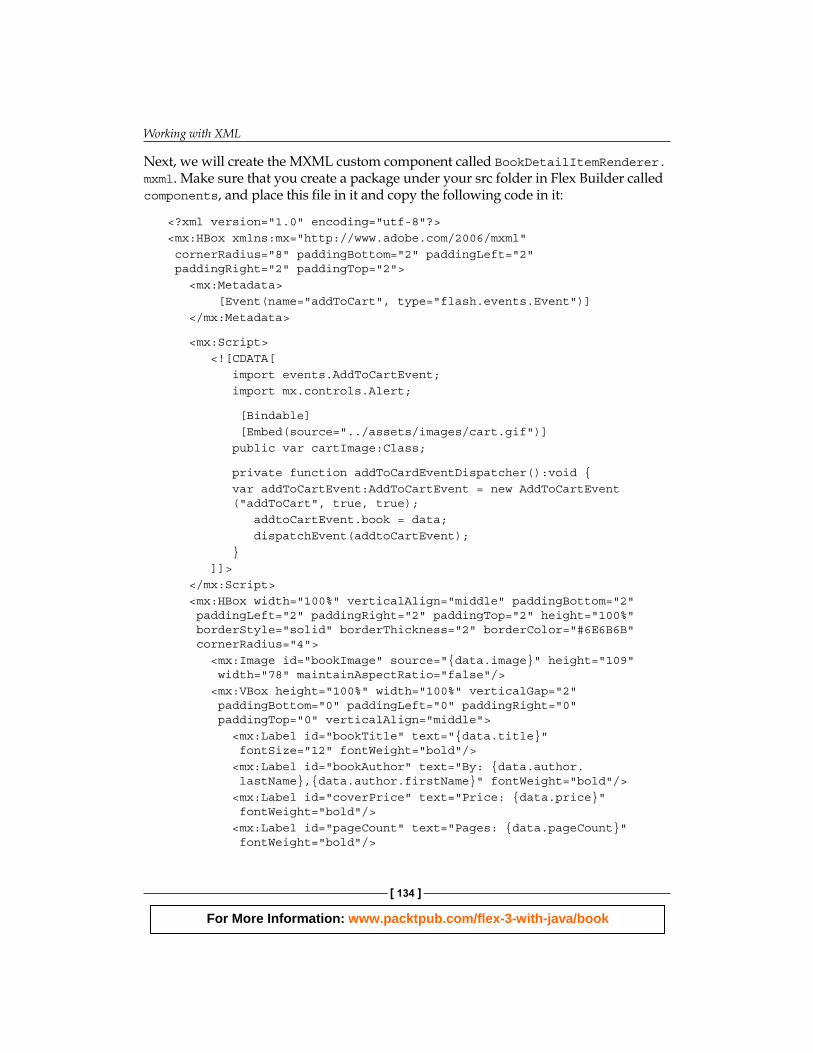
Ne xt, we will create the MXML custom component called BookDetailItemRenderer.mxml. Make sure that you create a package under your src folder in Flex Builder called components, and place this fi le in it and copy the following code in it:
<?xml version="1.0" encoding="utf-8"?><mx:HBox xmlns:mx="http://www.adobe.com/2006/mxml" cornerRadius="8" paddingBottom="2" paddingLeft="2" paddingRight="2" paddingTop="2"> <mx:Metadata> [Event(name="addToCart", type="flash.events.Event")] </mx:Metadata>
<mx:Script> <![CDATA[ import events.AddToCartEvent; import mx.controls.Alert;
[Bindable] [Embed(source="../assets/images/cart.gif")] public var cartImage:Class;
private function addToCardEventDispatcher():void { var addToCartEvent:AddToCartEvent = new AddToCartEvent ("addToCart", true, true); addtoCartEvent.book = data; dispatchEvent(addtoCartEvent); } ]]> </mx:Script> <mx:HBox width="100%" verticalAlign="middle" paddingBottom="2" paddingLeft="2" paddingRight="2" paddingTop="2" height="100%" borderStyle="solid" borderThickness="2" borderColor="#6E6B6B" cornerRadius="4"> <mx:Image id="bookImage" source="{data.image}" height="109" width="78" maintainAspectRatio="false"/> <mx:VBox height="100%" width="100%" verticalGap="2" paddingBottom="0" paddingLeft="0" paddingRight="0" paddingTop="0" verticalAlign="middle"> <mx:Label id="bookTitle" text="{data.title}" fontSize="12" fontWeight="bold"/> <mx:Label id="bookAuthor" text="By: {data.author. lastName},{data.author.firstName}" fontWeight="bold"/> <mx:Label id="coverPrice" text="Price: {data.price}" fontWeight="bold"/> <mx:Label id="pageCount" text="Pages: {data.pageCount}" fontWeight="bold"/>

For More Information: www.packtpub.com/flex-3-with-java/book
Chapter 5
[ 135 ]
<mx:HBox width="100%" backgroundColor="#3A478D" horizontalAlign="right" paddingBottom="0" paddingLeft="0" paddingRight="5" paddingTop="0" height="22" verticalAlign="middle"> <mx:Label text="Add to cart " color="#FFFFFF" fontWeight="bold"/> <mx:Button icon="{cartImage}" height="20" width="20" click="addToCardEventDispatcher();"/> </mx:HBox> </mx:VBox> </mx:HBox></mx:HBox>
The above custom component will be used as an itemRenderer to display books' details from an XML fi le. In this example, we have created a custom MXML-based component. This custom component dispatches a custom event called AddToCartEvent when a user clicks on the add to cart button. Notice that when we are dispatching an event, we are setting its bubbles argument (second argument in the AddToCartEvent constructor, which is inherited from the flash.events.Event class) to true. This is very important in order to bubble this event up to its parent where we will write an event listener for it. (For information on bubbling, please see the Event propagation section in Chapter 3). You will see how to write an event listener on the parent to handle the event dispatched by its children in the BooksExplorer.mxml code. At the end, this custom component will be used as ItemRenderer of the TileList component to display books. So we are using the data property of the itemRenderer instance to access XML nodes and properties using the E4X technique. The data property is implicitly available in item renderers that can be used to access content locally. For information on ItemRenderers and how to use its data property, please see the Understanding Flex item renderers section in Chapter 2.
Next, we will create the main application and layout the book explorer user interface, and then we will write business logic for loading XML data and display it in the custom component, and so on.
BooksExplorer.mxml:
<?xml version="1.0" encoding="utf-8"?><mx:Application xmlns:mx="http://www.adobe.com/2006/mxml" creationComplete="init()" xmlns:components="components.*" layout="horizontal">
<mx:Script> <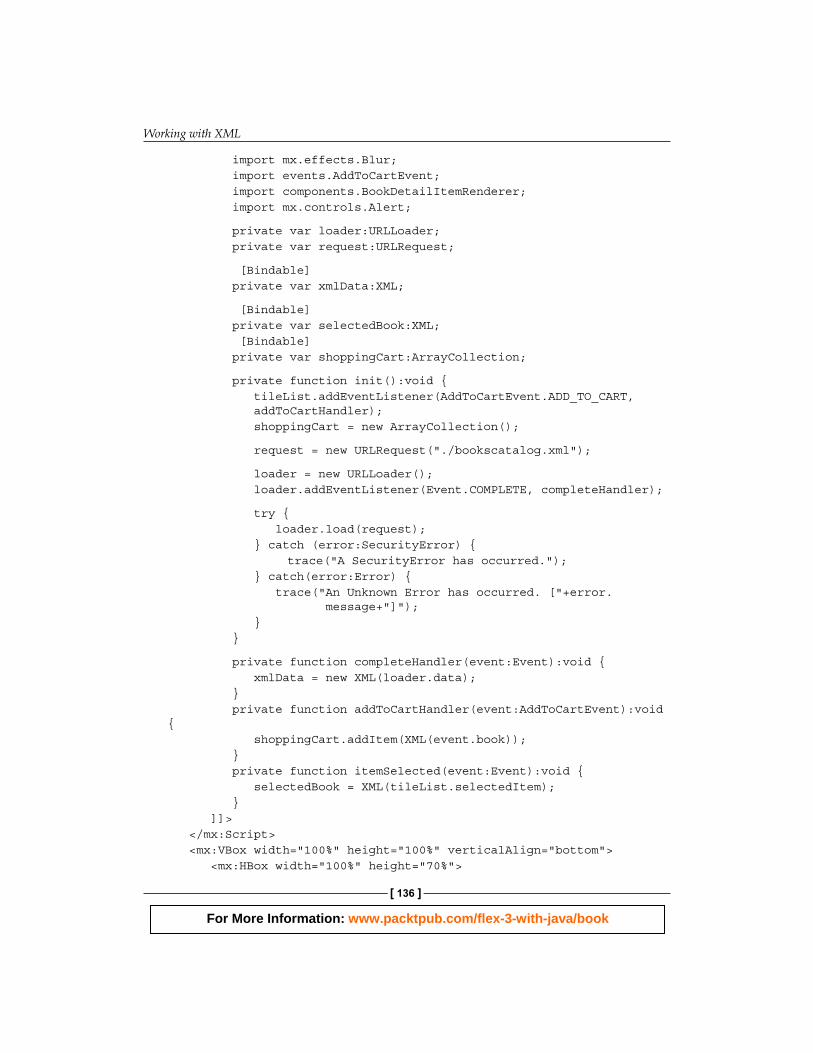
For More Information: www.packtpub.com/flex-3-with-java/book
Working with XML
[ 136 ]
import mx.effects.Blur; import events.AddToCartEvent; import components.BookDetailItemRenderer; import mx.controls.Alert;
private var loader:URLLoader; private var request:URLRequest;
[Bindable] private var xmlData:XML;
[Bindable] private var selectedBook:XML; [Bindable] private var shoppingCart:ArrayCollection;
private function init():void { tileList.addEventListener(AddToCartEvent.ADD_TO_CART, addToCartHandler); shoppingCart = new ArrayCollection();
request = new URLRequest("./bookscatalog.xml");
loader = new URLLoader(); loader.addEventListener(Event.COMPLETE, completeHandler);
try { loader.load(request); } catch (error:SecurityError) { trace("A SecurityError has occurred."); } catch(error:Error) { trace("An Unknown Error has occurred. ["+error. message+"]"); } }
private function completeHandler(event:Event):void { xmlData = new XML(loader.data); } private function addToCartHandler(event:AddToCartEvent):void { shoppingCart.addItem(XML(event.book)); } private function itemSelected(event:Event):void { selectedBook = XML(tileList.selectedItem); } ]]> </mx:Script> <mx:VBox width="100%" height="100%" verticalAlign="bottom"> <mx:HBox width="100%" height="70%">
For More Information: www.packtpub.com/flex-3-with-java/book
Chapter 5
[ 137 ]
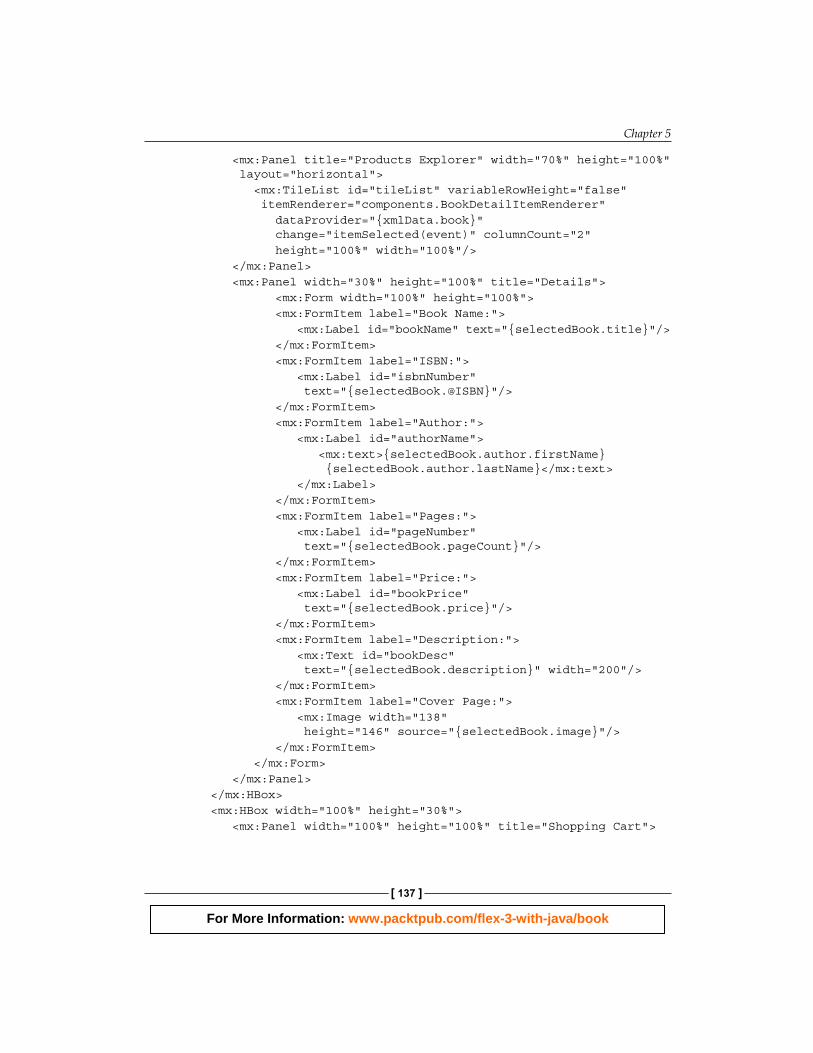
<mx:Panel title="Products Explorer" width="70%" height="100%" layout="horizontal"> <mx:TileList id="tileList" variableRowHeight="false" itemRenderer="components.BookDetailItemRenderer" dataProvider="{xmlData.book}" change="itemSelected(event)" columnCount="2" height="100%" width="100%"/> </mx:Panel> <mx:Panel width="30%" height="100%" title="Details"> <mx:Form width="100%" height="100%"> <mx:FormItem label="Book Name:"> <mx:Label id="bookName" text="{selectedBook.title}"/> </mx:FormItem> <mx:FormItem label="ISBN:"> <mx:Label id="isbnNumber" text="{selectedBook.@ISBN}"/> </mx:FormItem> <mx:FormItem label="Author:"> <mx:Label id="authorName"> <mx:text>{selectedBook.author.firstName} {selectedBook.author.lastName}</mx:text> </mx:Label> </mx:FormItem> <mx:FormItem label="Pages:"> <mx:Label id="pageNumber" text="{selectedBook.pageCount}"/> </mx:FormItem> <mx:FormItem label="Price:"> <mx:Label id="bookPrice" text="{selectedBook.price}"/> </mx:FormItem> <mx:FormItem label="Description:"> <mx:Text id="bookDesc" text="{selectedBook.description}" width="200"/> </mx:FormItem> <mx:FormItem label="Cover Page:"> <mx:Image width="138" height="146" source="{selectedBook.image}"/> </mx:FormItem> </mx:Form> </mx:Panel> </mx:HBox> <mx:HBox width="100%" height="30%"> <mx:Panel width="100%" height="100%" title="Shopping Cart">
For More Information: www.packtpub.com/flex-3-with-java/book
Working with XML
[ 138 ]
<mx:DataGrid id="dgGrid" dataProvider="{shoppingCart}" height="100%" width="100%" editable="true"> <mx:columns> <mx:DataGridColumn headerText="Book Name" dataField="title" editable="false"/> <mx:DataGridColumn headerText="Price" dataField="price" editable="false"/> <mx:DataGridColumn headerText="Qty." dataField="quantity" editable="true"/> </mx:columns> </mx:DataGrid> <mx:ControlBar> <mx:Button label="Checkout" click="Alert.show(‚Not yet implemented.');"/> <mx:Button label="Remove" click="Alert.show(‚Not yet implemented.');"/> </mx:ControlBar> </mx:Panel> </mx:HBox> </mx:VBox>
</mx:Application>
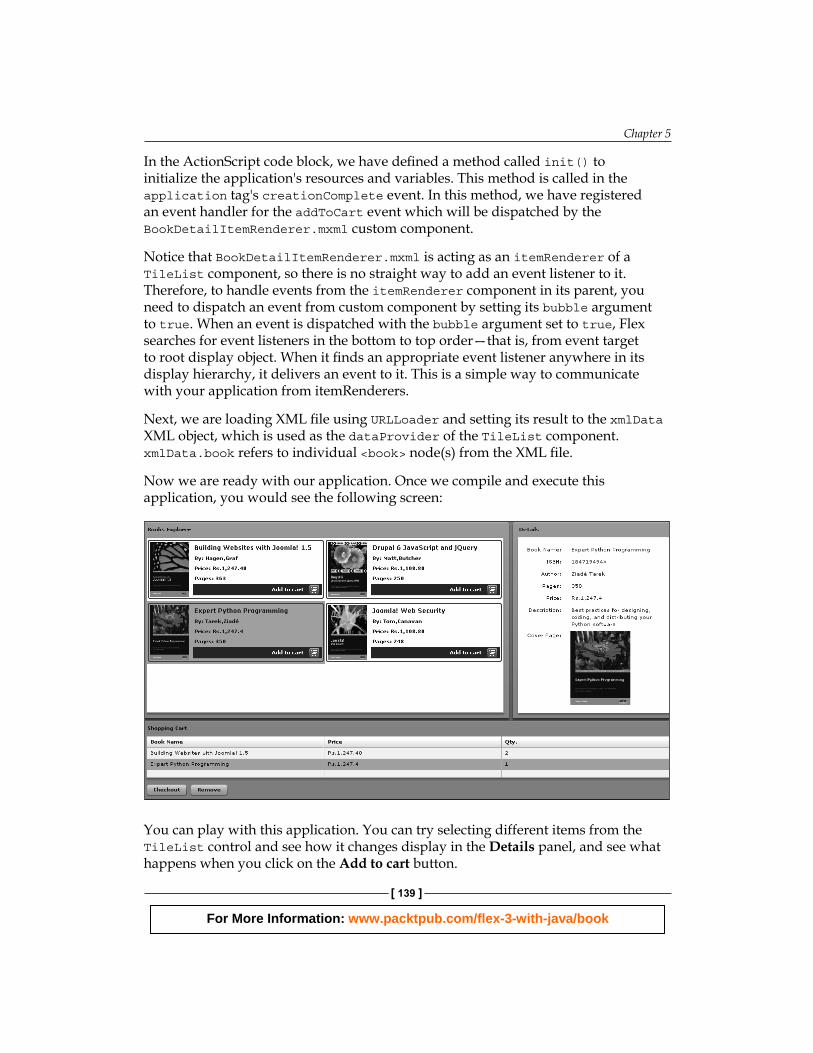
In the code above, we have used the HBox, VBox, and Panel containers to lay out the main user interface. We have also added a TileList component to display books using a custom component, that is, BookDetailItemRenderer.mxml as its itemRenderer. Next, we have added another Panel container to display the selected book's details using a Form container. We have used data binding to bind the selected book's details with individual labels in the Form container, for example, text="{selectedBook.title}". The selectedBook is an XML object which will be populated with the selected book's details when you select an item in the TileList component using its change event.
The TileList control displays a number of items laid out in tiles. It displays a scroll bar to access all items in the list. You can use its direction property to control the direction in which this control lays out its children. To know more about the TileList control, see Flex 3 language reference at http://livedocs.adobe.com/flex/3/langref/mx/controls/TileList.html.
Next, we have created another Panel container to create the shopping cart user interface and added a DataGrid component to display cart details. The DataGrid component is using data binding to display information from the shoppingCart ArrayCollection object, which will contain individual selected book nodes. We will populate the shopppingCart array in the addToCartH andler() method, which is the event handler for the addToCart custom event.
For More Information: www.packtpub.com/flex-3-with-java/book
Chapter 5
[ 139 ]
In the ActionScript code block, we have defi ned a method called init() to initialize the application's resources and variables. This method is called in the application tag's creationComplete event. In this method, we have registered an event handler for the addToCart event which will be dispatched by the BookDetailItemRenderer.mxml custom component.
Notice that BookDetailItemRenderer.mxml is acting as an itemRenderer of a TileList component, so there is no straight way to add an event listener to it. Therefore, to handle events from the itemRenderer component in its parent, you need to dispatch an event from custom component by setting its bubble argument to true. When an event is dispatched with the bubble argument set to true, Flex searches for event listeners in the bottom to top order—that is, from event target to root display object. When it fi nds an appropriate event listener anywhere in its display hierarchy, it delivers an event to it. This is a simple way to communicate with your application from itemRenderers.
Next, we are loading XML fi le using URLLoader and setting its result to the xmlData XML object, which is used as the dataProvider of the TileList component. xmlData.book refers to individual <book> node(s) from the XML fi le.
Now we are ready with our application. Once we compile and execute this application, you would see the following screen:
Y ou can play with this application. You can try selecting different items from the TileList control and see how it changes display in the Details panel, and see what happens when you click on the Add to cart button.
For More Information: www.packtpub.com/flex-3-with-java/book
Working with XML
[ 140 ]
SummaryIn this chapter, you learned what E4X is and how to use it to work with XML data. You also learned various Flex classes to work with XML data, and how to load external XML fi les and use XML as a data provider. You also created a sample books explorer application using various concepts such as custom component, event creation, data binding, and E4X.
In the next chapter, you will learn about Adobe's LiveCycle Data Services and what is the BlazeDS platform.

For More Information: www.packtpub.com/flex-3-with-java/book
Where to buy this book You can buy Flex 3 with Java from the Packt Publishing website: http://www.packtpub.com/flex-3-with-java/book
Free shipping to the US, UK, Europe and selected Asian countries. For more information, please read our shipping policy.
Alternatively, you can buy the book from Amazon, BN.com, Computer Manuals and most internet book retailers.
www.PacktPub.com