Fixing Up a Wormy Bowl - More Woodturning Magazine Up a Wormy Bowl by Bob Heltman Good neighbor...
6
Fixing Up a Wormy Bowl by Bob Heltman Good neighbor Keith Thomas, a most knowledgeable woodsman, brought me a trunk section from a longstanding and very dead maple tree. It was ambrosia maple; meaning rot had set in leaving interesting patterns in the wood. So many powder post beetles and larvae had dined on this tree that one could suspect they had eaten a significant percentage of the wood! (Fig.1) The 18" log section, about 10" in diameter, was quite light, also proving this would be quite a turning challenge. Figure 1. Surface of wormy wood. Figure 2. Roughed out bowl.
Transcript of Fixing Up a Wormy Bowl - More Woodturning Magazine Up a Wormy Bowl by Bob Heltman Good neighbor...

Fixing Up a Wormy Bowl by Bob Heltman
Good neighbor Keith Thomas, a most knowledgeable woodsman, brought me a trunk section from a longstanding and very dead maple tree. It was ambrosia maple; meaning rot had set in leaving interesting patterns in the wood. So many powder post beetles and larvae had dined on this tree that one could suspect they had eaten a significant percentage of the wood! (Fig.1) The 18" log section, about 10" in diameter, was quite light, also proving this would be quite a turning challenge.
Figure 1. Surface of wormy wood.
Figure 2. Roughed out bowl.

Eventually I got around to splitting the trunk, and roughed out an 8" diameter by 4" deep bowl (Fig. 2). The wood was so dry that I wore an airflow dust mask as well as using the big dust collector. Because of the wood’s dryness I was able to almost finish turn to a wall thickness of 3/16". At that point I sanded to 220-grit, vacuumed the piece, and set it aside for study. End grain tear-out had been considerable, and I could hardly believe the density of the holes and channels made by the beetles. This pause allowed me to phone chat with Michael McDunn (www.mcdunnstudio.com) who is a longtime teaching woodworker and fellow woodturner not far away in Greenville, SC. We are both members of the Carolina Mountain Woodturners (www.carolinamountainwoodturners.org).Michael and I debated approaches to “fixing up” this piece 3/4 salvaging might be a better word. Mike mentioned he had used superglue to coat and embed beetle “leavings” when they hadrather tightly filled the pathways. But, I had many holes that had no beetle residue, and the wood itself was in a condition halfway between sound and pithy. I debated mixing fine maple sawdust and cramming it in each small hole, then dropping thin superglue on top. That would have taken hours, considering the many many beetle channels and holes. The fumes would be horrific too. We both have used and experimented with a product called RayCrete. This same material is more recently named EZ-Poly Wood Rebuilder, which more accurately identifies its purpose and role. (Editor's note: RayCrete/EZ Poly Wood Rebuilder is no longer available. Any multipurpose polyurethane filler adhesive sealant can be used instead.) It is a two-part polymer material that can be described as a bonding structural filler. That is, it is a glue, strong filler, and sealant. Also, it has no VOCs or discernable odor. I had some on hand, which I always do for many purposes, so mixed up about 2 tablespoons full, and massaged it into the inner surface of the bowl with my fingertip inside a plastic Ziploc baggie to save later hand washing. This only took a few minutes, during which the polymer started to set up. I noticed a deep hole about 1/4" diameter was absorbing the polymer, so took the mixing spatula, lifted up a final polymer nugget which was now about the consistency of soft clay, and puttied this

hole and several others I discovered while closely examining the work. Figure 3 shows the bowl, EZ Poly Wood Rebuilder, RayCrete, cardboard for mixing, and my wife’s kitchen spatula used for brownies.
Figure 3. All the kit to fix the bowl.
Since the EZ Poly/RayCrete washes off with soap and water, and is non-toxic when cured anyway, this poses no health or marital problems, nor does it interfere with future brownie consumption, a matter of no small importance. A little earlier experimenting with a dental tool, trying to dig out the beetle “leavings,” showed that process would take 3 days beyond forever. If that had not been the case, another approachwould have been to color the polymer with Tempura paint powder in black, red, or some other chosen color. All the holes and pathways would really stand out, perhaps to the point of startling overkill. But, that technique works well in moderation as a highlight on other woodturnings.
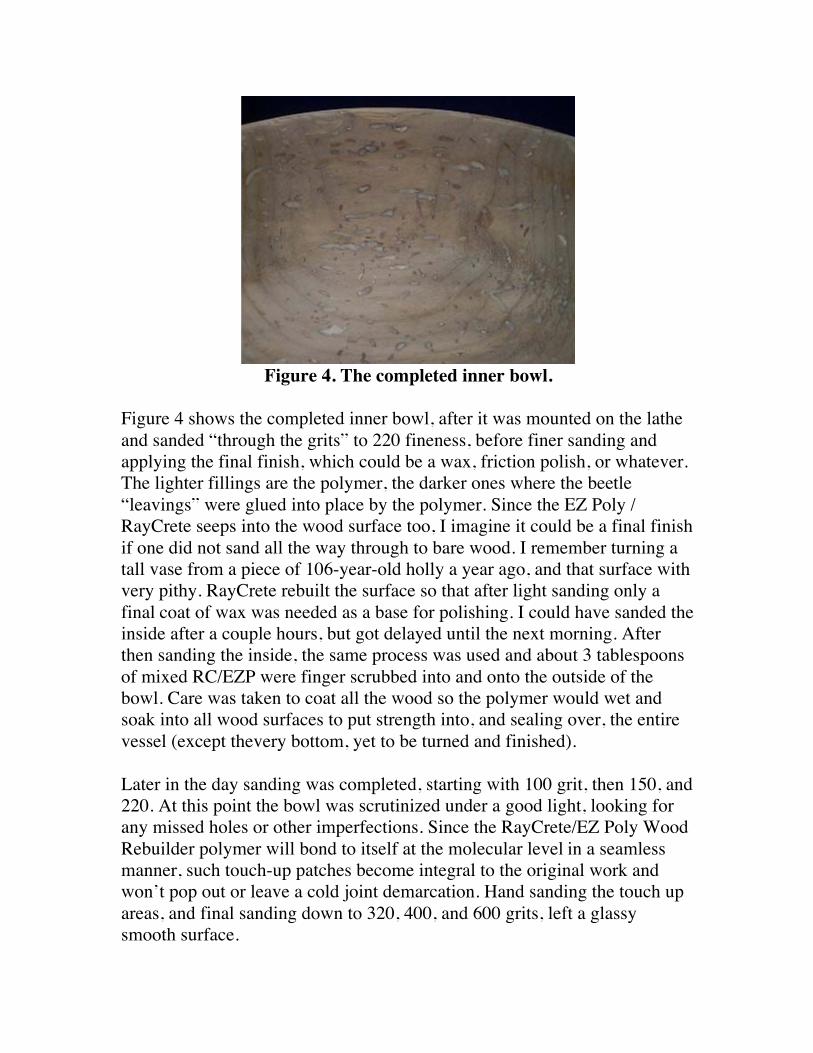
Figure 4. The completed inner bowl.
Figure 4 shows the completed inner bowl, after it was mounted on the lathe and sanded “through the grits” to 220 fineness, before finer sanding and applying the final finish, which could be a wax, friction polish, or whatever. The lighter fillings are the polymer, the darker ones where the beetle “leavings” were glued into place by the polymer. Since the EZ Poly / RayCrete seeps into the wood surface too, I imagine it could be a final finish if one did not sand all the way through to bare wood. I remember turning a tall vase from a piece of 106-year-old holly a year ago, and that surface with very pithy. RayCrete rebuilt the surface so that after light sanding only a finalcoat of wax was needed as a base for polishing. I could have sanded the inside after a couple hours, but got delayed until the next morning. After then sanding the inside, the same process was used and about 3 tablespoons of mixed RC/EZP were finger scrubbed into and onto the outside of the bowl. Care was taken to coat all the wood so the polymer would wet and soak into all wood surfaces to put strength into, and sealing over, the entire vessel (except thevery bottom, yet to be turned and finished). Later in the day sanding was completed, starting with 100 grit, then 150, and 220. At this point the bowl was scrutinized under a good light, looking for any missed holes or other imperfections. Since the RayCrete/EZ Poly Wood Rebuilder polymer will bond to itself at the molecular levelin a seamless manner, such touch-up patches become integral to the original work and won’t pop out or leave a cold joint demarcation. Hand sanding the touch up areas, and final sanding down to 320, 400, and 600 grits, left a glassy smooth surface.

The bowl was then reverse mounted on a vacuum chuck. A vacuum chuck works well in this case since the wood is thoroughly sealed on the inside (and most of the outside except the yet to be finished foot area) by the polymer, and the vacuum holds perfectly well on this once hole-riddled and somewhat porous work piece.
Figure 5. Finished Foot.
Upon finishing the foot, a small amount of RC/EZP could have been mixed and worked into the remaining beetle holes and wood surface and quickly hand sanded. But, I decided to leave some evidence of the original problems via several beetle holes. Thus, title, wood name, date, along with my name, were woodburned into place. Myland’s Friction Polish was applied generously to soak into the wood, and then buffed. A final wax coating and buffing produced this very unusual and eye-catching commemorative piece. While a production turner would avoid this kind of wood in most cases, there are times a specialpiece of wood holds historic value, personal memories, or perhaps a special artistic meaning, and can be well preserved and handled in the manner herein described.

Figure 6. Side view of finished bowl.
Figure 7. Top view of the finished bowl