Fiscal Year End - 2012 - University System of Georgia · Fiscal Year End - 2012 . Table of Contents...
240
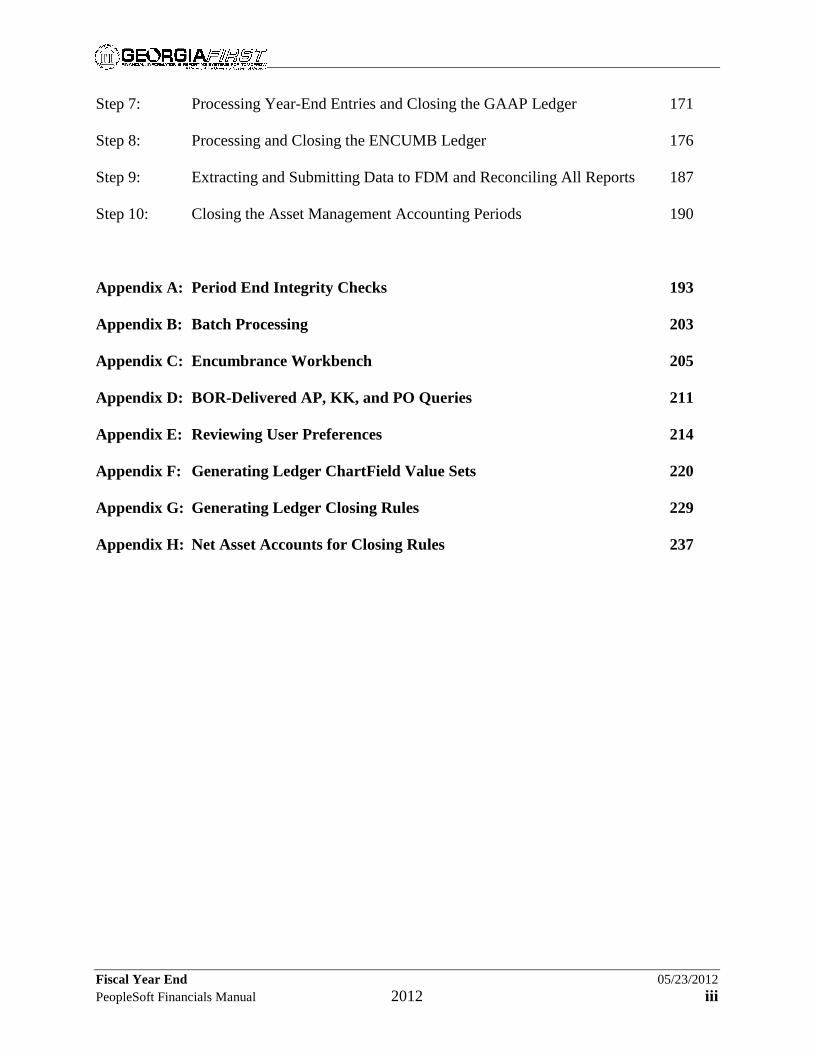
Fiscal Year End 05/23/2012 PeopleSoft Financials Manual 2012 i Fiscal Year End - 2012 Table of Contents Module 1: Fiscal Year End Overview Section 1: Understanding How the Fiscal Year End Processes Integrate with the PeopleSoft Systems Section 2: Running the Fiscal Year End Close Out Procedures Module 2: Year-End Payroll Processes Step 1: Running the Year-End Payroll Accrual Process Step 2: Moving Summer Faculty Payroll Expenses Step 3: Moving Maymester Faculty Payroll Expenses Step 4: Zeroing Year-End Personal Services Encumbrances Module 3: Year-End Purchasing Cleanup Processes Step 1: Determining and Implementing eProcurement Year End Cutoff Procedures (Optional) Step 2: Identifying Open Requisitions and Remaining PREENC Balances Step 3: Processing Valid Requisitions into Purchase Orders Step 4: Canceling and Closing Requisitions and Requisition Lines Step 5: Establishing the Purchasing Cleanup Groundwork Step 6: Finalizing Vouchers and Liquidating Purchase Orders with Remaining Encumbrances after Final Payment Step 7: Canceling and Closing Outstanding Purchase Orders and Purchase 2 3 5 25 26 37 47 57 65 67 72 73 74 76 88 97
Transcript of Fiscal Year End - 2012 - University System of Georgia · Fiscal Year End - 2012 . Table of Contents...

Fiscal Year End 05/23/2012 PeopleSoft Financials Manual 2012 i
Fiscal Year End - 2012 Table of Contents Module 1: Fiscal Year End Overview
Section 1: Understanding How the Fiscal Year End Processes Integrate with the
PeopleSoft Systems
Section 2: Running the Fiscal Year End Close Out Procedures
Module 2: Year-End Payroll Processes
Step 1: Running the Year-End Payroll Accrual Process
Step 2: Moving Summer Faculty Payroll Expenses
Step 3: Moving Maymester Faculty Payroll Expenses
Step 4: Zeroing Year-End Personal Services Encumbrances
Module 3: Year-End Purchasing Cleanup Processes
Step 1: Determining and Implementing eProcurement Year End Cutoff
Procedures (Optional)
Step 2: Identifying Open Requisitions and Remaining PREENC Balances
Step 3: Processing Valid Requisitions into Purchase Orders
Step 4: Canceling and Closing Requisitions and Requisition Lines
Step 5: Establishing the Purchasing Cleanup Groundwork
Step 6: Finalizing Vouchers and Liquidating Purchase Orders with
Remaining Encumbrances after Final Payment
Step 7: Canceling and Closing Outstanding Purchase Orders and Purchase
2 3 5
25
26
37
47
57
65
67
72
73
74
76
88
97

Fiscal Year End 05/23/2012 PeopleSoft Financials Manual 2012 ii
Order Lines That Should Not Remain Open
Step 8: Troubleshooting Purchase Orders That Will Not Reconcile
Step 9: Performing Requisition Cleanup (Finalize, Cancel, and Close)
Step 10: Reconciling Open POENC Balances in Purchasing to Open POENC
Balances in Commitment Control
Step 11: Reconciling Open PRENC Balances in Purchasing to Open PRENC
Balances in Commitment Control
Step 12: Updating BUD REF for All Requesters at Year End
Module 4: Year-End Travel and Expenses Cleanup Processes
Step 1: Processing and Reconciling Travel Authorizations
Step 2: Processing and Reconciling Cash Advances
Step 3: Processing and Reconciling Expense Reports
Step 4: Updating the Traveler’s Budget Reference to the New Fiscal Year
Module 5: Year-End Close Processes
Step 1: Processing Year-End Adjustments to the ACTUALS Ledger
Step 2: Establishing the Open ACTUALS Ledger for the New Fiscal Year
Period
Step 3: Running the Closing Rules Report
Step 4: Running the ACTUALS Closing Trial Balance Report
Step 5: Running the ACTUALS Ledger Close Process
Step 6: Processing Year-End Entries and Closing the CAPITAL Ledger
106
111
113
114
115
117
118
129
133
143
146
148
151
157
160
162
168
Fiscal Year End 05/23/2012 PeopleSoft Financials Manual 2012 iii
Step 7: Processing Year-End Entries and Closing the GAAP Ledger
Step 8: Processing and Closing the ENCUMB Ledger
Step 9: Extracting and Submitting Data to FDM and Reconciling All Reports
Step 10: Closing the Asset Management Accounting Periods
Appendix A: Period End Integrity Checks
Appendix B: Batch Processing
Appendix C: Encumbrance Workbench
Appendix D: BOR-Delivered AP, KK, and PO Queries
Appendix E: Reviewing User Preferences
Appendix F: Generating Ledger ChartField Value Sets
Appendix G: Generating Ledger Closing Rules
Appendix H: Net Asset Accounts for Closing Rules
171
176
187
190
193
203
205
211
214
220
229
237

Fiscal Year End 07/18/2012 PeopleSoft Financials Manual 2012 1
Fiscal Year End - 2012
Introduction This manual provides you with detailed information on the Year-End processing and closing for GeorgiaFIRST Financials. The topics covered in this class are: Fiscal Year End overview Year-End Payroll processes Year-End Purchasing cleanup processes Year-End Travel and Expenses cleanup processes Year-End close processes Note 1: All PSFIN Business Processes referenced in this manual are located on the Documentation page on the GeorgiaFIRST Financials web site at: http://www.usg.edu/gafirst-fin/documentation/. Click on the appropriate Module link to access the Business Processes for that particular module. Note 2: All HR Integration Business Processes referenced in this manual are located on the Documentation – Fiscal Year End page on the GeorgiaFIRST Financials web site at: http://www.usg.edu/gafirst-fin/documentation/category/fiscal_year_end/. Click on the appropriate ZIP file to access the individual documents for each step of the process. Note 3: Screen shots have been changed only for new or critical changes for 2012. Other screen shots may show information from previous processing years.
Fiscal Year End 07/18/2012 PeopleSoft Financials Manual 2012 2
Module 1: Fiscal Year End Overview Introduction In this module, we will concentrate on understanding how the
Fiscal Year End processes integrate with the PeopleSoft systems.
Objectives In this module, you will learn how to: Understand how the Fiscal Year End processes integrate with
the PeopleSoft systems Run the Fiscal Year End close out procedures
Institution-Specific Business Processes
____________________________________________________
____________________________________________________
____________________________________________________
____________________________________________________
____________________________________________________
____________________________________________________

Fiscal Year End 07/18/2012 PeopleSoft Financials Manual 2012 3
Section 1: Understanding How the Fiscal Year End Processes Integrate with the PeopleSoft Systems In this section, you will learn how the Fiscal Year End processes integrate with the PeopleSoft systems. The Year-End processing and closing at the GeorgiaFIRST project requires a coordination of effort between the PeopleSoft Purchasing, Accounts Payable, Payroll, Asset Management, and General Ledger functions and the Banner functions to ensure that the timing of the tasks required are completed in sequence. The key element to a successful closing is to make sure that there is clear communication between the PeopleSoft Accounts Payable, Payroll, Purchasing, and Asset Management personnel and the Banner personnel charged with transaction initiation, approval, and review. PeopleSoft will allow the users to run processes independently and out of sequence, so it is incumbent upon the users to communicate when they have completed the processing of all new entries and the cleanup of all outstanding items in their areas. This will ensure that all appropriate transactions will be encompassed in the Year End close. The primary table affected in the Actuals Year-End Process is the LEDGER Table. Based upon the Actuals Closing Rules defined by the user, the Revenue & Expense account balances for the year ending are moved to the Net Asset account(s) designated and the Net Balance of the Balance Sheet accounts are placed in Period 0 of the new year within the LEDGER Table. Note 1: Subsystem processing must be completed prior to running of the Year-End Closing Process. This will ensure that the year-end Revenue & Expense balances are properly calculated and reflected in the appropriate Net Asset account(s). Note 2: Period 0 is reserved by the system as the Beginning Balance period, and manual Journal Entries cannot be made to this period. Note 3: As part of the Close process, Ledgers for a Unit must be updated to make sure that the previous fiscal year has been closed and that only the current fiscal year is open. Once the Year-End Process is run, a review and reconciliation of the Balance Sheet should be performed to ensure that the amounts within the Asset, Liability, and Net Asset accounts are correct. Should any balances require changing through a Journal Entry reclassification, the Year-End Unclose process can be run, adjusting entries made, and the Year-End Closing Process rerun. The Year-End Unclose and Close processes can be rerun as many times as required prior to closing the Asset Management Accounting Periods for the previous year per the deadline set by Fiscal Affairs. The Year-End Closing process is flexible in allowing the user to define the criteria for closing. This manual attempts to define a closing rule set that should work for most institutions within the GeorgiaFIRST project. However, there may be special circumstances that require modification to the rule definition outlined. Any special requirements can be discussed and assessed on an

Fiscal Year End 07/18/2012 PeopleSoft Financials Manual 2012 4
individual basis after the workshop. This completes Section 1, Understanding How the Fiscal Year End Processes Integrate with the PeopleSoft Systems.

Fiscal Year End 07/18/2012 PeopleSoft Financials Manual 2012 5
Section 2: Running the Fiscal Year End Close Out Procedures In this section, you will learn about running the Fiscal Year End close out procedures. This listing is a summary of the steps that are required to complete the June Month End and the Fiscal Year End closing processes. Note: Starting in June 2003, these procedures include the Month End processes to close the month of June (Period 12). Each step refers to the Business Process, where necessary, that provides greater detail for the particular procedure being performed. Note: You can also refer to the appropriate end user training manuals for more information and examples on running many of the procedures listed below. Before starting these processes, you must hard close through period 11. If you find any unposted vouchers, etc., and complete the processing, this will force a June date for the accounting date. Then you must run the Journal Generate process for all modules. The items in the following sections are the general processes to be run under each category. These items are also in the Month End and Year End check lists titled “FY2012 Year End Checklist” on the Fiscal Year End page of the GeorgiaFIRST Financials web site at: http://www.usg.edu/gafirst-fin/documentation/category/fiscal_year_end/.
2.1 Payroll Interfaces Note 1: Only the University System Office and Skidaway Oceanographic Institute use the Accounts Receivable (AR) module. Note 2: Refer to Wimba Training Session: Transitioning Balances from Banner into New Recon Processes, April 11, 2011 at http://www.usg.edu/gafirst-fin/training/archives/ for more information on processing retiree AR balances. 1. Run the Load Payroll interface from the ADP system to GL. Refer to PSFIN
Business Process GL.040.001.
2. Run the CES Accounting interface, which creates Benefit Accrual accounting entries from the Carrier Enrollment data-dump file. Refer to HR Integration Business Process CES_Accounting_Interface_Process.
3. Run the Retiree Benefit Accounting interface, which creates retiree and COBRA benefit and expense and receivables from the Carrier Enrollment data-dump file. Refer to HR Integration Business Processes Retiree_Benefit_Accounting_Interface_Process and Retiree_Benefits_Supplemental_PDR_Interface_process.

Fiscal Year End 07/18/2012 PeopleSoft Financials Manual 2012 6
Note: Select the Encumbrance Reversal check box based on your institution’s business practices.
4. Load Leave of Absence and Disability receivables balances into Banner. Refer to the AR Load (ZSRINLD) process in Section 2.2, Step 3, on page 7.
Note: If your institution uses Banner to capture leave of absence and disability receivables balances, you will need to run the Banner tasks and interfaces noted in Section 2.2, starting on page 7.
5. Load Payroll Adjustments to the General Ledger, which creates the Benefit Accrual accounting entries from the Carrier Enrollment data-dump file. Refer to HR Integration Business Process Payroll_Adjustments_to_GL_Process.
6. Run the Month End 03 - BOR_CHK_CASH_ENCUMB query.
Note 1: Refer to Appendix A, Period End Integrity Checks, starting on page 193, for more information on the Period End Integrity Check queries.
Note 2: If you have any cash encumbrances in the query results, then you will need to submit a ticket to the ITS HELPDESK to run the Ledger Cleanup: Remove 118200 process.
7. Input any Leave of Absence or Disability receivables into the PeopleSoft Accounts Receivables module. Refer to PSFIN Business Process AR.040.010 and GL.040.002.
8. Run the Receivable Update process. Refer to PSFIN Business Process AR.030.070.
9. Run the batch processes to process all GL journals.
Note: Refer to Appendix B, Batch Processing, starting on page 203, for more information on these batch processes.
10. Run the Compensated Absences Report as delivered in ADP eTIME.
11. Run the ADP Compare Job Rates report to identify changes in ADP EV5 job definitions between 06/30 and the report end date.
Note 1: Rate changes will have to be manually addressed in the eTIME report.
Note 2: This report is located at BOR Menus⇒BOR Payroll⇒ADP Year End Reports⇒ADP Compare Job Rates.
12. Run the Year-End Payroll Accrual process.
Note: This process is described in Module 2, Step 1, starting on page 26.
Fiscal Year End 07/18/2012 PeopleSoft Financials Manual 2012 7
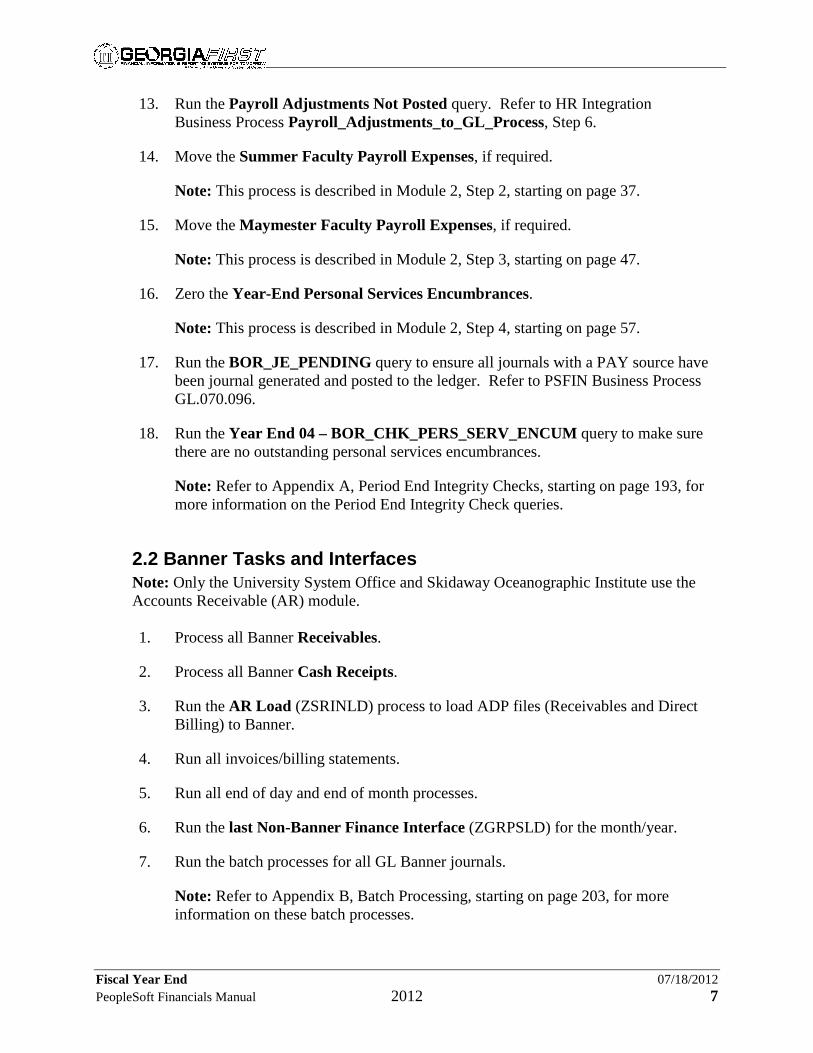
13. Run the Payroll Adjustments Not Posted query. Refer to HR Integration Business Process Payroll_Adjustments_to_GL_Process, Step 6.
14. Move the Summer Faculty Payroll Expenses, if required.
Note: This process is described in Module 2, Step 2, starting on page 37.
15. Move the Maymester Faculty Payroll Expenses, if required.
Note: This process is described in Module 2, Step 3, starting on page 47.
16. Zero the Year-End Personal Services Encumbrances.
Note: This process is described in Module 2, Step 4, starting on page 57.
17. Run the BOR_JE_PENDING query to ensure all journals with a PAY source have been journal generated and posted to the ledger. Refer to PSFIN Business Process GL.070.096.
18. Run the Year End 04 – BOR_CHK_PERS_SERV_ENCUM query to make sure there are no outstanding personal services encumbrances.
Note: Refer to Appendix A, Period End Integrity Checks, starting on page 193, for more information on the Period End Integrity Check queries.
2.2 Banner Tasks and Interfaces Note: Only the University System Office and Skidaway Oceanographic Institute use the Accounts Receivable (AR) module. 1. Process all Banner Receivables.
2. Process all Banner Cash Receipts.
3. Run the AR Load (ZSRINLD) process to load ADP files (Receivables and Direct Billing) to Banner.
4. Run all invoices/billing statements.
5. Run all end of day and end of month processes.
6. Run the last Non-Banner Finance Interface (ZGRPSLD) for the month/year.
7. Run the batch processes for all GL Banner journals.
Note: Refer to Appendix B, Batch Processing, starting on page 203, for more information on these batch processes.
Fiscal Year End 07/18/2012 PeopleSoft Financials Manual 2012 8
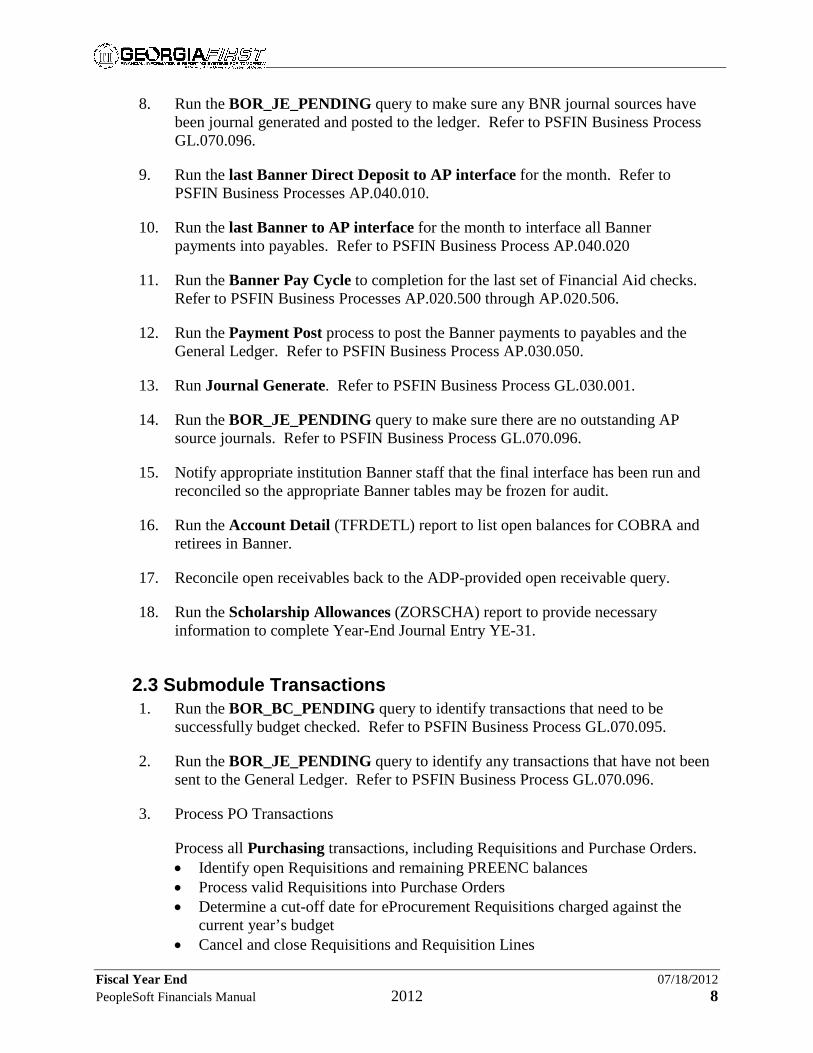
8. Run the BOR_JE_PENDING query to make sure any BNR journal sources have been journal generated and posted to the ledger. Refer to PSFIN Business Process GL.070.096.
9. Run the last Banner Direct Deposit to AP interface for the month. Refer to PSFIN Business Processes AP.040.010.
10. Run the last Banner to AP interface for the month to interface all Banner payments into payables. Refer to PSFIN Business Process AP.040.020
11. Run the Banner Pay Cycle to completion for the last set of Financial Aid checks. Refer to PSFIN Business Processes AP.020.500 through AP.020.506.
12. Run the Payment Post process to post the Banner payments to payables and the General Ledger. Refer to PSFIN Business Process AP.030.050.
13. Run Journal Generate. Refer to PSFIN Business Process GL.030.001.
14. Run the BOR_JE_PENDING query to make sure there are no outstanding AP source journals. Refer to PSFIN Business Process GL.070.096.
15. Notify appropriate institution Banner staff that the final interface has been run and reconciled so the appropriate Banner tables may be frozen for audit.
16. Run the Account Detail (TFRDETL) report to list open balances for COBRA and retirees in Banner.
17. Reconcile open receivables back to the ADP-provided open receivable query.
18. Run the Scholarship Allowances (ZORSCHA) report to provide necessary information to complete Year-End Journal Entry YE-31.
2.3 Submodule Transactions 1. Run the BOR_BC_PENDING query to identify transactions that need to be
successfully budget checked. Refer to PSFIN Business Process GL.070.095.
2. Run the BOR_JE_PENDING query to identify any transactions that have not been sent to the General Ledger. Refer to PSFIN Business Process GL.070.096.
3. Process PO Transactions
Process all Purchasing transactions, including Requisitions and Purchase Orders. • Identify open Requisitions and remaining PREENC balances • Process valid Requisitions into Purchase Orders • Determine a cut-off date for eProcurement Requisitions charged against the
current year’s budget • Cancel and close Requisitions and Requisition Lines

Fiscal Year End 07/18/2012 PeopleSoft Financials Manual 2012 9
• Establish the Purchasing cleanup groundwork • Finalize Vouchers and liquidate Purchase Orders with remaining encumbrances
after final payment • Cancel and close outstanding Purchase Orders and Purchase Order Lines that
should not remain open • Troubleshoot Purchase Orders that will not reconcile • Perform Requisition cleanup (Finalize, Cancel, and Close) • Reconcile open POENC balances in Purchasing to open POENC balances in
Commitment Control • Reconcile open PRENC balances in Purchasing to open PRENC balances in
Commitment Control • Implement eProcurement Year End cutoff procedures if needed (optional) Note: Refer to Module 3, starting on page 65, for more information.
4. Process EX Transactions
Process and reconcile all Travel and Expense transactions. • Process and reconcile Travel Authorizations • Process and reconcile Cash Advances • Process and reconcile Expense Reports • Update the traveler’s Budget Reference to the new Fiscal Year Note: Refer to Module 4, starting on page 117, for more information.
5. Process AP Vouchers
Run the AP batch processes to process all Vouchers.
Note: Refer to Appendix B, Batch Processing, starting on page 203, for more information on these batch processes.
6. Run the BOR_AP_UNPOSTED_VCHR query to verify that all vouchers have been posted. Refer to PSFIN Business Process AP.075.105.
7. Process AP Payments
Run the BOR_AP_DUE query to identify any vouchers not yet paid. Refer to PSFIN Business Process AP.075.045.
8. Run all pay cycles to completion as of June 30th.
9. Run the BOR_AP_PAYCYCLES_NOT_COMPLETED query to confirm that all pay cycles are complete.
10. Run the AP batch processes to process all Payments.
Fiscal Year End 07/18/2012 PeopleSoft Financials Manual 2012 10
Note: Refer to Appendix B, Batch Processing, starting on page 203, for more information on these batch processes.
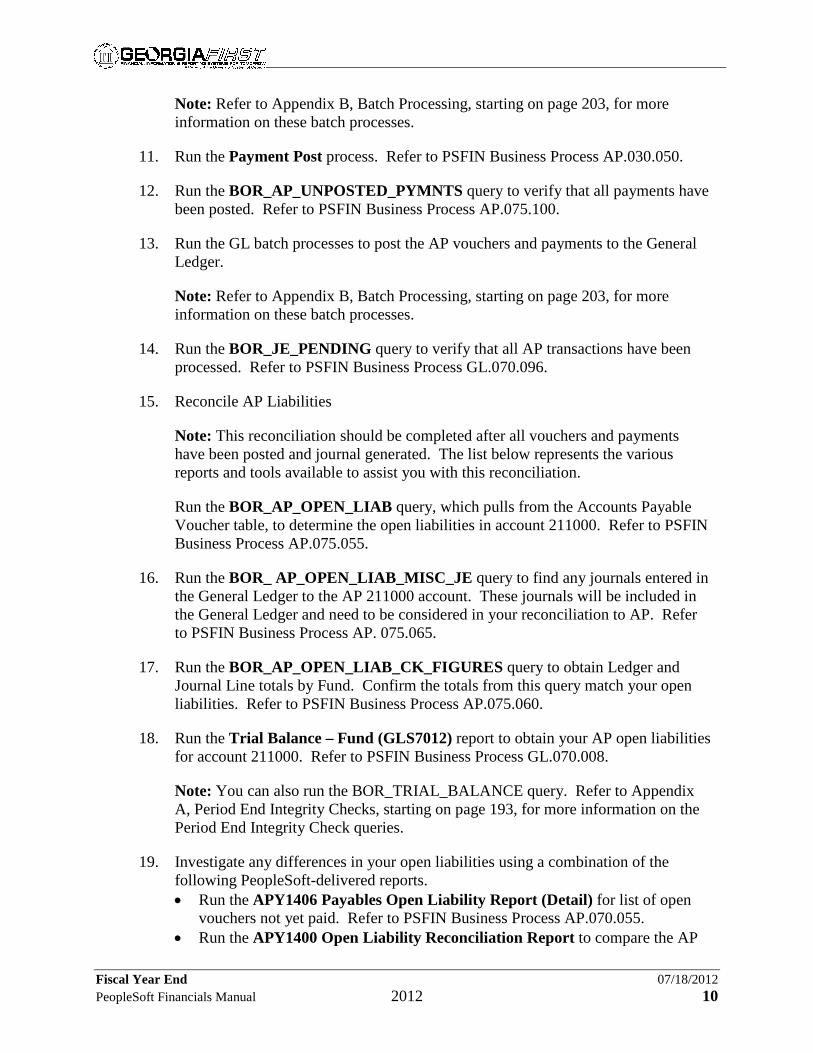
11. Run the Payment Post process. Refer to PSFIN Business Process AP.030.050.
12. Run the BOR_AP_UNPOSTED_PYMNTS query to verify that all payments have been posted. Refer to PSFIN Business Process AP.075.100.
13. Run the GL batch processes to post the AP vouchers and payments to the General Ledger.
Note: Refer to Appendix B, Batch Processing, starting on page 203, for more information on these batch processes.
14. Run the BOR_JE_PENDING query to verify that all AP transactions have been processed. Refer to PSFIN Business Process GL.070.096.
15. Reconcile AP Liabilities
Note: This reconciliation should be completed after all vouchers and payments have been posted and journal generated. The list below represents the various reports and tools available to assist you with this reconciliation.
Run the BOR_AP_OPEN_LIAB query, which pulls from the Accounts Payable Voucher table, to determine the open liabilities in account 211000. Refer to PSFIN Business Process AP.075.055.
16. Run the BOR_ AP_OPEN_LIAB_MISC_JE query to find any journals entered in the General Ledger to the AP 211000 account. These journals will be included in the General Ledger and need to be considered in your reconciliation to AP. Refer to PSFIN Business Process AP. 075.065.
17. Run the BOR_AP_OPEN_LIAB_CK_FIGURES query to obtain Ledger and Journal Line totals by Fund. Confirm the totals from this query match your open liabilities. Refer to PSFIN Business Process AP.075.060.
18. Run the Trial Balance – Fund (GLS7012) report to obtain your AP open liabilities for account 211000. Refer to PSFIN Business Process GL.070.008.
Note: You can also run the BOR_TRIAL_BALANCE query. Refer to Appendix A, Period End Integrity Checks, starting on page 193, for more information on the Period End Integrity Check queries.
19. Investigate any differences in your open liabilities using a combination of the following PeopleSoft-delivered reports. • Run the APY1406 Payables Open Liability Report (Detail) for list of open
vouchers not yet paid. Refer to PSFIN Business Process AP.070.055. • Run the APY1400 Open Liability Reconciliation Report to compare the AP

Fiscal Year End 07/18/2012 PeopleSoft Financials Manual 2012 11
and GL Open Liability balances. Refer to PSFIN Business Process AP.070.045.
• Run the APY1408 Vendor Liability Aging Data Report for a list of vouchers not paid by the As of Date specified. Refer to PSFIN Business Process AP.070.060.
20. Interface AM Assets. Interface all assets from PO and AP into the AM module. Refer to PSFIN Business Processes AM.020.010 through AM.020.014.
21. Process Accounts Receivable Transactions. Note: Only the University System Office and Skidaway Oceanographic Institute use the Accounts Receivable (AR) module.
Process all Receivables. Refer to PSFIN Business Process AR.020.010.
22. Process all Cash Receipts. Refer to PSFIN Business Process AR.020.020 or AR.020.030.
2.4 Month-End Journal Entries Note: Refer to PSFIN Business Process GL.020.001 unless otherwise noted. Reminder: All journals will be subject to the Journal Work Flow process and Approval. 1. Compute and remit Georgia sales tax.
2. Create and post journal entries to record the interest earned and the fees paid on cash and investment accounts.
3. Create and post journal entries to record the receipt of automated draws of State Appropriations, if required and not already completed.
4. Create and post the journal entry to record charges to departments from Institutional Central Stores Inventory.
5. Create and post the journal entry to record the wire transfer of the Georgia Withholding Tax to the Georgia Department of Revenue, if applicable.
6. Create and post the journal entry to record any Print Shop charges to departments, if applicable.
7. Create and post the journal entry to record any Copier Usage charges to departments, if applicable.
Fiscal Year End 07/18/2012 PeopleSoft Financials Manual 2012 12
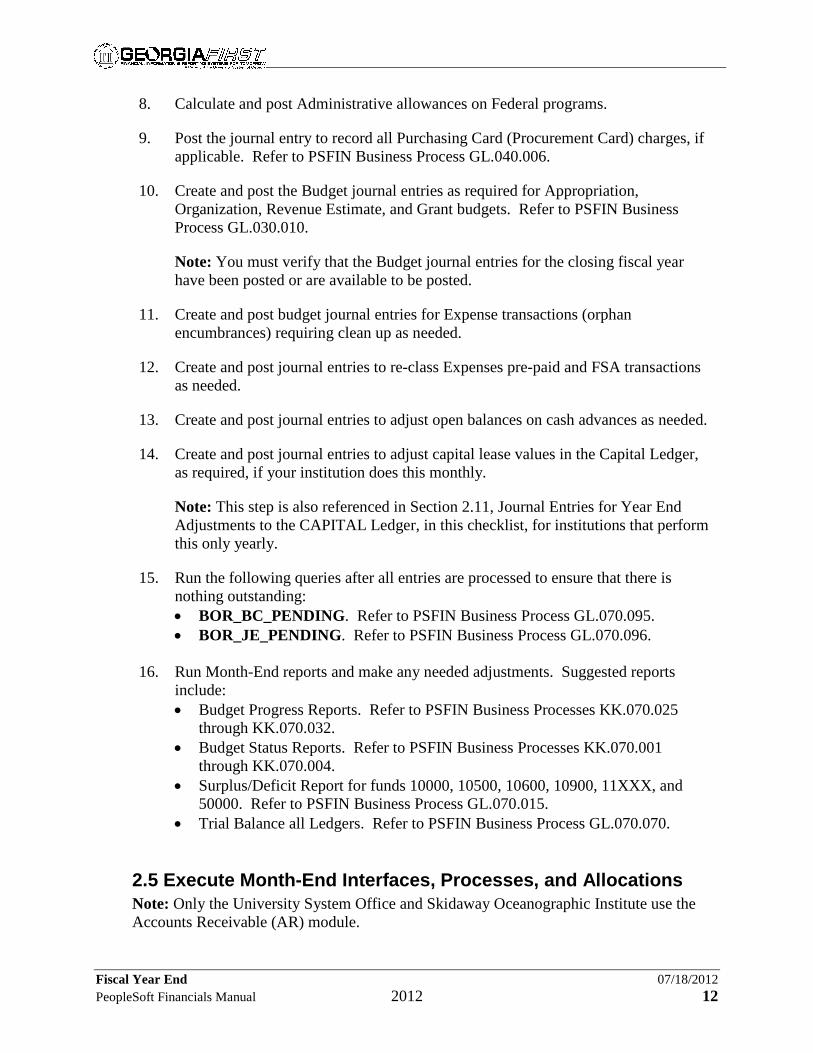
8. Calculate and post Administrative allowances on Federal programs.
9. Post the journal entry to record all Purchasing Card (Procurement Card) charges, if applicable. Refer to PSFIN Business Process GL.040.006.
10. Create and post the Budget journal entries as required for Appropriation, Organization, Revenue Estimate, and Grant budgets. Refer to PSFIN Business Process GL.030.010.
Note: You must verify that the Budget journal entries for the closing fiscal year have been posted or are available to be posted.
11. Create and post budget journal entries for Expense transactions (orphan encumbrances) requiring clean up as needed.
12. Create and post journal entries to re-class Expenses pre-paid and FSA transactions as needed.
13. Create and post journal entries to adjust open balances on cash advances as needed.
14. Create and post journal entries to adjust capital lease values in the Capital Ledger, as required, if your institution does this monthly.
Note: This step is also referenced in Section 2.11, Journal Entries for Year End Adjustments to the CAPITAL Ledger, in this checklist, for institutions that perform this only yearly.
15. Run the following queries after all entries are processed to ensure that there is nothing outstanding: • BOR_BC_PENDING. Refer to PSFIN Business Process GL.070.095. • BOR_JE_PENDING. Refer to PSFIN Business Process GL.070.096.
16. Run Month-End reports and make any needed adjustments. Suggested reports include: • Budget Progress Reports. Refer to PSFIN Business Processes KK.070.025
through KK.070.032. • Budget Status Reports. Refer to PSFIN Business Processes KK.070.001
through KK.070.004. • Surplus/Deficit Report for funds 10000, 10500, 10600, 10900, 11XXX, and
50000. Refer to PSFIN Business Process GL.070.015. • Trial Balance all Ledgers. Refer to PSFIN Business Process GL.070.070.
2.5 Execute Month-End Interfaces, Processes, and Allocations Note: Only the University System Office and Skidaway Oceanographic Institute use the Accounts Receivable (AR) module.

Fiscal Year End 07/18/2012 PeopleSoft Financials Manual 2012 13
1. Run the AR Processing Aging process for customer balances. Refer to PSFIN Business Process AR.030.040.
2. Run the AR Processing Statements process. Refer to PSFIN Business Process AR.070.020.
3. Run the Load DOAS Phone Bill interface. Refer to PSFIN Business Process GL.040.004.
4. Run the Plant Suspense Allocation process. Refer to PSFIN Business Process GL030.002.
5. Analyze Plant Suspense encumbrances and write journal entries YE-1 and YE-2.
Note: You must then reverse these journal entries in July.
6. Verify that all projects are in the Grant Allocation tree.
Note: Select Tree Manager⇒Tree Manager, and then select the 07/01/2009 GRANT_ALLOC_TREE. You can either view this tree online, or you can click on the Print Format link on the Tree Manager page to print the tree for review.
7. Run the Allocations-Grant Revenue process. Refer to PSFIN Business Process GL.030.003
8. Run the Grant Bill report. Refer to PSFIN Business Process GL.070.014.
9. Add completed GFSIC Buildings and Equipment, using Asset Add – Donation. Refer to PSFIN Business Process AM.020.080.
Note: This step will credit the Gift Revenue account 485XXX.
10. Add completed Construction Work in Progress, using Asset Add – CWIP TransCode. Refer to PSFIN Business Process AM.020.040.
Note: This step will debit the asset and credit the Construction Work in Progress.
11. Run the Year End 02 – BOR_CHK_FDM_CAPITAL_CF query to verify all chartfields are populated on assets prior to closing the month.
Note 1: Refer to Appendix A, Period End Integrity Checks, starting on page 193, for more information on the Period End Integrity Check queries.
Note 2: Asset transfer may be required before closing out the AM Submodule.
12. Run the Asset Depreciation Calculation process. Refer to PSFIN Business Process AM.100.010.

Fiscal Year End 07/18/2012 PeopleSoft Financials Manual 2012 14
13. Run the Asset Accounting Entry Creation process. Refer to PSFIN Business Process GL.030.005.
14. Run the Depreciation Close process. Refer to PSFIN Business Process GL.100.001.
15. Verify that there are no open transactions pending in the OPEN_TRANS table.
Note: You can check the Open Transaction Detail page (Asset Management⇒Depreciation⇒Open Transactions⇒Review, and select Pending Depreciation as the Depreciation Calc Status).
16. Load the Depreciation Reporting Table. Refer to PSFIN Business Process AM.100.050.
17. Load the Net Book Value (NBV) Table. Refer to PSFIN Business Process AM.100.060.
18. Run the batch processes to process all CAPITAL Ledger entries.
Note: Refer to Appendix B, Batch Processing, starting on page 203, for more information on these batch processes.
19. Reconcile the CAPITAL and ACTUALS ledgers for capital purchases and Footnote 6 analysis. Note: You can use the following queries to assist you with this reconciliation: • Run the BOR_AM_CAP_DTL_BQ query. Refer to PSFIN Business Process
AM.075.060. • Run the BOR_CAP_ACT_DTL_BQ query. Refer to PSFIN Business Process
AM.075.065. • Run the BOR_DEPR_AM_DET_BY_PERIOD_BQ query. Refer to PSFIN
Business Process AM.075.070. • Run the BOR_DEPR_AM_DIST_LN_BQ query. Refer to PSFIN Business
Process AM.075.075 • Run the BOR_DEPR_CAP_LED_TTL_BQ query. Refer to PSFIN Business
Process AM.075.080. • Run the BOR_ACTUALS_CAP_DTL_BQ query. Refer to PSFIN Business
Process AM.075.085. • Run the BOR_VCHR_ACCTG_LN_BQ query. Refer to PSFIN Business
Process AM.075.090. • Run the BOR_AM_NBV_COMPARE query. This query compares
accumulated depreciation by asset ID using the ASSET_NBV_TBL and DIST_LN tables.*
• Run the BOR_AM_LTD_DETAIL query. This query provides various detailed account information for assets by Asset ID and Accounting Period using the DIST_LN table.*
Fiscal Year End 07/18/2012 PeopleSoft Financials Manual 2012 15
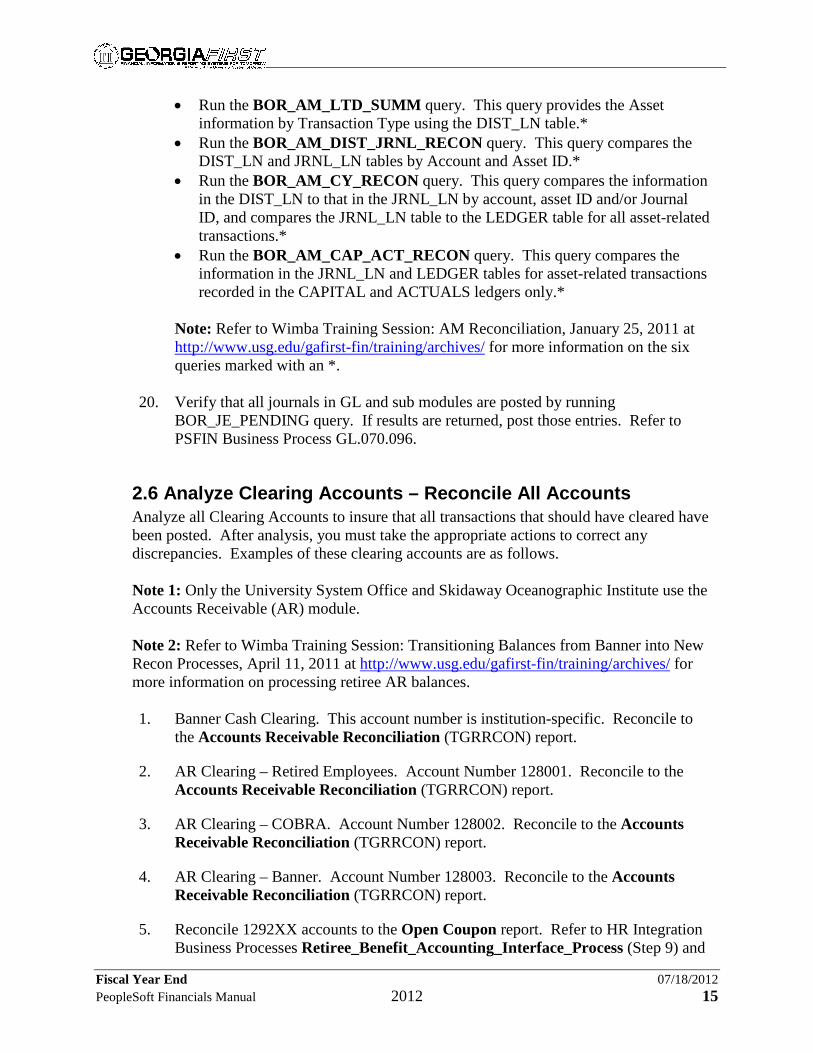
• Run the BOR_AM_LTD_SUMM query. This query provides the Asset information by Transaction Type using the DIST_LN table.*
• Run the BOR_AM_DIST_JRNL_RECON query. This query compares the DIST_LN and JRNL_LN tables by Account and Asset ID.*
• Run the BOR_AM_CY_RECON query. This query compares the information in the DIST_LN to that in the JRNL_LN by account, asset ID and/or Journal ID, and compares the JRNL_LN table to the LEDGER table for all asset-related transactions.*
• Run the BOR_AM_CAP_ACT_RECON query. This query compares the information in the JRNL_LN and LEDGER tables for asset-related transactions recorded in the CAPITAL and ACTUALS ledgers only.*
Note: Refer to Wimba Training Session: AM Reconciliation, January 25, 2011 at http://www.usg.edu/gafirst-fin/training/archives/ for more information on the six queries marked with an *.
20. Verify that all journals in GL and sub modules are posted by running BOR_JE_PENDING query. If results are returned, post those entries. Refer to PSFIN Business Process GL.070.096.
2.6 Analyze Clearing Accounts – Reconcile All Accounts Analyze all Clearing Accounts to insure that all transactions that should have cleared have been posted. After analysis, you must take the appropriate actions to correct any discrepancies. Examples of these clearing accounts are as follows. Note 1: Only the University System Office and Skidaway Oceanographic Institute use the Accounts Receivable (AR) module. Note 2: Refer to Wimba Training Session: Transitioning Balances from Banner into New Recon Processes, April 11, 2011 at http://www.usg.edu/gafirst-fin/training/archives/ for more information on processing retiree AR balances. 1. Banner Cash Clearing. This account number is institution-specific. Reconcile to
the Accounts Receivable Reconciliation (TGRRCON) report.
2. AR Clearing – Retired Employees. Account Number 128001. Reconcile to the Accounts Receivable Reconciliation (TGRRCON) report.
3. AR Clearing – COBRA. Account Number 128002. Reconcile to the Accounts Receivable Reconciliation (TGRRCON) report.
4. AR Clearing – Banner. Account Number 128003. Reconcile to the Accounts Receivable Reconciliation (TGRRCON) report.
5. Reconcile 1292XX accounts to the Open Coupon report. Refer to HR Integration Business Processes Retiree_Benefit_Accounting_Interface_Process (Step 9) and

Fiscal Year End 07/18/2012 PeopleSoft Financials Manual 2012 16
Retiree_Benefits_Supplemental_PDR_Interface_process (Step 6).
Note: The 1292XX accounts were introduced during the ADP Reconciliation Initiative. These new accounts should contain the open receivables balances as recorded by Benefits Direct. Known/valid variances could be retiree and COBRA pre-payments, as well as any Carrier Enrollment adjustments not processed by ADP.
6. Confirm 1290XX accounts (TGRRCON) have no open balance.
Note: The 1290XX accounts were retired during the ADP Reconciliation Initiative. These accounts should have been cleared out during the transition to the new accounting process. Effective 07/01/2011, these accounts will no longer be active.
7. Confirm the 129220 account (TGRRCON) reconciles to the Closing Trial Balance report. Refer to PSFIN Business Process GL.070.005 and Module 5, Step 4, starting on page 160, for more information on running the Closing Trial Balance Report.
Note: This account represents receivables due from employees on disability or leave of absence. Benefits Direct does not capture payments from employees on disability or leave of absence.
8. Petty Cash Advance Clearing Account. Account Number 1322xx
9. Cash Advance Repayment Account – from Banner or AR. Account Number 133100
10. Suspense Clearing Account. Account Number 799990
11. Pay Ded – Miscellaneous. Account Number 228999
12. Control Account – Cash – Interfund Transfers Account. Account Number 118200. Run the Trial Balance – Fund (GLS7012) report to verify account sums to zero across all funds. Refer to PSFIN Business Process GL.070.008.
13. Capital – Intraunit Offset Account. Account Number 329100. Run the Trial Balance – Fund (GLS7012) report to verify account sums to zero across all funds. Refer to PSFIN Business Process GL.070.008.
14. Travel Advance – Employee Clearing Account. Account Number 132300 (Expenses)
15. Travel Advance – Student Clearing Account. Account Number 132410 (Accounts Payable)
16. Travel Pre-paids – Employee Account. Account Number 132160

Fiscal Year End 07/18/2012 PeopleSoft Financials Manual 2012 17
17. Travel Pre-paids - Non-employee Account. Account Number 132170
18. Flexible Spending Accounts – Medical and Dependent Care. Account Numbers 2131XX and 2132XX
19. Other Advances Clearing. Account Number 1329xx
20. Procurement Card Clearing Account. Account Number 1391xx
21. Other Clearing Accounts. These account numbers are institution-specific.
2.7 Other Reconciliations 1. Reconcile PeopleSoft to the AR Reconciliation report from Banner (TGRRCON).
2. Reconcile Grants and Grant Receivables.
3. Reconcile ACTUALS ledger expenditures with CAPITAL ledger asset acquisitions using Contra Expense Accounts 8XXXXX.
4. Reconcile CAPITAL ledger asset acquisitions to Asset Management detail. Note: You can use the following queries to assist you in Steps 3 and 4: • Run the BOR_AM_CAP_DTL_BQ query. Refer to PSFIN Business Process
AM.075.060. • Run the BOR_CAP_ACT_DTL_BQ query. Refer to PSFIN Business Process
AM.075.065. • Run the BOR_DEPR_AM_DET_BY_PERIOD_BQ query. Refer to PSFIN
Business Process AM.075.070. • Run the BOR_DEPR_AM_DIST_LN_BQ query. Refer to PSFIN Business
Process AM.075.075 • Run the BOR_DEPR_CAP_LED_TTL_BQ query. Refer to PSFIN Business
Process AM.075.080. • Run the BOR_ACTUALS_CAP_DTL_BQ query. Refer to PSFIN Business
Process AM.075.085. • Run the BOR_VCHR_ACCTG_LN_BQ query. Refer to PSFIN Business
Process AM.075.090.
Reconcile DOAA/TIGA Reporting This is the Department of Audits and Accounts (DOAA) required reporting to comply with the Transparency in Government Act (TIGA). Note 1: This was formerly referred to as Continuous Audit.
5. Process Salary Data. Refer to the Salary Data for TIGA Reporting User’s Guide. This step should typically be completed by the HR/Payroll staff at your institution.

Fiscal Year End 07/18/2012 PeopleSoft Financials Manual 2012 18
6. Process TIGA Salary & Travel Reporting. Refer to the TIGA Reporting User’s Guide. This step should typically be completed by your PeopleSoft Financials staff.
Note 2: We recommend that you run and reconcile this report on a monthly basis, but it is not required. DOAA mandates that reconciliation be performed at the end of each Quarter. File submission is mandatory at the end of each Fiscal Year.
Note 3: If journal entries are required due to reconciling the TIGA reports in Steps 7 through 12, then careful analysis is required to determine what other processes and reports will need to be run again.
Reconcile Bank Statements 7. Reconcile the Bank Statement for the Payroll Account (1185XX).
Note: Per individual institutional business process, a register of outstanding Off-Cycle payroll checks as of June 30th may be required for account reconciliation.
8. Reconcile the Bank Statement for the General Operations Account. Refer to PSFIN Business Processes BK.020.011 through BK.070.100 as needed.
Note: If any journal entries are required due to reconciling the Bank Statements listed in Steps 13 and 14, then you must carefully analyze to determine what other processes and reports will need to be run again.
Reconcile Commitment Control 9. Run the BOR_BC_PENDING query to verify that there are no outstanding
transactions. Refer to PSFIN Business Process GL.070.095.
10. Run the Delete KK Exceptions process to delete warnings from the KK exception table (PS_KK_EXCPTN_TBL), which will help reduce or eliminate the volume of warnings that would appear when reviewing Budget Check Exceptions.
Note: This process is located at: BOR Menus⇒BOR General Ledger⇒BOR Year End⇒Year End Processing⇒Delete KK Exceptions.
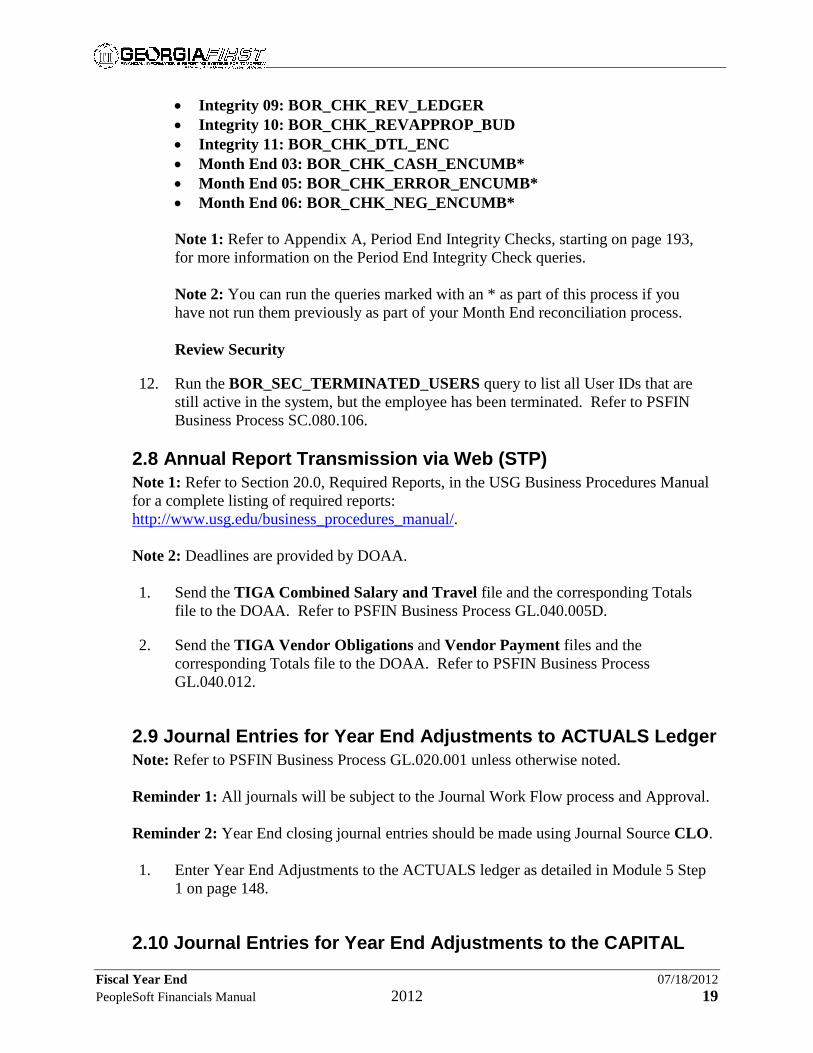
11. Reconcile Commitment Control by running the following Period End Integrity Check queries: • Integrity 01: BOR_CHK_PROJ_ENC_LEG • Integrity 02: BOR_CHK_PROJ_EXP_LEG • Integrity 03: BOR_CHK_PROJ_REV_LEG • Integrity 04: BOR_CHK_UNREST_LEDGER • Integrity 05: BOR_CHK_KKLEDG_ACTV • Integrity 06: BOR_CHK_KKLEDG_BUD • Integrity 07: BOR_CHK_DETL_ACTLS
Fiscal Year End 07/18/2012 PeopleSoft Financials Manual 2012 19
• Integrity 09: BOR_CHK_REV_LEDGER • Integrity 10: BOR_CHK_REVAPPROP_BUD • Integrity 11: BOR_CHK_DTL_ENC • Month End 03: BOR_CHK_CASH_ENCUMB* • Month End 05: BOR_CHK_ERROR_ENCUMB* • Month End 06: BOR_CHK_NEG_ENCUMB* Note 1: Refer to Appendix A, Period End Integrity Checks, starting on page 193, for more information on the Period End Integrity Check queries. Note 2: You can run the queries marked with an * as part of this process if you have not run them previously as part of your Month End reconciliation process.
Review Security
12. Run the BOR_SEC_TERMINATED_USERS query to list all User IDs that are still active in the system, but the employee has been terminated. Refer to PSFIN Business Process SC.080.106.
2.8 Annual Report Transmission via Web (STP) Note 1: Refer to Section 20.0, Required Reports, in the USG Business Procedures Manual for a complete listing of required reports: http://www.usg.edu/business_procedures_manual/. Note 2: Deadlines are provided by DOAA. 1. Send the TIGA Combined Salary and Travel file and the corresponding Totals
file to the DOAA. Refer to PSFIN Business Process GL.040.005D.
2. Send the TIGA Vendor Obligations and Vendor Payment files and the corresponding Totals file to the DOAA. Refer to PSFIN Business Process GL.040.012.
2.9 Journal Entries for Year End Adjustments to ACTUALS Ledger Note: Refer to PSFIN Business Process GL.020.001 unless otherwise noted. Reminder 1: All journals will be subject to the Journal Work Flow process and Approval. Reminder 2: Year End closing journal entries should be made using Journal Source CLO. 1. Enter Year End Adjustments to the ACTUALS ledger as detailed in Module 5 Step
1 on page 148.
2.10 Journal Entries for Year End Adjustments to the CAPITAL
Fiscal Year End 07/18/2012 PeopleSoft Financials Manual 2012 20
Ledger Note 1: Refer to PSFIN Business Process GL.020.001 unless otherwise noted. Note 2: When making journal entries in the CAPITAL ledger, please use the following masks to indicate the type of transaction that the journal represents: • ADD: Asset Additions • ADJ: Adjustments • DEPR: Depreciation • RECAT: Recategorization • PDP: Prior Period Depreciation (only recorded at conversion) • RAD: Reverse Accumulated Depreciation • RET: Retirement For example, a journal entry to correct an addition may be ADDCRTXXXX, where XXXX represents the numeric value in the original journal. A journal entry to record Prior Period Depreciation that was not captured at conversion may be written PDPXXXXXXX. 1. Enter Year End Adjustments to the CAPITAL ledger as detailed in Module 5 Step
6 on page 168.
2.11 Reports and Analysis 1. Run the Surplus/Deficit (BORRG024) report. Refer to PSFIN Business Process
GL.070.015. Note: After running this report, you must analyze any surplus amounts in Funds 10000, 10500, and 10600, 10900, Fund 11xxx, and Fund 50000. The PO Surplus Analysis Report (BORRP012) is available for assistance. This report lists all purchase order activity against the selected budget period where either: • The purchase order had an open amount at year end; or, • The purchase order had activity in a Fiscal year not equal to the Budget year
specified on the purchase order. Refer to PSFIN Business Process PO.070.230.
2. Run the Balance Sheet by Fund (BORRG018) report. Refer to PSFIN Business Process GL.070.013.
3. Review the key audit checkpoints and verify the following conditions are true: • Actual Revenue is less than or equal to Budgeted Revenue. • Actual Expense is less than or equal to Budgeted Expense. • Budgeted Revenue is equal to or greater than Budgeted Expense. • Actual Expense is less than or equal to Actual Revenue.
4. Run the Appropriation Budget Status (GLC8000) reports. Refer to PSFIN
Fiscal Year End 07/18/2012 PeopleSoft Financials Manual 2012 21
Business Process KK.070.001.
5. Run the Organization Budget Status (GLC8020) reports. Refer to PSFIN Business Process KK.070.002.
6. Run the Revenue Estimate Budget Status (GLC8030) reports. Refer to PSFIN Business Process KK.070.003.
7. Run the Project Grant Budget Status (GLC8030) reports. Refer to PSFIN Business Process KK.070.004.
8. Run the Budget Progress reports. • Summary (BORRG040). Refer to PSFIN Business Process KK.070.025. • Basic Detail (BORRG041). Refer to PSFIN Business Process KK.070.026. • Full Detail 2 (BORRG042). Refer to PSFIN Business Process KK.070.027.
9. Run the Auxiliary Profit/Loss Statement (BORRG017) report. Refer to PSFIN Business Process GL.070.060.
10. Run the Indirect Revenue Summary (BORRG025) report. Refer to PSFIN Business Process KK.070.022.
11. Run the Revenue History (BORRG020) report. Refer to PSFIN Business Process KK.070.021.
12. Run the Reconciliation of Financial Aid (BORAP02) report.
13. Run the Grant Reconciliation (BORRG016) report. Refer to PSFIN Business Process KK.070.020.
2.12 Journal Entries for Year End Adjustments to the GAAP Ledger Note: Refer to PSFIN Business Process GL.020.001 unless otherwise noted. 1. Enter Year End Adjustments to the GAAP ledger as detailed in Module 5 Step 7 on
page 171.
2.13 PeopleSoft Ledger Closing and FDM Submission 1. Check your configuration and Year End Base Table data.
Note: Reviewing your configuration and Year End Base Table data is covered in Appendix E, Reviewing User Preferences, starting on page 214.
2. Close the previous fiscal year and establish the open ACTUALS ledger for the new

Fiscal Year End 07/18/2012 PeopleSoft Financials Manual 2012 22
fiscal year period.
Note: Closing the previous fiscal year and establishing the open ACTUALS ledger for the new fiscal year period is covered in Module 5, Step 2, starting on page 151.
3. Enter all ACTUALS journal entries, as noted in Step 2.10.
Note: Capital Ledger Journal Entry YE-21 must be posted prior to running the query and posting Actuals Ledger Journal Entry YE-8.
4. Close the ACTUALS ledger.
Note: Closing the ACTUALS ledger is covered in Module 5, Step 5, starting on page 162.
5. Enter all CAPITAL ledger journal entries, as noted in Step 2.11.
6. Close the CAPITAL ledger.
Note: Closing the CAPITAL ledger in Module 5, Step 6, starting on page 168.
7. Enter all GAAP ledger journal entries, as noted in Step 2.13.
8. Close the GAAP ledger.
Note: Closing the GAAP ledger is covered in Module 5, Step 7, starting on page 171.
9. Close the ENCUMB ledger.
10. Extract Period 12 to FDM.
Note 1: This includes period 999.
Note 2: Do not submit until the final extraction has been completed.
11. Run all reports from PeopleSoft Financials and FDM. Refer to Section 2.16, Annual Financial Reports (AFR), in this checklist for the reports to run.
12. Reconcile all reports generated in Step 10.
13. Unclose and repeat where necessary.
14. Extract Period 12 to FDM again, if necessary.
15. Rerun all reports from PeopleSoft Financials and FDM. Refer to Section 2.17, Annual Financial Reports (AFR), in this checklist for the reports to run.

Fiscal Year End 07/18/2012 PeopleSoft Financials Manual 2012 23
16. Reconcile all reports generated in Step 14.
17. Complete your Annual Financial Report (AFR) as noted in Section 2.17, Annual Financial Reports (AFR), in this checklist.
18. Submit and have Period 12 accepted once your AFR is completed.
Note: Do not submit this information to the Data Warehouse until you have completed your AFR.
19. Close the Asset Management accounting periods. Refer to PSFIN Business Process GL.020.018.
Warning: This process cannot be undone once completed.
Note 1: This process should be done only after your Data Warehouse submission has been accepted.
Note 2: Closing the AM accounting periods is covered in Module 5, Step 10, starting on page 190.
20. Verify that the ACTUALS, CAPITAL, and GAAP ledgers are closed by checking the Ledgers for a Unit Definition page.
2.14 Annual Financial Reports (AFR) Note: Refer to Section 20.0, Required Reports, in the USG Business Procedures Manual for a complete listing of required reports: http://www.usg.edu/business_procedures_manual/. 1. Create the Statements of Net Assets from FDM and PeopleSoft nVision. Refer to
PSFIN Business Process GL.070.036.
2. Create any Notes to your Financial Statements by running footnotes from PeopleSoft Financials for entry into the following USG AFR Notes: • Capital Asset Footnote (PeopleSoft nVision). Refer to PSFIN Business
Process GL.070.071. • Footnote 3 – Accts Receivable (BORRG029). • Footnote 7 – Deferred Revenue (BORRG028). Refer to PSFIN Business
Process GL.070.051. • Footnote 8 – LT Liabilities (BORRG031). Refer to PSFIN Business Process
GL.070.050.
3. Create the Unrestricted Expendable Net Asset Footnotes from FDM and PeopleSoft nVision. Refer to PSFIN Business Process GL.070.035.

Fiscal Year End 07/18/2012 PeopleSoft Financials Manual 2012 24
4. Create the Restricted Expendable Net Asset Footnotes from FDM and PeopleSoft nVision. Refer to PSFIN Business Process GL.070.038.
5. Create the Statements of Revenues, Expenses, and Changes to Net Assets from FDM and PeopleSoft nVision. Refer to PSFIN Business Process GL.070.037.
6. Create the Auxiliary Statements of Net Assets from PeopleSoft nVision. Refer to PSFIN Business Process GL.070.041.
7. Create the Auxiliary SRECNAs from PeopleSoft nVision. Refer to PSFIN Business Process GL.070.042.
8. Prepare the Schedule of Federal Financial Assistance and compare it to SRECNA.
9. Create the Capital Asset Auxiliary Services (BORRM005) from PeopleSoft Financials. Refer to PSFIN Business Process GL.070.041.
10. Create the Statement of Cash Flows from PeopleSoft nVision. Refer to PSFIN Business Process GL.070.040.
11. Create Note 15 – Functional vs. Natural Classifications from FDM and PeopleSoft nVision. Refer to PSFIN Business Process GL.070.039.
12. Compare to last year’s AFR.
13. Create any Supplemental Information, such as: • Schedule of Operation of Agency Funds (BORRG027). Refer to PSFIN
Business Process GL.070.055. • Student Activities Funds Statement (BORRG030). Refer to PSFIN Business
Process GL.070.052. • Intercollegiate Athletics Statements (BORRG032). Refer to PSFIN Business
Process GL.070.054. Note: The information for Student Activities and Intercollegiate Athletics is needed for the State Auditors.
14. Run the PO Open Enc as of Acctg Period (BORRP014) (as of accounting period 12) report to create a list of Outstanding Encumbrances for the State Auditors. Refer to PSFIN Business Process PO.070.350.
Note: Be sure to retain this report for the auditors. Without this report, it is very difficult to give them your open Purchase Orders as of 06/30.
This completes Section 2, Running the Fiscal Year End Close Out Procedures. This completes Module 1, Fiscal Year End Overview.
Fiscal Year End 07/18/2012 PeopleSoft Financials Manual 2012 25
Module 2: Year-End Payroll Processes Introduction In this module, we will concentrate on the Year-End payroll
processes.
Objectives In this module you will: Run the Year-End Payroll Accrual process Move Summer faculty payroll expenses Move Maymester faculty payroll expenses Zero the Year-End Personal Services Encumbrances
Institution-Specific Business Processes
____________________________________________________
____________________________________________________
____________________________________________________
____________________________________________________
____________________________________________________
____________________________________________________
Security The following Security Role can perform the Year-End payroll processes: • BOR_GL_CUSTOM_INTFC

Fiscal Year End 07/18/2012 PeopleSoft Financials Manual 2012 26
Step 1: Running the Year-End Payroll Accrual Process In this step, you will run the Year-End Payroll Accrual process for a bi-weekly payroll that crosses fiscal years. This process creates payroll expenses (Accounts 5xxxxx) to be posted into the old fiscal year, and a reversal of those expenses to be posted into the new fiscal year. Data in the Financials PERS_SERV_BOR table are used to create the journal entries for the old and new fiscal years. Note: The Year-End Payroll Accrual may be run by choosing any bi-weekly Pay Run ID. If your institution chooses to run the Year-End Payroll Accrual process with the last third bi-weekly payroll of the current fiscal year and this third bi-weekly payroll is not combined with any monthly pay groups, the process will function as it has in previous years. Note: The last third bi-weekly payroll for FY12 is for the pay end date of June 22, 2010, with the check date of June 29, 2010. The Pay Run ID is 632. If your institution chooses to select a more recent bi-weekly Pay Run ID, the Year-End Payroll Accrual process will produce an entry based on a more current bi-weekly pay period. Because FICA and Medicare taxes are calculated after subtracting health and dental insurance from gross pay, the accrual expense for FICA and Medicare will be less if a pay period other than the third bi-weekly is used to run this process.
Process 1. Select BOR Menus⇒BOR General Ledger⇒BOR Year
End⇒Interface⇒Year End Payroll Accrual. The Year End Payroll Accrual – Find an Existing Value page displays.
Note: If you have previously run this process, then click on and select the appropriate Run Control ID. If this is the first time you have run this process at your institution, you would select Add a New Value, and enter YE_PAYROLL_ACCRUAL or another appropriate name for this Run Control ID, as shown below.
2. Click on the Add a New Value tab. The Year End Payroll Accrual – Add a New Value page displays.
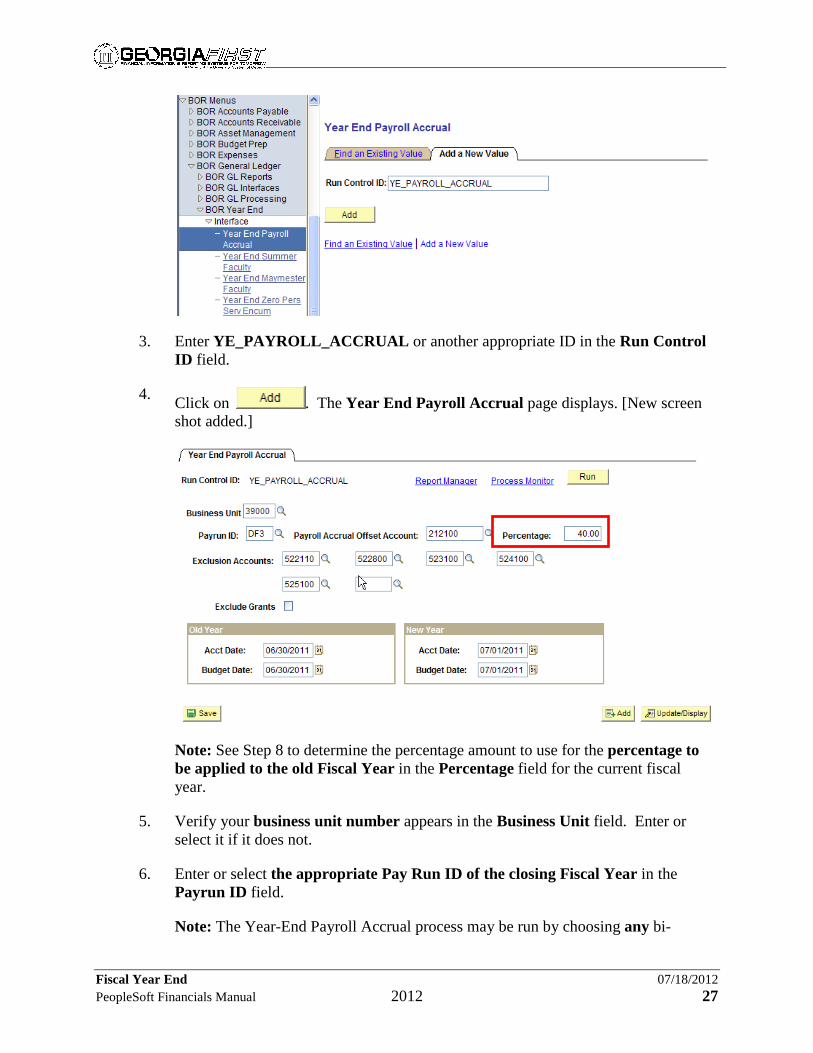
Fiscal Year End 07/18/2012 PeopleSoft Financials Manual 2012 27
3. Enter YE_PAYROLL_ACCRUAL or another appropriate ID in the Run Control ID field.
4. Click on . The Year End Payroll Accrual page displays. [New screen shot added.]
Note: See Step 8 to determine the percentage amount to use for the percentage to be applied to the old Fiscal Year in the Percentage field for the current fiscal year.
5. Verify your business unit number appears in the Business Unit field. Enter or select it if it does not.
6. Enter or select the appropriate Pay Run ID of the closing Fiscal Year in the Payrun ID field.
Note: The Year-End Payroll Accrual process may be run by choosing any bi-

Fiscal Year End 07/18/2012 PeopleSoft Financials Manual 2012 28
weekly Pay Run ID.
7. Enter or select the Payroll Accrual Offset Account in the Payroll Accrual Offset Account field.
Note: The Payroll Accrual Offset Account must be between 212000 and 212999.
8. Enter the percentage to be applied to the old Fiscal Year in the Percentage field. Note: For FY2012: • To accrue for the July 13th payroll only: use 50%. To accrue the partial pay
period crossing fiscal years, accrual period beginning 6/23/2012 ending 6/30/2012, you only need to accrue for the July 13th payroll and you should use 50% in the Percentage field.
9. Enter or select the appropriate Exclusion Account(s) in the Exclusion Account
field(s). Note 1: You can enter or select up to six Exclusion Account numbers that you need to exclude from these journals. These accounts should only be salary accounts that take all fringes associated with this salary per employee out of the journal. Note 2: If an employee is split-funded and the first salary account for this employee is not an exclusion account for the Year-End Payroll Accrual process, then the second salary account will not be excluded either, even if the second account is an exclusion account for the process. • Example: If account 522100 is not used as an exclusion account and account
522110 is, then the data for that employee will not be excluded, because 522100 precedes 522110.
Note 3: This step is optional.
10. Click the Exclude Grants check box ON if grants need to be excluded from the accrual process.
Note: This step is optional.
11. Enter or select 06/30/YYYY for the closing Fiscal Year in the Acct Date field in the Old Year group box.
Note: This field is automatically populated with the System Date.
Fiscal Year End 07/18/2012 PeopleSoft Financials Manual 2012 29
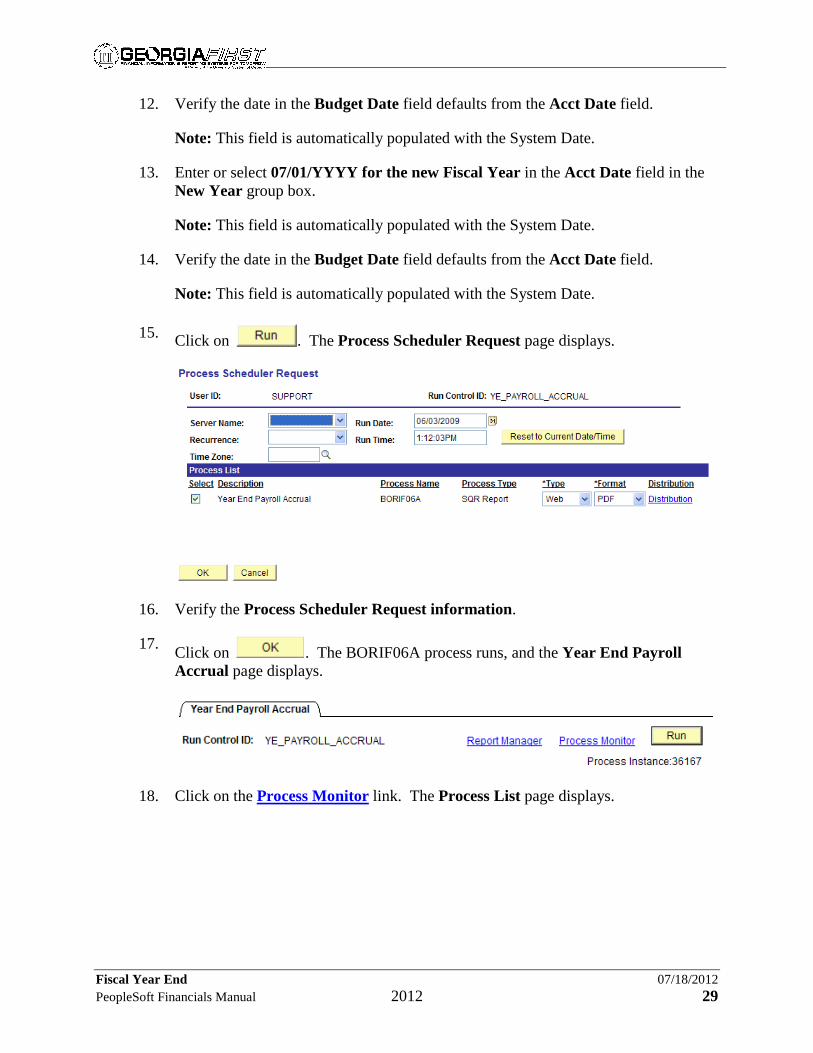
12. Verify the date in the Budget Date field defaults from the Acct Date field.
Note: This field is automatically populated with the System Date.
13. Enter or select 07/01/YYYY for the new Fiscal Year in the Acct Date field in the New Year group box.
Note: This field is automatically populated with the System Date.
14. Verify the date in the Budget Date field defaults from the Acct Date field.
Note: This field is automatically populated with the System Date.
15. Click on . The Process Scheduler Request page displays.
16. Verify the Process Scheduler Request information.
17. Click on . The BORIF06A process runs, and the Year End Payroll Accrual page displays.
18. Click on the Process Monitor link. The Process List page displays.
Fiscal Year End 07/18/2012 PeopleSoft Financials Manual 2012 30
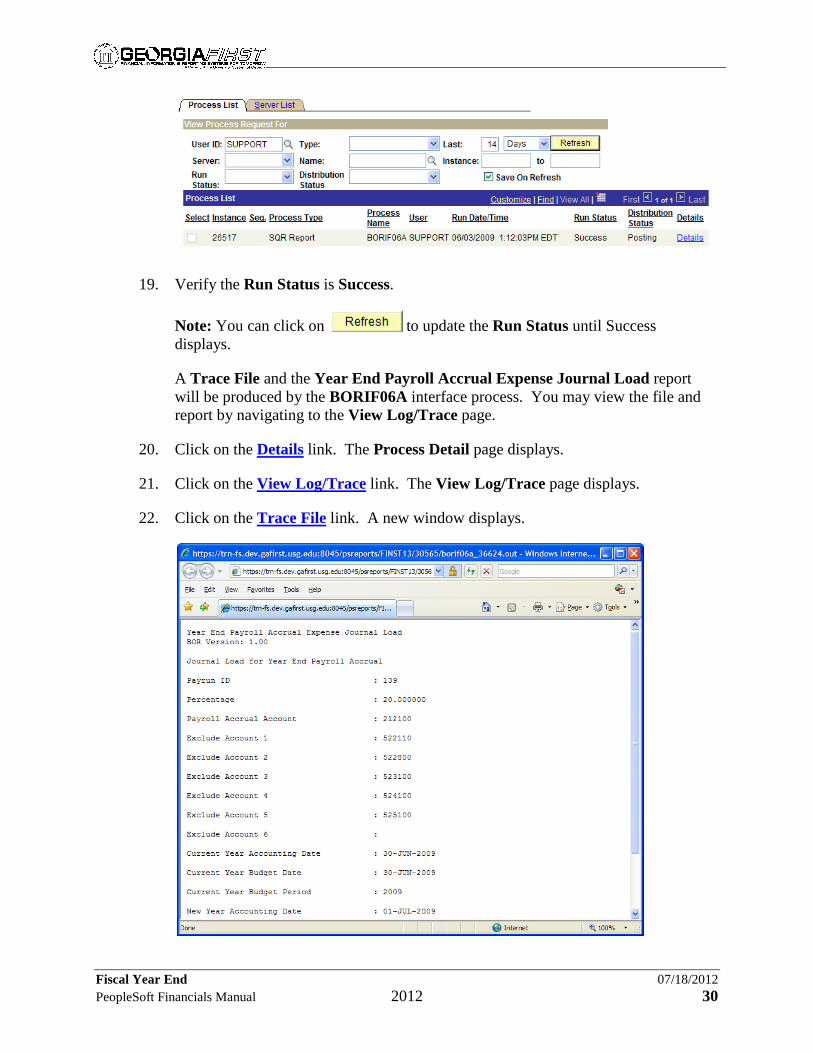
19. Verify the Run Status is Success.
Note: You can click on to update the Run Status until Success displays.
A Trace File and the Year End Payroll Accrual Expense Journal Load report will be produced by the BORIF06A interface process. You may view the file and report by navigating to the View Log/Trace page.
20. Click on the Details link. The Process Detail page displays.
21. Click on the View Log/Trace link. The View Log/Trace page displays.
22. Click on the Trace File link. A new window displays.

Fiscal Year End 07/18/2012 PeopleSoft Financials Manual 2012 31
23. Close this window after reviewing the Trace File. This brings you back to the View Log/Trace page.
24. Click on the borif06a_XXXXX.PDF link, where XXXXX is the process instance number. A new window opens to display the PDF file.
25. Close this window after reviewing the Year End Payroll Accrual Expense Journal Load report.
26. Click on the Go back to Year End Payroll Accrual link. This brings you back to the Year End Payroll Accrual page.
The BORIF06A interface process populates the HR_ACCTG_LINE staging table. This data needs to be journal generated and the resulting journals processed (Edit, Budget Check, and Post).
27. Run the Journal Generate process, using the parameters shown on the two Generate Journals Request pages shown below. Refer to PSFIN Business Process GL.030.001. [Two new screen shots added.]
Note: This process will generate two journals: one dated 06/30/20YY, where YY are the last two digits of the closing fiscal year, and the other dated 07/01/20YY, where YY are the last two digits of the new fiscal year. It is recommended to generate each journal separately. Choosing to generate these two journals together
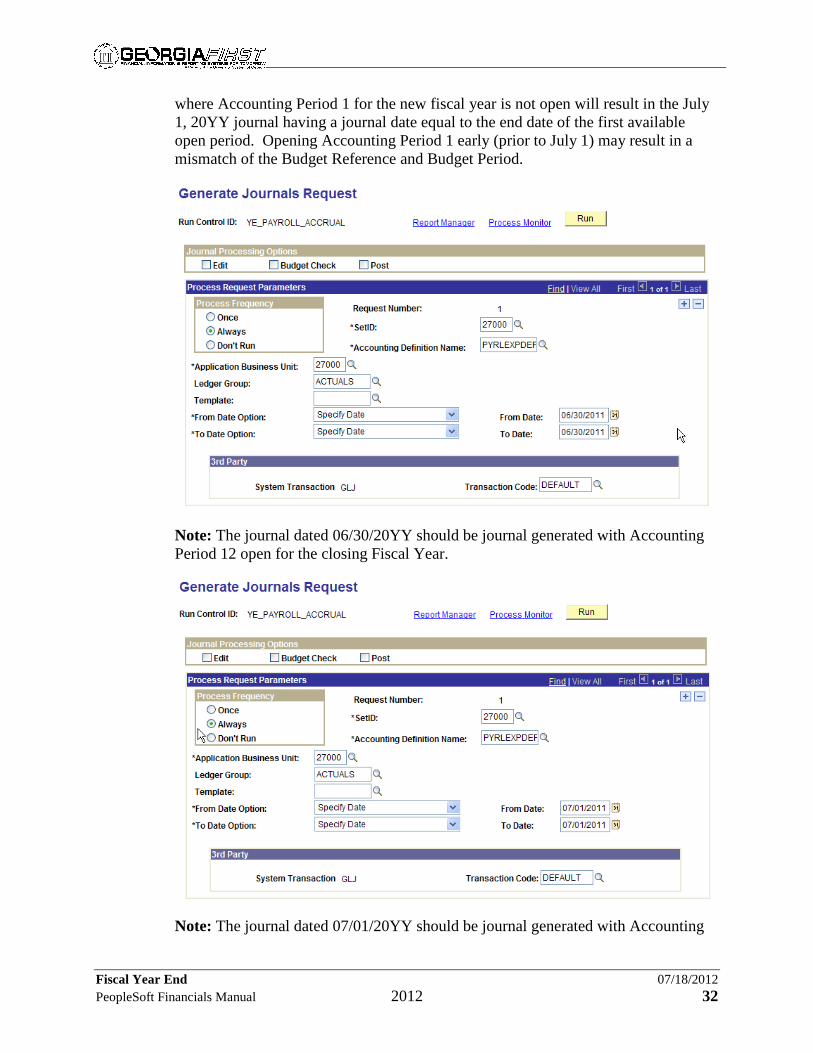
Fiscal Year End 07/18/2012 PeopleSoft Financials Manual 2012 32
where Accounting Period 1 for the new fiscal year is not open will result in the July 1, 20YY journal having a journal date equal to the end date of the first available open period. Opening Accounting Period 1 early (prior to July 1) may result in a mismatch of the Budget Reference and Budget Period.
Note: The journal dated 06/30/20YY should be journal generated with Accounting Period 12 open for the closing Fiscal Year.
Note: The journal dated 07/01/20YY should be journal generated with Accounting

Fiscal Year End 07/18/2012 PeopleSoft Financials Manual 2012 33
Period 1 open for the new Fiscal Year.
Once you have journal generated the data, you will review the two journals that were created by this process.
28. Select General Ledger⇒Journals⇒Journal Entry⇒Create/Update Journal Entries. The Create/Update Journal Entries – Add a New Value page displays.
29. Click on the Find an Existing Value tab. The Create/Update Journal Entries – Find an Existing Value page displays.
30. Verify that your institution’s Business Unit number appears in the Business Unit field.
31. Verify that No Status – Needs to be Edited appears in the Journal Header Status field.
32. Select Not Budget Checked in the Budget Checking Header Status field.
33. Enter or select PAY – Payroll Processing in the Source field.
34. Click on . A Search Results list displays showing the two journals that were created.
35. Click on the 06/30/20YY journal link, where YY are the last two digits of the closing fiscal year. The Header page displays.

Fiscal Year End 07/18/2012 PeopleSoft Financials Manual 2012 34
36. Verify the following information: • Long Description • Fiscal Year: closing fiscal year • Period: Appropriate period for the closing fiscal year
37. Click on the Lines tab. The Lines page displays.
38. Verify the following information: • The Exclusion Accounts, if you selected any, are not present.
• Note: Note any exceptions in Step 9 on page 33. • The Amount fields contain positive amounts. • The Amounts should be the percentage that you entered in the Percentage field
on the Year End Payroll Accrual page.

Fiscal Year End 07/18/2012 PeopleSoft Financials Manual 2012 35
39. Review the journal lines created for the bi-weekly payroll selected for the closing fiscal year for a selected ChartField string. Multiply the amount of this journal line by the percentage that you entered in the Percentage field. This amount should equal the Accrual journal line, +/- rounding by a penny.
Now that you have reviewed the journal entries for the old fiscal year, you will review the Lines information for the new fiscal year.
40. Click on . The Lines page for the 07/01/20YY journal displays, where YY are the last two digits of the new fiscal year.
41. Verify the following information: • The Exclusion Accounts, if you selected any, are not present.
• Note: Note any exceptions in Step 9 on page 33. • The Amount fields contain positive amounts. • The Amounts should be the percentage that you entered in the Percentage field
on the Year End Payroll Accrual page. This journal should be an exact reversal for the old fiscal year journal.
42. Complete the processing of these journals: • Edit • Budget Check • Mark for Posting • Post Note 1: You must complete the processing of the journal for the old fiscal year before running the Zero Personal Services Encumbrances process in Step 4 of this module.

Fiscal Year End 07/18/2012 PeopleSoft Financials Manual 2012 36
Note 2: You can process the journal for the new fiscal year once the new fiscal year has been opened, and the budgets have been established. If budgets have not been established for the new fiscal year, the journal will fail budget checking. Note 3: If the journals have errors, such as an incorrect date, you can delete these journals without posting them, and start the process over. • First, delete the journals without posting them. • Run the 3rd Party Purge process through 07/01/20YY, where YY are the last
two digits of the new fiscal year. This will clear the HR_ACCTG_LINE staging table. Refer to PSFIN Business Process GL.040.011.
• Finally, run the Year-End Payroll Accrual process again.
Now that you have run the Year-End Payroll Accrual process for a bi-weekly payroll that crosses fiscal years, you will move your Summer Faculty payroll expenses, if needed. This completes Step 1, Running the Year-End Payroll Accrual Process.

Fiscal Year End 07/18/2012 PeopleSoft Financials Manual 2012 37
Step 2: Moving Summer Faculty Payroll Expenses In this step, you will move your Summer Faculty payroll expenses, if needed. This process transfers payroll expenses (Accounts 5xxxxx) from the new fiscal year to the old fiscal year. Data in the Financials PERS_SERV_BOR table are used to create the journal entries for the old and new fiscal years. Note 1: If you are not posting your Summer Faculty payroll into the fiscal year in which it is run, the Summer Faculty payroll must be run separately from any other payroll. Otherwise, the process will not produce correct data. Note 2: This process is optional.
Process 1. Select BOR Menus⇒BOR General Ledger⇒BOR Year
End⇒Interface⇒Year End Summer Faculty. The Year End Summer Faculty – Find an Existing Value page displays.
Note: If you have previously run this process, then click on and select the appropriate Run Control ID. If this is the first time you have run this process at your institution, you would select Add a New Value, and enter YE_SUMMER_FACULTY or another appropriate name for this Run Control ID.
2. Click on the Add a New Value tab. The Year End Summer Faculty– Add a New Value page displays.
3. Enter YE_SUMMER_FACULTY in the Run Control ID field.
4. Click on . The Year End Summer Payroll page displays.

Fiscal Year End 07/18/2012 PeopleSoft Financials Manual 2012 38
5. Verify your business unit number appears in the Business Unit field. Enter or select it if it does not.
6. Enter or select the Pay Run ID for the Summer Faculty payroll of the closing Fiscal Year in the Payrun ID field.
7. Enter or select the Payroll Accrual Offset Account in the Payroll Accrual Offset Account field.
Note: The Payroll Accrual Offset Account must be between 212000 and 212999.
8. Enter or select 06/30/YYYY for the closing Fiscal Year in the Acct Date field in the Old Year group box.
Note: This field is automatically populated with the System Date.
9. Verify the date in the Budget Date field defaults from the Acct Date field.
Note: This field is automatically populated with the System Date.
10. Enter or select 07/01/YYYY for the new Fiscal Year in the Acct Date field in the New Year group box.
Note: This field is automatically populated with the System Date.
11. Verify the date in the Budget Date field defaults from the Acct Date field.
Note: This field is automatically populated with the System Date.
12. Click on . The Process Scheduler Request page displays.

Fiscal Year End 07/18/2012 PeopleSoft Financials Manual 2012 39
13. Verify the Process Scheduler Request information.
14. Click on . The BORIF06B process runs, and the Year End Summer Payroll page displays.
15. Click on the Process Monitor link. The Process List page displays.
16. Verify the Run Status is Success.
Note: You can click on to update the Run Status until Success displays.
A Trace File and the Year End Summer Faculty Payroll Expense Journal Load report will be produced by the BORIF06B interface process. You may view the file and report by navigating to the View Log/Trace page.
17. Click on the Details link. The Process Detail page displays.
18. Click on the View Log/Trace link. The View Log/Trace page displays.
19. Click on the Trace File link. A new window displays.

Fiscal Year End 07/18/2012 PeopleSoft Financials Manual 2012 40
20. Close this window after reviewing the Trace File. This brings you back to the View Log/Trace page.
21. Click on the borif06b_XXXXX.PDF link, where XXXXX is the process instance number. A new window opens to display the PDF file.
Fiscal Year End 07/18/2012 PeopleSoft Financials Manual 2012 41
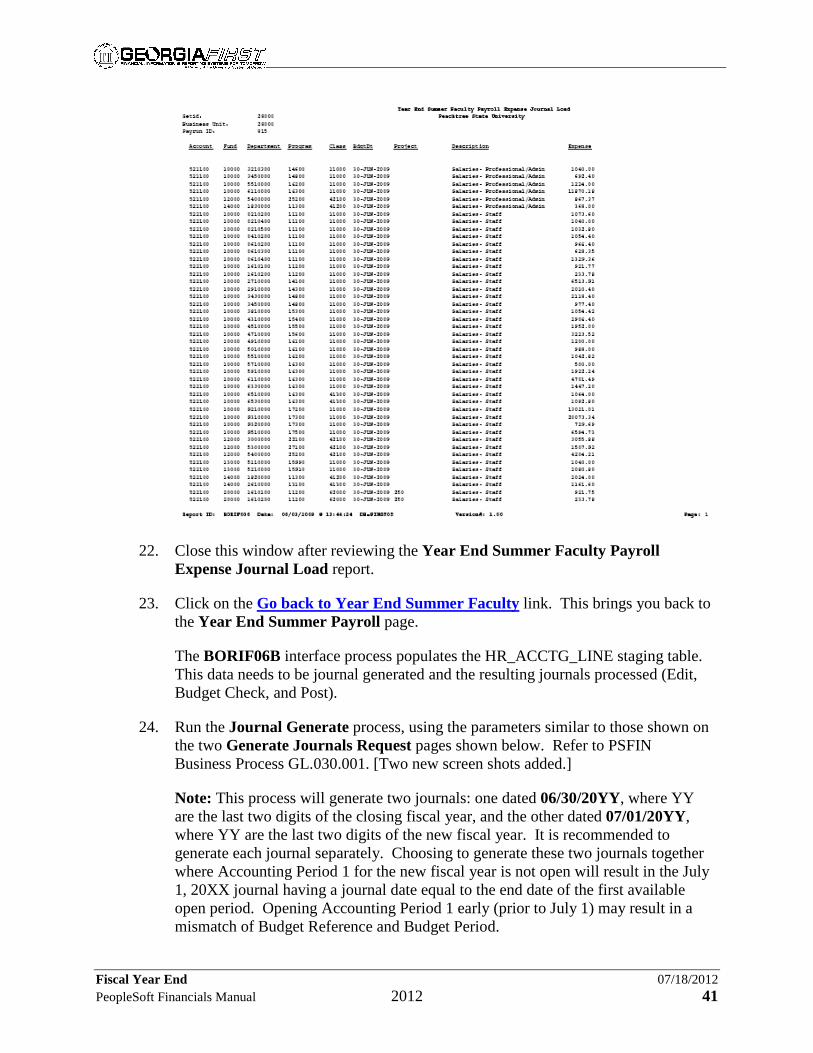
22. Close this window after reviewing the Year End Summer Faculty Payroll Expense Journal Load report.
23. Click on the Go back to Year End Summer Faculty link. This brings you back to the Year End Summer Payroll page.
The BORIF06B interface process populates the HR_ACCTG_LINE staging table. This data needs to be journal generated and the resulting journals processed (Edit, Budget Check, and Post).
24. Run the Journal Generate process, using the parameters similar to those shown on the two Generate Journals Request pages shown below. Refer to PSFIN Business Process GL.030.001. [Two new screen shots added.]
Note: This process will generate two journals: one dated 06/30/20YY, where YY are the last two digits of the closing fiscal year, and the other dated 07/01/20YY, where YY are the last two digits of the new fiscal year. It is recommended to generate each journal separately. Choosing to generate these two journals together where Accounting Period 1 for the new fiscal year is not open will result in the July 1, 20XX journal having a journal date equal to the end date of the first available open period. Opening Accounting Period 1 early (prior to July 1) may result in a mismatch of Budget Reference and Budget Period.

Fiscal Year End 07/18/2012 PeopleSoft Financials Manual 2012 42
Note: The journal dated 06/30/20YY should be journal generated with Accounting Period 12 open for the closing Fiscal Year.
Note: The journal dated 07/01/20YY should be journal generated with Accounting Period 1 open for the new Fiscal Year.
Once you have journal generated the data, you will review the two journals that were created by this process.

Fiscal Year End 07/18/2012 PeopleSoft Financials Manual 2012 43
25. Select General Ledger⇒Journals⇒Journal Entry⇒Create/Update Journal Entries. The Create/Update Journal Entries – Add a New Value page displays.
26. Click on the Find an Existing Value tab. The Create/Update Journal Entries – Find an Existing Value page displays.
27. Verify that your institution’s Business Unit number appears in the Business Unit field.
28. Verify that No Status – Needs to be Edited appears in the Journal Header Status field.
29. Select Not Budget Checked in the Budget Checking Header Status field.
30. Enter or select PAY – Payroll Processing in the Source field.
31. Click on . A Search Results list displays showing the two journals that were created.
32. Click on the 06/30/20YY journal link, where YY are the last two digits of the closing fiscal year. The Header page displays.

Fiscal Year End 07/18/2012 PeopleSoft Financials Manual 2012 44
33. Verify the following information: • Long Description • Fiscal Year: closing fiscal year • Period: Appropriate period for the closing fiscal year
34. Click on the Lines tab. The Lines page displays.
35. Verify that the journal entry contains 5xxxxx Account entries. These 5xxxx entries should have the same amounts as the original entries for the Summer Faculty payroll already posted into the new fiscal year.
Now that you have reviewed the journal entries for the old fiscal year, you will review the Lines information for new fiscal year.

Fiscal Year End 07/18/2012 PeopleSoft Financials Manual 2012 45
36. Click on . The Lines page for the 07/01/20YY journal displays, where YY are the last two digits of the new fiscal year.
37. Verify that this journal entry is an exact reversal of the old fiscal year journal entry for Summer Faculty.
38. Complete the processing of these journals: • Edit • Budget Check • Mark for Posting • Post Note 1: You must complete the processing of the journal for the old Fiscal Year before running the Zero Personal Services Encumbrances process in Step 4 of this module. Note 2: You can process the journal for the new fiscal year once the new fiscal year has been opened, and the budgets have been established. If budgets have not been established for the new fiscal year, the journal will fail budget checking. Note 3: If the journals have errors, such as an incorrect date, you can delete these journals without posting them, and start the process over. • First, delete the journals without posting them. • Run the 3rd Party Purge process through 07/01/20YY, where YY are the last
two digits of the new fiscal year. This will clear the HR_ACCTG_LINE staging table. Refer to PSFIN Business Process GL.040.011.
• Finally, run the Year-End Summer Faculty process again.
Now that you have moved the Summer Faculty payroll expenses, you will move your Maymester payroll expenses, if needed.
Fiscal Year End 07/18/2012 PeopleSoft Financials Manual 2012 46
This completes Step 2, Moving Summer Faculty Payroll Expenses.

Fiscal Year End 07/18/2012 PeopleSoft Financials Manual 2012 47
Step 3: Moving the Maymester Faculty Payroll Expenses In this step, you will move your Maymester Faculty payroll expenses, if needed. This process transfers payroll expenses (Accounts 5xxxxx) from the old fiscal year to the new fiscal year. The payroll is already posted into the old fiscal year. Data in the Financials PERS_SERV_BOR table are used to create the journal entries for the old and new fiscal years. Note: This process is optional.
Process 1. Select BOR Menus⇒BOR General Ledger⇒BOR Year
End⇒Interface⇒Year End Maymester Faculty. The Year End Maymester Faculty – Find an Existing Value page displays.
Note: If you have previously run this process, then click on and select the appropriate Run Control ID. If this is the first time you have run this process at your institution, you would select Add a New Value, and enter YE_MAYMESTER_FACULTY or another appropriate name for this Run Control ID.
2. Click on the Add a New Value tab. The Year End Maymester Faculty – Add a New Value page displays.
3. Enter YE_MAYMESTER_FACULTY in the Run Control ID field.
4. Click on . The Year End Maymester Payroll page displays.

Fiscal Year End 07/18/2012 PeopleSoft Financials Manual 2012 48
5. Verify your business unit number appears in the Business Unit field. Enter or select it if it does not.
6. Enter or select the Pay Run ID for the Maymester payroll of the closing Fiscal Year in the Payrun ID field.
7. Enter or select the Prepaid Expense Account in the Prepaid Expense Account field.
Note: The Prepaid Expense Account must be between 132100 and 132199.
8. Enter or select 06/30/YYYY for the closing Fiscal Year in the Acct Date field in the Old Year group box.
Note: This field is automatically populated with the System Date.
9. Verify the date in the Budget Date field defaults from the Acct Date field.
Note: This field is automatically populated with the System Date.
10. Enter or select 07/01/YYYY for the new Fiscal Year in the Acct Date field in the New Year group box.
Note: This field is automatically populated with the System Date.
11. Verify the date in the Budget Date field defaults from the Acct Date field.
Note: This field is automatically populated with the System Date.
12. Click on . The Process Scheduler Request page displays.
Fiscal Year End 07/18/2012 PeopleSoft Financials Manual 2012 49
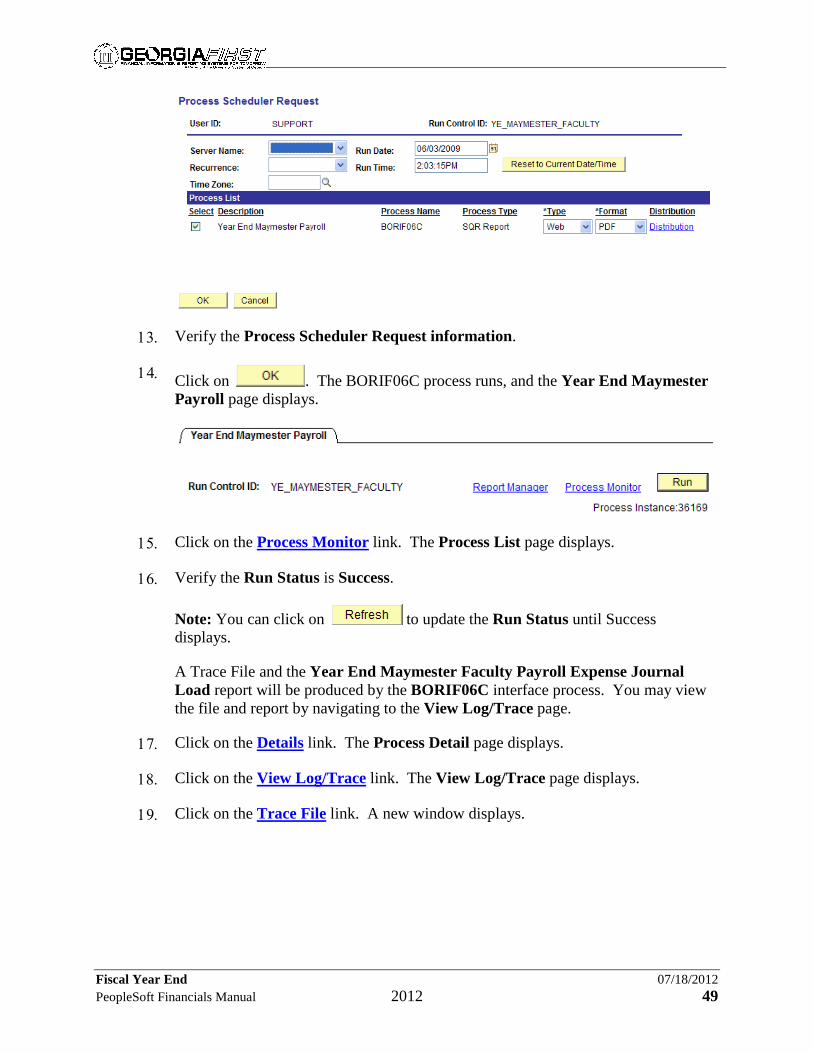
13. Verify the Process Scheduler Request information.
14. Click on . The BORIF06C process runs, and the Year End Maymester Payroll page displays.
15. Click on the Process Monitor link. The Process List page displays.
16. Verify the Run Status is Success.
Note: You can click on to update the Run Status until Success displays.
A Trace File and the Year End Maymester Faculty Payroll Expense Journal Load report will be produced by the BORIF06C interface process. You may view the file and report by navigating to the View Log/Trace page.
17. Click on the Details link. The Process Detail page displays.
18. Click on the View Log/Trace link. The View Log/Trace page displays.
19. Click on the Trace File link. A new window displays.
Fiscal Year End 07/18/2012 PeopleSoft Financials Manual 2012 50
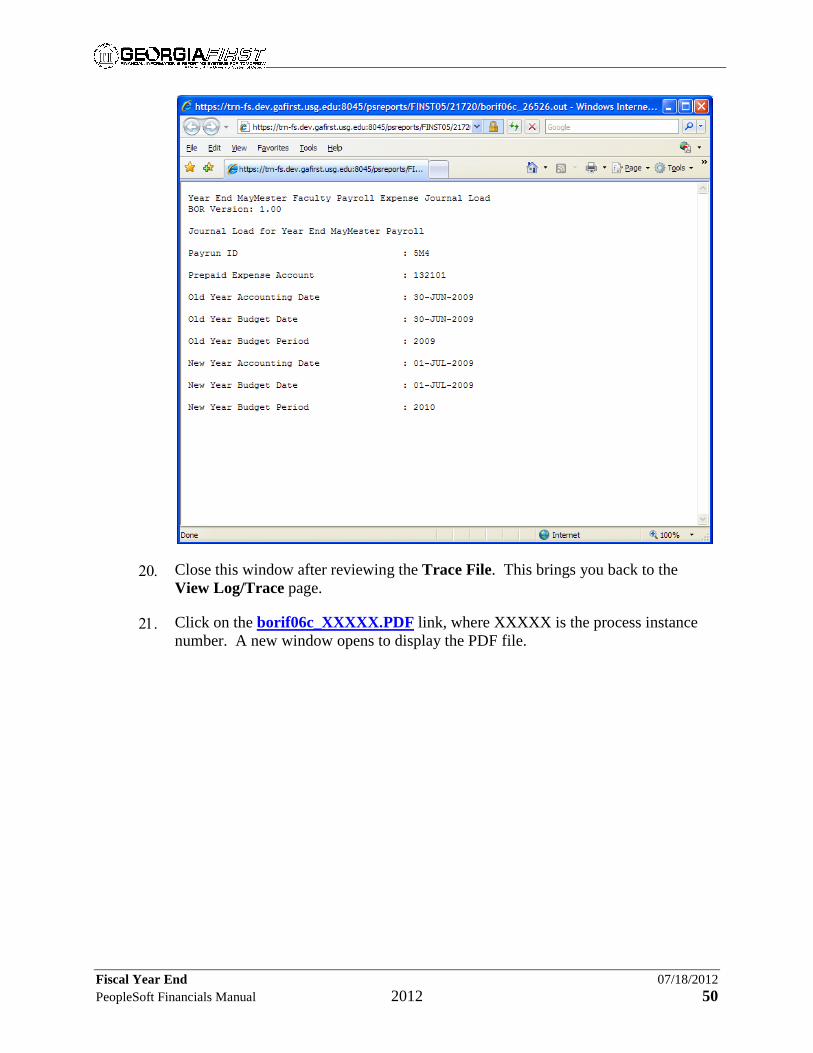
20. Close this window after reviewing the Trace File. This brings you back to the View Log/Trace page.
21. Click on the borif06c_XXXXX.PDF link, where XXXXX is the process instance number. A new window opens to display the PDF file.
Fiscal Year End 07/18/2012 PeopleSoft Financials Manual 2012 51
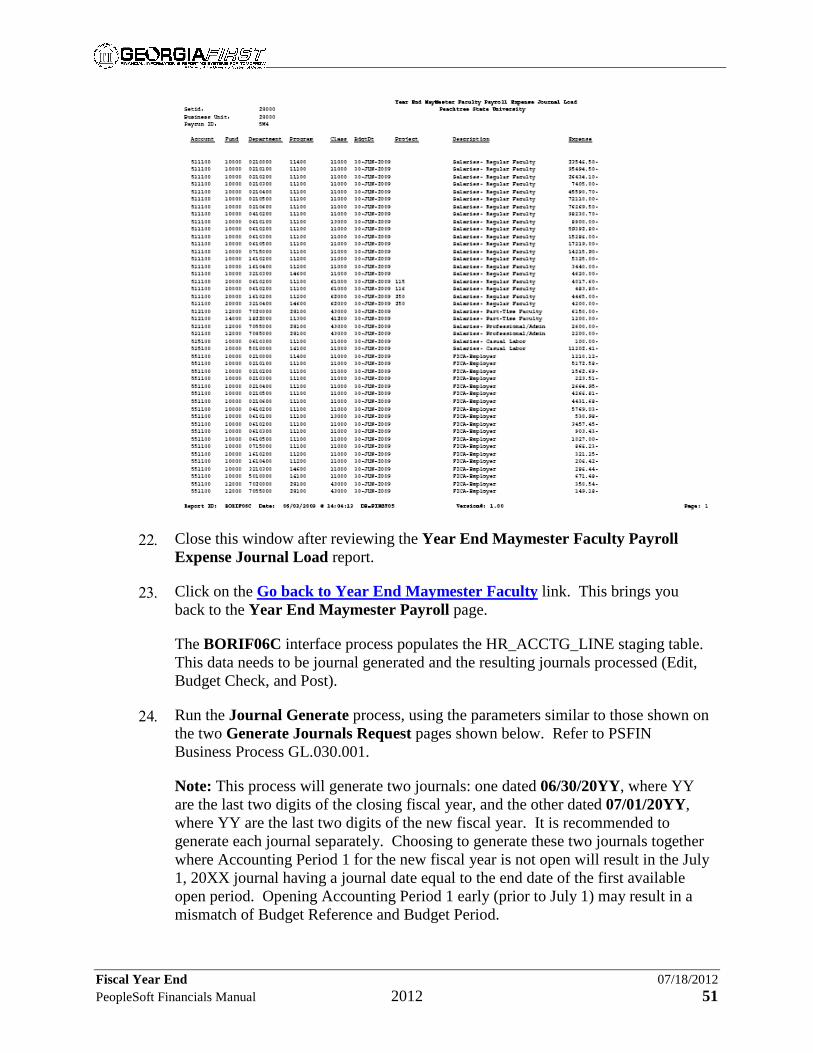
22. Close this window after reviewing the Year End Maymester Faculty Payroll Expense Journal Load report.
23. Click on the Go back to Year End Maymester Faculty link. This brings you back to the Year End Maymester Payroll page.
The BORIF06C interface process populates the HR_ACCTG_LINE staging table. This data needs to be journal generated and the resulting journals processed (Edit, Budget Check, and Post).
24. Run the Journal Generate process, using the parameters similar to those shown on the two Generate Journals Request pages shown below. Refer to PSFIN Business Process GL.030.001.
Note: This process will generate two journals: one dated 06/30/20YY, where YY are the last two digits of the closing fiscal year, and the other dated 07/01/20YY, where YY are the last two digits of the new fiscal year. It is recommended to generate each journal separately. Choosing to generate these two journals together where Accounting Period 1 for the new fiscal year is not open will result in the July 1, 20XX journal having a journal date equal to the end date of the first available open period. Opening Accounting Period 1 early (prior to July 1) may result in a mismatch of Budget Reference and Budget Period.

Fiscal Year End 07/18/2012 PeopleSoft Financials Manual 2012 52
Note: The journal dated 06/30/20YY should be journal generated with Accounting Period 12 open for the closing Fiscal Year.
Note: The journal dated 07/01/20YY should be journal generated with Accounting Period 1 open for the new Fiscal Year.
Once you have journal generated the data, you will review the two journals that were created by this process.

Fiscal Year End 07/18/2012 PeopleSoft Financials Manual 2012 53
25. Select General Ledger⇒Journals⇒Journal Entry⇒Create/Update Journal Entries. The Create/Update Journal Entries – Add a New Value page displays.
26. Click on the Find an Existing Value tab. The Create/Update Journal Entries – Find an Existing Value page displays.
27. Verify that your institution’s Business Unit number appears in the Business Unit field.
28. Verify that No Status – Needs to be Edited appears in the Journal Header Status field.
29. Select Not Budget Checked in the Budget Checking Header Status field.
30. Enter or select PAY – Payroll Processing in the Source field.
31. Click on . A Search Results list displays showing the two journals that were created.
32. Click on the 06/30/20YY journal link, where YY are the last two digits of the closing fiscal year. The Header page displays.

Fiscal Year End 07/18/2012 PeopleSoft Financials Manual 2012 54
33. Verify the following information: • Long Description • Fiscal Year: closing fiscal year • Period: Appropriate period for the closing fiscal year
34. Click on the Lines tab. The Lines page displays.
35. Verify that the journal entry contains 5xxxxx Account entries. These 5xxxx entries should have the same amounts as the original entries for the Maymester Faculty payroll already posted into the new fiscal year.
Now that you have reviewed the journal entries for the old fiscal year, you will review the Lines information for new fiscal year.

Fiscal Year End 07/18/2012 PeopleSoft Financials Manual 2012 55
36. Click on . The Lines page for the 07/01/20YY journal displays, where YY are the last two digits of the closing fiscal year.
37. Verify that this journal entry is an exact reversal of the old fiscal year journal entry for Maymester Faculty.
38. Complete the processing of these journals: • Edit • Budget Check • Mark for Posting • Post Note 1: You must complete the processing of the journal for the old Fiscal Year before running the Zero Personal Services Encumbrances process in Step 4 of this module. Note 2: You can process the journal for the new fiscal year once the new fiscal year has been opened, and the budgets have been established. If budgets have not been established for the new fiscal year, the journal will fail budget checking. Note 3: If the journals have errors, such as an incorrect date, you can delete these journals without posting them, and start the process over. • First, delete the journals without posting them. • Run the 3rd Party Purge process through 07/01/20YY, where YY are the last
two digits of the new fiscal year. This will clear the HR_ACCTG_LINE staging table. Refer to PSFIN Business Process GL.040.011.
• Finally, run the Year-End Maymester Faculty process again.
Now that you have moved the Maymester Faculty payroll expenses, you will zero your Personal Services encumbrances.

Fiscal Year End 07/18/2012 PeopleSoft Financials Manual 2012 56
This completes Step 3, Moving the Maymester Faculty Payroll Expenses.

Fiscal Year End 07/18/2012 PeopleSoft Financials Manual 2012 57
Step 4: Zeroing the Personal Services Encumbrances In this step, you will zero the encumbrance amounts for personal services accounts. Note 1: All payroll expense and encumbrance journals from the closing Fiscal Year must be processed before zeroing the personal services encumbrances. Note 2: This process will zero the encumbrances for ALL Personal Service Account numbers beginning with 5XXXXX. If the Zero Personal Services Encumbrances process is run at times other than Fiscal Year End, the journal may need to be modified by deleting lines that may affect Unemployment Insurance and Workers Compensation, etc. The premature zeroing of these accounts may require manual entries for correction.
Process 1. Select BOR Menus⇒BOR General Ledger⇒BOR Year End⇒Interface⇒
Year End Zero Pers Serv Encum. The Year End Zero Pers Serv Encum – Find an Existing Value page displays.
Note: If you have previously run this process, then click on and select the appropriate Run Control ID. If this is the first time you have run this process at your institution, you would select Add a New Value, and enter YE_PERS_SERV_ENCUM or another appropriate name for this Run Control ID.
2. Click on the Add a New Value tab. The Year End Zero Pers Serv Encum – Add a New Value page displays.
3. Enter YE_PERS_SERV_ENCUM.
4. Click on . The YE Zero Personal Serv Encum page displays.
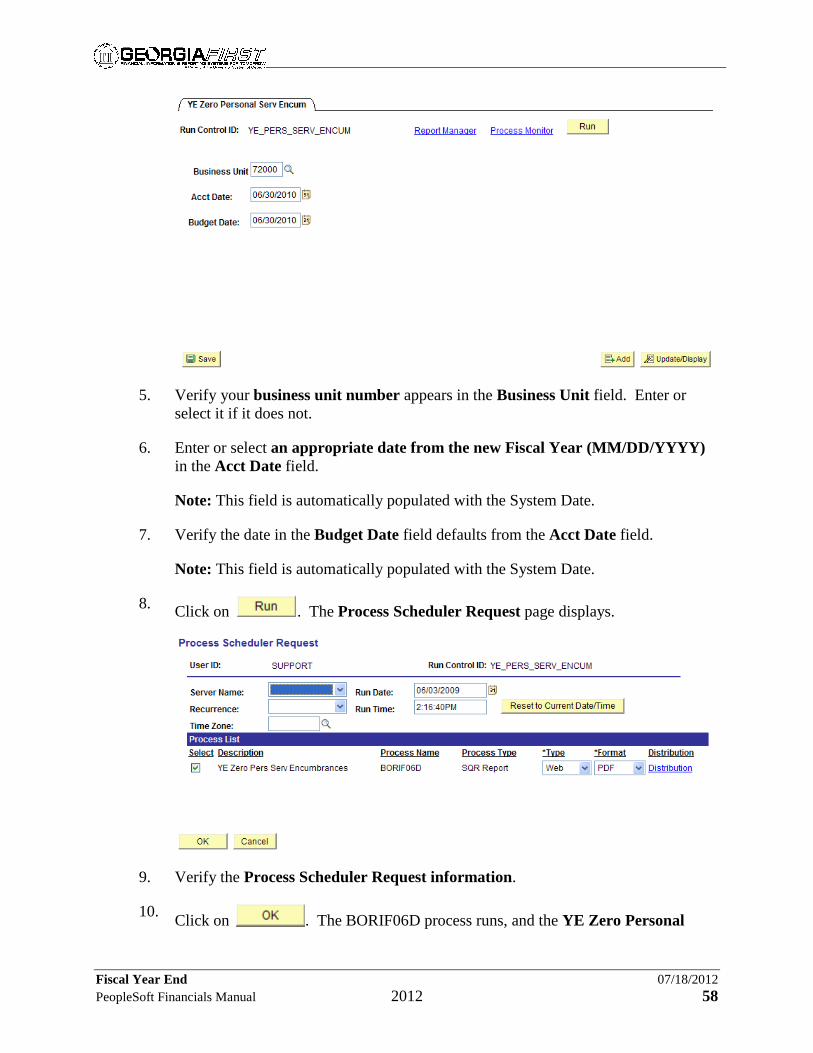
Fiscal Year End 07/18/2012 PeopleSoft Financials Manual 2012 58
5. Verify your business unit number appears in the Business Unit field. Enter or select it if it does not.
6. Enter or select an appropriate date from the new Fiscal Year (MM/DD/YYYY) in the Acct Date field.
Note: This field is automatically populated with the System Date.
7. Verify the date in the Budget Date field defaults from the Acct Date field.
Note: This field is automatically populated with the System Date.
8. Click on . The Process Scheduler Request page displays.
9. Verify the Process Scheduler Request information.
10. Click on . The BORIF06D process runs, and the YE Zero Personal

Fiscal Year End 07/18/2012 PeopleSoft Financials Manual 2012 59
Serv Encum page displays.
11. Click on the Process Monitor link. The Process List page displays.
12. Verify the Run Status is Success.
Note: You can click on to update the Run Status until Success displays.
A Trace File and the Year End Personal Service Encumbrance Journal Load report will be produced by the BORIF06D interface process. You may view the file and report by navigating to the View Log/Trace page.
13. Click on the Details link. The Process Detail page displays.
14. Click on the View Log/Trace link. The View Log/Trace page displays.
15. Click on the Trace File link. A new window displays.

Fiscal Year End 07/18/2012 PeopleSoft Financials Manual 2012 60
16. Close this window after reviewing the Trace File. This brings you back to the View Log/Trace page.
17. Click on the borif06d_XXXXX.PDF link, where XXXXX is the process instance number. A new window opens to display the PDF file.
18. Close the window after reviewing the Year End Personal Service Encumbrance Journal Load report.
19. Click on the Go back to Year End Zero Pers Serv Encum link. This brings you back to the YE Zero Personal Serv Encum page.
The BORIF06D interface process populates the HR_ACCTG_LINE staging table. This data needs to be journal generated and the resulting journals processed (Edit, Budget Check, and Post).
20. Run the Journal Generate process, using the parameters similar to those shown on the Generate Journals Request page shown below. Refer to PSFIN Business Process GL.030.001.
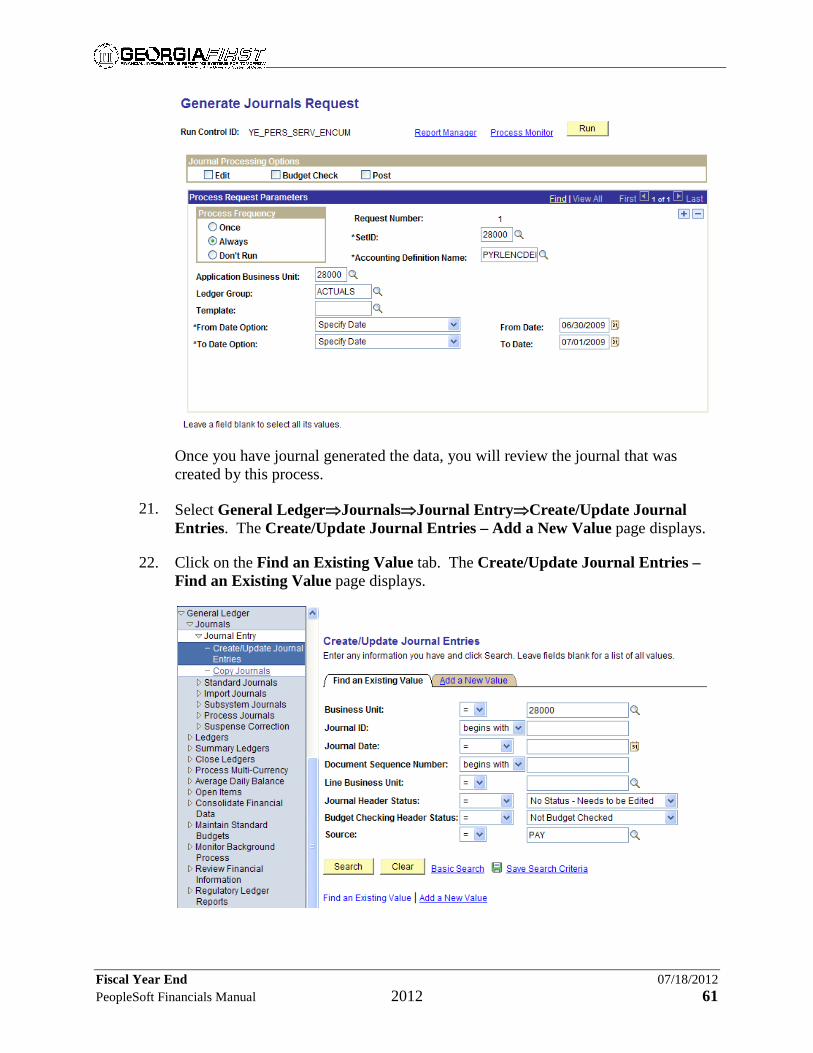
Fiscal Year End 07/18/2012 PeopleSoft Financials Manual 2012 61
Once you have journal generated the data, you will review the journal that was created by this process.
21. Select General Ledger⇒Journals⇒Journal Entry⇒Create/Update Journal Entries. The Create/Update Journal Entries – Add a New Value page displays.
22. Click on the Find an Existing Value tab. The Create/Update Journal Entries – Find an Existing Value page displays.
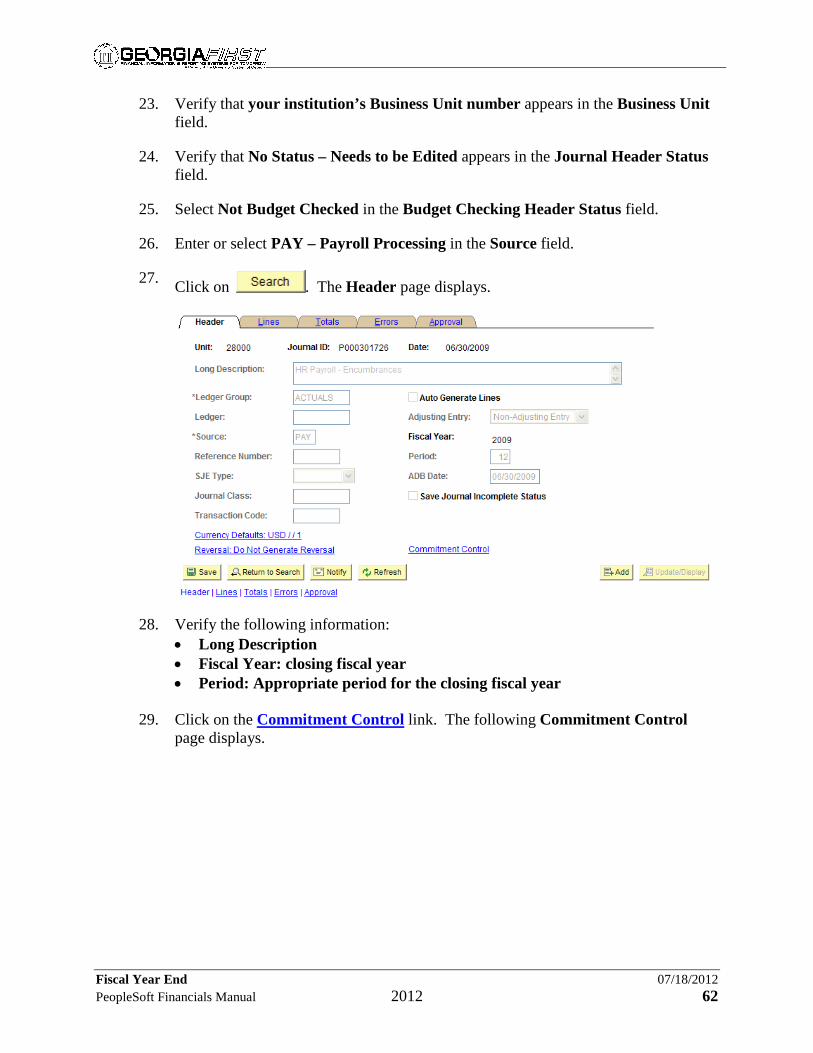
Fiscal Year End 07/18/2012 PeopleSoft Financials Manual 2012 62
23. Verify that your institution’s Business Unit number appears in the Business Unit field.
24. Verify that No Status – Needs to be Edited appears in the Journal Header Status field.
25. Select Not Budget Checked in the Budget Checking Header Status field.
26. Enter or select PAY – Payroll Processing in the Source field.
27. Click on . The Header page displays.
28. Verify the following information: • Long Description • Fiscal Year: closing fiscal year • Period: Appropriate period for the closing fiscal year
29. Click on the Commitment Control link. The following Commitment Control page displays.
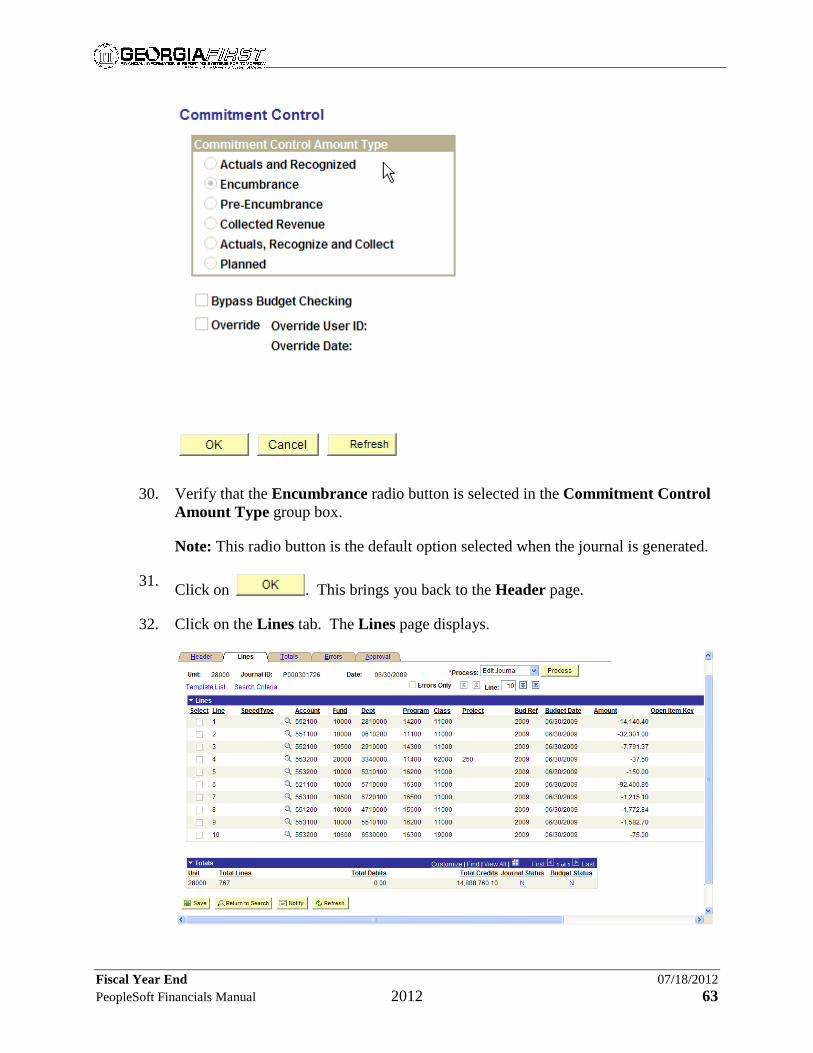
Fiscal Year End 07/18/2012 PeopleSoft Financials Manual 2012 63
30. Verify that the Encumbrance radio button is selected in the Commitment Control Amount Type group box.
Note: This radio button is the default option selected when the journal is generated.
31. Click on . This brings you back to the Header page.
32. Click on the Lines tab. The Lines page displays.

Fiscal Year End 07/18/2012 PeopleSoft Financials Manual 2012 64
33. Complete the processing of this journal: • Edit • Budget Check • Mark for Posting • Post
34. Verify that this journal zeros the encumbrance by running the Year End 04: BOR_CHK_PERSERV_ENCUMB query. No results should be returned from this query.
Note: Refer to Appendix A, Period End Integrity Checks, starting on page 193, for more information on the Period End Integrity Check queries.
At this point, all payrolls and the Year End processes for payroll should be edited, budget checked, and posted to the Actuals ledger. If you want to review these journal entries, you can run the General Ledger Activity Report (GLS7002) as a verification tool. This report lists the beginning and ending ledger balances by Chartfield combination and account, and the detailed journal line activity posted against a ledger for the accounting period specified. You can run this report by selecting General Ledger⇒General Reports⇒Ledger Activity.
This completes Step 4, Zeroing the Year-End Personal Services Encumbrances. Now that you have processed your Year-End payrolls, you will run the Year-End Purchasing Cleanup processes. This completes Module 2, Year-End Payroll Processes.

Fiscal Year End 07/18/2012 PeopleSoft Financials Manual 2012 65
Module 3: Year-End Purchasing Cleanup Processes Introduction In this module, we will concentrate on the Year-End Purchasing
Cleanup processes. The monthly processing and closing at the GeorgiaFIRST project requires a coordination of effort between the Purchasing, Accounts Payable, Asset Management, and General Ledger functions to ensure that the timing of the tasks required are completed in sequence. The key element to a successful closing is to make sure that there is clear communication between the Accounts Payable, Purchasing, and Asset Management personnel charged with transaction initiation, approval, and review. PeopleSoft will allow the users to run processes independently and out of sequence, so it is incumbent upon the users to communicate when they have completed the processing of all new entries and the cleanup of all outstanding items in their areas. This will ensure that all appropriate transactions will be encompassed in the purchasing cleanup.
Objectives In this module, you will: Determine and implement eProcurement Year End cutoff
procedures (optional) Identify open requisitions and remaining PREENC balances Process valid requisitions into purchase orders Cancel and close requisitions and requisition lines Establish the Purchasing cleanup groundwork Identify open purchase orders and remaining encumbrances Finalize vouchers and liquidate purchase orders with
remaining encumbrances after final payment Cancel and close outstanding purchase orders and purchase
order lines that should not remain open Troubleshoot purchase orders that will not reconcile Perform requisition cleanup (finalize/cancel/close) Reconcile open POENC balances in Purchasing to open
POENC balances in Commitment Control Reconcile open PRENC balances in Purchasing to open
PRENC balances in Commitment Control Update the BUD REF for all Requesters at Year End
Institution-

Fiscal Year End 07/18/2012 PeopleSoft Financials Manual 2012 66
Specific Business Processes
____________________________________________________
____________________________________________________
____________________________________________________
____________________________________________________
____________________________________________________
____________________________________________________
Security Refer to the individual PSFIN Business Processes for the appropriate Security roles to carry out your Year End Purchasing Cleanup processes.

Fiscal Year End 07/18/2012 PeopleSoft Financials Manual 2012 67
Step 1: Determining and Implementing eProcurement Year End Cutoff Procedures (Optional) A. In Step 1, you can choose to change the Budget Reference (Bud Ref) to the next fiscal year
as a way to control requisition entry during the year end closeout time period. Each institution can decide on its own implementation date.
Changing Budget Reference (Bud Ref) to the Next Fiscal Year Each requester in the PeopleSoft System has a Requester Setup page that contains default settings, including the Budget Reference (Bud Ref), as shown below.
Once the institution decides on the cutoff date, you can run a process in PeopleSoft to change the Bud Ref field to the new Fiscal Year for your institution, as shown in the following steps. Refer to PSFIN Business Process EP.080.700, Updating BUD REF for All Requesters at Year End. Process 1. Select BOR Menus⇒BOR Purchasing⇒BOR PO Use and
Processing⇒Update Requester Budget Ref.

Fiscal Year End 07/18/2012 PeopleSoft Financials Manual 2012 68
2. Enter the new Fiscal Year in the Budget Reference field.
3. Click on to run this process, which will update the default Bud Ref for all requesters at your institution to the new Fiscal Year.
This option will allow Requesters to continue to enter Requisitions during the cutoff period.
• If the Requester selects Save and Preview, the Requisition will be placed in an Open status and will not route through workflow.
• If the Requester selects Submit, the Requisition will be routed through workflow. Once the Requisition is approved, it will fail budget checking.
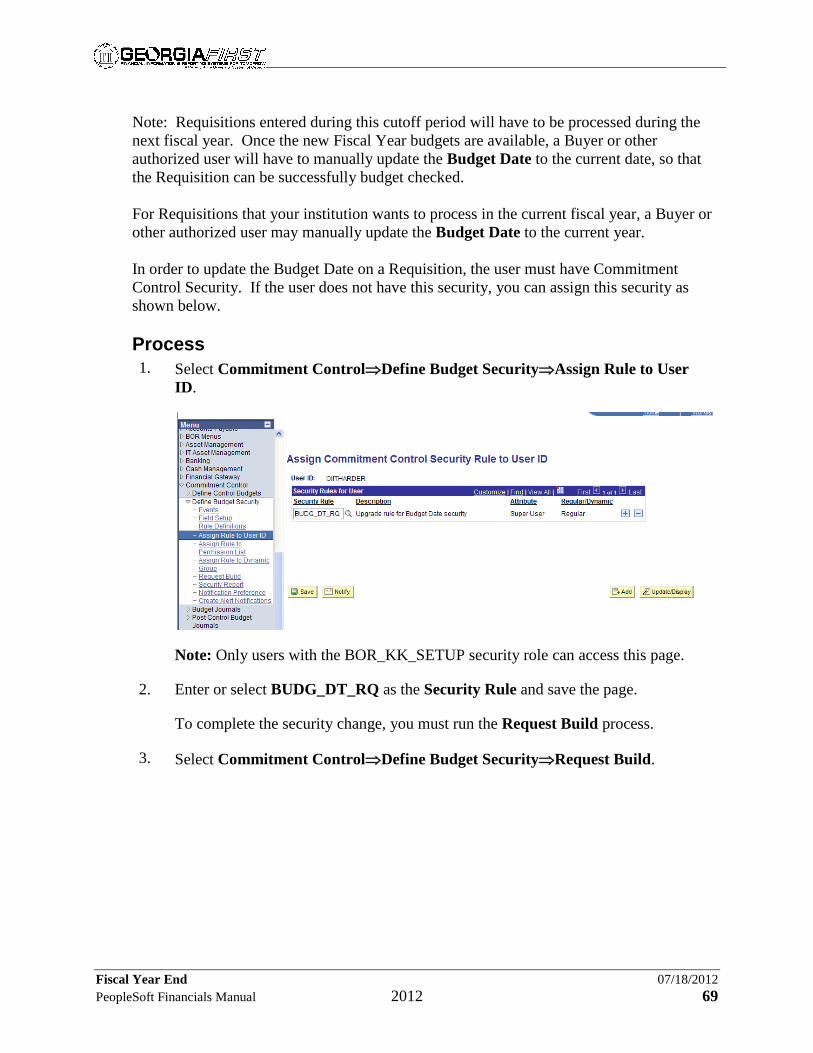
Fiscal Year End 07/18/2012 PeopleSoft Financials Manual 2012 69
Note: Requisitions entered during this cutoff period will have to be processed during the next fiscal year. Once the new Fiscal Year budgets are available, a Buyer or other authorized user will have to manually update the Budget Date to the current date, so that the Requisition can be successfully budget checked. For Requisitions that your institution wants to process in the current fiscal year, a Buyer or other authorized user may manually update the Budget Date to the current year. In order to update the Budget Date on a Requisition, the user must have Commitment Control Security. If the user does not have this security, you can assign this security as shown below.
Process 1. Select Commitment Control⇒Define Budget Security⇒Assign Rule to User
ID.
Note: Only users with the BOR_KK_SETUP security role can access this page.
2. Enter or select BUDG_DT_RQ as the Security Rule and save the page.
To complete the security change, you must run the Request Build process.
3. Select Commitment Control⇒Define Budget Security⇒Request Build.

Fiscal Year End 07/18/2012 PeopleSoft Financials Manual 2012 70
Note: Only users with the BOR_KK_PROCESSES security role can access this page.
4. Click on to run this process, and the user will now be able to modify the Budget Date, which drives the Bud Ref.
If there are Requisitions that were submitted during the cutoff time period that do not need
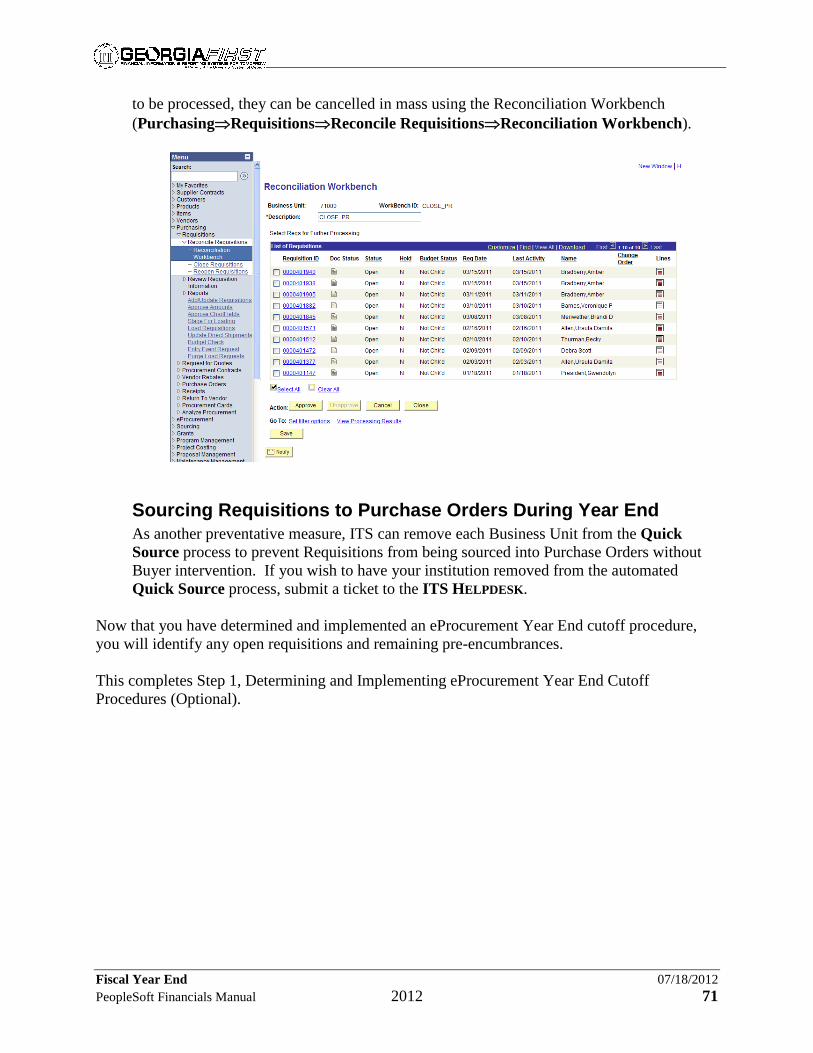
Fiscal Year End 07/18/2012 PeopleSoft Financials Manual 2012 71
to be processed, they can be cancelled in mass using the Reconciliation Workbench (Purchasing⇒Requisitions⇒Reconcile Requisitions⇒Reconciliation Workbench).
Sourcing Requisitions to Purchase Orders During Year End As another preventative measure, ITS can remove each Business Unit from the Quick Source process to prevent Requisitions from being sourced into Purchase Orders without Buyer intervention. If you wish to have your institution removed from the automated Quick Source process, submit a ticket to the ITS HELPDESK.
Now that you have determined and implemented an eProcurement Year End cutoff procedure, you will identify any open requisitions and remaining pre-encumbrances. This completes Step 1, Determining and Implementing eProcurement Year End Cutoff Procedures (Optional).
Fiscal Year End 07/18/2012 PeopleSoft Financials Manual 2012 72
Step 2: Identifying Open Requisitions and Remaining PREENC Balances In this step, you will run the BOR_REQ_OPEN_AMOUNT_ALL query. You can use this query to analyze and clean up requisitions as instructed in Steps 3 and 4 of this module, starting on pages 73 and 74, respectively. Note 1: This step may not apply to your institution. You must follow the steps in this process only if your institution uses requisitions for pre-encumbering funds. Note 2: You may wish to run this query periodically throughout the year to monitor and identify any completed or canceled requisitions that have remaining pre-encumbrance balances. The BOR_REQ_OPEN_AMOUNT_ALL query can assist you with identifying problem requisitions. You may wish to run the query results to Excel to assist you in reviewing the data. Requisitions with a Completed or Canceled status may be retrieved if the requisition pre-encumbrances were not properly liquidated and a pre-encumbrance balance remains. 1. If the requisition status is a value other than C (Complete), you must complete processing of
the requisition. 2. If the requisition status is C (Complete) with a remaining PREENC balance, you may need
to run Budget Checking on the requisition before it will liquidate and not be shown in the query results.
Now that you have identified any open requisitions and their remaining pre-encumbrances, you will liquidate the balances by either sourcing the remaining quantity or amount to a purchase order (Step 3), or by canceling/closing the requisition (Step 4). This completes Step 2, Identifying Open Requisitions and Remaining PREENC Balances.

Fiscal Year End 07/18/2012 PeopleSoft Financials Manual 2012 73
Step 3: Processing Valid Requisitions into Purchase Orders In this step, you will process valid requisitions into purchase orders. This process involves three basic steps. Note: This step may not apply to your institution. You must follow the steps in this process only if your institution uses requisitions for pre-encumbering funds.
Process 1. Source approved requisitions with Valid budget statuses to purchase orders.
Requisitions can be sourced via the Expedite Requisitions process (eProcurement⇒Buyer Center⇒Expedite Requisitions). Refer to PSFIN Business Process EP.020.760 for details on the sourcing process.
Note: Only Purchasing personnel with the appropriate security will be able to source requisitions into purchase orders.
Once the Expedite Requisitions process runs and posts successfully, the requisitions sourced and their corresponding approved purchase order IDs can be viewed within the Sourcing Workbench (Purchasing⇒Purchase Orders⇒Stage/Source Requests⇒Sourcing Workbench).
2. Run the PO Budget Check Request process (Purchasing⇒Purchase Orders⇒Budget Check). Budget checking ensures that commitments and expenditures do not exceed total budgets. Refer to PSFIN Business Process PO.030.030 for details on running the requisition budget check batch process.
3. Run the PO Dispatch process (Purchasing⇒Purchase Orders⇒Dispatch POs). Dispatching involves preparing the purchase orders for submission to the appropriate vendors. Refer to PSFIN Business Process PO.030.010 for details on running the dispatch process.
Now that you have processed your valid requisitions into purchase orders, you will need to need to cancel and reconcile/close requisitions or requisition lines that are not associated with purchase orders if you do not intend to source them. In addition, any requisitions that are partially sourced with outstanding remaining pre-encumbrance balances will need to be finalized and reconciled/closed. Refer to the following PSFIN Business Processes for more information: • PO.020.480 on how to finalize a requisition. • PO.020.960 on how to close requisitions via the Close Requisitions batch process or the
Requisition Reconciliation Workbench. This completes Step 3, Processing Valid Requisitions into Purchase Orders.

Fiscal Year End 07/18/2012 PeopleSoft Financials Manual 2012 74
Step 4: Canceling and Closing Requisitions and Requisition Lines In this step, you will cancel and close requisitions and requisition lines. Note 1: This step may not apply to your institution. You must follow the steps in this process only if your institution uses requisitions for pre-encumbering funds. Note 2: You cannot cancel or close a requisition or that has been sourced to a valid purchase order unless you first cancel or close the associated purchase order. After all PO Reconciliation is complete, you may or may not have additional requisition cleanup work to do. Refer to Step 9 in this module, starting on page 111, for more information on requisition cleanup.
Canceling a Requisition The option to cancel an entire requisition should be taken by selecting the Cancel Requisition option on the drop-down menu of the Manage Requisitions page (eProcurement⇒Manage Requisitions).
If you wish to cancel multiple requisitions simultaneously, this can be accomplished by using the Requisition Reconciliation Workbench. Refer to PSFIN Business Process EP.020.650 for more details on using the Requisition Reconciliation Workbench. When a requisition is canceled, it will require budget checking to be run in order to liquidate any pre-encumbrance balance. Refer to PSFIN Business Process PO.030.190 for more details on the Budget Checking Requisitions batch process or PO.020.930 for more details on Budget Checking an individual requisition online. Once the requisition is successfully budget checked, it will then be eligible for selection in the batch Requisition Close process (Purchasing⇒Requisitions⇒Reconcile Requisitions⇒Close Requisitions) or available to reconcile and close via the Requisition Reconciliation Workbench.
Fiscal Year End 07/18/2012 PeopleSoft Financials Manual 2012 75
Canceling a Requisition Line In the event that a multi-line requisition contains a line that has not been sourced to a purchase order and you do not intend to source that line to a purchase order, the un-sourced line should be canceled. Again, the requisition will require budget checking to be run in order to relieve the encumbrance balance remaining on the canceled requisition line. Finalizing a Requisition When a requisition line is partially sourced into a PO, the remaining quantity or amount can be finalized by finalizing the PO Line on the associated purchase order. When the PO Line is finalized, a reversal is created against the requisition in order to liquidate the remaining pre-encumbrance. Refer to PSFIN Business Process PO.020.480 for more details on the finalizing a requisition process. Closing Requisitions Once requisitions are finalized or canceled, you will need to run the Requisition Close process in order to set the Requisition Header status to Complete. Refer to PSFIN Business Process PO.020.960 for more details on the Requisition Close process. Once the Requisition Close process has run successfully, the requisitions may require budget checking be run against them.
Now that you have canceled and closed all requisitions and requisition lines, you will establish the groundwork for your PO Cleanup by running several queries and processes to ensure that all PO and AP transactions are complete. This completes Step 4, Canceling and Closing Requisitions and Requisition Lines.
Fiscal Year End 07/18/2012 PeopleSoft Financials Manual 2012 76
Step 5: Establishing the Purchasing Cleanup Groundwork In this step, you will establish your Purchasing cleanup groundwork by running several queries and processes to ensure that all PO and AP transactions are complete. Note 1: All parts in this Step are optional tools available to assist you in your purchasing analysis and reconciliation. Note 2: A list of BOR-delivered AP, KK, and PO queries is shown in Appendix A, Queries, starting on page 211.
Part 1: Ensuring that all AP and PO Transactions Are Complete In Part 1 of this step, you will run several queries and processes to ensure that all PO and AP transactions are complete. Process 1. Run the BOR_AP_UNPOSTED_VCHR query to list any vouchers that require
further processing. Vouchers requiring budget checking or posting are listed by the query. Any incomplete voucher transactions for a purchase order will be omitted from many queries and reports. Results will reflect the PO number populated for all PO Vouchers. Refer to PSFIN Business Process AP.075.105 for more details on this query.
Note: You should attempt to complete Budget Checking and Posting for all Vouchers before proceeding with PO analysis and cleanup steps.
2. Run the BOR_AP_UNPOSTED_PYMNTS query to ensure that all payments are posted. Post any payments, if needed. Refer to PSFIN Business Process AP.075.100 for more details on this query.
3. Run the BOR_AP_UNPOSTED_VCHR query again. Payment Posting sometimes performs transactions for the voucher itself that may require additional budget checking and/or posting. Complete any voucher transactions that show as unposted.
4. Run the PO Close/PO Reconciliation (PO_PORECON) process for the entire Business Unit. Refer to PSFIN Business Process PO.020.390 for more details on this process.
5. Complete processing on any reconciled POs. Reconciled POs may require budget checking. • View and budget check any POs with Budget Check exceptions using the
Budget Exceptions page • Select Commitment Control⇒Review Budget Check
Exceptions⇒Purchasing and Cost Management⇒Purchase Order. The Purchase Order – Find an Existing Value page displays.
Fiscal Year End 07/18/2012 PeopleSoft Financials Manual 2012 77
• Select Errors Exist as the Process Status.
• Click on to display a list of POs with Budget Check exceptions. • After errors are resolved, run the PO Budget Check process again to generate
the Commitment Control entries.
6. Journal Generate AP transactions if necessary. Refer to PSFIN Business Process GL.030.001.
7. Run the BOR_JE_PENDING query to ensure that all AP transactions have been journal generated and that the journals have been completely posted. Refer to PSFIN Business Process GL.070.096.
Now that you have ensured that all AP and PO transactions are complete, you will identify open purchase orders or remaining encumbrances.
This completes Step 5, Part 1, Ensuring that all AP and PO Transactions Are Complete.

Fiscal Year End 07/18/2012 PeopleSoft Financials Manual 2012 78
Part 2: Running the BOR_PO_OPEN_AMOUNT_ALL Query In Part 2 of this step, you will run the BOR_PO_OPEN_AMOUNT_ALL query to identify all Purchase Orders with a remaining encumbrance. Refer to PSFIN Business Process PO.075.130. This query can assist with identifying problem POs. POs with a Completed or Canceled status may be retrieved if the PO encumbrances were not properly liquidated and an encumbrance balance remains. You may wish to run the results to Excel to assist in your review of the data. Use this query to analyze and cleanup purchase orders as instructed in this manual. Note: You may wish to periodically run this query throughout the year to monitor and identify any completed or canceled POs with remaining encumbrance balances. Refer to Part 5 of this step, starting on page 81, for additional various other PO-related issues. Process 1.
Review the Status of the Purchase Order to determine if the PO is in the appropriate status of Dispatched. • If the status is A (Approved) or PA (Pending Approval), you must complete
the processing of the PO to a Dispatched status. • If the PO has a Complete status, you may need to run Budget Checking on the
PO before it will not be shown in the query results. Now that you have run the BOR_PO_OPEN_AMOUNT_ALL query to identify all open Purchase Orders, you will run the BOR_PO_NOT_COMPLETE query to identify all Purchase Orders and their remaining encumbrances where the Status is not Complete (or Canceled). This completes Step 5, Part 2, Running the BOR_PO_OPEN AMOUNT ALL Query.

Fiscal Year End 07/18/2012 PeopleSoft Financials Manual 2012 79
Part 3: Running the BOR_PO_NOT_COMPLETE Query In Part 3 of this step, you will run the BOR_PO_NOT_COMPLETE query to identify all Purchase Orders and their remaining encumbrances where the Status is not Complete (or Canceled). You may wish to run the results to Excel to assist in your review of the data. Refer to PSFIN Business Process PO.075.070. Process 1.
Review each purchase order/line to determine cause of PO not reconciling. Some possible causes may be: • PO Due Dates not yet passed • PO Processing not completed • PO Receiver/Receiver lines not appropriately canceled, etc.
2. Refer to the following steps in this document to determine why Purchase Orders with $0 remaining encumbrances have not yet reconciled.
Now that you have run the BOR_PO_NOT_COMPLETE query to identify all Purchase Orders and their remaining encumbrance where the Status is not Complete (or Canceled), you can run some additional queries to aid you in your PO analysis.
This completes Step 5, Part 3, Running the BOR_PO_NOT_COMPLETE Query.

Fiscal Year End 07/18/2012 PeopleSoft Financials Manual 2012 80
Part 4: Running Additional Reports/Queries (Optional) In Part 4 of this step, you can run some additional queries to assist you in your PO Analysis. Process 1. Run the PO Open Enc as of Acctg Period (BORRP014) report (BOR
Menus⇒BOR Purchasing⇒BOR PO Reports). This report provides the remaining PO Encumbrance balance as of FY/BP. Refer to PSFIN Business Process PO.070.350.
2. The following queries will retrieve PO lines with an open amount >$0 for various specific criteria: • BOR_PO_OPEN_AMOUNT_1 – By Fund, Program, Class, Budget Period
and Account. Refer to PSFIN Business Process PO.075.090. • BOR_PO_OPEN_AMOUNT_2 – By Budget Period, Department and
Account. Refer to PSFIN Business Process PO.075.100. • BOR_PO_OPEN_AMOUNT_3 – By Budget Period and Project/Grant. Refer
to PSFIN Business Process PO.075.110. • BOR_PO_OPEN_AMOUNT_4 – By Budget Period and PO ID. Refer to
PSFIN Business Process PO.075.120. Now that you have you have identified open purchase orders or remaining encumbrances, you will find any purchase orders with special problems. This completes Step 5, Part 4, Running Additional Queries (Optional).
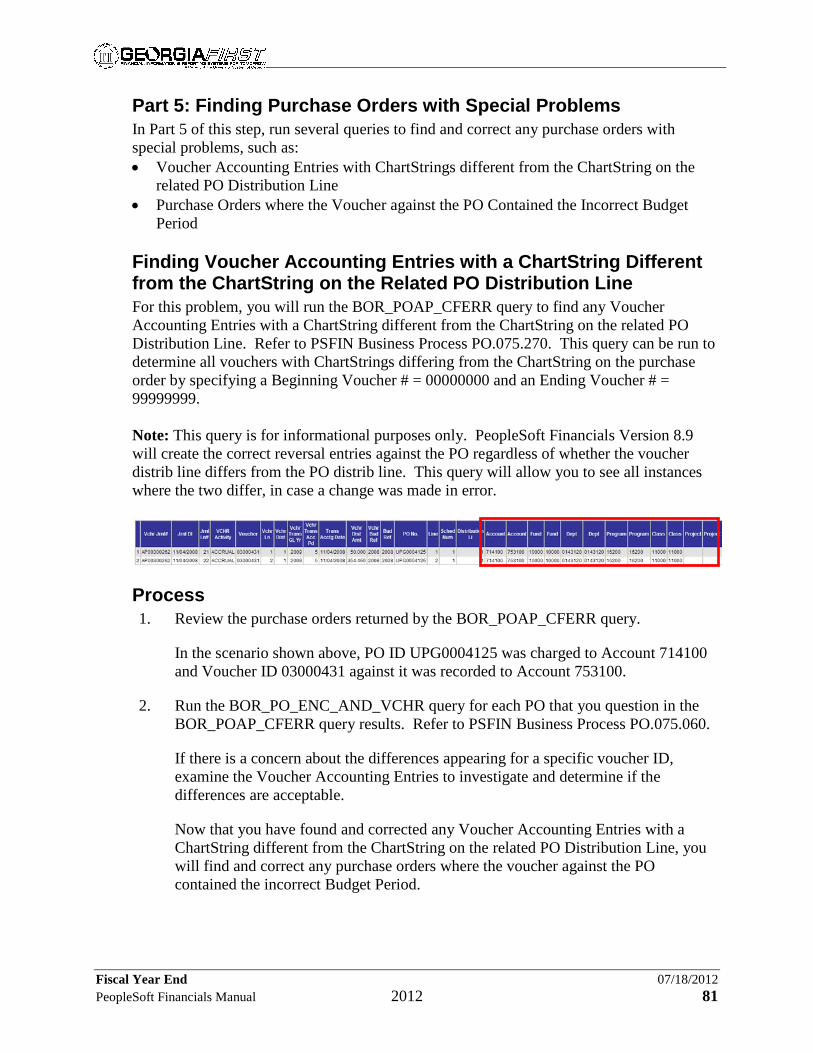
Fiscal Year End 07/18/2012 PeopleSoft Financials Manual 2012 81
Part 5: Finding Purchase Orders with Special Problems In Part 5 of this step, run several queries to find and correct any purchase orders with special problems, such as: • Voucher Accounting Entries with ChartStrings different from the ChartString on the
related PO Distribution Line • Purchase Orders where the Voucher against the PO Contained the Incorrect Budget
Period
Finding Voucher Accounting Entries with a ChartString Different from the ChartString on the Related PO Distribution Line For this problem, you will run the BOR_POAP_CFERR query to find any Voucher Accounting Entries with a ChartString different from the ChartString on the related PO Distribution Line. Refer to PSFIN Business Process PO.075.270. This query can be run to determine all vouchers with ChartStrings differing from the ChartString on the purchase order by specifying a Beginning Voucher # = 00000000 and an Ending Voucher # = 99999999. Note: This query is for informational purposes only. PeopleSoft Financials Version 8.9 will create the correct reversal entries against the PO regardless of whether the voucher distrib line differs from the PO distrib line. This query will allow you to see all instances where the two differ, in case a change was made in error.
Process 1. Review the purchase orders returned by the BOR_POAP_CFERR query.
In the scenario shown above, PO ID UPG0004125 was charged to Account 714100 and Voucher ID 03000431 against it was recorded to Account 753100.
2. Run the BOR_PO_ENC_AND_VCHR query for each PO that you question in the BOR_POAP_CFERR query results. Refer to PSFIN Business Process PO.075.060.
If there is a concern about the differences appearing for a specific voucher ID, examine the Voucher Accounting Entries to investigate and determine if the differences are acceptable.
Now that you have found and corrected any Voucher Accounting Entries with a ChartString different from the ChartString on the related PO Distribution Line, you will find and correct any purchase orders where the voucher against the PO contained the incorrect Budget Period.

Fiscal Year End 07/18/2012 PeopleSoft Financials Manual 2012 82
Finding any Purchase Orders where the Voucher against the PO Contained the Incorrect Budget Period For this problem, you will run the BOR_POAP_BUDERR query find any purchase orders where the voucher against the PO contained the incorrect Budget Period. Refer to PSFIN Business Process PO.075.260.
Process 1. Review the purchase orders returned by the BOR_POAP_BUDERR query.
In the example shown above, the PO for this voucher was encumbered against Budget Period 2002, but the voucher was expensed against Budget Period 2003.
2. Enter a $0 Adjustment voucher, reversing the charge to the incorrect Budget Period, and charging the correct budget period as found on the PO.
3. Be sure to relay this information to those responsible for Surplus Analysis, as the error and adjustment voucher will need to be considered in Surplus Analysis.
Now that you have found and corrected any purchase orders with special problems, you will look for purchase orders invoiced through a non-PO voucher and liquidate encumbrance balances if needed.
This completes Step 5, Part 5, Finding Purchase Orders with Special Problems.

Fiscal Year End 07/18/2012 PeopleSoft Financials Manual 2012 83
Part 6: Looking for Purchase Orders Invoiced through a Non-PO Voucher and Liquidating Encumbrance Balances if Needed In Part 6 of this step, you will run the BOR_PO_OPEN_AMOUNT_ALL query to obtain an updated listing of all purchase orders with outstanding encumbrances. Refer to PSFIN Business Process PO.075.030.
Process 1. Run the BOR_PO_OPEN_AMOUNT_ALL query data to Excel, as shown in the
example above.
2. Sort the data by Vendor, PO, PO Due Date, etc.
• Select the entire worksheet by clicking on the Select All box, which is the
unlabeled box to the left of Column heading A and just above Row heading 1. • Select Data⇒Sort. • Specify My List has Header Row. • Sort by the order you wish to view the data (1 – PO Date, Sort by 2 - PO, Sort
by 3 – Line, etc.). • Click on OK.
3. Look for any POSITIVE remaining encumbrances, where the PO SHOULD have been filled or cancelled by now, judging from the PO date.
In the example above, PO # 0000300221 was issued on 11/8/2008 and still has a remaining encumbrance of $38304.50. One possibility is that the ordered items were received, but were invoiced in the system via a Non-PO voucher. The BOR_POAP_VENDOR query can aid you in identifying if this is the case for this

Fiscal Year End 07/18/2012 PeopleSoft Financials Manual 2012 84
PO.
This query lists all PO lines for the specified vendor where the PO line has a remaining encumbrance. It also lists any vouchers entered for that vendor where the voucher was NOT associated with a Purchase Order. The Purchase Order Line and Voucher line descriptions, amounts, and ChartStrings are listed to assist you in determining if a Purchase Order has been vouchered on a Non-PO voucher. All PO lines are preceded by a “TRANS” type of PO. Any non-PO vouchers are preceded by a Trans Type of VCHR.
In the example illustrated above, it does NOT appear that the remaining amount on this PO line was vouchered through a Non-PO voucher.
If you do find a Non-PO voucher that relates to a PO line with an open encumbrance, make notes of any differences between the ChartString (including the Budget Period) for the PO line and the related Non-PO voucher line, and enter any needed Adjustment Vouchers, if necessary.
4. If the Budget Period is different and you determine definitively that the voucher should have been applied to the PO, you will need to enter an Adjustment voucher against the Non-PO voucher. The Adjustment voucher will be for a net of $0, charging the CORRECT budget period (as shown on the PO) and crediting the budget period shown on the non-PO voucher.
Note: Keep notes regarding any related standard and/or adjustment vouchers and provide that information to the individual responsible for surplus analysis.
5. If a Prior Budget Period is shown on either the PO or the voucher, the transaction (including any adjustment voucher you enter) will have to be reflected manually in surplus analysis. Note 1: Keep notes regarding any related standard and/or adjustment vouchers and provide that information to the individual responsible for surplus analysis. Note 2: How does this affect surplus analysis? ONLY purchase orders and PURCHASE ORDER VOUCHERS are reflected on the PO Surplus Analysis report. Non-PO vouchers that have no link to a PO and will not be listed on this

Fiscal Year End 07/18/2012 PeopleSoft Financials Manual 2012 85
report. If you determine that a PO encumbrance should NOT be open, you should close or finalize the encumbrance, as noted in Step 5, Part 2 of this module, starting on page 89. If the PO line is against a prior year, this closure/finalization will reflect as an addition to surplus on the PO Surplus Analysis report. The Non-PO voucher (and/or Adjustment voucher), if for a prior budget period, will appear on the BOR_SURPLUS_NOPO query, which lists non-PO vouchers with an Accounting Date AFTER the BUDGET PERIOD to which it is charged. The assumption is that any vouchers listed by this query are either: • Non-PO vouchers that were actually related to a PO; • Permissible replacement orders for prior year POs; OR • In error. By tracking these instances as you find them, these transactions can be linked and more easily reconciled for surplus analysis.
6. If the ChartString is different, you need to determine if the differences have any impact. For instance, Fund and/or Project Grant differences will definitely have effect, and those differences will need to be corrected via an Adjustment voucher ($0 voucher, crediting the incorrectly charged ChartString and debiting the correct ChartString). Conversely, the Department charged may be irrelevant for your institution, and you may choose to make no correction.
Note: Again, keep notes regarding any related standard and/or adjustment vouchers and provide that information to the individual responsible for surplus analysis.
Now that you have looked for purchase orders invoiced through a non-PO voucher and liquidated encumbrance balances if needed, you will find any Purchase Orders where a Discount taken is the only remaining encumbrance, and finalize those vouchers to relieve encumbrances.
This completes Step 5, Part 6, Looking for Purchase Orders Invoiced through a Non-PO voucher and Liquidating Encumbrance Balances if Needed.
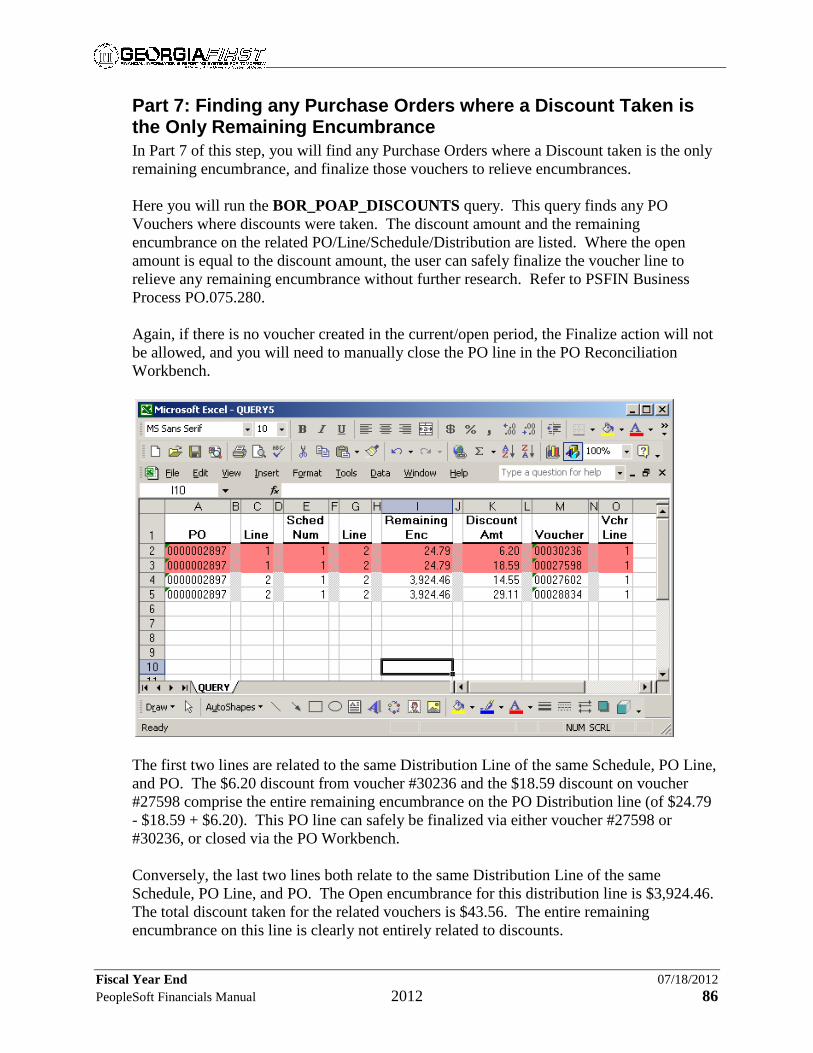
Fiscal Year End 07/18/2012 PeopleSoft Financials Manual 2012 86
Part 7: Finding any Purchase Orders where a Discount Taken is the Only Remaining Encumbrance In Part 7 of this step, you will find any Purchase Orders where a Discount taken is the only remaining encumbrance, and finalize those vouchers to relieve encumbrances. Here you will run the BOR_POAP_DISCOUNTS query. This query finds any PO Vouchers where discounts were taken. The discount amount and the remaining encumbrance on the related PO/Line/Schedule/Distribution are listed. Where the open amount is equal to the discount amount, the user can safely finalize the voucher line to relieve any remaining encumbrance without further research. Refer to PSFIN Business Process PO.075.280. Again, if there is no voucher created in the current/open period, the Finalize action will not be allowed, and you will need to manually close the PO line in the PO Reconciliation Workbench.
The first two lines are related to the same Distribution Line of the same Schedule, PO Line, and PO. The $6.20 discount from voucher #30236 and the $18.59 discount on voucher #27598 comprise the entire remaining encumbrance on the PO Distribution line (of $24.79 - $18.59 + $6.20). This PO line can safely be finalized via either voucher #27598 or #30236, or closed via the PO Workbench. Conversely, the last two lines both relate to the same Distribution Line of the same Schedule, PO Line, and PO. The Open encumbrance for this distribution line is $3,924.46. The total discount taken for the related vouchers is $43.56. The entire remaining encumbrance on this line is clearly not entirely related to discounts.

Fiscal Year End 07/18/2012 PeopleSoft Financials Manual 2012 87
If you determine that these lines should be liquidated, finalize the voucher line related to that PO line/Schedule/Distribution, or manually close the PO line if the Finalize process is not an option. Note: Refer to Part 3 of this step, starting on page 89, for the procedure to finalize voucher lines. Now that you have found any POs where a discount taken is the only remaining encumbrance, you will identify any purchase orders with an encumbrance balance in Commitment Control to determine if the PO line should be liquidated and closed. This completes Step 5, Part 7, Finding any Purchase Orders where a Discount Taken is the Only Remaining Encumbrance.
Now that you have established the Purchasing cleanup groundwork, you will finalize the vouchers or close the Purchase Orders via the PO Reconciliation Workbench in order to liquidate the purchase orders that have remaining encumbrances after all payments have been made. This completes Step 5, Establishing the Purchasing Cleanup Groundwork.

Fiscal Year End 07/18/2012 PeopleSoft Financials Manual 2012 88
Step 6: Finalizing Vouchers and Liquidating Purchase Orders with Remaining Encumbrances after Final Payment In this step, you will finalize the vouchers and liquidate purchase orders that have remaining encumbrances after all payments have been made. These are instances where, for example, a purchase order has been vouchered and paid, but the payment(s) did not liquidate the exact amount of the purchase order. You must finalize the voucher or close the purchase order via the PO Reconciliation Workbench to relieve any remaining encumbrance associated with them. Note: Refer to PSFIN Business Process AP.020.120 for more information on finalizing a voucher to liquidate a purchase order. Only vouchers with an Accounting Date in the current open period are available for finalization. If no voucher exists meeting this criteria, it will be necessary to manually close the PO in the PO Reconciliation Workbench. Refer to PSFIN Business Process PO.020.280 for more details on using the PO Reconciliation Workbench.
Part 1: Identifying Purchase Orders with Encumbrance Balances in Commitment Control to Determine if the PO Line Should be Liquidated and Closed In Part 1 of this step, you will identify any purchase orders with an encumbrance balance in Commitment Control to determine if the PO line should be liquidated and closed. Here you will run the BOR_PO_OPEN_ENCS_KK query. This query lists all POs by Line/Schedule/Distribution and their original encumbrance totals (POSTED_AMOUNT) with an outstanding encumbrance balance in Commitment Control, along with the total activity against the PO (ACTIVITY) and the remaining encumbrance balance. This query also provides the PO Status so that you can identify any POs requiring further processing. Note: You may wish to run this query to Excel for easier manipulation of the data.
Now that you have identified any purchase orders with an encumbrance balance in Commitment Control, you will need to determine if the PO line should be liquidated and closed. If so, you will finalize the vouchers or cancel/close individual PO lines or the entire purchase order to liquidate the balance. Note: If the voucher(s) against the purchase order were not created in the current/open period, the finalize option is not available. In this situation, you will need to manually close the purchase order using the PO Reconciliation Workbench. This completes Step 6, Part 1, Identifying Purchase Orders with Encumbrance Balances in Commitment Control to Determine if the PO Line Should be Liquidated and Closed.

Fiscal Year End 07/18/2012 PeopleSoft Financials Manual 2012 89
Part 2: Finalizing Vouchers and Liquidating Purchase Orders In Part 2 of this step, you will finalize the vouchers, if possible, or close PO lines to liquidate the purchase orders that have remaining encumbrances after payments have been made, which were identified as a result of running the queries in Parts 1 and 2. You must finalize or close these POs/PO lines and liquidate the purchase orders to relieve any remaining encumbrance balance associated with them before continuing your purchasing cleanup processes by following one of the following three options: 1. Finalize and Relieve All Lines on a PO 2. Finalizing Individual PO Lines 3. Manually Closing a PO if the Finalize Process is not an Option Option 1: Finalizing and Relieving All Lines on a PO Process 1. Select Accounts Payable⇒Vouchers⇒Add/Update⇒Regular Entry. The
Voucher – Add a New Value page displays.
2. Click on the Find an Existing Value tab. The Voucher – Find an Existing Value page displays.
3. Verify that your institution’s Business Unit number appears in the Business Unit field.
4. Enter the voucher number of the voucher you wish to finalize in the Voucher

Fiscal Year End 07/18/2012 PeopleSoft Financials Manual 2012 90
ID field.
5. Click on . The Summary page displays.
6. Click on the Invoice Information tab. The Invoice Information page displays.
7. Click on in the Voucher Header. The Finalize check box for all lines will be clicked ON.
8. Click on . Once the voucher is budget checked, the PO Finalized status will be Y.
9. Run the Budget Check batch process to generate the encumbrance reversals.
You can also finalize individual PO lines, as shown in Option 2.
Option 2: Finalizing Individual PO Lines Process 1. Follow Steps 1 through 8 in Option 1 to change the PO Finalized status from N to
Y as shown above.

Fiscal Year End 07/18/2012 PeopleSoft Financials Manual 2012 91
After the Finalize action is taken on all vouchers associated with purchase orders you intend to close and liquidate, the following steps will need to be taken.
2. Budget check the voucher. The PO Accounting entries reflect a reversal of the remaining amount and the Reference Reversal ID will reflect the voucher that was used to finalize the PO Line(s).
When the vouchers are successfully budget checked, Commitment Control will reflect an encumbrance reversal to the PO on the AP entries for the finalized vouchers (in this example, voucher id 030003759). The reversal entries for all 3 ledger groups are shown in the example below:
3. Process the finalized and budget checked vouchers completely by running the following processes: • Voucher Post – Refer to PSFIN Business Process AP.030.030 • Journal Generate – Refer to PSFIN Business Process GL.030.001 Both Options 1 and 2 can be used for POs where the Finalize process is available. For POs where the Finalize process is not available, you have to use Option 3 to manually close the PO.
Option 3: Manually Closing a PO if the Finalize Process is not an Option The alternative to finalizing a voucher when a voucher is not available in the current/open period is to manually close purchase orders via the PO Reconciliation Workbench. If this route is taken, the steps will be the same except that you will be required to budget check the PO in order to liquidate the remaining ENC balance. For example, we’ll use PO ID UPG0027159, which has 14 lines. Per the BOR_PO_OPEN_AMOUNT_ALL query results, all 14 lines have a remaining encumbrance balance. In looking at the remaining encumbrance, line 14 definitely looks like a candidate for closure.

Fiscal Year End 07/18/2012 PeopleSoft Financials Manual 2012 92
The PO should be assessed in its entirety to determine for sure what lines should be liquidated. We will analyze the PO lines further in the PO Reconciliation Workbench.
The Purchase order logs (per PO Workbench) for lines 1-10 appear as Not Qualified. After looking at the actual PO pages, it is clear that the lines were created to liquidate by amount. Therefore, when the initial voucher was only for part of the amount, the PO Line Match Status was set to Partial. The PO Line will remain in this status until the total line amount is vouchered , since this status does not qualify the PO for automatic closure when the PO Close process is run. If you do not expect to voucher these lines completely, you have the option to manually close them via the PO Reconciliation Workbench. Refer to PSFIN Business Process PO.020.280. The remaining 4 lines (11-14) were set to liquidate by quantity. Since the total quantity was vouchered on the initial voucher, it “Matched” the PO lines. These lines qualify for closure, provided the due date has passed, therefore, these lines will be picked up and closed when the batch PO Close process is run. There are three options to proceed: 1. If you wish to ONLY close the qualified lines (11-14), you can either:
• Close the individual lines via the PO Reconciliation Workbench. Refer to PSFIN Business Process PO.020.280; or,
• Run the batch PO Close process. These 4 lines would close along with all other qualified PO lines. Refer to PSFIN Business Process PO.020.390.
2. If you wish to close the entire PO, you are able to force the PO to the Qualified side.
This will set all lines to a Closed status and set the PO Header to a Compl status. If this action is taken, the batch PO Budget Check process should be run on the PO subsequent to the PO Close process being run in order to relieve the encumbrance balances on the PO or PO lines.

Fiscal Year End 07/18/2012 PeopleSoft Financials Manual 2012 93
3. If you wish to force-close only specific lines that do not appear as Qualified for closure, you can accomplish this using the PO Reconciliation Workbench.
• Click on Lines icon to the far right of the PO ID for which you want to select the specific lines for closure to display the Purchase Order Lines page.
• All lines are selected by default on the Purchase Order Lines page, so you will need to click the check box OFF for those lines you do not wish to close.
• Once you have specified the lines for closure, click on the Return to Reconciliation WorkBench link and run the closing process by clicking on
. In this example, only qualified lines 11-14 will be closed by running the batch PO Close process. However, you may wish to wait until all POs you intend to close are finalized or manually closed on the workbench, then run the batch process for your entire business unit one time. Process 1. Select Purchasing⇒Purchase Orders⇒Reconcile POs⇒Close Purchase
Orders. The Close Purchase Orders – Find an Existing Value page displays.
2. Enter an existing or create a new Run Control ID.
3. Click on . The Close PO page displays.
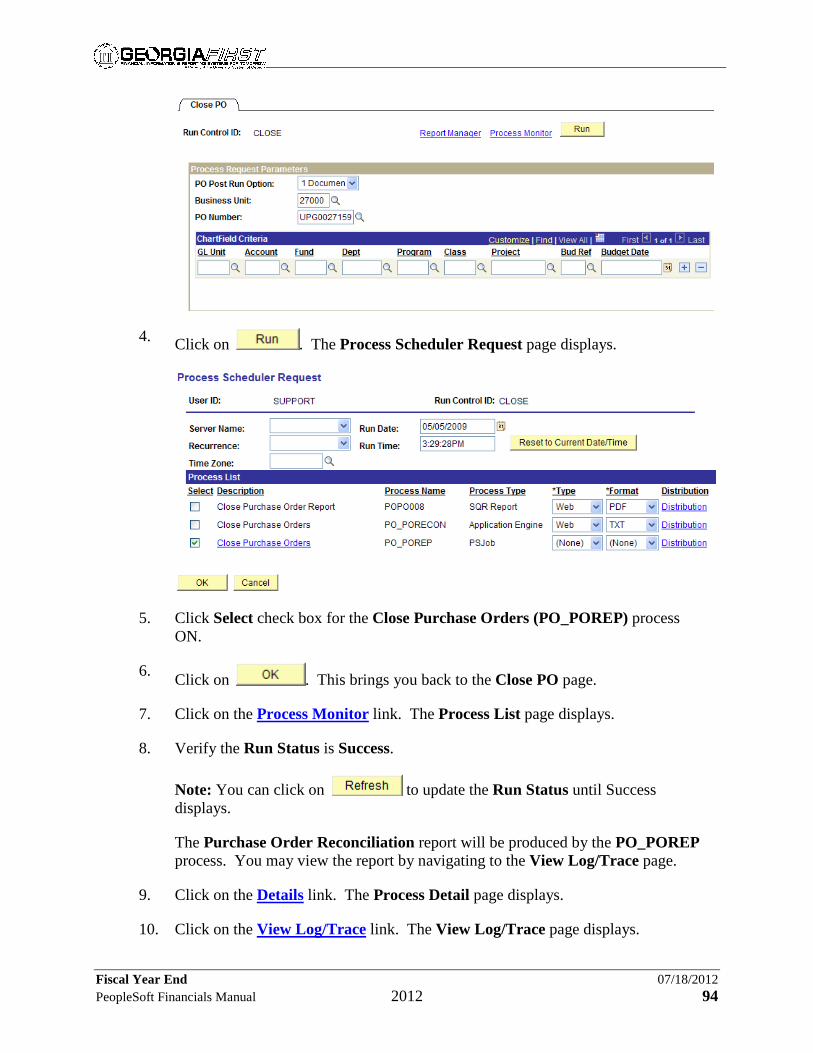
Fiscal Year End 07/18/2012 PeopleSoft Financials Manual 2012 94
4. Click on . The Process Scheduler Request page displays.
5. Click Select check box for the Close Purchase Orders (PO_POREP) process ON.
6. Click on . This brings you back to the Close PO page.
7. Click on the Process Monitor link. The Process List page displays.
8. Verify the Run Status is Success.
Note: You can click on to update the Run Status until Success displays.
The Purchase Order Reconciliation report will be produced by the PO_POREP process. You may view the report by navigating to the View Log/Trace page.
9. Click on the Details link. The Process Detail page displays.
10. Click on the View Log/Trace link. The View Log/Trace page displays.

Fiscal Year End 07/18/2012 PeopleSoft Financials Manual 2012 95
11. Click on the poporep_XXXXX.PDF link, where XXXXX is the process instance number. A new window opens to display the PDF file.
The report will show all PO lines that closed successfully.
The PO will then require budget checking to relieve the outstanding encumbrance balances. This can be run for the entire business unit after closing multiple POs/PO lines, or for an individual PO, as shown in the example below.
Once the PO(s) budget check successfully, you can run the BOR_PO_OPEN_AMOUNT_ALL query to find all PO IDs with an open encumbrance balance, or the BOR_PO_OPEN_AMOUNT_4 query for encumbrance balances on a single PO ID, to confirm that funds have been liquidated successfully. As you can see, encumbrance balances no longer show for lines 11-14.
Recap: Finalizing Voucher Amounts and Liquidating Purchase Orders Process 1. Finalize and liquidate entire POs or individual PO lines:
• Finalize associated voucher header or lines for the PO/PO Lines you wish to close and liquidate.
• Budget Check. • Address all Budget Check errors and re-Budget Check if necessary. • Post all finalized vouchers. • Journal Generate all finalized vouchers.
Fiscal Year End 07/18/2012 PeopleSoft Financials Manual 2012 96
• Run the batch PO Close process.
2. Manually close POs via the PO Reconciliation Workbench: • Analyze the Purchase Order Logs and PO pages to determine why the PO is not
qualified to close. • Complete all necessary processing against the PO/Voucher/Receivers, if
needed, according to the workbench PO log. • Force PO(s) to close via the workbench. • Run the batch Budget Check process. This will liquidate any remaining ENC
balance associated with the closed purchase orders/purchase order lines. • Address any Budget Check errors and re-budget check if needed. This completes Step 6, Part 2, Finalizing Vouchers and Liquidating Purchase Orders.
Now that you have finalized vouchers and liquidated purchase orders with remaining encumbrances after payments, you will find any purchase orders with special problems. This completes Step 6, Finalizing Voucher Amounts and Liquidating Purchase Orders with Remaining Encumbrances after Final Payment.

Fiscal Year End 07/18/2012 PeopleSoft Financials Manual 2012 97
Step 7: Canceling and Closing Outstanding Purchase Orders and Purchase Order Lines that Should Not Remain Open In Step 7, you will identify, cancel, and close all outstanding purchase orders and individual purchase order lines that should not remain open. Refer to PSFIN Business Process PO.020.260.
Part 1: Identifying All Outstanding Purchase Orders and Individual Purchase Order Lines In Part 1 of this step, you will run the BOR_PO_UNRECON query, specifying the PO number you are investigating, and look at all transactions for the particular PO\Line\Schedule\Distribution with which you are working. Sample results are shown on the following pages. Some general information for reading the BOR_PO_UNRECON query: 1. Column A- PO: Contains the PO number for all document types. 2. Column E- TRANS: Indicates the document type reflected on that line; PO, VCHR
(Voucher), or RCVR (Receiver).
3. Columns AO, AQ, and AS - PO Line, PO Sched, and PO Dist: Contains the related PO Line#, Schedule #, and Distribution # for all transactions listed.
4. Columns AU, AW, and AY - Voucher, Voucher Line, and Voucher Dist: Contains
the related voucher information for voucher transactions ONLY.
5. Columns BA, BC, BE, and BG - Receiver, Receiver Line, Receiver Shipment, and Receiver Dist: Contains the related receiver information for receiver transactions AND for voucher transactions copied in from that receiver.
Process 1. Voucher(s) against this PO\Line\Schedule\Distribution.
• Finalize the Distribution line through any of the vouchers listed as charged against that Distribution.
• Budget check and post the voucher. • The Encumbrance should be relieved.
2. No Voucher(s) against the distribution, and no other Distributions for the same PO\Line\Schedule. • If there are no other distributions for the same PO Line\Schedule, you should be
able to cancel the Schedule through the PO. • First, however, you may need to cancel receiver line shipments entered
against that PO\Line\Schedule. • The BOR_PO_UNRECON query will also show any Receivers entered
against the PO\Line\Schedule.

Fiscal Year End 07/18/2012 PeopleSoft Financials Manual 2012 98
• Note: Your institution needs to determine the permissibility and record keeping for canceling receivers in these instances.
• You may also wish to run the BOR_PO_NOT_RECEIVED and BOR_PO_PARTIAL_RECEIVED queries for additional analysis of POs that have receiving required. Refer to PSFIN Business Processes PO.075.080 and PO.075.150, respectively.
3. No Voucher(s) against any Distribution for the same PO\Line\Schedule.
• If there are NO vouchers entered against any distribution for the same PO\Line\Schedule, determine if ALL distributions for the PO\Line\Schedule can be closed. • If not, attempt to create a change order against the PO\Line\Schedule to
cancel the distribution for which the encumbrance should be relieved. • Be sure to complete all required processing – Budget Checking, Approval, and
Dispatching. • If there are any unmatched receivers against the Schedule, you will need to first
cancel the receiver line shipment. The BOR_PO_UNRECON query will also show any Receivers entered against the PO\Line\Schedule. • Note: Your institution needs to determine the permissibility and record
keeping for canceling receivers in these instances.
4. No Voucher(s) against the distribution, and other Distributions for the same PO\Line\Schedule With Vouchers entered against them. • In this case, the distribution line that does not have a voucher against it can be
Cancelled. Navigate to the appropriate Distribution line⇒Statuses tab and
select the to cancel.
Example 1
In this instance, no voucher has been entered against PO #66, Line 2, Schedule 1, Distribution 1, and there is only one distribution for PO#66, Line 2, Schedule 1.
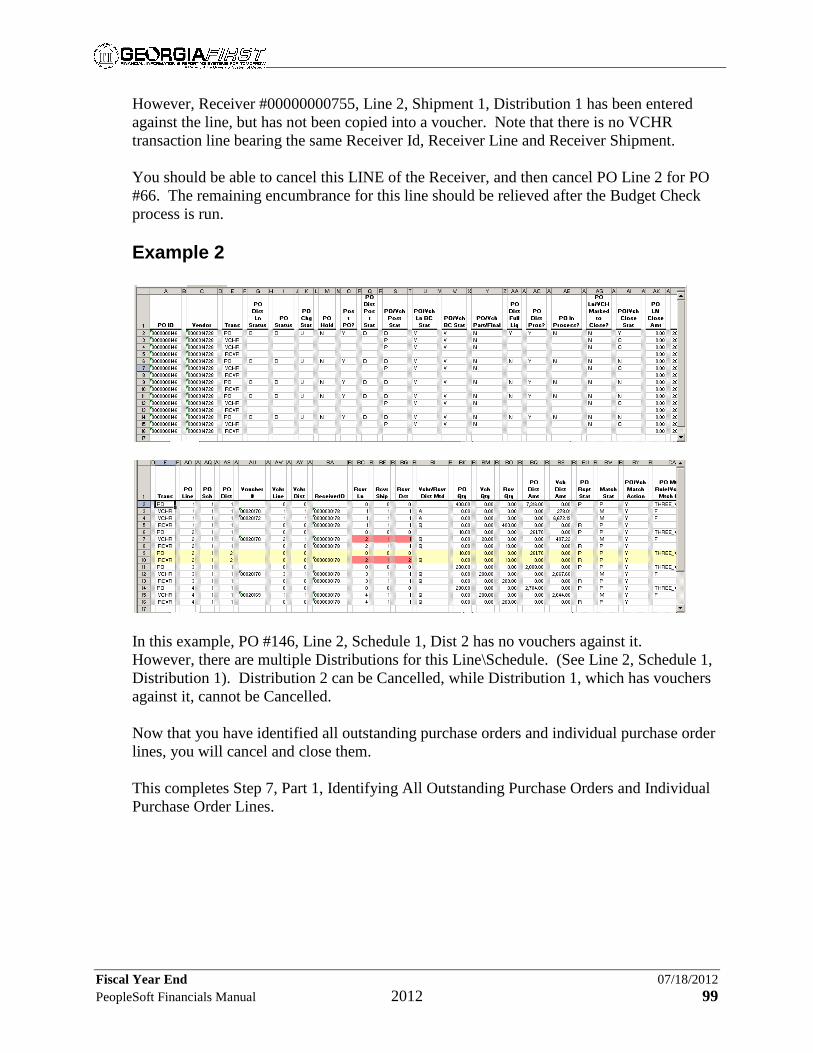
Fiscal Year End 07/18/2012 PeopleSoft Financials Manual 2012 99
However, Receiver #00000000755, Line 2, Shipment 1, Distribution 1 has been entered against the line, but has not been copied into a voucher. Note that there is no VCHR transaction line bearing the same Receiver Id, Receiver Line and Receiver Shipment. You should be able to cancel this LINE of the Receiver, and then cancel PO Line 2 for PO #66. The remaining encumbrance for this line should be relieved after the Budget Check process is run. Example 2
In this example, PO #146, Line 2, Schedule 1, Dist 2 has no vouchers against it. However, there are multiple Distributions for this Line\Schedule. (See Line 2, Schedule 1, Distribution 1). Distribution 2 can be Cancelled, while Distribution 1, which has vouchers against it, cannot be Cancelled. Now that you have identified all outstanding purchase orders and individual purchase order lines, you will cancel and close them. This completes Step 7, Part 1, Identifying All Outstanding Purchase Orders and Individual Purchase Order Lines.

Fiscal Year End 07/18/2012 PeopleSoft Financials Manual 2012 100
Part 2: Canceling and Closing Outstanding Purchase Orders In Part 2 of this step, you will cancel and close all outstanding purchase orders where you have determined that the PO is no longer required. Note: Prior to canceling and closing the purchase order(s), you will need to determine if a Receiver has been entered for this PO by running the BOR_PO_NOT_RECEIVED and BOR_PO_PARTIAL_RECEIVED queries, as noted in Part 1 of this step, starting on page 97 [deleted rest of sentence]. If there is a receiver associated with a purchase order, the receiver/receiver line must be canceled before the PO can be canceled and closed. Purchase orders to be cancelled must: 1. Be budget checked with no Budget Check Exceptions. 2. Not be associated with an open Receiver or Voucher. [Deleted sentence on three basic steps.] Process 1. Cancel the purchase orders via the PO Header or the PO Reconciliation
Workbench.
2. Run the batch PO Dispatch process. Refer to PSFIN Business Process PO.030.010.
3. Run the batch PO Budget Check process to budget check these purchase orders. Refer to PSFIN Business Process PO.030.030.
4. Run the batch PO Close process to complete/close the purchase orders. Refer to PSFIN Business Process PO.020.390.
5. Run the batch PO Budget Check process to relieve any remaining encumbrances. Refer to PSFIN Business Process PO.030.030.
6. Repeat Steps 1 through 5 to cancel and close any other outstanding purchase orders.
Now that you have canceled and closed all outstanding purchase orders, you will cancel and close any individual purchase order lines that need to be liquidated.
This completes Step 7, Part 2, Canceling and Closing Outstanding Purchase Orders.
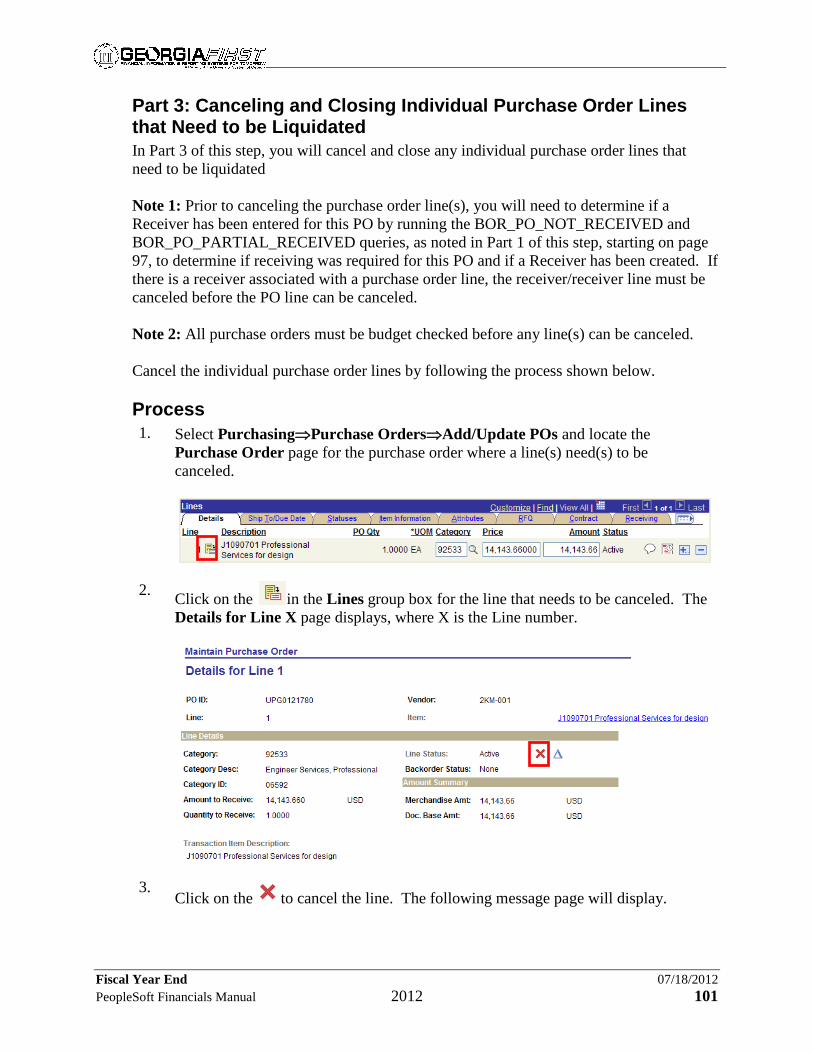
Fiscal Year End 07/18/2012 PeopleSoft Financials Manual 2012 101
Part 3: Canceling and Closing Individual Purchase Order Lines that Need to be Liquidated In Part 3 of this step, you will cancel and close any individual purchase order lines that need to be liquidated Note 1: Prior to canceling the purchase order line(s), you will need to determine if a Receiver has been entered for this PO by running the BOR_PO_NOT_RECEIVED and BOR_PO_PARTIAL_RECEIVED queries, as noted in Part 1 of this step, starting on page 97, to determine if receiving was required for this PO and if a Receiver has been created. If there is a receiver associated with a purchase order line, the receiver/receiver line must be canceled before the PO line can be canceled. Note 2: All purchase orders must be budget checked before any line(s) can be canceled. Cancel the individual purchase order lines by following the process shown below. Process 1. Select Purchasing⇒Purchase Orders⇒Add/Update POs and locate the
Purchase Order page for the purchase order where a line(s) need(s) to be canceled.
2. Click on the in the Lines group box for the line that needs to be canceled. The Details for Line X page displays, where X is the Line number.
3. Click on the to cancel the line. The following message page will display.

Fiscal Year End 07/18/2012 PeopleSoft Financials Manual 2012 102
4. Click on . The Purchase Order page displays.
Note: When you cancel a PO line that was created from a sourced requisition line, you will be asked questions about whether you wish to restore the pre-encumbrance balance to the requisition. If you do/do not wish to resource the requisition to a new PO, reply accordingly.
5. Click on .
Note: Approval will be necessary, as this creates a change order to the PO. If the PO was created in a closed accounting period, it will be necessary to update the Accounting Date on the Header Details page to the current date before the PO will allow you to save your changes.
6. Budget Check the purchase order.
7. Dispatch the purchase order.
8. Run the PO Close process against the purchase order. Refer to PSFIN Business Process PO.020.390.
9. Run the batch PO Budget Check process for the purchase order for the Business Unit in order to liquidate the outstanding encumbrance balances for the closed lines. Refer to PSFIN Business Process PO.030.030.
10. Repeat Steps 1 through 9 to cancel and close any other outstanding purchase order lines that should not be open.
Now that you have canceled and closed all outstanding purchase orders and purchase order lines that need to be liquidated, you will cancel and close POs in a Pend Cncl status.
This completes Step 7, Part 3, Canceling Outstanding Purchase Order Lines.

Fiscal Year End 07/18/2012 PeopleSoft Financials Manual 2012 103
Part 4: Canceling and Closing POs in a Pend Cncl Status In Part 4 of this step, you will cancel and close POs in a Pend Cncl status. Purchase Orders, when canceled via the PO Reconciliation Workbench, initially go to a Pend Cncl status. They will NOT be set to Canceled until they are re-dispatched. Once they are dispatched successfully, the PO Status will change to Canceled, and they will be eligible for closure. To find POs in a Pend Cncl status, you will want to do an Open search on the Workbench, where no search criteria are entered on the Filter Options page. Process 1. Select Purchasing⇒Purchase Orders⇒Reconcile POs⇒Reconciliation
Workbench. The Reconciliation Workbench – Find an Existing Value page displays.
2. Enter the appropriate Workbench ID.
3. Click on . The Filter Options page displays.
4. Leave all the Search Criteria fields blank.
5. Click on . The Reconciliation Workbench page displays with a List of Purchase Orders.

Fiscal Year End 07/18/2012 PeopleSoft Financials Manual 2012 104
6. Click the check boxes ON for all those POs with a PO Status of Pend Cncl.
7. Click on . The following message displays.
8. Click on . This brings you back to the Reconciliation Workbench page.
9. Click on the Process Request Options link at the bottom of the page. The Process Request Options page displays.
10. Enter the appropriate Run Control ID.
11. Click on . This brings you back to the Reconciliation Workbench page.
12. Click on . The Processing Results page displays and the PO IDs selected should appear on the Qualified side.
13. Click on to proceed with the Close process. Once the process completes, you will be returned to the Reconciliation Workbench page and the PO Status of those purchase orders should be Canceled. Once you have completed the Cancel process for all POs with a Pend Cncl status,
Fiscal Year End 07/18/2012 PeopleSoft Financials Manual 2012 105
you will need to close all those cancelled POs. There are two options: • Run the batch PO Close process • Use the PO Reconciliation Workbench
14. Option 1: Run the batch PO Close process • Run the batch PO Close process. Refer to PSFIN Business Process
PO.020.390. • Note: Be sure to review the Process Monitor Message Log to ensure the
process runs to success, and verify the number of PO Headers successfully closed.
• Run the batch PO Budget Check process to liquidate any outstanding encumbrance balances on the closed PO IDs. Refer to PSFIN Business Process PO.030.030.
• Run the BOR_PO_OPEN_AMOUNT_ALL query to ensure the PO IDs no longer appear. Refer to PSFIN Business Process PO.075.130.
15. Option 2: Use the PO Reconciliation Workbench (Refer to PSFIN Business
Process PO.020.280) • Specify Status criteria of Cancelled on the Filter Options page.
• Click on . • Click on the Select All link to select all the POs in a Canceled status. • Click on . The PO IDs selected should appear on the Qualified
side. • Click the PO ID check box ON.
• Click on to proceed. The status of all Canceled POs should be set to Compl once the Close process is complete.
• Run the batch PO Budget Check process for your Business Unit. Refer to PSFIN Business Process PO.030.030.
• Run the BOR_PO_OPEN_AMOUNT_ALL query to ensure the PO IDs no longer appear. Refer to PSFIN Business Process PO.075.130.
This completes Step 7, Part 4, Canceling and Closing POs in a Pend Cncl Status.
Now that you have canceled and closed all outstanding purchase orders and purchase order lines, you will troubleshoot purchase orders that will not reconcile. This completes Step 7, Canceling and Closing Outstanding Purchase Orders and Purchase Order Lines.

Fiscal Year End 07/18/2012 PeopleSoft Financials Manual 2012 106
Step 8: Troubleshooting Purchase Orders That Will Not Reconcile In Step 8, you will troubleshoot any purchase orders that will not reconcile. Some examples are shown below.
Part 1: Determining if Purchase Order Due Dates Have Passed In Part 1 of this step, you will run the BOR_PO_NOT_COMPLETE query, which will list any purchase orders not yet reconciled/completed. This may include Purchase Orders with 0.00 remaining encumbrances. Refer to PSFIN Business Process PO.075.070. Note: POs will ONLY reconcile if the PO Scheduled Due Date has passed, regardless of the remaining amount on the PO.
If the Due Date has passed and the PO will not reconcile when the PO Close process is run, you should attempt to close the purchase order via the PO Reconciliation Workbench. Refer to PSFIN Business Process PO.020.280. Now that you have determined if the PO Due Dates have passed, you will force purchase orders where the Due Date has passed and the PO(s) will not reconcile during a batch PO Close process to close. This completes Step 8, Part 1, Determining if Purchase Order Due Dates Have Passed.

Fiscal Year End 07/18/2012 PeopleSoft Financials Manual 2012 107
Part 2: Forcing Purchase Orders to Close In Part 2 of this step, you will force POs to close if the Due Date has passed and the PO(s) will not reconcile during a batch PO Close process. You will need to research the PO(s) further to determine why it is not eligible to close and force the PO(s) to close. Process 1. Select Purchasing⇒Purchase Orders⇒Reconcile POs⇒Reconciliation
Workbench and locate the Purchase Order ID(s) that will not close on the Reconciliation Workbench page.
2. Click on . The Processing Results page displays.
If the PO appears on the Qualified side, click on to proceed with the Close process.
If the PO appears on the Not Qualified side, review the Purchase Order Log to determine why it is not qualified. In this example, we will look at PO ID 0000300033.
3. Click on . The Purchase Order Logs page displays.
Fiscal Year End 07/18/2012 PeopleSoft Financials Manual 2012 108
According to the Log, lines 1 and 2 on this PO have not been completely Matched. First look at the Lines to see what status they are in.
4. Select Purchasing⇒Purchase Orders⇒Add/Update POs and locate the Purchase Order page for the purchase order where a line(s) need(s) to be matched.
5. Click on in the Lines group box. The Schedules page displays.
6. Click on the Matching tab in the Schedules group box.
As you can see, the Match Status for both lines is set to Partial, which does not qualify the line for closure. It appears that the Matching requirement has been changed after a voucher successfully partially matched both lines since Matching is set to No Match.
This can be confirmed by viewing and researching associated voucher IDs.
Fiscal Year End 07/18/2012 PeopleSoft Financials Manual 2012 109
7. Click on the Document Status link in the Header group box and navigate to the Summary page.
Analyzing the initial voucher, it was found to be Matched against this purchase order. Since the Quantity specified on the lines was greater than ‘1’, the status changed to Partial. Had the quantity been set to 1, the first voucher with quantity of 1 would have changed the Match Status to Matched, which would have qualified the PO for closure.
With Matching set to No Match, the Match Status will remain at Partial since the PO will not recognize any vouchers against it. Therefore, the quantity will not be liquidated by subsequent vouchers. In this case, you would need to decide: • Have all invoices for goods/services expected been received? Have all Receipts
been completely processed? • Have all vouchers against the PO been completely processed (i.e., budget
checked and posted)? • Should the PO be closed and any outstanding encumbrance balance liquidated? If so, you will manually close the PO via the workbench as show below.
8. Return to the Processing Results page in the Reconciliation Workbench.

Fiscal Year End 07/18/2012 PeopleSoft Financials Manual 2012 110
Do not modify the Accounting Date for Action. This should be the current date. [Added new screen shot and deleted sentence on the check box.]
9. Click on the to transfer the PO ID to the Qualified side.
10. Click on to proceed with the Close process.
Once the process completes, you will be returned to the Reconciliation Workbench page and the PO Status should be Compl.
11. Repeat Steps 1 through 10 for all PO IDs that: • Appear on the BOR_PO_NOT_COMPLETE query that you wish to close and
liquidate. • Will not close automatically when the batch PO Close Process is run
successfully. • After analysis of both the PO Reconciliation Workbench PO Logs and the PO
itself, reveal the PO should be closed and liquidated and all processing against the PO is complete.
Note: Use caution when forcing purchase orders to close. The Force to Close functionality should only be used after a full analysis of the PO has been completed. The Force to Close functionality should not be used when the Purchase Order Logs indicate either of the following reasons: • Open Vouchers Associated with a PO • Budget Check Exceptions Associated with a PO In cases such as these, processing of all associated vouchers should be completed and all Budget Check exceptions should be researched and resolved before closing the PO. Now that you have forced purchase orders where the Due Date has passed and the PO(s) will not reconcile during a batch PO Close process to close, you will search for, cancel, and close POs in a Pend Cancl status. This completes Step 8, Part 2, Forcing Purchase Orders to Close.
Now that you have completed troubleshooting purchase orders that will not reconcile, you will repeat the requisition cleanup steps to ensure that all fully sourced requisitions or requisitions/requisition lines that you do not intend to source are reconciled. This completes Step 8, Troubleshooting Purchase Orders That Will Not Reconcile.
Fiscal Year End 07/18/2012 PeopleSoft Financials Manual 2012 111
Step 9: Performing Requisition Cleanup (Finalize, Cancel, and Close) In Step 9, you will perform the requisition cleanup steps to ensure that all requisitions associated with any purchase orders that have been canceled and closed throughout the PO Cleanup process are reconciled and liquidated. Note: This step may not apply to your institution. You must follow the steps in this process only if your institution uses requisitions for pre-encumbering funds.
Process 1. Run the BOR_REQ_OPEN_AMOUNT_ALL query to determine all open
requisitions with pre-encumbrance balances.
2. Cancel any unsourced requisitions entirely that you wish to liquidate via the Requisition Reconciliation Workbench (PSFIN Business Process PO.020.960), or individually via the Manage Requisitions page (eProcurement⇒Manage Requisitions) by selecting the Cancel Requisition option, as shown in Step 2 of this module on page 74.
3. Delete any unsourced requisition lines, as indicated by the SOURCE_STATUS, that you do not intend to source via the Manage Requisitions page by selecting the Edit Requisition option, as shown in Step 2 of this module on page 74.

Fiscal Year End 07/18/2012 PeopleSoft Financials Manual 2012 112
4. Approve and budget check the requisitions where lines have been deleted. Refer to PSFIN Business Processes PO.020.920 and PO.020.930, respectively.
5. Run the Requisition Close process to close the requisitions and requisition lines that you have canceled or deleted. Refer to PSFIN Business Process PO.020.480.
6. Run the batch Requisition Budget Check process to liquidate any remaining pre-encumbrance balances. Refer to PSFIN Business Process PO.030.190.
Now that you have repeated the requisition cleanup steps to ensure that all fully sourced requisitions or requisitions/requisition lines that you do not intend to source are reconciled, you will reconcile open PO encumbrance balances in Purchasing to Open PO encumbrance balances in Commitment Control. This completes Step 9, Performing Requisition Cleanup (Finalize, Cancel, and Close).
Fiscal Year End 07/18/2012 PeopleSoft Financials Manual 2012 113
Step 10: Reconciling Open POENC Balances in Purchasing to Open POENC Balances in Commitment Control In Step 10, you will reconcile open PO encumbrance balances in Purchasing to Open PO encumbrance balances in Commitment Control.
Process 1. Run the BOR_PO_OPEN_AMOUNT_ALL query. This will show all open
encumbrance balances in Purchasing. Refer to PSFIN Business Process PO.075.130.
Note: It is important to run the PO Budget Check process for all Closed purchase orders prior to attempting to reconcile Purchasing to KK. Refer to PSFIN Business Process PO.030.030.
2. Run the BOR_PO_OPEN_ENCS_KK query. This will show all open encumbrance balances in Commitment Control.
Note: Use the Amount column.
Now that you have reconciled open PO encumbrance balances in Purchasing to Open PO encumbrance balances in Commitment Control, you will reconcile open requisition pre-encumbrance balances in Purchasing to open requisition pre-encumbrance balances in Commitment Control. This completes Step 10, Reconciling Open PO Encumbrance Balances in Purchasing to Open PO Encumbrance Balances in Commitment Control.
Fiscal Year End 07/18/2012 PeopleSoft Financials Manual 2012 114
Step 11: Reconciling Open PRENC Balances in Purchasing to Open PRENC Balances in Commitment Control In Step 11, you will reconcile open requisition pre-encumbrance balances in Purchasing to Open requisition pre-encumbrance balances in Commitment Control.
Process 1. Run the BOR_REQ_OPEN_AMOUNT_ALL query. This will show all open pre-
encumbrance balances in Purchasing.
Note: It is important to run the Requisition Budget Check process for all Closed requisitions prior to attempting to reconcile Purchasing to KK. Refer to PSFIN Business Process PO.030.190.
2. Run the BOR_REQ_OPEN_ENCS_KK query. This will show all open pre-encumbrance balances in Commitment Control.
Note: Use the Amount column.
Now that you have completed all your PO Cleanup activities, you will update the Budget Reference (BUD REF) for all Requesters to prevent entry of any Requisitions charged to the current budget year at Year End. This completes Step 11, Reconciling Open PO Encumbrance Balances in Purchasing to Open PO Encumbrance Balances in Commitment Control.
Fiscal Year End 07/18/2012 PeopleSoft Financials Manual 2012 115
Step 12: Updating BUD REF for All Requesters at Year End In this step, you will update the Budget Reference (BUD REF) for all Requesters to prevent entry of any Requisitions charged to the current budget year at Year End. Note: Refer to PSFIN Business Process EP.080.070, Updating BUD REF for All Requesters at Year End, for more information on this process. In order to ensure that requisitions are being created against the correct budget during fiscal year end, institutions can run the Mass Update Bud_Ref Req_Tbl (BOR_REQ_UPBR) process that will auto-update the default Budget Reference (BUD REF) identified on the Requester Setup page for all Requesters within their business unit to reflect the new budget year. Subsequently, all requisitions entered will be charged to the upcoming fiscal year’s budget. Once this process is run, Requisitions submitted for approval and approved are eligible for budget checking in the nightly batch process. Budget exceptions indicating No Budget Exists will be generated for all Requisitions until budget journals for the new fiscal year are imported into PeopleSoft and posted. Once budget journals are posted, these Requisition transactions will automatically be picked up in the nightly batch process and receive a Valid budget status, provided they contain a complete and valid chartstring on the Distribution Line(s). Note: If this process was run previously as part of determining and implementing the optional Year End cutoff procedures as noted in Step 1, starting on page 67, it should not be run again.
Process 1. Select BOR Menus⇒BOR Purchasing⇒BOR PO Use and
Processing⇒Update Requestor Budget Ref to access the Update Requestor Budget Ref page.

Fiscal Year End 07/18/2012 PeopleSoft Financials Manual 2012 116
Note: This process can be accessed and run for a specified Business Unit, by any user having the BOR_PO_SETUP_CONFIG security role.
2. Enter or select your business unit number in the Business Unit field.
3. Enter or select the new Fiscal Year in the Budget Reference field.
4. Click on to run the BOR_REQ_UPBR process.
This completes Step 12, Determining a Cut-Off Date for eProcurement Requisitions Charged Against the Current Year’s Budget. Now that you have completed all your PO Cleanup activities, you will run your Travel & Expenses cleanup processes. This completes Module 3, Year-End Purchasing Cleanup Processes.

Fiscal Year End 07/18/2012 PeopleSoft Financials Manual 2012 117
Module 4: Year-End Travel and Expenses Cleanup Processes Introduction In this module, we will concentrate on the Year-End Travel and
Expenses Cleanup Processes. The goal of these cleanup processes is to have: 1. All Travel Authorizations closed and encumbrances = $0. 2. All Expenses Open Liabilities in Account 211500 = $0. 3. All Cash Advances reconciled for the current fiscal year. 4. All Banner Clearing Accounts = $0.
Objectives In this module, you will learn how to:
Process and reconcile Travel Authorizations Process and reconcile Cash Advances Process and reconcile Expense Reports Update the Traveler’s Budget Reference to the New Fiscal
Year
Institution-Specific Business Processes
____________________________________________________
____________________________________________________
____________________________________________________
____________________________________________________
____________________________________________________
Security The following Security Roles can perform Year-End Travel and Expense cleanup processes: • BOR_EX_BUDCHK_PRC • BOR_EX_CASH_ADV_ADMIN • BOR_EX_CASH_ADV_APR • BOR_EX_MAINT_TRANS • BOR_EX_TAUTH_RESET

Fiscal Year End 07/18/2012 PeopleSoft Financials Manual 2012 118
Step 1: Processing and Reconciling Travel Authorizations In this step, you will process and reconcile all Travel Authorizations so that at year end, there are no open encumbrances. Any travel monies that need to be reserved will need to be booked as a manual encumbrance. The Travel and Expenses module does not have the ability to reference a prior budget year on a distribution line.
Part 1: Identifying Open Travel Authorizations In Part 1 of this step, you will identify any open Travel Authorizations, so that you can do the following: 1. Apply them to the accompanying Expense Report. 2. Deny or delete them. 3. Cancel them. Process 1. Run the 08-Open TAuths per KK report.
Note: This report is one of the BOR Encumbrance Recon reports. Refer to Appendix C, Encumbrance Workbench, starting on page 205, for more information on running the BOR Encumbrance Build process and the BOR Encumbrance Recon reports.
2. View the open Travel Authorizations. Refer to PSFIN Business Process EX.060.014.
Now that you have identified any open Travel Authorizations, you will deny or delete those that have not yet been submitted or fully approved.
This completes Step 1, Part 1, Identifying Open Travel Authorizations.

Fiscal Year End 07/18/2012 PeopleSoft Financials Manual 2012 119
Part 2: Denying or Deleting Travel Authorizations In Part 2 of this step, you will deny or delete any Travel Authorizations that have not yet been submitted or fully approved. Denying Travel Authorizations Process 1. Deny the open Travel Authorizations that are not yet fully approved. Refer to
PSFIN Business Process EX.080.011.
2. Run Budget Checking on the denied Travel Authorizations. Refer to PSFIN Business Process EX.030.010.
Case 1 An approver has a Travel Authorization in his/her Worklist that needs to be denied since the trip was cancelled. However, the Accounting Date has passed and the Approver cannot work the transaction. What can be done? An example of such a Travel Authorization is shown below:
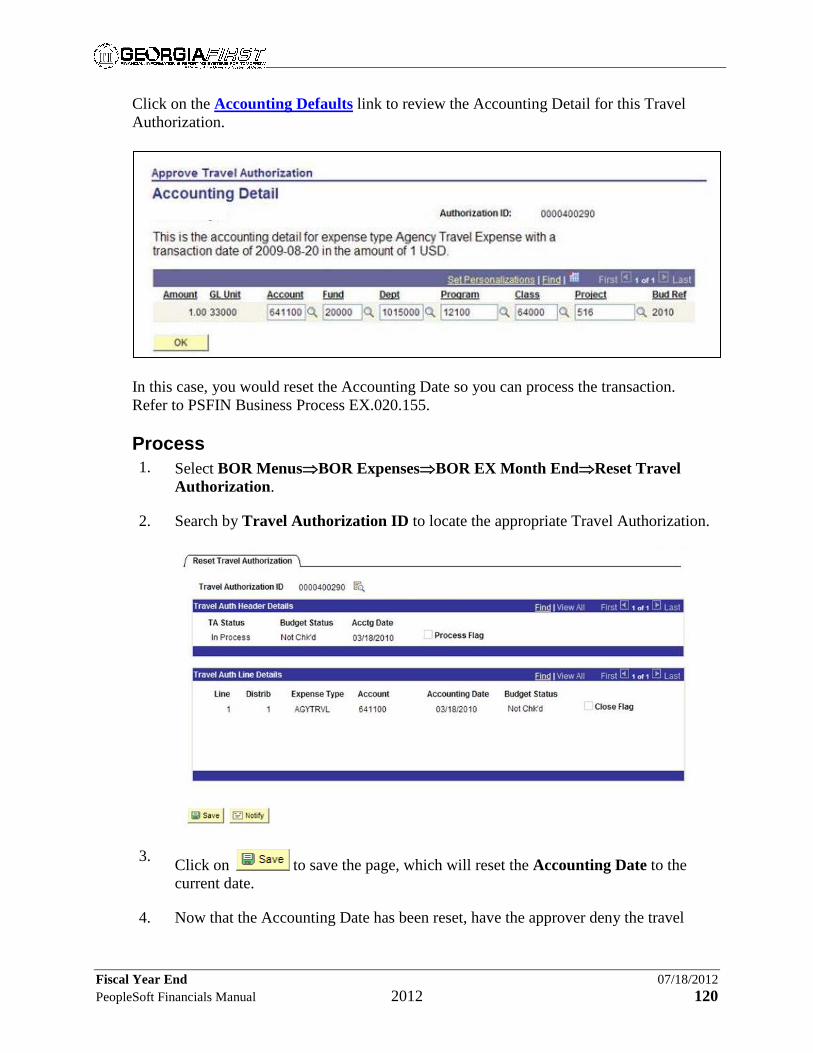
Fiscal Year End 07/18/2012 PeopleSoft Financials Manual 2012 120
Click on the Accounting Defaults link to review the Accounting Detail for this Travel Authorization.
In this case, you would reset the Accounting Date so you can process the transaction. Refer to PSFIN Business Process EX.020.155. Process 1. Select BOR Menus⇒BOR Expenses⇒BOR EX Month End⇒Reset Travel
Authorization.
2. Search by Travel Authorization ID to locate the appropriate Travel Authorization.
3. Click on to save the page, which will reset the Accounting Date to the current date.
4. Now that the Accounting Date has been reset, have the approver deny the travel

Fiscal Year End 07/18/2012 PeopleSoft Financials Manual 2012 121
authorization.
Note: This must be done in the open period or you will have to reset again.
5. Once the Travel Authorization has been denied, you can run budget checking on it to remove the encumbrance.
Now that you have denied the open Travel Authorizations that are not yet fully approved, you will delete any Travel Authorizations that have not yet been submitted.
Deleting Travel Authorizations A traveler has created, but not yet submitted, a Travel Authorization for a conference that was cancelled. How is it removed from the system? Only the Traveler or the Traveler’s Delegate can delete the Travel Authorization. A Travel Authorization can be deleted if: 1. It has been created but not yet submitted; or, 2. It has been submitted and the Approver has sent it back to the Traveler. An Approver cannot delete a Travel Authorization. However, the Approver can: 1. Close out the Travel Authorization by denying it; or, 2. Send the Travel Authorization back to the Traveler so that he/she can delete it. Refer to PSFIN Business Process EX.020.016 for more information. Now that you have denied or deleted your open Travel Authorizations that have not yet been submitted or fully approved, you will cancel any unused approved Travel Authorizations. This completes Step 1, Part 2, Denying or Deleting Travel Authorizations.

Fiscal Year End 07/18/2012 PeopleSoft Financials Manual 2012 122
Part 3: Canceling Unused Approved Travel Authorizations In Part 3 of this step, you will cancel any unused approved Travel Authorizations. If a Travel Authorization will not be used, you need to cancel it from the system. As soon as a Travel Authorization is submitted and budget checked, it creates an encumbrance. Typically, the encumbrance is relieved when the Travel Authorization is applied to the Expense Report. If the Travel Authorization is not applied to an Expense Report, you must cancel it from the system in order to remove the encumbrance
Refer to PSFIN Business Process EX.020.200 for more information. Case 1 Here are two situations covering fully approved Travel Authorizations that would be handled by canceling the Travel Authorization. 1. You have a fully approved Travel Authorization for future travel, but the trip has now
been canceled. How do you remove it from the system to remove the encumbrance? 2. You have a fully approved Travel Authorization for a trip that happened last month.
The Traveler forgot to apply the Travel Authorization to the Expense Report, so the original encumbrance is still in the system.
In order to cancel a Travel Authorization, it must have an Approved status. Process 1. Select Travel and Expenses⇒Travel and Expense Center⇒Travel
Authorization⇒View.
2. Search by Authorization ID to locate the appropriate Travel Authorization.

Fiscal Year End 07/18/2012 PeopleSoft Financials Manual 2012 123
3. Verify the Status is Approved.
Now that you have verified the Travel Authorization is approved, you can run the Cancel Travel Authorization process to cancel it.
Note: Refer to PSFIN Business Process EX.020.200.
4. Select Travel and Expenses⇒Process Expenses⇒Cancel Travel Authorizations.
5. Select an existing or add a new Run Control ID.
6. Search for and select the Travel Authorization that needs to be canceled.
7. Run the EX_BCHK_AUTH process to cancel the selected Travel Authorization.
Now that you have run the process, verify that the Travel Authorization has been canceled.
8. Select Travel and Expenses⇒Travel and Expense Center⇒Travel Authorization⇒View.
9. Search by Authorization ID to locate the appropriate Travel Authorization.

Fiscal Year End 07/18/2012 PeopleSoft Financials Manual 2012 124
10. Verify the Status is Closed.
Now that you have canceled any unused approved Travel Authorizations, you will budget check all Travel Authorizations.
This completes Step 1, Part 3, Canceling Unused Travel Authorizations.

Fiscal Year End 07/18/2012 PeopleSoft Financials Manual 2012 125
Part 4: Budget Checking Travel Authorizations In Part 4 of this step, you will budget check all your Travel Authorizations. Process 1. Run Budget Checking on all Travel Authorizations. Refer to PSFIN Business
Process EX.030.010.
Now that you have budget checked all your Travel Authorizations, you will identify and clear up any hanging encumbrances from Travel Authorizations.
This completes Step 1, Part 4, Budget Checking Travel Authorizations.

Fiscal Year End 07/18/2012 PeopleSoft Financials Manual 2012 126
Part 5: Identifying and Clearing Up Hanging Encumbrances from Travel Authorizations In Part 5 of this step, you will identify and clear up any hanging encumbrances from Travel Authorizations. Process 1. Run the BOR_KK_OPEN_TAUTH_ENC_CLS query to identify any hanging
encumbrances.
Now that you have identified any hanging encumbrances, you will run the Travel Authorization Encumbrance Interface.
2. Select BOR Menus⇒BOR Expenses⇒BOR EX Interfaces⇒TA Encumbrance Interface.
3. Select an existing or add a new Run Control ID.
4. Enter or select your Business Unit.
5. Run the TA Encumbrance Interface (BORIF039) process.
6. Once process runs to success, run Budget Checking on Travel Authorization to verify the Travel Authorization in question will be budget checked. Refer to PSFIN Business Process EX.020.150.
7. Rerun the BOR_KK_OPEN_TAUTH_ENC_CLS query to verify the hanging encumbrances have been canceled.
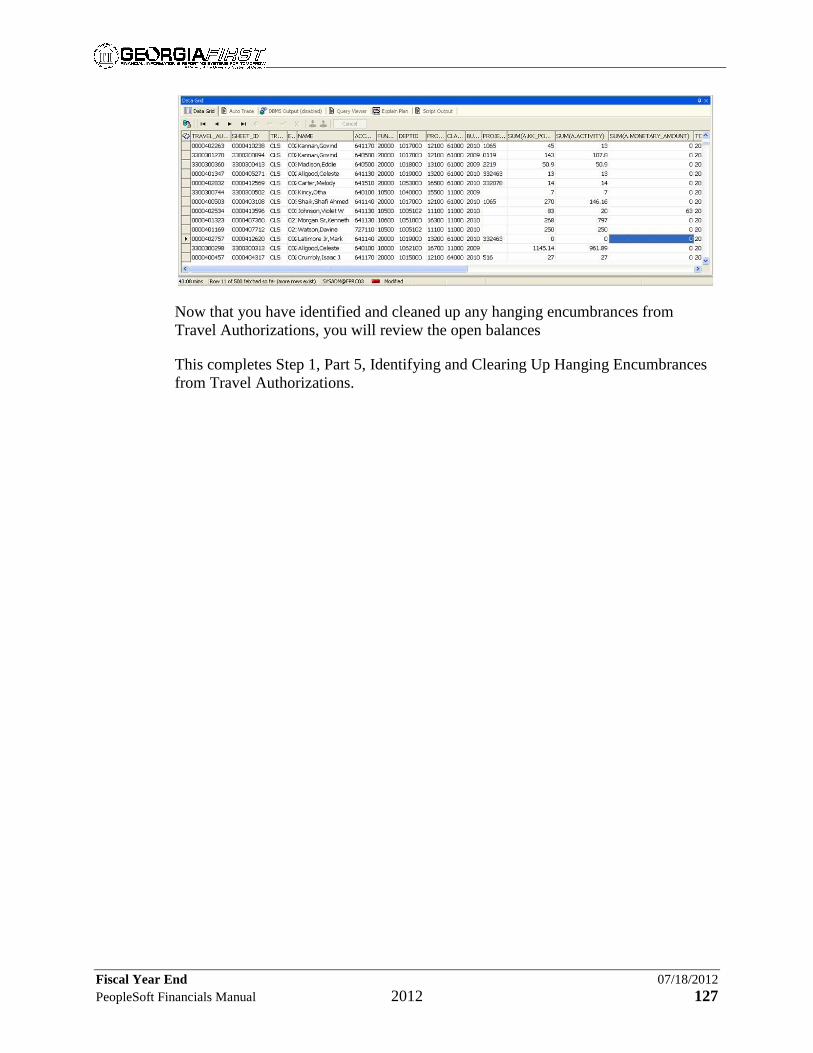
Fiscal Year End 07/18/2012 PeopleSoft Financials Manual 2012 127
Now that you have identified and cleaned up any hanging encumbrances from Travel Authorizations, you will review the open balances
This completes Step 1, Part 5, Identifying and Clearing Up Hanging Encumbrances from Travel Authorizations.

Fiscal Year End 07/18/2012 PeopleSoft Financials Manual 2012 128
Part 6: Reviewing Open Travel Authorization Balances In Part 6 of this step, you will review any open Travel Authorization balances. Process 1. Run the 08-Open TAuths per KK report.
Note: This report is one of the BOR Encumbrance Recon reports. Refer to Appendix C, Encumbrance Workbench, starting on page 205, for more information on the BOR Encumbrance Recon reports.
2. View the open Travel Authorizations. Refer to PSFIN Business Process EX.060.014.
3. Verify that no Travel Authorization balances exist.
Now that you have processed and reconciled your Travel Authorizations, you will process and reconcile your Cash Advances. This completes Step 1, Processing and Reconciling Travel Authorizations.

Fiscal Year End 07/18/2012 PeopleSoft Financials Manual 2012 129
Step 2: Processing and Reconciling Cash Advances In this step, you will process and reconcile all your Cash Advances (Account 132300) for the current fiscal year.
Part 1: Identifying Open Cash Advances In Part 1 of this step, you will identify any open Cash Advances. Process 1. Run the Cash Advance Aging report to obtain a list of all open Cash Advances.
Refer to PSFIN Business Process EX.070.022.
2. Use the Cash Advances View page to search for and review the open Cash Advances. Note: To search by EmplID and/or Advance Status, you will need to use the Advanced Search functionality for this page. • Select Travel and Expenses⇒Travel and Expense Center⇒Cash
Advance⇒View. The Cash Advance – Find an Existing Value page displays.
• Click on the Advanced Search link. An expanded set of search options displays.
• Enter the appropriate Advance ID and/or EmplID.
• Click on .
3. Review the open Cash Advances as needed.
Now that you have identified any open Cash Advances, you will reconcile or close

Fiscal Year End 07/18/2012 PeopleSoft Financials Manual 2012 130
those Cash Advances.
This completes Step 2, Part 1, Identifying Open Cash Advances.
Fiscal Year End 07/18/2012 PeopleSoft Financials Manual 2012 131
Part 2: Reconciling/Closing Cash Advances In Part 2 of this step, you will reconcile or close your open Cash Advances for the current fiscal year. Process 1. Close your open Cash Advances that have been approved but not paid or where the
payments have been voided. Refer to PSFIN Business Process EX.020.201.
Note: These closed Cash Advances will no longer be available to apply to Expense Reports.
2. Reconcile your paid Cash Advances where a balance was owed by an employee and has been receipted through Banner. Refer to PSFIN Business Process EX.020.202.
Note: Make sure that all associated Expense Reports are paid and/or all payments have been applied.
Now that you have reconciled or closed your open Cash Advances, you will review your Cash Advance balances in the Cash Advance (132300) and the Banner Clearing (133100) Accounts.
This completes Step 2, Part 2, Reconciling/Closing Cash Advances.

Fiscal Year End 07/18/2012 PeopleSoft Financials Manual 2012 132
Part 3: Reviewing Cash Advance Balances in the Cash Advance and Banner Clearing Accounts In Part 3 of this step, you will review your Cash Advance balances in the Cash Advance (132300) and the Banner Clearing (133100) Accounts. Process 1. Run the Trial Balance – Fund (GLS7012) report. Refer to PSFIN Business
Process GL.070.008.
Note: You can also run the Report 01: BOR_TRIAL_BALANCE query. Refer to Appendix A, Period End Integrity Checks, starting on page 193, for more information on the Period End Integrity Check queries.
2. Run the Cash Advance Aging report. Refer to PSFIN Business Process EX.070.022.
3. Verify that the Cash Advance balance from the Trial Balance report for Account 132100 reconciles with the total from the Cash Advance Aging report.
Note: Any remaining balances should only be for Cash Advances that will be expensed in the next fiscal year. If you have any balances other than those, you must follow the steps in Part 2 to reconcile or close the Cash Advances causing these balances.
4. Verify that the Banner Clearing Account 133100 is zero.
Now that you have reviewed your Cash Advance balances in the Cash Advance (132300) and the Banner Clearing (133100) Accounts, you will reconcile any open liabilities.
This completes Step 2, Part 3, Running the Trial Balance Report for Cash Advances.
Now that you have processed and reconciled your Cash Advances, you will process and reconcile your Expense Reports.
This completes Step 2, Processing and Reconciling Cash Advances.

Fiscal Year End 07/18/2012 PeopleSoft Financials Manual 2012 133
Step 3: Processing and Reconciling Expense Reports In this step, you will process and reconcile all your Expense Reports after you have processed your Travel Authorizations and Cash Advances.
Part 1: Indentifying Unapproved Expense Reports In Part 1 of this step, you will identify any unapproved Expense Reports. Process 1. Review your transactions in progress. Refer to PSFIN Business Process
EX.030.500.
Note: Enter EXRECNA as the Search by criteria. You can also select it by clicking on the Advanced Search link, and then clicking on the to bring up a list of options for Transactions in Progress.
2. Click on .
3. Identify any unapproved Expense Reports.
Now that you have identified any unapproved Expense Reports, you will reset the Accounting Date on any Expense Reports where the Accounting Date is no longer in the open period.
This completes Step 3, Part 1, Indentifying Unapproved Expense Reports.

Fiscal Year End 07/18/2012 PeopleSoft Financials Manual 2012 134
Part 2: Resetting the Accounting Date on Expense Reports In Part 2 of this step, you will reset the Accounting Date on any Expense Reports where the Accounting Date is no longer in the open period.
Case 1 The Expense Report is still in the Approver’s Worklist. In this case, the Approver can change the Accounting Date on the Expense Report.
Case 2 The Expense Report needs to be reassigned to another Approver’s Worklist. In this case, the Expense Report has to first be reset to change the Accounting Date to the current date, and then reassigned to the other Approver. Process 1. Select BOR Menus⇒BOR Expenses⇒BOR EX Month End⇒Reset Expense
Report.
2. Search for and select the Expense Report to be reset.
Note: The Status should be In Process.
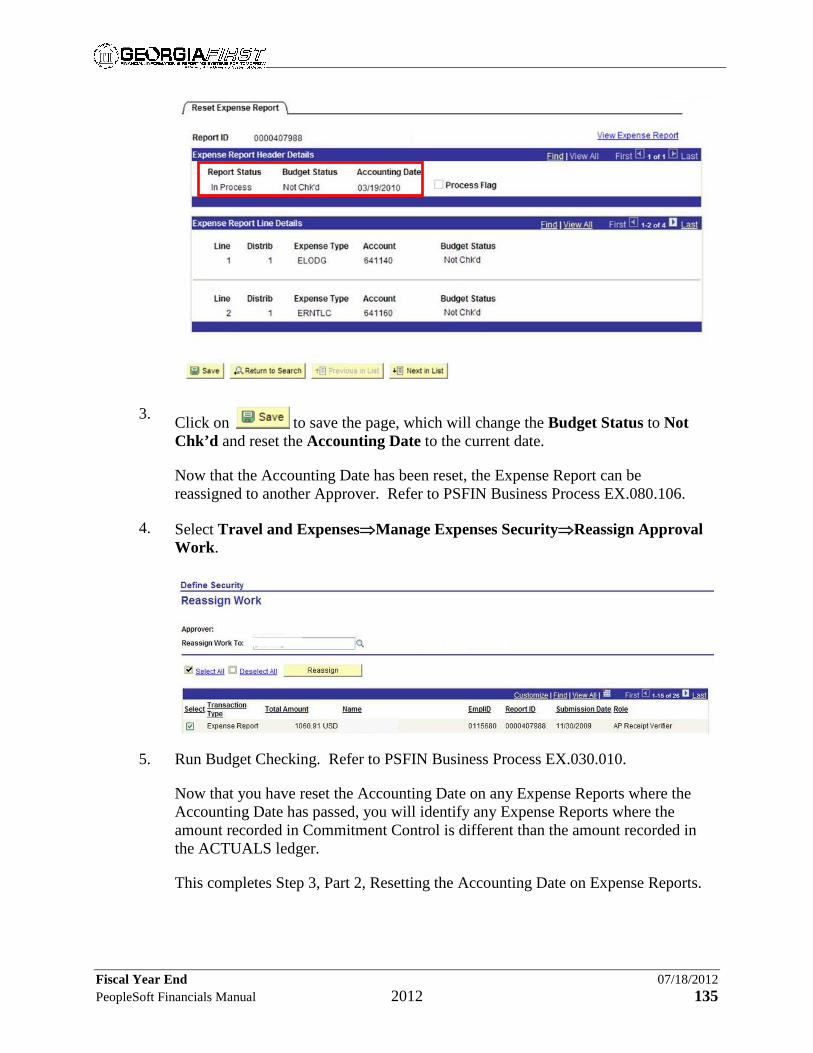
Fiscal Year End 07/18/2012 PeopleSoft Financials Manual 2012 135
3. Click on to save the page, which will change the Budget Status to Not Chk’d and reset the Accounting Date to the current date.
Now that the Accounting Date has been reset, the Expense Report can be reassigned to another Approver. Refer to PSFIN Business Process EX.080.106.
4. Select Travel and Expenses⇒Manage Expenses Security⇒Reassign Approval Work.
5. Run Budget Checking. Refer to PSFIN Business Process EX.030.010.
Now that you have reset the Accounting Date on any Expense Reports where the Accounting Date has passed, you will identify any Expense Reports where the amount recorded in Commitment Control is different than the amount recorded in the ACTUALS ledger.
This completes Step 3, Part 2, Resetting the Accounting Date on Expense Reports.

Fiscal Year End 07/18/2012 PeopleSoft Financials Manual 2012 136
Part 3: Identifying Expense Reports with Different Amounts in Commitment Control and the ACTUALS Ledger In Part 3 of this step, you will identify any Expense Reports where the amount recorded in Commitment Control is different than the amount recorded in the ACTUALS ledger. Occasionally, the line amounts in an Expense Report that has already been budget checked are changed, and the Budget Status flag is not set back to Not Checked as it should be. This can cause a situation where the amount that is posted in the ACTUALS ledger is different than the amount recorded in Commitment Control. These variances are often identified by running the Integrity Check 07: BOR_CHK_DETL_ACTLS query, which identifies the chartstrings having a variance, but does not identify the transaction (Expense Report, Voucher, etc.). Note: Refer to Appendix A, Period End Integrity Checks, starting on page 193, for more information on the Period End Integrity Check queries. To find any Expense Reports causing a variance, you can run one of the following queries: • BOR_EX_ER_KK_RECON • BOR_KK_EXSHEET_RECON: Refer to PSFIN Business Process KK.075.010 If any differences are found in the query results, then you will need to submit a ticket to the ITS HELPDESK. Now that you have identified any Expense Reports that have different Commitment Control amounts, you will process your open approved Expense Reports. This completes Step 3, Part 3, Identifying Expense Reports Having Different Commitment Control Amounts.

Fiscal Year End 07/18/2012 PeopleSoft Financials Manual 2012 137
Part 4: Processing Open Approved Expense Reports In Part 4 of this step, you will process your open approved Expense Reports. Note: All open Expense Reports should have a current Accounting Date and a Successful Budget Check Status. Process 1. Run the BOR_EX_OPEN_LIABILITY query.
Note: If the query results identify any open approved Expense Reports, you have two options to process them: • Pay • Close
2. Run the BOR_EX_DUE query for a list of Staged Expense Reports, and pay those that can be paid.
3. Close the remaining Expense Reports that cannot be paid once they are approved. Refer to PSFIN Business Process EX.020.204.
Now that you have processed your open Expense Reports, you will review your open liabilities.
This completes Step 3, Part 3, Processing Open Approved Expense Reports.
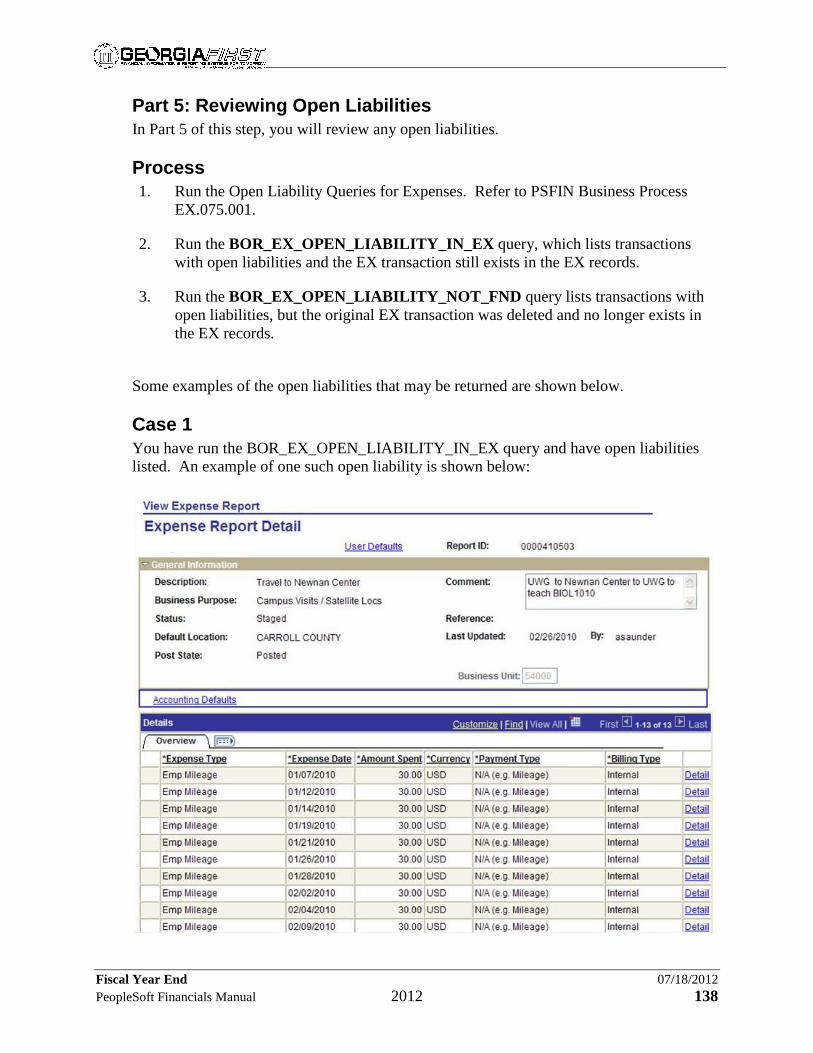
Fiscal Year End 07/18/2012 PeopleSoft Financials Manual 2012 138
Part 5: Reviewing Open Liabilities In Part 5 of this step, you will review any open liabilities. Process 1. Run the Open Liability Queries for Expenses. Refer to PSFIN Business Process
EX.075.001.
2. Run the BOR_EX_OPEN_LIABILITY_IN_EX query, which lists transactions with open liabilities and the EX transaction still exists in the EX records.
3. Run the BOR_EX_OPEN_LIABILITY_NOT_FND query lists transactions with open liabilities, but the original EX transaction was deleted and no longer exists in the EX records.
Some examples of the open liabilities that may be returned are shown below. Case 1 You have run the BOR_EX_OPEN_LIABILITY_IN_EX query and have open liabilities listed. An example of one such open liability is shown below:
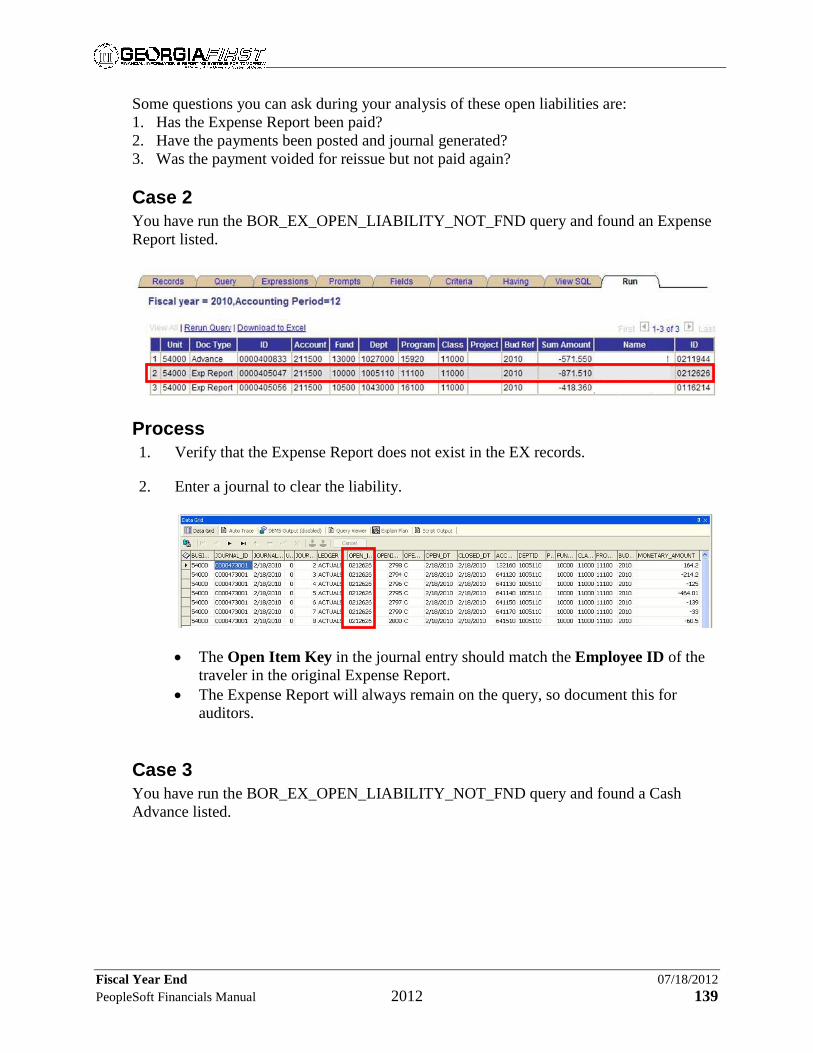
Fiscal Year End 07/18/2012 PeopleSoft Financials Manual 2012 139
Some questions you can ask during your analysis of these open liabilities are: 1. Has the Expense Report been paid? 2. Have the payments been posted and journal generated? 3. Was the payment voided for reissue but not paid again? Case 2 You have run the BOR_EX_OPEN_LIABILITY_NOT_FND query and found an Expense Report listed.
Process 1. Verify that the Expense Report does not exist in the EX records.
2. Enter a journal to clear the liability.
• The Open Item Key in the journal entry should match the Employee ID of the
traveler in the original Expense Report. • The Expense Report will always remain on the query, so document this for
auditors.
Case 3 You have run the BOR_EX_OPEN_LIABILITY_NOT_FND query and found a Cash Advance listed.
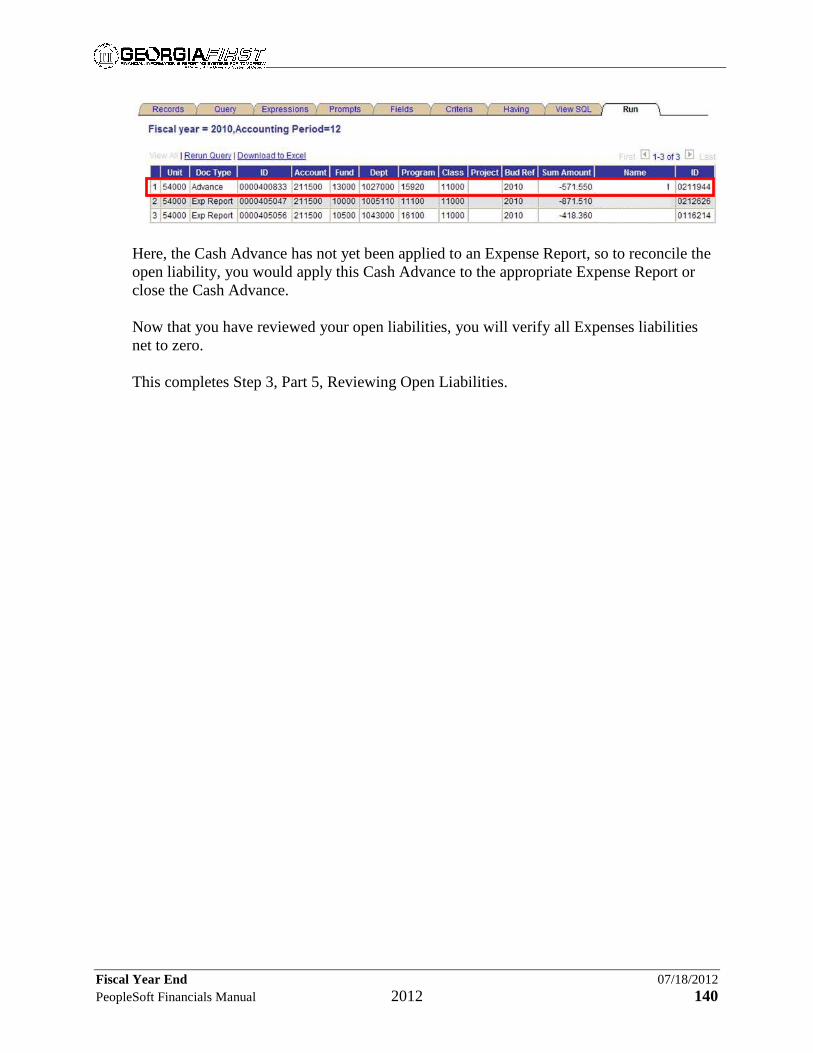
Fiscal Year End 07/18/2012 PeopleSoft Financials Manual 2012 140
Here, the Cash Advance has not yet been applied to an Expense Report, so to reconcile the open liability, you would apply this Cash Advance to the appropriate Expense Report or close the Cash Advance. Now that you have reviewed your open liabilities, you will verify all Expenses liabilities net to zero. This completes Step 3, Part 5, Reviewing Open Liabilities.

Fiscal Year End 07/18/2012 PeopleSoft Financials Manual 2012 141
Part 6: Verifying All Expenses Liabilities Net to Zero In Part 6 of this step, you will verify that all Expenses liabilities net to zero in both the Travel and Expense and General Ledger modules. Process 1. Run the BOR_EX_OPEN_LIABILITY query for Account 211500.
2. Run the Trial Balance – Fund (GLS7012) report. Refer to PSFIN Business Process GL.070.008.
Note: You can also run the Report 01: BOR_TRIAL_BALANCE query. Refer to Appendix A, Period End Integrity Checks, starting on page 193, for more information on the Period End Integrity Check queries.
3. Verify that all Expenses liabilities net to zero.
Now that you have verified that all Expenses liabilities net to zero in both the Travel and Expense and General Ledger modules, you will run the batch processes to process the Expense Reports.
This completes Step 3, Part 6, Verifying All Expenses Liabilities Net to Zero.

Fiscal Year End 07/18/2012 PeopleSoft Financials Manual 2012 142
Part 7: Running Batch Expenses Processes In Part 7 of this step, you will run the batch processes to process the Expense Reports. Process 1. Run the Budget Checking Expense Reports in Batch process. Refer to PSFIN
Business Process EX.030.011.
2. Run the Processing Expenses – Posting Liabilities process. Refer to PSFIN Business Process EX.030.031.
3. Run the Processing Expenses – Staging Payments process. Refer to PSFIN Business Process EX.030.030.
4. Issue the payments through Accounts Payable. Refer to PSFIN Business Processes AP.020.500 through AP.020.506.
5. Run the Processing Expenses – Posting Payments process. Refer to PSFIN Business Process EX.030.033.
6. Run the batch process for GL journals.
Note: Refer to Appendix B, Batch Processing, starting on page 203, for more information on these batch processes.
Now that you have processed and reconciled all your Expense Reports, you will update the traveler’s Budget Reference to the new Fiscal Year. This completes Step 3, Processing and Reconciling Expense Reports.
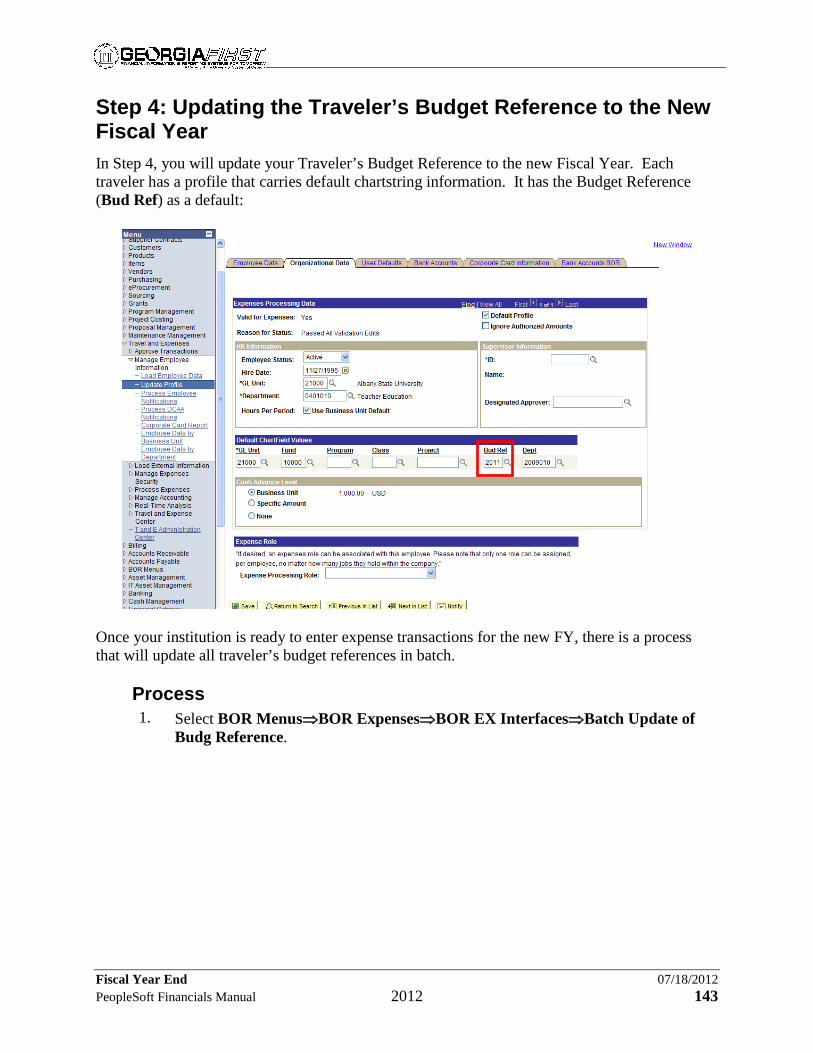
Fiscal Year End 07/18/2012 PeopleSoft Financials Manual 2012 143
Step 4: Updating the Traveler’s Budget Reference to the New Fiscal Year In Step 4, you will update your Traveler’s Budget Reference to the new Fiscal Year. Each traveler has a profile that carries default chartstring information. It has the Budget Reference (Bud Ref) as a default:
Once your institution is ready to enter expense transactions for the new FY, there is a process that will update all traveler’s budget references in batch.
Process 1. Select BOR Menus⇒BOR Expenses⇒BOR EX Interfaces⇒Batch Update of
Budg Reference.

Fiscal Year End 07/18/2012 PeopleSoft Financials Manual 2012 144
2. Enter or select the appropriate Run Control ID.
3. Click on . The Exp Upd Bud Rf Bor page displays.
4. Enter the new Fiscal Year in the Fiscal Year field.
5. Click on to run the BORIF040 process. Now your Traveler’s Bud Ref in the default chartstring will reflect the new Fiscal Year:
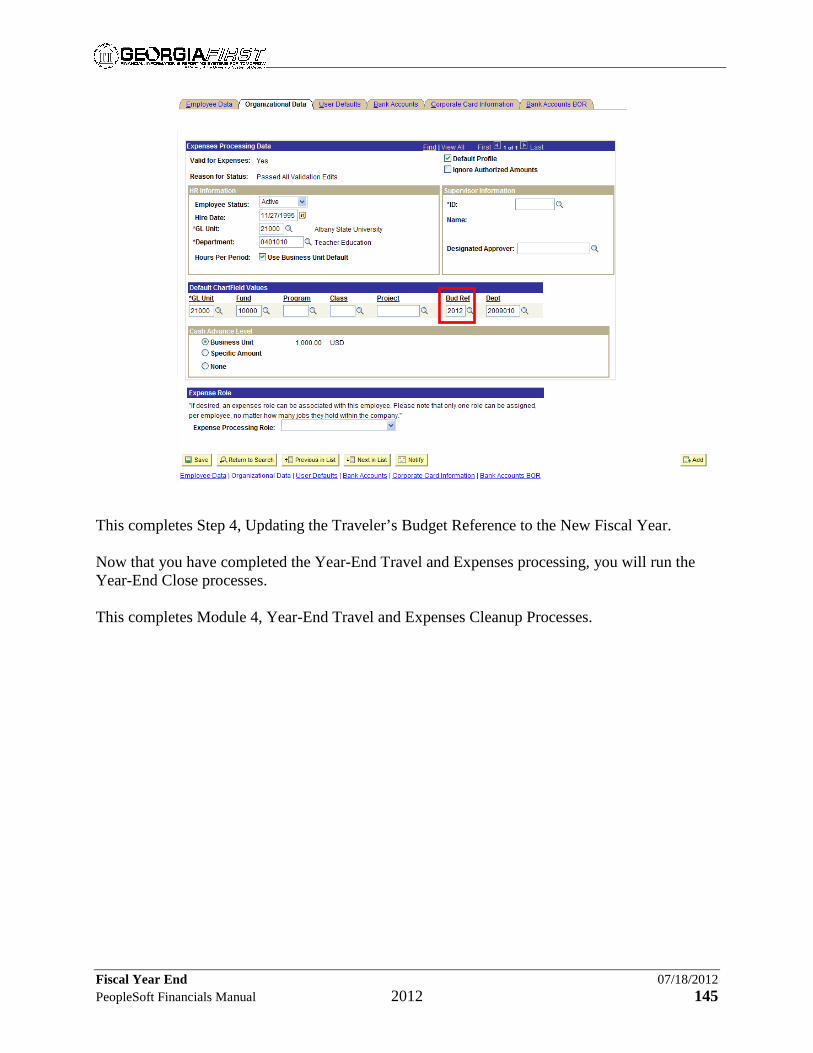
Fiscal Year End 07/18/2012 PeopleSoft Financials Manual 2012 145
This completes Step 4, Updating the Traveler’s Budget Reference to the New Fiscal Year. Now that you have completed the Year-End Travel and Expenses processing, you will run the Year-End Close processes. This completes Module 4, Year-End Travel and Expenses Cleanup Processes.
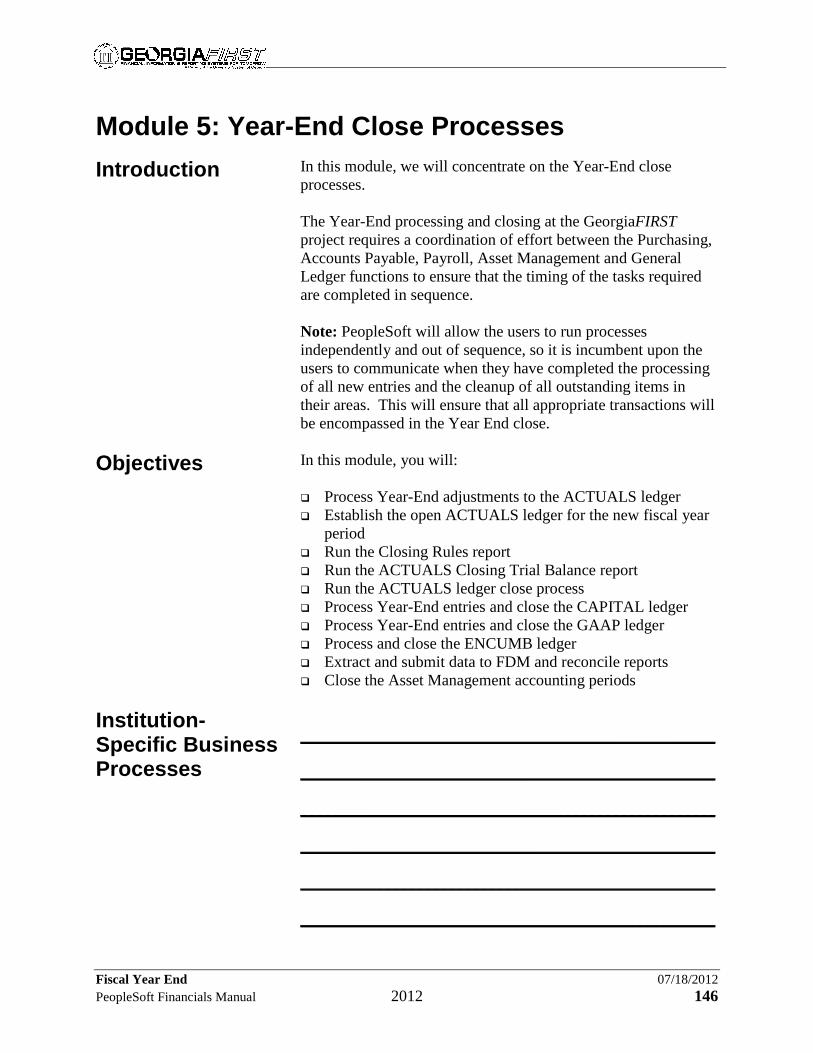
Fiscal Year End 07/18/2012 PeopleSoft Financials Manual 2012 146
Module 5: Year-End Close Processes Introduction In this module, we will concentrate on the Year-End close
processes. The Year-End processing and closing at the GeorgiaFIRST project requires a coordination of effort between the Purchasing, Accounts Payable, Payroll, Asset Management and General Ledger functions to ensure that the timing of the tasks required are completed in sequence. Note: PeopleSoft will allow the users to run processes independently and out of sequence, so it is incumbent upon the users to communicate when they have completed the processing of all new entries and the cleanup of all outstanding items in their areas. This will ensure that all appropriate transactions will be encompassed in the Year End close.
Objectives In this module, you will: Process Year-End adjustments to the ACTUALS ledger Establish the open ACTUALS ledger for the new fiscal year
period Run the Closing Rules report Run the ACTUALS Closing Trial Balance report Run the ACTUALS ledger close process Process Year-End entries and close the CAPITAL ledger Process Year-End entries and close the GAAP ledger Process and close the ENCUMB ledger Extract and submit data to FDM and reconcile reports Close the Asset Management accounting periods
Institution-Specific Business Processes
____________________________________________________
____________________________________________________
____________________________________________________
____________________________________________________
____________________________________________________
____________________________________________________
Fiscal Year End 07/18/2012 PeopleSoft Financials Manual 2012 147
Security The following Security Role can perform Year-End close processes: • BOR_GL_PERIOD_END

Fiscal Year End 07/18/2012 PeopleSoft Financials Manual 2012 148
Step 1: Processing Year-End Adjustments to the ACTUALS Ledger In this step, you will process the year-end adjustments to the ACTUALS ledger. The following adjustments are required before continuing with the Year-End processes for this ledger. Note: Refer to PSFIN Business Process GL.020.001 unless otherwise noted.
1. Reclassify sponsored Non-Operating Revenue to sponsored Operating Revenue, if
grants or contracts were classified improperly. Refer to Correcting Journal Entry C-1.
2. Identify reserves for capital projects and move from 3421xx to 371xxx. Refer to Correcting Journal Entry C-8.
3. Move balances in 342100 (current year) to 341100 (prior year). This is necessary for all funds that close to 342100, and should be posted to period 1 of the new year for both the ACTUALS and the GAAP Ledgers. Refer to Standard Journal Entry S-1.
Note: Journal S-1 must be posted after the current Fiscal Year Actuals Ledger is closed and immediately after the next Fiscal Year Actuals Ledger is opened.
4. Create and post a journal entry to reimburse Other General Funds for the payback of GSFIC bonds for Auxiliary capital projects, if required. Refer to Standard Journal Entry S-4.
5. Set up State Appropriations as a receivable. Refer to Standard Journal Entry S-7.
6. Separate lease purchase interest expense from lease purchase expense, if required. Refer to Standard Journal Entry S-8.
7. Recognize insurance claim on capital assets. Refer to Standard Journal Entry S-10.
8. Recognize insurance claim on non-capital assets. Refer to Standard Journal Entry S-11.
9. Analyze Plant Suspense Encumbrances. Refer to Year-End Journal Entries YE-1 and YE-2.
Note: Be sure to reverse these entries in July.
10. Adjust Student Receivables and Deferred Revenue balances for Banner feed of Student tuition for subsequent fiscal year in cases where nothing has been received or earned. Refer to Year-End Journal Entry YE-3.
Note: Be sure to reverse this entry in July.

Fiscal Year End 07/18/2012 PeopleSoft Financials Manual 2012 149
11. Adjust Book Inventories to the Central Stores physical inventory count. Refer to Year-End Journal Entry YE-4.
12. Adjust inventory reserves in all funds except Auxiliary Funds (12xxx). Refer to Year-End Journal Entry YE-4a.
13. Adjust Book Inventories to the Book Stores physical inventory count. Refer to Year-End Journal Entry YE-5.
14. Book Grant Deferred Revenue, as evidenced by credit balances in Restricted fund accounts receivable detail. Refer to Year-End Journal Entry YE-6a.
Note: Be sure to reverse this entry in July.
15. Reclassify Accounts Receivable credit balances to Accounts Payable using the Banner TGRAGES report. Refer to Year-End Journal Entry YE-6b.
Note: Be sure to reverse this entry in July.
16. Show credit memos as receivables instead of a reduction of payables by fund. Refer to Year-End Journal Entry YE-6c.
Note 1: Be sure to reverse this entry in July.
Note 2: This journal was previously GAAP ledger journal entry number YE-37 in prior years. It was changed to an Actuals ledger entry to accomplish both Budgetary and GAAP reporting objectives.
17. Write off uncollectible accounts for revenue transactions $3,000 and under. Refer to Year-End Journal Entry YE-7a.
18. Post current year allowance for doubtful accounts for non-revenue generating receivable balances over 180 days old. Refer to Year-End Journal Entry YE-7b.
19. Book current year reserve for uncollectible accounts over 180 days old. Refer to Year-End Journal YE-7c.
20. Book current year net assets allocated for Renewal and Replacement. Refer to Year-End Journal Entry YE-8.
Note: Year-End Journal Entry YE-21 (in Capital Ledger) must be posted prior to running query used for this journal entry.
21. Move the current year expenses allocated to Renewal and Replacement from Unallocated Net Assets to Reserve for Renewal and Replacement. Refer to Year-End Journal Entry YE-8a.
22. Book cash expendable restricted gifts for Auxiliary Services, if applicable. Refer to

Fiscal Year End 07/18/2012 PeopleSoft Financials Manual 2012 150
Year-End Journal Entry YE-9.
23. Move fringe benefits to Non Personal Services accrual account. Refer to Year-End Journal Entry YE-10.
24. Accrue Gift revenue associated with GSFIC/MRR encumbered amounts at year-end. Refer to Year-End Journal Entry YE-11a.
Note: Do not accrue Gift revenue for any remaining 2008 MRR encumbered amounts that were funded by State appropriation.
25. Record prepaid items for GHEFA/GSFIC managed projects where bonds have been sold and institution is prefunding activity. Refer to Year-End Journal Entry YE-11b.
26. Record project activity in CIP where bonds were not sold at 6/30/xx and institution is to pre-fund project. Refer to Year-End Journal Entry YE-11c.
27. Reverse cumulative revenue and expense balances in Funds 60000, 61000 and 62000, offsetting agency liability accounts. These entries are also required if revenue and/or expense balances exist in the Capital or GAAP ledgers for these funds. Refer to Year-End Journal Entries YE-12 and YE-13.
Now that you have processed the year-end adjustments to the ACTUALS ledger, you will establish the open ACTUALS Ledger for the new Fiscal Year period. This completes Step 1, Processing Year-End Adjustments to the ACTUALS Ledger.

Fiscal Year End 07/18/2012 PeopleSoft Financials Manual 2012 151
Step 2: Establishing the Open ACTUALS Ledger for the New Fiscal Year Period In this step, you will establish the open ACTUALS Ledger for the new Fiscal Year period. Refer to PSFIN Business Process GL.100.003. Note: You must open the ACTUALS ledger for each new fiscal year period, prior to running the Year-End close processes. You have the option to either close Period 12 or leave Period 12 open, depending on where you are in your Fiscal Year End close process.
Option 1 – Period 12 Closed In Option 1, you will close the previous fiscal year and establish the open ACTUALS Ledger for the new Fiscal Year period if your institution has completed all processing in Period 12 of the previous fiscal year. Process 1. Select Setup Financials/Supply Chain⇒Business Unit Related⇒General
Ledger⇒Open Periods⇒Open Periods Mass Update. The Open Period Mass Update page displays.
2. Verify GL General Ledger appears in the PeopleSoft Product fields in the Selection Criteria group box.
3. Verify that 02 (Fiscal Year) appears in the Calendar field.
4. Verify your Business Unit number appears in the Unit field.
5. Verify ACTUALS displays in the Ledger Group field.

Fiscal Year End 07/18/2012 PeopleSoft Financials Manual 2012 152
You can update individual ledger groups or all ledger groups in this process. In this case, you will update just the ACTUALS ledger groups.
6. Click on . A complete list of all GL transaction types for the ACTUALS ledger group appears on the page.
7. Enter the new Fiscal Year in the From Year field in the Update Selected Rows group box.
8. Enter the first period of the new Fiscal Year in the From Period field.
9. Enter the new Fiscal Year in the To Year field.
10. Enter the last period of the new Fiscal Year in the To Period field.
11. Enter the new Fiscal Year in the Def Adj Year field.
12. Click on the Select All link. The Select check boxes for all ledger groups and GL transaction types are clicked ON.
13. Click on to update the selected rows.
14. Click on .
Now the open period settings for the ACTUALS ledger group must be migrated to the submodules.
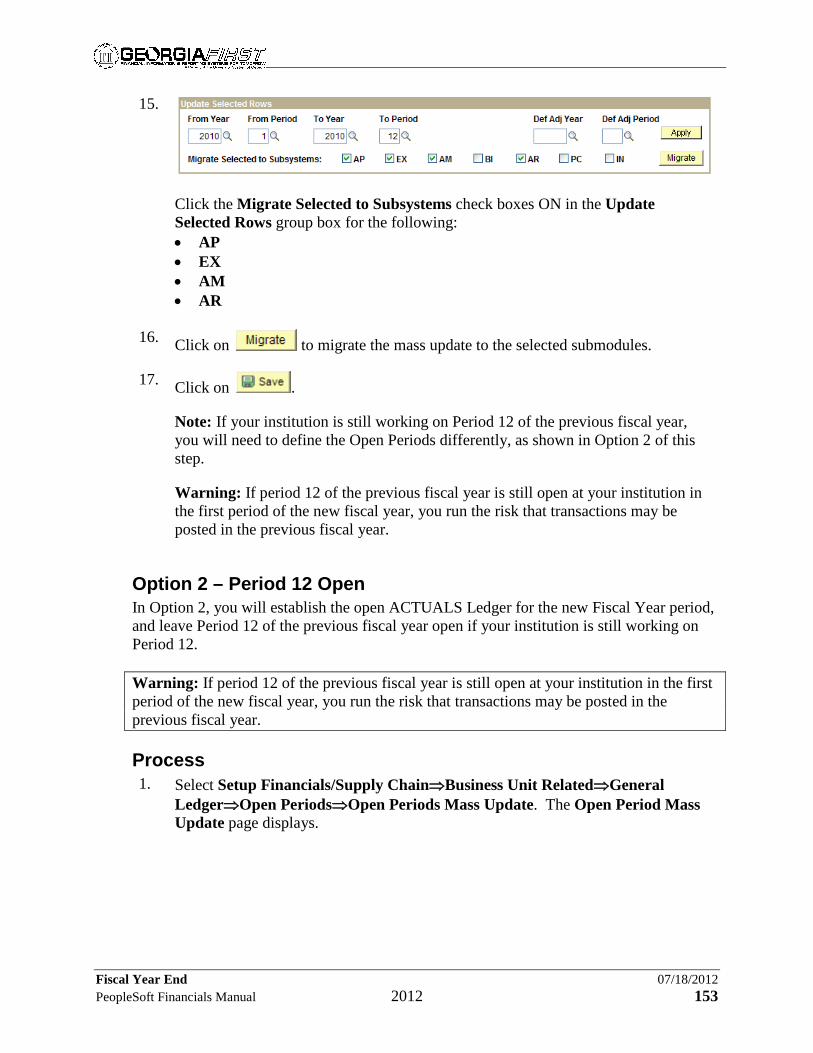
Fiscal Year End 07/18/2012 PeopleSoft Financials Manual 2012 153
15.
Click the Migrate Selected to Subsystems check boxes ON in the Update Selected Rows group box for the following: • AP • EX • AM • AR
16. Click on to migrate the mass update to the selected submodules.
17. Click on .
Note: If your institution is still working on Period 12 of the previous fiscal year, you will need to define the Open Periods differently, as shown in Option 2 of this step.
Warning: If period 12 of the previous fiscal year is still open at your institution in the first period of the new fiscal year, you run the risk that transactions may be posted in the previous fiscal year.
Option 2 – Period 12 Open In Option 2, you will establish the open ACTUALS Ledger for the new Fiscal Year period, and leave Period 12 of the previous fiscal year open if your institution is still working on Period 12. Warning: If period 12 of the previous fiscal year is still open at your institution in the first period of the new fiscal year, you run the risk that transactions may be posted in the previous fiscal year. Process 1. Select Setup Financials/Supply Chain⇒Business Unit Related⇒General
Ledger⇒Open Periods⇒Open Periods Mass Update. The Open Period Mass Update page displays.
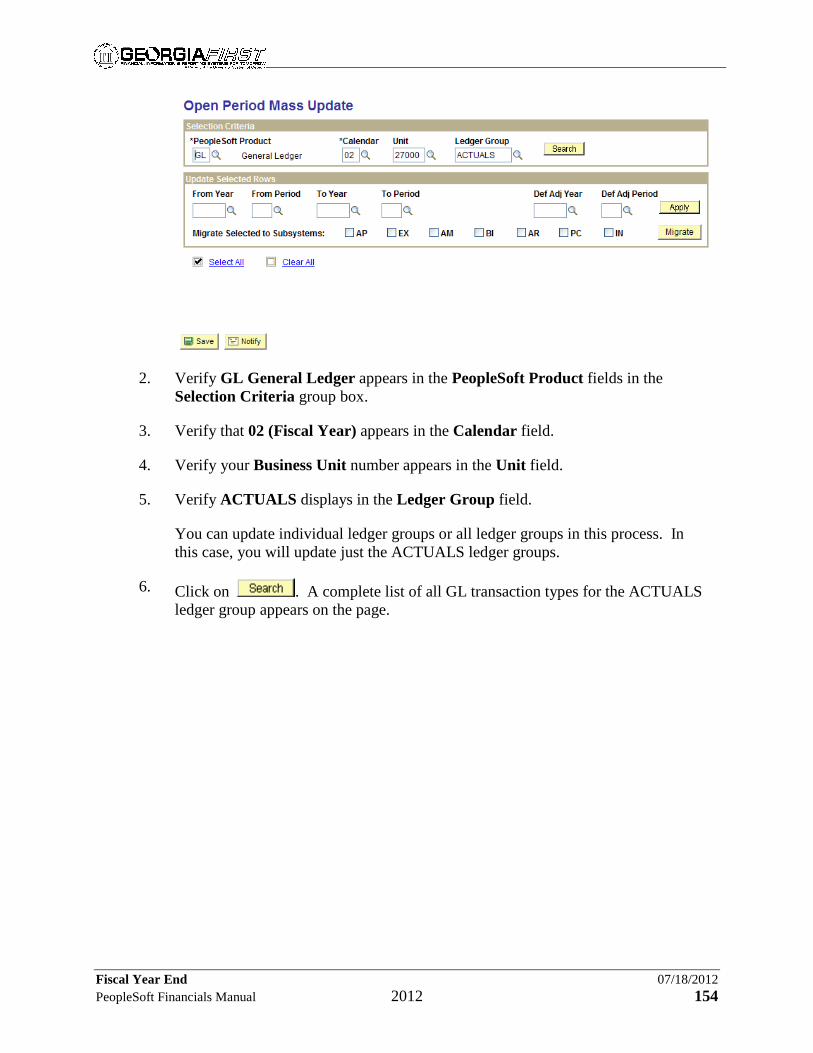
Fiscal Year End 07/18/2012 PeopleSoft Financials Manual 2012 154
2. Verify GL General Ledger appears in the PeopleSoft Product fields in the Selection Criteria group box.
3. Verify that 02 (Fiscal Year) appears in the Calendar field.
4. Verify your Business Unit number appears in the Unit field.
5. Verify ACTUALS displays in the Ledger Group field.
You can update individual ledger groups or all ledger groups in this process. In this case, you will update just the ACTUALS ledger groups.
6. Click on . A complete list of all GL transaction types for the ACTUALS ledger group appears on the page.
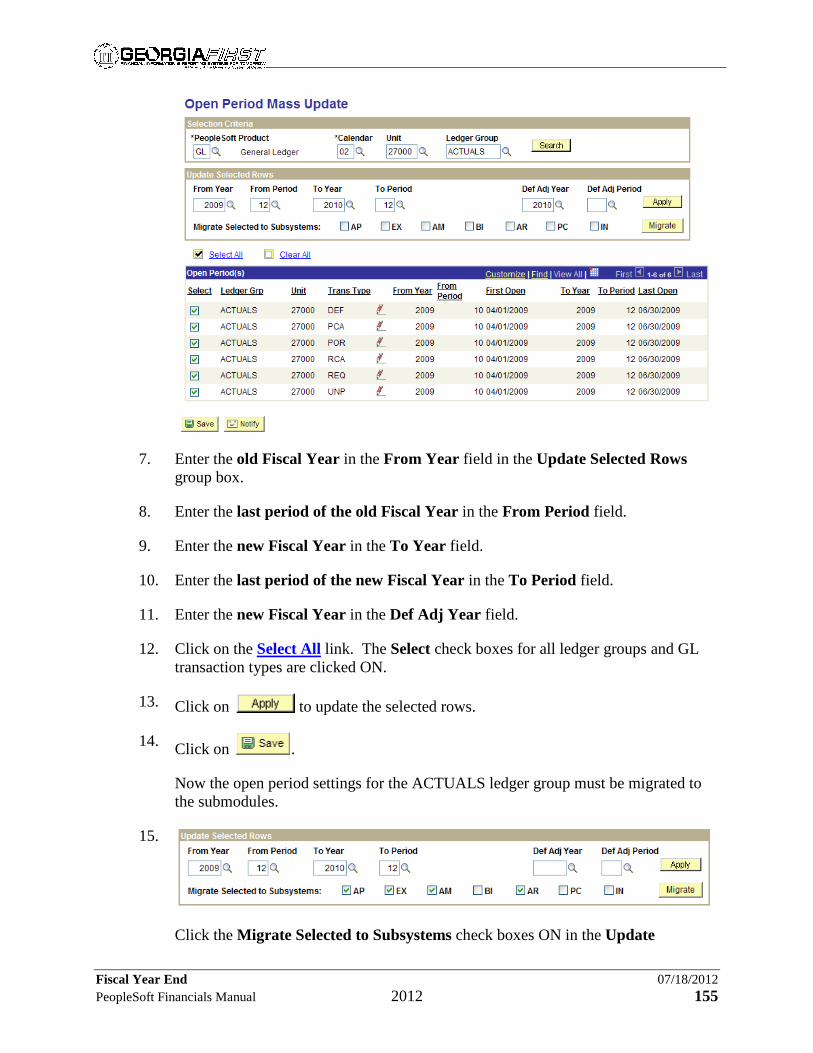
Fiscal Year End 07/18/2012 PeopleSoft Financials Manual 2012 155
7. Enter the old Fiscal Year in the From Year field in the Update Selected Rows group box.
8. Enter the last period of the old Fiscal Year in the From Period field.
9. Enter the new Fiscal Year in the To Year field.
10. Enter the last period of the new Fiscal Year in the To Period field.
11. Enter the new Fiscal Year in the Def Adj Year field.
12. Click on the Select All link. The Select check boxes for all ledger groups and GL transaction types are clicked ON.
13. Click on to update the selected rows.
14. Click on .
Now the open period settings for the ACTUALS ledger group must be migrated to the submodules.
15.
Click the Migrate Selected to Subsystems check boxes ON in the Update

Fiscal Year End 07/18/2012 PeopleSoft Financials Manual 2012 156
Selected Rows group box for the following: • AP • EX • AM • AR
16. Click on to migrate the mass update to the selected submodules.
17. Click on .
Once you have completed the final close of all ledgers for Period 12 of the ending fiscal year, you will have to redefine your open periods for the new fiscal year following the procedure shown in Option 1 of this step.
Now that you have established the open ACTUALS ledger for the new fiscal year period, you will run the Closing Rules report. This completes Step 2, Establishing the Open ACTUALS Ledger for the New Fiscal Year Period.

Fiscal Year End 07/18/2012 PeopleSoft Financials Manual 2012 157
Step 3: Running the Closing Rule Report In this step, you will run the Closing Rule report. For the current Fiscal Year, the closing rules will be the same as they were for the previous Fiscal Year, so you can use those rather than create new ones. You can review your previous Fiscal Year closing rules for the ACTUALS, GAAP, and CAPITAL ledgers by running the Closing Rule report. Note: The Year-End Closing process is flexible in allowing the user to define the criteria for closing. The model attempts to define a closing rule set that should work for most institutions within the GeorgiaFIRST project. However, there may be special circumstances that require modification to the model rule definition. Any special requirements can be discussed and assessed on an individual basis after the workshop. Refer to Appendices C, Creating Ledger ChartField Value Sets, and D, Creating Ledger Closing Rules, starting on pages 229 and 237 respectively, for detailed procedures on how to create your own chartfield value and closing rule sets.
Process 1. Select General Ledger⇒Close Ledgers⇒Closing Rule Report. The Closing
Rule Report – Find an Existing Value page displays.
2. Select an existing or add a new Run Control ID.
3. Click on . The Closing Rule Report page displays.

Fiscal Year End 07/18/2012 PeopleSoft Financials Manual 2012 158
4. Verify that your institution’s Business Unit number appears the Unit field. Enter or select it if it does not appear.
5. Select the appropriate Closing Rule.
6. Enter a new or verify the displayed As Of Date.
7. Click on . The Process Scheduler Request page displays.
8. Click on . This brings you back to the Closing Rule Report page.
9. Click on the Process Monitor link. The Process List page displays.
10. Verify the Run Status is Success.
11. Click on the Details link. The Process Detail page displays.
12. Click on the View Log/Trace link. The View Log/Trace page displays.
13. Click on the gls1002_XXXXX.PDF link, where XXXXX is the process instance number. A new window opens with the PDF report displayed.
Fiscal Year End 07/18/2012 PeopleSoft Financials Manual 2012 159
14. Review and print the Closing Rule report as needed.
15. Close the PDF window.
16. Click on . This brings you back to the Process Detail page.
17. Click on . This brings you back to the Process List page.
18. Click on the Go back to Closing Rule Report link. This brings you back to the Closing Rule Report page.
19. Repeat Steps 4 through 18 to run the Closing Rule Report for your other Closing Rules.
Now that you have printed and reviewed the Closing Rule report, you will run the ACTUALS Closing Trial Balance report. This completes Step 3, Running the Closing Rules Report.

Fiscal Year End 07/18/2012 PeopleSoft Financials Manual 2012 160
Step 4: Running the ACTUALS Closing Trial Balance Report In this step, you will run the Closing Trial Balance Report for the ACTUALS Ledger. Refer to PSFIN Business Process GL.070.005.
Process 1. Select General Ledger⇒Close Ledgers⇒Closing Trial Balance. The Closing
Trial Balance – Find an Existing Value page displays.
Note: If you have previously run this process, then click on and select the appropriate Run Control ID. If this is the first time you have run this report at your institution, you would select Add a New Value and enter ACTUALS_CLOSING_TRIAL_BAL_RPT or another appropriate name for this Run Control ID.
2. Click on the Add an Existing Value tab. The Closing Trial Balance – Add a New Value page displays.
3. Enter ACTUALS_CLOSING_TRIAL_BAL_RPT in the Run Control ID field.
4. Click on . The Closing Trial Balance page displays.

Fiscal Year End 07/18/2012 PeopleSoft Financials Manual 2012 161
5. Verify that your institution’s Business Unit number appears the Unit field. Enter or select it if it does not appear.
6. Verify that ACTUALS appears in the Ledger field. Enter or select it if it does not.
7. Enter the closing Fiscal Year in the Fiscal Year field.
8. Click on . The Process Scheduler Request page displays.
9. Click on . This brings you back to the Closing Trial Balance page.
10. Click on the Process Monitor link. The Process List page displays.
11. Verify the Run Status is Success.
12. Click on the Details link. The Process Detail page displays.
13. Click on the View Log/Trace link. The View Log/Trace page displays.
14. Click on the gls1003_XXXXX.PDF link, where XXXXX is the process instance number. A new window opens with the PDF report displayed.
15. Review and print the Closing Trial Balance report as needed.
16. Close the PDF window.
Now that you have printed and reviewed the ACTUALS Closing Trial Balance report, you will close the ACTUALS Ledger. This completes Step 5, Running the ACTUALS Closing Trial Balance Report.

Fiscal Year End 07/18/2012 PeopleSoft Financials Manual 2012 162
Step 5: Running the ACTUALS Ledger Close Process In this step, you will close the ACTUALS Ledger. Refer to PSFIN Business Process GL.020.024. The primary table affected in the Actuals Year-End Close Process is the LEDGER Table. Based upon the Actuals Closing Rules defined by the user, the P&L account balances for the year ending are moved to the Net Asset account(s) designated, and the Net Balance of the Balance Sheet accounts are placed in Period 0 of the new year within the LEDGER Table. Note: Period 0 is reserved by the system as the Beginning Balance period, and manual Journal Entries cannot be made to this period. Once the Close process is run, a review and reconciliation of the Balance Sheet should be performed to ensure that the amounts within the Asset, Liability, and Net Asset accounts are correct. Should any balances require changing through a Journal Entry, the Undo process can be run, adjusting entries made, and the Closing process rerun. The Undo and Close processes can be rerun as many times as required prior to the Asset Management Accounting Periods being closed out for the previous year.
Part 1: Running the ACTUALS Closing Request Process In Part 1 of this step, you will run the ACTUALS Closing Request process. Process 1. Select General Ledger⇒Close Ledgers⇒Request Ledger Close. The Request
Ledger Close – Find an Existing Value page displays.
Note: If you have previously run this process, then click on and select the appropriate Run Control ID. If this is the first time you have run this process at your institution, you would select Add a New Value and enter ACTUALS_CLOSING_REQUEST or another appropriate name for this Run Control ID.

Fiscal Year End 07/18/2012 PeopleSoft Financials Manual 2012 163
2. Click on the Add an Existing Value tab. The Request Ledger Close – Add a New Value page displays.
3. Enter ACTUALS_CLOSING_REQUEST in the Run Control ID field.
4. Click on . The Ledger Close Request page displays.
5. Select the Always radio button in the Process Frequency group box.
6. Verify 1 appears in the Request Number field.
7. Verify that Close appears in the Close Request Type field.
Note: You can run the ACTUALS Close process as often as necessary before the Asset Management Accounting period is closed, as shown in Step 10 of this module, starting on page 190. However, you must first run a process to unclose the ledger. To do this, you would select Undo as the Close Request Type, and rerun the Close Request process with the appropriate Ledger Group information on this

Fiscal Year End 07/18/2012 PeopleSoft Financials Manual 2012 164
page.
Once the Asset Management Accounting Period is closed, however, you will not be able to close or unclose any of the ACTUALS group ledgers.
8. Enter the closing Fiscal Year in the Fiscal Year field.
9. Verify that your institution’s Business Unit number appears in the Business Unit for Prompting field.
10. Click on the down arrow next to the Closing Rule field and select the Actuals Ledger Closing Rules.
11. Enter or select ACTUALS in the Ledger Group field.
12. Enter or select ACTUALS in the Ledger field.
13. Select the As Of Date radio button in the Closing Date Option group box.
14. Enter or select the last day of the closing Fiscal Year in the Specify field.
15. Verify that the Selected Detail Values radio button is selected in the Selections group box.
16. Enter or select your institution’s Business Unit number in the Select Value field in the Business Unit to Close group box.
17. Click on .
18. Click on . The Process Scheduler Request page displays.
19. Click on . This brings you back to the Ledger Close Request page.
20. Click on the Process Monitor link. The Process List page displays.
21. Verify the Run Status is Success.
Now that you have run the Closing Request process for the ACTUALS ledger, you will review the Net Asset accounts.
This completes Step 5, Part 1, Running the ACTUALS Ledger Close Process.

Fiscal Year End 07/18/2012 PeopleSoft Financials Manual 2012 165
Step 5 Part 2: Reviewing the Net Asset Accounts In Part 2 of this step, you will run the BOR_NET_ASSET_ACCOUNT query to review the Net Asset accounts after the ACTUALS Ledger Close process. The BOR_NET_ASSET_ACCOUNT query is included in the Period End Integrity Check queries. Refer to Appendix A, Period End Integrity Checks, starting on page 193, for more information on the Period End Integrity Check queries. Note: Refer to Appendix H, Net Assets Accounts for Closing Rules, on page 237 for a complete list of Net Asset Accounts. Process 1. Select BOR Menus⇒BOR General Ledger⇒BOR Year End⇒Year End
Reports⇒Period End Integrity Check. The Period End Integrity Checks page displays.
2. Click on the in the Description field to display a list of available queries.
3. Select the Year End 05: BOR_NET_ASSET_ACCOUNT query.

Fiscal Year End 07/18/2012 PeopleSoft Financials Manual 2012 166
4. Click on the Display Report link. A new window opens to run the query and display the results.
5. Enter or select your business unit number in the Unit field.
6. Enter the new fiscal year in the Fiscal Year field.
Note: 2010 is shown as the new fiscal year in this example.
7. Enter 342100 in the Account field.
Note: This is the Unalloc Net Asset – Current Yr (Unrestricted) account.
8. Click on .
9. Verify that 342100 appears in the Account column.
10. Verify that the new fiscal year appears in the Year column.

Fiscal Year End 07/18/2012 PeopleSoft Financials Manual 2012 167
11. Verify that 0 appears in the Period column.
12. Verify that amounts appear in the Sum Total Amt and Sum Amount columns.
13. Repeat Steps 2 through 12 for the following accounts: • 321100 – Net Assets – Alloc Reserves (Unrestricted) • 371100 – Net Assets – Alloc Other (Restricted Expendable) • 360100 – Net Assets – Permanent Endowment (Restricted Nonexpendable) • 311100 – Investment in Plant Note: Once the Close process is run for the ACTUALS Ledger, a review and reconciliation of the Balance Sheet should be performed to ensure that the amounts within the Asset, Liability and Net Asset accounts. Should any balances require changing through a Journal Entry reclassification, the Unclose process can be run, adjusting entries made, and the Closing process rerun. The Unclose and Close processes can be rerun as many times as required prior to the Accounting Calendar being closed out for the previous year. This completes Step 5, Part 2, Reviewing the Net Asset Accounts.
Now that you have processed and closed the ACTUALS ledger, you will process Year-End entries and close the CAPITAL ledger. This completes Step 5, Running the ACTUALS Ledger Close Process.

Fiscal Year End 07/18/2012 PeopleSoft Financials Manual 2012 168
Step 6: Processing Year-End Entries and Closing the CAPITAL Ledger In this step, you will process and close the CAPITAL Ledger.
Part 1: Processing the Year-End Adjustments In Part 1 of this step, you will process the Year-End adjustments. Note 1: Refer to PSFIN Business Process GL.020.001 unless otherwise noted. Note 2: When making journal entries in the CAPITAL ledger, please use the following masks to indicate the type of transaction that the journal represents: • ADD: Asset Additions • ADJ: Adjustments • DEPR: Depreciation • RECAT: Recategorization • PDP: Prior Period Depreciation (only recorded at conversion) • RAD: Reverse Accumulated Depreciation • RET: Retirement For example, a journal entry to correct an addition may be ADDCRTXXXX, where XXXX represents the numeric value in the original journal. A journal entry to record Prior Period Depreciation that was not captured at conversion may be written PDPXXXXXXX. Process 1. Create and post journal entries to adjust Capital Lease values as required in the
CAPITAL ledger.
2. Book Capital Leases. Refer to PSFIN Business Process AM.020.060.
3. Complete Impairment Questionnaire (see Journal Entry YE-22) and record any impairment loss meeting the GASB 42 criteria using PSFIN Business Process AM.020.160.
4. Correct Asset Management entries when a Capital Asset has been retired and then re-added. Refer to Correcting Journal Entry C-2.
5. Create and post a journal entry to adjust prior year accumulated depreciation for residual value of assets (10%). Refer to Correcting Journal Entry C-5.
Note: This journal should only be necessary if Year-End Journal Entry YE-21 has not been posted in prior years.
6. Create and post a journal entry to capitalize GSFIC Payback funded Auxiliary Building(s) [year of completion], if required. Refer to Standard Journal Entry S-3.

Fiscal Year End 07/18/2012 PeopleSoft Financials Manual 2012 169
7. Create and post a journal entry to post GSFIC bond payment against the long-term liability account and the interest expense account. Refer to Standard Journal Entry S-5.
8. Create and post a journal entry to post acquisition of new library books. Refer to Year-End Journal Entry YE-15.
9. Create and post a journal entry to post disposal of library books. Refer to Year-End Journal Entry YE-16.
10. Create and post a journal entry to post current year depreciation on library books. Refer to Year-End Journal Entry YE-17.
11. Create and post a journal entry to reclassify principal payments on Lease Purchase obligations from expense to the capital lease liability. Refer to Year-End Journal Entry YE-18a.
12. Create and post a journal entry to book non-current portion of long-term liabilities. Refer to Year-End Journal Entry YE-18b.
13. Create and post a journal entry to record Construction Work in Progress for Capital projects paid by your institution. Refer to Year-End Journal Entry YE-19.
Note: See Standard Journal Entry S-9, which is the same as YE-19 except that you post if a project is completed before year end.
14. Create and post a journal entry to adjust current year depreciation for residual value of assets (10%). Refer to Year-End Journal Entry YE-21.
Note: This journal must be posted before running the query for journal entry YE-8 (Actuals ledger). This journal also uses a RAD mask for correct Note 6 presentation.
15. Create and post a journal entry to allocate the purchase of Intangible assets to appropriate Intangible categories. Refer to Year-End Journal Entry YE-49.
16. Reclassify Impairment Loss recorded as a result of PSFIN Business Process AM.020.160 from contra-capital account to non-operating revenue (expense) account.
Note 1: This journal is required only if an impairment loss is recorded using PSFIN Business Process AM.020.160. Refer to Year-End Journal Entry YE-22.
Note 2: Please contact the BOR reporting department to discuss reporting implications of any impairment loss.
This completes Step 6, Part 1, Processing the Year-End Adjustments.

Fiscal Year End 07/18/2012 PeopleSoft Financials Manual 2012 170
Part 2: Closing the CAPITAL Ledger In Part 2 of this step, you will close the CAPITAL Ledger. Process 1. Generate new ChartField Value Sets for the closing of the CAPITAL Ledger, if
needed.
Note: Refer to Appendix F, Generating Ledger ChartField Value Sets, starting on page 220, for detailed procedures on how to create your own chartfield value set.
2. Generate new CAPITAL Ledger closing rules, if needed.
Note: Refer to Appendix G, Generating Ledger Closing Rules, starting on page 229, for detailed procedures on how to create your own closing rule set.
3. Run the CAPITAL Closing Trial Balance report. (If needed, refer to Step 4 of this module for instructions on running the Closing Trial Balance reports.)
4. Close the CAPITAL Ledger. (If needed, refer to Step 5, Part 1 of this module, starting on page 162, for instructions on closing ledgers.)
Note: Be sure to select the appropriate closing rules for the CAPITAL ledger.
5. Run the BOR_NET_ASSETS_ACCOUNT query and review the results. Refer to Step 6, Part 2 of this module, starting on page 165, for more information.
Note: Once the Close process is run for the CAPITAL Ledger, a review and reconciliation of the Balance Sheet should be performed to ensure that the amounts within the Asset, Liability and Net Asset accounts are correct. Should any balances require changing through a Journal Entry, the Unclose process can be run, adjusting entries made, and the Closing process rerun. The Unclose and Close processes can be rerun as many times as required prior to the Accounting Calendar being closed out for the previous year.
This completes Step 6, Part 2, Closing the CAPITAL Ledger.
Now that you have processed and closed the CAPITAL Ledger, you will process and close the GAAP Ledger. This completes Step 6, Processing and Closing the CAPITAL Ledger.

Fiscal Year End 07/18/2012 PeopleSoft Financials Manual 2012 171
Step 7: Processing and Closing the GAAP Ledger In this step, you will process and close the GAAP Ledger.
Part 1: Processing the Year-End Adjustments In Part 1 of this step, you will process the Year-End adjustments. Note: Refer to PSFIN Business Process GL.020.001 unless otherwise noted. Process 1. Move compensated absence current to compensated absence non-current. Refer to
Correcting Journal Entry C-4.
Note: This journal should not be necessary if FY2011 Journal Entry YE-27 was keyed to reverse in FY 2011.
2. Move balances in 342100 (current year) to 341100 (prior year). This is necessary for all funds that close to 342100, and should be posted to period 1 of the new year for both the ACTUALS and the GAAP Ledgers. Refer to Standard Journal Entry S-1.
Note: Journal S-1 must be posted after the current Fiscal Year GAAP Ledger is closed and immediately after the next Fiscal Year GAAP Ledger is opened.
3. Book non-capitalized gifts, if required. Refer to Year-End Journal Entry S-2.
4. Create and post a journal entry to eliminate payback bond entries for GAAP reporting (first year). Refer to Standard Journal Entry S-6a.
Note: Fund 10000 Account 4801xx chart fields were changed in this journal entry to Fund 10600 and Account 4921xx, respectively.
5. Create and post a journal entry to eliminate payback bond entries for GAAP reporting for “subsequent years.” Refer to Standard Journal Entry S-6b.
Note: Fund 10000 Account 4801xx chart fields were changed in this journal entry to Fund 10600 and Account 4921xx, respectively.
6. Create and post a journal entry to move liability amount from 321xxx to 311xxx. Refer to Standard Journal Entry S-6c. See also Standard Journal Entries S-5 and S-6b.
7. Create and post a journal to offset the Actuals ledger entry when funds are placed on deposit with GSFIC. Refer to Standard Journal Entry S-12.
8. Create and post a journal to offset the Actuals ledger entry when funds are placed on deposit with GSFIC and into a Georgia Fund 1 investment account. Refer to

Fiscal Year End 07/18/2012 PeopleSoft Financials Manual 2012 172
Standard Journal Entry S-13.
9. Book compensated absences. Refer to Year-End Journal Entries YE-25, YE-26, and YE-27.
10. Eliminate intra-institution revenue and expenses, and eliminate Quasi-Revenue (471xxx). Refer to Year-End Journal Entry YE-28.
11. Book 10% retainage on any construction contracts. Refer to Year-End Journal Entry YE-29.
12. Book the amount of contracts payable at year end. Refer to Year-End Journal Entry YE-29a.
13. Book the Retainage Revenue related to YE-29a. Refer to Year-End Journal Entry YE-29b.
14. Reclassify employee tuition remission-related fee waivers as a fringe benefit. Refer to Year-End Journal Entry YE-30.
15. Reclassify Graduate Teaching and Research Assistant waivers from waiver account to a Tuition and Fees account. Refer to Year-End Journal Entry YE-30a.
16. Book Scholarship Allowance adjustment for sponsored and unsponsored scholarships (Account 409999). Refer to Year-End Journal Entry YE-31.
17. Defer unearned portion of Gift revenue from Vendor donating Capital Assets to an Auxiliary fund. Refer to Year-End Journal Entry YE-32.
18. Recognize subsequent year Gift revenue resulting from Vendor donation of Capital Assets. Refer to Year-End Journal Entry YE-32a.
19. Establish a receivable account for designated scholarship accounts with negative balances. Refer to Year-End Journal Entry YE-33.
20. Establish a receivable account for any Agency account, including HOPE, that has a negative balance at year end. Refer to Year-End Journal Entry YE-33a.
21. Move externally restricted cash to non-current cash. Refer to Year-End Journal Entry YE-34.
Note: The account number for Non-Current Cash has been changed on this journal from 158xxx to 1581xx.
22. Move externally restricted Short-Term Investments to non-current S-T Investments. Refer to Year-End Journal YE-34a.
23. Reclassify entries for revenue and expenses for loan funds. Refer to Year-End

Fiscal Year End 07/18/2012 PeopleSoft Financials Manual 2012 173
Journal Entry YE-35.
24. Record the GAAP adjustments required when a Completed Project Report is received related to a project for which funds have been placed on deposit with GSFIC, where GSFIC holds and spends the funds. Refer to Year-End Journal Entry YE-36.
25. Record activity in a Georgia Fund 1 account that is created when funds are placed on deposit with GSFIC. The activity recorded is BEFORE the Completed Project Report is received. Refer to Year-End Journal Entry YE-37.
26. Record adjustments necessary when a Completed Project Report is received for a GSFIC project in which funds have been placed on deposit with GSFIC and into a Georgia Fund 1 account. Refer to Year-End Journal Entry YE-37a.
27. Record adjustments necessary to record activity AFTER a Completed Project Report is received for a GSFIC project in which funds have been placed on deposit with GSFIC and into a Georgia Fund 1 account. Refer to Year-End Journal Entry YE-37b.
28. Clear the balance in the Georgia Fund 1 account on the GAAP ledger once any funds are returned to the institution at project end. Refer to Year-End Journal Entry YE-37c.
29. Book changes in fair market value of Investments. Refer to Year-End Journal Entry YE-38.
30. Accrue current year expenses for GAAP reporting. Refer to Year-End Journal Entry YE-39.
31. Move funds from Accounts Receivable to "Due From Component Units." Refer to Year-End Journal Entry YE-40.
32. Move funds from Accounts Payable to "Due To Component Units." Refer to Year-End Journal Entry YE-41.
33. Move the current portion of Notes and Loans Payable from the noncurrent account to the current account. Refer to Year-End Journal Entry YE-42.
34. Reverse Gift revenue accrual for GSFIC/MRR encumbrances per Journal Entry YE-11. Refer to Journal Entry YE-43.
35. Record adjustment to the GSFIC Receivable and Gift Revenue amounts for amounts expended during the current year, but encumbered in prior years. Refer to Journal Entry YE-44.
36. Reduce equipment Capital Assets for the net book value of missing equipment per
Fiscal Year End 07/18/2012 PeopleSoft Financials Manual 2012 174
the annual physical equipment inventory. Refer to Year-End Journal Entry YE-45.
37. Recognize liability and expense for pollution remediation obligations as defined by GASB 49. Refer to Year-End Journal Entry YE-46.
Note: Contact BOR Reporting if your institution is using this journal entry, to ensure correct accounting and reporting.
Now that you have processed the Year-End adjustments, you will close the GAAP Ledger.
This completes Step 7, Part 1, Processing the Year-End Adjustments.

Fiscal Year End 07/18/2012 PeopleSoft Financials Manual 2012 175
Part 2: Closing the GAAP Ledger In Part 2 of this step, you will close the GAAP Ledger.
Process 1. Generate new GAAP Ledger ChartField Value Sets if needed.
Note: Refer to Appendix F, Generating Ledger ChartField Value Sets, starting on page 220, for detailed procedures on how to create your own chartfield value set.
2. Generate new GAAP Ledger closing rules or generate new ones, if needed.
Note: Refer to Appendix G, Creating Ledger Closing Rules, starting on page 229, for detailed procedures on how to create your own closing rule set.
3. Run the GAAP Closing Trial Balance report. (If needed, refer to Step 4 of this module for instructions on running the Closing Trial Balance report.)
4. Close the GAAP Ledger. (If needed, refer to Step 5 Part 1 of this module for instructions on closing a ledger.)
Note: Be sure to select the appropriate closing rules for the GAAP ledger.
5. Run the BOR_NET_ASSETS_ACCOUNT query and review the results. Refer to Step 5, Part 2 of this module, starting on page 165, for more information.
Note 1: Once the Close process is run for the GAAP Ledger, a review and reconciliation of the Balance Sheet should be performed to ensure that the amounts within the Asset, Liability and Net Asset accounts. Should any balances require changing through a Journal Entry reclassification, the Unclose process can be run, adjusting entries made, and the Closing process rerun. The Unclose and Close processes can be rerun as many times as required prior to the Accounting Calendar being closed out for the previous year.
Note 2: You must run the Close Request process for the ACTUALS, CAPITAL, and GAAP Ledger groups. You may need to process and close other ledger groups that you defined, if you have configured these ledger groups to include the Net Asset account(s).
This completes Step 7, Part 2, Closing the GAAP Ledger.
Now that you have processed and closed the GAAP Ledger, you will process and close the ENCUMB Ledger. This completes Step 7, Processing and Closing the GAAP Ledger.
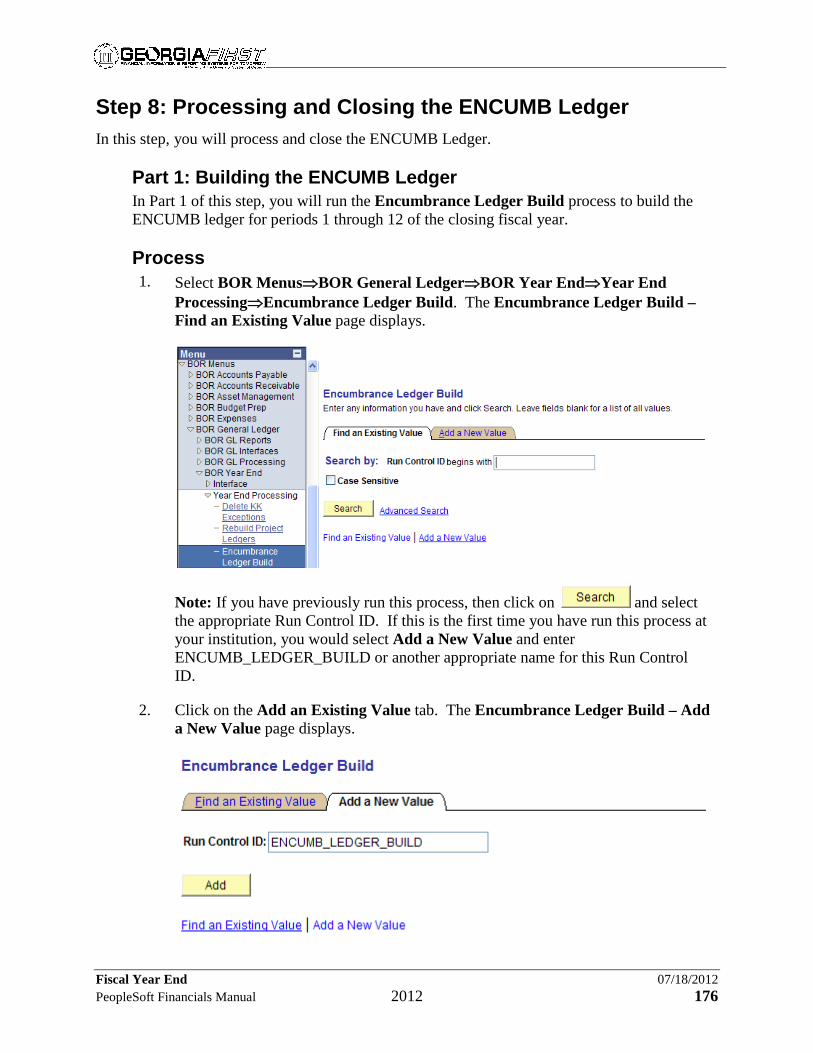
Fiscal Year End 07/18/2012 PeopleSoft Financials Manual 2012 176
Step 8: Processing and Closing the ENCUMB Ledger In this step, you will process and close the ENCUMB Ledger.
Part 1: Building the ENCUMB Ledger In Part 1 of this step, you will run the Encumbrance Ledger Build process to build the ENCUMB ledger for periods 1 through 12 of the closing fiscal year. Process 1. Select BOR Menus⇒BOR General Ledger⇒BOR Year End⇒Year End
Processing⇒Encumbrance Ledger Build. The Encumbrance Ledger Build – Find an Existing Value page displays.
Note: If you have previously run this process, then click on and select the appropriate Run Control ID. If this is the first time you have run this process at your institution, you would select Add a New Value and enter ENCUMB_LEDGER_BUILD or another appropriate name for this Run Control ID.
2. Click on the Add an Existing Value tab. The Encumbrance Ledger Build – Add a New Value page displays.

Fiscal Year End 07/18/2012 PeopleSoft Financials Manual 2012 177
3. Enter ENCUMB_LEDGER_BUILD in the Run Control ID field.
4. Click on . The Encumbrance Ledger Build page displays.
5. Select Purge and Rebuild Encum Ledger as the Process Option.
6. Verify that your institution’s Business Unit number appears the Business Unit field. Enter or select it if it does not appear.
7. Enter the closing fiscal year in the Fiscal Year field.
8. Enter 1 in the From Period field.
9. Enter 12 in the To Period field.
10. Enter or select 381100 as the Offset Account.
11. Click on . The Process Scheduler Request page displays.
12. Click on . This brings you back to the Encumbrance Ledger Build page.
13. Click on the Process Monitor link. The Process List page displays.
14. Verify the Run Status is Success.
Now that you have built the ENCUMB ledger, you will reconcile the ENCUMB and Detail ledgers.
This completes Step 8, Part 1, Building the ENCUMB Ledger.

Fiscal Year End 07/18/2012 PeopleSoft Financials Manual 2012 178
Part 2: Reconciling the ENCUMB and Detail Ledgers In Part 2 of this step, you will reconcile the ENCUMB and Detail ledgers by running the Integrity 11: BOR_CHK_DTL_ENC query as a period end integrity check. Process 1. Select BOR Menus⇒BOR General Ledger⇒BOR Year End⇒Year End
Reports⇒Period End Integrity Check. The Period End Integrity Checks page displays.
2. Click on the in the Description field to display a list of available queries.
3. Select the Integrity 11: BOR_CHK_DTL_ENC query.
4. Click on the Display Report link. A new window opens to run the query and display the results.

Fiscal Year End 07/18/2012 PeopleSoft Financials Manual 2012 179
5. Enter or select your business unit in the Business Unit field.
6. Enter the closing fiscal year in the Fiscal Year field.
7. Click on .
8. Verify that all Variance Amounts are 0.00.
Note: If any variances exist, the ENCUMB ledger should be rebuilt or you should submit a ticket to the ITS HELPDESK.
Now that you have reconciled the ENCUMB and Detail ledgers, you will close the ENCUMB ledger.
This completes Step 8, Part 2, Reconciling the ENCUMB and Detail Ledgers.

Fiscal Year End 07/18/2012 PeopleSoft Financials Manual 2012 180
Part 3: Closing the ENCUMB Ledger In Part 3 of this step, you will close the EMCUMB ledger. Process 1. Select General Ledger⇒Close Ledgers⇒Request Ledger Close. The Request
Ledger Close – Find an Existing Value page displays.
Note: If you have previously run this process, then click on and select the appropriate Run Control ID. If this is the first time you have run this process at your institution, you would select Add a New Value and enter ENCUMB_CLOSING_REQUEST or another appropriate name for this Run Control ID.
2. Click on the Add an Existing Value tab. The Request Ledger Close – Add a New Value page displays.
3. Enter ENCUMB_CLOSING_REQUEST in the Run Control ID field.
4. Click on . The Ledger Close Request page displays.
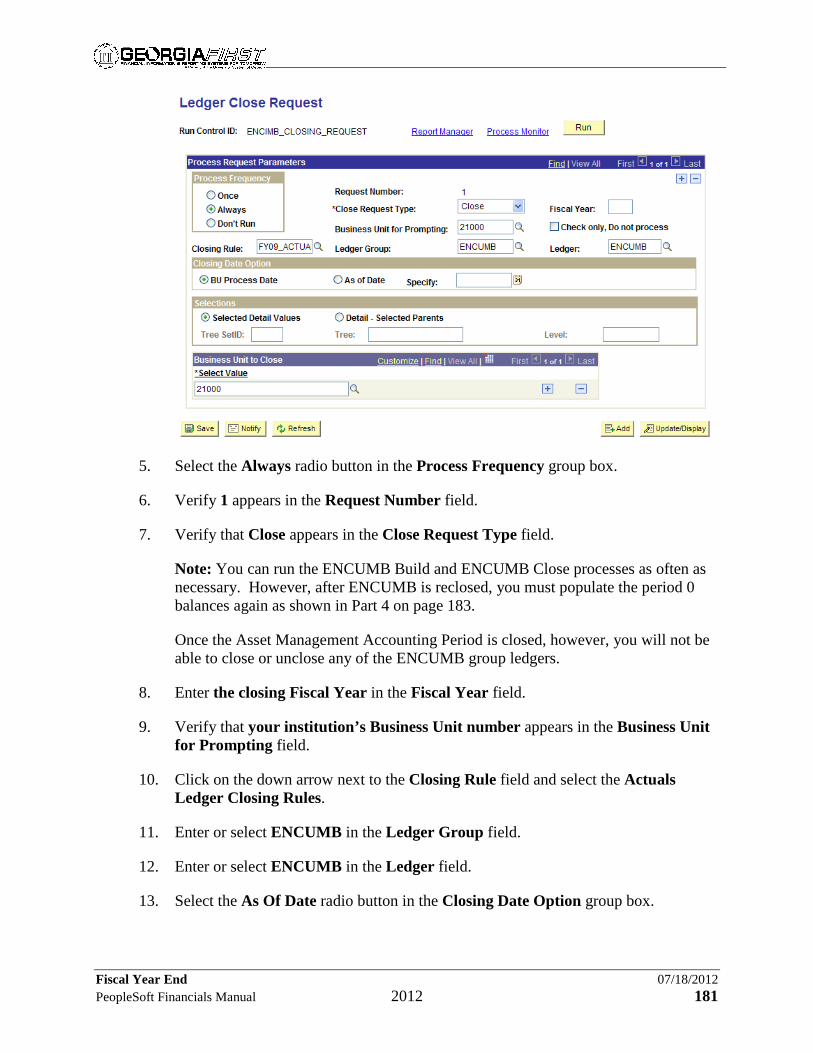
Fiscal Year End 07/18/2012 PeopleSoft Financials Manual 2012 181
5. Select the Always radio button in the Process Frequency group box.
6. Verify 1 appears in the Request Number field.
7. Verify that Close appears in the Close Request Type field.
Note: You can run the ENCUMB Build and ENCUMB Close processes as often as necessary. However, after ENCUMB is reclosed, you must populate the period 0 balances again as shown in Part 4 on page 183.
Once the Asset Management Accounting Period is closed, however, you will not be able to close or unclose any of the ENCUMB group ledgers.
8. Enter the closing Fiscal Year in the Fiscal Year field.
9. Verify that your institution’s Business Unit number appears in the Business Unit for Prompting field.
10. Click on the down arrow next to the Closing Rule field and select the Actuals Ledger Closing Rules.
11. Enter or select ENCUMB in the Ledger Group field.
12. Enter or select ENCUMB in the Ledger field.
13. Select the As Of Date radio button in the Closing Date Option group box.

Fiscal Year End 07/18/2012 PeopleSoft Financials Manual 2012 182
14. Enter or select the last day of the closing Fiscal Year in the Specify field.
15. Verify that the Selected Detail Values radio button is selected in the Selections group box.
16. Enter or select your institution’s Business Unit number in the Select Value field in the Business Unit to Close group box.
17. Click on .
18. Click on . The Process Scheduler Request page displays.
19. Click on . This brings you back to the Ledger Close Request page.
20. Click on the Process Monitor link. The Process List page displays.
21. Verify the Run Status is Success.
Now that you have run the Closing Request process for the ENCUMB ledger, you will copy the beginning balances to the Detail ledger for the new fiscal year.
This completes Step 8, Part 3, Closing the ENCUMB Ledger.
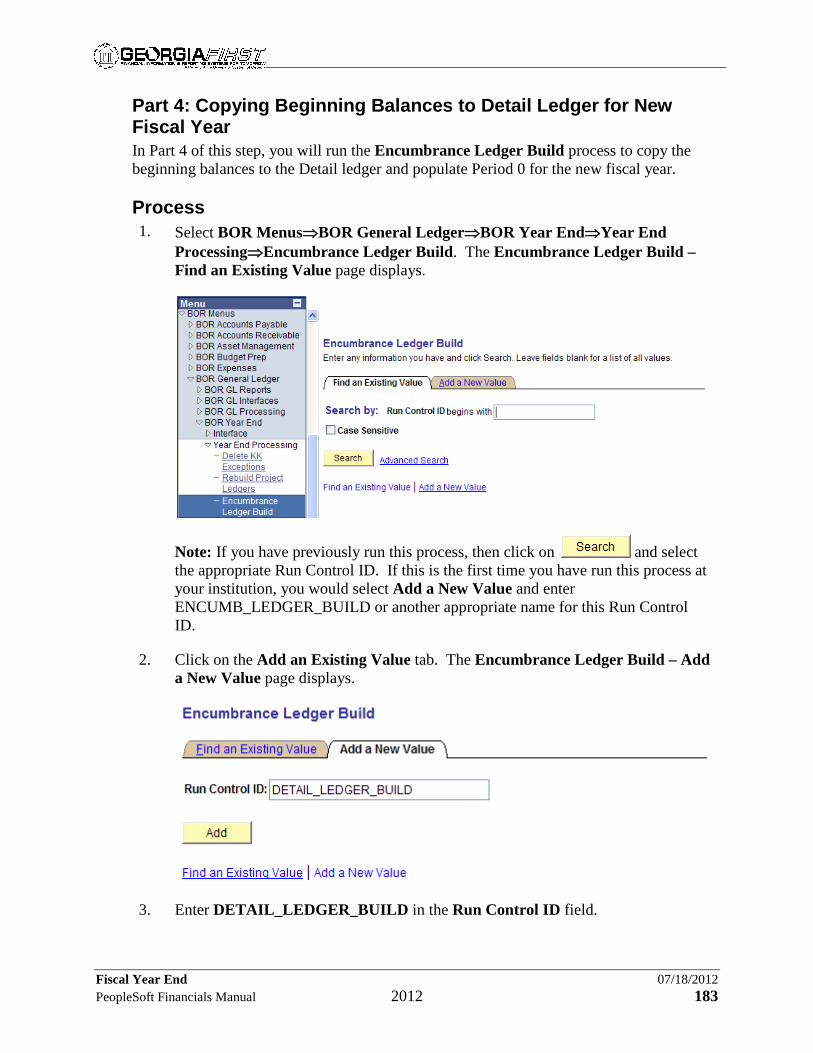
Fiscal Year End 07/18/2012 PeopleSoft Financials Manual 2012 183
Part 4: Copying Beginning Balances to Detail Ledger for New Fiscal Year In Part 4 of this step, you will run the Encumbrance Ledger Build process to copy the beginning balances to the Detail ledger and populate Period 0 for the new fiscal year. Process 1. Select BOR Menus⇒BOR General Ledger⇒BOR Year End⇒Year End
Processing⇒Encumbrance Ledger Build. The Encumbrance Ledger Build – Find an Existing Value page displays.
Note: If you have previously run this process, then click on and select the appropriate Run Control ID. If this is the first time you have run this process at your institution, you would select Add a New Value and enter ENCUMB_LEDGER_BUILD or another appropriate name for this Run Control ID.
2. Click on the Add an Existing Value tab. The Encumbrance Ledger Build – Add a New Value page displays.
3. Enter DETAIL_LEDGER_BUILD in the Run Control ID field.

Fiscal Year End 07/18/2012 PeopleSoft Financials Manual 2012 184
4. Click on . The Encumbrance Ledger Build page displays.
5. Select Populate Detail Ledger Beg Bal as the Process Option.
6. Verify that your institution’s Business Unit number appears the Business Unit field. Enter or select it if it does not appear.
7. Enter the new fiscal year in the Fiscal Year field.
8. Click on . The Process Scheduler Request page displays.
9. Click on . This brings you back to the Closing Trial Balance page.
10. Click on the Process Monitor link. The Process List page displays.
11. Verify the Run Status is Success.
Now that you have copied the beginning balances to the Detail ledger for the new fiscal year, you will verify that all ledgers have beginning balances.
This completes Step 8, Part 4, Copying Beginning Balances to Detail Ledger for New Fiscal Year.

Fiscal Year End 07/18/2012 PeopleSoft Financials Manual 2012 185
Part 5: Verifying All Ledgers have Beginning Balances In Part 5 of this step, you will verify that all ledgers have beginning balances for Period 0 in the new fiscal year by running the Year End 03: BOR_CHK_PERIOD0_POPULATED query as a period end integrity check. Process 1. Select BOR Menus⇒BOR General Ledger⇒BOR Year End⇒Year End
Reports⇒Period End Integrity Check. The Period End Integrity Checks page displays.
2. Click on the in the Description field to display a list of available queries.
3. Select the Year End 03: BOR_CHK_PERIOD0_POPULATED query.
4. Click on the Display Report link. A new window opens to run the query and display the results.

Fiscal Year End 07/18/2012 PeopleSoft Financials Manual 2012 186
5. Enter or select your business unit in the Business Unit field.
6. Enter the new fiscal year in the Fiscal Year field.
7. Click on .
Note: The example above shows 2010 as the new fiscal year.
8. Verify that one row displays for each of the following ledgers: • ACTUALS • CAPITAL • DETAIL_EN • ENCUMB • GAAP This completes Step 8, Part 5, Verifying All Ledgers have Beginning Balances.
Now that you have processed and closed the ENCUMB ledger, you will extract data to FDM, and run and reconcile all reports. This completes Step 8, Processing and Closing the ENCUMB Ledger.

Fiscal Year End 07/18/2012 PeopleSoft Financials Manual 2012 187
Step 9: Extracting and Submitting Data to FDM and Reconciling All Reports In this step, you will extract data to FDM, and run and reconcile all reports. Refer to Section 20.0, Required Reports, in the USG Business Procedures Manual for a complete listing of required reports: http://www.usg.edu/business_procedures_manual/.
Process 1. Extract Period 12 to FDM.
Note 1: This includes period 999.
Note 2: Do not submit until the final extraction has been completed.
2. Create the Statements of Net Assets from FDM and PeopleSoft nVision. Refer to PSFIN Business Process GL.070.036
3. Create any Notes to your Financial Statements by running footnotes from PeopleSoft Financials for entry into the following USG AFR Notes: • Capital Asset Footnote (PeopleSoft nVision). Refer to PSFIN Business
Process GL.070.071. • Footnote 3 – Accts Receivable (BORRG029). Footnote 7 – Deferred
Revenue (BORRG028). Refer to PSFIN Business Process GL.070.051. • Footnote 8 – LT Liabilities (BORRG031). Refer to PSFIN Business Process
GL.070.050.
4. Create the Unrestricted Expendable Net Asset Footnotes from FDM and PeopleSoft nVision. Refer to PSFIN Business Process GL.070.035.
5. Create the Restricted Expendable Net Asset Footnotes from FDM and PeopleSoft nVision. Refer to PSFIN Business Process GL.070.038.
6. Create the Statements of Revenues, Expenses, and Changes to Net Assets from FDM and PeopleSoft nVision.
7. Create the Auxiliary Statements of Net Assets from PeopleSoft nVision. Refer to PSFIN Business Process GL.070.041.
8. Create the Auxiliary SRECNAs from PeopleSoft nVision. Refer to PSFIN Business Process GL.070.042.
9. Prepare the Schedule of Federal Financial Assistance and compare it to SRECNA.
10. Create the Capital Asset Auxiliary Services (BORRM005) from PeopleSoft Financials.

Fiscal Year End 07/18/2012 PeopleSoft Financials Manual 2012 188
11. Create the Statement of Cash Flows from PeopleSoft nVision. Refer to PSFIN Business Process GL.070.040.
12. Create Note 15 – Functional vs. Natural Classifications from FDM and PeopleSoft nVision.
13. Compare to last year’s AFR.
14. Create any Supplemental Information, such as: • Schedule of Operation of Agency Funds (BORRG027). Refer to PSFIN
Business Process GL.070.055. • Student Activities Funds Statement (BORRG030). Refer to PSFIN Business
Process GL.070.052. • Intercollegiate Athletics Statements (BORRG032). Refer to PSFIN Business
Process GL.070.054. Note: The information for Student Activities and Intercollegiate Athletics is needed for the State Auditors.
15. Run the PO Open Enc as of Acctg Period (BORRP014) (as of accounting period 12) report to create a list of Outstanding Encumbrances for the State Auditors. Refer to PSFIN Business Process PO.070.350.
Note: Be sure to retain this report for the auditors. Without this report, it is very difficult to give them your open Purchase Orders as of 06/30.
16. Reconcile all reports generated in Steps 2 through 15.
Note: Once the Close process is run for the appropriate Ledgers, a review and reconciliation of the Balance Sheet should be performed to ensure that the amounts within the Asset, Liability and Net Asset accounts. Should any balances require changing through a Journal Entry reclassification, the Unclose process can be run, adjusting entries made, and the Closing process rerun. The Unclose and Close processes can be rerun as many times as required prior to the Accounting Calendar being closed out for the previous year, as noted in Step 22.
17. Unclose and repeat where necessary.
18. Extract Period 12 to FDM again, if necessary.
19. Rerun all reports from PeopleSoft Financials and FDM listed in Steps 2 through 15.
20. Reconcile all reports generated in Step 19.
21. Complete your Annual Financial Report (AFR).
22. Submit and have Period 12 accepted once your AFR is completed.

Fiscal Year End 07/18/2012 PeopleSoft Financials Manual 2012 189
Note: Do not submit this information to the Data Warehouse until you have completed your AFR.
Now that you have extracted the data to FDM, and run and reconciled all reports, you will close the Asset Management accounting periods. This completes Step 9, Extracting Data to FDM and Reconciling All Reports.

Fiscal Year End 07/18/2012 PeopleSoft Financials Manual 2012 190
Step 10: Closing the Asset Management Accounting Periods In this step, you will close the Asset Management accounting periods. Once the accounting periods have been closed, no more Asset Management transactions can have Accounting Dates in those periods. Note 1: This process should be done only after your Data Warehouse submission has been accepted. Note 2: Your institution will run this process only once in a fiscal year, as part of the Year-End processing. This process must be run for all Book Names, and for all accounting periods in each Book Name. Warning: This process cannot be undone once completed. Note 3: In order to close the Asset Management accounting periods, all the end-of-month accounting entry creation procedures must be completed. These include Depreciation Calculation, Accounting Entry Creation, and Depreciation Close.
Process 1. Select Asset Management⇒Accounting Entries⇒Close Accounting Period.
The Close Asset Accounting Period – Find an Existing Value page displays.
2. Enter or select your institution’s Business Unit number in the Business Unit field.
3. Enter or select ENTERPRISE in the Asset Book Name field.
4. Click on . The Close Asset Period page displays.
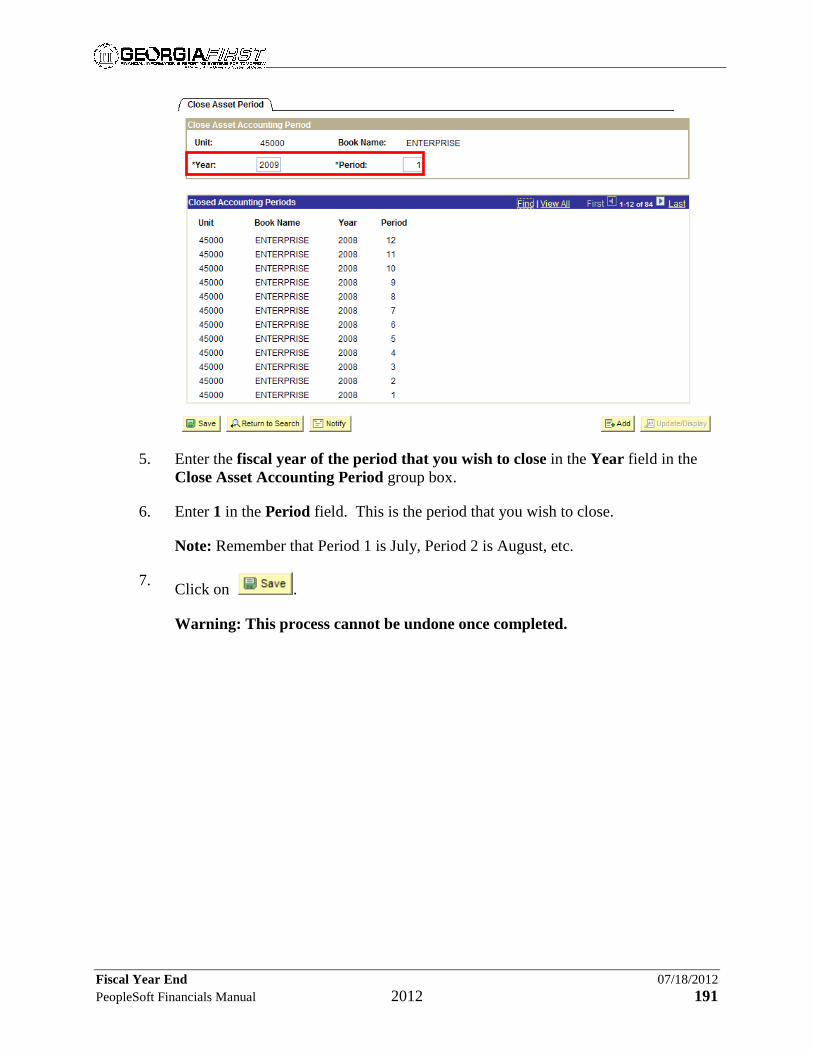
Fiscal Year End 07/18/2012 PeopleSoft Financials Manual 2012 191
5. Enter the fiscal year of the period that you wish to close in the Year field in the Close Asset Accounting Period group box.
6. Enter 1 in the Period field. This is the period that you wish to close.
Note: Remember that Period 1 is July, Period 2 is August, etc.
7. Click on .
Warning: This process cannot be undone once completed.

Fiscal Year End 07/18/2012 PeopleSoft Financials Manual 2012 192
8. Verify that the following information appears in the Closed Accounting Periods group box: • Unit: Your institution’s Business Unit number • Book Name: ENTERPRISE • Year: Current fiscal year • Period: 1
9. Repeat Steps 5 through 8 for periods 2 through 12.
Note 1: All 12 accounting periods for the ENTERPRISE Book must be closed.
Warning: This process cannot be undone once completed.
Note 2: This process should be done only after your Data Warehouse submission has been accepted.
This completes Step 10, Closing the Asset Management Accounting Periods. This completes Module 5, Year-End Close Processes.

Fiscal Year End 07/18/2012 PeopleSoft Financials Manual 2012 193
Appendix A: Period End Integrity Checks A collection of Period End Integrity Check queries are available to assist you in validating period end processing and data integrity. • Budg Compliance 01: BOR_BTA_ADJUST_QRY • Budg Compliance 02: BOR_BTA_BALSHT_REST_INCL_ENC • Budg Compliance 03: BOR_BTA_BALSHT_REST_NO_ENC • Budg Compliance 04: BOR_BTA_BALSHT_UNREST • Budg Compliance 05: BOR_BTA_ENCUMB_PAYABLE • Budg Compliance 06: BOR_BTA_PRIOR_YR_FUND_BAL • Budg Compliance 07: BOR_BTA_REVEXP_REST_INCL_ENC • Budg Compliance 08: BOR_BTA_REVEXP_REST_NO_ENC • Budg Compliance 09: BOR_BTA_REVEXP_UNREST • Budg Compliance 10: BOR_BTA_BCRADJ_JRNLS • Integrity 01: BOR_CHK_PROJ_ENC_LEG • Integrity 02: BOR_CHK_PROJ_EXP_LEG • Integrity 03: BOR_CHK_PROJ_REV_LEG • Integrity 04: BOR_CHK_UNREST_LEDGER • Integrity 05: BOR_CHK_KKLEDG_ACTV • Integrity 06: BOR_CHK_KKLEDG_BUD • Integrity 07: BOR_CHK_DETL_ACTLS • Integrity 08: BOR_CHK_LEDG_JRNL • Integrity 09: BOR_CHK_REV_LEDGER • Integrity 10: BOR_CHK_REVAPPROP_BUD • Integrity 11: BOR_CHK_DTL_ENC • Integrity 12: BOR_CHK_BUD_REF_FISCAL_YEAR • Month End 01: BOR_CHK_JE_PENDING • Month End 02: BOR_CHK_UNPOST_SUBSYSTEM • Month End 03: BOR_CHK_CASH_ENCUMB • Month End 04: BOR_CHK_REST_WOUT_PROJ • Month End 05: BOR_CHK_ERROR_ENCUMB • Month End 06: BOR_CHK_NEG_ENCUMB • Reporting 01: BOR_TRIAL_BALANCE • Reporting 02: BOR_ LEDGER_SURPLUS • Reporting 03: BOR_LEDGER_SURPLUS_DETAIL • Year End 01: BOR_CHK_12000_BALANCES • Year End 02: BOR_CHK_FDM_CAPITAL_CF • Year End 03: BOR_CHK_PERIOD0_POPULATED • Year End 04: BOR_CHK_PERSERV_ENCUM • Year End 05: BOR_NET_ASSET_ACCOUNT
Process 1. Select BOR Menus⇒BOR General Ledger⇒BOR Year End⇒Year End
Reports⇒Period End Integrity Check. The Period End Integrity Checks page

Fiscal Year End 07/18/2012 PeopleSoft Financials Manual 2012 194
displays.
2. Click on the in the Description field to display a list of available queries.

Fiscal Year End 07/18/2012 PeopleSoft Financials Manual 2012 195
3. Select the query that you wish to run. The Recon Description and Recon Correction fields are populated with information on that specific query, and the Display Report link becomes active.
4. Click on the Display Report link. A new window opens to run the query and display the results.
Note: Different prompts will be displayed depending on the query selected.
5. Enter or select your Business Unit.
6. Click on .

Fiscal Year End 07/18/2012 PeopleSoft Financials Manual 2012 196
A description of the remaining available queries is shown below.

Fiscal Year End 07/18/2012 PeopleSoft Financials Manual 2012 197

Fiscal Year End 07/18/2012 PeopleSoft Financials Manual 2012 198

Fiscal Year End 07/18/2012 PeopleSoft Financials Manual 2012 199

Fiscal Year End 07/18/2012 PeopleSoft Financials Manual 2012 200

Fiscal Year End 07/18/2012 PeopleSoft Financials Manual 2012 201

Fiscal Year End 07/18/2012 PeopleSoft Financials Manual 2012 202

Fiscal Year End 07/18/2012 PeopleSoft Financials Manual 2012 203
Appendix B: Batch Processing
Processing AP Vouchers and Payments 1. Run the batch Budget Check process. Refer to PSFIN Business Process
AP.030.020.
2. Run the BOR_BC_PENDING query to verify that the budget checking is successful. Refer to PSFIN Business Process GL.070.095.
3. Run the Document Tolerance process. Refer to PSFIN Business Process AP.030.070.
4. Run the Matching process. Refer to PSFIN Business Process AP.030.010.
5. Run the Voucher Post process. Refer to PSFIN Business Process AP.030.030.
6. Run the BOR_AP_UNPOSTED_VCHR query to verify that all vouchers have been posted. Refer to PSFIN Business Process AP.075.105.
7. Run the Payment Post process. Refer to PSFIN Business Process AP.030.050.
8. Run the BOR_AP_UNPOSTED_PYMNTS query to verify all payments have been posted. Refer to PSFIN Business Process AP.075.100.
9. Process the GL journals as noted below.
Processing Expenses 1. Run the batch Budget Check process for Expense Reports and Travel
Authorizations. Refer to PSFIN Business Processes EX.030.010 and EX.030.011, respectively.
2. Run the Liability Post process. Refer to PSFIN Business Process EX.030.031.
3. Run the Payment Post process. Refer to PSFIN Business Process EX.030.033.
4. Run the Journal Generate process. Refer to PSFIN Business Process GL.030.001.
5. Process the GL journals as noted below.
Processing GL Journals [changed order – put after processing the AP and EX submodules] 1. Run the Journal Generate process from payroll and receivables. Refer to PSFIN
Business Process GL.030.001.
Fiscal Year End 07/18/2012 PeopleSoft Financials Manual 2012 204
2. Run the batch Journal Editing process. Refer to PSFIN Business Process GL.030.008.
3. Run the batch Journal Budget Check process. Refer to PSFIN Business Process GL.030.009.
4. Mark journals for posting. Refer to PSFIN Business Process GL.020.015.
5. Run the batch Journal Post process. Refer to PSFIN Business Process GL.030.010.
6. Run the BOR_JE_PENDING query to ensure all journals have been journal generated and posted to the ledger. Refer to PSFIN Business Process GL.070.096.

Fiscal Year End 07/18/2012 PeopleSoft Financials Manual 2012 205
Appendix C: Encumbrance Workbench New BOR Encumbrance Recon reports have been added to provide an iterative component where detail encumbrance reconciliation reporting can be done. These reports are critical to completing month end reconciliation. • 01-Encumbrance Recon Summary • 02- Encumbrance Recon Errors • 03- Encumbrance Recon Detail • 04-Open PO’s per KK • 05- Open PO’s per Purchasing • 06-PO vs KK Recon • 07-PO vs KK – Variances Only • 08-Open TAuths per KK • 10-Hanging Tauth Encumbrances • 12-Manual Encumbrances • 13-POs Impacting Surplus • 14-Tauths Impacting Surplus The new Build Encumbrance Reports (BOR_ENC_REC) batch process has been added to build the summary encumbrance reporting tables. This process is a pre-requisite to use the functionality in the some of the BOR Year End Encumbrance Recon Reports described above, and should be run monthly as part of the month-end close.
Process 1. Select BOR Menus⇒BOR General Ledger⇒BOR Year End⇒Year End
Reports⇒Build Encumbrance Reports. The Build Encumbrance Recon – Find an Existing Value page displays.
2. Enter an appropriate Run Control ID.
3. Click on . The Encumbrance Reconciliation page displays.
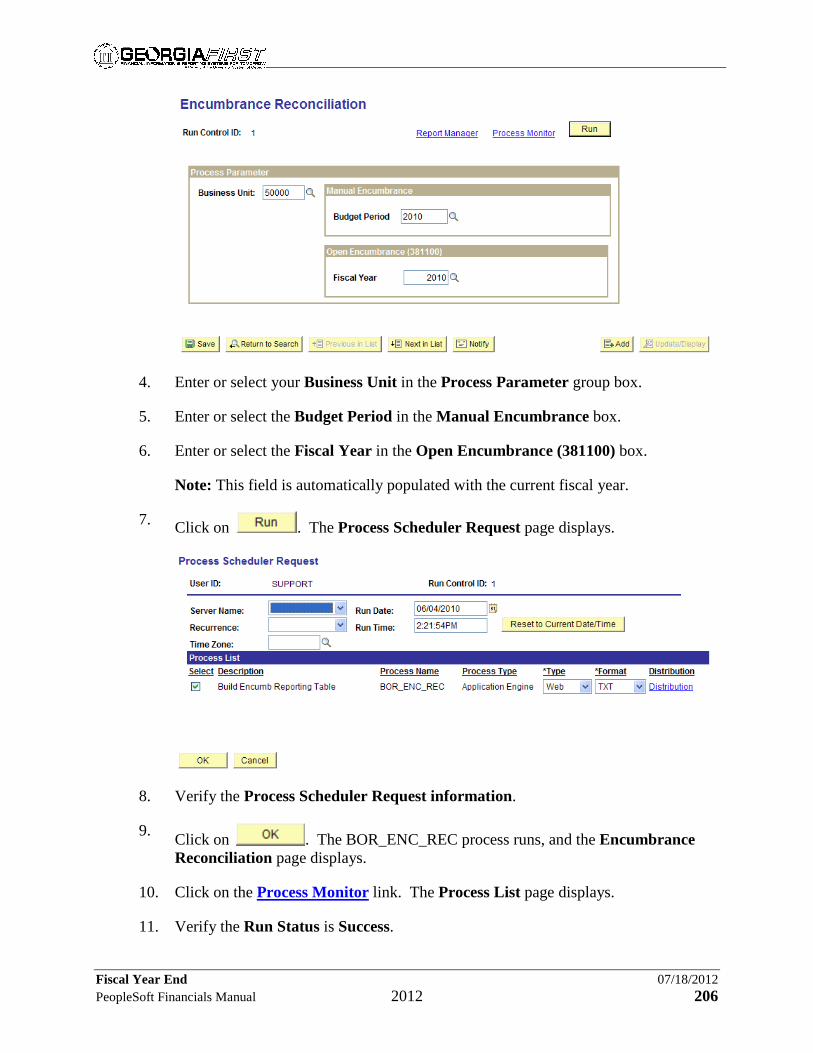
Fiscal Year End 07/18/2012 PeopleSoft Financials Manual 2012 206
4. Enter or select your Business Unit in the Process Parameter group box.
5. Enter or select the Budget Period in the Manual Encumbrance box.
6. Enter or select the Fiscal Year in the Open Encumbrance (381100) box.
Note: This field is automatically populated with the current fiscal year.
7. Click on . The Process Scheduler Request page displays.
8. Verify the Process Scheduler Request information.
9. Click on . The BOR_ENC_REC process runs, and the Encumbrance Reconciliation page displays.
10. Click on the Process Monitor link. The Process List page displays.
11. Verify the Run Status is Success.

Fiscal Year End 07/18/2012 PeopleSoft Financials Manual 2012 207
Note: You can click on to update the Run Status until Success displays.
Now that you have run the Build Encumbrance Reports process, you can run the BOR Encumbrance Recon reports.
12. Select BOR Menus⇒BOR General Ledger⇒BOR Year End⇒Year End Reports⇒Encumbrance Recon Reports. The Encumbrance Reconciliation Reports page displays.
13. Enter or select your Business Unit in the Processing Parameters group box. The Report Requested field and Display Report link are now active.

Fiscal Year End 07/18/2012 PeopleSoft Financials Manual 2012 208
Note: Be sure to check the Last Run Date, which will tell you the last time you ran the Build Encumbrance Reports process. These reports will only be as current as the last run date. If the Last Run Date is blank, this process has not been run for your institution and the BOR Encumbrance Reports will not contain any data.
14. Click on the in the Report Requested field to display a list of available reports.

Fiscal Year End 07/18/2012 PeopleSoft Financials Manual 2012 209
15. Enter any report criteria in the appropriate fields in the Processing Parameters group box.
Note: Only certain fields will be active depending on the report you select. You must enter a value for Business Unit or Fiscal Year, if these are displayed. For other fields that may be included, you may enter a specific value or leave these fields blank to include all values in the results. Do not use the % wildcard character.
16. Click on the Display Report link. A new window opens to display the report results.
A description of the available reports is shown below. Reports marked with an * require running the Encumbrance Report Build process beforehand.
The 01-Encumbrance Recon Summary report* proofs open encumbrance balances. Ledger balances are compared to open Purchase Orders, open Travel

Fiscal Year End 07/18/2012 PeopleSoft Financials Manual 2012 210
Authorizations, and manual encumbrances. Rows with and without variances are displayed.
The 02- Encumbrance Recon Errors report* proofs open encumbrance balances. Ledger balances are compared to open Purchase Orders, open Travel Authorizations, and manual encumbrances. Only rows with variances are displayed.
The 03- Encumbrance Recon Detail report* displays the transactions that comprise a balance reported in the 01-Encumbrance Recon Summary report. The Reconciliation Type field corresponds to a column in the summary report. For example, the Open PO Reconciliation Type shows all the transactions that comprise the PO column balance in the summary report.
The 04-Open PO’s per KK report executes an interactive version of the BOR_OPEN_ENCS_KK query, which displays open Purchase Orders per Commitment Control.
The 05- Open PO’s per Purchasing report executes an interactive version of the BOR_PO_OPEN_AMOUNT_ALL query, which displays open Purchase Orders per Purchasing. [Corrected query name.]
The 06-PO vs KK Recon report* compares the Commitment Control Open PO and the Purchasing Open PO queries to identify any Purchase Orders that had issues in finalization. This report displays all the rows whether or not a variance exists.
The 07-PO vs KK – Variances Only report* compares the Commitment Control Open PO and the Purchasing Open PO queries to identify any Purchase Orders that had issues in finalization. This report displays only the rows with a variance.
The 08-Open TAuths per KK report executes an interactive version of the BOR_KK_OPEN_TAUTH_ENC query, which displays open Travel Authorizations per Commitment Control.
The 10-Hanging Tauth Encumbrances report executes an interactive version of the BOR_KK_OPEN_TAUTH_ENC_CLS query, which displays hanging Travel Authorizations per Commitment Control.
The 12-Manual Encumbrances report analyzes the Journal transactions that are flagged as encumbrances (KK AMOUNT TYPE = 2).
The 13-POs Impacting Surplus report reviews Purchase Orders with prior budget years adjusted or closed in the current fiscal year.
The 14-Tauths Impacting Surplus report reviews Travel Authorizations with prior budget years adjusted or closed in the current fiscal year.
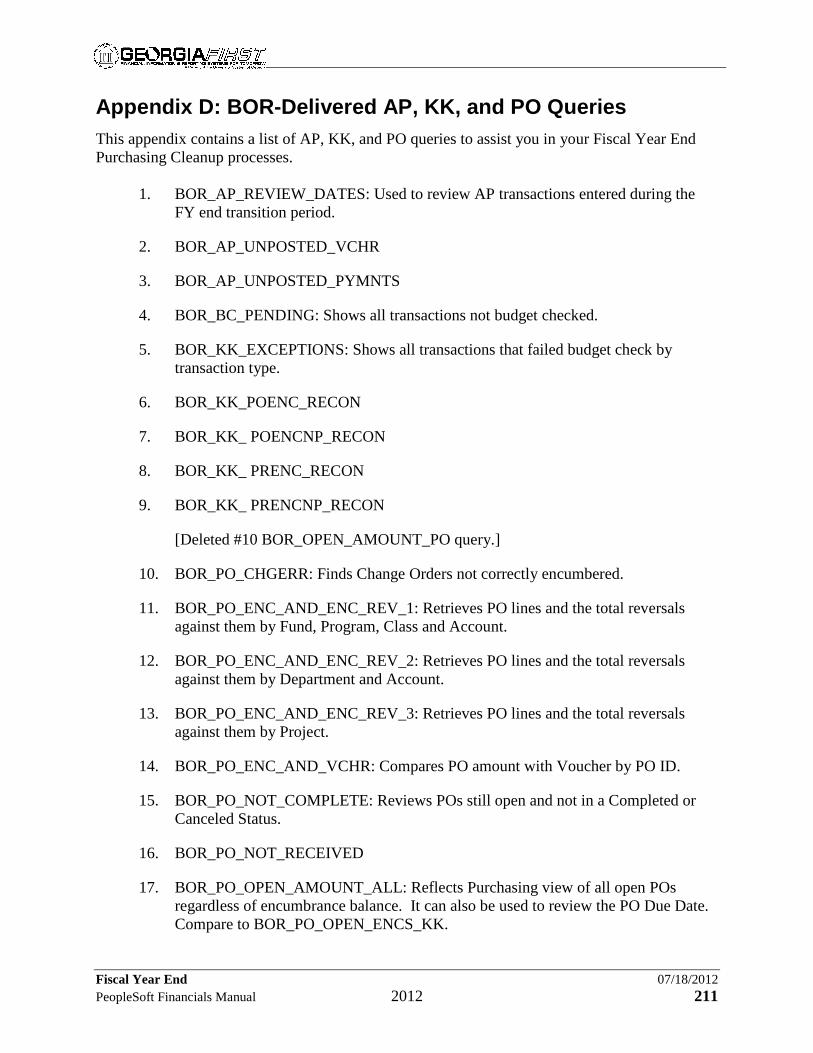
Fiscal Year End 07/18/2012 PeopleSoft Financials Manual 2012 211
Appendix D: BOR-Delivered AP, KK, and PO Queries This appendix contains a list of AP, KK, and PO queries to assist you in your Fiscal Year End Purchasing Cleanup processes.
1. BOR_AP_REVIEW_DATES: Used to review AP transactions entered during the
FY end transition period.
2. BOR_AP_UNPOSTED_VCHR
3. BOR_AP_UNPOSTED_PYMNTS
4. BOR_BC_PENDING: Shows all transactions not budget checked.
5. BOR_KK_EXCEPTIONS: Shows all transactions that failed budget check by transaction type.
6. BOR_KK_POENC_RECON
7. BOR_KK_ POENCNP_RECON
8. BOR_KK_ PRENC_RECON
9. BOR_KK_ PRENCNP_RECON
[Deleted #10 BOR_OPEN_AMOUNT_PO query.]
10. BOR_PO_CHGERR: Finds Change Orders not correctly encumbered.
11. BOR_PO_ENC_AND_ENC_REV_1: Retrieves PO lines and the total reversals against them by Fund, Program, Class and Account.
12. BOR_PO_ENC_AND_ENC_REV_2: Retrieves PO lines and the total reversals against them by Department and Account.
13. BOR_PO_ENC_AND_ENC_REV_3: Retrieves PO lines and the total reversals against them by Project.
14. BOR_PO_ENC_AND_VCHR: Compares PO amount with Voucher by PO ID.
15. BOR_PO_NOT_COMPLETE: Reviews POs still open and not in a Completed or Canceled Status.
16. BOR_PO_NOT_RECEIVED
17. BOR_PO_OPEN_AMOUNT_ALL: Reflects Purchasing view of all open POs regardless of encumbrance balance. It can also be used to review the PO Due Date. Compare to BOR_PO_OPEN_ENCS_KK.

Fiscal Year End 07/18/2012 PeopleSoft Financials Manual 2012 212
18. BOR_PO_OPEN_AMOUNT_1: Retrieves PO lines with an open amount >$0 for specific criteria by Fund, Program, Class, Budget Period, and Account.
19. BOR_PO_OPEN_AMOUNT_2: Retrieves PO lines with an open amount >$0 for specific criteria by Budget Period, Department, and Account.
20. BOR_PO_OPEN_AMOUNT_3: Retrieves PO lines with an open amount >$0 for specific criteria by Budget Period and Project/Grant.
21. BOR_PO_OPEN_AMOUNT_4: Retrieves PO lines with an open amount >$0 for specific criteria by Budget Period and PO ID.
22. BOR_PO_OPEN_AMT_NO_FINAL: Finds POs not yet Finalized for all budget periods.
23. BOR_PO_OPEN_ENCS_KK: Commitment Control view of open POs. Compare to BOR_PO_OPEN_AMOUNT_ALL.
24. BOR_PO_PARTIAL_RECEIVED
25. BOR_PO_REVIEW_DATES: Used to review PO transactions entered during the FY end transition period.
26. BOR_PO_UNRECON: Used to determine if PO is eligible to reconcile.
27. BOR_POAP_BUDERR: Finds where Voucher and PO Budget Periods are different.
28. BOR_POAP_CFERR: Finds Voucher accounting entries different than the PO.
29. BOR_POAP_DISCOUNTS: Finds PO Vouchers where discounts were taken.
30. BOR_POAP_VENDOR: Looks for POs vouchered on a Non-PO voucher.
31. BOR_REQ_ OPEN_AMOUNT_ALL
32. BOR_REQ_OPEN_AMOUNT_1: Retrieves Requisition lines with an open amount >$0 for specific criteria by Fund, Program, Class, and Account.
33. BOR_REQ_OPEN_AMOUNT_2: Retrieves Requisition lines with an open amount >$0 for specific criteria by Department and Account.
34. BOR_REQ_ OPEN_AMOUNT_3
35. BOR_REQ_ OPEN_AMOUNT_4
36. BOR_REQ_OPEN_PREENCS_KK: Finds Requisitions with open pre-encumbrances and related Commitment Control items.
Fiscal Year End 07/18/2012 PeopleSoft Financials Manual 2012 213
37. BOR_OPEN_PRE_ENC_AND_REV_1: Finds pre-encumbrances by Fund, Class, Program, and Account.
38. BOR_OPEN_PRE_ENC_AND_REV_2: Retrieves Requisition with open amount >$0 for specific criteria by Department and Account.
39. BOR_OPEN_PRE_ENC_AND_PO: Retrieves Requisition number and data with associated PO and amount.
40. BOR_SURPLUS_NOPO: Finds Non-PO vouchers with an Accounting Date after the Budget Period.
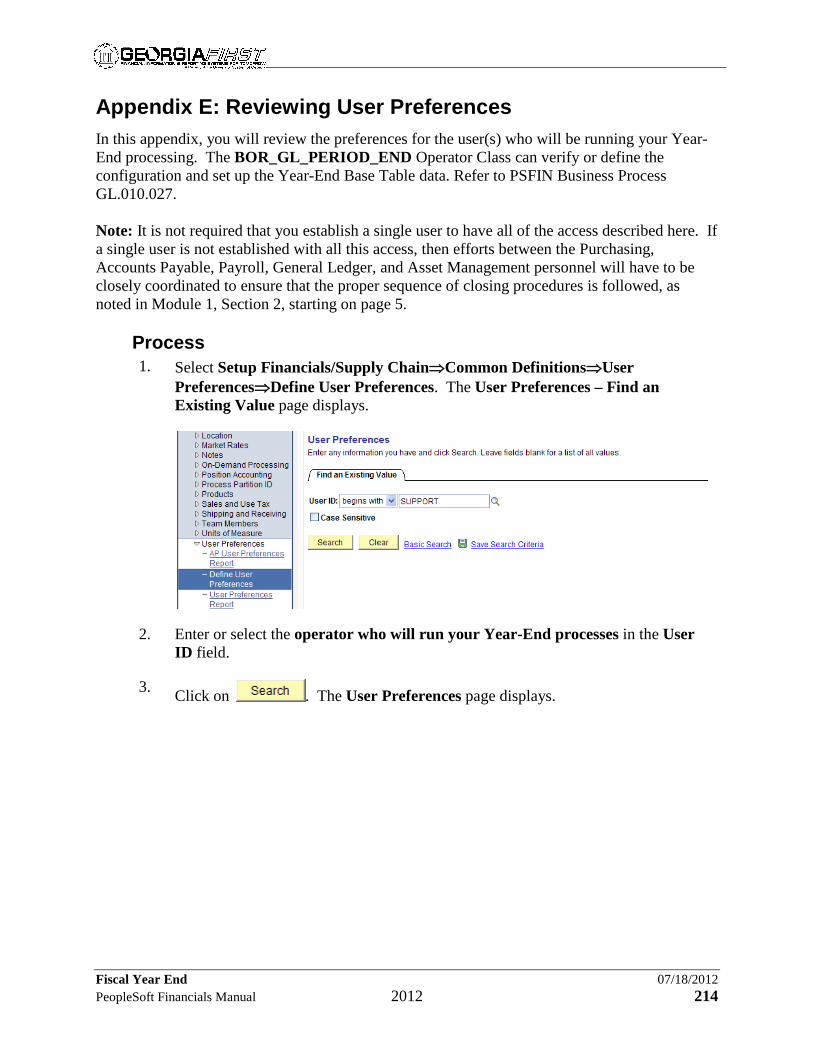
Fiscal Year End 07/18/2012 PeopleSoft Financials Manual 2012 214
Appendix E: Reviewing User Preferences In this appendix, you will review the preferences for the user(s) who will be running your Year-End processing. The BOR_GL_PERIOD_END Operator Class can verify or define the configuration and set up the Year-End Base Table data. Refer to PSFIN Business Process GL.010.027. Note: It is not required that you establish a single user to have all of the access described here. If a single user is not established with all this access, then efforts between the Purchasing, Accounts Payable, Payroll, General Ledger, and Asset Management personnel will have to be closely coordinated to ensure that the proper sequence of closing procedures is followed, as noted in Module 1, Section 2, starting on page 5.
Process 1. Select Setup Financials/Supply Chain⇒Common Definitions⇒User
Preferences⇒Define User Preferences. The User Preferences – Find an Existing Value page displays.
2. Enter or select the operator who will run your Year-End processes in the User ID field.
3. Click on . The User Preferences page displays.

Fiscal Year End 07/18/2012 PeopleSoft Financials Manual 2012 215
4. Click on the Overall Preference link. The Overall Preference page displays.
5. Verify that your institution’s Business Unit number appears in the Business Unit and SetID fields.
6. Verify that 01/01/1901 appears in the As of Date field.
7. Click on the User Preferences tab. The User Preferences page displays.
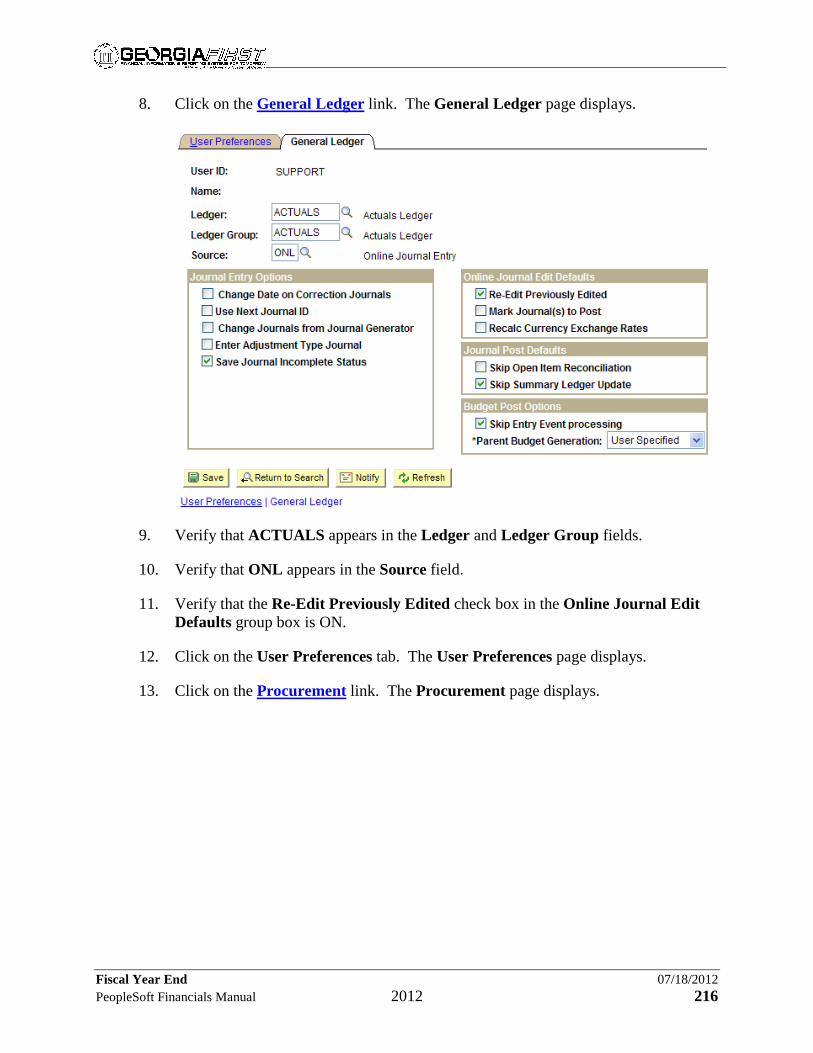
Fiscal Year End 07/18/2012 PeopleSoft Financials Manual 2012 216
8. Click on the General Ledger link. The General Ledger page displays.
9. Verify that ACTUALS appears in the Ledger and Ledger Group fields.
10. Verify that ONL appears in the Source field.
11. Verify that the Re-Edit Previously Edited check box in the Online Journal Edit Defaults group box is ON.
12. Click on the User Preferences tab. The User Preferences page displays.
13. Click on the Procurement link. The Procurement page displays.

Fiscal Year End 07/18/2012 PeopleSoft Financials Manual 2012 217
14. Click on the Payables Online Vouchering link. The Payables Online Vouchering page displays.
15. Verify that the Post Vouchers check box in the Online Voucher Processing group box is ON.

Fiscal Year End 07/18/2012 PeopleSoft Financials Manual 2012 218
16. Click on . This brings you back to the Procurement page.
17. Click on the Requisition Authorizations link. The Requisition Authorizations page displays.
18. Verify that the Cancel check box in the Allowed Requisitions Actions group box is ON.
19. Verify that the Can Work Approved Req’s check box is ON.
20. Verify that the Full Auth for All Requesters check box is ON.
21. Click on . This brings you back to the Procurement page.
22. Click on the Purchase Order Authorizations link. The Purchase Order Authorizations page displays.

Fiscal Year End 07/18/2012 PeopleSoft Financials Manual 2012 219
23. Verify that the Can Work Approved PO’s check box is ON.
24. Verify that the Cancel check box is ON.
25. Verify that the Full Authority for All Buyers check box is ON.
26. Click on . This brings you back to the Purchase Order Authorizations page.

Fiscal Year End 07/18/2012 PeopleSoft Financials Manual 2012 220
Appendix F: Generating Ledger ChartField Value Sets In this appendix, you will generate the ledger ChartField Value Sets (CVS). ChartField Value Sets enable you to define combinations of ChartField values to be used for source data during the General Ledger closing process and the Commitment Control ledger closing process. They can also be used to define the source data for consolidations, equitization, and various other processes. For example, you can create one ChartField Value Set for the income statement accounts used in interim closing, and a different set to be used in Year-End closing. When you define closing rules for the interim close or the Year-End close, you select the appropriate ChartField Value Set to use. Refer to PSFIN Business Process GL.020.034 for more information. Refer to Appendix E, Net Asset Accounts for Closing Rules, on page 237, for the specific net asset account numbers to use in these ChartField Value Sets. In this example, you will create the ChartField Value Sets for the ACTUALS ledger. You will need to define a separate ChartField Value Set for each of the following Net Asset Accounts: • 321100 • 371100 • 360100 • 311100
Process 1. Select Setup Financials/Supply Chain⇒Common Definitions⇒Design
ChartFields⇒ChartField Value Sets⇒Setup ChartField Value Sets. The Chartfield Value Sets – Find an Existing Value page displays.
2. Click on the Add a New Value tab. The Chartfield Value Sets – Add a New Value page displays.

Fiscal Year End 07/18/2012 PeopleSoft Financials Manual 2012 221
3. Verify that your institution’s Business Unit number appears in the SetID field.
4. Enter a Name for this ChartField Value Set in the ChartField Value Set field.
Note: You must enter a unique name for this ChartField Value Set. We recommend CLOSE_FY_ACTUALS_XXX, where FY is the closing Fiscal Year and XXX refers to the first three digits of the Net Asset Account.
5. Click on . The ChartField Value Set page displays.

Fiscal Year End 07/18/2012 PeopleSoft Financials Manual 2012 222
6. Enter 01/01/1901 in the Effective Date field.
Note: This field is automatically populated with the System Date.
7. Verify that Active appears in the Status field.
8. Verify STANDARD appears in the Ledger Template field.
9. Enter ACTUALS CVS FYXX 321100 in the Description field, where XX are the last two digits of the closing fiscal year.
10. Enter ACTUALS ChartField Value Set for FYXX for Net Asset Account 321100 in the Comments field, where XX are the last two digits of the closing fiscal year.
11. Enter or select Fund Code in the Field Name field of the Values by ChartFields group box.
12. Verify Selected Detailed Values appears in the How Specified field.
13. Select 12210 in the Select Value field in the Select Values/Nodes group box.
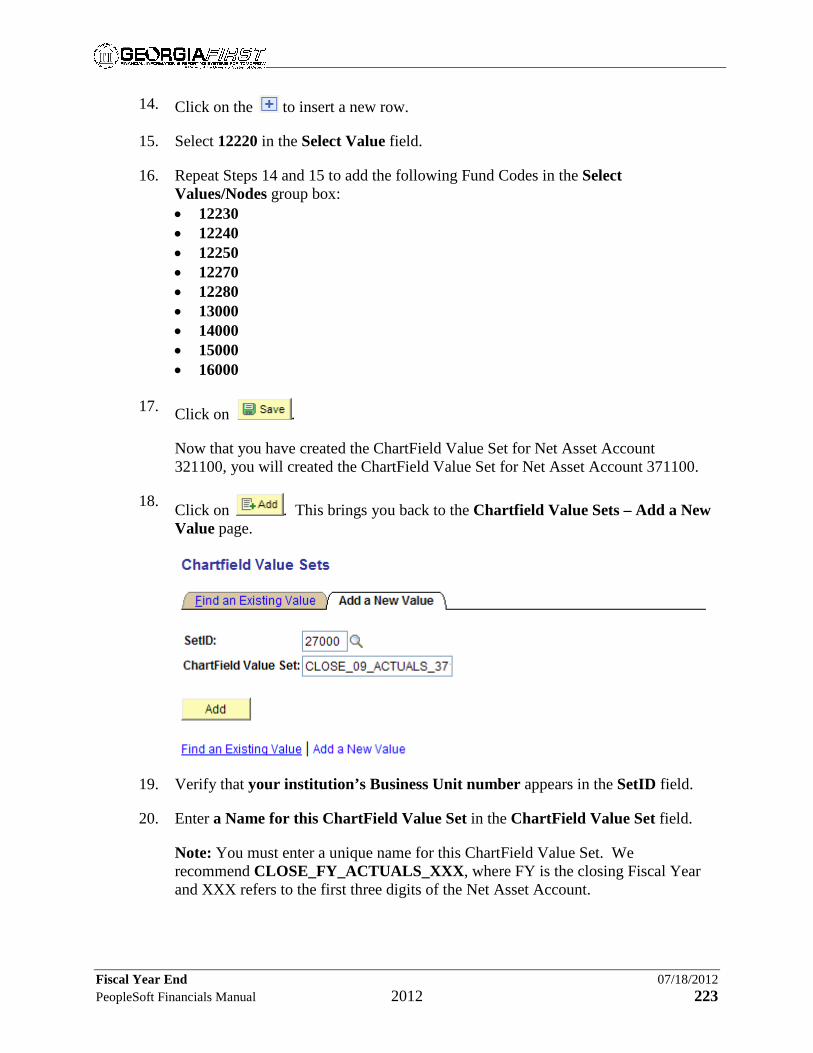
Fiscal Year End 07/18/2012 PeopleSoft Financials Manual 2012 223
14. Click on the to insert a new row.
15. Select 12220 in the Select Value field.
16. Repeat Steps 14 and 15 to add the following Fund Codes in the Select Values/Nodes group box: • 12230 • 12240 • 12250 • 12270 • 12280 • 13000 • 14000 • 15000 • 16000
17. Click on .
Now that you have created the ChartField Value Set for Net Asset Account 321100, you will created the ChartField Value Set for Net Asset Account 371100.
18. Click on . This brings you back to the Chartfield Value Sets – Add a New Value page.
19. Verify that your institution’s Business Unit number appears in the SetID field.
20. Enter a Name for this ChartField Value Set in the ChartField Value Set field.
Note: You must enter a unique name for this ChartField Value Set. We recommend CLOSE_FY_ACTUALS_XXX, where FY is the closing Fiscal Year and XXX refers to the first three digits of the Net Asset Account.

Fiscal Year End 07/18/2012 PeopleSoft Financials Manual 2012 224
21. Click on . The ChartField Value Set page displays.
22. Enter 01/01/1901 in the Effective Date field.
Note: This field is automatically populated with the System Date.
23. Verify that Active appears in the Status field.
24. Verify STANDARD appears in the Ledger Template field.
25. Enter ACTUALS CVS FYXX 371100 in the Description field, where XX are the last two digits of the closing fiscal year.
26. Enter ACTUALS ChartField Value Set for FYXX for Net Asset Account 371100 in the Comments field, where XX are the last two digits of the closing fiscal year.
27. Enter or select Fund Code in the Field Name field of the Values by ChartFields group box.
28. Verify Selected Detailed Values appears in the How Specified field.
29. Select 20000 in the Select Value field in the Select Values/Nodes group box.
30. Click on the to insert a new row.

Fiscal Year End 07/18/2012 PeopleSoft Financials Manual 2012 225
31. Select 30000 in the Select Value field.
32. Repeat Steps 30 and 31 to add the following Fund Codes in the Select Values/Nodes group box: • 31000 • 41000 • 42000 Note: If your institution uses any 21xxx funds, these funds also need to be added here. Currently, only Skidaway and the University System Office use 21xxx funds.
33. Click on .
Now that you have created the ChartField Value Set for Net Asset Account 371100, you will create the ChartField Value Set for Net Asset Account 360100.
34. Click on . This brings you back to the Chartfield Value Sets – Add a New Value page.
35. Verify that your institution’s Business Unit number appears in the SetID field.
36. Enter a Name for this ChartField Value Set in the ChartField Value Set field.
Note: You must enter a unique name for this ChartField Value Set. We recommend CLOSE_FY_ACTUALS_XXX, where FY is the closing Fiscal Year and XXX refers to the first three digits of the Net Asset Account.
37. Click on . The ChartField Value Set page displays.

Fiscal Year End 07/18/2012 PeopleSoft Financials Manual 2012 226
38. Enter 01/01/1901 in the Effective Date field.
Note: This field is automatically populated with the System Date.
39. Verify that Active appears in the Status field.
40. Verify STANDARD appears in the Ledger Template field.
41. Enter ACTUALS CVS FYXX 360100 in the Description field, where XX are the last two digits of the closing fiscal year.
42. Enter ACTUALS ChartField Value Set for FYXX for Net Asset Account 360100 in the Comments field, where XX are the last two digits of the closing fiscal year.
43. Enter or select Fund Code in the Field Name field of the Values by ChartFields group box.
44. Verify Selected Detailed Values appears in the How Specified field.
45. Select 40000 in the Select Value field in the Select Values/Nodes group box.
46. Click on .
Now that you have created the ChartField Value Set for Net Asset Account 360100, you will create the ChartField Value Set for Net Asset Account 311100.
47. Click on . This brings you back to the Chartfield Value Sets – Add a New
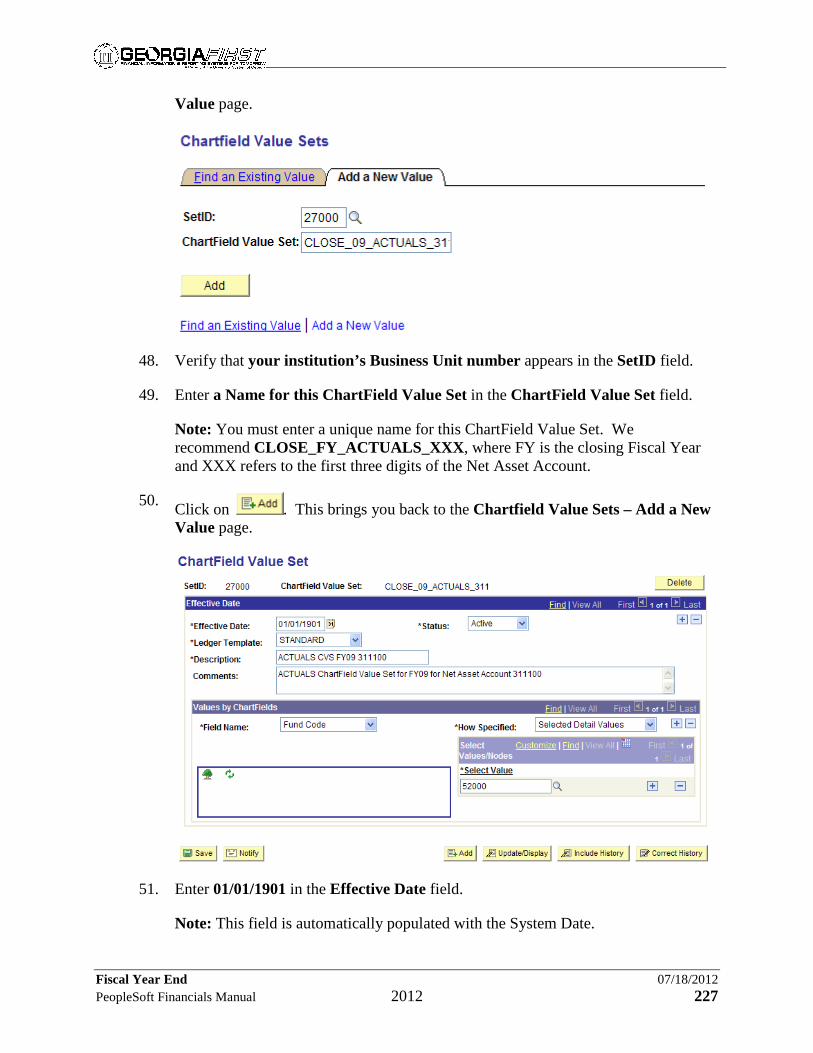
Fiscal Year End 07/18/2012 PeopleSoft Financials Manual 2012 227
Value page.
48. Verify that your institution’s Business Unit number appears in the SetID field.
49. Enter a Name for this ChartField Value Set in the ChartField Value Set field.
Note: You must enter a unique name for this ChartField Value Set. We recommend CLOSE_FY_ACTUALS_XXX, where FY is the closing Fiscal Year and XXX refers to the first three digits of the Net Asset Account.
50. Click on . This brings you back to the Chartfield Value Sets – Add a New Value page.
51. Enter 01/01/1901 in the Effective Date field.
Note: This field is automatically populated with the System Date.

Fiscal Year End 07/18/2012 PeopleSoft Financials Manual 2012 228
52. Verify that Active appears in the Status field.
53. Verify STANDARD appears in the Ledger Template field.
54. Enter ACTUALS CVS FYXX 311100 in the Description field, where XX are the last two digits of the closing fiscal year.
55. Enter ACTUALS ChartField Value Set for FYXX for Net Asset Account 311100 in the Comments field, where XX are the last two digits of the closing fiscal year.
56. Enter or select Fund Code in the Field Name field of the Values by ChartFields group box.
57. Verify Selected Detailed Values appears in the How Specified field.
58. Select 52000 in the Select Value field in the Select Values/Nodes group box.
59. Click on .
You can follow the steps given above to create new ChartField Value Sets for the GAAP and CAPITAL ledgers, with new names such as CLOSE_XX_GAAP_321, etc. Refer to Appendix H, Net Asset Accounts for Closing Rules, on page 237, for the specific net asset account numbers to use in these ChartField Value Sets.

Fiscal Year End 07/18/2012 PeopleSoft Financials Manual 2012 229
Appendix G: Generating Ledger Closing Rules In this appendix, you will generate the ledger Closing Rules for the ACTUALS, GAAP, and CAPITAL ledgers based on a ChartField Value Set created for the following accounts: • 342100 • 321100 • 371100 • 311100 In this example, you will generate the ledger closing rules for the ACTUALS ledger.
Process 1. Select General Ledger⇒Close Ledgers⇒Closing Rules. The Closing Rules –
Find an Existing Value page displays.
2. Click on the Add a New Value tab. The Closing Rules – Add a New Value page displays.
3. Verify that your institution’s Business Unit number appears in the SetID field.
4. Enter a Name for this closing rule in the Closing Rule field.
Note: You must enter a unique name for this closing rule. We recommend FYXX_ACTUALS, where FYXX is the closing Fiscal Year.
5. Select Year End Closing as the Closing Type.
6. Click on . The Closing Options page displays.

Fiscal Year End 07/18/2012 PeopleSoft Financials Manual 2012 230
7. Enter 01/01/1901 in the Effective Date field.
Note: This field is automatically populated with the System Date.
8. Verify that Active appears in the Status field.
9. Enter ACTUALS Ledger Closing Rules in the Description field.
Note: This should be an appropriate description of this closing rule.
10. Verify STANDARD displays in the Ledger Template field.
11. Select Account in the ChartField field in the Retained Earnings Default Retained Earnings group box.
12. Enter or select 342100 in the ChartField Value field. This is the Unalloc Net Asset – Current Yr (Unrestricted) account as noted in Appendix E, Net Asset Accounts for Closing Rules, on page 237.
13. Click on the to insert a new row.
14. Select Budget Reference in the ChartField field.
15. Click the Retain CFV check box ON.
16. Repeat Steps 14 and 15 for the following ChartFields: • Class Field • Department
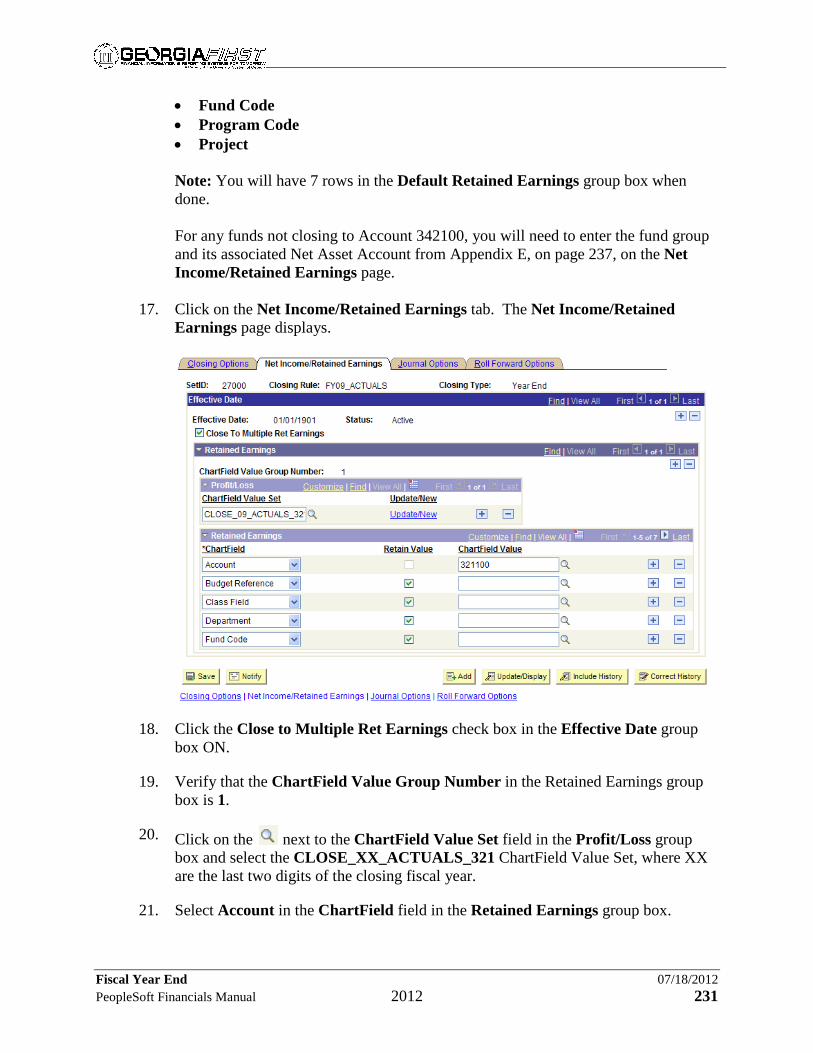
Fiscal Year End 07/18/2012 PeopleSoft Financials Manual 2012 231
• Fund Code • Program Code • Project Note: You will have 7 rows in the Default Retained Earnings group box when done. For any funds not closing to Account 342100, you will need to enter the fund group and its associated Net Asset Account from Appendix E, on page 237, on the Net Income/Retained Earnings page.
17. Click on the Net Income/Retained Earnings tab. The Net Income/Retained Earnings page displays.
18. Click the Close to Multiple Ret Earnings check box in the Effective Date group box ON.
19. Verify that the ChartField Value Group Number in the Retained Earnings group box is 1.
20. Click on the next to the ChartField Value Set field in the Profit/Loss group box and select the CLOSE_XX_ACTUALS_321 ChartField Value Set, where XX are the last two digits of the closing fiscal year.
21. Select Account in the ChartField field in the Retained Earnings group box.

Fiscal Year End 07/18/2012 PeopleSoft Financials Manual 2012 232
22. Enter 321100 in the ChartField Value field.
23. Click on the to insert a new row.
24. Select Budget Reference in the ChartField field.
25. Click the Retain Value check box ON.
26. Repeat Steps 24 and 25 for the following ChartFields: • Class Field • Department • Fund Code • Program Code • Project Note: You will have 7 rows in the Retained Earnings group box when done.
27. Click on the in the Retained Earnings group box to insert a new row.
28. Verify that the ChartField Value Group Number in the Retained Earnings group box is 2.
29. Click on the next to the ChartField Value Set field in the Profit/Loss group box and select the CLOSE_XX_ACTUALS_371 ChartField Value Set, where XX are the last two digits of the closing fiscal year.
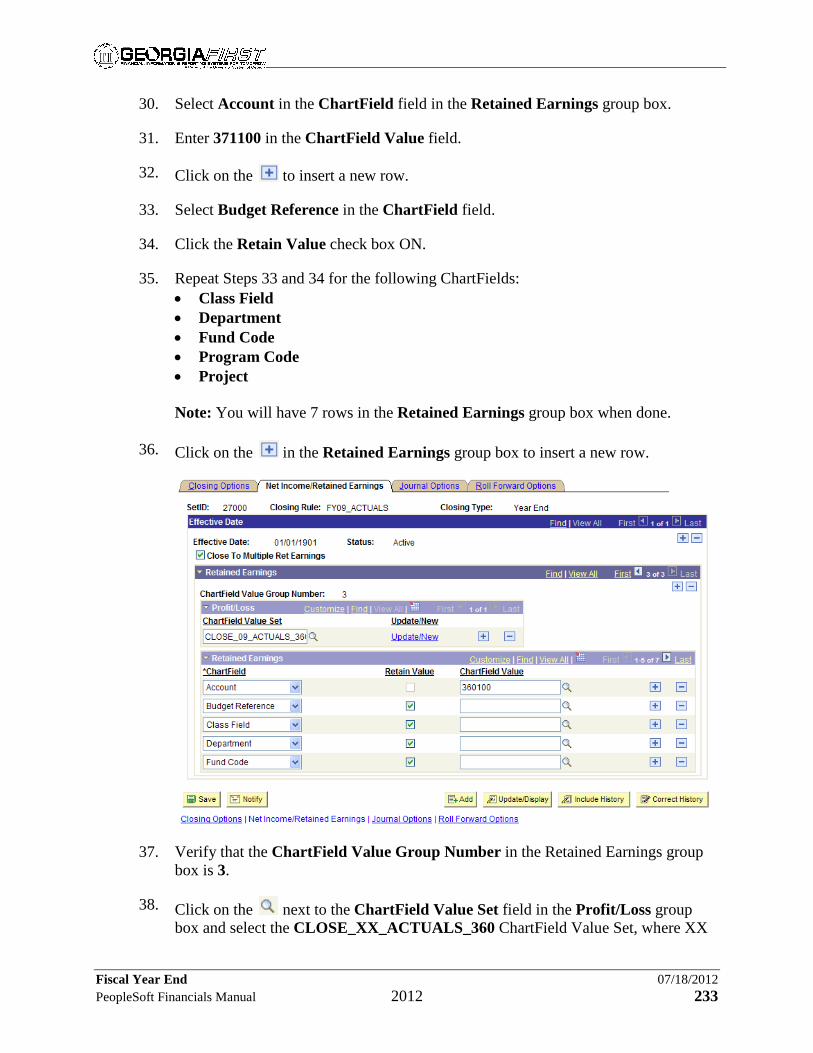
Fiscal Year End 07/18/2012 PeopleSoft Financials Manual 2012 233
30. Select Account in the ChartField field in the Retained Earnings group box.
31. Enter 371100 in the ChartField Value field.
32. Click on the to insert a new row.
33. Select Budget Reference in the ChartField field.
34. Click the Retain Value check box ON.
35. Repeat Steps 33 and 34 for the following ChartFields: • Class Field • Department • Fund Code • Program Code • Project Note: You will have 7 rows in the Retained Earnings group box when done.
36. Click on the in the Retained Earnings group box to insert a new row.
37. Verify that the ChartField Value Group Number in the Retained Earnings group box is 3.
38. Click on the next to the ChartField Value Set field in the Profit/Loss group box and select the CLOSE_XX_ACTUALS_360 ChartField Value Set, where XX

Fiscal Year End 07/18/2012 PeopleSoft Financials Manual 2012 234
are the last two digits of the closing fiscal year.
39. Select Account in the ChartField field in the Retained Earnings group box.
40. Enter 360100 in the ChartField Value field.
41. Click on the to insert a new row.
42. Select Budget Reference in the ChartField field.
43. Click the Retain Value check box ON.
44. Repeat Steps 42 and 43 for the following ChartFields: • Class Field • Department • Fund Code • Program Code • Project Note: You will have 7 rows in the Retained Earnings group box when done.
45. Click on the in the Retained Earnings group box to insert a new row.
46. Verify that the ChartField Value Group Number in the Retained Earnings group box is 4.
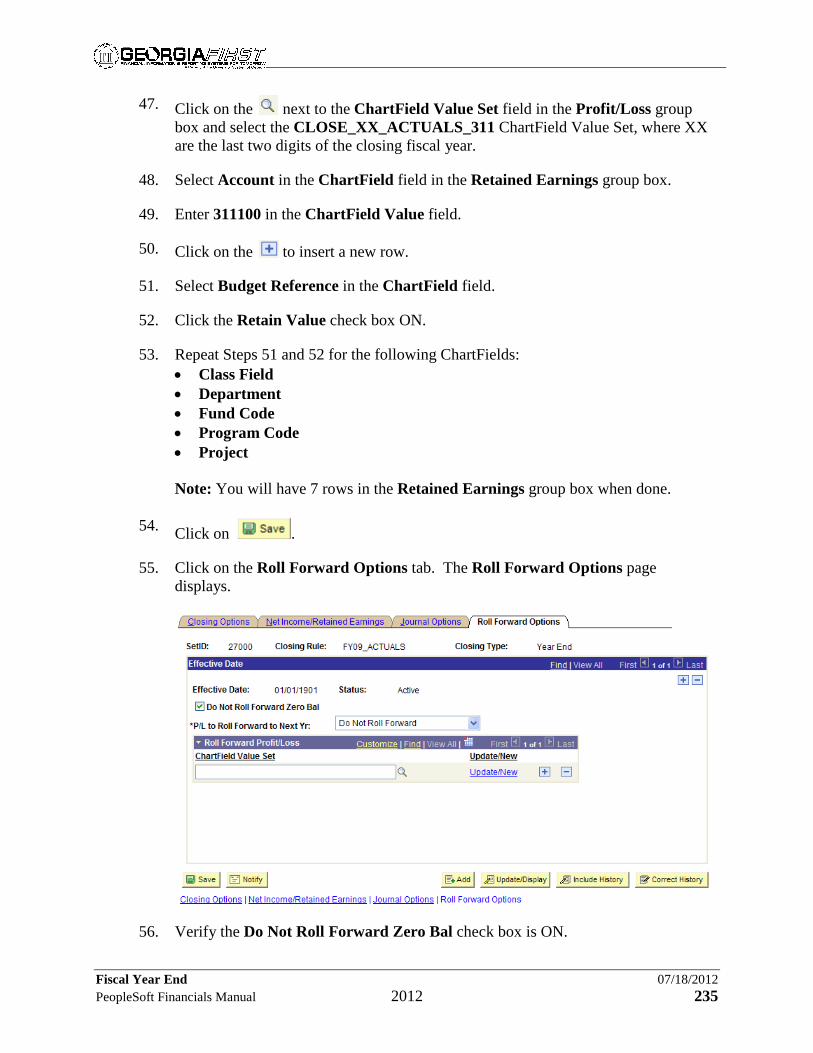
Fiscal Year End 07/18/2012 PeopleSoft Financials Manual 2012 235
47. Click on the next to the ChartField Value Set field in the Profit/Loss group box and select the CLOSE_XX_ACTUALS_311 ChartField Value Set, where XX are the last two digits of the closing fiscal year.
48. Select Account in the ChartField field in the Retained Earnings group box.
49. Enter 311100 in the ChartField Value field.
50. Click on the to insert a new row.
51. Select Budget Reference in the ChartField field.
52. Click the Retain Value check box ON.
53. Repeat Steps 51 and 52 for the following ChartFields: • Class Field • Department • Fund Code • Program Code • Project Note: You will have 7 rows in the Retained Earnings group box when done.
54. Click on .
55. Click on the Roll Forward Options tab. The Roll Forward Options page displays.
56. Verify the Do Not Roll Forward Zero Bal check box is ON.
Fiscal Year End 07/18/2012 PeopleSoft Financials Manual 2012 236
57. Verify Do Not Roll Forward appears in the P/L to Roll Forward to Next Yr field.
58. Click on .
You can follow the steps given above to create new Closing Rules for the GAAP and CAPITAL ledgers, with new names such as FYXX_GAAP, etc., based on the ChartField value sets you created in Appendix C.

Fiscal Year End 07/18/2012 PeopleSoft Financials Manual 2012 237
Appendix H: Net Asset Accounts for Closing Rules For the current Fiscal Year, the closing rules will be the same as they were for FY2010, as shown below. The FY2010 Net Assets Closing Rules Excel spreadsheet is located on the Fiscal Year End page of the GeorgiaFIRST Financials web site at: http://www.usg.edu/gafirst-fin/documentation/category/fiscal_year_end/.
Fund Description Actuals Net Asset Capital Net Asset GAAP Net Asset10000 State Appropriations 342100 311100 34210010500 Tuition 342100 311100 34210010600 Other General 342100 311100 34210010900 Federal Stimulus 342100 311100 34210011021 OOA-GTRI 342100 311100 34210011023 OOA-Center for Rehabilitation 342100 311100 34210011024 OOA-Adv Technology Dev Center 342100 311100 34210011026 State Data Research Center 342100 311100 34210011027 OOA-Agricultural Research 342100 311100 34210011240 OOA-Stdnt Ed Enrichment 342100 311100 34210011300 OOA- Experiment Stations 342100 311100 34210011310 OOA-Coop Extension Service 342100 311100 34210011320 OOA-Forestry Research 342100 311100 34210011330 OOA-Marine Extension Service 342100 311100 34210011340 OOA-Marine Institute-UGA 342100 311100 34210011350 OOA-Minority Business Entrpr 342100 311100 34210011360 OOA-Vet Med Ag Research 342100 311100 34210011370 OOA-Vet Med Teaching Hospital 342100 311100 34210011380 OOA-Vet Med Experiment Station 342100 311100 34210011390 OOA-Athens/Tifton Vet Labs 342100 311100 34210011810 OOA-Skidaway Institute 342100 311100 34210011920 OOA-Regents Central Office 342100 311100 34210011921 OOA-RCO State AppropDelivery (added 4/16/01) 342100 311100 34210011922 OOA-RCO Health Reporting (added 4/16/01) 342100 311100 34210011930 OOA-Public Libraries 342100 311100 34210011940 OOA-State Med Education Board 342100 311100 34210012000 Auxiliary Enterprises 321100 311100 32110012210 Auxiliary Housing 321100 311100 32110012220 Auxiliary Food 321100 311100 32110012230 Auxiliary Stores and Shops 321100 311100 32110012240 Auxiliary Health Services 321100 311100 32110012250 Auxiliary Transportation and Parking 321100 311100 32110012260 Auxiliary Plant Operations 321100 311100 32110012270 Auxiliary Other 321100 311100 32110012280 Athletics 321100 311100 32110013000 Student Activities 321100 311100 32110014000 Continuing Education 321100 311100 32110015000 Indirect Cost Recoveries 321100 311100 32110016000 Technology Fees 321100 311100 32110020000 Restricted Ed & General 371100 311100 37110021000 Restricted Othr Organized Act 371100 311100 37110021021 ROOA-GTRI 371100 311100 37110021023 ROOA-Center for Rehabilitation 371100 311100 37110021024 ROOA-Adv Technology Dev Center 371100 311100 37110021026 State Data Research Center 371100 311100 37110021027 ROOA-Agricultural Research 371100 311100 37110021210 ROOA-Hospitals and Clinics 371100 311100 37110021220 ROOA-Georgia Radiation Therapy 371100 311100 37110021230 ROOA-Jnt Board-Family Practice 371100 311100 37110021240 ROOA-Stdnt Ed Enrichment 371100 311100 37110021300 ROOA- Experiment Stations 371100 311100 37110021310 ROOA-Coop Extension Service 371100 311100 37110021320 ROOA-Forestry Research 371100 311100 37110021330 ROOA-Marine Extension Service 371100 311100 37110021340 ROOA-Marine Institute-UGA 371100 311100 37110021350 ROOA-Minority Business Entrpr 371100 311100 37110021360 ROOA-Vet Med Ag Research 371100 311100 37110021370 ROOA-Vet Med Teaching Hospital 371100 311100 37110021380 ROOA-Vet Med Expmental Station 371100 311100 37110021390 ROOA-Athens/Tifton Vet Labs 371100 311100 37110021810 ROOA-Skidaway Institute 371100 311100 37110021920 ROOA-Regents Central Office 371100 311100 37110021921 ROOA-RCO State AppropDelivery (added 4/16/01) 371100 311100 37110021922 ROOA-RCO Health Reporting (added 4/16/01) 371100 311100 37110021930 ROOA-Public Libraries 371100 311100 37110021940 ROOA-State Med Education Board 371100 311100 37110030000 Federal Loan (Report as an agency fund on annual repor 371100 311100 37110031000 Institutional Loan 371100 311100 37110040000 Endowment 360100 311100 36010041000 Term Endowment 371100 311100 37110042000 Quasi Endowment 371100 311100 37110050000 Unexpended Plant 342100 311100 34210051000 Renewal & Replacement of Plant-deleted not applicable not applicable not applicable52000 Investment in Plant 311100 311100 311100