
First Grade Curriculum Music - thewaldorfconnection.com
13
1
Transcript of First Grade Curriculum Music - thewaldorfconnection.com

1

2
First Grade CurriculumMusic
Teaching Flute/recorderThe Waldorf Connection
by Donna Ashton

3
The Waldorf Connection'sFirst Grade Curriculum
Text copyright ©2015 Donna AshtonPhoto copyright ©2015 Donna Ashton
All rights reserved. No part of this book/curriculum may be reproduced, transmitted, orstored in an information retrieval system in any form or by any means, graphic,
electronic, or mechanical, including photocopying, taping, and recording, without priorwritten permission from the author. Meant for individual use only.
First edition: 2015
for more training, guidance and inspiration for your Waldorf-inspired homeschooling-www.thewaldorfconnection.com

4
Teaching a Blowing Instrument
Using a pentatonic flute or recorder, you can bring music to your child's lessons in asimple and fun way. You are not teaching your child to read music, even you don'thave to know the language of music to do this.
Taking it slow and steady, you can learn the 7 notes on the scale and play songs forthe seasons, festivals or create your own.
Always play while standing up to use your breath properly. Left hand goeson top (no matter if you are left or right handed). I recommend pacticing thefirst month or lessons well before you need to start lessons with you child.

5
Teaching a Blowing Instrument
Week 1: Practice standing and holding your flute/recorder. We are only learning toblow correctly this week.See picture below for correct posture. The pads on your fingers should cover the holesgently.
To blow into a recorder you will gently blow the air with you tongue saying “ta ta ta”Tell the story of the Seven Birds and the Flute
Always play while standing up to use your breath properly. Left hand goeson top (no matter if you are left or right handed). I recommend pacticing thefirst month or lessons well before you need to start lessons with you child.Sound a bit squeaky? Check that fingers are covering holes fully or blow abit softer.

6
The Story of the Seven Birds and the Flute
Once, long ago before people had designed instruments to bring music into their homes,there was an old man. He lived in a small village with his family in a rather tiny dwelling. This did notmatterbecause the old man preferred spending all his days outdoors. He loved walking through the forests,down bythe river and through the meadows, that surrounded the village. The old man's favorite thing of allwas to listen to the birdsong. He would listen to the XX bird in the morning by the pond as they flewback and forth taking turns drinking.
Then he would walk up the hill into the woods to hear the XX. The small, bird would dart around forfood to feed its young blessing the wood with it's amazing musical song.
In the afternoon, he would lie in the meadow grass looking up at the blue sky and listening to the Xbird, playing in the tall grasses. He discovered by holding a piece of grass between his fingers andblowing, he could makea humming sound. The birds would hear him and happily swoop around his head, singing along.
The old man wished he could bring the beautiful birdsong home with him where he could listenanytime.He wondered if he could use something other than grass to make his musical humming, somethingmore sturdy, that would last.
One day while he was sitting on a large rock in the wood, he noticed a few small twigs near his feetthat had begun to decay. He picked one up and noticed it was similar in size to his blowing grass.Both ends of the twig had already rotted leaving holes. He put it to his mouth and blew into it, as hedid the grass.
His breath created another hole where the wood was weak. He blew again, now with this third holeand to his surprise- he heard a lovely sound. The old man jumped up and danced around blowing hiswooden twig. He blew so much that another hole was formed. This one had a different tone.
An idea began to form in his mind. What if he took a sturdy hardwood branch and carved holes into?He would have musicat his fingertips anytime he wished. That afternoon he searched the wood for the perfect smallbranch.
He spent the next day cutting, carving and smoothing his branch into the right size to hold in hishands. He carved out the top hole where he would place his mouth to blow, then the bottom holewhere the air would flow out. He remembered the two different sounds the rotted twig created and heremembred they holes were in diffeent places on the twig. What if he could make tones that matchedhis favorite birdsong?
Excitedly, he went into the woods to try. He listened to the Bluebird singing and worked on his branchuntil he had just the right tone to match. Then he found Anhinga (Acorn woodpecker) by the edge ofthe village in an old tree. He carved that hole.The Grackle, Eagle,Finch,Cardinal andcDove. He would seven holes were all that would fit onto thebranch. But with only those seven notes, he could play all the beautiful birdsong.

7
Week 2: Let's play “B” Left finger on the top hold (thumb covering the back hole) Theright hand it on the bottom part of the flite tp steady it, but not on any holes.
Practice playing note: BPlay short quick sounds, and longer sounds. You play 3 quick notes of B- they copy.
Listen for the tone of the note. See if you can get it to sound really clear. It's not aboutblowing harder,but smoothly through the flute.
You could add a drawing of the flute and it's seven bird notes into your mainlesson book.(A,B,C,D,E,F,G)
Week 3: Add “A”. Review note “B”. Then have child put down the middle finger ontothe second hole(now they should have the index finger on the top hole, and the middle on the seondon left hand- thumb covers back hole). This is “A”. Practice A and few times and seehow this note sounds different from the B.Play A then B.
Add new rhythms:
BBB AA BBB AA
B A B A BB
Week 4: New note “G” Add the ring finger on left hand, so now all three fingers arecovering the top three holes.This is G. Practice G and compare it's tone with B and A.
With the addition of this third note, you will be able to play a few simple songs.Hot Cross Buns is the first. Work on this this week and for Week 5.

8
9
Teaching a Blowing Instrument
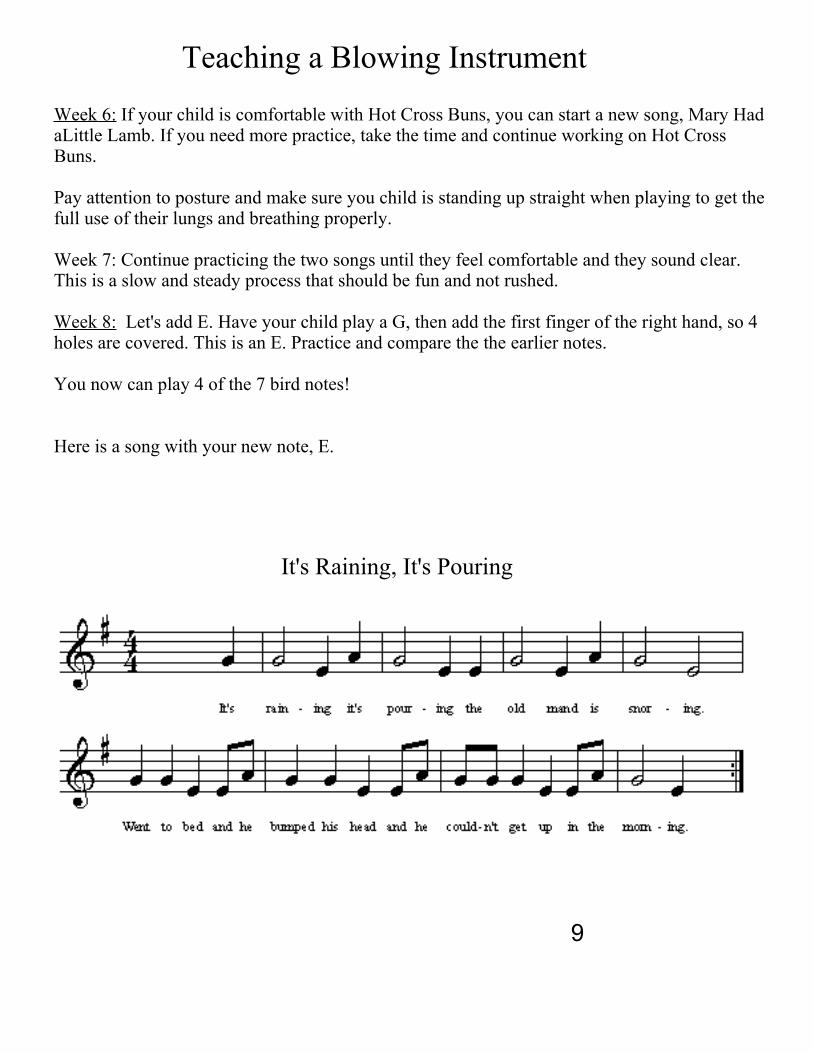
Week 6: If your child is comfortable with Hot Cross Buns, you can start a new song, Mary HadaLittle Lamb. If you need more practice, take the time and continue working on Hot CrossBuns.
Pay attention to posture and make sure you child is standing up straight when playing to get thefull use of their lungs and breathing properly.
Week 7: Continue practicing the two songs until they feel comfortable and they sound clear.This is a slow and steady process that should be fun and not rushed.
Week 8: Let's add E. Have your child play a G, then add the first finger of the right hand, so 4holes are covered. This is an E. Practice and compare the the earlier notes.
You now can play 4 of the 7 bird notes!
Here is a song with your new note, E.
It's Raining, It's Pouring

10
Teaching a Blowing InstrumentWeek 9-12: Let's add one more note- D. Three fingers on left hand and three on right makes aD. This will add quite a few songs to play. Only one more note to go. Go as fast or slow asyour child needs. These music lessons are meant to be used as a guide, please adjust as youneed.
Lucy Locket
Jolly Old St. Nicolas

11
Teaching a Blowing InstrumentWeek 13: The last bird note to add is the “C”. Use the fingering of “A”, then pick up your topfinger. That is “C”. From here, you can practice older songs, add new ones and even find your own seasonalsongs to add in, depending on skill. 1-2 songs per month is plenty for this age.
Lightly Row

12
Teaching a Blowing Instrument

13
Teaching a Blowing Instrument


![Middle Level Vocal Music Introduction[1] Curriculum Documents... · Sixth Grade Beginning Choir…………………… ... Middle Level Vocal Music Curriculum Essentials ...](https://static.fdocuments.net/doc/165x107/5a78a9ce7f8b9a852c8e222d/middle-level-vocal-music-introduction1-curriculum-documentssixth-grade-beginning.jpg)


