
Fireworks® MX Bible - Win-Seminar
1012
Create traffic- stopping vector or bitmap Web graphics and animations Build eye-catching effects using layers, rollovers, frames, and slices Master the new interface and improved graphics and Web connectivity tools F ireworks MX Joseph W. Lowery, bestselling author of Dreamweaver MX Bible and Derren Whiteman “Joseph Lowery and Derren Whiteman provide details and examples essential for the Web graphics professional.” David Morris, Fireworks Product Manager, Macromedia BONUS CD-ROM! Fireworks tools plus Fireworks MX trial version and more 100% ONE HUNDRED PERCENT COMPREHENSIVE AUTHORITATIVE WHAT YOU NEED ONE HUNDRED PERCENT F ireworks MX Includes 16 pages of full-color examples Foreword by David Morris, Fireworks Product Manager, Macromedia ® ® Fireworks Seminar
Transcript of Fireworks® MX Bible - Win-Seminar

LOWERY & WHITEMAN
If Fireworks MX can do it, you can do it too . . .From vector drawing and bitmap editing to animations and JavaScript output, Fireworks MX puts all the Webgraphics tools you need into a single cohesive package. Packed with time-saving tips and real-world examples —including 16 pages of color illustrations — this comprehensive guide shows you how to make the most ofFireworks, whether you’re looking for an in-depth tutorial on program fundamentals or the lowdown on thenew interface or new options for transparent gradients, text editing, and pop-up menus.
Inside, you’ll find complete coverage of Fireworks MX• Master the basics, from object creation to
full-blown photo manipulation
• Enhance your images with sophisticated fills, filters, xtras, layers, and Live Effects
• Build in interactivity using hotspots, slices, and JavaScript behaviors — no coding required
• Speed up production with styles, libraries, and round-trip workflow features
• Make the most of sliced file auto-checkout, XHTML support, and other new tools for Dreamweaver integration
• Get up to speed fast on GIF animation and createstate-of-the-art banner ads
Shelving Category:Web Development/Fireworks
Reader Level:Beginning to Advanced
System Requirements:PC running Windows 98 SE/2000/Me/XP, Windows NT 4SP6; Power Macintosh running System 9.1 or higher/OSX 10.1 or higher. See the “What’s on the CD-ROM”appendix for details and complete system requirements. ISBN 0-7645-3662-1
$44.99 USA$67.99 Canada£33.50 UK incl. VAT
Fireworks MX
Fireworks MX
Create traffic-stopping vector orbitmap Web graphicsand animations
Build eye-catchingeffects using layers,rollovers, frames,and slices
Master the newinterface andimproved graphicsand Web connectivitytools
Fireworks MX
Joseph W. Lowery, bestselling author of Dreamweaver MX Bible
and Derren Whiteman
“Joseph Lowery and Derren Whiteman provide details andexamples essential for the Web graphics professional.”
David Morris, Fireworks Product Manager, Macromedia
,!7IA7G4-fdggcf!:P;o;O;t;tFireworks tools
and moreon CD-ROM
BONUS CD-ROM!Fireworks tools plus Fireworks MX trial version and more
w w w . w i l e y . c o m / c o m p b o o k s /
100%O N E H U N D R E D P E R C E N T
C O M P R E H E N S I V EA U T H O R I T A T I V EW H A T Y O U N E E DO N E H U N D R E D P E R C E N T
Apply Photoshop-compatible Filters and Live Effects, or adjust opacity, togive your work a whole new look.
Bonus CD-ROM• Fireworks commands, templates, textures, gradients,
strokes, and images• Macromedia Flash MX, Dreamweaver MX, Fireworks MX,
and FreeHand trial versions• Splat!, Eye Candy 4000, and Xenofex demo versions by
Alien Skin Software Fireworks MXBible
Includes 16 pages offull-color examples
*85555-BAFCBi
100%C O M P R E H E N S I V E
Foreword by David Morris, Fireworks Product Manager, Macromedia
®®
®®
The Touchup tools in Fireworks MX make bitmapmanipulation much simpler by putting Blur, Sharpen,Dodge, Burn, and Smudge right at your fingertips.
536621 cover 7/25/02 9:36 AM Page 1
Fireworks Seminar

Fireworks Seminar

Fireworks® MX Bible
013662-1 FM.F 8/2/02 2:12 PM Page i
Fireworks Seminar

013662-1 FM.F 8/2/02 2:12 PM Page ii
Fireworks Seminar

Fireworks® MX Bible
Joseph W. Lowery and Derren Whiteman
Best-Selling Books • Digital Downloads • e-Books • Answer Networks • e-Newsletters • Branded Web Sites • e-Learning
013662-1 FM.F 8/2/02 2:12 PM Page iii
Fireworks Seminar

LIMIT OF LIABILITY/DISCLAIMER OF WARRANTY: WHILE THE PUBLISHER AND AUTHOR HAVE USED THEIR BESTEFFORTS IN PREPARING THIS BOOK, THEY MAKE NO REPRESENTATIONS OR WARRANTIES WITH RESPECT TO THEACCURACY OR COMPLETENESS OF THE CONTENTS OF THIS BOOK AND SPECIFICALLY DISCLAIM ANY IMPLIEDWARRANTIES OF MERCHANTABILITY OR FITNESS FOR A PARTICULAR PURPOSE. NO WARRANTY MAY BE CREATEDOR EXTENDED BY SALES REPRESENTATIVES OR WRITTEN SALES MATERIALS. THE ADVICE AND STRATEGIESCONTAINED HEREIN MAY NOT BE SUITABLE FOR YOUR SITUATION. YOU SHOULD CONSULT WITH A PROFESSIONALWHERE APPROPRIATE. NEITHER THE PUBLISHER NOR AUTHOR SHALL BE LIABLE FOR ANY LOSS OF PROFIT ORANY OTHER COMMERCIAL DAMAGES, INCLUDING BUT NOT LIMITED TO SPECIAL, INCIDENTAL, CONSEQUENTIAL,OR OTHER DAMAGES.
Fireworks® MX Bible
Published byWiley Publishing, Inc.909 Third AvenueNew York, NY 10022
www.wiley.comCopyright © 2002 by Wiley Publishing, Inc., Indianapolis, Indiana
Library of Congress Control Number: 2002107897
ISBN: 0-7645-3662-1
Manufactured in the United States of America
10 9 8 7 6 5 4 3 2 1
1B/SS/QY/QS/IN
Published by Wiley Publishing, Inc., Indianapolis, IndianaPublished simultaneously in Canada
No part of this publication may be reproduced, stored in a retrieval system or transmitted in any form or by any means,electronic, mechanical, photocopying, recording, scanning or otherwise, except as permitted under Sections 107 or 108 of the 1976 United States Copyright Act, without either the prior written permission of the Publisher, or authorizationthrough payment of the appropriate per-copy fee to the Copyright Clearance Center, 222 Rosewood Drive, Danvers, MA01923, (978) 750-8400, fax (978) 750-4744. Requests to the Publisher for permission should be addressed to the LegalDepartment, Wiley Publishing, Inc., 10475 Crosspoint Blvd., Indianapolis, IN 46256, (317) 572-3447, fax (317) 572-4447, E-Mail: [email protected].
For general information on our other products and services or to obtain technical support, please contact our CustomerCare Department within the U.S. at 800-762-2974, outside the U.S. at 317-572-3993 or fax 317-572-4002.
Wiley also publishes its books in a variety of electronic formats.
Trademarks: Wiley, the Wiley Publishing logo, and related trade dress are trademarks or registered trademarks of WileyPublishing, Inc., in the United States and other countries, and may not be used without written permission. PANTONE and other Pantone, Inc. trademarks are the property of Pantone, Inc. FreeHand 10 and Macromedia Flash MX Copyright ©1995-2000. Macromedia, Inc. 600 Townsend Street, San Francisco, CA 94103 USA. All Rights Reserved. Macromedia, Flash,Fireworks and FreeHand are trademarks or registered trademarks of Macromedia, Inc. in the United States and/or othercountries. All other trademarks are the property of their respective owners. Wiley Publishing, Inc., is not associated withany product or vendor mentioned in this book.
3662-1 FM.F 8/5/02 2:35 PM Page iv
Fireworks Seminar

About the AuthorsJoseph Lowery has been writing about computers and new technology since 1981.
He is the author of the current and previous editions of Dreamweaver Bible and
Fireworks Bible as well as Buying Online For Dummies (all from Wiley Publishing,
formerly Hungry Minds, Inc.). He recently co-wrote a book on Flash with designer
Hillman Curtis and has also written books on HTML and using the Internet for
business. His books are international best-sellers, having sold over 300,000 copies
worldwide in ten different languages. Joseph is also a consultant and trainer and
has presented at Seybold in both Boston and San Francisco, Macromedia UCON
in the U.S. and Europe, and at ThunderLizard’s Web World. As a partner in Deva
Associates, Ltd., Joseph developed the Deva Tools for Dreamweaver set of naviga-
tional extensions. Joseph and his wife, dancer/choreographer Debra Wanner, have
a daughter, Margot.
Derren Whiteman’s online life began before the invention of the World Wide Web,
when data moved across the Internet, and online communities were based around
electronic bulletin board systems (BBS). He built Web sites “by hand” in the early
days of the World Wide Web — because that was how you made them in those
days — and later took up modern tools after joining Mediafear, a San Francisco-
based Web design shop where he spent three years building dynamic Web sites
for artists and musicians. Derren has also served as an information technology
consultant and computer instructor, enabling individuals and small businesses
to use technology to their greatest advantage.
Derren spends much of his time in technical publishing, helping to make today’s
Web-building tools accessible to everyone. He served as Technical Editor for
versions 3 and 4 of Joseph Lowery’s Fireworks Bible (Hungry Minds, Inc.) and
Dreamweaver 4 Bible (Hungry Minds, Inc.). Other books that Derren worked on
include Mastering Dreamweaver 4 and Fireworks MX (Sybex, Inc.), Look & LearnDreamweaver 4 (Hungry Minds, Inc.), and From FrontPage to Dreamweaver (Sams
Publishing).
Derren is a Macromedia Certified Dreamweaver 4 Developer and a volunteer mem-
ber of Team Macromedia for Fireworks (http://www.macromedia.com/go/team).
He maintains a number of Web sites, including FrancinePaul.com, Konis.com,
and of course, Derren.com. He makes his home in Toronto, Ontario, Canada.
013662-1 FM.F 8/2/02 2:12 PM Page v
Fireworks Seminar

CreditsAcquisitions Editor
Michael Roney
Project Editor
Martin V. Minner
Technical Editor
Kleanthis Economou
Copy Editors
Roxane Marini
Nancy Rapoport
Editorial Manager
Rev Mengle
Vice President and
Executive Group Publisher
Richard Swadley
Vice President and
Executive Publisher
Bob Ipsen
Executive Editorial Director
Mary Bednarek
Project Coordinator
Ryan Steffen
Graphics and Production Specialists
Beth Brooks, Melanie DesJardins,
Joyce Haughey, Clint Lahnen,
Kristin McMullan, Barry Offringa,
Brent Savage, Jeremey Unger
Quality Control Technicians
John Greenough, Susan Moritz
Permissions Editor
Laura Moss
Media Development Specialist
Angela Denny
Proofreading and Indexing
TECHBOOKS Production Services
Cover Image
Anthony Stuart
013662-1 FM.F 8/2/02 2:12 PM Page vi
Fireworks Seminar

To Doris Cutler — doing business in our family as Aunt Doree —thanks for all the love and support you offered us from afar
and for keeping my Dad in his place as only an older sister could.
— JL
For Phyllis and Chris, your support has always gone above and beyond. And for Rob Houston, proof that a great teacher really does teach.
— DW
013662-1 FM.F 8/2/02 2:12 PM Page vii
Fireworks Seminar

013662-1 FM.F 8/2/02 2:12 PM Page viii
Fireworks Seminar

Foreword
The Fireworks engineering team saw the storm coming across the North Central
Texas landscape. The Internet bubble had burst and companies were looking
for ways to reduce costs while keeping quality high. The next release of Fireworks
had to be really special; it wasn’t enough to produce great looking, highly-optimized
Web graphics or cutting-edge navigation elements. The process of production had
become as important as the final output — the next generation of Fireworks needed
to be easy to use, more powerful and open for enhanced teamwork.
A key goal was to streamline both the workspace and the workflow. For the work-
space, we incorporated a Property inspector similar to the one found in Dreamweaver,
but customized for a graphics application. The Property inspector makes it far easier
to modify fill and stroke settings and much more without having to dig through a ton
of panels. However, the Property inspector can’t do it all, so we also enhanced the
overall panel management with dockable, collapsible panel groups that are easy to
find when you need them and get out of your way when you don’t. Not coinciden-
tally, you’ll find the same polished user interface across the Studio MX line, including
Macromedia Flash MX and Dreamweaver MX — a significant ease-of-use factor in and
of itself.
We tried to improve the workflow with other enhancements to the workspace.
One of the strengths of Fireworks is its ability to work both with vector-based and
bitmap-based graphics; it hasn’t, however, always been easy to move from one mode
to another. To smooth out the workflow, Fireworks now switches modes automati-
cally based on your selected tool, object, or layer; it’s so effortless that we call it
modeless editing. We think you’ll also find our new on-screen text editing a great
time-saver. Select the text tool, click anywhere on the canvas and begin typing to
insert your text. Need to correct a word or change a font? Just double-click into
the text and make your change.
One of the most popular features introduced in Fireworks 4 was our pop-up menu
creator. We decided to ramp up the power on this feature and now in Fireworks MX
you can make pop-up menus in either vertical or horizontal formats, with far greater
control over positioning, appearance, and interactivity. Another new power-user fea-
ture that’s getting rave reviews is the Data-Driven Graphics Wizard. This command —
actually created by Fireworks MX Bible author Joseph Lowery — dissolves production
roadblocks by combining Fireworks graphic templates with XML data files to output
as many variations on a theme as required, with a fraction of the work.
013662-1 FM.F 8/2/02 2:12 PM Page ix
Fireworks Seminar

x Fireworks MX Bible
The Data-Driven Graphics Wizard is, quite literally, the tip of an open architecture
powerhouse as big as a proverbial iceberg. Starting in Fireworks MX, custom
commands and panels can be constructed that leverage the JavaScript API of the
Fireworks graphics engine with a Flash user interface. You’ll find other examples of
new Fireworks extensibility throughout the program as evidenced by the very handy
Align panel and other extensions under the Commands menu. Like Dreamweaver and
Flash, extensions are easily installed and removed through the Extension Manager.
The Web is continuing to evolve and Fireworks is keeping pace. In addition to out-
putting JavaScript and HTML for the majority of the world’s code editors, Fireworks
MX now speaks XHTML fluently. Moreover, the code output is compliant with Web
accessibility standards, including Federal guideline Section 508. Fireworks is poised
to help designers like yourself grow and move steadily forward.
Changes — whether they are the result of an economic downturn or the introduction
of exhilarating new technologies — are often difficult to go through and made easier
with the proper guide. In the book you hold in your hands, you’ll find one of best
roadmaps to the changes in Fireworks MX available. Joseph Lowery and Derren
Whiteman provide details and examples essential for the Web graphics professional.
Our desire to make Fireworks better is ongoing and our mailbox never closes. If
you have a suggestion for a new feature or a way to be more productive, feel free
to drop us a line at [email protected]. We’re looking forward to
hearing from you.
David Morris
Product Manager, Fireworks
Macromedia
013662-1 FM.F 8/2/02 2:12 PM Page x
Fireworks Seminar

Preface
Remember that burst of pleasure when you first realized how exciting the
Web could be? I’ll let you in on a little secret: Macromedia Fireworks makes
creating graphics for the Web fun again. Images produced with Fireworks are as
sophisticated and rich as those created with any other combination of programs,
plus they’re Web-ready — as optimized as possible and bundled with HTML and
JavaScript code for amazing interactive effects.
I’ll be the first to admit my bias. I’m a Dreamweaver power user, and it seems only
natural to combine Macromedia’s exciting Web-graphics solution with its premier
Web-authoring tool. In fact, Macromedia encourages you to do so with its Studio
MX offering. But while I’m confessing, let me also note that I have no patience for
tools that don’t do the job. The wonderful revelation about Fireworks is that this
program eliminates production bottlenecks I didn’t even know existed — all while
producing stunning imagery that stays editable through revision after easy revision.
When I set out to write this book, I decided to really push Fireworks. Rather than
using it merely to optimize a series of images (which it does superbly), or to create
a compact animation (which it also does superbly) from work created in other
programs, I used Fireworks exclusively for all image manipulation and creation.
Consequently, both my productivity and my creativity went through the roof.
Fireworks MX Bible was designed to give you all the information and techniques
you need to achieve the same results.
— JL
Who Should Read This Book?The Web is, without a doubt, one of the key phenomena of our time, and it has
attracted an enormous amount of talent, both artistic and technical. After all, how
often does a new mass medium appear? The range of Web designers extends from
first-generation artists drawn to the exciting Internet possibilities, to print profes-
sionals who want to expand their creative horizons. Fireworks MX Bible talks to all
those groups, offering solutions to everyday graphics problems, as well as provid-
ing a complete reference for the program.
013662-1 FM.F 8/2/02 2:12 PM Page xi
Fireworks Seminar

xii Fireworks MX Bible
What Hardware and Software Do You Need?Fireworks MX Bible includes full coverage of Macromedia Fireworks MX. If you don’t
own a copy of the program, the CD-ROM that accompanies this book contains a fully
functional, 30-day trial version. Written to be platform-independent, this book covers
both Macintosh and Windows versions of Fireworks MX.
Fireworks for Windows requires a 300 MHz Pentium processor (Pentium II or higher
recommended) and one of the following operating systems: Windows NT 4 (Service
Pack 6 or later), Windows 98 SE, Windows Me, 2000, or XP.
Fireworks for Macintosh requires a Power Macintosh processor (G3 or higher rec-
ommended) and Mac OS 9.1 or a later version, including Mac OS X, version 10.1 or
later.
On either platform, Fireworks also requires the following:
✦ 64MB of available RAM
✦ 80MB of available disk space
✦ 800×600-pixel, 256-color display (1,024×768 pixels or higher and millions of
colors recommended)
✦ Adobe Type Manager 4, or a later version may be required if you work with
Type 1 (PostScript) fonts. For Macintosh, this requirement applies only to
OS 9.x)
Please note that these requirements are the minimum. As with all graphics-based
design tools, more capability is definitely better for using Fireworks, especially in
terms of RAM and processor speed.
How This Book Is OrganizedFireworks MX Bible can take you from raw beginner to full-fledged professional if
read cover to cover. However, you’re more likely to read each section as needed,
taking the necessary information and coming back later. To facilitate this approach,
Fireworks MX Bible is divided into seven major, task-oriented parts. When you’re
familiar with Fireworks, feel free to skip around the book, using it as a reference
guide as you build your own knowledge base.
The early chapters present the basics, and all chapters contain clearly written
steps for the tasks you need to perform. In later chapters, you’ll encounter sections
labeled “Fireworks Techniques.” Fireworks Techniques are step-by-step instructions
for accomplishing specific Web-design tasks — for example, using a mask to add an
interesting border to an image. Naturally, you can also use Fireworks Techniques as
steppingstones for your own explorations into Web-page creation.
013662-1 FM.F 8/2/02 2:12 PM Page xii
Fireworks Seminar

xiiiPreface
If you’re running Fireworks while reading this book, don’t forget to use the CD-ROM.
An integral element of the book, the CD-ROM offers a number of additional Fireworks
textures, gradients, and HTML templates, in addition to trial programs from major
software vendors.
Part I: Come See the FireworksPart I begins with an overview of the Fireworks philosophy and design. To get the
most out of the program, you need to understand the key advantages it offers and
the deficiencies it addresses. Part I takes you all the way from setting up documents
to getting the most out of Fireworks.
The opening chapters give you a full reference to the Fireworks interface and all
of its customizable features. Chapter 1 will be of special interest to users of previ-
ous versions of Fireworks; it’s a complete guide to all the newly added features
in Fireworks MX. Later chapters in Part I provide an overview of everything that
Fireworks can do — this feature-rich program will often surprise you.
Part II: Mastering the ToolsThe Fireworks approach to graphics is fundamentally different from any other tool
on the market. Consequently, you’ll need to travel the short learning curve before
you can get the most out of Fireworks. The early chapters in Part II cover all the
essentials, from basic object creation, to full-blown photo manipulation.
Color is a key component of any graphic designer’s tool kit, and color on the Web
requires special attention, as you’ll see in Chapter 7. The object-oriented nature of
Fireworks is explored in chapters on creating simple strokes and combining paths
in a variety of ways to help you make more sophisticated graphics. Fireworks
excels at creating graphical text for the Web — you’ll see how in Chapter 10.
Part III: Achieving EffectsFireworks graphics really begin to gain depth in Part III. The variety of fills and
textures available — as well as the capability to add your own — are critical for the
wide range of image production for which a Web designer is responsible. Chapter 12
explores the exciting world of Fireworks Live Effects and filters, which are exciting
not just because they’re easy to use and they look great, but also because of the
positive impact that their always-editable nature will have on your workflow.
Most of the time, a graphic will actually contain a number of images. Chapter 13
explains the Fireworks methods for arranging and compositing multiple objects in
order to achieve stunning results. The Fireworks mask-group feature, in particular,
is an especially creative and powerful tool that takes the hard work out of alpha
channels. Although Fireworks is a great drawing tool, it’s also adept at handling
bitmap imagery.
013662-1 FM.F 8/2/02 2:12 PM Page xiii
Fireworks Seminar

xiv Fireworks MX Bible
Part IV: Coordinating WorkflowWeb design is an ongoing process, not a single event. Part IV is dedicated to helping
you streamline your workflow, as you acquire images via scanning or importing,
manipulate them in Fireworks, and then optimize them on export, either for the
Web or for import into other creative tools, such as Macromedia Director or Flash.
Although it’s true that Web graphic design is an art form, it’s also a business — and
one element of that business is applying a consistent look and feel to each element
of a particular Web site. Fireworks styles enable you to save formatting instructions
from one object and apply them to other objects again and again. The Library panel
is a place to store symbols, objects you use frequently, such as logos and navigation
buttons. Fireworks symbols further minimize repetitive work by linking similar
objects so that changes need only be made once. Chapter 18 describes how
Fireworks MX helps you update and maintain your graphics through the URL panel
and the surprising Find and Replace feature. The final chapter in Part IV covers the
greatly expanded Command feature set with it’s new Flash movie interface capabil-
ity and the History panel, useful for constructing simple reusable commands from
your actions.
Part V: Entering the WebFireworks broke new ground as the first image editor to output HTML and JavaScript
code. With its full-featured hotspots, image maps, and sliced images embedded in
HTML tables, Fireworks is incredibly Web-savvy. Part V explains the basics of Web
interactivity for those designers unfamiliar with the territory and also offers specific
step-by-step instructions for linking JavaScript behaviors to graphics.
If you work with Dreamweaver (or work with someone who does), you’ll want to
check out Chapter 22 in order to get the most out of the integration possibilities
between Fireworks and Dreamweaver.
Part VI: AnimationAnimations have become important to the Web. Not only do they offer an alternative
to static displays, but GIF animations are used extensively in the creation of banner
ads. Animation in Fireworks MX is surprisingly full-featured and easy-to-use. We’ll
walk step by step through the creation of a banner ad and discover tweening, onion
skinning, and other basic animation techniques.
Part VII: Programming with FireworksOne of the most amazing things about Fireworks MX is the way it can be controlled
by scripts written in JavaScript, the most common scripting language for Web
authoring. Fireworks offers many ways to customize the way you work with the
013662-1 FM.F 8/2/02 2:12 PM Page xiv
Fireworks Seminar

xvPreface
program. We’ll look at each of them and discover the extensive Fireworks JavaScript
API (Application Programming Interface). The final chapter explores the brave new
world of Fireworks extensions and describes how you can use Flash to create user
interfaces for such commands.
Part VIII: AppendixesAppendix A is a Web primer, a place to get a good grounding on the ways of the Web.
Appendix B is a handy reference guide to productivity-boosting keyboard shortcuts
on both Macintosh and Windows systems. The material on the accompanying
CD-ROM is detailed in Appendix C.
Conventions Used in This BookThe following conventions are used throughout this book.
Windows and Macintosh conventionsBecause Fireworks MX Bible is a cross-platform book, it gives instructions for
both Windows and Macintosh users when keystrokes for a particular task differ.
Throughout this book, the Windows keystrokes are given first, and the Macintosh
keystrokes are given second in parentheses, as in the following example:
To undo an action, press Ctrl+Z (Command+Z).
The first action instructs Windows users to simultaneously press Ctrl and Z, and
the second action (in parentheses) instructs Macintosh users to press Command
and Z together. In Fireworks for Windows, the keyboard shortcuts are displayed in
the menus in plain English. In Fireworks for Macintosh, as in other Macintosh pro-
grams, the keyboard shortcuts are specified in the menus by using symbols that
represent the modifier keys.
You’ll notice that in most — but not all — keyboard shortcuts, the Windows Ctrl key
corresponds to the Macintosh Command key, and the Windows Alt key corresponds
to the Macintosh Option key.
Screen captures in odd-numbered chapters are of Fireworks for Windows running
on Windows 98; in even-numbered chapters, they’re of Fireworks for Macintosh run-
ning on Mac OS 9. In the rare event that a particular feature or example is markedly
different on each platform, both are shown.
For the purposes of this book, Windows generally refers to Windows NT 4 (Service
Pack 6 or later), Windows 98 SE, Windows Me, Windows 2000, or Windows XP.
Similarly, Macintosh or Mac OS refers to Mac OS 9.1 or higher or OS X, version 10.1
or higher.
013662-1 FM.F 8/2/02 2:12 PM Page xv
Fireworks Seminar

xvi Fireworks MX Bible
Keyboard combinationsWhen you are instructed to press two or more keys simultaneously, each key in the
combination is separated by a plus sign. For example:
Ctrl+Alt+T (Command+Option+T)
The preceding line tells you to press and hold down the two modifier keys (either
Ctrl+Alt or Command+Option, depending upon your platform), and then press and
release the final key, T.
Mouse instructionsWhen instructed to click an item, move the mouse pointer to the specified item and
click the mouse button once. A double-click means clicking the mouse button twice
in rapid succession.
A right-click means clicking the secondary mouse button once. Macintosh users
who use a one-button mouse can substitute a Control-click for a right-click. To do so,
press and hold down Control on your keyboard, and click the mouse button once.
When instructed to select an item, you may click it once as previously described. If
you are selecting text or multiple objects, you must click the mouse button once,
hold it down, and then move the mouse to a new location. The item or items selected
invert color. To clear the selection, click once anywhere in an empty part of the
document background.
Menu commandsWhen instructed to select a command from a menu, you see the menu and the com-
mand separated by an arrow symbol. For example, when instructed to execute the
Open command from the File menu, you see the notation File ➪ Open. Some menus
use submenus, in which case you see an arrow for each submenu, as in Modify ➪Transform ➪ Free Transform.
Typographical conventionsItalic type is used for new terms and for emphasis. Boldface type is used for text
that you need to type directly from the computer keyboard.
CodeA special typeface indicates HTML or other code, as demonstrated in the following
example:
013662-1 FM.F 8/2/02 2:12 PM Page xvi
Fireworks Seminar

xviiPreface
<html><head><title>Have a Nice Day!</title></head><body bgcolor=”#FFFFFF”></body></html>
This code font is also used within paragraphs to designate HTML tags, attributes,
and values, such as <body>, bgcolor, and #FFFFFF.
The (¬) character at the end of a code line means that you should type the next line
of code before pressing Enter (Return).
Navigating through this bookVarious signposts and icons are located throughout Fireworks MX Bible for your
assistance. Each chapter begins with an overview of its information, and ends with
a quick summary.
Icons are placed in the text to indicate important or especially helpful items. Here’s
a list of the icons and their functions:
Tips provide you with extra knowledge that separates the novice from the pro.
Notes provide additional or critical information, and technical data on the currenttopic.
Sections marked with a New Feature icon detail an innovation introduced inFireworks MX.
Cross-Reference icons indicate places where you can find more information on aparticular topic.
The Caution icon is your warning of a potential problem or pitfall.
The On the CD-ROM icon indicates the CD-ROM contains a related file.On theCD-ROM
Caution
Cross-Reference
NewFeature
Note
Tip
013662-1 FM.F 8/2/02 2:12 PM Page xvii
Fireworks Seminar

xviii Fireworks MX Bible
Further informationYou can find more help for specific problems and questions by investigating several
Web sites. Macromedia’s own Fireworks Web site is the best place to start:
http://www.macromedia.com/software/fireworks
I heartily recommend that you visit and participate in the official Fireworks
newsgroup:
news://forums.macromedia.com/macromedia.fireworks
You’re also invited to visit my Web site for book updates and new developments:
http://www.idest.com/fireworks
You can also e-mail me:
mailto:[email protected]
I can’t promise instantaneous turnaround, but I answer all my e-mail to the best of
my ability.
013662-1 FM.F 8/2/02 2:12 PM Page xviii
Fireworks Seminar

Acknowledgments
This is one of my favorite moments in writing a book: when I get to acknowledge
and thank the many generous people who helped make this book possible. First
and foremost among these folks is Derren Whiteman. For the past several editions,
Derren had served as the unindicted co-conspirator for the Fireworks Bible in his
role as technical editor. I’m extremely pleased to welcome him to the “indicted”
ranks with the pleasures and privileges so associated. In other words, “Duck,
Derren, duck!”
Seriously, Derren has provided an eagle eye for detail and a relentless drive for per-
fection all during the writing of the Fireworks MX Bible. I greatly value his expertise
and sense of humor — it helped me keep mine despite a rather grueling production
schedule.
I also owe a great debt of gratitude to Kleanthis Economou, who graciously accepted
the technical editor chores for this edition. Not only is Kleanthis a terrific designer
and Fireworks wizard in his own right — if you need any proof, just stop by www.projectfireworks.com— he’s also a leader in the new Fireworks extension
developer community. I’m honored to have him on-board.
The Fireworks community has grown considerably over the past year, and its gen-
erosity even more so. Special thanks to those designers who graciously allowed me
to include their work on the CD-ROM: Kleanthis Economou, Massimo Foti, Linda
Rathgeber, Eddie Traversa, Simon White, and others. I owe a debt of gratitude —
and probably a drink or three — to another Fireworks community member, author
Sandee Cohen. Sandee’s work continues to inspire, and I wish her continued success.
Of course, I wouldn’t be writing this book — and you certainly wouldn’t be reading
it — if it weren’t for the fantastic vision of the Fireworks team. Fireworks is a mar-
velously complex program, and there is true glory in bringing it to life. A hearty
thank you and a round of applause to you all: Jeff Ahlquist, Doug Benson, Brian
Edgin, Andy Finnell, Rob McCullough, Randy Varnell, and Eric Wolff among many
others. Finally, let me offer a special thanks to David Morris, Fireworks Product
Manager, for his support and encouragement, as well as the openness and access
he has granted me.
— JL
013662-1 FM.F 8/2/02 2:12 PM Page xix
Fireworks Seminar

Contents at a GlanceForeword . . . . . . . . . . . . . . . . . . . . . . . . . . . . . . . . . . . . . . . . . . ix
Preface. . . . . . . . . . . . . . . . . . . . . . . . . . . . . . . . . . . . . . . . . . . . xi
Acknowledgments . . . . . . . . . . . . . . . . . . . . . . . . . . . . . . . . . . . . xix
Part I: Come See the Fireworks . . . . . . . . . . . . . . . . . . . . . . . 1Chapter 1: Welcome to Fireworks MX . . . . . . . . . . . . . . . . . . . . . . . . . . 3
Chapter 2: Understanding the Interface . . . . . . . . . . . . . . . . . . . . . . . . 23
Chapter 3: Customizing Your Environment . . . . . . . . . . . . . . . . . . . . . . 93
Chapter 4: Setting Up Documents . . . . . . . . . . . . . . . . . . . . . . . . . . . 119
Part II: Mastering the Tools . . . . . . . . . . . . . . . . . . . . . . . . 141Chapter 5: Creating Vector Objects . . . . . . . . . . . . . . . . . . . . . . . . . . 143
Chapter 6: Working with Bitmaps . . . . . . . . . . . . . . . . . . . . . . . . . . . 171
Chapter 7: Managing Color . . . . . . . . . . . . . . . . . . . . . . . . . . . . . . . 203
Chapter 8: Choosing Strokes . . . . . . . . . . . . . . . . . . . . . . . . . . . . . . 229
Chapter 9: Structuring Paths . . . . . . . . . . . . . . . . . . . . . . . . . . . . . . 267
Chapter 10: Composing with Text . . . . . . . . . . . . . . . . . . . . . . . . . . . 297
Part III: Achieving Effects . . . . . . . . . . . . . . . . . . . . . . . . . 327Chapter 11: Using Fills and Textures . . . . . . . . . . . . . . . . . . . . . . . . . 329
Chapter 12: Creating Live Effects and Filters . . . . . . . . . . . . . . . . . . . . . 359
Chapter 13: Arranging and Compositing Objects . . . . . . . . . . . . . . . . . . 407
Part IV: Coordinating Workflow . . . . . . . . . . . . . . . . . . . . . . 455Chapter 14: Capturing and Importing . . . . . . . . . . . . . . . . . . . . . . . . . 457
Chapter 15: Exporting and Optimizing . . . . . . . . . . . . . . . . . . . . . . . . 493
Chapter 16: Working with Fireworks Styles . . . . . . . . . . . . . . . . . . . . . 547
Chapter 17: Using Symbols and Libraries . . . . . . . . . . . . . . . . . . . . . . 559
Chapter 18: Updating and Maintaining Web Graphics . . . . . . . . . . . . . . . 581
Chapter 19: Automating Workflow . . . . . . . . . . . . . . . . . . . . . . . . . . . 611
Part V: Entering the Web . . . . . . . . . . . . . . . . . . . . . . . . . . 643Chapter 20: Mastering Image Maps and Slices . . . . . . . . . . . . . . . . . . . . 645
Chapter 21: Activating Fireworks with Behaviors . . . . . . . . . . . . . . . . . . 683
Chapter 22: Integrating with Dreamweaver . . . . . . . . . . . . . . . . . . . . . 719
013662-1 FM.F 8/2/02 2:12 PM Page xx
Fireworks Seminar

Part VI: Animation . . . . . . . . . . . . . . . . . . . . . . . . . . . . . . 743Chapter 23: Applying Animation Techniques . . . . . . . . . . . . . . . . . . . . 745
Chapter 24: Animating Banner Ads . . . . . . . . . . . . . . . . . . . . . . . . . . 783
Part VII: Programming with Fireworks . . . . . . . . . . . . . . . . . . 797Chapter 25: Customizing Fireworks . . . . . . . . . . . . . . . . . . . . . . . . . . 799
Chapter 26: Building Fireworks Extensions . . . . . . . . . . . . . . . . . . . . . 811
Part VIII: Appendixes . . . . . . . . . . . . . . . . . . . . . . . . . . . . 863Appendix A: Web Primer . . . . . . . . . . . . . . . . . . . . . . . . . . . . . . . . 865
Appendix B: Keyboard Shortcuts . . . . . . . . . . . . . . . . . . . . . . . . . . . 889
Appendix C: What’s on the CD-ROM . . . . . . . . . . . . . . . . . . . . . . . . . 909
Index . . . . . . . . . . . . . . . . . . . . . . . . . . . . . . . . . . . . . . . . . . . . 915
End-User License Agreement . . . . . . . . . . . . . . . . . . . . . . . . . . . . . . 967
013662-1 FM.F 8/2/02 2:12 PM Page xxi
Fireworks Seminar

013662-1 FM.F 8/2/02 2:12 PM Page xxii
Fireworks Seminar

ContentsForeword . . . . . . . . . . . . . . . . . . . . . . . . . . . . . . . . . . . . . . ix
Preface. . . . . . . . . . . . . . . . . . . . . . . . . . . . . . . . . . . . . . . . xi
Acknowledgments . . . . . . . . . . . . . . . . . . . . . . . . . . . . . . . . xix
Part I: Come See the Fireworks 1
Chapter 1: Welcome to Fireworks MX . . . . . . . . . . . . . . . . . . . 3Mastering Fireworks MX — the Next-Generation Graphics Package . . . . . 4
Combining the best features . . . . . . . . . . . . . . . . . . . . . . . . . 4
Emphasizing vectors and incorporating bitmaps . . . . . . . . . . . . . 5
Digging into screen orientation . . . . . . . . . . . . . . . . . . . . . . . 5
Getting the most from this Internet-based program . . . . . . . . . . . 5
Getting the Best of Both Pixels and Paths . . . . . . . . . . . . . . . . . . . . 6
Using vector tools with organic bitmaps . . . . . . . . . . . . . . . . . . 7
Exploring bitmap compatibility . . . . . . . . . . . . . . . . . . . . . . . 8
Learning Live Effects . . . . . . . . . . . . . . . . . . . . . . . . . . . . . 9
Focusing on styles . . . . . . . . . . . . . . . . . . . . . . . . . . . . . . 10
Looking at animation . . . . . . . . . . . . . . . . . . . . . . . . . . . . 11
Linking to the Web . . . . . . . . . . . . . . . . . . . . . . . . . . . . . . . . . 12
Delving into hotspots and slices . . . . . . . . . . . . . . . . . . . . . . 12
Dissecting the URL panel . . . . . . . . . . . . . . . . . . . . . . . . . . 13
Evaluating images with Behaviors . . . . . . . . . . . . . . . . . . . . . 13
Optimizing for the Web . . . . . . . . . . . . . . . . . . . . . . . . . . . 14
Integrating with Dreamweaver MX . . . . . . . . . . . . . . . . . . . . 15
Stepping over to Flash MX . . . . . . . . . . . . . . . . . . . . . . . . . . . . 16
Examining Production Tools . . . . . . . . . . . . . . . . . . . . . . . . . . . 16
Grasping batch processing . . . . . . . . . . . . . . . . . . . . . . . . . 16
Using automation . . . . . . . . . . . . . . . . . . . . . . . . . . . . . . 17
Extending Fireworks with custom commands . . . . . . . . . . . . . . 18
Learning What’s New in Fireworks MX . . . . . . . . . . . . . . . . . . . . . 19
Looking at the user interface . . . . . . . . . . . . . . . . . . . . . . . . 19
Exploring graphics creation . . . . . . . . . . . . . . . . . . . . . . . . 19
Discovering Web connectivity . . . . . . . . . . . . . . . . . . . . . . . 20
013662-1 FM.F 8/2/02 2:12 PM Page xxiii
Fireworks Seminar

xxiv Fireworks MX Bible
Chapter 2: Understanding the Interface . . . . . . . . . . . . . . . . . 23Examining the Fireworks Environment . . . . . . . . . . . . . . . . . . . . . 24
Understanding the Document Window . . . . . . . . . . . . . . . . . . . . . 25
Smart Maximize . . . . . . . . . . . . . . . . . . . . . . . . . . . . . . . 28
Document window controls . . . . . . . . . . . . . . . . . . . . . . . . 28
Display options . . . . . . . . . . . . . . . . . . . . . . . . . . . . . . . 33
Exploring the Tools Panel . . . . . . . . . . . . . . . . . . . . . . . . . . . . . 34
Selecting the Proper View . . . . . . . . . . . . . . . . . . . . . . . . . . . . . 39
Accessing Toolbars (Windows Only) . . . . . . . . . . . . . . . . . . . . . . 39
Main toolbar . . . . . . . . . . . . . . . . . . . . . . . . . . . . . . . . . 40
Modify toolbar . . . . . . . . . . . . . . . . . . . . . . . . . . . . . . . . 41
Status bar . . . . . . . . . . . . . . . . . . . . . . . . . . . . . . . . . . . 43
The Property inspector . . . . . . . . . . . . . . . . . . . . . . . . . . . . . . 43
Tool options . . . . . . . . . . . . . . . . . . . . . . . . . . . . . . . . . 44
Stroke settings . . . . . . . . . . . . . . . . . . . . . . . . . . . . . . . . 44
Fill settings . . . . . . . . . . . . . . . . . . . . . . . . . . . . . . . . . . 45
Effect settings . . . . . . . . . . . . . . . . . . . . . . . . . . . . . . . . 46
Managing the Floating Panels . . . . . . . . . . . . . . . . . . . . . . . . . . . 47
Grouping and moving panels . . . . . . . . . . . . . . . . . . . . . . . . 48
Panel Layout Sets . . . . . . . . . . . . . . . . . . . . . . . . . . . . . . 48
Hiding and revealing panels . . . . . . . . . . . . . . . . . . . . . . . . 49
Collapsing panels . . . . . . . . . . . . . . . . . . . . . . . . . . . . . . 49
Examining common features . . . . . . . . . . . . . . . . . . . . . . . . 50
Optimize panel . . . . . . . . . . . . . . . . . . . . . . . . . . . . . . . . 52
Swatches panel . . . . . . . . . . . . . . . . . . . . . . . . . . . . . . . 53
Color Mixer panel . . . . . . . . . . . . . . . . . . . . . . . . . . . . . . 54
Layers panel . . . . . . . . . . . . . . . . . . . . . . . . . . . . . . . . . 56
Align panel . . . . . . . . . . . . . . . . . . . . . . . . . . . . . . . . . . 57
Frames panel . . . . . . . . . . . . . . . . . . . . . . . . . . . . . . . . . 58
History panel . . . . . . . . . . . . . . . . . . . . . . . . . . . . . . . . . 59
Info panel . . . . . . . . . . . . . . . . . . . . . . . . . . . . . . . . . . . 60
Behaviors panel . . . . . . . . . . . . . . . . . . . . . . . . . . . . . . . 61
URL panel . . . . . . . . . . . . . . . . . . . . . . . . . . . . . . . . . . . 62
Styles panel . . . . . . . . . . . . . . . . . . . . . . . . . . . . . . . . . . 63
Library panel . . . . . . . . . . . . . . . . . . . . . . . . . . . . . . . . . 65
Find and Replace panel . . . . . . . . . . . . . . . . . . . . . . . . . . . 66
Project Log panel . . . . . . . . . . . . . . . . . . . . . . . . . . . . . . 67
Answers panel . . . . . . . . . . . . . . . . . . . . . . . . . . . . . . . . 68
Using the Menus . . . . . . . . . . . . . . . . . . . . . . . . . . . . . . . . . . 69
Application menu (Mac OS X only) . . . . . . . . . . . . . . . . . . . . 69
File menu . . . . . . . . . . . . . . . . . . . . . . . . . . . . . . . . . . . 70
Edit menu . . . . . . . . . . . . . . . . . . . . . . . . . . . . . . . . . . . 72
View menu . . . . . . . . . . . . . . . . . . . . . . . . . . . . . . . . . . 74
Select menu . . . . . . . . . . . . . . . . . . . . . . . . . . . . . . . . . 77
Modify menu . . . . . . . . . . . . . . . . . . . . . . . . . . . . . . . . . 78
Text menu . . . . . . . . . . . . . . . . . . . . . . . . . . . . . . . . . . 83
Commands menu . . . . . . . . . . . . . . . . . . . . . . . . . . . . . . 85
013662-1 FM.F 8/2/02 2:12 PM Page xxiv
Fireworks Seminar

xxvContents
Filters . . . . . . . . . . . . . . . . . . . . . . . . . . . . . . . . . . . . . 86
Window menu . . . . . . . . . . . . . . . . . . . . . . . . . . . . . . . . 88
Help menu . . . . . . . . . . . . . . . . . . . . . . . . . . . . . . . . . . 90
Chapter 3: Customizing Your Environment . . . . . . . . . . . . . . . . 93Setting Preferences . . . . . . . . . . . . . . . . . . . . . . . . . . . . . . . . . 93
Learning general preferences . . . . . . . . . . . . . . . . . . . . . . . 94
Understanding editing preferences . . . . . . . . . . . . . . . . . . . . 96
Learning Launch and Edit preferences . . . . . . . . . . . . . . . . . 100
Examining folder preferences . . . . . . . . . . . . . . . . . . . . . . . 101
Discovering Import preferences . . . . . . . . . . . . . . . . . . . . . 102
Setting Up for Multiple Users . . . . . . . . . . . . . . . . . . . . . . . . . . 103
Adjusting the HTML Setup . . . . . . . . . . . . . . . . . . . . . . . . . . . . 104
Understanding general options . . . . . . . . . . . . . . . . . . . . . . 104
Discovering table options . . . . . . . . . . . . . . . . . . . . . . . . . 105
Learning document-specific options . . . . . . . . . . . . . . . . . . . 107
Selecting Print Options . . . . . . . . . . . . . . . . . . . . . . . . . . . . . . 111
Personalizing Keyboard Shortcuts . . . . . . . . . . . . . . . . . . . . . . . 112
Changing the current shortcut set . . . . . . . . . . . . . . . . . . . . 113
Working with custom keyboard shortcuts . . . . . . . . . . . . . . . 113
Chapter 4: Setting Up Documents . . . . . . . . . . . . . . . . . . . . 119Creating New Documents . . . . . . . . . . . . . . . . . . . . . . . . . . . . 119
Exploring two approaches . . . . . . . . . . . . . . . . . . . . . . . . 119
Understanding the canvas options . . . . . . . . . . . . . . . . . . . . 121
Discovering the steps to create a new document . . . . . . . . . . . 124
Opening Existing Images . . . . . . . . . . . . . . . . . . . . . . . . . . . . . 125
Examining file formats . . . . . . . . . . . . . . . . . . . . . . . . . . . 125
Opening multiple images . . . . . . . . . . . . . . . . . . . . . . . . . 129
Storing Files . . . . . . . . . . . . . . . . . . . . . . . . . . . . . . . . . . . . 130
Closing a file . . . . . . . . . . . . . . . . . . . . . . . . . . . . . . . . 132
Reverting to a saved file . . . . . . . . . . . . . . . . . . . . . . . . . . 132
Modifying Canvases . . . . . . . . . . . . . . . . . . . . . . . . . . . . . . . 133
Altering the canvas size . . . . . . . . . . . . . . . . . . . . . . . . . . 133
Trimming the canvas . . . . . . . . . . . . . . . . . . . . . . . . . . . 139
Picking a new canvas color . . . . . . . . . . . . . . . . . . . . . . . . 139
Rotating the canvas . . . . . . . . . . . . . . . . . . . . . . . . . . . . 140
Part II: Mastering the Tools 141
Chapter 5: Creating Vector Objects . . . . . . . . . . . . . . . . . . . . 143Understanding Vector Objects in Fireworks . . . . . . . . . . . . . . . . . . 143
Examining Paths . . . . . . . . . . . . . . . . . . . . . . . . . . . . . . . . . 144
Applying a stroke . . . . . . . . . . . . . . . . . . . . . . . . . . . . . . 145
Looking at open and closed paths . . . . . . . . . . . . . . . . . . . . 145
013662-1 FM.F 8/2/02 2:12 PM Page xxv
Fireworks Seminar

xxvi Fireworks MX Bible
Grasping the center point . . . . . . . . . . . . . . . . . . . . . . . . . 146
Examining direction . . . . . . . . . . . . . . . . . . . . . . . . . . . . 146
Starting from Shapes . . . . . . . . . . . . . . . . . . . . . . . . . . . . . . . 147
Examining rectangles and squares . . . . . . . . . . . . . . . . . . . . 148
Using ellipses and circles . . . . . . . . . . . . . . . . . . . . . . . . . 152
Exploring polygons and stars . . . . . . . . . . . . . . . . . . . . . . . 153
Drawing Lines and Freeform Paths . . . . . . . . . . . . . . . . . . . . . . . 157
Making straight lines . . . . . . . . . . . . . . . . . . . . . . . . . . . . 158
Drawing with the Vector Path tool . . . . . . . . . . . . . . . . . . . . 159
Constructing Bézier Curves . . . . . . . . . . . . . . . . . . . . . . . . . . . 161
Drawing lines with the Pen . . . . . . . . . . . . . . . . . . . . . . . . 162
Creating smooth curves with the Pen . . . . . . . . . . . . . . . . . . 163
Mixing lines and curves . . . . . . . . . . . . . . . . . . . . . . . . . . 164
Adjusting curves . . . . . . . . . . . . . . . . . . . . . . . . . . . . . . 165
Using the keyboard modifiers . . . . . . . . . . . . . . . . . . . . . . 167
Chapter 6: Working with Bitmaps . . . . . . . . . . . . . . . . . . . . 171Understanding Bitmaps in Fireworks . . . . . . . . . . . . . . . . . . . . . . 171
Examining bitmap preferences . . . . . . . . . . . . . . . . . . . . . . 172
Opening existing bitmaps . . . . . . . . . . . . . . . . . . . . . . . . . 172
Scaling bitmaps . . . . . . . . . . . . . . . . . . . . . . . . . . . . . . . 173
Inserting a bitmap into a document . . . . . . . . . . . . . . . . . . . 175
Inserting an empty bitmap . . . . . . . . . . . . . . . . . . . . . . . . 175
Using bitmap tools . . . . . . . . . . . . . . . . . . . . . . . . . . . . . 175
Understanding the Touchup tools . . . . . . . . . . . . . . . . . . . . 187
Fireworks Technique: Limiting Your Drawing Area . . . . . . . . . . . . . . 196
Making Pixel Selections . . . . . . . . . . . . . . . . . . . . . . . . . . . . . 197
Selecting all . . . . . . . . . . . . . . . . . . . . . . . . . . . . . . . . . 197
Selecting similar . . . . . . . . . . . . . . . . . . . . . . . . . . . . . . 197
Selecting none . . . . . . . . . . . . . . . . . . . . . . . . . . . . . . . 198
Selecting inverse . . . . . . . . . . . . . . . . . . . . . . . . . . . . . . 198
Feathering an existing selection . . . . . . . . . . . . . . . . . . . . . 198
Expanding or contracting a marquee . . . . . . . . . . . . . . . . . . 199
Adding a border . . . . . . . . . . . . . . . . . . . . . . . . . . . . . . 199
Using the Smooth command . . . . . . . . . . . . . . . . . . . . . . . 199
Saving and restoring selections . . . . . . . . . . . . . . . . . . . . . 200
Converting a Vector into a Bitmap . . . . . . . . . . . . . . . . . . . . . . . 200
Chapter 7: Managing Color . . . . . . . . . . . . . . . . . . . . . . . . 203Working with Color on the Web . . . . . . . . . . . . . . . . . . . . . . . . . 203
Examining bit depth . . . . . . . . . . . . . . . . . . . . . . . . . . . . 204
Understanding hexadecimal colors . . . . . . . . . . . . . . . . . . . 205
Exploring Websafe colors . . . . . . . . . . . . . . . . . . . . . . . . . 206
Looking at platform differences . . . . . . . . . . . . . . . . . . . . . 207
Working with color management . . . . . . . . . . . . . . . . . . . . . 208
013662-1 FM.F 8/2/02 2:12 PM Page xxvi
Fireworks Seminar

xxviiContents
Mixing Colors . . . . . . . . . . . . . . . . . . . . . . . . . . . . . . . . . . . 209
Using the Color Mixer . . . . . . . . . . . . . . . . . . . . . . . . . . . 209
Choosing a color . . . . . . . . . . . . . . . . . . . . . . . . . . . . . . 210
Accessing the color models . . . . . . . . . . . . . . . . . . . . . . . . 211
Selecting Swatches of Color . . . . . . . . . . . . . . . . . . . . . . . . . . . 215
Choosing from the color wells . . . . . . . . . . . . . . . . . . . . . . 215
Using the Eyedropper . . . . . . . . . . . . . . . . . . . . . . . . . . . 217
Accessing the system color picker(s) . . . . . . . . . . . . . . . . . . 217
Opting for no color . . . . . . . . . . . . . . . . . . . . . . . . . . . . . 219
Using the Swatches panel . . . . . . . . . . . . . . . . . . . . . . . . . 219
Accessing the Color Table . . . . . . . . . . . . . . . . . . . . . . . . . 223
Fireworks Technique: Converting Pantone Colors to Websafe Colors . . . 224
Using ColorWeb Pro for Windows . . . . . . . . . . . . . . . . . . . . 225
Using ColorWeb Pro for Macintosh . . . . . . . . . . . . . . . . . . . 226
Chapter 8: Choosing Strokes . . . . . . . . . . . . . . . . . . . . . . . 229Using the Stroke Settings . . . . . . . . . . . . . . . . . . . . . . . . . . . . 229
Stroke categories and types . . . . . . . . . . . . . . . . . . . . . . . 231
Stroke edge and size . . . . . . . . . . . . . . . . . . . . . . . . . . . . 232
Stroke texture . . . . . . . . . . . . . . . . . . . . . . . . . . . . . . . . 233
Working with the Built-in Strokes . . . . . . . . . . . . . . . . . . . . . . . . 234
Pencil . . . . . . . . . . . . . . . . . . . . . . . . . . . . . . . . . . . . 235
Basic . . . . . . . . . . . . . . . . . . . . . . . . . . . . . . . . . . . . . 237
Air Brush . . . . . . . . . . . . . . . . . . . . . . . . . . . . . . . . . . 238
Calligraphy . . . . . . . . . . . . . . . . . . . . . . . . . . . . . . . . . 239
Charcoal . . . . . . . . . . . . . . . . . . . . . . . . . . . . . . . . . . . 240
Crayon . . . . . . . . . . . . . . . . . . . . . . . . . . . . . . . . . . . . 241
Felt Tip . . . . . . . . . . . . . . . . . . . . . . . . . . . . . . . . . . . . 242
Oil . . . . . . . . . . . . . . . . . . . . . . . . . . . . . . . . . . . . . . 242
Watercolor . . . . . . . . . . . . . . . . . . . . . . . . . . . . . . . . . 244
Random . . . . . . . . . . . . . . . . . . . . . . . . . . . . . . . . . . . 245
Unnatural . . . . . . . . . . . . . . . . . . . . . . . . . . . . . . . . . . 246
Creating New Strokes . . . . . . . . . . . . . . . . . . . . . . . . . . . . . . . 247
Managing your strokes . . . . . . . . . . . . . . . . . . . . . . . . . . 247
Editing the stroke . . . . . . . . . . . . . . . . . . . . . . . . . . . . . 250
Fireworks Technique: Making Dotted Lines . . . . . . . . . . . . . . . . . . 260
Orienting the Stroke . . . . . . . . . . . . . . . . . . . . . . . . . . . . . . . 263
Chapter 9: Structuring Paths . . . . . . . . . . . . . . . . . . . . . . . . 267Transforming Objects Visually . . . . . . . . . . . . . . . . . . . . . . . . . 268
Using scaling . . . . . . . . . . . . . . . . . . . . . . . . . . . . . . . . 268
Examining skewing . . . . . . . . . . . . . . . . . . . . . . . . . . . . . 270
Discovering distorting . . . . . . . . . . . . . . . . . . . . . . . . . . . 271
Understanding rotating . . . . . . . . . . . . . . . . . . . . . . . . . . 271
Transforming Objects Numerically . . . . . . . . . . . . . . . . . . . . . . . 273
013662-1 FM.F 8/2/02 2:12 PM Page xxvii
Fireworks Seminar

xxviii Fireworks MX Bible
Fireworks Technique: Creating Perspective . . . . . . . . . . . . . . . . . . 274
Managing Points and Paths . . . . . . . . . . . . . . . . . . . . . . . . . . . 276
Moving points with the Subselection tool . . . . . . . . . . . . . . . . 276
Adding and removing points . . . . . . . . . . . . . . . . . . . . . . . 277
Closing an open path . . . . . . . . . . . . . . . . . . . . . . . . . . . 279
Working with multiple paths . . . . . . . . . . . . . . . . . . . . . . . 280
Editing Paths . . . . . . . . . . . . . . . . . . . . . . . . . . . . . . . . . . . 281
Redrawing a path . . . . . . . . . . . . . . . . . . . . . . . . . . . . . . 281
Examining the Freeform and Reshape Area tools . . . . . . . . . . . 282
Discovering the Path Scrubber . . . . . . . . . . . . . . . . . . . . . . 287
Discerning path operations . . . . . . . . . . . . . . . . . . . . . . . . 289
Chapter 10: Composing with Text . . . . . . . . . . . . . . . . . . . . . 297Working with Text . . . . . . . . . . . . . . . . . . . . . . . . . . . . . . . . . 297
Using the Text Editor . . . . . . . . . . . . . . . . . . . . . . . . . . . 299
Enabling Text Editor options . . . . . . . . . . . . . . . . . . . . . . . 301
Choosing basic font characteristics . . . . . . . . . . . . . . . . . . . 301
Discovering paragraph spacing . . . . . . . . . . . . . . . . . . . . . 303
Adjusting text spacing . . . . . . . . . . . . . . . . . . . . . . . . . . . 303
Re-Editing Text . . . . . . . . . . . . . . . . . . . . . . . . . . . . . . . . . . 308
Preserving Look or Editing Text . . . . . . . . . . . . . . . . . . . . . . . . . 309
Importing Text . . . . . . . . . . . . . . . . . . . . . . . . . . . . . . . . . . . 310
Checking Your Spelling . . . . . . . . . . . . . . . . . . . . . . . . . . . . . . 311
Transforming Text . . . . . . . . . . . . . . . . . . . . . . . . . . . . . . . . 314
Adding strokes . . . . . . . . . . . . . . . . . . . . . . . . . . . . . . . 314
Enhancing fills . . . . . . . . . . . . . . . . . . . . . . . . . . . . . . . 316
Using the transform tools . . . . . . . . . . . . . . . . . . . . . . . . . 317
Converting text to paths . . . . . . . . . . . . . . . . . . . . . . . . . 318
Converting text to an image . . . . . . . . . . . . . . . . . . . . . . . . 318
Fireworks Technique: Cookie-Cutter Text . . . . . . . . . . . . . . . . . . . 318
Using the Text on a Path Command . . . . . . . . . . . . . . . . . . . . . . 320
Fireworks Technique: Masking Images with Text . . . . . . . . . . . . . . . 323
Part III: Achieving Effects 327
Chapter 11: Using Fills and Textures . . . . . . . . . . . . . . . . . . . 329Using Built-in Fills . . . . . . . . . . . . . . . . . . . . . . . . . . . . . . . . . 329
Turning off an object’s fill . . . . . . . . . . . . . . . . . . . . . . . . . 330
Using a Solid fill . . . . . . . . . . . . . . . . . . . . . . . . . . . . . . . 330
Using the Web Dither fill . . . . . . . . . . . . . . . . . . . . . . . . . . 332
Managing Gradients . . . . . . . . . . . . . . . . . . . . . . . . . . . . . . . 335
Applying a Gradient fill . . . . . . . . . . . . . . . . . . . . . . . . . . 335
Altering gradients . . . . . . . . . . . . . . . . . . . . . . . . . . . . . 336
013662-1 FM.F 8/2/02 2:12 PM Page xxviii
Fireworks Seminar

xxixContents
Using Patterns . . . . . . . . . . . . . . . . . . . . . . . . . . . . . . . . . . . 341
Adding new Patterns . . . . . . . . . . . . . . . . . . . . . . . . . . . . 342
Adding Patterns to a document . . . . . . . . . . . . . . . . . . . . . 344
Altering Patterns . . . . . . . . . . . . . . . . . . . . . . . . . . . . . . 344
Fireworks Technique: Creating Seamless Patterns . . . . . . . . . . . . . . 346
Adding Texture to Your Fills . . . . . . . . . . . . . . . . . . . . . . . . . . . 351
Adding new textures . . . . . . . . . . . . . . . . . . . . . . . . . . . . 353
Converting a color image to grayscale . . . . . . . . . . . . . . . . . 353
Assigning an additional textures folder . . . . . . . . . . . . . . . . . 354
Adding textures to a document . . . . . . . . . . . . . . . . . . . . . . 354
Filling with the Paint Bucket Tool . . . . . . . . . . . . . . . . . . . . . . . . 354
Chapter 12: Creating Live Effects and Filters . . . . . . . . . . . . . . 359Understanding Fireworks Effects . . . . . . . . . . . . . . . . . . . . . . . . 360
Using Effects in the Property inspector . . . . . . . . . . . . . . . . . 360
Applying Live Effects . . . . . . . . . . . . . . . . . . . . . . . . . . . 361
Examining the Filters menu . . . . . . . . . . . . . . . . . . . . . . . . 363
Working with Included Live Effects . . . . . . . . . . . . . . . . . . . . . . . 364
Adjusting color . . . . . . . . . . . . . . . . . . . . . . . . . . . . . . . 366
Adjusting tonal range . . . . . . . . . . . . . . . . . . . . . . . . . . . 366
Using three dimensions with Bevel and Emboss . . . . . . . . . . . . 373
Adding depth with blurring . . . . . . . . . . . . . . . . . . . . . . . . 377
Learning holdover effects . . . . . . . . . . . . . . . . . . . . . . . . . 378
Examining Shadow and Glow . . . . . . . . . . . . . . . . . . . . . . . 379
Sharpening to bring out detail . . . . . . . . . . . . . . . . . . . . . . 382
Fireworks Technique: Making Perspective Shadows . . . . . . . . . . . . . 383
Managing Live Effects . . . . . . . . . . . . . . . . . . . . . . . . . . . . . . 386
Storing a customized effect . . . . . . . . . . . . . . . . . . . . . . . . 387
Grasping missing effects . . . . . . . . . . . . . . . . . . . . . . . . . 388
Reading All About Filters . . . . . . . . . . . . . . . . . . . . . . . . . . . . . 388
Using vector objects . . . . . . . . . . . . . . . . . . . . . . . . . . . . 389
Examining bitmap objects . . . . . . . . . . . . . . . . . . . . . . . . . 389
Identifying pixel selections in a bitmap object . . . . . . . . . . . . . 390
Checking out false pixel selections . . . . . . . . . . . . . . . . . . . 390
Evaluating multiple objects . . . . . . . . . . . . . . . . . . . . . . . . 391
Using Third-Party, Photoshop-Compatible Filters . . . . . . . . . . . . . . 392
Installing third-party filter packages . . . . . . . . . . . . . . . . . . . 392
Using filters with multiple applications . . . . . . . . . . . . . . . . . 393
Using shortcuts (aliases) to plug-in folders . . . . . . . . . . . . . . . 394
Exploring Alien Skin Eye Candy . . . . . . . . . . . . . . . . . . . . . 394
Investigating Kai’s Power Tools . . . . . . . . . . . . . . . . . . . . . 399
Chapter 13: Arranging and Compositing Objects . . . . . . . . . . . 407Using Layers . . . . . . . . . . . . . . . . . . . . . . . . . . . . . . . . . . . . 407
Adding a layer . . . . . . . . . . . . . . . . . . . . . . . . . . . . . . . 409
Naming a layer . . . . . . . . . . . . . . . . . . . . . . . . . . . . . . . 409
013662-1 FM.F 8/2/02 2:12 PM Page xxix
Fireworks Seminar

xxx Fireworks MX Bible
Duplicating a layer . . . . . . . . . . . . . . . . . . . . . . . . . . . . . 409
Deleting a layer . . . . . . . . . . . . . . . . . . . . . . . . . . . . . . . 410
Changing stacking order . . . . . . . . . . . . . . . . . . . . . . . . . . 410
Editing layer by layer . . . . . . . . . . . . . . . . . . . . . . . . . . . 410
Using the Selection column . . . . . . . . . . . . . . . . . . . . . . . . 411
Opening layers . . . . . . . . . . . . . . . . . . . . . . . . . . . . . . . 411
Examining the Web Layer . . . . . . . . . . . . . . . . . . . . . . . . . 414
Aligning and Distributing Objects . . . . . . . . . . . . . . . . . . . . . . . . 414
Using a theoretical rectangle . . . . . . . . . . . . . . . . . . . . . . . 415
Aligning to the canvas . . . . . . . . . . . . . . . . . . . . . . . . . . . 418
Looking at Layout Assistance . . . . . . . . . . . . . . . . . . . . . . . . . . 420
Using rulers . . . . . . . . . . . . . . . . . . . . . . . . . . . . . . . . . 420
Working with guides . . . . . . . . . . . . . . . . . . . . . . . . . . . . 422
Exploring the grid . . . . . . . . . . . . . . . . . . . . . . . . . . . . . 425
Grouping Objects . . . . . . . . . . . . . . . . . . . . . . . . . . . . . . . . . 426
Working with Alpha Masks . . . . . . . . . . . . . . . . . . . . . . . . . . . . 428
Creating vector masks . . . . . . . . . . . . . . . . . . . . . . . . . . . 430
Applying bitmap masks . . . . . . . . . . . . . . . . . . . . . . . . . . 431
Editing masks . . . . . . . . . . . . . . . . . . . . . . . . . . . . . . . . 436
Masking suggestions . . . . . . . . . . . . . . . . . . . . . . . . . . . . 439
Fireworks technique: Quick photo edges . . . . . . . . . . . . . . . . 439
Examining Opacity and Blending . . . . . . . . . . . . . . . . . . . . . . . . 441
Controlling opacity . . . . . . . . . . . . . . . . . . . . . . . . . . . . . 442
Using blending modes . . . . . . . . . . . . . . . . . . . . . . . . . . . 442
Investigating blending modes . . . . . . . . . . . . . . . . . . . . . . . 444
Fireworks technique: Simulating a light source
with blending modes . . . . . . . . . . . . . . . . . . . . . . . . . . 446
Fireworks Technique: Feathering Selections . . . . . . . . . . . . . . . . . 448
Fireworks Technique: Applied Compositing . . . . . . . . . . . . . . . . . . 449
Part IV: Coordinating Workflow 455
Chapter 14: Capturing and Importing . . . . . . . . . . . . . . . . . . 457Introducing Image Captures . . . . . . . . . . . . . . . . . . . . . . . . . . . 457
Examining TWAIN-compliant devices . . . . . . . . . . . . . . . . . . 458
Installing Photoshop Acquire plug-ins (Macintosh only) . . . . . . . 459
Scanning Pages . . . . . . . . . . . . . . . . . . . . . . . . . . . . . . . . . . 460
Examining the Scanning Process . . . . . . . . . . . . . . . . . . . . . . . . 461
Selecting a scan resolution . . . . . . . . . . . . . . . . . . . . . . . . 462
Choosing a color depth . . . . . . . . . . . . . . . . . . . . . . . . . . 464
Setting other options . . . . . . . . . . . . . . . . . . . . . . . . . . . 465
Scanning directly into Fireworks . . . . . . . . . . . . . . . . . . . . . 465
Looking at Digital Cameras . . . . . . . . . . . . . . . . . . . . . . . . . . . 466
Capturing images for use in Fireworks . . . . . . . . . . . . . . . . . 466
Exploring digital camcorders . . . . . . . . . . . . . . . . . . . . . . . 468
013662-1 FM.F 8/2/02 2:12 PM Page xxx
Fireworks Seminar

xxxiContents
Inserting Objects from Other Applications . . . . . . . . . . . . . . . . . . 468
Copying and pasting . . . . . . . . . . . . . . . . . . . . . . . . . . . . 469
Dragging and dropping . . . . . . . . . . . . . . . . . . . . . . . . . . 470
Importing External Files . . . . . . . . . . . . . . . . . . . . . . . . . . . . . 471
Grasping bitmap image files . . . . . . . . . . . . . . . . . . . . . . . 471
Discovering vector art files . . . . . . . . . . . . . . . . . . . . . . . . 477
Digging into text files . . . . . . . . . . . . . . . . . . . . . . . . . . . 482
Looking at common problems . . . . . . . . . . . . . . . . . . . . . . 482
Rebuilding Imported Web Pages . . . . . . . . . . . . . . . . . . . . . . . . 484
Making Screen Captures . . . . . . . . . . . . . . . . . . . . . . . . . . . . . 486
Exploring built-in screenshot tools . . . . . . . . . . . . . . . . . . . 486
Delving into specialized applications . . . . . . . . . . . . . . . . . . 487
Opening Animations . . . . . . . . . . . . . . . . . . . . . . . . . . . . . . . 488
Importing multiple files as a new animation . . . . . . . . . . . . . . 488
Importing Flash animations . . . . . . . . . . . . . . . . . . . . . . . . 489
Chapter 15: Exporting and Optimizing . . . . . . . . . . . . . . . . . . 493Exploring Optimization Features . . . . . . . . . . . . . . . . . . . . . . . . 493
Optimize panel . . . . . . . . . . . . . . . . . . . . . . . . . . . . . . . 495
Optimize panel’s Color Table . . . . . . . . . . . . . . . . . . . . . . . 496
Workspace preview . . . . . . . . . . . . . . . . . . . . . . . . . . . . 497
Frame controls . . . . . . . . . . . . . . . . . . . . . . . . . . . . . . . 502
Exporting Indexed Color . . . . . . . . . . . . . . . . . . . . . . . . . . . . . 503
Color palette . . . . . . . . . . . . . . . . . . . . . . . . . . . . . . . . 505
Number of colors . . . . . . . . . . . . . . . . . . . . . . . . . . . . . . 506
Matte . . . . . . . . . . . . . . . . . . . . . . . . . . . . . . . . . . . . . 509
Lossy GIF compression . . . . . . . . . . . . . . . . . . . . . . . . . . 510
Dither . . . . . . . . . . . . . . . . . . . . . . . . . . . . . . . . . . . . 511
Transparency . . . . . . . . . . . . . . . . . . . . . . . . . . . . . . . . 511
Remove unused colors . . . . . . . . . . . . . . . . . . . . . . . . . . 515
Interlaced . . . . . . . . . . . . . . . . . . . . . . . . . . . . . . . . . . 515
Saved settings . . . . . . . . . . . . . . . . . . . . . . . . . . . . . . . 516
Fireworks technique: Creating GIF-friendly images . . . . . . . . . . 516
Exporting Photographic Images . . . . . . . . . . . . . . . . . . . . . . . . . 518
JPEG . . . . . . . . . . . . . . . . . . . . . . . . . . . . . . . . . . . . . 520
PNG 32 and 24 . . . . . . . . . . . . . . . . . . . . . . . . . . . . . . . 525
Other formats . . . . . . . . . . . . . . . . . . . . . . . . . . . . . . . . 526
Sending Images to Other Programs . . . . . . . . . . . . . . . . . . . . . . . 526
Integrating Fireworks with FrontPage . . . . . . . . . . . . . . . . . . . . . 527
Working in the Export Preview . . . . . . . . . . . . . . . . . . . . . . . . . 529
Cropping . . . . . . . . . . . . . . . . . . . . . . . . . . . . . . . . . . . 530
Scaling exported images . . . . . . . . . . . . . . . . . . . . . . . . . . 532
Using the Export Wizards . . . . . . . . . . . . . . . . . . . . . . . . . . . . 533
Examining Additional Export Options . . . . . . . . . . . . . . . . . . . . . 535
Exporting as CSS layers . . . . . . . . . . . . . . . . . . . . . . . . . . 536
Exporting for Director . . . . . . . . . . . . . . . . . . . . . . . . . . . 538
013662-1 FM.F 8/2/02 2:12 PM Page xxxi
Fireworks Seminar

xxxii Fireworks MX Bible
Exporting files . . . . . . . . . . . . . . . . . . . . . . . . . . . . . . . 539
Exporting as Image Wells . . . . . . . . . . . . . . . . . . . . . . . . . 540
Exporting vectors . . . . . . . . . . . . . . . . . . . . . . . . . . . . . 541
Exporting Photoshop documents . . . . . . . . . . . . . . . . . . . . 543
Chapter 16: Working with Fireworks Styles . . . . . . . . . . . . . . . 547Understanding Styles . . . . . . . . . . . . . . . . . . . . . . . . . . . . . . . 548
Applying Styles . . . . . . . . . . . . . . . . . . . . . . . . . . . . . . . . . . 549
Creating New Styles . . . . . . . . . . . . . . . . . . . . . . . . . . . . . . . . 550
Managing Styles . . . . . . . . . . . . . . . . . . . . . . . . . . . . . . . . . . 552
Fireworks Technique: Isolating Patterns and Textures from Styles . . . . . 555
Chapter 17: Using Symbols and Libraries . . . . . . . . . . . . . . . . 559Understanding Symbols and Instances . . . . . . . . . . . . . . . . . . . . . 559
Introducing the Library Panel . . . . . . . . . . . . . . . . . . . . . . . . . . 563
Making and Modifying Symbols . . . . . . . . . . . . . . . . . . . . . . . . . 564
Creating a symbol . . . . . . . . . . . . . . . . . . . . . . . . . . . . . 564
Modifying symbols . . . . . . . . . . . . . . . . . . . . . . . . . . . . . 567
Creating Instances . . . . . . . . . . . . . . . . . . . . . . . . . . . . . 569
Modifying Instances . . . . . . . . . . . . . . . . . . . . . . . . . . . . 570
Working with Buttons . . . . . . . . . . . . . . . . . . . . . . . . . . . . . . 571
Making and modifying Button Symbols . . . . . . . . . . . . . . . . . 571
Using Button Instances . . . . . . . . . . . . . . . . . . . . . . . . . . 573
Instance Level Button Properties . . . . . . . . . . . . . . . . . . . . 574
Managing Libraries . . . . . . . . . . . . . . . . . . . . . . . . . . . . . . . . 575
Importing a Library . . . . . . . . . . . . . . . . . . . . . . . . . . . . 576
Exporting and sharing Libraries . . . . . . . . . . . . . . . . . . . . . 578
Chapter 18: Updating and Maintaining Web Graphics . . . . . . . . 581Using Preview in Browser . . . . . . . . . . . . . . . . . . . . . . . . . . . . 581
Managing Links with the URL Panel . . . . . . . . . . . . . . . . . . . . . . 585
Accessing the URL History list . . . . . . . . . . . . . . . . . . . . . . 586
Adding URLs to the URL Library . . . . . . . . . . . . . . . . . . . . . 587
Managing URL Libraries . . . . . . . . . . . . . . . . . . . . . . . . . . 589
Updating Graphics with Find and Replace . . . . . . . . . . . . . . . . . . . 591
Searching and replacing text . . . . . . . . . . . . . . . . . . . . . . . 594
Searching with Regular Expressions . . . . . . . . . . . . . . . . . . . 595
Altering font characteristics . . . . . . . . . . . . . . . . . . . . . . . 599
Changing colors throughout a site . . . . . . . . . . . . . . . . . . . . 601
Snapping colors to Websafe . . . . . . . . . . . . . . . . . . . . . . . . 602
Updating URLs . . . . . . . . . . . . . . . . . . . . . . . . . . . . . . . 603
Working with the Project Log . . . . . . . . . . . . . . . . . . . . . . . . . . 604
Batch Processing Graphics Files . . . . . . . . . . . . . . . . . . . . . . . . 606
Grasping the basic procedure . . . . . . . . . . . . . . . . . . . . . . 606
Running scriptlets . . . . . . . . . . . . . . . . . . . . . . . . . . . . . 609
013662-1 FM.F 8/2/02 2:12 PM Page xxxii
Fireworks Seminar

xxxiiiContents
Chapter 19: Automating Workflow . . . . . . . . . . . . . . . . . . . . 611Running Built-in Commands . . . . . . . . . . . . . . . . . . . . . . . . . . . 612
Examining the Creative commands . . . . . . . . . . . . . . . . . . . 612
Data-Driven Graphics Wizard . . . . . . . . . . . . . . . . . . . . . . . 620
Examining the Document submenu . . . . . . . . . . . . . . . . . . . 625
Using Panel Layout Sets . . . . . . . . . . . . . . . . . . . . . . . . . . 627
Storing Custom Panel Layouts . . . . . . . . . . . . . . . . . . . . . . 628
Using the Reset Warning dialog boxes . . . . . . . . . . . . . . . . . . 628
Examining the Web submenu . . . . . . . . . . . . . . . . . . . . . . . 629
Enhancing Productivity with the History Panel . . . . . . . . . . . . . . . . 630
Using Undo and Redo . . . . . . . . . . . . . . . . . . . . . . . . . . . 631
Building commands without coding . . . . . . . . . . . . . . . . . . . 632
Copying steps to the clipboard . . . . . . . . . . . . . . . . . . . . . . 636
Managing Commands . . . . . . . . . . . . . . . . . . . . . . . . . . . . . . . 637
Managing saved commands . . . . . . . . . . . . . . . . . . . . . . . . 638
Managing Flash commands . . . . . . . . . . . . . . . . . . . . . . . . 640
Part V: Entering the Web 643
Chapter 20: Mastering Image Maps and Slices . . . . . . . . . . . . 645Understanding Image Maps and Hotspots . . . . . . . . . . . . . . . . . . . 646
Using the Hotspot Tools . . . . . . . . . . . . . . . . . . . . . . . . . . . . . 647
Examining the rectangle hotspot . . . . . . . . . . . . . . . . . . . . . 648
Examining the circle hotspot . . . . . . . . . . . . . . . . . . . . . . . 649
Examining the polygon hotspot . . . . . . . . . . . . . . . . . . . . . 650
Assigning links to hotspots . . . . . . . . . . . . . . . . . . . . . . . . 651
Covering an object with a hotspot . . . . . . . . . . . . . . . . . . . . 653
Exporting Image Map Code . . . . . . . . . . . . . . . . . . . . . . . . . . . 653
Choosing an HTML style . . . . . . . . . . . . . . . . . . . . . . . . . 653
Inserting image map code in a Web page . . . . . . . . . . . . . . . . 656
Understanding Slices . . . . . . . . . . . . . . . . . . . . . . . . . . . . . . . 660
Slicing Images in Fireworks . . . . . . . . . . . . . . . . . . . . . . . . . . . 662
Looking at rectangle slices . . . . . . . . . . . . . . . . . . . . . . . . 662
Looking at polygon slices . . . . . . . . . . . . . . . . . . . . . . . . . 663
Working with slice guides . . . . . . . . . . . . . . . . . . . . . . . . . 664
Copying an image to a slice . . . . . . . . . . . . . . . . . . . . . . . . 668
Setting URLs in slices . . . . . . . . . . . . . . . . . . . . . . . . . . . 668
Exporting Slices . . . . . . . . . . . . . . . . . . . . . . . . . . . . . . . . . . 671
Exporting slices as different image types . . . . . . . . . . . . . . . . 671
Setting the Export options . . . . . . . . . . . . . . . . . . . . . . . . 671
Inserting slices in a Web page . . . . . . . . . . . . . . . . . . . . . . 672
Exporting single slices . . . . . . . . . . . . . . . . . . . . . . . . . . . 675
Fireworks Technique: Exporting Dreamweaver Library Items . . . . . . . 676
Fireworks Technique: Animating a Slice . . . . . . . . . . . . . . . . . . . . 678
013662-1 FM.F 8/2/02 2:12 PM Page xxxiii
Fireworks Seminar

xxxiv Fireworks MX Bible
Chapter 21: Activating Fireworks with Behaviors . . . . . . . . . . . 683Understanding Behaviors . . . . . . . . . . . . . . . . . . . . . . . . . . . . 683
Using the Behaviors Panel . . . . . . . . . . . . . . . . . . . . . . . . . . . . 684
Attaching Behaviors . . . . . . . . . . . . . . . . . . . . . . . . . . . . 685
Modifying a Behavior . . . . . . . . . . . . . . . . . . . . . . . . . . . 686
Deleting a Behavior . . . . . . . . . . . . . . . . . . . . . . . . . . . . 687
Creating Rollovers . . . . . . . . . . . . . . . . . . . . . . . . . . . . . . . . 687
Examining how rollovers work . . . . . . . . . . . . . . . . . . . . . . 687
Learning rollover states . . . . . . . . . . . . . . . . . . . . . . . . . . 688
Creating rollover images . . . . . . . . . . . . . . . . . . . . . . . . . 689
Applying the Simple Rollover Behavior . . . . . . . . . . . . . . . . . 691
Exporting Rollovers for the Web . . . . . . . . . . . . . . . . . . . . . . . . 692
Exporting the code from Fireworks . . . . . . . . . . . . . . . . . . . 693
Inserting rollover code in your Web page . . . . . . . . . . . . . . . . 695
Looking at Nav Bar Behavior . . . . . . . . . . . . . . . . . . . . . . . . . . 698
Creating a Nav Bar . . . . . . . . . . . . . . . . . . . . . . . . . . . . . 698
Building buttons in the Button Editor . . . . . . . . . . . . . . . . . . 699
Examining Advanced Rollover Techniques . . . . . . . . . . . . . . . . . . 702
Making disjointed rollovers . . . . . . . . . . . . . . . . . . . . . . . . 702
Creating external rollovers . . . . . . . . . . . . . . . . . . . . . . . . 703
Working with hotspot rollovers . . . . . . . . . . . . . . . . . . . . . 704
Displaying a status bar message . . . . . . . . . . . . . . . . . . . . . 706
Working with Pop-up Menus . . . . . . . . . . . . . . . . . . . . . . . . . . . 707
Using Drag-and-Drop Behaviors . . . . . . . . . . . . . . . . . . . . . . . . . 714
Creating a simple rollover with drag and drop . . . . . . . . . . . . . 715
Creating disjoint rollovers with drag and drop . . . . . . . . . . . . . 716
Removing drag-and-drop Behaviors . . . . . . . . . . . . . . . . . . . 718
Chapter 22: Integrating with Dreamweaver . . . . . . . . . . . . . . . 719Introducing Integration . . . . . . . . . . . . . . . . . . . . . . . . . . . . . . 719
Optimizing Images from Dreamweaver . . . . . . . . . . . . . . . . . . . . . 720
Editing Images from Dreamweaver . . . . . . . . . . . . . . . . . . . . . . . 722
Setting Fireworks as the graphics editor in Dreamweaver . . . . . . 723
Recognizing Design Notes in Dreamweaver . . . . . . . . . . . . . . . 724
Modifying sliced images . . . . . . . . . . . . . . . . . . . . . . . . . . 725
Exporting Dreamweaver Code . . . . . . . . . . . . . . . . . . . . . . . . . . 726
Working with Dreamweaver Libraries . . . . . . . . . . . . . . . . . . 727
XHTML Support . . . . . . . . . . . . . . . . . . . . . . . . . . . . . . 730
Quick Export . . . . . . . . . . . . . . . . . . . . . . . . . . . . . . . . 731
Fireworks technique: Adding CSS layers to Dreamweaver . . . . . . 731
Working with Image Placeholders from Dreamweaver . . . . . . . . . . . . 734
Using Fireworks Behaviors in Dreamweaver . . . . . . . . . . . . . . . . . 734
Fireworks Technique: Creating a Web Photo Album . . . . . . . . . . . . . 737
Making Hybrid Commands . . . . . . . . . . . . . . . . . . . . . . . . . . . . 739
013662-1 FM.F 8/2/02 2:12 PM Page xxxiv
Fireworks Seminar

xxxvContents
Part VI: Animation 743
Chapter 23: Applying Animation Techniques . . . . . . . . . . . . . . 745Understanding Web Animation . . . . . . . . . . . . . . . . . . . . . . . . . 745
Getting a handle on bandwidth . . . . . . . . . . . . . . . . . . . . . . 746
Making a statement . . . . . . . . . . . . . . . . . . . . . . . . . . . . 746
Examining why to animate a GIF . . . . . . . . . . . . . . . . . . . . . 747
Using the Fireworks Animation Toolkit . . . . . . . . . . . . . . . . . . . . 749
Managing frames . . . . . . . . . . . . . . . . . . . . . . . . . . . . . . 749
Animating objects . . . . . . . . . . . . . . . . . . . . . . . . . . . . . 754
Using the VCR controls . . . . . . . . . . . . . . . . . . . . . . . . . . 757
Setting frame delay timing . . . . . . . . . . . . . . . . . . . . . . . . 757
Using Onion Skinning . . . . . . . . . . . . . . . . . . . . . . . . . . . 759
Examining export settings and options . . . . . . . . . . . . . . . . . 761
Examining Web Design with Animated GIF Images . . . . . . . . . . . . . . 765
Animating background images . . . . . . . . . . . . . . . . . . . . . . 765
Reusing animations . . . . . . . . . . . . . . . . . . . . . . . . . . . . 765
Scaling an animation . . . . . . . . . . . . . . . . . . . . . . . . . . . . 765
Using the browser’s background image . . . . . . . . . . . . . . . . . 766
Preloading an animation . . . . . . . . . . . . . . . . . . . . . . . . . . 766
Using animated rollovers . . . . . . . . . . . . . . . . . . . . . . . . . 767
Slicing animations . . . . . . . . . . . . . . . . . . . . . . . . . . . . . 768
Tweening Graphic Symbols . . . . . . . . . . . . . . . . . . . . . . . . . . . 768
Fireworks technique: Tweening Filters . . . . . . . . . . . . . . . . . 771
Fireworks technique: Tweening depth . . . . . . . . . . . . . . . . . . 772
Fireworks technique: Fading in and out . . . . . . . . . . . . . . . . . 775
Using Animation Symbols . . . . . . . . . . . . . . . . . . . . . . . . . . . . 777
Creating animation symbols . . . . . . . . . . . . . . . . . . . . . . . 777
Editing an animation symbol . . . . . . . . . . . . . . . . . . . . . . . 779
Chapter 24: Animating Banner Ads . . . . . . . . . . . . . . . . . . . 783Understanding Banner Ad Basics . . . . . . . . . . . . . . . . . . . . . . . . 783
Examining size — IAB/CASIE standards . . . . . . . . . . . . . . . . . 783
Looking at weight . . . . . . . . . . . . . . . . . . . . . . . . . . . . . 785
Putting it in the page . . . . . . . . . . . . . . . . . . . . . . . . . . . . 785
Advertising it . . . . . . . . . . . . . . . . . . . . . . . . . . . . . . . . 785
Fireworks Technique: Creating a Banner Ad . . . . . . . . . . . . . . . . . . 786
Step I: Set the stage . . . . . . . . . . . . . . . . . . . . . . . . . . . . 786
Step II: Write the script . . . . . . . . . . . . . . . . . . . . . . . . . . 786
Step III: Create the cast of characters . . . . . . . . . . . . . . . . . . 787
Step IV: Direct the action . . . . . . . . . . . . . . . . . . . . . . . . . 789
Step V: Leave the excess on the cutting-room floor . . . . . . . . . . 793
Fireworks Technique: Using Blur to Save Frames . . . . . . . . . . . . . . . 793
013662-1 FM.F 8/2/02 2:12 PM Page xxxv
Fireworks Seminar

xxxvi Fireworks MX Bible
Part VII: Programming with Fireworks 797
Chapter 25: Customizing Fireworks . . . . . . . . . . . . . . . . . . . 799Using the HTML and JavaScript Engine . . . . . . . . . . . . . . . . . . . . 799
Examining the Configuration Folder . . . . . . . . . . . . . . . . . . . . . . 801
Batch Code . . . . . . . . . . . . . . . . . . . . . . . . . . . . . . . . . 803
Command Panels . . . . . . . . . . . . . . . . . . . . . . . . . . . . . . 803
Commands . . . . . . . . . . . . . . . . . . . . . . . . . . . . . . . . . 803
Extensions . . . . . . . . . . . . . . . . . . . . . . . . . . . . . . . . . . 804
jsextensions . . . . . . . . . . . . . . . . . . . . . . . . . . . . . . . . . 804
Export Settings . . . . . . . . . . . . . . . . . . . . . . . . . . . . . . . 804
HTML code . . . . . . . . . . . . . . . . . . . . . . . . . . . . . . . . . 804
Libraries . . . . . . . . . . . . . . . . . . . . . . . . . . . . . . . . . . . 805
Nav Menu . . . . . . . . . . . . . . . . . . . . . . . . . . . . . . . . . . 806
Patterns . . . . . . . . . . . . . . . . . . . . . . . . . . . . . . . . . . . 806
Styles . . . . . . . . . . . . . . . . . . . . . . . . . . . . . . . . . . . . . 806
Textures . . . . . . . . . . . . . . . . . . . . . . . . . . . . . . . . . . . 807
URL Libraries . . . . . . . . . . . . . . . . . . . . . . . . . . . . . . . . 807
Plug-Ins . . . . . . . . . . . . . . . . . . . . . . . . . . . . . . . . . . . 807
Looking at the Fireworks MX Preferences File . . . . . . . . . . . . . . . . 808
Chapter 26: Building Fireworks Extensions . . . . . . . . . . . . . . . 811Building a User Interface in Flash . . . . . . . . . . . . . . . . . . . . . . . . 812
Executing Fireworks functions . . . . . . . . . . . . . . . . . . . . . . 812
Finishing a command . . . . . . . . . . . . . . . . . . . . . . . . . . . 814
Integrating Flash input . . . . . . . . . . . . . . . . . . . . . . . . . . . 814
Debugging Flash commands . . . . . . . . . . . . . . . . . . . . . . . 814
Storing Commands and Commands panels . . . . . . . . . . . . . . . 816
Fireworks API Overview . . . . . . . . . . . . . . . . . . . . . . . . . . . . . 817
Examining Nonstandard Data Types . . . . . . . . . . . . . . . . . . . . . . 817
Colors . . . . . . . . . . . . . . . . . . . . . . . . . . . . . . . . . . . . 817
File URLs . . . . . . . . . . . . . . . . . . . . . . . . . . . . . . . . . . . 818
Masks . . . . . . . . . . . . . . . . . . . . . . . . . . . . . . . . . . . . 818
Matrices . . . . . . . . . . . . . . . . . . . . . . . . . . . . . . . . . . . 819
Points . . . . . . . . . . . . . . . . . . . . . . . . . . . . . . . . . . . . 819
Rectangles . . . . . . . . . . . . . . . . . . . . . . . . . . . . . . . . . . 819
Resolution . . . . . . . . . . . . . . . . . . . . . . . . . . . . . . . . . . 819
Looking at Global Methods . . . . . . . . . . . . . . . . . . . . . . . . . . . 820
alert(message) . . . . . . . . . . . . . . . . . . . . . . . . . . . . . . . 820
confirm(message) . . . . . . . . . . . . . . . . . . . . . . . . . . . . . 820
fw.yesNoDialog(text) . . . . . . . . . . . . . . . . . . . . . . . . . . . . 821
prompt(caption, text) . . . . . . . . . . . . . . . . . . . . . . . . . . . 821
WRITE_HTML(arg1[, arg2, . . ., argN]) . . . . . . . . . . . . . . . . . . 822
write(arg1[, arg2, . . ., argN]) . . . . . . . . . . . . . . . . . . . . . . . 823
013662-1 FM.F 8/2/02 2:12 PM Page xxxvi
Fireworks Seminar

xxxviiContents
Exploring the Fireworks Global Object . . . . . . . . . . . . . . . . . . . . . 823
fw . . . . . . . . . . . . . . . . . . . . . . . . . . . . . . . . . . . . . . . 823
Document . . . . . . . . . . . . . . . . . . . . . . . . . . . . . . . . . . 829
Errors . . . . . . . . . . . . . . . . . . . . . . . . . . . . . . . . . . . . 838
Find . . . . . . . . . . . . . . . . . . . . . . . . . . . . . . . . . . . . . 839
Files . . . . . . . . . . . . . . . . . . . . . . . . . . . . . . . . . . . . . 843
Dissecting Hotspot Objects . . . . . . . . . . . . . . . . . . . . . . . . . . . 846
exportDoc . . . . . . . . . . . . . . . . . . . . . . . . . . . . . . . . . . 847
Image maps . . . . . . . . . . . . . . . . . . . . . . . . . . . . . . . . . 849
Behaviors . . . . . . . . . . . . . . . . . . . . . . . . . . . . . . . . . . 851
Looking at Slice Objects . . . . . . . . . . . . . . . . . . . . . . . . . . . . . 853
SliceInfo object . . . . . . . . . . . . . . . . . . . . . . . . . . . . . . . 853
Slices object . . . . . . . . . . . . . . . . . . . . . . . . . . . . . . . . . 856
Accessing the Fireworks API . . . . . . . . . . . . . . . . . . . . . . . . . . 858
Document functions . . . . . . . . . . . . . . . . . . . . . . . . . . . . 858
Fireworks functions . . . . . . . . . . . . . . . . . . . . . . . . . . . . 859
History panel functions . . . . . . . . . . . . . . . . . . . . . . . . . . 860
Part VIII: Appendixes 863
Appendix A: A Web Primer . . . . . . . . . . . . . . . . . . . . . . . . 865
Appendix B: Keyboard Shortcuts . . . . . . . . . . . . . . . . . . . . . 889
Appendix C: What’s on the CD-ROM . . . . . . . . . . . . . . . . . . . 909
Index . . . . . . . . . . . . . . . . . . . . . . . . . . . . . . . . . . . . . . . 915
End-User License Agreement . . . . . . . . . . . . . . . . . . . . . . . . . 967
013662-1 FM.F 8/2/02 2:12 PM Page xxxvii
Fireworks Seminar

013662-1 FM.F 8/2/02 2:12 PM Page xxxviii
Fireworks Seminar

Come Seethe Fireworks
Part I begins with an overview of the Fireworks philoso-
phy and design. To get the most out of the program, you
need to understand the key advantages it offers and the defi-
ciencies it addresses. Part I takes you all the way from setting
up documents to getting the most out of Fireworks.
The opening chapters provide a full reference to the Fireworks
interface and its customizable features. Chapter 1 will be of
special interest to users of previous versions of Fireworks; it’s
a complete guide to all the newly added features in Fireworks
MX. Later chapters in Part I provide an overview of everything
Fireworks can do.
✦ ✦ ✦ ✦
In This Part
Chapter 1Welcome toFireworks
Chapter 2Understanding the Interface
Chapter 3Customizing Your Environment
Chapter 4Setting UpDocuments
✦ ✦ ✦ ✦
P A R T
II
023662-1 Part01.F 8/2/02 2:13 PM Page 1
Fireworks Seminar

023662-1 Part01.F 8/2/02 2:13 PM Page 2
Fireworks Seminar

Welcome toFireworks MX
Every Fourth of July, I sit with my friends and family on a
neighbor’s rooftop to watch the fireworks explode over
Manhattan. Almost every apartment building roof around us
holds a similar gathering. Everyone oohs and ahhs to his or
her own view of the spectacular light show; some of the pat-
terns and images are familiar, whereas others have never been
seen before.
The World Wide Web has become a global light show, running
around the clock. The graphics that fill Web pages explode
with brilliance, intensity, and meaning, and are viewed by mil-
lions, each from his or her own perspective. The Web is still a
relatively new medium, uniquely capable of both enlightening
and entertaining; it’s also an extremely voracious medium, as
thousands upon thousands of new and updated Web sites
emerge daily. In addition to content, the Web needs graphics:
all manner of images, illustrations, logos, symbols, and icons.
Some of the images are static, others are animated, and still
others are interactive. Design has definitely entered a new
frontier.
To contribute the most to this new medium, new tools are
necessary. The Web is screen-, not print-based, and it has its
own set of rules and guidelines. Though some print-oriented
graphics tools have begun to extend themselves with the
Internet in mind, a completely new tool was needed — a tool
that did everything Web designers needed and did it effi-
ciently, but with flair. A tool capable of creating graphics light
enough to soar, yet powerful enough to brighten the night.
Enter Fireworks.
11C H A P T E R
✦ ✦ ✦ ✦
In This Chapter
Understanding theFireworks philosophy
Bringing vectors andbitmaps together
Integrating withexisting images
Linking to the Web
Managing workflow
Discovering theenhancements inFireworks MX
✦ ✦ ✦ ✦
033662-1 ch01.F 8/2/02 2:22 PM Page 3
Fireworks Seminar

4 Part I ✦ Come See the Fireworks
Mastering Fireworks MX — the Next-Generation Graphics Package
Fireworks is the premier Web graphics program from Macromedia. As a next-
generation graphics package, Fireworks has definitely benefited from all the great
computer graphics programs that came before it. But whereas much of Fireworks
functions in a manner similar to other graphics tools — which significantly shortens
the learning curve — the program is purely focused on the Web and offers many
innovative Web-only features.
Fireworks was built from the ground up with the Web in mind. Before creating
Fireworks, Macromedia examined the way graphic designers were working and
found that most designers used a wide variety of tools to achieve their goals.
Typically, an initial design was laid out in a vector drawing program such as
FreeHand or Adobe Illustrator. But vectors aren’t native to the Web, so the illustra-
tion was then ported to an image-editing program, such as Photoshop or Corel
Photo-Paint. In these pixel-based programs, special effects, such as beveled edges,
were laboriously added and text was merged with the bitmap before it was
exported to an optimizing program. An optimizer, such as DeBabelizer, was neces-
sary to ensure that Web-safe colors were used and that the file size was the smallest
possible for the bandwidth-limited Internet. Next came integration into the Web:
linking URLs, image maps, rollovers, slices, and more. A slew of small specialty pro-
grams filled these needs. Moreover, many designers were forced to learn HTML and
JavaScript; because no program did everything that was needed, many tasks had to
be done manually. Adding to the intense difficulty of mastering all the various pro-
grams was the problem of modifying an image. If a client wanted a change — and
clients always want changes — the whole graphic had to be rebuilt from scratch.
Combining the best featuresFireworks offers a revolutionary way to create bitmap graphics for the Web. It com-
bines the best features of all the various graphics programs:
✦ Vector drawing tools for easy layout and editing
✦ Sophisticated, bitmap-editing tools for working with existing graphics and
scanned images
✦ Live effects for straightforward but spectacular special effects
✦ An export engine for file optimization to Web standards, with onscreen com-
parison views so that a Web designer can select the best image at the smallest
size
✦ HTML and JavaScript output tied to the graphics themselves
033662-1 ch01.F 8/2/02 2:22 PM Page 4
Fireworks Seminar

5Chapter 1 ✦ Welcome to Fireworks MX
Best of all, you can alter virtually every single aspect of a Fireworks graphic at any
stage. In other words, in Fireworks everything is editable, all the time. Not only is
this feature a tremendous time-saver, but it’s also a major production
enhancement — and the Web requires an extraordinary amount of material and
maintenance. Not only are new sites and Web pages constantly going online, but
existing pages also need continual updating. The underlying philosophy of
Fireworks — everything editable, all the time — reflects a deep awareness of the
Web designer’s real-world situation.
Emphasizing vectors and incorporating bitmapsIf you’re coming from a print background and you’re used to working with tools like
Photoshop, grasping certain Fireworks fundamentals is important. First, you should
realize that Fireworks is not primarily an image-editing program, although it has
excellent image-editing tools. Fireworks is fundamentally a vector-drawing program
that outputs natural-looking bitmap images. After you get the hang of drawing with
vectors — also known as paths and far more flexible than bitmaps — and applying
bitmap strokes and fills, you’ll never want to go back. With Fireworks, however, you
can go home again; switching between vectors and bitmap graphics is handled nat-
urally and intuitively by Fireworks.
Digging into screen orientationSecond, Fireworks, as a Web graphics engine, is screen — not print — oriented. The
resolution of an image on a monitor is typically far lower than the resolution of the
same image in print. Images are generally worked on and saved in their actual size;
the technique of working with a larger image for fine detail and then reducing it to
enhance the resolution won’t work with Fireworks — in fact, it will backfire, and
you’ll lose the very detail you were trying to instill. However, you can zoom in (up
to 6,400 percent) for detailed correction. Just keep in mind that, ultimately, all
images are viewed at 100 percent in the browser.
Getting the most from this Internet-based programThis brings us to the final point for designers who are new to the Web: Fireworks is
not just screen-based, it’s Internet-based. Many Fireworks options are geared
toward Web realities, such as the importance of a minimum file size, the limitations
of Web-safe colors, and capabilities of the majority of browsers. Fireworks is
extremely respectful of the Web environment and, when properly used, will help
you conserve production, browser, and Internet resources.
For a visual explanation of what Fireworks makes possible, turn to the color insert.Cross-Reference
033662-1 ch01.F 8/2/02 2:22 PM Page 5
Fireworks Seminar

6 Part I ✦ Come See the Fireworks
Getting the Best of Both Pixels and PathsAlthough the Web is almost always a bitmap-based medium, vectors — also called
paths — are much easier to control and edit. Fireworks bases most of its graphics
creation power on vectors, while offering a complete range of bitmap-editing
options. By switching effortlessly between paths and pixels, Fireworks smoothly
integrates them both.
Fireworks treats separate graphic elements as independent objects that you can
easily manipulate, arrange, and align. The two primary types of objects you will
work with in Fireworks are vector objects and bitmap objects. Fireworks’ object ori-
entation is also extremely useful for production work and greatly speeds up produc-
tion time. A single vector object that defines the basic outline of a button, for
example, can quickly be duplicated and positioned to build a navigation bar on
which each button is identical, except for the identifying text. For all the variety in
Figure 1-1, only three separate vector objects had to be drawn.
Figure 1-1: Reuse simple path shapes as you create and modify graphics in Fireworks.
033662-1 ch01.F 8/2/02 2:22 PM Page 6
Fireworks Seminar

7Chapter 1 ✦ Welcome to Fireworks MX
Using vector tools with organic bitmapsFor ultimate flexibility, Fireworks separates the stroke, fill, and effects of its objects
from the objects themselves. This enables the Web designer to create almost end-
less combinations for custom artwork, while keeping each element individual and
editable. If the client loves the orange glow around a button, but wants the text to
be centered instead of flush right, it’s no problem in Fireworks. Changing one
aspect of a graphic — without having to rebuild the image from scratch — is one of
Fireworks’ key strengths.
Although Fireworks depends on vector objects to create the underlying structure of
its graphics, what goes on top of that structure (the stroke, fill, and effects) is dis-
played with pixels, as shown in Figure 1-2.
Figure 1-2: With no stroke, fill, or effect specified, a vector object’s underlying path is clearly visible (left). After you apply a fill and/or stroke and/or effect, though, you can zoom in and see that Fireworks’ visible elements are made up entirely of pixels (right).
Pixel components are calculated with numerous variables and, as a result, give an
organic feel to Fireworks vector objects. Pixels are recalculated and reapplied each
time the path structure is changed, as shown in Figure 1-3. This procedure elimi-
nates the distortion that occurs with other programs that just reshape the pixels. In
a sense, when you alter a path in Fireworks, the program quickly redoes all the
work that you have done since you initially created the object.
033662-1 ch01.F 8/2/02 2:22 PM Page 7
Fireworks Seminar

8 Part I ✦ Come See the Fireworks
Figure 1-3: Change the shape of a Fireworks object and the bitmap fill, stroke, and other properties are recalculated and reapplied.
To find out more about strokes, see Chapter 8. You can find out more about fills inChapter 11.
Exploring bitmap compatibilityAs a next-generation graphics tool, Fireworks gracefully respects much of the
imagery that has been previously created. With a full range of import filters,
Fireworks can open and edit files from Photoshop, CorelDraw, FreeHand, and many
more tools. Fireworks offers a full complement of bitmap selection tools, including
Marquee, Lasso, and Magic Wand, as well as pixel-level drawing tools, such as
Pencil and Eraser.
Filters are an important aspect of an image-editing program’s feature set, and
Fireworks is no slouch in that respect, either. In addition to various built-in filters,
such as Gaussian Blur, Invert, and Sharpen, Fireworks is compatible with the
Photoshop filter standard. Consequently, it works with any third-party plug-in that
adheres to the standard, including Kai’s Power Tools or Alien Skin’s Eye Candy and
Xenofex plug-ins. In fact, three of the Eye Candy 4000 filters, including the Alien
Skin’s Motion Trail filter shown in Figure 1-4, are included with Fireworks as Eye
Candy 4000 LE (Limited Edition). What’s more, you can easily include all the third-
party plug-ins that you use in Photoshop by just editing a single preference.
Cross-Reference
033662-1 ch01.F 8/2/02 2:22 PM Page 8
Fireworks Seminar

9Chapter 1 ✦ Welcome to Fireworks MX
Figure 1-4: Alien Skin’s Motion Trail filter is included with Fireworks as part of Eye Candy 4000 LE.
Want to know more about using third-party filters in Fireworks? Turn to Chapter 12.
Learning Live EffectsOne of the most challenging aspects of Web graphics used to be special effects,
such as applying beveled edges and drop shadows. Fireworks takes all the complex,
painstaking layer and mask manipulation these effects used to require and replaces
it with Live Effects. Live Effects provides almost one-step ease with sophisticated
variations for such effects as Inner Bevel, Outer Bevel, Drop Shadow, Glow, and
Emboss.
Not only are these effects straightforward to create in Fireworks, but they adapt to
any changes made to the object itself — hence, the name Live Effects. This feature
is important for modifying graphics, and it speeds up production work tremen-
dously. You can even batch process a group of files, reducing them in size, and the
effects are scaled and reapplied automatically.
In addition to working with Fireworks’ built-in Live Effects, Fireworks will happily co-
opt many Photoshop-compatible image filters that you may have installed as Xtras.
These filters appear on the menu in the Effects section of the Property inspector, as
shown in Figure 1-5, and are as “live” as any other Live Effect. In other words, you
can apply Photoshop filters to vector objects while they remain editable, and the
effects themselves can be edited, removed, or reordered at any time, too. What’s
more, you can name effect combinations and save them for later use.
Cross-Reference
033662-1 ch01.F 8/2/02 2:22 PM Page 9
Fireworks Seminar

10 Part I ✦ Come See the Fireworks
Figure 1-5: The Effects feature enables you to apply, remove, and reorder Fireworks Live Effects, as well as Photoshop-compatible filters while maintaining the editability of all settings.
For detailed information on Live Effects, see Chapter 12.
Focusing on stylesStyles enable you to consistently apply the same look and feel to any number of
objects. Fireworks styles quickly replicate strokes, fills, effects, and even text set-
tings. Web designers can use styles to keep a client’s Web site looking consistent
across the board. Additionally, because styles can be exported as files and shared,
a lead designer can create a base style for a Web graphic, which can then be
applied on a production basis to the rest of the site.
Styles also provide a way to audition different looks for a single object because you
can quickly and easily apply complex groups of settings one after the other, as
shown in Figure 1-6.
Macromedia offers a huge range of prebuilt styles, in addition to the handful of
styles that are available by default in the Styles panel. Find the prebuilt styles
on the Fireworks CD-ROM, or at the Macromedia Exchange (www.macromedia.com/exchange).
Cross-Reference
033662-1 ch01.F 8/2/02 2:22 PM Page 10
Fireworks Seminar

11Chapter 1 ✦ Welcome to Fireworks MX
Figure 1-6: A basic geometric shape (left) quickly takes on a new life after styles are applied (center and right).
Styles are a major time- and work-saver; to find out more about them, see Chapter 16.
Looking at animationBefore Fireworks, one of the bevy of tools in a Web designer’s arsenal was often a
package to create animated GIFs (graphics stored in the Graphics Interchange
Format), often specifically for creating banner ads. This type of separate program is
no longer necessary: Fireworks enables Web designers to build, preview, and export
animated GIFs in any size or shape. Naturally, you can take advantage of all the
Fireworks vector and bitmap editing tools to create and edit your animation.
You can turn any Fireworks object into a symbol and store it in the Library. Copies
of symbols are called instances. Multiple instances can be tweened — you make the
beginning and end of an animation, and Fireworks extrapolates the middle for
you — to create an animation in record time. Tweening can imply motion across the
canvas or a change in an effect setting or other property. You could, for example,
create an animated fade by tweening a fully opaque instance with one that’s fully
transparent.
In addition to basic frame-by-frame animation, Fireworks also offers special ani-
mated symbols with always-editable animation properties that make creating and
editing animation in Fireworks a breeze (see Figure 1-7). The Animate Selection fea-
ture moves, rotates, scales, and fades any selected graphic over any number of
frames to automate the animation creation process.
Animation is a specialized but integral aspect of Web graphics. To find out moreabout it, turn to Part VI.
Cross-Reference
Cross-Reference
033662-1 ch01.F 8/2/02 2:22 PM Page 11
Fireworks Seminar

12 Part I ✦ Come See the Fireworks
Figure 1-7: This single animation symbol is easily created and stretches across multiple frames of a Fireworks document.
Linking to the WebWhat do you call a graphics program that doesn’t just output graphics? In the case
of Fireworks, I call it a major innovation, and a necessity for working Web artists.
On the surface, a Web page appears to be composed of images and text, but under-
neath that, it’s all code. Fireworks bridges the gap between the images of a Web
page and its HTML and JavaScript code to create image maps, slices, rollovers, and
much more. Fireworks even gives you the option of choosing different styles of
code, depending on which Web authoring tool you use.
Fireworks is fully integrated with the Web in mind. Every aspect of the program,
from Web-safe color pickers to export optimization, keeps the Internet target clearly
in focus. Even functions common to other programs have been given a special Web-
oriented twist. For example, the capability to output a graphic to print is invaluable
to Web designers as a way to present comps to clients; in Fireworks, you can print
an image the way it will appear on the Web, or at a higher print resolution — it’s
your choice.
Delving into hotspots and slicesHotspots and slices are frequently used elements in Web page design. Until
Fireworks came along, however, designers had to create them using a program out-
side their usual graphics tools, or designers had to tediously handcraft them indi-
vidually. A hotspot is used as part of a Web page image map and is made of a series
of x, y coordinates — elements definitely not in traditional visual artists’ vocabulary.
Fireworks enables you to draw out your hotspot, just as you would any other
object, and it handles all the math output for you.
033662-1 ch01.F 8/2/02 2:22 PM Page 12
Fireworks Seminar

13Chapter 1 ✦ Welcome to Fireworks MX
Slice is a general term for the different parts of a larger image that has been carved
into smaller pieces for faster loading, or to incorporate a rollover. The separate
parts of an image are then reassembled in an HTML table. If it sounds to you like an
overwhelming amount of work, you’re right — if you’re not using Fireworks. Slicing
an image is as simple as drawing slice objects, as shown in Figure 1-8, and choosing
Export. Fireworks builds the HTML table for you. Additionally, Fireworks lets you
optimize different slices, exporting one part as a JPEG (Joint Photographic Experts
Group) image and another as a GIF (or whatever combination gives you the highest
quality at the smallest file size).
Figure 1-8: You draw the slice objects andFireworks will do the cutting — and add theHTML.
Explore more of what’s possible with Fireworks hotspots and slices in Chapter 20.
Dissecting the URL panelTo take the fullest advantage of Fireworks HTML and JavaScript output, you need to
attach hyperlinks or URLs to your images. You can import URLs from URL libraries,
bookmark files, or HTML pages through the URL panel. Not only does this sidestep
the drudgery of manually entering Web links, it also eliminates any typing errors
you might otherwise have made in the process. After these URLs are in the URL
panel, you can easily apply them to slices or to image map hotspots in order to
Internet-enable navigation bar buttons.
Evaluating images with BehaviorsStatic images are no longer enough on the Web; interactive images — images that
react in some way when selected by the user — are a requirement for any state-of-
the-art Web page. Fireworks handles this interactivity through a technique known
as Behaviors. A Behavior is a combination of image and code: quite complex HTML
and JavaScript code, to be exact. But when you apply a Behavior in Fireworks, all
the code writing is handled for you.
A Fireworks Behavior can display a message when users pass their pointers over a
particular image, or it can swap one image for another. Fireworks can even swap an
image in one place if a graphic in another place is selected. Pop-up menu navigation
systems are a snap with Fireworks’ Set Pop-up Menu Behavior. Best of all, you can
choose to output generic HTML code, or code that’s optimized for your favorite
Cross-Reference
033662-1 ch01.F 8/2/02 2:22 PM Page 13
Fireworks Seminar

14 Part I ✦ Come See the Fireworks
Web authoring tool. Fireworks includes application-specific output templates for
Macromedia Dreamweaver, Adobe GoLive, and Microsoft FrontPage. If you have the
need and the savvy, you can also create custom templates.
For more information about Behaviors, check out Chapter 21.
Optimizing for the WebAn overriding concern of many Web designers is file optimization: How do you get
the best-looking image possible at the smallest size? Fireworks enables you to com-
pare the results of up to four different file compression views simultaneously, right
in the document window. Monitoring the way your work will look upon export is
easy; just click one of the document window preview tabs, as shown in Figure 1-9.
Figure 1-9: Quickly find the highest-quality image at the lowest possible size by comparing your original image with an optimized version, right in the workspace.
The Optimize panel contains the varied export options a Web artist requires, easily
accessible at any time. And colors can be edited, locked, snapped to Web-safe, or
made transparent with a click of the mouse in the Color Table panel. You’ll also find
animation timing controls in the Frames panel.
To get the most out of exporting in Fireworks, check out Chapter 15.Cross-Reference
Cross-Reference
033662-1 ch01.F 8/2/02 2:22 PM Page 14
Fireworks Seminar

15Chapter 1 ✦ Welcome to Fireworks MX
Integrating with Dreamweaver MXMacromedia’s Dreamweaver is a world-class Web authoring tool, now made even
better through a tighter integration with Fireworks. Images placed in Dreamweaver
pages are directly editable in Fireworks, as shown in Figure 1-10. Moreover,
Dreamweaver contains commands that directly access Fireworks features or assist
in importing Fireworks HTML code. In fact, the scriptability of Fireworks allows
Dreamweaver commands to actually control Fireworks.
Figure 1-10: Send individual graphics or sliced images from Dreamweaver for editing in Fireworks with the click of a button.
The integration is not just apparent from the Dreamweaver side, either. Fireworks
outputs standard Dreamweaver code or Dreamweaver Library code with Fireworks
Behaviors that are editable within Dreamweaver, as if they were applied in
Dreamweaver itself. The two programs are also moving closer to each other from a
usability standpoint, with the most recent versions of both applications featuring a
common user interface.
For all the details on maximizing the Fireworks-Dreamweaver combination, seeChapter 22.
Cross-Reference
033662-1 ch01.F 8/2/02 2:22 PM Page 15
Fireworks Seminar

16 Part I ✦ Come See the Fireworks
Stepping over to Flash MXDreamweaver isn’t the only Macromedia product that integrates with Fireworks —
Fireworks MX also works quite well with Flash MX, Macromedia’s high-profile ani-
mation and application development tool. In addition to sharing a common panels
and Property Inspector interface, Fireworks and Flash have a fairly porous barrier
that permits graphic elements to travel from one to the other with minimum alter-
ation. The connectivity between Fireworks and Flash enables a design to be
comped in Fireworks using its enhanced drawing tools and brought into Flash for
animation and compression.
Here are a few of the application-to-application moves possible:
✦ Copy a vector graphic in Fireworks and paste it directly in Flash — or vice
versa.
✦ Import a PNG file from Fireworks directly into Flash. You can choose whether
to keep the Fireworks objects, including text, editable or flatten them into a
bitmap.
✦ Export any Fireworks file as a Flash player (or SWF) file. Animated sequences
stretching over frames are automatically put into separated keyframes in
Flash.
✦ Bitmaps created in Fireworks and imported into Flash can be sent back to
Fireworks for editing — and then returned to Flash with all the changes intact.
Examining Production ToolsAlthough the Web offers plenty of room for creative expression, creating Web
graphics is often — bottom line — a business. To succeed at such a business, you
need a tool capable of high production output, and Fireworks certainly fits the bill.
You can insert whole pages of URLs at a time, rescale entire folders of images, or
update all the text embedded in a Web site’s images.
Grasping batch processingThe large number of images in a typical Web page has made batch processing a vir-
tual necessity. It’s not at all uncommon for a client to request that thumbnail
images of an entire product line be created for an online catalog. With batch pro-
cessing, just point to the folder of full-size images and tell Fireworks whether to
scale them to a particular pixel size or to a particular percentage.
Another great timesaver is the Find and Replace panel. Find and Replace in a graph-
ics program? What use could that possibly have? Very far-reaching uses, to be
033662-1 ch01.F 8/2/02 2:22 PM Page 16
Fireworks Seminar

17Chapter 1 ✦ Welcome to Fireworks MX
frank. Fireworks can search and replace text, fonts, colors, or URLs in any Fireworks
file or a group of files. What’s more, you can even search for and snap non-Web-safe
colors to their nearest Web-safe counterparts.
Chapter 18 has everything you need to know about batch processing in Fireworks.
Using automationNothing eats up time and patience like having to do the same thing over, and over,
and over again. Unfortunately, Web production features this kind of workflow all too
often. The same steps are often required again and again. Chances are, if you have
to do it more than once, you have to do it ten times.
In perhaps its simplest role, the History panel (see Figure 1-11) provides fine con-
trol over Undo steps, allowing you to reverse course at any time with pinpoint accu-
racy. Look a little deeper, though, and you’ll notice that the History panel is also the
heart of the Fireworks scripting and automation system.
Figure 1-11: Is the History panel an enhanced Undo or a macro recorder? Both.
Select any step or group of steps in the History panel and you can instantly turn
them into a command that’s automatically added to the Commands menu. As useful
as this feature is on its own, the History panel goes further still: Each step is actu-
ally represented by JavaScript code, which you can copy to the Clipboard and then
paste into a text editor for refinement.
Dive into Fireworks automation in Chapter 19.Cross-Reference
Cross-Reference
033662-1 ch01.F 8/2/02 2:22 PM Page 17
Fireworks Seminar

18 Part I ✦ Come See the Fireworks
Extending Fireworks with custom commandsThe underlying architecture that makes it possible to repeat steps in the History
panel form the foundation of Fireworks’ extensibility layer. One manifestation of
this extensibility is that commands from the History panel may be saved and
replayed later. Furthermore, custom commands — a combination of JavaScript and
Fireworks-specific code — may be created independently of the History panel and
run at will; these scripts are saved as .jsf files. Found under the Commands menu,
the simplest of these extensions range from converting an image to sepia tone to
rearranging the panel sets.
Fireworks MX offers much more than just Javascript commands, however. Thebiggest drawback to .jsf files was that the user interface was severely limited —typically, only a single text field was available for user input. With Fireworks MX, anew era in extensiblity dawns, born of the marriage of Fireworks and Flash tech-nology. Now, Fireworks extensions employ Flash interfaces to gather user parame-ters and an extraordinary range of automation is possible. Certain extensions, suchas the Align panel, have been incorporated into the standard Fireworks workflowwhile others, such as Arrowheads, shown in Figure 1-12, are available under theCommands menu. Even more extensions are available by visiting the MacromediaWeb site by choosing Help ➪ Fireworks Exchange.
Figure 1-12: The Arrowheads command, by Kleanthis Economou (this book’s technical editor), gets its sophisticated user interface from Flash, but works as a Fireworks command.
NewFeature
033662-1 ch01.F 8/2/02 2:22 PM Page 18
Fireworks Seminar

19Chapter 1 ✦ Welcome to Fireworks MX
Learning What’s New in Fireworks MXWith this version, Fireworks receives the full treatment: a major face-lift and deep
enhancements under the hood. The improvements can be categorized into three
areas: usability, graphics creation, and Web connectivity.
Looking at the user interfaceUser interface enhancements may not qualify as a “feature” for some people, but
they can have an incredible impact on your day-to-day work in an application
because changes are literally at your fingertips. Significant enhancements, such as
those implemented in Fireworks MX, greatly increase productivity and workflow.
User interface enhancements include the following:
✦ Fireworks MX has a whole new look — complete with Property Inspector and
docking panels, and what’s more, it shares the interface with other
Macromedia applications Dreamweaver MX and Flash MX.
✦ Speaking of new looks, Macintosh OS X and Windows XP users will appreciate
the system native look and feel.
✦ Fireworks now supports multiple users — great for design teams working with
a common set of preferences and extensions.
✦ The Tools panel is clearly divided now between bitmap and vector tools.
✦ Slices are easier to resize thanks to draggable slice guides.
✦ New view modes, selectable from the Tools panel, open up the display
options. Now users can choose between the standard screen mode, full screen
mode, and full screen mode with menus.
✦ Fireworks’ zoom control has increased its flexibility; instead of the fixed mag-
nification settings, zoom is now totally variable.
For details on all the user interface changes, see the rest of the chapters in Part I.
Exploring graphics creationWith each new release, Fireworks becomes a more focused drawing and bitmap-
editing tool.
Graphics-creation enhancements include the following:
✦ Ever realize while you are drawing a new element that it really should be in a
different place? Now you can suspend your drawing temporarily by holding
down the spacebar and move your object wherever you like. In addition to
working with drawing tools such as the rectangle, oval, and polygon, the space-
bar move facility is available when cropping, slicing, or dragging out a marquee.
Cross-Reference
033662-1 ch01.F 8/2/02 2:22 PM Page 19
Fireworks Seminar

20 Part I ✦ Come See the Fireworks
✦ Text — whether for logos, buttons, or body copy — is a key part of any Web
designer’s toolbox. Starting in Fireworks MX, you can enter text directly onto
the canvas, or, if you prefer, use the Text Editor as before.
✦ If you’re working with blocks of text, you’ll really appreciate the new para-
graph options such as first line indent and spacing control before or after
paragraphs.
✦ A host of new bitmap editing tools are on board including Blur, Sharpen,
Smudge, Dodge, and Burn.
✦ Transparency is now an option for gradients fills and can be applied to any
color in the gradient range at any degree of opacity.
Discovering Web connectivityWhen Fireworks first appeared, its capability to output HTML code was like a
rocket taking off. Now, other applications have followed suit, but Fireworks has con-
tinued to build on its excellent history, bringing the two worlds of Web designers —
graphics and code — closer together.
Web connectivity enhancements include the following:
✦ The popular Pop-up Menu Behavior has been greatly improved. In addition to
vertical drop-down menus, horizontal flyout menus are also supported.
Numerous parameters — such as cell padding, border color and width, and
menu delay — greatly increase the designer’s control over the final appear-
ance and interactivity.
✦ It’s not uncommon for Web designers to inherit a Web site designed by some-
one else and have to make modifications — without access to the source files.
In these situations, Fireworks’ new Reconstitute Table command is invaluable.
Reconstitute Table takes a completed Web page and rebuilds each table of
sliced graphics it finds. While this feature works with any HTML page, it really
shines with Fireworks tables where even interactive Behaviors are rebuilt.
✦ Look out HTML, XHTML is coming fast — and Fireworks is ready now. XHTML
is the next generation of HTML and offers increased connectivity to Web
devices other than browsers, such as PDAs and wireless phones. Starting with
this version, Fireworks is capable of exporting XHTML-compliant code.
✦ As XHTML crosses the browser barrier, UTF-8 spans international language
borders. UTF-8 is a text encoding method that enables the display of multiple
character sets in a single Web page. If you have a need to export text in
Chinese, Portuguese, or another language, Fireworks has you covered.
Find out more about Web connectivity in Part V.Cross-Reference
033662-1 ch01.F 8/2/02 2:23 PM Page 20
Fireworks Seminar

21Chapter 1 ✦ Welcome to Fireworks MX
Summary“Pick the right tool for the job,” the saying goes — and Fireworks is definitely the
right tool for the job of creating Web graphics. In many cases, it’s the only tool
you’ll need to handle every aspect of this particular job: image creation, editing,
optimization, and Web integration. It’s no surprise that in the past, Web designers
had to master many programs to even come close to what you can accomplish with
Fireworks. If you’re looking at Fireworks for the first time, keep these points in
mind:
✦ Fireworks replaces an entire bookshelf of programs that Web designers had
previously adapted for their use. With only one program to master, designers
can work more efficiently and creatively.
✦ Fireworks is equally at home with vector objects or bitmap objects. Moreover,
it combines vector structures with bitmap surfaces in order to make editing
easier and the results cleaner.
✦ Fireworks works with Photoshop and many other existing file types — and can
even use third-party Photoshop-compatible filters as Xtras or even as Live
Effects.
✦ One of Fireworks’ key capabilities is to connect you easily to the Web. To this
end, Web-safe palettes are always available and HTML and JavaScript code —
standard or custom — is just a click away.
✦ The more you work on the Web, the faster you realize just how much work
there is to do. Fireworks is a terrific production tool and makes updating
graphics, via search and replace operations or batch processing, an auto-
mated process instead of a manual drudge.
✦ Fireworks MX introduces a new user interface, ensuring a better experience
for users of multiple Macromedia applications, such as Fireworks,
Dreamweaver, and Flash.
In the next chapter, you take an extensive tour of the Fireworks user interface and
all of its menu commands.
✦ ✦ ✦
033662-1 ch01.F 8/2/02 2:23 PM Page 21
Fireworks Seminar

033662-1 ch01.F 8/2/02 2:23 PM Page 22
Fireworks Seminar

Understandingthe Interface
Fireworks was designed to meet a need among Web graph-
ics artists: to simplify workflow. Before Fireworks, design-
ers typically used different programs for object creation,
rasterization, optimization, and HTML and JavaScript cre-
ation. Fireworks combines the best features of several key
tools — while offering numerous innovative additions of its
own — into a sophisticated interface that’s easy to use and
offers many surprising creative advantages. After you’ve dis-
covered the power of Fireworks, designing Web graphics any
other way is hard.
With Fireworks, the designer has tools for working with both
vector objects and bitmap objects. You’ll even find ways to
combine the two different formats. When your document is
ready to make the move to the Web, Fireworks acts as a
bridge to the HTML environment by allowing you to create the
necessary code in a point-and-click manner.
As with any truly powerful computer graphics program, exam-
ining all the tools and options that Fireworks has to offer at
one time can be overwhelming. However, that’s not how most
artists work. You may find it easier to familiarize yourself with
a new tool by carrying out a specific task. It’s fine to go all the
way through this chapter — which covers every element of
the Fireworks interface — but you’ll probably get the most
value from the chapter elements, especially the menu-by-
menu description of commands at the end of the chapter, by
using them as a reference guide.
22C H A P T E R
✦ ✦ ✦ ✦
In This Chapter
Examining theFireworksenvironment
Working in thedocument window
Familiarizing yourselfwith the Tools panel
Using Windowstoolbars
Mastering theProperty inspector
Optimizing thefloating panels
Managing the menus
✦ ✦ ✦ ✦
043662-1 ch02.F 8/2/02 2:23 PM Page 23
Fireworks Seminar

24 Part I ✦ Come See the Fireworks
Examining the Fireworks EnvironmentWhether you start your graphics session by creating a new document or loading an
existing one, you’ll find yourself working within a complete environment that
includes pull-down menus, one or more document windows, and a selection of float-
ing panels, as shown in Figure 2-1. Each document window contains a single
Fireworks file; the menus and floating panels affect the file in the active document
window.
Figure 2-1: The Fireworks environment on both platforms includes menus, the Toolspanel, the Property inspector, one or more document windows, and a variety of otherfloating panels.
Fireworks for Windows (see Figure 2-2) features the same interface elements as its
Macintosh cousin, but also adds two toolbars and a context-sensitive status bar to
the mix. The toolbars mimic commonly used functions from the menus, such as
opening a document or arranging objects. The Windows version also uses a multi-
ple document interface that contains all the documents and interface elements
within the Fireworks application window. You can dock toolbars and panels to the
Floating panelsPull-down menusDocument window
Property inspectorTools panel Document controls
043662-1 ch02.F 8/2/02 2:23 PM Page 24
Fireworks Seminar

25Chapter 2 ✦ Understanding the Interface
application window, or float them as required, by dragging them toward or away
from the edges of the application window.
We examine each element of the complete Fireworks environment throughout this
chapter. Remember, you can refer to Figures 2-1 or 2-2 at any time if you find your-
self losing track of a particular item.
Figure 2-2: The Windows version of Fireworks has additional toolbars and uses a multiple document interface.
Understanding the Document WindowThe document window is the central focus of your work in Fireworks. Each
Fireworks document you open or create is contained within its own document win-
dow, with the filename and zoom setting displayed as the window’s title. When your
document has unsaved changes, Fireworks places an asterisk in the title bar of the
document window, or a dot inside the Close button on Mac OS X. This asterisk is
sometimes called a “dirty doc” indicator because it indicates that the document
you are looking at has been “dirtied” since it was opened and needs to be saved
to disk.
Application window Modify toolbarMain toolbar
043662-1 ch02.F 8/2/02 2:23 PM Page 25
Fireworks Seminar

26 Part I ✦ Come See the Fireworks
You can open multiple documents and display them simultaneously, as shown in
Figure 2-3. The menus and floating panels affect the file in the active document
window.
Objects are created and edited on the canvas within the document window. The
canvas is the active area of your document. To simplify editing at the edges of the
canvas, it is surrounded by a gray canvas border. When you zoom in on the edge of
a document, the canvas border provides some breathing room so that you can see
what you’re doing.
If you have multiple documents open and your workspace is getting cluttered, you
can organize the document windows in three different ways:
✦ Choose Window ➪ Cascade to stack your open documents on top of each
other in a diagonal, so that the title bar for each is visible.
✦ Select Window ➪ Tile Horizontal to see all open documents evenly distributed
from top to bottom in the document window.
✦ Select Window ➪ Tile Vertical to view all open documents evenly distributed
from left to right in the document window.
The Macromedia Common User Interface
The Web design workflow often involves more than one application. Many designers areworking mainly in a combination of Fireworks and Dreamweaver, or Fireworks and Flash.Unfortunately, previous versions of many of Macromedia’s own applications often featuredwildly divergent user interface (UI) conventions, such as different keyboard shortcuts anddifferent methods for hiding and showing floating panels. In short, Macromedia was notrewarding users for the time we spent learning one application’s user interface. Beginningwork in a second Macromedia application was often just like starting over. Moreover, differ-ent UI conventions made switching back and forth between two applications during thesame session more trouble than it needed to be.
With more recent versions, however, Macromedia’s applications have adopted interfaceelements from each other and now provide similar methods for accomplishing similar tasksno matter which Macromedia application you’re using. Some of the common elementsyou’ll notice if you switch between Fireworks and Dreamweaver are uniform keyboardshortcuts, customizable keyboard shortcuts, an optional launcher, located on each docu-ment window, for showing and hiding floating panels, and a Property inspector for modify-ing selections of objects. Focusing on the “cross-product UI” has also enabled Macromediato shake out a few longstanding UI quirks and provide the user with a sleeker, more intu-itive Fireworks experience.
043662-1 ch02.F 8/2/02 2:23 PM Page 26
Fireworks Seminar

27Chapter 2 ✦ Understanding the Interface
Figure 2-3: Each Fireworks file you open or create is contained within its own document window, and you can open multiple documents simultaneously.
You can also hide document windows that you’re not currently using. Mac OS 9
users can click the Windowshade button on a document window to hide all but the
title bar. Mac OS X users can click the Minimize Window button to minimize the
document window to the Dock. Windows users can click the Minimize button on a
document window to minimize its title bar to the bottom of the Fireworks applica-
tion window. Windows users can also click Maximize to dock a document window
to the application window, hiding all other windows. Clicking the document win-
dow’s Restore button undocks it.
In addition to multiple document windows for multiple documents, Fireworks can
also display multiple document windows for the same document. To open a new
view of a selected document, choose Window ➪ New Window, or use the keyboard
shortcut Ctrl+Alt+N in Windows (Command+Option+N for Macintosh). The new
document window opens at the same magnification setting as the original docu-
ment window but, as Figure 2-4 shows, you can easily zoom in for detail work on
one view while displaying the overall effect in another.
043662-1 ch02.F 8/2/02 2:23 PM Page 27
Fireworks Seminar

28 Part I ✦ Come See the Fireworks
Figure 2-4: Use the New Window command to open a new view of the same document if both pixel-level modifications and the big picture are required, such as when creating small icons.
Smart MaximizeA long-standing problem with applications that have customizable user interfaces is
that it’s difficult for the programmers to envision every possible way that users
might set up their workspace. Too often, you can end up opening a document just
to have its resize icon open underneath some portion of the UI. That’s not the case
with Fireworks. When you open a new document, Fireworks looks at the size of the
document and determines the optimal magnification and window sizing to show
you as much of your document as possible without hiding any portions of the docu-
ment window under the panels or the Property inspector.
Smart Maximize is new to Fireworks MX.
Document window controlsFireworks enables you to control what you see in a document window in a number of
ways. Tabs along the top of the document window enable you to preview your work
in-place; you’ll also find zoom and animation controls, and more (see Figure 2-5).
We’ll look at each of the document window controls in turn.
NewFeature
043662-1 ch02.F 8/2/02 2:23 PM Page 28
Fireworks Seminar

29Chapter 2 ✦ Understanding the Interface
Figure 2-5: Fireworks document window controls enable you to alter how your document is presented in the document window.
Original/Preview tabsWhen you open or create a document in Fireworks, the document window is set on
the Original tab, so that you can interact with and edit the objects on the canvas.
Choose one of the other tabs and Fireworks creates and displays a preview of your
work as it will appear in your exported final output.
You can switch from Original to one of the preview modes at any time. Fireworks
generates a preview based on the settings you select in the Optimize panel, as
shown in Figure 2-6. Control of the export color palette is also available here.
Although the 2-Up preview gives you a side-by-side view of the Original and Preview
views of a document, it only shows you half of each unless you manually expand
your document window. If you have the screen real estate available, another way to
get a side-by-side preview is to open a new document window for the same docu-
ment (Window ➪ New Window, as described previously) and set it to Preview.
For more on previewing and exporting, see Chapter 15.Cross-Reference
Quick Export menu
Canvas border
Canvas
Filename Export setting
Unsaved changes indicatorOriginal/Preview tabs
Pagepreviewbutton
SetMagnificationbutton
Exit Bitmap Mode button
Animationcontrols
043662-1 ch02.F 8/2/02 2:23 PM Page 29
Fireworks Seminar

30 Part I ✦ Come See the Fireworks
Figure 2-6: A preview of your work is never more than a click away with Fireworks’ in-place preview.
Quick Export menuThe upper right of the Fireworks document window features the Quick Export
menu, which enables you to quickly export images and HTML from Fireworks to
another application. With a single menu item, your Fireworks work is exported and
opened in Dreamweaver, for example. Options for Macromedia and other applica-
tions are provided.
The Quick Export menu allows you to export your document, or selected portionsof it, with a minimal amount of fuss.
See Chapter 15 for more about exporting from Fireworks.
Animation controlsWith these VCR-like buttons, you can play a frame-based animation straight
through, using the timing established in the Frames panel. You’ll also find buttons
that enable you to move through the animation a frame at a time, or to go to the
first or last frame.
See Chapter 23 for more about animation in Fireworks.Cross-Reference
Cross-Reference
NewFeature
043662-1 ch02.F 8/2/02 2:23 PM Page 30
Fireworks Seminar

31Chapter 2 ✦ Understanding the Interface
Exit Bitmap Mode buttonClick this Stop button to quickly exit bitmap mode, and enter vector mode. When
you’re already in vector mode, the Stop button is grayed out.
With the bitmap and vector tools listed separately in the Tools panel, Fireworksnow switches into bitmap mode or vector mode as soon as you select a tool fromthe appropriate category. This seamless mode switching simplifies your workflow.
Page PreviewThe Page Preview button displays the dimensions of your document in pixels.
When you click the Page Preview button, the width, height, and print resolution of
your document are displayed in a small pop-up window. Click anywhere outside or
on the pop-up window to dismiss it.
Magnification settingsWhether you’re working with pixels or vectors, a polished, finished graphic often
demands close-up, meticulous work. Likewise, the designer often needs to be able
to step back from an image in order to compare two or more large images for over-
all compatibility, or to cut and paste sections of a graphic. Fireworks offers a fast
Magnification control with numerous keyboard shortcuts for rapid view changes.
Fireworks uses a series of zoom settings, from 6 percent to 6,400 percent, for its
Magnification control. Because Fireworks always works with pixels (even when
they’re based on vectors), the magnification settings are predefined to offer the
best image pixel to screen pixel ratio. When an image is viewed at 100 percent mag-
nification, 1 screen pixel is used for each image pixel. Should you zoom in to 200
percent, 2 screen pixels are used for each image pixel. Zooming out reverses the
procedure: At 50 percent, each screen pixel represents 2 image pixels. Fireworks’
preset zoom method offers a full range of settings while maintaining an accurate
view of your image.
Clicking the arrow button in the Set Magnification option list displays the available
settings; alternatively you can choose View ➪ Magnification and then choose a per-
centage. Highlight the desired zoom setting and release the mouse button in order
to change magnifications. Fireworks also offers a variety of keyboard shortcuts to
change the zoom setting, as detailed in Table 2-1. In addition to specifying a magnifi-
cation setting, you can also have Fireworks fit the image in the current window.
With this command, Fireworks zooms in or out to the maximum magnification set-
ting possible — and still displays the entire image.
Fireworks MX adds a new feature called Variable Zoom. This allows you to selectthe Zoom tool and then drag out an area to zoom into. When you release themouse button, Fireworks zooms right into the selected area, filling your documentwindow with a full view of your selection. Zooming is no longer limited to presetlevels.
NewFeature
NewFeature
043662-1 ch02.F 8/2/02 2:23 PM Page 31
Fireworks Seminar

32 Part I ✦ Come See the Fireworks
Table 2-1Magnification Key Shortcuts
Magnification Windows Macintosh
50% Ctrl+5 Command+5
100% Ctrl+1 Command+1
200% Ctrl+2 Command+2
300% Ctrl+3 Command+3
400% Ctrl+4 Command+4
800% Ctrl+8 Command+8
1,600% Ctrl+6 Command+6
Zoom In Ctrl+Equals (=) Command+Equals (=)
Zoom Out Ctrl+Minus (–) Command+Minus (–)
Fit Selection Ctrl+Alt+Zero (0) Command+Option+Zero (0)
Fit All Ctrl+Zero (0) or Command+Zero (0) or double-click Hand tool double-click Hand tool
Switch to Zoom Hold down Ctrl+spacebar Hold down Command+tool temporarily spacebar
LauncherThe optional Launcher enables one-click access to commonly used floating panels.
Users of Macromedia Dreamweaver will recognize the Launcher right away. Turned
off by default, the Launcher is easily enabled via the Workspace: Show Tab Icons
option in the General category of the Preferences. Enabling this preference also
adds icons to your tabbed panels. If your document window is too narrow, you may
not be able to see the whole Launcher. If so, resize your document window until it is
wide enough to display the entire Mini-Launcher.
Clicking one of the buttons on the Launcher opens a panel if it is closed, brings a
panel to the front if it is behind another panel, or closes a panel if it is open and
already up front. To see what a Launcher button will do before you press it, hover
your mouse cursor over it until a descriptive tooltip appears. From left to right, the
Launcher buttons are for the Info, Color Mixer, Optimize, Layers, Library, Styles,
and Behaviors panels. Unlike Dreamweaver, you cannot customize the Launcher to
open any panels other than these, so you’re stuck with the default panel selection.
043662-1 ch02.F 8/2/02 2:23 PM Page 32
Fireworks Seminar

33Chapter 2 ✦ Understanding the Interface
The Launcher now has a preference so that you can enable it or disable it depend-ing on the way you work. It is disabled by default.
Floating panels are covered in more detail later in this chapter.
Display optionsMost of the time, Fireworks designers work in Full Display mode. In fact, this prac-
tice is so common that many designers don’t realize that another mode is even
available. Toggling the View ➪ Full Display command on and off controls whether
the current document is in Full Display or Draft Display mode. Draft Display shows
all vector objects with 1-pixel-wide outlines and no fill; bitmap objects are shown as
rectangles with an “X” in the middle.
If you have a complex document with multiple layers that each contain multiple
objects (see Figure 2-7), picking out the one object you would like to work on, or
getting a feel for the true alignment of objects that have complex strokes or image
filters applied, can sometimes be difficult.
Figure 2-7: In Full Display mode, picking out individual objects can be difficult.
Looking at your document in Draft Display mode (see Figure 2-8) pares the view
down to just the barest bones and enables you to pick out objects that are usually
obscured by other objects in Full Display mode.
Cross-Reference
NewFeature
043662-1 ch02.F 8/2/02 2:23 PM Page 33
Fireworks Seminar

34 Part I ✦ Come See the Fireworks
Figure 2-8: While you’re in Draft Display mode, only the outlines of your objects are visible.
Exploring the Tools PanelYou can find all the Fireworks drawing and editing tools in the Tools panel. To “pick
up” a tool, click its icon in the Tools panel. Your mouse cursor will change to reflect
the tool that’s currently active. Only one tool can be active at a time. Use the tool
by clicking the canvas. Some tools, such as the Marquee tool, require that you click
and drag to draw a selection. If you want to drag beyond the visible canvas area,
the document window will scroll automatically to follow your cursor.
The preceding paragraph assumes that you have not enabled the Precise Cursorsoption in the Editing category of the Preferences.
Vector and Bitmap tools are now in their own sections on the Tools panel, whichmakes them easier to access and understand.
The Tools panel is broken down into six sections to help keep the usage of particu-
lar tools as clear as possible. Tools located in the Bitmap section work only on
bitmaps, tools in the Vector section work only with vectors, and so on. The
Eyedropper, Paint Bucket, and Gradient tools, which work with both vectors and
bitmaps, have their own area between the Bitmap and Vector tool sections. Further,
tools that are similar, such as the Lasso and Polygon Lasso, are grouped together
into tool groups and accessed through a flyout. A tool group can be recognized by
the small triangle in the lower-right corner of the button; clicking and holding the
button causes the flyout to appear. After the tool group is visible, you can select
any of the tools in the group by moving the pointer over the tool and releasing the
mouse. Figure 2-9 shows a dissected Tools panel’s anatomy in great detail.
NewFeature
Note
043662-1 ch02.F 8/2/02 2:23 PM Page 34
Fireworks Seminar

35Chapter 2 ✦ Understanding the Interface
On OS X, there is no visual divider separating the Eyedropper, Paint Bucket, andGradient tools from the Bitmap tools. In Windows, and on OS 9, there is a dividerthat helps the user understand that those tools work with both bitmap and vectorobjects.
Figure 2-9: The Tools panel contains over 40 different creation and editing tools for both graphics and Web objects.
All but two of the tools have keyboard shortcuts. As befits a program that incorpo-
rates both bitmap and vector editing tools, these single-key shortcuts parallel the
shortcuts for some of the pixel-based tools in Photoshop, and vector-based ones in
FreeHand, where possible. If two or more tools share a keyboard shortcut (as with
M for Marquee and Oval Marquee), the key acts as a toggle between the tools; the
letter U toggles through the shape tools, for example. You can find the button for
each tool, as well as its keyboard shortcut and a brief description of the tool, in
Table 2-2. More detailed information on each tool is presented throughout this book
when the tool is used for various operations.
Hide slices Show slices
Stroke color wellFill color wellSwap stroke and fill colors
Set strokeand fill colorsto default
No stroke or fill color
Caution
043662-1 ch02.F 8/2/02 2:23 PM Page 35
Fireworks Seminar

36 Part I ✦ Come See the Fireworks
Tool flyouts now include the tool’s name and keyboard shortcut, which makes iteasier than ever to become familiar with Fireworks tools.
In the tables throughout this chapter, commands or tools listed in bold text arenew or have changed menu, or panel, locations in Fireworks MX.
Table 2-2Fireworks Tools
Button Name Shortcut Description
Pointer V or Zero Selects and moves objects
Select Behind V or Zero Selects and moves objects that arebehind other objects
SubSelection A or 1 Selects an object within a group or points on a vector path
Scale Q Resizes and rotates objects
Skew Q Slants, rotates, and modifies the perspective of objects
Distort Q Reshapes and rotates objects
Crop C Increases or decreases canvas size
Export Area C Exports a selected portion of adocument
Marquee M Selects a rectangular portion of a bitmap object
Oval Marquee M Selects an elliptical portion of a bitmapobject
Lasso L Selects a freely drawn area of a bitmap object
Polygon Lasso L Selects a polygon-shaped area of abitmap object
Magic Wand W Selects similarly colored areas of abitmap object
Brush B Draws strokes using the Stroke settingsin the Property inspector
Note
NewFeature
043662-1 ch02.F 8/2/02 2:23 PM Page 36
Fireworks Seminar

37Chapter 2 ✦ Understanding the Interface
Button Name Shortcut Description
Pencil B Draws single-pixel freeform strokes
Eraser E Deletes pixels from bitmap objects
Blur R Blurs pixels that the cursor is draggedacross
Sharpen R Sharpens pixels that the cursor isdragged across
Dodge R Lightens pixels that the cursor isdragged across
Burn R Darkens pixels that the cursor isdragged across
Smudge R Smudges pixels that the cursor is dragged across
Rubber Stamp S Repeats a portion of a bitmap object
EyeDropper I Picks up color from anywhere onscreen and applies it to the active color well
Paint Bucket G Fills the selected area with color,patterns, or textures and enables fills tobe adjusted
Gradient G Fills the selected area with gradients and enables them to be edited
Line N Draws straight lines
Pen P Adds points to vector paths
Vector Path P Draws freeform paths using the Strokesettings in the Property inspector
Redraw Path P Redraws portions of a selected vector path
Rectangle U Draws rectangles, rectangles withrounded corners, and squares
Rounded U Draws rectangles with a Rectangle Roundness setting of 30 percent
Ellipse U Draws ellipses and circles
Continued
043662-1 ch02.F 8/2/02 2:23 PM Page 37
Fireworks Seminar

38 Part I ✦ Come See the Fireworks
Table 2-2 (continued)
Button Name Shortcut Description
Polygon U Draws polygons and stars
Text T Inserts text objects
Freeform O Pushes or pulls a vector path with a variable-size cursor
Reshape Area O Reshapes an object’s area with avariable-size cursor
Path Scrubber (+) n/a Increases the stroke settings that are controlled by cursor speed or pen and tablet pressure
Path Scrubber (–) n/a Decreases the stroke settings that arecontrolled by cursor speed or pen andtablet pressure
Knife Y Cuts the paths of vector objects
Rectangle Hotspot J Draws an image-map hotspot area in arectangular shape
Circle Hotspot J Draws an image-map hotspot area in an elliptical shape
Polygon Hotspot J Draws an image-map hotspot area in apolygonal shape
Slice K Draws a slice object in a rectangular shape
Polygon Slice K Draws a slice object in a polygonalshape
Hand H, or press and Pans the view of a documenthold spacebar
Zoom Z Increases or decreases themagnification level of a document byone setting per mouse click, or drag toselect an area to zoom to
Certain tools have keyboard shortcuts that enable you to temporarily replace theactive tool. Press and hold Ctrl (Command) in order to switch to the Pointer tem-porarily, for example. You can also press and hold Ctrl+spacebar (Command+spacebar) in order to access the Zoom tool. Holding down the spacebar by itselftemporarily retrieves the Hand tool.
Tip
043662-1 ch02.F 8/2/02 2:23 PM Page 38
Fireworks Seminar

39Chapter 2 ✦ Understanding the Interface
Selecting the Proper ViewFireworks offers three different view modes depending on how you like to work. For
most people, the Standard Screen mode is all you need for day-to-day work, but it’s
always good to know that other options are available to you. Your view choices are
as follows:
✦ Standard Screen mode: This is the default mode that Fireworks starts up in. It
shows you all of the standard interface elements and UI components that
Fireworks has to offer.
✦ Full Screen with Menus mode: In this mode, your document is opened maxi-
mized, totally filling your screen so that you aren’t bothered by document
window edges.
✦ Full Screen Mode: This mode switches your entire screen black with the
exception of your panels and your canvas. This blocks out the menus as well.
The Full Screen with Menus and Full Screen modes are new to Fireworks MX.
Simply choose the method of working that feels the best to you and stick with it. Or,
switch between the different modes as needed depending on the project you’re
working on.
To get the most use out of the Full Screen with Menus and Full Screen modes, youcan hide all the visible floating panels by pressing F4. Then you can open just theinterface elements you really need, such as the Tools panel and the Propertyinspector, by choosing them from the Window menu.
On OS X, the Full Screen with Menus mode doesn’t expand past the Dock. If youreally wish to fill the entire screen, hide the Dock first by choosing Apple Menu ➪
Dock ➪ Turn Hiding On or by using the keyboard shortcut Command+Option+D.
Accessing Toolbars (Windows Only)Some people hate toolbars, and some people love them. Either way, they’re
expected in Windows applications and are a welcome part of Fireworks for
Windows for many users.
The two toolbars are Main and Modify. The Main toolbar contains common File and
Edit menu functions. The Modify toolbar contains Modify menu functions, such as
grouping, aligning, or rotating objects.
The toolbars are docked to the application window by default, but you can position
them anywhere within the Fireworks window by undocking them. To detach a
docked toolbar, click and drag the toolbar away from the application window. To
Caution
Tip
NewFeature
043662-1 ch02.F 8/2/02 2:23 PM Page 39
Fireworks Seminar

40 Part I ✦ Come See the Fireworks
dock a detached toolbar, drag the toolbar close to an edge of the Fireworks window
until it snaps into position, or double-click its title bar.
Fireworks for Windows also has a context-sensitive status bar that runs along the
bottom of the Fireworks window. We look at that in this section, as well.
Main toolbarThe Main toolbar, shown in Figure 2-10, displays a row of buttons that access the
most commonly used menu functions. The Main toolbar enables you to perform
several key file operations, such as creating a new document, opening or saving an
existing document, and exporting or importing an image, all with just one click. The
most often-used editing features — Undo, Redo, Cut, Copy, and Paste — are also
located on the Main toolbar. Table 2-3 describes each button on the Main toolbar.
Figure 2-10: The Main toolbar gives Windowusers one-click access to many commonlyused commands.
Table 2-3Main Toolbar
Button Name Description
New Creates a new document
Open Opens an existing document
Save Saves the current document
Import Imports a file into the current document
Export Exports the current document
Print Prints the current document
Undo Undoes the last action
Redo Redoes the last action that was undone
043662-1 ch02.F 8/2/02 2:23 PM Page 40
Fireworks Seminar

41Chapter 2 ✦ Understanding the Interface
Button Name Description
Cut Cuts the selected object to the Clipboard
Copy Copies the selected object to the Clipboard
Paste Pastes the Clipboard into the current document
Modify toolbarThe Modify toolbar, shown in Figure 2-11, offers single-click access to four primary
types of modifications:
✦ Grouping: Group or join two or more objects for easier manipulation. Buttons
are also available for ungrouping and splitting combined objects.
✦ Arranging: Position objects in front of or behind other objects. Objects can
also be moved on top of or underneath all other objects.
✦ Aligning: Align two or more objects in any of eight different ways, including
centered vertically or horizontally.
✦ Rotating: Flip selected objects horizontally or vertically, or rotate them 90
degrees, either clockwise or counterclockwise.
Figure 2-11: Group, arrange, align, or rotateselected objects with the Modify toolbar.
Instead of directly executing a command — like the other buttons on the Modify
toolbar — the Align button opens a pop-up toolbar that contains a range of align-
ment buttons. In Fireworks, alignment commands — whether they’re issued from
this pop-up toolbar or from the Modify ➪ Align submenu — align objects to a theo-
retical rectangle around the selection, not to the canvas as you might expect. For
example, if you select a circle on the left side of the canvas and a bitmap object on
the right, clicking the Align Left button causes the bitmap object to align along the
left edge of the circle because it is the leftmost object in the selection. Table 2-4
details each button on the Modify toolbar.
Read more about aligning objects in Fireworks in Chapter 13.Cross-Reference
Align pop-up
043662-1 ch02.F 8/2/02 2:23 PM Page 41
Fireworks Seminar

42 Part I ✦ Come See the Fireworks
Table 2-4Modify Toolbar
Button Name Description
Group Groups selected objects
Ungroup Ungroups previously grouped objects
Join Joins the paths of two vector objects
Split Separates previously joined vector objects
Bring Front Positions the selected object on top of all other objects
Bring Forward Moves the selected object one step closer to the top
Send Backward Moves the selected object one step closer to the bottom
Send to Back Positions the selected object underneath all otherobjects
Align Left Aligns the selected objects to the left edge of the selection
Center Vertical Axis Centers the selected objects on a vertical line
Align Right Aligns the selected objects to the right edge of the selection
Align Top Aligns the selected objects along the top edge of theselection
Center Horizontal Centers the selected objects on a horizontal lineAxis
Align Bottom Aligns the selected objects along the bottom edge ofthe selection
Distribute Widths Evenly distributes the selected objects horizontally
Distribute Heights Evenly distributes the selected objects vertically
Rotate 90° CCW Rotates the selected object 90 degrees counterclockwise
Rotate 90° CW Rotates the selected object 90 degrees clockwise
043662-1 ch02.F 8/2/02 2:23 PM Page 42
Fireworks Seminar

43Chapter 2 ✦ Understanding the Interface
Button Name Description
Flip Horizontal Flips the selected object horizontally
Flip Vertical Flips the selected object vertically
Status barThe status bar, shown in Figure 2-12, has two sections. The Selection Indicator dis-
plays the type of object or objects selected. If you’re in bitmap mode, the status bar
also displays the object type or selected object here as well. The Description indi-
cator provides tooltips for each of the tools that are selected or moused over. The
Status bar is not visible by default but its visibility is toggled by selecting View ➪Status Bar.
Figure 2-12: The status bar tells you what types of objects you have selected and offers context-sensitive tips.
The Property inspectorThe Property inspector, shown in Figure 2-13, provides a central interface for alter-
ing the properties of selected objects or the currently selected tool. The Property
inspector changes as you select different kinds of objects, exposing only the con-
trols that are relevant to your current selection. As a result, this relatively small
interface element packs a lot of power. You’ll find yourself returning again and again
to the Property inspector as you alter fills and strokes, add effects, or change text
size or style.
The Property inspector replaces the Object, Stroke, Fill, Effect, and Tool Optionspanels from Fireworks 4.
Figure 2-13: The Property inspector, shown as it appears with a blank new document, offers one-stop shopping for all your tool options and settings.
Tip
Description Selection indicator
043662-1 ch02.F 8/2/02 2:23 PM Page 43
Fireworks Seminar

44 Part I ✦ Come See the Fireworks
Tool optionsMany tools from the Fireworks Tools panel have configurable settings accessible
through the Property inspector. The available tool options vary according to which
tool is active. Some tools, such as the Rubber Stamp tool shown in Figure 2-14, pro-
vide numerous choices. Several tools — including the Hand, Zoom, Line, Pen, and
Slice tools — have no options. Each tool’s options are covered in the sections that
follow.
Figure 2-14: When the Rubber Stamp tool is selected, several options become available through the Property inspector.
Stroke settingsAny object created using one of the vector drawing tools — Line, Pen, Vector Path,
Rectangle, Ellipse, or Text tool — is initially constructed with a path, the outline of
the object. When a path is visible, it is said to be stroked. In Fireworks, strokes can
be as basic as the 1-pixel Pencil outline, or as complex as the multicolored Confetti.
The Stroke section of the Property inspector controls all the possible path settings
and is a key tool in a graphic artist’s palette.
Fireworks comes with a number of built-in stroke settings accessible through the
Stroke section of the Property inspector, shown in Figure 2-15. You can also modify
existing settings and save them as new strokes. Seven major options can affect the
stroke:
Figure 2-15: The Stroke section of the Property inspector controls the appearance of an object’s outline or path.
✦ Stroke category: Fireworks provides 11 stroke categories from which to
choose: Pencil, Basic, Airbrush, Calligraphy, Charcoal, Crayon, Felt Tip, Oil,
Watercolor, Random, and Unnatural. To hide the path entirely, choose None.
✦ Specific stroke: After you’ve chosen a stroke category, a set of specific
strokes, different for each category, is available. When you edit, rename, or
save new strokes, the changes are reflected in the specific stroke option list.
043662-1 ch02.F 8/2/02 2:23 PM Page 44
Fireworks Seminar

45Chapter 2 ✦ Understanding the Interface
✦ Stroke color: Selecting the Stroke color well displays the pop-up color picker
and activates the Eyedropper, which you can use to select a color from one of
the swatches or from anywhere on the screen. Click the Palette button to
open your operating system’s color picker(s).
✦ Stroke edge: Use the Stroke Edge slider to soften or harden the stroke. The
higher the slider, the softer the stroke; when the slider is all the way to the
bottom, the stroke has no softness.
✦ Stroke size: The Stroke Size slider determines the stroke size in pixels. You
can increase the size by moving the slider up; you can also enter the value
(from 1 to 100) directly in the Stroke Size text box. The size of the brush is
previewed dynamically in the Property inspector.
✦ Stroke texture: In addition to color, size, and softness, you can also apply a
texture to the stroke. Fireworks comes with 26 different textures, and you can
also add your own.
✦ Degree of stroke texture: After a texture has been selected, you must specify
how intensely you want the texture applied by using the Stroke Texture slider,
or by entering a percentage value in the appropriate text box. The degree of
stroke texture basically controls the opacity of the texture as it overlays the
stroke.
If an object is selected, any changes made on the Property inspector are immedi-
ately applied to the object.
Chapter 8 covers strokes in detail.
Fill settingsJust as the Stroke section of the Property inspector controls the outline of a drawn
shape, the Fill section of the Property inspector controls the inside. Fills can be a
solid color, a gradient, a pattern, or a Web Dither. All fills can have textures applied
with a sliding scale of intensity; moreover, textured fills can even appear transparent.
Once you’ve chosen the type of fill from the Fill section of the Property inspector,
shown in Figure 2-16, you can go on to pick a specific color, pattern, edge, or tex-
ture. Following are the key options for Fills:
Figure 2-16: The Fill section of the Property inspector offers many options to modify the interior of a drawn shape.
Cross-Reference
043662-1 ch02.F 8/2/02 2:23 PM Page 45
Fireworks Seminar

46 Part I ✦ Come See the Fireworks
✦ Fill category: Select a fill category from these options: Solid (single color fill),
Web Dither (two-color pattern), Pattern, or Gradient. The available standard
gradients are Linear, Radial, Ellipse, Rectangle, Cone, Starburst, Bars, Ripples,
Waves, Satin, and Folds.
✦ Specific pattern or gradient color scheme: If you choose Pattern or one of
the gradient options, clicking the Fill color well gives you an option list with
choices for each type of fill as well as a preview.
✦ Fill edge: The fill itself can have a hard edge, an antialiased edge, or a feath-
ered edge.
✦ Degree of feathering: If you give the fill a feathered edge, you can specify the
degree of feathering (the number of pixels affected) with this slider control, or
by entering a value into the text box.
✦ Fill texture: The same textures available to the Stroke panel are available to a
fill.
✦ Degree of texture: To make a texture visible, you must increase the degree of
the texture’s intensity by using the appropriate slider or text box. The higher
the value, the more visible the texture.
✦ Transparency of texture: If the Transparency checkbox is selected, you can
see through the lighter parts of the texture.
To delve deeper into fills, see Chapter 11.
Effect settingsIn the early days of the Web, special graphics effects, such as drop shadows and
beveled buttons, required many tedious steps in programs such as Photoshop.
These days, Fireworks enables you to apply wondrous effects in a single step
through the Effect section of the Property inspector. More importantly, like every-
thing else in Fireworks, the effects are “live” and adapt to any change in the object.
And you can easily alter them by adjusting values in the Property inspector.
The Add Effects menu, accessed by clicking the plus icon in the Effects section of
the Property inspector, contains the actual effects, split into two groups. The top
group consists of Fireworks built-in effects. The bottom group consists of
Photoshop-compatible image filters from your Fireworks Filters folder and from
another folder if you specified one in Fireworks’ Preferences.
The plug-ins on the Add Effects menu are only those that can be used as LiveEffects. As not all filters work as Live Effects, if you don’t see a particular set ofinstalled plug-ins listed, check the Filters menu.
Choosing an effect from the Add Effects menu applies it to the current selection and
adds it to the active list in the Effects section of the Property inspector. After an
effect is in the active list, you can click the checkmark, or the X, beside it in order to
enable or disable it.
Note
Cross-Reference
043662-1 ch02.F 8/2/02 2:23 PM Page 46
Fireworks Seminar

47Chapter 2 ✦ Understanding the Interface
Selecting the i button next to an applied effect’s name enables you to modify its set-
tings. Each Photoshop-compatible filter has its own unique dialog box. Many of
Fireworks’ built-in Live Effects open a small, pop-up editing window with their set-
tings. Clicking anywhere outside the pop-up editing window dismisses it. An example
of an effect with a pop-up editing window is Raised Emboss, shown in Figure 2-17.
Figure 2-17: The settings for some Live Effects are displayed in unusual pop-up editing windows, lovingly referred to at Macromedia as Windoids, such as this one for Raised Emboss.
Effects can add serious pizzazz to your graphics in a hurry. Find out more aboutthem — with details on how to get the most from each effect — in Chapter 12.
Managing the Floating PanelsFireworks maintains a great deal of functionality in its floating panels. In all, the pro-
gram offers 18 different panels for modifying everything from stroke colors to
JavaScript behaviors. Toggling whether a particular panel is shown or hidden is as
simple as choosing its name from the Window menu, or pressing its keyboard short-
cut. Although an almost dazzling array of panels exists from which to choose, the
effect is not overwhelming because panels are docked together into panel groups.
When a panel is docked behind another one, click its tab to bring it to the front.
By default, Fireworks combines the floating panels into five different groups, but
you can customize the groupings to fit the way you work. If you’re working with
dual monitors, you might want to display every panel separately, so that all 18 are
instantly available. On the other hand, you could conserve maximum screen real
estate by grouping all the panels into one supergroup with tabs visible for each
individual panel. The middle ground, though, is probably the best for most people:
some docked, some not, and commonly used panels always visible.
The more you work in Fireworks, the sooner you arrive at a panel configuration
that’s best for you. I tend to group my floating panels on the right side of the screen
and use the left area as my workspace. After you come up with an arrangement you
find useful, Fireworks allows you to save that arrangement as a Panel Layout Set
and recall it for later use.
Cross-Reference
043662-1 ch02.F 8/2/02 2:23 PM Page 47
Fireworks Seminar

48 Part I ✦ Come See the Fireworks
Grouping and moving panelsGrouping and ungrouping floating panels is a straightforward process. To separate
a floating panel from its current group, click the panel’s tab, open its Options menu,
and choose Group Panel name with ➪ New Panel Group, where Panel name is the
name of the panel you’re trying to separate. As soon as you click New Panel Group,
the panel is placed on the screen. The Options menu is dynamic for each panel you
select. If you’re trying to separate the Frames panel, then you select the Frames
panel, click the Frames panel Options menu and choose Group Frames with ➪New Panel Group.
Grouping one panel with another involves using the Options menu in the same man-
ner. If you want to group the Frames panel with the Layers panel, simply select the
Frames panel, click the Frames panel Options menu, and select Group Frames
with ➪ Layers. A panel sitting by itself is simply referred to as a panel, while two
or more panels grouped together are referred to as, surprisingly, a panel group.
In addition to the grouping feature, the floating panels also snap to the edges of the
screen or to another floating panel. This snapping feature enables the designer to
move panels out of the way quickly and to align them in a visually pleasing manner.
It may seem like a minor detail, but when panels are snapped to an edge, the
workspace appears less cluttered and more usable.
Just as individual panels can be moved around and grouped, so can panel groups.
An arrangement of multiple panel groups is referred to as a panel layout set. To cre-
ate a panel layout set, simply drag the panel, or panel group, by the Gripper, the
square section on the left of the panel’s title bar, referred to as the Gripper bar, and
drag it over another panel or panel group. On Windows the Gripper is represented
by 5 inlaid dots whereas the Macintosh Gripper appears as a grouping of 15 bumps
similar to Braille. When your pointer moves over a different panel, or panel group, a
thick line appears at either the top or the bottom, whichever you are closest to, of
that panel or panel group. Release the mouse button and the panel, or panel group,
being moved snaps in above or below the existing group.
The panel layout sets are easy to position around the screen. Just click the Gripper
on the panel closest to the top of the screen, as described in the previous panel,
and drag it to a new position. Likewise, you can easily resize and reshape any of the
floating panels, panel groups, or layout sets. In Windows, position your pointer over
any outer edge of the panel so that the cursor becomes a two-headed arrow and
then drag the edge to alter the size or shape of the panel. On the Mac, drag the
resize widget on the lower right corner of the panel in order to alter the size or
shape of the panel, panel group, or layout set. Each of the panels has a minimum
size that you’ll “bump” into if you try to make the panel too small.
Panel Layout SetsAfter you’ve discovered a particular arrangement of floating panels and panel
groups that works for you, Fireworks allows you to save that Panel Layout Set using
the Save Panel Layout command.
043662-1 ch02.F 8/2/02 2:23 PM Page 48
Fireworks Seminar

49Chapter 2 ✦ Understanding the Interface
To save a panel configuration as a Panel Layout Set, follow these steps:
1. Create an arrangement of floating panels that you would like to save.
2. Choose Commands ➪ Panel Layout Sets ➪ Save Panel Layout. A JavaScript dia-
log box appears.
This is a JavaScript dialog box because all the items under Fireworks’ Commandsmenu are built with Flash or XML and JavaScript. For more about the Commandsmenu, see Chapter 19.
3. Enter a name for your new Panel Layout Set. Click OK when you’re done.
The arrangement of your floating panels is saved as a new Panel Layout Set and is
added to the Commands ➪ Panel Layout Sets submenu.
To access a Panel Layout Set, choose Commands ➪ Panel Layout Sets and then the
name of the Panel Layout Set that you want to access.
If you don’t want to lose your current panel layout, save it before accessing a PanelLayout Set. A restored Panel Layout Set supercedes the current layout and thischange can’t be undone.
Hiding and revealing panelsThe floating panels are extremely helpful for making all manner of alterations to
your documents, but they can also get in the way, visually, as well as physically.
When working on a large document at 100 percent magnification, I often hide most
of the panels in order to better see and manipulate my work. Hiding — and
revealing — all the floating panels is a one-key operation. With just a press of the
Tab key, the floating panels all disappear, or, if they are already hidden, reappear.
Although the Tab key is extremely convenient, you can use a couple of other meth-
ods to hide and reveal panels:
✦ Choose View ➪ Hide Panels to toggle the panels off and on.
✦ Use the official keyboard shortcut, F4.
If there is another keyboard combination you prefer, you can customize the key-board shortcut assignments in Fireworks. Learn more about customizable key-board shortcuts in Chapter 3.
Collapsing panelsAn alternative to hiding the panels is temporarily collapsing them. Clicking any-
where on the Gripper bar of a floating panel collapses its contents; clicking the
Gripper bar again restores the panel to its original size.
Cross-Reference
Caution
Cross-Reference
043662-1 ch02.F 8/2/02 2:23 PM Page 49
Fireworks Seminar

50 Part I ✦ Come See the Fireworks
Examining common featuresAlthough each floating panel does something different, they all share common inter-
face elements. Many of the features, such as sliders and option lists, will be familiar
to users of most any computer program. Some, such as color pickers, are more
commonly found only in other graphics software. Figure 2-18 displays several differ-
ent floating panels with different interface features highlighted.
The following is an overview of the most common Fireworks interface elements:
✦ Tabs: As mentioned previously, tabs appear when you dock a panel to one or
more panels, thus creating a panel group.
✦ Options menus: All standard floating panels except for the Property inspector
and Tools panel have a number of different options that you can access by
selecting the Options menu button in the upper right of the panel. The third-
party Flash panels in Fireworks are the exceptions to this rule as they do not
have an Options menu.
✦ Help button: All standard floating panels except for the Tools panel have a
context-sensitive Help button that opens the Fireworks help at the appropri-
ate page to assist with the current operation. The third-party Flash panels in
Fireworks are the exceptions to this rule as they do not have a Help button.
✦ Option lists: For many selections, Fireworks uses option lists. Click the arrow
button of an option list to see the available choices. In some circumstances,
as with patterns and textures, the option list displays a visual image, as well
as a text listing of the options. This feature makes finding what you’re looking
for in Fireworks easy.
Working with Dual Monitors
Fireworks works with dual monitors on Macintosh and on Windows systems that supportthe feature. You can set up this arrangement through the Displays System Preference on theMac, and through the Display Control Panel on Windows. Traditionally, the best strategy forusing two monitors is to keep your documents on one monitor and your floating panels onthe other. This setup works especially well if you have one large monitor and one small one,for documents and panels, respectively.
Another advantage of dual monitors is the capability to continuously preview your work ata different screen resolution or color depth than the one that you typically work at. Mostdesigners and graphic artists work at a high resolution and color depth, such as1,600×1,200 with 32-bit color, whereas most Web surfers are using 800×600 or 1,024×768,with varying color depths. Work on one monitor, and preview your work in a browser win-dow simultaneously on the other. Adjust the settings of the preview monitor in order toview your work at a wide range of resolution and color depth combinations. Continuouslypreviewing your work as it will ultimately be displayed helps to avoid surprises and unnec-essary revisions.
043662-1 ch02.F 8/2/02 2:23 PM Page 50
Fireworks Seminar

51Chapter 2 ✦ Understanding the Interface
Figure 2-18: These floating panels exemplify many interface features found throughout Fireworks.
Windows users can type the first letter of an entry in an option list in order to jumpto it. If multiple entries have the same first letter, pressing the letter again cyclesthrough the entries.
✦ Color wells: Any color selection in Fireworks is handled through a color well
that displays its currently selected color. Click the color well to pop up the
color picker with the active swatch. All color pickers have an Eyedropper tool
for choosing colors and a Palette button for opening your operating system’s
color picker(s). Most Fireworks color pickers also have a No Color button for
deselecting any color.
✦ Numeric sliders: Any entry that requires a numeric value — whether it is a
percentage, a hexadecimal value, or just a plain number — uses pop-up slid-
ers. Selecting the arrow button next to a variable number, such as a stroke’s
tip size, pops up a sliding control. Drag the slider and the numbers in the text
box increase or decrease in value. Release the mouse button when you’ve
reached the desired value. You can also directly type a numeric value in the
adjacent text box.
✦ Disclosure triangle: Some floating panels — Property inspector, Layers
panel — have an additional section that you can reveal by selecting the
expander arrow. The expander arrow is a small triangle on the floating panel
Tip
Checkbox Option list
Text box
GripperOptions menu
buttonEdit/lock column
Show/hide columnDeletebutton
Disclosure triangle
Numeric slider Help buttonColor well
043662-1 ch02.F 8/2/02 2:23 PM Page 51
Fireworks Seminar

52 Part I ✦ Come See the Fireworks
that acts as a toggle. Select it once, and the panel expands to display the pre-
view section; select it again, and the panel returns to its previous size.
✦ Text boxes: Enter values directly into text boxes. All Fireworks sliders have
text boxes next to them so that you can quickly enter a number instead of
using a mouse to move the slider.
✦ Checkboxes: You can enable an option by clicking the associated checkbox,
or disable it by clicking it again in order to remove the checkmark.
Optimize panelThe Optimize panel enables you to specify export settings for the current docu-
ment. Choose a file type and file type — specific settings, such as Quality for JPEG
images, and palette for GIFs. Depending on which file format you choose, the avail-
able options change accordingly. The Optimize panel also displays the current
export palette when working with 8-bit images, such as GIFs. This Color Table pro-
vides feedback that allows you to minimize the file size of exported GIF images by
reducing the number of colors in their palette.
Figure 2-19 shows the Optimize panel set to GIF WebSnap 128.
The Color Table panel from Fireworks 4 has been merged with the Optimize panelin Fireworks MX to put all of your optimization needs in one place.
Figure 2-19: Choose export settings for yourdocument in the Optimize panel.
The Optimize panel Options menu contains commands for fine-tuning your export
settings. Table 2-5 details the commands.
Find more information about the Optimize panel in Chapter 15.Cross-Reference
NewFeature
043662-1 ch02.F 8/2/02 2:24 PM Page 52
Fireworks Seminar

53Chapter 2 ✦ Understanding the Interface
Table 2-5Optimize Panel Options Menu Commands
Option Description
Save Settings Saves the current export settings
Delete Settings Deletes the current saved export setting
Optimize to Size Optimizes the current document to a particular export file size
Export Wizard Starts the Export Wizard to assist in exporting a document
Interlaced Toggles the interlaced option for formats that support it
Progressive JPEG Toggles JPEG or Progressive JPEG
Sharpen JPEG Edges Toggles sharpening of edges in exported JPEGs
Unlock All Colors Unlocks all locked colors in the Optimize panel’s color palette
Remove Unused Colors Toggles whether or not Fireworks removes unused colors fromthe color palette on export
Replace Palette Entry Opens your operating system’s color picker(s) so that you canreplace the selected palette entry with a different color
Make Transparent Makes the selected color transparent
Show Swatch Feedback Toggles between icons that indicate whether a color is locked,transparent, or has another attribute
Remove Edit Restores selected color to what it was before editing
Remove All Edits Restores all colors to what they were before editing
Load Palette Loads a previously saved palette
Save Palette Saves the current palette
Swatches panelWhereas the Color Mixer defines the color universe, the Swatches panel identifies a
more precise palette of colors. As the name implies, the Swatches panel contains a
series of color samples, as you can see in Figure 2-20. You select a color by clicking
on a swatch.
To reset a swatch palette after you’ve modified it or sorted it by color, select thepalette again from the Swatches panel Options menu.
Tip
043662-1 ch02.F 8/2/02 2:24 PM Page 53
Fireworks Seminar

54 Part I ✦ Come See the Fireworks
Figure 2-20: Palette management is coordinatedthrough the Swatches panel.
A major feature of the Swatches panel is tucked away in its Options menu: palette
management. With the commands in the Options menu, you can switch to standard
palettes (such as the Windows or Macintosh system palettes), save and recall cus-
tom palettes, or access the current export palette. The Add Swatches command is
especially useful; it can load palettes previously stored in the Photoshop color
table file format, or pull the color information from a GIF file. Table 2-6 outlines all
the Options menu commands.
Table 2-6Swatches Panel Options Menu Commands
Option Description
Add Swatches Imports previously saved palettes from .aco or GIF files
Replace Swatches Exchanges the current palette set for a previously saved one
Save Swatches Stores the current palette set
Clear Swatches Removes all palettes from the panel
Macintosh System Switches to the Macintosh system palette
Windows System Switches to the Windows system palette
Grayscale Switches to a grayscale palette
Current Export Palette Switches to the current export palette
Sort by Color Sorts the swatches by color
Color Mixer panelWeb designers come from a variety of backgrounds: Some are well rooted in com-
puter graphics, others are more familiar with print publishing, whereas an increas-
ing number know only Web imagery. The Color Mixer lets you opt for the color
model that you’re most familiar with and that is best suited to your work.
043662-1 ch02.F 8/2/02 2:24 PM Page 54
Fireworks Seminar

55Chapter 2 ✦ Understanding the Interface
The Color Mixer, shown in Figure 2-21, displays three different ways to choose colors:
✦ Stroke and Fill color wells: Select a color well to open the pop-up color
picker and gain access to the system color picker(s) through the Palette
button.
✦ Color ramp: The full-spectrum preview of the chosen color model is known as
the color ramp. You can select any color by clicking it.
✦ Color component sliders: Like the color ramp, the color component sliders
change according to the chosen color model. Four of the five color models —
RGB, Hexadecimal, CMY, and HSB — display three different sliders, whereas
Grayscale shows only one, K (black).
Figure 2-21: Select your stroke and fill colors fromthe color wells, the color ramp, or the colorcomponent sliders in the Color Mixer panel.
Like the Tools panel, the Color Mixer also features a Default Colors button for restor-
ing the preset stroke and fill colors, and a Swap button for reversing the colors.
Choose a color model by selecting it from the Options menu, detailed in Table 2-7.
Table 2-7Color Mixer Panel Options Menu Commands
Option Description
RGB Changes the color mixer display to Red, Green, and Blue
Hexadecimal Changes the color mixer display to Hexadecimal Red, Green,and Blue, the standard way to specify colors in HTML
CMY Changes the color mixer display to Cyan, Magenta, and Yellow
HSB Changes the color mixer display to Hue, Saturation, andBrightness
Grayscale Changes the color mixer display to Grayscale, which is 256shades of gray
043662-1 ch02.F 8/2/02 2:24 PM Page 55
Fireworks Seminar

56 Part I ✦ Come See the Fireworks
A full understanding of the color possibilities and pitfalls is a must for any Webdesigner. Learn more about using the Color Mixer in Chapter 7.
Layers panelLayers in Fireworks enable the creation of extremely complicated graphics, as well
as compatibility with files stored in Photoshop format. Fireworks layers are like
folders that can contain multiple objects, each with its own stacking order. Layers,
in turn, have their own stacking order, and can be placed on top of, or beneath,
other layers. Moreover, each layer can be hidden from view for easier editing of
complex documents and can be locked to prevent accidental editing. Layers can be
shared across frames, allowing you to instantly add a static element to every frame
of an animation.
All Web objects, such as slices and hotspots, are stored in the Web Layer, which can
be hidden or locked, or have its stacking order changed, but which cannot be
deleted. The Web Layer is always shared across all frames.
The Layers panel, shown in Figure 2-22, is the central control center for layers. The
layer list contains each layer’s name, a thumbnail of its contents, as well as
Expand/Collapse, Show/Hide, and Lock/Unlock columns. Create or delete layers
with the New/Duplicate Layer and Delete Selection buttons. The Add Mask button
adds a mask to the selected object or layer. The New Bitmap Image button creates
an empty bitmap object as the next object on a layer.
Figure 2-22: Objects on a layer can be hidden orlocked with a single click on the Layers panel.
A good portion of Fireworks’ layer management is coordinated through the Layers
panel Options menu commands, as described in Table 2-8.
Cross-Reference
043662-1 ch02.F 8/2/02 2:24 PM Page 56
Fireworks Seminar

57Chapter 2 ✦ Understanding the Interface
Table 2-8Layers Panel Options Menu Commands
Option Description
New Image Creates a new, empty bitmap object the same size as thecanvas of the current document
New Layer Adds a new layer on top of all current layers
Duplicate Layer Clones the current layer
Share this Layer Enables all objects on the selected layer to be shared acrossall frames
Single Layer Editing Restricts edits to the current layer
Delete Layer Removes the current layer
Flatten Selection Converts the currently selected objects, both vector andbitmap, into a single bitmap object
Merge Down Merges a bitmap object with the bitmap that is directlybeneath it in the stacking order
Hide All Conceals all layers in the document
Show All Reveals all layers in the document
Lock All Prevents editing in the selected layer
Unlock All Enables a locked layer to be edited
Add Mask Adds a mask to the selected object
Edit Mask Puts Fireworks in mask edit mode, so only the mask of thecurrently selected object can be modified in the documentwindow
Disable Mask Disables the currently selected object’s mask
Delete Mask Removes the currently selected object’s mask
Thumbnail Options Opens the Thumbnail Options dialog box, which offers arange of thumbnail sizes to choose from
Align panelThe Align panel is a very useful and flexible tool when it comes to arranging items
in your document. It is a third-party Flash panel, written by Kleanthis Economou,
that gives Fireworks users alignment options that are akin to those available in
Flash MX. Rather than only being able to align objects in your document to each
other, the Align panel enables you to align individual or multiple objects to the can-
vas, or even to paths. Shown in Figure 2-23, the Align panel adds tremendous align-
ment capabilities to Fireworks.
043662-1 ch02.F 8/2/02 2:24 PM Page 57
Fireworks Seminar

58 Part I ✦ Come See the Fireworks
Figure 2-23: The Align panel takes Fireworksalignment options to a new level, enabling you toalign to the canvas or even to points on a path.
The Align panel is a new addition to Fireworks MX.
For more information on extensibility, and writing your own commands, see chapter 26.
Frames panelFrames have two primary uses in Fireworks: rollovers and animations. When used
to create rollovers, each frame represents a different state of the user’s mouse with
up to four frames being used. To create an animated GIF, each frame in Fireworks
corresponds to one frame of the animation. You can use as many frames for your
animation as necessary (although file size often dictates that the fewest frames pos-
sible is best).
By default, frame timing is set to 7 milliseconds. Double-click the frame timing set-
ting to edit it in the pop-up dialog box. Double-click a frame’s name to edit it in
another pop-up dialog box.
The Frames panel, shown in Figure 2-24, is laid out like the Layers panel, with a list
of frames featured prominently.
Figure 2-24: The Frames panel is Fireworks’ center stage for creating rollovers and animated GIF images.
Cross-Reference
NewFeature
043662-1 ch02.F 8/2/02 2:24 PM Page 58
Fireworks Seminar

59Chapter 2 ✦ Understanding the Interface
The Frames panel Options menu, detailed in Table 2-9, enables you to further con-
trol your interaction with frames.
Table 2-9Frames Panel Options Menu Commands
Option Description
Add Frames Opens the Add Frames dialog box
Duplicate Frame Duplicates the current frame
Delete Frames Deletes the current frame
Copy to Frames Copies the selected object to a frame or a range of frames
Distribute to Frames Distributes each selected object to a different frame, asdetermined by the stacking order of the objects
Auto Crop Sets the frame disposal method to Auto Crop
Auto Difference Sets the frame disposal method to Auto Difference
Properties Opens the pop-up edit window for the current frame
History panelThe History panel, shown in Figure 2-25, allows precise control over Fireworks’ mul-
tiple level Undo command. The Undo Marker points to your preceding step. To roll
back to even earlier steps, slide the Undo Marker up one or more notches. The
number of steps the History panel keeps track of is the number of Undo steps you
have specified in Fireworks’ Preferences.
The maximum number of Undo steps you can specify in Fireworks is 1,009.
Figure 2-25: The History panel contains a recordof your actions that you can undo, repeat, or saveas a command.
Caution
043662-1 ch02.F 8/2/02 2:24 PM Page 59
Fireworks Seminar

60 Part I ✦ Come See the Fireworks
The capability to save or replay your steps makes the History panel more than just
an enhanced Undo. Saving your previous steps as a command enables you to auto-
mate almost anything you do in Fireworks. If you have a project that requires you to
tediously edit a number of objects in the same way, do it once and save the steps as
a command that you can run on all the other objects.
The History panel Options menu contains the commands detailed in Table 2-10.
Table 2-10History Panel Options Menu Commands
Option Description
Replay Selected Steps Replays the selected steps
Copy Steps Copies the selected steps to the Clipboard
Save as Command Saves the selected steps as a command
Clear History Deletes all steps
Find out more about the History panel in Chapter 19.
Info panelOften, checking an object’s size or position when you’re creating an overall graphic
is necessary. The Info panel not only provides you with that feedback, but it also
enables you to modify those values numerically for precise adjustments. The Info
panel, shown in Figure 2-26, also lists the current pointer coordinates and the color
values of the pixel found under the pointer, updated in real time. When you use a
Transform tool, the Info panel keeps you advised of things such as rotation angle,
enabling more accurate free transforms.
Figure 2-26: You can find any object’s dimensionsand position in the Info panel.
Be sure to press Enter (Return) after changing a value in the Info panel. You canpress the Tab key to move from one value to another within the Info panel, but thevalues you enter won’t take effect until you press Enter (Return).
Caution
Cross-Reference
043662-1 ch02.F 8/2/02 2:24 PM Page 60
Fireworks Seminar

61Chapter 2 ✦ Understanding the Interface
You can alter the color model and measurement system shown in the Info panel by
choosing another from the Info panel Options menu, detailed in Table 2-11.
Table 2-11Info Panel Options Menu Commands
Option Description
Hexadecimal Changes the color settings display to Hexadecimal Red, Green,and Blue
RGB Changes the color settings display to Red, Green, and Blue
CMY Changes the color settings display to Cyan, Magenta, andYellow
HSB Changes the color settings display to Hue, Saturation, andBrightness
Pixels Changes the measurement display to pixels
Inches Changes the measurement display to inches
Centimeters Changes the measurement display to centimeters
Scale Attributes Enables attributes to be scaled with the object
Behaviors panelOne of the key features of Fireworks that separates it from other graphics programs
is its capability to output HTML and JavaScript code along with images. The code
activates an image and makes it capable of an action, such as changing color or
shape when the user passes the mouse over it. The code is known in Fireworks as a
Behavior. A Behavior is actually composed of two parts: an action that specifies
what is to occur, and an event that triggers the action.
Behaviors require a Web object, such as a slice or a hotspot, to function. After
you’ve selected the desired Web object, you assign a Behavior by choosing the Add
Action button (the plus sign) from the Behaviors panel. Fireworks comes with five
main groups of Behaviors from which to choose: Simple Rollover, Swap Image, Set
Nav Bar Image, Set Pop-up Menu, and Set Text of Status Bar.
All assigned Behaviors for a given Web object are listed in the Behaviors panel, as
shown in Figure 2-27. The events, such as OnMouseOver or OnClick, are listed in
the first column and the actions in the second. The third column, Info, offers
specifics that identify the Behavior. To remove a Behavior, select it and then choose
the Remove Action button (the minus sign). You can also delete a Behavior — or all
the Behaviors for a Web object — through the Options menu commands listed in
Table 2-12.
043662-1 ch02.F 8/2/02 2:24 PM Page 61
Fireworks Seminar
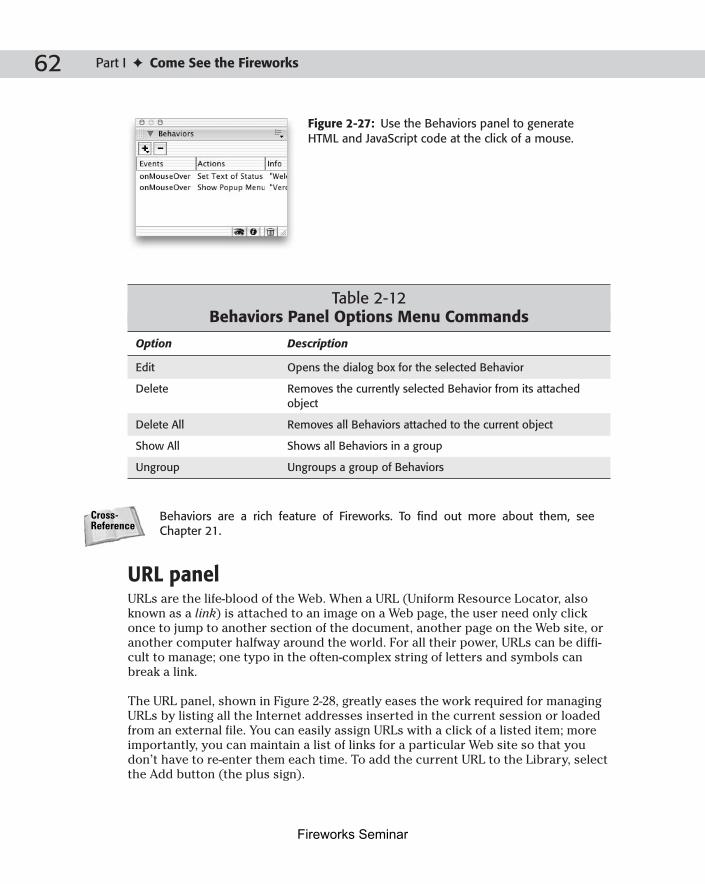
62 Part I ✦ Come See the Fireworks
Figure 2-27: Use the Behaviors panel to generateHTML and JavaScript code at the click of a mouse.
Table 2-12Behaviors Panel Options Menu Commands
Option Description
Edit Opens the dialog box for the selected Behavior
Delete Removes the currently selected Behavior from its attachedobject
Delete All Removes all Behaviors attached to the current object
Show All Shows all Behaviors in a group
Ungroup Ungroups a group of Behaviors
Behaviors are a rich feature of Fireworks. To find out more about them, seeChapter 21.
URL panelURLs are the life-blood of the Web. When a URL (Uniform Resource Locator, also
known as a link) is attached to an image on a Web page, the user need only click
once to jump to another section of the document, another page on the Web site, or
another computer halfway around the world. For all their power, URLs can be diffi-
cult to manage; one typo in the often-complex string of letters and symbols can
break a link.
The URL panel, shown in Figure 2-28, greatly eases the work required for managing
URLs by listing all the Internet addresses inserted in the current session or loaded
from an external file. You can easily assign URLs with a click of a listed item; more
importantly, you can maintain a list of links for a particular Web site so that you
don’t have to re-enter them each time. To add the current URL to the Library, select
the Add button (the plus sign).
Cross-Reference
043662-1 ch02.F 8/2/02 2:24 PM Page 62
Fireworks Seminar

63Chapter 2 ✦ Understanding the Interface
Figure 2-28: Adding links to your Web objects iseasy with the URL panel.
You can access most of Fireworks’ URL management utilities through the URL panel
Options menu, detailed in Table 2-13.
Table 2-13URL Panel Options Menu Commands
Option Description
Add Used URLs to Library Adds the list of current URLs to the URL Library
Clear Unused URLs Removes all URLs from the current listing
Add URL Adds a new URL to the URL Library
Edit URL Opens the Edit URL dialog box
Delete URL Removes the selected URL from the URL Library
New URL Library Creates a new URL Library
Import URLs Loads a new set of URLs from a previously stored URL Library,a bookmark file, or an HTML page
Export URLs Stores the current URL Library
Styles panelIf you’ve ever spent hours getting just the right combination of stroke, fill, and
effects for an object — and then find you need to apply the same combination to all
the navigation buttons throughout a Web site — you’ll greatly appreciate the
Fireworks Styles feature.
In Fireworks, a style is a collection of attributes that you can apply to any object.
The Styles panel is preset with a number of such designs, which appear as graphi-
cal buttons and text, with many more available on the Fireworks CD-ROM. To apply
043662-1 ch02.F 8/2/02 2:24 PM Page 63
Fireworks Seminar

64 Part I ✦ Come See the Fireworks
a style, select the object and then select the style; you can even select multiple
objects (such as a row of navigation buttons) and apply the same style to them all
with one click. Styles are a terrific time-saver and a great way to maintain a consis-
tent look and feel.
The Styles panel, shown in Figure 2-29, is composed of a series of icons, each repre-
senting a different style. A style can have the following attributes: fill type, fill color,
stroke type, stroke color, effect, text font, text size, and text color. In addition to the
preset styles, you can also save your own combinations. Just highlight the object
with the desired attributes and select the New Style button on the Styles panel. You
can also accomplish this by choosing New Style from the Options menu. A full list
of the Styles panel Options menu commands appears in Table 2-14.
Figure 2-29: Automate applying a consistent lookand feel to your objects by using the Styles panel.
Table 2-14Styles Panel Options Menu Commands
Option Description
New Style Creates a new style based on the current object
Edit Style Opens the Edit Style dialog box
Delete Styles Removes a selected style or styles
Import Styles Loads a new set of styles after the currently selected style
Export Styles Stores the currently selected style or styles
Reset Styles Reloads the default configuration of styles
Large Icons Displays the available styles with icons twice as large asnormal
Find out more about creating and applying styles in Chapter 16.Cross-Reference
043662-1 ch02.F 8/2/02 2:24 PM Page 64
Fireworks Seminar

65Chapter 2 ✦ Understanding the Interface
Library panelThe Library panel contains Fireworks Libraries: collections of symbols that you can
save and reopen as needed. Symbols are edited right in the Library. Dragging a sym-
bol from the Library panel and dropping it into a document creates an instance of
that symbol. Instances are copies of symbols that remain linked to the symbol and
inherit changes to the symbol. Instances are similar to a Windows file shortcut or
Mac alias — right down to the arrow badge — and can be animated, tweened, and
edited as a group. You can save symbols in Symbol Libraries and use them again
and again in multiple documents.
The commands detailed in Table 2-15 are located in the Library panel Options
menu. Figure 2-30 shows the Library panel.
Figure 2-30: The Library panel enables you tostore Libraries of symbols.
Table 2-15Library Panel Options Menu Commands
Option Description
New Symbol Creates a new symbol
Duplicate Duplicates the current symbol
Delete Removes the current symbol from the Library and all itsinstances from the document
Edit Symbol Opens the selected symbol in its own window for editing
Properties Displays the Symbol Properties dialog box for the currentsymbol
Select Unused Items Selects unused symbols in the Library
Continued
043662-1 ch02.F 8/2/02 2:24 PM Page 65
Fireworks Seminar

66 Part I ✦ Come See the Fireworks
Table 2-15 (continued)
Option Description
Update Updates symbols that were imported from external Libraries
Play Consecutively displays all frames of a button
Import Symbols Imports symbols from a saved Library
Export Symbols Exports symbols to a saved Library
Find and Replace panelLet’s suppose you’ve just finished the graphics for a major Web site, chock-full of
corporate logos, and you receive the call. You know, the one from the client who
informs you that the company has just been acquired and instead of NewCo, Inc.,
it’s now New2Co, Inc. Could you please redo all the graphics — by tomorrow?
Because Fireworks objects are always editable, the Find and Replace panel, shown
in Figure 2-31, makes updating a series of Web graphics a snap. You can change all
the graphics in a selection, a file, a frame, or a series of files. Moreover, Find and
Replace can handle more than just text; you can also alter fonts, colors, and URLs,
or even snap all the colors to their nearest Web safe neighbor.
Figure 2-31: Need to make global changes intext, font, color, or URLs? Pull up the Find andReplace panel and get the job done fast.
The Find and Replace feature works with the Project Log panel, which tracks
changes made to your documents. You can enable Project Log tracking through the
Options menu commands listed in Table 2-16, as well as specify replacement
options for multiple file operations.
043662-1 ch02.F 8/2/02 2:24 PM Page 66
Fireworks Seminar

67Chapter 2 ✦ Understanding the Interface
Table 2-16Find and Replace Panel Options Menu Commands
Option Description
Add Files to Project Log Tracks changes made in a Find and Replace operation in theProject Log
Replace Options Displays options for multiple-file Find and Replace operations
You can really ramp up your production level of Web graphics if you master theFind and Replace feature. To learn more about it, see Chapter 18.
Project Log panelWith the power inherent in Fireworks automation tools, such as Find and Replace
and Batch Processing, you need a way to keep track of the many changes you may
make. The Project Log panel, shown in Figure 2-32, details each change that has
taken place and enables you to not only receive confirmation of the change, but
also to easily open any file that was affected.
Figure 2-32: Use the Project Log to manage yourFind and Replace and Batch Process operations.
In addition to listing documents altered during an automated process, you can use
the Project Log to keep a number of files close at hand, ready to be opened at will.
Through the Add Files to Log command, in the Options menu detailed in Table 2-17,
files can be made accessible, but not immediately opened. The Options menu also
enables you to quickly make changes to files in the Project Log and to re-export
them using their previous settings.
To find out more about what’s possible with the Project Log, turn to Chapter 18.Cross-Reference
Cross-Reference
043662-1 ch02.F 8/2/02 2:24 PM Page 67
Fireworks Seminar

68 Part I ✦ Come See the Fireworks
Table 2-17Project Log Options Menu Commands
Option Description
Export Again Exports selected files in the Project Log using their previoussettings
Add Files to Log Includes additional graphic files in the Project Log withoutinitially opening them
Clear Selection Removes the selected files from the Project Log
Clear All Removes all files from the Project Log
Answers panelThe Answers panel, shown in Figure 2-33, is a Flash panel that dynamically interacts
with Macromedia’s Web site, allowing you to access a wide variety of information.
The Answers panel initially contains links to the What’s New file, the Readme file,
and the Fireworks Tutorials. Along with these links you find a button labeled
Update. Clicking the Update button checks the Macromedia Web site and refreshes
the panel with an option list containing access to tech notes, a Web search for tech
support issues, and a list of the newest extensions uploaded to the Fireworks
exchange. To Update the information in the panel again, select Settings from the
option list and then click Update Panel. The Answers panel Options menu has no
special settings.
Figure 2-33: The Answers panel is your window tothe Macromedia Web site. You can search for help,view top TechNotes, and even see recentlyuploaded extensions.
The Answers panel is a new addition to Fireworks MX.NewFeature
043662-1 ch02.F 8/2/02 2:24 PM Page 68
Fireworks Seminar

69Chapter 2 ✦ Understanding the Interface
Using the MenusYou can also find many of the commands and options available in the various
Fireworks panels in the menus. You’ll also find, however, that many features are
unavailable anywhere else. This section provides a reference to every menu item in
Fireworks, along with its corresponding default keyboard shortcut, if available.
Windows users won’t see all of Fireworks’ menus unless a document window is
open.
Application menu (Mac OS X only)The Application menu, also known as the Fireworks menu in this case, is an OS X
only menu that contains commands for setting up an application and controlling
how it interacts with the operating system. It is formally referred to the Application
menu because it becomes the name of the application that is forefront in the OS.
While in Fireworks, it’s the Fireworks menu, while in Dreamweaver it’s the
Dreamweaver menu, and so forth. Table 2-18 lists the commands in the Fireworks
menu.
Table 2-18Fireworks Menu Commands (Mac OS X only)
Command Description Keystroke
About Fireworks Displays the About Fireworks dialog box with n/ainformation about the application and its authors
Keyboard Shortcuts Displays the Keyboard Shortcuts dialog box, which n/aenables you to modify keyboard shortcuts
Preferences Displays the Preferences dialog box where you Command+Uset user preferences
Services Displays a submenu of available system services n/a
Hide Fireworks Hides the Fireworks application and all of Command+Hits windows
Hide Others Hides all running applications except for Fireworks n/a
Show All Shows all running applications n/a
Quit Fireworks Quits the Fireworks application Command+Q
In the tables throughout this chapter, commands or tools listed in bold text arenew or have changed menu, or panel, locations in Fireworks MX.
Note
043662-1 ch02.F 8/2/02 2:24 PM Page 69
Fireworks Seminar

70 Part I ✦ Come See the Fireworks
File menuPlacing basic computer operations — creating, saving, and printing files — in the
File menu is standard practice. Fireworks follows this practice and also includes
commands for importing and exporting. All File menu commands are listed in
Table 2-19.
Table 2-19File Menu Commands
Command Description Windows Macintosh
New Displays the New Document Ctrl+N Command+Ndialog box before creating a new document
Open Displays the Open dialog box Ctrl+O Command+Obefore opening existing documents
Open Recent ➪ Displays a submenu of your n/a n/aYour Recently recently opened documentsOpened Documents
Reconstitute Table Creates a Fireworks document n/a n/awith slice objects from an HTML table
Scan ➪ Twain Acquire Displays the interface dialog box n/a n/afor a twain source, such as a scanner, if one is available and has been selected, before acquiring an image
Scan ➪ Twain Select Displays the Select Source dialog n/a n/abox before allowing you to select a twain source to acquire an image from
Scan ➪ Your Lists currently installed — n/aPhotoshop Acquire Photoshop Acquire plug-ins —Plug-Ins typically, each plug-in enables you (Macintosh only) to acquire an image from a
corresponding device
Close Closes the current document Ctrl+W Command+W
Save Saves a document, or displays Ctrl+S Command+Sthe Save As dialog box for an unnamed document
Save As Displays the Save As dialog box Ctrl+Shift+S Command+before saving a document Shift+S
043662-1 ch02.F 8/2/02 2:24 PM Page 70
Fireworks Seminar

71Chapter 2 ✦ Understanding the Interface
Command Description Windows Macintosh
Save a Copy Displays the Save Copy As n/a n/adialog box before saving a copy of a document
Revert Replaces the current document n/a n/awith the previously saved version of the same document
Import Displays the Import dialog box Ctrl+R Command+Rbefore importing a file into any open document
Export Displays the Export dialog box Ctrl+Shift+R Command+before exporting a document in Shift+Rthe format specified in the Optimize panel
Export Preview Displays the Export Preview Ctrl+Shift+X Command+dialog box before exporting a Shift+Xdocument
Update HTML Places or updates Fireworks n/a n/aHTML code in another HTML file on the same computer
Export Wizard Displays the Export Wizard n/a n/abefore exporting a document
Batch Process Displays the Batch Process n/a n/adialog box before processing multiple image files
Preview in Browser ➪ Previews a document in your F12 F12Preview in Primary primary browserBrowser
Preview in Browser ➪ Previews a document in Shift+F12 Shift+F12Preview in Secondary your secondary browserBrowser
Preview in Browser ➪ Displays the Locate Browser n/a n/aSet Primary Browser dialog box before selecting a
browser as your primary browser
Preview in Browser ➪ Displays the Locate Browser n/a n/aSet Secondary Browser dialog box before selecting a
browser as your secondary browser
Page Setup Displays the Page Setup dialog n/a n/abox (for printing)
Print Displays the Print dialog box Ctrl+P Command+Pbefore printing a document
Continued
043662-1 ch02.F 8/2/02 2:24 PM Page 71
Fireworks Seminar

72 Part I ✦ Come See the Fireworks
Table 2-19 (continued)
Command Description Windows Macintosh
HTML Setup Displays the HTML Setup n/a n/adialog box
Exit (Windows only) Quits Fireworks Ctrl+Q —
Edit menuThe Edit menu holds the standard editing commands, such as Undo, Cut, Copy, and
Paste, as well as numerous commands specific to Fireworks graphics, such as Paste
Inside and Crop Document. The Edit menu is detailed in Table 2-20.
Table 2-20Edit Menu Commands
Command Description Windows Macintosh
Undo Reverses the last action; the Ctrl+Z Command+Znumber of Undo steps is set in Preferences
Redo Redoes the last edit that was Ctrl+Y Command+Yundone by Undo
Insert ➪ New Button Displays the Button Editor n/a n/abefore creating a new button
Insert ➪ New Symbol Displays the Symbol Properties Ctrl+F8 Command+F8dialog box before creating a new symbol
Insert ➪ Hotspot Inserts a hotspot object Ctrl+Shift+U Command+Shift+U
Insert ➪ Slice Inserts a slice object Alt+Shift+U Option+Shift+U
Insert ➪ Empty Bitmap Inserts an empty bitmap object n/a n/a
Insert ➪ Bitmap Creates a new bitmap of the n/a n/aVia Copy selected pixels, leaving the
original pixels in place
Insert ➪ Bitmap Via Cut Creates a new bitmap of the n/a n/aselected pixels, removing the original pixels from the document
Insert ➪ Layer Creates a new layer n/a n/a
043662-1 ch02.F 8/2/02 2:24 PM Page 72
Fireworks Seminar

73Chapter 2 ✦ Understanding the Interface
Command Description Windows Macintosh
Insert ➪ Frame Creates a new frame n/a n/a
Libraries ➪ Animations Imports sample animations n/a n/aincluded with Fireworks
Libraries ➪ Bullets imports sample bullets n/a n/aincluded with Fireworks
Libraries ➪ Buttons Imports sample buttons n/a n/aincluded with Fireworks
Libraries ➪ Themes Imports sample themes n/a n/aincluded with Fireworks
Libraries ➪ Other Displays the Open dialog n/a n/abox before importing a Library
Find and Replace Displays the Find and Ctrl+F Command+FReplace dialog box
Cut Moves the current selection Ctrl+X Command+Xto the system clipboard
Copy Copies the current selection Ctrl+C Command+Cto the system clipboard
Copy as Vectors Copies a Fireworks vector n/a n/aobject from the current selection to the system clipboard as vector information
Copy HTML Code Displays the Copy HTML Code Ctrl+Alt+C Command+Wizard, which guides you Option+Cthrough the process of exporting images and copying HTML code to the system clipboard for pasting into an HTML editor, such as Macromedia Dreamweaver
Paste Copies the contents of the system Ctrl+V Command+Vclipboard to the current cursor position
Clear Removes the current selection Backspace Deletefrom the document
Paste as Mask Copies the content of the n/a n/aclipboard as a mask
Continued
043662-1 ch02.F 8/2/02 2:24 PM Page 73
Fireworks Seminar

74 Part I ✦ Come See the Fireworks
Table 2-20 (continued)
Command Description Windows Macintosh
Paste Inside Copies the contents of the Ctrl+Shift+V Command+system clipboard into a Shift+Vselected, closed path
Paste Attributes Copies the Fireworks-specific Ctrl+Alt+ Command+attributes of the contents of Shift+V Option+the system clipboard to a Shift+Vselected object
Duplicate Creates a copy of the selected Ctrl+Alt+D Command+object, offset slightly from Option+Dthe original
Clone Creates a copy of the selected Ctrl+Shift+D Command+object, directly on top of the Shift+Doriginal
Crop Selected Bitmap Displays crop handles around n/a n/athe selected bitmap object
Crop Document Selects the Crop tool n/a n/a
Preferences Displays the Preferences Ctrl+U Command+Udialog box
Keyboard Shortcuts Displays the Keyboard Shortcuts n/a n/adialog box before modifying keyboard shortcuts
The last two menu items in Table 2-20 are only found on Windows and Mac OS 9.On Mac OS X, these items are in the Application menu, which is covered in Table2-18.
View menuThe View menu commands, listed in Table 2-21, control a Web artist’s views during
the creation phase. In addition to numerous magnification commands, the View
menu also contains helpful layout aids, such as Rulers, Grids, and Guides. You’ll
also find several features to help you see just the graphic when you need to have a
clear, uncluttered perspective.
Note
043662-1 ch02.F 8/2/02 2:24 PM Page 74
Fireworks Seminar

75Chapter 2 ✦ Understanding the Interface
Table 2-21View Menu Commands
Command Description Windows Macintosh
Zoom In Increases the magnification Ctrl+ Command+level of a document by one Equals (=) Equals (=)setting
Zoom Out Decreases the magnification Ctrl+ Command+level of a document by one Minus (–) Minus (–)setting
Magnification ➪ 6% Sets the magnification level n/a n/aof a document to 6 percent
Magnification ➪ 12% Sets the magnification level n/a n/aof a document to 12 percent
Magnification ➪ 25% Sets the magnification level n/a n/aof a document to 25 percent
Magnification ➪ 50% Sets the magnification level Ctrl+5 Command+5of a document to 50 percent
Magnification ➪ 66% Sets the magnification level n/a n/aof a document to 66 percent
Magnification ➪ 100% Sets the magnification level Ctrl+1 Command+1of a document to 100 percent
Magnification ➪ 150% Sets the magnification level n/a n/aof a document to 150 percent
Magnification ➪ 200% Sets the magnification level Ctrl+2 Command+2of a document to 200 percent
Magnification ➪ 300% Sets the magnification level Ctrl+3 Command+3of a document to 200 percent
Magnification ➪ 400% Sets the magnification level Ctrl+4 Command+4of a document to 400 percent
Magnification ➪ 800% Sets the magnification level Ctrl+8 Command+8of a document to 800 percent
Magnification ➪ 1600% Sets the magnification level Ctrl+6 Command+6of a document to 1,600 percent
Magnification ➪ 3200% Sets the magnification level n/a n/aof a document to 3,200 percent
Magnification ➪ 6400% Sets the magnification level n/a n/aof a document to 6,400 percent
Continued
043662-1 ch02.F 8/2/02 2:24 PM Page 75
Fireworks Seminar

76 Part I ✦ Come See the Fireworks
Table 2-21 (continued)
Command Description Windows Macintosh
Fit Selection Sets the magnification level Ctrl+Alt+ Command+of a document so that all Zero (0) Option+selected objects are visible Zero (0)
Fit All Sets the magnification level Ctrl+Zero (0) Command+of a document so that all Zero (0)objects are visible
Full Display Toggles Full Display Ctrl+K Command+K
Macintosh Gamma Toggles the document display n/a —(Windows only) to simulate a typical Macintosh
Gamma setting
Windows Gamma Toggles the document display — n/a(Macintosh only) to simulate a typical Windows
Gamma setting
Hide Selection Hides selected objects Ctrl+L Command+L
Show All Shows all hidden objects Ctrl+Shift+L Command+Shift+L
Rulers Toggles display of rulers Ctrl+Alt+R Command+Option+R
Grid ➪ Show Grid Toggles display of the grid Ctrl+Alt+G Command+Option+G
Grid ➪ Snap To Grid Toggles whether objects Ctrl+Alt+ Command+snap to the grid or not Shift+G Option+
Shift+G
Grid ➪ Edit Grid Displays the Edit Grid dialog box n/a n/a
Guides ➪ Show Guides Toggles display of guides Ctrl+Semi- Command+colon (;) Semicolon (;)
Guides ➪ Lock Guides Toggles whether or not guides Ctrl+Alt+ Command+can be edited and moved Semicolon (;) Option+
Semicolon (;)
Guides ➪ Snap to Guides Toggles whether objects snap Ctrl+Shift+ Command+to Guides or not Semicolon (;) Shift+
Semicolon (;)
Guides ➪ Edit Guides Displays the Edit Guides dialog box n/a n/a
Slice Guides Toggles display of Slice Guides Ctrl+Alt+ Command+Shift+ Option+Shift+Semicolon (;) Semicolon (;)
043662-1 ch02.F 8/2/02 2:24 PM Page 76
Fireworks Seminar

77Chapter 2 ✦ Understanding the Interface
Command Description Windows Macintosh
Slice Overlay Toggles display of the Slice Overlay n/a n/a
Hide Edges Toggles display of selection borders F9 F9
Hide Panels Toggles display of all open panels F4 F4
Status Bar (Windows only) Toggles display of the status bar n/a —
Select menuThe Select menu, detailed in Table 2-22, contains commands for selecting objects as
well as manipulating any selections you’ve already made.
Table 2-22Select Menu Commands
Command Description Windows Macintosh
Select All Selects all objects in a document Ctrl+A Command+Ain vector mode, or all pixels in a bitmap object in bitmap mode
Deselect Deselects all objects or pixels Ctrl+D Command+D
Superselect Selects the entire group to which n/a n/athe current (sub)selection belongs
Subselect Selects an individual object within n/a n/aa group
Select Similar Selects pixels that are similarly n/a n/acolored to the selection while in bitmap mode
Select Inverse Selects all deselected pixels and Ctrl+Shift+I Command+deselects all selected pixels in Shift+Ibitmap mode
Feather Displays the Feather Selection n/a n/adialog box before feathering the edges of a pixel selection in bitmap mode
Expand Marquee Displays the Expand Selection n/a n/adialog box before expanding the current selection in bitmap mode
Continued
043662-1 ch02.F 8/2/02 2:24 PM Page 77
Fireworks Seminar

78 Part I ✦ Come See the Fireworks
Table 2-22 (continued)
Command Description Windows Macintosh
Contract Marquee Displays the Contract Selection n/a n/adialog box before contracting the current selection in bitmap mode
Border Marquee Displays the Select Border dialog n/a n/abox before selecting a border around the current selection in bitmap mode
Smooth Marquee Displays the Smooth Selection n/a n/adialog box before smoothing the edges of the current selection in bitmap mode
Save Bitmap Selection Stores the current marquee n/a n/aselection for later recall
Restore Bitmap Recalls a stored marquee selection n/a n/aSelection
Modify menuAfter you’ve created your basic objects, you’ll undoubtedly spend as much, if not
more time, tweaking and modifying them in order to get them just right. The Modify
menu commands, detailed in Table 2-23, are quite numerous and specific.
Table 2-23Modify Menu Commands
Command Description Windows Macintosh
Canvas ➪ Image Size Displays the Image Size dialog n/a n/abox before changing the size of a bitmap
Canvas ➪ Canvas Size Displays the Change Canvas Size n/a n/adialog box before changing the size of the canvas
Canvas ➪ Canvas Color Displays the Canvas Color dialog n/a n/abox before changing the color of the canvas
Canvas ➪ Trim Canvas Shrinks the canvas to fit snugly Ctrl+Alt+T Command+around all objects Option+T
043662-1 ch02.F 8/2/02 2:24 PM Page 78
Fireworks Seminar

79Chapter 2 ✦ Understanding the Interface
Command Description Windows Macintosh
Canvas ➪ Fit Canvas Shrinks or expands the canvas Ctrl+Alt+F Command+to fit snugly around all objects Option+F
Canvas ➪ Rotate 180° Rotates the canvas 180 degrees n/a n/a
Canvas ➪ Rotates the canvas 90 degrees n/a n/aRotate 90° CW clockwise
Canvas ➪ Rotates the canvas 90 degrees n/a n/aRotate 90° CCW counterclockwise
Animation ➪ Displays the Animate dialog box Alt+Shift+F8 Option+Animate Selection before creating an animation Shift+F8
symbol
Animation ➪ Settings Displays the Animate dialog box n/a n/afor the selected animation symbol
Animation ➪ Changes an animation symbol into n/a n/aRemove Animation a graphic symbol, removing the
animation
Symbol ➪ Displays the Symbol Properties F8 F8Convert to Symbol dialog box before converting an
object to a symbol
Symbol ➪ Edit Symbol Displays the selected symbol in n/a n/aits own canvas for editing
Symbol ➪ Displays the Tween Instances Ctrl+Alt+ Command+Tween Instances dialog box before creating Shift+T Option+
intermediate steps between Shift+Ttwo selected symbol instances
Symbol ➪ Break Apart Breaks the link between the n/a n/aselected symbol and its instances
Pop-up Menu ➪ Displays the Add Pop-up Menu n/a n/aAdd Pop-up Menu dialog box
Pop-up Menu ➪ Displays the Edit Pop-up Menu n/a n/aEdit Pop-up Menu dialog box
Pop-up Menu ➪ Deletes an existing pop-up menu n/a n/aDelete Pop-up Menu
Mask ➪ Reveal All Shows an object and its mask n/a n/awhen editing a mask
Mask ➪ Hide All Shows only the mask when n/a n/aediting a mask
Continued
043662-1 ch02.F 8/2/02 2:24 PM Page 79
Fireworks Seminar

80 Part I ✦ Come See the Fireworks
Table 2-23 (continued)
Command Description Windows Macintosh
Mask ➪ Paste as Mask Copies the contents of the n/a n/aclipboard as a mask
Mask ➪ Group as Mask Groups one or more selected n/a n/aobjects with the top object used as an alpha mask
Mask ➪ Reveal Selection Shows the area defined by a n/a n/apixel selection
Mask ➪ Hide Selection Hides the area defined by a n/a n/apixel selection
Mask ➪ Disable Mask Disables the selected object’s mask n/a n/a
Mask ➪ Delete Mask Deletes the selected object’s mask n/a n/a
Selective JPEG ➪ Save Saves a selection as a selective n/a n/aSelection as JPEG Mask JPEG mask
Selective JPEG ➪ Restore Creates a selection that matches n/a n/aJPEG Mask as Selection a selective JPEG mask
Selective JPEG ➪ Settings Displays the Selective JPEG n/a n/aSettings dialog box
Selective JPEG ➪ Removes a selective JPEG mask n/a n/aRemove JPEG Mask
Flatten Selection Converts one or more selected Ctrl+Alt+ Command+objects into a single bitmap object Shift+Z Option+
Shift+Z
Merge Down Merges vectors or bitmaps onto Ctrl+E Command+Ea bitmap below
Flatten Layers Flattens visible layers into one n/a n/alayer, discarding hidden layers
Transform ➪ Toggles the display of an object’s n/a n/aFree Transform transformation handles
Transform ➪ Scale Sets transformation handles n/a n/ato resize and rotate objects
Transform ➪ Skew Sets transformation handles n/a n/ato slant, change perspective, and rotate objects
Transform ➪ Distort Sets transformation handles n/a n/ato distort and rotate objects
Transform ➪ Displays the Numeric Transform Ctrl+Shift+T Command+Numeric Transform dialog box Shift+T
043662-1 ch02.F 8/2/02 2:24 PM Page 80
Fireworks Seminar

81Chapter 2 ✦ Understanding the Interface
Command Description Windows Macintosh
Transform ➪ Rotate 180° Rotates an object 180 degrees n/a n/a
Transform ➪ Rotates an object 90 degrees Ctrl+9 Command+9Rotate 90° CW clockwise
Transform ➪ Rotates an object 90 degrees Ctrl+7 Command+7Rotate 90° CCW counterclockwise
Transform ➪ Flips an object horizontally n/a n/aFlip Horizontal
Transform ➪ Flip Vertical Flips an object vertically n/a n/a
Transform ➪ Removes all transformations n/a n/aRemove Transformations from an object
Arrange ➪ Bring to Front Moves an object to the front Ctrl+Shift+ Command+of a layer Up Arrow Shift+Up Arrow
Arrange ➪ Bring Forward Moves an object in front of the Ctrl+ Command+object just in front of it Up Arrow Up Arrow
Arrange ➪ Send Backward Moves an object in back of the Ctrl+ Command+object just behind it Down Arrow Down Arrow
Arrange ➪ Send to Back Moves an object to the back Ctrl+Shift+ Command+of a layer Down Arrow Shift+
Down Arrow
Align ➪ Left Aligns selected objects to Ctrl+Alt+1 Command+the left edge of the selection Option+1
Align ➪ Center Vertical Aligns selected objects to the Ctrl+Alt+2 Command+vertical center of the selection Option+2
Align ➪ Right Aligns selected objects to the Ctrl+Alt+3 Command+right edge of the selection Option+3
Align ➪ Top Aligns selected objects to the Ctrl+Alt+4 Command+top edge of the selection Option+4
Align ➪ Center Horizontal Aligns selected objects to the Ctrl+Alt+5 Command+horizontal center of the selection Option+5
Align ➪ Bottom Aligns selected objects to the Ctrl+Alt+6 Command+bottom of the selection Option+6
Align ➪ Distribute Widths Distribute selected objects Ctrl+Alt+7 Command+horizontally throughout Option+7the selection
Align ➪ Distribute Heights Distribute selected objects Ctrl+Alt+9 Command+vertically throughout the Option+9selection
Continued
043662-1 ch02.F 8/2/02 2:24 PM Page 81
Fireworks Seminar

82 Part I ✦ Come See the Fireworks
Table 2-23 (continued)
Command Description Windows Macintosh
Combine Paths ➪ Join Joins two or more selected Ctrl+J Command+Jpaths or endpoints
Combine Paths ➪ Split Splits an object into Ctrl+Shift+J Command+component paths Shift+J
Combine Paths ➪ Union Combines two or more selected n/a n/aclosed paths into a single object
Combine Paths ➪ Combines overlapping parts of n/a n/aIntersect two or more selected closed paths
Combine Paths ➪ Punch Combines two or more selected n/a n/aclosed paths by punching holes in the back object with the front object(s)
Combine Paths ➪ Crop Crops the back object of a n/a n/aselection with the front object of a selection of two or more closed paths
Alter Path ➪ Simplify Displays the Simplify dialog box n/a n/abefore removing points from a path while keeping its overall shape
Alter Path ➪ Displays the Expand dialog box n/a n/aExpand Stroke
Alter Path ➪ Inset Path Displays the Inset dialog box n/a n/abefore expanding or contracting one or more closed paths
Alter Path ➪ Hard Fill Removes antialiasing or feathering n/a n/afrom the edges of a selection
Alter Path ➪ Anti-Alias Fill Antialiases the edges of a selection n/a n/a
Alter Path ➪ Feather Fill Feathers the edges of a selection n/a n/a
Group Groups one or more selected Ctrl+G Command+Gobjects
Ungroup Ungroups a Group or Mask Group Ctrl+Shift+G Command+Shift+G
043662-1 ch02.F 8/2/02 2:24 PM Page 82
Fireworks Seminar

83Chapter 2 ✦ Understanding the Interface
Text menuText in a traditional graphics program plays a relatively small, but key role. In a Web
graphics program such as Fireworks, text becomes more important because graph-
ics are the only way to incorporate heavily styled text into Web pages. The Text
menu commands, detailed in Table 2-24, offer many shortcuts that enable you to
manipulate text objects without opening the Text Editor.
Table 2-24Text Menu Commands
Command Description Windows Macintosh
Font ➪ Your Font List Changes the selected text object’s n/a n/atypeface or the default typeface if no text object is selected
Size ➪ Other Displays the Text Size dialog box n/a n/a
Size ➪ Smaller Decreases the font size by Ctrl+Shift+ Command+one point comma (,) Shift+
comma (,)
Size ➪ Larger Increases the font size by Ctrl+Shift+ Command+one point period (.) Shift+period (.)
Size ➪ 8 to 120 Changes the selected text object’s n/a n/atype size or the default type size if no text object is selected
Style ➪ Plain Removes bold, italic, and n/a n/aunderline formatting from the selected text
Style ➪ Bold Makes the selected text bold Ctrl+B Command+B
Style ➪ Italic Italicizes the selected text Ctrl+I Command+I
Style ➪ Underline Underlines the selected text n/a n/a
Align ➪ Left Left-aligns the selected text Ctrl+Alt+ Command+Shift+L Option+
Shift+L
Align ➪ Centers the selected text Ctrl+Alt+ Command+Centered Horizontally Shift+C Option+
Shift+C
Align ➪ Right Right-aligns the selected text Ctrl+Alt+ Command+Shift+R Option+
Shift+R
Continued
043662-1 ch02.F 8/2/02 2:24 PM Page 83
Fireworks Seminar

84 Part I ✦ Come See the Fireworks
Table 2-24 (continued)
Command Description Windows Macintosh
Align ➪ Justified Justifies the selected text Ctrl+Alt+ Command+Shift+J Option+
Shift+J
Align ➪ Stretched Force-justifies the selected text Ctrl+Alt+ Command+Shift+S Option+
Shift+S
Align ➪ Top Aligns vertically flowing text to n/a n/athe top of the text block
Align ➪ Centered Vertically Aligns vertically flowing text to the n/a n/avertical center of the text block
Align ➪ Bottom Aligns vertically flowing text to n/a n/athe bottom of the text block
Align ➪ Justified Vertically Justifies vertically flowing text n/a n/ato the top and bottom of the text block
Align ➪ Force-justifies vertically flowing n/a n/aStretched Vertically text to the top and bottom of the
text block
Editor Displays the Text Editor dialog box n/a n/a
Attach to Path Attaches the selected text block Ctrl+ Command+to a selected path Shift+Y Shift+Y
Detach from Path Detaches the selected text block n/a n/afrom a path if it’s attached to one
Orientation ➪ Orients attached text so that the n/a n/aRotate Around Path bottom of each letter is closest to
the path
Orientation ➪ Vertical Orients attached text so that the n/a n/aside of each letter is closest to the path
Orientation ➪ Skews attached text vertically n/a n/aSkew Vertical
Orientation ➪ Skews attached text horizontally n/a n/aSkew Horizontal
Reverse Direction Reverses the direction of text n/a n/aattached to a path
Convert to Paths Converts text objects into Ctrl+ Command+vector objects Shift+P Shift+P
043662-1 ch02.F 8/2/02 2:24 PM Page 84
Fireworks Seminar

85Chapter 2 ✦ Understanding the Interface
Command Description Windows Macintosh
Check Spelling Begins spell checking the Shift+F7 Shift+F7current document
Spelling Setup Opens a dialog box to set n/a n/aspell checking preferences
Commands menuCommands enable the Fireworks user to extend the basic feature set; they are rela-
tively easy to create because they’re written in JavaScript. Table 2-25 details the
commands that are included with Fireworks.
Table 2-25Commands Menu Commands
Command Description Windows Macintosh
Manage Saved Opens the Manage Saved n/a n/aCommands Commands dialog box
Manage Extensions Loads the Extension Manager n/a n/ato install, remove, or temporarily disable extensions
Run Script Enables you to choose a scriptlet n/a n/afor Fireworks to run
Creative ➪ Adds arrowheads to an open path n/a n/aAdd Arrowheads
Creative ➪ Creates a faux-wood picture frame n/a n/aAdd Picture Frame around the current document
Creative ➪ Converts the selection to grayscale n/a n/aConvert to Grayscale
Creative ➪ Converts the selection n/a n/aConvert to Sepia Tone to a sepia tint
Creative ➪ Fade Image Applies one of eight preset alpha n/a n/amasks to your bitmap
Creative ➪ Adds depth and rotation to objects n/a n/aTwist and Fade
Data-Driven Use an external XML file to insert n/a n/aGraphics Wizard variables into batched file
processing
Continued
043662-1 ch02.F 8/2/02 2:24 PM Page 85
Fireworks Seminar

86 Part I ✦ Come See the Fireworks
Table 2-25 (continued)
Command Description Windows Macintosh
Document ➪ Distributes the selected objects in n/a n/aDistribute to Layers your document so that each one
is on its own layer
Document ➪ Hides all layers except n/a n/aHide Other Layers the current layer
Document ➪ Locks all layers except n/a n/aLock Other Layers the current layer
Document ➪ Reverses the order of the n/a n/aReverse Frames frames in a document
Panel Layout Sets ➪ Arranges the floating panels n/a n/a1024×768/1152×768/ to the right of the screen, sized 1280×1024/800×600/ for optimal viewing at various Your Panel Layout Sets display resolutions, and lists
panel layout sets created with the Commands ➪ Panel Layout Sets ➪
Save Panel Layout command
Panel Layout Sets ➪ Displays a dialog box where you n/a n/aSave Panel Layout can name the current panel layout
and save it so that it appears under Commands ➪ Panel Layout Sets
Reset Warning Dialogs Resets all Warning dialog boxes n/a n/athat have a “Don’t show this again” back to their default of appearing
Resize Selected Objects Resizes selected objects graphically n/a n/a
Web ➪ Create Creates a shared palette n/a n/aShared Palette from multiple files
Web ➪ Select Selects all hotspots or slices that n/a n/aBlank ALT Tags do not have alt text specified
Web ➪ Set ALT Tags Displays a dialog box where you n/a n/acan specify alt text for a document’s hotspots and slices
FiltersA filter is a plug-in that extends the capabilities of a program. With Fireworks, filters
are primarily image filters and are, in most cases, the same plug-ins that are
designed for use in Photoshop. As you can see in Table 2-26, Fireworks comes with
043662-1 ch02.F 8/2/02 2:24 PM Page 86
Fireworks Seminar

87Chapter 2 ✦ Understanding the Interface
four groups of its own filters, three Eye Candy 4000 filters, referred to as Eye Candy
4000 LE, plus Alien Skin Splat LE. Because Fireworks can read most Photoshop fil-
ters and plug-ins, you can greatly extend the available filters by assigning an addi-
tional Photoshop plug-ins folder in Fireworks Preferences.
Because all Fireworks filters are pixel-based image filters, any filter applied to avector object first converts it into a bitmap object. Many filters are also available inthe Effect section of the Property inspector as Live Effects, which work on bothbitmap and vector objects without reducing editability.
Table 2-26Filters Menu Commands
Command Description Windows Macintosh
Repeat Filter Repeats the most Ctrl+Alt+ Command+recently used Xtra Shift+X Option+
Shift+X
Adjust Color ➪ Autocorrects the selection’s levels n/a n/aAuto Levels
Adjust Color ➪ Displays the Brightness/Contrast n/a n/aBrightness/Contrast dialog box before adjusting the
selection’s brightness and/or contrast levels
Adjust Color ➪ Curves Displays the Curves dialog box n/a n/abefore adjusting the selection’s color curves
Adjust Color ➪ Displays the Hue/Saturation dialog n/a n/aHue/Saturation box before adjusting the selection’s
hue and saturation levels
Adjust Color ➪ Invert Changes each color in the selection Ctrl+Alt+ Command+to its mathematical inverse Shift+I Option+Shift+I
Adjust Color ➪ Levels Displays the Levels dialog box n/a n/abefore adjusting the selection’s levels
Blur ➪ Blur Blurs the selection n/a n/a
Blur ➪ Blur More Blurs the selection across a larger n/a n/aradius than Blur
Blur ➪ Gaussian Blur Displays the Gaussian Blur dialog n/a n/abox before blurring the selection
Continued
Caution
043662-1 ch02.F 8/2/02 2:24 PM Page 87
Fireworks Seminar

88 Part I ✦ Come See the Fireworks
Table 2-26 (continued)
Command Description Windows Macintosh
Other ➪ Convert to Alpha Converts the selection n/a n/ainto an alpha mask
Other ➪ Find Edges Identifies edges in the selection n/a n/a
Sharpen ➪ Sharpen Sharpens the selection n/a n/a
Sharpen ➪ Sharpen More Sharpens the selection n/a n/amore than Sharpen
Sharpen ➪ Unsharp Mask Displays the Unsharp Mask dialog n/a n/abox before sharpening the selection
Eye Candy 4000 LE ➪ Displays the Eye Candy 4000 n/a n/aBevel Boss Bevel Boss dialog box
Eye Candy 4000 LE ➪ Displays the Eye Candy 4000 n/a n/aMarble Marble dialog box
Eye Candy 4000 LE ➪ Displays the Eye Candy 4000 n/a n/aMotion Trail Motion Trail dialog box
Alien Skin Splat LE ➪ Displays the dialog for the Edges n/a n/aEdges filter for Alien Skin’s Splat!
Window menuThe Window menu commands, listed in Table 2-27, give you access to all of
Fireworks’ floating panels and toolbars. In addition, several commands help you
work with multiple documents or multiple views of the same document.
Table 2-27Window Menu Commands
Command Description Windows Macintosh
New Window Creates a duplicate of the Ctrl+Alt+N Command+current document window Option+N
Toolbars ➪ Main Toggles display of the Main toolbar n/a —(Windows only)
Toolbars ➪ Modify Toggles display of the n/a —(Windows only) Modify toolbar
Tools Toggles display of the Tools panel Ctrl+F2 Command+F2
043662-1 ch02.F 8/2/02 2:24 PM Page 88
Fireworks Seminar

89Chapter 2 ✦ Understanding the Interface
Command Description Windows Macintosh
Properties Toggles display of the Ctrl+F3 Command+F3Property inspector
Answers Toggles display of the Alt+F1 Option+F1Answers panel
Optimize Toggles display of the F10 F10Optimize panel
Layers Toggles display of the Layers panel F2 F2
Frames Toggles display of the Shift+F2 Shift+F2Frames panel
History Toggles display of the Shift+F10 Shift+F10History panel
Styles Toggles display of the Styles panel Shift+F11 Shift+F11
Library Toggles display of the Library panel F11 F11
URL Toggles display of the URL panel Alt+ Option+Shift+F10 Shift+F10
Color Mixer Toggles display of the Color Mixer Shift+F9 Shift+F9
Swatches Toggles display of the Ctrl+F9 Command+F9Swatches panel
Info Toggles display of the Info panel Alt+ Option+Shift+F12 Shift+F12
Behaviors Toggles display of the Shift+F3 Shift+F3Behaviors panel
Find and Replace Toggles display of the Ctrl+F Command+FFind and Replace panel
Project Log Toggles display of the n/a n/aProject Log panel
Align Toggles display of the Align panel n/a n/a
Sitespring Toggles display of the n/a n/aSitespring panel
Cascade Cascades the document windows n/a n/a
Tile Horizontal Tiles the document n/a n/awindows horizontally
Tile Vertical Tiles the document n/a n/awindows vertically
Your Open Lists the currently open n/a n/aDocuments List document windows
043662-1 ch02.F 8/2/02 2:24 PM Page 89
Fireworks Seminar

90 Part I ✦ Come See the Fireworks
Help menuEveryone needs help now and then, especially when working with a program as
rich and deep as Fireworks. The Help menu provides quick access to the Fireworks
help files, various online resources, and a number of key tutorials that explain the
basics of the program.
The Macromedia and Fireworks Web sites offer a tremendous range of support
options. If you’re troubleshooting a problem, you should start with the searchable
TechNotes, which cover virtually every aspect of working with Fireworks. You’ll
also find links to useful tutorials, articles on Web graphics design, and interviews
with industry leaders in Fireworks’ main Support section.
One of the most important resources is the Fireworks newsgroup, hosted by
Macromedia. This discussion group, located at <news://forums.macromedia.com/macromedia.fireworks>, is an essential source for contacting other users of
Fireworks. Fireworks support staff, as well as expert and novice users alike, fre-
quent the newsgroup. Need a quick answer to a perplexing graphics problem? Can’t
figure out the final step in a procedure? Looking to have users with different sys-
tems and browsers check your site for compatibility? The Fireworks newsgroup can
help in all of these areas and more.
The Help menu commands are detailed in Table 2-28.
Table 2-28Help Menu Commands
Command Description Windows Macintosh
About Balloon Help Describes Balloon Help — n/a(Mac OS 9 only)
Show Balloons Toggles Balloon Help on or off — n/a(Mac OS 9 only)
Fireworks Help Opens the help files for Fireworks — Command+?(Mac only)
Welcome Opens a dialog box allowing you n/a n/ato choose the What’s New file, the Tutorial, and the Lessons
What’s New Opens a Flash panel that leads n/a n/ato a list of new features
Using Fireworks Opens the help files for Fireworks F1 —(Windows only)
043662-1 ch02.F 8/2/02 2:24 PM Page 90
Fireworks Seminar

91Chapter 2 ✦ Understanding the Interface
Command Description Windows Macintosh
Manage Extensions Loads the Extension Manager n/a n/ato install, remove, or temporarily disable extensions
Fireworks Support Center Connects to the Internet n/a n/ato view the Fireworks Support Center Web site
Macromedia Opens your Web browser and n/a n/aOnline Forums loads the page on Macromedia’s
Web site with online forum information
Online Registration Connects to the Internet to n/a n/aregister your copy of Fireworks with Macromedia
Print Registration Prints the Fireworks registration n/a n/aform ready for you to mail to Macromedia
About Fireworks Displays the About Fireworks n/a —(Windows only) dialog box
Mac OS 9 users can display the About Fireworks dialog box by choosing AppleMenu ➪ About Fireworks.
SummaryWith a program as feature-laden as Fireworks, it’s helpful to have an overview of
what’s possible. The Fireworks user interface is very flexible and customizable. The
more familiar you become with the layout of the program, the smoother your work-
flow will become. When you’re looking at the Fireworks interface, keep these points
in mind:
✦ In some ways, Fireworks combines tools from several different types of appli-
cations: a bitmap graphics program, a vector drawing program, an image opti-
mizer, and an HTML editor.
✦ The Macromedia Common UI streamlines the Fireworks interface and simpli-
fies moving between multiple Macromedia apps.
✦ All the tools found in Fireworks’ Tools panel have one-key shortcuts, such as
V for the Pointer tool and Z for the Zoom tool.
Tip
043662-1 ch02.F 8/2/02 2:24 PM Page 91
Fireworks Seminar

92 Part I ✦ Come See the Fireworks
✦ Customize your workspace in Fireworks by grouping, referred to as docking,
the floating panels however you want, and then save that grouping as a Panel
Layout Set.
✦ Many tools have special options you can access via the new Property inspector.
In the next chapter, you find out how to set up the Fireworks environment to suit
your work style.
✦ ✦ ✦
043662-1 ch02.F 8/2/02 2:24 PM Page 92
Fireworks Seminar

CustomizingYourEnvironment
You’ll never find any two artists’ studios that are exactly
alike. And why should you? Creating — whether it’s fine
art, print images, or Web graphics — is a highly personal expe-
rience that requires the artist to be in comfortable, personal-
ized surroundings. Fireworks reflects this attitude by enabling
you to personalize numerous preferences to facilitate your
workflow, from importing existing images through graphics
editing all the way to exporting your final product. This chap-
ter describes options Fireworks offers to custom-fit the pro-
gram to your personal style.
Setting PreferencesMost, but not all, of Fireworks’ customization options are
handily grouped in the Preferences dialog box. Though you
can adjust these preferences at any time, they are generally
used to fine-tune the program’s overall functions between ses-
sions. Consequently, changes to a number of the options do
not take effect until you restart Fireworks.
To access these program-wide settings, choose Edit ➪Preferences (Fireworks ➪ Preferences on OS X). The
Preferences dialog box opens with the first of its five categories
displayed. The categories — detailed in the following
sections — are labeled General, Editing, Launch and Edit,
Folders, and Import. In Windows, move from category to cate-
gory by selecting the various tabs. On the Mac, choose another
option from the option list to move to another category.
33C H A P T E R
✦ ✦ ✦ ✦
In This Chapter
Establishing primaryoptions
Linking to externalresources
Setting Photoshopimport preferences
Controlling HTMLoutput
Getting Fireworkshard copy
Personalizingkeyboard shortcuts
✦ ✦ ✦ ✦
053662-1 ch03.F 8/2/02 2:24 PM Page 93
Fireworks Seminar

94 Part I ✦ Come See the Fireworks
Fireworks has an additional type of preference: the configuration and layout of thedockable floating windows. You can create your own combination of windows —Layers, Frames, Styles, and so on — by dragging and dropping their tabs on oneanother. For details on this aspect of customizing your workspace, see Chapter 2.
Learning general preferencesThe General category of the Preferences dialog box, shown in Figure 3-1, is divided
into three sections: Undo Steps, Color Defaults, and Interpolation.
The screenshots of the Preferences dialog box in Figures 3-1 through 3-6 show thedefault, freshly installed settings. If you’re ever wondering what the default for aparticular preference is, refer to these images.
Figure 3-1: Set the number of Undo steps, change the color defaults, and specify the default interpolation method in the General panel of the Preferences dialog box.
Specifying undo levelsThe capability to undo an action — whether it’s a font color change, an image rota-
tion, or an out-and-out deletion — is critical in computer graphics. Although some
graphics programs only let you reverse or undo your last command, Fireworks not
only gives you multiple undo levels, but the History panel provides a graphical way
to interact with your previous steps. Of course, storing the changes that you make
to a document in order to be able to undo that change requires a certain amount of
memory. Rather than let an unlimited number of undo steps accumulate in the
background until your computer starts to feel the strain, Fireworks allows you to
specify the number of undo levels that you think strikes the best balance between
usability and utility.
Tip
Cross-Reference
053662-1 ch03.F 8/2/02 2:24 PM Page 94
Fireworks Seminar

95Chapter 3 ✦ Customizing Your Environment
For more about the History panel, see Chapter 19.
By default, Fireworks prepares itself to keep track of 20 undo levels. You can change
this by altering the Undo Steps value. The amount of memory needed to undo an
operation depends on the type of operation. For example, rotating a 500×600-pixel
photograph requires far more memory than changing the color of a straight line.
If you alter the number of Undo Steps, the new setting takes effect for both the
Edit ➪ Undo menu command and the History panel after you restart Fireworks.
Indicating color defaultsAlthough the Web designer has a full palette from which to choose, Fireworks starts
with just three basic colors:
✦ Stroke: The default Stroke color is applied to any path that is drawn or
stroked with any of the drawing tools, such as the Pencil, Pen, Brush, or
Rectangle.
✦ Fill: The default Fill color is applied to any object when a Solid fill-type is
selected in the Fill window.
✦ Highlight: To show a selected object, Fireworks temporarily changes the out-
line of the object to the Highlight color. When the object is deselected (or
another object is selected), the Highlight color is removed.
You make all default color changes through the Color Defaults section of the
General category in the Preferences dialog box. To alter any of the Stroke, Fill, or
Highlight colors, use their respective color wells, which display the standard
Fireworks color picker. Choose any of the swatches shown, or use the Eyedropper
tool to select an onscreen color. For a wider selection of colors, select the Palette
icon to display your operating system’s color picker(s).
You can alter both the Stroke and Fill colors by choosing their respective color well
on the Tools panel, the Color Mixer, or any number of other windows. The Highlight
color can only be changed through Preferences. All color changes take place imme-
diately after the Preferences dialog box closes.
If you choose a gradient fill-type (such as Linear, Radial, or Cone) for an object, butno color combination, Fireworks uses the current Stroke and Fill selections to cre-ate the gradient.
Finding interpolation defaultsWhen you resize an image, Fireworks analyzes the original, and based on that analy-
sis creates a new image with either more or fewer pixels. This process is called
interpolation. Fireworks offers four interpolation methods: bicubic, bilinear, soft,
and nearest neighbor. When you resize an image, you can choose any of these four,
but the interpolation preference you set here determines the default in the Image
Tip
Cross-Reference
053662-1 ch03.F 8/2/02 2:24 PM Page 95
Fireworks Seminar

96 Part I ✦ Come See the Fireworks
Size dialog box. Bicubic (the default) is the best general-purpose option. Unless you
have a specific reason not to do so, I recommend leaving this preference at bicubic
and modifying it as needed for special circumstances.
For more about interpolation methods and resizing images, see Chapter 6.
Toggling panel icon visibilityThis option enables you to choose whether your tabbed panels simply display their
names, or if they include the panel’s icon as well. If the icon helps you to quickly
identify the panel then select the Show Tab Icons checkbox. If you prefer the unclut-
tered workspace of the default option then simply leave this option blank.
Fireworks MX adds the option of showing or hiding the icons next to the names ofthe floating panels.
Adding preview icons when saving (Mac only)Macintosh users have the choice of having Fireworks save their PNG source files
with the Fireworks icon, or with a thumbnail of your document as a preview icon.
The preview icon can be a great benefit if you’re the kind of user who finds it easier
to manage files by what your documents look like, rather than what you might have
named them. If you’d prefer to have the regular Fireworks icon applied to your PNG
files, rather than the default preview, then uncheck the Add Preview Icon checkbox.
Fireworks MX allows Mac users to choose either the Fireworks icon or a new pre-view icon that displays a thumbnail of your document, when you save your PNGfiles.
Understanding editing preferencesThe Editing category of the Preferences, shown in Figure 3-2, enables you to cus-
tomize the way tool cursors work, and presents options for working with bitmap
images.
Using precise cursorsBy default, when a particular drawing or selection tool is selected, the cursor
changes into a representative shape. For example, select the Pencil tool and the
cursor changes to a pencil shape. The Precise Cursors option replaces all the
affected individual cursor shapes with a crosshair cursor.
If the Precise Cursors option is selected, the following tools use the crosshair cursor:
✦ All selection tools, including the rectangular and elliptical Marquee, and the
Lasso, Polygon Lasso, and Magic Wand
✦ Drawing tools, such as the Line, Pen, Rectangle, Ellipse, Polygon, Pencil, and
Brush
NewFeature
NewFeature
Cross-Reference
053662-1 ch03.F 8/2/02 2:24 PM Page 96
Fireworks Seminar

97Chapter 3 ✦ Customizing Your Environment
✦ Modification tools, such as Eraser and Paint Bucket
✦ All Web objects tools, including Hotspot Rectangles, Circle and Polygons, and
the Slice tool
Figure 3-2: Customize your graphics creation style in the Editing category of the Fireworks Preferences dialog box.
The Precise Cursor is very useful for detail work where the tool-specific cursor
might block the designer’s view, as illustrated in Figure 3-3.
If you haven’t enabled the Precise Cursors option in Preferences, the option can betoggled on or off with the Caps Lock key. Unless you find the standard cursors par-ticularly distracting, I recommend keeping the Precise Cursors option disabled inPreferences and using the Caps Lock key whenever the crosshair cursor is needed.
Using the Delete Objects when Cropping preferenceThe Delete Objects when Cropping preference specifies that path or image objects
outside of a cropped area should be deleted. Alternatively, you can choose to have
cropping simply resize the canvas and leave your objects alone. If you prefer that
way of working, be sure to uncheck this preference setting.
Using Brush-Size Painting CursorsBy default, Fireworks increases the size of the cursor to match the size of your
painting stroke. For example, painting with the Brush tool and a Stroke setting of 20
displays a cursor that’s twice as big as painting with a Stroke setting of 10. To paint
with a standard-size cursor, uncheck this preference setting.
Tip
053662-1 ch03.F 8/2/02 2:24 PM Page 97
Fireworks Seminar

98 Part I ✦ Come See the Fireworks
Figure 3-3: Use the Precise Cursors feature for close-up work where a standard cursor might hamper pixel-level accuracy.
Examining pixel-based image optionsThe Bitmap Options section of the Editing category affects only pixel-based bitmap
images.
Hide Edges, found under the View menu, normally makes all the selection outlines
vanish. When the Turn off “Hide Edges” option is enabled, the Hide Edges command
is only temporary; making any selection causes the edges to reappear. In other
words, the Hide Edges option means “hide edges until I make another selection.”
When Turn off “Hide Edges” is unchecked, the Hide Edges command hides edges
until you choose it again and specifically ask to view selection borders. I’ve found
that it’s easy to lose track of selections if edges are hidden all the time, so I gener-
ally leave this option enabled.
Checking the Display Striped Border preference setting completely enables the
barber-pole that surrounds bitmap images while you are working with bitmap tools.
With this option enabled, you can quickly determine if you are working in Vector or
Bitmap mode. If you’re upgrading from an older version of Fireworks, where the
Striped Border was always displayed during bitmap editing, you may find it helpful
to enable this Preference while you’re getting accustomed to the new interface.
Pencil tool precise cursor
053662-1 ch03.F 8/2/02 2:24 PM Page 98
Fireworks Seminar

99Chapter 3 ✦ Customizing Your Environment
Setting Pen tool preferencesThe Show Pen Preview option enables you to set the Pen tool so that it shows you
how and where the next path segment will be drawn. Not only is it very useful for
ensuring that the lines you are drawing are straight, it also helps you to ensure that
everything will be positioned where you want it on the canvas.
By default, the Pen tool’s deselected points (the ones that you’ve already drawn)
are displayed as hollow squares on the path, while the one in use is depicted by a
solid square. The Show Solid Points option simply reverses this behavior by making
the selected point hollow and the deselected points solid.
Setting your pointer optionsThe Mouse Highlight preference toggles whether or not moving your mouse over
objects on the canvas highlights the bounding box for the various objects. You
might want to disable the Mouse Highlight for documents that contain a lot of
objects as the flashing of the highlight can become annoying. Keep in mind, how-
ever, that deselecting this option may make it difficult to select small objects on the
canvas.
Fireworks MX lets you toggle whether or not the bounding boxes of items on thecanvas light up when the mouse passes over them.
The Preview Drag preference is similar to the “Show window contents while drag-
ging” option in Microsoft Windows. If you disable this option, you will see an outline
of whatever you are dragging as opposed to moving the whole selection around.
Preview Drag is enabled by default but you may want to uncheck it for those occa-
sions where the preview of your selection makes exact positioning difficult.
Fireworks MX lets you decide whether you see the entire selection you are drag-ging, or just an outline.
Using Show Fill HandlesThis setting toggles whether or not Fireworks shows the Fill Handles on an object
that has a gradient fill applied. If you’ve already got a gradient fill tweaked just the
way you want it, you may want to turn this option off to avoid accidentally modify-
ing your fill by dragging one of the handles.
Fireworks MX lets you choose whether or not the fill handles are displayed for agradient fill.
Using the Pick and Snap preference settingAs much as we would all like to have the steady hands of a surgeon and pixel-per-
fect mastery of the Fireworks tools, the reality is that “fuzzier” accuracy is often
more productive. Missing an object by one pixel and coming away “empty handed”
can be frustrating. The Pick preference setting tells Fireworks how close your cur-
sor has to be to an object in order to select it successfully.
NewFeature
NewFeature
NewFeature
053662-1 ch03.F 8/2/02 2:24 PM Page 99
Fireworks Seminar

100 Part I ✦ Come See the Fireworks
The Snap preference setting tells Fireworks how close an object has to be to a grid
line or guide before it snaps to it. Once again, being slightly less accurate can result
in a more productive Fireworks session.
The default setting for both Pick and Snap is five. Experimenting with these values
is probably the best way to find out whether five or another value suits you best.
Learning Launch and Edit preferencesA common feature of the Web designer’s workflow is to edit or optimize an image
file that’s already in an HTML page. A placed image may be too big in width or
height, or even more commonly, too big in file size. Often, HTML editors such as
Macromedia Dreamweaver or Adobe GoLive allow you to specify a default external
image editor for image files. Of course, Fireworks is an excellent choice.
When you open an image for editing in Fireworks from an external application,
Fireworks asks whether you would like to edit the actual GIF, JPEG, or PNG file from
the page, or whether you want to use a Fireworks PNG file as a source for editing.
Using an original Fireworks PNG file (if one is available) is always preferable
because you’ll maintain the highest quality possible, as well as retain vector infor-
mation and editable text.
Under the Launch and Edit category of the Fireworks Preferences dialog box (see
Figure 3-4), you can choose to always use a Fireworks PNG file, never use a
Fireworks PNG file, or have Fireworks always ask. Additionally, you can specify a
similar preference for optimizing an image in Fireworks when you use the
Dreamweaver command Optimize Image in Fireworks.
Figure 3-4: Customize how Fireworks interacts with other applications in the Launch and Edit category of the Fireworks Preferences dialog box.
053662-1 ch03.F 8/2/02 2:24 PM Page 100
Fireworks Seminar

101Chapter 3 ✦ Customizing Your Environment
Examining folder preferencesOne of the features of a truly great software program is the capability for the user to
extend its functionality. You can access additional resources in the Folders category
of the Preferences dialog box, as shown in Figure 3-5.
Figure 3-5: Access additional resources for Fireworks through the Folders category of Preferences.
Finding additional materialsThree key areas for expansion are detailed in the Additional Materials section of the
Folders category.
✦ Photoshop plug-ins: Fireworks enables you to include additional image filters
for applying effects to bitmap images. Fireworks works with Photoshop-
compatible plug-ins, such as Alien Skin Eye Candy and Kai Power Tools.
✦ A second Textures folder: Textures are images that can be blended with
other images to give the appearance of different surfaces. Textures are typi-
cally stored in the Configuration/Textures folder within the Fireworks program
folder. Choose another folder here and Fireworks will use the textures from
both folders.
✦ A second Patterns folder: Patterns are single images that repeat to fill a
selected area. Find patterns in Configuration/Patterns within the Fireworks
program folder, and specify an additional folder here.
Typically, designers use the Folder preferences to include resources that are cur-
rently available to another program, such as Photoshop. Fireworks has its own
plug-ins (called Filters), Textures, and Patterns folders from which it works, but it is
also willing to piggyback on another application to double the options that you
have available when you’re working in Fireworks.
053662-1 ch03.F 8/2/02 2:24 PM Page 101
Fireworks Seminar

102 Part I ✦ Come See the Fireworks
Click the Browse button next to the Photoshop Plug-Ins, Textures, or Patterns
checkboxes to navigate to a folder on your hard drive that contains the plug-ins,
textures, or patterns that you want Fireworks to start using. Close the Preferences
dialog box and restart Fireworks to complete the installation of these resources.
Patterns and textures add a great deal of richness to your graphics. For moredetails on how to apply them in Fireworks, see Chapter 11. For details on how toincorporate Photoshop plug-ins, turn to Chapter 12.
Discovering Import preferencesPhotoshop is a well-established image-editing program that gains much of its power
from its capability to layer one image on top of another, with varying degrees of
opaqueness and transparency. Fireworks handles Photoshop 3, 4, 5, 6, and 7 files
quite elegantly, keeping the layers separate and the text editable. You can specify
import options each time you import a Photoshop document, but setting the
defaults that suit you best in the Import preferences will save you time and trouble
later on, as shown in Figure 3-6.
Figure 3-6: Specify the default options for importing Photoshop documents into Fireworks through the Import category of the Preferences dialog box.
By default, the Convert to Fireworks Objects option is selected and each layer of a
Photoshop image becomes a Fireworks object on import. Check the Share Layer
Between Frames option and Fireworks will share these layers across frames.
Alternatively, you can choose to convert the Photoshop layers to Fireworks frames
upon import by selecting Convert to Frames.
Cross-Reference
053662-1 ch03.F 8/2/02 2:24 PM Page 102
Fireworks Seminar

103Chapter 3 ✦ Customizing Your Environment
If you know that you’ll never want to edit the text in an imported Photoshop docu-
ment, or if you may not always have the matching fonts available, choose the
Maintain Appearance option under Text to “flatten” editable text into bitmaps.
To load a flat, single-layer version of the graphic, choose the Use Flat Composite
Image option. This is similar to flattening the layers of your Photoshop document in
Photoshop.
If you know that your Photoshop document contains attributes that Fireworksdoesn’t support, such as Adjustment Layers, then you should import your file withthe Use Flat Composite Image option checked.
Setting Up for Multiple UsersAs more operating systems have developed multiple user capabilities, so has
Fireworks. With multiple user support, you can ensure that each person using a
particular computer will always have things set up exactly the way they want them.
Gone are the days of setting up your panels just to find that someone used your
computer afterwards and rearranged everything. Table 3-1 lists the default location
of Fireworks user files on Windows and Table 3-2 lists the Macintosh locations.
Fireworks MX now supports multiple users across both platforms and all operatingsystem versions.
Table 3-1Default Windows User File Locations
Operating System Multiple Users Default Location
Windows 98 No C:\Windows\Application Data\Macromedia\Fireworks MX
Windows 98 Yes C:\Windows\Profiles\<username>\Application Data\Macromedia\Fireworks MX
Windows ME No C:\Windows\Application Data\Macromedia\Fireworks MX
Windows ME Yes C:\Windows\Profiles\<username>\Application Data\Macromedia\Fireworks MX
Windows NT — C:\WinNT\Profiles\<username>\Application Data\Macromedia\Fireworks MX
Windows 2000 — C:\Documents and Settings\<username>\Application Data\Macromedia\Fireworks MX
Windows XP — C:\Documents and Settings\<username>\Application Data\Macromedia\Fireworks MX
NewFeature
Tip
053662-1 ch03.F 8/2/02 2:24 PM Page 103
Fireworks Seminar

104 Part I ✦ Come See the Fireworks
Table 3-2Default Macintosh User File Locations
Operating System Multiple Users User Type Default Location
Mac OS 9 No — Macintosh HD/System Folder/Application Support/Macromedia/Fireworks MX
Mac OS 9 Yes Admin Macintosh HD/System Folder/Preferences/Macromedia/Fireworks MX
Mac OS 9 Yes User Macintosh HD/Users/<username>/Preferences/Macromedia/Fireworks MX
Mac OS X — — Macintosh HD/Users/<username>/Library/Application Support/Macromedia/Fireworks MX
Adjusting the HTML SetupFireworks files are similar to those from a page layout program in one important
way: Both are intended for publication. Although the page layout program outputs
files intended for a printer or service bureau, Fireworks generates files to be pub-
lished on the Web. Because of the increased variations possible with its HTML out-
put, Fireworks allows you to set a range of properties for each document. You might
think of the HTML Setup command as a “Printer Setup” for HTML.
The HTML Setup command enables you to set options for the kind of code that you
create, and for both slicing and image map operations. Briefly, slicing cuts an image
into smaller sections, which are placed in an HTML table, whereas an image map is
a graphic with one or more hotspots. The parameters chosen through the HTML
Setup command can be used for a single graphic or designated as the current
default settings. Choose File ➪ HTML Setup to set these parameters.
Understanding general optionsThe first tab of the HTML Setup dialog box (see Figure 3-7) deals with the actual
code that you generate with Fireworks. Choose an HTML style that matches your
favorite editor, from a list that includes Macromedia Dreamweaver, Adobe GoLive,
and Microsoft FrontPage. Additionally, you may choose a generic option that’s suit-
able for any editor.
053662-1 ch03.F 8/2/02 2:24 PM Page 104
Fireworks Seminar

105Chapter 3 ✦ Customizing Your Environment
Figure 3-7: The General panel of the HTML Setup dialog box enables you to tailor HTML output to taste.
The Extension option enables you to choose a default filename extension for the
HTML that you create. By default, Fireworks uses the DOS HTML filename extension
of “.htm.” You can change this to “.html” to suit your Web server, or to another
extension, such as “.shtml,” if that better serves your typical workflow.
If none of the predefined filename extensions suits your needs, you can simplytype one of your own.
The Include HTML Comments option tells Fireworks whether to include HTML com-
ments in its output. Your personal preference or company policy dictates whether
the comments that Fireworks provides are useful or a nuisance. I prefer to leave
Fireworks’ comments disabled and provide my own comments in my code.
Check the Lowercase File Name option and Fireworks-generated HTML will have a
lowercase filename suitable for posting on the Web.
The Macintosh version of Fireworks also has an additional option on the General
tab of the HTML Setup dialog box. The File Creator option list enables you to spec-
ify the Macintosh Creator Code that your HTML output file should have. The
Creator Code tells the Macintosh operating system which application to use when
opening the file. Choices include Dreamweaver, GoLive, BBEdit, and the two major
browsers. You can also select the Other option and use an Open dialog box to navi-
gate to a file and steal its Creator Code.
Discovering table optionsTables are a very important feature of almost any HTML page. Tables provide the
layout structure and, quite often, unite separate image slices into a cohesive whole.
The Table tab of the HTML Setup dialog box (see Figure 3-8) enables you to specify
how you want Fireworks to build tables.
Tip
053662-1 ch03.F 8/2/02 2:24 PM Page 105
Fireworks Seminar

106 Part I ✦ Come See the Fireworks
Figure 3-8: The Table tab of HTML Setup deals with table spacing and cell color.
Using spacer imagesAn unfortunate fact-of-Web-life has made a device known as a spacer image a neces-
sity for many sliced images. When an image is sliced, each section is placed in a
separate HTML table cell. Some browsers collapse the tables unless some content
is included in each cell, rendering the image unattractive. Fireworks solves this
problem by placing a one-pixel spacer image in each outside column and row, as
shown in Figure 3-9. The spacer images serve to keep the graphic looking as
designed, no matter what browser is used.
Learning spacer image optionsA range of possibilities exists for using spacer images. Choose one of the options
from the Space with option list:
✦ Nested Tables — No Spacers: Fireworks attempts to maintain the proper look
by nesting tables. If you use this option, be sure to test your final output in all
required browsers to make sure spacer images aren’t required.
✦ Single Table — No Spacers: One table and no spacer images. As with the pre-
ceding option, comprehensive testing is required to make sure your output is
acceptable.
✦ One-Pixel Transparent Spacer: This default method places transparent
spacer images around the outside of your original image. Only one image file
is added and used: a 1×1-pixel transparent GIF file called spacer.gif with a tiny
file size of 43 bytes. The spacer.gif file only needs to be downloaded once but
is used repeatedly and resized by the browser, when necessary.
053662-1 ch03.F 8/2/02 2:24 PM Page 106
Fireworks Seminar

107Chapter 3 ✦ Customizing Your Environment
You can also specify how Fireworks deals with empty table cells here. Generally,
you’ll want to leave these settings at their defaults: Fireworks fills each empty table
cell with a spacer image and sets the background color to the same color as the
canvas. If you prefer, Fireworks can place nonbreaking spaces into empty table
cells. If you use this option, make sure to test it in all of your target browsers.
Figure 3-9: Opening this Fireworks-generated table in Dreamweaver and increasing the cell padding allows you to see the extra cells along the top and right side, each containing a spacer image. Note that in the Dreamweaver Property inspector the selected spacer image — which is really a 1×1-pixel GIF — is sized at 30×8.
Learning document-specific optionsThe final tab of the HTML Setup dialog box, shown in Figure 3-10, displays options
that apply to the current document only, and specifies how you would like individ-
ual sliced images to be named. Numerous options under File Names enable you to
build the perfect filename structure.
When Fireworks slices an image, each individual sliced section becomes a separate
image file that must be stored using a unique name. Rather than asking the designer
to name each section on export, Fireworks automatically generates a filename. The
naming convention combines a number of identifiers, such as the document name,
or the word “slice,” with different numbering conventions. I find that the best way
to work with the Slices option list is, initially, to set them all to None. Then, begin at
the upper left and build the right filename by choosing options, noting each
option’s effect on the example filename that Fireworks displays.
Original Fireworks-generated table
One spacer image
Table with cellpadding increased
Properties of theselected spacer image
053662-1 ch03.F 8/2/02 2:24 PM Page 107
Fireworks Seminar

108 Part I ✦ Come See the Fireworks
Figure 3-10: The Document Specific tab of HTML Setup handles the naming of sliced images.
Examining the Slices option listsThe following combinations are available from the Slices option lists on the
Document Specific tab of the HTML Setup dialog box:
✦ None: Deactivates the particular option list’s contribution to the final
filename.
Leaving all the File Names option lists set to None effectively turns off slice export-ing, regardless of other Fireworks settings. Be sure to set at least one of the optionlists to a naming convention.
✦ doc.name: Adds the filename of the current document to the final filename.
✦ slice: Adds the name “slice” to the output filename. When you create a new
slice in Fireworks, by default its name is “slice” unless you explicitly change
its name via the Property inspector or the Layers panel.
✦ Slice # (1, 2, 3 . . .): Adds an ascending number for each slice to the final
filename.
✦ Slice # (01, 02, 03 . . .): Same as the preceding, but with a leading zero for
numbers less than ten.
Using the leading zero slice number creates filenames that sort properly in theMacintosh Finder or Windows Explorer. Without the leading zero, a list of files issorted slice1.gif, “slice10.gif,” “slice2.gif,” and so on.
✦ Slice # (A, B, C . . .): Adds an ascending uppercase letter name for each slice
to the output filename.
✦ Slice # (a, b, c . . .): Same as the preceding, but with lowercase letters.
Tip
Caution
053662-1 ch03.F 8/2/02 2:24 PM Page 108
Fireworks Seminar

109Chapter 3 ✦ Customizing Your Environment
✦ Row Column (r3_c2, r4_c7 . . .): Adds the number of the row and column of
the HTML table used to display the slices; row numbers are prefaced with an
“r” and columns with a “c.” For example, a slice in row 1, column 1 would be
called “r1_c1.”
✦ Underscore/Period/Space/Hyphen: Adds an underscore, period, space, or
hyphen to the output filename, respectively.
Both the numeric and alphabetical naming schemes follow the same pattern as they
name objects in the HTML table. Objects are named row by row, left to right, as
shown in Figure 3-11.
Figure 3-11: This figure depicts the slicing order as Fireworks moves top to bottom, left to right.
Slicing is one of Fireworks’ richest features. For a complete discussion of slicing,see Chapter 20.
Adding frame-specific informationYou can also add frame-specific information to a slice’s filename, with the two
Frames option lists. The following options are available:
✦ None: Deactivates the particular option list’s contribution to the final
filename.
✦ Frame # (f1, f2, f3 . . .): Adds an “f” (for frame), followed by an ascending
number for each frame to the final filename.
✦ Frame # (1, 2, 3 . . .): Adds an ascending number for each frame to the final
filename.
Cross-Reference
Name for selected slice Selected slice
053662-1 ch03.F 8/2/02 2:24 PM Page 109
Fireworks Seminar

110 Part I ✦ Come See the Fireworks
✦ Rollover (over, down, overdown): Describes the rollover function of a frame
and adds that description to the output filename.
✦ Abbreviated (o, d, od): Same as the preceding, but with abbreviated descrip-
tions of the rollover frames.
✦ Underscore/Period/Space/Hyphen: Adds an underscore, period, space, or
hyphen to the output filename, respectively.
Once again, be sure to keep an eye on the example filename as you work with the
File Names option lists. With a little experimentation, you can create very meaning-
ful, readable filenames for your sliced output, simplifying the task of identifying
individual slices later.
Under Alternate Image Description, you can provide a default alt property for the
img tags in your HTML output. Alternate text allows text-only browsing, and simpli-
fies browsing for visually impaired users, whose computers read alt text descrip-
tions of the images in a page. Text that’s entered here shows up in the Property
inspector for every slice. Although providing specific alt text for most of your
images is a good idea, having a meaningful default can save time and trouble.
Check Multiple Nav Bar HTML Pages in order to use Fireworks’ Nav Bar functions in
pages without HTML frames.
Find out more about using Nav Bars in Chapter 21.
Determining when slice objects aren’t usedWhen you slice an image, you don’t have to cover every portion of the canvas with
a slice object. Although most of the time the entire graphic is translated into slices,
you may prefer to store just the specifically sliced areas. If so, uncheck the Include
Areas without Slices option.
Let’s look at an example. Say that a designer uses a single canvas to create multiple,
similar graphic elements that will ultimately be used on separate pages. If the
Export Undefined Slices option is left selected (it’s the default), the entire graphic
will be exported in a single table with the individual elements in the same relative
position to each other — however, the output would not be suitable for use on sepa-
rate Web pages. If, on the other hand, the Include Areas without Slices option is
deselected, the sliced objects are exported as separate files, using the naming con-
vention described in the previous section.
Using UTF-8 encodingUTF-8 stands for Unicode Transformation Format-8. The Use UTF-8 Encoding prefer-
ence allows you to tell Fireworks to save the HTML page with a character set of
UTF-8. The typical character set for North America is ISO-8859-1, which allows for
Cross-Reference
053662-1 ch03.F 8/2/02 2:24 PM Page 110
Fireworks Seminar

111Chapter 3 ✦ Customizing Your Environment
the standard ASCII characters that exist in English. UTF-8 covers a much larger
character set and allows for double-byte characters that are used in languages such
as Japanese, Chinese, Korean, and Hebrew, just to name a few. In a nutshell, this
means that if the user has the necessary fonts installed, you can set up your pages
to display in multiple languages.
Fireworks now exports HTML with UTF-8 document encoding.
Finally, the Document Specific tab of the HTML Setup dialog box offers you the
option of a Set Defaults button, which resets all the Document Specific options to
their default settings. If you’ve made a mess of these settings and want to start over,
you’re never more than a click away.
Selecting Print OptionsAlthough Fireworks is primarily a Web-oriented program, a printout of a graphic
can be useful. Quite often, the designer is expected to present visual concepts to
clients or other team members, and occasionally in a printed format.
Fireworks’ Print feature is very straightforward and uses standards set on both
Macintosh and Windows operating systems. The File ➪ Page Setup command opens
a standard dialog box, shown in Figure 3-12, which enables the user to determine
the page size, paper source, orientation, and margins. Clicking the Printer button
opens the standard dialog box with printer-specific options. When you’re ready to
print the selected image, just choose File ➪ Print and select the number of copies
and other choices.
Figure 3-12: Use the Page Setup dialog boxto establish your page size and orientationwhen printing from within Fireworks.
NewFeature
053662-1 ch03.F 8/2/02 2:24 PM Page 111
Fireworks Seminar

112 Part I ✦ Come See the Fireworks
When Fireworks prints a selected image, the graphic is positioned in the center of
the page at the preset resolution. You can change the resolution and the print size
by selecting Modify ➪ Image Size and entering new values in the appropriate text
boxes in the Image Size dialog box.
If you often require printed proofs of Web designs, an excellent way to generatethem is with Adobe Acrobat 4. Its Web Capture tool can grab a Web page or com-plete site from a local machine or the Web and turn it into a surprisingly good-looking PDF file, complete with navigable PDF bookmark links.
Personalizing Keyboard ShortcutsPerhaps the most personal of all preference settings are keyboard shortcuts. If you
cut your computer graphics teeth in Photoshop, it’s likely that you have certain
keyboard commands from Photoshop firmly “in your fingers,” so that learning new
keyboard shortcuts in Fireworks may be counter-productive. Similarly, if you spend
the majority of your day using Macromedia Flash, you may not want to use com-
pletely different key shortcuts to access similar features in Fireworks. Enter cus-
tomizable keyboard shortcuts.
Keyboard shortcuts in Fireworks — and in other Macromedia applications that con-
form to the Macromedia Common User Interface — are dictated by a saved key
shortcut set. Fireworks starts out initially using the Macromedia Common key
shortcut set. If you are just starting with Fireworks, or don’t have a preference,
using the Macromedia Common set prepares you for other Macromedia applica-
tions as you learn Fireworks.
In addition to the default Macromedia Common key shortcut set, Fireworks ships
with four others that mimic the default keyboard shortcuts in other commonly
used graphics applications: Fireworks 3, Photoshop, FreeHand, and Illustrator.
These choices are excellent for users who already know the keyboard shortcuts
from one of these applications.
Work with key shortcut sets in Fireworks by choosing Edit ➪ Keyboard Shortcuts
(Fireworks ➪ Keyboard Shortcuts on OS X) to display the Keyboard Shortcuts dia-
log box (see Figure 3-13). Create or delete sets, edit a saved set, or even export a set
as an HTML reference.
Tip
053662-1 ch03.F 8/2/02 2:24 PM Page 112
Fireworks Seminar

113Chapter 3 ✦ Customizing Your Environment
Figure 3-13: Use the Keyboard Shortcuts dialog box to work with keyboard shortcut sets.
Changing the current shortcut setTo change the current key shortcut set, follow these steps:
1. Choose Edit ➪ Keyboard Shortcuts (Fireworks ➪ Keyboard Shortcuts on OS X)
to display the Keyboard Shortcuts dialog box.
2. Choose another set from the Current Set option list.
3. Click OK when you’re done.
The newly selected keyboard shortcut set is immediately made active.
Working with custom keyboard shortcutsCustom keyboard shortcut sets enable you to save time and trouble again and
again, whether you’re a keyboard shortcut power user, or just want to change one
or two shortcuts that you find unproductive. Either way, the first step is to dupli-
cate a default set and modify it further to suit your needs.
Commands list
Shortcuts list
Add New Shortcut buttonDelete Selected Shortcut
button
Rename Set button Export Set as HTML button
Duplicate Set button Delete Set button
053662-1 ch03.F 8/2/02 2:24 PM Page 113
Fireworks Seminar

114 Part I ✦ Come See the Fireworks
A shortcut key set consists of three kinds of shortcuts that you can modify:
✦ Menu commands: Key combinations that correspond exactly to a menu com-
mand, such as File ➪ Save. Menu command shortcuts must include either a
function key (F1–F12) or the Ctrl (Command) modifier key, and can also
include other modifier keys.
The modifier keys on Windows-based computers are Shift, Ctrl, and Alt. Macs haveShift, Command, Option, and Control modifier keys.
✦ Tools: A single letter or number key that makes a specific tool active. No mod-
ifier keys are allowed.
✦ Miscellaneous: Functions such as nudging an object a few pixels to the left or
right. Miscellaneous shortcuts follow the same rules as Menu Commands
(detailed earlier), but what makes them “miscellaneous” is that they don’t
have a corresponding menu command.
Each command, tool, or miscellaneous item can also have multiple keyboard short-
cuts assigned to it, enabling you to leave default key commands in place and add an
additional key command to an item, or access any particular command with a
whole list of keyboard shortcuts.
Creating a custom keyboard shortcut setTo create a custom keyboard shortcut for a menu command, tool, or miscellaneous
item, follow these steps:
1. Choose Edit ➪ Keyboard Shortcuts (Fireworks ➪ Keyboard Shortcuts on OS X)
to display the Keyboard Shortcuts dialog box.
2. Choose the default set that most suits your needs from the Current Set option
list. For example, if the Macromedia Standard set feels comfortable to you
except for a few commands that you want to modify, choose the Macromedia
Standard set as the basis for your new custom set.
3. Click the Duplicate Set button.
Fireworks displays the Duplicate Set dialog box.
4. Enter a name for your new custom set.
5. Click OK when you’re done.
Fireworks duplicates the current key shortcut set and gives it your custom name.
Modifying a custom keyboard shortcut setTo modify a custom keyboard shortcut set, follow these steps:
1. Choose Edit ➪ Keyboard Shortcuts (Fireworks ➪ Keyboard Shortcuts on OS X)
to display the Keyboard Shortcuts dialog box.
Tip
053662-1 ch03.F 8/2/02 2:24 PM Page 114
Fireworks Seminar

115Chapter 3 ✦ Customizing Your Environment
2. Make sure that the custom keyboard shortcut set that you want to modify is
the current set. If it is not, select it from the Current Set option list.
3. Choose the kind of shortcut you would like to modify — Menu Commands,
Tools, or Miscellaneous — from the Commands option list.
All the possible shortcut key combinations appropriate to the type of key
shortcut you are modifying are displayed in the Commands list.
4. Select the command whose shortcut you want to modify from the Commands
list.
If the command already has a keyboard shortcut, it is displayed in the
Shortcuts list.
5. If you want to add a new shortcut to the command, click the Add New
Shortcut button.
6. Select the shortcut that you want to modify from the Shortcuts list.
7. If you want to delete the key shortcut, click the Delete Key Shortcut button.
8. Click inside the Press Key text box, and press a new shortcut to replace the
selected key shortcut.
The new keyboard shortcut appears in the Press Key text box.
If the new keyboard shortcut conflicts with an existing one, Fireworks warns
you with a text message directly below the Press Key text box. For example, if
you try to assign Ctrl+E (Command+E) to File ➪ Export, Fireworks will warn
you that it is already assigned to the Merge Down command.
9. Click Change to update the keyboard shortcut.
If the new shortcut conflicts with an existing one, Fireworks displays a warn-
ing dialog box. Click Reassign to overwrite the conflicting shortcut with your
new one.
10. Click OK when you’re done.
Renaming a shortcut setTo rename a shortcut set, follow these steps:
1. Choose Edit ➪ Keyboard Shortcuts (Fireworks ➪ Keyboard Shortcuts on OS X)
to display the Keyboard Shortcuts dialog box.
2. Make sure that the custom keyboard shortcut set that you want to modify is
the current set. If it is not, select it from the Current Set option list.
3. Click the Rename Set button.
Hover your mouse cursor over the buttons in the Keyboard Shortcuts dialog box tosee tooltips that describe each function.
Fireworks displays the Rename Set dialog box.
Tip
053662-1 ch03.F 8/2/02 2:24 PM Page 115
Fireworks Seminar

116 Part I ✦ Come See the Fireworks
4. Enter a new name for the shortcut set and click OK.
Fireworks renames the current key shortcut set.
5. Click OK when you’re done.
Deleting a shortcut setTo delete a shortcut set, follow these steps:
1. Choose Edit ➪ Keyboard Shortcuts (Fireworks ➪ Keyboard Shortcuts on OS X)
to display the Keyboard Shortcuts dialog box.
2. Click the Delete Set button.
Fireworks displays the Delete Set dialog box (see Figure 3-14).
Figure 3-14: Choose a set to delete from the Delete Set dialog box.
3. Select the shortcut set you want to delete from the list.
Default sets are not shown in the Delete Set dialog box list and cannot be deleted.
4. Click Delete to delete the selected set, or Cancel to dismiss the Delete Set dia-
log box without deleting a shortcut set.
5. Click OK in the Keyboard Shortcuts dialog box when you’re done.
Making a shortcut key referenceFireworks can create an HTML file that details the contents of a shortcut key set,
formatted as an HTML table. Creating a shortcut key reference makes learning new
keyboard shortcuts, or studying the contents of a particular set in order to person-
alize it, easier.
Caution
053662-1 ch03.F 8/2/02 2:24 PM Page 116
Fireworks Seminar

117Chapter 3 ✦ Customizing Your Environment
To create an HTML shortcut key reference, follow these steps:
1. Choose Edit ➪ Keyboard shortcuts (Fireworks ➪ Keyboard Shortcuts on OS X)
to display the Keyboard Shortcuts dialog box.
2. Click the Export Set as HTML button.
Fireworks displays the Save dialog box.
3. Choose a folder and specify a filename for the HTML file. Click Save when
you’re done.
Fireworks exports an HTML file with your key shortcuts. Print the HTML file, or
view it in a browser.
SummarySetting your preferences not only allows you to work more comfortably, but also
more effectively. Fireworks gives you control over many aspects of your graphics
creation, output, and even printing. Here are a few key points to keep in mind about
setting your Fireworks preferences:
✦ You can find most of the program’s options by choosing Edit ➪ Preferences
(Fireworks ➪ Preferences on OS X).
✦ Several preferences — such as other Photoshop plug-ins, Patterns, and
Textures folders — require you to restart Fireworks before they take effect.
✦ You can turn the crosshair cursor on and off by pressing the Caps Lock key,
but only if you do not choose the Precise Cursors option in the Editing cate-
gory of the Preferences dialog box.
✦ The HTML Setup dialog box is similar to a Print Setup for your HTML output.
✦ Each document opened or created can have its own set of special properties
that affect the HTML output for slices and image maps.
✦ Fireworks enables you to create and modify your own custom keyboard short-
cut sets, and includes sets that correspond to commonly used graphics appli-
cations.
In the next chapter, you learn how to create new canvases for your Web graphic cre-
ations, as well as how to open existing works for modification.
✦ ✦ ✦
053662-1 ch03.F 8/2/02 2:24 PM Page 117
Fireworks Seminar

053662-1 ch03.F 8/2/02 2:24 PM Page 118
Fireworks Seminar

Setting UpDocuments
Oil painters must complete a fairly involved set of prepa-
ration rituals even before they can begin to paint.
Although Web artists don’t have to stretch or prime their can-
vases, choosing certain options prior to undertaking a new work
can save time down the line. Of course, one of the major bene-
fits of electronic illustration in general, and Fireworks in particu-
lar, is that you can modify virtually anything at any stage.
This chapter covers all you need to know about “prepping
your canvas” in Fireworks. How big should it be, and what
kinds of things are you going to put on it? In addition, you dis-
cover how to open, save, and close Fireworks documents. We
also look at how you can modify a canvas at any stage of the
creative process.
Creating New DocumentsBefore you actually begin work, it’s best to consider what you
are aiming to create. The better you can visualize the final
result, the fewer modifications you’ll have to make along the
way. This is not to say that trial and error is out of the question,
but a little planning can save a lot of time and trouble later.
Exploring two approachesA fundamental question that you have to answer before you
even choose File ➪ New is what approach you’re going to take
in creating the multiple image files that typically make up Web
pages. The two basic approaches are as follows:
✦ Create multiple small images in multiple Fireworks docu-
ments and assemble them into a Web page later in
another application, such as Macromedia Dreamweaver.
✦ Populate one Fireworks canvas with a complete Web
page design, including all the navigation elements, text,
and images.
44C H A P T E R
✦ ✦ ✦ ✦
In This Chapter
Prepping a newcanvas
Opening existingimages
Bringing in multiplefiles
Saving your work
Adjusting canvas sizeand color
✦ ✦ ✦ ✦
063662-1 ch04.F 8/2/02 2:24 PM Page 119
Fireworks Seminar

120 Part I ✦ Come See the Fireworks
Before I started using Fireworks, I created Web page designs in Macromedia
FreeHand, and then copied individual elements into separate Adobe Photoshop
documents for touching up and final rendering. Later, I found myself replicating this
workflow, but substituting Fireworks for Photoshop. Each of the images for the Web
site lived in its own Fireworks document, as shown in Figure 4-1.
Figure 4-1: In a traditional workflow, each graphic is a separate document.
For many projects, though, your best option may be to create one large canvas, as
shown in Figure 4-2, and populate it with your entire page design, either created
from scratch or a mixture of from-scratch and imported elements. Fireworks allows
you to happily draw, filter, effect, slice, specify hyperlinks, leave space for HTML
text and finally, export the whole lot as HTML and JavaScript, along with GIF and
JPEG images. And if, at any time, you want to export a single layer or slice all on its
own, Fireworks enables you to do that, too.
Turn to the color insert to see an example of a complete Web design in a singleFireworks document.
Whichever method you choose is a matter of personal preference, of course. I’ll go
on record as recommending the one-canvas approach. Fireworks excels at one-stop
Web graphics, and an integrated approach takes full advantage of the variety of
tools Fireworks places at your disposal.
Cross-Reference
063662-1 ch04.F 8/2/02 2:24 PM Page 120
Fireworks Seminar

121Chapter 4 ✦ Setting Up Documents
Figure 4-2: You can design and implement a complete Web page within one Fireworks document.
Understanding the canvas optionsThe “canvas” in Fireworks is a background for the visible area of a document.
Fireworks gives you control over the following four basic elements of the canvas:
✦ Width: The horizontal dimension of a document, available in pixels, inches, or
centimeters.
✦ Height: The vertical dimension of a document, also available in pixels, inches,
or centimeters.
✦ Resolution: A print-style dots-per-inch (or centimeter) setting that Fireworks
uses to translate inches or centimeters into pixels.
✦ Canvas color: The color of the underlying layer for your work. A transparent
option is also considered a valid “color.”
Discerning width and heightAlthough it may appear otherwise, all Web graphics files are ultimately rectangular.
A document’s width and height determine not only a document’s size, but also its
shape. Although the size of an image is theoretically unlimited, the Web designer
must always consider file size as a vital factor and, everything else being equal, the
063662-1 ch04.F 8/2/02 2:24 PM Page 121
Fireworks Seminar

122 Part I ✦ Come See the Fireworks
larger the image, the bigger the file size. Typically, image dimensions are given in
pixels, short for picture elements. Pixels are the red, green, and blue dots that make
up a computer color monitor’s screen. From time to time, it’s helpful to switch to
non-screen-based measurement systems, such as inches or centimeters, and
Fireworks gives you that option. But Web design is a pixel-oriented world, and you’ll
find yourself primarily using them for measuring.
If you are building an entire page design in one Fireworks document, a typical size
would be 600 pixels wide and 800 pixels tall for a page that is easily viewable at any
display resolution and calls for an acceptable amount of scrolling at smaller resolu-
tions (about two screen lengths). Another option is to make a page that’s suitable
for viewing on an 800×600 display with the browser filling the screen. If you start
with a canvas that’s 760×400 pixels (leaving space for browser toolbars), users
won’t have to scroll at all after they size their browser window correctly.
Don’t be afraid to make your canvas a little bigger than you actually require. I findthat a little elbow room is nice while drawing, especially when using a pen andtablet — you can experiment with strokes in the extra space before marking upyour actual work. When you’re done, delete the test strokes and choose Modify ➪
Canvas ➪ Trim Canvas to quickly get rid of the extra space and get your documentready for export.
Examining resolutionEven if you sized your canvas in inches or centimeters, the canvas itself is an online
(onscreen) item, made up of pixels, and it has to have a pixel measurement, too.
The (print) Resolution setting enables you to specify how Fireworks should make
the translation from dots to inches. If you sized your canvas to 8.5 by 11 inches in
order to print a standard letter-sized page at 150 dots per inch (dpi), then put 150 in
the Resolution box, and you’ll be able to print your document correctly when
you’re done.
If you’re only using Fireworks to create online images — like most of us — the good
news is that you can leave the Resolution setting at its default of 72 and continue to
size your canvas and all of your objects in pixel measurements. As long as you
leave the default at 72 for all the documents you make and work with, you can com-
pletely ignore it.
For more about online and print resolution settings, see Chapter 14.
Using canvas colorCanvas color is not only very important in Fireworks, but it’s also very flexible.
When you’re creating Web graphics, the canvas color often needs to match the
background color of a Web page. You don’t have to match the colors when creating
your new page, but if you can, you should in order to save a step or two in the near
Cross-Reference
Tip
063662-1 ch04.F 8/2/02 2:24 PM Page 122
Fireworks Seminar

123Chapter 4 ✦ Setting Up Documents
future. You can modify the canvas color at any point in Fireworks by choosing
Modify ➪ Canvas ➪ Canvas Color, or by clicking the Canvas color well on the
Property inspector.
Initially, you have three basic choices for a canvas color: white, transparent, or cus-
tom. Although white is not the default color for all browsers, it’s a common default
background in Web authoring tools and a popular choice on the Web in general.
Naturally, transparent is not really a color — it’s the absence of color. However, as
many Web pages use an image or pattern for a background, designers often choose
the transparent option to enable part of the background to be visible through their
graphics. This enables graphics — which are always saved in a rectangular
format — to appear nonrectangular. Fireworks includes many techniques for out-
putting a graphic with a transparent background, but many artists like to work with
a transparent canvas regardless.
The third choice, marked custom color, is really all the colors. Selecting the Custom
Color radio button enables you to choose a color from the 216 Web-safe colors that
display the same way in the major browsers on Macintosh and Windows computers
running at 8-bit color. You can also choose a color from your operating system’s
color picker(s), or use the Eyedropper to sample a color from anywhere on your
display. The Custom Color option is great when you’re trying to match a Web-page
background.
An understanding of color on the Internet is crucial for the Web graphics designer.See Chapter 7 for more information on using color in Fireworks.
Cross-Reference
Why 72?
The screen image on the original Macintosh computer was 512×342 pixels and 7.1×4.5inches. This works out to 72 dots per inch (dpi) for every Mac of that time period becausethey all had the exact same display. If you wanted something to be exactly an inch wide onthe screen (an inch on an onscreen ruler, for example) you would make it 72 pixels wideand it would work on all Macs. The number 72 is also convenient because there are 72points (a standard typographical measure) in an inch, so one pixel could easily representone point as well. Today, far too much variety exists in computer display resolutions anddimensions for there to be an actual, real-world common measurement, so 72 remains anarbitrary standard dpi setting. Although Windows and some Windows applications use 96,Fireworks uses the standard 72 on both platforms.
Determining your display’s actual dpi involves measuring its visible height and width andthen dividing those measurements by your display resolution. A display with a visible areaof 12×9 inches, running at 1024×768, has a resolution of 85 dpi. An 85×85-pixel object onthat display would be one inch square.
063662-1 ch04.F 8/2/02 2:24 PM Page 123
Fireworks Seminar

124 Part I ✦ Come See the Fireworks
Discovering the steps to create a new documentTo create a new document, follow these steps:
1. Choose File ➪ New or use the keyboard shortcut Ctrl+N (Command+N).
Windows users can also click the New button on the Main toolbar. The New
Document dialog box, shown in Figure 4-3, opens.
Figure 4-3: Set your document’s dimensions, print resolution, and canvas color in the New Document dialog box.
2. To change the horizontal measurement of the canvas, enter a new value in the
Width text box.
Press Tab when you’re done to move on to the Height text box.
3. To change the vertical measurement of the canvas, enter a new value in the
Height text box.
4. To enter a new resolution for the canvas, enter a value in the Resolution text
box. The default resolution in Fireworks is 72 pixels per inch. Unless you have
a specific reason to change it, leave it at 72.
5. To change the measurement systems used for Width, Height, or Resolution,
select the arrow button next to the corresponding list box. You can choose
Pixels, Inches, or Centimeters for both Width and Height; with Resolution, you
can select either Pixels/Inch or Pixels/cm (centimeter).
Whenever you switch Width or Height measurement systems, Fireworks automati-cally converts the existing values to the new scale. For example, if the new canvaswas originally 144 pixels wide at 72 pixels per inch resolution, and the Width mea-surement system was changed to inches, Fireworks converts the 144 pixels to 2inches. No matter which system you choose, Fireworks always displays the dimen-sions in pixels on the right side of the dialog box as W (width) and H (height).
Note
Tip
063662-1 ch04.F 8/2/02 2:24 PM Page 124
Fireworks Seminar

125Chapter 4 ✦ Setting Up Documents
6. Select a Canvas Color: White, Transparent, or Custom Color.
7. To choose a Custom Color, select the arrow button next to the color swatch
and pick the desired color from the color palette.
8. For a more extensive color choice (beyond the 216 Web-safe colors in the dis-
play), either select the Palette button on the pop-up display or double-click
the swatches to reveal the system color picker(s).
9. Click OK when you’re done.
The New Document dialog box remembers your last settings the next time youcreate a new file, with one exception. If you’ve cut or copied a graphic to your sys-tem’s Clipboard and you select File ➪ New, the dialog box contains the dimensionsof the image on the Clipboard. This feature makes pasting an existing image into anew file easy.
Opening Existing ImagesYour Fireworks documents will fall into two distinct categories. Sometimes you’ll
start from scratch in Fireworks, and sometimes you’ll import work from another
application just to prepare it for the Web. Because Fireworks is terrific at optimizing
images for the Web, you’re just as likely to find yourself opening an existing file as
creating a new one.
Use a lossless file format such as PNG or TIFF to move images between applica-tions. The GIF and JPEG formats are unsuitable for use as master copies becauseinformation — and quality — is thrown away when you create them in order toachieve a smaller file size.
Opening a regular PNG file is just like opening a Fireworks document. Opening a file
of another type creates a new Fireworks document that will need to be saved as a
Fireworks PNG-format document under a new name. Export GIF, JPEG, or other files
from your Fireworks document as required.
Examining file formatsAs probably anyone who’s ever touched a computer graphic is aware, different
computer programs, as well as platforms, store files in their own file format.
Fireworks opens a wide range of these formats. With formats from advanced
graphic applications, such as Photoshop, Fireworks retains as much of the special
components of the image — such as layers and editable text — as possible. You can
even open ASCII or RTF (Rich Text Format) files to import text into Fireworks.
Opening the native file formats of Macromedia FreeHand, Adobe Illustrator, orCorelDRAW causes Fireworks to display a dialog box for setting special options.The Vector File Options dialog box is described in Chapter 14.
Cross-Reference
Tip
Tip
063662-1 ch04.F 8/2/02 2:24 PM Page 125
Fireworks Seminar

126 Part I ✦ Come See the Fireworks
Table 4-1 details formats supported by Fireworks.
Table 4-1Supported Image Formats
Format Filename Macintosh Extension Type Code Notes
Fireworks File Format .png PNGf A PNG file with Fireworks-onlyinformation such as vectorsadded. The default file formatfor Fireworks 3, 4, and MX.
Fireworks 4.0 .png PNGf Updated automatically whenopened. Can be saved andthen opened again inFireworks 4.0.
Fireworks 3.0 .png PNGf Updated automatically whenopened. Can be saved andthen opened again inFireworks 3.0.
Fireworks 2.0 .png PNGf Updated automatically whenopened. Cannot be saved andthen opened again inFireworks 2.0.
Fireworks 1.0 .png PNGf Updated automatically whenopened. Cannot be saved andthen opened again inFireworks 1.0. The Backgroundis placed on its own layer.
Portable Network Graphic .png PNGf Standard PNG documents thatdon’t have extra Fireworksinformation.
Photoshop Document .psd 8BPS Version 3.0 or later only.Layers, editable text, and LayerEffects are preserved.
FreeHand 10 Document .fh10 IPTC The vector-based format ofFreeHand 10.
FreeHand 9 Document .fh9 AGD4 The vector-based format ofFreeHand 9.
FreeHand 7 or 8 Document .fh7 or .fh8 AGD3 The vector-based format ofFreeHand 7 or 8.
063662-1 ch04.F 8/2/02 2:24 PM Page 126
Fireworks Seminar

127Chapter 4 ✦ Setting Up Documents
Format Filename Macintosh Extension Type Code Notes
Illustrator 7 Document .ai or .art UMsk Adobe Illustrator 7’s vector-based default format.
CorelDRAW 8 Document .cdr CDR8 CorelDRAW’s vector-basedformat must have been savedwithout CorelDRAW’s built-inbitmap or object compressionto be opened in Fireworks.
GIF .gif GIFf Graphics Interchange FileFormat. Static or animated.Each frame of an animatedGIF is placed on its own framein Fireworks.
JPEG .jpg, .jpeg, JPEG Avoid importing JPEG images or .jpe due to their lossy compression
scheme and low quality.
Targa .tga TPIC Common UNIX image format.
WBMP .wbm or WBMP Wireless bitmap format. Used .wbmp in wireless devices.
EPS .eps UMsk Encapsulated PostScriptformat. Vectors are rasterized.
TIFF .tif or .tiff TIFF Tag Image File Format. High-quality lossless compressionsimilar to PNG.
ASCII Text .txt or .text TEXT Plain text.
Rich Text Format .rtf RTF Microsoft’s styled text format,easily exported from Word andmany other word processors.
Microsoft Bitmap .bmp BMP Default image format forWindows 3+.
PICT (Macintosh only) .pct , .pict, PICT Default image format for Mac or .p OS 1–9. Combination vector/
bitmap format. Fireworksrenders any vectors asbitmaps.
063662-1 ch04.F 8/2/02 2:24 PM Page 127
Fireworks Seminar

128 Part I ✦ Come See the Fireworks
To open an existing file in Fireworks, follow these steps:
1. Choose File ➪ Open or use the keyboard shortcut, Ctrl+O (Command+O).
Windows users can also select the Open button from the Main toolbar. The
Open File dialog box appears, as shown in Figure 4-4.
Figure 4-4: Preview files before opening them with the Fireworks Open File dialog box.
2. Select the desired file in the Open File dialog box. Fireworks identifies the file
and displays a thumbnail of the image for certain file types in the Preview sec-
tion of the dialog box.
Windows users: To limit your view to a specific file format, click the arrow buttonnext to the Files of Type option list and select a format. To choose from every filetype, select All Files (*.*) from the Files of Type option list, or type an asterisk in theFile Name text field. To choose from Fireworks-compatible files, select All ReadableFiles from the Files of Type option list.
3. To open a copy of the graphic, choose the Open as “Untitled” option.
4. Click OK when you’re done. Fireworks opens the file, reducing the magnifica-
tion, if necessary, so that the full image is displayed.
You can also open files in Fireworks with the drag-and-drop method. In Windows,drop compatible image files on the Fireworks application icon, onto a shortcut toit, directly into the Fireworks window, or into an open document. On the Mac, youcan drop image files on the Fireworks application, onto an alias of it, or onto theFireworks icon in the floating Application Switcher (Mac OS 9), or the Dock (MacOS X).
Tip
Tip
063662-1 ch04.F 8/2/02 2:24 PM Page 128
Fireworks Seminar

129Chapter 4 ✦ Setting Up Documents
Fireworks MX enhances the way Photoshop 6/7 files are imported and exported.
To get more information about the way Fireworks handles Photoshop 6/7 files,see Chapter 14.
Opening multiple imagesIt’s the rare Web page that has but a single image on it. Most Web pages contain
multiple graphics and, occasionally, a designer needs to work on several of them
simultaneously. With the Open command, you can select as many files as you want
to load into Fireworks, all at the same time. Hold down the Ctrl (Shift) key as you
click on each file in turn in the Open File dialog box. When you’re ready, click Open
and Fireworks opens and displays all the files in a series of cascading windows.
Macintosh users can also open multiple Fireworks documents by selecting a groupof them in the Finder and either double-clicking them or choosing File ➪ Open (orCommand+O). Multiple image files that don’t have a Fireworks Creator code canbe selected as a group in the Finder and dropped on the Fireworks icon.
One significant advantage to being able to open multiple images is that you can cre-
ate an animation by combining all the documents. When you choose the Open as
Animation option in the Open File dialog box, Fireworks inserts each chosen file in
a single graphic, but on an individual frame. Then, preview the animation using
Fireworks VCR controls, or adjust the timing in the Export dialog box.
To open several files in one operation, follow these steps:
1. Choose File ➪ Open or use the keyboard shortcut Ctrl+O (Command+O). The
Open File dialog box appears, as shown in Figure 4-5.
2. Navigate to the folder containing the images to open.
3. To add a continuous range of files, select the first file, press and hold the Shift
key, and then select the last file in the range.
4. To select a number of files that are not in a continuous range, press and hold
the Ctrl (Command) key and click the files you want to open, one by one.
Tip
Cross-Reference
NewFeature
Opening Photoshop Files
Fireworks makes opening and working with Photoshop images relatively easy. When youopen or import a Photoshop file, Fireworks displays a dialog box to enable you to adjusthow the file will be converted. By default, Fireworks maintains Photoshop’s layers andeditable text, but you can also choose to flatten the file if you don’t need to edit it inFireworks. Photoshop masks created from grouped layers are converted to Mask Groupsand Photoshop’s Layer Effects are converted to editable Fireworks Live Effects.
063662-1 ch04.F 8/2/02 2:24 PM Page 129
Fireworks Seminar

130 Part I ✦ Come See the Fireworks
Figure 4-5: Select multiple files in the Open File dialog box by holding down the Ctrl (Command) key as you click each filename or icon.
5. To open all the files in the current folder, press Ctrl+A (Command+A).
If you’re using Windows, you can open an entire folder of images by launching andminimizing Fireworks, dragging the folder onto Fireworks in the taskbar, and thenreleasing the folder on the Fireworks workspace once it has reopened. Fireworksopens all images in the selected folder and any existing subfolders.
6. To place the selected images in a series of frames, choose the Open as
Animation option. Each image is placed in a separate frame of a single
graphic, in the order listed.
7. To deselect a selected file, press and hold the Ctrl (Command) key and click
the file.
8. Click the Open button to open your images.
Storing FilesEvery computer graphics professional has one: a nightmare story about the system
crash that erased all the intense, meticulous, time-consuming effort that went into
an unsaved image. Saving your files is crucial in any graphics program, but it
becomes even more important in Fireworks. To maintain the “everything’s editable,
all the time” capability, you must save your graphics in Fireworks’ native format,
PNG. Fireworks offers a very full-featured Export module to convert your graphics
into whichever Web format you choose. However, a Fireworks file exported as a GIF
or JPEG loses its all-encompassing editability — text can no longer be edited as text,
vector-based objects are converted to bitmaps, effects are locked, and so on.
Tip
063662-1 ch04.F 8/2/02 2:24 PM Page 130
Fireworks Seminar

131Chapter 4 ✦ Setting Up Documents
Fireworks MX stores a cached image of text for better support across different plat-forms and in circumstances where the font used may not be available.
To increase compatibility with file sharing and fonts, Fireworks stores a bitmap
image of all fonts within the PNG file. If you create a document on one system, and
then transfer it to another that lacks the fonts you used, Fireworks warns you that
the font is not available and gives you the choice of maintaining the appearance of the
font, or substituting it for another. If you choose to maintain the appearance, then
you can edit other aspects of the file without affecting your text. The beautiful thing
about this feature is that, when you return the document to the system that created
it, the text is still editable, in the original font, despite the fact that other changes
were made.
To keep the full range of Fireworks features active, it’s essential that each file be
saved, as well as exported. Fireworks uses standard commands to save: File ➪ Save,
the keyboard shortcut Ctrl+S (Command+S), and, for Windows users, a Save button
on the Main toolbar. When you select any of these methods to store your file the
first time, the Save dialog box (see Figure 4-6) automatically opens.
Figure 4-6: To maintain full editability, be sure to save every working graphic as a master Fireworks file, in addition to exporting it as a GIF, JPEG, or other format.
To get all the details on exporting from Fireworks, see Chapter 15.
Saving a file after the initial save overwrites the existing file. If you would like to
store multiple versions of the same file, Fireworks gives you two options: Save As
and Save a Copy. Save As enables you to rename the file, and continue working with
Cross-Reference
NewFeature
063662-1 ch04.F 8/2/02 2:24 PM Page 131
Fireworks Seminar

132 Part I ✦ Come See the Fireworks
the newly saved file, while Save a Copy enables you to store a backup file in another
folder (without saving the current document under its own name as well). Both are
accessed in an identical manner. Choose File ➪ Save As or File ➪ Save a Copy to
open the Save dialog box. Enter the new filename or navigate to a new folder in
which to store the file (or both) and press the Save button.
Closing a fileWhen you’re finished with a document but want to continue working in Fireworks,
you can close the file in one of several ways:
✦ Choose File ➪ Close.
✦ Use one of the keyboard shortcuts, Ctrl+W (Command+W) or Ctrl+F4
(Windows only).
✦ Click the document window’s Close button.
If the document has not been saved since the last modification, Fireworks asks
whether you want to save the file before proceeding. You can identify documents
that have not been saved (said to be “dirty”) by the “dirty-dot” asterisk (see
Figure 4-7) that Fireworks places in the title bar of document windows with
unsaved changes. Document windows that don’t have the asterisk in the title
bar are exactly the same as the file saved on disk.
Figure 4-7: The “dirty-dot” asteriskenables you to identify documents withunsaved changes at a glance.
Reverting to a saved filePart of the joy of computer graphics is the capability to try different approaches
without fear of losing your earlier work. I’m a big fan of the Revert command, which
enables you to completely alter a graphic and then restore it to its last-saved condi-
tion with one command. Among Revert, Undo, Save a Copy, and the History panel,
you have a lot of options for safe creative experimentation.
Dirty-dot asterisk
063662-1 ch04.F 8/2/02 2:24 PM Page 132
Fireworks Seminar

133Chapter 4 ✦ Setting Up Documents
The Revert command is very straightforward to use. After you’ve made some
changes to your graphic and want to return to the original, choose File ➪ Revert.
Fireworks asks for confirmation to revert to the last saved version of the file, and,
when confirmed, replaces the onscreen image with the stored version.
Modifying CanvasesWhat do you mean, you want to change the size of your canvas? And its color, too?
Are you saying you’re not perfect and didn’t predict needing these alterations?
Don’t worry, you’re certainly not alone. In fact, most of my images undergo some
degree of document surgery before they’re done. It’s the nature and the glory of
computer graphics in general, and Fireworks in particular, to be very forgiving
about changes.
In Fireworks, you can easily change the size of a complete image and its canvas, just
the canvas dimensions, or the canvas color. It’s very easy to expand the canvas in a
particular direction, making it wider on the right, for example, either visually with
the Crop tool, numerically with the command Modify ➪ Canvas ➪ Canvas Size, or via
the Property inspector.
Fireworks MX adds the ability to modify the canvas via its new Property inspector.
Altering the canvas sizeSometimes, the canvas is perfectly sized for all the objects it contains, but you may
want to add another object, or apply a Glow or similar effect around an existing
object, and there’s no room. On the other hand, very often you start out with a can-
vas larger than necessary and you need to trim the canvas to fit the image.
Whatever the situation, Fireworks has you covered.
Fireworks offers three different methods for enlarging or reducing the canvas:
numerically, using a menu command; visually, using the Crop tool; or actually,
according to the image, by trimming the canvas.
Specifying a new canvas size numericallyQuite often, I find myself needing to add a drop shadow and realize that I have to
expand the canvas just a few pixels to the right and down for the effect to fit. With
Fireworks, you can expand the canvas from the center out, or in any of eight spe-
cific directions. Naturally, only the size of the canvas is modified; the objects it con-
tains don’t change at all, except for their placement on the canvas.
The key concept to understand when you’re resizing the canvas numerically is the
anchor. The placement of the anchor (handled through the Canvas Size dialog box)
determines how the canvas changes to meet the newly input dimensions. By
default, the anchor is placed in the center of the canvas. If, for example, the canvas
dimensions were increased by 100 pixels horizontally and 100 pixels vertically with
NewFeature
063662-1 ch04.F 8/2/02 2:24 PM Page 133
Fireworks Seminar

134 Part I ✦ Come See the Fireworks
a center anchor, the canvas edge would increase by 50 on all four sides. However, if
the upper-left anchor was chosen and the same increase in dimensions entered, the
canvas would increase by 100 pixels on the right and bottom border; because the
upper-left is the anchor, the canvas in that corner does not change. You can think of
the anchor as specifying where on the new canvas the old canvas should be.
To resize the canvas numerically, follow these steps:
1. Choose Modify ➪ Canvas ➪ Canvas Size or click on a blank portion of the can-
vas or workspace and click the Canvas Size button on the Property inspector.
The Canvas Size dialog box opens, as shown in Figure 4-8.
Figure 4-8: Enter new dimensions and select an anchor point in the Canvas Size dialog box to alter the canvas size.
2. To alter the dimensions of the canvas horizontally, enter a new value in the
width (the horizontal double-headed arrow) text box.
3. To alter the dimensions of the canvas vertically, enter a new value in the
height (the vertical double-headed arrow) text box.
Fireworks always displays the original canvas size in pixels in the Current Size sec-tion of the dialog box.
4. To alter the canvas size by inches or centimeters rather than the default pix-
els, select the arrow button next to the width and height drop-down lists and
choose the desired alternative. The dimensions in pixels appear to the right of
the height and width text boxes.
5. Choose one of the buttons inside the Anchor grid to determine how the can-
vas will expand or contract.
6. Click OK when you’re done.
Note
063662-1 ch04.F 8/2/02 2:24 PM Page 134
Fireworks Seminar

135Chapter 4 ✦ Setting Up Documents
Using the Crop toolResizing the canvas numerically is great when you have to match a specific width
or height for your image. Unfortunately, it can also take a lot of trial and error to get
the tightest fit for an effect, like a glow or a drop shadow. The Crop tool provides a
much faster method. Cropping is a familiar concept to anyone who has ever worked
with photographs and needs to eliminate extraneous imagery. To crop means to cut
off the excess. In addition to making the image smaller by cutting away the canvas,
the Crop tool can expand the canvas as well.
The Crop tool works by enabling you to draw a rectangle with numerous sizing han-
dles around an image. You then use these sizing handles to adjust the dimensions
and shape of the cropped area. When the cropped region looks right, a double-click
in the defined area completes the operation. The cropping border can stretch out
past the edge of the canvas and, when double-clicked, the canvas is extended to the
new cropped area.
Find the Crop tool in the Fireworks Tools panel, second from the top on the right.
You can also use the keyboard shortcut by pressing C.
Using the Crop tool to extend the canvas, as shown in Figure 4-9, requires an addi-
tional step. When you first use the Crop tool and try to draw on the outside of the
current canvas, you’ll find that Fireworks snaps the cropping border to the edge of
the canvas. As most designers are familiar with using the Crop tool to remove
excess canvas, this starting point is convenient for most operations. To extend the
cropping border, you then need to drag any of the sizing handles to a new position
outside the canvas.
Changing canvas size for a single imageIf your document only contains a single bitmap image, many times you’ll want to
adjust the size of an entire completed image either up or down to make it fit prop-
erly in a Web page. Fireworks allows you to make your adjustments either through
specifying absolute pixel values or relative percentages with the Image Size com-
mand and automatically sizes the canvas appropriately, enabling you to work with
single images as you would in Photoshop.
You can maintain the original proportions of your graphic or stretch it in one direc-
tion or another. The Image Size command enables you to resample your image, as
well as resize it. Resampling refers to the process of adding or subtracting pixels
when the image is resized. Resizing always works better with object-oriented (or
vector-based) graphics than with bitmap graphics, especially when you’re scaling
to a larger size. However, Fireworks offers you a choice of interpolation methods to
help create a scaled image that looks great.
063662-1 ch04.F 8/2/02 2:24 PM Page 135
Fireworks Seminar

136 Part I ✦ Come See the Fireworks
Figure 4-9: Adding some more canvas to the right and bottom of this Fireworksdocument is easy with the Crop tool.
Fireworks enables you to independently alter the onscreen pixel dimensions and
the print size by changing the print resolution of the image. With this capability,
you can print a higher or lower resolution of the image at the original image size. It
does, however, proportionately alter the pixel dimensions of the image for onscreen
presentation. In Figure 4-10, for example, the original image on the top is 1440×657
pixels — although it’s been zoomed to a 25 percent view in Fireworks — with a print
size of roughly 20×9 inches at 72 pixels per inch. The image on the bottom has been
resized by setting the resolution to 18 pixels per inch (one-quarter of the original
resolution) and is now only 360×164 pixels. The two images will print at the same
size, though, with the resized one lacking one-quarter of the detail.
Once again, if you’re using Fireworks exclusively to create online images — as mostof us are — stay entirely away from the Print Size settings and resize your imagesusing the Pixel Dimensions settings in the Image Size dialog box.
Note
063662-1 ch04.F 8/2/02 2:24 PM Page 136
Fireworks Seminar

137Chapter 4 ✦ Setting Up Documents
Figure 4-10: The bottom image, shown at 100 percent, was resampled at one-quarter the size of the original image, shown at 25 percent.
To alter the image size, follow these steps:
1. Choose Modify ➪ Canvas ➪ Image Size, or click on a blank portion of the can-
vas and click the Image Size button on the Property inspector. The Image Size
dialog box opens, as shown in Figure 4-11.
2. To alter the dimensions of the image proportionately, enter a new value in
width (the horizontal double-headed arrow) or height (the vertical double-
headed arrow) text boxes.
If the default option, Constrain Proportions, is selected, changing one value causesthe other to change as well.
It’s better to select the entire value in the text boxes first and then enter in yournew number. If you try to backspace through each digit, you’ll encounter an alertwhen you delete the final number. Fireworks warns you that you’re entering aninvalid number because it interprets this as trying to reduce the dimensions belowone.
Caution
Tip
063662-1 ch04.F 8/2/02 2:24 PM Page 137
Fireworks Seminar

138 Part I ✦ Come See the Fireworks
Figure 4-11: To proportionately enlarge or reduce your entire graphic, use the Image Size command.
3. To alter the dimensions by percentage rather than by pixel measurement,
select the arrow button next to the width or height drop-down lists and
choose Percent.
4. To use the print size as a guide for adjusting the image size, enter a value in
the Print Size width and height text boxes.
5. To alter the print size by percentage or centimeters rather than the default
inches, select the arrow button next to the Print Size width and height drop-
down lists and choose the desired alternative.
6. To change the number of pixels per inch, enter a new value in the Resolution
text box.
7. To disable the proportional sizing, deselect the Constrain Proportions option.
8. To change the print size but not the onscreen image, deselect the Resample
Image option and choose new values for the Print Size width and height text
boxes. When Resample Image is deselected, the Pixel Dimensions section
becomes unavailable.
9. Choose an interpolation method from the interpolation method option list.
Bicubic is the default and works well for most images.
A complete description of the various interpolation methods Fireworks offers isavailable in Chapter 6.
10. Click OK when you’re done.
Cross-Reference
063662-1 ch04.F 8/2/02 2:24 PM Page 138
Fireworks Seminar

139Chapter 4 ✦ Setting Up Documents
Trimming the canvasWhat’s the fastest, most accurate way to reduce the canvas to just the essential
objects? Trim it, of course. If you’ve ever trimmed a real canvas with a razor-sharp
matte knife, you know it’s a very dramatic, fast operation. However, the Trim
Canvas command is even faster — it handles four edges at once and there’s no need
to keep a supply of bandages.
The beauty of the Trim Canvas command is that it’s all automatic — you don’t even
have to select any objects for Fireworks to trim to. Moreover, this feature even
takes into account soft edges such as glows or drop shadows, so you can’t acciden-
tally truncate your effect. In fact, it’s a great command to use in combination with
other canvas expanders, such as the Crop tool or Canvas Size. Just open up the
canvas more than you think necessary, make the alterations, and then choose
Modify ➪ Canvas ➪ Trim Canvas. Presto! All the canvas edges are hugging the graph-
ics as tightly as possible.
As the name indicates, Trim Canvas can only make your overall document sizesmaller; it can’t expand it if part of the image is moved off the canvas. To expandthe canvas to best fit all your artwork, you can use the Fit Canvas command. Toaccess it choose Modify ➪ Canvas ➪ Fit Canvas
Picking a new canvas colorAlthough you set the canvas color when you create the document, you’re by no
means stuck with it. You can adjust the color at any point by choosing Modify ➪Canvas ➪ Canvas Color or by selecting the Canvas color chip on the Property
inspector. Using the menus, the Canvas Color dialog box opens. This replicates the
Canvas Color section of the New Document dialog box. Again, you have three
choices: White, Transparent, and Custom Color. Selecting the arrow button next to
Custom Color has the same result as clicking the Canvas color chip on the Property
inspector: it opens the color picker with the palette of 216 Web-safe choices (see
Figure 4-12). For a wider color selection, click the Palette button on the color picker
to display your operating system’s color picker(s).
Figure 4-12: The color picker on the Property inspector is useful for quickly picking a Web-safe color for the canvas.
Note
063662-1 ch04.F 8/2/02 2:24 PM Page 139
Fireworks Seminar

140 Part I ✦ Come See the Fireworks
If you open a Photoshop or Fireworks 1.0 document, you may find that a solid-color Background layer is created. Hide this layer by clicking the Show/Hide Layericon next to it in the Layers panel in order to see your document’s actual canvascolor.
Rotating the canvasAlthough you can rotate objects with the Transform tools, the canvas itself always
stays in the same place. If your canvas is not square, rotating a group of objects 90
degrees often leaves them hanging off the canvas. Instead of rotating objects, rotate
the entire canvas by choosing Modify ➪ Canvas ➪ Rotate 180 degrees, Modify ➪Canvas ➪ Rotate 90 degrees CW (clockwise), or Modify ➪ Canvas ➪ Rotate 90
degrees CCW (counterclockwise).
If you rotate any objects, and some portion of them ends up off of the canvas, youcan use the Fit Canvas command, accessed via Modify ➪ Canvas ➪ Fit Canvas, toresize the canvas so that all objects are visible.
SummarySetting up your document is the basis for all the work you do in Fireworks. Whether
you’re starting with the fresh slate of a new document, or opening an existing file,
Fireworks gives you all the tools you need to build a solid foundation and modify it
when necessary. When working with your objects, keep the following points in mind:
✦ The more you can visualize your graphics and thus design the canvas, the less
time you’ll spend making modifications.
✦ When you’re creating a new document, Fireworks enables you to set the
height, width, print resolution, and color of the canvas.
✦ Fireworks can open more than a dozen different file formats, including com-
mon ones such as TIFF, FreeHand, and Photoshop.
✦ You can open multiple files simultaneously.
✦ To get the most out of Fireworks, always save at least one version of your
graphic in the native PNG format.
✦ You can alter the canvas size using any one of three different methods: Canvas
Size, the Crop tool, or Trim Canvas.
✦ You can modify the canvas color or rotate the canvas at any time.
In the next chapter, you begin exploring the heart of Fireworks graphics: objects.
✦ ✦ ✦
Tip
Tip
063662-1 ch04.F 8/2/02 2:24 PM Page 140
Fireworks Seminar

Masteringthe Tools
The Fireworks approach to graphics is fundamentally dif-
ferent from any other tool on the market. Consequently,
you’ll need to travel the short learning curve before you can
get the most out of Fireworks. The early chapters in Part II
cover all the essentials, from basic object creation, to full-
blown photo manipulation.
Color is a key component of any graphic designer’s tool kit,
and color on the Web requires special attention, as you’ll
see in Chapter 7. The object-oriented nature of Fireworks is
explored in chapters on creating simple strokes and combin-
ing paths in a variety of ways to help you make more sophis-
ticated graphics. Fireworks excels at creating graphical text
for the Web — you’ll see how in Chapter 10.
✦ ✦ ✦ ✦
In This Part
Chapter 5Creating VectorObjects
Chapter 6Working with Bitmaps
Chapter 7Managing Color
Chapter 8Choosing Strokes
Chapter 9Structuring Paths
Chapter 10Composing with Text
✦ ✦ ✦ ✦
P A R T
IIII
073662-1 Part02.F 8/2/02 2:24 PM Page 141
Fireworks Seminar

073662-1 Part02.F 8/2/02 2:24 PM Page 142
Fireworks Seminar

Creating Vector Objects
Vector objects are the foundation of Fireworks. Don’t get
me wrong: All the other elements — bitmap objects, Web
objects, Live Effects, and more — are vital, but vector objects
are what give Fireworks its flexibility, precise control, and per-
vasive editability. They’re what separate Fireworks from its
contemporaries, such as Adobe Photoshop or ImageReady.
As you might suspect, a great number of Fireworks tools and
features focus on vector objects. This chapter covers the
basic vector operations — creation of the simple, geometric
shapes and freeform lines and drawings — that draw special
attention to one of the most difficult to master, but most
rewarding concepts: Bézier curves.
Understanding Vector Objects in Fireworks
A Fireworks vector object is a free-floating vector-based
graphic. Vector graphics are also called path-based, or simply
drawings. Unlike bitmap objects that use rows of pixels to
form mosaic-like images, vector objects use lines, or more
accurately, the description of a line. Instead of plotting a
series of pixels on the screen, a vector-based graphic basi-
cally says, “Start a line at position X, Y and draw it to position
A, B.” Or, “Draw a circle with a midpoint at C, D and make it
1.5 inches in diameter.” Of course, you don’t see all these
instructions on the screen — it’s all under the hood of the
graphics engine — but it’s what enables drawing programs,
such as FreeHand and Adobe Illustrator, to maintain a
smooth line, regardless of how the image is scaled.
55C H A P T E R
✦ ✦ ✦ ✦
In This Chapter
Mastering basicvector concepts
Forming geometricshapes
Drawing freely withthe Pencil and Brush
Shaping Béziercurves
✦ ✦ ✦ ✦
083662-1 ch05.F 8/2/02 2:25 PM Page 143
Fireworks Seminar

144 Part II ✦ Mastering the Tools
Whereas Fireworks vector objects maintain the underlying path structure, their sur-
faces are composed of pixels. Although this may seem to be a contradiction, it’s
really at the heart of Fireworks’ brilliance as a graphics tool. Whenever you modify
a vector object — slanting a rectangle, for example — Fireworks first applies the
modification to the path structure, and then reapplies the pixel surface. It is as if an
image of a ballerina in a magazine suddenly is alive, leaping across the stage, and
then it becomes an image again.
Examining PathsVector objects begin as paths. Paths are lines with at least two points. Whether you
draw a squiggly line with the Pencil tool, or a multipoint star with the Polygon tool,
the outline of your drawing is what is referred to as the path. Although Fireworks
highlights selected paths for editing, by themselves paths are invisible and won’t
appear in your exported images at all (see Figure 5-1).
Figure 5-1: This path has no stroke or fill applied, and is only visible when it is selected for editing. The preview on the right shows that the path itself is invisible in Fireworks output.
083662-1 ch05.F 8/2/02 2:25 PM Page 144
Fireworks Seminar

145Chapter 5 ✦ Creating Vector Objects
Applying a strokeTo make a path visible, you have to apply a stroke to see the outline. You can
quickly apply a stroke to a selected object by choosing a color from the Stroke
color well, located on the Tools panel, or on the Property inspector. Performing this
action via the Tools panel applies a 1-pixel Pencil stroke with a soft or antialiasededge. Selecting it from the Property inspector gives you whatever stroke settings
were used last. Strokes can vary in category, color, width, softness, and texture,
to name a few characteristics; several examples of different strokes are shown in
Figure 5-2. You’ll notice in the figure how, regardless of their different attributes,
strokes always follow the path of the vector object.
Figure 5-2: You can see the same path in each of these different strokes.
Part of Fireworks’ power is derived from the wide range of strokes possible. To findout more about strokes, see Chapter 8.
Looking at open and closed pathsThe two types of paths are open and closed. The difference between the two is sim-
ple: A closed path connects its two endpoints (the start and finish of the line, also
often referred to as origin and endpoints of a path), and an open path doesn’t.
Closed paths define different shapes, whether standard, such as a circle or polygon,
or custom, such as a freeform drawing. Just as a stroke gives the outline of a path
substance, a fill makes the interior of a path visible. As with strokes, fills come in
different categories, colors, and textures. In addition, a pattern can be used as a fill.
You can even change the softness of a fill’s edge. As Figure 5-3 shows, regardless of
what the interior fill is, it always follows the established path.
Cross-Reference
Pencil
Unnatural
None
Air Brush
083662-1 ch05.F 8/2/02 2:25 PM Page 145
Fireworks Seminar

146 Part II ✦ Mastering the Tools
Figure 5-3: A vector object can be filled with a solid color, a gradient, or a pattern.
Even though fills are most often applied to closed-path vector objects, it’s perfectlylegal to apply a fill to an open-path vector object — although the results are not aspredictable. But then, that’s one of the beauties of computer graphics — try it and ifyou don’t like it, undo it. This is one of the many features that sets Fireworks apartfrom other vector drawing applications.
Grasping the center pointOne common feature that all objects in Fireworks share is a center point. With vec-
tor objects, the location of the center point depends on whether the path is open or
closed. If the path is open, the center point is located in the center of the object’s
bounding box. If the path is closed, it’s located in the center of the object. Center
points are useful when you need to rotate an object. You can also adjust the center
point of an object when its transform handles are visible in order to rotate it around
a different axis, or control how its center aligns to other objects.
Discover how to work with rotation in Chapter 9.
Examining directionThe final point to keep in mind about vector objects is that their paths all have
direction. Though it’s more obvious with an object such as a line that you start
drawing at one point and finish at another, it’s true even with rectangles and
ellipses. Generally, Fireworks draws vector objects in a clockwise direction, starting
Cross-Reference
Tip
Gradient fillPattern fill
Selected with no fill Solid fill
083662-1 ch05.F 8/2/02 2:25 PM Page 146
Fireworks Seminar

147Chapter 5 ✦ Creating Vector Objects
at the upper-left corner of rectangles or squares and the left center of an ellipse or
circle, as shown in Figure 5-4. Path direction becomes important when you begin
attaching text to a path — wrapping a slogan around a circle, for example. Fireworks
includes several tools for adjusting the path’s direction.
Figure 5-4: A path’s direction determines how text is attached.
Starting from ShapesMost Fireworks documents include many vector objects of different shapes, sizes, col-
ors, and attributes. Drawing shapes sounds easy, but you must understand how to cre-
ate each of the basic elements to get the greatest effect in the shortest amount of time.
Fireworks provides tools for creating a series of basic geometric shapes — rectangles,
ellipses, and polygons — as well as those for drawing structured and freeform lines.
All of these tools will be familiar to anyone who has worked with a vector drawing
program in the last few years. In fact, many of the key shortcuts are industry-
standard. This chapter, though, is written for a complete novice. Even if you’ve
neve used a computer to draw before, you can have a full understanding of the
basic tools in Fireworks after working your way through this chapter.
If you have access to a graphics tablet, don’t be afraid to use it here. Drawing isalways easier with a pen and tablet than with a mouse.
The quickest way to create a Web page design, particularly the often-required navi-
gational buttons, is to use one of Fireworks’ shape-building tools. Although at first
glance there only seem to be four such tools — the Rectangle, Rounded Rectangle,
Ellipse, and Polygon — these tools each have options that enable them to produce a
wide range of objects.
It can be helpful to keep the Property inspector or the Info panel visible while youdraw or edit vector objects. They both display the pixel width and height of newobjects as they are drawn, making it easy to create a 50×50-pixel square, for exam-ple. The Property inspector and the Info panel also inform you of the canvas posi-tion of objects as you work with them.
Tip
Tip
083662-1 ch05.F 8/2/02 2:25 PM Page 147
Fireworks Seminar

148 Part II ✦ Mastering the Tools
Examining rectangles and squaresMy dictionary defines a rectangle as “any four-sided figure with four right angles.”
A Web designer generally sees a rectangle as a basic building block for designs that
are, after all, going to be viewed within the rectangular confines of a browser win-
dow. The Rectangle and Rounded Rectangle tools are very straightforward to use
and offer a number of very useful options.
The two Rectangle tools are functionally the same. Anything you can do with one,
you can do with the other. The difference between them is that the rectangles you
draw with the Rounded Rectangle tool have rounded corners, whereas the Rectangle
tool creates rectangles with perfectly square corners. You can even create a stan-
dard rectangle with the Rectangle tool, and then make it rounded by altering the
Roundness setting in the Property inspector.
Creating rectanglesAs with almost every other computer drawing tool on the planet, Fireworks creates
rectangles using the familiar click-and-drag method. To draw a rectangle in
Fireworks, follow these steps:
1. Select the Rectangle tool or use the keyboard shortcut, U.
2. Click once to select your originating corner and drag to the opposite corner to
form the rectangle, as shown in Figure 5-5. As you drag your pointer,
Fireworks draws a preview outline of the form.
Figure 5-5: Once you’ve selected your originating corner with the Rectangle tool, you can drag out a box shape in any direction, as indicated by the arrow.
Starting point
083662-1 ch05.F 8/2/02 2:25 PM Page 148
Fireworks Seminar

149Chapter 5 ✦ Creating Vector Objects
3. Release the mouse button when the rectangle is the desired size and shape. If
any stroke or fill has been previously set, these attributes are drawn when you
release the mouse button.
Using keyboard modifiersYou can use three keyboard modifiers with the Rectangle or Rounded Rectangle
tool: Shift, Alt (Option), and the spacebar in order to apply some very commonly
required behaviors while drawing.
Fireworks now has Spacebar Move! Without releasing the mouse button you canpress and hold the spacebar to temporarily enable the hand tool while you’redrawing. This allows you to pause drawing, move your shape, and then continuedrawing instead of requiring you to start from scratch in a new position.
✦ To create a square: You can easily make your rectangle into a square by
pressing Shift while you drag out your shape. Unlike some other graphics pro-
grams, you don’t have to press Shift before you begin drawing; pressing Shift
at any time while you’re drawing causes Fireworks to increase the shorter
sides to match the longer sides of the rectangle to form a square.
✦ To draw from the center: To draw your rectangle from the center instead of
from the corner, press Alt (Option) when dragging out the shape. While Alt
(Option) is held down, Fireworks uses the distance from your originating
point to the current pointer position as the radius, rather than the diameter of
the shape. As with Shift, you can press Alt (Option) at any time when drawing
to change to a center origin, as shown in Figure 5-6.
✦ Spacebar Move: While not a typical keyboard modifier key, I’ve included it
here because of the way it impacts your workflow. In those circumstances in
which you begin drawing your rectangle, only to find that it’s not quite where
you want it, you can hold down the spacebar, reposition your work, release
the spacebar, and continue dragging out your rectangle. This can be a huge
time saver.
Of course, you can use Shift and Alt (Option) together to draw a square from thecenter. In fact, you can throw the spacebar into the mix if you find that you need tomove your square before you’re finished drawing it.
Tip
NewFeature
083662-1 ch05.F 8/2/02 2:25 PM Page 149
Fireworks Seminar

150 Part II ✦ Mastering the Tools
Figure 5-6: Holding down Alt (Option) while drawing a shape centers the shape around your starting point.
You can use the Info panel or the Property inspector to check the pixel placement
of your rectangle as you are drawing. One section displays the Width and Height
(marked with a W and H) dynamically, while another displays the X, Y coordinates
of the upper-left point of the rectangle, even if it is being drawn from the center.
Working with rounded cornersThe square and the circle are the most basic shapes, and are obviously useful for the
Web designer in a number of ways. Fireworks also offers a pleasant and useful shape
that’s somewhere in between: the Rounded Rectangle. Whereas rectangles that are
created with the Rectangle tool have perfectly square corners, the Rounded Rectangle
tool creates rectangles with rounded corners. The most obvious use for rounded rect-
angles is more aesthetically pleasing square buttons. Rounding squares and rectan-
gles used as design elements can also quickly lead to a better-looking graphic.
You can specify the degree of roundness that the Rounded Rectangle tool creates
by selecting the tool and then changing the Roundness option on the Property
inspector. Fireworks continues to use that setting for new Rounded Rectangles
you create until you change it again. You can also alter the setting for any rectangle
you’ve already created by changing the Roundness setting on the Property inspec-
tor when a rectangle is selected.
Select a rectangle to choose how rounded you want the corners to appear, by enter-
ing a value in the Rectangle Roundness text box or by using the Roundness slider.
The Roundness scale is percentage-based: 0 represents a standard rectangle with
perfectly square corners and 100 creates a fully rounded rectangle — also known as
a circle. As Figure 5-7 shows, the higher the Rectangle Roundness value, the more
rounded the rectangle’s corners become.
Starting point
083662-1 ch05.F 8/2/02 2:25 PM Page 150
Fireworks Seminar

151Chapter 5 ✦ Creating Vector Objects
Figure 5-7: Select a rectangle and use the Rectangle Roundness setting in the Stroke section of the Property inspector to determine the degree of roundness for your rectangle or square’s corners.
Exactly how Fireworks applies the Rectangle Roundness percentage is most easily
explained with an example. Let’s say you draw a rectangle 100 pixels wide by 50 pix-
els tall, and then give it a Rectangle Roundness value of 50 percent. As shown in
Figure 5-8, Fireworks plots the points of the corner 50 pixels along the top edge
(50% of 100 pixels = 50 pixels) and 25 pixels along the side edge (50% of 50 pixels =
25 pixels). The resulting arc makes the corner. If you created an ellipse with a hori-
zontal diameter of 50 pixels and a vertical one of 25, it would fit right into the newly
rounded corner.
Figure 5-8: Fireworks draws the rounded corner of a rectangle according to a percentage formula.
Arc points for corner
Rounded rectangle
Standard rectangle
Roundness setting
50% 75% 100%30% (default)
083662-1 ch05.F 8/2/02 2:25 PM Page 151
Fireworks Seminar

152 Part II ✦ Mastering the Tools
While you are drawing your Rounded Rectangle, you can press the up or downcursor keys (or 1 and 2) on your keyboard to change the Rounded Rectangle per-centage before you release the mouse button. Roundness adjustment on the fly!
Using ellipses and circlesIn Fireworks, ellipses and circles are created in exactly the same manner as rectan-
gles and squares. Clicking the mouse once sets the origin point, and then the shape
is drawn out as you drag the pointer. Even the Shift and Alt (Option) keyboard mod-
ifiers and Spacebar Move function in the same way as they do with rectangles. In
fact, only two differences exist between the Rectangle tools and the Ellipse tool.
First, it’s pretty obvious that no need exists for an ellipse function equivalent to
the Roundness option for rectangles; ellipses are already rounded. Second — less
apparent, but notable nonetheless — is the fact that the origin point of an ellipse
or a circle never appears on its path. This fact is particularly important for novice
designers who are trying to place an ellipse correctly.
Using an imaginary bounding boxWhen Fireworks draws an ellipse, an imaginary bounding box is used, as shown in
Figure 5-9. The origin point of the bounding box acts as one corner, while the end
point becomes the opposite corner. As with rectangles, if Alt (Option) is pressed,
the center point is used as the origin for drawing. In either case, neither the origin
nor the end point is located on the path of the ellipse. It’s as though you’re drawing
a rectangle, and Fireworks fits an ellipse inside it when you’re done.
Figure 5-9: When you drag out a circle or oval using the Ellipse tool, Fireworks draws the shape using an imaginary bounding box, indicated by the dashed rectangle.
Ending point
Ellipse
Starting point
Bounding box
Tip
083662-1 ch05.F 8/2/02 2:25 PM Page 152
Fireworks Seminar

153Chapter 5 ✦ Creating Vector Objects
It’s particularly helpful to keep the concept of the imaginary bounding box in mindwhen you are trying to align ellipses of different sizes. The Align commands andsnapping to the grid work by using an ellipse’s bounding box rather than thedrawn path of the shape.
Drawing an ellipse or circleTo draw an ellipse or a circle, follow these steps:
1. Select the Ellipse tool. If the Ellipse tool is not visible, click and hold the
Rectangle, Rounded Rectangle, or Polygon tool until the flyout appears, and
then choose the Ellipse tool.
You can also press U until the Ellipse tool is selected. The U key shortcut cyclesthrough the shape tools.
2. Click once to select the origin point and drag to the opposite corner to create
the ellipse. As you drag your pointer, Fireworks draws a preview outline of the
form.
You can refine the positioning of your ellipse or circle by temporarily holding thespacebar while you drag.
3. Release the mouse button when the ellipse is the desired size and shape. If
any stroke or fill has been set, these attributes are drawn when you release
the mouse button.
4. To draw a circle, press the Shift key while you are drawing the ellipse.
5. To draw an ellipse or circle that uses the center point of the shape as the
origin, press the Alt (Option) key while you are drawing.
Combine the Alt (Option) key with the Shift modifier key to draw perfect circlesand squares from the center.
Exploring polygons and starsIn Fireworks, the Polygon tool creates many-sided objects where all the sides — and
all the angles connecting the sides — are the same. The technical term for this type
of geometric shape is an equilateral polygon. Fireworks permits the graphic
designer to specify the number of sides, from 3 to 25. You can also use the Polygon
tool to create a special type of polygon, a star. Star shapes can be drawn with any-
where from 3 to 25 points (and thus, 6 to 50 sides). Moreover, Fireworks gives you
the option of either specifying the angles for the star points, or having the program
assign them automatically based on the number of sides.
Tip
Tip
Tip
Tip
083662-1 ch05.F 8/2/02 2:25 PM Page 153
Fireworks Seminar

154 Part II ✦ Mastering the Tools
Looking at a drag-and-draw affairAs with rectangles and ellipses, making polygons is a drag-and-draw affair. Click
once to set the origin point and then drag out the shape. However, that’s where
the similarities end. With polygons, there’s only one possible origin point: the
center — there is no keyboard modifier to switch to an outside edge. You’ll also
immediately notice as you draw your first polygon that you can quickly set both
the size and the rotation. Dragging the pointer straight out from the origin
increases the dimensions of the polygon; moving the pointer side to side rotates
it around its midpoint.
Drawing a polygonTo draw a polygon, follow these steps:
1. Select the Polygon tool by clicking and holding the Rectangle, Rounded
Rectangle, or Ellipse tool until the flyout appears, and then choosing the
Polygon button. Alternatively, press the keyboard shortcut, U, until the
Polygon tool is visible.
2. To set the number of sides for a polygon:
• Go to the Property inspector and make sure the shape type is set to
Polygon (instead of Star).
• Next, enter a value in the Sides text box, or use the Sides slider.
3. Click and hold down the mouse button where you want the center of the poly-
gon to appear and drag out the polygon shape. Fireworks displays a preview
of the polygon as you draw.
You can use Spacebar Move to refine the positioning of your polygon by tem-porarily holding the spacebar while you drag.
4. Rotate the polygon to the desired position by moving your pointer from side
to side.
5. Release the mouse button when you’re done. Fireworks draws the polygon
with the current stroke and fill settings.
Fireworks interprets the distance from the origin point to the release point as the
radius to each of the points on the polygon. As you can see in Figure 5-10, just
changing the number of sides results in a wide range of basic shapes.
Tip
083662-1 ch05.F 8/2/02 2:25 PM Page 154
Fireworks Seminar

155Chapter 5 ✦ Creating Vector Objects
Figure 5-10: Polygons in Fireworks can have up to 25 sides — although anything above 15 tends to resemble a circle.
Pressing the Shift key while drawing a polygon constrains a side’s angle to a multi-
ple of 45 degrees. Because each shape, as it is initially drawn, is equilateral — with
identical sides and angles — you only notice a couple of variations for each type of
polygon. When drawing a hexagon and constraining the angle with the Shift key,
you only notice three differently angled shapes, although you can actually draw
eight (eight increments of 45 degrees are in a full 360-degree circle).
For most polygons, you can draw it so that the bottom of the shape is parallel tothe bottom of your canvas, by either dragging straight up or straight to one sidewhile holding down the Shift key.
Examining automatic anglesAlthough you can specify up to 25 sides for a polygon, polygons with more than 10
or 15 sides begin to resemble a circle. Not so with Fireworks stars, which, with the
proper angle setting, can create very distinctive graphics with any number of
sides. Fireworks offers both automatic and customizable angle options. When
Automatic Angles is selected (the default), Fireworks draws stars so that the
opposite arms are automatically aligned. With a five-pointed star, such as the
one shown in the lower-left of Figure 5-11, the tops of the left and right arms
are aligned.
Tip
083662-1 ch05.F 8/2/02 2:25 PM Page 155
Fireworks Seminar

156 Part II ✦ Mastering the Tools
Figure 5-11: All of these stars were drawn with the Automatic Angle option enabled. Notice that the opposing points on these stars mirror each other’s angles.
As is readily apparent in Figure 5-11, the automatic angles on stars with a higher
number of sides tend to flatten out the sharpness of the points. These types of
angles are known as obtuse angles. An obtuse angle is one over 90 degrees. The
opposite of an obtuse angle is an acute angle. Acute angles create much sharper
points on stars, as shown in Figure 5-12. To create an acute star in Fireworks, you
need to enter a custom value in the Angle text box.
Figure 5-12: Create acute stars by lowering the Angle value in the Property inspector and drawing with Star selected for the Polygon tool type.
Five-pointed star
083662-1 ch05.F 8/2/02 2:25 PM Page 156
Fireworks Seminar

157Chapter 5 ✦ Creating Vector Objects
Creating a starTo create a star in Fireworks, follow these steps:
1. As with drawing a regular polygon, select the Polygon tool. If it is not visible,
click and hold the Rectangle, Rounded Rectangle, or Ellipse tool until the fly-
out appears, and then choose the Polygon button. Alternatively, you can
repeatedly press the keyboard shortcut, U, until the Polygon tool is visible.
2. In the Property inspector, change the shape type by selecting Star from the
drop down list.
3. To change the number of points, enter a value in the Sides text box, or use the
Sides slider.
4. To change the angle of the star arms, enter a value in the Angle text box, or
use the Angle slider.
Use lower numbers for sharper points and higher numbers for blunter ones.
5. If you want to use the Fireworks predetermined angle for your star, choose the
Automatic checkbox.
6. Click on the canvas to set the origin point for the center of the star and drag
out to the desired size and rotation.
You can use Spacebar Move to refine the positioning of your star by temporarilyholding the spacebar while you drag.
7. Release the mouse when you’re done. As with any other shape, Fireworks
applies the current stroke, fill, or effect setting, if any.
Drawing Lines and Freeform PathsThe path drawing tools in Fireworks primarily vary according to how structured
they are. At one end of the spectrum is the Line tool, which only draws single
straight lines; at the other end is the Vector Path tool which is completely freeform.
In the middle (leaning more toward the Line tool) is the Pen tool, which draws
mathematically accurate curves.
As with a geometric shape, a path is invisible unless a particular stroke or fill is
applied to it. If the two endpoints that define a line are joined, the path is said to be
closed. When you’re drawing paths and two endpoints are about to be joined,
Fireworks displays a special square cursor badge. If the two endpoints of a line are
not joined, the path is said to be open. Unlike most vector drawing tools, Fireworks
enables you to apply fills to open paths, as well as closed.
Tip
Tip
083662-1 ch05.F 8/2/02 2:25 PM Page 157
Fireworks Seminar

158 Part II ✦ Mastering the Tools
Making straight linesThe Line tool is perhaps the simplest member of the Fireworks Tools panel. Click
and hold to set the beginning of the line, drag in any direction, and release to set
the end of the line. Two endpoints and a straight line in between; that’s it and
there’s not a whole lot more to the tool. Straight lines are, by definition, open paths.
You can only display the fill settings on a straight line if you set the stroke to none.
You can also apply effects and Styles to Line-created paths, as shown in Figure 5-13.
Precisely Adjusting a Shape’s Dimensions and Position
As with any graphic design, Web graphics are a blend of visual flair and precise placement.To many artists, an image isn’t right until it’s aligned just so. Whereas much of Fireworks’interface enables very intuitive drawing with a mouse or graphics pad, you can also positionand size objects numerically through the Property inspector or the Info panel.
Typically, I use the Info panel to get a general sense of the dimensions of an object or its X, Y coordinates. For those occasions when I need to render an exact rectangle, one that’sexactly 205 pixels wide by 166 high, say, and starts at 20 pixels in from the left and 35 pix-els down, I use the Property inspector. With Fireworks, you can rough out your shape andplacement, and then numerically resize and reposition the object. You can enter values intoeach of the four text boxes on the Property inspector representing the dimensions and theposition of the bounding box surrounding the object. If the object were a circle or a trian-gle, for example, the height and width displayed would be that of the invisible rectangleencompassing them.
To specify a new dimension or placement of an object, follow these steps:
1. Select the object you want to alter.
2. Double-click the value that you want to change in the Property inspector, or the Infopanel. The four possibilities are
• W (width)
• H (height)
• X (horizontal origin)
• Y (vertical origin)
3. Enter a new value.
4. Confirm your entry by pressing Tab. Fireworks changes the selected object.
5. To change another value, repeat Steps 2–4.
083662-1 ch05.F 8/2/02 2:25 PM Page 158
Fireworks Seminar

159Chapter 5 ✦ Creating Vector Objects
Figure 5-13: The Line tool draws straight-as-a-ruler lines that can take on a stroke setting and even an effect.
To use the Line tool, follow these steps:
1. Select the Line tool or use the keyboard shortcut, N.
2. Position the pointer where you would like the line to begin and click and hold
the mouse button.
Holding down the Shift key while drawing with the Line tool draws perfectly hori-zontal or vertical lines only. Many drawing tools take advantage of the Shift modi-fier to make drawing common shapes more convenient.
3. When the line is at the desired size and angle, release the mouse button.
Drawing with the Vector Path toolThe Vector Path tool is also a drag-and-draw tool, but without any of the restraints
imposed on all the other tools. Anything you can draw with a mouse or graphics
tablet, you can draw with the Vector Path tool. As you move your pointer on the
screen, Fireworks tracks the movements and plots points to replicate your drawing.
Remember, these are vector objects not bitmap objects like the brush tool; to draw
a perfectly straight line, Fireworks only needs two points to depict the line. All the
points that make up a line can be edited — moved, deleted, or increased — and the
line changes accordingly.
Fireworks not only tracks your pointer’s movement across the screen, it alsofollows the speed with which you draw your lines. With certain strokes, such asWatercolor and Charcoal, the velocity is translated visually when the stroke is ren-dered. For more details on varying your strokes, see Chapter 8.
Cross-Reference
Tip
Selected lineBasic strokeAir Brush strokeWith effect appliedWith style applied
083662-1 ch05.F 8/2/02 2:25 PM Page 159
Fireworks Seminar

160 Part II ✦ Mastering the Tools
Freehand drawing with the mouse is particularly difficult, and many artists avoid it
whenever possible. I prefer a graphics tablet and highly recommend them to others
whenever I get the chance. For some images that require an unrestrained look —
such as the fellow in Figure 5-14 — the Vector Path tool is ideal. Choosing one of the
Fireworks strokes that are pressure sensitive enables you to emulate the look of a
calligraphy pen, a pencil, or other drawing implement.
Figure 5-14: Freehand drawing is best done with a graphics tablet using the Vector Path tool set to a pressure-sensitive stroke.
Applying strokes automaticallyThe major difference between this tool and all the other geometric shape tools
(including Line), is that the Vector Path tool automatically applies a particular
stroke, even if none is selected. This feature enables you to see all paths completed
with the tool instantly — instead of having to wait until a stroke is selected and
applied.
As noted previously, the Vector Path tool is capable of creating either open or
closed paths. Remember, a closed path is one in which the beginning and final
endpoints meet.
Using the Vector Path toolTo use the Vector Path tool, follow these steps:
Paths withCalligraphyQuill stroke
Selectedpaths
only
083662-1 ch05.F 8/2/02 2:25 PM Page 160
Fireworks Seminar

161Chapter 5 ✦ Creating Vector Objects
1. Select the Vector Path tool, from the Pen tool flyout, or press the keyboard
shortcut, P, to cycle through.
2. Click and drag the pointer on the canvas. Fireworks renders the drawn path
with the current settings on the Stroke section of the Property inspector.
3. To draw a perpendicular line, press the Shift key while you’re dragging the
pointer. If your movement is primarily left to right, a horizontal line is drawn;
if it is up and down, a vertical line is drawn.
Here’s a rather interesting feature of the Vector Path tool: If you use the Shift key to
constrain your path to a perpendicular line and then release the mouse button —
but not the Shift key — a small plus sign appears next to a Paintbrush cursor. Draw
another stroke (still holding down the Shift key), and Fireworks connects the final
point of your previous stroke with the beginning point of your new stroke.
Constructing Bézier CurvesRemember those plastic stencils you used in school to trace different-size circles,
stars, and other shapes? One of those “other shapes” was probably an asymmetri-
cal, smoothly curving line that was referred to as a French curve. The Frenchman
who invented this type of curve was a mathematician named Pierre Bézier. His
theoretical work, collectively known as Bézier curves, forms the foundation for
much of vector computer graphics, both in print through PostScript and on the
screen through programs such as FreeHand, Illustrator, and, of course, Fireworks.
The learning curve — pun definitely intended — for Bézier curves is a steep one, but
it’s one that every graphic designer using vectors must master. Bézier curves are
amazingly flexible, often graceful to behold, and worth every bit of effort it takes to
understand them fully. So let’s get started.
Pierre Bézier’s breakthrough was the realization that every line — whether it was
straight or curved — could be mathematically described in the same way. Imagine a
rainbow. The shape appears to start in one place, arch to the sky, and then land
some distance away. The beginning and ending points of the rainbow are easily
described; if we were plotting them on a piece of graph paper, we could set down
their location as X and Y coordinates. But what about the arc itself? Consider an
imaginary element in the sky that attracts the rainbow, almost magnetically, which
causes the center of the rainbow to arch up, anchored by the beginning and ending
points. Bézier postulated that every anchor point on a curve had two such mag-
netic elements, called control points — one that affects the curve going into the
anchor point and one that affects it coming out of the anchor point, as shown in
Figure 5-16. In the Bézier vernacular, an anchor point with curves on either side is
called, naturally enough, a curve anchor point. An anchor point with a curve on just
one side is known as a corner anchor point.
083662-1 ch05.F 8/2/02 2:25 PM Page 161
Fireworks Seminar

162 Part II ✦ Mastering the Tools
Figure 5-15: Use control points to alter the shape of a Bézier curve, as defined by the placement of the curve and corner anchor points.
Drawing lines with the PenAlthough all path objects use Bézier curves, Fireworks’ primary tool for creating
Bézier curves is the Pen tool. But how could a Bézier curve describe a straight line?
When the control points are in the same location as the anchor points, the line is
not pulled one way or the other; it remains straight. In fact, the Pen is terrific for
creating connected straight lines. Unlike the Line tool, which draws a single straight
line by clicking and dragging, the Pen draws a series of straight lines by plotting
each point and enabling Fireworks to draw the connecting lines.
To draw a straight line with the Pen, follow these steps:
1. Select the Pen, or use its keyboard shortcut, P.
2. Click once where you want the line to start.
3. Move your pointer to where you want the line to end, and click once.
Fireworks draws a path from your starting point to the second point.
To draw a continuing series of straight lines with the Pen, follow these steps:
1. Select the Pen, or use its keyboard shortcut, P.
2. Click once where you want the line to start.
Corneranchorpoint
Corneranchorpoint
Curveanchorpoint
Control pointControl point
083662-1 ch05.F 8/2/02 2:25 PM Page 162
Fireworks Seminar

163Chapter 5 ✦ Creating Vector Objects
3. Move your pointer to where you want the next point on the line to be, and
either double-click to finish your line, or click once to add another point and
continue drawing. Fireworks draws paths between the points as you work, as
shown in Figure 5-16.
Figure 5-16: Create a Z with the Pen tool much like Zorro carves one with his sword, moving and clicking from point to point.
4. Repeat Step 3 as many times as is necessary to draw your series of lines.
As with the Brush and Pencil tools, you can close an open path created by the Pen
by moving the pointer over the beginning point.
Creating smooth curves with the PenLaying out a series of straight lines is a fine feature, but the Pen tool really shines
when it comes to drawing curves. The key difference between Pen-drawn lines and
curves is that, with curves, you drag the pointer after you’ve set the anchor’s posi-
tion to drag out the control handles and start a curve, whereas with lines, there is
no dragging whatsoever; you are just plotting corner points.
Follow these steps to create a smooth curve:
1. With the Pen tool, click and drag out control points where you want your
curve to start. This creates an anchor point with control handles that is the
start of your line.
2. Choose the location of your next anchor point, click to add it, and then drag
to pull out the control handles. Fireworks joins the two points with a path.
While keeping the mouse button held down, you can move your cursor to
adjust the control points to set the angle of your curve. Let go of the mouse
button when you’re done (see Figure 5-17).
083662-1 ch05.F 8/2/02 2:25 PM Page 163
Fireworks Seminar

164 Part II ✦ Mastering the Tools
Figure 5-17: When you drag out one Bézier curve, you begin to create this curve.
3. Select the Subselection tool and fine-tune your curve by manipulating the con-
trol points.
Hold down the Ctrl (Command) key while using the Pen tool to switch temporar-ily to the Subselection tool, which is suitable for manipulating control points.When you let go of the Ctrl (Command) key, the Pen tool is automatically selectedagain.
Mixing lines and curvesYou can, of course, combine the straight and curved line techniques with the Pen
by alternating just clicking with both clicking and dragging. However, because
dragging a control point affects curves on either side of the curve point, placing
a straight line directly next to a curve is often difficult. Fireworks uses the Alt
(Option) key to constrain the control point that affects the previous curve, while
permitting you to manipulate the current curve. As an example of this option,
follow these steps to create a shape such as the one shown in Figure 5-18.
1. Use the straight-line capability of the Pen to draw the outer edge of the arch
by clicking once for each of the outside points, starting at the inside left cor-
ner and moving in a clockwise direction. After you’ve drawn all the straight
lines, you have the outer shell of the arch, minus the inner arc, completed.
2. Move your pointer back over the beginning point. The closed path cursor is
displayed.
3. Click and hold the mouse button as if you are going to drag it. Press the Alt
(Option) key while continuing to hold down the mouse button.
Tip
Click anddrag out handles
Click and drag out handlesor double-click to finish
083662-1 ch05.F 8/2/02 2:25 PM Page 164
Fireworks Seminar

165Chapter 5 ✦ Creating Vector Objects
4. Drag the control point away from the arch. If Alt (Option) was not pressed, the
connecting line (on the left side of the arch) would be affected by the control-
point drag.
5. Release the mouse button when the arch is in the desired shape.
Figure 5-18: Use the Pen to manipulate Bézier curves and create objects with combinations of straight and curved lines.
You can also use this constraining property to draw uneven curves, where you drag
a little bit before pressing Alt (Option) and effectively lock the previous curve.
Adjusting curvesThe alternative name for the two control points in Bézier curves is control handles.As the name implies, you can grab and manipulate control handles. By changing the
position of the control handle, you can adjust the shape of the curve. Here are a few
guidelines for moving control handles:
✦ The closer the control handle is to its associated curve point, the flatter the
curve.
✦ Alternatively, the further away the control handle is from its curve point, the
steeper the curve.
✦ If a control handle is on top of its curve point, the curve becomes a straight
line, and the curve point becomes a corner point.
✦ You can convert straight lines into curves by pulling the control handle away
from the corner point.
✦ After you’ve drawn a curve point, you can retract one of the control handles
so that the next segment can be either a curve or a straight line.
083662-1 ch05.F 8/2/02 2:25 PM Page 165
Fireworks Seminar

166 Part II ✦ Mastering the Tools
All the manipulations involving control handles can be accomplished after the
fact using the Subselection tool; you can find a discussion of how to use this point
adjustment device in Chapter 9. However, you can perform a few of these opera-
tions while drawing with the Pen. The two key operations involve adding and
removing a control handle.
Adding a control handle to a corner pointTo add a control handle to a corner point, follow these steps:
1. Use the Pen to draw a path with a curve point. Two control points are visible.
2. Move the pointer over the last curve point set.
Figure 5-19: By retracting one control handle, you can continue the curve in the same direction.
3. Click once. The curve point is converted into a corner point, and one control
handle is retracted.
4. To draw a straight line from the corner point, move your pointer away and
click once.
5. To draw a curve, move your pointer away and click and drag out the control
handles.
This technique is very handy for drawing a series of scallop or wave shapes where
the curves all go in the same direction.
083662-1 ch05.F 8/2/02 2:25 PM Page 166
Fireworks Seminar

167Chapter 5 ✦ Creating Vector Objects
Extending a control handle from a corner pointThe opposite of retracting a control handle is extending one. To extend a control
handle from a corner point, you need to enlist the aid of a couple of keyboard modi-
fiers: Ctrl+Alt (Command+Option) to be specific. When you extend a control handle
while drawing, you are, in effect, changing your mind. Instead of proceeding with
the straight line that you first indicated you wanted with the corner point, you can
now draw a curve.
To extend a control handle from a corner point while drawing, follow these steps:
1. Draw a straight line segment with the Pen.
2. Move the pointer over the last point set.
3. Press Ctrl+Alt (Command+Option) and then click and drag a control handle
out from the point. When you press the keyboard modifiers, the pointer
changes to a white arrowhead.
4. Release the mouse button when you’ve positioned the control handle where
desired.
5. Move the pointer to the position for the curve to end.
6. Continue drawing or double-click the final point to complete the shape.
In this technique, it’s important that you press the keyboard modifiers before you
drag the control handle. If you begin dragging before pressing the special keys, you
move the anchor point instead of extending a control handle. This is actually a fea-
ture that enables you to move a previously set point by starting the drag and then
pressing the Ctrl (Command) key; the Alt (Option) key has no effect on this
sequence.
Bézier curves are not easy to master and you may find yourself getting frustrated.Stick with them as, once you have them tamed, they open a whole new creativedoor.
Using the keyboard modifiersBézier curves in Fireworks use a fair number of keyboard modifiers to achieve vari-
ous effects. While these special keys are explained throughout this section in con-
text, it is useful to put them all in one place (see Table 5-1) for easy reference.
Note
083662-1 ch05.F 8/2/02 2:25 PM Page 167
Fireworks Seminar

168 Part II ✦ Mastering the Tools
There’s a lot more to manipulating Bézier curves and other Fireworks objects, asyou find out in Chapter 9.
Table 5-1Bézier Curves Keyboard Modifiers
Windows Keys Macintosh Keys Description
Shift Shift Constrains the straight line or controlhandle to a 45-degree angle
Ctrl Command Moves a set curve or corner point ora control handle to a new position
Ctrl and double-click Command and double-click Completes an open path withoutadding another point
Ctrl+Alt Command+Option Extends a control handle from acorner point
SummaryI once had to indoctrinate a corporate design team into “The Fireworks Way” in a
two-day training session. When it came to vector objects, I described them as being
the “skeleton” of Fireworks graphics. After the vector object is completed — and
the body of fills and clothing of strokes have been applied — you won’t be able to
see its underlying structure, but it is the basis of the image. As you begin to build
vector objects, keep these points in mind:
✦ Paths are the most basic element of Fireworks’ vector objects. A path must be
stroked and/or filled before it becomes visible in your image.
✦ The geometric shape tools — Rectangle, Rounded Rectangle, Ellipse, and
Polygon — can also create squares, circles, and stars.
✦ Spacebar Move enables you to move geometric shapes while drawing by sim-
ply holding the spacebar and repositioning your shape. Spacebar Move works
while drawing Rectangles, Rounded Rectangles, Ellipses and Circles, as well as
Polygons and Stars.
✦ The Line tool creates one straight line at a time.
Cross-Reference
083662-1 ch05.F 8/2/02 2:25 PM Page 168
Fireworks Seminar

169Chapter 5 ✦ Creating Vector Objects
✦ The Vector Path tool enables you to draw on the Fireworks canvas without
restriction.
✦ The Pen draws Bézier curves, which use a series of corner and curve points in
conjunction with control points and handles to make smooth curves and con-
nected straight lines.
In the next chapter, you learn about the other side of Fireworks graphics: bitmap
objects.
✦ ✦ ✦
083662-1 ch05.F 8/2/02 2:25 PM Page 169
Fireworks Seminar

083662-1 ch05.F 8/2/02 2:25 PM Page 170
Fireworks Seminar

Working with Bitmaps
Vector objects are the backbone of Fireworks, and are
perfectly suited for the bulk of a Web artist’s work —
building navigation bars, drawing shapes and lines, and
inserting editable text. These design elements benefit from
the precision that vector drawing provides, and are the type
of things you’re likely to draw right from scratch in Fireworks.
Some kinds of images couldn’t possibly benefit from a vector-
based substructure, though. Photographic images that started
life in a digital camera or scanner are pure bitmap, through
and through. Think of product photographs for an online
store, or digitized paintings for an online art gallery; incorpo-
rating them into a Web page won’t involve drawing. Instead
you cut and paste pixel selections and manipulate alpha
masks and blending modes.
This chapter begins with a discussion of how Fireworks
generally handles bitmaps. We delve into an exploration of the
various tools available for bitmap editing. And, finally, this
chapter covers how to change a vector object into a bitmap
object and the benefits you might realize by doing so.
Understanding Bitmaps in Fireworks
Here’s a quick refresher course on bitmap images — just in
case you’re coming from the world of vector graphics and
can’t tell a pixel from a pig in a poke. The word pixel is
derived from the term picture element (pix for picture and elfor element). A pixel is the smallest component part of a
bitmap image. In the early days of computer graphics, the
color of each pixel was stored in 1 bit of memory, which was
66C H A P T E R
✦ ✦ ✦ ✦
In This Chapter
Getting to knowbitmaps
Opening bitmaps inFireworks
Resizing bitmaps
Selecting bitmapelements
Defining a drawingarea
Working with bitmaptools
✦ ✦ ✦ ✦
093662-1 ch06.F 8/2/02 2:25 PM Page 171
Fireworks Seminar

172 Part II ✦ Mastering the Tools
either on for white or off for black. Map these bits along an x and y axis and you can
create an image out of them. Editing a bitmap basically involves adding or removing
pixels, or changing their colors. Even when you erase part of an image, you’re just
setting the color of those excess pixels to your chosen background color (or to
“transparent” so that they show another image underneath) so that they appear
to have been erased.
The best way to describe the difference between a bitmap image (also called a
raster graphic) and a vector object, is to ask you to think of a line, 100-pixels long
and 1-pixel wide. With vector graphics, all you need to make this line visible is
two points and a stroke in between. With a bitmap, you need exactly 100 pixels. To
move one end of the vector version of this line up a notch, you just need to move
one of the endpoints. With pixel-based images, however, you have to erase all the
pixels in the line and redraw them in another location.
Examining bitmap preferencesThe two Bitmap options under the Editing category of the Preferences can prove
useful.
✦ Turn Off Hide Edges: Turns off the View ➪ Hide Edges command when you
select vector or bitmap objects. This is convenient to make your selection
easy to find, but if you really think edges are a visual nuisance, uncheck this
preference. Turn Off Hide Edges takes effect immediately upon exiting the
Preferences.
✦ Display Striped Border: Tells Fireworks to draw a striped “barber-pole” bor-
der around the canvas when you’re working on a bitmap object. Changes to
this preference take effect immediately upon exiting the Preferences.
Opening existing bitmapsI’m sure you’ve heard the expression, “Success is 1 percent inspiration and 99 per-
cent perspiration.” In the Internet graphics field, the formula is a bit different: “Web
design is 20 percent creation and 80 percent modification.” Of course, this is just
my rough estimate — but it definitely feels as if I spend most of my day revising an
image already created by me or someone else.
Fireworks offers multiple ways to open existing bitmaps — and it supports a wide
range of file formats as well. Increasingly, more of your work will be stored in
Fireworks’ PNG-based format, which enables both vector and bitmap editing.
However, many times you find yourself working with a bitmap file created in
another application such as Photoshop.
093662-1 ch06.F 8/2/02 2:25 PM Page 172
Fireworks Seminar

173Chapter 6 ✦ Working with Bitmaps
As with many computer programs, Fireworks loads images and other files through
the File ➪ Open command. This command displays the Open dialog box (see
Figure 6-1), which previews various file types. You can select multiple files by press-
ing Shift or Ctrl (Command) as you click on filenames. The Open dialog box also has
a very useful option, Open as Animation, which creates an animation from multiple
files by distributing them across the frames of one document. Make sure you select
more than one file in order to enable the Open as Animation checkbox.
For detailed information on how to use the Open command to load any type offile, see Chapter 14.
Figure 6-1: Opening an image sequence as an animation using Fireworks’ Open as Animation option
Scaling bitmapsChanging the size of a pixel-based bitmap image is something probably taken for
granted, but it’s actually a pretty complex task, requiring Fireworks to literally
create a new image — with the newly specified dimensions — by analyzing the old
image. Fireworks examines groups of pixels and basically makes a best guess about
how to represent them, with either more or fewer pixels. Coming up with intermedi-
ate values based on analysis of known values is called interpolation.
Cross-Reference
093662-1 ch06.F 8/2/02 2:25 PM Page 173
Fireworks Seminar

174 Part II ✦ Mastering the Tools
Fireworks offers you four interpolation methods (see Figure 6-2):
✦ Bicubic: With bicubic interpolation, Fireworks averages every pixel with all
eight pixels surrounding it — above, below, left, right, and all four corners.
This scaling option gives the sharpest results under the most conditions and
is recommended for most graphics.
✦ Bilinear: Bilinear interpolation is similar to bicubic, but only uses four neigh-
boring pixels (above, below, left, and right), instead of eight.
✦ Nearest Neighbor: The Nearest Neighbor algorithm causes Fireworks to copy
neighboring pixels whenever a new pixel must be interpolated. Consequently,
the Nearest Neighbor scaling option creates very pixelated, stairstep-like
images. This is the fastest interpolation method available.
✦ Soft: Soft interpolation offers a smoothing blur to the scaled-down images.
The Soft Interpolation scaling option is a good choice if your images are
producing unwanted artifacts using the other scaling options.
Figure 6-2: Fireworks offers four scaling options to suit different kinds of images.
Although I tend to use Bicubic Interpolation most of the time, I do turn to Bilinear
and Soft Interpolation in some cases, usually when small text is involved. I haven’t
found much use for the blockiness produced by the Nearest Neighbor scaling
option. Experimenting with the different interpolation methods is the best way
to become familiar with the results.
Interpolation methods option list
093662-1 ch06.F 8/2/02 2:25 PM Page 174
Fireworks Seminar

175Chapter 6 ✦ Working with Bitmaps
Inserting a bitmap into a documentCollage — the mixing of various images and other graphics — is a very important
design tool, on or off the Web. Whether you’re overlapping bitmaps or just laying
them side-by-side, Fireworks’ File ➪ Import command enables you to include an
existing graphic wherever necessary in an open document.
To include a bitmap in a document, follow these steps:
1. Choose File ➪ Import, or use the keyboard shortcut, Ctrl+R (Command+R).
Fireworks displays the Import dialog box.
2. Select your image and choose Open when you’re done. The cursor changes to
the Import cursor: a corner bracket.
3. Position the Import cursor wherever you would like the upper-left corner of
the image to be initially located, and click once. The chosen image is inserted
into the document as a new bitmap object and selected.
If you need to adjust the position of the newly inserted bitmap object, select the
Pointer tool, and click and drag it to a new place. For more precise placement, use
the cursor keys to move the selected bitmap object any direction, one pixel at a
time or the Property inspector to move the bitmap to a specific location.
When pressing Shift, the arrow keys move the selected bitmap object in 10-pixelincrements.
Inserting an empty bitmapSo far you’ve seen how Fireworks can open a wide range of file formats for bitmap
editing. But what if you want to create a bitmap image directly from within Fireworks?
Whereas vectors are far more editable than bitmaps, occasionally only a bitmap will
do. For those times, you can use a Fireworks feature that creates an editable bitmap
area by choosing Edit ➪ Insert ➪ Empty Bitmap.
The Empty Bitmap command is extremely helpful when you need to paint a fairlylarge background with a brush, such as the Air Brush, and don’t want to use theFill tool. You can then modify the Air Brushed background with any of the pixel-based tools, such as the Eraser.
Using bitmap toolsThe scoreboard shows an almost equal number of Fireworks tools dedicated to
working with bitmaps and vectors at eight to six respectively. Naturally, the better
you understand what a tool is intended for and how it is best used, the more fluid
your workflow becomes. This section discusses the bitmap tools.
Tip
Tip
093662-1 ch06.F 8/2/02 2:25 PM Page 175
Fireworks Seminar

176 Part II ✦ Mastering the Tools
The bitmap specific tools are primarily concerned with pixel manipulation, and
there’s a very good reason for this emphasis: Selecting and manipulating pixels is
much harder than selecting and manipulating vectors. The most complicated vector
possible can be selected with just one click. Pixels are chosen either by their posi-
tion with a tool, such as the Marquee, or by their color with the Magic Wand. Quite
often you need to use a combination of tools and methods to get the desired results.
Luckily, Fireworks offers a full range of pixel manipulation tools: Pointer, Marquee,
Oval Marquee, Lasso, Polygon Lasso, and Magic Wand. Each has its own way of
working, as well as a variety of user-definable options.
Examining the PointerAlthough the Pointer tool is listed as one of the selection tools, capable of being
used in both modes, it’s included here for a simple reason. You can use the Pointer
to quickly and easily reposition your bitmaps by clicking and dragging anywhere
within the bitmap object, as shown in Figure 6-3. Just make sure that there are no
active pixel selections.
Figure 6-3: You can use the Pointer to move whole bitmap objects around the canvas.
093662-1 ch06.F 8/2/02 2:25 PM Page 176
Fireworks Seminar

177Chapter 6 ✦ Working with Bitmaps
You can also use the Pointer to resize a bitmap object. You can drag the controlhandles, the solid squares in the corners of the selection indication bordersurrounding the image, to a new position, resizing the graphic much like theDistort tool does. You can even obtain proportional resizing by holding Shift whiledragging a corner.
Using the Marquee toolsThe Marquee tool is one of the most frequently used selection tools. The Marquee
selection tool is quite similar to the Rectangle vector drawing tool. Both are gener-
ally used by selecting a point for one corner of the rectangular shape and dragging
diagonally to the opposite corner. However, the Marquee tool doesn’t draw a shape
on the bitmap; it temporarily surrounds and selects an area of pixels for another
operation to take place, such as a copy or a fill.
Examining the Rectangular and Oval Marquee toolsThere are actually two different Marquee tools. The first is the default rectangular
Marquee, which you select through its button on the toolbar, or by pressing the
keyboard shortcut, M. The second parallels the Ellipse vector drawing tool: The
Oval Marquee selects an oval or circular area. Pressing and holding down the Shift
key while using the Marquee and Oval Marquee tools constrains the shapes you
draw to perfect squares and circles, as it would when using the vector Rectangle
or Ellipse drawing tools.
If you find yourself making a lot of perfect square and circle marquee selections,click the Marquee or Oval Marquee tool and choose Fixed Ratio from the Style boxon the Property inspector. Set the ratio at 1 to 1, and it’s easy to draw perfectsquare and circle selections instead of rectangles and ovals, with no need to holdthe Shift key.
To use the Marquee or Oval Marquee tool, follow these steps:
1. To select a rectangular or square region, select the Marquee tool from the
Tools panel or through its keyboard shortcut, M.
2. To select an elliptical or circular region, select the Oval Marquee tool from the
Tools panel by clicking and holding the Marquee tool and choosing the button
from the flyout menu. Alternatively, you can press the keyboard shortcut, M,
twice.
3. Click where you want one corner of your selection to begin, and drag to the
opposite corner. Fireworks displays a moving dashed line, called a marquee
or, more familiarly, “marching ants” (see Figure 6-4).
Tip
Tip
093662-1 ch06.F 8/2/02 2:25 PM Page 177
Fireworks Seminar

178 Part II ✦ Mastering the Tools
You can refine the positioning of your marquee selection by temporarily holdingthe Spacebar while you drag.
Figure 6-4: The Marquee tools are used for marking rectangular, square, oval, or circular areas for selection.
Exploring the Property inspectorThe two Marquee tools also share a set of options available from the Property
inspector. You can display the Property inspector, as shown in Figure 6-5, by select-
ing Window ➪ Properties, or by pressing Ctrl+F3 (Command+F3). The Marquee
properties affect two separate items: Style and Edge.
Figure 6-5: Use the Property inspector to set the Marquee to a predetermined size or ratio; you can also choose a type of edge for the selection: Hard, Anti-Alias, or Feather.
Tip
093662-1 ch06.F 8/2/02 2:25 PM Page 178
Fireworks Seminar

179Chapter 6 ✦ Working with Bitmaps
Discovering the Style portionGenerally, the Marquee tools are unrestrained, meaning the selection can be any
size or shape drawn out. But sometimes it’s useful to specify the needed selection
dimensions. The Style section of the Marquee Property inspector has three possible
settings:
✦ Normal: This default state enables you to drag out your rectangular or ellipti-
cal selections freely.
✦ Fixed Ratio: Sets the horizontal-to-vertical ratio for the Marquee selection
tools. Enter horizontal values in the first text box (marked with the side-to-
side double-headed arrow) and vertical values in the second (marked with the
up-and-down double-headed arrow). This option is useful when you know that
the selection must be a particular proportion. If, for example, the selection
should be twice as wide as high, you would enter a 2 in the horizontal text box
and a 1 in the vertical text box. To get a perfect square selection, specify 1 to
1. When you use either Marquee tool with a Set Ratio option enabled, the
selection size varies, but not the proportion.
✦ Fixed Size: Sets the dimensions to a particular pixel width and height. Enter
the desired pixel values in the horizontal and vertical text boxes. When either
Marquee tool is selected with this option enabled, a selection outlining the
specified dimensions is attached to the pointer and can be easily repositioned
on the screen. After you’ve located the area to be selected, clicking once
drops the selection outline on the bitmap. The Fixed Size option works
especially well when you need to create a number of same-sized selections.
If you enter a value in one of the Fixed Size text boxes, but leave the other blank,Fireworks creates a selection outline the width or height specified that spans theentire bitmap. It’s a great way to grab a slice of an image, one or two pixels wideor tall, and ensures that you get the full image without having to draw it. For thistechnique, using the Marquee tool rather than the Oval Marquee tool is best.
Learning the types of edgesThe Marquee Property inspector also controls the type of edge that the selection
uses. The default edge type is a hard-edged line — what you select is what you get.
The other two types, Anti-Alias and Feather, act to soften the selection. Anti-Alias is
the more subtle of the two options. When you choose the Anti-Alias option for your
selection, any jagged edges caused by an elliptical or circular selection are blended
into the background, much like bitmap type is antialiased to make it appear less
jagged.
You can get a very smooth bitmap crescent by making a circular selection usingthe Oval Marquee tool on a solid color. Set the Edge type on the Marquee Propertyinspector to Anti-Alias, and make your selection. Then, use the arrow keys to movethe selection one or two pixels vertically and the same distance horizontally.You’re left with a crescent shape that blends smoothly into its points.
Tip
Tip
093662-1 ch06.F 8/2/02 2:25 PM Page 179
Fireworks Seminar

180 Part II ✦ Mastering the Tools
Feathering a selection is much more noticeable. Basically, think of feathering as
blending. After selecting the Feather option, the value box becomes active with a
default of 10 pixels. Any feathered selection blends equally on either side of the
selection outline. If, for example, you choose a small Feather value of 2 pixels for a
rectangular selection, four rows of pixels are altered — two inside the selection and
two outside. If you delete a feathered selection, you’re left with a hole in the image,
blending smoothly into the canvas, because both the selection and the surrounding
image are feathered. If you move a feather selection and the pixels it contains, the
selection has a blended edge, as shown in Figure 6-6.
Figure 6-6: Moving a feathered selection blends both the selection and the remaining image to create a gentle transition.
Remember to hold Ctrl (Command) while you move a Marquee selection in orderto move both the selection and the pixels it contains.
Using the Lasso and Polygon Lasso toolsNot all regions to be selected are rectangular or elliptical. The Lasso tools select
irregularly shaped areas of an image. As the name implies, the Lasso tools surround
or lasso the desired pixels to select them. The standard Lasso tool is a click-and-
drag type instrument that enables freeform selection, in the same way the Vector
Tip
093662-1 ch06.F 8/2/02 2:25 PM Page 180
Fireworks Seminar

181Chapter 6 ✦ Working with Bitmaps
Path tool used for freeform drawing. The Polygon Lasso tool, on the other hand, is
similar to the Pen tool in its straight-line mode, and makes selections through a
series of connected straight lines.
All Lasso selections are by their very nature closed paths. As with the drawing tools,
when you drag the pointer near the beginning of a Lasso selection, Fireworks displays
a closed-path cursor with a black square, as shown in Figure 6-7. You can also close a
Lasso tool selection by releasing the mouse button; Fireworks draws a line from the
beginning point to the ending point, closing the shape. With the Polygon Lasso, dou-
ble-click the last point to close the shape automatically in the same manner.
If you’re selecting an area that has more curves than straight lines, use the Lasso. If
your selection has some long straight lines, you may find the Polygon Lasso is more
suitable, even if you also have some curves to deal with because the straight lines
are quick and accurate. Lots of short lines with the Polygon Lasso enable you to
draw around curves.
Figure 6-7: Drawing with the Polygon Lasso. The little block on the Polygon Lasso cursor means that one more click closes the path and creates the selection.
To make a freeform selection, follow these steps:
1. To use the Lasso, select it from the Tools panel, or use the keyboard shortcut, L.
2. With the Lasso, click at the starting point for your selection, and drag the
mouse around the desired area, releasing the mouse when you’re done.
Closed pathPolygon Lasso cursor
093662-1 ch06.F 8/2/02 2:25 PM Page 181
Fireworks Seminar

182 Part II ✦ Mastering the Tools
3. To use the Polygon Lasso, select and hold the Lasso tool until the flyout
appears, and then choose the Polygon Lasso, or press the keyboard shortcut,
L, twice.
4. With the Polygon Lasso, click at the starting point for your selection, and then
move the mouse to the next point on the outline, surrounding the desired area
and click again. Fireworks connects each point that you set down with a
straight line.
5. Repeat Step 4 until you’ve outlined the entire area, and then close the selec-
tion by moving your pointer over the starting point and clicking once or
double-clicking to permit Fireworks to connect the first and final points.
As a matter of personal preference, I get a lot more use out of the Polygon Lasso
than I do the regular drawing Lasso. Selecting an area of pixels is often a painstak-
ing chore, and I find the Polygon Lasso to be far more precise. Generally, I use the
Lasso to outline some stray pixels for deletion only when there’s little chance that
I’ll select part of the main image.
You can determine the type of edge the Lasso tools use through the Property
inspector. As with the Marquee tools, the three edge options are Hard, Anti-Alias,
and Feather, and they work in exactly the same manner as described in the previ-
ous Marquee section.
Working with the Magic WandThe Magic Wand is a completely different type of selection tool from those already
discussed. Instead of encompassing an area of pixels, the Magic Wand selects adja-
cent pixels of similar color. This type of tool enables you to select single-color back-
grounds or other regions quickly.
Using the Magic Wand is very straightforward. Choose the Magic Wand tool from
the Tools panel, or use the keyboard shortcut, W. Now click on any pixel in the
bitmap — it, and all pixels of a similar color next to it, are selected.
With both the Magic Wand and the Lasso, I find that the representational pointerssometimes get in the way. It’s hard to see exactly which pixel you’re pinpointing ifthere is a sparkly wand cursor obscuring the area. You can toggle Precise Cursors —a crosshair pointer — whenever you like, by pressing the Caps Lock key.
The key phrase in the description of the Magic Wand is “pixels of a similar color.”
Many bitmap images, especially photographic JPEGs, tend to use a range of colors,
even when depicting a seemingly monochromatic area. You control what Fireworks
defines as a “similar color” through the Tolerance setting on the Property inspector.
The Tolerance scale goes from 0 to 255; lower tolerance values select fewer colors
and higher values select more.
Tip
093662-1 ch06.F 8/2/02 2:25 PM Page 182
Fireworks Seminar

183Chapter 6 ✦ Working with Bitmaps
Here’s how the Magic Wand and the Tolerance work. By default, the initial
Tolerance is set to 32. The Tolerance value is applied to the RGB values of the
selected pixel — the exact one selected by the Magic Wand. If the Tolerance value is
50 and the selected pixel’s RGB values are 200, 200, and 200, Fireworks judges any
adjacent pixel with an RGB from 150, 150, 150 to 250, 250, 250 as being similar
enough to select. Pixels within that color range, but not in some way touching the
originally selected pixel, are not chosen.
In addition to varying the Tolerance, you can also determine the type of edge for a
Magic Wand selection. Edge options, as with Marquee and Lasso tools, are Hard,
Anti-Alias (the default), or Feather. For a detailed explanation of how these tools
work, see the “Using the Marquee tools” section earlier in this chapter.
Increasing or Reducing the Selection Area
Fireworks selection tools are very full-featured, but, for complex selections, you need moreflexibility. Adding several selections together, or using one selection tool to eliminate part ofan existing selection, opens up a whole range of possibilities.
The key to adding or removing pixels is to use the keyboard modifiers as you draw yourselections: Press Shift to add selections and Alt (Option) to remove them. Notice that thepointer indicates the operation; a plus sign (+) appears when Shift is pressed and a minussign (–) appears when Alt (Option) is pressed.
For example, I often use Shift in combination with the Magic Wand to select additionalareas of an image, rather than alter the Tolerance. Your first Magic Wand selection may havea couple of small gaps that need filling. Holding down Shift and clicking in those gaps isusually the quickest way to fill out the selection, as shown in the accompanying figure.
Continued
093662-1 ch06.F 8/2/02 2:25 PM Page 183
Fireworks Seminar

184 Part II ✦ Mastering the Tools
Rubber StampingIf you’re looking for a unique tool, look no further than the Rubber Stamp. One of
the few pixel-based drawing tools, Rubber Stamp acts like a real rubber stamp: pick-
ing up a section of your document and stamping it out somewhere else. The Rubber
Stamp tool makes picking up portions of an image and blending them into other
areas of the graphic easy.
The Rubber Stamp is a two-part tool, with both source and destination pointers.
The source, or origin, pointer is initially placed on the area of the document that
you want to duplicate. The destination pointer draws the duplicated section in a
different location on the image. While you are drawing, the two pointers maintain
the same relationship to each other; if you move the destination pointer to the left,
the source pointer moves to the left as well. Because the “ink” that the Rubber
Stamp tool uses is always changing while you move it (because the source pointer
is also moving), you can achieve a smooth blend, as in Figure 6-8. Getting a handle
on this tool is a little tricky, but well worth the time you spend mastering it.
Continued
Just as you can add onto selections, you can take away from them, too. Use the Alt (Option)key when applying any of the selection tools to reduce an existing selection. The basic tech-nique is to “carve out” the undesired selection; in the following figure, the donut shape wascreated by first drawing a circular selection, and then pressing Alt (Option) while drawing asmaller circular selection inside. An Xtra was then applied to the donut-shaped selection tocreate a frame around the subject’s face. Obviously, the selection reduction feature enablesyou to create some very unusual shapes.
093662-1 ch06.F 8/2/02 2:25 PM Page 184
Fireworks Seminar

185Chapter 6 ✦ Working with Bitmaps
Figure 6-8: Using the Rubber Stamp tool to create an extra head that practically draws itself
To use the Rubber Stamp tool, follow these steps:
1. Select the Rubber Stamp tool from the Tools panel, or use the keyboard short-
cut, S.
2. Set the source pointer by clicking once on the bitmap. If you attempt to set
the source pointer on a vector object, Fireworks tells you that the Rubber
Stamp tool can only be used on floating bitmap objects.
3. Move the destination pointer to where you want the copied image to appear,
and draw by clicking and dragging. As the source pointer moves over the
image, following the movement of the mouse, the image is copied under the
destination pointer.
Understanding Source AlignmentYou can use the Rubber Stamp in two basic modes, selectable from the Property
inspector once you’ve chosen the Rubber Stamp tool. First, with Source Aligned
mode (checked by default), you can always keep the relationship between the
093662-1 ch06.F 8/2/02 2:25 PM Page 185
Fireworks Seminar
186 Part II ✦ Mastering the Tools
source and destination pointers constant, not just when you’re drawing. This is use-
ful if you want to copy different portions of the image to a remote area, but keep
them proportionally spaced. For example, if I wanted to position two eyes as if they
were floating in space above my model’s head, I would copy one eye using the
Rubber Stamp tool, release the mouse button, and position the source pointer over
the second eye and then begin dragging and drawing again until the second eye was
completed.
By unchecking the Source Aligned box, you switch to a Fixed Source mode. In Fixed
Source mode, whenever the mouse button is released, the source pointer snaps
back to its original starting place. This mode enables you to copy the same image in
several locations. If, for example, I wanted to place a series of floating eyes around
my model’s head, I would use Fixed Source mode.
Press Alt (Option) to reset the origin for the Rubber Stamp.
Learning about other optionsThere are a couple of other controls on the Property inspector that change how the
Rubber Stamp tool behaves. The Edge Softness slider affects the hardness of the
duplicated image’s edge; the higher the slider, the softer the edge. To blend a
copied image more, use a softer edge. You can also change the size of the source
and destination pointers with the Stamp Size slider. The range of the Stamp Size
slider is from 0 to 72, and the default is 16 pixels. The selected Stamp Size includes
any feathering that may be required by the Edge Softness setting.
Exploring the EraserAs you might suspect, the Eraser removes pixels from an image, just like the trusty
gum-based version erases pencil drawings.
To use the Eraser, follow these steps:
1. Select the Eraser from the Tools panel; alternatively, you can use the keyboard
shortcut, E.
2. If necessary, select the image you want to work on.
3. Click and drag over the pixels you want to remove. Fireworks deletes the pix-
els leaving the canvas showing through, as shown in Figure 6-9.
In addition to being able to set the Edge Softness and Size of the Eraser on the
Property inspector, as you can with the Rubber Stamp tool, you can also select its
basic shape. By default, the Eraser is circular, but you can change it to a square by
choosing the Square Eraser button.
Tip
093662-1 ch06.F 8/2/02 2:25 PM Page 186
Fireworks Seminar

187Chapter 6 ✦ Working with Bitmaps
Figure 6-9: The Eraser tool removes pixels from your image according to the settings established on the Property inspector.
Understanding the Touchup toolsManipulating bitmaps pixel-by-pixel is all well and good but what about the fun
stuff? What do you do when you have a bitmap image that could use a little
retouching? That’s where the touchup tools come into play. They allow you to make
sharp edges blurry so they’re not as obvious, or make blurry edges sharper so you
can view things more clearly. They let you lighten the dark images and darken the
light ones. You can even shove your colors around to mix them into each other. Of
course, you’re not limited to using these tools on a one shot per image basis; you
can use combinations of any, or all, of them to get your bitmaps just right.
Fireworks MX adds new tools designed to help you touchup your bitmaps. Theyare Blur, Sharpen, Dodge, Burn, and Smudge.
Blur and SharpenThe Blur and Sharpen tools have opposing effects on pixels. Like their filter coun-
terparts, the Blur and Sharpen tools are used to decrease or enhance the focus on
areas of a bitmap image. Unlike the filters, the Blur and Sharpen tools allow you
very fine control over what gets blurred or sharpened because you’re applying
them directly with the mouse cursor rather than applying the filter to a selection,
or the entire document.
NewFeature
093662-1 ch06.F 8/2/02 2:25 PM Page 187
Fireworks Seminar

188 Part II ✦ Mastering the Tools
The options for the Blur and Sharpen tools are as follows:
✦ Size: This setting controls the size of the tip of the Blur and Sharpen tools. It
affects how large, or how small, an area the tool touches. The size range
extends from 1 to 100.
✦ Edge: The Edge setting determines how soft or how hard the edge of the tip is.
The valid range is from 1 to 100, with 1 being a solid shape and 100 being
fairly feathered around the edges.
✦ Shape: Determines whether the tip of the tool is round or square.
✦ Intensity: The intensity sets the degree of blurring or sharpening. The valid
range is between 1 and 100.
What do you do when you want to remove someone’s head and make it look like it’s
attached to someone else’s body? You know that almost everyone has done this
kind of thing and if you haven’t, you’ve certainly seen it done. After all, you know
that wasn’t a real picture of Britney Spears that arrived in your e-mail. Once you’ve
cut out the head, and resized it to match the body, what do you do about that line
where the neck attaches or the face gets put in? That’s where the Blur tool comes
in. In figure 6-10, you see, from left to right, the source image, the image for the new
face, and then the completed job. If it weren’t for the Blur tool, the edges of the cut
out face would all be totally obvious.
Figure 6-10: At 300 percent magnification, you can see the areas in the final shot (at right) where the Blur tool was used to blend the edges of the face transplant.
Blur masking edges of new faceImage with face to copySource image
093662-1 ch06.F 8/2/02 2:25 PM Page 188
Fireworks Seminar

189Chapter 6 ✦ Working with Bitmaps
To use the Blur tool, follow these steps:
1. If necessary, select the image you want to work on.
2. Select the Blur tool from the Tools panel; alternatively, you can use the key-
board shortcut by pressing R.
3. Tweak the settings in the Property inspector until they’re set up the way you
want them.
4. Click and drag over the pixels you want to blur. Fireworks uses the settings in
the Property inspector to blur the pixels in your image.
5. Repeat steps 3 and 4 for any other areas you wish to blur.
Use the sharpen tool to bring clarity to blurry or out-of-focus portions of bitmap
images. It can fix up those fuzzy photos or you can add crispness to some blurry
text (see Figure 6-11). With only a few swipes of the Sharpen tool, you can add new
life to your images.
Figure 6-11: The text on the right is the blurry original; the text on the left has been sharpened. With a little more work, it will be restored perfectly.
Blurryoriginal
text
Text withSharpenapplied
093662-1 ch06.F 8/2/02 2:25 PM Page 189
Fireworks Seminar

190 Part II ✦ Mastering the Tools
To use the Sharpen tool, follow these steps:
1. If necessary, select the image you want to work on.
2. Select the Sharpen tool from the Tools panel; alternatively, you can use the
keyboard shortcut by pressing R twice.
3. Tweak the settings in the Property inspector until they’re set up the way you
want them.
4. Click and drag over the pixels you want to sharpen. Fireworks uses the set-
tings in the Property inspector to sharpen the pixels in your image.
5. Repeat steps 3 and 4 for any other areas you wish to sharpen.
Holding down the Alt (Option) key temporarily switches from the Blur tool to theSharpen tool and vice versa. This allows you to blur and sharpen different areas ofthe same image without having to constantly switch between tools.
Dodge and BurnLike Blur and Sharpen, Dodge and Burn go hand-in-hand as they also perform oppo-
site functions. You can use the Dodge tool to lighten any dark or badly lit portions
of a bitmap image. The burn tool, on the other hand, is used to darken areas of an
image that appear too light.
The options for the Dodge and Burn tools are as follows:
✦ Size: This setting controls the size of the tip of the Dodge and Burn tools. It
affects how large, or how small, an area the tool touches. The size range
extends from 1 to 100.
✦ Edge: The Edge setting determines how soft or how hard the edge of the tip
is The valid range is from 1 to 100, with 1 being a solid shape and 100 being
fairly feathered around the edges.
✦ Shape: Determines whether the tip of the tool is round or square.
✦ Range: The Range option list has three settings:
• Shadows: Causes the Dodge and Burn tools to affect the dark tones in an
image.
• Highlights: Causes the Dodge and Burn tools to affect the light tones in
an image.
• Midtones: Causes the Dodge and Burn tools to affect the middle tonal
range in an image — the tones between the light and dark ranges.
✦ Exposure: The Exposure value can be set from 1 to 100. If you want a low level
of effect to be added, choose a low number; for those areas that you really
want to modify, choose a higher number.
Tip
093662-1 ch06.F 8/2/02 2:25 PM Page 190
Fireworks Seminar

191Chapter 6 ✦ Working with Bitmaps
Though its name is the least descriptive of the touchup tools, the Dodge tool is
great for those occasions when you need to lighten areas of an image that turned
out a little darker than expected. You can remove the shadow left by the brim of a
hat or simply brighten flesh tones. In Figure 6-12, I use the Dodge tool to lighten this
young scholar’s face, hands, and reading material. While I could have used the
Brightness/Contrast command, that would have brightened the walls and possibly
made the image too washed out.
Figure 6-12: The Dodge tool can work wonders to brighten areas of a photograph that are slightly too dark.
To use the Dodge tool, follow these steps:
1. If necessary, select the image you want to work on.
2. Select the Dodge tool from the Tools panel; alternatively, you can use the key-
board shortcut by pressing R three times.
3. Tweak the settings in the Property inspector until they’re set up the way you
want them.
4. Click and drag over the pixels you want to lighten and release the mouse
button when all of the desired pixels have been affected.
5. Repeat steps 3 and 4 for any other areas you need to lighten.
Originalimage
Dodge appliedto face, hands, and Bible
093662-1 ch06.F 8/2/02 2:25 PM Page 191
Fireworks Seminar

192 Part II ✦ Mastering the Tools
The Burn tool is one of those tools whose name says it all. If you need to darken
some areas of a bitmap image, simply get out the Burn tool and apply it. Those over-
exposed areas dim down in no time. Let’s say you want some focaccia, with goat
cheese and olive oil, and you ask to have it cooked well done so that the crust is
extra crispy. You get home, only to discover that the crust isn’t quite as crispy as
you’d like. Rather than head all the way back to Villa Agnese, in La Habra, California,
to have it cooked a little more, get out your digital camera, take a photograph, and
use the Burn tool to crisp the focaccia to your exact specifications. You can see the
results of the Burn tool in Figure 6-13 where I toasted my focaccia crust a little to
give it that extra crunch. An undocumented advantage to using the Burn tool for this
project is that you’re less likely to burn the roof of your mouth — your focaccia’s
been cooling down while you’ve been burning its crust.
Figure 6-13: The Burn tool is a great way to darken, or shade, areas of an image that are too light — especially when you don’t want to get into trouble with the chef.
To use the Burn tool, follow these steps:
1. If necessary, select the image you want to work on.
2. Select the Burn tool from the Tools panel; alternatively, you can use the key-
board shortcut by pressing R four times.
3. Tweak the settings in the Property inspector until they’re set up the way you
want them.
4. Click and drag over the pixels you want to darken. Fireworks uses the settings
in the Property inspector to darken the pixels in your image.
5. Repeat steps 3 and 4 for any other areas you wish to darken.
Original image Burn applied to crust
093662-1 ch06.F 8/2/02 2:25 PM Page 192
Fireworks Seminar

193Chapter 6 ✦ Working with Bitmaps
Holding down the Alt (Option) key temporarily switches from the Dodge tool tothe Burn tool and vice versa. This allows you to dodge and burn different areas ofthe same image without having to constantly switch between tools.
SmudgeAt some point in life, everyone’s done finger-painting. Pour some paint on a piece of
paper, get your hands in there, and push all the colors around, into, and through
each other. In many ways, the Smudge tool does for pixels what fingers do for
finger-painting. Essentially, the Smudge tool blends colors in a bitmap in whatever
direction you push or pull. It’s like grabbing the colors and smearing them across
other pixels (see Figure 6-14).
Figure 6-14: What started out as four rectangles can soon become impressionist art with some overzealous use of the Smudge tool.
The options for the Smudge tool are as follows:
✦ Size: This setting controls the size of the tip of the Smudge tool. It affects
how large, or how small, an area the tool touches. The size range extends
from 1 to 100.
✦ Edge: The Edge setting determines how soft or how hard the edge of the tip is.
The valid range is from 1 to 100, with 1 being a solid shape and 100 being
fairly feathered around the edges.
Tip
093662-1 ch06.F 8/2/02 2:25 PM Page 193
Fireworks Seminar

194 Part II ✦ Mastering the Tools
✦ Shape: Determines whether the tip of the tool is round or square.
✦ Use Entire Document: Check this option if want the Smudge tool to affect
bitmaps on all of the layers in your document at the same time. With this
option unchecked, only bitmaps on the selected layer are affected.
✦ Smudge Color: With this option checked, the color in the color well is applied
to the beginning of each smudge stroke you make. If this option is unchecked,
the color under the Smudge tool at the beginning of the stroke is used.
✦ Pressure: This controls how intense your smudge is. The valid range for this
option is from 1 to 100. A lower setting smudges a small amount of color; a
higher value smudges your colors deeper and further.
To use the Smudge tool, follow these steps:
1. If necessary, select the image you want to work on.
2. Select the Smudge tool from the Tools panel; alternatively, you can use the
keyboard shortcut by pressing R five times.
3. Tweak the settings in the Property inspector until they’re set up the way you
want them.
4. Click and drag over the pixels you want to smudge. Fireworks uses the set-
tings in the Property inspector to smudge the pixels in your image.
5. Repeat steps 3 and 4 for any other areas you wish to smudge.
You can accomplish an interesting effect with the Smudge tool by checking the Use
Entire Document option and using the Edit ➪ Insert ➪ Empty Bitmap command.
Follow these steps to discover a creative way to make some interesting graphics:
1. Open an existing banner or logo, or add some colorful text to a new document.
Text objects, or a logo, tend to be the best candidates for this procedure.
2. For this example, you should have extra space on all sides of your bitmap. If
your bitmap stretches right to the edges of the canvas, then select Modify ➪Canvas ➪ Canvas Size to add 20 or 30 extra pixels to all four sides.
3. Select Edit ➪ Insert ➪ Empty Bitmap to insert a blank bitmap into your
document.
4. Select the Smudge tool from the Tools panel; alternatively, you can use the
keyboard shortcut by pressing R five times.
5. Check the Use Entire Document option in the Property inspector.
6. Click and drag all across your document window. Don’t worry if you can no
longer make out the details in your image. This effect looks best when you’ve
got colors mixed up everywhere, especially off the sides of your image and
out onto the extra canvas space. Once you do, release the mouse button to
stop blurring.
093662-1 ch06.F 8/2/02 2:25 PM Page 194
Fireworks Seminar

195Chapter 6 ✦ Working with Bitmaps
7. Switch to the Pointer tool and click the middle of your document to ensure
that the Empty Bitmap you inserted earlier is selected.
8. Choose Modify ➪ Arrange ➪ Send to Back to send the Empty Bitmap to the
bottom of the stacking order.
You should now see your banner, logo, text, or image sitting on top of the Empty
Bitmap that you applied the Smudge tool to. The blank border of your document
should be strewn with smudges of color as in Figure 6-15.
Figure 6-15: Only the colors in your document get smudged on the Empty Bitmapyou inserted, leaving your original bitmap image, or text, untouched.
If you used text, you add Live Effects and/or a stroke to your text, as I did, to help it
stand out from the smudged colors. Play with this technique, applying it to any
number of bitmap or text objects, and you’ll come up with some interesting and
eye-catching combinations.
Text in frontwith strokeand effects
Smudge appliedto Empty Bitmap
Originaltext
093662-1 ch06.F 8/2/02 2:25 PM Page 195
Fireworks Seminar

196 Part II ✦ Mastering the Tools
Fireworks Technique: Limiting Your Drawing Area
Not only can the selection tools modify your images after they’re created, but they
can also help to structure them while they’re being made. When you place a selec-
tion on an image canvas — whether it’s an existing image or an inserted Empty
Image — any subsequent drawing is limited to that selected area. The selected area
can be any shape possible, with any or all the selection tools: Marquee, Oval
Marquee, Lasso, Polygon Lasso, and Magic Wand. In Figure 6-16, a feathered selec-
tion around the subjects’ faces was inverted so that everything in the document,
except the faces, was selected. The entire document was then painted over with the
Brush tool. Note that the Brush could only paint in the selected area.
Figure 6-16: The subjects’ faces aren’t selected, so they don’t get painted.
If you have a pixel selection in your document, a Filter will only be applied to theselected area as well.
The only prerequisite for using this technique is to make sure that the selection is
active — it has a marquee border — before you begin drawing.
Tip
Deselected area
Selected, paintable area
093662-1 ch06.F 8/2/02 2:25 PM Page 196
Fireworks Seminar

197Chapter 6 ✦ Working with Bitmaps
Making Pixel SelectionsThe Tools panel’s selection tools are handy, but they aren’t the only selection
options in Fireworks. The Select menu contains a host of useful options for fine-
tuning and even saving and restoring your pixel selections.
After you’ve made a pixel selection, the “marquee” or “marching ants” border acts
almost as if it’s a new object. You can drag the marquee selection around, or modify
its properties, without affecting the underlying pixels of your image. When you want
to move pixels along with a marquee selection, hold down the Ctrl (Command) key
while you drag your marquee. Fireworks adds a small scissors icon to your cursor
when Ctrl (Command) is pressed, indicating that you’re about to edit the selected
pixels.
Selecting allWhen you need to select all the objects — both bitmap and vector — in the current
document, choose Select ➪ Select All. I often find myself using the keyboard short-
cut for this command, Ctrl+A (Command+A), in combination with the Delete key
when I want to erase all the work in a document and start over. Of course, any oper-
ation that needs to be applied universally to every portion of a document benefits
from the Select All command.
Selecting similarThe Select Similar command is an extension of the Magic Wand selection tool.
Whereas the Magic Wand selects pixels within a particular color range adjacent to
the one initially chosen, Select Similar selects all the pixels in a document within
that color range, whether they are adjacent to the original pixel or not. To use this
command, choose Select ➪ Select Similar, after setting the Tolerance level on the
Magic Wand tool on the Property inspector.
Select Similar is a very powerful command that you should use with care. It’s oftenextremely difficult to predict all the areas of an image that will be affected. Youmay find yourself using this command in concert with Undo or the History panel,until you get a feel for what it does.
The Select menu’s Superselect and Subselect commands are concerned withgroups and are therefore covered in Chapter 13.
Cross-Reference
Caution
093662-1 ch06.F 8/2/02 2:25 PM Page 197
Fireworks Seminar

198 Part II ✦ Mastering the Tools
Selecting noneThe opposite of Select All is Deselect. I use this command so frequently, it goes on
my Top 10 Keyboard Shortcuts to Memorize list: Ctrl+D (Command+D). It’s a very
straightforward and extremely useful command. Choose Select ➪ Deselect to
remove all selections in the current document for any bitmap, vector, or text object.
Selecting inverseSometimes I think I select inverse more than I select the pixels I want directly.
Often, the background in an image contains fewer or flatter colors than the fore-
ground, making it easier to select with the Magic Wand tool. After the background
is selected, use the Select Inverse command to invert the selection, and select the
foreground elements. On the other hand, if you want to select a background full of
irregular colors and shapes, selecting the foreground elements and then inverting
the selection to select the background may be easier. This command can be a time-
saver over and over again.
1. First, select your foreground object through whatever tool or combination of
tools is required.
2. Choose Select ➪ Select Inverse, or use the keyboard shortcut, Ctrl+Shift+I
(Command+Shift+I). Fireworks inverts the marquee selection so that the
background is now selected (see Figure 6-17).
Figure 6-17: Selecting the foreground element and inverting the selection quickly isolated this complex, blended background.
Feathering an existing selectionYou’ve seen the Feather option for all the selection tools, but you may have noticed
that in each case, feathering has to be established prior to the selection being
made, whether through the Marquee or the Magic Wand. But what do you do when
you want to feather an existing selection? Make your selection and choose Select ➪Feather to open the Feather Selection dialog box, as shown in Figure 6-18. Whatever
value you enter into the Radius text box is then applied to the current selection.
093662-1 ch06.F 8/2/02 2:25 PM Page 198
Fireworks Seminar

199Chapter 6 ✦ Working with Bitmaps
Figure 6-18: The Feather Selection dialog box permits you to feather the edges of the current selection.
Remember that the Feather command does not blur the selection’s edges, but
rather alters the selection’s alpha channel, which controls transparency. To see the
effect of a feathered selection, moving or cutting and pasting the selection is often
necessary. As with all the other feathering options, both the selection and the area
adjacent to the selection are affected.
If you just want to blur all or part of an image, you’ll want to use one of the Blurcommands found under the Filters menu. Find out more about these commandsin Chapter 12.
Expanding or contracting a marqueeSometimes a hand-drawn marquee selection is just a few pixels too large or small.
Make a selection, and then choose Select ➪ Expand Marquee to open the Expand
Selection dialog box and specify the number of pixels by which you want to expand
the selection. Conversely, if you want to contract the selection, choose Select ➪Contract Marquee, and enter the number of pixels to contract the selection in the
Contract Selection dialog box. Click OK when you’re done in either case.
Adding a borderTo create an additional marquee around a current marquee, choose Select ➪Border Marquee, enter the width of the border you want to create in the Select
Border dialog box, and click OK when you’re done. Instead of your previous
selection, what is now selected is a border around the previous selection.
Using the Smooth commandThe Smooth command smoothes the outline of a selection to turn a jagged, compli-
cated marquee into a simpler one. This command is especially useful for the jagged
marquees that are easily created with the Magic Wand tool. Create a selection, and
then choose Select ➪ Smooth Marquee. Enter a sample radius in the Smooth
Selection dialog box; a higher number means a greater smoothing effect. Click
OK when you’re done.
Cross-Reference
093662-1 ch06.F 8/2/02 2:25 PM Page 199
Fireworks Seminar

200 Part II ✦ Mastering the Tools
Saving and restoring selectionsThe Select menu has two final commands that you haven’t yet looked at. Choose
Select ➪ Save Bitmap Selection to save the current pixel selection to a sort of selec-
tion clipboard within Fireworks. This selection is stored until you choose Select ➪Save Bitmap Selection again, and overwrite it with another selection. Choose
Select ➪ Restore Bitmap Selection to restore a saved selection at any time.
Converting a Vector into a BitmapKeeping parts of your document in vector form for easy modification is best, but
occasionally you may want to convert a vector object into a bitmap object. To
accomplish this, select one or more vector or bitmap objects, and then choose
Modify ➪ Flatten Selection, or use the keyboard shortcut Ctrl+Shift+Alt+Z
(Command+Shift+Option+Z). Fireworks converts the vector outline to a rectangular
bounding box, surrounding all the pixels from the vector object’s fill, stroke, and
effect settings.
If you have selected multiple objects, you can convert them all at one time with this
command. However, you lose the capability to reposition them individually, as they
all become part of one image; as the command’s name implies, you are flattening
the images.
After you’ve converted a vector to a bitmap, you can’t go back without using theUndo command or the History panel to actually reverse your work. New bitmapobjects in documents that have been saved and reloaded cannot return to theirvector state under any circumstances. Fireworks throws away the vector informa-tion when you convert a vector object into a bitmap object.
Similar to Flatten Selection is the Merge Down command. Let’s say you’re working
on a graphic where you’ve started out with a picture, perhaps that of a skyline, and
you’ve added a portion of text and some vector buttons to it. Once you’ve got
everything just right, you may want to flatten some of your vectors, text, or even
another bitmap onto the original skyline bitmap. All you need to do is select the
various objects and then go Modify ➪ Merge Down, or use the keyboard shortcut
Ctrl+E (Command+E). Fireworks then merges the selected objects — text, vectors,
or other bitmaps — with the bitmap they were on to create a new bitmap image.
While you lose future editability, you can greatly reduce the number of items filling
up the Layers panel.
For more about layers and the Layers panel, see Chapter 13.Cross-Reference
Caution
093662-1 ch06.F 8/2/02 2:25 PM Page 200
Fireworks Seminar

201Chapter 6 ✦ Working with Bitmaps
SummaryBitmap images are used throughout the Web, and Fireworks offers a robust set of
tools for creating and manipulating them. Whereas bitmaps don’t have the flexibil-
ity of vectors, editing them is an important part of the Web designer’s job. When
the time comes to begin modifying an existing image in Fireworks, keep these
points in mind:
✦ Images are composed of pixels, and each pixel is assigned a particular color.
At the most basic level, editing images involves changing the colors of pixels.
✦ A wide variety of photo retouching tool tools exist in Fireworks to help you
manipulate images.
✦ All the pixel selection tools in Fireworks — Marquee, Oval Marquee, Lasso,
Polygon Lasso, and Magic Wand — have numerous options available through
the Property inspector.
✦ Marquee — or “marching ants” — selections can be moved, modified, and even
saved without affecting the underlying image pixels.
✦ By selecting an area of the image prior to drawing, you can limit your drawing
area.
✦ Vector and text objects can be converted into bitmaps by either flattening
them, or merging them with bitmaps that they’re sitting on.
In the next chapter, you find out how to handle color in Fireworks.
✦ ✦ ✦
093662-1 ch06.F 8/2/02 2:25 PM Page 201
Fireworks Seminar

093662-1 ch06.F 8/2/02 2:25 PM Page 202
Fireworks Seminar

Managing Color
For any graphic designer, the importance of color is a
given. Not only can color attract the eye and convey emo-
tions, but it’s also an important commercial consideration. On
the Web, as with any mass medium, color also becomes a key
factor in branding. After all, if you’re working on a logo for the
Coca-Cola Web site, you had better make sure you’re using
genuine Coca-Cola red.
Fireworks outputs graphics for a screen-based medium. You
won’t find complex color separation, halftone, or calibration
tools in Fireworks; those instruments are for the world of
print. Moreover, Fireworks is not just screen-based, it’s
Internet-based — a distinction that signifies an important
balance of freedoms and restrictions.
This chapter covers color on the Web — both its basic theory
with the various standards, and its actual practice with
Fireworks. If you’re familiar with how computers handle color
in general, feel free to skip the initial part of the chapter, and
dive right into the more hands-on Fireworks sections. If, on
the other hand, you think RGB is a one-hit wonder band from
the ’80s and hexadecimal is a library catalog system, the first
section should be pixel-perfect for you.
Working with Color on the WebColor in the natural world comes at us full force, without any
impediments. Color on the Web, however, passes through
many filters. At the most basic level, the computer dictates
how color is generated. Rather than using a system of blend-
ing inks as with print, the computer blends light — red, green,
and blue light, to be precise. Next, the color settings and capa-
bility of a viewer’s specific system determine the range of col-
ors to be used. The final filter for Web-based color is the
browser, in all of its varied configurations and versions.
77C H A P T E R
✦ ✦ ✦ ✦
In This Chapter
Understanding Webcolor fundamentals
Blending new colors
Picking palettes
Fireworks technique:converting printcolors
✦ ✦ ✦ ✦
103662-1 ch07.F 8/2/02 2:25 PM Page 203
Fireworks Seminar

204 Part II ✦ Mastering the Tools
To get the most out of your Web graphics, you need a basic understanding of how
computers create color. The smallest component of a computer screen that you can
see is the pixel, which, you’ll remember, is short for picture element. Pixels are dis-
played by showing three colors in combination: red, green, and blue, often referred to
by the initials, RGB. The blend of red, green, and blue at full intensity creates white.
If you’re coming from a print background, you’ll probably be more familiar withthe CMYK (cyan, magenta, yellow, and black) color model than the RGB model. It’sgenerally not too difficult to make the transition; Fireworks offers ways to converta color in one system to its equivalent in the other, as explained in the section,“Using the Color Mixer,” later in this chapter.
If RGB blended at full intensity creates white, and if a pixel that’s turned off displays
black, how are other colors created? The intensity of each of the key colors in a
pixel — red, green, and blue — and their combinations can be varied. For example, if
you have red set all the way up and both blue and green off, you get pure red; if you
add a full dose of blue to the red, you create a deep purple. However, having only
the capability to turn a color on or off greatly limits the number of color combina-
tions possible. What’s needed is an increase in the number of steps or levels
between on and off.
Examining bit depthThe number of accessible RGB levels is called the bit depth. A bit is the smallest ele-
ment of computer memory, and each bit is basically an on-off switch. A computer
display with a bit depth of one is capable of showing two colors — one color in the
on position and another in the off position. Now, if the bit depth is doubled, twice
as many colors can be defined.
Each time you increase the bit depth, the number of colors increases exponentially.
Table 7-1 takes a look at how bit depth affects color range.
Table 7-1Bit Depth and Color Range
Bit Depth Number of Colors Description
1 2 Black and white, corresponding to the “on” or “off”possible with one bit.
2 4 Typically, computers with two-bit color depth (usuallyhandhelds or portables) display four shades of gray.
4 16 The minimum color depth of VGA (Video GraphicsAdapter) displays, the most common computerdisplay technology.
Tip
103662-1 ch07.F 8/2/02 2:25 PM Page 204
Fireworks Seminar

205Chapter 7 ✦ Managing Color
Bit Depth Number of Colors Description
8 256 Most computers manufactured after 1995 can display8-bit color or better.
16 65,536 Often called “Thousands of Colors” or “HiColor.”
24 16,777,216 Referred to as “Millions of Colors” or “True Color.”
32 16,777,216 True Color with an additional 8-bit alpha mask.
In Table 7-1, I skipped some bit depths because they’re not commonly used on
computer displays. Note that 32-bit color has the same number of colors as 24-bit.
Although with 32-bits you could potentially describe more than four billion colors,
the human eye can’t differentiate that many. Thirty-two-bit color is therefore a
combination of 24-bit color, with its 16.7 million colors, and an 8-bit grayscale over-
lay (known as a mask), which primarily specifies transparency and how graphics
should be composited. For example, a mask can be used to make a graphic appear
round or have holes in it, by showing parts of the graphic beneath it. This grayscale
mask is known as an alpha mask, or the alpha channel.
Because bit depth is directly related to computer memory (remember that a bit is a
chunk of memory), the higher the color range, the more memory required. And not
just any memory, but video memory. Until recently, video memory was fairly lim-
ited, and most computer systems were shipped displaying only 256 colors (8-bit).
Therefore, when designing for the Web, artists have been forced to work with the
lowest common denominator and create work in 256 colors.
Increasingly, the average computer used for surfing the Web has a greater bitdepth and can display more colors. A recent poll showed that out of 7 million Webvisitors, less than 10 percent were using 256 color systems. However, this doesn’tmean that all graphics can now be in millions of colors. The more colors used inan image, the larger the file size, and download speed over the Internet is a majorconsideration in Web design.
You can find examples of the appearance of various bit depths in the color insert.
Understanding hexadecimal colorsIn HTML, the language of the Web, RGB color values are given in hexadecimal for-
mat. Hexadecimal (or hex, as it is more commonly called), is a base-16 number sys-
tem, which means that instead of the numbers running from 0 to 9 and then
repeating, there is an initial series of 16 number values:
0, 1, 2, 3, 4, 5, 6, 7, 8, 9, A, B, C, D, E, F
Cross-Reference
Note
103662-1 ch07.F 8/2/02 2:25 PM Page 205
Fireworks Seminar

206 Part II ✦ Mastering the Tools
The single letters represent values that would normally take two digits in the deci-
mal system: A equals 10, B equals 11, C equals 12, and so on. When you want to
count beyond single hex digits — in other words, go higher than F — you place a
one in front of the numbers and continue, just as you do in decimals when you want
to go beyond single digits. Although this looks strange to our decimal-trained eyes,
continuing the above hex series appears as follows (keep in mind that “10” is
actually 16):
10, 11, 12, 13, 14, 15, 16, 17, 18, 19, 1A, 1B, 1C, 1D, 1E, 1F, 20
In the decimal number system, two digits can be used to express any number up to
99; but in the hexadecimal number system, the highest two-digit number is FF.
Although they’re both two-digit numbers, in hex, you have to count 255 things to fill
up two digits.
Don’t cheat and convert FF to 1515 and think of it as one thousand, five hundredand fifteen. When you look at the decimal number 99, you assume that the first 9is really 90, or 9 multiplied by (base) 10. When you look at the hexadecimal num-ber FF, remember that the first F is really 15 multiplied by (base) 16, which is equalto 240 in decimal. Add the other F, and you can see how FF is equal to 255.
RGB values are expressed in hex with a set of three two-digit numbers, with each of
the three values corresponding to 256 levels of red, green, and blue, respectively.
For example, white in RGB values would be represented as 255, 255, 255 — each
color being its most intense. The equivalent in hex is FF, FF, FF, which in HTML is
written all together, like this: FFFFFF. Black is 0, 0, 0 in RGB and 000000 in hex,
whereas a pure red would be 255, 0, 0 in RGB, and FF0000 in hex.
Although it may seem completely foreign to you initially, hexadecimal colors quickly
become recognizable. You’ll even start to notice patterns; for example, any color
where the hex triplets are all the same represents a shade of gray — 111111 is the
darkest gray, and EEEEEE is the lightest.
Exploring Websafe colorsAs noted previously, the generally accepted lowest-common denominator in monitor
displays is 8-bit, or 256 colors. Unfortunately, yet one more restriction exists on Web
colors: the browser. Each of the major browsers from Microsoft and Netscape uses a
fixed palette of 256 colors to render 8-bit images on both Windows and Macintosh
operating systems. After the 40 unique colors used for system displays in both
Macintosh and Windows platforms are subtracted — because you generally would
like your Web graphics to look the same on both Windows and Macintosh
platforms — a common palette of 216 colors remains. Because any system can safely
use any of these colors without dithering (faking the color with a combination of two
others), they are collectively referred to as the browser-safe or Websafe palette.
Tip
103662-1 ch07.F 8/2/02 2:25 PM Page 206
Fireworks Seminar

207Chapter 7 ✦ Managing Color
Interestingly enough — and thankfully — Websafe colors are easy to spot whengiven in hexadecimal. Any hex color that contains some combination of 00, 33, 66,99, CC, or FF — such as 0000FF, 336699, or FFCC00 — is Websafe.
It’s important to realize that the Websafe palette is for use with flat-color images,
such as illustrations, logos, and headline text — the kinds of images that are drawn
or created right on a computer and exported in the GIF format. Using Websafe
colors in these images keeps flat areas of color flat. Photographic images are still
exported with a 24-bit palette — usually in the JPEG format — and dithered by the
browser if necessary.
Because of its importance in Web design, Fireworks makes extensive use of the
Websafe palette, and includes a number of features for efficiently working with it:
✦ By default, the color picker that is accessible from every color well in the
program is set to the Websafe palette.
✦ Holding down the Shift key when you use the Eyedropper tool causes the tool
to convert any color that it samples to Websafe.
✦ The Find and Replace panel can search for colors that fall outside the Websafe
palette and snap them to their nearest neighbor, in one document or a range
of documents, all in one step.
For more about using the Find and Replace panel, see Chapter 18.
✦ The Fill panel has a Web Dither category that can convert any color into a
pattern of Websafe colors that closely approximates the color.
As you continue to work with Fireworks and in Web design in general, you’ll
become more and more familiar with the Websafe palette.
Looking at platform differencesNot only does the Web designer have to contend with a limited palette and a host of
issues with the wide variety of browsers in the market, but also many differences
worth noting exist between the Windows and Macintosh platforms. Chief among
these is the gamma setting.
The gamma setting, or more properly, the gamma correction setting, is designed to
avoid having midtones onscreen appear too dark. The problem is that different
gamma settings exist for different systems. The Macintosh typically defaults to a
setting of 1.8, whereas Windows uses 2.2, which is also the standard for television.
The lower gamma setting on the Mac works well to emulate print output, but the
display seems brighter when compared to Windows. Consequently, the same
graphic appears darker on a Windows machine than on a Macintosh.
Cross-Reference
Tip
103662-1 ch07.F 8/2/02 2:25 PM Page 207
Fireworks Seminar

208 Part II ✦ Mastering the Tools
Mac users who want to set their system to 2.2 for Web or television work can doso if they have ColorSync enabled. Open the Monitors or Monitors and SoundControl Panel, click the Color button, and then follow the instructions to calibrateyour display. Choose 2.2 as a gamma setting. You can also choose to use the“native” gamma setting of your display, which may be 2.2.
It’s also worth noting that Windows machines are typically paired with much more
diverse varieties of display hardware, while most Macs typically use very similar
graphics adapters and a matching, or even built-in, display. Actual testing might
lead us to find that typical Windows gamma varies more than typical Mac gamma;
after all, we’re talking about many different manufacturers instead of one. Aiming
squarely at 2.2 in your work won’t necessarily guarantee that your work is viewed
properly by all Windows users.
One solution to this problem — still, unfortunately, at the “coming soon” stage — is
Fireworks’ native format, PNG. Images saved in a PNG format have built-in gamma
correction, so that they are displayed correctly, regardless of the user’s system.
Although displaying a PNG image in a browser is old hat these days, support for the
gamma correction elements of the format is still unavailable anywhere except in
Internet Explorer for Windows.
In the future, the influence of television on the Internet, and the Internet on comput-
ing, may result in a 2.2 gamma correction setting becoming standard on the
Macintosh (I already run my Mac at this setting). For now, the best solution is to
view your work under both settings and compromise a little when necessary, in
order to achieve acceptable results on both platforms. To aid in this, Fireworks pro-
vides a shortcut for viewing the “other” gamma setting: the Macintosh Gamma and
Windows Gamma commands.
Choose View ➪ Macintosh Gamma in Fireworks for Windows in order to see a rep-
resentation of how your work will appear on most Macs. Similarly, choose View ➪Windows Gamma in Fireworks for Macintosh in order to view the way your work
will look on most Windows machines.
Mac users: If you’re using a gamma setting of 1.8 while preparing an image fortelevision, remember that Windows gamma is the same as TV gamma, so theWindows Gamma command doubles as a TV gamma preview.
See the effects of Fireworks’ cross-platform gamma view in the color insert.
Working with color managementColorSync (Macintosh only) and Kodak color management systems work with
Photoshop and certain other applications to achieve accurate color representa-
tions across monitors, scanners, and printers. If you import an image from one of
Cross-Reference
Tip
Tip
103662-1 ch07.F 8/2/02 2:25 PM Page 208
Fireworks Seminar

209Chapter 7 ✦ Managing Color
these applications into Fireworks, you may find that the color values are shifted
slightly because Fireworks does not work with color management systems.
The easiest way to prevent this color shifting is to disable color management in
the source application before exporting or saving an image. Alternatively, you can
import the image into Fireworks and use the Hue slider on the Hue/Saturation Xtra
to adjust all the colors slightly, moving them all back to Websafe values, for example.
Mixing ColorsThe general color mechanism in Fireworks is the Color Mixer. With the Color Mixer,
you can select your Fill and Stroke colors from the entire spectrum available to you
in any of five different color models. You can also directly determine a color by
entering the appropriate values through the sliders or text boxes.
Using the Color MixerTo open the Color Mixer, choose Window ➪ Color Mixer. The Color Mixer, shown in
Figure 7-1, is divided into three main areas:
✦ Color wells: The Stroke and Fill color wells display the active color for the
selected object stroke and fill, respectively. The color defaults can also be
applied and swapped through buttons in this section.
✦ Color sliders: Use the color sliders to choose a color by altering its
components.
✦ Color ramp: The color ramp displays all colors of a particular color model
and enables you to select them with an Eyedropper tool.
Figure 7-1: Open the Color Mixer to select your Stroke and Fill colors from the color ramp, or set them with the color sliders.
103662-1 ch07.F 8/2/02 2:25 PM Page 209
Fireworks Seminar

210 Part II ✦ Mastering the Tools
Choosing a colorThe Web artist alternates between creating new graphics fresh from the mind’s eye
and matching or adapting existing imagery. Both methods are valid ways of work-
ing, and Fireworks enables you to select the colors you need accordingly. Should
you want to create visually, selecting your colors direct from the palette, you can
sample colors either from a full-spectrum color ramp, the more limited showing of
the active swatches, or directly off the screen from another image. If you would pre-
fer to work more formulaically, the color sliders enable you to enter a precise value
in five different color models.
Using the color rampTo select a color from the color ramp, follow these steps:
1. Open the Color Mixer by choosing Window ➪ Color Mixer.
2. Select either the Stroke or Fill color well. The selected color well is high-
lighted with a border around it.
3. Move your pointer over the color ramp. The pointer changes into one of two
Eyedropper tools. The Eyedropper tool with a wavy line indicates that a
Stroke color is to be selected, whereas the Eyedropper tool with the solid
block indicates that you’re choosing a Fill color.
Initially, the color ramp display matches the chosen color model, such as RGB,Hexadecimal, or Grayscale. You can change the color ramp, however, by Shift+clicking it. With each Shift+click, the color ramp cycles through one of three dis-plays: the Websafe, full-color, and grayscale spectrums.
4. Choose any desired color in the color ramp by clicking it once.
If you click and drag your pointer across the color ramp, the wells and the slidersettings update dynamically. This gives you a better idea of the actual color you’reselecting — the swatch in the color well is large and the color values are easy to fol-low. If the color chosen is unsatisfactory, select Edit ➪ Undo in order to return toyour previous setting.
5. After you’ve selected the color by releasing the mouse button, both the color
well and sliders display the new color. If an object was selected when the new
color was chosen, its Fill or Stroke color changes to match the new one.
Using Color Mixer slidersAnother method of selecting a color uses the Color Mixer sliders. As with other
Fireworks sliders, you can enter the values either directly in the text boxes, or by
dragging the slider handle up or down. The availability of sliders depends upon the
color model chosen. Sliders for RGB, CMY, and HSB all match their respective initials.
Tip
Tip
103662-1 ch07.F 8/2/02 2:26 PM Page 210
Fireworks Seminar

211Chapter 7 ✦ Managing Color
Choosing the Hexadecimal model displays the R, G, and B color sliders. Selecting
Grayscale shows just one slider, K, which represents the percentage of black.
If you’re not trying to match a specific RGB or other value, you can visually — as
opposed to numerically — mix your colors by moving the slider and watching the
selected color well. If you have an object selected, its stroke or fill settings update
when you release the mouse button.
Accessing the color modelsAside from the previously described RGB and Hexadecimal models, Fireworks
offers three other possible color models. The capability to switch between different
color models is important in Web design. Quite often the Web artist is asked to con-
vert graphics from another medium, be it another computer-based medium or
print. You can also switch from one system to another in order to take advantage of
its special features. For example, switching the HSB enables you to select a tint of a
particular color by reducing the saturation.
All color models are chosen by selecting the panel’s Options menu in the upper-
right corner of the Color Mixer. Choose a color model from the list that appears,
as shown in Figure 7-2.
Figure 7-2: Choose from five different color models in the Color Mixer’s panel Options menu.
RGBChoosing the RGB color model enables you to select any one of 16.7 million colors
that are available in the 24-bit color spectrum. Whereas not all the colors are repre-
sented on the RGB color ramp (at a resolution of 72 pixels per inch, displaying all
pixels would require over 19,000 square feet — that’s a mighty big monitor), you can
enter any required value in the color sliders shown in Figure 7-3. The color sliders
use values from 0 to 255.
103662-1 ch07.F 8/2/02 2:26 PM Page 211
Fireworks Seminar

212 Part II ✦ Mastering the Tools
Figure 7-3: Work with the RGB color model to specify any one of 16.7 million colors.
If your computer display is not capable of showing as many colors as are viewablein the color model — for example, if your system is set on 256 colors and youchoose RGB — you’ll see some dithering in the color ramp. Dithering is the combi-nation of two or more colors to simulate another color, and it appears as notice-able dots. Although the display may dither, the colors that the Eyedropper toolchooses are accurate RGB values.
HexadecimalWhen you select the Hexadecimal color model, two things happen. The Color Mixer
sliders translate their displayed values to hexadecimal values, and the color ramp
depicts a Websafe spectrum, as shown in Figure 7-4. With a Websafe color ramp
(which is the default when Fireworks first starts up after installation), you’ll notice
what’s referred to as banding. Banding occurs when the range of colors is not large
enough to make a smooth gradation.
Figure 7-4: Although you can enter any valid hexadecimal RGB value inthe color sliders with the
Hexadecimal color model, only Websafe colors are selectable in the default color ramp.
Caution
103662-1 ch07.F 8/2/02 2:26 PM Page 212
Fireworks Seminar

213Chapter 7 ✦ Managing Color
All values entered manually in the slider text boxes must be in the proper hex-adecimal pair format. If you try to enter a numeric value outside of hexadecimalrange, such as 225, Fireworks just drops the first number without properly con-verting the value.
CMYAs mentioned previously in the section “Working with Color on the Web,” most
designers coming from a print background are used to expressing color as a mix-
ture of cyan, magenta, yellow, and black: CMYK, also known as the four-color pro-
cess. In theory, the color range should be representable with just the first three
colors, but in printing practice, the fourth color, black, is necessary to produce the
darker colors.
Fireworks presents CMY colors as a range of numbers from 0 to 255. In some ways,
CMY can be considered the opposite of RGB. RGB is referred to as an additive pro-
cess because you add the colors together to reach white. CMY is a subtractive pro-
cess because you take colors away to make white. When you choose CMY from the
panel Options menu, the Color Mixer panel displays a slider for C (Cyan), one for M
(Magenta), and one for Y (Yellow), as shown in Figure 7-5.
Figure 7-5: Print designers new to the Web will find the CMY color model familiar.
Fireworks isn’t concerned with output to a print medium, so it can express the
color spectrum with just cyan, magenta, and yellow, without resorting to the addi-
tion of black. This, however, does make translating a CMYK color to a CMY color
difficult. The best workaround I’ve found is to use a common third model, such as
RGB, or a specific Pantone color. Given the broad spectrum of colors, pun intended,
available in each color mode, you may notice some shifting of color as the best
match is found. It’s difficult to obtain a precise match when you convert colors.
Caution
103662-1 ch07.F 8/2/02 2:26 PM Page 213
Fireworks Seminar

214 Part II ✦ Mastering the Tools
HSBHSB is short for Hue, Saturation, and Brightness. It is a color model available on
numerous graphics programs, including Photoshop. Hue represents the color fam-
ily, as seen on a color wheel. Because of the circular model, Hue values are pre-
sented in degrees from 0 to 360. Saturation determines the purity of the color, in
terms of a percentage. Saturation of 100 percent is equal to the purest version of
any hue. The Brightness value, also expressed as a percentage, is the amount of
light or dark in a color — 0 percent is black, and 100 percent is the brightest that a
color can appear. If the brightness is reduced to zero, the Hue and Saturation values
are automatically reduced to zero, as well. After choosing HSB from the panel
Options menu on the Color Mixer panel, the three sliders change to H, S, and B
(see Figure 7-6).
Figure 7-6: Use the HSB color model to easily lighten or darken a particular hue.
Don’t attempt to directly translate HSB values from the similarly named HLS colormodel. HLS (Hue, Luminosity, and Saturation), a color model used in FreeHandand other drawing programs, also available in the Mac OS color picker, usesLuminosity rather than Brightness as its “light” component. The key differencebetween Luminosity and Brightness lies in how a color is affected at the higherend of the scale. In HSB, when full Brightness is combined with full Saturation, col-ors are at their most vivid. In HLS, full Luminosity, regardless of Saturation level,makes colors white.
GrayscaleDespite the richness of the realm of color — or maybe because of it — grayscale
images have an undeniable power. Whether you’re constructing graphics as
homage to black-and-white movies, or blending black-and-white photographs in a
full-color site, access to a grayscale palette is essential. The Fireworks grayscale
palette is a full range of 256 tones, ranging from absolute white to absolute black.
When you select Grayscale from the Color Mixer’s panel Options menu, the three
sliders of the other palette are reduced to one slider and marked K, for black. As
Figure 7-7 shows, the black value is expressed as a percentage, where 100 percent is
black and 0 percent is white.
Caution
103662-1 ch07.F 8/2/02 2:26 PM Page 214
Fireworks Seminar

215Chapter 7 ✦ Managing Color
Figure 7-7: To access any one of 256 shades of gray, select the Grayscale color model.
Selecting Swatches of ColorQuite often the graphics for a Web site are designed with a particular palette in
mind. The most common palette contains the 216 Websafe colors, which people use
to keep images from shifting colors on different platforms. Palettes are also devised
to match a particular color scheme — either for an entire Web site or for one partic-
ular area. Each palette can be saved as a separate swatch file.
Fireworks provides very full palette support through its Swatches panel. You can
modify, store, load, or completely scrap swatches to start fresh. You can even grab
the palette from a sample image.
Choosing from the color wellsThe standard Fireworks color picker is quite powerful. When it’s open, your cursor
changes into an Eyedropper tool that enables you to select a color from any onscreen
image — whether it’s in the color picker, in another part of Fireworks, or even any-
where else on your computer display. You can quickly set a stroke or fill to None by
using the No Color button, without opening the respective panels. Finally, the Palette
button gives you instant access to your operating system’s color picker(s).
To access the colors in the current swatch set, select the arrow button next to any
color well. When the color picker appears, as shown in Figure 7-8, move your
pointer over any of the color swatches. As you move your pointer, notice that the
color chip in the upper-right corner dynamically updates to show the color under-
neath the pointer; the color name in hexadecimal is also displayed. Click once to
choose a color.
103662-1 ch07.F 8/2/02 2:26 PM Page 215
Fireworks Seminar

216 Part II ✦ Mastering the Tools
Figure 7-8: You can open the color picker from any color well in Fireworks.
If you’ve selected a color for a stroke or fill where previously none existed,Fireworks automatically enables the setting, turning the Stroke type to Pencil andthe Fill type to Solid for the selected color.
Even though the color picker is handy, you might want to switch between different
swatch sets quite regularly. For example, if you decide to focus your work on an
object that’s composed entirely of grayscale colors, changing the color picker to
the grayscale swatch set will simplify your work. The panel Options menu on the
color picker enables you to quickly choose another swatch set (see Figure 7-9).
Figure 7-9: The panel Options menu on the color picker enables you to quickly choose another set of swatches.
Tip
103662-1 ch07.F 8/2/02 2:26 PM Page 216
Fireworks Seminar

217Chapter 7 ✦ Managing Color
Using the EyedropperThe Eyedropper is a great tool for ensuring color fidelity across images. Need to
match a particular shade of purple in the background graphic for the outline of the
navigation bar you’re building? Click once with the Eyedropper to grab that color,
and the selected color well fills with the chosen color.
The Eyedropper tool is straightforward to use. Once you’ve displayed the color
picker, the Eyedropper is already “in your hand,” and your cursor changes into its
namesake shape. Now you can easily select a color from anywhere within
Fireworks.
Moreover, the Eyedropper tool is not limited to sampling colors from Fireworks.
You can pick up a color from any application or graphic displayed on your com-
puter. However, a slight difference exists in the way this feature works on each
computing platform:
✦ With Macintosh systems, the Eyedropper works the same way outside of
Fireworks as it does within Fireworks. Any color anywhere on your display is
fair game, at all times.
✦ With Windows systems, click within the Fireworks window and hold down
the mouse button, then drag the mouse cursor outside of the Fireworks win-
dow. Release the mouse button when the cursor is over the color you want to
sample.
It’s possible — even likely — that the color you sample with the Eyedropper won’tbe Websafe. To snap the sampled color to the closest Websafe value, press Shiftwhen you select your color. Pressing Esc on the keyboard closes the color picker,canceling the selection of a new color, if you change your mind about using it.
Accessing the system color picker(s)If you work with a number of graphics applications, you may find working with your
operating system’s color picker(s) rather than with those in Fireworks is more
convenient. To open the system color picker(s), click the Palette button on the
Fireworks color picker. Closing the system color picker(s) automatically assigns the
last selected color to the Fireworks color well.
The Macintosh system color picker dialog box has several color pickers from which
to choose. Table 7-2 details these different schemes.
Tip
103662-1 ch07.F 8/2/02 2:26 PM Page 217
Fireworks Seminar

218 Part II ✦ Mastering the Tools
Table 7-2Color Models in the Macintosh Color Picker Dialog Box
Color Model Description
CMYK Standard model for color printing.
Crayon A box of crayons with names such as Banana and Cool Marble. Click acrayon to select that color.
HLS Hue, Luminosity, and Saturation.
HSV Hue, Saturation, and Value model with a color wheel.
HTML RGB expressed in hexadecimal numbers, with an optional Websafe snap.
RGB Standard model for computer displays, with an optional Websafe snap.
Choose a color model from the left part of the Color Picker dialog box, as shown in
Figure 7-10, and specify settings on the right. The color that the Fireworks color
picker is set to is shown in the upper right of the window as the “original” color, for
comparison with the color you’re currently choosing.
Figure 7-10: The Macintosh Color Picker dialog box offers numerous color models from which to choose.
If you hold down Option while you’re in the Macintosh color picker dialog box, thecursor changes into an Eyedropper tool that works just like the one in Fireworks.Use it to sample colors from anywhere on the screen.
In addition to these default color pickers, the Macintosh color picker system is
extensible, so you may have other color pickers, depending on the hardware and
software you have installed. Color pickers are installed by Apple Display Software,
for example, or you may have installed a third-party color picker yourself.
Tip
103662-1 ch07.F 8/2/02 2:26 PM Page 218
Fireworks Seminar

219Chapter 7 ✦ Managing Color
The Windows system color picker is split into two parts, as shown in Figure 7-11.
On the left, you have 48 color chips from the Windows system palette. Located on
the right is a full-color spectrum with a value bar for mixing colors. Both RGB and
Hue, Saturation, and Luminance text boxes are available below the spectrum. To
choose a color beyond the basic 48, you must create it by choosing a color from
both the main spectrum and the value bar on the right, and then adding it to one of
the 16 custom color wells on the left.
Figure 7-11: The Windows color picker offers easy access to colors from the Windows system palette, or create 16 of your own colors from the full spectrum.
In order to avoid overwriting a previously created custom color, select an emptycustom color well in the Windows color picker before creating a new custom color.
Opting for no colorWhen it comes to stroke and fill colors, remember that “no color” is as valid an
option as any color. To disable a fill or a stroke, just choose the No Color button
from the Fireworks color picker. When you select the No Color button, the color
chip displays the checkerboard pattern used to depict transparency in Fireworks.
Using the Swatches panelThe Swatches panel is deceptively simple in appearance. Consisting of just colors
(with the exception of the panel Options menu), the Swatches panel enables you to
choose a stroke, fill, or effect color from the active palette. As with all other Fireworks
floating panels, the Swatches panel can be moved and resized — the latter feature is
especially important if you want to show a larger palette.
Remember that the Swatches panel displays the current Fireworks palette, not thepalette of the current document.
Caution
Tip
103662-1 ch07.F 8/2/02 2:26 PM Page 219
Fireworks Seminar
220 Part II ✦ Mastering the Tools
The most basic use of the Swatches panel is similar to that of the Color Mixer and the
color picker. Select the color well you want to alter, and then choose a color by click-
ing any of the color chips in the Swatches panel, as shown in Figure 7-12. There’s no
real feedback in the Swatches panel to identify the color other than visually; you
would need to have the Info panel visible to see the RGB or other components.
Figure 7-12: Pick a color, any color, from the Swatches panel.
As you find out in the next section, you can choose from a number of preset color
palettes. However, you can also add any custom mixed color — or color selected
with the Eyedropper — to a swatch. The custom color then becomes available from
anywhere in the program where you can click a color well or access the Swatches
panel. You can add new colors, extending an existing palette or replacing a color on
the palette. You can also delete standard or custom colors from a palette.
To add, replace, or remove a color in the Swatches panel, follow these steps:
1. Mix or sample the color you want to add, so that it appears in the active color
well.
2. Display the Swatches panel by choosing Window ➪ Swatches, or by clicking
the Swatches tab if the panel is behind other panels in a group.
3. Position your pointer over an open area in the Swatches panel and click once
to add a new color to the current palette. When over an open area, the
Eyedropper pointer becomes a paint bucket.
4. Press Shift while you position your pointer over the color to be replaced, and
click once to replace an existing color in the current palette. If you press Shift
when the pointer is positioned over an existing color, the pointer becomes a
paint bucket.
5. Hold down Ctrl (Command), position the pointer over the color to be deleted,
and click once to remove a color from the current palette. When you press
Ctrl (Command), the pointer becomes a pair of scissors. For best results,
position the scissors so that the crossing of the blades — the middle of the
X — is placed directly over the color you want to delete.
103662-1 ch07.F 8/2/02 2:26 PM Page 220
Fireworks Seminar

221Chapter 7 ✦ Managing Color
To reset any standard palette that has been modified, select that palette from the
panel Options menu.
Picking preset swatchesFireworks has four standard palettes that you can select at any time:
✦ Web 216 Palette: Colors common on both major browsers, Netscape
Navigator and Internet Explorer, on Macintosh and Windows
✦ Windows System: The color palette used by Windows to display its system
elements
✦ Macintosh System: The color palette used by the Macintosh operating system
✦ Grayscale: A monochrome palette ranging from white to black
All palettes, with the exception of Web 216, are composed of 256 colors.
To switch palettes, select a different one from the Swatches panel Options menu, as
shown in Figure 7-13.
Figure 7-13: The Swatches panel Options menu enables you to select different standard palettes, or to load your own.
One additional palette is available from the panel Options menu: the Current Export
palette. Choosing this option loads the current document’s export palette from the
Color Table panel — detailed later in this chapter — into the Swatches panel.
103662-1 ch07.F 8/2/02 2:26 PM Page 221
Fireworks Seminar

222 Part II ✦ Mastering the Tools
Managing swatchesThe real power of Fireworks swatches is in the capability to load and store custom
palettes. The remaining five commands on the panel Options menu are dedicated to
managing swatches. Fireworks can load and save palettes in a format known as
Active Color Table (ACT). Adobe Photoshop can also read and write ACT files, so
loading Photoshop palettes in Fireworks is easy.
However, you don’t have to save your palettes as ACT files in order to work with
them in the Swatches panel. Fireworks can also glean the palette from any GIF or
other 8-bit indexed color file. Moreover, you have two different ways to access a
previously stored palette. You can either append the saved palette to the current
swatch, or you can use just the saved palette.
To load palettes into the Swatches panel, follow these steps:
1. Click the panel Options menu button in the Swatches panel.
2. Choose Add Swatches if you want to extend the existing palette with a new
palette.
3. Choose Replace Swatches if you want to use the just saved palette.
In either case, the Open dialog box appears for you to select a palette.
4. Choose the type of palette you want to load:
• Color table (filename typically ends in .act)
On the Mac, a color table file may not have (and doesn’t require) the .act filenameextension. Color table files have a File Type code of 8BCT. Although Fireworksdoesn’t provide an icon for its color table files, color table files saved by Photoshophave an icon with color wells and the description CLUT on them.
• GIF files (filename ends in .gif)
5. Locate the file and click Open when you’re ready.
If you chose Add Swatches, the new palette is appended to the end of the existing
swatch. If Replace Swatches is used, the existing swatch is removed, and the new
palette is displayed in its place.
Although the feature is a bit hidden, you can also load Adobe Swatches in additionto Adobe Color Tables. Adobe Swatches have a file extension of .aco, rather thanthe Color Tables extension of .act. Fireworks for Windows does not offer the .acofile type in its Open dialog boxes; enter *.aco in the File Name text box, and pressReturn in order to force the dialog box to list files with the filename extension .aco.
In Fireworks, all palettes are saved in Active Color Table format. To save a current
swatch, simply choose Save Swatches from the panel Options menu, and name the
file in the standard Save As dialog box.
Tip
Note
103662-1 ch07.F 8/2/02 2:26 PM Page 222
Fireworks Seminar

223Chapter 7 ✦ Managing Color
You can erase the entire palette from the Swatches panel by choosing Clear
Swatches from the panel Options menu. This removes any palette displayed in
the Swatches panel, but it doesn’t affect the default palettes at all. If you issue the
Clear Swatches command, the color wells revert to using the default Websafe
palette in the color pickers.
The final panel Options menu command in the Swatches panel is Sort by Color. As
the name implies, Sort by Color displays the active palette by color value, rather
than by the default mathematical order. If new colors have been added — or a com-
pletely new palette loaded — those colors are sorted, as well. Please note that you
can’t undo a Sort by Color command; to restore a standard palette to its previous
configuration, choose the particular palette from the panel Options menu.
Accessing the Color TableIf you’ve specified a reduced export palette in the Optimize panel — generally by
specifying to export as a GIF — then the current document’s export palette is
reduced accordingly and won’t match any standard palette. The Color Table, shown
in the lower portion of the Optimize panel, offers easy access to the export palette.
To display the Optimize panel, shown in Figure 7-14, choose Window ➪ Optimize, or
click the Optimize panel tab if the Optimize panel is docked behind another panel.
Figure 7-14: The Color Table on the Optimize panel enables you to access the current document’s export palette.
If you’ve carefully reduced the export palette for your document to 16 or 32 colors,
you probably don’t need or want access to colors outside that range while you’re
still working with the document. Accidentally adding a new color at this point may
simply undo optimization work you’ve already done.
103662-1 ch07.F 8/2/02 2:26 PM Page 223
Fireworks Seminar

224 Part II ✦ Mastering the Tools
If the Optimize panel displays a button entitled “(Rebuild)” at the bottom, the
colors displayed are “out of date” because you’ve made some modification to
the export palette. Click the Rebuild button to update it.
For more about working with the Color Table on the Optimize panel, see Chapter 15.
Fireworks Technique: Converting Pantone Colors to Websafe Colors
Many Web designers have clients with specific concerns regarding the use of their
logos, trademarks, and other brand identifiers. Many larger companies have spent
large amounts of money to develop a distinct look in their print, television, and
other media advertising and marketing — and they want to ensure that their look
continues over the Internet. Most designers work with a set series of colors —
Pantone colors are among the most popular — that can be specified for print work.
It should come as no surprise to discover that many of these colors fall outside of
the Websafe palette of 216 colors.
A way exists, however, to bring the two seemingly divergent worlds together. In
fact, several ways exist. Pantone makes a product called ColorWeb Pro that con-
verts its colors so they are usable in computer graphics. ColorWeb Pro is a small
utility that enables you to look up a Pantone color by number and then displays a
color chip with the equivalent RGB and/or HTML color values.
ColorWeb Pro runs in two modes: the Pantone Matching System, which enables you
to choose from all 1,012 Pantone colors; and the Pantone Internet Color System,
which converts your choice to a Websafe color before sending it to Fireworks. If
you’re satisfied with a simple conversion from Pantone to Websafe, use the Internet
Color System to choose a Pantone color and convert it to Websafe.
To get a more accurate representation of a Pantone color, you can combine the
Pantone Matching System with Fireworks’ Web Dither fill, sampling a Pantone color
and enabling Fireworks to create a Web Dither equivalent. This option opens many
of the Pantone colors for use on the Internet where it counts the most — in the fill
areas. Though this system is not perfect — I occasionally find Pantone colors that
do not have a good duplicate in the Web Dither mode — it’s quite close.
In Windows, ColorWeb Pro runs as an application that is basically a floating color
chip. Double-clicking this chip opens the Pantone color pickers. Right-clicking the
chip displays a context menu that enables you to specify options.
Cross-Reference
103662-1 ch07.F 8/2/02 2:26 PM Page 224
Fireworks Seminar

225Chapter 7 ✦ Managing Color
On the Mac, ColorWeb Pro simply installs its color pickers into the Mac’s extensible
color picker dialog box. Access these new color pickers as you would access any
other system-level color picker.
Mac users may find that they already have Pantone color pickers because theywere installed by ColorSync or the Apple Display Software. In this case, installingthe ColorWeb Pro demo overwrites your Pantone color pickers, necessitating areinstall of ColorSync or the Apple Display Software if you don’t purchaseColorWeb Pro after the demo times out.
Using ColorWeb Pro for WindowsTo convert a Pantone color to a Web Dither color in Fireworks for Windows, follow
these steps:
1. If it isn’t already running, start ColorWeb Pro.
2. Select the object you want to fill with a Pantone color.
3. Choose the Web Dither category from the Fill section of the Property inspector.
4. Select the Fill color well and then click on the color well entitled Source Color
to open the Fireworks color picker.
5. Click the Palette button to display the System Color Picker. The Pantone Color
Picker opens, as shown in Figure 7-15.
Figure 7-15: ColorWeb Pro offers you an extensive palette of Pantone colors.
Caution
103662-1 ch07.F 8/2/02 2:26 PM Page 225
Fireworks Seminar

226 Part II ✦ Mastering the Tools
6. Locate the desired color either by entering its number in the Find Color text
box, or by selecting it. Click OK when you’re done in order to return to your
document with the selected Pantone color filling your object.
Fireworks calculates the closest match using the Web Dither technique. If the
Pantone color is Websafe, both dither color wells hold the same color.
Using ColorWeb Pro for MacintoshTo convert a specific Pantone color to a Web Dither color in Fireworks for
Macintosh, follow these steps:
1. Select the object you want to fill with a Pantone color.
2. Choose the Web Dither category from the Fill section of the Property inspector.
3. Select the Fill color well and then click on the color well entitled Source Color
to open the Fireworks color picker.
4. Click the Palette button in order to display the Macintosh Color Picker dialog
box.
5. Select the Name category from the left portion of the Color Picker dialog box
and then choose PANTONE(r) solid coated from the option list at the top, as
shown in Figure 7-16.
6. Choose the desired Pantone color from the list in the center and then click
Done to return to your document with the selected Pantone color filling your
object.
Figure 7-16: ColorWeb Pro offers you an extensive palette of Pantone colors within the Macintosh color picker dialog box.
103662-1 ch07.F 8/2/02 2:26 PM Page 226
Fireworks Seminar

227Chapter 7 ✦ Managing Color
Fireworks calculates the closest match using the Web Dither technique. If the
Pantone color is Websafe, both dither color wells hold the same color.
SummaryFireworks offers brisk color control, enabling the designer to select from the overall
color model and specific palette that best serves. As you begin to delve deeper into
color with your Fireworks graphics, considers these points:
✦ RGB is the language of color for the screen. Pixels depend on a mixture of red,
green, and blue in order to achieve their color variations. HTML uses hexadec-
imal notation to designate RGB colors.
✦ Fireworks enables you to switch between several color models, such as
Hexadecimal, RGB, CMY, and grayscale.
✦ To ensure that your colors appear the same regardless of which browser you
use to view them, work with Websafe colors. Fireworks enables you to choose
a Websafe palette to pick colors from, and it enables you to snap selected col-
ors to their nearest Websafe equivalent.
✦ Fireworks uses three floating panels for color control: the Color Mixer, the
Swatches panel, and the Optimize panel. The Color Mixer enables the
designer to specify a new custom color or to modify an existing one. The
Swatches panel displays a series of color chips that can come from a standard
palette, such as Web 216, or from a custom palette. The Optimize panel
displays a Color Table of the current document’s export palette.
✦ The Eyedropper tool in the color picker can sample colors from any onscreen
image, whether the image is in Fireworks or another application.
In the next chapter, you explore working with the fine lines of Fireworks graphics —
strokes.
✦ ✦ ✦
103662-1 ch07.F 8/2/02 2:26 PM Page 227
Fireworks Seminar

103662-1 ch07.F 8/2/02 2:26 PM Page 228
Fireworks Seminar

ChoosingStrokes
Strokes are one of the three key features of a Fireworks
document. Along with fills and effects, strokes can give
each element its own unique character. While the stroke is
what makes a path visible, it offers far more than just “visibil-
ity.” You can vary a stroke’s width, color, softness, and shape,
as well as control how it reacts to the speed, pressure, and
direction of your drawing. Moreover, you can modify strokes
already applied to any selected path and instantly see the
results.
In addition to 48 built-in standard strokes in Fireworks, you
can customize your strokes with an almost infinite set of
variations. Numerous options, such as color, stroke width,
and edge softness, exist right in the Strokes section of the
Property inspector for easy experimentation. Additionally,
Fireworks enables you to custom build your own stroke from
the ground up. You can find explanations for all the controls
in this chapter, as well as step-by-step instructions for devel-
oping special strokes, such as dotted lines.
Using the Stroke SettingsThe Stroke section of the Property inspector is your control
center for all stroke settings. Although you can set the stroke
color in two other places, the Tools panel and the Color Mixer,
the Stroke section of the Property inspector is the only place
to select all the options.
Here’s the typical process for setting up or modifying an exist-
ing stroke that uses all the options available for Strokes:
88C H A P T E R
✦ ✦ ✦ ✦
In This Chapter
Applying strokes
Mastering strokes
Working withgraphics tablets
Investigatingstandard strokes
Creating customstrokes
Fireworks technique:building a dottedstroke
Stroke orientation
✦ ✦ ✦ ✦
113662-1 ch08.F 8/2/02 2:26 PM Page 229
Fireworks Seminar

230 Part II ✦ Mastering the Tools
1. Choose Window ➪ Properties to open the Property inspector (see Figure 8-1).
Alternatively, you can use the keyboard shortcut, Ctrl+F3 (Command+F3).
Figure 8-1: Use the controls in the Stroke section of the Property inspector tomodify the stroke for an existing path or to establish a stroke before you draw.
2. Select one of the 11 categories from the Category option list. To turn off the
stroke, select None from the Category option list.
3. Choose any of the available types listed for each category from the Type
option list. When you choose a type, the default settings for that type’s size,
edge softness, and texture are also selected.
4. If desired, select a new color from the stroke color well.
5. To change how the stroke blends, use the Edge Softness slider.
6. Alter the size of the stroke by using the Size slider, or by entering a value
directly in the Size text box.
7. Add a texture by choosing one from the Texture option list and setting its
opacity through the Amount of texture slider.
As noted previously, you can either modify the stroke for an existing, selected path,
or you can set up the stroke before you draw. To select a path, with or without a
stroke already applied, move the Pointer tool over the desired path and then click
the highlighted path once (assuming the Mouse Highlight preference has been left
at its default setting of enabled). The path displays a red highlight if it is capable of
being selected and, by default, a light-blue highlight after it has been selected.
If your work includes the same or similar color as Fireworks uses for highlighting achosen path, you can change the color. Choose Edit ➪ Preferences, and, in theGeneral category select the Highlight color well in order to pick a different hue orshade.
Tip
Size Edge softness slider
Color well Stroke category
Tip preview Texture Amount of texture
113662-1 ch08.F 8/2/02 2:26 PM Page 230
Fireworks Seminar

231Chapter 8 ✦ Choosing Strokes
Sometimes selecting the path for stroke modification by using the selection feature
of the Pointer tool is easier. If you click and drag the Pointer, a temporary rectangle
is drawn out. Any paths touched by this rectangle are selected. The Pointer selec-
tion is a great way to select multiple paths if you want to simultaneously change the
stroke settings for several paths. Alternatively, pressing Shift enables you to select
multiple paths, one at a time, with the Pointer tool.
You can quickly switch to the Pointer tool from any other tool by pressing andholding Ctrl (Command). When you release the key, the previously selected toolreturns.
When you’re setting up your next stroke, be sure that no path or object is
selected — otherwise, that selected object will be modified. Use the Pointer to click
an empty canvas area, or choose Edit ➪ Deselect — or its keyboard equivalent,
Ctrl+D (Command+D) — to clear any previous selections.
Stroke categories and typesWith the None option, Fireworks offers a dozen stroke categories. From the sim-
plest, Pencil and Basic, to the most outrageous, Random and Unnatural, the stroke
categories run the gamut, as evident in Figure 8-2. When you select a category, its
types become available, with the first one in an alphabetical list chosen.
Figure 8-2: Choose any of the preset stroke types — from the Basic to the farthest out Unnatural Fluid Splatter.
Unnatural Fluid SplatterBasic
Tip
113662-1 ch08.F 8/2/02 2:26 PM Page 231
Fireworks Seminar

232 Part II ✦ Mastering the Tools
The standard strokes are covered in detail later in this chapter, but two primary fac-
tors apply to all the basic strokes. First, when a particular stroke category and type
are selected, the default settings for that stroke are selected — even if you just mod-
ified it seconds ago and are returning from trying out another stroke. Second, you
can modify, alter, and adjust every facet of all the standard strokes.
Later in this chapter, in the section “Creating New Strokes,” you discover how tostore and reuse a modified stroke.
Stroke edge and sizeIf you’re reading this book in sequence, you’ve already discovered the concept of
feathering as it relates to bitmap images in Chapter 6. As you’ll remember, a feath-
ered edge is one that blends into the background. You can “feather” strokes
through the Edge Softness slider found in the Stroke panel. Moving the slider all
the way to the bottom creates the hardest edge, with no blending, whereas sliding
it to the top creates the softest edge, with maximum blending for the current
stroke size.
As in feathering, edge softness is actually an application of the alpha channel,
which controls transparency. There are 256 degrees of transparency in the alpha
channel and only 100 degrees of edge softness, but the overall control is similar.
Although you can select any degree of softness from the full range for any stroke,
you won’t see much of a difference if the stroke is thin. The thicker the stroke, the
more softness variations are apparent. At the softest setting, Fireworks maintains
roughly two-thirds of the stroke size. The object’s opacity and the other one-third
are blended into transparency equally on either side of the stroke.
You can change the thickness of a stroke either by entering a value in the Size box,
or by using the Size slider to select from the range of possible values: 1 to 72 pixels
wide. The Tip preview is not big enough to show the full stroke width. On both
Windows and Macintosh, the Tip preview in the Property inspector stops being use-
ful with anything much above 15 pixels and just goes black. If you need a larger,
more accurate, preview you can open the Stroke Options, covered later in this
chapter, where you’ll notice “2x” or “4x” appears after about 50 pixels to indicate
the actual width of large strokes, as shown in Figure 8-3.
Cross-Reference
113662-1 ch08.F 8/2/02 2:26 PM Page 232
Fireworks Seminar

233Chapter 8 ✦ Choosing Strokes
Figure 8-3: When you select a stroke size larger than the Property inspector’s preview can display, the Stroke Options preview compensates numerically.
Stroke textureApplying texture to a stroke can give a line true character and depth. Fireworks
comes with a number of standard textures built in and an additional library of them
on the product’s CD-ROM. You can apply each of these textures to any stroke with a
variable degree of intensity. Some of the preset strokes, such as the Textured Air
Brush or the Basic Crayon, use a texture to create their distinctive look.
To apply a texture to a stroke, follow these steps:
1. In the Stroke section of the Property inspector, select the category and type of
stroke to which you want to apply the texture.
2. If necessary, set the size, color, and edge softness for the stroke. Note: Many
textures are not apparent if the stroke width is too small.
3. Choose a texture from the Texture option list.
4. Set a degree of intensity for the Texture from the Amount of texture slider. You
can also enter a percentage value (with or without the percent sign) into the
Amount of texture text box.
113662-1 ch08.F 8/2/02 2:26 PM Page 233
Fireworks Seminar

234 Part II ✦ Mastering the Tools
You must enter a percentage value greater than 0 percent, or no texture will bevisible.
Textures, in effect, are image patterns that are overlaid on top of the stroke. The
amount of texture slider controls how transparent or opaque those textures
become. At 0 percent, the texture is transparent and, for all intents and purposes,
nonexistent. At 100 percent, the texture is as visible as possible. Figure 8-4 displays
the same stroke with several variations of a single texture. As a general rule, tex-
tures containing highly contrasting elements show up better, whereas those with
less contrast are more subtle and probably only useful on extremely thick strokes.
Figure 8-4: The higher the amount of the texture value, the more visible the texture becomes.
Can’t get enough of those fabulous textures? You’ll find another 50, courtesy ofMassimo Foti, in the Extensions folder of the CD-ROM.
Working with the Built-in StrokesOne of the key advantages of Fireworks’ preset strokes is speed — just pick one and
go. The other main advantage is consistency. You can use the Textured Air Brush
time and again to always get the same effect. Even if you prefer to work only with cus-
tom strokes, you generally begin the creation process with one of the standard ones.
This section explores each of the stroke categories and the different presets each
one offers. Fireworks starts the stroke categories with two of the simplest, Pencil
and Basic. After these, the list proceeds alphabetically from Air Brush to Unnatural.
The overall impression, however, is that the more often used standard strokes are
at the top of the list, and the more elaborate decorative strokes at the end.
On theCD-ROM
0% 25% 50% 75% 100%
Note
113662-1 ch08.F 8/2/02 2:26 PM Page 234
Fireworks Seminar

235Chapter 8 ✦ Choosing Strokes
PencilWhen you start to draw with the Pen tool, the path is rendered in the Pencil 1-Pixel
Hard stroke, regardless of any previous stroke settings for other tools. If you use
the Vector Path tool, and no stroke settings have been established, you get the
same Pencil 1-Pixel Hard stroke. You might say that the Pencil is one of the real
workhorses of the preset strokes.
Using a Graphics Tablet
Using a mouse to create objects is often derided as being like “drawing with a bar of soap,”and for good reason. In the past, graphics tablets — flat panels that you draw on with a pen-like stylus — were often expensive, insensitive, and unwieldy. But, as with most technolo-gies, graphics tablets have steadily become cheaper and better. These days, a range of sizesand specifications are available for any Macintosh or Windows computer. For beginners orcasual use, Wacom’s Graphire2 is a 4×5-inch tablet that hardly costs more than a mouse.Wacom’s professional range of Intuos2 tablets extends from 4×5 inches to 12×18 incheswith features and options to satisfy any artist. However, a 4×5-inch tablet can be quiteacceptable for the typically small canvases used for Web graphics.
There’s really almost no learning curve to using a graphics tablet with Fireworks. Everythingworks as with the mouse, except that you have far more control. The first advantage is theaccuracy provided by the tablet’s one-to-one relationship with areas on the screen. Theclassic test is a signature — try signing your name with a mouse and then with a pen andtablet — there’s a world of difference because similar horizontal and vertical movements ofthe mouse don’t correspond to similar movements of the mouse pointer.
The more obvious advantage is that you’re drawing with a pen, and the pressure that youapply directly affects the appearance of the strokes that you create. Press down harder andyou get a heavier line, or use a lighter touch for a softer line. This feature often leads to aslightly more imperfect or “human” look to the graphics that you create, and the imperfectappearance can be quite pleasing. Many standard Fireworks strokes are sensitive topressure, including all the Air Brush, Calligraphy, Charcoal, Oil, and Watercolor presets. Howstrokes respond to pressure is also adjustable, as you discover later in this chapter whenyou look at how to create strokes.
Even if you’re not much of an artist, selecting tools and drawing rectangles and ovals is eas-ier with a graphics tablet. After a short while, you’ll find yourself “reaching” for objects onyour canvas without having to look at them or track them down with a mouse becausethey’re always in the same place on your tablet. It’s an intuitive and creative way to assem-ble computer graphics.
If you don’t have a tablet, you can simulate increased or decreased pressure with your key-board. Press 1 to decrease the pressure and 2 to increase it. Be aware, however, that unlikea graphics tablet, the pressure doesn’t even out when you stop drawing. If you press 1 threetimes to decrease the pressure, the pressure continues to be light until you press 2 threetimes to restore it to its default state, or until you relaunch Fireworks.
113662-1 ch08.F 8/2/02 2:26 PM Page 235
Fireworks Seminar

236 Part II ✦ Mastering the Tools
The Pencil is a fairly generic stroke, intended to give a simple representation to any
path without any embellishments. You can see the differences between its four pre-
sets, listed in Table 8-1, and depicted in Figure 8-5. The 1-Pixel Soft Pencil stroke
antialiases the path to avoid the jaggies that may be apparent with the 1-Pixel Hard
setting. The Colored Pencil, at four pixels, is slightly wider and is affected by pres-
sure and speed in the same way that a real colored pencil would be affected. The
final preset, Graphite, is also affected by the pressure and speed at which the paths
are drawn; in addition, a high degree of texture is added to further break up the
stroke.
Figure 8-5: The 1-Pixel Hard and 1-Pixel Soft strokes remain constant when drawn, but the Colored Pencil and Graphite strokes are affected by pressureand speed.
Table 8-1Pencil Type Attributes
Name Size Edge Softness Texture Amount of Texture
1-Pixel Hard 1 0 percent None n/a
1-Pixel Soft 1 0 percent None n/a
Colored Pencil 4 0 percent None n/a
Graphite 4 0 percent Grain 80 percent
Colored Pencil
Graphite
1-Pixel Soft
1-Pixel Hard
113662-1 ch08.F 8/2/02 2:26 PM Page 236
Fireworks Seminar

237Chapter 8 ✦ Choosing Strokes
BasicAnother, slightly heavier variation of the simple path is the appropriately named
Basic stroke. All the Basic presets, detailed in Table 8-2, are 4-pixels wide and vary
only with the basic shape of the line (square or round) and its antialias setting.
Hard Line and Hard Line Rounded are not antialiased, whereas both Soft Line and
Soft Line Rounded are. The variations, shown in Figure 8-6, are subtle, but can make
quite a difference on some objects.
Figure 8-6: You can see the differences between the four Basic stroke types when you look closely at them.
Table 8-2Basic Type Attributes
Name Size Edge Softness Texture Amount of Texture
Hard Line 4 0 percent None n/a
Hard Line Rounded 4 0 percent None n/a
Soft Line 4 0 percent None n/a
Soft Line Rounded 4 0 percent None n/a
Hard Line
Hard Line Rounded
Soft Line
Soft Line Rounded
113662-1 ch08.F 8/2/02 2:26 PM Page 237
Fireworks Seminar

238 Part II ✦ Mastering the Tools
Air BrushI’ll ‘fess up — I’m an airbrush addict. I can’t get enough of the variations that the
Fireworks Air Brush stroke offers. Both presets (see Table 8-3) are very sensitive to
changes in speed and pressure; plus — like a real airbrush — the ink builds up if you
stay in one spot, as shown in Figure 8-7. The Textured Air Brush is significantly
different from the Basic Air Brush and offers a good example of what’s possible
when applying a texture to a stroke.
Figure 8-7: The difference between the two Air Brush presets is quite noticeable, as is the build-up on each at the end of the two strokes.
Table 8-3Air Brush Type Attributes
Name Size Edge Softness Texture Amount of Texture
Basic 60 100 percent None n/a
Textured 50 100 percent Grain 80 percent
Basic Textured
113662-1 ch08.F 8/2/02 2:26 PM Page 238
Fireworks Seminar

239Chapter 8 ✦ Choosing Strokes
CalligraphyCalligraphy is an elegant handwriting art in which the thickness of a stroke varies
as a line curves. The Calligraphy stroke in Fireworks offers five variations on this
theme, as detailed in Table 8-4 and shown in Figure 8-8. Only the Bamboo preset
does not create distinct thick-and-thin curved lines — that’s because all the others
use a slanted brush, whereas Bamboo’s brush is circular, like a bamboo stalk. The
Quill preset is pressure- and speed-sensitive and, along with the Ribbon and Wet
presets, builds up ink as it rounds a curve, emphasizing the angles.
Figure 8-8: Great lettering possibilities are the hallmark of the Calligraphy stroke.
Table 8-4Calligraphy Type Attributes
Name Size Edge Softness Texture Amount of Texture
Bamboo 20 0 percent Grain 50 percent
Basic 14 0 percent None n/a
Quill 20 20 percent Grain 25 percent
Ribbon 25 0 percent None n/a
Wet 20 0 percent None n/a
Bamboo
Basic
Web
Quill
Ribbon
113662-1 ch08.F 8/2/02 2:26 PM Page 239
Fireworks Seminar

240 Part II ✦ Mastering the Tools
CharcoalThe Charcoal strokes are notable for their textures, both within the strokes them-
selves and on their edges. As you can see in Table 8-5, each preset uses some
degree of Grain texture. The Creamy and Pastel presets vary according to a stroke’s
pressure and speed — Creamy more so than Pastel. The key difference between the
Soft preset and the other preset strokes is that with the Soft preset the size of the
brush changes randomly as you draw — the width fluctuates from a maximum of
20 pixels to a minimum of 5 pixels. Figure 8-9 shows a side-by-side comparison of
the Charcoal presets.
Figure 8-9: The Charcoal strokes offer a range of rough textures.
Table 8-5Charcoal Type Attributes
Name Size Edge Softness Texture Amount of Texture
Creamy 20 0 percent Grain 16 percent
Pastel 20 0 percent Grain 24 percent
Soft 20 20 percent Grain 30 percent
Textured 20 60 percent Grain 85 percent
Pastel
Textured
Creamy
Soft
113662-1 ch08.F 8/2/02 2:26 PM Page 240
Fireworks Seminar

241Chapter 8 ✦ Choosing Strokes
CrayonKids can never understand why their parents like to draw with crayons as much as
they do. The Crayon stroke in Fireworks captures that broken edge that gives real-
world crayons character. The three Crayon presets are interesting to compare; if
you look at the samples in Figure 8-10 and their details in Table 8-6, you see an obvi-
ous anomaly. The Rake preset has the smallest stroke size, but actually appears
slightly thicker than both the Basic and Thick preset because the Rake preset uses
four tips. It’s as if you were simultaneously drawing with four crayons. With four
tips, the lines overlap, and one tip can extend farther than the other three.
Figure 8-10: Return to your childhood — this time with scientific precision —through the Crayon strokes.
Table 8-6Crayon Type Attributes
Name Size Edge Softness Texture Amount of Texture
Basic 12 0 percent Grain 65 percent
Rake 8 0 percent Grain 65 percent
Thick 20 0 percent Grain 20 percent
Basic Rake Thick
113662-1 ch08.F 8/2/02 2:26 PM Page 241
Fireworks Seminar

242 Part II ✦ Mastering the Tools
Felt TipThe four presets for the Felt Tip stroke, shown in Figure 8-11, offer different degrees
of transparency that mimic the real-world drawing implements they’re named after.
The Highlighter and the Light Marker presets are largely transparent, in fact. The
Light Marker also uses a slightly softer edge than the other presets, as noted in
Table 8-7.
Figure 8-11: The various Felt Tip strokes achieve transparent and opaque effects when used over graphics or images.
Table 8-7Felt Tip Type Attributes
Name Size Edge Softness Texture Amount of Texture
Dark Marker 8 0 percent None n/a
Highlighter 16 0 percent None n/a
Light Marker 12 5 percent None n/a
Thin 4 0 percent None n/a
OilWhen you look at the five Oil stroke presets in Figure 8-12, it’s hard to believe that
the second stroke from the left, Broad Splatter, is a single stroke. Although the size
Dark Marker
Highlighter
Light Marker
Thin
113662-1 ch08.F 8/2/02 2:26 PM Page 242
Fireworks Seminar

243Chapter 8 ✦ Choosing Strokes
for Broad Splatter is only 10 pixels — the same as for the Bristle and Splatter pre-
sets, all shown in Table 8-8 — the larger width is because it uses two tips instead of
one, and they’re spaced 500 percent apart. In other words, the Broad Splatter pre-
set can be five times the width of its pixel size. All but the Splatter preset use
multiple tips, as well, but because they’re set to be less than 100 percent apart,
the strokes appear as single lines.
Figure 8-12: Looking for a stroke that doesn’t look like a line? Try the Oil Splatter and Oil Broad Splatter presets.
Table 8-8Oil Type Attributes
Name Size Edge Softness Texture Amount of Texture
Bristle 10 0 percent Grain 20 percent
Broad Splatter 10 0 percent Grain 30 percent
Splatter 10 0 percent Grain 30 percent
Strands 8 43 percent None n/a
Textured Bristles 7 0 percent Grain 50 percent
Bristle
Broad Splatter
Splatter
Strands
Textured Bristled
113662-1 ch08.F 8/2/02 2:26 PM Page 243
Fireworks Seminar

244 Part II ✦ Mastering the Tools
WatercolorAs with any of the pressure- and speed-sensitive strokes, you can’t get a true
Watercolor feel if you draw using one of the geometric shapes; you have to use a
freeform tool, such as the Brush, to achieve the more realistic look apparent in
Figure 8-13. The Thin preset especially appears to run out of ink when completing
a stroke. Both the Heavy and Thick presets are quite transparent and blend well
when applied over an image because of their relatively soft edges (see Table 8-9).
Figure 8-13: Watercolor strokes blend well and fade naturally due to their pressure and speed sensitivity.
Table 8-9Watercolor Type Attributes
Name Size Edge Softness Texture Amount of Texture
Heavy 50 50 percent Grain 30 percent
Thick 40 70 percent Grain 5 percent
Thin 15 25 percent None n/a
Heavy Thick Thin
113662-1 ch08.F 8/2/02 2:26 PM Page 244
Fireworks Seminar

245Chapter 8 ✦ Choosing Strokes
RandomSo much for natural media — it’s time to create strokes that only a computer can
create. In addition to the varying sizes, edge softness, and textures shown in Table
8-10, Random strokes also change the shape and color of the resulting stroke. The
basic brush shape is evident both by the Random preset names — Dots, Fur,
Squares, and Yarn — and in the sample strokes shown in Figure 8-14, but you have
to turn to the color insert to really see the color variations. The Confetti preset is
the most colorful and Dots the least colorful, but all the Random strokes exhibit
some changing hues.
Figure 8-14: The Random strokes provide five fanciful alternatives to natural media strokes.
Table 8-10Random Type Attributes
Name Size Edge Softness Texture Amount of Texture
Confetti 6 25 percent None n/a
Dots 3 20 percent None n/a
Fur 10 0 percent None n/a
Squares 5 0 percent Grain 20 percent
Yarn 8 0 percent None n/a
Confetti Dots Fur Squares Yarn
113662-1 ch08.F 8/2/02 2:26 PM Page 245
Fireworks Seminar

246 Part II ✦ Mastering the Tools
UnnaturalI think it’s a pretty safe bet that the Unnatural strokes were developed in a, shall we
say, party-like atmosphere. How else do you explain the messiness of Fluid Splatter,
or the glow-in-the-dark feel of Toxic Waste — not to mention the otherworldliness of
Viscous Alien Paint? No matter how they were developed, I find myself returning to
them time and again when I need a unique and distinctive look for my graphics.
Experiment by applying them to almost any object when you’re up against a cre-
ative wall; the results are often surprising and useful. As you can see in Table 8-11,
all the presets are roughly the same size, with the exception of Chameleon. Several
of the strokes have a transparent area: 3D Glow, Fluid Splatter, Outline, Paint
Splatter, and Toxic Waste. Although you can get a sense of the preset variations
from Figure 8-15, you must turn to the color insert to see the Unnatural strokes in
all their glory.
Figure 8-15: The Unnatural strokes provide an offbeat alternative to Fireworks’ natural media strokes.
3D
3D Glow
Cameleon
Fluid Splatter
Outline
Point Splatter
Toothpaste Viscous Alien PaintToxic Waste
113662-1 ch08.F 8/2/02 2:26 PM Page 246
Fireworks Seminar

247Chapter 8 ✦ Choosing Strokes
Table 8-11Unnatural Type Attributes
Name Size Edge Softness Texture Amount of Texture
3D 20 12 percent None n/a
3D Glow 19 100 percent None n/a
Chameleon 6 0 percent Grain 31 percent
Fluid Splatter 12 100 percent None n/a
Outline 19 100 percent None n/a
Paint Splatter 12 100 percent None n/a
Toothpaste 18 50 percent None n/a
Toxic Waste 18 100 percent None n/a
Viscous Alien Paint 12 30 percent None n/a
Creating New StrokesWhat, the standard 48 strokes aren’t enough? You need a slightly smaller Air Brush
or a Calligraphy stroke with more texture? What about a dashed or dotted line
instead of a solid one? Fear not; in Fireworks, custom strokes are just a click or two
away. Not only can you store your minor adjustments as new strokes, but you can
completely alter existing strokes and save them, either within the document or as
a Fireworks Style that you can use in any document, or export and share with a
colleague or workgroup.
This section is divided into two parts. The first section explains how to manage
your strokes so that the ones you need are always available. The second part
delves into the somewhat complex — but altogether addictive — option of editing
your strokes.
Managing your strokesStroke management is handled by selecting Stroke Options through the Stroke cate-
gory option list on the Property inspector, which is shown in Figure 8-16.
113662-1 ch08.F 8/2/02 2:26 PM Page 247
Fireworks Seminar

248 Part II ✦ Mastering the Tools
Figure 8-16: Manage your strokes through the Stroke Options menu entry in the Stroke category option list.
The Stroke Options pop-up dialog contains a number of items you should be famil-
iar with by now — Stroke category, Stroke type, size, color, and so on — as well as a
few new buttons. The new buttons, as shown in Figure 8-17, are as follows:
✦ Save Custom Stroke: Stores the current stroke under a new name within the
active document
✦ Delete Custom Stroke: Removes the current stroke, custom or standard, from
the Stroke category of the Property inspector
✦ Advanced: Displays the Edit Stroke dialog box, covered in detail later in this
chapter
Figure 8-17: Save customized strokes, Edit existing strokes, or Delete strokes from your current document through the Stroke Options pop-up dialog.
Edit stroke
Delete custom strokeSave custom stroke
113662-1 ch08.F 8/2/02 2:26 PM Page 248
Fireworks Seminar

249Chapter 8 ✦ Choosing Strokes
Use the Delete Stroke command carefully — although Fireworks asks for confirma-tion, you can’t undo removing a stroke.
To store a modified stroke, follow these steps:
1. Modify any existing stroke by changing the Edge Softness, Size, Texture,
and/or Amount of texture. The stroke color is not stored as part of the stroke.
2. Choose Stroke Options from the Stroke category option list. The Stroke
Options pop-up dialog appears.
3. Click the Save Custom Stroke button to open the Save Stroke dialog box.
4. Enter a unique name for the stroke. If you choose a name already in use,
Fireworks asks whether you want to replace the existing stroke.
5. After entering a new name, choose Save. The new stroke name is displayed
alphabetically in the Type option list of the active Stroke category.
It’s important to understand that any new or modified strokes are stored within the
document in which they’re used. The newly defined stroke is always available for
use in the document in which it was stored, even if no paths currently employ it. To
use the stroke in another document, follow these steps:
1. Open the document containing the stroke you want to use.
2. Select a path using the new stroke. If no path currently uses the stroke, draw a
temporary one and select it.
3. Open the new document in which you want to use the new stroke.
4. Copy the selected path to the new document, either by using Edit ➪ Copy
and Edit ➪ Paste, or by dragging and dropping the path from one document
to the other. The new stroke setting is added to the Stroke category in the
Stroke section of the Property inspector when the path containing the stroke
is pasted into the document.
5. If desired, delete the copied path from the new document; the stroke is still
available for later use in the document.
You can achieve the same effect of transferring strokes from one document to
another in several other ways:
✦ Import a document containing one or more custom strokes. After you’ve
clicked once to place the document, choose Undo. The graphics vanish, but
all custom strokes are incorporated into the Stroke category on the Property
inspector. With this technique, only custom strokes actually applied to paths
in the source document are transferred.
✦ Copy the path with the custom stroke in one document, and just paste the
attributes to a path in the new document by selecting that path and choosing
Edit ➪ Paste Attributes.
Caution
113662-1 ch08.F 8/2/02 2:26 PM Page 249
Fireworks Seminar

250 Part II ✦ Mastering the Tools
Perhaps the best way to always be sure your custom strokes are available is to use
the Styles feature. To create a new style using a custom stroke, follow these steps:
1. Select a path that uses the custom stroke.
2. If necessary, choose Window ➪ Styles, use the keyboard shortcut Shift+F11,
or click the Style tab, if visible, to display the Styles panel.
3. On the Styles panel, select the New Style button. The New Style dialog box
appears, as shown in Figure 8-18.
Figure 8-18: Declaring a stroke through the New Style dialog box stores the stroke definition for easy access from all Fireworks documents.
4. In the New Style dialog box, enter a descriptive name for your stroke in the
Name text box and deselect all checkboxes except Stroke Type.
5. Click OK when you’re done. A new style is created in the Styles panel.
Any style added in the fashion just described is always available for any Fireworks
document. To apply the stroke, just highlight any Fireworks path object and select
the new style. Your custom stroke is then added to the Stroke category in the
Stroke section of the Property inspector.
To discover more about the powerful Styles feature, see Chapter 16.
Editing the strokeWhereas you can make certain modifications through the Stroke section of the
Property inspector, if you really want to customize your strokes, you have to use
the Edit Stroke dialog box. Although the array of choices the dialog box offers can
be a bit overwhelming, after you understand how to achieve certain effects, creat-
ing new strokes becomes easy, fun, and compelling.
Cross-Reference
113662-1 ch08.F 8/2/02 2:26 PM Page 250
Fireworks Seminar

251Chapter 8 ✦ Choosing Strokes
You can access the Edit Stroke dialog box in one of two ways:
✦ Select a path in your document and click the Stroke color well on the Tools
panel. Then click the Stroke Options button, followed by the Advanced button.
✦ Select Stroke Options from the Stroke category option list in the Property
inspector and then click the Advanced button.
The Edit Stroke dialog box is divided into three tabs: Options, Shape, and
Sensitivity. Each of the tabs contains a preview panel that updates after every
change is made. If you have selected a stroke prior to opening the Edit Stroke dialog
box, you can also see the effect by using the Apply button.
In my explorations of the Edit Stroke dialog box, I uncovered one technique thatworked differently than I expected — if you make a change to a stroke withoutselecting a path, the change does not register. Always select a path, even a tem-porary one, before you create a custom stroke.
The Options tabThe Options tab hosts a number of general, but important, attributes. In addition to
providing controls for familiar parameters, such as a stroke’s degree of texture and
opacity, the Options tab, as shown in Figure 8-19, also holds the key to affecting the
tightness of the stroke, how it reacts over time, and what, if any, edge effect is
employed.
Figure 8-19: The Options tab of the EditStroke dialog box contains many criticalcontrols.
Caution
113662-1 ch08.F 8/2/02 2:26 PM Page 251
Fireworks Seminar

252 Part II ✦ Mastering the Tools
Ink AmountThe first stroke attribute on the Option tab is Ink Amount. Generally, this parameter
is set at 100 percent, but it’s possible to lower it for any stroke. The Ink Amount
value is responsible for a stroke’s opacity: 100 percent is completely opaque, and
0 percent is completely transparent. The bottom of the two “CLICK” buttons in
Figure 8-20 shows how a stroke is affected when the Ink Amount is reduced to
60 percent.
Figure 8-20: Reducing the Ink Amount of a stroke reduces its opacity.
You can also alter an object’s overall opacity through the Property inspector, but
changing the Ink Amount value alters just the stroke. Combine the two and the
effect is additive; if, for example, you see a stroke’s Ink Amount at 50 percent and
you reduce the opacity of the path object to 50 percent, the stroke would appear
to be 25 percent opaque (because half of 50 percent is 25 percent). The Felt Tip
Highlighter preset is a good example of a stroke that uses a reduced Ink Amount in
order to obtain transparency.
SpacingTechnically, each stroke consists of a long series of stroke stamps. A stamp is the
smallest unit of a stroke; you can see it by selecting a stroke and the Vector Path
tool, and then clicking the mouse once, without moving. As you draw with the
Vector Path tool, or another tool, one stamp after another is laid down. The Spacing
attribute determines how close those stamps are to each other. As detailed later in
this chapter, you can create dotted lines by changing the Spacing value.
113662-1 ch08.F 8/2/02 2:26 PM Page 252
Fireworks Seminar

253Chapter 8 ✦ Choosing Strokes
If you try to modify the Pencil 1-Pixel strokes or any of the Basic strokes, you findthat no matter what you do, you won’t be able to enable the Spacing or Flow Rateoptions. These strokes actually use a different rendering engine than all the otherstrokes, which sacrifices spacing and flow control to gain pinpoint pixel accuracy.To see the effects of changing either the Spacing or Flow Rate options, edit anyother stroke.
The Spacing value ranges from 0 percent to 1,000 percent. If the Spacing attribute is
set at 100 percent, stroke stamps in a straight line are positioned directly next to
each other. If the Spacing is less than 100 percent, the stamps are overlaid on top of
one another. If the Spacing is greater than 100 percent, the stamps are separated
from one another. Strokes with a soft edge, such as the Air Brush, appear to be sepa-
rated even when the Spacing is set to less than 100 percent, but this is only because
the soft edge is incorporated into the stroke stamp. The effect in Figure 8-21 is
achieved by increasing the spacing of a Felt Tip stroke to more than 200 percent.
Figure 8-21: Create dotted line patterns by increasing the Spacing value.
Flow Rate and Build-upMost stroke settings alter how a stroke changes as it’s drawn across a screen.
However, the Flow Rate percentage value represents how fast ink flows; the higher
the number, the faster it flows. The Air Brush category is the best example of the
use of Flow Rate. Both preset Air Brushes, Basic and Textured, use a fairly high
value of 80 percent.
The Build-up option is another way of affecting a stroke’s opacity. If Build-up is
enabled, for example, as with the Air Brush preset, and the stroke crosses itself as
in Figure 8-22, you’ll notice a darker area at the overlap of the stroke. If you disable
the Build-up option, the stroke has a much flatter, monochrome appearance.
Note
113662-1 ch08.F 8/2/02 2:26 PM Page 253
Fireworks Seminar

254 Part II ✦ Mastering the Tools
Figure 8-22: With the Build-up option enabled, the Air Brush stroke acts as if it’s a real airbrush, building up where it crosses itself.
Texture, Edge Texture, and Edge EffectThe Texture setting in the Edit Stroke dialog box is reflected on the Stroke section
of the Property inspector as the Amount of Texture value. Increase the Texture
value to make the chosen texture more visible on the opaque portion of the stroke;
a value of 0 percent effectively turns off the texture.
You cannot specify the type of texture from within the Edit Stroke dialog box; youmust set it through the Stroke section of the Property inspector. Whereas the tex-ture type is saved with the stroke when you select the Save custom stroke com-mand, if another texture type is chosen temporarily, the original texture does notreappear when you reselect the custom stroke. Reload the document with thesaved stroke in order to establish the custom texture settings.
Just as the Texture value causes the chosen texture to appear over the opaque por-
tion of the stroke, the Edge Texture setting causes the texture to appear over the
transparent portion. Remember that in Fireworks, you create edge softness by
affecting the stroke’s alpha channels or transparency. By increasing the Edge
Texture and lowering the Texture value, the soft edge of the stroke is textured
more noticeably than the center.
Edge Texture values, no matter how high, are, in effect, invisible if the EdgeSoftness is at 0 percent.
In addition to altering an edge’s texture, you can also create an Edge Effect.
Technically speaking, the five Edge Effects are created by applying an algorithm
affecting the alpha channel for both the stroke and its edge. In this case, descrip-
tions are a poor second to a visual representation of the intriguingly named Edge
Note
Caution
Build-up unchecked
Build-up checked
113662-1 ch08.F 8/2/02 2:26 PM Page 254
Fireworks Seminar
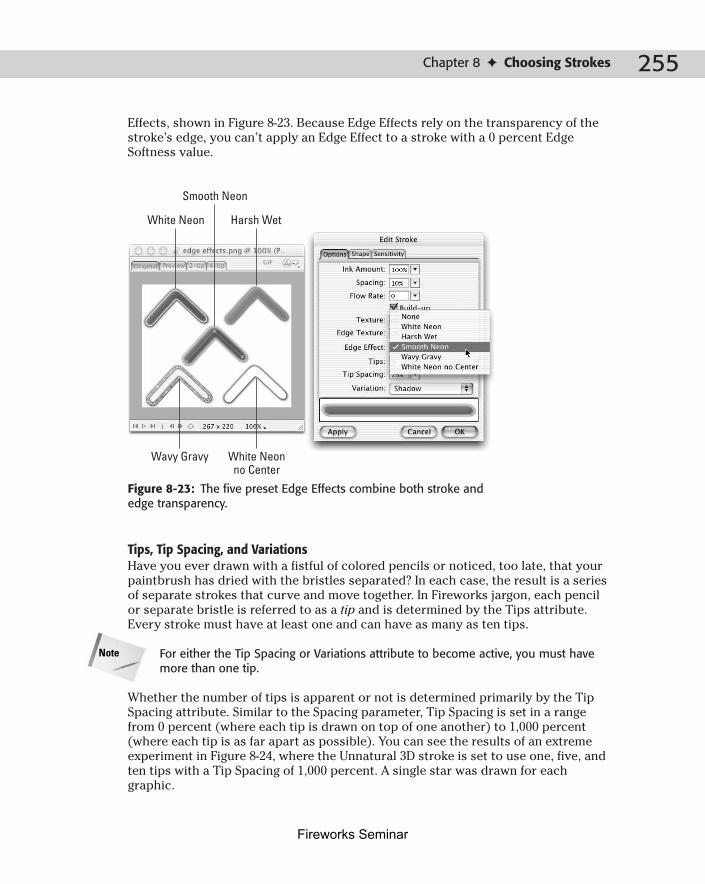
255Chapter 8 ✦ Choosing Strokes
Effects, shown in Figure 8-23. Because Edge Effects rely on the transparency of the
stroke’s edge, you can’t apply an Edge Effect to a stroke with a 0 percent Edge
Softness value.
Figure 8-23: The five preset Edge Effects combine both stroke and edge transparency.
Tips, Tip Spacing, and VariationsHave you ever drawn with a fistful of colored pencils or noticed, too late, that your
paintbrush has dried with the bristles separated? In each case, the result is a series
of separate strokes that curve and move together. In Fireworks jargon, each pencil
or separate bristle is referred to as a tip and is determined by the Tips attribute.
Every stroke must have at least one and can have as many as ten tips.
For either the Tip Spacing or Variations attribute to become active, you must havemore than one tip.
Whether the number of tips is apparent or not is determined primarily by the Tip
Spacing attribute. Similar to the Spacing parameter, Tip Spacing is set in a range
from 0 percent (where each tip is drawn on top of one another) to 1,000 percent
(where each tip is as far apart as possible). You can see the results of an extreme
experiment in Figure 8-24, where the Unnatural 3D stroke is set to use one, five, and
ten tips with a Tip Spacing of 1,000 percent. A single star was drawn for each
graphic.
Note
White Neon Harsh Wet
Smooth Neon
Wavy Gravy White Neonno Center
113662-1 ch08.F 8/2/02 2:26 PM Page 255
Fireworks Seminar

256 Part II ✦ Mastering the Tools
Figure 8-24: Although it appears that the stars in the two groups were cloned, only a single star was drawn in each group; multiple tips and wide Tip Spacing are the key to drawing many identical images with one stroke.
Variations are the final elements on the Options tab. When multiple tips are used,
how the different tips are depicted is determined by which of the Variations are
selected. Each of the Variations alters the color of the additional tips. The five
Variations are as follows:
✦ Random: A new color is selected at random for each tip with each new stroke.
✦ Uniform: All tips use the base color selected in the Stroke color well.
✦ Complementary: If the stroke uses two tips, one tip is displayed in the com-
plementary color (on the opposite side of an HLS (Hue, Lightness, Saturation)
color wheel) of the base color. If more than two tips are specified, the addi-
tional tips are selected from evenly spaced hues that are located between the
initial complementary colors.
✦ Hue: Multiple tips are presented in hues similar (plus or minus 5 percent on
an HLS color wheel) to the stroke color.
✦ Shadow: Additional tips are shown in alternating lighter and darker shades of
the stroke color (the Lightness).
The Shape tabCompared to the Object tab, the Shape tab of the Edit Stroke dialog box (see
Figure 8-25) is almost self-explanatory. The upper pane shows the stroke stamp,
and the lower pane shows a representation of the stroke over distance.
One Tip Five Tips Ten Tips
Actual drawing
113662-1 ch08.F 8/2/02 2:26 PM Page 256
Fireworks Seminar

257Chapter 8 ✦ Choosing Strokes
Figure 8-25: The look of the stroke stamp, and ultimately the stroke itself, is influenced by the attributes of the Shape tab.
The Shape tab offers the following five parameters:
✦ Square: When enabled, the Square option makes the stroke stamp square or
rectangular, according to the Aspect setting. If Square is disabled, the stroke
stamp is circular or elliptical.
✦ Size: Sets the initial stroke width, in pixels, from 1 to 100. The value is dis-
played in Stroke panel.
✦ Edge: Determines the softness of the stroke’s edge. This value is also reflected
in the Stroke panel.
✦ Aspect: Sets the height to width aspect ratio. Values 0 and 100 make circles or
squares — any other value creates rectangles or ellipses.
✦ Angle: Determines the angle of the stroke stamp. You can enter values
directly, or drag the dial in a circle.
You can achieve a wide range of different shapes by combining different parameters
from the Shape tab. I’ve found the Aspect and Angle controls to be especially use-
ful. For example, I used them to create a diamond dotted stroke, as detailed later in
this chapter.
113662-1 ch08.F 8/2/02 2:26 PM Page 257
Fireworks Seminar

258 Part II ✦ Mastering the Tools
The Sensitivity tabThe Sensitivity tab of the Edit Stroke dialog box, shown in Figure 8-26, permits you
to establish somewhat interactive controls for custom strokes. By altering your
drawing pressure, speed, or direction, your strokes can assume different sizes,
angles, opacities, or colors. You can even set up the stroke to alter any of its
properties randomly.
Figure 8-26: Create interactive strokes through the Sensitivity tab of the Edit Stroke dialog box.
The basic procedure for working in the Sensitivity tab is to select one of the stroke
attributes from the Stroke Property option list, and then set the desired control
found in the Affected By area. For example, if you want your stroke to shift colors
when it is drawn across the document but not down it, you would choose Hue from
the Brush Properties option list and set the Affected By Horizontal value to a high
percentage value. The higher the value, the more impact the condition (Pressure,
Speed, and so on) has.
The seven stroke attributes are as follows:
✦ Size: When the Size property is affected, the stroke always gets smaller than
the initial width, never larger. If the setting is at 50 percent, the stroke loses, at
most, one-half of its size.
113662-1 ch08.F 8/2/02 2:26 PM Page 258
Fireworks Seminar

259Chapter 8 ✦ Choosing Strokes
✦ Angle: The angle of the stroke stamp can be affected by as much as 90
degrees if Angle property is selected and an Affected By value is set to its
maximum, 100 percent.
✦ Ink Amount: As on the Options tab, Ink Amount refers to opacity. At the high-
est setting, the affecting condition can make the stroke transparent.
✦ Scatter: The amount of variance with which stroke stamps are drawn away
from the path. Scatter is really only effective with the Random condition.
✦ Hue: The color of the stroke. Multicolored strokes, such as those in the
Random category, make great use of this property.
✦ Lightness: The amount of white in a color. To make a stroke fade more as you
draw faster, choose the Lightness property and increase the Speed condition.
✦ Saturation: The intensity of the color. The higher the value set in the condi-
tion, the more the Saturation lessens. A stroke with a high Speed setting for
Saturation becomes grayer as the path is drawn faster.
The conditions that affect these properties each have a separate slider and text box
for entering values directly:
✦ Pressure: The degree of pressure applied by a stylus used with a pressure-
sensitive graphics tablet.
✦ Speed: The amount of speed used when a path is drawn either with a graphics
tablet or a mouse.
✦ Horizontal: Drawing paths from left to right, or vice versa.
✦ Vertical: Drawing paths from top to bottom, or vice versa.
✦ Random: The selected property is affected without any additional input from
the user.
The Affected By conditions can be used together. For example, setting Angle to be
equally affected by both the Horizontal and Vertical conditions causes a stroke,
such as Random Fur, to change direction as the path is drawn.
Generally, the Sensitivity tab settings tend to react more predictably with hand-drawn
paths, such as those created with the Vector Path tool, than paths constructed with
one of the geometric shapes, such as the Rectangle or Ellipse. However, experimenta-
tion is the key to uncovering unique effects with almost all the Edit Stroke parame-
ters, and you have nothing to lose by trying a particular setting.
113662-1 ch08.F 8/2/02 2:26 PM Page 259
Fireworks Seminar

260 Part II ✦ Mastering the Tools
Fireworks Technique: Making Dotted LinesAll the strokes in Fireworks’ standard arsenal are more or less solid lines with noth-
ing that you can use as a dotted line. Although a few exceptions exist, such as most
of the Random presets, these tend to be too unconventional to use for a basic
dotted line. As discussed in the previous section, however, Fireworks offers you a
tremendous degree of control in customizing your own strokes. The procedure for
creating a dotted line is fairly straightforward and a good introduction to the world
of custom stroke creation.
The key to creating a dotted line is in the Spacing control found on the Options tab
of the Edit Stroke dialog box. When the Spacing value is 100 percent, each stroke
stamp (the smallest component of a stroke) is right next to the one following it. If
the value is less than 100 percent, the stroke stamps overlap and — here’s the heart
of the dotted line — when the value is greater than 100 percent, the stroke stamps
are separated.
When creating any custom stroke, start with the built-in stroke that’s closest to
your goal. Although either of the Basic or Pencil 1-Pixel strokes would be ideal, the
key attribute for creating a dotted line, Spacing, is not available for these strokes.
As explained earlier in this chapter, these strokes are rendered with an eye toward
pixel precision that is incompatible with the Spacing and Flow attributes. However,
one of the other Pencil presets, Colored Pencil, works quite well as a stroke on
which to build a custom dotted line, with a minimum of adjustments required.
To create a simple dotted line, follow these steps:
1. Choose Pencil from the Stroke Category option list in the Stroke section of the
Property inspector.
2. Choose Colored Pencil from the Type submenu.
3. Open the Edit Stroke dialog box by choosing Stroke Options from the Stroke
category option list and then clicking Advanced.
4. On the Options tab of the Edit Stroke dialog box, change the Spacing value
from 15 percent to 200 percent.
Notice in the preview pane that you now have a dotted line, as shown in
Figure 8-27.
113662-1 ch08.F 8/2/02 2:26 PM Page 260
Fireworks Seminar

261Chapter 8 ✦ Choosing Strokes
Figure 8-27: You can easily create a dotted line by modifying the Edit Stroke settings.
5. Click OK when you’re done.
6. Select Stroke Options, from the Stroke category option list in the Stroke sec-
tion of the Property inspector, and click Save custom stroke.
7. In the Save Stroke dialog box, enter a unique name for the custom stroke.
Test out your new dotted line by using almost any of the path drawing tools — the
Rectangle, Ellipse, Polygon, Vector Path, or Pen.
Now that you’ve seen how easy customizing a brush stroke is, try a few variations,
such as the ones shown in Figure 8-28. Each set of instructions assumes that you’re
working in the Edit Stroke dialog box.
113662-1 ch08.F 8/2/02 2:26 PM Page 261
Fireworks Seminar

262 Part II ✦ Mastering the Tools
Figure 8-28: You can create a wide variety of dotted lines by modifying the Edit Stroke settings.
To give the dotted line a harder, more consistent edge, make these changes:
✦ Change the Edge Texture value on the Options tab to 0 percent.
✦ On the Shape tab, change the Edge value to 0 percent.
✦ On the Sensitivity tab, change the Size Speed setting to 0, the Ink Amount
Pressure and Speed settings to 0, and the Lightness Pressure and Speed set-
tings to 0.
Make these changes in order to create a dotted line with circles instead of squares:
✦ On the Shape tab, deselect the Square option.
✦ Also on the Shape tab, change the Aspect value to 100.
To create a horizontal line with dashes, change these values:
✦ From the Shape tab, change the Aspect value to 50.
✦ Also on the Shape tab, change the Angle to 0.
To create a vertical line with dashes, change these values:
✦ From the Shape tab, change the Aspect value to 50.
✦ Also on the Shape tab, change the Angle to 270.
113662-1 ch08.F 8/2/02 2:26 PM Page 262
Fireworks Seminar

263Chapter 8 ✦ Choosing Strokes
Change the following values in order to create a dotted line with diamonds:
✦ From the Shape tab, make sure the Square option is selected.
✦ Also on the Shape tab, change the Aspect value to 100.
✦ Change the Angle to 45.
Orienting the StrokeStrokes are useful, whether they are intended for an open path, such as a line, or a
closed path, such as a circle or rectangle. When a stroke is applied to a closed path,
however, Fireworks offers an additional set of options. By default, when strokes are
rendered they are centered on a path. Select any closed path object and the stroke
is rendered on either side of the actual path. The orientation of a stroke to a path
can be changed: The stroke can also be drawn completely inside the path or out-
side the path. As you can see from Figure 8-29, wildly different effects are possible
with this option.
Figure 8-29: The same stroke is rendered, from left to right, inside the path, centered on the path, and outside the path.
Inside Centered Outside
Strokeorientationoptions list
113662-1 ch08.F 8/2/02 2:26 PM Page 263
Fireworks Seminar

264 Part II ✦ Mastering the Tools
The controls for orienting a stroke to a path are in the Stroke Options dialog box
reachable via the Stroke category on the Property inspector. The three choices
place the stroke inside the path, centered on the path, or outside the path. A fourth
option, Fill over Stroke, is located below the stroke orientation controls. By default,
the stroke always appears on top of the fill color, Pattern, or gradient. However, by
enabling the Fill over Stroke option, you can reverse this preference.
By combining the Fill over Stroke option with a stroke rendered on the center ofthe path and a fill with a feathered edge, the stroke appears to blend into the fillwhile retaining a hard outer edge.
One of my favorite applications of the stroke orientation controls is to use inside
strokes as a sort of auxiliary fill, creating the effect of a more complex fill, as shown
in Figure 8-30. Hard to believe Fireworks enables you to do this kind of thing com-
pletely with paths!
Figure 8-30: Inside strokes figure prominently in this set of buttons. The bottom row is the selected button shown again, this time after each of the three stroke orientation options has been applied.
SummaryIn many ways, the stroke is the defining surface of a graphic. Fireworks offers a
superb catalog of standard strokes and even more flexibility to create your own. As
you begin to work with strokes, use these guidelines:
Stroke inside path Stroke outside path
Stroke centered in path
Tip
113662-1 ch08.F 8/2/02 2:26 PM Page 264
Fireworks Seminar

265Chapter 8 ✦ Choosing Strokes
✦ Strokes make paths visible. An unstroked line cannot be seen unless the path
is closed and a fill added.
✦ The Stroke panel offers immediate control over a stroke’s color, size, edge,
and texture. Tip preview shows the tip of the stroke.
✦ Fireworks includes 48 different preset strokes spread over 11 categories.
Many of the stroke presets are interactive and vary according to the speed
and pressure with which you draw.
✦ You can customize Fireworks strokes with a great number of variations
through the Edit Stroke dialog box.
✦ After you’ve customized your stroke, you can save it with the document by
using the Stroke Options on the Stroke category option list. You can also
store your custom strokes as Fireworks Styles.
✦ Although Fireworks doesn’t come with a preset dotted-line pattern, creating
one is easy.
✦ Fireworks works well with graphics tablets and takes great advantage of their
pressure sensitivity.
In the next chapter, you find out how you can employ advanced path techniques in
Fireworks.
✦ ✦ ✦
113662-1 ch08.F 8/2/02 2:26 PM Page 265
Fireworks Seminar

113662-1 ch08.F 8/2/02 2:26 PM Page 266
Fireworks Seminar

StructuringPaths
Even with the coolest stroke, the snazziest fill, and the
wildest effect, you rarely get exactly the graphic you
need the first time you draw an object. Maybe it needs to be a
little bigger, smaller, taller, or wider, or maybe it’s perfect —
but it’s facing the wrong way, and it’s upside down. Whatever
the problem, Fireworks has the tools to fix it and, because
Fireworks blends pixel surfaces with vector skeletons, you
get amazingly sharp results.
Fireworks has the kinds of tools you would normally expect to
find in a full-fledged vector drawing application. You can com-
bine several vector objects in any number of ways with evoca-
tively named tools, such as Union, Intersect, Punch, and Crop.
Naturally, what you have joined together you can split apart
and regroup as needed. Vector objects can be simplified,
expanded, or inset with Fireworks commands.
This chapter covers all the tools and techniques in Fireworks
for transforming and combining objects. You’ll also find a sec-
tion that describes how you can use Fireworks to create per-
spectives in your imagery.
You really begin to appreciate the power of Fireworks’ vector/
bitmap combination when you start transforming your
objects. In a pure bitmap graphics application, if you increase
the size of a bitmap, you have to add pixels, whereas shrink-
ing a bitmap causes the program to throw away pixels — you
rarely achieve ideal results in either situation. However, in
Fireworks, when you rescale a vector object, the vector path
is altered (a snap for vector graphics), and the pixels are
reapplied to the new path, just as if you had drawn it that
way to begin with.
99C H A P T E R
✦ ✦ ✦ ✦
In This Chapter
Transforming vectors
Fireworks technique:creating perspective
Working at the pointlevel on a vector path
Editing existingvectors
Using vector powertools
✦ ✦ ✦ ✦
123662-1 ch09.F 8/2/02 2:26 PM Page 267
Fireworks Seminar

268 Part II ✦ Mastering the Tools
Transforming Objects VisuallyFireworks includes methods for transforming objects, both visually and numeri-
cally. The visual method relies on three key tools found in the Select section of the
Tools panel: Scale, Skew, and Distort.
Although I primarily use vector objects as examples in this section, all the transfor-mation tools work with bitmap objects, as well.
Using scalingIn Web design, the size of an object frequently needs adjustment. Sometimes a
button is too large for the current navigation bar, or the client wants the “On Sale”
notice to be much bigger. Other times a graphic just looks better at a particular
size. Regardless of the reason, Fireworks gives you a quick way to resize an
object — up or down — through the Scale tool.
The Scale tool is the first of three transformation tools in the Tools panel that
become active when an object is selected. Choose the Scale tool (or use the key-
board shortcut, Q) and the standard selection highlight is replaced with a transform-
ing highlight, as shown in Figure 9-1. There are eight sizing handles — one on each
corner and one in the middle of each side — and a centerpoint on the transforming
highlight. You can drag any of the sizing handles to a new position in order to resize
the selected object. Dragging any corner handle scales the object proportionately.
Figure 9-1: Choose the Scale tool and sizing handles, and a centerpoint appears on the selected object.
To resize an object using the Scale tool, follow these steps:
1. Select the object you want to resize.
Sizing cursor CenterpointSizing handles
Note
123662-1 ch09.F 8/2/02 2:26 PM Page 268
Fireworks Seminar

269Chapter 9 ✦ Structuring Paths
2. Choose the Scale tool from the Tools panel, or use the keyboard shortcut, Q.
Alternatively, you can use the menu command, Modify ➪ Transform ➪ Scale.
Sizing handles and a centerpoint appear on the selected object.
3. Position your pointer over any sizing handle until it changes into a two-
headed arrow.
4. Click and drag the sizing handle in the direction you want the object to grow
or shrink. To scale an object while maintaining the current proportions, click
and drag a corner-sizing handle.
5. To cancel a resizing operation and return the object to its original dimensions,
press Esc.
6. To accept a rescaled object, double-click anywhere on the document.
You can also move or rotate an object when any of the transform tools are selected.
When the pointer is positioned within the selected object and it becomes a four-
headed arrow, click and drag the object to a new position. If the pointer is outside
of the selected object’s bounding box, the pointer turns into a rotate symbol; click-
ing and dragging when this occurs rotates the object around its centerpoint.
The transform tools all have a Scale Attributes option available through the Info
panel Options menu. By default, when you resize an object, the stroke, fill, and
effect settings are resized, as well. If you disable the Scale Attributes option in the
Info panel Options menu, these settings are reapplied without being recalculated.
Why might you want to do this? Although the results can be unpredictable, interest-
ing variations can occur, such as the variations in Figure 9-2.
Figure 9-2: Most of thetime you want your stroke,fill, and effects to rescalealong with your object, butturning off the ScaleAttributes option can leadto some interesting effects.
Scale Attributes checked Scale Attributes unchecked
2-pixel stroke 5-pixel stroke 2-pixel stroke
Original
123662-1 ch09.F 8/2/02 2:26 PM Page 269
Fireworks Seminar

270 Part II ✦ Mastering the Tools
In my experiments with the Scale Attributes option, the most interesting effectsoccurred when my object was filled with a gradient and the Scale Attributes optionwas turned off.
Examining skewingThe Skew tool is used to move one side of an object, while the opposing side
remains stationary. Select the Skew tool by clicking and holding the Scale tool until
you can choose the Skew tool from the flyout menu, or by pressing the keyboard
shortcut, Q, twice. Selecting the Skew tool causes transform handles to appear on
the selected object, as it does when selecting the Scale tool. The Skew handles work
somewhat differently, though:
✦ Drag any middle Skew handle in order to slant that side of the object.
✦ Drag any corner Skew handle in order to slant that side and the opposing side
in the opposite direction.
Skewing a corner is a useful technique for giving an object a dynamic appearance,
as shown in Figure 9-3.
Figure 9-3: Skew an object along one side by dragging the middle handle.
Completing a Skew operation is handled the same as completing a scaling opera-
tion: Press Esc to cancel, or double-click anywhere to accept the new shape.
Tip
123662-1 ch09.F 8/2/02 2:26 PM Page 270
Fireworks Seminar

271Chapter 9 ✦ Structuring Paths
Discovering distortingWith both the Scale and Skew tools, entire sides move when you adjust one of the
transform handles. The Distort tool (the third tool on the transform flyout) removes
this restriction. When the Distort tool is selected, you can adjust the bounding box
surrounding the selected object by dragging the handles in any direction. The
object is then redrawn to fit within the confines of the new bounding box shape,
as in Figure 9-4.
Figure 9-4: Use the Distort tool to reshape a bitmap or vector object by altering its bounding box.
The Distort tool is useful for warping flat objects — especially bitmaps — into novel
shapes, or for fitting an object into the shape of another object.
Use the Distort tool to flip a bitmap horizontally or vertically by dragging a middlehandle across the opposite side. This technique won’t automatically size thebitmap to match the original size, as do the Flip Horizontal or Flip Vertical com-mands, but you can control the sizing.
Understanding rotatingRotating is available with any of the transform tools: Scale, Skew, or Distort. Moving
your mouse cursor just outside of the bounding box causes the Rotate cursor to
appear. As you can see in Figure 9-5, an object rotates around its centerpoint and
can rotate a full 360 degrees.
Tip
123662-1 ch09.F 8/2/02 2:26 PM Page 271
Fireworks Seminar

272 Part II ✦ Mastering the Tools
Figure 9-5: An object rotates around its centerpoint when the Rotate cursor drags the object.
To rotate any object, follow these steps:
1. Select any one of the transform tools from the Tools panel, or choose the
equivalent tool from the Modify ➪ Transform menu.
2. Move your pointer outside of the bounding box. The pointer turns into a
Rotator cursor.
3. Click and drag in any direction to rotate the object.
4. To cancel the rotation and return to the original object, press Esc.
5. To accept the transformation, double-click anywhere on your document.
An object’s centerpoint is placed in the middle of the transform bounding box by
default. To change the rotation axis, click and drag the centerpoint to a new loca-
tion — the centerpoint can remain within the object’s bounding box or be placed
outside of it. If the centerpoint is placed outside of the object, the radius used
connects the centerpoint and the nearest corner handle, as shown in Figure 9-6.
Rotate cursor Centerpoint
123662-1 ch09.F 8/2/02 2:26 PM Page 272
Fireworks Seminar

273Chapter 9 ✦ Structuring Paths
Figure 9-6: Rotate an object around a different axis by dragging the centerpoint to a new location, even outside of the object’s bounding box.
Pressing Shift while you rotate an object constrains the rotation to 15-degreeincrements.
Transforming Objects NumericallyTransforming an object interactively by clicking and dragging works well for many
situations, but sometimes specifying your new measurement or rotation precisely is
preferable. For those exacting occasions, turn to Fireworks’ Numeric Transform fea-
ture. With Numeric Transform, you can scale any object up or down by a percent-
age, set a specific pixel size, or rotate to an exact degree.
To use Numeric Transform, follow these steps:
1. Select the object you want to change.
2. Choose Modify ➪ Transform ➪ Numeric Transform, or use the keyboard
shortcut, Ctrl+Shift+T (Command+Shift+T). The Numeric Transform dialog
box, shown in Figure 9-7, appears.
Tip
Centerpoint Rotation radius
123662-1 ch09.F 8/2/02 2:26 PM Page 273
Fireworks Seminar

274 Part II ✦ Mastering the Tools
Figure 9-7: The Numeric Transform dialog box gives you exacting control when scaling or rotating an object.
3. Check Scale Attributes to reapply the object’s attributes after the
transformation.
4. Check Constrain Proportions to preserve the object’s aspect ratio.
5. To scale an object proportionately:
a. Choose Scale from the Option list.
b. Enter a new percentage value in either the height or width text boxes.
If the height and width boxes are “locked” and you want to unlock them, uncheckConstrain Proportions.
6. To resize an object to a specific pixel size:
a. Choose Resize from the Option list.
b. Enter the pixel dimensions in either the width or height text boxes.
7. To rotate an object by a specific number of degrees:
a. Choose Rotate from the Option list.
b. Enter a degree value in the text box, or drag the knob to select a rotation
degree.
8. Click OK when you’re done.
Fireworks Technique: Creating PerspectiveAlthough Fireworks is hardly a 3D-modeling program, you can quickly generate per-
spective views using several of its transform and other tools. If you’ve ever taken
Drawing 101, you understand the basic principles of perspective: The particular
view you’re illustrating has a vanishing point where the imaginary lines of the draw-
ing meet on the horizon. The vanishing-point concept is most simply applied by
using a special property of the Skew tool.
Tip
123662-1 ch09.F 8/2/02 2:26 PM Page 274
Fireworks Seminar

275Chapter 9 ✦ Structuring Paths
To give an object the illusion of perspective, follow these steps:
1. Select the object you want to modify.
2. Choose the Skew tool from the Tools panel, or press the keyboard shortcut, Q,
twice.
3. Choose the direction of perspective:
• To make the object appear as if it is along a left wall, vertically drag the
top- or bottom-left corner away from the object.
• To make the object appear as if it is along a right wall, vertically drag the
top- or bottom-right corner away from the object.
• To make the object appear as if it is on the floor, horizontally drag the
bottom-left or -right corner away from the object.
• To make the object appear as if it is on the ceiling, horizontally drag the
top-left or -right corner away from the object.
4. To intensify the perspective, repeat Step 3 with the opposite corner, dragging
in the opposite direction. For example, in Figure 9-8, I dragged the bottom-
right corner away from the object and the bottom-left corner into the object
to exaggerate the effect.
Figure 9-8: Make a flat figure appear to have perspective by using the Skew tool.
Applying textures to a rectangle fill is a good way to start building a perspective
background. I’ve found that breaking up the textures into small rectangles, rather
than use one large rectangle is better. The room depicted in Figure 9-9 uses a series
of rectangles with a Wood-Light Pattern fill, which are then grouped and skewed
together to gain the perspective feel. By duplicating and flipping this skewed group,
I’m able to quickly build the other sides of the room.
Texture fills are discussed at length in Chapter 11.Cross-Reference
123662-1 ch09.F 8/2/02 2:26 PM Page 275
Fireworks Seminar

276 Part II ✦ Mastering the Tools
Figure 9-9: When using a pattern for perspective, try smaller rectangles of the same pattern, grouped and skewed together.
Dragging a corner with the Skew tool always moves the top opposite sidesequally. This operation makes an object’s vanishing point appear to be evenlyspaced between the sides of an object, which is not always the case. You can alsouse the Distort tool to drag one corner unevenly. But use the Distort tool with cau-tion — or perhaps with the Grid visible; there’s no way to snap a dragged cornerwhen using the Distort tool, and straight lines are often difficult to maintain.
Managing Points and PathsSometimes transforming an object in its entirety is more than you really want or
need to do. Fireworks offers numerous options for adjusting vector paths on a
point-by-point basis. You can easily move, add, or delete points. In addition, paths
can be joined, either to themselves — changing an open path to a closed path — or
to another path. Naturally, you can also split joined paths at any point.
Moving points with the Subselection toolMuch path work on the point level is handled through the Subselection tool. Similar
to the Pointer tool in that you use it for selecting and dragging, the Subselection
tool works on the components of the path, rather than on the path itself.
The Subselection tool is located directly to the right of the Pointer in the Tools
panel. You can also choose it through its keyboard shortcut, A. When you select a
Tip
123662-1 ch09.F 8/2/02 2:26 PM Page 276
Fireworks Seminar

277Chapter 9 ✦ Structuring Paths
path with the Subselection tool, all the points that create the path appear, not just
the path that becomes visible when you use the Pointer. Each point on a path ini-
tially resembles a small hollow square. When you approach a point with the
Subselection tool, the white pointer changes into a single white arrowhead, indicat-
ing that a point is available for selection, as shown in Figure 9-10. Clicking that point
selects it and changes the hollow square to a solid square.
Figure 9-10: Adjust paths on the point level with the Subselection tool.
If Bézier control handles aren’t visible from a point on a path, you can use theSubselection tool in combination with the Alt (Option) key in order to drag them out.
Clicking and dragging any point causes the path to move with it. You can com-
pletely reshape any path by using the Subselection tool.
Adding and removing pointsAdding or deleting points on a path is easy. Why would you want to increase the
number of points? Most commonly, the object you’re working on has a line that you
need to extend in a different direction, and the Bézier curves create too smooth a
transition. The reasoning behind removing points is just the reverse: You have a
sharp break where you would prefer a smooth curve. Additionally, drawing any
path with a freeform tool, such as the Brush or Pencil, creates many points. Not
that there is really any increased overhead, such as file size, associated with addi-
tional points; working with an object that has fewer points is just easier.
Tip
Points on the path Selected point
123662-1 ch09.F 8/2/02 2:26 PM Page 277
Fireworks Seminar

278 Part II ✦ Mastering the Tools
To add a point on a path, follow these steps:
1. Choose the Pen tool from the Tools panel, or use its keyboard shortcut, P.
2. Press and hold Ctrl (Command) to temporarily switch to the Subselection
tool.
3. Select the path that you want to work on.
4. Release Ctrl (Command).
5. Position your pointer over the area on the path where you want to add a point.
A small plus sign is added to the Pen tool pointer, as shown in Figure 9-11.
Figure 9-11: Add points with the Pen tool by clicking a selected line.
6. To add a single point, click once.
7. To add a point with Bézier control handles, click and drag.
8. Continue adding points by repeating Steps 5 through 7.
9. When you’re finished adding points, select another tool.
To delete points from a path, follow these steps:
1. Choose the Subselection tool from the Tools panel.
2. Select the path from which you want to delete points.
3. Move the pointer over the point you want to delete. A small X is added to the
pointer when you are over a point on the path.
4. Click once to select the point.
5. Press Backspace (Delete) to remove the point.
Add Point cursor badgePen tool cursor
123662-1 ch09.F 8/2/02 2:26 PM Page 278
Fireworks Seminar

279Chapter 9 ✦ Structuring Paths
To delete multiple points, press Ctrl (Command) to temporarily use the Pointertool and drag a selection rectangle around the points that you want to remove.Alternatively, hold down Shift while selecting points to keep adding to your selec-tion. Press Backspace (Delete) to remove the points.
Closing an open pathWhether by accident (“Drat, I thought I closed that path”) or design (“I like the sim-
plicity of the open path”), sometimes you need to convert an open path to a closed
path. The Pen tool makes this a simple operation.
If your path is almost closed — the end points are right next to each other — you canalso select both points with the Subselection tool and choose Modify ➪ CombinePaths ➪ Join, or you can use the keyboard shortcut Ctrl+J (Command+J) to closeyour path.
To close an open path, follow these steps:
1. Select the path you want to close.
2. Choose the Pen tool from the Tools panel.
3. Position your pointer over one endpoint of the path. An X is added to the
lower right of the Pen cursor when it is over an existing endpoint.
4. Click once on the endpoint. A small square replaces the X at the lower right of
the Pen cursor, as shown in Figure 9-12.
Figure 9-12: Use the Pen tool to close any open path.
Join Path cursor badgePen tool cursor
Tip
Tip
123662-1 ch09.F 8/2/02 2:26 PM Page 279
Fireworks Seminar

280 Part II ✦ Mastering the Tools
5. Continue the path with the Pen. With each plotted point, any stroke or effects
attributes are applied to the extended path.
6. To close the path, position the Pen over the remaining endpoint. A hollow
square appears on the lower right of the Pen cursor.
7. Click once to close the path.
If your stroke varies its thickness or opacity by speed or pressure, the section of thepath that was completed with the Pen tool may look odd because the Pen toolrecognizes neither speed nor pressure. However, you can use the Path Scrubbertools, discussed later in this chapter, to increase or reduce these types of effects.
Working with multiple pathsYou can join any path with another path with a simple command. Initially, this capa-
bility may appear to fall into the “Yeah, so what?” category; but after you realize
that paths don’t have to overlap, touch, or even be near each other, the design
possibilities expand considerably. Joining a number of simple shapes is an easy
way to make one complex shape. For example, joining empty circles with an object
effectively cuts holes in the object, as shown in Figure 9-13. Note that the joined
object has the attributes — stroke, fill, effect, and so on — of the original object that
was lowest in the stacking order (in other words, closest to the canvas).
Figure 9-13: Joining paths is an easy way to create complex objects.
Separate objects
Joined opject
Tip
123662-1 ch09.F 8/2/02 2:26 PM Page 280
Fireworks Seminar

281Chapter 9 ✦ Structuring Paths
To join two or more paths, follow these steps:
1. Select each path you would like to join with the Pointer tool.
2. Choose Modify ➪ Combine Paths ➪ Join, or Ctrl+J (Command+J).
Windows users can also select the Join button on the Modify toolbar.
After you’ve joined paths, they stay that way until you split them. To split joined
paths, choose Modify ➪ Combine Paths ➪ Split, or use the keyboard shortcut,
Ctrl+Shift+J (Command+Shift+J). In Windows, you can also select the Split button on
the Modify toolbar.
Editing PathsSo far in this chapter, most of the path editing tools have been fairly extreme;
delete, distort, rescale, rotate — these terms don’t promise much degree of subtlety.
Fireworks does offer several other tools, however, that can redraw portions of a
path or reshape an area with a varying amount of pressure. And for those times
that require a precise, almost surgical removal of path segments, Fireworks offers a
Knife tool that performs as sharply as any real blade.
Redrawing a pathIf you’ve ever drawn a shape that was perfect except for one little area of it, you’ll
greatly appreciate the Redraw Path tool. As the name implies, this tool enables you
to redraw any portion of a completed path, in effect throwing away the portion of
the original path that you’re replacing.
The Redraw Path tool, found in the flyout under the Pen tool, is a freehand drawing
tool. When you’re redoing a segment of a path, you initially select any part of the
path to start redrawing and then reconnect to the original path. Fireworks erases
the portion of the original path that is between the beginning and the ending points
of your redrawn section and connects your new path to the old path.
To redraw a portion of a path, follow these steps:
1. Select the path you want to redraw.
2. Choose the Redraw Path tool from the flyout under the Pen tool. Alternatively,
you can press the keyboard shortcut, P, three times.
3. Move the pointer over the area of the path where you want to start redrawing.
Fireworks displays a small caret (^) in the lower right of the pointer when you
are in position over the path.
123662-1 ch09.F 8/2/02 2:26 PM Page 281
Fireworks Seminar

282 Part II ✦ Mastering the Tools
4. Click and drag out your new path.
5. Position your pointer over the original path in the spot where you want to
connect the new and old paths, and then release the mouse button. Fireworks
removes the old path segment and connects the new path segment.
The Redraw Path tool isn’t just for correcting mistakes, though. Figure 9-14 shows
how you can use the Redraw Path tool to make a portion of a geometric shape more
organic-looking.
Figure 9-14: The Redraw Path tool can easily alter a standard shape into something unique.
Pressing Shift while using the Redraw Path tool constrains your replacement pathto lines in increments of 45 degrees.
Examining the Freeform and Reshape Area toolsLooking for a cool tool to give your objects that unique twist? Look no further than
Freeform tool and the Reshape Area tool. Rather than add or delete points as with
other tools, these reshaping features enable you to sculpt a path, pulling and push-
ing a line like stretchable clay.
Although similar, a couple of key differences exist between the two tools:
Tip
Original object
Modified with Redraw Path tool
123662-1 ch09.F 8/2/02 2:26 PM Page 282
Fireworks Seminar

283Chapter 9 ✦ Structuring Paths
✦ Freeform: Both pushes and pulls a segment of a selected path.
✦ Reshape Area: Only pushes a path, but controls the degree it pushes through
the strength field in the Property inspector. Moreover, this tool can reshape
an entire object, as well as just a segment.
Pushing a path into a new shapeTo push a path into a new shape with the Freeform tool, follow these steps:
1. Select the path you want to alter.
2. Choose the Freeform tool from the Tools panel, or use its keyboard
shortcut, O.
3. Position your cursor slightly off the path that you want to push. This could be
to either side of an open path, or inside or outside of a closed path.
Positioning your cursor slightly off a path enables the Freeform push cursor. Posi-tioning your cursor directly on a path enables the Freeform pull cursor, coveredlater in this chapter.
The cursor changes into a circle, as shown in Figure 9-15. Think of the circle
as an object that you use to push against the stroke.
Figure 9-15: Round out your paths with the Freeform tool’s push mode.
Freeform push cursor
Note
123662-1 ch09.F 8/2/02 2:26 PM Page 283
Fireworks Seminar

284 Part II ✦ Mastering the Tools
4. Click and drag the ball cursor into the path, pushing it into a new shape.
Pushing a closed path too fast or too far results in an overlapping path line withunpredictable results.
5. Release the mouse button when you’re satisfied with the shape.
Pulling a path segment into a new shapeTo pull a segment of a path into a new shape, follow these steps:
1. Select the path you want to alter.
2. Choose the Freeform tool from the Tools panel, or use its keyboard shortcut, O.
3. Position your cursor directly over the segment of the path that you want to
pull. An S-curve is added to the lower right of the Freeform tool’s cursor, as
shown in Figure 9-16.
Figure 9-16: The Freeform tool is used to pull out a segment of a path.
4. Click and drag in the direction that you want to pull the segment. You can pull
the path away from or into the object.
5. Release the mouse button in order to complete the pull.
Freeform pull cursor
Caution
123662-1 ch09.F 8/2/02 2:26 PM Page 284
Fireworks Seminar

285Chapter 9 ✦ Structuring Paths
Fireworks adds as few pixels as possible when you are pulling with the Freeform
tool. Pulling is like pinching just the one point of the path and dragging it away from
the rest of the shape. By contrast, the push mode of the Freeform tool is similar to
using a ball to reshape the path. The size of the ball with which you push is deter-
mined through the Property inspector when the Freeform tool is selected.
Learning about the Freeform tool’s optionsTo alter the size of the ball used with Freeform push mode, select the Freeform tool
to view its options in the Property inspector, shown in Figure 9-17, and enter a new
value in the Size text box, or use the slider to choose a new pixel size. The Size
option ranges from 1 to 500 pixels.
Figure 9-17: The Property inspector enables you to set the Freeform tool’s options, such as the size of the push cursor.
The Property inspector offers two other options for the Freeform tool. The Preview
option draws the stroke and fill, if any, while you use the Freeform tool. Although
this can be a bit processor-intensive, I enable it whenever I’m using Freeform on an
object with a wide stroke, such as an Airbrush, because the final effect can be so
different from just the path. When the Preview option is not on, you see both the
old outline and the new one while you are using the tool; when you stop drawing,
the old outline vanishes.
The other option, Pressure, is generally useful only if you’re using a pressure-sensi-
tive graphics tablet. When enabled, a medium amount of pressure specifies a push
cursor to the size set in the Property inspector; lighter amounts of pressure reduce
the size, and greater amounts increase it.
Altering a vector object with one operationThough the Reshape Area tool, when set to a small size, achieves similar effects to
the Freeform tool, that’s not what makes it special. The Reshape Area tool is best
when used to warp or to reshape an entire object. Take Figure 9-18, for example. I
start with a star created with the Polygon tool and then apply the Reshape Area
tool, set to a size on the Property inspector that is larger than the star. By dragging
the Reshape Area tool over the star, I transform the entire standard shape — not
just one segment — into something unique.
123662-1 ch09.F 8/2/02 2:26 PM Page 285
Fireworks Seminar

286 Part II ✦ Mastering the Tools
Figure 9-18: The Reshape Area tool can alter an entire vector object with one operation.
To use the Reshape Area tool, follow these steps:
1. Select the path you want to alter.
2. Choose the Reshape Area tool from the flyout underneath the Freeform tool,
or press the keyboard shortcut, O, twice.
Each time you press O, you toggle between the Freeform and Reshape Areatools.
3. Position your pointer over the object that you want to reshape.
4. Click and drag in the desired direction.
5. Release the mouse button when you’re satisfied with the resulting object.
As with the Freeform tool, the Size is set on the Property inspector; you’ll also find
a Pressure option that functions in the same manner as the Freeform tool. In addi-
tion, the Reshape Area tool has a Strength option. The Strength value determines
the strength of the Reshape Area tool’s gravitational-like pull. Strength is percent-
age based; at 100 percent, you get the maximum effect from the tool. If you’re using
a pressure-sensitive graphics tablet, you can alter both the size and the strength of
the Reshape Area tool while drawing with your stylus.
Don’t have a graphics tablet yet? To simulate a lighter stylus touch, use either 1 or the left arrow key; pressing 2 or the right arrow key simulates increasing thepressure on a graphics pad.
Tip
Tip
123662-1 ch09.F 8/2/02 2:26 PM Page 286
Fireworks Seminar

287Chapter 9 ✦ Structuring Paths
Discovering the Path ScrubberThe Path Scrubber tools are fairly subtle compared to the other tools covered in
this chapter. If you’ve experimented with strokes such as Airbrush, you’ve noticed
how the stroke can change according to how fast or, with a graphics tablet, how
much pressure you use when you draw. The Path Scrubber tools alter these
variables, after you’ve completed the path. One Path Scrubber tool increases the
interactive effect, and one lessens it, as shown in Figure 9-19.
Figure 9-19: The Path Scrubber tools can turn a simple path into one that resembles one created with a pressure-sensitive pen and tablet.
To use the Path Scrubber tools, follow these steps:
1. Apply a stroke to your path that uses speed- or pressure-sensitive effects,
such as Air Brush.
2. If you want to increase the pressure effect, choose the Path Scrubber Plus
tool; if you want to decrease the pressure effect, choose the Path Scrubber
Minus tool. Both are in the flyout underneath the Freeform tool.
3. Trace over the portion of the path where you want to adjust the speed or
pressure effect.
Path Scrubber cursor
Scrubbed path
Simple path
123662-1 ch09.F 8/2/02 2:26 PM Page 287
Fireworks Seminar

288 Part II ✦ Mastering the Tools
Using the Property inspectorWhen Fireworks draws a path, both speed and pressure data are gathered. The Path
Scrubber tools can work with either the speed or pressure information, or both;
moreover, they can do it at a variable rate. The Property inspector has all the
controls you need for these tools:
✦ Rate: The relative strength of the tool. Pick a value from 10 (the most effect)
to 1 (the least effect).
✦ Pressure: Enabling this option directs the Path Scrubber tools to adjust the
path, according to the simulated pressure of the stroke.
✦ Speed: Enabling this option directs the Path Scrubber tools to adjust the path
according to the simulated speed of the stroke.
Understanding the KnifeOne of my favorite — and most useful — design tools is my X-acto knife. The capa-
bility to finely trim the tightest curves has saved me many times. The computer
equivalent of this excellent implement is the Knife tool. Basically, the Knife tool
divides one path into two separate paths.
The Knife cuts paths by drawing a line where you want the separation to take place.
You can use the Knife tool on open or closed paths, or on any path-based object.
With an open path, you need only intersect the path once in order to make the cut
once. With a closed path, you have to draw a line all the way across the object with
the Knife, as shown in Figure 9-20.
Figure 9-20: The Knife stroke on the left cut the object into two pieces, which can then be pulled apart, as shown on the right.
123662-1 ch09.F 8/2/02 2:26 PM Page 288
Fireworks Seminar

289Chapter 9 ✦ Structuring Paths
To use the Knife, follow these steps:
1. Select the path you plan to divide.
2. Choose the Knife tool from the Tools panel, or use the keyboard shortcut, Y.
3. Draw a line through the path with the Knife tool. Fireworks separates the
path, although this is not always immediately obvious because both new
paths are still selected.
4. To move one of the newly divided paths, choose the Pointer tool and click
once on the canvas away from any object. The split paths are deselected.
5. Select either portion of the original path. Only one part is now selected and
can be deleted, moved, or otherwise modified.
The Knife tool is also great for making specific shapes, such as arcs. Just draw a
standard circle and then use the Knife to slice off a portion of it. As with many
tools, pressing Shift constrains the Knife to angles with increments of 45 degrees.
Discerning path operationsThe more you work in vector-based drawing programs such as Fireworks, the
sooner you begin to look for new and novel shapes. Face it, no matter how many
points you put on that star, it’s still a star. Whereas you can warp and reshape any
existing object using the various tools described elsewhere in this chapter, creating
a compound shape composed of two or more basic shapes is often far easier.
You can find all the commands that merge paths — Union, Intersect, Punch, and
Crop — under the Modify ➪ Combine Paths menu option. You can find the stroke
commands — Simplify, Expand Stroke, and Inset Path — under Modify ➪ Alter
Path menu.
When you combine multiple paths, the stroke, fill, and effects settings of the bottom
object in the stacking order — the one closest to the canvas — are applied to the
new combined object.
Understanding the Union commandThe Union command enables you to combine two or more objects into one merged
object. One technique that helps me decide whether the Union is the proper
command to use is that time-honored artist’s tool, squinting. After I’ve positioned
objects with which to form my new shape, I lean back from the monitor and squint
so that I can see just the outline of the new shape. That’s precisely what Union
does — it combines the shapes into an overall outline and removes any overlapping
areas.
123662-1 ch09.F 8/2/02 2:26 PM Page 289
Fireworks Seminar

290 Part II ✦ Mastering the Tools
The technique for using Union, as with all the Combine commands, is straightfor-
ward. Just position your objects, select them all, and then choose Modify ➪Combine Paths ➪ Union. Occasionally, you have to adjust the individual paths to
get them just right. For example, when I created the martini glass in Figure 9-21, I
united three objects: a triangle, a rectangle, and a custom Pen-drawn shape for the
base. After my first attempt, I realized that the rectangle and the base didn’t quite
match, so I chose Edit ➪ Undo — okay, I actually used the shortcut, Ctrl+Z
(Command+Z) — and adjusted the base. Then, after reselecting them and reissuing
the command, I was ready to pour.
Figure 9-21: I combined the three objects on the left with the Union command to form the new object on the right.
Examining the Intersect commandWhereas Union throws away the overlapping parts of combined paths, Intersect
keeps only the overlapping areas from all selected paths. Believe it or not, the key
word in the previous sentence is all — if even one object doesn’t overlap at least
some part of all the other selected objects, the Intersect operation erases all of
your objects. With that caveat out of the way, you’ll find Intersect to be a useful
command. I mean, how else could you create the perfect pizza slice, as I did in
Figure 9-22? After the two objects on the left were selected, I chose Modify ➪Combine Paths ➪ Intersect. Pizza’s ready!
123662-1 ch09.F 8/2/02 2:26 PM Page 290
Fireworks Seminar

291Chapter 9 ✦ Structuring Paths
Figure 9-22: Combining a circle and a triangle with the Intersect command creates the perfect pizza slice.
Using the Punch commandRemember the paper punch you had in school? That little handheld device that
took a round bite out of whatever you could get between its jaws? The Punch
command uses the same concept, except you define the punch shape to be any-
thing you want. When two vector objects overlap, the shape on top is punched out
of the shape on the bottom. You can see the Punch command illustrated in Figure
9-23, as I continue the food metaphors with the creation of a doughnut, of sorts.
After making sure that my two circles were centered on each other, I selected
them both and chose Modify ➪ Combine Paths ➪ Punch.
Figure 9-23: The Punch command removes the shape of the top object from the bottom object.
What happens when you apply the Punch command to more than two selectedobjects? The top object is still used as the punch pattern — and all the objects areaffected, but not joined.
Tip
123662-1 ch09.F 8/2/02 2:26 PM Page 291
Fireworks Seminar

292 Part II ✦ Mastering the Tools
Exploring the Crop commandPlainly put, Crop is the opposite of Punch. With Punch, the top object is cut out of
any other selected object. With Crop, the bottom object forms the clipping path for
the top object. To round out our food-like illustrations of the Combine commands,
Figure 9-24 disposes of all but the last bite of a cookie. I created the shapes of the
remains, joined the shapes into a single object, selected that object and the cookie,
and then chose Modify ➪ Combine Paths ➪ Crop. Almost completely gone in
one bite.
Figure 9-24: With the Crop command, the shape of the original top object provides the shape of the resulting object.
Looking at the Simplify commandFreeform drawing tools are terrific for quickly sketching out a specific shape. But,
quite often, the computer representation of your flowing strokes turns out pretty
blocky. The Simplify command is designed to reduce the number of points used in a
path while maintaining the overall shape of the object.
If you choose Modify ➪ Alter Path ➪ Simplify, the Simplify dialog box opens and
enables you to specify the number of pixels affected. The range is from 1 to 100; a
relatively low value of 12 was used to dramatic effect in Figure 9-25. The original
hand-drawn fellow on the left has too many points; trimming them down by hand
would be arduous. After I applied the Simplify command, a smoother, simpler
object resulted. That’s not necessarily the last step, though. Usually, you find
yourself tweaking a simplified object’s Bézier handles in order to get things
just right.
123662-1 ch09.F 8/2/02 2:26 PM Page 292
Fireworks Seminar

293Chapter 9 ✦ Structuring Paths
Figure 9-25: After the Simplify command is applied to the original hand-drawn paths, the result is the smoother and simpler gentleman on the right.
Applying the Expand Stroke commandAlthough you can accomplish much with an open path through the Stroke section
of the Property inspector, sometimes you need a fill, as well. The Expand Stroke
command offers an easy way to convert any path — open or closed — into a larger
closed path by enclosing the existing path, and then deleting it.
When you apply this command by choosing Modify ➪ Alter Path ➪ Expand Stroke,
the Expand Stroke dialog box appears, as shown in Figure 9-26. As you can see, it
offers quite a few options that enable you to control exactly what kind of path to
use to expand the stroke. The options include the following:
Figure 9-26: Choose your options in the Expand Stroke dialog box in order to make a wide range of Expanded strokes.
123662-1 ch09.F 8/2/02 2:26 PM Page 293
Fireworks Seminar

294 Part II ✦ Mastering the Tools
✦ Width: Determines the final width of the expanded stroke. The range is from
1 to 99 pixels.
✦ Corners: Choose from three types of corners. From left to right, the buttons
represent:
• Miter: With a miter corner, the outside edges of the path extend until
they touch in a sharp corner. Because miter corners can become quite
long, you can limit their length with the Miter Limit option, which is
explained in this list.
• Round: The corner is rounded equally from both sides of the path
approaching the corner. Round corners and round end caps are often
used together.
• Bevel: The corner is cut off at the center of the meeting paths, rather
than on the outside edge, as with the miter corner. This results in a
truncated corner.
✦ Miter Limit: The number of pixels the miter corner can extend before being
cut off. The Miter Limit works only with miter corners.
✦ End Caps: Choose among the following three End Cap types for closing off the
expanded path:
• Butt Cap: The Butt Cap creates a right-angle End Cap where the end is
perpendicular to the last point of the stroke.
• Square Cap: Similar to the Round Cap, the Square Cap attaches a square
to the end of the path, extending it the same radius as half the set width.
• Round Cap: A Round Cap attaches a semicircle to the end of the path,
extending it the same radius as half the set width.
Figure 9-27 shows the three different End Cap types, as well as an example of what
it looks like to change an object that consists of strokes and fills into an object
made up entirely of fills. After you’ve expanded the strokes, set the stroke to None,
and apply a fill to the whole object. Note that the third and fourth face use the hair
from the first face.
Discovering the Inset Path commandWhereas Expand Stroke applies strokes on both sides of a selected path, Inset Path
only applies strokes on one side. The Inset dialog box is identical to the Expand
Stroke dialog box, except for the addition of Inside and Outside options. You get the
most predictable results with Inset Path if you apply it to closed paths, but you can
use it with any kind of path, except straight lines.
Often, a plain and boring object can be replaced with an interesting variation just
by applying the Inset Path command, as shown in Figure 9-28.
123662-1 ch09.F 8/2/02 2:26 PM Page 294
Fireworks Seminar

295Chapter 9 ✦ Structuring Paths
Figure 9-27: The Expand Stroke command can change strokes to fills.
Figure 9-28: Create variations of an object with the Inset Path command.
Strokes expanded No stroke, pattern fill
Original object No stroke, radial fill
Original stroke Square Cap
Butt Cap Round Cap
123662-1 ch09.F 8/2/02 2:26 PM Page 295
Fireworks Seminar

296 Part II ✦ Mastering the Tools
One of my favorite applications of the Inset Path command is to create concentric
shapes, each one within the next.
To use the Inset Path command to create concentric shapes, follow these steps:
1. Select the closed path to which you want to add concentric shapes.
2. Choose Edit ➪ Clone. Because Inset Path erases the original path, you must
apply the command to a clone of the original path.
3. Choose Modify ➪ Alter Path ➪ Inset Path. The Inset dialog box appears.
4. Choose the Direction, Width, and Corner option. If you choose the Miter
Corner, you can enter a Miter Limit. Click OK when you’re done. The new path
is drawn and the old path is deleted.
5. Repeat Steps 2 through 4 for as many concentric shapes as desired, keeping
the same values in the Inset dialog box in order to create equidistant shapes.
After you’ve created your basic shapes, you can go in and vary the stroke width or
other settings in order to create interesting effects.
SummaryMastering the manipulation of paths is essential in order to achieve the most that’s
possible with Fireworks. You can distort, resize, rotate, and adjust vector objects in
many subtle ways in order to create the basic shapes you need for unique Web
graphics. When altering Fireworks objects, keep these points in mind:
✦ You can manipulate objects as a whole by using the transform tools: Scale,
Skew, and Distort.
✦ You can rotate an object using any one of the transform tools.
✦ For precise sizing or rotation, use the Numeric Transform feature.
✦ The Skew tool is great for simulating perspective views — especially of bitmap
objects. You can enhance the illusion by adding simulated light and shadow
effects.
✦ Whereas the Pointer is used to move an entire path, the Subselection tool is
used to maneuver individual points — and their Bézier control handles.
✦ After you draw a path, you can edit it in numerous ways by using tools such
as Freeform, Redraw Path, Redraw Area, and Path Scrubber.
✦ The Union, Intersect, Punch, Crop, Simplify, Expand Path, and Inset Path
commands are extraordinary power tools for working with paths in Fireworks.
In the next chapter, you learn about adding text to your Web graphics in Fireworks.
✦ ✦ ✦
123662-1 ch09.F 8/2/02 2:26 PM Page 296
Fireworks Seminar

Composingwith Text
Text has a special place in Web graphics. Although most
text — paragraphs, lists, and tables of information — is a
product of the HTML page viewed through a browser, graphic-
based text is generally used to create logos, fancy headings,
and other decorative elements that aren’t possible with basic
HTML. In addition, text is an integral part of a key Web
element: navigation. Many navigation buttons use text, either
alone or in combination with symbols, to quickly convey
meaning.
Before Fireworks, a recurring nightmare for Web designers
involved modifying a text graphic. Whether it was a typo or a
client change-of-mind that forced the revision, the designer
was stuck having to redo an entire graphic because any text,
once applied, was just another bunch of pixels. Fireworks
changed all that with the introduction of editable text. Now,
if a client’s logo changes because of a $7-billion merger,
or you just forgot to put the period at the end of Inc., text
modifications are just a double-click away.
A few programs have since followed Macromedia’s lead, but
Fireworks still leads the way. In this chapter, I show you basic
things such as choosing fonts and aligning text, as well as
more advanced features, such as attaching text to a path.
You also learn a technique that enables you to combine
images with text using Fireworks Mask Groups.
Working with TextIn Fireworks, all text creation and modification can take place
onscreen, right in your document window just like the other
drawing tools. For those who like to compose inside the box,
Fireworks includes a Text Editor, covered later in this chapter,
but onscreen text, combined with the options available in the
Property inspector, makes for a more robust experience.
1010C H A P T E R
✦ ✦ ✦ ✦
In This Chapter
Composing text
Inserting text files
Applying strokes andfills to text
Changing from textto paths
Flowing text ona path
Masking imageswith text
✦ ✦ ✦ ✦
133662-1 ch10.F 8/2/02 2:27 PM Page 297
Fireworks Seminar

298 Part II ✦ Mastering the Tools
When you click the text tool on the canvas, a bounding box appears in the current
Fireworks document, with a flashing cursor waiting for your text input. The text
object has many, but not all, of the properties of a path object — you can, for
example, use the transform tools such as Skew, but you can’t use the Reshape
Area tool to warp the text as you can a path. On the other hand, text objects have
features unlike any other object, such as the capability to be aligned to a path,
for example, a circle. If necessary, converting a text object to a path object or an
image object is possible, but you can no longer edit the text.
Onscreen text is new to Fireworks MX. No longer are you confined to the TextEditor; now you can type directly onto the canvas. Talk about thinking outside ofthe box! Of course, should you want to use it, the Text Editor is only a menu away.
You can use the Text tool two ways:
✦ Click once on the canvas with the Text tool to set a starting point for your
text. If necessary, the text flows to the edge of the current document and
expands downward toward the bottom of the document.
✦ Drag out a rectangular text region with the Text tool. The text created in the
Text Editor wraps on the horizontal boundaries of the established region and,
if necessary, expands downward.
The general steps for inserting text into a Fireworks document are as follows:
1. Select the Text tool from the Tools panel, or use the keyboard shortcut, T.
2. Set the text area by
• Clicking once on the document where you want the text to start
• Dragging out a text area for the text to fit into
Either method creates a text object bounding box and prepares Fireworks for
text entry.
3. From the Property inspector, choose the text characteristics, such as font,
size, color, and alignment.
4. Type the text you want to type, and it appears directly in the document
window. As you can see in Figure 10-1, when the Text tool I-beam is inside a
text block, you see a small, right pointing triangle. This indicates that you can
select text or move the insertion point within a text block.
If you find that you need to reposition your text block as you’re typing, hold downCtrl (Command) to temporarily enable the Hand tool, and you’ll be able to dragyour text block around. When your text block is positioned correctly, simply releaseCtrl (Command) and continue typing.
5. Click the canvas, or the workspace, once when you’re done typing to cease
text entry.
Tip
NewFeature
133662-1 ch10.F 8/2/02 2:27 PM Page 298
Fireworks Seminar

299Chapter 10 ✦ Composing with Text
Figure 10-1: Text is typed directly into the document window, making it easy to position. The Text tool changes when you’re over a text block.
When you’ve finished with a text object, you can move it as you would any other
Fireworks object, by clicking and dragging with the Pointer tool. To adjust the
shape of the text object, drag any of the six handles that become available when
you select the object.
Dragging a text object’s handles doesn’t resize the text itself, but instead changes theoutside boundaries of the text object, after which the text reflows through its newboundaries. A text object can only be vertically resized to fit the current text itcontains. If you want your text object to take up more vertical room, select it andchoose a larger font size from the Text ➪ Size menu or from the Property inspector.
When you need to edit an existing text object, there are a couple of ways to
accomplish the task. You can choose the Text tool and hover it over an existing text
object; when the I-beam cursor gains a small, right-pointing triangle, click once to
place the cursor in that position in your text object. You also can select the text
object as you would any other Fireworks object, and then choose Text ➪ Editor.
Finally, the most efficient method (and certainly my most often used one) is to
double-click the text object with the Pointer or Subselection tool; your insertion
point appears at that location within the text box.
Using the Text EditorThe Text Editor, shown in Figure 10-2, is a separate window with a full range of text
controls and its own preview pane. After you click the canvas with the Text tool, a
text object appears in the current Fireworks document, surrounded by a bounding
Note
133662-1 ch10.F 8/2/02 2:27 PM Page 299
Fireworks Seminar

300 Part II ✦ Mastering the Tools
box. The Text Editor can then be opened by either selecting an existing block of
text, choosing the Text tool and clicking the canvas to create a new text block, and
then choosing Text ➪ Editor. Alternatively, if you already have a text block in your
document, you can select it and then choose Text ➪ Editor.
Figure 10-2: You can use the Text Editor to compose and edit text for those occasions when onscreen text use can be awkward, such as when dealing with very small font sizes.
The general steps for inserting text with the Text Editor are as follows:
1. Select the Text tool from the Tools panel, or use the keyboard shortcut, T.
2. Set the text area by
• Clicking once on the document where you want the text to start
• Dragging out a text area for the text to fit into
3. Choose Text ➪ Editor to open the Text Editor.
4. From the Text Editor, choose a text characteristic, such as font, size, color,
or alignment.
5. Click in the Preview pane and input the text. If Auto-Apply is enabled,
Fireworks updates the text object in the document after each keystroke.
6. Click OK when you’re done.
Pressing Enter (Return) when your cursor is in the Preview pane adds a line break,as you might expect. Unfortunately, the OK button in the Text Editor is highlighted,which may tempt you to press Enter (Return) to dismiss the Text Editor dialog box.Instead, press the other Enter — on the numeric keypad — to dismiss the Text Editor.
Tip
133662-1 ch10.F 8/2/02 2:27 PM Page 300
Fireworks Seminar

301Chapter 10 ✦ Composing with Text
After the text object is onscreen, you move it by clicking and dragging with the
Pointer tool, just as with any other Fireworks object. To change the shape of the
text object, drag any of the six handles that become available when you select
the object.
When you want to edit an existing text object using the Text Editor, select the text
object as you would any other Fireworks object, and then choose Text ➪ Editor.
Enabling Text Editor optionsThe final elements found in the Text Editor are the options: two for the Text Editor
itself and three for the final product. To get the closest approximation possible in
the Preview pane, enable both the Show Font and Show Size & Color options. The
Show Font option displays the text in the current selected typeface. When the Show
Font option is turned off, the Preview pane shows text in a sans serif font, such as
Arial or Helvetica. The Size & Color option — no surprises here — enables you to
see your text in the current size and color. Without this option enabled, you see
text at approximately 24 points and black.
The three other options, Anti-Alias, Auto Kern, and Apply, are applicable to the
text object. The Anti-Alias option smoothes the text by providing an antialiased
edge to the fill for the text object. Auto Kern, as discussed in the upcoming section
“Adjusting text spacing,” uses a font’s kerning pairs. Apply enables any changes
made in the Text Editor to be automatically updated and viewed in the document’s
text object.
In my way of working, only occasionally do these features actually become
optional. If I have a large block of text in the Preview pane, I might disable the Size
& Color option, but I almost never turn off the Font option. Only when trying to
achieve a special effect would I even consider disabling either Anti-Alias or Auto
Kern. But I’ve noticed that I’m totally dependent on the Apply function for constant
feedback as I work.
Choosing basic font characteristicsWith either the Text tool, or a text object, selected, you have full control over the
look and style of your text through the Property inspector. The Property inspector
offers two methods of working when it comes to setting up your text. To set your
options, use either one of the following techniques:
✦ Select the Text tool and set the font attributes prior to clicking the canvas to
create a text object.
✦ Use the text tool to select the text you want to modify in the document
window — all or a portion — and then alter the attributes.
You can find all the core characteristics in the Property inspector, as shown in
Figure 10-3.
133662-1 ch10.F 8/2/02 2:27 PM Page 301
Fireworks Seminar

302 Part II ✦ Mastering the Tools
Figure 10-3: Select your font typeface, size, color, style, and so forth from theProperty inspector.
The basic attributes are very straightforward to establish:
✦ Font: To choose a typeface, select a name from the Font list. The Font list
displays all the available TrueType or Type 1 fonts on your system.
Windows users can also select the Font list itself and either use the cursor keys tomove up or down the list, one font at a time, or type the first letter of a font’sname to jump to that part of the list.
✦ Size: Choose the text size using the Text Size slider, or by entering a value
directly in the Text Size box. Size is the height of a font in points. Fireworks
accepts sizes from 4 to 1,000 points, although the slider only goes from
8 to 128.
You can also adjust text size by using the Scale tool on your text object, just as youwould resize any other object. Although the text remains editable, its point size inthe Property inspector or Text Editor doesn’t change as you resize it. This canbecome confusing when you attempt to edit a huge text object and find that itsays it’s 10pt.
✦ Color: Initially, text is applied based on the color specified in the Fill color
well. However, you can easily choose a new text fill color by clicking the color
well in the Property inspector. The standard pop-up color picker is displayed
with the current swatch set. Each character in your text object can have its
own color.
✦ Style: Choose from Bold, Italic, and Underline styles for your text; each style
button is a toggle, and you can apply any or all to one text object.
The Underline style is useful for mimicking hyperlinks in design mock-ups youmight create for client approval, before actually making any HTML.
All the basic attributes are applicable on a letter-by-letter basis. You can — although
it’s inadvisable for aesthetic reasons — change every letter’s font, size, color, or
style. Ransom notes were never easier.
Tip
Caution
Tip
Text styles
Color wellText size slider
Text size boxFont list
133662-1 ch10.F 8/2/02 2:27 PM Page 302
Fireworks Seminar

303Chapter 10 ✦ Composing with Text
Discovering paragraph spacingThe amount of spacing that is applied to paragraphs in Fireworks is user
configurable. If you don’t like the default amount of space that appears between
paragraphs, then you can adjust it through the Property inspector.
The paragraph spacing options are new to Fireworks MX.
The steps for adjusting paragraph spacing in text in Fireworks document are as
follows:
1. Select a block of text that you have entered, ideally consisting of at least two
paragraphs, or enter some new paragraphs now.
2. If you wish to adjust the space before a paragraph, enter a value in the Space
preceding paragraph field on the Property inspector, or adjust the slider to
the desired point.
3. If you wish to adjust the spacing following a paragraph, enter a value in the
Space after paragraph field on the Property inspector, or adjust the slider to
the desired point.
Adjusting text spacingAdjustments to determine how text is situated within the text object occur in the
Property inspector. Fireworks includes five text-spacing controls, as shown in
Figure 10-4.
Figure 10-4: Control your text character and line positioning through the Fireworks text-spacing controls.
Left Stretched
Right
JustifiedCenterSpace preceedingparagraph
Paragraphindent
LeadingKerning
Space after paragraph
Baseline shift
Auto Kern checkbox
Horizontal Scale
NewFeature
133662-1 ch10.F 8/2/02 2:27 PM Page 303
Fireworks Seminar

304 Part II ✦ Mastering the Tools
KerningKerning determines how close letters appear to each other. The default value of 0
percent uses the standard font spacing. Increasing the Kerning slider (1 percent to
100 percent) moves letters further apart, whereas decreasing it (–1 percent to –100
percent) moves letters closer together, or overlaps them. Alter the kerning between
two letters by placing the cursor between the letters in the Preview pane of the
Text Editor and moving the Kerning slider, or entering a new value. To change the
kerning for a range of letters, or the entire text in the Preview pane, select the
letters before changing the kerning value.
If you are using the Text Editor, the Preview pane does not show changes in thekerning. However, if you have the Auto-Apply option checked, you can see theeffect of kerning on your text object in the document itself after each change.
In the Text Editor, you can position your cursor between characters and useAlt+Left/Right Arrow Keys and change the kerning between characters more easilyand quickly. This is not possible in Text mode (typing directly on the canvas).
Auto KernMany fonts define the spacing for kerning pairs, such as the letters “WA” or “ov,”
which fit together, to make text more legible. Some fonts come with as many as 500
kerning pairs defined. Fireworks applies the kerning pair information whenever the
Auto Kern option is enabled. The Auto Kern option affects the entire text object.
The effect of kerning pairs is most noticeable in the larger font sizes. The top
text object in Figure 10-5 has Auto Kern enabled, which is the default. The bottom
object is identical, except that the Auto Kern option has been unchecked. Note the
differences in the overall length of the word, as well as how the first A fits between
the W and the V. Leave Auto Kern checked unless you have a specific reason not
to do so.
Figure 10-5: The Auto Kern option uses a font’s built-in spacing for better kerning, as shown in the top text object.
Auto Kern on
Auto Kern off
Tip
Note
133662-1 ch10.F 8/2/02 2:27 PM Page 304
Fireworks Seminar

305Chapter 10 ✦ Composing with Text
LeadingLeading (pronounced ledding as in lead, the metal) is the printer’s term for line
spacing. In Fireworks, leading is expressed as a percentage of the font size and only
affects text with multiple lines. Single-spaced lines use the default 100 percent; a
value of 200 percent would give you a double-spaced paragraph. Leading values less
than 90 percent or so cause lines to touch or overlap (see Figure 10-6). Unless you’re
creating a special effect, you probably want to keep your leading at 90 percent or
higher.
Figure 10-6: The Leading value controls the space between multiple lines of text.
Horizontal ScaleYou can alter the relative width of any text through the Horizontal Scale control.
The range of the Horizontal Scale slider is from 50 percent to 300 percent, but you
can specify another value through the text box. You can see the effect of the
Horizontal Scale in Figure 10-7, where the same text is presented at 200 percent,
100 percent, 50 percent, and 25 percent. Horizontal Scale does not display in the
Preview pane of the Text Editor.
Don’t confuse kerning and Horizontal Scale. Kerning affects the space betweenindividual characters while Horizontal Scale affects the characters themselves.
Baseline ShiftIf you’re building a Web site on which chemical formulas are a key element, you’ll be
happy to discover the Baseline Shift control. Normally, all text is rendered along the
same baseline so that the bottoms of most letters are aligned. The Baseline Shift
control enables you to place letters or words above or below the normal baseline.
Fireworks specifies the Baseline Shift value in points: Negative values go below the
Note
Leading at 70%Leading at 130%Leading at 100%
133662-1 ch10.F 8/2/02 2:27 PM Page 305
Fireworks Seminar

306 Part II ✦ Mastering the Tools
baseline, and positive values go above. For a standard subscript letter, such as the 2
in H2O, use a negative value about half the size of the current font (see Figure 10-8).
Likewise, for a superscript, choose a positive value; again, about half the current
font size.
Figure 10-7: Change the width of a text object by adjusting the Horizontal Scale slider in the Text Editor.
Figure 10-8: Specify a new Baseline Shift value for subscript characters such as the 2 in H2O, and superscript characters such as the (r) and the (c).
Aligning textAll text objects, when selected in the Fireworks document, are surrounded by a
bounding box. The bounding box sets the position of the text through its upper-left
corner coordinates, but it also determines the limits for the text block. Most
importantly, all alignment for the text is relative to the bounding box.
Superscript
Subscript
Horizontal Scale 200%
Horizontal Scale 100%
Horizontal Scale 50%
Horizontal Scale 25%
133662-1 ch10.F 8/2/02 2:27 PM Page 306
Fireworks Seminar

307Chapter 10 ✦ Composing with Text
You can apply different alignment options to different text in the same text object,
as long as each piece of text is on its own line. Figure 10-9 illustrates this capability
with each of the five horizontal alignment options in one paragraph, as well as
showing whole paragraphs of each option.
Figure 10-9: Fireworks offers many text alignment options.
The Text Editor contains controls for specifying text alignment (see Figure 10-10).
Text can be Horizontal Left to Right (the default), Horizontal Right to Left, Vertical
Left to Right (the default), or Vertical Right to Left, depending on what you choose
from the Set text orientation pop-up.
Figure 10-10: Use the Set text orientation pop-up Horizontal Alignment controls to align text left, center, right, justified, or stretched.
When Horizontal Left to Right or Horizontal Right to Left are selected, the alignment
options affect your text the same way. The only thing that changes is the direction
in which your text is rendered across the screen. The alignment options affect you
text as follows:
✦ Left Alignment: Text is aligned to the left edge of the bounding box.
✦ Right Alignment: Text is aligned to the right edge of the bounding box.
✦ Center Alignment: Text is centered between the left and right edges of the
bounding box.
Left
Center
Stretched
Right
Justified
Combination
133662-1 ch10.F 8/2/02 2:27 PM Page 307
Fireworks Seminar

308 Part II ✦ Mastering the Tools
✦ Justified Alignment: Text is evenly spaced so that the letters of each line
touch both the left and right edges of the bounding box; the letters, however,
remain the size specified in the Font size.
✦ Stretched Alignment: Text is expanded horizontally so that the letters of each
line touch both the left and right edges of the bounding box.
The middle sizing handles on a text object’s bounding box are always adjustable.This feature is very useful because you can quickly center text in a document bydragging the middle sizing handles to either edge of the canvas and choosing theCenter alignment option in the Property inspector.
When Vertical Left to Right or Vertical Right to Left are chosen, the alignment
options change. As with the Horizontal text choices, the only difference between
the two vertical text options is the direction in which your words are rendered
across the screen. The vertical text options are as follows:
✦ Top Alignment: Text is aligned to the top of the bounding box.
✦ Center Alignment: Text is centered between the top and bottom of the
bounding box.
✦ Bottom Alignment: Text is aligned to the bottom of the bounding box.
✦ Justified Alignment: Text is evenly spaced so that the letters of each line
touch both the top and bottom edges of the bounding box, however, the
letters remain the size specified in the Font size.
✦ Stretched Alignment: Text is expanded vertically so that the letters of each
line touch both the top and bottom edges of the bounding box.
Re-Editing TextThe Property inspector is perhaps the most commonly used method for editing text in
Fireworks, but it’s not the only one. To make a global change to a text object, such as
altering the typeface or size, you can use a menu command. Although you do sacrifice
the full range of features, menus can be much faster than using the Property inspector
or the Text Editor, especially if you take advantage of the keyboard shortcuts.
In all, you can apply four menu items under the Text heading to a selected text object:
✦ Font: Lists the fonts available on your system, in alphabetical order.
✦ Size: To quickly change your selected text object to a set size, choose Text ➪Size, and then one of the dozen point sizes: 8, 9, 10, 12, 14, 18, 24, 36, 48, 72,
and 96. Choose Other to enter a different size than those available or choose
Smaller or Larger to decrease or increase the font size by one point.
✦ Style: In addition to the options available through the Text Editor (Bold, Italic,
and Underline), the Text ➪ Style menu enables you to remove all styles with
one command, Text ➪ Style ➪ Plain.
Tip
133662-1 ch10.F 8/2/02 2:27 PM Page 308
Fireworks Seminar

309Chapter 10 ✦ Composing with Text
✦ Align: The Text ➪ Align menu is broken up into two groups, one for horizontal
text and one for vertical text. Choosing an alignment from one group automat-
ically alters the orientation of the text, if necessary. For example, if you apply
Text ➪ Align ➪ Bottom to a horizontal text object, the text object converts to a
vertical text object and aligns the text to the bottom, simultaneously.
To be completely thorough, one other command in the Text menu could be listed
in this category: Text ➪ Editor, which opens the Text Editor for the selected text
object.
Preserving Look or Editing TextIdeally, source files such as Fireworks documents would never go anywhere without
the fonts that were used to create them. Of course, this is not always the case. You
may archive a document, find a need for it a year later and then, upon opening it,
discover that you no longer have one or more of the fonts you originally used. You
might send a document to someone and forget to send the fonts, or need to open a
Fireworks document on another platform where your fonts won’t work without
conversion. Suddenly, a careful design is thrown into disarray because the
substituted fonts don’t have the same spacing or characteristics.
Fireworks MX saves a bitmap representation of your document in the source PNGand substitutes that bitmap for fonts you don’t have if you choose to maintaintheir appearance. When the file is saved again, it can be taken to a system that hasthe font, and the original text remains editable and in the correct font.
Fireworks solves this problem by saving a snapshot of your document within the
Fireworks PNG source file. If you open a document that contains a font that’s not on
your system, Fireworks warns you that the font is missing and asks whether you
would like to maintain the appearance of the font or replace the font with another
(see Figure 10-11).
If you choose to maintain the appearance, Fireworks displays the text block taken
from the archived bitmap image, giving you an exact representation of the font even
though you don’t have it. You can make any changes you like to other aspects of
the document, and as long as you don’t edit the text, you can save the file again and
the original text block remains editable, and in the original font, when opened on a
system that has the font.
If this sounds like a great time and energy saver, then you’ll really like the next
aspect of this feature. If you choose to maintain the appearance of the font, but you
need to make some font changes, you can select the text tool and alter the text.
When you save the file, Fireworks keeps the original font name attached to the text
you have just modified. If you send the file to someone who has the original fonts,
they can grab the text tool, click within the font block, and the text immediately
snaps back to its original appearance.
NewFeature
133662-1 ch10.F 8/2/02 2:27 PM Page 309
Fireworks Seminar

310 Part II ✦ Mastering the Tools
Figure 10-11: Fireworks warns you that you do not have the required fonts and offers the choice of maintaining the appearance of the text or replacing the fonts.
If you know that you won’t be using a particular font again, or if you have no idea
where to get the font in the document from, you can choose to replace the font with
a font on your system. Clicking Replace Fonts, on the dialog in Figure 10-11, brings
up the Missing Fonts dialog, as seen in Figure 10-12.
Figure 10-12: If you decide to replace fonts, you can select a different font substitute for each missing font.
You can choose fonts that have the look and feel that you want for your document
without having to retype the text. When you save the file this way, Fireworks saves
the font substitutions, rather than the original fonts, in your document.
Importing TextAlmost all the text that’s used in Web graphics is relatively short; longer paragraphs
are generally part of the HTML file rendered by the browser. There are numerous
reasons why text on the Web is generally not in graphic form, although first and
foremost — as with many aspects of the Web — is file size. Download time for a page
of graphic text is considerably longer than for that of HTML text.
133662-1 ch10.F 8/2/02 2:27 PM Page 310
Fireworks Seminar

311Chapter 10 ✦ Composing with Text
However, in the for-every-rule-there’s-an-exception category, occasionally blocks of
text have to be rendered as a graphic. Some clients insist on an absolute fidelity to
their traditional printed material across all platforms. The only way to keep these
clients happy — even at the expense of a longer download — is to render the text as
a graphic. In these cases, you have the potential for taking advantage of one of
Fireworks’ least-known features: text import.
In addition to the numerous graphic file types supported by Fireworks, you can also
open ASCII and Rich Text Format (RTF) files. ASCII (American Standard Code for
Information Interchange) files are the lowest common denominator of all text files
and contain no formatting whatsoever. RTF files, on the other hand, convey a good
deal of basic formatting, such as typeface, size, styles (bold, italic, and underline),
and alignment.
Although you can copy short passages of text from another program and paste
them into a text object, for a large block of text, you’re better off importing it.
To import a text file, follow these steps:
1. Be sure the file you want to import is saved in either ASCII or RTF format.
2. Choose File ➪ Import, or use the keyboard shortcut, Ctrl+R (Command+R).
The Import dialog box appears.
3. If you’re working in Windows, choose either ASCII Text (*.txt) or RTF Text
(*.rtf) from the Files of Type option list.
4. Navigate to your ASCII or RTF file, select it, and click Open.
After the Import dialog box closes, the Insert cursor appears.
5. Place the imported text in your document in one of two ways:
• Position the cursor where you want the upper-left corner of the text
object to start and click once.
• Click and drag out the bounding box for the text file.
The text flows into the new text object.
The click-and-drag method for creating a text object is currently somewhat limited.Rather than have the full freedom to draw whatever shape you desire, the rectangleis constrained to a 4:1 ratio of vertical to horizontal space. In other words, the initialtext object is always four times as wide as it is tall. More importantly, Fireworksrenders the text to fit within this bounding box, regardless of its previous font size.
Checking Your SpellingHave you ever created the perfect look in Fireworks, exported to your site folder,
imported everything into Dreamweaver, or another web design program, just to
Caution
133662-1 ch10.F 8/2/02 2:27 PM Page 311
Fireworks Seminar

312 Part II ✦ Mastering the Tools
discover that you’ve spelled something wrong on one of your buttons or graphics?
If you’re like me, doing this once is one time too many. As easy as it is, it can be a
real annoyance to go back into Fireworks, fix the spelling mistake, and then export
to your site again. Not to worry, Fireworks, as you may have already noticed, is an
all-inclusive package that even offers spell-checking.
Spell-check is a new feature in Fireworks MX.
The spell-checking in Fireworks isn’t just a plain old spell-checker. It’s full featured
and customizable enough for any user. The first thing to do to get ready for your
spell-check is to define your language of choice from the Spelling Setup dialog box,
as seen in Figure 10-13. To open the Spelling Setup dialog box, choose Text ➪Spelling Setup.
Figure 10-13: Fireworks offers you plenty of options in the Spelling Setup dialog box.
The Spelling Setup dialog box has the following options:
✦ Dictionaries: This is where you choose the language that you’re using in your
document. The entry entitled Macromedia.tlx is always selected, and placed
first in the list, as this is your custom dictionary.
If you do not select a dictionary language to use, Fireworks prompts you for oneevery time you run spell-check.
✦ Personal Dictionary Path: The path listed here reflects the location of your
custom dictionary.
✦ Edit Personal Dictionary: Clicking on the Edit Personal Dictionary button
gives you an easy way to add, edit, or remove words in your dictionary. If
spell-check doesn’t recognize a word you can add it to this dictionary when
you click the Add to Personal button in the Check Spelling dialog box. You can
add individual words, or paste in an entire list of words, with this option.
Note
NewFeature
133662-1 ch10.F 8/2/02 2:27 PM Page 312
Fireworks Seminar

313Chapter 10 ✦ Composing with Text
✦ Find Duplicate Words: This tells Fireworks whether or not to look for duplicate
instances of words directly next to each other.
✦ Ignore words with numbers: Very often, short form versions for software
products include both the program’s initials and the version number. With
this option checked, Fireworks ignores words that have numbers in them,
such as DW4 or FW4, in order to reduce the number of false spelling mistakes.
✦ Ignore Internet and file addresses: With this option checked, Fireworks skips
the checking of URLs listed in your document.
✦ Ignore words in UPPERCASE: This tells Fireworks not to check the spelling of
words that are all in uppercase. It can be useful to have this option selected
so that the spell-checker doesn’t continually complain about acronyms.
Spell-check in Fireworks functions much the same as spell-check in Dreamweaver,
Microsoft Word, and many other programs. To check your spelling, follow these
steps:
1. Open the document that you would like to perform the spell-check on.
The Check Spelling dialog box opens with the first error, or unknown word
displayed (see Figure 10-14).
Figure 10-14: The Check Spelling dialog box resembles that of the spell-check in many other applications.
2. Fireworks offers suggestions for alternative spellings for words it doesn’t know.
You can select one of the suggestions, or make your correction manually in the
Change To field, and click Change to accept the new word.
3. If the highlighted word is spelled correctly, but is not in Fireworks’ dictionary,
such as company or individual names, click the Add to Personal button to add
the word to your custom dictionary.
4. If you find that you’re stepping through numerous corrections of the same
word, you can choose Ignore All if the word is correct, or Replace All if the
word is consistently misspelled throughout the entire text.
133662-1 ch10.F 8/2/02 2:27 PM Page 313
Fireworks Seminar

314 Part II ✦ Mastering the Tools
5. When the spell-check is completed, Fireworks displays a dialog box that says
Spelling check completed. Click OK or hit Enter (return) to close the dialog
box and return to your document.
Transforming TextYou really start to feel the power of Fireworks after you begin adding strokes,
textured gradient fills, and multiple effects to a block of text — and you’re still able
to edit it. You can even use any of the transform tools — Scale, Skew, or Distort —
to warp the text completely, and it’s still editable.
No real shortcut exists to mastering text in your images. You really can only get a
sense of what’s possible by working, experimenting, trying — in essence, playing.
In the following sections, you’ll find some avenues to begin your text explorations.
Adding strokesWhen you first create a text object, only the basic fill color is applied. However,
this doesn’t mean you can’t add a stroke to your text — any combination of stroke
settings is fair game. You do have to be a bit careful, though. Some of the preset
strokes, such as Basic Airbrush, are quite hefty and can completely obscure all but
text in the larger font sizes. However, modifying a stroke size (or color, softness, or
texture) is quite easy, and you can generally adjust the presets to find a workable
setting.
One use for text with an added stroke is to create outlined text. Almost all fonts are
presented with solid, filled-in letters. In Fireworks, however, you can make almost
any font an outline font, with a fairly straightforward procedure:
1. Select a text object.
2. Click the Stroke color well, on the Property inspector or the Tools panel, and
then click Stroke Options.
3. Change the stroke from None to any of those available in the Stroke category
option list.
Try Basic or Pencil strokes for simple outlines; experiment with Airbrush orRandom strokes for more unusual results.
4. Select any desired preset from the Stroke name option list, and modify its
settings as needed.
5. Click the Fill color well, on the Property inspector or the Tools panel.
6. Click Fill Options and set the fill to None in the Fill category option list. The
solid fill disappears, and the remaining stroke outlines the text.
The results of these steps are shown in Figure 10-15.
Tip
133662-1 ch10.F 8/2/02 2:27 PM Page 314
Fireworks Seminar

315Chapter 10 ✦ Composing with Text
Figure 10-15: Fireworks’ strokes can turn almost any font into an outline version.
Another technique for adjusting the look of a stroke on text is to alter the stroke’s
orientation. With most path objects, an applied stroke is centered on the path. With
text objects, however, the default is to place the stroke on the outside of the path.
Change the orientation of the stroke by selecting a text block, clicking the Stroke
color well on the Property inspector, and then choosing Stroke Inside, Stroke
Centered, or Stroke Outside. By altering the stroke orientation, you can get three
completely different graphic looks, as shown in Figure 10-16.
Figure 10-16: The only difference between these three variations is the orientation of the stroke.
To find out more about strokes, turn to Chapter 8.Cross-Reference
Stroke inside path
Stroke centered on path
Stroke outside path
Original text object
Strokes applied (no fill)
133662-1 ch10.F 8/2/02 2:27 PM Page 315
Fireworks Seminar

316 Part II ✦ Mastering the Tools
Enhancing fillsAlthough the default method of displaying text already uses a colored fill, it’s just
the tip of what’s possible with Fireworks text. Any type of fill that you can devise —
solid color, Web dither, gradient, or textured — is applicable to text objects.
Moreover, you can alter the edges of a fill to give either a softer or harder textual
appearance.
Applying a fill to text is very straightforward. Just select the text object, and choose
your fill from the Fill color well on the Property inspector. Fireworks treats the
entire text object as a single unit, so gradients and Patterns flow across all the
separate letters and words. You can, however, adjust the way the fill is distributed
by adjusting the gradient and Pattern controls, as described in these steps:
1. Select your text object.
2. Click the Fill color well on the Property inspector, or on the Tools panel, and
then select Fill Options.
3. Choose a gradient or Pattern fill.
4. Select the Gradient tool.
The gradient editing handles appear on the filled text object, as shown in
Figure 10-17.
Figure 10-17: Alter the way a gradient moves across your text by moving the Gradient Fill handles.
Gradientstarting handle
Gradientwidth handle
Gradientending handle
133662-1 ch10.F 8/2/02 2:27 PM Page 316
Fireworks Seminar

317Chapter 10 ✦ Composing with Text
5. To adjust the centerpoint of the gradient, click and drag the round starting
handle.
6. To adjust the direction of the gradient, click and drag the square ending handle.
Some gradients, such as Ellipse, Rectangle, and Starburst, have a third handle,
which you can move to adjust the width and skew of the gradient.
7. Click any tool, other than the Gradient tool, to cease editing the Gradient.
Want to know more about fills? Turn to Chapter 11.
Using the transform toolsYou can apply each of the three transform tools — Scale, Skew, and Distort — to any
text object, enabling you to resize, rotate, slant, and even pull text out of shape and
still edit it. In this regard, text objects act just like path objects: The same sizing
handles appear, and you can even use the Flip Horizontal/Vertical or Numeric
Transform commands, as in Figure 10-18.
Figure 10-18: Text objects are fair game for Fireworks transform tools. Text, as always, remains editable.
Original text object
Scaled
Skewed
Distorted
Horizontally flipped
Cross-Reference
133662-1 ch10.F 8/2/02 2:27 PM Page 317
Fireworks Seminar

318 Part II ✦ Mastering the Tools
Keep a couple of points in mind about transforming text:
✦ Before using the Skew tool on a text object, narrow the bounding box on
either side of the text object as much as possible. Skew affects all portions of
a text object, and excess area may give you an undesirable effect.
✦ As with a regular path object, both Skew and Distort are useful for providing
perspective effects with text. Adding an effect to text, such as inner bevel or
drop shadow, also helps the effect.
Converting text to pathsSo if editability of text is such a big deal, why would you ever want to give it up?
After you convert text to a path, you can combine it with other path objects by
using commands on the Modify ➪ Combine Paths submenu. You might also want to
alter a letter’s shape, but to do that, you need to convert it to a path in order to
gain access to its underlying points. You might find an interesting graphic hiding in
a dingbats font and want to use it as a clipart foundation for a new drawing. In any
case, select your text and choose Text ➪ Convert to Paths, or use the keyboard
shortcut Ctrl+Shift+P (Command+Shift+P).
Before converting a text object to a path object, always, always, always make acopy of it and keep the copy on a hidden layer or unused frame. It’s a good backupwhen things go wrong, and an additional design element for that unexpectedcreative moment, 10 or 20 steps down the line.
Converting text to an imageNot only can you convert text to paths, you can also convert it to a bitmap image.
Just select the text object and choose Modify ➪ Flatten Selection, or use the
keyboard shortcut Ctrl+Alt+Shift+Z (Command+Option+Shift+Z). As with the path
conversion, text converted to pixels is no longer editable.
Fireworks Technique: Cookie-Cutter TextOne of my favorite things to do with text is to convert it to a path and punch it
through other path objects. The resulting objects make great guinea pigs for
experimentation with Filters or Live Effects. Buttons created this way are easy to
turn into rollovers because the text — or rather, the hole that the text punches
out — is transparent. You can make these buttons glow different colors by placing
them over different backgrounds, or placing them over an image so the image
shows through.
In any case, to use a former text object as a cookie cutter on other path objects,
follow these steps, which are illustrated in Figure 10-19:
Tip
133662-1 ch10.F 8/2/02 2:27 PM Page 318
Fireworks Seminar

319Chapter 10 ✦ Composing with Text
1. Create a text object.
2. Choose Text ➪ Convert to Paths, or use the keyboard shortcut, Ctrl+Shift+P
(Command+Shift+P). Each letter in the text object is converted to a path, and
then grouped.
3. Select your text path object and choose Modify ➪ Ungroup, and then Modify
➪ Combine Paths ➪ Join, or use the keyboard shortcuts Ctrl+Shift+G
(Command+Shift+G) and Ctrl+J (Command+J), respectively.
This ungroups the individual letters, and then joins them all into one
composite path.
4. Create a path object — such as a rectangle — to punch your text through.
Make sure that it has a fill of some sort.
5. Place the text path object on top of your path object, aligning the text path
object carefully where you want it to punch through.
You may have to select your text paths and choose Modify ➪ Arrange ➪ Bring toFront to bring it higher in the stacking order than your path object. Alternatively,you could send the path object to the back.
6. Select both objects, and choose Modify ➪ Combine Paths ➪ Punch.
Figure 10-19: Text is converted to a path and then punched through another path object, cookie-cutter style.
Your two objects are combined into a new path object with the same fill, stroke and
other properties of the bottom object. Experiment with different fills, strokes, and
effects, or place your new object on top of other objects that show through.
Original text object
Path text on topof path rectangle
New combined path
New path with effects
Tip
133662-1 ch10.F 8/2/02 2:27 PM Page 319
Fireworks Seminar

320 Part II ✦ Mastering the Tools
Using the Text on a Path CommandFor the most part, text is either strictly horizontal or vertical. The Text on a Path
command, however, enables you to flow text in the shape of any path — whether
the path is a circle, rectangle, or freeform shape.
The basic procedure is pretty simple: First, create each part — a text object and
a path — and then combine them. Because paths can come in so many shapes,
Fireworks offers a number of different controls and options to help you get what
you want. Amazingly enough, text remains editable even after it’s been attached
to a path.
To align text on a path, follow these steps:
1. Draw or create any path object.
2. If necessary, create a text object.
3. Select both the path and the text object.
4. Choose Text ➪ Attach to Path, or use the keyboard shortcut, Ctrl+Shift+Y
(Command+Shift+Y).
The text flows along the path and the attributes of the path (stroke, fill, and
effect) disappear, as shown in Figure 10-20.
5. To edit the text, double-click with the Pointer tool or choose the Text tool and
click your text block.
6. To separate the text from the path, choose Text ➪ Detach from Path.
Figure 10-20: The two separate objects — text and path —are combined into one with the Attach to Path command.
Text object
Path object
Text attachedto path
133662-1 ch10.F 8/2/02 2:27 PM Page 320
Fireworks Seminar

321Chapter 10 ✦ Composing with Text
Several variables affect exactly how the text flows along the path. First, the alignment
of the text itself can have an effect:
✦ Left Aligned: The text starts at the beginning of the path.
✦ Centered: The text is centered between the beginning and end of the path.
✦ Right Aligned: The text ends at the end of the path.
✦ Justified: All the characters are evenly spaced along the path with additional
spacing, if necessary.
✦ Stretched: All the characters are stretched to fit along the path with standard
spacing.
It’s pretty easy to guess where a linear path starts and ends, but how about a circle?
If you remember the discussion on using the Ellipse tool in Chapter 5, you might
recall I mentioned that circle paths generally start at about 9 o’clock and travel in a
clockwise direction, around the outside of the circle. To cause the text to begin its
flow in a different area, you have three options:
✦ Rotate the text attached to the path using one of the transform tools.
✦ Choose Modify ➪ Transform ➪ Numeric Transform, and select Rotate from the
option list before choosing the angle of rotation.
✦ Enter an Offset value in the Property inspector.
The Offset value moves the text the specified number of pixels in the direction of
the path. Because circle diameters vary, trial and error is the best method for using
the Offset value. The Offset option also accepts negative numbers to move the text
in the opposite direction of the path.
To flow the text along the inside of the circle, choose Text ➪ Reverse Direction
(see Figure 10-21). With an Offset value at 0, the text begins at 6 o’clock and flows
counterclockwise.
The final aspect that you can control with regard to attaching text to a path is the
text’s orientation to the path. You can find the options, shown in Figure 10-22, under
Text ➪ Orientation:
✦ Rotate Around Path: Each letter in the text object is positioned perpendicularly
to its place on the path (the default).
✦ Vertical: Each letter of the text object remains straight relative to the
document, as the letters travel along the path.
✦ Skew Vertical: Rotates the letters along the path, but slants them vertically.
✦ Skew Horizontal: Keeps the letters straight on the path, and slants them
horizontally according to the angle of the curve.
133662-1 ch10.F 8/2/02 2:27 PM Page 321
Fireworks Seminar

322 Part II ✦ Mastering the Tools
Figure 10-21: Use the Reverse Direction command in combination with Offset to properly place your text in a circle.
Figure 10-22: Achieve different effects by changing the orientation of the text to its attached path.
After looking at the Skew Horizontal example in Figure 10-22, you might be wondering
why this option was included. One of the reasons why it looks so unappealing is
that the skew changes when the underlying path changes its angles. When Skew
Horizontal is applied to a path with no or fewer curves, you can achieve a more
pleasing effect, as shown in Figure 10-23.
Rotate around path
Vertical
Skew vertical
Skew horizontal
133662-1 ch10.F 8/2/02 2:27 PM Page 322
Fireworks Seminar

323Chapter 10 ✦ Composing with Text
Figure 10-23: The horizontal skew orientation looks best when it’s applied to a path with few or no curves.
Fireworks Technique: Masking Imageswith Text
What do you get when you combine images and text so that the text becomes the
image? A graphic worth a thousand and one words? Actually, I think the technique
of masking images is often worth far more. Moreover, its relative ease of creation in
Fireworks makes it especially valuable.
A mask group is two or more objects grouped together where the bottom object
is visible only through the top object. Take a look at Figure 10-24, and you’ll see
immediately what I mean. Because color is often so vital to a mask group’s effect —
and because I think it’s cool — I’ve also included the image in the color insert.
To mask an image with text, follow these steps:
1. Create an image and a text object, or move existing image and text objects
into the same document.
2. Position the text object over the image in its approximate final place.
3. Select both objects.
133662-1 ch10.F 8/2/02 2:27 PM Page 323
Fireworks Seminar

324 Part II ✦ Mastering the Tools
4. Choose Modify ➪ Mask ➪ Group as Mask.
The image is now only visible through the text.
5. Use the Subselection tool to select and modify the placement of the image,
if necessary.
The basic technique for masking an image with text is the same as using any other
object as a mask. I’ve found, however, that manipulating the text into the proper
shape beforehand creates a more successful mask. Try to start with a fairly wide
font so that much of the image comes through, and then apply the Horizontal Scale
and/or Kerning controls in the Property inspector to get the largest possible type.
For example, the font used in Figure 10-20 is the very thick Arial Black, with a –12
percent Kerning value, so that the characters touch and don’t break up the image.
Figure 10-24: Combine imagery and text through a mask group. Note the bevel Live Effect on the text, which remains after grouping.
SummaryText and images are codependents on the Web. It’s nearly impossible to have one
without the other, but the text-handling features of Fireworks make for a smooth
integration. Gaining a complete understanding of creating and editing Fireworks’
text objects is essential for strong Web design. Keep these considerations in mind
as you work with text in Fireworks:
133662-1 ch10.F 8/2/02 2:27 PM Page 324
Fireworks Seminar

325Chapter 10 ✦ Composing with Text
✦ Text is always editable for files saved in Fireworks’ native format. You can
apply a stroke, fill, or effect, and you can transform text repeatedly — and still
be able to edit all the text, all the time.
✦ Text in Fireworks is represented in the document as a text object. You create
text objects onscreen using the Text tool or import them from ASCII or RTF
files.
✦ With the Text tool selected, the Property inspector contains all the controls
necessary for assigning attributes, such as typeface, size, color, spacing, and
alignment to text.
✦ Text alterations can be made in the Text Editor for those times when onscreen
text entry is awkward.
✦ Text can accept the full range of strokes, fills, and effects available in
Fireworks. The transform tools — Scale, Skew, and Distort — also work with
text objects.
✦ Converting a text object into a series of paths enables you to combine those
paths with other path objects for interesting effects.
✦ Fireworks has a very full-featured Align Text with Path command that enables
you to flow text around a circle, down a curving slope, or tracing any path you
desire. Moreover, you can adjust the spacing of the text through the
Alignment and Offset features.
✦ You can easily combine text and images by using the Fireworks Group as Mask
command.
In the next chapter, you get into the center of Fireworks objects, as I explain fills
and textures.
✦ ✦ ✦
133662-1 ch10.F 8/2/02 2:27 PM Page 325
Fireworks Seminar

133662-1 ch10.F 8/2/02 2:27 PM Page 326
Fireworks Seminar

AchievingEffects
Fireworks graphics really begin to gain depth in Part III.
The variety of fills and textures available — as well as the
capability to add your own — are critical for the wide range
of image production for which a Web designer is responsible.
Chapter 12 explores the exciting world of Fireworks Live
Effects and filters, which are exciting not just because they’re
easy to use and they look great, but also because of the posi-
tive impact that their always-editable nature will have on your
workflow.
Most of the time, a graphic will actually contain a number of
images. Chapter 13 explains the Fireworks methods for arrang-
ing and compositing multiple objects in order to achieve stun-
ning results. The Fireworks mask-group feature, in particular,
is an especially creative and powerful tool that takes the hard
work out of alpha channels. Although Fireworks is a great
drawing tool, it’s also adept at handling bitmap imagery.
✦ ✦ ✦ ✦
In This Part
Chapter 11Using Fills andTextures
Chapter 12Creating Live Effectsand Filters
Chapter 13Arranging andCompositing Objects
✦ ✦ ✦ ✦
P A R T
IIIIII
143662-1 Part03.F 8/2/02 2:27 PM Page 327
Fireworks Seminar

143662-1 Part03.F 8/2/02 2:27 PM Page 328
Fireworks Seminar

Using Fills andTextures
Fills and strokes are fairly equal partners in Fireworks
graphics. A fill gives substance to the inside of an object,
just as a stroke does the outside. Fills in Fireworks come in
many flavors — solid colors, gradations of color, and image
patterns — and, as with strokes, they are astoundingly flexible
and almost infinitely variable. Moreover, fills in objects are
always editable, which means changing from a flat color to a
repeating pattern takes only a click or two.
After touring the standard fills included with Fireworks, this
chapter begins to explore the many ways you can customize
and enhance fills. In addition to the techniques for editing
gradients, Patterns, and the many variations obtainable
through textures, you’ll see how you can add custom
gradients, Patterns, and textures.
Using Built-in FillsAs with strokes and the Stroke section of the Property
inspector, you generally apply and modify fills from the Fill
section of the Property inspector, shown in Figure 11-1. You
can display the Property inspector by choosing Window ➪Properties, or using the keyboard shortcut, Ctrl+F3
(Command+F3).
The five primary fill categories are as follows:
✦ None: No fill.
✦ Solid: Specifies a flat color fill, selectable with the
Eyedropper in the pop-up color picker.
You can switch to None from Solid, simply by clicking theno-color chip in the pop-up color picker.
Tip
1111C H A P T E R
✦ ✦ ✦ ✦
In This Chapter
Understanding fills
Choosing a fill type
Extending colorrange with WebDither
Modifying aGradient fill
Enhancing yourgraphics withPatterns
Fireworks technique:Developing seamlessPatterns
Texturizing your Webgraphics
Filling parts of animage with the PaintBucket
✦ ✦ ✦ ✦
153662-1 ch11.F 8/2/02 2:27 PM Page 329
Fireworks Seminar

330 Part III ✦ Achieving Effects
✦ Web Dither: Extends the Web-safe color range by using a repeating pattern of
two Web-safe colors that simulates an unsafe color.
✦ Pattern: Applies a full-color image as a repeating pattern.
✦ Gradient: Inserts one of eleven gradient patterns blending two or more
colors. The Gradient category is not separately listed, but implied through the
listing of the gradient patterns.
Figure 11-1: The Fill section of the Property inspector is your command center for applying and modifying any type of fill.
The Edge option works exactly the same way as the one found in the Stroke section
of the Property inspector, with three choices: Hard Edge, Anti-Alias, and Feather.
Choosing a Hard Edge fill uses only the fill specified with no enhancements; Anti-Alias
blends the edge a bit, softening away the jaggies, if any; and Feather blends the edge
the number of pixels specified through the Amount of Feather slider.
Textures work with fills in the same fashion as they do with strokes, but because
they’re so much more visible, you’ll find a special section later in this chapter that
delves deeper into their use.
Turning off an object’s fillKnowing how to remove the fill is just as important as adding a fill. In Fireworks, the
easiest way to remove a fill is to choose None from the Fill category option list in
the Fill section of the Property inspector. As mentioned in the previous chapter,
a path with no stroke or fill assigned is invisible. Figure 11-2 shows a rectangle with
no fill or stroke. As you can see, or as you can’t, all that is visible are the four
corners of the rectangle’s bounding box. If you deselected it, you wouldn’t even
know it was there.
Using a Solid fillA Solid fill is a basic, monochrome fill, sometimes called a flat fill. The color used in
the Solid fill type is selected from the Fill color well — whether it’s the one on the
Property inspector, the Tools panel, or the Color Mixer. The Fill color well uses the
Fill color well Fill category Amount of feather
Texture Amount of texture
153662-1 ch11.F 8/2/02 2:27 PM Page 330
Fireworks Seminar

331Chapter 11 ✦ Using Fills and Textures
standard Fireworks pop-up color picker, shown in Figure 11-3. The color picker
displays the swatches active in the Swatches panel, which, by default, is the
Web-safe, 216-color palette.
Figure 11-2: Paths are invisible until a stroke or fill is applied, as demonstrated by this rectangle with neither a stroke nor a path.
Figure 11-3: Assign a solid color fill through the Fill color well on the Property inspector.
To apply a solid color to an object, follow these steps:
1. Select the object.
Eyedropper
Palette pop-up button
System Palette button
153662-1 ch11.F 8/2/02 2:27 PM Page 331
Fireworks Seminar

332 Part III ✦ Achieving Effects
2. Access the Fill color well in one of these three ways:
• Choose Window ➪ Properties to open the Property inspector, and select
the color well in the Fill section.
• Select the Fill color well, as marked by the Paint Bucket, in the Tools
panel.
• Choose Window ➪ Color Mixer to display the Color Mixer panel and
select the Fill color well, as marked by the Paint Bucket.
Any one of these methods displays the pop-up color picker.
3. Use the Eyedropper to choose a color from the current swatch set, or select
any color that’s currently visible on your screen.
4. To access the operating system color picker(s), select the Palette button and
select one of the colors in that dialog box.
You can adjust solid fills in several ways. You can select different edge options
(Hard, Anti-Aliased, or Feather) from the Edge option list in the Fill section of the
Property inspector; if you choose Feather, the Amount of Feather slider becomes
available. In addition, a texture chosen from the Texture option list on the Fill panel
may be applied. Remember, though, for a texture to be visible, you have to increase
the Amount of texture past zero percent.
Using the Web Dither fillColor is one of the most frustrating elements of Web design. Most Web designers
use a palette of 216 Web-safe colors that the major browsers display correctly on
both Macintosh and Windows computers set to 256 colors (8-bit color). The most
obvious limitation is the relatively small number of colors: 216 out of a visible
palette of millions of colors. Another limitation is the distance between colors; each
Web-safe color is a large jump from its nearest Web-safe neighbor. These limitations
become particularly acute when a client’s logo contains colors that aren’t available
in the Web-safe palette. Luckily, Fireworks offers you a way to increase the Web-safe
color variations to over 45,000: the Web Dither fill.
To understand how to use the Web Dither fill, you’ll need a little more background
in computer color. Dithering refers to the process where two or more pixels of
different colors are positioned to create a pattern which, to the human eye, appears
to be a third color. This technique works because a small pattern of pixels tends to
blend visually; the eye can’t separate the individual pixels. Dithering was originally
used to overcome the 256-color restriction of early computer monitors. If you
convert a photograph with millions of colors to a GIF with only 256 colors, you’ll
notice dithered areas where the computer graphics program is attempting to
simulate the unavailable colors. For flat-color graphics, though, relying on dithering
forces the designer to give up a lot of control. You don’t know what you’re going to
get until you export.
153662-1 ch11.F 8/2/02 2:27 PM Page 332
Fireworks Seminar

333Chapter 11 ✦ Using Fills and Textures
Hybrid-Safe Colors were developed initially by Don Barnett and Bruce Heavin and
later popularized by Web designer Lynda Weinman. A Hybrid-Safe color consists of
two Web-safe colors in an alternating 2×2 pattern. Fireworks has adopted this
technique and renamed it Web Dither. Not only does this feature now give you a
total of 46,656 (216×216) Web-safe colors, but it also enables you to make any solid
fill semitransparent, opening up a whole new area of graphic design.
When you choose the Web Dither category from the Fill section of the Property
inspector, and then click on the Fill color well, you’ll notice that the Web Dither
dialog pops up, as shown in Figure 11-4. Instead of one color well, there are now
three. The top color well represents the current Fill color, whereas the other two
color wells are used to create the dither pattern. If the current Fill color is already
Web-safe, both dither colors will be identical. If the Fill color is not Web-safe,
Fireworks creates the closest match possible by dithering two Web-safe colors.
To apply a Web Dither fill, follow these steps:
1. Select your object.
2. Select Web Dither from the Fill category of the Property inspector.
3. Click the Fill color well to open the Web Dither dialog box.
Figure 11-4: The Web Dither fill greatly expands the range of possible Web-safe colors that you can use.
4. Click on the color well in the top right of the pop-up window to open the color
palette.
5. Pick a color that is not Web-safe in one of these ways:
• To select a color from the swatch in your active palette, choose the color
from the pop-up color picker. The active color must not be from the Web
216 Palette for this method.
• To select a color from an image onscreen, sample the desired color with
the Eyedropper in the pop-up color picker.
• To select a color using your system’s color picker, choose the Palette
button from the pop-up color picker.
153662-1 ch11.F 8/2/02 2:27 PM Page 333
Fireworks Seminar

334 Part III ✦ Achieving Effects
If you can’t find an unsafe color, go outside of Fireworks with the Eyedropper andsample one elsewhere on your display. Windows users should hold down themouse button while still over Fireworks, and keep the mouse button down as youhover the mouse over the color you want to sample, and release the mousebutton to sample it.
Fireworks creates the closest color match possible by dithering your original
color, as shown in Figure 11-5.
Figure 11-5: The middle square has a Web Dither fill applied. The squares on the left and right are the Web-safe colors used in the Web Dither, shown for example.
The Web Dither fill is terrific for finding absolutely must-have colors, such as those
used for a logo, in a Web environment. When working from print materials, you can
sample the color for the Web Dither fill.
Although the Web Dither does give you a huge range of colors to choose from,that doesn’t mean all the color combinations are useful. If you choose two highlycontrasting colors for the dither color wells, the dithered pattern appears to bedotted. It’s usually better to select the desired color for the Fill color well by usingthe Eyedropper or any other method, and enable Fireworks to create the ditherpattern for you.
Fireworks takes the Web Dither fill further by including a Transparent option. When
you enable the Transparent option, Fireworks sets the first dither color well to
None, while snapping the second dither color well to the nearest Web-safe color.
The dither pattern now alternates a transparent pixel with a Web-safe colored pixel,
and the resulting fill pattern is semitransparent.
Tip
Tip
153662-1 ch11.F 8/2/02 2:27 PM Page 334
Fireworks Seminar
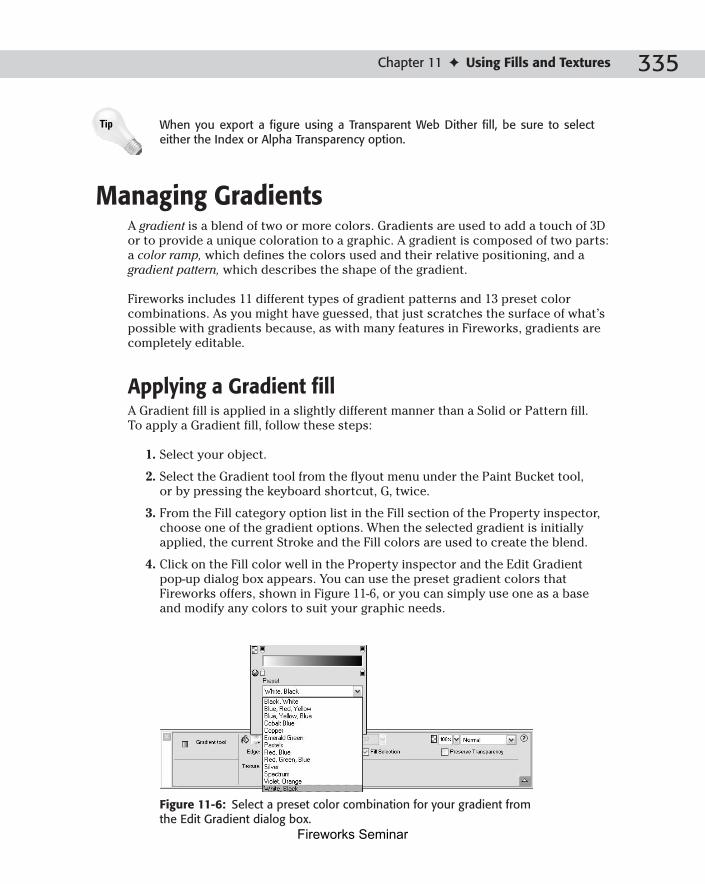
335Chapter 11 ✦ Using Fills and Textures
When you export a figure using a Transparent Web Dither fill, be sure to selecteither the Index or Alpha Transparency option.
Managing GradientsA gradient is a blend of two or more colors. Gradients are used to add a touch of 3D
or to provide a unique coloration to a graphic. A gradient is composed of two parts:
a color ramp, which defines the colors used and their relative positioning, and a
gradient pattern, which describes the shape of the gradient.
Fireworks includes 11 different types of gradient patterns and 13 preset color
combinations. As you might have guessed, that just scratches the surface of what’s
possible with gradients because, as with many features in Fireworks, gradients are
completely editable.
Applying a Gradient fillA Gradient fill is applied in a slightly different manner than a Solid or Pattern fill.
To apply a Gradient fill, follow these steps:
1. Select your object.
2. Select the Gradient tool from the flyout menu under the Paint Bucket tool,
or by pressing the keyboard shortcut, G, twice.
3. From the Fill category option list in the Fill section of the Property inspector,
choose one of the gradient options. When the selected gradient is initially
applied, the current Stroke and the Fill colors are used to create the blend.
4. Click on the Fill color well in the Property inspector and the Edit Gradient
pop-up dialog box appears. You can use the preset gradient colors that
Fireworks offers, shown in Figure 11-6, or you can simply use one as a base
and modify any colors to suit your graphic needs.
Figure 11-6: Select a preset color combination for your gradient from the Edit Gradient dialog box.
Tip
153662-1 ch11.F 8/2/02 2:27 PM Page 335
Fireworks Seminar

336 Part III ✦ Achieving Effects
5. Change the fill edge or add a texture, if desired.
Rather than describe the standard gradients in words, grasping the differences
visually is much easier, as demonstrated in Figure 11-7.
Figure 11-7: Fireworks provides 11 different gradient patterns.
Altering gradientsFireworks’ built-in gradient patterns and preset colors offer a good number of
possibilities, but the real power of gradients comes in their customizability.
You can modify gradients in three major ways:
✦ Every gradient pattern’s center, width, and skew (if any) are all adjustable.
With this facility, you can reshape the gradient’s appearance with any object.
✦ The color ramp used to create the progression of colors in a gradient is
completely flexible. Existing colors can be changed, deleted, or moved,
and new colors can be added anywhere in the gradation.
✦ You can alter the transparency of your gradient, to enable objects beneath it
to show through. This can add an interesting look to your document by only
partially obscuring portions of a bitmap image for example.
Transparent gradients are new to Fireworks MX. See later in the chapter for moreinformation.
NewFeature
Linear Radial Ellipse Rectangle
Starburst
Cone
Bars
Ripples
Waves Satin Folds
153662-1 ch11.F 8/2/02 2:27 PM Page 336
Fireworks Seminar

337Chapter 11 ✦ Using Fills and Textures
Modifying the gradient patternEach gradient object has handles. Handles are the keys to unlocking — and
customizing — the gradient patterns. Selecting an object that has a Gradient or
Pattern fill with the Pointer tool causes the gradient controls to appear (assuming
the Show Fill Handles preference has been left at its default setting of enabled).
All gradients have a starting point and an ending point, and four (Ellipse, Rectangle,
Starburst, and Ripples) use two controls to adjust the size and skew of the pattern.
The gradient controls are placed differently for each gradient pattern, as is evident
in Figure 11-8.
Figure 11-8: Each of the 11 standard gradients has individual control handles.
To modify a gradient pattern, follow these steps:
1. Select the object with the Gradient fill. The gradient controls appear.
2. To move the starting point for the gradient, drag the circular handle to
another position.
3. To rotate the direction of the gradient, move the cursor over the length of any
control handle until the Rotate cursor appears, and then drag the handles to a
new location. As you rotate the gradient, Fireworks uses the gradient’s starting
point as a center axis.
4. To change the size of any gradient, drag the square handle straight to another
position.
5. To alter the skew of an Ellipse, Rectangle, Starburst, or Ripples gradient, drag
either square handle in the desired direction.
Control handles
Ending points
Starting point
153662-1 ch11.F 8/2/02 2:27 PM Page 337
Fireworks Seminar

338 Part III ✦ Achieving Effects
You’re not limited to keeping the gradient controls within the selected object. You
can move any gradient control — beginning, ending, or sizing/skewing handle —
away from the object. In fact, many of my nicest gradient patterns resulted from
placing the controls completely outside of the object. Experiment and think
“outside the box.”
If you want to copy a modified gradient pattern from one object to another, selectthe source gradient to be copied, choose Edit ➪ Copy, select the destination objectand choose Edit ➪ Paste Attributes.
Editing gradient colorsIf you cycle through the preset gradient color combinations, you’ll notice that some
presets have as few as two colors and others have as many as six. To see how the
color preset is structured, select your Gradient and click on the color well in the Fill
section of the Property inspector. The Edit Gradient pop-up dialog box, shown in
Figure 11-9, is divided into three main areas: the color ramp, the color wells, and
the preview pane. You can dismiss pop-up dialog boxes in Fireworks by clicking
anywhere outside of them, or by pressing Esc.
Figure 11-9: Modify the colors used in a gradient through the Edit Gradient pop-up dialog box.
The color ramp shows the current color combination as it blends from one key
color to another. The key colors are displayed in the color wells, located beneath
the color ramp. The preview pane shows how the color combination would be
applied to the active gradient pattern. You can either modify a preset gradient,
or adjust a gradient created from the Fill and Stroke colors.
To edit a gradient, follow these steps:
1. Click on the Fill color well in the Fill section of the Property inspector. The
Edit Gradient pop-up dialog box appears.
2. To adjust the rate of change between colors, drag the color wells into new
positions. One color well can be dragged on the far side of another color well.
Edit Gradientpop-up
dialog box
Gradient transparency wells
Color ramp Gradient Color wells
Preset color option list
Preview
Tip
153662-1 ch11.F 8/2/02 2:27 PM Page 338
Fireworks Seminar

339Chapter 11 ✦ Using Fills and Textures
3. To remove a color well completely, drag the color well and drop it outside of
the Edit Gradient pop-up dialog box, or into the Gradient preview area.
4. To add a new color well, click anywhere directly below the color ramp.
The added color well displays the color directly above it in the color ramp.
You’ll notice a little plus sign added to your cursor where clicking adds anothercolor well.
5. To select a new color for a color well, click the color well. The standard
pop-up color picker appears. Select any of the available swatches, or use the
Eyedropper tool to sample an onscreen color, including one from another
color well. You can use the Palette button on the pop-up color picker to
access the system color picker(s).
6. Click the Property inspector when you’re done or press Escape to cancel.
Although no real limit exists as to the number of colors you can add to an edited
gradient, adding more than a dozen or so is not practical. With so many colors, the
color wells begin to overlap, and selecting the correct one to modify becomes
increasingly difficult.
Editing gradient transparencyAs previously mentioned, the color ramp shows the current color combination as
it blends one key color to another. Below the color ramp are the colors in your
gradient, however, you’re going to focus on what’s above the color ramp — the
gradient settings.
Transparent gradients are new to Fireworks MX. Gone are the days of needing tofuss with masks to obtain this functionality!
By setting certain areas of your gradient as transparent, you enable the canvas, or
any vector, or bitmap object beneath your gradient, to show through in specific
areas. As you can see in Figure 11-10, transparent gradients add another effect to
Fireworks’ widely diverse toolset.
To edit a gradient’s transparency, follow these steps:
1. Select the gradient and click on the Fill color well in the Fill section of the
Property inspector. The Edit Gradient pop-up dialog box appears.
2. To adjust where the transparency takes place in a particular color’s ramp,
drag the transparency well into a new position. One transparency well can be
dragged on the far side of another transparency color well.
3. To remove a transparency well completely, drag and drop it outside of the
Edit Gradient pop-up dialog box.
4. To add a new transparency well, click anywhere directly above the color
ramp. The added transparency well controls the opacity of the color directly
below it in the color ramp.
NewFeature
Tip
153662-1 ch11.F 8/2/02 2:27 PM Page 339
Fireworks Seminar

340 Part III ✦ Achieving Effects
5. To alter the color’s opacity, click on the transparency well and the opacity set-
tings appear. Either move the opacity slider from left to right, or type a new
number into the text box. A setting of 100 is opaque while 0 is completely
transparent.
6. Click the Property inspector when you’re done.
As with adding colors, there are no limits to the number of transparency wells you
can add to a gradient. Adding numerous transparency wells can actually make for
an interesting effect in your gradient. You can create waves of light and dark color
across your gradient simply by adding transparency wells and then altering the
opacity of every other one from high to low. Experimenting with gradients, and
especially transparent gradients, is the best way to determine what’s best for you.
Figure 11-10: Here you see three identical objects, with one difference. One has a solid fill, one has a gradient fill, and the third has a transparent gradient fill.
Saving gradients as stylesTo ensure that your custom gradients are available for use in the future, save them
as styles and store them in the Styles panel. To create a new style using a custom
gradient, follow these steps:
Solid fill
Gradient fill
Gradient fill with transparency
153662-1 ch11.F 8/2/02 2:27 PM Page 340
Fireworks Seminar

341Chapter 11 ✦ Using Fills and Textures
1. Select an object that uses the custom gradient.
2. If the Styles panel isn’t visible, choose Window ➪ Styles, use the keyboard
shortcut, Shift+F11, or click the Styles tab, if visible. The Styles panel appears.
3. On the Styles panel, select the New Style button.
4. In the New Style dialog box, enter a descriptive name for your gradient in the
Name text box and deselect all checkboxes except Fill Type.
5. Click OK when you’re done. A new style is entered in the Styles panel.
Any style added in the previously described fashion is always available for any
Fireworks document. To apply the gradient, simply highlight any Fireworks object
and select the new style. Your custom gradient is then added to the Fill category in
the Fill section of the Property inspector.
To find out more about using styles, see Chapter 16.
Using PatternsSimply put, a Pattern fill uses a repeating image to fill an object. Patterns are
often used to provide a real-world surface, such as denim or water, to a computer-
generated drawing. More abstract Patterns are also used to vary the look of a
graphic. Fireworks includes an extensive collection of standard Patterns with even
more available in the Goodies/Patterns folder of the Fireworks CD-ROM. Not
surprisingly, you can also add your own images to be used as a Pattern.
Fireworks’ built-in patterns are detailed in the color insert.
The Pattern fill is one of the primary categories found on the Fill section of the
Property inspector. When you select the Pattern option, the Fill color well in the
Property inspector and in the Tools panel becomes a preview of the currently
selected Pattern. Clicking on the Fill color well opens a dialog with an option list,
containing the Pattern names, and a larger preview of the currently selected
Pattern. Clicking the Pattern name causes the option list to expand showing the
names of all the available Patterns. As you move up and down this option list, a
small preview of the Pattern is displayed next to each highlighted file, as shown in
Figure 11-11.
Pattern fill images can be saved in PNG, TIFF, GIF, BMP, or JPEG format. However,
not all images are well suited to making Patterns; the best Patterns are those that
repeat seamlessly so that the boundaries of the original file cannot be detected. All
the standard Fireworks files fill this requirement, as is clearly visible in the color
insert.
Cross-Reference
Cross-Reference
153662-1 ch11.F 8/2/02 2:27 PM Page 341
Fireworks Seminar

342 Part III ✦ Achieving Effects
Figure 11-11: Choose your Pattern fill from the Pattern Fill Name option list in the Fill section of the Property inspector.
As with any other fill, you can apply Pattern fills to any shape object. The other fill
attributes — edge and texture — are also applicable.
Adding new PatternsThe two ways to add Patterns to the Pattern Name option list so that they are
available every time you use Fireworks are as follows:
✦ Save or export a file, in PNG, TIFF, GIF, BMP, or JPEG format, into the
Configuration/Patterns folder within the Fireworks program folder.
The Fireworks program folder is typically found at C:\Program Files\Macromedia\Fireworks MX\ on Windows-based computers, and atMacintosh HD:Applications:Macromedia Fireworks MX: on the Mac.
✦ Through the Fireworks Preferences dialog box, assign an additional folder for
Patterns.
Pattern images are usually full-color (whereas textures are displayed in grayscale),
but that’s not a hard-and-fast rule. Likewise, Patterns are generally 128-pixels
square, but that’s just a convention, not a requirement; one of the Patterns found
on the Fireworks CD, Light Panel, is 12-pixels wide by 334-pixels high.
Tip
153662-1 ch11.F 8/2/02 2:27 PM Page 342
Fireworks Seminar

343Chapter 11 ✦ Using Fills and Textures
After you’ve saved a file in your Patterns folder and restarted Fireworks, the new
Pattern is listed along with the other Patterns. As shown with my new Patterns in
Figure 11-12, they even preview in the same way.
Figure 11-12: My own Tapeworm Pattern is available from the Pattern Name option list after saving it in the Configuration/Patterns folder and restarting Fireworks.
Assigning an external Patterns folder is a very easy way to add a whole group of
folders at one time, as well as a good way to share resources in a networked
environment. To assign an additional Patterns folder, follow these steps:
1. Choose Edit ➪ Preferences. The Preferences dialog box opens.
2. Select the Folders tab (choose Folders from the option list on the Macintosh).
3. Choose the Browse button in the Additional Materials section, next to the
Patterns option. A navigation dialog box appears.
4. Locate the external folder that contains the PNG files you want to access as
Patterns. Click OK when you’ve selected the folder. The Patterns checkbox is
now enabled on the Preferences dialog box.
5. Click OK to accept the changes and close Preferences.
6. Relaunch Fireworks to make the additional Patterns available for use.
153662-1 ch11.F 8/2/02 2:27 PM Page 343
Fireworks Seminar

344 Part III ✦ Achieving Effects
Want quick access to the Patterns on the Fireworks CD? Assign your externalPatterns folder in Preferences to the Goodies/Patterns folder and restart Fireworks.When Fireworks opens, if the CD is present, the additional Patterns are integratedinto the Fill panel list — and you can remove the CD after Fireworks has finishedloading, and the Patterns are still available. If the CD is not available, Fireworksloads normally, but the additional Patterns are not incorporated.
The more Patterns you add, the longer Fireworks takes to start because it needs toinitialize all the Patterns. For optimal performance, load only the patterns you useregularly.
Adding Patterns to a documentAdding commonly used Patterns to your default list in Fireworks is great, but what
if you want to quickly grab an image file and use it as a Pattern without the hassle
of moving it into the Fireworks Patterns folder first? On such an occasion,
Fireworks enables you to work with Patterns on a document-by-document basis.
To access an external PNG image as a Pattern in the current document, follow
these steps:
1. Select the object you would like to apply the Pattern to.
2. Choose Pattern from the Fill category option list in the Fill section of the
Property inspector.
3. Click the Fill color well to display the Pattern selection pop-up dialog with the
Pattern preview and the Pattern Name option list.
4. From the Pattern Name option list, choose Other to display an Open dialog box.
5. Navigate to the file you would like to use as a Pattern and select it. Click OK
when you’re done.
Fireworks adds your new Pattern to the Pattern Name option list and applies it to
your selected object. The Pattern will be accessible from the Pattern Name option
list only within the current document. When you save the document, the Pattern is
saved within the document.
Patterns are saved within a document, making them portable. If you share workwith someone at another location, adding your custom Patterns to your documentautomatically makes them available to coworkers when they receive the document.
Altering PatternsYou can adjust Patterns in the same manner as gradients. After a Pattern fill has
been applied to an object, selecting it causes the control handles to appear, as
shown in Figure 11-13. The same types of vector controls are available:
Tip
Caution
Tip
153662-1 ch11.F 8/2/02 2:27 PM Page 344
Fireworks Seminar

345Chapter 11 ✦ Using Fills and Textures
If you’ve changed the default setting for Show Fill Handles in the Editing section ofthe Preferences, then you have to select either the Paint Bucket tool or theGradient tool to get the control handles to appear.
✦ Adjust the center of the Pattern fill by dragging the round starting point.
✦ Rotate the Pattern fill by moving the cursor over the length of any
control handle until the Rotate cursor appears, then drag the handles
to a new angle.
✦ Change the size of any Pattern by dragging either square handle straight to
another position.
✦ Alter the skew of any Pattern by dragging either square handle in the desired
direction.
Figure 11-13: Both rectangles were filled with the standard Illusion2 Pattern and then the control handles of the bottom rectangle were rotated to change the Pattern direction.
Unlike gradients, all Patterns have two control handles in addition to the starting
point of the fill. The handles are always perpendicular to one another and presented
in the same ratio as the height to the width.
Tip
153662-1 ch11.F 8/2/02 2:27 PM Page 345
Fireworks Seminar

346 Part III ✦ Achieving Effects
Fireworks Technique: Creating SeamlessPatterns
The biggest problem with creating new Pattern fills is making them appear seamless.
When Fireworks tries to fill an object larger than the size of the Pattern file, it
repeats or tiles the image until the object is completely filled. If an image is used
with even the smallest border, the repeating pattern is immediately noticeable; in
most cases, this is not the desired effect. Several methods eliminate the appearance
of seams.
The first, and simplest, technique is to avoid placing graphic elements near the
edge of your Pattern image. This enables the canvas — or background color — to
blend smoothly from one instance of a Pattern into another. For example, the image
shown in Figure 11-14 could be made into a Pattern without showing any seams.
Figure 11-14: An image that has the same color all around its outside border can easily be made into a Pattern because areas of identical color appear seamless when they touch.
Many images, of course, rely on a visually full background where the canvas color is
completely covered. To convert this type of graphic into a Pattern, a fair amount of
image editing is necessary to make the edges disappear. Luckily, Fireworks contains
enough graphic editing power to make this procedure feasible.
A tiled Pattern places images next to every side of the original image. To remove
any indication of a boundary, you need to simulate a tiled Pattern and then blend
the images so that no edges show. The following steps detail the procedure I use to
smooth Pattern edges in Fireworks.
153662-1 ch11.F 8/2/02 2:27 PM Page 346
Fireworks Seminar

347Chapter 11 ✦ Using Fills and Textures
Throughout this technique, I refer to the menu syntax for the command, suchas Edit ➪ Copy. Naturally, feel free to use whatever keyboard shortcuts you’refamiliar with.
1. Open the image you want to convert to a Pattern.
2. Select a portion of the image to use as the basis for your Pattern.
Using a portion of a scanned image or other graphic as a Pattern is quite
common. The best technique I’ve found for this is to determine how large you
want your Pattern to be (128×128 pixels is a good size), and then use the Fixed
Size feature of the Marquee tool available through the Property inspector to
set those dimensions. This enables you to work with a preset Marquee and
move it into position more easily.
3. Choose Edit ➪ Copy to copy the selected area.
4. Choose File ➪ New to create a new document. The document should be large
enough to contain your original graphic four times over. Because mine is 128
pixels square, 256×256 pixels would be my minimum size.
5. To guide placement, choose View ➪ Grid ➪ Edit Grid to set the size of the grid
the same as your image, and enable the Show Grid and Snap to Grid options.
6. Choose Edit ➪ Paste to paste the copied area in the upper-left corner of the
document, as shown in Figure 11-15.
Figure 11-15: After setting the grid to help with alignment, the first image is pasted down.
Note
153662-1 ch11.F 8/2/02 2:27 PM Page 347
Fireworks Seminar

348 Part III ✦ Achieving Effects
7. Copy the image with the Alt+drag (Option+drag) method. Place the copy of
the image to the right of the original.
8. Repeat Step 7 twice more, but place the two new image copies below the two
already in place, as shown in Figure 11-16.
Figure 11-16: With all four copies in place, the edges are plainly visible.
9. Turn off both the grid (toggle View ➪ Grid ➪ Show Grid) and the Snap to Grid
options (toggle View ➪ Grid ➪ Snap to Grid).
10. Select all four copies of the image and choose Modify ➪ Flatten Selection. This
step is necessary because the core of this technique uses the Rubber Stamp
tool, which only works with bitmap objects. By selecting all copies, the four
separate bitmap objects have been merged into one.
11. Select the Rubber Stamp tool from the Tools panel.
The next step is the core of this procedure and, as such, requires a bit of
finesse and trial-and-error to get it right. You might want to save the
document at this stage so you can restart the process without having to
start completely over.
12. Working on the vertical seam between the copies on the left and the right,
click the Rubber Stamp origin point down one side a few pixels to the side,
near the edge. Drag over the edge in a left-to-right motion (or from right to
left, depending on which side the Rubber Stamp origin is located), extending
the side of one image into the side of another.
153662-1 ch11.F 8/2/02 2:27 PM Page 348
Fireworks Seminar

349Chapter 11 ✦ Using Fills and Textures
Follow this procedure down the vertical seam. Occasionally, you might need
to switch directions and origin point to vary the blurring. Press Alt (Option)
to reset the origin point of the Rubber Stamp tool. If necessary, set the Rubber
Stamp options to the softest possible edge on the Property inspector.
13. After you’ve blurred the vertical seam, repeat the process for the horizontal
seam, changing the direction of the Rubber Stamp as needed.
When you’re done blurring both the vertical and horizontal edges, the resulting
image should appear to be a seamless Pattern, as shown in Figure 11-17. After
this step, it’s time to copy the portion of the image used to make the Pattern.
Figure 11-17: After the edges are blurred, it’s hard to tell where one image stops and another starts.
14. Choose View ➪ Grid ➪ Edit Grid, and reset the grid to half of its former size,
enabling both the view and the snap options as well. Using a half-sized grid
enables you to easily grab the center of the current image. My original grid
was 128×128 pixels, so my new one for this step is 64×64.
15. Choose the Marquee tool from the Tools panel. The Marquee’s Options should
still be set to the Fixed Size option, using your original dimensions.
16. Use the Marquee tool to select the central portion of the overall image, as
shown in Figure 11-18. Notice that the selection takes a portion of all four
images, previously separate.
17. Choose Edit ➪ Copy to copy the selection.
153662-1 ch11.F 8/2/02 2:27 PM Page 349
Fireworks Seminar

350 Part III ✦ Achieving Effects
Figure 11-18: The combination of the grid and the Fixed Size marquee selection make selecting part of all four original images easy.
18. Choose File ➪ New to create a new document. Fireworks automatically sizes
the new document to match the graphic on the clipboard.
19. Choose Edit ➪ Paste to paste the selection. This is your finished Pattern file
(see Figure 11-19).
Figure 11-19: The final Pattern uses the center of four adjacent images so that its edges meet seamlessly when patterned.
20. Choose File ➪ Save, and store the image in the Configuration/Patterns folder,
within your Fireworks program folder.
153662-1 ch11.F 8/2/02 2:27 PM Page 350
Fireworks Seminar

351Chapter 11 ✦ Using Fills and Textures
21. Restart Fireworks.
If you don’t want to restart Fireworks, you don’t have to, but you’ll have to use theOther option from the Pattern Name option list to select your Pattern file for use.
22. Test your Pattern by drawing out a closed path and filling it with your new
Pattern.
23. If necessary, open the just-saved Pattern file and edit to remove any
noticeable edges.
Numerous other ways to blur the line between your edges exist, such as with
the Blur or Smudge tools, but the Rubber Stamp tool works in many situations.
Although it does take a bit of practice to get the hang of the tool and this technique,
the results are definitely worth it.
For more information on the Blur, Smudge, and Rubber Stamp tools, as well astheir options, see Chapter 6.
Adding Texture to Your FillsA common complaint about computer graphics in general is that their appearance
is too artificial. If you take a quick look around the real world, very few surfaces are
a flat color — most have some degree of texture. Fireworks simulates this reality by
enabling any fill (or stroke, for that matter) to combine with a texture. In Fireworks,
a texture is a repeating image that you can apply on a percentage basis.
As with Fireworks patterns, textures are PNG images designed to be repeated, and
are stored in a specific folder. But that’s where the similarity with patterns ends.
Whereas a pattern replaces any other fill, a texture is used in addition to the chosen
fill. A texture is, in effect, another object, which is blended on top of the original
object. As you increase the degree of a texture through the Amount of setting in the
Fill section of the Property inspector, you are actually increasing the opacity of the
texture. When the amount of texture is at 100 percent, the texture is totally opaque
and the textured effect is at its maximum.
Another difference between pattern and texture is color: Patterns can be any range
of color, whereas textures are displayed in grayscale. The reason for this is purely
functional: If textures included color, the color of the original fill or stroke would be
altered. One consequence of the grayscale property is that flat white fills are almost
totally unaffected by textures.
Generally, textures work better with darker colors, which permit more range ofcontrast.
Tip
Cross-Reference
Tip
153662-1 ch11.F 8/2/02 2:27 PM Page 351
Fireworks Seminar

352 Part III ✦ Achieving Effects
Fireworks includes a wide range of textures, and provides even more on the
Fireworks CD-ROM. Each texture is chosen from an option list on the Fill section
of the Property inspector and, as with patterns, a preview is displayed for each
texture. Next to the Texture option list is a slider that controls the chosen texture’s
degree of intensity. The higher the amount of texture, the more pronounced the
texture’s effect on the fill, as shown in Figure 11-20.
Extending Textures to Strokes and Images
Textures aren’t limited to enhancing fills. You can just as easily apply them to strokes and,with a little more work, images as well. Sometimes a stroke is used to define a filled object,and it’s best not to extend the texture onto the stroke. Certain images, however, benefitfrom a continuation of the texture from fill to stroke.
Take, for example, the following figure. I created a very simple texture of alternating linesthat is applied to the stroke (a big Air Brush) in the top example. Because the same set oftextures are available from both the Fill and Stroke sections of the Property inspector, it’seasy to duplicate settings from one section to the other, so in the middle example, a fill hasbeen added and the same lines texture applied to it. The bottom example has had someLive Effects added, but the lines still show through and bring the stroke and fill together.
Applying a texture to an image requires an additional step. Strokes and fills cannot beapplied directly to an image. The technique then is to create a vector object that completelycovers the image and apply the texture to that vector object. Blend it into the image eitherby altering the opacity of the vector object, and/or its blending mode (these controls can befound in the Layers panel as well as above the Effects section of the Property inspector),or by using the vector object as a mask for the image. As is often the case with Fireworks,a little experimentation can lead to some very interesting results.
153662-1 ch11.F 8/2/02 2:27 PM Page 352
Fireworks Seminar

353Chapter 11 ✦ Using Fills and Textures
Figure 11-20: Increasing the amount of texture on the Fill panel makes the texture more visible.
An additional property of textures is transparency. If your textured object is on
top of other objects, the background objects show through the light portions of the
texture when the Transparent option is enabled. The higher the degree of texture,
the more transparent an object becomes.
Adding new texturesNew textures are added exactly the same way that new patterns are added:
✦ Save or export a file to the Configuration/Textures folder within your
Fireworks program folder.
✦ Through the Preferences dialog box, assign an additional folder for textures.
Textures files work best when they enable a repeating pattern without visible edges
and, as mentioned previously, all textures are shown in grayscale.
Converting a color image to grayscaleAlthough you don’t have to convert images to grayscale before saving them as
textures — Fireworks simply displays color textures as grayscale, anyway —
converting them enables you to get a better sense of how the texture will ultimately
look. It also gives you a chance to alter the overall brightness and contrast to
achieve the best-looking texture.
To convert a color vector or bitmap object to grayscale using the Convert to
Grayscale Command, follow these steps:
1. Select the object you want to convert.
2. Choose Commands ➪ Creative ➪ Convert to Grayscale. Fireworks converts
your object to grayscale.
0% texture 40% texture 80% texture
153662-1 ch11.F 8/2/02 2:27 PM Page 353
Fireworks Seminar

354 Part III ✦ Achieving Effects
Assigning an additional textures folderIf you have an entire group of textures you want to add at one time, you can assign an
additional folder for Fireworks to include in the texture list. To assign an additional
Textures folder, follow these steps:
1. Choose Edit ➪ Preferences. The Preferences dialog box opens.
2. Select the Folders category (choose Folders from the option list on a
Macintosh).
3. In the Additional Materials section, choose the Browse button next to the
Textures option. A navigation dialog box appears.
4. Locate the external folder that contains files you want to access as textures.
Click OK when you’ve selected the folder. The Textures checkbox is now
enabled on the Preferences dialog box.
5. Click OK to accept the changes and close Preferences.
6. Restart Fireworks to make the additional textures available.
Can’t get enough textures? You’ll find more in the Textures folder on the CD-ROMaccompanying this book.
Adding textures to a documentAs with patterns, you can open textures one at a time and use them with your
current document, enabling easy access to textures stored anywhere on your
computer. Textures opened in this way are saved within the current document.
To access an external PNG image as a texture in the current document, follow
these steps:
1. Choose Solid, Pattern, or a gradient from the Fill category option list, in the
Fill section of the Property inspector, to view the Texture Name option list.
2. From the Texture Name option list, choose Other to display an Open dialog box.
3. Navigate to and select the file you want to use as a texture. It can be a color or
a grayscale image, but the result is always a grayscale texture. Click OK when
you’re done.
Fireworks adds your new texture to the Texture option list.
Filling with the Paint Bucket ToolThe Paint Bucket tool is used to fill a selected area with the settings that are
currently in the Fill section of the Property inspector — whether those settings
On theCD-ROM
153662-1 ch11.F 8/2/02 2:27 PM Page 354
Fireworks Seminar

355Chapter 11 ✦ Using Fills and Textures
involve a solid color, a gradient, or a pattern. The Paint Bucket can be used to fill
both vector objects and bitmap objects. The Paint Bucket fills all of a vector object
completely, whereas it only fills the selected portion of a bitmap object, or a range
of like, adjacent colors if there is no selection, as shown in Figure 11-21.
Figure 11-21: The vector object on the bottom left is filled completely by the Paint Bucket. Applying the same fill to the bitmap object on the bottom right only affects pixels colored similarly to those under the cursor.
With vector objects, nothing is as simple as using the Paint Bucket. Choose the
Paint Bucket tool (or use the keyboard shortcut, G), and then click the object once
to apply the current Fill settings from the Property inspector.
Fireworks doesn’t distinguish between open and closed paths when the PaintBucket is used. If the Paint Bucket is used on an open path, such as an S-curve, aninvisible line is drawn from the beginning to the ending point and the fill isapplied.
Bitmap objects are a different story with regard to the Paint Bucket. If you click a
bitmap object with the Paint Bucket without selecting an area using one of the
selection tools (Marquee, Ellipse Marquee, Lasso, Polygon Lasso, or Magic Wand),
one of the following three things happens:
✦ The current Fill settings are applied to the selected pixel and the neighboring
pixels that fall within the Tolerance range set in the Property inspector.
Caution
Path objects Image objects
Pre-Bucket
Post-Bucket
Cursor point
153662-1 ch11.F 8/2/02 2:27 PM Page 355
Fireworks Seminar

356 Part III ✦ Achieving Effects
✦ The entire bitmap object is filled with the current Fill settings, if the Fill
Selection option is selected from the Property inspector.
✦ The entire document is filled with the current Fill settings, if the Fill Selection
Only object is selected from the Property inspector.
The Property inspector, shown in Figure 11-22, becomes very important when you
apply the Paint Bucket tool to bitmap objects.
Figure 11-22: The Property inspector options for the Paint Bucket tool have a major effect on how bitmap objects are filled.
The available options are as follows:
✦ Fill Selection: Fills a selected area and disregards color tolerance settings,
or if no area is selected, fills either the bitmap object or document according
to the Expand to Fill Document setting.
✦ Preserve Transparency: Only colors existing pixels, so that transparent
pixels stay transparent.
✦ Tolerance: Sets the range of colors to be filled when Fill Selection is not
enabled. The Tolerance slider accepts values from 0 (where no additional
colors are filled) to 255 (where all additional colors are filled).
✦ Edge: Determines the type of edge on the fill — Hard, Anti-Aliased, or Feather.
If Feather is selected, the Amount of Feather slider becomes available, which
sets the degree to which the fill is blended into surrounding pixels.
After you’ve made a selection in a bitmap object, you don’t have to click in theselected area with the Paint Bucket to change it. Clicking anywhere in the documentautomatically fills the selected area.
SummaryFills are one of Fireworks’ basic building blocks. Without fills, objects would appear
to have outlines only and arranging objects on top of one another would be difficult,
if not impossible. As you begin to work with fills, keep these points in mind:
✦ You can apply Fills to any Fireworks object: vector or bitmap.
✦ Access all the fill settings through the Fill section of the Property inspector.
You can also find the Fill color well on the Tools panel and the Mixer.
Tip
153662-1 ch11.F 8/2/02 2:27 PM Page 356
Fireworks Seminar

357Chapter 11 ✦ Using Fills and Textures
✦ The five options for fills are None, Solid, Web Dither, Pattern, and Gradient.
✦ The Web Dither fill visually blends two Web-safe colors to make a third color
outside the limited Web-safe palette.
✦ You can modify a Gradient or Pattern fill by selecting the filled object with the
Pointer, Paint Bucket tool, or Gradient tool and adjusting the control handles.
✦ New gradient color combinations can be saved as a Style and reused.
✦ A Pattern fill can be made from any repeating image, stored in PNG format,
or can be stored within a document.
✦ Textures can bring a touch of realism to an otherwise flat graphic, and can
also be stored within a document.
✦ The Paint Bucket options control whether the entire bitmap object is filled,
or just a selection is filled.
In the next chapter, you find out about the razzle-dazzle side of Fireworks:
Live Effects and Filters.
✦ ✦ ✦
153662-1 ch11.F 8/2/02 2:27 PM Page 357
Fireworks Seminar

153662-1 ch11.F 8/2/02 2:27 PM Page 358
Fireworks Seminar

Creating LiveEffects andFilters
Many Fireworks graphics are based on three separate
but interlocking features: strokes, fills, and effects.
Not everyone would put effects — the capability to quickly
add a drop shadow or bevel a button — on the same level as
strokes and fills, but most Web designers would. Effects are
pretty close to essential on the Internet. Not only is the look
and feel of many Web sites dependent on various effects, but
also much of their functionality, especially when techniques
such as button rollovers are concerned, demands it.
Live Effects are a Fireworks innovation. For the first time,
designers can edit common effects without having to rebuild
the graphic from the ground up. But what makes Live Effects
truly “Live” is Fireworks’ capability to automatically reapply
the effects to any altered graphic — whether the image is
reshaped, resized, or whatever. You can even use many
standard Photoshop-compatible filters as Live Effects, and
apply, edit, or remove them as easily as Fireworks’ own
classic bevels and glows.
Later in the chapter, we look at how you can apply filters and
what you can apply them to. You work with the filters that are
included with Fireworks and examine some of the techniques
that you can use to apply them creatively. You also see how
you can add more filters to Fireworks, including ones that you
may already have as part of another application. Finally, this
chapter reviews some very popular third-party image filter
packages, including Eye Candy 4000, Kai’s Power Tools, and
Auto FX’s DreamSuite series.
1212C H A P T E R
✦ ✦ ✦ ✦
In This Chapter
UnderstandingFireworks effects
Using the Effectssection of theProperty inspector
Working with LiveEffects
Fireworks technique:creating perspectiveshadows
Managing LiveEffects
Applying filters
Using Photoshop-compatible plug-infilters
Third-party filters
✦ ✦ ✦ ✦
163662-1 ch12.F 8/2/02 2:28 PM Page 359
Fireworks Seminar

360 Part III ✦ Achieving Effects
Understanding Fireworks EffectsAlthough the Filters menu contains the definitive image-filters list to which
Fireworks has access, many image filters are also available in “live” versions from
the Effects section of the Property inspector. You can treat Photoshop-compatible
filters in the Effects section of the Property inspector just like any other Live Effect:
Add and remove them as you please, reorder them, or adjust their settings at any
time.
New kinds of creative experimentation are made possible with many of the same
image filters that you may have used for years in Photoshop. Rearranging the order
that filters are applied without having to start from scratch, or easily saving favorite
combinations of filters, is truly liberating. Exciting new combinations of effects are
made possible because they’re so easy to mix, match, and experiment with.
Using Effects in the Property inspectorThe Effects section of the Property inspector, shown in Figure 12-1, is a powerful
tool that centralizes almost all the effects in Fireworks, with the exception of some
third-party image filters, which remain only accessible from the Filters menu.
The Effects section of the Property inspector offers you access to two key sections:
the Add and Delete Effects buttons, which offer you a menu containing all the Live
Effects to which you have access; and the Effects list, which contains only the
Live Effects that are currently applied to a selection.
Figure 12-1: The Add Effects menu in the Effects section of the Property inspector is a central access point for almost all the effects available in Fireworks.
The Add Effects menu is divided into five distinct parts:
✦ None: Choosing this option removes all the effects from the selection.
✦ Options: The Options submenu is the place to go if you want to save your
effects as Fireworks Styles, turn all effects on or off for a selected object,
or choose your Photoshop-compatible plug-ins folder.
Third-partyPhotoshop-compatible
image filters
Yoursavedeffects
IncludedAlien Skinfilters
IncludedLive Effects
163662-1 ch12.F 8/2/02 2:28 PM Page 360
Fireworks Seminar

361Chapter 12 ✦ Creating Live Effects and Filters
✦ Effects combinations that you save: This section is not visible until you save
your first combination.
✦ Included Live Effects: Such as bevels, blurs, and glows.
✦ Third-party Photoshop-compatible image filters: All third-party plug-ins
available in your Filters folder or through the Photoshop Plug-Ins option in
the General section of the Preferences.
Not all third-party image filters can be used as Live Effects. Those that can’t
simply don’t show up in the Add Effects menu and can only be accessed from
the Filters menu.
Applying Live EffectsYou can only apply Live Effects to objects selected in vector mode. If you want to
apply a Live Effect to a pixel selection, you have the following two choices:
✦ Select an area with the pixel selection tools and copy it to the clipboard. Next,
paste the selection as a new bitmap object. The new bitmap object is placed
exactly where your pixel selection was located. Apply the Live Effect to your
new bitmap object. If you like, you can then group or flatten the new bitmap
object and the original bitmap object from which the pixel selection was
taken.
✦ Some Live Effects are also available from the Filters menu and can be applied
to a pixel selection from there, although this doesn’t maintain editability.
Although each effect has its own unique settings, you apply them all in basically the
same fashion:
1. Select an object or objects. Fireworks can simultaneously apply the same
effect to multiple objects.
2. Click the Add Effects button (the Plus sign) in the Effects section of the
Property inspector and choose the desired effect from the Add effects menu.
If the effect has editable settings — most do — Fireworks displays a pop-up
window, a regular dialog box (see Figure 12-2), or a plug-in package specific
dialog box, depending on the effect you selected.
3. Modify the settings to achieve the desired effect. After you’re done, click
anywhere outside a pop-up window, click OK in a regular dialog box, or press
Enter (Return) in either.
4. The effect is applied to all selected objects.
After an effect is applied, it is added to the Effects list in the Effects section of the
Property inspector, and Fireworks keeps it alive throughout any other changes that
the object may undergo. Fireworks actually recalculates the required pixel effects and
163662-1 ch12.F 8/2/02 2:28 PM Page 361
Fireworks Seminar

362 Part III ✦ Achieving Effects
reapplies the effect after a change is made for vector, bitmap, or text objects. In my
opinion, the capability to make completely editable vector artwork (see Figure 12-3)
resemble bitmaps that have undergone numerous image filter modifications is a
superb addition to the Web designer’s toolbox.
Figure 12-2: The Effects section of the Property inspector offers a high level of control over the way effects are applied, edited, and removed.
Figure 12-3: Fireworks’ always-editable Live Effects make these vector objects resemble bitmaps that have been extensively modified with image filters.
Deleteeffectbutton
Addeffectbutton
Info button
Apply Effect checkbox
Pop-up dialog box
Effects list
163662-1 ch12.F 8/2/02 2:28 PM Page 362
Fireworks Seminar

363Chapter 12 ✦ Creating Live Effects and Filters
To edit the parameters for an applied effect, select the object, and click the Info
button next to the effect that you want to modify in the Effects list on the Property
inspector. Fireworks displays the effect’s dialog box. Edit the parameters and
dismiss the dialog box by clicking OK, or by clicking anywhere outside it if it is a
pop-up window.
As good as Fireworks effects look, sometimes objects look better with no effects.
To remove all effects from an object, select the object, click the Add Effects button
(plus sign) and then choose None from the Add Effects menu. To temporarily
disable a single effect, deselect the checkbox next to that effect in the Effects list.
To temporarily disable all effects, choose Options ➪ All Off from the Add Effects
menu in the Effects section of the Property inspector. Of course, choosing Options
➪ All On from the Add Effects menu enables all applied effects. To remove a single
effect permanently, select the effect in the Effects list and click the Delete Effect
button (minus sign) in the Effects section of the Property inspector.
Examining the Filters menuMany bitmap-editing applications offer a dedicated menu that contains Photoshop-
compatible plug-in image filters. Fireworks is no exception, and the Filters menu,
shown in Figure 12-4, is it. When you launch Fireworks, it populates the Filters
menu with all the image filters it can access. Generally, these are installed in
Fireworks’ Filters folder (more on that later), or in a separate Photoshop plug-ins
folder specified in your Fireworks preferences.
Figure 12-4: The Filters menu contains built-in Fireworks image filters, as well as any third-party, Photoshop-compatible image filters you’ve added.
Image filters are called “filters” because every pixel in the image is evaluated —filtered — and either modified or not according to the settings and the effect that’sbeing applied. The terms plug-ins and filters are used interchangeably throughoutthis chapter.
Tip
IncludedAlien Skinfilters
Repeat last filter
Included filters
Third-partyPhotoshop-compatible
image filters
163662-1 ch12.F 8/2/02 2:28 PM Page 363
Fireworks Seminar

364 Part III ✦ Achieving Effects
In a nutshell, the difference between the effects contained in the Filters menu and
the ones in the Effects section of the Property inspector are that the ones in the
Filters menu are not live. You can only apply filters to bitmap objects; applying
them to a text or vector object flattens the object into a bitmap object. After a filter
is applied, there is no way to remove the effect except with the Undo command or
the History panel.
The Filters menu is divided into three sections. From top to bottom, they are the
following:
✦ A single menu command that identifies and repeats the last-used filter
✦ Image filters that are included with Fireworks itself
✦ Third-party, Photoshop-compatible image filters
One exception is the DitherBox filter that’s included with Photoshop 5. It finds itsway onto the Other menu if you make it available to Fireworks.
Plug-in image filters automatically organize themselves into submenus that
are specified by the developer of the plug-in so you have no control over the
arrangement.
Working with Included Live EffectsFireworks is shipped with a range of useful Live Effects built-in, contained in the
following submenus of the Add Effects menu in the Effects section of the Property
inspector:
✦ Adjust Color: Auto Levels, Brightness/Contrast, Color Fill, Curves,
Hue/Saturation, Invert, and Levels
✦ Bevel and Emboss: Inner Bevel, Inset Emboss, Outer Bevel, and Raised
Emboss
✦ Blur: Including Blur, Blur More, and Gaussian Blur
✦ Other: The unclassifiable Convert to Alpha and Find Edges
✦ Shadow and Glow: Drop Shadow, Glow, Inner Glow, and Inner Shadow
✦ Sharpen: Including Sharpen, Sharpen More, and Unsharp Mask
Table 12-1 details the Live Effects that are included with Fireworks, and what each
one does.
Caution
163662-1 ch12.F 8/2/02 2:28 PM Page 364
Fireworks Seminar

365Chapter 12 ✦ Creating Live Effects and Filters
Table 12-1Included Live Effects
Live Effect Description
Auto Levels Automatically produces an image with the maximum tonal range.
Brightness/Contrast Adjusts the brightness and/or contrast of all the pixels in an image.
Color Fill Colors the pixels of an object.
Curves Enables you to adjust the level of a particular color in an image,without affecting other colors.
Hue/Saturation Adjusts the color in an image.
Invert Changes the color of each pixel to its mathematical inverse. Createsa photo-negative-type effect.
Levels Enables you to adjust the tonal range of all the pixels in an image.
Inner Bevel Adds a three-dimensional look to an object by beveling its inside edge.
Inset Emboss Simulates an object in relief against its background.
Outer Bevel Frames the selected object with a three-dimensional, roundedrectangle.
Raised Emboss Simulates an object raised from its background.
Blur Blurs pixels together to create an unfocused effect.
Blur More Same as Blur but across a slightly larger radius, for a morepronounced blur.
Gaussian Blur Same as Blur More but with a Gaussian bell curve and a dialog boxthat enables you to specify the blur radius.
Convert to Alpha Converts an image into a grayscale image that’s suitable for use asan alpha mask. White pixels are colored transparent.
Find Edges Detects the outlines of forms and converts them to solid lines.
Drop Shadow Shadows the object against the background to make it stand outmore effectively.
Glow Puts a halo or soft glow around an object.
Inner Glow Puts a glow within the inner edge of an object.
Inner Shadow Puts a shadow within the inner edge of an object.
Sharpen Sharpens by finding edges and increasing the contrast betweenadjacent pixels.
Sharpen More Same as Sharpen but across a larger radius.
Unsharp Mask Same as Sharpen More, but with control over which pixels aresharpened (and which are left “unsharp”), according to the image’sgrayscale mask.
163662-1 ch12.F 8/2/02 2:28 PM Page 365
Fireworks Seminar

366 Part III ✦ Achieving Effects
For more about mask groups, see Chapter 13.
Adjusting colorThe Adjust Color submenu of the Add Effects menu contains powerful tools for
adjusting the tonal range and color correcting, or for adding special effects to
objects. Traditionally, these tools have only been available in a destructive form:
You adjust an image’s tonal range, and if you find out later you went a little too dark
or light, you had to start with an earlier iteration of a document and redo your
work. Introducing these tools to Fireworks users as Live Effects provides a dramatic
increase in workflow flexibility.
Adjusting tonal rangeIdeally, a photographic image would have a fairly even ratio of dark tones, mid-
tones, and light tones. Too many dark pixels hides detail; too many light pixels and
your image appears washed out. Too many midtones — darks aren’t dark enough
and lights aren’t light enough — and your image appears bland, as in the Before
image in Figure 12-5. Fireworks offers you a few different methods for adjusting the
tonal range of images; which one you choose to use depends on how bad the
damage is.
Figure 12-5: Before and after increasing an image’s tonal range to add contrast. Dark pixels are darkened and light pixels are lightened.
AfterBefore
Cross-Reference
163662-1 ch12.F 8/2/02 2:28 PM Page 366
Fireworks Seminar

367Chapter 12 ✦ Creating Live Effects and Filters
Dissecting Brightness/ContrastFor images that are only a little too dark or light, or lacking slightly in contrast,
slight adjustments made with the Brightness/Contrast effect may be all you need.
Fireworks can provide visual feedback by previewing your adjustments in the
document window.
To use the Brightness/Contrast filter, follow these steps:
1. Select the object that you want to apply the effect to.
2. In the Effects section of the Property inspector, click the Add Effects button
and choose Adjust Color ➪ Brightness/Contrast from the Add Effects menu.
Fireworks displays the Brightness/Contrast dialog box, as shown in Figure 12-6.
Figure 12-6: Adjust an image’s brightness or contrast with the controls in the Brightness/Contrast dialog box.
3. Check Preview to view your changes as you make them in the document
window.
4. Use the Brightness and/or Contrast sliders to adjust the settings. Values for
the sliders range from –100 to 100. Click OK when you’re done.
Coloring with Color FillThe Color Fill Live Effect enables you to color the pixels of an object without
permanently altering them.
To use the Color Fill Live Effect, follow these steps:
1. Select the object that you want to modify.
2. Click the Add Effects button and choose Adjust Color ➪ Color Fill from the
Add Effects menu. Fireworks displays the Color Fill dialog box.
3. Select the desired fill color from the pop-up color picker.
4. Alter the opacity setting with the Opacity slider.
5. Choose a blending mode from the Blending Mode option list.
See Chapter 13 for more about opacity and blending modes.Cross-Reference
163662-1 ch12.F 8/2/02 2:28 PM Page 367
Fireworks Seminar

368 Part III ✦ Achieving Effects
6. Click anywhere outside the pop-up dialog box to dismiss it, or press Enter
(Return).
Fireworks applies the effect to your selected object.
Getting to know Levels and Auto LevelsFor images that need more adjustment than is possible with Brightness/Contrast,
Fireworks offers the Levels and Auto Levels filters. Auto Levels works just like
Levels, except that you skip the Levels dialog box entirely, and Fireworks maps
the darkest pixels in your image to black and the lightest ones to white. For many
images, you may find that Auto Levels does the trick in record time. If not, you can
take matters into your own hands with Levels.
See the Auto Levels filter demonstrated in the color insert.
The Levels dialog box introduces a special set of three eyedropper tools, shown in
Figure 12-7. (These are also available in the Curves dialog box, which is discussed
in the next section.) The trio of eyedroppers, one for highlights, one for midtones,
and one for shadows, enable you to remap the highlights, midtones, or shadows of
an image to new levels by pointing to a pixel with the desired level. For example,
if your image is too dark, use the Shadow eyedropper and select a pixel that is a
little lighter than the darkest pixels. Fireworks substitutes the tones of the newly
selected “shadow” pixels for the darkest pixels in your image, lightening the image.
The highlights and midtones eyedroppers work in a similar fashion, providing
target levels for highlights and midtones, respectively.
Clicking Auto in the Levels dialog box is just like using the Auto Levels filter.
Figure 12-7: These special Eyedropper tools enable you to specify a new highlight, midtone, or shadow level by pointing to pixels.
Identify the three eyedroppers by the ink they seem to contain. The highlighteyedropper has white ink, whereas the midtone eyedropper has gray ink, and theshadow eyedropper has black ink.
Note
Midtone eyedropper
Highlight eyedropperShadow eyedroper
Tip
Cross-Reference
163662-1 ch12.F 8/2/02 2:28 PM Page 368
Fireworks Seminar

369Chapter 12 ✦ Creating Live Effects and Filters
The Levels dialog box also includes a Histogram — essentially a chart — that
reports the levels of dark, middle, and light tones in your image, giving you a quick
graphical representation of what might need to be fixed. The horizontal axis is dark
to light, from left to right. The vertical axis is a level from 0 to 255.
To apply the Levels filter and modify the tonal range of an image, follow these steps:
1. Select the object that you want to modify.
2. Click the Add Effects button in the Effects section of the Property inspector,
and choose Adjust Color ➪ Levels from the Add Effects menu. Fireworks
displays the Levels dialog box, as shown in Figure 12-8.
Figure 12-8: The Levels dialog box displays a Histogram of the light, midtone, and dark tones in your image.
3. Check the Preview checkbox to view your changes as you make them in the
document window.
4. Select which channels you want to modify from the Channels option list: just
Red, just Green, just Blue, or RGB to modify all three.
Modifying just the Red channel in an RGB image is similar to adjusting a color byincreasing or decreasing the R value in the Color Mixer panel when it’s set to RGBor Hexadecimal.
5. Modify the highlights and shadows in your image with the Highlight, Midtone,
and Shadow Input Levels sliders, or enter new values directly in the Highlight
and Shadow Input Levels boxes. Highlights and shadows are specified from 0 to
255, whereas midtones are specified with 1.0 being neutral, or 50 percent gray.
Tip
Highlight Input Level boxShadow Input Level box
Midtone Input Level box
Histogram
Shadow InputLevel slider
Midtone InputLevel slider
Highlight InputLevel slider
Highlight Output Level sliderShadow Output Level slider
163662-1 ch12.F 8/2/02 2:28 PM Page 369
Fireworks Seminar

370 Part III ✦ Achieving Effects
The Shadow value can’t be higher than the Highlight value, and the Highlight valuecan’t be lower than the shadow Value.
6. Use the Highlights and Shadows Output Levels sliders to adjust your image’s
overall contrast.
7. If desired, use the Highlight, Midtone, or Shadow eyedropper to sample
a target color to be used as a level for highlights, midtones, or shadows,
respectively, from your image.
8. Click OK when you’re satisfied with the changes you’ve made.
The changes you’ve made are applied to the selected object.
Turn to the color insert to see a demonstration of the Levels filter.
Evaluating CurvesThe Curves filter essentially serves the same purpose as the Levels filter, but it
presents the information to you in a different way. Whereas the Levels filter enables
you to adjust the individual levels of light, mid, and dark tones in an image, the
Curves filter focuses on the levels of individual colors. You can adjust the level of
red, for example, without affecting the balance of light to dark in an image.
The Curves dialog box contains a grid. The horizontal axis is the original brightness
values, which are also shown in the Input box. The vertical axis displays the new
brightness values, which are also shown in the Output box. The values that are
represented are 0 to 255, with 0 being complete shadow. The line plotted on the
grid always starts out as a perfect diagonal, indicating that no changes have been
made (the Input and Output values are the same).
As mentioned previously, the Curves dialog box also contains a trio of eyedropper
tools similar to the Levels dialog box. The Curves dialog box also contains an Auto
button, which yields the same result here as it does in the Levels box: The darkest
pixels in your image are mapped to black and the lightest to white, as if you had
used the Auto Levels filter.
To use the Curves filter, follow these steps:
1. Select the object that you want to modify.
2. Click the Add Effects button (plus sign), in the Effects section of the Property
inspector, and choose Adjust Color ➪ Curves from the Add Effects menu.
Fireworks displays the Curves dialog box, as shown in Figure 12-9.
3. Check the Preview checkbox to view your changes as you make them in the
document window.
Cross-Reference
Note
163662-1 ch12.F 8/2/02 2:28 PM Page 370
Fireworks Seminar

371Chapter 12 ✦ Creating Live Effects and Filters
Figure 12-9: The Curves dialog box enables you to graphically alter a color curve.
4. Select which channels you would like to modify from the Channels option list:
just Red, just Green, just Blue, or RGB to modify all three.
5. Click a point on the grid’s diagonal line, and drag it to a new position to adjust
the curve. Changing the curve changes the Input and Output values.
6. To delete a point from the curve, select it and drag it out of the grid.
You can’t delete the curve’s endpoints.
7. If desired, use the Highlight, Midtone, or Shadow eyedropper to sample a
color to be used as a target level for highlights, midtones, or shadows,
respectively, from your image.
8. Click OK when you’re satisfied with the changes you’ve made.
Fireworks applies the changes you’ve made to the selected object.
See the color insert to compare the effects of the Curves filter.
Looking into Hue/SaturationThe Hue/Saturation filter is similar to specifying colors using the HSL (Hue,
Saturation, and Lightness) color model. If you’re familiar with the concept of a
color wheel, adjusting the hue is the same as moving around the color wheel,
selecting a new color. Adjusting the saturation is like moving across the radius of
the color wheel, selecting a more or less pure version of the same color.
Cross-Reference
Caution
Original brightness axisNew brightness axis
163662-1 ch12.F 8/2/02 2:28 PM Page 371
Fireworks Seminar

372 Part III ✦ Achieving Effects
Find examples of color wheels in your operating system’s color picker(s), accessedby clicking the Palette button on the Fireworks pop-up color picker. Mac users canchoose to view different color methods, including an HLS picker.
To adjust the hue or saturation of an image with the Hue/Saturation filter, follow
these steps:
1. Select the object that you want to modify.
2. Click the Add Effects button, in the Effects section of the Property inspector,
and choose Adjust Color ➪ Hue/Saturation from the Add Effects menu.
Fireworks displays the Hue/Saturation dialog box, as shown in Figure 12-10.
Figure 12-10: The Hue/Saturation dialog box offers Hue, Saturation, and Lightness sliders.
3. Check the Preview checkbox to view your changes in the document window
as you make them.
4. Choose Colorize to add color to a grayscale image, or change an RGB image
into a two-tone image.
If you choose Colorize, the range of the Hue slider changes from –180 through180, to 0 through 360; the range of the Saturation slider changes from –100through 100, to 0 through 100.
5. Adjust the purity of the colors with the Saturation slider.
6. Adjust the color of the image with the Hue slider.
7. Adjust the lightness of the colors with the Lightness slider.
8. When you’re satisfied with the changes you’ve made, click OK.
The changes you’ve made are applied to the selected object.
See the Hue/Saturation filter in action in the color insert.Cross-Reference
Note
Tip
163662-1 ch12.F 8/2/02 2:28 PM Page 372
Fireworks Seminar
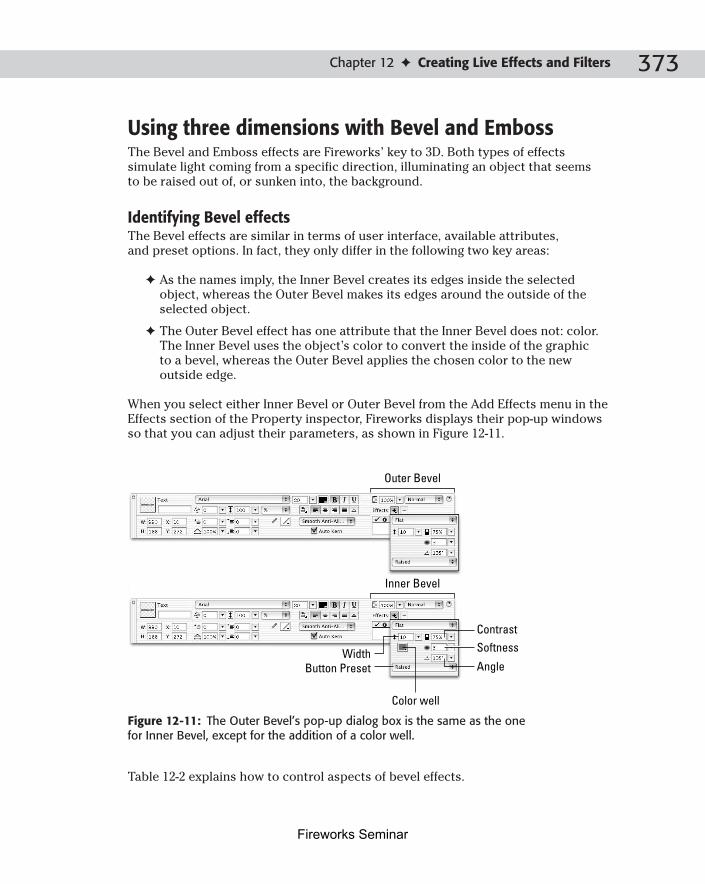
373Chapter 12 ✦ Creating Live Effects and Filters
Using three dimensions with Bevel and EmbossThe Bevel and Emboss effects are Fireworks’ key to 3D. Both types of effects
simulate light coming from a specific direction, illuminating an object that seems
to be raised out of, or sunken into, the background.
Identifying Bevel effectsThe Bevel effects are similar in terms of user interface, available attributes,
and preset options. In fact, they only differ in the following two key areas:
✦ As the names imply, the Inner Bevel creates its edges inside the selected
object, whereas the Outer Bevel makes its edges around the outside of the
selected object.
✦ The Outer Bevel effect has one attribute that the Inner Bevel does not: color.
The Inner Bevel uses the object’s color to convert the inside of the graphic
to a bevel, whereas the Outer Bevel applies the chosen color to the new
outside edge.
When you select either Inner Bevel or Outer Bevel from the Add Effects menu in the
Effects section of the Property inspector, Fireworks displays their pop-up windows
so that you can adjust their parameters, as shown in Figure 12-11.
Figure 12-11: The Outer Bevel’s pop-up dialog box is the same as the one for Inner Bevel, except for the addition of a color well.
Table 12-2 explains how to control aspects of bevel effects.
ContrastSoftness
AngleWidth
Button Preset
Outer Bevel
Inner Bevel
Color well
163662-1 ch12.F 8/2/02 2:28 PM Page 373
Fireworks Seminar

374 Part III ✦ Achieving Effects
Table 12-2Bevel Effects
Bevel effect Description
Effect name Seven different types of bevel effects are accessible through the Effect name option list. Each type of effect alters the number, shape, or degreeof the bevel.
Width Sets the thickness of the beveled side. The Width slider has a rangefrom 0 to 10 pixels, although you can enter a higher number directly inthe text box.
Contrast Determines the difference in relative brightness of the lit and shadowedsides, where 100 percent provides the greatest contrast and 0 percentprovides no contrast.
Softness Sets the sharpness of the edges used to create the bevel, where 0 is thesharpest and 10 is the softest. Values above 10 have no effect.
Angle Provides the angle for the simulated light on the beveled surface. Dragthe knob control to a new angle or enter it directly in the text box.
Button Preset Offers four preset configurations, primarily used for creating rolloverbuttons.
Color Available for Outer Bevel, this standard color well is used to determinethe color of the surrounding border.
Although you can apply the bevel effects to any object, if the object’s edge isfeathered too much, you won’t be able to see the effect. To combine a featherededge with a bevel, set the Amount of Feather to less than the width of the bevel.
Each of the bevel effects has the same types of edges. Compare the Inner Bevel and
Outer Bevel effects in Figure 12-12, and you see the similarities among the seven
types for both effects. Found under the Effect name option list, these types vary
primarily in the shape of the bevel itself. Looking at each of the bevel shapes from
the side makes differentiating between the possible shapes easier.
Mastering Bevel effects Button presetsBevel effects are terrific for creating buttons for all purposes: navigation, forms,
links, and so on. One of the most common applications of such buttons involves
rollovers. Rollover is the commonly used name (another is mouseover) for the effect
when a user moves the pointer over a button and it changes in some way. Both
bevel effects provide four presets under the Button preset option list — Raised,
Highlight, Inset, and Inverted — that you can employ for rollovers.
Caution
163662-1 ch12.F 8/2/02 2:28 PM Page 374
Fireworks Seminar

375Chapter 12 ✦ Creating Live Effects and Filters
Figure 12-12: Inner Bevel effects are all contained within the original vector of the object, whereas Outer Bevel effects create edges outside the original vector. The side views, shown in the middle row, make telling the types of effects apart easier.
Unlike Stroke or Fill presets on the Property inspector, the bevel Button presets do
not actually change the dialog box’s attributes, but rather internally change the
lighting angle and lighten the object (see Figure 12-13). The Raised and Highlight
presets use the same lighting angle, derived from the Angle value, but Highlight is
about 25 percent lighter. The Inset and Inverted presets, on the other hand, reverse
the angle of the lighting — and, of this pair, Inverted is the lighter one.
To take the fullest advantage of the bevel effect Button presets in creating rollovers,set your lighting angle first with the Angle knob in the Effect’s pop-up window. Thenduplicate the object and apply the different Button presets to each copy.
Outlining embossingIf you’ve ever seen a company’s Articles of Incorporation or other official papers,
you’ve probably encountered embossing. An embossing seal is used to press the
company name right into the paper — so that it can be both read and felt. Fireworks’
emboss effects provide a similar service, with a great deal more flexibility, of course.
Both emboss effects replace an object’s fill with the canvas color or the color of
background objects, and then add highlights and shadows. Inset Emboss and
Raised Emboss each reverse the placement of these highlights and effects in order
to make the embossed object appear to be pushed into or out of the background,
respectively, as shown in Figure 12-14.
Tip
Flat Frame 1 Frame 2 Ring Ruffle Sloped Smooth
163662-1 ch12.F 8/2/02 2:28 PM Page 375
Fireworks Seminar

376 Part III ✦ Achieving Effects
Figure 12-13: Both the bevel effects offer four Button presets:Raised, Highlight, Inset, and Inverted.
Figure 12-14: The two emboss effects make an object appear to be part of the background —either pushed into or out of it.
The Emboss effects are applied as any other Live Effect, with the options presented
in a pop-up window, shown in Figure 12-15.
Raised
Inset
Highlight
Inverted
163662-1 ch12.F 8/2/02 2:28 PM Page 376
Fireworks Seminar

377Chapter 12 ✦ Creating Live Effects and Filters
Figure 12-15: Adjust the parameters of either the Inset Emboss or Raised Emboss effects through their identical pop-up dialog boxes.
Following are the adjustable emboss parameters:
✦ Width: Determines the thickness of the embossed edges. As with other
effects, the slider’s range is from 0 to 30, but you can enter higher values
directly into the associated text box.
✦ Contrast: Contrast controls the relative lightness of the highlights to the dark-
ness of the shadows.
✦ Softness: Sets the sharpness of the embossed edges, higher numbers make
the edges fuzzier.
✦ Angle: Establishes the direction of the embossed edges.
✦ Show Object: Shows or hides the embossed object. The emboss itself is
always visible.
Adding depth with blurringSometimes, what should be the focal point of your image can get lost among other
elements of the composition. This is especially true when you’re compositing
multiple objects, or really laying the filters on thick. Adding a little blur to the
background area of an image can cause the foreground to stand out, immediately
drawing the viewer’s eye to it.
To add depth to the background area of an image, follow these steps:
1. Use one of the marquee selection tools to create a pixel selection around the
part of your bitmap object that you want to remain in the foreground. You
might create a circle to focus attention within that circle, or use the Magic
Wand to create a complex selection, such as around a person’s head or face.
2. Choose Select ➪ Select Inverse to invert your selection and select the
background of your image.
3. Choose Filters ➪ Blur ➪ Gaussian Blur. Fireworks displays the Gaussian Blur
dialog box.
Some Live Effects and Filters have an ellipsis after their menu command, whichindicates that choosing that command opens a dialog box in which you can specifysettings. Filters without the ellipsis either don’t have any parameters for you tochange, or display their parameters in a pop-up dialog box.
Note
Contrast
Angle
SoftnessWidth
163662-1 ch12.F 8/2/02 2:28 PM Page 377
Fireworks Seminar

378 Part III ✦ Achieving Effects
4. Adjust the Blur Radius slider to specify the intensity of the effect. The more
blur you add, the more depth you add to your image. Generally, a blur radius
of between 1 and 2 creates a depth effect without destroying the edges of the
elements in the image. Click OK when you’re done.
You may want to feather the edge of your selection before applying your blur bychoosing Select ➪ Feather, or by clicking the Edge option list on the Propertyinspector. This gives a smoother transition between the pixels that are blurred andthose that aren’t.
The area that was within your original pixel selection now seems to stand out and
draws the eye at first glance (see Figure 12-16), because it is clear and sharp and
appears to be closer to your eyes. In addition, the blurred background creates
an overall feeling of depth because background elements seem to be a little
further away.
Figure 12-16: Blurring the background seems to give an image extra depth and makes the foreground stand out. Notice how your eye is immediately drawn to the subject’s face.
The Blur and Blur More effects work similarly to the Gaussian Blur effect, except
that they don’t have parameters. Blur provides a slight blurring effect, and Blur
More — well, you get the idea.
Learning holdover effectsThe two effects on the Other submenu of the Add Effects menu, in the Effects
section of the Property inspector, are holdovers all the way from Fireworks 1.
Original image Foreground excluded from selection
Blur appliedto selection
Tip
163662-1 ch12.F 8/2/02 2:28 PM Page 378
Fireworks Seminar

379Chapter 12 ✦ Creating Live Effects and Filters
The Convert to Alpha filter is unnecessary now that Fireworks has mask groups,
but you may find creative uses for it. Applying it converts the selection to grayscale
and sets white to transparent. The Find Edges filter detects the outlines of forms
and converts them to solid lines. This feature can be useful for special effects, or
for creating masks.
Examining Shadow and GlowThe shadow and glow effects help to create depth and softness in your Fireworks
documents.
Understanding drop and inner shadowsI remember the overwhelming sense of pride I felt after I made my first drop
shadow in an early version of Photoshop. Of course, it had taken me all afternoon
to follow two different sets of instructions and involved masking layers, Gaussian
blurs, nudged layers, and who remembers what else. My pride was quickly deflated
when I tried out my new drop-shadowed image against a color background — and
found a completely undesired halo of white pixels around my graphic.
All of that effort and anxiety is out the window with Fireworks. Applying a drop
shadow to an object can be a simple, two-step process: Select the object and then
choose Drop Shadow from the Add Effects menu in the Effects section of the
Property inspector. Best of all, you can position the drop shadow against any
colored background; Fireworks adjusts the blending of shadow to background,
eliminating the unwanted halo effect.
I’m not trying to defame Photoshop, which is a fine application. It’s only fair toacknowledge that newer versions also have a Drop Shadow effect that’s easilyapplied and also easily imported into Fireworks, with editability intact.
A drop shadow is a monochrome copy of an image, offset so that it appears behind
the image to one side. Drop shadows are usually presented in a shade of gray
(although they can be any color) and can be either faded on the edge or hard
edged. Drop shadows are used extensively on the Web — some would say that
they’re overused. However, the effect of giving flat images dimension by adding a
shadow behind it is so compelling and downright useful that I think drop shadows
will be around for a long time.
In addition to Drop Shadow, Fireworks also offers an Inner Shadow effect. Both
effects are essentially the same — and even use the same pop-up dialog box for
setting parameters — except for the location of the shadow. Inner Shadow places
the shadow within your object, as though it is recessed and the shadow is being
cast by the edges of whatever it’s recessed into.
To apply a Drop Shadow or Inner Shadow to any object in Fireworks, follow
these steps:
Note
163662-1 ch12.F 8/2/02 2:28 PM Page 379
Fireworks Seminar

380 Part III ✦ Achieving Effects
1. Select the object you want to apply the effect to. Drop shadows work well on
most any object: open or closed vectors, geometric shapes, bitmap objects,
text objects, and more.
2. Choose either Drop Shadow or Inner Shadow from the Add Effects menu, off
of the Add Effects button in the Effects section of the Property inspector.
The initial parameters — which are the same for both effects — are displayed
in a pop-up dialog box, as shown in Figure 12-17.
Figure 12-17: The default Drop Shadow effect offers a classic soft shadow,slightly cast to the right, but you can modify it in the pop-up dialog box.
3. To make the shadow appear farther away or closer, change the Distance
slider, or enter a value directly in the associated text box.
The Distance slider has a range from 0 to 100 pixels, but you can enter a highernumber in the text box to make the shadow appear even farther away. The textbox also accepts negative numbers, which cause the shadow to be cast in theopposite direction of the Angle setting.
4. To change the shadow color from the default black, pick a color from the
color well.
5. To change the transparency of the shadow, alter the Opacity slider or text
box. Opacity is given in a percentage value; 100 percent is completely opaque
and 0 percent is completely transparent (and therefore invisible).
6. To make the edge of the shadow softer or harder, move the Softness slider, or
enter a value in its text box. The Softness slider goes from 0 to 30, but you can
enter a higher value directly in the text box.
7. To change the direction of the shadow, drag the Angle knob to a new location,
or enter a degree (0 to 360) directly in the text box.
8. To display just the shadow and make the object disappear, choose the Knock
Out option.
I find myself using a hard-edged shadow almost as much as I do the soft-edge
versions, particularly in graphics, where file size is paramount. Any image with a
blended edge is larger than the same image with a solid edge because more pixels
are necessary to create the faded look — typically half as many again. When file size
is key — and you like the look of a solid drop shadow — bring the Softness slider all
the way down to zero.
Tip
Opacity
Softness
AngleColor wellDistance
163662-1 ch12.F 8/2/02 2:28 PM Page 380
Fireworks Seminar

381Chapter 12 ✦ Creating Live Effects and Filters
I do find softer shadows particularly effective, however, when one shadow overlaps
another. A good way to enhance the three dimensionality of your Web graphics is to
place one object with a shadow over another object, also with a shadow.
Using the Knock Out optionThe Knock Out option offered in the shadow effects deserves special mention. The
phrase knock out is an old printer’s term referring to the practice of dropping the
color out of certain type to enable the background to show through. Obviously if
you eliminated the color from an ordinary bit of type — without an outline or other
surrounding element — the type would seem to disappear. A shadow is perfect for
surrounding knocked out type because of the way the mind has of filling in the
details that are missing from the actual image. Selecting the Knock Out option
removes both the fill and stroke color of the object and leaves just the shadow,
as shown in Figure 12-18.
Figure 12-18: Use a Drop Shadow effect with Knock Out checked to highlight text or other objects with just the shadow.
In the introduction to this section, I noted how it’s easy in Fireworks to avoid theso-called halo effect that occurs when you move a drop shadow built against onebackground to another. In Fireworks, there are really two ways to do this. If youdon’t need the object or its shadow to be transparent, change the canvas color tothe background color of your Web page and export the image normally. To avoidthe halo effect, but maintain a transparent image, make the background colortransparent during export.
Exploring GlowWhereas a shadow is only visible on one or two sides of an object, the glow
effects — Glow and Inner Glow — create a border all around the object. The glow’s
color is user selectable, as is its width, opacity, and softness.
Tip
163662-1 ch12.F 8/2/02 2:28 PM Page 381
Fireworks Seminar

382 Part III ✦ Achieving Effects
To apply a glow, follow these steps:
1. Select the object you want to apply the effect to.
2. Click the Add Effects button, in the Effects section of the Property inspector,
and choose either Glow or Inner Glow from the Shadow and Glow submenu on
the Add Effects menu. Fireworks displays the glow parameters in a pop-up
window, which is identical to the drop-shadow dialog box, shown previously
in Figure 12-17, except for the lack of a Knock Out option.
3. Set the other options — Width, Color, Opacity, and Softness — as desired.
All the Glow effect parameters are the same as those found on the shadow effects.
One effect you can create with Glow that’s not immediately obvious is a border.Apply the Glow effect to an object and set the Softness to 0 and the Opacity to 100percent. Voilà, a border.
Sharpening to bring out detailSharpening an image can bring out depth that’s not there by finding the edges of
objects and creating more contrast between pixels on either side of that edge.
It can especially help to fix a bad scan, or bring out detail after you go overboard
with special effects filters.
To sharpen an image a little bit, select it and choose Sharpen ➪ Sharpen, or Sharpen
➪ Sharpen More from the Add Effects menu in the Effects section of the Property
inspector.
To sharpen an image with control over individual settings, follow these steps:
1. Select an object.
2. Click the Add Effects button, in the Effects section of the Property inspector,
and choose Sharpen ➪ Unsharp Mask from the Add Effects menu.
Fireworks displays the Unsharp Mask dialog box, as shown in Figure 12-19.
Figure 12-19: Specify the parameters for Unsharp Mask in the Unsharp Mask dialog box.
Tip
163662-1 ch12.F 8/2/02 2:28 PM Page 382
Fireworks Seminar

383Chapter 12 ✦ Creating Live Effects and Filters
3. Moving the Sharpen Amount slider specifies the intensity of the effect. You
might start with this slider at about midway and increase or decrease it later,
after setting other options.
4. Move the Pixel Radius slider to control how many pixels are evaluated
simultaneously. A larger radius value results in a more pronounced effect,
because the differences among a larger group of pixels typically are greater.
5. Move the Threshold slider to determine which pixels are affected. Only pixels
that have a grayscale value higher than the threshold value are affected.
A lower threshold affects more pixels. Click OK when you’re done.
Your image should now have a crisper, sharper look (see Figure 12-20).
Figure 12-20: Sharpening an image may seem to bring out extra detail.
Sometimes, a sharpened image appears too harsh. Adding a touch of blur with theBlur Live Effect, or applying the Auto Levels filter may help to remedy this.
Fireworks Technique: Making PerspectiveShadows
Fireworks is flexible enough to enable you to extend its Live Effects to create many of
your own effects. One such possibility is perspective shadows. Unlike drop shadows,
perspective shadows are not flat carbon copies of the selected object, but rather
shadows that appear to exist in a three-dimensional world. In addition, perspective
shadows can appear in front, behind, or to the side of the object.
Tip
Original image Simulated bad scan Sharpened image
163662-1 ch12.F 8/2/02 2:28 PM Page 383
Fireworks Seminar

384 Part III ✦ Achieving Effects
Alien Skin’s Eye Candy 4000 filters, covered later in this chapter, include aperspective shadow effect that’s worth investigating, if you have the Eye Candy4000 package.
This perspective shadow technique takes advantage of Fireworks’ facility with
vector objects and its capability to adjust gradients and edges. With this technique,
you can add perspective shadows to text, bitmap, or vector objects. A bitmap
object that received this treatment is shown in Figure 12-21.
Figure 12-21: Create perspective shadows in Fireworks by combining gradient fills with distorted copies of an object.
To create a perspective shadow, follow these steps:
1. Duplicate the outline of the original object to create a new shadow object.
Depending on the type of object, this first step is either very simple, very
time-consuming, or something in-between. Here are techniques for working
with the three basic types of objects:
• Vector objects: By far the easiest of the three, simply choose Edit ➪Clone to copy any vector object. Cloning is a better choice than
Duplicating because aligning the shadow and its source later is easier.
Cross-Reference
163662-1 ch12.F 8/2/02 2:28 PM Page 384
Fireworks Seminar

385Chapter 12 ✦ Creating Live Effects and Filters
• Text objects: Although it’s not absolutely necessary, I’ve found it
sometimes easier to work with text as a vector for my shadow object
than with regular text. In my experience, distorting vector objects gets
more predictable results than distorting text. Therefore, I first Clone the
text and then choose Text ➪ Convert to Paths. Finally, to reduce the
gradients of the separate letters to one, choose Modify ➪ Combine Paths
➪ Union.
• Bitmap objects: Bitmap objects can be simple rectangles, or irregular
shapes. If your object is rectangular or another geometric shape, use the
Rectangle, Ellipse, or Polygon to create a same-size copy of the object.
Otherwise, the best tool for this particular job is the Pen. For outlining
an image, I use the Pen primarily in its straight-line mode, clicking from
one point to the next, although occasionally when I need to copy a
curve, I use the Pen’s Bézier curve feature. The outline doesn’t have to
be exact, although the more details you include, the more realistic your
shadow.
2. If necessary, flip the shadow object. Depending on your hypothetical light
source, you want to flip the shadow object vertically so that the perspective
shadow falls in front of the original object.
3. If necessary, move the shadow object into position.
You won’t need to move the shadow object if the perspective shadow falls
behind the original object. However, for perspective shadows in front, you
do need to move the shadow object so that the bases of each object meet.
Although using the mouse to drag the shadow object into position is entirely
possible, I often find myself using the cursor keys to move the selected
shadow object in one direction. Pressing Shift+Arrow keys moves the object
in ten-pixel increments and the regular arrow keys, one pixel.
4. Send the shadow object behind the original object.
Whether you choose Modify ➪ Arrange ➪ Send Backward, or Modify ➪ Arrange
➪ Send to Back depends on what other objects are in the document and how
you want the shadow to relate to them. But even if the perspective shadow
falls in front of the source object, you’ll want to put it behind to mask the
meeting point.
5. Distort the shadow object.
Here’s where the real artistry — and numerous attempts — enter the picture.
Select the shadow object, and choose the Skew tool from the Tools panel to
slant the shadow in one direction; again, the direction depends on where the
apparent “light” for the shadow is coming from. Next, while the Skew tool is
still active, switch to the Scale tool. (By pressing the keyboard shortcut,
Q you don’t have to move the mouse.) You can now easily resize the same
bounding box. Choose the middle horizontal sizing handle on the edge
farthest away from the original object. Now you can drag that handle to either
shorten or lengthen the shadow.
163662-1 ch12.F 8/2/02 2:28 PM Page 385
Fireworks Seminar

386 Part III ✦ Achieving Effects
6. Optionally, fill the shadow object with a gradient.
You may be satisfied with the shadow as it stands now, but adding and
adjusting a gradient adds more depth and realism to the image. From the Fill
section of the Property inspector, choose the Linear gradient with a Black,
White preset color combination.
7. Adjust the gradient of the shadow object.
As applied, the Linear gradient just goes left to right. If you need it to flow at a
different angle (and you probably do), choose the Gradient tool while the
shadow object is selected to activate the gradient controls. Reposition and
angle the gradient, so that the starting point is at the juncture of the source
and shadow object, and the ending point is just beyond the end of the
shadow. This enables the shadow to gently fade away.
8. If desired, slightly feather the edge of the shadow object.
To my eye, shadows look a bit more realistic if they’re not so hard-edged. I like
to set the Edge option list in the Fill section of the Property inspector to
Feather and set the Amount of Feather relatively low, about three or four
pixels. You may have to adjust the shadow object a bit to hide the feathered
edge where it touches the original object.
You can add many enhancements to this technique. For example, you could add an
object for the shadow to fall over, by bending or pulling the shadow object with the
Freeform or Reshape Area tools, or the shadow itself could be not so realistic to
make a point. Computer graphics make turning anyone’s shadow into a horned devil
or winged angel oh-so-tempting. Play with perspective — you’ll be glad you did.
Managing Live EffectsAs with strokes and fills, you can save custom configurations of Live Effects with
each document. You can then later apply these custom effects to other objects in
the same document or, if the object is copied to another document, other graphics.
As with strokes and fills, management of custom effects is easily handled through
the Add Effects menu.
The commands on the Options submenu of the Add Effects menu, in the Effects
section of the Property inspector, are as follows:
✦ Save As Style: Displays the New Style dialog box to store the effects settings
of the currently selected object as a new Style in the Styles panel.
✦ All On and All Off: Turns all applied effects on or off, respectively. This is the
same as checking or unchecking all the checkboxes in the Effects list.
✦ Locate Plugins: A shortcut to specifying a folder of Photoshop-compatible
plug-ins for Fireworks to use. This is the same as modifying the Photoshop
Plug-Ins option in the Folders area of Fireworks preferences. Fireworks must
be restarted for changes to this option to take effect.
163662-1 ch12.F 8/2/02 2:28 PM Page 386
Fireworks Seminar

387Chapter 12 ✦ Creating Live Effects and Filters
Storing a customized effectCreating your own effects is a tremendous time-saver and an enjoyable creative
exercise, as well. You can apply even complex effects with one action. The effects
shown in Figure 12-22 combine Fireworks default effects with some that are
borrowed from Photoshop 5.5.
Figure 12-22: A range of effects such as these can be created and stored under sometimes goofy names for instant recall.
To store a customized effect, follow these steps:
1. Apply effects to an object until you create a combination that you would like
to save.
2. Choose Save As Style from the Options submenu of the Add Effects menu in
the Effects section of the Property inspector. The New Style dialog box
appears.
For more information on the power of Styles, see Chapter 16.
3. Enter a unique name for the effect. If you choose a name already in use,
Fireworks asks whether you want to replace the existing effect.
4. After entering a new name, check the Style properties you would like to
save with the new Style and click OK. The new effect name is displayed
alphabetically in the user area of the Add Effects menu and a thumbnail
preview of it is added to the Styles panel.
Cross-Reference
163662-1 ch12.F 8/2/02 2:28 PM Page 387
Fireworks Seminar

388 Part III ✦ Achieving Effects
If you export your new style, it won’t work properly on another machine thatdoesn’t have the same effects installed. If you only use Fireworks’ default LiveEffects, you can avoid this problem, of course.
As well as being useful for complex combinations of effects, saving simple effects
can save you time. Often, I find myself choosing the same simple drop shadow,
or using the same 4-pixel flat Inner Bevel on almost every standard 88×31 pixel
microbutton that I create. An effects-only style saves me a small amount of time
and trouble each day.
See some saved effects in greater detail in the color insert.
Grasping missing effectsAs great as it is to include all kinds of third-party filters in your saved effects,
the downside is that documents that use those effects depend upon them being
available. If you try to open a document from a colleague, for example, who used
effects that you don’t have on your system, Fireworks displays the Missing Effects
dialog box (see Figure 12-23), warning you that certain effects are unavailable.
Obviously, the larger remedy is to install the correct effects; however, you can edit
the document in the meantime.
Figure 12-23: Fireworks displays the Missing Effects dialog box when you open a document that uses filters that are not available.
Reading All About FiltersAlthough many of the items in the Filters menu are also available in the Effects
section of the Property inspector, choosing them from the Filters menu has a key
Cross-Reference
Caution
163662-1 ch12.F 8/2/02 2:28 PM Page 388
Fireworks Seminar

389Chapter 12 ✦ Creating Live Effects and Filters
difference. Unlike using Live Effects in the Effects section of the Property inspector,
applying a filter from the Filters menu flattens text and vector objects into bitmaps,
reducing their editability.
Before you choose a filter from the Filters menu, you have to decide what you want
to modify with that filter and select it in the appropriate way. All the filters that are
included with Fireworks work on any type of selection, but some third-party filters
work better on pixel selections within bitmap objects, or even require such a
selection to run.
Using vector objectsAs mentioned previously, applying a filter to a vector object, or vector object
group, flattens it into a bitmap object. The vector information is thrown away and
you lose the advantages, such as smooth scalability and editability, that vector
objects provide. Try using Live Effects on your vector objects to achieve the look
that you want before you turn to the Filters menu. After your vector object
becomes a bitmap object, there’s no going back, except by using the Undo
command, or the History panel.
Sometimes, though, you can get the best of both worlds. If you’re using a filter thatdraws outside the selection (for example, the Eye Candy Fire filter, which drawsflames around your image), you can apply the plug-in to a copy of your object andthen place the resulting, filtered image behind your original object and groupthem. Later, you can still color and use Live Effects on your vector object. If youresize it, you should throw away the filtered image and reapply the saved settingsof the filter to a new copy of your object. If you’re applying a filter that alters withinthe selection, try applying the filter to a copy of your object, and then using thecopy as an alpha mask for your original. You can create some interesting effectsthis way, without being stuck with bitmaps when you’re done.
When you do apply a filter to a vector object, Fireworks warns you that doing so
converts it to a bitmap object. You can disable this warning by checking the “Don’t
show again” checkbox. I recommend that you leave it unchecked for a little while,
until you get used to this conversion. If you accidentally convert a vector object
to a bitmap object and then save your file, your vector information may be gone
for good.
To apply a filter to a vector object, select it with the mouse and then choose the
filter’s name from the Filters menu.
Examining bitmap objectsApplying a filter to a bitmap object couldn’t be easier. The only thing to keep in
mind is that some filters draw outside the selection to create effects such as motion
trails and drop shadows. If your bitmap object is the same size as the canvas, the
Tip
163662-1 ch12.F 8/2/02 2:28 PM Page 389
Fireworks Seminar

390 Part III ✦ Achieving Effects
effect will either be invisible because it’s off the canvas, or, with some filters, won’t
even be drawn. Before applying one of these filters, resize the canvas to give them a
little room.
To apply a filter to a bitmap object, select it and then choose the desired filter from
the Filters menu.
Identifying pixel selections in a bitmap objectMany filters work best when applied to a pixel selection within a bitmap object
because they create a difference between the area inside the selection and the area
outside the selection. Often, complex pixel selections, such as those made with the
Magic Wand or the Polygon Lasso, work better than simple rectangular or circular
selections. The extra complexity creates areas where some filters create things,
such as bevels, shadows, or textures.
Creating a pixel selection doesn’t necessarily mean that you’ve limited a filter todrawing only inside the selection. Although most stay inside, some draw outsidethe selection to create their effect. Your selection marks a focal point for whateverfilter you’re applying.
To apply a filter to a pixel selection within a bitmap object, use one of the marquee
selection tools from the Tools panel to draw your selection, and then choose a filter
from the Filters menu.
For more on creating selections within bitmap objects, see Chapter 6.
Checking out false pixel selectionsSome filters ignore your pixel selections and apply their effect to an entire bitmap
object. If you find that a particular filter exhibits this behavior, you can work
around it by creating a “false pixel selection,” by copying your pixel selection to
the Clipboard and pasting it as a new bitmap object.
All the filters in Kai’s Power Tools, detailed later in this chapter, apply their effectsto your entire bitmap object and require that you use a false pixel selection to limitthem to a portion of your image.
To create a false pixel selection, follow these steps:
1. Create a selection around the area to which you want to apply the filter, by
using one of the marquee selection tools from the Tools panel.
2. Copy the selection to the Clipboard by choosing either Edit ➪ Copy, or the
keyboard shortcut, Ctrl+C (Command+C).
Tip
Cross-Reference
Note
163662-1 ch12.F 8/2/02 2:28 PM Page 390
Fireworks Seminar

391Chapter 12 ✦ Creating Live Effects and Filters
3. Paste the selection back into the document by choosing either Edit ➪ Paste, or
the keyboard shortcut, Ctrl+V (Command+V).
The selection is pasted as a new bitmap object, on top of the area it was
copied from. Even though it now has a square marquee selection, the bitmap
object is, in fact, the same size and shape as what you originally copied to the
clipboard.
4. Apply a filter to the new bitmap object by choosing the filter you want to use
from the Filters menu.
The filter affects only the new bitmap object.
The original bitmap object and the new one that you created and then filtered are
merged into one. The net result is that only the area of your original pixel selection
is modified.
Evaluating multiple objectsIn addition to individual objects, you can apply filters to a selection or group of
multiple objects. If your selection or group contains any vector objects, they will be
converted to bitmap objects, just as they would be if you were applying the filter to
them individually. When applying filters to multiple objects, keep the following in
mind:
✦ If you apply a filter to a selection of objects, the filter runs multiple times,
applying to each object in turn. If you select three objects, for example, the
filter runs three times in a row, once on each object. If you select Cancel in
any of the filter’s dialog boxes, it cancels the entire operation, and none of
your objects are altered.
✦ If you apply a filter to a group of objects, the group acts as if it is one object.
After you apply the filter, the objects actually are one bitmap object, and
you can’t separate them. To make a selection of objects into a group, select
multiple objects and choose Modify ➪ Group, or use the keyboard shortcut,
Ctrl+G (Command+G).
The exceptions to the preceding list are the Adjust Color, Blur, Other, and Sharpenfilters that come with Fireworks (all of those above the line in the Filters menu).They act on a selection of objects as if they are already grouped.
The differences in the way groups and selections are handled by filters is actually
quite handy. Imagine that you have created five objects that are going to be five
buttons in a navigation interface. If you want to apply a filter with the exact same
settings to all of them, group them and apply the filter. If, however, you want to
apply the same filter to all of them, but tweak the settings for each — to add a
slightly different texture to each one, for example — just select them and apply
the filter.
Caution
163662-1 ch12.F 8/2/02 2:28 PM Page 391
Fireworks Seminar

392 Part III ✦ Achieving Effects
Many filters start with the same settings as when you last used them. When applyinga filter to a selection of objects, the second time the filter starts, it will have the samesettings that you used on the first object, making it easier to apply a similar effectacross a selection of objects. You can also save settings in some filters.
Using Third-Party, Photoshop-CompatibleFilters
So far, you’ve seen what you can do with the Live Effects and filters that are
included with Fireworks, but that’s just the tip of the iceberg. Many third-party,
Photoshop-compatible, plug-in filters are available.
Fireworks supports Photoshop-compatible filters, but some developers targettheir filters directly at Photoshop itself, creating filters that don’t work in otherapplications. Check the Disabled plugins file in your Configuration subfolder, off of the Fireworks Application folder, for a list of filters that are known tobe incompatible. Just because a filter is not on that list doesn’t mean that it’sguaranteed to work with Fireworks, though. Whenever possible, ask the softwarepublisher about Fireworks compatibility before purchasing filters.
Installing third-party filter packagesMost filter packages come with installers that are similar to the installers provided
with full applications, such as Fireworks. Before you install a package, close
Fireworks. You have to restart Fireworks before you use the filters, anyway. When
the installer’s instructions ask you to locate your Photoshop Plug-Ins folder, specify
Fireworks’ Plug-Ins folder, which is inside your Fireworks program folder. If the
package did not come with an installer, you have to copy the filters to your Plug-Ins
folder yourself.
The Fireworks program folder is typically found at C:\Program Files\Macromedia\Fireworks MX on Windows-based computers, and at MacintoshHD:Applications:Macromedia Fireworks MX: on the Mac.
After the installation is complete, start Fireworks. You should see a new option
under the Filters menu, and — if Fireworks can use the filters as Live Effects — on
the Add Effects menu in the Effects section of the Property inspector. This is a
whole new submenu, which often has multiple filters available. Sometimes, new
effects hide themselves on menus you already have. If you have a Distort submenu,
for example (some of Photoshop 5’s filters create this), and you install a filter that
also wants to live in a Distort submenu, it may not be apparent that you’ve gained a
filter until you open the Distort submenu.
Tip
Caution
Tip
163662-1 ch12.F 8/2/02 2:28 PM Page 392
Fireworks Seminar

393Chapter 12 ✦ Creating Live Effects and Filters
Where can you get more filters? A good place to start is The Plugin Site, athttp://www.thepluginsite.com, where you’ll find lots of free filters and filter-related links. Some great individual developers: Alien Skin Software, athttp://www.alienskin.com; Auto FX Software, at http://www.autofx.com,Furbo Filters, at http://www.furbo-filters.com; and VanDerLee athttp://www.v-d-l.com. Of course, Adobe also sells Photoshop-compatiblefilters at http://www.adobe.com.
Using filters with multiple applicationsIf you use another image-editing application in addition to Fireworks, you may have
a whole host of filters on your computer that you can also use in Fireworks. Sharing
filters among numerous applications can instantly add many features to all of them
and can also speed up your workflow because you don’t have to leave an application
to apply a particular effect.
Aside from Fireworks, here are some other applications that use Photoshop-
compatible filters:
✦ Adobe Photoshop and Illustrator
✦ Macromedia FreeHand and Director
✦ Corel Photo-Paint and CorelDRAW
I have about six or seven applications that use filters, so I keep all of my filters in
one folder, independent of all the applications, and then I have all the applications
use that folder as their plug-ins folder. The alternative would be to install filters
numerous times into the plug-ins folder of each and every application. If you have
multiple applications that use standard filters, you might want to do the same
thing.
To specify an additional filters folder, follow these steps:
1. Choose Edit ➪ Preferences.
Fireworks displays the Preferences dialog box.
2. Choose the Folders tab (Folders option list on Macintosh), as shown in
Figure 12-24.
3. Check the Photoshop Plug-Ins checkbox.
4. Click the Browse button to the right of the Photoshop Plug-Ins checkbox.
Fireworks displays the Browse for Folder dialog box.
5. Select the folder that contains the filters you want to use. Click OK when
you’re done.
6. Restart Fireworks to see the changes to the Filters menu and to use your
newly available filters.
Tip
163662-1 ch12.F 8/2/02 2:28 PM Page 393
Fireworks Seminar

394 Part III ✦ Achieving Effects
Figure 12-24: Fireworks can use filters from another folder on your computer. This means you can put all of your plug-ins into one folder and point all applications that use Photoshop-compatible plug-ins at this centralized folder.
Using shortcuts (aliases) to plug-in foldersAnother method for specifying an additional plug-in folder or folders is to place
shortcuts (aliases) to those folders into Fireworks’ Filters folder. As well as being an
intuitive way to specify where filters are located, this also has the advantage of
enabling you to specify more than one additional folder (see Figure 12-25).
To create a shortcut to a folder of filters on Windows, select the folder, right-click it,
and then drag it into your Fireworks Filters folder. When you drop it, choose
Make Shortcut from the contextual menu that appears. On the Mac, hold down
Command+Option while you drag the folder into your Fireworks Filters folder, and
an alias to the plug-ins folder is created.
Exploring Alien Skin Eye CandyEye Candy is a popular filter collection that you can purchase and install as filters
in Fireworks. Fireworks even includes three of the Eye Candy filters as Eye Candy
4000 LE. Even if you don’t (yet) have the full Eye Candy 4000 package, this section
introduces you to the kinds of things that are possible with filters in general, and
may also help you evaluate other, similar packages for their quality and creative
potential.
Alien Skin has optimized Eye Candy 4000 for use as Live Effects in Fireworks. Checkout Alien Skin Software’s plug-ins on the Web at http://www.alienskin.com—or go directly to the Eye Candy 4000 plug-ins at http://www.eyecandy.com.
Tip
163662-1 ch12.F 8/2/02 2:28 PM Page 394
Fireworks Seminar

395Chapter 12 ✦ Creating Live Effects and Filters
Figure 12-25: Place shortcuts (aliases) to folders that contain filters into Fireworks’Filters folder to enable Fireworks to access the filters.
The theme here is classic effects done right: beveling, drop shadows, smoke,
motion trails, distortion. The Eye Candy filters are a great foundation for any filter
collection because they’re the kind of blue-collar, hard-working, tried-and-true
effects that are used again and again in the kinds of tasks that the working Web
artist does every day.
Following are some of the features you’ll find in Eye Candy:
✦ Many presets for each filter enable you to start using them quickly. In addition,
you can save your own settings to the preset list for later recall.
✦ A dynamic preview capability enables you to zoom in or out on your image for
precise, detailed modifications.
✦ All Eye Candy filters share common interface features, which cuts down the
learning curve (see Figure 12-26).
Central folders of filter Alias in Photoshop's plug-ins folder
Alias in Fireworks' Filters folder Alias in Freehand's Xtras (Filters) folder
163662-1 ch12.F 8/2/02 2:28 PM Page 395
Fireworks Seminar

396 Part III ✦ Achieving Effects
Figure 12-26: The Eye Candy filters have a dynamic interface and easy-to-use presets. This figure shows the Fire filter igniting some text.
Table 12-3 details each of the filters that make up Eye Candy and explains what
they do.
Many Eye Candy filters draw outside the selection and, therefore, rely heavily onhaving a pixel selection within a bitmap object, or having space around a bitmapobject against the canvas.
Table 12-3Alien Skin Eye Candy 4000
Filter Description
Antimatter Inverts brightness without affecting hue and saturation values. For example, dark red becomes light red, but is still red.
Bevel Boss Makes a pixel selection appear to be beveled or carved out of anobject. Eye Candy 4000 also has a sophisticated bevel editor foradvanced bevels.
Chrome Applies a metallic effect that you can use to simulate chrome, silver,gold, and other metals.
Corona Creates astronomical effects such as gaseous clouds and solar flares.
Cutout Makes a pixel selection appear as a hole in the image, including ashadow, so that it appears recessed.
Caution
163662-1 ch12.F 8/2/02 2:28 PM Page 396
Fireworks Seminar

397Chapter 12 ✦ Creating Live Effects and Filters
Filter Description
Drip A sophisticated version of the classic wet paint effect.
Fire Creates a realistic flame effect rising from a pixel selection or object.
Fur Applies randomly placed clumps of fur.
Glass Superimposes a sheet of colored glass.
Gradient Glow Adds a semitransparent glow around the outside edge of a pixelselection or object. Eye Candy 4000 also includes a gradient editorfor more advanced glow effects.
HSB Noise Adds noise by varying hue, saturation, brightness, and transparency.
Jiggle Creates a bubbling, gelatinous, or shattered effect.
Marble Creates marble textures.
Melt Makes objects appear as if they are melting.
Motion Trail Creates the illusion of motion by smearing a pixel selection or objectoutward in one direction.
Shadowlab Adds a drop shadow or a realistic perspective shadow to a pixelselection or an object.
Smoke Creates smoke coming from a pixel selection or object.
Squint Unfocuses a pixel selection or object in a way similar to badeyesight.
Star Creates stars and other polygon shapes.
Swirl Adds randomly placed whirlpools.
Water Drops Adds randomly placed water drops.
Weave Applies a woven effect.
Wood Creates wood textures.
Using JiggleJiggle produces a unique distortion based on randomly placed bubbling. The
patterns that it produces are more random and organic — less computerized —
than many distortion filters. A selection can seem like it’s bubbling, gelatinous,
or shattered. As you can see in Figure 12-27, you can create interesting effects with
this filter.
To use Jiggle, select an image and follow these steps:
1. Choose Filters ➪ Eye Candy 4000 ➪ Jiggle and the Jiggle dialog box appears.
163662-1 ch12.F 8/2/02 2:28 PM Page 397
Fireworks Seminar

398 Part III ✦ Achieving Effects
Figure 12-27: Jiggle is organic distortion in action, using the Bubbles type ofmovement. The third image (right) is the original image with the jiggled image as its alpha mask, and the canvas color changed to show through.
2. Adjust these controls to achieve the effect you desire:
• Bubble Size slider: Controls the frequency of the distortion. The lower
the value, the more closely spaced the distortion.
• Warp Amount: Controls how much your selection is stretched.
• Twist: Controls the amount of twisting that occurs, measured in degrees.
• Movement Type drop-down list: Use to select the way you want the
image jiggled. The three types of jiggling are Bubbles, which is a smooth,
even distortion; Brownian Motion, which is a more ragged effect; and
Turbulence, which creates sharper breaks in the image.
3. If you like, you can save your settings by using the Save Preset button. Click
OK (the checkmark) when you’re done.
The effect is applied to your image.
Understanding ShadowlabThe ubiquitous drop shadow has its place, but a more realistic shadow that mimics
the effects of the sun can be applied with Eye Candy 4000’s Shadowlab. The effect
Original image Jiggled image Jiggled image as alpha mask
163662-1 ch12.F 8/2/02 2:28 PM Page 398
Fireworks Seminar

399Chapter 12 ✦ Creating Live Effects and Filters
makes your selection appear to be standing up as the light comes from above and
in front. The shadow is attached to the object rather than floating, which creates
the three-dimensional perspective.
To use Shadowlab, select an object and follow these steps:
1. Choose Filters ➪ Eye Candy 4000 ➪ Shadowlab.
The Shadowlab dialog box appears.
2. Select any of these preset effects and/or adjust the controls, if necessary, to
achieve the effect you desire:
• Vanishing Point Direction: Controls the direction in which the shadow
falls behind your selection. The shadow always falls behind your
selection.
• Vanishing Point Distance: Controls how far the vanishing point on the
horizon is from your selection. Lower values are closer.
• Shadow Length: Controls the length of the shadow without affecting the
tapering much. Lower values produce a shorter shadow.
• Blur: Controls how blurred the edges of the shadow are. Higher values
make the shadow blurrier and create the effect of a faraway light source.
• Opacity: Adjusts the overall transparency of the shadow.
• Color: Changes the color of the shadow.
3. If you like, you can save your settings, using the Save Preset button. Click OK
(the checkmark) when you’re done.
The effect is applied to your image, as shown in Figure 12-28.
Investigating Kai’s Power ToolsKai’s Power Tools (KPT) stands out from the crowd with the extremity of the
modifications you can make to your images. Ending up with a completely
unrecognizable image after applying just one filter is easy. In fact, making sure
your image stays recognizable sometimes takes some work.
The Kai in Kai’s Power Tools is Kai Krause, who became a legend among graphicartists when he introduced the original Kai’s Power Tools.
Tip
163662-1 ch12.F 8/2/02 2:28 PM Page 399
Fireworks Seminar

400 Part III ✦ Achieving Effects
Figure 12-28: Eye Candy 4000’s Shadowlab put a realistic 3D shadow at your disposal. The original is a vector object. The other is a bitmap object with the Perspective Shadow filter applied to it.
Some highlights of KPT include the following:
✦ Complex masking and transparency options
✦ Complex three-dimensional lighting and environment options
✦ Interactive Preview windows
✦ Presets with thumbnail views
✦ Common interface elements shared by the entire set of filters. Figure 12-29
shows FraxPlorer from Kai’s Power Tools 5.
The color insert shows what you can do with FraxPlorer.
Table 12-4 details KPT 5 filters.
The KPT 5 package also includes Kai’s Power Tools 3, with 19 completely separateand useful plug-ins, making the KPT 5 package an excellent value.
Tip
Cross-Reference
Perspective Shadowed objectOriginal object
163662-1 ch12.F 8/2/02 2:28 PM Page 400
Fireworks Seminar

401Chapter 12 ✦ Creating Live Effects and Filters
Figure 12-29: This shot of the KPT 5 interface shows that it can be a bit tricky at first,but it contains much functionality. This is FraxPlorer.
Table 12-4Kai’s Power Tools 5
Filter Description
Blurrrr All the blur effects you could ever need, including spins, zooms, spirals, and motion blurs.
Noize Typical and unusual noise effects, including transparent noise.
RadWarp Creates or corrects a fish-eye lens effect. Sort of like a fun-house mirroron steroids.
Continued
Preview windowKPT Web site
link buttonCreditsbutton
Filter-specific control panels
KPT preferences button
OKbutton
Cancelbutton
Interfacelayout
memorydots
Settingsmemory
dots
Presetsbutton
163662-1 ch12.F 8/2/02 2:28 PM Page 401
Fireworks Seminar

402 Part III ✦ Achieving Effects
Table 12-4 (Continued)
Filter Description
Smoothie Multiple ways to clean up dirty, jagged edges, quickly and easily.
Frax4D Creates 3D or “4D” fractal sculptures. The “4D” ones look like reallychewed-up versions of the 3D ones.
FraxFlame Fractal effects that resemble fire. Reminiscent of long-exposurephotographs of fireworks.
FraxPlorer An incredible Fractal Explorer with real-time fly-throughs, which are likefractal movies. Create amazing textures or backgrounds, or just have funplaying.
FiberOptix Adds true three-dimensional fibers onto images, including masks. Youcan make something hairy and then composite it easily.
Orb-It Creates very detailed three-dimensional spheres. Make bubbles,raindrops, lenses, and distortions.
ShapeShifter Makes three-dimensional shapes from masks, including environmentmaps and textures.
Using RadWarpKPT RadWarp simulates a photographic effect called barrel roll. You can either add
the fish-eye effect to create fantastic variations on an image, or use the filter to
“unfish-eye” an image with a slight, unwanted barrel roll.
All KPT 5 filters affect your entire bitmap object, even if you have created a selection.If you want to affect just a portion of a bitmap object, see the workaround in thesection “Checking out false pixel selections,” earlier in this chapter.
To use RadWarp, select a bitmap object and follow these steps:
1. Choose Filters ➪ KPT 5 ➪ RadWarp.
The RadWarp dialog box appears (see Figure 12-30).
By default, KPT 5 dialog boxes open up full-screen, but you can snap the dialogboxes to a number of pixel sizes, if you prefer. Hold down Ctrl (Command) andpress 1 for 640×480, 2 for 800×600, 3 for 1024×768, 4 for 1152×870, 5 for1280×1024, and 0 for full-screen. The panels are also set to Panel Auto Popup bydefault, which I find distracting. Click the name of the filter at the top of its dialogbox to select the panel options. If your display has a low resolution, Panel Solomode will save the day.
Tip
Caution
163662-1 ch12.F 8/2/02 2:28 PM Page 402
Fireworks Seminar

403Chapter 12 ✦ Creating Live Effects and Filters
Figure 12-30: RadWarp is fun and can create extreme effects, including especiallystrange-looking faces.
2. Adjust these controls to achieve the effect you desire:
• Alpha slider: Controls how much of a rounded distortion is added
• Beta slider: Controls how much of another type of slightly squarer
distortion is added
• X Center: Controls where the horizontal center of the warping effect is
located
• Y Center: Controls where the vertical center of the warping effect is
located
You can also modify X and Y Center by dragging your mouse in the real-timePreview window.
Rotation rotates the image.
3. Click OK (the checkmark) to apply the effect.
The effect is applied to your image.
Tip
163662-1 ch12.F 8/2/02 2:28 PM Page 403
Fireworks Seminar

404 Part III ✦ Achieving Effects
Understanding ShapeShifterWhen you’re working with vector objects in Fireworks, you can use Live Effects to
apply amazing three-dimensional effects. If you’ve ever tried to get the same effect
with a bitmap object using Live Effects, you were probably quite disappointed. KPT
5’s ShapeShifter filter enables you to make those bitmap objects compete with your
vector objects.
To use ShapeShifter, select an object and follow these steps:
1. Choose Filters ➪ KPT 5 ➪ ShapeShifter.
The ShapeShifter dialog box appears (see Figure 12-31).
Figure 12-31: Using ShapeShifter gives your bitmap objects that three-dimensionallook so that they can compete with Live Effects on vector objects.
2. In the Main Shape panel, click the thumbnail preview to import a mask. The
mask specifies how the three-dimensional shape is added to your image. Adjust
the Bevel Scale and Height to determine how much of a three-dimensional effect
you’re going to create. Select from the three bevel modes.
Unfortunately, Portable Network Graphics (PNG) images are not among the typesthat KPT 5 can use as masks. When you create a mask for KPT 5, export it fromFireworks as a Tag Image File Format (TIFF) image.
Note
163662-1 ch12.F 8/2/02 2:28 PM Page 404
Fireworks Seminar

405Chapter 12 ✦ Creating Live Effects and Filters
3. In the 3D Lighting panel, add light sources by clicking the plus (+) button.
Drag light sources to different locations to affect the highlights and shadows
on your image.
4. In the Bump Map panel, add a three-dimensional texture to your image and set
the scale and height. Scale zooms in on the texture. Height specifies how
three-dimensional the bump map will be.
5. In the Glow panel, add a colored glow to your image, if you desire. You can
choose to offset it from the image and also vary the transparency.
Click the eye icon on the Glow panel to show or hide the glow, just like the eyeicons in the Fireworks Layers panel.
6. In the Shadow panel, add a shadow to your image, if you want to. As with
glow, you can offset the shadow by varying degrees, choose colors, and
specify transparency.
7. In the Top Mask panel, you can import another mask to create an emboss
effect on top of your three-dimensional object, as if you had stamped out a
shape in the top.
8. In the Environment Map panel, load an image to be used as an environment
map. This image is reflected by your three-dimensional shape as if it were the
sky being reflected on a quiet lake. This adds much depth and character to
your image.
You can also alter the settings by dragging your mouse across the Previewwindow.
9. Click OK (the checkmark) to apply the effect.
The effect is applied to your image.
SummaryEffects may be the icing on the cake, but then what’s cake without icing? Seriously,
effects play an important role in Web graphics, particularly when it comes to
creating buttons with variations that can be used for rollovers. Fireworks makes the
hardest effect easy by providing five standard effects and numerous preset looks.
When you first begin applying effects to your graphics, consider these points:
✦ Filters and effects applied from the Effects section of the Property inspector
remain editable. Filters applied from the Filters menu flatten text and vector
objects.
✦ Fireworks applies Live Effects, which are recalculated every time a graphic is
altered.
Tip
Tip
163662-1 ch12.F 8/2/02 2:28 PM Page 405
Fireworks Seminar

406 Part III ✦ Achieving Effects
✦ All Fireworks effects are tweaked in the Effects section of the Property inspector,
which changes to offer different attributes according to the effect chosen.
✦ The Inner Bevel and Outer Bevel effects are similar, but result in completely
different looks. The Inner Bevel effect uses the object’s color to create an edge
within the object itself, whereas the Outer Bevel effect uses a separate color
chosen by the designer to make a border around the outside of the object.
✦ The Drop Shadow sets off any vector, text, or bitmap object with a shadow
behind the figure — large or small, subtle or bold, your choice.
✦ Emboss removes the fill and stroke from any selected object and builds edges
from the underlying canvas or objects to make it appear as if the object is
emerging from the background, or sinking into it.
✦ Fireworks Glow effect creates a soft glow around an object.
✦ Using a combination of other Fireworks tools and commands, any object can
have a perspective shadow.
✦ In Fireworks, you can easily apply multiple effects.
✦ Custom effects combinations can be saved and quickly recalled through the
use of Fireworks styles and the Styles panel.
✦ You can share filters among multiple, compatible applications, to have access
to them wherever you’re working.
In the next chapter, you discover how to use Fireworks to arrange and composite
different objects.
✦ ✦ ✦
163662-1 ch12.F 8/2/02 2:28 PM Page 406
Fireworks Seminar

Arranging andCompositingObjects
Fireworks differs dramatically from other bitmap-editing
applications in that the component parts of your
document are independent objects — often with vector
information — and are always editable. Individual objects float
above the canvas and can easily be arranged and aligned with
each other. One of the best aspects of this creative power is
that it enables you to easily composite, layer, and blend
objects and then return to them later and undo or change any
aspect of your work. Even advanced operations, such as alpha
masking, leave the masked image — and the mask itself —
intact and editable.
Compositing is the process of combining multiple imagesinto one image, usually by feathering, blending, masking,and altering the transparency of the images.
This chapter looks at the various ways to combine, group,
arrange, align, blend, and generally lay out multiple objects
within Fireworks.
Using LayersLayers are a powerful Fireworks feature that enable you to
organize your document into separate divisions that you can
work with individually or hide from view when convenient.
Think of an artist drawing on separate transparencies instead
of one sheet of paper. He or she could take one transparency
out of the stack and draw only the background elements of
the drawing and then take another transparency and put
related foreground elements on that. Another could have
text elements, and another a signature. Restacking the
transparencies produces a finished drawing.
Tip
1313C H A P T E R
✦ ✦ ✦ ✦
In This Chapter
Using layers
Aligning anddistributing objects
Getting layoutassistance
Grouping objects
Masking andtransparency
Using opacity andblending
Simulating a lightsource with blendingmodes
Feathering selections
Working with appliedcompositing
✦ ✦ ✦ ✦
173662-1 Ch13.F 8/2/02 2:28 PM Page 407
Fireworks Seminar

408 Part III ✦ Achieving Effects
The Layers panel (see Figure 13-1) is the central control center for using layers.
To show or hide the Layers panel, choose Window ➪ Layers, or use the keyboard
shortcut, F2. The Layers panel enables you to see at a glance how many layers
you have in your document, which ones are locked or hidden, and even whether
a selection exists on the current layer. As with most other Fireworks panels, the
Layers panel also has a pop-up menu that provides easy access to commands
related to the functions of the panel.
Figure 13-1: The Layers panel packs many layer-manipulation options into a small, convenient space.
You may find it helpful to refer to the Layers panel features in Figure 13-1 as you
explore their functions throughout this chapter.
When you create a new document in Fireworks, it initially has two layers:
✦ Web Layer: A special layer just for hotspots and slices
✦ Layer 1: A regular layer on which all the objects you create reside until you
create another layer
Optionmenu
buttonPop-up menu
Object indicator
Selection column
Share layer icon
Lock/Unlock column
Show/Hide column
DeleteSelectionbutton
Layer list
New Bitmap Image buttonAdd Mask button
New/DuplicateLayer button
173662-1 Ch13.F 8/2/02 2:28 PM Page 408
Fireworks Seminar

409Chapter 13 ✦ Arranging and Compositing Objects
Adding a layerEach new layer that you add to your document is placed above the current layer in
the layers list. The stacking order in the Layers panel reflects the stacking order on
the canvas, so objects on the bottom layer in the Layers panel are also the closest
to the canvas.
To add a new, blank layer to your document, do one of the following:
✦ Click the New/Duplicate Layer button on the Layers panel.
Hold down the Alt (Option) key while you press the New/Duplicate Layer button,and Fireworks displays the New Layer dialog box, enabling you to give your layer acustom name before creating it.
✦ Choose New Layer from the Layers panel Options menu.
✦ Choose Edit ➪ Insert ➪ Layer.
Naming a layerTo change the name of a layer, double-click its name in the layer list and type a new
name in the pop-up dialog box that appears. Press Enter (Return), or click anywhere
outside the pop-up dialog box to close it.
Duplicating a layerYou can also add a layer to your document by duplicating one that already
exists. When you duplicate a layer, all the objects on that layer are also duplicated.
Working with layers in this fashion is reminiscent of working with folders and files
in Windows Explorer or the Macintosh Finder, where duplicating a file duplicates
the file, and duplicating a folder duplicates the folder and all of its contents.
To duplicate an existing layer and all of its contents, do one of the following:
✦ Drag the layer from the layers list and drop it onto the New/Duplicate Layer
button on the Layers panel.
✦ Hold down the Alt (Option) key, and drag and drop the layer within the
layers list.
✦ Choose Duplicate Layer from the Layers panel Options menu.
Duplicating a layer and then hiding the duplicate is a quick way to make a backup of
all the objects on a layer before you perform extensive edits. If the edits don’t go
well, you can always delete them and show the “backup” layer again, taking you
back to square one. Even better, I find that making “backup” layers every once in a
while builds up a library of objects that often become creatively useful at a later
Tip
173662-1 Ch13.F 8/2/02 2:28 PM Page 409
Fireworks Seminar

410 Part III ✦ Achieving Effects
stage. For example, you may find yourself wrapping text around the same circle
that you used earlier to mask a bitmap object. Reusing such objects automatically
makes your designs more consistent.
Deleting a layerWhen you delete a layer, all the objects on that layer are also deleted. If you delete
a layer accidentally, choose Edit ➪ Undo right away to get it back.
To delete a layer, do one of the following:
✦ Drag a layer from the layer list in the Layers panel to the Delete Selection
button (Trash can icon) on the Layers panel.
✦ Select a layer from the layer list in the Layers panel and click the Delete
Selection button.
✦ Select a layer from the layer list in the Layers panel and choose Delete Layer
from the Layers panel Options menu.
Changing stacking orderAfter you have more than one layer in your document, you may want to change
the stacking order at some point. To change the stacking order of layers in your
document, simply click and drag a layer higher or lower in the layer list in the
Layers panel. Layers that are higher up the layer list are higher up in the stacking
order in relation to the canvas.
Editing layer by layer By default, all objects, no matter which layer they reside on, are fair game for
editing on the canvas. To protect the contents of a layer from editing, you can lock
or hide the individual layer. Objects on locked or hidden layers are not editable on
the canvas.
To lock or unlock a layer, click within the Lock/Unlock column of the Layers panel,
next to the layer you want to lock or unlock. After a layer is locked, a padlock
icon appears in the Lock/Unlock column next to the layer’s name, and none of the
objects on that layer can be selected or edited in the document window. When a
layer is unlocked, the Lock/Unlock column next to its name is empty.
To show or hide a layer, click within the Show/Hide column of the Layers panel,
next to the layer that you want to show or hide. When the eye icon is visible, the
layer is visible. When the eye icon is not showing, the layer is hidden, and all the
objects on that layer are invisible in the document window.
173662-1 Ch13.F 8/2/02 2:28 PM Page 410
Fireworks Seminar

411Chapter 13 ✦ Arranging and Compositing Objects
When a layer is hidden, it is also locked. When you hide a layer, you don’t need tolock it as well.
The Layers panel Options menu features commands for hiding or showing all layers
simultaneously, or locking or unlocking all layers simultaneously. Alternatively, you
can hold down Alt (Option) and click in the Show/Hide or Lock/Unlock column to
affect all layers at once.
An alternative method of layer-by-layer editing is to enter Single Layer Editing
mode, by choosing Single Layer Editing from the Layers panel Options menu. When
you’re in Single Layer Editing mode, you can select or edit only the objects on the
current layer, although you can still see objects on other layers. As you select each
layer from the layers list in the Layers panel, the other layers automatically act as if
they are locked. When working with a complex document, this is an easy way to
limit the scope of your edits.
Giving your layers descriptive names before using Single Layer Editing really
simplifies things. If your layers are named Background, Text, and so forth, you can
quickly select a layer based on which objects you want to edit, without worrying
about accidentally altering objects on other layers.
Two of the commands in the Command menu also enable you to quickly work ona single layer without using Single Layer Editing mode. Choose Commands ➪
Document ➪ Hide Other Layers to hide all but the current layer. ChooseCommands ➪ Document ➪ Lock Other Layers to lock all but the current layer.
Using the Selection columnWhen you want to move objects from one layer to another, you might be inclined to
cut them to the clipboard, change to another layer in the Layers panel, and then
paste the objects into the new layer. That works fine, but the Layers panel provides
you with another method. Whenever you select an object or objects on the canvas
or in the Layers panel, a small blue box appears in the Selection column next to the
layer that the selected objects are located on. Drag this box up or down and drop it
next to another layer, and the objects are moved there. Hold down the Alt (Option)
key as you drag and drop to copy the selection instead of moving it.
Opening layersThe Layers panel uses a folder icon for layers, and for good reason. Just as your
overall document is divided into discrete layers, each layer is itself divided into
objects, which appear in the Layers panel as an object sublayer, complete with
thumbnail images. To open a particular layer and display its contents, click the
plus/minus box (disclosure triangle on the Mac) in the Expand/Collapse column next
to the layer’s name, as shown in Figure 13-2. To hide the contents of the layer, click
the square (disclosure triangle) again. Hold down the Alt (Option) key as you click in
Tip
Tip
173662-1 Ch13.F 8/2/02 2:28 PM Page 411
Fireworks Seminar

412 Part III ✦ Achieving Effects
the Expand/Collapse column to open or close all the layers in your document at
once. I often find myself Alt- (Option-) clicking to quickly close all layers when I don’t
want to work with individual objects.
Figure 13-2: Each layer is a container for the objects that reside on it. Each object on the layer is displayed as its own sublayer.
When you drag a layer up or down in the layers list, Fireworks automatically scrollsthe list of layers if you’re dragging a layer below or above the ones that arecurrently visible within the size of the Layers panel.
Many of the same techniques you use to work with layers in the Layers panel also
apply to working with object sublayers. Keep the following points in mind:
✦ To add a new object sublayer: Simply create a new object on the canvas with
any of the usual methods, such as importing, drawing, copying and pasting,
and so on. As each new object is added to your document, Fireworks adds
new object sublayers to the current layer, complete with a thumbnail image.
You can also click the New Bitmap Image button on the Layers panel to create
a new, empty bitmap object directly above the currently selected object.
✦ To name an object: Double-click its generic name, such as “rectangle” in the
layer list, and type a new name. Press Enter (Return) when you’re done.
NewFeature
Open and closeddisclosure triangles
Open layer
Closed layer
Expand/Collapse column
Selected object
Current layer
Object thumbnail
173662-1 Ch13.F 8/2/02 2:28 PM Page 412
Fireworks Seminar

413Chapter 13 ✦ Arranging and Compositing Objects
✦ To change the stacking order of objects: Drag their object sublayers up or
down the layers list in the Layers panel. Note that you can move objects up
or down within their layers, or further up or down into other layers (see
Figure 13-3). Dragging and dropping between layers is physically easier if you
open both the source and target layer, exposing the objects inside each. This
also enables you to choose where your dropped object resides within the
stacking order of the target layer.
Figure 13-3: The layers and object sublayers in the Layers panel display the complete hierarchy of the stacking order in your document.
Dragging and dropping between layers is physically easier if you open both thesource and target layer, exposing the objects inside each. This also enables you tochoose where your dropped object resides within the stacking order of the targetlayer.
✦ To duplicate an object sublayer: Hold down the Alt (Option) key and drag
and drop the object sublayer up or down the layer list. A copy is created, and
your original object is unaffected. You can even drop the copy in another
layer.
Use the Shift modifier key to make multiple selections of object sublayers, just asyou would with objects on the canvas.
✦ To hide an object: Click the eye icon in the Show/Hide column next to the
object’s sublayer in the Layers panel. You can also hide a selection of objects
by choosing View ➪ Hide Selection. To show the objects again, choose View ➪Show All or click on the Show/Hide column again.
✦ To delete an object: Select it — on the canvas or in the Layers panel — and
click the Delete Selection button on the Layers panel.
Tip
Tip
173662-1 Ch13.F 8/2/02 2:28 PM Page 413
Fireworks Seminar

414 Part III ✦ Achieving Effects
Old-school Fireworks users — like myself — may find it a little annoying that theLayers panel defaults to fully expanded when you initially open a Fireworksdocument. Derren Whiteman has created a scriptlet that sets a hidden Fireworkspreference so that the Layers panel defaults to fully collapsed. Find it — and acompanion script that sets the preference back to its default — on Derren’sFireworks Web site at http://www.derren.com/geek/fireworks/.
Examining the Web LayerAll Fireworks documents have a Web Layer on which you can draw “Web objects,”
such as hotspots and slice guides. You can move the Web Layer in the stacking
order by dragging it up or down the layer list in the Layers panel, but you can’t
delete the Web Layer. The Web Layer is always shared across all frames.
For more information about using the Web Layer, see Chapters 20 and 21. Formore details about sharing layers across frames, and about frames in general, seeChapter 23.
In addition to creating hotspots with one of the hotspot tools, you can create
hotspots out of regular bitmap and vector objects by using the Layers panel. This is
a handy way to quickly add hotspots to objects if you want the hotspots to be the
same size as the objects.
To create hotspots out of objects, follow these steps:
1. Select the object or objects that you want to make into hotspots.
Fireworks displays a selection icon (a blue box) in the Selection column of the
Layers panel, next to the layer that the selected objects are located in.
2. Drag the selection icon and drop it in the same column on the Web Layer.
If you have multiple objects selected, Fireworks asks whether you want to
create one hotspot or multiple hotspots. Choosing to create one hotspot
combines the shapes into one.
The hotspots are created on the Web Layer, and your original objects are
unaffected.
Aligning and Distributing ObjectsOne of the most basic layout techniques is aligning and distributing objects.
If you’ve ever used any kind of drawing or publishing application, then you’re
familiar with the concept. When you’re in vector mode in Fireworks, every object
on the canvas “floats” and can be easily aligned with another.
Cross-Reference
Tip
173662-1 Ch13.F 8/2/02 2:28 PM Page 414
Fireworks Seminar

415Chapter 13 ✦ Arranging and Compositing Objects
Using a theoretical rectangleWhen you’re aligning a selection of objects, imagine a rectangle around your
selection (see Figure 13-4) described by the objects themselves. The top of the
rectangle is the topmost point on the topmost object; the left side of the rectangle
is the far-left point on the farthest-left object in the selection, and so on. This
theoretical rectangle is what you align objects to, and what you distribute them
across. For consistent results, imagine this theoretical rectangle each time you
prepare to use an Align command.
Figure 13-4: Imagine a theoretical rectangle around your selection. This is what the selected objects align to when you choose one of the commands from the Modify ➪ Align submenu.
When you left-align a selection of objects, all the objects move left until they bump
into the left border of the theoretical rectangle. Similarly, if you align to the bottom,
all the objects move down until they hit the bottom border of the rectangle. It’s
very important to understand that alignment in Fireworks has nothing to do with a
page or the canvas, as in some applications. In Fireworks, objects are aligned to
other selected objects. If you try to align only one object, the alignment commands
are unavailable.
I show you a workaround for aligning a single object to the canvas later in thischapter.
Cross-Reference
Theoretical alignment rectangle
173662-1 Ch13.F 8/2/02 2:28 PM Page 415
Fireworks Seminar

416 Part III ✦ Achieving Effects
To align a selection of objects to the selection’s left, right, top, or bottom, select the
objects that you want to align and choose the appropriate alignment command:
✦ Left alignment: To align all objects to the far-left point of the farthest-left
object (see Figure 13-5), choose either Modify ➪ Align ➪ Left, or the keyboard
shortcut, Ctrl+Alt+1 (Command+Option+1).
Figure 13-5: The selection of objects shown in Figure 13-4 moves to the left side of the theoretical alignment rectangle when you use the Modify ➪
Align ➪ Left command.
✦ Right alignment: To align all objects to the far-right point of the farthest-right
object, choose either Modify ➪ Align ➪ Right, or the keyboard shortcut
Ctrl+Alt+3 (Command+Option+3).
✦ Top alignment: To align all objects to the topmost point of the topmost object
(see Figure 13-6), choose either Modify ➪ Align ➪ Top, or the keyboard short-
cut, Ctrl+Alt+4 (Command+Option+4).
✦ Bottom alignment: To align all objects to the bottommost point of the
bottommost object, choose either Modify ➪ Align ➪ Bottom, or the keyboard
shortcut, Ctrl+Alt+6 (Command+Option+6).
Theoretical alignment rectangle
173662-1 Ch13.F 8/2/02 2:28 PM Page 416
Fireworks Seminar

417Chapter 13 ✦ Arranging and Compositing Objects
Figure 13-6: The selection of objects shown in Figure 13-4 moves to the top of the theoretical alignment rectangle when you use the Modify ➪
Align ➪ Top command.
Fireworks also has two alignment commands that deal with centering objects.
Again, rather than centering objects on the canvas, Fireworks centers them to a
theoretical horizontal or vertical line drawn through the selection. In order to
understand what to expect from these commands, imagine a cross drawn over
the theoretical alignment rectangle shown previously in Figure 13-4. This cross
demonstrates the vertical and horizontal center lines that objects can be aligned to.
✦ Center Vertical alignment: To align all objects to a theoretical vertical
center line, choose either Modify ➪ Align ➪ Center Vertical, or the keyboard
shortcut, Ctrl+Alt+2 (Command+Option+2).
Remember that the center in question is not the center of the canvas, but thecenter of the selection.
✦ Center Horizontal alignment: To align all objects to a theoretical horizontal
center line (see Figure 13-7), choose either Modify ➪ Align ➪ Center
Horizontal, or the keyboard shortcut, Ctrl+Alt+5 (Command+Option+5).
Caution
Theoretical alignment rectangle
173662-1 Ch13.F 8/2/02 2:28 PM Page 417
Fireworks Seminar

418 Part III ✦ Achieving Effects
Figure 13-7: The selection of objects from Figure 13-4 snaps to a theoretical horizontal line when you use the Modify ➪ Align ➪ Center Horizontal command.
You can also distribute objects across a selection, which is handy when you have a
few objects, such as a row of buttons that you want to space evenly. To distribute a
selection of objects across the width of the selection, select the objects that you
want to distribute and choose the appropriate command:
✦ Even horizontal distribution: To space your objects evenly from left to right
(see Figure 13-8), choose either Modify ➪ Align ➪ Distribute Widths, or the
keyboard shortcut, Ctrl+Alt+7 (Command+Option+7).
✦ Even vertical distribution: To space your objects evenly from top to bottom,
choose either Modify ➪ Align ➪ Distribute Heights, or the keyboard shortcut,
Ctrl+Alt+9 (Command+Option+9).
Aligning to the canvasAlthough Fireworks’ alignment tools are very powerful, the commands in the
Modify ➪ Align submenu have no knowledge of the canvas at all. What do you do
when you just want to snap an object to the center of the canvas, or align it to the
left edge of the canvas? Fortunately, a command and a simple technique enable you
to meet almost any kind of alignment challenge.
Theoretical alignment rectangle
Theoreticalvertical center line
Theoreticalhorizontal center line
173662-1 Ch13.F 8/2/02 2:28 PM Page 418
Fireworks Seminar

419Chapter 13 ✦ Arranging and Compositing Objects
Figure 13-8: A selection of objects can be distributed across the width of the selection with the Distribute Widths command. Note that the leftmost and rightmost object do not move at all. They define the width of the selection.
The Align panel that ships with Fireworks MX offers much more powerful, andmore user-friendly, alignment options than the standard Fireworks menu choices.The Align panel, written by Kleanthis Economou, is based on the alignmentoptions in Flash and is available via Window ➪ Align. With it, you are able to alignto the canvas, or other objects, as you see fit. For more information on the Alignpanel, and the other third-party panels shipping with Fireworks MX, please seeChapter 26.
For those times when all you want to do is take a selection and center it on the
canvas, choose Commands ➪ Document ➪ Center in Document. Your selected
object or objects snap to the absolute (horizontal and vertical) center of the
canvas. This handy shortcut demonstrates the power of Fireworks’ built-in
extensibility.
For more about Fireworks’ Commands menu, see Chapter 19.
For more sophisticated canvas alignment, such as aligning a selection to the left
side of the canvas, draw a rectangle the size and shape of the canvas and then align
other objects to the rectangle. Visually, the effect is exactly the same as aligning to
the canvas, with the added feature that you can easily create a border around your
document, just by reducing the alignment rectangle in size by a small amount, as
shown in Figure 13-9. You may want to keep your alignment rectangle on its own
layer, so that it is very easy to hide, show, lock, or delete.
Cross-Reference
Note
Before
After
Width of selection
173662-1 Ch13.F 8/2/02 2:28 PM Page 419
Fireworks Seminar

420 Part III ✦ Achieving Effects
Figure 13-9: Although you can’t align objects to the canvas, you can create a rectangle that’s roughly the size of the canvas and align objects to the rectangle for the same effect.
Fireworks considers the edges of the canvas to be guides. Enabling View ➪ Guides➪ Snap to Guides causes a dragged selection to snap to the edge of the canvas.Align objects to each other, and then select them all and drag them near a canvasedge to create the same effect as an alignment to the canvas.
Looking at Layout AssistanceFireworks provides a variety of ways to precisely lay out objects on the canvas.
Rulers enable you to place guides at precise locations and snap objects to those
guides as you move them around. Or, you can choose to lay a grid over your
document to help you align things correctly.
Using rulersRulers are a standard feature of nearly every drawing or graphics application. In fact,
rulers (the kind that you hold in your hand) are a standard feature of traditional,
paper-based layouts, as well. Rulers enable you to keep track of the size of your
objects and their placement on the canvas with much more precision than the naked
eye alone.
To toggle the visibility of the rulers, choose either View ➪ Rulers, or the keyboard
shortcut, Ctrl+Alt+R (Command+Option+R). The rulers appear within your document,
running along the top and left borders (see Figure 13-10).
Tip
173662-1 Ch13.F 8/2/02 2:28 PM Page 420
Fireworks Seminar

421Chapter 13 ✦ Arranging and Compositing Objects
Figure 13-10: Dropping the zero-point cursor next to the top-left object you’re aligningsimplifies the math involved in aligning objects.
You can see your mouse pointer’s position on the canvas in the rulers as they trackyour mouse. This is helpful when you want to draw a new object at a preciseposition on the canvas.
By default, the ruler’s zero-point — the point where the horizontal and vertical
rulers meet — is set to 0 pixels, but you can set it to another location in your
document by dragging the zero-point marker to a new location and releasing it.
The zero-point marker is in the upper-left corner of the document window when the
rulers are visible. If all objects in your document are going to be at least 20 pixels
from the top and 20 pixels from the left, moving the zero-point to 20×20 pixels
simplifies the math that you have to do later as you align objects. To set the zero-
point back to zero again, double-click the zero-point marker.
Tip
Zero-Point marker
Zero-Point cursor
Horizontal ruler
Vertical ruler
173662-1 Ch13.F 8/2/02 2:29 PM Page 421
Fireworks Seminar

422 Part III ✦ Achieving Effects
Working with guidesGuides are simply lines that you can position to mark important points in your
documents, such as a margin or center point. As a design time tool intended to
make laying out objects easier, guides don’t print or export, and they exist above
the layers of your document. For example, if your layout calls for many objects to
be placed at 20 pixels from the top, then creating a horizontal guide at that position
enables you easily to see where that point is located so that you can place objects
there.
Creating guidesAdding a new guide to your document is a simple, mouse-only affair. Simply clicking
and dragging the horizontal ruler into your document creates a new horizontal
guide that you can drop anywhere.
A horizontal guide runs parallel to the horizontal ruler, so you drag from the
horizontal ruler to make a horizontal guide. Sometimes, this can be a bit confusing
because you tend to drop a horizontal guide after checking its position on the
vertical ruler. In other words, you might place a horizontal guide at 20 pixels from
the top according to the vertical ruler. If you find yourself trying to create horizontal
guides by dragging from the vertical ruler, think of the guides as clones of the rulers
from which you drag them — horizontal for horizontal, vertical for vertical.
To add a new guide to your document, follow these steps:
1. If the rulers aren’t visible, choose either View ➪ Rulers, or the keyboard short-
cut, Ctrl+Alt+R (Command+Option+R), to show them.
2. Drag from the horizontal ruler to create a new horizontal guide. Drag from
the vertical ruler to create a new vertical guide (see Figure 13-11). When you
reach the position where you want to place your guide, simply drop it in place
by releasing the mouse button.
Locking or hiding guidesAfter you create quite a few guides, you may find that they get in the way. Because
they aren’t on a layer, you can’t just lock or hide their layer to make them invisible
or not editable. Carefully placing a guide in the correct spot and then dragging
it somewhere else accidentally goes a long way toward negating the primary
timesaving aspect of using guides.
To show or hide guides, choose either View ➪ Guides ➪ Show Guides, or use
the keyboard shortcut, Ctrl+Semicolon (Command+Semicolon). Hiding guides
periodically gives you a better sense of what your final image will look like.
To lock all of your guides so that they can’t be moved, choose either View ➪ Guides
➪ Lock Guides, or the keyboard shortcut, Ctrl+Alt+Semicolon
(Command+Option+Semicolon).
173662-1 Ch13.F 8/2/02 2:29 PM Page 422
Fireworks Seminar

423Chapter 13 ✦ Arranging and Compositing Objects
Figure 13-11: Create guides at key locations in your design to simplify object alignment.
Snapping to guidesSnapping objects to guides really uses guides to their full potential. With a little
planning, you can create guides at important points in your document so that your
layout comes together almost automatically as you move objects around the canvas.
To toggle whether or not objects snap to the nearest guide, choose either View ➪Guides ➪ Snap to Guides, or the keyboard shortcut, Ctrl+Shift+Semicolon
(Command+Shift+Semicolon).
Using guide colorsIf your document contains a lot of green objects, the default green color of the
guides may be hard to see. Guides can be any color. Choosing a color that contrasts
sharply with the color scheme of your document makes guides easier to see and
also has the effect of separating them from your document, so that you can see
your layout through the guides without having to hide the guides all the time.
Vertical guide Horizontal guide
173662-1 Ch13.F 8/2/02 2:29 PM Page 423
Fireworks Seminar

424 Part III ✦ Achieving Effects
To change the color that guides are displayed in, follow these steps:
1. Choose View ➪ Guides ➪ Edit Guides.
Fireworks displays the Guides (Grids and Guides) dialog box, as shown in
Figure 13-12.
Figure 13-12: Change the color that guides are displayed in (and other options) by using the Guides (Grids and Guides) dialog box.
On the Macintosh, instead of a Guides dialog box and a Grids dialog box, thesingle Grids and Guides dialog box offers a Grids tab and a Guides tab that selectsbetween Grids and Guides views.
2. Use the guides color picker to specify the color you want the guides to be
displayed in, and then click OK.
For convenience, all the guide options have been collected into the Guides (Grids
and Guides) dialog box. You can check or uncheck Show Guides to toggle the
visibility of the guides; check Snap to Guides to cause objects to snap to the guides;
or check Lock Guides to lock them. Options for slice guides are also available here.
Clearing guidesRemoving a single guide from your document is a drag-and-drop affair, just like
adding one. Simply grab the guide with your mouse and drag it out of your document.
You can drag it out to the left, right, top, or bottom, and it will disappear from your
document.
You can also clear all the guides out of your document simultaneously, by using the
Guides (Grids and Guides) dialog box. To clear all guides, follow these steps:
1. Choose View ➪ Guides ➪ Edit Guides.
Fireworks displays the Guides (Grids and Guides) dialog box (refer to
Figure 13-12).
Note
173662-1 Ch13.F 8/2/02 2:29 PM Page 424
Fireworks Seminar

425Chapter 13 ✦ Arranging and Compositing Objects
2. Click the Clear All button to remove all the guides from your document. Click
OK when you’re done.
The Clear All button removes ruler guides, but not slice guides.
Exploring the gridThe grid is a quick way to achieve more precise layouts. Usually, you want objects
to align in a fairly regular pattern. The grid makes it easy to see the relationship
between the elements of your layout by splitting the document into smaller, more
manageable sections. Grid lines don’t export or print, and they aren’t on a layer.
They’re simply a visual aid at design time.
To show or hide the grid, choose either View ➪ Grid ➪ Show Grid, or the keyboard
shortcut, Ctrl+Alt+G (Command+Option+G).
Snapping to the gridYou can choose to have objects snap to the grid automatically, just as you did
earlier with guides. When this feature is enabled, you’ll notice that objects are
attracted to the grid lines like magnets. Because all of your objects are snapping to
the same grid, you can get more precise layouts without any extra effort.
To make objects snap to the grid, choose either View ➪ Grid ➪ Snap to Grid, or the
keyboard shortcut, Ctrl+Alt+Shift+G (Command+Option+Shift+G).
Changing grid color and frequencyAgain, as with guides, you can change the color of the grid to make it stand out
from your document. The default color for each new document is black.
If you’re creating a navigation bar with numerous buttons that are 100-pixels wide
and 50-pixels tall, set the grid so that it also is 100-pixels wide and 50-pixels tall, so
that you can easily see where each button should sit. Enable Snap to Grid, and your
layout comes together automatically. The default grid frequency for new documents
is 36×36 pixels.
To modify the grid, follow these steps:
1. Choose View ➪ Grid ➪ Edit Grid.
Fireworks displays the Edit Grid (Grids and Guides) dialog box, as shown in
Figure 13-13.
2. Use the grid color picker to specify the color in which you want the grid to be
displayed.
For convenience, you can also toggle the visibility of the grid, or enable Snap
to Grid while you’re in the Edit Grid (Grids and Guides) dialog box.
Note
173662-1 Ch13.F 8/2/02 2:29 PM Page 425
Fireworks Seminar

426 Part III ✦ Achieving Effects
Figure 13-13: Set grid options in the Edit Grid (Grids and Guides) dialog box.
3. In the horizontal spacing box, enter the horizontal spacing that you want the
grid to have. This is the space, in pixels, between vertical grid lines.
4. Enter in the vertical spacing box the vertical spacing that you want the grid to
have. This is the space, in pixels, between horizontal grid lines.
5. Click Apply to see the results of your modifications without exiting the Edit
Grid (Grids and Guides) dialog box. Click OK when you’re done.
Grouping ObjectsWhen you group objects, you basically create a new object that is made up entirely
of other objects. You can treat a group as if it’s a single object, apply Live Effects,
alter blending modes, and more.
Objects in a group maintain their positions and stacking order relative to each
other. They retain their effects settings until you modify the whole group. If half the
objects in a group have a drop shadow, and you apply a drop shadow to the whole
group, then all the objects will have a drop shadow. Fireworks is smart enough to
apply that drop shadow to the whole group, as if all members were one object. You
can also select and modify the component objects of a group individually, without
ungrouping them.
Grouping objects is a good way to keep a complex drawing under control. For
example, you might build a logo out of vector and text objects and then group
those objects together so that you can easily manipulate the whole logo. Grouping
together any objects that you don’t need to manipulate individually essentially
reduces the number of discrete objects that you have to manipulate as you work.
To group two or more objects, select them and choose either Modify ➪ Group, or
the keyboard shortcut, Ctrl+G (Command+G). Your grouped objects now behave as
one object. A Live Effect or opacity setting applied to a group affects the whole
group, as if it were one object (see Figure 13-14).
173662-1 Ch13.F 8/2/02 2:29 PM Page 426
Fireworks Seminar

427Chapter 13 ✦ Arranging and Compositing Objects
Figure 13-14: Applying a Live Effect or opacity setting to a group shows how it acts as one object.
After you make a group, you can ungroup it at any time. To ungroup a group, select
it and choose either Modify ➪ Ungroup, or the keyboard shortcut, Ctrl+Shift+G
(Command+Shift+G).
If you have applied Live Effects, opacity settings, or blending modes to a group,they are lost when you ungroup it.
To modify individual objects within a group, you can either ungroup them, or use
the Subselection tool to subselect only the objects you want to work with. If you
move a subselected object to another layer, it is removed from the group. To select
all the component objects within a group, choose Select ➪ Subselect. To select the
parent group of an object, choose Select ➪ Superselect.
If a text block is part of a group, you can edit the text, simply by using the Text tooland editing directly on your canvas. If you prefer to use the Text editor, you canselect the text block using the SubSelection tool and then use Text ➪ Editor.
Fireworks actually has three types of groups: the plain groups discussed here;
masked objects, which are discussed next; and symbols, which are covered in
Chapter 24. You can use all the techniques, such as subselecting and superselecting,
on any kind of group.
Tip
Caution
GroupWithGlow
Withdrop
shadow
Withinnerbevel
50 percentopacity
173662-1 Ch13.F 8/2/02 2:29 PM Page 427
Fireworks Seminar

428 Part III ✦ Achieving Effects
Working with Alpha MasksIn a nutshell, an alpha mask is an 8-bit grayscale image that is used to describe
the transparency of another image. Areas of the alpha mask that are solid black
represent areas of the resulting masked image that are completely transparent,
whereas areas of solid white represent areas that are completely opaque. The 254
grays between black and white each represent a different level of translucency:
Dark gray is almost transparent, and light gray is almost opaque.
Fireworks MX handles alpha masks differently than previous versions of Fireworks.In previous versions, black was opaque and white was transparent. In FireworksMX this relationship is now reversed, with black being transparent and white beingopaque.
If you’ve ever created a transparent Graphics Interchange Format (GIF) with a
light-colored background and then placed that GIF in a Web page with a dark
background, you’ve seen a graphic (no pun intended) example of the challenges of
compositing transparent images. The edges of your image, where they meet the
transparent color, are antialiased to either a light color or a dark color. Artifacts are
visible when the image is placed over the opposite-colored background.
The 8-bit alpha mask used in Fireworks and the PNG image format solves this
problem, enabling you to composite transparent objects without worrying about
the color of the objects on which you’re placing them because transparency is
specified for each and every pixel (see Figure 13-15).
Typically, your Fireworks images have three 8-bit channels — one for red, one for
green, and one for blue — resulting in a 24-bit RGB image that accurately describes
every color that the human eye can see. When you add one more 8-bit grayscale
channel to describe the levels of transparency — the so-called “alpha channel” —
you get a 32-bit image (see Table 13-1) that describes exactly the same colors as the
24-bit image, but also knows where its transparent and translucent edges are.
Table 13-1Channels and Bit Depth
Image Channels Bit Depth
Grayscale 1 grayscale 8-bit
True Color 1 red, 1 green, 1 blue 24-bit
True Color with Alpha Mask 1 red, 1 green, 1 blue, 1 grayscale (as mask) 32-bit
NewFeature
173662-1 Ch13.F 8/2/02 2:29 PM Page 428
Fireworks Seminar

429Chapter 13 ✦ Arranging and Compositing Objects
Figure 13-15: Shown here in Macromedia Flash, 32-bit PNG images created withFireworks can be attractively placed on any background color while maintaining theirtransparency. GIF images, on the other hand, show artifacts when they are placed on a background color that’s much darker or lighter than the one they were created for.
Each pixel of the alpha mask has a value between 0 and 255 to indicate the amount
of transparency, which ranges from completely transparent (black, or 0) to
completely opaque (white, or 255). The grays in between can be thought of as
shades of transparency. Fireworks uses the value of each pixel of the mask to
determine the transparency level for the underlying pixel of the masked object,
which in turn determines how to blend that pixel with the background pixel it
sits on.
If you haven’t worked with 32-bit PNG images yet and are used to the limited
transparency options inherent in the GIF format, the ease with which alpha
transparency enables you to composite transparent objects will thrill you.
GIF withwhite transparent
32-bit PNG 32-bit PNGGIF with
black transparent
173662-1 Ch13.F 8/2/02 2:29 PM Page 429
Fireworks Seminar

430 Part III ✦ Achieving Effects
Currently, few Web browsers properly support the PNG alpha channel. Alphatransparency is still useful for working within Fireworks and exporting transparencyto other applications, such as Macromedia’s Director and Flash applications.Incidentally, both Director and Flash can import your Fireworks PNG files — no needto export as a regular, non-Fireworks-specific PNG.
In brief, working with masks in Fireworks is centered around the Layers panel and
the Property inspector. The Layers panel contains controls and commands related
to masks, and displays a thumbnail of an object’s mask next to the thumbnail of the
object itself. Click the thumbnail of the mask to edit it, and the Property inspector
displays mask-related options. Masked vector objects have a Move Handle in their
centers, which you can click and drag to reposition the masked object without
moving the mask.
The various masking controls are shown in greater detail throughout this section.
Creating vector masksWhenever possible, I try to use vector masks for the same reason I always try to
use vector objects: editability. Vector masks enable you to radically alter the look of
a masked object using all the standard techniques you use to edit vector objects,
such as fills, strokes, and Live Effects. Vector masks can also be easily scaled,
skewed, and distorted with the transformation tools. Text objects can also be used
as vector masks, creating exciting text effects.
See Chapter 10 for more about text masking effects.
To create and apply a vector mask, follow these steps:
1. Choose an object to mask, as shown in Figure 13-16.
2. Create an object to act as a mask for your original object, as shown in Figure
13-17. The size of the mask specifies the size of the resulting masked object.
Where the mask is white, the resulting masked object is opaque; where the
mask is black, the masked object is transparent. Shades of gray in the mask
vary the transparency of the group, according to how light or dark they are.
3. Position the mask in relation to the object you are masking.
4. Select the mask and choose Edit ➪ Cut, or use the keyboard shortcut, Ctrl+X
(Command+X), to cut the mask to the clipboard.
5. Select the object you want to apply the mask to and choose Modify ➪ Mask ➪Paste as Mask.
6. In the Property inspector choose Grayscale in the Mask options.
If you find that your mask is the inverse of what you wanted, the Invert LiveEffect — found in the Effects section of the Property inspector — can quickly invertyour mask and set things straight.
Tip
Cross-Reference
Caution
173662-1 Ch13.F 8/2/02 2:29 PM Page 430
Fireworks Seminar

431Chapter 13 ✦ Arranging and Compositing Objects
Figure 13-16: The image of the fireworks display doesn’t blend into the striped background.
Figure 13-17: A gradient fill for the mask provides a smooth transparent fade for the masked object.
The mask is applied to the original object, as shown in Figure 13-18.
Applying bitmap masksThere are almost as many ways to create a bitmap mask in Fireworks as there are
ways to create a bitmap. Whatever method you choose, however, you are ultimately
creating a simple 8-bit grayscale image that masks another object. As with any
alpha mask, black areas of the mask become completely transparent in the final,
masked object, whereas white areas will be completely opaque, and varying shades
of gray describe varying levels of transparency.
173662-1 Ch13.F 8/2/02 2:29 PM Page 431
Fireworks Seminar

432 Part III ✦ Achieving Effects
Figure 13-18: The masked object blends into the background because the mask’s fade from white to black is translated into a transparency fade from transparent to opaque.
Adding a bitmap maskThe Layers panel provides a number of masking controls, including a simple Add
Mask button that creates a new, empty bitmap mask and selects it for editing. If the
mask you’re after is so simple that you can draw it with Fireworks tools, then
adding a mask is a good way to get started.
To add a bitmap mask to an object, follow these steps:
1. Select the object that you want to apply a mask to.
2. Choose Window ➪ Layers to display the Layers panel, or use the keyboard
shortcut, F2.
3. If necessary, click in the Expand/Collapse column in the Layers panel to open
the current layer so that you can see the currently selected object.
4. Click the Add Mask button on the Layers panel.
Fireworks creates an empty bitmap mask and applies it to the currently selected
object. The mask is also selected for editing.
Find out about editing masks later in this chapter.
Using Reveal All and Hide AllFireworks provides a quick method for getting masks started with the Reveal All
and Hide All commands.
Cross-Reference
173662-1 Ch13.F 8/2/02 2:29 PM Page 432
Fireworks Seminar

433Chapter 13 ✦ Arranging and Compositing Objects
To use the Reveal All or Hide All command, follow these steps:
1. Select the object that you want to mask.
2. To apply a completely white mask to the object, choose Modify ➪ Mask ➪Reveal All. Alternatively, you can apply a completely black mask to the object
by choosing Modify ➪ Mask ➪ Hide All.
Fireworks creates the mask and selects it for editing.
Using Reveal Selection and Hide SelectionThe Reveal Selection and Hide Selection commands basically change marquee
selections into bitmap masks, which makes applying simple bitmap masks a breeze.
To create a bitmap mask with the Reveal Selection or Hide Selection command,
follow these steps:
1. Make a pixel selection with one of the pixel selection tools, such as the
Marquee.
2. To show just the pixels inside the selection, choose Modify ➪ Mask ➪ Reveal
Selection. Alternatively, you can hide the pixels inside of the selection by
choosing Modify ➪ Mask ➪ Hide Selection.
Fireworks creates the appropriate mask and selects it for editing.
Fireworks technique: The contrast methodOne common reason for creating a bitmap mask is to remove the background from
an image, isolating the foreground figure or object. Duplicating an image and then
increasing the overall contrast of the duplicate can often isolate foreground and
background areas, helping to create a suitable mask.
To create a mask using the contrast method, follow these steps:
1. Duplicate the bitmap object that you want to mask, as shown in Figure 13-19.
The mask will be created from the duplicate.
2. Select the duplicate and choose Commands ➪ Creative ➪ Convert to Grayscale
to convert it into a grayscale image.
3. From the Add Effects menu in the Effects section of the Property inspector,
choose Adjust Color ➪ Brightness/Contrast.
Fireworks displays the Brightness/Contrast dialog box.
4. Set the Contrast slider to 100%.
5. Adjust the Brightness slider until your object resembles the desired mask as
much as possible, with sharply delineated foreground and background areas
(see Figure 13-20). Depending on the image you use, you may need to make a
large adjustment, or none at all.
173662-1 Ch13.F 8/2/02 2:29 PM Page 433
Fireworks Seminar

434 Part III ✦ Achieving Effects
Figure 13-19: A duplicate of your original object is a good starting point for creating a mask.
Figure 13-20: Increase the contrast to maximum, and then adjust the brightness in order to isolate foreground and background elements.
For some images, you may find that using the Levels Live Effect provides bettercontrol than the Brightness/Contrast Live Effect.
6. Choose Modify ➪ Flatten Selection to flatten your object and its Live Effects
into a single bitmap object.
Tip
173662-1 Ch13.F 8/2/02 2:29 PM Page 434
Fireworks Seminar

435Chapter 13 ✦ Arranging and Compositing Objects
Your nascent bitmap mask is no longer editable after it is converted into a bitmap.
7. Use the Paint Bucket tool and/or the Eraser tool to clean up your mask, filling
in and erasing pixels as required, until your mask is clear.
8. As mentioned earlier, white areas become opaque, and black areas will be
transparent, so you need to invert your mask before continuing by choosing
Filters ➪ Adjust Color ➪ Invert (see Figure 13-21).
Figure 13-21: To obtain the correct mask colors, you need to invert the current selection. Now, the white will be opaque and the black will be transparent.
9. Position your mask correctly in relation to the object you are masking.
Use the commands in the Modify ➪ Align submenu, or the Align panel, to precisely align your mask and object, if required.
10. Select the mask and choose Edit ➪ Cut, or use the keyboard shortcut, Ctrl+X
(Command+X), to cut the object to the clipboard.
11. Select the object that you are going to apply the mask to, and choose Edit ➪Paste as Mask to apply the mask from the clipboard, as shown in Figure 13-22.
Tip
Caution
173662-1 Ch13.F 8/2/02 2:29 PM Page 435
Fireworks Seminar

436 Part III ✦ Achieving Effects
Figure 13-22: After the mask is applied, the background area iscompletely transparent.
Editing masksAfter you’ve created a masked object — whether you used a vector or bitmap
mask — the Layers panel makes it easy to select and edit it.
To edit a mask, follow these steps:
1. Choose Window ➪ Layers to display the Layers panel. It is good to keep both
the Layers panel and the Property inspector in view while editing masks in
order to have all the necessary controls “at your fingertips.”
2. Click the mask’s thumbnail in the Layers panel. Alternatively, you can select
the masked object, either on the canvas or from the Layers panel, and choose
Edit Mask from the Layers panel Options menu.
You can also double-click the Move Handle that appears in the center of a maskedobject to edit its mask.
Fireworks selects the mask for editing on the canvas.
If you’re editing a bitmap mask, the Property inspector says Bitmap Mask;
Fireworks displays the yellow Mask Edit Border around selected masked
objects, instead of the default blue outline (see Figure 13-23).
If you are editing a vector mask, the Property inspector says Vector Mask.
3. Edit the mask with any of the pixel-editing tools in the Tools panel, just as you
would edit the pixels of a bitmap image. Although the mask itself is not shown
on the canvas, the results of edits that you apply to the mask are shown.
Tip
173662-1 Ch13.F 8/2/02 2:29 PM Page 436
Fireworks Seminar

437Chapter 13 ✦ Arranging and Compositing Objects
Figure 13-23: Fireworks masking controls include the Layers panel and the Property inspector.
4. Apply Live Effects or Filters to the mask, if desired.
5. If desired, convert a vector mask into a bitmap mask by choosing Modify ➪Flatten Selection.
6. If desired, change the way the mask is applied, using the controls in the
Property inspector:
• If you’re editing a vector mask, choose whether to apply the mask using
the Path Outline — optionally with the fill and stroke shown — or using
the object’s Grayscale appearance. The grayscale appearance option
effectively treats the vector mask as a bitmap mask.
• For bitmap masks, choose whether to mask to the bitmap’s Alpha
Channel or Grayscale appearance.
7. Deselect the masked object when you’re done, either by choosing Edit ➪Deselect, or by using the keyboard shortcut, Ctrl+D (Command+D).
If you’re editing a mask, you can click an empty part of the canvas to stop editing.
Your mask-editing options don’t stop at directly editing the mask itself. Keep these
points in mind as you edit masks:
✦ Just as you can edit a mask by selecting its thumbnail in the Layers panel,
selecting the object’s thumbnail enables you to edit the object independently
from the mask.
Tip
Layers panel
Mask thumbnail
Linkbutton
Object thumbnail
Mask editindicator
173662-1 Ch13.F 8/2/02 2:29 PM Page 437
Fireworks Seminar

438 Part III ✦ Achieving Effects
✦ Click the Link button in between an object and mask thumbnail (refer to
Figure 13-23) to unlink a mask from an object, enabling you to position them
independently. Click again in the empty space between two unlinked
thumbnails to relink them.
✦ Click and drag the Move Handle (see Figure 13-24) that appears in the center
of masked objects in vector mode to position the underlying object without
moving the mask. This is especially useful when cropping a bitmap with a
vector mask, because it enables you to reposition the bitmap within its vector
“frame.”
Figure 13-24: Drag the Move Handle to move the underlying image without moving the mask.
✦ To temporarily disable a mask, select the mask thumbnail or the masked
object and choose Modify ➪ Mask ➪ Disable Mask, or choose Disable Mask
from the Layers panel Options menu. Fireworks displays a red X through the
mask’s thumbnail in the Layers panel to alert you that the mask is disabled.
To restore the mask, choose Modify ➪ Mask @ Enable Mask, or choose Enable
Mask from the Layers panel Options menu.
✦ To remove a mask permanently — aside from the Undo command, of course —
select the mask thumbnail or masked object and choose Modify ➪ Mask ➪Delete Mask. Or, you can choose Delete Mask from the Layers panel Options
menu.
Move handle
173662-1 Ch13.F 8/2/02 2:29 PM Page 438
Fireworks Seminar
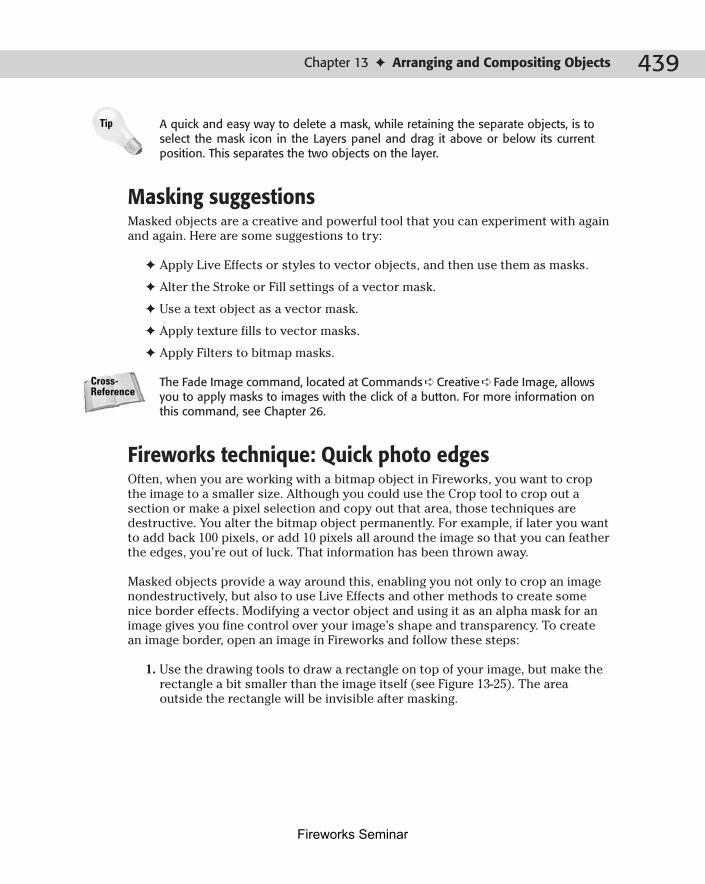
439Chapter 13 ✦ Arranging and Compositing Objects
A quick and easy way to delete a mask, while retaining the separate objects, is toselect the mask icon in the Layers panel and drag it above or below its currentposition. This separates the two objects on the layer.
Masking suggestionsMasked objects are a creative and powerful tool that you can experiment with again
and again. Here are some suggestions to try:
✦ Apply Live Effects or styles to vector objects, and then use them as masks.
✦ Alter the Stroke or Fill settings of a vector mask.
✦ Use a text object as a vector mask.
✦ Apply texture fills to vector masks.
✦ Apply Filters to bitmap masks.
The Fade Image command, located at Commands ➪ Creative ➪ Fade Image, allowsyou to apply masks to images with the click of a button. For more information onthis command, see Chapter 26.
Fireworks technique: Quick photo edgesOften, when you are working with a bitmap object in Fireworks, you want to crop
the image to a smaller size. Although you could use the Crop tool to crop out a
section or make a pixel selection and copy out that area, those techniques are
destructive. You alter the bitmap object permanently. For example, if later you want
to add back 100 pixels, or add 10 pixels all around the image so that you can feather
the edges, you’re out of luck. That information has been thrown away.
Masked objects provide a way around this, enabling you not only to crop an image
nondestructively, but also to use Live Effects and other methods to create some
nice border effects. Modifying a vector object and using it as an alpha mask for an
image gives you fine control over your image’s shape and transparency. To create
an image border, open an image in Fireworks and follow these steps:
1. Use the drawing tools to draw a rectangle on top of your image, but make the
rectangle a bit smaller than the image itself (see Figure 13-25). The area
outside the rectangle will be invisible after masking.
Cross-Reference
Tip
173662-1 Ch13.F 8/2/02 2:29 PM Page 439
Fireworks Seminar

440 Part III ✦ Achieving Effects
2. Color the rectangle black by selecting it and choosing black from the fill color
well at the bottom of the Tools panel.
You may want to experiment at this point, giving your shape various gradient
fills or textures. Remember that black areas are completely visible in your
final image, whereas white areas are not. The lighter the areas in between
these extremes, the more transparent they become.
Figure 13-25: Use a rectangle to block out the area of your photograph that you want to keep.
3. Select the rectangle and feather its edges by choosing Feather from the Edge
option list in the Fill section of the Property inspector.
Pause at this point, if you like, and experiment with applying Live Effects,
styles, Filters, or various strokes to your shape, instead of feathering it. If you
have Photoshop 5.x’s filters installed, the Distort, Brush Strokes, Sketch, and
Stylize filters are good choices. If you use Alien Skin’s Eye Candy, the Jiggle
feature is a great choice, too.
4. Position the mask correctly in relation to the object you’re masking.
5. Select the mask and choose Edit ➪ Cut, or use the keyboard shortcut, Ctrl+X
(Command+X), to cut it to the clipboard.
6. Select the object that you’re masking and choose Edit ➪ Paste as Mask to
apply your mask to it.
The Paste as Mask command is also available in another menu location: Modify ➪
Mask ➪ Paste as Mask.
The masked object is now the same size and shape as the black-colored shape that
you drew on top of it, as shown in Figure 13-26.
Tip
173662-1 Ch13.F 8/2/02 2:29 PM Page 440
Fireworks Seminar

441Chapter 13 ✦ Arranging and Compositing Objects
Figure 13-26: A selection of photo edge effects created by applying Live Effects to a vector object and using it as an alpha mask for an image.
Examining Opacity and BlendingThe primary tools in compositing images are opacity and blending. Altering these
properties can literally merge two images together. You can make one image show
through the other by giving the top image a lower opacity setting, or you can use a
blending mode to make them steal colors from each other. A bitmap object or pixel
selection that appears to float above a background can be seamlessly integrated in
just a few short steps.
Feathering objects before compositing them often provides good results. With asofter edge, removing the borderline between the two images is easier.Experiment with blending Fireworks strokes, texture fills, and effects.
After you select an object in Fireworks, you can either use the Layers panel, or the
Property inspector, to control its opacity and blending (see Figure 13-27).
Tip
Feathered circlevector mask
Feathered rectanglevector maskOriginal image
Eye CandyMarble appliedto bitmap mask
Eye CandyJiggle appliedto bitmap mask
173662-1 Ch13.F 8/2/02 2:29 PM Page 441
Fireworks Seminar

442 Part III ✦ Achieving Effects
Figure 13-27: The opacity and blending controls affect the selected object(s).
Controlling opacityAs you make an object more transparent, more of the background shows through.
This can go a long way toward integrating two images. While the opacity and
blending options are available from both the Layers panel and the Property
inspector, I’ll refer to the Property inspector when describing their functionality
as it’s more likely that the Property inspector will always be visible in your panel
layout. Keep in mind that modifying the settings on the Layers panel gives you the
exact same results.
Controlling opacity in Fireworks is easy. Select an object and then slide the opacity
slider. A setting of 100 equals no transparency, completely opaque. A setting of 1,
with the slider all the way down, brings an object as close to invisible as possible in
Fireworks (see Figure 13-28). If you do want to make an image completely invisible,
you can type a zero (0) in the opacity box and press Enter (Return).
If you specify an opacity setting without an object selected, you set a default opacityfor objects that you create from that point on. If you accidentally set it to 10 percentor less, you might not even be able to see some of the objects that you draw. If thishappens, you know where to go to change it back. Deselect all objects with Edit ➪
Deselect and move the opacity slider in the Layers panel back to 100.
Using blending modesBlending modes manipulate the color of pixels in a foreground image and the color
of pixels beneath them in the background image in a variety of ways to blend the
two together. Before you start using blending modes, here’s the terminology that
you need to know:
Caution
Blend modeoption list
Blend modeoption list
Opacitysetting
Opacitysetting
Opacityslider
Opacityslider
173662-1 Ch13.F 8/2/02 2:29 PM Page 442
Fireworks Seminar

443Chapter 13 ✦ Arranging and Compositing Objects
✦ Blend color: The color of the selected object, typically a foreground object
✦ Base color: The color beneath the selected object, typically a background
object
✦ Result color: The color resulting from the blend of the blend color and base
color
For the sake of simplicity, this discussion primarily uses foreground, background,
and result.
Figure 13-28: Vary the opacity level of an object with the Property inspector’s opacity slider. The fellow on the left is 100 percent opaque. On the extreme right, he’s 10 percent opaque.
As you’ve seen earlier, Fireworks enables you to alter the opacity of an object at
any time with the Opacity slider in the Property inspector. The opacity of an object
also effects the way it blends.
A blending mode applies to an individual object or to an entire group. If you give an
object a certain blending mode and then group it, the blending mode disappears
because the object is given the group’s blending mode instead (although ungrouping
restores the individual object’s blending mode). If you’re working extensively with
blending modes, instead of grouping your objects, you might want to use layers to
separate and organize your objects. This also enables you to stack blending modes
for interesting effects, as objects on each layer blend into objects on the layer below.
100 percentopacity
75 percentopacity
50 percentopacity
25 percentopacity
10 percentopacity
173662-1 Ch13.F 8/2/02 2:29 PM Page 443
Fireworks Seminar

444 Part III ✦ Achieving Effects
Depending on what kind of object you have selected, the blending modes work in
one of the following ways:
✦ Vectors: The blending mode affects the selected object.
✦ Bitmaps: If you have a marquee selection drawn, the blending mode affects
the selection of pixels. If you don’t have a marquee selection drawn, the
blending mode affects the tools that you use from then on.
Select an object and modify its blending mode setting in the Property inspector.
If an object isn’t selected, modifying the blending mode creates a new default
blending mode for objects that you create from that point on.
Investigating blending modesBlending modes can be confusing and strangely mathematical. The best way to
understand them is to compare their results, which is what Figure 13-29 does.
Figure 13-29: Comparing the 12 blending modes that Fireworks offers, with the unaltered image in the center
Screen Darken
Multiply
Erase
Tint
Invert
Lighten
Difference
Hue
Saturation
Luminosity Color
173662-1 Ch13.F 8/2/02 2:29 PM Page 444
Fireworks Seminar

445Chapter 13 ✦ Arranging and Compositing Objects
You can see the dogs in Figure 13-29 in full color in the color insert.
Twelve mysterious blending modes can seem like much at first, but most modes
have an opposite partner or other related modes. After you understand one mode
of a group, you’re well on your way to understanding them all.
References to the foreground or background color refer to the color at the pixel
level, not at the object level. Individual pixels of the foreground and background
objects are compared.
Multiply and ScreenMultiply mode multiplies the foreground color with the background color. It can give
your blended image a deeper, richer tone. The result color is always darker. If the
foreground or background color is black, the result will be black; if one of them is
white, Multiply has no effect.
Screen mode is basically the opposite of Multiply. The result color is a ghostly,
faded blend. It works by inverting the foreground color and then multiplying it with
the background color. Whereas Multiply always results in a darker color, Screen
always results in a lighter one. If either the foreground or background is white, the
result color will be white. If either is black, Screen has no effect.
Darken, Lighten, and DifferenceDarken compares the foreground and background colors and keeps the darkest
one, whereas Lighten does the opposite; the foreground and background color is
compared and only the lightest remains.
Difference compares the foreground color and the background color, and it
subtracts the darker color from the lighter color. It can result in some surprising
color choices.
Hue, Saturation, Color, and LuminosityHue combines the hue value of the foreground color with the luminance and
saturation of the background color. Essentially, you get the foreground color,
but as dark or light as the background.
Saturation combines the saturation of the foreground color with the luminance and
hue of the background color.
Color combines the hue and saturation of the foreground color with the luminance
of the background color. Grays are preserved, so this is a good way to add color to
a black-and-white photograph, or to tint color photographs.
Luminosity combines the luminance of the foreground color with the hue and satu-
ration of the background color.
Cross-Reference
173662-1 Ch13.F 8/2/02 2:29 PM Page 445
Fireworks Seminar

446 Part III ✦ Achieving Effects
Invert and TintInvert and Tint don’t bother with the foreground color at all. With Invert, the
foreground object’s colors are replaced with inverted background colors. With Tint,
gray is added to the background color to create the result.
EraseErase removes all background color pixels, leaving the canvas color.
Fireworks technique: Simulating a light source withblending modesOne key to creating a good three-dimensional look is providing a simulated light
source. Blending an object that uses a black-and-white gradient fill into another
object mimics the interplay of light and shadows. In other words, the image has a
controllable light to dark range added. This enables you to adjust the “lighting” so
that it looks appropriate with your particular graphic.
To use blending modes to simulate light and shadow and create objects such as
those shown in Figure 13-30, follow these steps:
Figure 13-30: Get the lights: Blend a gradient-filled object and adjust the gradient to simulate a light source.
The color insert provides another look at light source effects.
1. Create a new, empty layer by clicking the New Layer button on the Layers
panel. Double-click the new layer in the layers list and name it Object1.
Cross-Reference
173662-1 Ch13.F 8/2/02 2:29 PM Page 446
Fireworks Seminar

447Chapter 13 ✦ Arranging and Compositing Objects
2. Using one of the geometric drawing tools (Rectangle, Ellipse, or Polygon),
draw an object on the Object1 layer. This object is your base object (not the
light source).
3. In the Fill section of the Property inspector, give your object a Solid fill and
add a texture, such as Parchment, to it. Set the texture to 100 percent.
Alternatively, you might also use a Pattern fill, instead of a Solid fill with a texture.
4. Choose Edit ➪ Clone to create a copy of your object directly on top of the orig-
inal.
5. From the Fill section of the Property inspector, choose a Radial gradient fill for
the new object with the White, Black color preset. Remove the texture (if any)
by sliding the Amount of texture slider to 0 percent.
6. Change the blending mode in the Property inspector to Multiply and alter the
Opacity setting to taste, depending on the color of your original object.
7. Note the Fill modification handles that appear on your object. Drag the round
starting handle of the gradient fill to reposition the gradient so that the center
of the white portion is located where you want the brightest “light” to fall.
Slightly up and to the left is a good choice. If desired, drag the square-ending
handle to adjust the angle of the gradient. In a sense, you are adjusting the
light source.
You may want to use the Select Behind tool to select your original object — the onewith the texture or Pattern fill — and apply one of the bevel Live Effects. Adjustingthe bevel height can make a big difference to how realistically 3D your objectlooks.
8. Select both objects and position them, if necessary. Lock the Object1 layer
and don’t put other objects on it. Both of the objects it contains must be
moved together, but they cannot be grouped, or they will share the same
blending mode and the lighting effect is lost. Keeping them on their own layer
makes it easy to use Single Layer Mode to isolate them during later editing.
The Radial gradient was used in the previous example, but you can get some really
great effects (such as a starburst of light) by applying different gradient types.
Moreover, you can adjust the subtlety of the lighting by editing the gradient and
toning down the pure white to a more muted gray. Feel free to experiment with
different blending modes, as well.
For more about gradients, see Chapter 11.Cross-Reference
Tip
Tip
173662-1 Ch13.F 8/2/02 2:29 PM Page 447
Fireworks Seminar

448 Part III ✦ Achieving Effects
Fireworks Technique: Feathering SelectionsA common image-editing task is to remove a subject from one image and place that
subject in another document against another background. Feathering your selection
can make this process much more forgiving, hiding ragged edges and stray
background pixels that come along for the ride.
To copy a foreground image from one document and place it into another, follow
these steps:
1. Open your source and target documents in Fireworks. The source document
should have a foreground element. The target document should contain a
suitable background.
2. In the source document, use the Lasso or Polygon Lasso tools to make a pixel
selection (see Figure 13-31). Select your foreground element as accurately as
possible.
3. Choose Select ➪ Feather, enter 10 in the Feather Selection dialog box, and
then click OK. This feathers your selection, which hides any rough edges.
4. Choose either Edit ➪ Copy, or the keyboard shortcut, Ctrl+C (Command+C), to
copy the pixel selection to the Clipboard.
5. Switch to your target document and choose either Edit ➪ Paste, or the
keyboard shortcut, Ctrl+V (Command+V), to paste the pixel selection from the
clipboard into your document as a new bitmap object.
6. Move the subject around until it’s placed where you want it.
Figure 13-31: Copying a feathered pixel selection into another document
173662-1 Ch13.F 8/2/02 2:29 PM Page 448
Fireworks Seminar

449Chapter 13 ✦ Arranging and Compositing Objects
Fireworks Technique: Applied CompositingPresenting separate elements as an integrated image often means applying a few
different compositing techniques. In the following example, you use masked
objects, opacity, blending modes, and layering, along with texture fills and drop
shadows to unify seven or eight separate objects into one final, composited image.
If you want to take a look at the final result of the techniques in this section beforeyou start, turn to the color insert.
Starting from the bottom of the stacking order, the first step is a canvas color; in
this case, it’s black, as shown in Figure 13-32. Only a small portion of the canvas
shows along the bottom of the final image. The background object has a mesh
texture fill, which shows through other elements later and provides a feeling of
depth. It also has a red drop shadow effect that softens the transition between it
and the canvas. Avoiding straight lines and obvious borders — or hiding them —
helps to make separate objects appear to be one.
Figure 13-32: This textured background shows through translucent objects that are placed on it, whereas a drop shadow blends it into the black-colored canvas.
Background object
Canvas
Drop shadow
Cross-Reference
173662-1 Ch13.F 8/2/02 2:29 PM Page 449
Fireworks Seminar

450 Part III ✦ Achieving Effects
The next layer up contains a red and black pattern. In order to blend it with the
background object, use an alpha mask to make the red and black pattern fade from
opaque at the top to fully transparent at the bottom. This can be achieved by
combining it into a masked object, with the mask shown in Figure 13-33. Where the
mask is white, the underlying object is opaque; where it’s black, the object is
completely transparent. Shades of gray provide varying degrees of transparency.
Figure 13-33: When used as a mask, this gradient-filled vector object makes the red and black pattern appear to fade away from top to bottom.
Combining the mask and object into the masked object shown in Figure 13-34 is as
simple as selecting the gradient, choosing Edit ➪ Cut, and then choosing Modify ➪Mask ➪ Paste as Mask. The background object is now showing through the mask.
All the objects appear to be part of the same image, rather than distinct objects.
Of course, the vector mask is still editable.
The three separate variations on the Fireworks logo in Figure 13-35 are on separate
layers. The Big Crinkley Logo has holes in it where the background shows through,
and its Bevel effect raises it off the canvas and provides a feeling of depth. The Real
Logo — quickly purloined from the Fireworks Web site or somewhere similar —
looks a little ragged, but will be mostly covered by the Hand-Drawn Logo, so that
only its colors show through. The drop shadow and inner bevel applied to the
Hand-Drawn Logo adds more depth and provides a nice transition between it and
the Real Logo beneath it.
MaskObject
173662-1 Ch13.F 8/2/02 2:29 PM Page 450
Fireworks Seminar

451Chapter 13 ✦ Arranging and Compositing Objects
Figure 13-34: Moving the mask’s gradient fill handle adjusts the opacity of the underlying object.
Figure 13-35: These foreground elements stack nicely because of their transparent holes and the depth provided by drop shadows and bevel effects.
Big crinkley logo Hand-drawn logo with effects
Real logo
173662-1 Ch13.F 8/2/02 2:29 PM Page 451
Fireworks Seminar

452 Part III ✦ Achieving Effects
The leathery look of the bottom half of the document seems as if it’s a good place
to put some text. In Figure 13-36, you can see that my chosen typeface — Heavy
Rotation — is structured to look as if it’s been pressed into something. A 50 percent
opacity setting for the text object allows some of the underlying texture to show
through and adds to the inset look of the text. Changing the text object’s blending
mode to Screen completes the illusion; inverting the foreground color and
multiplying it with the background color to blend them.
Figure 13-36: The opacity setting and blending modes in the Property inspector or Layers panel help to sink the basic text object (top) into the underlying texture of the background (bottom).
The final product — completed using masked objects, opacity settings, blending
modes, and layers along with texture fills and effects, such as drop shadows — is
shown in Figure 13-37.
100 percent opacity
50 percent opacity
173662-1 Ch13.F 8/2/02 2:29 PM Page 452
Fireworks Seminar

453Chapter 13 ✦ Arranging and Compositing Objects
Figure 13-37: A number of compositing techniques were used to combine multiple objects into this integrated, multilayer image.
SummaryFireworks provides lots of options for combining many types of objects to create
more complex objects or special effects. When you’re arranging or compositing
objects in Fireworks, keep these points in mind:
✦ You can use layers to organize your document, enabling easier selection and
editing of similar objects.
✦ The Layers panel is your control center for working with layers.
✦ You can choose to work with individual layers in a variety of ways, including
hiding, showing, and locking layers.
✦ Layers are also containers for object sublayers. Show, hide, move, copy, and
delete sublayers using the same techniques you use with layers.
✦ The ruler, grid, and guides are all available to help you precisely position
objects on the canvas.
✦ Objects can be grouped, and a group behaves as if it’s one object.
✦ Masks give you amazing control over alpha transparency.
✦ Blending modes enable you to blend objects quickly and easily.
✦ Multiple compositing techniques can be utilized together to integrate many
objects into a seamless image.
The next chapter looks at capturing and importing images into Fireworks.
✦ ✦ ✦
173662-1 Ch13.F 8/2/02 2:29 PM Page 453
Fireworks Seminar

173662-1 Ch13.F 8/2/02 2:29 PM Page 454
Fireworks Seminar

CoordinatingWorkflow
Web design is an ongoing process, not a single event.
Part IV is dedicated to helping you streamline your
workflow, as you acquire images via scanning or importing,
manipulate them in Fireworks, and then optimize them on
export, either for the Web or for import into other creative
tools, such as Macromedia Director or Flash.
Although it’s true that Web graphic design is an art form, it’s
also a business — and one element of that business is apply-
ing a consistent look and feel to each element of a particular
Web site. Fireworks styles enable you to save formatting
instructions from one object and apply them to other objects
again and again. The Library panel is a place to store symbols,objects you use frequently, such as logos and navigation but-
tons. Fireworks symbols further minimize repetitive work by
linking similar objects so that changes need be made only
once. Chapter 18 describes how Fireworks MX helps you
update and maintain your graphics through the URL panel
and the surprising Find and Replace feature. The final chapter
in Part IV covers the greatly expanded Command feature set
with its new Flash movie interface capability and the History
panel, useful for constructing simple reusable commands
from your actions.
✦ ✦ ✦ ✦
In This Part
Chapter 14Capturing andImporting
Chapter 15Exporting andOptimizing
Chapter 16Working withFireworks Styles
Chapter 17Using Symbols and Libraries
Chapter 18Updating andMaintaining Web Graphics
Chapter 19Automating Workflow
✦ ✦ ✦ ✦
P A R T
IVIV
183662-1 Part04.F 8/2/02 2:29 PM Page 455
Fireworks Seminar

183662-1 Part04.F 8/2/02 2:29 PM Page 456
Fireworks Seminar

Capturing and Importing
Moving information easily, from one application to
another, has a great effect on your workflow and
productivity. In addition to creating objects from scratch in
Fireworks, you can also quickly and easily include elements
created in a traditional drawing program, such as Macromedia
FreeHand, or stock photos from a clip art collection, or photo-
graphic prints directly from a page scanner or digital camera.
From a design perspective, incorporating elements from a
wide variety of sources gives your documents depth and
contrast, and makes them more interesting and pleasing to
the eye. You can combine and contrast simple vector shapes
with detailed photographs and organic bitmap textures. After
these elements are incorporated into Fireworks, they’re fair
game for Fireworks’ unique drawing tools and comprehensive
export features.
This chapter begins with a discussion of the issues involved
in accessing image capture hardware, such as a scanner or
digital camera within Fireworks. You look briefly at screen
captures and explore how you can drag and drop, or copy and
paste from other applications. You look at importing bitmap
and vector art files. Finally, you examine some of the issues
involved in importing animations.
Introducing Image CapturesAcquiring an image from a hardware device, such as a page
scanner or digital camera, is an almost magical process —
unless your hardware and software aren’t talking to each
other. In Fireworks, getting this conversation started involves
an industry standard called TWAIN. TWAIN is a fully cross-
platform method that enables scanners, digital cameras, and
1414C H A P T E R
✦ ✦ ✦ ✦
In This Chapter
Scanning
Working with digital cameras and camcorders
Incorporating objects from otherapplications
Importing bitmap and Photoshop files
Importing vector art
Working with clip art
Taking screencaptures
Opening animations
✦ ✦ ✦ ✦
193662-1 ch14.F 8/2/02 2:54 PM Page 457
Fireworks Seminar

458 Part IV ✦ Coordinating Workflow
other devices to acquire images. On a Macintosh, Fireworks also supports
Photoshop Acquire plug-ins. If your scanner or digital camera uses a Photoshop
Acquire plug-in, see “Installing Photoshop Acquire plug-ins,” later in this chapter.
What does TWAIN stand for? It’s rumored to be an acronym for “TechnologyWithout An Interesting Name.” It might also have started as a play on bringing soft-ware and hardware together, as in “ne’er the twain shall meet.” For its part, theTWAIN Working Group, which created the standard, claims that it’s only a nameand has no meaning at all. For more information about TWAIN, visit the TWAINWorking Group on the Web at http://www.twain.org.
Examining TWAIN-compliant devicesWhen you start Fireworks, if a TWAIN module or Photoshop Acquire plug-in
(Mac only) is available, a Scan command will be added to the File menu, as shown
in Figure 14-1. If you have multiple TWAIN-compliant devices connected to your
computer, you can select any one of them from within Fireworks.
Figure 14-1: Fireworks adds a Scansubmenu to the File menu if a TWAINmodule or Photoshop Acquire plug-in is available.
If you have a scanner or digital camera and the Scan submenu is not available, ver-ify that your capture hardware is correctly installed and that its software is current.If necessary, consult the device’s documentation for details.
To select a TWAIN source in Fireworks, follow these steps:
1. Choose File ➪ Scan ➪ Twain Source.
Fireworks displays the Select a source dialog box (see Figure 14-2).
Note
Note
193662-1 ch14.F 8/2/02 2:54 PM Page 458
Fireworks Seminar

459Chapter 14 ✦ Capturing and Importing
Figure 14-2: In Fireworks, select a TWAINsource from which to capture images in the Select a source dialog box.
2. Choose the TWAIN-compliant device from which you want Fireworks to
acquire an image. Click OK when you’re done.
If you haven’t purchased a scanner or digital camera yet, but are planning to do so,visit the Fireworks Support Center by choosing Help ➪ Fireworks Support Center.Refer to the Fireworks TechNotes for a list of hardware that has been tested andfound to work well with Fireworks.
Installing Photoshop Acquire plug-ins (Macintosh only)On a Macintosh, Photoshop Acquire plug-ins provide another way to interface
with a scanner or digital camera. Many devices — especially those that aren’t
TWAIN-compliant — generally come with a Photoshop Acquire plug-in. To use
one in Fireworks, you must do one of the following:
✦ Install the Photoshop Acquire plug-in into Fireworks’ Plug-Ins folder, found
within the Fireworks program folder.
The Fireworks program folder is typically found at C:\Program Files\Macromedia\Fireworks MX on Windows-based computers, and at Macintosh HD:Applications:Macromedia Fireworks MX: on the Mac.
✦ Install the Photoshop Acquire plug-in into your Photoshop Plug-Ins folder
or another folder on your computer. Then, in Fireworks, choose Edit ➪Preferences (Fireworks ➪ Preferences on OS X), select the Folders tab (option
list on the Macintosh), check Photoshop Plug-Ins, and then browse
to and select the folder that contains the Acquire plug-in.
You can also refer Fireworks to plug-ins that are located in an external folder byplacing a shortcut (alias) to that folder into Fireworks’ Plug-Ins folder.
After following either of these methods, Fireworks will add a Scan submenu to the
File menu. Select your Photoshop Acquire plug-in from that menu to initiate a scan.
Tip
Tip
Tip
193662-1 ch14.F 8/2/02 2:54 PM Page 459
Fireworks Seminar

460 Part IV ✦ Coordinating Workflow
Some Photoshop Acquire plug-ins may not function correctly with Fireworksbecause they are generally marketed and tested first and foremost for use withPhotoshop. If your Acquire plug-in doesn’t work, check the manufacturer’s Website for an updated version that may be compatible with Fireworks, or investigatewhether your hardware device is TWAIN-compliant.
Scanning PagesA page scanner enables you to capture printed documents — from drawings to art-
work to photographs. You can scan an image and use it in your Fireworks document
unaltered, or you can transform it a little or a lot with Fireworks’ drawing tools,
effects, and plug-ins, and then export it for publishing on the Web.
Scanning for print publishing requires a different approach than scanning for onlinepublishing. For the print publisher, the online image is part of the process and notan end in itself. Because Fireworks is almost exclusively a Web-publishing tool, thisbook looks at things from the perspective of the online publisher.
Scanning an image is the procedure of literally converting an image from a printed
image to an online image (one that’s viewed on a computer). Most of the confusion
in scanning comes from mixing up print and online concepts, especially when it
comes to resolution. Resolution basically means “the number of dots,” which is
important to scanning because print and online images fundamentally consist
entirely of dots.
Resolution is measured differently for printed images than it is for online images.
Printed resolution is a measure of how many dots are in an inch of the image, which
is expressed as dots per inch, or dpi. An example is 300 dpi. Online resolution is a
measure of how many dots are in the entire image, measured in X pixels by Y pixels.
An example is 640×480 pixels. If you select an image in Fireworks and choose
Modify ➪ Image Size, Fireworks displays the Image Size dialog box (see Figure 14-3),
which clearly shows the relationship between online and printed resolution. If you
specify 100 dpi, a 500×400 pixel image will have a print size of 5×4 inches.
The following list describes some of the resolutions that you’ll encounter as you
scan:
✦ The resolution of the printed image, in dpi: The upper limit of detail that the
printed image contains.
✦ The scan resolution, in dpi: Before you scan an image, you must specify a
scan resolution, which specifies how the scanner should translate the printed
image, measured in inches, into an online image, measured in pixels. A scan
resolution of 100 dpi tells the scanner to split each inch of the printed image
into 100 parts, and make those 100 parts into 100 pixels of online image. You’ll
look more closely at scan resolution later in the chapter.
Note
Caution
193662-1 ch14.F 8/2/02 2:54 PM Page 460
Fireworks Seminar

461Chapter 14 ✦ Capturing and Importing
✦ The scanner’s maximum optical resolution, in dpi: The upper limit of the
scanner’s ability to look at something it’s scanning. A scanner with a maxi-
mum optical resolution of 300 dpi can split an inch of your printed image
into 300 parts. Detail finer than that cannot be captured with that scanner.
✦ The scanner’s interpolated resolution, in dpi: The upper limit of the scanner’s
ability to guess at details it can’t see. A 300-dpi scanner that is asked to scan
at a resolution of 600 dpi will guess at what the missing pixels should be. This
is similar to resampling an online image to a higher resolution and generally
should be avoided.
✦ The online image’s resolution, in pixels: Because each pixel of an online image
is represented by one screen-pixel location, an online image’s resolution is the
same as its size. A 640×480-pixel image has a resolution of 640×480 pixels.
✦ The display resolution, in pixels: A computer display might have a resolution
of 800×600 pixels or 1024×768 pixels. How big the display is in inches is
unknown and, therefore, unimportant.
A common misconception is that computer displays have a standard resolution of72 dpi. Early Macintosh displays did have a 72-dpi resolution, and it became astandard because Macs dominated the publishing industry, and they all had thesame size and type display. Today, computer displays come in a wide variety ofsizes and resolutions. A 19-inch display with a resolution of 640×480 pixels has adrastically different number of dots per inch than a 14-inch display with a resolu-tion of 1024×768 pixels.
Figure 14-3: Fireworks’ Image Sizedialog box shows the relationshipbetween an image’s online resolution(pixel size) and print resolution.
Examining the Scanning ProcessWhen you initiate a scan in Fireworks, a dialog box that’s specific to your scanner
or Acquire plug-in is displayed so that you can specify the settings that you want
for the particular scan. Some scanners offer a choice of different interfaces. One
Note
193662-1 ch14.F 8/2/02 2:54 PM Page 461
Fireworks Seminar

462 Part IV ✦ Coordinating Workflow
interface may be a quick and simple dialog box with few options, while another
interface may contain an almost bewildering array of options for the advanced user.
Some scanners also offer a supplementary wizard-based interface, such as the one
shown in Figure 14-4, allowing you to specify options in plain English. For example,
instead of choosing a specific descreen setting — to compensate for the patterns
inherent in some types of printing — you might only have to specify that your origi-
nal is from a magazine or newspaper. The software then chooses the correct setting
for you.
Figure 14-4: Epson’s TWAIN scanner driver is tailored for beginners or advanced users and enables you to choose scanning options in plain English from option lists.
Chances are that you’ll want to learn to use your scanner’s advanced interface so
that you can exert a greater degree of control over the settings that you use and,
therefore, get the best results. The most important of these settings are the scan
resolution and the color depth. We’ll look at them closely, and then look briefly at
some of the other options that might be presented.
Selecting a scan resolutionIn simple terms, the scan resolution that you choose determines the size of the
resulting online image — and that’s all. Table 14-1 shows the relationship between
the size of the original, printed image and the size of the resulting, online image at
various scan resolutions.
193662-1 ch14.F 8/2/02 2:54 PM Page 462
Fireworks Seminar

463Chapter 14 ✦ Capturing and Importing
Table 14-1Scan Results at Various Scan Resolutions
Printed Image Size (inches) Scan Resolution (dpi) Online Image Size (pixels)
5×7 10 dpi 50×70
5×7 20 dpi 100×140
5×7 50 dpi 250×350
5×7 100 dpi 500×700
5×7 150 dpi 750×1,050
5×7 200 dpi 1,000×1,400
5×7 300 dpi 1,500×2,100
Note that each of the following three important pieces of information is measured
in different ways:
✦ Printed image: Measured in inches. In print publishing, the inch is the con-
stant. If you create an 8.5×11-inch page layout and print it at different print
resolutions, it will still be an 8.5×11-inch page layout, but it will have a differ-
ent number of dots on each page.
✦ Scan resolution: Measured in dots per inch. This is the translation of the
printed image (in inches) to the online image (in dots, or pixels). How many
pixels of online image do you want for each inch of printed image? Fifty?
That’s a scan resolution of 50 dpi.
✦ Online image: Measured in pixels. In online publishing, the pixel, or dot, is the
constant. If you create a 640×480-pixel image and view it at different screen
resolutions, it will still be a 640×480-pixel image, but it will be a different size
in inches on each screen.
Determining the ideal resolutionTo determine an ideal scan resolution, follow these steps:
1. Decide how wide you want your online image to be, in pixels.
2. Divide that number by the width of the printed image, in inches.
The result is your scan resolution in dots per inch.
If you’re not sure how big you want the final image to be, overestimate rather thanunderestimate. Making an image smaller later in the process is not as detrimentalto its quality as trying to make it larger. A scan resolution of 100 dpi is a good placeto start, because it makes the translation from inches to pixels easy to calculate. A3×5-inch printed image will be 300×500 pixels after scanning. If 300×500 ends upbeing too big or too small, adjust the scan resolution from there.
Tip
193662-1 ch14.F 8/2/02 2:54 PM Page 463
Fireworks Seminar

464 Part IV ✦ Coordinating Workflow
Running out of printed resolutionWhen selecting a scan resolution, keep in mind the resolution of the printed image
that you’re scanning. At the point when the scan resolution is equal to either the
resolution of the printed image, or the maximum optical resolution of your scanner,
increasing the scan resolution stops capturing more detail. Consider the following
examples:
✦ If your printed image was printed at 200 dpi, a scan resolution of 300 dpi will
not add detail that isn’t already there. Scan the image at 200 dpi and resample
it to a larger size in Fireworks, if necessary.
✦ If your scanner’s best optical resolution is 300 dpi, you won’t be able to cap-
ture more than 300 dots for each inch of the printed image. Many scanners
allow you to choose a higher scan resolution than they can really achieve, and
then the scanner “interpolates,” or fills in, the missing information with a best
guess. This is equivalent to scanning the image at your scanner’s maximum
optical resolution and resampling it in Fireworks, if necessary.
Choosing a color depthChoose a color depth based on the type of document you are scanning. Typically,
a scanner has three main color settings for you to choose from: line art, grayscale,
and color. You may also be able to specify bit depth for grayscale and color scans.
Higher bit depths scan a higher number of colors and are more accurate, but also
result in a larger file size.
Examining line artLine art refers to black-and-white images that don’t contain shades of gray. This
might include cartoons, blueprints, or diagrams. Line art is scanned with one-bit
color depth. In other words, each pixel is either on or off: black or white.
Exploring grayscale imagesGrayscale images contain actual shades of gray. Typically, a grayscale setting will
be 8-bit, meaning that your image will have 256 different shades of gray. This is the
best setting for black-and-white photographs.
Looking at color imagesThe color setting is obviously used for scanning any sort of color image. Typically, this
is 24-bit color, but some scanners have a 36-bit setting. Twenty-four-bit color means
that each pixel can be any one of 16.7 million colors. A 36-bit scanner can record 68.7
billion colors. Scan at your scanner’s best setting and then remove extra colors when
you export your image as a Graphics Interchange Format (GIF), a Joint Photographic
Experts Group (JPEG), or a Portable Network Graphics (PNG) for use on the Web.
For more about color depth, see Chapter 7.Cross-Reference
193662-1 ch14.F 8/2/02 2:54 PM Page 464
Fireworks Seminar

465Chapter 14 ✦ Capturing and Importing
Setting other optionsConsult the documentation that came with your scanner for specific information on
other options or features that your scanner has.
Here are some of the common options you may encounter:
✦ Preview window: A window in which you can see a thumbnail of the original
before you perform the actual scan. You can usually draw a border in this win-
dow to limit the scan to the portion of the scanner window. Some scanning
interfaces will draw a best guess selection themselves, which you can adjust
as required.
✦ Brightness and Contrast: Adjust these only if your original is exceptionally
bright or dark, or lacking in contrast.
✦ Image enhancements: For example, dust, scratch, or moiré removal.
✦ Orientation: You may be able to specify that the scanner flip the image
vertically or horizontally.
✦ Settings: For different types of original documents, such as transparencies
and slides.
✦ Gamma correction: Most Macs are set to a gamma correction of 1.8, whereas
most Windows machines use 2.2.
✦ Descreen: A descreen setting enables you to scan newspaper or magazine
clippings with better results.
Scanning directly into FireworksTo scan directly into Fireworks, follow these steps:
1. Place the original document onto your scanner’s scanning bed.
2. If you’re using a TWAIN source and have multiple TWAIN-compliant devices,
choose File ➪ Scan ➪ Twain Source and select the appropriate device.
3. If you’re using TWAIN, choose File ➪ Scan ➪ TWAIN Acquire. If you’re using
a Photoshop Acquire plug-in (Macintosh only), choose File ➪ Scan and the
name of that plug-in.
Your scanner’s options dialog box appears.
4. In the scanner’s options dialog box, adjust the settings for the scan, specifying
resolution, color depth, and other settings, as required. Consult your scanner’s
documentation for specific information about the options you’re presented
with. Click OK after you’re done.
The device begins scanning and then sends the image to Fireworks. When the scan
is completed, the image appears as a new document in Fireworks.
193662-1 ch14.F 8/2/02 2:54 PM Page 465
Fireworks Seminar

466 Part IV ✦ Coordinating Workflow
Looking at Digital CamerasIncreasingly, images are staying completely digital. The advantages of creating images
for the Web using a digital camera are obvious: no film or printing expenses, nearly
instant access to the photographs, no loss of quality as photos are printed and then
scanned. Whether you consider yourself a great photographer or not, graphics pro-
fessionals are increasingly called upon to get behind the camera, even if only to
grab a couple of quick snapshots for the company intranet.
Some of the same considerations that apply to scanning also apply to using images
from a digital camera. You use TWAIN or a Photoshop Acquire plug-in to interface
with the camera, and you are presented with a dialog box full of options that help
you transfer the images from the camera into Fireworks.
Cameras differ from scanners in that you don’t have to worry about print resolution
because no printing is involved. Resolution is specified — just like online images —
in terms of width by height in pixels. Generally, you’ll want to use the camera at its
highest resolution in order to get the best quality image and leave yourself the most
editing options in Fireworks. A larger image can be made smaller without losing
quality, but the reverse is not true. For the most part, though, images on the Web
tend to be smaller, rather than larger, and photos from even a basic digital camera
are often 640×480 pixels or larger, plenty big enough for most Web applications.
Capturing images for use in FireworksTo capture images from a digital camera directly into Fireworks, follow these steps:
1. Take some pictures.
If your camera supports it, create pictures in a lossless file format, rather than alossy format, such as JPEG. JPEG images should — whenever possible — be consid-ered a final product only. They will display noticeable artifacting when exportedfrom Fireworks.
2. Connect the camera to your computer according to the camera’s documen-
tation. Cameras that connect with a universal serial bus (USB) can be hot
plugged into a Windows or Macintosh machine and accessed immediately.
If your camera uses a legacy interface, you will have to shut down your
computer before making connections.
3. Run the software that came with your digital camera to transfer the pictures
you have taken to your computer’s hard drive.
If your camera software is like most, it begins transferring the images and you see
thumbnails of the images that it contains while they transfer, as shown in Figure 14-5.
Tip
193662-1 ch14.F 8/2/02 2:54 PM Page 466
Fireworks Seminar

467Chapter 14 ✦ Capturing and Importing
Figure 14-5: Digital cameras often show thumbnails of their images as they transfer them, as seen in Apple’s free iPhoto software.
When the camera’s interface software has finished transferring all the images,
you’re ready to choose which images you want to transfer into Fireworks, as
shown in Figure 14-6.
Figure 14-6: Once the images have been transferred to your computer, pick and choose which images to transfer into Fireworks through the camera’s software, or in this case, Apple’s iPhoto software.
193662-1 ch14.F 8/2/02 2:54 PM Page 467
Fireworks Seminar

468 Part IV ✦ Coordinating Workflow
Exploring digital camcordersMany digital camcorders offer a still photo mode, making them an alternative to
regular, digital still cameras. This mode captures one frame at the camera’s highest
resolution and typically writes this image onto seven seconds of tape, creating a
much better image than a single freeze-frame of video. An advantage to using a cam-
corder rather than a camera is that a camcorder can typically store 500 still images
on an hour-long, digital video tape with one battery charge, whereas most still cam-
eras max out well below 100 photos and eat batteries with a vengeance.
Digital camcorders can also transfer their images to a computer or another cam-
corder at high speeds, using an IEEE 1394 interface, often called FireWire or i.Link.
FireWire interfaces are standard on all Macintosh computers, and they are included
on many Windows machines from Sony, Hewlett-Packard, and other manufacturers.
FireWire interfaces can also be added to most computers with an add-in card.
Connecting the camcorder simply involves hot plugging the camcorder and the
computer together with the correct cable. Most camcorders have a 4-pin IEEE 1394
connector, whereas most computers offer a 6-pin connector. No special converter is
required, though, just an inexpensive cable with a 4-pin connector on one end and a
6-pin connector on the other end.
Although you can’t transfer images from a digital camcorder directly into Fireworks
as you can with a scanner or still camera, many camcorders and FireWire interfaces
include the necessary software. Typically, the output from the camera is presented
in real time in an onscreen window. This preview enables you to pick and choose
which images you would like to transfer from tape to an image file on disk.
After an image is stored as an image file on your hard disk — usually as a TIFF, PICT,
or BMP — you can easily open it in Fireworks. Because the images are always stored
digitally, they do not lose quality as they move from tape to disk.
Make sure to use still video mode when capturing still images with a digital cam-corder. Still frames of a moving video are only half of an interlaced image and willmake poor quality photographs.
Inserting Objects from Other ApplicationsSo far, I’ve showed how you can import a document from external hardware or a
screen capture, but what if the elements that you want to include are sitting right
there on your computer screen, but within another application? Fireworks has two
methods for directly inserting elements from other applications: copy and paste,
and drag and drop.
Caution
193662-1 ch14.F 8/2/02 2:54 PM Page 468
Fireworks Seminar

469Chapter 14 ✦ Capturing and Importing
Copying and pastingThe simplest and most widely used method for moving information from one appli-
cation to another is with the system clipboard and the commands Cut, Copy, and
Paste.
You can paste the following formats into Fireworks:
✦ Bitmap images
✦ Vector art from Macromedia FreeHand or Adobe Illustrator
✦ ASCII text
To copy from another application and paste into Fireworks, follow these steps:
1. In the source application, select the object(s) or pixel area that you want
to copy.
2. Choose Edit ➪ Copy, or use the keyboard shortcut, Ctrl+C (Command+C).
Your selection is copied to the clipboard.
3. In Fireworks, choose either Edit ➪ Paste, or the keyboard shortcut, Ctrl+V
(Command+V).
4. If your source selection has a different print resolution than your Fireworks
document, Fireworks displays a dialog box, shown in Figure 14-7, and offers to
resample the pasted image to match the target document. Choose Resample
to maintain the pasted object’s original width and height, adding or subtract-
ing pixels as necessary. Choose Don’t Resample to keep all the original pixels,
which may make the relative size of the pasted image larger or smaller than
expected.
Figure 14-7: If your source selection has a different print resolution than your target document, Fireworks offers to resample the selection for you.
Your selection is inserted into the active document, centered on the canvas.
193662-1 ch14.F 8/2/02 2:54 PM Page 469
Fireworks Seminar

470 Part IV ✦ Coordinating Workflow
If you’re pasting into Fireworks and you want to fill a new, empty canvas, copyfrom the source application and then create a new Fireworks document. Fireworkswill offer to make the new document the same dimensions as the clipboard.
Dragging and droppingYou can drag and drop objects into Fireworks from any application that supports
OLE (object linking and embedding) drag and drop on Windows, or Macintosh
drag and drop on a Macintosh. Dropped objects are rendered as images, unless
they’re vector art from Macromedia FreeHand or Adobe Illustrator. Following are
a few other applications that support drag and drop:
✦ Macromedia Flash
✦ Adobe Photoshop
✦ Microsoft Word
If you’re not sure whether a specific application supports drag and drop, try it to
find out. As you drag and drop, you can tell whether it’s working in Windows if your
mouse cursor changes when you hover above a target application. Similarly, on the
Mac, sounds provide feedback when things become “droppable.” The target appli-
cation on the Macintosh may also provide some visual indication.
To drag and drop an object into Fireworks from another application, follow these
steps:
1. Make sure that you have a Fireworks document open to drop objects into.
2. Position the source application and Fireworks side by side so that you have
a clear path to drag between them (see Figure 14-8).
3. In the source application, select the object(s) that you want to drag and drop
into Fireworks.
4. Click the selected object(s) and hold down the mouse button in order to “pick
up” the object(s).
5. While keeping the mouse button down, position the mouse cursor over the
target Fireworks document.
6. Release the mouse button to drop the object(s) into Fireworks.
The object(s) appear centered on your Fireworks canvas and are now part of your
Fireworks document.
You can also drag and drop between two open Fireworks documents.Tip
Tip
193662-1 ch14.F 8/2/02 2:54 PM Page 470
Fireworks Seminar

471Chapter 14 ✦ Capturing and Importing
Figure 14-8: This FreeHand vector object instantly became a Fireworks vector object after being dragged and dropped, and then it quickly fell victim to the Inner Bevel Live Effect and a Fiber texture fill.
Importing External FilesSharing objects between applications on your computer is fine, but sometimes you’ll
want to import whole files into Fireworks. This is as easy as opening Fireworks’ own
PNG files. The process is slightly different depending upon whether you’re importing
bitmap image files or vector art.
In addition to using File ➪ Import, you can quickly import entire files into Fireworksby dragging them from Explorer on Windows or the Finder on Macintosh, and thendropping them into a Fireworks document window.
Grasping bitmap image filesImported bitmap image files appear as bitmap objects in Fireworks. Table 14-2
details the bitmap image file formats that Fireworks understands.
Tip
Fireworks document window Freehand document window
193662-1 ch14.F 8/2/02 2:54 PM Page 471
Fireworks Seminar

472 Part IV ✦ Coordinating Workflow
Table 14-2Bitmap Image Files Fireworks Can Import
Filename Macintosh Format Extension Type Code Notes
Fireworks .png PNGf A PNG file with Fireworks-only File Format information, such as vectors, added.
This is the default file format forFireworks 3 and 4.
Fireworks 4.0 .png PNGf Updated automatically when opened.Can be saved and opened again inFireworks 4.0.
Fireworks 3.0 .png PNGf Updated automatically when opened.Can be saved and opened again inFireworks 3.0.
Fireworks 2.0 .png PNGf Updated automatically when opened.Cannot be saved and then opened againin Fireworks 2.0.
Fireworks 1.0 .png PNGf Updated automatically when opened.Cannot be saved and then opened againin Fireworks 1.0. The Background isplaced on its own layer.
Portable .png PNGf Standard PNG documents that don’t Network Graphic have extra Fireworks information.
Photoshop .psd 8BPS Version 3.0 or later only. Layers, Layer Document Effects, and editable text are preserved,
except for editable text layers fromPhotoshop 6.
GIF .gif GIFf Graphics Interchange File Format. Staticor animated. Each frame of an animatedGIF is placed on its own frame inFireworks.
JPEG .jpg, .jpeg, JPEG Avoid importing JPEG images due to .jpe, .jfif their lossy compression scheme and
low quality.
Targa .tga TPIC Common UNIX image format.
WBMP .wbm WBMP Wireless bitmap format. Used in wirelessdevices.
193662-1 ch14.F 8/2/02 2:54 PM Page 472
Fireworks Seminar

473Chapter 14 ✦ Capturing and Importing
Filename Macintosh Format Extension Type Code Notes
TIFF .tif or .tiff TIFF Tag Image File Format. High-qualitylossless compression similar to PNG.
Microsoft Bitmap .bmp BMP Default image format for Windows 3.0and later.
PICT .pict, .pic, PICT Default image Combination vector-(Macintosh only) .pct, .p bitmap format. Fireworks renders any
vector as a bitmap.
Importing a bitmap image into an existing documentTo import a bitmap image into an existing Fireworks document, follow these steps:
1. Choose File ➪ Import, or use the keyboard shortcut, Ctrl+R (Command+R).
Alternatively, you can use the command Insert ➪ Image.
Fireworks displays the Import File dialog box (see Figure 14-9).
Figure 14-9: The Import File dialog box shows previews as you navigate and then choose a file to import into Fireworks.
193662-1 ch14.F 8/2/02 2:54 PM Page 473
Fireworks Seminar

474 Part IV ✦ Coordinating Workflow
2. In the Import File dialog box, select your file and click Import after you finish.
3. Hover your mouse cursor over the Fireworks document window into which
you would like to import.
The cursor changes to the import cursor, which resembles a right angle.
4. Position the import cursor where you want the upper-left corner of the
imported image to be located, and then do one of the following:
• If you want to insert the image at its original size, click once.
• If you want to insert the image so that it fits a specific area in your docu-
ment, click and drag a box that delineates that specific area. Fireworks
resizes the image to fit that area while maintaining the image’s aspect
ratio.
The chosen image is inserted into the document as a new bitmap object.
Bringing in Photoshop filesMost of the bitmap files that Fireworks can import are fairly interchangeable;
importing a PNG or TIFF image results in a single bitmap object inside Fireworks.
Photoshop documents are a bit different, though, because they contain layer infor-
mation. Therefore, they can contain the equivalent of multiple Fireworks bitmap
objects. Photoshop files also contain unique attributes, such as editable text and
layer effects, which have corresponding features in Fireworks.
If your Photoshop file contains layers, they are changed into Fireworks objects upon
import, instead of into Fireworks layers. Although the nomenclature is different,
Photoshop layers and Fireworks objects perform a similar function within each
application. Importing multiple Photoshop files into a Fireworks document results
in each document being placed into its own Fireworks layer, while still maintaining
the individual elements of each document as Fireworks objects.
Layer Effects are similar to many of Fireworks Live Effects, creating editable bevels,
drop shadows, and glows. In fact, when you import a Photoshop document into
Fireworks, all Layer Effects are converted directly into their corresponding Live
Effects and remain editable, as shown in Figure 14-10. Also note that the four layers
of the Photoshop document have been translated into four separate Fireworks
objects within one Fireworks layer.
193662-1 ch14.F 8/2/02 2:54 PM Page 474
Fireworks Seminar

475Chapter 14 ✦ Capturing and Importing
Figure 14-10: Importing Photoshop files maintains layers, layer effects — converted to Live Effects — and editable text.
Although the translation of a Photoshop document into a Fireworks document can
be remarkably accurate, you can fine-tune the process to suit your workflow in the
Import panel of Fireworks Preferences. To modify the way that Fireworks imports a
Photoshop document, follow these steps:
1. Choose Edit ➪ Preferences, or use the keyboard shortcut, Ctrl+U
(Command+U).
Fireworks displays the Preferences dialog box.
2. In the Preferences dialog box, select the Import tab (Windows), or the Import
option (Macintosh).
Fireworks displays the Import preference options (see Figure 14-11).
Layer Effects become Live Effects
Text layer becomes text object
Photoshopdocument
window
Fireworksdocumentwindow
Photoshop layers become Fireworks objects
193662-1 ch14.F 8/2/02 2:54 PM Page 475
Fireworks Seminar

476 Part IV ✦ Coordinating Workflow
Figure 14-11: The Import preference options enable you to choose how Fireworks imports a Photoshop file.
3. Under Layers, choose Convert to Fireworks Objects in order to change the
layers of the Photoshop document to Fireworks objects; check Share Layer
Between Frames in order to share the Fireworks layer that contains your new
objects across all the frames of your document. To distribute Photoshop layers
to Fireworks frames instead, choose Convert to Frames.
4. Under Text, choose Editable to convert Photoshop editable text to Fireworks
text objects. Choose Maintain Appearance to flatten editable text into Fireworks
bitmap objects. You might want to flatten text when you know you won’t need
to edit it so that the appearance will be even closer to the original Photoshop
document. You might also choose this option if you know you don’t have the
correct typefaces installed.
5. Check Use Flat Composite Image to ignore all the special attributes of the
Photoshop document and import it as a single flat image, as though it were
a TIFF. This provides the maximum similarity to the original Photoshop image,
and is a good choice if you’re only using Fireworks to optimize and export
your Photoshop document.
6. Click OK when you’re done.
After your Import preferences are set, you’re ready to import a Photoshop document,
confident that it will be imported in the way that’s most useful to you.
To import a Photoshop document into a Fireworks document, follow these steps:
1. Choose File ➪ Import, or use the keyboard shortcut, Ctrl+R (Command+R).
Fireworks displays the Import File dialog box.
2. Navigate to and select the Photoshop file that you want to import. Click Open
when you’re done.
193662-1 ch14.F 8/2/02 2:54 PM Page 476
Fireworks Seminar

477Chapter 14 ✦ Capturing and Importing
3. Hover your mouse cursor over the Fireworks document window into which
you would like to import.
The cursor changes to the import cursor, which looks like a right angle.
4. Position the import cursor where you want the upper-left corner of the
imported image to be located, and then do one of the following:
• If you want to insert the image at its original size, click once.
• If you want to insert the image so that it fits a specific area in your docu-
ment, click and drag a box that delineates that specific area. Fireworks
resizes the image to fit that area while maintaining the image’s aspect
ratio.
The Photoshop document is inserted into your Fireworks document.
Fireworks can import Photoshop file formats from version 3 through version 7.Photoshop was a Macintosh-only application before version 3, and the file formatwas also different. Photoshop 2.5 or earlier documents have a Macintosh Type of“8BIM,” rather than the newer format’s “8BPS,” and they typically don’t have a file-name extension. Open them in Photoshop 3, or higher, and then save them in thenewer format before attempting to import them into Fireworks.
Although Fireworks can’t directly import the native file formats of applications other
than Photoshop, many other bitmap-editing applications, such as Painter, can export
as Photoshop documents. You can then import them into Fireworks with layers intact.
Corel Photo-Paint is a popular Photoshop alternative that can save images asPhotoshop documents and retain layer information. Unfortunately, Fireworksimports Photo-Paint-created Photoshop documents as flat images.
Discovering vector art filesIf you prefer to do your drawing in a traditional vector graphics drawing program,
Fireworks is the ideal place to finish up your work and prepare it for the Web. Under
most circumstances, vector objects remain vector objects, just as if you had created
them in Fireworks itself.
Table 14-3 details the vector file types that Fireworks can import.
These file types cover the most common vector drawing tools. One vector art file
format that is notable for its absence is Macromedia’s own open vector standard,
Shockwave Flash (.swf). Moving objects between Flash and Fireworks involves
exporting from Flash as an Illustrator document and then importing into Fireworks.
Another fairly common format that Fireworks can’t import is a Windows Meta File
(.wmf), which is commonly used for vector graphics clip art collections for Windows
users. To open these files, first open them in another application and export them
as one of the file types in Table 14-3.
Caution
Caution
193662-1 ch14.F 8/2/02 2:54 PM Page 477
Fireworks Seminar
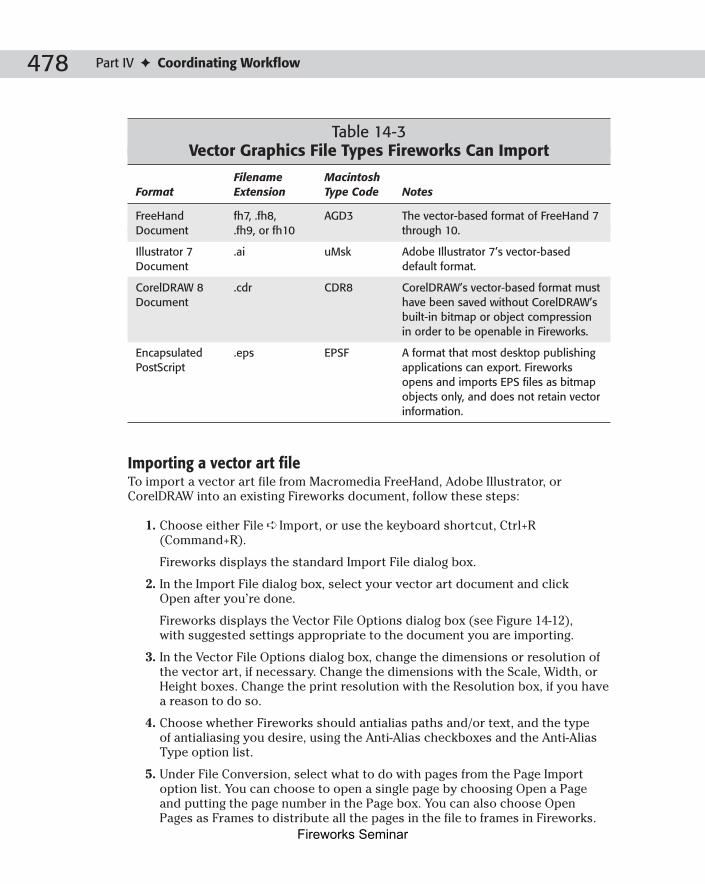
478 Part IV ✦ Coordinating Workflow
Table 14-3Vector Graphics File Types Fireworks Can Import
Filename Macintosh Format Extension Type Code Notes
FreeHand fh7, .fh8, AGD3 The vector-based format of FreeHand 7 Document .fh9, or fh10 through 10.
Illustrator 7 .ai uMsk Adobe Illustrator 7’s vector-based Document default format.
CorelDRAW 8 .cdr CDR8 CorelDRAW’s vector-based format must Document have been saved without CorelDRAW’s
built-in bitmap or object compressionin order to be openable in Fireworks.
Encapsulated .eps EPSF A format that most desktop publishing PostScript applications can export. Fireworks
opens and imports EPS files as bitmapobjects only, and does not retain vectorinformation.
Importing a vector art fileTo import a vector art file from Macromedia FreeHand, Adobe Illustrator, or
CorelDRAW into an existing Fireworks document, follow these steps:
1. Choose either File ➪ Import, or use the keyboard shortcut, Ctrl+R
(Command+R).
Fireworks displays the standard Import File dialog box.
2. In the Import File dialog box, select your vector art document and click
Open after you’re done.
Fireworks displays the Vector File Options dialog box (see Figure 14-12),
with suggested settings appropriate to the document you are importing.
3. In the Vector File Options dialog box, change the dimensions or resolution of
the vector art, if necessary. Change the dimensions with the Scale, Width, or
Height boxes. Change the print resolution with the Resolution box, if you have
a reason to do so.
4. Choose whether Fireworks should antialias paths and/or text, and the type
of antialiasing you desire, using the Anti-Alias checkboxes and the Anti-Alias
Type option list.
5. Under File Conversion, select what to do with pages from the Page Import
option list. You can choose to open a single page by choosing Open a Page
and putting the page number in the Page box. You can also choose Open
Pages as Frames to distribute all the pages in the file to frames in Fireworks.
193662-1 ch14.F 8/2/02 2:54 PM Page 478
Fireworks Seminar

479Chapter 14 ✦ Capturing and Importing
Figure 14-12: The Vector File Options dialog box allows you to specify how your vector file is imported.
6. Under File Conversion, select what to do with layers from the Layers Import
option list. Choose Ignore Layers to flatten the layers. Choose Remember
Layers to keep them as they are. Choose Open Layers as Frames in order
to distribute all the layers in the file to frames in Fireworks.
7. To include invisible and background layers, select the appropriate checkboxes.
8. Under Render as Images, select how you want to handle complex vector
objects. Deselect all the boxes to maintain vector information under all
circumstances.
9. Hover your mouse cursor over the Fireworks document window into which
you would like to import.
The cursor changes to the import cursor, which looks like a right angle.
10. Position the import cursor where you want the upper-left corner of the
imported vector art to be located, and then do one of the following:
• If you want to insert the vector art at its original size, click once.
• If you want to insert the vector art so that it fits a specific area in your
document, click and drag a box describing that specific area. Fireworks
resizes the image to fit that area while maintaining the image’s aspect
ratio.
The vector information is inserted into the document as a new vector object.
Layers import option list
Page import options list
Anti-Alias Typeoption list
193662-1 ch14.F 8/2/02 2:54 PM Page 479
Fireworks Seminar

480 Part IV ✦ Coordinating Workflow
Importing an EPS fileMost desktop publishing applications can export to an Encapsulated PostScript
(EPS) file. Although an EPS file technically contains vector information, opening
EPS files in Fireworks flattens the entire file into one bitmap object.
To import an EPS file into an existing Fireworks document, follow these steps:
1. Choose either File ➪ Import, or use the keyboard shortcut, Ctrl+R
(Command+R).
Fireworks displays the standard Import File dialog box.
2. In the Import File dialog box, select your EPS file, and click Open when
you’re done.
Fireworks displays the EPS File Options dialog box (see Figure 14-13).
Figure 14-13: The EPS File Options dialog box enables you to fine tune how your EPS document is imported.
3. In the EPS File Options dialog box, change the dimensions or resolution of
the incoming image information, if necessary. Change the dimensions with
the Width, or Height boxes. Change the print resolution with the Resolution
box, if you have a reason to do so. Check Constrain Proportions to keep from
distorting the height to width ratio of your image.
4. Choose whether Fireworks should antialias the image using the Anti-Alias
checkbox. Click OK when you’re done.
5. Hover your mouse cursor over the Fireworks document window into which
you would like to import.
The cursor changes to the import cursor, which resembles a right angle.
193662-1 ch14.F 8/2/02 2:54 PM Page 480
Fireworks Seminar

481Chapter 14 ✦ Capturing and Importing
6. Position the import cursor where you want the upper-left corner of the
imported vector art to be located, and then do one of the following:
• If you want to insert the vector art at its original size, click once.
• If you want to insert the vector art so that it fits a specific area in your
document, click and drag a box describing that specific area. Fireworks
resizes the image to fit that area, while maintaining the image’s aspect
ratio.
The EPS file’s information is inserted into the document as a new bitmap object.
Working with clip artIn a commercial or production environment, the constraints of deadlines often pre-
clude creating documents completely from scratch. Besides, there’s no need to keep
reinventing the wheel. Often, things such as icons and buttons can be quickly based
on existing clip art images, which are easily modified in Fireworks to suit a particular
project.
Fireworks includes an extensive collection of clip art on its CD-ROM; almost 2,000
separate Fireworks documents. Thankfully, these documents are also referenced by
an Extensis Portfolio database file called “Fireworks MX Clipart.fdb.” This document
opens in the free Extensis Portfolio browser — also included on the CD-ROM —
displaying thumbnails for each and every clip art document. Use the Portfolio
Browser to search or browse for a particular document. Double-click a thumbnail
in order to view it at full size; right-click (Control-click) a thumbnail, and choose
Edit Original from the context menu in order to open it in Fireworks for editing.
After you open the thumbnail in Fireworks, you can drag and drop elements into
other Fireworks documents.
Look in the Goodies folder on your Fireworks CD-ROM and find the Fireworks clipart in the Clipart folder and the Extensis Portfolio Browser inside the PortfolioBrowser folder.
Clip art collections are also commonly included with vector drawing tools, such
as FreeHand and CorelDRAW. In fact, Corel is famous for including extensive collec-
tions of clip art with its products, often 10,000 items or more. Clip art in FreeHand,
CorelDRAW, and Illustrator formats is easily imported into Fireworks.
Many stand-alone clip art collections are also available, either on CD-ROM, or on
the Web. Be careful to choose collections in formats that Fireworks can import
and favor collections of vector images because they provide maximum flexibility
in Fireworks.
Tip
193662-1 ch14.F 8/2/02 2:54 PM Page 481
Fireworks Seminar

482 Part IV ✦ Coordinating Workflow
Extensis also offers a full version of Portfolio that enables you to organize yourown files into Portfolio databases (available for both Macintosh and Windows athttp://www.extensis.com). On a Macintosh, iView Multimedia from ScriptSoftware — find it at http://www.scriptsoftware.com— is an excellentshareware alternative, providing similar functionality at one-eighth the price.
Digging into text filesObviously, Fireworks can work with a multitude of image formats, but Fireworks is
also adept at handling text and can import two types of text files: Rich Text Format
(RTF) and ASCII. Either kind of text file is imported by choosing File ➪ Import and
navigating to and selecting the file.
RTF is native to Microsoft Word; therefore, RTF files contain formatting, such as
typefaces, and italicized or bold text. Many word-processing applications other
than Word can also save RTF files. If you need to preserve text formatting, use an
RTF file.
ASCII text files are plain text without formatting, but they can be read with few or
no translation problems by any application that handles text. If you want to move
blocks of text from another application into Fireworks and you’re not worried about
preserving formatting, ASCII text files are a good choice.
For more about importing and using text in Fireworks, see Chapter 10.
Looking at common problemsThe fact that Fireworks can import a particular document doesn’t mean that
the transition from the original file to the Fireworks document will be seamless.
Converting data between different applications may involve some compromises
along the way.
Examining missing fontsIdeally, documents would never leave home without their font suitcases (or font
files on Windows). Unfortunately, this is not always the case. When you open or
import a document that relies on a typeface that’s not available on your system,
Fireworks warns you by displaying the Missing Fonts dialog box (see Figure 14-14).
To replace a missing font, select its name from the Change Missing Font box and
select a font to replace it from the To box. Repeat this process for every font listed
in the Missing Font box. Click Reset to restore the original state of the Missing Fonts
dialog box at anytime. Click No Change to open your document without making any
substitutions. Click OK after you’re done.
Cross-Reference
Tip
193662-1 ch14.F 8/2/02 2:54 PM Page 482
Fireworks Seminar

483Chapter 14 ✦ Capturing and Importing
Figure 14-14: The Missing Fonts dialog box enables you to substitute a font that is present on your computer for one that isn’t, when the document that you’re opening requires it.
If you choose No Change, you can edit and even save the document while leaving
the font information intact for a future time when the document can be opened
with the correct fonts available.
If your document uses Type 1 (PostScript) fonts, make sure to install or enableAdobe Type Manager before opening the document.
Discerning font spacingIn general, you can expect many of the print-related features of your vector docu-
ments to be unsatisfactorily translated. These include the following:
✦ PostScript strokes, fills, and effects
✦ Fine letter spacing, leading, and kerning
Rendering text as paths before saving a vector document for Fireworks import gen-
erally leads to better results, although the text will not be editable in Fireworks. If you
want to keep text editable throughout your workflow, leave any fine text positioning
or even text creation until you’re in Fireworks.
Sharing files across platformsAlmost all the documents that Fireworks can open or import are cross-platform.
On the surface, this would seem to suggest that you can ignore any cross-platform
issues, but what it really means is that you’re likely to be working with files from
the “other” platform at some point. Although there are no insurmountable issues,
keeping a few points in mind can quickly save the day — and your deadline.
Tip
193662-1 ch14.F 8/2/02 2:54 PM Page 483
Fireworks Seminar

484 Part IV ✦ Coordinating Workflow
Importing Macintosh files into Fireworks for WindowsFiles don’t need to have filename extensions on a Macintosh, but they do on
Windows. Although most Mac users understand this and add the correct filename
extensions before “shipping out” a document, occasionally you may find yourself
trying to import a file into Fireworks for Windows that does not have an extension.
If you know what kind of file it is, add the correct filename extension; if you don’t,
you’ll probably have to ask the Mac user who sent you the file, or take a few best
guesses. Without the correct filename extension, Fireworks for Windows will not
import a file.
You may also receive a file with a four-character filename extension rather than the
three-character extension that Windows favors. For example, you receive a file with
.jpeg as its filename extension rather than .jpg. Windows sometimes treats these as
the same file type and sometimes it doesn’t. Fireworks for Windows will import JPEGs
with the extensions .jpg, .jpeg, or .jpe; but not with the less-common extension .jfif.
Fireworks for Windows cannot import Macintosh PICT files (.pict, .pct, .pic, or .p),
although they can be imported and exported by Fireworks for Macintosh.
Importing Windows files into Fireworks for MacintoshWhen you move documents to a Macintosh system from a Windows system, the
Mac OS typically adds the correct Macintosh Creator and File Type codes based on
filename extensions. Even if a particular file type is not listed in your File Exchange
preferences — in which case it appears with a blank icon — after you have chosen
File ➪ Import, Fireworks for Macintosh goes the extra mile and imports it on faith,
as long as it has the correct filename extension.
You can also manually “bless” files with Creator and File Type codes by using certain
utilities, such as File Buddy, FinderPop, or Snitch. Adding the Fireworks Creator code
MKBY to a file causes it to open in Fireworks after it is double-clicked.
If you’re using OS X, and your document is set to open in an application other thanFireworks, select it and choose File ➪ Show Info (Command+I) from the Finder,select Open with application from the option list, and select Fireworks MX fromthe application list.
Rebuilding Imported Web PagesA fairly common occurrence is the need to modify a navigation menu or a Web site
header that someone worked on before you. It’s perfectly normal for a client, or a
company, to want to have their existing site redone because the design is outdated
or a corporate merger has caused a name change. What’s not quite so common is
for the client, or even a large corporation, to have the original source files for the
site. Without the original PNG file, if the site was created using Fireworks, you’re
confronted with the much larger task of redoing the whole site, or going through
the painstaking process of trying to reconstruct the navigation or the header like
a digital jigsaw puzzle. Fireworks’ Reconstitute Table feature makes this reassembly
a snap.
Tip
193662-1 ch14.F 8/2/02 2:54 PM Page 484
Fireworks Seminar

485Chapter 14 ✦ Capturing and Importing
The Reconstitute Table feature is new to Fireworks MX. Now you can rebuild Websites in seconds, keeping all behaviors and JavaScript intact.
Not only does Fireworks rebuild a Web page’s graphical elements, it also rebuilds
all text areas within the file as text slices within Fireworks. The Reconstitute Table
command works on standard HTML and XHTML files. As if this functionality weren’t
enough to make your redesign job much simpler, Fireworks, as always, goes that
extra mile. If you open the Behaviors panel, by choosing Window ➪ Behavior or
by using the keyboard shortcut Shift+F3, you’ll notice that all of the Behaviors that
were applied to the original site, such as Pop-up menus and JavaScript rollovers,
are preserved and properly applied in the new Fireworks document.
The Reconstitute Table feature has three methods of importing Web pages. You can
open all of the tables within an HTML or XHTML file, you can open the first table
only, or you can import the first table into a Fireworks document that you already
have open.
To use the Reconstitute Table command to open all of the tables in a Web page,
follow these steps:
1. Choose File ➪ Reconstitute Table.
2. Select the HTML or XHTML file you want to rebuild from the Open File dialog
box and click Open or press Enter (Return) on your keyboard.
3. Fireworks opens the HTML or XHTML file and rebuilds the table, the graphics,
and the behaviors. It leaves the file ready for you to save as a source PNG and
then edit, as needed, for your site redesign.
To open just the first table in a Web page, follow these steps:
1. Choose File ➪ Open.
2. Select the HTML or XHTML file you want to rebuild from the Open File dialog
box and click Open or press Enter (Return) on your keyboard.
3. Fireworks opens the HTML or XHTML file and rebuilds the first table and its
graphics and behaviors. It leaves the file ready for you to save as a source
PNG and then edit, as needed, for your site redesign.
To import the first table in a Web page into an open document, follow these steps:
1. Choose File ➪ Import.
2. Select the HTML or XHTML file you want to rebuild from the Import dialog
box and click Open or press Enter (Return) on your keyboard.
3. Position the Import cursor where you want the first table of the Web page to
be imported and click the left mouse button.
4. Fireworks imports the HTML or XHTML file and rebuilds the graphics and the
behaviors in the first table. It leaves the file ready for you save as a source
PNG and then edit, as needed, for your site redesign.
NewFeature
193662-1 ch14.F 8/2/02 2:54 PM Page 485
Fireworks Seminar

486 Part IV ✦ Coordinating Workflow
Making Screen CapturesCapturing all or part of your computer screen to the clipboard or to a file has appli-
cations above and beyond creating illustrations for computer books. There are
sometimes workflow advantages to screen captures at design time. Two applica-
tions may refuse to maintain the proper formatting if you copy and paste between
them, but a capture of one will paste or import easily into the other. If you are pre-
sented with an esoteric file format — a specialty of Web design clients — you may
find that you can open the file in a viewer, but not convert it to a file format that
Fireworks can use. A quick screen capture will have you pasting or importing that
image into Fireworks in no time.
In addition, a screen capture of a browser window dropped into an e-mail is a good
way to send a client quick design proofs of a site that is not yet live, or to build a
portfolio page of your Web-design work. Screen captures of a browser window might
also make good link icons for a Web page, if appropriately resized.
Exploring built-in screenshot toolsScreen-capture tools are built right into Windows and Mac OS. Windows provides
just enough functionality to get the job done, whereas Mac OS provides a few extra
features over and above the call of duty.
Examining WindowsWhat Windows lacks in screen-capture functionality it probably makes up for in
utility: Everything is centered around the easy-to-remember PrintScreen key, which
is sometimes marked Prt Scrn, or similarly marked. Pressing PrintScreen copies an
image of the entire screen to the clipboard. Pressing Alt+PrintScreen copies only the
active window or dialog box to the clipboard. From there, paste the contents of the
clipboard into Fireworks.
When you choose File ➪ New, Fireworks offers to create a document with thesame dimensions as the clipboard. Take your screen capture before you create anew document in order to automatically size the canvas correctly.
Examining Mac OSOn a Macintosh, you can capture the whole screen, a single window or dialog box,
or a selected portion of the screen to either a picture file (PICT), or the clipboard.
To make a screen capture on the Macintosh and save it as a picture file in the root
folder of your startup disk, press and hold Shift+Command and then do one of the
following:
Tip
193662-1 ch14.F 8/2/02 2:54 PM Page 486
Fireworks Seminar

487Chapter 14 ✦ Capturing and Importing
✦ Press 3 to capture the entire screen.
✦ Press 4 and then draw a selection with the mouse to capture only the contents
of that selection.
✦ Enable Caps Lock, press 4, and then click on a window or dialog box in order
to capture only that window or dialog box.
To place a screen capture on the clipboard instead of saving it to a file, follow the
preceding instructions, but hold down Control in addition to Shift+Command.
If you captured to the clipboard, paste your capture into Fireworks. If you captured
to a file, open your startup disk and then drag the picture file(s) onto the Fireworks
icon. Alternatively, you can choose File ➪ Open or File ➪ Import in Fireworks, navi-
gate to the picture file(s), and then open them.
If you’re using OS X, you can use the included Grab utility to graphically capturescreen elements.
Delving into specialized applicationsNumerous third-party applications provide additional screen-capture features,
such as on-the-fly palette changes, individual menu captures or individual “child”
windows in Windows, or a choice of file formats, sometimes including movie files.
One such application for the Macintosh is Ambrosia Software’s Snapz Pro X, shown
in Figure 14-15. Snapz Pro X was used to create all the screen captures in this book.
Many screen-capture applications are also available for Windows. Most screen-
capture tools fit perfectly into the Shareware or Freeware application categories,
you can find them on Web sites that feature those listings.
Figure 14-15: Snapz Pro X forMacintosh offers many differentscreen-capture options and a variety of file formats, includingQuickTime movies.
Tip
193662-1 ch14.F 8/2/02 2:54 PM Page 487
Fireworks Seminar

488 Part IV ✦ Coordinating Workflow
Opening AnimationsOpening an animated GIF by choosing File ➪ Open works just as you might expect;
the animated GIF is opened and the individual frames are available on — what
else — Fireworks frames. You can then modify the GIF, if you like, and optimize and
export it for the Web.
For more information about animation in Fireworks, see Chapter 23. For moreinformation on exporting, see Chapter 15.
However, if you import an animated GIF into an existing animation, you may be in
for a surprise. Only the first frame of the animated GIF will be imported. If you want
to import one animation into another, the workaround is to open both animations
in Fireworks and then copy and paste objects from one to the other until you have
the combined animation that you require.
Importing multiple files as a new animationMost animation programs can export their animations as a series of individual doc-
uments, one frame of animation to one document. If your animation is ten frames
long, you export ten files, each with a similar filename and numbered 1–10. You can
open these files as an animation in Fireworks by checking Open as Animation in the
Open dialog box. Each document becomes a frame within a single new Fireworks
document, and you have an animation again.
Imagine that you’ve created an exciting, full-color animation with your favorite 3D
animation program, and you want to change it into an animated GIF for use on the
Web. Unfortunately, this 3D animation program is not very Web-savvy, and the GIFs
it creates are always dithered and contain a full 256-color palette. You could create
a much more optimized GIF if you could only create it in Fireworks. The way to
achieve this is to export your animation as a series of high-quality PNG or TIFF
bitmaps, and then import that series into Fireworks.
Importing a group of files as a new animation renders them as images, even if theyare vector art documents or Fireworks PNG files with vector information. For aworkaround using Macromedia Flash as an example, see “Importing Flash anima-tions,” later in this chapter.
To open a group of independent documents as one animation, follow these steps:
1. Choose File ➪ Open, or use the keyboard shortcut, Ctrl+O (Command+O).
Fireworks displays the Open dialog box (see Figure 14-16).
Caution
Cross-Reference
193662-1 ch14.F 8/2/02 2:54 PM Page 488
Fireworks Seminar

489Chapter 14 ✦ Capturing and Importing
Figure 14-16: Files become frames when you import an animation series with the Open dialog box’s Open as Animation checkbox enabled.
2. Navigate to the folder that contains your animation series.
If the files you are importing are similarly named and include numbers —movie01.png, movie02.png, for example — Fireworks will distribute them to framesin the correct order. If the files are not numbered, they are imported in alphabeti-cal order.
3. Select the files that you want to open. To select all the files in the folder, press
Ctrl+A (Command+A). To add or remove an individual file to or from your
selection, hold down Ctrl (Shift) and click the individual file.
4. Make sure the Open as Animation checkbox is checked. Click Open when
you’re done.
A new Fireworks document is created, and your files are now frames in that
document.
Test your animation by playing it with the VCR-style controls on the bottom of thedocument window. Adjust each frame’s timing in the Frames panel.
Importing Flash animationsMacromedia Flash has more sophisticated animation tools than Fireworks, but its
animated GIF export features pale in comparison to Fireworks.
Tip
Caution
193662-1 ch14.F 8/2/02 2:54 PM Page 489
Fireworks Seminar

490 Part IV ✦ Coordinating Workflow
If you want to use Fireworks tools on the vector elements of your Flash animation,
you have to go a little further to import your Flash animation as vectors. Ideally,
you would export from Flash as an Adobe Illustrator Sequence, and bring those files
into Fireworks, using the File ➪ Open command, with the Open as Animation check-
box enabled. Unfortunately, Open as Animation always renders vectors as image
objects. A workaround is to turn your Flash movie into a multilayer Adobe
Illustrator document, in which each layer is actually a frame of your movie, and
then convert the layers to frames while importing into Fireworks. Although this
example uses Flash, if you use another vector animation application the principles
might still apply.
If you’re not worried about retaining vector information, you can export from Flashas a PNG sequence, and then open the file in Fireworks with Open as Animationchecked in the Open dialog box.
To import a Flash animation into Fireworks while retaining vector information,
follow these steps:
1. Export your movie from Flash as a Flash SWF movie.
2. Create a new Flash document and import the SWF movie into it.
You have effectively flattened the layers of your Flash movie, leaving you with
a single-layer, frame-by-frame animation.
3. Export your movie from Flash as an Adobe Illustrator Sequence.
4. Create a new Flash document and import the Adobe Illustrator Sequence into
it. Select all the files in the sequence by individually Ctrl-clicking (Command-
clicking) each file until they are all selected. Click OK when you’re done.
You have effectively converted the frames of your Flash movie to layers.
Frame 1 is now Layer 1, Frame 2 is Layer 2, and so on.
5. Export your movie from Flash as an Adobe Illustrator file.
This is the file you will import into Fireworks. Flash can export seven vector
file types, and Fireworks can import three vector file types (plus EPS as a
bitmap object), but Adobe Illustrator is the only vector file type that they
have in common.
Choose Adobe Illustrator, not Adobe Illustrator Sequence.
6. In Fireworks, choose either File ➪ Open, or the keyboard shortcut, Ctrl+O
(Command+O).
Fireworks displays the Open dialog box.
7. Choose the Adobe Illustrator file that you created in Step 5. Click OK when
you’re done.
Fireworks displays the Vector File Options dialog box.
Caution
Tip
193662-1 ch14.F 8/2/02 2:54 PM Page 490
Fireworks Seminar

491Chapter 14 ✦ Capturing and Importing
8. Under File Conversion, select Convert Layers to Frames in the Layers Import
option list, so that each layer of your Adobe Illustrator file is placed in a
Fireworks frame.
9. Under Render as Images, deselect Groups Over and Tiled Fills Over. Click OK
when you’re done.
Fireworks imports the file, and your Flash animation is now a Fireworks animation,
complete with vector information. Objects are editable and are ready to be manipu-
lated with Fireworks’ tools and exported as an animated GIF.
SummaryYou can incorporate elements into Fireworks documents from external sources.
When you’re importing elements into Fireworks, keep these points in mind:
✦ You can acquire images directly into Fireworks from TWAIN-compliant hard-
ware devices, such as page scanners and digital cameras. On a Macintosh,
you can also use Photoshop Acquire plug-ins.
✦ Resolution — the number of dots — is the most important thing to understand
about scanning.
✦ You can copy and paste, or drag and drop elements from other applications
into Fireworks.
✦ You can import a long list of bitmap and vector file types into Fireworks.
✦ Fireworks imports Photoshop files with layer information, editable text, and
layer effects intact. Fireworks can also export to the Photoshop file format.
✦ Fireworks includes an extensive collection of clip art, as well as the Portfolio
Browser for accessing it.
✦ Screen captures are a simple, but effective tool.
✦ You should open animated GIFs instead of import them. Opening them gets
you an animated GIF, whereas importing them gets you only the first frame
of an animation.
✦ You can import a series of files as an animation. Extra steps are necessary to
maintain vector information.
In the next chapter, you find how to export your images from Fireworks.
✦ ✦ ✦
193662-1 ch14.F 8/2/02 2:54 PM Page 491
Fireworks Seminar

193662-1 ch14.F 8/2/02 2:54 PM Page 492
Fireworks Seminar

Exporting andOptimizing
The cross-platform, almost universal access of the Web is
achieved with limitations. Although many different image
file formats exist, browsers are currently limited to displaying
only three of them: GIF, JPEG, and PNG. What’s more, only GIF
and JPEG enjoy truly wide acceptance. Bandwidth is severely
limited for the mass market. Although an increasing number
of Web surfers enjoy the speed of a DSL or cable modem, the
vast majority still view the Internet through a 56K dial-up
modem.
These limitations make optimizing and exporting graphics a
necessity, not just a nicety. Your work in Fireworks has to be
exported in the correct format and with the smallest file size
possible. Macromedia realized the importance of export fea-
tures when it created Fireworks; much of the program centers
around making the best looking graphic, with the smallest file
size, in an accepted format. The features covered in this chap-
ter rank among the best available with advanced controls,
such as lossy GIF, selective JPEG, and color locking. Fireworks
takes the limitations imposed by the Web and turns them into
an art form.
This chapter covers the fundamentals of exporting andoptimizing your graphics. For more specific information onexporting graphics with hotspots and slices, see Part V. Youcan find details on exporting animations in Chapter 23.
Exploring Optimization FeaturesAlthough using a graphic stored in Fireworks’ native format,
PNG, in a Web page is possible, it really isn’t practical, nor is it
the intention of the program for you to do so. The PNG images
that you create with the Save command in Fireworks contain
extra Fireworks-specific information beyond the simple PNG
Cross-Reference
1515C H A P T E R
✦ ✦ ✦ ✦
In This Chapter
Introducing exportfundamentals
Optimizing indexed color
Working withphotographic images
Using Export Preview
Summoning Export wizards
Examining otherexport features
✦ ✦ ✦ ✦
203662-1 ch15.F 8/2/02 2:55 PM Page 493
Fireworks Seminar

494 Part IV ✦ Coordinating Workflow
bitmap image. Although this makes them great for opening and editing in Fireworks,
the file size is too heavy to place in a Web page. Publishing your work requires the
use of the Export command, which enables you to create a number of image file types
in both bitmap and vector formats. Although some of these formats, such as GIF and
JPEG, are suitable for publishing on the Web, others, such as BMP and Photoshop,
are more suited to moving your work between different graphics applications, or
sharing your work with colleagues (see Figure 15-1).
Figure 15-1: Create aFireworks PNG document(center) with the Savecommand, and the entiresurrounding family of imagefile formats can be createdfrom it with the Exportcommand. The “private”formats enable you to move your work to otherapplications, whereas the“public” formats are ready topublish as is on the Web — orwireless Web in the case ofWBMP (Wireless BitMaP).
Working hand-in-hand with selecting an appropriate file type is the other main goal
of exporting, referred to as optimization. Optimization is the process of producing
the best looking, smallest possible file. An optimized image loads faster, without
sacrificing perceived quality. Because data is thrown away in the optimization pro-
cess, avoid opening and editing the so-called public file types, shown in Figure 15-1,
whenever possible. Store your work and move it between applications using the
private file types. Think of the private file types as originals, and the public file
types as photocopies made for sharing.
Optimizing and exporting in Fireworks is focused around the preview tabs of the doc-
ument window, the Optimize panel, and the Frames panel for animations. Adjusting
settings in these panels is a necessary precursor to choosing File ➪ Export to cre-
ate your exported image file. After you’ve made these settings, they are saved with
your Fireworks PNG file for next time. Export settings are as much a part of a docu-
ment as the kinds of fills or strokes you used.
The hardest part of optimizing is finding a balance between image quality and file
size. Fireworks takes a lot of the guesswork out of this task by providing up to four
comparison views of different formats at various color resolutions or compressions.
203662-1 ch15.F 8/2/02 2:55 PM Page 494
Fireworks Seminar

495Chapter 15 ✦ Exporting and Optimizing
Optimizing every image that goes out on your Web page is important because the
smaller your files, the shorter the loading time of your Web pages — and the quicker
visitors can view your work.
You’ll explore individual export features in much greater depth throughout this
chapter, but for now, here’s an overview of the typical procedure to use when
optimizing a file.
1. Create your image with optimization in the back of your mind at all times;
scale and crop images as small as possible, and create large areas of flat
color or horizontal stripes of color to make the smallest GIFs.
2. Select a file format in the Optimize panel, based on the type of image you’re
working on. Choose an indexed color format, such as GIF, for illustrations and
flat-color artwork, or a continuous-tone, True Color format, such as JPEG for
photographic images.
3. For indexed color images, reduce the number of colors as much as possible,
using the Color Table in the Optimize panel. Reducing the number of colors
is the primary method of reducing the file size of indexed color images. The
fewer colors used, the smaller the file.
4. For the JPEG format, use the Quality slider in the Optimize panel to choose
the lowest acceptable quality in order to achieve the smallest file size.
5. Select any additional format-specific options in the Optimize panel, such as
Interlaced GIF or JPEG Smoothing.
6. Choose File ➪ Export to export your document and create the optimized file.
Optimize panelThe Optimize panel is the main control center for your image optimization efforts in
Fireworks, containing nearly all the controls you use to set export options. Choose
an export file format and modify settings unique to that format. The Optimize panel’s
settings affect your entire Fireworks document, except when you have an individual
slice object selected, in which case the settings are for that slice only.
If the Optimize panel (see Figure 15-2) is not visible, choose Window ➪ Optimize to
view it. Many factors contribute to image optimization, but the format of an image
plays perhaps the most important role. In Fireworks, all format selections are made
in the Optimize panel’s Export File Format option list. Selecting a particular format
displays the available options, such as Bit Depth or Quality, for that format. Choosing
GIF, for example, makes the transparency controls available, whereas choosing
JPEG removes the transparency controls and displays the Quality slider.
The Optimize panel also allows you to save its settings as a preset at any time. Your
preset is added to the default presets on the Saved Settings option list. Choosing a
preset and then adjusting any setting (except Matte) creates a custom setting. To
save a custom export setting, click the Save Settings button (the disk icon) on the
bottom of the Optimize panel. A simple Preset Name dialog box appears for you to
203662-1 ch15.F 8/2/02 2:55 PM Page 495
Fireworks Seminar

496 Part IV ✦ Coordinating Workflow
enter a unique name for the setting. After you enter the name and click OK, the set-
ting is added to the preset list and is always available. To delete the current saved
setting, click the Delete Current Saved Settings button (the Trash icon).
We look more closely at the features of the Optimize panel as we work with specific export formats later in this chapter.
Figure 15-2: Virtually all exportoptions are set in the Optimize panel.
Optimize panel’s Color TableThe Color Table on the Optimize panel (see Figure 15-3) comes alive when you opti-
mize an indexed color image, such as a GIF or 8-bit PNG. These formats carry their
own limited palette of colors with them, and limiting the size of this palette is the
primary way to limit the file size of indexed color images. The Color Table portion
of the Optimize panel provides easy access to this palette, and enables you to add,
remove, and lock specific colors and more. Clicking the Rebuild button from the
bottom of the Optimize panel displays swatches of the current document’s export
palette. The number of colors in your document replaces the Rebuild button when
the palette is up to date.
Delete Current Saved Settings button
Save Settings button
Saved Settings option list
Export File Format option list
Optimize panel Options menu
Note
203662-1 ch15.F 8/2/02 2:55 PM Page 496
Fireworks Seminar

497Chapter 15 ✦ Exporting and Optimizing
Figure 15-3: The Optimize panel’sColor Table displays the exportpalette for 8-bit indexed colorimages.
Workspace previewThe Preview tab of the document window, shown in Figure 15-4, offers you an opti-
mized view of your document according to the settings in the Optimize panel. The
Preview tab provides a view so similar to the working Original view that I sometimes
find myself grabbing a tool and trying to get back to work without switching away
from Preview first.
Figure 15-4: An optimized preview of your work is never more than a click away, thanks to the document window’s in-place previews.
Optimize panel Options menu
Swatches
Number of colors
203662-1 ch15.F 8/2/02 2:55 PM Page 497
Fireworks Seminar

498 Part IV ✦ Coordinating Workflow
Multiple previewsFireworks’ capability to offer side-by-side comparisons of the effects of different
export settings on an image is often crucial to optimizing a graphic. This chapter
has noted several times that an optimized graphic is one that strikes a balance
between the best appearance and the smallest file size. That balance can be directly
judged through Fireworks’ multiple previews.
The 2-Up and 4-Up tabs show you both sides of the export equation: how the image
looks, and the file size. The file size is given in both kilobytes and its approximate
download time with a 56 Kbps modem. Although the visual representation of your
document is an obvious benefit, the file size information that accompanies a preview
is just as important. Every adjustment you make in the Optimize panel is reflected
in a recalculated and updated file size estimate. The file size is shown in both kilo-
bytes and the approximate length of time the exported image will take to download.
If your image contains multiple frames, the file size shown is for the current frameonly, unless the chosen format is Animated GIF. Images with rollovers, for example,use multiple frames, and each frame is exported as a separate image. To find thetotal “weight” of a multiple-framed image, you must add all the frames together.
Each of the document window’s three preview tabs offers its own kind of multiple
preview.
Preview tabYou can access a somewhat hidden multiple preview by choosing Window ➪ New
Window to create a second document window for your current document. Then
select the Preview tab in the new window, as shown in Figure 15-5. With one docu-
ment window set to Original and one set to Preview, your work in the Original win-
dow is immediately reflected in the Preview window.
Note
Previewing Cross-Platform Gamma
As well as seeing what your work will look like after it’s exported, Fireworks can also giveyou an idea of what your work will look like on both the Windows and Macintosh platforms.Windows machines use a gamma correction setting of 2.2, whereas most Macs use 1.8 bydefault. The difference in gamma correction settings — which regulate how dark or light thedisplay looks — means that the same image will look brighter on a Mac than on Windows.
At any time during a Fireworks session — not just when you’re looking at one of the previewtabs of the document window — a Windows user can choose View ➪ Macintosh Gamma, ora Mac user can choose View ➪ Windows Gamma, to toggle the document window to sim-ulate the other platform. Viewing your images at both gamma settings enables you to avoida surprise when seeing your work on the opposite platform.
203662-1 ch15.F 8/2/02 2:55 PM Page 498
Fireworks Seminar

499Chapter 15 ✦ Exporting and Optimizing
Figure 15-5: Choose Window ➪ New Window to create another document window and set one to Original and one to Preview.
2-Up tabThe 2-Up tab splits the document window vertically and provides two views of your
image (see Figure 15-6). By default, the left pane displays your original image, while
the right displays the optimized version, according to the settings in the Optimize
panel. An option list at the bottom of each pane enables you to choose whether to
display an original view (your work as it looks in Fireworks), or an export preview.
Setting a second preview in the left pane enables you to closely compare two sets
of export settings without looking at the original image. When you select a pane
with the mouse, Fireworks draws a border around it. The Optimize panel affects
only the settings for the selected pane.
When viewing the 2-Up preview, you can stretch the document window to get acomplete side-by-side view.
Tip
Set to Preview tabSet to Original tab
203662-1 ch15.F 8/2/02 2:55 PM Page 499
Fireworks Seminar

500 Part IV ✦ Coordinating Workflow
Figure 15-6: The 2-Up preview showsyou one original and one optimized viewof your document by default.
4-Up tabThe 4-Up tab (see Figure 15-7) offers four views, each approximately one-quarter
of the document window, arranged in a square. The upper-left view is initially your
original document, while the other three panes display optimized views. 4-Up works
just like 2-Up in other respects.
Figure 15-7: In the 4-Up preview, you have to select a pane to be the focus of your work in the Optimize panel. Here, the lower-right pane is selected.
Selected pane
203662-1 ch15.F 8/2/02 2:55 PM Page 500
Fireworks Seminar

501Chapter 15 ✦ Exporting and Optimizing
I find that the 4-Up view is especially useful when optimizing an image for JPEG
export. The JPEG format is finicky; reducing the quality to 70 percent might make
one image look terrible, whereas another might still look great with the quality
dropped all the way down to 50 percent. Achieving the perfect JPEG quality setting
for a particular image is often best accomplished by viewing it at three different
settings at once.
You may have to resize the document window to get a good look at your document,especially if your document is small. A portion of each preview pane is given overto the file size report, which can be most of the window for a 200×200 or smallerdocument.
PanningIf the image is too big to view all at once in the preview area, you can use the Hand
tool to pan the image. When you select an image in a preview area with the Hand
tool, the cursor becomes a hand, and you can drag the other parts of the image into
view. The panning capability of the Hand tool is especially valuable when viewing
multiple settings. Panning one of the multiple views causes all the other views to
pan as well, as shown in Figure 15-8. This feature makes direct comparison very
straightforward.
Figure 15-8: With multiple views, if you pan in one view, all views pan.
ZoomingOne of the export features in Fireworks is color locking; you can lock the color of
any pixel in the preview by selecting it and then clicking the Lock Color button in
the Color Table section of the Optimize panel. How do you identify just the right
Tip
203662-1 ch15.F 8/2/02 2:55 PM Page 501
Fireworks Seminar

502 Part IV ✦ Coordinating Workflow
pixel? You zoom in, naturally. The Zoom tool and the document window view con-
trols work exactly the same way in the preview views as they do in the original view
of the document window. To magnify a view, either select the Zoom tool and click
the image, or choose a magnification from the magnification option list on the bot-
tom of the document window. To reduce the magnification of the view, press Alt
(Option) while clicking with the Zoom tool — or choose a lower magnification.
Keep in mind that your Web graphics will almost always be viewed at 100 percent.Although you might be tempted to make a decision on which file format to usebased on a magnified view, the magnified view is largely irrelevant to how thegraphics are ultimately viewed.
If you have two or four multiple views enabled, changing the magnification of one
view changes the magnification for all of them, as shown in Figure 15-9.
Figure 15-9: When you zoom in on one view, the accompanying views also zoom in.
To pan around a close-up view without having to switch away from the Zoom tool,press and hold down the spacebar to temporarily switch to the Hand tool.
Frame controlsYou can use the VCR-like animation controls on the document window no matter
which document window Original/Preview tab you are currently viewing. When
optimizing in one of the preview tabs, you can use the frame controls to quickly
call up a specific frame for optimization, or to play the frames in sequence.
Tip
Tip
203662-1 ch15.F 8/2/02 2:55 PM Page 502
Fireworks Seminar

503Chapter 15 ✦ Exporting and Optimizing
The controls, from left to right, are as follows:
✦ First Frame: Displays the first frame of the image.
✦ Play/Stop: Plays all the frames in sequence. When the frames are playing,
the button image changes to a square and, if pressed, stops the playback.
✦ Last Frame: Displays the last frame of the image.
✦ Current Frame: Displays the current frame number of the image.
✦ Previous Frame: Displays the frame before the current one.
✦ Next Frame: Displays the frame after the current one.
In addition to being useful for viewing the separate frames of an animation, I often
use the VCR controls to step through the frames of a rollover. Remember that each
frame in your document is exported as a separate file, and thus can be optimized
individually.
In addition to the VCR controls, the Frames panel also contains frame-timing con-trols. Explore these animation and export features in Part VI.
Exporting Indexed ColorImages that have large areas of flat color (typically illustrations, as opposed to
photographic images) and that can get by with only a limited number of colors
are exported in an indexed color format. Indexed color formats have a maximum
of 256 different colors, also known as 8-bit color. A particular image file contains
information about which 256, of all available colors, the file uses. The information
is maintained in a color index inside the file, hence the name indexed color.
A key feature of indexed color files is that their index can be reduced to only the spe-
cific colors actually used in the image. Reducing the number of colors has a major
impact on file size. In fact, this method is the primary one for optimizing indexed
color files. The Color Table section of the Optimize panel provides a comprehensive
access point to this index.
When an indexed color graphic needs to create the impression of more than 256 col-
ors, you can use dithering. A dithered color is made from a pattern of two or more
colored pixels that, because the eye cannot differentiate the individual pixels, blend
into the new color.
The indexed color formats that Fireworks exports are detailed in Table 15-1.
Of all the indexed color formats, only GIF and PNG 8 can be used on the Web. GIF is
the most popular and the most suitable on today’s Web because an overwhelming
number of browsers support it. Although PNG is a superior format in many ways,
its transparency features have yet to find support in a wide range of browsers.
Cross-Reference
203662-1 ch15.F 8/2/02 2:55 PM Page 503
Fireworks Seminar

504 Part IV ✦ Coordinating Workflow
Table 15-1Indexed Color Export Formats
Format Description
GIF Graphics Interchange Format. The overwhelmingly most popularindexed color format for the Web. Excellent Web browser support; small file sizes; 1-bit transparency.
Animated GIF Same as GIF, except that it contains multiple images that are shown one after the other, usually rapidly, as in a film or flipbook.
PNG 8 Portable Network Graphic. Offers similar features to GIF, buttransparency is not supported by most Web browsers.
WBMP A 1-bit (black/white) file format specifically for Wireless ApplicationProtocol (WAP) pages, which are displayed on mobile devices withsmall screens and limited color depth.
TIFF 8 Tag Image File Format. Not suitable for the Web, but common for print work.
BMP 8 Microsoft Bitmap image. The native graphics format of MicrosoftWindows. Not suitable for the Web, but a good way to share imagesbetween Windows applications.
PICT 8 Macintosh Picture. The native graphics format of Mac OS. Vectors are (Macintosh only) not supported by Fireworks. Not suitable for the Web, but a good way
to share image files between Mac applications.
Both GIF and PNG support transparency, but again, PNG suffers from lack of browser
support. Transparency is extremely valuable on the Web because it enables you to
create graphics that appear nonrectangular, or create the illusion that one image is
in front of another. Both GIF and PNG files can be optionally interlaced. An interlaced
image appears to be developing on the page as it downloads.
The WBMP format is notable for its color support, or lack thereof. This 1-bit format
stores each pixel as either on or off, yielding a color palette that’s essentially one
dark gray and one light gray, once the WBMP image is ultimately viewed on the
limited gray display of a mobile device. The process of exporting any indexed color
image is very similar, no matter which format you choose. The GIF format has more
options, and is the most popular, so I’ll focus mainly on the GIF format throughout
this section. After you can export a GIF, applying that knowledge to exporting any
of the other indexed color formats is easy because when you switch from GIF to
another format in the Optimize panel, Fireworks removes the controls that are no
longer applicable, while those that are left function in the same way.
203662-1 ch15.F 8/2/02 2:55 PM Page 504
Fireworks Seminar

505Chapter 15 ✦ Exporting and Optimizing
Color paletteA palette is the group of colors actually used in the image. Fireworks offers nine pre-
set palettes in the Optimize panel’s Indexed Palette option list, plus the Custom
setting that refers to a deviation from one of the preset palettes. After you customize
a palette, you can store it as a preset and add it to the Indexed Palette option list.
Each of the nine different palettes (available to all indexed formats, not only GIF)
accesses a different group of colors. The WebSnap Adaptive and Web 216 palettes
are the choices generally made for Internet graphics, although other palettes are
appropriate in some situations. The following are the preset palettes:
✦ Adaptive: Examines all the colors in the image and finds a maximum of the
most suitable 256 colors; it’s called an adaptive palette because the best
256 colors are adapted to the image, instead of a fixed set of colors. If
possible, Fireworks assigns Websafe colors initially and then assigns any
remaining non-Websafe colors. The Adaptive palette can contain a mixture
of Websafe and non-Websafe colors.
✦ WebSnap Adaptive: This palette is similar to the Adaptive palette insofar as
both are custom palettes in which colors are chosen to match the originals
as closely as possible. After selecting the initial matching Websafe colors, all
remaining colors are examined according to their hexadecimal values. Any
colors close to a Websafe color (plus or minus seven values from a Websafe
color) are “snapped to” that color. Although this palette does not ensure that
all colors are Websafe, a greater percentage of colors will be Websafe.
Exactly how does Fireworks decide which colors are within range for the use ofWebSnap Adaptive? The plus or minus seven value range is calculated by using theRGB model. For example, suppose that one of the colors is R-100, G-100, B-105 —a medium gray. With the WebSnap Adaptive palette, that color snaps to R-102, G-102, B-102, because the difference between the two colors is seven or less (R-2, G-2, B-3 = 7). If, however, the color were slightly different, say R-99, G-100, B-105, thedifference would be outside the snap range and the actual color would be used.
✦ Web 216: All colors in the image are converted to their nearest equivalent in
the Websafe range.
✦ Exact: Uses colors that match the exact original RGB values. Useful only for
images with less than 256 colors; for images with more colors, Fireworks
alerts you to use the Adaptive palette.
✦ Macintosh: Matches the system palette used by the Macintosh operating
system when the display is set to 256 colors.
✦ Windows: Matches the system palette used by the Windows operating system
when the display is set to 256 colors.
Note
203662-1 ch15.F 8/2/02 2:55 PM Page 505
Fireworks Seminar

506 Part IV ✦ Coordinating Workflow
✦ Grayscale: Converts the image to a grayscale graphic with a maximum of
256 shades of gray.
✦ Black & White: Reduces the image to a two-tone image; the Dither option is
automatically set to 100 percent when you choose this palette, but you can
modify this setting.
✦ Uniform: A mathematical progression of colors across the spectrum is chosen.
This palette has little application on the Web, although I have been able to get
the occasional posterization effect out of it by severely reducing the number
of colors and by reducing the 100 percent Dither setting that is automatically
applied.
✦ Custom: Whenever a stored palette is loaded or a modification is made to one
of the standard palettes, Fireworks labels the palette Custom. Such changes
are made through the Export File Format option list on the Optimize panel.
Given these options, what’s the recommended path to take? Probably the best
course is to build your graphic in Fireworks by using the Websafe palette, and then
export them by using the WebSnap Adaptive palette. This approach ensures that
your image remains the truest to its original colors, while looking the best for Web
viewers whose color depth is set to 24-bit or higher, and still looking good on lower-
end systems that are capable of showing only 256 colors.
Keep in mind that even if you use all Websafe colors in your graphic, the final result
won’t necessarily be within that complete palette. Fireworks generates other colors
to antialias, to create drop shadows, and to produce glows, and the colors generated
may not be Websafe. For this reason, either the Adaptive palette or WebSnap Adaptive
palette often offers the truest representation of your image across browsers.
Number of colorsOne of the quickest ways to decrease an image’s file size is to reduce the number of
colors. Recall that GIF is referred to as an 8-bit format; this means that the maximum
number of available colors is 256, or 8-bit planes of information — math aficionados
will remember that 256 is equal to 28 (two raised to the eighth power). Each bit plane
used permits exponentially more colors and reserves a certain amount of memory
(but also increases the file size). For this reason, the Number of Colors option list
contains powers of 2, 4, 8, 16, 32, 64, 128, and 256.
The Color Table sectionFor complete control of individual colors, the controls in the Color Table section of
the Optimize panel enable you to add, edit, and delete individual colors, as well as
store and load palettes. Fireworks enables you to select a color from the swatches
and then lock it, snap it to its closest Websafe neighbor, or convert it to transparent
by clicking one of the Color Table’s buttons, or choosing a command from the
Optimize panel Options menu.
203662-1 ch15.F 8/2/02 2:55 PM Page 506
Fireworks Seminar

507Chapter 15 ✦ Exporting and Optimizing
Locking one or more colors in your graphic ensures that the most important colors —
whether they’re important for branding, a visual design, or both — can be main-
tained. After a color is locked, it does not change, regardless of the palette chosen.
For example, you could preview your image by using the Web 216 palette, lock all
the colors, and then switch to an Adaptive palette to broaden the color range, but
keep the basic colors Websafe. Websafe colors are displayed in the swatches with a
diamond symbol in them, and locked colors are identified by a square in the lower-
right corner of the swatch, as shown in Figure 15-10.
Figure 15-10: The Color Table section ofthe Optimize panel is your window into animage’s color index.
Clicking a pixel in the preview with the Pointer tool selects its color in the ColorTable section of the Optimize panel.
The Optimize panel’s Color Table specific commands are detailed in Table 15-2,
along with information detailing whether they are represented by a button or an
option list, or if they’re on the Optimize panel Options menu.
All of these commands are also available from the shortcut menu that appearswhen you right-click (Control+click) an individual swatch.
Tip
Tip
Sort color option list
Websafe color Locked color
Edit color button Delete color button
Add color buttonSnap to Websafe button
Lock color button
203662-1 ch15.F 8/2/02 2:55 PM Page 507
Fireworks Seminar

508 Part IV ✦ Coordinating Workflow
Table 15-2Optimize panel’s Color Table Commands
Command Location Description
Rebuild Color Table Button Rebuilds the color table swatchesaccording to the settings in theOptimize panel.
Add Color Button Allows you to insert an additionalcolor into the current palette bychoosing it from the system colorpicker(s).
Edit Color Button Opens the system color picker(s) topermit a new color to be chosen toreplace the selected color.
Delete Color Button Removes the selected color(s).
Replace Palette Entry Options menu Swaps the selected color for thecolor chosen through the systemcolor picker(s).
Snap to Websafe Button Converts the selected color(s) to theclosest color in the Websafe palette.
Add color to transparency Button Makes the selected color(s)transparent.
Remove color Button Restores the color(s), removing itfrom transparency from the list of transparent colors
Select transparent color Button Makes a single color you selecttransparent.
Lock Color Button Maintains the current color duringany overall palette transformations,such as bit-depth reduction orpalette changes. The color, however,can still be edited directly.
Unlock All Colors Options menu Allows all colors to be changed.
Sort by Luminance Option list Sorts the current palette swatch setfrom brightest to darkest.
Sort by Popularity Option list Sorts the current palette swatch setfrom most pixels used to least pixelsused.
203662-1 ch15.F 8/2/02 2:55 PM Page 508
Fireworks Seminar
509Chapter 15 ✦ Exporting and Optimizing
Command Location Description
Sort by None Option list Restores the default swatcharrangement.
Remove Edit Options menu Reverts the swatch to its originalcolor.
Remove All Edits Options menu Restores the current palette to itsoriginal state.
Load Palette Options menu Allows a palette to be loaded fromAdobe Color Table (ACT) files or from GIF.
Save Palette Options menu Stores the current palette as a ColorTable file.
Sort by popularityThe Sort by Popularity command is available from the Sort by option list, and is
very helpful when it’s time to trim file size down by cutting colors. By default, the
swatches are displayed in an unsorted order. After you choose Sort by Popularity
from the Sort by option list, the most-used color is displayed first, in the upper-left
corner, and the least-used color is shown last, in the lower-right corner. This makes
it easy to select and delete the colors that are least likely to be missed. You can
Shift+click two colors to select them and the range between them, or Ctrl+click
(Command+click) to select multiple swatches that are not adjacent to each other.
MatteWhen a photograph is framed, the framer often mounts the image on a matte,
which provides a different, contrasting background to make the photograph stand
out. Fireworks uses the matte idea to allow the Web designer to export images with
varying canvas colors — without changing the canvas. One of the biggest problems
with GIF transparency is the unwanted “halos” that result from creating a drop
shadow or other gradation against a different background. The traditional method
of handling this problem is to change your canvas color in the graphics program to
match the background color on the Web page. This solution works well for graphics
you’re only going to use once, but many Web designers find that they need to use
the same graphic in many different situations, against many different backgrounds.
The Matte feature enables you to keep one master graphic and export as many spe-
cific instances — against as many different mattes or canvases — as necessary, as
shown in Figure 15-11.
203662-1 ch15.F 8/2/02 2:55 PM Page 509
Fireworks Seminar

510 Part IV ✦ Coordinating Workflow
Figure 15-11: The Matte feature enables you to export your image against different canvas colors, without having to modify the original image.
Choosing a matte color is very straightforward: Simply click the Matte arrow button
to display the standard pop-up color picker. From there, choose one of the swatches
or a color from elsewhere onscreen using the Eyedropper tool. To return a matte
color to transparent, click the No Color button in the pop-up color picker.
Lossy GIF compressionRecall that the GIF format uses lossless compression; so what’s this Loss option in
the Optimize panel all about? The so-called Lossy GIF is not a separate format at all,
but rather a method for optimizing an image so that when it’s actually saved as a GIF
it will have a smaller file size. When it comes to determining the ideal Loss setting,
Fireworks multiple previews are invaluable, as shown in Figure 15-12. I usually start
with an extreme setting, such as 60 or 70 percent, and then gradually reduce it until
the image looks acceptable.
I find that the Loss option works for some images and not for others. Sometimes it
will actually increase the resulting file size until you really get into a high Loss set-
ting. For those times when it trims a particular image down to a much lower weight,
you’ll be happy to have this tool in your export toolkit.
203662-1 ch15.F 8/2/02 2:55 PM Page 510
Fireworks Seminar

511Chapter 15 ✦ Exporting and Optimizing
Figure 15-12: In the lower-leftpane, the lossy compression at30 percent is starting to becomevisible. In the lower-right pane, at60 percent, it’s unacceptably so.
DitherOne way — although not necessarily the best way — to break up areas of flat color
caused by the lower color capabilities of GIF is to use the Dither option. When the
Dither option is enabled, Fireworks simulates new colors by using a pattern of exist-
ing colors — exactly how the Web Dither fill is created. However, because dithering
is not restricted to a single area, but instead is spread throughout the graphic, the
dithering can be significantly more noticeable — dithering makes the image appear
“dotty,” as shown in Figure 15-13, and usually increases your file size. The degree of
dithering is set by changing the Dither Amount slider, or by entering the amount
directly in the text box.
TransparencyOne of the main reasons GIF is often selected as a format over JPEG is GIF’s capabil-
ity to specify any one color — and thus certain apparent areas — of the graphic
transparent. As mentioned previously, transparency is the key to making nonrectan-
gular-shaped graphics, and the Fireworks transparency controls (see Figure 15-14)
are the key to making transparency.
203662-1 ch15.F 8/2/02 2:55 PM Page 511
Fireworks Seminar

512 Part IV ✦ Coordinating Workflow
Figure 15-13: The image on theright was produced with dithering at100 percent, which caused the solidcolor to be heavily dotted.
Figure 15-14: The Optimize panel containstransparency controls for file formats that supportit, such as GIF.
The transparency controls in detail are as follows:
✦ Type of Transparency option list: Choose No Transparency, Index
Transparency, or Alpha Transparency to specify the transparency type.
By default, the canvas color is initially made transparent.
Type of transparency option list
Make transparent color button
Remove color from transparency button
Add color to transparency button
203662-1 ch15.F 8/2/02 2:55 PM Page 512
Fireworks Seminar

513Chapter 15 ✦ Exporting and Optimizing
✦ Add Color to Index Transparency button: Enables you to choose additional
colors to make transparent, either from the swatch set or sampled directly
from the previewed image.
✦ Remove Color from Index Transparency button: Converts transparent colors
to their original color, either from the swatch set, or sampled directly from the
previewed image.
✦ Set Transparent Index Color button: Select to choose a single color to be
transparent, either from the swatch set, or sampled directly from the pre-
viewed image.
When a color is made transparent, its swatch and pixels in the Preview image are
replaced with a gray-and-white checkerboard pattern, as shown in Figure 15-15.
You can choose as many colors as you would like to make transparent.
Figure 15-15: Part of the power of the GIF format is the ability to make any color transparent, so that the GIF image can be seamlessly composited into a Web page.
To make portions of your GIF image transparent, follow these steps:
1. Select a document window preview tab to view a preview of your document.
2. If the Optimize panel is not visible, choose Window ➪ Optimize to view it.
3. If necessary, select GIF from the Optimize panel’s Export Format option list.
203662-1 ch15.F 8/2/02 2:55 PM Page 513
Fireworks Seminar

514 Part IV ✦ Coordinating Workflow
4. To make the canvas color transparent, select Index Transparency from the
Type of Transparency option list.
5. To make a color other than the canvas transparent, click the Set Transparent
Index Color button and sample a color either from a swatch or from the pre-
view image.
If you want to select a small area in your image for transparency, use the Zoomtool to magnify that selection before choosing the color.
6. To make more colors transparent, click the Add Color to Index Transparency
button and sample the colors, either from the swatch or from the Preview
image.
7. To restore a transparent color to its original color, click the Remove Color
from Index Transparency button and select the color either from a swatch
or from the Preview image.
8. For even greater control, select a color or colors from the Color Table panel
and click the Transparent button.
As noted in the Transparency option list description, two different types are avail-
able: Index and Alpha Transparency. Index Transparency enables you to make any
color totally transparent — think of it as an On/Off switch; the color is either trans-
parent or it isn’t. Alpha Transparency, on the other hand, enables you to create
degrees of transparency, such as tints and shades of a color. You can discover more
details about Alpha Transparency in the PNG section, later in this chapter.
Index Transparency is generally used for the GIF format, because, technically, only
the PNG format truly supports Alpha Transparency. However, the Fireworks engi-
neers have left Alpha Transparency enabled for GIFs, to achieve a slightly different
effect. When Alpha Transparency is chosen, a new color register is created for the
canvas and then made transparent. How is this different from converting the canvas
color to transparent, as occurs with Index Transparency? If you’ve ever created an
image where part of the graphic is the same color as the background — the white
of a person’s eyes is also the white of a canvas — you’ll quickly understand and
appreciate this feature. Basically, Alpha Transparency, as applied in Fireworks’ GIF
format, leaves your palette alone and only makes the canvas transparent, as shown
in Figure 15-16.
If you don’t notice a new color register being added when you select AlphaTransparency, check to see whether the Optimized option is enabled. If it is,Fireworks may combine other colors to keep the same number of colors.
Note
Tip
203662-1 ch15.F 8/2/02 2:55 PM Page 514
Fireworks Seminar

515Chapter 15 ✦ Exporting and Optimizing
Figure 15-16: The Alpha Transparency feature enabled me to make the white background of this image transparent without also making the white areas within the subject transparent.
Remove unused colorsThe Remove Unused Colors option — which is enabled by default — is a Fireworks-
only feature that causes the program to discard duplicate and unused colors from
a palette. This can seriously reduce your file size, particularly when choosing one
of the fixed palettes, such as Web 216, or either of the operating system palettes.
Find the Remove Unused Colors option on the Optimize panel Options menu.
InterlacedThe Interlaced option on the Optimize panel Options menu enables a GIF property
that displays a file as it downloads. The file is shown in progressively finer detail as
more information is transferred from the server to the browser. Although a graphic
exported with the Interlaced option won’t download any faster, it provides a visual
cue to Web page visitors that something is happening. Interlacing graphics is a mat-
ter of taste; some Web designers would never design a page without them; others
are vehemently opposed to their use.
203662-1 ch15.F 8/2/02 2:55 PM Page 515
Fireworks Seminar

516 Part IV ✦ Coordinating Workflow
Saved settingsFour of the six presets in the Saved Settings option list in the Optimize panel relate
to the GIF format:
✦ GIF Web 216: Sets the GIF format using the Web 216 palette.
✦ GIF WebSnap 256: Sets the GIF format using the WebSnap Adaptive palette
and a maximum of 256 colors.
✦ GIF WebSnap 128: Sets the GIF format using the WebSnap Adaptive palette
and a maximum of 128 colors.
✦ GIF Adaptive 256: Sets the GIF format using the Adaptive palette and a
maximum of 256 colors.
Use these presettings when exporting GIFs, or use them as a starting point for your
own optimizations.
Fireworks technique: Creating GIF-friendly imagesBefore you even get to the Optimize panel, you can make an image more GIF-friendly
by paying attention to the patterns of pixels that make up the image, and under-
standing how the GIF format compresses pixels. Taking a little time to create more
GIF-friendly images can be an even more effective means of reducing export file size
than the obvious methods offered by Fireworks’ export tools.
The easiest way to create a GIF-friendly document is to include large areas of flat
color. Any changes from pixel to pixel are less compressible than large similar areas.
A small experiment shows just how much the GIF format loves flat color. Create a
new document, 400×400 pixels, and choose a canvas color. Click the Preview tab of
the document window and note the tiny export file size of about 600 bytes, or 0.6K
(you may have to stretch the document window to see the file size). Switch back to
the Original tab and use the Pencil tool to draw a large X through your document,
touching each corner. Go back to Preview and note that your file size has increased
to about 1.74K — or almost triple — all for that skinny, penciled X.
The next best thing to large areas of flat color in the GIF format is horizontal lines.
GIF compresses pixels from left to right, so a horizontal line of identically colored
pixels is very compressible. Without compression, a line of red pixels might be
expressed as “red pixel, red pixel, red pixel, red pixel, red pixel.” You can see that
expressing only five pixels takes a lot of explaining. With GIF compression, that
same line might be “red pixel×5.” That’s an enormous savings in and of itself, but
“red pixel×300” is an even more dramatic savings when compared to spelling out
each pixel in turn. It’s obvious that paying a little attention to using horizontal lines
in your designs can minimize GIF file size.
203662-1 ch15.F 8/2/02 2:55 PM Page 516
Fireworks Seminar

517Chapter 15 ✦ Exporting and Optimizing
The simplest way to put more horizontal lines into your images is to replace com-
plex, chaotic texture fills such as Fiber with a simpler, horizontal lines texture, as
shown in Figure 15-17. The two documents are identical except that the one on the
left uses a 50 percent Fiber texture fill in the circle, and the one on the right uses a
50 percent Line-Horiz texture fill. Other export settings are the same, but the one
with the horizontal lines texture is one third of the weight.
Figure 15-17: Replacing a Fiber fill with an alternating lines texture reduced the export file size from 19K to less than 6K because of the compressibility of long horizontal lines of similar pixels in the GIF format.
Another way to make an image more GIF-friendly is to reduce areas of stray pixels.
Sometimes an area of otherwise flat color will have some randomly placed pixels of
colors one or two shades away. When viewed at 100 percent, these pixels may not
be obvious, but their random nature is reducing the GIF-compressibility of your
image. Zooming in and cleaning up those stray pixels is optimization-time well spent.
One way to end up with lots of stray pixels is to work from a JPEG original.Sometimes an image goes through a few hands before it ends up in yours. I’ve hadclients submit flat-color artwork such as illustrations or logos — obvious candidatesfor GIF export — as JPEGs, in spite of my protestations. What’s worse, they’ve lostthe original PNG or TIFF files. As good as the JPEG format can be for photographicimages, it mangles areas of flat color, creating lots of unsightly and uncompress-ible stray pixels. Use the following technique to reduce or eliminate stray pixelsand reclaim the image for the GIF format.
You can use the Pencil tool to clean up areas of stray pixels, as shown in Figure 15-18.
Drawing the predominant flat color over the strays creates more areas of flat hori-
zontal lines, often dramatically reducing export file size.
Tip
203662-1 ch15.F 8/2/02 2:55 PM Page 517
Fireworks Seminar

518 Part IV ✦ Coordinating Workflow
Figure 15-18: Zoom in on animage and eliminate stray pixelsto create bigger areas of flatcolor that compress better uponGIF export.
To zap stray pixels, follow these steps:
1. Choose the Pencil tool from the Tools panel.
2. Use the Stroke color well on the Tools panel, or in the Stroke section of the
Property inspector, to sample a predominant flat color from your image.
3. Use the Pencil tool to color over stray pixels that are adjacent to that flat
color, converting them to the flat color.
4. Repeat Steps 2 and 3 until you have flattened as many stray pixel areas as
possible.
While you’re zoomed in on your image, Choose Window ➪ New Window to createa new, 100% window to monitor how your changes are affecting your image at itstrue size.
Exporting Photographic ImagesPhotographic images are most often displayed in 24-bit True Color, in a format such
as JPEG, rather than the limited palette of an indexed color image, such as a GIF.
Photographic images contain subtle gradations that are not easily reproduced in
fewer colors, and yet are dithered quite serviceably by the browser if the client
machine is running in a 256-color video mode.
What’s more, the JPEG format excels at compressing the smooth tones of photo-
graphic images down to unbelievably small file sizes, without an appreciable loss
of quality. The fact that the JPEG format is so good at the things the GIF format fails
miserably at is part of the reason for their enduring, successful partnership as the
king and queen of Web graphics formats.
Tip
203662-1 ch15.F 8/2/02 2:55 PM Page 518
Fireworks Seminar

519Chapter 15 ✦ Exporting and Optimizing
The True Color formats that Fireworks exports are detailed in Table 15-3.
Table 15-3True Color Export Formats
Format Description
JPEG Joint Photographic Experts Group image file format. Used foralmost all the true color images on the Web. Uses lossycompression to achieve maximum reduction in file size.
PNG 24, PNG 32 Portable Network Graphic. Offers lossless compression thatresults in larger file sizes than JPEG — often much larger — butmaintains pristine quality.
TIFF 24, TIFF 32 Tag Image File Format. Print artists commonly use 24- and32-bit TIFFs, although they are not suitable for the Web.
BMP 24 Microsoft Bitmap image. The native graphics format ofMicrosoft Windows. Not suitable for the Web, but a goodway to share images between Windows applications.
PICT 24 (Macintosh only) Macintosh Picture. The native graphics format of Mac OS.Vectors are not supported by Fireworks. Not suitable for the Web, but a good way to share image files between Mac applications.
The Photoshop file format can also contain photographic images, as well as layersand other extended attributes. Exporting a Photoshop document from Fireworks iscovered later in this chapter.
Of all the formats in Table 15-3, only JPEG and PNG 24 can be used on the Web.
PNG 32’s alpha mask is ignored by most browsers, rendering it the same as PNG 24.
If you want to display an image with the highest quality, regardless of file size, then
PNG 24 is a good choice. If bandwidth is an issue at all — and it’s very rare that it
isn’t — then JPEG is the better choice, providing excellent quality photographic
images in a much smaller file size than PNG.
To alter the bit depth for an exported image, choose a lower bit-depth export format
from the Optimize panel’s Export Format option list. Instead of PNG 32, for example,
choose PNG 24. Although a change from 24-bit to 8-bit means lowering the maximum
number of colors supported, a change from 32-bit to 24-bit supports the same colors,
but removes the alpha mask. The upper 8 bits of a 32-bit image are always an alpha
channel — an 8-bit grayscale image that defines the image’s transparency.
For more about alpha masks, see Chapter 13.Cross-Reference
Cross-Reference
203662-1 ch15.F 8/2/02 2:55 PM Page 519
Fireworks Seminar

520 Part IV ✦ Coordinating Workflow
JPEGWhereas GIFs generally are made smaller by lowering the number of colors used,
JPEGs use a sliding scale that creates smaller file sizes by eliminating pixels. This
sliding scale is built on a lossy algorithm, so-called because the lower the scale, the
more pixels are lost. The JPEG algorithm is a very good one, and you can signifi-
cantly reduce the file size by lowering the JPEG Quality setting.
Other characteristics of the JPEG format include the following:
✦ JPEG images are capable of displaying over 16 million colors. This wide color
range, also referred to as 24-bit, enables the subtle shades of a photograph to
be depicted easily.
✦ Although JPEG images can display almost any color, none of the colors can
be made transparent. Consequently, any image that requires transparency in
a Web browser must be stored as a GIF.
✦ For JPEG images to be viewed as they are downloaded, they must be stored as
Progressive JPEGs, which appear to develop onscreen, like an interlaced GIF.
Progressive JPEGs have a slightly better compression engine and can produce
smaller file sizes.
Internet Explorer doesn’t fully support Progressive JPEGs. They are displayed justas if they were not Progressive, though, so there’s no harm in using them.
QualityThe major method used to alter a JPEG’s file size is to change the Quality value.
In Fireworks, the Quality value is gauged as a percentage, and the slider goes from
0 percent to 100 percent. Higher values mean less compression, and lower values
mean that more pixels are discarded. Trying to reduce a JPEG’s file size by lowering
the Quality slider is always worthwhile; you can also enter a value directly in the
text box. The JPEG compression algorithm is so good that almost every continuous-
tone image can be reduced in file size without significant loss of quality, as shown
in Figure 15-19. On the other hand, increasing a JPEG’s Quality value from its initial
setting is never helpful. Whereas JPEG is very good at losing pixels to reduce file
size, adding pixels to increase quality never works — you’ll only increase the file’s
size and download time.
With the JPEG image-compression algorithm, the initial elements of an image thatare “compressed away” are least noticeable. Subtle variations in brightness andhue are the first to disappear. With additional compression, the image growsdarker and less varied in its color range.
Tip
Note
203662-1 ch15.F 8/2/02 2:55 PM Page 520
Fireworks Seminar

521Chapter 15 ✦ Exporting and Optimizing
Figure 15-19: Each of these fourpreviews uses a different JPEG qualityvalue; only when the quality is loweredsignificantly (bottom right) does theimage become unacceptable.
A good technique for comparing JPEG images in Fireworks is to use the 4-Up preview
option. The upper-left pane shows your original document, so that you always have
an image on which to base your comparisons. In another view, reduce the Quality
to about 75 percent or so. If that image is acceptable, reduce the Quality setting to
50 percent in another view. By then, you’ll probably start to get some unwanted
artifacts, so use the fourth window to try a setting midway between the last accept-
able and the unacceptable Quality settings, such as 65 percent. Be sure to view
your images at 100 percent magnification. That’s how your Web audience will see
them, so you should, too.
Don’t forget that you can stretch the document window to a larger size to increasethe size of the multiple preview panes.
Selective QualityThe Selective Quality setting works just like the Quality setting, except that its
value only applies to areas of your document that are covered by a JPEG mask.
This enables you to isolate foreground areas and apply a high Selective Quality
setting to them while applying a very low quality setting to the rest of your image.
Basically, you trade some of the quality of the least important areas of an image
for better quality where it matters most.
Tip
203662-1 ch15.F 8/2/02 2:55 PM Page 521
Fireworks Seminar

522 Part IV ✦ Coordinating Workflow
You can create JPEG masks from Marquee selections by choosing Modify ➪Selective JPEG ➪ Save Selection as JPEG Mask. Fireworks displays JPEG masks
as a translucent pink overlay by default, as shown in Figure 15-20.
Figure 15-20: Convert a marquee selectioninto a JPEG mask and Fireworks colors it pink.
If you’ve ever created a JPEG image that contains text or flat color graphics such as
buttons, you know that the JPEG compression process is murder on GIF-like images.
Text and flat color areas turn into an unsightly, blocky patchwork. You can choose
to have your Selective Quality setting also apply to the text objects and Button
Symbols in your document, without having to cover each element individually with
a JPEG mask. To do so, choose Modify ➪ Selective JPEG ➪ Settings to display the
Selective JPEG Settings dialog box (see Figure 15-21), and check the Preserve Text
Quality and/or Preserve Button Quality checkboxes. You can also enable or disable
the Selective Quality setting in the same dialog box.
Figure 15-21: Choose whether theSelective Quality setting also applies to text and buttons in the Selective JPEG Settings dialog box.
203662-1 ch15.F 8/2/02 2:55 PM Page 522
Fireworks Seminar

523Chapter 15 ✦ Exporting and Optimizing
You can also click the Edit Selective Quality Options button that appears on the Optimize panel when it’s set to JPEG to display the Selective JPEG Settingsdialog box.
Figure 15-22 shows the Quality and Selective Quality settings in action, using the
image and JPEG mask from Figure 15-20.
Figure 15-22: The text and the area under the JPEG mask are clear and sharp because they have a high Selective Quality setting of 90. The rest of the image, however, is all but obscured by JPEG artifacting, due to its low Quality setting of 25.
Sharpening edgesGraphics on the Web are often a montage of photographs, illustrations, and text.
Although JPEG is the right choice for a continuous tone image, such as a photograph,
it can make text that overlays a photograph appear fuzzy because JPEG is far better
at compressing gradations than it is at compressing images with hard edges and
abrupt color changes. To overcome these obstacles, use Fireworks’ Sharpen JPEG
Edges option, which is on the Optimize panel Options menu.
As the name implies, Sharpen JPEG Edges restores some of the hard-edge transitions
that are lost during JPEG compression. This is especially noticeable on text and sim-
ple graphics, such as rectangles superimposed on photographs (see Figure 15-23).
Keep an eye on the balance between image quality and file size, though, because
Sharpen JPEG Edges can sometimes increase file size to the point where you may
be better off simply increasing the Quality setting for your whole image.
Tip
203662-1 ch15.F 8/2/02 2:55 PM Page 523
Fireworks Seminar

524 Part IV ✦ Coordinating Workflow
Figure 15-23: When a photographic image includes sharp edges such as text, keep them from getting too blurry by enabling the Sharpen JPEG Edges option in the Optimize panel Options menu.
SmoothingThe more that a JPEG file is compressed, the “blockier” it becomes. As the compres-
sion increases, the JPEG algorithm throws out more and more similar pixels — after
a certain point, the transitions and gradations are lost and areas become flat color
blocks.
Fireworks’ Smoothing feature slightly blurs the overall image so that stray pixels
resulting from the compression are less noticeable. The Smoothing scale in the
Optimize panel runs from zero to eight. Smoothing offers two benefits: It reduces
the blockiness that is sometimes evident with JPEG compression, and it also
slightly decreases file size.
Just as images with lots of straight lines or text benefit from the Sharpen JPEG Edges
setting, Smoothing works best for images with lots of curves and generally smooth
shapes.
ProgressiveTo most, Progressive JPEG is seen only as an incremental display option for JPEGs,
similar to Interlaced for the GIF format. The Progressive JPEG option on the Optimize
panel Options menu is more than that, however: It actually enables a different com-
pression algorithm — a second generation one — that often offers lower file sizes at
the equivalent quality of the original JPEG compression. The Progressive JPEG format
was developed by Netscape, but has won the support of recent browser versions
from Microsoft, as well.
203662-1 ch15.F 8/2/02 2:55 PM Page 524
Fireworks Seminar

525Chapter 15 ✦ Exporting and Optimizing
Although Internet Explorer displays Progressive JPEG images, it displays themwithout the progressive look of developing as they download. They appear to theuser to be regular JPEG images.
In practice, I find that enabling the Progressive JPEG option often (but not always)
gives me a smaller file size. For me, choosing this option generally depends on
whether the client prefers to see the images slowly develop as they download or
prefers them to download completely and appear as a finished image.
PNG 32 and 24As a Web format, PNG is still in its infancy — well, maybe early childhood — as far
as general browser acceptance is concerned. The PNG format holds great promise
for Web graphics. Combining the best of both worlds, PNG has lossless compression,
like GIF, and is capable of millions of colors, like JPEG. Moreover, PNG offers an inter-
lace scheme that appears much more quickly than either GIF or JPEG, as well as
transparency support that is far superior to both other formats.
One valuable aspect of the PNG format is that it makes the display of images stored
as PNG files appear more uniform across various computer platforms. Generally,
graphics made on a PC look brighter on a Macintosh, and Mac-made images seem
darker on a PC. PNG includes gamma correction capabilities that alter the image,
depending on the computer used by the viewer.
Until recently, the various browsers supported PNG only through plug-ins. After PNG
was endorsed as a new Web graphic format by the World Wide Web Consortium
(W3C), both Netscape and Microsoft 4.0 browser versions added native, inline
support of the new format. Perhaps most importantly, however, Macromedia’s
Dreamweaver was among the first Web-authoring tools to offer native PNG support.
Inserted PNG images preview in the document window as GIFs and JPEGs do. Then,
Fireworks was introduced, which not only allows you to export PNG images, but
uses PNG as its own format.
Although support for PNG is growing steadily, browser support currently is not
widespread enough to warrant a total switchover to the PNG format. PNG is capable
of many more features, such as Alpha Transparency, that are not fully in use by any
major browser. Interestingly enough, Fireworks is way ahead of most other graphic
programs in its support of PNG. Greg Roelofs, one of the developers of the PNG for-
mat, calls Fireworks, “the best PNG-supporting image editor available.”
Unlike an Index Transparency color, which is either completely transparent or com-
pletely opaque, an Alpha Transparent color can be partially transparent — in fact,
the transparency can use as many as 256 gradations. This allows a 32-bit image to
be easily composited with other images, meaning that although PNG is not yet the
best choice for the browser, it is an excellent choice for creating graphics for use
in multimedia presentations, such as Shockwave or Flash movies, where animated
Note
203662-1 ch15.F 8/2/02 2:55 PM Page 525
Fireworks Seminar

526 Part IV ✦ Coordinating Workflow
objects are often stacked on top of each other, or composited with different back-
grounds. Director and Flash are also both happy to import your actual Fireworks
PNG files, Fireworks header and all.
The Fireworks native PNG format is considered an extended PNG format becauseof the additional effects, text, and other data included in the header of each file.Other programs capable of generally displaying PNG files may show the basicFireworks image, but won’t be able to edit it in the same way. To display a file inPNG format on a Web page, specifying PNG as the format when you export is best, so that your PNG image lacks extra Fireworks information and is as small aspossible.
Other formatsThe issues that are involved in exporting a PNG 24 or PNG 32 image are the same
as those for exporting a TIFF, BMP, or PICT (Macintosh only) image from Fireworks.
Generally, this export is straightforward, involving only the Matte setting.
Sending Images to Other ProgramsFireworks offers a number of different methods for you to export files so that they’re
ready to use in other applications. You can choose File ➪ Export if you know your
settings are correct; you can choose File ➪ Export Preview if you wish to tweak any
settings on the way out; or you can take advantage of the Quick Export pop-up menu
to send your file out to another application via the standard export settings for that
program. If you were working on a document that was destined for FrontPage, you
could click on the Quick Export pop-up menu, select the Other category, and then
choose Export to FrontPage (see Figure 15-24). This would export your image, with
the settings in the Optimize panel, and create the FrontPage style HTML/XHTML
file, if necessary.
Figure 15-24: The Quick Export pop-up menu enables you to export your file toMacromedia’s main applications as well as others, such as Microsoft’s FrontPage.
Caution
203662-1 ch15.F 8/2/02 2:55 PM Page 526
Fireworks Seminar

527Chapter 15 ✦ Exporting and Optimizing
Another feature of the Quick Export pop-up menu is something that’s available only
for the Macromedia products listed in the menu (refer to Figure 15-24). One of the
options on the submenus for the Macromedia applications allows you to launch any
of those programs that you have on your system without having to go to the Start
Menu, your Applications folder, or the Dock. This can be a real time saver since
your mouse is most likely to be close to the Fireworks document window, thus, the
Quick Export pop-up menu.
Integrating Fireworks with FrontPageFireworks has a long history of working well with Dreamweaver. The integration
between the two applications makes it a breeze to take images, and even whole Web
site designs, back and forth between the two applications. But what happens if you’re
not using Dreamweaver for your Web page designs? Don’t worry, Fireworks still has
you covered.
Fireworks MX allows you to jump easily between using Microsoft FrontPage for yourlayout work and Fireworks for your graphic editing, all with the click of a button.
When you install Fireworks, the installation program detects the presence of
Microsoft FrontPage and offers to install the files required to enable Fireworks
integration with FrontPage, as shown in Figure 15-25.
Figure 15-25: The Fireworks installer detects that FrontPage is installed and asks whether or not you wish to install the FrontPage integration.
If you aren’t interested in installing Fireworks integration into FrontPage then it’s a
simple matter of clicking the No radio button and then clicking the Next button to
continue the installation. If you decide you want to enable the integration, clicking
NewFeature
203662-1 ch15.F 8/2/02 2:55 PM Page 527
Fireworks Seminar

528 Part IV ✦ Coordinating Workflow
Next causes the Fireworks installer to continue the installation, giving FrontPage
a powerful new feature. When everything is installed, you can open FrontPage and
see a new button among those in its toolbars. Now, when you open a webpage with
an image in it, you can select the image and click the Launch and Edit Selected
Graphic in Fireworks button, as seen in Figure 15-26, to open Fireworks and begin
the editing session.
Figure 15-26: With FrontPage integration installed, you are able to launch and edit your graphics in Fireworks with the click of a button.
Fireworks opens the Find Source dialog box asking if you’d like to continue editing
the file you’re working with, or if you’d like to open the Fireworks PNG file that orig-
inally created it. To look for, and then edit, the Fireworks PNG, click Yes. If you would
like to continue with the current image, click No, and Fireworks finishes loading with
your image in the current document window. You can make the changes you need to
make, and then click Done at the top of the document window to return to FrontPage.
Once you are back in FrontPage, the newly edited image is in your document window.
For more on integration between Dreamweaver and Fireworks, see Chapter 22.Cross-Reference
203662-1 ch15.F 8/2/02 2:55 PM Page 528
Fireworks Seminar

529Chapter 15 ✦ Exporting and Optimizing
Working in the Export PreviewAs convenient as optimizing and previewing images in Fireworks’ workspace is, you
may sometimes find that you want to access all the export features in one centralized
location. Fireworks’ Export Preview dialog box (see Figure 15-27) is just the place, and
offers some extra export options that are unavailable in the workspace, to boot.
Figure 15-27: The Export Preview dialog box centralizes Fireworks’ export features, and offers a few special features of its own.
The three tabbed panels in the Export Preview dialog box are as follows:
✦ Options: The primary panel for optimizing your image. The file format, bit-
depth, compression, transparency, and other preferences are selected here.
All color control — such as locking, editing, and deleting colors — is handled
here, as well. The controls here are analogous to those found in the Optimize
panel.
Optimization settings
Tabbed panels
Frame controlsPointer (Hand) Zoom
Zoom
Crop Single/multiple views
Current settings Saved Settings options list
Preview auto-update Preview area
203662-1 ch15.F 8/2/02 2:55 PM Page 529
Fireworks Seminar

530 Part IV ✦ Coordinating Workflow
✦ File: Controls two aspects of an exported file — scale and numeric cropping.
The exported image can be resized either by a percentage or to a precise pixel
measurement. The image can be cropped by entering X and Y coordinates for
the upper-left corner, and width and height dimensions of the new area. In
Fireworks, the exported image can also be cropped visually in the Preview
area.
✦ Animation: Contains all the settings for running an animated GIF, including
the frame delay, disposal method, and looping preferences. Many of these
options are also available in the Frames panel when you’re optimizing in the
workspace.
The always-visible Preview area provides a visual reference to compare different
settings, and also allows you to visually crop the image. Also included are a panning
tool (the Pointer), a Zoom tool (the magnifying glass), and a VCR-like control for
playing an animation or other multiframe file. You may experience some déjà vu as
you look around the Export Preview dialog box. Many of the controls are the same
or very similar to those you use when optimizing in the workspace, and with good
reason. There’s no need to learn the Export Preview dialog box from scratch.
As previously mentioned, the Export Preview dialog box does contain some addi-
tional, unique export features, such as cropping and scaling exported images.
CroppingThe Export Area tool found on the Tools panel might seem a logical place to define
an export area within the document window, but using the Export Area tool is only
a first step to exporting an image with the Export Preview dialog box. In other words,
although the Export Area tool is used in the document window, it’s not part of the
document window’s in-place preview or export.
You can export a cropped version of a document by outlining an area with the
Export Area tool and double-clicking that area to open the Export Preview dialog
box, or you can simply open the Export Preview dialog box directly and then crop
your image in its preview. When you initiate a cropping session in the Export Preview
dialog box by clicking the Export Area button in the Preview area, the familiar dashed
cropping outline surrounds the image, as shown in Figure 15-28. The eight handles
are used to narrow the exported area. The original image is not permanently cropped
or altered in any way.
Unlike the regular Crop tool in the document window, you can’t use the ExportArea tool to expand the boundaries of the canvas.
Note
203662-1 ch15.F 8/2/02 2:55 PM Page 530
Fireworks Seminar

531Chapter 15 ✦ Exporting and Optimizing
Figure 15-28: In Fireworks, you can crop visually right in the Export Preview dialog box.
If the File tab is displayed in the Export Preview while you’re cropping, the X and Y
coordinates of the upper-left corner of your exported area, as well as the width and
height dimensions, are visible. The numeric cropping information is updated each
time after a cropping handle is dragged to a new position. Alternatively, you can
adjust the visual cropping precisely by entering values in the appropriate Export
Area text boxes.
You can also crop an image by selecting an area in the document window with theExport Area tool (the camera on the flyout under the Pointer tool) and double-clicking the area. The Export Preview opens, and you can export your croppedimage without affecting the original.
To crop an image visually, follow these steps:
1. Choose either the Export Area tool beneath the Preview window(s), or the
Export Area option on the File tab. An outline with cropping handles appears
around the image.
2. Drag the handles to a new position so that only the area you want to export
is displayed.
3. Choose any other tool (Pointer or Zoom), or click either the Set Defaults or
the Next button to accept the newly cropped area.
Tip
203662-1 ch15.F 8/2/02 2:55 PM Page 531
Fireworks Seminar

532 Part IV ✦ Coordinating Workflow
To crop an image numerically, follow these steps:
1. From the File tab, select the Export Area option.
2. Select a new upper-left coordinate by entering new values in the X and/or Y
text boxes, and press Tab to accept the changed value.
3. Select a new image size by entering new values in the W (Width) and H (Height)
text boxes, and press Tab to accept the changed value.
Both cropping methods — visual and numeric — work together as well as separately.
While viewing the File panel, select the Export Area tool and crop the image visually.
When you release the mouse button, the numeric values automatically update.
Similarly, change the numeric values, and the visual display is redrawn.
Scaling exported imagesIt might seem redundant to note that “Web graphics come in all shapes and sizes” —
except it’s also true to say that the same Web graphic often comes in different shapes
and sizes. Reusing graphic elements is a very key design strategy in product brand-
ing in most media, and the technique is especially useful on the Web. Fireworks
makes it very easy to export resized or cropped graphics from a master file, through
the Export Preview dialog box.
Scaling controls are under the File tab in the Export Preview dialog box. You can
resize a graphic by specifying either a percentage or an exact pixel size. By default,
all rescaling is constrained to the original height-to-width ratio — however, you can
disable the Constrain option to alter one dimension separately from the other.
To resize an image, follow these steps:
1. From the Export Preview dialog box, select the File tab.
2. To rescale an image by percentage, use the % slider, or enter a value directly
into the % text box.
The % slider’s range is from 1 percent to 200 percent, but you can enter any
value in the text box.
3. To resize an image to an exact dimension, enter a figure in the W (Width)
and/or H (Height) text box.
If the Constrain option is selected, enter a value in only one of the dimension
text boxes and press Tab. The other dimension will be calculated for you
according to the image’s original height-to-width ratio.
4. To alter the height-to-width ratio, deselect Constrain and perform Step 3.
203662-1 ch15.F 8/2/02 2:55 PM Page 532
Fireworks Seminar

533Chapter 15 ✦ Exporting and Optimizing
One of my favorite image optimization techniques is to scale an image to 50 per-cent of its size upon export and then place it in an HTML page at double size; dou-bling the width and height attributes of the img tag. The effects of this are usuallynoticeable, but often not objectionable, especially for flat color images. One thing’sfor sure: no faster way exists to halve the weight of an exported document.Experiment with this technique and see whether it works for you.
Using the Export WizardsFireworks’ export options are very full-featured and can certainly be overwhelming
if you’re new to Web graphics. If you’re not even sure how best to begin optimizing
your image, let one of Fireworks’ Export Wizards guide you. In addition to the origi-
nal Export Wizard, which is very helpful for selecting the appropriate file format,
Fireworks introduces the Export to Size Wizard to meet those absolute file-size
limits.
If you are ready to export, but don’t know where to start, bring up Fireworks’ Export
Wizard, which not only helps you to determine the correct file format best suited to
the graphic’s purpose, but it also provides you with an alternative in certain cases.
For this reason, seasoned Web designers can also use the Export Wizard to get
quickly to a jumping-off place for further optimization.
Regardless of the selection that the Export Wizard makes for you, it always presents
you with a visual display through the Export Preview dialog box, covered extensively
earlier in this chapter. Feel free to either accept the recommendations of the Export
Wizard as is — and click the Next button to complete the operation — or tweak the
settings first before you proceed.
The Export Wizard has three primary uses:
✦ To help you select an export format
✦ To offer suggestions to optimize your image after you select an export format
✦ To recommend export modes that will reduce a graphic to a specified file size
To use the Export Wizard to select an export format, follow these steps:
1. Choose File ➪ Export Wizard.
The initial screen of the Export Wizard appears, as shown in Figure 15-29.
2. With the “Select an export format” option selected, click Continue.
Tip
203662-1 ch15.F 8/2/02 2:55 PM Page 533
Fireworks Seminar

534 Part IV ✦ Coordinating Workflow
Figure 15-29: The Export Wizardprovides a good launch pad forexport selections.
3. The next screen of the Export Wizard appears and offers four choices for the
graphic’s ultimate destination:
• The Web: Restricts the export options to the most popular Web formats,
GIF and JPEG.
• An image-editing application: Selects the best format for continuing
to edit the image in another program, such as Photoshop. Generally,
Fireworks selects the TIFF format.
• Desktop publishing application: Selects the best print format, typically
TIFF.
• Dreamweaver: The same as The Web option, restricts the export
options to the most popular Web formats — GIF and JPEG.
If your graphic uses frames, the Export Wizard asks instead whether your file is tobe exported as an Animated GIF, a JavaScript button rollover, or a single image file.
4. Click Continue after you make your choice.
Fireworks presents its analysis of your image, with suggestions on how to nar-
row the selection further if more than one export choice is recommended.
If you select Animated GIF as your destination for your multiframe image, you mustselect the resulting Preview window to display the details in the Options panel.
5. Click Exit to open the Export Preview dialog box and complete the export
operation.
If you choose either The Web or Dreamweaver for your graphic’s export destination,
Fireworks presents you with two options for comparison: a GIF and a JPEG. The file
in the upper Preview window is the smallest file size. Fireworks is fairly conserva-
tive in this aspect of the Export Wizard and does not attempt to seriously reduce
the file size at the cost of image quality.
Caution
Note
203662-1 ch15.F 8/2/02 2:55 PM Page 534
Fireworks Seminar

535Chapter 15 ✦ Exporting and Optimizing
If you would like to limit the file size while selecting an export format, select the
“Target export file size” option on the Export Wizard’s first screen. After you enable
this option, you need to enter a file size value in the adjacent text box. File size is
always measured in kilobytes. After you enter a file size, click Continue for Fireworks
to calculate the results.
When Fireworks attempts to fit a graphic into a particular file size, it exports the
image up to 12 times to find the best size with the least compression. Although it’s
usually very fast, this process can take several minutes to complete with a large
graphic. Again, for graphics intended for the Web, Fireworks presents two choices —
both at, or under, your specified target size.
In addition to specifying a file size through the Export Wizard, you can choose the
Optimize to Size Wizard by clicking the button on the Options tab of the Export
Preview dialog box. The Optimize to Size Wizard opens a simple dialog box that
asks for the specified file size. The major difference between this wizard and the
Target export file size option on the Export Wizard is that the Optimize to Size
Wizard works only with the current format — no alternative choices are offered.
Consequently, the Optimize to Size Wizard is faster, but it’s intended more for
the intermediate-to-advanced user who understands the differences between file
formats.
Examining Additional Export OptionsThe vast majority of the time, graphics are exported from Fireworks as single images,
or as an HTML document with separate image slices, or as a Dreamweaver Library
item. However, Fireworks also offers several other export options. You can export
the following:
✦ Fireworks layers, frames, or slices as Cascading Style Sheet (CSS) layers in an
HTML document for use in Dynamic-HTML-capable Web browsers
✦ Fireworks layers or slices as an HTML document for easy import into
Macromedia Director
✦ The layers of a Fireworks document as separate image files
✦ Fireworks frames as separate image files
✦ The four frames of a rollover button as an Image Well format image used by
Lotus Domino Designer
✦ Vector artwork as a Flash movie
✦ Vector artwork in Adobe Illustrator format
✦ Your complete Fireworks document as a multi-layer Photoshop document,
suitable for further editing in Photoshop
203662-1 ch15.F 8/2/02 2:55 PM Page 535
Fireworks Seminar

536 Part IV ✦ Coordinating Workflow
All of these additional export methods are grouped in the Save as type (Save As on
the Mac) option list in the Export dialog box, as shown in Figure 15-30. To display
the Export dialog box, choose File ➪ Export.
Figure 15-30: The Save as type (Save As) option list in the Export dialog box handles a variety of individual export situations.
Regardless of which type of export operation you undertake, the current settingsin the Optimize panel determine the image file format and other settings whereapplicable.
Chapter 21 covers the two items on the Export dialog box’s Save as type (Save As)option list: HTML and Images, and Dreamweaver Library.
Exporting as CSS layersThe term layers is used quite often in the Web graphics field. To the Photoshop
user, a “layer” is a division capable of holding a single graphic element. In Fireworks,
a “layer” is a useful organizational tool that can hold any number of objects. In
Dynamic HTML and in Web-authoring tools such as Dreamweaver, a “layer” is a
type of container that can be precisely positioned, hidden, or displayed — or flown
across the screen with JavaScript-driven animation. You can create these layers by
using a standard known as Cascading Style Sheets (CSS). Fireworks enables you to
save the contents of Fireworks layers, frames, or slices along with the CSS-based
HTML. This facility enables you to achieve effects, such as the “flying” buttons in
Figure 15-31.
Cross-Reference
Tip
203662-1 ch15.F 8/2/02 2:55 PM Page 536
Fireworks Seminar

537Chapter 15 ✦ Exporting and Optimizing
Figure 15-31: These buttons, exported from Fireworks as separate CSS layers and then animated in Dreamweaver, fly into place.
To export Fireworks components as CSS layers, follow these steps:
1. Specify format and optimization settings in the Optimize panel.
2. Choose File ➪ Export.
The Export dialog box appears.
3. Choose CSS Layers from the Save as type (Save As) option list.
Fireworks displays further options relating to exporting CSS Layers.
4. From the Source option list, select the Fireworks component to export as CSS
Layers. The options are Fireworks Layers, Fireworks Frames, or Fireworks
Slices.
5. Check the Trim Images checkbox to export the individual components on the
smallest-sized canvas necessary.
If Trim Images is not selected, each exported file will be the same dimensions
as the original image.
6. If you’re exporting from Fireworks Frames, check the Current Frame Only
checkbox to limit the export to the current frame only.
203662-1 ch15.F 8/2/02 2:55 PM Page 537
Fireworks Seminar

538 Part IV ✦ Coordinating Workflow
7. Check the Put Images in Subfolder checkbox to have Fireworks place the
image files in their own folder.
Click the Browse button to select a particular folder.
8. Click Save when you’re done.
After you complete the export process, you’ll have both the separate images and
the HTML necessary to place each image in its own CSS layer. To use the layers on
your Web page, you need to incorporate the generated code into your own Web
page. You can accomplish this with any Web-authoring tool that allows you to
access the HTML directly. Initially, the code appears overwhelming, but only the
plain-English phrases that bracket it are important. In your favorite HTML or text
editor, select the code from the line
<! ---------- BEGIN COPYING THE CODE HERE ---------->
and end your selection with the line
<! ---------- STOP COPYING THE CODE HERE ---------->
After you select the code, copy it to the clipboard and then open your working
HTML page and paste the clipboard contents anywhere in the <body> section.
Now, you can continue to manipulate the layers in any manner that you prefer in
your Web-authoring program.
Dreamweaver users don’t have to use the HTML Source window or any other texttool to copy and paste the Fireworks code. In Dreamweaver, simply find theInvisible Element symbols that enclose the layer code — you’ll see a DreamweaverHTML comment symbol on either side of the layer symbols. Select all of thesesymbols and then copy and paste them into your working document. You musthave Invisible Elements enabled for this technique to work.
Exporting for DirectorFireworks is a key component of Macromedia’s Director Shockwave Internet Studio,
and as such, has developed some extra features that simplify creating and editing
bitmaps for use in Director. Buttons and rollovers that you’ve created in Fireworks
can be exported as images and HTML that can then be imported into Macromedia
Director. Director does its part by converting the JavaScript-based Fireworks
Behaviors into Director Behaviors. In addition, each object or layer from Fireworks
becomes a Director cast member, with antialiasing and correct alpha transparency.
To export a Fireworks document for use in Director, follow these steps:
1. Choose File ➪ Export.
The Export dialog box appears.
Note
203662-1 ch15.F 8/2/02 2:55 PM Page 538
Fireworks Seminar

539Chapter 15 ✦ Exporting and Optimizing
2. Select Director (.htm) from the Save as type (Save As) option list.
3. Select either Fireworks Frames or Fireworks Layers from the Source option
list.
4. Select the Trim images option to export the individual components on the
smallest canvas necessary.
5. Click Save when you’re ready.
Director 7 or above is required in order to import the Fireworks-generated HTML.A Director Xtra may also be required to enable this feature. Consult your Directordocumentation and/or Macromedia’s Web site.
Exporting filesOccasionally, you may want to break up the component layers or frames of your
Fireworks document into separate files. Perhaps you need to reuse some of these
elements in another part of the Web site, or maybe you want to process the files in
another application before reintegrating them in Fireworks. Whatever the reason,
Fireworks provides a fairly straightforward method for generating separate graphic
files for almost any situation.
Chapter 20 discusses exporting a single slice as an image file.
To export a Fireworks element as a separate file, follow these steps:
1. Specify format and optimization settings in the Optimize panel.
2. Choose File ➪ Export.
The Export dialog box appears.
3. To export frames as files, select Frames to Files from the Save as type (Save As)
option list. Alternatively, to export layers as files, select Layers to Files.
4. Select the Trim images option to export the individual components on the
smallest-sized canvas necessary.
If Trim images is not selected, each exported file will be the same dimensions
as the original image.
5. Click Save when you’re ready.
You can control which frames or layers are exported by turning off their visibility intheir respective panels. The visibility is controlled by the Eye symbol next to eachitem name. The frame or layer will not be exported if it is not visible when youchoose the Export command.
Tip
Cross-Reference
Caution
203662-1 ch15.F 8/2/02 2:55 PM Page 539
Fireworks Seminar

540 Part IV ✦ Coordinating Workflow
Exporting as Image WellsImage Wells are used by Lotus Domino Designer to create rollover effects. Just as
Fireworks uses frames to separate the different rollover states — up, over, down, and
overdown — Domino Designer uses Image Wells. An Image Well is a single graphic
with each rollover state side by side, separated by a single-pixel vertical line, as the
example in Figure 15-32 shows.
Figure 15-32: The final output of anImage Well export is used by LotusDomino Designer to create rolloverbutton effects.
Image Wells are similar to the four state rollovers in Fireworks, but not exactly thesame. The last two states — over and overdown — are reversed. Fireworks, however,understands this difference and exports your Image Well so that it will work cor-rectly in Lotus Domino Designer.
This feature is best used to convert your existing multiframe images to Image Wells
for use as rollovers. To export a graphic as an Image Well, follow these steps:
1. Specify format and optimization settings in the Optimize panel.
2. Choose File ➪ Export.
The Export dialog box appears.
3. Select Lotus Domino Designer from the Save as type (Save As) option list.
4. Select Fireworks Frames, Fireworks Layers, or Fireworks slices from the Source
option list to create an Image Well from frames, layers, or slices, respectively.
5. Select the Trim images option to export the individual components on the
smallest-sized canvas necessary.
If Trim images is not selected, each exported file will be the same dimensions
as the original image.
6. Click Save when you’re ready.
Fireworks saves your document as an Image Well, in the image format specified in
the Optimize panel.
Note
203662-1 ch15.F 8/2/02 2:55 PM Page 540
Fireworks Seminar

541Chapter 15 ✦ Exporting and Optimizing
Exporting vectorsYou can choose to export the vector shapes in your document as either a Flash SWF
movie or an Adobe Illustrator document. The Flash format can be viewed in the
majority of Web browsers as-is, and the Illustrator format can be imported into the
majority of vector drawing applications, such as Adobe Illustrator and Macromedia
FreeHand.
It’s important to keep in mind that although Fireworks works with vector lines, it
uses vector lines only as a substructure or “skeleton” for bitmaps and bitmap-based
effects, such as bevels and drop shadows. Exporting this vector skeleton is a useful
feature, but keep in mind that the exported objects will often bear only a passing
resemblance to their Fireworks-native counterparts, as shown in Figure 15-33.
Figure 15-33: The object inFireworks (top left) is a vectorshape, but much of its lookcomes from Fireworks’ strokesettings and Live Effects. Afterexporting as a Flash movie,shown bottom right, the objectis expressed only in vector linesand its appearance changesdramatically.
To export vector shapes from Fireworks, follow these steps:
1. Choose File ➪ Export.
Fireworks displays the Export dialog box.
2. To export as Flash, choose Macromedia Flash SWF from the Save as type
(Save As) option list. Alternatively, to export in Illustrator format, choose
Illustrator 7.
Fireworks Illustrator export is Adobe Illustrator 7 compatible, and may not importcorrectly into applications that expect a previous or later version of the Illustratorformat.
Caution
203662-1 ch15.F 8/2/02 2:55 PM Page 541
Fireworks Seminar

542 Part IV ✦ Coordinating Workflow
3. Click the Options button to specify format-specific options.
Fireworks displays the options dialog box for the vector type you are exporting,
as shown in Figure 15-34.
Figure 15-34: Specify export options for a vector format in the Macromedia Flash SWF Export Options dialog box (left), or the Illustrator Export Options dialog box, depending on which vector export format you choose.
4. If you are exporting as Macromedia Flash SWF, set the appropriate options:
• Set the Objects radio buttons to Paths to export paths, or to Maintain
Appearance to export as JPEG bitmaps. If you choose Maintain
Appearance, set the JPEG Quality slider to specify the quality of
the JPEGs.
• Choose to maintain text, or convert text to paths with the Text radio
buttons.
• Export all frames, or a range of frames with the Frames option.
• If necessary, change the target frame rate in the Frame Rate box.
Otherwise, leave it at its default of 15.
Click OK when you’re done.
5. If you are exporting Illustrator 7, set the appropriate options:
• Choose to export the current frame only, or to export Fireworks frames
as Illustrator layers.
• If you are going to import your file into Macromedia FreeHand, make
sure the FreeHand 8 Compatible checkbox is checked.
Click OK when you’re done.
6. Click Save in the Export dialog box when you’re done.
Your document’s vector shapes are exported.
203662-1 ch15.F 8/2/02 2:55 PM Page 542
Fireworks Seminar

543Chapter 15 ✦ Exporting and Optimizing
If you have the standalone Flash Player, double-clicking your Flash SWF file opens it
for viewing. If not, you can also view Flash movies in a Web browser that’s equipped
with the Flash Player plug-in, or in the QuickTime Player.
If you exported as an Illustrator 7 document, open this document with Illustrator,
FreeHand, Flash, or another vector art application.
Exporting Photoshop documentsExporting your Fireworks document in the Photoshop format enables you to open
and edit your Fireworks work in Photoshop, while maintaining the editability of
individual objects, text objects, and Live Effects. You can later import the Photoshop
document into Fireworks again for further editing and optimization. This feature is
invaluable if you use both applications, or if your workgroup is made up of a mix of
Fireworks and Photoshop users.
To export a Fireworks document as a Photoshop document, follow these steps:
1. Choose File ➪ Export.
The Export dialog box appears.
2. Select Photoshop PSD from the Save as type (Save As) option list.
PSD refers to PhotoShop Document, and also to the typical filename extension forPhotoshop documents: .psd.
3. From the Settings option list, choose one of the following:
• Maintain Editability over Appearance strictly converts Fireworks elements
to their corresponding Photoshop elements, but may result in your work
looking slightly different after it’s opened in Photoshop. This option is
the default, and the best one for most situations.
Keeping at least a backup of your original Fireworks document is always a goodidea, even after exporting to Photoshop format. If you choose any option otherthan Maintain Editability over Appearance, though, be absolutely certain to keepyour original Fireworks document. The other export options all result in editableinformation being flattened or thrown away.
• Maintain Fireworks Appearance keeps your Fireworks objects as
Photoshop layers, but renders Live Effects and text objects as bitmap
images, sacrificing editability for the cause of strictly maintaining the
look of your work.
• Smaller Photoshop File converts Fireworks layers to Photoshop layers,
flattening all the objects on each Fireworks layer.
• Custom enables you to choose specifically whether to maintain or flatten
layers, and whether to maintain or render text and effects.
4. Click Save when you’re ready.
Caution
Tip
203662-1 ch15.F 8/2/02 2:55 PM Page 543
Fireworks Seminar

544 Part IV ✦ Coordinating Workflow
Fireworks exports a Photoshop document, ready to be opened in Photoshop.
Importing files with more than 100 layers requires Photoshop 6 or above. Flattenor remove some objects or layers from your Fireworks document before export ifyou are using Photoshop 5.5 or earlier.
SummaryEvery graphic created or edited in Fireworks is eventually exported for use on the
Web or in another application. Reducing file size is a key facet of making Web graph-
ics, so Fireworks offers a wide variety of export options. Keep the following points
in mind as you optimize and export images:
✦ Maintaining at least two versions of any file is considered the best practice:
one version in the Fireworks PNG format as a master copy, and a second
version in whatever format you’ve exported for use on the Web.
✦ The primary goal of an export operation for the Web is to create the best-
looking image with the smallest file size. This is called optimizing a graphic.
✦ Fireworks provides access to optimization and export options directly in the
workspace, through the Optimize and Frames panels, and with the multiple
tabs of the document window. Alternatively, you can choose to use the Export
Preview dialog box, which you open by choosing File ➪ Export Preview.
✦ Fireworks offers up to four comparison views of an image being exported, so
that you can quickly judge appearance alongside the displayed file size and
approximate download time.
✦ The two major formats for the Web — GIF and JPEG — are each best used for
different types of images. The GIF format is good for graphics with flat color,
for which transparency is important, such as logos. The JPEG format works
best with continuous-tone images, such as photographs.
✦ Another format, PNG, is considered the heir apparent to GIF, but still doesn’t
have enough support to warrant widespread usage. The PNG format has many
advantages, such as full alpha transparency and gamma correction, which ame-
liorate image differences on different platforms. These are currently poorly
supported by common Web browsers, however.
✦ Images can be easily — and precisely — scaled and cropped during the export
operation, by using the Export Preview dialog box.
✦ Fireworks’ advanced color control enables you to lock or replace any color in
an indexed palette.
✦ Fireworks offers expert export guidance in the form of the Export Wizard.
Caution
203662-1 ch15.F 8/2/02 2:55 PM Page 544
Fireworks Seminar

545Chapter 15 ✦ Exporting and Optimizing
✦ In addition to the standard image export, Fireworks can also export compo-
nents of an image, such as layers, frames, or slice objects, in several different
ways. Fireworks can even export just the vector shapes of your Fireworks
objects as Macromedia Flash SWF or Illustrator documents.
✦ Fireworks can export to the Adobe Photoshop format, while maintaining the
editability of individual elements.
In the next chapter, you find out how to maintain a consistent look and feel for your
Web graphics through Fireworks Styles.
✦ ✦ ✦
203662-1 ch15.F 8/2/02 2:55 PM Page 545
Fireworks Seminar

203662-1 ch15.F 8/2/02 2:55 PM Page 546
Fireworks Seminar

Working withFireworks Styles
A lthough not obvious to the beginning designer, Web
graphics is as much about repetition as it is creation.
After you establish a particular look and feel, that theme — the
palette, fonts, effects, and more — is often carried through Web
page after Web page. Several reasons exist for this repetition:
✦ Consistency of approach is one of the fundamental
tenets of design work.
✦ For commercial sites, a consistent look and feel often
ties in with the particular marketing message or brand-
ing that is being pursued.
✦ On the Internet, repetition of graphic elements aids visi-
tors in the navigation of a Web site: If navigation buttons
look the same from page to page, users can quickly learn
how to move around the site — even on their first visit.
However, no matter how many reasons there are to use repeti-
tion, it can also be mind-numbing drudgery. Fireworks rescues
Web designers from repetitive drudgery by offering a mar-
velous time- and work-saver known as styles. By using styles,
you can easily apply the overall look and feel to any selected
object. A single style can contain a variety of user-definable
settings, and styles are always available as you move from
document to document. Moreover, Macromedia designed
styles to be very portable — you can import and export
them as a group. This facility enables you, as a working
Web designer, to keep different style files for different clients.
Styles are, without a doubt, a major boost in Web productivity.
1616C H A P T E R
✦ ✦ ✦ ✦
In This Chapter
Introducing styles
Working with theStyles panel
Making your own styles
Maintaining a styles library
Fireworks technique:Isolating patterns ortextures from styles
✦ ✦ ✦ ✦
213662-1 ch16.F 8/2/02 2:55 PM Page 547
Fireworks Seminar

548 Part IV ✦ Coordinating Workflow
Understanding StylesA Fireworks object is potentially composed of several separate formatting choices:
a path, a stroke, a fill, and one or more Live Effects. Each of these elements can be
broken down further; for example, a stroke consists of a particular stroke type set
to a specific color. Duplicating all the individual settings, one by one, that are neces-
sary to establish a custom look would be extremely time-intensive and error-prone.
Although you can copy an object to the Clipboard and then paste its formatting
onto another object, this requires that you first have a suitable object available to
copy. Rather than keep example objects around just in case you want to re-create
their look, Fireworks allows you to separate the appearance of an object from the
object itself, and save that appearance as a style.
Fireworks MX now saves even more text attributes than before. By checking TextOther in the New Style dialog box, you instruct Fireworks to also save the textalignment, antialiasing, auto-kerning, horizontal scale, range kerning, and leadingright in your style.
Fireworks provides a very novel, graphical method of maintaining and presenting
styles: the Styles panel, shown in Figure 16-1. Acting as a formatting library, the
Styles panel enables you to create, import, export, delete, and otherwise manage
styles.
Figure 16-1: Fireworks includes a default palette of styles, available through the Styles panel.
Styles are visually divided in the Styles panel with two different types of icons: but-
ton styles and text styles. The only difference between the two is that a text style
contains additional information: a typeface, size, and style, or any combination of
the three. Button styles are depicted as squares and text styles are displayed as the
letters ABC, but both preview the appearance that their style contains. Fireworks
comes with 20 button styles and 10 text styles in its built-in default collection
(which can be restored at any time) and over 300 more styles are available on the
Panel Options menu
Button style
Text style
Delete Style buttonNew Style button
NewFeature
213662-1 ch16.F 8/2/02 2:55 PM Page 548
Fireworks Seminar

549Chapter 16 ✦ Working with Fireworks Styles
Fireworks CD-ROM, or on the Web at http://www.macromedia.com/software/fireworks/download/styles. If you think the default styles are a little bland for
your taste, be sure to check out the wide variety of additional styles.
Find even more styles to add to your collection.
The more styles you add, the longer Fireworks will take to start because it needs toinitialize all the styles.
Even though the Styles panel is divided between the button and text style types,
you can apply both to any Fireworks object. In other words, you can apply button
styles to text objects, and text styles to path objects. Any unusable style informa-
tion (such as font color for a path object) is disregarded. You might think of button
styles as styles, and text styles as “styles-plus”; the extra information they contain
doesn’t stop them from being a perfectly good choice for a button or other graphic.
The term styles is commonly used in computer programs. Unlike the styles youtypically find in word processing, Fireworks styles do not maintain a link betweenthe original style and the applied objects. If you edit a style, any objects that thestyle was previously applied to remain unaffected.
Applying StylesTo apply a style, you must first access the Styles panel, which you can open in a
number of ways:
✦ Choose Window ➪ Styles.
✦ Use the keyboard shortcut, Shift+F11.
✦ Click the Styles tab, if the Styles panel is docked behind another, visible panel.
After the Styles panel is available, actually applying the style is very straightforward:
Simply select the object you want to apply the style to and then click a style from
the Styles panel. If you don’t like the results, you can select another style. You can
even duplicate the object and apply several styles to select the best option, as shown
in Figure 16-2.
Applying one style overrides another style but only if both styles affect the samesettings. Styles that contain every possible setting can be mixed and matched freelybecause they will always override the previously applied style. However, applyingmultiple styles that contain only a few of the possible settings — just a fill andstroke color, or just an effect, for example — will lead to your object having a mix ofthose styles. Suppose that you apply a style that only contains a green fill and thenapply another style that only contains a drop shadow effect. Your object will nowhave a green fill and a drop shadow.
Caution
Caution
Caution
On theCD-ROM
213662-1 ch16.F 8/2/02 2:55 PM Page 549
Fireworks Seminar

550 Part IV ✦ Coordinating Workflow
Figure 16-2: Applying different styles to the same object gives you a wide range ofchoices.
After you apply a style, the object remains completely independent of the style,
and you can adjust all the settings on the various panels — Stroke, Fill, Effects, and
Text — to customize the object. Regardless of what changes you make to a styled
object, the style itself is unaltered.
Creating New StylesAlthough using the standard styles — or any of those included on the Fireworks
CD-ROM — is a quick way to establish a consistent look and feel, you may not
be able to find the exact style that you want. The real power in Fireworks styles
comes from the capability to create, save, and use your own styles. The look of
any object — the stroke, fill, effect, or text settings — can be converted to a style
and easily used over and over again by you or a colleague.
Imagine you’ve created an object — a button, say — with a finely tuned stroke setting,
a perfect fill color, and five complex effects modifications with a mix of Fireworks’
built-in drop shadows and bevels and third-party Photoshop plug-ins such as Kai
Power Tools or Alien Skin’s Eye Candy. The entire process might take five minutes
Modified with stylesOriginal path object
213662-1 ch16.F 8/2/02 2:55 PM Page 550
Fireworks Seminar

551Chapter 16 ✦ Working with Fireworks Styles
to re-create, but instead of doing so, select your object and create a style from it.
Image or path objects can look incredibly textured and fussed-over in the time it
takes to apply a style. It’s worth noting again that these effects remain completely
editable on each new object they’re applied to.
For more about Live Effects and Xtras, see Chapter 12.
To create a new style, follow these steps:
1. Select the object upon which you want to base the style.
If you want to base your new style on a style you already have, apply the style toyour object, modify the object’s formatting accordingly, and then continue withStep 2.
2. If the Styles panel is hidden, choose Window ➪ Styles to view it, or use the
keyboard shortcut Shift+F11, or click the Styles panel’s tab if it is docked
behind another, visible window.
3. Click the New Styles button at the bottom of the Styles panel. The New Style
dialog box appears, as shown in Figure 16-3.
Figure 16-3: Create a new style by selecting available options in the New Style dialog box.
4. Enter a unique name for your new style in the Name text box.
Fireworks automatically names new styles Style 1, Style 2, Style 3, and so on, whichit considers to be different from the Style 01, Style 02, Style 03, and so on withwhich its built-in styles are named. You can rename your new style by deleting thesuggested name and entering your own choice. Be aware, however, that Fireworksdoes not check for conflicting names, so you can easily end up with two or morestyles with the same name. I find it’s best to make very descriptive names for thestyles I create, so that they’re easy to recall later, and harder to duplicate acciden-tally. If you hover your cursor over a style’s icon in the Styles panel, Fireworks showsyou the style’s name at the bottom of the panel.
Caution
Tip
Cross-Reference
213662-1 ch16.F 8/2/02 2:55 PM Page 551
Fireworks Seminar

552 Part IV ✦ Coordinating Workflow
5. Select which of the available style settings you want to save with your style.
Available settings are the following:
• Fill Type: Stores the Fill category (Solid, Gradient, Web Dither, or Pattern),
the name of the gradient or Pattern, the edge settings (including the
Amount of Feather, if applicable), and all the texture settings (name,
degree, and transparency).
• Fill Color: Stores the Fill colors for Solid fills. For Gradient, Web Dither,
and Pattern fills, the colors are stored with the Fill Type option.
• Stroke Type: Stores the category, name of stroke, all stroke stamp infor-
mation (even if customized through the Edit Stroke command), the edge
softness, the stroke size, and the texture settings (name and amount of
texture).
• Stroke Color: Stores the selection in the current object’s Stroke color well.
• Effect: Stores all the settings for an object’s Live Effect, whether single
(Inner Bevel, Outer Bevel, Drop Shadow, Glow, or Emboss) or multiple.
• Text Font: Stores the name of the current font for a text object.
• Text Size: Stores the size of the current font for a text object.
• Text Style: Stores the style (bold, italic, and/or underline) for a text
object.
• Text Other: Stores the extra formatting (alignment, antialiasing, auto-
kerning, horizontal scale, range kerning, or leading) for a text object.
6. Click OK when you’re done.
For all the information that styles are capable of retaining, you should note that
although a style remembers gradients, Fireworks styles do not retain any gradient
settings pertaining to modified Gradient Control handles, accessed through the
Gradient tool.
You should remember two points when you are creating and applying new styles.
First, if a style does not affect a particular setting, that setting is left as is on the
selected object. Second, a Stroke, Fill, or Effect set to None is as valid a setting as
any other. For example, if the object on which you base your new style does not
include a fill, but you’ve selected Fill Type in the Edit Style dialog box, any object to
which this style is applied — whether it has a fill or not — will have the fill removed.
Managing StylesEvery time you add a style, it stays available for every document opened in
Fireworks. If you really become adept at using styles, you’ll quickly begin to have
a massive collection of styles — truly too much of a good thing. Fireworks offers
several commands, mostly grouped under the Styles panel’s Options menu, for
managing your styles.
213662-1 ch16.F 8/2/02 2:55 PM Page 552
Fireworks Seminar

553Chapter 16 ✦ Working with Fireworks Styles
Before you start selecting styles in order to delete or modify them, make sure thatyou don’t have any objects in your document selected, or selecting a style willapply that style to the object. Click the mouse in an empty area of the canvas, orchoose Select ➪ Deselect, or use the keyboard shortcut Ctrl+D (Command+D).
You’ve seen how you can create a style by selecting the New Style button from the
bottom of the Styles panel. Its obvious companion is the Delete Style button (the
trash can) right next to it. To remove any unwanted style, select its icon in the
Styles panel and choose the Delete Style button.
You can select multiple styles at the same time. Hold down Ctrl (Command) whileyou select styles to add one at a time. Hold down Shift to select a range of adjacentstyles; Fireworks will select the two styles you click on and every style along theshortest route between them. This selection method is more similar to a spread-sheet than a word processor. To select a row of styles, hold down Shift and clickthe first and last in the row. To add another row to your selection, keep holdingShift and click the last style in the second row. To add part of a row to your selec-tion, switch to holding down Ctrl (Command) and add the final styles one by one.The same technique applies to selecting columns.
A total of seven commands are available in the Styles panel’s Options menu, shown
in Figure 16-4:
Figure 16-4: Manage your stylesthrough the commands in the Styles panel’s Options menu.
✦ New Style: Creates a new style based on the selected object. This command is
identical to the New Style button.
✦ Edit Style: Opens the Edit Style dialog box, enabling you to select or deselect
the setting options.
You can also access the Edit Style dialog box by double-clicking a style’s icon in theStyles panel.
✦ Delete Styles: Removes a selected style or styles.
Tip
Tip
Tip
213662-1 ch16.F 8/2/02 2:55 PM Page 553
Fireworks Seminar

554 Part IV ✦ Coordinating Workflow
✦ Import Styles: Loads a new set of styles after the currently selected one. You
must store styles in the Fireworks Styles format, and you can’t import them
from a Fireworks document, for example.
✦ Export Styles: Stores the currently selected style or styles in the Fireworks
Styles format.
✦ Resets Styles: Removes any styles you have added to the Styles panel and
reloads the default configuration of styles.
✦ Large Icons: Toggles between regular and large-sized icons. When checked,
icons are displayed twice their normal size.
Earlier in this chapter, I showed you how to create and delete styles; the New Style
and Delete Styles commands work in the same way as their respective buttons.
Editing an existing style is also a familiar process. Choose Edit Style, and you are
presented with the same options in the Edit Styles dialog box as when you create a
new one. Just make any changes, click OK, and your revised style is ready to use.
The Edit Style command is also a good way to check what formatting options a par-ticular style affects before applying it. Double-click the style or select it and chooseEdit Style from the Options menu to see which formatting options are checked.
The Export Styles command opens a dialog box, shown in Figure 16-5. Fireworks
offers to save your new file in its Styles folder under the name Custom Styles.stl,
(“Custom Styles” on the Macintosh) but you can change the name to anything else
and store the file wherever you want (as long as you can find it later). If you use
a Macintosh, the .stl filename extension is not necessary, but leaving it on keeps
your style files cross-platform-ready, and will enable you to share your styles with
Windows users or use them yourself on a Windows machine.
Figure 16-5: Export a collection of styles and save them as a Fireworks style file with the filename extension .stl.
Tip
213662-1 ch16.F 8/2/02 2:55 PM Page 554
Fireworks Seminar

555Chapter 16 ✦ Working with Fireworks Styles
The Import Styles command opens a standard Open dialog box. Choose a style file
and click Open to import it.
Mac users: If you receive a Fireworks style file from a Windows-using friend ordownload it unarchived from the Internet, it may not have a Mac OS Creator orType and will appear with a blank icon. As long as it still has its .stl filename exten-sion, though, Fireworks will recognize it and allow you to import and use it. If youwant, you can use the File Exchange Control Panel or a utility such as File Buddy orFinderPop to give the file the proper creator of MKBY (Fireworks, of course) andtype of STYf, which restores its icon.
As noted previously, when you import a set of Fireworks styles, all styles are inserted
after the currently selected style. For this reason, I typically find it best to select the
last currently loaded style before importing. You also can create a spacer or two —
create a style from a plain object with no fill, stroke, or effects. The style icon will
appear blank and acts to separate your imported styles from the standard ones.
You’ll find a style file called No Style.stl in the Configuration/Styles folder that con-tains only one style that applies a Fill, Stroke, and Effect of None. This makes ahandy spacer and a quick, easy way to unformat an object before applying anotherstyle. You could also save this as the first or last style in your exported style files toprovide an easy-to-see start or finish.
The final two Styles panel commands, Reset Styles and Large Icons, are fairly self-
explanatory. Reset Styles removes all styles currently in the Styles panel and reloads
the standard set of styles in their place. Because this measure is fairly drastic,
Fireworks asks for confirmation before proceeding. Selecting Large Icons displays
the style icons at twice their standard size — they enlarge from 36 pixels square
to 72. This feature is sometimes useful when trying to differentiate between two
similar styles.
Fireworks Technique: Isolating Patterns and Textures from Styles
A close look at some of the styles that come with Fireworks — both the defaults
and the extras found on the Fireworks CD-ROM — reveals several exciting Patterns
and textures. On the CD you’ll find a style — quite innocently named Style 37, and
contained within text1-201.stl — that has an intriguing spotted Pattern, shown in
Figure 16-6. A quick check of the Fill panel reveals that a texture, called (appropri-
ately) cow, is in use as part of the style. However, no such file exists in the Textures
folder; so, where did it come from? The texture is actually embedded in the style.
Find text1-201.stl on the Fireworks CD-ROM at Goodies/Styles/Styles/text/text1-201.stl.
Tip
On theCD-ROM
Tip
213662-1 ch16.F 8/2/02 2:55 PM Page 555
Fireworks Seminar

556 Part IV ✦ Coordinating Workflow
Figure 16-6: Examine the cow texture fromStyle 37. It works fine on a plain circle andalso specifies 170pt Arial Black when appliedto text.
Donna Casey, a Web designer whose work you can see at www.n8vision.com,
uncovered a technique for extracting the embedded textures and Patterns that
you may find in a style. Why would you do this? You might find that the Pattern
and/or texture is, to your eye, better when combined with a different stroke or effects
setting — or you might want to incorporate only the Pattern or texture in an image.
This problem has two approaches. First, you could edit the style, removing all the
options except for Fill Type. This is, at best, a partial solution. The Pattern/texture
is still encased in the other pertinent settings; textures, for example, could be part
of a Solid, Pattern, or Gradient Fill. To completely separate the texture or Pattern
and then save it, follow these steps:
1. Draw a fairly large rectangle or square, approximately 500×500 pixels.
The goal is to make the object large enough so that the pattern clearly repeats.
2. From the Styles panel, select the style whose texture or fill you want to isolate.
The style is applied to the object.
3. From the Property inspector, choose None in the Stroke section.
4. Select any Effects in the Property inspector and click on the minus to
delete them.
5. To retrieve a texture, make the following changes to the Fill section of the
Property inspector:
• Set the Fill category to Solid.
• Set the Fill color to black.
• Set the Amount of texture to 100%.
6. To retrieve a Pattern, set the Amount of texture to 0%.
213662-1 ch16.F 8/2/02 2:55 PM Page 556
Fireworks Seminar

557Chapter 16 ✦ Working with Fireworks Styles
7. Choose the Crop tool from the Tools panel.
8. Crop the object to encompass the repeating pattern.
This is, by far, the hardest part; it might take several attempts to get it just
right. It is a good idea is to save the file before you begin to crop the object.
With most textures, the repeating pattern will actually be smaller than it
might first appear.
9. When you finish cropping, save the file in either the Patterns or Textures folders
in the Configuration folder within your Fireworks program folder.
10. Restart Fireworks to refresh the Pattern and texture lists.
You can also use your new Pattern or texture without restarting Fireworks bychoosing Other, from the Pattern or texture list in the Fill section of the Propertyinspector, and selecting your newly saved file.
Your new extricated Pattern or texture should now be available to you in the Stroke
and Fill sections of the Property inspector.
SummaryStyles are a major production boost, enabling you to easily build up a library of
formatting choices and add a consistent look and feel to all of your graphics on a
client-by-client or site-by-site basis. Styles are also a significant work-saver — rather
than having to add individually all the characteristics that compose a particular
look, you can add them all with one click of the Styles panel. The main points with
regard to styles are:
✦ Styles are accessible through the Styles panel.
✦ A style may contain almost all the information for reproducing a graphic’s
stroke, fill, effect, and text settings.
✦ Unlike some other programs, such as Macromedia FreeHand, Fireworks styles
do not retain a link to objects that use them.
✦ Any newly created style is available to all documents until the style is
removed from the Styles panel.
✦ Styles can be edited, imported, exported, and otherwise managed through
the commands found in the Styles panel’s Options menu.
✦ A style can be “reverse engineered” to isolate the Pattern or texture that it
contains.
In the next chapter, you find out how to use Symbols and Libraries to cut down on
even more repetitive work.
✦ ✦ ✦
Tip
213662-1 ch16.F 8/2/02 2:55 PM Page 557
Fireworks Seminar

213662-1 ch16.F 8/2/02 2:55 PM Page 558
Fireworks Seminar

Using Symbolsand Libraries
Many Fireworks features are specifically designed to
prevent duplication of effort on the part of the busy
Web artist. Perhaps none more so than the symbols. In a nut-
shell, a symbol is an object that’s been designated as a master
copy and stored in a Symbol Library. Copies of a symbol, called
Instances, retain a link to their symbol so that they can be
modified as a group. Editing the symbol causes its Instances
to inherit the changes.
This chapter begins with a discussion of the basics of using
symbols, Instances, and Libraries in Fireworks. Later, you dis-
cover how to make, modify, and manage symbols, Instances,
and Libraries.
Understanding Symbols and Instances
Symbols in Fireworks are like templates for single objects. The
symbol itself is like a rubber stamp that you dip in ink. You can
“stamp out” virtually unlimited copies of any symbol, called
Instances. Instances are copies of symbols that retain a link to
their parent symbol. Editing the symbol causes its Instances
to inherit many of the changes, such as fill and stroke settings.
On the other hand, Instances have some independent proper-
ties of their own: You can apply the Transform tools to them,
add Live Effects, or alter opacity settings on an individual basis,
as shown in Figure 17-1. From a design perspective, symbols
and Instances enable you to maintain a common look without
losing a feeling of variety.
1717C H A P T E R
✦ ✦ ✦ ✦
In This Chapter
Understandingsymbols
Creating andmodifying symbols
Modifying Instances
Working with buttons
Managing Libraries
✦ ✦ ✦ ✦
223662-1 ch17.F 8/2/02 2:55 PM Page 559
Fireworks Seminar

560 Part IV ✦ Coordinating Workflow
Figure 17-1: These are all Instances of the same symbol, with modifications made to scale, skew, opacity, and with Live Effects. The Instance at top left is unmodified and looks exactly like the parent symbol.
When you edit a symbol in the Symbol Editor, the link that its Instances have with
the parent symbol causes them to inherit the changes, as shown in Figure 17-2.
Fireworks automatically updates Instances to match their parent symbol as soon
as you close the Symbol Editor. Note that any modifications that were made to the
individual Instances — such as applying a Live Effect, Photoshop filter, or Transform
tool — are unaffected.
Symbols themselves are always stored in a Library, accessible through the Library
panel, shown in Figure 17-3. Converting an object to a symbol places it in the
Library and leaves a copy behind — an Instance — in the document window. The
Library panel provides a range of functions for managing and modifying symbols
and Libraries, but its most basic function is as a way to make Instances. Dragging
a symbol from the Library and dropping it in the document window makes a new
Instance, much like making a shortcut to a file in Windows, or a file alias on the Mac.
In fact, Instances even have the little arrow badge that Windows shortcuts and Mac
aliases share.
ModifiedInstances
223662-1 ch17.F 8/2/02 2:55 PM Page 560
Fireworks Seminar

561Chapter 17 ✦ Using Symbols and Libraries
Figure 17-2: The Instances from Figure 17-1 are automatically updated by Fireworks after their parent symbol is modified. Even though most of the Instances have been heavily modified themselves, the change to the basic Instance (top left) shows through.
Figure 17-3: Symbols are stored in the Library panel. Dragging them into a document creates an Instance, identified by the arrow badge in its bounding box.
UpdatedmodifiedInstances
Edited symbol
223662-1 ch17.F 8/2/02 2:55 PM Page 561
Fireworks Seminar

562 Part IV ✦ Coordinating Workflow
One advantage of using Instances is that they are simplified renderings of their
parent symbol. Where a symbol might be a complex vector object with an intricate
stroke and gradient fill, an Instance of it is just a simple bitmap object. Using many
Instances rather than using independent objects, as shown in Figure 17-4, improves
your computer’s performance because Fireworks draws bitmap objects instead of
the more complex vector objects over and over again.
Figure 17-4: Instances aresimplified, bitmap versions of their parent symbols. Youcan use numerous Instanceswithout adversely affectingFireworks’ performance.
Although this chapter only deals with two Symbol types, three types of symbols are
available to you:
✦ Graphic Symbols: You might think of a Graphic Symbol as a basic, vanilla
symbol. Generally, when you refer to a symbol, you’re talking about a Graphic
Symbol. An Instance of a Graphic Symbol acts much the same way as any
Fireworks object. You can place it anywhere on the canvas, move it to another
layer, and modify many of its properties.
✦ Animation Symbols: What separates an Animation Symbol from a regular
Graphic Symbol is that an Animation symbol has multiple frames, usually
with slightly differing versions of a Graphic Symbol on each frame. When the
frames are shown in succession, the different frames animate to make your
Symbol into a mini-movie.
✦ Button Symbols: Button Symbols are Symbols-Plus. A Button Symbol has multi-
ple frames that contain the different states of the button, such as Up, Over, and
Down. Instances of Button Symbols carry their own slice object with them,
Original vector drawing
Hundreds of Instances(bitmap objects)
Instance(bitmap object)
223662-1 ch17.F 8/2/02 2:55 PM Page 562
Fireworks Seminar

563Chapter 17 ✦ Using Symbols and Libraries
which can have a URL or Behavior attached. In a sense, a Button Symbol is a
combination of all the separate Fireworks objects you would need to use to
make a button, wrapped up into a tidy package that’s easy to edit and reuse.
Animation Symbols are covered in Chapter 23.
The steps you take to create and modify the two types of symbols are slightly
different, as each type of symbol has its own editor, but they are also similar in
many ways. Button Instances share the same properties with their parent symbols
as Graphic Instances.
Instances also enable advanced animation building because Fireworks can tween
two or more of them and automatically create intermediate steps, simplifying and
speeding up the animation process. Tweening a scaled-down Instance with a scaled-
up one, for example, causes Fireworks to connect them with stair steps of new
Instances, which are then easily distributed to frames to create an animation of a
single object growing or shrinking.
Find out more about tweening Instances in Chapter 23.
Introducing the Library PanelThe Library panel, shown in Figure 17-5, is a central place to access and manage a
Symbol Library. Every symbol in the current document is displayed in the symbol
list in the Library panel, and they are identified as either a Graphic Symbol or
Button Symbol by a distinctive icon. Like most other Fireworks panels, the Library
panel has an Options menu and can be grouped with other panels. To display the
Library panel, choose Window ➪ Library, or use the keyboard shortcut, F11.
Following are the main features of the Library panel:
✦ Symbol list: As you create or import symbols, they are added to the symbol
list automatically. Initially, when you create a new document, the Library
panel is completely empty. The symbol list is divided into columns that detail
different properties of the symbols it contains, similar to the columns you see
in a Windows or Macintosh folder that is set to List view. Double-clicking a
symbol’s entry in the symbol list opens the Symbol Properties dialog box for
that symbol, enabling you to rename the symbol, or convert it from a Button
to a Graphic Symbol, or vice versa.
✦ Symbol preview: Selecting a symbol from the symbol list displays a preview
of the symbol. Dragging the symbol’s preview into a document creates an
Instance of the symbol in the document. Double-clicking the symbol preview
opens the symbol for editing.
✦ Options menu: The Options menu contains commands for creating and
managing symbols.
Cross-Reference
Cross-Reference
223662-1 ch17.F 8/2/02 2:55 PM Page 563
Fireworks Seminar

564 Part IV ✦ Coordinating Workflow
Figure 17-5: The Library panel is a central place to store and manage Symbol Libraries.
You’ll look more closely at the Library panel as you use it throughout this chapter
to create, edit, and manage symbols.
Making and Modifying SymbolsMost of the time, you create and manage symbols using the commands in the
Edit ➪ Insert menu, although similar commands are also available through the
Options menu on the Library panel, which you look at in detail later in this chapter.
Creating a symbolObviously, the first step in using symbols is to actually make one. Fireworks provides
three routes to a new symbol: convert an existing object into a symbol, create a
symbol from scratch, or duplicate an existing symbol. Converting an existing object
is probably the most common method of creating a new symbol. Fireworks even
betrays this bias for converting existing objects in the keyboard shortcuts it uses:
plain F8 to convert an object into a symbol, and the slightly less convenient Ctrl+F8
(Command+F8) to create a symbol from scratch.
Play Symbol button
Toggle Sorting button
Options menuSymbol preview
Optionsmenubutton
Delete Symbol button
Edit Symbol button
New Symbol button
Symbol list
ButtonSymbol
icon
Graphic Symbol icon
223662-1 ch17.F 8/2/02 2:55 PM Page 564
Fireworks Seminar

565Chapter 17 ✦ Using Symbols and Libraries
Mac OS 9 users: If you have mapped the keyboard’s function keys in the Mac OSKeyboard Control Panel to start programs or perform other tasks, function key short-cuts in Fireworks are superceded by those mappings. Use the menu commands inFireworks instead, or disable the mappings in the Keyboard Control Panel.
Converting an objectYou can convert almost any object into a symbol, whether it is a vector object or a
bitmap object, or even a group.
Although you can convert an Instance into a symbol, doing so breaks the link to itsoriginal parent symbol.
To convert an object into a symbol, follow these steps:
1. Select the object you want to convert to a symbol.
2. Choose Modify ➪ Symbol ➪ Convert to Symbol, or use the keyboard shortcut,
F8. Fireworks displays the Symbol Properties dialog box (see Figure 17-6).
Figure 17-6: Give a symbol a namein the Symbol Properties dialog boxand decide whether it will be aGraphic or a Button Symbol.
3. In the Name box, change “Symbol” to a unique name for your symbol.
4. By default, Fireworks offers to create a Graphic Symbol. Leave the Type radio
buttons set to Graphic. Click OK when you’re done.
I cover Button Symbols later in this chapter, and Animation Symbols in Chapter 23.
Fireworks places your original object into the Library panel and leaves an Instance
behind in its place in the document. You can identify the Instance by its arrow badge.
Creating a symbol from scratchWhen you have the presence of mind to know that an object should be a symbol
right from the start, you can make one entirely from scratch. You may also want to
create a symbol that’s a combination of different objects. In this case, you can cre-
ate a new symbol and then copy and paste different elements from the document
window into your new symbol.
Cross-Reference
Note
Caution
223662-1 ch17.F 8/2/02 2:55 PM Page 565
Fireworks Seminar

566 Part IV ✦ Coordinating Workflow
To create a brand-new symbol, follow these steps:
1. Choose Edit ➪ Insert ➪ New Symbol, or use the keyboard shortcut, Ctrl+F8
(Command+F8). Alternatively, you can choose New Symbol from the Library
panel Options menu. Fireworks displays the Symbol Properties dialog box.
2. Change the generic “Symbol” name in the Name box to a unique name for
your symbol.
3. Leave the Type radio buttons set to Graphic to create a Graphic Symbol.
Click OK when you’re done.
4. Fireworks displays the Symbol Editor (see Figure 17-7).
Figure 17-7: The Symbol Editor is like a special document window for creating or editing Graphic Symbols.
5. Create your new symbol in the Symbol Editor, just as you would in the
document window, using any combination of Fireworks tools, panels, or
the Property inspector. You can copy and paste between the Symbol Editor
and the document window, as well.
You can easily edit and modify your new symbol later, so don’t worry about makingit absolutely perfect.
6. Close the Symbol Editor when you’re done by clicking its Close box, located
in the upper-right corner of the dialog box in Windows and in the upper-left
corner on a Mac.
Your new symbol appears in the Library panel, and an Instance is placed in
the document window.
Tip
223662-1 ch17.F 8/2/02 2:55 PM Page 566
Fireworks Seminar

567Chapter 17 ✦ Using Symbols and Libraries
A bug in Fireworks MX disables the Save command when the Symbol Editor isopen. Pressing Ctrl+S (Command+S) while in the Symbol Editor does not saveyour current document. The workaround is to save your document before openingthe Symbol Editor.
Duplicating an existing symbolThe final way to create a new symbol is to duplicate an existing one.
To duplicate a symbol, follow these steps:
1. Choose Window ➪ Library, or use the keyboard shortcut, F11, to view the
Library panel, if it is not already visible.
2. Select a symbol to duplicate from the symbol list.
3. Choose Duplicate from the Library panel Options menu.
Fireworks duplicates the selected symbol, adding a number after its name to distin-
guish it from the original.
To rename a symbol, double-click its name in the symbol list and change its namein the Symbol Properties dialog box.
Modifying symbolsYou can easily edit symbols in the Symbol Editor. When you’re done editing a sym-
bol and have closed the Symbol Editor, the changes that you’ve made are applied
to the symbol and to all of its Instances. Editing a symbol, then, is also editing all
of its Instances.
To modify an existing symbol, follow these steps:
1. Choose Window ➪ Library, or use the keyboard shortcut, F11, to view the
Library panel, if it isn’t already visible.
2. Select the symbol you want to edit from the symbol list.
3. Double-click the symbol preview to open the symbol in the Symbol
Editor. Alternatively, you can choose Edit Symbol from the Library panel
Options menu.
4. Modify the symbol in the Symbol Editor. When you’re done, close the Symbol
Editor by clicking its Close box, located in the upper-right corner in Windows
and in the upper-left corner on a Mac.
Your edits are applied to the symbol and to all of its Instances.
Tip
Caution
223662-1 ch17.F 8/2/02 2:55 PM Page 567
Fireworks Seminar

568 Part IV ✦ Coordinating Workflow
Using symbol-editing shortcutsFireworks also provides these two shortcuts for editing symbols:
✦ If you have an Instance selected in the document window and you just want to
edit its parent symbol, choose Modify ➪ Symbol ➪ Edit Symbol to view the
Instance’s parent symbol in the Symbol Editor.
✦ If you are editing a symbol’s properties in the Symbol Properties dialog box
(detailed in the next section), you can click the Edit button to open the sym-
bol in the Symbol Editor.
When using either of these shortcuts, closing the Symbol Editor applies your
changes to all the symbol’s Instances.
If you take a wrong turn with your edits in the Symbol Editor, you can close theSymbol Editor — which applies your changes — and then choose Edit ➪ Undo toundo those changes.
Modifying symbol propertiesIn addition to modifying the symbol itself, you can also modify a symbol’s properties,
changing its name, or converting it from a Graphic Symbol to a Button Symbol, or
vice versa.
To edit a symbol’s properties, follow these steps:
1. Choose Window ➪ Library, or use the keyboard shortcut, F11, to view the
Library panel, if it isn’t already visible.
2. Open the Symbol Properties dialog box by doing one of the following:
• Double-click a symbol’s name in the symbol list.
• Select the symbol in the symbol list and choose Properties from the
Options menu.
• Click the symbol’s name in the symbol list and then click the Symbol
properties button on the Library panel.
Fireworks displays the Symbol Properties dialog box, shown in Figure 17-8.
Figure 17-8: The Symbol Properties dialog box displays athumbnail of an existing symboland enables you to rename asymbol, or convert its Type.
Tip
223662-1 ch17.F 8/2/02 2:55 PM Page 568
Fireworks Seminar

569Chapter 17 ✦ Using Symbols and Libraries
3. Modify the symbol’s properties in the Symbol Properties dialog box and click
OK when you’re done.
Fireworks applies your changes to the symbol. If you converted the symbol’s Type,
all of its Instances also take on that change. For example, if you converted a symbol
from a Graphic Symbol to a Button Symbol, all of its Instances become buttons.
Deleting a symbolDeleting a symbol is an easy affair, but keep in mind that if the symbol has
Instances, they will be deleted, too.
To delete a symbol, follow these steps:
1. If the Library panel is not visible, choose Window ➪ Library, or use the key-
board shortcut, F11, to display it.
2. Select the symbol you want to delete in the symbol list.
3. Choose Delete from the Library panel Options menu. If the symbol doesn’t
have any Instances, it is deleted immediately without confirmation. If the
symbol does have Instances, Fireworks displays the Delete Symbol dialog
box, shown in Figure 17-9.
Figure 17-9: The Delete Symbol dialog box confirms that you really want to delete a symbol.
4. Click the Delete button in the Delete Symbol dialog box to delete the symbol.
The symbol and its Instances are removed from your document.
Creating InstancesCreating an Instance is a common task that you can accomplish with one of two
simple methods:
✦ Drag and drop a symbol from the Library panel onto the canvas. You can drag
it from either the symbol preview, or from the symbol list.
You can create Instances of multiple symbols in one step by selecting a group ofsymbols from the symbol list and dragging them all onto the canvas.
Tip
223662-1 ch17.F 8/2/02 2:55 PM Page 569
Fireworks Seminar

570 Part IV ✦ Coordinating Workflow
✦ Duplicate an Instance in the document window. A copy of an Instance is also
an Instance. Any of the methods that you’re used to using to duplicate objects
in Fireworks also work to duplicate Instances:
• Choose the Instance and then choose Edit ➪ Duplicate or Edit ➪ Clone.
• Copy the Instance to the clipboard and paste back a copy.
• Hold down the Alt (Option) key, and drag an Instance to create a copy.
You can identify the new Instance as another Instance by the arrow icon in the
lower-left corner of its bounding box.
Modifying InstancesAlthough modifying a symbol passes changes on to all of its Instances, you can also
make modifications to individual Instances. Fireworks treats Instances like groups,
enabling you to apply similar transformations. The relationship between transfor-
mations applied to a symbol and transformations applied to an Instance is the same
as making transformations to individual objects, and then grouping them and apply-
ing a transformation to the group. In fact, you can observe the group-like behavior
of an Instance by breaking the link with its symbol. What you’re left with is a group.
Although you can apply a filter to an Instance, doing so breaks the link and turns itinto a bitmap object.
Applying modifications to an Instance has no effect on any other Instance, or on the
parent symbol. Scale one Instance, for example, and its parent symbol and other
Instances of that symbol are unaffected. In other words, the link goes one way, only
from symbol to Instance.
You can apply these transformations to Instances:
✦ Shape transformations: Adjust the width, height, skew, distortion, and
rotation, or flip the Instance vertically or horizontally. Anything on the
Modify ➪ Transform submenu is fair game.
✦ Opacity: Alter the opacity settings on the Property inspector.
✦ Blending mode: Alter the blending mode on the Property inspector.
For more about opacity and blending modes, see Chapter 13.
✦ Live Effects: Apply Live Effects from the Add Effects menu, in the Effects sec-
tion of the Property inspector. The effects that are applied to the symbol are
flattened in the Instance, so even though an Instance may appear to have Live
Effects, there are actually no Live Effects applied until you add them to an
individual Instance.
Cross-Reference
Caution
223662-1 ch17.F 8/2/02 2:55 PM Page 570
Fireworks Seminar

571Chapter 17 ✦ Using Symbols and Libraries
For more about Live Effects, see Chapter 12.
Breaking linksIf you want to break the link between an Instance and its parent symbol, select the
Instance and choose Modify ➪ Symbol ➪ Break Apart. The link is broken and your
Instance is now a regular group, even if the symbol only contained one object. To
separate the group, choose Modify ➪ Ungroup.
Deleting InstancesDeleting an Instance works just like deleting any Fireworks object and has no effect
on the parent symbol or any other Instance. To delete an Instance, select it and
press Delete.
Working with ButtonsButton Symbols enable you to encapsulate up to four button states, such as Up,
Over, and Down, along with a slice object containing a URL or a Behavior into a
single object that you can think of as a button.
You can place button Instances onto the canvas again and again, and change the
link and Button Text independently for each one. In addition, Behaviors are applied
to the Button Symbol itself, meaning that you only have to build one rollover for an
entire Web site of rollover buttons. Button Instances do not appear on shared layers.
Instead, they appear on their own layer on Frame 1 of the document.
Fireworks MX adds Instance-level button properties. In previous versions ofFireworks, changing the text on a button meant creating a new symbol. Now, youcan alter button text and much more.
I cover Behaviors in Chapter 21.
Making and modifying Button SymbolsThe Fireworks Button Editor is a special Symbol Editor window with tabs for each
state of a button that makes it easy to make or modify a Button Symbol.
To create a Button Symbol, follow these steps:
1. Choose Edit ➪ Insert ➪ New Button.
Fireworks displays the Button Editor, as shown in Figure 17-10.
Cross-Reference
NewFeature
Cross-Reference
223662-1 ch17.F 8/2/02 2:55 PM Page 571
Fireworks Seminar

572 Part IV ✦ Coordinating Workflow
Figure 17-10: The Button Editor has individual tabs for each state of a button.
2. Create the Up state of your button in the Up tab of the Button Editor.
3. Select the Button Editor’s Over tab and create the Over state of your button.
To start with the Up state and modify it to be an Over state, click Copy Up
Graphic. Fireworks copies the Up state to the Over tab, ready for whatever
modification you desire.
4. If you want to include a Down state in your button, select the Down tab and
create the Down state of your button. Fireworks automatically checks Include
Nav Bar Down State when you start building a down button. Again, you can
click Copy Over Graphic to copy the previous state to this tab for modification.
5. To add an Over While Down state to your button, switch to the Over While
Down tab and either create a new state, or copy the previous one — click
Copy Down Graphic — and modify it to create the Over While Down state.
6. Switch to the Active Area tab. Fireworks automatically creates a slice in the
Active Area tab that encompasses the area of your button. Adjust the size of
the slice if necessary.
If your button has a drop shadow, or other effect, the slice that Fireworks createsencompasses the space your effects take up as well. To avoid having your buttonchange when you viewer’s mouse is over a drop shadow, for example, you canuncheck Set Active Area Automatically and resize the slice to include only the but-ton itself. This can lead to buttons that feel more realistic because they do notchange until the mouse is really over the button.
7. Close the Button Editor when you’re done.
Your new Button Symbol is added to the Library panel, and an Instance is
placed in the document window.
Tip
223662-1 ch17.F 8/2/02 2:55 PM Page 572
Fireworks Seminar

573Chapter 17 ✦ Using Symbols and Libraries
To modify a Button Symbol, double-click its name or its symbol preview in the
Library panel, or select it in the symbol list and choose Edit Symbol from the
Library panel Options menu.
Converting existing objects into Button SymbolsConverting an existing object into a Button Symbol is a quick way to get a button
started. Because each state of a multistate button is usually a variation on the first
state, converting an existing object into a Button Symbol, and then modifying it
slightly in the Button Editor to create Over, Down, and Over While Down states is
an excellent strategy.
To convert an object into a button, select it and choose Modify ➪ Symbol ➪ Convert
to Symbol, or use the keyboard shortcut, F8. Choose Button from the Type setting
in the Symbol Properties dialog box, give your button a unique name in the Name
box, and click OK. Fireworks converts your object into a Button Symbol, creating a
slice object on top of it in the document window, as shown in Figure 17-11.
Figure 17-11: Converting an objectinto a Button Symbol also covers itwith a slice object.
Add more states to your button by editing it in the Library panel.
Converting Button Symbols into Graphic SymbolsIf you convert a Button Symbol into a Graphic Symbol by editing its properties in
the Symbol Properties dialog box, the slice object that makes up the Active Area of
the button remains with the symbol. To remove it, edit your symbol in the Symbol
Editor and manually delete the slice object.
Using Button InstancesIn addition to the standard, modifiable Instance properties, such as opacity, X and
Y coordinates, width, height, and Live Effects, Button Instances have two additional
223662-1 ch17.F 8/2/02 2:55 PM Page 573
Fireworks Seminar

574 Part IV ✦ Coordinating Workflow
editable properties: their Button Text and the links that are applied to their slice
objects (see Figure 17-12). Selecting the Button Instance and viewing the Property
inspector allows you to modify both of these, enabling you to assign each Button
Instance a separate URL and some unique text.
Figure 17-12: Modify the Button Text and the URL for each Button Instance in the Property inspector to truly turn each Instance into a separate button.
To modify the Button Text, type new text into the Button Text box in the Property
Inspector and press Enter (Return).
You can only modify Button Text if your Button Symbol contains a text object. If itdoesn’t, the Button Text area of the Property inspector is grayed out.
To modify a button’s link, simply click the Link field in the Property inspector and
add the URL for your Instance.
Instance Level Button PropertiesFireworks MX takes individual control over buttons a step further. For most people,
the amount of control over Instances and buttons in Fireworks 4 was enough. While
the level of control over Instances mentioned so far allows for a great deal of flexi-
bility and ease of use, Fireworks always seems to be able to go that extra mile if
you need it to. In Fireworks MX, whenever you have an Instance selected, you can
edit all of the Instance Level Button Properties from the Property inspector (see
Figure 17-13).
Note
223662-1 ch17.F 8/2/02 2:55 PM Page 574
Fireworks Seminar

575Chapter 17 ✦ Using Symbols and Libraries
Fireworks MX lets you take the control over Buttons to the next level by enablingyou to change the export settings, add Behaviors, and so much more — all at theInstance level.
Instance Level Button Properties give you control over the following:
✦ Export Settings: Export settings for the Instance, such as GIF WebSnap 128.
✦ Behaviors: You can use the Behaviors panel to apply additional Behaviors to
just one Instance.
✦ Link: A URL, as well as ALT text, for the button.
✦ Target: A target window or frame for the hyperlink to open in.
✦ Filename: A filename for the button’s Instance, or Auto-Name Slices can be
left on to have Fireworks name the slice on its own.
Figure 17-13: The ability to edit button properties at the Instance level means that a group of Instances can be significantly changed without altering the originalsymbol.
Managing LibrariesMaking and managing buttons is a common task for the Web artist, and having a
central place to store buttons and an easy way to reuse them — drag and drop
from the Library panel to a document — saves time and work, again and again.
Libraries exist in one of two places: within a document by default, or as a standalone
PNG file that you create by exporting a Library.
NewFeature
223662-1 ch17.F 8/2/02 2:55 PM Page 575
Fireworks Seminar

576 Part IV ✦ Coordinating Workflow
Importing a LibraryYou can import Libraries from other Fireworks documents, or from Library-only
PNG files that are created by exporting a Library from Fireworks.
To import a Library into the current document, follow these steps:
1. Choose Window ➪ Library, or use the keyboard shortcut, F11, to view the
Library panel, if it’s not visible.
2. From the Library panel Options menu, choose Import Symbols.
Fireworks displays an Open File dialog box.
3. Navigate to the Fireworks PNG file that contains the Library you want to
import, and choose Open when you’re done.
Fireworks displays the Import Symbols dialog box, as shown in Figure 17-14.
Figure 17-14: Fireworks displays the Import Symbols dialog box when you import a Library.
4. Choose symbols to import in one of the following ways:
• To import all the symbols, click the Select All button.
• To import a contiguous list of symbols, hold down Shift and click the
first and last symbol in the contiguous list.
• To pick and choose symbols from the list, hold down Ctrl (Command)
and, in turn, click each symbol you want to import.
To quickly import a single symbol, double-click its name in the Import Symbolsdialog box.
5. After you make your selection, click Import to import the symbols into the
current document.
Fireworks imports the symbols and makes them available in the Symbol list.
Tip
223662-1 ch17.F 8/2/02 2:55 PM Page 576
Fireworks Seminar

577Chapter 17 ✦ Using Symbols and Libraries
Accessing often-used LibrariesChoose a Library from the Edit ➪ Libraries submenu to begin importing it. This sub-
menu reflects the contents of Fireworks’ Libraries folder, shown in Figure 17-15. The
Libraries folder is located inside the Configuration folder, inside your Fireworks
program folder. Placing a Fireworks PNG file into this folder and restarting Fireworks
makes it available as a Library on the Insert ➪ Libraries submenu. If you frequently
access the same sets of Libraries, this can be a real timesaver.
Figure 17-15: Place often-used Libraries into Fireworks’ Libraries folder for easy import.
The Fireworks program folder is typically found at C:\Program Files\Macromedia\Fireworks MX on Windows-based computers, and at Macintosh HD:Applications:Macromedia Fireworks MX on the Mac.
You can also import a Library from the Edit ➪ Libraries submenu without restarting
Fireworks by choosing Edit ➪ Libraries ➪ Other and navigating to the Library PNG
file anywhere on your computer. Fireworks imports the Library into the current
document.
Updating imported LibrariesFireworks remembers where it originally acquired an imported symbol and can
update imported symbols from that original source. This enables you, for example,
to maintain a single Library of buttons for a Web site and to import that Library
into multiple documents. If you need to modify a button later, modify it in the
Library, and then click Update in each of the documents that uses that Library.
In one step for each document, any number of documents can be updated from a
single edit of the master Library.
Tip
223662-1 ch17.F 8/2/02 2:55 PM Page 577
Fireworks Seminar

578 Part IV ✦ Coordinating Workflow
To update imported symbols from their original sources, choose Update from the
Library panel Options menu.
If you try to edit an imported symbol, Fireworks notifies you that doing so breaksthe link to the original symbol. In effect, you are creating a new symbol based onthat symbol by editing it.
Exporting and sharing LibrariesAlthough you can import Libraries directly from any Fireworks document that con-
tains symbols, exporting a group of symbols as a standalone Library — which is still
a standard Fireworks PNG file — is a good way to share symbols with colleagues or
to create archives of symbols for later use.
To export symbols as a standalone Library, follow these steps:
1. Choose Window ➪ Library, or use the keyboard shortcut, F11, to view the
Library panel, if it is not visible.
2. Choose Export Symbols from the Library panel Options menu.
Fireworks displays the Export Symbols dialog box, as shown in Figure 17-16.
Figure 17-16: Fireworks displays the Export Symbols dialog box, enabling you to choose which symbols you’d like to export.
3. Choose symbols to export in one of the following ways:
• To export all the symbols in your document, click Select All.
• To export a contiguous list of symbols, hold down Shift and click the first
and last symbol in the contiguous list.
• To pick and choose symbols from the list, hold down Ctrl (Command)
and click each symbol you want to export.
Caution
223662-1 ch17.F 8/2/02 2:55 PM Page 578
Fireworks Seminar

579Chapter 17 ✦ Using Symbols and Libraries
4. After you make your selection, click Export.
Fireworks displays the Export Symbols As dialog box.
5. Navigate to a folder where you want to save your symbols file and provide
a filename. Click Save when you’re done.
The exported file contains your exported symbols, and you can import it into
another document or share it with others.
SummarySymbols and Libraries can greatly simplify many of the most common tasks of the
Web artist. Keep the following points in mind:
✦ Fireworks has three kinds of symbols: Graphic, Animation, and Button.
✦ Symbols are kept in the Library panel. Dragging a symbol from the Library
panel onto the canvas creates an Instance of the symbol.
✦ Symbols can contain any object, except Instances.
✦ Every copy that you make of an Instance is another Instance.
✦ Some properties of Instances, such as Live Effects, and some transformations,
such as scale and skew, can be modified independently of the parent symbol
or other Instances. Some properties, such as fill and stroke, can be modified
only on the symbol and are then inherited by its Instances.
✦ Symbols are stored in Libraries, which you can export from and import into
the current document using the Library panel.
In the next chapter, you look at how to update and maintain your graphics in
Fireworks.
✦ ✦ ✦
223662-1 ch17.F 8/2/02 2:55 PM Page 579
Fireworks Seminar

223662-1 ch17.F 8/2/02 2:55 PM Page 580
Fireworks Seminar

Updating andMaintainingWeb Graphics
I’m sure you’ve heard the expression, “One percent inspira-
tion and 99 percent perspiration.” In my experience, Web
graphics is more balanced — half the time you’re creating a
new work, and the other half you’re revising something that
you’ve already done. Updating Web pages is a continual,
seemingly never-ending process, and although some of the
work involves importing new text, quite often you need to
alter the graphics, as well. No product can completely turn
such a chore into a joyful, creative pleasure, but at least
Fireworks helps you to get the job done in the most efficient
manner possible.
Web-graphic maintenance is at the core of Fireworks’ “every-
thing-editable, all-the-time” philosophy. When Fireworks first
arrived, Web designers everywhere were thrilled with the ease
with which changes to images could be made. Fireworks has
since extended that ease-of-use philosophy to include produc-
tion tasks, such as updating URLs and replacing colors. This
chapter explores all the production enhancement techniques —
from previewing your graphics directly in a browser to opti-
mizing entire folders of images at one time.
Using Preview in BrowserIt’s amazing to me how many so-called Web-graphics programs
don’t enable you to easily see your work through its intended
medium: the Web browser. Fireworks enables you to preview
in not one, but two browsers at the press of a keyboard short-
cut. Not only do you quickly get to see how the browsers are
interpreting your graphics, but you can also test any rollovers
or other Behaviors you may have included in Fireworks.
1818C H A P T E R
✦ ✦ ✦ ✦
In This Chapter
Viewing yourgraphics in abrowser
Managing links in Fireworks
Updating a site withFind and Replace
Batch processingautomation
Reusing scriptlets
✦ ✦ ✦ ✦
233662-1 ch18.F 8/2/02 2:56 PM Page 581
Fireworks Seminar

582 Part IV ✦ Coordinating Workflow
Web designers, as with most Internet users, tend to work with a particular version
of Navigator or Internet Explorer most of the time. But, unlike ordinary Web surfers,
Web designers must be able to view work under various conditions in order to
ensure consistency across platforms and browser versions. As of this writing,
Microsoft has the lion’s share of the browser market, with Netscape in second.
Although Internet Explorer 6 and Netscape 6 are in many ways more compatible
than the corresponding 4 and 5 versions, you still must test early and often in
multiple browsers to guarantee a professional quality of work.
You can even use the Preview in Browser feature to display different versions of thesame graphic side by side, without having to make additional copies in Fireworks.Just make a new Web browser window after previewing the first time (File ➪ NewWindow in your browser), and — at least on Windows — the second preview opensin the second window.
Before you can use the Preview in Browser feature, you have to tell Fireworks which
two browsers you want to use. Although you don’t have to define both a primary
and a secondary browser, it’s a good idea (if you have two browsers on your system).
To set the browsers, follow these steps:
Fireworks automatically sets the primary browser from what is configured in youroperating system. You need to follow this step only if you wish to alter the primarybrowser that Fireworks selects.
1. Choose File ➪ Preview in Browser ➪ Set Primary Browser.
The Locate Primary Browser dialog box appears, as shown in Figure 18-1.
Figure 18-1: Declare your primary browser through the Locate Primary Browser dialog box.
Tip
Tip
233662-1 ch18.F 8/2/02 2:56 PM Page 582
Fireworks Seminar

583Chapter 18 ✦ Updating and Maintaining Web Graphics
2. In the Locate Browser dialog box, navigate to the browser directory to locate
the application itself. Table 18-1 shows typical locations for browser applica-
tion files, although you may have chosen a different location if you installed
the browser yourself. If you’re using a Macintosh, you may also have moved it
after installation, or if the browser doesn’t have an installation program
(Internet Explorer 5, for example), then it remains wherever you left it.
Table 18-1Typical Browser Locations
Browser Windows Location Macintosh Location
Microsoft Internet C:\Program Files\Internet Explorer\ Macintosh HD:Explorer 4.x Iexplore.exe Internet: Microsoft Internet
Applications:InternetExplorer 4.01 Folder:Internet Explorer
Microsoft Internet C:\Program Files\Internet Explorer\ Macintosh HD:Explorer 5.x IEXPLORE.exe Applications:
Internet Explorer 5: Internet Explorer /Macintosh HD:Applications:Internet Explorer (OS X)
Microsoft Internet C:\Program Files\Internet Explorer\ n/aExplorer 6.x IEXPLORE.exe
Netscape C:\Program Files\Netscape\ Macintosh HD:Navigator 4.x Navigator\netscape.exe Internet:
Netscape Navigator:Netscape Navigator
Netscape C:\Program Files\Netscape\ Macintosh HD:Communicator 4.x Programs\netscape.exe Applications:
Netscape Communicator:Netscape Communicator /Macintosh HD:Applications:Netscape Communicator:Netscape (OS X)
Netscape 6.x C:\Program Files\Netscape 6\ Macintosh HD:netscp6.exe Applications:
Netscape 6.x:Netscape
Opera C:\Program Files\Opera\Opera.exe Macintosh HD:Applications:Opera:Opera
233662-1 ch18.F 8/2/02 2:56 PM Page 583
Fireworks Seminar

584 Part IV ✦ Coordinating Workflow
Although the Web TV Viewer for Macintosh or Windows is a great way to get anidea of what your work looks like on the MSN TV service, formerly Web TV, theapplication itself can’t receive a URL from another application. So it can’t be usedas a primary or secondary browser in Fireworks. Preview in a regular browserinstead and then copy and paste the file:\\ URL from there to the Web TV Viewer.If you don’t have the Web TV Viewer, it’s free at http://developer.msntv.com/.
3. Click Open after you locate the browser.
4. To define the secondary browser, choose File ➪ Preview in Browser ➪ Set
Secondary Browser and repeat Steps 2 and 3.
After you define your browsers, they’re immediately available for use. If you selected
Netscape Navigator as one of your browsers, you can preview your work in it by
choosing File ➪ Preview in Browser ➪ Preview in Netscape Navigator. I heartily rec-
ommend memorizing the keyboard shortcuts for this command: to preview in your
primary browser, press F12; to preview in your secondary browser, press Shift+F12.
Depending on the version of Windows and Internet Explorer that you are using, anentirely new instance of Internet Explorer may be launched each time you previewin IE. This can heavily tax your system’s resources. A workaround is to close InternetExplorer for Windows before previewing again.
Working with a client who depends on a different browser, or a different browser
version than the one you normally use, isn’t an unusual circumstance. It’s a good
idea to install as many different browsers — and different browser versions — as
possible.
Internet Explorer (IE) for Windows only enables you to have one version installedat a time. The (sort of) exception to this is if you install IE 5 over IE 4 and select the“Compatibility Mode” custom install option. You can continue to launch IE 4 asbefore, and you’ll get an IE 4/5 hybrid that mimics most — but not all — of IE 4’sunique quirks and formatting. Installing IE 4 on a version of Windows that comeswith IE 5 preinstalled is not possible. If possible, keep multiple Windows systemsor multiple Windows partitions with a different version of IE on each.
Previewing early and often in multiple browsers helps to avoid surprises caused by
browser incompatibilities or bugs.
Macintosh users might want to investigate an IBM PC-compatible emulator, suchas Connectix Virtual PC. Because you can create multiple “hard drives” with multi-ple and varied installations of the different flavors of Windows and InternetExplorer, maintaining every Windows and Macintosh Web browser on onemachine is possible. It’s even possible to install Linux and OS/2 into Virtual PC andrun browsers there, too.
Tip
Caution
Caution
Tip
233662-1 ch18.F 8/2/02 2:56 PM Page 584
Fireworks Seminar

585Chapter 18 ✦ Updating and Maintaining Web Graphics
Managing Links with the URL PanelTo me, links are the lifeblood of the Web. Without the ability to jump from one
section, page, or site to another, the Internet would be a very linear medium — and
nowhere near as popular. Before Fireworks, the normal course of Web graphics pro-
duction kept the images and the links completely separate until the final Web page
was assembled. However, because Fireworks extends its graphic capabilities into
HTML and JavaScript code through Behaviors and hotspots, links can actually be
incorporated during the creation phase.
A link is more technically known as a URL (generally pronounced as if it were spelled
out, U-R-L). URL is short for Uniform Resource Locator and is best thought of as the
Web’s address system. Every Web page on the Internet has a URL. Web design deals
with two kinds of URLs: absolute and relative. An absolute URL is the exact address
that enables a Web page to be accessed from anywhere on the Internet, such as
http://www.idest.com/fireworks/index.htm#book.
In the preceding example, the URL is divided into five main parts:
✦ Method: The method specifies the protocol used to address the server. Web
servers use HTTP (HyperText Transfer Protocol). Other methods include FTP(File Transfer Protocol), for transmitting files; News, for accessing newsgroup
servers; and Mailto, for sending e-mail.
✦ Domain: The domain name (in this example, www.idest.com) is registered
with an Internet authority, such as Network Solutions, so that the server to
which the domain name refers can be found. The IP (Internet Protocol)
address (for example, 199.227.52.143) can be used in place of a domain name.
✦ Path: Depending on exactly where on the server the Web page is located, the
path can be a single folder, as it is in this example (fireworks), or many fold-
ers, in which case each folder is separated by a forward slash (/).
✦ Page: The name of the Web page itself is the name under which it is stored —
in the example the name is index.htm. The file extension used depends on
the type of server and the authoring system. Most typically, Web pages end in
either .html or .htm; however, you’ll also see extensions such as .shtml, .asp,
.cfm, and .taf, just to mention a few.
✦ Named anchor: A portion of the page marked with an HTML tag, called an
anchor (in the URL example it is #book). With named anchors, you can quickly
move from one section of a long document to another, all on a single page.
All but the target portion is mandatory for an absolute URL. The other type of URL,
a relative URL, however, can use as little as just the page, or even just the named
anchor. Whatever the link is, its location is relative to the current page. For example,
if you need to link to another Web page in the same folder as the current one, the
link would look something like this example:
contact.html
233662-1 ch18.F 8/2/02 2:56 PM Page 585
Fireworks Seminar

586 Part IV ✦ Coordinating Workflow
On the other hand, if you need to link to a page that is stored in a subfolder of the
current page, the relative link would resemble the following:
old_news/pr2001.htm
The more that your site structure is developed — blank Web pages and empty fold-
ers created — before working in Fireworks, the more you can take advantage of the
program’s URL tools.
Accessing the URL History listIn Fireworks, links are attached to either of the two types of Web object: a hotspot
or a slice. You can assign a link to a selected Web object either through the URL
panel or the Property inspector. The URL panel, shown in Figure 18-2, enables you
to assign a link in one of two ways:
✦ Enter the URL directly into the Link text box.
If you choose to type your new URL into the Link text box, double-check your textto avoid any mistakes. Computers are literal when it comes to URLs, and thusevery element — names, punctuation, and even case (uppercase or lowercase) onsome servers — must match.
✦ Select the URL from the Current URL option list.
Figure 18-2: Enter a new URL or select one from the Current URL option list on the URL panel.
The Current URL option list is divided into two parts: the No URL selection and the
URL History list. Choose the No URL (no HREF) selection when you want to specify
that a slice or hotspot does not have a link assigned; this is the default selection for
Current URL box
No URL selection
URL Library list
Caution
233662-1 ch18.F 8/2/02 2:56 PM Page 586
Fireworks Seminar

587Chapter 18 ✦ Updating and Maintaining Web Graphics
Web objects. The URL panel shows a history of the links that have been added to
the current document. Every time that you manually enter a new link in the Current
URL text box, it is stored as part of the URL panel’s history.
If your URL panel’s history list is filled with links that are no longer used, a command
that is available through the URL panel Options menu, Clear Unused URLs, can
remove all but the links actually used in the document. Another command, Add
Used URLs to Library, can save your document links so that they can be retrieved
independently of the current document.
Adding URLs to the URL LibraryThe URL Library represents a more permanent list of links than those found in the
URL History. URL Libraries can be stored, edited, and reloaded to work with any
document. This facility makes building all the graphics involving rollovers and
image maps — anything that needs a URL — far easier on the site level. From a Web
graphics production perspective, a different URL Library can be maintained for
each site or client, which further simplifies your workflow.
Once a URL has been entered into the URL Library, it’s accessible from the Propertyinspector, the URL panel, and even the Pop-up Menu Editor. Entering your URLsonce, and then selecting them from any of these locations, makes URL Librariesreal time savers.
Although you can access what’s in the URL Library from the Property inspector for
a selected Web object, all management of the Library is handled through the URL
panel, shown in Figure 18-3. To open the URL panel, choose Window ➪ URL, or press
the keyboard shortcut, Alt+Shift+F10 (Option+Shift+F10). Alternatively, if the URL
panel is docked with another panel, click the URL panel’s tab to bring it to the front
of the panel group.
Figure 18-3: Use the URL panel to build,access, and store URL Libraries.
The URL Library is stored in an HTML file format used for browser bookmark files;
the default Library is called URLs.htm. However, you can add URLs to the Library in
Tip
233662-1 ch18.F 8/2/02 2:56 PM Page 587
Fireworks Seminar

588 Part IV ✦ Coordinating Workflow
several ways, almost all of which are commands available in the URL panel’s
Options menu. The commands are shown in Figure 18-4 and in the following list:
✦ Add Used URLs to Library: Enables you to save the current document’s URL
History as part of the URL Library.
✦ Add URL: Adds a single URL directly to the Library.
✦ Import URLs: Inserts URLs found within any HTML file, including Bookmark
pages.
✦ Add to Library button: Adds the URL in the History text box of the URL to
the Library.
Figure 18-4: Most URL Library commands are accessible through the URL panel Options menu.
Combining the document’s URL History with the current URL Library is a one-step
process — just choose the Add Used URLs to Library command from the panel
Options menu. Fireworks automatically integrates the two lists of links, alphabeti-
cally. If any links appear in both lists, Fireworks eliminates the duplicates.
To add a single URL to the Library, choose the Add URL command from the panel
Options menu. The New URL dialog box appears. Enter the new link directly in
the large text area, and click OK when you’re done. The new link is added to the
Library list.
You can also click the New URL button located at the bottom of the URL panel toadd a new link.
The Import URLs command is a wonderful work-saver and is extremely flexible.
Because you can import the links from any HTML file, you can quickly bring in all
the links from a site just by importing a Web site’s home page.
Tip
233662-1 ch18.F 8/2/02 2:56 PM Page 588
Fireworks Seminar

589Chapter 18 ✦ Updating and Maintaining Web Graphics
To import links from an HTML page, follow these steps:
1. From the URL panel Options menu, choose Import URLs.
The standard Open dialog box appears.
2. Locate the HTML page containing the links you want to incorporate into a
Library. Click Open after you find the HTML page.
Any link, relative or absolute, found on the selected HTML page is integrated
with the current URL Library.
As you find out in the next section, you can also create, edit, delete, store, and load
URL Libraries through the URL panel.
Managing URL LibrariesURL Libraries are extremely flexible in Fireworks. You can create new Libraries with
a single command, and you can edit, delete, load, or store existing Libraries.
From time to time, a Web page moves to a new location on the Web. If you have the
page’s URL in your URL Library, you have to change it. To do so, follow these steps:
1. Select the URL you want to change from the URL panel list.
2. From the URL panel Options menu, choose Edit URL.
The Edit URL dialog box, shown in Figure 18-5, appears.
Figure 18-5: Update your URL Library links with the Edit URL command and the Edit URL dialog box.
3. Enter the new URL in the text area. To also update any existing links in the
current document, select the Change All Occurrences in Document checkbox.
Click OK when you’re done.
The URL is modified in the Library.
233662-1 ch18.F 8/2/02 2:56 PM Page 589
Fireworks Seminar

590 Part IV ✦ Coordinating Workflow
Following are the two ways to remove a URL from the Library:
✦ Select the unwanted URL, and then click the Delete URL button in the lower-
right corner of the URL panel.
✦ Select the URL, and then select Delete URL from the URL panel Options menu.
By default, Fireworks starts with one URL Library, URLs.htm. You can add others by
following these steps:
1. Choose the New URL Library command from the URL panel Options menu.
The New URL Library dialog box, shown in Figure 18-6, appears.
Figure 18-6: Organize a new Library for each client through the New URL Library command.
2. Enter a unique name for the new library.
If you don’t include a .htm or .html file extension, Fireworks automatically
appends one.
Fireworks creates a new file in the URL Libraries folder, inside the Configuration
folder. This file is updated when Fireworks closes; you don’t need to save your URL
Library in a separate operation.
For more information regarding the Configuration folder and its location for youroperating system, see Chapter 25.
Although Fireworks makes creating a new Library a breeze, removing an unwanted
Library is a little more hands-on. No command is available to delete a Library, so
you have to open the URL Libraries folder located inside your Fireworks
Configuration folder, and delete the HTML file using Windows Explorer or the
Macintosh Finder. The deleted Library disappears from the URLs list when
Fireworks is restarted.
If Fireworks automatically stores the URL Libraries that you create, why would
you need an Export command? The Export URLs command, found in the URL
panel Options menu, enables you to save the URL Library as an HTML file in
another directory. The HTML file, as shown in Figure 18-7, is a straightforward
list of links. If your URL Library is complete, you could use the exported Library
file as the basis for a text-only home page to go along with the graphical one you’re
making in Fireworks.
Cross-Reference
233662-1 ch18.F 8/2/02 2:56 PM Page 590
Fireworks Seminar

591Chapter 18 ✦ Updating and Maintaining Web Graphics
If you create popup menus, and you’ve already created your links in the URLpanel, all those links are available in the Popup Menu wizard at a click of button.
Figure 18-7: Exporting a URL Library results in a list of links in HTML format.
On the Macintosh, even if you name your exported file with an .html filenameextension, Fireworks still saves it with an .htm filename extension.
Updating Graphics with Find and ReplaceFireworks has always been great about enabling you to alter any aspect of your
graphic at any time; before Fireworks, you had to make every change by hand.
Graphics for a Web site often have a great deal of overlap — a consistent color
scheme, the same typeface, even the same URLs embedded in image maps and
buttons. Replacing a misspelled client name in one graphic is one thing, replacing
them in all the graphics, sitewide, is another.
Fireworks offers a robust Find and Replace feature that automates the onerous chore
of modifying text, fonts, colors, and URLs. Through the Find and Replace dialog box,
you can direct your updates to the current selection, frame, document, or to a
selection of documents. The Find and Replace options for text and URLs include
a powerful wildcard capability, known as Regular Expressions. You can also track
your changes through Fireworks’ Project Log.
Outside of batch processing and scriptlets, all automated modifications in Fireworks
are handled through the Find and Replace dialog box, shown in Figure 18-8, which
Caution
Tip
233662-1 ch18.F 8/2/02 2:56 PM Page 591
Fireworks Seminar

592 Part IV ✦ Coordinating Workflow
displays different options depending on which attribute is being altered. The five
attributes and their options are as follows:
Figure 18-8: Use the Find and Replace dialog box to automate changes to text, fonts, URLs, and even color.
✦ Text: Any text object in a Fireworks file can be modified under Find and
Replace. The text search can include anything from a single character to full
sentences. Options include Whole Word, which ensures that the text to be
found is not within another word; Match Case, which seeks out the exact text
entered and replaces it verbatim; and Regular Expressions, a system of wild-
card matching discussed in detail later in this chapter.
✦ Font: Every text object must use a particular font with a set style (or lack of
one), in a particular size. The Find and Replace feature of Fireworks enables
you to update all of these characteristics, either separately or combined. You
can even search for a font in a range of sizes and convert all occurrences to
one size.
✦ Color: In a Fireworks object, color is just another attribute that you can search
for and replace, if necessary. You can alter color in strokes, fills, effects, strokes
and fills, or all properties.
✦ URL: The URL Find and Replace option is similar to the Find and Replace
option for text. Any link can be altered in any way; you can even use the Find
and Replace feature to remove all links. The Whole Word, Match Case, and
Regular Expressions options are available for the URL attribute, just as they
are for the Text attribute of Find and Replace.
✦ Find Non-Web 216: This option searches for non-Websafe colors and changes
them to their nearest Websafe color. You can apply it to fills and/or strokes,
effects, or every object.
Search In option listAttribute option list
233662-1 ch18.F 8/2/02 2:56 PM Page 592
Fireworks Seminar

593Chapter 18 ✦ Updating and Maintaining Web Graphics
Regardless of the specific attribute, with each Find and Replace operation, you have
the option of making changes on a case-by-case basis, or all at once. Click Find Next
to locate the next item fulfilling the search criteria, and then click either Replace, to
make a change to the selected item, or Find Next, to locate the next item without
making a change. You can also click Replace All at any time to make the alterations
within your search scope to all matches in the document(s).
What if you’re running a Find and Replace operation and you make a mistake,such as clicking Replace All instead of Replace? If you’re working within a singledocument, you can use Edit ➪ Undo or the History panel to reverse all the changesand start over. This method has no effect on Find and Replace actions applied tomultiple files.
With all attributes, the scope of the search is defined by the value set in the Search
In option list, which includes the following possible options:
✦ Selection: You can modify only the currently selected object or objects.
✦ Frame: Limits the search to the current selected frame of the active document.
✦ Document: Enables the search to be applied to the entire active document.
✦ Project Log: Limits the search to files listed in the Project Log. Use of the
Project Log is covered in detail later in this chapter.
✦ Files: Carries out the Find and Replace operation on any accessible file or
files. Selecting the Files option displays the Open Multiple dialog box, in
which files are added to the selection list, either individually or by the folder.
If you need to adjust the selected files for a Multi-File Find and Replace operation,reopening the Open Multiple dialog box involves a small trick. Temporarily choosea different Search In option, such as Document or Frame, and then select Filesagain. The Open Multiple dialog box reopens.
Although the Search In options have their place, Fireworks’ Multi-File capability
really gives the Find and Replace feature its power. Naturally, such increased power
also brings increased risk for making a mistake. To offset that risk, Fireworks offers
two backup options. To set the backup options, choose Replace Options from the
Find and Replace panel’s Options menu. The Replace Options dialog box (see Figure
18-9) appears. If the first option, Save and Close Files, is selected, Fireworks closes
each file after it makes a replacement; if the option is not selected, the files are left
open. The Backup Original Files drop-down list box includes three choices:
Figure 18-9: Choose your backup options fromthe Replace Options dialog box.
Tip
Tip
233662-1 ch18.F 8/2/02 2:56 PM Page 593
Fireworks Seminar

594 Part IV ✦ Coordinating Workflow
✦ No Backups: The target files are overwritten and no backups are saved.
✦ Overwrite Existing Backups: The target files are copied to a subfolder called
Original Files, and the Find and Replace operation is performed on the files in
their original location. Each time you perform another Find and Replace oper-
ation, the existing backup in the Original Files folder is overwritten with a
newer backup. In a sense, this is similar to having an Undo feature with only
one Undo. The Original Files folder always contains files that are one step
older than the last Find and Replace operation.
✦ Incremental Backups: If you don’t want to risk losing any changes, choose
this option. Each time you perform a Find and Replace, the target files are
copied to the Original Files folder, but rather than overwriting the other files,
they are renamed incrementally. For example, the first time a file named
Star.png is changed, the source file is saved in the Original File subfolder as
Star.png. The next time you use Find and Replace, the copy of Star.png in the
Original Files folder is renamed Star-1.png and the target file is copied there
as Star.png. The most recent version always retains the original name, and
the oldest version ends with the highest number. This essentially gives you
an unlimited Undo for Find and Replace (except for running out of hard drive
space).
You could use the Incremental Backups option as a type of version control, but the
downside is that this choice stores all the files. Your choice may depend on how
much free hard drive space you have and/or how big your target files are. If you
have 10GB of hard drive space, go ahead and use Incremental Backups. After you’ve
finished your work session, you can easily go into the original file’s folder and delete
(Trash) anything with a number higher than three, so that you’re saving only the
last few versions.
Searching and replacing textI recently had a client come to me with every Web designer’s major nightmare —
a name change. Not only did every logo need to be altered, but also the name was
incorporated on much of the Web site as a graphic background. I was faced with
days upon days of pure drudgery — until I realized that I could use Find and Replace
to automate the process. I was able to make the revisions in a few short hours,
spending much of the time quite amazed at how quickly the job was getting done.
To find and replace text, follow these steps:
1. If the Find and Replace panel is not visible, choose Edit ➪ Find and Replace or,
if it is behind another tabbed panel, click its tab to bring the panel forward.
2. Choose the scope of the search operation, by selecting one of the choices
from the Search In option list.
3. Make sure that the Attribute selection is set to Text.
4. Enter in the Find text box the text that you want to find.
233662-1 ch18.F 8/2/02 2:56 PM Page 594
Fireworks Seminar

595Chapter 18 ✦ Updating and Maintaining Web Graphics
5. If you intend to change the text, enter its replacement in the Change To
text box.
6. Select any options desired: Whole Word, Match Case, or Regular Expressions.
7. To make changes on a case-by-case basis, first click Find Next and then click
either Replace, to change the text, or Find Next again, to move to the next
matched text.
8. To change all the text at once, click Replace All.
If no changes are made, Fireworks reports that the search is complete.
Otherwise, Fireworks informs you of how many occurrences it changed.
Although the Find and Replace Text operation may be the most straightforward of
all the attributes, you still need to be aware of some issues, as follows:
✦ Text objects expand to make room for new words, but if you add a lot of
text, you may find objects hanging off canvas. Left-aligned text expands to
the right, right-aligned text expands to the left, and centered text expands
in both directions.
✦ During Multi-File Find and Replace operations, if one of the selected docu-
ments is open in Fireworks, the document must be activated before any
changes can be made.
Searching with Regular ExpressionsThe serious power in the Find and Replace feature is the Regular Expressions option.
I’ve referred to Regular Expressions as being similar to wildcards in other programs,
but the Fireworks capabilities are really far, far more extensive.
Regular Expressions are best described as a text pattern-matching system. If you can
identify any pattern in your text, you can manipulate it with Regular Expressions.
For example, suppose that you’re building a navigation bar in which the buttons
are all contact names that are listed in a Lastname, Firstname format. With Regular
Expressions, you could match the pattern and reformat the entire list, placing the
Firstname before the Lastname, without the comma — all in one Find and Replace
operation.
You can apply Regular Expressions to either the text or URL attributes by selecting
the Regular Expressions option. When you enable this option, Fireworks processes
the text entered in both the Find and Change To text boxes differently, looking for
special key characters, such as backslash and asterisk.
The most basic Regular Expression is the text itself. If you enable the Regular
Expressions option and then enter “th” in the Find What text box, Fireworks locates
every example of “th” in the text and/or source. Although this capability by itself
has little use, it’s important to remember this functionality as you begin to build
your patterns.
233662-1 ch18.F 8/2/02 2:56 PM Page 595
Fireworks Seminar

596 Part IV ✦ Coordinating Workflow
Using wildcard charactersInitially, it’s helpful to be able to use what traditionally are known as wildcards:
characters that match different types of characters. The wildcards in Regular
Expressions all represent single characters only, as described in Table 18-2. In other
words, no single Regular Expression represents all the characters, in the same way
the asterisk does when used in DOS file searches. However, such a condition can be
represented with a slightly more complex Regular Expression (described later in
this section).
Table 18-2Regular Expressions Wildcard Characters
Character Matches Example
. Any single character. w.d matches wide but not world.
\w Any alphanumeric character, w\wd matches wide and world.including the underscore.
\W Any nonalphanumeric character. jboy\Widest.com matches [email protected] and jboy$idest.com.
\d Any numeric character 0-9. y\dk matches Y2K.
\D Any nonnumeric character. \D2\D matches Y2K and H2O.
\s Any white-space character, \smedia matches media but not including space, tab, form feed, Macromedia.or line feed.
\S Any nonwhite-space character. \Smedia matches Macromedia butnot media.
Be careful with the \S wildcard. In Fireworks, it actually matches one more charac-ter than it should; for instance \Sworks actually matches Fireworks, instead ofjust Fireworks.
The backslash character (\) is used to escape special characters so that they can
be included in a search. For example, if you want to look for an asterisk, you need
to specify it as \*. Likewise, when trying to find the backslash character, precede
it with another backslash character: \\.
Matching character positions and repeating charactersWith Regular Expressions, you not only can match the type of character, but also
match its position in the text. This feature enables you to perform operations on
characters at the beginning, end, or middle of the word or line. Using Regular
Caution
233662-1 ch18.F 8/2/02 2:56 PM Page 596
Fireworks Seminar

597Chapter 18 ✦ Updating and Maintaining Web Graphics
Expressions also enables you to find instances in which a character is repeated
either an unspecified or specified number of times. Combined, these features
broaden the scope of the patterns that you can find.
Table 18-3 details the options available for matching by text placement and character
repetition.
Table 18-3Regular Expressions Character Positions
Character Matches Example
^ Beginning of a line. ^c matches “Call me Ishmael.”
$ End of a line. d$ matches the final d in “Be afraid.Be very afraid.”
\b A word boundary, such as a \btext matches textbook but not space or carriage return. SimpleText.
\B A nonword boundary inside a word. \Btext matches SimpleText but nottextbook.
* The preceding character zero or b*c matches BBC and cold.more times.
+ The preceding character one or b+c matches BBC but not cold.more times.
? The preceding character zero or st?un matches stun and sun but notone time. strung.
{n} Exactly n instances of the e{2} matches reed and each pair of preceding character. two e’s in Aieeeeeeee!, but nothing
in the word red.
{n,m} At least n and at most m. C{2,4} matches #CC00FF and#CCCC00, but not the full string#CCCCCC.
Matching character rangesBeyond single characters or repetitions of single characters, Regular Expressions
incorporates the capability to find or exclude ranges of characters. This feature is
particularly useful when you’re working with groups of names or titles. Ranges are
specified in set brackets. A match is made when any one of the characters within the
set brackets is found, not necessarily all the characters.
Table 18-4 describes how to match character ranges with Regular Expressions.
233662-1 ch18.F 8/2/02 2:56 PM Page 597
Fireworks Seminar

598 Part IV ✦ Coordinating Workflow
Table 18-4Regular Expressions Character Ranges
Character Matches Example
[abc] Any one of the characters [lmrt] matches the l and m’s in a, b, or c. lemmings and the r’s and t in
roadtrip.
[^abc] Any character except a, b, or c. [^etc] matches each of the letters in GIFs, but not etc in the phrase“GIFs etc.”
[a-z] Any character in the range [l-p] matches l and o in lowery and from a to z. m, n, o, and p in pointman.
x|y Either x or y. boy|girl matches both boy and girl.
Using grouping with Regular ExpressionsGrouping is perhaps the single most powerful concept in Regular Expressions.
With it, you can easily manipulate any matched text pattern — for example, a list
of names such as this:
Schmidt, John Jacob JingleheimerKirk, James T.Fishman, Cara
could be rearranged so that the last name comes last and the comma is removed,
such as this:
John Jacob Jingleheimer SchmidtJames T. KirkCara Fishman
Grouping is handled primarily with parentheses. To indicate a group, enclose it
in parentheses in the Find text field. Regular Expressions can manage up to nine
grouped patterns. Each grouped pattern is designated by a dollar sign ($) in front
of a number, (1 to 9) in the Change To text field, such as this: $3.
To switch the series of names as previously described, enter the following in the
Find text box:
(/w+),/s(.+)
In Regular Expressions speak, this translates into “(Pattern 1 matches any alpha-
numeric character, one or more times) followed by a comma, a space, and (Pattern
233662-1 ch18.F 8/2/02 2:56 PM Page 598
Fireworks Seminar

599Chapter 18 ✦ Updating and Maintaining Web Graphics
2 matches any character — including white spaces — one or more times).” In the
Change To text field, enter
$2 $1
This configuration places the second matching pattern before the first, with just a
space in between.
Remember that the dollar sign is also used after a character or pattern to indicatethe last character in a line.
Table 18-5 shows how Regular Expressions uses grouping.
Table 18-5Regular Expressions Grouping
Character Matches Example
(p) Any pattern p. (/d).(/d) matches two patterns, the firstbefore a period and the second after aperiod, such as in a filename with anextension.
$1, $2...$9 The nth pattern noted The replacement pattern $1’s extension is with parentheses. .$2 would manipulate the pattern described
in the preceding example so thatChapter07.txt and Image12.gif wouldbecome Chapter07’s extension is .txt andImage12’s extension is .gif.
Altering font characteristicsChoosing the Font attribute in the Find and Replace panel enables you to search
based on any or all of three different font characteristics:
✦ Font: Choose Any Font or select from a list of installed fonts.
✦ Style: Choose Any Style or choose standard options, such as Plain, Bold,
Italic, or Underline. You can also choose combinations, such as BoldItalic
or ItalicUnderline.
✦ Size: Use the Min and Max boxes to target a range of font sizes, or set them
both to the same value to find only one size.
The real power of the Font Find and Replace is that you can search on one criteria,
such as Size, and if a match exists, you can change another criteria, such as Font.
Caution
233662-1 ch18.F 8/2/02 2:56 PM Page 599
Fireworks Seminar

600 Part IV ✦ Coordinating Workflow
This flexibility enables you to, for example, search all graphics in a site and, if the
font size is between 8 and 12, change the font from Times to Helvetica, without
changing the original size (leave the Change to size box empty). This feature might
cover all the “body text” in your document in one shot.
To change the font characteristic with Find and Replace, follow these steps:
Start at the top of the Find and Replace box and work down as you go.
1. If the Find and Replace panel is not showing, choose Edit ➪ Find and Replace
or, if it is behind another tabbed panel, click its tab to bring the panel forward.
2. Choose the scope of the search operation by selecting Search Document,
Search Selection, and so on, from the Search In option list.
3. Select Font from the Attribute option list to specify a Font Find and Replace.
The Find and Replace panel displays the Font options, as shown in Figure 18-10.
Figure 18-10: Change font size, typeface, or stylewhen the Font attribute is selected from the Findand Replace panel.
4. To search for a specific typeface, change Any Font to an installed font by
choosing the font from the list.
5. To search for a specific font style, change Any Style to one of the other
options on the list, such as Plain or Bold.
6. To search for a specific range of font sizes, set the minimum point size in the
Min box and the maximum point size in the Max box; to search for a single
point size, set the Min and Max text boxes to the same value.
The Min and Max boxes also have pop-up sliders to adjust their values.Tip
Note
233662-1 ch18.F 8/2/02 2:56 PM Page 600
Fireworks Seminar

601Chapter 18 ✦ Updating and Maintaining Web Graphics
7. To change target objects to a specific font, change Same Font to another
installed font by choosing a font from the list.
8. To change target objects to a specific style, change Same Style to another
option, such as Italic.
9. To change target objects to a specific size, enter a value in the Size text box,
or use the slider to select a value.
10. Click the Find button to find the first target object, and then click Replace to
replace it, or click the Replace All button to make all the changes in one step.
Changing colors throughout a siteA color can be as important to a brand as a logo — for example, IBM blue. Web
graphics often use a specific color scheme to make a marketing point or to assist
with navigation. Manually updating graphics to incorporate a color change could
be an extraordinarily tedious chore. In Fireworks, you can search for and replace
colors just as easily as you can text — and, in some cases, even more easily.
Fireworks applies color to objects via three primary elements: strokes, fills, and
effects. When the Color attribute is selected in the Find and Replace panel, you can
change colors associated with any single one of these components, associated with
both strokes and fills, or associated with all properties. To search and replace a
color, follow these steps:
1. If the Find and Replace panel is not showing, choose Edit ➪ Find and Replace
or, if it is behind another tabbed panel, click its tab to bring the panel forward.
2. Choose the scope of the search operation by selecting one of the choices from
the Search In option list.
3. From the Attribute option list, select Color.
The Find and Replace panel displays the Color options, as shown in Figure 18-11.
Figure 18-11: Update all the colors across a site withthe Find and Replace panel’s Color attribute.
233662-1 ch18.F 8/2/02 2:56 PM Page 601
Fireworks Seminar

602 Part IV ✦ Coordinating Workflow
4. In the Find color picker, select the color to search for.
You can select one of the available swatches, or any other onscreen color
using the Eyedropper tool, or select the Palette icon to open the system
color picker(s).
5. From the Apply To option list, set which component of Fireworks the search
should be limited to.
6. In the Change To color picker, select the color to replace the color being
searched for.
7. Click the Find and Replace buttons to make changes on a case-by-case basis,
or click the Replace All button to make global changes.
Snapping colors to WebsafeReplacing colors with their nearest Websafe equivalent is unfortunately a reality of
today’s Web. Until the vast majority of computer users have 32-bit color hardware
(and know how to enable it), sticking to Websafe colors gives you the best chance
of your work looking similar for the majority of your audience.
Find Non-Web 216 is similar to the Color Find and Replace. The same caveats apply,
but in this case, Fireworks chooses the colors. To search for non-Websafe colors
and replace them with Websafe colors, follow these steps:
1. If the Find and Replace panel is not showing, choose Edit ➪ Find and Replace
or click its tab to bring the panel to the front of a panel group.
2. Choose the scope of the search by selecting one of the choices from the
Search In option list.
3. From the Attribute option list, select Find Non-Web 216.
The Find and Replace panel displays the Find Non-Web 216 options, as shown
in Figure 18-12.
Figure 18-12: Search for non-Websafe colors in aselection, a document, or across multiple files andsnap them to their nearest Websafe color.
233662-1 ch18.F 8/2/02 2:56 PM Page 602
Fireworks Seminar

603Chapter 18 ✦ Updating and Maintaining Web Graphics
4. From the Apply To option list, set which component of Fireworks the search
should be limited to.
5. Click the Find and Replace buttons to make changes on a case-by-case basis,
or click the Replace All button to make global changes.
Updating URLsAfter you spend any amount of time designing for the Web, you learn to appreciate
how active the Web is. Sites are constantly in motion, with new pages being added
and old ones deleted or moved. Because Fireworks graphics are tied so directly to
the Web through the URLs embedded in hotspots and slices that Fireworks creates,
you need a way to modify the links quickly, if necessary. The URL attribute of the
Find and Replace panel fulfills that need.
The URL attribute works much the same way that the Text attribute does — in fact,
the interfaces for the two are identical, as you can see in Figure 18-13. A link to
be searched for is entered in the Find text box and the new link is entered in the
Change To text box. The same three options (Whole Word, Match Case, and Regular
Expressions) apply. With URLs, however, a whole word is not designated by a
space, but rather by a separator — either a period, a forward slash, or a colon.
Figure 18-13: Update your links with the URLattribute of the Find and Replace panel.
To search and replace links embedded in Fireworks graphics, follow these steps:
1. If the Find and Replace panel is not showing, choose Edit ➪ Find and Replace
or, if it is visible, click its tab to bring the panel to the front of a panel group.
2. Choose the scope of the search operation by selecting one of the choices from
the Search In option list.
3. From the Attribute option list, select URL.
The Find and Replace panel displays the URL options.
233662-1 ch18.F 8/2/02 2:56 PM Page 603
Fireworks Seminar

604 Part IV ✦ Coordinating Workflow
4. Enter the link to be found in the Find text box.
5. If you intend to change the link, enter its replacement in the Change To text box.
6. Select any options desired: Whole Word, Match Case, or Regular Expressions.
7. To make changes on a case-by-case basis, first click Find Next and then click
either Replace, to change the link, or Find Next again, to move to the next
matched URL.
8. To change all the URLs at once, click Replace All.
As noted earlier in the chapter, the URL attribute can take advantage of Fireworks’
Regular Expressions features when the Regular Expressions option is selected. The
pattern-matching features of Regular Expressions go far beyond any simple wildcard
character. For example, suppose that you have to convert from absolute to relative
an entire site’s worth of links inside of graphics, where all the links are within the
same folder. This would require changing files from http://www.idest.com/fireworks/main.htm to just main.htm. Moreover, suppose that you have links to
files from both Windows and Macintosh designers, so that some files end in .htm
and others in .html. With Fireworks’ Regular Expressions option enabled, here’s
what you would enter in the Find text box:
(.+)/(/b.*/.html?)
Translated from Regular Expressions language, this means “(Pattern 1 contains all
characters) before a forward slash and (Pattern 2, which can be any single word
followed by a period, and then either htm or html).”
To change these patterns to just the filename, enter $2 by itself into the Change To
text box. This returns just the results of pattern 2, without any other characters.
Working with the Project LogOne of the dangers of working with a find-and-replace feature as powerful as
Fireworks’ Find and Replace is that you can inadvertently make unwanted changes.
This is especially true when you use the Multi-File Search & Replace option —
Fireworks can open, modify, and close a file so quickly that you won’t know what
happened. You won’t know, that is, unless you enable the Project Log option to
track all changes.
With the Project Log option turned on, all Multi-File changes are noted. The Project
Log, shown in Figure 18-14, lists the filename, the frame in which the change was
made, and the date and time that the modification took place. Moreover, you can
immediately check the alteration by double-clicking the filename in the Project Log
in order to open the file in Fireworks.
233662-1 ch18.F 8/2/02 2:56 PM Page 604
Fireworks Seminar

605Chapter 18 ✦ Updating and Maintaining Web Graphics
Figure 18-14: Keep track of all your Multi-File Findand Replace operations through the Project Log.
You enable the Project Log to note search-and-replace changes by selecting the
Add Files to Project Log command found in the panel Options menu on the Find
and Replace panel. Once selected, any file altered when the search scope is set
to Files is listed by name, frame number, date, and time. To verify a change — or
to reverse it — open the file from the Project Log by double-clicking its name or
selecting it, and then clicking the Open button.
The Project Log panel Options menu offers some additional functionality with the
following four commands:
✦ Export Again: Because all Find and Replace operations are conducted only
on source files, after you alter a file, you usually need to re-export it. The
Export Again command repeats the last export and overwrites the previously
exported file.
✦ Add Files to Log: You don’t have to run a Find and Replace procedure on a file
to include it in the Project Log. By selecting the Add Files to Log command,
you can select which additional files are listed in the Project Log. This is a
handy way of having your working files close at hand, but not opened until
they’re necessary.
✦ Clear Selection: Removes the currently selected listing from the Project Log.
✦ Clear All: Removes all entries from the Project Log.
The Project Log has yet another use: All files or selected files in the Project Log can
be processed together with Fireworks Batch Processing feature, discussed in the
next section.
To get a separate hard copy of the Project Log, detailing all the changes in a ses-sion, open the Project_Log.htm file found in the Fireworks Configurationfolder and then print the page from your browser. The Project_Log.htm file isupdated with every change.
Tip
233662-1 ch18.F 8/2/02 2:56 PM Page 605
Fireworks Seminar

606 Part IV ✦ Coordinating Workflow
Batch Processing Graphics FilesThe unfortunate truth is that producing graphics for the Web involves about as
much mindless repetition as it does creative expression. The more automated the
processes, the more time you have to experiment and create, rather than resize and
convert. The Batch Process dialog box, shown in Figure 18-15, is the automation
control center.
Figure 18-15: Select your automation options — and the files you want to process — in the Batch Process dialog box.
Grasping the basic procedureFollowing is the basic procedure for running an automated session:
1. Choose File ➪ Batch Process to open the Batch Process dialog box.
2. Specify which files are to be affected by the batch process, by using one or all
of the following techniques:
• Add a file to the batch list by navigating to it, selecting it, and clicking
the Add button. Repeat as required.
Batch list
233662-1 ch18.F 8/2/02 2:56 PM Page 606
Fireworks Seminar

607Chapter 18 ✦ Updating and Maintaining Web Graphics
• Add multiple files from the same folder to the batch list by navigating to
the folder, holding Ctrl (Shift) as you select each file, then clicking the
Add button. Repeat as required.
• Add all the files from one folder to the batch list by navigating to the
folder and clicking the Add All button. Repeat as required.
Select a file from the batch list and click the Remove button to remove it from thebatch list. The file itself is unaffected.
• Include all the files listed in the Project Log panel, whether open or not,
by checking the Include Files from Project Log checkbox.
• Include all the files that are currently open in Fireworks by checking the
Include Current Open Files checkbox.
3. When you are satisfied that you have compiled a complete list of target files
for your batch job, click the Next button. The Batch Process dialog box
changes to enable you to specify the operations to be performed upon your
files (see Figure 18-16).
Figure 18-16: When you press the Next button, the Batch Processdialog box changes so that you canspecify which operations will be part of your batch.
4. Under Batch Options, select an operation to apply to your batch and click the
Add button to add it to the Include in Batch list. The newly added operation is
selected by default, and options for that operation (if any) appear in the lower
portion of the Batch Process dialog box. Of course, you can click the Remove
button to remove an operation from the Include in Batch list, as well.
5. Specify options for newly added operation. For example, if you add a Scale
operation (as shown in Figure 18-16), you can choose No Scaling, Scale to Size,
Scale to Fit Area, or Scale to Percentage, and specify the appropriate height,
width, or percentage, as required.
Tip
233662-1 ch18.F 8/2/02 2:56 PM Page 607
Fireworks Seminar

608 Part IV ✦ Coordinating Workflow
Some batch operations require you to click an Edit button in the lower portion ofthe Batch Process dialog box in order to display another dialog box with theappropriate options.
6. Repeat Steps 4 and 5 as many times as necessary in order to create the desired
batch operation. Use the up and down arrow buttons in the Batch Process dia-
log box in order to move operations up and down in the Include to Batch list.
Operations are executed in the order they appear.
7. When you’re satisfied that your batch operations are completely specified,
click the Next button. The Batch Process dialog box changes again, to a final
form that enables you to finalize and execute your batch operation (see Fig-
ure 18-17).
Figure 18-17: Finalize your batchand execute it and/or save it as ascriptlet in the final configuration of the Batch Process dialog box.
8. Choose whether you want your batch output to be saved in the Same Location
as Original File, or in a Custom Location. If you choose Custom Location, use
the Browse button to navigate to and select a folder.
9. Check the Backups checkbox to make one of two kinds of backups. Select
Overwrite Existing Backups to maintain only one set of backups, which is
equivalent to having one Undo. Select Incremental Backups to maintain a
backup of each batch operation, as described earlier in the “Updating
Graphics with Find and Replace” section.
10. After setting all other criteria, you can optionally choose to save your batch
operation as a scriptlet (discussed in the next section) by clicking the Save
Script button. The scriptlet enables you to run the whole batch operation
again without re-entering any options.
11. Click the Batch button to execute your batch operation.
Tip
233662-1 ch18.F 8/2/02 2:56 PM Page 608
Fireworks Seminar

609Chapter 18 ✦ Updating and Maintaining Web Graphics
A Batch Progress dialog box reports how many files have been processed and how
many are remaining. When finished, the total number of affected files is displayed.
Running scriptletsScriptlets are Fireworks script files, written in JavaScript. You can generate scriptlets
by using the Batch Process dialog box, by hand-coding them, or by using a combi-
nation of both options. The simple, yet powerful, idea behind scriptlets is that they
are reusable.
After you save a scriptlet, with an identifying .jsf filename extension, you can run it
in any of these ways from the Batch Process dialog box:
✦ Double-click the Scriptlet icon.
✦ Choose File ➪ Run Script and select the scriptlet.
✦ Drag the Scriptlet icon onto the Fireworks application, onto a shortcut, or
onto an alias of it.
✦ Drag the Scriptlet icon into the Fireworks window (Windows only).
All scriptlets run immediately. Fireworks includes many custom JavaScript “hooks”
so that you can take advantage of the functions that are accessible through
scriptlets.
For more detailed information on scriptlets, see Part VII.
SummaryThe term production can’t be overemphasized in Web graphics production.
Much of a Web designer’s job is devoted to updating and editing existing graphics.
Fireworks offers a number of workflow solutions to reduce the workload:
✦ You can preview graphics immediately — with or without rollovers — and
directly in the primary and secondary browsers of your choice.
✦ Links used in Fireworks Web objects, such as rollovers and hotspots, are coor-
dinated through the URL panel, which maintains both the current document’s
links (URL History) and an independently stored set of links (URL Library).
✦ You can import the links from any HTML file into a separate URL Library.
✦ The Find and Replace panel enables you to update text, font attributes, colors,
and URLs, and it even snaps colors to Websafe in the current document,
frame, selection, or a series of selected documents.
Cross-Reference
233662-1 ch18.F 8/2/02 2:56 PM Page 609
Fireworks Seminar

610 Part IV ✦ Coordinating Workflow
✦ Export operations — including optimization and scaling of images — can be
automated through the Batch Process features of Fireworks, saving you from
lots of tedious, repetitive work.
✦ A batch processing session can be saved as a special JavaScript file, known
as a scriptlet. Scriptlets can be customized or run, as is, any time they are
needed.
In the next chapter, you work with Fireworks’ Commands menu and History panel.
✦ ✦ ✦
233662-1 ch18.F 8/2/02 2:56 PM Page 610
Fireworks Seminar

AutomatingWorkflow
How long does it take to design the graphics for a site? In
an ideal world, it takes as long as necessary — but few
designers get to live in that world. Most designers are faced
with stringent production deadlines and hefty workloads.
Fireworks provides some relief for those of us living in the
real world with the productivity-saving features of the History
panel and the default commands.
In a nutshell, the History panel is a combination super-Undo
tool and macro recorder. Actions you take while working in
Fireworks are recorded in the History panel automatically.
Although the obvious side effect of this is the capability to
step back through those actions as though rolling back time,
the truly exciting consequence is that you can save those
steps as commands and replay them again and again.
Constantly resizing buttons to 40×40 pixels to satisfy corpo-
rate guidelines? Do it once, save it as a command, and make
it a one-step process forever after. In this chapter, you learn
about the History panel’s other raison d’être: Undo central.
Next, this chapter covers the built-in default commands of the
Commands menu, as well as how to add to the menu’s con-
tents with the History panel. The commands in Fireworks MX
have gotten a major face-lift and productivity boost with
their ability to incorporate a Flash user interface. Fireworks
commands can do virtually anything from add an arrowhead
to a line to generate a series of graphics based on an XML
data file.
Finally, we’ll touch on the kind of housekeeping you can do to
keep the Commands menu from scrolling off your screen as
you fill it with workflow shortcuts. Fireworks includes two
tools to help you manage your automation workhorses, one
for saved History panel commands and one for full-blown
extensions.
1919C H A P T E R
✦ ✦ ✦ ✦
In This Chapter
Running built-incommands
Increasingproductivity withthe History panel
Commands withoutcoding
Managing theCommands menu
✦ ✦ ✦ ✦
243662-1 ch19.F 8/2/02 2:56 PM Page 611
Fireworks Seminar

612 Part IV ✦ Coordinating Workflow
Running Built-in CommandsFireworks arrives from the factory with a group of standard commands that
enable you to take its underlying extensibility for a serious test drive. The built-in
commands, some of which are shown in Figure 19-1 and detailed throughout this
section, are extraordinarily useful additions to the Fireworks toolkit. Let’s look at
the Creative category of commands first.
Figure 19-1: The Commands menu contains a range of commands — organized into submenus like the Creative category —that demonstrate Fireworks’ extensibility.
Examining the Creative commandsLooking for a new spark of inspiration? Or maybe just a more efficient way to han-
dle a complex graphic embellishment? The commands grouped under the Creative
category are both artistic and functional. There are six commands in all:
✦ Add Arrowheads: Inserts one of 17 different arrowheads on one or both ends
of a path.
✦ Add Picture Frame: Creates a patterned border around the current document.
✦ Convert to Grayscale: Changes the current selection to a grayscale image.
✦ Convert to Sepia Tone: Alters the current selection to a sepia color scheme.
✦ Fade Image: Applies a transparency gradient to an image in one of eight
styles.
✦ Twist and Fade: Replicates the selected graphic as many times as desired,
while optionally changing the scale, rotation, and opacity of the replications.
While two of the commands — Convert to Grayscale and Convert to Sepia Tone —
have no interface at all, the rest are all products of Fireworks MX’s capability to
incorporate Flash movies as a user interface. You’ll notice a wide range of interface
approaches as a result.
243662-1 ch19.F 8/2/02 2:56 PM Page 612
Fireworks Seminar

613Chapter 19 ✦ Automating Workflow
Add ArrowheadsAs you might expect, the Add Arrowheads command adds arrowheads to a selected
path. What you probably do not expect is the sheer number of options and the flexi-
bility available in this feature. Created by Kleanthis Economou, the technical editor
for this book, the Add Arrowheads command enables you to apply any one of 17
differently shaped arrowheads to either end of any open path.
With its classy Flash-built interface, shown in Figure 19-2, Add Arrowheads pro-vides both a practical and elegant solution to a very specific production problem.Paths with arrowheads are essential for explanatory diagrams and they’re a keygraphical symbol. The Add Arrowheads command works with any open selectedpath by appending a designated shape on either or both ends and then groupingall the elements. The arrowhead drawn uses the characteristics of the currentstroke. You have the option of scaling the arrowheads to any chosen size; addi-tionally you can specify whether you want to apply just the stroke, just the fill, orboth to the new arrowhead shape.
Figure 19-2: Add the arrowhead of your choice to either end of an open path — or both — with the Add Arrowheads command.
To use the Add Arrowheads command, follow these steps:
1. Select any single open path.
Although you can use any path tool available in Fireworks, I find that the Add
Arrowheads command works best with those created with the Line and Pen
tools.
2. Choose Commands ➪ Creative ➪ Add Arrowheads.
The Add Arrowheads dialog box is displayed.
NewFeature
243662-1 ch19.F 8/2/02 2:56 PM Page 613
Fireworks Seminar

614 Part IV ✦ Coordinating Workflow
If you choose a closed path, such as a rectangle, or multiple paths, you’ll still beable to choose the command, but when you attempt to apply your choices in theAdd Arrowheads dialog box, an alert informs you that you’ve made an invalidselection and you’re returned to the document without any changes being made.
3. Choose which ends of the path you want the arrowheads to appear on by
selecting Add to Start and/or Add to End.
4. If you want both ends to use the same arrowhead and be scaled the same,
make sure the padlock symbol is shown as locked.
The padlock toggles between locked and unlocked positions.
5. Choose the desired arrowhead shape for the end(s). Use the left and right
triangles to preview each of the available shapes or enter the number of the
shape in the text field.
6. Set the size of the arrowhead by entering a percentage value in the Scale text
fields.
Enter 100% to use the default size of the arrowhead.
7. Select the desired drawing options: Apply Stroke and/or Solid Fill.
It’s possible to leave both options unselected; the arrowhead(s) will still be
drawn but will not be visible until either a stroke or fill is applied.
8. Click OK when you’re done.
Fireworks creates the arrowhead(s) as specified and then groups the path and the
new elements.
Add Arrowheads remembers your settings from one use to the next, so you don’thave to start from the default settings each time.
Add Picture FrameThe next command in the Creative category, Add Picture Frame, affects the whole
document rather than a selection. When executed, this command extends the can-
vas area to accommodate a border around the document, as you can see in Figure
19-3. The border is beveled and filled with a user-selected pattern; the figure shown
uses a wood pattern.
Tip
Caution
243662-1 ch19.F 8/2/02 2:56 PM Page 614
Fireworks Seminar

615Chapter 19 ✦ Automating Workflow
Figure 19-3: Place an instant picture frame around a document with the Create Picture Frame command.
To create a picture frame around your document, follow these steps:
1. Choose Commands ➪ Creative ➪ Add Picture Frame.
Fireworks displays the Add Picture Frame dialog box.
2. Choose a pattern for the picture from the drop-down list.
3. Enter a width for the picture frame in pixels.
4. Click OK when you’re done.
Fireworks creates a new layer, entitled Frame, for the created border and locks
the layer. The canvas is automatically expanded to accommodate the additional
graphic. Technically, the frame consists of two rectangles, one set inside the other,
which are combined with a Punch command. To achieve a three-dimensional look,
an Inner Bevel effect is applied to the composite path.
You can modify the appearance of the frame in numerous ways. Before any modifi-
cations can be made, however, you must unlock the Frame layer. Once it’s available,
you can select the composite path object. Once selected, the fill handles become
available and can be rotated or manipulated in other ways. To alter the pattern,
choose Pattern ➪ Fill Options from the Property inspector and then select another
fill pattern.
243662-1 ch19.F 8/2/02 2:56 PM Page 615
Fireworks Seminar

616 Part IV ✦ Coordinating Workflow
The available patterns are taken from those found in the standard FireworksConfiguration\Patterns folder. If you add your own file to the folder, the next timeyou launch Fireworks your pattern will be available from the drop-down list in theAdd Picture Frame dialog box; the list, however, is not sorted and you may have toscroll to the bottom to see your custom pattern.
Convert to Grayscale and Convert to Sepia ToneTwo of the three commands in the Creative submenu convert the palette of
selected objects:
✦ Commands ➪ Creative ➪ Convert to Grayscale simply converts any object to
a grayscale palette, which is 256 shades of gray.
✦ Commands ➪ Creative ➪ Convert to Sepia Tone is similar to Convert to
Grayscale, but the resulting image has a sepia tint.
No dialog box is used for either of these commands — just select your object(s),
choose the command, and you’re done. Essentially, these commands apply the
Hue/Saturation effect at preset values. Once the command has been executed,
choose the Edit button next to the Hue/Saturation effect to alter the values, if
desired.
If you have to export a photographic image as a Graphics Interchange Format(GIF) (in order to create a transparent portion, or to include it in an animated GIF,for example) converting it to grayscale or sepia first often leads to much betterresults than dithering the True Color image. Grayscale and sepia both contain 256shades or less, just like the GIF format.
Fade ImageOne of the most common questions on the Fireworks newsgroup is “How do I make
an image fade in?” The standard Fireworks technique is as follows:
1. Draw a rectangle or other shape over the existing image.
2. Fill the new shape with a black to white gradient.
3. Select both the shape and your original image.
4. Choose Modify ➪ Mask ➪ Group as Mask.
While not overly difficult, the method often proves difficult to grasp for designers
new to Fireworks. To eliminate this confusion and provide an easy path for a
commonly used technique, the Fade Image command was created.
Tip
Tip
243662-1 ch19.F 8/2/02 2:56 PM Page 616
Fireworks Seminar

617Chapter 19 ✦ Automating Workflow
The Fade Image command fades any selected image in one of eight differentstyles. Conceived by Sandee Cohen, author of the Fireworks Visual QuickStartGuide series, and programmed by the author of this book, Fade Image automatesthe masking technique just described. To keep this effect at its most flexible, the fillhandle of the gradient mask is made available immediately after the command iscompleted. Moving the fill handle adjusts the fade.
Fade Image uses a visual interface, completely designed in Flash, as shown in
Figure 19-4. The eight fade possibilities are (listed in left-to-right, top-to-bottom
order):
✦ Rectangular fade in from left
✦ Rectangular fade in from right
✦ Rectangular fade in from top
✦ Rectangular fade in from bottom
✦ Circular fade in from all sides
✦ Elliptical fade in from all sides
✦ Rectangular fade in from all sides
✦ Wave-shaped fade
Figure 19-4: The Fade Image command fades any single or grouped image in any of eight directions.
To use the Fade Image command, follow these steps:
1. Select an object or object group.
Fade Image works with bitmap or vector objects. To fade more than one
object at a time, group the objects first.
NewFeature
243662-1 ch19.F 8/2/02 2:56 PM Page 617
Fireworks Seminar

618 Part IV ✦ Coordinating Workflow
2. Choose Commands ➪ Creative ➪ Fade Image.
The Fade Image dialog box is displayed.
3. Select the type of fade desired from the eight possibilities.
As you move your mouse over each of the fade styles, a red outline shows the
basic shape of the fade. A white outline notes a selected style.
4. Click OK when you’re done.
Once the fade is applied, adjust the angle and the degree of transparency by
dragging the gradient fill handles of the mask.
Fade Image uses the variations on the standard gradient fills — such as Linear,Radial, and Elliptical — to achieve its effects. Once the command is applied, youcan alter the type of transparency mask by selecting a different gradient fill typefrom the Property inspector.
Twist and FadeFor pure creative pleasure, it’s hard to beat the Twist and Fade command. Repetition
of an image is a key principle of graphic design — a principle that you can explore
wildly with Twist and Fade.
The Twist and Fade command duplicates any selected object any number of times,automatically scaling down each duplicate and placing the new images howeverfar apart you like at whatever degree of rotation desired. You can even control theopacity of the objects. Developed by Steven Grosvenor and Stephen Voisey ofwww.phireworx.com, Twist and Fade takes full advantage of the Flash user inter-face structure, as shown in Figure 19-5. Control elements within the interface aremoveable and some, like the Preview pane, can be hidden.
Figure 19-5: With Twist andFade, you can create noveltransfigurations, automatically.
NewFeature
Tip
243662-1 ch19.F 8/2/02 2:56 PM Page 618
Fireworks Seminar

619Chapter 19 ✦ Automating Workflow
To use Twist and Fade, follow these steps:
1. Select one or more objects in your Fireworks document.
2. Choose Commands ➪ Creative ➪ Twist and Fade.
The Twist and Fade interface appears.
3. Set the basic parameters by dragging their respective sliders:
• Steps: Determines how many times the object(s) will be duplicated.
• Spacing: Sets how far apart the images will be placed. The spacing value
is applied both horizontally and vertically so that the duplicates appear
below and to the right of the original. Negative spacing values move the
image above and to the right of the original.
• Rotation: Determines the angle of rotation for each duplicate.
• Opacity: Sets the overall opacity for both the original and each duplicate.
4. To set any of the additional parameters, select Options from the menu and
choose one or more of the following:
• Random Effect: Randomly resets the four basic parameters.
• Convert to Symbol: Creates a new symbol for the original and the
duplicates.
• Fade Opacity: Reduces the opacity of each duplicate.
Twist and Fade uses a single name for all of the symbols it creates: Twist and FadeSymbol. Because the same name is used multiple times, each succeeding symbolincorporates the symbol previously created with Twist and Fade. To avoid thisoccurrence, give your Twist and Fade symbols unique names.
5. To see an example of the results of your settings, make sure the Preview pane
is visible by choosing Preview from the menu.
You can zoom into or out of the Preview pane by clicking the plus and minus
buttons, respectively. You can also drag the preview symbol within the pane
itself.
6. When all of your settings are selected, choose Apply.
If you don’t like the results, undo the action and re-run the command. The standard
settings are remembered from one session to the next, although the options
(Random Effect, Convert to Symbol, and Fade Opacity) are not.
Resize Selected ObjectsWhile it’s not under the Creative category, the Resize Selected Objects command is
a great tool for fine-tuning your creative masterpieces. Although Fireworks scaling
facilities work well for general adjustments, it’s often difficult to rescale an element
Caution
243662-1 ch19.F 8/2/02 2:56 PM Page 619
Fireworks Seminar

620 Part IV ✦ Coordinating Workflow
in small increments in a single direction. With the Resize Selected Objects com-
mand, you can increase or decrease any side of an object by as little as one pixel.
The Resize Selected Objects command was created by John Dunning. Its snazzyFlash interface makes scalar adjustments a point-and-click affair; you can rescaleany selected objects smaller or larger — in any of four directions — by single or 10pixel increments. The Resize Selected Objects command works extremely wellwith multiple objects, rescaling each independently.
To rescale page elements with the Resize Selected Objects command, follow these
steps:
1. Select the desired elements.
2. Choose Commands ➪ Resize Selected Objects.
The Resize Selected Objects dialog box is displayed, as shown in Figure 19-6.
Figure 19-6: The Resize Selected Objects command works extremely well with rounded rectangles.
3. Select the small arrows to resize your elements by 1 pixel and the larger
arrows to resize your elements by 10 pixels. The arrows outside the rectangle
make the object larger and the arrows inside rectangle, smaller.
Hold down the mouse button after you’ve selected an arrow to continue
incrementing or decrementing the size.
4. Click the checkmark when you’re done.
Data-Driven Graphics WizardOne of the most innovative new features in Macromedia Fireworks MX is the Data-
Driven Graphics Wizard. With this new command — created by the author of this
book — you can produce multiple graphics from a single data source and automate
your Web graphics production process.
NewFeature
243662-1 ch19.F 8/2/02 2:56 PM Page 620
Fireworks Seminar

621Chapter 19 ✦ Automating Workflow
The Data-Driven Graphics Wizard combines data from XML files with variablesembedded in a Fireworks template to generate new graphics based on the origi-nal template. If you ever had the chore of churning out a slew of images whereonly a few key phrases and maybe a central graphic were different, you’re going tolove the Data-Driven Graphics Wizard.
The Data-Driven Graphics Wizard works with standard-format XML files, which
can be exported by a database program such as Access 2002 or created by hand in
Dreamweaver MX or any text editor. The XML file should follow a format like this:
<?xml version=”1.0” encoding=”iso-8859-1”?><records>
<record><varModel>ZX2002</varModel><image>luxury.png</image><url>http://www.triomotors.com/zx2002</url>
</record><record>
<varModel>M210</varModel><image>power.png</image><url>http://www.triomotors.com/zr2002</url>
</record></records>
You’ll notice that within each of the two <record> tags shown here, there are three
separate fields. The field names, varModel, image, and url, form the tags enclos-
ing the data for that particular field. In an XML file, you can have as many records
and fields as you need.
The graphics template itself is created in Fireworks. To turn any Fireworks file into
a template, simply add variables. The Data-Driven Graphics Wizard recognizes any
text enclosed by curly braces — like {varModel} — as a variable. You can use as
many variables as you like and you can repeat the same variable multiple times.
In addition to text variables, the Data-Driven Graphics Wizard works with two other
variable types: images and URLs. To turn any image into a variable, select it and, in
the name field of the Property inspector, enter a unique name in curly braces, like
{varImage}. Effects applied to the template image are applied to the replacement
images. For URLs, the process is similar. Select any slice or hotspot and enter a
variable — such as {url} — in the Link field.
While you can use any name you want for a variable, it’s best to choose the same
name used in the data file for the corresponding field. If, for example, there was a
field in the data file called “lastName”, use the variable {lastName} wherever
you’d like the data from that field to appear. Naming your variables in this manner
will save you a step in the process as the Data-Driven Graphics Wizard automati-
cally maps template variables to data fields with the same name.
NewFeature
243662-1 ch19.F 8/2/02 2:56 PM Page 621
Fireworks Seminar

622 Part IV ✦ Coordinating Workflow
Be sure to save all the changes to your template graphic before beginning to runthe Data-Driven Graphics Wizard.
Let’s work through a typical Data-Driven Graphics Wizard session by following
these steps. The Data-Driven Graphics Wizard is a six-step wizard; contextual help
is available on every screen by selecting the question mark icon.
If you want to try out the Data-Driven Graphics Wizard, you’ll find sample files —including a Fireworks template and XML data files — on the CD-ROM in theExamples folder.
Choosing your data sourcesIn this first step, you point to the proper XML data file and, if necessary, the folder
containing the replacement images for any image variables.
The replacement images are usually the same height and width as the image vari-able. The replacement images can be any image format capable of being importedinto Fireworks.
1. With your template graphic selected as the current document, choose
Commands ➪ Data-Driven Graphics Wizard.
On the opening screen, the Data-Driven Graphics Wizard identifies all the
variables in your template.
2. Locate the XML data file by selecting the folder icon next to the first field.
3. If you have any image variables, you need to select the folder holding the
replacement images.
4. Choose Next when you’re ready.
Looking at the data recordsThe next step of the Data-Driven Graphics Wizard displays the records found in
your data file. You can page through the various records with the VCR-like controls.
There are four record controls:
✦ First Record
✦ Previous Record
✦ Next Record
✦ Last Record
This screen is especially helpful in identifying the fields as well as any specific
records you’d like to process. When you’re through reviewing your records, click
Next to continue.
Tip
On theCD-ROM
Tip
243662-1 ch19.F 8/2/02 2:56 PM Page 622
Fireworks Seminar

623Chapter 19 ✦ Automating Workflow
Selecting the proper recordsIn the third step, you choose which records you’d like to process. The choices are
as follows:
✦ All: Processes all the records in the data file.
✦ First Record Only: Uses the data from the first record to process a single
record.
✦ Specific: Processes specific records, designated by comma-separated
numbers, like “1,3,5” or “2,4”.
First Record Only is often chosen to run a test of the Data-Driven Graphics Wizard
and make sure the results are what you expect. After the First Record Only is
processed, the PNG source file remains open.
Linking variables to dataStep 4, shown in Figure 19-7, is the heart of the Data-Driven Graphics Wizard. Here,
you map variables found in your document to fields in the data file. As noted ear-
lier, variables and fields with the same name are automatically mapped to one
another. To map unlinked variables to data, follow these steps:
Figure 19-7: The Data-Driven Graphics Wizard automatically matches variables and data fields with the same names; this matching capability is not case-sensitive so a variable named {varName} will match a data field named VARNAME.
243662-1 ch19.F 8/2/02 2:56 PM Page 623
Fireworks Seminar

624 Part IV ✦ Coordinating Workflow
1. Choose a variable found in your Fireworks template from the Variable list.
The type of variable is displayed first, like Image: {varImage}.
2. Select a data field from the Field list.
Your selection appears next to the Add Link and Remove Link buttons.
3. Confirm your selection by choosing the Add Link button.
The variable and field are moved into the Mapped Variables list.
4. To unlink a variable and field combination, select it from the Mapped
Variables list and choose the Remove Link button.
5. When you’ve mapped all your variables, click Next.
Managing filesWe’re almost done! Step 5 is mostly devoted to housekeeping: naming files, choos-
ing folders for export, and so on. First you need to choose a naming scheme for the
generated files. The naming scheme combines a base name with an automatically
generated number. By default, the base name picks up the name of the template;
you can substitute any valid filename, without the extension. You have three
different types of autonumbering to choose from.
After you’ve decided upon a naming scheme, you need to set the export options.
You can choose any of the standard settings available within Fireworks or use the
export option currently in place for the template. You also have the option to just
export graphics or export and save the source PNG files or just save the source
files. All you need to do is select the desired checkbox(es) and specify a folder
for storing the files.
Follow these steps to complete this stage of the Data-Driven Graphics Wizard:
1. Enter the desired base name in the Filename field.
The base name will be used for both exported and source files, so you should
enter a name without an extension.
2. Select one of the three autonumbering patterns: no leading zero, one leading
zero, or two leading zeros.
3. Enter a starting value for the autonumbering scheme. Alternatively you could
just leave the default.
4. If you want to export the files, select the type of export from the drop-down list.
The default option in the drop-down list, Template Export Settings, picks up
whatever settings your template is using.
5. If exporting, choose the folder icon to open a Select Folder dialog box and
pick a folder to store the generated images in.
243662-1 ch19.F 8/2/02 2:56 PM Page 624
Fireworks Seminar

625Chapter 19 ✦ Automating Workflow
If you select the folder icon, the Export Images option is automatically
checked.
6. If you want to generate PNG source files, choose a folder for them as well.
7. Click Next to move to the final step.
Generating the filesUse the final step to review your choices. To change any choices, select Previous to
return the desired step. If everything looks good, select Done to generate the graph-
ics. Fireworks immediately begins processing. All generated files will be saved in
the selected folder(s).
Once the command has finished, open up the generated files and you’ll note that all
the variables have been replaced with data. If your variable image had one or more
effects applied to it, those effects have been transferred to the replacement images.
Furthermore, all the slices with variable URLs are linked to new addresses.
Examining the Document submenuThe Commands ➪ Document submenu contains four commands that operate on the
canvas, layers, or frames of your document.
Distributing to layersSelecting multiple objects and choosing Commands ➪ Document ➪ Distribute to
Layers places each object on its own layer. If there are not enough layers, Fireworks
creates new ones. Objects are distributed according to their stacking order, so that
the closest object to the canvas stays in the current layer, and the farthest object
from the canvas ends up in the highest-numbered layer.
When you import a Photoshop document, Fireworks converts Photoshop layersinto Fireworks objects and places them all within one Fireworks layer. TheDistribute to Layers command enables you to quickly place each object on its ownFireworks layer.
Toggling layersTwo commands provide straightforward shortcuts to focusing in on only the
current layer:
✦ Commands ➪ Document ➪ Hide Other Layers hides all layers except the
current layer.
✦ Commands ➪ Document ➪ Lock Other Layers locks all layers except the
current layer.
Tip
243662-1 ch19.F 8/2/02 2:56 PM Page 625
Fireworks Seminar

626 Part IV ✦ Coordinating Workflow
Reversing framesOccasionally, you may find that you’ve imported a rollover button upside down so
that the initial state is not in Frame 1 in Fireworks. This often occurs when
FreeHand layers are converted into Fireworks frames. Reversing frames is also a
common way to save time and work while creating animations. The Reverse Frames
dialog box provides two options to reverse the order of frames in a document.
✦ Reverse All Frames simply reverses the order of all the frames in your docu-
ment. The first frame becomes the last frame; the last frame becomes the first
frame.
✦ Reverse Frame Range works in the same way as Reverse All Frames, except
you can set the starting and ending frame in their respective drop-down lists.
When executed just the frame range specified is reversed.
Fireworks technique: Completing an animationWhen working on an animation, it’s common to build one-half of an animation
sequence, such as a sun rising, and then reverse the already built frames to create
the other half of the animation, such as the sun setting. Fireworks’ Reverse Frames
command provides an easy way to accomplish this task in record time:
1. Create the first half of your animation, such as the previously mentioned
sunrise, or an animated object flying onto the canvas.
2. Choose File ➪ Save a Copy to save a copy of your document.
3. Choose Commands ➪ Document ➪ Reverse Frames to reverse the frames of
your animation, essentially running it backward.
Choose Reverse All Frames, or choose Range of Frames and select a starting
and ending frame.
4. Choose Add Frames from the Frames panel pop-up menu.
Fireworks displays the Add Frames dialog box.
5. In the Number box, type in the same number of frames as your document
currently contains. For example, if your document has 10 frames, enter 10
to create 10 new frames so that you end up with 20 frames.
6. Under Insert New Frames, select At the Beginning, and click OK when
you’re done.
Fireworks creates the new frames at the beginning of your document and
selects Frame 1.
7. Choose File ➪ Import. Navigate to and select the copy of your document that
you created in Step 2. Click Import to import it.
8. Place the L-shaped import cursor at the top left of the canvas in order to line
up the imported document with the current document. Click once to complete
the import operation.
243662-1 ch19.F 8/2/02 2:56 PM Page 626
Fireworks Seminar

627Chapter 19 ✦ Automating Workflow
Your original animation — running forward — fills up the empty frames and pro-
vides the beginning of the animation. The reversed frames provide the end of the
cycle so that the animation completes itself.
Find out more about animation in Fireworks in Chapters 23 and 24.
Using Panel Layout SetsPanel Layout Sets are saved configurations of Fireworks’ floating panels. Saved sets
are automatically added to the Commands ➪ Panel Layout Sets submenu for easy
recall of any particular organization of floating panels.
Fireworks provides three built-in Panel Layout Sets, each specifically optimized for
a different screen resolution:
✦ Commands ➪ Panel Layout Sets ➪ 1024×768
✦ Commands ➪ Panel Layout Sets ➪ 1280×1024
✦ Commands ➪ Panel Layout Sets ➪ 800×600 (see Figure 19-8)
Figure 19-8: The 800×600 Panel Layout Set organizes panels into tight configurations in order to fit them on an 800×600 display.
Cross-Reference
243662-1 ch19.F 8/2/02 2:56 PM Page 627
Fireworks Seminar

628 Part IV ✦ Coordinating Workflow
Panel Layout Sets are a welcome solution when you change to a lower display res-olution and all of your floating panels are out of the visible area. Recalling a savedset restores Fireworks to working order.
Storing Custom Panel LayoutsThe Save Panel Layout command enables you to easily save your own Panel Layout.
Aside from saving your One True Favorite panel setup for posterity, you might save
configurations that are optimized for certain tasks, such as a drawing layout that
places the Object, Info, Fill, and Stroke panels front and center, or an optimization
layout that pops up the Optimize, Color Table, and Frames panels.
Although Fireworks offers some built-in Panel Layout Sets, the initial, default con-figuration of panels is not saved. If you’re still using the initial configuration, createa Panel Layout Set and store it. If not, you can restore the initial configuration bytrashing your Fireworks MX Preferences file on the Mac (in the Preferences folderinside your System Folder), or deleting the file Fireworks MX.ini on Windows(inside your Fireworks 4 folder). When you start Fireworks again, all the prefer-ences will be at their default values, including the location of the floating panels.
To create your own Panel Layout Set, follow these steps:
1. Create a panel layout worth saving by toggling the visibility of particular pan-
els and/or adjusting their positions. You can also create new panel groups by
choosing Group Panelname with from a particular panel’s Options menu.
2. Choose Commands ➪ Panel Layout Sets ➪ Save Panel Layout.
Fireworks displays a JavaScript dialog box asking for a name for your new
Panel Layout.
3. Enter a name for your Panel Layout in the dialog box. Click OK when
you’re done.
Fireworks saves your panel configuration as a new Panel Layout and adds it to the
Panel Layout Sets submenu in the Commands menu.
Creating a new Panel Layout with the same name as an existing one overwritesthe original without asking for confirmation. It’s possible to have both entriesbriefly coexist on the Panel Layout Sets submenu, but your original command filewill still be lost.
Using the Reset Warning dialog boxesMany of Fireworks’ warning dialog boxes have a “Don’t ask again” checkbox that
enables you to disable the warning in the future. Choose Commands ➪ Reset
Warning Dialogs to enable all of Fireworks’ warnings.
Caution
Tip
Tip
243662-1 ch19.F 8/2/02 2:56 PM Page 628
Fireworks Seminar

629Chapter 19 ✦ Automating Workflow
Examining the Web submenuThe Web submenu of the Commands menu has three entries that enhance
Fireworks’ export features: Create Shared Palette, Set Blank ALT Tags, and Set
ALT Tags.
Creating Shared PaletteThe Create Shared Palette command looks at a folder full of images and creates a
common color table file (.act) from them.
To create a shared palette from a folder of images, follow these steps:
1. Choose Commands ➪ Web ➪ Create Shared Palette.
Fireworks displays the command’s dialog box, as shown in Figure 19-9.
Figure 19-9: The Create Shared Palette command lets you specify the number of colors to include.
2. Enter the maximum number of colors in the appropriate text field.
3. Locate a folder containing the images by selecting the Browse button.
Fireworks displays the Select Folder dialog box.
4. Click OK when you’re done.
Fireworks displays a Save File dialog box when it’s done.
5. Navigate to a folder and specify a filename for the palette file. Click Save when
you’re done.
Fireworks saves the shared palette as a color table file, with the filename extension
.act. You can open this file with the Fireworks Color Table panel, or import it into
Photoshop.
243662-1 ch19.F 8/2/02 2:56 PM Page 629
Fireworks Seminar

630 Part IV ✦ Coordinating Workflow
Mac users: Fireworks saves the palette file with a Fireworks Creator code (MKBY),but Fireworks doesn’t provide an icon for a color table file type (8BCT). If you alsohave Photoshop, applying a Photoshop Creator code (8BIM) to the file withAppleScript or a utility, such as File Buddy, applies an icon (from Photoshop) to itas well.
Selecting blank ALT tagsThe HTML <img> tag (used for inserting images into Web pages) can have an altattribute containing text that is displayed to users who have images turned off in
their browser or are using a text-only browser. Alt text is particularly important to
visually impaired Web surfers, who may have a browser that simply reads text and
alt text aloud to them. You can set alt text in the Object panel while single or multi-
ple hotspot or slice objects are selected. Choosing Commands ➪ Web ➪ Select
Blank ALT Tags selects all the hotspots or slices in your document that don’t have
alt text, enabling you to add text to them with one step. You might set all buttons to
say “button,” for example.
Setting ALT tagsWhen you choose Commands ➪ Web ➪ Set Alt Tags, Fireworks displays a dialog
box, as shown in Figure 19-10. Enter alt text and click OK, and Fireworks applies the
alt text to all the hotspots and slices in your document that lack alt text. Leaving
the text field empty and clicking OK is the same as clicking Cancel, and does not set
the alt text to an empty string (which would effectively hide an image — such as a
spacer — from text-only browsers).
Figure 19-10: Provide alt text for all the Web objects in your document that lack alt text in one step.
Enhancing Productivity with the History PanelThe History panel not only enables you to undo actions, but it also enables you to
save steps as commands, which you can then repeat. This productivity enhance-
ment can be quite remarkable. If you’re used to a History panel from Photoshop,
you know that it’s hard to do without it once you’re hooked.
Tip
243662-1 ch19.F 8/2/02 2:56 PM Page 630
Fireworks Seminar

631Chapter 19 ✦ Automating Workflow
Macromedia’s Dreamweaver also gained a History panel in version 3.
Using Undo and RedoFireworks has long had multiple Undo, enabling busy Web artists to Edit ➪ Undo or
Ctrl+Z (Command+Z) their way step-by-step back through their previous actions.
With the History panel, Fireworks’ Undo feature gains a friendly front-end that
makes jumping back one or ten steps a simple, intuitive affair.
The History panel contains a special slider, called an Undo Marker, that enables you
to point to any of your previous steps in order to return your document to the state
it was in right before that step. Figure 19-11 shows the History panel with the Undo
Marker.
Figure 19-11: The History panel is empty when you create a new document, but from that point on, it records your every move.
To undo steps in the History panel, try one of the following methods:
✦ Drag the Undo Marker up the History panel until it is next to the last step that
you want to undo.
✦ Click the Undo Marker track next to the last step that you want to undo. The
Undo Marker slides directly to that point.
Undone steps are grayed out in the History panel, and your document changes to
reflect the steps that have been undone.
Tip
243662-1 ch19.F 8/2/02 2:56 PM Page 631
Fireworks Seminar

632 Part IV ✦ Coordinating Workflow
The logical companion to Undo is, of course, Redo. After you have undone a step or
steps, reversing the procedure applies those actions again.
To redo undone steps with the History panel, try one of the following methods:
✦ Drag the Undo Marker down the History panel until it is next to the last step
that you want to redo.
✦ Click the Undo Marker track next to the last step that you want to redo. The
Undo Marker slides directly to that point.
By default, Fireworks records 20 unique steps in the History panel, after which, the
oldest step is discarded to make room for the newest step.
To change the number of unique steps the History panel can record, follow these
steps:
1. Choose Edit ➪ Preferences.
Fireworks displays the Preferences dialog box.
2. If necessary, click the General tab in Windows or choose the General option
from the option list on a Mac.
3. Change the number of steps in the Undo Steps box to the number of steps
that you want the History panel to record.
The number of Undo steps has a theoretical maximum ceiling of 1,009 steps, butin practice, this number is limited by the amount of RAM Fireworks has access to.
Clearing steps from the History panel can free memory and disk space, although
you lose the ability to work with the steps you are deleting. For example, you will
be unable to perform Undo or Redo on deleted steps. To clear all steps from the
History panel, choose Clear History from the History panel pop-up menu.
Building commands without codingBuilding commands with the History panel is a tremendous timesaver, and a lot of
fun, to boot. Creating commands with the History panel emphasizes the minimalist,
easy-to-use interface of the History panel.
The simplest way to create a command is just to replay a step or a series of steps
from the History panel by using the Replay button. Select a step in the History
panel by clicking it, and then click the Replay button to reapply that step to
whatever is currently selected on the canvas.
Caution
243662-1 ch19.F 8/2/02 2:56 PM Page 632
Fireworks Seminar

633Chapter 19 ✦ Automating Workflow
For example, imagine that you colored an object a certain blue and then later
decided that a few other objects should also share that same blue color. Click the
Fill Color step in the History panel that represents the application of that blue fill
(see Figure 19-12), and the Replay button is now a Fill With Blue button. Select
objects on the canvas and hit Replay to color them blue. You can select multiple
contiguous steps in the History panel by holding down Shift while clicking the first
and last steps in a series. You can select multiple noncontiguous steps by
Ctrl+clicking (Command+clicking).
Figure 19-12: With the Fill Color step selected (left), the Replay button becomes a command that applies a fill to selected objects on the canvas. Hold down Shift to select multiple steps and apply them to selected objects with the Replay button.
But what if you decide that blue fill is so useful that you’ll need it again and again?
The Fill Color step moves further up the History panel as you continue your work
and will eventually be removed to make space for newer steps. To keep your Fill
With Blue command for later use, simply press the History panel’s Save Steps
as Command button, which looks like a floppy disk. Saving a step or steps as a
command adds the command to the Commands menu for later use.
To save History panel steps as a command, follow these steps:
1. Perform an action or a consecutive series of actions that you would like to
save as a command. Following are examples of steps you could perform
before saving them:
• Create a standard copyright/legal footer for your Web site, with associ-
ated text formatting and precise canvas placement.
• Create a circle object, duplicate it five times, select all six objects, align
them horizontally, and distribute them to widths, creating a basic button
bar that can be easily built upon or modified.
243662-1 ch19.F 8/2/02 2:56 PM Page 633
Fireworks Seminar

634 Part IV ✦ Coordinating Workflow
2. If you want to save just one step as a command, click that step in the History
panel to select it. To save multiple steps, hold down Shift and click the first
and the last step in the series that you want to save. Ctrl+click
(Command+click) noncontiguous steps to select them.
3. Click the Save Steps as Command button in the History panel.
Fireworks displays the Save Command dialog box.
4. Enter a name for your new command. Click OK when you’re done.
Your steps are saved as a command and added to the Commands menu in alphabet-
ical order. To apply your command, choose the name of your new command from
the Commands menu.
Limitations to saving steps as commandsThe two caveats to saving steps as commands are:
✦ Some actions, such as drawing a shape with the Brush tool, are nonrepeat-
able. Fireworks marks these steps with a red X, as shown in Figure 19-13.
Figure 19-13: Items with a red X next to them are nonrepeatable. A separator line indicates a change in selection, which can lead to unpredictable results.
✦ Fireworks places a separator in the History panel (also shown in Figure 19-13)
when you change your selection. Replaying steps across a separator can have
unpredictable results because some objects can’t be modified in the same
way as other objects.
243662-1 ch19.F 8/2/02 2:56 PM Page 634
Fireworks Seminar

635Chapter 19 ✦ Automating Workflow
When you attempt to save steps that include either of these potential problems,
Fireworks notifies you with a dialog box, indicating that there may be a problem
and providing you with the opportunity to continue or cancel.
Fireworks technique: Quick menu command shortcutsFireworks offers the user a lot of editing choices and power with many menu
commands that have numerous options. This creative flexibility is, of course, a
wonderful feature, but there have been times I wished for a few simpler commands,
such as Modify ➪ Reduce Image to 25%. After you’ve opened up the Image Size
dialog box and almost laboriously chosen Percentage and entered 25% for the 20th
time in a particular session, you start to think there must be a better way. And with
the History panel, there is.
The History panel not only enables you to create a complex series of steps and
make intricate commands, but it’s also useful as a way to make one-step commands
that simply use common settings. If you find yourself scaling buttons to 30×30 pix-
els all the time, or changing the canvas size to 300×200 pixels constantly, create
new scaling and canvas-changing commands with those settings built right in.
To save a Fireworks menu command as a modified command with your own built-in
settings, follow these steps:
1. Open a Fireworks document. As long as you don’t save the document after
creating your command, you can experiment with almost any document.
Simply use it as a guinea pig in your command-building session.
2. Perform a simple, one-step transformation on your document. Here are some
possibilities:
• Choose Modify ➪ Image Size and reduce the image’s size to 50%,
or another percentage (or a pixel size) that you commonly change
images to.
• Import a commonly used file, such as a logo.
3. Select the single step in the History panel that represents the command you
just gave Fireworks.
4. Click the Save Steps as Command button in the History panel.
Fireworks displays the Save Command dialog box.
5. Enter a name for your new command. Click OK after you’re done.
Your step is saved as a command and added to the Commands menu in alphabeti-
cal order.
243662-1 ch19.F 8/2/02 2:56 PM Page 635
Fireworks Seminar

636 Part IV ✦ Coordinating Workflow
Copying steps to the clipboardFireworks has achieved a new level of productivity with the new capability to turn
steps in the History panel into commands on the clipboard without writing a line of
code. In previous versions, users had to perform tasks again and again manually.
However, the History panel also has a trick or two for those of us who don’t mind
getting into a little JavaScript once in a while.
The Copy Steps to Clipboard button copies the History panel’s selected steps to the
clipboard as plain text JavaScript statements, ready for pasting into any text editor.
Copy Steps to Clipboard provides a way for even the experienced JavaScript coder
to get a command or scriptlet roughed out in record time.
After the steps are pasted into a text editor, they can be modified and added to until
you have created a complex command. The Fireworks application programming
interface (API) contains a host of entries that make it possible to build complex
commands or scriptlets that access almost any feature of Fireworks.
Chapter 26 covers the Fireworks API.
To use Copy Steps to Clipboard to start building a command or scriptlet visually,
follow these steps:
1. Create a series of steps that you would like to save.
2. Select the steps in the History panel.
3. Click the Copy Steps to Clipboard button to copy your steps to the system
clipboard as JavaScript statements.
4. Launch or switch to your favorite text editor, such as Notepad in Windows
or SimpleText on a Mac. Create a new document or open an existing one, if
necessary.
5. Choose Edit ➪ Paste within the text editor to paste your JavaScript code.
Feel free to modify the pasted JavaScript, or even to repeat the preceding steps to
add more code to your project.
Chapter 26 has all the details on the Fireworks JavaScript API.Cross-Reference
Cross-Reference
243662-1 ch19.F 8/2/02 2:56 PM Page 636
Fireworks Seminar

637Chapter 19 ✦ Automating Workflow
Managing CommandsThe extensibility of the Fireworks’ Commands menu is its most useful feature. Items
can be easily created and added to it. In addition to the default commands included
with Fireworks, Macromedia and other extension authors are creating new exten-
sions on an on-going basis.
Using Commands in Commands
After you’ve applied a command, the action is recorded in the History panel as a step calledCommand Script. It might not be immediately obvious, but steps that apply commands canthemselves be selected and saved as part of a command (see the figure), thus, creatingmeta-commands: commands that combine a number of commands into one.
The button bar in the accompanying figure was built almost entirely by running commandsthat I had previously saved. One command applied a drop shadow and inner bevel, whilestill another command applied a radial gradient fill and offset the fill to provide a lightingeffect. Selecting the steps that applied the commands and saving them creates a complexsequence of actions that can be applied in the future with just one step. There is one smallcaveat, though: To use the new command, the original commands must be installed andavailable.
243662-1 ch19.F 8/2/02 2:56 PM Page 637
Fireworks Seminar

638 Part IV ✦ Coordinating Workflow
Fireworks recognizes two different types of extensions:
✦ JavaScript commands: Stored with the extension .jsf, the Fireworks
JavaScript files may be hand-coded or saved from the History panel.
✦ Flash commands: Saved as a .swf file from Flash, these extensions typically
have a more complete interface allowing a wider variety of user interaction.
Let’s look at ways of managing the JavaScript commands first.
Find even more JavaScript commands to enhance your productivity in Fireworks.
Managing saved commandsThe Commands menu is all about enhancing productivity, and as such, maintaining
a neat and tidy Commands menu is an important part of the process. It doesn’t take
too much experimentation with the Copy Steps as Command button to realize that
you can fill up your Commands menu with useful — okay, and sometimes not so
useful — new Fireworks commands. The Manage Saved Commands command
provides a visual interface for renaming or deleting installed commands.
Working with the Manage Saved Commands dialog boxTo edit your Commands menu with the Manage Saved Commands command, follow
these steps:
1. Choose Commands ➪ Manage Saved Commands.
Fireworks displays the Manage Saved Commands dialog box, as shown in
Figure 19-14.
Figure 19-14: Rename or remove commands in the Manage Saved Commands dialog box.
2. Select a command to modify and apply one of the following:
• Click Delete to delete the command from the Command menu.
On theCD-ROM
243662-1 ch19.F 8/2/02 2:56 PM Page 638
Fireworks Seminar

639Chapter 19 ✦ Automating Workflow
Deleting a command in the Manage Saved Commands dialog box removes thecommand’s scriptlet from your computer and cannot be undone. What’s more,Fireworks offers no confirmation or warning dialog box after you press Delete.
• Click Rename. Fireworks displays the Save Command dialog box. Enter a
new name for the command, and click OK to rename it.
3. Click OK in the Manage Saved Commands dialog box after you’re done.
Modifying the Commands folderIn addition to removing or renaming commands in the workspace, you can get
under the hood and organize or add commands in Fireworks’ Commands folder.
To accommodate multiuser systems, Fireworks MX uses different configurationfiles for each user as well as a master configuration folder. The master configura-tion folder is stored by default with the other programs on your system. On aWindows system, this would be in the Program Files\Macromedia\Fireworks MXfolder while for a Macintosh user it would be in the Applications/Macromedia/Fireworks MX folder. The location of the user’s configuration files depends on theoperating system. For example, Macintosh OS X users would find the configurationfolder at HD\Users\User ID\Library\Application Support\Macromedia\FireworksMX whereas Windows 2000 and XP users would find it at C:\Documents andSettings\User ID\Application Data\Macromedia\Fireworks MX. The Commandsfolder is inside the Configuration folder in your Fireworks program folder.
The hierarchy of your Fireworks Commands folder determines the hierarchy of
your Commands menu. In other words, a folder inside the Commands folder
becomes a submenu in the Commands menu, so that the Creative folder is shown
as a Creative submenu (see Figure 19-15).
Figure 19-15: Subfolders in the Fireworks Commands folder (left) become submenus in the Fireworks Commands menu.
NewFeature
Caution
243662-1 ch19.F 8/2/02 2:56 PM Page 639
Fireworks Seminar

640 Part IV ✦ Coordinating Workflow
Create new subfolders in the Commands folder in order to better organize your
commands. Placing folders within those subfolders has no effect; the hierarchy can
be only one deep. Changes take effect immediately in Fireworks, without relaunch-
ing, making it easy to experiment with new arrangements.
At 1,024×768-pixel display resolution, Fireworks for Macintosh allows you about 45
Command menu entries (commands and submenus) before it begins scrolling the
menu. When it’s maximized, Fireworks for Windows can contain about 30 Command
menu items at a 1,024×768-pixel display resolution before the menu scrolls. I find
scrolling menus to be a real productivity hit. Aside from the fact that you can’t see
all the entries, they are sometimes hard to navigate, especially on Windows, where
the menu itself does not stay fixed to the menu bar when it gets too long, and it
interferes with the taskbar at the bottom of the display. Keeping your Commands
menu organized with subfolders is worth the effort.
Managing Flash commandsFlash commands may be installed either as modal or modeless. If a command
interrupts the general use of the program; the Add Arrowheads and Data-Driven
Graphics Wizard are both examples of modal commands. Modal commands are
typically found in the Commands menu. A modeless extension is one that co-exists
with the program; the Align panel is an excellent example of a modeless extension.
To facilitate the process of adding new extensions, Macromedia developed the aptly
named Extension Manager. The Extension Manager is a cross-product utility for use
with Dreamweaver, Flash, and, now, Fireworks. The Extension Manager works with
extensions created in a special format, Macromedia Exchange Package or MXP. MXP
files contain the necessary files for the extension, all the required information on
where the files should be installed, how to access the extension, who the author is,
and more, as shown in Figure 19-16.
Figure 19-16: The ExtensionManager can temporarily disablecommands without uninstallingthem.
243662-1 ch19.F 8/2/02 2:56 PM Page 640
Fireworks Seminar

641Chapter 19 ✦ Automating Workflow
The primary source for Macromedia Extension Package files is the Macromedia
Exchange (www.macromedia.com/exchange/), but you can also retrieve these files
from other sources such as developers’ sites or this book’s CD-ROM.
At the time of this writing, Fireworks extensions were only available through theDreamweaver Exchange and could be found by choosing the Fireworks category.However, there are plans for a Fireworks Exchange; from the Extension Manager,choose File ➪ Go to Macromedia Exchange to see the latest exchanges available.
If you’ve located the MXP file from the Internet, your browser may offer you
alternative methods to start the installation:
✦ Download the file to your system and complete the installation after that
process is complete.
✦ Install the file directly from the Internet.
It’s a matter of personal preference, but I prefer to store all the extensions locally.The vast majority of them tend to be fairly small and if I need to install them againor on a different machine, I don’t have to go through the download process again.
To complete the installation, follow these steps:
1. If you chose to open the extension from the Internet, the Extension Manager is
automatically launched. If you downloaded the extension, double-click the
.mxp file to launch the Extension Manager. In either case, the Macromedia
Exchange legal disclaimer is presented.
2. Select the Accept button to continue with the installation or Decline to
cancel it.
After you accept the disclaimer, the Extension Manager informs you whether
the installation is successful or alerts you to any errors it encounters, such as
existing files with the same name.
If the installation succeeds, the extension is added to your list. The list displays the
name of the installed extensions, their version number, the type, and the author.
Selecting the extension will give you a description of the extension, how to access
the extension in the Fireworks interface, and usually a bit of help on how to use it
or how to find help.
If you have a great number of extensions, you can sort the list in the ExtensionManager by selecting the column heading. To change the display order fromascending to descending (to show, for example, the highest version numbers first)click the heading again under Windows; on Macintosh systems, select the sort-order button on top of the scroll bar.
Tip
Tip
Note
243662-1 ch19.F 8/2/02 2:56 PM Page 641
Fireworks Seminar
642 Part IV ✦ Coordinating Workflow
You can also install an extension from within Fireworks by following these steps:
1. Choose Commands ➪ Manage Extensions to open the Extension Manager.
2. Select File ➪ Install Extension or use the keyboard shortcut, Ctrl+I
(Command+O). Alternatively, Windows users can also select the Install
New Extension button.
The Select Extension to Install dialog box opens.
3. In the Select Extension to Install dialog box, locate the desired .mxp file on
your system and choose Install.
The legal disclaimer is presented.
4. Select the Accept button to continue with the installation or Decline to
cancel it.
5. After the installation is complete, choose File ➪ Exit (File ➪ Quit) to close the
Extension Manager or click the Close button.
Some extensions may require Fireworks to be relaunched in order to take effect.
Once an extension is installed you can disable it temporarily by clearing the check-
box in the On/Off column. This removes the command from the Fireworks menu
until you enable the checkbox again. To permanently remove an extension, select
the entry and choose File ➪ Remove Extension; Windows users may also select the
Remove Extension button. In multiuser environments, extensions installed by the
administrator — such as the standard commands and command panels — can be
removed only by someone with administer privileges.
SummaryThe Commands menu and the History panel are powerful productivity features and
welcome additions to Fireworks. Keep the following points about them in mind:
✦ Fireworks’ extensible Commands menu already contains useful commands
right out of the box.
✦ The History panel offers precise control over multiple Undo and Redo.
✦ Steps in the History panel can be replayed, saved as a command, or copied to
the clipboard as JavaScript code for later editing.
✦ You can add new commands to Fireworks by dropping them in the Commands
folder, the structure of which represents the Commands menu.
In the next chapter, you explore image maps and slices in Fireworks.
✦ ✦ ✦
Caution
243662-1 ch19.F 8/2/02 2:56 PM Page 642
Fireworks Seminar

Entering the Web
Fireworks broke new ground as the first image editor to
output HTML and JavaScript code. With its full-featured
hotspots, image maps, and sliced images embedded in HTML
tables, Fireworks is incredibly Web-savvy. Part V explains the
basics of Web interactivity for those designers unfamiliar with
the territory and also offers specific step-by-step instructions
for linking JavaScript behaviors to graphics.
If you work with Dreamweaver (or work with someone who
does), you’ll want to check out Chapter 22 in order to get the
most out of the integration possibilities between Fireworks
and Dreamweaver.
✦ ✦ ✦ ✦
In This Part
Chapter 20Mastering ImageMaps and Slices
Chapter 21Activating Fireworkswith Behaviors
Chapter 22Integrating withDreamweaver
✦ ✦ ✦ ✦
P A R T
VV
253662-1 Part05.F 8/2/02 2:56 PM Page 643
Fireworks Seminar

253662-1 Part05.F 8/2/02 2:56 PM Page 644
Fireworks Seminar

Mastering ImageMaps and Slices
Have you ever encountered a Web page in which all the
image links are broken? All you see amidst the text is a
bunch of rectangles with the browser’s icon for “No graphic
found.” That’s what a Web page really is to a browser: text and
rectangles. You can use GIF transparency to disguise the box-
like shape of an image file, but that won’t limit the image link
to just the visible area. For that, you need to use image maps
or slices, which also enable you to create the effect of inter-
twined, irregularly shaped image links, such as a yin yang
symbol.
Fireworks excels in its support of image maps and slices.
Collectively known as Web objects in Fireworks, both slices
and image maps (or their individual parts, referred to as
hotspots), serve several functions. In addition to helping
designers break out of the rectangularity of the Web, Web
objects add interactivity through links and a bit of flair
through rollovers and other Behaviors. Although you could
design a site full of Web graphics without ever coming near
hotspots or slices, fully understanding their uses and limita-
tions significantly increases your Web design repertoire.
This chapter covers the basics of setting up hotspots andslices, and includes some techniques for incorporatingthem into your Web pages. For detailed information onbuilding rollovers and using other Fireworks Behaviors, seeChapter 21.
Cross-Reference
2020C H A P T E R
✦ ✦ ✦ ✦
In This Chapter
Working with Webobjects
Assigning hotspots inimage maps
Inserting exportedcode into a Webpage
Dividing an imagewith slices
Exporting slices toHTML
Animating a slice
✦ ✦ ✦ ✦
263662-1 ch20.F 8/2/02 2:57 PM Page 645
Fireworks Seminar

646 Part V ✦ Entering the Web
Understanding Image Maps and HotspotsTo understand how an image map works, you needn’t look any further than an
actual map of almost any country in the world. Divisions between regions, territo-
ries, or states are usually geographic and rarely rectangular. To best translate any
such map to the Web, you would make each region (territory or state) a separate
clickable area (see Figure 20-1). This is exactly the type of job for which an image
map is intended.
Figure 20-1: The simplest example of an image map is one made from a real map.
Each separately defined area of an image map is referred to as a hotspot. Hotspots
come in three basic shapes: rectangles, circles, and polygons. Rectangles can be
Circlehotspot
Polygon hotspotRectangle hotspot
263662-1 ch20.F 8/2/02 2:57 PM Page 646
Fireworks Seminar

647Chapter 20 ✦ Mastering Image Maps and Slices
rectangles or squares, and circles can be circles or ovals; every other shape is a
polygon. After you define an area of an image map, you can name it and assign a
URL to it. Hotspots can also be used to trigger other events, such as rollovers or
the display of messages. Hotspots are not visible on the graphic when viewed
through the browser. Hotspots themselves are not actually part of the final
image; to be used, the hotspot information is translated into HTML code, which
is embedded in the Web page.
Because image maps and hotspots are HTML constructs and not data embedded
in your graphics file, you need to export both the image and the code from
Fireworks — and insert them both in your Web page. As you find out later in this
chapter, Fireworks handles this dual export quite effortlessly and gives you many
options for incorporating graphics and code however you like.
Using the Hotspot ToolsIn Fireworks, the Hotspot tools are immediately accessible in the bottom-left area of
the Tools panel. The following are the three basic Hotspot tools, corresponding to
the three basic hotspot shapes:
✦ Rectangle: Use to draw rectangular or square hotspots. You can’t round the
corner of a rectangle, as you can with the standard Rectangle tool, although
the keyboard modifiers work the same.
✦ Circle: Use to draw elliptical or circular hotspots. Again, the keyboard modi-
fiers, Shift and Alt (Option), function the same as they do with the regular
Ellipse tool.
✦ Polygon: Use to draw irregularly shaped hotspots. It functions similarly to the
Polygon Lasso and uses a series of points, plotted one at a time, to make the
hotspot shape.
When drawn, the hotspot appears as a shape overlaying the other graphics, as
shown in Figure 20-2. Fireworks keeps all hotspots — and slices, for that matter —
on the Web Layer, which is always shared across all frames and can be both hidden
and locked and moved up or down in the stacking order in the same way other lay-
ers are. Hotspots are displayed initially with the same color, but you can assign
each hotspot its own color, if desired, through the Property inspector.
263662-1 ch20.F 8/2/02 2:57 PM Page 647
Fireworks Seminar

648 Part V ✦ Entering the Web
Figure 20-2: Use the three Hotspot tools to draw hotspots on the Web Layer.
Examining the rectangle hotspotAs noted previously, all the Hotspot tools work in a similar fashion to correspond-
ing standard tools. However, a few key differences exist. To create a rectangle
hotspot, follow these steps:
1. Select the Rectangle Hotspot tool from the Tools panel.
2. Click once to select your originating corner and drag to the opposite corner to
form the rectangle. As you drag your pointer, Fireworks draws a preview out-
line of the hotspot.
To create a square hotspot, press Shift while you drag out your shape. To drawyour hotspot from the center instead of from the corner, press Alt (Option) whendragging out the shape. You can also combine the two modifier keys to create asquare drawn from the center.
Tip
Rectangle hotspotPolygon hotspotCircle hotspot
Web LayerRectangle Hotspot toolCircle Hotspot toolPolygon Hotspot tool
263662-1 ch20.F 8/2/02 2:57 PM Page 648
Fireworks Seminar

649Chapter 20 ✦ Mastering Image Maps and Slices
3. Release the mouse button when the rectangle is the desired size and shape.
Fireworks creates the hotspot with a colored fill, as shown in Figure 20-3.
Figure 20-3: Use the Rectangle Hotspot tool to create square or rectangular hotspots.
Examining the circle hotspotTo draw an elliptical or circular hotspot, follow these steps:
1. Select the Circle Hotspot tool from the Tools panel. If it’s not visible, click and
hold the visible Hotspot tool until the flyout appears, and then click the Circle
Hotspot button.
2. Click once to select the origin point, and then drag to the opposite corner to
create the circle or ellipse. As you drag your pointer, Fireworks draws a pre-
view outline of the form.
Hold down Shift while drawing to create a perfect circle, and/or hold down Alt(Option) to draw from the center.
3. Release the mouse button when the circle or ellipse is the desired size and
shape.
Fireworks creates the hotspot, as shown in Figure 20-4.
Tip
263662-1 ch20.F 8/2/02 2:57 PM Page 649
Fireworks Seminar

650 Part V ✦ Entering the Web
Figure 20-4: Use the Circle Hotspot tool to create circular and elliptical hotspots.
Precisely matching the size and shape of an elliptical object with a correspondinghotspot is fairly difficult. After you create hotspot objects, however, you can movethem with the pointer, resize them with the transform tools, or adjust themnumerically through the Info panel or Property inspector. If the oval you’re creatinga hotspot for is a separate object — as opposed to a region of a larger object — theeasiest method by far is to select the object and choose Edit ➪ Insert ➪ Hotspot,which tells Fireworks to make the hotspot for you.
Examining the polygon hotspotTo draw a polygon hotspot, follow these steps:
1. Select the Polygon Hotspot tool from the Tools panel. If it’s not visible, click
and hold whichever Hotspot tool is visible until the flyout appears, and then
click the Polygon Hotspot button.
2. Click the starting point for your hotspot and move the mouse to the next
point on the outline surrounding the desired area, and then click again.
Fireworks connects each point that you set down with a straight line, as
shown in Figure 20-5.
3. Repeat Step 2 until you’ve outlined the entire area.
As you create more points, Fireworks fills in the polygon with the default
hotspot color.
4. To finish creating the hotspot, click your original starting point to close the
polygon.
Fireworks creates the hotspot with a colored fill.
Tip
263662-1 ch20.F 8/2/02 2:57 PM Page 650
Fireworks Seminar

651Chapter 20 ✦ Mastering Image Maps and Slices
Figure 20-5: Fireworks fills in the polygon hotspot as you select each point.
Assigning links to hotspotsThe Property inspector does much more for hotspots than choose their color. In
fact, the Property inspector (see Figure 20-6) could easily be regarded as the fourth
Hotspot tool. To be truly useful, you must assign hotspots a link and other HTML
options — all of which you handle in Fireworks through the Property inspector.
Figure 20-6: Use the Property inspector, once you’ve selected a hotspot, to enter essential Web data, such as the linked URL and ALT text.
263662-1 ch20.F 8/2/02 2:57 PM Page 651
Fireworks Seminar

652 Part V ✦ Entering the Web
The Property inspector options for a hotspot include:
✦ Link: Use this text box to both assign and display the link associated with the
selected hotspot. You can either enter a new link by typing directly into the
text field, or choose an existing link by selecting one from the option list. The
option list displays URLs from the URL History for the current document as
well as the current URL Library.
For more information on using the URL History and URL Library to manage yourlinks, as well as links in general, see Chapter 18.
✦ Alt: Alternate image text entered here is shown when the server can’t find the
image, if the user has image loading turned off in their browser, or if the user’s
mouse is hovering over the image. In the latter case, the text appears in a
tooltip attached to the pointer. Fireworks includes both the standard alt
attribute and the title attribute required by Internet Explorer in the
generated HTML.
✦ Target: The target defines where the Web page requested by a link appears.
Targets are commonly used with HTML framesets. You can enter a named
frame directly in the Target text box, or choose one of the following target
keywords from the option list:
• _blank opens the link into a new browser window and keeps the current
window available.
• _parent opens the link into the parent frameset of the current frame, if
any.
• _self opens the link into the current frame, replacing its contents (this
action is the default if nothing is specified).
• _top opens the link into the outermost frameset of the current Web page,
replacing all frames.
✦ Color: When created, all hotspots are filled with the same semitransparent
color. You can, however, alter an individual hotspot’s color by selecting a new
one from the pop-up color picker.
✦ Shape: Displays the current hotspot shape. This shape is initially derived
from the tool used to create the hotspot, and is used to determine a portion of
the HTML code. You can change the shape by selecting a different one from
the option drop-down list, although doing so can radically alter your hotspot.
If you’re entering links directly into the Current URL text box, be careful of yourspelling. Web servers are very sensitive to typos — even whether you use upper-case or lowercase letters in some instances. You can save yourself a great deal ofpainstaking typing by using Fireworks’ Import URL feature, located in the URLpanel and covered in Chapter 18, to import links from any HTML file.
Cross-Reference
Cross-Reference
263662-1 ch20.F 8/2/02 2:57 PM Page 652
Fireworks Seminar

653Chapter 20 ✦ Mastering Image Maps and Slices
Covering an object with a hotspotAs one who has played connect-the-dots too many times while trying to create a
star-shaped hotspot, I heartily embrace Fireworks’ object matching hotspot cre-
ation. Instead of attempting to outline an object with any of the hotspot drawing
tools, select the object and choose Edit ➪ Insert ➪ Hotspot. A hotspot precisely
matching the shape of the object is created on the Web Layer, ready for linking.
This command works for rectangular, elliptical, and irregular shapes, whether they
are vector, bitmap, or text objects.
If you select multiple objects before using the Edit ➪ Insert ➪ Hotspot command,Fireworks asks whether you want to create one hotspot or multiple hotspots.Choosing to create one hotspot combines the Web Layer shapes into one rectan-gular hotspot encompassing all the selections.
Exporting Image Map CodeWhen an image map is translated into HTML, it appears in two key parts. The first
part is the image tag, <img>, which holds the information for the overall graphic.
The <img> attributes include src (the filename of the graphic), the dimensions of
the image, and a connection to the map data, usemap. The usemap attribute is set to
the name of the second image map element, the <map> tag. For every hotspot in the
image map, a corresponding <area> tag exists within the <map> . . . </map> tag pair.
The following code is for an image map with five hotspots:
<img name=”sloth” src=”sloth.gif” width=”300” height=”125”¬border=”0” usemap=”#m_sloth”><map name=”m_sloth”><area shape=”rect” coords=”14,18,68,46” href=”sloth.html”><area shape=”rect” coords=”68,18,122,46” href=”envy.html”><area shape=”rect” coords=”122,18,176,46” href=”greed.html”><area shape=”rect” coords=”176,18,230,46” href=”lust.html”><area shape=”rect” coords=”230,18,284,46” href=”ties.html”></map>
Fireworks handles outputting all of this code for you — and in several different
styles for various authoring tools, as well. All that you’re responsible for is incorpo-
rating the code in your Web page.
Choosing an HTML styleFireworks generates the HTML or XHTML code for an image map when you export
your image. The style of the code that Fireworks exports depends on the HTML
Style setting in the HTML Setup dialog box, as shown in Figure 20-7. Choosing an
HTML or XHTML style that matches your Web-authoring program makes incorpo-
rating the Fireworks-generated code easier.
Note
263662-1 ch20.F 8/2/02 2:57 PM Page 653
Fireworks Seminar

654 Part V ✦ Entering the Web
Figure 20-7: Select an HTML/XHTML style and more through the HTML Setup dialog box.
The standard HTML and XHTML styles included in Fireworks are as follows:
✦ Dreamweaver HTML/XHTML: Code styled for Macromedia Dreamweaver. For
image maps, no real difference exists between the Generic and the
Dreamweaver code.
Fireworks can also export HTML code as a Dreamweaver Library Item. Details laterin this chapter.
✦ Generic HTML/XHTML: The basic code, useful in hand-coded Web pages and
the majority of Web-authoring tools that work with standard HTML.
✦ FrontPage: FrontPage uses a series of webbots to format its code; Fireworks
includes the code necessary for an image map webbot, as well as instructional
code that displays when the document is opened in FrontPage.
✦ GoLive HTML/XHTML: Code optimized for use with Adobe’s GoLive HTML
editor.
You can find additional HTML templates in the HTML Templates folder on theCD-ROM accompanying this book. To use, just copy the desired folder with its filesto the Fireworks/Settings/HTML Settings directory — you don’t need to relaunchFireworks.
To export an image map, follow these steps:
1. Optimize your image as needed in the Optimize panel.
On theCD-ROM
Cross-Reference
263662-1 ch20.F 8/2/02 2:57 PM Page 654
Fireworks Seminar

655Chapter 20 ✦ Mastering Image Maps and Slices
2. Choose File ➪ Export to begin the exporting process.
The Export dialog box, shown in Figure 20-8 appears.
Figure 20-8: The Export dialog box enables access to export settings.
3. Choose a folder and provide a filename to save your exported file under.
4. Select HTML and Images from the Save as type (Save As) option list.
5. From the HTML option list, select whether you want to export the HTML file,
or copy the code to the clipboard.
6. Select None from the Slices option list.
7. If desired, check the Put Images in Subfolder checkbox, and click Browse to
choose the desired location for the image files only.
8. To alter any of the settings in the HTML Setup dialog box, click the Options
button to open the HTML Setup dialog box and adjust your settings.
9. After you make your selections, click Save to complete the export.
10. If you copied the HTML code to the clipboard, paste it into an HTML editor.
263662-1 ch20.F 8/2/02 2:57 PM Page 655
Fireworks Seminar

656 Part V ✦ Entering the Web
Inserting image map code in a Web pageAfter you create the graphic, link the hotspots, and generate the code, how do you
integrate all of that material within an existing Web page? Although the thought of
touching code may be just this side of horrifying for many graphic designers, for
most situations it’s really not that bad — and for some, it’s an absolute breeze.
Bottom line? If you can cut and paste in a word processor, you can insert an
image map in your Web page.
Although the process is much the same for most of the different style outputs,
some variations exist in the procedure. The following sections detail how to
integrate the Fireworks-generated code for each of the standard HTML styles.
Examining Generic code styleThe Generic HTML code style is, as the name implies, used in most general situa-
tions. If you’re building Web pages by hand — using a text editor, such as Notepad
in Windows or SimpleText on the Macintosh — the Generic HTML style is for you.
Likewise, if you’re using a Web-authoring program, but not one for which Fireworks
has a specific template, such as Dreamweaver, FrontPage, or GoLive, you should
use Generic HTML.
The general procedure for incorporating a Generic image map is fairly
straightforward:
1. Open the Generic code in a text editor or in the text editor portion of your
Web-authoring tool.
2. Select and copy to the clipboard the section in the <body> tag that starts with
<!---------- BEGIN COPYING THE HTML ---------->
and ends with
<!---------- STOP COPYING THE HTML HERE ---------->
3. Open your existing Web page in a text editor or in the text editor portion of
your Web-authoring tool.
4. In the <body> section of your Web page, insert the code where you want the
image to appear.
Be sure that you insert the code between the <body> and </body> tags, and notbetween the <head> and </head> tags.
5. Preview the page in a browser and adjust the placement of the <img> tag, if
necessary.
Caution
263662-1 ch20.F 8/2/02 2:57 PM Page 656
Fireworks Seminar

657Chapter 20 ✦ Mastering Image Maps and Slices
It’s not essential that the <img> part of the image map code and the <map> section
appear side by side, as long as they are in the same document.
If the image map is to form the basis of your document — and you don’t haveanother existing page to use — you don’t have to delete or move any code whatso-ever. Just add HTML elements around the image map as you build your new page.If you want, you can remove the HTML comments, but, frankly, they don’t addmuch weight to a page, so removing them really isn’t necessary.
Incorporating Dreamweaver codeYou can incorporate the standard Dreamweaver HTML code into a Web page in two
ways. The first is similar to the procedure used for including Generic code: Cut the
code from the Fireworks-generated page and paste it into the Dreamweaver page in
Dreamweaver’s Code inspector, or in Dreamweaver’s Code View. As long as you
make sure to insert the code in the <body> section of the document, and not the
<head> section, you won’t have any problems.
The other method takes advantage of Dreamweaver’s Invisible Elements to com-
pletely avoid opening the Code Inspector or switching to Code View. To incorporate
Dreamweaver-style HTML visually, follow these steps:
1. In Dreamweaver, open the Fireworks-generated HTML/XHTML page, which
was created with the Dreamweaver HTML/XHTML style option.
2. Make sure that View ➪ Visual Aids ➪ Invisible Elements is enabled.
Notice an HTML Comment symbol beside your image, followed by a Map
symbol, shown selected in Figure 20-9.
3. Select the image, press Shift, and click the Map symbol on the right of the
image.
If you want to transfer all the comments as well, click the first Comment symbol,press Shift, and then click the last Comment symbol.
4. Choose either Edit ➪ Copy, or use the keyboard shortcut, Ctrl+C
(Command+C).
5. Open the existing Web page to which you want to add the image map.
6. Place the cursor where you want the image map to appear.
7. Choose either Edit ➪ Paste, or use the keyboard shortcut, Ctrl+V
(Command+V).
Note
Note
263662-1 ch20.F 8/2/02 2:57 PM Page 657
Fireworks Seminar

658 Part V ✦ Entering the Web
Figure 20-9: With Dreamweaver’s Invisible Elements feature, you can copy andpaste or drag and drop visual icons in the document window instead of movingblocks of code in the Code inspector or in Code View.
The image map — and its code — is inserted into the Dreamweaver document.
If for some reason you don’t see either the Comment symbols or the Map symbolin Dreamweaver’s document window, choose Edit ➪ Preferences (Dreamweaver ➪
Preferences in OS X) in Dreamweaver and, from the Invisible Elements category,make sure that the Comments and Client-side Image Map options are selected. Ifyou still don’t see the Comment or Map symbols, choose File ➪ HTML Setup inFireworks and make sure that Include HTML Comments is checked.
The easiest way to insert Fireworks HTML or XHTML in Dreamweaver is to use theInsert Fireworks HTML object in the Common category of the Insert bar. It auto-matically places the code in the correct areas of your page.
Using GoLiveYou can easily select and then copy and paste HTML code in GoLive’s HTML Source
Editor, or drag and drop it between HTML Outline windows (see Figure 20-10). The
HTML Outline windows make it easy to move individual tags between documents
because the <img> or <map> tag can be easily collapsed to a single line. As well as
Tip
Note
263662-1 ch20.F 8/2/02 2:57 PM Page 658
Fireworks Seminar

659Chapter 20 ✦ Mastering Image Maps and Slices
the <img> and <map> tags, code exported with the GoLive style contains a
cssscriptdict tag that tells GoLive how to edit the image map. Make sure to copy
all three tags to the new document, placing the <img> and <map> tags into the body
tag and the cssscriptdict tag into the head tag. HTML code exported with the
GoLive option is very plain, with just a single “exported by Fireworks” comment.
Figure 20-10: GoLive’s HTML Outline view is a good way to drag and drop the <img>,<map>, and cssscriptdict tags from your exported code to another document.
To insert an image map from Fireworks into a GoLive document, follow these steps:
1. In GoLive, open the Fireworks-generated HTML page, which was created with
the GoLive style option.
2. Switch to the HTML Outline view for both your source and target documents.
3. Select the <img> tag in the exported Fireworks code and drag it into place in
your target document. Do the same for the <map> tag, placing both tags within
the body tag in your target document.
4. Select the cssscriptdict tag from the head of your source document and
drag it into the head of your target document.
263662-1 ch20.F 8/2/02 2:57 PM Page 659
Fireworks Seminar

660 Part V ✦ Entering the Web
If you want to transfer the “created by Fireworks” comments as well, select it in thesource document and drag it to the target document.
Using FrontPageMicrosoft’s FrontPage is an introductory Web-authoring tool that uses proprietary
code for many of its special effects, including image maps. Fireworks outputs code
to match the FrontPage format when you select FrontPage from the HTML Style
option list during export. The exported image map is inserted into an HTML page
that instructs the FrontPage user how to incorporate the code.
To insert an image map from Fireworks into a FrontPage document, follow these
steps:
1. Open the Fireworks-generated page in FrontPage.
Both the FrontPage document and the Fireworks-generated document must be inthe same folder.
2. Select the HTML View.
3. Select the code starting with
<!---------- BEGIN COPYING THE HTML ---------->
and ending with
<!---------- STOP COPYING THE HTML HERE ---------->
4. Choose Edit ➪ Copy.
5. Open the document into which the image map is to be inserted.
6. While still in HTML View, choose Edit ➪ Paste to insert the code into the
document.
Understanding SlicesIf image maps enable you to target areas of a graphic for links, why not use them for
everything? The primary drawback to an image map is also one of its key character-
istics: An image map is a single file. As such, image maps of any size — and they
tend to be sizable, to take advantage of multiple hotspots — take a long time to
download and can be frustrating for the Web page visitor. Moreover, with one file
you’re locked into one graphic format with a single panel. What if your image map
contains a photographic image in one color with lots of flat color in the rest of the
graphic? You would be forced to export the entire file as a JPEG to make the photo
look good, and the file size would be much higher than if you exported the image as
a GIF. And forget about including animations or special effects, such as rollovers —
duplicating frames of a large graphic would make the file huge.
Caution
Note
263662-1 ch20.F 8/2/02 2:57 PM Page 660
Fireworks Seminar

661Chapter 20 ✦ Mastering Image Maps and Slices
An alternative approach to image maps is a technique known as slicing. Slicing
takes a large image and literally carves it into multiple smaller graphics, which are
reassembled in an HTML table for viewing. Each separate image is referred to as
a slice and the whole process is often just called slices. Here are some of the key
features of slices:
✦ Incremental download: On most browsers, each slice appears as it’s down-
loaded, which makes the whole image appear to be loading faster.
✦ Linking without image maps: Each slice can have its own link, although all
such links are rectangular.
✦ Mixed file formats: Each slice can be optimized separately, reducing the over-
all file size of the image while enhancing the quality. This technique means
that you not only can have a JPEG and GIF side by side, but can also export
one slice as a JPEG at 100 percent and another slice as a JPEG at 30 percent.
✦ Update image areas: If your graphic includes an area that must be updated
frequently, such as a headline or a date, you can simply alter the single image
in the slice and leave the rest of the image untouched.
✦ Embedded rollovers: One of the chief uses of slices, especially in Fireworks,
is to create rollovers (also known as mouseovers). With slices, you can have a
series of rollovers, as with a navigation bar, all tied together in one graphic.
You can also use one slice to trigger a rollover in another part of the image.
✦ Embedded animation: With a GIF animation in one slice, you can achieve spe-
cial effects, such as a flashing neon sign in a large graphic, without doubling
or tripling your file size.
The key, fact-of-life, limitation to slices is their shape: All slices are rectangular. Not
only are images that make up each individual slice always rectangular, but the table
cells into which the slices must fit are, too. To create any illusion of nonrectangular
shapes, you must use GIF or PNG files with transparency. An additional restriction
is that slices cannot overlap.
When deciding whether or not to slice an image, keep in mind that slices depend
on HTML tables to hold them together in the browser. Tables, in turn, have some of
their own limitations. For example, you can’t place two tables side by side on a Web
page; the code won’t allow it. However, you can nest one table inside another to
achieve a similar effect.
Because slices are tied to HTML tables, you must take special care to ensure that all
browsers treat the tables identically. Under some situations, tables viewed in some
browsers can “collapse” and lose all their width and height information that is nec-
essary to appear as a single graphic. The workaround for this problem is to use
very small (one pixel) transparent images called spacer images. Fireworks automati-
cally generates the spacer images if you’d like, or outputs the code for the sliced
image without them. Spacer images are covered in detail later in this chapter.
263662-1 ch20.F 8/2/02 2:57 PM Page 661
Fireworks Seminar

662 Part V ✦ Entering the Web
This chapter covers the basics of creating slices. For information on how to useslices to build rollovers, see Chapter 21.
Slicing Images in FireworksSlices and hotspots are created in a similar manner — generally, you draw a slice
area on top of an image. Although hotspots can be any shape, including circular,
slices are ultimately rectangular. However, Fireworks aids in creating complex slices
by enabling you to use the Polygon Slice tool to draw complex polygon-shaped
slices, which Fireworks then converts into multiple rectangular slices upon export.
The two Slice tools are located in the Web section of the Tools panel, on the lower
right, on a flyout similar to the one used for the Hotspot tools.
As you draw slices with the Slice tools, Fireworks creates slice guides, which help
you to keep the number of files exported to a minimum, by aligning the slices. The
fewer images you ultimately use, the faster your work displays in a browser and the
less taxing the page is for the browser to display. When slices overlap, Fireworks
considers slices that are higher in the stacking order to be more important.
Looking at rectangle slicesTo slice an image with the Slice tool in Fireworks, follow these steps:
1. Select the Slice tool from the Tools panel.
2. Click the image and draw out a rectangle the size and shape of the desired
slice, as shown in Figure 20-11.
Figure 20-11: The Slice tool divides a Fireworks document into straightforward rectangular slices that are exported as individual image files.
Cross-Reference
263662-1 ch20.F 8/2/02 2:57 PM Page 662
Fireworks Seminar

663Chapter 20 ✦ Mastering Image Maps and Slices
As with the regular Rectangle tool, the Alt (Option) key causes the Slice tool todraw from the center rather than from a corner, and the Shift key constrains theslice to a square.
3. Release the mouse when you’re satisfied with the shape.
Fireworks creates the slice object and fills in the rectangle with the default, semi-
transparent slice color. If enabled, the slice guides appear.
After you draw the slice object, you can manipulate it as with any other object in
Fireworks. You can use the four handles on the slice object to resize it — just drag
one corner in the desired direction. Rectangular slices are constrained to rectan-
gles, so moving just one point moves the entire side. In fact, you don’t have to
select the corner; it’s just as effective to click and drag a slice object’s side.
You can also use the transform tools, such as Scale, although any resulting nonrect-
angular shape is converted back into an encompassing rectangle. To move the slice
object one pixel at a time, use the arrow keys.
An alternative to the Slice tool is to use the standard guides. In this technique,
guides are dragged from the horizontal and vertical rulers to form the slicing grid.
Then, during export, choose the Slice Along Guides option. This technique works
well when your goal in slicing an image is to enable smaller portions of the image to
appear quicker than a single large image could load. If you want to add a URL or a
Behavior to a slice, you have to create slice objects.
Looking at polygon slicesAs previously mentioned, polygon slices exist only within Fireworks. When you
export your document, Fireworks uses your polygon slices as a guide in creating
more complex rectangular slices. Polygon slices can be any shape — just like
Polygon hotspots — as shown in Figure 20-12.
Figure 20-12: Outline nonrectangular areas with the Polygon Slice tool.
Tip
263662-1 ch20.F 8/2/02 2:57 PM Page 663
Fireworks Seminar

664 Part V ✦ Entering the Web
A side effect of this conversion is that polygon slices can often result in a large num-
ber of individual image files. This adds to the overhead of displaying the page in a
browser. Each image file must be requested by the browser and sent by the server,
and each image must be rendered by the browser separately. When you incorporate
10 or 15 images, the user may start to notice the difference in the perceived speed
of the download.
To draw a polygon slice, follow these steps:
1. Select the Polygon Slice tool from the Tools panel. If it’s not visible, click and
hold the Slice tool until the flyout appears, and then click the Polygon Slice
button.
2. Click at the starting point for your slice and move the mouse to the next point
on the outline surrounding the desired area, and then click again.
Fireworks connects each point that you set down with a straight line.
3. Repeat Step 2 until you’ve outlined the entire area.
As you create more points, Fireworks fills in the polygon with the default slice
color.
4. To finish creating the slice, click your original starting point to close the
polygon.
Fireworks creates the slice with a colored fill.
Working with slice guidesBefore Fireworks, creating a sliced image by hand was very meticulous, eye-strain-
ing work. Each slice had to be measured and cut precisely to the pixel — if you were
one pixel off, the resulting image would either have gaps or over-lapping areas. You
can approximate this level of frustration by disabling the slice guide features in
Fireworks.
Unlike regular guides, you don’t position slice guides by hand; they are automati-
cally created as you draw out your slices. The slice guides effectively show you
the table layout that would result from the existing slices. More importantly, the
slice guides take advantage of the Snap to Guide feature, enabling you to avoid
overlapping slices or sliced images with gaps.
Personally speaking, I find the slice guides very useful, and I highly recommend
using them. Choose View ➪ Show Guides to show or hide slice guides. Slices auto-
matically snap to the edge of a document, but to snap to the guides themselves,
choose View ➪ Guides ➪ Snap to Guides.
The standard guides and the slice guides are drawn in two different colors.
Occasionally, the slice guide color is too similar to that of the current image and
you can’t see the guides’ location. To change the color of the slice guides, select
263662-1 ch20.F 8/2/02 2:57 PM Page 664
Fireworks Seminar

665Chapter 20 ✦ Mastering Image Maps and Slices
View ➪ Guides ➪ Edit Guides to see the Guides (Grids and Guides) dialog box,
shown in Figure 20-13. Select a new color from the Slice Color pop-up menu.
Figure 20-13: Choose a new slice guide color from the Guides (Grids and Guides) dialog box.
On Windows, the grid and guide options are displayed in separate Grids andGuides dialog boxes. On the Mac, a single Grids and Guides dialog box containsboth sets of options, separated by tabs.
You can also enable the slice guide feature from the Guides (Grids and Guides)
dialog box by choosing Show Slice Guides, or turn on the Snap feature by selecting
Snap to Guides.
Unlike the regular guides, the slice guides can’t be dragged to a new location; theirposition is controlled by the slices themselves. Therefore, the Lock Guides optionon the Guides (Grids and Guides) dialog box applies only to standard guides.
Taming your slice guidesWhat happens when you inherit a Web site update and the original designer was a
little overzealous in the use of slices? This designer read the same chapter you
read in which I suggest that slicing up a large image makes it appear to load faster.
However, the original designer decided to try to get it to appear to load really fast.
As you can see in Figure 20-14, this site hasn’t been sliced, it’s been put through the
blender. So what’s the problem? With so many slices, and so many file pieces, it
actually takes longer to load because the server has to keep receiving requests for
image segments before it actually sends the portion that you want. Because the
original designer took the advice too literally, you now have a mess to clean up.
Note
Note
263662-1 ch20.F 8/2/02 2:57 PM Page 665
Fireworks Seminar

666 Part V ✦ Entering the Web
Figure 20-14: Slicing larger graphics into chunks can make things load faster, or at least appear to, but dicing them actually slows things down.
So you’ve got a couple of choices to make. Do you delete most of the slices, and
then resize the rest, or do you delete them all and start over? Either choice can be a
real nuisance but the good news is that Fireworks, as always, can assist. You can
easily fix this problem using Dragable Slice Guides.
The Dragable Slice Guides feature is new to Fireworks MX and enables you toselect a slice guide, hold Shift, and drag it across other slice guides. As you crossother guides, they are picked up and a single, combined, slice is left behind.
Rather than selecting separate slices to delete, or dragging individual slice guides
off the canvas, you can select a slice guide, hold Shift, and Fireworks scoops up all
of the slice guides you cross. When you have dragged them off the canvas, or sim-
ply combined enough slice guides to make you happy, you can release the mouse
button and you’re left with one larger slice. To combine a group of slices, follow
these steps:
1. Select the Pointer tool and position the arrow close to the slice you wish
to drag.
2. The standard Pointer icon changes to the guide movement pointer, similar to
the double-headed resize pointer, indicating that you’re close enough to grab
and drag a slice guide.
NewFeature
263662-1 ch20.F 8/2/02 2:57 PM Page 666
Fireworks Seminar

667Chapter 20 ✦ Mastering Image Maps and Slices
3. Press and hold Shift and a small solid square appears in the upper-left corner
of the guide movement pointer, indicating that slice guides you cross are
picked up and combined.
4. Drag your mouse across a group of slice guides to pick them up. As you
approach a guide that is going to be picked up, it changes color from the
default red, to a light purple. This gives you a visual cue as to exactly what
you’re changing.
5. When you reach the point that you want your slice guide positioned, release
the mouse button and your new, simpler, slice appears.
6. Repeat this as necessary for areas in your document where you’d like to
combine slice guides.
If you change your mind about removing multiple guides, simply release the Shift
key before releasing the mouse button and the guides you scooped up are all
snapped back to where they were. Figure 20-15 shows the previous image after
dragging the right edge of the bottom-left slice all the way to the right side of the
document. Presto chango!
Figure 20-15: Removing a large number of extra slice guides is a simple task forFireworks.
263662-1 ch20.F 8/2/02 2:57 PM Page 667
Fireworks Seminar

668 Part V ✦ Entering the Web
Copying an image to a sliceSometimes, ensuring that you have all of a particular object can be very tricky —
especially if that object has a drop shadow or glow effect. Incorrect placement of
a slice could cut off part of the image. To avoid these problems, you can have
Fireworks do all the work for you. Just as Fireworks can convert any object to
a hotspot, any object can also be made into a slice.
To create a slice with the same dimensions as your object, select the object and
choose Edit ➪ Insert ➪ Slice. Fireworks draws the slice completely encompassing the
selected object — special effects and all. If you select multiple objects, Fireworks
asks whether you want to create slices for all the items together or separately.
Setting URLs in slicesTo use a slice as a link, the slice must be assigned a URL. You can assign URLs to
slices in two different locations: the Property inspector or the URL panel. Slices
have the same options on both panels as those covered earlier in this chapter for
hotspots.
To assign a link to a slice by using the Property inspector, follow these steps:
1. Select the slice to which you want to assign a link.
2. Choose Window ➪ Properties, or use the keyboard shortcut, Ctrl+F3
(Command+F3), to display the Property inspector, as shown in Figure 20-16.
Figure 20-16: The Property inspector enables you to assign a link and alternative text to a slice.
3. Enter a link directly in the Link text box, or select one from the option list. The
option list shows both the URL History and the URL Library.
4. Enter the appropriate alternative text in the Alt text field.
5. To set the target for the linked page to load into, choose one of the presets
from the Target option list, or enter a frame name.
6. To change the color of the selected slice object, click the color well and
choose a new one from the color picker.
7. To assign a custom name for the slice, enter a new name in the text box on the
left of the Property inspector.
263662-1 ch20.F 8/2/02 2:57 PM Page 668
Fireworks Seminar

669Chapter 20 ✦ Mastering Image Maps and Slices
You can also set a different pattern for the naming scheme in the HTML Setup
dialog box, as described later in this chapter.
Using Text slicesOne little known, but useful feature of slices is the ability to create a Text Slice. A
Text Slice displays HTML text in your image instead of part of the image, as shown
in Figure 20-17.
Figure 20-17: Setting a slice’s type to Text enables you to incorporate HTML text inside a sliced graphic.
To make a Text Slice, follow these steps:
1. Select the slice and display the Property inspector.
2. From the Type option list, choose HTML.
The Property inspector displays an Edit button next to a new HTML option.
3. Click Edit and enter the desired text and/or HTML into the Edit HTML Slice
dialog box.
4. Click OK when you’re done.
Fireworks displays your entered text within its slice’s overlay.
5. To edit the text, select the slice object, click Edit in the Property inspector
again, and make your changes.
263662-1 ch20.F 8/2/02 2:57 PM Page 669
Fireworks Seminar

670 Part V ✦ Entering the Web
HTML tables used for slices typically have no borders or additional cell spacing orpadding, so that all the images fit snugly next to each other. However, if you areusing a Text Slice, this can be a problem because the text fits too snugly to theimage, with no surrounding margin. You can work around this problem by creatinga slightly larger, but empty, Text Slice in front of the Text Slice with the content.
Using slice optionsEven with only two slices explicitly defined — depending on their placement — you
can generate many slices for an image. For the slices to be inserted into a table,
each slice has to have a unique filename. To save you the work of entering in name
after name each time you export a sliced image, Fireworks enables you to create a
slice-naming policy in the HTML Setup dialog box (File ➪ HTML Setup). If desired,
you can override the automatic naming on a slice-by-slice basis by entering a new,
unique name in the text box directly to the right of the Slice’s preview on the
Property inspector. Although I like to name slices individually in a navigation bar
so that I can easily find the image reference in the HTML code, I tend to allow
Fireworks to automatically name most of my slices.
Fireworks can create some extremely complex tables as a result of slicing; multiple
column and row spans are quite normal. In some ways, such complex tables are like a
house of cards — and certain browsers are a big wind, ready to knock them down. In
some circumstances, the table cells appear to lose their carefully calculated widths
and heights, and the table literally breaks apart to display the separate images.
To support such tables, Fireworks uses a series of spacer images. A spacer image is a
very small (one pixel by one pixel) transparent GIF image placed in cells along the top
and right of the HTML table. Fireworks takes advantage of how HTML works, to use
just one image, spacer.gif, which weighs just 43 bytes — or, in other words, .04K. The
same image is used in all the spacer cells and sized appropriately in the code. HTML
enables you to specify a different height and width for an image, and then enables the
browsers to handle the scale. Although this is generally a bad idea for most images —
browsers don’t use very sophisticated scaling algorithms — it works well for spacer
images. The spacer images are almost invisible: Those along the top row remain one
pixel in height, and those on the side remain one pixel in width. But, most impor-
tantly, spacer images do the job for which they were intended — a sliced table with
spacer images maintains its shape and integrity, regardless of the browser.
Despite all their intended good, transparent spacer images are not for every situa-
tion. Therefore, Fireworks offers a degree of user control over spacer image cre-
ation, through the Table tab of the HTML Setup dialog box. You can choose to space
with a 1-Pixel Transparent Spacer, Single Table-No Spacers, or Nested Table-No
Spacers. If you select Single Table-No Spacers, be sure to test the results in a variety
of browsers to make sure your spacing is acceptable in each one.
Tip
263662-1 ch20.F 8/2/02 2:57 PM Page 670
Fireworks Seminar

671Chapter 20 ✦ Mastering Image Maps and Slices
Exporting SlicesWhen exporting an image map, you end up with an image and a snippet of HTML
code. When exporting slices, you could get a whole lot of images and a bit more
HTML. You need to realize that each sliced image ultimately means numerous files
that must all be stored together. Fireworks offers two different slicing techniques
and a variety of HTML styles from which to choose. The options you select are deter-
mined by how your slices were created and which Web-authoring tool you are using.
Exporting slices as different image typesAnother advantage of slices over hotspots is that each slice can be a different
image format because each slice is an individual image file. This enables you to
export one slice as a JPEG, one as a GIF, and another as a PNG, if you so desire.
Specifying the export format for a slice is easy and, as with many things in
Fireworks, can be done in more than one way. First, simply select the slice object in
the document window and choose Window ➪ Optimize to view the Optimize panel.
When a slice object is selected, the Optimize panel displays its individual export
settings. Alternatively, you can select a slice and choose the export format from the
Slice export settings option list on the Property inspector. In either case, choose a
format and optimization options. Then select another slice and modify its options,
or deselect all slices to modify the export options for the whole document.
Setting the Export optionsAfter deciding on a path and filename for your images, you must select which
slicing technique to use. In the Export dialog box, the following options are under
Slicing:
✦ None: When this option is chosen, the image is exported in one piece, regard-
less of the number of slice objects.
✦ Export Slices: The exported slices are created from the slice objects on the
image.
✦ Slice Along Guides: The standard guides are used to determine the slices.
For most situations, Export Slices is the best choice. Slice objects are required for
rollovers or any other Behavior, and they are very easy to create. The only reason
to choose Slice Along Guides is to carve a large image into numerous smaller ones,
without any attached Behaviors. To use Slice Along Guides, you must have set the
standard guides into place, as detailed earlier in this chapter.
263662-1 ch20.F 8/2/02 2:57 PM Page 671
Fireworks Seminar

672 Part V ✦ Entering the Web
To export an image in slices, follow these steps:
1. Choose File ➪ Export.
The Export dialog box appears.
2. Set the filename and path of the Export in the upper part of the dialog box.
3. Select HTML and Images from the Save as type (Save As) option list.
4. Choose Export HTML File, or Copy to Clipboard from the HTML option list.
5. Choose either Export Slices, or Slice Along Guides from the Slicing option list.
6. To save the image files in a different folder, check the Put Images in Subfolder
checkbox, click Browse, and choose the desired folder for your images.
7. To alter any of the slice settings previously set, click Options to open the
HTML Setup dialog box and adjust your settings.
8. After you make your selections, click Save to complete the export.
9. If you copied the code to the clipboard, paste it into a document in your
HTML editor.
Inserting slices in a Web pageAs with image maps, four HTML styles — Generic, Dreamweaver, GoLive, and
FrontPage — dictate some aspects of the HTML code that Fireworks generates.
Inserting code from a simple sliced image is straightforward. From an HTML per-
spective, all the code is contained within one tag, <table>. Remember, in HTML,
tags containing data use both a starting and ending tag; in the case of the tags for
an HTML table, the starting tag is <table>, and the ending tag is </table>. So, all
the necessary code is between <table> and </table>, inclusive. Fireworks plainly
marks this code with HTML comments, showing where to begin copying and where
to stop.
In this chapter, the techniques for integrating slices in your Web pages are for sim-ple sliced images, without rollovers or other Behaviors. To learn how to exportslices with Behaviors, see Chapter 21.
Using the Generic templateUse the Generic template when you are hand-coding your pages in a text editor or
using a Web-authoring tool without a specific template.
Follow these steps to incorporate a Generic sliced image:
1. Open the Generic code in a text editor, or in the text editor portion of your
Web-authoring tool.
Cross-Reference
263662-1 ch20.F 8/2/02 2:57 PM Page 672
Fireworks Seminar

673Chapter 20 ✦ Mastering Image Maps and Slices
2. Select and copy to the clipboard the section in the <body> tag that starts with
<!---------- BEGIN COPYING THE HTML ---------->
and ends with
<!---------- STOP COPYING THE HTML HERE ---------->
3. Open your existing Web page in a text editor, or in the text editor portion of
your Web-authoring tool.
4. In the <body> section of your Web page, insert the code where you want the
image to appear.
5. Preview the page in a browser and adjust the placement of the <img> tag, if
necessary.
Using DreamweaverAlthough you can use Dreamweaver’s Code inspector or Code View to integrate
the Fireworks-generated code, you can also stay in Design View and do it visually,
thanks to Dreamweaver’s Tag Selector.
To insert Fireworks-generated code for a sliced image into Dreamweaver, follow
these steps:
1. In Dreamweaver, open the HTML or XHTML page generated in Fireworks.
2. Click the exported image once.
Because the image is now sliced into different sections, the entire image is not
selected, just one slice.
3. On the bottom left of the document window, select the <table> tag from the
Tag Selector, as shown in Figure 20-18.
The entire sliced image and all the code is selected.
Figure 20-18: Use Dreamweaver’s Tag Selector to easily select the entire sliced image for cutting and pasting.
263662-1 ch20.F 8/2/02 2:57 PM Page 673
Fireworks Seminar

674 Part V ✦ Entering the Web
4. Choose either Edit ➪ Copy, or the keyboard shortcut, Ctrl+C (Command+C).
5. Open the existing Web page to which you want to add the sliced image.
6. Place the cursor where you want the sliced image to appear.
7. Choose either Edit ➪ Paste, or the keyboard shortcut, Ctrl+V (Command+V).
The sliced image and corresponding code are inserted into the document.
Using GoLiveGoLive’s HTML Outline view is an easy way to drag and drop HTML code between
two documents. Code exported with the GoLive style also contains a cssscriptdicttag that tells GoLive how to edit the code. Make sure to copy the cssscriptdict tag,
as well as your plain HTML code.
To insert Fireworks-generated code for a sliced image into GoLive, follow these steps:
1. In GoLive, open the HTML or XHTML page generated in Fireworks.
2. Switch to the HTML Outline view for both your source and target documents.
3. In the source document, select the <table> tag. This table contains all of
your sliced images.
4. Drag and drop the table tag into place in your target document.
5. Select the cssscriptdict tag from the head of your source document and
drag it into the head of your target document.
Using FrontPageMicrosoft’s FrontPage stores external code — including any JavaScript — in a struc-
ture (or webbot in FrontPage jargon) called HTML markup. Fireworks produces the
proper structure through the FrontPage template, so that the code can be seam-
lessly integrated.
To insert an image map from Fireworks into a FrontPage document, follow these
steps:
1. Open the Fireworks-generated page in FrontPage.
Both the FrontPage document and the Fireworks-generated document must be inthe same folder.
2. Select the HTML View.
3. Select the code that starts with
<!---------- BEGIN COPYING THE HTML ---------->
Caution
263662-1 ch20.F 8/2/02 2:57 PM Page 674
Fireworks Seminar

675Chapter 20 ✦ Mastering Image Maps and Slices
and ends with
<!---------- STOP COPYING THE HTML HERE ---------->
4. Choose Edit ➪ Copy.
5. Open the document in which the sliced image is to be inserted.
6. While still in HTML View, choose Edit ➪ Paste to insert the code into the
document.
Exporting single slicesSometimes I find myself wanting to quickly export a small area of the Fireworks
canvas as a single image file. Rather than copying a section of the overall image and
placing it into a new document and then exporting that, a quick way to define the
area for an exported image file is to place a slice object on top of it, and then export
that single slice. You can even separately optimize that single slice before export.
To export a single slice, follow these steps:
1. Select the slice that you want to export.
2. Choose Window ➪ Optimize to view the Optimize panel if it is not already
visible.
3. Specify export settings in the Optimize panel.
These settings affect only the selected slice.
4. Choose File ➪ Export.
The Export dialog box appears.
5. Navigate to a folder to export your slice into, and specify a filename.
6. Choose Images Only from the Save as type (Save As) option list.
7. Choose Export Slices from the Slices option list.
8. Check the Selected Slices Only checkbox.
9. Click Save when you’re done.
Your selected slice is exported as an individual image file.
You can skip the Export preview dialog box completely if you right click (Ctrl+clickon a Mac) and choose Export Selected Slice from the contextual menu.
Tip
263662-1 ch20.F 8/2/02 2:57 PM Page 675
Fireworks Seminar

676 Part V ✦ Entering the Web
Fireworks Technique: Exporting Dreamweaver Library Items
Library items are a powerful Dreamweaver feature that enable a section of a Web
page to be updated once, after which Dreamweaver automatically updates all pages
on which the section appears. Originally intended to replace page elements that are
often repeated, such as a copyright line or logo, Dreamweaver Library items also
enable you to regard a section of code as a single, easy-to-manage unit. If, as a
designer, you’re familiar with Encapsulated PostScript, think of Dreamweaver
Libraries as Encapsulated HTML.
For a Library item to be recognized as such, it must be stored in a special folder for
each local site. When you choose the Dreamweaver Library (.lbi) option from the
Save as type (Save As) option list in the Export dialog box, Fireworks prompts you
to locate your site’s Library folder. If you’ve never created a Library item for the
current site before, you need to make a new folder. You must place the folder in the
local site root and name it, appropriately enough, Library. For example, if your local
site root is located in a folder called Web Pages, you must create the Library folder
at Web Pages/Library.
Most Web sites use a lowercase-only naming convention. You can name your Libraryfolder “library” if that suits you, and Dreamweaver will use it without complaint.
The Dreamweaver Library (.lbi) export option exports your image map or slices
within the same table as the Dreamweaver HTML style template, but it also marks
the table as a Dreamweaver Library item that can be inserted over and over again.
You can export using the Dreamweaver Library (.lbi) option at any time, no matter
what your HTML style setting in the HTML Setup dialog box.
To export HTML and images from Fireworks as a Dreamweaver Library item, follow
these steps:
1. Choose File ➪ Export.
Fireworks displays the Export dialog box.
2. Navigate to your Dreamweaver site root folder, and then into the site’s Library
subfolder. If your site does not yet have a Library folder, create one and then
navigate into it.
3. Specify a filename for your library item, if necessary.
4. Select Dreamweaver Library (.lbi) from the Save as type (Save As) option list.
If you have not previously navigated to a Library folder, Fireworks warns you at thispoint that a Library folder is required. Then, Fireworks asks you to choose one.Navigating to the Library folder before selecting the Dreamweaver Library (.lbi)option avoids this warning — as you did in Step 2, earlier — enabling you to choose
Note
Tip
263662-1 ch20.F 8/2/02 2:57 PM Page 676
Fireworks Seminar

677Chapter 20 ✦ Mastering Image Maps and Slices
the Library folder in a larger dialog box, and having Fireworks return to that folderthe next time you export from the same document.
5. Check the Put Images in Subfolder checkbox, and click Browse to choose your
site’s images folder.
6. Click Save when you’re done.
Now that you’ve exported your Library item from Fireworks, follow these steps to
incorporate the Library item into your work in Dreamweaver:
1. In Dreamweaver, choose Window ➪ Assets, or use the keyboard shortcut, F11,
to display the Assets panel.
The current site’s Assets panel appears.
Mac OS 9 users: If you have mapped the keyboard’s function keys in the KeyboardControl Panel to start programs or perform other tasks, function key shortcuts inFireworks are superceded by those mappings. Use the menu commands instead,or disable the mappings in the Keyboard Control Panel.
2. Select the Library category of the Assets panel, as shown in Figure 20-19.
Figure 20-19: After you export an image map from Fireworks as a DreamweaverLibrary item, it is available from the Library category of Dreamweaver’s Assets panel.
Caution
263662-1 ch20.F 8/2/02 2:57 PM Page 677
Fireworks Seminar

678 Part V ✦ Entering the Web
3. Place your cursor in the document window where you want the image map to
appear.
4. In the Assets panel, select your exported image map from the list window.
The preview pane of the Assets panel displays the selected Library item.
5. Click the Insert button or, alternatively, drag the item from either the preview
pane or the list window and drop it in the document window.
The image map and all the necessary code are inserted into the Dreamweaver page.
If you ever need to edit the image map, select it and then click Open from
Dreamweaver’s Property inspector. A document window appears with the Library
item in it. From there, you can choose the image and select either Edit from the
Property inspector, or Optimize Image in Fireworks from the Commands menu.
After you edit the image, closing the Library document window prompts
Dreamweaver to ask whether you would like to update the Library. Click Yes
to update the Library items; click No to postpone the update.
Fireworks Technique: Animating a SliceFireworks can build terrific animations — and with just a little technique, you can
integrate any animation into a larger image through slices. Animations can be fairly
heavy in terms of file size. If only a small section of an overall image is moving —
such as a radar screen on a control panel — converting the entire image to an ani-
mation is prohibitive, due to the file size that would result. However, with slices,
you can animate just the area that you need to animate, and keep the rest of the
image static, thus dropping the size of the file dramatically.
To include an animation in Fireworks, follow these steps:
1. Build your animation in Fireworks as you would normally.
Explore Fireworks’ animation features in Part VI.
2. If the animation is not already part of a larger image, go to Frame 1 in the
Frame panel, choose Modify ➪ Canvas ➪ Canvas Size, and enlarge the canvas
as desired.
Cross-Reference
263662-1 ch20.F 8/2/02 2:57 PM Page 678
Fireworks Seminar

679Chapter 20 ✦ Mastering Image Maps and Slices
3. Complete the graphics surrounding the animation.
4. Make a slice object from the animation either by choosing the animation and
selecting Edit ➪ Insert ➪ Slice, or by using the Slice tool to draw a rectangle
around the entire animation.
5. If it’s not already visible, display the Property inspector.
6. In the Property inspector, set the link and any other desired options.
7. If it’s not already visible, display the Optimize panel.
8. From the Export File Format option list, choose Animated GIF.
9. Specify other image optimization options as necessary.
Chapter 15 details Fireworks’ image optimization options.
10. Repeat Steps 4–9 for the static slices in your document, but choose formats
other than animated GIF in the Optimize panel. Alternatively, deselect all
slices and set an overall document export format in the Optimize panel. This
format is used for any slices that are not explicitly set to another format.
11. When your document is ready for export, choose File ➪ Export.
The Export dialog box opens.
12. Set your path and filename in the upper portion of the dialog box.
13. Choose HTML and Images from the Save as type (Save As) option list.
14. Choose whether to export an HTML file, or copy the code to the clipboard
from the HTML option list.
15. Select Export Slices from the Slices option list.
16. To modify HTML Setup options, click the Options button to display the HTML
Setup dialog box.
17. Click Save when you’re ready to complete the export.
Your animation is exported as part of the overall image, as shown in the example in
Figure 20-20.
Cross-Reference
263662-1 ch20.F 8/2/02 2:57 PM Page 679
Fireworks Seminar

680 Part V ✦ Entering the Web
Figure 20-20: In this image, the radar screen is animated, and the rest of the graphic is static.
SummaryFireworks Web objects — hotspots and slices — provide a gateway from graphic
imagery to the Internet. By integrating Web objects with other graphic elements,
the Web designer can seamlessly migrate from one medium to another, all the while
maintaining editability. When working with Web objects, keep these points in mind:
✦ Fireworks supports two types of Web objects: hotspots and slices. A hotspot
marks part of a larger graphic through code, whereas slices actually divide
the larger image into smaller files.
✦ Hotspots come in three basic shapes: rectangle, circle, and polygon.
Fireworks has a different tool for each type of hotspot. The term hotspotdenotes an area of the overall image, called an image map.
✦ You can easily convert any Fireworks object into a hotspot by selecting the
image and choosing Edit ➪ Insert ➪ Hotspot.
✦ When exporting image maps, be sure to work with both parts of the code: the
<img> tag containing the link to the source image, and the <map> tag that con-
tains the hotspot data.
263662-1 ch20.F 8/2/02 2:57 PM Page 680
Fireworks Seminar

681Chapter 20 ✦ Mastering Image Maps and Slices
✦ Fireworks makes slices in three ways: with the Rectangle or Polygon Slice tool,
with the Edit ➪ Insert ➪ Slice command, and with the standard guides.
✦ Enabling the View ➪ Slice Guides option enables you to reduce the number of
slices to a minimum.
✦ Holding Shift while dragging a slice causes Fireworks to pick up any slice
guides you cross, easily cleaning up files with too many slices.
✦ You can export individual slices as different image types, even as animated
GIFs, enabling you to mix animated and static slices.
In the next chapter, you learn how to assign Behaviors for interactive effects.
✦ ✦ ✦
263662-1 ch20.F 8/2/02 2:57 PM Page 681
Fireworks Seminar

263662-1 ch20.F 8/2/02 2:57 PM Page 682
Fireworks Seminar

ActivatingFireworks with Behaviors
From a user’s perspective, the Web includes two types of
images: graphics that you look at and graphics that you
interact with. You can create the “look, but don’t touch” vari-
ety of graphics with most any graphics program — Fireworks
is among the few graphics programs that can output interac-
tive graphics.
Although the result may be a complex combination of images
and code, Fireworks uses Behaviors to simplify the process.
With Fireworks Behaviors, you can create everything from
simple rollovers — exchanging one image for another — to
more complicated interactions, in which selecting a hotspot
in one area may trigger a rollover in another, while simultane-
ously displaying a message in the status bar. And you can do
it all in Fireworks without writing a line of code.
This chapter covers all the intricacies of using Behaviors
and demonstrates some techniques that combine several
Behaviors. You may never use each and every one of the
Fireworks Behaviors, but after you start to use them, your
Web pages will never be the same.
Understanding BehaviorsBefore Fireworks, making your Web pages responsive to Web
page visitors required in-depth programming skills or a Web-
authoring program (such as Macromedia’s Dreamweaver) that
automated the process for you. The basic Web page, scripted in
HTML, is fairly static; only forms enable any degree of user
interaction. To activate your page, you have to use a more
2121C H A P T E R
✦ ✦ ✦ ✦
In This Chapter
Using Behaviors
Creating rolloverbuttons
Exporting rolloversfor the Web
Working with theButton Editor
Making disjointedrollovers
Creating externalrollovers
Using pop-up menus
Incorporatingrollovers in slices
✦ ✦ ✦ ✦
273662-1 ch21.F 8/2/02 2:57 PM Page 683
Fireworks Seminar

684 Part V ✦ Entering the Web
advanced language. Because of its integration into both major browsers, JavaScript is
the language of choice for this task for most Web programmers. Although JavaScript
is not as difficult to use as, say, C++, the majority of Web designers don’t have the
time or the inclination to master it. Because Fireworks permits Behaviors to be inte-
grated into graphics, Web designers don’t have to master a programming language.
A Behavior consists of two parts: an event and an action. An event is a trigger that
starts an action — the way pushing Play on a VCR starts a videotape. Events on the
Web are either user driven, such as moving a pointer over an image; or automatic,
such as when a page finishes loading. Generally speaking, actions range from dis-
playing a message to launching a whole new browser window.
Behaviors are said to be “attached” to a specific element on the Web page, such as a
text or image link; Behaviors in Fireworks are always attached to slices or hotspots.
Several other products in the Macromedia family, including Dreamweaver and
Director, use Behaviors in much the same way as Fireworks.
In one sense, you can think of Behaviors as Encapsulated JavaScript. As a designer,
you need only make a few key decisions, such as which two images to swap, and
Fireworks handles the rest. Then, the code is written for you, in the HTML style of
your choice. With Fireworks, you can output code that’s tweaked for various Web-
authoring programs, including Dreamweaver. Before you can export your images
and associated Behavior code, however, you must assign the Behavior through the
Behaviors panel.
Using the Behaviors PanelThe Behaviors panel is used to add and remove Behaviors. Although each Behavior
has its own dialog box for selecting options and entering parameters, the Behaviors
panel lists basic information for every Behavior assigned. You can assign multiple
Behaviors — either the same Behavior or different ones — to any slice or hotspot;
the number of Behaviors that you can attach to a single Web object has no practical
limit.
Fireworks includes five main groups of Behaviors:
✦ Simple Rollover: Automatically swaps the image on Frame 1 with the image
from Frame 2 when the user’s mouse cursor rolls over the image.
✦ Swap Image (Swap Image Restore): Displays one image in place of another.
The swapped image can be located on a different frame, in a different slice, or
both. An external image can also be exchanged for the current or any other
slice in the document. The Swap Image Restore Behavior is automatically
applied to restore the swap to its original state.
✦ Set Nav Bar Image (Nav Bar Over, Nav Bar Down, Nav Bar Restore): This
group of Behaviors specifies in which state of a navigation bar the selected
slice should be.
273662-1 ch21.F 8/2/02 2:57 PM Page 684
Fireworks Seminar
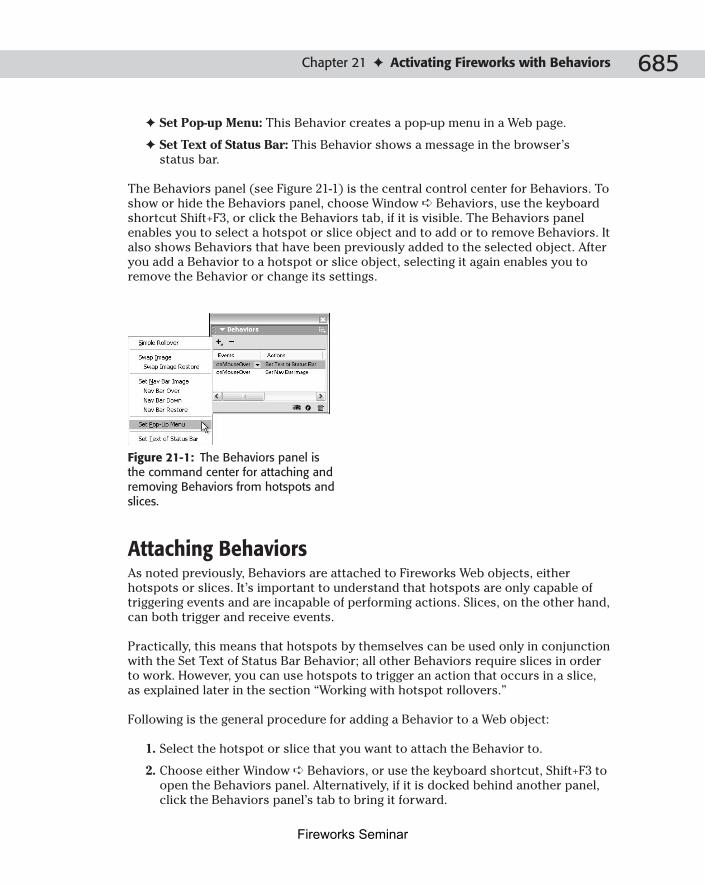
685Chapter 21 ✦ Activating Fireworks with Behaviors
✦ Set Pop-up Menu: This Behavior creates a pop-up menu in a Web page.
✦ Set Text of Status Bar: This Behavior shows a message in the browser’s
status bar.
The Behaviors panel (see Figure 21-1) is the central control center for Behaviors. To
show or hide the Behaviors panel, choose Window ➪ Behaviors, use the keyboard
shortcut Shift+F3, or click the Behaviors tab, if it is visible. The Behaviors panel
enables you to select a hotspot or slice object and to add or to remove Behaviors. It
also shows Behaviors that have been previously added to the selected object. After
you add a Behavior to a hotspot or slice object, selecting it again enables you to
remove the Behavior or change its settings.
Figure 21-1: The Behaviors panel is the command center for attaching and removing Behaviors from hotspots and slices.
Attaching BehaviorsAs noted previously, Behaviors are attached to Fireworks Web objects, either
hotspots or slices. It’s important to understand that hotspots are only capable of
triggering events and are incapable of performing actions. Slices, on the other hand,
can both trigger and receive events.
Practically, this means that hotspots by themselves can be used only in conjunction
with the Set Text of Status Bar Behavior; all other Behaviors require slices in order
to work. However, you can use hotspots to trigger an action that occurs in a slice,
as explained later in the section “Working with hotspot rollovers.”
Following is the general procedure for adding a Behavior to a Web object:
1. Select the hotspot or slice that you want to attach the Behavior to.
2. Choose either Window ➪ Behaviors, or use the keyboard shortcut, Shift+F3 to
open the Behaviors panel. Alternatively, if it is docked behind another panel,
click the Behaviors panel’s tab to bring it forward.
273662-1 ch21.F 8/2/02 2:57 PM Page 685
Fireworks Seminar

686 Part V ✦ Entering the Web
If you have anything other than a Web object selected, Fireworks alerts you to thisfact and gives you the option to create a Web object from the selected object. Ifnothing is selected when you try to add a Behavior, Fireworks asks you to choosea hotspot or slice first.
3. Click the Add Action button (the plus sign), and choose a Behavior from the
drop-down list.
A dialog box, which is specific to the chosen Behavior, opens.
4. Enter the desired options for the Behavior, and click OK when you’re done.
The Behaviors panel displays the newly attached Behavior in the list window.
Modifying a BehaviorTo modify a Behavior that you’ve already added to a hotspot or slice object, select
a hotspot or slice object and double-click the Behavior’s entry on the Behaviors list
in the Behaviors panel. Fireworks displays the Behavior’s dialog box, in which you
can adjust the settings that you made when you added the Behavior.
In addition to modifying the Behavior’s settings, you can select another event to
trigger the Behavior. By default, Fireworks initially assigns the onMouseOver event
for all events. Following is a list of available events:
✦ onMouseOver: A user’s mouse cursor hovers over an image and triggers the
Behavior.
✦ onMouseOut: When a user’s mouse cursor moves away from an image, the
Behavior is triggered.
✦ onClick: A user clicks an image and the Behavior is triggered.
✦ onLoad: When the Web page has finished loading, the Behavior is triggered.
When a Behavior is selected in the Behaviors list, the Event pop-up menu button
(a down-pointing arrow) appears just to the right of the event. Click this button to
choose a new event from the Event pop-up menu, as shown in Figure 21-2.
Figure 21-2: Click the Event pop-up button to chooseanother trigger for any selected Behavior.
Note
273662-1 ch21.F 8/2/02 2:57 PM Page 686
Fireworks Seminar

687Chapter 21 ✦ Activating Fireworks with Behaviors
Deleting a BehaviorWhen you delete a Behavior, all the settings that you have created are lost.
To delete a Behavior, follow these steps:
1. Select the hotspot or slice object from which you want to remove the
Behavior.
2. Choose the Behavior that you want to remove from the Behaviors list in the
Behaviors panel.
The Behavior’s event, action, and information are highlighted.
3. Click the Remove Action button (the minus sign) on the Behaviors panel.
The Behavior is removed from your hotspot or slice object, and its entry disap-
pears from the Behaviors list.
Creating RolloversPerhaps the most common use of JavaScript on the Web is the rollover. Rolloversare images in a Web page that change appearance when a user rolls a mouse cursor
over them.
Rollovers are popular because they’re fairly simple to implement, are supported by
many browsers, and are an effective way to heighten the feeling of interaction for
Web site visitors.
Examining how rollovers workTo understand how a rollover works, you need to grasp a fundamental HTML con-
cept. Web pages do not contain images in themselves — they only contain links to
images. With an image, the link is referred to its source and is specified in the <img>tag in HTML as the src attribute. When a user’s mouse pointer hovers over an
image — or in some cases, clicks an image — the src attribute is changed to another
image file. Because this happens quickly, it appears as if the image itself is changing.
Before the rollover effect, a typical <img> tag might read as follows:
<a href=”home.html”><img src=”button_regular.gif” height=”100”width=”50” alt=”home”></a>
After the rollover effect is applied, the effect is as if the code was the following code:
<a href=”home.html”><img src=”button_over.gif” height=”100”width=”50” alt=”home”></a>
273662-1 ch21.F 8/2/02 2:57 PM Page 687
Fireworks Seminar

688 Part V ✦ Entering the Web
As this code shows, the height, width, and alt text for the image don’t change, nor
does the link that the hyperlink is pointing to (in this example, home.html), as
specified in the <a> tag. All that changes — and this can’t be overemphasized — is
the actual GIF (Graphics Interchange Format), JPEG (Joint Photographic Experts
Group), or PNG (Portable Network Graphics) image file that’s being used — the file
referenced by the src attribute.
Because only the src attribute changes with a rollover, the original image and anyswapped images must have the same dimensions. You can’t swap a smaller imagewith a larger one, or vice versa. If you do, the browser applies the height and widthdimensions of the original image, leading to a distorted image.
Note that any <img> tag can be modified, not just the <img> tag that is rolled over.
This is the foundation for disjointed rollovers, as discussed later in this chapter.
Learning rollover statesAlthough a rollover actually switches one image for another, the illusion that most
Web designers want is of a button changing into different states. Before the user
triggers the rollover effect, the image is in the Up state. When the rollover is trig-
gered, the image changes to an Over state, because the cursor of the user’s mouse
is over the image. In Fireworks, the easiest and most typical method of creating the
different states for a rollover is with frames.
A basic rollover uses just two states (and, thus, two Fireworks frames): Up and
Over. Rollovers, though, can have up to four states, in which case they would be
built across four Fireworks frames. Table 21-1 details the rollover states and their
typical associated frames.
Table 21-1Rollover States
Frame State Description
1 Up The way the button looks when the user is not interacting withit; how it looks when the page first loads into the browser.
2 Over The button’s appearance when the user’s mouse cursor ishovering over it.
3 Down The button’s appearance after it’s pressed. The Down state of arollover button depicts the button’s state on the destinationWeb page. For example, the Down state is commonly used toshow which button was clicked to view the current Web page.
4 Over Down The way a button that’s in its Down state looks when the user’smouse cursor hovers over it.
Caution
273662-1 ch21.F 8/2/02 2:57 PM Page 688
Fireworks Seminar

689Chapter 21 ✦ Activating Fireworks with Behaviors
Creating rollover imagesThe first step in building a rollover is to create the separate rollover images that
reside on the separate frames of a Fireworks document. I use either of two basic
techniques to create images, depending upon whether the rollovers are to be inde-
pendently used, each in their own unique Fireworks document, or if they’re part of
a complete design in a larger document. Both techniques involve creating an initial
button object, which is then duplicated and modified.
If your rollover buttons exist independently, use the following technique to create
images:
1. Create the initial button in Frame 1, as it should appear before being clicked
by the user.
2. Click the button and choose Edit ➪ Clone to create a duplicate directly on top
of the button.
3. If you are going to create a Down state for this button, repeat Step 2. If you are
also going to create an Over Down state, repeat Step 2, so that you have a
total of four objects stacked on top of each other in Frame 1.
4. Select all of your button states by drawing a selection around them with the
mouse. Click the Distribute to Frames button (which resembles the small
movie strip) in the Layers panel.
Your objects are distributed to separate frames, so that each button state is
now in its own frame.
5. Frame 1 already contains a suitable Up state for your button. Go to Frame 2
and modify your button object slightly in order to create an interesting Over
state for the button. You might add a Glow Live Effect to the Over state, or
change the Fill or Stroke settings.
6. If you have Down and Over Down states, as well, modify them slightly on
Frame 3 and Frame 4 so that each frame now contains a unique — but
similar — button.
If the Over state of your button has a Live Effect bevel on it for a three-dimensionalappearance, a good way to modify subsequent states is to click the button objectand then modify the Button Preset settings of the bevel Live Effect (the bottomoption list on the pop-up edit window). This creates the impression of a three-dimensional button moving up and down. For example, the Up state could be setto Raised, the Over state to Highlighted, the Down state to Inset, and the OverDown state to Inverted.
If your rollovers are part of a larger document that contains many buttons or
objects that you want to create rollovers for, use the following technique to create
the images:
1. Create all the initial objects in Frame 1 of your document.
Tip
273662-1 ch21.F 8/2/02 2:57 PM Page 689
Fireworks Seminar

690 Part V ✦ Entering the Web
2. From the Options menu on the Frames panel, select Duplicate Frames.
The Duplicate Frames dialog box appears.
3. In the Duplicate Frames dialog box, enter the number of frames that you want
to add. In the Number text box, add one frame for each additional state used.
For a simple rollover with just an Up and Over state, add one frame. For a
rollover that also uses the Down and Over Down states, add three frames.
4. Make sure that the Insert New Frame After the Current Frame option is
selected and click OK when you’re done.
The duplicate frames are inserted.
Another way to duplicate a frame is to drag its name to the New/Duplicate Framebutton in the Frames panel. Each time you do this, another duplicate frame isadded after the one you dragged. Layers can also be duplicated in this fashion inthe Layers panel.
5. In each new frame, modify the rollover objects slightly in order to create a dif-
ferent look in each frame.
You can modify many objects simultaneously — to make them all glow, for exam-ple — by selecting all of them at once and applying the changes through the Stroke,Fill, or Effects sections of the Property inspector.
No matter which technique you use to create the separate rollover images, the best
effect usually results from applying a degree of subtlety. If one button is too drastically
different from another of its states, the underlying image swap becomes overt and the
illusion of a single button being clicked or highlighted is lost. Instead, the user sees
one image simply change into another. Small shifts in position, or an incremental
change in an effect seem to work best, as shown by the examples in Figure 21-3.
Figure 21-3: Subtle modifications to your originalbutton image create convincing state changes.Here, three buttons are exploded in order to view(from left to right) their Up, Over, Over Down, andDown states.
Tip
Tip
273662-1 ch21.F 8/2/02 2:57 PM Page 690
Fireworks Seminar

691Chapter 21 ✦ Activating Fireworks with Behaviors
You can preview your soon-to-be rollover by clicking Play on the animationcontrols; the frames of your image are then shown one after the other.
After you create your separate button images, they are ready to have Behaviors
applied to them and can be used as true buttons.
Applying the Simple Rollover BehaviorFireworks takes the simple in simple rollover very seriously: The Behavior creates a
classic Up-and-Over rollover effect, while offering exactly zero user settings. When
you just want a classic rollover, Fireworks makes creating one a snap.
The only difference between the simple rollover and Swap Image Behaviors is the
interface and the number of options. The code you generate is the same compatible
JavaScript you always expect from Fireworks.
To apply the Simple Rollover Behavior, follow these steps:
1. Select a slice on the Web Layer of your document.
2. From the Behaviors panel, choose Simple Rollover from the Add Action pop-
up menu in the Behaviors panel.
To preview your rollover, select the document window’s Preview tab and roll the
mouse over your button. You can also preview your rollover in your primary
browser by pressing F12.
The Simple Rollover Behavior doesn’t have any options that need to be specified. In
fact, if you double-click the Behavior in the Behaviors list, Fireworks just explains
the Behavior, as shown in Figure 21-4.
Figure 21-4: The “options dialog” for a simple rollover simply explains what a simple rollover is without offering any options; it’s that simple.
Of course — as with any Behavior — you can still choose a different kind of event,
such as onClick or onLoad, from the Behaviors panel Event list.
Tip
273662-1 ch21.F 8/2/02 2:57 PM Page 691
Fireworks Seminar

692 Part V ✦ Entering the Web
If you plan to use the rollover as a link, you need to assign it a URL. For detailedinformation on how to add a link to a Web object, see Chapter 20.
Exporting Rollovers for the WebObviously, you can export images from Fireworks. When you create rollovers, the
JavaScript code that controls the behavior of your images is exported within an
HTML or XHTML file. The JavaScript itself is compatible with Netscape Navigator 3
and above, and Microsoft Internet Explorer 4 and above. The Macintosh version of
Internet Explorer 3 also displays your rollover effects, but in Internet Explorer 3 for
Windows, your rollover effects are not visible, although hyperlinks still work. If
you’re exporting your rollovers in XHTML, use Netscape Navigator 4, and above,
or Internet Explorer 4, and above.
XHTML support is new to Fireworks MX.
Macromedia has continually improved the HTML editor compatibility of Fireworks’
exported JavaScript. In the first version of Fireworks, only one type of rollover code
was generated; it worked in browsers, sure, but you had to edit it by hand if you
opened it in a visual editor. As Fireworks matured, the capability to pick the style
of code that’s best for your workflow, or even create templates of your own to fine-
tune the settings even further, became available.
Before exporting your first rollovers, it pays to make a quick stop in the HTML
Setup dialog box, if only to choose an HTML or XHTML style that suits your work-
flow. For the most part, this choice is governed by the Web-authoring tool that you
are using to lay out the Web page onto which the rollover is to be placed. The stan-
dard HTML styles included in Fireworks are the following:
✦ Dreamweaver HTML: Code styled for Dreamweaver. Dreamweaver-style
rollover code generated by Fireworks appears as native Dreamweaver
Behaviors when opened in Dreamweaver.
✦ FrontPage HTML: FrontPage uses a series of webbots — FrontPage-only code
snippets — to create Web elements; Fireworks includes the code necessary for
an image map webbot, so that it displays correctly and can be further manipu-
lated when the document is opened in FrontPage.
✦ Generic HTML: The basic functional code, useful in hand-coded Web pages
and the majority of Web-authoring tools that work with standard HTML. If
you’re not sure which HTML style to choose, go with this one.
✦ GoLive HTML: Code styled for Adobe’s GoLive, including special tags that
make editing the code in GoLive easier.
NewFeature
Cross-Reference
273662-1 ch21.F 8/2/02 2:57 PM Page 692
Fireworks Seminar

693Chapter 21 ✦ Activating Fireworks with Behaviors
You can also tell Fireworks to export XHTML, if that’s what you’ll be using in your
site. The XHTML styles included with Fireworks are:
✦ Dreamweaver XHTML: Code styled for Dreamweaver. Dreamweaver-style
rollover code generated by Fireworks appears as native Dreamweaver
Behaviors when opened in Dreamweaver.
✦ Generic XHTML: The basic functional code, useful in hand-coded Web pages
and the majority of Web-authoring tools that work with standard XHTML. If
you’re not sure which XHTML style to choose, or you don’t plan to edit the
page further using one of the supported authoring tools, go with this one.
✦ GoLive XHTML: Code styled for Adobe’s GoLive, including special tags that
make editing the code in GoLive easier.
While you’re in the HTML Setup dialog box, you may also want to change the
default filename extension for HTML files from the nonstandard .htm, to the stan-
dard .html. You can also choose whether Fireworks inserts its own comments in
your HTML output and force Fireworks to lowercase the exported filenames for
better compatibility with different kinds of servers. Mac users can also choose the
Creator code that exported HTML and XHTML files should have, so that double-
clicking opens them in the code editor of your choice.
I cover the HTML Setup dialog box in Chapter 3.
Integrating a Fireworks-generated rollover into your Web page is a three-stage process.
✦ Stage 1: Create and test your rollover in Fireworks.
✦ Stage 2: Export the images and code from Fireworks. You can export code as
an HTML file, or copy it to the clipboard.
✦ Stage 3: Insert the code into your Web page, using whatever Web page editor
you prefer (even a plain text editor, such as NotePad or SimpleText, works).
Either open the HTML or XHTML file in your editor, or if you copied the code
to the clipboard, simply paste it into your editor.
Exporting the code from FireworksTo export a rollover — and its code — from Fireworks, follow these steps:
1. Specify your image export settings in the Optimize panel.
2. Choose File ➪ Export.
The Export dialog box, shown in Figure 21-5, appears.
Cross-Reference
273662-1 ch21.F 8/2/02 2:57 PM Page 693
Fireworks Seminar
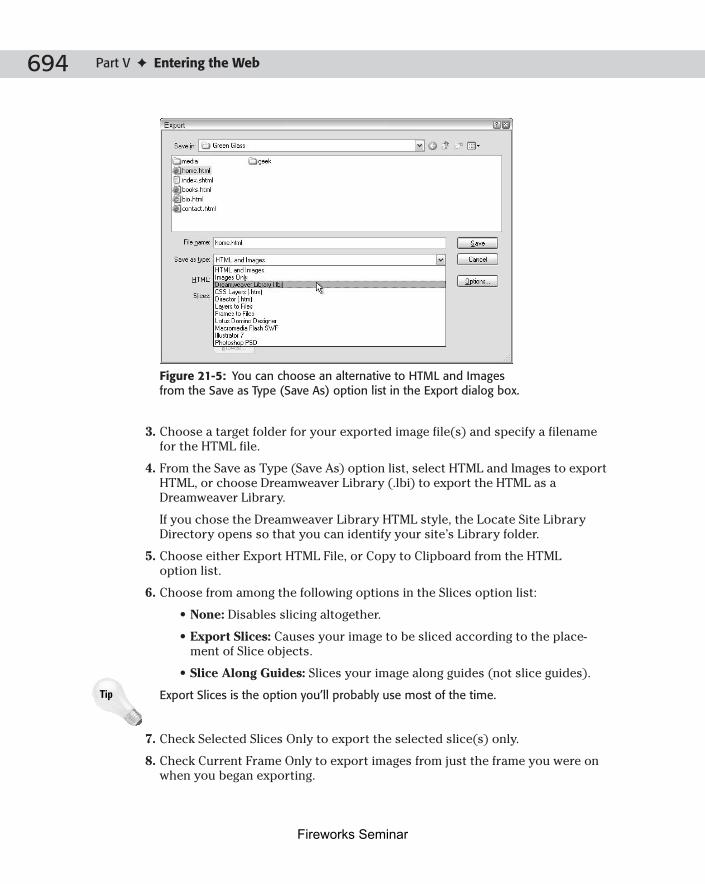
694 Part V ✦ Entering the Web
Figure 21-5: You can choose an alternative to HTML and Images from the Save as Type (Save As) option list in the Export dialog box.
3. Choose a target folder for your exported image file(s) and specify a filename
for the HTML file.
4. From the Save as Type (Save As) option list, select HTML and Images to export
HTML, or choose Dreamweaver Library (.lbi) to export the HTML as a
Dreamweaver Library.
If you chose the Dreamweaver Library HTML style, the Locate Site Library
Directory opens so that you can identify your site’s Library folder.
5. Choose either Export HTML File, or Copy to Clipboard from the HTML
option list.
6. Choose from among the following options in the Slices option list:
• None: Disables slicing altogether.
• Export Slices: Causes your image to be sliced according to the place-
ment of Slice objects.
• Slice Along Guides: Slices your image along guides (not slice guides).
Export Slices is the option you’ll probably use most of the time.
7. Check Selected Slices Only to export the selected slice(s) only.
8. Check Current Frame Only to export images from just the frame you were on
when you began exporting.
Tip
273662-1 ch21.F 8/2/02 2:57 PM Page 694
Fireworks Seminar

695Chapter 21 ✦ Activating Fireworks with Behaviors
9. Check Include Areas without Slices to export images that don’t have a slice
specified.
10. To save the image files in a different folder, check the Put Images in Subfolder
checkbox, click Browse, and choose the desired folder for your images.
11. To alter any of the slice settings previously set, click Options to reopen the
HTML Setup dialog box and adjust your settings accordingly.
To review the possible slice settings, see Chapter 20.
12. When you’re ready to complete the export, click Save.
Inserting rollover code in your Web pageAfter you select your HTML style, Fireworks automatically outputs the requested
type of code, either to an HTML related file or to the clipboard, according to which
option you selected. If you chose to output the HTML code to the clipboard, open
your target HTML file in your HTML editor and paste the code into place. If you
chose to output to a file, open that file and your target HTML file in a text or HTML
editor and then copy and paste between them.
The process for transferring rollover code to a Web page is essentially the same as
that for transferring image maps or sliced images, with one important exception;
the code generated for rollovers — and all Behaviors — generally comes in these
two parts:
✦ The event portion of a code, which contains the <img> tags and their triggers,
is stored in the <body> section of a Web page.
✦ The action portion of a code — with all the JavaScript functions — is kept in
the <head> section.
You must transfer both parts of the code in order for the rollover to function properly.
With Dreamweaver, Generic, and GoLive code, the process is similar. Cut or copy
the code from both the <body> and the <head> sections of the Fireworks-generated
document and paste it into your existing Web page. FrontPage does not separate
the <head> and the <body> sections for rollovers in its code, so simply copy the
one section of code from the source to the target page. When you export as a
Dreamweaver Library, the process is even simpler: Include the Library item and its
code in your Web page, using the Library category of the Assets panel, just as you
would any Library item.
Cross-Reference
273662-1 ch21.F 8/2/02 2:57 PM Page 695
Fireworks Seminar

696 Part V ✦ Entering the Web
For Dreamweaver, FrontPage, Generic, and GoLive styles of code, follow these steps
to insert Fireworks code into your Web page:
1. Open the Fireworks-generated source HTML file in a text or HTML editor.
If you are using Dreamweaver, I recommend that you use the Fireworks HTMLobject, located on the Common category of the Insert bar, to import yourFireworks HTML page. It converts a series of copy and paste routines into a simplematter of locating the HTML document exported from Fireworks and lettingDreamweaver take care of the rest.
2. Select and copy to the clipboard the section in the <body> tag that starts with
<!---------- BEGIN COPYING THE HTML HERE ---------->
and ends with
<!–––----––– STOP COPYING THE HTML HERE –––----–––>
If you’re using Dreamweaver, you don’t have to open the HTML Source window oran external text editor in order to copy the code. Just make sure that View ➪ VisualAids ➪ Invisible Elements is enabled and copy the icons that represent the code.
3. Open your existing target Web page in a text or HTML editor.
4. In the <body> section of your Web page, insert the code where you want the
image to appear.
If you’re using the FrontPage template, your code transfer is complete; skip
the rest of the steps. You can now view your rollover.
5. Return to the source HTML file and locate the <head> section.
6. Select and copy to the clipboard the section in the <body> tag that starts with
<!–––––– BEGIN COPYING THE JAVASCRIPT SECTION HERE ––––––>
and ends with
<!–––––– STOP COPYING THE JAVASCRIPT HERE ––––––>
7. Switch to your existing Web page.
8. Paste the copied code in the <head> section of the document.
Placing the JavaScript code after the <title> and any <meta> tags makes yourpage friendlier to the spider programs, also referred to as bots, that add pages toWeb search engines.
After you insert both sections of the rollover code, you can view your rollovers in
any supported browser.
Tip
Tip
Tip
273662-1 ch21.F 8/2/02 2:57 PM Page 696
Fireworks Seminar

697Chapter 21 ✦ Activating Fireworks with Behaviors
Dreamweaver’s Library feature enables a single repeating element to be inserted in
multiple Web pages, which can then all be updated simultaneously, after you mod-
ify the original item. The only stipulation is that the rollover code must be stored in
a special folder, called Library, within each local site, during export. If you’ve never
created a Library item for the current site, you need to make a new folder named
“Library” in the local site folder.
After you export the HTML file as a Dreamweaver Library item, follow these steps
to incorporate the rollover images and code:
1. In Dreamweaver, choose Window ➪ Assets.
Dreamweaver displays the Assets panel.
2. Select the Library category of the Assets panel.
The Assets panel displays the site’s current Library items.
3. Place your cursor in the document window where you want the rollover to
appear.
4. Select your exported rollover’s Library item from the list in the Assets panel.
A preview of the Library item appears in the Assets panel.
5. Click the Insert button to insert your Library item in the page. Alternatively,
you can drag the item from either the preview pane or the list window of the
Assets panel, and drop it in your page.
The sliced image, and all the necessary code, is inserted into your Dreamweaver page.
Preloading Rollover Images
When the HTML document that contains your rollovers is first displayed, the Up state ofyour rollovers is visible, along with the other image files on the Web page. Ideally, as theuser interacts with your document, the other states of the rollovers become instantly avail-able from the browser cache, instead of slowly available from the Web. Instantaneous reac-tions reinforce the illusion that an object is being modified — a button pushed, forexample — instead of one image being replaced with another. To make sure that the otherstates are available from the browser cache, Fireworks includes JavaScript with its HTMLoutput that “preloads” the Over, Over Down, and Down image files.
273662-1 ch21.F 8/2/02 2:57 PM Page 697
Fireworks Seminar

698 Part V ✦ Entering the Web
Looking at Nav Bar BehaviorA Nav Bar is a way to turn a series of rollover buttons into a set of radio buttons.
Each button is linked to the others, so that clicking one button and setting it to a
Down state sets the other buttons to an Up state. Fireworks creates Nav Bars by
using JavaScript cookies. In JavaScript, a cookie is a small bit of information written
to the user’s computer. Cookies generally are used by Web sites to record visitors’
selections as they travel from one Web page to another, as with a shopping cart on
an e-commerce site. Fireworks uses this same technology to keep track of which
button in a group has been selected.
Nav Bars and cookies might seem like advanced topics, but if you’ve implemented a
three- or four-frame Simple Rollover Behavior, you’ve already used them. Fireworks
automatically creates a Nav Bar (named FwNavBar) for each simple rollover that
uses a Down and/or Over Down state. You don’t need to do anything else to get the
toggle effect. However, if you use Swap Image to create your rollover, or want to tog-
gle just the two Up and Over states of a simple rollover, you need to apply the Nav
Bar Behavior explicitly.
Creating a Nav BarTo create a Nav Bar, follow these steps:
1. Create your rollover buttons, with appropriate states (Up, Over, Down, and
Over Down) on the appropriate frames, 1 through 4.
2. In Frame 1, draw a slice object over each rollover button.
3. Select each slice object, in turn, and turn it into a rollover by choosing Simple
Rollover from the Add Action pop-up menu in the Behaviors panel.
Your rollovers are now ready to be turned into a Nav Bar.
4. Select all the slice objects to be included in the Nav Bar.
5. Choose Set Nav Bar Image from the Add Action pop-up menu in the Behaviors
panel.
Fireworks displays the Set Nav Bar Image dialog box (see Figure 21-6).
6. If you have included the Over Down state in your rollovers, check the Include
Over While Down State box. Click OK when you’re done.
7. If you want one of the buttons to appear in its Down state by default, first des-
elect all the slices and then select the individual slice. Next, double-click the
Set Nav Bar Image Behavior in the Behaviors panel, and then check Show
Down Image Upon Load. Click OK when you’re done.
When you view your Nav Bar on the Preview tab of the document window or in a
Web browser (see Figure 21-7), the buttons change depending upon which one is
clicked.
273662-1 ch21.F 8/2/02 2:57 PM Page 698
Fireworks Seminar

699Chapter 21 ✦ Activating Fireworks with Behaviors
Figure 21-6: The Nav Bar Behavior makes any set of rollovers mutually exclusive; therefore, only one button can be selected at any time.
Figure 21-7: The second button in this Nav Bar is in the Down state. Only one button in a Nav Bar can be down at a time, creating the impression of a group of radio buttons.
The term radio buttons comes from tuning buttons on old AM/FM radios. Onlyone station can be tuned in at a time, so only one button can be down at a time.Clicking a button causes all other buttons to pop up.
Building buttons in the Button EditorThe Fireworks Button Editor enables you to create or assemble a button Symbol
that includes a two-, three-, or four-state rollover. A special tabbed window —
similar to the document window — walks you step by step through the process.
Tip
273662-1 ch21.F 8/2/02 2:57 PM Page 699
Fireworks Seminar

700 Part V ✦ Entering the Web
To create a rollover button with the Button Editor, follow these steps:
1. Choose Insert ➪ New Button.
Fireworks displays the Button Editor (see Figure 21-8).
Figure 21-8: The Button Editor can display four button states — four Fireworks frames —plus a slice object on its five tabbed canvases.
2. Create the Up state of your button in the initial Up tab of the Button Editor.
3. Select the Button Editor’s Over tab and create the Over state of your button.
Alternatively, to start with the Up state and modify it to be an Over state, click
Copy Up Graphic. Fireworks copies the Up state to the Over tab, ready for
editing.
At any time, you can check the Onion Skinning box to simultaneously view all thetabs in the Button Editor, helping you to align your buttons correctly. You can alsouse the view controls to zoom in or out on your button, and you can choose a dis-play option to view the buttons in Full or Draft display. Click the Play button at thebottom left of the Button Editor to cycle through the states of your button.
4. If you want to include a Down state in your button, select the Down tab and
create the Down state of your button. Again, you have the option to click a
button and copy the previous state to this tab for modification. Click Copy
Over Graphic to do this.
5. If your button is exported as a Nav Bar, check Show Down State Upon Load to
display the Down state when a page loads.
Tip
273662-1 ch21.F 8/2/02 2:57 PM Page 700
Fireworks Seminar

701Chapter 21 ✦ Activating Fireworks with Behaviors
6. To add an Over While Down state to your button, switch to the Over While
Down tab and either create a new state or copy the previous one — click Copy
Down Graphic — and modify it to create the Over While Down state.
7. Switch to the Active Area tab. Fireworks automatically creates a slice in the
Active Area tab that encompasses the area of your button, but you can adjust
its size if necessary.
The slice on the Active Area tab is similar to the Hit area in Flash buttons.
8. To have Fireworks help with the process of adding a link to your button, click
the Link Wizard button and move from tab to tab in the Link Wizard dialog box.
9. Close the Button Editor when you’re done.
Your new Button Symbol is added to the Library panel, and a copy of it — an
Instance — is placed in the document window, as shown in Figure 21-9. Switch to
the Preview tab of the document window to preview your new button’s rollover
actions in the document window.
Figure 21-9: The Button Editor creates a new Button Symbol, which is added to theLibrary. An Instance of that symbol is placed on the canvas.
Tip
273662-1 ch21.F 8/2/02 2:57 PM Page 701
Fireworks Seminar

702 Part V ✦ Entering the Web
For more about symbols and Libraries, see Chapter 17.
Examining Advanced Rollover TechniquesThe simple rollover is quick and easy, and I use it quite often. But sometimes a Web
page needs more than just a simple rollover. You can extend traditional rollovers
with advanced techniques in order to create interesting effects, or provide even
more navigation help for your users. The underlying engine for the simple rollover,
the Swap Image Behavior, is key to these advanced techniques.
Making disjointed rolloversA disjointed rollover is one in which the user hovers his or her mouse cursor over
one part of an image (the event area), and another part of the image (the target
area) does the actual rollover. A typical use for a disjointed rollover is to display
details of each button in a navigation bar in a common area. Creating a disjointed
rollover generally involves outlining the event and target areas with slice objects,
although it is possible to trigger a disjointed rollover from a hotspot.
To create a disjointed rollover, follow these steps:
1. Create a slice object over the event area (the part of your image that the
mouse cursor needs to hover over in order to trigger the rollover).
2. Create a slice object over the target area (the part of the image that will seem
to change).
3. Select the event area slice and choose Swap Image from the Add Action pop-
up menu in the Behaviors panel.
Fireworks displays the Swap Image dialog box (see Figure 21-10).
Figure 21-10: The SwapImage dialog box containsoptions that enable you toswap any slice in yourdocument after any otherslice is selected by the user.
Cross-Reference
273662-1 ch21.F 8/2/02 2:57 PM Page 702
Fireworks Seminar

703Chapter 21 ✦ Activating Fireworks with Behaviors
4. Choose the slice for the target area by choosing it from either the Target list of
slice names or the Slice preview to the right of the Target list. Whichever you
choose, the other is updated to reflect your choice.
5. Choose the Source for the swap by selecting a frame number from the
Frame list.
The area below the target slice on that frame is used as the source for the
image swap.
6. Check Restore Image onMouseOut to undo the swap again when the
user moves his mouse cursor away from the event area. Click OK when
you’re done.
7. Repeat this process until all of your slices have been assigned the Swap Image
Behavior.
To swap more than one slice simultaneously, repeat the preceding steps to apply
multiple Swap Image Behaviors to the same Web Layer object. Through this tech-
nique, your navigation button can roll over itself and display a disjointed rollover
at the same time.
Creating external rolloversInstead of using an object in another frame as the Over state for a rollover,
Fireworks can also use external GIF images (regular or animated), JPEG images, or
PNG images. When the rollover is viewed in a Web browser, the external file is used
as the source file for a rollover, instead of using an area of a frame within your
Fireworks document. External rollovers enable you to easily include animated GIF
images into an existing image.
You can’t swap one image file format for another because of Web browser limita-tions. If you’re going to export a slice as a GIF, make sure to use an external GIF oranimated GIF only as the Over state. Similarly, if you’re exporting a slice as a JPEGor a PNG, include only external JPEG images and PNG images, respectively, as theOver state.
Keep in mind that only the image source is changed (the src attribute of the imgtag), so the browser resizes your external image to fit the size of the initial slice
object it’s being swapped for.
Caution
273662-1 ch21.F 8/2/02 2:57 PM Page 703
Fireworks Seminar

704 Part V ✦ Entering the Web
If you need to make a slice object the same size as an external image so that youcan swap that sliced area of your image for an external file, select the slice object;choose either Modify ➪ Transform ➪ Numeric Transform, or the keyboard shortcut,Ctrl+Shift+T (Command+Shift+T); choose Resize from the list in the NumericTransform dialog box; and then enter the desired width and height. Alternatively,you can select the slice object and enter the desired width and height on theProperty inspector.
To create an external rollover, follow these steps:
1. Select the slice to trigger the external rollover.
2. Choose Swap Image from the Add Action pop-up menu in the Behaviors panel.
Fireworks displays the Swap Image dialog box.
3. Select the slice that the external image will be swapped into.
4. To locate the external file through the standard Open dialog box, choose the
Source for the swap by clicking the Folder icon.
5. Check Restore Image onMouseOut to undo the swap again when the user
moves his mouse cursor away from the event area.
6. Click OK when you’re done.
Working with hotspot rolloversHotspot rollovers enable you to create the effect of irregularly shaped rollovers. All
images are rectangular boxes, so all image swaps involve swapping a rectangular
area or slice. However, the image triggering the rollover does not have to be rectan-
gular — you can use any hotspot. The key to the illusion of the hotspot rollover is
Fireworks’ ability to swap entire slices from different frames.
Figure 21-11 shows an image with slices that are far from rectangular, but the design
requires that each area highlight independently when rolled over and link to differ-
ent pages on the Web site. Hotspot rollovers swap the entire image, though, so each
highlight can be any shape.
One limitation applies, though: Because each hotspot swaps the entire image, the
hotspots can’t overlap, or the illusion of separate highlighted areas is lost. It’s also
a good idea to keep the overall image small because each added hotspot requires
another copy of the whole image. A larger image could lead to a significant down-
load time for the user.
Tip
273662-1 ch21.F 8/2/02 2:57 PM Page 704
Fireworks Seminar

705Chapter 21 ✦ Activating Fireworks with Behaviors
Figure 21-11: This navigation system uses hotspots to trigger a rollover of the whole image in order to create the impression of irregularly shaped rollover buttons.
To create hotspot rollovers, follow these steps:
1. Create a hotspot for each active area with the Rectangle, Circle, or Polygon
Hotspot tool.
2. Create a single slice that covers your whole image.
3. Select the slice and choose Modify ➪ Arrange ➪ Send to Back to send it
behind your hotspots so that you can easily access the individual hotspots in
order to apply Behaviors to them.
4. Duplicate your current frame until you have a separate frame for each active
area. If you have made ten hotspots, make ten frames.
5. In each frame, modify a different active area so that it appears highlighted in
some way. This is the “Over” state for that area. The other areas in each frame
are left in their default state.
273662-1 ch21.F 8/2/02 2:57 PM Page 705
Fireworks Seminar

706 Part V ✦ Entering the Web
Hiding the Web Layer — and your hotspots — makes it easier to see what you’redoing when modifying your active areas. Hide the Web Layer by clicking the eyeicon next to its name in the Layers panel.
6. Select a hotspot and fill in a URL for the hotspot in the Property inspector.
7. With your hotspot still selected, open the Behaviors panel and apply a Swap
Image Behavior to it. In the Swap Image dialog box, make sure you follow
these steps:
• Select the lone slice in the slice list.
• Under “Show the swapped image from,” set the Frame number to the
corresponding highlighted frame for the selected hotspot. If the highlight
for a hotspot is in Frame 3, set the hotspot to swap to Frame 3.
8. Repeat Steps 6 and 7 for each hotspot until all of your hotspots have a URL
and a Behavior attached.
9. Export your image along with the HTML code. In the Export dialog box,
choose Export Slices from the Slices option list.
Fireworks exports an HTML document along with an image file for each frame of
your document. When displayed in a browser, the overall impression that’s created
is that of a single image with eccentrically shaped, individual rollovers.
Displaying a status bar messageYou can provide the user with additional navigational assistance by supplying a
message in the status bar. Status bar messages are often used with hotspots and
image maps. They are limited by the width of the status bar area in the viewer’s
browser, which in the case of Internet Explorer 4 for Windows (but not 5) is very,
very small. Even in other browsers, because browser window sizes can vary
tremendously, lengthy messages are not recommended.
To add a status bar message to your document, follow these steps:
1. Select a slice object or hotspot, and choose Set Text of Status Bar from the
Add Action pop-up menu in the Behaviors panel.
Fireworks displays the Set Text of Status Bar dialog box (see Figure 21-12).
Figure 21-12: The Set Text of Status Bar dialog box enables you to add a status bar message to a slice or hotspot, which assists your users in navigating your site.
Tip
273662-1 ch21.F 8/2/02 2:57 PM Page 706
Fireworks Seminar

707Chapter 21 ✦ Activating Fireworks with Behaviors
2. Type in the Message box the message that you want to display when the user
activates this slice. Click OK when you’re done.
3. Change the event from onMouseOver to onMouseOut, onClick or onLoad, if
desired, by choosing that event from the event list.
Working with Pop-up MenusWeb sites are becoming increasingly complex and now routinely offer their visitors
a choice of hundreds, or even thousands of pages of information. The traditional
Web button bar with a handful of options can be strained to the seams by the bulk
of topics and subtopics such complex sites contain. Luckily, the Set Pop-up Menu
Behavior aids in the quick creation of powerful hierarchical navigation systems that
are easy for the Web user to grasp at first glance (see Figure 21-13).
Figure 21-13: Pop-up menus are easy to create in Fireworks, and easy for the Web user to navigate when viewed in the browser.
Pop-up menus in Fireworks MX are almost an entirely new creation. They’re fea-ture-packed, and positioning problems are a thing of the past.
The Content tab of the Pop-up Menu EditorTo add pop-up menus to your Fireworks document, follow these steps:
NewFeature
273662-1 ch21.F 8/2/02 2:57 PM Page 707
Fireworks Seminar

708 Part V ✦ Entering the Web
1. Select a slice or hotspot, and choose Set Pop-up Menu from the Add Action
pop-up menu in the Behaviors panel, or choose Modify ➪ Pop-up Menu ➪ Add
Pop-up Menu.
Fireworks displays the Set Pop-up Menu dialog box (see Figure 21-14).
Figure 21-14: The Pop-up Menu Editor asks for the specifications for your pop-up menu in fairly plain terms.
2. To create a new menu item, click the Add Menu button or double-click in the
first editable position so that your cursor becomes an insertion point. Specify
a name in the Text box, a URL in the Link box, and a URL target in the Target
box (if desired), and then press Tab to move to the next field, or press Enter
(Return) to move to the next line.
3. To change the properties of a menu item, select the menu item and change the
contents of the Text, Link, or Target boxes. The Link box is also an option list,
enabling access to all the URLs in your document.
4. To convert a menu item into a submenu, select the menu item, and click the
Indent Menu button. To covert a submenu into a menu, click the Outdent
Menu button.
Indent Menu button
Outdent Menu button
Delete Menu button
Add Menu button
Menu
Submenu
273662-1 ch21.F 8/2/02 2:57 PM Page 708
Fireworks Seminar

709Chapter 21 ✦ Activating Fireworks with Behaviors
5. To move a menu item up or down the list, select it and drag it up or down.
6. To insert a menu item, select the item above where the new item should be
and click the plus sign. If you want to remove a menu item, select it and click
the minus sign.
7. Click Next when you’re done with the available options and ready to progress
to the Appearance tab.
After clicking Next, you can click Back at any time to return to the previous state ofthe Set Pop-up Menu dialog box.
The Appearance tab of the Pop-up Menu EditorThe Appearance tab allows you to control many of the different ways that
Fireworks can arrange your pop-up menus on the screen. To get the most out of
these options, follow the steps below:
1. On the Appearance tab, specify a menu style, either HTML (see Figure 21-15)
or Image (see Figure 21-16).
HTML menus are composed of plain HTML text and tables after export. Image
menus use images formatted with Fireworks styles.
Figure 21-15: HTML pop-up menu formatting options include text and table cell colors. A preview of the look of your eventual pop-up menu system is always available.
2. Choose either Vertical Menu or Horizontal Menu from the option list to
determine the orientation of your pop-up menu.
Tip
273662-1 ch21.F 8/2/02 2:57 PM Page 709
Fireworks Seminar

710 Part V ✦ Entering the Web
3. Specify a font, font size, bold and/or italic style, as well as justification for the
text in your menu system.
4. Select Text and Cell colors for the Up State of your menu.
This is how the menu appears initially.
5. Select Text and Cell colors for the Over State of your menu.
This is the way the menu looks under the user’s mouse cursor.
As you adjust settings, keep an eye on the preview of the finished product thatFireworks provides.
6. If you are creating an Image Pop-up Menu (see Figure 21-16), choose an Up
Style and an Over Style for the images that make up the menu.
Figure 21-16: The formatting options for Image pop-up menus use Fireworks Styles to dress up otherwise drab menus.
7. Click Done if you’re finished, or click Next to move on to the Advanced settings.
The Advanced tab of the Pop-up Menu EditorThe Advanced tab, shown in Figure 21-17, covers a number of standard table set-
tings that can be applied to your pop-up menu. Follow these steps to learn more:
Tip
273662-1 ch21.F 8/2/02 2:57 PM Page 710
Fireworks Seminar

711Chapter 21 ✦ Activating Fireworks with Behaviors
1. If you would like to specify specific cell widths for your pop-up menu, choose
Pixels from the Cell Width or Cell Height option lists, then enter a specific
value in the text box.
Figure 21-17: Do you want your pop-up menu to fit exactly within a column on your page? That’s just one of the many cell-level modifications you can make on the Advanced tab in the Pop-up Menu Editor.
2. If you wish to change the Cell padding or Cell Spacing, enter new values in
these fields.
3. Unless you alter the text’s justification on the Appearance tab, the text on
your pop-up menus has no extra spacing between it and the left edge of the
cell. You can change this by modifying the number in the Text indent field.
Numbers entered are in pixels.
4. Changing the timing, in milliseconds, in the Menu Delay field enables you to
adjust the length of time that it takes your menu to disappear after the user
has moved their mouse. The default is 1000 milliseconds, or one second, but
Fireworks enables you to make that longer or shorter.
5. In Fireworks, the controls on the Advanced tab set the final adjustments to
show borders on your pop-up menus and the colors used for those borders.
The Shadow option controls the drop shadow color to be used, whereas bor-
der width adjusts how wide the border on your menu appears.
273662-1 ch21.F 8/2/02 2:57 PM Page 711
Fireworks Seminar

712 Part V ✦ Entering the Web
6. Altering the Border Color and Highlight settings changes the outside appear-
ance of your pop-up menu. The Border Color option sets the thin color that
surrounds your entire menu, whereas the Highlight color only appears across
the top and down the left side.
The Border Width, Border Color, and Highlight settings only work with HTML stylepop-up menus, not with image-based ones.
7. Press Done if you’re finished or press Next to move to the settings on the
Position tab.
The Position tab of the Pop-up Menu EditorThe Position tab, shown in Figure 21-18, enables you to precisely control the posi-
tioning of your pop-up menus and their submenus. The following steps walk you
through the options on the Position tab:
Figure 21-18: Want your pop-up menus to appear in a specific position relative to your button? It’s a snap with Fireworks.
1. Selecting the Pop-up Menu position from the first section here enables you to
specify the position of your pop-up menu relative to the slice, or button, it’s
attached to. The following are the available options:
• Set menu position to the bottom-right of slice: This sets your pop-up
menu to line up with the bottom right-hand corner of the slice that it’s
attached to.
Tip
273662-1 ch21.F 8/2/02 2:57 PM Page 712
Fireworks Seminar

713Chapter 21 ✦ Activating Fireworks with Behaviors
• Set menu position to bottom of slice: This causes your pop-up Menu
to appear directly below the slice, or hotspot, that you attached the
behavior to.
• Set menu position to top of slice: This causes your pop-up menu to
appear directly above your hotspot or slice.
• Set menu position to the top-right of slice: This option sets your pop-up
menu to appear directly to the right of your slice or hotspot.
2. Next you need to decide how your submenus should look relative to your
main menu. You have the following choices:
• Set submenu position to bottom-right of menu: This causes the sub-
menus of your pop-up menu to appear in the lower-right corner of the
parent menu’s cell.
• Set submenu position to top-right of menu: This puts your submenu
directly to the right of the parent menu’s cell — probably the most
commonly expected appearance for a set of menus — which is a behav-
ior akin to the way menus and submenus appear in software programs.
• Set submenu position to bottom of menu: This causes the submenus of
your pop-up Menu to appear directly below the parent menu’s cell.
If you have several menu items with submenus, be careful with this last option.When your submenu appears, it shows up higher on the z-axis than its parentmenu and may obscure other menu items, frustrating your viewers by forcingthem to rush past items with submenus to get where they want to go.
3. When Place in Same Position is checked, Fireworks places your submenus rel-
ative to the parent menu’s cell. Without this option selected, the submenu is
positioned relative to the trigger point for the entire pop-up menu.
After you add a Pop-up Menu Behavior to your document, you can edit its settings
at any time by double-clicking its name in the Behaviors panel, or by double-
clicking the pop-up menu outline in your document.
You can’t preview Pop-up Menus in the workspace. Press F12 to preview yourwork in your primary browser and see your pop-up menus in action.
Pop-up menu styles are stored in a folder called Nav Menu, in the Configuration
folder in your Fireworks application folder. These styles are the same styles that we
know and love from the Styles panel. So adding your own styles to the Set Pop-up
Menu dialog box and making them available for use in a pop-up menu is as simple
as exporting the styles from the Styles panel to the Nav Menu folder.
The Fireworks program folder is typically found at C:\Program Files\Macromedia\Fireworks MX on Windows-based computers, and at MacintoshHD:Applications:Macromedia Fireworks MX: on the Mac.
Tip
Note
Caution
273662-1 ch21.F 8/2/02 2:57 PM Page 713
Fireworks Seminar

714 Part V ✦ Entering the Web
To add your own styles to the Set Pop-up Menu Behavior, follow these steps:
1. Create an object with the fill, stroke, and effect properties that you would like
your pop-up menu to have.
2. Choose Window ➪ Styles to display the Styles panel.
3. Select your object and click the New Style button on the Styles panel.
The properties of your object are saved as a new style.
4. Select the new style in the Styles panel and choose Export Styles from the
Styles panel’s pop-up menu.
Fireworks displays a Save dialog box.
5. Navigate to your Fireworks application folder, then into the Configuration
folder, and then the Nav Bar folder. Click Save to export your selected style as
a Fireworks .stl file.
Next time you use the Set Pop-up Menu Behavior, your added styles will be avail-
able for use.
Using Drag-and-Drop BehaviorsDrag-and-drop Behaviors enable you to quickly create rollovers using simple drag-
and-drop methods. Instead of selecting a slice or hotspot and then interacting with
the Behaviors panel, drag-and-drop Behaviors enable you to directly interact with
the trigger Web object — over the area where the user hovers or clicks to trigger
the Behavior — and the target Web object — where the rollover itself happens. Join
the two areas with a drag-and-drop, and you have created a rollover.
When selected, each hotspot and slice object displays a drag-and-drop handle, as
shown in Figure 21-19. Drag the drag-and-drop Behavior handle from a triggering
slice or hotspot onto a target slice to create a rollover. You can create a simple
rollover by dragging the drag-and-drop Behavior handle and dropping it on the
same slice, whereas you can create a disjoint rollover by dragging the drag-and-
drop Behavior handle and dropping the Behavior handle on a different slice.
273662-1 ch21.F 8/2/02 2:57 PM Page 714
Fireworks Seminar

715Chapter 21 ✦ Activating Fireworks with Behaviors
Figure 21-19: Each hotspot or slice has a drag-and-drop handle that displays when the hotspot or slice is selected.
It’s important to realize that you must prepare the slices and frames before dragging
and dropping. Fireworks won’t add frames to your document just because you attach
a rollover Behavior to a slice.
Creating a simple rollover with drag and dropTo create a simple rollover where the trigger and target areas are the same, follow
these steps:
1. Make sure that you have created a second frame in your document, which
contains the image that’s to be shown when the user rolls his mouse over the
trigger area.
2. Select the trigger slice, which covers the area of the image that triggers the
Behavior.
3. Click and hold on the drag-and-drop Behavior handle in the center of the slice.
The mouse cursor changes into a fist.
4. Drag the cursor slightly and drop over the same slice.
A blue drag-and-drop Behavior line displays from the center to the top-left
corner of the hotspot or slice (see Figure 21-20).
273662-1 ch21.F 8/2/02 2:57 PM Page 715
Fireworks Seminar

716 Part V ✦ Entering the Web
Figure 21-20: When you drag and drop within one hotspot or slice, a drag-and-drop Behavior line displays from the center to the top-left corner of the hotspot or slice.
Fireworks displays the Swap Image dialog box (see Figure 21-21).
Figure 21-21: A special Swap Image dialog box displays after you drag and drop.
5. Choose a frame to swap for the current frame, from the Swap Image From
option list.
6. To access the full Swap Image Behavior dialog box, click More Options.
The full Swap Image dialog box is covered earlier in this chapter.
7. Click OK when you’re done.
Fireworks attaches the Behavior to the slice.
Creating disjoint rollovers with drag and dropTo create a disjoint rollover — where the trigger and target Web objects are not the
same — join the trigger and target Web objects with a drag-and-drop Behavior line.
Cross-Reference
273662-1 ch21.F 8/2/02 2:57 PM Page 716
Fireworks Seminar

717Chapter 21 ✦ Activating Fireworks with Behaviors
To create a disjoint rollover with drag and drop, follow these steps:
1. Make sure that you have created a second frame in your document, which
contains the image to be shown when the user rolls his mouse over the
trigger area.
2. Make sure that you have both a trigger and target hotspot or slice.
3. Select the Web object over the trigger area.
4. Click and hold on the drag-and-drop Behavior handle in the center of the
hotspot or slice.
The mouse cursor changes into a fist.
5. Drag the cursor and drop it on the target slice.
The blue drag-and-drop Behavior line is displayed from the center of the
trigger Web object to the top-left corner of the target slice, as shown in
Figure 21-22.
Figure 21-22: A blue drag-and-drop Behavior line shows the relationship between the trigger and target slice after a drag and drop. Here, a click on the button by the user swaps the larger slice at the bottom.
Fireworks displays the Swap Image dialog box.
6. Select the frame to swap from in the Swap Image From option list.
7. To access the full Swap Image Behavior dialog box, click More Options.
8. Click OK when you’re done.
Fireworks attaches the Behavior to the selected Web object.
273662-1 ch21.F 8/2/02 2:57 PM Page 717
Fireworks Seminar

718 Part V ✦ Entering the Web
Removing drag-and-drop BehaviorsTo remove a drag-and-drop Behavior attached to a hotspot or slice, follow these
steps:
1. Select the hotspot or slice.
The drag-and-drop Behavior relationships for the Web object are shown as
blue lines.
2. Click on the blue line you want to delete.
Fireworks displays a dialog box, confirming that you want to remove the
Behavior.
3. Click OK to remove the Behavior.
SummaryFireworks enables you to add dynamic JavaScript effects to your images, even if
you don’t know JavaScript, through the use of Fireworks Behaviors. When using
Behaviors, keep these points in mind:
✦ The Behaviors panel is your control center for working with Behaviors.
✦ Behaviors are attached only to Web Layer objects (either hotspots or slices)
and not to regular vector or bitmap objects on other layers.
✦ Rollovers can be rollover buttons, or they can be disjointed rollovers, in
which the image that changes is not the same as the one that triggered the
event.
✦ Fireworks includes a Button Editor that simplifies the process of building a
Button Symbol.
✦ You can preview rollovers in the document window by selecting the
Preview tab.
✦ Fireworks can also show text in the browser’s status bar through Set Text of
Status Bar Behavior.
✦ The Set Pop-up Menu Behavior option enables you to create powerful,
complex navigation systems with a minimum of time and effort.
✦ Drag-and-drop Behaviors provide a quick and easy method for creating
rollover Behaviors.
In the next chapter, you look at integrating Fireworks with Dreamweaver.
✦ ✦ ✦
273662-1 ch21.F 8/2/02 2:57 PM Page 718
Fireworks Seminar

Integrating withDreamweaver
Not all Web designers have the luxury — or the
hardship — of just working on Web graphics. Many
graphic artists create both the graphics and the layout for the
Web pages on which they work. And those designers who only
create imagery for the Internet must work closely with layout
artists in order to incorporate their designs. No matter how
you look at it, Fireworks is not — and was never intended
to be — a stand-alone product. All graphics generated by
Fireworks must be published on the Web by some other means.
Dreamweaver, the premier Web-authoring program from
Macromedia, is the perfect partner for Fireworks. Not only do
they both feature the Macromedia Common User Interface,
both also speak JavaScript commands, and Dreamweaver
understands Fireworks’ Behaviors, as well as its own.
Dreamweaver even recognizes images — whether whole or
sliced — as coming from Fireworks and displays a special
Property inspector, so you can seamlessly optimize images
with standard Fireworks controls from within Dreamweaver —
without even opening Fireworks. This chapter delves into this
and many other features, including Fireworks commands that
can be automatically issued from Dreamweaver.
If you don’t have a copy of Dreamweaver, use the trial ver-sion included on the CD-ROM accompanying this book.
Introducing IntegrationAs noted elsewhere in this book, Web graphics is as much
about production and maintenance as it is about creation. The
more efficiently you — or someone who works with you — can
insert and update images into Web page layouts, the better the
workflow. Because a Web page typically has numerous graph-
ics, as well as text and other media, such as a Shockwave or
QuickTime movie, a Web designer must be concerned with
how all the elements work together. Not only must the overall
On theCD-ROM
2222C H A P T E R
✦ ✦ ✦ ✦
In This Chapter
Setting up integrationfeatures
Optimizing graphicsfrom withinDreamweaver
Altering Dreamweaverimages in Fireworks
Cross-programBehaviors
UpdatingDreamweaverLibrary items
Exporting CSS layersinto Dreamweaver
Creating a Webphoto album
Making hybridcommands
✦ ✦ ✦ ✦
283662-1 ch22.F 8/2/02 2:57 PM Page 719
Fireworks Seminar

720 Part V ✦ Entering the Web
design function well aesthetically, but the Web page as a whole must also be
practical — that is, the download time must be kept to a minimum. All of these
concerns require a constant back-and-forth between graphics and layout programs.
Macromedia has taken steps to reduce these problems by integrating Dreamweaver
and Fireworks into a complete Web production environment.
Optimizing Images from DreamweaverWhat’s the most common modification needed for graphics being added to a lay-
out? I don’t know about everybody else, but I sure do an awful lot of resizing of
images to get the right fit. To me, the term resizing encompasses rescaling an image,
cropping it, and getting it to the smallest possible file size — all while maintaining
the original image quality. The Optimize Image in Fireworks command does just
that, as well as enabling complete color and animation control. Best of all, you can
do everything right from Dreamweaver in a standard Fireworks interface.
If you’ve never tried the Optimize Image command, that last statement might give
you pause. How can you optimize an image “. . . from Dreamweaver in a standard
Fireworks interface”? Aren’t we talking about two different programs? Well, yes,
and — most excitedly — no. You definitely need both programs for the command
to work, but the full version of Fireworks does not have to be running. Instead, a
special “light” version of Fireworks is launched, one that displays only the Export
Preview dialog box, as shown in Figure 22-1.
Figure 22-1: Choosing the Optimize Image in Fireworks command opens a dialog box equivalent to the Export Preview dialog box, and does so without running Fireworks.
283662-1 ch22.F 8/2/02 2:57 PM Page 720
Fireworks Seminar

721Chapter 22 ✦ Integrating with Dreamweaver
The Optimize dialog box has all the features of Export Preview with one small
change: An Update button sits in place of the Next button. In Fireworks, clicking
Next from Export Preview opens the Export dialog box, in which you can select
Slicing and HTML template options. The command relies on your last settings saved
from within Fireworks for these options.
To optimize your image in Fireworks from within Dreamweaver, follow these steps:
1. In Dreamweaver, select the image you need to modify.
You must save the current page at least once before running the Optimize Imagein Fireworks command. The current state of the page doesn’t need to have beensaved, but a valid file must exist for the command to work properly. If you haven’tsaved the file, Dreamweaver alerts you to this fact when you call the OptimizeImage command.
2. Choose Commands ➪ Optimize Image in Fireworks.
You can also invoke the Optimize Image in Fireworks command from the contextmenu — just right-click (Control-click) on the image in Dreamweaver.
3. If the selected image is not in PNG (Portable Network Graphics) format, you’re
given the opportunity to select whether you want to use a Fireworks source
file instead of the lower-quality GIF (Graphics Interchange Format) or JPEG
(Joint Photographic Experts Group), as shown in Figure 22-2.
Figure 22-2: Choose whether to use a Fireworks PNG file as a source for the image, if one exists.
4. Click No in the Find Source for Optimizing dialog box to continue, and then
optimize the GIF or JPEG image. Click Yes to have Dreamweaver automatically
find the Fireworks source file, if possible. If not possible, you are prompted
with a standard Open dialog box. Select the PNG format source file and click
Open to continue.
After the selected file is located, if appropriate, the Optimize dialog box
appears.
Tip
Caution
283662-1 ch22.F 8/2/02 2:57 PM Page 721
Fireworks Seminar

722 Part V ✦ Entering the Web
5. Make whatever modifications you want from the Options, File, and Animation
tabs of the Optimize dialog box.
6. When you’re finished, click the Update button.
If you’re working with a Fireworks source file, the changes are saved to both the
source file and the exported file; otherwise, only the exported file is altered.
If you changed the scale, size, or cropping of the image during optimization, you
need to adjust the height and width values in the Dreamweaver Property inspector.
To do this, click the Refresh button.
If the image to be optimized is in PNG format — whether it be in the enhancedPNG format that Fireworks uses to store all of its additional editing information, orin the bitmap PNG export — the Optimize Image in Fireworks command saves it asa bitmap file. In other words, Fireworks native files lose their editability. As always,it’s best to store your Fireworks source files in one directory and use your exportedWeb page files — in GIF, JPEG, or PNG format — from another.
Editing Images from DreamweaverFor many purposes, optimizing an image is all you need to do — whether it’s to crop
one side slightly or to reduce the file size. Often, though, you need to go further,
such as when the client has decided to change a department name on a navigation
button. Without Fireworks-Dreamweaver integration, in a situation such as this, you
would need to start your graphics program, load in the image, make the change,
save the image, switch back to your Web-authoring tool, and reload the graphic.
With Dreamweaver MX and Fireworks MX, the process is greatly simplified. You
need to follow these steps only:
1. Select an image in Dreamweaver, and choose Edit from Dreamweaver’s
Property inspector.
The image automatically loads into Fireworks, which starts, if necessary
(see Figure 22-3).
Figure 22-3: Imagesfrom Dreamweaveraren’t shy about it inFireworks — note the“from Dreamweaver toFireworks” symbolsnext to the Donebutton.
Caution
283662-1 ch22.F 8/2/02 2:58 PM Page 722
Fireworks Seminar

723Chapter 22 ✦ Integrating with Dreamweaver
2. Modify the image in Fireworks and click Done.
The revised image is saved and automatically updated in Dreamweaver.
Setting Fireworks as the graphics editor in DreamweaverTo take advantage of this enhanced connectivity, you first have to set Fireworks as
your graphics editor in Dreamweaver’s Preferences by following these steps:
1. In Dreamweaver, choose Edit ➪ Preferences.
The Preferences dialog box appears.
2. Select the File Types / Editors category from the list on the left.
3. In the File Types / Editors pane, shown in Figure 22-4, click the image type
from the Extensions section, on the left, and then click the plus sign (+)
above the Editors section, on the right, to browse to the location of the
main Fireworks program.
Figure 22-4: To quickly edit a graphic on a Dreamweaver page, make sure Fireworks is your default editor for common graphics files, such as GIF.
283662-1 ch22.F 8/2/02 2:58 PM Page 723
Fireworks Seminar

724 Part V ✦ Entering the Web
The default location for Fireworks for Windows is C:\Program Files\Macromedia\Fireworks MX\Fireworks.exe (the .exe filename extension may or may not be visible). On a Macintosh, Fireworks is usually found at Macintosh HD:Applications:Macromedia FireworksMX:Fireworks MX.
Now, whenever you want to edit a graphic, select the image and click the Edit but-
ton in the Property inspector. Fireworks starts up, if it’s not already open. As with
the Optimize Image in Fireworks command, if the inserted image is a GIF or a JPEG,
and not a PNG format, Fireworks asks whether you want to work with a separate
source file. If you click Yes, you’re given an opportunity to locate the file.
Fireworks always follows your Dreamweaver Launch and Edit preferences, withone exception. If the image chosen is a sliced image, Fireworks always optimizesthe exported file rather than the source, regardless of your settings.
After you make your alterations to your file in Fireworks, click the Done button in
the title bar of the window, or choose either File ➪ Update, or the keyboard short-
cut, Ctrl+S (Command+S). If you’re working with a Fireworks source file, both the
source file and the exported file are updated and saved.
If you choose File ➪ Update, make sure that your source file and exported file arethe same dimensions. If your exported file is a cropped version of the source file,the complete source file is used as the basis for the export file, and any croppinginformation is discarded. To maintain the cropping, choose File ➪ Export to re-export the file, instead of saving it with File ➪ Update.
Recognizing Design Notes in DreamweaverBoth Dreamweaver and Fireworks are capable of saving Design Notes, an innovative
method for sharing information between graphic designers who use Fireworks and
Web designers using Dreamweaver. A Design Note is basically an external file that
contains editable information about any element in Dreamweaver, such as HTML
pages or graphics. Fireworks adds Design Notes to images that are exported into a
Dreamweaver site, storing the location of the source file. This enables
Dreamweaver to optimize or edit the source file of an included image without ask-
ing the user to locate the file.
From within Dreamweaver, you can read Fireworks Design Notes — or add your own
information. However, you have to make sure that Design Notes are enabled for the
current site. To enable Design Notes, follow these steps:
1. In Dreamweaver, choose Site ➪ Edit Sites.
Dreamweaver displays the Define Sites dialog box.
2. Select your current site, and then click Edit.
Dreamweaver displays the Edit Sites dialog box.
Caution
Note
Tip
283662-1 ch22.F 8/2/02 2:58 PM Page 724
Fireworks Seminar

725Chapter 22 ✦ Integrating with Dreamweaver
3. Select the Design Notes category to view the Design Notes panel.
4. Enable the Maintain Design Notes option.
5. If you want other team members to be able to view the Design Notes, select
Upload Design Notes for Sharing.
6. Click OK to close the Edit Sites dialog box, and then click Done in order to
close the Define Sites dialog box.
To view or add Design Notes to a Fireworks (or any other) image, follow these
steps:
1. Select the image file and right-click (Control-click) to display the context menu
and choose Design Notes.
The Design Notes dialog box appears.
2. Select the All Info tab to see the path to the source file. The source file infor-
mation is contained in a Design Note key called fw_source. It looks like this:
fw_source=file:///D|/DW4 Bible/images/house.png
3. To add additional information to the Design Note, click the Add button and fill
in the Name and Value fields.
Rather than pressing Enter (Return), tab out of the Value field to confirm yourentry.
Modifying sliced imagesPlacing sliced images on your Dreamweaver Web page couldn’t be simpler thanks
to the Insert Fireworks HTML command. But, like standard non-sliced graphics,
sliced images often need to be modified. One technique that many designers use is
to create a framing graphic that encompasses HTML text; in Fireworks, a sliced area
designated as a text slice can hold any HTML content. Text is often modified and —
if it’s in a framing graphic — that could mean that the images need to be changed,
or the table will separate, making the separate slices apparent.
In Dreamweaver, sliced images from Fireworks are recognized as a Fireworks table
and may be modified through a dedicated Property inspector, as shown in Figure
22-5. The Fireworks Table Property inspector displays the PNG source file and an
Edit button for sending the entire table back to Fireworks for alterations. As with
non-sliced graphics, select Done from the document title bar in Fireworks when
your modifications are complete to update the source and exported files. The
newly exported images are then reloaded into Dreamweaver.
Tip
283662-1 ch22.F 8/2/02 2:58 PM Page 725
Fireworks Seminar

726 Part V ✦ Entering the Web
Figure 22-5: Modify sliced graphics by first selecting the surrounding table, and then choosing Edit from the Fireworks Table Property inspector in Dreamweaver.
Although Fireworks attempts to honor any changes you may have made to theHTML table, certain alterations may result in Fireworks overwriting your table. If,for example, you add or remove one or more cells from the table in Dreamweaver,Fireworks recognizes that the tables no longer match. An alert appears, indicatingthat Fireworks will replace the table in Dreamweaver. To keep your table the samein Dreamweaver, make no changes in Fireworks and click Done.
Exporting Dreamweaver CodeBesides outputting highly optimized graphics, Fireworks speaks fluent Dreamweaver.
For all export operations involving HTML output, including hotspots, slices, and
Behaviors, Fireworks is capable of writing code, either as Dreamweaver, or
Dreamweaver Library. The Fireworks and Dreamweaver engineers worked
closely together to ensure that the code would match across the two programs.
The type of HTML output you use for standard HTML and Images export operations
is set in the HTML Setup dialog box. Choose File ➪ HTML Setup and select
Dreamweaver from the HTML Style option list on the General tab. Now, when you
export HTML and Images from the Export dialog box, you are exporting
Dreamweaver code.
Caution
283662-1 ch22.F 8/2/02 2:58 PM Page 726
Fireworks Seminar

727Chapter 22 ✦ Integrating with Dreamweaver
For precise details on how to export Dreamweaver-style code from Fireworks andinsert it into your Dreamweaver pages, see Chapters 20 and 21.
Working with Dreamweaver LibrariesThe export of Dreamweaver Library code from Fireworks is a real time-saver. One of
the most difficult tasks for graphic designers moving to the Web is handling code.
With the plain HTML and Images export setting, all code must be cut and pasted from
the Fireworks-generated page to the working Dreamweaver document. Although this
is fairly straightforward in Dreamweaver (and Fireworks makes it as clear as possible
with concise HTML comments marking the code to move), it still involves working in
an environment in which many designers aren’t comfortable: code.
Dreamweaver Libraries eliminate the need for designers to handle code when
inserting any Fireworks output, including even the most complex Behaviors.
What’s a Dreamweaver Library? I like the explanation given to me by a Dreamweaver
engineer: “Think of it as Encapsulated HTML.” Designers routinely work with
Encapsulated PostScript (EPS) files, and the metaphor fits. Like EPS files, a
Dreamweaver Library item is capable of containing hundreds of lines of code, but
the designer need only be concerned with one element — and a visual one, at that.
To export a Fireworks document as a Dreamweaver Library, follow these steps:
1. In Fireworks, choose File ➪ Export.
Fireworks displays the Export dialog box.
Cross-Reference
Dreamweaver’s Insert Fireworks HTML
Dreamweaver features a Fireworks logo in its Insert bar, representing the Fireworks HTMLobject, which enables you to browse to an HTML file that you exported from Fireworks andinclude it in your current Dreamweaver document. Once activated, the Fireworks HTML objectasks for the location of a Fireworks-generated HTML file, as shown in the following figure.
I find the Fireworks HTML object handy for times when I’m exporting a lot of codefrom Fireworks. Rather than worry about where the code is going, I just export it allto one folder and, later, insert it into the right places within Dreamweaver.
283662-1 ch22.F 8/2/02 2:58 PM Page 727
Fireworks Seminar

728 Part V ✦ Entering the Web
2. Choose Dreamweaver Library (.lbi) from the Save as type (Save As) option list.
Fireworks warns that it needs to know the location of your Dreamweaver site’s
Library folder. Click OK to dismiss the warning.
Fireworks displays a Choose a Folder dialog box.
3. Navigate to and choose your Dreamweaver site’s Library folder. Click Select
(Choose) when you’re done.
Fireworks displays the Export dialog box again.
4. Click Save in the Export dialog box to save your Dreamweaver Library code.
5. In Dreamweaver, open the document into which you want to insert the
exported Fireworks code.
6. Choose Window ➪ Assets, or click the Assets icon from the Dreamweaver
Launcher, if visible.
The Assets panel opens.
7. Select the Library category of the Assets panel, as shown in Figure 22-6.
Figure 22-6: The Library category of Dreamweaver’s Assets panel is where you’ll find your exported Dreamweaver Library item.
8. Select the exported item from the list pane.
9. Insert the Library item on the page, either by choosing Add to Page, or by
dragging and dropping the item from the list or preview pane.
The Library item is added to your page and initially selected.
Feel free to move the Fireworks-generated Library item anywhere on the page; if
necessary, the code will move as well.
283662-1 ch22.F 8/2/02 2:58 PM Page 728
Fireworks Seminar

729Chapter 22 ✦ Integrating with Dreamweaver
A key feature of Dreamweaver Library items is their ability to be updated. Edit a sin-
gle Library item, and Dreamweaver automatically updates all the Web pages using
that item. This capability is a major time-saver. Unlike regular graphics, which you
can modify at the click of the Edit button from Dreamweaver’s Property inspector,
Library item graphics first must be unlocked.
To edit a Library item, follow these steps:
1. In Dreamweaver, choose Window ➪ Assets to open the Assets panel.
2. Choose the Library category of the Assets panel.
3. Select the Library item embedded in the page, either from the Web page or
the Assets panel.
4. Click the Open button on the Library Item Property inspector, as shown in
Figure 22-7.
The Library item opens in its own Dreamweaver window.
Figure 22-7: Select a Library item and click Open in the Property inspector in orderto edit the item.
283662-1 ch22.F 8/2/02 2:58 PM Page 729
Fireworks Seminar

730 Part V ✦ Entering the Web
5. Select the graphic and choose Edit from the Property inspector.
If the file is not in PNG format, Fireworks asks whether you prefer to edit an
original source file and gives you the chance to locate it. The selected PNG file
is opened in Fireworks.
6. Modify the file, as needed.
7. When you’re done, choose File ➪ Update.
The altered file is automatically updated in the Dreamweaver Library file.
8. In Dreamweaver, choose File ➪ Save.
Dreamweaver notes that your Library item has been modified and asks
whether you want to update all the Web pages in your site that contain the
item. Click Yes to update all Library items (including the one just modified), or
No to postpone the updates.
9. Close the editing window by choosing File ➪ Close.
If you opt to postpone the Library item update, you can do it at any time by choosing
Modify ➪ Library ➪ Update Pages.
XHTML SupportThe latest version of HTML is known as XHTML, short for Extensible HTML. XHTML
is based on XML and, as such, has a more rigid syntax than HTML. For example,
tags that do not enclose content — the so-called empty tags — are written differently.
In HTML, a line-break tag is:
<br>
while in XHTML, the line-break tag adds a closing slash, like this:
<br />
Note the additional space before the closing slash. While the space is not requiredfor XHTML, it is needed to be properly recognized in Netscape 4.x browsers.
Aside from the line-break tag, the other notable empty tag is the image tag, <img>—
or, as it is written in XHTML, <img />. You can see why if your Web authoring pro-
gram is writing out XHTML pages, your graphics program should be, too.
Fireworks makes it easy to output code in XHTML. All you need do is switch your
export options by following these steps:
1. When you’re ready to export your page, choose File ➪ Export.
The Export dialog box opens.
2. From the Save as Type list, make sure HTML and Images or Dreamweaver
Library is chosen.
Note
283662-1 ch22.F 8/2/02 2:58 PM Page 730
Fireworks Seminar

731Chapter 22 ✦ Integrating with Dreamweaver
If Images Only or some of the other settings are selected, the Options button
is not available.
3. Select Options to open the HTML Setup dialog box.
4. From the HTML Style drop-down list, choose Dreamweaver XHTML.
5. Click OK to close the HTML Setup dialog box and export your file as you
would normally.
There are also options for Generic XHTML and GoLive XHTML.
Quick ExportFor a more direct route to outputting files to Dreamweaver, try Fireworks’ new
Quick Export feature.
Situated on the top right of every document window, the Quick Export optiongives you access to the following submenu:
✦ Dreamweaver ➪ Export HTML
✦ Dreamweaver ➪ Update HTML
✦ Dreamweaver ➪ Copy HTML to Clipboard
✦ Dreamweaver ➪ Launch Dreamweaver
As the name implies, the Quick Export option offers faster access to the most
commonly used Dreamweaver (and other program) export features. They all func-
tion exactly the same as if you went through the usual menus or keyboard shortcut
methods — they’re just a little more available.
When choosing Dreamweaver ➪ Export HTML from the Quick Export option, theHTML type is set as either Dreamweaver HTML or Dreamweaver XHTML, depend-ing on the last type of code chosen. For example, if you previously output GenericXHTML, the HTML type will be Dreamweaver XHTML.
Fireworks technique: Adding CSS layers to DreamweaverFireworks features another type of export that — although not strictly a
Dreamweaver feature — fits so well in the Dreamweaver-Fireworks workflow that it’s
worth including in this chapter. Fireworks is capable of exporting images directly
into Cascading Style Sheet (CSS) layers. A CSS layer is a free-floating structure that
can be viewed in any version 4 or higher browser. CSS layers have several notable
properties, including the following:
✦ Position: Layers — and, thus, the content they hold — can be precisely posi-
tioned. This makes layout far easier than with traditional HTML methods.
Note
NewFeature
283662-1 ch22.F 8/2/02 2:58 PM Page 731
Fireworks Seminar

732 Part V ✦ Entering the Web
✦ Depth: You can stack layers one upon another, and change their depth
dynamically.
✦ Visibility: You can hide or reveal layers at will.
✦ Movement: You can dynamically position layers and thus move them across
the screen over time to create animation.
I’ve exported CSS layers to use in Dreamweaver with two different methods: export-
ing Fireworks layers and exporting Fireworks frames. Using Fireworks layers is
useful for determining a precise layout of images against a background. For one pro-
ject, eight separate artworks needed to be placed in the proper position against a
background. To ease the workflow, I used the following technique:
1. In Fireworks, open the background graphic and lock it on the Layers panel.
2. Click the New Layer button on the Layers panel.
A new layer is created.
If desired, give the layer a unique name; the layer names in Fireworks are used asthe CSS layer names.
3. Choose Insert ➪ Image to open a foreground image.
Alternatively, you can cut and paste an object or image from an open file.
4. Position the image against the background.
5. Repeat Steps 2–4, creating a new layer for each object.
Although each object is placed in its own layer, they appear as if side by side.
6. When all the images are properly placed, hide the layer the background is on
by deselecting the appropriate eye symbol in the Layers panel.
7. Choose File ➪ Export.
The Export dialog box appears.
8. Choose CSS Layers from the Save as type (Save As) option list.
Fireworks displays further options related to exporting CSS Layers.
9. From the Source option list, select the Fireworks component to export as CSS
Layers. The options are Fireworks Layers, Fireworks Frames, or Fireworks
Slices.
10. Make sure the Trim Images option is not selected.
11. If you’re exporting from Fireworks Frames, check the Current Frame Only
checkbox to limit the export to the current frame only.
Tip
283662-1 ch22.F 8/2/02 2:58 PM Page 732
Fireworks Seminar

733Chapter 22 ✦ Integrating with Dreamweaver
12. Check the Put Images in Subfolder checkbox to have Fireworks place the
image files in their own folder.
Click the Browse button to select a particular folder.
13. Click Save when you’re ready.
Each Fireworks layer is saved as a separate image, and the CSS layer informa-
tion is written out in HTML.
14. In Dreamweaver, open the Fireworks-generated HTML page.
15. Select all the CSS layers on the page by using one of the following methods:
• From the Dreamweaver Layers panel, press Shift and select each layer.
• In the Dreamweaver document window, press Shift and select each of the
CSS layer symbols.
16. Choose Edit ➪ Copy to copy the selected layers.
17. Choose File ➪ Open and navigate to and open the target Web page for the lay-
ers. Alternatively, you can open the target Web page in the Site window.
18. Choose Edit ➪ Paste to insert the layers.
The depth of the CSS layers is determined by the order of layers in Fireworks. In
CSS layers, higher numbered layers are on top of lower numbered layers, just as a
layer that is higher in the Layers panel’s layer list is on top of those below it.
The other method of using the CSS layer export feature of Fireworks, exporting
Fireworks frames, comes in handy when you need to build complex Show-Hide
layer Behaviors in Dreamweaver. Often, the layers that are alternately shown and
hidden are in front of one another. You can take advantage of this positioning by
setting up the separate objects as frames in Fireworks. Then, choose File ➪ Export
and choose CSS Layers and Fireworks Frames from the Save as type (Save As) and
Source option lists, respectively. Deselect the Trim Images option if you want each
image to maintain its relative place in the frames; enable the option if you want the
upper-left corner of each image to match.
If you are displaying separately saved images, you can use the Open commandand check the Open as Animation option in the Open dialog box in order to placeeach image automatically into its own frame. Then, export as CSS Layers, choosingto output the frames as layers.
Tip
283662-1 ch22.F 8/2/02 2:58 PM Page 733
Fireworks Seminar

734 Part V ✦ Entering the Web
Working with Image Placeholders from Dreamweaver
During the Web design process, the final images may not be initially available.
Sometimes, the designer inserts a graphic element to act as a placeholder so that
the rest of the page can proceed while the graphic is being created. Dreamweaver
MX has added a new feature to facilitate this methodology. When you insert an
image placeholder in Dreamweaver, you specify the width and height, a name, a
color and, optionally, the alt text. The placeholder appears as a single color block
with the name and dimensions prominently displayed.
When you select an image placeholder in Dreamweaver, instead of an Edit buttonin the Property inspector, you find a Create button. Selecting Create opens up anew blank document in Fireworks — with the same dimensions as the placeholder.Use any and all of the Fireworks tools to make whatever image is needed toreplace the placeholder. When you’re finished, select Done to send the completedimage back to Dreamweaver.
Fireworks prompts you for both a PNG source filename and an exported image file-
name — and then conveys that information to Dreamweaver. Should the image need
to be modified, you can easily modify the PNG source and Fireworks re-exports the
file as previously specified.
Using Fireworks Behaviors in DreamweaverFireworks writes in Dreamweaver standard code so that its Behaviors are recog-
nized in Dreamweaver. What’s the big deal about being recognized in Dreamweaver?
If Dreamweaver can identify a Behavior as the same as its own, you can edit param-
eters in Dreamweaver that were defined in Fireworks. If you apply a Set Text of
Status Bar Behavior in Fireworks and want to change the message in Dreamweaver,
you can.
Fireworks exports code for five categories of Behaviors: Simple Rollover, Swap
Image, Set Nav Bar Image, Show Pop-Up Menu, and Set Text of Status Bar.
Another Behavior is automatically inserted for all Fireworks Behaviors: PreloadImages. As the name implies, the Preload Images Behavior makes sure that thebrowser has all images ready for smooth rollovers.
To modify a Fireworks-applied Behavior in Dreamweaver, you must first open the
Dreamweaver Behaviors panel, shown in Figure 22-8, which looks quite similar to
the Behaviors panel in Fireworks. Select an object or tag in Dreamweaver, and any
applied Behaviors are listed in the Behaviors panel.
Note
NewFeature
283662-1 ch22.F 8/2/02 2:58 PM Page 734
Fireworks Seminar

735Chapter 22 ✦ Integrating with Dreamweaver
Figure 22-8: The Behaviors panel in Dreamweaver uses events and actions, just like the Behaviors panel in Fireworks.
Each of the Behaviors uses a different dialog box in Dreamweaver for modifications;
however, the overall procedure is the same. To modify any of the Fireworks-
generated Behaviors in Dreamweaver, follow these steps:
1. In Dreamweaver, open the file incorporating your Fireworks-generated
HTML code.
2. Choose Window ➪ Behaviors to open the Behaviors panel.
Alternatively, you can click the Behavior button from the Launcher.
3. Select the image, object, or tag that the Behavior is assigned to.
The Behavior’s event(s) and action(s) appear in the Behaviors panel.
4. To change to a different triggering event, click the desired Behavior option
arrow and choose another option from the drop-down list.
283662-1 ch22.F 8/2/02 2:58 PM Page 735
Fireworks Seminar

736 Part V ✦ Entering the Web
The list of available events changes, depending upon the associated tag.
5. To cause one action to be triggered before another action with the same event
(for example, two onClick events), click the action and use the Up and Down
buttons in the Behaviors panel to move the Behavior.
6. Double-click the Behavior that you want to modify.
The appropriate dialog box appears, such as the one for the Show Pop-up
Menu Behavior, shown in Figure 22-9.
Figure 22-9: Make any necessary changes through the Dreamweaver-specific user interfaces for each Behavior.
7. Make any desired changes on the invoked dialog box.
8. Click OK when you’re done.
The Set Nav Bar Image Behavior in Fireworks is translated into the following three
separate Behaviors in Dreamweaver, each of which you can individually adjust in
Dreamweaver:
✦ Set Nav Bar Image: Controls the Down and highlighted Down state (typically,
Frames 3 and 4 in a Fireworks rollover).
✦ Swap Image: Controls rollovers for Nav Bars.
✦ Swap Image Restore: Restores rollovers to their Up position when the user’s
mouse cursor leaves the image.
Tip
283662-1 ch22.F 8/2/02 2:58 PM Page 736
Fireworks Seminar

737Chapter 22 ✦ Integrating with Dreamweaver
Fireworks Technique: Creating a Web Photo Album
Online catalogs and other sites often depend on images to help sell their products.
Full-scale product shots can be large and time-consuming to download, so it’s com-
mon for Web designers to display a thumbnail of the images instead. If the viewer
wants to see more detail, a click on the thumbnail loads the full-size image. Although
it’s not difficult to save a scaled-down version of an image in a graphics program and
link the two in a Web layout program, creating page after page of such images is an
overwhelming chore. An excellent example of the Dreamweaver-Fireworks interoper-
ability comes to the rescue: the Create Web Photo Album command, which is
included with Dreamweaver.
As long as you have both Dreamweaver MX and Fireworks MX, you can use the Web
Photo Album command to create a presentation that enables Web users to browse
thumbnail images that they can click to access the full-size version. Although the
Create Web Photo Album command is a Dreamweaver command, it uses Fireworks
to do the image processing, such as scaling thumbnails and converting all full-size
images to a common format.
To create a Web photo album with Dreamweaver and Fireworks, follow these steps:
1. Place all the images that you intend to use into a single folder, anywhere on
your computer.
When run, the Web Photo command asks you to choose a single folder of
images.
2. In Dreamweaver, choose Commands ➪ Create Web Photo Album.
Dreamweaver displays the Web Photo Album dialog box, as shown in
Figure 22-10.
3. Enter a title for your photo album in the Photo Album Title box.
The title will be displayed at the top of the page of thumbnails.
4. If desired, enter a subheading in the Subheading Info box.
This appears directly below the title on the page of thumbnails.
5. If desired, enter a sub-subheading in the Other Info box.
This appears below the Title and Subheading on the page of thumbnails.
6. Click the Source Images Folder Browse button and select a folder containing
the images to include in the photo album.
Image files from the folder will be included in the photo album if they have the
following filename extensions:
• .gif
• .jpg or .jpeg
283662-1 ch22.F 8/2/02 2:58 PM Page 737
Fireworks Seminar

738 Part V ✦ Entering the Web
Figure 22-10: Choose from numerous options when building a Web photo album.
Using JPEG images as source files is never recommended. JPEG compressionmakes files that are suitable for viewing, but not for importing and re-exporting.
• .png
• .tif or .tiff
• .psd
Mac users: Image files that don’t have filename extensions are ignored byFireworks and are not included in the photo album. Add appropriate filenameextensions to any images that don’t have them.
7. Click the Destination Folder Browse button and select or create a folder for all
the exported images and HTML.
8. Select a size for the thumbnail images from the Thumbnail Size option list.
Fireworks scales images proportionally to create thumbnails that fit within
the specified pixel dimensions.
9. Check the Show Filenames checkbox to display the filenames of the original
images below their thumbnails.
10. Enter the number of columns of thumbnails.
11. Select a format for the exported thumbnail images from the Format option list.
12. Select a format for the exported photo album images from the Photo Format
option list.
13. If desired, enter a Scale percentage for the photo album images. A setting of
100% creates full-size images the same size as the original images.
Caution
Caution
283662-1 ch22.F 8/2/02 2:58 PM Page 738
Fireworks Seminar

739Chapter 22 ✦ Integrating with Dreamweaver
The scale setting is used for all the photo album images.
14. If desired, check Create Navigation Page for Each Photo to create an individual
Web page for each image in the photo album.
If you don’t select Create Navigation Page for Each Photo, the thumbnail imagesare linked directly to the full-size images. This is a common way to create a Webphoto album.
15. Click OK when you’re done.
Fireworks launches (if it’s not already running). It creates a thumbnail and a
full-size image for each of the imported image files in your photo album. After
the images are created, Dreamweaver creates the necessary HTML.
16. Dreamweaver displays an Album Complete dialog box. Click OK to end your
photo album creation session.
Open your Web photo album in a browser, or integrate it into your Dreamweaver
Web site.
Making Hybrid CommandsThe scripting capability of Dreamweaver and Fireworks enables the Web artist to
control either application with custom commands. An exciting side effect of the
enhanced control is that Dreamweaver can actually do the Fireworks scripting,
making Fireworks a willing partner in executing Dreamweaver commands.
Here’s how Dreamweaver is typically used to communicate with Fireworks:
1. The user runs a command in Dreamweaver.
2. Dreamweaver opens a dialog box, as with other extensions.
3. After the user has filled in the dialog box and clicked OK, the command
executes.
4. All user-supplied parameters are read and used to create a JavaScript scriptlet
or function, which serves as instructions for Fireworks.
5. If used, the scriptlet is stored on the disk.
6. Fireworks launches and is instructed to run the Dreamweaver-created script-
let or function.
7. Fireworks processes the scriptlet or function, while Dreamweaver tracks its
progress via a cookie on the user’s machine.
Note
Caution
283662-1 ch22.F 8/2/02 2:58 PM Page 739
Fireworks Seminar

740 Part V ✦ Entering the Web
8. When Fireworks is finished, a positive result is returned.
The Fireworks application programming interface (API) includes several error
codes if problems, such as a full disk, are encountered.
9. While tracking Fireworks’ progress, Dreamweaver sees the positive result and
integrates the graphics by rewriting the DOM (Document Object Model) of the
current page.
10. The dialog box is closed and the current page refreshed to correctly present
the finished product.
To successfully control Fireworks, you need a complete understanding of the
Fireworks DOM and its extension capabilities. Macromedia provides documentation
called Extending Fireworks, which is available on your Fireworks MX CD-ROM, or
from the Fireworks Support Center at www.macromedia.com/support/fireworks.
The Fireworks API is detailed in Chapter 26. Also, See Chapter 19 for details on theHistory panel, which allows you to create commands — or at least get themstarted — without coding.
On the Dreamweaver side of the API fence, you’ll find seven useful methods in the
FWLaunch JSExtension, detailed in Table 22-1.
Table 22-1FWLaunch Methods
Method Returns Use
BringDWToFront() nothing Brings the Dreamweaverwindow in front of any other running application.
BringFWToFront() nothing Brings the Fireworkswindow in front of any other running application.
ExecJsInFireworks Result from the running Executes the supplied (javascriptOrFileURL) of the scriptlet in Fireworks. JavaScript function or
If the operation fails, scriptlet.returns an error code.*
GetJsResponse Result from the running Determines whether (progressTrackerCookie) of the scriptlet in Fireworks: Fireworks has finished
provides information as to unning JavaScript passed whether it completed to it, whether it ran successfully, returns null successfully, or whether it if it is still running, or returned an error.returns an error code.*
Cross-Reference
283662-1 ch22.F 8/2/02 2:58 PM Page 740
Fireworks Seminar

741Chapter 22 ✦ Integrating with Dreamweaver
Method Returns Use
MayLaunchFireworks() Boolean Determines whetherFireworks may be launched.
OptimizeInFireworks Result from the running Performs an Optimize in (fileURL, docURL, of the scriptlet in Fireworks. Fireworks operation, {targetWidth}, of the scriptlet in Fireworks. Fireworks operation, {targetHeight}) returns an error code.* Export Preview dialog box.
ValidateFireworks Boolean Determines whether the (versionNumber) user has a specific version
of Fireworks
*Error codes: 1) The argument proves invalid; 2) File I/O error; 3) Improper version of Dreamweaver; 4)Improper version of Fireworks; 5) User-cancelled operation
Don’t be afraid to experiment with Dreamweaver-Fireworks integration and with
extensibility in general. Exciting possibilities await.
SummaryFireworks and Dreamweaver integration is definitely a case of the whole being
greater than the individual parts. Taken on their own merits, each program is a
powerful Web tool, but together, they become a total Web graphics solution. As you
begin to work with Fireworks and Dreamweaver together, consider these points:
✦ Dreamweaver MX gains features when Fireworks MX is installed.
✦ With the Optimize Image in Fireworks command, you don’t even have to leave
Dreamweaver to rescale, crop, or store your graphics in another format.
✦ After designating Fireworks as your graphics editor in Dreamweaver, selected
images can be edited and updated automatically.
✦ Fireworks outputs Dreamweaver-compliant code, making modifications within
Dreamweaver seamless.
✦ Fireworks images exported as a Dreamweaver Library item can be inserted in
a Web page without additional cutting and pasting.
✦ You can retain positioning set in Fireworks by exporting Fireworks layers as
CSS layers.
✦ Hybrid Dreamweaver-Fireworks commands offer exciting possibilities for
workflow automation.
In the next chapter, you find out about Fireworks’ animation capabilities.
✦ ✦ ✦
283662-1 ch22.F 8/2/02 2:58 PM Page 741
Fireworks Seminar

283662-1 ch22.F 8/2/02 2:58 PM Page 742
Fireworks Seminar

Animation
A nimations have become important to the Web. Not only
do they offer an alternative to static displays, but GIF
animations are used extensively in the creation of banner ads.
Animation in Fireworks MX is surprisingly full-featured and
easy-to-use. In Part VI, we walk step by step through the cre-
ation of a banner ad and discover tweening, onion skinning,
and other basic animation techniques.
✦ ✦ ✦ ✦
In This Part
Chapter 23Applying AnimationTechniques
Chapter 24Animating Banner Ads
✦ ✦ ✦ ✦
P A R T
VIVI
293662-1 Part06.F 8/2/02 2:58 PM Page 743
Fireworks Seminar

293662-1 Part06.F 8/2/02 2:58 PM Page 744
Fireworks Seminar

ApplyingAnimationTechniques
A nimation has become a prominent feature of the Web,
and very few Web sites get by without at least a little of
it. Animated GIF banner ads have proliferated from common
to ubiquitous. Animated logos and buttons are an easy way to
add spice to a site. Short, animated cartoons are increasingly
popular as Web bandwidth increases.
This chapter looks briefly at some animation basics and then
focuses on the Fireworks features that enable you to create
animations. You’ll work with Fireworks frames and animated
GIF export features, such as timing and looping. Next, specific
issues are discussed that you might confront when making
animated banner ads, and then you go through the process
from start to finish.
You can find information on importing animations andimporting multiple files as animations in Chapter 14.
Understanding Web AnimationAnimation is a trick. Show a rapid succession of similar
images with slight changes in an element’s location or
properties, and you think that you see something moving.
This movement can be very complex or very simple. The 24
frames per second of a motion picture aren’t even required; in
as little as three frames, an object can actually appear to be
moving (loop two frames and an object just appears to flash).
Cross-Reference
2323C H A P T E R
✦ ✦ ✦ ✦
In This Chapter
Understanding Webanimation
Managing frames
Animating objects
Using OnionSkinning
Using the VCRcontrols
Exporting youranimated GIF
Tweening graphicsymbols
Working withanimation symbols
✦ ✦ ✦ ✦
303662-1 ch23.F 8/2/02 2:58 PM Page 745
Fireworks Seminar

746 Part VI ✦ Animation
Because Fireworks creates animated GIF images, this chapter focuses on that for-
mat. However, many of the ideas that go into creating good animated GIF images
also apply when creating images in other Web animation formats.
Getting a handle on bandwidthRemember first and foremost that bandwidth is always an issue. Then, remember
again that bandwidth is always an issue. I’ll end up harping on that again and again,
because bandwidth affects everything. You must analyze each and every bold,
creative move for its eventual effect on the overall weight of the resulting animated
GIF file (the total file size). Throughout the entire process of creating an animation
for display on the Web, you need to balance variables carefully, such as the number
of colors used, the number of frames, the timing of those frames, and how much
area of your image is actually animated. If you want more colors, you may have to
take out a few frames and settle for a less fluid animation. If you’re animating
complex shapes that don’t compress well, you may have to get by with fewer colors.
The dial-up connection is the great equalizer. The Web is slow and generally static,
and almost everybody knows it. If you can give your audience a quick, dynamic
presentation, you’ll score two times. Keep in mind the nature of GIF compression
as you create your designs. Big blocks of cartoonish color and horizontal stripes
compress much better than photographic images, vertical stripes, or gradients
and dithers.
Making a statementSo, maybe you’re not going to win an Oscar with your animation; that doesn’t mean
you shouldn’t give it a reason for existing. Every part of your animation needs to
be focused and necessary, because each little added movement also purchases a
corresponding amount of bandwidth. A short, tight, and concise animation is much
more popular with your audience. This applies whether you’re creating a complex
cartoon with an intricate story line, a flashy, abstract design, or even an animated
logo. If you decide before you start what you want to accomplish creatively, you
increase your chances of ending up with a tight, presentable result.
Animated GIF images are good at some things, but not so good at others. Consider
those limitations carefully, and focus on creating a good animated GIF — not just a
good animation that happens to be forced into the framework of an animated GIF.
Logos, buttons, and simple frame-by-frame animations work best. You might find
that thinking of an animated GIF image as a slideshow rather than a movie is helpful.
Typically, you work with fewer frames than a movie uses, and with slow, simple,
animated elements. I find that thinking of animated GIFs as little PowerPoint-style
presentations reminds me of the limitations of the format. You can make a little
303662-1 ch23.F 8/2/02 2:58 PM Page 746
Fireworks Seminar

747Chapter 23 ✦ Applying Animation Techniques
movement go a long way. You can show that something’s moving either by smoothly
animating it frame by frame across the entire width of the image, or you can place it
once on the left side of the canvas, followed by a blurred version in the center, and
then display it again at the right side.
Don’t forget everything that you learned by watching Saturday morning cartoonsor reading comic books. Techniques such as word balloons and lines that illustratemovement or action in still comics can help you get your message across withoutadding significantly to the frame count (and the file size). Instead of moving anelement off the canvas in ten smooth frames, replace it with a puff of smoke andsome lines that point to which way the element went. Study animations for suchtricks and make lean, mean animations that really make an impression and getyour message across.
As usual on the Web, you’re at the mercy of your users’ browsers — and you don’t
even know which browsers they’ll be using. However, generally, animated GIF
images play back a little faster in Internet Explorer than in Navigator (and, naturally,
play back faster on faster computers). Don’t try to be too precise, attempting to
measure the time between frames and worrying about it. Instead, embrace a little of
the Web’s anarchy and just try to find a good middle ground. Trust the timing
settings in Fireworks and hope for the best.
Examining why to animate a GIFFireworks is the perfect place to create animated GIF images. Creating the illusion
of animation means changing the objects on the canvas over time, and an always-
editable object in Fireworks is easy to move, scale, or modify with effects. And
when your animation is complete, Fireworks’ unmatched image optimization
enables you to create the lightest-weight animated GIF possible. (There’s that
bandwidth issue again.)
Although you usually create GIF animations directly in Fireworks, you also can exportan animation as a series of files by choosing File ➪ Export and then selecting eitherFrames to Files or Layers to Files from the Save As option list. These files—which canbe other image formats, such as PNG or JPEG— can then be modified in anotherapplication, or used in another animation format, such as an SMIL presentation inRealPlayer, or an interactive Dynamic HTML (DHTML) slideshow. If you’re a Flashfan, you can easily export an animated GIF slice as a Flash SWF file by changing theSave As option on the Export dialog box from HTML and Images to MacromediaFlash SWF.
The animated GIF has its share of limitations and gets its share of disrespect,
especially when sized up feature for feature against some of the more “serious”
animation formats used on the Web. Table 23-1 makes just such a comparison.
Tip
Tip
303662-1 ch23.F 8/2/02 2:58 PM Page 747
Fireworks Seminar

748 Part VI ✦ Animation
Table 23-1Comparing Web Animation Formats
Format Sound Interactivity Streaming Transparency Colors
Animated GIF No No No Yes 256
Dynamic HTML No Yes Yes Yes Millions
Java Yes Yes Yes No Millions
Flash Yes Yes Yes Sometimes Millions
Shockwave Yes Yes Yes No Millions
QuickTime Yes Yes Yes No Millions
RealPlayer Yes Yes Yes No Millions
Transparency refers to a transparent background when the animation is placed ina browser, not support within the editing environment or the animation formatitself.
Based on this table, the animated GIF seems as if it’s a fairly poor choice. Other
formats feature high levels of interactivity and automatically stream or simulate
streaming with multiple component files. Some have video and many have sound.
What’s more, Flash gets a lot more done in a much smaller file size.
So, why is the animated GIF used so often? Why haven’t designers dropped it in
favor of one or more of these other, seemingly superior methods? Find the answers
to these questions and more in Table 23-2, which details browser support for each
format.
Table 23-2Browser Support for Web Animation Formats
Format Navigator 2/3 Navigator 4 and 6 Most Other Browsersand IE 3 and IE 4, 5 and 6
Animated GIF Yes Yes Yes
Dynamic HTML No Yes No
Java Yes; user can disable Yes; user can disable No
Flash With plug-in With plug-in No
Shockwave With plug-in With plug-in No
QuickTime With plug-in With plug-in No
RealPlayer With plug-in With plug-in No
Note
303662-1 ch23.F 8/2/02 2:58 PM Page 748
Fireworks Seminar

749Chapter 23 ✦ Applying Animation Techniques
When you consider who can actually view your animation, the animated GIF doesn’t
look so bad after all. Other formats may be flashier, but the animated GIF is “old
reliable.” No matter which platform or browser, the animated GIF is always available.
Using the Fireworks Animation ToolkitAnimation in Fireworks focuses on these major tools:
✦ Frames panel: The heart of Fireworks’ animation features, where you
manipulate individual frames — such as a director editing the frames of a
film — adding, removing, reordering, and specifying timing for individual
frames.
The Export Preview dialog box also duplicates some of the Frames panel controls,such as animation timing.
✦ Layers panel: Where you manage each frame’s layers. Organize your animation
by keeping objects on the same layer from frame to frame, or share a layer
across every frame, so that backgrounds or static objects can be created once
for the entire animation.
✦ VCR-style controls: Where you flip through frames, or play your entire
animation right in the document window.
✦ Graphic symbols: Fireworks can create intermediate steps between two
instances of the same symbol, quickly generating a complete animation.
✦ Animation symbols: A multi-frame symbol that is a self-contained animation.
Managing framesWhat separates an animation from a regular Fireworks document is that the
animation has multiple frames. The relationship between layers and frames can
be hard to understand when you first start animating in Fireworks. However,
understanding how they work — and work together — is essential.
Frames resemble the frames of a traditional filmstrip (see Figure 23-1) that you
might run through a movie projector. When you play your animation, only one
frame is visible at a time. Frame 1 is shown first, and then Frame 2, Frame 3, and so
on. When you add a frame to your document, you’re extending the length of the
filmstrip and making a longer movie. When you change the order of frames in the
Frames panel, it’s as if you’re cutting a frame out of your filmstrip and splicing it
back in at another point on the strip. If you move Frame 5 to the beginning of your
movie, before Frame 1, all the frames are renumbered, so that what used to be
Frame 5 is now Frame 1, what used to be Frame 1 becomes Frame 2, and so on.
Tip
303662-1 ch23.F 8/2/02 2:58 PM Page 749
Fireworks Seminar

750 Part VI ✦ Animation
Figure 23-1: Think of frames as the frames of a filmstrip, and layers as a stack of filmstrips stuck together.
The layers in an animation are similar to separate filmstrips stacked together. When
you play your animation, all the layers of Frame 1 are shown together, and then all
the layers of Frame 2 are shown, and then Frame 3, and so on. Just as how you use
layers in a static Fireworks document, layers provide a way to organize the order of
objects and keep dissimilar objects separate from each other, for easier editing.
When you add a layer to your document, you add a whole new filmstrip to the
stack. Changing the order of layers in the Layers panel is analogous to changing the
order of that filmstrip in the stack of filmstrips.
When you add a frame to your movie, it automatically has the same layers as all theother frames. To continue the filmstrip metaphor, adding a frame to one filmstrip inthe stack adds it to all the filmstrips. When you add a layer to your movie, it isadded to every frame. Adding a layer adds a whole new filmstrip the same lengthas the others.
One very useful interaction between layers and frames is the ability to share a layer.
When a layer is shared, its content is the same on every frame, and no matter
which frame you are viewing when you edit the objects in that layer, the changes
appear on every frame. This is handy for static elements, such as backgrounds.
You take a closer look at this later in the chapter.
You do the bulk of your animation work in the Frames panel (see Figure 23-2), so
you need to have it open all the time while creating an animation. From there, you
can add, delete, reorder, or duplicate frames. You can view and edit a single frame,
Note
303662-1 ch23.F 8/2/02 2:58 PM Page 750
Fireworks Seminar

751Chapter 23 ✦ Applying Animation Techniques
a group of frames, or all of your frames simultaneously. You can copy or move
objects from frame to frame. You can specify the timing each frame has in your
animated GIF. As with the Layers panel, when a Frame contains a selection item,
the selection indicator appears next to its name in the Frames panel.
Figure 23-2: Manage frames with the Frames panel and its handy Options menu.
When working on animation, you might want to dock your Layers panel with yourFrames panel, if it isn’t already, so that you can easily move between the panels. Ifyou’re not short on screen real estate, you could even keep them side by side.Location doesn’t matter, as long as they’re both close at hand.
Adding framesWhen you start creating an animation in Fireworks, your document has exactly one
frame. Obviously, this has to change before you can simulate any kind of movement.
At first, you might make a rough guess at how many frames your animation should
contain, and then add that number of frames to your document. Later, you can add
or remove frames as the need arises. Another approach is to start with just two
frames: the first and the last. After you establish where your animation starts and
finishes, filling in the intervening frames is often easier.
To add a frame to the end of the Frame list, click the Add Frames button (blank
sheet of paper with a plus sign on it) at the bottom of the Frames panel, or choose
Insert ➪ Frame.
To add one or more frames at a specific point in the Frame list, follow these steps:
1. Choose Add Frames from the Frames panel’s Options menu.
Fireworks displays the Add Frames dialog box (see Figure 23-3).
Tip
Selection iconFrame names Frame timing
OnionSkinningmenubutton
Frameslist
Delete Framesbutton
New/Duplicate Frames button
Distribute to Framesbutton
303662-1 ch23.F 8/2/02 2:58 PM Page 751
Fireworks Seminar

752 Part VI ✦ Animation
Figure 23-3: The Add Frames dialog box gives you careful control over how many frames you add and where you add them.
2. Enter the number of frames to add in the Number box, or use the slider to add
up to ten frames.
3. Choose where to insert the new frames. The options are At the beginning,
Before current frame, After current frame, and At the end. Click OK when
you’re done.
The new frames are created and added to the Frame list at the point you specified.
Naming framesBy default, Fireworks names each frame with a very generic “Frame 1” or “Frame 2.”
When you’re animating, moving objects back and forth from frame to frame, these
generic names can be very confusing. To name a frame with a descriptive name,
double-click its name in the Frames panel. Fireworks displays a small raised dialog
box that enables you to type any name you please, as shown in Figure 23-4. After
you’ve entered a new name, dismiss the raised dialog box by clicking anywhere
outside it, or by pressing Enter (Return).
Figure 23-4: Name your frames just as you please,by double-clicking them in the Frames panel.
303662-1 ch23.F 8/2/02 2:58 PM Page 752
Fireworks Seminar

753Chapter 23 ✦ Applying Animation Techniques
Deleting a frameThe most important thing to remember when you delete a frame is that you also
delete all the objects that it contains, except for those that are on a shared layer.
Take care to identify and delete the correct frame.
If you delete a frame accidentally and want to restore it to the Frame list, chooseeither Edit ➪ Undo, or the keyboard shortcut, Ctrl+Z (Command+Z).
To delete a frame, select it on the Frame list and do one of the following:
✦ Click the Delete Frames button (a Trash icon) at the bottom of the Frames
panel.
✦ Drag the frame to the Delete Frames button at the bottom of the Frames
panel.
✦ Choose Delete Frame from the Frames panel’s Options menu.
Reordering framesAs you continue to work on your animation, you might want to change the order of
your frames, by moving them earlier or later in the animation.
To reorder a frame, click and drag it up or down the Frame list in the Frames panel.
From working with layers in the Layers panel, you may be accustomed to seeingthe layer retain its name as you change its stacking order by dragging it up or downthe layers list. When you reorder a frame, though, all frames are renumbered toreflect their new positions. The first frame in your animation is always Frame 1.
As with Layers, you may wish to give your Frames custom names. If you customname your frames and move Frame 9, putting it between Frame 2 and Frame 3, itwill still be called Frame 9 and will appear to be out of order.
Duplicating framesOne way to save a significant amount of time and effort is to copy a sequence of
frames that you’ve already created and then modify the copies further. If you have
created an animation sequence of a sunrise, you can copy those frames and then
reverse their order to get an automatic sunset. This not only saves you the time
and effort of creating the sunset animation from scratch, but also has the added
advantage that the sun sets in the same place from which it rose.
To duplicate a single frame, drag it from the Frame list onto the Add Frames button
at the bottom of the Frames panel. Fireworks inserts the copy into the Frame list,
right after the original.
Tip
Note
Tip
303662-1 ch23.F 8/2/02 2:58 PM Page 753
Fireworks Seminar

754 Part VI ✦ Animation
To duplicate one or more frames and place the copies in a specific place in the
Frame list, follow these steps:
1. Choose Duplicate Frame from the Frames panel’s Options menu.
Fireworks displays the Duplicate Frames dialog box.
The Duplicate Frames dialog box is very similar to the Add Frames dialog box,shown previously in Figure 23-3.
2. Enter the number of frames to duplicate in the Number box, or use the slider
to duplicate up to ten frames.
3. Choose where to insert the copies. The options are At the beginning, Before
current frame, After current frame, and At the end. Click OK when you’re done.
The frames are duplicated and the copies are added to the Frame list at the point
you specified.
Animating objectsA significant part of creating animation is managing how objects in your document
change over time. If you are creating a simple, animated sunrise, the sun starts out
at a low point on the canvas and, over time (through later frames), moves to a
higher point on the canvas. At the same time, a cloud might move from left to right,
while the ground and sky stay the same.
You certainly don’t want to draw each of these objects numerous times. Aside from
being a lot of extra effort, you would probably end up with objects that are not
exactly the same dimensions or properties from frame to frame. If the sun were
to change size slightly in each frame, it would detract from the illusion that the
animation contains just one moving sun.
Instead, when you create an animation, draw objects once and then copy or
distribute them from frame to frame, where the copies can be moved or modified
slightly to give the appearance of the same object moving or changing over time.
Keeping similar objects on their own layers makes working with just those objects
easier as you copy objects to frames. In the animated sunrise example, you might
keep the sun on its own layer, the clouds on another layer, and the unchanging
background objects on another.
Copying objects to framesMost of the time, you add objects to other frames by copying them. To copy an
object or objects to another frame, follow these steps:
Note
303662-1 ch23.F 8/2/02 2:58 PM Page 754
Fireworks Seminar

755Chapter 23 ✦ Applying Animation Techniques
1. Select the object(s).
2. Choose Copy to Frames from the Frames panel’s Options menu.
Fireworks displays the Copy to Frames dialog box (see Figure 23-5).
3. Choose where to copy the selection. The available options are All frames,
Previous frame, Next frame, or Range, which is used to specify a specific
range of frames. Click OK when you’re done.
Figure 23-5: Use the Copy to Frames dialog box to copy objects to all of your frames, or just a specific range of frames.
Distributing objects to framesWhen you choose to distribute a group of objects to frames, the objects are
distributed after the current frame, according to their stacking order. The bottom
object in the group stays on the current frame, the next one up goes to the next
frame, the next one above that goes to the frame after that, and so forth. If you start
with a blank canvas and create three objects, such as a square, circle, and star, the
star will be on top, because it was created last. If you select those objects and
distribute them to frames, the star — which was created last — will now be in the
last frame of your animation. New frames are added to contain all the objects,
if necessary. For example, if you distribute ten objects to five frames, five more
frames are added to contain all the objects.
You can quickly turn a static document into an animation in this way. Objects that
were created first on the canvas end up first in the animation.
To distribute a selection of objects across multiple frames, select the objects and
then do one of the following:
303662-1 ch23.F 8/2/02 2:58 PM Page 755
Fireworks Seminar

756 Part VI ✦ Animation
✦ Click the Distribute to Frames button (a filmstrip icon) at the bottom of the
Frames panel.
✦ Choose Distribute to Frames from the Frames panel’s Options menu.
✦ Drag the blue selection knob on the object’s bounding box to the Distribute to
Frames button.
Managing static objectsFireworks simplifies management of the objects in your animation that aren’t
animated because any layer can be shared across every frame of your animation.
For example, if you create a background in Frame 1, you can share the layer that
contains the background, and that background will appear in every frame. After
the layer is shared, you can modify the objects it contains in any frame, and the
modifications show up everywhere. Any static element in your animation needs to
be created or edited only once.
To share a layer across all the frames of your animation, follow these steps:
1. In the Layers panel, double-click the layer that you want to share.
Fireworks displays the Layer Options dialog box.
2. Check Share Across Frames, and then press Enter (return) or click outside of
the dialog box.
Fireworks warns you that any objects on this layer in other frames will be
deleted. Click OK to delete those objects and share the layer.
When a layer is shared across frames, you see a filmstrip icon next to that layer inthe Layers panel. You can see this icon next to the Web Layer as it is always shared.
To stop sharing a layer across all frames of your animation, follow these steps:
1. In the Layers panel, double-click the layer that you want to stop sharing.
Fireworks displays the Layer Options dialog box.
2. Uncheck Share Across Frames, and then press Enter (return) or click outside
of the dialog box.
Fireworks asks whether you want to leave the contents of the layer in all
frames, or just in the current frame. Choose Current to leave the contents of
the layer just in the current frame. Choose All to leave the contents of the
layer in all frames.
Another way to modify whether or not a layer is shared is to select the layer in theLayers panel and check or uncheck Share Layer on the Layers panel’s Options menu.
Note
Tip
303662-1 ch23.F 8/2/02 2:58 PM Page 756
Fireworks Seminar

757Chapter 23 ✦ Applying Animation Techniques
Using the VCR controlsAs you build your animations in Fireworks, you’ll no doubt want to play them
to get a feel for the motion between frames. Fireworks offers VCR-style controls,
available along the bottom of each document window, so that you can preview
your animations (see Figure 23-6).
Figure 23-6: The VCR controls on the Fireworks document window enable you to control your multiframe Fireworks document like a movie.
When you click the Play button, Fireworks plays your animation, using the timing
that is specified in the Frames panel or on the Animation tab of the Export Preview
dialog box. If you don’t set the timing yourself, your animation plays at the default
of 7⁄100 of a second between frames. Frame delay is discussed in the next section.
While the animation is playing, the Play button turns into a Stop button. Fireworks
also displays the current frame, and has buttons available to jump quickly to the
previous or next frame, or to the first or last frame of your animation.
You can also stop a running animation by clicking your mouse inside the documentwindow.
When you play your animation in the document window, it always loops, whether
you have looping enabled in the Frames panel or not. The setting in the Frames
panel controls looping only in the animated GIF file your animation eventually
becomes.
Setting frame delay timingThe first thing to remember about controlling animation speed is that the settings
you specify are ultimately approximate. Although Fireworks is perfectly happy to
Tip
VCR-stylecontrols
Next Frame button
Previous Frame button
CurrentFramedisplay
Play/Stopbutton
(playing)
Last Frame button
Play/Stop button (stopped)
Frame button
303662-1 ch23.F 8/2/02 2:58 PM Page 757
Fireworks Seminar

758 Part VI ✦ Animation
follow your directions, after your animation becomes an animated GIF, timing is in
the virtual hands of the playback software, usually a browser. Internet Explorer
tends to play animations faster than Navigator, and both browsers play animated
GIFs faster on faster computers.
As if approximated GIF timing isn’t enough, an animation that is currently beingdownloaded staggers along with no attention to timing, because each frame isdisplayed as it arrives. A couple of tricks for getting around the staggering playbackof a downloading animated GIF are detailed later in this chapter, under “WebDesign with Animated GIF Images.”
The default frame delay setting for new frames is 7, specified in hundredths of a
second. For example, a setting of 25 is a quarter-second, 50 is a half-second, and 200
is two seconds.
To change a frame’s delay setting, follow these steps:
1. If the Frames panel is not already open, choose Window ➪ Frames, or use the
keyboard shortcut, Shift+F2to open it.
2. Double-click the frame timing for the frame you want to modify in the frame
list. Fireworks displays a pop-up edit window with the frame’s delay settings
(see Figure 23-7).
Figure 23-7: Double-click the frame timing for aparticular frame in the Frames panel to view a pop-up edit window with the frame’s delay settings.
3. Type a new setting in the Frame Delay field.
4. Uncheck Include when Exporting if you want this frame delay setting to affect
the way the animation is viewed in Fireworks, without being included in the
animated GIF you export.
5. Click anywhere outside the pop-up edit window, or press Enter (Return) to
dismiss it.
Alternatively, if you’re using the Export Preview dialog box to export your animated
GIF, you can alter frame delay by choosing the frame from the list on the Animation
tab and changing the value in the Frame Delay field.
Tip
303662-1 ch23.F 8/2/02 2:58 PM Page 758
Fireworks Seminar

759Chapter 23 ✦ Applying Animation Techniques
Using Onion SkinningMost of the time, your document window displays the contents of a single frame. By
flipping back and forth from frame to frame, you can get a feel for how the animation
is flowing, but this is just a rough guide. To get a more precise view of the changes
from one frame to the next, turn on Onion Skinning to view, and even edit, multiple
frames simultaneously.
Onion skinning is the traditional animation technique of drawing on translucenttracing paper — such as an onion skin — to view a series of drawings simultaneously.
The Onion Skinning button in the lower-left corner of the Frames panel enables you
to access the Onion Skinning menu (see Figure 23-8) and select which frames you
want to view. You can choose to view any range of frames within your animation,
or all of them.
Figure 23-8: The Onion Skinning menu on the Frames panel provides various ways to select which frames you want to view, and even edit, simultaneously.
When Onion Skinning is turned on, objects on the current frame are displayed
normally, while objects on other frames are shown slightly dimmed. When playing
an animation by using the Frame controls at the bottom of the document window,
Onion Skinning is switched off temporarily.
Setting the range of frames to onion skinYou can turn on Onion Skinning and choose a range of frames to display in any one
of three ways:
Onion Skinning range selector
Onion Skinning menu
Note
303662-1 ch23.F 8/2/02 2:58 PM Page 759
Fireworks Seminar

760 Part VI ✦ Animation
✦ Specify a range of frames by using the Onion Skinning range selector, located in
the Frame list’s left margin in the Frames panel (refer to Figure 23-2). This is the
quickest way to specify a range of frames, especially for shorter animations.
To expand the range to include earlier frames, click inside an empty box above
the selector. To expand the range to include later frames, click inside an empty
box below the selector. To contract the range, click inside the selector itself. To
turn off Onion Skinning, click the bottom end of the selector.
✦ Choose predefined ranges from the Onion Skinning menu on the Frames
panel. To show the current frame and the next frame, choose Show Next
Frame. To show the previous frame, the current frame, and the next frame,
choose Before and After. To show all frames, choose Show All.
✦ Choose Custom from the Onion Skinning menu to display the Onion Skinning
dialog box (see Figure 23-9), which gives you precise control over the frames
that you view, all the way down to the opacity of other frames. Fill in the
number of frames Before Current Frame and After Current Frame that you
want to view, and specify an Opacity setting for those frames. A setting of 0
makes frame contents invisible, whereas a setting of 100 makes objects on
other frames appear as though they’re on the current frame.
Figure 23-9: Select a specific range of frames to onion skin, and control theopacity of the onion-skinned frames with the Onion Skinning dialog box.
Exploring Multi-Frame EditingWhen Multi-Frame Editing is enabled, you can select and edit objects in the document
window that are on different frames. Whether an object is on the current frame and
displayed regularly or on another frame and dimmed makes no difference. You can
easily select all versions of a particular object across multiple frames and move or
scale them as one.
To enable multi-frame editing, check Multi-Frame Editing on the Onion Skinning
dialog box or the Onion Skinning menu. To switch off multi-frame editing, uncheck
Multi-Frame Editing. on the Onion Skinning dialog box.
303662-1 ch23.F 8/2/02 2:58 PM Page 760
Fireworks Seminar

761Chapter 23 ✦ Applying Animation Techniques
Examining export settings and optionsThe animated GIF format contains support for frame delay timing, looping, and
various frame disposal methods. These options are built right into the Frame panel
itself, or the Animation tab of the Export Preview dialog box.
The first export setting that you must specify is the animated GIF format itself.
Choose Window ➪ Optimize to view the Optimize panel, if it isn’t already visible,
and choose Animated GIF from the format option list, as shown in Figure 23-10.
Figure 23-10: Choose Animated GIF as your exportformat in the Optimize panel.
As usual, the last step before publishing Web media is to put that media on a “diet.”
All the same rules for exporting a regular, static GIF also apply to animated GIFs.
Limiting the number of colors reduces file size, and specifying a transparent
background makes for easier compositing with the browser’s background when
your animated GIF becomes part of a Web page.
For more on specifying GIF export options, such as number of colors andtransparency, see Chapter 15.
Using frame disposalIn addition to regular GIF options, the animated GIF format has a special trick up its
sleeve for reducing file size: frame disposal. For the most part, you can use Fireworks’
default frame disposal settings to produce very lightweight animated GIF images.
Learning to tweak the Export settings might save you some valuable kilobytes here
and there, though, depending on the type of animation you’ve created.
The frame disposal options are only available from the Frame Disposal menu on the
Animation tab of the Export Preview dialog box. Access the Export Preview dialog
box by choosing File ➪ Export Preview. Choose from one of these options:
✦ Unspecified: Fireworks automatically selects the disposal method for each
frame. This option is the default and generally creates the lightest animated
GIF images.
Cross-Reference
303662-1 ch23.F 8/2/02 2:58 PM Page 761
Fireworks Seminar

762 Part VI ✦ Animation
✦ None: Overlays each frame on top of the previous frame. The first frame is
shown, and then the next frame is added on top of it, and the following frame
is added on top of that, and so forth. This option is suitable for adding a small
object to a larger background, if the object doesn’t move throughout the
animation. For example, this technique works well with an animation that
features parts of a logo that steadily appear until the animation is complete.
✦ Restore to Background: Shows the contents of each new frame over the
background color. For example, to move an object in a transparent
animated GIF.
✦ Restore to Previous: Shows the contents of each new frame over the contents
of the previous frame; for example, to move an object across a background
image.
In addition to the Frame Disposal menu, two related options greatly affect the
export file size:
✦ Auto Crop: Causes Fireworks to compare each frame of the animation with
the previous frame, and then crop to the area that changes. This reduces file
sizes by saving information in each animated GIF only once, and avoids a
situation in which, for example, a patch of blue in a certain position is saved
repeatedly in each frame.
If you are exporting your animated GIF for editing in another application, turningoff Auto Crop is recommended. Some applications don’t handle this type ofoptimization very well, and you may end up with artifacts. Macromedia’s Director 7is one such application.
✦ Auto Difference: Converts unchanged pixels within the Auto Crop area to
transparent, which sometimes reduces file size further.
Auto Crop and Auto Difference can be checked or unchecked on the Frames panel’s
Options menu, or from the Animation tab of the Export Preview dialog box.
LoopingLooping is fairly straightforward. An animated GIF can loop any number of times,
or it can be set to loop “forever,” which means it never stops. If the last frame of
your animation is a final resting point that looks good all on its own, setting your
animation to loop a finite number of times is a good option.
If you’re creating an animated rollover button, set looping to Forever for best
results. Roll over to an animated GIF that plays once, and you may find that it
doesn’t play at all, or you may catch it in mid-play. Different browsers treat
preloaded animated GIF images in different ways.
To change the looping setting for your animated GIF, do one of the following:
Tip
303662-1 ch23.F 8/2/02 2:58 PM Page 762
Fireworks Seminar

763Chapter 23 ✦ Applying Animation Techniques
✦ Choose No Looping, a specific number, or Forever from the Looping menu in
the Frames panel (shown in Figure 23-11).
Figure 23-11: Choose your looping option from theFrames panel’s Looping menu.
✦ Select the Play Once button or the Loop button from the Animation tab of the
Export Preview dialog box, while exporting your animation. If you choose the
Loop button, choose Forever, or a number from the Number of Loops option
list, or type your own number directly into the box.
Exporting with the Export Preview dialog boxAlthough you can specify most of the options for your exported animated GIF
within the Optimize and Frames panel, the Export Preview dialog box centralizes
animation options and also provides a more realistic preview than Fireworks
provides in the document window.
To export your animation with the Export Preview dialog box, follow these steps:
1. Choose File ➪ Export Preview.
Fireworks displays the Export Preview dialog box, as shown in Figure 23-12.
2. On the Options tab, choose Animated GIF from the format option list.
3. On the Options and File tabs, specify settings, such as Bit Depth and
Transparency, just as you would for a regular, static GIF image.
4. On the Animation tab, choose each frame from the list, in turn, and enter a
number (in hundredths of a second) in the Frame Delay field. Set the Frame
Delay to 0 to make frames display as quickly as possible. Preview the results
of your timing settings by using the VCR controls, located below the Preview
window in the bottom-right area of the Export Preview dialog box.
303662-1 ch23.F 8/2/02 2:58 PM Page 763
Fireworks Seminar

764 Part VI ✦ Animation
Figure 23-12: The Export Preview dialog box’s Animation tab centralizesanimation export settings.
For more about optimizing GIF Export settings, see Chapter 15.
5. If necessary, click the Frame View/Hide buttons (the eye icons) at the left of
each frame on the list to show or hide a frame. If a frame is hidden, it isn’t
exported, and thus, isn’t shown when the animation is played in Fireworks.
The Frame Delay settings are saved with your file after you export. Fireworkscontinues to use these settings when you play your animation in the documentwindow using the VCR controls.
6. Specify a method for frame disposal by clicking the Frame Disposal menu
button (the Trash icon next to the Frame Delay field) and choosing an option.
7. Choose whether or not your animation loops by clicking either the Play Once
or the Loop button. If you click the Loop button, specify the number of times
to loop in the Number of Loops option list. You can either choose a number
from the list, type another number, or choose Forever to loop continuously.
Click the Next button when you’re done.
Fireworks displays the Export dialog box.
Note
Cross-Reference
Frame Delay field
FrameDisposal
menubutton
Animation tab
FrameView/Hide
buttons
VCR controlsNumber of Loops options listLoop button
PlayOnce
button
303662-1 ch23.F 8/2/02 2:58 PM Page 764
Fireworks Seminar

765Chapter 23 ✦ Applying Animation Techniques
8. Choose the target folder and filename for your animated GIF, and then click Save.
Your animation is exported as an animated GIF image.
Examining Web Design with Animated GIFImages
One of the nicest things about animated GIF images is that you can place them in a
Web page just as easily as you can place regular GIF images. This section describes
some ways you can incorporate animated GIF images into your Web pages to create
a complete presentation.
Animating background imagesVersion 4 and up browsers can display an animated GIF as a background image.
A small-animated GIF is tiled across the whole page, creating a very dynamic
presentation with a very low weight.
Reusing animationsA viewer has to download your animated GIF only once. If you use it again on the
same page or on another page, it plays from their browser’s cache. This is especially
useful for an animated logo, or for animated buttons.
Scaling an animationUse the height and width attributes of the img tag to present an animation at a
larger size without increasing its weight. The slight reduction in quality that
comes from scaling a bitmap image to double its size — in effect, you’re halving its
resolution — is a very small price to pay for the impact of a large animation. For
example, if you create an animation that is 200×200 pixels, you can put it in a page
at 400×400 pixels with the following img tag:
<img src=”example.gif” width=”400” height=”400”>
You can also use a percentage width or height to make an animation fit a page. This
works better for some animations than others, but again, it can create quite an
impact. Set the width and height to 100% and fill the entire browser window. The
img tag would resemble this:
<img src=”example.gif” width=”100%” height=”100%”>
303662-1 ch23.F 8/2/02 2:58 PM Page 765
Fireworks Seminar

766 Part VI ✦ Animation
Using the browser’s background imageOne of the limitations of animated GIF images is the small number of colors that
the GIF format can contain — and the high price you pay in weight for each extra
color. However, you can give your animation a colorful background by making it
transparent, and then placing it in a Web page with a JPEG background. The weight
of the whole presentation remains low because you combine the strengths of the
GIF format — animation and transparency — with the strengths of the JPEG
format — lots of colors with a low weight.
Preloading an animationPreloading an animated GIF in one of the following ways avoids the staggering
playback that you see when an animation plays while it’s downloading:
✦ Use the lowsrc attribute of the img tag. The browser shows the lowsrcimage until the regular image finishes downloading. The following line of code
tells the browser “Show spacer.gif until animated.gif has downloaded,
and then replace spacer.gif with animated.gif”:
<img src=”animated.gif” lowsrc=”spacer.gif” width=”200” ¬height=”200”>
The file spacer.gif is the transparent 1×1-inch image that Fireworks uses to
space tables. You’ve seen it and have a few copies of it on your hard drive if
you’ve ever exported a sliced image from Fireworks. If you haven’t, you can
make your own by creating a 1×1-inch image with a transparent canvas and
exporting it. Because it’s lightweight, it doesn’t affect the weight of your page
too much. Because it’s transparent, the background color shows through until
the animation starts.
Internet Explorer does not support the img tag’s lowsrc attribute.
✦ Use a Fireworks Swap Image behavior to swap a static image or spacer.gifwith your animated image. Modify the Event that triggers the Swap Image
behavior to onLoad. When the entire page’s content has loaded, the onLoadevent fires and the static image is replaced with your fully downloaded
animated GIF.
For more about using Fireworks Behaviors, see Chapter 21.Cross-Reference
Note
303662-1 ch23.F 8/2/02 2:58 PM Page 766
Fireworks Seminar

767Chapter 23 ✦ Applying Animation Techniques
Using animated rolloversReplacing the Over state of a rollover button with an animation of the same size can
create an exciting effect. When the viewer’s mouse hovers over your button, the
animation begins. When it stops hovering over your button, the animation stops.
Some browsers have problems with complex animated GIF images in rollovers.A small, simple animation that loops forever is likely to work best.
To create a simple animated rollover, follow these steps:
1. Create a rollover button with at least three states (Up, Over, and Down), and
export it as a GIF in the usual way. (A rollover with two states appears to flash
rather than move.) Note the filename that Fireworks gives the Over state of
your button; it will be something such as button_r2_c2_f2, where f2 stands for
frame 2, where you created the Over state.
For detailed instructions about creating rollover buttons, see Chapter 21.
After you’ve exported your file once as a rollover, you need to export it again
as an animated GIF. The individual frames that served as each state of the
rollover button will now serve as the frames of an animation.
2. To export your file again as an animated GIF, choose File ➪ Export Preview.
Fireworks displays the Export Preview dialog box.
3. On the Options tab, choose Animated GIF from the format option list.
4. On the Animation tab, click the Loop button, choose Forever, and then
click Next.
Fireworks displays the Export dialog box.
5. Under Slices, select None.
6. Under HTML, select None.
7. Choose the filename of the Over state of your rollover button, and click Save
to save your animated GIF with that name.
Fireworks asks whether you want to replace the original file. Click Yes.
When you open the HTML file that Fireworks created, you find that hovering your
mouse over the button makes the button start cycling through its Up, Over, and
Down states.
You can also make an animated rollover button that stops animating when theuser places his mouse over it. Instead of replacing the f2 image with an animation,as before, replace the f1 image. The animation plays as the page loads, but stopswith a hover of the mouse over the button.
Tip
Cross-Reference
Caution
303662-1 ch23.F 8/2/02 2:58 PM Page 767
Fireworks Seminar

768 Part VI ✦ Animation
Slicing animationsDon’t be afraid to unleash Fireworks’ formidable slicing tools on your animations.
Some ideas for things you might do with slicing and animation:
✦ Add extra colors: Slice colorful, static areas and set the slice to export as a
JPEG or PNG, and your animation appears to have sections of 24-bit color.
✦ Add interactivity: Replace a blank slice of your animated GIF with an HTML
form element, such as an option list, or a set of radio buttons.
For more information about slicing images in Fireworks, see Chapter 20.
Tweening Graphic SymbolsYou can really unleash your animations in Fireworks by incorporating graphic
symbols. Symbols are reusable objects that have been placed in a Fireworks
Library. Copies of symbols placed onto the canvas are called Instances. Instances
maintain a link to their symbols, so that changing certain properties of a symbol
also updates all of its Instances.
A basic knowledge of symbols serves you well for the rest of this chapter. Readmore about graphic symbols in Chapter 17.
Two or more Instances of the same symbol can be “tweened” automatically by
Fireworks. Tweening is a traditional animation term that refers to generating
intermediate frames between two images to create the effect of the first image
changing smoothly into the second image. In Fireworks, you provide the starting
point for an animation with one Instance, and the ending point of the animation with
another, and Fireworks creates the intermediate steps between them. Each new
Instance is slightly changed from the one before it, so that the first Instance seems
to evolve into the last. You can also tween more than two Instances (Figure 23-13),
in which case it might be helpful to think of each Instance as a resting point, or a
keyframe.
You can obviously use tweening to simulate motion, but by tweening object
properties, you can also make an object appear to change over time. If you scale an
Instance to a larger size and then tween it with another that’s not scaled, the
tweened Instances will be sized to create a smooth transition, as was the case in
Figure 23-12. Any property of an Instance that can be independently modified can
be tweened. These include the following:
✦ Transformations such as width, height, and skew made with the Transform
tool, or with the Modify ➪ Transform submenu.
Cross-Reference
Cross-Reference
303662-1 ch23.F 8/2/02 2:58 PM Page 768
Fireworks Seminar

769Chapter 23 ✦ Applying Animation Techniques
Fireworks always tweens two or more Instances of the same symbol, and as such,can’t tween shapes (morphing) because the shapes of the Instances are alwaysthe same. If you want to tween shapes, you can do a blend in MacromediaFreeHand and then import the file into Fireworks and distribute the shapes toframes. You can also do a shape tween in Macromedia Flash, save the result as anAdobe Illustrator document, and then import that document into Fireworks inorder to retain the vector information.
✦ Opacity and/or Blending modes adjusted in the Property inspector.
✦ Live Effects. As long as all the Instances have the same Live Effect applied,
you can tween the properties of that Live Effect. If you want to make an object
appear to go from not having an effect to having one, set the effect’s settings
to 0 on one of the Instances and a higher value on another.
Figure 23-13: Each Instance is a resting point, or a keyframe. Fireworks automatically creates the rest of the objects with tweening.
Fireworks always tweens from the canvas up; the lowest object in the stacking order
is first, and the highest object last, as shown in Figure 23-14. If you’re tweening more
than two objects, adjust their stacking order to make sure that they tween in the
order that you want them to.
Don’t be confused into thinking that objects tween from left to right across thecanvas. The stacking order is always the guideline for tweening order.
After you set the stacking order to determine the order that objects get tweened,
you also have to decide how many steps Fireworks should fill in between each
object. Refer again to Figure 23-13. The number of steps in that tween was three,
so Fireworks filled in three objects between each of the original Instances.
Tip
Original Original Original Original Original
Note
303662-1 ch23.F 8/2/02 2:58 PM Page 769
Fireworks Seminar

770 Part VI ✦ Animation
Figure 23-14: Four Instances become an entire animation after tweening. Note that Fireworks tweened according to the stacking order. The start of the tween is the object closest to the canvas, and the highest object in the stacking order is the end.
So far, we’ve tweened objects and created an interesting display across the canvas.
Usually, though, you want to distribute your tweened objects to frames to create a
real animation. You have the option to do this at the same time as the tweening, or
you can select your tweened objects and click the Distribute to Frames button on
the Frames panel at any time. Fireworks distributes objects to frames from bottom
to top, the same way that it tweens, so that your objects stay in the correct order.
To tween Instances, follow these steps:
1. Create an object or a group of objects, and convert it to a symbol. Select the
object and choose Modify ➪ Symbol ➪ Convert to Symbol. Name your symbol
in the Symbol Properties dialog box, and click OK when you’re done. Your
object is converted into a symbol and stored in the Library. An Instance is left
in its place on the canvas.
2. Choose Edit ➪ Duplicate, or use the keyboard shortcut, Ctrl+Alt+D
(Command+Option+D) to create a copy of the Instance. Alternatively, you can
create a duplicate Instance of your symbol by dragging it from the Library panel
and dropping it onto the canvas. A copy of an Instance is also an Instance. Keep
in mind that the duplicate is placed one higher in the stacking order.
3. Position the duplicate Instance to a spot on the canvas where you want the
tween to stop.
Original Original
Original Original
303662-1 ch23.F 8/2/02 2:58 PM Page 770
Fireworks Seminar

771Chapter 23 ✦ Applying Animation Techniques
4. Select both Instances either by dragging a selection box around them with
your mouse, or by holding down the Shift key and clicking each one in turn.
5. Choose Modify ➪ Symbol ➪ Tween Instances.
Fireworks displays the Tween Instances dialog box (see Figure 23-15).
Figure 23-15: Set the number of steps to tween, and choose whether or not you want to distribute the objects to frames in the Tween Instances dialog box.
6. Enter the number of steps to tween. A setting of 3 makes Fireworks create
three new objects between each of your original Instances.
7. Check Distribute to Frames to distribute the tweened objects to frames and
make them into an animation. Click OK when you’re done.
Fireworks creates the new objects, and you have an instant animation.
Fireworks technique: Tweening FiltersUnlike Live Effects, you can’t really tween Filters, because they’re applied directly
to bitmap objects only. Applying them to linked objects also breaks the link and
leaves you with regular bitmap objects. You can use tweening, though, to create an
animation quickly, in which the only changes are the settings of the Filter as it’s
applied to each frame.
This example uses a Filter called Fire, which is part of a third-party package calledEye Candy, from Alien Skin Software. Fire is available in both Eye Candy 3.1 andEye Candy 4000. If you don’t have the full version of Eye Candy, use one of the EyeCandy 4000 LE filters included with Fireworks MX, or another third-party Filter —many are available free on the Web. For more information about Filters and aboutEye Candy 4000, see Chapter 12.
To animate Filters in Fireworks, follow these steps:
1. Create the basic object or group to which you’re going to apply the Filter,
and then make the group or object into a symbol using Modify ➪ Symbol ➪Convert to Symbol. Name your symbol in the Symbol Properties dialog and
click OK when you’re done. The symbol is placed in the Library and an
Instance is left in its place.
Cross-Reference
303662-1 ch23.F 8/2/02 2:58 PM Page 771
Fireworks Seminar

772 Part VI ✦ Animation
2. Select your Instance and create another Instance directly on top of it by
choosing either Edit ➪ Clone, or by using the keyboard shortcut, Ctrl+Shift+D
(Command+Shift+D).
3. Select both Instances by dragging a selection box around them. Alternatively,
if they are the only objects in your document, you can select them both by
choosing either Edit ➪ Select All, or Ctrl+A (Command+A).
4. Create tweened Instances between your two Instances by choosing Modify ➪Symbol ➪ Tween Instances.
Fireworks displays the Tween Instances dialog box.
5. Set the number of steps to a small number, such as 5.
6. Uncheck the Distribute to Frames checkbox, and then click OK.
Now we have a stack of identical objects, to which we’re going to apply a
Filter, changing the settings slightly each time so that each object looks
slightly different.
7. Select all the Instances by dragging a selection around them with the mouse.
8. Choose Filters ➪ Eye Candy 4000 ➪ Fire.
Fireworks displays the Fire dialog box for the first Instance.
9. Specify the settings that you want, and then click OK.
Fireworks displays the Fire dialog box for the second Instance.
10. The controls are set the same way you left them after the first Instance.
Modify the controls slightly to create a difference between this Instance and
the previous one. Click OK when you’re done.
Fireworks displays the Fire dialog box for the third Instance.
11. Continue to change control settings slightly in each box as it appears, until
you have modified all the Instances.
Clicking Cancel at any time in the Filter’s dialog box cancels the operation for allthe Instances.
12. With your Instances still selected, click the Distribute to Frames button (the
filmstrip icon) on the Frames panel.
All Instances are distributed over frames to create an animation, such as the one
in Figure 23-16. Preview your animation with the VCR controls on the bottom of
the document window. Alternatively, you can choose File ➪ Export Preview and
preview your animation in the Export Preview dialog box, or choose a browser
from the File ➪ Preview in Browser submenu to see your work in a browser.
Fireworks technique: Tweening depthA quick and useful effect that you can create with tweened Instances is 3D depth,
wherein your object appears to fly out from the canvas.
Tip
303662-1 ch23.F 8/2/02 2:58 PM Page 772
Fireworks Seminar

773Chapter 23 ✦ Applying Animation Techniques
Figure 23-16: This animation depends entirely on the slight changes in the Fire effect applied to each Instance to make our subject’s skull appear to be vigorously aflame.
To create a depth effect with tweened Instances, follow these steps:
1. Create the basic object or group that you’re going to work with, and then
convert it into a symbol using Modify ➪ Symbol ➪ Convert to Symbol. Name
your symbol in the Symbol Properties dialog box, and click OK when you’re
done. The symbol is placed in the Library and an Instance is left in its place.
2. Move the Instance near the top of the canvas.
3. Choose Edit ➪ Clone, or use the keyboard shortcut, Ctrl+Shift+D
(Command+Shift+D), to create another Instance directly on top of the first.
4. Hold down the Shift key and, at the same time, use the arrow down key to
move the new Instance down the canvas, without moving it left or right. A few
hundred pixels is usually all you can get away with while still keeping the
depth effect resembling depth.
5. With the Instance still selected, choose Modify ➪ Transform ➪ Numeric
Transform.
Fireworks displays the Numeric Transform dialog box.
6. Scale the Instance to 30 percent of its size, by selecting Scale from the option
list, checking Scale Attributes, checking Constrain Proportions, and entering
30 in one of the fields. Click OK when you’re done.
7. Set the Instance’s opacity to 10 percent by double-clicking it and entering 10
in the Opacity field on the Property inspector or on the Frames panel.
8. With the Instance still selected, choose Modify ➪ Arrange ➪ Send to Back, or
press Ctrl+Shift+down arrow (Command+Shift+down arrow).
303662-1 ch23.F 8/2/02 2:58 PM Page 773
Fireworks Seminar

774 Part VI ✦ Animation
9. Hold down Shift and click each Instance to select all of them. If they are the
only objects in your document, you can choose Edit ➪ Select All, or press
Ctrl+A (Command+A).
10. Choose Modify ➪ Symbol ➪ Tween Instances.
Fireworks displays the Tween Instances dialog box.
11. Set the number of steps you want in between the two Instances, uncheck
Distribute to Frames, and then click OK.
Fireworks tweens the Instances.
You can choose Edit ➪ Undo and then do Steps 10 and 11 again if you find thatyou want to change the number of steps.
12. If you prefer, you can select the original Instance and make it stand out by
adding a Live Effect such as glow or inner bevel to it.
Your object now appears to fly out from the canvas (see Figure 23-17).
Figure 23-17: Fireworks created the steps between the front and back Instances with tweening. A little of the Glow Live Effect was then added to the front object to make it stand out.
To change this depth effect into an animation, select all the Instances by drawinga selection around them with the mouse (or, if they are the only objects in yourdocument, choose Edit ➪ Select All), and then click the Distribute to Framesbutton on the Frames panel. Your object animates its way toward you.
Tip
Tip
303662-1 ch23.F 8/2/02 2:58 PM Page 774
Fireworks Seminar

775Chapter 23 ✦ Applying Animation Techniques
Fireworks technique: Fading in and outFading an object in and out is a common effect that’s easy to create in Fireworks.
Tweening two Instances that are positioned in the same place on the canvas, one
with an Opacity setting of 0 percent, and one with an opacity of 100 percent,
produces a fade. The Instance that is highest in the stacking order determines
whether it’s a fade-in or a fade-out. In this section, we create an animation in which
the object fades in, then fades back out, and then loops, so that it seems to fade in
and out continuously.
To fade an object in and out, follow these steps:
1. Create the basic object or group to which you’re going to apply the fade, and
then convert the object or group into a symbol. Select it and choose Modify ➪Symbol ➪ Convert to Symbol. Name your symbol in the Symbol Properties
dialog box, and click OK when you’re done. Your new symbol is stored in the
Library and an Instance is left in its place.
2. Select the Instance and choose Edit ➪ Clone, or press Ctrl+Shift+D
(Command+Shift+D), to create another Instance directly on top of it.
3. Open the Property inspector and set the Opacity of the new Instance to
0 percent.
The Opacity setting might not seem to have any effect, because you’re able to seethe original Instance through the newer Instance, which is now transparent.
4. Choose Modify ➪ Arrange ➪ Send to Back to send the transparent Instance
directly behind the original Instance.
5. Select both Instances by dragging a selection box around them. If they are the
only objects in your document, you can select them by choosing either Edit ➪Select All, or by using the keyboard shortcut, Ctrl+A (Command+A).
6. Choose Modify ➪ Symbol ➪ Tween Instances.
Fireworks displays the Tween Instances dialog box.
7. Set the number of steps to 5.
You can choose a different number of steps, if you prefer, but during this example,I count steps and frames as if you’ve chosen 5.
8. Check the Distribute to Frames checkbox, and then click OK.
Play your animation. Your object should appear to fade in. You should have
seven frames. In the first frame, the Instance is completely transparent (opacity
of 0); in the second frame, the Instance is slightly more opaque, making it
appear to fade in; and so on until the seventh frame, in which the Instance is
fully opaque.
Note
Note
303662-1 ch23.F 8/2/02 2:58 PM Page 775
Fireworks Seminar

776 Part VI ✦ Animation
At this point, you can choose to either leave your animation as is, or continue andmake your animation appear to fade out as well.
9. Open the Frames panel and select the final frame in your animation to
display it in the document window. This frame contains your fully opaque
Instance.
10. Select the Instance and choose either Edit ➪ Clone, or use the keyboard short-
cut, Ctrl+Shift+D (Command+Shift+D), to create another Instance directly on
top of the first.
11. Open the Property inspector and set the Opacity of the Instance to 0 percent.
12. Select both Instances by dragging a selection box around them. If they are the
only objects in this frame, you can select them by choosing either Edit ➪Select All, or by using the keyboard shortcut, Ctrl+A (Command+A).
13. Choose Modify ➪ Symbol ➪ Tween Instances.
Fireworks displays the Tween Instances dialog box.
14. Set the number of steps to the same number you used when fading the object
in (in this case, 5).
15. Check the Distribute to Frames checkbox, and then click OK.
16. Select the final frame of your animation in the Frames panel and remove it by
clicking the Delete Frame button (the Trash icon). This final frame is redundant,
because the first frame is also a fully transparent object. Your animation loops
more smoothly without it.
Click Play to preview your animation. The object appears to fade in and then fade
out (see Figure 23-18). If you prefer, you can double-click the fully opaque frame in
the middle of your animation (Frame 7 in the example), and specify a longer frame
delay so that the pause between the fade-in and fade-out is longer. Choose File ➪Export Preview to preview your animation in the Export Preview dialog box, where
it often runs more smoothly than in the document window.
Figure 23-18: Fading an object in and out is easy with tweening.
Note
303662-1 ch23.F 8/2/02 2:58 PM Page 776
Fireworks Seminar

777Chapter 23 ✦ Applying Animation Techniques
Using Animation SymbolsAnimation symbols are self-contained, multi-frame symbols with their own
animation properties, such as number of frames, rotation, and scaling. You can
create an animation symbol from any object, and it can even contain other symbols.
As with graphic and button symbols, animation symbols are stored in the Library
and can be reused.
You can graphically edit an animation symbol in the Symbol Editor, and its properties
in the Object panel, or with the Modify ➪ Animate ➪ Settings command. You can edit
its motion path directly in the document window.
Creating animation symbolsYou can create a new animation symbol from scratch, or convert an existing object
into an animation symbol.
To create an animation symbol, follow these steps:
1. Choose Edit ➪ Insert ➪ New Symbol.
Fireworks displays the Symbol Properties dialog box, as shown in Figure 23-19.
Figure 23-19: Name your new symbol and specify animation in the Symbol Properties dialog box.
2. Enter a name for the new symbol.
3. Select the Animation radio button under Type. Click OK when you’re done.
Fireworks displays the Symbol Editor.
4. Use the drawing tools to create a new graphic.
5. Close the Symbol Editor window when you’re done.
Fireworks places the new animation symbol in the Library, and places a copy
of it in your document.
303662-1 ch23.F 8/2/02 2:58 PM Page 777
Fireworks Seminar

778 Part VI ✦ Animation
6. To add new frames to the new animation symbol, select it on the canvas and
adjust the Frames slider in the Property inspector.
7. To edit the symbol’s animation properties, select it and choose Modify ➪Animation ➪ Settings to display the Animate dialog box.
To convert an existing object into an animation symbol, follow these steps:
1. Select the object that you want to convert into an animation symbol.
2. Choose Modify ➪ Animation ➪ Animate Selection, or use the keyboard short-
cut, Alt+Shift+F8 (Option+Shift+F8).
Fireworks displays the Animate dialog box, as shown in Figure 23-20.
Figure 23-20: Modify animation settings in the Animate dialog box.
3. Modify the following settings in the Animate dialog box:
• Frames: The number of frames you want to include in the animation.
The Frames slider only goes to 250, but you can type a higher number in thetext field. Fireworks automatically adds the required number of frames to yourdocument.
• Movement: The distance that you want each object to move. Possible
values range from 0 to 250 pixels. The default is 72.
• Direction: The direction in which you want the object to move. Possible
values range from 0 to 360 degrees.
• Scaling: The percent change in size from start to finish. The default is
100 percent. You can specify a number from 0 to 250.
• Opacity: Specifies how much to fade in or out from start to finish.
Possible values range from 0, which is completely transparent, to 100
(the default), which is completely opaque.
Tip
303662-1 ch23.F 8/2/02 2:58 PM Page 778
Fireworks Seminar

779Chapter 23 ✦ Applying Animation Techniques
• Rotation: The amount that the symbol rotates from start to finish,
specified in degrees. The default is 0 degrees, which is no rotation.
Specify 90 degrees for a quarter-turn, 180 for a half-turn, and 360 for a
complete rotation. Enter a number higher than 360 to start a second
rotation.
• CW and CCW: Clockwise and counterclockwise, respectively; determine
the object’s rotation direction.
4. Click OK when you’re done.
Your new symbol is added to the Library, and a copy is placed on the canvas.
Editing an animation symbolThere may be a handful of skilled animators who can create the perfect animation
symbol the first time through, but for most of us, the settings of our animation
symbols require careful adjustment in order to achieve the desired effect.
You can use a number of methods to alter the settings of an animation symbol. Let’s
explore each of them.
Adjusting animation settingsSelect an animation symbol and choose Modify ➪ Animation ➪ Settings to display
the Animate dialog box. Alter any of the settings as desired.
A discussion of the settings in the Animate dialog box is included earlier in thischapter, in the section “Creating animation symbols.”
Using the Property inspectorWhen an animation symbol is selected, the Property inspector changes to display
animation symbol options that are similar to the Animate dialog box, as shown in
Figure 23-21. Modify any of these options to adjust the corresponding setting.
Figure 23-21: Use the Property inspector to modify animation symbol options.
Adjusting the motion pathWhen selected, Animation symbols display a motion path that describes their
frame-by-frame movement across the canvas, as shown in Figure 23-22. The green
Cross-Reference
303662-1 ch23.F 8/2/02 2:58 PM Page 779
Fireworks Seminar

780 Part VI ✦ Animation
dot on the motion path indicates the start of the animation’s path, and the red dot
shows the end point. The blue points on the path represent each frame of the
animation. The object itself is shown on the current frame.
Figure 23-22: The motion path describes the movement of the animation symbol. The visible object is on the current frame, frame 4.
You can change the direction of the animation symbol’s motion by changing the
angle of the motion path. Drag one of the animation handles to a new location,
as follows:
Hold down the Shift key while dragging to constrain the movement to perfectlyhorizontal or vertical.
✦ Move the green point to move the starting point of the animation.
✦ Move the red point to move the ending point of the animation.
✦ Move any blue point to move the object on the corresponding frame. Click a
blue point to switch to that frame.
Converting into a graphic symbolChoose Modify ➪ Animation ➪ Remove Animation to convert the animation symbol
into a graphic symbol. Although your symbol is no longer animated, Fireworks
retains the animation settings, in case you convert the symbol back into an anima-
tion symbol.
Removing the symbolTo remove an animation symbol from the Library, follow these steps:
1. Choose Window ➪ Library to display the Library panel.
2. In the Library panel, select the animation symbol you want to remove.
Tip
303662-1 ch23.F 8/2/02 2:58 PM Page 780
Fireworks Seminar
781Chapter 23 ✦ Applying Animation Techniques
3. Click the Delete Symbol button (the trash can) on the Library panel.
4. Click Delete to remove the symbol.
Editing symbol graphicsJust as with button and graphic symbols, animation symbols are based on a graphic
that you can edit in the Symbol Editor. When you modify the graphic that your
animation symbol is based on, all of its instances — the copies on the canvas —
inherit those changes, as well.
To edit the graphic in an animation symbol, follow these steps:
1. Select the animation symbol you want to edit.
2. Choose Modify ➪ Symbol @ Edit Symbol to open the Symbol Editor.
Alternatively, you can choose Window ➪ Library and double-click your
symbol in the Library panel.
3. Perform your graphical edits in the Symbol Editor.
4. Close the Symbol Editor window when you’re done.
See Chapter 17 for more on the Symbol Editor.
SummaryFireworks enables you to create and edit animation by using a variety of techniques,
most of which revolve around the Frames panel. When working with animation in
Fireworks, keep these points in mind:
✦ The overall weight of your animated GIF is always a consideration. Every
creative decision must be examined for its effect on file size.
✦ The Frames panel is the heart of Fireworks’ animation tools, but the Layers
panel is also important.
✦ Each frame in your Fireworks document resembles a frame of a filmstrip.
Copy objects to other frames by using the Frames panel, and then change the
objects’ locations on the canvas or their properties to create animation.
✦ Layers can be shared across multiple frames, to manage static objects better
in an animation.
✦ Onion Skinning enables you to view and edit multiple frames simultaneously.
✦ The Web design opportunities for animated GIF images are numerous,
such as animated rollover buttons, sliced animations, and animated browser
backgrounds.
Cross-Reference
303662-1 ch23.F 8/2/02 2:58 PM Page 781
Fireworks Seminar

782 Part VI ✦ Animation
✦ Tweening is a great time- and work-saver because Fireworks fills in the middle
elements of an animation automatically. Any selection of two or more
instances of the same symbol can be tweened.
✦ Fireworks tweens objects starting at the bottom of the stacking order, nearest
the canvas, and moving up.
✦ Distribute a tweened sequence to frames to create an instant animation.
✦ You can use tweening to create advanced effects, such as objects fading in
and out, or flying out from the canvas.
✦ Animation symbols provide an intuitive way to work with animations.
In the next chapter, you look at how you can apply animation techniques to create
that most common species of animated GIF: the banner ad.
✦ ✦ ✦
303662-1 ch23.F 8/2/02 2:58 PM Page 782
Fireworks Seminar

AnimatingBanner Ads
Banner ads are nearly ubiquitous on today’s Web, and
have contributed enormously to the rapid growth of the
World Wide Web. After you have a sponsored banner ad on a
page, the page begins to pay for itself, and you crave hits —
requests for files made to your server — rather than worrying
about the bandwidth costs of a page that grows too popular.
Understanding Banner Ad BasicsBanner ads are where animated GIF images really shine. You
want a Web advertisement to be eye-catching and universally
viewable, and animated GIF images are really the only choice.
When does an animated GIF stop being an animated GIF and
start being a banner ad? Four elements are involved:
✦ It is a certain size in width and height.
✦ It is below a certain weight in kilobytes.
✦ It is placed on a Web page.
✦ It advertises something.
Let’s take a closer look at each of these points in the following
sections.
Examining size — IAB/CASIE standardsWhen banner ads started to proliferate on the Web, it became
apparent that some sort of standard sizing scheme would
benefit both the advertisers and the sites displaying the
advertising. If you have a Web site on which you leave a
450×50-pixel space in your design for a banner ad, and I then
send you one that’s 460×60, we have a problem. If ten other
people send you ten other ads, all slightly different in size,
then the problem becomes a big problem.
2424C H A P T E R
✦ ✦ ✦ ✦
In This Chapter
Understandingbanner ad standards
Putting banners adsin a Web page
Learning advertisinglingo
Creating banner adsin Fireworks
Using Blur to saveframes
✦ ✦ ✦ ✦
313662-1 ch24.F 8/2/02 2:58 PM Page 783
Fireworks Seminar

784 Part VI ✦ Animation
To solve this problem, the Standards and Practices committee of the Internet
Advertising Bureau (IAB) and the Coalition for Advertising Supported Information
and Entertainment (CASIE) got together, looked at the sizes everybody was using,
and came up with a list of standard sizes. They offered this list as a recommendation
to the ad buyers and sellers, who overwhelmingly accepted the list. Almost all ads
on the Web now follow the IAB/CASIE standards.
For more about the IAB/CASIE standards, visit the IAB at http://www.iab.netor CASIE at http://www.casie.com.
Table 24-1 details the standard banner ad sizes and their names. Full Banner is by
far the most common type of ad, with Micro Button probably in second place, but
other sizes are gaining popularity as Web sites display advertising in newer and
smaller spaces, such as margins and even inline with content. If you don’t know
which size to choose, choose Full Banner, 468×60.
The companion CD-ROM includes a set of Fireworks PNG format files, one foreach banner ad size, that you can use as templates when creating banner ads inFireworks.
Table 24-1IAB/CASIE Advertising Banner Sizes
Pixel Dimensions Name
468×60 Full Banner
392×72 Full Banner with Vertical Navigation Bar
234×60 Half Banner
125×125 Square Button
88×31 Micro Button
120×90 Button 1
120×60 Button 2
120×240 Vertical Banner
These days, most people surf the Web with a display that’s capable of 800×600 orgreater resolution, and many Web sites are now constructed to take up the extrahorizontal real estate. Advertisers have responded with the occasional 600×60 adbanner. Although this size is not in the IAB/CASIE specification, you might considerusing these wide banners under some circumstances. Make sure that the site(s)you plan to advertise on will accept this banner size.
Tip
On theCD-ROM
Note
313662-1 ch24.F 8/2/02 2:58 PM Page 784
Fireworks Seminar

785Chapter 24 ✦ Animating Banner Ads
Looking at weightIn addition to making sure your banner ads are the correct dimensions, you need
to consider their weight (file size). No “one true standard” exists for banner ad
file sizes. Many Webmasters set an upper limit on weight, beyond which they
won’t accept your ad. If you’re designing an ad for a specific site, check with its
Webmaster first to see what the limit is, or at least check the weight of some of the
ads that are already on that site. If you’re not designing for a specific site, a general
rule is to aim for less than 10K, and certainly to keep it under 12K. If you can
produce an exciting ad in 8K, so much the better. Your ad downloads quickly, and
more viewers see your entire message.
Putting it in the pageObviously, a banner ad is as much an image as any other GIF, and the most basic
way to place a banner ad in a page is with an ordinary <img> tag. When you export
HTML from Fireworks, this is exactly the way you find your banner ad displayed.
Typically, though, most Web sites that depend on advertising have some sort of
dynamic scheme for rotating through a series of banner ads, so that ads are added
to pages on-the-fly by the server. Visitors who return to a page get an entirely new
ad instead of seeing the same one again. The server also keeps track of how many
times it displays each ad because the sponsor pays for the ad to be displayed a
certain number of times.
Implementing a banner ad rotation system is not nearly as hard as it might sound.
The Web has many low-cost and even free CGI (Common Gateway Interface) scripts.
A few hours of work and even the smallest site can start serving ads like the big guys.
A good place to start looking for the appropriate CGI script for your needs is theCGI Resource Index at www.cgi-resources.com.
Advertising itAlthough a complete course in Madison Avenue advertising methods is well beyond
the scope of this book, it doesn’t hurt to at least know the lingo:
✦ A page view or page impression is one Web page served with your ad on it.
✦ A hit is one request by a browser for one file — an HTML document, or an
image or multimedia file — from your server. Many people use “hits” and
“page views” interchangeably, but one Web page might be made up of
20 individual files, while another page is only 10 files. As a result, it’s best to
define your terms, and seek common ground when discussing “hits.”
✦ CPM is the cost per one thousand (Roman numeral M) page views. This is the
standard way that ad space is bought and sold on the Web. A site with excellent
demographics could demand a higher cost-per-one-thousand ads served.
Tip
313662-1 ch24.F 8/2/02 2:58 PM Page 785
Fireworks Seminar

786 Part VI ✦ Animation
✦ A click-through is one specific time when a viewer is interested enough in a
banner ad to click it and go to the advertiser’s site. The Web average for
click-throughs might be less than 1 percent.
✦ The click rate is the percentage of people who click-through a particular ad.
✦ Mindshare is basically brand recognition. Even though Web users don’t click-
through banner ads the way advertisers once hoped they would, studies have
shown that people do look at banner ads and take the brand away with them.
Fireworks Technique: Creating a Banner AdAlthough banner ads are often created by a chain gang of ad people, copywriters,
producers, Web artists, and others, a good way to work on the techniques involved
is to just dive in and start creating ad campaigns for fictional companies of your
own creation. This is exactly what we do as we go step-by-step through the process
of creating a banner ad in Fireworks.
The Mundane Magazine example banner ad created for this section is in both theoriginal Fireworks PNG format and the exported animated GIF.
Step I: Set the stageThe very first step in creating a banner ad is to make sure you know what size it
should be. Although you may sometimes come up with a creative idea that would
dictate using a certain size, most of the time when you sit down to make a banner
ad, the space has already been allotted. I follow the IAB/CASIE standards with my
banner ad, and make a 468×60 Full Banner, which can be displayed on almost any
Web site that accepts advertising.
Step II: Write the scriptNow that you have a suitable “blank page” of the right size and shape, you are
ready to sit and stare at it while you come up with an idea. All the same things that
apply to regular animations apply to banner ads with regard to making a concise
statement, planning ahead, and watching file size.
Let’s face it: A 10K or 12K banner ad is not going to get into serious character
development, or include a lot of scene changes or scenery. If you can’t express your
idea in a few lines, it probably won’t fit into the banner. Think “bumper sticker” and
you’ll probably be more successful.
My ad is for a fictional magazine called Mundane Magazine. It’s a hip, youth-oriented
magazine about the Web. I want to make something that attracts the attention of
the target audience of young, hip Web surfers. Here’s the pitch for my ad: “A UFO
crash lands on a barren alien landscape. The pilot thinks, ‘&*/$.’” Not much of a
plot line, but again, what do you want from 12K?
On theCD-ROM
313662-1 ch24.F 8/2/02 2:58 PM Page 786
Fireworks Seminar

787Chapter 24 ✦ Animating Banner Ads
Step III: Create the cast of charactersOur little movie has a stage and a script. Now it needs a cast.
Banner ads are deliberately sized as small as can be, and I find the dimensions a bit
of a constraint when I’m drawing. Objects in banner ads are often cropped, scaled
down, or halfway off the canvas. So I like to draw and build objects in a second,
larger document window (see Figure 24-1); sort of a scratchpad — or, to keep the
showbiz analogy going, a backstage area where objects wait to be placed in their
scenes. Because Fireworks objects always remain editable and can be easily
dragged and dropped between documents, this backstage area is a convenient
way to work.
Figure 24-1: Use a second document as a scratchpad or backstage area when buildingobjects for use in a banner ad to avoid working entirely within the puny confines of thead itself.
Complex effects, such as drop shadows and glows, increase the weight of the final
animated GIF quite a bit because flat colors compress better in the GIF format.
Concentrate on drawing good-looking objects, and leave the effects for later. If your
final animation is underweight (yeah, right), then you can easily go back and add
some effects to objects.
313662-1 ch24.F 8/2/02 2:58 PM Page 787
Fireworks Seminar

788 Part VI ✦ Animation
These elements make up the “cast” in my ad:
✦ Some rugged, otherworldly mountains to serve as a setting
✦ Some text of the magazine’s name and catchphrase
✦ A flying saucer to do the crash-landing
✦ A thought bubble with the word “&*/$.” in it
Reusing Design Elements
The tiny face that banner ads present to the world can be very limiting creatively, but thereis one major advantage: Design elements and even bitmap images that were originallycreated for a Web site or print media are easily scaled down and reused without losingquality. Creating a banner ad for a Web site often means you have no end of big logos andartwork readily available for repurposing in a banner ad, as shown in the following figure.
Although this strategy is efficient from a production standpoint, it’s also valid from a designperspective to maintain a consistent look between a Web site and a banner ad thatadvertises it.
313662-1 ch24.F 8/2/02 2:58 PM Page 788
Fireworks Seminar

789Chapter 24 ✦ Animating Banner Ads
Each of these elements can be thought of as a cast member, an independent entity
that we need to tell what to do as we make our ad.
Step IV: Direct the actionNow you’re ready to start putting the objects where they go. Create a layer for each
of your cast members. I have four cast members, and I have a pretty good idea of
the order in which they should be stacked: The background should be on the
bottom and the text should be on the top, so I made four layers:
✦ Text
✦ Bubble
✦ Saucer
✦ Background
Figure 24-2 shows these layers and shows that the mountains are placed into the
layer called background, which is then shared so that it appears in every frame.
I can lock the background layer now and forget about it.
Figure 24-2: The background is going to stay the same throughout the animation, so the background layer is shared. This layer is now the same in every frame.
To share a layer, double-click its name in the Layers panel to view the LayerOptions dialog box and check the Shared Across Frames box.
Splitting up objects onto their own layers enables you to share a layer at any time,
if you decide that a cast member should be static. I’m not sure yet whether the text
with the name of the magazine and the catch phrase is going to be static. It probably
will be, but I might get to change that after I see my animated GIF’s weight. For now,
I place the text in the banner and share its layer, too.
Tip
313662-1 ch24.F 8/2/02 2:58 PM Page 789
Fireworks Seminar

790 Part VI ✦ Animation
At this point, the first frame is basically done. The mountains and logo are in
place, and the UFO hasn’t appeared yet. I like to build the last frame next, which is
where the animation rests before looping. I want to make sure that the UFO and the
thought bubble are the right size, so that they hang together nicely in that frame,
before I animate them through a bunch of middle frames (see Figure 24-3). Creating
the first and last frames before the others often makes filling in the middle frames a
lot easier. Naming your first and last frame with descriptive names helps ensure
that you always keep them first and last. Double-click the frame’s name in the
Frames panel to open a dialog box in which you can provide a name.
Figure 24-3: After you finish the first frame, create a new frame in which to build the last frame. Your two-frame animation now has a start and finish — named First Frame and Last Frame, here — which makes building the middle much easier.
Finally, I’m ready to start some serious animating. In the first frame, the UFO hasn’t
appeared yet; in the last frame, it has landed. I’m going to copy the UFO from the
last frame, paste it into the first frame, and then move it to the top of the canvas,
so that it’s just peeking in.
So, in Frame 1, the saucer is just appearing. I want the next frame to be almost
identical, except that the saucer should move a little bit closer to its landing site.
The saucer doesn’t have far to travel, and I would like it to do so in seven or eight
frames, so that the whole animation is nine or ten frames long. Keeping the
animation in a small area and on a small number of frames limits its file size.
You can distribute objects to their own frames at any time with the Distribute to
Frames button on the Frames panel, so it’s often easiest to build an animation
entirely within Frame 1. In my case, I just keep duplicating and arranging copies of
the saucer in the correct positions on the canvas. Eventually, Frame 1 contains a
bunch of saucers in the correct positions on the canvas, but in the wrong frames,
as shown in Figure 24-4.
The quickest way to duplicate objects is to drag them while holding down the Alt(Option) key.
Tip
313662-1 ch24.F 8/2/02 2:58 PM Page 790
Fireworks Seminar

791Chapter 24 ✦ Animating Banner Ads
Figure 24-4: Duplicating the saucer and moving the copies into the correct positions on the canvas gets them ready to be distributed to their own frames.
If your animation features an object that moves in a straight line, use tweening togenerate the intermediate steps. Tweening is covered in Chapter 23.
Because the last frame is already done, I want to manually create frames before
clicking the Distribute to Frames button, so that Fireworks doesn’t have to create
any frames and overlap my final frame. I have seven saucers in Frame 1, so I need
six new frames after Frame 1.
After distributing the saucers to frames, I can preview my animation by using the
VCR controls. If necessary, I tweak the saucer’s descent by moving it a bit to the left
or right in certain frames, until I get the effect that I want, which is a bit of a rough
landing.
When you get to the point where your animation is actually playing, the inevitable
rewrites begin. In my case, I decided that I didn’t want the thought bubble to be the
last frame. Instead, the last three frames should go: Saucer lands, thought bubble
appears, and then thought bubble disappears. I also realized that the “landed”
saucer needs a little chewing up to emphasize that it has “crashed.”
Chewing up the saucer is pretty easy, but it appears in Frame 7 and Frame 8. After
modifying it in Frame 7, I selected it on the canvas and Alt-dragged (Option-dragged)
its selection icon in the Frames panel (see Figure 24-5) from Frame 7 to Frame 8. This
copies the selection from Frame 7 to Frame 8.
The quickest way to get that extra frame on the end is simply to duplicate the last
frame, and then delete the thought bubble out of it. I lose very little in bandwidth
this way, because the last two frames are almost identical, and the only addition to
the final frame is more flat color where the thought bubble was. Duplicating the last
frame is as simple as dragging it in the Frame panel to the New Frame button.
The only thing that’s left now is to set the frame timing, so that the last three
frames are a little slower. The frame timing, looping, and such are set either in the
Frames panel, or on the Animation tab of the Export Preview dialog box. Working in
the Export Preview dialog box, shown in Figure 24-6, sometimes provides smoother
animation playback than the document window, and a centralized access point for
Cross-Reference
313662-1 ch24.F 8/2/02 2:58 PM Page 791
Fireworks Seminar

792 Part VI ✦ Animation
animation controls. You can see that the last three frames are set to one second,
two seconds, and one second, specified in hundredths of a second. I tested a few
combinations of speeds by using the VCR controls in the Export Preview dialog
box. Looping is set to 10 times, which is long enough that it loops for about a
minute because my banner takes a little over five seconds to play. At that point, it
becomes a static banner that still invites the viewer to visit Mundane Magazine,
without annoying them by continuing to flash away.
Figure 24-5: Dragging the selection icon in the Frames panel from frame to frame moves a selection. Alt-dragging (Option-dragging) copies the selection.
Figure 24-6: Set the timing of individual frames, and set the looping for the whole animation.
313662-1 ch24.F 8/2/02 2:58 PM Page 792
Fireworks Seminar

793Chapter 24 ✦ Animating Banner Ads
If you don’t set looping to forever, make sure the last frame of your animation hasall the pertinent details, so that it provides enough information to get yourmessage across on its own.
Step V: Leave the excess on the cutting-room floorDon’t be afraid to be brutal when exporting your animation and creating the
animated GIF image itself. Remember that your focus is to get a message across
quickly — not to win awards for the most colors, or the most profound use of
animation. My banner came in just under 12K, but if it were any bigger, I would
definitely have to consider one of the following options:
✦ Cut some frames, which might make the animation less smooth.
✦ Move the saucers closer together from frame to frame, so that the area that’s
animated is smaller.
✦ Flatten some areas, such as the bumpy, textured mountains. Areas of solid,
flat color compress better.
✦ Take out some colors by cutting the palette further.
✦ Remove effects, such as the inner bevel on the text and the saucer, again to
gain more areas of flat color.
✦ Make some objects smaller, such as the text, so that more of the flat, blue
background is showing, resulting in better compression.
Sometimes, swallowing your creative pride can lead to a better overall presentation
and a fast-loading, attention-attracting banner ad that’s ready to take a message to
the Web.
The final Mundane Magazine banner is exploded in Figure 24-7.
Turn to the color insert for another look at the example banner ads from thischapter.
Fireworks Technique: Using Blur toSave Frames
Generally, you want your ads to be dynamic and fast-moving, but as with everything
on the Web, bandwidth is always an issue. Every frame that you add to your banner
increases the file size.
Cross-Reference
Tip
313662-1 ch24.F 8/2/02 2:58 PM Page 793
Fireworks Seminar

794 Part VI ✦ Animation
Figure 24-7: The finished banner ad keeps the animation in a small area and in a small number of frames. The flat color background compresses well. The banner weighs under 12K.
A common technique for creating a feeling of action and speed in a banner ad,
without increasing the frame count and file size drastically, is to use a motion blur
filter (such as the Eye Candy 4000 LE Motion Trail filter included with Fireworks)
to get an object from point A to point B, as shown in Figure 24-8. Instead of moving
across the banner in five or six frames, the saucer takes three steps from when it
first appears to when it stops moving, but still seems to fill the intervening space.
Without the Motion Trail filter, spacing the saucer so far apart would give it the
appearance of disappearing and reappearing instead of moving.
This second Mundane Magazine banner reuses elements from the banner createdearlier in this chapter. Creating banner ad “sequels” is a pretty common practice,building on the recognition of an earlier ad.
You can also make objects seem to be moving more quickly by altering their
opacity settings. The motion-blurred saucers in Figure 24-7 have an opacity setting
of 70 percent. Experimenting with the opacity setting and the controls in the Eye
Candy 4000 LE Motion Trail filter can lead to impressive results.
Tip
313662-1 ch24.F 8/2/02 2:58 PM Page 794
Fireworks Seminar

795Chapter 24 ✦ Animating Banner Ads
Figure 24-8: The saucer seems to quickly fly across the banner, at the meager expense of just three frames.
Find the animated GIF banner ad detailed in this section, as well as the FireworksPNG file, on the accompanying CD-ROM.
SummaryBanner ads are a practical and popular application of the animated GIF. When
creating banner ads in Fireworks, keep these things in mind:
✦ Standard sizes exist for banner ads. Before you create a banner ad, make sure
that you’ve selected the correct size so that your banner ad can be used on
the widest variety of Web sites.
✦ Many Web sites have upper limits on the file sizes accepted. Generally, banner
ads should be under 12K.
✦ Use motion blur to cut out frames without slowing down the action.
In the next chapter, you look at customizing Fireworks.
✦ ✦ ✦
On theCD-ROM
313662-1 ch24.F 8/2/02 2:59 PM Page 795
Fireworks Seminar

313662-1 ch24.F 8/2/02 2:59 PM Page 796
Fireworks Seminar

Programmingwith Fireworks
One of the most amazing things about Fireworks MX
is the way it can be controlled by scripts written in
JavaScript, the most common scripting language for Web
authoring. Fireworks offers many ways to customize the way
you work with the program. In Part VII we look at each of
them and discover the extensive Fireworks JavaScript API
(Application Programming Interface). The final chapter
explores the brave new world of Fireworks extensions and
describes how you can use Flash to create user interfaces for
such commands.
✦ ✦ ✦ ✦
In This Part
Chapter 25CustomizingFireworks
Chapter 26Building FireworksExtensions
✦ ✦ ✦ ✦
P A R T
VIIVII
323662-1 Part07.F 8/2/02 2:59 PM Page 797
Fireworks Seminar

323662-1 Part07.F 8/2/02 2:59 PM Page 798
Fireworks Seminar

CustomizingFireworks
Web development has become an incredibly diverse
field. It spans the range from the person building
a personal home page, all the way to incredibly complex
Web applications that generate pages on the fly and provide
functionality that has traditionally only been found in stand-
alone applications. With the variety of technologies in use on
the Web today, imagining a Web development tool that could
be all things to all people, without demonstrating an amazing
degree of flexibility, is hard.
Macromedia has certainly demonstrated with Fireworks
that it believes an extensible Web tool is a good Web tool.
Almost every feature can be accessed through the extensive
JavaScript API, and many features are executed in easy-to-
modify HTML and JavaScript. Preferences are easily exposed
in a simple text file. Extensions are added by dropping them in
the appropriate subfolder of the Configuration folder, inside
the Fireworks program folder.
In this chapter, I show you some of the ways that you can
customize Fireworks and create your own ultimate Web
graphics editor.
Using the HTML andJavaScript Engine
Part of the explosive growth of the Web is due to the relative
accessibility of the underlying code. HTML is — as programming
languages go — extremely easy to learn and abundantly
available. Whereas JavaScript is more difficult, it is far more
open than any compiled programming language, such as C or
C++. The Fireworks engineers applied this accessibility to a
novel approach: Portions of Fireworks itself are written in HTML
and JavaScript, stored as simple text files in subfolders of
Fireworks’ Configuration folder.
2525C H A P T E R
✦ ✦ ✦ ✦
In This Chapter
The HTML andJavaScript engine
The Configurationfolder
Adding newextensibility files
Fireworks Preferencesfile
✦ ✦ ✦ ✦
333662-1 ch25.F 8/2/02 2:59 PM Page 799
Fireworks Seminar

800 Part VII ✦ Programming with Fireworks
Fireworks uses JavaScript and HTML templates to output JavaScript and HTML
code; scripts that automate tasks in Fireworks are written in JavaScript. This open
approach makes it easy for Web designers to customize many aspects of their
Fireworks workflow completely.
Scriptlets are stand-alone JavaScript files that run on Fireworks itself. They can be
placed in Fireworks’ Commands folder and run from the Commands menu, run with
the Commands ➪ Run Script command, or opened like any Fireworks document —
with a double-click. Scriptlets have their own icon, as shown in Figure 25-1. Double-
clicking a scriptlet, or dropping it onto the Fireworks icon, launches Fireworks and
executes the scriptlet.
Figure 25-1: Fireworks scriptlets — JSF files — are stand-alone JavaScripts that run on Fireworks.
On Windows machines, scriptlets are their own file type, with the .jsf filename
extension. Create or edit a scriptlet as a regular text file, and then change the
filename extension from .txt to .jsf when you’re ready to run it.
On the Mac, a scriptlet is a text file with a Fireworks Creator code, just as a
Fireworks document is a PNG image with a Fireworks Creator code. Compile the
following AppleScript as an application in Script Editor, and drop files on it to
convert them to Fireworks’ Creator code. Dropping a text file marks the text file
as a scriptlet; dropping a PNG image marks it as a Fireworks PNG document.
Alternatively, use a utility, such as File Buddy or FinderPop, to change Mac Creator
and/or File Type codes.
on opentell application “Finder”set creator type of every file of selection to “MKBY”
end tellend open
333662-1 ch25.F 8/2/02 2:59 PM Page 800
Fireworks Seminar

801Chapter 25 ✦ Customizing Fireworks
You can use scriptlets to do an amazing range of tasks. Anything that the Fireworks
API can access is fair game, and that’s a fair number of things. Scriptlets can change
preference settings, automate tasks, batch process files, and more.
Scriptlets are also commands. Placing scriptlets in the Commands folder and
choosing their name from the Commands menu runs them from within Fireworks.
Alternatively, you can run a scriptlet from within Fireworks by choosing Commands
➪ Run Script and navigating to a scriptlet within the Open dialog box that follows.
To make your own scriptlets, study the JavaScript API in Chapter 26.
Examining the Configuration FolderStarting with the MX version, Dreamweaver is compatible with multiple-user
operating systems including Windows NT, 2000, and XP as well as Mac OS 9 and
Mac OS X. This compatibility means that multiple users can work with a single
installation of the program but maintain their own preferences and configuration.
To achieve such flexibility, Dreamweaver maintains customized files in a special
folder for each user. These folders are stored in different locations according to the
operating system. Under multiple-user systems, the folders are within the specified
user folder, designated by the user’s ID or login name as shown in Table 25-1 and
Table 25-2. You may wish to refer to these tables are you proceed through the chapter.
Table 25-1Default Windows User File Locations
Operating Multiple Default LocationSystem Users
Windows 98 No C:\Windows\Application Data\Macromedia\Fireworks MX
Windows 98 Yes C:\Windows\Profiles\<username>\Application Data\Macromedia\Fireworks MX
Windows ME No C:\Windows\Application Data\Macromedia\Fireworks MX
Windows ME Yes C:\Windows\Profiles\<username>\Application Data\Macromedia\Fireworks MX
Windows NT — C:\WinNT\Profiles\<username>\Application Data\Macromedia\Fireworks MX
Windows 2000 — C:\Documents and Settings\<username>\Application Data\Macromedia\Fireworks MX
Windows XP — C:\Documents and Settings\<username>\Application Data\Macromedia\Fireworks MX
Cross-Reference
333662-1 ch25.F 8/2/02 2:59 PM Page 801
Fireworks Seminar

802 Part VII ✦ Programming with Fireworks
Table 25-2Default Macintosh User File Locations
Operating Multiple User Type Default LocationSystem Users
Mac OS 9 No — Macintosh HD/System Folder/Application Support/Macromedia/Fireworks MX
Mac OS 9 Yes Admin Macintosh HD/System Folder/Preferences/Macromedia/Fireworks MX
Mac OS 9 Yes User Macintosh HD/Users/<username>/Preferences/Macromedia/Fireworks MX
Mac OS X — — Macintosh HD/Users/<username>/Library/Application Support/Macromedia/Fireworks MX
The geographic heart of Fireworks’ extensibility and customization is the
Configuration folder, shown in Figure 25-2. You can find the Configuration folder
within your Fireworks program folder as well as in the Configuration folder within
your user folder on a multiple-user OS. Subfolders of the Configuration folder
contain files that relate in a certain way to extending a particular feature of
Fireworks. Placing additional files in these folders can add new textures to your
texture list, more commands to your Commands menu, additional Flash panels to
your Window menu, or more plug-ins to your Filters menu. Many of these files are
text files containing HTML and JavaScript that you can easily customize.
Figure 25-2: The Configuration folder is the place to add custom files.
333662-1 ch25.F 8/2/02 2:59 PM Page 802
Fireworks Seminar

803Chapter 25 ✦ Customizing Fireworks
Dreamweaver users have long been making and trading Dreamweaver objects,
Behaviors, and commands on the Web. Some of the same sources for Dreamweaver
extensions are good for Fireworks commands, templates, and other files. There are
some Fireworks-only spots, as well. Some good sources include the following:
✦ Macromedia’s Fireworks Exchange at http://www.macromedia.com/exchange/ (click on Fireworks)
✦ Joseph Lowery’s Fireworks, etc. at http://www.idest.com/fireworks/
✦ Derren Whiteman’s Fireworks page at http://www.derren.com/geek/fireworks/
✦ Kleanthis Economou’s http://www.projectfireworks.com/
✦ Massimo Foti’s excellent site at http://www.massimocorner.com/
As well as using extensions created by others, you can, of course, create your own.
Modifying existing code is the easiest way to get quick results and better understand
Fireworks capabilities. Always work on a copy of the file you are customizing, so that
the original is still available, though.
Batch CodeLocated only in the Configuration folder within the Fireworks program folder, the
Batch code templates are placed in the Batch Code folder. By default, the Batch
Code folder contains just two files: BatchGen.jst and BatchTemplate.jst.
Command PanelsThis folder can be found in both the Fireworks Configuration folder as well as
within the user folder if you’re running a multiple-user OS. Third-party Flash panel
commands are stored in the Command panels folder. The ones in the Fireworks
Configuration folder show up for all users while files in the specific user’s
Command Panels folder are only available to that particular user.
CommandsAvailable in the Fireworks Configuration folder as well as your user folder, the
Commands folder contains scriptlets. Each scriptlet in the Commands folder
appears as a menu command in Fireworks’ Commands menu.
Open a Command scriptlet in a text editor, or in Dreamweaver’s Code view, and
you’ll see that it contains simple JavaScript code. Almost every feature of Fireworks
is accessible through the Fireworks JavaScript API. Custom Functions such as
dom.applyEffects() and dom.setDocumentCanvasSize() give commands the
capability to automate otherwise repetitive tasks, extending the native Fireworks
feature set. Even with all that, my favorite thing about commands is that you don’t
even have to write code to make them, thanks to the History panel.
333662-1 ch25.F 8/2/02 2:59 PM Page 803
Fireworks Seminar

804 Part VII ✦ Programming with Fireworks
By default, Fireworks includes 24 commands organized into 4 folders, with 6
individual commands in the Commands folder itself. New commands are added
by dropping files into the Commands folder or by installing extensions using the
Extension Manager. Any scriptlet within the Commands folder itself, or within
subfolders one level down, are displayed in the Commands menu in Fireworks,
so that you can run them by choosing a menu item. New additions are immediately
available without restarting Fireworks.
Find out more about commands in Chapter 19, and study the Fireworks API inChapter 26.
ExtensionsThis folder contains files used by the Extension Manager to install third-party
commands. You should not touch the files within this folder because the Extension
Manager needs them to remove or disable any installed commands.
jsextensionsMost computer programs are written in the C or C++ languages, and compiled
into impenetrable object form before release. Fireworks leaves many functions
accessible by JavaScript. More JavaScript functionality can be added through the
use of C Libraries, added to Fireworks by dropping them into the jsextensions
folder. By default, this folder contains the MMNotes extension.
Export SettingsThe Export Settings folder, located in your user folder for multiple-user operating
systems, is empty by default. When you save export settings as a preset in the
Optimize panel — using the Save Settings command on the Options menu —
Fireworks creates a similarly named text file in the Export Settings folder. The file
contains a description of the saved setting that you can copy to another machine
in order to standardize export settings across a workgroup, for example.
HTML codeFireworks HTML output templates are stored in the HTML Code folder in the
Configuration subfolder within the Fireworks application folder. HTML output
templates are HyperText templates (.htt) that tell Fireworks how to create a
particular “flavor” of HTML. For example, outputting HTML from Fireworks using
the Dreamweaver template creates a file that fools Dreamweaver into thinking that
it’s a home-cooked Dreamweaver page.
Templates are stored within a subfolder of the HTML Code folder, with the folder
name specifying the name of the template. By default, Fireworks offers
Dreamweaver, GoLive, FrontPage, and Generic output (see Figure 25-3).
Cross-Reference
333662-1 ch25.F 8/2/02 2:59 PM Page 804
Fireworks Seminar

805Chapter 25 ✦ Customizing Fireworks
Figure 25-3: The subfolders of the HTML Code folder specify your HTML output options within Fireworks.
Because HTML Code templates are standard HTML and JavaScript, modifying a
default template, or creating your own from scratch, is possible.
To enable a new template, follow these steps:
1. Using Windows Explorer or the Macintosh Finder, create a new folder within
the HTML Code folder. The new folder should have a unique name to identify
the template easily.
2. Name your new or modified template slices.css and place it into your new
folder.
3. In Fireworks, choose File ➪ HTML Setup to display the HTML Setup dialog box.
4. On the General tab, choose your new template from the HTML Style option
list. Click OK when you’re done.
Restarting Fireworks to use the newly installed template is not necessary.
For more about the HTML Setup dialog box, see Chapter 3.
LibrariesThe Libraries folder, located in the Configuration subfolder within the Fireworks
application folder, contains Fireworks PNG images that typically contain Symbol
Libraries. The Libraries folder contains just four files, initially, containing example
Cross-Reference
333662-1 ch25.F 8/2/02 2:59 PM Page 805
Fireworks Seminar

806 Part VII ✦ Programming with Fireworks
animations, bullets, buttons, and themes. Symbol Libraries are regular Fireworks
documents that contain symbols, created by exporting symbols from the Library
panel. You can convert commonly used buttons, graphics, and clip art into symbols
and store them in Symbol Libraries. Symbol Libraries that you place in the Libraries
folder are easily accessed within Fireworks from the Edit ➪ Libraries submenu,
which displays each file as a menu item.
Explore Libraries in Chapter 17.
Nav MenuStyles stored in the Nav Menu folder, in the user folder on multiple-user operating
systems, are available to the Set Pop-Up Menu Behavior, for use when creating
pop-up menus. Copy style files from the Configuration/Styles folder, or export
individual styles from the Styles panel and save them in Configuration/Nav Menu.
See Chapter 21 for more about the Set Pop-up Menu behavior.
PatternsPatterns are full-color images saved in standard Fireworks PNG format. Initially, the
Patterns folder contains 46 Patterns, featuring things such as bricks, jeans, and
wood. You can create any image in Fireworks and save it in the Patterns folder. After
a Fireworks restart, it’s available for use as a Pattern from the Patterns option list in
the Fill panel. The Patterns folder is located in the Configuration subfolder within
the Fireworks Application folder.
I detail Patterns in Chapter 11.
StylesFireworks Style files are given the filename extension .stl and, on the Mac, have the
file type STYf.
Although the Styles panel contains numerous default Styles, you can easily store
many Styles in one Fireworks Style file. Although Style files are typically stored in
the Styles folder, within the user folder on multi-user systems, that doesn’t make
them immediately accessible within Fireworks. To use the Styles from a particular
Style file, import the file using the Styles panel.
When you first install Fireworks, the Styles folder contains one file called Style
Defaults.stl. As the name implies, this file contains the default Styles that you can
Cross-Reference
Cross-Reference
Cross-Reference
333662-1 ch25.F 8/2/02 2:59 PM Page 806
Fireworks Seminar

807Chapter 25 ✦ Customizing Fireworks
reload into the Styles panel by choosing Reset Styles from the Styles panel Options
menu. Copy the Style Defaults.stl file to another name, and replace it with your own
favorite to make those favorites quickly accessible with the Reset Styles command.
I cover Styles in Chapter 16.
TexturesThe Textures folder, within the Fireworks application’s Configuration folder,
contains Fireworks PNG images that are used as textures in Fireworks. Files in
the Textures folder show up as textures on the Textures option list in the Fill and
Stroke panels.
Textures are images that are overlaid on objects in Fireworks, using the Fill section
of the Property inspector to give the appearance of a textured surface. Although
the images themselves can be full color, a texture is always converted to grayscale
when it’s applied in Fireworks. PNG images you add to the Textures folder are
available for use after a Fireworks restart. Fireworks includes 49 textures by default,
including things like sand, grass, and smoke.
Learn to create your own textures in Chapter 11.
URL LibrariesWhen you first install Fireworks, the URL Libraries folder (in the user folder for
systems supporting multiple users) contains the single, completely empty file
called URLs.htm.
An important part of any Web development is obviously the creation and management
of hyperlinks. Rather than laboriously typing URL after URL into Fireworks whenever
they’re needed, you can list them in an HTML document and drop the document into
the URL Libraries folder. Access the file from the URL Panel and easily apply URLs to
Web objects by pointing and clicking.
Find out more about URL Libraries in Chapter 18.
Plug-InsThe Plug-Ins folder contains Fireworks Filters and Photoshop-compatible effects
plug-ins. Adding Photoshop plug-ins to Fireworks is as simple as dropping them —
or shortcuts (aliases) to them somewhere else on your computer — into the Filters
folder. Typically, they live in their own subfolders. Where they sit on the Filters
Cross-Reference
Cross-Reference
Cross-Reference
333662-1 ch25.F 8/2/02 2:59 PM Page 807
Fireworks Seminar

808 Part VII ✦ Programming with Fireworks
menu is determined by settings contained within the plug-ins themselves. Restart
Fireworks after adding plug-ins, and access them from the Filters menu or the
Effects section of the Property inspector.
Initially, the Plug-Ins folder contains the Eye Candy 4000 LE and Splat! Photoshop-
compatible filters. While this folder is in the Fireworks application folder, and not
within its Configuration folder, it is covered here as it behaves in a similar manner
to those previously mentioned.
I cover Filters in Chapter 12.
Looking at the Fireworks MX Preferences FileFireworks offers you a graphical look into its preference settings with the
Preferences dialog box, accessed within Fireworks by choosing Edit ➪ Preferences.
Although the choices it offers are extensive, they are just a subset of the complete
preference settings contained in the Fireworks Preferences file.
Chapter 3 details the Preferences dialog box.
The Fireworks Preferences file is found in different locations depending on your
operating system. To determine the location of your Preference file, please see
Table 25-1 and Table 25-2 earlier in this chapter.
In Windows, the Fireworks MX Preferences file is called Fireworks MXPreferences.txt in the Fireworks MX user folder. Also note that some versions ofWindows are set to hide the last four characters of filenames by default, so the filemay appear to be called simply Fireworks MX Preferences.
Be sure to make backup copies of the preceding files before altering them in anyway, in order to avoid losing your personal preference settings in Fireworks.
The Preference file itself is a standard XML file that one could create in
Dreamweaver. As such, it’s best to view, and edit, it using Dreamweaver, or another
Web editor that understands XML. This way you’re certain that the file is saved
properly once you’ve made your changes. To change a particular preference
setting, find its keyword and alter the value next to it. Make sure not to add line
breaks or otherwise alter the formatting of the file. Save the file when you’re done
and restart Fireworks.
As you can imagine, changing preference values haphazardly can prove verydisruptive to the program. Many of the preferences are not intended to be altered bythe user, such as the DragTab positions. If you ever mistakenly damage your prefer-ences, you can restore the defaults by deleting (trashing) the Fireworks Preferencesfile and restarting Fireworks. Fireworks creates a new default preferences file.
Caution
Caution
Note
Cross-Reference
Cross-Reference
333662-1 ch25.F 8/2/02 2:59 PM Page 808
Fireworks Seminar
809Chapter 25 ✦ Customizing Fireworks
The other approach to altering the Fireworks Preferences file is to attack it with the
Fireworks API. The getPref() and setPref() methods of the Fireworks object (fwor fireworks) enable you to read or alter any preference setting. For example, the
following code pops up a dialog box with the path to the Primary Browser:
alert(fw.getPref(‘PrimaryBrowser’));
Note that the specific preference setting is passed as a string. Just as you can get a
preference with fw.getPref(), you can set a preference with fw.setPref(). The
following code uses setPref() to tell Fireworks not to ever ask the user to register:
fw.setPref(‘NeverBugForRegistration’, ‘true’);
You could use the preceding techniques to create a scriptlet that offers the user a
list of browsers and asks them to choose a primary and secondary, or to create a
command that simply changes the primary and secondary browsers from two
version 5 browsers to two version 4 browsers, depending on the browser generation
you’re targeting. Of course, another similar command could change them back.
SummaryFor me, the true power of any tool is demonstrated when it adapts to my own way
of working. You can greatly extend Fireworks with custom commands, scriptlets,
and more. When customizing Fireworks, keep these points in mind:
✦ You can extensively customize Fireworks just by including files in subfolders
of the Configuration folder — adding commands, Filters, and more.
✦ Scriptlets are stand-alone JavaScript files that run on Fireworks. In Windows,
all scriptlets must have the filename extension .jsf. On Macintosh, scriptlets
should have the Fireworks Creator code of MKBY and the File Type code
of TEXT.
✦ Fireworks stores your preferences in a standard XML file that you can modify
in Dreamweaver, edit with another XML-compatible editor, or alter through
the use of scriptlets and commands.
In the next chapter, you look closely at the Fireworks JavaScript API.
✦ ✦ ✦
333662-1 ch25.F 8/2/02 2:59 PM Page 809
Fireworks Seminar

333662-1 ch25.F 8/2/02 2:59 PM Page 810
Fireworks Seminar

BuildingFireworksExtensions
How is a graphics engine like Fireworks able to process
JavaScript code? Fireworks has a JavaScript 1.4
interpreter built in. JavaScript is the Web scripting lingua
franca, and as such, is an excellent choice for a scripting
language for controlling Web development tools. The
Fireworks JavaScript API (application programming interface)
includes an amazing array of special objects with properties
and methods for accessing, controlling, and modifying a
Fireworks document.
But all that power under the hood doesn’t really do any
good if you don’t have a way to control it. Until Fireworks
MX, user interface possibilities were severely limited — a
single-line text field prompt was the only method of gathering
user input. However, Fireworks MX introduced the capability
to incorporate a Flash movie interface and now, the possibili-
ties are endless.
Keep these points in mind as you work through this chapter:
✦ This chapter deals with advanced HTML and JavaScript
concepts. If you’re just getting started with JavaScript,
you might want to keep a good resource nearby as you
look over this chapter. I like and use JavaScript Bible, 4thEdition, by Danny Goodman, published by Wiley
Publishing.
✦ Throughout this chapter, I followed certain conventions
in the descriptions of each Fireworks API item. Arguments
for methods are italicized; optional arguments are in
square brackets.
2626C H A P T E R
✦ ✦ ✦ ✦
In This Chapter
Fireworks extensions
Nonstandard datatypes
Fireworks API
Developingcommands
✦ ✦ ✦ ✦
343662-1 ch26.F 8/2/02 2:59 PM Page 811
Fireworks Seminar

812 Part VII ✦ Programming with Fireworks
✦ Because of the great number of objects and methods that the Fireworks
API now includes, you are occasionally referred to Macromedia’s Extending
Fireworks documentation, which is available in PDF on your Fireworks
installation CD-ROM, or on the Fireworks Web site at www.macromedia.com/software/fireworks/extensibility.html; a hard-copy version of
Extending Fireworks is also available for ordering.
Building a User Interface in FlashFireworks MX includes a special version of the Flash player, which allows
communication between a Flash movie and Fireworks — and thus forms the
foundation of a Flash user interface. All of the flexibility of Flash MX now becomes
available to the Fireworks extension developer: components, enhanced XML
handling, and even video.
The new Flash command capability is evident throughout Fireworks MX. Most ofthe commands in the shipping version of the program are Flash commands. Flashreally lends itself to interface design and almost anything is possible. Take a lookat the different interfaces in some of the commands: Add Arrowheads, Add PictureFrame, Twist and Fade, and the Data-Driven Graphics Wizard to name a few.
Here’s a very general overview of the process for developing Flash commands for
Fireworks:
✦ Create the interface in Flash, as shown in Figure 26-1, and save as an .fla file.
✦ Code ActionScript to gather the various user input values.
✦ Add Fireworks-specific functions to the ActionScript.
✦ Publish the Flash movie as an .swf file.
✦ Store the .swf file in either the Fireworks Commands or Command Panels
folder.
Of course, there’s an awful lot of experimentation, debugging, and testing that goes
on during the development process. But the most important aspects of Fireworks-
Flash communication are handled by just two functions as you’ll see in the following
sections.
Executing Fireworks functionsThe key to this cross-application connectivity is a single API function only available
in the special Flash player embedded in Fireworks: MMExecute(). The MMExecute()function, written in ActionScript, performs the Fireworks function passed as an
argument and returns the resulting value as a string. This functionality effectively
opens up the entire scope of Fireworks extensibility to the Flash user interface.
NewFeature
343662-1 ch26.F 8/2/02 2:59 PM Page 812
Fireworks Seminar

813Chapter 26 ✦ Building Fireworks Extensions
Figure 26-1: The Fireworks Fade Image command started out as a Flash movie.
Let’s take a look at how it works. Here’s the standard Fireworks JavaScript for
placing an oval on the page:
fw.getDocumentDOM().addNewOval({left:309, top:74, right:424, bottom:189});
Now here’s how you would do the same thing as a Flash command, in ActionScript:
MMExecute(“fw.getDocumentDOM().addNewOval({left:309, top:74, right:424,bottom:189});”)
Note that the entire JavaScript function is quoted and passed as an argument to the
MMExecute() function.
If the Fireworks JavaScript includes quotes, surround the argument with singlequotes instead, as in this example:
MMExecute(‘fw.getDocumentDOM().setHotspotColor(“hotspots”,”#ff00ff”);’);
If necessary, quotes may also be escaped using the backslash character.
Tip
343662-1 ch26.F 8/2/02 2:59 PM Page 813
Fireworks Seminar

814 Part VII ✦ Programming with Fireworks
Finishing a commandOther than MMExecute(), one other key API function is used by Flash commands:
MMEndCommand(). The MMEndCommand() takes two arguments, endStatus and
notifyString like this:
MMEnd(endStatus, notifyString);
where endStatus is either true or false; true if the command should be executed,
false if the command should be canceled. The notifyString argument is only used
if endStatus is false and you want to alert the user to an error. So, a complete
ActionScript function to place the oval in our earlier example might look like this:
function doCommand() {MMExecute(“fw.getDocumentDOM().addNewOval({left:309, top:74, right:424,
bottom:189});”)MMEndCommand(true,””);
}
Here’s an example of a function linked to a Cancel button:
function cancelCommand() {MMEndCommand(false,””);
}
Integrating Flash inputOf course, the whole point of having a Flash user interface is to gather input from
the user. To pass values from Flash to Fireworks using the MMExecute() function,
you need to concatenate the Flash variables — which contain the user-supplied
values — with the JavaScript function. In this example, the Flash movie has two text
input fields, one for the left value (leftField) and one for the top (topField).
After converting the entered text values to numbers via the parseInt() function,
the user values are passed to Fireworks:
theLeft = parseInt(leftField.text);theTop = parseInt(topField.text);MMExecute(“fw.getDocumentDOM().addNewOval({left:” + theLeft + “, top:” +
theTop + “, right:424, bottom:189});”);
For certain Fireworks functions, a far simpler, more direct approach is available by
installing the API wrapper extension for use in Flash. See the sidebar, “Rapid
Fireworks Coding in Flash” for more details.
Debugging Flash commandsNo one writes perfect code the first time through when working with just one
application — and cross-application coding can be doubly difficult. This difficulty is
343662-1 ch26.F 8/2/02 2:59 PM Page 814
Fireworks Seminar

815Chapter 26 ✦ Building Fireworks Extensions
even more pronounced when there is little or no feedback while the command is
running. One technique that many developers use in this situation is the judicious
placement of the alert() function. While this is effective for revealing single
variables, it can be time-consuming to write alert() statements for large sections
of code.
Rapid Fireworks Coding in Flash
While the MMExecute() function syntax is workable, it’s not the most elegant. Quoting andconcatenating values can become quite a chore. The Fireworks Commands Wrapper hasbeen developed to integrate better with ActionScript and is available as an extension on theFireworks CD-ROM from Macromedia as well as online at the Macromedia Exchange. Toinstall the Fireworks Commands Wrapper in Flash, choose Help ➪ Manage Extensions toopen the Extension Manager. In the Extension Manager, choose File ➪ Install Extension andlocate the Fireworks Commands Wrapper.mxp file.
Once installed, you’ll notice a new category in the Components panel: FW CommandComponents. Many of these components — such as the Checkbox and Pushbutton —are duplicates of the standard Flash elements but with a Fireworks look-and-feel. Onecomponent, however, is not intended to be seen when included in a Flash movie. Whenyou drag the Fireworks API Wrapper component into the first frame of the Flash movie — itdoesn’t even have be on the stage — ActionScript is extended to include the fwapi object.The fwapi object is used in place of MMExecute() and with much less fuss.
To create a new oval using fwapi, the code would look like this:
fwapi.addNewOval({left:309,top:74,right:400,bottom:150});
While this may not seem like much savings over the MMExecute() method, consider whathappens when you parameterize the same function:
fwapi.addNewOval({left:theLeft,top:theTop,right:400,bottom:150});
Note the complete lack of complex quoting and concatenation; it’s all handled by thefwapi object.
There are over 200 functions available in the fwapi object. The easiest way to see if thedesired function is available is to enter in ActionScript the term fwapi and then pressperiod to begin the dot notation coding. A complete list of the available functions is thendisplayed in a pop-up window in ActionScript. As you begin typing the name of the desiredfunction, the list automatically scrolls to the closest match. If you find the function you’relooking for, press Enter (Return) to complete the code. Entering the opening parenthesesdisplays any available code hints for the function’s arguments.
The fwapi object and MMExecute functions can be used in the same movie and even in thesame function without penalty.
343662-1 ch26.F 8/2/02 2:59 PM Page 815
Fireworks Seminar

816 Part VII ✦ Programming with Fireworks
Fireworks offers a handy way to see all the commands as they are being sent fromFlash in a system alert. Place the fw.enableFlashDebugging() functionbefore the code you need to debug and fw.disableFlashDebugging() afterit and every Fireworks statement received for processing is revealed. Thesecommands save you the extra steps involved in having to specify each of thestatements in a separate alert().
The debugging commands must be passed within an MMExecute() function,
as follows:
MMExecute(“fw.enableFlashDebugging();”);[ActionScript and Fireworks code goes here...]MMExecute(“fw.disenableFlashDebugging();”);
Use these Flash debugging commands judiciously as each and every Fireworks
statement appears in a JavaScript alert, which must be dismissed before continuing.
For a different debugging approach, try John Dunning’s Fireworks Log extension,available on the CD-ROM under Additional Extensions. The Fireworks Log appearsas a Commands panel and remains visible while the command is processing. Oncethe fwlog.as file is included in the ActionScript source, any variable or informationpassed with the fwlog function appears in the Commands panel in a scrolling textfield. With this technique, you don’t have to dismiss alert dialog boxes and theinformation is always available — until you choose to clear the Fireworks Log, ofcourse.
Storing Commands and Commands panelsTwo different types of Flash commands are possible in Fireworks, modalcommands such as Add Arrowheads, or modeless commands such as the Align
panel. A command is said to be modal when the dialog box must be dismissed —
either by executing or canceling the command — before program execution can
resume. Modeless panels, on the other hand, may remain open during the normal
running of the program.
Modal commands — also just called commands — are different from modeless
command panels in their coding. Commands typically include buttons for executing
or applying the user settings as well as a button for canceling the command without
affecting the page. Commands panels do not have such buttons and rely on the
system options for closing and opening the panel.
If you’re using the Flash components — particularly the pushbutton one — you maynotice that their appearance seems off. Text in the pushbutton, for example, ishorizontally cut off. You can correct this by changing the movie’s scaleMode inyour ActionScript with this code:
Stage.scaleMode = “noScale”;
This code will also keep your movie from being rescaled by the user.
Tip
On theCD-ROM
NewFeature
343662-1 ch26.F 8/2/02 2:59 PM Page 816
Fireworks Seminar

817Chapter 26 ✦ Building Fireworks Extensions
How does Fireworks know whether an extension is a command or a Commands
panel? By where it is stored. Commands are in the Configuration/Commands folder
while Commands panels are in — you guessed it — the Configuration/Commands
Panel folder.
If you’re packaging your Fireworks extensions with the Extension Manager, use thedestination attribute of the file tag to direct your command or Commandspanel into the proper folder. For example, the following places a fictitiousextension called EdgeMaker into the Commands panels folder:
<file source=”EdgeMaker” destination =“$fireworks/configuration/command panels/”/>
Fireworks API OverviewThe Fireworks API employs both static methods and properties, as well as instancemethods and properties. A static method or property (also called a class method or
property) is associated with the object itself, rather than an instance or copy of the
object. As the name implies, an instance method or property is associated with an
instance of the object. Instance methods and properties can therefore use the thiskeyword.
Examining Nonstandard Data TypesBecause Fireworks deals with graphics-related objects — for example, masks and
specific Fireworks settings, such as resolution, that aren’t commonly accessed
with JavaScript — some common ways to format this data are required. Macromedia
provides guidelines for formatting colors, file URLs, masks, matrices, points,
rectangles, and resolution.
ColorsColors are specified in the Hexadecimal RGB (red-green-blue) color model, which is
one of the models accessible from the Color Mixer panel in Fireworks. This is the
standard method for defining colors in HTML, and is formatted “#RRGGBB,” where
each color channel is written with a hexadecimal number. For example, pure red is
#FF0000. Additionally, you can specify an alpha channel by adding an extra
hexadecimal number in the format #RRGGBBAA.
If the alpha channel value is not specified, Fireworks automatically assumes that thealpha channel is fully opaque. For example, a solid red fill color with a hexadecimalvalue of #FF0000 is interpreted by Fireworks to have a value of #FF0000FF.
Note
Tip
343662-1 ch26.F 8/2/02 2:59 PM Page 817
Fireworks Seminar

818 Part VII ✦ Programming with Fireworks
File URLsFireworks specifies filenames and pathnames in scripts as file URLs. For example,
the Windows path to the Fireworks Commands folder
C:\Program Files\Macromedia\Fireworks 4\Configuration\Commands
looks like this when written as a file URL:
file:///C|Program%20Files/Macromedia/Fireworks%204/Configuration/Commands
Note that all slashes are forward slashes, and that the pipe character (|) replaces the
colon after the drive letter, and the %20 escape code is substituted for the space.
On a Mac, the path to the Commands folder would be written like this (if the hard
drive were named Grover):
Grover:Applications:Macromedia Fireworks4:Configuration:Commands
As a file URL, it’s written like this:
file:///Grover/Applications/Macromedia%20Fireworks%204/Configuration/Commands
Again, %20 is substituted for a space, and forward slashes are used.
When you’re writing scripts to be cross-platform, use the platform property of thefw object to determine whether your script is running on Windows or Macintosh,and write file URLs appropriately.
MasksAlpha masks are defined using the following properties:
✦ maskBounds specifies a rectangle, which is the area of the mask.
✦ Choose from five types of masks with maskKind: rectangle, oval, zlibcompressed, rle compressed, or uncompressed.
✦ maskEdgeMode is either “hard” or “antialiased”.
✦ The value for featherAmount is a number between 0 and 1,000, representing
the feather value in pixels. A value of 0 means no feathering.
✦ For rectangle and oval masks, the maskData value is ignored. For other
masks, maskData should contain 8-bit mask data in hexadecimal format.
Masks are specified in the format {maskBounds: rectangle, maskKind: string,
maskEdgeMode: string, featherAmount: int, maskData: hex-string}.
Tip
343662-1 ch26.F 8/2/02 2:59 PM Page 818
Fireworks Seminar

819Chapter 26 ✦ Building Fireworks Extensions
MatricesIn programming, computer graphics are described using a three-by-three array of
numbers called a matrix. In Fireworks, the format for a matrix is {matrix: [float,float, float, float, float, float, float, float, float]}. Discussion of matrices is beyond the
scope of this book.
PointsSpecify a point in the format {x: float, y: float}. For example, when the Pen tool is
used, the placement of the initial point is coded like this:
fw.getDocumentDOM().addNewSinglePointPath({x:124, y:37},{x:124, y:37}, {x:124, y:37}, true);
In this example, all three point coordinates are the same and correspond to the
preceding Bezier control point, the point itself, and the following Bezier control
point.
In the previous example, and throughout the book, the code fw.getDocumentDOM() is used to refer to the current active document in Fireworks.
RectanglesDefine a rectangle {left: number, top: number, right: number, bottom: number}.
If, for example, I draw a rectangle 100×50 pixels, starting at the upper-left corner
(0, 0 coordinates), the code looks like this:
fw.getDocumentDOM().addNewRectanglePrimitive({left:0, top:0,right:100, bottom:50}, 0);
Another function, addNewRectangle(), takes the same arguments. Elements
created with addNewRectangle() are closed paths in rectangle form; if one corner is
dragged, the path is reshaped. Objects created with addNewRectanglePrimitive(),
however, are true rectangles. If a corner is dragged, the object rescales, remaining a
rectangle.
ResolutionThe format for specifying resolution with the Fireworks API is {pixelsPerUnit:
number, units: [“inch” or “cm”]. Setting the resolution of the current document to
72 dpi is accomplished with this code:
fw.getDocumentDOM().setDocumentResolution({pixelsPerUnit:72,units:”inch”})
Note
343662-1 ch26.F 8/2/02 2:59 PM Page 819
Fireworks Seminar

820 Part VII ✦ Programming with Fireworks
Looking at Global MethodsGlobal methods are always available for use in Fireworks scripts. The user interaction
functions are helpful in debugging code and in guiding the user. The two file output
functions —WRITE_HTML() and write()— are only available during an exporting
operation.
alert(message)The alert() method displays a simple dialog box (see Figure 26-2) to the user with
a Fireworks title, a message, and an OK button. The message can be a text string, or
the contents of a variable, or the result of a JavaScript statement. The alert()dialog box must be dismissed before the user can continue; this type of dialog box
is referred to as modal.
Figure 26-2: The alert() method is a simple way to tell the user something.
For example, the following code informs the user that the batch process job is
completed:
alert(“All done!”);
After discovering that the JavaScript engine in Fireworks does not display UTF-8characters correctly, Macromedia developed a special version of the alert()function to be used in Flash commands. The MMAlert() function works exactlythe same as the standard alert() function, except it is only valid in Flashcommands. If you are using the fwapi wrapper object, fwapi.alert() hasbeen engineered to actually use MMAlert() under the hood.
confirm(message)The confirm() method displays a string in a modal dialog box and waits for the
user to select either the OK or Cancel button, as shown in Figure 26-3. The function
returns true if OK is selected and false if the user clicks Cancel.
Note
343662-1 ch26.F 8/2/02 2:59 PM Page 820
Fireworks Seminar

821Chapter 26 ✦ Building Fireworks Extensions
Figure 26-3: Use the confirm() method to get a confirmation from a user during an export or batch processing procedure.
The following code asks whether the user is ready to proceed with a particular
operation; if not, the operation is not carried out:
function doConfirm(curBeh) {var message = “Ready to proceed with integrating “ + curBeh;if (confirm(message)) {doFile(curBeh)}}
fw.yesNoDialog(text)Looking for an alternative to the standard OK/Cancel alert? Fireworks also offers a
dialog box with Yes and No buttons, shown in Figure 26-4. If the user selects Yes,
the function returns true; if No is selected, false is returned. Unlike the other
messaging alternatives, the yesNoDialog() function is not a global method, but a
method of the Fireworks object and so the syntax is slightly different than the
others, as shown in this example:
var theAns = fw.yesNoDialog(“File not found. Continue processing?”);if (theAns != true) {fw.closeDocument(newDoc, false);fw.openDocument(gThePath, false);return;
}
To offset a problem with UTF-8 characters, Macromedia has developed a specialversion of this function to be used in Flash commands, MMYesNoAlert(). TheMMYesNoAlert() function also takes one argument but instead of returning aBoolean, returns string values true or false.
prompt(caption, text)The prompt() method enables the user to enter information in a modal dialog box
(see Figure 26-5) that can be incorporated in the JavaScript code or HTML output.
Note
343662-1 ch26.F 8/2/02 2:59 PM Page 821
Fireworks Seminar

822 Part VII ✦ Programming with Fireworks
The prompt() dialog box includes a text field (with a default value) and OK and
Cancel buttons. If OK is selected, the contents of the text field are returned;
otherwise null is returned.
Figure 26-4: The Yes/No dialog box gives a slightly different interface.
Figure 26-5: The user can type text into the dialog box that’s provided with the prompt()method.
In this example, the code lets the user select the exported slice’s basename during
the script’s runtime:
function getName() {var baseName = “”prompt(“Enter the basename for the slice now being ¬exported.”, baseName)}
Currently, the prompt() method is the only native mechanism available toFireworks extension authors for gathering parameters from a user. Some extensioncreators use multiple prompts or a single prompt with comma-separated values inorder to get user input. One other possible route for advanced extensions is to opena parameter form in Dreamweaver and use its values to run a Fireworks command.
WRITE_HTML(arg1[, arg2, . . ., argN])The WRITE_HTML() method converts each argument to a string and outputs the
string to the currently open HTML file during export. This method is available only
Note
343662-1 ch26.F 8/2/02 2:59 PM Page 822
Fireworks Seminar

823Chapter 26 ✦ Building Fireworks Extensions
when exporting. The arguments are written one after the other, which enables you
to easily concatenate text and variables. To create an end-of-line character, use \n,
which is automatically converted to Carriage Return Line Feed (CR LF) for Windows
and Carriage Return for Macintosh systems. Quotations within the string should be
escaped by prefacing them with the backslash character; therefore, they will be
interpreted as part of the string, rather than as quotations.
For example, the following code writes out the <title> tag for an HTML page using
a supplied filename and the first <meta> tag:
WRITE_HTML(“<title>”, exportDoc.filename, “</title>\n”);WRITE_HTML(“<meta name=\”description\” content=\”Fireworks¬Splice HTML\”>\n”);
If the filename were MuseumPiece, the following code would be output:
<title>MuseumPiece</title><meta name=”description” content=”Fireworks Splice HTML”>
write(arg1[, arg2, . . ., argN])The write() method is exactly the same as the WRITE_HTML() method.
Macromedia recommends that WRITE_HTML() be used instead of write() to avoid
confusion with the document.write() method of JavaScript.
Exploring the Fireworks Global ObjectThe Fireworks global object enables you to manage files, initiate a find-and-replace
operation, report errors in a localized language, and uncover almost any detail
about documents or the current application settings. The key global object is
fireworks, which can be abbreviated as fw. Note that the object is written in
lowercase. The fireworks object and its associated methods and properties are
extremely valuable and used throughout commands, templates, and scriptlets alike.
In previous versions, the App object was the primary global object and, althoughFireworks 4 still supports the App object for backwards compatibility, the objectitself has been deprecated and should not be used in future development.
fwThe fw object accesses information about the Fireworks application as it is
installed on the user’s system. Through the fw object, the programmer can
determine the operating system being used; where specific folders, such as
Commands or Templates, are located; and what files are currently open, among
many other items.
Note
343662-1 ch26.F 8/2/02 2:59 PM Page 823
Fireworks Seminar

824 Part VII ✦ Programming with Fireworks
Two of the most powerful methods of the fw object are the getPref() and
setPref() pair. With these two methods, you can control virtually every aspect
of Fireworks’ interface by setting and restoring options.
PropertiesMost of the properties of the fw object are read-only — you can get them, but you
can’t set them — except for batchStatusString, dismissDialogWhenDone,
progressCountCurrent, and progressCountTotal.
appBatchCodeDirThis property returns the pathname to the Batch Code folder.
appDirThis property returns the pathname to the folder containing Fireworks.
appExportSettingsDirThis property returns the pathname to the Export Settings folder.
appFavoritesDirThis property returns the pathname to the URL Libraries folder.
appHelpDirThis property returns the pathname to Fireworks’ Help folder.
appHtmlCodeDirThis property returns the pathname to the HTML Code folder.
appJsCommandsDirThis property returns the pathname to the Commands folder.
appJsExtensionsDirThis property returns the pathname to the JSExtensions folder.
appMacCreatorA Macintosh identifies which application a particular file belongs to by its Creator
code. On a Mac, the appMacCreator property returns Fireworks’ Creator code
of MKBY.
appMacJsfFileTypeA Mac identifies the file type of a particular document by its embedded File Type
code. On Macintosh systems, TEXT is the File Type code for text files. Because
Fireworks commands and scriptlets are text files, the appMacJsfFileType property
returns the string TEXT.
343662-1 ch26.F 8/2/02 2:59 PM Page 824
Fireworks Seminar

825Chapter 26 ✦ Building Fireworks Extensions
appPatternsDirThis property returns the pathname to the Patterns folder.
appPresetsDirThis property returns the pathname to the Presets folder.
appSettingsDirThis property returns the pathname to the Configuration folder.
appStylesDirThis property returns the pathname to the Styles folder.
appSymbolLibrariesDirThis property returns the pathname to the Libraries folder.
appTexturesDirThis property returns the pathname to the Textures folder.
appXtrasDirThis property returns the pathname to the Plug-ins folder.
batchStatusStringThe batchStatusString property — which is not read-only — is used to display
the current string in the Batch Progress dialog box. You can establish a new message
in the dialog box by setting this property to the desired string. For example, the
following code from the BatchTemplate.jst file displays the filename of each file
as it is being processed:
fw.batchStatusString = Files.getFilename(sourceDocumentPath);
dismissBatchDialogWhenDoneIf you display the Batch Progress dialog box, you can cause it to be dismissed
automatically by setting the dismissBatchDialogWhenDone property — which is
obviously not read-only — to true at some point in the code, as in the following:
fw.dismissBatchDialogWhenDone = true;
documentListThe documentList property returns an array object with a Document object for
every document currently open in Fireworks.
The following code makes the first Fireworks document active and brings it to the
front for editing:
var editFirst = fw.documentList[0].makeActive();
343662-1 ch26.F 8/2/02 2:59 PM Page 825
Fireworks Seminar

826 Part VII ✦ Programming with Fireworks
platformThe platform property returns win if Fireworks is running on a Windows system
and mac if Fireworks is running on a Macintosh.
progressCountCurrentWhen a batch process is running, the dialog box keeps track of how many files
have been completed, displaying something like “1 of 6 files processed.” The
progressCountCurrent property — which is not read-only — represents the first
number in this message and is used in a loop that increments the number each
time a file is completed.
progressCountTotalThe progressCountTotal property is not read-only and represents the
second number in the Batch Progress dialog box — the total number of files
to be processed. This value can be set from the number of documents selected
in the dialog box, which is presented at the beginning of the operation; the
chooseScriptTargetDialog() method returns such a list. Therefore, to
determine the total number of files to be processed, use code similar to this:
var theDocList = fw.chooseScriptTargetDialog(PNG);fw.progressCountTotal = theDocList.length;
MethodsThe functions associated with the fw object are all extremely useful. With them, you
can do everything from opening a specific file, to altering any Fireworks preferences,
or even closing Fireworks itself.
All the fw methods are static.
chooseScriptTargetDialog(formatlist)Similar to locateDocDialog(), the chooseScriptTargetDialog() method
displays the same dialog box so that the user can select the files to be targeted
for an operation. Unlike locateDocDialog(), here the formatlist is a required
argument and no maximum number of documents can be specified. In this example,
file formats are limited to BMP files:
var theFiles = fw.chooseScriptTargetDialog¬(“kMoaCfFormat_TIFF”)
To restrict the resulting dialog box from the chooseScriptTargetDialog()method to multiple file types, use the same array structure as locateDocDialog().
findOpenDocument(pathname)The findOpenDocument() method checks to see whether Fireworks already has
the given pathname open in a document window. If so, that Document object is
Tip
Note
343662-1 ch26.F 8/2/02 2:59 PM Page 826
Fireworks Seminar

827Chapter 26 ✦ Building Fireworks Extensions
returned. If not, it returns null. Usually, findOpenDocument() takes the pathname
argument from an array of filenames, as in the following code:
theDocList = fw.chooseScriptTargetDialog(fw.getPref(“PNG”));for (var i = 0; i < theDocList.length; i++) {theDoc = fw.findOpenDocument(theDocList[i]);if theDoc == null {alert(“No file found”);}}
getPref(prefname) and setPref(prefname, prefval)The getPref() and setPref() methods enable you to read — and alter — the
current program settings for almost every aspect of Fireworks. From the default fill
color to the x and y coordinates for the Edit Gradient dialog box, these two methods
provide a powerful peek into the program.
The prefname and prefval arguments are set keywords contained in the Fireworks
MX Preferences file.
See Chapter 25 for more about the Fireworks MX Preferences file and specificpreference settings.
locateDocDialog(maxnumdocs [, formatlist])The locateDocDialog() method presents users with a dialog box that enables
them to choose one or more files. The maxnumdocs argument tells Fireworks
whether to use the standard Open dialog box to open a single file, or to use the
Open Multiple Files dialog box for loading more than one file. Use 1, 0, or –1 to open
the standard Open dialog box and any number higher than 1 to specify the Open
Multiple Files dialog box. The number used as an argument does not limit the
number of files that can be opened in any other way.
The formatlist argument is an optional list of acceptable file types to open.
If formatlist is omitted, then all files will be listed. The formatlist argument is
in the form of an array. For example, to specify just the PNG and TIFF file formats
for a single file dialog box, use the following code:
var formats = [ “PNG”, “kMoaCfFormat_TIFF” ];var theFiles = fw.locateDocDialog(1, formats);for (f in theFiles) {alert(theFiles[f]);}
The resulting dialog box also permits the user to select All Readable Files and AllFiles.
The locateDocDialog() method returns an array of filenames, or, if the dialog box
is canceled, it returns null.
Note
Cross-Reference
343662-1 ch26.F 8/2/02 2:59 PM Page 827
Fireworks Seminar

828 Part VII ✦ Programming with Fireworks
You can also access whatever file types the user’s system has available by deter-mining the MultiFileBatchTypes setting with code like this:
var thePrefs = fw.getPrefs(MultiFileBatchTypes);var theFile = fw.locateDocDialog(1,thePrefs);
Table 26-1 details the formatlist arguments.
Table 26-1Fireworks formatlist Arguments
Argument Document Filename Mac File Extension Type Code
ADOBE AI3 Adobe Illustrator .ai UMsk
Fireworks JavaScript Fireworks JSF .jsf TEXT
kMoaCfFormat_BMP Microsoft Bitmap .bmp BMP
kMoaCfFormat_ Macromedia .fh7 or .fh8 AGD3FreeHand7and8 FreeHand 7.0
or 8.0
kMoaCfFormat_GIF GIF image .gif GIF
kMoaCfFormat_JPEG JPEG image .jpg or .jpeg JPEG
kMoaCfFormat_PICT Macintosh Picture .pict, .pic, or .p PICT
kMoaCfFormat_RTF Rich Text Format .rtf RTF
kMoaCfFormat_Text Plain text file .txt TEXT
kMoaCfFormat_TIFF TIFF image .tif or .tiff TIFF
PNG PNG image .png PNGf
PS30 Photoshop Document .psd 8BIM(3.0 or higher)
openDocument(pathname[, openAsUntitled])The openDocument() method opens the specified file in the pathname argument.
Because openDocument() opens another instance of an already opened file, the
openDocument() method is often used in conjunction with findOpenDocument().
If the file cannot be opened, openDocument() returns null. If the optional
openAsUntitled argument is set as true, the document is opened in a new
Untitled window.
Tip
343662-1 ch26.F 8/2/02 2:59 PM Page 828
Fireworks Seminar

829Chapter 26 ✦ Building Fireworks Extensions
quit()The quit() method, when invoked, closes Fireworks. No further confirmation is
offered, unless an open document has been modified, but not saved. You can use
the confirm() global method to create a confirmation routine in this way:
if (confirm(“Ready to Quit?”)) {fw.quit();}
DocumentThe Document object in Fireworks is similar to the Document object in JavaScript.
Both deal with a document on a precise, exacting level. You use the Fireworks
Document object to define the export parameters, as well as the basis for a find-
and-replace operation.
Because this object is mostly concerned with a specific document, it has no static
properties and only two static methods: findExportFormatOptionsByName() and
makeGoodNativeFilePath().
PropertiesThe Document object has numerous properties that enable you to determine
whether a file is open and whether it’s been modified, gather the current filename,
and much more.
Because all the Document object properties work with a specific document, you
must associate them with a specific instance of the Document object and not the
Document object itself. To get an instance of the Document object, use the
getDocumentDOM() function, as in this code:
var theDoc = fw.getDocumentDOM();
Now the properties of the current document are accessible. To see the current
background color, for example, your script would include this code:
var theDoc = fw.getDocumentDOM();alert(theDoc.backgroundColor);
backgroundColorThis property is the background color of the document.
backgroundUrlThis property is the relative or absolute URL for the Background link.
343662-1 ch26.F 8/2/02 2:59 PM Page 829
Fireworks Seminar

830 Part VII ✦ Programming with Fireworks
brushesThe brushes property is read-only and contains an array of Brush objects available
for use in the document. The Brush object has properties, such as antiAliased,
diameter, and flowRate, that enable you to control aspects of the strokes used in
a document. For a complete list of Brush object properties and values, see
Macromedia’s Extending Fireworks documentation.
currentFrameNumThis is the current frame selected in the Frames panel.
currentLayerNumThis is the current layer selected in the Layers panel.
defaultAltTextIf a single or sliced image doesn’t have alt text specified, it is given this default.
exportFormatOptionsThis is identical to exportOptions (detailed next). It is included for backward
compatibility with Fireworks 2 scripts.
exportOptionsAlthough all the properties of any object are important, certainly the most
complex — and arguably the most useful — property of the Fireworks Document
object is exportOptions. The exportOptions property returns an object that
contains the current export settings. Most of the export settings are expressed as a
number, rather than as a string. For example, the following code
var theFormat = theDoc.exportOptions.exportFormat
returns a 0 if the format is GIF and a 1 if it is JPEG. Several settings —paletteInfo,
paletteEntries, and frameInfo— are expressed as arrays.
Table 26-2 details the exportOptions settings.
Table 26-2exportOptions Settings
Setting Possible Values
animAutoCrop True | False
animAutoDifference True | False
applyScale True | False
343662-1 ch26.F 8/2/02 2:59 PM Page 830
Fireworks Seminar

831Chapter 26 ✦ Building Fireworks Extensions
Setting Possible Values
colorMode 0 (Indexed), 1 (24-bit color), or 2 (32-bit color).“Indexed” is default.
crop True | False
cropBottom From 0 to the Image Height minus 1
cropLeft From 0 to the Image Width minus 1
cropRight From 0 to the Image Width minus 1
cropTop From 0 to the Image Height minus 1
ditherMode 0 (None), 1 (2×2), or 2 (Diffusion). Default is None.
ditherPercent 0 to 100. 100 is the default value.
exportFormat 0 (GIF), 1 (JPEG), 2 (PNG), 3 (Custom, including TIFFand BMP), or 4 (GIF-Animation)
frameInfo (array)
delayTime (Previous) 0100000
frameHidden True | False
frameName Text: the name of the frame shown in the Frames panel.
gifDisposalMethod 0 (Unspecified), 1 (None), 2(Background), or 3
interlacedGIF True | False
jpegQuality 1 to 100. 80 is the default.
jpegSmoothness 0 to 8. 0 is the default.
jpegSubsampling 0 to 4. 1 is the default.
localAdaptive True | False
lossyGifAmount 0 to 100. 0 is the default.
macFileCreator “XXXX” (a Macintosh Creator code, Fireworks is “MKBY”)
macFileType “XXXX” (a Macintosh File Type code, used to chooseformat if exportFormat = Custom)
name Text-Name of Setting
numCustomEntries 0–256 (default is 0)
numEntriesRequested 0–256 (default is 128)
numGridEntries 0–256 (default is 6)
optimized True | False
Continued
343662-1 ch26.F 8/2/02 2:59 PM Page 831
Fireworks Seminar

832 Part VII ✦ Programming with Fireworks
Table 26-2 (Continued)
Setting Possible Values
paletteEntries (array)
colorstring1 Red-Green-Blue-Alpha numbers where each number colorstring2 is in the range 0–255. Example: “255 0 0 255”. If etc. Alpha is 0, the color is transparent.
paletteInfo (array)
colorLocked True | False
colorModified True | False
colorSelected True | False
colorTransparent True | False
colorDeleted True | False
paletteMode “adaptive” (default), “custom”, “grid”, “monochrome”,“Macintosh”, “Windows”, “exact”, or “Web 216”.
paletteTransparencyType 0 (None), 1 (Index), 2 (IndexAlpha), or 3 (RGBA).Default is None.
percentScale 1–100000 (default is 100)
progressiveJPEG True | False
savedAnimationRepeat 0–1000000 (default is 0)
sorting “none” (default), “luminance”, or “popularity”
transparencyIndex 0–255, or –1 if none
useScale True | False
webSnapAdaptive True | False
webSnapTolerance Always set to 14
xSize –100000 to 100000
ySize –100000 to 100000
The useScale and applyScale settings of the Document object are dependent on
each other to determine the type of scaling that is actually used. The following
rules determine the scaling type:
343662-1 ch26.F 8/2/02 2:59 PM Page 832
Fireworks Seminar

833Chapter 26 ✦ Building Fireworks Extensions
✦ If useScale is false, and applyScale is false, no scaling is done on export.
✦ If useScale is true, then percentScale is used, regardless of the setting of
applyScale.
✦ If useScale is false and applyScale is true, then xSize and ySize are used
to determine the scaling in the following manner:
• If the value is positive, the value is used as specified for the x or y axis.
• If the value is zero, the x or y axis varies without limit.
• If the value is negative, the x or y axis varies, but it may be no larger than
the absolute value of the specified number.
Note that if one value is positive and one is negative, the positive value is always
used.
ExportSettingsThe ExportSettings object has properties such as htmlDestination (“same”,
“one up”, “custom”, “clipboard”) and shimGeneration (“none”, “transparent”,
“internal”, “nested tables”). See the Extending Fireworks documentation for a
complete list of the properties and associated values of the ExportSettings object.
filePathForRevertThe filePathForRevert property returns the pathname from which the Revert
operation reads — in other words, the file opened to create the current document.
Use filePathForRevert to determine an original pathname for non-Fireworks
native files or documents opened as “Untitled.” This property returns null if the
document was newly created and not read from a file.
filePathForSaveThe filePathForSave property finds and sets the filename of the current
document. This property is essential for creating backup files. If the file has never
been saved, the result is null. The following code relies on the filePathForSaveproperty to store a filename for later use during a backup operation:
function saveName(theDoc) {var sourcePathif (theDoc.filePathForSave != null) {sourcePath = theDoc.filePathForSave}}
343662-1 ch26.F 8/2/02 2:59 PM Page 833
Fireworks Seminar

834 Part VII ✦ Programming with Fireworks
fillsThe fills property is read-only and contains an array of Fill objects available for
use in the document. The Fill object has properties like gradient and pattern. See
the Extending Fireworks documentation for a complete list of Fill object properties
and values.
frameCountThis is the number of frames in the document.
frameLoopingCountPossible values for the frameLoopingCount property are
✦ 0: Loop forever
✦ 1: Don’t loop (just play once)
✦ 2 or more: Loop this number of times
framesThe frames property is read-only and is an array containing the Frame objects
in the document. The Frame object has properties such as layers and delay.
Refer to Extending Fireworks for a complete list of Frame object properties and
acceptable values.
gammaPreviewThe gammaPreview property can be either true or false. On a Windows machine,
true indicates that View ➪ Macintosh Gamma is enabled. On a Mac, true indicates
that View ➪ Windows Gamma is enabled.
gradientsThe gradients property is read-only and is an array that contains the Gradient
objects that are available to the document. See Extending Fireworks for a list of
Gradient object properties and values.
gridColorThis is the color in which the grid is displayed, which can also be set in the Grid
dialog box.
gridOriginThis is the point that corresponds to the grid origin. You can also set the origin of
the grid by dragging it from the intersection of the horizontal and vertical rulers.
gridSizeThis is the horizontal and vertical grid size for the document. The horizontal grid
size is gridSize.x and the vertical grid size is gridSize.y.
343662-1 ch26.F 8/2/02 2:59 PM Page 834
Fireworks Seminar

835Chapter 26 ✦ Building Fireworks Extensions
guidesThe guides property is read-only, and it corresponds to the Guides object. The
Guides object has properties such as color and locked. See Extending Fireworks
for a complete list of Guides properties and values.
heightThis is the height of the document in pixels.
isDirtyIt’s often necessary to determine whether a file has been modified before deciding
how to act on it. The isDirty property returns true if the document has been
modified since the last save, or if it has never been saved; otherwise, the property
returns false.
isPaintModeThis property is read-only. It returns true if the document is in paint-mode editing
and false if it is not.
isSymbolDocumentThis read-only property returns true if the document is a Graphic Symbol or Button
Symbol, and false if not. The Symbol-editing window is an open document like
any other.
isValidThe isValid property returns true if the current document is still open and false if
it has been closed.
lastExportDirectoryThis is the target folder for the last export operation, expressed as a file URL.
lastExportFileThis is the target file for the last export operation, expressed as a file URL.
layersThis read-only property is an array containing the Layer objects in the document.
Properties of the Layer object include sharing and layerType. Refer to Extending
Fireworks for a complete list of properties and values.
leftThe left property is a value in pixels that specifies how far from the left border of
the canvas the farthest-left object is located.
343662-1 ch26.F 8/2/02 2:59 PM Page 835
Fireworks Seminar

836 Part VII ✦ Programming with Fireworks
mapTypeThe type of image map that the document creates. Possible values are client,
server, or both.
matteColorThe Matte color value for the document, also specified in the Optimize panel.
onionSkinAfterThis is the number of frames after the current frame to be displayed using onion
skinning. This value is also specified in the Onion Skinning dialog box, accessed
from the Frames panel.
onionSkinBeforeThis is the number of frames before the current frame to be displayed using onion
skinning.
pathAttributesThis property corresponds to the PathAttrs object, which has properties such as
brush and fill. See Extending Fireworks for a complete list of properties and values.
pngTextThe pngText property is the text contained in a Fireworks document.
resolutionThis is the document’s print resolution setting. Possible values are between 1 and
5,000.
resolutionUnitsThis is the measurement unit for the document’s print resolution setting
(resolution property). It can be either “inch” or “cm”, for inches or centimeters,
respectively.
texturesThe textures property is read-only and is an array of Texture objects available
to the document. The Texture object has one read-only property, name, which
contains the name of an associated texture.
topThe top property is how far in pixels the topmost object is from the top of the
document.
useMatteColorThis can be either true or false. When true, the Matte color specified in the Optimize
panel or defined in the matteColor property is used when exporting.
343662-1 ch26.F 8/2/02 2:59 PM Page 836
Fireworks Seminar

837Chapter 26 ✦ Building Fireworks Extensions
widthThis is the width of the document in pixels.
MethodsThe Document object methods provide a great deal of functionality. These functions
activate, save, and close files — and more. The findExportFormatOptions() and
makeGoodNativeFilePath() methods are static, and the rest are instance methods.
exportTo(pathname [, exportOptions])The actual export operation is handled by the exportTo() method. The full
pathname argument is mandatory, and if the optional exportOptions argument is
omitted, the current export settings are used. Should exportOptions be specified,
they are used without affecting the document’s exportOptions property. The
exportTo() method returns true if it is successful.
findExportFormatOptionsByName(name)You use this static method to access any preset Export Settings. If an Export Setting
is preset with the given name, a Document object is returned with the same settings
as the exportOptions property. If there is no preset by the given name, null is
returned.
makeActive()Use the makeActive() method to make the referenced document the active one in
Fireworks. The active document is then brought to the front of all other documents.
makeGoodNativeFilePath(pathname)To make sure that a given pathname ends in a proper Fireworks .png extension, the
makeGoodNativeFilePath static method is applied. When used, it converts any
filename extension to .png. For example, the following code snippets all return
“file:///images/logo.png” as the filename:
var theFile =¬Document.makeGoodNativeFilePath(“file:///images/logo.ping”)var theFile =¬Document.makeGoodNativeFilePath(“file:///images/logo.bmp”)var theFile =¬Document.makeGoodNativeFilePath(“file:///images/logo”)
save([okToDoSaveAs])The save() method is used to store the document in its default location. If the
optional okToDoSaveAs argument is true, then the user will be prompted for a file
location if the document has never been saved. If okToDoSaveAs is false and the file
has never been saved, the operation will fail and return false. Upon a successful
save, the document’s dirty flag is cleared. The save() method returns true if the
save operation completes successfully, and false otherwise.
343662-1 ch26.F 8/2/02 2:59 PM Page 837
Fireworks Seminar

838 Part VII ✦ Programming with Fireworks
To force a Save As dialog box to appear, set the fw.filePathForSave propertyto null before calling Document.save().
saveCopyAs(pathname)To store a duplicate of the current document, use the saveCopyAs() method. You
must use the full pathname: for example, “file:///images/logo.png”. With this
method, neither the filePathForSave nor the isDirty property is affected.
ErrorsTo help keep the user informed when something goes wrong, the Fireworks API
includes an Errors object. Each property of the Errors object returns a string
localized for the language of the program. For example, the code
var theError = Errors.EFileIsReadOnly;
returns “File is locked” in English. Table 26-3 lists all the Errors properties and their
messages in English.
Table 26-3Errors Properties
Property English Message
EAppAlreadyRunning An internal error occurred. Fireworks is optimizing an image.
EAppNotSerialized An internal error occurred.
EArrayIndexOutOfBounds An internal error occurred.
EBadFileContents Unsupported file format.
EBadJIsVersion This script does not work in this version ofFireworks.
EBadNesting An internal error occurred.
EBadParam A parameter was incorrect.
EBadParamType A parameter was not the correct type.
EBadSelection The selection was incorrect for this operation.
EBufferTooSmall An internal error occurred.
ECharConversionFailed An internal error occurred.
EDatabaseError An internal error occurred.
EDeletingLastMasterChild A symbol must contain at least one object.
EDiskFull The disk is full.
Tip
343662-1 ch26.F 8/2/02 2:59 PM Page 838
Fireworks Seminar

839Chapter 26 ✦ Building Fireworks Extensions
Property English Message
EDuplicateFileName Filename is already in use.
EFileIsReadOnly File is locked.
EFileNotFound The file was not found.
EGenericErrorOccurred An error occurred.
EGroupDepth An internal error occurred.
EIllegalThreadAccess An internal error occurred.
EInternalError An internal error occurred.
ELowOnMem Memory is nearly full.
ENoActiveDocument This command requires an active document.
ENoFilesSelected At least one file must be selected for scripts tooperate.
ENoNestedMastersOrAliases Although symbols may contain other symbols, asymbol cannot contain a copy of itself. Symbolsmay not contain Instances or other Symbols.
ENoNestedPasting The JavaScript contains a paste step, which wouldcreate an endless loop.
ENoSliceableElems No paths were found. Objects were cut.
ENoSuchElement An internal error occurred.
ENotImplemented An internal error occurred.
ENotMyType An internal error occurred.
EOutOfMem Fireworks is low on memory.
EResourceNotFound An internal error occurred.
ESharingViolation An internal error occurred.
EUnknownReaderFormat Unknown file type.
EUserCanceled An internal error occurred.
EuserInterrupted An internal error occurred.
EWrongType An internal error occurred.
FindWithin the Fireworks API, a separate Find object exists for running a find-and-replace
operation. To link the Find object to a particular document, use the MakeFind()method to make the Find object and specify the criteria. Just as the Fireworks find-
and-replace facility is capable of searching four different types of elements — text,
font, color, and URLs — the findParms argument can take four different array forms.
343662-1 ch26.F 8/2/02 2:59 PM Page 839
Fireworks Seminar

840 Part VII ✦ Programming with Fireworks
Generating Errors on Purpose
If you’re programming in Fireworks, it’s helpful to gain a full understanding of the errors auser might encounter. When users report a problem, most often they mention the errorcode generated, if any. Fireworks does a terrific job of avoiding numeric error codes that areonly meaningful to someone who has a decoding manual.
The Errors collection, as documented in Extending Fireworks, is presented only as analphabetized list of the properties:
EAppAlreadyRunning, EAppNotSerialized, EArrayIndexOutOfBounds,EBadFileContents, EBadJsVersion, EBadNesting, EBadParam,EBadParamType, EBadSelection, EBufferTooSmall,ECharConversionFailed, EDatabaseError, EDeletingLastMasterChild,EDiskFull, EDuplicateFileName, EFileIsReadOnly, EFileNotFound,EGenericErrorOccurred, EGroupDepth, EIllegalThreadAccess,EInternalError, ELowOnMem, ENoActiveDocument, ENoFilesSelected,ENoNestedMastersOrAliases, ENoNestedPasting, ENoSliceableElems,ENoSuchElement, ENotImplemented, ENotMyType, EOutOfMem,EResourceNotFound, ESharingViolation, EUnknownReaderFormat,EUserCanceled, EUserInterrupted, EWrongType
The Error messages presented in Table 26-3 are the errors coded for the English release ofthe program. So how does a programmer uncover what the messages are in his or her ownlanguage? I used Fireworks itself — and a little macro magic — to help decipher the Errorproperties.
For example, a text Find and Replace operation that searches for “FW” using the
Whole Word option, and replaces it with “Fireworks” is defined with code like this:
var findParms = {whatToFind: “text”,find: “FW”,replace: “Fireworks”,wholeWord: true,matchCase: false,regExp: false};var theFinder = Document.makeFind(findParms);
Note the use of quotation marks and parentheses to delineate the parameters.
Different properties are available depending on the type of Find and Replace
operation, specified with the whatToFind() method. Table 26-4 details the four
types of Find parameters: text, font, color, and URL.
343662-1 ch26.F 8/2/02 2:59 PM Page 840
Fireworks Seminar

841Chapter 26 ✦ Building Fireworks Extensions
Table 26-4Find Object Properties and Methods
Type of Find Property or Method Possible Values
text whatToFind “text”
find “Any text string”
replace “Any text string”
wholeWord (True | False)
matchCase (True | False)
regExp (True | False)
Continued
I often use Microsoft Word whenever I need to massage text from one format to another. Inthis situation, I needed to take the comma-delimited list from Extending Fireworks and ulti-mately put it into a code that would generate a visible error message. The syntax for myerror generator was
var theError = Errors.errorCodealert(theError)
where errorCode was one of the 37 properties. To accomplish this, first I used MicrosoftWord’s Find and Replace feature to convert every comma-and-space combination (whichseparated the properties) into a paragraph return. This gave me a one-property-per-linelist. Next, I used Word’s Macro Recorder feature to add the necessary text before —var theError = Errors.— and after —alert(theError)— each property. So what was
EAppAlreadyRunningEAppNotSerializedEArrayIndexOutOfBounds
became
var theError = Errors.EAppAlreadyRunningalert(theError)var theError = Errors.EAppNotSerializedalert(theError)var theError = Errors.EArrayIndexOutOfBoundsalert(theError)
and so on until all properties were converted. I then saved this file as a standard text filewith a .jsf extension, thus creating a Fireworks command. Upon running the command,each error was reported in sequence and could be copied and included in Table 26-3.
343662-1 ch26.F 8/2/02 2:59 PM Page 841
Fireworks Seminar

842 Part VII ✦ Programming with Fireworks
Table 26-4 (continued)
Type of Find Property or Method Possible Values
font whatToFind “font”
find “fontname-to-find”
replace “fontname-to-replace”
findStyle (–1 to 7) where –1 means (StyleAnyStyle),0 (StylePlain), 1 (StyleBold), 2 (StyleItalic),3 (StyleBoldItalic), 4 (StyleUnderline),5 (StyleBoldUnderline),6 (StyleItalicUnderline), or 7 (StyleBoldItalicUnderline)
replaceStyle (–1 to 7) as described under findStyle
findMinSize (0–9999)
findMaxSize (0–9999)
replaceSize (0–9999, or –1 for “same size”)
color whatToFind “color”
find RGB Alpha values 0–255
replace RGB Alpha values 0–255
fills (True | False)
strokes (True | False)
effects (True | False)
URL whatToFind “url”
find “url-to-find”
replace “url-to-replace”
wholeWord (True | False)
matchCase (True | False)
regExp (True | False)
When defining color strings for use in the color Find and Replace operation, defininga few key variables to reuse again and again, such as the following, is often easier:
var kSolidWhite = “255 255 255 255”;var kSolidBlack = “0 0 0 255”;var kTransparent = “255 255 255 0”;var kRed = “255 0 0 255”;var kGreen = “0 255 0 255”;var kBlue = “0 0 255 255”;
Note
343662-1 ch26.F 8/2/02 2:59 PM Page 842
Fireworks Seminar

843Chapter 26 ✦ Building Fireworks Extensions
FilesThe Files object of the Fireworks API is robust and covers more than 20 functions
that permit you to perform almost any file operation. All the Files methods are static
and must be called from the Files object itself, except for close(), readline(), and
write(). No properties are associated with the Files object.
close()As you might suspect, this Instance method closes the associated file. Although
close() is not necessary because all files opened or created as a File object are
closed when the script terminates, the close() method enables you to control
access to a file within a script.
copy(sourcePathname, destinationPathname)To quickly copy a file to a new location — including on another drive — use the
copy() method. This function fails if the file named in the destinationPathnameargument already exists. In other words, copy() won’t overwrite a file. You can’t
copy folders with this function.
createDirectory(pathname)Needing new folders (directories) when running batch procedures is not uncom-
mon; the createDirectory() method handles this procedure for you. If the folder
creation was successful, the function returns true; if not, it returns false.
createFile(pathname[, mactype [, maccreator]])To create a new file of any type, use the createFile() method. This method fails
if the file already exists. The mactype (file type) and maccreator (associated
application) arguments are necessary for properly making a new permanent file
on a Macintosh system.
See Chapter 14 for Fireworks-related Macintosh File Type codes.
deleteFile(pathname)To remove a file or directory, use the deleteFile() method. If the deletion is
successful, true is returned. False is returned if the pathname supplied in the
argument does not exist, or if the file or directory could not be deleted.
deleteFileIfExisting(pathname)Rather than run a separate function to see whether a file exists before removing it,
you could use the deleteFileIfExisting() method. With this method, in addition
to returning true if the file is successfully removed, true is also returned if the
supplied pathname does not exist. The only circumstance in which false is returned
is if the found file could not be removed.
Cross-Reference
343662-1 ch26.F 8/2/02 2:59 PM Page 843
Fireworks Seminar

844 Part VII ✦ Programming with Fireworks
enumFiles(pathname)The enumFiles() method returns an array of pathnames for every file specified in
the argument. The pathname argument should not, however, point to a file; if it
does, enumFiles() returns just the single pathname for the file.
exists(pathname)You can check the existence of either a file or directory with the exists() method.
True is returned unless the file or directory does not exist or the supplied pathname
is invalid.
getDirectory(pathname)To extract just the folder — or directory — portion of a pathname, use
getDirectory(). This code returns file:///images/winter:
var theFolderName =¬Files.getDirectory(“file:///images/winter/seasonal.png”);
getExtension(filename)To retrieve just the filename extension, use the getExtension() method. If the
filename has no extension, an empty string is returned. This code returns .png:
var theExt = Files.getExtension(“logo.png”);
getFilename(pathname)The parallel function to getDirectory() is getFilename(), which extracts a
filename from a fully qualified pathname. This code returns seasonal.png:
var theFileName =¬Files.getFilename(“file:///images/winter/seasonal.png”);
getLastErrorString()If the last call to a method in the Files object resulted in an error,
getLastErrorString() returns text describing the error. If the last call
succeeded, this method returns null. The following example code returns
an error if a copy operation was unsuccessful:
if (Files.copy(sourcePath, destPath) == false) {return Files.getLastErrorString();}
The error returned is taken from the Fireworks API Errors object, described later in
this chapter. Note that getLastErrorString() is dedicated to errors committed
by methods of the Files object; the Errors object is used for displaying error
messages resulting from other situations.
343662-1 ch26.F 8/2/02 2:59 PM Page 844
Fireworks Seminar

845Chapter 26 ✦ Building Fireworks Extensions
getTempFilePath([dirname])The getTempFilePath() method returns a pathname in the system temporary
files directory. This function does not create a file; it simply returns a unique
pathname that does not conflict with any existing file. If the dirname argument is
given (and is not null), the pathname will indicate a file in the given directory rather
than in the temporary files directory. The dirname argument is taken literally, and
no other path information is appended.
On a Windows system, getTempFilePath() generally returns file:///C|/windows/TEMP/00000001, depending on your system settings; on a Macintosh
it returns file:///Macintosh%20HD/Temporary Items/00000001, where
Macintosh HD is the name of your Startup Disk.
isDirectory(pathname)To verify that a supplied pathname is a directory and not a file, use the
isDirectory() method. If the pathname is not a valid directory, true is returned.
makePathFromDirAndFile(dirname, filename)Often, during a batch operation, Fireworks is called upon to take a directory from
one source and a filename from another and put them together to store a file. That
is exactly what makePathFromDirAndFile() does. The directory is specified in the
first argument and the filename in the second, as shown in this example:
var dirname = “file:///fireworks”;var filename = “borg.png”;theNewFile = Files.makePathFromDirAndFile(dirname, filename)
In this example, file:///fireworks/borg.png is returned.
open(pathname, wantWriteAccess)A basic function of the Files object, the open() method opens a specified file for
reading or writing. To write to a file, the wantWriteAccess argument must be true.
If open() is successful, a Files object is returned, otherwise null is returned.
The open() method is intended for use with text files.
readline()Text files are often read in one line at a time; in Fireworks, this function is handled
by the readline() Instance method. The lines are returned as strings without the
end-of-line character. Null is returned when the end-of-file is reached (or if the line
is longer than 2,048 characters).
rename(pathname, filename)Use the rename() method to change a full pathname to a new one. For example, the
following code
Files.rename(“file:///images/logo.png”, “newlogo.png”);
343662-1 ch26.F 8/2/02 2:59 PM Page 845
Fireworks Seminar

846 Part VII ✦ Programming with Fireworks
renames the file logo.png to newlogo.png and returns
file:///images/newlogo.png.
setFilename(pathname, filename)The setFileName() method replaces a filename in a pathname with another
specified filename. For instance, the code
Files.setFilename(“file:///images/logo.png”, “newlogo.png” );
returns file:///images/newlogo.png. Note that this function does not affect
the file on disk in any way, but is just a convenient way to manipulate pathnames.
Whereas setFileName() appears to perform the same operation as rename(),
only rename() actually alters the name of the file on the drive.
swap(pathname, pathname)Fireworks provides numerous methods for moving files around during an export
operation; the swap() method switches the contents of one pathname for the
contents of another. This function is helpful when you need to exchange a source
file for a backup file.
The swap() method has two limitations: First, you can only swap files, not folders.Second, both files to be swapped must be on the same drive.
write(string)To insert text in a file, use this Instance method. No end-of-line characters are
automatically appended after each string; it’s necessary to attach a \n to generate a
proper end-of-line character, as in the following code:
theString = “Log Report\n”;theFile.write(theString);
Dissecting Hotspot ObjectsHotspots — alternatively known as image maps — are one of two types of Web
objects in Fireworks. Along with slices, hotspots enable a wide range of user
interactivity to occur. The Fireworks API hotspot objects are, for the most part,
read-only properties that enable you to gather any needed bit of information about
image maps embedded in the Fireworks document.
Because hotspots and slices employ many of the same mechanisms, severalFireworks API objects — exportDoc, BehaviorInfo, and BehaviorsList — listed underHotspot Objects, are also valid for use with slices.
Note
Caution
343662-1 ch26.F 8/2/02 2:59 PM Page 846
Fireworks Seminar

847Chapter 26 ✦ Building Fireworks Extensions
exportDocThe exportDoc object is available for use in all the exporting templates —
slices.htt, metafile.htt, and Servermap.mtt. However, exportDoc cannot be outside
of these files. All of its properties are read-only and relate to the current document
and its Document properties, detailed in Table 26-5.
Table 26-5exportDoc Properties
Property Possible Value Description
altText Text The text string set as the ALT text for the document.
backgroundColor Hexadecimal String String that is the hex color forthe document canvas.
BackgroundIsTransparent True | False True if the canvas or theexport settings are set totransparent GIF.
backgroundLink URL The relative or absolute URLfor the Background Link.
docID Number A number assigned to eachdocument to identify HTMLcreated from it. This numberdoes not change, but multipleSave As commands can resultin multiple documents withthe same docID.
docSaveName Text The filename that was usedwhen the document wassaved, such as nav.gif. Pathinformation is not included.
emptyCellColor Text The empty table cell colorstring.
enptyCellContents Number Specifies what belongs inempty cells. Values are 1(nothing), 2 (spacer image),and 3 (nonbreaking space).
EmptyCellUsesCanvasColor True | False If true, empty cells inherit thevalue of backgroundColor.If false, they receive the valueof emptyCellColor.
Continued
343662-1 ch26.F 8/2/02 2:59 PM Page 847
Fireworks Seminar

848 Part VII ✦ Programming with Fireworks
Table 26-5 (continued)
Property Possible Value Description
filename Relative URL Simple URL for the exported image, relative to the HTMLoutput: for example,images/Button.gif. In slices.htt,this property is the imagebasename plus the baseextension: for example,Button_r2_c2.gif.
generateHeader True | False True if an HTML file isexported, false if the HTMLoutput is sent to the clipboard.
hasAltText True | False True if alternate text has beenspecified in the HTMLProperties dialog box.
hasBackgroundLink True | False True if a Background Link hasbeen set through the HTMLProperties dialog box.
height Number Height of the exported imagein pixels. In slices.htt, it is thetotal height of the outputimages.
htmlOutputPath URL The complete file URL towhich the HTML is beingwritten.
imagename Text The image basename, withouta filename extension — forexample, Button.
IncludeHTMLComments True | False If True, then comments are leftin the HTML. If False then allnonessential comments areremoved.
numFrames Number The number of frames in a file.
pathBase Pathname without The filename with the filename extension extension removed — for
example, images/Button.
343662-1 ch26.F 8/2/02 2:59 PM Page 848
Fireworks Seminar

849Chapter 26 ✦ Building Fireworks Extensions
Property Possible Value Description
pathSuffix Filename Extension The filename extension. For example, .gif.
startColumn Number Indicates the column of theslice when generating HTMLfor a single slice. Used only inmetafile.htt.
startRow Number Indicates the row of the slicewhen generating HTML for asingle slice. Used only inmetafile.htt.
style Text HTML style used for export,such as “Dreamweaver,”“Generic,” or “FrontPage.”
width Number Width of the export image inpixels. In slices.htt, it is thetotal width of the outputimages.
Image mapsTwo objects relate to image maps: ImageMap and ImageMapList. Not only can you
uncover the shape and number of coordinates of a hotspot by using these two
objects, but you can also determine what, if any, Behaviors are linked to them.
ImageMap objectLike several of the Fireworks API extensions, most of the work with the ImageMap
object is handled through an array. Each element in the ImageMap array represents
one hotspot in the current document. Get a particular ImageMap object with code
like this:
var theHotspot = imagemap[0];
PropertiesThe properties of the ImageMap object are all read-only instance properties and are
detailed in Table 26-6.
343662-1 ch26.F 8/2/02 2:59 PM Page 849
Fireworks Seminar

850 Part VII ✦ Programming with Fireworks
Table 26-6ImageMap Instance Properties
Property Possible Value Description
altText Text The specified alternative text.
behaviors A BehaviorsList Details regarding the Behavior attached to object (described the hotspot.later in this chapter)
hasAltText True | False Returns true if alternative text has beenspecified.
hasHref True | False Returns true if the hotspot has a URLassigned.
hasTargetText True | False Returns true if the hotspot has a targetspecified.
href Relative or The assigned URL.Absolute URL
numCoords 1 for circle, 2 for The number of coordinates used to describe rectangle, and any the hotspot in HTML.number for polygon
radius Number The radius of the circle area hotspot.
shape Circle, rectangle, The type of hotspot.or polygon
targetText An HTML frame The specified target.name
The ImageMap object has one other property associated with it: Behaviors.Because the BehaviorInfo object can also work with slice objects, it is described indetail in the following section.
MethodsThe only ImageMap methods are those concerned with gathering the x and ycoordinates for the hotspot, xCoord() and yCoord().
Both xCoord() and yCoord() work identically. Each gets one coordinate, in pixels,
for the index point. These methods are used together in conjunction with the
numCoords property to list the coordinates for the entire image map, as shown in
this code:
Note
343662-1 ch26.F 8/2/02 2:59 PM Page 850
Fireworks Seminar

851Chapter 26 ✦ Building Fireworks Extensions
for (var j=0; j<curImagemap.numCoords; j++) {if (j>0) WRITE_HTML(“,”);WRITE_HTML(curImagemap.xCoord(j), “,”, curImagemap.yCoord(j));}
ImageMapList objectThe ImageMapList object is an array of ImageMap objects, describing the areas in
an image map. The ImageMapList object has only one property, numberOfURLs, and
it is a read-only, static property.
The numberOfURLs property is important because it contains the number of
hotspots in a particular image map. As such, numberOfURLs is often used to loop
through an ImageMap object array, as with this code:
var i = 0;while (i < imagemap.numberOfURLs) {hasImagemap = true;}i++;
If no image maps are in the document, the numberOfURLs returns zero.
BehaviorsBehaviors, in Fireworks, are effects that are exported as JavaScript code to be
included in an HTML page. A Behavior is attached to a Web object (a hotspot or a
slice) and triggered by a specific user event, such as a mouse click or rolling over
an image. Two objects deal with Behaviors: BehaviorsList and BehaviorInfo.
BehaviorInfoAll the properties of the BehaviorInfo object are read-only, and no methods are
associated with the BehaviorInfo object.
Although the Behaviors panel lists four main Behavior groups — Simple Rollover,
Swap Image, Set Nav Bar, and Set Text of Status Bar — from the BehaviorInfo object
perspective, there are six different Behaviors: Status Message, Swap Image, Button
Down, Swap Image Restore, Button Highlight, and Button Restore. Only four possible
events are recognized: onMouseOver, onClick, onMouseOut, and onLoad.
Table 26-7 lists the BehaviorInfo object properties and their possible values.
343662-1 ch26.F 8/2/02 2:59 PM Page 851
Fireworks Seminar

852 Part VII ✦ Programming with Fireworks
Table 26-7Properties for the BehaviorInfo Object
Property Possible Value Description
action 1 (Status Message), The type of Behavior.2 (Swap Image), 4 (Button Down), 5 (Swap Image Restore), 6 (Button Highlight), 7 (Button Restore), or 9 (pop-up menu)
downHighlight True | False For Button HighlightBehaviors, returns true if thereis a highlight image.
event 0 (onMouseOver), The event that triggers the 1 (onClick), 2 (onMouseOut), Behavior.or 3 (onLoad)
hasHref True | False For Swap Image Behaviors,returns true if the swap imageswaps in an external file asopposed to a Fireworks frame.
hasStatusText True | False For Status Message Behaviors,returns true if the status text isnot empty.
hasTargetFrame True | False For Swap Image Behaviors,returns true if the swap imageswaps in another frame in theFireworks file, as opposed toan external file.
horzOffset Number If action has a value of 9(pop-up menu), then thehorzOffset property is themenu’s horizontal pixel offset.
href A file URL For Swap Image Behaviors, theURL for the swap image filefor an external file swapimage.
preload True | False For Swap Image Behaviors,returns true if the image isgoing to be preloaded.
restoreOnMouseout True | False For Swap Image Behaviors,returns true if the originalimage is to be restoredonMouseOut.
343662-1 ch26.F 8/2/02 2:59 PM Page 852
Fireworks Seminar

853Chapter 26 ✦ Building Fireworks Extensions
Property Possible Value Description
statusText Text string The text used in the Status Message Behavior.
targetColumnNum Number For Swap Image Behaviors, thecolumn in the slices table thatwill be swapped.
targetFrameNum Number (0 to number of For Swap Image Behaviors, frames minus 1) if hasTargetFrame is true,
this is the frame number thatwill be swapped. The firstframe is 0.
targetRowNum Number For Swap Image Behaviors, therow in the slices table that willbe swapped.
vertOffset Number If action has a value of 9 (pop-up menu) then thevertOffset property is themenu’s vertical pixel offset.
BehaviorsList objectThe one property of the BehaviorsList object, numberOfBehaviors, is used in the
same fashion as numberOfURLs is used with the ImageMap object, to determine
how many Behaviors are included in the current document. In the following code,
the numberOfBehaviors property is used to loop through the array of Behaviors:
for (var I=0; i<theCurBehaviors.numberOfBehaviors; i++) {var curBehavior = theCurBehaviors[i];if (curBehavior.action == kActionRadioGroup) {groupName = curBehavior.groupName;}}
Looking at Slice ObjectsSlices make it possible to divide one graphic into several different files, each of
which you can save separately with its own export settings or Behaviors. Two
objects relate directly to slices: SliceInfo and Slices.
SliceInfo objectThe SliceInfo object enables you to examine every aspect of the separate slices of
an overall image.
343662-1 ch26.F 8/2/02 2:59 PM Page 853
Fireworks Seminar

854 Part VII ✦ Programming with Fireworks
PropertiesAll properties of the SliceInfo object are read-only, and are detailed in Table 26-8.
Table 26-8Properties of the SliceInfo Object
Property Possible Values Description
altText Text The alternative text for this slice.
behaviors A BehaviorsList object The BehaviorsList object describingany Behaviors attached to thecurrent slice.
cellHeight Number in pixels The height of the current HTMLtable row.
cellWidth Number in pixels The width of the current HTMLtable column.
downIndex Number The index for this slice, if it is amultiple file export down button.
getFrameFileName Number Returns the basename for the slice (frameIndex) on the designated frame.
hasAltText True | False Returns true if the slice has analternative text description.
HasHref True | False Returns true if the slice has a URL.
HasHtmlText True | False Returns true if the slice is a text-only slice.
HasImage True | False Returns true if the current sliceincludes an image; text-only slicesreturn false.
HasImagemap True | False Returns true if hotspots areassociated with the current slice.
HasTargetText True | False Returns true if a target is specifiedfor the current slice.
Height Number in pixels The height of the image in theslice, including row spans.
Href URL The URL for the current slice.
HtmlText Text The text string for a text-only slice.
Imagemap An ImageMapList object The ImageMapList objectdescribing any hotspots attached tothe current slice.
343662-1 ch26.F 8/2/02 2:59 PM Page 854
Fireworks Seminar

855Chapter 26 ✦ Building Fireworks Extensions
Property Possible Values Description
ImageSuffix Filename extension The filename extension for the image in the current slice, includingthe period.
IsUndefined True | False Returns true if the current slicedoes not have a user-drawn sliceassociated with it. Fireworksautomatically generates slices tocover these undefined cells.
Left Number in pixels The left side of the cell in pixels,starting at 0.
NestedTableSlices Slices object (detailed Slices object describing a nested later in this chapter) table that occupies the current
table cell. Returns null if the celldoesn’t contain a nested table.
setFrameFileName Integer, starting with zero Looks at the specified frame and (frameIndex) sets the filename for the slice,
without path information. If you setits name to “” (empty string), theimage won’t export.
skipCell True | False Returns true if the table cell for thecurrent slice is included in aprevious row or column span.
targetText HTML frame name The specified target for the currentframe.
top Number in pixels The top of the cell in pixels, startingat 0.
width Number in pixels The width of the image in the slice,including column spans.
MethodsThe SliceInfo object has two methods associated with it: getFrameFileName() and
setFrameFileName(). Both are instance methods.
getFrameFileName(frame)The getFrameFileName() method reads the filename for the slice and frame. The
returned name does not include any path information, such as folder or filename
extension. For example, using the Fireworks defaults, the name of the first slice for
a file named newLogo.gif, would be newLogo_r1_c1. The first frame in an image file
is 0; generally all slices in frame 0 are named. For frames 1 and higher, only slices
that are rollovers or that are targeted by a swap image are named.
343662-1 ch26.F 8/2/02 2:59 PM Page 855
Fireworks Seminar

856 Part VII ✦ Programming with Fireworks
The following code shows how the getFrameFileName() method is used, both
with a constant and with a variable:
var curFile = SliceInfo.getFrameFileName(0);for (var curFrame = 0; curFrame < exportDoc.numFrames;¬curFrame++) {var curFile = SliceInfo.getFrameFileName(curFrame);// processing code for each slice goes here}
setFrameFileName(frame, filename)To change the filename of a slice, use the setFrameFileName() method. Specify
the frame number and the new name of the slice in the two arguments, as in the
following code:
SliceInfo.setFrameFileName(swapFrame, fileName);
An interesting side effect of setFrameFileName() is that this method determineswhich image is written. By default, Fireworks sets it up so that all slices on frame 0are named, and no other frames are named. If a Swap Image Behavior uses a sliceat row 2, column 3 on frame 2, the export templates set the frame filename, so thatthat image gets written. You can also set slices on frame 0 to an empty string, andthey won’t get written. This is how the “Don’t export undefined slices” option getsimplemented.
Slices objectThe Slices object is an array of SliceInfo objects. Because slices exist in a table,
each slice can be identified by its location in the row and column structure.
A two-dimensional array holds these row and column values and marks each
instance of a slice object. For example, the slice in the first row, first column
position is slices[0][0]. To process all the individual slices, use code similar
to the following:
var curRow;var curCol;for (curRow = 0; curRow < Slices.numRows; curRow++) {for (curCol=0; curCol < Slices.numColumns; curCol++) {var curSlice = Slices[curRow][curCol];// do whatever processing with curSlice.}}
Notice how you must use both the numRows and numColumns static properties to
properly loop through all the slices. Once the individual slice has been identified by
its two-dimensional array, the properties of the instance slice can be read.
Note
343662-1 ch26.F 8/2/02 3:00 PM Page 856
Fireworks Seminar

857Chapter 26 ✦ Building Fireworks Extensions
Several of the static properties of the slices object —doShimEdges, doShimInternal,
and doSkipUndefined— refer to options. These options are all set in the HTML
Properties dialog box. To find out if the user has selected the No Shims option, use
code like this:
if (Slices.doShimInternal || Slices.doShimEdges) {//create shim code here}
Table 26-9 details the static properties of the Slices object.
Table 26-9Properties of the Slices Object
Property Possible Values Description
demoindex Integer, starting The index for each file generated with zero for a multiple-file button export.
doDemoHTML True | False Returns true for a rollover, multiple-file button export.
doShimEdges True | False Returns true if the Table Shimsoption is set to Transparent Imagein Document Properties.
doShimInternal True | False Returns true if the Table Shimsoption is set to Shims from Imagein Document Properties.
doSkipUndefined True | False Returns true if the ExportUndefined Slices is not enabled inDocument Properties.
imagesDirPath Relative URL Path to the folder used to store theimages in the sliced table. If theimages and the HTML file are inthe same folder, returns an emptystring.
numColumns Number The total number of columns,excluding the shim column, in theHTML table.
numRows Number The total number of rows, excludingthe shim column, in the HTML table.
shimPath Relative URL Path to the GIF file used for shims;for example, images/shim.gif.
343662-1 ch26.F 8/2/02 3:00 PM Page 857
Fireworks Seminar

858 Part VII ✦ Programming with Fireworks
Accessing the Fireworks APIThe addition of the History panel to Fireworks had a major effect on the Fireworks
API. In order to display each user action as a separate repeatable step, each action
had to be accessible as a separate function. The Fireworks API JavaScript functions
can be categorized in three groups: Document functions, History panel functions,
and general Fireworks functions. With these functions, you can programmatically
repeat virtually every Fireworks command.
The Fireworks JavaScript API — as well as all the other Fireworks methods and
properties — is documented in the Extending Fireworks manual from Macromedia.
Rather than repeat the information found in that resource, the balance of this
chapter focuses on how to best apply that information.
Document functionsAs noted previously, the Fireworks extensibility model relies heavily on the
Document Object Model (DOM). In the Fireworks API, every Document function
requires the DOM of a specific document in order to work correctly. The
getDocumentDOM() function is used to retrieve the DOM in one of two ways.
First, the function can be written out for every action, like this:
fw.getDocumentDOM.align(top);
This method is used in the History panel, as you can see by selecting any action,
clicking the Copy Selected Steps to Clipboard button, and then pasting your
clipboard in any text editor. Although it’s perfectly suited for single-line functionality,
spelling out the entire function call each time is considered too wordy for general
programming, and this syntax is often used:
var theDOM = fw.getDocumentDOM();
Once this variable is declared and set to the DOM, all future references to the DOM
use the variable instead. For example, a series of statements could read:
var theDOM = fw.getDocumentDOM();theDoc.addNewOval({left:20, top:20, right:100, bottom:50});theDOM.applyStyle(stylename, 0);theDOM.setDocumentCanvasSizeToDocumentExtents(true);fw.exportDocumentAs(theDOM, exportPath, exportOptionsGif);fw.closeDocument(theDOM, false);
The variable used here, the DOM, is completely arbitrary, and you can feel free to
choose your own.
343662-1 ch26.F 8/2/02 3:00 PM Page 858
Fireworks Seminar

859Chapter 26 ✦ Building Fireworks Extensions
The Fireworks API Document functions are, by far, the largest, most comprehensive
group of functions. The quickest way that I’ve found to code a specific action is
through the Copy Selected Steps to Clipboard button found on the History panel.
Follow these steps to avoid searching through the Extending Fireworks manual for a
likely function:
1. Perform the desired action — such as drawing an oval, or adding new frames.
2. If necessary, open the History panel by choosing Window ➪ History.
3. Select the steps in the History panel that represent your action(s).
4. Click the Copy Selected Steps to Clipboard button.
5. In your favorite text editor, paste the steps.
The steps copied from Fireworks will include all the code necessary to replicate
your action, exactly. Usually, the next step in creating a command is to generalize
the parameters, so that the command can be applied in many circumstances. For
example, when an oval is created in a Fireworks document, the Fireworks-generated
code looks like this:
fw.getDocumentDOM.addNewOval({left:20, top:20, right:100,bottom:50});
When I’ve finished incorporating the function into a command, the same code looks
like this:
theDOM.addNewOval({left:theLeft, top:theTop, right:theRight,bottom:theBottom});
In addition to substituting a variable for the getDocumentDOM() function, I’ve done
the same for Fireworks’ absolute numbers for the left, top, right, and bottom values.
These new variables can then be altered by a user prompt, or another programming
function.
Fireworks functionsOne group of API functions is generically referred to as the Fireworks functions.
These functions are concerned with general document manipulation — creating,
exporting, saving, closing, and reverting — as well as executing Find and Replace
operations and controlling floater accessibility. You’ll also find the often used
getDocumentDOM() function in this category.
The general Fireworks functions must be prefaced with either fireworks or fw—the initial fireworks and fw are interchangeable.
Note
343662-1 ch26.F 8/2/02 3:00 PM Page 859
Fireworks Seminar

860 Part VII ✦ Programming with Fireworks
The getDocumentDOM() function isn’t the only way to access the Document Object
Model of a document. Both createDocument() and createFireworksDocument()return the DOM when they are used in this manner:
var theDOM = fw.createDocument();var theDOM =fw.createFireworksDocument({x:400,y:500},{pixelsPerUnit:72,units,”inch”},”#ffffff”);
These two functions serve exactly the same purpose — to make a new document —
but differ in that fw.createDocument() uses the current defaults, whereas with
createFireworksDocument(), the size, resolution, and canvas color must be
expressly stated.
Several functions in this category are used for connecting to files outside of
Fireworks. With the browseDocument() function, you can view any HTML or
other compatible file in the user’s primary browser. One possible use for the
browseDocument() function is to display a help file or programmatically preview
an exported file in the browser. Two other functions aid in saving Fireworks files:
browseForFileURL() and browseForFolderURL(). The browseForFileURL()function displays an Open or Save dialog box and returns a file URL like this:
file:///C|images/clientlogo.gif
On a Macintosh, the drive letter (here, C) would be replaced by the drive name.
The browseForFolder() function, on the other hand, returns a path to a folder.
This function is useful when you want to store a group of generated graphics in a
common folder and will be naming them programmatically. The
browseForFolderURL() function returns a string like this:
file:///C|images
Note that the final forward slash is not provided; it’s up to the programmer to add
that character when saving files.
History panel functionsAs you might suspect from the name, the History panel functions are concerned
solely with the operations of that particular Fireworks floating palette. These
functions enable you to programmatically execute every function capable with the
History panel, including the following functions:
✦ Clear all History steps.
✦ Find the number of current steps.
✦ Replay selected steps.
Note
343662-1 ch26.F 8/2/02 3:00 PM Page 860
Fireworks Seminar

861Chapter 26 ✦ Building Fireworks Extensions
Although these functions might appear arcane at first glance, the History panel
functions greatly extend the automation possibilities of Fireworks. As an example,
I built a Repeat History command, which enables the user to repeat any series of
selected steps — or just the last action taken — any number of times. The Repeat
History command uses the History panel functions almost exclusively.
Here’s the code for the entire command:
var theSteps = fw.historyPalette.getSelection();if (theSteps.length == 0) {alert(“No steps selected.\nPlease select at least one step
and repeat command.”);} else {var theNum = prompt(“Repeat History\nEnter the Number of
Repetitions Desired”);for (i=0;i < parseInt(theNum);++i) {fw.historyPalette.replaySteps(theSteps);
}}
The first line uses the History panel function to get the array of steps currently
selected in the History panel:
var theSteps = fw.historyPalette.getSelection();
Next, a check is made to see whether any steps are selected. If no actions are
selected in the History panel, the user is asked to select one or more steps, and
then to reissue the following command:
if (theSteps.length == 0) {alert(“No steps selected.\nPlease select at least one step
and repeat command.”);}
Because at least one step has been chosen, the user is then asked with the following
function for the number of times the selected steps should be repeated:
var theNum = prompt(“Repeat History\nEnter the Number ofRepetitions Desired”);
The number of desired repetitions is stored in the variable, theNum, as a string.
The next — and final — bit of code alters that string to a number and then replays
the selected steps for the requested number of times.
for (i=0;i < parseInt(theNum);++i) {fw.historyPalette.replaySteps(theSteps);
}
The Repeat History command is useful when combined with the Fireworks Clone
or Duplicate command. If, for example, I wanted to make 10 stars, each rotated
5 degrees from one another, I would create the initial star, clone it, and then with the
343662-1 ch26.F 8/2/02 3:00 PM Page 861
Fireworks Seminar

862 Part VII ✦ Programming with Fireworks
Modify ➪ Transform ➪ Numeric Transform command, rotate the clone 5 degrees.
Next, I would select the Clone and Rotate steps from the History panel and issue the
Repeat History command, specifying 10 repetitions. A starburst effect is created.
You’ll find the Repeat History command on the CD-ROM that accompanies thisbook, under Additional Extensions ➪ Joseph Lowery.
SummaryFireworks includes a comprehensive — to say the least — JavaScript API that allows
scripted access to almost all the application’s features. Keep the following points in
mind when you use Fireworks:
✦ Fireworks provides scripting access to almost every feature of the program.
✦ Full-featured user interfaces can be crafted in Flash and used to create
Fireworks commands and command panels.
✦ Nonstandard data types, such as colors, masks, and points, must be format-
ted correctly within your scripts.
✦ Five global methods are always available: alert(), confirm(), prompt(),
WRITE_HTML(), and write(). Use these methods to display dialog boxes and
receive user input, and to write text or HTML into exported documents.
✦ Fireworks provides five global objects that are always available:
• The fw object provides access to many features of Fireworks itself, such
as preferences and the platform that Fireworks is running on.
• The Document object provides access to individual documents, enabling
you to change layers, set export options, or find out if a document has
been changed since it was opened.
• The Errors object enables your scripts to provide meaningful error
messages, regardless of which localized version of Fireworks they run on.
• The Files object can be used to copy files, create folders, and perform
many other file-related tasks.
• The Find object provides access to Fireworks’ search-and-replace
functionality.
✦ Objects such as BehaviorInfo, BehaviorsList, exportDoc, ImageMap, and
ImageMapList provide control of exporting options within HTML export
templates.
✦ Modifying Fireworks’ built-in commands is a good way to begin building your
own scripts.
✦ ✦ ✦
On theCD-ROM
343662-1 ch26.F 8/2/02 3:00 PM Page 862
Fireworks Seminar

Appendixes
A ppendix A is a Web primer, a place to get a good
grounding on the ways of the Web. Appendix B is a
handy reference guide to productivity-boosting keyboard
shortcuts on both Macintosh and Windows systems.
Appendix C introduces the material on the accompanying
CD-ROM.
✦ ✦ ✦ ✦
In This Part
Appendix AA Web Primer
Appendix BKeyboard Shortcuts
Appendix CWhat’s on theCD-ROM
✦ ✦ ✦ ✦
P A R T
VIIIVIII
353662-1 Part08.F 8/2/02 3:00 PM Page 863
Fireworks Seminar

353662-1 Part08.F 8/2/02 3:00 PM Page 864
Fireworks Seminar

A Web Primer
If you grew up in graphics using Photoshop, you’re savvy
with alpha channels and gradients, but the subtleties of
Internet protocols and HTML code may have escaped you.
With Fireworks you can make HTML and JavaScript as easily
as GIFs and JPEGs, so you may find yourself creating whole
Web sites — or at least prototypes — directly in Fireworks. A
good grounding in the ways of the Web enables you to take
full advantage of these powerful Fireworks features.
A significant portion of becoming truly Web-savvy is justknowing what the acronyms mean. Although your eyesmay glaze over at the mere mention of protocol suites, theideas behind these lofty-sounding technical terms areactually fairly simple. Don’t let unfamiliar technobabbledeter you.
Formatting for the WebHypertext Markup Language, or HTML, is the page description
language of the World Wide Web. Viewed in a browser, an HTML
document such as the one shown in Figure A-1 is a formatted
and readable page similar to a page in a printed magazine,
complete with an assortment of typefaces and styles, images,
and even multimedia such as streaming audio or movies.
Note
AAA P P E N D I X
✦ ✦ ✦ ✦
In This Appendix
Formatting for the Web
Looking at the Web Browser Variety Show
Understandingprotocols
✦ ✦ ✦ ✦
3662-1 AppA.F 8/2/02 3:00 PM Page 865
Fireworks Seminar

866 Part VIII ✦ Appendixes
Figure A-1: Viewed in a browser, an HTML document is displayed with formatting such as typefaces and styles.
But opening an HTML document in a text editor reveals the HTML code itself:
formatting specifications called tags that tell the browser how to display text
and how to link to media such as images and movies.
To view a Web page as HTML code, open it in your Web browser and proceed as
follows:
✦ If you are using Netscape Navigator or Communicator, choose View ➪ Page
Source.
✦ If you are using Microsoft Internet Explorer, choose View ➪ Source.
✦ If you are using another browser, look for commands similar to the preceding,
or consult the browser’s documentation.
Typically, the HTML code for the current page appears in your text editor or a
special HTML code window, and resembles the code in Figure A-2.
3662-1 AppA.F 8/2/02 3:00 PM Page 866
Fireworks Seminar

867Appendix A ✦ A Web Primer
Figure A-2: Viewed in a text editor, the HTML document from Figure A-1 takes on an entirely different appearance.
If what you see is Greek to you, don’t worry. The seeming complexity of HTML
hides a very simple structure.
Investigating tags and attributesYou can identify tags in HTML code by the angle brackets (<>) that surround them.
Everything in an HTML document is either a tag, or is contained inside a tag. Tags
specify whether a passage of text is a heading, or a paragraph, or how that passage
should be formatted. For example, to display We Got the Funk in bold text, you
would surround it with the Bold tag, which is a letter b, like so:
<b>We Got the Funk</b>
Note the forward slash (/) in the previous code that marks the second tag as a clos-
ing tag. This convention is repeated again and again in HTML, although some tags
don’t require a closing tag.
3662-1 AppA.F 8/2/02 3:00 PM Page 867
Fireworks Seminar

868 Part VIII ✦ Appendixes
An opening and closing tag pair says “anything within me is this.” For example, the
<title></title> pair says, “anything within me is the title.” The <b></b> pair
shown previously says, “anything within me is bold.”
Many tags can also have attributes that modify the formatting of the tag further; a
tag that says “insert a table here” (the <table> tag) can have attributes that spec-
ify the width of the table, how thick the border should be, and more. Attributes are
just placed within a tag. So a plain, bare-minimum opening <table> tag is as follows:
<table>
A <table> tag that specifies that the table should be 400-pixels wide and have a
3-pixel border appears as follows:
<table width=”400” border=”3”>
Although almost one hundred different HTML tags exist, the overwhelming majority
of Web pages are created using only a handful of them.
Knowing the top ten tagsHTML has all kinds of tags to meet the needs of all kinds of people, creating all kinds
of pages. Fortunately for the beginning Web designer, not all of them are necessary
to build almost everything on the Web today. A basic understanding of the ten most
commonly used tags takes a lot of the mystery out of a page of HTML code, and
Web pages in general. As you take a look at each of these super-tags, you can build
a simple example Web page in order to place the tags in context.
Don’t worry about remembering every tag and all of its attributes. This section isprimarily meant to demystify the underlying code structure of the World WideWeb. Even the most advanced HTML coders frequently consult an HTML referenceguide to refine their work.
The HTML tag: <html></html>The <html> tag simply says, “everything within me is HTML.” Every HTML docu-
ment starts with the opening <html> tag, and ends with the closing </html> tag.
Web browsers generally ignore anything in the page that’s not within the <html>tag. Why? It’s not HTML. The HTML tag never takes any attributes.
XML (Extensible Markup Language) documents also contain an <xml></xml> tagpair that encloses all the XML. Similarly, SMIL (Synchronized MultimediaIntegration Language) documents have a <smil></smil> pair that holds all theSMIL code. These languages also use the / in their tags to specify closing tags.
Starting to build a Web page by adding the <html> tag looks like this:
<html></html>
Tip
Note
3662-1 AppA.F 8/2/02 3:00 PM Page 868
Fireworks Seminar

869Appendix A ✦ A Web Primer
The head tag: <head></head>You can think of the <head> tag as a Web page’s way of introducing itself to the
browser. It’s behind-the-scenes info that isn’t displayed in the browser window
itself. The <head> tag contains the title of the page and indexing information for
search engines. Adding the <head> tag into our example Web page gives us this
(new code is shown in bold text):
<html><head></head></html>
Other things you might find in a <head> tag are script functions that are refer-enced by scripts in the body of the page (within a <script> tag) and CSS(Cascading Style Sheets) formatting information (contained in a <style> tag).
The title tag: <title></title>The <title> tag simply contains the plain-language title of the page. This tag is
very important because search engines often give the title a lot of weight when they
index a page. In other words, if a user searches for Pokemon, the list of sites he
receives from a search engine is more likely to contain sites with Pokemon in the
title than sites that mention Pokemon in the body text but not in the title. The
<title> tag always goes inside the <head> tag and should always be the first one
following the opening <head> tag; otherwise, some search engines won’t find it.
Adding a title to our Web page appears as follows:
<html><head><title>An Example Page</title></head></html>
The meta tag: <meta></meta>The <meta> tag enables you to store information about the page within the page
itself. Think of <meta> tags as fields in a database. You can add as many <meta>tags to a page as you like, giving each one a unique name (the type of data) and
content (the data). The most commonly used meta names are description, which
contains a description of the page that some search engines show after the title in
their results; and keywords, which contains keywords — separated by commas —
that search engines use to index your page in their databases. Accurate and descrip-
tive keywords in a keywords <meta> tag lead to more interested users finding your
page. Use as many as you like, but the first 16 are often given special weight, and
repeating keywords (spamming the index) may cause a search engine not to index
your page. There are also other <meta> tags in use, such as ones that contain the
page’s author. Now our example page is as follows:
<html><head>
Note
3662-1 AppA.F 8/2/02 3:00 PM Page 869
Fireworks Seminar

870 Part VIII ✦ Appendixes
<title>An Example Page</title><meta name=”description” content=”A Web page built as an¬example of the most common tags and where they go.”><meta name=”keywords” content=”HTML, code, examples, learning,¬tags, markup languages, hypertexts, Web designs, Web¬authoring”><meta name=”author” content=”Derren Whiteman”></head></html>
Make your keywords plural. If you include the keyword mp3s, then Web surferslooking for mp3 or mp3s will find your page. Include common misspellings, too.
The body tag: <body></body>The <body> tag is where the stuff you actually see in the browser window lives.
Text, images, plug-ins, Java applets — it’s all contained in the <body> tag. The
<body> tag immediately follows the <head> tag. The <body> tag almost always has
some attributes that specify the background color and the text color of the page;
otherwise, the page is displayed in the user’s default colors (which vary from user
to user). Colors in HTML are usually specified in RGB color, written in hexadecimal
notation. In this example, use a white (#FFFFFF) background and black (#000000)
text, so the code for our example page now looks like this:
<html><head><title>An Example Page</title><meta name=”description” content=”A Web page built as an¬example of the most common tags and where they go.”><meta name=”keywords” content=”HTML, code, examples, learning,¬tags, markup languages, hypertexts, Web designs, Web¬authoring”><meta name=”author” content=”Derren Whiteman”></head><body bgcolor=”#FFFFFF” text=”#000000”></body></html>
Now that it has a <body>, our example page could be displayed in a Web browser,
but the only thing that would be shown would be the white background color.
The paragraph tag: <p></p>Each opening and closing set of <p> tags contains a paragraph. Paragraphs can
contain text, images, and just about anything that can appear on a Web page.
Browsers leave a line space between paragraphs. You can add an align attribute to
a paragraph tag to specify that it be aligned left, center, or right, as in the example
code. If you leave the align attribute out, the paragraph is aligned left.
<html><head><title>An Example Page</title>
Tip
3662-1 AppA.F 8/2/02 3:00 PM Page 870
Fireworks Seminar

871Appendix A ✦ A Web Primer
<meta name=”description” content=”A Web page built as an¬example of the most common tags and where they go.”><meta name=”keywords” content=”HTML, code, examples, learning,¬tags, markup languages, hypertexts, Web designs, Web¬authoring”><meta name=”author” content=”Derren Whiteman”></head><body bgcolor=”#FFFFFF” text=”#000000”><p>Here is a paragraph full of text.</p><p align=”right”>Here is a right-aligned paragraph fullof text.</p></body></html>
A closing </p> tag is not required by Web browsers, but using one anyway is goodpractice. XML, SMIL, and other HTML-like languages always require a closing tag,and the HTML 4 specification demands closing tags for complete compliance.
Viewed in a browser, as shown in Figure A-3, our Web page finally has some content.
Figure A-3: Browsers leave a line of space between paragraphs and align them according to the <p> tag’s align attribute.
The anchor tag: <a></a>The <a> (anchor) tag is the heart of the World Wide Web because it’s used to make
hyperlinks. What kind of hypertext would you have without hyperlinks? Making a
link is easy: Simply surround text or images that you would like to make into a link
with an opening and closing <a> tag and give the tag an href attribute as follows:
<a href=”http://www.google.com”>Search at Google!</a>
Tip
3662-1 AppA.F 8/2/02 3:00 PM Page 871
Fireworks Seminar

872 Part VIII ✦ Appendixes
The href attribute tells the browser what page to go to when the user clicks on
Search at Google! Links are usually underlined and displayed in dark blue. Adding
a link to the word text in our example page gives us the following:
<html><head><title>An Example Page</title><meta name=”description” content=”A Web page built as an¬example of the most common tags and where they go.”><meta name=”keywords” content=”HTML, code, examples, learning,¬tags, markup languages, hypertexts, Web designs, Web¬authoring”><meta name=”author” content=”Derren Whiteman”></head><body bgcolor=”#FFFFFF” text=”#000000”><p>Here is a paragraph full of¬<a href=”http://www.dictionary.com”>text</a>.</p><p align=”right”>Here is a right-aligned paragraph full¬of text.</p></body></html>
The previous code looks like Figure A-4 when shown in a browser.
Figure A-4: Links are underlined by default.
3662-1 AppA.F 8/2/02 3:00 PM Page 872
Fireworks Seminar

873Appendix A ✦ A Web Primer
The image tag: <img>The <img> tag is the way you tell a browser, “display this particular image file at
this point in the page.” Note that there is no closing tag for an <img> tag because it
doesn’t wrap around other tags or content. It’s an image, plain and simple. Although
you don’t have to put the width and height of the image as width and height
attributes, doing so enables pages to load faster. An alt attribute is also a good
idea; it provides alternative text for text-only browsers, users who have turned
images off in their browsers, and visually impaired Web surfers. You can place an
<img> tag within other tags, typically within paragraphs or tables, and you can
wrap an <a> tag around it to make the image into a link.
Images are placed in Web pages as illustrations, obviously, but they are also the
only reliable way to put certain types of formatting into a page, and thus are often
used for titles, logos, and so on. In our example page, we will use one image as an
illustration, and one as a page title.
Typically, image files are stored near the HTML file they belong to, either in the
same folder, or in their own nearby folder, often called images or something similar.
The ones for our example page are in the same folder, so the src attributes just
contain their names, like so:
<html><head><title>An Example Page</title><meta name=”description” content=”A Web page built as an¬example of the most common tags and where they go.”><meta name=”keywords” content=”HTML, code, examples, learning,¬tags, markup languages, hypertexts, Web designs, Web¬authoring”><meta name=”author” content=”Derren Whiteman”></head><body bgcolor=”#FFFFFF” text=”#000000”><p><img src=”example_title.gif” width=”400” height=”50”¬alt=”An Example Page”></p><p>Here is a paragraph full of¬<a href=”http://www.dictionary.com”>text</a>.</p><p align=”right”>Here is a right-aligned paragraph full¬of text.</p><p><img src=”mona.gif” width=”125” height=”160” alt=”A¬generic placeholder image of the Mona Lisa.”></p></body></html>
And the result resembles Figure A-5.
3662-1 AppA.F 8/2/02 3:00 PM Page 873
Fireworks Seminar

874 Part VIII ✦ Appendixes
Figure A-5: The <img> tagcauses the browser to display an image file, such as this Mona Lisa, within a Web page.
You can also use an image from another folder or anywhere on the Web by supplying
a valid URL to that image in the href attribute.
The font tag: <font></font>Plain text can get pretty boring. Placing a <font> tag around text enables us to alter
its formatting and specify a typeface with the face attribute, and a color with the
color attribute. Colors are specified with RGB color names in hexadecimal notation,
however which fonts you can use bears special attention. Fonts are typically speci-
fied with a list, such as “Arial, Helvetica, sans serif” because the user must actually
have the font you specify on his or her system. If not, then the browser goes to the
second choice on the list, then the third, and so on. The options serif or sans serifshould always be the last choices in your font lists. These generic terms tell the
browser to use a default serif (such as Times Roman) or sans serif font (such as
Helvetica).
You can also use Bitstream’s Dynamic Fonts to download any font with your page.They’re viewable natively in Netscape 4+ and with the addition of a small ActiveXControl in IE 4+.
I’m going to bend the rules and go a bit beyond 10 tags by also introducing you to
two related tags: To make text bold, wrap it in <b> tags; to make it italicized, wrap
it in <i> tags.
With the addition of <font>, <b>, and <i> tags, our example page now looks as
follows:
<html><head><title>An Example Page</title>
Tip
3662-1 AppA.F 8/2/02 3:00 PM Page 874
Fireworks Seminar

875Appendix A ✦ A Web Primer
<meta name=”description” content=”A Web page built as an¬example of the most common tags and where they go.”><meta name=”keywords” content=”HTML, code, examples, learning,¬tags, markup languages, hypertexts, Web designs, Web¬authoring”><meta name=”author” content=”Derren Whiteman”></head><body bgcolor=”#FFFFFF” text=”#000000”><p><img src=”example_title.gif” width=”400” height=”50”¬alt=”An Example Page”></p><p><font face=”Verdana, Helvetica, sans-serif”¬color=”FF0000”><i>Here</i> is a <b>paragraph</b> full of¬<a href=”http://www.dictionary.com”>text</a>.</font></p><p align=”right”>Here is a right-aligned paragraph full¬of text.</p><p><img src=”mona.gif” width=”137” height=”190” alt=”A¬generic placeholder image of the Mona Lisa.”></p></body></html>
Figure A-6 shows what our example page now looks like in a browser.
Figure A-6: The <font>, <b>,and <i> tags make the firstparagraph of text look quitedifferent from the second.
The table tag: <table></table>The <table> tag was originally developed so that tables of data — similar to what
you find in a spreadsheet — could be more easily displayed in Web pages. These
days, it’s more commonly used as a way of providing a formatting skeleton for an
entire Web page, where elements such as text and images are placed within table
cells so that they can appear at an approximate point on a page. The <table> tag is
probably the hardest of the top ten tags to grasp just by looking at it, which is why
table tags are often created in visual editors, rather than by hand-coding.
3662-1 AppA.F 8/2/02 3:00 PM Page 875
Fireworks Seminar

876 Part VIII ✦ Appendixes
Stretching the 10-tag limitation again, the <table> tag always contains two helpers:
the <tr> (table row) tag and the <td> (table data) tag. The <tr> tag simply says,
“everything within me is a table row.” The <td> tag, which always goes within a
<tr> tag, is a table cell. Columns aren’t specified; they’re implied by the number
of cells in a row. An empty table with two rows and three columns would appear
as follows:
<table><tr> <td></td> <td></td> <td></td> </tr><tr> <td></td> <td></td> <td></td> </tr></table>
Note that the string of three <td></td> pairs in each row implies the columns. If all
tables were completely empty, formatting tables by hand would be much simpler,
but after you start to fill them with things, they’re a little harder to grasp at first
glance. Wrapping the content in a table with three rows and two columns gives us
this:
<html><head><title>An Example Page</title><meta name=”description” content=”A Web page built as an¬example of the most common tags and where they go.”><meta name=”keywords” content=”HTML, code, examples, learning,¬tags, markup languages, hypertexts, Web designs, Web¬authoring”><meta name=”author” content=”Derren Whiteman”></head><body bgcolor=”#FFFFFF” text=”#000000”><table width=”500” border=”0”><tr><td colspan=”2”><img src=”example_title.gif” width=”400”¬
height=”50” alt=”An Example Page”></td></tr><tr><td> </td><td> </td>
</tr><tr><td><p><img src=”mona.gif” width=”125” height=”160”¬
alt=”A generic placeholder image of the Mona Lisa.”></p></td><td><p><font face=”Verdana, Helvetica, sans-serif”¬
color=”FF0000”><i>Here</i> is a <b>paragraph</b> full of¬<a href=”http://www.dictionary.com”>text</a>.</font></p>
<p align=”right”>Here is a right-aligned paragraph¬full of text.</p>
</td></tr>
</table></body></html>
3662-1 AppA.F 8/2/02 3:00 PM Page 876
Fireworks Seminar

877Appendix A ✦ A Web Primer
The finished example page, shown in Figure A-7, includes a title, indexing informa-
tion, formatted text, a hyperlink, an image, and a table — all created with the most
commonly used tags.
Figure A-7: Looking at the example page in Dreamweaver shows the structure that the <table> tag provides. Behind Dreamweaver is the same page in Internet Explorer.
If you’re still hungry for even more tags, the next ones to learn might be <style>,<form>, <script>, and the comment tag. Consult an HTML reference such asRob Schluter’s HTML Tag List at http://www.home.zonnet.nl/robschluter/htmltaglist/.
Looking at the Web Browser Variety ShowOn an ideal Web, there would be a minimum set of things you could ask any Web
browser to do and be guaranteed that they would all do those things in a similar
fashion, and do them well. If you stick to authoring for the feature set of Netscape
Navigator 3.0, you can pretty much expect most browsers to provide most of the
goods, but that still leaves you bumping up against different bugs in individual
browsers or browser versions. If you author for a more current Web standard such
Tip
3662-1 AppA.F 8/2/02 3:00 PM Page 877
Fireworks Seminar

878 Part VIII ✦ Appendixes
as CSS 2 (Cascading Style Sheets 2.0), then you find browser support to often be
sporadic and buggy. Either way, testing your work in as many browsers as possible
is highly recommended, early in the design phase and often.
Examining the browsersDifferent projects may require you to target different audiences with different types
of browsers. For example, if you’re authoring a site that provides tips for using
Windows 2000, you can expect the overwhelming majority of your audience to be
using Internet Explorer 5 running on Windows 2000 because Internet Explorer 5 is
included with Windows 2000. An online magazine for Web professionals might have
an audience that’s using very current versions of IE or Navigator running on both
Windows and Macintosh. A general shopping site probably targets just about
anybody, including users of multiple versions of Macintosh, Windows, and AOL
browsers. Being familiar with the capabilities and quirks of the browsers you’re
targeting and — as always — testing, testing, testing, avoids ugly surprises later.
Netscape Navigator (Communicator)Navigator 1, 2, and 3 are virtually nonexistent now, but Navigator 3 is a good browser
to target and test with if you’re looking to build a site for a wide audience. It was the
first “mature” browser, gained a wide audience, and its feature set was mimicked by
browsers that came later. For the most part, if your page works well in Navigator 3,
it may not need more than a little tweaking to look very much the same in later ver-
sions of Navigator, in Internet Explorer, or in other browsers such as Opera.
Although Navigator 4.x has dwindled in popularity because of the wait for version 6
of Navigator, it remains the most popular non-Microsoft browser, and the trickiest
to develop for. It supports some CSS features, including layers, but not to World Wide
Web Consortium (W3C) standards. It contains a widely known bug that causes it
not to reload a page without CSS formatting if the user resizes the browser window.
Navigator 4.x is available for Windows, Macintosh, OS/2, Linux, and many, many
other UNIX platforms. Keep in mind that browser plug-ins are platform dependent,
and most exist only in Windows and Macintosh versions. When combined with a
complete Internet suite, it’s called Netscape Communicator, but the browser com-
ponent is still the same.
Visit the World Wide Web Consortium at http://www.w3.org.
Netscape’s long-awaited update to Navigator 4 is Navigator 6, a completely new
product based on the open source work of the Mozilla.org team. Netscape 6 pro-
vides excellent support for HTML 4 and CSS 1 standards, but has received only
lukewarm product reviews. The open source status of the major components of
Netscape 6 suggests that the HTML rendering engine — called Gecko — is likely
Tip
3662-1 AppA.F 8/2/02 3:00 PM Page 878
Fireworks Seminar

879Appendix A ✦ A Web Primer
to be built into a range of software and hardware products such as other Web
browsers or set-top boxes. Web professionals should definitely keep an eye on
these developments.
Microsoft Internet ExplorerIE 1 and 2 were very limited in their feature sets and not widely used, and can be
ignored completely. IE 3 includes some basic CSS features, but they are poorly
implemented and in a completely different way than IE 4, so targeting CSS at IE 3 is
not recommended. The Windows version doesn’t support image swaps, but if you
use them, the user will not see any errors. Keep this in mind if you create complex
image swaps that appear to do nothing when viewed or tested in IE 3.
If a Web design feature doesn’t work for a particular browser, but that browserdoesn’t display an error upon encountering the code, it is said that it “fails withouterror.” It’s good to know common Web design terms like this.
Internet Explorer 4 for Windows generally renders HTML pages very well, and
supports — albeit incompletely — a number of advanced Web technologies. Its
reputation is marred by its forced integration with Windows and its refusal to play
nice with a Netscape browser installed on the same machine. IE 5 for Windows
improved standards support, but many Web developers still target the feature set
of IE 4 (although testing in IE 5 is still recommended). IE 5.5 for Windows introduced
a new range of Microsoft-specific HTML extensions, recalling the bad old days when
browser manufacturers competed mainly in new ways to encourage Web developers
to create pages that would work only in one brand of browser.
IE 3 is rarely used now, but the feature set survives in many AOL browsers basedon it.
Tip
Note
The Wonders of a Mac with Virtual PC
A Macintosh with Virtual PC installed is the ideal testing computer for any Web design shopbecause you can run multiple versions of every Netscape, Microsoft, and AOL browser forWindows, Macintosh, and Linux, and also the WebTV viewer, all on the same machine(without multiple hard drive partitions or rebooting). The key to this is getting around IEand AOL for Windows’ insistence that there be only one version of their browser on eachWindows computer. Virtual PC circumvents this problem by enabling you to maintain mul-tiple configurations, each corresponding to a different virtual boot drive — just a file on yourhard disk, really — for the Virtual PC application. Each configuration can contain a differentWindows or Linux version, configuration, and browser (and/or set of installed browser plug-ins). In fact, all the screen captures in this book were taken on one Macintosh computer,running multiple versions of Windows, and about 10 different browser versions.
3662-1 AppA.F 8/2/02 3:00 PM Page 879
Fireworks Seminar

880 Part VIII ✦ Appendixes
Internet Explorer for Macintosh is an entirely different animal from the Windows
versions, with different development teams, codebases, and rendering engines. IE 3
and 4 for Macintosh have nice user interfaces, but are — frankly — lousy browsers.
However, IE 5.x for Macintosh is a completely different story. It continues the
Macintosh IE tradition of an excellent user interface, but adds one of the most
standards-compliant rendering engine of any shipping browser, code-named Tasmanby Microsoft, and available only in Macintosh versions of IE 5.x (see Figure A-8).
Figure A-8: Internet Explorer 5.x for Macintosh was the first shipping browser that could properly render the W3C’s “CSS acid test,” a document that tests for fullcompatibility with the CSS 1.0 specification. Type “about:tasman” in the Address bar of IE 5.x for Macintosh to see a special version of the acid test that substitutes the developer’s names for the placeholder text in the real version.
Find the W3C’s CSS Acid Test online at http://www.w3.org/Style/CSS/Test/current/sec5526c-test.htm.
Note
3662-1 AppA.F 8/2/02 3:00 PM Page 880
Fireworks Seminar

881Appendix A ✦ A Web Primer
As far as plug-in and scripting support in IE, the Windows and Macintosh versions
are entirely different as well. IE for Windows uses Windows-only technologies such
as ActiveX and VBScript, although it has basic support for Netscape plug-ins and
excellent JavaScript support as well. The Mac version uses Netscape plug-ins and
JavaScript exclusively, although its support for both in the 3 and 4 versions is the
worst of any major browser. However, the support for plug-ins and JavaScript in
IE 5.x for Macintosh is excellent. Remember that browser plug-ins are platform-
dependent, but Macintosh versions of all major plug-ins are available.
UNIX versions of Internet Explorer also exist, but they are not widely used or promoted.
America OnlineAOL 3, 4, and 5 browsers are modified versions of Microsoft’s Internet Explorer, but,
unfortunately, the version numbers do not always correspond. In other words, an
AOL 6 browser may be based on IE 3.02, IE 4.x, or IE 5.5. The major modification to
keep in mind is that AOL browsers are single-window — they do not allow a second
window to be opened. AOL also caches and recompresses images, which can cause
artifacts to appear in some JPEGs. Images are also limited to 640×480 in size.
For more about authoring for AOL see AOL’s Webmaster page at http://webmaster.aol.com.
WebTVWebTV has not exactly taken the world by storm, and its users remain a very small
minority of the Web. Accessing the Web with a TV and a set-top box may be much
more popular in the future, though, and future devices will no doubt learn some
lessons from WebTV, so it is an interesting study for any Web developer.
WebTV renders Web pages in a fairly unique way in order to account for the very
low resolution of TV screens. The major point to note is that its “browser window”
is fixed at 544-pixels wide and 378-pixels tall. If your page is wider, it is squeezed to
fit. If your page is longer, the user scrolls (a lot) to see the rest. WebTV only allows
one browser window, and supports frames in a unique way: Your frameset is con-
verted to a table and then squeezed to fit into 544 pixels. WebTV enables you to use
any font you want to as long as it’s 14-pixel bold sans serif. Flash is Flash 2.0, and
RealAudio is 3.0. One thing that WebTV does very well is play back MIDI files — in a
software synthesizer based on technology from Beatnik, Inc.
There’s no substitute for actually viewing your work as a WebTV user would see it.
Thankfully, the WebTV people offer a free WebTV Viewer for Windows or Macintosh
that goes a long way toward helping you make your pages WebTV-savvy. You can
find it at http://developer.msntv.com and view it in Figure A-9.
Tip
Note
3662-1 AppA.F 8/2/02 3:00 PM Page 881
Fireworks Seminar

882 Part VIII ✦ Appendixes
Figure A-9: The Web page from Figure A-1 is revisited in the WebTV Viewer 2.0 forMacintosh.
Understanding cross-platform concernsThe Web can be surprisingly cross-platform when you consider that Netscape
browsers act similarly on Windows, Macintosh, and Linux, but you need to keep a
few major caveats in mind if you want your Web pages to look similar on different
platforms.
FontsBefore the Web existed, computer-based publishing was primarily print publishing.
Choosing a font in a computer program has therefore traditionally meant choosing
a point (pt) size. Displaying a 12pt font on a pixel-based computer display requires
that the computer convert points, which are 1⁄72 of an inch, into pixels (px), the
smallest dots a computer monitor can display.
3662-1 AppA.F 8/2/02 3:00 PM Page 882
Fireworks Seminar

883Appendix A ✦ A Web Primer
Figure A-10 shows a Web page displayed on a Macintosh, where the specified 10pt
font is displayed as a 10px font because the Mac assumes the standard 72 dpi.
Figure A-10: Mac OS uses a value of 72 dpi to convert points into pixels, so fonts appear smaller in Mac OS browsers than they do in their Windows counterparts.
Figure A-11 shows the same Web page on a Windows computer, where the specified
10pt font is displayed as a 12px font because Windows assumes 96 dpi.
Internet Explorer 5 for Macintosh introduced a new feature to improve the cross-platform display of fonts: It has a resolution preference that is set to the Windowsstandard of 96 dpi by default. However, it also sets the default font size to 16points so that users who don’t change the settings will actually see text at a largersize than their Windows-using counterparts.
Note
3662-1 AppA.F 8/2/02 3:00 PM Page 883
Fireworks Seminar

884 Part VIII ✦ Appendixes
Figure A-11: Windows uses a value of 96 dpi to convert points into pixels, so fontsappear bigger in Windows browsers than they do in their Mac OS counterparts.
Form widgetsForm widgets are provided by a computer’s operating system, not by the browser,
and so look different on each platform, and are often differently sized as well, as
shown in Figure A-12. Web authors need to be aware of this and allow for it in their
designs, leaving extra space as necessary and testing on other platforms whenever
possible. One common mistake is to mix form widgets with image buttons that
resemble the form widgets on your particular operating system. Mac OS X form
widgets are very different than those on other operating systems — they appear
as translucent glass — and can really change the look of your page.
3662-1 AppA.F 8/2/02 3:00 PM Page 884
Fireworks Seminar

885Appendix A ✦ A Web Primer
Figure A-12: Form widgets look different and are even slightly different sizes on each operating system.
Understanding ProtocolsInformation travels across the Internet according to the specifications of a protocol
suite called TCP/IP (Transmission Control Protocol/Internet Protocol). A protocol
suite is, quite simply, a collection of protocols, or agreements on how to do some-
thing. TCP/IP contains over a hundred of them, but let’s look at just the most com-
monly used ones here.
HTTP and HTTPSHTTP, or Hypertext Transfer Protocol, carries requests for HTML pages from Web
browsers to servers, and carries HTML pages back from servers to browsers. As
you may well imagine, this function is fairly common on the World Wide Web. When
a browser and server want to talk privately — during an e-commerce transaction,
for example — they use the HTTPS protocol instead: Hypertext Transfer Protocol
Secure. When a browser is using HTTPS, a closed lock or similar icon is displayed
for the user and information is encrypted before it’s sent. All Web browsers support
HTTP; most support HTTPS. An HTTP URL is written http://www.opensrs.com.
An HTTPS URL is similar, except it uses an https:// prefix.
3662-1 AppA.F 8/2/02 3:00 PM Page 885
Fireworks Seminar

886 Part VIII ✦ Appendixes
FTPFTP (File Transfer Protocol) enables files to be copied between computers — even
different kinds of computers — and for basic file manipulation functions, such as
listing a folder of files on a remote computer. Browsers support rudimentary FTP,
but a dedicated FTP Client such as WS FTP for Windows or Interarchy for Macintosh
is needed to take full advantage of the control that FTP enables. Many FTP servers
enable anonymous guest logins, where your e-mail address is your password and
you have limited privileges. An FTP URL appears as follows: ftp://ftp.panic.com.
It may seem as if ftp is specified twice in the URL ftp://ftp.panic.com, butthat is not the case. The first ftp is the protocol, and the second ftp is the nameof panic.com’s FTP server. In the same way, HTTP servers are often named www, asin http://www.panic.com.
SMTP and POPSMTP, or Simple Mail Transfer Protocol, enables different computers on a network
to route e-mail to each other. POP, or Post Office Protocol, is a newer method for
receiving mail. E-mail clients such as Netscape Messenger or Microsoft Outlook
Express use SMTP and POP to send and receive e-mail.
NNTPNNTP (Network News Transfer Protocol) is used by Internet news readers to query
news servers, and by news servers to deliver news messages. NNTP is responsible
for the Usenet news we all know and love. An NNTP URL appears as: news://forums.macromedia.com/macromedia.fireworks.
Other protocols use prefixes that are the same as their names —ftp:// for FTP,for example — but NNTP URLs use the news:// prefix.
RTSPRTSP, or Real-Time Streaming Protocol, is perhaps the sexiest Internet protocol,
enabling for the efficient transfer of streaming multimedia files such as audio or
video over the Internet. The real-time refers to the fact that audio and video files
need to get to the client in a timely fashion so as not to interrupt the presentation.
An example of server software that sends information using RTSP is QuickTime
Streaming Server. All that’s needed is the QuickTime Player (see Figure A-13) to
receive it. An RTSP URL starts with an rtsp:// prefix.
Note
Tip
3662-1 AppA.F 8/2/02 3:00 PM Page 886
Fireworks Seminar

887Appendix A ✦ A Web Primer
Figure A-13: QuickTime Player (left) and Windows Media Player both use RTSP to receive streaming multimedia (in this case, video) over the Internet.
✦ ✦ ✦
3662-1 AppA.F 8/2/02 3:00 PM Page 887
Fireworks Seminar

3662-1 AppA.F 8/2/02 3:00 PM Page 888
Fireworks Seminar

KeyboardShortcuts
Fireworks includes a full complement of keyboard short-
cuts to cut down on the time and trouble it takes to
access commonly used commands. The default keyboard
shortcuts in Fireworks MX are part of the Macromedia
Common UI and are similar to the defaults found in many
other Macromedia applications. We’ll go menu by menu in
the first of the tables that follow. In Table B-12, you’ll find
keyboard shortcuts for the Fireworks tools that will aid in
quickly selecting commonly used tools. In Table B-13, you’ll
find my Top Ten Fireworks Keyboard Shortcuts.
In the tables throughout this appendix, commands or toolslisted in bold text are new or have changed menu, orpanel, locations in Fireworks MX.
The Application MenuYou can find application-specific commands such as
Preferences and Quit in the Application menu on Mac OS X,
also known as the Fireworks menu. Fireworks menu com-
mands are listed in Table B-1.
Note
BBA P P E N D I X
✦ ✦ ✦ ✦
In This Appendix
Saving time withkeyboard shortcuts
Selecting Fireworkstools the fast andeasy way
Learning the top ten shortcuts
✦ ✦ ✦ ✦
3662-1 AppB.F 8/2/02 3:00 PM Page 889
Fireworks Seminar

890 Part VIII ✦ Appendixes
Table B-1Fireworks Menu Commands (Mac OS X only)
Command Keystroke
About Fireworks n/a
Keyboard Shortcuts n/a
Preferences Command+U
Services n/a
Hide Fireworks Command+H
Hide Others n/a
Show All n/a
Quit Fireworks Command+Q
The File MenuThe File menu contains commands for file handling and import and export functions.
Table B-2 details its keyboard shortcuts.
Table B-2File Menu Keyboard Shortcuts
Command Windows Macintosh
New Ctrl+N Command+N
Open Ctrl+O Command+O
Open Recent ➪ Your Recently n/a n/aOpened Documents
Reconstitute Table n/a n/a
Scan ➪ Twain Acquire n/a n/a
Scan ➪ Twain Select n/a n/a
Scan ➪ Your Photoshop Acquire — n/aPlug-Ins (Macintosh only)
Close Ctrl+W Command+W
Save Ctrl+S Command+S
3662-1 AppB.F 8/2/02 3:00 PM Page 890
Fireworks Seminar

891Appendix B ✦ Keyboard Shortcuts
Command Windows Macintosh
Save As Ctrl+Shift+S Command+Shift+S
Save a Copy n/a n/a
Revert n/a n/a
Import Ctrl+R Command+R
Export Ctrl+Shift+R Command+Shift+R
Export Preview Ctrl+Shift+X Command+Shift+X
Update HTML n/a n/a
Export Wizard n/a n/a
Batch Process n/a n/a
Preview in Browser ➪ Preview F12 F12in Primary Browser
Preview in Browser ➪ Preview Shift+F12 Shift+F12in Secondary Browser
Preview in Browser ➪ Set Primary Browser n/a n/a
Preview in Browser ➪ Set Secondary Browser n/a n/a
Page Setup n/a n/a
Print Ctrl+P Command+P
HTML Setup n/a n/a
Exit (Windows only) Ctrl+Q —
The Edit MenuThe Edit menu enables you to select, duplicate, or remove objects. Cut, Copy, and
Paste are standard on all programs; others, such as Paste Attributes, are unique to
Fireworks. Table B-3 details the Edit menu’s keyboard shortcuts.
Table B-3Edit Menu Keyboard Shortcuts
Command Windows Macintosh
Undo Ctrl+Z Command+Z
Redo Ctrl+Y Command+Y
Continued
3662-1 AppB.F 8/2/02 3:00 PM Page 891
Fireworks Seminar

892 Part VIII ✦ Appendixes
Table B-3 (continued)
Command Windows Macintosh
Insert ➪ New Button n/a n/a
Insert ➪ New Symbol Ctrl+F8 Command+F8
Insert ➪ Hotspot Ctrl+Shift+U Command+Shift+U
Insert ➪ Slice Alt+Shift+U Option+Shift+U
Insert ➪ Empty Bitmap n/a n/a
Insert ➪ Bitmap Via Copy n/a n/a
Insert ➪ Bitmap Via Cut n/a n/a
Insert ➪ Layer n/a n/a
Insert ➪ Frame n/a n/a
Libraries ➪ Animations n/a n/a
Libraries ➪ Bullets n/a n/a
Libraries ➪ Buttons n/a n/a
Libraries ➪ Themes n/a n/a
Libraries ➪ Other n/a n/a
Find and Replace Ctrl+F Command+F
Cut Ctrl+X Command+X
Copy Ctrl+C Command+C
Copy as Vectors n/a n/a
Copy HTML Code Ctrl+Alt+C Command+Option+C
Paste Ctrl+V Command+V
Clear Backspace Delete
Paste as Mask n/a n/a
Paste Inside Ctrl+Shift+V Command+Shift+V
Paste Attributes Ctrl+Alt+Shift+V Command+Option+Shift+V
Duplicate Ctrl+Alt+D Command+Option+D
Clone Ctrl+Shift+D Command+Shift+D
Crop Selected Bitmap n/a n/a
Crop Document n/a n/a
Preferences Ctrl+U Command+U
Keyboard Shortcuts n/a n/a
3662-1 AppB.F 8/2/02 3:00 PM Page 892
Fireworks Seminar

893Appendix B ✦ Keyboard Shortcuts
The last two menu items in Table B-3 are found on Windows and Mac OS 9 only. OnMac OS X, these items are in the Application menu, which is covered in Table B-1.
The View MenuWith the commands on the View menu, you can zoom in or out on your work, or
view a grid or guides to assist with layout. Table B-4 details the View menu’s key-
board shortcuts.
Table B-4View Menu Keyboard Shortcuts
Command Windows Macintosh
Zoom In Ctrl+Equals (=) Command+Equals (=)
Zoom Out Ctrl+Minus (-) Command+Minus (-)
Magnification ➪ 6% n/a n/a
Magnification ➪ 12% n/a n/a
Magnification ➪ 25% n/a n/a
Magnification ➪ 50% Ctrl+5 Command+5
Magnification ➪ 66% n/a n/a
Magnification ➪ 100% Ctrl+1 Command+1
Magnification ➪ 150% n/a n/a
Magnification ➪ 200% Ctrl+2 Command+2
Magnification ➪ 300% Ctrl+3 Command+3
Magnification ➪ 400% Ctrl+4 Command+4
Magnification ➪ 800% Ctrl+8 Command+8
Magnification ➪ 1600% Ctrl+6 Command+6
Magnification ➪ 3200% n/a n/a
Magnification ➪ 6400% n/a n/a
Fit Selection Ctrl+Alt+Zero (0) Command+Option+Zero (0)
Fit All Ctrl+Zero (0) Command+Zero (0)
Full Display Ctrl+K Command+K
Continued
Note
3662-1 AppB.F 8/2/02 3:00 PM Page 893
Fireworks Seminar

894 Part VIII ✦ Appendixes
Table B-4 (continued)
Command Windows Macintosh
Macintosh Gamma n/a —(Windows only)
Windows Gamma — n/a(Macintosh only)
Hide Selection Ctrl+L Command+L
Show All Ctrl+Shift+L Command+Shift+L
Rulers Ctrl+Alt+R Command+Option+R
Grid ➪ Show Grid Ctrl+Alt+G Command+Option+G
Grid ➪ Snap To Grid Ctrl+Alt+Shift+G Command+Option+Shift+G
Grid ➪ Edit Grid n/a n/a
Guides ➪ Show Guides Ctrl+Semicolon (;) Command+Semicolon (;)
Guides ➪ Lock Guides Ctrl+Alt+Semicolon (;) Command+Option+Semicolon (;)
Guides ➪ Snap to Guides Ctrl+Shift+Semicolon (;) Command+Shift+Semicolon (;)
Guides ➪ Edit Guides n/a n/a
Slice Guides Ctrl+Alt+Shift+ Command+Option+Semicolon (;) Shift+Semicolon (;)
Slice Overlay n/a n/a
Hide Edges F9 F9
Hide Panels F4 F4
Status Bar (Windows only) n/a —
The Select MenuThe Select menu contains objects you can insert into your documents. Table B-5
details the items available on the Select menu and their keyboard shortcuts.
3662-1 AppB.F 8/2/02 3:00 PM Page 894
Fireworks Seminar

895Appendix B ✦ Keyboard Shortcuts
Table B-5Select Menu Keyboard Shortcuts
Command Windows Macintosh
Select All Ctrl+A Command+A
Deselect Ctrl+D Command+D
Superselect n/a n/a
Subselect n/a n/a
Select Similar n/a n/a
Select Inverse Ctrl+Shift+I Command+Shift+I
Feather n/a n/a
Expand Marquee n/a n/a
Contract Marquee n/a n/a
Border Marquee n/a n/a
Smooth Marquee n/a n/a
Save Bitmap Selection n/a n/a
Restore Bitmap Selection n/a n/a
The Modify MenuThe Modify menu lists commands for altering existing selections. Its keyboard
shortcuts are detailed in Table B-6.
Table B-6Modify Menu Keyboard Shortcuts
Command Windows Macintosh
Canvas ➪ Image Size n/a n/a
Canvas ➪ Canvas Size n/a n/a
Canvas ➪ Canvas Color n/a n/a
Canvas ➪ Trim Canvas Ctrl+Alt+T Command+Option+T
Canvas ➪ Fit Canvas Ctrl+Alt+F Command+Option+F
Continued
3662-1 AppB.F 8/2/02 3:00 PM Page 895
Fireworks Seminar

896 Part VIII ✦ Appendixes
Table B-6 (continued)
Command Windows Macintosh
Canvas ➪ Rotate 180° n/a n/a
Canvas ➪ Rotate 90° CW n/a n/a
Canvas ➪ Rotate 90° CCW n/a n/a
Animation ➪ Animate Selection Alt+Shift+F8 Option+Shift+F8
Animation ➪ Settings n/a n/a
Animation ➪ Remove Animation n/a n/a
Symbol ➪ Convert to Symbol F8 F8
Symbol ➪ Edit Symbol n/a n/a
Symbol ➪ Tween Instances Ctrl+Alt+ Command+OptionShift+T +Shift+T
Symbol ➪ Break Apart n/a n/a
Pop-up Menu ➪ Add Pop-up Menu n/a n/a
Pop-up Menu ➪ Edit Pop-up Menu n/a n/a
Pop-up Menu ➪ Delete Pop-up Menu n/a n/a
Mask ➪ Reveal All n/a n/a
Mask ➪ Hide All n/a n/a
Mask ➪ Paste as Mask n/a n/a
Mask ➪ Group as Mask n/a n/a
Mask ➪ Reveal Selection n/a n/a
Mask ➪ Hide Selection n/a n/a
Mask ➪ Disable Mask n/a n/a
Mask ➪ Delete Mask n/a n/a
Selective JPEG ➪ Save Selection as JPEG Mask n/a n/a
Selective JPEG ➪ Restore JPEG Mask n/a n/aas Selection
Selective JPEG ➪ Settings n/a n/a
Selective JPEG ➪ Remove JPEG Mask n/a n/a
Flatten Selection Ctrl+Alt+ Command+OptionShift+Z +Shift+Z
Merge Down Ctrl+E Command+E
Flatten Layers n/a n/a
Transform ➪ Free Transform n/a n/a
3662-1 AppB.F 8/2/02 3:00 PM Page 896
Fireworks Seminar

897Appendix B ✦ Keyboard Shortcuts
Command Windows Macintosh
Transform ➪ Scale n/a n/a
Transform ➪ Skew n/a n/a
Transform ➪ Distort n/a n/a
Transform ➪ Numeric Transform Ctrl+Shift+T Command+Shift+T
Transform ➪ Rotate 180° n/a n/a
Transform ➪ Rotate 90° CW Ctrl+9 Command+9
Transform ➪ Rotate 90° CCW Ctrl+7 Command+7
Transform ➪ Flip Horizontal n/a n/a
Transform ➪ Flip Vertical n/a n/a
Transform ➪ Remove Transformations n/a n/a
Arrange ➪ Bring to Front Ctrl+Shift+ Command+Shift+Up Arrow Up Arrow
Arrange ➪ Bring Forward Ctrl+Up Arrow Command+Up Arrow
Arrange ➪ Send Backward Ctrl+Down Arrow Command+Down Arrow
Arrange ➪ Send to Back Ctrl+Shift+ Command+Shift+Down Arrow Down Arrow
Align ➪ Left Ctrl+Alt+1 Command+Option+1
Align ➪ Center Vertical Ctrl+Alt+2 Command+Option+2
Align ➪ Right Ctrl+Alt+3 Command+Option+3
Align ➪ Top Ctrl+Alt+4 Command+Option+4
Align ➪ Center Horizontal Ctrl+Alt+5 Command+Option+5
Align ➪ Bottom Ctrl+Alt+6 Command+Option+6
Align ➪ Distribute Widths Ctrl+Alt+7 Command+Option+7
Align ➪ Distribute Heights Ctrl+Alt+9 Command+Option+9
Combine Paths ➪ Join Ctrl+J Command+J
Combine Paths ➪ Split Ctrl+Shift+J Command+Shift+J
Combine Paths ➪ Union n/a n/a
Combine Paths ➪ Intersect n/a n/a
Combine Paths ➪ Punch n/a n/a
Combine Paths ➪ Crop n/a n/a
Alter Path ➪ Simplify n/a n/a
Continued
3662-1 AppB.F 8/2/02 3:00 PM Page 897
Fireworks Seminar

898 Part VIII ✦ Appendixes
Table B-6 (continued)
Command Windows Macintosh
Alter Path ➪ Expand Stroke n/a n/a
Alter Path ➪ Inset Path n/a n/a
Alter Path ➪ Hard Fill n/a n/a
Alter Path ➪ Anti-Alias Fill n/a n/a
Alter Path ➪ Feather Fill n/a n/a
Group Ctrl+G Command+G
Ungroup Ctrl+Shift+G Command+Shift+G
The Text MenuThe Text menu enables you to change the formatting options for text objects or to
convert them to paths. Table B-7 details Text menu keyboard shortcuts.
Table B-7Text Menu Keyboard Shortcuts
Command Windows Macintosh
Font ➪ Your Font List n/a n/a
Size ➪ Other n/a n/a
Size ➪ Smaller Ctrl+Shift+comma (,) Command+Shift+comma (,)
Size ➪ Larger Ctrl+Shift+period (.) Command+Shift+period (.)
Size ➪ 8 to 120 n/a n/a
Style ➪ Plain n/a n/a
Style ➪ Bold Ctrl+B Command+B
Style ➪ Italic Ctrl+I Command+I
Style ➪ Underline n/a n/a
Align ➪ Left Ctrl+Alt+Shift+L Command+Option+Shift+L
Align ➪ Centered Horizontally Ctrl+Alt+Shift+C Command+Option+Shift+C
3662-1 AppB.F 8/2/02 3:00 PM Page 898
Fireworks Seminar

899Appendix B ✦ Keyboard Shortcuts
Command Windows Macintosh
Align ➪ Right Ctrl+Alt+Shift+R Command+Option+Shift+R
Align ➪ Justified Ctrl+Alt+Shift+J Command+Option+Shift+J
Align ➪ Stretched Ctrl+Alt+Shift+S Command+Option+Shift+S
Align ➪ Top n/a n/a
Align ➪ Centered Vertically n/a n/a
Align ➪ Bottom n/a n/a
Align ➪ Justified Vertically n/a n/a
Align ➪ Stretched Vertically n/a n/a
Editor n/a n/a
Attach to Path Ctrl+Shift+Y Command+Shift+Y
Detach from Path n/a n/a
Orientation ➪ Rotate Around Path n/a n/a
Orientation ➪ Vertical n/a n/a
Orientation ➪ Skew Vertical n/a n/a
Orientation ➪ Skew Horizontal n/a n/a
Reverse Direction n/a n/a
Convert to Paths Ctrl+Shift+P Command+Shift+P
Check Spelling Shift+F7 Shift+F7
Spelling Setup n/a n/a
The Commands MenuFireworks commands are written in JavaScript and can be added to Fireworks by
the user to customize the feature set. Although the Commands menu does not
include any keyboard shortcuts, it is included here (see Table B-8) for the sake
of completeness and for those using this section as a command reference.
For more about Fireworks commands, see Chapter 19.Cross-Reference
3662-1 AppB.F 8/2/02 3:00 PM Page 899
Fireworks Seminar

900 Part VIII ✦ Appendixes
Table B-8Commands Menu Keyboard Shortcuts
Command Windows Macintosh
Manage Saved Commands n/a n/a
Manage Extensions n/a n/a
Run Script n/a n/a
Creative ➪ Add Arrowheads n/a n/a
Creative ➪ Add Picture Frame n/a n/a
Creative ➪ Convert to Grayscale n/a n/a
Creative ➪ Convert to Sepia Tone n/a n/a
Creative ➪ Fade Image n/a n/a
Creative ➪ Twist and Fade n/a n/a
Data-Driven Graphics Wizard n/a n/a
Document ➪ Distribute to Layers n/a n/a
Document ➪ Hide Other Layers n/a n/a
Document ➪ Lock Other Layers n/a n/a
Document ➪ Reverse Frames n/a n/a
Panel Layout Sets ➪ 1024×768/1152×768/ n/a n/a1280×1024/800×600/Your Panel Layout Sets
Panel Layout Sets ➪ Save Panel Layout n/a n/a
Reset Warning Dialogs n/a n/a
Resize Selected Objects n/a n/a
Web ➪ Create Shared Palette n/a n/a
Web ➪ Select Blank ALT Tags n/a n/a
Web ➪ Set ALT Tags n/a n/a
The Filters MenuFilters are plug-in image manipulation tools (usually Photoshop-compatible) that
expand the capabilities of Fireworks. Table B-9 details the standard filters that are
included with Fireworks. Your Filters menu has additional options if you have
installed third-party plug-ins.
3662-1 AppB.F 8/2/02 3:00 PM Page 900
Fireworks Seminar

901Appendix B ✦ Keyboard Shortcuts
Table B-9Filters Menu Keyboard Shortcuts
Command Windows Macintosh
Repeat Filter Ctrl+Alt+Shift+X Command+Option+Shift+X
Adjust Color ➪ Auto Levels n/a n/a
Adjust Color ➪ Brightness/Contrast n/a n/a
Adjust Color ➪ Curves n/a n/a
Adjust Color ➪ Hue/Saturation n/a n/a
Adjust Color ➪ Invert Ctrl+Alt+Shift+I Command+Option+Shift+I
Adjust Color ➪ Levels n/a n/a
Blur ➪ Blur n/a n/a
Blur ➪ Blur More n/a n/a
Blur ➪ Gaussian Blur n/a n/a
Other ➪ Convert to Alpha n/a n/a
Other ➪ Find Edges n/a n/a
Sharpen ➪ Sharpen n/a n/a
Sharpen ➪ Sharpen More n/a n/a
Sharpen ➪ Unsharp Mask n/a n/a
Eye Candy 4000 LE ➪ Bevel Boss n/a n/a
Eye Candy 4000 LE ➪ Marble n/a n/a
Eye Candy 4000 LE ➪ Motion Trail n/a n/a
Alien Skin Splat LE ➪ Edges n/a n/a
The Window MenuThe Window menu manages document windows and also Fireworks panels. Through
this menu you can open, close, arrange, bring to the front, or hide all of Fireworks’
windows. Table B-10 details the Window menu keyboard shortcuts.
All the commands for the various panels and inspectors are toggles. Select once toview a floating window; select again to hide it.
Tip
3662-1 AppB.F 8/2/02 3:00 PM Page 901
Fireworks Seminar

902 Part VIII ✦ Appendixes
Table B-10Window Menu Keyboard Shortcuts
Command Windows Macintosh
New Window Ctrl+Alt+N Command+Option+N
Toolbars ➪ Main (Windows only) n/a —
Toolbars ➪ Modify (Windows only) n/a —
Tools Ctrl+F2 Command+F2
Properties Ctrl+F3 Command+F3
Answers Alt+F1 Option+F1
Optimize F10 F10
Layers F2 F2
Frames Shift+F2 Shift+F2
History Shift+F10 Shift+F10
Styles Shift+F11 Shift+F11
Library F11 F11
URL Alt+Shift+F10 Option+Shift+F10
Color Mixer Shift+F9 Shift+F9
Swatches Ctrl+F9 Command+F9
Info Alt+Shift+F12 Option+Shift+F12
Behaviors Shift+F3 Shift+F3
Find and Replace Ctrl+F Command+F
Project Log n/a n/a
Align n/a n/a
Sitespring n/a n/a
Cascade n/a n/a
Tile Horizontal n/a n/a
Tile Vertical n/a n/a
Your Open Documents List n/a n/a
3662-1 AppB.F 8/2/02 3:00 PM Page 902
Fireworks Seminar

903Appendix B ✦ Keyboard Shortcuts
The Help MenuThe Help menu offers access to Fireworks’ online manual, tutorial, and even the
Fireworks Web site. Table B-11 details its keyboard shortcuts.
Table B-11Help Menu Keyboard Shortcuts
Command Windows Macintosh
About Balloon Help (Mac OS 9 only) — n/a
Show Balloons (Mac OS 9 only) — n/a
Fireworks Help — Command+?
Welcome n/a n/a
What’s New n/a n/a
Using Fireworks F1 —
Manage Extensions n/a n/a
Fireworks Support Center n/a n/a
Macromedia Online Forums n/a n/a
Online Registration n/a n/a
Print Registration n/a n/a
About Fireworks (Windows only) n/a —
Mac OS 9 users can display the About Fireworks dialog box by choosing AppleMenu ➪ About Fireworks.
The Tools PanelAs well as providing keyboard shortcuts for menu commands, Fireworks also
enables you to use the keyboard to change the active tool quickly and easily. Hover
your cursor over a particular tool and Fireworks displays the name of the tool, as
well as its keyboard shortcut. Table B-12 describes each tool’s keyboard shortcut.
Some of the keyboard shortcuts act as a toggle between tools that are similar. Forexample, V (or Zero) toggles between the Pointer and the Select Behind tools.
Note
Tip
3662-1 AppB.F 8/2/02 3:00 PM Page 903
Fireworks Seminar

904 Part VIII ✦ Appendixes
Table B-12Tools Keyboard Shortcuts
Button Name Shortcut
Pointer V or Zero
Select Behind V or Zero
Subselection A or 1
Scale Q
Skew Q
Distort Q
Crop C
Export Area C
Marquee M
Oval Marquee M
Lasso L
Polygon Lasso L
Magic Wand W
Brush B
3662-1 AppB.F 8/2/02 3:00 PM Page 904
Fireworks Seminar

905Appendix B ✦ Keyboard Shortcuts
Button Name Shortcut
Pencil B
Eraser E
Blur R
Sharpen R
Dodge R
Burn R
Smudge R
Rubber Stamp S
Eyedropper I
Paint Bucket G
Gradient G
Line N
Pen P
Vector Path P
Redraw Path P
Continued
3662-1 AppB.F 8/2/02 3:00 PM Page 905
Fireworks Seminar

906 Part VIII ✦ Appendixes
Table B-12 (continued)
Button Name Shortcut
Rectangle U
Rounded Rectangle U
Ellipse U
Polygon U
Text T
Freeform O
Reshape Area O
Path Scrubber (+) n/a
Path Scrubber (-) n/a
Knife Y
Rectangle Hotspot J
Circle Hotspot J
Polygon Hotspot J
Slice K
3662-1 AppB.F 8/2/02 3:00 PM Page 906
Fireworks Seminar

907Appendix B ✦ Keyboard Shortcuts
Button Name Shortcut
Polygon Slice K
Hand H, or press and hold spacebar
Zoom Z
The Top Ten Fireworks Keyboard ShortcutsOf course, you’ll want to learn universal keyboard shortcuts, such as Open, Save,
and Close (see Table B-2), and Cut, Copy, and Paste (see Table B-3). But after you
have those down, Table B-13 contains my recommendations for the most useful
Fireworks-specific keyboard shortcuts, presented with the tools first, and then
going across the menus from left to right.
Table B-13Top Ten Fireworks Keyboard Shortcuts
Command Windows Macintosh
Pointer/Select Behind Tool V or Zero V or Zero
Text Tool T T
View ➪ Magnification ➪ 50%, 100%, Ctrl+5, 1, 2, 4 Command+5, 1, 2, 4200%, 400%
Edit ➪ Duplicate Ctrl+Alt+D Command+Option+D
Select ➪ Deselect Ctrl+D Command+D
Modify ➪ Transform ➪ Numeric Transform Ctrl+Shift+T Command+Shift+T
Modify ➪ Align ➪ Center Vertical Ctrl+Alt+2 Command+Option+2
Modify ➪ Align ➪ Center Horizontal Ctrl+Alt+5 Command+Option+5
Modify ➪ Group Ctrl+G Command+G
Text ➪ Check Spelling Shift+F7 Shift+F7
✦ ✦ ✦
3662-1 AppB.F 8/2/02 3:00 PM Page 907
Fireworks Seminar

3662-1 AppB.F 8/2/02 3:00 PM Page 908
Fireworks Seminar

What’s on theCD-ROM
This appendix provides you with information on the con-
tents of the CD-ROM that accompanies the Fireworks MXBible. For the latest and greatest information, please refer to
the ReadMe file located at the root of the CD. The CD-ROM
contains the following:
✦ Fully functioning trial versions of Macromedia’s
Fireworks MX, Dreamweaver MX, Flash MX, and
FreeHand 10
✦ Fireworks-compatible filters from the leading manufac-
turers of such tools, Alien Skin Software and Auto FX
Software
Also included, from some of the finest designers working with
Fireworks today, are a wide range of commands, strokes, gra-
dients, textures, and custom HTML templates designed to
make your work more productive. Finally, you’ll also find sev-
eral sample graphics from the book for you to inspect, modify,
and experiment with at your leisure.
System RequirementsMake sure that your computer meets the minimum system
requirements listed in this section. If your computer doesn’t
match up to most of these requirements, you may have a
problem using the contents of the CD.
CCA P P E N D I X
✦ ✦ ✦ ✦
In This Appendix
System requirements
Using the CD with Windows and Macintosh
What’s on the CD
Troubleshooting
✦ ✦ ✦ ✦
3662-1 AppC.F 8/2/02 3:01 PM Page 909
Fireworks Seminar

910 Part VIII ✦ Appendixes
For Windows 98SE, Windows 2000, Windows NT4 (with SP 6 or later),
Windows Me, or Windows XP:
✦ PC with a Pentium II processor running at 300 Mhz or faster
✦ At least 96 MB of total RAM installed on your computer; for best performance,
we recommend at least 128 MB
✦ Ethernet network interface card (NIC) or modem with a speed of at least
28,800 bps
✦ A CD-ROM drive
For Macintosh:
✦ A G3 or faster processor running OS 9.1 or later, or OS X 10.1 or later
✦ At least 96 MB of total RAM installed on your computer; for best performance,
we recommend at least 128 MB
Using the CD-ROMThe CD-ROM is a “hybrid” CD-ROM, which means that it contains one section for
Windows and one section for Macintosh. Your operating system automatically
chooses the correct section.
Several files, primarily the Macromedia trial programs and the additional commer-
cial programs, are compressed. Double-click these files to begin the installation
procedure. Most other files on the CD-ROM are not compressed and can simply
be copied from the CD-ROM to your system by using your file manager. A few of
the Fireworks extensions that include files that must be placed in different folders
are also compressed.
Where possible, the file structure of the CD-ROM replicates the structure that
Fireworks MX sets up when it is installed. For example, textures are found in
the Fireworks MX/Settings/Textures folder on both the CD-ROM and the folder
that the Fireworks MX installer creates on your computer.
Within the Extensions folder, you’ll find some commands packed in Macromedia
.mxp format. Double-click these files to install them using the Extension Manager.
For more details on using the Extension Manager, see Chapter 19.
What’s on the CDThe Fireworks MX Bible companion CD-ROM contains a host of programs and auxiliary
files to assist you in your exploration of Fireworks, as well as in your Web-page design
work in general. A description of the files and programs on the CD-ROM follows.
3662-1 AppC.F 8/2/02 3:01 PM Page 910
Fireworks Seminar

911Appendix C ✦ What’s on the CD-ROM
Fireworks MX, Dreamweaver MX, Flash MX,and FreeHand 10 demosIf you haven’t had a chance to work with Fireworks (or Dreamweaver, Flash, or
FreeHand), the CD-ROM offers fully functioning trial versions of these key
Macromedia programs for both Macintosh and Windows systems. Each of these
demos can be used for 30 days; they cannot be reinstalled for additional use time.
To install a demo, simply double-click its installer icon in the main folder of the
CD-ROM and follow the installation instructions on your screen.
The trial versions of the Macromedia programs are very sensitive to system datechanges. If you alter your computer’s date, the program “times out” and is nolonger functional.
The full Fireworks version comes with a wonderful assortment of styles. To sample
this work, visit the Fireworks Web site at www.macromedia.com/software/fireworks/.
Additional programsFireworks MX is definitely one program that “plays well with others.” Virtually any
third-party Photoshop-compatible plug-in can be used as a Fireworks Effect — good
news if you’re a Photoshop user or have Photoshop-compatible filters from another
application. Several of the leading filter developers have generously loaned their
programs for inclusion on this CD-ROM.
In addition to the filters described in this section, the world-renowned color spe-
cialist, Pantone, has contributed a program, ColorWeb Pro, in a trial version to
help ease the transition for designers from the world of print to the Web. We are
including the full software product along with a QuickTime movie that briefly
demos ColorWeb. To activate the software, users must call Pantone to purchase
the serial number. The product will not function without purchasing it through
Pantone.
Filters from Alien SkinAlien Skin Software has contributed a trial version of three different filter collections:
Xenofex, EyeCandy 4000, and their newest offering, Splat!. Xenofex is a collection of
inspirational special effects that energize any graphics project. Realistic natural phe-
nomena and sophisticated distortions have never been easier to create. Eye Candy
4000 from Alien Skin, is a terrific collection of 23 effects applicable to any Fireworks
image including Smoke, Marble, Melt and Corona. Splat! adds frames, textures,
edges, borders, mosaics and more to Fireworks graphics. Alien Skin’s Web site can
be found at www.alienskin.com/.
Caution
3662-1 AppC.F 8/2/02 3:01 PM Page 911
Fireworks Seminar

912 Part VIII ✦ Appendixes
Filters from Auto FXAuto FX Software has contributed a trial version of one of its finest plug-in packages
called DreamSuite Series One. DreamSuite Series One is a collection of 18 different
plug-ins that offer a wide variety of effects such as Chisel, Crackle, Crease,
PhotoBorder, and Liquid Metal. Along with DreamSuite Series One, Auto FX offers
DreamSuite Series Two, DreamSuite Gel Series, Photo/Graphic Edges, and AutoEye.
The filters in these packages offer effects that aren’t available in other plug-in pack-
ages making them unique. Auto FX Software’s Web site is www.autofx.com/.
ColorWeb Pro from PantoneMany new Web designers are not new to design at all and bring a rich history — as
well as a client list — from their print backgrounds. One constant in print color
reproduction is the Pantone Color System. Many clients require that all of their
graphics, whether intended for print or for the Internet, conform to a specific selec-
tion of Pantone colors. The ColorWeb Pro application translates Pantone colors
into their RGB equivalents. Find more information by visiting Pantone’s Web site at
www.pantone.com/.
Chapter 7 teaches a special technique for using ColorWeb Pro with Fireworks.
Fireworks extensionsFireworks is blessed with a robust community that not only creates great artwork
and utilities, but also shares them. The CD-ROM includes numerous extensions —
commands, styles, and textures — from the Fireworks community. Not only can
these tools ease your workflow, but they can also vary and enhance your designs.
Fireworks commandsWith the availability of the Fireworks graphics engine through the Flash user inter-
face, Fireworks commands are really taking off. Commands are undeniably power-
ful, whether they are used to automate tedious production or produce fun effects.
You can access a Fireworks JavaScript command from anywhere by choosing
Commands ➪ Run Script. Flash commands should be installed using the Extension
Manager. The CD-ROM has numerous examples in the Extensions folder.
Fireworks styles and texturesPart of the power of Fireworks is the capability to extend both its image-creating
capabilities and its HTML output. Making a set of textures available is as simple as
copying a folder from one location to another. For the textures included with this
CD-ROM, you simply need to copy the images in any of the Textures folders found
under the various contributors’ names to the equivalent Fireworks folder and then
relaunch Fireworks. The Fireworks MX Bible companion CD-ROM includes more
than 50 new textures.
Cross-Reference
3662-1 AppC.F 8/2/02 3:01 PM Page 912
Fireworks Seminar

913Appendix C ✦ What’s on the CD-ROM
You can also use an individual texture without having to copy it to your Texturesfolder by selecting Other from the Textures list in Fireworks and then choosing thetexture from another folder on your computer.
Gradients, strokes, and image librariesFireworks also gives you the capability to add many other components of an image,
such as the stroke or gradient fill. For your graphic-creation pleasure, the CD-ROM
includes a useful compendium of various gradient fills, strokes, and image libraries,
each in their own self-named folder. Although these are fairly simple to create in
Fireworks, why reinvent the wheel when you have so much other work to do?
Included in this collection is a wide variety of dotted and dashed strokes as well as
an arrowhead library.
Fireworks MX Bible examplesExample images used in the Fireworks MX Bible can be found in the Examples folder
of the CD-ROM, organized by the chapter in which they appear in the book. You’ll
find examples of everything from alpha transparency to a pseudo banner ad that
conforms to industrywide specifications.
Web resource directoryThe Web is a vital resource for any Web designer, whether a seasoned professional or
a beginner. The CD-ROM contains an HTML page with a series of links to resources on
the Web; the series contains general, as well as Fireworks-specific references.
Shareware programs are fully functional, trial versions of copyrighted programs. If
you like particular programs, register with their authors for a nominal fee and
receive licenses, enhanced versions, and technical support. Freeware programs are
copyrighted games, applications, and utilities that are free for personal use. Unlike
shareware, these programs do not require a fee or provide technical support. GNUsoftware is governed by its own license, which is included inside the folder of the
GNU product. See the GNU license for more details.
Trial, demo, or evaluation versions are usually limited either by time or functionality
(such as being unable to save projects). Some trial versions are very sensitive to
system date changes. If you alter your computer’s date, the programs will “time
out” and will no longer be functional.
eBook version of Fireworks MX BibleThe complete text of this book is on the CD in Adobe’s Portable Document Format
(PDF). You can read and search through the file with the Adobe Acrobat Reader
(also included on the CD).
Tip
3662-1 AppC.F 8/2/02 3:01 PM Page 913
Fireworks Seminar

914 Part VIII ✦ Appendixes
TroubleshootingIf you have difficulty installing or using any of the material on the companion CD,
try the following solutions:
✦ Turn off any anti-virus software that you may have running. Installers
sometimes mimic virus activity and can make your computer incorrectly
believe that it is being infected by a virus. (Be sure to turn the anti-virus soft-
ware back on later.)
✦ Close all running programs. The more programs you’re running, the less
memory is available to other programs. Installers also typically update files
and programs; if you keep other programs running, installation may not work
properly.
✦ See the ReadMe: Please refer to the ReadMe file located at the root of the
CD-ROM for the latest product information at the time of publication.
If you still have trouble with the CD, please call the Customer Care phone number:
(800) 762-2974. Outside the United States, call 1 (317) 572-3994. You can also con-
tact Customer Service by e-mail at [email protected]. Wiley Publishing Inc.
will provide technical support only for installation and other general quality control
items; for technical support on the applications themselves, consult the program’s
vendor or author.
✦ ✦ ✦
3662-1 AppC.F 8/2/02 3:01 PM Page 914
Fireworks Seminar

SYMBOLS AND NUMERICS<> (angle brackets) surrounding HTML tags, 867
* (asterisk) in title bar (“dirty doc” indicator), 25, 132
8-bit color, 205, 428, 464
800x600 command (Commands menu), 627
4-Up tab (document window), 498, 500–502
1.8 gamma setting, 207, 208
72 dpi resolution, 122, 123
/ (slash) in HTML closing tags, 867
1024x768 command (Commands menu), 627
36-bit color scanners, 464
32-bit color, 205, 428, 519
3D depth, tweening, 772–774
1280x1024 command (Commands menu), 627
24-bit color
channels and, 428
described, 205
export formats, 519
for photographic images, 207, 518–519
scanner setting, 464
256 colors, 205, 332. See also exporting indexed color;
Websafe colors
2.2 gamma setting, 207–208
2-Up tab (document window), 29, 498, 499–500
A<a> (anchor) tag (HTML), 871–872
absolute URLs, 585
accessing. See opening or accessing
action property (BehaviorInfo object), 852
actions. See Behaviors
acute angles, 156
Adaptive palette, 505, 516
Add Arrowheads command (Commands menu), 612,
613–614
Add Arrowheads dialog box, 613–614
Add Effects menu (Property inspector)
accessing, 46
Adjust Color submenu
Brightness/Contrast command, 367
Color Fill command, 367
Curves command, 370
Hue/Saturation command, 372
Levels command, 369
overview, 365, 366
Bevel and Emboss submenu, 364
Blur submenu
Gaussian Blur command, 377
overview, 364
built-in effects on, 365
enabling/disabling effects on, 46, 386
filters and, 46
Filters menu versus, 46, 360, 361, 388–389
Options submenu
All Off command, 386
All On command, 386
Locate Plugins command, 386
Save As Style command, 386, 387
Other submenu, 364, 378
overview, 360–361, 364
Shadow and Glow submenu, 364
Sharpen submenu
overview, 364
Sharpen command, 382
Sharpen More command, 382
Unsharp Mask command, 382
using, 46–47
Add Frames dialog box, 751–752
Add Picture Frame command (Commands menu), 612,
614–616
Add Picture Frame dialog box, 615
Add Pop-up Menu command (Modify menu), 708
Adjust Color submenu (Add Effects menu)
Brightness/Contrast command, 367
Color Fill command, 367
Curves command, 370
Hue/Saturation command, 372
Levels command, 369
overview, 364, 366
Adjust Color submenu (Filters menu)
Invert command, 435
overview, 87
Adobe. See also Illustrator; Photoshop
applications with Photoshop-compatible filters,
393
GoLive, 104, 105, 654, 658–660
Web site, 393
ads, banner. See banner ads
Air Brush strokes, 175, 238, 314
alert() global method, 820
aliases (shortcuts)
to plug-in folders, 395, 459
symbol Instances and, 560
Index
3662-1 Index.F 8/2/02 3:01 PM Page 915
Fireworks Seminar

916 Index ✦ A
Alien Skin Eye Candy
features, 395
filters included with program, 396–397
filters on companion CD-ROM, 8, 394, 912
Fire filter, animating, 771–772
Fireworks MX compatibility with, 8, 394
Jiggle filter, 397–398
Motion Trail filter, 794
Shadowlab filter, 398–399
version 4000 LE included with Fireworks MX, 8,
394, 912
Web sites, 394
Alien Skin Splat!, 912
Alien Skin Web site, 393
Alien Skin Xenofex, 912
Align Bottom button (Modify toolbar), 42
Align button (Modify toolbar), using, 41
Align command (Window menu), 419
Align commands (Text menu), 83–84, 309
Align Left button (Modify toolbar), 42
Align panel
aligning to canvas using, 419
overview, 57–58
Align Right button (Modify toolbar), 42
Align submenu (Modify menu)
Bottom command, 416
Center Horizontal command, 417
Center Vertical command, 417
Distribute Heights command, 418
Distribute Widths command, 418
Left command, 416
overview, 81
Right command, 416
Top command, 416
Align Top button (Modify toolbar), 42
aligning and distributing objects
bottom alignment, 416
canvas alignment, 418–420
center horizontal alignment, 417
center vertical alignment, 417
distributing objects to frames, 755–756
distributing objects to separate layers, 625
even horizontal distribution, 418
even vertical distribution, 418
left alignment, 416
Modify toolbar for, 41
right alignment, 416
theoretical alignment rectangle for, 415–418
top alignment, 416
aligning text
in boundary box, 306–308, 309
on paths, 321, 322
All Off command (Add Effects menu), 386
All On command (Add Effects menu), 386
alpha channel, 205, 428
alpha masks. See masking
Alt (Option) key
Bézier curves and, 164–165, 168
drawing ellipses or circles from the center
using, 153
drawing rectangles or squares from the center
using, 149, 150
with PrintScreen key (Windows), 486
with selection tools, 183, 184
alt text with <img> tag (HTML), 630
Alter Path submenu (Modify menu)
Expand Stroke command, 293–294
Inset Path command, 294–296
overview, 82
Simplify command, 292–293
altText property
exportDoc object, 847
ImageMap object, 850
SliceInfo object, 854
Ambrosia Software Snapz Pro X, 487
America Online browser, 881
American Standard Code for Information Interchange.
See ASCII
anchor (<a>) tag (HTML), 871–872
angle brackets (<>) surrounding HTML tags, 867
Animate dialog box, 778–779
Animate Selection command (Modify menu), 778
animated GIF files. See also banner ads
for animated rollovers, 767
animating background images, 765
Auto Crop option, 762
Auto Difference option, 762
banner ads, 783–795
exporting with Export Preview dialog box, 763–765
frame disposal options, 761–762
limiting colors for, 761
looping options, 762–763
other animation formats versus, 747–749
preloading, 766
reusing animations, 765
scaling animations, 765
setting for exporting, 761
slicing, 768
spacer.gif file with, 766
transparency, 766
Web design using, 765–768
animation. See also banner ads; frames; tweening;
specific tools
Animation Symbols for, 749, 777–781
3662-1 Index.F 8/2/02 3:01 PM Page 916
Fireworks Seminar

917Index ✦ A
bandwidth issues, 746
banner ads, 783–795
browser support for formats, 748
browsers and performance, 747
completing by reversing frames, 626–627
controls in document window, 30
export settings and options, 761–765
exporting as series of files, 747
fading in and out using tweening, 775–776
format comparison, 748
frame delay settings, 757
frame-saving tips, 747
GIF advantages and drawbacks for, 747–749
importing Flash animations, 489–491
importing multiple files as new animation, 488–489
managing frames, 749–754
managing objects, 754–756
minimum frames for, 745
multi-frame editing, 760
Onion Skinning, 759–760
Open as Animation option, 173
opening animated GIF files, 488
overview, 11–12, 745–749, 781–782
of a slice, 678–680
slide shows compared to, 746–747
tools for, 749
tweening depth, 772–774
tweening filters, 771–772
tweening Graphic Symbols, 563, 768–776
tweening object properties, 768–769
VCR-style controls, 757
Web design with animated GIF images, 765–768
Animation submenu (Modify menu)
Animate Selection command, 778
overview, 79
Settings command, 778, 779
Animation Symbols. See also symbols
adjusting animation settings, 779
adjusting motion path, 779–780
converting to Graphic Symbols, 780
creating, 777–779
defined, 562, 749, 777
deleting from Library, 780–781
editing graphics in, 781
Property inspector settings, 779
Answers panel, 68
Anti-Alias option (Text Editor), 301
AOL browser, 881
API (application programming interface). See
Fireworks API
appBatchCodeDir property (fw object), 824
appCommandsDir property (fw object), 824
appDir property (fw object), 824
appExportSettingsDir property (fw object), 824
appExtensionsDir property (fw object), 824
appFavoritesDir property (fw object), 824
appHelpDir property (fw object), 824
appHTMLCodeDir property (fw object), 824
Apple iPhoto software, 467
Apple Menu (Macintosh), Dock submenu, Turn Hiding
On command, 39
Application menu. See Fireworks menu (Mac OS X
only)
application programming interface. See Fireworks API
Apply option (Text Editor), 301
appMacCreator property (fw object), 824
appMacJsFileType property (fw object), 824
appPatternsDir property (fw object), 825
appPresetsDir property (fw object), 825
appSettingsDir property (fw object), 825
appStylesDir property (fw object), 825
appSymbolLibrariesDir property (fw object), 825
appTexturesDir property (fw object), 825
appXtrasDir property (fw object), 825
Arrange submenu (Modify menu)
overview, 41, 81
Send Backward command, 385
Send to Back command, 195, 385, 775
arrowhead library on companion CD-ROM, 913
arrowheads, adding to selected path, 612, 613–614
ASCII (American Standard Code for Information
Interchange)
copying and pasting text files, 469–470
Fireworks support for, 127
importing text files, 311, 482
asterisk (*) in title bar (“dirty doc” indicator), 25, 132
Attach to Path command (Text menu), 320
Auto Crop option, 762
Auto Difference option, 762
Auto FX Software Web site, 393
Auto Kern option for text, 301, 304
Auto Levels Live Effect, 368
automation features. See also batch processing; Find
and Replace panel; History panel
Commands menu management, 637–642
Creative submenu commands, 353, 433, 439,
612–619
Data-Driven Graphics Wizard, 620–625
Document submenu commands, 625–627
Find and Replace feature, 591–604
overview, 17
Panel Layout Sets, 627–628
Reset Warning Dialogs command, 628
Resize Selected Objects command, 619–620
Web submenu, 629–630
3662-1 Index.F 8/2/02 3:01 PM Page 917
Fireworks Seminar

918 Index ✦ B
BbackgroundColor property
Document object, 829
exportDoc object, 847
BackgroundIsTransparent property (exportDocobject), 847
backgroundLink property (exportDoc object), 847
backgroundUrl property (Document object), 829
backups
Backup Original Files, 593–594
Batch Process dialog box options, 608
Find and Replace panel options, 593–594
incremental, 594, 608
overwriting existing files, 594, 608
Replace Options, 593
bandwidth, animation issues, 746
banner ads. See also animated GIF files
advertising terminology, 785–786
creating, 786–793
designing elements of, 787–789
file size (weight), 785, 793
frames for, 789–795
IAB/CASIE standards, 783–784
<img> tag for, 785
layers for, 789
motion blur for saving frames, 793–795
overview, 783–786
planning, 786
reducing file size of, 793
reusing design elements, 788
size (dimensions) of, 783–784, 786
Barnett, Don (Hybrid-Safe Colors developer), 333
Bars Gradient fills, 336. See also Gradient fills
Basic strokes
overview, 237
for text, 314
Batch Code folder, 803
Batch Process command (File menu), 606
Batch Process dialog box, 606–609
batch processing
basic procedure, 606–609
Find and Replace panel for, 16–17
graphics files, 606–609
overview, 16–17
Project Log panel and, 67, 605, 607
resizing images, 16
scriptlets for, 609
batchStatusString property (fw object), 825
BBEdit Creator Code (Macintosh), 105
BehaviorInfo object
overview, 851
properties, 852–853
Behaviors. See also Nav Bars; pop-up menus; rollovers
actions, 684
attaching, 685–686
defined, 13, 61
deleting, 61, 687, 718
drag-and-drop, 714–718
events, 684
JavaScript as language for, 684
Nav Bars, 698–701
overview, 13–14, 683–684
pop-up menus, 20, 707–714
preloading animations and, 766
rollovers, 374, 687–697, 702–707, 714–718
selecting events for, 686
status bar message, 706–707
using Fireworks Behaviors in Dreamweaver,
734–736
Behaviors panel
Add Action button, 686
attaching Behaviors, 685–686
Behavior groups, 684–685
deleting Behaviors, 61, 687
Event pop-up menu, 686
opening, 685
Options menu commands, 63
overview, 61–62, 684–685
Remove Action button, 687
selecting events for Behaviors, 686
behaviors property
ImageMap object, 850
SliceInfo object, 854
BehaviorsList object, 853
Bevel and Emboss submenu (Add Effects menu), 364
bevel corner for expanded paths, 294
Bevel effects
Button presets, 374–375
Inner Bevel versus Outer Bevel, 375
overview, 373–374
Property inspector settings, 373
table of, 374
Bézier curves
adjusting curves, 165–167
control points, 161
corner anchor points, 161
curve anchor points, 161
drawing lines with Pen tool, 162–163
drawing smooth curves, 163–164
keyboard modifiers, 167–168
mixing lines and curves, 164–165
overview, 161
Bézier, Peter (inventor of Bézier curves), 161
3662-1 Index.F 8/2/02 3:01 PM Page 918
Fireworks Seminar

919Index ✦ B
Bicubic Interpolation
as default, 95–96, 138, 174
defined, 174
Bilinear Interpolation, 174
bit depth. See also Websafe colors
channels and, 428
color range and, 204–205
memory requirements, 205
scanning color depth, 464
bitmaps. See also specific tools
adding Design Notes to, 725
applying filters to entire object, 389–390
applying filters to pixel selections, 390–391
blending modes and, 444
clip art, 481–482
converting color images to grayscale, 353, 433,
612, 616
converting text to, 103, 318
converting to sepia color scheme, 612, 616
converting to symbols, 565, 573
converting vector objects to, 200, 389
copying and pasting from other applications,
469–470
from Dreamweaver, optimizing, 720–722
file formats that can be imported, 472–473
Fireworks MX features, 5, 6–9
flattening imported text into, 103
importing, 175, 469–477
increasing or reducing the selection area, 183–184
inserting empty bitmaps, 175, 194
inserting graphics in documents, 175
interpolation methods for scaling, 174
limiting your drawing area, 196
Live Effects and, 361
masking with text, 323–324
masks using, 431–436
new tools, 20
opening existing bitmaps, 172–173
overview, 171–172, 201
Paint Bucket fills for, 355–356
perspective shadow technique, 383–386
pixel manipulation tools, 175–187
preferences, 98, 172
repositioning using Pointer tool, 176
resizing using Pointer tool, 177
resizing, vector objects versus, 135
scaling, 173–174
selection commands, 197–200
selection outlines for, 98, 172
selection tools, 176–184
striped border around, 98, 172
textures for, 352
touchup tools, 187–195
Black & White palette, 506
blending modes
comparison of results, 444
compositing images and, 441
overview of modes, 445–446
simulating light source using, 446–447
for symbols, 570
tweening, 769
using, 442–444
Blur commands (Filters menu), 87
Blur Live Effect, 378
Blur More Live Effect, 378
Blur submenu (Add Effects menu)
Gaussian Blur command, 377
overview, 364
Blur tool
overview, 37, 187
Property inspector settings, 188
switching heads using, 188
using, 188–189
<body> tag (HTML), 870
Bold text style, 302
Border Marquee command (Select menu), 199
borders, patterned, around documents, 612, 614–616
Bottom command (Modify menu), 416
bounding boxes
adjusting with Property inspector, 158
Distort tool and, 271
for ellipses and circles, 152–153
for importing text files, 311
rotating with transform tools, 271–273
Scale tool and, 268, 269
Skew tool and, 270
text alignment and, 306–308
Break Apart command (Modify menu), 571
Brightness/Contrast dialog box, 367
Brightness/Contrast Live Effect, 367
Bring Forward button (Modify toolbar), 42
Bring Front button (Modify toolbar), 42
browseDocument() function, 860
browseForFileURL() function, 860
browseForFolderURL() function, 860
browsers
animation formats supported by, 748
animation performance and, 747
AOL browser, 881
browser-safe palette, 206–207
cross-platform concerns, 882–885
Continued
3662-1 Index.F 8/2/02 3:01 PM Page 919
Fireworks Seminar

920 Index ✦ B–C
browsers (continued)
Extensis Portfolio browser, 481, 482
fonts and, 882–884
form widgets and, 884–885
image files displayed by, 493
installing different browsers and browser
versions, 584
JPEG image dithering by, 207
locations for, 583
lowscr attribute of <img> and, 766
Microsoft Internet Explorer overview, 879–881
need for testing on variety of, 877–878
Netscape Navigator overview, 878–879
PNG files and, 504
Preview in Browser feature, 581–584
Progressive JPEG format and, 524–525
setting primary browser for Fireworks, 582–584
supporting XHTML, 692
viewing Web pages as HTML code, 866–867
Virtual PC (Connectix) for PC browsers on Macs,
584, 879
WebTV, 881–882
browser-safe palette, 206–207
Brush tool, 36
brushes property (Document object), 830
Build-up attribute of strokes, 253–254
built-in effects. See Live Effects
Burn tool
overview, 36, 190, 192
Property inspector settings, 190
using, 192–193
Butt Cap for expanded paths, 294
Button Editor, 571–572, 699–701
Button 1, 784. See also banner ads
button styles. See styles
Button Symbols. See also symbols
converting objects to, 573
converting to Graphic Symbols, 573
creating, 571–573
defined, 562–563
editing, 573, 574
Instance Level Button Properties, 574–575
using Button Instances, 573–574
Button 2, 784. See also banner ads
CCalligraphy strokes, 239
canvas
aligning to, 418–420
color, 121, 122–123, 125, 139–140
cropping, 135
defined, 121
described, 26
dragging beyond canvas area, 34
enlarging to fit artwork, 139
height, 121–122, 124
resolution, 121, 122, 124
rotating, 140
with single image, resizing, 135–138
snap to edge feature, 420
specifying size numerically, 133–134
transparent, 123, 139
trimming, 122, 139
typical sizes, 122
width, 121–122, 124
Canvas Color command (Modify menu), 123, 139
Canvas Size command (Modify menu), 133, 134, 194
Canvas Size dialog box, 134
Canvas submenu (Modify menu)
Canvas Color command, 123, 139
Canvas Size command, 133, 134, 194
Fit Canvas command, 139
Image Size command, 112, 135, 137
overview, 78–79
Rotate 90 degrees CCW command, 140
Rotate 90 degrees CW command, 140
Rotate 180 degrees command, 140
Trim Canvas command, 122, 139
capturing images. See also importing; scanning
from digital cameras and camcorders, 466–468
Photoshop Acquire plug-in support (Macintosh),
458, 459–460
scanning pages, 460–465
screen captures, 486–487
TWAIN standard for, 457–458
TWAIN-compliant devices, 458–459
Cascade command (Window menu), 26
Cascading Style Sheet layers. See CSS layers
Casey, Donna (Web designer), 556
CASIE (Coalition for Advertising Supported
Information and Entertainment), 784
CD-ROM. See companion CD-ROM; Fireworks CD-ROM
cellHeight property (SliceInfo object), 854
cellWidth property (SliceInfo object), 854
Center Horizontal Axis button (Modify toolbar), 42
Center Horizontal command (Modify menu), 417
Center in Document command (Commands menu), 419
center point for vector objects, 146
Center Vertical Axis button (Modify toolbar), 42
Center Vertical command (Modify menu), 417
centimeters
altering canvas size by, 134
pixels versus, 122
CGI (Common Gateway Interface) scripts, 785
3662-1 Index.F 8/2/02 3:01 PM Page 920
Fireworks Seminar

921Index ✦ C
CGI Resource Index Web site, 785
channels
alpha channel, 205, 428
bit depth and, 428
characters
matching positions with Regular Expressions,
596–597
matching ranges with Regular Expressions,
597–598
UTF-8 encoding, 110–111
Charcoal strokes, 240
Check Spelling dialog box, 313
checkboxes (floating panels), described, 52
chooseScriptTargetDialog() method (fwobject), 826
Circle Hotspot tool, 38, 647, 649–650
circles
adjusting dimensions and position, 158
drawing, 153
hotspots, 647, 649–650
imaginary bounding box for, 152–153
keyboard modifiers for, 152
selecting circular areas, 177
clearing the History panel, 632
click rate for banner ad, 786
click-through for banner ad, 786
clip art, 481–482
Clone command (Edit menu), 689, 773
Close button (document window), 132
Close command (File menu), 132
close() method (Files object), 843
closed paths. See also paths; shapes
cutting with Knife, 288–289
defined, 145
closing
files, 132
layers, 411–412
paths with Pen tool, 163
CMY color model, 213
CMYK color model, 204, 213
Coalition for Advertising Supported Information and
Entertainment. See CASIE
collapsing floating panels, 49
color. See also exporting indexed color; fills; palettes
alpha channel, 205, 428
animated GIF format colors, limiting, 761
Auto Levels filter, 368
bit depth and color range, 204–205
Brightness/Contrast filter, 367
canvas, 121, 122–123, 125, 139–140
choosing from color wells, 215–216
choosing from graphics with Eyedropper tool, 217
cleaning up stray pixels, 517–518
CMYK color model, 204
color management systems, 208–209
Color Table (Optimize panel), 223–224, 496–497,
506–515
converting Pantone colors to Websafe colors,
224–227
creating GIF-friendly images, 516–517
Curves filter, 370–371
defaults, setting, 95
exporting indexed color, 503–518
finding and replacing, 592, 601–602
Fireworks API and, 817
gamma correction, 207–208
grid colors, 425
guide colors, 423–424
hexadecimal colors, 205–206, 212–213, 817
for hotspots, 647, 652
Hue/Saturation filter, 371–372
Hybrid-Safe Colors, 333
Levels filter, 368–370
locking, 501–502
mixing colors, 209–215
natural color versus Web color, 203
platform differences, 207–208
pop-up menus, 710, 712
reducing the number of colors, 506, 793
RGB color model, 204
scanning color depth, 464
searching and replacing, 601–602
slice guides, 664–665
slices, 668
slicing animations and, 768
Swatches panel, 53–54, 219–223
system color picker(s), 217–219
text, 302
Web color fundamentals, 203–209
Web page background, 122–123
Websafe colors, 206–207, 602–603
Color blending mode, 444, 445
Color Fill dialog box, 367–368
Color Fill Live Effect, 367–368
color locking, choosing color for, 501–502
color management systems, 208–209
Color Mixer command (Window menu), 210
Color Mixer panel
color models, 211–215
color ramp, 209, 210
color sliders, 209, 210–211
opening, 210
Options menu commands, 55
overview, 54–55, 209
3662-1 Index.F 8/2/02 3:01 PM Page 921
Fireworks Seminar

922 Index ✦ C
color models
CMY, 213
CMYK, 204, 213
in Color Mixer panel, 211–215
Grayscale, 214–215
Hexadecimal, 212–213, 817
HSB, 214
in Macintosh Color Picker dialog box, 218
RGB, 204, 205–206, 211–212
color palettes. See palettes
color picker
choosing colors from, 215–216
Macintosh color picker, 217–218
No Color button, 215, 219
opening from color wells, 215, 216
Palette button, 215
switching swatches, 216
Windows color picker, 219
Color Picker dialog box (Macintosh), 218
Color Table (Optimize panel)
accessing, 223–224
commands, 508–509
Dither option, 510
Loss option, 510
Matte option, 509–510
overview, 496–497, 506–507
Sort by Popularity command, 509
transparency options, 511–515
Color Table panel (Fireworks 4). See Optimize panel
color wells
Canvas, 123
choosing colors from, 215–216
Color Mixer panel and, 55, 209
described, 51
opening color picker from, 215, 216
Websafe palette for, 207
ColorSync color management system (Macintosh),
208–209
ColorWeb Pro (Pantone)
on companion CD-ROM, 912
converting Pantone colors to Websafe colors,
225–227
for Macintosh, 225, 226–227
modes, 224
for Windows, 224, 225–226
Combine Paths submenu (Modify menu)
Crop command, 292
Intersect command, 290–291
Join command, 281
overview, 82
Punch command, 291
text and, 318, 319
Union command, 289–290
combining paths. See merging paths
Command key (Macintosh). See Ctrl (Command) key
Command Panels folder, 803
commands, custom. See custom commands
Commands folder, 639–640, 803–804, 817
Commands menu
Creative submenu
Add Arrowheads command, 612, 613–614
Add Picture Frame command, 612, 614–616
Convert to Grayscale command, 353, 433,
612, 616
Convert to Sepia Tone command, 612, 616
Fade Image command, 439, 612, 616–618
overview, 85
Twist and Fade command, 612, 618–619
custom commands
Commands folder, 639–640, 803–804, 817
commands within commands, 637
deleting extensions, 642
deleting saved commands, 638–639
Flash commands, 638, 640–642
Flash technology for, 18
installing extensions, 641–642
JavaScript commands, 638–640
Macromedia Exchange Package (MXP) files,
640–641
managing, 637–642
menu command shortcuts, 635
MXP files, 640–641
overview, 18
renaming, 639
saving History panel steps as, 17, 60, 633–635
Data-Driven Graphics Wizard command, 622
Document submenu
Center in Document command, 419
Distribute to Layers command, 625
Hide Other Layers command, 625
Lock Other Layers command, 625
overview, 86
Reverse Frames command, 626–627
keyboard shortcuts, 85–86, 899–900
Manage Extensions command, 642
Manage Saved Commands command, 638
Panel Layout Sets submenu
adding Panel Layout Sets to, 49, 628
800x600 command, 627
overview, 86
Save Panel Layout command, 49, 628
1024x768 command, 627
1280x1024 command, 627
3662-1 Index.F 8/2/02 3:01 PM Page 922
Fireworks Seminar

923Index ✦ C
Reset Warning Dialogs command, 628
Resize Selected Objects command, 619–620
Run Script command, 609, 800
table of commands, 85–86
Web submenu
Create Shared Palette command, 629–630
overview, 86
Select Blank ALT Tags command, 630
Set Alt Tags command, 630
Commands Wrapper, 815
Common Gateway Interface. See CGI scripts
companion CD-ROM
banner ad example on, 795
banner ad templates on, 784
contents, 911–914
customer support, 915
eBook version of this book on, 914
Fireworks MX Bible examples on, 913
installing, 910–911
system requirements, 909–910
troubleshooting, 914–915
using with the Mac OS, 911
using with Windows, 910–911
compositing
alpha masks for, 428–441
applied compositing techniques, 449–453
blending modes for, 441, 442–447
feathering selections, 448
grid for, 425–426
grouping objects, 426–427
guides for, 422–425
opacity for, 441, 442
rulers for, 420–421
concentric shapes, creating, 296
Cone Gradient fills, 95, 336. See also Gradient fills
Configuration folder
Batch Code folder in, 803
Command Panels folder in, 803
Commands folder in, 639–640, 803–804, 817
Export Settings folder in, 804
Extensions folder in, 804
HTML Code folder in, 804–805
jsextensions folder in, 804
Libraries folder in, 805–806
Nav Menu folder in, 713, 806
overview, 801–803
Patterns folder in, 806
Plug-Ins folder in, 807–808
Styles folder in, 806–807
Textures folder in, 353, 807
URL Libraries folder in, 807
confirm() global method, 820–821
Connectix Virtual PC, 584, 879
contrast
bitmap mask method, 433–436
Brightness/Contrast filter for, 367
control handles or points
adding to corner point, 166
adjusting curves using, 165–167
defined, 161, 165
extending from corner point, 167
keyboard modifiers, 167–168
manipulating with Subselection tool, 164
Control key. See Ctrl (Command) key
Convert to Alpha Live Effect, 379
Convert to Grayscale command (Commands menu),
353, 433, 612, 616
Convert to Paths command (Text menu), 318, 319
Convert to Sepia Tone command (Commands menu),
612, 616
Convert to Symbol command (Modify menu), 565, 573
converting
Animation Symbols to Graphic Symbols, 780
Button Symbols to Graphic Symbols, 573
color images to grayscale, 353, 433, 612, 616
images to sepia color scheme, 612, 616
objects to symbols, 564, 565, 573
Pantone colors to Websafe colors, 224–227
text to bitmaps, 103, 318
text to paths, 318–319
vector objects to bitmaps, 200, 389
cookie-cutter text, 318–319
coordinates. See X, Y coordinates
Copy button (Main toolbar), 41
Copy command (Edit menu), 249, 469
copy() method (Files object), 843
copying
between applications, copying and pasting,
469–470
frames, duplicating, 689–690, 753–754
History panel steps to the Clipboard, 636
image to a slice, 668
layers, 409–410
object sublayers, 413
objects to frames, 754–755
saving file copy, 131–132
strokes, 249
symbols, 567
Twist and Fade command for, 612, 618–619
Corel Photo-Paint
importing documents from, 477
Photoshop-compatible filters with, 393
3662-1 Index.F 8/2/02 3:01 PM Page 923
Fireworks Seminar

924 Index ✦ C–D
CorelDRAW
clip art, 481
Fireworks support for files, 127, 478
importing vector art files from, 478–479
Photoshop-compatible filters with, 393
corner anchor points
adding control handle to, 166
defined, 161
extending control handle from, 167
keyboard modifiers, 168
CPM for banner ads, 785
Crayon strokes, 241
Create Shared Palette command (Commands menu),
629–630
createDirectory() method (Files object), 843
createFile() method (Files object), 843
Creative submenu (Commands menu)
Add Arrowheads command, 612, 613–614
Add Picture Frame command, 612, 614–616
Convert to Grayscale command, 353, 433, 612, 616
Convert to Sepia Tone command, 612, 616
Fade Image command, 439, 612, 616–618
overview, 85
Twist and Fade command, 612, 618–619
Creator Code (Macintosh)
for HTML output, 105
importing Windows files and, 484
for scriptlets, 800
for shared palettes, 630
Crop command (Modify menu), 292
Crop tool, 36, 135
cropping
Auto Crop option for animation frames, 762
Delete Objects when Cropping preference, 97
enlarging or reducing canvas size, 135
in Export Preview dialog box, 530–532
crosshair (precise) cursor, 96–97, 98
cross-platform concerns, 207–208, 483–484, 882–885
CSS (Cascading Style Sheets) layers
adding to Dreamweaver, 731–733
exporting as, 536–537
Ctrl (Command) key
Bézier curves and, 168
switching between Pen and Subselection tool, 164
for switching to Pointer tool, 231
currentFrameNum property (Document object), 830
currentLayerNum property (Document object), 830
cursors
brush-size versus standard-size, 97
precise, 96–97, 98
curve anchor points
defined, 161
keyboard modifiers, 168
curves, Bézier. See Bézier curves
Curves dialog box, 370–371
Curves Live Effect, 370–371
custom canvas color, 123, 139
custom commands. See also Fireworks API; Flash
commands; JavaScript commands
Commands folder, 639–640, 803–804, 817
commands within commands, 637
on companion CD-ROM, 913
deleting extensions, 642
deleting saved commands, 638–639
Flash commands overview, 638, 640–642
Flash technology for, 18
installing extensions, 641–642
JavaScript commands overview, 18, 638–640
Macromedia Exchange Package (MXP) files, 640–641
managing, 637–642
menu command shortcuts, 635
MXP files, 640–641
overview, 18
renaming, 639
Repeat History command, 861–862
saving History panel steps as, 17, 60, 633–635
Custom palette, 506
Customer Care phone number, 915
Customer Service e-mail address, 915
customizing Fireworks
Configuration folder for, 801–808
HTML and JavaScript engine for, 799–801
Preferences file for, 808–809
customizing your environment
floating panels, 47–49
HTML setup, 104–111
keyboard shortcuts, 112–117
multiple user setup, 103–104
preferences, 93–103
print options, 111–112
Cut button (Main toolbar), 41
cutting paths, 288–289
DDarken blending mode, 444, 445
data types
colors, 817
file URLs, 818
masks, 818
matrices, 819
points, 819
rectangles, 819
resolution, 819
Data-Driven Graphics Wizard
choosing data sources, 622
generating files, 625
3662-1 Index.F 8/2/02 3:01 PM Page 924
Fireworks Seminar

925Index ✦ D
linking variables to data, 623–624
managing files, 624–625
opening, 622
overview, 620–622
reviewing data records, 622
selecting records, 623
templates for, 621
variables for, 621, 622, 623–624
XML file for, 621, 622
Data-Driven Graphics Wizard command (Commands
menu), 622
debugging Flash commands, 814–816
defaultAltText property (Document object), 830
Delete Mask command (Modify menu), 438
Delete Objects when Cropping preference, 97
Delete Set dialog box, 116
deleteFile() method (Files object), 843
deleteFileIfExisting() method (Files object), 843
deleting
Animation Symbol from Library, 780–781
Behaviors, 61, 687, 718
color from Swatches panel, 219–220
custom strokes, 248
Delete Objects when Cropping preference, 97
drag-and-drop Behaviors, 718
Eraser tool for, 186–187
extensions, 642
fills, 330
frames, 753
History panel steps, 632
keyboard shortcut from set, 115
keyboard shortcut set, 116
layers, 410
masks, 438–439
objects, 413
Optimize panel saved settings, 406
palette from Swatches panel, 223
points, 277, 278–279
saved commands, 638–639
slices, 666–667
styles, 553, 554
symbol Instances, 571
symbols, 569
unused colors when exporting, 515
URL Libraries, 590
URLs from URL Library, 690
demoindex property (Slices object), 857
demos on companion CD-ROM, 911–912, 914
depth effect using tweening, 772–774
Derren Whiteman’s Fireworks Web site, 803
Description indicator of status bar (Windows only), 43
Deselect command (Select menu), 198, 231
Design Notes, 724–725
Detach from Path command (Text menu), 320
detaching text from path, 320
dictionaries for spell-checking, 312
Difference blending mode, 444, 445
digital camcorders, 468
digital cameras, 466–467
dimensions. See height; width
direction of paths, 146–147
Director (Macromedia)
exporting for, 538–539
Photoshop-compatible filters with, 393
“dirty doc” indicator, 25, 132
Disable Mask command (Modify menu), 439
disabling. See enabling/disabling
disclosure triangle (floating panels), described, 51–52
disjointed rollovers
creating, 702–703
with drag and drop, 716–717
dismissBatchDialogWhenDone property
(fw object), 825
Display Control Panel (Windows), 50
display options
Draft Display mode, 33–34
Full Display mode, 33
switching, 33
displaying. See enabling/disabling; hiding and/or
showing; toggling
Displays System Preference (Macintosh), 50
Distort tool
creating perspective using, 276
overview, 36, 271
rotating objects using, 271–273
text objects and, 317–318
distorting objects
creating perspective using, 276
images, 271
text, 317–318
Distribute Heights button (Modify toolbar), 42
Distribute Heights command (Modify menu), 418
Distribute to Layers command (Commands menu), 625
Distribute Widths button (Modify toolbar), 42
Distribute Widths command (Modify menu), 418
distributing objects. See aligning and distributing
objects
dithering
defined, 332
flat-color graphics and, 332
indexed color and, 503, 511
of JPEG images by browser, 207
of photographic images, 518
256-color restriction and, 332, 503
Web Dither fills, 330, 332–335
docID property (exportDoc object), 847
3662-1 Index.F 8/2/02 3:01 PM Page 925
Fireworks Seminar

926 Index ✦ D
Dock submenu (Apple Menu), Turn Hiding On
command, 39
docSaveName property (exportDoc object), 847
Document functions (Fireworks API), 858–859
Document object
methods, 837–838
overview, 829
properties, 829–837
Document Object Model. See DOM
Document submenu (Commands menu)
Center in Document command, 419
Distribute to Layers command, 625
Hide Other Layers command, 625
Lock Other Layers command, 625
overview, 86
Reverse Frames command, 626–627
document window. See also specific elements
animation controls, 30
asterisk (“dirty doc” indicator) in title bar, 25, 132
canvas, 26
Close button, 132
controls, 28–33
display options, 33–34
4-Up tab, 498, 500–502
hiding windows, 27
Launcher, 32
magnification settings, 31–32
multiple windows for the same document, 27–28,
498–499
organizing multiple documents, 26
Original tab, 29
overview, 25–34
Page Preview button, 31
panning, 501
Preview tab, 29–30, 497, 498–499
Quick Export menu, 30
Smart Maximize feature, 28
Stop button, 31
2-Up tab, 29, 498, 499–500
VCR-style controls for animations, 757
zooming, 501–502
documentList property (fw object), 825
documents
adding Patterns to, 344
adding textures to, 354
canvas options, 121–123
centering objects in, 419
creating a new document, 124–125
creating separate images versus complete Web
page, 119–121
exporting as Photoshop documents, 535–536
identifying documents with changes not saved, 25,
132
inserting bitmap graphics, 175
inserting empty bitmaps, 175, 194
multiple windows for the same document, 27–28,
498–499
patterned border around, 612, 614–616
doDemoHTML property (Slices object), 857
Dodge tool
overview, 36, 190, 191
Property inspector settings, 190
using, 191
DOM (Document Object Model), 858
Domino Designer (Lotus), exporting as Image Wells for,
540
Don’t Resample option, 469
doShimInternal property (Slices object), 857
doSkipUndefined property (Slices object), 857
dotted lines, 260–263
downHighlight property (BehaviorInfo object), 852
downIndex property (SliceInfo object), 854
dpi (dots per inch). See resolution
Draft Display mode
described, 33–34
switching to Full Display mode, 33
drag-and-drop Behaviors
disjoint rollover with, 716–717
overview, 714–715
removing, 718
simple rollover with, 715–716
Draggable Slice Guides feature, 666–667
dragging. See also moving objects
beyond canvas area, 34
drag-and-drop Behaviors, 714–718
dragging and dropping between applications,
470–471
panel Gripper, 48
Preview Drag preference, 99
slice guides, 666–667
drawing tools, Precise Cursor for, 96–97
drawings. See vector objects
Dreamweaver Libraries
editing in Dreamweaver, 729–730
exporting items from Fireworks, 676–678, 697,
727–728
Dreamweaver (Macromedia)
adding CSS layers to, 731–733
creating a Web photo album, 737–739
Creator Code (Macintosh) for, 105
demo on companion CD-ROM, 911–912
editing images from, 722–726
3662-1 Index.F 8/2/02 3:01 PM Page 926
Fireworks Seminar

927Index ✦ D–E
exporting Dreamweaver code, 726–733
Fireworks Behaviors in, 734–736
Fireworks slices in, 725–726
hybrid commands (Fireworks/Dreamweaver),
739–741
image maps, HTML style for, 654, 657–658
image placeholders from, 734
Invisible Elements, 657, 696
Libraries, 676–678, 697, 727–730
Macromedia common interface, 26
optimizing images from, 720–722
overview of integration with, 15, 719–720
Quick Export to, 731
rollovers, HTML style for, 692, 693
setting Fireworks as graphic editor for, 723–724
slices, HTML style for, 673–674
XHTML support, 730–731
Drop Shadow Live Effect, 379–381
dual monitors, working with, 50
Dunning, John (programmer), 620
Duplicate Frames dialog box, 690, 754
Duplicate Set dialog box, 114
duplicating. See copying
EEAppAlreadyRunning property (Errors object), 838
EAppNotSerialized property (Errors object), 838
EArrayIndexOutOfBounds property (Errors
object), 838
EBadFileContents property (Errors object), 838
EBadJIsVersion property (Errors object), 838
EBadNesting property (Errors object), 838
EBadParam property (Errors object), 838
EBadParamType property (Errors object), 838
EBadSelection property (Errors object), 838
eBook version of Fireworks MX Bible on companion
CD-ROM, 914
EBufferTooSmall property (Errors object), 838
ECharConversionFailed property (Errors
object), 838
Economou, Kleanthis (programmer and Webmaster),
419, 803
EDatabaseError property (Errors object), 838
EDeletingLastMasterChild property (Errors
object), 838
Edge Effect attribute of strokes, 254–255
Edge Texture attribute of strokes, 254
EDiskFull property (Errors object), 838
Edit Grid command (View menu), 347, 349, 425
Edit Guides command (View menu), 424
Edit menu
Clone command, 73, 689
Copy command, 249, 469
Find and Replace command, 594
Insert submenu
Empty Bitmap command, 175, 194
Frame command, 751
Hotspot command, 653
New Button command, 571
New Symbol command, 566, 777
overview, 72–73
Slice command, 668
Keyboard Shortcuts command, 112
keyboard shortcuts for, 72–74, 891–893
Libraries submenu, 73, 577
Paste command, 249, 469
Preferences command, 343, 354, 632
Redo command, 631
table of commands, 72–74
Undo command, 95, 631, 753
Edit Stroke dialog box
Build-up attribute, 253–254
Edge Effect attribute, 254–255
Edge Texture attribute, 254
Flow Rate attribute, 253
Ink Amount attribute, 252
opening, 248, 251
Options tab, 251–256
Sensitivity tab, 258–259
Shape tab, 256–257
Spacing attribute, 252–253
Texture attribute, 254
Tip Spacing attribute, 255
Tips attribute, 255
Variation attributes, 255, 256
Edit Styles dialog box, 554
Edit Symbol command (Modify menu), 781
editing
Animation Symbols, 779–781
Button Symbols, 573, 574
Dreamweaver images, 722–726
effect parameters, 363
grid, 347, 349, 425–426
guides, 424
masks, 436–439
paths, 281–296
preferences for, 96–100
strokes, 250–259
styles, 554
symbol instances, 570–571
symbols, 567–569
text, 299, 301, 308–309
URLs in URL Library, 589
Editor command (Text menu), 300
EDuplicateFileName property (Errors object), 839
3662-1 Index.F 8/2/02 3:01 PM Page 927
Fireworks Seminar

928 Index ✦ E
effects. See also image filters; Live Effects; plug-ins;
specific effects and filters
combining paths and, 289
editing parameters of, 363
finding and replacing colors, 601–602
Missing Effects dialog box, 388
overview, 405–406
Property inspector settings, 46–47, 360–362
resizing objects and, 269
separation of objects from, 7
effects property (Find object), 842
EFileIsReadOnly property (Errors object), 839
EFileNotFound property (Errors object), 839
EGenericErrorOccurred property (Errors
object), 839
EGroupDepth property (Errors object), 839
8-bit color, 205, 428, 464
800x600 command (Commands menu), 627
EIllegalThreadAccess property (Errors object), 839
EInternalError property (Errors object), 839
Ellipse Gradient fills, 336. See also Gradient fills
Ellipse tool
described, 37
drawing an ellipse or circle, 153
keyboard modifiers, 152, 153
ellipses
adjusting dimensions and position, 158
drawing, 153
hotspots, 647, 649–650
imaginary bounding box for, 152–153
keyboard modifiers for, 152
ELowOnMem property (Errors object), 839
e-mail address for Customer Service, 915
Emboss effects, 375–377
Empty Bitmap command (Edit menu), 175, 194
emptyCellColor property (exportDoc object), 847
emptyCellContents property (exportDocobject), 847
emptyCellUsesCanvasColor property (exportDocobject), 847
Enable Mask command (Modify menu), 439
enabling/disabling. See also hiding and/or showing;
toggling
Design Notes in Dreamweaver, 724–725
effects on Add Effects menu, 46, 386
Launcher, 32, 33
masks, 438
new templates, 805
Onion Skinning, 759
Precise Cursors, 96–97
Scale Attributes option, 269
striped border around bitmaps, 98, 172
warning dialog boxes, 628
Encapsulated PostScript files. See EPS files
End Caps for expanded paths, 294
enhancements. See new features
ENoActiveDocument property (Errors object), 839
ENoFilesSelected property (Errors object), 839
ENoNestedMastersOrAliases property (Errors
object), 839
ENoNestedPasting property (Errors object), 839
ENoSliceableElems property (Errors object), 839
ENoSuchElement property (Errors object), 839
ENotImplemented property (Errors object), 839
ENotMyType property (Errors object), 839
enumFiles() method (Files object), 844
environment. See customizing your environment; user
interface overview
EOutOfMem property (Errors object), 839
EPS (Encapsulated PostScript) files, 478, 480–481
EPS File Options dialog box, 480
equilateral polygons, 153. See also polygons
Erase blending mode, 444, 446
Eraser tool, 37, 186–187
EResourceNotFound property (Errors object), 839
Errors object
error messages, 838–839
generating a list of error messages, 840–841
overview, 838
properties, 838–839
ESharingViolation property (Errors object), 839
EUnknownReaderFormat property (Errors object), 839
EUserCanceled property (Errors object), 839
EUserInterrupted property (Errors object), 839
evaluation versions of software on companion
CD-ROM, 911–912, 914
event property (BehaviorInfo object), 852
events. See Behaviors
EWrongType property (Errors object), 839
Exact palette, 505
exists() method (Files object), 844
Exit command (File menu of Extension Manager), 642
Expand Marquee command (Select menu), 199
Expand Stroke command (Modify menu), 293–294
Expand Stroke dialog box, 293–294
Export Area tool
described, 36
Export Preview dialog box, 530–532
Tools panel, 530
Export button (Main toolbar), 40
Export command (File menu), 494
3662-1 Index.F 8/2/02 3:01 PM Page 928
Fireworks Seminar

929Index ✦ E
Export dialog box
for animations as series of files, 747
for CSS layers, 536–538
for Director, 538–539
for Dreamweaver Library items, 676–677
for elements as separate files, 539
for Image Wells, 540
for Photoshop documents, 543–544
for rollovers, 693–695
Save as type options, 535–536
for slices, 671–672, 675, 679
for vector shapes, 541–543
Export Preview command (File menu), 526, 761
Export Preview dialog box
animated GIF settings, 761–762, 763–765
Auto Crop option, 762
Auto Difference option, 762
cropping exported images in, 530–532
frame delay setting, 758
Frame Disposal options, 761–762
opening, 761
overview, 529–530
scaling exported images in, 532–533
Export Settings folder, 804
Export Wizard, 533–535
Export Wizard command (File menu), 533
exportDoc object
overview, 847
properties, 847–849
exportFormatOptions property (Document
object), 830
exporting. See also exporting indexed color; exporting
photographic images; saving
in animated GIF format, 761–765
animations as series of files, 747
as CSS layers, 536–537
custom effects, 388
for Director, 538–539
Dreamweaver code, 726–727
Dreamweaver Library items, 676–678, 697
elements as separate files, 539
Export Preview dialog box for, 529–533
Export Wizard for, 533–535
file formats for, 494
image map code, 653–655
as Image Wells, 540
images to other programs, 526–527
indexed color, 503–518
keyboard shortcut set reference, 116–117
optimization process for, 494–495
Optimize panel settings for, 52–53
overview, 495, 544–545
photographic images, 518–526
Photoshop documents, 535–536, 543–544
Quick Export pop-up menu for, 30, 526–527
Quick Export to Dreamweaver, 731
rollovers, 692–695
Save As options for, 535–536
slices, 110, 535–536, 671–675
styles, 554, 713–714
symbol Instance settings for, 575
Symbol Libraries, 578–579
URL Library, 590–591
vector shapes, 541–543
exporting indexed color
color palettes, 505–506
creating GIF-friendly images, 516–517
dithering, 503, 511
file formats exported by Fireworks, 503–504
interlaced GIF files, 515
Lossy GIF compression, 510–511
Matte feature, 509–510
overview, 503–504
presets, 516
reducing the number of colors, 506
removing unused colors, 515
transparency options, 511–515
exporting photographic images
dithering, 518
in JPEG format, 520–525
in other formats, 526
overview, 518–519
in PNG format, 525–526
True Color export formats, 519
exportOptions property (Document object), 830–833
ExportSettings object, 833
exportTo() method (Document object), 837
Extending Fireworks documentation, 812
Extension Manager, 640, 641
extensions. See Fireworks API; Flash commands;
JavaScript commands
Extensions folder, 804
Extensis Portfolio browser, 481, 482
Extensis Portfolio Web site, 482
external rollovers, 703–704
extracting patterns and textures from styles, 555–557
Eye Candy. See Alien Skin Eye Candy
Eye Candy 4000 LE submenu (Filters menu)
Fire command, 772
Jiggle command, 397
overview, 88
Shadowlab command, 399
3662-1 Index.F 8/2/02 3:01 PM Page 929
Fireworks Seminar

930 Index ✦ E–F
Eyedropper tool
choosing colors from graphics, 217
color picker and, 215
described, 37
outside Fireworks, 217
for Solid fills, 332
Websafe palette with, 207
FFade Image command (Commands menu), 439, 612,
616–618
Fade Image dialog box, 618
fading in and out using tweening, 775–776
Feather command (Select menu), 198–199, 448
Feather Selection dialog box, 198–199, 448
feathering selections, 448
Felt Tip strokes, 242
File menu
Batch Process command, 606
Close command, 132
Export command, 494
Export Preview command, 526, 761
Export Wizard command, 533
Go to Macromedia Exchange command, 641
HTML Setup command, 104
Import command, 175
keyboard shortcuts, 70–72, 890–891
New command, 124
Open command, 128
Page Setup command, 111
Preview in Browser submenu
overview, 71
Preview in Netscape Navigator command, 584
Set Primary Browser command, 582
Reconstitute Table command, 20, 485
Revert command, 132–133
Save a Copy command, 131–132
Save As command, 131–132
Save command, 131
Scan submenu
overview, 70
Twain Source command, 458, 465
table of commands, 70–72
File menu (Extension Manager)
Exit command, 642
Install Extension command, 642
Remove Extension command, 642
file size
banner ads, 785, 793
batch processing for resizing, 16
canvas size and, 121–122
image quality versus, 494–495
limiting in Export Wizard, 535
number of colors and, 506
optimizing for the Web, 14
PNG files and the Web, 493–494
File Transfer Protocol. See FTP
File Type code (Macintosh), importing Windows files
and, 484
file URLs, 818
filename extensions (Windows)
for bitmaps Fireworks can import, 472–473
default for HTML files, 105
for exported URL Libraries, 690
for image formats, 126–127
for JavaScript commands, 638
for vector graphics Fireworks can import, 478
filename property (exportDoc object), 848
filenames. See naming
filePathForRevert property (Document object), 833
filePathForSave property (Document object), 833
files. See also exporting; image formats; importing;
specific types
animation formats, 748
bitmap formats that can be imported, 472–473
closing, 132
default user file locations (Macintosh), 802
default user file locations (Windows), 801
exporting elements as separate files, 539
fonts in PNG files, 131
identifying documents with changes not saved,
25, 132
names in scripts, 818
opening as animation, 173
opening multiple images, 129–130
opening single images, 128
for Patterns, 341–343
reverting to a saved file, 132–133
saving and renaming, 131–132
saving copy of, 131–132
sharing across platforms, 483–484
vector formats that can be imported, 477–478
Files object
methods, 843–846
overview, 843
Fill Handles
hiding or showing, 99, 337
modifying Gradient fills using, 337–338
modifying Patterns using, 344–345
Fill over Stroke option, 264
Fill panel, Web Dither category, 207
fills. See also specific types
categories, 329–330
Color Fill Live Effect, 367–368
3662-1 Index.F 8/2/02 3:01 PM Page 930
Fireworks Seminar

931Index ✦ F
combining paths and, 289
in custom styles, 552
default color, 95
edge options, 330, 332
Fill Handles, 99, 337–338, 344–345
finding and replacing colors, 601–602
Gradient, 95, 316–317, 330, 335–341
None, 329, 330
overview, 356–357
Paint Bucket tool for, 354–356
paths and, 145–146
Pattern, 101–102, 145–146, 330, 341–351
Property inspector settings, 45–46, 329–336,
338–340
removing, 330
resizing objects and, 269
selecting colors for, 95, 330–331, 332
separation of objects from, 7
Solid, 329, 330–332
for text, 316–317
textures for, 351–354
Web Dither, 330, 332–335
fills property
Document object, 834
Find object, 842
filters. See image filters; import filters; Live Effects;
specific filters
Filters menu
Add Effects menu versus, 46, 360, 361, 388–389
Adjust Color submenu
Invert command, 435
overview, 87
Blur submenu, 87
Eye Candy 4000 LE submenu
Fire command, 772
Jiggle command, 397
overview, 88
Shadowlab command, 399
keyboard shortcuts, 87–88, 900–901
KPT 5 submenu
RadWarp command, 402
ShapeShifter command, 404
Other submenu, 88
overview, 363–364
Sharpen submenu, 88
table of commands, 87–88
vector object flattening and, 389
Find and Replace command (Edit menu), 594
Find and Replace dialog box. See Find and Replace
panel
Find and Replace panel. See also Regular Expressions
Attribute list, 592–593
Backup Original Files drop-down list box, 593–594
Color attribute, 592, 601–602
Find Non-Web 216 attribute, 592, 602–603
Font attribute, 592, 599–601
opening, 594
Options menu commands, 67
overview, 16–17, 66, 591–594
Project Log panel and, 66
Regular Expressions option, 595–599
Replace Options command, 593
Search In option list, 592, 593
Text attribute, 592, 594–595
tracking changes with Project Log, 604–605
URL attribute, 592, 603–604
Find Edges Live Effect, 379
Find object
methods, 841–842
overview, 839–840, 842
properties, 841–842
find property (Find object), 841, 842
Find Source dialog box, 528
findExportFormatOptionsByName() method
(Document object), 837
findMaxSize property (Find object), 842
findMinSize property (Find object), 842
findOpenDocument() method (fw object), 826–827
findStyle property (Find object), 842
Fire command (Filters menu), 772
Fire filter (Alien Skin Eye Candy), animating, 771–772
FireWire (IEEE 1394), capturing digital camcorder
images using, 468
Fireworks API. See also Flash commands; JavaScript
commands; specific objects
accessing, 858–862
BehaviorInfo object, 851–853
BehaviorsList object, 853
Document functions, 858–859
Document object, 829–838
Errors object, 838–839
exportDoc object, 847–849
ExportSettings object, 833
Extending Fireworks documentation, 812
Find object, 839–842
Fireworks functions, 859–860
fw object, 823–829
global methods, 820–823
History panel functions, 860–862
hotspot objects, 846–853
ImageMap object, 849–851
ImageMapList object, 851
nonstandard data types, 817–818
overview, 811–812, 817, 862
SliceInfo object, 853–856
Slices object, 856–857
3662-1 Index.F 8/2/02 3:01 PM Page 931
Fireworks Seminar

932 Index ✦ F
Fireworks CD-ROM
clip art on, 481
Extending Fireworks documentation on, 812
Patterns on, 344
styles on, 548–549
text1-201.stl file on, 555
Fireworks Commands Wrapper, 815
Fireworks Exchange Web site, 803
Fireworks 4.0 files, 126
Fireworks functions (Fireworks API), 859–860
Fireworks menu (Mac OS X only)
Keyboard Shortcuts command, 112
keyboard shortcuts for, 69, 889–890
overview, 69
Fireworks MX Bible CD-ROM. See companion CD-ROM
Fireworks MX Bible (Lowery, Joseph)
eBook version on companion CD-ROM, 914
examples on companion CD-ROM, 913
Fireworks MX (Macromedia). See also customizing
Fireworks; customizing your environment;
Fireworks API
bitmap files that can be imported, 472–473
custom commands, 18
default file format, 126
demo on companion CD-ROM, 911–912
as Dreamweaver graphics editor, 723–724
examples on companion CD-ROM, 913
Flash MX with, 16, 18
FrontPage integration, 527–528
hybrid commands (Fireworks/Dreamweaver),
739–741
image formats supported by, 126–127, 472–473
import filters, 8
indexed color export formats, 503–504
Macromedia common interface, 26
new features, 19–20
next-generation graphics features, 4, 6–12
object orientation, 6
opening from an external application, options
for, 100
overview, 3–21
primary browser for, 582–584
production tools, 16–18
program folder, 342, 713
scanning directly into, 465
as screen-based program, 3, 5
sharing files across platforms, 483–484
vector files that can be imported, 477–478
Web-related features, 4, 5, 12–15
Websafe palette features, 207
fireworks object. See fw object
Fireworks 1.0 files, 126
Fireworks PNG files. See PNG files
Fireworks Support Center, 740
Fireworks 3.0 files, 126
Fireworks 2.0 files, 126
Fit Canvas command (Modify menu), 139
Flash commands. See also custom commands;
Fireworks API
Commands folder for, 803–804, 817
on companion CD-ROM, 913
creating interface in Flash, 812, 813
debugging, 814–816
defined, 638
executing Fireworks functions, 812–813
Extension Manager for, 640, 641
finishing a command, 814
Fireworks Commands Wrapper for, 815
Flash player in Fireworks, 812
fwapi object and, 815
installing extensions, 641–642
integrating Flash input, 814
Macromedia Exchange Package (MXP) files,
640–641
managing, 640–642
MMEndCommand() function, 814
MMExecute() function, 812–813, 814, 815, 816
modal versus modeless, 640, 816
process for developing, 812
scaleMode for, 816
storing commands and Commands panels, 816–817
Flash (Macromedia)
custom commands using Flash technology, 18
demo on companion CD-ROM, 911–912
drag and drop support, 470
exporting shapes as Flash SWF, 542
Fireworks MX with, 16, 18
Flash movie interface for Creative commands, 612
importing animations, 489–491
Macromedia common interface, 26
player in Fireworks, 812
flat fills. See Solid fills
Flatten Selection command (Modify menu), 200,
318, 348
flattening
selected vector objects, 200
text into bitmaps, 103, 318
vector objects flattened by filters, 389
Flip Horizontal button (Modify toolbar), 43
Flip Vertical button (Modify toolbar), 43
floating panels. See also specific panels
collapsing, 49
common features, 50–52
dual monitors and, 47, 50
3662-1 Index.F 8/2/02 3:01 PM Page 932
Fireworks Seminar

933Index ✦ F
grouping and ungrouping, 47, 48
hiding and showing, 39, 47, 49
Launcher for, 32–33
moving, 48
overview, 47–68
Panel Layout Sets, 48–49, 627–628
resizing, 48
toggling icon visibility for, 96
Flow Rate attribute of strokes, 253
folders
additional filters folders, 393–394
additional Patterns folder, 101–102, 343
additional Textures folder, 101–102, 354
Batch Code folder, 803
for browsers, 583
Command Panels folder, 803
Commands folder, 639–640, 803–804, 817
Configuration folder, 801–808
for Data-Driven Graphics Wizard, 622, 624–625
default user file locations (Macintosh), 802
default user file locations (Windows), 801
Export Settings folder, 804
Extensions folder, 804
Fireworks program folder, 342, 713
HTML Code folder, 804–805
jsextensions folder, 804
Libraries folder, 805–806
Macintosh user file locations, 104
Nav Menu folder, 713, 806
Patterns folder, 806
for plug-ins, 101, 386, 459
Plug-Ins folder, 807–808
for pop-up menu styles, 713
preferences for, 101–102
shortcuts (aliases) to plug-in folders, 395, 459
Styles folder, 806–807
for templates, 804
Textures folder, 353, 807
URL Libraries folder, 807
Windows user file locations, 103
Folds Gradient fills, 336. See also Gradient fills
Font command (Text menu), 308
<font> tag (HTML), 874–875
fonts. See also text
cross-platform concerns, 882–884
in custom styles, 552
editing, 308
finding and replacing characteristics, 599–601
importing text files and, 482–483
Missing Fonts dialog box, 482–483
outline, 314–315
in PNG files, 131, 309–310
for pop-up menus, 710
setting basic attributes, 301–302
form widgets, cross-platform concerns, 884–885
forward slash (/) in HTML closing tags, 867
Foti, Massimo (Webmaster), 803
4-Up tab (document window), 498, 500–502
Frame command (Edit menu), 751
frame controls, 502–503
frameCount property (Document object), 834
frameLoopingCount property (Document object), 834
frames. See also animation
adding, 751–752
for banner ads, 789–795
copying objects to, 754–755
default timing for, 58
delay settings, 757
deleting, 753
distributing objects to, 755–756
document window controls for, 502–503
document-specific options, 109–110
duplicating, 689–690, 753–754
editing, 58
exporting, 535–536
frame disposal for animated GIFs, 761–762
for hotspot rollovers, 705
information in slice filenames, 109–110
layers relationship with, 749–750
looping options, 762–763
minimum needed for animation, 745
motion blur for saving, 793–795
multi-frame editing, 760
naming, 752
Onion Skinning, 759–760
overview, 749–751
patterned border around documents, 612, 614–616
reordering, 753
restoring deleted frames, 753
reversing, 626–627
for rollover images, 689–691
setting timing for, 58
sharing and unsharing layers across, 750, 756, 789
Frames panel. See also animation
adding frames, 751–752
as animation tool, 749
copying objects to frames, 755
Delete Frames button, 753
deleting frames, 753
distributing objects to frames, 755–756
docking Layers panel with, 751
Continued
3662-1 Index.F 8/2/02 3:01 PM Page 933
Fireworks Seminar

934 Index ✦ F–G
Frames panel (continued)
duplicating frames, 753–754
frame delay settings, 757
looping options, 762–763
naming frames, 752
Onion Skinning settings, 759–760
opening, 758
Options menu commands, 59
overview, 58–59, 750–751
reordering frames in Frame list, 753
frames property (Document object), 834
Freeform tool
described, 38, 282–283
Property inspector settings, 285
pulling path segment into new shape, 284–285
pushing a path into new shape, 283–284
Reshape Area tool versus, 285
freehand drawing
graphics tablet versus mouse for, 160
Vector Path tool for, 159–161
FreeHand (Macromedia)
clip art, 481
copying and pasting from, 469–470
demo on companion CD-ROM, 911–912
Fireworks support for files, 126, 478
importing vector art files from, 478–479
Photoshop-compatible filters with, 393
freeware on companion CD-ROM, 911–912, 914
FrontPage (Microsoft)
image maps, HTML style for, 654, 660
integrating Fireworks with, 527–528
rollovers, HTML style for, 693
slices, HTML style for, 674–675
FTP (File Transfer Protocol), 886
Full Banner, 784. See also banner ads
Full Display command (View menu), 33
Full Display mode, 33
Full Screen mode, 39
Full Screen with Menus mode, 39
Furbo Filters Web site, 393
fw object
methods, 826–829
overview, 823–824
properties, 824–826
fwapi object, 815
FWLaunch methods (Dreamweaver), 740–741
fw.yesNoDialog() function, 821
GgammaPreview property (Document object), 834
Gaussian Blur Live Effect, 377–378
generateHeader property (exportDoc object), 848
Generic HTML style
for image maps, 654, 656–657
for rollovers, 692, 693
for slices, 672–673
getDirectory() method (Files object), 844
getDocumentDOM() function
Document function, 858–859
Fireworks function, 859–860
getExtension() method (Files object), 844
getFilename() method (Files object), 844
getFrameFileName() method (SliceInfo object),
855–856
getFrameFileName property (SliceInfo object), 854
getLastErrorString() method (Files object), 844
getPref() method (fw object), 827
getTempFilePath() method (Files object), 845
GIF files. See also animated GIF files; animation;
exporting indexed color
animation advantages and drawbacks for, 747–749
browser support for, 493
creating GIF-friendly images, 516–517
editability and, 130
for exporting indexed color, 503–504
Fireworks support for, 127
interlaced, 515
Lossy GIF compression, 510–511
master copies and, 125
opening animated GIF files, 488
Optimize panel presets, 516
PNG files versus, 503–504
transparency, 428, 429, 511–515
global methods
alert(), 820
confirm(), 820–821
overview, 820
prompt(), 821–822
write(), 823
WRITE_HTML(), 822–823
Glow Live Effect, 381–382
Go to Macromedia Exchange command (File menu),
641
GoLive (Adobe)
Creator Code (Macintosh) for, 105
image maps, HTML style for, 654, 658–660
rollovers, HTML style for, 692, 693
slices, HTML style for, 674
Goodman, Danny (author of JavaScript Bible), 811
gradient, defined, 335
Gradient fills. See also specific types
altering gradients, 337–340
applying, 335–336
colors for, 95, 338–339
3662-1 Index.F 8/2/02 3:01 PM Page 934
Fireworks Seminar

935Index ✦ G–H
on companion CD-ROM, 913
defined, 330
gradient pattern, 337–338
handles, 337–338
for perspective shadows, 386
Property inspector settings, 335–336, 338–339
saving gradients as styles, 340–341
for text, 316–317
transparency gradient using Fade Image command,
439, 612, 616–618
transparency of, 339–340
types of, 336
Gradient tool, 37
gradients property (Document object), 834
Graphic Symbols. See also symbols; tweening
as animation tools, 749
converting Animation Symbols to, 780
converting Button Symbols to, 573
defined, 562
tweening, 563, 768–776
graphics tablet
drawing with, 160, 235, 259
mouse versus, 160, 235
graphics-creation enhancements, 19–20
grayscale
color depth for scanning images, 464
converting color images to, 353, 433, 612, 616
Grayscale color model, 214–215
Grayscale palette, 221, 506
grid
color and frequency, 425–426
editing, 347, 349, 425–426
hiding, 348
snapping to, 348, 425
Grid submenu (View menu)
Edit Grid command, 347, 349, 425
overview, 76
Show Grid command, 348, 425
Snap to Grid command, 348, 425
gridColor property (Document object), 834
gridOrigin property (Document object), 834
Grids and Guides dialog box
for grids, 425–426
for guides, 424–425, 665
gridSize property (Document object), 834
Gripper bar, 48–49
Group as Mask command (Modify menu), 324, 616
Group button (Modify toolbar), 42
Group command (Modify menu), 391, 426
grouping floating panels, 47, 48
grouping objects. See also masking; symbols
converting groups to symbols, 565, 573
creating group from selected objects, 391
defined, 41
Modify toolbar for, 41
modifying individual objects, 427
overview, 426–427
ungrouping, 427
grouping with Regular Expressions, 598–599
guides
clearing, 424–425
colors for, 423–424
creating, 422
defined, 422
locking, 422
showing and hiding, 422
snapping to, 420, 423
guides property (Document object), 835
Guides submenu (View menu)
Edit Guides command, 424
Lock Guides command, 422
overview, 76
Show Guides command, 422, 664
Snap to Guides command, 420, 423, 664
HHalf Banner, 784. See also banner ads
Hand tool, 38
hasAltText property
exportDoc object, 848
ImageMap object, 850
SliceInfo object, 854
hasBackgroundLink property (exportDoc object),
848
hasHref property
BehaviorInfo object, 852
ImageMap object, 850
HasHref property (SliceInfo object), 854
HasHTMLText property (SliceInfo object), 854
HasImage property (SliceInfo object), 854
HasImagemap property (SliceInfo object), 854
hasStatusText property (BehaviorInfo object), 852
hasTargetFrame property (BehaviorInfo object), 852
hasTargetText property (ImageMap object), 850
HasTargetText property (SliceInfo object), 854
<head> tag (HTML), 869
Heavin, Bruce (Hybrid-Safe Colors developer), 333
height. See also resizing
of banner ads, 783–784
canvas, 121–122, 124
distributing objects evenly, 418
rectangle, 150
height property
Document object, 835
exportDoc object, 848
Height property (SliceInfo object), 854
3662-1 Index.F 8/2/02 3:01 PM Page 935
Fireworks Seminar

936 Index ✦ H
Help button (floating panels), described, 50
Help menu
keyboard shortcuts, 90, 903
Manage Extensions command, 815
table of commands, 90–91
Hexadecimal color model, 212–213, 817
hexadecimal colors, 205–206, 817
Hide All command (Modify menu), 432–433
Hide Edges command (View menu), preferences for,
98, 172
Hide Other Layers command (Commands menu), 625
Hide Panels command (View menu), 49
Hide Selection command (Modify menu), 433
hiding and/or showing. See also enabling/disabling;
opening or accessing; toggling
document windows, 27
Fill Handles, 99, 337
floating panels, 39, 47, 49
grid, 348
guides, 422
layers, 410–411, 625
object sublayers, 413
selection outlines, 98, 172
slice guides, 664, 665
status bar (Windows only), 43
highlight eyedropper, 368
highlights
Curves filter for, 370–371
default color, 95
Levels and Auto Levels filters for, 368–370
selecting color for, 95, 230
stroke color and, 230
History panel
caveats, 634–635
changing number of undo steps, 94–95, 632
clearing, 632
copying steps to the Clipboard, 636
creating command shortcuts using, 635
default number of undo steps, 95, 632
Fireworks API functions, 860–862
maximum undo steps, 59, 632
Options menu commands, 60
overview, 17, 59–60
red X for nonrepeatable actions, 634
redoing undone steps, 632
replaying steps, 632–633, 634–635
saving steps as commands, 17, 60, 633–635
separator for changed selection, 634
Undo Marker, 631, 632
undoing using, 59, 631
History panel functions (Fireworks API), 860–862
hit for banner ad, 785
holes, joining paths to create, 280–281
horzOffset property (BehaviorInfo object), 852
Hotspot command (Edit menu), 653
hotspot objects
BehaviorInfo, 851–853
BehaviorsList, 853
exportDoc, 847–849
ImageMap, 849–851
ImageMapList, 851
overview, 846
hotspot rollovers, 704–706
hotspots. See also Behaviors; image maps
alternate images for, 652
assigning links to, 651–652
basic shapes for, 646–647
changing shape of, 652
Circle Hotspot tool, 647, 649–650
code example, 653
color for, 647, 652
covering objects with, 653
creating out of objects, 414
defined, 12
drawing, 648–651
overview, 12, 646–647, 680
Polygon Hotspot tool, 647, 650–651
Property inspector settings, 647, 651–652
Rectangle Hotspot tool, 647, 648–649
rollovers, 704–706
setting alt text for, 630
slices versus, 660–661, 671
target for, 652
without alt text, selecting, 630
href property
BehaviorInfo object, 852
ImageMap object, 850
Href property (SliceInfo object), 854
HSB color model, 214
HTML Code folder, 804–805
HTML editors, style setup for, 104
HTML (Hypertext Markup Language). See also HTML
styles; HTML tags
comments in Fireworks output, 105
default filename extension, 105
editors, style setup for, 104
exporting image map code, 653–655
Fireworks HTML in Dreamweaver, 726–727
lowercase names for files, 105
3662-1 Index.F 8/2/02 3:01 PM Page 936
Fireworks Seminar

937Index ✦ H–I
overview of tags and attributes, 867–877
viewing Webs page as HTML code, 866–867
HTML Setup command (File menu), 104
HTML Setup dialog box
Document Specific tab, 107–111
enabling new templates, 805
General tab, 104–105
HTML and XHTML styles, 653–654
opening, 104
Table tab, 105–107
HTML styles
for image maps, 653–654, 656–660
overview, 104, 653–654
for rollovers, 692–693
for slices, 672–675
<html> tag (HTML), 868
HTML tags. See also <img> tag (HTML)
<a> (anchor), 871–872
angle brackets surrounding, 867
attributes of, 868
<body>, 870
<font>, 874–875
<head>, 869
<html>, 868
<map>, 653
<meta>, 869–870
<p> (paragraph), 870–871
pairs of, 867–868
slash in closing tags, 867
<table>, 875–877
<td> (table data), 876
<title>, 869
<tr> (table row), 876
Web resources, 877
HTML templates, 800
htmlOutputPath property (exportDoc object), 848
HtmlText property (SliceInfo object), 854
HTTP (Hypertext Transfer Protocol), 885
HTTPS (Hypertext Transfer Protocol Secure), 885
Hue blending mode, 444, 445
Hue/Saturation dialog box, 372
Hue/Saturation Live Effect
Convert to Grayscale command and, 616
Convert to Sepia Tone command and, 616
overview, 371–372
hybrid commands (Fireworks/Dreamweaver), 739–741
Hybrid-Safe Colors, 333. See also Web Dither fills
hyperlinks. See URLs (Uniform Resource Locators)
Hypertext Transfer Protocol. See HTTP
Hypertext Transfer Protocol Secure. See HTTPS
IIAB (Internet Advertising Bureau), 784
icons
preview icons for source files (Macintosh), 96
for styles, 554, 555
toggling visibility for floating panels, 96
IE (Internet Explorer). See browsers
IEEE 1394. See FireWire (IEEE 1394)
i.Link. See FireWire (IEEE 1394)
Illustrator (Adobe)
clip art, 481
copying and pasting from, 469–470
exporting Flash animations as Illustrator
Sequences, 490
exporting vector shapes for, 542
Fireworks support for files, 127, 478
importing vector art files from, 478–479
Photoshop-compatible filters with, 393
image filters. See also effects; Live Effects; plug-ins;
specific filters and effects
Add Effects menu and, 46
adding folders for, 393–394
applications using Photoshop-compatible
filters, 393
applying to bitmaps, 389–390
applying to multiple objects, 391–392
applying to pixel selections, 390–391
combining paths and, 289
as filters, 363
Fireworks MX compatibility with, 8, 9
Missing Effects dialog box, 388
overview, 405–406
Photoshop filter standard, 8
Property inspector settings, 46–47
resizing objects and, 269
sharing among applications, 393–394
tweening, 771–772
using Photoshop-compatible plug-ins, 101, 102,
392–405
vector objects flattened by, 389
image formats. See also specific formats
animation formats, 748
bitmap files that can be imported, 472–473
for moving images between applications, 125
overview, 125
for saving files, 130
table of supported formats, 126–127
vector files that can be imported, 477–478
image libraries on companion CD-ROM, 913
3662-1 Index.F 8/2/02 3:01 PM Page 937
Fireworks Seminar

938 Index ✦ I
image maps. See also hotspots
code example, 653
Dreamweaver HTML style for, 654, 657–658
exporting code, 653–655
FrontPage HTML style for, 654, 660
Generic HTML style for, 654, 656–657
GoLive HTML style for, 654, 658–660
ImageMap object, 849–851
ImageMapList object, 851
inserting code in a Web page, 656–660
limitations, 660
overview, 646–647, 680
selecting HTML style for, 653–654
slices versus, 660–661, 671
uses for, 645, 646
image placeholders from Dreamweaver, 734
Image Size command (Modify menu), 112, 135, 137, 635
Image Size dialog box, 137–138
image tag. See <img> tag (HTML)
Image Wells, exporting as, 540
ImageMap object
methods, 850–851
overview, 849
properties, 849–850
Imagemap property (SliceInfo object), 854
ImageMapList object, 851
imagename property (exportDoc object), 848
images. See bitmaps; vector objects
imagesDirPath property (Slices object), 857
ImageSuffix property (SliceInfo object), 855
<img> tag (HTML)
for banner ads, 785
height and width attribute for animations, 765
for image maps, 653
lowscr attribute, 766
overview, 873–874
selecting tags without alt text, 630
setting alt text, 630
src attribute, rollovers and, 687–688
Import button (Main toolbar), 40
Import command (File menu), 175
Import File dialog box
for bitmaps, 175, 473–474
for EPS files, 480
for Photoshop documents, 476
for text files, 311
for vector art files, 478
for Web page tables, 485
import filters, 8
importing. See also capturing images; opening or
accessing
bitmap files that can be imported, 472–473
bitmap images, 175, 469–477
clip art, 481
copying and pasting, 469–470
dragging and dropping, 470–471
EPS (Encapsulated PostScript) files, 480–481
Flash animations, 489–491
multiple files as new animation, 488–489
overview, 491
Photoshop files, 474–477
preferences for, 102–103
rebuilding imported Web pages, 484–485
sharing files across platforms, 483–484
styles, 555
Symbol Libraries, 576
text, 310–311, 469–470, 482–483
URLs to URL Library, 588–589
vector art, 469–470, 477–482
vector files that can be imported, 477–478
inches
altering canvas size by, 134
pixels versus, 122
IncludeHTMLComments property (exportDocobject), 848
incremental backups, 594, 608
indexed color. See exporting indexed color
Info panel
checking pixel placement while drawing
rectangles, 150
Options menu commands, 61
overview, 60–61
Property inspector versus, 158
transform tools and, 60
working with vector objects and, 147
Ink Amount attribute of strokes, 252
Inner Bevel Live Effect. See Bevel effects
Inner Glow Live Effect, 381–382
Inner Shadow Live Effect, 379–381
Insert submenu (Edit menu)
Empty Bitmap command, 175, 194
Frame command, 751
Hotspot command, 653
New Button command, 571, 700
New Symbol command, 566, 777
overview, 72–73
Slice command, 668
inserting. See also capturing images; importing
empty bitmaps, 175, 194
frames, 751–752
graphics in documents, 175
image map code in a Web page, 656–660
rollover code in a Web page, 695–697
3662-1 Index.F 8/2/02 3:01 PM Page 938
Fireworks Seminar

939Index ✦ I–K
slices in a Web page, 672–675
text with Text Editor, 300
Inset dialog box, 296
Inset Emboss Live Effect, 375–377
Inset Path command (Modify menu), 294–296
Install Extension command (File menu of Extension
Manager), 642
installing
browsers and browser versions, 584
companion CD-ROM, 910–911
extensions, 641–642
FrontPage integration, 527–528
Photoshop Acquire plug-ins (Macintosh),
459–460
program demos from companion CD-ROM, 912
third-party filter packages, 392
Instances of symbols. See also symbols; tweening
advantages of, 562
automatic updating of, 559, 560, 561
breaking link with parent, 571
creating, 65, 560, 569–570
deleting, 571
editing, 570–571
Instance Level Button Properties, 574–575
tweening, 563, 770–771
using Button Instances, 573–574
interface. See user interface overview; specific
elements
interlaced GIF files, 515
Internet Advertising Bureau. See IAB
Internet Explorer (Microsoft). See browsers
interpolation by scanners, 464
interpolation for scaling images
bicubic, 174
bilinear, 174
default method for, 95–96, 138, 174
defined, 95, 173
Nearest Neighbor, 174
Soft, 174
Intersect command (Modify menu), 290–291
Invert blending mode, 444, 446
Invert command (Filters menu), 435
iPhoto software (Apple), 467
isDirectory() method (Files object), 845
isDirty property (Document object), 835
isPaintMode property (Document object), 835
IsUndefined property (SliceInfo object), 855
isValid property (Document object), 835
Italic text style, 302
iView Multimedia (Script Software), 482
JJavaScript API. See Fireworks API
JavaScript Bible (Goodman, Danny), 811
JavaScript commands. See also custom commands;
Fireworks API
Commands folder for, 639–640
on companion CD-ROM, 913
defined, 638
deleting, 638–639
limitations of, 18
renaming, 639
JavaScript events and actions. See Behaviors
JavaScript scriptlets
for batch processing, 609
folder for, 803
overview, 800–801
Jiggle command (Filters menu), 397
Jiggle filter (Alien Skin Eye Candy), 397–398
Join button (Modify toolbar), 42
Join command (Modify menu), 281
joining paths. See merging paths
Joseph Lowery’s Fireworks Web site, 803
JPEG files
browser support for, 493
characteristics, 520
dithering by browsers, 207
editability and, 130
for exporting photographic images, 520–525
Fireworks support for, 127
master copies and, 125
palette for, 207
Progressive JPEG format, 524–525
Quality settings, 520–521
Selective Quality setting, 521–523
sharpening edges, 523–524
smoothing, 524
stray pixels and, 517
True Color export formats, 519
jsextensions folder, 804
KKai’s Power Tools
filters included, 401–402
Fireworks MX compatibility with, 8
overview, 399–401
RadWarp filter, 402–403
ShapeShifter filter, 404–405
kerning text, 301, 304
keyboard shortcuts
adding shortcut to set, 114–115
changing current set, 113
Continued
3662-1 Index.F 8/2/02 3:01 PM Page 939
Fireworks Seminar

940 Index ✦ K–L
keyboard shortcuts (continued)
Commands menu, 85–86, 899–900
conflicts between, 115
creating custom set, 114
creating HTML reference for set, 116–117
custom sets, 113–116
deleting set, 116
deleting shortcut from set, 114–115
Edit menu, 72–74, 891–893
File menu, 70–72, 890–891
Filters menu, 87–88, 900–901
Fireworks menu (Macintosh), 69, 889–890
Fireworks tools, 35, 36–38, 903–907
Help menu, 90, 903
to hide panels, 49
for magnification, 32
Modify menu, 78–82, 895–898
most useful (top ten), 907
to open new document window, 27
overview, 112
renaming set, 115–116
Select menu, 77–78, 894–895
Text menu, 83–85, 898–899
Tools panel, 35, 36–38, 903–907
types of shortcuts, 114
View menu, 75–77, 893–894
Window menu, 88–89, 901–902
Keyboard Shortcuts command (Edit or Fireworks
menu), 112
Keyboard Shortcuts dialog box
Add New Shortcut button, 115
Commands list, 115
Current Set options, 113, 114, 115
Delete Key Shortcut button, 115
Delete Set button, 116
Duplicate Set button, 114
Export Set as HTML button, 117
opening, 112
Rename Set button, 115
Shortcuts list, 115
Knife tool, 38, 288–289
Knock Out option for shadow effects, 381
Kodak color management system, 208–209
KPT. See Kai’s Power Tools
KPT 5 submenu (Filters menu)
RadWarp command, 402
ShapeShifter command, 404
Krause, Kai (of Kai’s Power Tools), 399
LLasso tool
described, 36, 180–181
edge options, 182
keyboard modifiers, 183–184
limiting your drawing area using, 196
Polygon Lasso tool versus, 181, 182
Precise Cursors for, 182
using, 181
lastExportDirectory property (Document
object), 835
lastExportFile property (Document object), 835
Launch and Edit preferences, 100
Launcher
enabling/disabling, 32, 33
overview, 32
Layer Options dialog box, Share Across Frames
option, 756
layers. See also Web layer
adding a new layer, 409
adding bitmap mask to, 432
for banner ads, 789
changing stacking order, 410
CSS, adding to Dreamweaver, 731–733
CSS, exporting as, 536–537
deleting, 410
duplicating, 409–410
exporting, 535–536
focusing on only current layer, 625
frames relationship with, 749–750
importing Photoshop files containing, 474–475
importing Photoshop graphics as Fireworks
layers, 102
importing single-layer version of graphics, 103
locking and unlocking, 410, 411, 625
Merge Down command, 200
moving objects between, 411
naming, 409, 411
in new documents, 408
object sublayers, 412–413
opening and closing, 411–412
overview, 56, 407
sharing and unsharing across frames, 750, 756, 789
showing and hiding, 410–411, 625
Layers command (Window menu), 408
Layers panel
as animation tool, 749
Delete Layer option, 410
docking Frames panel with, 751
Duplicate Layer option, 409
Expand/Collapse column, 411–412
layer list, 409, 410
Lock/Unlock column, 410
managing static objects, 756
New/Duplicate Layer button, 409, 731
opacity and blending controls, 441–442
Options menu commands, 57
3662-1 Index.F 8/2/02 3:01 PM Page 940
Fireworks Seminar

941Index ✦ L–M
overview, 56, 408
Selection column, 411
Show/Hide column, 410
Single Layer Editing option, 411
layers property (Document object), 835
layout. See compositing
leading of text, 305
Left command (Modify menu), 416
left property (Document object), 835
Left property (SliceInfo object), 855
Levels dialog box, 368–370
Levels Live Effect, 368–370
Libraries folder, 805–806
Libraries of symbols. See Symbol Libraries
Libraries submenu (Edit menu), 73, 577
Library panel. See also symbols
Delete command, 569
Duplicate command, 567
Edit Symbol command, 573
opening, 567
Options menu commands, 65–66
overview, 65, 560, 561, 563–564
Properties command, 568
Symbol properties button, 569
light source simulation, 446–447
Lighten blending mode, 444, 445
lightness, Hue/Saturation filter for, 371–372
line art, color depth for scanning, 464
Line tool
described, 37
drawing horizontal or vertical lines, 159
other path drawing tools versus, 157
using, 158–159
Linear Gradient fills, 95, 336. See also Gradient fills
lines. See also Bézier curves; paths; strokes
dotted, 260–263
drawing freehand with Vector Path tool, 159–161
drawing straight lines, 158–159, 162–163
drawing tools for, 157
GIF-friendly images and, 516–517
invisibility of paths, 157
mixing lines and curves, 164–165
links, Web. See URLs (Uniform Resource Locators)
Live Effects. See also effects; image filters; specific
effects
for adjusting tonal range, 366–372
applying, 361–363
Auto Levels, 368
Bevel effects, 373–375
Blur effects, 377–378
Brightness/Contrast, 367
built-in effects, 364–365
Color Fill, 367–368
combining paths and, 289
Convert to Alpha, 379
Curves, 370–371
in custom styles, 552
Drop Shadow, 379–381
editing parameters of, 363
Emboss effects, 375–377
enabling/disabling on Add Effects menu, 46, 386
exporting custom effects, 388
Find Edges, 379
Glow, 381–382
Hue/Saturation, 371–372
Inner Glow, 381–382
Inner Shadow, 379–381
Levels, 368–370
for masks, 439–441
Missing Effects dialog box, 388
overview, 9–10, 359, 405–406
perspective shadow technique, 383–386
Photoshop Layer Effects and, 474
Property inspector settings, 46–47, 360–362
resizing objects and, 269
saving custom effects as styles, 386, 387–388
separation of objects from, 7
Sharpen, 382
Sharpen More, 382
for symbols, 570
third-party image filters and, 361
tweening, 769
Unsharp Mask, 382–383
loading, palettes into Swatches panel, 222
Locate Plugins command (Add Effects menu), 386
Locate Primary Browser dialog box, 582–584
locateDocDialog() method (fw object), 827–828
Lock Guides command (View menu), 422
Lock Other Layers command (Commands menu), 625
locking
color, 501–502
guides, 422
layers, 410, 411, 625
looping, animated GIF options, 762–763
Lossy GIF compression, 510–511
Lotus Domino Designer, exporting as Image Wells for,
540
Lowery, Joseph (author of this book), 803
Luminosity blending mode, 444, 445
MMacintosh Gamma command (View menu), 208
Macintosh system palette, 221, 505
3662-1 Index.F 8/2/02 3:01 PM Page 941
Fireworks Seminar

942 Index ✦ M
Macromedia. See also Dreamweaver; Flash
applications with Photoshop-compatible filters, 393
common interface among applications, 26
Director, 393, 538–539
Fireworks Exchange Web site, 803
Fireworks Support Center Web site, 740
FreeHand, 393, 469, 478–479, 481, 911–912
Macromedia Exchange Web site, 641
program demos on companion CD-ROM, 911–912
styles Web site, 549
Macromedia Exchange Package files. See MXP files
Magic Wand tool
described, 36
edge options, 183
increasing or reducing the selection area, 183–184
keyboard modifiers, 183–184
limiting your drawing area using, 196
Precise Cursors for, 182
Tolerance setting for, 182–183
using, 182–183
magnification
for color locking, 501–502
document window settings, 31–32
in Export Preview dialog box, 530
keyboard shortcuts, 32
Variable Zoom, 31
Zoom tool for, 502
Magnification commands (View menu), 31, 75
Main toolbar (Windows only)
docking and undocking, 39
overview, 40–41
table of tools and descriptions, 40–41
maintaining Web graphics. See Web-graphic
maintenance
makeActive() method (Document object), 837
makeGoodNativeFilePath() method (Document
object), 837
makePathFromDirAndFile() method (Files
object), 845
Manage Extensions command
Commands menu, 642
Help menu, 815
Manage Saved Commands command (Commands
menu), 638
Manage Saved Commands dialog box, 638–639
<map> tag (HTML), 653
mapType property (Document object), 836
Marquee and Oval Marquee tools
Anti-Alias edge option, 179
Border Marquee command, 199
described, 36
Expand Marquee command, 199
Feather edge option, 180
Fixed Ratio for selections, 177
Fixed Ratio setting, 177, 179
Fixed Size setting, 179
Hard edge option, 179
keyboard modifiers, 183–184
limiting your drawing area using, 196
Property inspector settings, 178–180
selecting regions using, 177–178
selecting squares or circles, 177
Mask submenu (Modify menu)
Delete Mask command, 438
Disable Mask command, 439
Enable Mask command, 439
Group as Mask command, 324, 616
Hide All command, 432–433
Hide Selection command, 433
overview, 79–80
Reveal All command, 432–433
Reveal Selection command, 433
masking
adding bitmap mask to a layer, 432
alpha masks, 428–441
bitmap masks, 431–436
channels and bit depth, 428
contrast method, 433–436
Convert to Alpha filter and, 379
deleting masks, 438–439
editing masks, 436–439
enabling/disabling masks, 438
Find Edges filter and, 379
Fireworks API and, 818
Hide All command for, 432–433
Hide Selection command for, 433
images with text, 323–324
photo edge effects using, 439–441
Reveal All command for, 432–433
Reveal Selection command for, 433
thumbnails for masks, 437–438
tips, 439
transparency and, 428–429
vector masks, 430–431, 439–441
matchCase property (Find object), 841, 842
matrices in Fireworks API, 819
Matte feature, 509–510
matteColor property (Document object), 836
Maximize button of document window (Windows
only), 27
memory
bit depth and, 205
maximum undo steps and, 632
3662-1 Index.F 8/2/02 3:01 PM Page 942
Fireworks Seminar

943Index ✦ M
menu command shortcuts, 114. See also keyboard
shortcuts
Merge Down command (Modify menu), 200
merging paths
Crop command for, 292
Intersect command for, 290–291
Join command for, 280–281
Punch command for, 291
removing shape of bottom object from top
object, 291
removing shape of top object from bottom
object, 291
retaining only overlapping areas, 290–291
retaining outline and removing overlapping areas,
289–290
text and, 318, 319
Union command for, 289–290
<meta> tag (HTML), 869–870
methods. See also global methods; specific methods
Document object, 837–838
Files object, 843–846
Find object, 841–842
fw object, 826–829
global, 820–823
ImageMap object, 850–851
SliceInfo object, 855–856
typographic conventions for, 811
Micro Button, 784. See also banner ads
Microsoft Bitmap format, Fireworks support for, 127
Microsoft FrontPage. See FrontPage (Microsoft)
Microsoft Internet Explorer. See browsers
Microsoft Word. See Word (Microsoft)
midtone eyedropper, 368
midtones
Curves filter for, 370–371
Levels and Auto Levels filters for, 368–370
mindshare, 786
Minimize button (document window), 27
Missing Effects dialog box, 388
Missing Fonts dialog box, 482–483
miter corner for expanded paths, 294
MMEndCommand() function, 814
MMExecute() function
debugging commands and, 816
Fireworks Commands Wrapper versus, 815
overview, 812–813
passing values from Flash to Fireworks
using, 814
modal versus modeless Flash commands, 640, 816. See
also Flash commands
Modification tools, Precise Cursor for, 96–97
Modify menu
Align submenu
Bottom command, 416
Center Horizontal command, 417
Center Vertical command, 417
Distribute Heights command, 418
Distribute Widths command, 418
Left command, 416
overview, 81
Right command, 416
Top command, 416
Alter Path submenu
Expand Stroke command, 293–294
Inset Path command, 294–296
overview, 82
Simplify command, 292–293
Animation submenu
Animate Selection command, 778
overview, 79
Settings command, 778, 779
Arrange submenu
overview, 81
Send Backward command, 385
Send to Back command, 195, 385, 775
Canvas submenu
Canvas Color command, 123, 139
Canvas Size command, 133, 134, 194
Fit Canvas command, 139
Image Size command, 112, 135, 137, 635
overview, 78–79
Rotate 90 degrees CCW command, 140
Rotate 90 degrees CW command, 140
Rotate 180 degrees command, 140
Trim Canvas command, 122, 139
Combine Paths submenu
Crop command, 292
Intersect command, 290–291
Join command, 281
overview, 82
Punch command, 291
text and, 318, 319
Union command, 289–290
Flatten Selection command, 200, 318, 348
Group command, 391, 426
keyboard shortcuts, 78–82, 895–898
Mask submenu
Delete Mask command, 438
Disable Mask command, 439
Enable Mask command, 439
Group as Mask command, 324, 616
Continued
3662-1 Index.F 8/2/02 3:01 PM Page 943
Fireworks Seminar

944 Index ✦ M–N
Modify menu, Mask submenu (continued)
Hide All command, 432–433
Hide Selection command, 433
overview, 79–80
Reveal All command, 432–433
Reveal Selection command, 433
Merge Down command, 200
Pop-up Menu submenu
Add Pop-up Menu command, 708
overview, 79
Selective JPEG submenu
overview, 80
Settings command, 522
Symbol submenu
Break Apart command, 571
Convert to Symbol command, 565, 573
Edit Symbol command, 781
overview, 79
Tween Instances command, 771, 774, 775, 776
table of commands, 78–82
Transform submenu
Numeric Transform command, 273, 321, 773
overview, 80–81
selecting transform tools using, 272
symbols and, 570
Ungroup command, 427
Modify toolbar (Windows only)
Align button, 41
docking and undocking, 39
overview, 41–43
table of tools and descriptions, 42–43
types of modifications, 41
monitors, dual, 50
motion blur for saving frames, 793–795
motion path of Animation Symbols, 779–780
Motion Trail filter (Alien Skin Eye Candy), 794
mouse. See also cursors; dragging
drawing with, 160, 235
graphics tablet versus, 160, 235
Mouse Highlight preference, 99, 230
Preview Drag preference, 99
rollovers, 374
mouseovers. See rollovers
moving objects
between layers, 411
bitmaps using Pointer tool, 176
floating panels, 48
inserted bitmaps, 175
organizing multiple documents, 26
points with Subselection tool, 276–277
shapes, 158
Spacebar Move, 19, 149, 153, 154
text objects, 299, 301
without moving masks, 438
multiple document windows
organizing, 26
for the same document, 27–28, 498–499
multiple images
importing as new animation, 488–489
opening, 129–130
separate files versus complete Web page, 119–121
multiple users
default user file locations (Macintosh), 802
default user file locations (Windows), 801
Macintosh user file locations, 104
setting up for, 103
Windows user file locations, 103
Multiply blending mode, 444, 445
MXP (Macromedia Exchange Package) files, 640–641
Nnaming
banner ad names by size, 784
button Instance files, 575
files and paths in scripts, 818
files with Data-Driven Graphics Wizard, 624
frames, 752
frame-specific information in slice filenames,
109–110
layers, 409
renaming custom commands, 639
saving files and renaming, 131–132
slice files, 107–110, 668, 670
styles, 551
symbols, 566
Nav Bars. See also Behaviors
building buttons in Button Editor, 699–701
creating, 698–699
defined, 698
overview, 698
Nav Menu folder, 713, 806
Navigator (Netscape). See browsers
Nearest Neighbor Interpolation, 174
NestedTableSlices property (SliceInfo object), 855
Netscape Navigator. See browsers
Network News Transfer Protocol. See NNTP
New Button command (Edit menu), 571
New button (Main toolbar), 40
New command (File menu), 124
New Document dialog box, 124–125
new features, 19–20
New Panel Group command (Options menu for floating
panels), 48
New Style button (Styles panel), 250
3662-1 Index.F 8/2/02 3:01 PM Page 944
Fireworks Seminar

945Index ✦ N–O
New Style dialog box
creating new styles using, 551–552
declaring strokes using, 250
saving gradient styles using, 341
New Symbol command (Edit menu), 566, 777
New URL Library dialog box, 590
New Window command (Window menu), 27, 28, 498
NNTP (Network News Transfer Protocol), 886
No Color button (color picker), 215, 219
numberOfURLs property
BehaviorsList object, 853
ImageMapList object, 851
numColumns property (Slices object), 857
numCoords property (ImageMap object), 850
numeric cropping in Export Preview dialog box, 532
numeric sliders (floating panels), 51
Numeric Transform command (Modify menu), 273,
321, 773
Numeric Transform dialog box, 273–274, 321, 773
numFrames property (exportDoc object), 848
numRows property (Slices object), 857
Oobject orientation of Fireworks MX, 6
objects. See also aligning and distributing objects;
Fireworks API; vector objects
copying to frames, 754–755
covering with hotspots, 653
creating hotspots out of, 414
Delete Objects when Cropping preference, 97
deleting, 413
importing Photoshop image layers as, 102
managing static objects, 756
separation from strokes, fills, and effects, 7
tweening properties, 768–769
obtuse angles, 156
Oil strokes, 242–243
onClick event, 686
1.8 gamma setting, 207, 208
Onion Skinning
defined, 759
multi-frame editing, 760
range of frames for, 759–760
turning on, 759
Onion Skinning dialog box, 760
onionSkinAfter property (Document object), 836
onionSkinBefore property (Document object), 836
onLoad event, 686
onMouseOut event, 686. See also rollovers
onMouseOver event, 686. See also rollovers
opacity. See also transparency
of Animation Symbols, 778
compositing images and, 441
controlling, 442
of symbols, 570
tweening, 769
Open button (Main toolbar), 40
Open command (File menu), 128
Open File dialog box
Flash animations and, 490
Open as Animation option, 173
opening existing images and, 128, 173
opening multiple files as new animation, 488–489
opening multiple images, 129–130
Web page tables and, 485
open() method (Files object), 845
open paths. See also Bézier curves; lines; paths
closing, 163, 279–280
cutting with Knife, 288–289
defined, 145
openDocument() method (fw object), 828
opening or accessing. See also hiding and/or showing
Add Effects menu, 46
animated GIF files, 488
Behaviors panel, 685
Color Mixer panel, 210
Color Table, 223
Data-Driven Graphics Wizard, 622
Edit Stroke dialog box, 248, 251
existing bitmaps, 172–173
existing images, 128
Export Preview dialog box, 761
Find and Replace panel, 594
Fireworks API, 858–862
Fireworks from an external application, options
for, 100
Frames panel, 758
HTML Setup dialog box, 104
Keyboard Shortcuts dialog box, 112
layers, 411–412
Layers panel, 408
Library panel, 567
multiple files as animation, 173
multiple images, 129–130
Optimize panel, 223, 495
Patterns on Fireworks CD, 344
Photoshop files, 129
Pop-up Menu Editor, 708
Preferences dialog box, 93, 343, 354
Property inspector, 230
Styles panel, 341, 549
Symbol Editor, 781
Symbol Libraries, 577
Text Editor, 300
URL History list, 586–587
3662-1 Index.F 8/2/02 3:01 PM Page 945
Fireworks Seminar

946 Index ✦ O–P
Opera. See browsers
optimization features, 493–495. See also Frames panel;
Optimize panel
Optimize command (Window menu), 223, 495
Optimize Image command (Dreamweaver), 720–722
Optimize panel
Animated GIF option, 761
Color Table, 223–224, 496–497, 506–515
Delete Current Saved Settings button, 496
Dither option, 511
Interlaced option, 515
Loss option, 510–511
Matte feature, 509–510
Number of Colors option, 506
opening, 223, 495
Options menu commands, 53
overview, 52, 495–496
Progressive JPEG option, 524–525
Quality settings, 520–521
Rebuild button, 224
Remove Unused Colors option, 515
Save Settings button, 495–496
Saved Settings option list, 516
Selective Quality setting, 521–523
Sharpen JPEG Edges option, 523–524
Smoothing scale, 524
transparency options, 511–515
Option key (Macintosh). See Alt (Option) key
option lists (floating panels), described, 50–51
Options menu (floating panels)
Behaviors panel commands, 63
Color Mixer panel commands, 55
described, 50
Find and Replace panel commands, 67
Frames panel commands, 59
History panel commands, 60
Info panel commands, 61
Layers panel commands, 57
Library panel commands, 65–66
New Panel Group command, 48
Optimize panel Color Table commands, 508–509
Optimize panel commands, 53
Project Log panel commands, 68, 605
Styles panel commands, 64, 553–554
Swatches panel commands, 54
switching color swatches, 216
URL panel commands, 63, 588
Options submenu (Add Effects menu)
All Off command, 386
All On command, 386
Locate Plugins command, 386
Save As Style command, 386, 387
Orientation commands (Text menu), 84, 321–323
orienting
pop-up menus, 709
strokes, 263–264
text (horizontal or vertical), 307–308, 309
text on paths, 321–323
Original tab (document window), 29
Other submenu
Add Effects menu, 364, 378
Filters menu, 88
Outer Bevel Live Effect. See Bevel effects
outline fonts, 314–315
Oval Marquee tool. See Marquee and Oval Marquee
tools
P<p> (paragraph) tag (HTML), 870–871
page impression for banner ad, 785
Page Preview button (document window), 31
page scanners, 460. See also scanning
Page Setup command (File menu), 111
Page Setup dialog box, 111
page view for banner ad, 785
Paint Bucket tool
described, 37
filling with, 354–356
Property inspector settings, 356
painting, cursors for, brush-size versus
standard-size, 97
Palette button (color picker), 215
palettes. See also Swatches panel
creating shared palettes, 629–630
erasing from Swatches panel, 223
for exporting indexed color, 505–506
loading into Swatches panel, 222
managing with Swatches panel, 54, 222–223
Optimize panel presets, 516
preset swatches, 221
saving current swatch, 222
sorting by color value, 223
Websafe colors, 206–207
panel groups, 48
Panel Layout Sets. See also floating panels
built-in sets, 627
creating, 48, 628
defined, 48
moving, 48
resizing and reshaping, 48
saving panel configuration as, 49, 628
Panel Layout Sets submenu (Commands menu)
adding Panel Layout Sets to, 49, 628
800x600 command, 627
3662-1 Index.F 8/2/02 3:01 PM Page 946
Fireworks Seminar

947Index ✦ P
overview, 86
Save Panel Layout command, 49, 628
1024x768 command, 627
1280x1024 command, 627
panels. See floating panels
panning
in document window, 501
in Export Preview dialog box, 530
Pantone colors, converting to Websafe colors, 224–227
Pantone ColorWeb Pro. See ColorWeb Pro
paragraph (<p>) tag (HTML), 870–871
paragraph spacing, 303
Paste button (Main toolbar), 41
Paste command (Edit menu), 249, 469
Path Scrubber tools, 38, 287–288
pathAttributes property (Document object), 836
pathBase property (exportDoc object), 848
path-based objects. See vector objects
paths. See also merging paths; strokes
adding arrowheads to, 612, 613–614
adding points, 277–278
applying strokes to, 145
center point and, 146
closing with Pen tool, 163, 279–280
converting text to, 318–319
Crop command for, 292
cutting, 288–289
defined, 144
deleting points, 277, 278–279
described, 6
detaching text, 320
direction of, 146–147
drawing freehand with Vector Path tool, 159–161
drawing straight lines, 158–159
editing, 281–296
enclosing and then deleting existing path, 293–294
Expand Stroke command for, 293–294
fills and, 145–146
Fireworks MX features, 5, 6–8
Inset Path command for, 294–296
Intersect command for, 290–291
invisibility of, 144, 157
Join command for, 280–281
merging, 280–281, 289–292, 318, 319
moving points with Subselection tool, 276–277
names in scripts, 818
open versus closed, 145, 146
patterns and, 145–146
previewing when using Pen tool, 99
pulling segment into new shape, 284–285
Punch command for, 291
pushing into new shape, 283–284
redrawing segments, 281–282
scrubbing, 287–288
selecting, 230–231
Simplify command for, 292–293
stroke commands for, 292–296
stroke orientation and, 263–264
text on, 147, 320–323
tools for drawing, 157
Union command for, 289–290
working with multiple paths, 280–281
pathSuffix property (exportDoc object), 849
Pattern fills
accessing Patterns on Fireworks CD, 344
adding new Patterns, 342–343
adding Patterns to a document, 344
adding second folder for, 101–102, 343
altering Patterns, 344–345
defined, 101, 330
extracting from styles, 555–557
file formats for, 341
folder for, 806
overview, 341–342
paths and, 145–146
performance and number of Patterns, 344
seamless Patterns, 346–351
textures versus, 351
patterned border around documents, 612, 614–616
Patterns folder
adding another folder, 101–102, 343
overview, 806
Pen tool
adding points with, 278
adjusting curves, 165–167
closing paths, 163, 278–280
described, 37
drawing smooth curves, 163–164
drawing straight lines, 162–163
mixing lines and curves, 164–165
other path drawing tools versus, 157
Pencil stroke with, 235
Show Pen Preview option, 99
Show Solid Points option, 99
switching to Subselection tool, 164
Pencil strokes
for cleaning up stray pixels, 517–518
overview, 235–236
for text, 314
Pencil tool, 37
perspective
creating with Skew tool, 274–276
shadows, 383–386
3662-1 Index.F 8/2/02 3:01 PM Page 947
Fireworks Seminar

948 Index ✦ P
Photo-Paint (Corel)
importing documents from, 477
Photoshop-compatible filters with, 393
Photoshop (Adobe)
drag and drop support, 470
exporting documents for, 535–536, 543–544
Fireworks support for files, 126
importing files, 474–477
Layer Effects, 474
opening files in Fireworks, 129
Photoshop Acquire plug-ins (Macintosh), 458,
459–460
Photoshop-compatible plug-ins, 101, 102, 392–405
Web site, 393
Photoshop filter standard, 8
Pick preference, 99, 100
PICT files (Macintosh), 127, 484, 519
pixel manipulation tools. See also specific tools
Eraser, 186–187
Lasso and Polygon Lasso, 180–182
Magic Wand, 182–184
Marquee and Oval Marquee, 177–180
Pointer, 176–177
Rubber Stamp, 184–186
pixel selections
applying filters to, 390–391
applying Live Effects to, 361
false pixel selections, 390–391
pixels. See also bitmaps
Auto Difference option, 7621
canvas size, 121–122, 134
checking placement while drawing rectangles, 150
cleaning up stray pixels, 517–518
defined, 122, 204
organic feel of, 7
placeholders for images, from Dreamweaver, 734
platform property (fw object), 826
platforms, sharing files across, 483–484
Plugin Site, The, 393
plug-ins. See also Alien Skin Eye Candy; image filters;
Kai’s Power Tools
on Add Effects menu, 46
Alien Skin Eye Candy, 8, 394–399
finding, 393
folders for, 101, 386, 459, 807–808
installing third-party filter packages, 392
Kai’s Power Tools, 8, 399–405
Photoshop Acquire plug-ins (Macintosh), 458,
459–460
Photoshop filter standard, 8
Photoshop-compatible, 101, 102, 392–405
shortcuts (aliases) to plug-in folders, 395, 459
third-party plug-in compatibility, 8
Plug-Ins folder, 807–808
PNG files
browsers and, 493
editability and, 130
for exporting indexed color, 503–504
for exporting photographic images, 525–526
Fireworks PNG files, 126
fonts in, 131, 309–310
GIF files versus, 503–504
image quality and, 100
Launch and Edit preferences for, 100
for moving images between applications, 125
transparency and, 428, 429
True Color export formats, 519
Web pages and, 493–494
pngText property (Document object), 836
Pointer tool
deleting points with, 279
described, 36
moving text objects using, 299, 301
for panning in Export Preview dialog box, 530
repositioning bitmaps using, 176
resizing bitmaps using, 177
selecting paths, 230
switching from another tool to, 231
points. See also paths
adding, 277–278
deleting, 277, 278–279
Fireworks API and, 819
moving with Subselection tool, 276–277
Polygon Hotspot tool, 38, 647, 650–651
Polygon Lasso tool
described, 36, 181
edge options, 182
keyboard modifiers, 183–184
Lasso tool versus, 181, 182
limiting your drawing area using, 196
Precise Cursors for, 182
using, 182
Polygon Slice tool, 38, 663–664
Polygon tool, 38
polygons
adjusting dimensions and position, 158
with bottom parallel to canvas bottom, 155
center as origin point for, 154
constraining angles while drawing, 155
drawing, 154–155
equilateral, 153
hotspots, 647, 650–651
3662-1 Index.F 8/2/02 3:01 PM Page 948
Fireworks Seminar

949Index ✦ P
number of sides for, 153, 154
overview, 153
rotating while drawing, 154
slices, 663–664
POP (Post Office Protocol), 886
Pop-up Menu Editor
Advanced tab, 710–712
Appearance tab, 709–710
Content tab, 707–709
opening, 708
Position tab, 712–713
Pop-up Menu submenu (Modify menu)
Add Pop-up Menu command, 708
overview, 79
pop-up menus. See also Behaviors
adding to Fireworks document, 707–709
changing appearance of, 709–710
improvements to, 20
Nav Menu folder and, 806
positioning, 712–713
styles, 713–714
table settings, 710–712
Portable Network Graphic files. See PNG files
positions of characters, matching with Regular
Expressions, 596–597
Post Office Protocol. See POP
Power Tools. See Kai’s Power Tools
Precise Cursors, 96–97, 98
Preferences command (Edit menu), 343, 354, 632
Preferences dialog box
default settings, finding, 94
Editing category, 96–100, 172
Folders category, 101–102, 343, 354
General category, 94–96, 632
Import category, 102–103, 475–476
importing Photoshop documents and, 475–476
Launch and Edit category, 100
opening, 93, 343, 354
overview, 93
selecting categories, 93
Preferences file, 808–809
preload property (BehaviorInfo object), 852
preloading animated GIF files, 766
Preview Drag preference, 99
preview icons (Macintosh), 96
Preview in Browser feature, 581–584
Preview in Browser submenu (File menu)
overview, 71
Preview in Netscape Navigator command, 584
Set Primary Browser command, 582
Preview in Netscape Navigator command (File
menu), 584
Preview tab (document window), 29–30, 497, 498–499
previewing
4-Up tab (document window) for, 498, 500–502
frame controls for, 502–503
panning in document window, 501
Pen tool paths, 99
Preview tab (document window) for, 29–30, 497,
498–499
selections when dragging, 99
2-Up tab (document window) for, 29, 498, 499–500
zooming in document window, 501–502
Print button (Main toolbar), 40
printing
options for, 111–112
page setup, 111
scan resolution for, 464
size and resolution for, 112, 136, 138, 463
PrintScreen (PrtScrn) key (Windows), 486
production tools. See automation features; batch
processing
program demos on companion CD-ROM, 911–912, 914
progressCountCurrent property (fw object), 826
progressCountTotal property (fw object), 826
progressive JPEG files, 524–525
Project Log panel
adding files to the log, 67, 605
batch processing and, 67, 605, 607
Find and Replace feature and, 66
Multi-File changes in, 604–605
Options menu commands, 68, 605
overview, 67
search-and-replace changes in, 604–605
prompt() global method, 821–822
Properties command (Window menu), 230
properties of Fireworks API objects. See also specific
properties
BehaviorInfo object, 852–853
BehaviorsList object, 853
Document object, 829–837
Errors object, 838–839
exportDoc object, 847–849
Find object, 841–842
fw object, 824–826
ImageMap object, 849–850
ImageMapList object, 851
SliceInfo object, 854–855
Slices object, 857
Property inspector. See also Add Effects menu
adjusting shape dimensions and position, 158
animation settings, 779
Bevel effect settings, 373
Continued
3662-1 Index.F 8/2/02 3:01 PM Page 949
Fireworks Seminar

950 Index ✦ P–R
Property inspector (continued)
Blur and Sharpen tool settings, 188
for checking pixel placement while drawing
rectangles, 150
Dodge and Burn tool settings, 190
Drop Shadow settings, 380, 381
effect settings, 46–47, 360–362
Emboss effect settings, 377
Eraser tool settings, 186
fill settings, 45–46, 329–336, 338–340
Freeform tool settings, 285
Gradient fill settings, 335–336, 338–339
hotspot settings, 647, 651–652
Info panel versus, 158
Inner Shadow settings, 380, 381
Lasso and Polygon Lasso tool settings, 182
Magic Wand tool settings, 182–183
Marquee and Oval Marquee tool settings, 178–180
opacity and blending setting, 441–442
opening, 230
overview, 43–47
Paint Bucket tool settings, 356
Path Scrubber tool settings, 288
Roundness setting, 150–151
Rubber Stamp tool settings, 185–186
slice settings, 668–669
Smudge tool settings, 193–194
Solid fill settings, 330–331, 332
stroke settings, 44–45, 229–234
text settings, 301–308
tool options, 44
Web Dither fill settings, 333–334
protocols
FTP, 886
HTTP, 885
HTTPS, 885
NNTP, 886
POP, 886
RTSP, 886–887
SMTP, 886
suites, 885
TCP/IP, 885
PrtScrn (PrintScreen) key (Windows), 486
pulling path segment into new shape, 284–285
Punch command (Modify menu), 291
pushing a path into new shape, 283–284
QQuality settings for JPEGs, 520–521
Quick Export pop-up menu, 30, 526–527, 731
quit() method (fw object), 829
RRadial Gradient fills, 95, 336. See also Gradient fills
radius property (ImageMap object), 850
RadWarp command (Filters menu), 402
RadWarp filter (Kai’s Power Tools), 402–403
Raised Emboss Live Effect, 375–377
RAM. See memory
Random strokes, 245
ranges of characters, matching with Regular
Expressions, 597–598
readline() method (Files object), 845
Real-Time Streaming Protocol. See RTSP
Rebuild button (Optimize panel), 224
rebuilding imported Web pages, 484–485
Reconstitute Table command (File menu), 20, 485
Rectangle Gradient fills, 336. See also Gradient fills
Rectangle Hotspot tool, 38, 647, 648–649
Rectangle tool
creating rectangles, 148–149
described, 37
keyboard modifiers, 149
Rounded Rectangle tool versus, 148
rectangles
adjusting dimensions and position, 158
as basic building block for Web designs, 148
checking pixel placement while drawing, 150
creating, 148–149
defined, 148
drawing from the center, 149, 150
Fireworks API and, 819
hotspots, 647, 648–649
keyboard modifiers for, 149–150
rounded corners, 150–152
Spacebar Move, 149
squares, 149
theoretical, for aligning objects, 415–418
rectangular slices, 661, 662–663
red X for nonrepeatable actions in History panel, 634
Redo button (Main toolbar), 40
Redo command (Edit menu), 631
redoing segments of paths, 281–282
Redraw Path tool, 37, 281–282
regExp property (Find object), 841, 842
Regular Expressions
applying to text or URL attributes, 595
defined, 595
grouping with, 598–599
matching character positions and repeating
characters, 596–597
matching character ranges, 597–598
wildcard characters, 595
3662-1 Index.F 8/2/02 3:01 PM Page 950
Fireworks Seminar

951Index ✦ R
relative URLs, 585–586
Remove Extension command (File menu of Extension
Manager), 642
removing. See deleting
rename() method (Files object), 845–846
Rename Set dialog box, 115–116
renaming. See naming
reordering frames, 753
Repeat History command, 861–862
repeating characters with Regular Expressions,
596–597
repetitious tasks. See also automation features; batch
processing; Find and Replace panel
replaying History panel steps, 632–633, 634–635
styles for, 547
Replace Options dialog box, 593
replace property (Find object), 841, 842
replaceSize property (Find object), 842
replaceStyle property (Find object), 842
replacing. See Find and Replace panel
replaying History panel steps, 632–633, 634–635
Resample option, 469
resampling, 135, 469
Reset Warning Dialogs command (Commands
menu), 628
Reshape Area tool
altering entire object with one operation, 285–286
described, 38, 282–283
Freeform tool versus, 285
reshaping
distorting objects, 271
entire object with one operation, 285–286
floating panels, panel groups, or layout sets, 48
paths, 282–286
skewing objects, 270
Resize Selected Objects command (Commands menu),
619–620
Resize Selected Objects dialog box, 620
resizing. See also resizing canvases; resizing images
animated GIF images, 765
Animation Symbols, 778
Flash components using scaleMode, 816
floating panels, panel groups, or layout sets, 48
grid, 347, 349
Patterns, 345
Scale Attributes option of transform tools and,
269–270
scaling vector objects, 268–270
strokes, 232–233
text, 299, 305, 306, 308, 317
tweening and, 768
resizing canvases
Crop tool for, 135
enlarging to fit artwork, 139
resampling during, 135
for single image, 135–138
specifying size numerically, 133–134
trimming, 122, 139
vector versus bitmap images and, 135
resizing images. See also file size; interpolation for
scaling images
batch processing for, 16
bitmaps, 173–174
bitmaps using Pointer tool, 177
in Export Preview dialog box, 532–533
print size and resolution, 112, 136, 138, 463
resampling during, 135
Scale Attributes option of transform tools and,
269–270
scaling objects, 268–270
shapes, 158
without recalculating stroke, fill, and effect
settings, 269
resolution
canvas, 121, 122, 124
changing print size and resolution, 112, 136, 138
copying and pasting and, 469
default for screen (72 dpi), 122, 123
defined, 460
of digital cameras, 466
dual monitors and screen resolution, 50
Fireworks API and, 819
image sizes and scan resolutions, 463
Panel Layout Sets and display resolution, 627–628
print documents versus Web documents, 122
scanning and, 460–461, 462–464
resolution property (Document object), 836
resolutionUnits property (Document object), 836
Restore Bitmap Selection command (Select menu), 200
Restore button (document window), 27
restoreOnMouseout property (BehaviorInfo
object), 852
restoring deleted frames, 753
reusing
animations, 765
banner ad design elements, 788
Reveal All command (Modify menu), 432–433
Reveal Selection command (Modify menu), 433
revealing. See hiding and/or showing
Reverse Frames command (Commands menu), 626–627
Reverse Frames dialog box, 626
Revert command (File menu), 132–133
3662-1 Index.F 8/2/02 3:01 PM Page 951
Fireworks Seminar

952 Index ✦ R–S
reverting to a saved file, 132–133
RGB color model
in Color Mixer, 211–212
defined, 204
hexadecimal format, 205–206, 817
Rich Text Format. See RTF
Right command (Modify menu), 416
Ripples Gradient fills, 336. See also Gradient fills
Rob Schulter’s HTML Tag List Web site, 877
rollovers. See also Behaviors; Nav Bars
advanced techniques, 702–707
animated, 767
applying the Simple Rollover Behavior, 691–692
creating rollover images, 689–691
defined, 374, 687
disjoint rollover with drag and drop, 716–717
disjointed, 702–703
drag-and-drop Behaviors, 714–718
exporting, 692–695
external, 703–704
hotspot, 704–706
HTML styles for, 692–693
<img> tag src attribute changed by, 687–688
inserting code in a Web page, 695–697
as links, 692
overview, 687–688
preloading rollover images, 697
simple rollover with drag and drop, 715–716
states, 688
status bar message, 706–707
Rotate cursor, 271
Rotate 90 degrees CCW command (Modify menu), 140
Rotate 90 degrees CW command (Modify menu), 140
Rotate 90° CCW button (Modify toolbar), 42
Rotate 90° CW button (Modify toolbar), 42
Rotate 180 degrees command (Modify menu), 140
rotating objects
Animation Symbols, 778
canvas, 140
defined, 41
Modify toolbar for, 41
Patterns, 345
polygons while drawing, 154
text, 321
using transform tools, 269, 271–273
Round Cap for expanded paths, 294
round corner for expanded paths, 294
Rounded Rectangle tool
changing roundness on the fly, 152
keyboard modifiers, 149
overview, 36, 150
Rectangle tool versus, 148
specifying roundness of corners, 150–151
RTF (Rich Text Format)
Fireworks support for, 127
importing text files, 311, 482
RTSP (Real-Time Streaming Protocol), 886–887
Rubber Stamp tool
other Property inspector options, 186
overview, 37, 184
smoothing tiled Patterns using, 348–349
source alignment options, 185–186
using, 185
rulers, 420–421
Rulers command (View menu), 420
Run Script command (Commands menu), 609, 800
SSatin Gradient fills, 336. See also Gradient fills
saturation, Hue/Saturation filter for, 371–372
Saturation blending mode, 444, 445
Save a Copy command (File menu), 131–132
Save As command (File menu), 131–132
Save As Style command (Add Effects menu), 386, 387
Save Bitmap Selection command (Select menu), 200
Save button (Main toolbar), 40
Save command (File menu), 131
Save dialog box
creating HTML shortcut key reference, 117
storing files, 131
save() method (Document object), 837–838
Save Panel Layout command (Commands menu),
49, 628
saveCopyAs() method (Document object), 838
saving. See also exporting
bitmap selection, 200
bug with Symbol Editor and, 567
current swatch in Swatches panel, 222
custom effects as styles, 386, 387–388
custom strokes, 248, 249
files, 130–132
gradients as styles, 340–341
History panel steps as commands, 17, 60, 633–635
identifying documents with changes not saved,
25, 132
Optimize panel settings, 495–496
panel configuration as Panel Layout Set, 49, 628
reverting to a saved file, 132–133
source files with preview icons (Macintosh), 96
Scale tool
overview, 36, 268–270
rotating objects using, 269, 271–273
text objects and, 317
scaleMode for Flash commands, 816
scaling. See resizing; resizing canvases;
resizing images
3662-1 Index.F 8/2/02 3:01 PM Page 952
Fireworks Seminar

953Index ✦ S
Scan submenu (File menu)
overview, 70
Twain Source command, 458, 465
scanning
color depth for, 464
directly into Fireworks, 465
image sizes and scan resolutions, 463
interpolation by scanners, 464
other common options, 465
overview, 460, 461–462
process of, 461–465
resolution selection for, 462–464
resolutions encountered during, 460–461
Screen blending mode, 444, 445
screen captures, 486–487
screen orientation of Fireworks MX, 3, 5
screen resolution. See also resolution
default (72 dpi), 122, 123
dual monitors and, 50
Script Software iView Multimedia (Macintosh), 482
scriptlets. See JavaScript scriptlets
scrubbing paths, 287–288
seamless Patterns, 346–351
searching and replacing. See Find and Replace panel
Select All command (Select menu), 197
Select Behind tool, 36
Select Blank ALT Tags command (Commands
menu), 630
Select Extension to Install dialog box, 642
Select Inverse command (Select menu), 198
Select menu
Border Marquee command, 199
Deselect command, 198, 231
Expand Marquee command, 199
Feather command, 198–199, 448
keyboard shortcuts, 77–78, 894–895
overview, 197
Restore Bitmap Selection command, 200
Save Bitmap Selection command, 200
Select All command, 197
Select Inverse command, 198
Select Similar command, 197
Smooth command, 199
Subselect command, 427
Superselect command, 427
table of commands, 77–78
Select Similar command (Select menu), 197
selecting. See also color; pixel selections; Select menu;
selection tools
circular areas, 177
creating group from selected objects, 391
deselecting, 198, 231
events for Behaviors, 686
feathering selections, 448
flattening selections, 200
hiding or showing selection outlines, 98, 172
History panel separator for changed selection, 634
HTML styles for image maps, 653–654
HTML tags without alt text, 630
increasing or reducing the selection area, 183–184
multiple files to open, 129–130
multiple styles, 553
paths, 230–231
Pick preference, 99, 100
Precise Cursor for, 96–97
records for Data-Driven Graphics Wizard, 623
Snap preference, 100
Selection indicator of status bar (Windows only), 43
selection tools. See also specific tools
increasing or reducing the selection area, 183–184
keyboard modifiers, 183–184
Lasso and Polygon Lasso, 180–182
limiting your drawing area using, 196
Magic Wand, 182–184
Marquee and Oval Marquee, 177–180
Pointer, 176–177
Precise Cursor for, 96–97
Selective JPEG Settings dialog box, 522
Selective JPEG submenu (Modify menu)
overview, 80
Settings command, 522
Selective Quality setting for JPEG files, 521–523
Send Backward button (Modify toolbar), 42
Send Backward command (Modify menu), 385
Send to Back button (Modify toolbar), 42
Send to Back command (Modify menu), 195, 385, 775
sensitivity attributes for strokes, 258–259
sepia color scheme, converting images to, 612, 616
Set Alt Tags command (Commands menu), 630
Set Pop-up Menu Behavior. See pop-up menus
Set Pop-up Menu dialog box. See Pop-up Menu Editor
Set Primary Browser command (File menu), 582
Set Text of Status Bar dialog box, 706–707
setFilename() method (Files object), 846
setFrameFileName() method (SliceInfo object), 856
setFrameFileName property (SliceInfo object), 855
setPref() method (fw object), 827
Settings command (Modify menu)
Animation submenu, 778, 779
Selective JPEG submenu, 522
72 dpi resolution, 122, 123
Shadow and Glow submenu (Add Effects menu), 364
shadow eyedropper, 368
Shadowlab command (Filters menu), 399
3662-1 Index.F 8/2/02 3:01 PM Page 953
Fireworks Seminar

954 Index ✦ S
Shadowlab filter (Alien Skin Eye Candy), 398–399
shadows
Curves filter for, 370–371
Drop Shadow Live Effect, 379–381
Inner Shadow Live Effect, 379–381
Knock Out option for shadow effects, 381
Levels and Auto Levels filters for, 368–370
perspective shadow, 383–386
shape attributes for strokes, 256–257
shape property (ImageMap object), 850
shapes. See also merging paths; paths; vector objects;
specific types
adjusting dimensions and position, 158
concentric, creating, 296
ellipses and circles, 152–153
exporting vector shapes, 541–543
invisibility of paths, 157
merging paths for, 280–281, 289–292
overview, 147
polygons and stars, 153–157
rectangles and squares, 148–152
ShapeShifter command (Filters menu), 404
ShapeShifter filter (Kai’s Power Tools), 404–405
shared layers, 750, 756, 789
shared palettes, 629–630
shareware on companion CD-ROM, 911–912, 914
sharing and unsharing layers across frames, 750,
756, 789
Sharpen Live Effect, 382
Sharpen More Live Effect, 382
Sharpen submenu (Add Effects menu)
overview, 364
Sharpen command, 382
Sharpen More command, 382
Unsharp Mask command, 382
Sharpen submenu (Filters menu), 88
Sharpen tool
overview, 36, 187
Property inspector settings, 188
using, 189–190
sharpening JPEG edges, 523–524
Shift key
Bézier curves and, 168
constraining polygon angles using, 155
drawing circles using, 153
drawing horizontal or vertical lines using, 159
drawing squares using, 149
with Marquee and Oval Marquee tools, 177
with Pointer tool, 231
with Redraw Path tool, 282
with selection tools, 184
with Vector Path tool, 161
for Websafe palette, 207
shimPath property (Slices object), 857
shortcuts (aliases)
to plug-in folders, 395, 459
symbol Instances and, 560
Show Font option (Text Editor), 301
Show Grid command (View menu), 348, 425
Show Guides command (View menu), 422, 664
Show Size & Color option (Text Editor), 301
showing. See hiding and/or showing; opening or
accessing
Simple Mail Transfer Protocol. See SMTP
Simple Rollover Behavior
creating, 691–692
with drag and drop, 715–716
Simplify command (Modify menu), 292–293
Simplify dialog box, 292
Size commands (Text menu), 83, 299, 308
size (dimensions). See height; width
size of files. See file size
sizing. See resizing
Skew tool
creating perspective using, 274–276
overview, 36, 270
perspective shadows using, 385
rotating objects using, 271–273
text objects and, 317–318
skewing objects
images, 270
Patterns, 345
perspective shadows, 385
text in boundary box, 317–318
text on paths, 321–322
skipCell property (SliceInfo object), 855
slash (/) in HTML closing tags, 867
Slice command (Edit menu), 668
slice guides
colors for, 664–665
creating rectangular slices using, 663
Draggable Slice Guides feature, 666–667
showing or hiding, 664, 665
Snap to Guide feature, 664, 665
using, 665–667
slice objects
BehaviorInfo, 851–853
BehaviorsList, 853
exportDoc, 847–849
SliceInfo, 853–856
Slices, 856–857
Slice tool, 38, 662–663
3662-1 Index.F 8/2/02 3:01 PM Page 954
Fireworks Seminar

955Index ✦ S
SliceInfo object
methods, 855–856
overview, 853
properties, 854–855
slices. See also Behaviors; rollovers
for animated GIFs, 768
animating a slice, 678–680
assigning URLs to, 668–669
color for, 668
copying images to, 668
defined, 13
deleting, 666–667
for disjointed rollovers, 702–703
Draggable Slice Guides feature, 666–667
drawing polygon slices, 663–664
drawing rectangular slices, 662–663
Dreamweaver HTML style for, 673–674
exporting, 110, 535–536, 671–675
for external rollovers, 704
features of, 661
filenames, 107–110, 668, 670
frame-specific information in filenames, 109–110
FrontPage HTML style for, 674–675
Generic HTML style for, 672–673
GoLive HTML style for, 674
for hotspot rollovers, 704, 705, 706
image map hotspots versus, 660–661, 671
inserting in a Web page, 672–675
limitations, 661
loading speed and number of, 665–666
modifying Fireworks slices in Dreamweaver,
725–726
overview, 13, 681
Property inspector settings, 668–669
selecting export format for, 671
setting alt text for, 630
slice guides, 663, 664–667
spacer images for, 106
in tables, 106, 670
Text Slices, 669–670
uses for, 645
without alt text, selecting, 630
Slices object
overview, 856–857
properties, 857
Smart Maximize feature, 28
Smooth command (Select menu), 199
smoothing
JPEG images, 524
tiled Patterns, 346–351
SMTP (Simple Mail Transfer Protocol), 886
Smudge tool
overview, 36, 193
Property inspector settings, 193–194
Use Entire Document option with empty bitmap,
194–195
Snap preference, 100
Snap to Grid command (View menu), 348, 425
Snap to Guides command (View menu), 420, 423, 664
Snapz Pro X (Ambrosia Software), 487
Soft Interpolation, 174
software demos on companion CD-ROM, 911–912, 914
Solid fills
defined, 329, 330
Property inspector settings, 330–331, 332
using, 330–332
Sort by Popularity command (Color Table Options
menu), 509
sorting, palette by color value, 223
Spacebar Move
drawing ellipses or circles and, 153
drawing polygons and, 154
drawing rectangles and, 149
overview, 19
spacer images, 106–107
spacer.gif file, 766
Spacing attribute of strokes, 252–253
special effects. See image filters; Live Effects
spell-checking, 311–314
Spelling Setup command (Text menu), 312
Spelling Setup dialog box, 312–313
Splat! (Alien Skin), 912
Split button (Modify toolbar), 42
Square Button, 784. See also banner ads
Square Cap for expanded paths, 294
squares. See also rectangles
adjusting dimensions and position, 158
drawing, 149
hotspots, 647, 648–649
selecting square areas, 177
stacking order
for layers, 410
for object sublayers, 413
reordering frames, 753
tweening and, 769
stamps of strokes, 252–253
Standard Screen mode, described, 39
standards
IAB/CASIE, for banner ads, 784
Photoshop filter standard, 8
Starburst Gradient fills, 336. See also Gradient fills
3662-1 Index.F 8/2/02 3:01 PM Page 955
Fireworks Seminar

956 Index ✦ S
stars
adjusting dimensions and position, 158
automatic angles and, 155–156
creating, 157
number of points for, 153, 157
specifying angles for, 153, 156, 157
startColumn property (exportDoc object), 849
startRow property (exportDoc object), 849
states for rollovers, 688
Status Bar command (View menu), 43
status bar message, 706–707
status bar (Windows only), overview, 43
statusText property (BehaviorInfo object), 853
Stop button (document window), 31
storing. See saving
straight lines
drawing with Line tool, 158–159
drawing with Pen tool, 162–163
stretching text, 308
Striped Border around bitmaps, 98
stroke commands for paths
Expand Stroke, 293–294
Inset Path, 294–296
Simplify, 292–293
Stroke options dialog box, 247–249
strokes. See also Edit Stroke dialog box
Air Brush, 175, 238
applying automatically with Vector Path tool, 160
applying texture to, 233–234
applying to paths, 145
Basic, 237
Build-up attribute, 253–254
built-in, 234–247
Calligraphy, 239
categories, 231–232
Charcoal, 240
combining paths and, 289
on companion CD-ROM, 913
Crayon, 241
creating styles for custom strokes, 250
in custom styles, 552
default color, 95
defaults active when selected, 232
deleting custom strokes, 248
dotted lines, 259–263
Edge Effect attribute, 254–255
edge options, 232
Edge Texture attribute, 254
editing, 250–259
Felt Tip, 242
Fill over Stroke option, 264
finding and replacing colors, 601–602
Flow Rate attribute, 253
Ink Amount attribute, 252
managing, 247–250
Oil, 242–243
orienting, 263–264
overview, 229, 264–265
Pencil, 235–236
pressure applied to, 235, 259
Property inspector settings, 44–45, 229–234
Random, 245
resizing objects and, 269
saving custom strokes, 248, 249
selecting colors for, 95
selecting path for, 230–231
sensitivity attributes, 258–259
separation of objects from, 7
shape attributes, 256–257
size setting, 232–233
Spacing attribute, 252–253
speed of movement and, 159, 259
stamps, 252–253
for text, 314–315
Texture attribute, 254
textures for, 352
Tip Spacing attribute, 255
Tips attribute, 255
transferring between documents, 249–250
Unnatural, 246–247
Variation attributes, 255, 256
Watercolor, 244
strokes property (Find object), 842
Style commands (Text menu), 83, 308
Style Defaults.stl file, 806
style property (exportDoc object), 849
Style 37, 555
styles. See also HTML styles
applying, 63–64, 549–550
button versus text styles, 548, 549
on companion CD-ROM, 913
creating new styles, 550–552
for custom strokes, 250
defined, 63
deleting, 553, 554
displaying large icons for, 555
editing, 554
exporting, 554
extracting patterns and textures from, 555–557
on Fireworks CD-ROM, 548–549
folder for, 806–807
importing, 555
managing, 552–555
overview, 10–11, 548–549, 557
3662-1 Index.F 8/2/02 3:01 PM Page 956
Fireworks Seminar

957Index ✦ S
pop-up menu, 713–714
repetitious tasks and, 547
saving custom effects as, 386, 387–388
saving gradients as, 340–341
selecting multiple styles, 553
text, 302, 308
Web site for additional styles, 549
Styles command (Window menu), 341, 549
Styles folder, 806–807
Styles panel
applying styles, 63–64, 549–550
Delete Style button, 553
Delete Styles command, 553, 554
Edit Style command, 553, 554
Export Styles command, 554, 714
exporting styles for pop-up menus, 713–714
Import Styles command, 554, 555
Large Icons command, 554, 555
New Style button, 250, 550, 714
New Style command, 553, 554
opening, 341, 549
Options menu commands, 64, 553–554
overview, 63–64, 548–549
Reset Styles command, 554, 555, 807
selecting multiple styles, 553
subscripts, 305–306
Subselect command (Select menu), 427
Subselection tool
deleting points with, 278
described, 36
manipulating control points with, 164
moving points with, 276–277
switching from Pen tool, 164
superscripts, 305–306
Superselect command (Select menu), 427
Swap Image dialog box
for disjointed rollovers, 702–703
for drag-and-drop Behaviors, 716, 717
for external rollovers, 704
for hotspot rollovers, 706
swap() method (Files object), 846
Swatches panel
changing colors in, 220–221
erasing palette from, 223
loading palettes, 222
managing palettes, 222–223
Options menu commands, 54
overview, 53–54, 219–220
palette management using, 54
preset swatches, 221
saving current swatch, 222
sorting by color value, 223
Symbol Editor, 566–567, 781
Symbol Libraries
accessing, 577
defined, 65, 560
deleting Animation Symbols, 780–781
exporting, 578–579
folder for, 805–806
importing, 576
managing, 575–579
updating imported Libraries, 577–578
Symbol Properties dialog box, 566, 568–569, 573, 777
Symbol submenu (Modify menu)
Break Apart command, 571
Convert to Symbol command, 565, 573
Edit Symbol command, 781
overview, 79
Tween Instances command, 771, 774, 775, 776
symbols. See also Instances of symbols; Library panel;
specific types
advantages of, 562
Animation Symbols, 562, 749, 777–781
as animation tools, 749
automatic updating of Instances, 559, 560, 561
breaking link between Instance and parent, 571
Button Symbols, 562–563, 571–575
converting Animation Symbols to Graphic
Symbols, 780
converting Button Symbols to Graphic
Symbols, 573
converting objects to, 564, 565, 573
creating Button Symbols, 571–573
creating from scratch, 564, 565–567
creating Instances, 65, 560, 569–570
defined, 559
deleting, 569
deleting Instances, 571
duplicating an existing symbol, 567
editing Button Symbols, 573
editing existing symbols, 567–568
editing Instances, 570–571
exporting Libraries, 578–579
Graphic Symbols, 562, 573, 749, 768–776
importing Libraries, 576
Instance Level Button Properties, 574–575
Instances defined, 65, 559
Libraries, 560
modifying properties of, 568–569
opening Libraries, 577
overview, 559–563, 579
shortcuts for editing, 568
tweening Graphic Symbols, 563, 768–776
updating imported Libraries, 577–578
using Button Instances, 573–574
3662-1 Index.F 8/2/02 3:01 PM Page 957
Fireworks Seminar

958 Index ✦ S–T
system color picker(s), 217–219
system requirements for companion CD-ROM, 909–910
Ttable data (<td>) tag (HTML), 876
table row (<tr>) tag (HTML), 876
<table> tag (HTML), 875–877
tables. See also pop-up menus
empty cells, 107
HTML tags for, 875–877
slices in, 106, 670
spacer images for, 106, 107
tabs for floating panels, 49, 50
Targa files, Fireworks support for, 127
target for hotspots, 652
targetColumnNum property (BehaviorInfo object), 853
targetFrameNum property (BehaviorInfo object), 853
targetRowNum property (BehaviorInfo object), 853
targetText property
ImageMap object, 850
SliceInfo object, 855
TCP/IP (Transmission Control Protocol/Internet
Protocol), 885. See also protocols
<td> (table data) tag (HTML), 876
technical support for the companion CD-ROM, 915
templates. See also HTML styles
for banner ads, on companion CD-ROM, 784
for Data-Driven Graphics Wizard, 621
enabling new templates, 805
folders for, 804
HTML, 800
1024x768 command (Commands menu), 627
text
adjusting shape of text objects, 299
aligning, 306–308, 309
Auto Kern option, 301, 304
Baseline Shift control, 305–306
converting to bitmaps, 103, 318
converting to paths, 318–319
cookie-cutter, 318–319
custom styles for, 550–552
detaching from path, 320
distorting, 317–318
editing existing text, 299, 301, 308–309
editing images on other systems and, 131
enhancements in Fireworks MX, 20
entering onscreen, 297–298
fills for, 316–317
finding and replacing, 592, 594–599
flattening imported text into bitmaps, 103
font attributes, basic, 301–302
fonts, changing, 308
fonts in PNG files, 131, 309–310
Horizontal Scale, 305, 306
importing, 310–311, 469–470, 482–483
inserting with Text Editor, 300
kerning, 301, 304
leading, 305
Maintain Appearance versus Replace Fonts, 301,
309–310
masking images with, 323–324
merging paths and, 318, 319
moving text objects, 299, 301
orientation, 307–308, 309
outline fonts, 314–315
overview, 324–325
paragraph spacing, 303
on paths, 147, 320–323
perspective shadow technique, 383–386
Property inspector settings, 301–308
Regular Expressions for, 595–599
resizing, 299, 305, 306, 308, 317
rotating, 321
skewing, 317–318
spell-checking, 311–314
stretching, 308
strokes for, 314–315
styles, 302, 308
superscripts and subscripts, 305–306
Text Editor for, 299–301
Text Slices, 669–670
Text tool for, 297–299
text-spacing controls, 303–308
transform tools with, 317–318
UTF-8 encoding, 110–111
text boxes (floating panels), described, 52
Text Editor
inserting text with, 300
opening, 300
options, 301
overview, 299–300
Text menu
Align commands, 83–84, 309
Attach to Path command, 320
Convert to Paths command, 318, 319
Detach from Path command, 320
Editor command, 300
Font command, 308
keyboard shortcuts, 83–85, 898–899
Orientation commands, 84, 321–323
Size commands, 83, 299, 308
Spelling Setup command, 312
Style commands, 83, 308
table of commands, 83–85
3662-1 Index.F 8/2/02 3:01 PM Page 958
Fireworks Seminar


![621 Mx Install Bea814 Win [RexonaVn.com]](https://static.fdocuments.net/doc/165x107/577d1d0f1a28ab4e1e8b86b0/621-mx-install-bea814-win-rexonavncom.jpg)


