FINALE FIREWORKS USER · PDF fileIntroduction FINALE Fireworks User Guide PAGE 4 6 Working...
167
Transcript of FINALE FIREWORKS USER · PDF fileIntroduction FINALE Fireworks User Guide PAGE 4 6 Working...


FINALE FIREWORKS USER GUIDE

PAGE 3
Contents
1 Introduction .................................................................................................................. 9
Logging In ............................................................................................................................... 9
2 User Interface Layout .................................................................................................. 11
Other Views .......................................................................................................................... 13
3 Working with Fireworks ............................................................................................... 15
The Inventory ........................................................................................................................ 15
Firework Categories ................................................................................................................... 15
Expanding your Inventory ........................................................................................................... 16
Adding a Firework to Your Show .............................................................................................. 16
Click to Add ............................................................................................................................... 17
Drag and Drop ........................................................................................................................... 18
Note for the Real-World Designer: Obeying the Caliber .................................................................. 19
Deleting Fireworks ................................................................................................................. 19
4 Launch Positions: The Basics ........................................................................................ 20
Creating a Launch Position ...................................................................................................... 20
Deleting Fireworks and Launch Positions .................................................................................. 21
5 Adding Fireworks in Time ............................................................................................ 22
Adding Fireworks as the Playhead Is Moving ................................................................................. 22
Modifying a Firework ............................................................................................................. 23
Making a Selection ..................................................................................................................... 23
Moving in Space ........................................................................................................................ 24
Moving in Time .......................................................................................................................... 25
Using Launch Positions to Select Fireworks ............................................................................... 26

Introduction FINALE Fireworks User Guide
PAGE 4
6 Working With the Timeline .......................................................................................... 27
The Playhead ......................................................................................................................... 27
Time Zoom Buttons ................................................................................................................ 28
Time Display .......................................................................................................................... 28
Time Zoom Slider ................................................................................................................... 28
Changing the Duration of Your Show ....................................................................................... 30
7 Changing Backgrounds ................................................................................................. 31
8 Saving, Opening, and Exporting your Show ................................................................... 32
9 Real-World Show Design .............................................................................................. 33
Real-World Workflow ............................................................................................................. 33
Assigning Modules to Launch Positions .................................................................................... 34
Full Automation ..................................................................................................................... 36
Multiple Launches-per-Pin ...................................................................................................... 37
Using Slats ............................................................................................................................ 38
Splitting Modules Across Launch Positions ............................................................................... 38
The Firing View ...................................................................................................................... 40
Positioning the Playhead ............................................................................................................. 41
Re-assigning Addresses and Pins .................................................................................................. 41
Conflict Detection .................................................................................................................. 42
10 Creating Your Own Fireworks ....................................................................................... 44
Editing a Firework .................................................................................................................. 44
Saving your Firework .............................................................................................................. 46
Creating a Cake ...................................................................................................................... 47
Managing your Personal Inventory .......................................................................................... 49
11 Common Tabs ............................................................................................................. 50
Firework ............................................................................................................................... 50

Introduction FINALE Fireworks User Guide
PAGE 5
Field notes ............................................................................................................................ 52
12 Peony ......................................................................................................................... 53
Launch .................................................................................................................................. 54
Shell tail ................................................................................................................................ 55
Shell burst ............................................................................................................................. 56
Shell burst sound ................................................................................................................... 57
Star ...................................................................................................................................... 58
Star body .............................................................................................................................. 59
Star tip .................................................................................................................................. 60
Star transition ....................................................................................................................... 61
Transition tip ......................................................................................................................... 62
Pistil ..................................................................................................................................... 63
Pistil body ............................................................................................................................. 64
Pistil tail ................................................................................................................................ 65
Pistil glitter ............................................................................................................................ 66
13 Chrysanthemum, Kamuro, Diadem, Brocade, Willow, and Dahlia ................................... 67
Launch .................................................................................................................................. 68
Shell tail ................................................................................................................................ 69
Shell burst ............................................................................................................................. 70
Shell burst sound ................................................................................................................... 71
Star ...................................................................................................................................... 72
Star body .............................................................................................................................. 73
Star tip (some diadems, only) .................................................................................................. 74
Star tail ................................................................................................................................. 75
Star glitter ........................................................................................................................... s76
Star transition ....................................................................................................................... 77
Transition tip ......................................................................................................................... 78
Pistil ..................................................................................................................................... 79
Pistil body ............................................................................................................................. 80

Introduction FINALE Fireworks User Guide
PAGE 6
Pistil tip ................................................................................................................................ 81
14 Palm ........................................................................................................................... 82
Launch .................................................................................................................................. 83
Shell tail ................................................................................................................................ 84
Shell burst ............................................................................................................................. 85
Shell burst sound ................................................................................................................... 86
Star ...................................................................................................................................... 87
Star body .............................................................................................................................. 88
Star tip .................................................................................................................................. 89
Star tail ................................................................................................................................. 90
Star tail, cont. ........................................................................................................................ 91
Star sparkle ........................................................................................................................... 92
Star transition ....................................................................................................................... 93
Transition tip ......................................................................................................................... 94
Pistil ..................................................................................................................................... 95
Pistil body ............................................................................................................................. 96
Pistil tail ................................................................................................................................ 97
Pistil glitter ............................................................................................................................ 98
15 Salute ......................................................................................................................... 99
Launch ................................................................................................................................ 100
Shell tail .............................................................................................................................. 101
Flash ................................................................................................................................... 102
Flash colors ......................................................................................................................... 103
Salute sound ....................................................................................................................... 105
16 Comet ....................................................................................................................... 106
Launch ................................................................................................................................ 107
Launch sound ...................................................................................................................... 108
Shell ................................................................................................................................... 109

Introduction FINALE Fireworks User Guide
PAGE 7
Shell body ........................................................................................................................... 110
Shell tip .............................................................................................................................. 111
Shell tail .............................................................................................................................. 112
Shell sparkle ........................................................................................................................ 113
17 Mine ......................................................................................................................... 114
Mine Launch ....................................................................................................................... 115
Launch sound ...................................................................................................................... 117
Shell ................................................................................................................................... 118
Shell body ........................................................................................................................... 119
Shell tip .............................................................................................................................. 120
Shell tail .............................................................................................................................. 121
Shell tail, cont. ..................................................................................................................... 122
Shell burst ........................................................................................................................... 123
Shell burst sound ................................................................................................................. 124
Star .................................................................................................................................... 125
Star body ............................................................................................................................ 126
Star tip ................................................................................................................................ 127
Star tail ............................................................................................................................... 128
Star tail, cont. ...................................................................................................................... 129
Report ................................................................................................................................ 130
Report sound ...................................................................................................................... 131
18 Fountain ................................................................................................................... 132
Firework ............................................................................................................................. 133
Spray .................................................................................................................................. 134
Spray sound ........................................................................................................................ 136
Particle ............................................................................................................................... 137
Particle body ....................................................................................................................... 138
Particle tail .......................................................................................................................... 139
Particle tail, cont. ................................................................................................................. 140

Introduction FINALE Fireworks User Guide
PAGE 8
Report ................................................................................................................................ 141
Report sound ...................................................................................................................... 142
Salute, Salute colors, Salute sound ........................................................................................ 143
19 Candle ...................................................................................................................... 144
Launch ................................................................................................................................ 145
Launch sound ...................................................................................................................... 146
Mine ................................................................................................................................... 147
Shell ................................................................................................................................... 148
Shell body ........................................................................................................................... 149
Shell tip .............................................................................................................................. 150
Shell tail .............................................................................................................................. 151
Shell tail, cont. ..................................................................................................................... 152
Shell burst ........................................................................................................................... 153
Shell burst sound ................................................................................................................. 154
Star .................................................................................................................................... 155
Star body ............................................................................................................................ 156
Star tip ................................................................................................................................ 157
Star tail ............................................................................................................................... 158
Star tail, cont. ...................................................................................................................... 159
Report ................................................................................................................................ 160
Report sound ...................................................................................................................... 161
Cycle .................................................................................................................................. 162
Multicycle ........................................................................................................................... 164
20 FINALE CSV Script Format .......................................................................................... 165
File Layout and Formatting Rules ........................................................................................... 165
Format Table ....................................................................................................................... 166

PAGE 9
1 Introduction
Welcome to FINALE Fireworks, a visual simulation and choreography program that lets you create and
control a complete fireworks display. The program can be used by fireworks professionals and amateurs who
are designing real-world fireworks shows, as well as by enthusiasts and artists working in the virtual world.
FINALE Fireworks provides a simple and intuitive interface that lets you build a performance by dragging-
and-dropping individual shells onto a “Sky Field” canvas. You can add and synchronize music, insert a
background that depicts an actual shoot site, capture your creation as a “firing script” (indispensible for the
real-world designer), and even record a video that you can share with your friends.
The graphical engine that creates the fireworks simulation in FINALE fireworks doesn’t use pre-rendered
images or simple “wireframe” outlines. All of the shots you’ll see when you play your show are created in real-
time, based on the physical properties of the mortars, shells, and other components that professionals use
when designing an event—with just enough natural randomness to make each performance a unique
experience.
The first few chapters of this User Guide tells you everything you need to know to create a fireworks show
with FINALE Fireworks. The final chapters explain how to create your own firework effects.
Logging In
The first thing you have to do, of course, is download the FINALE Fireworks software. If you’re reading this,
you’re probably already running the program, but just in case, you can find the latest version of the program
at the FINALE Fireworks website:
http://www.finalefireworks.com/
The Website will step you through the process of creating an account and will download the latest version of
the program. If you’ve accepted the default installation location, you’ll be able to launch FINALE Fireworks
by double-clicking...
C:\Program Files\FINALE Fireworks\FINALE Fireworks.bat
After launching the program, you’ll see the login panel:

Introduction FINALE Fireworks User Guide
PAGE 10
The only wrinkle, here, is that you must be connected to the Internet so the program can download the latest
fireworks catalog. If you see the “Network error: communication failure” message when you log in…
…check your Internet connection.

PAGE 11
2 User Interface Layout
In this chapter we’ll look at the general layout of the FINALE Fireworks user interface. Except for a couple
simple editing windows, everything you need to create a fireworks show is presented in a single workspace.
The illustration, below, points out the principal components of the workspace:
Main Menu
Sky Field
Inventory
Timeline
Playhead
Playback Controls
Wind slider
Zoom slider
User Interface Layout FINALE Fireworks User Guide
PAGE 12
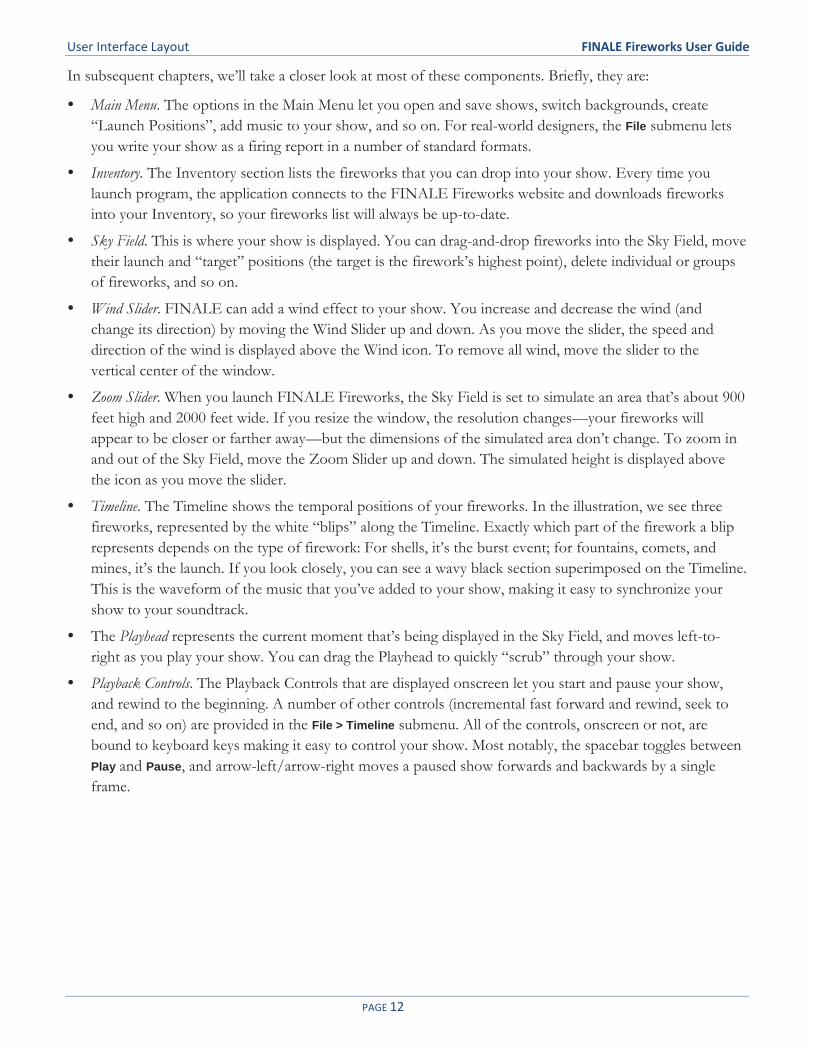
In subsequent chapters, we’ll take a closer look at most of these components. Briefly, they are:
Main Menu. The options in the Main Menu let you open and save shows, switch backgrounds, create
“Launch Positions”, add music to your show, and so on. For real-world designers, the File submenu lets
you write your show as a firing report in a number of standard formats.
Inventory. The Inventory section lists the fireworks that you can drop into your show. Every time you
launch program, the application connects to the FINALE Fireworks website and downloads fireworks
into your Inventory, so your fireworks list will always be up-to-date.
Sky Field. This is where your show is displayed. You can drag-and-drop fireworks into the Sky Field, move
their launch and “target” positions (the target is the firework’s highest point), delete individual or groups
of fireworks, and so on.
Wind Slider. FINALE can add a wind effect to your show. You increase and decrease the wind (and
change its direction) by moving the Wind Slider up and down. As you move the slider, the speed and
direction of the wind is displayed above the Wind icon. To remove all wind, move the slider to the
vertical center of the window.
Zoom Slider. When you launch FINALE Fireworks, the Sky Field is set to simulate an area that’s about 900
feet high and 2000 feet wide. If you resize the window, the resolution changes—your fireworks will
appear to be closer or farther away—but the dimensions of the simulated area don’t change. To zoom in
and out of the Sky Field, move the Zoom Slider up and down. The simulated height is displayed above
the icon as you move the slider.
Timeline. The Timeline shows the temporal positions of your fireworks. In the illustration, we see three
fireworks, represented by the white “blips” along the Timeline. Exactly which part of the firework a blip
represents depends on the type of firework: For shells, it’s the burst event; for fountains, comets, and
mines, it’s the launch. If you look closely, you can see a wavy black section superimposed on the Timeline.
This is the waveform of the music that you’ve added to your show, making it easy to synchronize your
show to your soundtrack.
The Playhead represents the current moment that’s being displayed in the Sky Field, and moves left-to-
right as you play your show. You can drag the Playhead to quickly “scrub” through your show.
Playback Controls. The Playback Controls that are displayed onscreen let you start and pause your show,
and rewind to the beginning. A number of other controls (incremental fast forward and rewind, seek to
end, and so on) are provided in the File > Timeline submenu. All of the controls, onscreen or not, are
bound to keyboard keys making it easy to control your show. Most notably, the spacebar toggles between
Play and Pause, and arrow-left/arrow-right moves a paused show forwards and backwards by a single
frame.

User Interface Layout FINALE Fireworks User Guide
PAGE 13
Other Views
In addition to the default workspace, FINALE presents two other important views: The Firework Editor and
the Firing View.
The Firework Editor presents a set of sliders, menus, and other controls that let you modify the attributes
of a firework. To display the Firework Editor, you double-click on a firework that you’ve added to your
show. The editor is presented as a series of tabs across the top of the main window:
The Firework Editor is described in detail starting with the Creating Your Own Fireworks chapter of this User
Guide.
Firework Editor

User Interface Layout FINALE Fireworks User Guide
PAGE 14
The Firing View is a list of the fireworks that you’ve added to your show, in chronological order. To bring
up the Firing View, choose File > Firing View or type CONTROL-F:
The Firing View is described in the Real-World Show Design chapter in this book.
Firing View

PAGE 15
3 Working with Fireworks
In this chapter, we’ll look at how you choose a firework and add it to your show. We’ll also look at how you
select, place, modify, and delete fireworks.
The Inventory
The Inventory section of the UI contains all the fireworks that you can add to your show. When you log in,
the program forms a connection to the FINALE Fireworks website and downloads the latest set of fireworks,
including the fireworks that you’ve designed and those that you’ve selected from other FINALE users.
Firework Categories
There are a number of ways you can search for a firework. First, you can search by category. There are six
firework categories, represented by the six tabs that run across the top of the Inventory:
The Inventory provides a UI that lets you search within a category based on collection, subcategory, color,
and mortar caliber:
The subcategories provide a further categorization of the fireworks type. Currently, only the Shells and
Candle types have subcategories.
You can choose from three collection options: Standard fireworks is the set that’s provided by FINALE;
My fireworks are the effects that you’ve created or have selected from other users; All collections is a
combination of the two.
Firework Categories
Firework Subcategories Color Caliber Collection

Working with Fireworks FINALE Fireworks User Guide
PAGE 16
The color dropdown menu applies to all fireworks types. It lets you search for a firework that paints a
particular color, whether in its tail or its burst. Many fireworks have more than one color.
The caliber dropdown also applies to all types. The larger the caliber, the bigger (and higher) the firework.
Expanding your Inventory
You can add fireworks to your inventory through the Edit > Add new fireworks option. This will bring up the
Add Fireworks window:
To add a firework, click the corresponding copy link. The firework will be add to your My fireworks collection.
To delete a firework from your My fireworks collection, go to Edit > Manage my fireworks. A panel similar to the
one above will appear that lets you remove individual effects.
Adding a Firework to Your Show
After you’ve found the firework that you want, it’s time to add it to the show. There are two ways to add a
firework:
By clicking on its icon in the Inventory.
By dragging and dropping the icon into the Sky Field.
The difference between these two methods is the way in which the firework is placed in the scene, as
described in the following sections.

Working with Fireworks FINALE Fireworks User Guide
PAGE 17
Click to Add
When you click an icon, the firework is dropped into the scene with its launch point set just above the launch
caret that sits on the imaginary launch line, and its height (or target point) is defined by its caliber. Here, we’ve
clicked on the 5” Red Ext Comet:
You can drag the launch point after you’ve dropped it, but only horizontally. You can’t drag a launch point up
into the Sky Field—it always lies on the launch line at the bottom of the Sky Field. When you drag a
firework’s launch point, the launch caret goes with it. The next firework you click-to-add will drop into
thisnew location. (Note that you can’t move the launch caret by hand.)
Notice that the firework’s trajectory is outlined with white dots. The white dots mean that the firework is
selected. If we add another comet the first object becomes unselected, as indicated by the red dots (you have
to hover the mouse over the Sky Field to see the unselected outline):
Click here
Height determined by caliber Launch point above
the launch caret
Launch line
Target point

Working with Fireworks FINALE Fireworks User Guide
PAGE 18
The second firework is added at the same position as the first, above the launch caret. The angle of the
trajectory, however, is varied so that the two fireworks don’t lie on top of each other. The amount of
variation depends on the firework’s definition.
You can select a firework by clicking anywhere along its trajectory. We’ll talk more about selection when we
get to the Modifying a Firework section.
Drag and Drop
When you drag and drop an icon, you get to control the firework’s launch point and its height (if you’re a
real-world designer, this probably isn’t what you want—see the Note for the Real-World Designer, below). As you
drag the icon out of the Inventory, the launch caret follows the mouse. When you drop the icon, the
firework’s launch point drops to the caret, and its target point is wherever you let go of the mouse. However,
this is only true for shells and comets; for the other firework types, the height is always controlled by the
caliber of the mortar (you can adjust it by hand, later).
The illustrations, below, show the caret as we drag a shell, and the placement of the launch and target points
when we drop. (Note that the icon itself doesn’t actually appear under the mouse as you drag it.)
Unselected Selected

Working with Fireworks FINALE Fireworks User Guide
PAGE 19
Note for the Real-World Designer: Obeying the Caliber
If you’re choreographing a real-world show, you want the physics of the fireworks to obey the caliber of the
mortar—when you drag-and-drop an object, you don’t want the drop point to define the placement of the
target point. To place the firework so its target point is placed according to the firework’s caliber, press the
SHIFT key before you drop.
Deleting Fireworks
To delete a firework, you first must select it and then hit the DELETE key (not the BACKSPACE key). You can also
delete a firework by selecting it and choosing the Edit > Delete option.
If you want to delete all the fireworks in your show, choose the Edit > Select All option and hit DELETE (or
choose Edit > Delete).
Height and launch point are determined by the
position of the drop
Drag
Caret moves with the drag
Drop

PAGE 20
4 Launch Positions: The Basics
Rather than drop you fireworks randomly along the launch line, you can add them to specific launch positions.
A launch position is a pre-defined location along the launch line that acts as a “magnetic cradle” for the
fireworks that you add into the scene. If you reposition the launch position, all of the fireworks that have
been added to it move as a group.
If you’re a real-world designer you’ll probably use launch positions exclusively (as opposed to dropping
fireworks into undefined locations on the launch line). Moreover, you’ll probably define all of your launch
positions first, before you start adding fireworks.
This chapter looks at the basic elements of launch positions. A later chapter, Real-World Show Design looks at
move advanced topics, such as how to use launch positions to assign modules and firing pins.
Creating a Launch Position
To create a launch position, select the Edit > Add launch position menu item:
A launch position marker will appear in the center of the launch line:
If we zoom in on the marker, we see a caret sitting in the “cradle”. This means that the launch position is
selected. Here’s a selected an unselected launch position:
Launch position marker
Launch Positions: The Basics FINALE Fireworks User Guide
PAGE 21
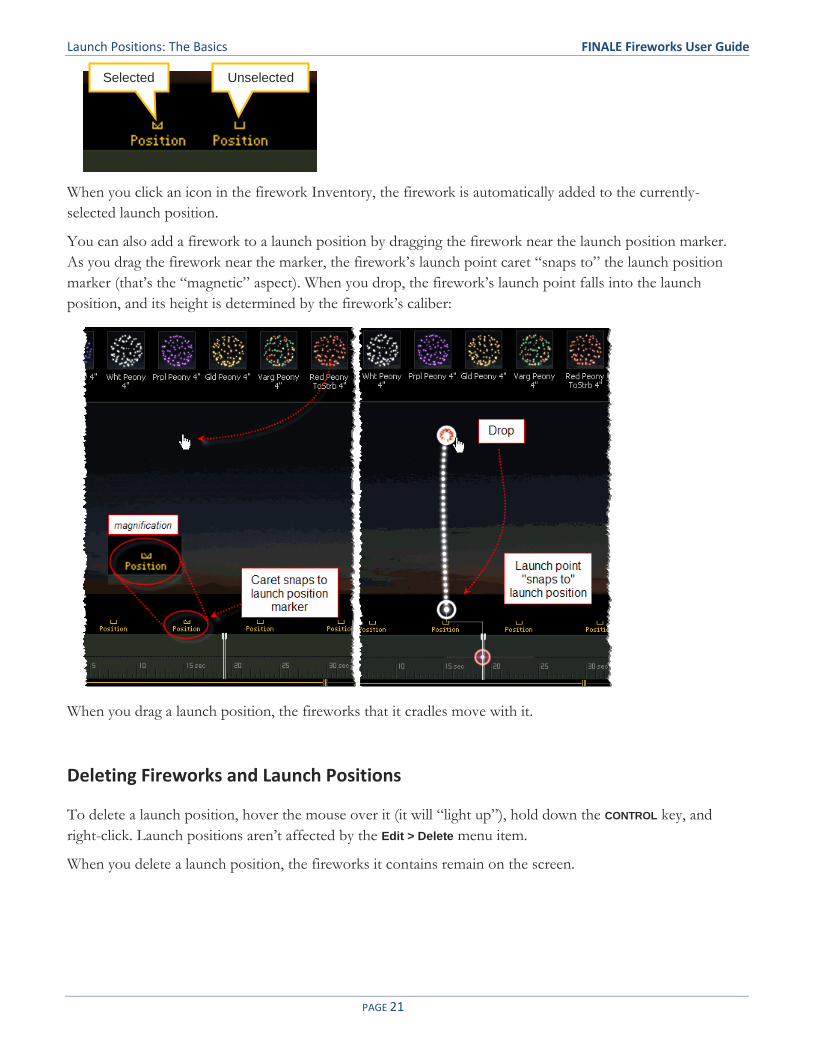
When you click an icon in the firework Inventory, the firework is automatically added to the currently-
selected launch position.
You can also add a firework to a launch position by dragging the firework near the launch position marker.
As you drag the firework near the marker, the firework’s launch point caret “snaps to” the launch position
marker (that’s the “magnetic” aspect). When you drop, the firework’s launch point falls into the launch
position, and its height is determined by the firework’s caliber:
When you drag a launch position, the fireworks that it cradles move with it.
Deleting Fireworks and Launch Positions
To delete a launch position, hover the mouse over it (it will “light up”), hold down the CONTROL key, and
right-click. Launch positions aren’t affected by the Edit > Delete menu item.
When you delete a launch position, the fireworks it contains remain on the screen.
Selected Unselected

PAGE 22
5 Adding Fireworks in Time
So far, we’ve only discussed how to add a firework in space along the launch line. A firework’s position in
time is just as important. The rule for adding a firework in time is simple: It’s placed at the current position of
the Playhead. However, there’s a wrinkle, here:
For shells, the event that’s dropped onto the Playhead (when the shell is added) is the burst.
For all other fireworks, it’s the launch.
In the UI Layout chapter, we mentioned that a firework is represented as a blip on the Timeline. There’s
actually more to it than that. If we zoom into the Timeline, you’ll see that the blip leaves a trail. When we add
a shell, the trail looks like this:
The blip (the burst, for a shell) is aligned with the Playhead. The trail leading up to the blip shows the
duration of the launch; the trail to the right is the fall off.
For comets, fountains, and mines, the burst (essentially) coincides with the launch point:
Adding Fireworks as the Playhead Is Moving
Our simple rule of adding a firework at the Playhead doesn’t mean that the Playhead has to be sitting still.
Another nice feature of FINALE Fireworks is that you can start the Playhead moving and add fireworks as it
travels along the Timeline.
To add a firework while the Playhead is moving, you use the same methods that were previously described:
Click a firework icon, or drag-and-drop the icon into the Sky Field. By default, the firework’s “launch
moment” is added to the scene—when you click or drop, the firework is added and immediately launched. In
some cases, this might not be what you want. Most notably, if you’re adding fireworks as you play your show
in order to coordinate bursts with specific moments in your soundtrack, you don’t want the fireworks to be

Adding Fireworks in Time FINALE Fireworks User Guide
PAGE 23
added at their launch moments, you want a “click-means-burst” effect. To do this, hold down the SHIFT key
when you click (or drop). The firework will be added at its “burst moment”.
Modifying a Firework
You can modify a firework you’ve placed in the scene by…
moving its launch point,
bending or stretching its target point,
and moving it in time.
All three modifications are performed by grabbing some part of the firework and dragging the mouse. But
before you do any of this, you have to select the firework.
Making a Selection
To select a firework, you simply click anywhere along its trail in the Sky Field or on its blip on the Timeline.
As you hover over the firework, its outline and blip will glow red. When you click, the glow changes to white.
Here we see the effect as you approach, hover over, and then click on the firework:

Adding Fireworks in Time FINALE Fireworks User Guide
PAGE 24
You can expand the selection by SHIFT-clicking on other
fireworks. In the illustration, below, we’ve selected two of the
three shells in the scene:
SHIFT-clicking a selected firework will remove it from the selection.
Moving in Space
Once you’ve made your selection, you can move the selected fireworks’ launch points or target points. To
move the launch, mouse down anywhere along the trajectory of a selected firework (this won’t change the
selection) and drag. All selected fireworks move together. As you drag, a “measuring stick” appears that
shows you the distance from the center of the screen to the launch point of whichever firework you clicked
on. Here, we drag our selection to the left:
To bend or stretch the target points, click within the “target circle” at the top of the firework and drag. You
can drag in any direction; again, the target points of all selected fireworks move in concert while the launch
points remain where they are:

Adding Fireworks in Time FINALE Fireworks User Guide
PAGE 25
When you move the target point, a measuring stick (not shown in the illustration) shows you the height and
angle of the target. By default, you can only move the targets to specific spots in the Sky Field—the targets
“snap to” and invisible grid. If you want to smoothly adjust the targets, hold down the SHIFT key as you drag.
Moving in Time
Moving a firework in time is similar to moving it in space: You make your selection as before, but this time
you click on one of the Timeline blips and drag. Moving to the left pushes the selected fireworks backwards
in time; moving to the right is into the future. As you drag, you’ll see your fireworks “perform”. For example,
here we drag a green mine forward in time (to the right).
In relation to the Playhead, the mine is getting “younger”, so it appears to run backwards. If you push the
firework past the Playhead, the connection to the Sky Field disappears, and a message tells you that the object
is no longer visible.
Adding Fireworks in Time FINALE Fireworks User Guide
PAGE 26
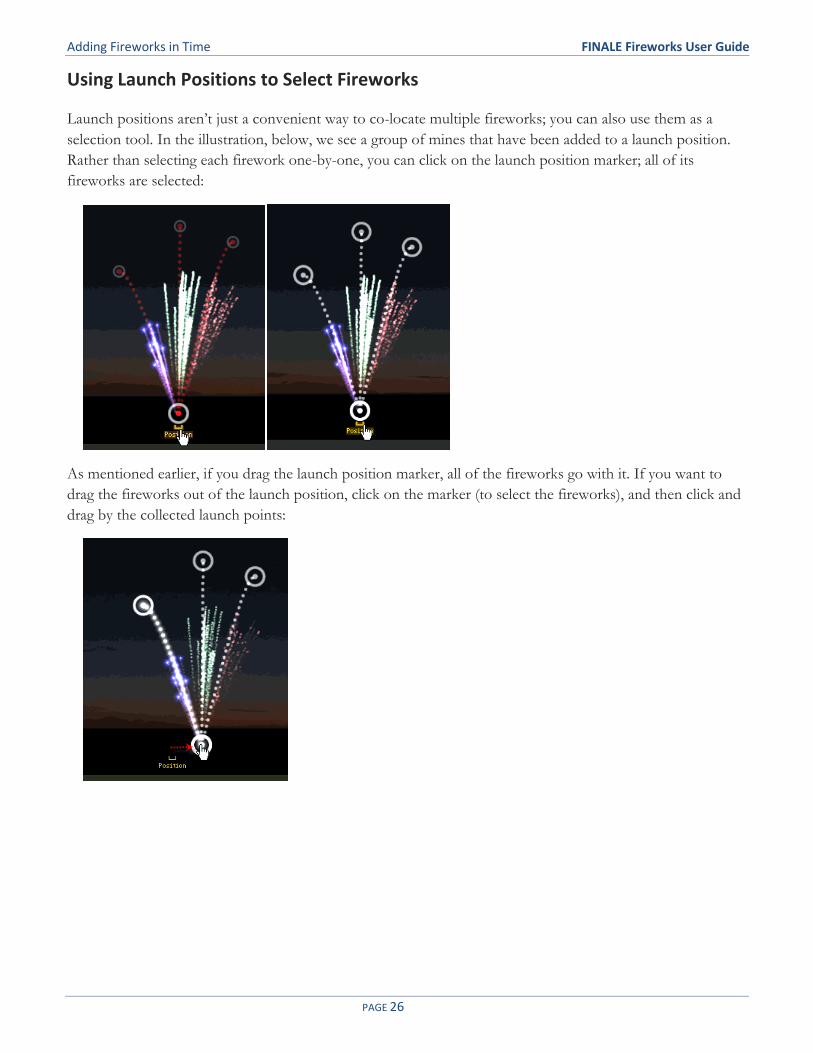
Using Launch Positions to Select Fireworks
Launch positions aren’t just a convenient way to co-locate multiple fireworks; you can also use them as a
selection tool. In the illustration, below, we see a group of mines that have been added to a launch position.
Rather than selecting each firework one-by-one, you can click on the launch position marker; all of its
fireworks are selected:
As mentioned earlier, if you drag the launch position marker, all of the fireworks go with it. If you want to
drag the fireworks out of the launch position, click on the marker (to select the fireworks), and then click and
drag by the collected launch points:

PAGE 27
6 Working With the Timeline
This chapter looks at the tools you use to change the resolution and playback position of the Timeline, and
the duration of your show.
The Timeline components are illustrated below:
The Playhead
The Playhead shows you the current temporal position in your show. There are a number of ways to position
the Playhead:
You can drag it. As you drag the Playhead, your fireworks launch and explode accordingly.
You can jump to the beginning or end of the show by pressing the HOME and END keys, respectively.
You can step the Playhead incrementally forward (toward the end of the show) by pressing PAGE UP (big
step) or the RIGHT-ARROW key (small step).
Similarly, PAGE DOWN and LEFT-ARROW bump the Playhead back toward the beginning of the show.
You can start and stop the show by using the Playback Controls (which we saw in the first chapter), or by
pressing the spacebar.
You can also move the Playhead by dragging the zoom slider, which we’ll describe later in this chapter.
Playhead Time Zoom Buttons Time Display
Time Zoom Slider

Working With the Timeline FINALE Fireworks User Guide
PAGE 28
Time Zoom Buttons
The Time Zoom Buttons let you expand and contract the Timeline. When you click the button, you
expand the Timeline. A smaller portion of your show is represented on the Timeline, but the Timeline blips
“spread out” making it easier to select a specific firework. Here we see the before-and-after effect of zooming
into the Timeline:
The button contracts time; more of your show is represented, but the blips are closer together.
You can also zoom in and out with the Time Zoom Slider. Which method you use for zooming is a matter of
taste.
Time Display
The Time Display shows you the current time location of the Playhead (on the left) and the duration of the
entire show (on the right). Both measurements are in minutes:seconds.hundredths-of-seconds:
Time Zoom Slider
The Time Zoom Slider fulfills a number of functions. It represents the portion of the show that’s displayed
on the Timeline, it lets you quickly move to a different part of your show, and it lets you zoom in and out.
The track that the zoom slider sits on represents the duration of your entire show. The zoom slider itself
maps to the portion that’s currently displayed in the Timeline:
Playhead location Show duration

Working With the Timeline FINALE Fireworks User Guide
PAGE 29
You can move the Time Zoom Slider by grabbing anywhere along the middle portion and dragging. This is a
great way to quickly jump to a different part of your show. Notice that when you drag, the Playhead “sticks”
to one edge or the other—the Playhead can’t scroll out of view:
A particularly welcome feature of the Time Zoom Slider is that it’s resizable. Resizing the Slider is a
convenient way to expand and contract the Timeline. As opposed to the zoom buttons, which zoom in and
out in discrete steps, the Time Zoom Slider is continuous, letting you quickly zoom into exactly the portion of
your show that you want to examine.
For example, let’s say you want to see the eight-second slice of your show that starts at exactly 90 seconds in.
First, you drag the Time Zoom Slider so the section is in view:
Next, you drag the Slider’s left thumb to the right until the 1:30 mark is at the left edge of the Timeline. (Note
that contracting the slider zooms in; expanding it zooms out):
Now drag the right thumb to the left:
With just three quick mouse moves, you’ve zoomed into the part of the show that you’re interested in.

Working With the Timeline FINALE Fireworks User Guide
PAGE 30
Changing the Duration of Your Show
By default, all shows are two minutes long. To change the duration, select the Edit > Set show duration option.
The Set show duration window will open. Type in the new duration, in seconds, and click Set:
When you increase the duration, a blank portion is added to the end of the show. If you want to add time to
the beginning of the show, increase the show’s length, select all of the fireworks, click on a firework blip on
the Timeline, and drag to the right.
Be aware that the undo command (Edit > Undo or CONTROL-Z) doesn’t apply to modifications to the show’s
duration.

PAGE 31
7 Changing Backgrounds
You set your show’s background image by selecting an image from the Background menu. If you want to add
an image of your own, select Background > Add new background and browsing to an image file. The file must
be in this format:
5x3 ratio, width to height. (The images that are shipped with FINALE Fireworks are 1667 x1000 pixels).
Your image will be scaled to fit the Sky Field, so it can be as small or as large as you like.
JPEG format.
When you add your own background, the image is copied into the backgrounds/user directory in the
FINALE Fireworks installation directory, and the name of the image is added to the Background menu. Keep
in mind that the image that you see in the program is a copy of the file that you added. If you make changes
to the original file, you have to re-add the image and then restart the program.
If you want to delete an image from the Background list, remove it from the backgrounds/user directory.

PAGE 32
8 Saving, Opening, and Exporting
your Show
To save your show, go to the File menu and select an option:
Save. This will upload your show to the FINALE Fireworks website where it can be viewed by other
FINALE users. The show will be rendered as a high-resolution movie and added to the website’s Show
page. It takes about an hour to complete the rendering, so you won’t see it on the Show page immediately.
When you select Save, you’re asked to give your show a name.
Save to disk. This saves your show to your local disk as an “HBS” file. The file contains everything
FINALE needs to reconstruct your show—firework placements, background image name, soundfile
name, and so on. The file is text-based; if you’re intrepid, you can modify your show directly by editing
the file. Note, however, that the HBS format isn’t currently documented, and you can easily corrupt the
file so that FINALE won’t be able to load it.
Save as to disk…. This is the same as the above, but lets you save the show as a new HBS file.
The File menu’s show-opening options are:
Open. When you select Open, FINALE opens a panel that lists the shows that you’ve uploaded to the
FINALE website. Note that it only lists your own shows—you can’t open shows that were created by
other FINALE users.
Open from disk… lets you browse to and open a previously-saved HBS file.
The rest of the File items are meant for real-world designers:
Print Inventory Report creates a printable list of the fireworks that you’re using in your show.
Print Loading Report creates a printable mapping of fireworks-to-launch positions, and the mapping
between launch positions and modules/pins.
Print Firing Report creates a printable version of the firing script. It lists your fireworks in chronological
order, along with their firing times and launch position information.
The Export …Script options create firing scripts in various industry-standard formats.

PAGE 33
9 Real-World Show Design
This chapter proposes a workflow for real-world show design and looks at the advanced aspects of FINALE
that let you (the real-world designer) create and export the reports and scripts that you’ll use in the field.
We’ve already looked at some of the FINALE tools that can be an aid to real-world design—launch
positions, in particular. In this chapter, we’ll show you how to assign firing modules (including devices with
slats) to launch positions, how to use the Firing View to view the module and pin assignments of individual
fireworks, and how to export the reports that FINALE will generate for you.
Real-World Workflow
If you’re a real-world designer, your work in FINALE will probably follow this workflow.
1 Add launch positions. Define and name a set of launch positions.
2 Assign modules or slats. Assign one or more firing modules or slats to each of the launch positions.
3 Add fireworks. Add fireworks to the launch positions.
4 Assign module addresses and firing pins. Modify the fireworks’ modules and pin assignments by using the
Firing View.
5 Export your show. Save your show and export it as a set of reports and a firing script.
FINALE can automate some of this work for you. Specifically, it can create and assign modules and firing
pins automatically. Whether you take advantage of this automation depends, primarily, on your resources. If
the number of modules that you can use isn’t an issue, and if all of the modules are the same type, then you
can let FINALE automate all (or much) of the process for you. If your resources are limited, if your modules
are of different types (different numbers of firing pins, specifically), of if you want to split modules across
launch points, then you may need to create assignments by hand.
The next few sections will concentrate on the second and fourth steps outlined above. We’ll assume that
you’ve already added launch positions to your show, a subject that we’ve already discussed. (To review, you
add a launch position by choosing the Edit > Add launch position menu item.)

Real-World Show Design FINALE Fireworks User Guide
PAGE 34
Assigning Modules to Launch Positions
To configure a launch position’s attributes, right-click or double-click on the launch position marker. This will
bring up the Edit position properties panel:
The Name is provided as a convenience and is reproduced in some of the reports.
Distance from audience sets the location of the launch position. As you increase the distance, the launch
position is pushed away from the audience. In the Sky Field, the launch position will get smaller and “rise up”
towards the horizon in a simulation of its real-world location. The fireworks that you add to a more distant
launch position will appear smaller—or farther away—than those that are added to a closer launch position
The most important control is Add module or slat. You can either add modules/slats to the launch position
yourself or let FINALE add them for you. When FINALE adds a module, it creates a generic module with
these characteristics:
Module type: “Generic32”. The type is the name of the device, used both as a convenience for the user in
the printed reports and as information to FINALE so consideration can be made for the specific features
or constraints of different types of modules. For example, the type “m156” tells FINALE that you’re
using an ATF m156. In this case, FINALE will adjust its assignment algorithm (and possibly move
fireworks in time) to accommodate the characteristics of the m156 module. We’ll discuss the details, later;
the point, here, is that if you’re using an ATF m156, you may want to add a module if only to assign the
proper type.
Address: Starts with 1 and increases monotonically as more modules are needed.
First pin #: Starts with 1 and increases until the No. of pins has been reached.
No. of pins: 32
Launches/pin: 1. This attribute lets you declare the number of e-matches that are assigned to each pin, thus
letting you economize your pin assignments. If you set the value to be greater than 1, FINALE will
automatically assign simultaneous fireworks to the same pin until the Launches/pin setting is reached.

Real-World Show Design FINALE Fireworks User Guide
PAGE 35
If these characteristics match your system, then you can let FINALE automate everything for you—you don’t
need to add a module/slat to the launch position. However, if you need to modify the settings, click the Add
module or slat link. This will add a new entry to the table in the middle of the panel:
By adding a single module, you can re-define the default settings that FINALE will use when it creates new
modules and makes pin assignments. If you’re using different types of modules at the same launch point, add
and define more modules as needed. If you assign more fireworks to the launch point then are
accommodated by the modules you’ve added, FINALE will automatically create modules that match the
characteristics of the last module in the list, and will set the module’s address to the first available address
value.
Bear in mind that if you want to be able to assign module addresses and firing pins to specific fireworks, you
must provide an address in the form, above.
There are a lot more details to FINALE’s assignment algorithm that you should understand, but first we’ll
look at some examples that introduces the basic concepts, and also introduce the Firework View.

Real-World Show Design FINALE Fireworks User Guide
PAGE 36
Full Automation
In this example, we’ll add two launch positions, PositionA and PositionB. Both launch positions use the
FINALE default module (no slats, 32 pins, one launch per pin, etc). We add 36 fireworks to each position (in
order to get over the 32 pin limit), but in three groups each, as illustrated below:
The modules and firing pins assignments are listed in the Firing View. To bring up the view, choose File > Firing
View (or type CONTROL-F):
The columns in the view should be reasonably self-explanatory (PFT means “prefire time”). We’ve scrolled
forward to the point in the show between the first 16 fireworks at PosA and the first of PosB. Notice that the
module addresses jump from 1 to 3 between the two modules.
If we scroll much farther forward, to the juncture between “16 more” at PosB and the “Final 4” at PosA,
we’ll see that address 2 was assigned to the second module in PosA:
16 at PosA
16 at PosB 16 more at PosA
16 more at PosB
Final 4 at PosA
Final 4 at PosB
Real-World Show Design FINALE Fireworks User Guide
PAGE 37
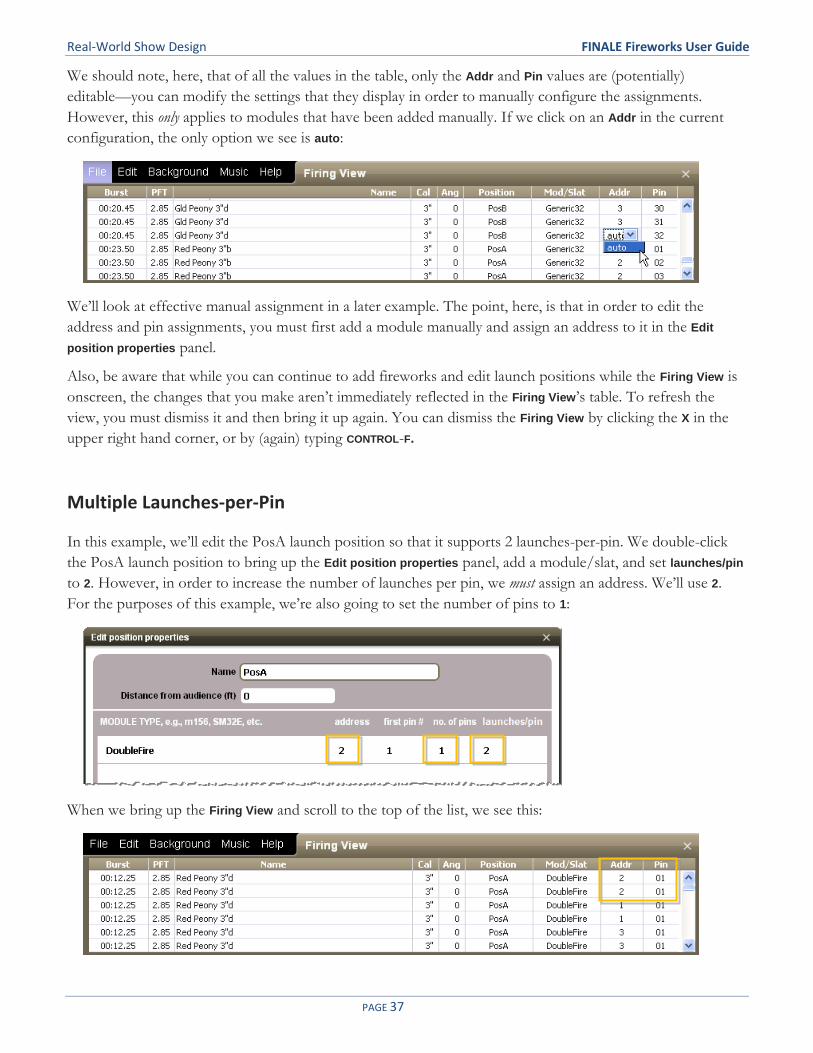
We should note, here, that of all the values in the table, only the Addr and Pin values are (potentially)
editable—you can modify the settings that they display in order to manually configure the assignments.
However, this only applies to modules that have been added manually. If we click on an Addr in the current
configuration, the only option we see is auto:
We’ll look at effective manual assignment in a later example. The point, here, is that in order to edit the
address and pin assignments, you must first add a module manually and assign an address to it in the Edit
position properties panel.
Also, be aware that while you can continue to add fireworks and edit launch positions while the Firing View is
onscreen, the changes that you make aren’t immediately reflected in the Firing View’s table. To refresh the
view, you must dismiss it and then bring it up again. You can dismiss the Firing View by clicking the X in the
upper right hand corner, or by (again) typing CONTROL-F.
Multiple Launches-per-Pin
In this example, we’ll edit the PosA launch position so that it supports 2 launches-per-pin. We double-click
the PosA launch position to bring up the Edit position properties panel, add a module/slat, and set launches/pin
to 2. However, in order to increase the number of launches per pin, we must assign an address. We’ll use 2.
For the purposes of this example, we’re also going to set the number of pins to 1:
When we bring up the Firing View and scroll to the top of the list, we see this:

Real-World Show Design FINALE Fireworks User Guide
PAGE 38
Even though the module only has one pin, two fireworks are assigned to each module (and to the same pin),
as we wanted. Also, notice that while the address of the first module is 2, the address of the next module
(which is added automatically) is 1. As mentioned earlier, when FINALE assigns module addresses
automatically, it picks the first available address—and since address 1 wasn’t used, that’s the address it chose.
Using Slats
To add a module that contains slats, double-click a launch position to bring up the Edit position properties
panel, click the Add module or slat link, and construct the address so that it contains a number and a letter.
(For this example we’ve set the number of pins to 2 and the launches-per-pin to 1):
When you use the “numberLetter” address format, FINALE knows that you’re using slats. As you exhaust
the pins on one slat, FINALE creates another for you, incrementing the letter portion of the address:
FINALE will automatically create 12 slats, with addresses that run from a to l.
Splitting Modules Across Launch Positions
So far, we’ve assigned all the launches from a module to a single launch position. But
let’s say that you want a single module to control two groups of fireworks that are
assigned to different launch positions. The first group is set of 16 fountains that are
launched 200 feet from the audience—this is the main launch position. You then run
scab wire to a second group of three large, important peonies that are launched 100
feet farther back and to the right. In the field, the setup looks like this:
To simulate this in FINALE, you create two launch positions (Main and Accent) and add the fireworks:

Real-World Show Design FINALE Fireworks User Guide
PAGE 39
For both launch positions, bring up the Edit position properties panel and add a module with the same address
(we’ll use 1):
By assigning the same address, you tell FINALE that the two launch positions are using the same module.
Bring up the Firing View and scroll to the Accent fireworks:

Real-World Show Design FINALE Fireworks User Guide
PAGE 40
Because the Accent fireworks appear later than the Main
fireworks, FINALE has automatically assigned pins 17-
19 to them. But let’s say that you want them to be on
pins 1-3. To change the assignments, click on the pin
number and select another value:
When you’re finished, the assignments look like this:
Notice that the Accent information is presented in
bold. This means that the assignments have been
manually configured. FINALE won’t alter settings
that have been manually configured. Also notice that
the pin assignments for Main have been bumped
up—that’s because pins 1, 2, and 3 are no longer
available for automatic assignment.
The Firing View
We just saw an example of how to use the Firing View to change a pin assignment. In this section, we’ll take a
closer look at the Firing View UI and functionality. But, first, a general principle:
You can move your fireworks and edit launch positions while the Firing View is onscreen. However, the
changes that you make won’t be immediately reflected in the Firing View list. Whenever you make a change
to a firework or launch position, you should close the Firing View and then re-open it (by typing CONTROL-F
twice).
Real-World Show Design FINALE Fireworks User Guide
PAGE 41
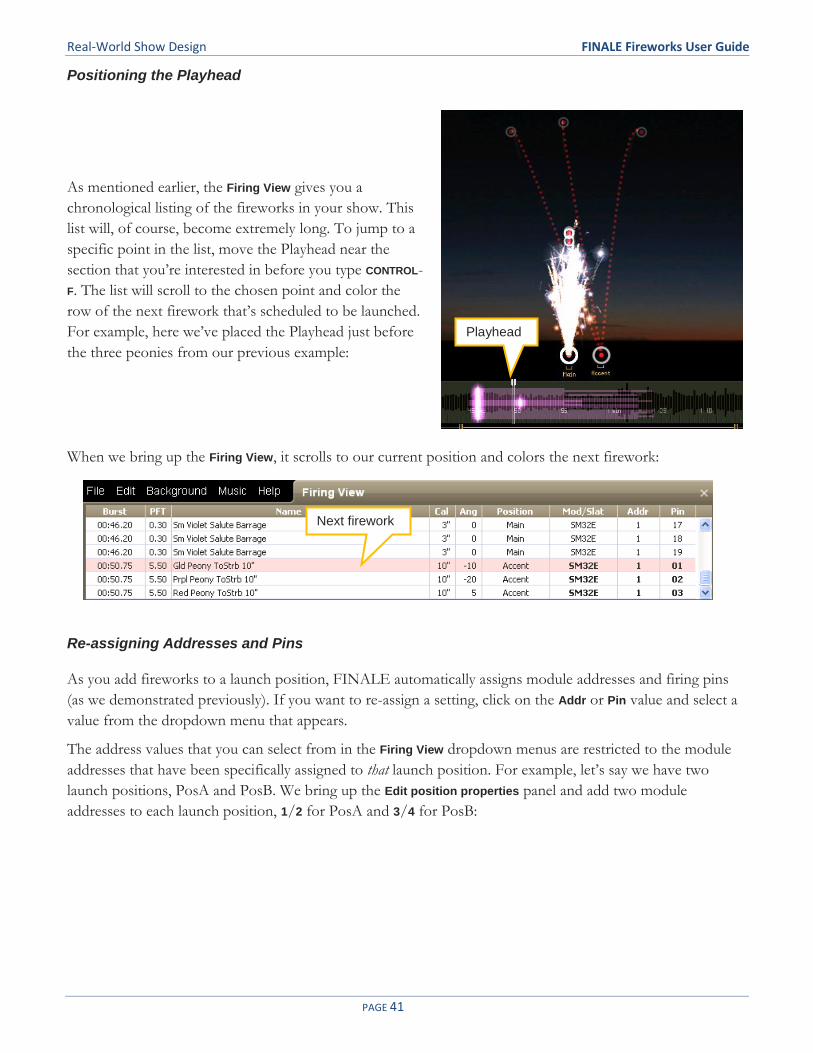
Positioning the Playhead
As mentioned earlier, the Firing View gives you a
chronological listing of the fireworks in your show. This
list will, of course, become extremely long. To jump to a
specific point in the list, move the Playhead near the
section that you’re interested in before you type CONTROL-
F. The list will scroll to the chosen point and color the
row of the next firework that’s scheduled to be launched.
For example, here we’ve placed the Playhead just before
the three peonies from our previous example:
When we bring up the Firing View, it scrolls to our current position and colors the next firework:
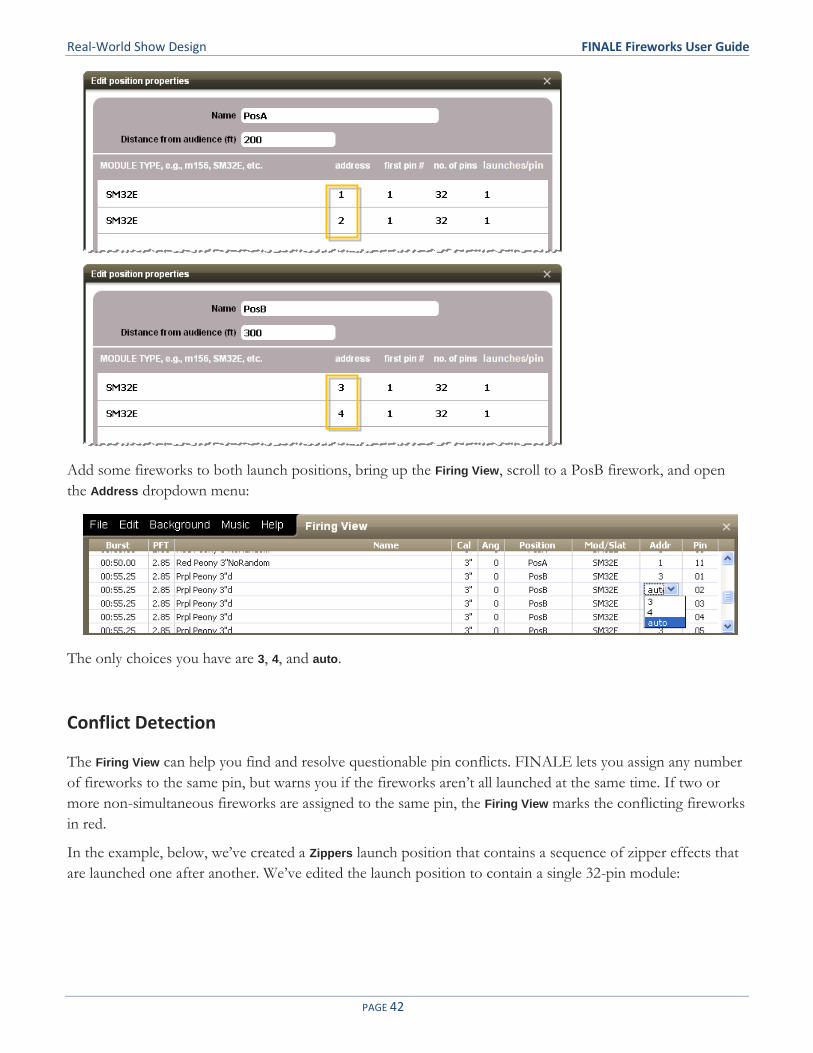
Re-assigning Addresses and Pins
As you add fireworks to a launch position, FINALE automatically assigns module addresses and firing pins
(as we demonstrated previously). If you want to re-assign a setting, click on the Addr or Pin value and select a
value from the dropdown menu that appears.
The address values that you can select from in the Firing View dropdown menus are restricted to the module
addresses that have been specifically assigned to that launch position. For example, let’s say we have two
launch positions, PosA and PosB. We bring up the Edit position properties panel and add two module
addresses to each launch position, 1/2 for PosA and 3/4 for PosB:
Playhead
Next firework
Real-World Show Design FINALE Fireworks User Guide
PAGE 42
Add some fireworks to both launch positions, bring up the Firing View, scroll to a PosB firework, and open
the Address dropdown menu:
The only choices you have are 3, 4, and auto.
Conflict Detection
The Firing View can help you find and resolve questionable pin conflicts. FINALE lets you assign any number
of fireworks to the same pin, but warns you if the fireworks aren’t all launched at the same time. If two or
more non-simultaneous fireworks are assigned to the same pin, the Firing View marks the conflicting fireworks
in red.
In the example, below, we’ve created a Zippers launch position that contains a sequence of zipper effects that
are launched one after another. We’ve edited the launch position to contain a single 32-pin module:

Real-World Show Design FINALE Fireworks User Guide
PAGE 43
We add the zippers, bring up the Firing View, and set the pin number of the first firework to 1. The font
changes to bold to show that the value has been manually set:
Now we set the pin for a later firework to 1, as well. Because the two fireworks aren’t launched at the same
time, FINALE detects a conflict and marks the second assignment in red:
FINALE doesn’t try to correct this sort of conflict for you, it just points them out. By scanning the Firing
View, you can easily see (and correct, if necessary) your module’s pin conflicts.

PAGE 44
10 Creating Your Own Fireworks
There are two ways to create a new firework in FINALE: By editing a single firework in order to create a new
effect, by selecting a group of fireworks and saving them as a cake. This chapter looks at both methods of
firework creation. The following chapters look at the tabs in the Firework Editor.
Editing a Firework
To create a new firework effect, you select an existing firework from the Inventory, add it to the scene, and
then double-click it to bring up the Firework Editor. The Firework Editor contains a set of sliders, menus, and
other controls that let you modify the attributes of the firework—there’s no programming or file editing
involved.
N O T E If you’re going to edit a firework, you shouldn’t modify its height or angle by dragging its target
point in the Sky Field. Any hand-modifications that you make will be ignored when you save your
new creation.
To get started, select an
existing firework that’s
similar to the one you want
to create and add it to the
scene by clicking its icon.
When you add the firework,
it will automatically become
selected.Here, we’ve
selected the Red Ext Tail
Comet 6”
Double-click anywhere
along the firework’s
outlined path or click the
Edit button that will appear
onscreen to open the
Firework Editor.
The Firework Editor will appear at the top of the window:
1. Click to add
…or click the Edit button
2. Double-click the selected firework…

Creating Your Own Fireworks FINALE Fireworks User Guide
PAGE 45
As long as the Firework Editor is open, the firework will remain selected (although it might not to appear to
be). You won’t be able modify the firework by hand, nor can you select another firework, but the Timeline
and Playhead are still “live”. As you’re editing your firework, you’ll be able to play your show
You use the controls in the Firework Editor tabs to
modify the firework. (You’ll need to use the slider at
the bottom of the menu to reach all of the tabs.) The
changes that you make are immediately applied to the
selected firework. Here, we’ve increased the size of
the comet’s shell and added some “sparkle”. We’ve
also moved the Playhead forward so we can get a
better view of the changes we’re making:
To make the changes permanent and dismiss the
menu, click Apply. If you’re dissatisfied with what
you’ve done, click Cancel. All of the modifications
that you made will be forgotten.
Increase the size
Add some sparkle
Adjust the Playhead for better viewing

Creating Your Own Fireworks FINALE Fireworks User Guide
PAGE 46
Saving your Firework
After you’re finished with your modifications (and have clicked Apply), you’ll return to the normal view of
your scene. To save your creation, make sure the firework is still selected and choose
Edit > Save selected firework from the Main Menu. This will bring up the Save Firework panel:
If you’re editing a new firework, you should change the name so it doesn’t overwrite the original object.
The Public checkbox lets you share your firework with other FINALE users. Leave it unchecked if you
want to keep the firework to yourself.
The image below the Public checkbox is the icon that will be used to display the firework in the Inventory.
FINALE makes a best guess at creating the icon, but you may need to use the Snapshot delay and Zoom
sliders to adjust it.

Creating Your Own Fireworks FINALE Fireworks User Guide
PAGE 47
When you’re ready to publish your firework, click SAVE. Your firework will be added to your local Inventory
and uploaded to the FINALE Website. If the save is successful, you’ll see this message:
The panel will disappear after a few seconds, or you can dismiss it by clicking the close button.
If you tried to save a firework without changing its name, you’ll see this:
This isn’t necessarily an error. You’ll see this message if you’re making iterative changes to your own
fireworks; in this case, click UPDATE. You’re not allowed to update the standard fireworks or those created by
other users.
To find your firework in the Inventory, select My private fireworks from the first pulldown menu (make sure
you’re in the correct category, and have selected the proper caliber):
Creating a Cake
A cake combines any number of other fireworks into a single effect. The individual fireworks that you add to
a cake can include the fireworks that you’ve edited, and can come from any of the firework categories—you
can even create a cake by combining other cakes.
An important difference between editing a firework and creating a cake is that you are allowed to hand-modify
the heights and angles of the individual fireworks that comprise the cake. The modifications that you’ve made
will become part of the cake’s definition.

Creating Your Own Fireworks FINALE Fireworks User Guide
PAGE 48
To get started, add some number of
fireworks to the scene. Here, we’ve added a
mine, two comets, and two fountains.
We’ve also adjust the angles of the
fountains and comets so they’re
symmetrically distributed around the mine.
Next, shift-click to select all of the
fireworks, and then choose Edit > Save
selected fireworks as cake. You’ll see the
same Save Firework panel that we described
earlier. Give your cake a name, make it
public (or not), adjust the snapshot, and
click SAVE.
The original fireworks that you used to
create the cake don’t become a cake,
themselves—they remain as separate
fireworks.
To find the cake you created and add an
instance of it to the show, go to the Cake
category of your inventory and look in the
My private fireworks section.
As mentioned above, a cake is treated as a single effect. When you modify a cake’s launch position or its
placement on the timeline, all of the fireworks that make up the cake move together. However, you can’t
change a cake’s height or its angle.
You can “break apart” a cake, and thus turn it back into individual fireworks, by selecting the cake and then
choosing the Edit > Break apart cake menu item.

Creating Your Own Fireworks FINALE Fireworks User Guide
PAGE 49
Managing your Personal Inventory
If you want to delete a firework that you’ve created, go to Edit > Manage personal inventory:
This will bring up the Personal Inventory panel:
The panel lists all the fireworks that you’ve saved (both individual fireworks and cakes). To delete a firework,
click the delete button at the far right. When you’ve finished, click Done.

PAGE 50
11 Common Tabs
This chapter lists the tabs that are common (or nearly so) to all fireworks.
Firework
The Firework tab sets some basic attributes of your firework.
Name Attribute
Name Text
The name of the firework as it’s displayed to the user. The name mustn’t contain accented characters or any
other formatting. The text field only accepts simple ASCII characters; non-ASCII characters are removed
from the text that you supply.
Category Menu
The category in which the firework will be listed in the FINALE application. You should rarely need to
change a firework’s category. The choice you make won’t affect the firework’s appearance; for example, if
you’re editing a mine, setting the Category to Fountain won’t turn your design into a fountain. The firework
isn’t placed in the selected category until you publish it through the Edit > Save selected firework. If you
change the Category setting for an existing firework (and Save), the firework is removed from its current
category and moved to the new one.
Caliber Menu
N O T E Fountains don’t have a Caliber control. Instead, they have a Duration. This is explained in the
Fountain chapter.
The caliber of the launching device. The menu provides options that let you choose from among a dozen
industry-standard sizes, from 1 inch to 10 inches.
The caliber affects almost all aspects of a firework—it’s size, velocity, and duration, and so on. It also
indirectly influences the velocity of the stars that a shell produces.

Common Tabs FINALE Fireworks User Guide
PAGE 51
Name Attribute
Prefire Slider (seconds)
Prefire is the delay between the time a firework is launched and the time that it “reveals itself”. What this
means depends on the type of firework:
Non-shells (mines, comets, fountains, and candles) reveal themselves almost immediately, so their prefire
durations are extremely short (0.3 seconds by default). For these fireworks, the Prefire setting places the
“blip” on the Timeline, but it doesn’t affect the firework itself. For example, if you increase the Prefire value,
the blip will move to the right, but the firework itself won’t look any different. You should rarely need to
change the Prefire value for a non-shell.
For a shell, the Prefire setting also sets the Timeline blip; in addition, it sets the amount of time between the
shell’s launch and its burst. The greater the Prefire value, the farther the shell will travel before it bursts. If
you set the value to 0.0 (for a shell), FINALE computes the prefire duration for you based on the shell’s
caliber.

Common Tabs FINALE Fireworks User Guide
PAGE 52
Field notes
The Field notes tab lets you add a description, explanation, instruction or any other arbitrary text to your
firework. Provided primarily for the pro, the notes that you supply will appear in the reports that you
generate.
Name Attribute
Notes Text
Arbitrary text that’s added to the firework. The text can be of any length, but may only contain normal
ASCII characters—it can’t contain accents or other special characters. Non-ASCII characters are removed
from the text.

PAGE 53
12 Peony
A peony is a shell that bursts into a spherical set of stars and pistils. The stars can have two layers of
pyrotechnic material. After a star burns through its first layer, it transitions into a second effect.

Peony FINALE Fireworks User Guide
PAGE 54
Launch
The Launch tab defines the attributes of the shell’s launch.
Name Attribute
Cone angle Slider (degrees)
A shell’s cone angle is the angle across which successive launches are randomly distributed. The center of the
angle is straight up. As you increase the cone angle value, the cone widens symmetrically around the center.
N O T E The adjustments that you make to the cone angle won’t affect the firework that you’re currently
editing. The setting is applied after you’ve saved your firework and added a new instance to the
scene.
Cone height Slider (scaler; 1.0 = natural height)
By default, the height (or distance) of a shell’s trajectory is determined by the velocity with which it’s
launched, and velocity is directly related to the mortar’s caliber (and some other physical properties).
The Cone height slider lets you adjust the shell’s velocity (and so its height). If you set the slider to 1.0, you
get the velocity/height that’s determined by the caliber. Values greater than 1.0 produce greater heights, as
much as twice as high as the natural caliber height. Values less than 1.0 reduce the height. If you set the
value to 0.0, the firework won’t lift off at all.
Keep in mind that you’re increasing and decreasing the shell’s velocity. The duration of its trajectory will be
the same regardless of this slider’s value. Thus, you can adjust the cone height without invalidating the
shell’s prefire setting.
Randomness Slider (Fraction; only affects new fireworks)
The velocity with which a shell is launched is set naturally by its caliber. The Randomness slider lets you add
some randomness to the velocity. As you increase the slider’s value, the range of velocities widens, but
they’re always less than the natural velocity that’s set by the shell’s caliber. For example, let’s say you’re
creating firework that launches a shell with an initial velocity of 400 ft/sec. If you set the Randomness to
0.00, the shells will always emerge with (nearly) the same initial velocity (400 ft/sec). A value of 0.5 means
shell could emerge with an initial velocity that’s anywhere between 200 and 400 ft/sec.

Peony FINALE Fireworks User Guide
PAGE 55
Shell tail
A shell’s tail is the trail of glowing particles that it leaves behind after it’s launched and that lasts until it bursts.
You make the tail visible by setting the Tail effect, below, to something other than No tail. You can then set the
tail’s color through the other control.
Name Attribute
Tail effect Menu
Lets you choose the type of tail you want the shell to display:
No tail. Use this effect to turn off the tail.
Thin. The particles are equally-spaced along the trajectory, and are of the same brightness and duration
(although with some randomness thrown in). The particles stay fairly close to the path of the trajectory.
Thick. This is the same as Thin but there are more particles, and they trace a wider path.
Color Color picker
Sets the tail’s color.

Peony FINALE Fireworks User Guide
PAGE 56
Shell burst
The Shell burst controls set some basic attributes of the stars that emerge when the shell bursts (or “breaks”).
Name Attribute
No. of Stars Slider (Count)
Sets the number of stars that each shell contains. When the shell bursts, the stars are thrown in random
directions away from the shell, creating a peony effect. If you set No. of stars to 0, the shell won’t throw any
stars. The stars’ attributes (color, weight, sound, and so on) are set through the various Star tabs.
Burst force Slider (Scaler; 1.0 = natural size)
Sets the power with which the stars break from the shell. 1.0 is the shell’s natural burst power, based on the
caliber of the shell and other physical properties. Other values are applied as scalers on the natural power:
0.5 means the stars are thrown half has hard; 2.0 means they’re thrown twice as hard. A setting of 0.0 means
that there’s virtually no power—the stars fall out of the break with very little outward momentum.
Note that the Burst force setting affects the sound volume of the report. If you want to create a weak shell
with a loud report, you have to increase the Report > Loudness setting.
No. of Pistils Slider (Count)
Pistil burst force Slider (Scaler; 1.0 = natural size)
These two controls are similar to the first two, but are applied to the shell’s pistils. A pistil creates a trail
effect that’s similar to a star’s tail; however, pistils are independent of stars. When the shell bursts, the pistils
are thrown in random directions away from the shell, creating the “spokes” in a peony effect. The pistil’s
other attributes are set in the various Pistil tabs.

Peony FINALE Fireworks User Guide
PAGE 57
Shell burst sound
The Shell burst sound controls let you select and modify the sound that’s played when the firework’s shell
finishes its trajectory (the sound is played even if the shell doesn’t actually burst).
Name Attribute
Sound Menu
The Sound menu gives you a choice of sounds that are played when the shell bursts. The names of the
sounds that you can choose from are self-descriptive: Whoosh, Pop, Thud shriek, and so on.
Volume Slider (Fraction)
Sets the amplitude of the sound as a percentage of its unattenuated amplitude. A volume of 1.0 is
completely unattenuated; a volume of 0.0 is silent. The amplitude isn’t affected by the firework’s caliber or
the Shell burst > Burst force setting; for example, if you increase a firework’s caliber, the shell’s burst sound
doesn’t get louder.
Pitch shift Slider (-1.0 = one octave lower; 1.0 = one octave higher)
Shifts the pitch of the sound by as much as an octave lower (-1.0) to an octave higher (1.0). Pitch shifting is
effected by changing the playback speed of the soundfile. Shifting the sound lower will increase its duration;
shifting it higher will increase the duration.
Random pitch shift Slider (-1.0 = one octave lower; 1.0 = one octave higher)
Adds a random amount of pitch shift to the sound of each shell burst. You can declare a random pitch shift
from an octave lower to an octave higher than the pitch defined by the Pitch shift attribute. For example, if
you set Pitch shift to -0.5 (half an octave lower than the “natural” pitch of the sound) and set Random pitch
shift to 0.3, the pitch shift for a specific burst will be somewhere between -0.2 (a fifth of an octave below the
natural pitch) and -0.5 (a half an octave lower than natural).

Peony FINALE Fireworks User Guide
PAGE 58
Star
A star is created when particles of pyrotechnic composition material are ignited and emitted by a bursting
shell. The Star tab defines the basic attributes of a star, such as its duration and whether it’s accompanied by a
tip. A star’s force—but not its duration—is affected by the Shell burst > Burst force setting.
Name Attribute
Longevity Slider (Scaler; 1.0 = natural longevity)
Sets the amount of time between the star’s emergence from the bursting shell and the time that its
pyrotechnic material is exhausted. The slider value isn’t an amount of time in seconds: It’s a scaler on the
star’s natural duration, which is determined by its caliber, speed, and other factors. This natural duration is
represented by a value of 1.0. If you set the slider to 0.5, for example, the duration between the burst and
the time that the star is exhausted will be half as long as the natural duration. If you want to extend the
stars’ trajectories, increase the longevity value.
Abridgment Slider (Fraction)
Abridgment adds a bit of randomness to the star’s longevity. With a setting of 0.0, there’s no randomness—
all stars that burst from a shell last (approximately) the same amount of time (as set through the Longevity
slider). As you increase the Abridgment value, you reduce the duration range. For example, a setting of 0.5
means that a star may die out any time after half of its longevity has expired.
The Abrigment setting never increases a star’s duration so that it lasts longer than the Longevity setting—it can
only decrease it.
Tip effect Menu
Lets you choose the type of tip you want the star to display:
No tip. Turns off the tip.
Constant. All star tips appear together, last for the same amount of time, and burn with the same intensity.
Strobe. Some randomness is added to the initial appearances, durations, and intensities of the tips, creating a
strobe effect.

Peony FINALE Fireworks User Guide
PAGE 59
Star body
The Star body controls let you fine-tune a star’s mass so that it’s more or less susceptible to air friction,
gravity, and wind. These attributes only affect the stars’ trajectories; they don’t modify the size or appearance
of the stars.
Name Attribute
Weight Slider (Scaler; 1.0 = natural weight)
Sets the star’s weight. A value of 1.0 is the star’s “natural” weight. If you increase the value, the star
becomes heavier and is pulled back to Earth more quickly. Smaller values make the star lighter and so the
straight-outward portion of its trajectory is less affected by gravity.
Momentum Slider (Scaler; 1.0 = natural momentum loss)
As a star consumes its pyrotechnic material, it loses mass and momentum, and thus slows down and
becomes increasingly more susceptible to the effects of the wind and air friction. This attribute lets you set
the scale of the star’s ultimate momentum (the point at which it has exhausted its material) compared to its
burst momentum. A value of 1.0 produces a “natural” momentum loss. If you increase the value, the star
maintains more of its momentum over the course of its trajectory. If you decrease the value, the star loses
momentum more quickly.
Wind resistance Slider (Scaler; 1.0 = natural wind resistance)
Sets the star’s susceptibility to the wind and air friction. A value of 1.0 produces a slight, natural resistance.
Decreasing the slider’s value makes the star less affected by the wind, causing its trajectory to straighten and
elongate. Increasing the value increases the effect of the wind and air friction on the star, shortening its
trajectory and bending it in the direction of the wind.

Peony FINALE Fireworks User Guide
PAGE 60
Star tip
The tip of a star is its leading edge as it burst from a shell. The tip can begin “glowing” as soon as the star
emerges and can continue through the star’s duration. You make the tip visible by setting the Star > Tip effect
to something other than No tip. You then set the tip’s other attributes through the controls in this tab.
Name Attribute
Color Color picker
Sets the tip’s color.
Second color Color picker
If you set the star’s second color, half of the stars will be painted with the main color (the Color setting) and
the other half will be painted with the second color. The colors are randomly distributed amongst the stars.
Not all palms have a Second color control.
Size Slider (Scaler)
Sets the magnitude of the tip’s glow. Unlike a shell tip, a star tip doesn’t have a “natural” size that’s based
on the Fireworks > Caliber setting. As you select larger or smaller caliber settings, you’ may want to increase
or decrease the value of this attribute.

Peony FINALE Fireworks User Guide
PAGE 61
Star transition
After a star has exhausted a layer of its pyrotechnic material, it can transition into a second layer of material
that can create an effect that’s different from the first. This second effect displays tips but not tails.
Name Attribute
Tip effect Menu
Lets you choose the type of tip you want the transition effect to display:
No tip. Turns off the tip.
Constant. All tips appear together, last for the same amount of time, and burn with the same intensity.
Strobe. Some randomness is added to the initial appearances, durations, and intensities of the tips, creating a
strobe effect.
Delay Slider (Seconds)
Sets the amount of time, in seconds, that the transition effect appears after the original effect has burned
through its pyrotechnic material.
Longevity Slider (Scaler; 1.0 = natural longevity)
Sets the amount of time between the transition effect’s initial appearance and the time that its pyrotechnic
material is exhausted. The slider value isn’t an amount of time in seconds: It’s a scaler on the effect’s natural
duration, which is determined by its caliber, speed, and other factors. This natural duration is represented by
a value of 1.0. If you set the slider to 0.5, for example, the duration will be half as long as the natural
duration. If you want to extend the trajectories, increase the longevity value.

Peony FINALE Fireworks User Guide
PAGE 62
Transition tip
The Transition tip tab sets the color and size of the tips that are displayed by the transition effect.
Name Attribute
Color Color picker
Sets the tip’s color.
Size Slider (Scaler)
Sets the magnitude of the tip’s glow. The tip doesn’t have a “natural” size that’s based on the Fireworks >
Caliber setting. As you select larger or smaller caliber settings, you may want to increase or decrease the
value of this attribute.
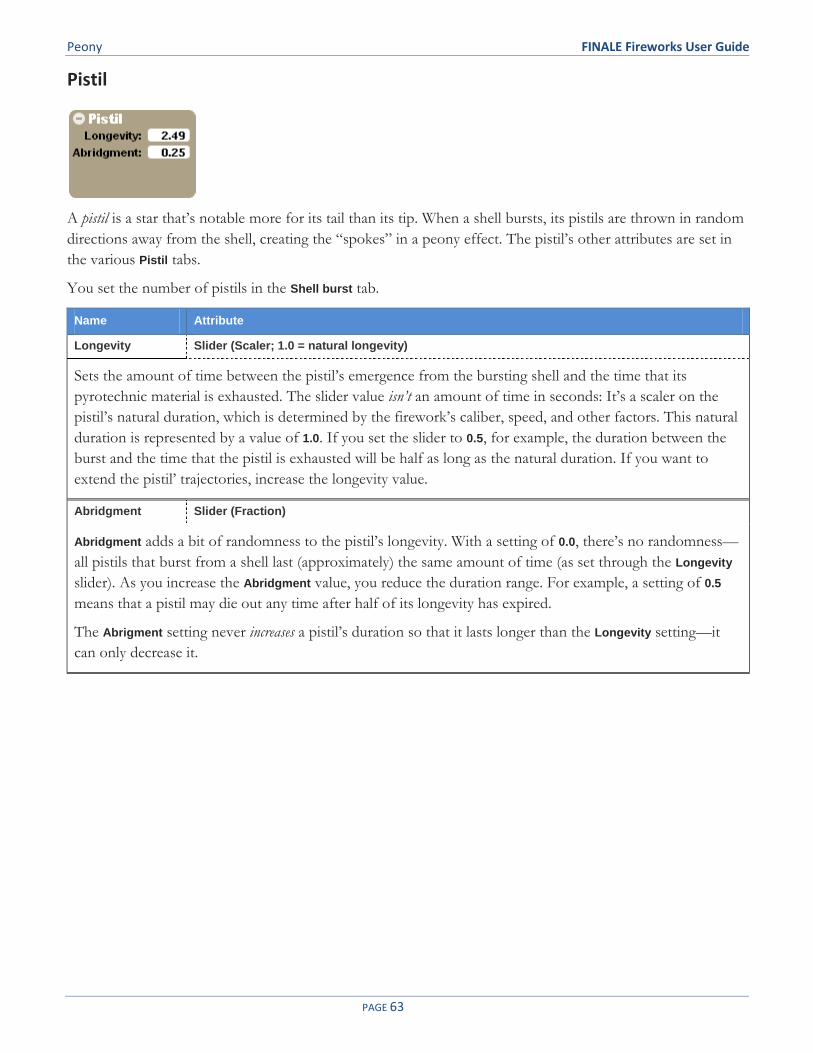
Peony FINALE Fireworks User Guide
PAGE 63
Pistil
A pistil is a star that’s notable more for its tail than its tip. When a shell bursts, its pistils are thrown in random
directions away from the shell, creating the “spokes” in a peony effect. The pistil’s other attributes are set in
the various Pistil tabs.
You set the number of pistils in the Shell burst tab.
Name Attribute
Longevity Slider (Scaler; 1.0 = natural longevity)
Sets the amount of time between the pistil’s emergence from the bursting shell and the time that its
pyrotechnic material is exhausted. The slider value isn’t an amount of time in seconds: It’s a scaler on the
pistil’s natural duration, which is determined by the firework’s caliber, speed, and other factors. This natural
duration is represented by a value of 1.0. If you set the slider to 0.5, for example, the duration between the
burst and the time that the pistil is exhausted will be half as long as the natural duration. If you want to
extend the pistil’ trajectories, increase the longevity value.
Abridgment Slider (Fraction)
Abridgment adds a bit of randomness to the pistil’s longevity. With a setting of 0.0, there’s no randomness—
all pistils that burst from a shell last (approximately) the same amount of time (as set through the Longevity
slider). As you increase the Abridgment value, you reduce the duration range. For example, a setting of 0.5
means that a pistil may die out any time after half of its longevity has expired.
The Abrigment setting never increases a pistil’s duration so that it lasts longer than the Longevity setting—it
can only decrease it.

Peony FINALE Fireworks User Guide
PAGE 64
Pistil body
The Pistil body controls let you fine-tune a pistil’s mass so that it’s more or less susceptible to air friction,
gravity, and wind. These attributes only affect the pistil’ trajectories; they don’t modify the size or appearance
of the stars.
Name Attribute
Weight Slider (Scaler; 1.0 = natural weight)
Sets the weight of a single pistil. A value of 1.0 is the pistil’s “natural” weight. If you increase the value, the
pistil becomes heavier and is pulled back to Earth more quickly (it appears to droop). Smaller values make
the pistil lighter and so the straight-outward portion of its trajectory is less affected by gravity.
The Pistil tail tab also has a Weight attribute. The two Weight controls affect different aspects of the pistil’s
trajectory: This attribute affects the weight of the pistil’s star, bending its trajectory. The Weight controls in
the Pistil tail tab set the weight of the particles along the entire tail. When you increase the weight of this
attribute, you cause the stars to arc and then droop; when you increase the weight of the pistil’s tail, the
effect is that of “pulling down” the entire tail from the pistil’s initial burst point.
Momentum Slider (Scaler; 1.0 = natural momentum loss)
As a pistil consumes its pyrotechnic material, it loses mass and momentum, and thus slows down and
becomes increasingly more susceptible to the effects of the wind and air friction. This attribute lets you set
the scale of the pistil’s ultimate momentum (the point at which it has exhausted its material) compared to its
burst momentum. A value of 1.0 produces a “natural” momentum loss. If you increase the value, the pistil
maintains more of its momentum over the course of its trajectory. If you decrease the value, the pistil loses
momentum more quickly.
Wind resistance Slider (Scaler; 1.0 = natural wind resistance)
Sets the pistil’s susceptibility to the wind and air friction. A value of 1.0 produces a slight, natural resistance.
Decreasing the slider’s value makes the pistil less affected by the wind, causing its trajectory to straighten
and elongate. Increasing the value increases the effect of the wind and air friction on the pistil, shortening
its trajectory and bending it in the direction of the wind.

Peony FINALE Fireworks User Guide
PAGE 65
Pistil tail
This tab sets the attributes of the pistil’s tail. Additional pistil tail attributes are set through the Pistil glitter tab.
Name Attribute
Color Color picker
Sets the color of the pistil’s tail. (NOTE: The Bright: slider in the Color picker is ignored. The tail’s brightness
is set by the Brightness control.)
Brightness Slider (Scaler)
Controls the brightness of the tail’s color. Increasing the value of the slider causes the tail to become more
intense.
Weight Slider (Scaler; 1.0 = natural weight)
Sets the weight the individual particles in the pistil’s tail. A value of 1.0 is a particle’s “natural” weight (which
is very close to weightless). If you increase the value, the particles become heavier and are pulled back to
Earth, causing the entire tail to appear to be “pulled down” from its launch point. Smaller values make the
particles lighter and less affected by gravity.
The Pistil tab also has a Weight attribute. A discussion of the difference between the two weights is provided
in the Weight description in the Pistil tab.
Length Slider (Scaler; 1.0 = natural length)
Sets the longevity of the particles in the pistil’s tail (in other words, the amount of time before they’re
extinguished). By increasing or decreasing this value, you can cause more or less of the tail to be visible at a
given time.

Peony FINALE Fireworks User Guide
PAGE 66
Pistil glitter
A pistil’s tail can contain glitter. These are particles that have more of a shimmer when compared to the tail’s
normal particles.
Name Attribute
Brightness Slider (Scaler)
Controls the brightness of the tail’s glitter particles. Increasing the value of the slider causes the glitter to
become more intense.
Density Slider (Fraction; 0.0 = no glitter)
Adjusts the proportion of glitter compared to the tail’s normal particles. If you set the value to 0.0, you get
no glitter; if you set it to 1.0, all of the particles will glitter.

PAGE 67
13 Chrysanthemum, Kamuro,
Diadem, Brocade, Willow, and
Dahlia
The fireworks in this chapter are composed much like peonies: They’re shells that burst into stars (which can
transition into a second effect) and pistils.

Chrysanthemum, Kamuro, Diadem, Brocade, Willow, and Dahlia FINALE Fireworks User Guide
PAGE 68
Launch
The Launch tab defines the attributes of the shell’s launch. .
Name Attribute
Cone angle Slider (degrees)
A shell’s cone angle is the angle across which successive launches are randomly distributed. The center of the
angle is straight up. As you increase the cone angle value, the cone widens symmetrically around the center.
N O T E The adjustments that you make to the cone angle won’t affect on firework that you’re currently
editing. The setting is applied after you’ve saved your firework and added a new instance to the
scene.
Cone height Slider (scaler; 1.0 = natural height)
By default, the height (or distance) of a shell’s trajectory is determined by the velocity with which it’s
launched, and velocity is directly related to the mortar’s caliber (and some other physical properties).
The Cone height slider lets you adjust the shell’s velocity (and so its height). If you set the slider to 1.0, you
get the velocity/height that’s determined by the caliber. Values greater than 1.0 produce greater heights, as
much as twice as high as the natural caliber height. Values less than 1.0 reduce the height. If you set the
value to 0.0, the firework won’t lift off at all.
Keep in mind that you’re increasing and decreasing the shell’s velocity. The duration of its trajectory will be
the same regardless of this slider’s value. Thus, you can adjust the cone height without “invalidating” the
shell’s prefire setting.
Randomness Slider (Fraction; 0.0 = autocompute)
The velocity with which a shell is launched is set naturally by its caliber. The Randomness slider lets you add
some randomness to the velocity. As you increase the slider’s value, the range of velocities widens, but
they’re always less than the natural velocity that’s set by the shell’s caliber. For example, let’s say you’re
creating firework that launches a shell with an initial velocity of 400 ft/sec. If you set the Randomness to
0.01, the shells will always emerge with (nearly) the same initial velocity (400 ft/sec). If you set the value to
0.5, a shell could emerge with an initial velocity that’s somewhere between 200 and 400 ft/sec.
A value of 0.0 tells FINALE to select a physically reasonable—but fairly small—range of velocities.

Chrysanthemum, Kamuro, Diadem, Brocade, Willow, and Dahlia FINALE Fireworks User Guide
PAGE 69
Shell tail
A shell’s tail is the trail of glowing particles that it leaves behind after it’s launched and that lasts until it bursts.
You make the tail visible by setting the Tail effect, below, to something other than No tail. You can then set the
tail’s color through the other control.
Name Attribute
Tail effect Menu
Lets you choose the type of tail you want the shell to display:
No tail. Use this effect to turn off the tail.
Thin. The particles are equally-spaced along the trajectory, and are of the same brightness and duration
(although with some randomness thrown in). The particles stay fairly close to the path of the trajectory.
Thick. This is the same as Thin but there are more particles, and they trace a wider path.
Color Color picker
Sets the tail’s color.

Chrysanthemum, Kamuro, Diadem, Brocade, Willow, and Dahlia FINALE Fireworks User Guide
PAGE 70
Shell burst
The Shell burst controls set some basic attributes of the stars that emerge when the shell bursts (or “breaks”).
Name Attribute
No. of Stars Slider (Count)
Sets the number of stars that each shell contains. When the shell bursts, the stars are thrown in random
directions away from the shell, creating a peony effect. If you set No. of stars to 0, the shell won’t throw any
stars. The stars’ attributes (color, weight, sound, and so on) are set through the various Star tabs.
Burst force Slider (Scaler; 1.0 = natural size)
Sets the power with which the stars break from the shell. 1.0 is the shell’s natural burst power, based on the
caliber of the shell and other physical properties. Other values are applied as scalers on this natural power:
0.5 means the stars are thrown half has hard; 2.0 means they’re thrown twice as hard. A setting of 0.0 means
that there’s virtually no power—the stars fall out of the break with very little outward momentum.
Note that the Burst force setting affects the sound volume of the report. If you want to create a weak shell
with a loud report, you have to increase the Report > Loudness setting.
No. of Pistils Slider (Count)
Pistil burst force Slider (Scaler; 1.0 = natural size)
These two controls are similar to the first two, but are applied to the shell’s pistils. A pistil creates an effect
that’s similar to a star’s tail; however, pistils are independent of stars. When the shell bursts, the pistils are
thrown in random directions away from the shell, creating the “spokes” in a peony effect. The pistil’s other
attributes are set in the various Pistil tabs.

Chrysanthemum, Kamuro, Diadem, Brocade, Willow, and Dahlia FINALE Fireworks User Guide
PAGE 71
Shell burst sound
The Shell burst sound controls let you select and modify the sound that’s played when the firework’s shell
finishes its trajectory (the sound is played even if the shell doesn’t actually “burst”).
Name Attribute
Sound Menu
The Sound menu gives you a choice of sounds that are played when the shell bursts. The names of the
sounds that you can choose from are self-descriptive: Whoosh, Pop, Thud shriek, and so on.
Volume Slider (Fraction)
Sets the amplitude of the sound as a percentage of its “natural” amplitude. A volume of 1.0 is unattenuated;
a volume of 0.0 is silent. The amplitude isn’t affected by the firework’s caliber or the Shell burst > Burst force
setting; for example, if you increase a firework’s caliber, the shell’s burst sound doesn’t get louder.
Pitch shift Slider (-1.0 = one octave lower; 1.0 = one octave higher)
Shifts the pitch of the sound by as much as an octave lower (-1.0) to an octave higher (1.0). Pitch shifting is
effected by changing the playback speed of the soundfile. Shifting the sound lower will increase its duration;
shifting it higher will increase the duration.
Random pitch shift Slider (-1.0 = one octave lower; 1.0 = one octave higher)
Adds a random amount of pitch shift to the sound of each shell burst. You can declare a random pitch shift
from an octave lower to an octave higher than the pitch defined by the Pitch shift attribute. For example, if
you set Pitch shift to -0.5 (half an octave lower than the “natural” pitch of the sound) and set Random pitch
shift to 0.3, the pitch shift for a specific burst will be somewhere between -0.2 (a fifth of an octave below the
natural pitch) and -0.5 (a half an octave lower than natural).

Chrysanthemum, Kamuro, Diadem, Brocade, Willow, and Dahlia FINALE Fireworks User Guide
PAGE 72
Star
A star is created when particles of pyrotechnic composition material are ignited and emitted by a bursting
shell. The Star tab defines the basic attributes of a star. A star’s force—but not its duration—is affected by the
Shell burst > Burst force setting.
Name Attribute
Longevity Slider (Scaler; 1.0 = natural longevity)
Sets the amount of time between the star’s emergence from the bursting shell and the time that its
pyrotechnic material is exhausted. The slider value isn’t an amount of time in seconds: It’s a scaler on the
star’s natural duration, which is determined by its caliber, speed, and other factors. This natural duration is
represented by a value of 1.0. If you set the slider to 0.5, for example, the duration between the burst and
the time that the star is exhausted will be half as long as the natural duration. If you want to extend the
stars’ trajectories, increase the longevity value.
Abridgment Slider (Fraction)
Abridgment adds a bit of randomness to the star’s longevity. With a setting of 0.0, there’s no randomness—
all stars that burst from a shell last (approximately) the same amount of time (as set through the Longevity
slider). As you increase the Abridgment value, you reduce the duration range. For example, a setting of 0.5
means that a star may die out any time after half of its longevity has expired.
The Abrigment setting never increases a star’s duration so that it lasts longer than the Longevity setting—it can
only decrease it.
Tip effect Menu
Lets you choose the type of tip you want the star to display:
No tip. Turns off the tip.
Constant. All star tips appear together, last for the same amount of time, and burn with the same intensity.
Strobe. Some randomness is added to the initial appearances, durations, and intensities of the tips, creating a
strobe effect.
Only some of the diadems have a Tip effect slider. None of the other types in this chapter do.

Chrysanthemum, Kamuro, Diadem, Brocade, Willow, and Dahlia FINALE Fireworks User Guide
PAGE 73
Star body
The Star body controls let you fine-tune a star’s mass so that it’s more or less susceptible to air friction,
gravity, and wind. These attributes only affect the stars’ trajectories; they don’t modify the size or appearance
of the stars.
Name Attribute
Weight Slider (Scaler; 1.0 = natural weight)
Sets the star’s weight. A value of 1.0 is the star’s “natural” weight. If you increase the value, the star
becomes heavier and is pulled back to Earth more quickly. Smaller values make the star lighter and so the
straight-outward portion of its trajectory is less affected by gravity.
Momentum Slider (Scaler; 1.0 = natural momentum loss)
As a star consumes its pyrotechnic material, it loses mass and momentum, and thus slows down and
becomes increasingly more susceptible to the effects of the wind and air friction. This attribute lets you set
the scale of the star’s ultimate momentum (the point at which it has exhausted its material) compared to its
burst momentum. A value of 1.0 produces a “natural” momentum loss. If you increase the value, the star
maintains more of its momentum over the course of its trajectory. If you decrease the value, the star loses
momentum more quickly.
Wind resistance Slider (Scaler; 1.0 = natural wind resistance)
Sets the star’s susceptibility to the wind and air friction. A value of 1.0 produces a slight, natural resistance.
Decreasing the slider’s value makes the star less affected by the wind, causing its trajectory to straighten and
elongate. Increasing the value increases the effect of the wind and air friction on the star, shortening its
trajectory and bending it in the direction of the wind.

Chrysanthemum, Kamuro, Diadem, Brocade, Willow, and Dahlia FINALE Fireworks User Guide
PAGE 74
Star tip (some diadems, only)
The tip of a star is its leading edge as it burst from a shell. The tip can begin “glowing” as soon as the star
emerges and can continue through the star’s duration. You make the tip visible by setting the Star > Tip effect
to something other than No tip.
Only some of the diadems have Star tip tabs. None of the other types in this chapter do.
Name Attribute
Color Color picker
Sets the tip’s color.
Second color Color picker
If you set the star’s second color, half of the stars will be painted with the main color (the Color setting) and
the other half will be painted with the second color. The colors are randomly distributed amongst the stars.
Not all palms have a Second color control.
Size Slider (Scaler)
Sets the magnitude of the tip’s glow. Unlike a shell tip, a star tip doesn’t have a “natural” size that’s based
on the Fireworks > Caliber setting. As you select larger or smaller caliber settings, you’ may want to increase
or decrease the value of this attribute.

Chrysanthemum, Kamuro, Diadem, Brocade, Willow, and Dahlia FINALE Fireworks User Guide
PAGE 75
Star tail
A star’s tail is the trail of glowing particles that it leaves behind after it’s emerged from its shell, and lasting
until it dies.
Name Attribute
Color Color picker
Sets the tail’s color. (NOTE: The Bright: slider in the Color picker is ignored. The tail’s brightness is set by the
Brightness control.)
Brightness Slider (Scaler)
Controls the brightness of the tail’s particles. Increasing the value of the slider causes the tail to become
more intense.
Weight Slider (Scaler; 1.0 = natural weight)
Sets the weight the individual particles in the star’s tail. A value of 1.0 is a particle’s “natural” weight (which
is very close to weightless). If you increase the value, the particles become heavier and are pulled back to
Earth, causing the entire tail to appear to be “pulled down” from its launch point. Smaller values make the
particles lighter and less affected by gravity.
Length Slider (Scaler; 1.0 = natural length)
Sets the longevity of the particles in the star’s tail (in other words, the amount of time before they’re
extinguished). By increasing or decreasing this value, you can cause more or less of the tail to be visible at a
given time.
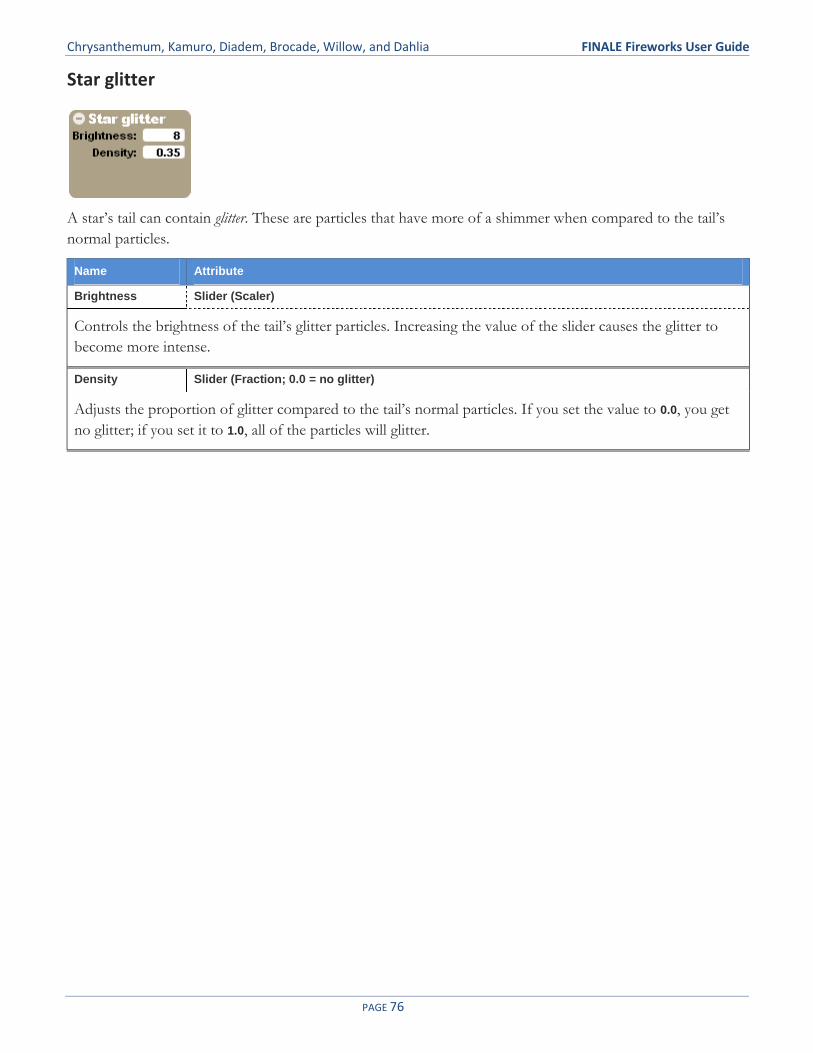
Chrysanthemum, Kamuro, Diadem, Brocade, Willow, and Dahlia FINALE Fireworks User Guide
PAGE 76
Star glitter
A star’s tail can contain glitter. These are particles that have more of a shimmer when compared to the tail’s
normal particles.
Name Attribute
Brightness Slider (Scaler)
Controls the brightness of the tail’s glitter particles. Increasing the value of the slider causes the glitter to
become more intense.
Density Slider (Fraction; 0.0 = no glitter)
Adjusts the proportion of glitter compared to the tail’s normal particles. If you set the value to 0.0, you get
no glitter; if you set it to 1.0, all of the particles will glitter.

Chrysanthemum, Kamuro, Diadem, Brocade, Willow, and Dahlia FINALE Fireworks User Guide
PAGE 77
Star transition
After a star has exhausted a layer of its pyrotechnic material, it can transition into a second layer of material
that can create an effect that’s different from the first. This second effect displays tips but not tails.
Name Attribute
Tip effect Menu
Lets you choose the type of tip you want the transition effect to display:
No tip. Turns off the tip.
Constant. All tips appear together, last for the same amount of time, and burn with the same intensity.
Strobe. Some randomness is added to the initial appearances, durations, and intensities of the tips, creating a
strobe effect.
Delay Slider (Seconds)
Sets the amount of time, in seconds, that the transition effect appears after the original effect has burned
through its pyrotechnic material.
Longevity Slider (Scaler; 1.0 = natural longevity)
Sets the amount of time between the transition effect’s initial appearance and the time that its pyrotechnic
material is exhausted. The slider value isn’t an amount of time in seconds: It’s a scaler on the effect’s natural
duration, which is determined by its caliber, speed, and other factors. This natural duration is represented by
a value of 1.0. If you set the slider to 0.5, for example, the duration will be half as long as the natural
duration. If you want to extend the trajectories, increase the longevity value.
Size Slider (Scaler)
Sets the magnitude of the tip’s glow. The tip doesn’t have a “natural” size that’s based on the Fireworks >
Caliber setting. As you select larger or smaller caliber settings, you may want to increase or decrease the
value of this attribute.

Chrysanthemum, Kamuro, Diadem, Brocade, Willow, and Dahlia FINALE Fireworks User Guide
PAGE 78
Transition tip
The Transition tip tab sets the color and size of the tips that are displayed by the transition effect.
Name Attribute
Color Color picker
Sets the tip’s color.
Size Slider (Scaler)
Sets the magnitude of the tip’s glow. The tip doesn’t have a “natural” size that’s based on the Fireworks >
Caliber setting. As you select larger or smaller caliber settings, you may want to increase or decrease the
value of this attribute.

Chrysanthemum, Kamuro, Diadem, Brocade, Willow, and Dahlia FINALE Fireworks User Guide
PAGE 79
Pistil
A pistil is one of a second set of stars. For the fireworks in this chapter, the pistils don’t have tails; instead,
they have tips.
You set the number of pistils in the Shell burst tab.
Name Attribute
Longevity Slider (Scaler; 1.0 = natural longevity)
Sets the amount of time between the pistil’s emergence from the bursting shell and the time that its
pyrotechnic material is exhausted. The slider value isn’t an amount of time in seconds: It’s a scaler on the
pistil’s natural duration, which is determined by the firework’s caliber, speed, and other factors. This natural
duration is represented by a value of 1.0. If you set the slider to 0.5, for example, the duration between the
burst and the time that the pistil is exhausted will be half as long as the natural duration. If you want to
extend the pistil’ trajectories, increase the longevity value.
Abridgment Slider (Fraction)
Abridgment adds a bit of randomness to the pistil’s longevity. With a setting of 0.0, there’s no randomness—
all pistils that burst from a shell last (approximately) the same amount of time (as set through the Longevity
slider). As you increase the Abridgment value, you reduce the duration range. For example, a setting of 0.5
means that a pistil may die out any time after half of its longevity has expired.
The Abrigment setting never increases a pistil’s duration so that it lasts longer than the Longevity setting—it
can only decrease it.
Tip effect Menu
Lets you choose the type of tip you want the pistil to display:
Constant. All tips appear together, last for the same amount of time, and burn with the same intensity.
Strobe. Some randomness is added to the initial appearances, durations, and intensities of the tips, creating a
strobe effect.
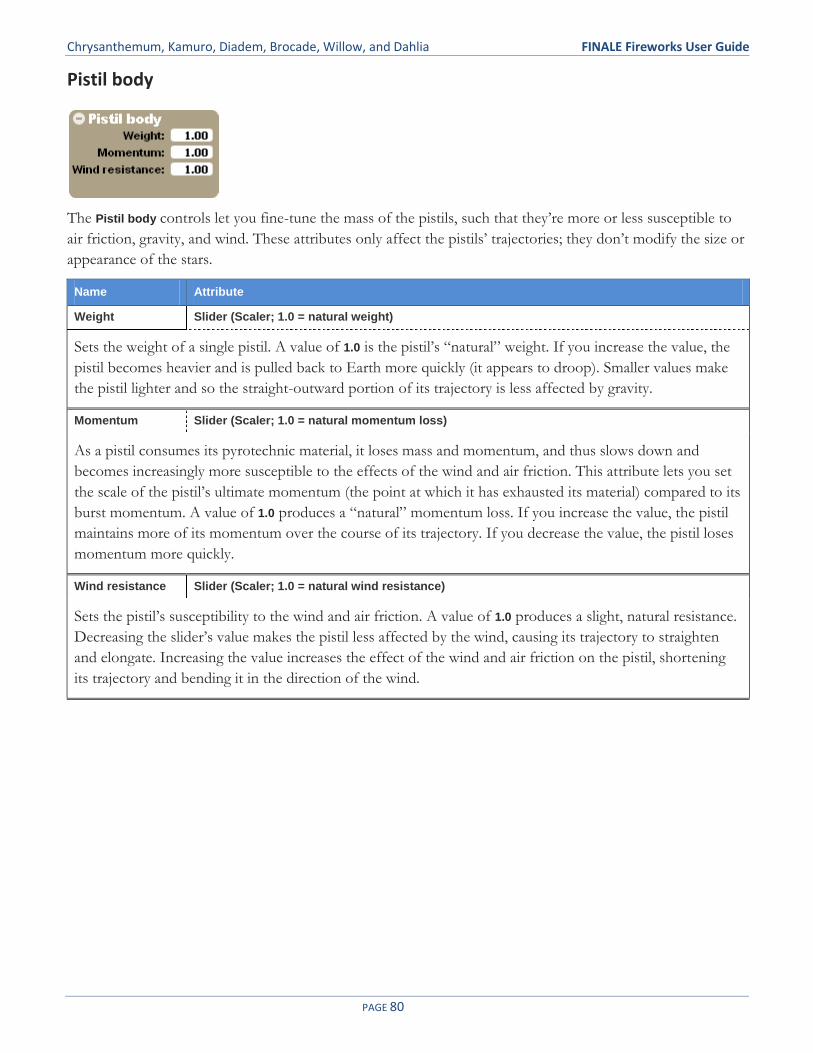
Chrysanthemum, Kamuro, Diadem, Brocade, Willow, and Dahlia FINALE Fireworks User Guide
PAGE 80
Pistil body
The Pistil body controls let you fine-tune the mass of the pistils, such that they’re more or less susceptible to
air friction, gravity, and wind. These attributes only affect the pistils’ trajectories; they don’t modify the size or
appearance of the stars.
Name Attribute
Weight Slider (Scaler; 1.0 = natural weight)
Sets the weight of a single pistil. A value of 1.0 is the pistil’s “natural” weight. If you increase the value, the
pistil becomes heavier and is pulled back to Earth more quickly (it appears to droop). Smaller values make
the pistil lighter and so the straight-outward portion of its trajectory is less affected by gravity.
Momentum Slider (Scaler; 1.0 = natural momentum loss)
As a pistil consumes its pyrotechnic material, it loses mass and momentum, and thus slows down and
becomes increasingly more susceptible to the effects of the wind and air friction. This attribute lets you set
the scale of the pistil’s ultimate momentum (the point at which it has exhausted its material) compared to its
burst momentum. A value of 1.0 produces a “natural” momentum loss. If you increase the value, the pistil
maintains more of its momentum over the course of its trajectory. If you decrease the value, the pistil loses
momentum more quickly.
Wind resistance Slider (Scaler; 1.0 = natural wind resistance)
Sets the pistil’s susceptibility to the wind and air friction. A value of 1.0 produces a slight, natural resistance.
Decreasing the slider’s value makes the pistil less affected by the wind, causing its trajectory to straighten
and elongate. Increasing the value increases the effect of the wind and air friction on the pistil, shortening
its trajectory and bending it in the direction of the wind.

Chrysanthemum, Kamuro, Diadem, Brocade, Willow, and Dahlia FINALE Fireworks User Guide
PAGE 81
Pistil tip
Name Attribute
Color Color picker
Sets the tip’s color.
Second color Color picker
If you set the pistil tip’s second color, half of the tips will be painted with the main color (the Color setting)
and the other half will be painted with the second color. The colors are randomly distributed amongst the
pistils.
Size Slider (Scaler)
Sets the magnitude of the tip’s glow. Unlike a shell tip, a pistil’s tip doesn’t have a “natural” size that’s based
on the Fireworks > Caliber setting. As you select larger or smaller caliber settings, you’ may want to increase
or decrease the value of this attribute.
Begin Slider (Fraction)
Determines the point, along the pistil’s trajectory, at which the tip starts glowing. If you set this slider to 0.0,
the tips will appear immediately after the shell bursts. If you set it to 0.5, they’ll appear halfway through the
pistil’s duration (as set by the Pistil > Longevity slider). If you set it to 1.0, they won’t appear at all.

PAGE 82
14 Palm
A palm is a shell with stars and pistils that typically have a pronounced droop.

Palm FINALE Fireworks User Guide
PAGE 83
Launch
The Launch tab defines the attributes of the shell’s launch.
Name Attribute
Cone angle Slider (degrees)
A shell’s cone angle is the angle across which successive launches are randomly distributed. The center of the
angle is straight up. As you increase the cone angle value, the cone widens symmetrically around the center.
N O T E The adjustments that you make to the cone angle won’t affect the firework that you’re currently
editing. The setting is applied after you’ve saved your firework and added a new instance to the
scene.
Cone height Slider (scaler; 1.0 = natural height)
By default, the height (or distance) of a shell’s trajectory is determined by the velocity with which it’s
launched, and velocity is directly related to the mortar’s caliber (and some other physical properties).
The Cone height slider lets you adjust the shell’s velocity (and so its height). If you set the slider to 1.0, you
get the velocity/height that’s determined by the caliber. Values greater than 1.0 produce greater heights, as
much as twice as high as the natural caliber height. Values less than 1.0 reduce the height. If you set the
value to 0.0, the firework won’t lift off at all.
Keep in mind that you’re increasing and decreasing the shell’s velocity. The duration of its trajectory will be
the same regardless of this slider’s value. Thus, you can adjust the cone height without “invalidating” the
shell’s prefire setting.
Randomness Slider (Fraction; 0.0 = autocompute)
The velocity with which a shell is launched is set naturally by its caliber. The Randomness slider lets you add
some randomness to the velocity. As you increase the slider’s value, the range of velocities widens, but
they’re always less than the natural velocity that’s set by the shell’s caliber. For example, let’s say you’re
creating firework that launches a shell with an initial velocity of 400 ft/sec. If you set the Randomness to
0.01, the shells will always emerge with (nearly) the same initial velocity (400 ft/sec). If you set the value to
0.5, a shell could emerge with an initial velocity that’s somewhere between 200 and 400 ft/sec.
A value of 0.0 tells FINALE to select a physically reasonable—but fairly small—range of velocities.

Palm FINALE Fireworks User Guide
PAGE 84
Shell tail
A shell’s tail is the trail of glowing particles that it leaves behind after it’s launched and that lasts until it bursts.
You make the tail visible by setting the Tail effect, below, to something other than No tail. You can then set the
tail’s color through the other control.
Name Attribute
Tail effect Menu
Lets you choose the type of tail you want the shell to display:
No tail. Use this effect to turn off the tail.
Thin. The particles are equally-spaced along the trajectory, and are of the same brightness and duration
(although with some randomness thrown in). The particles stay fairly close to the path of the trajectory.
Thick. This is the same as Thin but there are more particles, and they trace a wider path.
Color Color picker
Sets the tail’s color.

Palm FINALE Fireworks User Guide
PAGE 85
Shell burst
The Shell burst controls set some basic attributes of the stars that emerge when the shell bursts (or “breaks”).
Name Attribute
No. of Stars Slider (Count)
Sets the number of stars that each shell contains. When the shell bursts, the stars are thrown in random
directions away from the shell, creating a peony effect. If you set No. of stars to 0, the shell won’t throw any
stars. The stars’ attributes (color, weight, sound, and so on) are set through the various Star tabs.
Burst force Slider (Scaler; 1.0 = natural size)
Sets the power with which the stars break from the shell. 1.0 is the shell’s natural burst power, based on the
caliber of the shell and other physical properties. Other values are applied as scalers on the natural power:
0.5 means the stars are thrown half has hard; 2.0 means they’re thrown twice as hard. A setting of 0.0 means
that there’s virtually no power—the stars fall out of the break with very little outward momentum.
Note that the Burst force setting affects the sound volume of the report. If you want to create a weak shell
with a loud report, you have to increase the Report > Loudness setting.
No. of Pistils Slider (Count)
Pistil burst force Slider (Scaler; 1.0 = natural size)
These two controls are similar to the first two, but are applied to the shell’s pistils. A pistil creates a trail
effect that’s similar to a star’s tail; however, pistils are independent of stars. When the shell bursts, the pistils
are thrown in random directions away from the shell, creating the “spokes” in a peony effect. The pistil’s
other attributes are set in the various Pistil tabs.

Palm FINALE Fireworks User Guide
PAGE 86
Shell burst sound
The Shell burst sound controls let you select and modify the sound that’s played when the firework’s shell
finishes its trajectory (the sound is played even if the shell doesn’t actually “burst”).
Name Attribute
Sound Menu
The Sound menu gives you a choice of sounds that are played when the shell bursts. The names of the
sounds that you can choose from are self-descriptive: Whoosh, Pop, Thud shriek, and so on.
Volume Slider (Fraction)
Sets the amplitude of the sound as a percentage of its “natural” amplitude. A volume of 1.0 is completely
unattenuated; a volume of 0.0 is silent. The amplitude isn’t affected by the firework’s caliber or the Shell
burst > Burst force setting; for example, if you increase a firework’s caliber, the shell’s burst sound doesn’t get
louder.
Pitch shift Slider (-1.0 = one octave lower; 1.0 = one octave higher)
Shifts the pitch of the sound by as much as an octave lower (-1.0) to an octave higher (1.0). Pitch shifting is
effected by changing the playback speed of the soundfile. Shifting the sound lower will increase its duration;
shifting it higher will increase the duration.
Random pitch shift Slider (-1.0 = one octave lower; 1.0 = one octave higher)
Adds a random amount of pitch shift to the sound of each shell burst. You can declare a random pitch shift
from an octave lower to an octave higher than the pitch defined by the Pitch shift attribute. For example, if
you set Pitch shift to -0.5 (half an octave lower than the “natural” pitch of the sound) and set Random pitch
shift to 0.3, the pitch shift for a specific burst will be somewhere between -0.2 (a fifth of an octave below the
natural pitch) and -0.5 (a half an octave lower than natural).

Palm FINALE Fireworks User Guide
PAGE 87
Star
A star is created when particles of pyrotechnic composition material are ignited and emitted by a bursting
shell. The Star tab defines the basic attributes of a star, such as its duration and whether it’s accompanied by a
tip. A star’s force—but not its duration—is affected by the Shell burst > Burst force setting.
Name Attribute
Longevity Slider (Scaler; 1.0 = natural longevity)
Sets the amount of time between the star’s emergence from the bursting shell and the time that its
pyrotechnic material is exhausted. The slider value isn’t an amount of time in seconds: It’s a scaler on the
star’s natural duration, which is determined by its caliber, speed, and other factors. This natural duration is
represented by a value of 1.0. If you set the slider to 0.5, for example, the duration between the burst and
the time that the star is exhausted will be half as long as the natural duration. If you want to extend the
stars’ trajectories, increase the longevity value.
Abridgment Slider (Fraction)
Abridgment adds a bit of randomness to the star’s longevity. With a setting of 0.0, there’s no randomness—
all stars that burst from a shell last (approximately) the same amount of time (as set through the Longevity
slider). As you increase the Abridgment value, you reduce the duration range. For example, a setting of 0.5
means that a star may die out any time after half of its longevity has expired.
The Abrigment setting never increases a star’s duration so that it lasts longer than the Longevity setting—it can
only decrease it.
Tip effect Menu
Lets you choose the type of tip you want the star to display:
No tip. Turns off the tip.
Constant. All star tips appear together, last for the same amount of time, and burn with the same intensity.
Strobe. Some randomness is added to the initial appearances, durations, and intensities of the tips, creating a
strobe effect.

Palm FINALE Fireworks User Guide
PAGE 88
Star body
The Star body controls let you fine-tune a star’s mass so that it’s more or less susceptible to air friction,
gravity, and wind. These attributes only affect the stars’ trajectories; they don’t modify the size or appearance
of the stars.
Name Attribute
Weight Slider (Scaler; 1.0 = natural weight)
Sets the star’s weight. A value of 1.0 is the star’s “natural” weight. If you increase the value, the star
becomes heavier and is pulled back to Earth more quickly. Smaller values make the star lighter and so the
straight-outward portion of its trajectory is less affected by gravity.
Momentum Slider (Scaler; 1.0 = natural momentum loss)
As a star consumes its pyrotechnic material, it loses mass and momentum, and thus slows down and
becomes increasingly more susceptible to the effects of the wind and air friction. This attribute lets you set
the scale of the star’s ultimate momentum (the point at which it has exhausted its material) compared to its
burst momentum. A value of 1.0 produces a “natural” momentum loss. If you increase the value, the star
maintains more of its momentum over the course of its trajectory. If you decrease the value, the star loses
momentum more quickly.
Wind resistance Slider (Scaler; 1.0 = natural wind resistance)
Sets the star’s susceptibility to the wind and air friction. A value of 1.0 produces a slight, natural resistance.
Decreasing the slider’s value makes the star less affected by the wind, causing its trajectory to straighten and
elongate. Increasing the value increases the effect of the wind and air friction on the star, shortening its
trajectory and bending it in the direction of the wind.

Palm FINALE Fireworks User Guide
PAGE 89
Star tip
The tip of a star is its leading edge as it burst from a shell. The tip can begin “glowing” as soon as the star
emerges and can continue through the star’s duration. You make the tip visible by setting the Star > Tip effect
to something other than No tip.
Name Attribute
Color Color picker
Sets the tip’s color.
Second color Color picker
If you set the star’s second color, half of the stars will be painted with the main color (the Color setting) and
the other half will be painted with the second color. The colors are randomly distributed amongst the stars.
Not all palms have a Second color control.
Size Slider (Scaler)
Sets the magnitude of the tip’s glow. Unlike a shell tip, a star tip doesn’t have a “natural” size that’s based
on the Fireworks > Caliber setting. As you select larger or smaller caliber settings, you’ may want to increase
or decrease the value of this attribute.
Begin Slider (Fraction)
End Slider (Fraction)
These two sliders determine the points, along the star’s trajectory, at which the tip starts and stops glowing.
The default settings mean that the tip starts glowing as soon as the star emerges from the shell, and it
disappears when the star dies. Settings of 0.25 and 0.75 (for example) would start the glow a quarter of the
way along the trajectory and extinguish it a quarter of the way from the burst.
The End value must be greater than the Begin value; if it isn’t, the tip won’t appear.
Not all palms have Begin and End controls.

Palm FINALE Fireworks User Guide
PAGE 90
Star tail
A star’s tail is the trail of glowing particles that it leaves behind after it’s emerged from its shell, and lasting
until it dies. You make the tail visible by setting the Tail effect, below, to something other than No tail. You can
then set the tail’s other attributes through the rest of the controls.
Name Attribute
Tail effect Menu
Lets you choose the type of tail you want the shell to display:
No tail. Use this effect to turn off the tail.
Thin. The particles are equally-spaced along the trajectory, and are of the same brightness and duration
(although with some randomness thrown in). The particles stay fairly close to the path of the trajectory.
Thick. This is the same as Thin but there are more particles, and they trace a wider path.
Glitter. The glitter tail is like the Thick tail, but with the randomness turned up. The increased variation in
particle and brightness gives the tail a glittery or twinkling effect.
Color Color picker
Sets the tail’s color.
Begin Slider (Fraction)
End Slider (Fraction)
These two sliders determine the length of the star’s tail measured along the star’s trajectory. Settings of 0.0
and 1.0, respectively, mean that the tail begins as soon as the star emerges from the shell, and it disappears
when the star dies. Settings of 0.25 and 0.75 (for example) would cause the tail to appear a quarter of the way
along the trajectory and die out a quarter of the way from the end of the trajectory.
The End value must be greater than the Begin value; if it isn’t, the tail won’t appear.
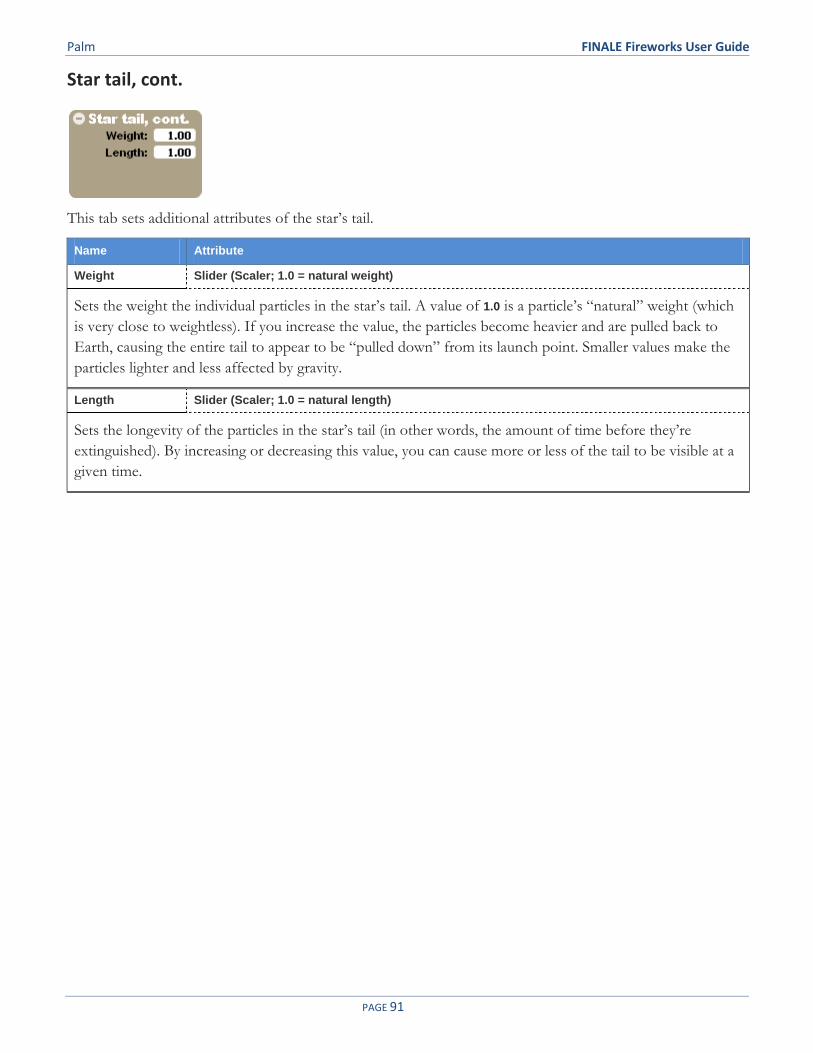
Palm FINALE Fireworks User Guide
PAGE 91
Star tail, cont.
This tab sets additional attributes of the star’s tail.
Name Attribute
Weight Slider (Scaler; 1.0 = natural weight)
Sets the weight the individual particles in the star’s tail. A value of 1.0 is a particle’s “natural” weight (which
is very close to weightless). If you increase the value, the particles become heavier and are pulled back to
Earth, causing the entire tail to appear to be “pulled down” from its launch point. Smaller values make the
particles lighter and less affected by gravity.
Length Slider (Scaler; 1.0 = natural length)
Sets the longevity of the particles in the star’s tail (in other words, the amount of time before they’re
extinguished). By increasing or decreasing this value, you can cause more or less of the tail to be visible at a
given time.

Palm FINALE Fireworks User Guide
PAGE 92
Star sparkle
A sparkle is a small series of sparks that are left behind along the star’s trajectory. It’s similar to the star’s tail,
but is much shorter-lived and more intense.
Name Attribute
Has sparkle Checkbox
If checked, the star has a sparkle; if not, it doesn’t.
Color Color picker
Sets the color of a star’s sparkle.

Palm FINALE Fireworks User Guide
PAGE 93
Star transition
After a star has exhausted a layer of its pyrotechnic material, it can transition into a second layer of material
that can create an effect that’s different from the first. This second effect displays tips but not tails.
Name Attribute
Tip effect Menu
Lets you choose the type of tip you want the transition effect to display:
No tip. Turns off the tip.
Constant. All tips appear together, last for the same amount of time, and burn with the same intensity.
Strobe. Some randomness is added to the initial appearances, durations, and intensities of the tips, creating a
strobe effect.
Delay Slider (Seconds)
Sets the amount of time, in seconds, that the transition effect appears after the original effect has burned
through its pyrotechnic material.
Longevity Slider (Scaler; 1.0 = natural longevity)
Sets the amount of time between the transition effect’s initial appearance and the time that its pyrotechnic
material is exhausted. The slider value isn’t an amount of time in seconds: It’s a scaler on the effect’s natural
duration, which is determined by its caliber, speed, and other factors. This natural duration is represented by
a value of 1.0. If you set the slider to 0.5, for example, the duration will be half as long as the natural
duration. If you want to extend the trajectories, increase the longevity value.

Palm FINALE Fireworks User Guide
PAGE 94
Transition tip
The Transition tip tab sets the color and size of the tips that are displayed by the transition effect.
Name Attribute
Color Color picker
Sets the tip’s color.
Size Slider (Scaler)
Sets the magnitude of the tip’s glow. The tip doesn’t have a “natural” size that’s based on the Fireworks >
Caliber setting. As you select larger or smaller caliber settings, you may want to increase or decrease the
value of this attribute.

Palm FINALE Fireworks User Guide
PAGE 95
Pistil
A pistil is a star that’s notable more for its tail than its tip. When a shell bursts, its pistils are thrown in random
directions away from the shell, creating the “spokes” in a peony effect. The pistil’s other attributes are set in
the various Pistil tabs.
You set the number of pistils in the Shell burst tab.
Name Attribute
Longevity Slider (Scaler; 1.0 = natural longevity)
Sets the amount of time between the pistil’s emergence from the bursting shell and the time that its
pyrotechnic material is exhausted. The slider value isn’t an amount of time in seconds: It’s a scaler on the
pistil’s natural duration, which is determined by the firework’s caliber, speed, and other factors. This natural
duration is represented by a value of 1.0. If you set the slider to 0.5, for example, the duration between the
burst and the time that the pistil is exhausted will be half as long as the natural duration. If you want to
extend the pistil’ trajectories, increase the longevity value.
Abridgment Slider (Fraction)
Abridgment adds a bit of randomness to the pistil’s longevity. With a setting of 0.0, there’s no randomness—
all pistils that burst from a shell last (approximately) the same amount of time (as set through the Longevity
slider). As you increase the Abridgment value, you reduce the duration range. For example, a setting of 0.5
means that a pistil may die out any time after half of its longevity has expired.
The Abrigment setting never increases a pistil’s duration so that it lasts longer than the Longevity setting—it
can only decrease it.

Palm FINALE Fireworks User Guide
PAGE 96
Pistil body
The Pistil body controls let you fine-tune the mass of the pistil’s stars, such that they’re more or less
susceptible to air friction, gravity, and wind. These attributes only affect the pistils’ trajectories; they don’t
modify the size or appearance of the stars.
Name Attribute
Weight Slider (Scaler; 1.0 = natural weight)
Sets the weight of a single pistil. A value of 1.0 is the pistil’s “natural” weight. If you increase the value, the
pistil becomes heavier and is pulled back to Earth more quickly (it appears to droop). Smaller values make
the pistil lighter and so the straight-outward portion of its trajectory is less affected by gravity.
The Pistil tail tab also has a Weight attribute. The two Weight controls affect different aspects of the pistil’s
trajectory: This attribute affects the weight of the pistil’s star, bending its trajectory. The Weight controls in
the Pistil tail tab set the weight of the particles along the entire tail. When you increase the weight of this
attribute, you cause the stars to arc and then droop; when you increase the weight of the pistil’s tail, the
effect is that of “pulling down” the entire tail from the pistil’s initial burst point.
Momentum Slider (Scaler; 1.0 = natural momentum loss)
As a pistil consumes its pyrotechnic material, it loses mass and momentum, and thus slows down and
becomes increasingly more susceptible to the effects of the wind and air friction. This attribute lets you set
the scale of the pistil’s ultimate momentum (the point at which it has exhausted its material) compared to its
burst momentum. A value of 1.0 produces a “natural” momentum loss. If you increase the value, the pistil
maintains more of its momentum over the course of its trajectory. If you decrease the value, the pistil loses
momentum more quickly.
Wind resistance Slider (Scaler; 1.0 = natural wind resistance)
Sets the pistil’s susceptibility to the wind and air friction. A value of 1.0 produces a slight, natural resistance.
Decreasing the slider’s value makes the pistil less affected by the wind, causing its trajectory to straighten
and elongate. Increasing the value increases the effect of the wind and air friction on the pistil, shortening
its trajectory and bending it in the direction of the wind.

Palm FINALE Fireworks User Guide
PAGE 97
Pistil tail
This tab sets the attributes of the pistil’s tail. Additional pistil tail attributes are set through the Pistil glitter tab.
Name Attribute
Color Color picker
Sets the color of the pistil’s tail. (NOTE: The Bright: slider in the Color picker is ignored. The tail’s brightness
is set by the Brightness control.)
Brightness Slider (Scaler)
Controls the brightness of the tail’s color. Increasing the value of the slider causes the tail to become more
intense.
Weight Slider (Scaler; 1.0 = natural weight)
Sets the weight the individual particles in the pistil’s tail. A value of 1.0 is a particle’s “natural” weight (which
is very close to weightless). If you increase the value, the particles become heavier and are pulled back to
Earth, causing the entire tail to appear to be “pulled down” from its launch point. Smaller values make the
particles lighter and less affected by gravity.
The Pistil tab also has a Weight attribute. A discussion of the difference between the two weights is provided
in the Weight description in the Pistil tab.
Length Slider (Scaler; 1.0 = natural length)
Sets the longevity of the particles in the pistil’s tail (in other words, the amount of time before they’re
extinguished). By increasing or decreasing this value, you can cause more or less of the tail to be visible at a
given time.

Palm FINALE Fireworks User Guide
PAGE 98
Pistil glitter
A pistil’s tail can contain glitter. These are particles that have more of a shimmer when compared to the tail’s
normal particles.
Name Attribute
Brightness Slider (Scaler)
Controls the brightness of the tail’s glitter particles. Increasing the value of the slider causes the glitter to
become more intense.
Density Slider (Fraction; 0.0 = no glitter)
Adjusts the proportion of glitter compared to the tail’s normal particles. If you set the value to 0.0, you get
no glitter; if you set it to 1.0, all of the particles will glitter.

PAGE 99
15 Salute
A salute is a shell that produces a report (a bright flash and a loud bang).

Salute FINALE Fireworks User Guide
PAGE 100
Launch
The Launch tab defines the attributes of the shell’s launch.
Name Attribute
Cone angle Slider (degrees)
A shell’s cone angle is the angle across which successive launches are randomly distributed. The center of the
angle is straight up. As you increase the cone angle value, the cone widens symmetrically around the center.
N O T E The adjustments that you make to the cone angle won’t affect the firework that you’re currently
editing. The setting is applied after you’ve saved your firework and added a new instance to the
scene.
Cone height Slider (scaler; 1.0 = natural height)
By default, the height (or distance) of a shell’s trajectory is determined by the velocity with which it’s
launched, and velocity is directly related to the mortar’s caliber (and some other physical properties).
The Cone height slider lets you adjust the shell’s velocity (and so its height). If you set the slider to 1.0, you
get the velocity/height that’s determined by the caliber. Values greater than 1.0 produce greater heights, as
much as twice as high as the natural caliber height. Values less than 1.0 reduce the height. If you set the
value to 0.0, the firework won’t lift off at all.
Keep in mind that you’re increasing and decreasing the shell’s velocity. The duration of its trajectory will be
the same regardless of this slider’s value. Thus, you can adjust the cone height without “invalidating” the
shell’s prefire setting.
Randomness Slider (Fraction; 0.0 = autocompute)
The velocity with which a shell is launched is set naturally by its caliber. The Randomness slider lets you add
some randomness to the velocity. As you increase the slider’s value, the range of velocities widens, but
they’re always less than the natural velocity that’s set by the shell’s caliber. For example, let’s say you’re
creating firework that launches a shell with an initial velocity of 400 ft/sec. If you set the Randomness to
0.01, the shells will always emerge with (nearly) the same initial velocity (400 ft/sec). If you set the value to
0.5, a shell could emerge with an initial velocity that’s somewhere between 200 and 400 ft/sec.
A value of 0.0 tells FINALE to select a physically reasonable—but fairly small—range of velocities.

Salute FINALE Fireworks User Guide
PAGE 101
Shell tail
A shell’s tail is the trail of glowing particles that it leaves behind after it’s launched and that lasts until it bursts.
You make the tail visible by setting the Tail effect, below, to something other than No tail. You can then set the
tail’s color through the other control.
Name Attribute
Tail effect Menu
Lets you choose the type of tail you want the shell to display:
No tail. Use this effect to turn off the tail.
Thin. The particles are equally-spaced along the trajectory, and are of the same brightness and duration
(although with some randomness thrown in). The particles stay fairly close to the path of the trajectory.
Thick. This is the same as Thin but there are more particles, and they trace a wider path.
Color Color picker
Sets the tail’s color.

Salute FINALE Fireworks User Guide
PAGE 102
Flash
The Flash tab sets the graphical attributes of the salute (aside from color).
Name Attribute
Shape Menu
Sets the figuration of the salute. There are three shapes: Spoke, Ring, and Star, as shown below. More
examples are given in the Flash color tab description.
Spoke Ring Star
Size Slider (Meters)
The size of the “sweet spot” of the salute, in meters. The size setting isn’t affected by the caliber of the
firework.
Sky brightening Slider (Scaler)
Part of the spectacle of a salute is that it can light up the night sky. The Sky brightening attribute adds an
extremely brief, non-linear lightening mask on the show’s background image as the salute explodes. Dark
parts of the image remain dark while the brightness of lighter pixels is increased, creating an effect that
seems to cast shadows. Sky brightening isn’t affected by the salute’s size or color.

Salute FINALE Fireworks User Guide
PAGE 103
Flash colors
The Flash colors tab sets the colors that are used in the salute. All four sliders are color pickers that attribute a
certain aspect of the graphic. Rather than describe them in a table, we’ll explain them with some examples.
A salute consists of three discrete parts and a “blur”.
The discrete parts are the “big spikes”, the “small
spikes”, and the “ring”. As you can see from the
example, the color of the big spikes is set through Color
A. That of the small spikes is Color C, and the ring is
Color B. The Gradient color is the blur that’s placed on
top of the entire effect, and that fades out spherically
from the center.
Here’s the same effect, but now we’ve desaturated the
blur (the Gradient color), in order to make the “blur”
more pronounced.
Notice that we’re using the Ring shape. The ring is the
only shape that uses all four colors. So what if we
choose another shape?...

Salute FINALE Fireworks User Guide
PAGE 104
Here, we’ve changed to the Star shape without changing
the color settings. Notice that the ring disappears—the
star doesn’t use Color B—but we can still see the effects
of the spike colors and the blur.
Finally, we shift to Spoke and dim the Gradient color.
The ring comes back, but the spokes are painted with
the “small spike” color (Color C) only. The spoke shape
doesn’t use Color A.

Salute FINALE Fireworks User Guide
PAGE 105
Salute sound
The Salute sound controls let you select and modify the sound that’s played when the salute explodes.
Name Attribute
Sound Menu
The Sound menu gives you a choice of sounds that are played when the salute explodes. The names of the
sounds that you can choose from are self-descriptive: Whoosh, Pop, Thud shriek, and so on.
Volume Slider (Fraction)
Sets the amplitude of the sound as a percentage of its unattenuated amplitude. A volume of 1.0 is
completely unattenuated; a volume of 0.0 is silent. The amplitude isn’t affected by the salute’s caliber or the
Flash > size setting.
Pitch shift Slider (-1.0 = one octave lower; 1.0 = one octave higher)
Shifts the pitch of the sound by as much as an octave lower (-1.0) to an octave higher (1.0). Pitch shifting is
effected by changing the playback speed of the soundfile. Shifting the sound lower will increase its duration;
shifting it higher will increase the duration.
Random pitch shift Slider (-1.0 = one octave lower; 1.0 = one octave higher)
Adds a random amount of pitch shift to the sound. You can declare a random pitch shift from an octave
lower to an octave higher than the pitch defined by the Pitch shift attribute. For example, if you set Pitch
shift to -0.5 (half an octave lower than the “natural” pitch of the sound) and set Random pitch shift to 0.3, the
pitch shift for a specific salute will be somewhere between -0.2 (a fifth of an octave below the natural pitch)
and -0.5 (a half an octave lower than natural).

PAGE 106
16 Comet
A comet is an effect that launches a single, vivid shell that doesn’t burst.

Comet FINALE Fireworks User Guide
PAGE 107
Launch
The Launch tab defines the attributes of the comet’s launch.
Name Attribute
Cone angle Slider (degrees)
A comet’s cone angle is the angle across which successive launches are randomly distributed. The center of
the angle is straight up. As you increase the cone angle value, the cone widens symmetrically around the
center.
Cone height Slider (scaler; 1.0 = natural height)
By default, the height (or distance) of a comet’s trajectory is determined by the velocity with which it’s
launched, and velocity is directly related to the mortar’s caliber (and some other physical properties).
The Cone height slider lets you adjust the comet’s velocity (and so its height). If you set the slider to 1.0, you
get the velocity/height that’s determined by the caliber. Values greater than 1.0 produce greater heights, as
much as twice as high as the natural caliber height. Values less than 1.0 reduce the height. If you set the
value to 0.0, the firework won’t lift off at all.
Keep in mind that you’re increasing and decreasing the comet’s velocity. The duration of its trajectory will be
the same regardless of this slider’s value. Thus, you can adjust the cone height without “invalidating” the
comet’s prefire setting.
Randomness Slider (Fraction; 0.0 = autocompute)
The velocity with which a comet shoots its shell is set naturally by the comet’s caliber. The Randomness
slider lets you add some randomness to the velocity. As you increase the slider’s value, the range of
velocities widens, but they’re always less than the natural velocity that’s set by the comet’s caliber. For
example, let’s say you’re creating a comet that shoots its shell with an initial velocity of 400 ft/sec. If you set
the Randomness to 0.0, the comet’s shell will always emerge with the same initial velocity (400 ft/sec). If you
set the value to 0.5, the shell could emerge with an initial velocity that’s somewhere between 200 and 400
ft/sec. A value of 1.0 means that the shell could emerge at anywhere from 0 to 400 ft/sec.
N O T E Unlike for other firework types, a value of 0.0 for a comet is interpreted literally—it means that
no randomness is applied to the velocity.

Comet FINALE Fireworks User Guide
PAGE 108
Launch sound
The Launch sound tab lets you select and modify the sound that’s played when the comet is launched.
Name Attribute
Sound Menu
The Sound menu gives you a choice of sounds that are played when the comet is launched. The names of
the sounds that you can choose from are self-descriptive: Whoosh, Pop, Thud shriek, and so on.
Volume Slider (Fraction)
Sets the amplitude of the sound as a percentage of its “natural” amplitude. A volume of 1.0 is completely
unattenuated; a volume of 0.0 is silent. The amplitude isn’t affected by caliber; for example, if you increase a
firework’s caliber, the launch sound doesn’t get louder.
Pitch shift Slider (-1.0 = one octave lower; 1.0 = one octave higher)
Shifts the pitch of the sound by as much as an octave lower (-1.0) to an octave higher (1.0). Pitch shifting is
effected by changing the playback speed of the soundfile. Shifting the sound lower will increase its duration;
shifting it higher will increase the duration.
Random pitch shift Slider (-1.0 = one octave lower; 1.0 = one octave higher)
Adds a random amount of pitch shift to the sound of each launch. You can declare a random pitch shift
from an octave lower to an octave higher than the pitch defined by the Pitch shift attribute. For example, if
you set Pitch shift to 0.5 (half an octave higher than the “natural” pitch of the sound) and set Random pitch
shift to -0.3, the pitch shift for a specific launch will be somewhere between 0.2 (a fifth of an octave above
the natural pitch) and 0.5 (a half an octave higher than natural).

Comet FINALE Fireworks User Guide
PAGE 109
Shell
The Shell tab defines the basic attributes of the comet’s shell. Other shell attributes are provided through Shell
body, Shell tip, and so on.
Name Attribute
Longevity Slider (Scaler; 1.0 = natural longevity)
Sets the amount of time between the shell’s emergence and the time that its pyrotechnic material is
exhausted. The slider value isn’t an amount of time in seconds: It’s a scaler on the shell’s natural duration,
which is determined by its caliber, speed, and other factors. This natural duration is represented by a value
of 1.0. If you set the slider to 0.5, for example, the duration between the launch and the time that the shell is
exhausted will be half as long as the natural duration. If you want to extend the shells’ trajectories, increase
the longevity value.
Has tip Checkbox
These two checkboxes determine whether or not the comet has a tip. The tip and report attributes are set in
the Shell tip tab.

Comet FINALE Fireworks User Guide
PAGE 110
Shell body
The Shell body controls let you fine-tune a shell’s mass so that it’s more or less susceptible to air friction,
gravity, and wind. These attributes only affect the shell’s trajectory; they don’t modify the size or appearance
of the shell.
Name Attribute
Weight Slider (Scaler; 1.0 = natural weight)
Sets the weight of the comet’s shell. A value of 1.0 is the shell’s “natural” weight. If you increase the value,
the shell becomes heavier and is pulled back to Earth more quickly. Smaller values make the shell lighter
and so the straight-outward portion of its trajectory is less affected by gravity.
Momentum Slider (Scaler; 1.0 = natural momentum loss)
As a shell consumes its pyrotechnic material, it loses mass and momentum, and thus slows down and
becomes increasingly more susceptible to the effects of the wind and air friction. This attribute lets you set
the scale of the shell’s ultimate momentum (the point at which it has exhausted its material) compared to its
launch momentum. A value of 1.0 produces a “natural” momentum loss. If you increase the value, the shell
maintains more of its momentum over the course of its trajectory. If you decrease the value, the shell loses
momentum more quickly.
Wind resistance Slider (Scaler; 1.0 = natural wind resistance)
Sets the shell’s susceptibility to the wind and air friction. A value of 1.0 produces a slight, natural resistance.
Decreasing the slider’s value makes the shell less affected by the wind, causing its trajectory to straighten
and elongate. Increasing the value increases the effect of the wind and air friction on the shell, shortening its
trajectory and bending it in the direction of the wind.
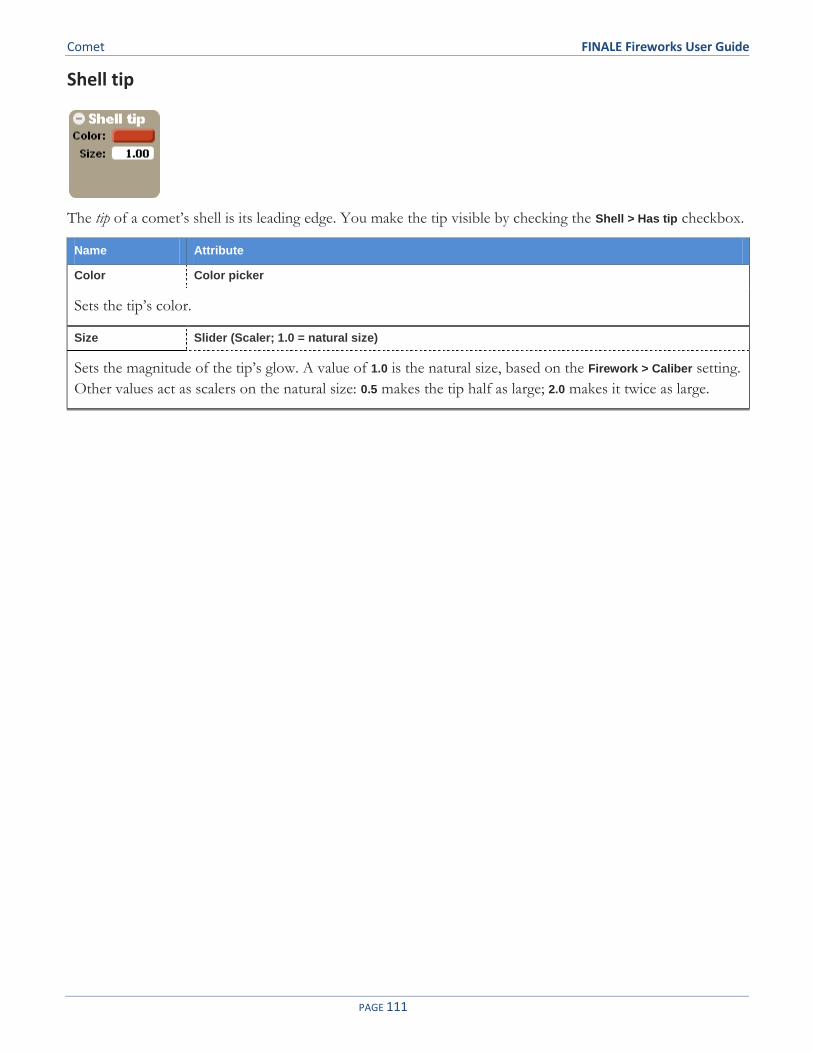
Comet FINALE Fireworks User Guide
PAGE 111
Shell tip
The tip of a comet’s shell is its leading edge. You make the tip visible by checking the Shell > Has tip checkbox.
Name Attribute
Color Color picker
Sets the tip’s color.
Size Slider (Scaler; 1.0 = natural size)
Sets the magnitude of the tip’s glow. A value of 1.0 is the natural size, based on the Firework > Caliber setting.
Other values act as scalers on the natural size: 0.5 makes the tip half as large; 2.0 makes it twice as large.
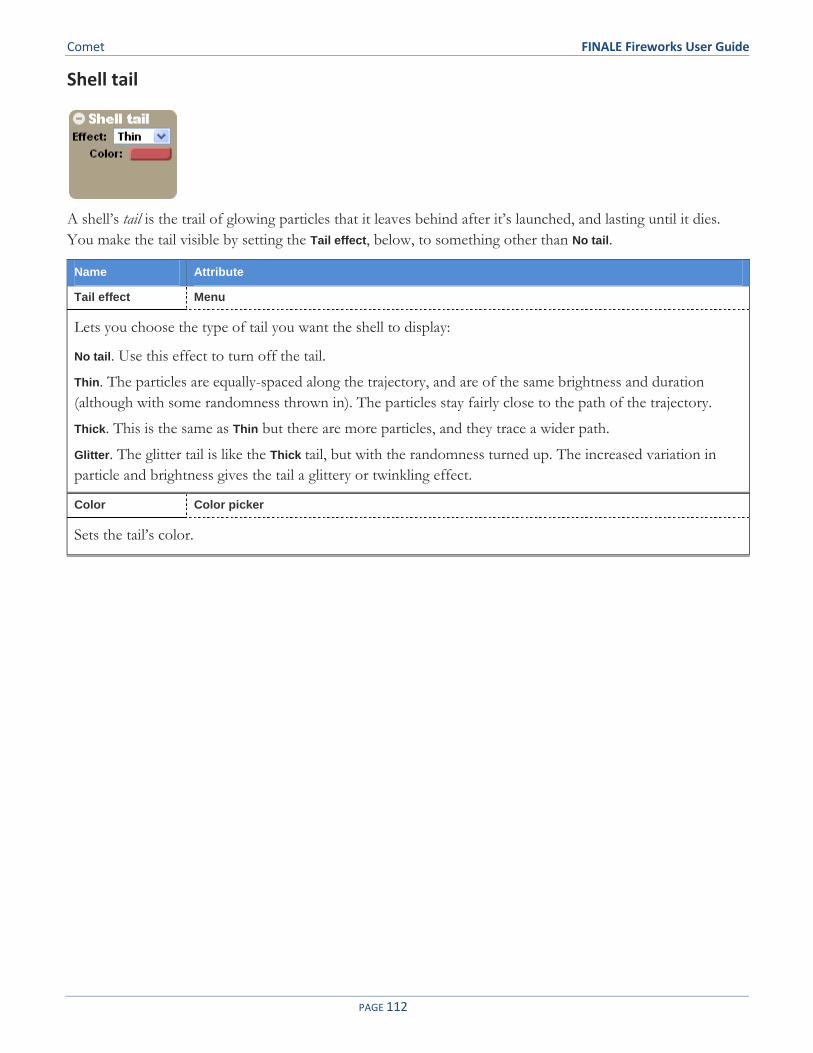
Comet FINALE Fireworks User Guide
PAGE 112
Shell tail
A shell’s tail is the trail of glowing particles that it leaves behind after it’s launched, and lasting until it dies.
You make the tail visible by setting the Tail effect, below, to something other than No tail.
Name Attribute
Tail effect Menu
Lets you choose the type of tail you want the shell to display:
No tail. Use this effect to turn off the tail.
Thin. The particles are equally-spaced along the trajectory, and are of the same brightness and duration
(although with some randomness thrown in). The particles stay fairly close to the path of the trajectory.
Thick. This is the same as Thin but there are more particles, and they trace a wider path.
Glitter. The glitter tail is like the Thick tail, but with the randomness turned up. The increased variation in
particle and brightness gives the tail a glittery or twinkling effect.
Color Color picker
Sets the tail’s color.

Comet FINALE Fireworks User Guide
PAGE 113
Shell sparkle
A sparkle is a small series of sparks that are left behind along the shell’s trajectory. It’s similar to the shell’s tail,
but is much shorter-lived and more intense.
Name Attribute
Has sparkle Checkbox
If checked, the shell has a sparkle; if not, it doesn’t.
Color Color picker
Sets the color of a shell’s sparkle.

PAGE 114
17 Mine
A mine is a dense, overpowering effect that sprays a number of shells (or projectiles) that can burst into stars
that finish with a report.

Mine FINALE Fireworks User Guide
PAGE 115
Mine Launch
The Mine launch tab defines the number and distribution of projectiles that are launched at a time.
Name Attribute
Thickness Slider (Scaler; 0.0 = one projectile)
This slider controls the number of projectiles that are launched during a single launch. If you want a single
projectile, set the slider to 0.0. Greater values increase the count. The maximum value produces about 200
projectiles.
Cone angle Slider (degrees)
A mine’s cone angle is the angle across which the projectiles in a single launch are randomly distributed. The
center of the angle is straight up. As you increase the cone angle value, the cone widens symmetrically
around the center.
Cone height Slider (scaler; 1.0 = natural height)
By default, the height (or distance) of a projectile’s trajectory is determined by the velocity with which it’s
launched, and velocity is directly related to the mine’s caliber (and some other physical properties).
The Cone height slider lets you adjust the projectiles’ velocities (and so they’re heights). If you set the slider
to 1.0, you get the velocity/height that’s determined by the caliber. Values greater than 1.0 produce greater
heights, as much as twice as high as the natural caliber height. Values less than 1.0 reduce the height. If you
set the value to 0.0, the projectiles won’t lift off at all.
Keep in mind that you’re increasing and decreasing the velocity of the projectiles. Their durations will be the
same regardless of this slider’s value.
N O T E If you’ve modified the mine’s height by dragging the target in the Sky Field, this control will
have no effect.

Mine FINALE Fireworks User Guide
PAGE 116
Name Attribute
Randomness Slider (Fraction; 0.0 = autocompute)
The velocities of a mine’s projectiles are set naturally by the mine’s caliber. The Randomness slider lets you
add some randomness to the distribution of velocities. As you increase the slider’s value the range of
velocities widens, but they’re always less than the natural velocity that’s set by the caliber. For example, let’s
say you’re creating a 6” mine that produces a stream of projectiles that are shot at an initial default velocity
of 400 ft/sec. If you set the Randomness to 0.01, all projectiles will emerge with (very nearly) the same initial
velocity (400 ft/sec). If you set the value to 0.5, each projectile will emerge with an initial velocity that’s
somewhere between 200 and 400 ft/sec. A value of 1.0 means that a projectile could emerge at anywhere
from 0 to 400 ft/sec.
A value of 0.0 tells FINALE to select a physically reasonable—but fairly small—range of velocities.

Mine FINALE Fireworks User Guide
PAGE 117
Launch sound
The Launch sound tab lets you select and modify the sound that’s played when the mine is launched.
Name Attribute
Sound Menu
The Sound menu gives you a choice of sounds that are played when the mine is launched. The names of the
sounds that you can choose from are self-descriptive: Whoosh, Pop, Thud shriek, and so on.
Volume Slider (Fraction)
Sets the amplitude of the sound as a percentage of its unattenuated amplitude. A volume of 1.0 is
completely unattenuated; a volume of 0.0 is silent. The amplitude isn’t affected by caliber; for example, if
you increase a mine’s caliber, the launch sound doesn’t get louder.
Pitch shift Slider (-1.0 = one octave lower; 1.0 = one octave higher)
Shifts the pitch of the sound by as much as an octave lower (-1.0) to an octave higher (1.0). Pitch shifting is
effected by changing the playback speed of the soundfile. Shifting the sound lower will increase its duration;
shifting it higher will increase the duration.
Random pitch shift Slider (-1.0 = one octave lower; 1.0 = one octave higher)
Adds a random amount of pitch shift to the sound of each launch. You can declare a random pitch shift
from an octave lower to an octave higher than the pitch defined by the Pitch shift attribute. For example, if
you set Pitch shift to 0.5 (half an octave higher than the “natural” pitch of the sound) and set Random pitch
shift to -0.3, the pitch shift for a specific launch will be somewhere between 0.2 (a fifth of an octave above
the natural pitch) and 0.5 (a half an octave higher than natural).

Mine FINALE Fireworks User Guide
PAGE 118
Shell
The Shell tab defines the basic attributes of a mine’s projectiles. More detailed attributes are provided through
the Shell body, Shell burst, Shell tip, and so on.
Name Attribute
Longevity Slider (Scaler; 1.0 = natural longevity)
Sets the amount of time between the shell’s launch and its burst. The slider value isn’t an amount of time in
seconds: It’s a scaler on the shell’s natural duration, which is determined by its caliber, speed, and other
factors. The natural duration causes the shell to burst right about the time it has reached its apex. This
natural duration is represented by a value of 1.0. If you set the slider to 0.5, for example, the duration
between launch and burst will be half as long as the natural duration. If you want the shell to start to fall
back to earth before it bursts, increase the longevity value.
Abridgment Slider (Fraction)
Abridgment adds a bit of randomness to the shell’s longevity. With a setting of 0.0, there’s no randomness—
all shells that are fired in a single launch will burst at (approximately) the same time (as set through the
Longevity slider). As you increase the Abridgment value, you reduce the duration range. For example, a
setting of 0.1 means that a shell may burst at any time after 9/10ths of the shell’s longevity has expired.
The Abrigment setting never increases a shell’s duration so that it lasts longer than the Longevity setting—it
can only decrease it.
Has tip Checkbox
Has report Checkbox
These two checkboxes determine whether or not the firework has a tip and a report, respectively. The tip and
report attributes are set in the Shell tip, Report, and Report sound tabs. Note that shells and stars use the same
Report and Report sound settings.
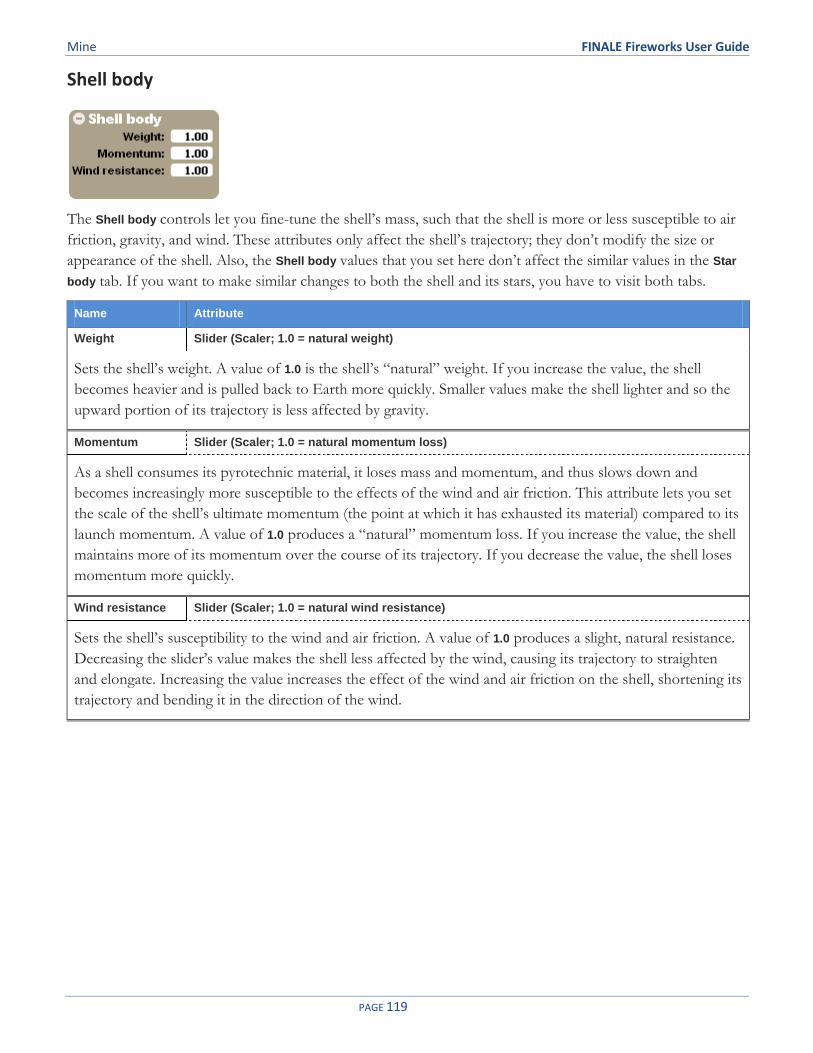
Mine FINALE Fireworks User Guide
PAGE 119
Shell body
The Shell body controls let you fine-tune the shell’s mass, such that the shell is more or less susceptible to air
friction, gravity, and wind. These attributes only affect the shell’s trajectory; they don’t modify the size or
appearance of the shell. Also, the Shell body values that you set here don’t affect the similar values in the Star
body tab. If you want to make similar changes to both the shell and its stars, you have to visit both tabs.
Name Attribute
Weight Slider (Scaler; 1.0 = natural weight)
Sets the shell’s weight. A value of 1.0 is the shell’s “natural” weight. If you increase the value, the shell
becomes heavier and is pulled back to Earth more quickly. Smaller values make the shell lighter and so the
upward portion of its trajectory is less affected by gravity.
Momentum Slider (Scaler; 1.0 = natural momentum loss)
As a shell consumes its pyrotechnic material, it loses mass and momentum, and thus slows down and
becomes increasingly more susceptible to the effects of the wind and air friction. This attribute lets you set
the scale of the shell’s ultimate momentum (the point at which it has exhausted its material) compared to its
launch momentum. A value of 1.0 produces a “natural” momentum loss. If you increase the value, the shell
maintains more of its momentum over the course of its trajectory. If you decrease the value, the shell loses
momentum more quickly.
Wind resistance Slider (Scaler; 1.0 = natural wind resistance)
Sets the shell’s susceptibility to the wind and air friction. A value of 1.0 produces a slight, natural resistance.
Decreasing the slider’s value makes the shell less affected by the wind, causing its trajectory to straighten
and elongate. Increasing the value increases the effect of the wind and air friction on the shell, shortening its
trajectory and bending it in the direction of the wind.

Mine FINALE Fireworks User Guide
PAGE 120
Shell tip
The tip of a shell is its leading edge. Depending on the values you set in this tab, the tip can begin “glowing”
as soon as the shell is launched and can continue through the shell’s duration, ending at the burst point. You
make the tip visible by checking the Shell > Has tip checkbox. You then set the tip’s attributes through the
controls in this tab.
Name Attribute
Color Color picker
Sets the tip’s color.
Size Slider (Scaler; 1.0 = natural size)
Sets the size of the tip’s glow. A value of 1.0 is the natural size, based on the Firework > Caliber setting. Other
values act as scalers on the natural size: 0.5 makes the tip half as large; 2.0 makes it twice as large.
Begin Slider (Fraction)
End Slider (Fraction)
These two sliders determine the points, along the shell’s trajectory, at which the tip starts and stops glowing.
If you set the sliders to 0.0 and 1.0, respectively, the tip will start glowing as soon as the shell is launched,
and disappears when the shell bursts. Settings of 0.25 and 0.75 would start the glow a quarter of the way
from the launch and extinguish it a quarter of the way from the burst.
The End value must be greater than the Begin value; if it isn’t, the tip won’t appear.

Mine FINALE Fireworks User Guide
PAGE 121
Shell tail
A shell’s tail is the trail of glowing particles that it leaves behind after it’s launched and that lasts until it bursts.
You make the tail visible by setting the Tail effect, below, to something other than No tail. You can then set the
tail’s color and duration through the other controls. Additional attributes are set through the Shell tail, cont.
tab.
Name Attribute
Tail effect Menu
Lets you choose the type of tail you want the shell to display:
No tail. Use this effect to turn off the tail.
Thin. The particles are equally-spaced along the trajectory, and are of the same brightness and duration
(although with some randomness thrown in). The particles stay fairly close to the path of the trajectory.
Thick. This is the same as Thin but there are more particles, and they trace a wider path.
Glitter. The glitter tail is like the Thick tail, but with the randomness turned up. The increased variation gives
the tail a glittery or twinkling effect.
Color Color picker
Sets the tail’s color.
Begin Slider (Fraction)
End Slider (Fraction)
These two sliders determine the points, along the shell’s entire trajectory, at which the tail starts and stops.
If you set the sliders to 0.0 and 1.0, respectively, the tail will be visible from the moment the shell is
launched until the shell bursts. Settings of 0.25 and 0.75 would draw a tail that lasts from a quarter of the
way from the launch to a quarter of the way from the burst.
The End value must be greater than the Begin value; if it isn’t, the tail won’t appear.

Mine FINALE Fireworks User Guide
PAGE 122
Shell tail, cont.
This tab sets additional attributes of the shell’s tail.
Name Attribute
Weight Slider (Scaler; 1.0 = natural weight)
Sets the weight the individual particles in the shell’s tail. A value of 1.0 is a particle’s “natural” weight (which
is very close to weightless). If you increase the value, the particles become heavier and are pulled back to
Earth, causing the entire tail to appear to be “pulled down” from its launch point. Smaller values make the
particles lighter and less affected by gravity.
Length Slider (Scaler; 1.0 = natural length)
Sets the longevity of the particles in the shell’s tail (in other words, the amount of time before they’re
extinguished). By increasing or decreasing this value, you can cause more or less of the tail to be visible at a
given time.
Ramp up Slider (Fraction)
It takes some amount of time after the launch of a shell for the particles in the shell’s tail to reach their
maximum density. This slider lets you control this “ramp up” time as a fraction of the shell’s duration. If
you set the slider to 1.0, the tail continues to thicken across its entire duration, reaching its maximum density
near the end of its trajectory. If you set the slider to 0.0, the tail becomes maximally dense almost
immediately upon launch.

Mine FINALE Fireworks User Guide
PAGE 123
Shell burst
The Shell burst controls set some basic attributes of the stars that emerge when the shell bursts (or “breaks”).
Name Attribute
No. of Stars Slider (Count)
Sets the number of stars that each shell contains. When the shell bursts, the stars are thrown in random
directions away from the shell, creating a peony effect. If you set No. of stars to 0, the shell won’t throw any
stars. The stars’ attributes (color, weight, sound, and so on) are set through the various Star tabs.
Burst force Slider (Scaler; 1.0 = natural size)
Sets the power with which the stars break from the shell. 1.0 is the shell’s natural burst power, based on the
caliber of the shell and other physical properties. Other values are applied as scalers on the natural power:
0.5 means the stars are thrown half has hard; 2.0 means they’re thrown twice as hard. A setting of 0.0 means
that there’s virtually no power—the stars fall out of the break with very little outward momentum.
Note that the Burst force setting affects the sound volume of the report. If you want to create a weak shell
with a loud report, you have to increase the Report > Loudness setting.

Mine FINALE Fireworks User Guide
PAGE 124
Shell burst sound
The Shell burst sound controls let you select and modify the sound that’s played when the mine’s shell finishes
its trajectory (the sound is played even if the shell doesn’t actually “burst”).
Be aware that if the mine has a report sound, the shell burst sound will not be played.
Name Attribute
Sound Menu
The Sound menu gives you a choice of sounds that are played when the shell bursts. The names of the
sounds that you can choose from are self-descriptive: Whoosh, Pop, Thud shriek, and so on.
Volume Slider (Fraction)
Sets the amplitude of the sound as a percentage of its unattenuated amplitude. A volume of 1.0 is
completely unattenuated; a volume of 0.0 is silent. The amplitude isn’t affected by the firework’s caliber or
the Shell burst > Burst force setting; for example, if you increase a firework’s caliber, the shell’s burst sound
doesn’t get louder.
Pitch shift Slider (-1.0 = one octave lower; 1.0 = one octave higher)
Shifts the pitch of the sound by as much as an octave lower (-1.0) to an octave higher (1.0). Pitch shifting is
effected by changing the playback speed of the soundfile. Shifting the sound lower will increase its duration;
shifting it higher will increase the duration.
Random pitch shift Slider (-1.0 = one octave lower; 1.0 = one octave higher)
Adds a random amount of pitch shift to the sound of each shell burst. You can declare a random pitch shift
from an octave lower to an octave higher than the pitch defined by the Pitch shift attribute. For example, if
you set Pitch shift to -0.5 (half an octave lower than the “natural” pitch of the sound) and set Random pitch
shift to 0.3, the pitch shift for a specific burst will be somewhere between -0.2 (a fifth of an octave below the
natural pitch) and -0.5 (a half an octave lower than natural).
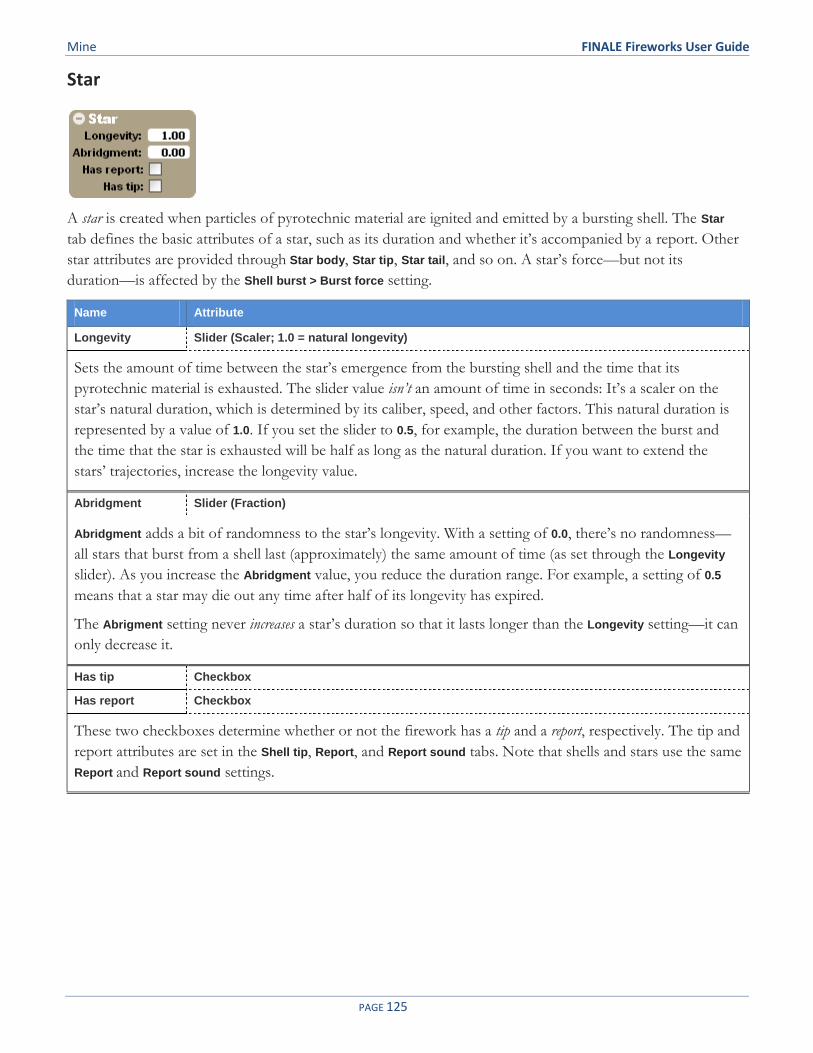
Mine FINALE Fireworks User Guide
PAGE 125
Star
A star is created when particles of pyrotechnic material are ignited and emitted by a bursting shell. The Star
tab defines the basic attributes of a star, such as its duration and whether it’s accompanied by a report. Other
star attributes are provided through Star body, Star tip, Star tail, and so on. A star’s force—but not its
duration—is affected by the Shell burst > Burst force setting.
Name Attribute
Longevity Slider (Scaler; 1.0 = natural longevity)
Sets the amount of time between the star’s emergence from the bursting shell and the time that its
pyrotechnic material is exhausted. The slider value isn’t an amount of time in seconds: It’s a scaler on the
star’s natural duration, which is determined by its caliber, speed, and other factors. This natural duration is
represented by a value of 1.0. If you set the slider to 0.5, for example, the duration between the burst and
the time that the star is exhausted will be half as long as the natural duration. If you want to extend the
stars’ trajectories, increase the longevity value.
Abridgment Slider (Fraction)
Abridgment adds a bit of randomness to the star’s longevity. With a setting of 0.0, there’s no randomness—
all stars that burst from a shell last (approximately) the same amount of time (as set through the Longevity
slider). As you increase the Abridgment value, you reduce the duration range. For example, a setting of 0.5
means that a star may die out any time after half of its longevity has expired.
The Abrigment setting never increases a star’s duration so that it lasts longer than the Longevity setting—it can
only decrease it.
Has tip Checkbox
Has report Checkbox
These two checkboxes determine whether or not the firework has a tip and a report, respectively. The tip and
report attributes are set in the Shell tip, Report, and Report sound tabs. Note that shells and stars use the same
Report and Report sound settings.

Mine FINALE Fireworks User Guide
PAGE 126
Star body
The Star body controls let you fine-tune a star’s mass so that it’s more or less susceptible to air friction,
gravity, and wind. These attributes only affect the stars’ trajectories; they don’t modify the size or appearance
of the stars.
The Star body values aren’t affected by changes in the Shell body tab.
Name Attribute
Weight Slider (Scaler; 1.0 = natural weight)
Sets the weight of a single star. A value of 1.0 is the star’s “natural” weight. If you increase the value, the star
becomes heavier and is pulled back to Earth more quickly. Smaller values make the star lighter and so the
straight-outward portion of its trajectory is less affected by gravity.
Momentum Slider (Scaler; 1.0 = natural momentum loss)
As a star consumes its pyrotechnic material, it loses mass and momentum, and thus slows down and
becomes increasingly more susceptible to the effects of the wind and air friction. This attribute lets you set
the scale of the star’s ultimate momentum (the point at which it has exhausted its material) compared to its
burst momentum. A value of 1.0 produces a “natural” momentum loss. If you increase the value, the star
maintains more of its momentum over the course of its trajectory. If you decrease the value, the star loses
momentum more quickly.
Wind resistance Slider (Scaler; 1.0 = natural wind resistance)
Sets the star’s susceptibility to the wind and air friction. A value of 1.0 produces a slight, natural resistance.
Decreasing the slider’s value makes the star less affected by the wind, causing its trajectory to straighten and
elongate. Increasing the value increases the effect of the wind and air friction on the star, shortening its
trajectory and bending it in the direction of the wind.

Mine FINALE Fireworks User Guide
PAGE 127
Star tip
The tip of a star is its leading edge as it burst from a shell. The tip can begin “glowing” as soon as the star
emerges and can continue through the star’s duration. You make the tip visible by checking the Star > Has tip
checkbox.
Name Attribute
Color Color picker
Sets the tip’s color.
Size Slider (Scaler)
Sets the magnitude of the tip’s glow. Unlike a shell tip, a star tip doesn’t have a “natural” size that’s based
on the Fireworks > Caliber setting. As you select larger or smaller caliber settings, you’ may want to increase
or decrease the value of this attribute.
Begin Slider (Fraction)
End Slider (Fraction)
These two sliders determine the points, along the star’s trajectory, at which the tip starts and stops glowing.
The default settings mean that the tip starts glowing as soon as the star emerges from the shell, and it
disappears when the star dies. Settings of 0.25 and 0.75 (for example) would start the glow a quarter of the
way along the trajectory and extinguish it a quarter of the way from the burst.
The End value must be greater than the Begin value; if it isn’t, the tip won’t appear.

Mine FINALE Fireworks User Guide
PAGE 128
Star tail
A star’s tail is the trail of glowing particles that it leaves behind after it’s emerged from its shell, and lasting
until it dies. You make the tail visible by setting the Tail effect, below, to something other than No tail. You can
then set the tail’s other attributes through the rest of the controls. Additional attributes are set through the
Star tail, cont. tab.
Name Attribute
Effect Menu
Lets you choose the type of tail you want the shell to display:
No tail. Use this effect to turn off the tail.
Thin. The particles are equally-spaced along the trajectory, and are of the same brightness and duration
(although with some randomness thrown in). The particles stay fairly close to the path of the trajectory.
Thick. This is the same as Thin but there are more particles, and they trace a wider path.
Glitter. The glitter tail is like the Thick tail, but with the randomness turned up. The increased variation in
particle and brightness gives the tail a glittery or twinkling effect.
Color Color picker
Sets the tail’s color.
Begin Slider (Fraction)
End Slider (Fraction)
These two sliders determine the length of the star’s tail measured along the star’s trajectory. Settings of 0.0
and 1.0, respectively, mean that the tail begins as soon as the star emerges from the shell, and it disappears
when the star dies. Settings of 0.25 and 0.75 (for example) would cause the tail to appear a quarter of the way
along the trajectory and die out a quarter of the way from the end of the trajectory.
The End value must be greater than the Begin value; if it isn’t, the tail won’t appear.

Mine FINALE Fireworks User Guide
PAGE 129
Star tail, cont.
This tab sets additional attributes of the star’s tail.
Name Attribute
Weight Slider (Scaler; 1.0 = natural weight)
Sets the weight the individual particles in the star’s tail. A value of 1.0 is a particle’s “natural” weight (which
is very close to weightless). If you increase the value, the particles become heavier and are pulled back to
Earth, causing the entire tail to appear to be “pulled down” from its launch point. Smaller values make the
particles lighter and less affected by gravity.
Length Slider (Scaler; 1.0 = natural length)
Sets the longevity of the particles in the star’s tail (in other words, the amount of time before they’re
extinguished). By increasing or decreasing this value, you can cause more or less of the tail to be visible at a
given time.

Mine FINALE Fireworks User Guide
PAGE 130
Report
A report is an explosive device that creates a bright flash and a loud bang. This tab defines the report’s
appearance. A companion tab, Report sound, defines its sound. The report settings are shared by the shell and
the star.
Name Attribute
Color Color picker
Sets the color of the report’s flash.
Size Slider (Scaler)
Sets the magnitude of the report’s flash. Unlike other objects, a report doesn’t have a “natural” size that’s
based on the Fireworks > Caliber setting (or any other attributes). As you select larger or smaller caliber
settings, you may want to increase or decrease the value of this attribute.
Adjusting the Size setting could automatically adjust the volume of the report’s sound, depending on the
volume of the Report sound > Volume setting.

Mine FINALE Fireworks User Guide
PAGE 131
Report sound
A report is an explosive device that creates a bright flash and a loud bang. This tab defines the report’s sound.
A companion tab, Report, defines its appearance.
If you set the mine’s report sound, the Shell burst sound is suppressed.
Name Attribute
Sound Menu
The Sound menu gives you a choice of sounds that are played when the report explodes. The names of the
sounds that you can choose from are self-descriptive: Whoosh, Pop, Thud shriek, and so on.
Volume Slider (Scaler; 0.0 = natural volume)
Sets the amplitude of the report’s sound. If you set the slider to 0.0, the amplitude is automatically adjusted
to match the Report > Size setting. Any other value sets the amplitude as a percentage of the soundfile’s
unattenuated amplitude.
Pitch shift Slider (-1.0 = one octave lower; 1.0 = one octave higher)
Shifts the pitch of the sound by as much as an octave lower (-1.0) to an octave higher (1.0). Pitch shifting is
effected by changing the playback speed of the soundfile. Shifting the sound lower will increase its duration;
shifting it higher will increase the duration.
Random pitch shift Slider (-1.0 = one octave lower; 1.0 = one octave higher)
Adds a random amount of pitch shift to the sound of each report. You can declare a random pitch shift
from an octave lower to an octave higher than the pitch defined by the Pitch shift attribute. For example, if
you set Pitch shift to -0.5 (half an octave lower than the “natural” pitch of the sound) and set Random pitch
shift to 0.3, the pitch shift for a specific report will be somewhere between -0.2 (a fifth of an octave below
the natural pitch) and -0.5 (a half an octave lower than natural).

PAGE 132
18 Fountain
A fountain is a groundwork that sprays a continuous stream of particles. Some fountains can end with a report,
others with a salute.

Fountain FINALE Fireworks User Guide
PAGE 133
Firework
The Firework tab for a fountain is different from the other firework types: It has a Duration control rather than Caliber.
Name Attribute
Duration Slider (Seconds)
The duration of the fountain, in seconds.
For an explanation of the other controls in the Firework tab, see the Common Tabs chapter.
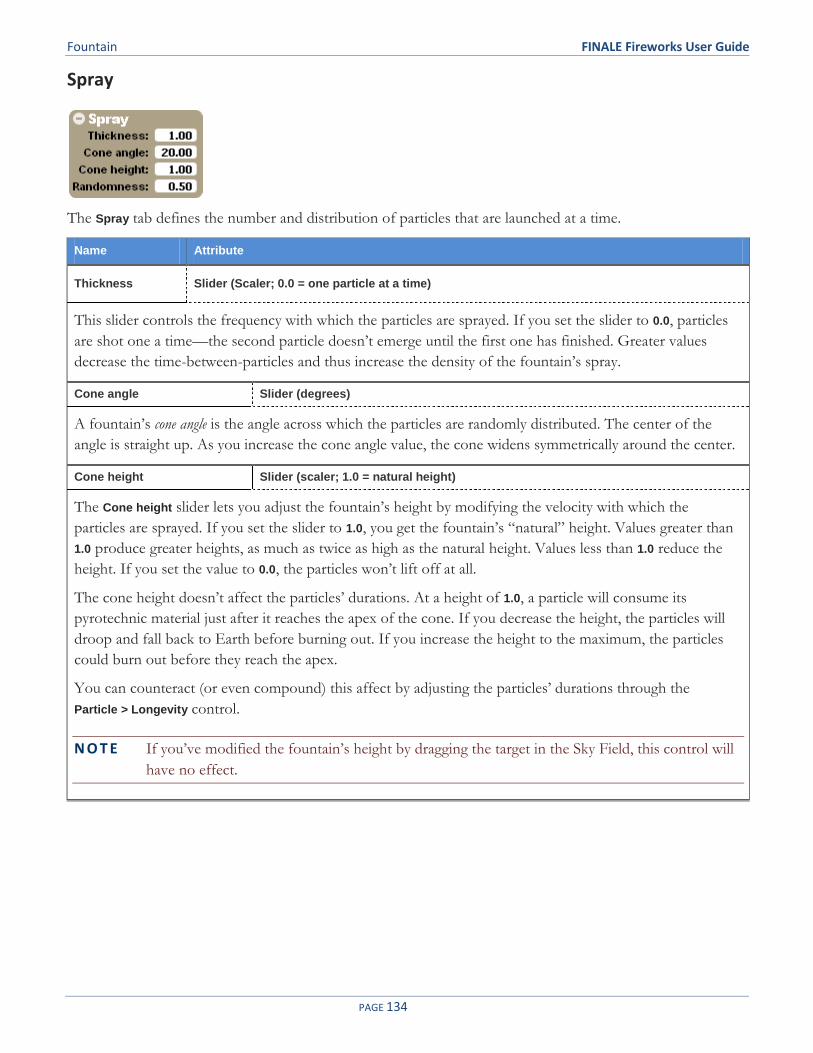
Fountain FINALE Fireworks User Guide
PAGE 134
Spray
The Spray tab defines the number and distribution of particles that are launched at a time.
Name Attribute
Thickness Slider (Scaler; 0.0 = one particle at a time)
This slider controls the frequency with which the particles are sprayed. If you set the slider to 0.0, particles
are shot one a time—the second particle doesn’t emerge until the first one has finished. Greater values
decrease the time-between-particles and thus increase the density of the fountain’s spray.
Cone angle Slider (degrees)
A fountain’s cone angle is the angle across which the particles are randomly distributed. The center of the
angle is straight up. As you increase the cone angle value, the cone widens symmetrically around the center.
Cone height Slider (scaler; 1.0 = natural height)
The Cone height slider lets you adjust the fountain’s height by modifying the velocity with which the
particles are sprayed. If you set the slider to 1.0, you get the fountain’s “natural” height. Values greater than
1.0 produce greater heights, as much as twice as high as the natural height. Values less than 1.0 reduce the
height. If you set the value to 0.0, the particles won’t lift off at all.
The cone height doesn’t affect the particles’ durations. At a height of 1.0, a particle will consume its
pyrotechnic material just after it reaches the apex of the cone. If you decrease the height, the particles will
droop and fall back to Earth before burning out. If you increase the height to the maximum, the particles
could burn out before they reach the apex.
You can counteract (or even compound) this affect by adjusting the particles’ durations through the
Particle > Longevity control.
N O T E If you’ve modified the fountain’s height by dragging the target in the Sky Field, this control will
have no effect.

Fountain FINALE Fireworks User Guide
PAGE 135
Name Attribute
Randomness Slider (Fraction; 0.0 = autocompute)
The Randomness slider lets you add some randomness to the heights of individual particles. As you increase
the slider’s value the range of heights widens, but the maximum will never be greater than the height that’s
set by the Cone height control. For example, let’s say you’ve set Cone height so that the fountain is 200 feet
height. If you set Randomness to 0.01, all particles will (very nearly) reach the 200 foot maximum. If you set
the value to 0.5, each particle will rise somewhere between 100 and 200 feet. Set it to .75 and the range will
be between 50 and 200 feet, and so on.
A value of 0.0 tells FINALE to add a natural—but fairly small—amount of randomness.
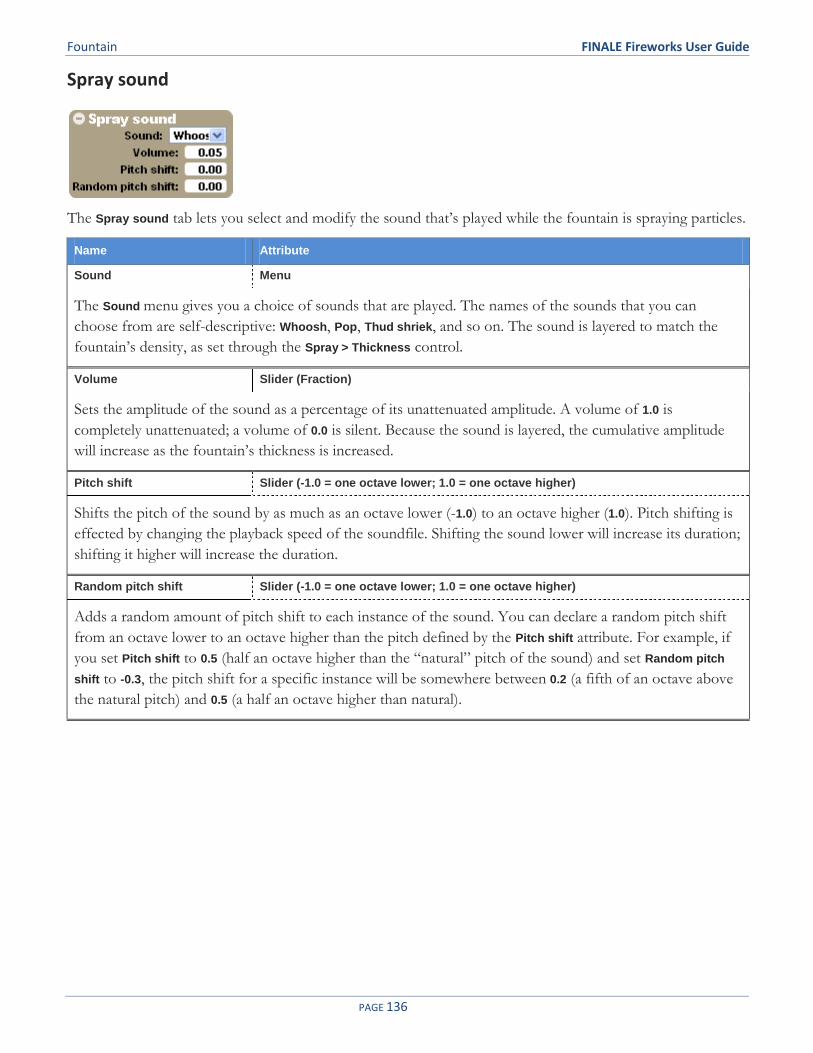
Fountain FINALE Fireworks User Guide
PAGE 136
Spray sound
The Spray sound tab lets you select and modify the sound that’s played while the fountain is spraying particles.
Name Attribute
Sound Menu
The Sound menu gives you a choice of sounds that are played. The names of the sounds that you can
choose from are self-descriptive: Whoosh, Pop, Thud shriek, and so on. The sound is layered to match the
fountain’s density, as set through the Spray > Thickness control.
Volume Slider (Fraction)
Sets the amplitude of the sound as a percentage of its unattenuated amplitude. A volume of 1.0 is
completely unattenuated; a volume of 0.0 is silent. Because the sound is layered, the cumulative amplitude
will increase as the fountain’s thickness is increased.
Pitch shift Slider (-1.0 = one octave lower; 1.0 = one octave higher)
Shifts the pitch of the sound by as much as an octave lower (-1.0) to an octave higher (1.0). Pitch shifting is
effected by changing the playback speed of the soundfile. Shifting the sound lower will increase its duration;
shifting it higher will increase the duration.
Random pitch shift Slider (-1.0 = one octave lower; 1.0 = one octave higher)
Adds a random amount of pitch shift to each instance of the sound. You can declare a random pitch shift
from an octave lower to an octave higher than the pitch defined by the Pitch shift attribute. For example, if
you set Pitch shift to 0.5 (half an octave higher than the “natural” pitch of the sound) and set Random pitch
shift to -0.3, the pitch shift for a specific instance will be somewhere between 0.2 (a fifth of an octave above
the natural pitch) and 0.5 (a half an octave higher than natural).

Fountain FINALE Fireworks User Guide
PAGE 137
Particle
The Particle tab defines the basic attributes of a fountain’s particles. More detailed attributes are provided
through the Particle body and Particle tail tabs.
Name Attribute
Longevity Slider (Scaler; 1.0 = natural longevity)
Sets the amount of time it takes for a particle to consume its pyrotechnic material. The slider value isn’t an
amount of time in seconds: It’s a scaler on a particle’s natural duration. The natural duration causes a
particle to burn out just after it’s reached its apex (depending on the Spray > Cone height setting). This
natural duration is represented by a value of 1.0. If you set the slider to 0.5, the particle will last half as long
as the natural duration. If you increase the value, the particle will fall back to earth before dying.
Abridgment Slider (Fraction)
Abridgment adds a bit of randomness to a particle’s longevity. With a setting of 0.0, there’s no randomness—
all particles last the same amount of time (as set through the Longevity slider). As you increase the
Abridgment value, you reduce the duration range. For example, a setting of 0.1 means that a particle will burn
out any time after 9/10ths of its longevity has expired.
The Abrigment setting never increases a particle’s duration so that it lasts longer than the Longevity setting—it
can only decrease it.

Fountain FINALE Fireworks User Guide
PAGE 138
Particle body
Particle body lets you fine-tune the particle’s mass so that it’s more or less susceptible to air friction, gravity,
and wind.
Name Attribute
Weight Slider (Scaler; 1.0 = natural weight)
Sets the particle’s weight. A value of 1.0 is a particle’s “natural” weight. If you increase the value, the particle
becomes heavier and is pulled back to Earth more quickly. Smaller values make the particle lighter and so
the upward portion of its trajectory is less affected by gravity.
Momentum Slider (Scaler; 1.0 = natural momentum loss)
As a particle consumes its pyrotechnic material, it loses mass and momentum, and thus slows down and
becomes increasingly more susceptible to the effects of the wind and air friction. This attribute lets you set
the scale of the particle’s ultimate momentum (the point at which it has exhausted its material) compared to
its launch momentum. A value of 1.0 produces a “natural” momentum loss. If you increase the value, the
particle maintains more of its momentum over the course of its trajectory. If you decrease the value, the
particle loses momentum more quickly.
Wind resistance Slider (Scaler; 1.0 = natural wind resistance)
Sets the particle’s susceptibility to the wind and air friction. A value of 1.0 produces a slight, natural
resistance. Decreasing the slider’s value makes the particle less affected by the wind, causing its trajectory to
straighten and elongate. Increasing the value increases the effect of the wind and air friction, shortening the
particle’s trajectory and bending it in the direction of the wind.

Fountain FINALE Fireworks User Guide
PAGE 139
Particle tail
A particle’s tail is the trail of sparks that it leaves behind after it’s launched and that lasts until it has consumed
its pyrotechnic material. You make the tail visible by setting the Tail effect, below, to something other than No
tail. You can then set the tail’s color and duration through the other controls. Additional attributes are set
through the Particle tail, cont. tab.
Name Attribute
Color Color picker
Sets the color of the sparks in a particle’s tail.
Brightness Slider (Scaler)
This is an additional brightness control that’s compounded with the color picker’s Bright: slider. It lets you
enhance the brightness of the tail so that it becomes more intense.
Begin Slider (Fraction)
End Slider (Fraction)
These two sliders determine the points, along the particle’s entire trajectory, at which the tail starts and
stops. If you set the sliders to 0.0 and 1.0, respectively, the tail will be visible from the moment the particle is
launched until the particle burns out. Settings of 0.25 and 0.75 would draw a tail that lasts from a quarter of
the way from the launch to a quarter of the way from the end.
For a fountain, you typically want to leave the End slider set to 1.0 and use the Particle > Longevity control to
adjust the length of the tail (which is analogous to adjusting the particle’s endpoint).
The End value must be greater than the Begin value; if it isn’t, the tail won’t appear.

Fountain FINALE Fireworks User Guide
PAGE 140
Particle tail, cont.
This tab sets additional attributes of the particles’ tails. Not all fountains have Weight and Ramp up controls
Name Attribute
Length Slider (Scaler; 1.0 = natural length)
Sets the length of the tail that a particle produces. By increasing or decreasing this value, you can cause
more or less of the tail to be visible at a given time.
Fadeaway Slider (Fraction)
As a particle nears the end of its trajectory, it emits fewer and fewer sparks. Fadeaway lets you control the
rate at which the emission of sparks tapers off. A setting of 0.5 is a “natural” decrease; if you set the slider
to 0.0, there’s no decrease at all: The “spark spigot” remains full on until the very end. As you increase the
slider’s value, the particle will begin to decrease its spark emission earlier in its trajectory.
Weight Slider (Scaler; 1.0 = natural weight)
Sets the weight of the sparks in the fountain’s tails. A value of 1.0 is a spark’s “natural” weight. If you
increase the value, the spark becomes heavier and is pulled back to Earth more quickly. Smaller values make
the spark lighter and so the upward portion of its trajectory is less affected by gravity.
Ramp up Slider (Fraction)
It takes some amount of time after the launch of a particle for its tail to reach its maximum spark density.
This slider lets you control this “ramp up” time as a fraction of the tail’s duration. If you set the slider to 1.0,
the tail continues to thicken across its entire duration, reaching its maximum density near the end of its
trajectory. If you set the slider to 0.0, the tail becomes maximally dense almost immediately upon launch.
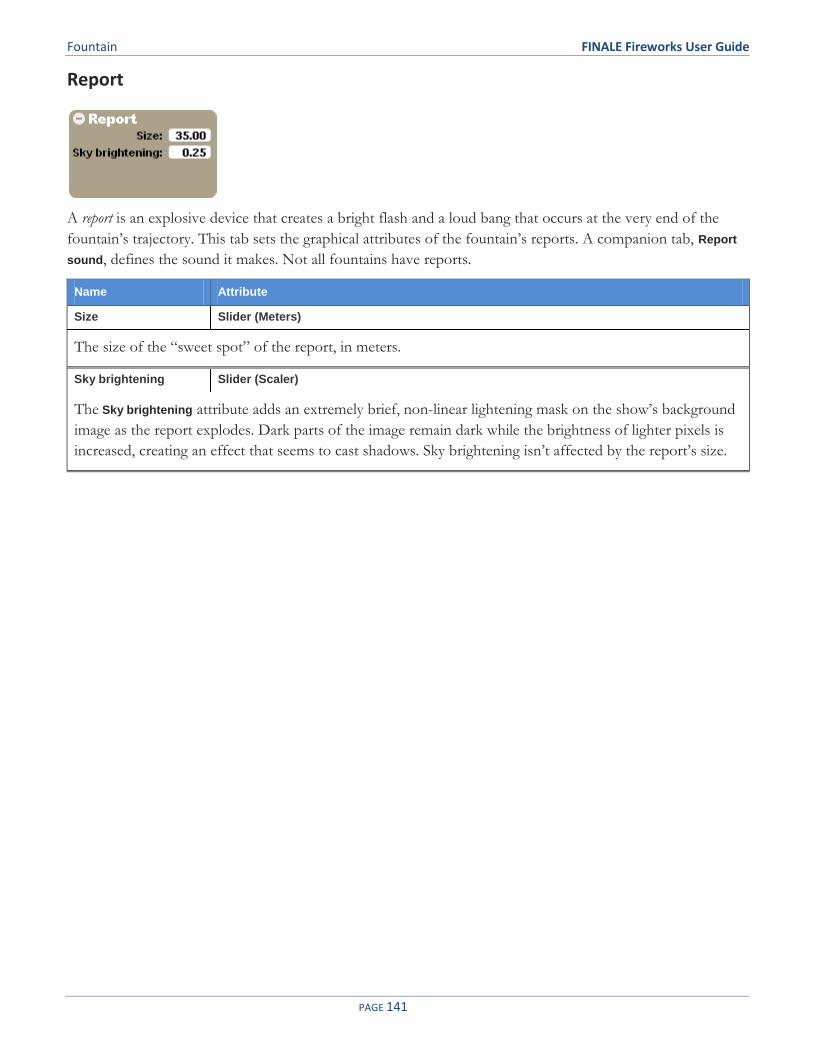
Fountain FINALE Fireworks User Guide
PAGE 141
Report
A report is an explosive device that creates a bright flash and a loud bang that occurs at the very end of the
fountain’s trajectory. This tab sets the graphical attributes of the fountain’s reports. A companion tab, Report
sound, defines the sound it makes. Not all fountains have reports.
Name Attribute
Size Slider (Meters)
The size of the “sweet spot” of the report, in meters.
Sky brightening Slider (Scaler)
The Sky brightening attribute adds an extremely brief, non-linear lightening mask on the show’s background
image as the report explodes. Dark parts of the image remain dark while the brightness of lighter pixels is
increased, creating an effect that seems to cast shadows. Sky brightening isn’t affected by the report’s size.

Fountain FINALE Fireworks User Guide
PAGE 142
Report sound
This tab defines the report’s sound. A companion tab, Report, defines its appearance.
Name Attribute
Sound Menu
The Sound menu gives you a choice of sounds that are played when the report explodes. The names of the
sounds that you can choose from are self-descriptive: Whoosh, Pop, Thud shriek, and so on.
Volume Slider (Scaler; 0.0 = natural volume)
Sets the amplitude of the report’s sound. If you set the slider to 0.0, the amplitude is automatically adjusted
to match the Report > Size setting. Any other value sets the amplitude as a percentage of the soundfile’s
unattenuated amplitude.
Pitch shift Slider (-1.0 = one octave lower; 1.0 = one octave higher)
Shifts the pitch of the sound by as much as an octave lower (-1.0) to an octave higher (1.0). Pitch shifting is
effected by changing the playback speed of the soundfile. Shifting the sound lower will increase its duration;
shifting it higher will increase the duration.
Random pitch shift Slider (-1.0 = one octave lower; 1.0 = one octave higher)
Adds a random amount of pitch shift to the sound of each report. You can declare a random pitch shift
from an octave lower to an octave higher than the pitch defined by the Pitch shift attribute. For example, if
you set Pitch shift to -0.5 (half an octave lower than the “natural” pitch of the sound) and set Random pitch
shift to 0.3, the pitch shift for a specific report will be somewhere between -0.2 (a fifth of an octave below
the natural pitch) and -0.5 (a half an octave lower than natural).
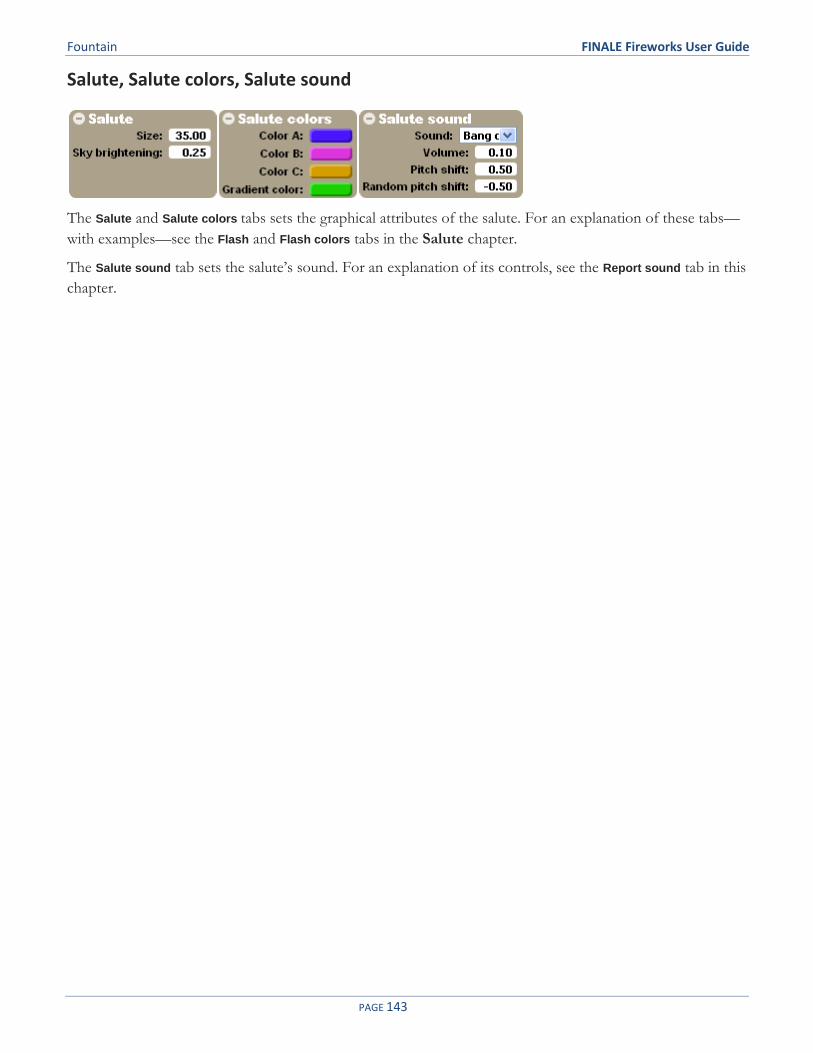
Fountain FINALE Fireworks User Guide
PAGE 143
Salute, Salute colors, Salute sound
The Salute and Salute colors tabs sets the graphical attributes of the salute. For an explanation of these tabs—
with examples—see the Flash and Flash colors tabs in the Salute chapter.
The Salute sound tab sets the salute’s sound. For an explanation of its controls, see the Report sound tab in this
chapter.

PAGE 144
19 Candle
A candle is a single tube device that shoots a sequence of effects such as comets or mines. Individual candles
are often fused together at different angles to create a pattern of repeated shots that fan or zigzag across the
sky.
Instead of manually configuring dozens of individual fireworks at the desired angles and times and then
saving the construction as a cake, you can edit a single firework in the Candle category to create an entire
pattern of shots. The Candle editor lets you set the pattern and timing of the firework sequence through its
Cycle and Multicycle tabs. In contrast with cakes, which can combine any number of different firework types,
the sequence of shots in a Candle firework are all the same effect.

Candle FINALE Fireworks User Guide
PAGE 145
Launch
The Launch tab defines the attributes of the candle’s launch.
Name Attribute
Cone angle Slider (degrees)
A firework’s cone angle is the angle across which the projectiles in a single launch are randomly distributed. If
you’re not using a cyclical effect (as created through the Cycle tab), the center of the angle is straight up. As
you increase the cone angle value, the cone widens symmetrically around the center.
If you are using a cycle, the center of the cone will “swing” as the successive shots are distributed over time
across the fan angle (again, this is explained in the Cycle description). In this case, you’ll probably want to
drastically reduce the cone angle so that you don’t spoil the effect of the pattern.
Cone height Slider (scaler; 1.0 = natural height)
By default, the height (or distance) of a firework’s trajectory is determined by the velocity with which it’s
launched, and velocity is directly related to the firework’s caliber (and some other physical properties).
The Cone height slider lets you adjust the firework’s velocity (and so its height). If you set the slider to 1.0,
you get the velocity/height that’s determined by the caliber. Values greater than 1.0 produce greater heights,
as much as twice as high as the natural caliber height. Values less than 1.0 reduce the height. If you set the
value to 0.0, the firework won’t lift off at all.
Keep in mind that you’re increasing and decreasing the firework’s velocity. The duration of its trajectory will
be the same regardless of this slider’s value. Thus, you can adjust the cone height without “invalidating” the
firework’s prefire setting.
Randomness Slider (Fraction; 0.0 = autocompute)
The velocities of a candle’s shells are set naturally by the candle’s caliber. The Randomness slider lets you
add some randomness to the distribution of velocities. As you increase the slider’s value the range of
velocities widens, but they’re always less than the natural velocity that’s set by the caliber. For example, let’s
say you’re creating a candle that launches shells at an initial default velocity of 400 ft/sec. If you set the
Randomness to 0.01, all shells will emerge with (very nearly) the same initial velocity (400 ft/sec). If you set
the value to 0.5, each shell will emerge with an initial velocity that’s somewhere between 200 and 400 ft/sec.
A value of 1.0 means that a shell could emerge at anywhere from 0 to 400 ft/sec.
A value of 0.0 tells FINALE to select a physically reasonable—but fairly small—range of velocities.

Candle FINALE Fireworks User Guide
PAGE 146
Launch sound
The Launch sound tab lets you select and modify the sound that’s played when the firework is launched.
Name Attribute
Sound Menu
The Sound menu gives you a choice of sounds that are played when the firework is launched. The names of
the sounds that you can choose from are self-descriptive: Whoosh, Pop, Thud shriek, and so on.
Volume Slider (Fraction)
Sets the amplitude of the sound as a percentage of its unattenuated amplitude. A volume of 1.0 is
completely unattenuated; a volume of 0.0 is silent. The amplitude isn’t affected by caliber; for example, if
you increase a firework’s caliber, the launch sound doesn’t get louder.
Pitch shift Slider (-1.0 = one octave lower; 1.0 = one octave higher)
Shifts the pitch of the sound by as much as an octave lower (-1.0) to an octave higher (1.0). Pitch shifting is
effected by changing the playback speed of the soundfile. Shifting the sound lower will increase its duration;
shifting it higher will increase the duration.
Random pitch shift Slider (-1.0 = one octave lower; 1.0 = one octave higher)
Adds a random amount of pitch shift to the sound of each launch. You can declare a random pitch shift
from an octave lower to an octave higher than the pitch defined by the Pitch shift attribute. For example, if
you set Pitch shift to 0.5 (half an octave higher than the “natural” pitch of the sound) and set Random pitch
shift to -0.3, the pitch shift for a specific launch will be somewhere between 0.2 (a fifth of an octave above
the natural pitch) and 0.5 (a half an octave higher than natural).

Candle FINALE Fireworks User Guide
PAGE 147
Mine
The Mine tab defines the number of projectiles (shells, sparks, stars) that are launched at a time.
Name Attribute
Is mine Checkbox
If this checkbox is checked, the firework behaves like a mine in that it can launch more than one projectile.
The number of projectiles is controlled by the Mine thickness slider.
If the checkbox is unchecked, the firework will only launch one projectile, regardless of the Mine thickness
setting.
Mine thickness Slider (Scaler; 0.0 = one projectile)
If Is mine is checked, this slider controls the number of projectiles that are launched during a single launch.
If you want a single projectile, set the slider to 0.0. Greater values increase the count. The maximum value
produces about 200 projectiles per launch.
If Is mine is unchecked, the Mine thickness slider is ignored and the firework launches a single projectile.

Candle FINALE Fireworks User Guide
PAGE 148
Shell
The Shell tab defines the basic attributes of a firework’s shell (or projectiles). More detailed attributes are
provided through the Shell body, Shell burst, Shell tip, Shell tail, and Report tabs.
Name Attribute
Longevity Slider (Scaler; 1.0 = natural longevity)
Sets the amount of time between the shell’s launch and its burst. The slider value isn’t an amount of time in
seconds: It’s a scaler on the shell’s natural duration, which is determined by its caliber, speed, and other
factors. The natural duration causes the shell to burst right about the time it has reached its apex. This
natural duration is represented by a value of 1.0. If you set the slider to 0.5, for example, the duration
between launch and burst will be half as long as the natural duration. If you want the shell to start to fall
back to earth before it bursts, increase the longevity value.
Abridgment Slider (Fraction)
Abridgment adds a bit of randomness to the shell’s longevity. With a setting of 0.0, there’s no randomness—
all shells that are fired in a single launch will burst at (approximately) the same time (as set through the
Longevity slider). As you increase the Abridgment value, you reduce the duration range. For example, a
setting of 0.1 means that a shell may burst at any time after 9/10ths of the shell’s longevity has expired.
The Abrigment setting never increases a shell’s duration so that it lasts longer than the Longevity setting—it
can only decrease it.
Has tip Checkbox
Has report Checkbox
These two checkboxes determine whether or not the firework has a tip and a report, respectively. The tip and
report attributes are set in the Shell tip, Report, and Report sound tabs. Note that shells and stars use the same
Report and Report sound settings.

Candle FINALE Fireworks User Guide
PAGE 149
Shell body
The Shell body controls let you fine-tune the shell’s mass so that it’s more or less susceptible to air friction,
gravity, and wind. These attributes only affect the shell’s trajectory; they don’t modify the size or appearance
of the shell. Also, the Shell body values that you set here don’t affect the similar values in the Star body tab. If
you want to make similar changes to both the shell and its stars, you have to visit both tabs.
Name Attribute
Weight Slider (Scaler; 1.0 = natural weight)
Sets the shell’s weight. A value of 1.0 is the shell’s “natural” weight. If you increase the value, the shell
becomes heavier and is pulled back to Earth more quickly. Smaller values make the shell lighter and so the
upward portion of its trajectory is less affected by gravity.
Momentum Slider (Scaler; 1.0 = natural momentum loss)
As a shell consumes its pyrotechnic material, it loses mass and momentum, and thus slows down and
becomes increasingly more susceptible to the effects of the wind and air friction. This attribute lets you set
the scale of the shell’s ultimate momentum (the point at which it has exhausted its material) compared to its
launch momentum. A value of 1.0 produces a “natural” momentum loss. If you increase the value, the shell
maintains more of its momentum over the course of its trajectory. If you decrease the value, the shell loses
momentum more quickly.
Wind resistance Slider (Scaler; 1.0 = natural wind resistance)
Sets the shell’s susceptibility to the wind and air friction. A value of 1.0 produces a slight, natural resistance.
Decreasing the slider’s value makes the shell less affected by the wind, causing its trajectory to straighten
and elongate. Increasing the value increases the effect of the wind and air friction on the shell, shortening its
trajectory and bending it in the direction of the wind.

Candle FINALE Fireworks User Guide
PAGE 150
Shell tip
The tip of a shell is its leading edge. Depending on the values you set in this tab, the tip can begin “glowing”
as soon as the shell is launched and can continue through the shell’s duration, ending at the burst point. You
make the tip visible by checking the Shell > Has tip checkbox. You then set the tip’s attributes through the
controls in this tab.
Name Attribute
Color Color picker
Sets the tip’s color.
Size Slider (Scaler; 1.0 = natural size)
Sets the size of the tip’s glow. A value of 1.0 is the natural size, based on the Firework > Caliber setting. Other
values act as scalers on the natural size: 0.5 makes the tip half as large; 2.0 makes it twice as large.
Begin Slider (Fraction)
End Slider (Fraction)
These two sliders determine the points, along the shell’s trajectory, at which the tip starts and stops glowing.
If you set the sliders to 0.0 and 1.0, respectively, the tip will start glowing as soon as the shell is launched,
and disappears when the shell bursts. Settings of 0.25 and 0.75 would start the glow a quarter of the way
from the launch and extinguish it a quarter of the way from the burst.
The End value must be greater than the Begin value; if it isn’t, the tip won’t appear.

Candle FINALE Fireworks User Guide
PAGE 151
Shell tail
A shell’s tail is the trail of glowing particles that it leaves behind after it’s launched and that lasts until it bursts.
You make the tail visible by setting the Tail effect, below, to something other than No tail. You can then set the
tail’s color and duration through the other controls. Additional attributes are set through the Shell tail, cont.
tab.
Name Attribute
Tail effect Menu
Lets you choose the type of tail you want the shell to display:
No tail. Use this effect to turn off the tail.
Thin. The particles are equally-spaced along the trajectory, and are of the same brightness and duration
(although with some randomness thrown in). The particles stay fairly close to the path of the trajectory.
Thick. This is the same as Thin but there are more particles, and they trace a wider path.
Glitter. The glitter tail is like the Thick tail, but with the randomness turned up. The increased variation gives
the tail a glittery or twinkling effect.
Color Color picker
Sets the tail’s color.
Begin Slider (Fraction)
End Slider (Fraction)
These two sliders determine the points, along the shell’s entire trajectory, at which the tail starts and stops.
If you set the sliders to 0.0 and 1.0, respectively, the tail will be visible from the moment the shell is
launched until the shell bursts. Settings of 0.25 and 0.75 would draw a tail that lasts from a quarter of the
way from the launch to a quarter of the way from the burst.
The End value must be greater than the Begin value; if it isn’t, the tail won’t appear.

Candle FINALE Fireworks User Guide
PAGE 152
Shell tail, cont.
This tab sets additional attributes of the shell’s tail.
Name Attribute
Weight Slider (Scaler; 1.0 = natural weight)
Sets the weight the individual particles in the shell’s tail. A value of 1.0 is a particle’s “natural” weight (which
is very close to weightless). If you increase the value, the particles become heavier and are pulled back to
Earth, causing the entire tail to appear to be “pulled down” from its launch point. Smaller values make the
particles lighter and less affected by gravity.
Length Slider (Scaler; 1.0 = natural length)
Sets the longevity of the particles in the shell’s tail (in other words, the amount of time before they’re
extinguished). By increasing or decreasing this value, you can cause more or less of the tail to be visible at a
given time.
Ramp up Slider (Fraction)
It takes some amount of time after the launch of a shell for the particles in the shell’s tail to reach their
maximum density. This slider lets you control this “ramp up” time as a fraction of the shell’s duration. If
you set the slider to 1.0, the tail continues to thicken across its entire duration, reaching its maximum density
near the end of its trajectory. If you set the slider to 0.0, the tail becomes maximally dense almost
immediately upon launch.

Candle FINALE Fireworks User Guide
PAGE 153
Shell burst
The Shell burst controls set some basic attributes of the stars that emerge when the shell bursts (or “breaks”).
Name Attribute
No. of Stars Slider (Count)
Sets the number of stars that each shell contains. When the shell bursts, the stars are thrown in random
directions away from the shell, creating a peony effect. If you set No. of stars to 0, the shell won’t throw any
stars. The stars’ attributes (color, weight, sound, and so on) are set through the various Star tabs.
Burst force Slider (Scaler; 1.0 = natural size)
Sets the power with which the stars break from the shell. 1.0 is the shell’s natural burst power, based on the
caliber of the shell and other physical properties. Other values are applied as scalers on the natural power:
0.5 means the stars are thrown half has hard; 2.0 means they’re thrown twice as hard. A setting of 0.0 means
that there’s virtually no power—the stars fall out of the break with very little outward momentum.
Note that the Burst force setting affects the sound volume of the report. If you want to create a weak shell
with a loud report, you have to increase the Report > Loudness setting.

Candle FINALE Fireworks User Guide
PAGE 154
Shell burst sound
The Shell burst sound controls let you select and modify the sound that’s played when the firework’s shell
finishes its trajectory (the sound is played even if the shell doesn’t actually “burst”).
Be aware that if the shell burst has a report, the shell’s burst sound will not be played.
Name Attribute
Sound Menu
The Sound menu gives you a choice of sounds that are played when the shell bursts. The names of the
sounds that you can choose from are self-descriptive: Whoosh, Pop, Thud shriek, and so on.
Volume Slider (Fraction)
Sets the amplitude of the sound as a percentage of its unattenuated amplitude. A volume of 1.0 is
completely unattenuated; a volume of 0.0 is silent. The amplitude isn’t affected by the firework’s caliber or
the Shell burst > Burst force setting; for example, if you increase a firework’s caliber, the shell’s burst sound
doesn’t get louder.
Pitch shift Slider (-1.0 = one octave lower; 1.0 = one octave higher)
Shifts the pitch of the sound by as much as an octave lower (-1.0) to an octave higher (1.0). Pitch shifting is
effected by changing the playback speed of the soundfile. Shifting the sound lower will increase its duration;
shifting it higher will increase the duration.
Random pitch shift Slider (-1.0 = one octave lower; 1.0 = one octave higher)
Adds a random amount of pitch shift to the sound of each shell burst. You can declare a random pitch shift
from an octave lower to an octave higher than the pitch defined by the Pitch shift attribute. For example, if
you set Pitch shift to -0.5 (half an octave lower than the “natural” pitch of the sound) and set Random pitch
shift to 0.3, the pitch shift for a specific burst will be somewhere between -0.2 (a fifth of an octave below the
natural pitch) and -0.5 (a half an octave lower than natural).

Candle FINALE Fireworks User Guide
PAGE 155
Star
A star is created when particles of pyrotechnic composition material are ignited and emitted by a bursting
shell. The Star tab defines the basic attributes of a star, such as its duration and whether it’s accompanied by a
report. Other star attributes are provided through Star body, Star tip, Star tail, and so on. A star’s force—but
not its duration—is affected by the Shell burst > Burst force setting.
Name Attribute
Longevity Slider (Scaler; 1.0 = natural longevity)
Sets the amount of time between the star’s emergence from the bursting shell and the time that its
pyrotechnic material is exhausted. The slider value isn’t an amount of time in seconds: It’s a scaler on the
star’s natural duration, which is determined by its caliber, speed, and other factors. This natural duration is
represented by a value of 1.0. If you set the slider to 0.5, for example, the duration between the burst and
the time that the star is exhausted will be half as long as the natural duration. If you want to extend the
stars’ trajectories, increase the longevity value.
Abridgment Slider (Fraction)
Abridgment adds a bit of randomness to the star’s longevity. With a setting of 0.0, there’s no randomness—
all stars that burst from a shell last (approximately) the same amount of time (as set through the Longevity
slider). As you increase the Abridgment value, you reduce the duration range. For example, a setting of 0.5
means that a star may die out any time after half of its longevity has expired.
The Abrigment setting never increases a star’s duration so that it lasts longer than the Longevity setting—it can
only decrease it.
Has tip Checkbox
Has report Checkbox
These two checkboxes determine whether or not the firework has a tip and a report, respectively. The tip and
report attributes are set in the Shell tip, Report, and Report sound tabs. Note that shells and stars use the same
Report and Report sound settings.

Candle FINALE Fireworks User Guide
PAGE 156
Star body
The Star body controls let you fine-tune a star’s mass so that it’s more or less susceptible to air friction,
gravity, and wind. These attributes only affect the stars’ trajectories; they don’t modify the size or appearance
of the stars.
The Star body values aren’t affected by changes in the Shell body tab.
Name Attribute
Weight Slider (Scaler; 1.0 = natural weight)
Sets the star’s weight. A value of 1.0 is the star’s “natural” weight. If you increase the value, the star
becomes heavier and is pulled back to Earth more quickly. Smaller values make the star lighter and so the
straight-outward portion of its trajectory is less affected by gravity.
Momentum Slider (Scaler; 1.0 = natural momentum loss)
As a star consumes its pyrotechnic material, it loses mass and momentum, and thus slows down and
becomes increasingly more susceptible to the effects of the wind and air friction. This attribute lets you set
the scale of the star’s ultimate momentum (the point at which it has exhausted its material) compared to its
burst momentum. A value of 1.0 produces a “natural” momentum loss. If you increase the value, the star
maintains more of its momentum over the course of its trajectory. If you decrease the value, the star loses
momentum more quickly.
Wind resistance Slider (Scaler; 1.0 = natural wind resistance)
Sets the star’s susceptibility to the wind and air friction. A value of 1.0 produces a slight, natural resistance.
Decreasing the slider’s value makes the star less affected by the wind, causing its trajectory to straighten and
elongate. Increasing the value increases the effect of the wind and air friction on the star, shortening its
trajectory and bending it in the direction of the wind.

Candle FINALE Fireworks User Guide
PAGE 157
Star tip
The tip of a star is its leading edge as it burst from a shell. The tip can begin “glowing” as soon as the star
emerges and can continue through the star’s duration. You make the tip visible by checking the Star > Has tip
checkbox.
Name Attribute
Color Color picker
Sets the tip’s color.
Size Slider (Scaler)
Sets the magnitude of the tip’s glow. Unlike a shell tip, a star tip doesn’t have a “natural” size that’s based
on the Fireworks > Caliber setting. As you select larger or smaller caliber settings, you’ may want to increase
or decrease the value of this attribute.
Begin Slider (Fraction)
End Slider (Fraction)
These two sliders determine the points, along the star’s trajectory, at which the tip starts and stops glowing.
The default settings mean that the tip starts glowing as soon as the star emerges from the shell, and it
disappears when the star dies. Settings of 0.25 and 0.75 (for example) would start the glow a quarter of the
way along the trajectory and extinguish it a quarter of the way from the burst.
The End value must be greater than the Begin value; if it isn’t, the tip won’t appear.

Candle FINALE Fireworks User Guide
PAGE 158
Star tail
A star’s tail is the trail of glowing particles that it leaves behind after it’s emerged from its shell, and lasting
until it dies. You make the tail visible by setting the Tail effect, below, to something other than No tail. You can
then set the tail’s other attributes through the rest of the controls.
Name Attribute
Effect Menu
Lets you choose the type of tail you want the shell to display:
No tail. Use this effect to turn off the tail.
Thin. The particles are equally-spaced along the trajectory, and are of the same brightness and duration
(although with some randomness thrown in). The particles stay fairly close to the path of the trajectory.
Thick. This is the same as Thin but there are more particles, and they trace a wider path.
Glitter. The glitter tail is like the Thick tail, but with the randomness turned up. The increased variation in
particle and brightness gives the tail a glittery or twinkling effect.
Color Color picker
Sets the tail’s color.
Begin Slider (Fraction)
End Slider (Fraction)
These two sliders determine the length of the star’s tail measured along the star’s trajectory. Settings of 0.0
and 1.0, respectively, mean that the tail begins as soon as the star emerges from the shell, and it disappears
when the star dies. Settings of 0.25 and 0.75 (for example) would cause the tail to appear a quarter of the way
along the trajectory and die out a quarter of the way from the end of the trajectory.
The End value must be greater than the Begin value; if it isn’t, the tail won’t appear.

Candle FINALE Fireworks User Guide
PAGE 159
Star tail, cont.
This tab sets additional attributes of the star’s tail.
Name Attribute
Weight Slider (Scaler; 1.0 = natural weight)
Sets the weight the individual particles in the star’s tail. A value of 1.0 is a particle’s “natural” weight (which
is very close to weightless). If you increase the value, the particles become heavier and are pulled back to
Earth, causing the entire tail to appear to be “pulled down” from its launch point. Smaller values make the
particles lighter and less affected by gravity.
Length Slider (Scaler; 1.0 = natural length)
Sets the longevity of the particles in the star’s tail (in other words, the amount of time before they’re
extinguished). By increasing or decreasing this value, you can cause more or less of the tail to be visible at a
given time.

Candle FINALE Fireworks User Guide
PAGE 160
Report
A report is an explosive device that creates a bright flash and a loud bang. This tab defines the report’s
appearance. A companion tab, Report sound, defines its sound. The report settings are shared by the shell and
the star.
Name Attribute
Color Color picker
Sets the color of the report’s flash.
Size Slider (Scaler)
Sets the magnitude of the report’s flash. Unlike other objects, a report doesn’t have a “natural” size that’s
based on the Fireworks > Caliber setting (or any other attributes). As you select larger or smaller caliber
settings, you may want to increase or decrease the value of this attribute.
Adjusting the Size setting could automatically adjust the volume of the report’s sound, depending on the
volume of the Report sound > Volume setting.

Candle FINALE Fireworks User Guide
PAGE 161
Report sound
A report is an explosive device that creates a bright flash and a loud bang. This tab defines the report’s sound.
A companion tab, Report, defines its appearance. The report settings are shared by the shell and the star.
If a shell contains a report, the report’s sound is played and the Shell burst sound is suppressed.
Name Attribute
Sound Menu
The Sound menu gives you a choice of sounds that are played when the shell bursts. The names of the
sounds that you can choose from are self-descriptive: Whoosh, Pop, Thud shriek, and so on.
Volume Slider (Scaler; 0.0 = natural volume)
Sets the amplitude of the report’s sound. If you set the slider to 0.0, the amplitude is automatically adjusted
to match the Report > Size setting. Any other value sets the amplitude as a percentage of the soundfile’s
unattenuated amplitude.
Pitch shift Slider (-1.0 = one octave lower; 1.0 = one octave higher)
Shifts the pitch of the sound by as much as an octave lower (-1.0) to an octave higher (1.0). Pitch shifting is
effected by changing the playback speed of the soundfile. Shifting the sound lower will increase its duration;
shifting it higher will increase the duration.
Random pitch shift Slider (-1.0 = one octave lower; 1.0 = one octave higher)
Adds a random amount of pitch shift to the sound of each report. You can declare a random pitch shift
from an octave lower to an octave higher than the pitch defined by the Pitch shift attribute. For example, if
you set Pitch shift to -0.5 (half an octave lower than the “natural” pitch of the sound) and set Random pitch
shift to 0.3, the pitch shift for a specific report will be somewhere between -0.2 (a fifth of an octave below
the natural pitch) and -0.5 (a half an octave lower than natural).

Candle FINALE Fireworks User Guide
PAGE 162
Cycle
A cycle is a series of events that can be distributed in a pattern in the sky. Each event is a single performance of
the effect that’s defined by the preceding tabs. The Cycle tab lets you set the number of events in a cycle, the
amount of time between events, and the pattern that the cycle of events creates. A companion tab, Multicycle,
lets you create a series of cycles.
The entire performance, from the first launch until the moment of the last launch (including multicycle
repetitions), can last no more than 120 seconds. Because of this, the number of events and cycles that you can
ask for may be less than the maximum values that are proclaimed by the “number of X” sliders. The lingering
effect of the last event can stretch beyond the 120-second barrier—it just has to be launched within 120
seconds of the first event’s launch.
Name Attribute
Events per cycle Slider (Count)
Seconds per event Slider (Seconds)
These two controls set the number of events in a single cycle, and the amount of time, in seconds, between
the start times of successive events. By multiplying the seconds-per-event by the events-per-cycle (minus 1),
you get the duration of a single cycle.
Pattern Menu
Fan angle Slider (degrees)
These two controls work together to create a “fan” effect over time by changing the angle of the launch of
successive events. The range or “pie wedge” of the fan is set by the Fan angle; the fan effect is defined by
the Pattern selection. There are nine effects:
Straight up. This turns off the fan pattern. All events are projected straight up. Note, however, that the Shell
> Cone angle is still applied; individual projectiles in an event are distributed randomly within the cone angle.
Fan left to right. In this pattern, the first event is fired at an angle that’s half of the Fan angle to the left of
center, and successive events move in equal steps to the right, reaching the far right side of the Fan angle at
the last event (see the illustration, below). Again, the cone angle is applied around each step. If you’re using
this pattern—or any of the following patterns—you may want to set the Launch > Cone angle value to 0.0 (or
very close) so that you don’t spoil the effect.
Fan right to left. This is the same as the above but moves right-to-left.
Fan left to right to left. The events move twice as fast, from the left edge to the right edge and back again in a
single cycle.
Fan right to left to right. This is the same as the above, but from right-to-left and back again.
Fan open. Pairs of events are fired at the same time, one on the far left edge of the Fan angle, and the other

Candle FINALE Fireworks User Guide
PAGE 163
Name Attribute
on the far right side. Successive events close the gap, and the final events are fired (nearly) straight up.
When you use this pattern (and the other fan open/close patterns), you effectively double the Events per
cycle setting.
Fan close. The same as the above, but the fan opens from the center to the extremes.
Fan open and close. Events move twice as fast, opening and then closing the fan.
Fan close and open. The same as the above, but the fan closes and then opens.
Keep in mind that in order to see the effect of the pattern, you must have multiple events within a cycle.
Fan left to right pattern

Candle FINALE Fireworks User Guide
PAGE 164
Multicycle
The Multicycle tab lets you declare the number of times you want to repeat the effect defined by the Cycle tab.
It also lets you impose a time delay between each cycle.
Name Attribute
No. of cycles Slider (Count)
Sets the number of cycles. Note that the upper limit may be less than 100—it depends on the number and the
timing of the events that you’ve requested in the Cycle tab, and the time between cycles that you request by
setting the next attribute. The entire performance must be less than 120 seconds. See the Cycle tab
specification for more information.
Seconds between Slider (Seconds)
The amount of time, in seconds, between the end of one cycle and the beginning of the next.
Seconds before first Slider (Seconds)
An initial delay that’s imposed before the first cycle. Be aware that this delay does eat into the 120-second limit.

PAGE 165
20 FINALE CSV Script Format
The File menu lets you save your show in a number of formats. One of the options in the menu is Export
Finale Generic CSV Script, FINALE’s own version of a firing script. The script’s format is explained in the table
below. This information is provided, primarily, for firing system manufacturers who want to support the
FINALE firing script format.
File Layout and Formatting Rules
The first line in the FINALE CSV script lists the names of the script’s columns. The column names, which
are listed in the format table, are provided as a convenience. If you’re writing a program to read the script,
you should ignore this first row. The end of the line is marked with a newline character (\r\n).
Each of the rest of the lines in the file describes a single firework “event” (or shot), where a shot can launch
more than one firework. The format of a single line follows these rules:
Values are comma-separated with no whitespace surrounding the commas.
There are 17 columns in the format. Thus, each line will contain 16 commas, even if some of the columns
don’t contain value.
A value contains a string, a single character, an integer, or a floating-point number (a number with a
fractional part).
String values are ASCII characters only.
Whitespace in a string value is replaced with an underbar, and double quotes and commas are removed.
For example, Red Peony 3”, No Tail becomes Red_Peony3NoTail.
Although whitespace is replaced with underbars in strings, if a row represents a shot that contains more
than one launch, some of the columns will contain whitespace. This will be explained in the format table.
Unless otherwise noted, floating-point numbers (numbers that have a fractional part) are always given to
two decimal places: 1.05, 3.40, 6.00.
The end of a line is marked with a newline character (\r\n).

FINALE CSV Script Format FINALE Fireworks User Guide
PAGE 166
Format Table
The table lists the columns that appear in a single row in the CSV file. The columns are given in the order that
they appear in the file.
Name Type Instances
Shot Number Integer Single
This is an ordinal number that gives the index of the shot, starting with shot 0 and increasing
monotonically.
Shot Time Floating-point Single
The time of the event, in seconds, from the beginning of the show as it was created in FINALE. This is the
time at which the pin is activated with an electrical impulse.
Number Of Launches Integer Single
The number of fireworks that are assigned to this pin. The value will only be greater than 1 if the module
that controls the shot was defined, in the Edit position properties panel, to have more than one launch-per-
pin. The rest of the columns that are marked as Multiple will have a list of values that correspond to the
number of launches that are declared here, with neighboring values separated by a single whitespace.
Launch Delays Floating-point Multiple
This is a list of the delays, after the Shot Time, of the launches that are contained in the shot. The delays are
listed from least to greatest. The first value in the list will always be 0.00. As mentioned above, the list is
given with a single whitespace between each value. For example:
0.00 0.15 0.60 1.15
To create a launch delay, you use the Firing View to manually set the pin numbers for two or more fireworks
to the same value (the same pin), and then move one or more of the fireworks along the timeline. The
earliest firework will have a delay of 0.00 (even if it was moved, as well). The second value in the list is the
amount of time between the first and second launches, the third value is the difference between the first
and third, and so on. In other words, the delays are computed by comparing a launch to the time of the first
launch—they’re not the time spans between successive launches.
Match Types String Multiple
A list of the devices that ignite the launches. Currently, the ignition device is always ematch.
Prefire Times Floating-point Multiple
A list of the fireworks’ prefire times, in seconds.
Effect Names Strings Multiple
The names of the fireworks that are contained in the shot. The names are taken from the FINALE
inventory.

FINALE CSV Script Format FINALE Fireworks User Guide
PAGE 167
Name Type Instances
Calibers Integer/Floating-point Multiple
A list of the fireworks’ calibers, in inches. If the caliber is a whole number, the value is given as an integer,
otherwise the value contains as many decimal places as are needed. As examples: 3 3.5 5 7.5. Two decimal
places are possible, but unlikely.
Angles Floating-point (positive/negative) Multiple
A list of the fireworks’ angles, in degrees. Positive angles lean to the right from the audience’s perspective.
Negative angles lean to the left. As examples: -45.00 0.00 45.00.
Position Names String Multiple
The names of the launch positions that the fireworks are associated with. The launch position names are
provided as a convenience.
Position Distances Floating-point Multiple
The distance-from-the-audience values that were assigned to the launch positions, in meters.
Module Type String Single
The type of firing module that controls this shot, as given in the Edit position properties panel. Multiple-
launch shots can’t cross modules, thus this column takes a single value.
Module Number Integer Single
Slat Letter Character Single
Pin Number Integer Single
The module, slat, and pin that control the shot. All shots have a Module Number and a Pin Number but not
necessarily a Slat Letter.
Assignment Method String Single
The method that was used to assign the module/slat/pin, either auto or manual.
Notes String Multiple
A list of the “field notes” that describe the fireworks. Field notes are created through the Field Notes tab in
the Firework Editor. The field notes are provided as a convenience.