FIG. 3 CB-MET-ECOM - Side Views - AV Ace · FIG. 3 CB-MET-ECOM Mounting Specifications ... 3. While...
2
Installation Guide CB-MET-ECOM Rough-In Box Overview The CB-MET-ECOM Rough-In Box (FG039-12) is an optional accessory for the Metreau Entry Communicators. The CB-MET-ECOM allows Metreau Entry Communicators to be mounted directly to the studs/pre-wall and includes a Rough-In box and mounting screws. Mounting Specifications The following illustrations (FIG. 2, FIG. 3 and FIG. 4) provide mounting specifications for the CB-MET-ECOM. Reference these measurements when planning and installing the CB-MET-ECOM. CB-MET-ECOM - Front View CB-MET-ECOM - Top View CB-MET-ECOM - Side Views FIG. 1 CB-MET-ECOM CB-MET-ECOM (FG039-12) Specifications Dimensions (HWD) • 4.42" x 3.08" x 1.81" • 11.21 cm x 7.82 cm x 4.59 cm Certifications • UL 508A FIG. 2 CB-MET-ECOM Mounting Specifications (front view) FIG. 3 CB-MET-ECOM Mounting Specifications (top view) FIG. 4 CB-MET-ECOM Mounting Specifications (side views)
-
Upload
phungtuong -
Category
Documents
-
view
216 -
download
3
Transcript of FIG. 3 CB-MET-ECOM - Side Views - AV Ace · FIG. 3 CB-MET-ECOM Mounting Specifications ... 3. While...

Installation GuideCB-MET-ECOM Rough-In Box
OverviewThe CB-MET-ECOM Rough-In Box (FG039-12) is an optional accessory for the Metreau Entry Communicators. The CB-MET-ECOM allows Metreau Entry Communicators to be mounted directly to the studs/pre-wall and includes a Rough-In box and mounting screws.
Mounting SpecificationsThe following illustrations (FIG. 2, FIG. 3 and FIG. 4) provide mounting specifications for the CB-MET-ECOM.
Reference these measurements when planning and installing theCB-MET-ECOM.
CB-MET-ECOM - Front View
CB-MET-ECOM - Top View
CB-MET-ECOM - Side Views
FIG. 1 CB-MET-ECOM
CB-MET-ECOM (FG039-12) Specifications
Dimensions (HWD) • 4.42" x 3.08" x 1.81"
• 11.21 cm x 7.82 cm x 4.59 cm
Certifications • UL 508A
FIG. 2 CB-MET-ECOM Mounting Specifications (front view)
FIG. 3 CB-MET-ECOM Mounting Specifications (top view)
FIG. 4 CB-MET-ECOM Mounting Specifications (side views)
Installing onto a Flat Surface Using Mounting ScrewsMounting screws (#4 flathead, not included) are secured through two sets of circular holes located at the left and right sides of the CB-MET-ECOM.
Ensure the CB-MET-ECOM is flush against the mounting surface.
FIG. 5 provides recommended cutout dimensions for the CB-MET-ECOM.
It is recommended that you cutout the surface slightly smaller than what is outlined in the installation drawings so that you can make any necessary cutout adjustments.
Note: Be sure to install the Cat5 Suppression Ferrite (provided) before mounting the Metreau Entry Communicator unit into the Rough-In Box.
Note: The device and Rough-In Box must have an Earth ground.
Note: Replacement drywall clip sets must be ordered from AMX.
Note: Do not over-torque the screws; doing so can cause the unit to not function properly
Typical Installation (without Expansion Clips)
1. Remove the tabs for the expansion clip installation from the Rough-In Box by bending back and forth with pliers.
2. Use screws through the rough-in tabs to the stud.
• The CB-MET-ECOM is 1.81" (4.597 cm) deep.
• The front of the Rough-In Box should be flush with the front surface of the sheetrock.
• While the Rough-In Box can be recessed it should never stand out from the surface.
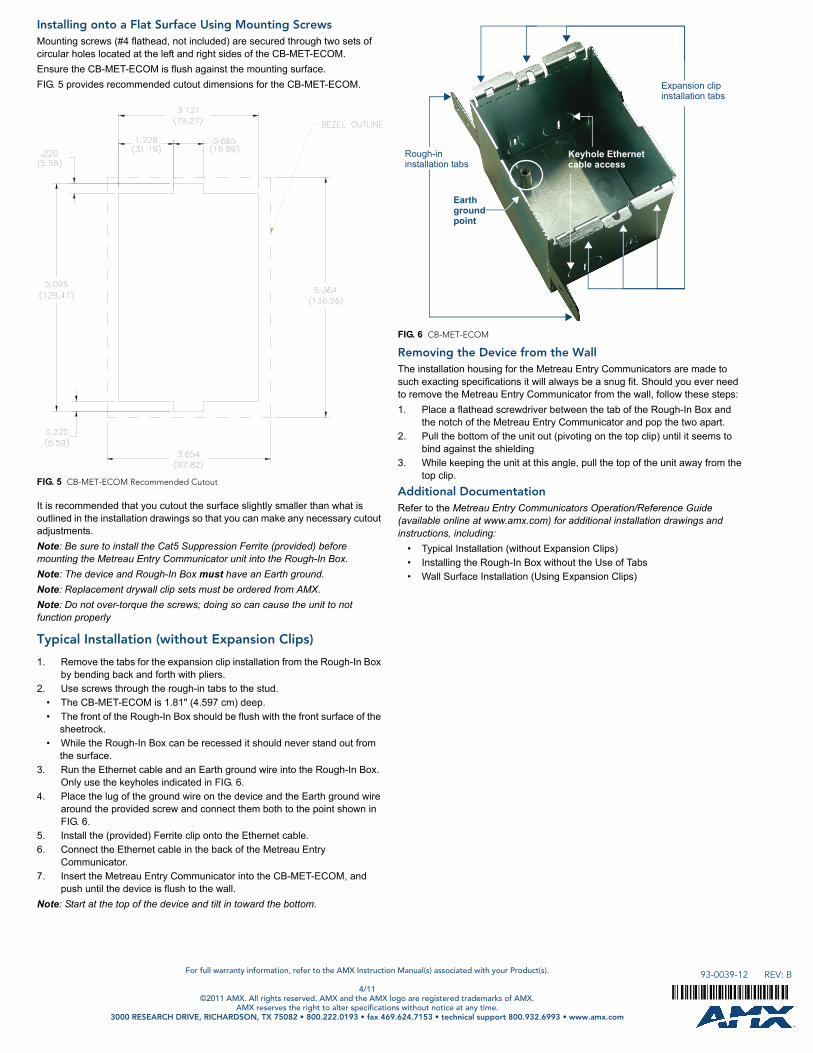
3. Run the Ethernet cable and an Earth ground wire into the Rough-In Box. Only use the keyholes indicated in FIG. 6.
4. Place the lug of the ground wire on the device and the Earth ground wire around the provided screw and connect them both to the point shown in FIG. 6.
5. Install the (provided) Ferrite clip onto the Ethernet cable.
6. Connect the Ethernet cable in the back of the Metreau Entry Communicator.
7. Insert the Metreau Entry Communicator into the CB-MET-ECOM, and push until the device is flush to the wall.
Note: Start at the top of the device and tilt in toward the bottom.
Removing the Device from the WallThe installation housing for the Metreau Entry Communicators are made to such exacting specifications it will always be a snug fit. Should you ever need to remove the Metreau Entry Communicator from the wall, follow these steps:
1. Place a flathead screwdriver between the tab of the Rough-In Box and the notch of the Metreau Entry Communicator and pop the two apart.
2. Pull the bottom of the unit out (pivoting on the top clip) until it seems to bind against the shielding
3. While keeping the unit at this angle, pull the top of the unit away from the top clip.
Additional DocumentationRefer to the Metreau Entry Communicators Operation/Reference Guide (available online at www.amx.com) for additional installation drawings and instructions, including:
• Typical Installation (without Expansion Clips)
• Installing the Rough-In Box without the Use of Tabs
• Wall Surface Installation (Using Expansion Clips)
FIG. 5 CB-MET-ECOM Recommended Cutout
FIG. 6 CB-MET-ECOM
Expansion clipinstallation tabs
Rough-ininstallation tabs
Keyhole Ethernetcable access
Earthgroundpoint
For full warranty information, refer to the AMX Instruction Manual(s) associated with your Product(s).
4/11©2011 AMX. All rights reserved. AMX and the AMX logo are registered trademarks of AMX.
AMX reserves the right to alter specifications without notice at any time. 3000 RESEARCH DRIVE, RICHARDSON, TX 75082 • 800.222.0193 • fax 469.624.7153 • technical support 800.932.6993 • www.amx.com
93-0039-12 REV: B