FIELD FOLDER TRAINING SEMINAR - dblequip.com Paper Folding Machine Concepts.pdf · Automatic Fold...
34
www.dblequip.com Copyright © 2007 Double Equipment FIELD FOLDER TRAINING SEMINAR
Transcript of FIELD FOLDER TRAINING SEMINAR - dblequip.com Paper Folding Machine Concepts.pdf · Automatic Fold...

www.dblequip.com Copyright © 2007 Double Equipment
FIELD FOLDER TRAINING SEMINAR

www.dblequip.com Page 2
Copyright © 2014 Double Equipment
Notice: Information contained here is for educational proposes only and is not to intended replace the original equipment manufactures’ instructions. For the safe
operation of your equipment, ALWAYS refer to the original owner’s manual that came with your equipment.

www.dblequip.com Page 3
Copyright © 2014 Double Equipment
The Folding Machine
Today’s commercial folding machines are available in a variety of configurations. The most popular folders found in the USA are “Buckle Folders”. When discussing your equipment with others you need to know the proper description of your equipment. It is best to have the following when calling for service or parts: Make:_____________ Model:_______________ Serial No.:____________ For example: Make: Stahl, Model: B26 444 Cont, Serial No.: 12345-6789 Generally speaking, when describing the model it will tell some important information: “B26 444 Cont” is a: “B” series “26 x40 inch” “4 plate Parallel” “4 plate 8pg” “4 plate 16pg” with “Continuous Feeder” The size of your folder will be described as the WIDTH of the folder rollers or the WIDTH of the sheet size that can be fed though the machine. The size can be standard inches or metric centimeters. B26 (26”) is equal in size to a T66 (66 cm).

www.dblequip.com Page 4
Copyright © 2014 Double Equipment
Common folder sizes found in the US are: INCH METRIC 14 x 20 T36 18 x 23 T47 & T49 20 x 26 T50 & T52 23 x 36 T60 26 x 40 T66 The primary parts of the folding machine are: FEEDER
Friction Feed
Air Pile Feed
Continuous Feed
In-Line Roller or Burster
Pallet Feed REGISTER TABLE
Marble Side-guide
Air Side-guide FOLDING UNIT
Standard Fold Plates and Stationary Deflectors
Standard Fold Plates with Hinged Deflectors
Automatic Fold Plates w/ Manual or Servo controls SLITTER SHAFTS
Adjustable
Fixed RIGHT ANGLE UNITS
Cross Carrier
Side Guide
Folding Unit
Slitter Shafts STACKER/DELIVERY UNITS
With or without Pressure (Presser) rollers
Standard Stacker
Vertical Stacker
Horizontal Stacker
Shingle Stacker

www.dblequip.com Page 5
Copyright © 2014 Double Equipment
OPTIONAL EQUIPMENT: Batch Counters Gluing Units Gatefold Attachment Specialized conveyors

www.dblequip.com Page 6
Copyright © 2014 Double Equipment
THEORY OF OPERATION There are 3 common types of folders in use today. The most popular is the “Buckle Folder”. Buckle Folder
Versatile, can accommodate many different layouts
High Speeds

www.dblequip.com Page 7
Copyright © 2014 Double Equipment
Knife Folder
Limited to one or two folds
Better on thicker materials
Slow Speed (7,500 per hour)
Plow Folder
Found on Pocket Folder Gluers and Web presses
Can fold a continuous and thicker SCORED covers.

www.dblequip.com Page 8
Copyright © 2014 Double Equipment
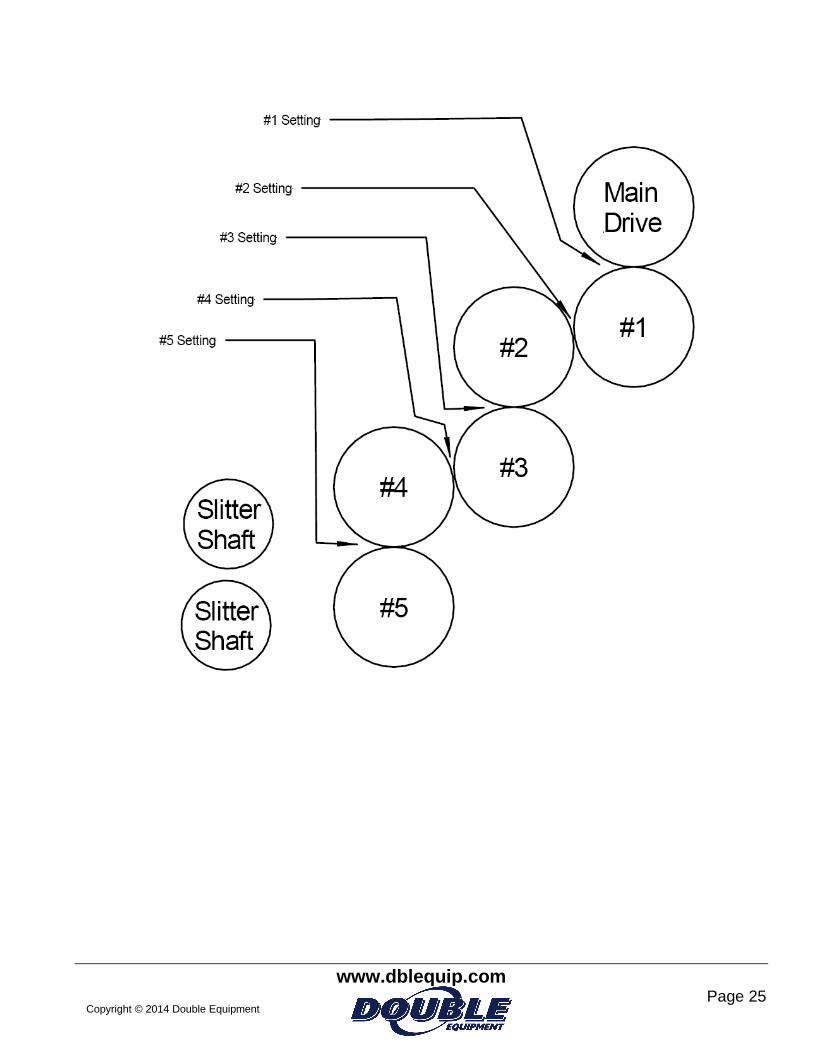
Roller Layout Deflecting “NO FOLD”
MBO Shown Swap Main Drive with #1 for Baumfolder & Stahl
www.dblequip.com Page 9
Copyright © 2014 Double Equipment
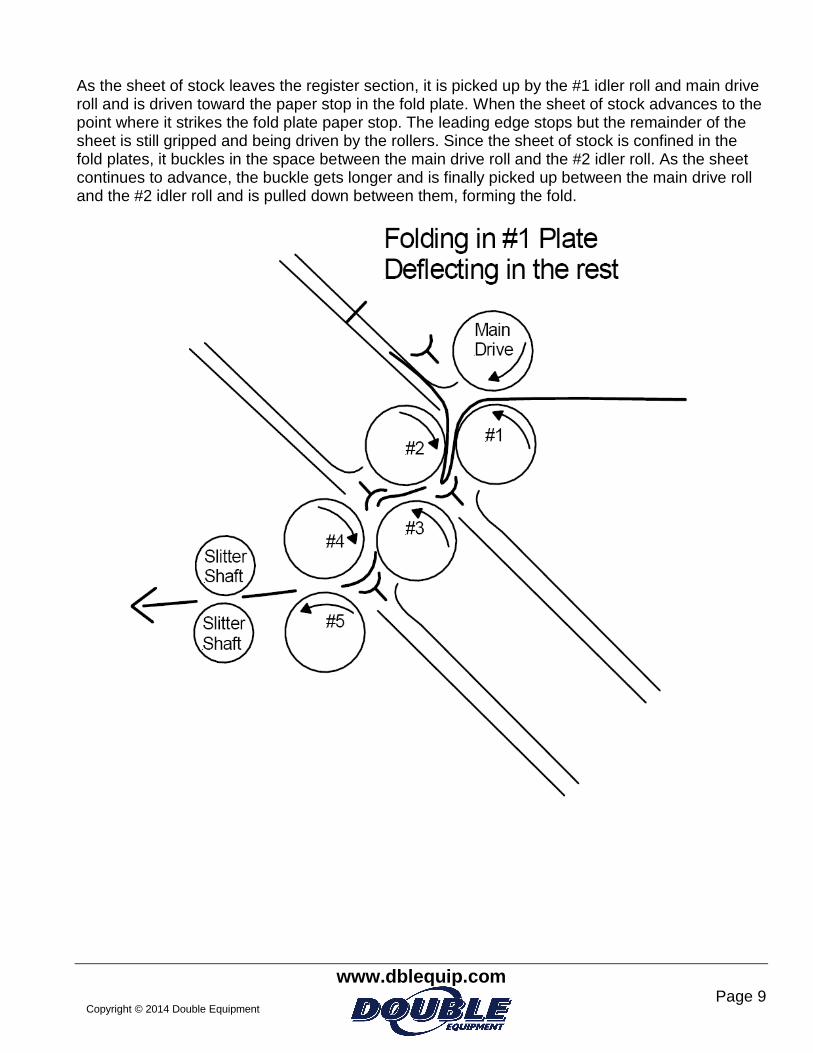
As the sheet of stock leaves the register section, it is picked up by the #1 idler roll and main drive roll and is driven toward the paper stop in the fold plate. When the sheet of stock advances to the point where it strikes the fold plate paper stop. The leading edge stops but the remainder of the sheet is still gripped and being driven by the rollers. Since the sheet of stock is confined in the fold plates, it buckles in the space between the main drive roll and the #2 idler roll. As the sheet continues to advance, the buckle gets longer and is finally picked up between the main drive roll and the #2 idler roll and is pulled down between them, forming the fold.

www.dblequip.com Page 10
Copyright © 2014 Double Equipment
When first learning how to setup a paper folding machine, it can be difficult to understand how the machine works and knowing all the correct steps needed to setup and run the folder. The following information is a “technique” you might use to figure out the correct information needed to complete a quick and thorough setup. Remember the key word here is “TECHNIQUE” and this is not intended to teach the theory or mechanics of an actual paper folding machine. The intention here is to teach someone how to easily decide on a proper setup. Remember, paper folders are very versatile and there will often be more then one way to setup and run a folding job. The goal here is to answer the following questions when setting up a folding machine:
1. How is the job folded? 2. How many times do you fold the piece? 3. How many fold plates do I need to fold the job? 4. How will I load the feeder? 5. Which fold plates should I use? 6. In the fold plates used, where should I set the fold stop at? 7. How should I set each roller?
When you can continuously answer these questions correctly, you have mastered the most difficult part of setting up a paper folding machine. THE FOLDING MACHINE Before we dive into answering all the questions, we need to know a little bit about the folding machine. It would be hard to answer some of our questions without first knowing something about the equipment. You must know the sheet size you can run and how many fold plates are available. For this training, it is assumed we are working with a common 26” wide folder with 4 fold plates.
The standard four (4) plate folder will have two (2) UP plates and two (2) DOWN plates. Each plate is number, 1, 2, 3, & 4, the ODD plates are UP and the EVEN plates are DOWN.

www.dblequip.com Page 11
Copyright © 2014 Double Equipment
The folder will send the paper to each plate in order starting with the #1 plate and ending with the # 4 plate. A good way to visualize the folding process is by observing the following diagram:
Notice the direction of the arrows, the sheet travels through the folder in the direction the big arrow is pointing, to the left. As the paper passes through the folder it will come to each fold plate in order. First it comes to the #1 plate and it will fold or deflect, then the #2 plate, then #3 and last #4. Also notice we have two UP folds and two DOWN folds. Look at the previous folder diagram and this diagram. Can you see the similarities? To “deflect” is when you close a plate and do not fold in it; you open the deflector to use a
fold plate to make a fold. The paper will “fold or deflect” in each plate, try to remember that even when you close the deflector and you are not using the plate for a fold, the paper will continue to be driven past it. Which brings us to the rollers, this standard folder with four (4) fold plates has six (6) fold rollers and two (2) slitter shafts “M” and these will be set accordingly to the job. The rollers and slitter shafts adjustments are numbered or marked; 1, 2, 3, 4, 5, and “M”. The adjustment on the Stahl folder marked with the “M” is to set the slitter shaft tension. This should not be confused with the “main” fold roller, that you will see references to elsewhere. The “main” roller is also referred to as the “stationary” roller and this roller is NOT adjustable and doesn’t need to be set, thus leaving five (5) adjustable fold rollers out of the six (6). Each roller is numbered for the corresponding plate that the roller drives into, for instance: the #1 roller drives the sheet into (or past when deflecting) the #1 plate, the # 2 roller drives the sheet into or past the #2 plate, and so on…
#1 roller drives to the #1 plate #2 roller drives to the #2 plate #3 roller drives to the #3 plate #4 roller drives to the #4 plate #5 roller drives out to slitter shafts “M” “M” slitter shafts drives out onto the delivery.
When setting these rollers and shafts you will adjust or set for the MINIMUM thickness that will be driven through. YOU MUST ALWAYS SET ALL THE ROLLERS. It’s a common misconception that there is no need to set all the rollers if you are not using all the plates and this is WRONG! The paper travels through every roller no matter how many plates you are folding in, so remember to set ALL the rollers every time.

www.dblequip.com Page 12
Copyright © 2014 Double Equipment
1st foldUP in #1 Plate2nd fold DOWN
in #2 Plate
3rd foldUP in #3 Plate
1st foldUP in #1 Plate
2nd fold DOWNin #2 Plate
3rd foldUP in #3 Plate
#4 PlateDeflectorCLOSED
You see in this example we only need three (3) fold plates to fold this piece, by going UP in the #1 plate, DOWN in the #2 plate and UP in the #3 plate, the #4 is closed because we don’t need it. You might hear a person say “That’s folding UP-DOWN-UP & OUT” when referring to the setup for this job. Notice: we are working from right to left as paper would travel through the folder being viewed from the operator side of the machine. After each fold is made, that new fold becomes the LEADING edge. The paper continues to travel in the same right to left direction. As you read on, you will notice that the folds are shown in this format, starting on right side. Study the above diagram until you understand this. Having a good understanding of this concept will make the rest of this training that much easier.

www.dblequip.com Page 13
Copyright © 2014 Double Equipment
THE SETUP Now let’s get into answering these questions:
1. How is the job folded? 2. How many times do you fold the piece? 3. How many fold plates do I need to fold the job? 4. How will I load the feeder? 5. Which fold plates should I use? 6. In the fold plates used, where should I set the fold stop at? 7. How should I set each roller?
1. HOW IS THE JOB FOLDED? Here we need the SAMPLE or DUMMY. If one is not available then its time to make one. Fold the piece like it should be done when finished. Mark or write on this sample with some indication of how it folds so it can’t be confused if it was handled and then accidentally fold incorrectly.
1 12 2
X
SAMPLE

www.dblequip.com Page 14
Copyright © 2014 Double Equipment
2. HOW MANY TIMES DO YOU FOLD THE PIECE?
This can be a tricky question. The correct answer to this question will lead to the answer for our next question about how many fold plates needed. Think of this…if you fold it by hand, how many times did you fold the sheet, not how many folds are in the sheet. I’ll try to explain with the following example. If you fold a sheet in ½, then in ½ again, you only had to fold it two (2) times. But you’ll also observe it has four (4) panels and three (3) folds. The answer we’re looking for here; is you can fold this job by making two (2) folds.
1st Fold in 1/22nd fold in 1/2 again
ONLY "2" Folds to fold 4 panels in this example
We’ll use the following example for the rest of this explanation and questions:
1 12 2X
SAMPLE
In this example we fold our sheet TWO (2) times.Making a 3 panel fold

www.dblequip.com Page 15
Copyright © 2014 Double Equipment
3. HOW MANY FOLD PLATES DO I NEED TO FOLD THE JOB? This answer is easy, if you answer the previous question correctly. In this case the answer to the previous question is two (2). Therefore, the answer to this question is 2. Now that you know how many fold plates are needed, you can proceed to work out the answers for the next questions. NOTE: Be patient; carefully consider all the options when looking for the following answers. Remember there may be more then one correct answer. With practice and experience, the answers will become easier. For now, take the time to work through all your choices. 4. HOW WILL I LOAD THE FEEDER? There are four (4) choices here. You can load the feeder four different ways and the choice made will influence the fold plates you will be using. Each choice may have advantages or disadvantages. Some choices just will not work, so you can eliminate those choices right away. To start, make a choice, at this point it really doesn’t matter which one, just remember how you started so you don’t repeat it when making the next choice. I usually mark the paper with an ARROW to remind me how I started. After you choose work through the next question, then return to this question and make your next choice. Please try all 4 choices.
1 1
Mark sheet with a arrow as reminder
11
Brochure
Brochure

www.dblequip.com Page 16
Copyright © 2014 Double Equipment
5. WHICH FOLD PLATES SHOULD I USE? This really depends on how you loaded the feeder. In our example, we already know we only need two (2) fold plates. So let’s start by looking at how the FIRST fold is going into the machine using the first choice shown in the previous question. Does the FIRST fold go UP or DOWN when it enters the machine? It goes UP.
1 1
Mark sheet with a arrow as reminder
Brochure
UP From this illustration, we can see that the FIRST fold made in the sheet will go UP and we can do that in an UP fold plate. Since the first plate the sheet could enter is the #1 UP plate, we can use this plate to make the first fold in our sheet. Now let’s figure out the next fold plate needed. Again, ask yourself, does the next fold go UP or DOWN? It goes UP.
UP
2 2
So, we need another UP plate. The next plate the sheet hits is the #2 plate which is a DOWN plate. (Remember the paper will go to every plate in order) We don’t need this DOWN plate so we would close it and continue on to the next fold plate, #3 which is an UP plate. The #3 plate will make our 2nd fold and that would complete the job. Therefore, by loading the feeder this

www.dblequip.com Page 17
Copyright © 2014 Double Equipment
way, we determine that we can use the #1 and #3 fold plates. We would close the #2 and #4 plates. You might hear this setup referred to as “UP & UP & OUT”.
1st fold#1 UP Plate
2nd fold#3 UP Plate
#4 DOWN PlateDeflectorCLOSED
#2 DOWN PlateDeflectorCLOSED
1 1
Mark sheet with a arrow as reminder
Brochure
Here we load another way (our 2nd choice) and find we can run “UP & DOWN & OUT” using the #1 and #2 fold plates, and closing the #3 and #4 Defectors.
1st fold#1 UP Plate
2nd fold#2 DOWN Plate
#4 DOWN PlateDeflectorCLOSED
#3 UP PlateDeflectorCLOSED
11
Brochure

www.dblequip.com Page 18
Copyright © 2014 Double Equipment
The advantage of the 1st choice when compared to our 2nd choice is we could run the sheets closer. When ever the first fold is longer then ½ the sheet size we must provide more space between the sheets, thus slowing down machine and losing some production speed.
11
Brochure
1 1
Mark sheet with a arrow as reminder
Brochure
First FoldFirst Fold
LESS THEN 1/2 THE SHEETFASTER
MORE THEN 1/2 THE SHEETSLOWER
Now you have the answers for two of the four choices when loading the feeder. Practice figuring this out and see if you can determine the last two choices.
www.dblequip.com Page 19
Copyright © 2014 Double Equipment
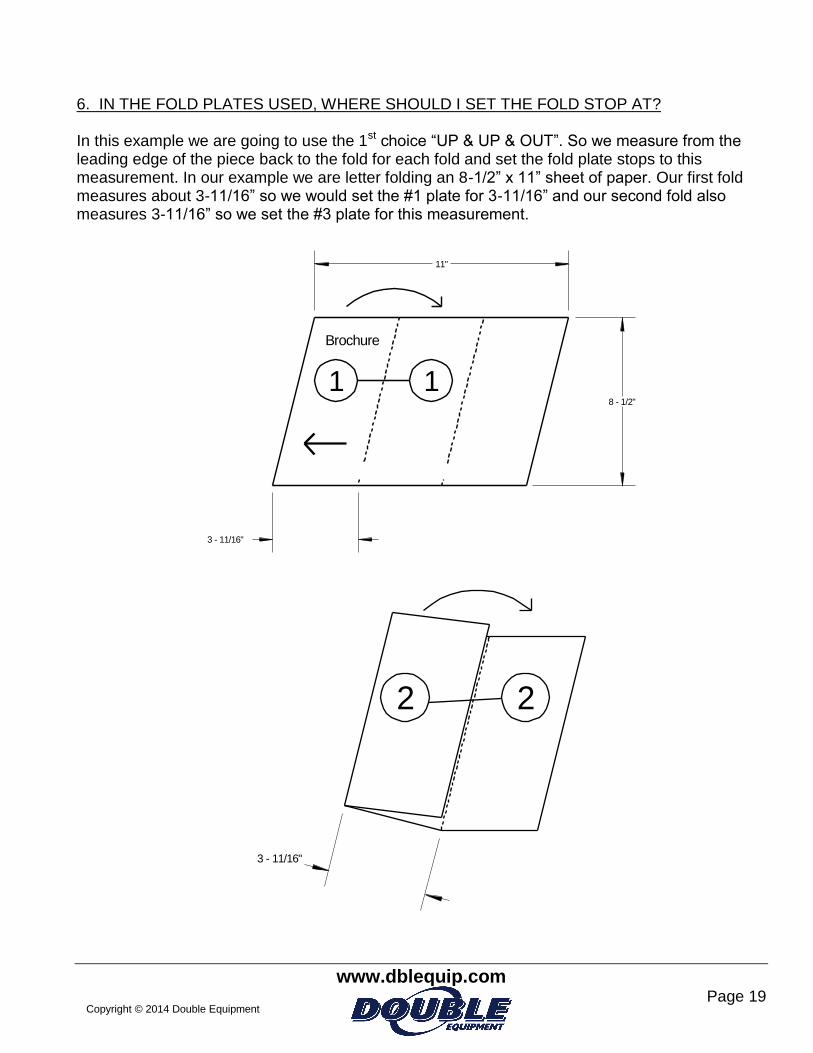
6. IN THE FOLD PLATES USED, WHERE SHOULD I SET THE FOLD STOP AT? In this example we are going to use the 1st choice “UP & UP & OUT”. So we measure from the leading edge of the piece back to the fold for each fold and set the fold plate stops to this measurement. In our example we are letter folding an 8-1/2” x 11” sheet of paper. Our first fold measures about 3-11/16” so we would set the #1 plate for 3-11/16” and our second fold also measures 3-11/16” so we set the #3 plate for this measurement.
1 1
Brochure
3 - 11/16"
11"
8 - 1/2"
2 2
3 - 11/16"
www.dblequip.com Page 20
Copyright © 2014 Double Equipment
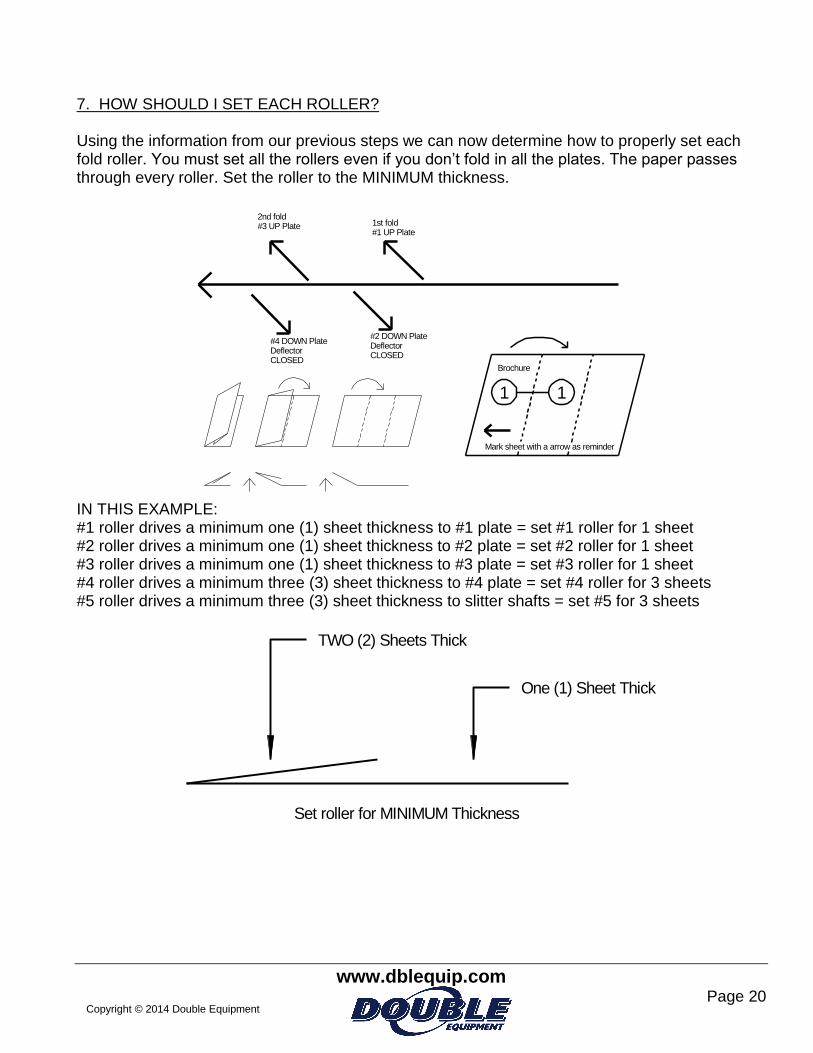
7. HOW SHOULD I SET EACH ROLLER? Using the information from our previous steps we can now determine how to properly set each fold roller. You must set all the rollers even if you don’t fold in all the plates. The paper passes through every roller. Set the roller to the MINIMUM thickness.
1st fold#1 UP Plate
2nd fold#3 UP Plate
#4 DOWN PlateDeflectorCLOSED
#2 DOWN PlateDeflectorCLOSED
1 1
Mark sheet with a arrow as reminder
Brochure
IN THIS EXAMPLE: #1 roller drives a minimum one (1) sheet thickness to #1 plate = set #1 roller for 1 sheet #2 roller drives a minimum one (1) sheet thickness to #2 plate = set #2 roller for 1 sheet #3 roller drives a minimum one (1) sheet thickness to #3 plate = set #3 roller for 1 sheet #4 roller drives a minimum three (3) sheet thickness to #4 plate = set #4 roller for 3 sheets #5 roller drives a minimum three (3) sheet thickness to slitter shafts = set #5 for 3 sheets
TWO (2) Sheets Thick
One (1) Sheet Thick
Set roller for MINIMUM Thickness

www.dblequip.com Page 21
Copyright © 2014 Double Equipment
Our example job notes:
X
SAMPLE
Job Name: SAMPLE Flat Size: 8-1/2” x 11” one up Folded Size: 3-11/16” x 8-1/2” letter fold (or 6 page fold)
Number Fold Plate Setting Roller Setting
1 3 – 11/16” 1 sheet
2 Closed (Deflect) 1 sheet
3 3 – 11/16” 1 sheet
4 Closed (Deflect) 3 sheets
5 n/a 3 sheets
M n/a 3 sheets
www.dblequip.com Page 22
Copyright © 2014 Double Equipment
Basic Paper Folder Set-up & Adjustments
WARNING: ALWAYS DISCONNECT POWER BEFORE WORKING ON
EQUIPMENT For the safe operation of your equipment, ALWAYS refer to the
original owner’s manual that came with your equipment.
Rollers (set rollers for the job you’re running)
Slitter Shafts (before you roll right angles up to machine) (Put perf/score or slitting attachments on as
required by job)
Fold Plates and Defectors (square & set-up plates for the job, open or closed the plates as
required for job)
Side Guide and Hold Downs (square and adjust side guide for job)
Right Angle Unit (repeat above for each RA unit)
o Rollers
o Slitter Shafts
o Fold Plates & Deflectors
o Cross Carrier/Side Guide
Stacker/Delivery (adjust stacker wheels to catch/deliver job)
Feeder (some operators do this step first, set up feeder for size job your running)
Learning to set-up and run a folder can’t be taught in one or two days. It takes practice and experience to become good folder operator. Some operators run only a few simple jobs for years and don’t have the same skills as an operator who runs complicated jobs. Most of your knowledge is going to come from first hand experience setting up your jobs.
One of the common mistakes for new operators is adjusting the wrong adjustment or just turning all the knobs with out really understanding the adjustment. Normally they just make things worst and get the whole machine out of adjustment.
An operator should carefully make ONE small adjustment and check his results. If the results are getting better then you’re making the right adjustment. If the result is worse then you’re going the wrong way, but probably on the correct adjustment. If there is no change in your results after making an adjustment then you’re probably adjusting the wrong thing, put this adjustment back were you found it and try something else.
With experience you’ll learn just how all your adjustments work. Here some general rules.
Rollers must be set correctly, pay special attention to the first roller it has a big influence on how square the first fold will be.
Check all alignment settings before setting up the job, “zero” the plates and side guide. Check things in ORDER, if the first fold is not correct it makes no sense to adjust the
second or third fold, until the first fold is correct. This is especially true when setting up right angle jobs.

www.dblequip.com Page 23
Copyright © 2014 Double Equipment
Do a complete set-up, short cuts like not setting your score for right angle job may save “set-up” time, but if job doesn’t run you waste far more time then if you would have just set it up correctly to begin with. Not to mention the frustration factor.
CHECKING YOUR PAPER FOLDER ROLLERS FOR WEAR.
WARNING: ALWAYS DISCONNECT POWER BEFORE WORKING ON EQUIPMENT
For the safe operation of your equipment; ALWAYS refer to the original owner’s manual that came with your equipment.
Using 3" wide strips of text weight paper carefully set each fold roller for a light pull/drag.
Place one strip at each end of the roller and one strip in the middle. Set roller for even light pull or drag on each end, if the middle strip has no grip or then rollers
need replaced.
Also check each roller for play, if the roller has excessive play you may need
bearings and/or parts that hold the rollers in the machine.

www.dblequip.com Page 24
Copyright © 2014 Double Equipment
CALIBRATING and SETTING FOLD ROLLERS “The most common mistake is operators setting the roller TOO TIGHT!”
1. NEVER CLEAN ROLLERS or SET ROLLERS with power to machine. Be sure to disconnect the power before going any further.
2. Make sure the rollers are in good condition; give them a good cleaning with some roller wash. Follow manufacture’s instructions.
3. Place one strip of paper under the pressure settings (calipers) 4. Take two strips of paper and place one strip at each end of the rollers then wind them in. 5. Start pulling them out very slowly and adjust the pressures as needed. 6. On "MBO* & STAHL*": To increase pressure, turn the knob counter-clockwise. To decrease pressure, turn it
clockwise. (Just the opposite for BAUM*) 7. Every operator sets the roller pressures differently but it is suggested that rollers are set to LIGHTLY grip the
paper. Do not forget the rollers are pushing the work through, not pulling it through. It is important to remember that your settings should be as even as possible on each end.
8. Test the whole set of rollers, start with #1 and go in order. 9. If the rollers grip at the ends and not in the middle, it is time for a new set of rollers. 10. Now you can place the appropriate number of strips of paper under each roller setting according to the job
you are setting up.
DO NOT FORGET WHEN YOU TEST THE ROLLERS NEVER USE THE SPINE OF A FOLDED PIECE TO SET THEM. IF YOU DO, THIS WILL SET THE ROLLERS TO LOSE
After you calibrate the rollers, adjust reference ring to the Zero point.
www.dblequip.com Page 25
Copyright © 2014 Double Equipment

www.dblequip.com Page 26
Copyright © 2014 Double Equipment
REPLACEMENT PAPER FOLD ROLLERS
All the major paper folder manufactures offer different types of fold rollers to meet specific needs.
These are the most common rollers:
Type roller Paper Pros Cons
Solid Steel Uncoated Longest lasting more durable, good on UNCOATED papers, resist marking from wet inks,
Tends to slip on coated stocks, roller marks on thicker material.
Solid Urethane
Coated or thick material
Good gripping characteristics Wears out quickly, will mark wet jobs, ink build up is a problem rollers need
cleaned more often.
Solid Rubber Coated or
thick material Good gripping characteristics
Wears out quicker then urethane, will mark wet jobs, ink build up is problem
rollers need cleaned more often.
Segmented Rollers
Coated and uncoated
paper
Good all-around long lasting roller,
Will mark wet jobs, ink build up is problem, rollers need cleaned more
often. SOFT
Urethane Segmented
Rollers
Aqueous Coated paper
Excellent roller for coated materials
Wears out faster then standard urethane roller, touchier to set-up,
marking is also problem on wet stocks.
Segmented Glue Roller
www.dblequip.com Page 27
Copyright © 2014 Double Equipment
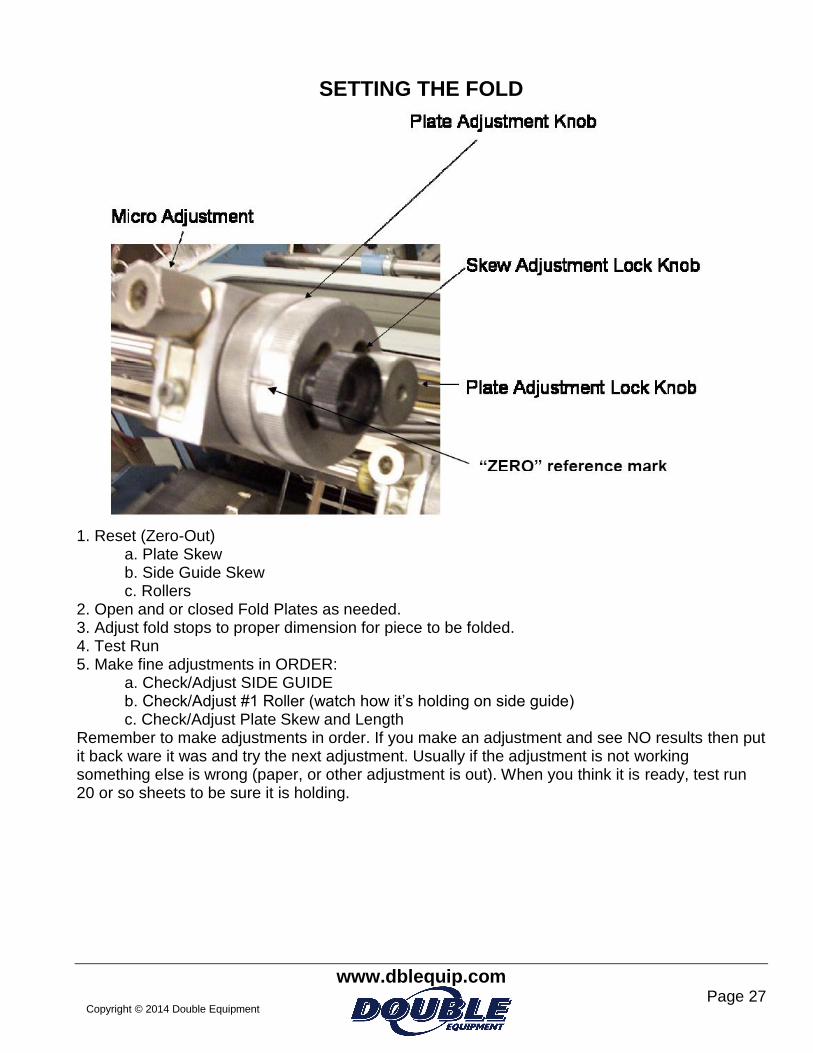
SETTING THE FOLD
1. Reset (Zero-Out)
a. Plate Skew b. Side Guide Skew c. Rollers
2. Open and or closed Fold Plates as needed. 3. Adjust fold stops to proper dimension for piece to be folded. 4. Test Run 5. Make fine adjustments in ORDER:
a. Check/Adjust SIDE GUIDE b. Check/Adjust #1 Roller (watch how it’s holding on side guide) c. Check/Adjust Plate Skew and Length
Remember to make adjustments in order. If you make an adjustment and see NO results then put it back ware it was and try the next adjustment. Usually if the adjustment is not working something else is wrong (paper, or other adjustment is out). When you think it is ready, test run 20 or so sheets to be sure it is holding.

www.dblequip.com Page 28
Copyright © 2014 Double Equipment
Double Sheet Detector
1. Place single sheet under adjustment screw 2. Unlock lock nut and adjust screw so one sheet will pass and two sheets will trip detector. 3. Lock the lock nut. When a double sheet (2 pieces of paper) tries to enter folder detector will trip the micro switch which will stop the feeder. To clear the double press the detector lever to release the double and pull it out of the machine.

www.dblequip.com Page 29
Copyright © 2014 Double Equipment
SIDE GUIDE This adjustment is use to square or skew side guide. The first five marbles should normally be steel, this helps pull the sheets out of the feeder. Then depending on the sheet you are running you may add or remove marbles as needed to get the sheet to hold firmly against the guide. You may choose plastic or steel marbles. Generally the more steel you use, the more the sheet is driven against the guide. It is ok to completely remove the marbles in some holes to lessen the drive if you are running light stock.
www.dblequip.com Page 30
Copyright © 2014 Double Equipment
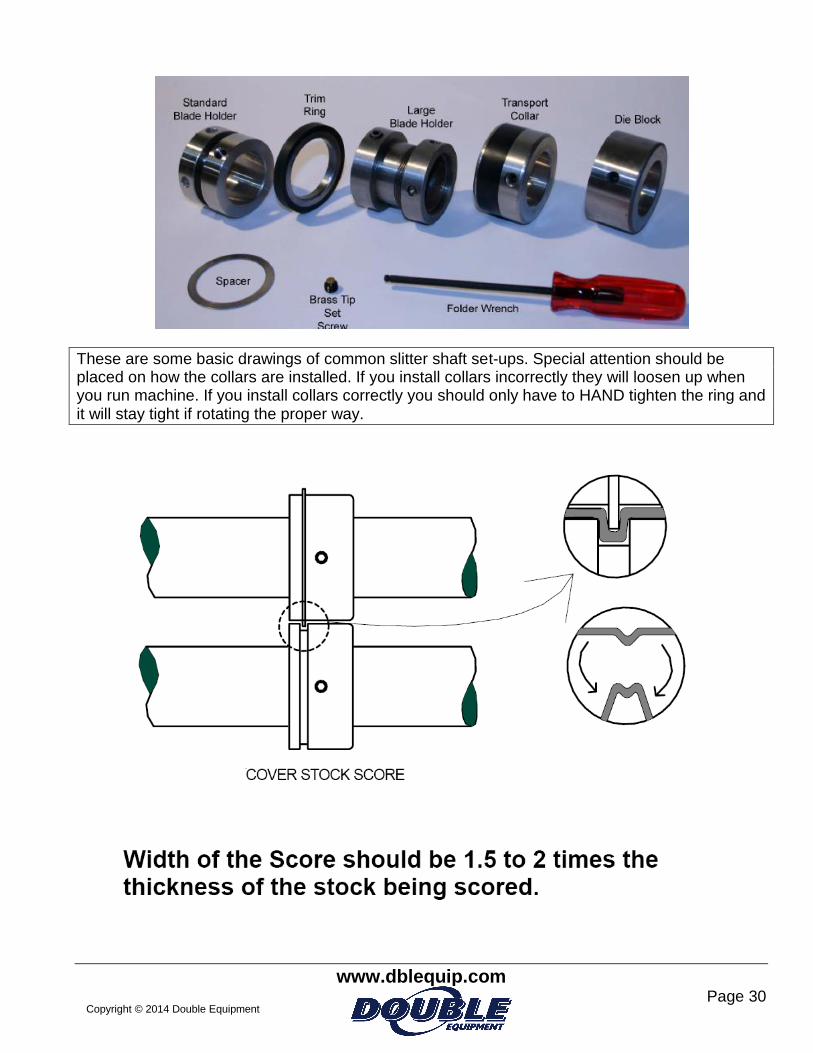
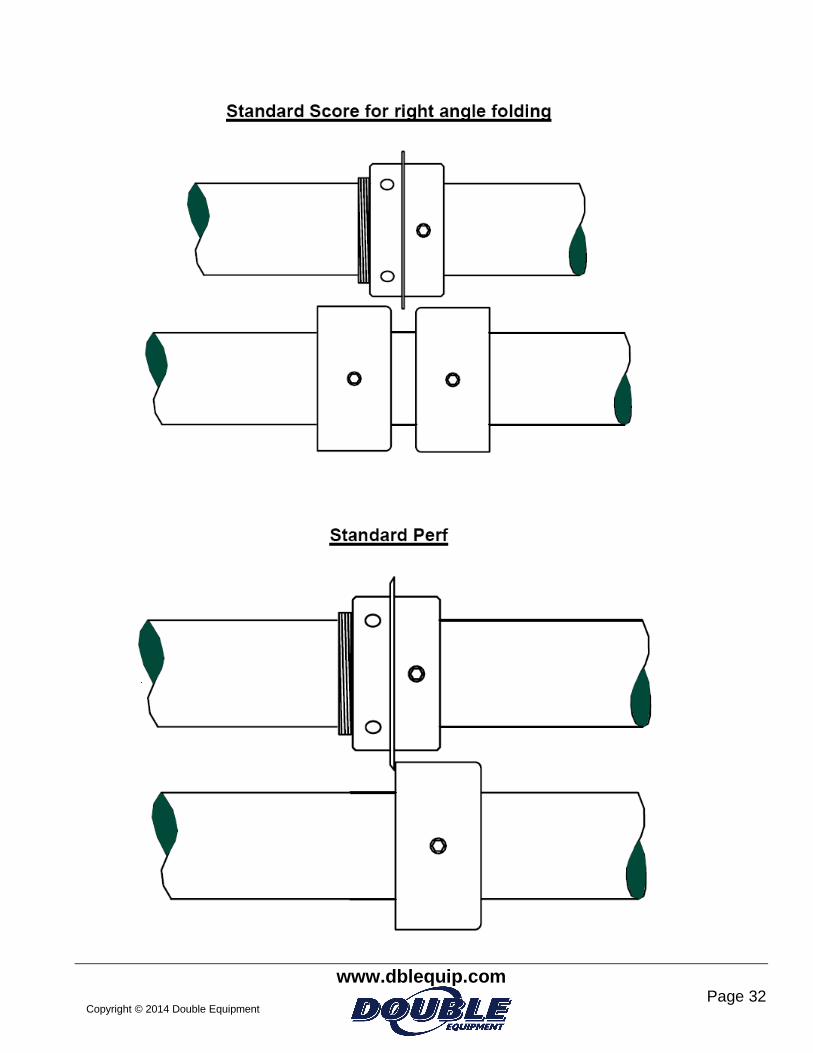
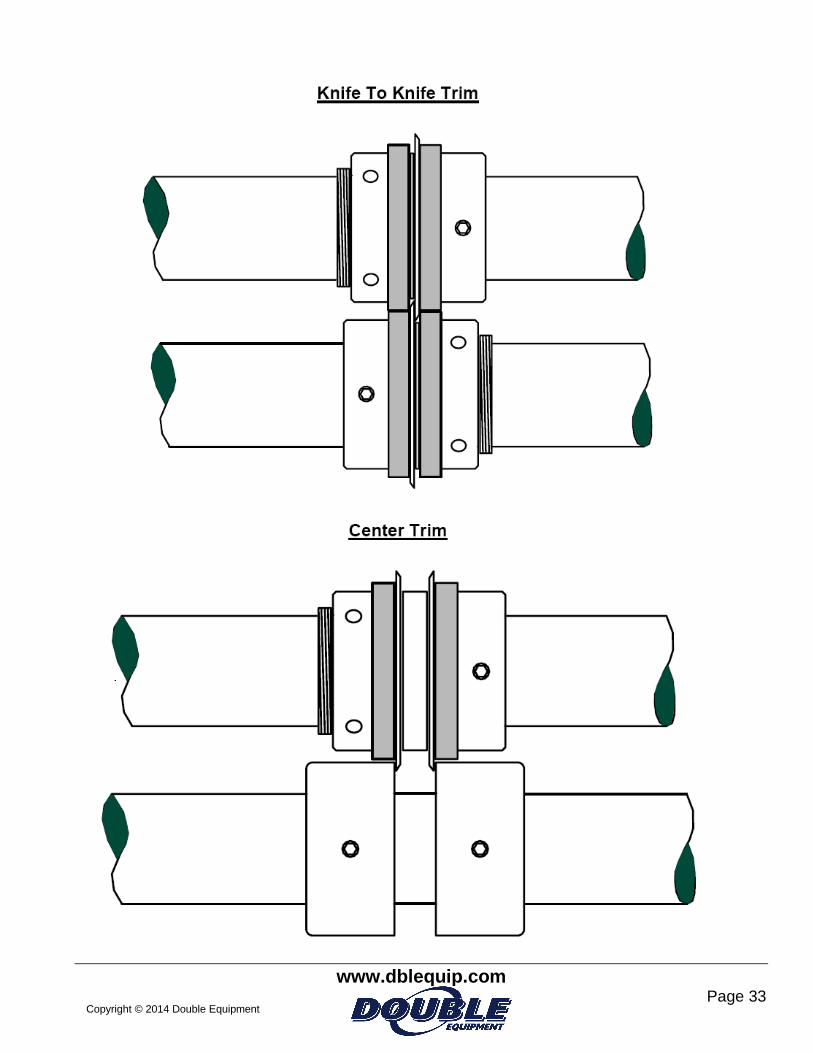
These are some basic drawings of common slitter shaft set-ups. Special attention should be placed on how the collars are installed. If you install collars incorrectly they will loosen up when you run machine. If you install collars correctly you should only have to HAND tighten the ring and it will stay tight if rotating the proper way.

www.dblequip.com Page 31
Copyright © 2014 Double Equipment
35 MM Shaft Size
www.dblequip.com Page 32
Copyright © 2014 Double Equipment
www.dblequip.com Page 33
Copyright © 2014 Double Equipment
www.dblequip.com Page 34
Copyright © 2014 Double Equipment
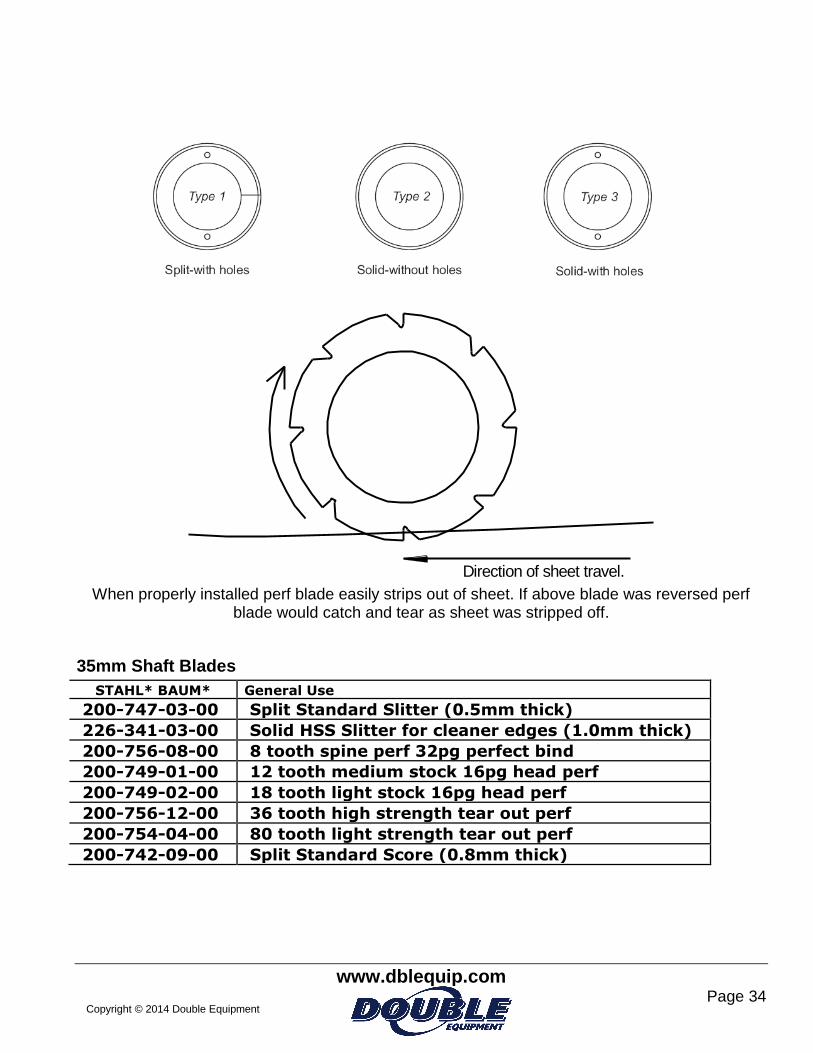
Direction of sheet travel.
When properly installed perf blade easily strips out of sheet. If above blade was reversed perf blade would catch and tear as sheet was stripped off.
35mm Shaft Blades
STAHL* BAUM* General Use
200-747-03-00 Split Standard Slitter (0.5mm thick)
226-341-03-00 Solid HSS Slitter for cleaner edges (1.0mm thick)
200-756-08-00 8 tooth spine perf 32pg perfect bind
200-749-01-00 12 tooth medium stock 16pg head perf
200-749-02-00 18 tooth light stock 16pg head perf
200-756-12-00 36 tooth high strength tear out perf
200-754-04-00 80 tooth light strength tear out perf
200-742-09-00 Split Standard Score (0.8mm thick)