Festo:60 RGB Festoon Strings - Animated Lightinganimatedlighting.com/pdf/rgb/Festo60.pdfFESTO MODULE...
6
4 2 8 6 P I 968 LINCOLN PL • BROOKLYN NY 11213 718.635.0817 Many Applications • Architectural Accents • Concerts and Events • Decorative Elements • Retail Interiors • Light Shows • Trade Shows • Themed Environments • Restaurants • Holiday Lighting • Patio Lighting • Weddings • Festivals • Carnivals Further Reading Visit us online for the most up-to- date product information: Introducing The Festo:60 Festo:60, by Vivid RGB Lighting, updates the traditional festoon light string with modern color changing LED technology. Pre-programmed or fully controllable with any DMX lighting system, Festo adds a new level of excitement with color, flexibility and energy efficiency. Designed for indoor and outdoor applications, the 2.4” diameter translucent globes meet a wide range of applications and provide the perfect ambient glow. Festo:60 strings are easily customizable – you choose the size, you choose the spacing, snap on a Festo:60… and “Presto” let the festivities begin! 360º Viewing Angle Customizable Spacing Easy Hook Mounting Option Full-color RGB pixels Dust- and waterproof 24 Month Warranty RoHS Certified and Built to CE, UL, ETL Standards 1 Festo:60 RGB Festoon Strings Key Features [email protected] www.VividRGBlighting.com x
Transcript of Festo:60 RGB Festoon Strings - Animated Lightinganimatedlighting.com/pdf/rgb/Festo60.pdfFESTO MODULE...

42
86PI
968 LINCOLN PL • BROOKLYN NY 11213 718.635.0817
Many Applications
• Architectural Accents• Concerts and Events• Decorative Elements• Retail Interiors• Light Shows• Trade Shows• Themed Environments• Restaurants• Holiday Lighting• Patio Lighting• Weddings• Festivals• Carnivals
Further ReadingVisit us online for the most up-to-date product information:
Introducing The Festo:60
Festo:60, by Vivid RGB Lighting, updates the traditional festoon light string with modern color changing LED technology. Pre-programmed or fully controllable with any DMX lighting system, Festo adds a new level of excitement with color, flexibility and energy efficiency.
Designed for indoor and outdoor applications, the 2.4” diameter translucent globes meet a wide range of applications and provide the perfect ambient glow.
Festo:60 strings are easily customizable – you choose the size, you choose the spacing, snap on a Festo:60… and “Presto” let the festivities begin!
360º Viewing Angle
CustomizableSpacing
Easy Hook Mounting Option
Full-colorRGB pixels
Dust- and waterproof
24 MonthWarranty
RoHS Certified and Built to CE, UL, ETL Standards
1
Festo:60 RGB Festoon Strings
Key Features
www.VividRGBlighting.com
x

42
86PI
968 LINCOLN PL • BROOKLYN NY 11213 718.635.0817
Many Applications
• Architectural Accents• Concerts and Events• Decorative Elements• Retail Interiors• Light Shows• Trade Shows• Themed Environments• Restaurants• Holiday Lighting• Patio Lighting• Weddings• Festivals• Carnivals
Further ReadingVisit us online for the most up-to-date product information:
Introducing The Festo:100
Festo:100, by Vivid RGB Lighting, updates the traditional festoon light string with modern color changing LED technology. Pre-programmed or fully controllable with any DMX lighting system, Festo adds a new level of excitement with color, flexibility and energy efficiency.
Designed for indoor and outdoor applications, the 4” diameter translucent globes meet a wide range of applications and provide the perfect ambient glow.
Festo:100 strings are easily customizable – you choose the size, you choose the spacing, snap on a Festo:100… and “Presto” let the festivities begin!
360º Viewing Angle
CustomizableSpacing
Easy Hook Mounting Option
Full-colorRGB pixels
Dust- and waterproof
24 MonthWarranty
RoHS Certified and Built to CE, UL, ETL Standards
2
Festo:100 RGB Festoon Strings
Key Features
www.VividRGBlighting.com
x

Part# Product ConfigurationsFESTO-60-G-B 2.4” Glossy Globe, Black Body FESTO-60-G-W 2.4” Glossy Globe, White Body FESTO-60-M-B 2.4” Matte Globe, Black BodyFESTO-60-M-W 2.4” Matte Globe, White Body FESTO-100-M-W 4” Module, Matte Globe, White BodyFESTO-100-M-B 4” Module, Matte Globe, Black Body
24V–
FEST
O
LUMEN MAINTENANCE
LED CHANNELS
GRAYSCALE
INPUT VOLTAGE
POWER
INTERFACE
CONTROL SYSTEM
TEMPERATURE RANGES
HUMIDITY
ENVIRONMENT
OUTPUT
ELECTRICAL
CONTROL
PHYSICAL
SAFETY
25,000+ hours
Red, Green, Blue
256, 8-bit
24V DC
1.50 W / FESTO
DMX
Color Mimic / Vivid Pixel Driver or other
-20ºC – 50ºC / -4ºF – 122ºF
Any
Dry, damp, wet locations; IP66
Technical Specifications*
968 LINCOLN PL • BROOKLYN NY 11213 718.635.0817 3
Ordering Guide
Labeled flat cablePunch ToolModules: 2.4” Black Housing 2.4” White Housing 4” Black Housing 4” White HousingMatte FinishGlossy Finish
POWER & CONTROL
Up to fifty (50)FESTO modules per power feed.
End cap or cable loop seals cable ends from moisture
Power and data input feed.
System Overview
Revised 05/07/2014
2.4”4”
Custom
*Due to continuous improvements and design innovations, specifications subject to change without notice.
Festo RGB Festoon Strings
SizeFinish Color
968 LINCOLN PL • BROOKLYN NY 11213 718.635.0817 4
FESTO MODULE
FESTO-100
FESTO MODULE
FESTO-60
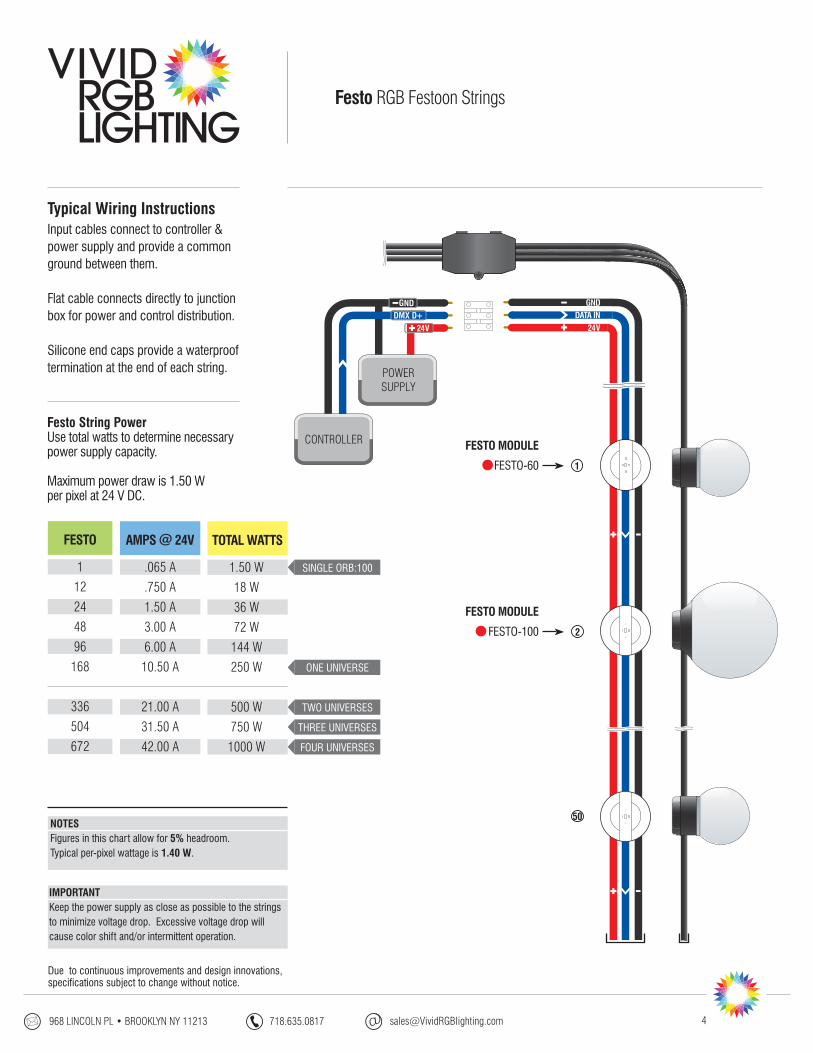
Typical Wiring InstructionsInput cables connect to controller & power supply and provide a common ground between them.
Flat cable connects directly to junction box for power and control distribution.
Silicone end caps provide a waterproof termination at the end of each string.
CONTROLLER
POWERSUPPLY
50
Festo String PowerUse total watts to determine necessarypower supply capacity.
Maximum power draw is 1.50 W per pixel at 24 V DC.
IMPORTANTKeep the power supply as close as possible to the strings to minimize voltage drop. Excessive voltage drop will cause color shift and/or intermittent operation.
NOTESFigures in this chart allow for 5% headroom.Typical per-pixel wattage is 1.40 W.
Due to continuous improvements and design innovations, specifications subject to change without notice.
Festo RGB Festoon Strings
1
12
24
48
96
168
336
504
672
FESTO TOTAL WATTSAMPS @ 24V
SINGLE ORB:100
ONE UNIVERSE
TWO UNIVERSES
THREE UNIVERSES
FOUR UNIVERSES
1.50 W
18 W
36 W
72 W
144 W
250 W
500 W
750 W
1000 W
.065 A
.750 A
1.50 A
3.00 A
6.00 A
10.50 A
21.00 A
31.50 A
42.00 A
968 LINCOLN PL • BROOKLYN NY 11213 718.635.0817 5
Installation Guide
Flat 3 Conductor 16AWG
Top View
Silicone covering ID pins
Scaled Illustrations
Align printed spacing with hole punch
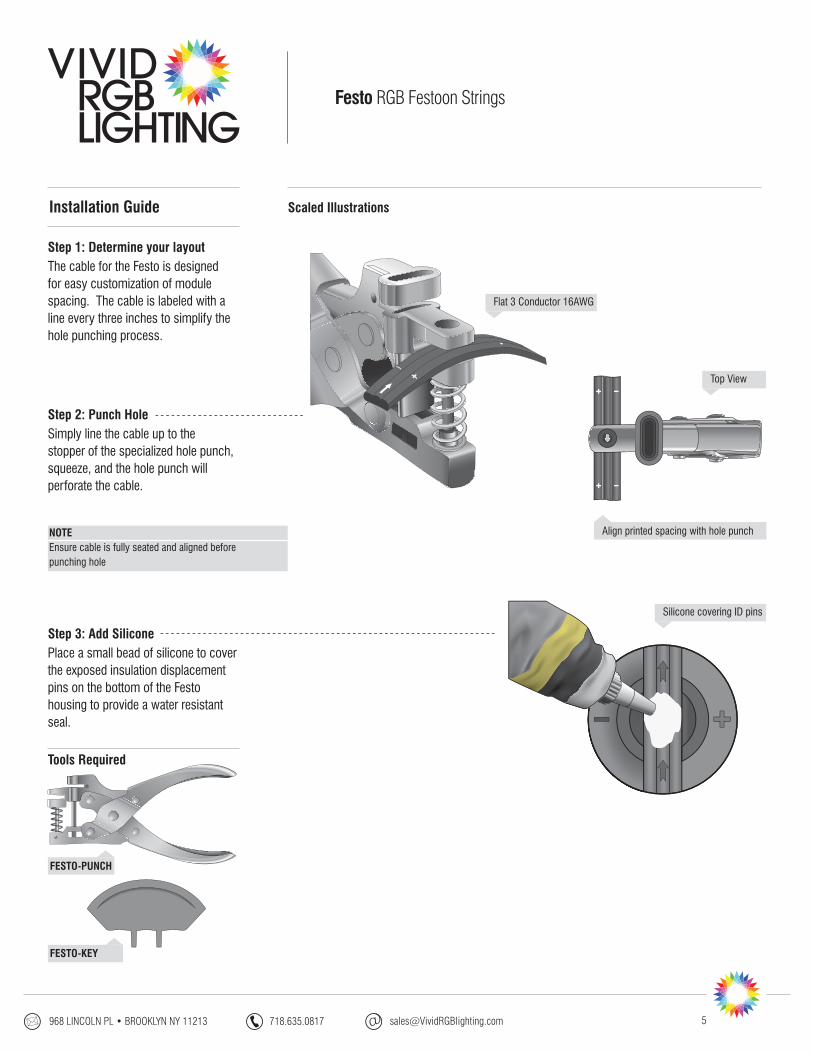
Step 1: Determine your layout
Step 2: Punch Hole
The cable for the Festo is designed for easy customization of module spacing. The cable is labeled with a line every three inches to simplify the hole punching process.
Simply line the cable up to the stopper of the specialized hole punch, squeeze, and the hole punch will perforate the cable.
Place a small bead of silicone to cover the exposed insulation displacement pins on the bottom of the Festo housing to provide a water resistant seal.
Step 3: Add Silicone
Festo RGB Festoon Strings
NOTEEnsure cable is fully seated and aligned before punching hole
Tools Required
FESTO-PUNCH
FESTO-KEY
968 LINCOLN PL • BROOKLYN NY 11213 718.635.0817 6
Installation Guide Scaled Illustrations
Festo Key
Rotate clockwise
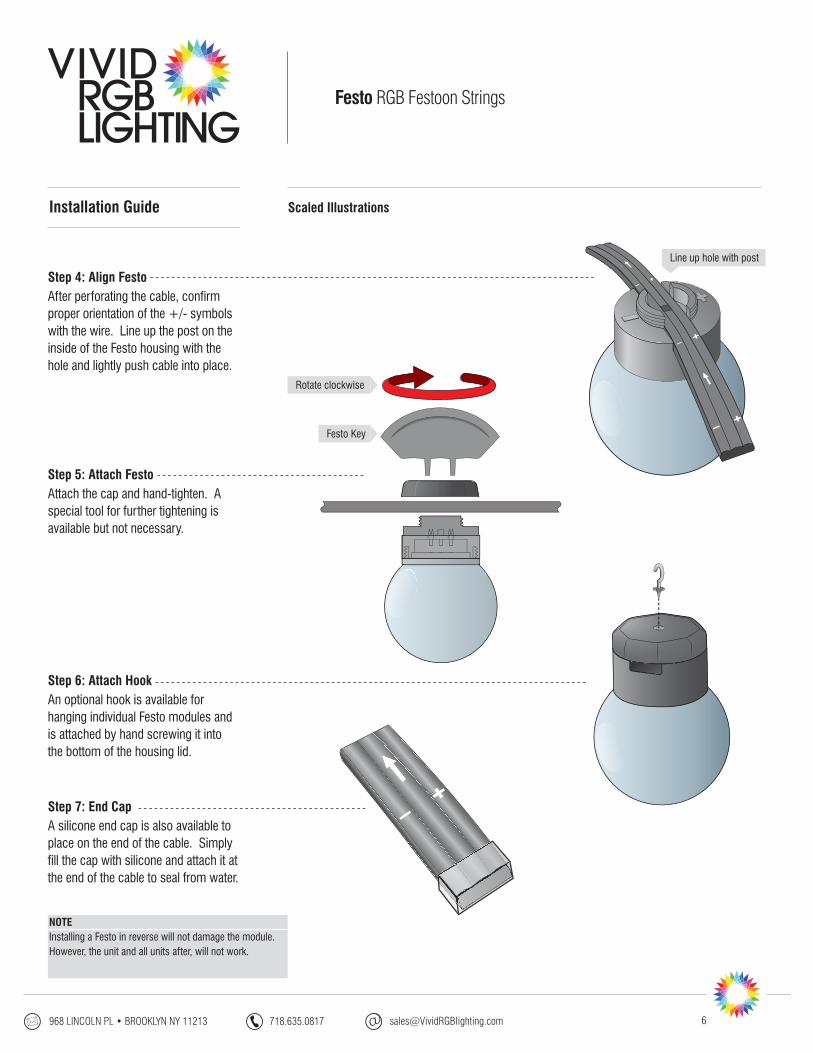
Step 5: Attach FestoAttach the cap and hand-tighten. A special tool for further tightening is available but not necessary.
An optional hook is available for hanging individual Festo modules and is attached by hand screwing it into the bottom of the housing lid.
A silicone end cap is also available to place on the end of the cable. Simply fill the cap with silicone and attach it at the end of the cable to seal from water.
Step 6: Attach Hook
Step 7: End Cap
Festo RGB Festoon Strings
Line up hole with post
After perforating the cable, confirm proper orientation of the +/- symbols with the wire. Line up the post on the inside of the Festo housing with the hole and lightly push cable into place.
Step 4: Align Festo
NOTEInstalling a Festo in reverse will not damage the module.However, the unit and all units after, will not work.