Fence marking to reduce grouse collisions · Fence marking to reduce grouse collisions ... which is...
12
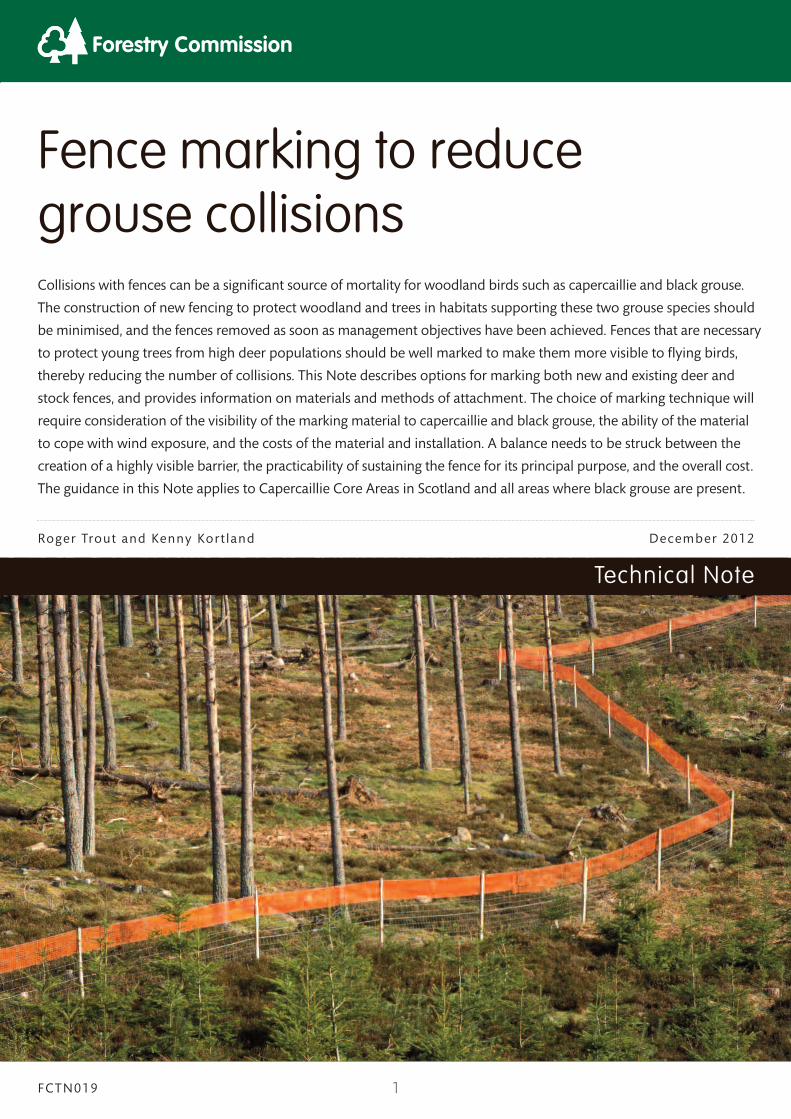
1 FCTN019 December 2012 Fence marking to reduce grouse collisions Technical Note Collisions with fences can be a significant source of mortality for woodland birds such as capercaillie and black grouse. The construction of new fencing to protect woodland and trees in habitats supporting these two grouse species should be minimised, and the fences removed as soon as management objectives have been achieved. Fences that are necessary to protect young trees from high deer populations should be well marked to make them more visible to flying birds, thereby reducing the number of collisions. This Note describes options for marking both new and existing deer and stock fences, and provides information on materials and methods of attachment. The choice of marking technique will require consideration of the visibility of the marking material to capercaillie and black grouse, the ability of the material to cope with wind exposure, and the costs of the material and installation. A balance needs to be struck between the creation of a highly visible barrier, the practicability of sustaining the fence for its principal purpose, and the overall cost. The guidance in this Note applies to Capercaillie Core Areas in Scotland and all areas where black grouse are present. Roger Trout and Kenny Kortland
Transcript of Fence marking to reduce grouse collisions · Fence marking to reduce grouse collisions ... which is...
1FCTN019
December 2012
Fence marking to reducegrouse collisions
Technical Note
Collisions with fences can be a significant source of mortality for woodland birds such as capercaillie and black grouse.
The construction of new fencing to protect woodland and trees in habitats supporting these two grouse species should
be minimised, and the fences removed as soon as management objectives have been achieved. Fences that are necessary
to protect young trees from high deer populations should be well marked to make them more visible to flying birds,
thereby reducing the number of collisions. This Note describes options for marking both new and existing deer and
stock fences, and provides information on materials and methods of attachment. The choice of marking technique will
require consideration of the visibility of the marking material to capercaillie and black grouse, the ability of the material
to cope with wind exposure, and the costs of the material and installation. A balance needs to be struck between the
creation of a highly visible barrier, the practicability of sustaining the fence for its principal purpose, and the overall cost.
The guidance in this Note applies to Capercaillie Core Areas in Scotland and all areas where black grouse are present.
Roger Trout and Kenny Kort land
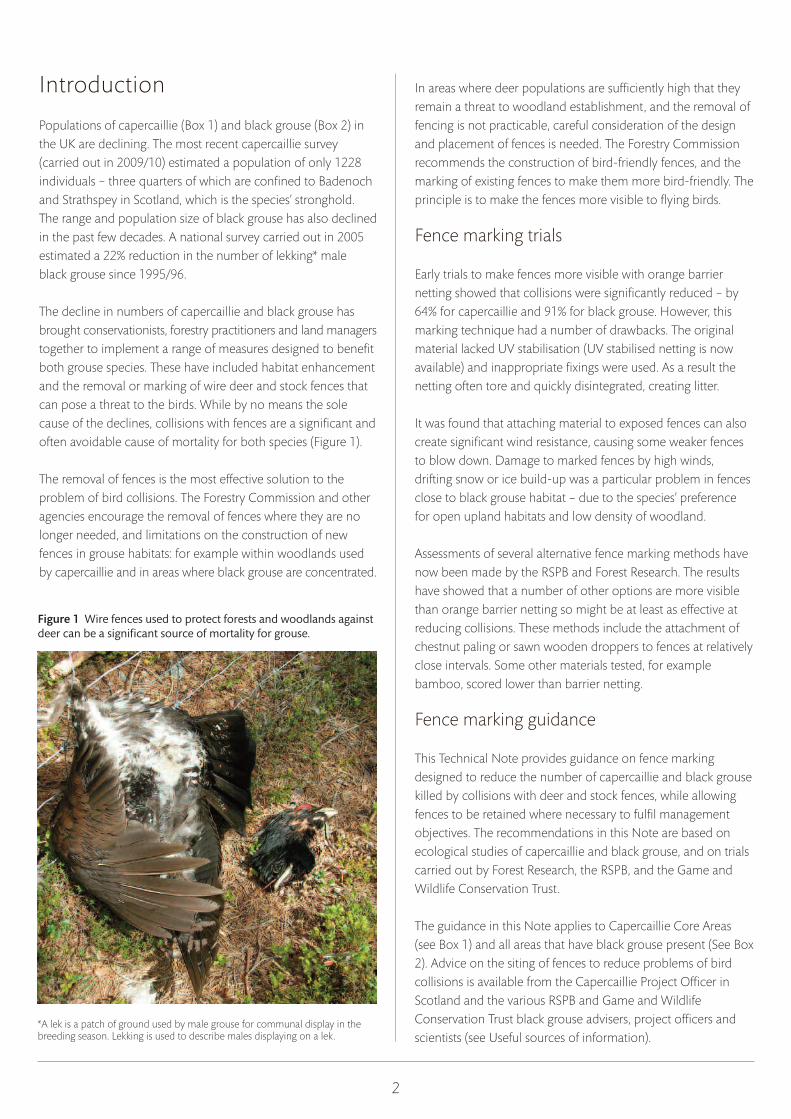
Figure 1 Wire fences used to protect forests and woodlands againstdeer can be a significant source of mortality for grouse.
Introduction
Populations of capercaillie (Box 1) and black grouse (Box 2) inthe UK are declining. The most recent capercaillie survey(carried out in 2009/10) estimated a population of only 1228individuals – three quarters of which are confined to Badenochand Strathspey in Scotland, which is the species’ stronghold.The range and population size of black grouse has also declinedin the past few decades. A national survey carried out in 2005estimated a 22% reduction in the number of lekking* maleblack grouse since 1995/96.
The decline in numbers of capercaillie and black grouse hasbrought conservationists, forestry practitioners and land managerstogether to implement a range of measures designed to benefitboth grouse species. These have included habitat enhancementand the removal or marking of wire deer and stock fences thatcan pose a threat to the birds. While by no means the solecause of the declines, collisions with fences are a significant andoften avoidable cause of mortality for both species (Figure 1).
The removal of fences is the most effective solution to theproblem of bird collisions. The Forestry Commission and otheragencies encourage the removal of fences where they are nolonger needed, and limitations on the construction of newfences in grouse habitats: for example within woodlands usedby capercaillie and in areas where black grouse are concentrated.
In areas where deer populations are sufficiently high that theyremain a threat to woodland establishment, and the removal offencing is not practicable, careful consideration of the designand placement of fences is needed. The Forestry Commissionrecommends the construction of bird-friendly fences, and themarking of existing fences to make them more bird-friendly. Theprinciple is to make the fences more visible to flying birds.
Fence marking trials
Early trials to make fences more visible with orange barriernetting showed that collisions were significantly reduced – by64% for capercaillie and 91% for black grouse. However, thismarking technique had a number of drawbacks. The originalmaterial lacked UV stabilisation (UV stabilised netting is nowavailable) and inappropriate fixings were used. As a result thenetting often tore and quickly disintegrated, creating litter.
It was found that attaching material to exposed fences can alsocreate significant wind resistance, causing some weaker fencesto blow down. Damage to marked fences by high winds,drifting snow or ice build-up was a particular problem in fencesclose to black grouse habitat – due to the species’ preferencefor open upland habitats and low density of woodland.
Assessments of several alternative fence marking methods havenow been made by the RSPB and Forest Research. The resultshave showed that a number of other options are more visiblethan orange barrier netting so might be at least as effective atreducing collisions. These methods include the attachment ofchestnut paling or sawn wooden droppers to fences at relativelyclose intervals. Some other materials tested, for examplebamboo, scored lower than barrier netting.
Fence marking guidance
This Technical Note provides guidance on fence markingdesigned to reduce the number of capercaillie and black grousekilled by collisions with deer and stock fences, while allowingfences to be retained where necessary to fulfil managementobjectives. The recommendations in this Note are based onecological studies of capercaillie and black grouse, and on trialscarried out by Forest Research, the RSPB, and the Game andWildlife Conservation Trust.
The guidance in this Note applies to Capercaillie Core Areas(see Box 1) and all areas that have black grouse present (See Box2). Advice on the siting of fences to reduce problems of birdcollisions is available from the Capercaillie Project Officer inScotland and the various RSPB and Game and WildlifeConservation Trust black grouse advisers, project officers andscientists (see Useful sources of information).
2
*A lek is a patch of ground used by male grouse for communal display in thebreeding season. Lekking is used to describe males displaying on a lek.
3
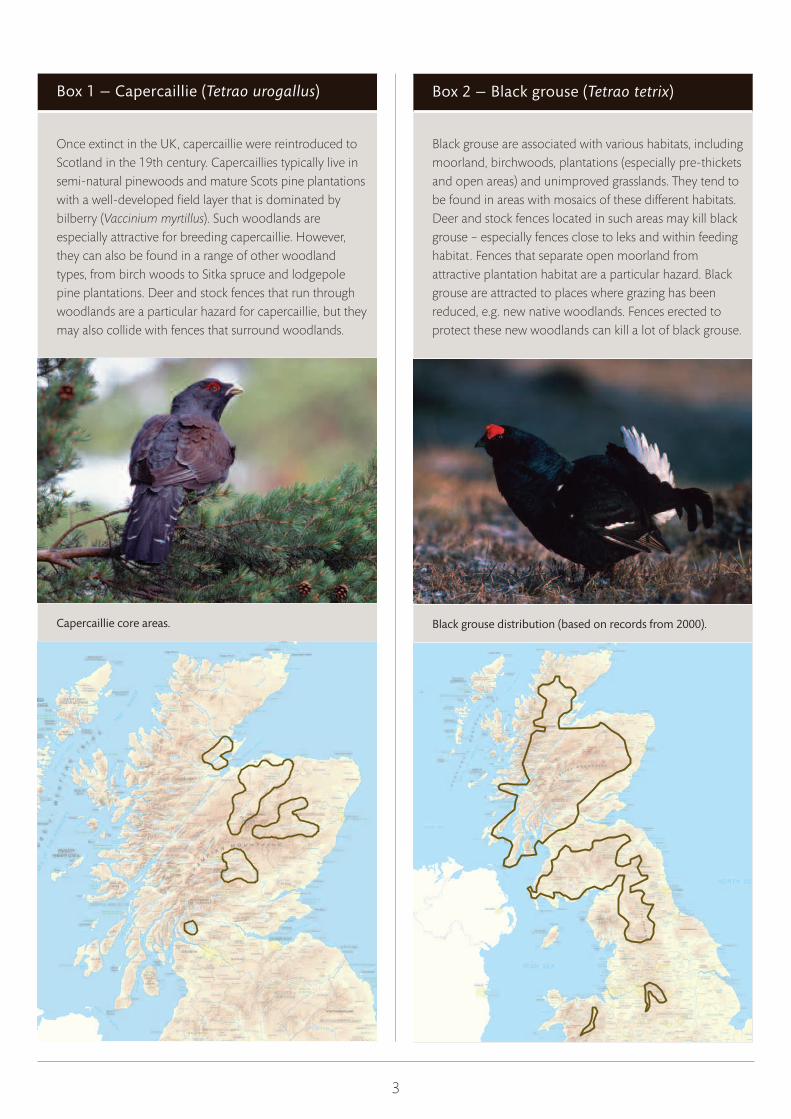
Box 1 — Capercaillie (Tetrao urogallus)
Once extinct in the UK, capercaillie were reintroduced toScotland in the 19th century. Capercaillies typically live insemi-natural pinewoods and mature Scots pine plantationswith a well-developed field layer that is dominated bybilberry (Vaccinium myrtillus). Such woodlands areespecially attractive for breeding capercaillie. However,they can also be found in a range of other woodlandtypes, from birch woods to Sitka spruce and lodgepolepine plantations. Deer and stock fences that run throughwoodlands are a particular hazard for capercaillie, but theymay also collide with fences that surround woodlands.
Capercaillie core areas.
Box 2 — Black grouse (Tetrao tetrix)
Black grouse are associated with various habitats, includingmoorland, birchwoods, plantations (especially pre-thicketsand open areas) and unimproved grasslands. They tend tobe found in areas with mosaics of these different habitats.Deer and stock fences located in such areas may kill blackgrouse – especially fences close to leks and within feedinghabitat. Fences that separate open moorland fromattractive plantation habitat are a particular hazard. Blackgrouse are attracted to places where grazing has beenreduced, e.g. new native woodlands. Fences erected toprotect these new woodlands can kill a lot of black grouse.
Black grouse distribution (based on records from 2000).
44
Table 1 Fence marking options in Capercaillie Core Areas or black grouse areas.
1Where capercaillie are present or likely to be so in the near future. Seek advice from the Capercaillie Project Officer (see Useful sources of information). 2Where a fence is protected from strong winds, e.g. sheltered by mature woodland, below the skyline and along the contour of a slope, or running along a valley bottom. 3Where a fence has no protection from the wind, e.g. on an open moor or hillside.
*See Figure 3 for gap measurements.†Upgrades are recommended as advised to compensate for local conditions, e.g. use of short runs of closer marking or 1.8 m material instead of 0.9 m for locationssuspected to suffer more bird strikes, e.g. sections of fences across the end of rides or sections of fences running through high quality habitat patches.
Location of fence Option
CapercaillieCore Area1
Inside forest< 1 km of lek 1, 2, 3 or 5
> 1 km of lek 4, 5, 6
Outside forestForest perimeter fence 2, 3, 5
> 500 m from forest 4, 5, 6
Black grousearea
Low exposure site2< 2 km of lek 3, 5, 6
> 2 km of lek 4, 6, 7
High exposure site3< 2 km of lek 4, 6, 7
> 2 km of lek 4, 6, 8
Table 2 Summary of the recommended marking options listed in Table 1.
Option Generic marking material, size and spacing Exposure
1 Orange plastic ‘snow fence’ netting: UV-stable, 1.2 m wide Sheltered
2 Individual pales 0.9 m† or 1.8 m of chestnut/sawn softwood @ 150 mm centres if vertical or 1.2 mor 1.8 m pales @ 500 mm apart at both ends if diagonal*
3 Rolls of 0.9 m or 1.8 m chestnut/sawn timber @ 150 mm centres
4 Rolls of 0.9 m† or 1.8 m chestnut/sawn softwood pales @ 300 mm centres
5 UV stable orange netting one or two strip(s) of, 600 mm or 300 mm wide
6 Individual pales 0.9 m† or 1.8 m chestnut/sawn softwood @ 300 mm, if vertical.Individual 1.2 or 1.8 m pales with pales @1 m apart at both ends if diagonal*
7 0.9–1.2 m bamboo diagonal* @ 300 mm apart † Exposed
8 0.9–1.2 m bamboo diagonal* @ 600 mm apart † Anti bird strike flaps @ 3 per metre minimum Very exposed
Marking existing fences
The decision on which materials to use to mark existing fenceswill initially depend on whether capercaillie or black grouse arethe main species at risk, and this depends on whether the site iswithin 1 km of a capercaillie lek or 2 km of a black grouse lek.Males congregate at the lek sites in spring to display and mate.After mating, most of the females will raise their broods within a1 or 2 km radius of the lek site. If both species are at risk, themarking methods suitable for capercaillie should be adopted.
The methods recommended in this Note are a compromisebetween making a fence visible to grouse while ensuring it willwithstand severe weather. Most of the methods described havebeen tested in the field on deer fences and are considered to bedurable; all of the methods can be adapted to suit stock fences.
In addition, reflective marker plates (see page 8) have beenfound to be effective in preventing black grouse collisions onstock fences in the north of England but this method has notbeen tested on deer fences. In many circumstances it may benecessary to adapt some of the techniques for both deer andstock fences to suit local conditions. The opinion of experiencedfence-marking contractors will be important in this regard.
Choosing suitable marking options
Use Table 1 to find the marking options that are appropriate forthe location of the fence. Table 2 provides the generaldescription of the marking method for each option. Use thisinformation along with the more detailed specifications inTables 2.1–2.4 to choose the suitable marking method. Table 3sets out the recommended fixings for the markers.
55
Table 2.1 Specification of marking materials for Options 1 and 5.
UV-stable orange plastic mesh Options 1 and 5
UV-stable plastic orange mesh or ‘snow fence’ netting has thick strands and joints and is more wind resistant than the thin,roadside netting previously used.
Material required Attaching the material to the fence
• Full width (1.2 m) net should only be used in areas withinforests with relatively little wind (Figure 2a).
• At more exposed sites, one horizontal strip of 300 mm widthcan be used at the top of the fence but, preferably, two parallelwidths should be attached (Figure 2b).
• In less exposed areas, a width of 600 mm is recommended.
• Green UV-stable barrier netting is also available (Figure 2c).This is less obvious in the landscape but its effectiveness atreducing collisions has not been tested.
• To cut a roll into strips, bind the roll tightly and cut with a saw.
• To attach the material to the fence, nail a wooden batten throughthe net and into each stake, this will maintain a tight length andprovide firm anchorage.
• The plastic mesh should only be attached to the wires byhighly UV-stabilised black plastic cables ties placed across thestrong intersections of the netting and a fence intersection ifpossible, otherwise to a vertical or horizontal wire (see Figure8a on page 9).
• Do not use metal clips across the weakest strand of the net – itwill result in early tearing and failure.
Labour estimate Notes
250–500 m per man dayUV-stable material is guaranteed for 8 years and will need to bereplaced far less often than non-stabilised plastic.
Figure 2a Orange UV-stable barrier netting. Note that full-width netting should only be used in sheltered locations.
Figure 2c Green netting on a sheltered perimeter fence at the bottomof a glen. Note that extra struts that have been added to the fence.
Figure 2b Narrower widths are suitable for forest edge sites that arenot exposed to the prevailing wind.
6
Figure 4c 0.9 m wooden droppers fixed vertically at close spacing.
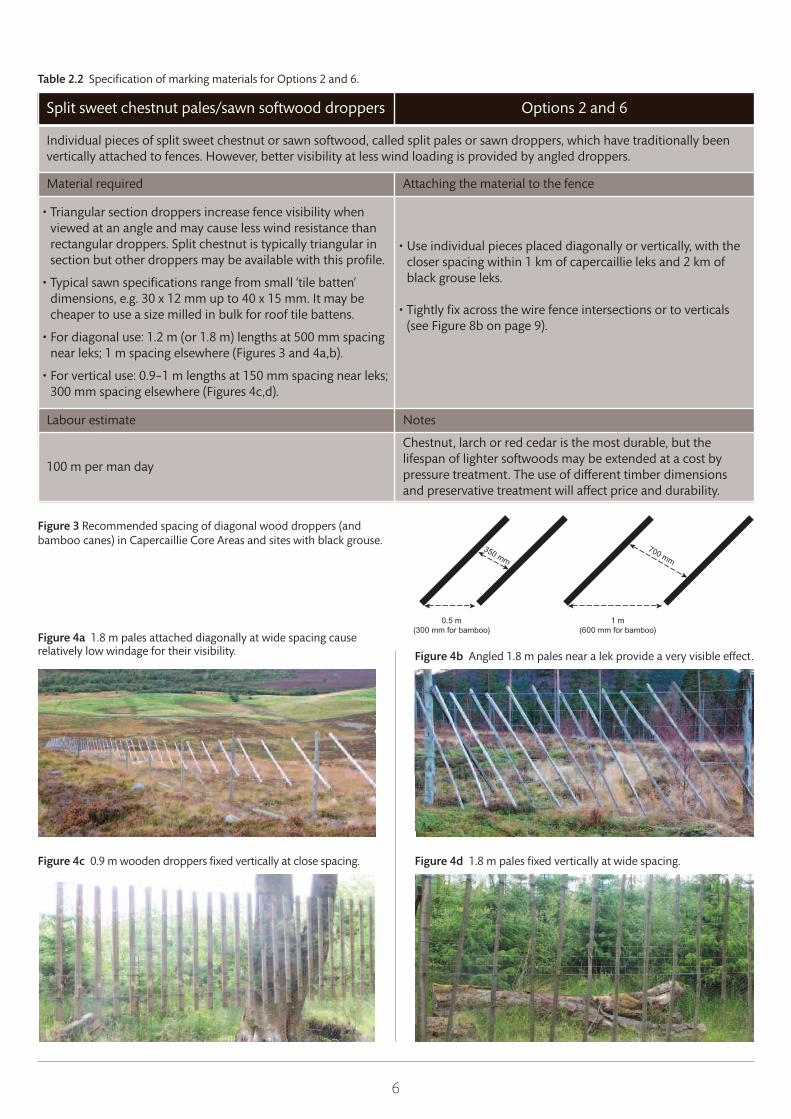
Figure 3 Recommended spacing of diagonal wood droppers (andbamboo canes) in Capercaillie Core Areas and sites with black grouse.
Figure 4b Angled 1.8 m pales near a lek provide a very visible effect.
Figure 4d 1.8 m pales fixed vertically at wide spacing.
0.5 m(300 mm for bamboo)
1 m(600 mm for bamboo)
700 mm350 mm
Split sweet chestnut pales/sawn softwood droppers Options 2 and 6
Individual pieces of split sweet chestnut or sawn softwood, called split pales or sawn droppers, which have traditionally beenvertically attached to fences. However, better visibility at less wind loading is provided by angled droppers.
Material required Attaching the material to the fence
• Triangular section droppers increase fence visibility whenviewed at an angle and may cause less wind resistance thanrectangular droppers. Split chestnut is typically triangular insection but other droppers may be available with this profile.
• Typical sawn specifications range from small ‘tile batten’dimensions, e.g. 30 x 12 mm up to 40 x 15 mm. It may becheaper to use a size milled in bulk for roof tile battens.
• For diagonal use: 1.2 m (or 1.8 m) lengths at 500 mm spacingnear leks; 1 m spacing elsewhere (Figures 3 and 4a,b).
• For vertical use: 0.9–1 m lengths at 150 mm spacing near leks;300 mm spacing elsewhere (Figures 4c,d).
• Use individual pieces placed diagonally or vertically, with thecloser spacing within 1 km of capercaillie leks and 2 km ofblack grouse leks.
• Tightly fix across the wire fence intersections or to verticals(see Figure 8b on page 9).
Labour estimate Notes
100 m per man day
Chestnut, larch or red cedar is the most durable, but thelifespan of lighter softwoods may be extended at a cost bypressure treatment. The use of different timber dimensionsand preservative treatment will affect price and durability.
Table 2.2 Specification of marking materials for Options 2 and 6.
Figure 4a 1.8 m pales attached diagonally at wide spacing causerelatively low windage for their visibility.
7
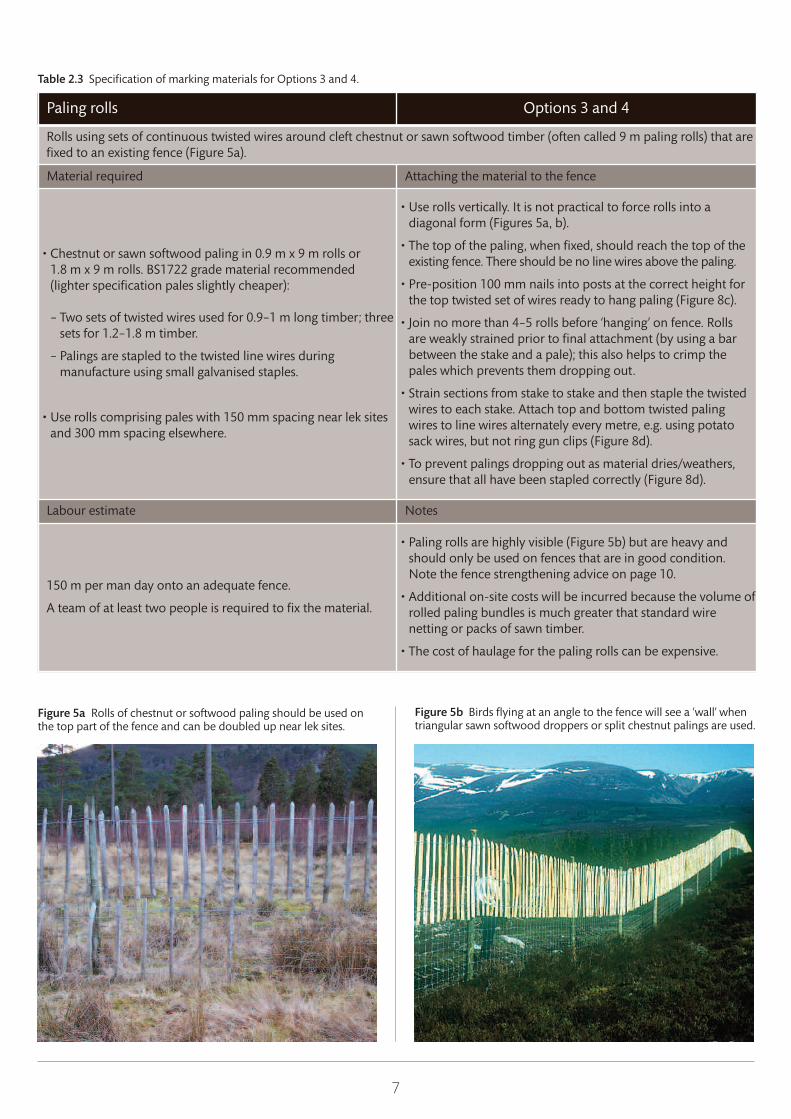
Figure 5a Rolls of chestnut or softwood paling should be used onthe top part of the fence and can be doubled up near lek sites.
Figure 5b Birds flying at an angle to the fence will see a ‘wall’ whentriangular sawn softwood droppers or split chestnut palings are used.
Paling rolls Options 3 and 4
Rolls using sets of continuous twisted wires around cleft chestnut or sawn softwood timber (often called 9 m paling rolls) that arefixed to an existing fence (Figure 5a).
Material required Attaching the material to the fence
• Chestnut or sawn softwood paling in 0.9 m x 9 m rolls or1.8 m x 9 m rolls. BS1722 grade material recommended(lighter specification pales slightly cheaper):
– Two sets of twisted wires used for 0.9–1 m long timber; threesets for 1.2–1.8 m timber.
– Palings are stapled to the twisted line wires duringmanufacture using small galvanised staples.
• Use rolls comprising pales with 150 mm spacing near lek sitesand 300 mm spacing elsewhere.
• Use rolls vertically. It is not practical to force rolls into adiagonal form (Figures 5a, b).
• The top of the paling, when fixed, should reach the top of theexisting fence. There should be no line wires above the paling.
• Pre-position 100 mm nails into posts at the correct height forthe top twisted set of wires ready to hang paling (Figure 8c).
• Join no more than 4–5 rolls before ‘hanging’ on fence. Rollsare weakly strained prior to final attachment (by using a barbetween the stake and a pale); this also helps to crimp thepales which prevents them dropping out.
• Strain sections from stake to stake and then staple the twistedwires to each stake. Attach top and bottom twisted palingwires to line wires alternately every metre, e.g. using potatosack wires, but not ring gun clips (Figure 8d).
• To prevent palings dropping out as material dries/weathers,ensure that all have been stapled correctly (Figure 8d).
Labour estimate Notes
150 m per man day onto an adequate fence.
A team of at least two people is required to fix the material.
• Paling rolls are highly visible (Figure 5b) but are heavy andshould only be used on fences that are in good condition.Note the fence strengthening advice on page 10.
• Additional on-site costs will be incurred because the volume ofrolled paling bundles is much greater that standard wirenetting or packs of sawn timber.
• The cost of haulage for the paling rolls can be expensive.
Table 2.3 Specification of marking materials for Options 3 and 4.
8
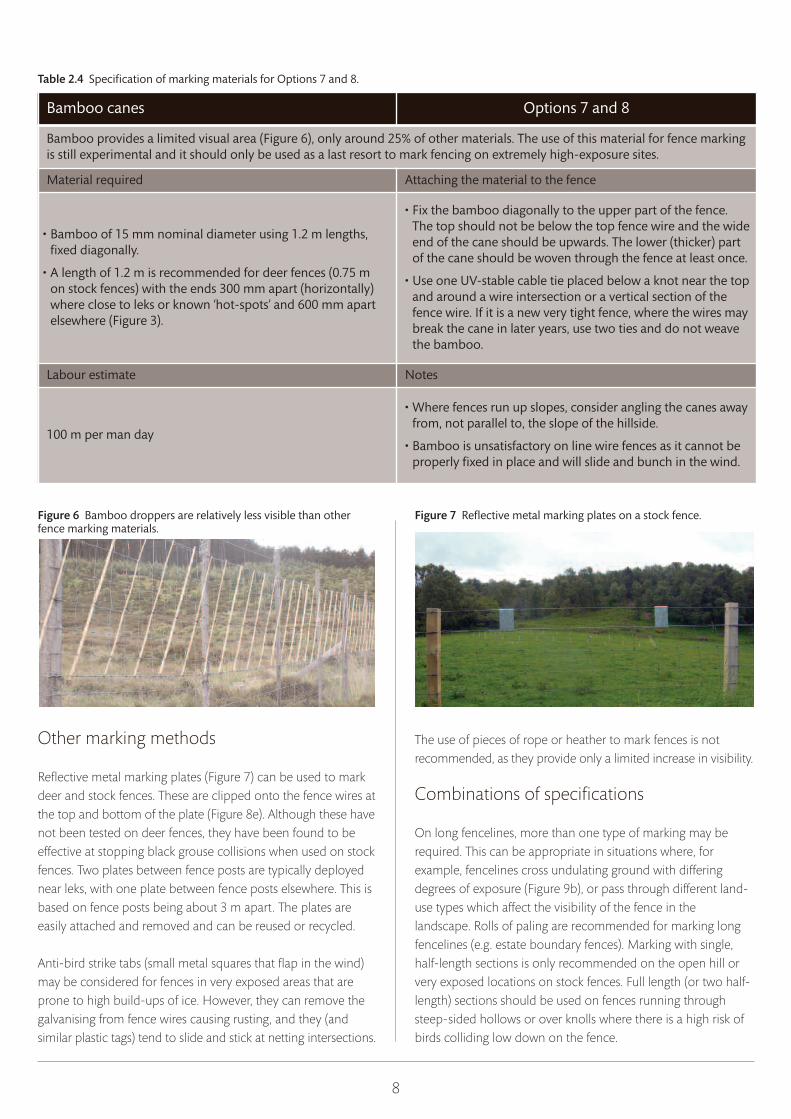
Figure 6 Bamboo droppers are relatively less visible than otherfence marking materials.
Bamboo canes Options 7 and 8
Bamboo provides a limited visual area (Figure 6), only around 25% of other materials. The use of this material for fence markingis still experimental and it should only be used as a last resort to mark fencing on extremely high-exposure sites.
Material required Attaching the material to the fence
• Bamboo of 15 mm nominal diameter using 1.2 m lengths,fixed diagonally.
• A length of 1.2 m is recommended for deer fences (0.75 mon stock fences) with the ends 300 mm apart (horizontally)where close to leks or known ‘hot-spots’ and 600 mm apartelsewhere (Figure 3).
• Fix the bamboo diagonally to the upper part of the fence.The top should not be below the top fence wire and the wideend of the cane should be upwards. The lower (thicker) partof the cane should be woven through the fence at least once.
• Use one UV-stable cable tie placed below a knot near the topand around a wire intersection or a vertical section of thefence wire. If it is a new very tight fence, where the wires maybreak the cane in later years, use two ties and do not weavethe bamboo.
Labour estimate Notes
100 m per man day
• Where fences run up slopes, consider angling the canes awayfrom, not parallel to, the slope of the hillside.
• Bamboo is unsatisfactory on line wire fences as it cannot beproperly fixed in place and will slide and bunch in the wind.
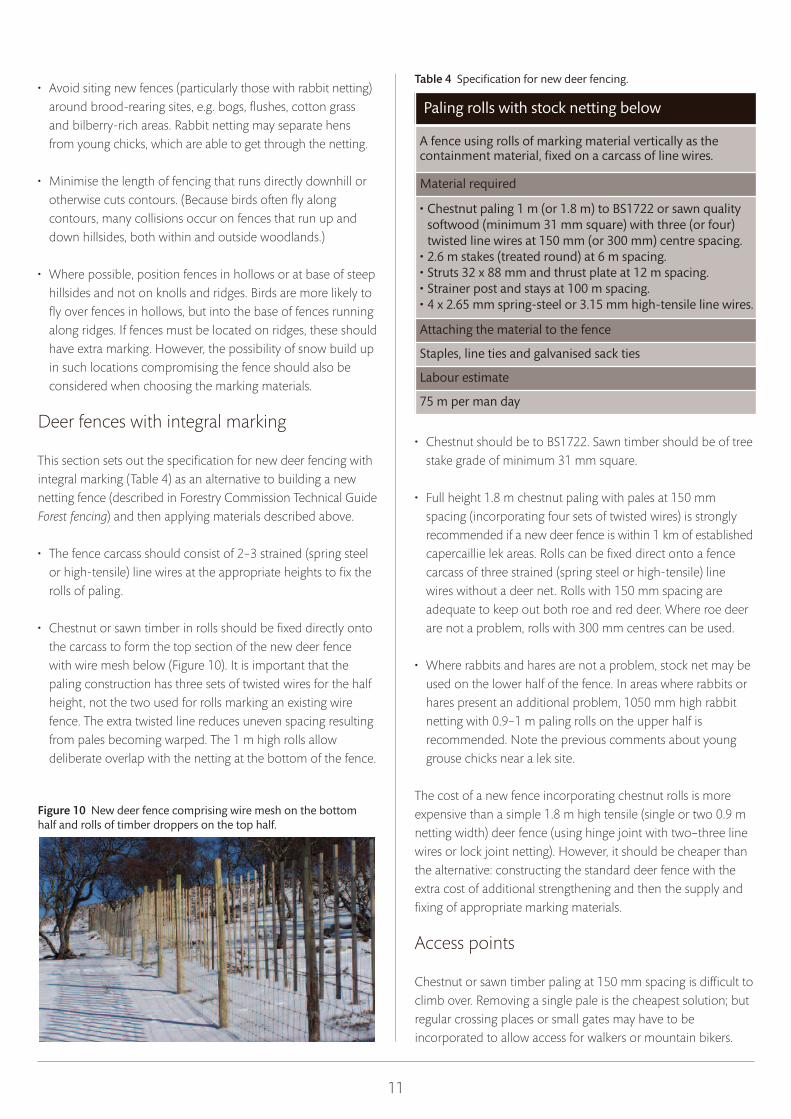
Figure 7 Reflective metal marking plates on a stock fence.
Other marking methods
Reflective metal marking plates (Figure 7) can be used to markdeer and stock fences. These are clipped onto the fence wires atthe top and bottom of the plate (Figure 8e). Although these havenot been tested on deer fences, they have been found to beeffective at stopping black grouse collisions when used on stockfences. Two plates between fence posts are typically deployednear leks, with one plate between fence posts elsewhere. This isbased on fence posts being about 3 m apart. The plates areeasily attached and removed and can be reused or recycled.
Anti-bird strike tabs (small metal squares that flap in the wind)may be considered for fences in very exposed areas that areprone to high build-ups of ice. However, they can remove thegalvanising from fence wires causing rusting, and they (andsimilar plastic tags) tend to slide and stick at netting intersections.
The use of pieces of rope or heather to mark fences is notrecommended, as they provide only a limited increase in visibility.
Combinations of specifications
On long fencelines, more than one type of marking may berequired. This can be appropriate in situations where, forexample, fencelines cross undulating ground with differingdegrees of exposure (Figure 9b), or pass through different land-use types which affect the visibility of the fence in thelandscape. Rolls of paling are recommended for marking longfencelines (e.g. estate boundary fences). Marking with single,half-length sections is only recommended on the open hill orvery exposed locations on stock fences. Full length (or two half-length) sections should be used on fences running throughsteep-sided hollows or over knolls where there is a high risk ofbirds colliding low down on the fence.
Table 2.4 Specification of marking materials for Options 7 and 8.

9
Figure 8a Attach plastic to the fence using highly UV stabilisedplastic ties tied twice around the joints.
Figure 8b Fix individual pales with galvanised ‘potato’ sack ties.
Figure 8c A nail in each stake assists hanging paling rolls.
Figure 8e Reflective metal platesclipped on to stock fencewires at the top andbottom of the plates.
Figure 8f Attach paling rolls with heavy duty clips using a crimp tool.
Figure 8d Attaching twisted wires to a stake using a staple (a) and toa line wire using a galvanised ‘potato’ sack tie (b).
Table 3 Recommended fixings for fence markers
*Length of tie depends on circumference of timber used: 150–200 mm normal for timber. Standard C type 22 clips (as used for rabbit fencing) are NOT suitable for(a) orange mesh – they cut plastic, or (b) for holding rolls of paling – they are too weak. Standard personal protective clothing should be used when fixing.
Marking material Fixing type (minimum specification)
Number or spacing of fixings Notes
Plastic mesh 4.5 x 150 mm heavy UV-stablecable tie, not metal clips (Figure 8a).
1 m maximum at topand at bottom
• Place ties across mesh joints. • Nail vertical batten on stakes.
Individual droppers/pales
Stainless steel or galvanised sack tie1.4–1.8 mm x 150 mm* (Figure 8b)
(or heavy UV-stable cable tie 4.5 mm x 150 mm*)
1 per piece
1 per piece
• Weave bottom into fence mesh oruse 2 ties fixed around vertical wires.
• Use proprietary tightening tool forsack ties. Use ungalvanised wire.
Rolls of chestnut or sawn wood paling
Stainless steel or galvanised sack tie1.4–1.8 mm x 100 mm (Figures 8 c,d)
(or heavy metal clip, or hog ringbut not ring gun clips)
1 m apart alternatelyaround top and thenaround bottomtwisted wires
• Fix to line wires or net horizontals. • Staple at each stake. • Do not use thin metal C22 type clips. • Plastic cable ties may fail at ~5 years.
Bamboo 2.5 mm x 75–100 mm* heavy UV-stable cable tie
1 under a knot atmesh intersection
• 1 if cane woven into fence. • 2 per length if cane not woven.
Fixing the materials to the fence
Where possible, material should be attached to the side of thefence facing the prevailing wind, so the force pushes the markingonto the fence carcass not away from it. This is especially
important when using plastic netting, to minimise the strain onthe plastic fixings. For all types of marking methods, the fixingsused should not harm either the marking material or the fence(see Table 3 and Figures 8a–f).
a
b

10
Strengthening fences
It is important that existing fences continue to function despitehaving additional material attached. The strainer postassemblies and the top line wire must be inspected andstrengthened, or replaced if necessary, to support the addedweight of the marking material and subsequent wind loading.
The line wire must be adequately strong. Where necessary (forexample, where a mild steel top wire or an unsupported hinge-joint net with no line wire exists) a new galvanised top line wireof 2.65 mm spring steel or 3.15 mm high-tensile wire should beinserted, fixed and strained.
Where the existing stakes are weak or far apart, new stakesshould be inserted to give extra support at every 6 m maximum(Figure 9a). In areas with high wind exposure or soft ground(Figure 9b), angled stake braces and thrust posts should beplaced at every second to fourth stake and fixed with two
galvanised nails at each end. Every post may have to be bracedat very exposed sites (Figure 9c). These braces may be on oneside or alternate sides and should be attached at a minimum oftwo-thirds of the height of the fence. Stakes must be addedbefore attaching individual pieces of marking material, or onthe same day as rolls of material.
Durability of marking materials
The longevity of markers varies with the material. Cleft chestnutor larch or cedar may last decades and are thus good optionsfor march (estate boundary) fences that need to remain in placefor many years. UV-stable plastic netting has a guaranteed lifefor eight years; untreated sawn softwood touching the ground islikely to last for shorter time periods. Timber touching theground will deteriorate faster than that suspended at the toppart of a fence. Chestnut paling may be able to be removedfrom a redundant fence and reused for a second time.
New fences
There may be occasions when new fences to protect trees orhabitats need to be erected in areas that have woodland grouse.Such fences should be retained for the minimum timenecessary to achieve management objectives and then removed.
It is recommended that at least the top section of any new deerfence is constructed using good quality rolls of chestnut pales orsawn softwood pales attached to a line wire carcass, or wooddroppers attached to stock net, as described below. Wherehigher risks are identified, the lower section may also be marked.
Siting new fences
If the construction of a new deer or stock fence is essential:
• Seek site-specific advice on the position of new fences inCapercaillie Core Areas and in areas with black grouse. TheCapercaillie Project Officer in Scotland and the black grouseadvisers can give free advice on fence positioning and marking.
• Avoid siting new fences within 1 km of a lek site, except inexceptional circumstances when there is over-riding publicinterest (e.g. road safety) or where it is agreed that there is anoverall benefit for the grouse (e.g. significant habitatimprovement). Expert advice should be sought in both cases.
• Avoid siting new fences within woodlands in Core CapercaillieAreas unless, as before, there is a health and safety issue orwhere it is agreed that there is an overall benefit for thegrouse. Expert advice should be sought in both cases.
Figure 9a Extra struts added to a weak fence in a sheltered location.
Figure 9b Extra struts added to a newly-marked fence in an exposedlocation.
Figure 9c Struts are vital in exposed or known snowfield locations.Creating deliberate ‘weak points’ in line wires and mesh will mean thatonly a limited length of fence may collapse during adverse weather.
11
• Avoid siting new fences (particularly those with rabbit netting)around brood-rearing sites, e.g. bogs, flushes, cotton grassand bilberry-rich areas. Rabbit netting may separate hensfrom young chicks, which are able to get through the netting.
• Minimise the length of fencing that runs directly downhill orotherwise cuts contours. (Because birds often fly alongcontours, many collisions occur on fences that run up anddown hillsides, both within and outside woodlands.)
• Where possible, position fences in hollows or at base of steephillsides and not on knolls and ridges. Birds are more likely tofly over fences in hollows, but into the base of fences runningalong ridges. If fences must be located on ridges, these shouldhave extra marking. However, the possibility of snow build upin such locations compromising the fence should also beconsidered when choosing the marking materials.
Deer fences with integral marking
This section sets out the specification for new deer fencing withintegral marking (Table 4) as an alternative to building a newnetting fence (described in Forestry Commission Technical GuideForest fencing) and then applying materials described above.
• The fence carcass should consist of 2–3 strained (spring steelor high-tensile) line wires at the appropriate heights to fix therolls of paling.
• Chestnut or sawn timber in rolls should be fixed directly ontothe carcass to form the top section of the new deer fencewith wire mesh below (Figure 10). It is important that thepaling construction has three sets of twisted wires for the halfheight, not the two used for rolls marking an existing wirefence. The extra twisted line reduces uneven spacing resultingfrom pales becoming warped. The 1 m high rolls allowdeliberate overlap with the netting at the bottom of the fence.
• Chestnut should be to BS1722. Sawn timber should be of treestake grade of minimum 31 mm square.
• Full height 1.8 m chestnut paling with pales at 150 mmspacing (incorporating four sets of twisted wires) is stronglyrecommended if a new deer fence is within 1 km of establishedcapercaillie lek areas. Rolls can be fixed direct onto a fencecarcass of three strained (spring steel or high-tensile) linewires without a deer net. Rolls with 150 mm spacing areadequate to keep out both roe and red deer. Where roe deerare not a problem, rolls with 300 mm centres can be used.
• Where rabbits and hares are not a problem, stock net may beused on the lower half of the fence. In areas where rabbits orhares present an additional problem, 1050 mm high rabbitnetting with 0.9–1 m paling rolls on the upper half isrecommended. Note the previous comments about younggrouse chicks near a lek site.
The cost of a new fence incorporating chestnut rolls is moreexpensive than a simple 1.8 m high tensile (single or two 0.9 mnetting width) deer fence (using hinge joint with two–three linewires or lock joint netting). However, it should be cheaper thanthe alternative: constructing the standard deer fence with theextra cost of additional strengthening and then the supply andfixing of appropriate marking materials.
Access points
Chestnut or sawn timber paling at 150 mm spacing is difficult toclimb over. Removing a single pale is the cheapest solution; butregular crossing places or small gates may have to beincorporated to allow access for walkers or mountain bikers.
Figure 10 New deer fence comprising wire mesh on the bottomhalf and rolls of timber droppers on the top half.
Paling rolls with stock netting below
A fence using rolls of marking material vertically as thecontainment material, fixed on a carcass of line wires.
Material required
• Chestnut paling 1 m (or 1.8 m) to BS1722 or sawn qualitysoftwood (minimum 31 mm square) with three (or four)twisted line wires at 150 mm (or 300 mm) centre spacing.
• 2.6 m stakes (treated round) at 6 m spacing.• Struts 32 x 88 mm and thrust plate at 12 m spacing.• Strainer post and stays at 100 m spacing.• 4 x 2.65 mm spring-steel or 3.15 mm high-tensile line wires.
Attaching the material to the fence
Staples, line ties and galvanised sack ties
Labour estimate
75 m per man day
Table 4 Specification for new deer fencing.

12ISBN: 978-0-85538-873-7 © CROWN COPYRIGHT
FCTN
019/FC-G
B(ECD
)/ALD
R-1.5K/DEC
12
Enquiries relating to this publication should be addressed to:
Kenny KortlandForestry Commission ScotlandInverness Forest DistrictTower Road, SmithtonInverness IV1 2NL+44 (0)1463 791575
[email protected]/scotland
For more information about the work of Forest Research,visit: www.forestresearch.gov.uk
For more information about Forestry Commissionpublications, visit: www.forestry.gov.uk/publications
The Forestry Commission will consider all requeststo make the content of publications available inalternative formats. Please send any such requeststo [email protected] or call 0131 314 6575.
Contacts
For further information and advice on grouse conservation:
Alice BroomeForest ResearchNorthern Research StationRoslin EH25 9SY0131 445 6974 [email protected]/forestresearch
RSPB (UK Headquarters)Potton RoadSandyBedfordshire SG19 2DL01767 680551www.rspb.org.uk
Game & Wildlife Conservation TrustBurgate ManorFordingbridgeHampshire SP6 1EF01425 652381www.gwct.org.uk
Capercaillie Project Officer: see the Capercaillie Biodiversity ActionPlan Steering Group website at: www.capercaillie-life.info
Black grouse advisers: a list is available on the Black Grouse UKBiodiversity Action Plan website at: www.blackgrouse.info
For information on any grant eligibility for fencing see theForestry Commission website at: www.forestry.gov.uk/grants
Useful sources of information
Publications
Forest fencingForestry Commission Technical Guide (FCTN002).
Forest management for capercaillie.Capercaillie Biodiversity Action Plan Steering Group.
Deer and fencing Forestry Commission Scotland Guidance Note
Joint agency statement and guidance deer fencing.Forestry Commission Scotland, Scottish Natural Heritageand Deer Commission for Scotland
Websites
www.capercaillie-life.infoThe website of the LIFE Nature Project aimed at halting thedecline of Scottish capercaillie.
www.blackgrouse.infoThe website supporting the UK Biodiversity Action Plan forblack grouse.
http://data.nbn.org.ukInformation and data on UK biodiversity, includingdistribution maps for capercaillie and black grouse.
www.naturalengland.org.ukInformation on nature conservation and protectingbiodiversity in England.
www.snh.org.ukInformation on the conservation of capercaillie and blackgrouse and other species on its Action List for Scotland.
www.ccw.gov.ukInformation on nature conservation and protectingbiodiversity in Wales.
Please note that the list of products and manufacturers in this publication is not comprehensive and other manufacturers may be able toprovide products with equivalent characteristics. Reference to a particular manufacturer or product does not imply endorsement orrecommendation of that manufacturer or product by the Forestry Commission. The Forestry Commission accepts no liability for any lossor damage arising from the interpretation or use of this information.