Federated Identity Service (FIS) Manage Certificates · Download Certificates – Medium Level of...
27
Copyright © 2018 Exostar, LLC All rights reserved. 1 Federated Identity Service (FIS) Manage Certificates February 2018
Transcript of Federated Identity Service (FIS) Manage Certificates · Download Certificates – Medium Level of...

Copyright © 2018 Exostar, LLC All rights reserved. 1
Federated Identity Service (FIS)
Manage Certificates February 2018

Copyright © 2018 Exostar, LLC All rights reserved. 2
Contents Manage Certificates ...................................................................................................................................... 3
Download Certificates – Basic Level of Assurance (Identity) .................................................................... 3
Download Certificates – Basic Level of Assurance (SecureEmail) ............................................................. 4
Download Certificates – Medium Level of Assurance (Software) ............................................................. 6
Download Certificates – Medium Level of Assurance (Hardware) ........................................................... 9
Hardware Token FIPS Mode Review ........................................................................................................... 10
Hardware Token FIPS Mode Initialization ............................................................................................... 11
Downloading Certificates to your Token ................................................................................................. 14
View Certificates ......................................................................................................................................... 16
View Certificates (eToken – for MLOA hardware) ................................................................................... 16
Revoke Certificates .................................................................................................................................. 17
Recover Encryption Keys ......................................................................................................................... 19
Importing Recovered Encryption Keys ................................................................................................. 22
Renew Certificates ................................................................................................................................... 26
Reapply for Certificates ........................................................................................................................... 26

Copyright © 2018 Exostar, LLC All rights reserved. 3
Manage Certificates If you are approved for FIS access, you are able to view the Manage Certificates tab under the My Account tab.
In certain situations, the FIS user may not obtain some or all of the permissions needed to download and install the Exostar ActiveX XEnrollPlus control via a web browser. To handle these situations, system administrators can use a Microsoft installer-based package (MSI), to install the Exostar ActiveX control. There are three versions of the installer currently available:
1. One for Windows 2000 platforms
2. One for Windows XP
3. One for Windows Vista.
In addition, Exostar has a system check functionality, which allows you to review the issues with the certificate download process. Complete a system check prior to downloading your certificates.
Download Certificates – Basic Level of Assurance (Identity)
Pre-requisites for downloading the certificates:
Received 16-digit passcode from Exostar via email
Reviewed the system and certificate download requirements document

Copyright © 2018 Exostar, LLC All rights reserved. 4
To download the certificates you are approved for: 1. Go to the My Account tab, and click on the Manage Certificates tab.
2. Enter the passcode you received via email from Exostar, and click Submit.
Note: The passcode is a 16-digit number separated by hyphens; for example: 1234-5678-1234-5678. You must enter all the characters, including hyphens (or leave the hyphens out completely). The passcode is NOT the same as your Identity and Access Management Platform (MAG) log-in password.
3. Download your certificates. If your passcode is correct, you will see the certificate listed
with a status. The system will automatically select the certificate to download.
Note: You are only able to see the Download Certificates sub-tab under Manage Certificates, when you have an approved FIS request pending certificate download. If no certificates are available for download, you cannot view this sub-tab.
4. After the certificate is successfully downloaded, you will see a confirmation message on
your screen. Note: Refer to the FAQ section for Federated Identity Service on www.myexostar.com for information on any errors encountered while downloading the certificates.
Download Certificates – Basic Level of Assurance (SecureEmail) Pre-requisites for downloading the certificates:
Received 16-digit passcode from Exostar via email
Reviewed the system and certificate download requirements document

Copyright © 2018 Exostar, LLC All rights reserved. 5
To download your certificates: 1. Go to the My Account tab, and click the Manage Certificates tab.
2. Enter the passcode you received via email from Exostar, and click Submit.
Note: The passcode is a 16-digit number separated by hyphens; for example: 1234-5678-1234-5678. You must enter all the characters, including hyphens (or leave the hyphens out completely). The passcode is NOT the same as your Identity and Access Management Platform (MAG) log-in password.
3. Download your certificates. If your passcode is correct, you will see the list of
certificates you can download. The system will automatically select all of them for download.
4. Click the OK button to archive your encryption key and enable key recovery.
Note: This activity allows Exostar to archive the encryption key for recovery at a later time. Refer to the Recover Encryption Keys section for details.

Copyright © 2018 Exostar, LLC All rights reserved. 6
5. Complete the certificate download. The system presents the download status at each step.
6. Once the download is complete, you will receive the following message screen:
Note: Refer to the FAQ section for Federated Identity Service on http://www.myexostar.com/fis.aspx for information on any errors encountered while downloading.
Download Certificates – Medium Level of Assurance (Software) Pre-requisites for downloading the certificates:
Completed in-person proofing. For more information click here.
Received 16-digit passcode from the proofer. If you lose this passcode, you are required to complete a reproofing purchase, and go through the in-person proofing process again.
Reviewed the system and certificate download requirements document.
Copyright © 2018 Exostar, LLC All rights reserved. 7
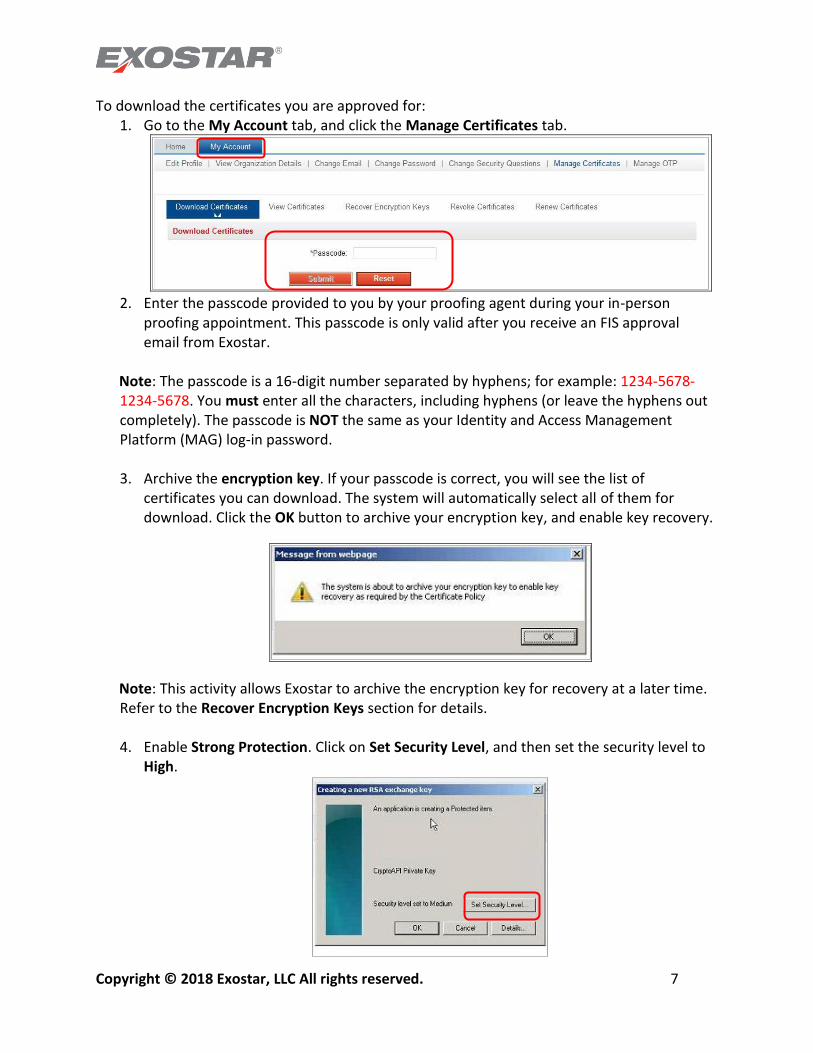
To download the certificates you are approved for: 1. Go to the My Account tab, and click the Manage Certificates tab.
2. Enter the passcode provided to you by your proofing agent during your in-person proofing appointment. This passcode is only valid after you receive an FIS approval email from Exostar.
Note: The passcode is a 16-digit number separated by hyphens; for example: 1234-5678-1234-5678. You must enter all the characters, including hyphens (or leave the hyphens out completely). The passcode is NOT the same as your Identity and Access Management Platform (MAG) log-in password.
3. Archive the encryption key. If your passcode is correct, you will see the list of
certificates you can download. The system will automatically select all of them for download. Click the OK button to archive your encryption key, and enable key recovery.
Note: This activity allows Exostar to archive the encryption key for recovery at a later time. Refer to the Recover Encryption Keys section for details.
4. Enable Strong Protection. Click on Set Security Level, and then set the security level to
High.

Copyright © 2018 Exostar, LLC All rights reserved. 8
Note: Exostar strongly recommends you enable strong protection for your MLOA certificates, unless there are corporate policies against doing so.
5. By default, the Medium option is already selected. Change this to High and click Next.
6. Provide a password for this certificate. Please note you will need to provide this
password each time you use your certificate.
7. The system now displays the new security level. Click OK.
Copyright © 2018 Exostar, LLC All rights reserved. 9
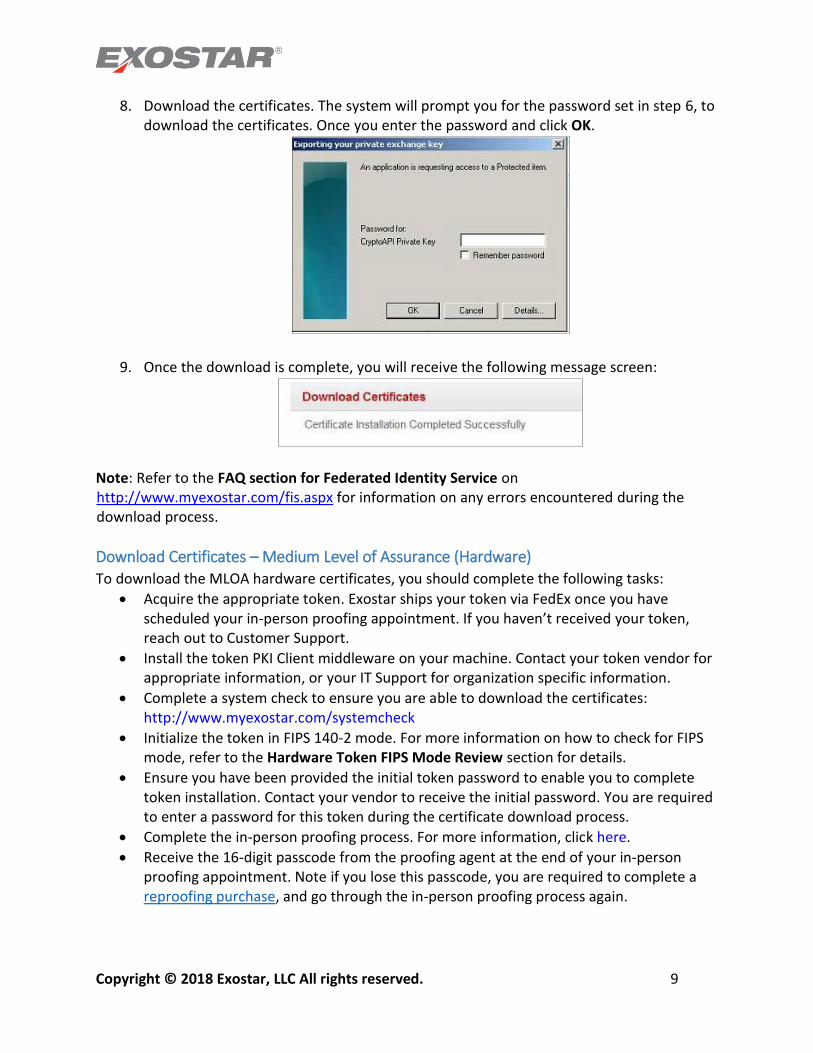
8. Download the certificates. The system will prompt you for the password set in step 6, to download the certificates. Once you enter the password and click OK.
9. Once the download is complete, you will receive the following message screen:
Note: Refer to the FAQ section for Federated Identity Service on http://www.myexostar.com/fis.aspx for information on any errors encountered during the download process.
Download Certificates – Medium Level of Assurance (Hardware)
To download the MLOA hardware certificates, you should complete the following tasks:
Acquire the appropriate token. Exostar ships your token via FedEx once you have scheduled your in-person proofing appointment. If you haven’t received your token, reach out to Customer Support.
Install the token PKI Client middleware on your machine. Contact your token vendor for appropriate information, or your IT Support for organization specific information.
Complete a system check to ensure you are able to download the certificates: http://www.myexostar.com/systemcheck
Initialize the token in FIPS 140-2 mode. For more information on how to check for FIPS mode, refer to the Hardware Token FIPS Mode Review section for details.
Ensure you have been provided the initial token password to enable you to complete token installation. Contact your vendor to receive the initial password. You are required to enter a password for this token during the certificate download process.
Complete the in-person proofing process. For more information, click here.
Receive the 16-digit passcode from the proofing agent at the end of your in-person proofing appointment. Note if you lose this passcode, you are required to complete a reproofing purchase, and go through the in-person proofing process again.

Copyright © 2018 Exostar, LLC All rights reserved. 10
Hardware Token FIPS Mode Review Exostar’s Medium Level of Assurance Hardware (MLOA) digital certificates are 2048 FIPS 140-2 compliant. To ensure the tokens also comply with the FIPS 140-2 compliance, review the token information. Note: You must review this information BEFORE downloading the digital certificates.
1. If you completed the initial password change process for your token, plug the token into your USB drive. The following screen is presented to you for the Aladdin eToken PRO (72K) Java.
Note: Your view of the screenshots may differ from this guide. This is due to the token settings specific to your organization.
2. Click on View eToken Info to display the token details.
Copyright © 2018 Exostar, LLC All rights reserved. 11
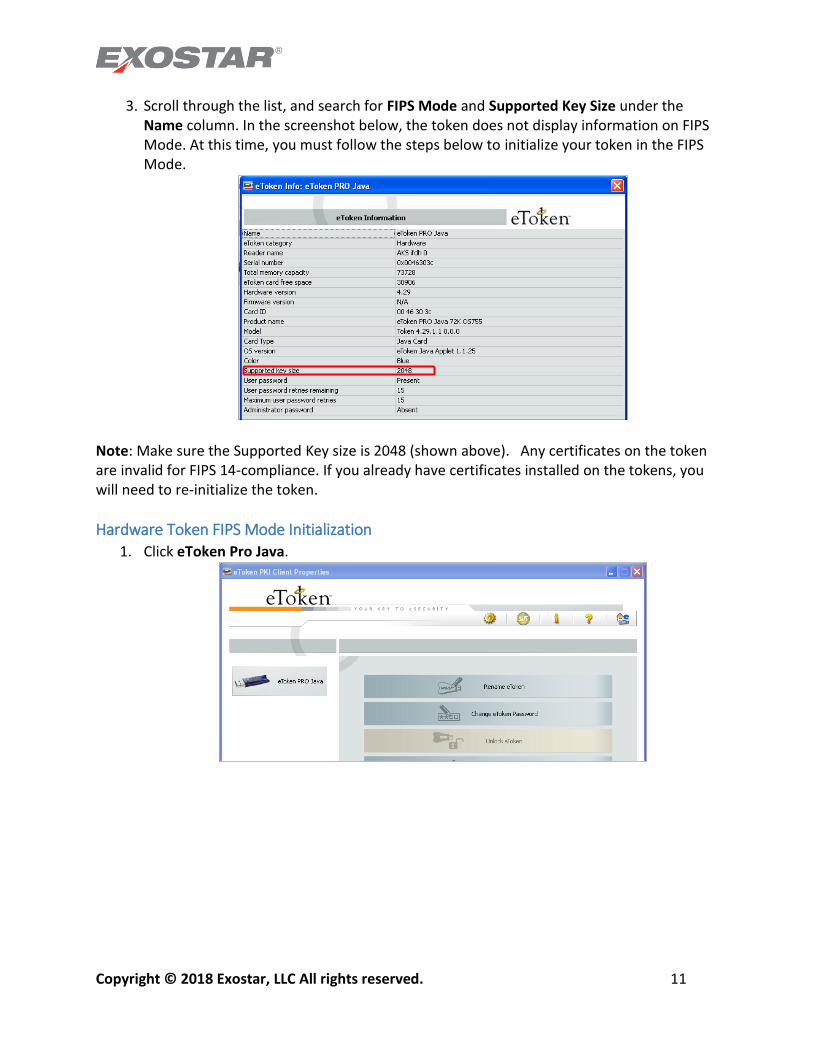
3. Scroll through the list, and search for FIPS Mode and Supported Key Size under the Name column. In the screenshot below, the token does not display information on FIPS Mode. At this time, you must follow the steps below to initialize your token in the FIPS Mode.
Note: Make sure the Supported Key size is 2048 (shown above). Any certificates on the token are invalid for FIPS 14-compliance. If you already have certificates installed on the tokens, you will need to re-initialize the token.
Hardware Token FIPS Mode Initialization 1. Click eToken Pro Java.
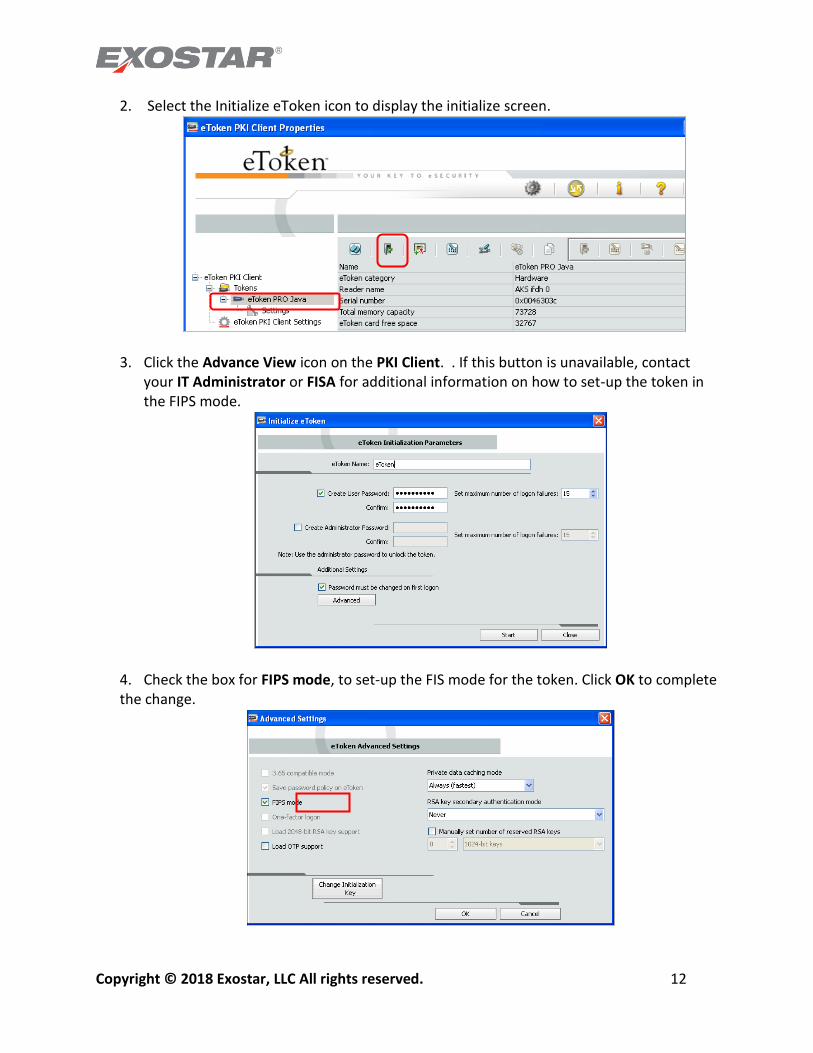
Copyright © 2018 Exostar, LLC All rights reserved. 12
2. Select the Initialize eToken icon to display the initialize screen.
3. Click the Advance View icon on the PKI Client. . If this button is unavailable, contact
your IT Administrator or FISA for additional information on how to set-up the token in the FIPS mode.
4. Check the box for FIPS mode, to set-up the FIS mode for the token. Click OK to complete the change.

Copyright © 2018 Exostar, LLC All rights reserved. 13
5. On the Initialize eToken screen, click Start. The following screen is presented. Select OK to start token initialization.
6. Once you have successfully initialized your token, you will receive a success message.
7. Click OK, and go back to the PKI Client main screen. Select View eToken Info. The FIPS Mode will appear as shown below.

Copyright © 2018 Exostar, LLC All rights reserved. 14
Downloading Certificates to your Token
Before you begin downloading your certificates, you should install the PKI Client on your computer, as well as change the initial password of your token. Once you have completed this, please follow the steps below:
1. Plug the token into your USB drive, and make sure you are logged into your Identity and Access Management Platform (MAG) user account.
2. To download the certificates you were approved for, go to the My Account tab and then click the Manage Certificates tab.
Note: You will only see the Download Certificates sub-tab under the Manage Certificates tab, when you have an approved FIS request pending certificate download. If no certificates are available for download, this sub-tab will not appear.
3. Enter your 16-digit passcode. At the time of in-person proofing appointment, the
proofer provided you a passcode. This passcode is only valid after you receive a packet approval email from Exostar.
Note: The passcode is a 16-digit number separated by hyphens, for example: 1234-5678-1234-5678. You must enter all characters, including the hyphens, OR leave the hyphens out completely. The passcode is NOT the same as your Identity and Access Management Platform (MAG) log-in password.

Copyright © 2018 Exostar, LLC All rights reserved. 15
4. If your passcode is correct, you will see a list of certificates to download. The system will automatically select all of them for download. Once selected, you are prompted to enter the hardware token password. Enter the token password and click OK.
5. Click OK. Certificates are created and archived.
Note: This activity allows Exostar to archive the encryption key for recovery at a later time. Refer to the Recover Encryption Keys section for details.
6. Once the archiving process is complete, click OK to complete the installation process.
Copyright © 2018 Exostar, LLC All rights reserved. 16
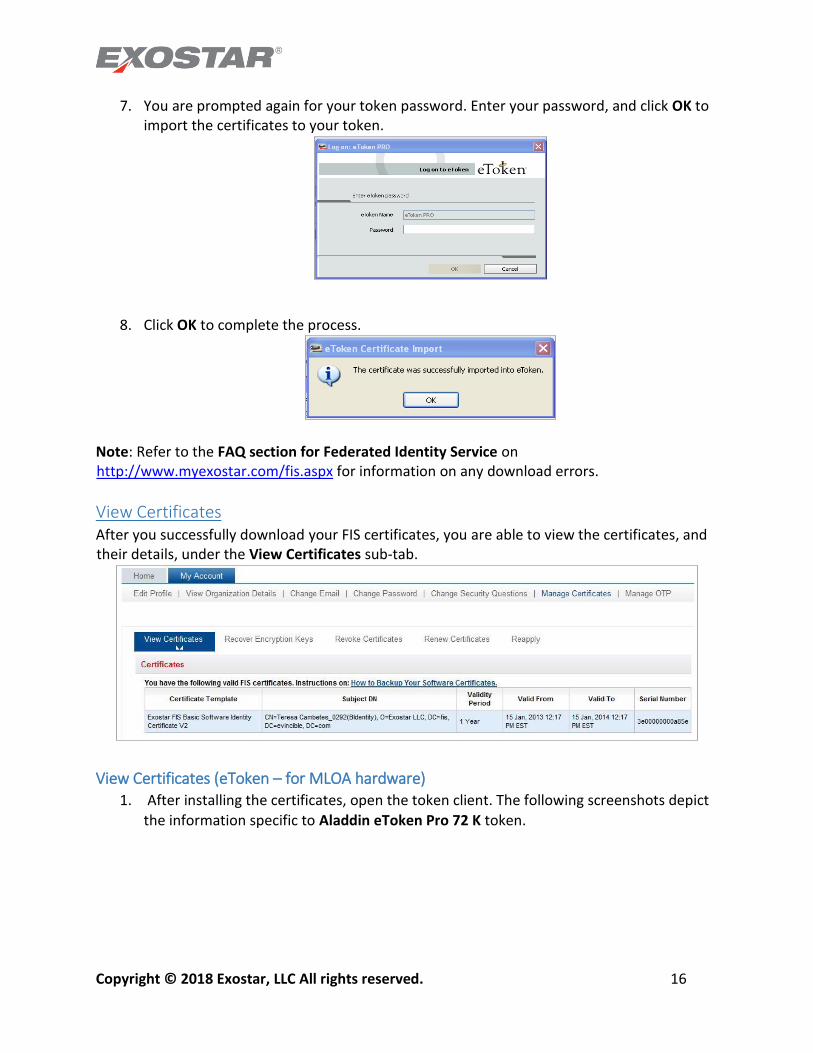
7. You are prompted again for your token password. Enter your password, and click OK to import the certificates to your token.
8. Click OK to complete the process.
Note: Refer to the FAQ section for Federated Identity Service on http://www.myexostar.com/fis.aspx for information on any download errors.
View Certificates
After you successfully download your FIS certificates, you are able to view the certificates, and their details, under the View Certificates sub-tab.
View Certificates (eToken – for MLOA hardware) 1. After installing the certificates, open the token client. The following screenshots depict
the information specific to Aladdin eToken Pro 72 K token.

Copyright © 2018 Exostar, LLC All rights reserved. 17
2. Click on the advanced view (highlighted above).
3. Expand the User Certificates by clicking on plus sign (+). You should view the list of all installed certificates. Click on each certificate to view details.
Revoke Certificates If you suspect one of the following, you should revoke your certificates:
Loss, compromise or theft of your private key
Fraud There are four ways to revoke your certificates:
1. Yourself: Log-in to your Identity and Access Management Platform (MAG) account using your user ID and password, and follow the steps provided below.
2. Organization Administrator: Your Organization Admin can revoke your certificates at any time.
3. FIS Administrator: Your organization’s designated FIS Admin can revoke your certificates on your behalf.
Copyright © 2018 Exostar, LLC All rights reserved. 18
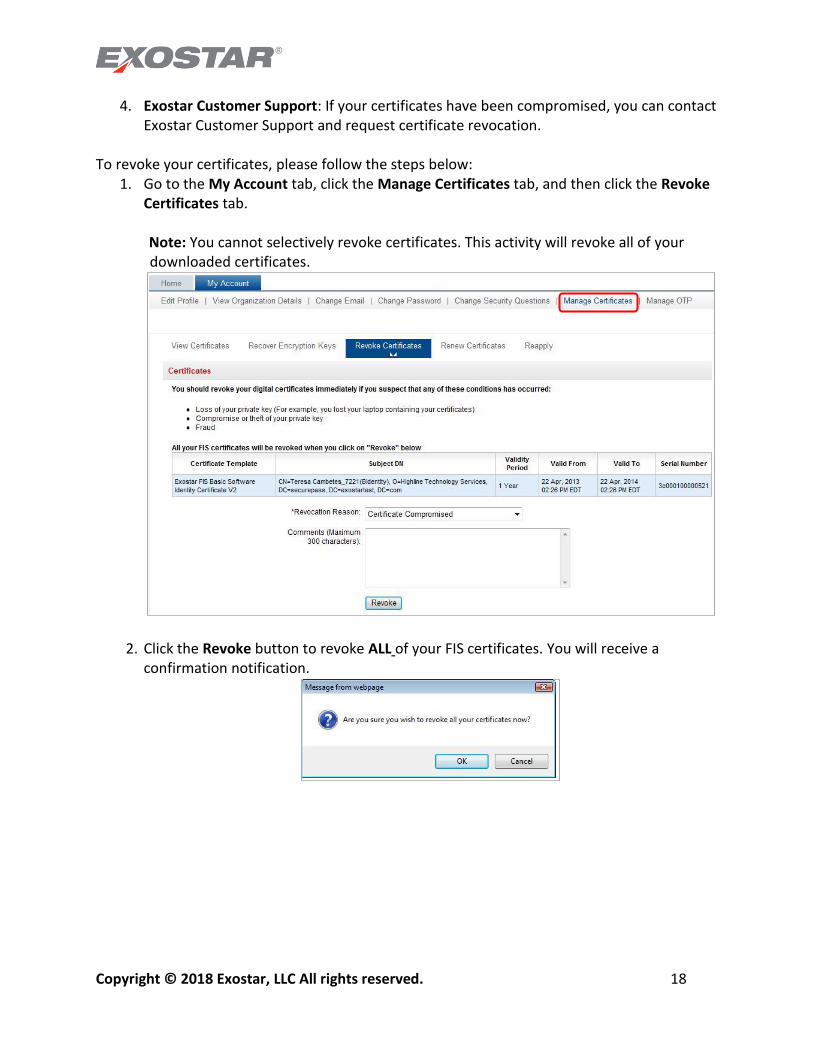
4. Exostar Customer Support: If your certificates have been compromised, you can contact Exostar Customer Support and request certificate revocation.
To revoke your certificates, please follow the steps below:
1. Go to the My Account tab, click the Manage Certificates tab, and then click the Revoke Certificates tab.
Note: You cannot selectively revoke certificates. This activity will revoke all of your downloaded certificates.
2. Click the Revoke button to revoke ALL of your FIS certificates. You will receive a confirmation notification.

Copyright © 2018 Exostar, LLC All rights reserved. 19
3. Select OK to revoke all certificates. The Certificate Revocation Confirmation is presented.
Recover Encryption Keys
This section is only pertinent to users with BLOA SecureEmail, MLOA Software and MLOA Hardware certificates. A user receives three certificates for FIS BLOA SecureEmail, MLOA Software, and Hardware:
1. Identity 2. Authentication 3. Encryption
Once a user revokes or loses their MLOA certificates, they need to re-apply for certificates, and go through the in-person proofing process again. This may also require an additional purchase. To enable the users to access data encrypted using the revoked/lost certificates, Exostar offers the self-key recovery functionality.
IMPORTANT:
If you are approved for and have downloaded FIS BLOA SecureEmail certificates, you can recover encryption keys for all active, revoked, or expired certificates.
If you are approved for and have downloaded FIS MLOA Software certificates, you can recover both BLOA SecureEmail and MLOA Software encryption keys for all active, revoked or expired certificates.
If you are approved for and have downloaded FIS MLOA Hardware certificates, you can recover encryption keys for all certificates – BLOA SecureEmail, MLOA Software, and MLOA Hardware. However, for hardware certificates, you can only recover expired or revoked encryption keys. Current keys cannot be recovered.
If you are recovering hardware encryption keys, you need to log-in using your hardware token.
You can use the keys only to access the data which was encrypted using the revoked or lost certificates.
To recover the keys, follow the steps below: 1. Log-in to your Identity and Access Management Platform (MAG) account using your new
MLOA certificates. If you have not reapplied for certificates, complete all the activities related to requesting access, in-person proofing, and downloading your certificates,

Copyright © 2018 Exostar, LLC All rights reserved. 20
prior to attempting to recover encryption keys. Refer to the Reapply for Certificates section for information on reapplying for certificates.
2. The following screen is presented if you have not logged-in using your new certificates.
Click on the link to select the certificate associated with your log-in credentials.
3. Click the Recover Encryption Keys tab under the Manage Certificates tab.
4. Select the certificate for which you need to recover the encryption key. If multiple
certificates are available, you will need to repeat the process to recover each key. You will receive a notification. Click OK.

Copyright © 2018 Exostar, LLC All rights reserved. 21
5. From the Choose a digital certificate pop-up screen, select the certificate you used to log-in.
6. You may be prompted to log-in again using your MLOA certificate. Complete the log-in
with the MLOA certificate used to log-in in step 1, and click OK. The following screen is presented. Click Download.
7. You will be prompted to either open or save the file. Click Save.
8. Save the certificate file (.p12 format) at a location of your choice. Click Close on the Exostar Self Key Recovery screen.
Copyright © 2018 Exostar, LLC All rights reserved. 22
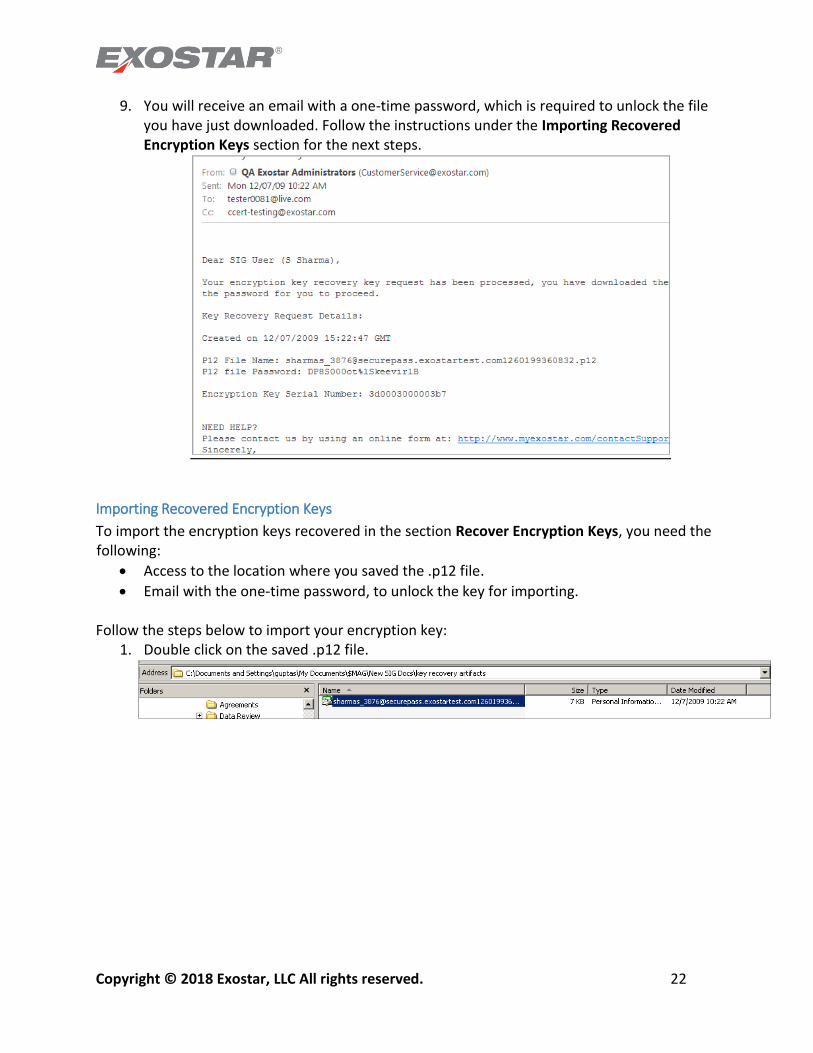
9. You will receive an email with a one-time password, which is required to unlock the file you have just downloaded. Follow the instructions under the Importing Recovered Encryption Keys section for the next steps.
Importing Recovered Encryption Keys
To import the encryption keys recovered in the section Recover Encryption Keys, you need the following:
Access to the location where you saved the .p12 file.
Email with the one-time password, to unlock the key for importing. Follow the steps below to import your encryption key:
1. Double click on the saved .p12 file.

Copyright © 2018 Exostar, LLC All rights reserved. 23
2. You are presented with the Certificate Import Wizard. Click Next.
3. Confirm the filename, and click Next.
4. Copy or enter the one-time password from the email you received, make sure no trailing
spaces are entered. In addition, it is strongly suggested you enable strong key

Copyright © 2018 Exostar, LLC All rights reserved. 24
protection, and set-up a password to access the encryption key. To enable further
export of the key, you may also select Mark this key as exportable option.
5. Click Next. You will be prompted to select a location to store the certificate. Click Next.
6. Click Next again to complete the import process, then click Finish.

Copyright © 2018 Exostar, LLC All rights reserved. 25
7. If you selected to Enable strong protection in step four, you are presented with the below screen. Click Set Security Level to set a password for the encryption key.
8. Select High to ensure you are prompted for a password each time, and then click Next.
9. Enter a password and click Finish.
Copyright © 2018 Exostar, LLC All rights reserved. 26
10. Click OK, and the following screen is presented:
Note: When you attempt to open an encrypted document or email, which was encrypted using this key, you will be automatically prompted for the key password you set-up. Enter the password to access your document or email.
Renew Certificates
You may renew your certificates 90 days prior to expiration. If you have expiring certificates, you must not reapply for certificates, unless you are attempting to upgrade the certificate assurance level. Note: For FIS MLOA Software and Hardware certificates, you must download your renewed certificates using your existing unexpired certificates. Follow the instructions provided to you in the renewal email to complete the certificate download. For detailed information on renewing your certificates, refer to the FIS Certificate Renewal/Reapply Guide.
Reapply for Certificates
You can reapply for certificates for any of the following reasons:
Your certificates have been revoked.
Your certificates have expired (you must complete a new purchase in this case).
You want to upgrade the certificate assurance level, in which case, a new purchase must be made.
Your Organization Administrator has instructed you to reapply for FIS certificates. There are three ways to reapply for your certificates:
1. Yourself: Log-in to your Identity and Access Management Platform (MAG) account using your user ID and password, and follow the steps provided below.
2. Organization Administrator: Your Organization Admin can reapply for certificates on your behalf.
3. Exostar Customer Support: If you are unable to request certificates yourself, or the Organization Administrator is unable to request them on your behalf, contact Exostar Customer Support.
Copyright © 2018 Exostar, LLC All rights reserved. 27
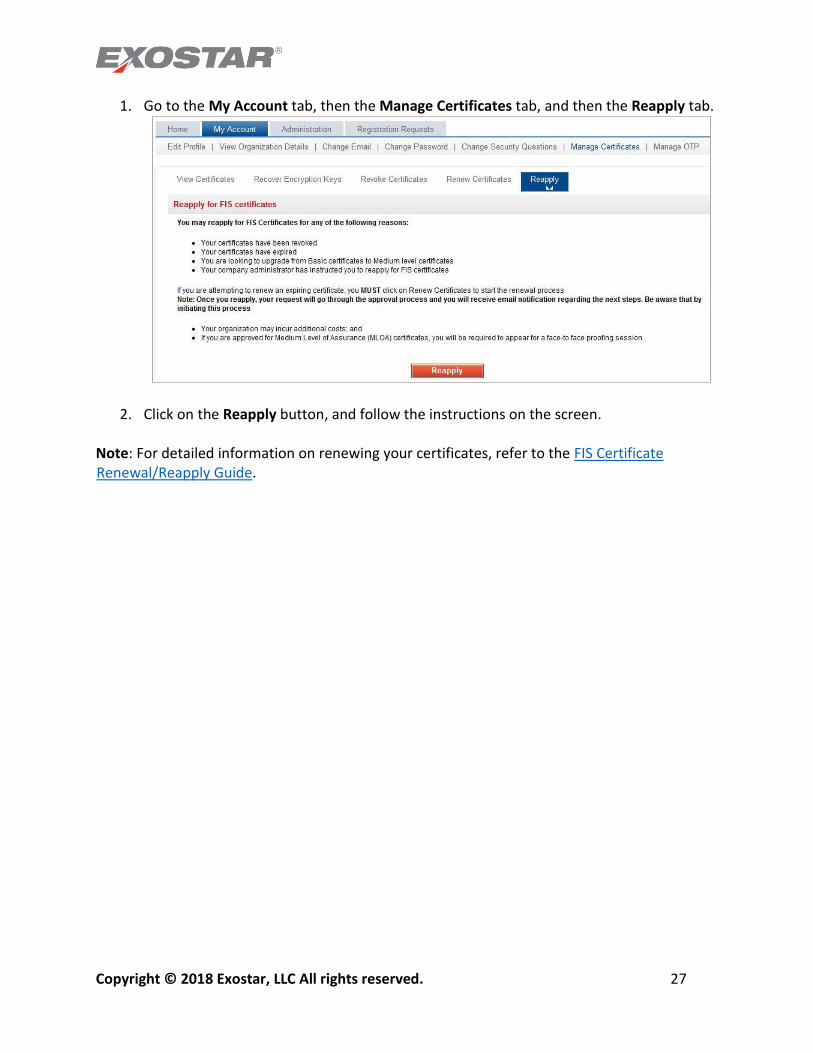
1. Go to the My Account tab, then the Manage Certificates tab, and then the Reapply tab.
2. Click on the Reapply button, and follow the instructions on the screen. Note: For detailed information on renewing your certificates, refer to the FIS Certificate Renewal/Reapply Guide.


![&KDSWHU 90ZDUH+RUL]RQ,QIUDVWUXFWXUH2YHUYLHZ · Certificates (Local Computer) Certificates - Current User Window Help Name Certificates (Local Computer) Certificates - Current User](https://static.fdocuments.net/doc/165x107/5f1018217e708231d4476ab3/kdswhu-90zduhrulrqqiudvwuxfwxuh2yhuylhz-certificates-local-computer-certificates.jpg)