
FEATURING D a YDreaM COLLECTION BY pattY BaSeMI
25
FREE PATTERN FEATURING DAYDREAM COLLECTION BY PATTY BASEMI
Transcript of FEATURING D a YDreaM COLLECTION BY pattY BaSeMI

f r e e p a t t e r n
F E AT U R I N G D a Y D r e a M C O L L E C T I O N B Y p a t t Y B a S e M I

© 2020 Courtesy of Art Gallery Quilts LLC. All Rights Reserved.
F A B R I C S D E S I G N E D B Y P A T T Y B A S E M I
Q U I L T D E S I G N E D B Y
DDR-25447Blooming ice cream
DDR-25442Sweet DreamlanD
DDR-25444gentle PetalS
DDR-25451wiSh JarS
DDR-25446Playing DreSS UP
DDR-25441girl at heart
DDR-25448little KeePSaKeS
DDR-25449BeSt FrienDS Forever
DDR-25445DollhoUSe town

artgal lery fabr ics . com
PE-408white linen
PE-446honeyDew
PE-411QUartz PinK
PE-488BloSSomeD
aDD It Ional BlenDerS for th IS project

artgal lery fabr ics . com
FINISHED SIZE | 74" × 76"
faBr Ic reQUIreMentS
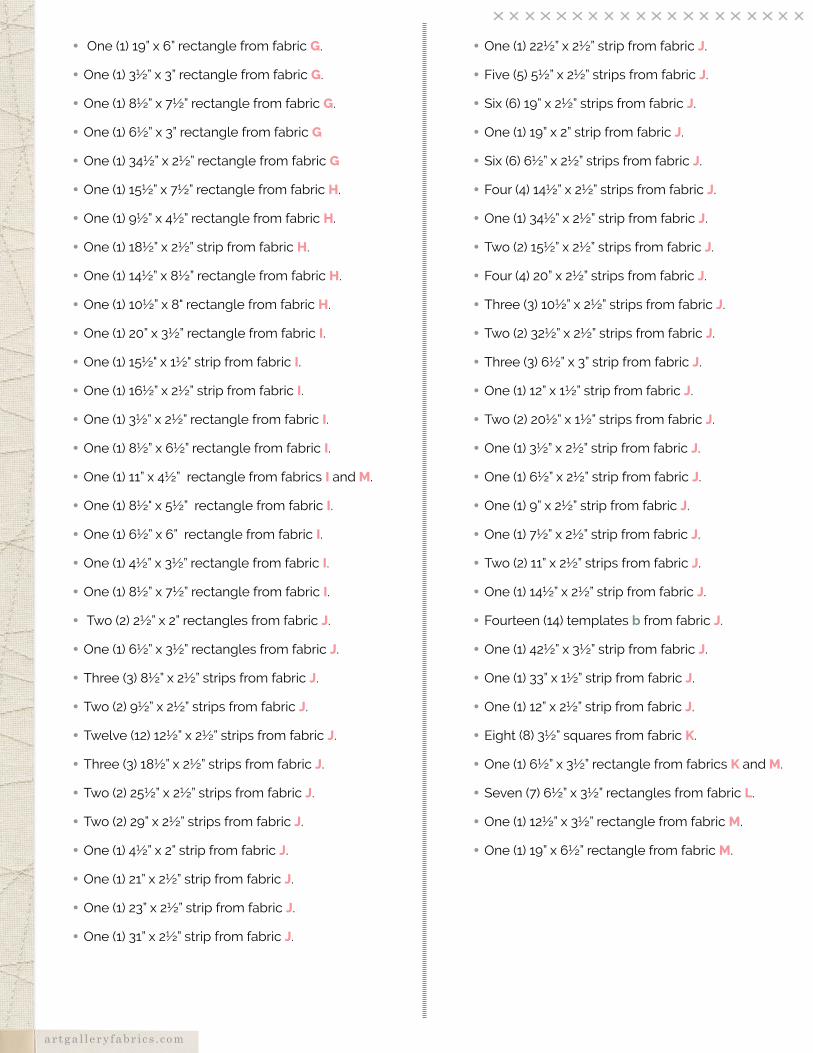
cUtt Ing D Irect IonS
¼" seam allowances are included.WOF means width of fabric.RSF means right side of fabric.
• one (1) 12½" x 7½" rectangle from fabric B.
•one (1) 9½" x 5 ½" rectangle from fabric B.
•one (1) 13" x 3 ½" rectangle from fabric B.
•three (3) 6 ½" x 3 ½" rectangles from fabric B.
•one (1) 12" x 4 ½" strip from fabric B.
•Six (6) 3 ½"squares from fabrics B, F and L.
•Four (4) templates a from fabrics B, E and H.
•twenty-four (24) 3 ½" squares from fabric C.
•one (1) 18½" x 3½" strip from fabric C.
•one (1) 23" x 2½" strip from fabric C.
•Four (4) 6½” x 3½” rectangles from fabric C.
•one (1) 6" x 2½" rectangle from fabric C.
•two (2) 8½” x 5½ rectangle from fabric D.
•Seven (7) 6½" x 3½" rectangles from fabric D.
•one (1) 12" x 3½" rectangle from fabric D.
•one (1) 10½" x 4½" rectangle from fabric D.
•one (1) 9½” x 3½” rectangle from fabric D.
•one (1) 9” x 5½” rectangle from fabrics D and M.
•one (1) 14½” square from fabric E.
•one (1) 14½” x 6½” rectangle from fabrics E and F.
•one (1) 11½” x 6½” rectangle from fabric E.
•one (1) 14½” x 9” rectangle from fabric E.
•one (1) 12½” x 2" rectangle from fabric E.
•two (2) templates a from fabric F.
•three (3) 6½” x 3½” rectangles from fabric F.
•one (1) 6½” x 5½” rectangle from fabric F.
•one (1) 16” x 5½” rectangle from fabric F.
•one (1) 14½" x 6½" strip from fabric F.
•one (1) 6½” x 3½” rectangle from fabric G.
•one (1) 8½” x 4½” rectangle from fabric G.
•one (1) 10½” x 5½” rectangle from fabric G.
Fabric A DDr-25441 ⅜ yd.
Fabric B DDr-25442 ¾ yd.
Fabric C DDr-25444 ⅝ yd.
Fabric D DDr-25445 ½ yd.
Fabric E DDr-25446 ¾ yd.
Fabric F DDr-25447 ½ yd.
Fabric G DDr-25448 ⅜ yd.
Fabric H DDr-25449 ¾ yd.
Fabric I DDr-25451 ¾ yd.
Fabric J Pe-408 3 yd.
Fabric K Pe-446 ¼ yd.
Fabric L Pe-411 ¼ yd.
Fabric M Pe-488 ⅓ yd.
BACKING FABRIC DDr-25445 5 yds (Suggested) BINDING FABRIC Fabric A DDr-25441 (Included)
artgal lery fabr ics . com
• one (1) 19” x 6” rectangle from fabric G.
•one (1) 3½” x 3” rectangle from fabric G.
•one (1) 8½” x 7½” rectangle from fabric G.
•one (1) 6½” x 3” rectangle from fabric G
•one (1) 34½” x 2½” rectangle from fabric G
•one (1) 15½” x 7½” rectangle from fabric H.
•one (1) 9½” x 4½” rectangle from fabric H.
•one (1) 18½” x 2½” strip from fabric H.
•one (1) 14½” x 8½” rectangle from fabric H.
•one (1) 10½” x 8" rectangle from fabric H.
•one (1) 20” x 3½” rectangle from fabric I.
•one (1) 15½" x 1½" strip from fabric I.
•one (1) 16½” x 2½” strip from fabric I.
•one (1) 3½” x 2½” rectangle from fabric I.
•one (1) 8½” x 6½” rectangle from fabric I.
•one (1) 11” x 4½” rectangle from fabrics I and M.
•one (1) 8½" x 5½” rectangle from fabric I.
•one (1) 6½” x 6” rectangle from fabric I.
•one (1) 4½” x 3½” rectangle from fabric I.
•one (1) 8½” x 7½” rectangle from fabric I.
• two (2) 2½” x 2” rectangles from fabric J.
•one (1) 6½” x 3½” rectangles from fabric J.
•three (3) 8½” x 2½” strips from fabric J.
•two (2) 9½” x 2½” strips from fabric J.
•twelve (12) 12½” x 2½” strips from fabric J.
•three (3) 18½” x 2½” strips from fabric J.
•two (2) 25½” x 2½” strips from fabric J.
•two (2) 29” x 2½” strips from fabric J.
•one (1) 4½” x 2” strip from fabric J.
•one (1) 21” x 2½” strip from fabric J.
•one (1) 23” x 2½” strip from fabric J.
•one (1) 31” x 2½” strip from fabric J.
•one (1) 22½” x 2½” strip from fabric J.
•Five (5) 5½” x 2½” strips from fabric J.
•Six (6) 19” x 2½” strips from fabric J.
•one (1) 19” x 2” strip from fabric J.
•Six (6) 6½” x 2½” strips from fabric J.
•Four (4) 14½” x 2½” strips from fabric J.
•one (1) 34½” x 2½” strip from fabric J.
•two (2) 15½” x 2½” strips from fabric J.
•Four (4) 20” x 2½” strips from fabric J.
•three (3) 10½” x 2½” strips from fabric J.
•two (2) 32½” x 2½” strips from fabric J.
•three (3) 6½” x 3” strip from fabric J.
•one (1) 12” x 1½” strip from fabric J.
•two (2) 20½” x 1½” strips from fabric J.
•one (1) 3½” x 2½” strip from fabric J.
•one (1) 6½” x 2½” strip from fabric J.
•one (1) 9” x 2½” strip from fabric J.
•one (1) 7½” x 2½” strip from fabric J.
•two (2) 11” x 2½” strips from fabric J.
•one (1) 14½” x 2½” strip from fabric J.
•Fourteen (14) templates b from fabric J.
•one (1) 42½” x 3½” strip from fabric J.
•one (1) 33” x 1½” strip from fabric J.
•one (1) 12” x 2½” strip from fabric J.
•eight (8) 3½” squares from fabric K.
•one (1) 6½” x 3½” rectangle from fabrics K and M.
•Seven (7) 6½” x 3½” rectangles from fabric L.
•one (1) 12½” x 3½” rectangle from fabric M.
•one (1) 19” x 6½” rectangle from fabric M.

artgal lery fabr ics . com
DIAGRAM 2
DIAGRAM 3
conStrUct Ion
Sew all rights sides together with ¼"seam allowance.
DIAGRAM 1
•Start with the fourteen different flying geese combinations.
•Bring all the 6½" x 3½" rectangles from fabrics B,C,D,F,G,K & L and all the 3½" squares from fabrics B, C, F, K & L.
•For the first flying geese combination, KBK, take two 3½" squares from fabric K and one 6½" x 3½" rectangle from fabric B.
•Place one fabric K square on top of the fabric B rectangle.
• align it to the left side of the rectangle, rSF together and draw a diagonal line on top of the square as shown in Diagram 1.
•Stitch on the drawn line.
•trim the rectangle corner excess fabric and press open.
•now, repeat the same procedure on the right side with the remaining fabric K 3½" square.
FLYING GEESE

artgal lery fabr ics . com
•repeat the previous steps for the remaining flying geese combinations.
•refer to the diagram below for combinations and quantities, when you are done set aside.
•Now that you got all the flying geese combinations, it is time to contruct the six different flying geese strip combinations.
DIAGRAM 4
KBK •BFB - BLB - CDC - CLC - CKC.
•BLB - KBK - CLC - FLF.
•CDC - CFC - LDL - FCF.
•LBL - CDC - LBL - KCK.
LBL
FCF
KCK
KDK
CDC
LDL
CFC
BFB
FGF
CKC
FLF
BLB
CLC
2
2
2
2
1
4
5
1
1
1
1
1
1
1
FLYING GEESE STRIP 1
FLYING GEESE STRIP 2
FLYING GEESE STRIP 3
FLYING GEESE STRIP 4

artgal lery fabr ics . com
•Join template a and template b following the fabric combinations below.
•attach them in pairs to create the half circle block.
•Set aside.
HALF CIRCLE
JB
JE
JH
JF 2
4
4
4
DIAGRAM 5
1
2
2
2
DIAGRAM 6
•KDK - CLC - CFC - CDC.
•CLC - FGF - CDC - KCK.
FLYING GEESE STRIP 5
FLYING GEESE STRIP 6
•Section #1 is divided in three different panels.
•to start panel #1 take one 18½” x 2” strip from fabric H, one 2½” x 2” rectangle from fabric J and one 6" x 2½" rectangle from fabric C.
•attach them in the order HJC.
•Press and set aside.
•This quilt will be built in three different sections.
•Start with section #1.
SECTION #1
Panel #1
DIAGRAM 7
DIAGRAM 8
•now, take one 6½” x 3½” rectangles from fabrics C, J and M.
•attach them in the order CJM.
•Press and set aside.

artgal lery fabr ics . com
•take one 8½” x 6½” rectangle from fabric I, one 8½” x 2½” strip from fabric J and one 8½” x 4½” rectangle from fabric G
•attach them in the order IJG.
•Press and set aside.
DIAGRAM 9
DIAGRAM 11
DIAGRAM 10
•take the CJM unit, two 9½" x 2½" strips from fabric J, one 9½" x 5 ½" rectangle from fabric B and one 9½” x 3½” rectangle from fabric D.
•attach them vertically the order CJM-J-B-J-D.
•Press and set aside.
•take the IJG unit, two 12½" x 2½" strips from fabric J and one JE half circle block.
•a.ttach them vertically the order J-JE-J-IJG.
•Press and set aside.
•now, take two 18½" x 2½" strips from fabric J and attach them in-between the previous made pieces as shown in the diagram below.
•Press.
DIAGRAM 12
DIAGRAM 13
•now, take two 25½" x 2½" strips from fabric J and the HJC strip made in diagram 1.
• attach all the pieces together as shown in the diagram below.
DIAGRAM 14

artgal lery fabr ics . com
•Press.
•voila! panel #1 for section #1 is done.
•move on with panel #2.
•take one 14½” x 6½” rectangle from fabric F, one 6½” x 3” strip from fabric J and the Flying geeSe StriP 5.
•attach them as shown in the diagram below.
Panel #2
DIAGRAM 15
•Bring two 29" x 2½" strips from fabric J.
•attach them to the top and bottom edge.
•Press and set aside.
DIAGRAM 16
•take one 16½” x 2½” strip from fabric I, one 2" x 2½" rectangle from fabric J and one 3½” x 2½” rectangle from fabric I.
•attach them in the order IJI.
•Press and set aside.
•take one 9½” x 4½” rectangle from fabric H, one 4½" x 2" from fabric J and one 10½" x 4½" rectangle from fabric D.
•attach them in the order HJD.
•Press.
•take the last two sewn pieces and one 21" x 2½" strip from fabric J.
•attach them together as shown in the diagram below.
•Press.
•now, bring one 8½" x 2½" strip from fabric J.
•attach it to the right side of the sewn piece.
•Press.
DIAGRAM 17
DIAGRAM 18
DIAGRAM 19
DIAGRAM 20

artgal lery fabr ics . com
•now, bring one 23" x 2½" strip from fabrics C & J.
•attach them to the bottom of the previous sewn piece in the order J-C.
•Press.
•take one JH half circle block and attach it to the left side of panel #2.
•Press.
•now bring the piece that was sewn on diagram 16 and attach it to the top edge of panel #2.
•Press.
•take one 23½" x 2½" strip from fabric J and attach it to the right edge of the panel.
•To finalize panel #2 take one 31" x 2½" strip from fabric J and attach it to the bottom edge of the panel.DIAGRAM 21
DIAGRAM 22
DIAGRAM 23
DIAGRAM 25
•Press.
•voila! panel #2 for section #1 is done.
DIAGRAM 24

artgal lery fabr ics . com
Panel #3
DIAGRAM 26
DIAGRAM 27
DIAGRAM 28
•move on with panel #3.
•take one 6½” x 3” rectangle from fabric G, one 6½” x 2½” strip from fabric J and one 14½” x 6½” rectangle from fabric E.
•attach them in the order GJE.
•Press and set aside.
•now, take one 9” x 5½” rectangle from fabrics D, one 5½” x 2½” strip from fabric J and 8½" x 5½” rectangle from fabric I.
•attach them in the order DJI.
•Press.
•Bring the sewn pieces for panel #3 and one 19" x 6" rectangle from fabric G, three 19" x 2½” strips from fabric J and one 19" x 2" strip from fabric J.
•attach them as shown in the diagram below.
19" x 2"
DIAGRAM 28
•Press.
•voila! panel #3 for section #1 is done.
SECTION #1 ASSEMBLY
•attach the three panels together in the order panel #1 - panel #2 - Panel #3
•Press and set aside.
DIAGRAM 29
•Section #2 is divided in two different panels.
•to start with panel #2 take Flying geeSe StriP 3 and one 6½" x 3½" strip from fabric J.
•attach the J strip on the right side of the Flying geeSe StriP 3 .
•Press.
•move forward with section #2.
SECTION #2
Panel #1

artgal lery fabr ics . com
DIAGRAM 31
DIAGRAM 32
DIAGRAM 34
DIAGRAM 35
DIAGRAM 36
DIAGRAM 33
DIAGRAM 30
•Bring two 14½" x 2½" strips from fabric J.
•attach the J strips to the top and bottom of the previous sewn piece.
•Press and set aside.
•take one 8½” x 7½” rectangle from fabric I, one 8½” x 2½” strip from fabric J and one 8½” x 5½ rectangle from fabric D.
•attach them in the order IJD.
•Press.
•take one 14½" x 2½" strip from fabric J, and attach it to the top edge.
•Press.
•now, bring the sewn piece in diagram 31 and one 14½” square from fabric E.
•attach them as shown in the diagram below and press.
•take one 34½” x 2½" strip from fabric J.
•attach it to the right side of the piece.
•Press and set aside.
•take one 12½” x 3½" strip from fabric M and one 12½” x 2½" strip from fabric J.
•attach them in the order MJ.
•Press and set aside.

artgal lery fabr ics . com
•take one 18½" x 3½" strip from fabric C and one 18½” x 2½" strip from fabric J.
•attach them in the order CJ.
•Press.
•now, take one 15½” x 7½” rectangle from fabric H, two 15½” x 2½" strips from fabric J and one 15½” x 1½" strip from fabric I.
•attach them in the order HJIJ.
•Press.•now, take one 16” x 5½” rectangle from
fabric F and two 5½” x 2½" strips from fabric J.
•attach them in the order JFJ.
•Press.
•now, bring the piece sewn in diagram 35 and attach it to the left side of the previous made piece.
•Press and set aside.
•Bring one JF half circle block, three 12½" x 2 ½ strips from fabric J and one 12½" x 7½" rectangle from fabric B.
•attach them alternating the J strips with the sewn pieces as shown in the diagram below.
•Press.
DIAGRAM 37
DIAGRAM 38
•now, bring the sewn piece in diagram 36 and two 5½” x 2½" rectangles from fabric J.
•attach them alternating fabric J rectangles with the sewn pieces as shown in the diagram below.
•Press and set aside.
DIAGRAM 39
DIAGRAM 40
DIAGRAM 41
DIAGRAM 42

artgal lery fabr ics . com
•take the Flying geeSe StriP 6, one JB half circle block, three 12½" x 2½" strips from fabric J and one 12½" x 2" strip from fabric E.
•attach them in the order J - Fg6 -J- E- J-JB.
•Press.
•Bring the piece sewn in diagram 42 and one 20" x 2½" strip from fabric J.
•attach them as shown in the diagram below.
•Press and set aside.
•take JE half circle block, one 6½" x 2½" strip from fabric J and one 6½" x 6" rectangle from fabric I.
•attach them in the order JE - J - I.
•now, bring one 20" x 2½" strip from fabric J and one 20" x 3½" rectangle from fabric I.
•attach them as shown in the diagram below.
•Bring the piece sewn in diagram 44 and attach it to the top.
•Press.
DIAGRAM 44
DIAGRAM 45
DIAGRAM 46
DIAGRAM 48
DIAGRAM 47
•now, bring two 20” x 2½” strips from fabric J and attach them to the bottom and top sides.
•Press and set aside.
DIAGRAM 43

artgal lery fabr ics . com
•Bring the piece sewn in diagram 41 and attach it to the left side of the previous sewn piece.
•Press and set aside.
DIAGRAM 49
DIAGRAM 50
DIAGRAM 51
•take one JB half circle, one 6½” x 2½" rectangle from fabric J and one 19” x 6½” rectangle from fabric M.
•attach them in the order JB-J-M.
•Press and set aside.
•then take one 32½" x 2½" from fabric J and attach it to the top edge of the previous sewn piece.
•Press and set aside.
•take the Flying geeSe StriP 1 and two 6½" x 3" rectangles from fabric J.
•attach the fabric J rectangles on the top and bottom of the Flying geeSe StriP 1 edges.
•Press.
•now, bring two 20½ x 1½" strips from fabric J.
•attach the fabric J strips on the Flying geeSe StriP 1 side edges.
•Press.
•Bring back the sewn piece in diagram 51 and attach it with the previous sewn piece as shown in the diagram below.
•Press.
DIAGRAM 52
DIAGRAM 53
DIAGRAM 54

artgal lery fabr ics . com
•Bring back the sewn piece in diagram 49 and attach on top of the previous sewn piece as shown in the diagram below.
DIAGRAM 55
DIAGRAM 56
DIAGRAM 57
•Press.
•voila! panel #1 for section #2 is done.
•For panel #2 start with
•to start with panel #2 take one (1) 4½” x 3½” rectangle from fabric I one 3½" x 2½" rectangle from fabric J and one (1) 13" x 3 ½" rectangle from fabric B.
•attach them in the order IJB.
•Press.
Panel #2
•now bring two 19" x 2½" strips from fabric J and attach them to the top and bottom of the previous sewn piece.
•Press and set aside.
•take one 9” x 5½” rectangle from fabric M and one 9” x 2½” strip from fabric J.
•attach them as shown in the diagram below.
•Press.
•now bring one 8½” x 7½” rectangle from fabric G and one 7½” x 2½” strip from fabric J.
•attach them as shown in the diagram below.
•Press.
DIAGRAM 58
DIAGRAM 59
DIAGRAM 60

artgal lery fabr ics . com
•Bring back the sewn piece in diagram 58 and attach it on top of the previous sewn piece as shown in the diagram below.
•Press and set aside.
•take one 11” x 4½” rectangle from fabrics M & I and two 11” x 2½” strips from fabric J.
•attach them in the order JMJI.
•Press.
•now bring one 12½” x 2½” strip from fabric J and the Flying geeSe StriP 4.
•attach them as shown in the diagram below.
•Press and set aside.
•take one 14½” x 9” rectangle from fabric E, one 14½” x 2½” strip from fabric J and one 14½” x 8½” rectangle from fabric H.
•attach in the order EJH.
•Press.
•now bring one 19” x 2½” strip from fabric J and attach to the top of EJH.
•Press.
DIAGRAM 63
DIAGRAM 64
DIAGRAM 65
DIAGRAM 66
DIAGRAM 62
DIAGRAM 61
•Bring back the sewn pieces in diagrams 61 and 63.
•attach them as shown in the diagram below.
•Press.
•voila! panel #2 for section #2 is done.

artgal lery fabr ics . com
SECTION #2 ASSEMBLY
•attach the two panels together in the order panel #1 - panel #2
•Press and set aside.
DIAGRAM 67
DIAGRAM 68
•Section #3 is divided in three different panels.
•to start with panel #1 take Flying geeSe StriP 2, two 6½" x 2½" strip from fabric J, one 6½” x 5½” rectangle from fabric F and one 11½” x 6½” rectangle from fabric E.
•attach them in the order Flying geeSe StriP 2 - J - F - J - E.
•Press.
•now, bring two 32½" x 2½" strip from fabric J.
•attach them as shown in the diagram below.
•move forward with section #3.
SECTION #3
Panel #1
DIAGRAM 69
DIAGRAM 70
•Press.
•voila! panel #1 for section #3 is done.

artgal lery fabr ics . com
•to start with panel #2 take three 10½" x 2½" strips from fabric J, one 10½” x 8” rectangle from fabric H and one 10½” x 5½” rectangle from fabric G.
•attach them in the order JHJGJ.
•to start with panel #3 take one 12" x 2½" strip from fabric J, one 12" x 1½" strip from fabric J, one 12” x 4½” rectangle from fabric B and one 12” x 3½” rectangle from fabric I.
•attach them in the order JBJI.
•Press and set aside.
•take one JH half circle block and two 12½" x 2½" strip from fabric J.
•attach the J strips to the top and bottom of JH half circle block.
•Press
•Bring back the sewn piece in diagram 71 and attach them as shown in the diagram below.
Panel #2
Panel #3
DIAGRAM 70
DIAGRAM 71
DIAGRAM 72
DIAGRAM 73
•Press.
•voila! panel #2 for section #3 is done.
•Press.
•voila! panel #3 for section #3 is done.
SECTION #3 ASSEMBLY
•attach the three panels together in the order panel #1 - panel #2 - panel #3.
DIAGRAM 74
•Press and set aside.

artgal lery fabr ics . com
top aSSeMBlY
Sew all rights sides together with ¼"seam allowance.
•attach the three sections together in the order sectionl #1 - section #2 - section #3.

artgal lery fabr ics . com
QUIlt aSSeMBlY
Sew rights sides together.
• Place BacKing FaBric on a large surface wrong side up. Stretch it with masking tape against that surface.
• Place Batting on top of backing fabric.
• Place toP on top of the batting with right side facing up. Smooth away wrinkles using your hands.
• Pin all layers together and baste with basting thread, using long stitches. you can also use safety pins to join the layers.
• machine or hand quilt starting at the center and working towards the corners. remember that quilting motifs are a matter of personal prefer-ence. have fun choosing yours!
• after you finished, trim excess of any fabric or batting, squaring the quilt to proceed to bind it.
B InD Ing
Sew rights sides together.
•cut enough strips 1½" wide by the width of the fabric A to make a final strip 310" long. Start sewing the binding strip in the middle of one of the sides of the quilt, placing the strip right side down and leaving an approximated 5" tail. Sew with ¼" seam allowance (using straight stitch), aligning the strip’s raw edge with the quilt top’s raw edge.
• Stop stitching ¼" before the edge of the quilt (DIAGRAM B 1). clip the threads. remove the quilt from under the machine presser foot. Fold the strip in a motion of 45° and upward, pressing with your fingers (DIAGRAM B2). hold this fold with your finger, bring the strip down in line with the next edge, making a horizontal fold that aligns with the top edge of the quilt (DIAGRAM B3). Start sewing at ¼" of the border, stitching all the layers. Do the same in the four corners of the quilt.
• Stop stitching before you reach the last 5 or 6 inches. cut the threads and remove the quilt from under the machine presser foot. lay the loose ends of the binding flat along the quilt edge, folding the ends back on themselves where they meet. Press them together to form a crease. Using this crease as the stitching line, sew the two open ends of the binding with right sides together (you can help your-self marking with a pencil if the crease is difficult to see).
• trim seam to ¼" and press open. complete the sewing. turn binding to back of the quilt, turn raw edge inside and stitch by hand using blind stitch.
45˚
DIAGRAM B2
DIAGRAM B1 Stop stitching here
DIAGRAM B3 fold

artgal lery fabr ics . com
NOTE: While all possible care has been taken to ensure the accuracy of this pattern, We are not responsible for printing errors or the way in which individual work varies.
Please read instructions carefully before starting the construction of this quilt. If desired, wash and iron your fabrics before starting to cut.
artgal lery fabr ics . com
© 2020 Courtesy of Art Gallery Quilts LLC. All Rights Reserved.

artgal lery fabr ics . com
teMplateS
template a

artgal lery fabr ics . com
teMplateS
template b


