FEATURE GUIDE PSR Keyboard Performer - Yamaha … 0010.pdf · We’ve looked at the effect of the...
14
Over the past few issues of Inter-Active we’ve been looking at some of the features of the PSR9000’s Function Menu. Many other instruments share aspects of this menu and in this issue we continue to explore the HARMONY feature which can be found on most modern Yamaha keyboard instruments. Harmony / Echo (continued) We’ve looked at the effect of the DUET and the TRIO harmony modes when a C major chord is held in the lower part of the keyboard. Now let’s move up a gear to the four-note chords... 7/3 Block and 4-Way Chord Harmonies The PSR9000 has several different types of four note harmonies with titles such as Block ; 4-Way Open and 4-Way Close. In each case three extra notes are ‘borrowed’ from the left hand chord and added to the melody. The difference between them is the order in which the notes are placed relative to the melody note. Hold the chord of C Major (left) in the accompani- ment section of the keyboard. Now, with a piano sound, play the scale of C major (below). Don’t use any harmony effect yet... Block Harmony: Add the Block harmony effect and play the scale again. This is what you will hear... The automatic harmony feature adds three (and in some cases four) notes below the melody note. The extra notes are tightly grouped together - forming a solid “block” of notes. The lowest note of the block is one octave below the melody with other notes from the C major chord (C, E and G) filling the gap in between. Your music will sound better if you play a little further up the keyboard because as so many notes are added below the melody the sound can get a bit ‘muddy’ if the melody line is too deep. 4-Way Close The 4-Way Close harmony setting adds three notes below the melody note. Close harmony, as the term implies, means that the chord notes are grouped close together. The PSR9000 offers two alternative groupings - named 4-Way Close 1 and, not surprisingly, 4-Way Close 2. 4-Way 1: The first option is very similar to the Block effect. The lowest note still sounds the octave below the melody, but in 4-Way Close 1 no more than four notes are sounded in total - hence “4-Way” - whereas in the Block formation five notes can be sometimes be detected. 4-Way Close 2: When 4-Way Close 2 is selected the formation is changed. Although the notes you are holding with your left hand form a straight-forward C major chord (C, E and G), the instrument automatically bases its harmony on a “jazz” interpretation of the chord and 6th, Major 7th and 9th notes of the C major scale are thrown in for good measure. The result of this is that you can achieve some great jazz sounding chords from the auto-harmony, even though, in reality, you may only play very simple major and minor chords with your left hand. 1 AUGUST / SEPTEMBER 2001 FEATURE GUIDE PSR Keyboard Performer A series for all PSR Portable Keyboard Players - Part 14 CVP Clavinova digital pianos and AR series organs share many features with PSR series keyboard instruments C Major (C) 4 Way Close 1 is very similar to Block - but the maximum number of notes sounded at one time is four.
Transcript of FEATURE GUIDE PSR Keyboard Performer - Yamaha … 0010.pdf · We’ve looked at the effect of the...

Over the past few issues of Inter-Active we’ve beenlooking at some of the features of the PSR9000’sFunction Menu. Many other instruments shareaspects of this menu and in this issue we continue toexplore the HARMONY feature which can be found onmost modern Yamaha keyboard instruments.
Harmony / Echo (continued)
We’ve looked at the effect of the DUET and the TRIOharmony modes when a C major chord is held in thelower part of the keyboard. Now let’s move up a gearto the four-note chords...
7/3 Block and 4-Way Chord Harmonies
The PSR9000 has several different types of four noteharmonies with titles such as Block ; 4-Way Open and4-Way Close. In each case three extra notes are‘borrowed’ from the left hand chord and added to themelody. The difference between them is the order inwhich the notes are placed relative to the melodynote.
Hold the chord ofC Major (left) inthe accompani-ment section ofthe keyboard.
Now, with a piano sound, play the scale of C major(below). Don’t use any harmony effect yet...
Block Harmony:
Add the Block harmony effect and play the scaleagain. This is what you will hear...
The automatic harmony feature adds three (and insome cases four) notes below the melody note. Theextra notes are tightly grouped together - forming asolid “block” of notes. The lowest note of the block isone octave below the melody with other notes fromthe C major chord (C, E and G) filling the gap inbetween.
Your music will sound better if you play a little furtherup the keyboard because as so many notes areadded below the melody the sound can get a bit‘muddy’ if the melody line is too deep.
4-Way Close
The 4-Way Close harmony setting adds three notesbelow the melody note. Close harmony, as the termimplies, means that the chord notes are groupedclose together. The PSR9000 offers two alternativegroupings - named 4-Way Close 1 and, notsurprisingly, 4-Way Close 2.
4-Way 1:The first option is verysimilar to the Blockeffect. The lowest notestill sounds the octavebelow the melody, butin 4-Way Close 1 nomore than four notesare sounded in total -hence “4-Way” - whereas in the Block formation fivenotes can be sometimes be detected.
4-Way Close 2:When 4-Way Close 2 is selected the formation ischanged. Although the notes you are holding withyour left hand form a straight-forward C major chord(C, E and G), the instrument automatically bases itsharmony on a “jazz” interpretation of the chord and6th, Major 7th and 9th notes of the C major scale arethrown in for good measure.
The result of this is that you can achieve some greatjazz sounding chords from the auto-harmony, eventhough, in reality, you may only play very simple majorand minor chords with your left hand.
1 AUGUST / SEPTEMBER 2001
FEATURE GUIDE
PSR Keyboard PerformerA series for all PSR Portable Keyboard Players - Part 14CVP Clavinova digital pianos and AR series organs share many features with PSR series keyboard instruments
C Major (C)
4 Way Close 1 is very similar to Block -but the maximum number of notes
sounded at one time is four.

the sound can become very “muddy” when you playtowards the lower end of the keyboard’s range. in factit’s not unknown for people to complain of “faulty”keyboards and “growling noises”.
Higher up the keyboard, however, everything isresolved, and this harmony type can be reallyeffective when used with a pad type sound such asstrings and with practice you’ll find that you can createsome very big orchestral effects. The best way, asalways, is to experiment to see which voices suit yourtaste the most.
...and finally...
Well, that’s all on the subject of Block and 4-Wayharmony types and I hope you’ve been able to makesense of it all... There’s still more on the wider subjectof Harmony to cover and we’ll be returning to thissection in the next edition of Inter-Active.
Don’t worry if your instrument doesn’t exactly matchthe specification of the 9000. Your keyboard may noteven have a “Function” menu as such - but chancesare that it will include several of the harmony effectswe’ve discussed here. Whichever instrument you play,the effect produced by each harmony type is fairlystandard.
For information that is more specific to your owninstrument, check out the index of your owners’manual for HARMONY. Then, when you’ve seenwhat’s available from your model match it to ourarticles in Inter-Active.
Play the scale of C major again...
See what I mean..?
This provides an ideal harmony effect for jazz - as inthe famous George Shearing piano, vibes & guitarcombo setting below...
4-Way Open
The last harmony format we’re going to look at intoday’s session is 4-Way Open.
Take a look at what happens when you play the scaleof C major using the 4-Way Open selection.
In contrast with the close formations we’ve looked atso far, the harmony notes (which are still borrowedfrom your left hand chord) are now spread wide apart -hence the term “Open Harmony”.
You need to be careful how you use this one...Because of the depth of some of the harmony notes
2AUGUST / SEPTEMBER 2001
FEATURE GUIDE
Melody note 1: Vibraphone (Right Voice 1)Melody note 2: Jazz Guitar (Right voice 2)
The jazz guitar will sound an octave lower than the vibes Chord notes: Piano (Right Voice 3)
Add the automatic harmony effect:Switch on the Harmony button and go into the Harmony display page on your keyboard. Add the 4-Way
Close 2 harmony effect if available - or, if not, choose another Block type harmony effect. If, like thePSR9000, your instrument lets you assign the harmony to an individual part, select R3. This will result in
the extra harmony notes being added only to the piano voice.
Making The George Shearing Sound
When the 4 Way Open harmony effect is selected the harmony notes arespread wide apart. It is important therefore, not to play too far down the
keyboard, as the very deep harmony notes will sound “muddy”.

With this issue we bring our examination of theHarmony / Echo feature to a close. It is a featurewhich, like many others that we explore in Inter-Active, can be found in the specification of manydifferent models of PSR keyboard and Clavinovadigital piano. This one section has been the subject ofthese pages for several past issues, but we have byno means reached the end of our journey. There arestill many exciting discoveries to look forward to aswe delve deeper into the workings of the Yamahahome keyboard.
7. Harmony / Echo (continued)
The last three effects in the PSR9000’s Harmony /Echo section are unusual in the Harmony section inthat they are not affected by the chord notes you playwith your left hand in the auto-accompanimentsection of the keyboard.
7/10 Echo
If you use a piano sound as you experiment, you’ll beable to hear clearly the effect Echo has on this voice.Select [ECHO] and, making sure that the [HARMONY/ ECHO] button is illuminated on the panel, strike akey - quite sharp and short.
You’ll hear the first (accented) note followed by threeechoes fading into the distance.
The echoes are synchronised to the rhythm tempo soby adjusting the tempo you’ll increase / decrease theecho speed as well.
Try this with a rhythm - such as 8Beat - to hear theeffect...
With the rhythm in play you’ll notice that every echofalls exactly on each beat of the bar and indeed, thePSR9000’s screen display confirms this.
You have the option to choose crotchet echoes (4 tothe bar), triplet crotchet echoes (6 to the bar), quaverechoes (8 to the bar), or triplet quaver echoes (12 tothe bar) by adjusting the [SPEED] control. However,regardless of which you choose you’ll actually get nomore than four echoes before the note dies away.This is no bad thing as it prevents all the notes fromrunning into each other.
3 DECEMBER 2001 / JANUARY 2002
FEATURE GUIDE
PPSSRR KKeeyybbooaarrdd PPeerrffoorrmmeerrA series for all PSR Portable Keyboard Players - Part 16CVPP Clavinova ddigital pianos andd ARR series organs share many features with PPSRR series keyboardd instruments
This is what you play...
One accented note followed by three “crotchet” echoes.
How to use Echo..?
Do you remember the Les Paul echo-guitar soundfrom the 1960’s? You can easily recreate this effectif you like for tunes such as How High The Moon.
1) Select a Jazz Guitar sound from the panel. 2) Next choose the Gypsy Swing style from
the Jazz / Swing section (tempo 232)3) Use [DIRECT ACCESS] to go into the
[HARMONY / ECHO] control and select ECHO from the list. Make sure the [HARMONY / ECHO] button is illuminated.
4) Set the [SPEED] control to 8 (quavers).
Play How High The Moon (or something similar). Ithelps if you’re able to play chords with your righthand but don’t worry if you can’t. The echoesfollow the speed of the rhythm, so if you feel thatyou need to go a little slower you’ll still get theeffect.
That’s all there is to it and it’s agreat fun sound ...

7/11 Tremolo
Don’t make the mistake of confusing this TREMOLOeffect with the swirling sound which can be added toorgan voices... because this is now called DSP RotarySpeaker (fast).
This is the problem when a manufacturer doesn’tstandardise the terminology throughout his productrange. I’m afraid that Yamaha are very good atintroducing a feature, giving it a name, and thenchanging the name on the next model..!! Then, to addto the confusion, they give the same name to acompletely different feature. Wouldn’t life be so muchsimpler if they could choose one name per feature -and stick to it..?
For example: The name TREMOLO was originallyused to describe the fast speed of a revolving organspeaker. Now we find the same term applied to afeature that used to be called REPEAT.
And what does the TREMOLO effect do? It repeatsthe note you play. Simple as that. Well, not quite. Youcan adjust the speed of the tremolo (repeat) just aswe did for the ECHO effect and, like the Echo, thespeed is synchronised to the tempo of the auto-accompaniment although you don’t have to actuallyswitch the rhythm on to adjust the tempo.
The PSR9000 allows you to choose between 8, 12, 16or 32 repeat notes per bar to fine tune the effect toyour taste.
The TREMOLO effect only works on the top note ofany chord you play so don’t expect your whole chordto repeat. If you want a two-note repeating effect, usethe TRILL effect instead.
7/12 Trill
If you strike a single note you may wonder why theTRILL effect isn’t working. Play two notes and you’llfind that it is...
TRILL produces a “twin mallet” effect which is reallyuseful for recreating the sound made by marimba,xylophone etc. when two beaters are used to “roll”the notes. Try it for yourself and you’ll understandwhat I mean.
Play two notes a third apart (e.g. C and E ). Switch onthe [TRILL] effect and you’ll hear each note repeatalternately.
4DECEMBER 2001 / JANUARY 2002
FEATURE GUIDE
TREMOLO
You could use this for our Easy-Beat music sheetfrom the last issue - O Sole Mio.
1) Select Mandolin from the Guitar voice section on the panel.
2) Choose the Rumba style from the Ballroomsection (tempo 112)
3) Use [DIRECT ACCESS] to go into the [HARMONY / ECHO] control and select [TREMOLO] from the list. Make sure the [HARMONY / ECHO] button is illuminated.
4) Set the [SPEED] control to 32 (demi-semi quavers).
Play “O Sole Mio” (or something similar) with asingle note melody. You can achieve a fuller effectby adding a string or pad voice to the mandolin.
TRILL
Don’t think you can get away without playingSpanish Eyes...
1) Select Marimba from the Percussion voice section on the panel.
2) Choose the 8 Beat Adria style from the 8 Beat section (tempo 100).
3) Use [DIRECT ACCESS] to go into the [HARMONY / ECHO] control and select [TRILL] from the list. Make sure the [HARMONY / ECHO] button is illuminated.
4) Set the [SPEED] control to 32 (demi-semi quavers).
Play “Spanish Eyes” playing the melody notes inthirds. (The twin-mallet reiteration effect will onlywork when you play two notes with your righthand.)
The Live Mmh! (PSR9000) vocal sound makes alovely dual voice to accompany the repeatingmarimba so if you have it... why not flaunt it. Otherkeyboard owners will also achieve a nice effectwith a pad sound such as warm strings etc.
How to use Tremolo & Trill..?

Many of the latest keyboards incorporate a complexMixing Console display where you can fine tune yoursound settings. Others may only feature a simple set ofvolume controls... Check out the index in your owners’manual for any information about the “Mixer”.
The Main MixerThe volume sliders of the main mixer provide you withthe basic controls you need to adjust the volume ofeach individual sound section. Usually these volumesliders are displayed on the screen as soon as theinstrument is switched on - so you don’t have to look farto find them.
You’ll find volume controllers for...
1. Song (i.e. a recorded tune played from the sequencer)
2. Accompaniment Section (this is a general volume control for all the accompaniment parts.)
3. Multi-PPad (controls the volume of voices triggered by the Multi-pad buttons)
4. Left (controls the volume of the voice left of the split point)
5. Right 1, Right 2 and Right 3 (controls the volume of the voices to the right hand side of the split point. Although the PSR9000 has three voices to the right of the split this varies from one instrument to another. )
6. Mic. (controls the microphone volume)
Whilst these controls offer a basic control the MixingConsole provides a much more in-depth facility.
The Mixing Console
The Mixing Console looks incredibly complicated andthere’s a danger that the first glance at all the “virtual” knobsand switches could send a novice keyboard user into a flatspin from which they never recover - which is a pity becausethe Mixing Console isn’t at all difficult to use and it offers pin-point control of all your sounds and effects.
Study the diagram of the mixing console on page 5.Actually this diagram represents only the first of manydisplay pages within the Mixing Console - all equallycovered with dials numbers and sliders. You’ll have seensomething similar if you’ve ever seen a professional soundmixer at close quarters. Of course, if you’ve already used a
mixing desk the display will be very familiar and you won’tneed me to describe the various functions.
Reading The DisplayAfter a moment or two it will become apparent that thedisplay is set out in vertical columns and that the controlsare identical within each column. As soon as you recognisethis the display begins, as if by magic, to take on a moreordered appearance and because there are only three orfour buttons in each column, by viewing one column at atime, the display seems much less threatening.
The Number 64...Those of you who are “up” on modern electronickeyboards, computers, MIDI etc., will have noticed thesignificance of the number 128.
For example... There are 128 stages of volume (0-127)There are 128 sounds in the General MIDI library. There are 128 notes in the MIDI note range.
I won’t go on to bore you with the technical reasons forthis (and I think we may have covered it before in a MIDIsession) but you will find that nearly all numeric valuesare described between 0 and 127. It is for this reasonthat in my diagram opposite all the control dials are setto 64 (exactly half). The numeric value 64 describes the“normal” setting for most controls - although 64 tendsto be a bit quiet to use as the default setting for thevolume sliders.
EQ HighSet a piano voice for the Right 1 part. Then increase thevalue of the [EQ High] dial to 127 as you play the pianosound on the keyboard. The volume of the highfrequencies within the sound will be increased and thesound will become much brighter. Now turn the “dial”counter-clockwise and reduce the level of the highfrequencies. The sound will become more mellow.
** Now you know how to quickly create a brighter ormellower piano sound.
EQ LowRaise the level of the low frequencies in the piano soundand you may be able to hear the “clunk” as the pianomechanism is triggered. The piano sound was recordedfrom an acoustic instrument and yes, the sound of themechanism was captured too...
5 FEBRUARY / MARCH 2002
FEATURE GUIDE
PPSSRR KKeeyybbooaarrdd PPeerrffoorrmmeerrA series for all PSR Portable Keyboard Players - Part 17CVPP Clavinova ddigital pianos share many features with PPSRR series keyboardd instruments andd whilst the layout may beslightly ddifferent, the overall operation andd performance is very similar in most cases.

Pan PotWe’ve talked at length about the effect PAN has on a sound. Set the level to “0” and the sound will come from the leftspeaker. Increase the level to “127” and the sound will come from the right speaker. Set the level to “64” (normal) andthe sound will be heard equally from both speakers.
VolumeVirtual “sliders” are used for the main volume controllers simply to make the appearance of the display as similar to areal sound mixer as possible.
Alternative DisplaysIf you press the Mixing Console[PART] button you’ll be able todisplay several different pages.Although the dials and slidersappear the same on each page,the parts they control will differ.
Page 1...provides control for Song ;Accompaniment ; Multi-pads ;Left ; Right and Mic settings(Just as in the Main Mixer page).
Page 2...provides individual volumecontrol for the parts within theauto-accompaniment section(i.e. Rhythm ; Bass ; Chord ; Padand Phrase parts)
Pages 3 & 4...provide individual volumecontrol for recorded tracks withina Song in the sequencer. Youcan also temporarily “mix” yourpre-recorded Song disks usingthis function.
Activity indicators:The small circular whiteindicator beside each slider ishighlighted whenever anyactivity is detected on thatchannel. This is particularlyuseful when SongDisks are beingplayed through thesequencer so thatyou can tell whichtracks are “live” andtherefore availablefor “tweaking”.
6FEBRUARY / MARCH 2002
FEATURE GUIDE

In the last issue we looked at the first page of the PSR9000’sMixing Console a feature originally found only on the topYamaha models. Recently many mid-range PSR keyboardsand Clavinova digital pianos are incorporating the MixingConsole as an essential part of their specification. For thisreason we have chosen the PSR2000 as our “illustration” forthe Mixing Console feature in future issues. This shouldprovide all our keyboard / and Clavinova owners with aninsight into how the feature works and the kind of facilities itprovides. Whilst your instrument may not have exactly thesame layout as the PSR2000, a quick check in your owners’handbook will tell you if any feature we describe is presentin your own model. If so, the operation performed by thefeature will, to a large extent, be the same.
Song Auto Revoice
Following on from the last issue, the PSR2000 (1000) /CVP209 (207/205/203) series instruments feature a “SongAuto Revoice” function on the main VOLUME / PAN page ofthe mixing console. The EQ functions we looked at last timeare on a separate page on these models.
What ddoes “Song Auto RRevoice”” ddo..?
The feature provides a quick and easy way to revoicecertain sounds within General MIDI or XG MIDI songfiles so that the best sounds of the new instrument areused in the song playback.
Why ddo we needd this..?
Many older song files were created using the GeneralMIDI (GM) format - a system which didn’t have anyprovision to utilise the much better sounds which havebeen introduced in recent years. Even the latest XG MIDIformat doesn’t take into account the huge range of“Sweet”, “Cool” and “Live” voices that have become a
standard ingredient in the specification of many newmodels.
When the “Song Auto Revoice” feature is switched on(fig.1), the latest (and often the best) sounds areautomatically substituted in place of the original GM/XGselection.
Set Up
When [Set up] is selected you have the option to use theRevoice facility on some, all - or none - of the sounds listedin the left column.
The right column (fig.2) shows a list of the new voices thatwill be used in place of those on the song disk. You’ll seethat these all belong to the “special” family of ‘Sweet’, ‘Cool’and ‘Live’ sounds that form the new model’s unique set ofpanel sounds.
Try this with a song disk to hear the effect. Don’t use a songyou’ve created yourself on the keyboard though becauseyou will have probably used the sounds from yourinstrument’s main voice panel anyway. If you use a GeneralMIDI or XG MIDI disk you will probably hear a differencewhen you switch between [ALL REVOICE] and [ALL NOREVOICE]. Sometimes the change is great and sometimesit is not - and be prepared for it to sound worse, becausesometimes it will.
Using the latest sounds isn’t guaranteed to make a song filesound better. Indeed, song files (like registration settings)invariably sound best when used with the instrument theywere originally created on.. but the AUTO REVOICE optionis a useful tool if it is used selectively.
* See pages 14/15 for information about Yamaha’s new operating system.
7 APRIL / MAY 2002
FEATURE GUIDE
PPSSRR KKeeyybbooaarrdd PPeerrffoorrmmeerrA series for all PSR Portable Keyboard Players - Part 18CVPP Clavinova ddigital pianos share many features with PPSRR series keyboardd instruments andd whilst the layout may beslightly ddifferent, the overall operation andd performance is very similar in most cases.
fig.1 Song Auto
Revoice On / Off
Choose SET UP for a
moredetailedselection
fig.2Some of thevoices arerevoiced
None of thevoices arerevoiced
Confirm yourselection
8APRIL / MAY 2002
FEATURE GUIDE
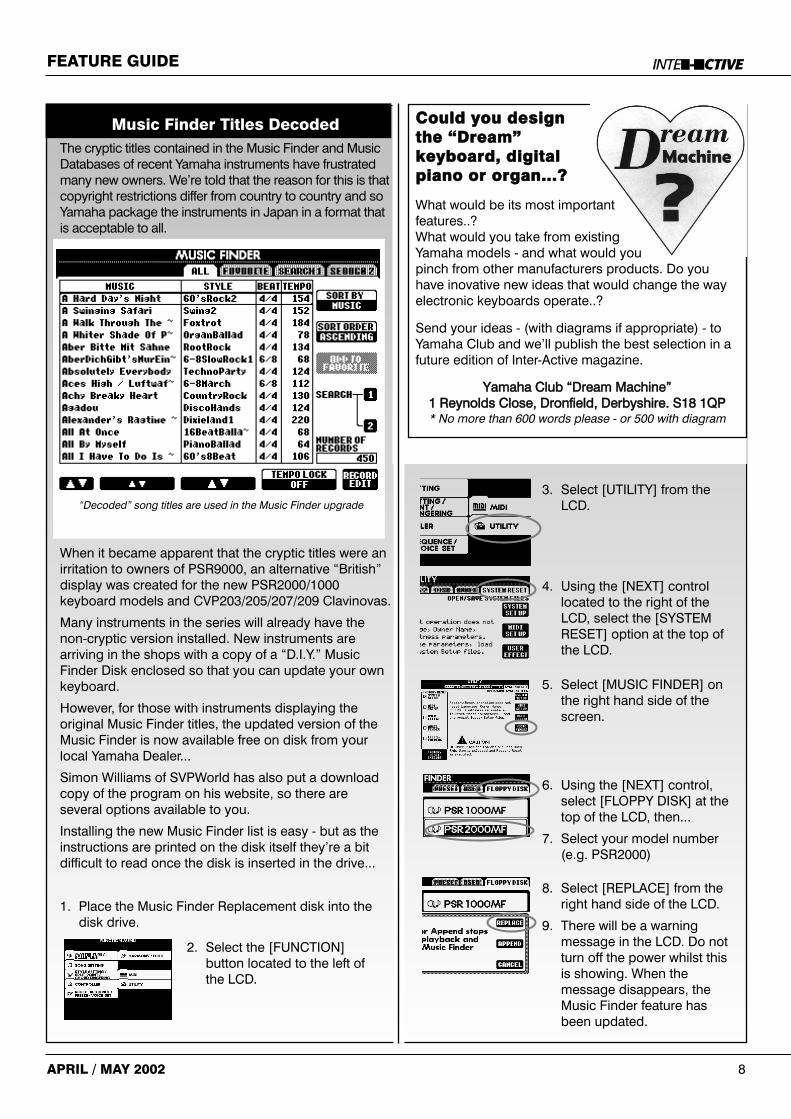
Music Finder Titles DecodedThe cryptic titles contained in the Music Finder and MusicDatabases of recent Yamaha instruments have frustratedmany new owners. We’re told that the reason for this is thatcopyright restrictions differ from country to country and soYamaha package the instruments in Japan in a format thatis acceptable to all.
When it became apparent that the cryptic titles were anirritation to owners of PSR9000, an alternative “British”display was created for the new PSR2000/1000keyboard models and CVP203/205/207/209 Clavinovas.
Many instruments in the series will already have thenon-cryptic version installed. New instruments arearriving in the shops with a copy of a “D.I.Y.” MusicFinder Disk enclosed so that you can update your ownkeyboard.
However, for those with instruments displaying theoriginal Music Finder titles, the updated version of theMusic Finder is now available free on disk from yourlocal Yamaha Dealer...
Simon Williams of SVPWorld has also put a downloadcopy of the program on his website, so there areseveral options available to you.
Installing the new Music Finder list is easy - but as theinstructions are printed on the disk itself they’re a bitdifficult to read once the disk is inserted in the drive...
1. Place the Music Finder Replacement disk into the disk drive.
“Decoded” song titles are used in the Music Finder upgrade
Could you designthe “Dream”keyboard, digitalpiano or organ...?
What would be its most importantfeatures..? What would you take from existingYamaha models - and what would youpinch from other manufacturers products. Do youhave inovative new ideas that would change the wayelectronic keyboards operate..?
Send your ideas - (with diagrams if appropriate) - toYamaha Club and we’ll publish the best selection in afuture edition of Inter-Active magazine.
Yamaha Club “Dream Machine” 1 Reynolds Close, Dronfield, Derbyshire. S18 1QP* No more than 600 words please - or 500 with diagram
2. Select the [FUNCTION] button located to the left of the LCD.
3. Select [UTILITY] from the LCD.
4. Using the [NEXT] control located to the right of the LCD, select the [SYSTEM RESET] option at the top of the LCD.
5. Select [MUSIC FINDER] on the right hand side of the screen.
6. Using the [NEXT] control, select [FLOPPY DISK] at the top of the LCD, then...
7. Select your model number (e.g. PSR2000)
8. Select [REPLACE] from the right hand side of the LCD.
9. There will be a warning message in the LCD. Do not turn off the power whilst this is showing. When the message disappears, the Music Finder feature has been updated.

As we continue our journey through the MIXING CONSOLE- a feature which appears in the specification of many newkeyboards and Clavinova digital pianos - we come to theFILTER.
Where is the FFIILLTEERR control..?
The FILTER control is located in your instrument’sMIXING CONSOLE.
*Check your owners guide if you’re not sure whetherthis feature is included in your instrument’s specification.
Why ddo II needd a FFIILLTEERR control..?
“Beauty is in the eye ofthe beholder...” and so itis with music that theperceived beauty (orotherwise) of the soundlies in the ear of thelistener. What appears,to one listener, to be aperfect representation ofa piano sound, maysound nothing like thereal thing to another.
To some degree the filtercontrol allows you toshape the sound to yourpersonal taste bygranting you control overthe brightness (ormellowness) andharmonic content of each keyboard voice.
The FILTER page of your keyboard or Clavinova’sMIXING CONSOLE will look something like the displayon the right (PSR2000) although a slightly more complexdisplay appears on some larger instruments - such asPSR9000 because more voice sections are involved.
LLet’’s experiment with the FFIILLTEERR control..?
1) Select a GRAND PIANO voice for the MAIN voicesection and then return to the MIXING CONSOLE -FILTER page.
* The natural setting for both the Brightness andHarmonic controls is 64. You can adjust either within arange between 0 and 127. (Remember that magic figure128 that keeps cropping up.? Here it is again... with 128incremental steps available).
2) As you play some notes on the keyboard, increasethe [BRIGHTNESS] level of the MAIN voice sectiongradually to 127... and then reduce it again to 0. Listento the difference in the sound...
* As you increase the BRILLIANCE setting the soundbecomes sharper and more like the Rock Piano voice.As you reduce the level the sound becomes moremellow - to the point where it sounds as though there iscotton wool stuffed into the speaker cones.
3) Leaving the BRILLIANCE level at 0, increase the[HARMONIC] level of the MAIN voice section graduallyto 127... and then reduce it again to 0. Listen to thedifference in the sound again before returning both
controls to their normal settingat 64.
* The HARMONIC levelproduces a much moremarked effect on the soundthan the Brilliance control -although either control willmake the sound brighter ormellower.
Whilst the Brilliance controlmerely brightens or dulls thesound, the Harmonic Filterlevel introduces new contentinto the sound as extraharmonic overtones areadded or subtracted.
You can use the Harmonicfilter control to create sounds
of a more synthesised or “electronic” nature which canthen be used to add new tonal colour to yourarrangements or compositions.
Try this experiment with a range of different voices tosee what effect the filter has on other sound textures.
9 JUNE / JULY 2002
FEATURE GUIDE
PPSSRR KKeeyybbooaarrdd PPeerrffoorrmmeerrA series for all PSR Portable Keyboard Players - Part 19CVPP Clavinova ddigital pianos share many features with PPSRR series keyboardd instruments andd whilst the layout may beslightly ddifferent, the overall operation andd performance is very similar in most cases.
1) Press the [MIXINGCONSOLE] button...
2) Press the [NEXT]button until the “FILTER”page appears...
The FILTER display of the PSR-2000 is very similar to that found in thePSR9000 / 1000 keyboards and CVP203 / 205 / 207 / 209 Clavinovas

3: PPORRTAMMEENNTO TIIMMEE
In MONO mode only one note sounds at a time. Byholding down one key as you press the next thePORTAMENTO effect causes the note to slide from thefirst note to the second. The [PORTAMENTO] control inthe MIXING CONSOLE sets the length of time it takesfor the first note to slide to the next.
4: PPIITCHH BBEENNDD RRANNGEE
Use the [PITCH BEND RANGE] control to set (insemitones) how strong an effect the PITCH BEND WHEELproduces. The default setting is two semitones - but youcan use the wheel to “bend” the sound by as much as anoctave, which is great on some synth sounds.
5: OCTAVEE
There is an [UPPER OCTAVE] selector on the panel ofmost instruments - but the MIXING CONSOLE version
offers a great deal moreflexibility. The pitch ofindividual voice sectionscan be transposed up(or down) by as much astwo octaves. Usingdifferent octave settingswith layered sounds canproduce some very bigmixes.
1: TRRANNSPPOSEE
Use the [TRANSPOSE]controls to raise or lower thepitch in semitone steps. Youcan individually adjust thepitch for...
a) The KKeyboardd [KKBBDD]]Any change here will affectthe pitch of all the melodyvoices and auto-accompaniment styles.
b) The Song [SONNG]]Any change here will affectthe pitch of any MIDI songfile that you are playing inthe instrument’s sequencer.This means that, forexample, if your MIDIbacking track is in a different key from the one you’reused to, you can adjust the pitch of the track to suit.
c) BBoth KKeyboardd andd Song [MMASTEERR]]
A change here will affect the pitch of both the MIDIbacking track and the keyboard voices equally. Unlikethe MASTER TUNE control in the FUNCTION menu(mentioned above) the pitch is adjusted here byincrements of one semitone - to a maximum one octave(sharp or flat).
A: BBigger Orchestralsoundds...If, for example, youwant to create a bigorchestral effect
using two string sounds - one as the MAIN voiceand another as the LAYER voice, you can“expand” the sound by setting each voice to aslightly different pitch.
If you listen to a real orchestra, all the instrumentsare very slightly out of tune with each other. Notideal, you may think, but this disparity of pitchcreates a pleasing modulation in the sound wavesthat reach our ears which, unless extreme, isbarely noticeable - but the overall effect is a“wider” more expansive orchestral sound.
BB: Special effects...You can add “jangle” to your piano sounds byusing the Grand Piano and Bright Piano voicestogether. Accentuate the “jangle” by sharpeningthe pitch of the Bright Piano voice. As youincrease the pitch the jangle becomes morepronounced - until you go too far, in which case itsimply sounds out of tune..!!
10JUNE / JULY 2002
FEATURE GUIDE
TThhee TTUUNNEE CCoonnttrroollssAnother useful feature you’ll usually find hidden in thepages of your instrument’s MIXING CONSOLE is theTUNE control.
*Check your owners guide if you’re not sure whetherthis feature is included in your instrument’sspecification.
What is the TUNNEE control..?
Don’t confuse the TUNE controls here with the MASTERTUNE function which we explored in an earlier edition[Keyboard Performer part 8 - August 2000] when wecovered the FUNCTION menu.
The MASTER TUNE function affects the entire keyboard.The TUNE controls of the MIXING CONSOLE are muchmore versatile and allow you to make changes to thepitch of individual voice sections and MIDI song files.
2: TUNNIINNG
Use the [TUNING] controls to raise or lower thepitch in very fine steps. The full range (64 steps)produces a one semitone pitch adjustment (sharpor flat).
You can adjust the pitch individually for the MAIN,LAYER and LEFT voice sections to create...
The TUNE display of the PSR-2000 is also very similar to that found inmany other recent keyboard and Clavinova models

11 AUGUST / SEPTEMBER 2002
FEATURE GUIDE
PPSSRR KKeeyybbooaarrdd PPeerrffoorrmmeerrA series for all PSR Portable Keyboard Players - Part 20CVPP Clavinova ddigital pianos share many features with PPSRR series keyboardd instruments andd whilst the layout may beslightly ddifferent, the overall operation andd performance is very similar in most cases.
Our journey through the controls of the MIXING CONSOLE (a feature found in the specification of many recent portablekeyboards and Clavinovas) has taken us through many of the “basic” functions of this central feature. Now we come to theEFFECT display - and I should warn you now that an explanation of what goes on here could take a while... I don’t mean bythis that you should be put off in any way. On the contrary, I would urge you to explore this section with all the enthusiasmand sense of adventure befitting such a powerful tool.
Let’s begin by finding the EFFECT page. At this stage it’sprobably best to check the index of your Owners’ Guide tosee if your instrument does actually feature the MIXINGCONSOLE. If it does...
i) Press the [MIXING CONSOLE] button. (Illustrations were provided in the last issue of Inter-Active)
ii) Press the [NEXT] button until the “EFFECT” page appears.
As you’ll see from the diagram above, which shows theMIXING CONSOLE (PANEL PART) display, the screen isdivided into separate sections for Reverb, Chorus and DSP.
If you press the [MIXING CONSOLE] button again on thepanel, a second page of the EFFECT display appears...
...and now you can view the Reverb, Chorus and DSP controls
for the MIXING CONSOLE (STYLE PART).
Okay - but what are they for..?
In earlier editions we’ve explored basic effects such as Reverband Chorus, but in addition to these your keyboard / Clavinovahouses many different types of effects that fall under thegeneral heading of DSPs (Digital Signal Processors). You don’tneed to know anything about them at all, because theinstrument will automatically select an appropriate set of effectsevery time a new voice or style is called up from the panel.
The adventurous among you will, however, be able to use theEFFECT pages of the MIXING CONSOLE to create a totallynew sound by selecting from a vast library of DSP effects whichcan then be blended with the styles and voices to completelypersonalise your keyboard’s sound.
Let’s experiment...
The easiest way to learn about the EFFECT section is to use it,so let’s begin with a wah guitar style...
i) Select the [POP & ROCK] style category and choose astyle with a rhythmically strummed electric guitar sound in thebackground - such as [FUNKY FUSION].
ii) Next, press the [CHANNEL/PARTON/OFF] button.
iii) Start the rhythm and play a chord. As you listen to theaccompaniment style isolate each part of the style in turn untilyou find the part containing the strummed electric guitar. Whenyou have it, turn off all the other parts - leaving just the guitarplaying.
iv) Return to the MIXING CONSOLE (STYLE PART) page. Takenote of the DSP setting at the bottom of the page. In myinstrument you’ll see that the DSP level is set to “0”. If you don’tincrease this you won’t be able to hear the effect - so adjust thelevel to around “100”. Then... press the [TYPE] button.

12AUGUST / SEPTEMBER 2002
FEATURE GUIDE
The EFFECT TYPE EDIT display
This page gives you a great deal of information about theeffects you are currently employing. Once you can decipherthe information, you can begin to make your own selectionsrather than relying on the preset effects. Take a look at thediagram above whilst I try to explain the function behind eacharea of the display.
11:: EEffffeecctt BBlloocckk
All the REVERB effects, CHORUS effects and DSP effects aregrouped together in BLOCKS. Each EFFECT BLOCK providesyou with a selection of effects from which you can select oonneeto use in your sound mix. This means that the more blocksavailable in your keyboard, the more effects you’ll be able touse at any one time. This is one major difference between, forexample, the PSR1000 and the PSR2000.
For our experiment, choose the DSP1 EFFECT BLOCK fromthis list.
22:: EEffffeecctt PPaarrtt
This column shows which parts of the keyboard will be affectedby the effect you choose. It is quite likely that, when DSP1 isused, this column will be inaccessible.
DSP1 is what is known as a SYSTEM effect. This means thatany effect set in the DSP1 BLOCK will affect the wholeinstrument - rather than a single section of it - and this is whythe EFFECT PART column is inaccessible.
““SSYYSSTTEEMM”” aanndd ““IINNSSEERRTTIIOONN”” EEffffeeccttss
Before we go further, it’s probably worth taking a little time toexplain what SYSTEM and INSERTION effects are... and thedifference between them. The owners’ manuals typicallyassume that you come to the keyboard with a ready-to-useknowledge - not only of how to play your keyboard, but of howits electronic circuits work too!
TThhee ““SSiiggnnaall FFllooww......””
I am a musician and I happily confess to having absolutely notechnical expertise, so I hope that my very basic explanation ofhow the sound flows through your instrument will, a) be more-or-less correct and, b) be understandable....
From the momentyour fingerpresses a key tothe time the soundissues from thespeakers, anelectronic signal startsflows through theinstrument.
Individual signals are sent out fromeach keyboard voice section -
Main Voice, Layer (Dual) Voice, LeftVoice.
A signal is also sent from each of theeight voice parts of the auto-accompaniment styles -
Rhythm 1, Rhythm 2, Bass, Chord 1,Chord 2, Pad, Phrase 1, Phrase 2
6: Overall Effect Setting
1: Effect Block
2: Effect Part 3: Effect Category
4: EffectType
5: Effect Parameter Edit
Main Voice Layer Voice Left Voice Style Voice
If the DSP is used as an “INSERTION”effect, (left) it is placed here in the “signalflow” and will affect only the signal from thevoice section it is attached to. In thisexample the DSP will only affect the soundselected in the Main Voice section.
DSP Effect(e.g. Rotary,
Delay, Flanger,Phaser, Wah,
Distortion, etc.)
REVERB / CHORUS / DSP (System)
If the DSP is used as a “SYSTEM” effect, (above) it isplaced here in the “signal flow” and will have an effecton all the signals coming from all the voice sections. Inthis example the DSP (System) effect is added, alongwith Reverb and Chorus before the sound is finallyoutput through the speakers.
Speaker
This is a very simplified version of how the differentplacing of the DSP effect affects the signal flow. Youmay find a fuller, more detailed version, in your owners’guide.
Keep the diagram at the top of the page to handbecause we’ll be continuing the “effects” theme in thenext issue as we explore the remaining controls of theMIXING CONSOLE.
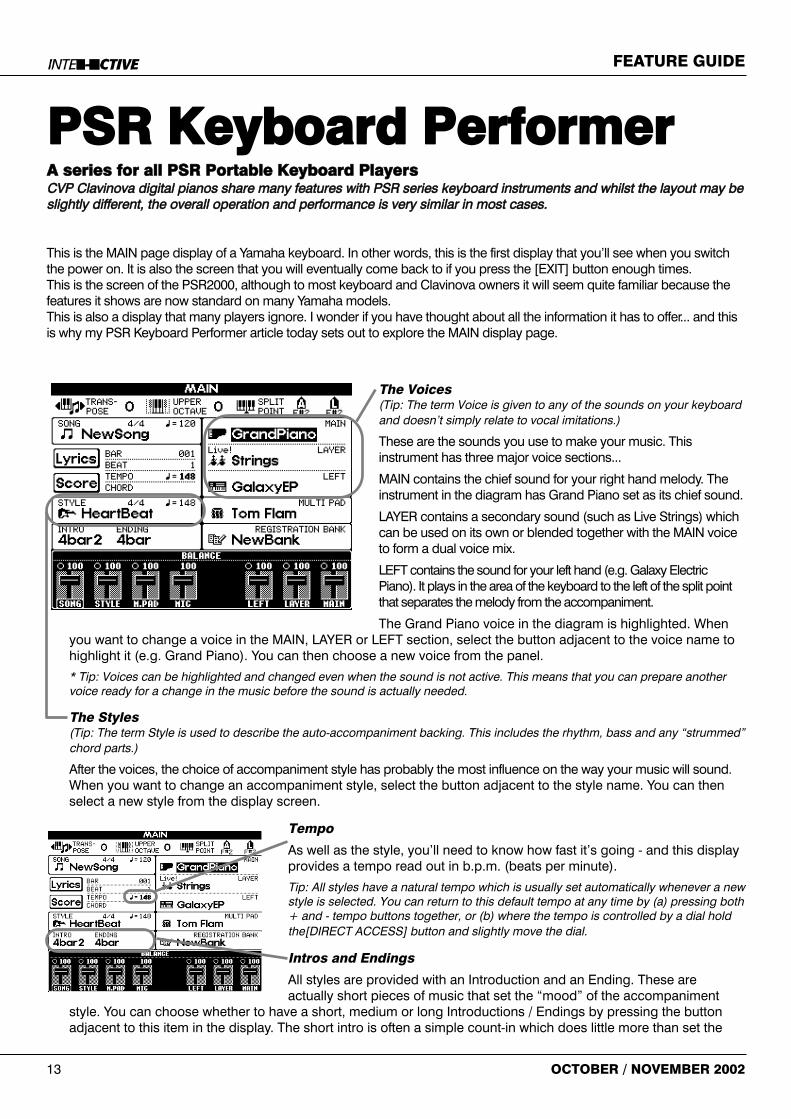
The Voices (Tip: The term Voice is given to any of the sounds on your keyboardand doesn’t simply relate to vocal imitations.)
These are the sounds you use to make your music. Thisinstrument has three major voice sections...
MAIN contains the chief sound for your right hand melody. Theinstrument in the diagram has Grand Piano set as its chief sound.
LAYER contains a secondary sound (such as Live Strings) whichcan be used on its own or blended together with the MAIN voiceto form a dual voice mix.
LEFT contains the sound for your left hand (e.g. Galaxy ElectricPiano). It plays in the area of the keyboard to the left of the split pointthat separates the melody from the accompaniment.
The Grand Piano voice in the diagram is highlighted. Whenyou want to change a voice in the MAIN, LAYER or LEFT section, select the button adjacent to the voice name tohighlight it (e.g. Grand Piano). You can then choose a new voice from the panel.
* Tip: Voices can be highlighted and changed even when the sound is not active. This means that you can prepare anothervoice ready for a change in the music before the sound is actually needed.
The Styles (Tip: The term Style is used to describe the auto-accompaniment backing. This includes the rhythm, bass and any “strummed”chord parts.)
After the voices, the choice of accompaniment style has probably the most influence on the way your music will sound.When you want to change an accompaniment style, select the button adjacent to the style name. You can thenselect a new style from the display screen.
Tempo
As well as the style, you’ll need to know how fast it’s going - and this displayprovides a tempo read out in b.p.m. (beats per minute).
Tip: All styles have a natural tempo which is usually set automatically whenever a newstyle is selected. You can return to this default tempo at any time by (a) pressing both+ and - tempo buttons together, or (b) where the tempo is controlled by a dial holdthe[DIRECT ACCESS] button and slightly move the dial.
Intros and Endings
All styles are provided with an Introduction and an Ending. These areactually short pieces of music that set the “mood” of the accompaniment
style. You can choose whether to have a short, medium or long Introductions / Endings by pressing the buttonadjacent to this item in the display. The short intro is often a simple count-in which does little more than set the
13 OCTOBER / NOVEMBER 2002
FEATURE GUIDE
PPSSRR KKeeyybbooaarrdd PPeerrffoorrmmeerrA series for all PSR Portable Keyboard PlayersCVPP Clavinova ddigital pianos share many features with PPSRR series keyboardd instruments andd whilst the layout may beslightly ddifferent, the overall operation andd performance is very similar in most cases.
This is the MAIN page display of a Yamaha keyboard. In other words, this is the first display that you’ll see when you switchthe power on. It is also the screen that you will eventually come back to if you press the [EXIT] button enough times. This is the screen of the PSR2000, although to most keyboard and Clavinova owners it will seem quite familiar because thefeatures it shows are now standard on many Yamaha models.This is also a display that many players ignore. I wonder if you have thought about all the information it has to offer... and thisis why my PSR Keyboard Performer article today sets out to explore the MAIN display page.

tempo for the style. The longer introductions can provide a useful insight into the the musical ideas that were inthe style composer’s mind...
Tip: Listen to the full version of the introduction to hear which sounds the composer chooses for the melody and backgroundvoices. By using a similar voice for your melody and left hand parts you’ll achieve a degree of consistency that is musicallypleasing.
The Multi Pads
Multi-Pads provide extra “flourishes” to embellish your music.they are triggered by pressing one of several small fingerpads on the panel of your keyboard. Your instrument willprobably contain many sets of pre-programmed multi-padsound effects, drum hits and musical phrases. You canchange the current multi-pad setting by pressing the buttonadjacent to this item in the display.
Unfortunately for digital piano players, multi-pads are notincluded on the Clavinova.
Registration Banks
When you’ve set everything as you want it - the ideal style foryour music, the correct tempo, suitable sounds and a goodchoice of multi-pad - all this information can be saved as a
REGISTRATION. It’s a bit like storing a long number in your phone’s memory. All the information can be recalledinstantly at the press of one button. Your instrument will probably have a selection of about eight [REGISTRATIONMEMORY] buttons. Each one can store a complete sound set-up. But when the eight buttons have all been usedthey can be saved as a [BANK] of registrations - leaving you free to start again with another set. Brilliant..!!
Call up a new bank of [REGISTRATION MEMORY BUTTONS] by selecting this item from the display or, if you’vealready saved several banks, the display will tell you which one is currently selected.
Score
You can record yourself or play pre-recorded disks usingthe sequencer in your keyboard or Clavinova. The Scorefunction, which is a recent addition to the Yamahaspecification, shows you the music you are hearing -notated on a stave so that you can play along.
The notes are displayed - with a “bouncingball” indicating which note is currently playing.Chord symbols can also be displayed... andsome instruments offer a “guide” facility whichcorrects you if you play wrong notes.
Lyrics
Karaoke is the name of the game with the Lyric display -but you must use a disk that has lyrics included or allyou’ll see is a blank screen when this item is selectedfrom the display. The words are highlighted in time to themusic so you can sing along...
Song
The Score and Lyric functions have one thing in common. They both form part of a Song. A Song is the term usedto describe a piece of music - either recorded within the instrument or imported on a disk. Press the buttonadjacent to this item in the display to see which other Songs are available.
14OCTOBER / NOVEMBER 2002
FEATURE GUIDE