
FAX SYSTEM P
199
Cod 541806en Operation Guide GB Fax System (P)
Transcript of FAX SYSTEM P

Cod 541806en
Operation Guide
GB
Fax System (P)

PUBLICATION ISSUED BY: Olivetti S.p.A. Gruppo Telecom Italia
Via Jervis, 77 - 10015 Ivrea (ITALY) www.olivetti.com
Copyright © 2007, Olivetti All rights reserved The manufacturer reserves the right to carry out modifications to the product described in this manual at any time and without any notice.
ENERGY STAR is a U.S. registered mark.
The ENERGY STAR program is an energy reduction plan introduced by theUnited States Environmental Protection Agency in response to environmental issues and for the purpose of advancing the development and utilization of more energy efficient office equipment.
Your attention is drawn to the following actions which could compromise the conformity attested to above, as well as the characteristics of the product: • incorrect electrical power supply; • incorrect installation, incorrect or improper use or use not in compliance with the warnings provided in the
User’s Manual supplied with the product; • replacement of original components or accessories with others of a type not approved by the manufacturer, or
performed by unauthorised personnel.
All rights reserved. No part of this material may be reproduced or transmitted in any form or by any means, electronic or mechanical, including photocopying, recording or by any information storage and retrieval system, without permission in writing from the Publisher.
The mark affixed to the product certifies that theproduct satisfies the basic quality requirements.

Safety Conventions in This GuidePlease read the Operation Guide before using the facsimile. Keep it close to the facsimile for easy reference.
The sections of this handbook and parts of the facsimile marked with symbols are safety warnings meant to protect the user, other individuals and surrounding objects, and ensure correct and safe usage of the facsimile. The symbols and their meanings are indicated below.
WARNING: Indicates that serious injury or even death may result from insufficient attention to or incorrect compliance with the related points.
CAUTION: Indicates that personal injury or mechanical damage may result from insufficient attention to or incorrect compliance with the related points.
Symbols
The symbol indicates that the related section includes safety warnings. Specific points of attention are indicated inside the symbol.
The symbol indicates that the related section includes information on prohibited actions. Specifics of the prohibited action are indicated inside the symbol.
The symbol indicates that the related section includes information on actions which must be performed. Specifics of the required action are indicated inside the symbol.
Please contact your service representative to order a replacement if the safety warnings in this Operation Guide are illegible or if the guide itself is missing. (fee required)
<Note>
Due to performance updating, information in this Operation Guide is subject to change without notice.
.... [General warning]
.... [Warning of danger of electrical shock]
.... [Warning of high temperature]
.... [Warning of prohibited action]
.... [Disassembly prohibited]
.... [Alert of required action]
.... [Remove the power plug from the outlet]
.... [Always connect the machine to an outlet with a ground connection]
i

Contents
1 Preparation and Features ........................................................... 1-1Names of Parts ............................................................................ 1-2Preparations ................................................................................ 1-5Features and Functions of this Fax .......................................... 1-9
2 Basic Fax Operation ................................................................... 2-1Sending Documents ................................................................... 2-2Automatic Fax Reception ........................................................... 2-9Canceling a Communication ................................................... 2-11Entering Characters ................................................................. 2-13Dialing with One-Touch Keys .................................................. 2-15Dialing With a One-Touch Key ................................................ 2-19Dialing with a 4-Digit Number (Abbreviated Dialing) ............. 2-20Dialing with the Address Book ................................................ 2-22Redialing a Number .................................................................. 2-25
3 Advanced Fax Operation ........................................................... 3-1Sending 2-Sided Documents (Duplex Transmission) ............. 3-3Preparing the Next Documents During Another Communication (Standby Transmission) ............................................................. 3-5Sending the Same Documents to Multiple Destinations (Broadcast Transmission) ......................................................... 3-7Sending Important Documents Before Others (Interrupt Transmission) ............................................................ 3-9Sending Documents at a Specified Time (Communication Using the Timer) .......................................... 3-10Dialing the Destination With A Registered Number and the Numeric Keys (Chain Dial Keys) ............................................. 3-12Managing Information for a Scheduled Communication (Editing a Communication in Memory) ................................... 3-16Initiating the Fax Connection Manually (Manual Fax Transmission) ..................................................... 3-20Initiating the Fax Connection Manually (Manual Fax Reception) ........................................................... 3-22Initiating Fax Reception From A Connected Telephone (Remote Switching) .................................................................. 3-24Allowing the Receiving Party to Initiate Reception (Polling Communication) ......................................................... 3-26Communicating Using F-Codes (F-Code Based Communication) ............................................. 3-30Communicating Confidentially (F-Code Based Confidential Communication) ....................... 3-33Using a Relay Station to Send Your Documents (F-Code Based Relay Broadcast Communication) ................ 3-42Forwarding Faxes to Another Fax Number ........................... 3-49Dialing Multiple Destinations as a Group (Group Dial Keys) ..................................................................... 3-52
ii

Saving Specific Communication Settings as a Single Program (Program Keys) ......................................................................... 3-57Managing Fax Use by Each Department (Restricted Access) .................................................................. 3-62
4 Troubleshooting ......................................................................... 4-1When the Fax Lamp is Lit... ....................................................... 4-2If an Error Occurs... .................................................................... 4-2When One of These Message is Displayed... ........................... 4-3Troubleshooting Tables ............................................................. 4-5
5 Managing Information About Your Fax Communications ...... 5-1Checking the Result of Each Communication (Communication Result Display) .............................................. 5-2Printing the Different Management Reports/List (Management Reports/Lists Printout) ...................................... 5-4
6 Various Settings and Registration ............................................ 6-1Automatically Switching Between the Fax and a Telephone (Auto FAX/TEL Switching) ......................................................... 6-3Automatically Switching Between the Fax and an Answering Machine (TAD Reception) .......................................................... 6-5Turning Print Out of Each Report ON/OFF (Print Report setting) .................................................................. 6-7Turning the Bulletin Board ON/OFF (Bulletin Board setting) . 6-9Setting the Number of Rings [Auto Fax Reception] (Number of Rings setting) ....................................................... 6-10Making Volume Settings (Volume setting) ............................. 6-11Setting the Number of Redial Attempts (Number of Redials setting) ..................................................... 6-12Setting the Document Size for Scanning from the Document Processor (Scan from DP setting) .......................................... 6-13Setting the Default Transmission Mode (TX Mode/Default setting) ........................................................ 6-14Selecting the Automatic Reception Mode (Receive Mode setting) ............................................................ 6-15Turning Reception Date & Time Print Out ON/OFF (RX Date/Time setting) ............................................................. 6-16Selecting the Paper Feed Selection Mode (Fax Paper Feeding Tray setting) ............................................ 6-17Turning Manual Paper Feed ON/OFF (MP Tray setting) ........ 6-19Turning Duplex Reception ON/OFF (Duplex RX setting) ...... 6-20Turning 2 in 1 Reception ON/OFF (2 in 1 RX setting) ............ 6-21Turning Remote Diagnosis ON/OFF (Remote Diagnosis setting) ..................................................... 6-22Registering the Remote Test ID (Remote Test ID setting) .... 6-23Receiving faxes at the same size or a reduced size (Reception Size setting) ........................................................... 6-24Restricting Communication To/From Specific Destinations (TX/RX Restriction) ................................................................... 6-25Communicating with Encrypted Documents (Encrypted Communication) ................................................... 6-33
iii

7 Optional Equipment .................................................................... 7-1Optional Memory ........................................................................ 7-2
8 Reference Information ................................................................ 8-1Specifications ............................................................................. 8-2Character Input Screens ............................................................ 8-3Paper Size and Priority Feed Chart ........................................... 8-5Menu Flow Charts ....................................................................... 8-7Error Code Tables ....................................................................... 8-9
Index ....................................................................................Index-1
iv

Legal and Safety Information
Legal NoticeWE SHALL HAVE NO LIABILITY FOR LOSS, WHETHER OR PARTIAL, OF RECEIVED DOCUMENTS WHEN SUCH LOSS IS CAUSED BY DAMAGES TO THE FAX SYSTEM, MALFUNCTIONS, MISUSE, OR EXTERNAL FACTORS SUCH AS POWER OUTAGES; OR FOR PURELY ECONOMIC LOSSES OR LOST PROFITS RESULTING FROM MISSED OPPORTUNITIES ATTRIBUTABLE TO MISSED CALLS OR RECORDED MESSAGES RESULTING THEREFROM.
Important! Please read it first.This Operation Guide contains information on using the facsimile functions of this machine. be sure to read the Operation Guide for your machine as well and maintain both guides in good condition in a location close to the machine.
During use, refer to the Operation Guide for your machine for information regarding the sections listed below.
• Caution/Warning Labels• Installation Precautions• Precautions for Use• Loading Paper• Cleaning• Toner Container and Waste Toner Box Replacement• Troubleshooting• Clearing Paper Jams
Installation Precautions
EnvironmentAvoid installing this product in locations where the top or upper rear portion of the unit will be exposed to direct sunlight. Such conditions might adversely effect the unit’s ability to detect the correct size of originals and documents. When such a location cannot be avoided, change the direction the unit is facing in order to eliminate exposure to direct sunlight.
Power supply/Grounding the productDo not connect this product to the same outlet as an air conditioner or copier, etc.
v

Precautions for Use
CautionDo not leave the Document Processor open as there is a danger of personal injury.
Other precautions
Do not open the front cover or left cover, turn off the main power switch, or pull out the power plug while transmitting, receiving, or copying.
This product may only be used within the country of purchase due to the different safety and communication standards in each country. (International communication standards, however, make the communication between countries possible.)
This product may be inoperable in areas with poor telephone lines or communication conditions.
“CALL WAITING” or other telephone company optional services that produce audible tones or clicks on the line can disrupt or cause termination of facsimile communications.
No matter what the status of the unit, if the sound of the motor within the unit is audible, never open either the front cover or the left cover, nor turn off the main power switch.
Return used battery to point of sales.
Other precautions (for users in California, the United States)
This product contains a CR Coin Lithium Battery which contains Perchlorate Material - special handling may apply. See www.dtsc.ca.gov/hazardouswaste/perchlorate.
vi

General Notice
Trademark Information• Microsoft, Windows, Windows NT, and Internet Explorer are
registered trademarks of Microsoft Corporation in the U.S. and other countries.
• Windows ME and Windows XP are trademarks of Microsoft Corporation.
• Ethernet is a registered trademark of Xerox Corporation.• IBM and IBM PC-AT are trademarks of International Business
Machines Corporation.• Adobe and Acrobat are registered trademarks of Adobe Systems
Incorporated.
All other company and product names in this Operation Guide are trademarks or registered trademarks of their respective companies. The designations™ and ® are omitted in this guide.
vii

Declarations to European Directives
DECLARATION OF CONFORMITY TO 2004/108/EC, 2006/95/EEC, 93/68/EEC and 1999/5/EC
We declare under our sole responsibility that the product to which this declaration relates is in conformity with the following specifications.
Limits and methods of measurement for immunity characteristics of information technology equipment
EN55024
Limits and methods of measurement for radio interference characteristics of information technology equipment
EN55022 Class B
Limits for harmonic currents emissions for equipment input current 16A per phase
EN61000-3-2
Limitation of voltage fluctuations and flicker in low-voltage supply systems for equipment with rated current 16A
EN61000-3-3
Safety of information technology equipment, including electrical business equipment
EN60950-1
The common technical regulation for the attachment requirements for connection to the analogue public switched telephone networks (PSTNs) of terminal equipment (excluding terminal equipment supporting the voice telephony justified case service) in which network addressing, if provided, is by means of dual tone multi-frequency (DTMF) signaling
CTR 21
viii

Technical regulations for terminal equipmentThis terminal equipment complies with:
Network Compatibility DeclarationThe manufacturer declares that the equipment has been designed to operate in the public switched telephone networks (PSTN) in the following countries:
• TBR21 . • DE 05R00 National AN for D• AN 01R00 AN for P • DE 08R00 National AN for D• AN 02R01 AN for CH and N • DE 09R00 National AN for D• AN 04R00 General Advisory
Note• DE 12R00 National AN for D
• AN 05R01 AN for D, E, GR, P and N
• DE 14R00 National AN for D
• AN 06R00 AN for D, GR and P• ES 01R01 National AN for E• AN 07R01 AN for D, E, P and
N• GR 01R00 National AN for GR
• AN 09R00 AN for D • GR 03R00 National AN for GR• AN 10R00 AN for D • GR 04R00 National AN for GR• AN 11R00 AN for P • NO 01R00 National AN for N• AN 12R00 AN for E • NO 02R00 National AN for N• AN 16R00 General Advisory
Note• P 03R00 National AN for P
• DE 03R00 National AN for D • P 04R00 National AN for P• DE 04R00 National AN for D • P 08R00 National AN for P
Austria Germany Liechtenstein SlovakiaBelgium Greece Lithuania SloveniaCyprus Hungary Luxembourg SpainCzech Iceland Malta SwedenDenmark Ireland Norway SwitzerlandEstonia Italy Poland The Netherlands Finland Latvia Portugal United KingdomFrance
ix

x

Introduction
The explanations contained in this Operation Guide have been separated into different sections in order to allow those using a fax for the first time, as well as those well familiar with such operation, to use this machine efficiently, properly and with relative ease. A basic introduction to each section can be found below for reference. Refer to the related section when using this fax.
Important! Please read it first.
This section contains notes and cautions on installation and operation that should be read prior to using this fax machine for the first time and then strictly obeyed in order to ensure its safe and proper operation. BE SURE to read the notes and cautions contained in the Operation Guide for your machine as well.
1 Preparation and Features
This section contains explanations on the names of the various parts of this fax and their functions, as well as certain settings and preparations required before you actually use the fax for the first time.
Reading the explanations regarding the various features and functions of this fax as well will assist you in its overall use.
2 Basic Fax Operation
This section contains explanations on such basic fax operations as “Sending Documents” and “Receiving Documents Automatically”. Reading this section will make it possible for you to perform the basic procedures required to operate this fax machine.
3 Advanced Fax Operation
This section contains explanations on convenient fax functions. By making use of these advanced operations, you will be able to use the fax more effectively than before.
4 Troubleshooting
This section contains explanations on handling problems that may occur during operation of this fax. It includes information on responding to error messages that are displayed as well as check points regarding the various settings made.
BE SURE to read this section carefully and follow all procedures and cautions precisely.
5 Managing Information About Your Fax Communications
This section contains explanations on checking the message display for information on the conditions surrounding recent fax transmissions and reception.
In addition, it includes explanations on how to print out the management reports and lists that contain information about the result of fax communications and other settings made in this fax.
xi

6 Various Settings and Registration
This section contains explanations on certain settings and registration such as adjusting the volume of the alarm that sounds in the event of some sort of error.
Use this section to perform the settings and registration most appropriate to how you use this fax.
7 Optional Equipment
This section contains an explanation on the addition of Optional Memory, something which enables the use of the Ultra fine resolution mode and thus allows even clearer fax transmission and reception of documents.
8 Reference Information
This section contains information on the specifications for this fax machine, a flowchart of the menus that are shown in the message display and tables with explanations related to various error codes. Use this section as reference when using this fax.
Note This Operation Guide contains information that corresponds to using both the inch and metric versions of these machines.
The inch versions of these machines are shown in the screens in this guide. If you are using the metric version, use the messages provided for the inch version as reference only. In the body text, only the inch messages are given if these versions differ only in capitalization. When there is even a slight difference in the message, we have listed the information for the inch version followed, in brackets, by the corresponding information for the metric version.
xii

1 Preparation and Features
This section contains the names of parts and explanations on the general features and functions of this fax.
Names of Parts 1-2Main Body Parts ................................................................... 1-2Operation Panel.................................................................... 1-3Fax Screens ......................................................................... 1-3
Preparations 1-5Dial type of the line (Not all countries).................................. 1-5TTI Line print on send pages................................................ 1-6Registering the fax number .................................................. 1-6Date & Time setting .............................................................. 1-8
Features and Functions of this Fax 1-9
Preparation and Features 1-1

Names of Parts
Main Body PartsThe following contains information on the names when this machine is used as a facsimile.
Refer to the Operation Guide for your machine for information on other parts of this machine.
1 Operation panel2 Line jack (L)3 Telephone jack (T1)4 Main power switch
Document Processor
This unit is a duplex document feeder from which you can fax both 1-sided and 2-sided originals.
5 Original table6 Original width guides7 Top cover8 Original eject table9 Opening handle10 Original placement indicator11 Original stopper
10 7 6
9
5 8 11
1
4
32
IMPORTANT Be aware that fax transmission/reception will not be available if the main power switch is turned OFF ( ). To continue to allow fax communication, turn the power off by pressing the Power key on the operation panel.
For 120 V specifications: Use the ITEM 303HZ4501 (UL listed. Chau's Type CS) modular connector cable provided with the Fax System (P).
1-2 Preparation and Features

Operation Panel
1 Touch Panel2 Numeric Keys3 Start Key/Indicator4 Fax Key/Indicator5 Fax Lamp6 Reset Key7 Stop/Clear Key8 Print Management Key/Indicator9 System Menu/Counter Key10 Interrupt Key/Indicator11 Power Key/Indicator
Fax ScreensThe initial screen that appears in the touch panel when you press the [Fax] key in the Copy Operation mode, etc., in order to change to the Fax Operation mode is called the ‘basic fax screen’. Press (A), (B), (C) or (D) to switch between the various fax screens as follows:
(A) Basic fax screen
1 2 345
6
89 10
7
11
(A)
Place the original & assign destination.
.0%
Dest
Ready for fax transmission.
Basic Application
Abbrev. TXAddress
Register
Re-dial
On-hook
settingbook
Dest.check
Memory TX
Auto RXPrint Report
Memory usage:
JUN-06-2007 16:00
(B) (C) (D)
12
3
4
5
Preparation and Features 1-3

(B) Application screen
(C) Register screen
(D) Print Report screen
1 Message display Current status, the next step in a procedure and error messages are shown in the message display.
2 Number of destinations display
The number of destinations that you have chosen to dial to is shown in this area.
3 Speed-dial keys Keys that you have registered to function as either a one-touch key, a group dial key (G), a program key (P) or a chain dial key (C) are displayed here.
4 Memory bar Indicates the amount of data stored in memory. As documents are being stored, the bar will move towards 100% indicating that the data stored in memory is increasing. Once it reaches 100%, no more documents can be stored in memory.
5 Reception mode select key
Press this key when you want to select a different reception mode. The display will change to the reception mode selection screen where you can select the desired reception mode by pressing the [Auto RX], [Manual RX] or [Answering Machine] key, as appropriate.
RX Polling
TX Polling
Basic Application Register
box inputSub.conf.
TX statusReserved
on LCDTX result
on LCDRX result
data boxPrint encr
box outputSub.conf.
.0%Memory usage:
JUN-06-2007 16:00
Print Report
Option screenSelect item.
Info.Location
Dial
Basic Application Register
Box ForwardingFax
dialRemote SW
Test IDRemote
Restrict.TX/RX
Print Report
Registering item option screen.Select item for register.
& TimeDate
keyEncryption
Select size
reportConfirm.
reportActivity
Basic Application Register
box listSubad conf
key listOne-touch
ListGroup dial
dial listProgram
box listEncryption
box listSubad. rel
Print Report
Report printing option screen.Select item.
listUser set.
direc.listTelephone
key listEncryption
1-4 Preparation and Features
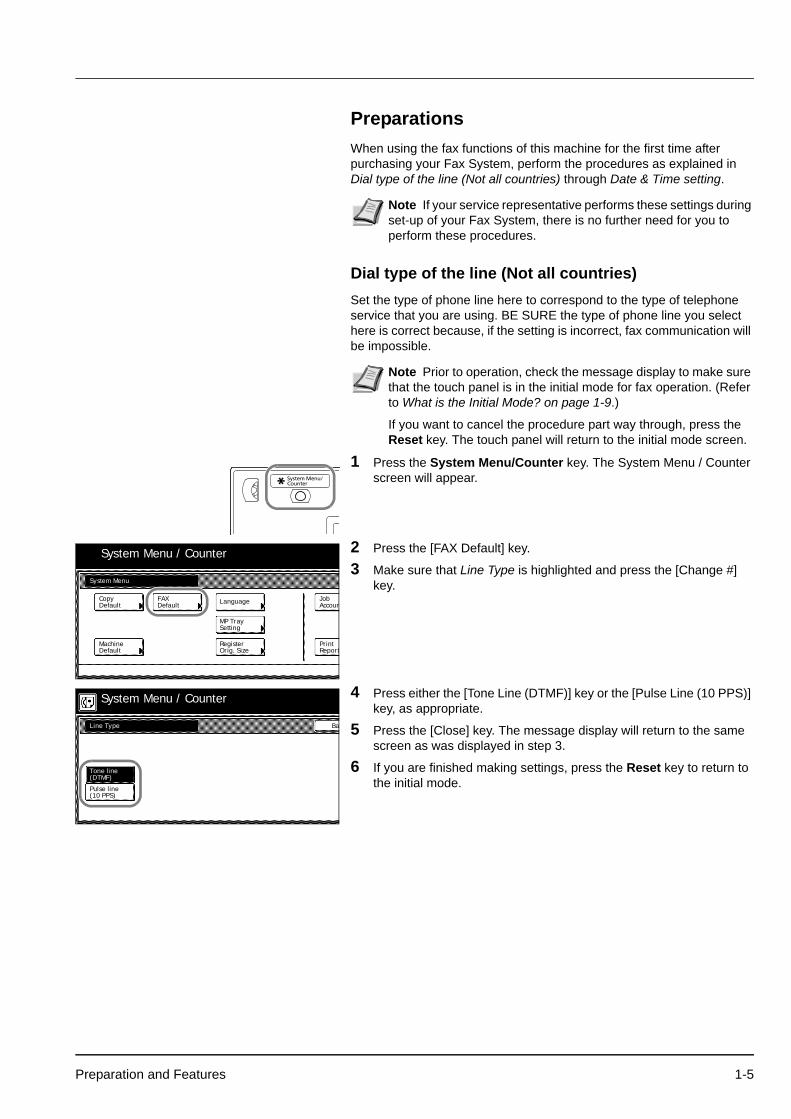
PreparationsWhen using the fax functions of this machine for the first time after purchasing your Fax System, perform the procedures as explained in Dial type of the line (Not all countries) through Date & Time setting.
Dial type of the line (Not all countries)Set the type of phone line here to correspond to the type of telephone service that you are using. BE SURE the type of phone line you select here is correct because, if the setting is incorrect, fax communication will be impossible.
1 Press the System Menu/Counter key. The System Menu / Counter screen will appear.
2 Press the [FAX Default] key.
3 Make sure that Line Type is highlighted and press the [Change #] key.
4 Press either the [Tone Line (DTMF)] key or the [Pulse Line (10 PPS)] key, as appropriate.
5 Press the [Close] key. The message display will return to the same screen as was displayed in step 3.
6 If you are finished making settings, press the Reset key to return to the initial mode.
Note If your service representative performs these settings during set-up of your Fax System, there is no further need for you to perform these procedures.
Note Prior to operation, check the message display to make sure that the touch panel is in the initial mode for fax operation. (Refer to What is the Initial Mode? on page 1-9.)
If you want to cancel the procedure part way through, press the Reset key. The touch panel will return to the initial mode screen.
System Menu
DefaultCopy
DefaultFAX Language
SettingMP Tray
Orig. SizeRegister
DefaultMachine
AccounJob
ReportPrint
System Menu / Counter
Line Type
Tone line(DTMF)
Pulse line(10 PPS)
System Menu / Counter
Ba
Preparation and Features 1-5

TTI Line print on send pagesThe TTI (Transmit Terminal Identifier) refers to information – such as the time of the transmission, the number of pages, your station name and fax number, etc. – that is automatically sent to the receiving party's fax and printed out on the received documents. With this fax, you can select here whether or not that TTI information will be sent to the receiving party's fax, and – if it is – whether it will be printed inside or outside the border of the transmitted page.
1 Press the System Menu/Counter key. The System Menu / Counter screen will appear.
2 Press the [FAX Default] key.
3 Press the [ ] cursor key until TTI is highlighted and then press the [Change #] key.
4 If you want your TTI information to be sent to the other party, press the desired location where you want it to be printed.If you do NOT want it to be sent, press the [Not Printed] key.
5 Press the [Close] key. The message display will return to the same screen as was displayed in step 3.
6 If you are finished making settings, press the Reset key to return to the initial mode.
Registering the fax numberIf you register information identifying your station (fax number, station name and station ID) here, it can be sent to the receiving party's fax and printed on the received documents, thereby instantly notifying that party of the source of the fax transmission.
Note Prior to operation, check the message display to make sure that the touch panel is in the initial mode for fax operation. (Refer to What is the Initial Mode? on page 1-9.)
If you want to cancel the procedure part way through, press the Reset key. The touch panel will return to the initial mode screen.
Ordinarily, the registered self-station name will be displayed as part of the TTI, but, if Restricted Access is turned ON and the transmission is initiated by entering an ID-code, the department name corresponding to that ID-code will be displayed.
System Menu
DefaultCopy
DefaultFAX Language
SettingMP Tray
Orig. SizeRegister
DefaultMachine
AccounJob
ReportPrint
System Menu / Counter
TTI
Outsidepage
Insidepage
System Menu / Counter
Ba
NotPrinted
Note Use the following procedure as well when you want to change information that is already registered.
Prior to operation, check the message display to make sure that the touch panel is in the initial mode for fax operation. (Refer to What is the Initial Mode? on page 1-9.)
If you want to cancel the procedure part way through, press the Reset key. The touch panel will return to the initial mode screen.
1-6 Preparation and Features

1 Press the [Register] key. The Register screen will appear.
2 Press the [Location Info.] key. The currently registered information will be displayed.
3 Registering your fax number
Use the numeric keys to enter your fax number.
4 Press the [OK] key. The message display will return to the same screen as was displayed in step 2.
5 Registering your station name
Enter the desired name for your station. (Refer to Entering Characters on page 2-13.)
6 In the Character input screen, press the [End] key. The message display will return to the same screen as was displayed in step 2.
Place the original & assign destination.
Dest
Ready for fax transmission.
Basic Application
Abbrev. TXAddress
Register
settingbook
Print Report
Info.Location
Dial
Basic Application Register
Box ForwardingFax
dialRemote SW
Test IDRemote
Restrict.TX/RX
Print Report
Registering item option screen.Select item for register.
& TimeDate
keyEncryption
Regist'd contents cnf
Program Fax Parameter.
Own Name
Own ID 0000.
Note To register your fax number: Press the [ ] key and go to step 3. To register your station name: Press the [Own Name] key and go directly to step 5. To register your station ID: Press the [Own ID] key and proceed directly to step 7.
Delete
Enter using # key.
Own location tel # Ba
Program Fax Parameter.
(MAX. 20 digits)
Space
Note The fax number can be up to 20 digits in length.
If you want to clear the currently displayed number from the message display, simply press the Stop/Clear key.
If you want to revise the entered number, press the [ ] or [ ] cursor key to move the cursor to the number that you want to change. Then press the [Delete] key to delete that number and enter the correct number as desired.
Note Your station name can be up to 32 characters in length.
Preparation and Features 1-7

7 Registering your station ID
Use the numeric keys to enter the desired station ID (4 digits). Under
normal circumstances there is no need to make an input here.
8 Press the [Confirm] key. The message display will return to the same screen as was displayed in step 2.
9 If you are finished making settings, press the Reset key to return to the initial mode.
Date & Time settingSet the date and the time that will appear in the message display here. BE SURE that the date and time that you set here are correct since they will serve as a basis for all communications that use the timer.
1 Press the [Register] key. The Register screen will appear.
2 Press the [Date & Time] key. The currently registered information will be displayed.
3 Use the numeric keys to enter the present date, in order of the month, day and year (day, month and year).
Use the [ ] or [ ] cursor keys to move the cursor as required.
4 Press the [Time] key and then use the numeric keys to enter the present time.
Enter using # key.
Own ID Ba
Program Fax Parameter.
( 4 digits)0000.
Note If you want to reset the displayed number to 0000, simply press the Stop/Clear key.
If you want to revise the entered number, press the [ ] or [ ] cursor key to move the cursor to the number that you want to change. Then enter the correct number as desired.
IMPORTANT Be sure to periodically check the time that is shown in the touch panel on the operation panel, and adjust it to match the current time when necessary.
Note Prior to operation, check the message display to make sure that the operation panel is in the initial mode for fax operation. (Refer to What is the Initial Mode? on page 1-9.)
If you want to cancel the procedure part way through, press the Reset key. The touch panel will return to the initial mode screen.
Place the original & assign destination.
Dest
Ready for fax transmission.
Basic Application
Abbrev. TXAddress
Register
settingbook
Print Report
Info.Location
Dial
Basic Application Register
Box ForwardingFax
dialRemote SW
Test IDRemote
Restrict.TX/RX
Print Report
Registering item option screen.Select item for register.
& TimeDate
keyEncryption
Date/Time
Time
Enter using # key.
Ba
Register date & time.
Date 06-06-2007.
15:37.
Note The time should be entered on a 24-hour basis (00:00 - 23:29).
1-8 Preparation and Features
5 Press the [Confirm] key. The message display will return to the same screen as was displayed in step 2.
6 If you are finished making settings, press the Reset key to return to the initial mode.
Features and Functions of this FaxThe following contains explanations about features and functions that should be understood when this machine is used as a facsimile.
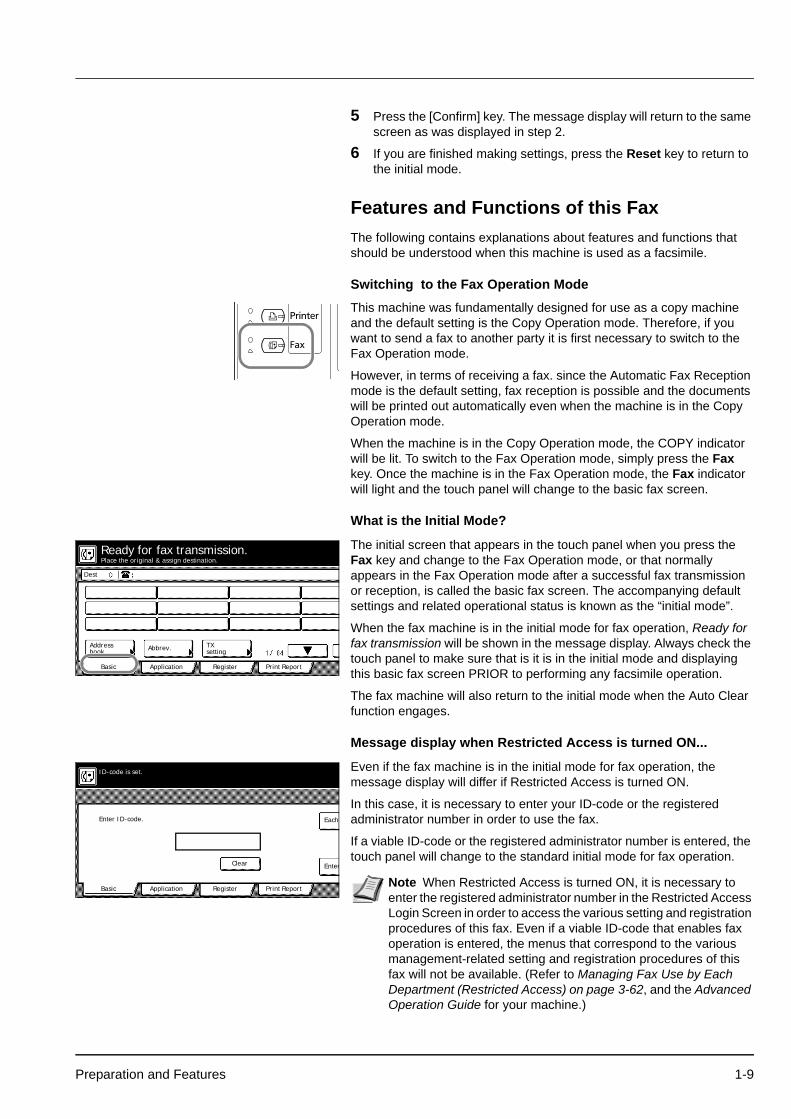
Switching to the Fax Operation Mode
This machine was fundamentally designed for use as a copy machine and the default setting is the Copy Operation mode. Therefore, if you want to send a fax to another party it is first necessary to switch to the Fax Operation mode.
However, in terms of receiving a fax. since the Automatic Fax Reception mode is the default setting, fax reception is possible and the documents will be printed out automatically even when the machine is in the Copy Operation mode.
When the machine is in the Copy Operation mode, the COPY indicator will be lit. To switch to the Fax Operation mode, simply press the Fax key. Once the machine is in the Fax Operation mode, the Fax indicator will light and the touch panel will change to the basic fax screen.
What is the Initial Mode?
The initial screen that appears in the touch panel when you press the Fax key and change to the Fax Operation mode, or that normally appears in the Fax Operation mode after a successful fax transmission or reception, is called the basic fax screen. The accompanying default settings and related operational status is known as the “initial mode”.
When the fax machine is in the initial mode for fax operation, Ready for fax transmission will be shown in the message display. Always check the touch panel to make sure that is it is in the initial mode and displaying this basic fax screen PRIOR to performing any facsimile operation.
The fax machine will also return to the initial mode when the Auto Clear function engages.
Message display when Restricted Access is turned ON...
Even if the fax machine is in the initial mode for fax operation, the message display will differ if Restricted Access is turned ON.
In this case, it is necessary to enter your ID-code or the registered administrator number in order to use the fax.
If a viable ID-code or the registered administrator number is entered, the touch panel will change to the standard initial mode for fax operation.
Place the original & assign destination.
Dest
Ready for fax transmission.
Basic Application
Abbrev. TXAddress
Register
settingbook
Print Report
Basic Application Register Print Report
Clear Enter
Enter ID-code. Each
ID-code is set.
Note When Restricted Access is turned ON, it is necessary to enter the registered administrator number in the Restricted Access Login Screen in order to access the various setting and registration procedures of this fax. Even if a viable ID-code that enables fax operation is entered, the menus that correspond to the various management-related setting and registration procedures of this fax will not be available. (Refer to Managing Fax Use by Each Department (Restricted Access) on page 3-62, and the Advanced Operation Guide for your machine.)
Preparation and Features 1-9
What is the Administrator Number Used For?
In order to manage each individual's or each department's use of this fax in the Fax Operation mode – and enhance security during Encrypted Communication as well – it is necessary to enter the registered administrator number in those cases noted in 1 and 2 below.
As you can only register one administrator number, it is recommended that the person-in-charge of managing use of this fax be the one to register that number.
1 You must enter the administrator number when...
2 If Restricted Access is turned ON, you must enter the administrator number when...
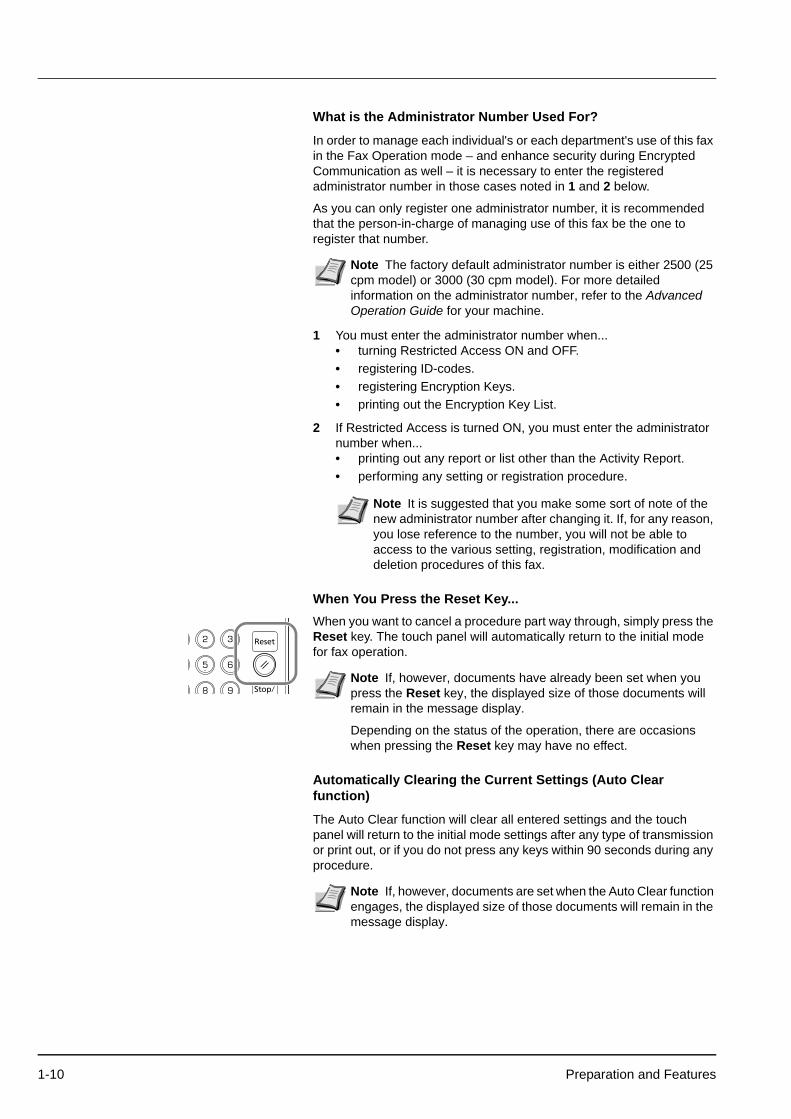
When You Press the Reset Key...When you want to cancel a procedure part way through, simply press the Reset key. The touch panel will automatically return to the initial mode for fax operation.
Automatically Clearing the Current Settings (Auto Clear function)
The Auto Clear function will clear all entered settings and the touch panel will return to the initial mode settings after any type of transmission or print out, or if you do not press any keys within 90 seconds during any procedure.
Note The factory default administrator number is either 2500 (25 cpm model) or 3000 (30 cpm model). For more detailed information on the administrator number, refer to the Advanced Operation Guide for your machine.
• turning Restricted Access ON and OFF.• registering ID-codes.• registering Encryption Keys.• printing out the Encryption Key List.
• printing out any report or list other than the Activity Report.• performing any setting or registration procedure.
Note It is suggested that you make some sort of note of the new administrator number after changing it. If, for any reason, you lose reference to the number, you will not be able to access to the various setting, registration, modification and deletion procedures of this fax.
Note If, however, documents have already been set when you press the Reset key, the displayed size of those documents will remain in the message display.
Depending on the status of the operation, there are occasions when pressing the Reset key may have no effect.
Note If, however, documents are set when the Auto Clear function engages, the displayed size of those documents will remain in the message display.
1-10 Preparation and Features

Using a 3-digit Document Number to Manage Fax Communications (Document Number)
The fax uses a 3-digit document number in order to manage each fax communication. This document number is assigned during each procedure and in the order that each communication that uses the timer, as well as each transmission or reception, is accomplished.
The actual timing of the determination of each document number will differ depending upon the operation being carried out.
In addition to appearing in the message display, this document number can be verified by checking the Transaction Result display, the Delayed Communication Report that is printed out for each communication that uses the timer or by printing out a Confirmation Report. (Refer to Checking the Result of Transmissions on page 5-2, Printing Out a Confirmation Report on page 5-4, and Turning Print Out of Each Report ON/OFF (Print Report setting) on page 6-7.)
Automatically Engaging the Energy Saving Mode (Auto sleep function)
Anytime there is no operation of or activity with this fax (no keys are pressed, no documents are set, nothing is printed out, etc.) for a designated period of time, the Auto sleep function will engage for energy saving purposes and the fixing section heater and fan inside the machine will shut down.
The amount of time most copy or fax machines spend waiting for some operation to begin is generally greater than the time actually spent on copying or fax communication. Thus, the energy consumed during that time is a great percentage of the overall energy used by the machine. Shutting down the fixing section heater and fan enables energy and cost reductions by minimizing unnecessary energy consumption while the machine is in this waiting state.
If you receive a fax while the Auto sleep function is engaged...
Incoming faxes will be received and printed out even when the Auto sleep function is engaged.
Energy saving mode Fax reception Warm-up Fax print out
Handling 2 Jobs Simultaneously (Dual Access function)
The Dual Access function allows the machine to simultaneously process 2 operations. For example, you can perform the procedure to transmit documents even during an ongoing fax communication. It is also possible to receive a fax during copying with the received document(s) printed out automatically once the copy operation is completed.
Status of Fax
Stop
Check Status of Fax
020.PortDoc #:Dialing.
03.
Prin
Note It is possible to change the amount of time that will elapse before the Auto sleep function is to engage (factory default: 9 minutes). It is recommended that this be set to a longer period of time if the machine is used frequently during the day, and to a shorter time if there are normally long periods between use. (Refer the Advanced Operation Guide for your machine.)
Once the Auto sleep function engages, the power will be automatically turned OFF and all indications on the operation panel will go out except for the Main Power Indicator. To send a fax or perform other fax operations, simply press the Power key.
Preparation and Features 1-11

Because the Dual Access function is constantly enabled, no matter what operation is currently in progress, you can perform fax transmission procedures anytime that Ready for fax transmission appears in the message display. No special settings are required to use the Dual Access function.
Checking the status of a fax communication in progress
Press the [Status] ([Act status]) key in the bottom right of the touch panel. The document number and information related to the other party will be displayed.
It is possible to cancel that ongoing communication by pressing the [Stop] key. Press the [Close] key to return to the previous screen.
Checking the status of a print out in progress
Press the [Status] ([Act status]) key in the bottom right of the touch panel.
Press the [Close] key to return to the previous screen.
When the Dual Access function is not available
There are cases in which the Dual Access function is not available. For example, during a fax communication to one party, you will not be able to receive a fax from another party, nor can you perform setting or registration procedures during any fax transmission or reception.
In such cases, perform the desired operation after the current communication is completed.
Refer to Table of Operations Available/ Unavailable under Dual Access on page 1-13, for more detailed information regarding which operations can and cannot be performed simultaneously.
ign destination.
.0%x transmission.
tion Register
Re-dial
On-hook
Dest.check
Memory TX
Auto RXPrint Report
Memory usage:
JUN-06-2007 16:00
TXsetting
Status
ign destination.
.0%x transmission.
tion Register
Re-dial
On-hook
Dest.check
Memory TX
Auto RXPrint Report
Memory usage:
JUN-06-2007 16:00
TXsetting
Status
Note Communications that use the timer will not be accomplished, even upon reaching the designated time for the communication to begin, until the current operation has been completed.
1-12 Preparation and Features
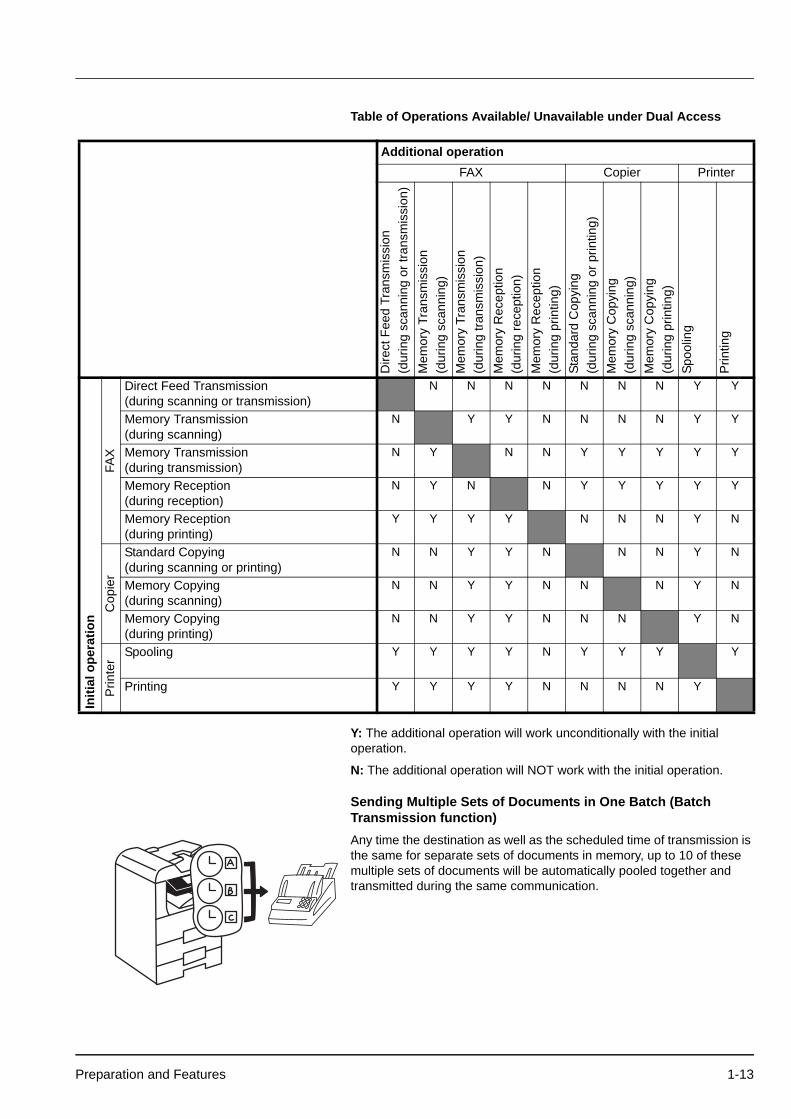
Table of Operations Available/ Unavailable under Dual Access
Y: The additional operation will work unconditionally with the initial operation.
N: The additional operation will NOT work with the initial operation.
Sending Multiple Sets of Documents in One Batch (Batch Transmission function)Any time the destination as well as the scheduled time of transmission is the same for separate sets of documents in memory, up to 10 of these multiple sets of documents will be automatically pooled together and transmitted during the same communication.
Additional operationFAX Copier Printer
Dire
ct F
eed
Tran
smis
sion
(d
urin
g sc
anni
ng o
r tra
nsm
issi
on)
Mem
ory
Tran
smis
sion
(d
urin
g sc
anni
ng)
Mem
ory
Tran
smis
sion
(d
urin
g tra
nsm
issi
on)
Mem
ory
Rec
eptio
n (d
urin
g re
cept
ion)
Mem
ory
Rec
eptio
n (d
urin
g pr
intin
g)St
anda
rd C
opyi
ng
(dur
ing
scan
ning
or p
rintin
g)M
emor
y C
opyi
ng
(dur
ing
scan
ning
)M
emor
y C
opyi
ng
(dur
ing
prin
ting)
Spoo
ling
Prin
ting
Initi
al o
pera
tion
FAX
Direct Feed Transmission (during scanning or transmission)
N N N N N N N Y Y
Memory Transmission (during scanning)
N Y Y N N N N Y Y
Memory Transmission (during transmission)
N Y N N Y Y Y Y Y
Memory Reception (during reception)
N Y N N Y Y Y Y Y
Memory Reception (during printing)
Y Y Y Y N N N Y N
Cop
ier
Standard Copying (during scanning or printing)
N N Y Y N N N Y N
Memory Copying (during scanning)
N N Y Y N N N Y N
Memory Copying (during printing)
N N Y Y N N N Y N
Prin
ter Spooling Y Y Y Y N Y Y Y Y
Printing Y Y Y Y N N N N Y
Preparation and Features 1-13
This Batch Transmission function eliminates the need for you to dial the same destination multiple times, thereby lowering communication costs.
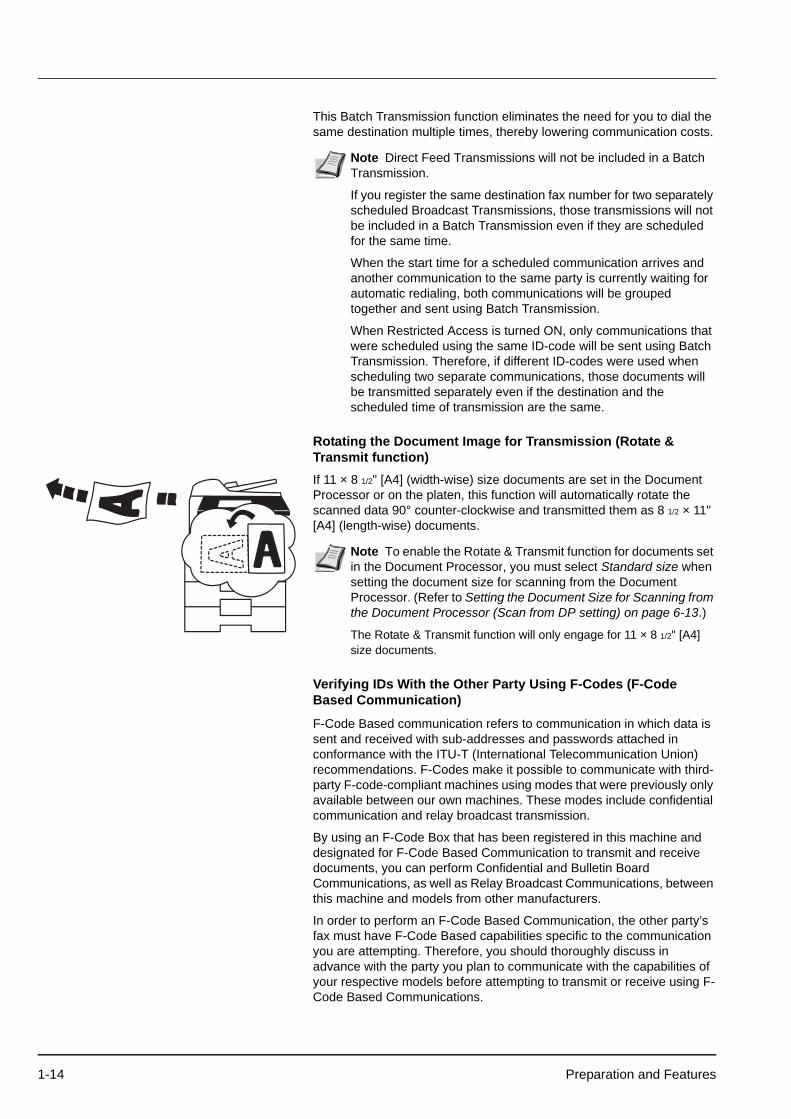
Rotating the Document Image for Transmission (Rotate & Transmit function)If 11 × 8 1/2" [A4] (width-wise) size documents are set in the Document Processor or on the platen, this function will automatically rotate the scanned data 90° counter-clockwise and transmitted them as 8 1/2 × 11" [A4] (length-wise) documents.
Verifying IDs With the Other Party Using F-Codes (F-Code Based Communication)
F-Code Based communication refers to communication in which data is sent and received with sub-addresses and passwords attached in conformance with the ITU-T (International Telecommunication Union) recommendations. F-Codes make it possible to communicate with third-party F-code-compliant machines using modes that were previously only available between our own machines. These modes include confidential communication and relay broadcast transmission.
By using an F-Code Box that has been registered in this machine and designated for F-Code Based Communication to transmit and receive documents, you can perform Confidential and Bulletin Board Communications, as well as Relay Broadcast Communications, between this machine and models from other manufacturers.
In order to perform an F-Code Based Communication, the other party’s fax must have F-Code Based capabilities specific to the communication you are attempting. Therefore, you should thoroughly discuss in advance with the party you plan to communicate with the capabilities of your respective models before attempting to transmit or receive using F-Code Based Communications.
Note Direct Feed Transmissions will not be included in a Batch Transmission.
If you register the same destination fax number for two separately scheduled Broadcast Transmissions, those transmissions will not be included in a Batch Transmission even if they are scheduled for the same time.
When the start time for a scheduled communication arrives and another communication to the same party is currently waiting for automatic redialing, both communications will be grouped together and sent using Batch Transmission.
When Restricted Access is turned ON, only communications that were scheduled using the same ID-code will be sent using Batch Transmission. Therefore, if different ID-codes were used when scheduling two separate communications, those documents will be transmitted separately even if the destination and the scheduled time of transmission are the same.
Note To enable the Rotate & Transmit function for documents set in the Document Processor, you must select Standard size when setting the document size for scanning from the Document Processor. (Refer to Setting the Document Size for Scanning from the Document Processor (Scan from DP setting) on page 6-13.)
The Rotate & Transmit function will only engage for 11 × 8 1/2" [A4] size documents.
1-14 Preparation and Features

Refer to Communicating Using F-Codes (F-Code Based Communication) on page 3-30, for a more detailed information regarding the F-Code Based Communication capabilities of this fax.
Receiving Documents Even When Paper Has Run Out (Memory Reception function)When you cannot print out because paper has run out or a paper jam occurs, the data for all received documents will be temporarily stored in memory and will then be printed out automatically once printing is enabled.
Rotating Received Data to Fit the Available Paper (Rotate Received Data function)Even if the orientation of the received documents and of the paper set in the drawers differs, if their size is the same (11 × 8 1/2" [A4]), this function will automatically rotate the received data 90° counter-clockwise before printing it out. No special settings are required to use this function.
Backing Up Memory Even During a Power Failure (Imaging Memory Backup function)If, for any reason, power to the fax is disconnected or lost, the back-up battery in this machine will protect all data related to documents that were already received into Imaging Memory, or that are waiting for transmission, for up to 60 minutes (32 MB of optional memory must be installed).
Thus, if power is restored to the fax within that time period, those communications that were scheduled and waiting in memory prior to the failure will be carried out as scheduled. If power cannot be restored in time and data is lost, a Power Failure Report that indicates what information was lost will be automatically printed out once power is restored to the fax.
IMPORTANT If, for any reason, power to the fax is disconnected or lost, data received into memory may be lost. Ask the other party to retransmit any documents for which data was lost. (Refer to page 4-2.)
Note If paper of the same size is set in different orientations, depending on the type of communication that is involved, there are times when rotation of the received data is not possible. For further information on paper orientation, refer to Paper Size and Priority Feed Chart on page 8-5, and Paper Size and Priority Feed Chart on page 8-5.
If the transmitting party’s TTI information is set to be printed outside the border of the transmitted page, received data cannot be rotated and the received image will be reduced slightly to enable the appropriate information to be printed out.
Note The actual length of time the back-up battery will protect the data in memory may differ depending on the conditions and environment of use of this machine.
Preparation and Features 1-15

Printing Out Received Documents Even During Copying (Fax Priority Printout function)
It is possible to have incoming faxes, which are received during a copy operation, printed out without having to wait for that copy operation to be completed.
1 When an incoming fax is received, the Fax lamp will light.
2 Press the Print Management key. The Print Status screen will appear.
3 Press the [ ] cursor key and select the fax job to be printed out.
4 Press the [Interrupt Print] key. The received fax will be printed out. Once print out of the received fax is complete, the interrupted copy operation will be resumed automatically.
Make Copies Even During Printing of an Incoming Fax (Copy Priority Printout function)
It is possible to stop print out of an incoming fax and make copies without having to wait for that print job to end.
1 Press the Interrupt key. Copying is now possible.
2 Once copying is completed, press the Interrupt key to return to print out of the incoming fax.
Using a 4-Digit Number to Select the Destination (Abbreviated Numbers)
1000 speed-dial keys are available and each of these keys can be designated to function as either a one-touch key, a group dial key, a program key or a chain dial key. Each of these keys is given a 4-digit “abbreviated number” between 0001 and 1000. It is then possible to dial a destination number by simply entering the corresponding abbreviated number. (Refer to page 2-20.) Since only 12 of these speed-dial keys can be display on the touch panel at one time, using the corresponding abbreviated number may be faster than the time required to change screens and find a desired key.
Print Management
Pr
Job Input Source Original Set Registration Date
Wa
Prt Status
InterruptPrint
MoveMoveBehindAhead
Copy
Fax Wa
Printer
100. 100.123.
Ready for fax transmission.
( 4 digits)
Enter using # key.
Abbreviation Ba
_.
1-16 Preparation and Features

2 Basic Fax Operation
This section contains explanations on the basic use of this fax.
Sending Documents 2-2
Automatic Fax Reception 2-9
Canceling a Communication 2-11Canceling a Memory Transmission (during scanning) ......... 2-11Canceling a Memory Transmission (during transmission).... 2-11Canceling a Direct Feed Transmission................................. 2-11Canceling a Reception ......................................................... 2-12
Entering Characters 2-13What is in the Character Input screen? ................................ 2-13How Do I Enter Characters?................................................. 2-14
Dialing with One-Touch Keys 2-15Registering New One-Touch Keys........................................ 2-15Modifying or Deleting Registered Information ...................... 2-17
Dialing With a One-Touch Key 2-19Printing Out a One-Touch Key List ....................................... 2-20
Dialing with a 4-Digit Number (Abbreviated Dialing) 2-20
Dialing with the Address Book 2-22Searching for a Destination with the Address Book ............. 2-22How Do I Find a Destination in the Address Book?.............. 2-22Printing Out a Telephone Directory List ................................ 2-24
Redialing a number 2-25Automatic Redialing.............................................................. 2-25Manual Redialing.................................................................. 2-25
Basic Fax Operation 2-1
Sending DocumentsThe following contains explanations on the standard method for transmitting documents. Carefully read all the notes regarding acceptable documents, etc., to ensure correct operation.
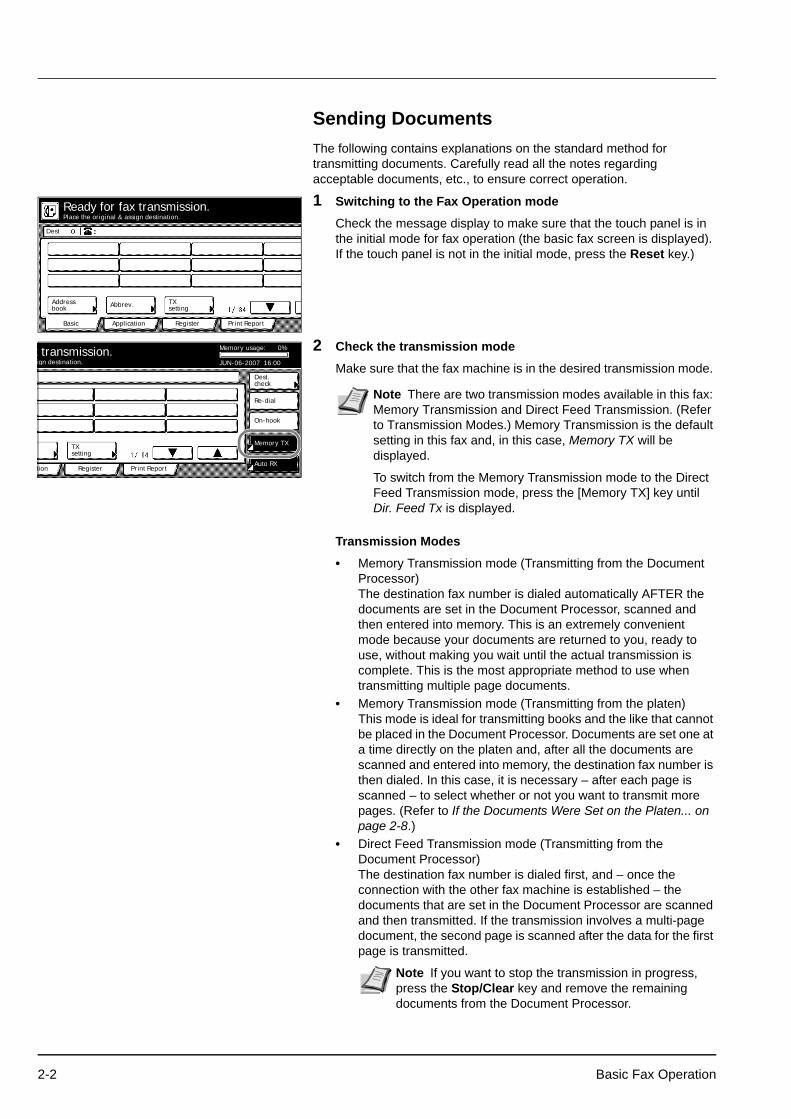
1 Switching to the Fax Operation mode
Check the message display to make sure that the touch panel is in the initial mode for fax operation (the basic fax screen is displayed). If the touch panel is not in the initial mode, press the Reset key.)
2 Check the transmission mode
Make sure that the fax machine is in the desired transmission mode.
Transmission Modes
• Memory Transmission mode (Transmitting from the Document Processor) The destination fax number is dialed automatically AFTER the documents are set in the Document Processor, scanned and then entered into memory. This is an extremely convenient mode because your documents are returned to you, ready to use, without making you wait until the actual transmission is complete. This is the most appropriate method to use when transmitting multiple page documents.
• Memory Transmission mode (Transmitting from the platen) This mode is ideal for transmitting books and the like that cannot be placed in the Document Processor. Documents are set one at a time directly on the platen and, after all the documents are scanned and entered into memory, the destination fax number is then dialed. In this case, it is necessary – after each page is scanned – to select whether or not you want to transmit more pages. (Refer to If the Documents Were Set on the Platen... on page 2-8.)
• Direct Feed Transmission mode (Transmitting from the Document Processor) The destination fax number is dialed first, and – once the connection with the other fax machine is established – the documents that are set in the Document Processor are scanned and then transmitted. If the transmission involves a multi-page document, the second page is scanned after the data for the first page is transmitted.
Place the original & assign destination.
Dest
Ready for fax transmission.
Basic Application
Abbrev. TXAddress
Register
settingbook
Print Report
ign destination.
.0%x transmission.
tion
TX
Register
Re-dial
On-hook
setting
Dest.check
Memory TX
Auto RXPrint Report
Memory usage:
JUN-06-2007 16:00
Note There are two transmission modes available in this fax: Memory Transmission and Direct Feed Transmission. (Refer to Transmission Modes.) Memory Transmission is the default setting in this fax and, in this case, Memory TX will be displayed.
To switch from the Memory Transmission mode to the Direct Feed Transmission mode, press the [Memory TX] key until Dir. Feed Tx is displayed.
Note If you want to stop the transmission in progress, press the Stop/Clear key and remove the remaining documents from the Document Processor.
2-2 Basic Fax Operation

• Direct Feed Transmission mode (Transmitting from the platen) This mode is ideal for transmitting books and the like that cannot be placed in the Document Processor. Documents are set one at a time directly on the platen, the destination fax number is then dialed first, and – once the connection with the other fax machine is established – scanning of the document begins and the document is transmitted. This process is carried out for each page that you want to transmit and it is necessary, after each page is scanned, to select whether or not you want to transmit more pages. (Refer to If the Documents Were Set on the Platen... on page 2-8.)
3 Setting the documents
Acceptable documents
• When set in the Document Processor...
• When set on the platen...
Notes on acceptable documents
• If documents with very low contrast images or light colored text are transmitted, they may not be received clearly by the other party.
• MAKE SURE that documents written in ink or containing glue, etc., have dried COMPLETELY before setting them for transmission.
• When setting documents in the Document Processor, ALWAYS set documents AFTER removing any clips and staples as they can cause damage to the machine.
• Documents of sizes outside the prescribed range may not be transmitted successfully.
• If documents with punch holes are set in the Document Processor for transmission, gray streaks may appear on the documents received by the other party. In this case, set the documents in a different direction and try to transmit them again.
Items SpecificationsType Standard sheet documentsSize 5 1/2 × 8 1/2" – 11 × 17" [A5R – A3]Paper weight 1-sided documents: 45 g/m² – 160 g/m²
Duplex (2-sided) documents: 50 g/m² – 120 g/m²
Number (plain paper) Max 75 sheets (50 g/m² – 80 g/m²)
Note If you attempt to transmit a document over 63" [1600 mm] in length, a message indicating that a document jam has occurred in the Document Processor will appear in the message display.
Items SpecificationsMaximum size 11 × 17" [A3]
Basic Fax Operation 2-3

1 Adjust the original width guides to match the width of the documents you want to transmit.
2 Set the documents face-up on the original table.
Setting the Documents on the Platen
Documents can also be transmitted by lifting open the Document Processor and setting one document at a time directly on the platen. Always use the platen when transmitting pages from books and the like.
1 Set the document face-down and align it properly with the lines on the original size scales.
2 When transmitting single-sheet documents directly from the platen, be sure to close the Document Processor.
4 Dialing a destination fax number
Use the numeric keys to enter the destination fax number.
Note If the documents are set properly, the original placement indicator will be lit green.
DO NOT set more documents than indicated by the paper volume lines that are located on the inside of the rear document insert guide. Setting more than the acceptable number of documents can be the cause of document jams.
Refer to the Operation Guide for your machine for more detailed information on the Document Processor.
It is possible to set duplex (2-sided) documents and have both the front and back sides of those documents transmitted. (Refer to page 3-3.)
CAUTION Do not leave the document processor open as there is a danger of personal injury.
Note The destination fax number can be up to 32 digits in length.
If a mistake is made at any point in entering the fax number, press the [ ] or [ ] cursor key to move the cursor to the desired position and enter the correct number as desired, or press the Stop/Clear key and enter the full number once again from the beginning.
2-4 Basic Fax Operation

Using the [Pause] key
Press this key to enter a 3-second pause at that point in dialing. This is useful, for example, if you need to dial a specific number first and then wait for the connection to an outside line before the actual destination number is dialed.
Dialing methods
In addition to using the numeric keys, the following methods of dialing are possible.
• Dialing with a one-touch key....Refer to page 2-19.• Dialing with abbreviated numbers....Refer to page 2-20.• Dialing with a program key....Refer to page 3-57.• Dialing with a group key....Refer to page 3-52.• Redialing manually....Refer to page 2-25.
5 Selecting the resolution
It is possible to select a resolution from among the 5 available settings.
1 If you want to change the resolution, press the [Original image] key.
Press start key to transmit
Dest
Ready for fax transmission.
Basic Application
DuplexAddress
Register
TXbook
Print Report
1234_.
Abbrev.
One touchdestinat.
Delayed TX
OriginalSize
OriginalImage
DeMo
8½×11" Normal R
Delete SpacePause Subadd.
Resolution DescriptionNormal For transmitting documents with standard
size characters.Fine For transmitting documents with relatively
small characters or thin lines.Super fine For transmitting documents with detailed
lines and characters.Ultra fine For transmitting the clearest reproduction of
documents with detailed lines and characters.
Half tone (Half-tone) For transmitting the clearest reproduction of documents containing both photographs as well as text.
Note The default setting is for Normal resolution.
Press start key to transmit
Dest
Ready for fax transmission.
Basic Application
DuplexAddress
Register
TXbook
Print Report
1234_.
Abbrev.
One touchdestinat.
Delayed TX
OriginalSize
OriginalImage
DeMo
8½×11" Normal R
Delete SpacePause Subadd.
Basic Fax Operation 2-5

2 Select the desired resolution from among the 5 available.
6 Selecting the density
It is possible to select a density from among the 3 available settings.
1 If you want to change the density, press the [Density Mode] key.
2 Select the desired density from among the 3 available.
7 Indicating the document size
When you set any documents that you want to transmit on the platen, you will need to indicate the size of those documents.
This procedure is not necessary when transmitting documents from the Document Processor.
Original Image
Normal
Fine
Ultra fine
Ready for fax transmission.
Super fine
Half tone
Note The Fine and Super fine resolutions reproduce clearer images in comparison to transmission with the Normal resolution, but transmission time is longer.
The Half tone [Half-tone] resolution reproduces grays clearly, but transmission time is longer than with the Normal or Fine resolutions.
To transmit with the Ultra fine resolution, 32 MB of optional memory must be installed. If the additional memory is NOT installed, the Ultra fine resolution will not selectable.
To transmit with the Super fine or Ultra fine resolutions, the receiving fax must have the corresponding resolution capabilities in order to benefit from their features. If the receiving fax does not have the corresponding capability, transmission will be accomplished with the Fine resolution.
Density DescriptionDark For transmitting light documents at a darker
contrast.Regular For transmitting document with a normal contrast.Light For transmitting dark documents at a lighter
contrast.
Note The default setting is for Regular density.
mit
.0%x transmission.
tion Register
Re-dial
On-hook
Dest.check
Memory TX
Auto RXPrint Report
Memory usage:
JUN-06-2007 16:00
TX
OriginalSize
OriginalImage
DensityMode
8½×11" Normal Regular
lete SpacePause Subadd. Next des
Density setting
Regular
Light
Ready for fax transmission.
Dark
2-6 Basic Fax Operation

1 In order to indicate the document size, press the [Original Size] key.
2 Select the appropriate document size.
8 Initiating the fax transmission
Press the Start key. The transmission operation will begin automatically.
> Checking the status of the transmission...
Press the [Status] ([Act status]) key in the bottom right of the touch panel. The document number and information related to the other party will be displayed.
> Stopping the transmission in progress
It is possible to cancel the ongoing operation by pressing the [Stop] key in the confirmation screen that was accessed above. Press the [Close] key to return to the previous screen.
Press start key to transmit
Dest
Ready for fax transmission.
Basic Application
DuplexAddress
Register
TXbook
Print Report
1234_.
Abbrev.
One touchdestinat.
Delayed TX
OriginalSize
OriginalImage
DeMo
8½×11" Normal R
Delete SpacePause Subadd.
Original size
8½x14"
8½x11"
Ready for fax transmission.
11x8½"
11x17"
8½x5½"
5½x8½"
Note You can select or change the resolution or density during scanning.
ign destination.
.0%x transmission.
tion Register
Re-dial
On-hook
Dest.check
Memory TX
Auto RXPrint Report
Memory usage:
JUN-06-2007 16:00
TXsetting
Status
Status of Fax
Stop
Check Status of Fax
020.PortDoc #:Dialing.
03.
Prin
Basic Fax Operation 2-7

If the Documents Were Set on the Platen...
Whenever you set the documents that you want to transmit on the platen, close the Document Processor in order to allow the machine to detect the size of those documents. If you are transmitting information from books or other types of documents that will not allow you to close the Document Processor, it is necessary to indicate the document size manually. (Refer to page 2-6.)
> If you have more documents to send...
1 Set the next page to be scanned on the platen.
2 Press the [Yes] key.
3 Press the [Start] key.
> Once there are no further pages to be scanned...
Press the [No] key. Transmission of the documents will begin automatically.
Note In addition, any time you set documents on the platen for transmission, a menu like that shown below will appear in the message display once you press the Start key and the documents have been scanned. In this case, perform the following procedure.
Note The next document(s) may also be set in the Document Processor.
Yes
Storing data into memory
No
Continue scanning?
Note If you set the document(s) in the Document Processor, scanning and then transmission of the documents will begin automatically.
Repeat steps (1) through (3) for all remaining documents.
2-8 Basic Fax Operation

Automatic Fax ReceptionAutomatic Fax Reception is the default setting for fax reception in this machine and no special settings are required for its use. The data for an incoming fax are stored and then printed out in a single batch at the end of the communication.
Reception modes
This fax machine offers the following 4 or 5 (depending upon the region of use) ways to receive a fax.
• Automatic Fax Reception....Refer to this page.• Manual Fax Reception.....Refer to page 3-22.• Auto FAX/TEL Switching.....Refer to page 6-3.• TAD Reception.....Refer to page 6-5.• D.R.D. Reception.....Refer to page 6-7.
> Checking the reception mode
Make sure that Auto RX is displayed.
> Changing the reception mode
1 Press the reception mode select key when you want to change the reception mode.
2 Press the key that corresponds to the desired reception mode.
1 Receiving a fax
When a fax comes in, fax reception will begin automatically after the amount of time equal to a designated number of rings.
Note In order to use the Automatic Fax Reception mode, it is necessary to select the [Fax Reception] ([Fax Rx]) key under Selecting the Automatic Reception Mode (Receive Mode setting) on page 6-15.
ign destination.
.0%x transmission.
tion
TX
Register
Re-dial
On-hook
setting
Dest.check
Memory TX
Auto RXPrint Report
Memory usage:
JUN-06-2007 16:00
Receive Mode
Manual RX
AnsweringMachine
Ready for fax transmission.
Auto RX
Note Once fax reception begins, the [Status] ([Act status]) key will appear in the bottom right of the touch panel.
Basic Fax Operation 2-9

> Stopping the reception in progress
1 Press the [Status] ([Act status]) key in the bottom right of the touch panel.
2 Press the [Stop] key and the reception will be canceled.
Memory ReceptionWhen you cannot print out because paper has run out or a paper jam occurs, the data for all received documents will be temporarily stored in memory and will then be printed out automatically once printing is enabled.
When a fax has been received into memory, the Fax lamp will light and Receive document in memory will appear in the message display. To print out the documents, set paper or fix the paper jam, as appropriate to the situation.
2 Printing out the received documents
Received document(s) will be printed out and ejected face-down in the top tray.
ign destination.
.0%x transmission.
tion Register
Re-dial
On-hook
Dest.check
Memory TX
Auto RXPrint Report
Memory usage:
JUN-06-2007 16:00
TXsetting
Status
Status of Fax
Stop
Check Status of Fax
Port
Receive
03.
Prin
No. of pages 001.
Service center
IMPORTANT If, for any reason, power to the fax is disconnected or lost, data received into memory may be lost. Ask the other party to retransmit any documents for which data was lost.
Note Refer to the Operation Guide for your machine about the maximum number of sheets that can be stored. When the maximum number of sheets has been reached, remove all of the documents from the top tray.
Even if you cannot print out because paper has run out or a paper jam occurs, reception is still possible (Memory Reception).
32 MB of optional memory must be installed in order to use the Ultra fine resolution.
2-10 Basic Fax Operation

Canceling a CommunicationYou can cancel a communication even if it is already in progress. The methods for canceling a communication differ depending on whether that communication is a fax transmission or a fax reception, and whether that transmission was initiated using the Memory Transmission mode or the Direct Feed Transmission mode. The following contains explanations on the various methods used for canceling communications.
Canceling a Memory Transmission (during scanning)If you want to cancel a Memory Transmission during scanning of the documents, simply press the Stop/Clear key. The document that is currently being scanned will be ejected and the touch panel will return to the initial mode settings. If there are any documents left in the Document Processor, remove them from the document table.
Canceling a Memory Transmission (during transmission)If you want to cancel a Memory Transmission in which scanning all of the documents has been completed and the dialing or transmission operation has already begun, perform the following procedure.
1 Press the [Status] ([Act status]) key or the Stop/Clear key in the bottom right of the touch panel.
The status of the communication currently in progress will appear in the message display.)
2 Press the [Stop] key. The touch panel will return to the initial mode settings.
Canceling a Direct Feed TransmissionA message such as that shown below will be displayed after dialing the destination party in the Direct Feed Transmission mode.
If you want to cancel a Direct Feed Transmission, press the [Stop] key or press the Stop/Clear key. The document that is currently being scanned will be ejected and the touch panel will return to the initial mode settings. If there are any documents left in the Document Processor, remove them from the Document Processor.
ign destination.
.0%x transmission.
tion Register
Re-dial
On-hook
Dest.check
Memory TX
Auto RXPrint Report
Memory usage:
JUN-06-2007 16:00
TXsetting
Status
Status of Fax
Stop
Check Status of Fax
020.PortDoc #:Dialing.
03.
Prin Note If you attempt to cancel a transmission that is scheduled to multiple destinations (such as a Broadcast Transmission) and there were destinations still remaining to be transmitted to, a message will appear in the message display asking whether or not you want to continue the transmissions to the remaining destinations. To continue, press the [Yes] key. To stop the transmissions, press the [No] key.
Status of Fax
Stop
Check Status of Fax
020.PortDoc #:Dialing.
03.
Prin
Basic Fax Operation 2-11

Canceling a ReceptionIf you want to cancel a reception, perform the following procedure.
1 Press the [Status] ([Act status]) key in the bottom right of the touch panel. The status of the communication currently in progress will appear in the message display.
2 Press the [Stop] key. The touch panel will return to the initial mode settings.
ign destination.
.0%x transmission.
tion Register
Re-dial
On-hook
Dest.check
Memory TX
Auto RXPrint Report
Memory usage:
JUN-06-2007 16:00
TXsetting
Status
Status of Fax
Stop
Check Status of Fax
Port
Receive
03.
Prin
No. of pages 001.
Service center
Note If you attempt to cancel a reception that is scheduled from multiple transmitting faxes (such as a Polling Reception) and there were fax machines still remaining to be received from, a message will appear in the message display asking whether or not you want to continue the receptions from the remaining faxes. To continue, press the [Yes] key. To stop the receptions, press the [No] key.
2-12 Basic Fax Operation

Entering CharactersThe Character Input screen will appear during registration of your own name (self-station name), destination names, etc.
What is in the Character Input screen?There are actually 4 different Character Input screens. One each for uppercase input, one for lowercase input and two for special character input. Touch the [Capital] key, the [Letter] key, the [Symbol 1] key and the [Symbol 2] key respectively to access the desired input screen.
Uppercase input
Lowercase input
Symbol 1 input
Symbol 2 input
Enter name End
Capital
Back
Letter Symbol 1 Space
Char.Limit:32 including #
AllDel. Del. prev
Symbol 2
EndEnter name
Capital
Back
Letter Symbol 1 Space
Char.Limit:32 including #
AllDel. Del. prev
Symbol 2
Enter name End
Capital
Back
Letter Symbol 1 Space
Char.Limit:32 including #
AllDel. Del. prev
Symbol 2
Enter name End
Capital
Back
Letter Symbol 1 Space
Char.Limit:32 including #
AllDel. Del. prev
Symbol 2
Basic Fax Operation 2-13

The functions of each key in the Character Input screen...
[Capital] key...Press this key when you want to enter uppercase letters.
[Letter] key...Press this key when you want to enter lowercase letters.
[Symbol 1] key...Press this key when you want to enter numerals and some available symbols.
[Symbol 2] key...Press this key when you want to enter other symbols.
[Space] key... Press this key when you want to enter a space.
[ ] and [ ] keys... Press these keys when you want to move the cursor.
[AllDel.] key... Press this key when you want to delete all of the currently entered information.
[Del. prev.] key... Press this key when you want to delete the character to the left of the cursor.
[Back] key... Press this key when you want to return to the screen prior to character input.
[End] key or [Next] key... Press this key when you want to register the entered information.
How Do I Enter Characters?[Ex.] To enter [Km@4]
1 Verify that the [Capital] key is highlighted and press the [K] key.
2 Press the [Letter] key to switch to lowercase input.
3 Press the [m] key.
4 Press the [Num./Sym.] ([Symbol 1]) key to switch to input of numerals and other available symbols.
5 Press the [@] key and then the [4] key.
6 Press the [End] key or [Next] key to register the entered information.
Enter name
Capital
Ba
Letter Num./Sym. Space
Char.Limit:32 including #
AllDel.K|
Enter name
Capital
Ba
Letter Num./Sym. Space
Char.Limit:32 including #
AllDel.Km|
Enter name
Capital
Ba
Letter Num./Sym. Space
Char.Limit:32 including #
AllDel.Km@4|
2-14 Basic Fax Operation

Dialing with One-Touch KeysIf you register a fax number under a one-touch key in advance, you will be able to dial that number with the press of a key. You can also use one-touch keys to designate destination fax numbers for F-Code Based Communication and Encrypted Transmissions.
Registering New One-Touch Keys
1 Press the [Register] key. The Register screen will appear.
2 Press the [Dial] key. The touch panel will switch to dial registration.
Note 1000 speed-dial keys are available and each of these keys can be designated to function as either a one-touch key, a group dial key, a program key or a chain dial key.
The abbreviated number for the speed-dial key that you press (0001 - 1000) will automatically become the abbreviated number for the destination fax number registered under that one-touch key.
You CANNOT designate a one-touch key for both F-Code Based Communication AND Encrypted Transmission.
If you want to check the information already registered under each one-touch key, print out a One-Touch Key List.
It is recommended that you register the name of the other party as well as the fax number under each one-touch key. If you register the other party's name as well, you will be able to use the address book to search for their fax number.
Prior to operation, check the message display to make sure that the touch panel is in the initial mode for fax operation. (Refer to What is the Initial Mode? on page 1-9.)
If you want to cancel the procedure part way through, press the Reset key. The touch panel will return to the initial mode settings.
Place the original & assign destination.
Dest
Ready for fax transmission.
Basic Application
Abbrev. TXAddress
Register
settingbook
Print Report
Info.Location
Dial
Basic Application Register
Box ForwardingFax
dialRemote SW
Test IDRemote
Restrict.TX/RX
Print Report
Registering item option screen.Select item for register.
& TimeDate
keyEncryption
Basic Fax Operation 2-15

3 Press an unregistered speed-dial key on the touch panel.
4 Press the [One-touch key] key.
5 Use the numeric keys to enter the fax number you want to register under that one-touch key. (Maximum 32 digits)
6 Press the [Next] key.
7 Enter the name of the other party. (Maximum 20 characters)
8 Check the registered information. If you want to change any portion of it, press the key that corresponds to the desired item and change the information as desired.
Making More Detailed Settings
9 If you want to perform more detailed settings like selecting the transmission speed, or designating this one-touch key for F-Code Based Communication or Encrypted Transmission, press the [Setting] key and then go to the next step.
10Select the desired transmission speed from among those available: 33600bps, 14400bps and 9600bps.
11 If you want to designate this key for F-Code Based Communication, press the [Subaddress Tx] key and then go to the next step.
If you want to designate this key for Encrypted Transmission, go directly to step 15.
If you want to register this one-touch key with the entered information as is, press the [Close] key and proceed directly to step 20.
Register dial #
Set dial for registration.
Register the dial.
1/167.
Note If there are no unregistered speed-dial keys displayed, use the [ ] and/or [ ] cursor keys to switch to a screen that displays an unregistered key.
Dial type
Group
Register the dial.
33600bpsOne-touchkey
Chain
Program
Ba
Enter using # key.
Fax # Ba
Register the dial.One-Touch Key
(MAX. 32 digits)
0001.
Delete
SpacePause
Note [ ] and [ ] cursor keys...Use to move the cursor.
[Delete] key...Press to delete the character that the cursor is currently under. (When the cursor is at the last space, the previous character will be deleted.)
[Space] key...Press to enter a space.
[Pause] key...Press to enter a slight pause (indicated by a hyphen) at that point in dialing.
Note In order to enter characters, refer to Entering Characters on page 2-13.)
Note If you want to register this one-touch key with the entered information as is, go directly to step 20.
Detail setting
14400bps
TX Start Speed
Ba
Register the dial.
33600bps
9600bps
SubaddressTX
EncryptionTX
0001.One-Touch Key
(Either subadd TX. nor encryption trans. can register)
2-16 Basic Fax Operation

12To use this key for F-Code Based Communication, press the [On] key. The Subaddress/Password Input screen will appear.
13Use the numeric keys to enter the desired subaddress and F-Code password. (Maximum 20 digits)
14Press the [Close] key twice and then go directly to step 20.
15 If you want to designate this key for Encrypted Transmission, press the [Encryption TX] ([Encryption]) key.
16To use this key for Encrypted Transmission, press the [On] key. The Key Number/Box Number Input screen will appear.
17Use the numeric keys to enter the 2-digit Key Number (01 - 20) that corresponds to the Encryption Key you want to use for this one-touch key.
18Press the [Encryption box #] key and then use the numeric keys to enter the number of the destination party's Encryption Box.
19Press the [Close] key twice.
20To register this one-touch key with the entered information as is, press the [OK] key.
The message display will return to the same screen as was displayed in step 3.
If you want to continue registering other one-touch keys, repeat steps 3 through 20.
21 If you are finished making settings, press the Reset key to return to the initial mode.
Modifying or Deleting Registered Information
1 Press the [Register] key. The Register screen will appear.
2 Press the [Dial] key.
Subaddress TX
Off
_.
Enter using # key.
On
Ba
Subaddress
Password
Register the dial.One-Touch Key0001.
Dele
Note To switch between the subaddress and password input screens, press the [Password] key.
A subaddress is required during F-Code Based Communication in order to designate the other party's corresponding F-Code Box.
An F-Code password is used during F-Code Based Communication. However, you do not have to enter an F-Code password here if you have determined in advance with the other party not to use one.
Encryption
Off
00.
Enter using # key.
On
Ba
EncryptionKey No.
Encryptionbox # 0000.
Register the dial.One-Touch Key0001.
Note If the one-touch key that you want to modify is designated for F-Code Based Communication, you will NOT be able to change the designation of that key into one for Encrypted Transmission. Likewise, if it is designated for Encrypted Transmission, you can NOT change the designation into one for F-Code Based Communication.
Place the original & assign destination.
Dest
Ready for fax transmission.
Basic Application
Abbrev. TXAddress
Register
settingbook
Print Report
Basic Fax Operation 2-17

3 Press the speed-dial key (one-touch key) containing the information you want to modify or delete.
4 If you want to delete the registered one-touch key, press the [Delete] key and then go to the next step. If you want to modify the registered information, press the [Change contents] key and then go directly to step 6.
> Deleting a one-touch key
5 Press the [Yes] key.
The message display will return to the same screen as was displayed in step 3.
If you want to continue deleting other one-touch keys, repeat steps 3 through 5. If you are finished deleting one-touch keys, press the Reset key.
> Modifying registered information
6 If you want to modify the abbreviated number (the displayed number of the speed-dial key under which the one-touch key is registered), press the [Abbr. #] key. If you want to modify any other basic information, press the key that corresponds to that information. (To modify information, refer to the corresponding step under Registering New One-Touch Keys on page 2-15.)
7 Enter the abbreviated number of an unregistered speed-dial key (0001 - 1000).
8 Press the [Close] key.
9 Once you are finished modifying all of the items that you want, press the [OK] key.
The message display will return to the same screen as was displayed in step 3.
If you want to continue modifying other one-touch keys, repeat steps 3 through 9. If you are finished deleting one-touch keys, press the Reset key.
Register dial #
Set dial for registration.
Register the dial.
1/167.
ABC
Note If that key is not displayed, use the [ ] and/or [ ] cursor keys to switch to the screen that displays the key that you want.
Contents change/del.
Changecontents
Ba
Register the dial.One-Touch Key
Delete
03.
0001.
Name ABC
Note If you want to change more detailed settings, press the [Setting] key and select the desired item.
( 4 digits)
Enter using # key.
Abbreviation Ba
Register the dial.One-Touch Key
0001.
0001.
Note Once a 4-digit number is entered, that number may be changed using the [+] and [-] keys.
2-18 Basic Fax Operation

Dialing With a One-Touch KeyYou can dial a fax number by simply pressing the one-touch key under which that number is registered.
1 If the operation involves the transmission of documents, set the documents you want to transmit.
2 If you want to change the transmission conditions, such as the resolution and density, press the [TX setting] key.
If you do NOT want to change the current conditions, go directly to step 5.
3 Press the key that corresponds to the desired item and change the information as desired. (To change each transmission condition, refer to pages 2-5 and 2-6.)
4 Once you are finished changing transmission conditions, press the [One touch destinat.] key.
5 Press the one-touch key under which the desired fax number is registered.
6 Press the Start key.
The transmission operation will begin automatically.
Note To select the conditions related to transmitting documents, such as the resolution and density, refer to pages 2-5 and 2-6.
Prior to operation, check the message display to make sure that the touch panel is in the initial mode for fax operation. (Refer to What is the Initial Mode? on page 1-9.)
If you want to cancel the procedure part way through, press the Reset key. The touch panel will return to the initial mode settings.
Enter Destination.
Dest
Ready for fax transmission.
Basic Application
DuplexAddress
Register
TXbook
Print Report
Abbrev.
One touchdestinat.
Delayed TX
OriginalSize
OriginalImage
DeMo
8½×11" Normal
Press start key to transmit
Dest
Ready for fax transmission.
Basic Application
Abbrev.Address
Register
book
Print Report
TXsetting
ABC.
ABC.
.1
Note Any time you set documents on the platen, after each document is scanned you will need to select whether or not you want to scan more pages into memory. (Refer to page 2-8.)
Basic Fax Operation 2-19

Printing Out a One-Touch Key ListPrint out the list in order to check the information (destination name and fax number, etc.) registered under one-touch keys.
1 Press the [Print Report] key. The Print Report screen will appear.
2 Press the [One-touch key list] key.
3 To print out that list, press the [Yes] key. A One-Touch Key List will be printed out.
Dialing with a 4-Digit Number (Abbreviated Dialing)Speed-dial keys are available to be registered as either a one-touch key, a group dial key, a program key or a chain dial key. Each of these keys is given a 4-digit number between 0001 and 1000 and this number is referred to as that key's [abbreviated number]. It is then possible to dial a destination number by simply entering the corresponding abbreviated number.
1 Set the documents you want to transmit.
2 If you want to change the transmission conditions, such as the resolution and density, press the [TX setting] key.
If you do NOT want to change the current conditions, go directly to step 5.
3 Press the key that corresponds to the desired item and change the information as desired.
To change each transmission condition, refer to pages 2-5 and 2-6.
Note If there are no one-touch keys registered in this fax, a One-Touch Key List will not be printed out.
Prior to operation, check the message display to make sure that the touch panel is in the initial mode for fax operation. (Refer to What is the Initial Mode? on page 1-9.)
If you want to cancel the procedure part way through, press the Reset key. The touch panel will return to the initial mode settings.
Place the original & assign destination.
Dest
Ready for fax transmission.
Basic Application
Abbrev. TXAddress
Register
settingbook
Print Report
Select size
reportConfirm.
reportActivity
Basic Application Register
box listSubad conf
key listOne-touch
ListGroup dial
dial listProgram
box listEncryption
box listSubad. rel
Print Report
Report printing option screen.Select item.
listUser set.
direc.listTelephone
key listEncryption
Note Prior to operation, check the message display to make sure that the touch panel is in the initial mode for fax operation. (Refer to What is the Initial Mode? on page 1-9.)
If you want to cancel the procedure part way through, press the Reset key. The touch panel will return to the initial mode settings.
2-20 Basic Fax Operation
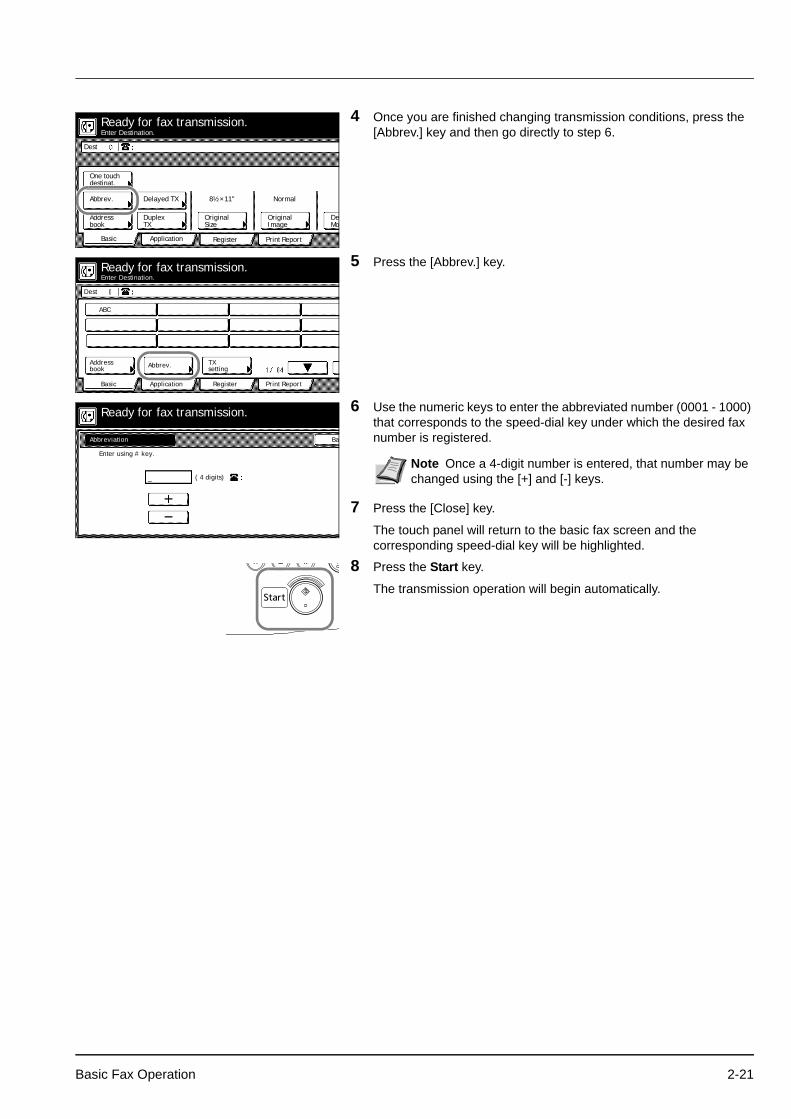
4 Once you are finished changing transmission conditions, press the [Abbrev.] key and then go directly to step 6.
5 Press the [Abbrev.] key.
6 Use the numeric keys to enter the abbreviated number (0001 - 1000) that corresponds to the speed-dial key under which the desired fax number is registered.
7 Press the [Close] key.
The touch panel will return to the basic fax screen and the corresponding speed-dial key will be highlighted.
8 Press the Start key.
The transmission operation will begin automatically.
Enter Destination.
Dest
Ready for fax transmission.
Basic Application
DuplexAddress
Register
TXbook
Print Report
Abbrev.
One touchdestinat.
Delayed TX
OriginalSize
OriginalImage
DeMo
8½×11" Normal
Enter Destination.
Dest
Ready for fax transmission.
Basic Application
Abbrev.Address
Register
book
Print Report
TXsetting
ABC.
Ready for fax transmission.
( 4 digits)
Enter using # key.
Abbreviation Ba
_.
Note Once a 4-digit number is entered, that number may be changed using the [+] and [-] keys.
Basic Fax Operation 2-21
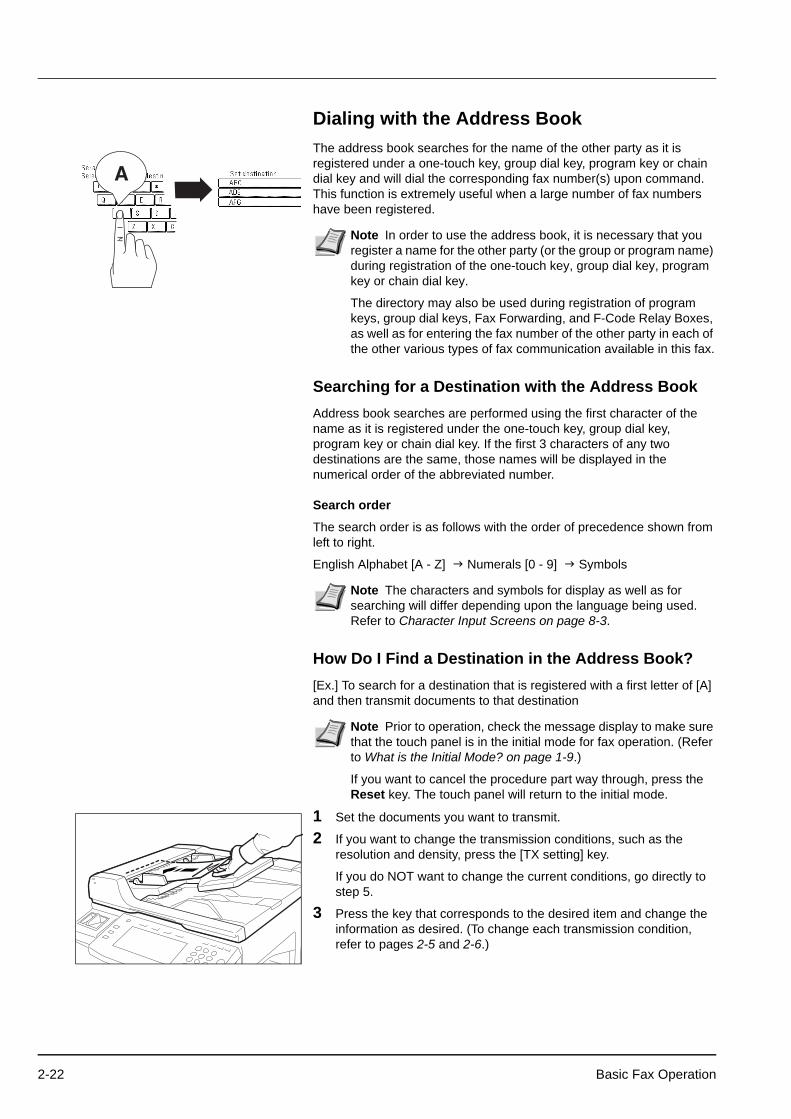
Dialing with the Address BookThe address book searches for the name of the other party as it is registered under a one-touch key, group dial key, program key or chain dial key and will dial the corresponding fax number(s) upon command. This function is extremely useful when a large number of fax numbers have been registered.
Searching for a Destination with the Address BookAddress book searches are performed using the first character of the name as it is registered under the one-touch key, group dial key, program key or chain dial key. If the first 3 characters of any two destinations are the same, those names will be displayed in the numerical order of the abbreviated number.
Search order
The search order is as follows with the order of precedence shown from left to right.
English Alphabet [A - Z] Numerals [0 - 9] Symbols
How Do I Find a Destination in the Address Book?[Ex.] To search for a destination that is registered with a first letter of [A] and then transmit documents to that destination
1 Set the documents you want to transmit.
2 If you want to change the transmission conditions, such as the resolution and density, press the [TX setting] key.
If you do NOT want to change the current conditions, go directly to step 5.
3 Press the key that corresponds to the desired item and change the information as desired. (To change each transmission condition, refer to pages 2-5 and 2-6.)
Note In order to use the address book, it is necessary that you register a name for the other party (or the group or program name) during registration of the one-touch key, group dial key, program key or chain dial key.
The directory may also be used during registration of program keys, group dial keys, Fax Forwarding, and F-Code Relay Boxes, as well as for entering the fax number of the other party in each of the other various types of fax communication available in this fax.
Note The characters and symbols for display as well as for searching will differ depending upon the language being used. Refer to Character Input Screens on page 8-3.
Note Prior to operation, check the message display to make sure that the touch panel is in the initial mode for fax operation. (Refer to What is the Initial Mode? on page 1-9.)
If you want to cancel the procedure part way through, press the Reset key. The touch panel will return to the initial mode.
2-22 Basic Fax Operation

4 Once you are finished changing transmission conditions, press the [Address book] key and go directly to step 6.
5 Press the [Address book] key.
6 On the touch panel, press the first letter of the name that you want to search for.
If the first character is a symbol
Press the [Others] key. The message display will change to show a list of names that are registered with a symbol as the first character.
7 The speed-dial keys that are registered with a name that starts with that first letter will be displayed.
8 Press the speed-dial key under which the desired destination is registered.
9 Press the [OK] key.
The touch panel will return to the basic fax screen.
10Press the Start key.
The transmission operation will begin automatically.
Enter Destination.
Dest
Ready for fax transmission.
Basic Application
DuplexAddress
Register
TXbook
Print Report
Abbrev.
One touchdestinat.
Delayed TX
OriginalSize
OriginalImage
DeMo
8½×11" Normal
Enter Destination.
Dest
Ready for fax transmission.
Basic Application
Abbrev.Address
Register
book
Print Report
TXsetting
ABC.
Ready for fax transmission.
Searching.Select first letter of destination.
Search: Ba
Ready for fax transmission.
ABC
Set destination.
A
1/1.
AMC Note If that key is not displayed, use the [ ] and/or [ ] cursor keys to switch to the screen that displays the key that you want.
Basic Fax Operation 2-23
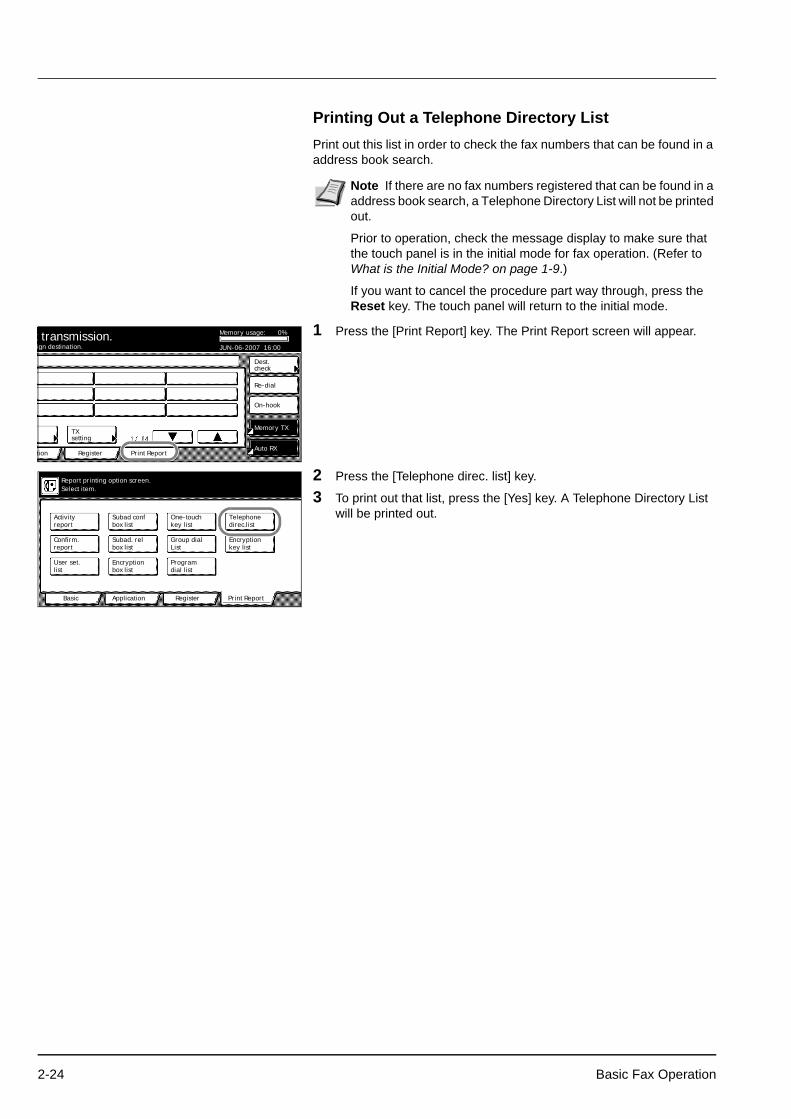
Printing Out a Telephone Directory ListPrint out this list in order to check the fax numbers that can be found in a address book search.
1 Press the [Print Report] key. The Print Report screen will appear.
2 Press the [Telephone direc. list] key.
3 To print out that list, press the [Yes] key. A Telephone Directory List will be printed out.
Note If there are no fax numbers registered that can be found in a address book search, a Telephone Directory List will not be printed out.
Prior to operation, check the message display to make sure that the touch panel is in the initial mode for fax operation. (Refer to What is the Initial Mode? on page 1-9.)
If you want to cancel the procedure part way through, press the Reset key. The touch panel will return to the initial mode.
ign destination.
.0%x transmission.
tion
TX
Register
Re-dial
On-hook
setting
Dest.check
Memory TX
Auto RXPrint Report
Memory usage:
JUN-06-2007 16:00
Select size
reportConfirm.
reportActivity
Basic Application Register
box listSubad conf
key listOne-touch
ListGroup dial
dial listProgram
box listEncryption
box listSubad. rel
Print Report
Report printing option screen.Select item.
listUser set.
direc.listTelephone
key listEncryption
2-24 Basic Fax Operation

Redialing a numberRedialing refers to dialing the most recently dialed number once again.
Automatic RedialingWhen attempting to transmit documents, etc., the other party's fax machine may be busy with another communication and may not respond. In this type of situation, your fax machine will automatically attempt to redial that same number.
Manual RedialingWhat if you try to transmit documents but the other party's fax line is busy and can't answer your call? In this type of situation, you will be able to redial that last number dialed once again by simply pressing the [Re-dial] key.
Press the [Re-dial] key. The fax will automatically begin redialing the most recently dialed number.
Note Automatic Redialing is performed automatically and no special operation is required. However, you can set the number of times that redialing will be attempted to any number between 0 and 14. Refer to Setting the Number of Redial Attempts (Number of Redials setting) on page 6-12.
Automatic Redialing will not engage when documents are being transmitted in the Direct Feed Transmission mode.
ign destination.
.0%x transmission.
tion
TX
Register
Re-dial
On-hook
setting
Dest.check
Memory TX
Auto RXPrint Report
Memory usage:
JUN-06-2007 16:00
Basic Fax Operation 2-25

2-26 Basic Fax Operation

3 Advanced Fax Operation
This section contains explanations on methods to use this fax more effectively.
Sending 2-Sided Documents (Duplex Transmission) 3-3
Preparing the Next Documents During Another Communication (Standby Transmission) 3-5
Sending the Same Documents to Multiple Destinations (Broadcast Transmission) 3-7
Sending Important Documents Before Others (Interrupt Transmission) 3-9
Sending Documents at a Specified Time (Communication Using the Timer) 3-10
Dialing the Destination With A Registered Number and the Numeric Keys (Chain Dial Keys) 3-12
Registering New Chain Dial Keys......................................... 3-12Modifying or Deleting Registered Information ...................... 3-13Dialing With a Chain Dial Key............................................... 3-15
Managing Information for a Scheduled Communication (Editing a Communication in Memory) 3-16
Printing Out a Sample Image of Waiting Documents ........... 3-16Force-Starting the Communication ....................................... 3-17Deleting the Communication ................................................ 3-17Modifying the Contents of the Communication..................... 3-18
Initiating the Fax Connection Manually (Manual Fax Transmission) 3-20
Initiating the Fax Connection Manually (Manual Fax Reception) 3-22
Initiating Fax Reception From A Connected Telephone (Remote Switching) 3-24
Changing the Remote Switching Number ............................ 3-24Initiating the Reception......................................................... 3-25
Allowing the Receiving Party to Initiate Reception (Polling Communication) 3-26
Preparing Documents for a Polling Transmission................. 3-26Receiving Documents Using Polling Reception ................... 3-28
Communicating Using F-Codes (F-Code Based Communication) 3-30
What F-Codes are used in this fax? ..................................... 3-30What are F-Code Boxes?..................................................... 3-31
Communicating Confidentially (F-Code Based Confidential Communication) 3-33
Registering New F-Code Confidential Boxes ....................... 3-33Modifying or Deleting F-Code Confidential Boxes................ 3-34Sending Documents Using F-Code Based Confidential Transmission ........................................................................ 3-35
Advanced Fax Operation 3-1
Printing Out Documents from an F-Code Confidential Box .. 3-37Printing Out an F-Code Confidential Box List ....................... 3-38Entering Documents into an F-Code Confidential Box ......... 3-38Receiving Documents from an F-Code Based Bulletin Board .................................................................................... 3-39
Using a Relay Station to Send Your Documents (F-Code Based Relay Broadcast Communication) 3-42
Registering New F-Code Relay Boxes ................................. 3-42Modifying or Deleting F-Code Relay Boxes.......................... 3-44Sending Documents as an F-Code Based Relay Broadcast Transmission ........................................................................ 3-46Printing Out an F-Code Relay Box List................................. 3-48
Forwarding Faxes to Another Fax Number 3-49Registering the Fax Forwarding Information......................... 3-49Modifying Registered Fax Forwarding Information ............... 3-50Turning Fax Forwarding ON/OFF ......................................... 3-50
Dialing Multiple Destinations as a Group (Group Dial Keys) 3-52Registering New Group Dial Keys ........................................ 3-52Modifying or Deleting Registered Information....................... 3-53Dialing With a Group Dial Key .............................................. 3-55Printing Out a Group Dial List ............................................... 3-56
Saving Specific Communication Settings as a Single Program (Program Keys) 3-57
Registering New Program Keys............................................ 3-57Modifying or Deleting Registered Information....................... 3-58Using a Program Key............................................................ 3-61Printing Out a Program Dial List ........................................... 3-61
Managing Fax Use by Each Department (Restricted Access) 3-62
Using the fax with Restricted Access turned ON... ............... 3-63Accessing the Register Screen When Restricted Access is Turned ON ............................................................................ 3-64Accessing the Application Screen When Restricted Access is Turned ON ........................................................................ 3-65Accessing the Print Report Screen When Restricted Access is Turned ON ........................................................................ 3-65Printing Out a Restricted Access Report .............................. 3-67
3-2 Advanced Fax Operation

Sending 2-Sided Documents (Duplex Transmission)Duplex Transmission enables the transmission of both the front and back sides of duplex (2-sided) documents. Duplex transmission is always accomplished by setting the documents you want to transmit in the Document Processor and scanning them into memory in the Memory Transmission mode.
During the set-up procedure for a Duplex Transmission, it is possible to select whether or not you want to include a separate cover page (a 1-sided page) with the transmission as well as whether the image on the back side of the documents needs to be inverted during transmission to match the orientation of the image on the front side.
It is also possible to use Duplex Transmission capabilities in combination with each of the other various types of fax communication available in this fax. The following method explains the procedure for sending duplex documents to a single destination.
1 Set the 2-sided documents in the Document Processor.
2 Enter the destination fax number.
3 Press the [TX setting] key.
4 Press the [Duplex TX] key.
5 Press the [On] key to enable Duplex Transmission.
Note Prior to performing Duplex Transmission, you must select [Standard size] when setting the document size for scanning from the Document Processor. (Refer to Setting the Document Size for Scanning from the Document Processor (Scan from DP setting) on page 6-13.)
If you want to cancel the procedure part way through, press the Reset key. The touch panel will return to the initial mode settings.
Press start key to transmit
Dest
Ready for fax transmission.
Basic Application
DuplexAddress
Register
TXbook
Print Report
1234_.
Abbrev.
One touchdestinat.
Delayed TX
OriginalSize
OriginalImage
DeMo
8½×11" Normal R
Delete SpacePause Subadd.
Note If you entered the fax number using the numeric keys, go to step 4.
If you entered the fax number using abbreviated numbers, one-touch keys, group dial keys, program keys or chain dial keys, go to the next step.
Press start key to transmit
Dest
Ready for fax transmission.
Basic Application
DuplexAddress
Register
TXbook
Print Report
1234_.
Abbrev.
One touchdestinat.
Delayed TX
OriginalSize
OriginalImage
DeMo
8½×11" Normal R
Delete SpacePause Subadd.
Advanced Fax Operation 3-3

6 Select whether or not you want to include a 1-sided cover page with the transmission by pressing either the [Yes] key or the [No] key, as appropriate.
• If you want to send a 1-sided document as a cover sheet to the rest of the 2-sided documents, select [Yes]. In this case, the fax will transmit the documents WITHOUT scanning the back side of the first page.
• If you want to transmit the 2-sided documents WITHOUT a cover page, select [No].
7 Select whether or not you want the image on the back side of the documents to be inverted during transmission to match the orientation of the front side by pressing either the [On] key (invert rear images) or the [Off] key (do NOT invert images), as appropriate.• If you transmit documents as shown in the illustration at right,
select [On]. The fax will then invert the image of the rear side of each document in memory 180°.
• If you transmit documents as shown in the illustration at right, select [Off].
8 Press the [Close] key.
9 Press the Start key. The documents will be scanned into memory and the transmission operation will begin automatically.
Duplex TX
Off
On
Ba
Cover page Top binding
Yes
No
On
Off
Ready for fax transmission.
Scanning Printout at the destination fax
Direction of document feed
Scanning Printout at the destination fax
Direction of document feed
3-4 Advanced Fax Operation

Preparing the Next Documents During Another Communication (Standby Transmission)Standby Transmission refers to the process of preparing documents for transmission while the fax is occupied with another communication.
If, during that communication, the documents you want to transmit are set and the destination fax number is entered, those documents will be automatically transmitted once the current communication has been completed.
Since, with this fax, it is possible to schedule a Standby Transmission and then have your documents given priority whenever the fax is currently sending to multiple communications or there are other communications already scheduled in memory ahead of yours, Standby Transmission is thus convenient for sending urgent documents quickly during communications which normally take an extended amount of time, such as Broadcast Transmission and Polling Reception.
1 Set the documents you want to transmit in the Document Processor or on the platen.
2 Enter the destination fax number.
3 Press the Start key. The documents will be scanned into memory.
Note A maximum of 50 communications (including any combination of Standby Transmissions, communications that use the timer and Interrupt Transmissions) can be scheduled at one time.
You can also designate each of the various types of fax communication available in this fax such as Broadcast Transmission as a Standby Transmission.
If you want to cancel the procedure part way through, press the Reset key. The touch panel will return to the initial mode settings.
Press start key to transmit
Dest
Ready for fax transmission.
Basic Application
DuplexAddress
Register
TXbook
Print Report
1234_.
Abbrev.
One touchdestinat.
Delayed TX
OriginalSize
OriginalImage
DeMo
8½×11" Normal R
Delete SpacePause Subadd.
Note You can enter the fax number(s) using the numeric keys, abbreviated numbers, one-touch keys, group dial keys, program keys or the address book. Chain dial keys can be used as well.
Note If the fax is in the Direct Feed Transmission mode, the documents will remain in the Document Processor or on the platen waiting for the transmitting operation to begin.
Once the other communication is completed, the transmission operation will begin automatically.
Advanced Fax Operation 3-5

Canceling a waiting transmission in the Direct Feed Transmission mode...
1 Press the [Stop] key on the touch panel, or press the Stop/Clear key.
2 If you DO want to cancel the Standby Transmission, press the [Yes] key.
Stop OriginalImage
Dialing.
Doc #:
Send
03.
024.
8½×11" Norm
Original
3-6 Advanced Fax Operation

Sending the Same Documents to Multiple Destinations (Broadcast Transmission)Broadcast Transmission allows the same documents to be transmitted to a number of destinations one after another, in a single operation. If, for example, you want to transmit the same documents from a central office to multiple branch offices, this function is quite convenient as it only requires you to perform the transmission operation one time. The documents you want to transmit are first entered in memory, and dialing and transmitting operations are repeated automatically for each destination.
1 Set the documents you want to transmit in the Document Processor or on the platen.
2 Enter a destination fax number.
> Entering the fax number with the numeric keys...
If you want to enter more than one destination fax number, press the [Next des] ([N dest.]) key after you enter the first fax number and you will be able to enter the next number.
Note If you enter all of the destination numbers using abbreviated numbers, one-touch keys or group dial keys, this fax can automatically transmit the same documents to up to 300 different destinations in a single operation. Program keys cannot be used in combination with any other dialing method.
You can also perform Broadcast Transmission as F-Code Based Transmission or in conjunction with the timer.
During a Broadcast Transmission to multiple destinations, documents will be transmitted using the Memory Transmission mode even if the fax is currently in the Direct Feed Transmission mode.
If you want to cancel the procedure part way through, press the Reset key. The touch panel will return to the initial mode settings.
Note When the documents are set on the platen, it is necessary, after each page is scanned, to select whether or not you want to transmit more pages and to select the size of each page. (Refer to page 2-8.)
Note You can enter the fax number(s) using the numeric keys, abbreviated numbers, one-touch keys, group dial keys or the address book. Chain dial keys can be used as well.
mit
.0%x transmission.
tion Register
Re-dial
On-hook
Dest.check
Memory TX
Auto RXPrint Report
Memory usage:
JUN-06-2007 16:00
TX
OriginalSize
OriginalImage
DensityMode
8½×11" Normal Regular
lete SpacePause Subadd. Next des
Note If you want to enter the next number with one of the speed-dial keys, press the [One touch destinat.] key instead. The speed-dial keys will appear.
Advanced Fax Operation 3-7

> Entering the fax number with a speed-dial key...
Press the speed-dial key that is registered with the one-touch or group dial information that you want to use. The selected key will be highlighted.
3 Press the Start key. The transmission operation will begin automatically.
Press start key to transmit
Dest
Ready for fax transmission.
Basic Application
Abbrev.Address
Register
book
Print Report
TXsetting
EXF
ABC.
EXF
.2
Note It is also possible to use a registered chain dial key followed by another speed-dial key.
To verify the selected destination, press the [Dest. check] key. It is possible to delete individual destinations.
3-8 Advanced Fax Operation

Sending Important Documents Before Others (Interrupt Transmission)Interrupt Transmission lets you send your documents before others, eliminating the need to wait until all communications are complete whenever the fax is currently scheduled for multiple communications (Broadcast Transmission or Polling Reception, etc.), or there are other communications already scheduled in memory ahead of yours.
1 Press the [Memory TX] key until it changes to [Dir. Feed Tx].
2 Set the documents you want to transmit in the Document Processor or on the platen.
3 Enter the destination fax number.
4 Press the Start key. The documents will remain in the Document Processor or on the platen, without being scanned, waiting for the transmitting operation to begin. Once the operation currently in progress is completed, the transmission operation for your documents will begin automatically.
Note Interrupt Transmission may only be accomplished to a single destination.
A maximum of 50 communications (including any combination of Interrupt Transmissions, communications that use the timer and Standby Transmissions) can be scheduled at one time.
Depending on the timing of when you perform the Interrupt Transmission procedure, there are occasions where your documents may not be send [immediately] after the current communication.
If you want to cancel an Interrupt Transmission, simply remove the set documents.
To cancel an Interrupt Transmission while it is still waiting to start, perform the same procedure as in Canceling a waiting transmission in the Direct Feed Transmission mode... on page 3-6.
If you want to cancel the procedure part way through, press the Reset key. The touch panel will return to the initial mode settings.
ign destination.
.0%x transmission.
tion Register
Re-dial
On-hook
Dest.check
Memory TX
Auto RXPrint Report
Memory usage:
JUN-06-2007 16:00
TXsetting
Note When the documents are set on the platen, it is necessary, after each page is scanned, to select whether or not you want to transmit more pages and to select the size of each page. (Refer to page 2-8.)
Note You can enter the fax number using the numeric keys, abbreviated numbers, one-touch keys or the directory. Chain dial keys can be used as well.
Advanced Fax Operation 3-9

Sending Documents at a Specified Time (Communication Using the Timer)If you designate in advance the time for a communication to begin, that communication will be carried out automatically once the appointed time is reached. You can designate a communication to be one that uses the timer during the operation procedure for each of various types of fax communication available in this fax such as Broadcast Transmission. The example in the procedure below is for the transmission of documents to a single destination using the timer function.
1 Set the documents you want to transmit in the Document Processor or on the platen.
2 Enter the destination fax number.
IMPORTANT If the time that is shown in the touch panel on the operation panel does not match the current time, communications that use the timer may not be accomplished as expected. If the displayed time is not current, be sure to adjust it to match the correct time.
Note Communication using the timer is not available in the Direct Feed Transmission mode.
Each communication that uses the timer can be set to begin at any minute between 00:00 - 23:59.
A maximum of 50 communications (including any combination of communications that use the timer, Interrupt Transmissions and Standby Transmissions) can be scheduled at one time.
When 2 or more communications that use the timer are scheduled to begin at the same time, fundamentally each communication will be accomplished in the order that they were registered. However, even if it has been registered later, any communication that scheduled with a single location will take priority over a communication to multiple locations.
It is possible to cancel or change the contents of a communication that is waiting for a start time, (Refer to Managing Information for a Scheduled Communication (Editing a Communication in Memory) on page 3-16.)
If you want to cancel the procedure part way through, press the Reset key. The touch panel will return to the initial mode settings.
Note When the documents are set on the platen, it is necessary, after each page is scanned, to select whether or not you want to transmit more pages and to select the size of each page. (Refer to page 2-8.)
Press start key to transmit
Dest
Ready for fax transmission.
Basic Application
DuplexAddress
Register
TXbook
Print Report
1234_.
Abbrev.
One touchdestinat.
Delayed TX
OriginalSize
OriginalImage
DeMo
8½×11" Normal R
Delete SpacePause Subadd.
Note You can enter the fax number using the numeric keys, abbreviated numbers, one-touch keys or the address book. Chain dial keys can be used as well.
If you entered the destination fax number with a one-touch key or a chain dial key, press the [TX setting] key after that.
3-10 Advanced Fax Operation

3 Press the [Delayed TX] key.
4 Press the [On] key and the Time Entry screen will appear.
5 Use the numeric keys to enter the desired time for the transmission to begin.
6 Press the [Close] key.
7 Press the Start key. The documents will be scanned into memory, and the transmission operation will begin when the appointed time is reached.
Press start key to transmit
Dest
Ready for fax transmission.
Basic Application
DuplexAddress
Register
TXbook
Print Report
1234_.
Abbrev.
One touchdestinat.
Delayed TX
OriginalSize
OriginalImage
DeMo
8½×11" Normal R
Delete SpacePause Subadd.
Delayed TX
Off
Enter using # key.
On
Ba
16:23.
Ready for fax transmission.
Start Time
Note If you want to change the entered time, use the [ ] and/or [ ] keys to move the cursor to the desired location.
Note If the Delayed Communication Report print out setting is turned [ON], a Delayed Communication Report will be printed out. (Refer to page 6-7.)
Advanced Fax Operation 3-11

Dialing the Destination With A Registered Number and the Numeric Keys (Chain Dial Keys)If you register a chain dial number under a speed-dial key in advance, that speed-dial key will function as a chain dial key and the chain dial key can be used to enter the initial portion of the other party’s fax number.
Example: If the number [212] is registered under a speed-dial key (which then functions as a chain dial key) and you want to dial the number 212-XX-XXXX, press the key under which [212] is registered and enter the rest of the number with the numeric keys.
Registering New Chain Dial Keys
1 Press the [Register] key. The Register screen will appear.
2 Press the [Dial] key. The touch panel will switch to dial registration.
3 Press an unregistered speed-dial key on the touch panel.
Note You can only use chain dial keys once in a dialing sequence: to enter the initial digits of the other party’s fax number.
You can use chain dial keys when entering destination fax numbers in each of the various types of fax communication available in this fax such as Broadcast Transmission.
You CANNOT use chain dial keys in combination with group dial keys.
Note A maximum of 1000 speed-dial keys can be registered as chain dial keys (minus the number of registered one-touch, group dial and program keys).
If you want to cancel the procedure part way through, press the Reset key. The touch panel will return to the initial mode settings.
Place the original & assign destination.
Dest
Ready for fax transmission.
Basic Application
Abbrev. TXAddress
Register
settingbook
Print Report
Info.Location
Dial
Basic Application Register
Box ForwardingFax
dialRemote SW
Test IDRemote
Restrict.TX/RX
Print Report
Registering item option screen.Select item for register.
& TimeDate
keyEncryption
Register dial #
Set dial for registration.
Register the dial.
1/167.
Note If there are no unregistered speed-dial keys displayed, use the [ ] and/or [ ] cursor keys to switch to a screen that displays an unregistered key.
3-12 Advanced Fax Operation

4 Press the [Chain] key.
5 Use the numeric keys to enter the desired chain dial number. (Maximum 32 digits)
6 Press the [Next] key.
7 Enter the desired name for the chain dial key. (Maximum 20 characters)
8 Check the registered information. If you want to change any portion of it, press the key that corresponds to the desired item and change the information as desired.
9 To register this chain dial key with the entered information as is, press the [OK] key.
The message display will return to the same screen as was displayed in step 3.
If you want to continue registering other one-touch keys, repeat steps 3 through 9.
10 If you are finished making settings, press the Reset key to return to the initial mode. (C) will be displayed next to the registered speed-dial key.
Modifying or Deleting Registered Information
1 Press the [Register] key. The Register screen will appear.
Dial type
Group
Register the dial.
33600bpsOne-touchkey
Chain
Program
Ba
Enter using # key.
Fax # Ba
Register the dial.Chain
(MAX. 32 digits)
0003.
Delete
SpacePause
Note [ ] and [ ] cursor keys...Use to move the cursor.
[Delete] key...Press to delete the character that the cursor is currently under. (When the cursor is at the last space, the previous character will be deleted.)
[Space] key...Press to enter a space.
[Pause] key...Press to enter a slight pause (indicated by a hyphen) at that point in dialing.
Note In order to enter characters, refer to Entering Characters on page 2-13.)
Regist'd contents cnf
800 .
FREE.
Register the dial.
Press confirmation key after checking registered contents.
Name
Chain 0003.
Note If you want to cancel the procedure part way through, press the Reset key. The touch panel will return to the initial mode settings.
Place the original & assign destination.
Dest
Ready for fax transmission.
Basic Application
Abbrev. TXAddress
Register
settingbook
Print Report
Advanced Fax Operation 3-13

2 Press the [Dial] key.
3 Press the speed-dial key (chain dial key) containing the information you want to modify or delete.
4 If you want to delete the registered chain dial key, press the [Delete] key and then go to the next step.
If you want to modify the registered information, press the [Change contents] key and then go directly to step 6.
> Deleting a chain dial key
5 Press the [Yes] key.
The message display will return to the same screen as was displayed in step 3.
If you want to continue deleting other chain dial keys, repeat steps 3 through 5. If you are finished deleting chain dial keys, press the Reset key.
> Modifying registered information
6 If you want to modify the abbreviated number (the displayed number of the speed-dial key under which the chain dial key is registered), press the [Abbr. #] key.
If you want to modify any other basic information, press the key that corresponds to that information. To modify information, refer to the corresponding step under Registering New Chain Dial Keys on page 3-12.
7 Enter the abbreviated number of an unregistered speed-dial key (0001 - 1000).
8 Press the [Close] key.
9 Once you are finished modifying all of the items that you want, press the [OK] key.
The message display will return to the same screen as was displayed in step 3.
Info.Location
Dial
Basic Application Register
Box ForwardingFax
dialRemote SW
Test IDRemote
Restrict.TX/RX
Print Report
Registering item option screen.Select item for register.
& TimeDate
keyEncryption
Register dial #
Set dial for registration.
Register the dial.
1/167.
FREE
ABC
Note If that key is not displayed, use the [ ] and/or [ ] cursor keys to switch to the screen that displays the key that you want.
Contents change/del.
Changecontents
Ba
Register the dial.Chain
Delete
800 .
0003.
Name FREE
( 4 digits)
Enter using # key.
Abbreviation Ba
Register the dial.Chain
0003.
0003.
Note Once a 4-digit number is entered, that number may be changed using the [+] and [-] keys.
3-14 Advanced Fax Operation

If you want to continue modifying other chain dial keys, repeat steps 3 through 9.
10 If you are finished making settings, press the Reset key to return to the initial mode.
Dialing With a Chain Dial Key
1 If the operation involves the transmission of documents, set the documents you want to transmit.
2 Press the desired speed-dial key that was registered as a chain dial key.
3 Enter the other party’s fax number.
4 Press the Start key. The communication operation will begin automatically.
Note If you want to cancel the procedure part way through, press the Reset key. The touch panel will return to the initial mode settings.
Enter Destination.
Dest
Ready for fax transmission.
Basic Application
Abbrev.Address
Register
book
Print Report
TXsetting
FREE +.
FREE .
ABC
Note You can enter the fax number using the numeric keys, abbreviated numbers, one-touch keys or the address book.
Once the other party’s fax number is entered, only the registered chain dial name will be displayed, followed by the other party’s fax number or name.
If you want to enter the fax number once again from the beginning during input with the numeric keys, simply press the Stop/Clear key.
Advanced Fax Operation 3-15

Managing Information for a Scheduled Communication (Editing a Communication in Memory)You can modify certain information relating to a scheduled communication that uses the timer or even cancel the communication completely. You can also print out a sample image of the corresponding documents as well as initiate (force-start) the communication without waiting for the actually scheduled start time.
Printing Out a Sample Image of Waiting DocumentsIf you want to check the documents that correspond to a specific transmission that is in memory and waiting for transmission, you can print out a sample page of those documents.
1 Press the [Application] key. The Application screen will appear.
2 Press the [Reserved TX status] key.
The content of the first schedule communication will be displayed.
3 Use the [ ] and/or [ ] cursor keys to switch to the communication that you want.
Note If the scheduled communication begins automatically while you are in the middle of any editing operation, it will impossible to continue that procedure.
Note Even if you print out a sample image of the documents, the transmission will be carried out on schedule.
If you want to cancel the procedure part way through, press the Reset key. The touch panel will return to the initial mode settings.
Place the original & assign destination.
Dest
Ready for fax transmission.
Basic Application
Abbrev. TXAddress
Register
settingbook
Print Report
RX Polling
TX Polling
Basic Application Register
box inputSub.conf.
TX statusReserved
on LCDTX result
on LCDRX result
data boxPrint encr
box outputSub.conf.
Print Report
Option screenSelect item.
123456
Reservation status
Reserved communication status.
Doc #:
1/2.
Send
TX No.of pages: 001.22:22.
025.
Start Time:
001.(No.party: )
3-16 Advanced Fax Operation

4 Press the [Print] key.
5 Press the [Yes] key. A sample image of the corresponding documents will be printed out.
Force-Starting the CommunicationYou can force-start a communication that is waiting in memory, without having to wait for the scheduled start time.
1 Perform steps 1 through 3 of Printing Out a Sample Image of Waiting Documents on page 3-16.
2 Press the [Immediate TX] key.
3 Press the [Yes] key. The corresponding operation will begin automatically.
Deleting the CommunicationYou can delete a scheduled communication that is in memory and waiting for a start time.
1 Perform steps 1 through 3 of Printing Out a Sample Image of Waiting Documents on page 3-16.
2 Press the [Delete] key.
3 Press the [Yes] key. The selected communication will be deleted and the touch panel will return to the initial mode settings.
If you want to continue deleting other scheduled communications, repeat steps 1 through 3.
Close
n status.Memory usage:
JUN-06-2007 16:00
1/2.
Send
TX No.of pages: 001.
.0%
001.(No.party: )
Delete
ChangeProgram/
TXImmediate
Note You can also force-start a communication that is waiting for Automatic Redialing.
You cannot, however, force-start a Polling Transmission.
If you want to cancel the procedure part way through, press the Reset key. The touch panel will return to the initial mode settings.
Close
n status.Memory usage:
JUN-06-2007 16:00
1/2.
Send
TX No.of pages: 001.
.0%
001.(No.party: )
Delete
ChangeProgram/
TXImmediate
Note You CANNOT delete a scheduled communication that is in memory waiting to be forwarded to a destination fax.
If you want to cancel the procedure part way through, press the Reset key. The touch panel will return to the initial mode settings.
Close
n status.Memory usage:
JUN-06-2007 16:00
1/2.
Send
TX No.of pages: 001.
.0%
001.(No.party: )
Delete
ChangeProgram/
TXImmediate
Advanced Fax Operation 3-17

Modifying the Contents of the CommunicationYou can modify the information relating to a scheduled communication that is presently saved in memory. The scheduled time for the communication to start can be changed, destinations changed, added and deleted, or the communication can be canceled completely. The actual procedure and information available for modification is slightly different depending on the type of communication involved. The example in the procedure below is for a scheduled Broadcast Transmission that uses the timer. If you want to modify the information relating other types of communications, simply refer to this example but follow the flow of the message display in order to perform the actual procedure.
1 Perform steps 1 through 3 of Printing Out a Sample Image of Waiting Documents on page 3-16.
2 Press the [Program/Change] key.
3 If you want to change the scheduled start time, press the [Delayed TX] key and then go to the next step.
If you want to modify the destination information, press the [ ] key and then go directly to step 6.
> Changing the scheduled start time
4 Use the numeric keys to enter the desired time for the communication to begin.
If you want to change the entered time, use the [ ] and/or [ ] keys to move the cursor to the desired location.
5 Press the [Close] key. The message display will return to the same screen as was displayed in step 3.
If you also want to modify the destination information, press the [ ] key. If you do NOT want to modify the information, go directly to step 14.
> Modifying destination information
6 The currently registered information will be displayed.
• If you want to delete a fax number(s), press the corresponding dial key (or keys) and then go to the next step.
Note You CANNOT modify a scheduled communication that is waiting for Automatic Redialing, nor is it possible to modify a scheduled Polling Communication, a scheduled Broadcast Transmission, or an F-code Transmission.
If you want to cancel the procedure part way through, press the Reset key. The touch panel will return to the initial mode settings.
Close
n status.Memory usage:
JUN-06-2007 16:00
1/2.
end
TX No.of pages: 001.
.0%
001.(No.party: )
Delete
ChangeProgram/
TXImmediate
Program/Change
Delayed TX
Ba
22:22.
001.
Reserved communication status.
Press confirmation key after change setting.
3-18 Advanced Fax Operation

• If you want to add a fax number(s), press the [Add] key and then go directly to step 9.
• If you want to change a fax number, press the corresponding dial key and then proceed directly to step 11.
Deleting fax numbers
7 Press the [Delete] key.
8 Press the [Yes] key. The message display will return to the same screen as was displayed in step 6 and you can continue to delete, add or change other fax numbers. To do so, repeat steps 6 through 13.
If you are finished with this procedure, press the [Close] key and go to step 14.
Adding fax numbers
9 Enter the additional fax number(s).
10Press the [Finish dest. Set] ([Dest. set]) key. The message display will return to the same screen as was displayed in step 6 and you can continue to delete, add or change other fax numbers. To do so, repeat steps 6 through 13.
If you are finished with this procedure, press the [Close] key and go to step 14.
Changing fax numbers
11Press the [Change] key.
12Enter the new destination fax number.
You can enter the fax number(s) using the numeric keys, abbreviated numbers, one-touch keys and the address book. Chain dial keys can be used as well.
13Press the [Finish dest. Set] ([Dest. set]) key. The message display will return to the same screen as was displayed in step 6. You can change, delete or add other fax destination numbers. To do so, repeat steps 6 through 13. If you are finished with this procedure, press the [Close] key and go to step 14.
14Press the [Confirm] key. The touch panel will return to the initial mode settings. If the Delayed Communication Report print out setting is turned ON, a Delayed Communication Report will be printed out. (Refer to page 6-7.)
CloseBack
n status.
Change
Add
Delete
Memory usage:
JUN-06-2007 16:00
1/1.
03.
.0%
FREE
Enter Destination.
Reserved communication status.
bookAddress Abbrev.
Delete SpacePause
ABC
Dest .1
destinat.Next
ABC Note You can enter the fax number(s) using the numeric keys, abbreviated numbers, one-touch keys, group dial keys and the address book. Chain dial keys can be used as well.
In order to enter multiple destinations with the numeric keys, press the [Next destinat.] ([Next dest.]) key after you enter each fax number.
FREE
Enter Destination.
Reserved communication status.
bookAddress Abbrev.
Delete SpacePause
ABC
ABC
Advanced Fax Operation 3-19

Initiating the Fax Connection Manually (Manual Fax Transmission)Once you are connected with the destination party, transmission can be initiated manually by pressing the Start key.
Use this mode when you want to talk to the other party prior to actual transmission of the documents, or when the other party must manually switch to fax reception.
1 Set the documents you want to transmit in the Document Processor.
2 Pick up the telephone receiver or press the [On-hook] key.
3 Dial the destination fax number.
4 Check whether or not you are connected to a fax machine.
> If you hear a fax tone...You are connected to a fax machine.
Press the Start key. Fax transmission will begin.
> If the other party answers...
You are connected to a telephone.
Note Speaking to the other party and/or performing Manual Fax Transmission is only possible if a separately purchased telephone is connected to this fax machine.
If you want to cancel the procedure part way through, press the [On-hook] key or hang up the receiver.
Note It is not possible to set documents on the platen with this mode.
Note If you pressed the [On-hook] key, that key will be highlighted.
3-20 Advanced Fax Operation

Press the Start key at the end of the conversation. Fax transmission will begin.
5 Hang up the receiver when the transmission begins.
Note It is only possible to speak to the other party when a separately purchased telephone is connected to this fax machine.
Advanced Fax Operation 3-21
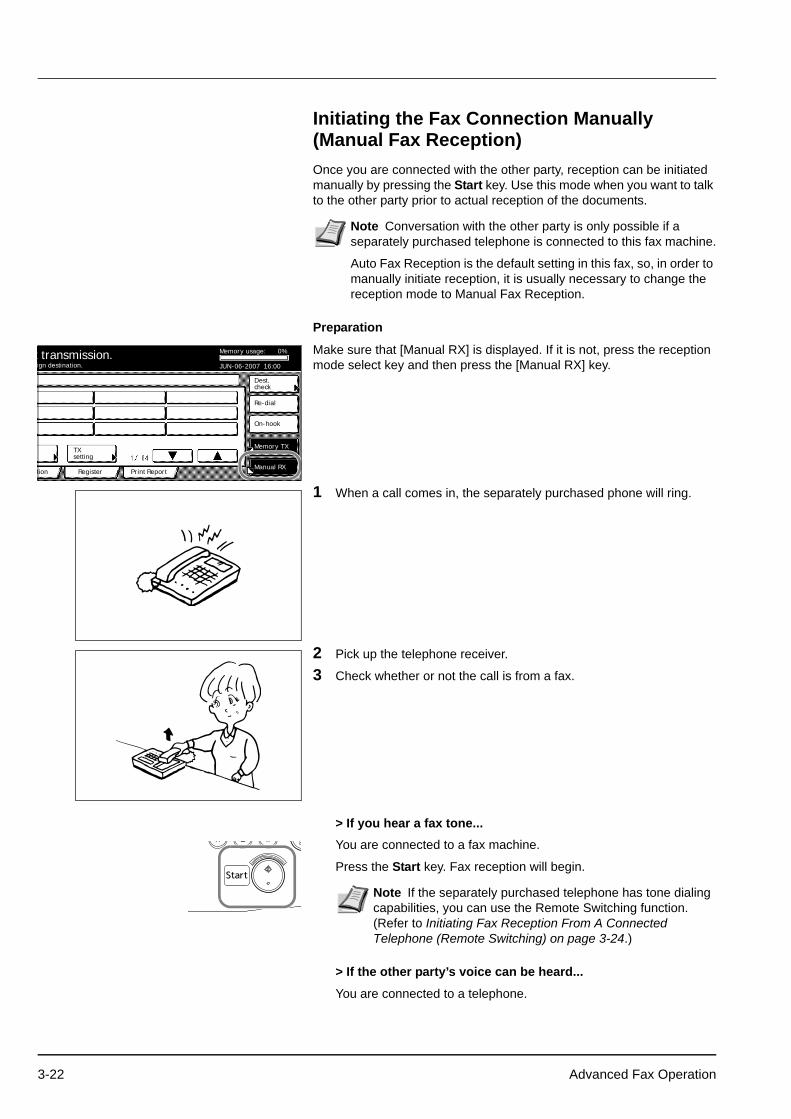
Initiating the Fax Connection Manually (Manual Fax Reception)Once you are connected with the other party, reception can be initiated manually by pressing the Start key. Use this mode when you want to talk to the other party prior to actual reception of the documents.
Preparation
Make sure that [Manual RX] is displayed. If it is not, press the reception mode select key and then press the [Manual RX] key.
1 When a call comes in, the separately purchased phone will ring.
2 Pick up the telephone receiver.
3 Check whether or not the call is from a fax.
> If you hear a fax tone...You are connected to a fax machine.
Press the Start key. Fax reception will begin.
> If the other party’s voice can be heard...
You are connected to a telephone.
Note Conversation with the other party is only possible if a separately purchased telephone is connected to this fax machine.
Auto Fax Reception is the default setting in this fax, so, in order to manually initiate reception, it is usually necessary to change the reception mode to Manual Fax Reception.
ign destination.
.0%x transmission.
tion Register
Re-dial
On-hook
Dest.check
Memory TX
Manual RXPrint Report
Memory usage:
JUN-06-2007 16:00
TXsetting
Note If the separately purchased telephone has tone dialing capabilities, you can use the Remote Switching function. (Refer to Initiating Fax Reception From A Connected Telephone (Remote Switching) on page 3-24.)
3-22 Advanced Fax Operation

Press the Start key at the end of the conversation. A tone will sound to inform the other party that this machine has switched to the fax reception mode. Fax reception will begin once the transmission is initiated by the other party.
4 Hang up the receiver when Status (Act status) appears in the message display or the reception begins.
Advanced Fax Operation 3-23

Initiating Fax Reception From A Connected Telephone (Remote Switching)Remote Switching lets you initiate fax reception from a telephone that is connected to this fax machine. This function is thus convenient if you want to be able to initiate fax reception from a location separate from the fax machine itself.
Changing the Remote Switching NumberThe factory default setting for the Remote Switching Number is 55, but you can change this if you want.
1 Press the [Register] key. The Register screen will appear.
2 Press the [Remote SW dial] key. Remote Switching registration is now possible.
3 Use the numeric keys to enter the new Remote Switching Number (2 digits).
4 Press the [Confirm] key. Registration of the new Remote Reception Number is complete.
5 If you are finished making settings, press the Reset key.
Note Remote Switching is only possible if a separately purchased telephone with tone dialing capabilities is connected to this fax machine. Even if the phone you use has tone dialing capabilities, depending upon the model of the phone, this function may not work as expected. For further information, contact your service representative, an authorized service center or the place or purchase.
Note If you want to cancel the procedure part way through, press the Reset key. The touch panel will return to the initial mode settings.
Place the original & assign destination.
Dest
Ready for fax transmission.
Basic Application
Abbrev. TXAddress
Register
settingbook
Print Report
Info.Location
Dial
Basic Application Register
Box ForwardingFax
dialRemote SW
Test IDRemote
Restrict.TX/RX
Print Report
Registering item option screen.Select item for register.
& TimeDate
keyEncryption
Enter using # key.
Remote Switch Ba
Register remote switch dial.
( 2 digits)55.
Note If you want to change the entered number, use the [ ] and/or [ ] keys to move the cursor to the desired location.
If you want to reset the displayed number to 00, simply press the Stop/Clear key.
3-24 Advanced Fax Operation

Initiating the ReceptionWhen you want to initiate fax reception from a telephone that is connected to this fax machine, perform the following procedure.1 When a call comes in, the telephone will ring.
2 Pick up the telephone receiver.
3 If you hear a fax tone, use the tone signal capabilities of the telephone to enter the 2-digit Remote Switching Number.
4 The connection will switch to the fax machine and fax reception will start automatically.
Note The factory default setting for the Remote Switching Number is 55.
Advanced Fax Operation 3-25

Allowing the Receiving Party to Initiate Reception (Polling Communication)Polling refers to the method of communication whereby transmission is not initiated by the transmitting party, but is requested and initiated at the convenience of the receiving party.
There are two types of polling procedures available in this fax: Polling Transmission and Polling Reception.
Preparing Documents for a Polling TransmissionThe documents to be transmitted using the Polling Transmission procedure are first scanned into memory and then, when a polling request comes from the receiving party, those documents are transmitted automatically to that party.
1 Set the documents you want to transmit.
2 Press the [Application] key. The Application screen will appear.
IMPORTANT Since the polling operation is initiated by a call from the receiving party, telephone charges will be billed to the receiving party.
Note During a Polling Transmission, documents will be transmitted using the Memory Transmission mode even if the fax is currently in the Direct Feed Transmission mode.
It is possible to add documents to the Polling Transmission as long as you are still waiting for the polling request.
If you use Polling Transmission in combination with the Bulletin Board function, the same documents can be made available and transmitted to an unlimited number of receiving parties. (Refer to Turning the Bulletin Board ON/OFF (Bulletin Board setting) on page 6-9.)
If you want to cancel the procedure part way through, press the Reset key. The touch panel will return to the initial mode settings.
Note When the documents are set on the platen, it is necessary, after each page is scanned, to select whether or not you want to transmit more pages. (Refer to page 2-8.)
Enter Destination.
Dest
Ready for fax transmission.
Basic Application
Abbrev. TXAddress
Register
settingbook
Print Report
3-26 Advanced Fax Operation

3 Press the [TX Polling] key.
If you are entering documents for this Polling Transmission for the first time, go to the next step.
If you want to add documents to those which have already been saved into memory or replace them completely, go directly to step 6.
> Entering documents for the first time
4 If you want to limit who can request transmission of the documents from your fax, use the numeric keys to enter a 4-digit Polling ID (the self-station ID of the receiving fax).
5 Press the [Confirm] key and then go directly to step 8.
> Adding or replacing documents
6 If you want simply to add documents to those already in memory, press the [Add] key. If you want to delete all of the documents currently in memory and replace them with new documents, press the [Overwrite] key.
7 Press the [Confirm] key.
If you selected [Overwrite], the message display will return to the same screen as was displayed in step 4.
8 Select any related transmission settings that you want to use.
9 Press the Start key. The documents will be scanned and stored in memory where they will awaiting the polling request.
RX Polling
TX Polling
Basic Application Register
box inputSub.conf.
TX statusReserved
on LCDTX result
on LCDRX result
data boxPrint encr
box outputSub.conf.
Print Report
Option screenSelect item.
Enter using # key.
Polling ID Ba
TX Polling.
( 4 digits)0000.
Note If you DO NOT want to designate any specific fax, do not enter a Polling ID here.
If a Polling ID other than ‘0000’ is entered, the receiving fax must be one of our models that has the corresponding capabilities.
Even if you enter ‘0000’, a check of Permit Fax Numbers, Permit IDs and Rejection Fax Numbers will be performed.
Add orig./overwrite
Add
Overwrite
Ba
TX Polling.
Note If you are using duplex (2-sided) documents, press the [Duplex TX] key. Refer to Sending 2-Sided Documents (Duplex Transmission) on page 3-3 for setting procedures.
Advanced Fax Operation 3-27

Receiving Documents Using Polling ReceptionIn Polling Reception, the receiving party dials the number of the transmitting fax, triggering transmission of the documents set in that other fax machine. If reception of documents from more than one transmitting fax is designated, those destinations will be dialed in order and reception will be carried out from each fax. It is possible for the receiving party to use the timer to have the documents received at a time convenient to them.
1 Press the [Application] key. The Application screen will appear.
2 Press the [RX Polling] key.
3 Enter the fax number of the transmitting party.
4 If you want to designate a time for the reception to begin, press the [Delayed TX] key. If you do NOT want to designate a time for the reception to begin, go directly to step 8.
5 Press the [On] key.
Note If you enter all of the transmitting fax numbers using abbreviated numbers, one-touch keys and/or group dial keys, this fax can automatically receive documents from up to 300 different fax machines in a single operation. However, you CANNOT enter the number of a transmitting fax with abbreviated numbers or one-touch keys that have been designated for Encrypted Transmission.
Polling Reception is only possible if the transmitting parties have first performed the necessary Polling Transmission operation. (Refer to Preparing Documents for a Polling Transmission on page 3-26.)
If you want to cancel the procedure part way through, press the Reset key. The touch panel will return to the initial mode settings.
Place the original & assign destination.
Dest
Ready for fax transmission.
Basic Application
Abbrev. TXAddress
Register
settingbook
Print Report
RX Polling
TX Polling
Basic Application Register
box inputSub.conf.
TX statusReserved
on LCDTX result
on LCDRX result
data boxPrint encr
box outputSub.conf.
Print Report
Option screenSelect item.
FREE
Enter Destination.RX Polling.
bookAddress Abbrev.
Delete SpacePause
ABC
Dest .0
destinat.Next
Note You can enter the fax number using the numeric keys, abbreviated numbers, one-touch keys, group dial keys or the address book. Chain dial keys can be used as well.
3-28 Advanced Fax Operation

6 Use the numeric keys to enter the desired time for the reception to begin.
7 Press the [Close] key.
8 Press the Start key. The reception operation will begin automatically.
Delayed TX
Off
Enter using # key.
On
Ba
16:42.Start Time
RX Polling.
Note If you want to change the entered time, use the [ ] and/or [ ] keys to move the cursor to the desired location.
Note If a time for the reception to begin was designated, the reception operation will begin when the appointed time is reached.
Advanced Fax Operation 3-29

Communicating Using F-Codes (F-Code Based Communication)
F-Code Based communication refers to communication in which data is sent and received with sub-addresses and passwords attached in conformance with the ITU-T (International Telecommunication Union) recommendations. F-Codes make it possible to communicate with third-party F-code-compliant machines using modes that were previously only available between our own machines. These modes include confidential communication and relay broadcast transmission.
This fax uses an F-Code Box to transmit documents to, and receive documents from, another party's fax during an F-Code Based Communication. In this case, in order to designate the F-Code Box and password, special codes are used (in this fax they are called the ‘subaddress’ and ‘F-Code password’, respectively).
In this way, this fax is able to perform F-Code Based Confidential Communications, as well as carry out and Relay Broadcasting, with facsimiles made by other manufacturers and, naturally, with our own models that have F-Code Based Communication capabilities.
What F-Codes are used in this fax?In this fax there are two codes used for F-Code Based Communication: a ‘subaddress’ and an F-Code password.
Subaddress
This code must be entered by the transmitting party during an F-Code Based Confidential Transmission and F-Code Based Relay Broadcast Transmission. The subaddress is used to designate the desired box (equal to the F-Code Confidential Box or the F-Code Relay Box, as appropriate, in this fax) that is registered in the other party's fax.
The acceptable length of the subaddress differs depending on model and maker of the fax machine and, if the entered numbers do not match within the parameters of the fax machine that has the shortest acceptable length, F-Code Based Communication will not be successful. Consult with the other party and compare the parameters of both faxes before actually attempting an F-Code Based Communication. In this fax, the subaddress can be up to 20 digits in length and can include any combination of the numerals 0 - 9 and the symbols * and #.
Note F-Code transmission is used vey seldom. If you do not need thhis function, the following pages can be skipped.
Note In order to perform an F-Code Based Communication, the other party's fax must have F-Code Based capabilities specific to the communication you are attempting.
F-Code Based Communication can be used in combination with the other various types of fax communication available in this fax. In addition, if you register, in advance, the appropriate subaddress and F-Code password under a speed-dial key, you will not need to enter that information during the actual transmission or reception procedure. Refer to the procedures for each type of fax communication and for the related registration procedures for more detailed information.
3-30 Advanced Fax Operation

When attempting an F-Code Based Confidential Communication or an F-Code Based Relay Broadcast Transmission with another fax of this same model, the last 4 digits of the subaddress that you enter must match the 4-digit subaddress that the other party has registered in their fax.
F-Code password
This code must also be entered by the transmitting party during an
F-Code Based Confidential Transmission and F-Code Based Relay Broadcast Transmission. The F-Code password is used to designate the password of the desired box (equal to the F-Code Confidential Box or the F-Code Relay Box, as appropriate, in this fax) that is registered in the other party's fax.
The acceptable length of the F-Code password differs depending on model and maker of the fax machine and, if the entered numbers do not match within the parameters of the fax machine that has the shortest acceptable length, F-Code Based Communication will not be successful. Consult with the other party and compare the parameters of both faxes before actually attempting an F-Code Based Communication. In this fax, the F-Code password can be up to 20 digits in length and can include any combination of the numerals 0 - 9 and the symbols * and #.
What are F-Code Boxes?By using codes developed for F-Code based Communication, more functional fax communications such as Confidential Communication and Relay Broadcasting are possible with facsimiles made by other manufacturers. In order to accomplish this, you register in the memory of your fax, in advance, a memory box and use that box to transmit documents to, and receive documents from, the other party. That memory box is called an ‘F-Code Box’ in this handbook and there are two such boxes in this fax: an ‘F-Code Confidential Box’ when it is designated for F-Code Based Confidential Communication and an ‘F-Code Relay Box’ when it is designated for F-Code Based Relay Communication.
Note If you are going to receive documents into an F-Code Confidential Box registered in this fax, F-Code Based Confidential Communication is possible even if the transmitting party does not enter an F-Code password. In order to receive documents into an F-Code Relay Box, however, the transmitting party must enter the appropriate F-Code password.
If you are going to transmit documents from this fax using the Bulletin Board function and if you register ‘0000’ as the F-Code password for that operation, the receiving party will not need to enter an F-Code password during the actual reception procedure.
Advanced Fax Operation 3-31

Each F-Code Box is registered with a subaddress and an F-Code password. The subaddress is used to designate the desired box (equal to the F-Code Box in this fax) that is registered in the other party's fax. In this fax, that box is registered as a 4-digit number from 0000 to 9999. The F-Code password is used to retrieve the documents from the box (equal to the F-Code Box in this fax). In this fax, that password is registered as a 4-digit number that can include any combination of the numerals 0 - 9 and the symbols * and #.
Note You can register up to 100 F-Code Confidential Boxes and 15 F-Code Relay Boxes in this fax machine. (Refer to Registering New F-Code Confidential Boxes on page 3-33 and Registering New F-Code Relay Boxes on page 3-42.)
If you want to check the information in regard to each F-Code Box, such as the box numbers and data regarding the existence of documents in each respective box, print out an F-Code Confidential Box List or an F-Code Relay Box List, as appropriate. (Refer to Printing Out an F-Code Confidential Box List on page 3-38 and Printing Out an F-Code Relay Box List on page 3-48.)
3-32 Advanced Fax Operation

Communicating Confidentially (F-Code Based Confidential Communication)F-Code Based Confidential Communication involves the reception of documents into an F-Code Confidential Box that is registered in the receiving party's fax. In this way, confidential documents can be received without being seen by others.
Registering New F-Code Confidential BoxesPerform the following procedure to register a new F-Code Confidential Box.
1 Press the [Register] key. The Register screen will appear.
2 Press the [Box] key. F-Code Confidential Box registration is now possible.
Note In order to use F-Code Based Confidential Communication, both the transmitting and receiving facsimiles must possess F-Code Based Communication and Confidential Communication capabilities.
IMPORTANT When registering the subaddress for an F-Code Confidential Box, you must use a different number than all of the box numbers used for the Encryption Boxes and all of subaddresses that have already been registered for F-Code Relay Boxes.
If, for any reason, you lose reference to an F-Code password, you will not be able to print out documents that are received into the corresponding F-Code Confidential Box nor will you be able to delete that box. Therefore, you exercise DUE CAUTION in the management of the F-Code password.
Note You can register up to 100 F-Code Confidential Boxes in this fax machine.
If you want to cancel the procedure part way through, press the Reset key. The touch panel will return to the initial mode settings.
Place the original & assign destination.
Dest
Ready for fax transmission.
Basic Application
Abbrev. TXAddress
Register
settingbook
Print Report
Info.Location
Dial
Basic Application Register
Box ForwardingFax
dialRemote SW
Test IDRemote
Restrict.TX/RX
Print Report
Registering item option screen.Select item for register.
& TimeDate
keyEncryption
Advanced Fax Operation 3-33

3 Press the [Subaddress confi. box] key.
4 Press an unregistered key.
5 Use the numeric keys to enter the subaddress 4-digit that you want to use for this F-Code Confidential Box.
6 Press the [Password] key and enter the 4-digit F-Code password that you want to use for this F-Code Confidential Box.
7 Press the [Confirm] key.
The message display will return to the same screen as was displayed in step 4. If you want to continue registering other F-Code Confidential Boxes, repeat steps 4 through 7. Once you are finished registering F-Code Confidential Boxes, press the Reset key.
Modifying or Deleting F-Code Confidential BoxesPerform the following procedure when you want to modify the registered subaddress or F-Code password for an F-Code Confidential Box, as well as when you want to completely delete one of those boxes.
1 Perform steps 1 through 3 of Registering New F-Code Confidential Boxes on page 3-33.
Box type
Subaddressconf. box
Register box
Subaddressrelay box
Encryptionbox
Subaddress confi. box
1234.
Register box
0688.
1111.
1/7.
Note The subaddress will be displayed for all keys that have already been registered.
Subaddress/password
Password
Enter using # key.
Ba
Register box
Subaddress 0000.
0000. ( 4 digits)
( 4 digits)
Subaddress confidential box003.
IMPORTANT The password can include any combination of the numerals 0 - 9 and the symbols * and #.
If you register ‘0000’ as the F-Code password, it will not be necessary to enter a password when you print out documents from that F-Code Confidential Box.
Note In order to modify the contents of or completely delete an F-Code Confidential Box, it is necessary to enter the corresponding F-Code password during the procedure.
You CANNOT delete an F-Code Confidential Box which still contains received documents.
If you want to cancel the procedure part way through, press the Reset key. The touch panel will return to the initial mode settings.
3-34 Advanced Fax Operation

2 Press the key which displays the subaddress for the F-Code Confidential Box you want to modify or delete.
3 Enter the F-Code password (4-digits) for that F-Code Confidential Box.
4 Press the [Confirm] key.
5 If you want to completely delete the F-Code Confidential Box, press the [Delete] key and go to the next step. If you want to modify the information for that F-Code Confidential Box, press the [Change contents] key and go to step 7.
> Deleting an F-Code Confidential Box
6 Press the [Yes] key. The message display will return to the same screen as was displayed in step 2. If you are finished deleting F-Code Confidential Boxes, press the Reset key.
> Modifying information
7 Modify the information under either or both settings as desired. To modify information, refer to the corresponding steps 5 through 6 under Registering New F-Code Confidential Boxes on page 3-33.
8 Press the [Confirm] key.
The message display will return to the same screen as was displayed in step 2. If you are finished F-Code Confidential Boxes, press the Reset key.
Sending Documents Using F-Code Based Confidential TransmissionIt is necessary for you to perform the following procedure in order to transmit documents to an F-Code Confidential Box that is registered in the destination party's fax machine.
Conditions
You (the transmitting party) must...know, in advance, the number (in this fax, a 4-digit number called the ‘subaddress’) that corresponds to the desired box (in this fax, called the ‘F-Code Confidential Box’) in the receiving party's fax and enter that, AND the related F-Code password, during the transmission procedure.
Subaddress confi. box
1234.
Register box
0688.
1111.
1/7.
( 4 digits)
Enter password using # key.
Password confirmation Ba
Register boxSubaddress confidential box
_.
002.
Contents change/del.
Changecontents
Ba
Register boxSubaddress confidential box
Delete
002.
1111.2222.
SubaddressPassword
Advanced Fax Operation 3-35

The receiving party must...have a facsimile that has the same F-Code Based Confidential Communication capabilities as your fax machine. In addition, they must register, in advance, the corresponding box (in this fax, called the ‘F-Code Confidential Box’) in their fax, inform you (the transmitting party) of the registered number (in this fax, a 4-digit number called the ‘subaddress’) for that box, and enter that number and the corresponding password during the procedure to print out the received documents. (Refer to Printing Out Documents from an F-Code Confidential Box on page 3-37.)
1 Set the documents you want to transmit.
2 Use the numeric keys to enter the destination party's fax number.
3 Press the [Subadd.] key.
4 Press the [On] key.
5 Use the numeric keys to enter the appropriate subaddress.
6 Press the [Password] key.
7 If necessary, use the numeric keys to enter the predetermined F-Code password.
8 Press the [Close] key. The message display will return to the same screen as was displayed in step 2. You can now change any transmission settings that you want or set the time for the transmission to begin.
9 Press the Start key. The transmission operation will begin.
Note If you designate a time for the transmission to begin, the Direct Feed Transmission mode will not be available.
If you want to cancel the procedure part way through, press the Reset key. The touch panel will return to the initial mode settings.
Note You can also enter the fax number using one-touch keys that have been designated for F-Code Based Communication as well. If you do use such a one-touch key, press the Start key and the transmission operation will begin automatically.
mit
.0%x transmission.
tion Register
Re-dial
On-hook
Dest.check
Memory TX
Auto RXPrint Report
Memory usage:
JUN-06-2007 16:00
TX
OriginalSize
OriginalImage
DensityMode
8½×11" Normal Regular
lete SpacePause Subadd. Next des
Subaddress TX
Off
_.
Enter using # key.
On
Ba
Dele
Ready for fax transmission.
Subaddress
Password
Note This subaddress is required during an F-Code Based Communication in order to designate the box in the destination party's fax. It can be up to 20 digits in length and can include any combination of the numerals 0 - 9 and the symbols * and #.
You can use the [ ] and/or [ ] keys to move the cursor to a desired location, and you can clear the entered number by pressing the [Delete] key.
Note The password can be up to 20 digits in length and can include any combination of the numerals 0 - 9 and the symbols * and #.
This password is not required if you agree in advance with the destination party not to use one.
3-36 Advanced Fax Operation

Printing Out Documents from an F-Code Confidential BoxPerform the following procedure to print out documents that have been received into your F-Code Confidential Box. If the documents are printed out correctly, the data will be deleted from that box.
If you are using an F-Code Confidential Box for F-Code Based Bulletin Board Transmission and you want to delete that data, simply print the documents out and the data will be deleted from that box.
1 Press the [Application] key. The Application screen will appear.
2 Press the [Sub.conf. box output] key.
3 Press the key that corresponds to the desired F-Code Confidential Box if it is highlighted. If the key is not highlighted, there are no documents in that box.
4 Press the [Yes] key. The documents that are in that F-Code Confidential Box will be printed out.
5 Use the numeric keys to enter the F-Code password (4 digits) that corresponds to that F-Code Confidential Box.
6 Press the [Confirm] key.
The documents that are in that F-Code Confidential Box will be printed out.
Note If you registered ‘0000’ as the F-Code password for your F-Code Confidential Box, it is not necessary to enter a password just to print out documents from that box.
If you want to cancel the procedure part way through, press the Reset key. The touch panel will return to the initial mode settings.
Place the original & assign destination.
Dest
Ready for fax transmission.
Basic Application
Abbrev. TXAddress
Register
settingbook
Print Report
RX Polling
TX Polling
Basic Application Register
box inputSub.conf.
TX statusReserved
on LCDTX result
on LCDRX result
data boxPrint encr
box outputSub.conf.
Print Report
Option screenSelect item.
Subaddress confi. box
1111.
There are originals saved in the box which is highlighted.
Ba
Print data in confidential box.
1234.
1/7.
Note If you registered ‘0000’ as the F-Code password, go to the next step. If you registered any other password, proceed directly to step 5.
( 4 digits)
Enter password using # key.
Password confirmation Ba
Print data in confidential box.Subaddress confidential box
_.
002.
Advanced Fax Operation 3-37

Printing Out an F-Code Confidential Box ListPrint out this list in order to check the information in each F-Code Confidential Box as well as data regarding the existence of documents in each respective box.
1 Press the [Print Report] key. The Print Report screen will appear.
2 Press the [Subad conf box list] key.
3 To print out an F-Code Confidential Box List, press the [Yes] key. An F-Code Confidential Box List will be printed out.
Entering Documents into an F-Code Confidential BoxPerform the following procedure when you want to enter documents into your F-Code Confidential Box for transmission under the F-Code Based Bulletin Board function. Using this procedure, you can add new documents to those currently in your F-Code Confidential Box, and you can also delete all of the documents currently in that box and replace them with new documents.
1 Set the documents you want to transmit.
Note If there are no F-Code Confidential Boxes registered in this fax, an F-Code Confidential Box List will not be printed out.
If you want to cancel the procedure part way through, press the Reset key. The touch panel will return to the initial mode settings.
Place the original & assign destination.
Dest
Ready for fax transmission.
Basic Application
Abbrev. TXAddress
Register
settingbook
Print Report
Select size
reportConfirm.
reportActivity
Basic Application Register
box listSubad conf
key listOne-touch
ListGroup dial
dial listProgram
box listEncryption
box listSubad. rel
Print Report
Report printing option screen.Select item.
listUser set.
direc.listTelephone
key listEncryption
Note If you want to delete the data for documents stored in an F-Code Confidential Box, simply print out those documents. (Refer to Printing Out Documents from an F-Code Confidential Box on page 3-37.)
If you want to cancel the procedure part way through, press the Reset key. The touch panel will return to the initial mode settings.
3-38 Advanced Fax Operation

2 Press the [Application] key. The Application screen will appear.
3 Press the [Sub. conf. box Input] ([Scan orig. to box]) key.
4 Press the key which displays the subaddress for the F-Code Confidential Box you want to enter documents into.
If you want simply to add documents to those already in memory, or you want to delete all of the documents currently in memory and replace them with new documents, go to the next step.
If you are entering documents for this Confidential Transmission for the first time, go directly to step 7.
5 If you want to add documents, press the [Add] key. If you want to replace the documents, press the [Overwrite] key.
6 Press the [Confirm] key.
7 Select any related transmission settings that you want to use.
8 Press the Start key. The documents will be scanned into memory.
Receiving Documents from an F-Code Based Bulletin BoardF-Code Based Bulletin Board Communication involves fax communication that uses an F-Code Box (in this fax, called an [F-Code Confidential Box]) that is registered in memory in the transmitting fax machine and that works like a Bulletin Board server, allowing the same documents to be made available and transmitted to an unlimited number of receiving parties.
The transmitting party registers, in advance, an F-Code Box in the their fax, and enters the documents to be transmitted into that box. Until the data for those documents is deleted, the documents will remain in that box for transmission any time they are requested with the correct subaddress and F-Code password.
Place the original & assign destination.
Dest
Ready for fax transmission.
Basic Application
Abbrev. TXAddress
Register
settingbook
Print Report
RX Polling
TX Polling
Basic Application Register
box inputSub.conf.
TX statusReserved
on LCDTX result
on LCDRX result
data boxPrint encr
box outputSub.conf.
Print Report
Option screenSelect item.
Subaddress confi. box
1111.
There are originals saved in the box which is highlighted.
Ba
Scan original to confidential box.
1234.
1/7.
Note If you are using duplex (2-sided) documents, press the [Duplex TX] key. Refer to Sending 2-Sided Documents (Duplex Transmission) on page 3-3 for setting procedures.
Advanced Fax Operation 3-39

Each receiving party can then simply perform the appropriate Polling Reception procedure and retrieve the documents from that box using the corresponding subaddress and F-Code password to designate and access that F-Code Confidential Box.
Communication is possible even with third-party fax machines, as long as they are equipped with the corresponding F-Code Based bulletin board communication capabilities.
Restriction: It is necessary that the other fax machine has the same F-Code Based Bulletin Board Communication capabilities as your fax machine. However, depending upon the fax machine, there is a possibility that they may not be able to enter documents in their box or may not be able to perform Polling Reception, so both the transmitting party and the receiving party should check in advance whether the appropriate conditions are met.
(For example, even if you are going to transmit documents with this fax and you enter documents into your F-Code Confidential Box, the receiving party's fax must have Polling Reception capabilities or Bulletin Board Communication will not be possible.)
Conditions
The transmitting party must...register a corresponding box (F-Code Confidential Box) and store the documents to be transmitted in that box. They must then inform the receiving party of the registered box number (a 4-digit subaddress in this fax) and password (called the F-Code password in this fax) for that F-Code Confidential Box. (Refer to Entering Documents into an F-Code Confidential Box on page 3-38.)
You (the receiving party) must...enter – during the procedure for the Polling Reception – the box number (a 4-digit subaddress in this fax) and password (a 4-digit F-Code password in this fax) that corresponds to the box (F-Code Confidential Box) that the transmitting party registered in their fax. Thus, this information must be known in advance.
1 Press the [Application] key. The Application screen will appear.
2 Press the [RX Polling] key.
Place the original & assign destination.
Dest
Ready for fax transmission.
Basic Application
Abbrev. TXAddress
Register
settingbook
Print Report
RX Polling
TX Polling
Basic Application Register
box inputSub.conf.
TX statusReserved
on LCDTX result
on LCDRX result
data boxPrint encr
box outputSub.conf.
Print Report
Option screenSelect item.
3-40 Advanced Fax Operation

3 Use the numeric keys to enter the fax number of the transmitting party.
4 Press the [Subadd.] key.
5 Press the [On] key.
6 Use the numeric keys to enter the appropriate subaddress.
7 Press the [Password] key.
8 If necessary, use the numeric keys to enter the predetermined F-Code password.
9 Press the [Close] key. The message display will return to the same screen as was displayed in step 3. You can now change any transmission settings that you want or set the time for the transmission to begin. You can additionally select another transmitting fax to receive documents from.
10Press the Start key. The reception operation will begin.
FREE
Enter Destination.RX Polling.
bookAddress Abbrev.
Delete SpacePause
ABC
Dest .0
destinat.Next
Note You can also enter the fax number using one-touch keys that have been designated for F-Code Based Communication as well. If you do use such a one-touch key, press the Start key and the reception operation will begin automatically.
Subaddress TX
Off
_.
Enter using # key.
On
Ba
Subaddress
Password
RX Polling.
Dele
Note This subaddress is required during an F-Code Based Communication in order to designate the box in the destination party's fax. It can be up to 20 digits in length and can include any combination of the numerals 0 - 9 and the symbols * and #.
You can use the [ ] and/or [ ] keys to move the cursor to a desired location, and you can clear the entered number by pressing the [Delete] key.
Note The password can be up to 20 digits in length and can include any combination of the numerals 0 - 9 and the symbols * and #.
This password is not required if you agree in advance with the destination party not to use one.
Advanced Fax Operation 3-41

Using a Relay Station to Send Your Documents (F-Code Based Relay Broadcast Communication)F-Code Based Relay Broadcast Communication involves the transmission of documents to multiple, long distance destinations by transmitting the documents through a relay station, generally located between the initial transmitting station and the final destinations.
This function can help you to reduce telephone costs if, for example, the documents are transmitted from the initial transmitting station to the relay station through an international connection and are then transmitted from the relay station to the multiple final destinations through a local (domestic) connection.
Registering New F-Code Relay BoxesPerform the following procedure to register a new F-Code Relay Box.
1 Press the [Register] key. The Register screen will appear.
Initial transmitting
station
Relay station
Final destination
Note The fax machine acting as the relay station must have an F-Code Relay Box registered in advance. (Refer to Registering New F-Code Relay Boxes on page 3-42.)
The content of such a box can be verified by printing out an F-Code Relay Box List. (Refer to Printing Out an F-Code Relay Box List on page 3-48.)
Refer to Sending Documents as an F-Code Based Relay Broadcast Transmission on page 3-46 for the procedure on acting as the initial transmitting station and sending documents through a relay station.
IMPORTANT When registering the subaddress for an F-Code Relay Box, you must use a different number than all of the box numbers used for the Encryption Boxes and all of subaddresses that have already been registered for F-Code Confidential Boxes.
If, for any reason, you lose reference to the F-Code password that you register here, you will not be able to delete that box. Therefore, you should exercise DUE CAUTION in the management of the F-Code password.
Note You can register up to 15 F-Code Relay Boxes in this fax machine.
If you want to cancel the procedure part way through, press the Reset key. The touch panel will return to the initial mode settings.
Place the original & assign destination.
Dest
Ready for fax transmission.
Basic Application
Abbrev. TXAddress
Register
settingbook
Print Report
3-42 Advanced Fax Operation

2 Press the [Box] key. F-Code Relay Box registration is now possible.
3 Press the [Subaddress relay box] key.
4 Press an unregistered key.
5 Use the numeric keys to enter the subaddress 4-digit that you want to use for this F-Code Relay Box.
6 Press the [Password] key and enter the 4-digit F-Code password that you want to use for this F-Code Relay Box.
7 Press the [Next] key.
8 Repeat steps 1 and 2 below until all of the final destination fax numbers are registered. (Max. 300 destinations)
1 Enter the fax number of a final destination.
2 If you entered the fax number with the numeric keys, press the [Next destinat.] ([Next dest.]) key.
9 Press the [Finish dest. Set] ([Dest. set]) key.
10Select whether or not you want the received documents to be printed out at your fax (press the [On] key to have them printed and the [Off] key to stop print out), and whether or not you want send a Transmission Report regarding the results of the final transmissions to the initial transmitting station (press the [On] key to send a report and the [Off] key to not send a report.).
11Press the [Next] key.
Info.Location
Dial
Basic Application Register
Box ForwardingFax
dialRemote SW
Test IDRemote
Restrict.TX/RX
Print Report
Registering item option screen.Select item for register.
& TimeDate
keyEncryption
Box type
Subaddressconf. box
Register box
Subaddressrelay box
Encryptionbox
Subaddress relay box
Register box
8888.
0715.
3333.
Note The subaddress will be displayed for all keys that have already been registered.
Subaddress/password
Password
Enter using # key.
Ba
Register box
Subaddress 0000.
0000. ( 4 digits)
( 4 digits)
Subaddress relay box02.
Note The password can include any combination of the numerals 0 - 9 and the symbols * and #.
FREE
Subaddress relay boxEnter Destination.
Register box
bookAddress Abbrev.
Delete SpacePause
ABC
ABC
02.
Dest .1
destinat.Next
Note You can use the numeric keys, abbreviated numbers, one-touch keys and group dial keys to enter the fax number. Chain dial keys can be used as well.
Local print/return
Off
Print Here
Ba
Register box
On
02.Subaddress relay box
Off
On
Return report
Advanced Fax Operation 3-43

If you selected to send a Transmission Report to the initial transmitting station, go to the next step. If you selected NOT to send a report, proceed directly to step 14.
12Enter the fax number of the initial transmitting station.
13Press the [Finish dest. Set] ([Dest. set]) key.
14Check the registered information.
Each item can be modified.
15Press the [OK] key. The message display will return to the same screen as was displayed in step 4. If you want to continue registering other F-Code Relay Boxes, repeat steps 4 through 15. Once you are finished registering F-Code Relay Boxes, press the Reset key.
Modifying or Deleting F-Code Relay BoxesPerform the following procedure when you want to add or delete final destinations or change other information registered under any F-Code Relay Box, as well as when you want to completely delete one of those boxes.
1 Perform steps 1 through 3 of Registering New F-Code Relay Boxes on page 3-42.
2 Press the key which displays the subaddress for the F-Code Relay Box you want to modify or delete.
3 Enter the F-Code password (4-digits) for that F-Code Relay Box.
4 Press the [Confirm] key.
Note You can use the numeric keys, one-touch keys and Chain dial keys to enter the fax number.
Note In order to modify the contents of or completely delete an F-Code Relay Box, it is necessary to enter the corresponding F-Code password during the procedure.
If you want to cancel the procedure part way through, press the Reset key. The touch panel will return to the initial mode settings.
Subaddress relay box
Register box
8888.
0715.
3333.
( 4 digits)
Enter password using # key.
Password confirmation Ba
Register boxSubaddress relay box
_.
01.
3-44 Advanced Fax Operation

5 If you want to completely delete the F-Code Relay Box, press the [Delete] key and go to the next step. If you want to modify the information for that F-Code Relay Box, press the [Change contents] key and go to step 7.
> Deleting an F-Code Relay Box
6 Press the [Yes] key. The message display will return to the same screen as was displayed in step 2. If you are finished deleting F-Code Relay Boxes, press the Reset key.
> Modifying information
7 If you want to change the final destination fax numbers, press the [ ] key and go to the next step. If you want to modify any other basic information, press the key that corresponds to that information and refer to Registering New F-Code Relay Boxes on page 3-42.
> Deleting destinations8 Press the destination that you want to delete until it is highlighted.
Multiple selections are available. If the destination you want to delete is not displayed, use the [ ] and/or [ ] cursor keys to switch to the screen that displays the destination that you want.
9 To delete the selected destination(s), press the [Delete] key and then the [Yes] key.
Adding destinations10Press the [Add] key.
11Enter the additional fax number(s).
12Once you are finished entering all of the fax numbers that you want, press the [Finish dest. Set] ([Dest. set]) key.
Contents change/del.
Changecontents
Ba
Register boxSubaddress relay box
Delete
01.
3333.3333.
SubaddressPassword
0002.
Add/change/del des. Ba
Register boxSubaddress relay box
*0002.
12345678.
1/1.
01.
CloseBack
Change
Add
Delete
Memory usage:
JUN-06-2007 16:00
1/1.
.0%
1.
FREE
Subaddress relay boxEnter Destination.
Register box
bookAddress Abbrev.
Delete SpacePause
01.
ABC
ABCDest
destinat.Next
1 Note You can enter the fax number(s) using the numeric keys, one-touch keys and the address book. Chain dial keys can be used as well.
If you want to enter multiple fax numbers with the numeric keys, press the [Next destinat.] ([Next dest.]) key after each fax number.
Advanced Fax Operation 3-45

Changing destinations13Select one destination to be changed, and then press the [Change]
key.
14Enter the new fax number.
You can enter the fax number using the numeric keys, one-touch keys and the address book. Chain dial keys can be used as well.
15Press the [Finish dest. Set] ([Dest. set]) key.
16Press the [Close] key.
Once you are finished making all of the modification that you want, go to the next step.
17Press the [OK] key.The message display will return to the same screen as was displayed in step 2. If you are finished F-Code Relay Boxes, press the Reset key.
Sending Documents as an F-Code Based Relay Broadcast TransmissionPerform this procedure when you want to act as the initial transmitting station and send documents, first to an F-Code Relay Box that is registered in a relay station, and then from that relay station onward to its final destination.
Restrictions
• It is necessary that the other fax machine has the same F-Code Based Relay Broadcast Communication capabilities as your fax machine. However, depending upon the machine, there is a possibility that only transmission or only reception under the F-Code protocol is available, so both the initial transmitting party and the party acting as the relay station should check in advance whether the appropriate conditions are met.
• The subaddress that is required when this fax is acting as the initial transmitting station can be up to 20 digits in length, but the number of digits acceptable in the destination fax may differ. Check with the relay station and make sure that you register a subaddress that is within the number of digits that is acceptable to the other party's fax machine.
Conditions
In the initial transmitting station...As it is necessary to enter, exactly as it is registered in the relay station's fax, the number (the 4-digit ‘subaddress’ in this fax) of the box (called the ‘F-Code Relay Box’ in this fax) that will receive the documents, as well as its corresponding F-Code password, be sure to verify that information in advance.
CloseBack
Change
Add
Delete
Memory usage:
JUN-06-2007 16:00
1/1.
.0%
1.
Note The fax number of each relay station can be entered with the numeric keys or using one-touch keys that have been designated for F-Code Based Communication. If you use the numeric keys it will be necessary to enter the corresponding subaddress during the set-up procedure.
The final destinations must be registered in advance under the corresponding F-Code Relay Box in the relay station fax.
3-46 Advanced Fax Operation

In the relay station...The box (called the ‘F-Code Relay Box’ in this fax) that will receive the documents must be registered in advance and the initial transmitting party must be informed of the number (the 4-digit ‘subaddress’ in this fax) of that box. (Refer to Registering New F-Code Relay Boxes on page 3-42.)
1 Set the documents you want to transmit
2 Use the numeric keys to enter the fax number of a relay station.
3 Press the [Subadd.] key.
4 Press the [On] key.
5 Use the numeric keys to enter the appropriate subaddress.
6 Press the [Password] key.
7 If necessary, use the numeric keys to enter the predetermined F-Code password.
8 Press the [Close] key.
The message display will return to the same screen as was displayed in step 2. You can now change any transmission settings that you want or set the time for the transmission to begin.
Note If, during registration of the F-Code Relay Box, the fax numbers of all of the final destinations that the received documents will be transmitted to are entered using one-touch keys, this fax is capable of automatically transmitting the same documents to up to 300 different final destinations in a single operation.
Note You can also enter the fax number using one-touch keys that have been designated for F-Code Based Communication as well. If you do use such a one-touch key, press the Start key and the transmission operation will begin automatically.
mit
.0%x transmission.
tion Register
Re-dial
On-hook
Dest.check
Memory TX
Auto RXPrint Report
Memory usage:
JUN-06-2007 16:00
TX
OriginalSize
OriginalImage
DensityMode
8½×11" Normal Regular
lete SpacePause Subadd. Next des
Subaddress TX
Off
_.
Enter using # key.
On
Ba
Dele
Ready for fax transmission.
Subaddress
Password
Note This subaddress is required during an F-Code Based Communication in order to designate the box in the destination party's fax. It can be up to 20 digits in length and can include any combination of the numerals 0 - 9 and the symbols * and #.
You can use the [ ] and/or [ ] keys to move the cursor to a desired location, and you can clear the entered number by pressing the [Delete] key.
Note The password can be up to 20 digits in length and can include any combination of the numerals 0 - 9 and the symbols * and #.
This password is not required if you agree in advance with the destination party not to use one.
Advanced Fax Operation 3-47

9 Press the Start key. The transmission operation will begin.
Printing Out an F-Code Relay Box ListPrint out this list in order to check the information registered for each F-Code Relay Box.
1 Press the [Print Report] key. The Print Report screen will appear.
2 Press the [Subad. rel box list] key.
3 To print out an F-Code Relay Box List, press the [Yes] key. An F-Code Relay Box List will be printed out.
Note If there are no F-Code Relay Boxes registered in this fax, an F-Code Relay Box List will not be printed out.
If you want to cancel the procedure part way through, press the Reset key. The touch panel will return to the initial mode settings.
Place the original & assign destination.
Dest
Ready for fax transmission.
Basic Application
Abbrev. TXAddress
Register
settingbook
Print Report
Select size
reportConfirm.
reportActivity
Basic Application Register
box listSubad conf
key listOne-touch
ListGroup dial
dial listProgram
box listEncryption
box listSubad. rel
Print Report
Report printing option screen.Select item.
listUser set.
direc.listTelephone
key listEncryption
3-48 Advanced Fax Operation
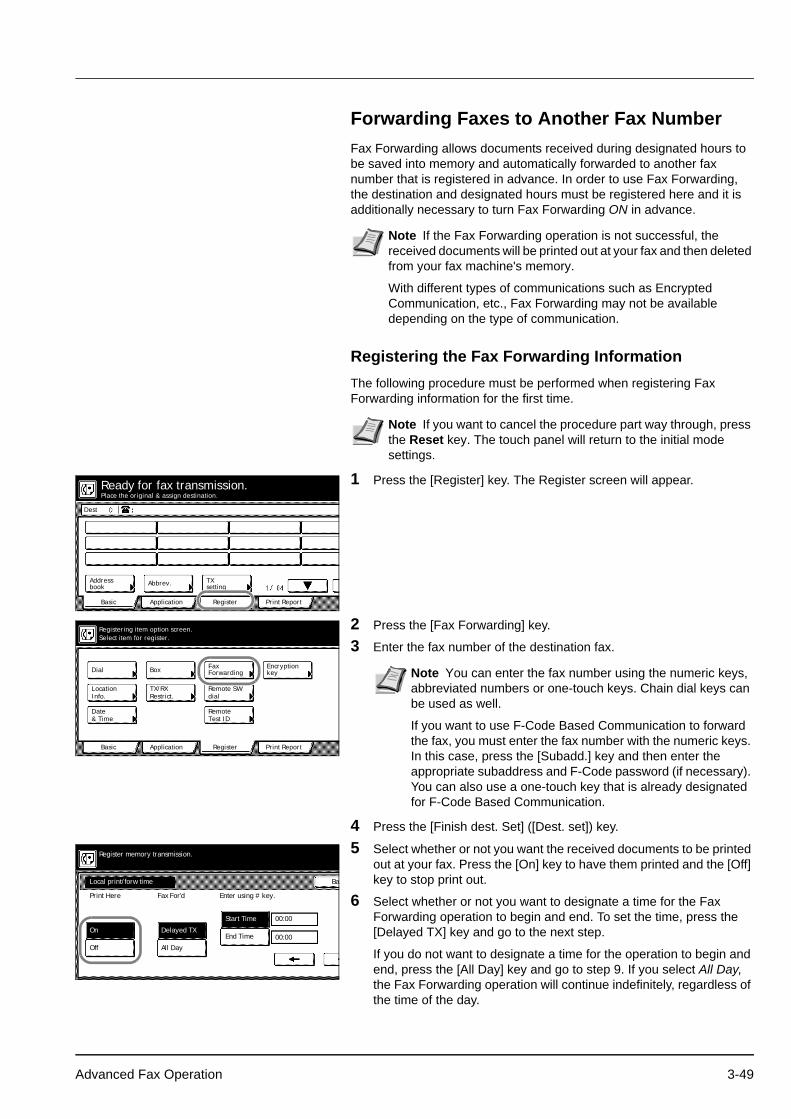
Forwarding Faxes to Another Fax NumberFax Forwarding allows documents received during designated hours to be saved into memory and automatically forwarded to another fax number that is registered in advance. In order to use Fax Forwarding, the destination and designated hours must be registered here and it is additionally necessary to turn Fax Forwarding ON in advance.
Registering the Fax Forwarding InformationThe following procedure must be performed when registering Fax Forwarding information for the first time.
1 Press the [Register] key. The Register screen will appear.
2 Press the [Fax Forwarding] key.
3 Enter the fax number of the destination fax.
4 Press the [Finish dest. Set] ([Dest. set]) key.
5 Select whether or not you want the received documents to be printed out at your fax. Press the [On] key to have them printed and the [Off] key to stop print out.
6 Select whether or not you want to designate a time for the Fax Forwarding operation to begin and end. To set the time, press the [Delayed TX] key and go to the next step.
If you do not want to designate a time for the operation to begin and end, press the [All Day] key and go to step 9. If you select All Day, the Fax Forwarding operation will continue indefinitely, regardless of the time of the day.
Note If the Fax Forwarding operation is not successful, the received documents will be printed out at your fax and then deleted from your fax machine's memory.
With different types of communications such as Encrypted Communication, etc., Fax Forwarding may not be available depending on the type of communication.
Note If you want to cancel the procedure part way through, press the Reset key. The touch panel will return to the initial mode settings.
Place the original & assign destination.
Dest
Ready for fax transmission.
Basic Application
Abbrev. TXAddress
Register
settingbook
Print Report
Info.Location
Dial
Basic Application Register
Box ForwardingFax
dialRemote SW
Test IDRemote
Restrict.TX/RX
Print Report
Registering item option screen.Select item for register.
& TimeDate
keyEncryption
Note You can enter the fax number using the numeric keys, abbreviated numbers or one-touch keys. Chain dial keys can be used as well.
If you want to use F-Code Based Communication to forward the fax, you must enter the fax number with the numeric keys. In this case, press the [Subadd.] key and then enter the appropriate subaddress and F-Code password (if necessary). You can also use a one-touch key that is already designated for F-Code Based Communication.
Local print/forw time
On
Print Here
Off
Ba
Register memory transmission.
Delayed TX
All Day
Start Time
End Time
Fax For'd Enter using # key.
00:00.
00:00.
Advanced Fax Operation 3-49

> Designating the time for Fax Forwarding to begin and end
7 Use the numeric keys to enter the desired time for Fax Forwarding to begin.
8 Press the [End Time] key and use the numeric keys to enter the desired time for Fax Forwarding to end.
9 Press the [Next] key. The currently registered information will be displayed.
10Check that information and press the key that corresponds to any item that you want to modify.
11Press the [OK] key. The message display will return to the same screen as was displayed in step 2. If you are finished making settings, press the Reset key.
Modifying Registered Fax Forwarding InformationPerform the following procedure in order to modify information already registered for Fax Forwarding.
1 Press the [Register] key. The Register screen will appear.
2 Press the [Fax Forwarding] key. The currently registered information will be displayed.
3 Check that information and press the key that corresponds to any item that you want to modify. Refer to Registering the Fax Forwarding Information on page 3-49 in order to modify that information.
4 Once you are finished modifying information, press the [OK] key. The message display will return to the same screen as was displayed in step 2. If you are finished making settings, press the Reset key.
Turning Fax Forwarding ON/OFFIn order to use Fax Forwarding, it is necessary to turn it ON in advance.
1 Press the System Menu/Counter key. The System Menu / Counter screen will appear.
Back
mission.
ayed TX
Day
Start Time
End Time
Next
For'd Enter using # key.
00:00.
08:00.
Note If you want to change the entered time, use the [ ] and/or [ ] keys to move the cursor to the desired location.
Note If you want to cancel the procedure part way through, press the Reset key. The touch panel will return to the initial mode settings.
Place the original & assign destination.
Dest
Ready for fax transmission.
Basic Application
Abbrev. TXAddress
Register
settingbook
Print Report
Info.Location
Dial
Basic Application Register
Box ForwardingFax
dialRemote SW
Test IDRemote
Restrict.TX/RX
Print Report
Registering item option screen.Select item for register.
& TimeDate
keyEncryption
Note If you want to cancel the procedure part way through, press the Reset key. The touch panel will return to the initial mode settings.
3-50 Advanced Fax Operation

2 Press the [Fax Default] key.
3 Press the [ ] cursor key until Fax forwarding is highlighted.
4 Press the [Change #] key.
5 To turn Fax Forwarding ON, press the [ON] key.
6 Press the [Close] key. If you are finished making settings, press the Reset key to return to the initial mode.
System Menu
DefaultCopy
DefaultFAX Language
SettingMP Tray
Orig. SizeRegister
DefaultMachine
AccounJob
ReportPrint
System Menu / Counter
Fax Forwarding
On
Off
Ba
System Menu / Counter
Advanced Fax Operation 3-51

Dialing Multiple Destinations as a Group (Group Dial Keys)If you register multiple destinations under a speed-dial key in advance, that key will then function as a group dial key and you will be able to dial all those number with the press of a key.
Registering New Group Dial Keys
1 Press the [Register] key. The Register screen will appear.
2 Press the [Dial] key. The touch panel will switch to dial registration.
Note Group dial keys can be used for entering the other party's fax numbers during a number of the various functions of this fax such as Broadcast Transmission, etc.
You CANNOT use group dial keys in combination with chain dial keys.
Note A maximum of 1000 speed-dial keys can be registered as group dial keys (minus the number of registered one-touch, chain dial and program keys).
Up to 300 destinations can be registered under each group dial key.
The abbreviated number for the speed-dial key that you press (0001 - 1000) will automatically become the abbreviated number for the destination fax numbers registered under that group dial key.
If you register a group name for each group dial key, you will be able to use the address book to search for the related fax numbers.
If you want to cancel the procedure part way through, press the Reset key. The touch panel will return to the initial mode settings.
Place the original & assign destination.
Dest
Ready for fax transmission.
Basic Application
Abbrev. TXAddress
Register
settingbook
Print Report
Info.Location
Dial
Basic Application Register
Box ForwardingFax
dialRemote SW
Test IDRemote
Restrict.TX/RX
Print Report
Registering item option screen.Select item for register.
& TimeDate
keyEncryption
3-52 Advanced Fax Operation

3 Press an unregistered speed-dial key on the touch panel.
4 Press the [Group] key.
5 Enter the other party's fax numbers.
6 Press the [Finish dest. Set] ([Dest. set]) key.
7 Enter the desired group name and the [Next] key. (Maximum 20 characters)
8 Check the currently registered information and press the key that corresponds to any item that you want to modify.
9 Press the [OK] key.
The message display will return to the same screen as was displayed in step 3. If you want to continue registering other group dial keys, repeat steps 3 through 9. If you are finished registering group dial keys, press the Reset key. (G) will be displayed next to the registered speed-dial key.
Modifying or Deleting Registered Information1 Press the [Register] key. The Register screen will appear.
Register dial #
Set dial for registration.
Register the dial.
1/167.
Note If there are no unregistered speed-dial keys displayed, use the [ ] and/or [ ] cursor keys to switch to a screen that displays an unregistered key.
Dial type
Group
Register the dial.
33600bpsOne-touchkey
Chain
Program
Ba
FREE
Group dialEnter Destination.
Register the dial.
bookAddress Abbrev.
Delete SpacePause
ABC
ABC
0004.
Dest .1
destinat.Next
Note You can enter the fax numbers using the numeric keys, abbreviated numbers, one-touch keys or the address book. Chain dial keys can be used as well.
If you want to enter multiple fax numbers with the numeric keys, press the [Next destinat.] ([Next dest.]) key after each fax number.
Note In order to enter characters, refer to Entering Characters on page 2-13.)
Place the original & assign destination.
Dest
Ready for fax transmission.
Basic Application
Abbrev. TXAddress
Register
settingbook
Print Report
Advanced Fax Operation 3-53
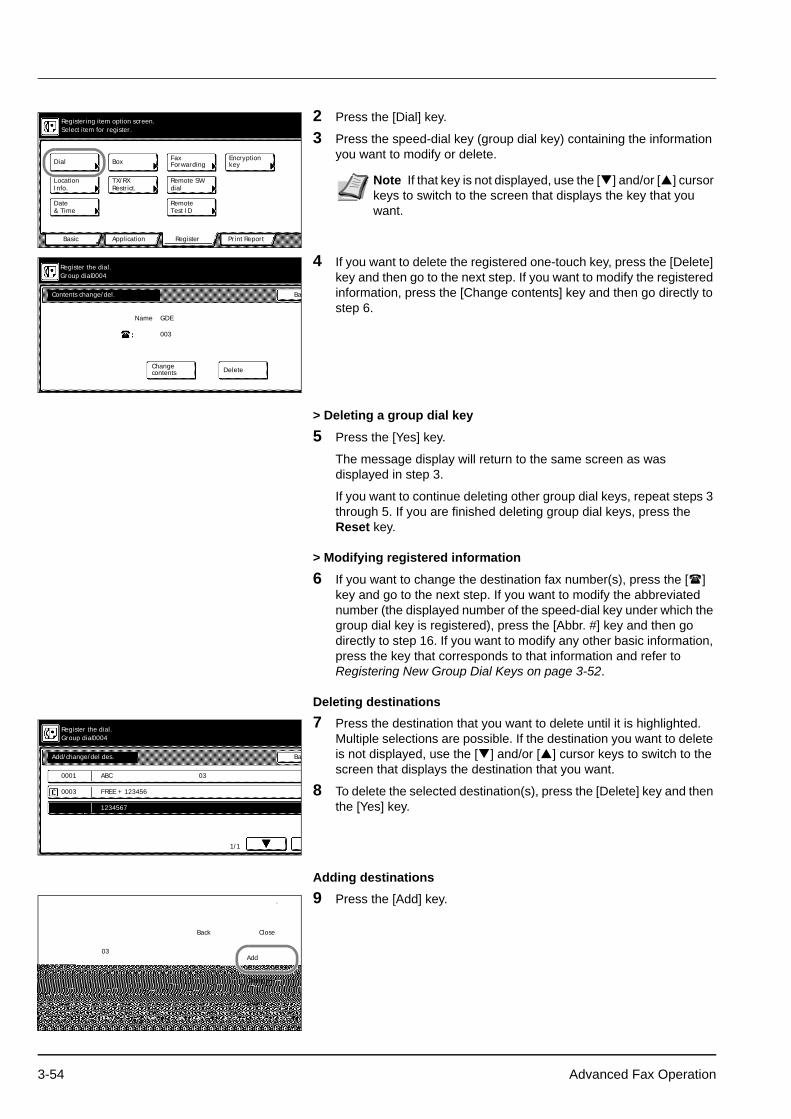
2 Press the [Dial] key.
3 Press the speed-dial key (group dial key) containing the information you want to modify or delete.
4 If you want to delete the registered one-touch key, press the [Delete] key and then go to the next step. If you want to modify the registered information, press the [Change contents] key and then go directly to step 6.
> Deleting a group dial key
5 Press the [Yes] key.
The message display will return to the same screen as was displayed in step 3.
If you want to continue deleting other group dial keys, repeat steps 3 through 5. If you are finished deleting group dial keys, press the Reset key.
> Modifying registered information
6 If you want to change the destination fax number(s), press the [ ] key and go to the next step. If you want to modify the abbreviated number (the displayed number of the speed-dial key under which the group dial key is registered), press the [Abbr. #] key and then go directly to step 16. If you want to modify any other basic information, press the key that corresponds to that information and refer to Registering New Group Dial Keys on page 3-52.
Deleting destinations7 Press the destination that you want to delete until it is highlighted.
Multiple selections are possible. If the destination you want to delete is not displayed, use the [ ] and/or [ ] cursor keys to switch to the screen that displays the destination that you want.
8 To delete the selected destination(s), press the [Delete] key and then the [Yes] key.
Adding destinations9 Press the [Add] key.
Info.Location
Dial
Basic Application Register
Box ForwardingFax
dialRemote SW
Test IDRemote
Restrict.TX/RX
Print Report
Registering item option screen.Select item for register.
& TimeDate
keyEncryption
Note If that key is not displayed, use the [ ] and/or [ ] cursor keys to switch to the screen that displays the key that you want.
Contents change/del.
Changecontents
Ba
Register the dial.Group dial
Delete
003.
0004.
Name GDE
0001.
Add/change/del des. Ba
Register the dial.Group dial
ABC
1234567.
1/1.
0003. FREE + 123456.
03.
0004.
CloseBack
Change
Add
Delete
Memory usage:
JUN-06-2007 16:00
1/1.
3456.
03.
.0%
3-54 Advanced Fax Operation
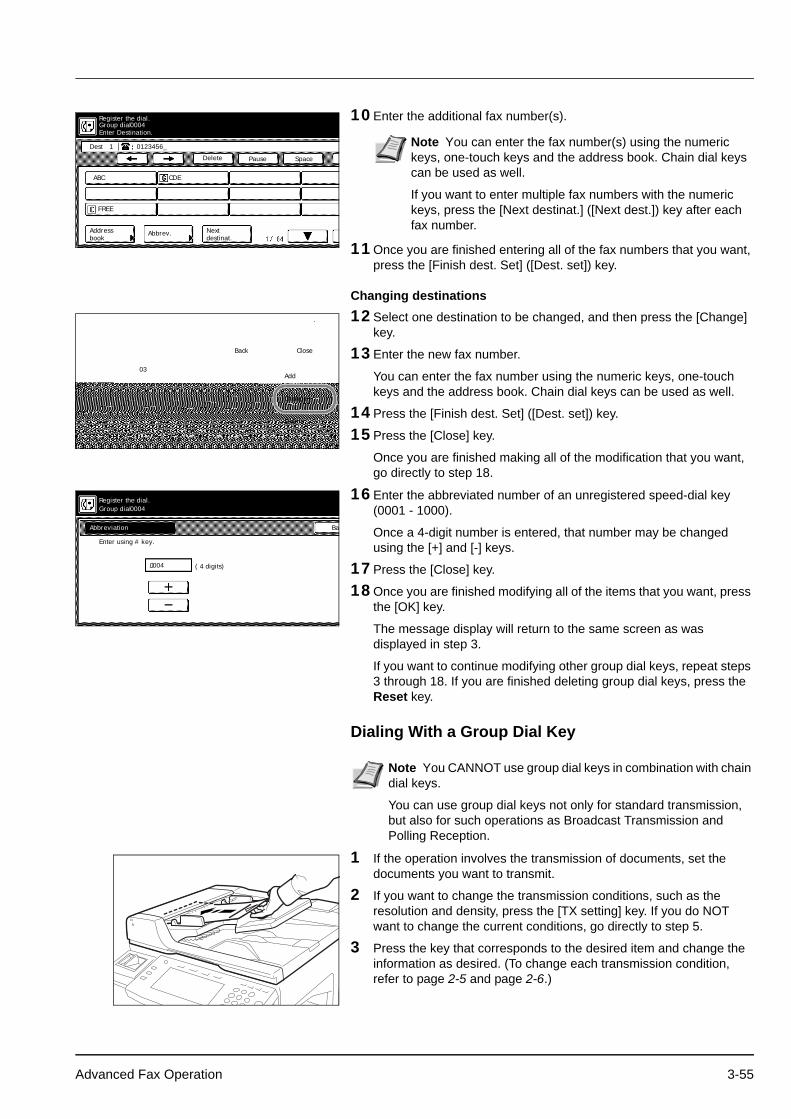
10Enter the additional fax number(s).
11Once you are finished entering all of the fax numbers that you want, press the [Finish dest. Set] ([Dest. set]) key.
Changing destinations12Select one destination to be changed, and then press the [Change]
key.
13Enter the new fax number.
You can enter the fax number using the numeric keys, one-touch keys and the address book. Chain dial keys can be used as well.
14Press the [Finish dest. Set] ([Dest. set]) key.
15Press the [Close] key.
Once you are finished making all of the modification that you want, go directly to step 18.
16Enter the abbreviated number of an unregistered speed-dial key (0001 - 1000).
Once a 4-digit number is entered, that number may be changed using the [+] and [-] keys.
17Press the [Close] key.
18Once you are finished modifying all of the items that you want, press the [OK] key.
The message display will return to the same screen as was displayed in step 3.
If you want to continue modifying other group dial keys, repeat steps 3 through 18. If you are finished deleting group dial keys, press the Reset key.
Dialing With a Group Dial Key
1 If the operation involves the transmission of documents, set the documents you want to transmit.
2 If you want to change the transmission conditions, such as the resolution and density, press the [TX setting] key. If you do NOT want to change the current conditions, go directly to step 5.
3 Press the key that corresponds to the desired item and change the information as desired. (To change each transmission condition, refer to page 2-5 and page 2-6.)
FREE
Group dialEnter Destination.
Register the dial.
bookAddress Abbrev.
Delete SpacePause
0123456_.
CDEABC
0004.
destinat.Next
1Dest Note You can enter the fax number(s) using the numeric keys, one-touch keys and the address book. Chain dial keys can be used as well.
If you want to enter multiple fax numbers with the numeric keys, press the [Next destinat.] ([Next dest.]) key after each fax number.
CloseBack
Change
Add
Delete
Memory usage:
JUN-06-2007 16:00
1/1.
3456.
03.
.0%
( 4 digits)
Enter using # key.
Abbreviation Ba
Register the dial.Group dial
0004.
0004.
Note You CANNOT use group dial keys in combination with chain dial keys.
You can use group dial keys not only for standard transmission, but also for such operations as Broadcast Transmission and Polling Reception.
Advanced Fax Operation 3-55

4 Once you are finished changing transmission conditions, press the [One touch destinat.] key.
5 Press the group dial key under which the desired fax numbers are registered.
6 Press the Start key. The transmission operation will begin automatically.
Printing Out a Group Dial ListPrint out this list in order to check the contents of group dial keys currently registered in this fax, such as the registered fax numbers and the group name.
1 Press the [Print Report] key. The Print Report screen will appear.
2 Press the [Group dial List] key.
3 To print out a Group Dial List, press the [Yes] key. A Group Dial List will be printed out.
Enter Destination.
Dest
Ready for fax transmission.
Basic Application
DuplexAddress
Register
TXbook
Print Report
Abbrev.
One touchdestinat.
Delayed TX
OriginalSize
OriginalImage
DeMo
8½×11" Normal
Press start key to transmit
Dest
Ready for fax transmission.
Basic Application
Abbrev.Address
Register
book
Print Report
TXsetting
CDE.
FREE.
CDE.
.1
Note If there are no group dial keys registered in this fax, a Group Dial List will not be printed out.
If you want to cancel the procedure part way through, press the Reset key. The touch panel will return to the initial mode settings.
Place the original & assign destination.
Dest
Ready for fax transmission.
Basic Application
Abbrev. TXAddress
Register
settingbook
Print Report
Select size
reportConfirm.
reportActivity
Basic Application Register
box listSubad conf
key listOne-touch
ListGroup dial
dial listProgram
box listEncryption
box listSubad. rel
Print Report
Report printing option screen.Select item.
listUser set.
direc.listTelephone
key listEncryption
3-56 Advanced Fax Operation
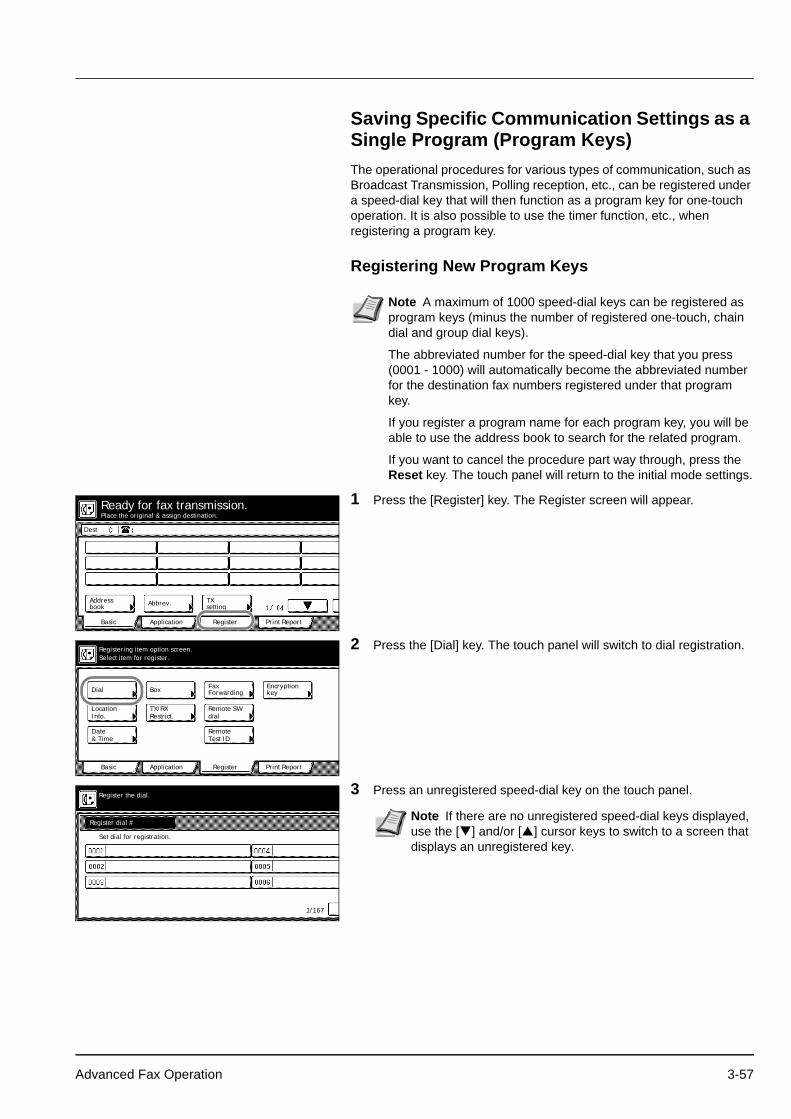
Saving Specific Communication Settings as a Single Program (Program Keys)The operational procedures for various types of communication, such as Broadcast Transmission, Polling reception, etc., can be registered under a speed-dial key that will then function as a program key for one-touch operation. It is also possible to use the timer function, etc., when registering a program key.
Registering New Program Keys
1 Press the [Register] key. The Register screen will appear.
2 Press the [Dial] key. The touch panel will switch to dial registration.
3 Press an unregistered speed-dial key on the touch panel.
Note A maximum of 1000 speed-dial keys can be registered as program keys (minus the number of registered one-touch, chain dial and group dial keys).
The abbreviated number for the speed-dial key that you press (0001 - 1000) will automatically become the abbreviated number for the destination fax numbers registered under that program key.
If you register a program name for each program key, you will be able to use the address book to search for the related program.
If you want to cancel the procedure part way through, press the Reset key. The touch panel will return to the initial mode settings.
Place the original & assign destination.
Dest
Ready for fax transmission.
Basic Application
Abbrev. TXAddress
Register
settingbook
Print Report
Info.Location
Dial
Basic Application Register
Box ForwardingFax
dialRemote SW
Test IDRemote
Restrict.TX/RX
Print Report
Registering item option screen.Select item for register.
& TimeDate
keyEncryption
Register dial #
Set dial for registration.
Register the dial.
1/167.
Note If there are no unregistered speed-dial keys displayed, use the [ ] and/or [ ] cursor keys to switch to a screen that displays an unregistered key.
Advanced Fax Operation 3-57

4 Press the [Program] key.
5 If you do NOT want to designate a time of day for the operation to begin, press the [Off] key under Delayed TX and go directly to step 7.
6 Use the numeric keys to enter the desired time of day for the operation to begin.
7 Press the [Send] key or the [RX Polling] key to choose the type of transmission.
8 Press the [Next] key.
9 Enter the destination fax number.
10Press the [Finish dest. Set] ([Dest. set]) key.
11Enter a name for the program and the [Next] key. (Maximum 20 characters)
12Check the currently registered information and press the key that corresponds to any item that you want to modify.
13Press the [OK] key. The message display will return to the same screen as was displayed in step 3.
If you want to continue registering other program keys, repeat steps 3 through 13. If you are finished registering program keys, press the Reset key. (P) will be displayed next to the registered speed-dial key.
Modifying or Deleting Registered Information
Dial type
Group
Register the dial.
33600bpsOne-touchkey
Chain
Program
Ba
Delayed TX/TX type
Off 08:00.
No Restri-ction
Delayed TX
Enter using # key.
On
Ba
Register the dial.Program Dial(Send) 0006.
Start Time Send
RX Pol
TX
Note If you want to change the entered time, use the [ ] and/or [ ] keys to move the cursor to the desired location.
FREE
Program Dial(Send)Enter Destination.
Register the dial.
bookAddress Abbrev.
Delete SpacePause
ABC
ABC
0006.
Dest .1
destinat.Next
GDE
Note You can enter the fax number using the numeric keys, abbreviated numbers, one-touch keys or the address book. Chain dial keys can be used as well.
If you want to enter multiple fax numbers with the numeric keys, press the [Next destinat.] ([Next dest.]) key after each fax number.
Note In order to enter characters, refer to Entering Characters on page 2-13.)
Note If you want to cancel the procedure part way through, press the Reset key. The touch panel will return to the initial mode settings.
3-58 Advanced Fax Operation

1 Press the [Register] key. The Register screen will appear.
2 Press the [Dial] key.
3 Press the speed-dial key (program key) containing the information you want to modify or delete.
4 If you want to delete the registered program key, press the [Delete] key and then go to the next step. If you want to modify the registered information, press the [Change contents] key and then go directly to step 6.
> Deleting a program key
5 Press the [Yes] key.
The message display will return to the same screen as was displayed in step 3.
If you want to continue deleting other program keys, repeat steps 3 through 5. If you are finished deleting program keys, press the Reset key.
> Modifying registered information
6 If you want to change the destination fax number(s), press the [ ] key and go to the next step. If you want to modify the abbreviated number (the displayed number of the speed-dial key under which the program key is registered), press the [Abbr. #] key and then go directly to step 16. If you want to modify any other basic information, press the key that corresponds to that information and refer to Registering New Program Keys on page 3-57.
Deleting destinations7 Press the destination that you want to delete until it is highlighted.
Multiple selections are possible. If the destination you want to delete is not displayed, use the [ ] and/or [ ] cursor keys to switch to the screen that displays the destination that you want.
8 To delete the selected destination(s), press the [Delete] key and then the [Yes] key.
Place the original & assign destination.
Dest
Ready for fax transmission.
Basic Application
Abbrev. TXAddress
Register
settingbook
Print Report
Info.Location
Dial
Basic Application Register
Box ForwardingFax
dialRemote SW
Test IDRemote
Restrict.TX/RX
Print Report
Registering item option screen.Select item for register.
& TimeDate
keyEncryption
Note If that key is not displayed, use the [ ] and/or [ ] cursor keys to switch to the screen that displays the key that you want.
Contents change/del.
Changecontents
Ba
Register the dial.Program Dial(Send)
Delete
002.
Name
0006.
GDE
0001.
Add/change/del des. Ba
Register the dial.Program Dial(Send)
ABC
FREE + 1236546.
1/1.
0003.
03.
0006.
Advanced Fax Operation 3-59
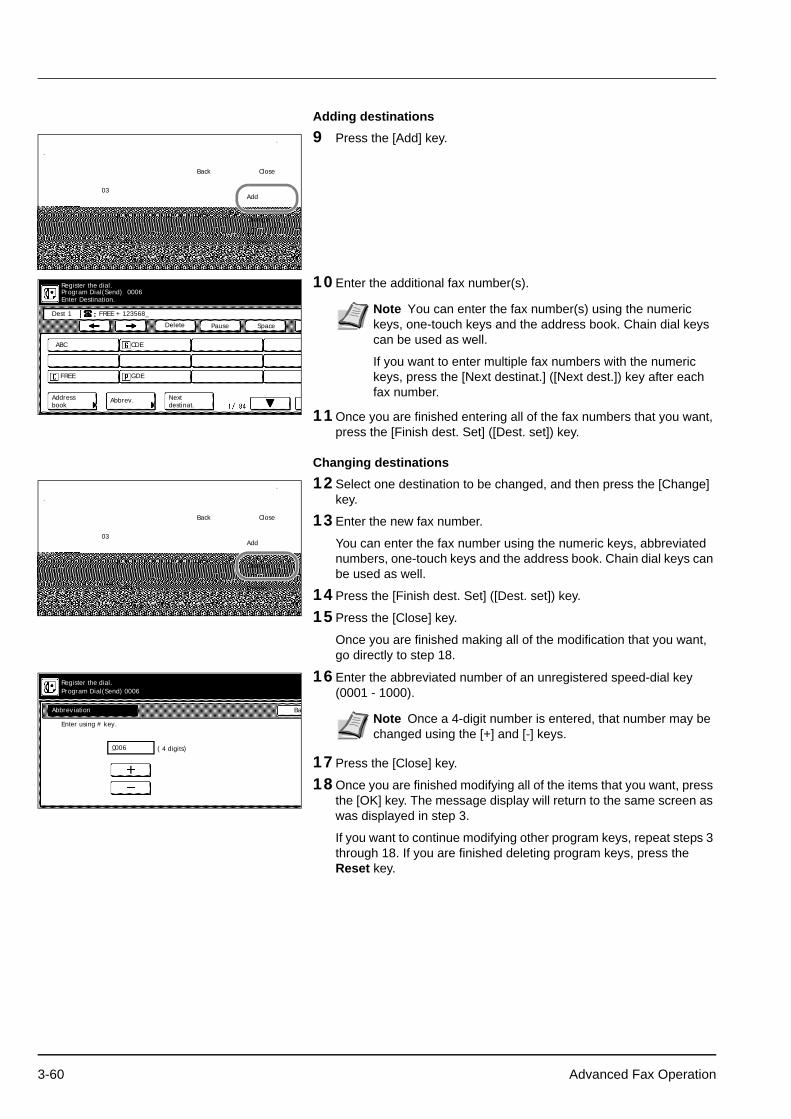
Adding destinations9 Press the [Add] key.
10Enter the additional fax number(s).
11Once you are finished entering all of the fax numbers that you want, press the [Finish dest. Set] ([Dest. set]) key.
Changing destinations12Select one destination to be changed, and then press the [Change]
key.
13Enter the new fax number.
You can enter the fax number using the numeric keys, abbreviated numbers, one-touch keys and the address book. Chain dial keys can be used as well.
14Press the [Finish dest. Set] ([Dest. set]) key.
15Press the [Close] key.
Once you are finished making all of the modification that you want, go directly to step 18.
16Enter the abbreviated number of an unregistered speed-dial key (0001 - 1000).
17Press the [Close] key.
18Once you are finished modifying all of the items that you want, press the [OK] key. The message display will return to the same screen as was displayed in step 3.
If you want to continue modifying other program keys, repeat steps 3 through 18. If you are finished deleting program keys, press the Reset key.
CloseBack
Change
Add
Delete
Memory usage:
JUN-06-2007 16:00
36546.
1/1.
03.
.0%
06.
FREE
Program Dial(Send)Enter Destination.
Register the dial.
bookAddress Abbrev.
Delete SpacePause
FREE + 123568_.
CDEABC
GDE
0006.
destinat.Next
Dest 1 Note You can enter the fax number(s) using the numeric keys, one-touch keys and the address book. Chain dial keys can be used as well.
If you want to enter multiple fax numbers with the numeric keys, press the [Next destinat.] ([Next dest.]) key after each fax number.
CloseBack
Change
Add
Delete
Memory usage:
JUN-06-2007 16:00
36546.
1/1.
03.
.0%
06.
( 4 digits)
Enter using # key.
Abbreviation Ba
Register the dial.Program Dial(Send)
0006.
0006.
Note Once a 4-digit number is entered, that number may be changed using the [+] and [-] keys.
3-60 Advanced Fax Operation
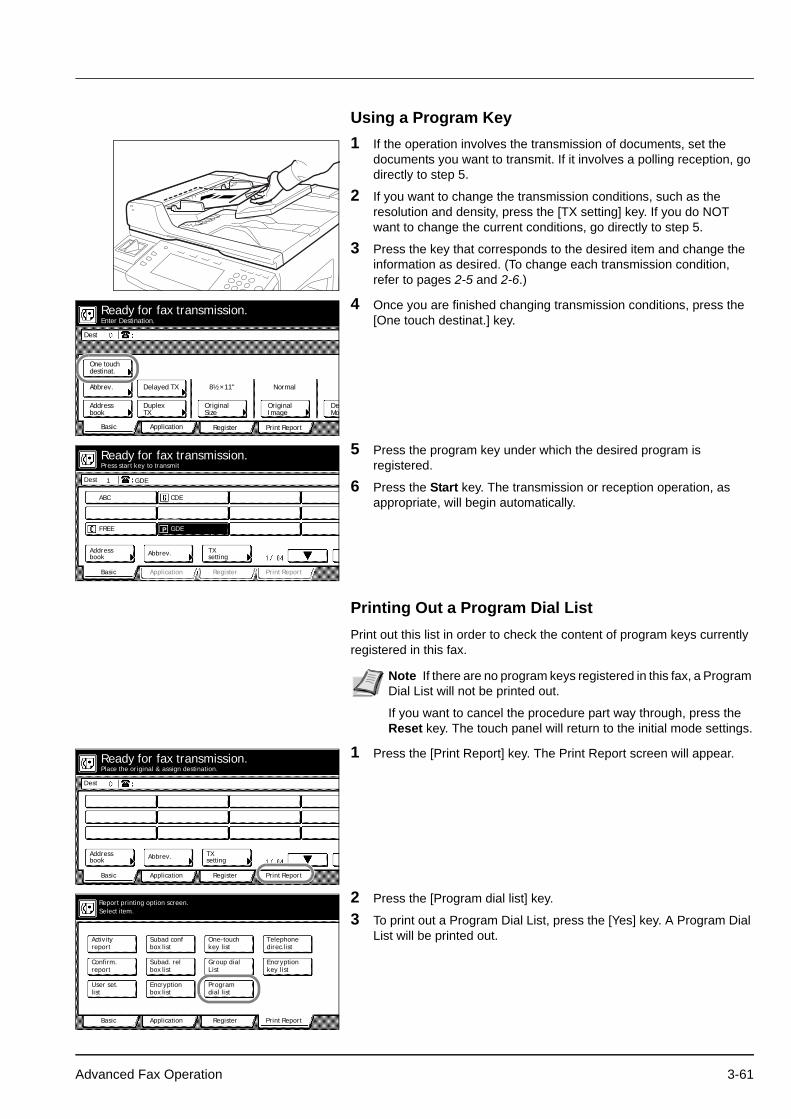
Using a Program Key1 If the operation involves the transmission of documents, set the
documents you want to transmit. If it involves a polling reception, go directly to step 5.
2 If you want to change the transmission conditions, such as the resolution and density, press the [TX setting] key. If you do NOT want to change the current conditions, go directly to step 5.
3 Press the key that corresponds to the desired item and change the information as desired. (To change each transmission condition, refer to pages 2-5 and 2-6.)
4 Once you are finished changing transmission conditions, press the [One touch destinat.] key.
5 Press the program key under which the desired program is registered.
6 Press the Start key. The transmission or reception operation, as appropriate, will begin automatically.
Printing Out a Program Dial ListPrint out this list in order to check the content of program keys currently registered in this fax.
1 Press the [Print Report] key. The Print Report screen will appear.
2 Press the [Program dial list] key.
3 To print out a Program Dial List, press the [Yes] key. A Program Dial List will be printed out.
Enter Destination.
Dest
Ready for fax transmission.
Basic Application
DuplexAddress
Register
TXbook
Print Report
Abbrev.
One touchdestinat.
Delayed TX
OriginalSize
OriginalImage
DeMo
8½×11" Normal
Press start key to transmit
Dest
Ready for fax transmission.
Basic Application
Abbrev.Address
Register
book
Print Report
TXsetting
GDE.
FREE.
.1
GDE.
CDE.
P.
ABC
Note If there are no program keys registered in this fax, a Program Dial List will not be printed out.
If you want to cancel the procedure part way through, press the Reset key. The touch panel will return to the initial mode settings.
Place the original & assign destination.
Dest
Ready for fax transmission.
Basic Application
Abbrev. TXAddress
Register
settingbook
Print Report
Select size
reportConfirm.
reportActivity
Basic Application Register
box listSubad conf
key listOne-touch
ListGroup dial
dial listProgram
box listEncryption
box listSubad. rel
Print Report
Report printing option screen.Select item.
listUser set.
direc.listTelephone
key listEncryption
Advanced Fax Operation 3-61

Managing Fax Use by Each Department (Restricted Access)By allowing certain communication and operation only upon entry of one of the viable ID-codes, use of this fax – such as the number of communications initiated – can be effectively scrutinized for up to 100 individual departments.
Restricted Access Procedure
Functions that can be scrutinized under Restricted Access
• Standard transmission• Transmission that uses the timer• Broadcast Transmission• F-Code Based Relay Broadcast Transmission• Polling Reception• F-Code Based Confidential Transmission• F-Code Based Bulletin Board Reception• Encrypted Transmission• Manual transmission/reception when dialing is initiated from this fax
Available functions in Restricted Access
Restricted Access limits the available functions of this fax to those individuals who enter a viable ID-code – or to the person-in-charge of managing use who enters the registered administrator number.
The following functions of this fax are available upon entering a viable ID-code.
• Standard transmission• Transmission that uses the timer• Broadcast Transmission• F-Code Based Relay Broadcast Transmission• Polling Reception• F-Code Based Confidential Transmission• F-Code Based Bulletin Board Reception• Entering documents into an F-Code Confidential Box• Printing out documents from an F-Code Confidential Box
Item Description ReferenceRegistering ID-codes To enable Restricted Access, it is necessary to register ID-
codes in this fax in advance.Advanced Operation Guide for your machine
Turning Restricted Access ON/OFF
To use Restricted Access for the management of fax functions, turn this setting ON.
Advanced Operation Guide for your machine
Setting the Fax Transmission Limit
Sets the maximum number of documents that each department can transmit. This setting can also be made so that there is no restrictions on the number of documents transmitted, or so that documents can not be sent at all.
Advanced Operation Guide for your machine
Checking Transmission/Copy Counts
Checks the number of documents that have been transmitted under an individual ID-code or by all ID-codes overall.
Advanced Operation Guide for your machine
Clearing the Count for All Departments
Clears the count for total number of documents that have been transmitted. All copy counts will be cleared as well.
Advanced Operation Guide for your machine
Printing Out a Restricted Access Report
Print out this report in order to check the details of communications occurring under Restricted Access.
page 3-67
3-62 Advanced Fax Operation

• Encrypted Transmission• Printing out documents from an Encryption Box• Editing a communication in memory• Confirmation Report• Restricted Access report print out• Manual transmission/reception when dialing is initiated from this fax
Using the fax with Restricted Access turned ON...When Restricted Access is turned ON, it is necessary to enter a viable ID-code or the registered administrator number in order to use the fax machine. Perform the following procedure in order to carry out standard fax transmission (operations OTHER than those which are accessed using the [Register] key, the [Application] key or the [Print Report] key).
Note It is possible to dial a fax or telephone number or view the Communication Result Display, as well as print out the Activity Report, without entering an ID-code or the registered administrator number.
If Restricted Access is turned ON, only those sets of documents entered using the same ID-code will be pooled together under the Batch Transmission function. Any documents that were entered using different ID-codes will be sent during different transmissions. (Refer to Sending Multiple Sets of Documents in One Batch (Batch Transmission function) on page 1-13.)
If Restricted Access Report print out is turned ON, a Restricted Access Report will be automatically printed out upon reaching 50 individual transactions. This report may, however, be automatically printed out even before 50 transactions are reaching depending upon the number of ID-codes registered in the fax. (Refer to Turning Print Out of Each Report ON/OFF (Print Report setting) on page 6-7.)
Ordinarily, the registered self-station name will be displayed as part of the TTI, but, if Restricted Access is turned ON and the transmission is initiated by entering an ID-code, the department name corresponding to that ID-code will be displayed. If you attempt a transmission by entering the administrator password under Restricted Access, however, it will still be the registered self-station name that is displayed.
Note When Restricted Access is turned ON, the registration procedures accessed using the [Register] key will not be available to those who only enter an ID-code.
When Restricted Access is turned ON, refer to the following pages in order to access the procedures available under the Register, Application and Print Report screens.
Accessing the Register Screen When Restricted Access is Turned ON...Refer to this page.
Accessing the Application Screen When Restricted Access is Turned ON...Refer to page 3-65.
Accessing the Print Report Screen When Restricted Access is Turned ON...Refer to page 3-65.
Advanced Fax Operation 3-63

1 Use the numeric keys to enter a viable ID-code (between 1 and 8 digits).
2 Press the [Enter] key. The touch panel will return to the basic fax screen.
Accessing the Register Screen When Restricted Access is Turned ONWhen Restricted Access is turned ON, it is necessary to enter the registered administrator number in order to access the Register screen (available when you press the [Register] key) and thereby perform the corresponding registration settings. To do so, perform the following procedure.
1 Press the [Register] key. The Administrator Number Entry screen will appear.
2 Use the numeric keys to enter the currently registered administrator number.
3 The touch panel will change to the Register screen.
Basic Application Register Print Report
Clear Enter
Enter ID-code. Each
ID-code is set.
.0%
tion Register
Re-dial
On-hook
Dest.check
Memory TX
Auto RXPrint Report
Memory usage:
JUN-06-2007 16:00
Clear Enter
Each Accnt
****.
IMPORTANT This procedure is not available to those who only enter an ID-code.
Basic Application Register Print Report
Clear Enter
Enter ID-code. Each
ID-code is set.
Basic Application Register Print Report
Registering item option screen.
Enter the administrator number.
Info.Location
Dial
Basic Application Register
Box ForwardingFax
dialRemote SW
Test IDRemote
Restrict.TX/RX
Print Report
Registering item option screen.Select item for register.
& TimeDate
keyEncryption
3-64 Advanced Fax Operation

Accessing the Application Screen When Restricted Access is Turned ONWhen Restricted Access is turned ON, perform the following procedure in order to access the Application screen (available when you press the [Application] key) and thereby use the corresponding functions of this fax machine.
1 Use the numeric keys to enter a viable ID-code (between 1 and 8 digits).
2 Press the [Enter] key.
3 Press the [Application] key.
4 The Application screen will appear. Perform the desired procedure.
Accessing the Print Report Screen When Restricted Access is Turned ONWhen Restricted Access is turned ON, perform the following procedure in order to access the Print Report screen (available when you press the [Print Reports] key) and thereby print out the corresponding reports.
Basic Application Register Print Report
Clear Enter
Enter ID-code. Each
ID-code is set.
Enter Destination.
Dest
Ready for fax transmission.
Basic Application
Abbrev.Addressbook
Print Report
TXsetting
FREE GDE
CDE
RX Polling
TX Polling
Basic Application
box inputSub.conf.
TX statusReserved
on LCDTX result
on LCDRX result
data boxPrint encr
box outputSub.conf.
Print Report
Option screenSelect item.
Note The reports that are available for print out will depend on whether you enter an ID-code or the registered administrator number.
If you enter an ID-code...Only the Activity Report, Confirmation Report and Restricted Access Report are available.
If you enter the administrator number...All reports are available
Advanced Fax Operation 3-65

> If you enter an ID-code...
1 Use the numeric keys to enter a viable ID-code (between 1 and 8 digits).
2 Press the [Enter] key.
3 Press the [Print Report] key.
4 The keys for reports that can be printed out will appear. Press the key for the report that you want to print out.
> If you enter the administrator number...
1 Press the [Print Report] key.
2 Press the [Admin.Item] key.
3 Use the numeric keys to enter the currently registered administrator number.
4 The Report Print screen will appear. Print out the desired report(s).
Basic Application Register Print Report
Clear Enter
Enter ID-code. Each
ID-code is set.
Enter Destination.
Dest
Ready for fax transmission.
Basic Application
Abbrev.Addressbook
Print Report
TXsetting
FREE GDE
CDE
Select size
reportConfirm.
reportActivity
Basic Application Print Report
Report printing option screen.Select item.
access repRestricted
Basic Application Register Print Report
Clear Enter
Enter ID-code. Each
ID-code is set.
Note If you press the [Activity report] key at this point, an Activity Report will be printed out.
Enter the administrator number.
Admin. Number Check Ba
Report printing option screen.
Select size
reportConfirm.
reportActivity
Basic Application Register
box listSubad conf
key listOne-touch
ListGroup dial
dial listProgram
box listEncryption
box listSubad. rel
Print Report
Report printing option screen.Select item.
listUser set.
direc.listTelephone
key listEncryption
accesRestr
3-66 Advanced Fax Operation

Printing Out a Restricted Access ReportPrint out this report in order to check the details of communications occurring under Restricted Access. It is possible to print out a report for each individual department, or a report for all departments at the same time.
1 Press the [Print Report] key.
2 Press the [Admin.Item] key.
3 Use the numeric keys to enter the currently registered administrator number.
4 Press the [Restricted access rep] key.
5 Select the ID-code for which you want to print out a Restricted Access Report by pressing the corresponding key to highlight it. It is possible to select more than one ID-code.
6 Press the [Close] key.
7 Press the [Yes] key. A Restricted Access Report will be printed out for the selected department(s).
Note It is possible to print out a Restricted Access Report by entering an ID-code, however, the report that is printed out will only be in relation to the information that corresponds to that particular code. To print out such a Restricted Access Report for your ID-code only, refer to Accessing the Print Report Screen When Restricted Access is Turned ON on page 3-65. This report can only be printed out while Restricted Access is turned ON and the registered administrator number has been entered. If no communications have taken place in this fax under Restricted Access, a Restricted Access Report will not be printed out. If you want to cancel the procedure part way through, press the Reset key. The touch panel will return to the initial mode settings.
Basic Application Register Print Report
Clear Enter
Enter ID-code. Each
ID-code is set.
Note If you press the [Activity report] key at this point, an Activity Report will be printed out.
Enter the administrator number.
Admin. Number Check Ba
Report printing option screen.
tion Register
confkey listOne-touch
ListGroup dial
dial listProgramtion
rel
Print Report
creen.
direc.listTelephone
key listEncryption
access repRestricted
Select output department code.
Print Report.
1/1.
102.
1.
222.
1.
1111. 1212.
AllDepart.
Note If you want to print out a report for all the ID-codes at one time, press the [All Depart.] ([All ID-codes]) key. All of the ID-code keys that are registered and have been used under Restricted Access will be highlighted.
Advanced Fax Operation 3-67

3-68 Advanced Fax Operation

4 Troubleshooting
This section contains explanations on troubleshooting procedures.
When the Fax Lamp is Lit... 4-2CAUTIONS before Disconnecting the Power Cord .............. 4-2If a Power Failure Report is Printed Out............................... 4-2
If an Error Occurs... 4-2
When One of These Message is Displayed... 4-3
Troubleshooting Tables 4-5
Troubleshooting 4-1

When the Fax Lamp is Lit...During a fax communication that use the memory, documents will be entered into memory and, to indicate this, the Fax lamp will light. The Fax lamp will also light when documents are received directly into memory (Memory Reception) during copying in the Copy Operation mode.
CAUTIONS before Disconnecting the Power CordAs electricity is necessary to retain documents in memory, BE SURE to check whether the Fax data indicator is lit or not BEFORE intentionally disconnecting the power cord to this machine. If the indicator IS lit indicating there ARE documents in memory, print out all important documents from memory and then make sure that the Fax lamp is out BEFORE disconnecting the power.
If a Power Failure Report is Printed Out...If documents, schedule communications or other information contained in memory are lost because power to the fax is disconnected or lost, a Power Failure Report will be printed out once power is restored. Refer to this report to find out what information was lost.
If an Error Occurs...In the event of trouble, an explanation in regard to the error will appear in the message display. Refer to When One of These Message is Displayed... on page 4-3 and follow the necessary procedure to eliminate the trouble.
If a communications error occurs, along with the information in the message display, a Transmission or Reception Report, as appropriate, will be printed out and an alarm will sound. Check the error code that is displayed the corresponding report and then refer to Error Code Tables on page 8-9 to confirm the cause of the error. It is also possible to check the error code on the regularly printed Activity Report. (Refer to Printing Out an Activity Report on page 5-4.)
Note The Fax lamp will flash while documents are being entered into memory.
Note The Imaging Memory back-up function of this machine will protect the contents of memory for up to 60 minutes (32 MB of optional memory must be installed) even if, for any reason, power to the fax is disconnected or lost.
Note If no data or information was lost, a Power Failure Report will not be printed out.
Place the original & assign destination.
Dest
Basic Application
Abbrev.Address
Register
book
Print Report
TXsetting
Toner will be empty soon.
Note Whether or not a Transmission or Reception Report is printed out (and the alarm sounds) will depend upon the setting made under Turning Print Out of Each Report ON/OFF (Print Report setting) on page 6-7.
4-2 Troubleshooting

When One of These Message is Displayed...When any of the following messages appear in the message display, follow the corresponding procedure.
Message Procedure PageClose XX Cover. Check the cover.
The cover indicated in the message display is open. Close it securely. ______
Add paper (top cassette) (Add paper (1st cassette))
• There is no paper in the selected drawer. Refer to the Operation Guide for your machine and add paper to the drawer indicated in the message display.
• This message will also be displayed when one or more of the drawers is not set properly. Insert the drawers securely into the machine.
______
Load XX paper in cassette. • The Fixed Size mode is selected in the Paper Feed Selection setting. Load paper of the size indicated in the message display.
• The sizes of the received documents and the paper in the selected drawer are not compatible for printing. Load paper of the same size as that of the received documents.
______
Receive document in memory Data for received documents was stored in memory (Memory Reception) because there was no paper in any of the drawers. Once you load paper into one of the drawers, the documents that were stored in memory will be printed out.If Add paper (top cassette) (Add paper (1st cassette)) is also displayed at the same time, load paper into that drawer. If a specific size is indicated as well in the message display, load paper of that particular size.
______
Add toner There is insufficient toner left in the toner container. Refer to the Operation Guide for your machine and replace the toner container.
______
Paper Misfeed. Paper has jammed somewhere in the fax machine. Refer to the Operation Guide for your machine and remove the jammed paper from the fax machine without leaving any loose scraps.A document has jammed in the Document Processor. Refer to the Operation Guide for your machine and remove the jammed document.Then, reset all of the documents in the Document Processor. The fax will recount the number of documents that were already scanned and will start the scanning operation once again from the document that jammed.
______
Memory Full The memory has reached its capacity. Select whether to continue with the communication or cancel it.If this message appears while you are scanning in documents, you can select whether or not you want to continue and transmit only those documents have already been successfully scanned. If you press the [Yes] key, the transmission operation will begin automatically. If you press the [No] key, the operation will be canceled and the touch panel will return to the initial mode settings.
______
Call for Service Maintenance by qualified service personnel is required. Contact your service representative, an authorized service center or the place of purchase. If [C] and a 4-digit number are displayed as well, inform the service personnel of the displayed number.
______
Time for maintenance Time for scheduled maintenance
Maintenance by qualified service personnel is required. Contact your service representative, an authorized service center or the place of purchase.
______
Communication Error An error has occurred during a fax transmission or fax reception. Check the error code – that indicates the origin of the error – on the corresponding Transmission Report (or Reception Report) that is printed out in order to confirm the cause of the error.
8-9
Troubleshooting 4-3

No DC Loop No Dial Tone
The modular cord may not be connected properly to either the telephone or the line jack (L) on the fax. Either that, or there is a problem with the telephone line. In this case, contact your telephone company.
______
No Response Dialing was accomplished, but connection to the other party was not possible. Check with the other party.
______
No encryption key is registered. The destination was dialed using a one-touch key that was designated for Encrypted Transmission, but the Encrypted Transmission was not possible because the corresponding Encryption Key is no longer registered in your fax.
6-336-41
Message Procedure Page
4-4 Troubleshooting

Troubleshooting TablesIf you experience trouble with your fax machine, refer to the tables below for the appropriate corrective procedures.
If the trouble persists, contact your service representative, an authorized service center or the place of purchase.
Problem Check point Corrective procedure Reference page
The detected document size is often wrong.
Is the machine installed in a location where it is exposed to strong light from directly overhead, or from above and behind?
If the machine is installed in such a location, document size detection may be influenced by the light. Consult with your service representative, an authorized service center or the place of purchase.
______
I am not able to send my documents.
Is the modular cord connected correctly?
Connect the modular cord correctly. ______
Is Communication Error displayed? Perform the necessary procedure to correct the error and try to transmit the documents again.
8-9
Is TX/RX Restriction (transmission or reception) turned ON?
Turn OFF TX/RX Restriction (transmission or reception).
6-25
I am not able to perform Broadcast Transmission.
Is the memory in your fax machine full? Try the Broadcast Transmission procedure again after memory becomes available or after you create available space in memory.
2-113-376-40
During registration of an Encryption Box, an error occurs when I enter the box number and I cannot register the Encryption Box.
Is the box number you are trying to enter the same as the subaddress already registered for an F-Code Box?
You CANNOT register an Encryption Box number that is identical to a registered F-Code Box subaddress. Select a different Encryption Box number.
______
I am not able to print out documents from my Encryption Box.
Are the Encryption Box number and ID that you entered correct?
If you do not know the correct Encryption Box ID, contact your service representative, an authorized service center or the place of purchase.
______
I am not able to perform Encrypted Communication.
Did the transmitting party perform the appropriate registration procedure for the one-touch key (designated for Encrypted Transmission) as decided in advance with the receiving party?
Check the information to be registered once again with the other party.
2-19
Did the receiving party perform the appropriate registration procedure for the Encryption Box as decided in advance with the transmitting party?
Check the information to be registered once again with the other party.
6-36
Is the Encryption Key you used correct?
Check the Encryption Key to be registered once again with the other party.
6-336-41
I am not able to perform Remote Switching.
Is your telephone service set for pulse dialing?
Some telephones allow you to transmit the desired tone signals by simply pushing the appropriate buttons. Refer to the Instruction Manual for the telephone being used.
______
Did you use the correct Remote Switching number?
Check the registered number. (Factory default setting: 55)
3-24
Troubleshooting 4-5

I was able to receive a fax, but it was not printed out and the documents are not in memory.
Is Fax Forwarding turned ON? Check the Fax Forwarding setting. 3-49
I am not able to receive documents.
Is the modular cord connected correctly?
Connect the modular cord correctly. ______
Is Communication Error displayed? Perform the necessary procedure to correct the error and try to receive the documents again.
8-9
Is TX/RX Restriction (transmission or reception) turned ON?
Turn OFF TX/RX Restriction (transmission or reception).
6-25
I am not able to receive documents into memory (Memory Reception).
Is the memory in your fax machine full? Try to receive the documents once again after memory becomes available or after you create available space in memory.
2-113-376-40
I am not able to perform Polling Reception.
Did the transmitting party perform the Polling Transmission procedure correctly?
Check with the transmitting party. ______
I am not able to perform F-Code Based Relay Broadcast Transmission.
Does the relay station fax machine have the appropriate F-Code Based Relay capabilities?
If the relay station fax machine does not one have the appropriate F-Code Based Relay capabilities, Relay Broadcast Transmission will NOT be possible. Check with the relay station.
______
Is there an appropriate box (equal to an F-Code Relay Box) registered in the relay station's fax machine?
Check with the relay station. ______
Do the subaddress and the F-Code password that you entered match the corresponding subaddress and password that are registered in the relay station's fax machine?
If you think the information you entered IS correct, check with the other party.
______
Is the memory in the relay station's fax machine full?
Check with the relay station. ______
During registration of an F-Code Box, an error occurs when I enter the subaddress is entered and I cannot register the F-Code Box.
Is the subaddress you are trying to enter the same as a registered Encryption Box number?
You CANNOT register an F-Code Box subaddress that is identical to a registered Encryption Box number. Select a different subaddress.
______
I am not able to perform F-Code Based Confidential Transmission.
Does the destination party's fax machine have the same F-Code Based Confidential Communication capabilities as your fax machine?
If the destination fax machine does not have the same F-Code Based Confidential Communication capabilities as your machine, F-Code Based Confidential Transmission will NOT be possible. Check with the destination party.
______
Is there an appropriate box (equal to an F-Code Confidential Box) registered in the destination fax?
Check with the destination party. ______
Are the subaddress and the F-Code password that you entered correct?
If you think the information you entered IS correct, check with the other party.
______
Is the memory in the receiving party's fax full?
Check with the receiving party. ______
Problem Check point Corrective procedure Reference page
4-6 Troubleshooting
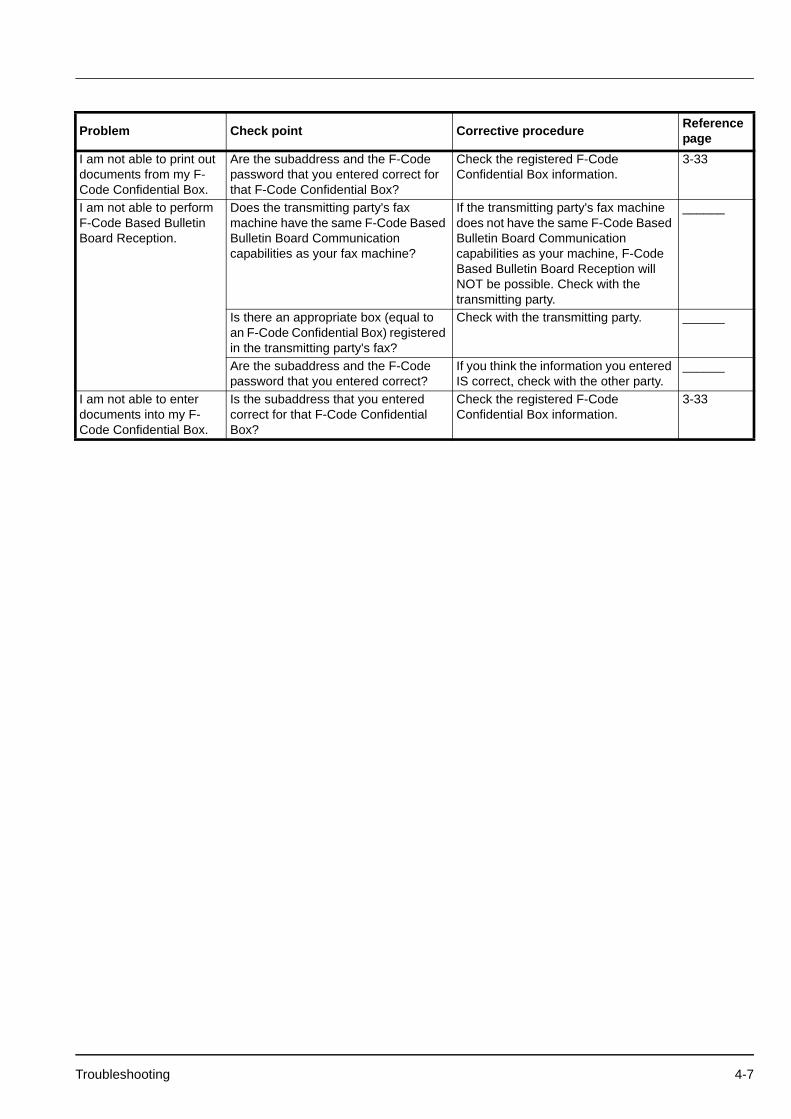
I am not able to print out documents from my F-Code Confidential Box.
Are the subaddress and the F-Code password that you entered correct for that F-Code Confidential Box?
Check the registered F-Code Confidential Box information.
3-33
I am not able to perform F-Code Based Bulletin Board Reception.
Does the transmitting party's fax machine have the same F-Code Based Bulletin Board Communication capabilities as your fax machine?
If the transmitting party's fax machine does not have the same F-Code Based Bulletin Board Communication capabilities as your machine, F-Code Based Bulletin Board Reception will NOT be possible. Check with the transmitting party.
______
Is there an appropriate box (equal to an F-Code Confidential Box) registered in the transmitting party's fax?
Check with the transmitting party. ______
Are the subaddress and the F-Code password that you entered correct?
If you think the information you entered IS correct, check with the other party.
______
I am not able to enter documents into my F-Code Confidential Box.
Is the subaddress that you entered correct for that F-Code Confidential Box?
Check the registered F-Code Confidential Box information.
3-33
Problem Check point Corrective procedure Reference page
Troubleshooting 4-7

4-8 Troubleshooting
5 Managing Information About Your Fax Communications
This section contains explanations on checking the message display and printed reports for information on the status of communications.
Checking the Result of Each Communication (Communication Result Display) 5-2
Checking the Result of Transmissions ................................. 5-2Checking the Result of Receptions ...................................... 5-3
Printing the Different Management Reports/List (Management Reports/Lists Printout) 5-4
Printing Out an Activity Report ............................................. 5-4Printing Out a Confirmation Report ...................................... 5-4Printing Out a User Setting List ............................................ 5-5
Managing Information About Your Fax Communications 5-1
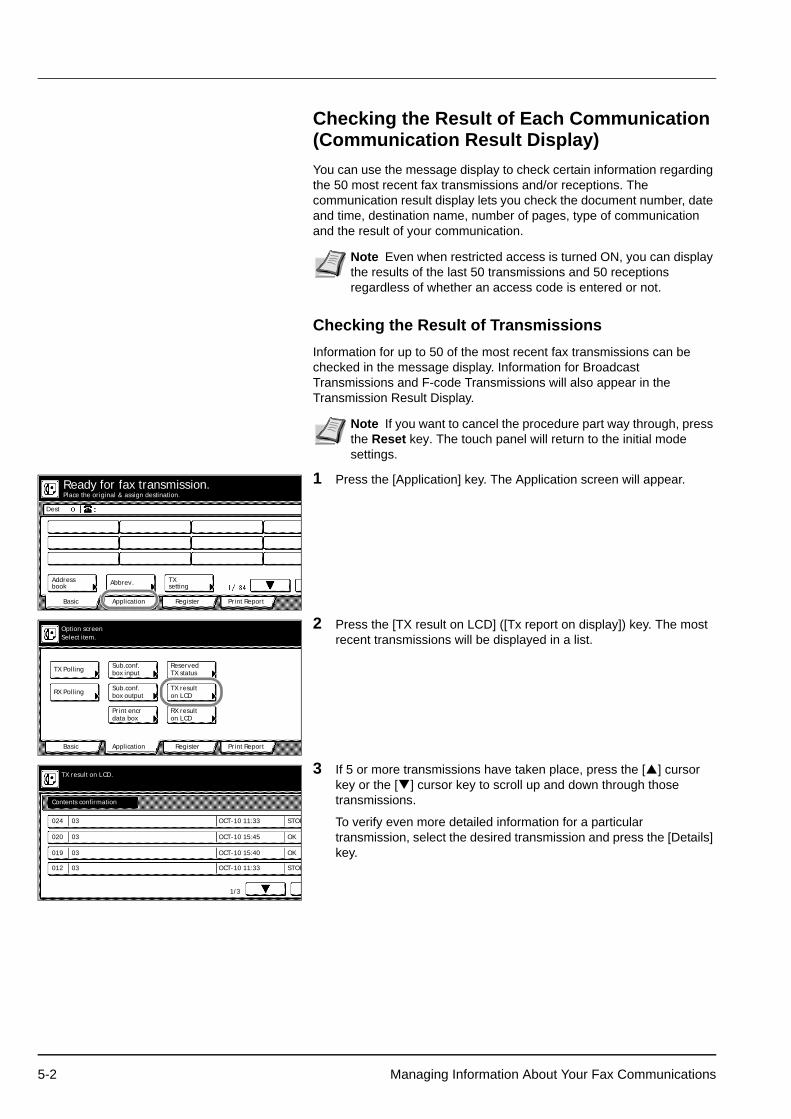
Checking the Result of Each Communication (Communication Result Display)You can use the message display to check certain information regarding the 50 most recent fax transmissions and/or receptions. The communication result display lets you check the document number, date and time, destination name, number of pages, type of communication and the result of your communication.
Checking the Result of TransmissionsInformation for up to 50 of the most recent fax transmissions can be checked in the message display. Information for Broadcast Transmissions and F-code Transmissions will also appear in the Transmission Result Display.
1 Press the [Application] key. The Application screen will appear.
2 Press the [TX result on LCD] ([Tx report on display]) key. The most recent transmissions will be displayed in a list.
3 If 5 or more transmissions have taken place, press the [ ] cursor key or the [ ] cursor key to scroll up and down through those transmissions.
To verify even more detailed information for a particular transmission, select the desired transmission and press the [Details] key.
Note Even when restricted access is turned ON, you can display the results of the last 50 transmissions and 50 receptions regardless of whether an access code is entered or not.
Note If you want to cancel the procedure part way through, press the Reset key. The touch panel will return to the initial mode settings.
Place the original & assign destination.
Dest
Ready for fax transmission.
Basic Application
Abbrev. TXAddress
Register
settingbook
Print Report
RX Polling
TX Polling
Basic Application Register
box inputSub.conf.
TX statusReserved
on LCDTX result
on LCDRX result
data boxPrint encr
box outputSub.conf.
Print Report
Option screenSelect item.
024.
Contents confirmation
TX result on LCD.
1/3.
020.
019.
012.
03.
03.
03.
03.
STOP
OK
OK
STOP
OCT-10 11:33
OCT-10 15:45
OCT-10 15:40
OCT-10 11:33
5-2 Managing Information About Your Fax Communications
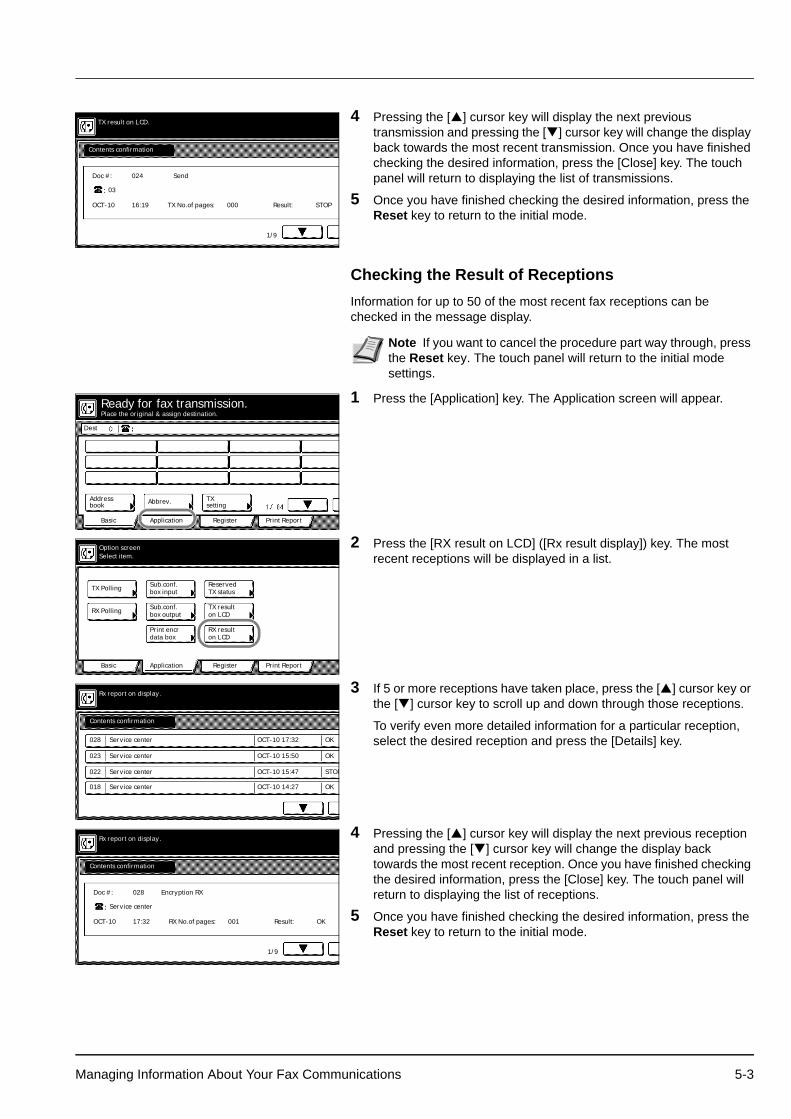
4 Pressing the [ ] cursor key will display the next previous transmission and pressing the [ ] cursor key will change the display back towards the most recent transmission. Once you have finished checking the desired information, press the [Close] key. The touch panel will return to displaying the list of transmissions.
5 Once you have finished checking the desired information, press the Reset key to return to the initial mode.
Checking the Result of ReceptionsInformation for up to 50 of the most recent fax receptions can be checked in the message display.
1 Press the [Application] key. The Application screen will appear.
2 Press the [RX result on LCD] ([Rx result display]) key. The most recent receptions will be displayed in a list.
3 If 5 or more receptions have taken place, press the [ ] cursor key or the [ ] cursor key to scroll up and down through those receptions.
To verify even more detailed information for a particular reception, select the desired reception and press the [Details] key.
4 Pressing the [ ] cursor key will display the next previous reception and pressing the [ ] cursor key will change the display back towards the most recent reception. Once you have finished checking the desired information, press the [Close] key. The touch panel will return to displaying the list of receptions.
5 Once you have finished checking the desired information, press the Reset key to return to the initial mode.
03.
Contents confirmation
TX result on LCD.
Doc #:
1/9.
Send
OCT-10 TX No.of pages: Result: STOP000.16:19.
024.
Note If you want to cancel the procedure part way through, press the Reset key. The touch panel will return to the initial mode settings.
Place the original & assign destination.
Dest
Ready for fax transmission.
Basic Application
Abbrev. TXAddress
Register
settingbook
Print Report
RX Polling
TX Polling
Basic Application Register
box inputSub.conf.
TX statusReserved
on LCDTX result
on LCDRX result
data boxPrint encr
box outputSub.conf.
Print Report
Option screenSelect item.
028.
Contents confirmation
Rx report on display.
OCT-10 17:32
023.
022.
018.
Service center
OCT-10 15:50
OCT-10 15:47
OCT-10 14:27
OK
OK
STOP
OK
Service center
Service center
Service center
Service center
Contents confirmation
Rx report on display.
Doc #:
1/9.
Encryption RX
OCT-10 RX No.of pages: Result: OK001.17:32.
028.
Managing Information About Your Fax Communications 5-3

Printing the Different Management Reports/List (Management Reports/Lists Printout)The results of your fax communications as well as certain fax-related settings in this machine can be checked whenever you want by printing out different management reports. The following procedures explain how to print out the Activity Report, Confirmation Report and User Setting List.
Each of these reports can be printed out at any time.
Printing Out an Activity ReportPrint out this report in order to check the results of the transmissions and receptions that were carried out on this fax. Information for the 50 most recent communications will be printed on the Activity Report.
1 Press the [Print Report] key. The Print Report screen will appear.
2 Press the [Activity report] key.
3 To print out an Activity Report, press the [Yes] key. An Activity Report will be printed out.
Printing Out a Confirmation ReportPrint out this report in order to check the information for fax communications held in memory in the waiting state, such as Transmissions using the timer, Polling Transmissions and those awaiting redialing.
Note If no communications have taken place, an Activity report will not be printed out.
If you want to cancel the procedure part way through, press the Reset key. The touch panel will return to the initial mode settings.
Place the original & assign destination.
Dest
Ready for fax transmission.
Basic Application
Abbrev. TXAddress
Register
settingbook
Print Report
Select size
reportConfirm.
reportActivity
Basic Application Register
box listSubad conf
key listOne-touch
ListGroup dial
dial listProgram
box listEncryption
box listSubad. rel
Print Report
Report printing option screen.Select item.
listUser set.
direc.listTelephone
key listEncryption
Note If there are no related communications or documents for Polling Transmission held in memory, a Confirmation Report will not be printed out.
If you want to cancel the procedure part way through, press the Reset key. The touch panel will return to the initial mode settings.
5-4 Managing Information About Your Fax Communications
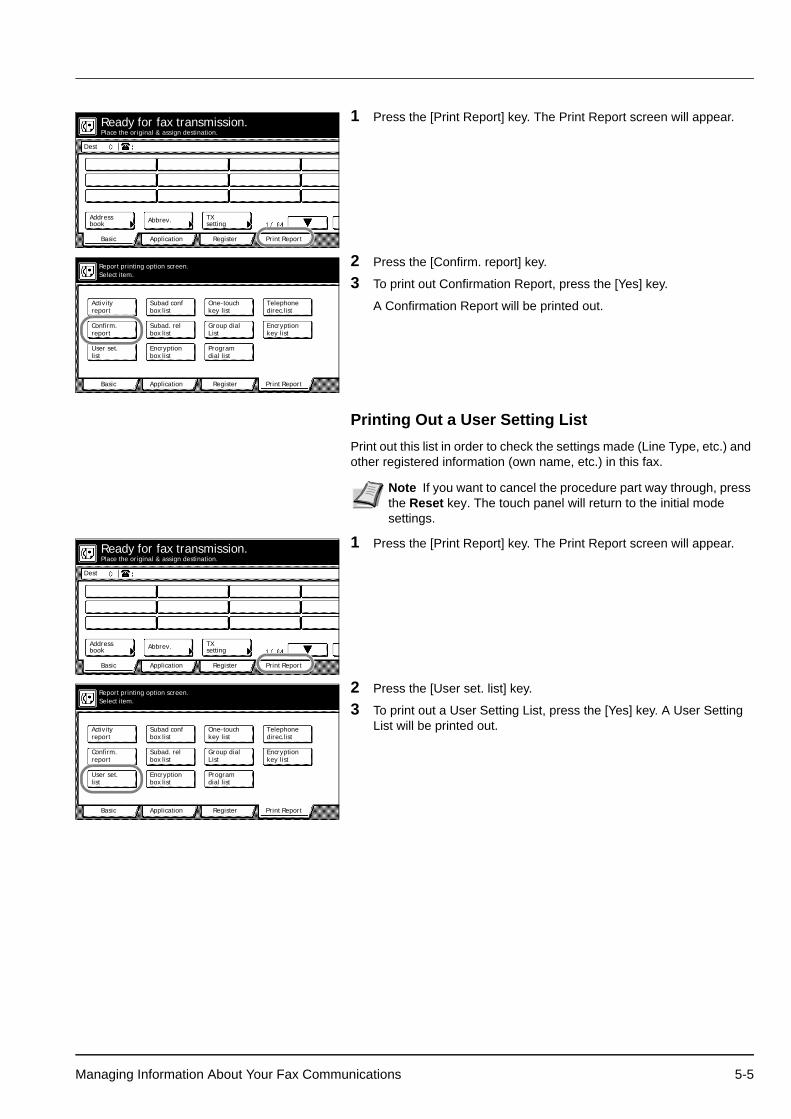
1 Press the [Print Report] key. The Print Report screen will appear.
2 Press the [Confirm. report] key.
3 To print out Confirmation Report, press the [Yes] key.
A Confirmation Report will be printed out.
Printing Out a User Setting ListPrint out this list in order to check the settings made (Line Type, etc.) and other registered information (own name, etc.) in this fax.
1 Press the [Print Report] key. The Print Report screen will appear.
2 Press the [User set. list] key.
3 To print out a User Setting List, press the [Yes] key. A User Setting List will be printed out.
Place the original & assign destination.
Dest
Ready for fax transmission.
Basic Application
Abbrev. TXAddress
Register
settingbook
Print Report
Select size
reportConfirm.
reportActivity
Basic Application Register
box listSubad conf
key listOne-touch
ListGroup dial
dial listProgram
box listEncryption
box listSubad. rel
Print Report
Report printing option screen.Select item.
listUser set.
direc.listTelephone
key listEncryption
Note If you want to cancel the procedure part way through, press the Reset key. The touch panel will return to the initial mode settings.
Place the original & assign destination.
Dest
Ready for fax transmission.
Basic Application
Abbrev. TXAddress
Register
settingbook
Print Report
Select size
reportConfirm.
reportActivity
Basic Application Register
box listSubad conf
key listOne-touch
ListGroup dial
dial listProgram
box listEncryption
box listSubad. rel
Print Report
Report printing option screen.Select item.
listUser set.
direc.listTelephone
key listEncryption
Managing Information About Your Fax Communications 5-5

5-6 Managing Information About Your Fax Communications

6 Various Settings and Registration
This section contains explanations on making settings and registering information.
Automatically Switching Between the Fax and a Telephone (Auto FAX/TEL Switching) 6-3
Automatically Switching Between the Fax and an Answering Machine (TAD Reception) 6-5
Turning Print Out of Each Report ON/OFF (Print Report setting) 6-7
Turning the Bulletin Board ON/OFF (Bulletin Board setting) 6-9
Setting the Number of Rings [Auto Fax Reception] (Number of Rings setting) 6-10
Making Volume Settings (Volume setting) 6-11
Setting the Number of Redial Attempts (Number of Redials setting) 6-12
Setting the Document Size for Scanning from the Document Processor (Scan from DP setting) 6-13
Setting the Default Transmission Mode (TX Mode/Default setting) 6-14
Selecting the Automatic Reception Mode (Receive Mode setting) 6-15
Turning Reception Date & Time Print Out ON/OFF (RX Date/Time setting) 6-16
Selecting the Paper Feed Selection Mode (Fax Paper Feeding Tray setting) 6-17
Turning Manual Paper Feed ON/OFF (MP Tray setting) 6-19
Turning Duplex Reception ON/OFF (Duplex RX setting) 6-20
Turning 2 in 1 Reception ON/OFF (2 in 1 RX setting) 6-21
Turning Remote Diagnosis ON/OFF (Remote Diagnosis setting) 6-22
Registering the Remote Test ID (Remote Test ID setting) 6-23
Receiving faxes at the same size or a reduced size (Reception Size setting) 6-24
Restricting Communication To/From Specific Destinations (TX/RX Restriction) 6-25
Registering New Permit Fax Numbers ................................. 6-26Modifying or Deleting Permit Fax Numbers.......................... 6-27Registering New Permit IDs ................................................. 6-28Modifying or Deleting Permit IDs .......................................... 6-28Registering New Reject Fax Numbers ................................. 6-29Modifying or Deleting Reject Fax Numbers .......................... 6-30Turning TX/RX Restriction ON/OFF ..................................... 6-31
Various Settings and Registration 6-1
Communicating with Encrypted Documents (Encrypted Communication) 6-33
Registering New Encryption Keys ........................................ 6-33Modifying or Deleting Encryption Keys ................................. 6-35Registering New Encryption Boxes ...................................... 6-36Modifying or Deleting Encryption Boxes ............................... 6-37Performing the Operation at the Transmitting Fax................ 6-38Performing the Operation at the Receiving Fax.................... 6-39Printing Out Documents from an Encryption Box ................. 6-40Printing Out an Encryption Key List ...................................... 6-41Printing Out an Encryption Box List ...................................... 6-41
6-2 Various Settings and Registration

Automatically Switching Between the Fax and a Telephone (Auto FAX/TEL Switching)This reception mode is convenient for using a separately purchased telephone together with this fax on a single telephone line. If an incoming call is from a fax machine, fax reception will start automatically. If the call is from a telephone, the fax will ring to let you know that you should answer.
Reception flow
Preparation
Refer to Selecting the Automatic Reception Mode (Receive Mode setting) on page 6-15, and select Auto Fax/Tel. SW.
Make sure that Auto RX is displayed on the basic fax screen. If it is not, press the reception mode select key and then press the [Auto RX] key.
1 When a call comes in, the telephone will ring. However, if ‘0’ is selected for Auto Fax/Tel SW under the Number of Rings setting, the ringing will not be audible.
2 Answering the call...
Note Auto FAX/TEL Switching is only possible if a separately purchased telephone is connected to this fax machine.
Even if you do not answer the telephone, the calling party will incur telephone charges after the phone rings a predetermined number of times.
ign destination.
.0%x transmission.
tion
TX
Register
Re-dial
On-hook
setting
Dest.check
Memory TX
Auto RXPrint Report
Memory usage:
JUN-06-2007 16:00
Note The telephone will ring only once in the metric version models. In the inch version models, you can set the number of times the telephone will ring. (Refer to Setting the Number of Rings [Auto Fax Reception] (Number of Rings setting) on page 6-10.)
Various Settings and Registration 6-3

> If the call is from a telephone...1 The fax will ring to let you know that you should answer. Pick up
the telephone receiver within 30 seconds after the ringing starts.
2 Speak with the other party.
> If the call is from a fax...
Fax reception will start automatically.
Note If the telephone receiver is not picked up within 30 seconds, the fax machine will switch to fax reception.
Note At the end of the conversation, fax reception can be initiated manually. (Refer to Initiating the Fax Connection Manually (Manual Fax Reception) on page 3-22.)
6-4 Various Settings and Registration

Automatically Switching Between the Fax and an Answering Machine (TAD Reception)This reception mode is convenient for using a separately purchased telephone with answering machine capabilities together with this fax. If an incoming call is from a fax machine, fax reception will begin automatically. If the call is from a telephone, the functions of the answering machine will engage, so, even if you cannot answer, the caller will be able to leave a message.
Reception flow
Preparation
Make sure that Answering Machine is displayed on the basic fax screen. If it is not, press the reception mode select key and then press the [Answering Machine] key.
Note TAD Reception is only possible if a separately purchased telephone with answering machine capabilities is connected to this fax machine.
Refer to the Instruction Manual for the telephone in use for details on recording and listening to messages, etc.
BE SURE that the number of times your answering machine is set to ring is LESS than the number of times the fax is set to ring.
If you have selected TAD Reception as the current reception mode, MAKE SURE that, in the first minute after the telephone answers the incoming call, there are no silent pauses of 9 seconds or more [6 seconds or more for metric versions] in either the message you record or the message you receive. If there is such a pause, the silence detection function of this fax will be activated and the fax machine will switch to fax reception.
FaxIf the other party is sending documents using an automatic fax transmission mode...
The other party’s documents will be automatically received.
FaxIf the other party is sending documents using a manual fax transmission mode... The answering
machine will play your message.
The answering machine will record the other party’s message.
If the other party initiates a fax transmission, fax reception will start automatically.
TelephoneIf the other party is calling from a telephone...
ign destination.
.0%x transmission.
tion Register
Re-dial
On-hook
Dest.check
Memory TX
MachineAnswering
Print Report
Memory usage:
JUN-06-2007 16:00
TXsetting
Various Settings and Registration 6-5

1 The telephone will ring a designated number of times.
2 Your answering machine will answer the call as follows:
> If the call is from a telephone, but you do not answer...
The functions of the answering machine will engage, your message will be played and the caller will be able to leave a message.
> If the call is from a fax...
Fax reception will start automatically.
Note You can set the number of times the telephone will ring. Refer to Setting the Number of Rings [Auto Fax Reception] (Number of Rings setting) on page 6-10.
If the telephone receiver is picked up while the telephone is still ringing, the fax will deal with the call in the same manner as a standard Manual Fax Reception. (Refer to Initiating the Fax Connection Manually (Manual Fax Reception) on page 3-22.)
Note If there is a silent pause of 9 seconds or more [6 seconds or more for metric versions], the fax machine will switch to fax reception.
6-6 Various Settings and Registration
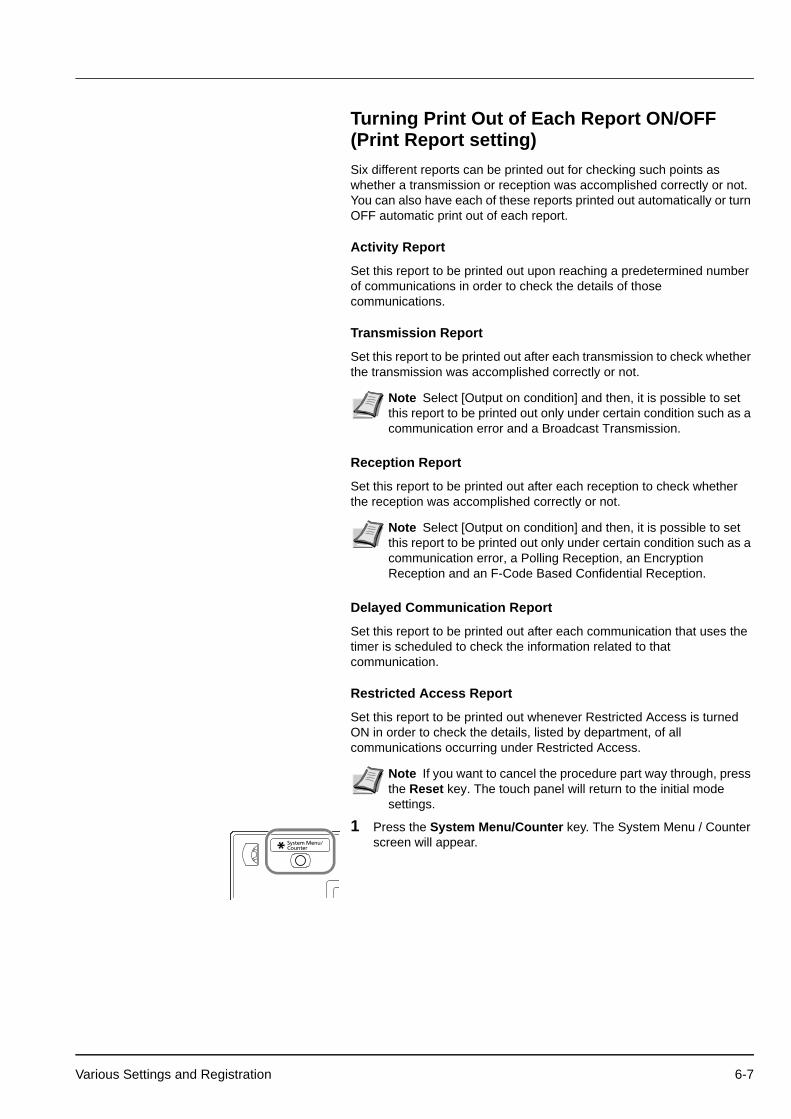
Turning Print Out of Each Report ON/OFF (Print Report setting)Six different reports can be printed out for checking such points as whether a transmission or reception was accomplished correctly or not. You can also have each of these reports printed out automatically or turn OFF automatic print out of each report.
Activity Report
Set this report to be printed out upon reaching a predetermined number of communications in order to check the details of those communications.
Transmission Report
Set this report to be printed out after each transmission to check whether the transmission was accomplished correctly or not.
Reception Report
Set this report to be printed out after each reception to check whether the reception was accomplished correctly or not.
Delayed Communication Report
Set this report to be printed out after each communication that uses the timer is scheduled to check the information related to that communication.
Restricted Access Report
Set this report to be printed out whenever Restricted Access is turned ON in order to check the details, listed by department, of all communications occurring under Restricted Access.
1 Press the System Menu/Counter key. The System Menu / Counter screen will appear.
Note Select [Output on condition] and then, it is possible to set this report to be printed out only under certain condition such as a communication error and a Broadcast Transmission.
Note Select [Output on condition] and then, it is possible to set this report to be printed out only under certain condition such as a communication error, a Polling Reception, an Encryption Reception and an F-Code Based Confidential Reception.
Note If you want to cancel the procedure part way through, press the Reset key. The touch panel will return to the initial mode settings.
Various Settings and Registration 6-7

2 Press the [Fax Default] key.
3 Press the [ ] cursor key until Print Report is highlighted.
4 Press the [Change #] key.
5 Select whether or not you want the Activity Report to be automatically printed out. Press the [On] key to have it printed automatically and the [Off] key to stop print out.
6 In the screen for step 5, select whether or not you want the Transmission Report to be automatically printed out. Press the [On] key to have it printed automatically and the [Off] key to stop print out. If you want it to be printed out only under certain conditions, press the [Output on condition] key.
7 In the screen for step 5, select whether or not you want the Reception Report to be automatically printed out. Press the [On] key to have it printed automatically and the [Off] key to stop print out. If you want it to be printed out only under certain conditions, press the [Output on condition] key.
8 In the screen for step 5, select whether or not you want the Delayed Communication Report to be automatically printed out. Press the [On] key to have it printed automatically and the [Off] key to stop print out.
9 In the screen for step 5, select whether or not you want the Restricted Access Report to be automatically printed out. Press the [On] key to have it printed automatically and the [Off] key to stop print out.
10Press the [Close] key. If you are finished making settings, press the Reset key to return to the initial mode.
System Menu
DefaultCopy
DefaultFAX Language
SettingMP Tray
Orig. SizeRegister
DefaultMachine
AccounJob
ReportPrint
System Menu / Counter
Print Report
On
Off
Back
RX Transaction
On
Output oncondition
On
Off
Close
System Menu / Counter
Off
On
Off
On
Output oncondition
Off
TX TransactionActivityCont'l Restri. AccessDelayed Comm.
6-8 Various Settings and Registration

Turning the Bulletin Board ON/OFF (Bulletin Board setting)If you use the Bulletin Board function, you only need to enter documents into memory once and they will be available for transmission to any number of receiving parties upon receipt of their polling request. (Refer to Preparing Documents for a Polling Transmission on page 3-26.) In order to use the Bulletin Board function, it is necessary to turn it ON here in advance.
1 Press the System Menu/Counter key. The System Menu / Counter screen will appear.
2 Press the [Fax Default] key.
3 Press the [ ] cursor key until Bulletin Board is highlighted.
4 Press the [Change #] key.
5 Select whether you want to turn the Bulletin Board function ON or OFF. Press the [Save doc. after Tx] key to turn it ON and the [Del. doc. after Tx] key to turn it OFF.
6 Press the [Close] key. If you are finished making settings, press the Reset key to return to the initial mode.
Note If you want to cancel the procedure part way through, press the Reset key. The touch panel will return to the initial mode settings.
System Menu
DefaultCopy
DefaultFAX Language
SettingMP Tray
Orig. SizeRegister
DefaultMachine
AccounJob
ReportPrint
System Menu / Counter
Bulletin Board
Del. doc.after TX
Save doc.after TX
Ba
System Menu / Counter
Note If you select Del. doc. after Tx, the documents to be deleted from memory after they are transmitted once. If you select Save doc. after Tx, the documents will remain in memory waiting for the next polling request even after they are transmitted.
Various Settings and Registration 6-9

Setting the Number of Rings [Auto Fax Reception] (Number of Rings setting)The number of times the fax will [ring] before an incoming call is answered in the Auto Fax Reception mode, the Auto FAX/TEL Switching mode [this setting is not available in metric models] or the TAD Reception mode can be set here to any number between 1 and 15.
1 Press the System Menu/Counter key. The System Menu / Counter screen will appear.
2 Press the [Fax Default] key.
3 Press the [ ] key until # of Rings is highlighted.
4 Press the [Change #] key.
5 Use the [+] or [-] key to select the number of rings before an incoming call is answered in each mode: the Auto Fax Reception mode, the Auto FAX/TEL Switching mode (this setting is not available in metric models) and the TAD Reception mode.
6 Press the [Close] key. If you are finished making settings, press the Reset key to return to the initial mode.
Note If you want to cancel the procedure part way through, press the Reset key. The touch panel will return to the initial mode settings.
System Menu
DefaultCopy
DefaultFAX Language
SettingMP Tray
Orig. SizeRegister
DefaultMachine
AccounJob
ReportPrint
System Menu / Counter
# of Rings Ba
02.
For fax RX(01-15)
Auto Fax/Tel SW(00-15)
For answering te(01-15)
00. 15.
System Menu / Counter
6-10 Various Settings and Registration

Making Volume Settings (Volume setting)The volume of the alarm, the monitor and the speaker can be adjusted here, or you can make the alarm inaudible.
Alarm Volume
Sets the volume of the alarm that sounds in the event of an error or when you press an incorrect key on the operation panel.
Monitor Volume
Sets the volume of the internal speaker that allows you to listen to conditions on the telephone line when the [On-hook] key was NOT pressed.
Speaker Volume
Sets the volume of the internal speaker that allows you to listen to conditions on the telephone line when the [On-hook] key WAS pressed.
1 Press the System Menu/Counter key. The System Menu / Counter screen will appear.
2 Press the [Fax Default] key.
3 Press the [ ] cursor key until Set Volume (Set the sound volume) is highlighted.
4 Press the [Change #] key.
5 Select the desired alarm volume from among Maximum, Minimum and Off.
6 Select the desired monitor volume from among Maximum, Medium, Minimum and Off.
7 Select the desired speaker volume from among Maximum, Medium, Minimum and Off.
8 Press the [Close] key. If you are finished making settings, press the Reset key to return to the initial mode.
Note If you want to cancel the procedure part way through, press the Reset key. The touch panel will return to the initial mode settings.
System Menu
DefaultCopy
DefaultFAX Language
SettingMP Tray
Orig. SizeRegister
DefaultMachine
AccounJob
ReportPrint
System Menu / Counter
Set Volume
Minimum
Off
Ba
Speaker Volume
Medium
Minimum
System Menu / Counter
Off
Medium
Minimum
Off
Monitor VolumeBuzzer Volume
MaximumMaximum Maximum
Off
Various Settings and Registration 6-11

Setting the Number of Redial Attempts (Number of Redials setting)Sets the number of times the fax will automatically attempt to redial a number when the other party's fax line is busy or some other trouble occurs with the connection.
1 Press the System Menu/Counter key. The System Menu / Counter screen will appear.
2 Press the [Fax Default] key.
3 Press the [ ] cursor key until Retry Times is highlighted.
4 Press the [Change #] key.
5 Use the [+] or [-] key to select the desired number of redial attempts.
6 Press the [Close] key. If you are finished making settings, press the Reset key to return to the initial mode settings.
Note The number of redial attempts can be set here to any number between 0 and 14.
If you want to cancel the procedure part way through, press the Reset key. The touch panel will return to the initial mode settings.
System Menu
DefaultCopy
DefaultFAX Language
SettingMP Tray
Orig. SizeRegister
DefaultMachine
AccounJob
ReportPrint
System Menu / Counter
System Menu / Counter
.03
Retry Times Ba
(00 14).~.
6-12 Various Settings and Registration

Setting the Document Size for Scanning from the Document Processor (Scan from DP setting)Select here whether documents that are set in the Document Processor will be scanned as 8 1/2 × 11" [A4R] or other such standard size paper, or as long documents (in the direction of the paper feed).
1 Press the System Menu/Counter key. The System Menu / Counter screen will appear.
2 Press the [Fax Default] key.
3 Press the [ ] key until Scan from Doc. P. (Doc. P. scanning) is highlighted.
4 Press the [Change #] key.
5 Select the desired original size setting by pressing either the [Standard size] key or the [Long original] ([Long orig.]) key, as appropriate.
6 Press the [Close] key. If you are finished making settings, press the Reset key to return to the initial mode.
Note It is necessary to select Standard size here when transmitting both sides of duplex (2-sided) documents. (Refer to Sending 2-Sided Documents (Duplex Transmission) on page 3-3.)
If you select Long original (Long orig.) here, it will not be possible to have documents rotated for transmission. (Refer to Rotating the Document Image for Transmission (Rotate & Transmit function) on page 1-14.)
If you want to cancel the procedure part way through, press the Reset key. The touch panel will return to the initial mode settings.
System Menu
DefaultCopy
DefaultFAX Language
SettingMP Tray
Orig. SizeRegister
DefaultMachine
AccounJob
ReportPrint
System Menu / Counter
Scan from Doc.P.
Standardsize
Longoriginal
System Menu / Counter
Ba
Various Settings and Registration 6-13

Setting the Default Transmission Mode (TX Mode/Default setting)You can select which transmission mode, Memory Transmission or Direct Feed Transmission, will be the default setting in this fax.
If you select Dir. Feed Tx here, the [Dir. Feed Tx] key will be shown in the basic fax screen.
1 Press the System Menu/Counter key. The System Menu / Counter screen will appear.
2 Press the [Fax Default] key.
3 Press the [ ] cursor key until TX Mode/Default is highlighted.
4 Press the [Change #] key.
5 Select the desired transmission mode setting by pressing either the [Memory TX] key or the [Dir. Feed Tx] key, as appropriate.
6 Press the [Close] key. If you are finished making settings, press the Reset key to return to the initial mode.
Note If you want to cancel the procedure part way through, press the Reset key. The touch panel will return to the initial mode settings.
System Menu
DefaultCopy
DefaultFAX Language
SettingMP Tray
Orig. SizeRegister
DefaultMachine
AccounJob
ReportPrint
System Menu / Counter
TX Mode/Default
Memory TX
Dir. FeedTX
System Menu / Counter
Ba
6-14 Various Settings and Registration
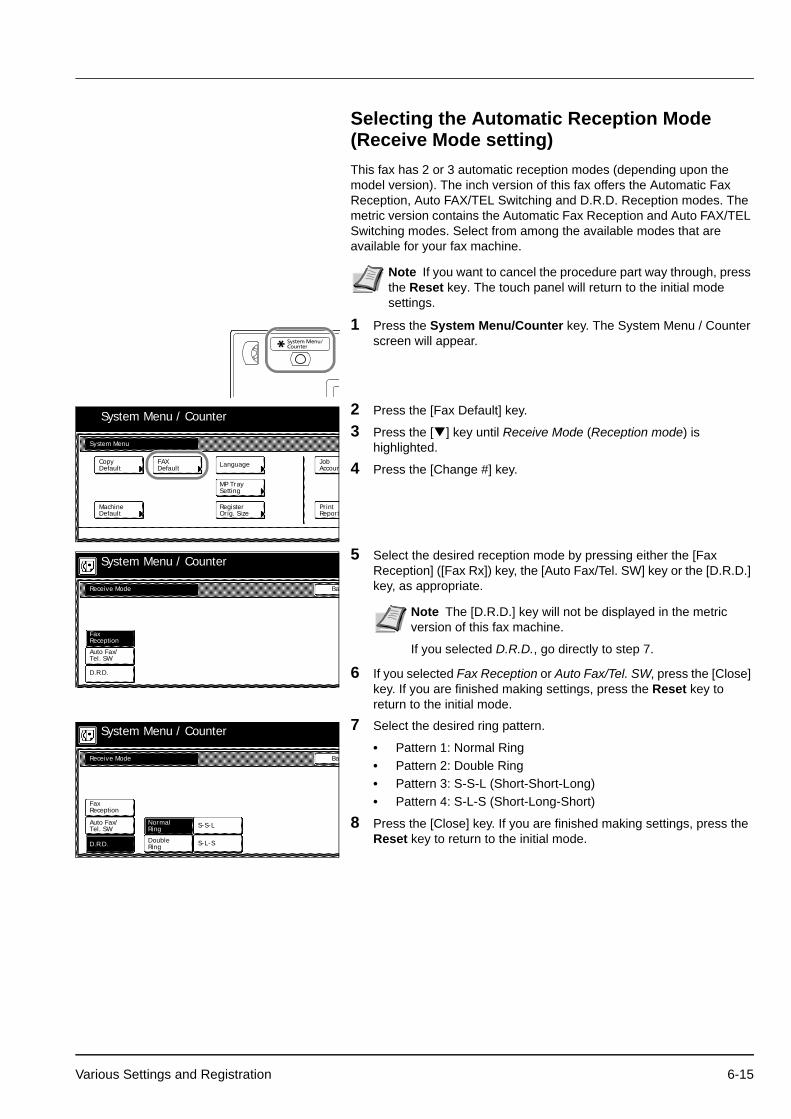
Selecting the Automatic Reception Mode (Receive Mode setting)This fax has 2 or 3 automatic reception modes (depending upon the model version). The inch version of this fax offers the Automatic Fax Reception, Auto FAX/TEL Switching and D.R.D. Reception modes. The metric version contains the Automatic Fax Reception and Auto FAX/TEL Switching modes. Select from among the available modes that are available for your fax machine.
1 Press the System Menu/Counter key. The System Menu / Counter screen will appear.
2 Press the [Fax Default] key.
3 Press the [ ] key until Receive Mode (Reception mode) is highlighted.
4 Press the [Change #] key.
5 Select the desired reception mode by pressing either the [Fax Reception] ([Fax Rx]) key, the [Auto Fax/Tel. SW] key or the [D.R.D.] key, as appropriate.
6 If you selected Fax Reception or Auto Fax/Tel. SW, press the [Close] key. If you are finished making settings, press the Reset key to return to the initial mode.
7 Select the desired ring pattern.
• Pattern 1: Normal Ring• Pattern 2: Double Ring• Pattern 3: S-S-L (Short-Short-Long)• Pattern 4: S-L-S (Short-Long-Short)
8 Press the [Close] key. If you are finished making settings, press the Reset key to return to the initial mode.
Note If you want to cancel the procedure part way through, press the Reset key. The touch panel will return to the initial mode settings.
System Menu
DefaultCopy
DefaultFAX Language
SettingMP Tray
Orig. SizeRegister
DefaultMachine
AccounJob
ReportPrint
System Menu / Counter
Receive Mode
FaxReception
Auto Fax/Tel. SW
System Menu / Counter
Ba
D.R.D.
Note The [D.R.D.] key will not be displayed in the metric version of this fax machine.
If you selected D.R.D., go directly to step 7.
Receive Mode
FaxReception
Auto Fax/Tel. SW
System Menu / Counter
Ba
D.R.D.
NormalRing
DoubleRing
S-S-L
S-L-S
Various Settings and Registration 6-15
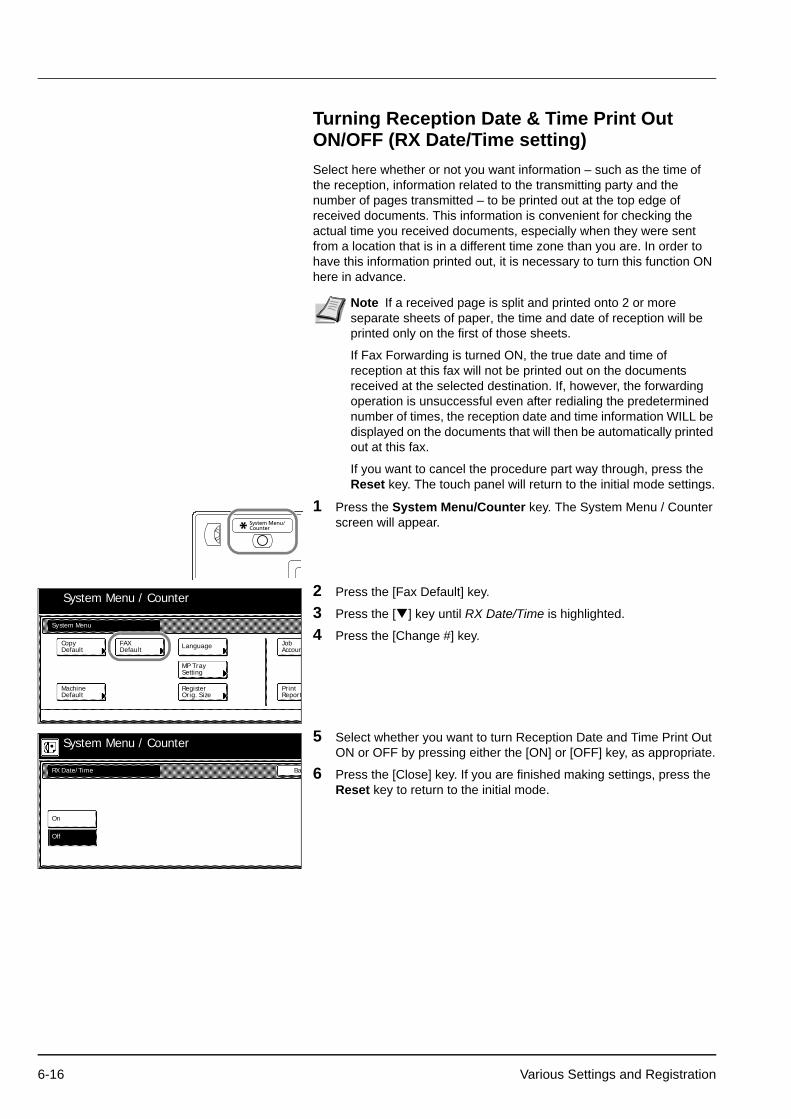
Turning Reception Date & Time Print Out ON/OFF (RX Date/Time setting)Select here whether or not you want information – such as the time of the reception, information related to the transmitting party and the number of pages transmitted – to be printed out at the top edge of received documents. This information is convenient for checking the actual time you received documents, especially when they were sent from a location that is in a different time zone than you are. In order to have this information printed out, it is necessary to turn this function ON here in advance.
1 Press the System Menu/Counter key. The System Menu / Counter screen will appear.
2 Press the [Fax Default] key.
3 Press the [ ] key until RX Date/Time is highlighted.
4 Press the [Change #] key.
5 Select whether you want to turn Reception Date and Time Print Out ON or OFF by pressing either the [ON] or [OFF] key, as appropriate.
6 Press the [Close] key. If you are finished making settings, press the Reset key to return to the initial mode.
Note If a received page is split and printed onto 2 or more separate sheets of paper, the time and date of reception will be printed only on the first of those sheets.
If Fax Forwarding is turned ON, the true date and time of reception at this fax will not be printed out on the documents received at the selected destination. If, however, the forwarding operation is unsuccessful even after redialing the predetermined number of times, the reception date and time information WILL be displayed on the documents that will then be automatically printed out at this fax.
If you want to cancel the procedure part way through, press the Reset key. The touch panel will return to the initial mode settings.
System Menu
DefaultCopy
DefaultFAX Language
SettingMP Tray
Orig. SizeRegister
DefaultMachine
AccounJob
ReportPrint
System Menu / Counter
RX Date/Time
On
Off
Ba
System Menu / Counter
6-16 Various Settings and Registration

Selecting the Paper Feed Selection Mode (Fax Paper Feeding Tray setting)Select here from among the 3 available modes for feeding paper to print out all documents that are received when the fax is in the Fax Operation mode - as well as for printing out reports and lists: the Auto Selection mode, the Fixed Size mode or the Fixed Cassette mode.
Auto Selection mode
In this mode, the fax will automatically select and feed the most appropriate paper.
Fixed Size mode
In this mode, paper feed will be accomplished from the drawer that contains the selected size of paper. If there is no paper of the selected size in any drawer, the documents will be received directly into memory.
Fixed Cassette mode
In this mode, paper feed will be accomplished from a specified drawer regardless of the size of the received documents. If there is no paper in the selected drawer, the documents will be received directly into memory.
1 Press the System Menu/Counter key. The System Menu / Counter screen will appear.
IMPORTANT This setting CANNOT be changed while there are documents remaining in memory.
The available media types for printing received faxes are as follows:
Plain, Rough, Recycled, Bond, Color (Colour), High Quality, Custom 1 - 8
For more information on specifying the media type, refer to the Operation Guide for your machine.
IMPORTANT You CANNOT select more than one size of paper in this setting.
If the same size of paper is set in more than one location, the upper drawer will have priority for paper feed.
IMPORTANT You CANNOT select more than one drawer in this setting.
Note If you want to cancel the procedure part way through, press the Reset key. The touch panel will return to the initial mode settings.
Various Settings and Registration 6-17

2 Press the [Fax Default] key.
3 Press the [ ] key until Fax pap. feeding tray (Fax paper tray) is highlighted.
4 Press the [Change #] key.
5 Select the desired paper feed mode by pressing either the [Auto Select] ([Auto sel.]) key, the [Fix Size] ([Fixed size]) key or the [Fixed Cassette] key, as appropriate.
If you selected Auto Select (Auto sel.), proceed directly to step 8.
If you selected Fix Size (Fixed size), go the next step.
If you selected Fixed Cassette, go directly to step 7.
6 Select the desired paper size and then proceed directly to step 8.
7 Select the desired drawer.
8 Press the [Close] key.If you are finished making settings, press the Reset key to return to the initial mode.
System Menu
DefaultCopy
DefaultFAX Language
SettingMP Tray
Orig. SizeRegister
DefaultMachine
AccounJob
ReportPrint
System Menu / Counter
Fax pap. feeding tray
Fix Size
Ba
AutoSelect
FixedCassette
System Menu / Counter
6-18 Various Settings and Registration
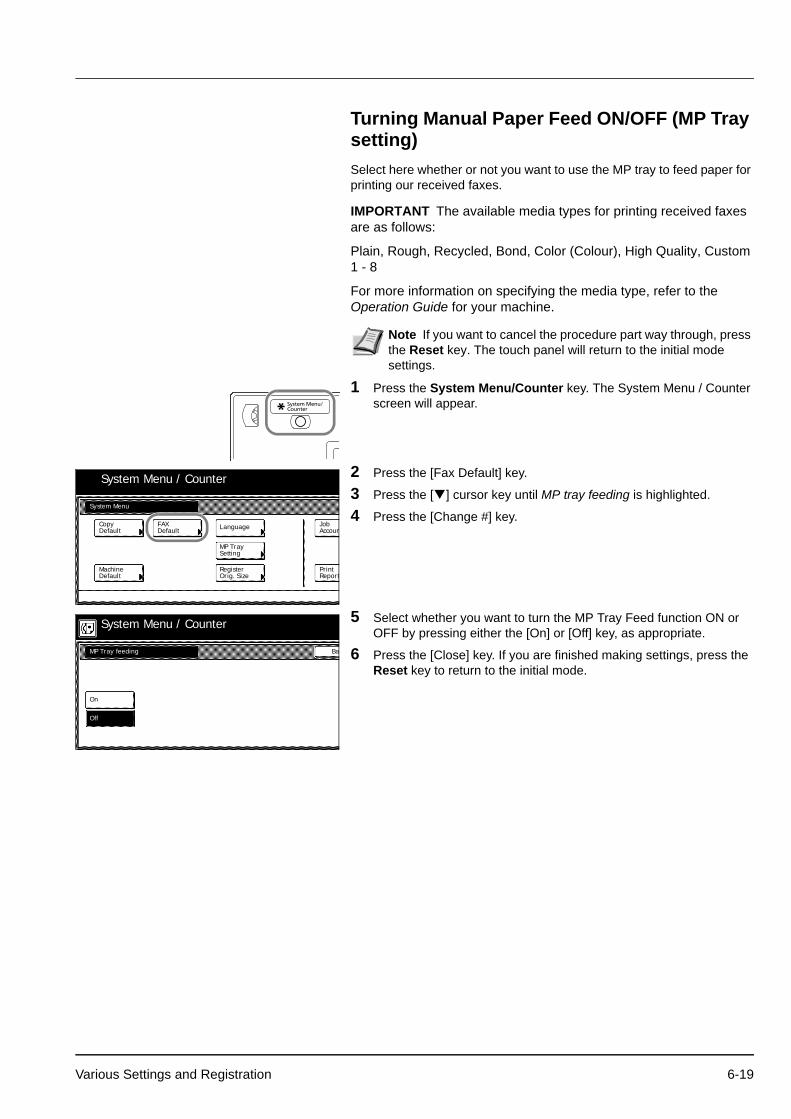
Turning Manual Paper Feed ON/OFF (MP Tray setting)Select here whether or not you want to use the MP tray to feed paper for printing our received faxes.
1 Press the System Menu/Counter key. The System Menu / Counter screen will appear.
2 Press the [Fax Default] key.
3 Press the [ ] cursor key until MP tray feeding is highlighted.
4 Press the [Change #] key.
5 Select whether you want to turn the MP Tray Feed function ON or OFF by pressing either the [On] or [Off] key, as appropriate.
6 Press the [Close] key. If you are finished making settings, press the Reset key to return to the initial mode.
IMPORTANT The available media types for printing received faxes are as follows:
Plain, Rough, Recycled, Bond, Color (Colour), High Quality, Custom 1 - 8
For more information on specifying the media type, refer to the Operation Guide for your machine.
Note If you want to cancel the procedure part way through, press the Reset key. The touch panel will return to the initial mode settings.
System Menu
DefaultCopy
DefaultFAX Language
SettingMP Tray
Orig. SizeRegister
DefaultMachine
AccounJob
ReportPrint
System Menu / Counter
MP Tray feeding
On
Off
Ba
System Menu / Counter
Various Settings and Registration 6-19
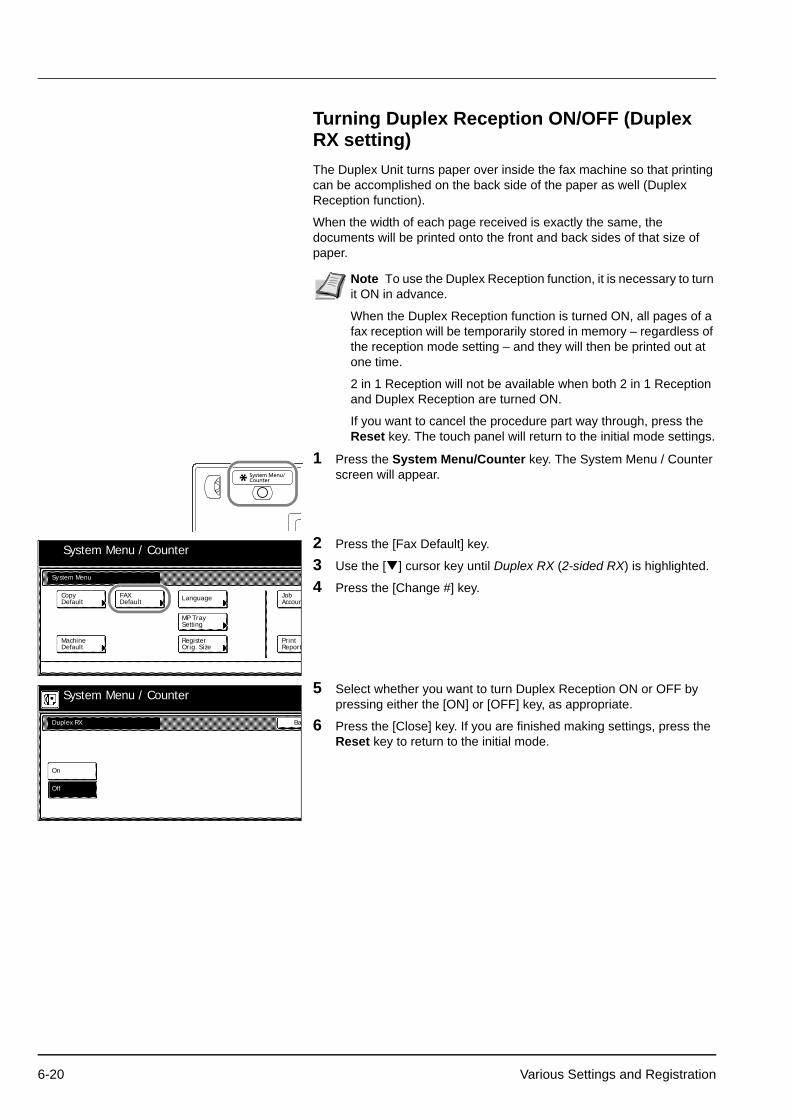
Turning Duplex Reception ON/OFF (Duplex RX setting)The Duplex Unit turns paper over inside the fax machine so that printing can be accomplished on the back side of the paper as well (Duplex Reception function).
When the width of each page received is exactly the same, the documents will be printed onto the front and back sides of that size of paper.
1 Press the System Menu/Counter key. The System Menu / Counter screen will appear.
2 Press the [Fax Default] key.
3 Use the [ ] cursor key until Duplex RX (2-sided RX) is highlighted.
4 Press the [Change #] key.
5 Select whether you want to turn Duplex Reception ON or OFF by pressing either the [ON] or [OFF] key, as appropriate.
6 Press the [Close] key. If you are finished making settings, press the Reset key to return to the initial mode.
Note To use the Duplex Reception function, it is necessary to turn it ON in advance.
When the Duplex Reception function is turned ON, all pages of a fax reception will be temporarily stored in memory – regardless of the reception mode setting – and they will then be printed out at one time.
2 in 1 Reception will not be available when both 2 in 1 Reception and Duplex Reception are turned ON.
If you want to cancel the procedure part way through, press the Reset key. The touch panel will return to the initial mode settings.
System Menu
DefaultCopy
DefaultFAX Language
SettingMP Tray
Orig. SizeRegister
DefaultMachine
AccounJob
ReportPrint
System Menu / Counter
Duplex RX
On
Off
Ba
System Menu / Counter
6-20 Various Settings and Registration
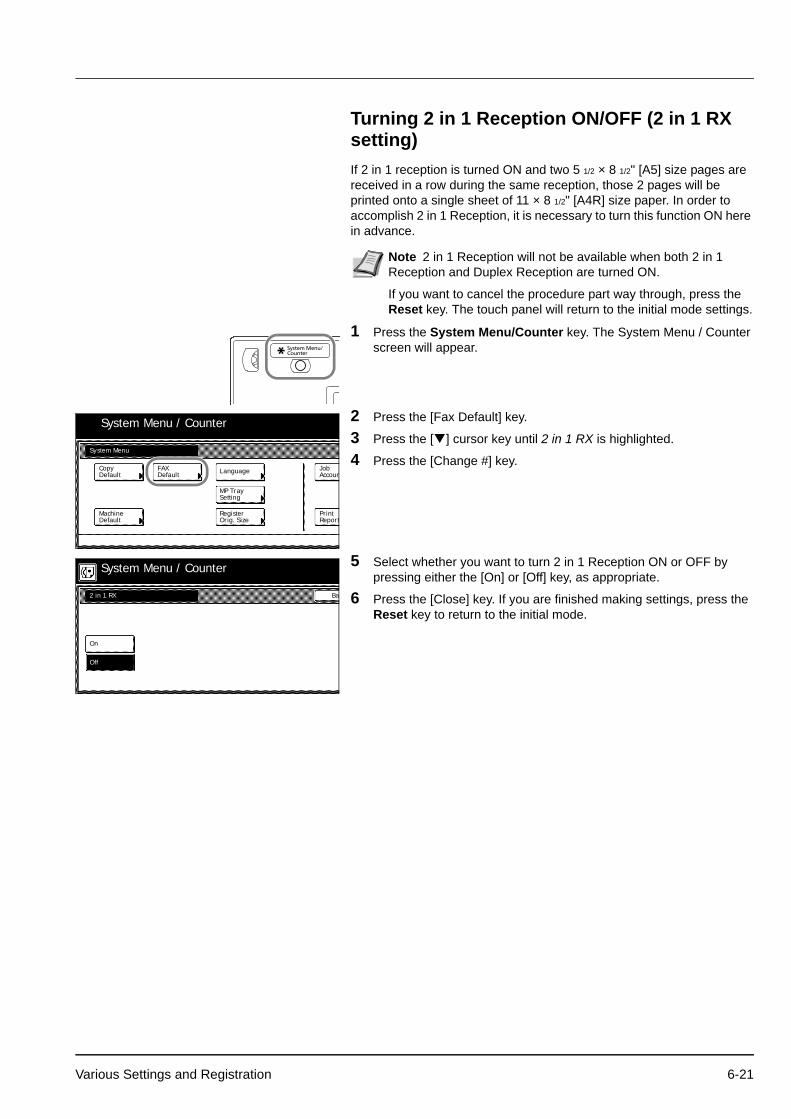
Turning 2 in 1 Reception ON/OFF (2 in 1 RX setting)If 2 in 1 reception is turned ON and two 5 1/2 × 8 1/2" [A5] size pages are received in a row during the same reception, those 2 pages will be printed onto a single sheet of 11 × 8 1/2" [A4R] size paper. In order to accomplish 2 in 1 Reception, it is necessary to turn this function ON here in advance.
1 Press the System Menu/Counter key. The System Menu / Counter screen will appear.
2 Press the [Fax Default] key.
3 Press the [ ] cursor key until 2 in 1 RX is highlighted.
4 Press the [Change #] key.
5 Select whether you want to turn 2 in 1 Reception ON or OFF by pressing either the [On] or [Off] key, as appropriate.
6 Press the [Close] key. If you are finished making settings, press the Reset key to return to the initial mode.
Note 2 in 1 Reception will not be available when both 2 in 1 Reception and Duplex Reception are turned ON.
If you want to cancel the procedure part way through, press the Reset key. The touch panel will return to the initial mode settings.
System Menu
DefaultCopy
DefaultFAX Language
SettingMP Tray
Orig. SizeRegister
DefaultMachine
AccounJob
ReportPrint
System Menu / Counter
2 in 1 RX
On
Off
Ba
System Menu / Counter
Various Settings and Registration 6-21

Turning Remote Diagnosis ON/OFF (Remote Diagnosis setting)Especially if trouble occurs in this fax in which it is necessary to call for service, it is possible for our service center computer to access the fax directly over the telephone line and check its status and other information about the trouble.
1 Press the System Menu/Counter key. The System Menu / Counter screen will appear.
2 Press the [Fax Default] key.
3 Press the [ ] cursor key until Remote Diag. (Remote diagn.) is highlighted.
4 Press the [Change #] key.
5 Select whether you want to turn Remote Diagnosis ON or OFF by pressing either the [On] or [Off] key, as appropriate.
6 Press the [Close] key. If you are finished making settings, press the Reset key to return to the initial mode.
Note To use Remote Diagnosis, it is necessary to enter into a contract with an authorized service center in advance and also to register a predetermined Remote Test ID in advance. (Refer to Registering the Remote Test ID (Remote Test ID setting) on page 6-23.) For further information, contact your service representative, an authorized service center or the place of purchase.
If you want to cancel the procedure part way through, press the Reset key. The touch panel will return to the initial mode settings.
System Menu
DefaultCopy
DefaultFAX Language
SettingMP Tray
Orig. SizeRegister
DefaultMachine
AccounJob
ReportPrint
System Menu / Counter
Remote Diag.
On
Off
Ba
System Menu / Counter
6-22 Various Settings and Registration

Registering the Remote Test ID (Remote Test ID setting)If you have entered into a contract with an authorized service center for their Remote Diagnosis service, it is necessary to register here in advance the Remote Test ID that they designate for you.
1 Press the [Register] key. The Register screen will appear.
2 Press the [Remote Test ID] key.
3 Use the numeric keys to enter the designated 4-digit Remote Test ID.
4 Press the [Confirm] key. The message display will return to the same screen as was displayed in step 2. If you are finished making settings, press the Reset key to return to the initial mode.
Note A previously registered Remote Test ID can also be modified by performing the following procedure.
If you want to cancel the procedure part way through, press the Reset key. The touch panel will return to the initial mode settings.
Place the original & assign destination.
Dest
Ready for fax transmission.
Basic Application
Abbrev. TXAddress
Register
settingbook
Print Report
Info.Location
Dial
Basic Application Register
Box ForwardingFax
dialRemote SW
Test IDRemote
Restrict.TX/RX
Print Report
Registering item option screen.Select item for register.
& TimeDate
keyEncryption
Enter using # key.
Remote Test ID Ba
Enter Remote ID.
( 4 digits)0000.
Note If you want to revise the entered number, press the [ ] or [ ] cursor key to move the cursor to the number that you want to change.
Various Settings and Registration 6-23

Receiving faxes at the same size or a reduced size (Reception Size setting)If Auto Select (Auto sel.) is selected under the Fax Paper Feeding Tray setting, and the size of an incoming fax is larger than the size of paper loaded in the drawer[cassette] to be used for print out, you can select whether to have such faxes printed out at their original size onto multiple sheets of paper, or have them reduced as much as possible to fit onto the available size of paper.
1 Press the System Menu/Counter key. The System Menu / Counter screen will appear.
2 Press the [Fax Default] key.
3 Press the [ ] cursor key until Reception size is highlighted.
4 Press the [Change #] key.
5 To have the reception size reduced to fit the available paper, press the [Reduction Override] key. To have the fax printed out at its original size, press the [Same Size Override] key.
6 Press the [Close] key. If you are finished making settings, press the Reset key to return to the initial mode.
Note If you want to cancel the procedure part way through, press the Reset key. The touch panel will return to the initial mode settings.
System Menu
DefaultCopy
DefaultFAX Language
SettingMP Tray
Orig. SizeRegister
DefaultMachine
AccounJob
ReportPrint
System Menu / Counter
System Menu / Counter
Reception Size Ba
OverrideReduction
Same SizeOverride
6-24 Various Settings and Registration
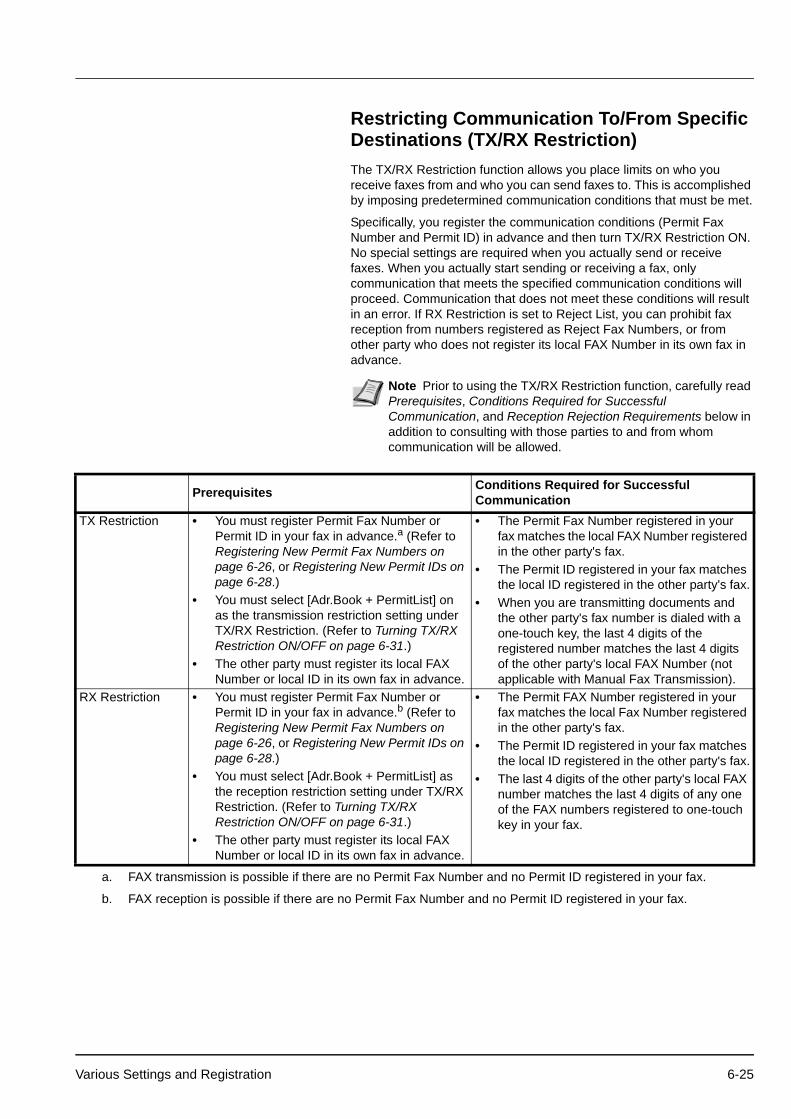
Restricting Communication To/From Specific Destinations (TX/RX Restriction)The TX/RX Restriction function allows you place limits on who you receive faxes from and who you can send faxes to. This is accomplished by imposing predetermined communication conditions that must be met.
Specifically, you register the communication conditions (Permit Fax Number and Permit ID) in advance and then turn TX/RX Restriction ON. No special settings are required when you actually send or receive faxes. When you actually start sending or receiving a fax, only communication that meets the specified communication conditions will proceed. Communication that does not meet these conditions will result in an error. If RX Restriction is set to Reject List, you can prohibit fax reception from numbers registered as Reject Fax Numbers, or from other party who does not register its local FAX Number in its own fax in advance.
Note Prior to using the TX/RX Restriction function, carefully read Prerequisites, Conditions Required for Successful Communication, and Reception Rejection Requirements below in addition to consulting with those parties to and from whom communication will be allowed.
Prerequisites Conditions Required for Successful Communication
TX Restriction • You must register Permit Fax Number or Permit ID in your fax in advance.a (Refer to Registering New Permit Fax Numbers on page 6-26, or Registering New Permit IDs on page 6-28.)
• You must select [Adr.Book + PermitList] on as the transmission restriction setting under TX/RX Restriction. (Refer to Turning TX/RX Restriction ON/OFF on page 6-31.)
• The other party must register its local FAX Number or local ID in its own fax in advance.
• The Permit Fax Number registered in your fax matches the local FAX Number registered in the other party's fax.
• The Permit ID registered in your fax matches the local ID registered in the other party's fax.
• When you are transmitting documents and the other party's fax number is dialed with a one-touch key, the last 4 digits of the registered number matches the last 4 digits of the other party's local FAX Number (not applicable with Manual Fax Transmission).
RX Restriction • You must register Permit Fax Number or Permit ID in your fax in advance.b (Refer to Registering New Permit Fax Numbers on page 6-26, or Registering New Permit IDs on page 6-28.)
• You must select [Adr.Book + PermitList] as the reception restriction setting under TX/RX Restriction. (Refer to Turning TX/RX Restriction ON/OFF on page 6-31.)
• The other party must register its local FAX Number or local ID in its own fax in advance.
• The Permit FAX Number registered in your fax matches the local Fax Number registered in the other party's fax.
• The Permit ID registered in your fax matches the local ID registered in the other party's fax.
• The last 4 digits of the other party's local FAX number matches the last 4 digits of any one of the FAX numbers registered to one-touch key in your fax.
a. FAX transmission is possible if there are no Permit Fax Number and no Permit ID registered in your fax.
b. FAX reception is possible if there are no Permit Fax Number and no Permit ID registered in your fax.
Various Settings and Registration 6-25

Registering New Permit Fax Numbers
1 Press the [Register] key. The Register screen will appear.
2 Press the [TX/RX Restrict.] key.
3 Press the [Permit Fax No.] key.
4 Press an unregistered key. The information will be displayed for all keys that have already been registered.
Prerequisites Reception Rejection RequirementsProhibit FAX Reception
• You must register Reject Fax Number in your fax in advance.a (Refer to Registering New Reject Fax Numbers on page 6-29.)
• You must select [Reject List] as the reception restriction setting under TX/RX Restriction. (Refer to Turning TX/RX Restriction ON/OFF on page 6-31.)
• The other party does not register its local FAX Number in its own fax in advance.
• The Reject Fax Number registered in your fax matches the local Fax Number registered in the other party's fax.
a. If there are no Reject FAX numbers registered, calls are only rejected from senders whose Local FAX Numbers (Indicates local FAX information entries, not the actual line numbers.) are not registered.
Note You can register up to 5 numbers as Permit Fax Numbers in this fax.
If you want to cancel the procedure part way through, press the Reset key. The touch panel will return to the initial mode settings.
Place the original & assign destination.
Dest
Ready for fax transmission.
Basic Application
Abbrev. TXAddress
Register
settingbook
Print Report
Info.Location
Dial
Basic Application Register
Box ForwardingFax
dialRemote SW
Test IDRemote
Restrict.TX/RX
Print Report
Registering item option screen.Select item for register.
& TimeDate
keyEncryption
Item option
Register in TX/RX Restriction list.
FAX No.Permit
ID No.Permit
FAX No.Reject
Permit FAX No.
Register in TX/RX Restriction list.
12345678.#01
#02
#03
#04
#05 5555.
0612345.
6-26 Various Settings and Registration
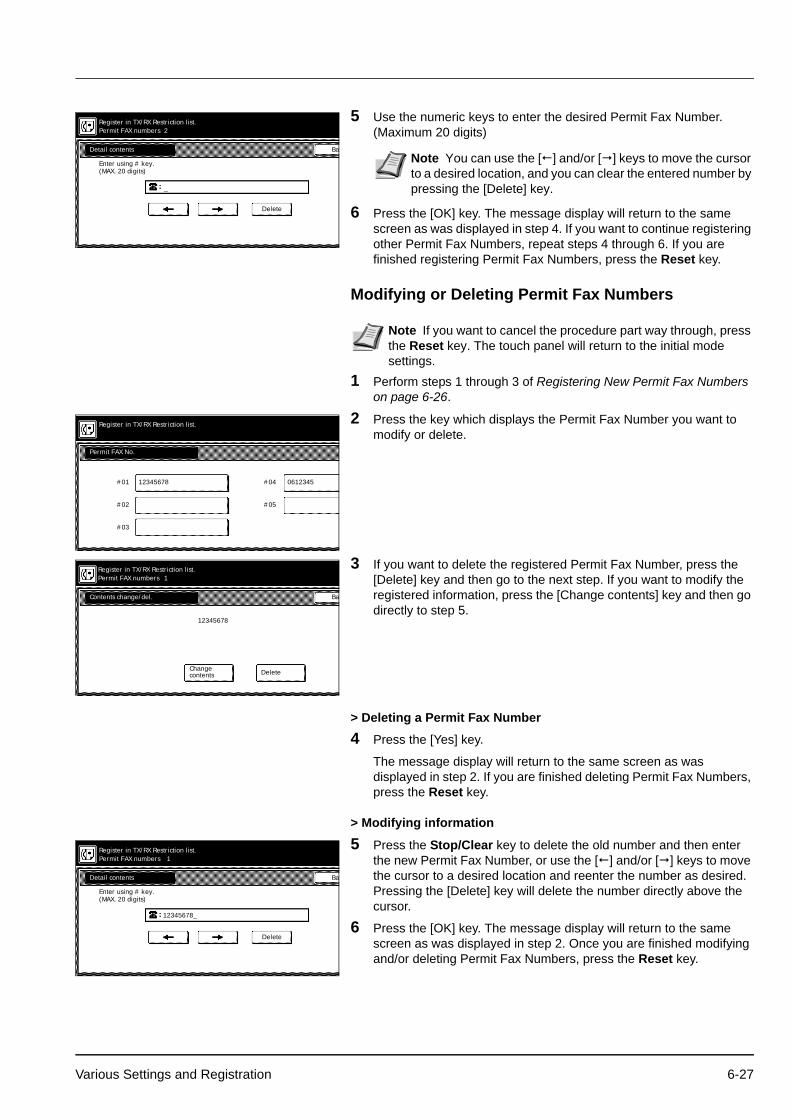
5 Use the numeric keys to enter the desired Permit Fax Number. (Maximum 20 digits)
6 Press the [OK] key. The message display will return to the same screen as was displayed in step 4. If you want to continue registering other Permit Fax Numbers, repeat steps 4 through 6. If you are finished registering Permit Fax Numbers, press the Reset key.
Modifying or Deleting Permit Fax Numbers
1 Perform steps 1 through 3 of Registering New Permit Fax Numbers on page 6-26.
2 Press the key which displays the Permit Fax Number you want to modify or delete.
3 If you want to delete the registered Permit Fax Number, press the [Delete] key and then go to the next step. If you want to modify the registered information, press the [Change contents] key and then go directly to step 5.
> Deleting a Permit Fax Number
4 Press the [Yes] key.
The message display will return to the same screen as was displayed in step 2. If you are finished deleting Permit Fax Numbers, press the Reset key.
> Modifying information
5 Press the Stop/Clear key to delete the old number and then enter the new Permit Fax Number, or use the [ ] and/or [ ] keys to move the cursor to a desired location and reenter the number as desired. Pressing the [Delete] key will delete the number directly above the cursor.
6 Press the [OK] key. The message display will return to the same screen as was displayed in step 2. Once you are finished modifying and/or deleting Permit Fax Numbers, press the Reset key.
Enter using # key.
Detail contents Ba
Register in TX/RX Restriction list.Permit FAX numbers
(MAX. 20 digits)
2.
Delete
_.
Note You can use the [ ] and/or [ ] keys to move the cursor to a desired location, and you can clear the entered number by pressing the [Delete] key.
Note If you want to cancel the procedure part way through, press the Reset key. The touch panel will return to the initial mode settings.
Permit FAX No.
Register in TX/RX Restriction list.
12345678.#01
#02
#03
#04
#05 5555.
0612345.
Contents change/del.
Changecontents
Ba
Register in TX/RX Restriction list.Permit FAX numbers
Delete
1.
12345678.
Enter using # key.
Detail contents Ba
Register in TX/RX Restriction list.Permit FAX numbers
(MAX. 20 digits)
1.
Delete
12345678_.
Various Settings and Registration 6-27

Registering New Permit IDs
1 Press the [Register] key. The Register screen will appear.
2 Press the [TX/RX Restrict.] key.
3 Press the [Permit ID No.] key.
4 Press an unregistered key. The information will be displayed for all keys that have already been registered.
5 Use the numeric keys to enter the desired 4-digit Permit ID. If you want to change the entered number, use the [ ] and/or [ ] keys to move the cursor to the desired location.
6 Press the [Confirm] key. The message display will return to the same screen as was displayed in step 4. If you want to continue registering other Permit IDs, repeat steps 4 through 6. If you are finished registering Permit IDs, press the Reset key.
Modifying or Deleting Permit IDs
1 Perform steps 1 through 3 of Registering New Permit IDs on page 6-28.
Note You can register up to 5 numbers as Permit IDs in this fax.
If you want to cancel the procedure part way through, press the Reset key. The touch panel will return to the initial mode settings.
Place the original & assign destination.
Dest
Ready for fax transmission.
Basic Application
Abbrev. TXAddress
Register
settingbook
Print Report
Info.Location
Dial
Basic Application Register
Box ForwardingFax
dialRemote SW
Test IDRemote
Restrict.TX/RX
Print Report
Registering item option screen.Select item for register.
& TimeDate
keyEncryption
Item option
Register in TX/RX Restriction list.
FAX No.Permit
ID No.Permit
FAX No.Reject
Permit List
Register in TX/RX Restriction list.
0101.#01
#02
#03
#04
#050202. 5555.
Note If you want to cancel the procedure part way through, press the Reset key. The touch panel will return to the initial mode settings.
6-28 Various Settings and Registration

2 Press the key which displays the Permit ID you want to modify or delete.
3 If you want to delete the registered Permit ID, press the [Delete] key and then go to the next step. If you want to modify the registered information, press the [Change contents] key and then go directly to step 5.
> Deleting a Permit ID
4 Press the [Yes] key.
The message display will return to the same screen as was displayed in step 2. If you are finished deleting Permit IDs, press the Reset key.
> Modifying information
5 Press the Stop/Clear key to delete the old number and then enter the new Permit ID, or use the [ ] and/or [ ] keys to move the cursor to a desired location and reenter the number as desired.
6 Press the [Confirm] key. The message display will return to the same screen as was displayed in step 2. Once you are finished modifying and/or deleting Permit IDs, press the Reset key.
Registering New Reject Fax Numbers
1 Press the [Register] key. The Register screen will appear.
Permit List
Register in TX/RX Restriction list.
0101.#01
#02
#03
#04
#050202. 5555.
Contents change/del.
Changecontents
Ba
Register in TX/RX Restriction list.Permit ID No.
Delete
1.
0101.
( 4 digits)
Enter using # key.
Detail contents Ba
Register in TX/RX Restriction list.Permit ID No.
0101.
1.
Note You can register up to 5 numbers as Reject Fax Numbers in this fax.
If you want to cancel the procedure part way through, press the Reset key. The touch panel will return to the initial mode settings.
Place the original & assign destination.
Dest
Ready for fax transmission.
Basic Application
Abbrev. TXAddress
Register
settingbook
Print Report
Various Settings and Registration 6-29

2 Press the [TX/RX Restrict.] key.
3 Press the [Reject FAX No.] key.
4 Press an unregistered key. The information will be displayed for all keys that have already been registered.
5 Use the numeric keys to enter the desired Reject Fax Number. (Maximum 20 digits)
You can use the [ ] and/or [ ] keys to move the cursor to a desired location, and you can clear the entered number by pressing the [Delete] key.
6 Press the [OK] key. The message display will return to the same screen as was displayed in step 4. If you want to continue registering other Reject Fax Numbers, repeat steps 4 through 6. If you are finished registering Reject Fax Numbers, press the Reset key.
Modifying or Deleting Reject Fax Numbers
1 Perform steps 1 through 3 of Registering New Reject Fax Numbers on page 6-29.
2 Press the key which displays the Reject Fax Number you want to modify or delete.
Info.Location
Dial
Basic Application Register
Box ForwardingFax
dialRemote SW
Test IDRemote
Restrict.TX/RX
Print Report
Registering item option screen.Select item for register.
& TimeDate
keyEncryption
Item option
Register in TX/RX Restriction list.
FAX No.Permit
ID No.Permit
FAX No.Reject
Reject FAX No.
Register in TX/RX Restriction list.
12345678901234567890.#01
#02
#03
#04
#05
06123456.
Delete
Enter using # key.
Detail contents Ba
Register in TX/RX Restriction list.Reject FAX numbers
._
(MAX. 20 digits)
002.
Note If you want to cancel the procedure part way through, press the Reset key. The touch panel will return to the initial mode settings.
Reject FAX No.
Register in TX/RX Restriction list.
12345678901234567890.#01
#02
#03
#04
#05
06123456.
6-30 Various Settings and Registration

3 If you want to delete the registered Reject Fax Number, press the [Delete] key and then go to the next step. If you want to modify the registered information, press the [Change contents] key and then go directly to step 5.
> Deleting a Reject Fax Number
4 Press the [Yes] key. The message display will return to the same screen as was displayed in step 2. If you are finished deleting Reject Fax Numbers, press the Reset key.
> Modifying information5 Press the Stop/Clear key to delete the old number and then enter
the new Reject Fax Number, or use the [ ] and/or [ ] keys to move the cursor to a desired location and reenter the number as desired. Pressing the [Delete] key will delete the number directly above the cursor.
6 Press the [OK] key. The message display will return to the same screen as was displayed in step 2. Once you are finished modifying and/or deleting Reject Fax Numbers, press the Reset key.
Turning TX/RX Restriction ON/OFFYou can select to only allow fax transmission/reception to/from those facsimiles that are registered in your address book and those registered as Permit Fax Numbers and Permit IDs. If RX Restriction is set to Reject List, you can prohibit fax reception from numbers registered as Reject Fax Numbers, or from other party who does not register its local FAX Number in its own fax in advance. (Refer to Restricting Communication To/From Specific Destinations (TX/RX Restriction) on page 6-25.)
1 Press the System Menu/Counter key. The System Menu / Counter screen will appear.
2 Press the [Fax Default] key.
3 Press the [ ] cursor key until TX/RX Restriction is highlighted.
4 Press the [Change #] key.
Contents change/del.
Changecontents
Ba
Register in TX/RX Restriction list.Reject FAX numbers
Delete
.12345678901234567890
002.
Delete
Enter using # key.
Detail contents Ba
Register in TX/RX Restriction list.Reject FAX numbers
Tray
(MAX. 20 digits)
.12345678901234567890
001.
Note If you want to cancel the procedure part way through, press the Reset key. The touch panel will return to the initial mode settings.
System Menu
DefaultCopy
DefaultFAX Language
SettingMP Tray
Orig. SizeRegister
DefaultMachine
AccounJob
ReportPrint
System Menu / Counter
Various Settings and Registration 6-31

5 Press the [Adr.Book + PermitList] key to turn ON transmission restrictions or the [No Restriction] key to turn those restrictions OFF.
6 Press the [Adr.Book + PermitList] key or the [Reject List] key to turn ON the corresponding reception restrictions, or the [No Restriction] key to turn those restrictions OFF.
7 Press the [Close] key. If you are finished making settings, press the Reset key to return to the initial mode settings.
TX/RX Restriction
System Menu / Counter
Reject
Adr.Book +
List
PermitListAdr.Book +PermitList
No Restri-ction
TX Restriction RX Restriction
No Restri-ction
Ba
6-32 Various Settings and Registration

Communicating with Encrypted Documents (Encrypted Communication)Encrypted Communication involves the encryption of documents prior to their transmission. In this way, third parties are prevented from seeing the actual documents even if they should be able to access the transmission itself.
Those documents are then decrypted and printed out in their original form only after receipt by the receiving party, making this function extremely beneficial for sending strictly confidential information.
.
Settings in the transmitting and receiving faxes
Registering New Encryption KeysThe Encryption Key to be used must be selected by the transmitting party during the registration of the corresponding one-touch key which is to be designated for Encrypted Transmission, and by the receiving party during registration of the corresponding Encryption Box.
IMPORTANT To accomplish Encrypted Communication, the other party's fax machine must be one of our models that has the same Encrypted Communication capabilities as your fax machine.
To successfully accomplish encryption, and then the corresponding decryption, both the transmitting and receiving parties must use the same 16-character Encryption Key.
If the Encryption Keys used by both parties do not match EXACTLY, Encrypted Communication will not be possible. Therefore, it is necessary for both parties to determine, in advance, the Encryption Key that will be used and register it under a 2-digit Encryption Key Number.
Settings Transmitting fax Receiving fax Reference page
Key Number (A) 2 digits (B) 2 digits 6-33Encryption Key (C) 16 characters (C) 16 characters 6-33Key Number Registered Under the Corresponding One-Touch Key
(A) 2 digits 2-15
Receiving Fax's Encryption Box (D) 4 digits 2-15Encryption Box Number (D) 4 digits 6-36Encryption Box Key Number (B) 2 digits 6-36
Note Be sure that those settings above which are indicated with the same letter in parenthesis are registered with the EXACT same numbers or characters, as appropriate.
Various Settings and Registration 6-33

Each Encryption Key contains 16 characters that can include any combination of the numerals 0 - 9 and the letters A - F. This key will then be registered under a 2-digit Encryption Key Number from 01 - 20.
1 Press the [Register] key. The Register screen will appear.
2 Press the [Encryption key] key.
3 Use the numeric keys to enter the currently registered administrator number.
4 Press an unregistered key. The information will be displayed for all keys that have already been registered.
Note You can register up to 20 Encryption Keys in this fax.
If Restricted Access is turned OFF, it is necessary to enter the currently registered administrator number before you can register Encryption Keys.
You can also modify a registered Encryption Key by following the procedure below.
If you want to cancel the procedure part way through, press the Reset key. The touch panel will return to the initial mode settings.
Place the original & assign destination.
Dest
Ready for fax transmission.
Basic Application
Abbrev. TXAddress
Register
settingbook
Print Report
Info.Location
Dial
Basic Application Register
Box ForwardingFax
dialRemote SW
Test IDRemote
Restrict.TX/RX
Print Report
Registering item option screen.Select item for register.
& TimeDate
keyEncryption
Note If Restricted Access is turned OFF, go to the next step. If Restricted Access is turned ON, proceed directly to step 4.
Enter the administrator number.
Admin. Number Check Ba
Encryption key is registered.
Note If the number that you entered matches the registered one, the message display will change.
Set encryption key # for registration.
Encryption key is registered.
1/4.
3333333333333333.
1234567890ABCDEF.
0505050505050505.
6-34 Various Settings and Registration

5 Use the numerals (0 - 9) and the English alphabet (A - F) that is shown on the touch panel to create the desired 16-character Encryption Key.
Understanding the Encryption Key and Key Number
Each Encryption Key is registered under an Encryption Key Number (a 2-digit number from ‘01’ to ‘20’). When you want to designate an Encryption Key for a certain communication, it is this 2-digit number that you must enter.
6 Press the [OK] key. The message display will return to the same screen as was displayed in step 4. If you want to continue registering other Encryption Keys, repeat steps 4 through 6. If you are finished registering Encryption Keys, press the Reset key.
Modifying or Deleting Encryption Keys
1 Perform steps 1 through 3 of Registering New Encryption Keys on page 6-33.
2 Press the key which displays the Encryption Key you want to modify or delete.
3 If you want to delete the registered Encryption Key, press the [Delete] key and then go to the next step. If you want to modify the registered information, press the [Change contents] key and then go directly to step 5.
Enter using right key.
Detail contents Ba
Encryption key is registered.Encryption key 02.
(16digits)
Note If you want to change the entered key, use the [ ] and/or [ ] keys to move the cursor to the desired location.
Note In order to receive document successfully, while it is absolutely necessary that the Encryption Key used by the transmitting party matches the Encryption Key that is registered for the corresponding Encryption Box in the receiving party's fax, it is not necessary that the Key Number match.
For example, if the transmitting party initiates an Encrypted Transmission using an Encryption Key of ABFE468C2569D341 that is registered under Key Number ‘18’, and the receiving party has registered the same Encryption Key, but it is registered under Key Number ‘09’, as long as the receiving party has registered Key Number ‘09’ for the Encryption Box that will receive the encrypted documents, the 2 Encryption Keys will match so reception and correct print out will be successful.
Note If you want to cancel the procedure part way through, press the Reset key. The touch panel will return to the initial mode settings.
Set encryption key # for registration.
Encryption key is registered.
1/4.
3333333333333333.
1234567890ABCDEF.
0505050505050505.
Contents change/del.
Changecontents
Ba
Encryption key is registered.Encryption key
Delete
01.
1234567890ABCDEF.
Various Settings and Registration 6-35
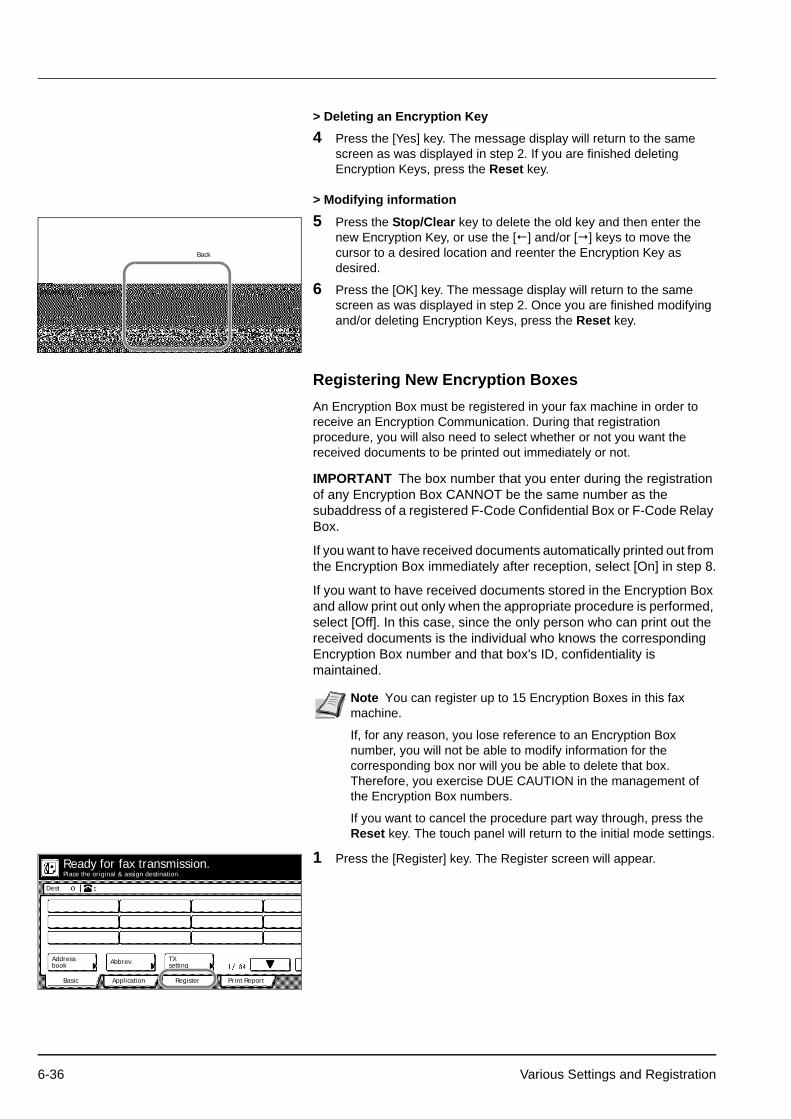
> Deleting an Encryption Key
4 Press the [Yes] key. The message display will return to the same screen as was displayed in step 2. If you are finished deleting Encryption Keys, press the Reset key.
> Modifying information
5 Press the Stop/Clear key to delete the old key and then enter the new Encryption Key, or use the [ ] and/or [ ] keys to move the cursor to a desired location and reenter the Encryption Key as desired.
6 Press the [OK] key. The message display will return to the same screen as was displayed in step 2. Once you are finished modifying and/or deleting Encryption Keys, press the Reset key.
Registering New Encryption BoxesAn Encryption Box must be registered in your fax machine in order to receive an Encryption Communication. During that registration procedure, you will also need to select whether or not you want the received documents to be printed out immediately or not.
1 Press the [Register] key. The Register screen will appear.
Back
ered.
OK
(16digits)7890ABCDEF.
IMPORTANT The box number that you enter during the registration of any Encryption Box CANNOT be the same number as the subaddress of a registered F-Code Confidential Box or F-Code Relay Box.
If you want to have received documents automatically printed out from the Encryption Box immediately after reception, select [On] in step 8.
If you want to have received documents stored in the Encryption Box and allow print out only when the appropriate procedure is performed, select [Off]. In this case, since the only person who can print out the received documents is the individual who knows the corresponding Encryption Box number and that box's ID, confidentiality is maintained.
Note You can register up to 15 Encryption Boxes in this fax machine.
If, for any reason, you lose reference to an Encryption Box number, you will not be able to modify information for the corresponding box nor will you be able to delete that box. Therefore, you exercise DUE CAUTION in the management of the Encryption Box numbers.
If you want to cancel the procedure part way through, press the Reset key. The touch panel will return to the initial mode settings.
Place the original & assign destination.
Dest
Ready for fax transmission.
Basic Application
Abbrev. TXAddress
Register
settingbook
Print Report
6-36 Various Settings and Registration

2 Press the [Box] key.
3 Press the [Encryption box] key.
4 Press an unregistered key. The box number will be displayed for all keys that have already been registered.
5 Use the numeric keys to enter the 4-digit number that you want to use as the Encryption Box number.
6 Press the [Box. ID] key and enter the 4-digit number that you want to use for the Encryption Box ID.
7 Press the [Encryption Key No.] key and use the numeric keys to enter the 2-digit Key Number (01 - 20) that corresponds to the Encryption Key to be used for this Encryption Box.
8 Select whether or not you want documents received into this Encryption Box to be automatically printed out.
If you want to have received documents printed out immediately after reception, select [On].
If you want to allow print out only when the appropriate procedure is performed, select [Off].
9 Press the [Confirm] key. The message display will return to the same screen as was displayed in step 4. If you want to continue registering other Encryption Boxes, repeat steps 4 through 9. Once you are finished registering Encryption Boxes, press the Reset key.
Modifying or Deleting Encryption Boxes
Info.Location
Dial
Basic Application Register
Box ForwardingFax
dialRemote SW
Test IDRemote
Restrict.TX/RX
Print Report
Registering item option screen.Select item for register.
& TimeDate
keyEncryption
Box type
Subaddressconf. box
Register box
Subaddressrelay box
Encryptionbox
Encryption box
Register box
9876.
0352.
Detail contents
Box. ID
Enter using # key.
EncryptionKey No.
Ba
( 4 digits)
Register box
Box. No.
Off
On
Pri
Encryption box
( 4 digits)
( 2 digits)
0000.
0000.
00.
01.
Note If you register ‘0000’ as the Encryption Box ID, it will not be necessary to enter an ID-code when you print out documents from that Encryption Box.
Back Confirm
( 4 digits)
Off
On
Print on RX.
( 4 digits)
( 2 digits)
Note If you want to cancel the procedure part way through, press the Reset key. The touch panel will return to the initial mode settings.
Various Settings and Registration 6-37
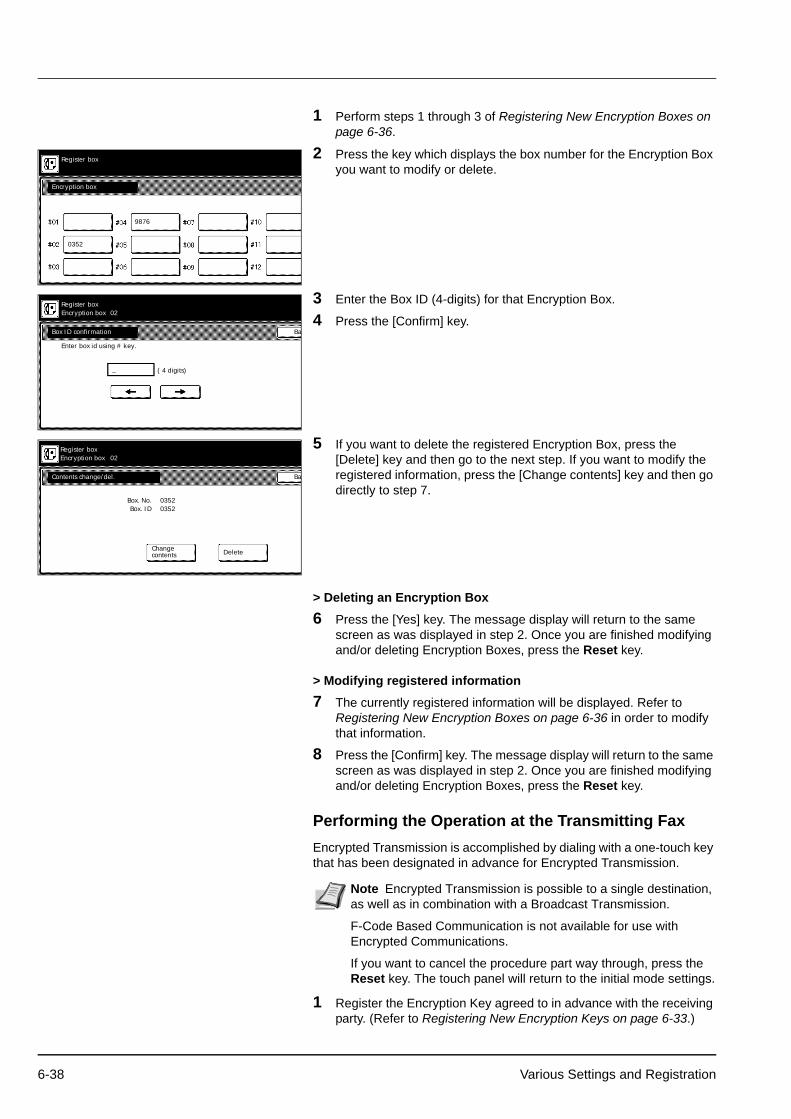
1 Perform steps 1 through 3 of Registering New Encryption Boxes on page 6-36.
2 Press the key which displays the box number for the Encryption Box you want to modify or delete.
3 Enter the Box ID (4-digits) for that Encryption Box.
4 Press the [Confirm] key.
5 If you want to delete the registered Encryption Box, press the [Delete] key and then go to the next step. If you want to modify the registered information, press the [Change contents] key and then go directly to step 7.
> Deleting an Encryption Box
6 Press the [Yes] key. The message display will return to the same screen as was displayed in step 2. Once you are finished modifying and/or deleting Encryption Boxes, press the Reset key.
> Modifying registered information
7 The currently registered information will be displayed. Refer to Registering New Encryption Boxes on page 6-36 in order to modify that information.
8 Press the [Confirm] key. The message display will return to the same screen as was displayed in step 2. Once you are finished modifying and/or deleting Encryption Boxes, press the Reset key.
Performing the Operation at the Transmitting FaxEncrypted Transmission is accomplished by dialing with a one-touch key that has been designated in advance for Encrypted Transmission.
1 Register the Encryption Key agreed to in advance with the receiving party. (Refer to Registering New Encryption Keys on page 6-33.)
Encryption box
Register box
9876.
0352.
( 4 digits)
Enter box id using # key.
Box ID confirmation Ba
Register boxEncryption box
_.
02.
Contents change/del.
Changecontents
Ba
Register boxEncryption box
Delete
02.
0352.0352.
Box. No.Box. ID
Note Encrypted Transmission is possible to a single destination, as well as in combination with a Broadcast Transmission.
F-Code Based Communication is not available for use with Encrypted Communications.
If you want to cancel the procedure part way through, press the Reset key. The touch panel will return to the initial mode settings.
6-38 Various Settings and Registration

If the Encryption Key has already been registered, go directly to step 2.
2 Register the one-touch key that will be used to dial the destination fax number and designate it for Encrypted Transmission. Refer to Registering New One-Touch Keys on page 2-15.
If a one-touch key has already been registered in this way, go directly to step 3.
3 Set the documents you want to transmit.
4 Use the one-touch key described in step 2 to enter the destination fax number.
5 Press the Start key. The transmission operation will begin.
Performing the Operation at the Receiving FaxPerform the following procedure in order to receive and print out documents under Encrypted Communication.
1 Register the Encryption Key agreed to in advance with the transmitting party. (Refer to Registering New Encryption Keys on page 6-33.)
If the Encryption Key has already been registered, go directly to step 2.
2 Register the Encryption Box that will be used to receive the encrypted documents. (Refer to Registering New Encryption Boxes on page 6-36.)
If an Encryption Box has already been registered in this way, go directly to step 3.
3 The transmitting party will send you the encrypted documents. Once they are received, they are normally decrypted to their original form and then stored in a specified Encryption Box.
Press start key to transmit
Dest
Ready for fax transmission.
Basic Application
Abbrev.Address
Register
book
Print Report
TXsetting
ABC.
ABC.
.1
IMPORTANT If the Encryption Key Number designated for the one-touch key is no longer registered in this fax, an error will occur and the transmission will not be completed.
Note F-Code Based Communication is not available for use with Encrypted Communications.
If you want to cancel the procedure part way through, press the Reset key. The touch panel will return to the initial mode settings.
Note If the Encryption Box has been registered for manual print out of the documents, go to the next step.
If the Encryption Box has been registered for automatic print out of the documents, received documents will be automatically printed out upon reception into that box.
Various Settings and Registration 6-39

4 Refer to Printing Out Documents from an Encryption Box on page 6-40, and print out the received documents from the corresponding Encryption Box.
Printing Out Documents from an Encryption BoxPerform the following procedure to print out documents that have been received into your Encryption Box. If the documents are printed out correctly, the data will be deleted from that box.
1 Press the [Application] key. The Application screen will appear.
2 Press the [Print encr data box] ([Encry.code box output]) key.
3 Press the key that corresponds to the desired Encryption Box if it is highlighted. If the key is not highlighted, there are no documents in that box.
> If the Box ID is other than ‘0000’...
4 Enter the Box ID (4 digits) that corresponds to that Encryption Box.
5 Press the [Confirm] key. The documents that are in that Encryption Box will be printed out.
Note If you registered ‘0000’ as the Box ID for your Encryption Box, it is not necessary to enter a Box ID just to print out documents from that box. In this case, only the box number you enter needs to be correct in order to print out your documents.
If you want to cancel the procedure part way through, press the Reset key. The touch panel will return to the initial mode settings.
Place the original & assign destination.
Dest
Ready for fax transmission.
Basic Application
Abbrev. TXAddress
Register
settingbook
Print Report
RX Polling
TX Polling
Basic Application Register
box inputSub.conf.
TX statusReserved
on LCDTX result
on LCDRX result
data boxPrint encr
box outputSub.conf.
Print Report
Option screenSelect item.
Encryption box
0352.
There are originals saved in the box which is highlighted.
Ba
Print encryption data box.
9876.Note If you registered ‘0000’ as the Box ID, proceed directly to step 6. If you registered any other Box ID, go to the next step.
( 4 digits)
Enter box id using # key.
Box ID confirmation Ba
Print encryption data box.Encryption box
_.
02.
6-40 Various Settings and Registration
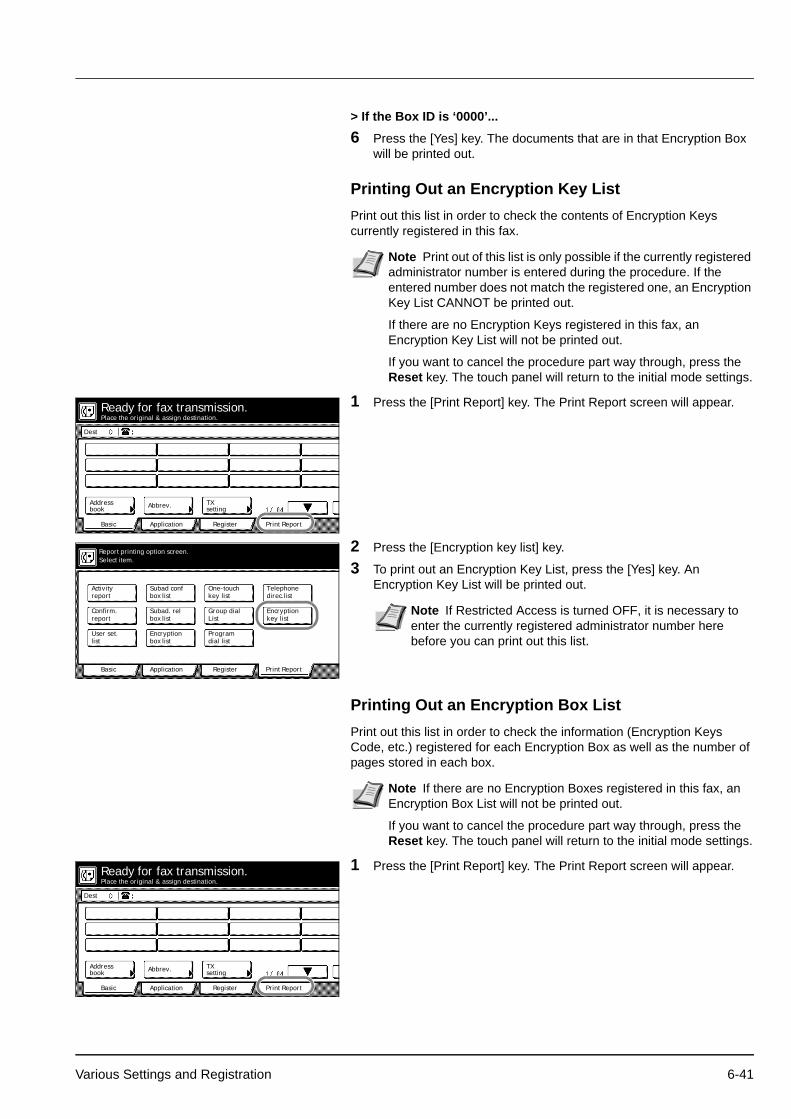
> If the Box ID is ‘0000’...
6 Press the [Yes] key. The documents that are in that Encryption Box will be printed out.
Printing Out an Encryption Key ListPrint out this list in order to check the contents of Encryption Keys currently registered in this fax.
1 Press the [Print Report] key. The Print Report screen will appear.
2 Press the [Encryption key list] key.
3 To print out an Encryption Key List, press the [Yes] key. An Encryption Key List will be printed out.
Printing Out an Encryption Box ListPrint out this list in order to check the information (Encryption Keys Code, etc.) registered for each Encryption Box as well as the number of pages stored in each box.
1 Press the [Print Report] key. The Print Report screen will appear.
Note Print out of this list is only possible if the currently registered administrator number is entered during the procedure. If the entered number does not match the registered one, an Encryption Key List CANNOT be printed out.
If there are no Encryption Keys registered in this fax, an Encryption Key List will not be printed out.
If you want to cancel the procedure part way through, press the Reset key. The touch panel will return to the initial mode settings.
Place the original & assign destination.
Dest
Ready for fax transmission.
Basic Application
Abbrev. TXAddress
Register
settingbook
Print Report
Select size
reportConfirm.
reportActivity
Basic Application Register
box listSubad conf
key listOne-touch
ListGroup dial
dial listProgram
box listEncryption
box listSubad. rel
Print Report
Report printing option screen.Select item.
listUser set.
direc.listTelephone
key listEncryption Note If Restricted Access is turned OFF, it is necessary to
enter the currently registered administrator number here before you can print out this list.
Note If there are no Encryption Boxes registered in this fax, an Encryption Box List will not be printed out.
If you want to cancel the procedure part way through, press the Reset key. The touch panel will return to the initial mode settings.
Place the original & assign destination.
Dest
Ready for fax transmission.
Basic Application
Abbrev. TXAddress
Register
settingbook
Print Report
Various Settings and Registration 6-41

2 Press the [Encryption box list] key.
3 To print out an Encryption Box List, press the [Yes] key. An Encryption Box List will be printed out.Select size
reportConfirm.
reportActivity
Basic Application Register
box listSubad conf
key listOne-touch
ListGroup dial
dial listProgram
box listEncryption
box listSubad. rel
Print Report
Report printing option screen.Select item.
listUser set.
direc.listTelephone
key listEncryption
6-42 Various Settings and Registration

7 Optional Equipment
This section contains explanations on optional memory.
Optional Memory 7-2
Optional Equipment 7-1

Optional MemoryBy adding 32 MB of optional memory, the amount of memory available for Bitmapping will be increased and you will thus be able to transmit and receive documents using the Ultra fine resolution mode.
In addition, you will be able to store a greater number of documents into memory (for transmission or through reception).
7-2 Optional Equipment

8 Reference Information
This section contains reference information such as machine specifications, etc.
Specifications 8-2
Character Input Screens 8-3
Paper Size and Priority Feed Chart 8-5
Menu Flow Charts 8-7
Error Code Tables 8-9
Reference Information 8-1

SpecificationsNote Specifications are subject to change without notice.
Item Description
Type Optional FAX Kit
Compatibility Group 3
Line Requirement Subscription telephone line
Transmission Speed Within 3 seconds (33600 bps, JBIG, ITU-T A4R #1 chart)
Modem Speed 33600/31200/28800/26400/24000/21600/19200/16800/14400/12000/9600/7200/4800/2400 bps
Data Compression JBIG/MMR/MR/MH
Error Correction ECM
Maximum Document Dimensions Width: 11" [297 mm] Length: 63" [1600 mm]
Automatic Document Processor Capacity
Max. 75 pages (when using the optional Document Processor)
Auxiliary Scanning Line Density Horizontal x Vertical Normal (8 dots/mm x 3.85 lines/mm) Fine (8 dots/mm x 7.7 lines/mm) Super fine (8 dots/mm x 15.4 lines/mm) Ultra fine (16 dots/mm x 15.4 lines/mm)
Recording Resolution 600 dpi x 600 dpi
Grayscale 128 levels (Value differential diffusion)
Speed-Dial Keys Max. 1000 destinations
Broadcast Transmission Max. 300 destinations
Polling Reception Max. 300 locations
Memory Reception 256 pages or more (with standard memory and ITU-T A4 #1 orignals)
Installed Bitmap Memory Standard: Max. 2 MB (for reading), max. 2 MB (for writing)When using the optional memory: Max. 4 MB (for reading), max. 4 MB (for writing)
Installed Imaging Memory Standard: 4 MBWhen using the optional memory: 32 MB
Management Reports and Lists Activity Report, Confirmation List, User Setting List, One-Touch Key List, Telephone Directory List, Program Dial List, Group Dial List, Encryption Key List, Restricted Access Report
Option Memory (32 MB)
8-2 Reference Information

Character Input ScreensWhen entering your self-station name and the destination name under a speed-dial key, the available characters and symbols as well as the input screen itself will differ depending upon the language being used. The following indicate the layouts of the keys for each screen.
Danish, Dutch, English, Finnish, French, German, Italian, Spanish, Portuguese, Swedish and Norwegian
Uppercase input
Lowercase input
Symbol 1 input
Symbol 2 input
Polish and Czech
Uppercase input
Lowercase input
Reference Information 8-3
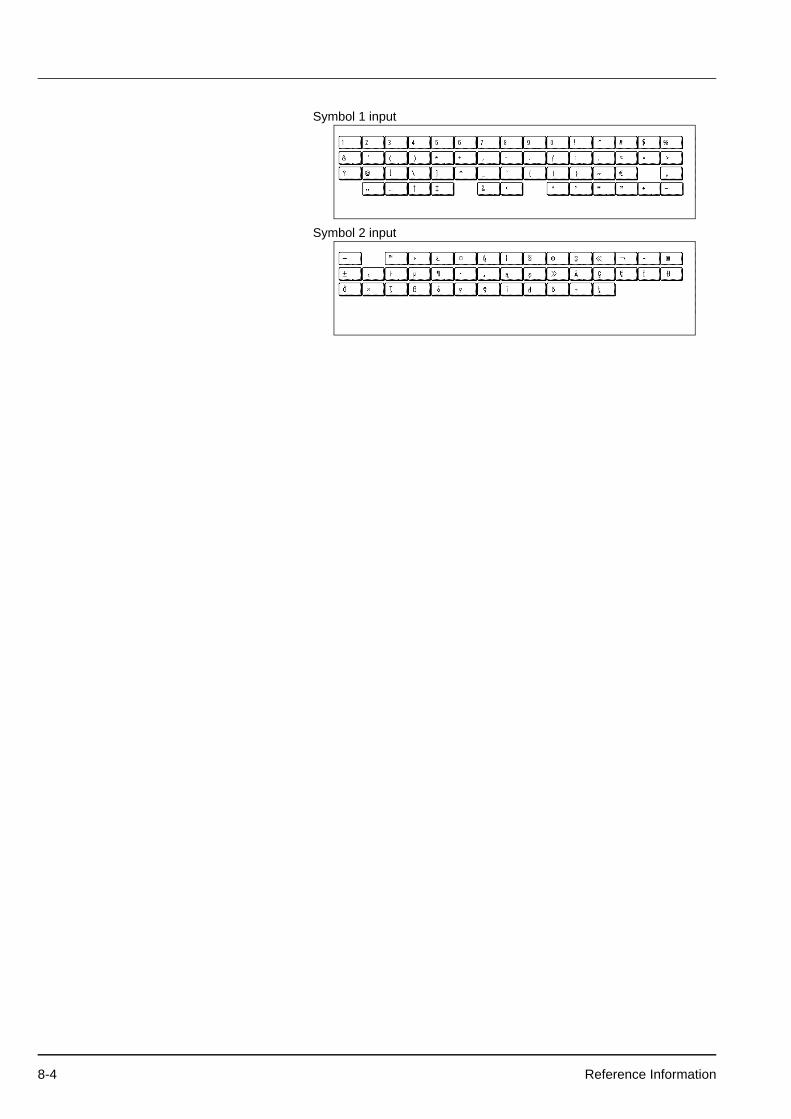
Symbol 1 input
Symbol 2 input
8-4 Reference Information

Paper Size and Priority Feed ChartIf the drawers do not contain paper that is of a size and orientation exactly the same as that of the received documents, the FAX will automatically select the most appropriate paper for print out. The following chart indicates the order of priority for paper selection in such a case.
Notes for this Chart
• The top edge of the paper in these illustrations indicates the direction of feed for transmission or print out.
Received Document Size
Ord
er o
f Se
lect
ion
Pape
r in
Dra
wer
s
1
a
2
a a a b
3
a a
4
a a a
5
a a
6
a a a a
7
b
8
a a
a. Indicates that the Rotate Received Data function will be used.
b. If the received image of Folio size documents is automatically reduced to fit onto the paper, it will be accomplished onto A4R size paper.
: Indicates that a received page will be split and printed onto 2 or more separate sheets of paper.
A5 B5 A4R A4 FL B4 A3
A5R B5 A4R A4 FL B4 A3
A4R B5R A4 A4R A4R A3 A4
FL B4 FL FL A3 B5 A4R
A4 A4 A3 A3 B4 B5R B4
B5 A4R B4 B4 A4R A4
B5R FL A5R A4 A4R
A3 A3 B5 B5
B4 B5R B5R
Reference Information 8-5

• FL refers to Folio size paper.• If the same size of paper is set in more than one location, the upper
drawer will have priority for paper feed.• If the either of the Fixed Size or Fixed Cassette modes are selected
in the Paper Feed Selection Mode setting, that setting will take precedent over the order indicated here.
8-6 Reference Information
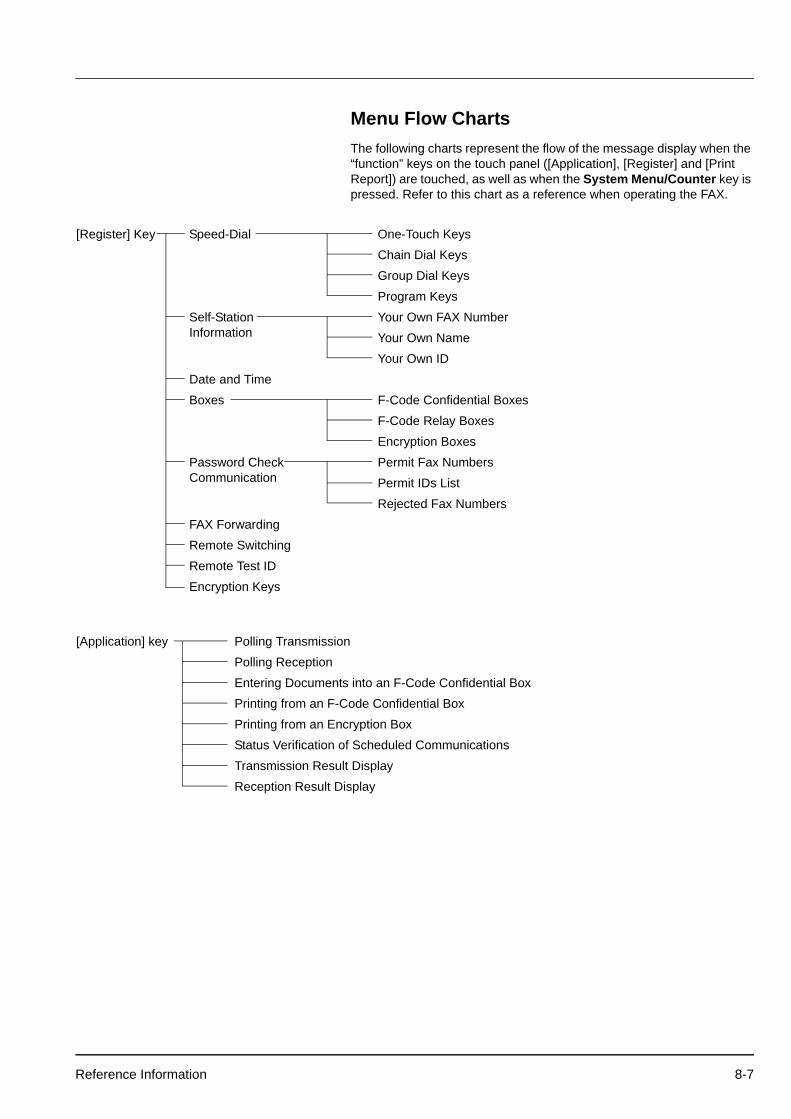
Menu Flow ChartsThe following charts represent the flow of the message display when the “function” keys on the touch panel ([Application], [Register] and [Print Report]) are touched, as well as when the System Menu/Counter key is pressed. Refer to this chart as a reference when operating the FAX.
[Register] Key Speed-Dial One-Touch KeysChain Dial KeysGroup Dial KeysProgram Keys
Self-Station Information
Your Own FAX NumberYour Own NameYour Own ID
Date and TimeBoxes F-Code Confidential Boxes
F-Code Relay BoxesEncryption Boxes
Password Check Communication
Permit Fax NumbersPermit IDs ListRejected Fax Numbers
FAX ForwardingRemote SwitchingRemote Test IDEncryption Keys
[Application] key Polling TransmissionPolling ReceptionEntering Documents into an F-Code Confidential BoxPrinting from an F-Code Confidential BoxPrinting from an Encryption BoxStatus Verification of Scheduled CommunicationsTransmission Result DisplayReception Result Display
Reference Information 8-7

System Menu/Counter key
[FAX default] key Type of Phone Line (Inch version only)TTI Transmission ON/OFFReport Print Out ON/OFFTX/RX Restriction ON/OFFFAX Forwarding ON/OFFBulletin Board Function ON/OFFNumber of Rings (Auto FAX Reception)Volume SettingsNumber of RedialsDocument Size for Scanning from the Document ProcessorTX mode defaultAutomatic Reception ModeReception Date & Time Print Out ON/OFFPaper Feed Selection ModeMP Tray Setting2 in 1 Reception ON/OFFDuplex Reception ON/OFFRemote Diagnosis ON/OFFReception Size Setting
[Print Report] key Activity ReportConfirmation ReportUser Setting ListF-Code Confidential Box ListF-Code Relay Box ListEncryption Box ListOne-Touch Key ListGroup Dial ListProgram Dial ListTelephone Directory ListEncryption Key ListRestricted Access Report (Print out available only when Restricted Access is turned ON.)
8-8 Reference Information

Error Code TablesWhen a communications error occurs, one of the following error codes will be printed out on the corresponding Transmission Report or Reception Report as well as the Activity Report.
Refer to the following tables for a more detailed explanation of the error.
Note If an error occurs during V34 communication, the ‘U’ in the error codes noted below will change to an ‘E’.
CODE CAUSE AND/OR PROCEDURE FOR CORRECTIONBusy The line is busy or the other party does not answer after automatically redialing the set
number of times. Perform transmission or reception procedures again.
Stopped Transmission has been interrupted by pressing the Stop/Clear key.Reception has been interrupted by pressing the Stop/Clear key.During multiple communication (Broadcast Transmission, Polling Reception, etc.), this unit was unable to transmit to all destinations due to a communications interruption.
U00300 The destination FAX has run out of recording paper. Check with the destination party.U00420 - U00462 Connection was made on a call initiated by the transmitting party, but the transmission has
been interrupted because the transmitting party does not possess the necessary communication capabilities.
U00600 - U00690 Communication was interrupted due to trouble with your unit. Perform transmission or reception procedures again.
U00700 Communication was interrupted due to trouble with the other party’s FAX unit. Check with the other party.
U00800U00810
Unsuccessfully transmitted page(s) remain. Perform transmission procedures again.
U00900U00910
Unsuccessfully received page(s) remain. Perform reception procedures again.
U01000 - U01092 A communication error occurred during transmission. Perform transmission procedures again.
U01100 - U01199 A communication error occurred during reception. Perform reception procedures again.U01400 A communication which uses the timer was scheduled, and a number was entered using an
abbreviated number or one-touch key, etc., but communication with that party was impossible because that number was no longer registered when the scheduled time arrived. Check your unit. Or, communication with that party was impossible because the number included a pound sign (#) and it was registered with the Line Type setting set to “Tone Line”, but the Line Type setting had been changed to “Pulse Line” at the time you attempted that communication.
U01500 A communication error occurred during transmission at high transmission speed. Perform transmission procedures again.
U01600 A communication error occurred during reception at high transmission speed. Perform reception procedures again after having the transmitting party lower the transmission speed.
U01700U01720
A communication error occurred during transmission at high transmission speed. Perform transmission procedures again.
U01721 A communication error occurred during transmission at high transmission speed. The destination party’s FAX may not have the corresponding high speed reception capabilities. If the destination party’s FAX number was dialed using an abbreviated number or one-touch key, change the transmission speed registered for that number to a lower setting and perform transmission procedures again.
U01800 - U01820 A communication error occurred during reception at high transmission speed. Perform reception procedures again after having the transmitting party lower the transmission speed.
Reference Information 8-9
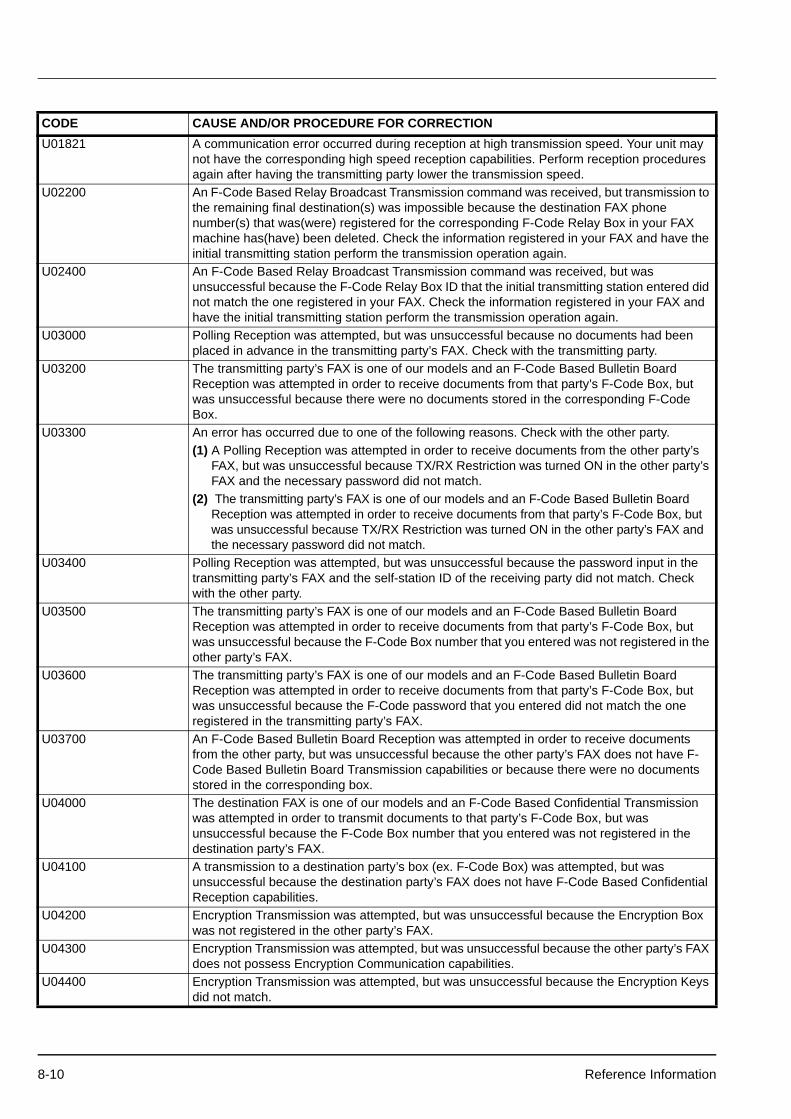
U01821 A communication error occurred during reception at high transmission speed. Your unit may not have the corresponding high speed reception capabilities. Perform reception procedures again after having the transmitting party lower the transmission speed.
U02200 An F-Code Based Relay Broadcast Transmission command was received, but transmission to the remaining final destination(s) was impossible because the destination FAX phone number(s) that was(were) registered for the corresponding F-Code Relay Box in your FAX machine has(have) been deleted. Check the information registered in your FAX and have the initial transmitting station perform the transmission operation again.
U02400 An F-Code Based Relay Broadcast Transmission command was received, but was unsuccessful because the F-Code Relay Box ID that the initial transmitting station entered did not match the one registered in your FAX. Check the information registered in your FAX and have the initial transmitting station perform the transmission operation again.
U03000 Polling Reception was attempted, but was unsuccessful because no documents had been placed in advance in the transmitting party’s FAX. Check with the transmitting party.
U03200 The transmitting party’s FAX is one of our models and an F-Code Based Bulletin Board Reception was attempted in order to receive documents from that party’s F-Code Box, but was unsuccessful because there were no documents stored in the corresponding F-Code Box.
U03300 An error has occurred due to one of the following reasons. Check with the other party.(1) A Polling Reception was attempted in order to receive documents from the other party’s
FAX, but was unsuccessful because TX/RX Restriction was turned ON in the other party’s FAX and the necessary password did not match.
(2) The transmitting party’s FAX is one of our models and an F-Code Based Bulletin Board Reception was attempted in order to receive documents from that party’s F-Code Box, but was unsuccessful because TX/RX Restriction was turned ON in the other party’s FAX and the necessary password did not match.
U03400 Polling Reception was attempted, but was unsuccessful because the password input in the transmitting party’s FAX and the self-station ID of the receiving party did not match. Check with the other party.
U03500 The transmitting party’s FAX is one of our models and an F-Code Based Bulletin Board Reception was attempted in order to receive documents from that party’s F-Code Box, but was unsuccessful because the F-Code Box number that you entered was not registered in the other party’s FAX.
U03600 The transmitting party’s FAX is one of our models and an F-Code Based Bulletin Board Reception was attempted in order to receive documents from that party’s F-Code Box, but was unsuccessful because the F-Code password that you entered did not match the one registered in the transmitting party’s FAX.
U03700 An F-Code Based Bulletin Board Reception was attempted in order to receive documents from the other party, but was unsuccessful because the other party’s FAX does not have F-Code Based Bulletin Board Transmission capabilities or because there were no documents stored in the corresponding box.
U04000 The destination FAX is one of our models and an F-Code Based Confidential Transmission was attempted in order to transmit documents to that party’s F-Code Box, but was unsuccessful because the F-Code Box number that you entered was not registered in the destination party’s FAX.
U04100 A transmission to a destination party’s box (ex. F-Code Box) was attempted, but was unsuccessful because the destination party’s FAX does not have F-Code Based Confidential Reception capabilities.
U04200 Encryption Transmission was attempted, but was unsuccessful because the Encryption Box was not registered in the other party’s FAX.
U04300 Encryption Transmission was attempted, but was unsuccessful because the other party’s FAX does not possess Encryption Communication capabilities.
U04400 Encryption Transmission was attempted, but was unsuccessful because the Encryption Keys did not match.
CODE CAUSE AND/OR PROCEDURE FOR CORRECTION
8-10 Reference Information

U04401 Encryption Transmission was attempted, but the other party was not dialed because the designated Encryption Key is not registered in your unit.
U04500 Encryption Reception was attempted, but was unsuccessful because the Encryption Keys did not match.
U05100 Transmission was attempted, but was unsuccessful because TX/RX Restriction was turned ON in your unit and the necessary communication conditions were not met. Check with the destination party.
U05200 A transmission was attempted by another party, but was unsuccessful because TX/RX Restriction was turned ON in your unit and the necessary communication conditions were not met.
U05300 Transmission was attempted, but was unsuccessful because TX/RX Restriction was turned ON in the destination party’s FAX and the necessary communication conditions were not met. Check with the destination party.
U09000 Communication was attempted but, but was unsuccessful because the other party’s FAX does not match the communication protocol in use (the other party is using a G2 facsimile).
U12000 An F-Code Based Relay Broadcast Transmission command was received, but all the data to be transmitted was not received because the memory in your FAX machine has become full. Check the contents of your machine’s memory and, after you have created sufficient space in memory, have the initial transmitting station perform the transmission operation again.
U14000 A reception from an F-Code box was attempted, but was unsuccessful because the memory in your FAX machine has become full. Print out data from memory and try again or abandon the F-Code Based Confidential Reception attempt.
U14100 The destination FAX is one of our models and a transmission to a destination party’s F-Code Box was attempted, but was unsuccessful because memory in the destination party’s FAX machine has become full.
U19000 Memory Reception was attempted, but was unsuccessful because your memory has become full. Clear your memory of all other data and attempt reception again.
U19100 Transmission was attempted, but was unsuccessful because the destination party’s memory has become full. Check with the destination party.
U19200 The data stored in memory is faulty. Perform the necessary communication procedures again.U19300 A transmission was attempted, but was unsuccessful because the data to be transmitted is
faulty. Perform the transmission procedure again.
U19400 A reception was attempted, but was unsuccessful because the received data is faulty. Perform the reception procedure again.
CODE CAUSE AND/OR PROCEDURE FOR CORRECTION
Reference Information 8-11

8-12 Reference Information

Index
Numerics
2 in 1 RX setting ............................................................6-21
A
Abbreviated Dialing ........................................................2-20
Abbreviated Numbers ....................................................1-17
Accessing the Application Screen When Restricted Access is Turned ON .....................................................................3-65
Accessing the Print Report Screen When Restricted Access is Turned ON ..................................................................3-65
Accessing the Register Screen When Restricted Access is Turned ON .....................................................................3-64
Activity Report ..................................................................5-4
Address Book ................................................................2-22Searching for a Destination with the Address Book 2-22Using the Address Book .........................................2-22
Administrator Number ....................................................1-10
Auto Clear function ........................................................1-11
Auto FAX/TEL Switching ..................................................6-3
Automatic Fax Reception .................................................2-9
Automatic Redialing .......................................................2-25
Auto sleep function ........................................................1-11
B
Batch Transmission function ..........................................1-14
Broadcast Transmissio ....................................................3-7
Broadcast Transmission ..................................................4-5
Bulletin Board setting .......................................................6-9
C
Canceling a Communication ..........................................2-11
Canceling a Direct Feed Transmission ..........................2-11
Canceling a Memory Transmission (during scanning) ...2-11
Canceling a Memory Transmission (during transmission) .....................................................2-11
Canceling a Reception ...................................................2-12
Cannot perform F-code Based Confidential Transmission ....................................................................4-6
Cannot print out from FAX ...............................................4-6
Cannot receive document ................................................4-6
Cannot send document ....................................................4-5
Chain Dial Keys .............................................................3-12Dialing With a Chain Dial Key .................................3-15Modifying or Deleting Registered Information .........3-13Registering New Chain Dial Keys ...........................3-12
Communication Result Display ........................................5-2
Communication Using the Timer ....................................3-10
Confirmation Report .........................................................5-4
Copy Priority Printout function .......................................1-16
D
Date & Time setting ..........................................................1-8
Deleting the Communication ..........................................3-17
Document Number .........................................................1-11
Document Processor ............................................... 1-2, 2-3
Dual Access function .....................................................1-12
Duplex RX setting ..........................................................6-20
Duplex Transmission ........................................................3-3
E
Editing a Communication in Memory .............................3-16
Encrypted Communication ..................................... 4-5, 6-33
Encryption Box List ........................................................6-41
Encryption Key ...............................................................6-35
Entering Characters .......................................................2-13
Entering Documents into an F-Code Confidential Box ...3-38
Error Code Tables ............................................................8-9
Error Message .................................................................4-3
F
Fax Forwarding ...................................................... 3-49, 4-6Modifying Registered Fax Forwarding Information .3-50Registering the Fax Forwarding Information ...........3-49Turning Fax Forwarding ON/OFF ...........................3-50
Fax Paper Feeding Tray setting .....................................6-17
Fax Priority Printout function ..........................................1-16
Fax Screens .....................................................................1-3
F-Code ...........................................................................3-30
F-Code Based Bulletin Board Reception .........................4-7
F-Code Based Communication ............................ 1-14, 3-30
F-Code Based Confidential Communication ..................3-33
F-Code Based Relay Broadcast Communication ..........3-42
F-Code Based Relay Broadcast Transmission ................4-6
Index-1
F-Code Box ....................................................................3-31
F-Code Confidential Box ..................................................4-6
F-Code Confidential Box List .........................................3-38
F-Code password ...........................................................3-31
Force-Starting the Communication .................................3-17
G
Group Dial Keys .............................................................3-52Dialing With a Group Dial Key ................................3-55Modifying or Deleting Registered Information .........3-53Registering New Group Dial Keys ..........................3-52
Group Dial List ...............................................................3-56
I
If an Error Occurs .............................................................4-2
Imaging Memory Backup function ..................................1-16
Initial Mode .......................................................................1-9
Interrupt Transmission ......................................................3-9
Introduction ........................................................................ xi
K
Key Number ...................................................................6-33
L
Legal and Safety InformationInstallation Precautions ................................................vPrecautions for Use .................................................... viSafety Conventions in This Guide ................................. iSymbols ........................................................................ i
Line Type setting ..............................................................1-5
Location Info. setting ........................................................1-7
M
Management Reports/Lists Printout .................................5-4
Manual Fax Reception ...................................................3-22
Manual Fax Transmission ..............................................3-20
Manual Redialing ...........................................................2-25
Memory Reception ................................................. 2-10, 4-6
Memory Reception function ...........................................1-15
Modifying or Deleting Encryption Boxes ........................6-37
Modifying or Deleting Encryption Keys ..........................6-35
Modifying or Deleting F-Code Confidential Boxes .........3-34
Modifying or Deleting F-Code Relay Boxes ...................3-44
Modifying or Deleting Permit Fax Numbers ...................6-27
Modifying or Deleting Permit IDs ....................................6-28
Modifying or Deleting Reject Fax Numbers ................... 6-30
Modifying the Contents of the Communication .............. 3-18
MP Tray Setting ............................................................. 6-19
N
Names of Parts ................................................................ 1-2
Number of Redials setting ............................................. 6-12
Number of Rings setting ................................................ 6-10
O
One-Touch Key List ....................................................... 2-20
One-Touch Keys ............................................................ 2-15Dialing With a One-Touch Key ............................... 2-19Modifying or Deleting Registered ........................... 2-17Registering New One-Touch Keys ......................... 2-15
Operation Panel .............................................................. 1-3
Optional Memory ............................................................. 7-2
P
Paper Size and Priority Feed Chart .......................... 8-5, 8-7
Polling Communication .................................................. 3-26
Polling Reception ................................................... 3-28, 4-6
Polling Transmission ..................................................... 3-26
Power Failure Report ...................................................... 4-2
Printing Out an Encryption Key List ............................... 6-41
Printing Out an F-Code Relay Box List ......................... 3-48
Printing Out a Sample Image of Waiting Documents .... 3-16
Printing Out Documents from an Encryption Box .......... 6-40
Printing Out Documents from an F-Code Confidential Box ............................................................ 3-37
Print Report setting .......................................................... 6-7
Program Dial List ........................................................... 3-61
Program Keys ................................................................ 3-57Modifying or Deleting Registered Information ........ 3-58Registering New Program Keys ............................. 3-57Using a Program Key ............................................. 3-61
R
Receive Mode setting .................................................... 6-15
Receiving Documents from an F-Code Based Bulletin Board ............................................................................. 3-39
Reception Size setting ................................................... 6-24
Redialing functions ........................................................ 2-25
Registering New Encryption Boxes ............................... 6-36
Registering New F-Code Confidential Boxes ................ 3-33
Registering New F-Code Relay Boxes .......................... 3-42
Index-2
Registering New Permit Fax Numbers ..........................6-26
Registering New Permit IDs ...........................................6-28
Registering New Reject Fax Numbers ...........................6-29
Remote Diagnosis setting ..............................................6-22
Remote Switching ...................................................3-24, 4-5Changing the Remote Switching Number ..............3-24Initiating the Reception ...........................................3-25
Remote Test ID setting ..................................................6-23
Restricted Access ..........................................................3-62
Restricted Access Report ..............................................3-67
Rotate & Transmit function ............................................1-14
Rotate Received Data function ......................................1-15
RX Date/Time setting .....................................................6-16
S
Scan from DP setting .....................................................6-13
Sending Document ..........................................................2-2
Sending Documents as an F-Code Based Relay Broadcast Transmission ..................................................................3-46
Setting the documents .....................................................2-3
Specifications ...................................................................8-2
Standby Transmission ......................................................3-5
Subaddress ....................................................................3-30
T
TAD Reception .................................................................6-5
Troubleshooting ...............................................................4-1
Troubleshooting Tables ....................................................4-5
TTI setting ........................................................................1-6
TX/RX Restriction ..........................................................6-25
TX/RX Restriction ON/OFF Setting ...............................6-31
TX Mode/Default setting ................................................6-14
U
User Setting List ..............................................................5-5
V
Volume setting ............................................................... 6-11
Index-3

Index-4

DIRECTIVE 2002/96/CE ON THE TREATMENT, COLLECTION, RECYCLING ANDDISPOSAL OF ELECTRIC AND ELECTRONIC DEVICES AND THEIR COMPONENTS
INFORMATION
1. FOR COUNTRIES IN THE EUROPEAN UNION (EU)
The disposal of electric and electronic devices as solid urban waste is strictly prohibited: it must be collected separately.
The dumping of these devices at unequipped and unauthorized places may have hazardous effects on health and theenvironment.Offenders will be subjected to the penalties and measures laid down by the law.
TO DISPOSE OF OUR DEVICES CORRECTLY:
a) Contact the Local Authorities, who will give you the practical information you need and the instructions for handling thewaste correctly, for example: location and times of the waste collection centres, etc.
b) When you purchase a new device of ours, give a used device similar to the one purchased to our dealer for disposal.
The crossed dustbin symbol on the device means that:
- when it to be disposed of, the device is to be taken to the equipped waste collection centres and is to behandled separately from urban waste;
- The producer guarantees the activation of the treatment, collection, recycling and disposal procedures in accordance with Directive 2002/96/CE (and subsequent amendments).
2. FOR OTHER COUNTRIES (NOT IN THE EU)
The treatment, collection, recycling and disposal of electric and electronic devices will be carried out in accordance with thelaws in force in the country in question.


