FAQ 01/2015 Creating User-defined Block Icons with SIMATIC PCS 7 · PDF file ·...
33
http://support.automation.siemens.com/WW/view/en/16514590 FAQ 01/2015 Creating User-defined Block Icons with SIMATIC PCS 7 SIMATIC PCS 7 V8.0 / V8.1
Transcript of FAQ 01/2015 Creating User-defined Block Icons with SIMATIC PCS 7 · PDF file ·...

http://support.automation.siemens.com/WW/view/en/16514590
FAQ 01/2015
Creating User-defined Block Icons with SIMATIC PCS 7 SIMATIC PCS 7 V8.0 / V8.1

1 Creating Graphic Icons
Create own icon blocks Entry ID: 16514590, V1.0, 01/2015 2
S
iem
ens
AG 2
015
All r
ight
s re
serv
ed
This entry originates from the Siemens Industry Online Support. The conditions of use specified there apply (www.siemens.com/nutzungsbedingungen).
Security Notes
Siemens offers products and solutions with industrial security functions which support the secure operation of plants, solutions, machines, devices and/or networks. They are important components in a comprehensive industrial security concept. The Siemens products and solutions continue to be developed under this aspect. Siemens recommends that you keep yourself regularly informed about product updates.
For the safe operation of Siemens products and solutions it is necessary to take appropriate security measures (cell protection concept, for example) and to integrate each component in an overall industrial security concept which is state of the art. This should also cover the third-party products used. Additional information about industrial security is available at: http://www.siemens.com/industrialsecurity.
In order to keep yourself informed about product updates, we recommend subscribing to our product-specific newsletter. Additional information about this is available at: http://support.automation.siemens.com.
Contents 1 Creating Graphic Icons ..................................................................................... 3
1.1 Creating a Pump Icon ........................................................................... 3 1.2 Creating Status Displays ...................................................................... 6
1.3 Exporting the Status Displays ............................................................ 11 2 Creating Your Own Block Icons ..................................................................... 12
2.1 Creating a Template File .................................................................... 12
2.2 Copying a Standard Block Icon .......................................................... 14
2.3 Changing Block Properties ................................................................. 16 2.4 Changing the Block Display ............................................................... 18
3 Creating/Updating Block Icons ...................................................................... 29
3.1 Assigning Block Icons in the CFC Chart ............................................ 29
3.2 Creating/Updating Block Icons ........................................................... 31 4 History............................................................................................................... 33
Validity
This document is valid for SIMATIC PCS 7 V8.0/ V8.1 and WinCC V7.2/ V7.3

1 Creating Graphic Icons
Create own icon blocks Entry ID: 16514590, V1.0, 01/2015 3
S
iem
ens
AG 2
015
All r
ight
s re
serv
ed
1 Creating Graphic Icons In this document we take the example of a motor block to describe how to configure your own block icons in your PCS 7 project. For this you create your own icon for pump in the Graphics Designer and export it in a file format which you can use later for editing.
1.1 Creating a Pump Icon
Requirements The WinCC Explorer and the WinCC project are open.
Procedure 1. Open the Graphics Designer in the WinCC Explorer.
In the Graphics Designer a new picture is created by default if no other picture has yet been opened. If not, create a new picture via "File > New".
2. In the "Standard" toolbar you select the circle from the "Standard Objects" folder and create a circle.
3. If the object properties are not displayed when you mark the circle, select the menu command "View > Toolbars > Object Properties".

1 Creating Graphic Icons
Create own icon blocks Entry ID: 16514590, V1.0, 01/2015 4
S
iem
ens
AG 2
015
All r
ight
s re
serv
ed
Enter the following parameters for the circle:
Property Attribute Parameter – 'Static' column
Geometry Position X 50 Position Y 50 Width 110 Styles Draw Border Inside No Effects Global Color Scheme No
4. From the standard objects you select the rectangle and create a rectangle. Enter the
following parameters:
Property Attribute Parameter – 'Static' column
Geometry Position X 105 Position Y 50 Width 75 Height 40 Styles Draw Border Inside No Effects Global Color Scheme No
5. Create a circle with the following parameters:
Property Attribute Parameter – 'Static' column
Geometry Position X 52 Position Y 50 Width 107 Styles Line Weight 0 Effects Global Color Scheme No
6. Create a circle with the following parameters:
Property Attribute Parameter – 'Static' column
Geometry Position X 62 Position Y 62 Width 86
7. Create a circle with the following parameters:
Property Attribute Parameter – 'Static' column
Geometry Position X 95 Position Y 95

1 Creating Graphic Icons
Create own icon blocks Entry ID: 16514590, V1.0, 01/2015 5
S
iem
ens
AG 2
015
All r
ight
s re
serv
ed
Property Attribute Parameter – 'Static' column
Width 20 Effects Global Color Scheme No
8. The icon for the pump should now look like this:

1 Creating Graphic Icons
Create own icon blocks Entry ID: 16514590, V1.0, 01/2015 6
S
iem
ens
AG 2
015
All r
ight
s re
serv
ed
1.2 Creating Status Displays The icon created stands for a switched-off pump (gray). In this step we create the icons for the statuses of a switched-on pump (green) and a defective pump (red).
Requirements The icon for the switched-off pump has already been created.
Procedure 1. Mark all the objects of the created pump icon, right-click and then select "Copy".

1 Creating Graphic Icons
Create own icon blocks Entry ID: 16514590, V1.0, 01/2015 7
S
iem
ens
AG 2
015
All r
ight
s re
serv
ed
2. Click in the drawing area, right-click and select "Paste".
3. Position the inserted pump icon and repeat the last step so that you now have three identical pump icons.

1 Creating Graphic Icons
Create own icon blocks Entry ID: 16514590, V1.0, 01/2015 8
S
iem
ens
AG 2
015
All r
ight
s re
serv
ed
4. Mark the light circle of the left pump icon and assign the color gray under "Properties > Colors > Background Color". Confirm the change with the "OK" button.
5. Change the parameter of the circle under "Properties > Effects > Global Color Scheme" by double-clicking "No". The circle is now displayed gray (darker).

1 Creating Graphic Icons
Create own icon blocks Entry ID: 16514590, V1.0, 01/2015 9
S
iem
ens
AG 2
015
All r
ight
s re
serv
ed
6. Mark the light circle of the middle pump icon and assign the color green under "Properties > Colors > Background Color". Confirm the change with the "OK" button.
Note The color of the circle will not yet change after this action. This happens in the next step.
7. Change the parameter of the circle under "Properties > Effects > Global Color Scheme" by double-clicking "No". The circle is now displayed green.

1 Creating Graphic Icons
Create own icon blocks Entry ID: 16514590, V1.0, 01/2015 10
S
iem
ens
AG 2
015
All r
ight
s re
serv
ed
8. Mark the light circle of the right pump icon and assign the color red under "Properties > Colors > Background Color". Confirm the change with the "OK" button.
Note The color of the circle will not yet change after this action. This happens in the next step.
9. Change the parameter of the circle under "Properties > Effects > Global Color Scheme"
by double-clicking "No". The circle is now displayed red.

1 Creating Graphic Icons
Create own icon blocks Entry ID: 16514590, V1.0, 01/2015 11
S
iem
ens
AG 2
015
All r
ight
s re
serv
ed
1.3 Exporting the Status Displays In this step the created status displays are exported in a usable file format so that they can be utilized as block icons.
Requirements The status displays of the pump have been created.
Procedure 1. Mark all the objects of the icon of the switched-off pump (gray) and click "File >
Export...".
2. Enter "pump_off" in the input field and click the "Save" button.
Note Make sure that "Enhanced Metafiles (*.emf)" is selected as file type.
3. Repeat Steps 1 to 2 with the middle pump (green) and enter the name "pump_on".
4. Repeat Steps 1 to 2 with the right pump (red) and enter the name "pump_error".
5. Save the picture file under "File > Save" and close the Graphics Designer.

2 Creating Your Own Block Icons
Create own icon blocks Entry ID: 16514590, V1.0, 01/2015 12
S
iem
ens
AG 2
015
All r
ight
s re
serv
ed
2 Creating Your Own Block Icons 2.1 Creating a Template File
Standard block icons The standard block icons are stored in the file "@PCS7TypicalsAPLV8.PDL" which is installed automatically with the installation of PCS 7. Block icons already include many functions. Starting from a block icon you can, in Process mode, for example, open the associated faceplates which give you extensive information about the measuring point. Some block icons already have an integrated group display or a status display, for example. The essential feature of standard block icons is that they are assigned to specific blocks in the CFC charts so that they are generated automatically.
Naming convention for template files You should not change the name of the file "@PCS7TypicalsAPLV8.PDL". With this name PCS 7 knows automatically from which file the block icons are to be taken when executing the function "Create/Update Block Icons...". If you want to use modified block icons in your project, you can store them in the corresponding template files. You can use up to 10 different template files. When naming a file you must make sure that the file name consists of the fixed name component "@PCS7Typicals" plus additional variable name components. The fixed name component is always at the beginning of the file name and it is necessary for PCS 7 to recognize in which files other block icons are stored. You can assign the variable name component as you wish to suit your requirements.
Procedure
1. Open the Graphics Designer in the WinCC Explorer. In the Graphics Designer a new picture is created by default if no other picture has yet been opened. If not, create a new picture via "File > New".

2 Creating Your Own Block Icons
Create own icon blocks Entry ID: 16514590, V1.0, 01/2015 13
S
iem
ens
AG 2
015
All r
ight
s re
serv
ed
2. Click "File > Save".
3. Enter a name in compliance with the naming convention given above ("@PCS7Typicals_my_icon_blocks.PDL") and click the "Save" button.

2 Creating Your Own Block Icons
Create own icon blocks Entry ID: 16514590, V1.0, 01/2015 14
S
iem
ens
AG 2
015
All r
ight
s re
serv
ed
2.2 Copying a Standard Block Icon
Requirements The WinCC project and the WinCC Explorer are open.
Procedure
1. Open the template file you created in the previous step (here "@PCS7Typicals_my_symbols.PDL").
2. Open the file "@PCS7TypicalsAPLV8.PDL" in the Graphics Designer. This is the file in which the standard block icons are stored.
3. In the file "@PCS7TypicalsAPLV8.PDL", in the "MotL" line you mark the block icon with the object name "MotL1", right-click and select "Copy".

2 Creating Your Own Block Icons
Create own icon blocks Entry ID: 16514590, V1.0, 01/2015 15
S
iem
ens
AG 2
015
All r
ight
s re
serv
ed
Note The object name of a block icon can be found in the object properties of the block icon under "APL_BLOCK_ICON > Object name".
4. Switch to the file you created (here "@PCS7Typicals_my_symbols.PDL"), right-
click and select "Paste".
5. Close the file "@PCS7TypicalsAPLV8.PDL".

2 Creating Your Own Block Icons
Create own icon blocks Entry ID: 16514590, V1.0, 01/2015 16
S
iem
ens
AG 2
015
All r
ight
s re
serv
ed
2.3 Changing Block Properties
Requirements The template file you created is open (here "PCS7Typicals_my_symbols.PDL").
Procedure 1. Mark the motor icon, right-click and select "Properties".
2. Mark the property "APL_BLOCK_ICON" and enter the value "PUMP" for the "Object Name" under "Attribute".

2 Creating Your Own Block Icons
Create own icon blocks Entry ID: 16514590, V1.0, 01/2015 17
S
iem
ens
AG 2
015
All r
ight
s re
serv
ed
3. Mark the property "System" and double-click the attribute "Type".
4. Enter "@MotL/pump" and click the "OK" button.

2 Creating Your Own Block Icons
Create own icon blocks Entry ID: 16514590, V1.0, 01/2015 18
S
iem
ens
AG 2
015
All r
ight
s re
serv
ed
2.4 Changing the Block Display
Requirements The file "@PCS7Typcials_my_symbols.PDL" is open.
Procedure 1. Mark the motor block icon and in the pop-up menu you select "Customized
Object > Edit...".
In this way you split the block icon created as so-called user object into single elements. You can edit these separately.
Note Never select the menu command "Resolve". This resolves the user object and deletes the complete configuration of the block icon.

2 Creating Your Own Block Icons
Create own icon blocks Entry ID: 16514590, V1.0, 01/2015 19
S
iem
ens
AG 2
015
All r
ight
s re
serv
ed
2. Mark the circle and select "Delete" in the pop-up menu.
Note Several objects are on top of each other in the block icon. In this step we remove the topmost object.
3. From the palette of standard objects you insert two static texts labeled "Symbol
1" and "Symbol 2" next to the block icon.

2 Creating Your Own Block Icons
Create own icon blocks Entry ID: 16514590, V1.0, 01/2015 20
S
iem
ens
AG 2
015
All r
ight
s re
serv
ed
4. Mark the circle. In the drop-down list box of the toolbar you see which object is currently selected ("Symbol 2").
5. Move this object under the static text "Symbol 2".
6. Mark the circle again. In the drop-down list box of the toolbar you see that "Symbol 1" is selected.

2 Creating Your Own Block Icons
Create own icon blocks Entry ID: 16514590, V1.0, 01/2015 21
S
iem
ens
AG 2
015
All r
ight
s re
serv
ed
7. Move this object under the static text "Symbol 1".
8. Mark the "Symbol 2" object, right-click and select "Configuration Dialog...".

2 Creating Your Own Block Icons
Create own icon blocks Entry ID: 16514590, V1.0, 01/2015 22
S
iem
ens
AG 2
015
All r
ight
s re
serv
ed
9. Switch to the "Assign Pictures" tab and make sure that the option "*.wmf, *.emf" is enabled.
10. Mark the second line "Index 1" and in the list with the pictures you double-click the file "pump_error.emf". Then click the "OK" button.
In the preview and in the list you see that the original motor display in the basic picture has been replaced by the pump display.

2 Creating Your Own Block Icons
Create own icon blocks Entry ID: 16514590, V1.0, 01/2015 23
S
iem
ens
AG 2
015
All r
ight
s re
serv
ed
11. Mark the "Symbol 1" object, right-click and select "Configuration Dialog...".
12. Switch to the "Assign Pictures" tab and mark the second line "Index 1".
13. In the list with the pictures you double-click the file "pump_off.emf" while the second line "Index 1" is marked.
2 Creating Your Own Block Icons
Create own icon blocks Entry ID: 16514590, V1.0, 01/2015 24
S
iem
ens
AG 2
015
All r
ight
s re
serv
ed
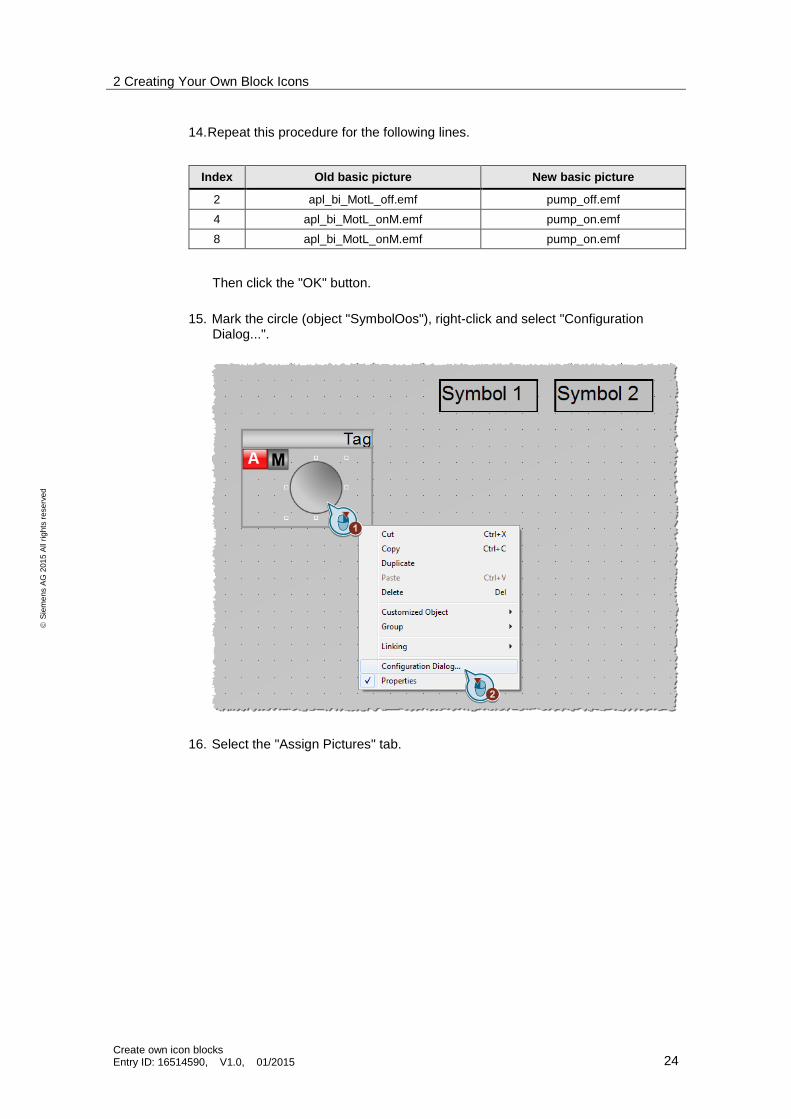
14. Repeat this procedure for the following lines.
Index Old basic picture New basic picture
2 apl_bi_MotL_off.emf pump_off.emf 4 apl_bi_MotL_onM.emf pump_on.emf 8 apl_bi_MotL_onM.emf pump_on.emf
Then click the "OK" button.
15. Mark the circle (object "SymbolOos"), right-click and select "Configuration Dialog...".
16. Select the "Assign Pictures" tab.

2 Creating Your Own Block Icons
Create own icon blocks Entry ID: 16514590, V1.0, 01/2015 25
S
iem
ens
AG 2
015
All r
ight
s re
serv
ed
17. Mark the first line "Index 0" and in the list with the pictures you double-click the file "pump_off.emf" while the first line "Index 0" is marked.
18. Mark the second line "Index 1", double-click the file "pump_off.emf" and then
click the "OK" button. 19. In the Graphics Designer you now see the pump icon (gray). Change the size of
the icon to fit the frame.

2 Creating Your Own Block Icons
Create own icon blocks Entry ID: 16514590, V1.0, 01/2015 26
S
iem
ens
AG 2
015
All r
ight
s re
serv
ed
20. Mark the three objects "SymbolOos", "Symbol1" and "Symbol2" with "Shift + left-click" and select the command "Same Width and Height" from the toolbar.
The objects are now all the same size.
21. Mark the three objects "SymbolOos", "Symbol1" and "Symbol2" with "Shift +
left-click" and select the command "Align Left" from the toolbar.
Shift + Shift +

2 Creating Your Own Block Icons
Create own icon blocks Entry ID: 16514590, V1.0, 01/2015 27
S
iem
ens
AG 2
015
All r
ight
s re
serv
ed
22. You execute this step according to the situation. If the objects "Symbol2" and "Symbol1" are graphically under the object "SymbolOos", then you mark the three objects and select the command "Align Top".
If the objects "Symbol2" and "Symbol1" are graphically over the object "SymbolOos", then you mark the three objects and select the command "Align Bottom".

2 Creating Your Own Block Icons
Create own icon blocks Entry ID: 16514590, V1.0, 01/2015 28
S
iem
ens
AG 2
015
All r
ight
s re
serv
ed
23. Mark all the objects of the pump block icon, right-click and select "Customized object > Finish editing".
24. Click "File > Save" and close the Graphics Designer.

3 Creating/Updating Block Icons
Create own icon blocks Entry ID: 16514590, V1.0, 01/2015 29
S
iem
ens
AG 2
015
All r
ight
s re
serv
ed
3 Creating/Updating Block Icons 3.1 Assigning Block Icons in the CFC Chart
Once you have created the pump block icon, you have to assign it to the properties of the desired block in the CFC chart.
Procedure 1. Open the CFC chart in which the motor block is located.
2. Open the Properties of the motor block by double-clicking the block or by right-clicking the block and selecting "Object Properties...".

3 Creating/Updating Block Icons
Create own icon blocks Entry ID: 16514590, V1.0, 01/2015 30
S
iem
ens
AG 2
015
All r
ight
s re
serv
ed
3. In the "Create block icon" input field you enter the "Type" of the pump block icon which you defined in section 2.3 – Step 4 and click the "OK" button. Here only the part with the prefix "@MotL/" is relevant.
4. Do a changes-only download and then close the CFC chart.
3 Creating/Updating Block Icons
Create own icon blocks Entry ID: 16514590, V1.0, 01/2015 31
S
iem
ens
AG 2
015
All r
ight
s re
serv
ed
3.2 Creating/Updating Block Icons
Requirements
The Plant View of the project is open.
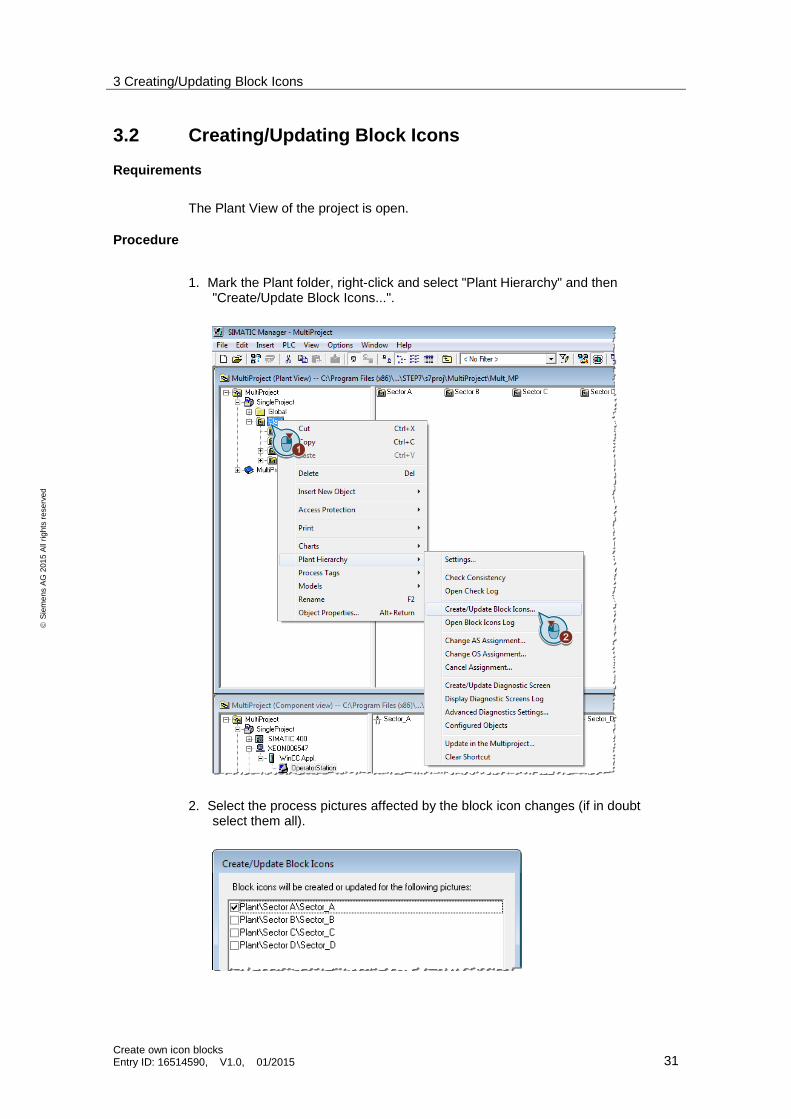
Procedure 1. Mark the Plant folder, right-click and select "Plant Hierarchy" and then
"Create/Update Block Icons...".
2. Select the process pictures affected by the block icon changes (if in doubt select them all).

3 Creating/Updating Block Icons
Create own icon blocks Entry ID: 16514590, V1.0, 01/2015 32
S
iem
ens
AG 2
015
All r
ight
s re
serv
ed
3. After completing automatic generation of the block icons, the objects are incorporated in the configured WinCC picture and connected with the measuring point.

4 History
Create own icon blocks Entry ID: 16514590, V1.0, 01/2015 33
S
iem
ens
AG 2
015
All r
ight
s re
serv
ed
4 History
Version Date Change
V1.0 01/2015 First edition