Fall 2017 - SHERIDAN ASSIGNMENTS - home · Web viewTrowel type, 4" blade long, 1/4" wide tip...
17
Painting 1 FAS 145H Fall 2017 Art and Art History Program Sheridan Institute /UTM Instructor: Mark Bell [email protected] Thursdays 9:00 am to 12:00 noon and 2:00 pm to 5:00 pm Above: Claude Monet in his Giverny studio, c. 1905.
Transcript of Fall 2017 - SHERIDAN ASSIGNMENTS - home · Web viewTrowel type, 4" blade long, 1/4" wide tip...

Painting 1FAS 145H
Fall 2017
Art and Art History Program
Sheridan Institute /UTM
Instructor: Mark Bell [email protected]
Thursdays 9:00 am to 12:00 noon
and2:00 pm to 5:00 pm
Above: Claude Monet in his Giverny studio, c. 1905.
Painting 1 Weekly Outline - Fall Term 2017
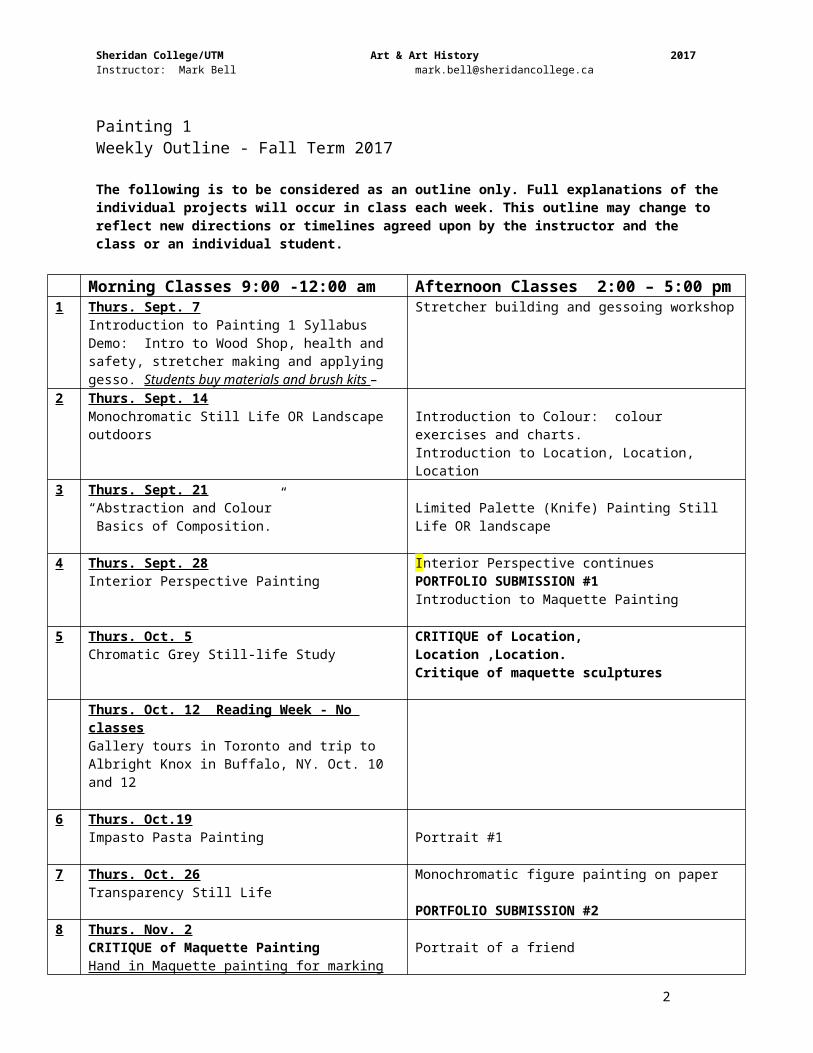
Sheridan College/UTM Art & Art History 2017Instructor: Mark Bell [email protected]
The following is to be considered as an outline only. Full explanations of the individual projects will occur in class each week. This outline may change to reflect new directions or timelines agreed upon by the instructor and the class or an individual student.
Morning Classes 9:00 -12:00 am Afternoon Classes 2:00 – 5:00 pm1 Thurs. Sept. 7
Introduction to Painting 1 SyllabusDemo: Intro to Wood Shop, health and safety, stretcher making and applying gesso. Students buy materials and brush kits –
Stretcher building and gessoing workshop
2 Thurs. Sept. 14Monochromatic Still Life OR Landscape outdoors Introduction to Colour: colour exercises and charts.
Introduction to Location, Location, Location3 Thurs. Sept. 21
“Abstraction and Colour” Basics of Composition.
Limited Palette (Knife) Painting Still Life OR landscape
4 Thurs. Sept. 28Interior Perspective Painting
Interior Perspective continuesPORTFOLIO SUBMISSION #1Introduction to Maquette Painting
5 Thurs. Oct. 5Chromatic Grey Still-life Study
CRITIQUE of Location, Location ,Location.Critique of maquette sculptures
Thurs. Oct. 12 Reading Week - No classesGallery tours in Toronto and trip to Albright Knox in Buffalo, NY. Oct. 10 and 12
6 Thurs. Oct.19Impasto Pasta Painting Portrait #1
7 Thurs. Oct. 26Transparency Still Life
Monochromatic figure painting on paper
PORTFOLIO SUBMISSION #28 Thurs. Nov. 2
CRITIQUE of Maquette PaintingHand in Maquette painting for markingCollage demonstration
Portrait of a friend
9 Thurs. Nov. 9Collage Self-portrait AND Narrative Collage(Bring collage materials!)
Colour Figure Painting on paper
10 Thurs. Nov. 16Work-in-progress critique of Narrative CollageWork on Narrative Collage in class
Portrait #2PORTFOLIO SUBMISSION #3Artist Talk review is due
11 Thurs. Nov. 23Grisaille Painting Grisaille Painting” continued
12 Thurs. Nov. 30Work Period for Narrative Collage
PORTFOLIO SUBMISSION #4Critique of Narrative Collage
2
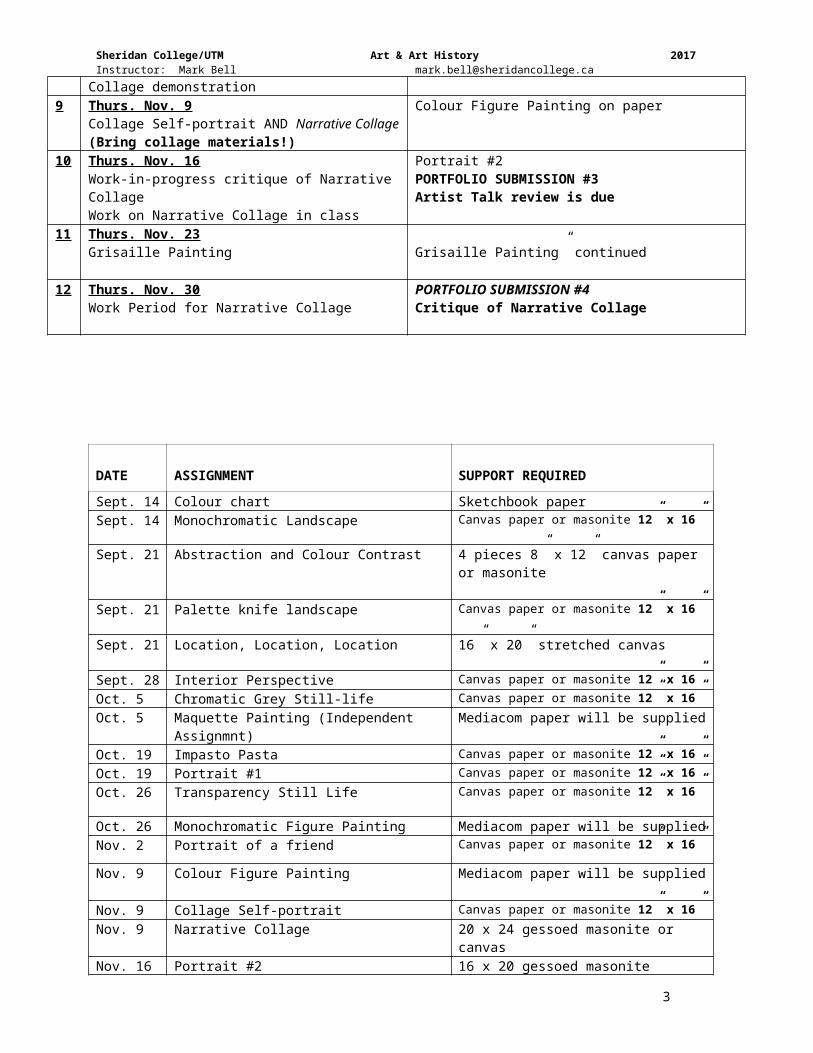
Sheridan College/UTM Art & Art History 2017Instructor: Mark Bell [email protected]
DATE ASSIGNMENT SUPPORT REQUIRED
Sept. 14 Colour chart Sketchbook paperSept. 14 Monochromatic Landscape Canvas paper or masonite 12” x 16”
Sept. 21 Abstraction and Colour Contrast 4 pieces 8” x 12” canvas paper or masonite
Sept. 21 Palette knife landscape Canvas paper or masonite 12” x 16”
Sept. 21 Location, Location, Location 16” x 20” stretched canvas
Sept. 28 Interior Perspective Canvas paper or masonite 12” x 16”Oct. 5 Chromatic Grey Still-life Canvas paper or masonite 12” x 16”Oct. 5 Maquette Painting (Independent Assignmnt) Mediacom paper will be suppliedOct. 19 Impasto Pasta Canvas paper or masonite 12” x 16”Oct. 19 Portrait #1 Canvas paper or masonite 12” x 16”Oct. 26 Transparency Still Life Canvas paper or masonite 12” x 16”
Oct. 26 Monochromatic Figure Painting Mediacom paper will be suppliedNov. 2 Portrait of a friend Canvas paper or masonite 12” x 16”
Nov. 9 Colour Figure Painting Mediacom paper will be supplied
Nov. 9 Collage Self-portrait Canvas paper or masonite 12” x 16”Nov. 9 Narrative Collage 20 x 24 gessoed masonite or canvasNov. 16 Portrait #2 16 x 20 gessoed masoniteNov. 24 Grisaille Painting 20 x 24” gessoed masonite
Dimensions are intended as a MINIMUM size, feel free to go larger if you wish. At least one (1) support must be a stretched canvas that you build yourself.
Please come to class prepared to paint. This means having the appropriate Support primed and ready to go. Don’t use class time to gesso your canvases. The above list will tell you exactly what is required for each class.
Grading Scheme There are 14 in-class paintings (or groups of paintings) that are each worth roughly 4% for a total of 55% And 3 independent assignments each worth 10%
3
Sheridan College/UTM Art & Art History 2017Instructor: Mark Bell [email protected]
Portfolio #1 Due Sept. 29 10%Portfolio #2 Due Oct. 26 30%Portfolio #3 Due Nov. 2 10%Portfolio #4 Due Nov. 16 10%Portfolio #5 Due Nov. 30 25%1 Written Artist Talk review 5%
Class participation – attendance and participation in critiques 10%
Total 100%
Portfolios are as follows:
Portfolio #1 Due Sept. 28 (10%)-Chromatic Grey Charts-Abstraction & Colour (4 paintings)-Monochromatic Painting-Palette Knife Painting
Portfolio #2 Due Oct. 26 (30%)-Interior Perspective-Chromatic Grey Still-life-Location, Location, Location*-Impasto Pasta painting-Portrait #1
Portfolio #3 Due Nov. 2 (10%)-Maquette painting*
Portfolio #4 Due Nov. 16 (10%)-Monochromatic Figure Painting on paper-Colour Figure Painting on paper-Portrait of a Friend
-Include with #4 your written review of one artist talk (5%)
Portfolio #5 Due Nov. 30 (25%)-Grisaille Painting-Portrait #2-Narrative Collage Painting*-Collage Self-portrait
Participation will account for 10% of the final mark. Participation includes the following: arriving on time, listening to lectures and instruction, being prepared and working in class time, sharing ideas, concepts and creative exploration and conceptual development with other students and cooperating in group projects, analyzing and offering opinions about work in progress and listening to and being an active participant in critique and discussions.
Please hand all work in in some sort of portfolio. This could be any sort of bag or cardboard or leather container. As long as they are all packaged together.
All work should be clearly labeled with your name and the title of the project on the back.
BASIC PAINTING MATERIALS LIST
The absolute minimum requirements are:1 brush kit (sold by Mark Bell for $15)
4
Sheridan College/UTM Art & Art History 2017Instructor: Mark Bell [email protected]
1 paint kit (sold by Mark Bell for $20)1 disposable palette1 or 2 palette knivesRhoplex and/or gel medium1 book of canvas paper (10 sheets 12” x 16”)1 sketchbook 8” x 10”several pieces of Masonite or Canvas boarda pair of scissors or an exacto knife
Acrylic paint will be used for all Painting 1 asignments
A basic paint kit is available for you to purchase from Mark Bell for $20. This subsidized kit will include:
Titanium WhiteAlizarin CrimsonLemon YellowUltramarine BluePthalo GreenHansa OrangeDioxazene Violet
This kit is sufficient to complete all the assignments for the class, but if you would like to experience a fuller range of colours, then you should also purchase some or all of these colours:
Raw UmberBurnt SiennaBurnt UmberYellow Ochre or Raw Sienna (or both)Cadmium redPthalo BlueCobalt blue Hookers Green, or Sap Green or Cadmium Green
Try to avoid buying really cheap paint, the pigments are weak and it is difficult to mix colours accurately. Do not buy thin, watery acrylic paint (the type found in squeeze bottles). All acrylic paints, regardless of brand, are compatible with one another.
Forbidden Colours:Ivory Black, Mars Black, Bone Black, Eerie Black, Black Oxide, Olive Black, Black Spinel, Jet Black, Ebony, Charcoal Noir, Smokey Black, Raven Black, Schwartzwald Schwartz ,Uberdunkelfarben Schwartz Black
Or any other black
Gesso (white primer) there will be a limited amount available to the class, but you may have to purchase additional gesso
once this runs out.
Palette
Use a disposable paper palette or you can make one cheaply by using a piece of cardboard covered with a sheet of wax paper, or use masonite, plywood or Plexiglas that you can purchase from John McCartney in the Woodshop of the Annie Smith Building. Take note that masonite/cardboard palette must be sealed with gesso.Do not purchase the palette with cups these are for watercolour use.Your palette should be a flat surface. Recommended size 9” x 12”.
Palette Knives
Trowel type, 4" blade long, 1/4" wide tip –recognizable by its cranked handle and more flexible blade. Plastic knives are fine; buy 3 to 4 knives in different sizes and shapes and one metal knife. Palette knives are used to apply paint to the picture surface and to scrape it off. They are an essential tool for scraping areas of paint from the picture surface so the surface can be reworked if necessary. They are also necessary for mixing colours and cleaning the palette.
5
Sheridan College/UTM Art & Art History 2017Instructor: Mark Bell [email protected]
Brushes:
All students are required to purchase a Brush Kit for $15. The Brush Kits are subsidized by the A&AH Program and students are only paying half of the price. These brushes are of good quality and have long handles (short handles are for gouache or watercolour painting). Synthetic bristles are for acrylics – do not use hair bristle brushes. If looked after properly brushes will last for years and keep their shape. The Brush Kits contain 8 brushes in various sizes plus 1 plastic palette knife, so buy a few more knives (see Palette Knives). Buy a 4” house painting brush for applying gesso. See the Painters’ Handbook for more information on brushes.
Brush Kits will be supplied for purchase in the first class of the term and for two weeks after.
Mediums:Many mediums are on the market; they are used to thin and/or to modify the paint — to improve its consistency for impasto. You will need at least one of the following mediums:
Rhoplex – available from John McCartney for cheap!Recommended: Acrylic gloss medium (liquid) (this is similar to Rhoplex, but much higher in quality).Acrylic gel medium – gloss (not essential, but it also works as an effective glue for collage)Acrylic retarder (this will slow down the drying time and extend the “open time” of your paint)
Sketchbook
Minimum size 10" x 8" spiral bound Pencils HB, 2B, 4B
Acrylic users might also have in their paint box:
Plastic water container (yoghurt type, 750 ml) Good provision of rags (cotton) Sandpaper – medium: approx. 150 gritCharcoal – Willow branch type – 3 sticks1” roll of masking tape or green painters tape.Small utility knife or a pair of scissorsRoll of waxed paper if you are using this for your palettePlastic tool box to carry paints and other materials – it’s a good idea to have a carrying case.
NOTE: Fabric stained with acrylic paint is almost impossible to clean totally. Please wear appropriate clothing.
Disposable gloves and dust masks are available from the wood shop for anyone who would like them.
PAINTING 1 ASSIGNMENTS
INTRODUCTION to the Syllabus
This first class will be an overview of what we plan to cover in Painting 1. We’ll also have a demonstration from John McCartney in the woodshop on how to build a stretcher and apply canvas so you’ll be prepared for week 2.
6
Sheridan College/UTM Art & Art History 2017Instructor: Mark Bell [email protected] BUILDING AND GESSOING WORKSHOP.
Under the guidance of Technologist John McCartney everyone in the class will build a wooden support (stretcher) in the wood shop. (16” x 20”) We will then learn how to stretch canvas and staple it in place. Once the canvas is stretched everyone will prime (gesso) their canvases. These canvases will be used for the Location, Location, Location project. We will also be priming masonite panels. There will be a nominal cost of approx $3.00 supplies.
SKETCHBOOKThroughout the class you are required to bring sketchbook which you will use to map out your compositions for most of the assignments we do. Also, use your sketchbook to plan your home assignments, take notes, make observations, experiment with colour mixing, doodle aimlessly or experiment with any medium or subject matter whether it is relevant to the course or not. Hand this in at the end of the term.
LOCATION, LOCATION, LOCATION (INDEPENDENT ASSIGNMENT)
Support: stretched canvas; use the canvas that you construct in the wood shop during the first day.
Painting is a way of communicating. An interior doesn’t have to be just a depiction of architecture, nor does a landscape have to be only about trees. A painted image can also speak of who we are as well as describing our environment. Unlike (most) photography, painting is capable of being expressive as well as descriptive.
Step 1: choose a Location (could be an interior or exterior space) that you are familiar with or have visited or are somehow interested in. Perhaps a place that holds some significance to you. This could be a childhood home or it could be where you are living now. It could be a place you once visited. It could even be a virtual space where you have gamed online.
Step 2: make a painting of this place either from OBSERVATION or from MEMORY or by using a REFERERNCE such as a photograph. (Note: if you use a photographic reference, try not to make your painting a direct copy of the photo. Use it as a starting point and be open to change.)
Step 3: The Hard Part: use some of the formal aspects of the painting process (colour, composition, brushwork, lighting etc) to emphasize anything you would like to say about the space you are depicting. Is this place safe? Menacing? Melancholy? Calming? Disturbing? Boring? Heart wrenching? Friendly? Quiet? Thought provoking? Is there a specific philosophical or political idea you would like the painting to evoke? Are you in awe of Nature’s/God’s terrifying force as Casper David Friedrich was when he painted “Monk by the Sea”? Or are you trying to evoke the powers of darkness as Vincent Van Gogh did when he painted “Night Café
Don’t feel that you have to be too obvious with your ideas. Better to err on the side of being too subtle rather than too obvious.
MONOCHROMATIC STILL LIFE / LANDSCAPE
Support 12” x 16” Masonite primed with Gesso or Canvas paperMaterials: sketchbook, pencils, paint supplies.On your support you will execute a simple landscape painting using ONE DARK COLOUR and white and various tones in between. Find an interesting view that might make a good painting (don’t just find the most comfortable place to sit and hope that it looks out over a good composition.) Start by doing a few sketches in your sketchbook. Once you have decided on a composition you might lightly draw a few key elements on your board with charcoal or pencil, or draw these elements with a small brush and some thin paint.
7

Sheridan College/UTM Art & Art History 2017Instructor: Mark Bell [email protected] painting with a washy medium grey. Use this wash to draw in some of the key elements and determine where the darks are. Don’t worry about the details; just loosely map out your composition. Next, introduce a darker grey (not washy but mixed on your palette) to push some of the darks back. Use a light grey to show where the light areas are. Continue developing the painting in this way. Squinting will help you to see where the large areas of light and dark are.
Don’t get caught up in the details, think of the big picture. Don’t worry about painting individual leaves or small twigs. Concentrate on the areas of dark and light. Use as large a brush as you dare.
INTRODUCTION TO COLOURThis class will look at some of the fundamental aspects of colour in both the subtractive theory (pigment) and the additive theory (light). We’ll discuss colour terminology and we’ll execute a chromatic grey scale and practice colour mixing.
COLOUR ASSIGNMENT 1. Chromatic Grey Scales. You’ll find two scales at the back of your Handbook of Painting Techniques. Use these as a guide to making your own chromatic grey chart in your sketch book. As the name suggests, Chromatic greys are greys that have colour (chroma) in them. They are achieved by mixing any two complementary colours in near equal proportion.
COLOUR ASSIGNMENT 2. Matching Skin TonesSupport: page from your sketchbook.Use the skin on your forearm as a reference. Try to match this colour in your sketchbook. Try to remember roughly what colours you used to get this skin tone.
COLOUR ASSIGNMENT 3. Colour InventorySupport: (2) 8 x10 page from your sketchbook.
Find an image or object you like and make a proportional colour inventory of it. Look at the colours in your original art work/object and try to match the colours in your sketchbook rendering the original source as a series of horizontal bands of colour. Try to make the size of your bands of colour proportional to how much space they take up in the original.
Now use those same colours to make an abstract composition (also in your sketchbook).
2 COLOUR PALETTE KNIFE PAINTINGSupport: Masonite, primed with gesso OR canvas paper (Minimum size 12 x 16”)Materials Use only the following colours: YELLOW, PURPLE AND WHITE. (If you don’t have Yellow, Raw Sienna or Yellow Ochre are fine.) Mix them up to make a variety of colours and tones. Try to create as much contrast as possible.
Start by applying a coloured ground to the surface of your support. A washy mid-tone of a mixture of yellow and purple and white would be best.
Then: Draw out some compositions in your sketchbook (a minimum of 4) until you have one you are happy with.
8

Sheridan College/UTM Art & Art History 2017Instructor: Mark Bell [email protected] draw out the basics of your composition with either diluted paint or charcoal.
Refine your information using palette knives. The knives will be bulky compared to brushes, so you will have to simplify your image as you go along.
Palette knife: use a trowel-shaped knife because the bend in the blade keeps your knuckles off the canvas. Use the flat underside of the blade to pick up paint from the mixtures that you have made. Make big, broad strokes with the flat side and smaller strokes with the tip. Always work with the minimum number of strokes. Don’t move the knife back and forth, set it down firmly and spread the paint with a single decisive movement. Aim to cover each area with a minimum number of knife strokes.
ABSTRACTION AND COLOUR Understanding how colour functions can sometimes be accomplished with greater ease when there are no objects to distract the viewer (or the artist). For this assignment complete a total of at least 4 abstract paintings on 8” x12” masonite panels or canvas paper.
Use your new found knowledge of Saturated Colour, Muted Colour and Chromatic Grey to paint the following abstract compostions:
Study 1: Predominantly Saturated ColoursStudy 2: Predominantly Muted ColoursStudy 3: Predominantly Chromatic GreysStudy 4: Base this final painting on anything you discovered that was successful in the first 3 paintings. There are no other parameters, but try to make an engaging, abstract painting.
Try to make each of your first three studies distinct from one another by using a different approach, different applications of paint, etc. These three painting should look like 3 separate people painted them.
Try to experiment with the physical properties of the paint as much as possible. How thick or thin can you make the paint? Consider using additives such as thickeners or plaster, sawdust etc. Experiment.
Use Rhoplex or Gel Medium in at least one paintng.
Try to think about how Colour can be used as a compositional device. For this you may wish to refer to the 7 Colour Contrasts in your painting handbook.
INTERIOR PERSPECTIVE
This painting of an architectural space will be done during class time. At the beginning of the class the basic principles of perspective will be covered.
In the first 30 minutes make at least 4 sketches of possible compositions of the interior space of our painting studio, the surrounding halls or any other architectural aspect of our environment.
Select sections that you think might make an interesting painting, but try to make your composition as broad as possible so that you are taking in a wide-angle view of the space. Feel free to move around the studio or move outdoors and find the point of view that works best for you. Once you have finished 4 sketches select the one that has the best composition and begin your painting.
Be aware of how perspective exists in the space and how to translate that perspective into your painting.
Think of where eye-level is in relation to the scene you are painting. Are there any vanishing points that might help you plot out the composition?
9

Sheridan College/UTM Art & Art History 2017Instructor: Mark Bell [email protected]
Just because we are rendering architectural forms does not mean that they have to be constructed with flawless, straight lines. This isn’t geometry, it’s supposed to be art, so don’t worry if some of your lines are a bit wavy, just try to follow the general principles of perspective.
Paint the scene as you see it using real (a.k.a. “local”) colours and tones.
Note: make sure your sketches have the same proportions as the support (otherwise your composition will not be the same when you start painting it on the support).
CHROMATIC GREY STILL-LIFE
Support: Canvas paper or Masonite 12” x 16”, gessoed and tinted with a colour of your choosing. (Orange, Raw Sienna, Burnt Umber, Ultramarine Blue etc.) Note: a tinted ground does not have to be a solid layer of colour. A thin, mottled wash is fine, if not preferable.
The class will divide into 4 or 5 groups and 4 or 5 tables will be set up each with a cluttered arrangement of various objects. The objects will include white things and clear glass and will be arranged on a white ground. Your task is to render these objects into a composition that fills the painting’s space – use your viewfinders to help compose and crop. Students may bring some objects to add to the arrangement. Use only Chromatic greys to execute this painting*.
Some things to consider:
Take into account the subtle differences between the various shades of white. Notice the difference between a warm white and a cool white. What colour are the shadows? Do not use black to render them. Observe the surfaces you are representing and think about how best to render something that is
glossy, matt or transparent. Think about perspective when rendering your composition. Most if not all of the coloured ground will be covered up, but it will nonetheless have and effect on
the final painting. You have only the time in class to complete this painting so work quickly and use your time
efficiently.
MAQUETTE PAINTING (INDEPENDENT ASSIGNMENT )
Part A: Construction of a Maquette (3-D Model)
A maquette is a small model, which usually serves as a sketch for a sculpture. In this case you are going to use the maquette as a subject for a large-scale painting on paper. Using found or purchased materials (i.e. toothpicks, wood scraps, a cereal box, crumpled paper, bubblegum, toys…) construct a small three-dimensional object. Your construction could either be a combination of different materials or objects, joined with hot glue, string, wire, … or, it could be a single seamless object made out of one or various materials placed in a 3-D environment.
Scale: It should be something that you can hold in your hand. Preferably multi-textured and multi-coloured
Part 2 – Maquette Painting
10
Sheridan College/UTM Art & Art History 2017Instructor: Mark Bell [email protected] full-size Mediacom paper with foam brushes and or house-painting brushes execute a painting of the maquette. The painting should fill or come close to the edges of your paper. Think about scale and proportion, and how you can render this small object on a large scale.
PORTRAIT #1 & #2
Support: Canvas Paper or Masonite 12” x 16” (min.) with coloured ground.Two models, one male and one female, will be posed at either end of the studio and students will choose which model they want to work from for their portrait painting. You will use a support with a saturated colour ground - your choice of colour.
The face, including the neck and/or shoulders, can be painted full-face or in a 3/4 view (avoid profiles if possible). Concentrate on proportions and emphasize the planes of the face. Natural flesh colours should be used but with some exaggerated colour using primary and secondary colour in the initial painting of the face.
IMPASTO PASTA – Representational abstraction Supports: canvas paper or masonite board, 12” x 16” Materials: all painting materials.
Many artists, although they use representational imagery in their work, push their paintings to the point of abstraction. The tactile nature of paint is one of it’s most seductive qualities and artists often play with the idea that a simple brush stroke can toy with the thin line between abstraction and representation. (Is that blob of paint a representation of a human / a bird /a piece of wire etc, or is it just a blob of paint?)
Students will be painting a large, tangled pile of wires, ropes and long, stringy things. The objective is to paint from thin to thick, gradually building up the surface of the painting, emphasizing the directions and shapes seen in the mass of spaghetti-like cords. Eventually paint may even be squeezed right out of the tube onto the painting surface.
1. Stage 1: at the beginning everyone will cover their painting surface with a thin ground, which will be mixed with a lot of water or Rhoplex. Use Foam Brushes.
2. Stage 2: use large brushes to make broad strokes in different colour using slightly thicker paint to set up the composition of the painting. Don’t worry about details.
3. Stage 3: using a large brush and even thicker paint begin to make the shapes and directions of the mass of “spaghetti”. Also use smaller brushes here.
4. Stage 4: even thicker paint to define the spaghetti shapes – use palette knives here.5. Stage 5: no water added to paint – very thick – you may add gel medium or modeling paste.
Squeeze paint straight out of the tube onto the painting if you like.
One of the objectives here is to paint fast. Learn to rely on some of the exciting mistakes that will be inevitable when you try to complete a painting in the class time. Don’t try to make a “perfect” painting, it can be loose and energetic – expressionistic.
This system of layering your paint and covering the entire surface within the first few minutes of starting a painting is an excellent model for how you should proceed with most of your paintings in this class. When you are doing any painting, start them the same way: using broad, simple strokes, thinner paint first and worry about adding the details and thicker paint later.
FIGURE PAINTING ON PAPER #1 & #2
Support and materials: Media-com paper will be supplied.
11
Sheridan College/UTM Art & Art History 2017Instructor: Mark Bell [email protected]
Using your largest brushes and large sheets of media-com paper, paint a series of gesture paintings. The model will pose in a series of short and longer poses and we will start with black and white acrylic paint and then move on into using colour to achieve skin tones and shading. Try to use your largest brushes as much as possible. The goal here is to work quickly and achieve a gestural painting that still contains plenty of information about the form and dimension of the model.
NARRATIVE and COLLAGE IN PAINTING Support: 20" x 24" stretched canvas or Masonite - ground of your choice i.e. gesso, Rhoplex, coloured ground.
Traditionally, narrative has played an important role in the history of painting. For the majority of citizens who could not read in Renaissance Italy, for instance, paintings and murals provided the key to understanding stories from the Bible, history and mythology. To this day it is difficult (if not impossible) to execute a representational painting that does not contain some element of narrative.
This assignment will be a painting about your own ideas and observations and could present a current or historical narrative, describe a personal experience, or express a political or philosophical point of view. You will create a narrative in your painting and also include collaged elements to enhance the narrative. Collage is excellent in combination with acrylics because the paint and mediums work like glue to adhere such items as photographic images, materials and text directly into the painting. A demonstration of collage techniques will be given before the start of this assignment.
Research: For this painting collect an assortment of images and patterns. This research can be in the form of photographs, photocopies, computer printouts magazines, newspapers, advertisements, items of clothing, fabric, wrapping paper and any other materials or objects you can think of. These images and objects are intended to help you paint as well as to use for collage. Here are some suggestions of items to gather for your research: a) images of people. (or parts of people, eyes, hands, hair etc.)b) images of the natural world. (animals, landscapes, outer space etc.)c) images of human-made structures (cars, houses, architectural spaces, cities etc.)d) textures, fabrics, patterns (wallpaper, wrapping paper), packaging (labels, logos, food wrappers). e) 3-D objects that could be attached to a painted surface. (toys, buttons, small bottles, stuffed animals—no live animals, please—but anything else goes)
Think about various narrative ideas for your painting and make preparatory sketches or mock-ups in your sketchbook. Make photo transfers ahead of time and bring all the research you have collected plus sketches/sketchbooks to class.
First Class: In this class you will come with your prepared support and your research and begin your painting as well as start to apply the collaged materials. You do not have to have a fully formed idea for your narrative at the beginning and could let this evolve as the painting progresses.
Second Class: Bring your almost-completed collages to class and we will spend the first half hour looking at the work and discussing various strengths and weaknesses. You will then have time to continue working on these collages in class.
GRISAILLE PAINTINGSupport: 20” x 24” Masonite or stretched canvas. White gesso ground.This two-session studio assignment will use one long pose and incorporate the traditional glazing technique known as “grisaille”. You will only paint the head and shoulders of the model. There are two stages to this painting; the first is the foundation layer, which will be executed entirely in gray and white. There will be a shiny background behind the model, either in fabric or metal foil. This stage will take most if not all of the first 3-hour class.
The second stage involves glazing your foundation with a series of transparent veils of colour. By
12
Sheridan College/UTM Art & Art History 2017Instructor: Mark Bell [email protected] a large proportion (50 to 90%) of gloss glazing medium or Rhoplex to your paint, your colours will become translucent. Using these glaze colours you can start adding colour to your foundation layer. Try to build up areas with multiple layers to create a rich, luminous painting.
For more details in this process see the “Grisaille” section of your Handbook of Painting Techniques.
Slide presentation of Grisaille - Artists: Caravaggio, Rembrandt, Rubens, Chardin, John Currin, etc.
13