Face to Face Requirements for Home Health to Face Requirements for Home Health ... face encounter...
14
Page 1 of 14 Date 7/28/14 Face to Face Requirements for Home Health CMS requires that a physician certifies a patient’s need for home health services. For home health patients, a face-to face encounter must occur up to 90 days prior to the start of care or within 30 days of the start of care. When a sufficient and signed Face to Face Document is received at time of Referral/Admission: Entering the Encounter Information 1. In the Patient component, select the patient. 2. Go to General>Admissions & Status tab, and then select the appropriate admission tab (located under the Allscripts Patient ID number). If the patient has more than 1 admission tab it would display here. 3. Click the Encounter Information tab on the bottom portion of the screen. 4. In the F2F Resource Field, select the inpatient physician, or non-physician practitioner (NPP) working in collaboration with the inpatient physician, that conducts and documents the encounter. This is for use when the physician conducting and documenting the encounter is a physician other than the physician listed as MD#1 (MD#1 is the signing MD for your plan of treatment and your default MD for all supplemental orders). If the physician conducting and documenting the encounter is the same as MD#1 then you do not need to do anything in this field. 5. In the Encounter Date column, enter the date when the patient’s face-to-face encounter information was signed.
Transcript of Face to Face Requirements for Home Health to Face Requirements for Home Health ... face encounter...
Page 1 of 14 Date 7/28/14
Face to Face Requirements for Home Health
CMS requires that a physician certifies a patient’s need for home health services. For home health patients, a face-to
face encounter must occur up to 90 days prior to the start of care or within 30 days of the start of care.
When a sufficient and signed Face to Face Document is received at time of
Referral/Admission:
Entering the Encounter Information
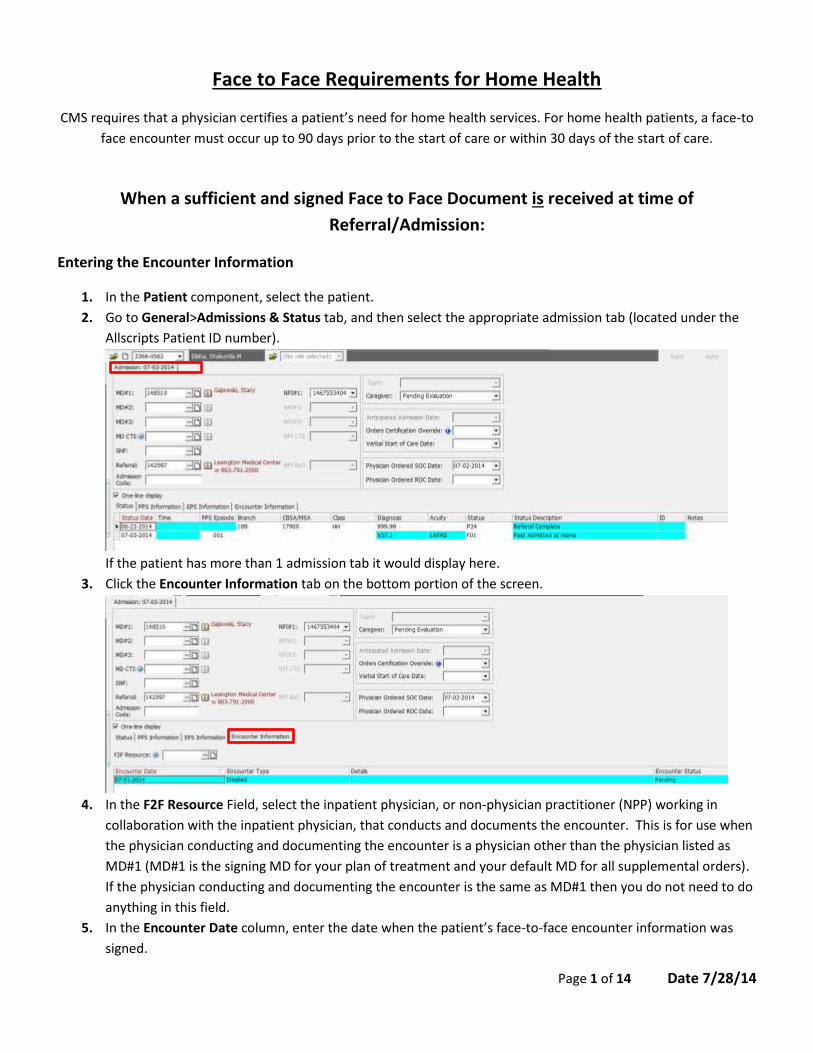
1. In the Patient component, select the patient.
2. Go to General>Admissions & Status tab, and then select the appropriate admission tab (located under the
Allscripts Patient ID number).
If the patient has more than 1 admission tab it would display here.
3. Click the Encounter Information tab on the bottom portion of the screen.
4. In the F2F Resource Field, select the inpatient physician, or non-physician practitioner (NPP) working in
collaboration with the inpatient physician, that conducts and documents the encounter. This is for use when
the physician conducting and documenting the encounter is a physician other than the physician listed as
MD#1 (MD#1 is the signing MD for your plan of treatment and your default MD for all supplemental orders).
If the physician conducting and documenting the encounter is the same as MD#1 then you do not need to do
anything in this field.
5. In the Encounter Date column, enter the date when the patient’s face-to-face encounter information was
signed.

Page 2 of 14 Date 7/28/14
6. In the Encounter Type column, enter the appropriate type of encounter that represents the detailed
information about face-to-face encounter and its documentation.
a. If the received face-to-face document is sufficient and signed, enter the record with the Performed
(document signed) encounter type and the Signed encounter status. In this case, claims will be
released for processing.
b. The received face-to-face document will need to be scanned into the Patient’s electronic chart in
AllDocs.
7. You can use the Details column to enter additional details (up to 50 characters) or your own (other)
encounter type i.e. patient has MD apt scheduled for 3-25-14,
a. For the Encounter Types Returned on and Other, the Details column is required.
8. Save your changes
Page 3 of 14 Date 7/28/14
When a sufficient and signed Face to Face Document is Not received at time of
Referral/Admission and one needs to be generated internally in the Allscripts Application:
If the agency received insufficient documentation or no document, use the Face-to-Face Documents Window in the Patient component to create the document within the Allscripts Homecare Application. Once the internal document is printed or sent to Physician Portal for signature, the Encounter Information tab is automatically updated with encounter status of pending. If the document is printed via right-fax or printed, the document will have to be processed back into the system (directions are further down in this document). When the document has been received back signed, and is captured in the system, the Encounter Information tab on the Admissions & Status Screen will have a line reading “Encounter Type – Created, Encounter Status – Signed”. If using physicians’ portal when received signed the encounter status will automatically update. This will allow the claim to release for processing and payment.
Entering the Encounter Information if the certifying physician is the primary physician
This should be utilized when the physician conducting and documenting the encounter is the physician listed as
MD#1. (MD#1 is the signing MD for your plan of treatment and your default MD for all supplemental orders).
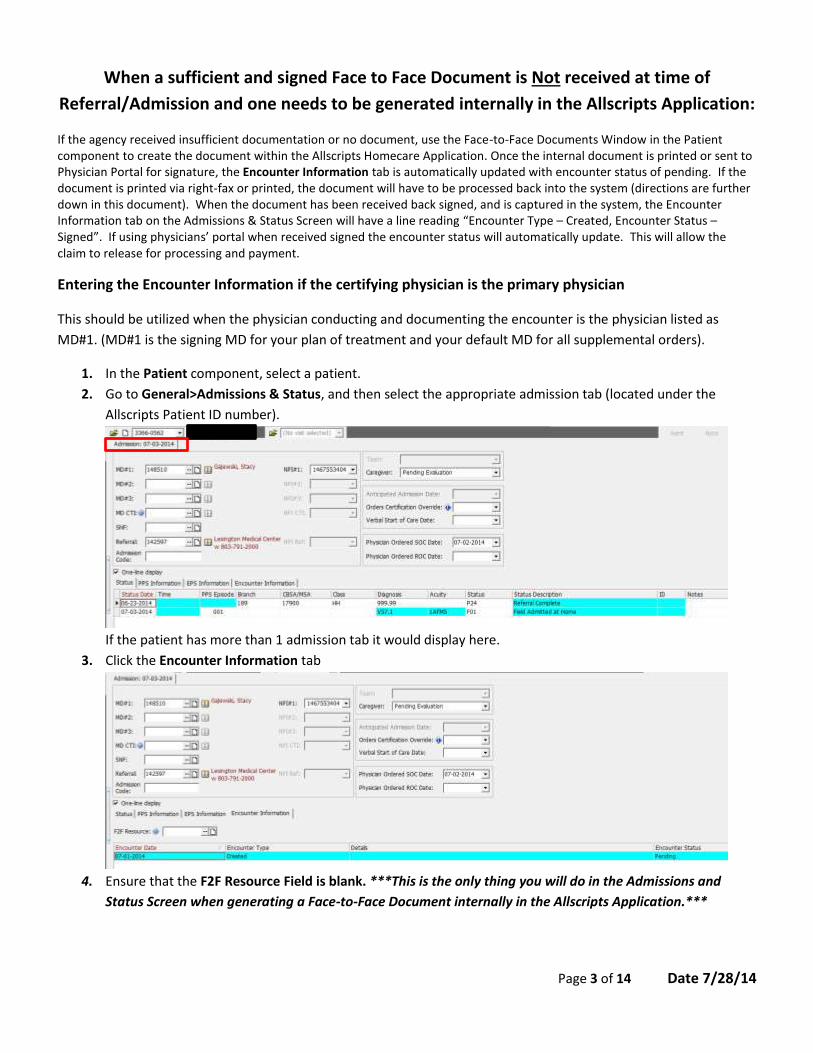
1. In the Patient component, select a patient.
2. Go to General>Admissions & Status, and then select the appropriate admission tab (located under the
Allscripts Patient ID number).
If the patient has more than 1 admission tab it would display here.
3. Click the Encounter Information tab
4. Ensure that the F2F Resource Field is blank. ***This is the only thing you will do in the Admissions and
Status Screen when generating a Face-to-Face Document internally in the Allscripts Application.***

Page 4 of 14 Date 7/28/14
5. While still in the Patient component with the Patient selected, Go to Documents>Face-to-Face Documents.
6. On the Define tab of the Face-to-Face Documents window, add a new row by clicking on the “Add a Row”
button on the right side of the screen beside Details.
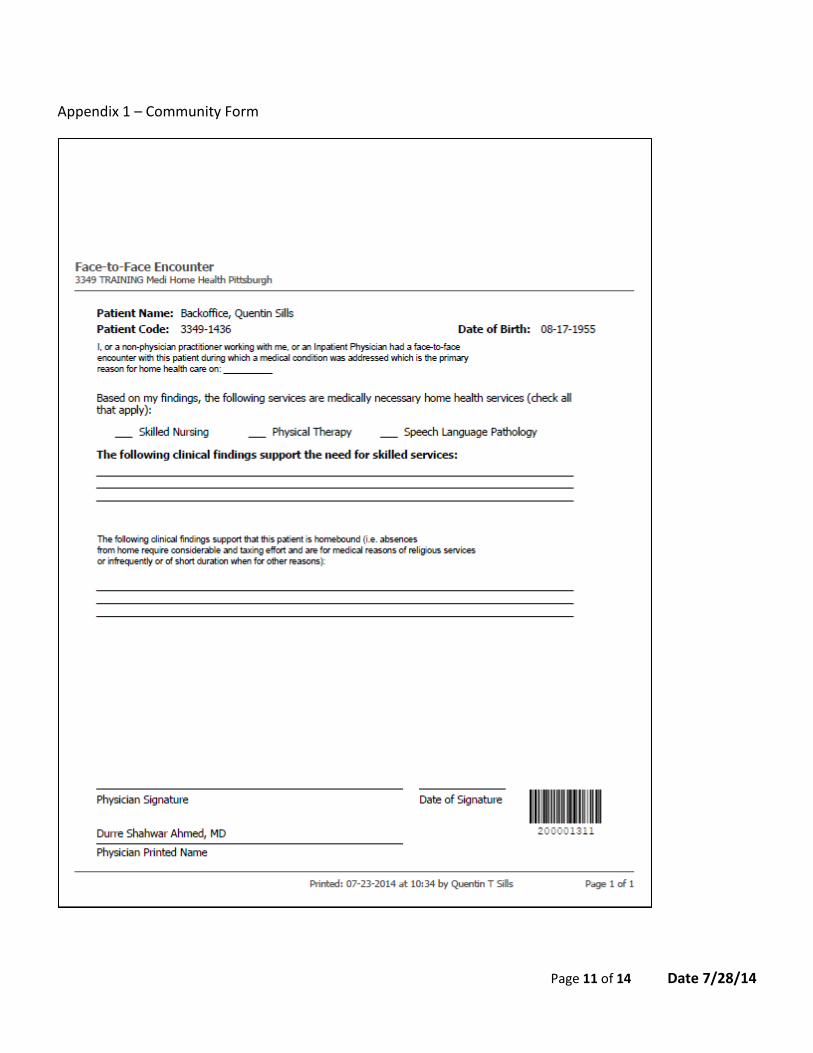
a. When you add a new row in the Face-to-Face Documents Window (Patient), MD #1 appears in the
F2F Physician column, and community form (See Appendix 1) of face-to-face document is generated.
The face-to-face physician must specify the date of encounter, clinical findings, and sign the
document.
7. Click to put a check in the box on the left side of the line next to the Form.
8. Click the Preview tab.
a. Note: Blank space is left at the top of the form, so that the agency can print its own header.
9. If the document is ready for signature, proceed with Printing Face-to-Face Documents from Patient
Component or Printing Face-to-Face Documents from Orders Component. Instructions for printing are
contained later in this document.
Entering the Encounter Information if certifying physician is NOT the primary physician
This should be utilized when the generating physician is an inpatient physician, or non-physician practitioner (NPP)
working in collaboration with the inpatient physician, conducts and documents the encounter.
1. In the Patient component, select a patient.
2. Go to General>Admissions & Status, and then select the appropriate admission tab (located under the
Allscripts Patient ID number).
Page 5 of 14 Date 7/28/14
If the patient has more than 1 admission tab it would display here.
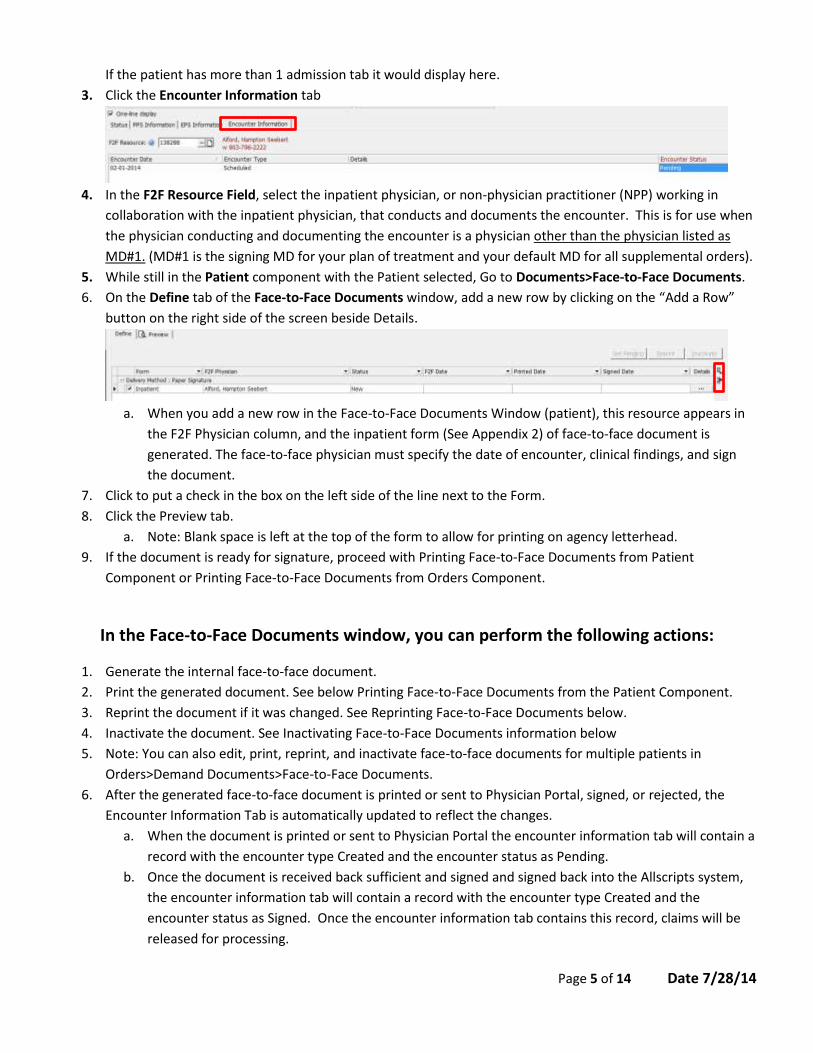
3. Click the Encounter Information tab
4. In the F2F Resource Field, select the inpatient physician, or non-physician practitioner (NPP) working in
collaboration with the inpatient physician, that conducts and documents the encounter. This is for use when
the physician conducting and documenting the encounter is a physician other than the physician listed as
MD#1. (MD#1 is the signing MD for your plan of treatment and your default MD for all supplemental orders).
5. While still in the Patient component with the Patient selected, Go to Documents>Face-to-Face Documents.
6. On the Define tab of the Face-to-Face Documents window, add a new row by clicking on the “Add a Row”
button on the right side of the screen beside Details.
a. When you add a new row in the Face-to-Face Documents Window (patient), this resource appears in
the F2F Physician column, and the inpatient form (See Appendix 2) of face-to-face document is
generated. The face-to-face physician must specify the date of encounter, clinical findings, and sign
the document.
7. Click to put a check in the box on the left side of the line next to the Form.
8. Click the Preview tab.
a. Note: Blank space is left at the top of the form to allow for printing on agency letterhead.
9. If the document is ready for signature, proceed with Printing Face-to-Face Documents from Patient
Component or Printing Face-to-Face Documents from Orders Component.
In the Face-to-Face Documents window, you can perform the following actions:
1. Generate the internal face-to-face document.
2. Print the generated document. See below Printing Face-to-Face Documents from the Patient Component.
3. Reprint the document if it was changed. See Reprinting Face-to-Face Documents below.
4. Inactivate the document. See Inactivating Face-to-Face Documents information below
5. Note: You can also edit, print, reprint, and inactivate face-to-face documents for multiple patients in
Orders>Demand Documents>Face-to-Face Documents.
6. After the generated face-to-face document is printed or sent to Physician Portal, signed, or rejected, the
Encounter Information Tab is automatically updated to reflect the changes.
a. When the document is printed or sent to Physician Portal the encounter information tab will contain a
record with the encounter type Created and the encounter status as Pending.
b. Once the document is received back sufficient and signed and signed back into the Allscripts system,
the encounter information tab will contain a record with the encounter type Created and the
encounter status as Signed. Once the encounter information tab contains this record, claims will be
released for processing.

Page 6 of 14 Date 7/28/14
Signing back in a Sufficient and Signed Face-to-Face Document that was generated out of
the Allscripts Application
Accelerated Post Signed Documents
1. This will only be used for Orders and Face-to-Face Documents that were generated out of the Allscripts
Application and have been returned back Sufficient and Signed.
2. Transactions>General>Accelerated Post Signed Documents
a. Place your cursor in the document number window and scan the barcode with the bar code reader.
At this point the status of the F2F document is changed from Pending to Signed. This has to be done
the day the orders are received by the agency as the date is auto assigned to today’s date.
b. DO NOT USE ACCELERATED POST SIGNED DOCUMENTS if the Face-to-Face is Rejected.
c. If the barcode will not scan then you can type in the document number located on the bottom right
corner of the page into the document number window.
Process Signed Documents
1. Transactions>General>Process Signed Documents
2. Enter in the date range to capture the date the Face-to-Face document was generated
3. Choose the Physician Name
4. Click on the tab that says Face-to-Face
5. Any outstanding Face-to-Face documents for that physician during the selected date range will display.
6. Select the correct face-to-face document (Match up the Patient Name, Form Type, and Printed Date)
7. Make sure to select the correct Signed Date.
8. If the document was rejected you will be required to enter in a Rejection Reason
9. Save the screen to save any changes you made.
Reprinting Face-to-Face Documents
Reprinting is used for updating printed face-to-face document (with the Pending status) if the discipline, clinical
findings, or F2F physician were changed.
1. To reprint a face-to-face document:
a. For multiple patients, go to Orders>Demand Documents>Face-to-Face Documents and select the
patients for whom you need to reprint the face-to-face document.
b. For the individual patient, select a patient in the Patient component and go to Documents>Face-to-
Face Documents.
2. On the Define tab, select the face-to-face document you want to update.
3. If needed, edit the discipline and clinical findings using the Face-to-Face Details dialog. To access this dialog,
click the ellipsis button in the Details column or double-click the record.

Page 7 of 14 Date 7/28/14
4. Click Reprint, and then click Save.
a. The face-to-face document is updated.
5. To see the changes, click the Preview tab.
Inactivating Face-to-Face Documents
Inactivation is used when printed or signed face-to-face document is no longer valid. Inactivated face-to-face
document is retained in the system for historical purposes and you can generate the new one instead.
Note: To inactivate face-to-face documents, you need to have the appropriate privilege granted by the Allscripts
Homecare administrator.
1. To inactivate a face-to-face document:
a. For multiple patients, go to Orders>Demand Documents>Face-to-Face Documents and select the
needed patients.
b. For the individual patient, select a patient in the Patient component and go to Documents>Face-to-
Face Documents.
2. On the Define tab, select the face-to-face document that you want to inactivate.
3. Click Inactivate, and then click Save.
a. The face-to-face document is inactivated.
Encounter Date Report
Overview of report used for tracking patients who need a face-to-face encounter.
Using the Encounter Date Report, you can track what patients need clinical face-to-face encounters based on the
information entered on the Encounter Information Tab in the Admissions & Status window. According to regulations,
for home health patients, a face-to-face encounter must occur up to 90 days prior to the start of care or within 30
days of the start of care.
1. Reports>General>Encounter Date Report
2. Select appropriate date range you want to pull the report for
3. Select Mode: Home Health
a. Home Health mode of the report shows admissions with the encounter records for active and
prospective home health patients. Encounter records are shown in the report on the following
conditions:
i. Patient's admission (or referral period) contains records on the Encounter Information tab.
Otherwise, admissions are shown in the Admissions without Encounter Records section.
ii. Patient's class is home health on the date when the encounter record was created.

Page 8 of 14 Date 7/28/14
iii. Encounter record start date falls within the selected date range.
4. To view the encounter records, you must select all or specific encounter statuses in the Status section of the
Define tab.
a. If you do not select an encounter status in the Status section of the define tab the only results that
will be shown are active and prospective home health patients and their admissions (or referral
periods) that do not contain records on the Encounter Information tab and start date of which falls
within the selected date range. (This is also at the end of every report if you do define specific
encounter statuses in the Status section of the Define tab.)
b. To view patients whose Face to Face documents are not received back signed you will need to select
both Pending and Signed. The report will show patients who have an encounter status (Face-to-Face
document status) of Pending as well as Signed during that time period. You will need to look through
the report to see which patients do not have an encounter status of signed to see which Face-to-Face
documents are outstanding. Patients with no encounter record (no face-to-face has been generated)
will be listed at the end of this report. If you enter documentation in the detail box on the admissions
and status screen this information will also print on the report.
c. If you select the checkbox to include notes, any notes entered during processing face-to-face
documents in Transactions > General > Process Signed Documents will display in the report.
d. You may also specify the level of details you want to include in the report using the Consolidation tab
for each level; you should define the values that you want to include. (default is to include all)
i. You can select to just report for specific payer sources
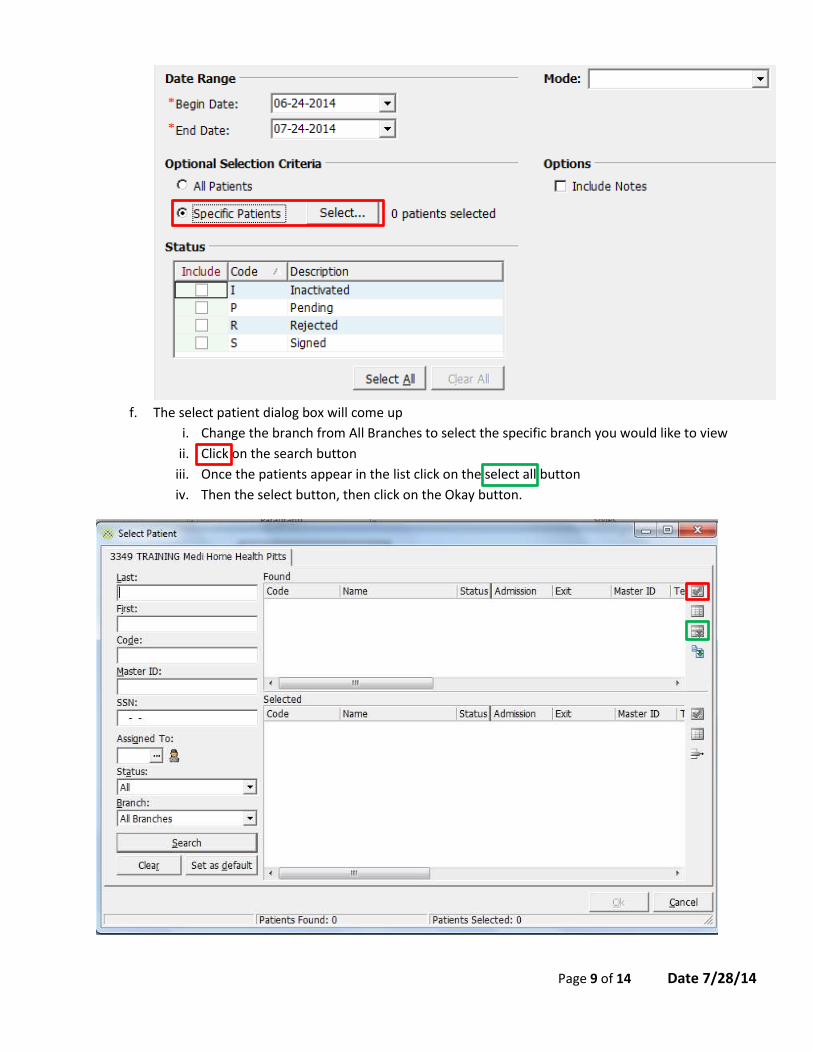
e. If you want to view the report by branch you can select Specific patients and click select;
Page 9 of 14 Date 7/28/14
f. The select patient dialog box will come up
i. Change the branch from All Branches to select the specific branch you would like to view
ii. Click on the search button
iii. Once the patients appear in the list click on the select all button
iv. Then the select button, then click on the Okay button.

Page 10 of 14 Date 7/28/14
5. Click Preview to see the report (See Appendix 3)
a. See Appendix 4 for a table describing the report’s fields in detail.
Reporting F2F Resource on Claims
To comply with CR 8441, the NPI and name of the physician who signed the face-to-face encounter are reported for
the hardcopy and electronic PPS Final claims of the initial episodes that begin on or after July 1, 2014.
The F2F physician information is reported from the F2F Resource field Information based on the following criteria for
the latest encounter:
The encounter date is before the claim thru date (the initial episode) up to 90 days prior to the start of the
admission.
The encounter type is Performed (document signed).
The encounter status is Signed.
The F2F physician information is not reported on claims in the following cases:
A physician is not PECOS enrolled (No is specified in Resource>General>Basic>PECOS Enrollment). You can
use the Physician is PECOS enrolled billing rule to defer paper claims with the F2F physicians who are not
PECOS enrolled. To defer EMCs, use the Defer claims when physician is not PECOS enrolled option.
The MD1 is the same person as the certifying physician.
Physician's NPI is not defined.
Page 11 of 14 Date 7/28/14
Appendix 1 – Community Form

Page 12 of 14 Date 7/28/14
Appendix 2 – Inpatient Form

Page 13 of 14 Date 7/28/14
Appendix 3 – Encounter Date Report
Page 14 of 14 Date 7/28/14
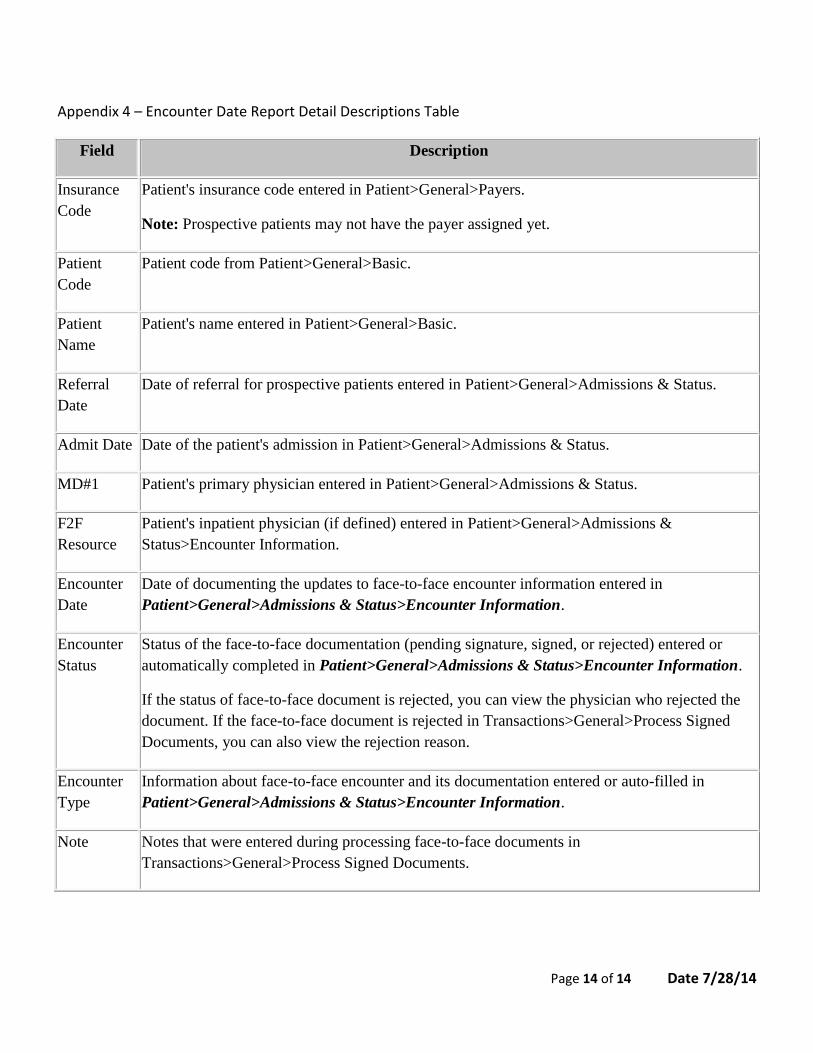
Appendix 4 – Encounter Date Report Detail Descriptions Table
Field Description
Insurance
Code
Patient's insurance code entered in Patient>General>Payers.
Note: Prospective patients may not have the payer assigned yet.
Patient
Code
Patient code from Patient>General>Basic.
Patient
Name
Patient's name entered in Patient>General>Basic.
Referral
Date
Date of referral for prospective patients entered in Patient>General>Admissions & Status.
Admit Date Date of the patient's admission in Patient>General>Admissions & Status.
MD#1 Patient's primary physician entered in Patient>General>Admissions & Status.
F2F
Resource
Patient's inpatient physician (if defined) entered in Patient>General>Admissions &
Status>Encounter Information.
Encounter
Date
Date of documenting the updates to face-to-face encounter information entered in
Patient>General>Admissions & Status>Encounter Information.
Encounter
Status
Status of the face-to-face documentation (pending signature, signed, or rejected) entered or
automatically completed in Patient>General>Admissions & Status>Encounter Information.
If the status of face-to-face document is rejected, you can view the physician who rejected the
document. If the face-to-face document is rejected in Transactions>General>Process Signed
Documents, you can also view the rejection reason.
Encounter
Type
Information about face-to-face encounter and its documentation entered or auto-filled in
Patient>General>Admissions & Status>Encounter Information.
Note Notes that were entered during processing face-to-face documents in
Transactions>General>Process Signed Documents.