F-Secure Messaging Security Gateway · Administration Sourceanddestination Protocol Port...
36
F-Secure Messaging Security Gateway Deployment Guide
Transcript of F-Secure Messaging Security Gateway · Administration Sourceanddestination Protocol Port...

F-Secure Messaging Security GatewayDeployment Guide

Contents
Chapter 1: Deploying F-Secure Messaging Security Gateway...........31.1 The typical product deployment model.....................................................................................41.2 Configuring the firewall.............................................................................................................41.3 Installing the virtual appliance from OVF..................................................................................51.4 Setting up the appliance through a console.............................................................................71.5 Changing the network settings.................................................................................................81.6 Changing the keyboard layout................................................................................................111.7 Allowing remote SSH access.................................................................................................131.8 Completing the setup in the web interface.............................................................................16
Chapter 2: Updating to the latest recommended settings................242.1 Importing settings...................................................................................................................252.2 Configuring the environment settings.....................................................................................26
Appendix A: Adding agents to the cluster.........................................34A.1 Adding a new agent to the cluster..........................................................................................35
TOC | F-Secure Messaging Security Gateway

Deploying F-Secure Messaging Security Gateway
This guide describes how to install F-Secure Messaging SecurityGateway.
Topics:
• The typical product deploymentmodel
• Configuring the firewall• Installing the virtual appliance
from OVF• Setting up the appliance through
a console• Changing the network settings• Changing the keyboard layout• Allowing remote SSH access• Completing the setup in the web
interface

1.1 The typical product deployment modelThe diagram shows a typical deployment model of the product.
1.2 Configuring the firewallYou need to configure your company firewalls to allow the network traffic through.
E-mail traffic
PortProtocolSource and destination
25TCPInternet ← → F-SecureMessaging Security Gateway
25TCPMicrosoft Exchange ← →F-Secure Messaging SecurityGateway
53TCP/UDPF-Secure Messaging SecurityGateway ← → DNS Server
Updates
PortProtocolSource and destination
80, 443TCPF-Secure Messaging SecurityGateway → Internet
Administration
PortProtocolSource and destination
10000TCPAdministrator → F-SecureMessaging Security Gateway
22TCPAdministrator → F-SecureMessaging Security Gateway
4 | Deploying F-Secure Messaging Security Gateway

Importing users (optional)
PortProtocolSource and destination
389 or 636TCPF-Secure Messaging SecurityGateway -> LDAP Server
End-user commands
PortProtocolSource and destination
443TCPEnd-user→ F-Secure MessagingSecurity Gateway
1.3 Installing the virtual appliance from OVFThe following steps provide instructions for installing the OVF image.
If you are using a hardware appliance, you can skip this step.
1. Verify the OVF files are available in a directory or URL that you can navigate to using the vSphereClient.
2. From the vSphere Client File menu, select Deploy OVF Template.3. In the Deploy OVF Template pop-up window, browse to the directory where OVF file is located, and
then click Next.4. Enter a name for the virtual appliance (for example, F-Secure Messaging Security Gateway). Click
Next.5. Select a datastore. Highlight the datastore and click Next.6. For the Disk Format, select the Thick provisioned format radio button and then click Next.
Thick Provisioning Lazy Zeroed: Allocates the disk space statically (no other volumes can take thespace), but doesn’t write zeros to the blocks until the first write takes place to that block during runtime(which includes a full disk format).
Thick Provisioning Eager Zeroed: Allocates the disk space statically (no other volumes can takethe space), and writes zeros to all the blocks.
7. Click Finish to complete the installation. It will take several minutes for the installation to complete.8. Before you start the OVF image, you will need to edit the instance settings:
F-Secure Messaging Security Gateway | 5

9. Remove the default flexible type adapter:
10. Add a new network adapter:a) Select adapter type E1000 and click Next.b) Confirm the settings.c) Click Finish.
6 | Deploying F-Secure Messaging Security Gateway

For highest reliability, F-Secure strongly recommends the E1000 network adapter over the Flexible.
11. Everything is now configured and you can start to use the image.
Note: The OVF image size is either 80 GB or 250 GB. We recommend that you use the largerimage for the first server (master). You can download the OVF images from this link:http://www.f-secure.com/en/web/business_global/support/downloads/-/carousel/view/96.
1.4 Setting up the appliance through a consoleFollow these instructions to set up F-Secure Messaging Security Gateway with the console.
1. Log in to the appliance with the following user name and password:
• Login: admin• Password: password
The welcome screen opens.2. Select Yes to change the admin password.
F-Secure Messaging Security Gateway | 7

3. Enter your new admin password.At this stage, the keyboard input language is US English. When you enter a new password, make surethat you use characters that are available after you change the keyboard layout.
4. Press Enter.
Next, you need to change the network settings.
1.5 Changing the network settingsYou need to change the network settings the first time you log in to the system.
1. Select Yes to change the network settings.
8 | Deploying F-Secure Messaging Security Gateway

The network configuration wizard opens.2. Enter Yes to continue.
3. Enter the IP address of the appliance.
4. Enter the subnet mask of the appliance.
5. Enter y for the automatic negotiation mode, unless you want to manually configure the transmissionparameters of your network device.
6. Enter the IP address of the default gateway.
F-Secure Messaging Security Gateway | 9

7. Enter the host name of the appliance.
8. Enter the domain name.
9. Enter the IP addresses of the DNS servers in use.We recommend that you use at least two different DNS server addresses for redundancy.
10. Enter a host name override if you are creating two nodes cluster. Add the agent information to the firstserver (master), and add the master server information if you are installing the agent.
11. Enter Yes to confirm the network settings.
10 | Deploying F-Secure Messaging Security Gateway

Your new settings are saved.12. When the new settings have been saved, press ENTER.
Next, change the keyboard layout to suit your needs.
1.6 Changing the keyboard layoutChange the keyboard layout the first time you log in to the system.
1. In the F-Secure Messaging Security Gateway menu, select Console Keyboard Selector and pressENTER.
2. Select the preferred keyboard from the list and press ENTER.
F-Secure Messaging Security Gateway | 11
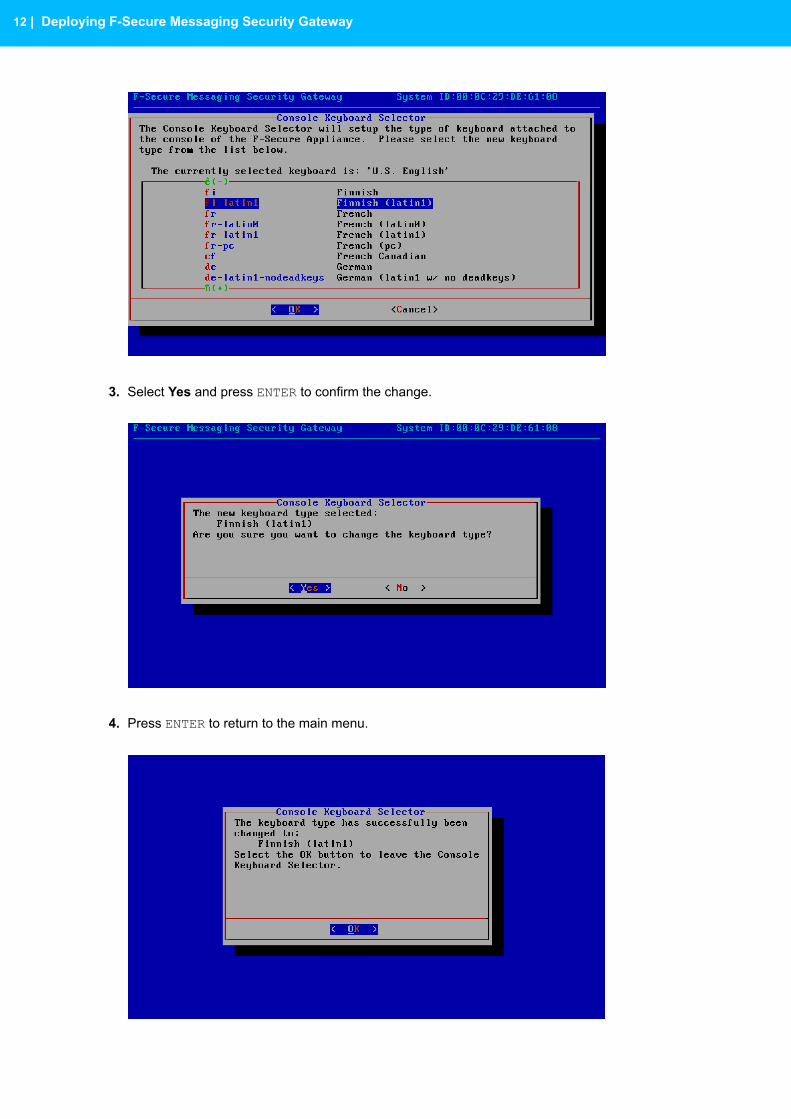
3. Select Yes and press ENTER to confirm the change.
4. Press ENTER to return to the main menu.
12 | Deploying F-Secure Messaging Security Gateway

1.7 Allowing remote SSH accessYou need to allow a remote SSH access to the system.
1. From the main menu, select Advanced System Control Operations.
2. Select Remote SSH Access.
3. Select Enable Remote SSH Access for all.
F-Secure Messaging Security Gateway | 13

4. Select Yes to confirm that you want to allow the SSH access to the appliance.
5. Press ENTER to return to the menu.
6. Select Return to Advanced System Control Menu.
14 | Deploying F-Secure Messaging Security Gateway

7. Select Return to the Main Menu.
8. Select Logout of the F-Secure Appliance.
F-Secure Messaging Security Gateway | 15
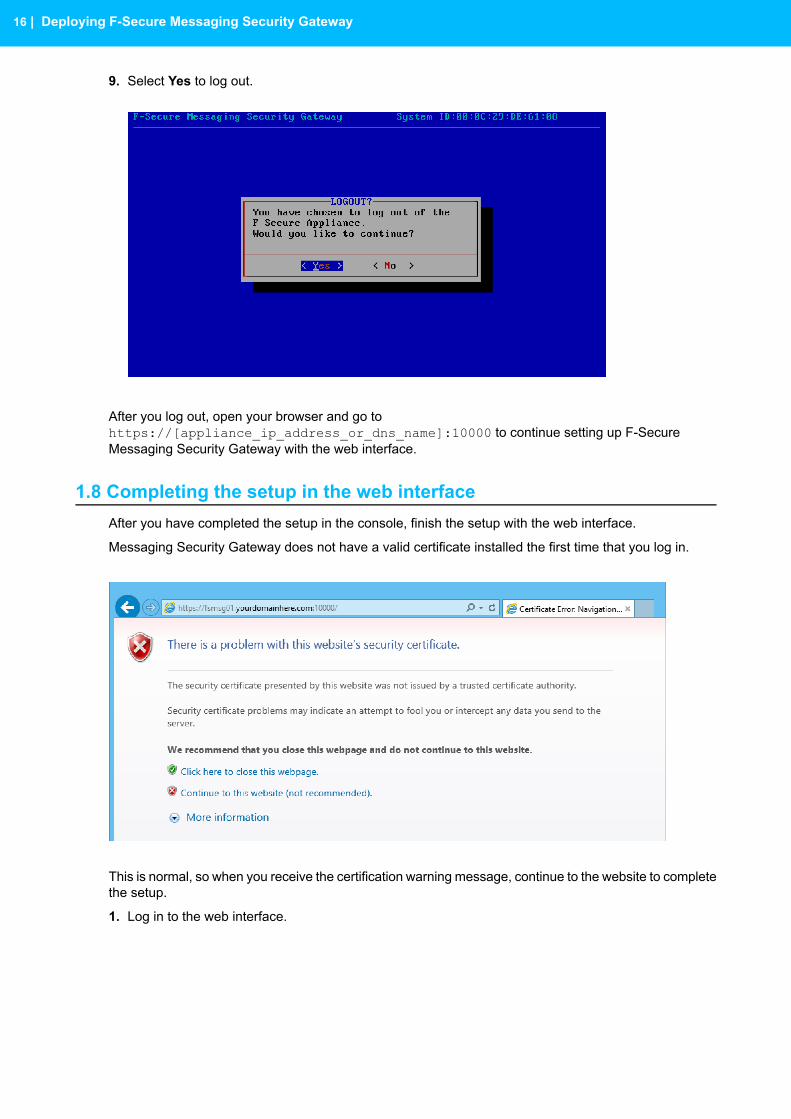
9. Select Yes to log out.
After you log out, open your browser and go tohttps://[appliance_ip_address_or_dns_name]:10000 to continue setting up F-SecureMessaging Security Gateway with the web interface.
1.8 Completing the setup in the web interfaceAfter you have completed the setup in the console, finish the setup with the web interface.
Messaging Security Gateway does not have a valid certificate installed the first time that you log in.
This is normal, so when you receive the certification warning message, continue to the website to completethe setup.
1. Log in to the web interface.
16 | Deploying F-Secure Messaging Security Gateway

2. Read the introductory screen.
3. Read and accept the license agreement.
F-Secure Messaging Security Gateway | 17

4. Check the server host name and domain settings, select Master as the appliance type, and enter theActivation ID from the license that you received from F-Secure.
5. Check the network settings.
18 | Deploying F-Secure Messaging Security Gateway

6. Check the DNS settings.
Note: Depending on how your network is set up, DNS servers may not recognize the IPaddresses or host names of the F-Secure Messaging Security Gateway Servers on yournetwork. In this case, add IP addresses and host names of each F-Secure Messaging SecurityGateway Server to the Hostname Override text box. If you are creating a two-node cluster,make sure that you add also the host name and IP address of the agent.
7. Check the proxy settings.
F-Secure Messaging Security Gateway | 19

8. Enter the settings for inbound mail.
Note: Enter the domains that you use to receive e-mails, and the e-mail servers where thefiltered e-mails are routed.
9. Enter the settings for outbound mail.
20 | Deploying F-Secure Messaging Security Gateway

Note: Add all servers that have rights to send outbound emails to the Internet. Normally, thisis your email server address.
10. Select your language, date and time settings.
11. Create a profile for the alerts that are sent by the Messaging Security Gateway server.
F-Secure Messaging Security Gateway | 21

12. Enter the e-mail address that receives all the alerts sent by Messaging Security Gateway.
13. Click Finish to complete the installation.
22 | Deploying F-Secure Messaging Security Gateway

Note: The Messaging Security Gateway server needs to access the Internet. If the servercannot access the Internet, the registration will not succeed.
14. Click OK to continue.
You have now completed the setup of F-Secure Messaging Security Gateway.
F-Secure Messaging Security Gateway | 23

Updating to the latest recommended settings
We recommend that you use the latest recommended settings withthe product.
Topics:
• Importing settings• Configuring the environment
settings
24 | Updating to the latest recommended settings

2.1 Importing settingsFollow these instructions to import the configuration.
1. Go to System > Licenses and Updates > General and make sure that all patches are installed. Thestatus should be Up to date in all lines.
2. Go to System > Backup and Restore and download the configuration backup fromhttps://www.f-secure.com/en/web/business_global/downloads/messaging-security-gateway/latest.
3. Browse to your downloaded backup file.
4. Select the imported backup file and click Restore backup.
F-Secure Messaging Security Gateway | 25

5. Click Yes.
6. Wait while the backup is restored.
7. Refresh your browser after the backup has been restored.
2.2 Configuring the environment settingsConfigure your environment settings.
1. Go to Appliance > SMTP Settings > General to configure the postmaster email address and thesystem administrator email address.
2. If you use an external email relay for outbound emails, for example an ISP, go to Appliance > SMTPSettings > Advanced and click Add Smart host.
26 | Updating to the latest recommended settings
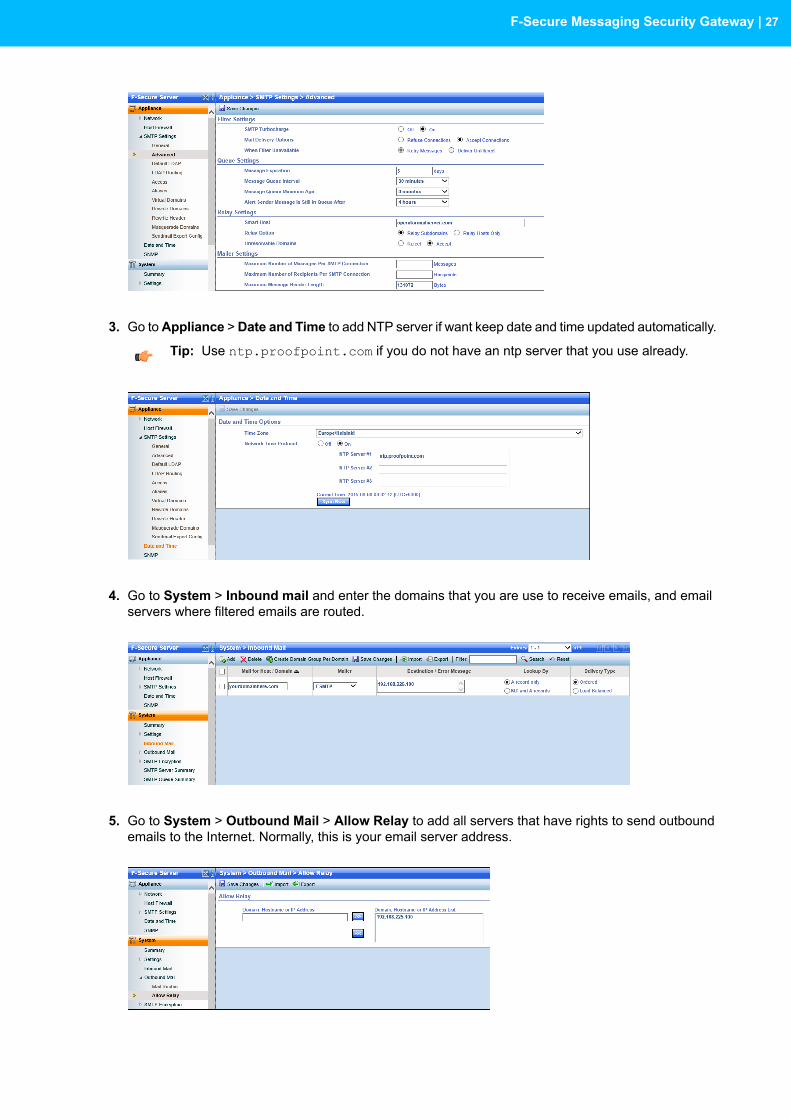
3. Go toAppliance >Date and Time to add NTP server if want keep date and time updated automatically.
Tip: Use ntp.proofpoint.com if you do not have an ntp server that you use already.
4. Go to System > Inbound mail and enter the domains that you are use to receive emails, and emailservers where filtered emails are routed.
5. Go to System > Outbound Mail > Allow Relay to add all servers that have rights to send outboundemails to the Internet. Normally, this is your email server address.
F-Secure Messaging Security Gateway | 27

6. Go to System > Alerts > Alert Profiles to add the email address where the product can send alerts.
7. Go to System > Policy Routes to add all those IP addresses that you added to System > OutboudMail > Allow Relay to the outbound policy route.
8. If you have a Protection Bundle license and you use email encryption, change following settings:a) Go to Encryption > Settings > Secure Reader.b) Turn on Enable External Message Initiation.c) Turn on Enable Recipient Domain Restrictions.d) Turn on Enable Allowed Domains.e) Move your inbound domains to Selected domains list.
9. Choose the language that you want to use in email encryption (DLP) and Digest.
28 | Updating to the latest recommended settings

Digest: Go to User Management > Organization > Services and choose the language.
Encryption: Go to User Management > Organization > DLP and choose the language.
10. Admin and all end user connections are encrypted with HTTPS. We recommend that you use a signedSSL certificate and that you use wildcard or SAN certificates, because you need to use the same SSLcertificate with multiple services (admin, enduser services, and encryption).a) If you need to create a certificate request, go to System > Certificates > Certificates and click
Generate Certificate Request.
b) Add your server and company details to the certificate request.
F-Secure Messaging Security Gateway | 29

c) Send your certificate request to your SSL certificate provider.d) After you have received the signed certificate, click Import to import it to Messaging Security
Gateway.Add all needed certificates in one file. The correct order is:
1. Private Key (if you did not create a certificate request)2. Server Certificate3. Intermediate Certificates4. Root Certificate (optional)
e) Browse to your certificate file and add a password if you are importing private key as well, and clickImport.
f) Go to System > Certificates > Services to change your certificate to all services. Click Save toconfirm the new settings.
30 | Updating to the latest recommended settings

11. The service needs to know your company email addresses.You can use several different methods to import users (manually, file, or LDAP). The following stepsinstruct how to use LDAP, which is the method that we recommend.a) Go to User Management > Import/Auth Profiles and click Add.
b) In the Import window, click Advanced LDAP Options.Fill in the following information:
• Data Source: Defines the location where the user data is imported. The LDAP query is sent tothis location.
• Profile Name: ID of the import profile.• Host/IP Address: Host name or IP address of the LDAP (Active Directory) server.• Base DN: A distinguishable name for the AD scope.• Bind DN: The user whose (read) credentials are used to access the AD.• Password: Bind DN user’s password.
F-Secure Messaging Security Gateway | 31

c) Go to the Advanced tab.
• Allow Mailing lists without Owner: Choose Off if you use Managed By with all email enabledgroups in Active Directory. Otherwise, choose Yes.
• Map UID to Attribute: Use objectGUID if your LDAP server is Active Directory. Otherwise, useyour unique attribute in your LDAP server.
• Group Attribute: memberOf
d) Click Schedule to schedule your LDAP import profile.
32 | Updating to the latest recommended settings

e) Add how often you want to run LDAP import.
F-Secure Messaging Security Gateway | 33

Adding agents to the cluster
The following steps are optional and needed only if you want to addanother agent to your current environment.
Topics:
• Adding a new agent to thecluster
34 | Adding agents to the cluster
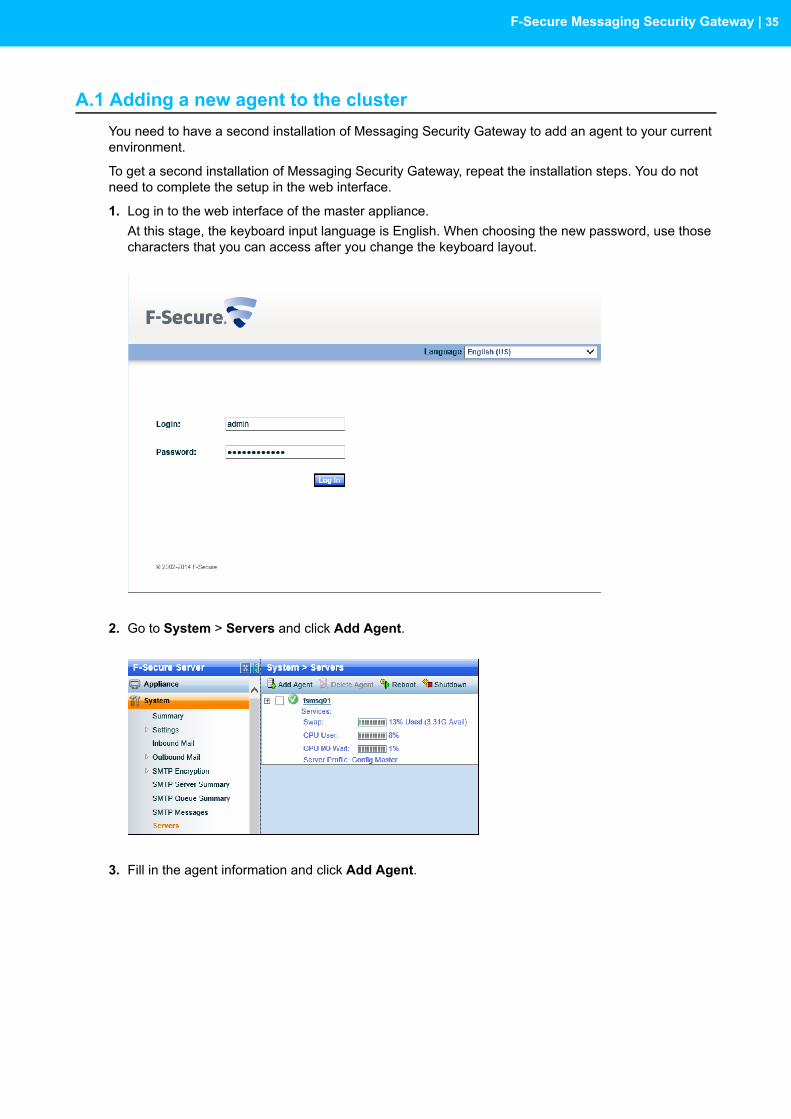
A.1 Adding a new agent to the clusterYou need to have a second installation of Messaging Security Gateway to add an agent to your currentenvironment.
To get a second installation of Messaging Security Gateway, repeat the installation steps. You do notneed to complete the setup in the web interface.
1. Log in to the web interface of the master appliance.At this stage, the keyboard input language is English. When choosing the new password, use thosecharacters that you can access after you change the keyboard layout.
2. Go to System > Servers and click Add Agent.
3. Fill in the agent information and click Add Agent.
F-Secure Messaging Security Gateway | 35

Note: Admin User Password is the admin password for the agent.
Note: If you are using email encryption, select Secure Reader.
Adding the server may take several minutes.
4. The agent is now added to the cluster.5. After the agent has been added to the cluster successfully, go to System > Summary and wait until
the agent status turns green. This can take a while.
6. Repeat the same steps for the agent to configure the environment and click Change Certificate toall services in System > Certificates > Services.
36 | Adding agents to the cluster