F-35 A LIGHTNING II JOINT STRIKE FIGHTER OPERATIONS … · f-35 a lightning ii joint strike fighter...
33
F-35 A LIGHTNING II JOINT STRIKE FIGHTER OPERATIONS MANUAL BY EXPLORATION OUT INDUSTRIES (EOI) & The JSF DEVELOPMENT TEAM for X-PLANE 11.30r3+
Transcript of F-35 A LIGHTNING II JOINT STRIKE FIGHTER OPERATIONS … · f-35 a lightning ii joint strike fighter...

F-35 A LIGHTNING II JOINT STRIKE FIGHTER OPERATIONS MANUAL
BY EXPLORATION OUT INDUSTRIES (EOI)
& The JSF DEVELOPMENT TEAM
for X-PLANE 11.30r3+

TABLE OF CONTENTS
DISCLAIMER & ISSUE REPORTING 3
A QUICK THANKS 5
USEFUL LINKS 6
WHAT’S INCLUDED 8
SIMULATOR SET UP 11
FLIGHT CONFIGURATION 12
EXTERIOR DESCRIPTIONS 13
COCKPIT GUIDE 17
MULTIFUNTION DISPLAY (MFD) 19
COLD / DARK START UP 22
TAKE OFF 25
BASIC FLIGHT & LANDING 27
G1000 OPERATIONS 29
ADVANCED FLIGHT CONTROL 30
COMBAT 31
DISCLAIMER ALL INSTRUMENTS AND SYSTEMS WERE CREATED BY THE X-PLANE 11 DEVELOPERS (LAMINAR RESEARCH). IT IS NOT THE RESPONSIBILITY OF EOI TO PROBLEMSOVLE, REPORT, OR FIX SOFTWARE ISSUES FOUND BY THE USER THAT ARE NOT DIRECTLY RELATED TO ELEMENTS DEVELOPED BY EOI. PLEASE CONTACT EOI AT THE SUPPORT FORUM IF YOU ARE UNSURE OF WHETHER OR NOT YOUR ISSUE MEETS THIS REQUIREMENT. SUPPORT FORUM FOUND HERE: https://forums.x-plane.org/index.php?/forums/topic/161765-f-35a-lighting-ii-by-eoi/&tab=comments#comment-1524288 FOR BUG X-PLANE REPORTS PLEASE VISIT the SUPPORT PAGE FOUND AT: https://www.x-plane.com/support/ The JOINT STRIKE FIGHTER (JSF) model produced by Exploration Out Industries (EOI) is not an accurate study level depiction of real F-35 aircraft. A leading factor for differences is that this model operates with basic stock systems provided by XP 11 that were not intended to reproduce fifth generation combat aircraft. It is with great hope that more accurate avionics will be included in future for better representation of the real F-35 A. All files released in Joint Strike Fighter (F-35 A) package are deemed as freeware and are not made for commercial use or commercial distribution under any circumstances. It is also prohibited that users release alterations as downloadable content for the aircraft without the written expressed consent of EOI, with the one exception third party livery creation. Creation of liveries is welcomed, encouraged, and does not require coordination with the EOI development team. Liveries may be also be uploaded where ever the third party chooses.

DISCLAIMER While the JSF package includes combat features such as weapons, please remember that X-Plane 11 was designed for commercial and general aviation flight. EOI has produced this model mostly for flight and asks that you the user please not have high expectations for the combat features. In other words, just go fly around and have fun; do some aerobatics and see what this bird can accomplish!

A QUICK THANKS
For providing such wonderful tutorials that I couldn’t have done this without a special thanks goes to:
• Dan Klaue. https://www.youtube.com/user/danklaue/featured
• Blender Guru. https://www.youtube.com/user/AndrewPPrice For providing such wonderful tutorials that I couldn’t have done this without!
• Also, I would like to thank the XP community members Built_to_last, Runway_01, and
all others not listed who have supported this project.
• And of course, to Laminar Research, Xplane.org, Blender, Xplane2blender, and Gimp for providing this wonderful opportunity.
ADDITIONAL INFO EOI: Michael Seng – Lead Project Developer (Research and Planning, Customer Relations, Flight
Model, 3d Model, Audio, Paint, Flight Model Testing) JSF DEVELOPMENT TEAM: listings below are x plane community member names DEVELOPERS: Dom Henry: (Paint, Audio, Knowledge Wizard) Troopie: (Lead Programming) TEST CREW: Nasa_Test_Pilot Renanls Gulfman650
Useful links
EXPLORATION OUT INDUSTRIES EOI MEMBER PAGE: https://forums.x-plane.org/index.php?/profile/610614-exploration-out-industries/ JSF DOWNLOAD: https://forums.x-plane.org/index.php?/files/file/47996-joint-strike-fighter/ JSF SUPPORT FORUM: https://forums.x-plane.org/index.php?/forums/topic/161765-f-35-a-joint-strike-fighter/&tab=comments#comment-1524288 EOI YOUTUBE: https://www.youtube.com/channel/UCVtcfb4e4mobAiaUvuDzJOw
3d & X-Plane tutorials: Danklaue. https://www.youtube.com/user/danklaue/featured Blender Guru. https://www.youtube.com/user/AndrewPPrice
Freeware downloads that may be useful: Blender: https://www.blender.org GIMP: https://www.gimp.org Xplane2blender: https://github.com/der-On XP Developer: https://developer.x-plane.com FMOD: https://www.fmod.com FlyWithLua by X-Friese - for running certain addons: https://forums.x-plane.org/index.php?/files/file/38445-flywithlua-ng-next-generation-edition-for-x-plane-11-win-lin-mac/ Night Vision Preference by joe_rowe - Note that in XP 11.3 it appears to not function: https://forums.x-plane.org/index.php?/files/file/41825-night-vision-goggles-preferences/

Useful links
Default Keyboard layout: https://flyawaysimulation.com/downloads/files/24285/x-plane-11-10-controls-keyboard-commands/ Planemaker Manual: https://developer.x-plane.com/manuals/planemaker/#modifyingtheappearanceofanaircraft FlyAgi Tweak Utility (For computers that struggle) https://forums.x-plane.org/index.php?/files/file/47301-flyagi-tweak-utility/ F-35 INFO: https://www.f35.com LOCKHEED MARTIN: https://www.lockheedmartin.com/en-us/index.html

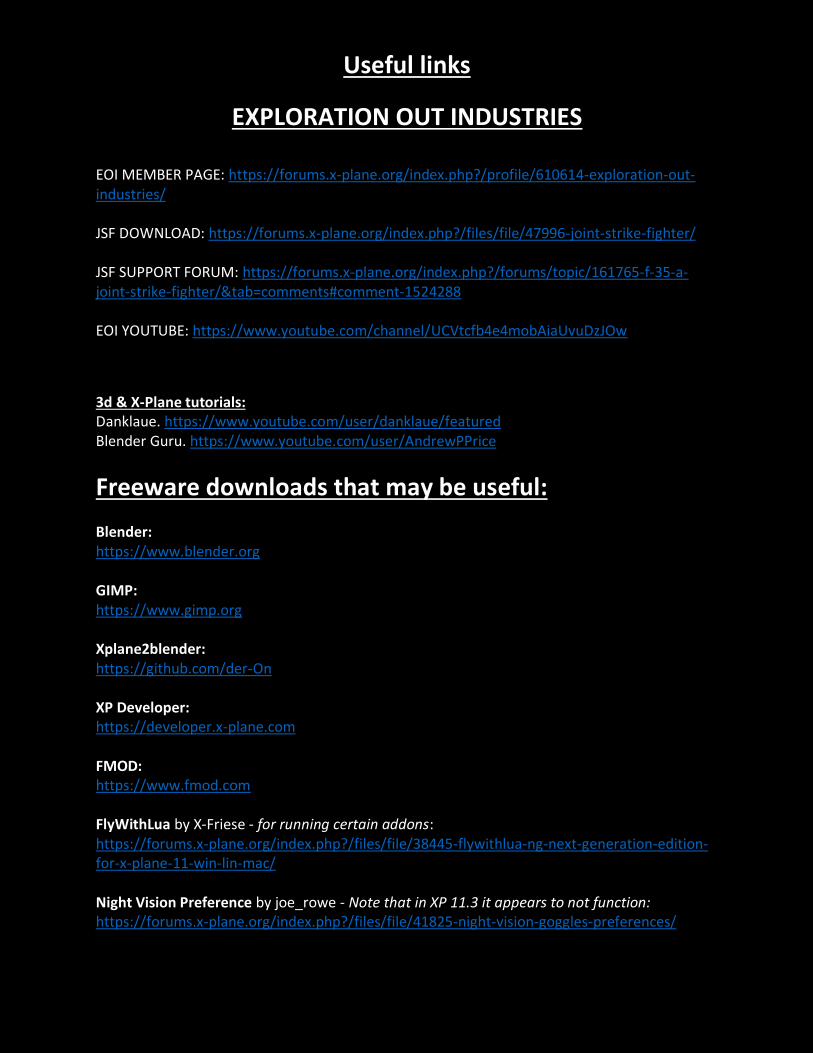
WHAT’S INCLUDED IN THE PACKAGE?
1) One F-35 A with multiple liveries, and one F-35 A test squadron plane. 2) 2 Scenery Objects (Further liveries to be included in the future). 3) F-35 A.I. Model with liveries. 4) Plugins
a. Accurate default Flaperon and Leading-Edge Slat positions (Also controls automatic functions.
b. Changes the values for cannon ammunition to reflect closer to accurate numbers.
c. Other features to be included in the future to include HMD, G-Force governance, weapon functions, etc…
5) FMOD (Game Sound Engineering) a. Real F-35 A audio for flyby sounds. b. Custom exterior and interior sounds. c. “Mostly” accurate supersonic flyby sound that is silent until the plane reaches
your point of view and then is accompanied by a double sonic boom! 6) Paint Kit
7) 13 Liveries Included:
a. Default b. USAF c. RAAF d. ITAF e. IAF f. RNLAF g. RNOAF h. FICTIONAL: USAF THUNDERBIRDS & RAF

WHAT’S INCLUDED IN THE PACKAGE?
WHAT’S INCLUDED IN THE PACKAGE?

SIMULATOR SET-UP GUIDE
1) Go to SETTINGS 2) Optional: You may need to make adjustments to the FLIGHT MODELS PER FRAME
depending on your computer make up. (Often resolves issues with skidding when parked)
3) Optional: Go to DATA OUTPUT “I check the box to show COMMANDED THROTTLE.”
4) Optional: Under Joystick settings it can be helpful to set response and stability to suit
individual preference on handling. 5) Go to Keyboard to set up and keyboard functions you may want to use. 6) Optional: Under SLIDERS you may set up a hot key for quickly activating and deactivating
the HMD. Do so under Slider #1
1
2ç
3ç
4ç
5ç
4ç
5ç 6
ç

FLIGHT CONFIGURATION
1) Under the Weight, Balance, & Fuel menu, X-Plane will automatically add around 6,000 extra pounds to the aircraft weight. This will affect performance and it is important to set the payload weight to something similar to that of a pilot and some extra gear.
2) Under the Weapons menu you may decide to change the weapons under slots (3 & 4)
for either AIM 120-AMRAAM or any of the other bombs included. The primary (1 & 2) AIM 120-AMRAAM slots are not designed for any other weapons besides air to air missiles. Additionally, you may set all slots to empty by selecting the “X” on the right-hand side. The cannon may be set to Gun-Unloaded for having only the gun weight without when no ammunition is desired.
3) AND DON’T FORGET TO choose here for your livery options.
1
2
1 2
3

EXTERIOR
This is a brief overview of “some” of the exterior elements of the F-35 A. For more thorough and accurate documentation, please take a look at the links on the useful links page listed in this document.

EXTERIOR
1) Canopy / Cockpit. 2) Cannon housing. 3) Lead edge Slats / Flaps. (I’ve found multiple terminology – you decide) 4) Aerial refueling port. 5) Flaperons (The F-35 A does not have ailerons. It uses a combination of the flaps and
horizontal stabilizers for maneuvering. 6) Horizontal and Vertical stabilizers.
1
v
v
v
2 3
4
5
6

EXTERIOR
7) Forward Landing gear bay. 8) Weapons bay. 9) Aft Landing gear bay. 10) Exhaust port. 11) IPP opening and exhaust port (somewhat similar to APU) To be modeled in the future.
7
v
v
v
vvcxzbv
8
9
11
10
EXTERIOR
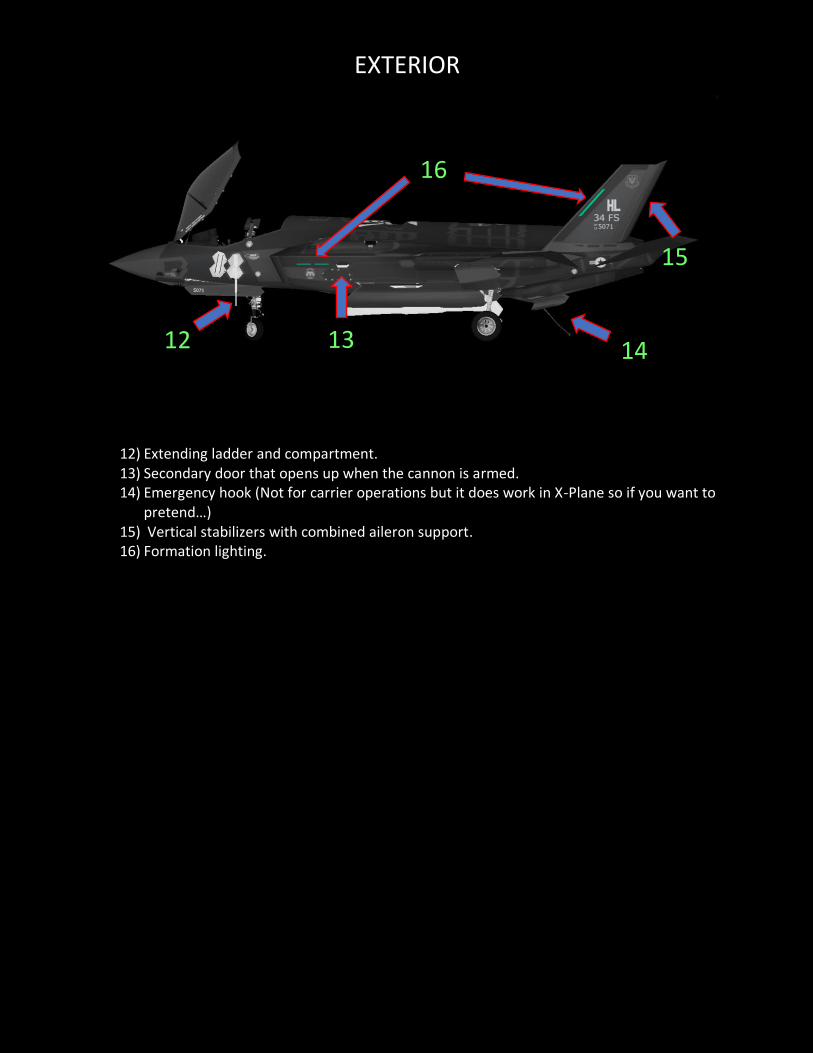
12) Extending ladder and compartment. 13) Secondary door that opens up when the cannon is armed. 14) Emergency hook (Not for carrier operations but it does work in X-Plane so if you want to
pretend…) 15) Vertical stabilizers with combined aileron support. 16) Formation lighting.
12
v
13 14
15
16

COCKPIT GUIDE
1
2
3
4
5
6
7 8
19
33
17
18
11
10
12 13 14 15
16
20
22
23
24
25
26
27
28
29
30
31
32 33
34
35
36
37 38
39 40 41
42
50
51
43
44
45
47 48
49
46
52 53
54
55
9
21
56

COCKPIT GUIDE
1) FUEL DUMP 2) BRAKES & PARKING BRAKE 3) EMERGENCY HOOK (For landing strips equipped with arrestor cables- common on modern U.S. Fighters). 4) LANDING GEAR HANDEL 5) EMERGENCY LANDING GEAR PUMP (Currently has some bugs to work out) 6) LANDING LIGHTS 7) Unused - to be established further in development. 8) ELEVATOR TRIM RESET (Sometimes the trim gets stuck after using autopilot- this will reset) 9) UPPER MULTIFUNCTION DISPLAY SCREEN 10) LOWER MULTIFUNCTION DISPLAY SCREEN 11) HELMET MOUNTED DISPLAY ON / OFF 12) INSTRUMENT BRIGHTNESS 13) CAMERA ON / OFF 14) NIGHT VISION ON / OFF 15) FLOOD LIGHT BRIGHTNESS 16) FORMATION LIGHTS ON / OFF 17) TOUCH PAD FOR CAMERA DIRECTION 18) CLOCK / TIMER 19) SECONDARY HORIZON INDICATOR 20) Unused - to be established further in development. 21) PROTECTIVE HOUSING COVER FOR WEAPONS 22) CANNON DOOR OPEN 23) MISSILE DOOR OPEN 24) BOMB DOOR OPEN 25) CANNON ARM 26) MISSILE ARM 27) BOMB ARM 28) AIR TO AIR NEXT TARGET LOCK 29) AIR TO AIR PREVIOUS TARGET LOCK 30) GROUND TARGET LOCK (Must have camera on and AGM armed to work) 31) CAMERA QUICK POSITION UP 32) CAMERA QUICK POSITION DOWN 33) RUDDER PEDALS 34) Unused - to be established further in development. 35) AIR REFUEL BAY DOORS OPEN / CLOSE 36) ADVANCED FLIGHT CONTROL ON / OFF (Default to on- activates flaperon with pitch). 37) INSTRUMENT LIGHTS 38) NAVIGATION LIGHTS 39) STROBE LIGHTS 40) TAXI LIGHT 41) ENGINE STARTER PUSH BUTTON 42) FUEL SWITCH WITH PROTECTIVE HOUSING COVER 43) BATTERIES ONE & TWO 44) APU 45) IGNIGHTER 46) AVIONICS 47) GENERATOR ONE & TWO 48) INVERTERS ONE & TWO 49) PITOT SENSOR HEAT 50) THROTTLE 51) HI / LOW IDLE 52) JOYSTICK 53) Unused - to be established further in development. 54) CANOPY OPEN / CLOSE 55) TRANSPONDER & AUDIO PANEL 56) EJECTION SEAT HANDEL

Multi-function Display (MFD)
Multi-Page Touch Screen Display.
DISCLAIMER: For G1000 instruction and all other X-Plane stock instrument instruction (everything in this plane) please refer to the instruction manuals that are included with the XP 11 Install.

Multi-function Display (MFD)
• At the top center of the MFD click on any of the four green boxes to activate a different display screen.
• G1000 is tangible on the screen and with normal pop out window function.
Three primary display settings and customizable to user preference.
1) Main Control Display (MCD)
2) Default G1000 Display (DGD)
3) EFFIS & Tactical Display (ETD)
4) EFFIS & Tactical Display with Ground Target Acquisition Camera (ETD + GTAC)
1
2
3
4
v
Multi-function Display (MFD)
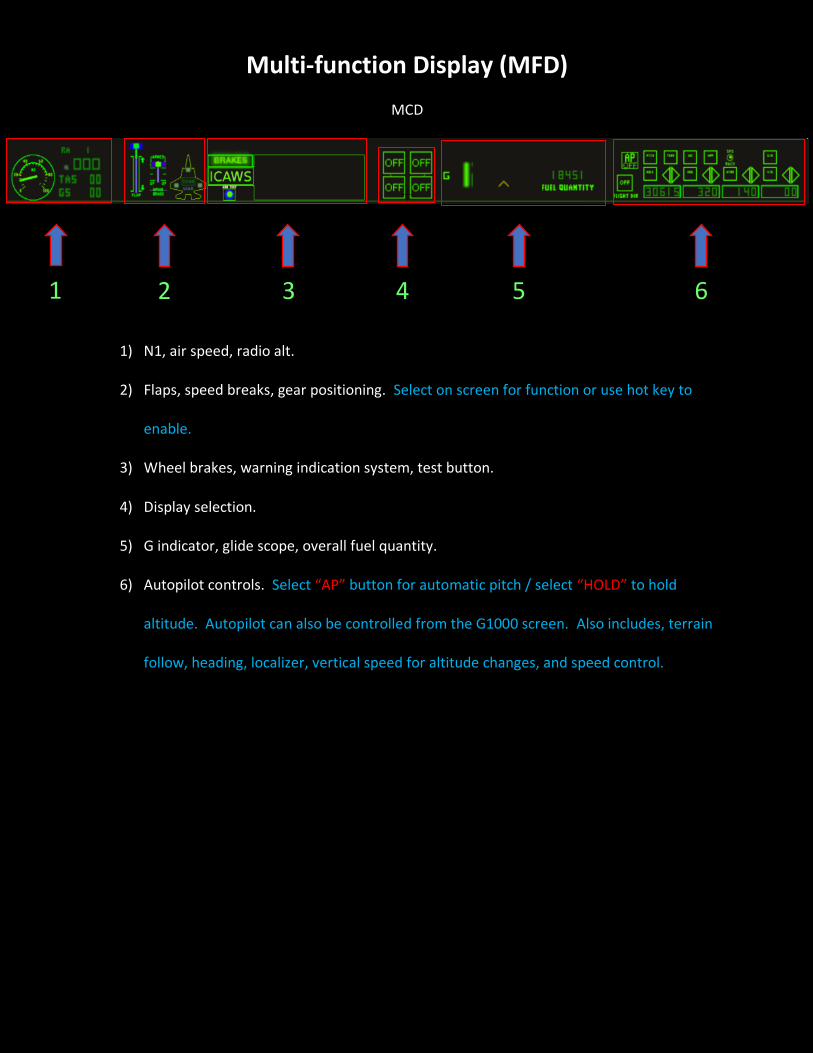
MCD
1) N1, air speed, radio alt.
2) Flaps, speed breaks, gear positioning. Select on screen for function or use hot key to
enable.
3) Wheel brakes, warning indication system, test button.
4) Display selection.
5) G indicator, glide scope, overall fuel quantity.
6) Autopilot controls. Select “AP” button for automatic pitch / select “HOLD” to hold
altitude. Autopilot can also be controlled from the G1000 screen. Also includes, terrain
follow, heading, localizer, vertical speed for altitude changes, and speed control.
1
v
v
v
v
v
v
2 3 4 5 6

COLD & DARK START UP
Cold and Dark Start Up: It’s so easy! This section provides a step by step guide on how to start the F-35 A.
ENGINE START UP SECTION 1) External Lights Panel / Night lighting for switches. 2) Batteries / APU / Ignitor / Avionics / Generator / Inverter / Pitot heat. 3) Starter push button / Fuel Selector Switch On/Off (under the red housing). 4) Hi / Low Idle Switch.
1
2ç
3
4 ç

COLD & DARK START UP
Cold and Dark Start Up: It’s so easy!
1) Turn Batteries 1 & 2 “ON.” 2) Flip the APU to “ON.” (Note the real F-35 has what is called an Integrated Power
Package (IPP) instead of an APU, however, this is not a provided feature of X-Plane as of this time.)
3) Flip the Ejection handle up so that it may be used if need be.
4) Flip the Ignitor, Avionics, and open Red Cover Housing for the Fuel Selector Switch, set to “ON” then close it back up.
5) Press the Start push button until the N1 value on the G1000 display reaches 20% and
then let off. 6) Once the N1 value has reached around 50%, turn all of the remaining switches to “ON.”
Note that the Inverters require only one switch to be activated to turn both of them on. 7) Turn the APU “OFF”. 8) Flip the High / Low Idle switch to Low.
1 2ç
3
1 2ç

COLD & DARK START UP
9) NOW REMEMBER TO TURN ON THE EXTERNAL LIGHTS IF YOU HAVEN’T ALREADY unless you are planning to go destroy something... This is a stealth fighter after all. Note the landing light switch will be covered momentarily. (There are also functions on the MFD for all lighting operations.
10) YOU DID IT! THE F-35 ENGINES ARE POWERD ON! Side notes: The avionics switch turns on the multifunction display (MFD). Some lighting features may also be found in the MFD in addition to the switches and knobs. -Switch lighting can be activated at night on the Lights panel. Formation Lights can be activated from the center console button labelled FORM LTS, HMD toggles the Helmet Display. INST and FLOOD BRIGHT knobs control lighting in the cockpit. CAMERA toggles the external targeting camera. Leaving this off can help save FPS. NVG toggles night vision.

TAKE OFF
For taking off.
1) You can toggle any exterior lighting from the MFD or by switches in the cockpit.
2) You can set the trim however this is not needed if Advanced Flight Control is
activated (On by default).
3) Flap and Slats are automatic and there is no need for the user to make any settings
adjustments.
4) If you want a controlled burn for take-off set the Auto Throttle (ATHR) to around
248-250 kts or your desired take of speed. (Mach vs Knots can be toggled on the
small dot above this.)
5) Next select the ATHR button. You may notice the engines start revving up and I’m
not sure why it does this.
1
v
v
vvcxzbv 3
4
5 6
2

TAKE OFF
6) Finally select the Flight Director (FLIGHT DIR) button once to where it says on and
your speed will be controlled.
7) Note that autopilot functions can be controlled from the G1000 as well.
8) Rotate around 140 to 160 knots and you are on your way. Don’t forget the raise the
landing gear. If Advanced Flight Control is deactivated, trim needs to be set
manually or take off speed will require 180 knots.
PLEASE NOTE: Due to certain limitations, flying in inclement weather may require deactivation of one or all three elements of the artificial stability. Refer back to page 17, item 4, and you will see on the MFD four green square buttons towards the center bottom of the left screen. Those are the artificial stability buttons that activate / deactivate, all or individual elements. In the future we hope to have code that will provide drastic improvements to the artificial stability system.

BASIC FLIGHT & LANDING
DURING FLIGHT.
1) For fuel efficiency, the best cruise setting is 40% throttle at 30k to 40k ft. (NOT to be
confused with N1 found on the far left- that is not your throttle setting!!!). The
ECAM display will provide readouts of fuel amounts, weight, etc… It is quite helpful.
2) Should you find the elevator trim is off center there is a FCS / ENG reset button
found to the front right of the throttle. Push it and the elevator trim will return to
center. For aileron and rudder, just push one of the blue buttons found on the
screen.
1
v
3
2

BASIC FLIGHT & LANDING
FLIGHT / LANDING
3) For use of speed brakes, just like all other controls, they can be controlled by a
hotkey, assignment to a hardware button, or by click on the screen. If you click to
the very top of the icon, this will activate automatic speed braking upon landing and
is very useful.
4) For landing, you need to learn how to do this by reading and watching tutorials
found all over the internet. The best time to land the F-35 A is with minimal weight,
at around 130-140 kts, on a stable glide scope, and at 10-15 AOA upon touch down.
Advanced Flight Control activation / deactivation will have a direct impact on how
your nose will come down (soft or hard). My advice is to watch a lot of videos on
how the F-35 A lands and strive to mimic what you see happening.
5) Last note: The F-35 A is equipped with an emergency hook for “LAND” based
arrestor cables only!!! This is a common feature found on other modern fighters
such as the F-16. While flying in X-Plane 11 you can land on an aircraft carrier should
you choose, but that is not what the plane was intended for in real life. So, if you
want to play realistic, don’t land on the aircraft carrier. The hook is for emergency
landings at airfields that have arrestor cables installed. (Currently I am unaware of
any sceneries that provide functioning arrestor cables.)
PLEASE NOTE: Due to certain limitations, flying in inclement weather may require deactivation of one or all three elements of the artificial stability. Refer back to page 17, item 4, and you will see on the MFD four green square buttons towards the center bottom of the left screen. Those are the artificial stability buttons that activate / deactivate, all or individual elements. In the future we hope to have code that will provide drastic improvements to the artificial stability system.

G1000 OPERATIONS THE G1000 THAT COMES WITH THIS F-35 PACKAGE IS THE X-PLANE 11 STOCK INSTRUMENT. IT WAS CREATED AND PROVIDED BY LAMINAR RESEARCH AND THE ONLY THING EOI DEVELOPMENT HAS DONE IS CHANGED ITS APPEARANCE. IF A FUNCTION OF THE G1000 DOES NOT WORK FOR YOU THE USER, IT IS YOUR RESPONSIBILITY TO REPORT THE PROBLEM TO LAMNIAR RESEARCH. IT IS NOT THE RESPONSIBILITY OF E.O.I. TO PROBLEMSOLVE, REPORT, OR FIX ANY G1000 BUGS FOUND BY OTHER USERS. As I cannot dedicate time to explain how to use the G1000, I would at least like to provide some instructional resources for those who seek to learn. Also note that the G1000 autopilot features may be used in conjunction with the autopilot buttons found in the top right-hand corner of the MFD. THE COMPLETE USER MANUAL BY LAMINAR RESEARCH: http://x-plane.com/manuals/G1000_Manual.pdf BIGGINER TUTORIAL VIDEOS BY REACTION REVIEW:
1) https://www.youtube.com/watch?v=JeDJIhL0Pb4
2) https://www.youtube.com/watch?v=JhfyrgS1Wl8
PHILIPP RINGLER – COMMERCIAL DEVELOPER
1) https://www.youtube.com/channel/UCgkAYGe5a56RbnwYXFC1p6w OTHER G1OOO TUTORIALS
1) https://www.youtube.com/watch?v=ED0-l4nKj-A
2) https://www.youtube.com/watch?v=qQz7xaW05fU
3) https://www.youtube.com/watch?v=sXeDbXg01Zk

ADVANCED FLIGHT CONTROL
These real-life photos of the F-35 reveal how the flaperon deflection surface moves in conjunction with pitch. Leaving aside any discussion of the real-world applications of this setting, I can tell you that there is at least one use of this deflection when it comes to advanced maneuvers in X-Plane.
Pulling all the way back on the joystick will cause the deflection to occur, and at certain speeds and bank angles, a drifting motion with additional AOA begins to take shape due to certain losses of lift. This is great if the users desire is to do specific flight maneuvers that could benefit from this loss of lift, however, having flaperons mapped to pitch deflection comes at a cost. Some might not be interested in simulating more advanced flight and would enjoy a something more laid back and user friendly. Therefore, a toggle switch has been placed on the right panel so that you may control when you want this function activated. By default, it is on.

COMBAT
STEPS TO ACTIVATE AND USE WEAPONS
NOTE:
1) For now, the only way to show the target lock for air to air mode is by using the 2D Simulator View illustrated below. If the target is not in view, green or reed arrows will point to where the target is at. This is X-Plane 11 stock functions that come with the program and I am not responsible for how good or bad it works. The HMD can be one while in 2D mode for extra flight information.
2) If you want external animations to work with the weapons you need to use the center console button defined below and not the MFD. The MFD will still work, but I haven’t been able to get the different functions to cooperate for whatever reason. Probably because this isn’t a combat simulator.

COMBAT
1) Click on the red protective cover to open it
2) Select the Weapon standby button for the weapon you wish to use. (This is the function that will open the bay doors)
3) Select the weapon "Arm" buttons to active the weapon - Air to Air / Air to Ground selections will blink on the screen. Guns will simply show a name on the screen.
4) Fire when target has been acquired (you can select air and ground targets from the center console as well.)
To deactivate, do all of these steps in reverse.
Click the Arm button until the a2a or age stop blinking if any are left or until the guns display disappears…
1 2ç
3 4 ç

COMBAT
Then click the standby button for the weapon
Then close the protective covering. To lock onto ground targets, use the Maverick AGM or TV guided bombs. Arm the weapon, turn the camera on and then hit the ground target lock (GRND TRGT LOCK) button once you see what you want to shoot line up in the cross hairs of the camera. It’s honestly a lot easier if you just set up a hot key for it. Search “target lock” in the keyboard settings and you should be able to find it. If not, just look around like I did, and you will eventually figure it out.