Exploring the Solar System with a Human Orrery - cwsei - University

DOI: 10.1119/1.3517019 The Physics Teacher ◆ Vol. 48, December 2010 573
system. Finally, the students answer a set of questions that re-quires them to interact with the model. As the students build and explore the model themselves, they have the opportunity to personally discover the vast range of planet distances and speeds.
PreparationBefore the activity, we prepare the following materials for
running the activity indoors, with modifications for running the activity outdoors. • For the Sun, a wooden dowel held vertical in a 30 cm x
30 cm sheet of plywood. Strips of two-sided tape secure the plywood to the floor. Outdoors, we simply pound the dowel into the ground.
• A large 360o protractor on which the students can easily read angles to the nearest degree. This protractor (white square in Figs. 2 and 3) sits over the central Sun-dowel and must also be secured down so it does not rotate.
• Construction kits for each team of students (Table I shows how we break the work into 13 teams). Each kit is a plastic bag containing: – A string cut to the length of the planet’s semi-major
axis, scaled to 1 m = 1 astronomical unit (AU). For ease of construction, we assume the orbits are circular. We attach a carabiner (snap-link) on the “Sun” end of the strings, allowing the team to unhook from the Sun when they have finished their section of the model. The Earth string is 1.00 m long.
– 10–15 round, labelled sticky notes used as planet loca-
Exploring the Solar System with a Human OrreryPeter Newbury, University of British Columbia, Vancouver, BC, Canada
One of the fundamental learning goals of introduc-tory astronomy is for the students to gain some perspective on the scale and structure of the solar
system. Many astronomy teachers have laid out the planets along a long strip of paper1 or across a school grounds or campus.2 Other activities that investigate the motion of the planets are often computer based,3,4 hiding the awe-inspiring distances between the planets. Our human orrery activ-ity, adapted from the design at the Armagh Observatory in Ireland,5-7 combines the best of both approaches by creating a working model of the solar system that mimics both the scale and the motion of the planets.
We briefly describe the activity here, followed by a detailed description of the preparation and facilitation.8 An orrery, like the one in Fig. 1, is a mechanical model of the solar system that shows the orbital motion of the planets and moons when you turn a crank. Figure 2 shows the human orrery, where the orbit of each planet is laid out in a large, open area and students play the roles of the planets by moving around the orbits. Our students are undergraduates enrolled in a survey course in astronomy, typically referred to as “Astro 101,” at the University of British Columbia, but with minimal modifica-tions the activity can be run for school children and members of the general public. We break the activity into four steps so groups of 40 students, led by two teaching assistants, can complete the activity in 50 minutes. First, students work in teams of three to lay out the orbits of the planets using strings and planet markers. Then the model “comes to life” with stu-dents orbiting the Sun along their planets’ orbits. Next we lead the group on an expedition to the outer reaches of the solar
Fig. 1. An orrery is a mechanical model of the solar system that shows the motion of the planets and moon. (© Science Museum, London)
Fig. 2. The human orrery. The Sun (at the center of the white square) is surrounded by the orbits of Mercury, Venus, Earth, and Mars. Jupiter's orbit crosses at the right; Saturn's orbit is not vis-ible. Students play the roles of the planets by stepping from one colored marker to the next. (UBC photo)

574 The Physics Teacher ◆ Vol. 48, December 2010
The orrery requires a large open space, at least 20 meters in diameter. Weather permitting, we run the activity outdoors but we also run it in the foyer of the University Library. At the center of the open space, we anchor the Sun-dowel and place the 360o protractor over it, as shown see Fig. 3.
We divide the work into 13 sections (see Table I) and as-sign teams of three students to each section. After the teach-ing assistant gives a brief introduction demonstrating how to locate the planet markers—stretch the string, move to the correct angle, stick down a marker—each team receives their construction kit. Typically, two students lay down markers at the end of the planet’s string while the third student near the Sun reads angles off the protractor. As each team finishes their
tion markers. These eye-catching markers can easily be removed after the activity. Earth Team 1 receives markers E1–E12.
– A “blueprint” for their section of the model listing the position (in degrees) for each planet marker. The angles were generated in Excel by listing all the mul-tiples of 360/(number of markers) between 0 and 360, rounded off to 0 decimal places. Table II is the blue-print for Earth Team 1.
– When holding the activity outdoors, we use paper plates (dinner plates for Jupiter and Saturn and small-er side plates for Mercury, Venus, Earth, and Mars) instead of sticky notes and include a handful of golf tees to stick the plates to the ground to prevent the wind from blowing them away.
• Pictures of each object in the model (Sun, Mercury, Venus, Earth, Mars, Jupiter, Saturn, Uranus, Neptune, Pluto, Eris, and the Voyager spacecraft) attached to meter sticks so the students can hold them up for all to see.
• A 100-m long tape measure for the expedition to the outer solar system.
• A worksheet, described in Step 4, for each student with a set of assessment questions.
Step 1: ConstructionOur model includes Mercury, Venus, Earth, Mars, Jupiter,
and Saturn, the planets that can be seen with the naked eye. The genius of the Armagh Observatory design, and what makes the model correctly reproduce the motion of the plan-ets, is that the orbits are laid out by placing planet markers along the orbits at 16-day intervals. This carefully chosen in-terval of time very nearly divides the orbital periods of Venus (14 times), Earth (23), Mars (43), two orbits of Mercury (11), and, in 160-day intervals (10 times longer), the orbital periods of Jupiter (27) and Saturn (67).
Table I. Data for laying out the orbits of the planets and dividing students into teams in the human orrery.
Planet Orbital radius
(m)
Planet mark-
ers
Period in model
ActualPeriod
Angle between
markers (deg)
Team Markers Angles
Mercury 0.39 11 11x16 d=176 d 176 days(2 orbits)
720 / 11 = 65.5 1 M1–M11 0,65,131,...,295(covers 2 orbits)
Venus 0.72 14 14x16 d=224 d 226 d 360 / 14 = 25.7 1 V1–V14 0,26,51,...,334
Earth 1.00 23 23x16 d=368 d 365 d 360 / 23 = 15.6 12
E1–E12E13–E23
0,16,31,...,172188,203,...,344
Mars 1.52 43 43x16 d=688 d 686 d 360 / 43 = 8.4 123
M1–M15M16–M30M31–M43
0,8,17,...,117126,134,...,243251,260,...,352
Jupiter 5.20 27 27x160 d=4320 d 11.86 years4329 d
360 / 27 = 13.3 12
J1–J14J15–J27
0,13,27,...,173187,200,...,347
Saturn 9.54 67 67x160 d=10,720 d
29.42 years10,740 d
360 / 67 = 5.4 1234
S1–S17S18–S34S35–S51S52–S67
0,5,11,...,8691,97,...,177183,188,...,269274,279,...,355
Table II. The “blueprint” of planet markers and angles for Earth Team 1.
Earth Team 1Markers: E1–E12
String: 1.00 meters
Marker Angle
E1 0
E2 16
E3 31
E4 47
E5 63
E6 78
E7 94
E8 110
E9 125
E10 141
E11 157
E12 172
The Physics Teacher ◆ Vol. 48, December 2010 575
by many orders of magnitude. At our scale of 1 m = 1 AU, the Earth is only 0.009 mm in diameter, far too small to represent with even the head of a pin. We settled on gluing a 9-mm ball bearing at the top of the wooden dowel at the center of the solar system to represent the Sun and then asking students to look at the dust and dirt at their feet, which roughly represents the planets. When asked to assess the risk of an asteroid hit-ting the Earth, the students quickly see how unlikely it is for two grains of dust starting meters apart to collide.
The model can also be used to address another common learning goal of introductory astronomy courses: predict-ing which planets are currently visible in the night sky. To do this, before running the activity, we find a map showing the locations of the planets in the solar system for the day of the activity.9 By comparing the map to the layout of the markers, it is possible to find a set of planet markers in the model that closely matches the actual configuration of the planets. With the volunteers standing at these markers, we ask which planets are visible from Earth at night (the planets “behind” the Earth, away from the Sun), which planets are not visible (those “in front of ” the Earth, toward the Sun), and which planets are visible at sunrise or sunset. Figure 4, available online,10 fur-ther explains how to visualize which planets are visible (or not) from Earth. This exercise is particularly insightful if any of the planets are near opposition and already prominent in the night sky. As well, the Earth volunteer can rotate on the marker to predict when each planet rises and sets.
Step 3: Beyond SaturnNext, we lead the entire group beyond Saturn by unwind-
ing a 100-meter long tape measure and dropping off students holding pictures at Uranus (19.2 m), Neptune (30.1 m), Pluto (39.5 m), and Eris (67.8 m). We continue out to 100 meters and then a few steps beyond to reach the Voyager spacecraft, the most distant man-made object.11 On this walk, students experience how big the solar system is and how much empty space there is between the planets. We carefully choose the direction in which we lead the expedition so we do not have to cross any busy streets, and when starting inside, we pass through the building exit.
Step 4: Exploring the solar systemWhen the students are gathered back in the inner solar
system, they complete a worksheet with questions that require each student to explore the orrery. The meter sticks with the planet pictures are available for students to make measure-ments. We specifically decided not to give the students the worksheet until this moment so they would not be distracted and cut short their exploration and participation in the pre-vious steps just to answer the questions. We ask students to work together, but each student must hand in a separate work-sheet (which also gives us a way to record who participated in the activity). There are three versions of the worksheet, with Questions 1–3 shuffled to spread the students across the model. The questions (and answers) are as follows:
section, they unclip the string and return it with the blueprint to the teaching assistant. Construction usually takes 10–15 minutes.
Step 2: Dance of the planetsOnce the orrery is built, we have all the students stand
between Mars and Jupiter (where they pretend to be aster-oids). We ask for volunteers to play each planet, hand them a meter stick with a picture of the planet, and send them to planet marker 1 on their respective orbits. Once all the planets are in position, the teaching assistant starts loudly counting out “One! Two! Three!...” at about one count per second. On each count, Venus, Earth, and Mars step to the next marker. Mercury, with markers for two orbits, jumps to every second marker. Jupiter and Saturn move on every 10th count (though they’ll very likely start “leading off ” to arrive at the next mark-er after 10 tiny steps). The teaching assistant counts to 30 or so, allowing Earth to make more than one full orbit of the Sun.
Because the markers are spaced at equal intervals of time, if the students waited 16 days before stepping to the next planet marker, they would create a miniature, but real-time, model of the solar system. At one step per second, they create a speed-ed-up, properly scaled model. Saturn and Jupiter crawl along their orbits while Mars, Earth, and Venus must move briskly just to keep up. Mercury hops around the Sun, getting dizzy and losing track. The center of the solar system is a beehive of activity.
When the motion has stopped, we ask the students if they observed any patterns in the motion. Every time we run the activity, students immediately remark that the outer planets are moving much more slowly than the inner planets and, more specifically, the farther out a planet, the slower it goes—Kepler’s third law!
We would have liked to include models of the planets themselves at the same scale. This is a well-known and diffi-cult problem because the planets and their orbits differ in size
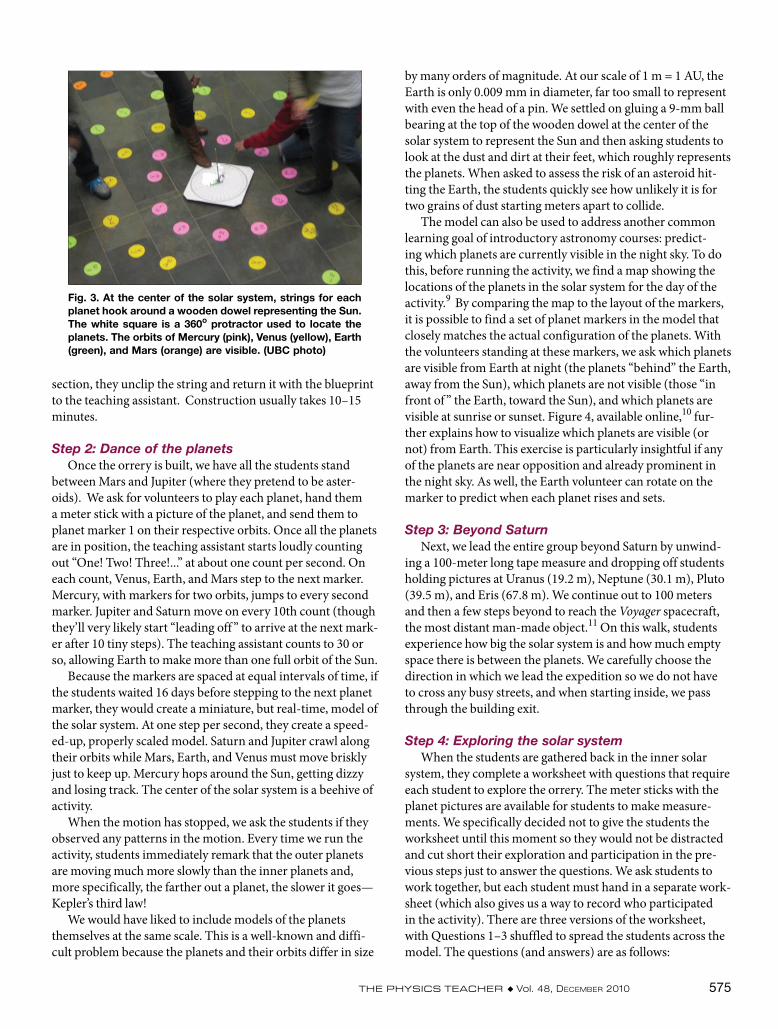
Fig. 3. At the center of the solar system, strings for each planet hook around a wooden dowel representing the Sun. The white square is a 360o protractor used to locate the planets. The orbits of Mercury (pink), Venus (yellow), Earth (green), and Mars (orange) are visible. (UBC photo)

576 The Physics Teacher ◆ Vol. 48, December 2010
(Answer: just barely) If it’s so small, how can you see Jupiter with your naked eye at night? (Answer: bright dot on dark background) How did Galileo see the moons? (Answer: with a telescope)
Question 4:The nearest star to our solar system is called Proxima Centauri. It is 267,800 AU away. If we want to include it in our model, where would we put it? Choose one: campus bus loop, downtown Vancouver, Seattle, New York City (Answer: 267.8 km away, so in Seattle)
ConclusionWhen teaching students about the size of the solar system
and motion of the planets, an instructor who presents a table of orbital sizes, periods, and velocities, no matter how en-thusiastically he or she describes it, is unlikely to have much lasting impact on the students or give them any intuition as to the scale. With the human orrery activity described here, however, we see clear indications of learning in pre-test and post-test matched data from 186 students. Before the activity, 24% of the students indicated Mars is five times farther from Earth when it is on the opposite side of the Sun, compared to when Mars and Earth line up on the same side of the Earth, only slightly better than a guess on the five-option multiple-choice question. On a post-test taken three months after the activity, 70% of the same students correctly determined the shortest and longest amount of time for a radio signal to reach Earth from Mars is four minutes and 20 minutes, respectively. The normalized gain of 0.61 between these questions means more than 60% of the students who did not know the answer initially were able to determine the Earth-Mars distances at the end of the term.
We learn best by interacting with new material, relating it to what we already know, and personally discovering the concepts.12,13 This certainly rings true for the students explor-ing the solar system with the human orrery. The instructor’s role is to create the learning environment and then shepherd the students’ focus so they engage, explore, and discover for themselves.
AcknowledgmentsWe thank the team of teaching assistants who helped develop this activity through patient trial-and-error, instructors Brett Gladman and Harvey Richer, the enthusiastic staff of the Irving K. Barber Learning Centre, and, of course, the hun-dreds of ASTR 310 students who participated. This work is supported by the University of British Columbia through the Carl Wieman Science Education Initiative.
References1. Cliff Swartz, “Pocket solar system,” Phys. Teach. 43, 120 (Feb.
2005).2. Jeffery O. Bennett, Thomas R. Ayres, Kenneth B. Center, Mat-
thew F. Carter, and Ronald S. Bass, “The Colorado Scale-Model
Question 1: Have one partner stand on an Earth marker and another partner stand on the nearest Mars marker. The moment when Earth and Mars are lined up on the same side of the Sun is called opposition because, seen from Earth, the Sun and Mars are on opposite sides of the sky. In our scaled model, it takes light eight minutes to travel one meter. How long does it take to send a radio signal from Earth to one of the spacecraft on Mars? (Answer: about four minutes)
Move to Earth and Mars markers that are on opposite sides of the Sun. This moment is called conjunction because, seen from Earth, the Sun and Mars are together (“conjoined”) in the sky. Now how long does it take to send a radio signal to Mars? (Answer: 20 minutes)
Approximately how many times farther from Earth is Mars when the two planets are on opposite sides of the Sun, compared to when they line up on the same side of the Sun? (Answer: five times)
Question 2:Stand on the orbit of Saturn. Saturn is 10 times farther from the Sun than Earth is. Compared to Earth, how many times farther does Saturn travel to orbit the Sun? (Answer: 10 times farther)
The planet markers for the inner solar system are spaced at 16-day intervals, but the Saturn markers are every 160-days. Why didn’t we use 16-day markers for Saturn, too? (Answer: because there would be 670 markers to put down!)
If we did use 16-day markers, how many centimeters apart would the markers be? (Answer: about 10 cm) How many cen-timeters apart are the Earth markers? (Answer: about 30 cm) Which planet is traveling slower, Earth or Saturn? (Answer: Saturn) Approximately how many times slower? (Answer: three times)
Can you combine these facts to explain why Saturn takes about 30 years to orbit the Sun? (Answer: compared to Earth, it travels 10 times farther going three times slower, so it takes 3 × 10 = 30 times longer)
Question 3:Get an extra sticky note and stand on one of the Jupiter markers. On the sticky note, draw a scale model of Jupiter and the orbits of its Galilean moons, Io, Europa, Ganymede, and Callisto, using the data given below:
Leave your drawing at Jupiter and look at it from Earth. Can you see the dot of Jupiter or the orbits of its moon?
Actual (km) (AU)
Scaled(mm)
Jupiter's diameter 143 000 0.001 1
Orbital radius of:Io
EuropaGanymede
Callisto
422 000 671 0001 070 0001 880 000
0.0030.0050.0070.013
357
13

9. Maps of the solar system for any future (or past) date can be generated with the Solar System Live application at www. fourmilab.ch/solar/.
10. See figure online at http://netserver.aip.org/cgi-bin/epaps?ID=E-PHTEAH-48-007009.
11. The current distance to Voyager can be found online at heavens-above.com under “Satellites: Spacecraft escaping the Solar System – where are they now?”
12. How People Learn: Bridging Research and Practice, edited by M. Suzanne Donovan, John D. Bransford, and James W. Pellegrino (National Academies Press, Washington, DC, 1999).
13. Eugenia Etkina, Aaron Warren, and Michael Gentile, “The role of models in physics instruction,” Phys. Teach. 44, 34-39 (Jan. 2006).
Peter Newbury is a Science Teaching and Learning Fellow with the Carl Wieman Science Education Initiative in the Department of Physics and Astronomy at the University of British Columbia. He works with faculty to help transform their classes toward effective, evidence-based science education.Department of Physics and Astronomy, University of British Columbia, 6224 Agricultural Road, Vancouver, BC, Canada V6T 1Z1; [email protected]
The Physics Teacher ◆ Vol. 48, December 2010 577
Solar System,” Phys. Teach. 29, 371–374 (Sept. 1991), and Michael C. LoPresto, Steven R. Murrell, and Brian Kirchner, “Assessment of a solar system walk,” Phys. Teach. 48, 236–239 (April 2010).
3. Bruce Thompson, “March of the planets,” Phys. Teach. 45, 369–371 (Sept. 2007).
4. “My Solar System” PhET simulation available at phet.colorado.edu.
5. Mark Bailey, David Asher, and Apostolos Christou, “The hu-man orrery: Ground-based astronomy for all,” Astron. Geophys. 46 (3), 3.31–3.35 (June 2005).
6. D.J. Asher, M.E. Bailey, A.A. Christou, and M.D. Popescu, “The human orrery: A new educational tool for astronomy,” Astron. Educ. Rev. 5 (2), 159–176 (2007).
7. Alan Gould, “A human orrery,” University of California publi-cation (2005). Available at kepler.nasa.gov/ed/pdf/ HumanOrrery.pdf.
8. A nine-minute video of the construction and exploration of the human orrery can be found on YouTube at www.youtube.com/watch?v=ju4cfEp2BgU or simply search for “UBC orrery.”